

Page 1

HIGH EXCURSION
SUBWOOFER
USER’S MANUAL
P
R
O
U
D
L
Y
A
U
S
T
R
A
L
I
A
N
S
I
N
C
E
1
9
8
6
SERIES
V
Page 2
–2–
Specifications
Model Thor MkV
High excursion woofer 1 x 300mm; 32mm excursion
Power (RMS) 300Watts
Enclosure design Vented
Low frequency extension ~12Hz (-6dB) Min. frequency setting (Music mode)
Weight 28KG
Dimensions (unpacked) 500mm (H); 440 (W); 450 (D) inc. heat sink
Protection and control Overload and Thermal
Amplifier THD @1V full band: ).009%
Construction High inertia baffle (32mm); full cross-bracing and
wool fibre damping
Warranty Two years
Phase control 0°–180° switch
Variable low-pass filter 35Hz–140Hz
High pass filter 80Hz
Inputs Line level
High level
A word from the designer
Thor Series 5 lifts the performance bar in every
element of subwoofer design: frequency
response, power, distortion and unwanted
noise. Every component has undergone a
complete upgrade. We also wanted the Thor to
excel for both home theatre and hi-fi music.
More power
The amplifier is now a 300W (true RMS) fully
digital class D design, producing no more than
0.037% distortion even at 100W RMS and its
high efficiency (>82%) means it runs cool and
uses less power.
Longer cone excursion
The large-roll-surround driver has been
redesigned for greater cone travel using a huge
double magnet assembly with a rubber rollsurround for long life.
This driver has been designed to move a lot of
air and to do it fast with a minimal amount of
ringing, breakup or
noise.
Full digital control
The Thor now uses
full digital signal
processing (DSP) to
control every aspect
of the signal,
provide much
greater control over
the response and
dynamics. Two
completely separate digital control formats are
utilised for home theatre and music modes.
Cabinet and vents:
The cabinet has been redesigned with larger
more dynamic reflex vents and lower cabinet
colouration with high density damping.
Dr Martin Gosnell B.E.(Hons.) PhD (Physics)
Page 3
–3–
Important safety instructions
• Read and follow instructions – all safety
and operating instructions should be read
before operating the product and then
adhered to.
• Heed warnings – Adhere to all warnings on
the product and in the operating
instructions.
• Cleaning – unplug the product from the
wall outlet before cleaning. Use only a
damp cloth; do not use liquid or aerosol
cleaners
• Attachments – do not use any attachments
unless recommended by the manufacturer
as they may cause hazards
• Water and moisture – do not use this
product near water
• Ventilation – This product should not be
placed in a built-in installation such as a
bookshelf unless adequate ventilation is
provided.
• Power source – Use only Australian mains
electrical power.
Features
Auto On/Off circuit
Your subwoofer is equipped with a special Auto On/Off circuit which automatically turns
on your subwoofer when it detects a signal. At a predetermined time after it stops
receiving the signal, the subwoofer turns off automatically. This feature is
active when the power switch is set to the centre or Auto position. For
manual switching, use the On and Off positions. If the Auto feature does not
work properly there may be an incompatibility with your amplifier and you
will need to power your subwoofer manually.
Clipping and overload protection circuit
Richter’s protection circuitry continuously senses the signal level and automatically adjusts
the amplifier to reduce clipping of the waveform, leaving the bass undistorted. If the
subwoofer is overdriven it may shut down. If this occurs adjust the level and turn the
power switch off and on to reset.
Speaker Level input and output terminals
The Speaker Level inputs allow you to connect your subwoofer via the speaker outputs of
any A/V receiver, stereo amplifier/receiver or power amplifier. This signal is sent through a
high pass filter within the Thor en route to the Speaker Level output terminals. You may
wish to connect your main/satellite speakers via these terminals rather than directly from
the amplifier/receiver, thus reducing the bass load on your main speakers and improving
overall performance.
Line Level RCA input jacks
The RCA input jacks allow you to connect your subwoofer to the Subwoofer Output of an
A/V receiver or processor.
Music/Theatre modes
This switch on the rear panel adjusts the frequency curve to better suit either music
listening or home theatre.
Page 4
–4–
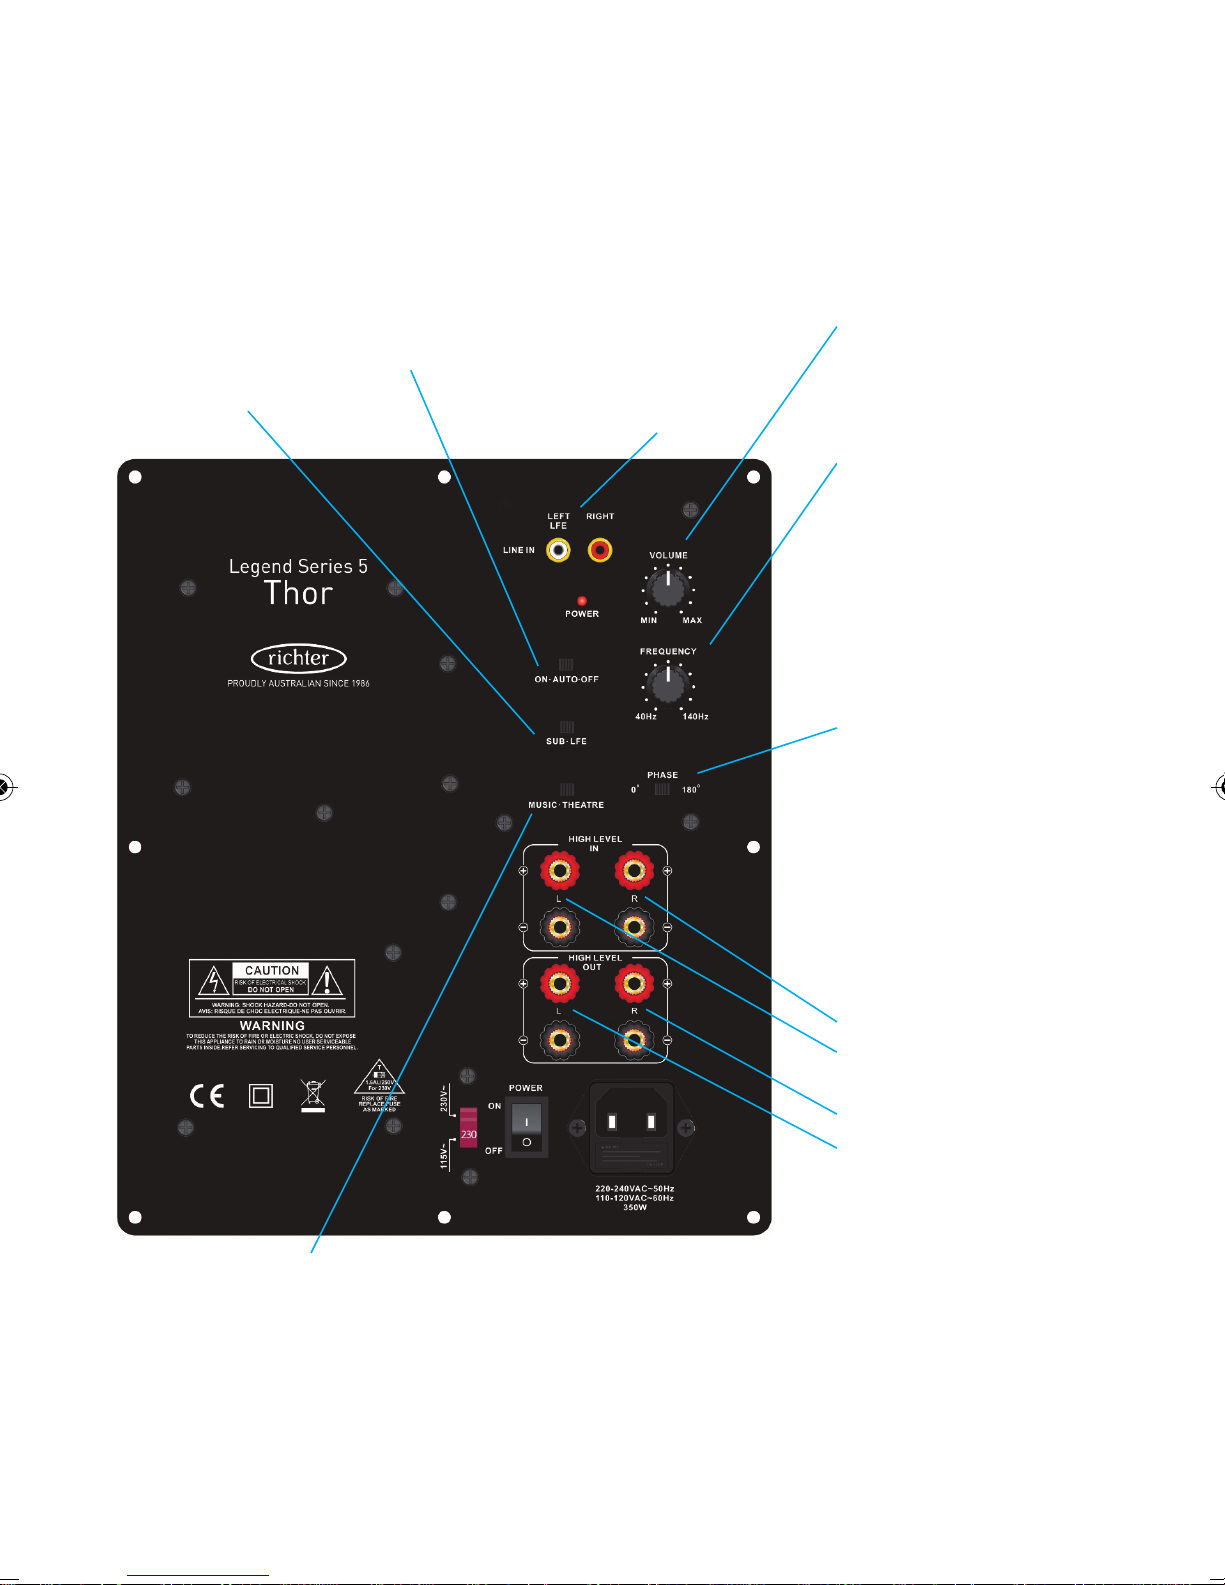
Speaker Level connection
Front right channel from amp
Front left channel from amp
[Optional]
To Right speaker
To Left speaker
DO NOT use in addition to
Line Level inputs
Music/Theatre switch
Changes low frequency
response rolloff to better
suit music or movies.
S
ub/LFE switch
Switch to SUB if
u
sing Pre-Out or
Speaker Level
Connections. Use
L
FE for a single
Subwoofer Out line
level connection.
On/Auto/Off
Auto setting turns
subwoofer on and off
a
ccording to signal
f
rom your amplifier.
Main power switch
must be ‘On’.
Volume
Adjusts the volume
of the subwoofer
Frequency
Adjusts the subwoofer’s
upper frequency cut-off
point so it best blends
with main speakers
Phase switch
Reverses the subwoofer’s
phase – if the sound is
‘hollow’, try the opposite
setting.
L
ine Level inputs
Connect ‘Subwoofer out’
R
CA jack to EITHER left
or right inputs. Set
S
UB/LFE switch to LFE.
OR connect ‘Pre-out’
jacks left-left and rightr
ight. Set SUB/LFE switch
to SUB.
DO NOT use in addition
to Speaker Level
connections.
Thor Series V Rear panel controls
Page 5
–5–
Operating controls
Volume control
This control adjusts the output level of the subwoofer and should be used to balance the
levels of the subwoofer and main/satellite speakers.
Frequency control
This control adjusts the subwoofer’s high frequency roll-off point. Variable from 35Hz to
140Hz, it is used to blend the subwoofer perfectly with the satellite/main speakers. In
general, the better the bass response of your main speakers, the lower this control should
be set.
Phase switch
This switch allows you to match the phase of the subwoofer with the phase of your
satellite/main speakers. Switchable from Nom. (0°) to Rev (180°). It compensates for the
mid-bass acoustic effects of different speaker locations and listening room acoustic effects.
Music/Theatre switch
You may prefer Music mode when listening to music and Theatre mode when watching
movies. Music mode delivers a slightly lower bass volume but extends the lowest
frequencies including subsonic sounds to deliver true hi-fi realism. Theatre mode delivers
higher sound levels but rolls off more steeply into the subsonics, attenuating them so that,
for example, an earthquake scene in a blockbuster movie does not actually shake your
vases off the sideboard.
Sub/LFE switch
Switch to LFE when using the single ‘Sub Out’ connection from a Home Threatre receiver.
This allows the receiver to set the crossover between subwoofer and main speakers. For all
other connections use the SUB setting which activates the Thor’s crossover controls.
Connecting the subwoofer
to your stereo or A/V system
There are essentially two ways to connect your subwoofer with your audio/video system.
The first one is via the High Level (Speaker Level) input
terminals and the second is through the line level RCA
terminals. Your system components will usually determine
which method to use.
For most A/V setups you run only one RCA lead from the
subwoofer output to EITHER left or right line input on the
subwoofer.
The High Level connections can be used with virtually any
stereo receiver or amplifier. When there is no specific
subwoofer output on the amplifier, use these Left and Right
Caution
1. Do not use both Low Level and
High Level methods
simultaneously.
2. Turn off all power to your
audio/video system before
proceeding with the
installation of the subwoofer.
Page 6
–6–
channel inputs. The subwoofer combines the bass signal from both channels.
Whichever method you use, the signal is passed through the variable low-pass filter
(adjustable via the Frequency Control knob) for seamless matching of the subwoofer
to the main/satellite speakers.
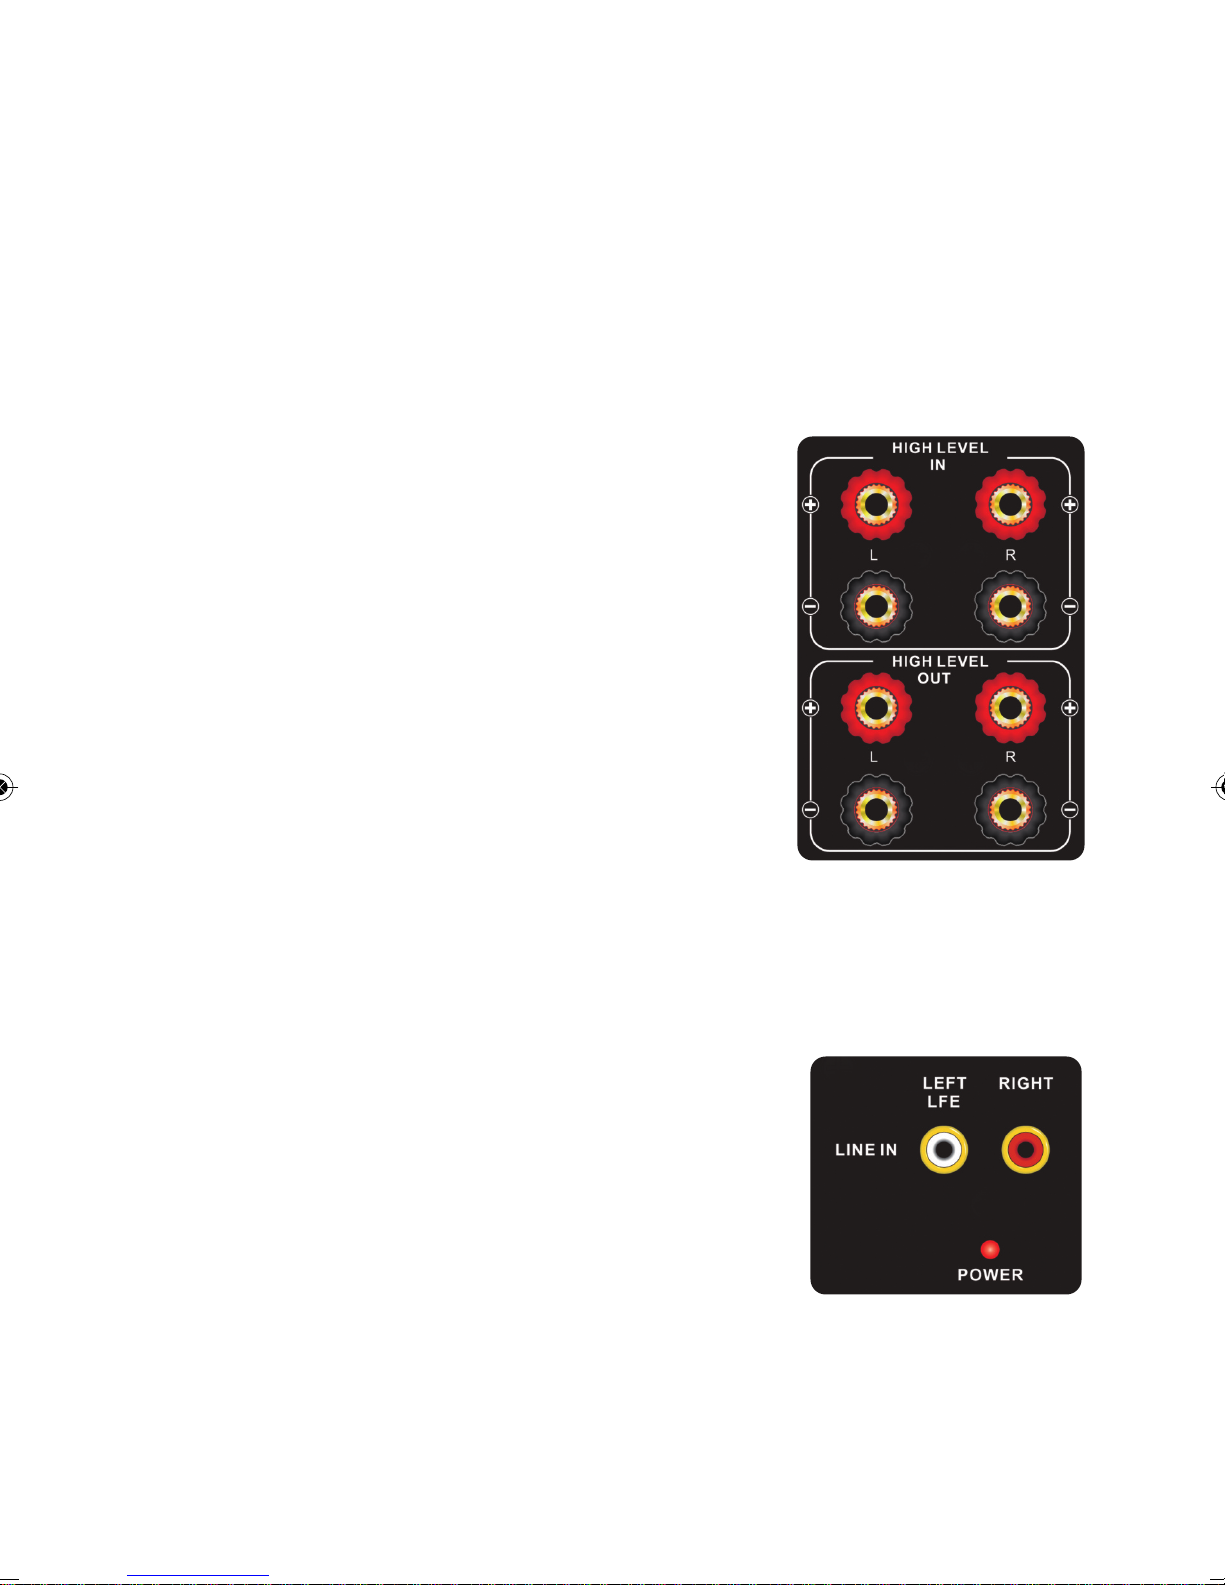
Using High Level inputs
On the rear of your subwoofer is a panel designated ‘HIGH LEVEL OUT / HIGH LEVEL
IN’. This panel contains four pairs of speaker terminals. These should be connected to
your amplifier and/or speakers as marked - each pair of terminals is marked left or
right and is colour-coded black (negative) or red (positive).
ALWAYS connect red to red and black to black between your
amplifier/receiver and subwoofer and, if used, between subwoofer
outputs and main/satellite speakers. If you accidentally reverse one
of the connections (ie red to black), you will notice a lack of bass
from your subwoofer and the acoustic image from your main
speakers may be poorly defined.
Start by connecting the right speaker output of your
amplifier/receiver to the right input of the subwoofer, then repeat
for the left channel, and so-on.
Using High Level outputs
If you connect your main speakers to the High Level outputs, you
will reduce the amount of bass produced by your front speakers,
taking some load off them and letting the subwoofer do the work.
This is especially helpful if your main speakers are small.
Using the Line Level connections
This method used RCA-to-RCA cables to connect the ‘SUBWOOFER OUT’ jack or the
‘PRE-OUT’ jacks on your A/V receiver to the ‘LINE LEVEL INPUT’ on the rear panel of
your subwoofer.
Connect the Subwoofer Output on your A/V receiver or processor
to EITHER L or R input.
If using Pre-Out jacks, connect left to left and right to right and
bass signals from both channels will be combined within the
subwoofer. This setup does not remove low frequencies from your
main speakers. Their output will also produce some of the
subwoofer frequencies, which you may prefer.
Page 7
–7–
Room acoustics and subwoofer placement
Richter subwoofers can be placed virtually anywhere in your listening room without
significantly affecting the stereo image of your main speakers. However interactions
between any subwoofer and room acoustics can affect overall bass performance.
Follow this section to help you find the best placement for optimal bass.
Although a clear path between the subwoofer and listening
position is not required it is important to leave at least four
inches clearance between the subwoofer and walls or
furniture. Generally, shorter runs of connecting cables are
preferred (and easier to hide), so locating the subwoofer close
to your audio equipment is often desirable.
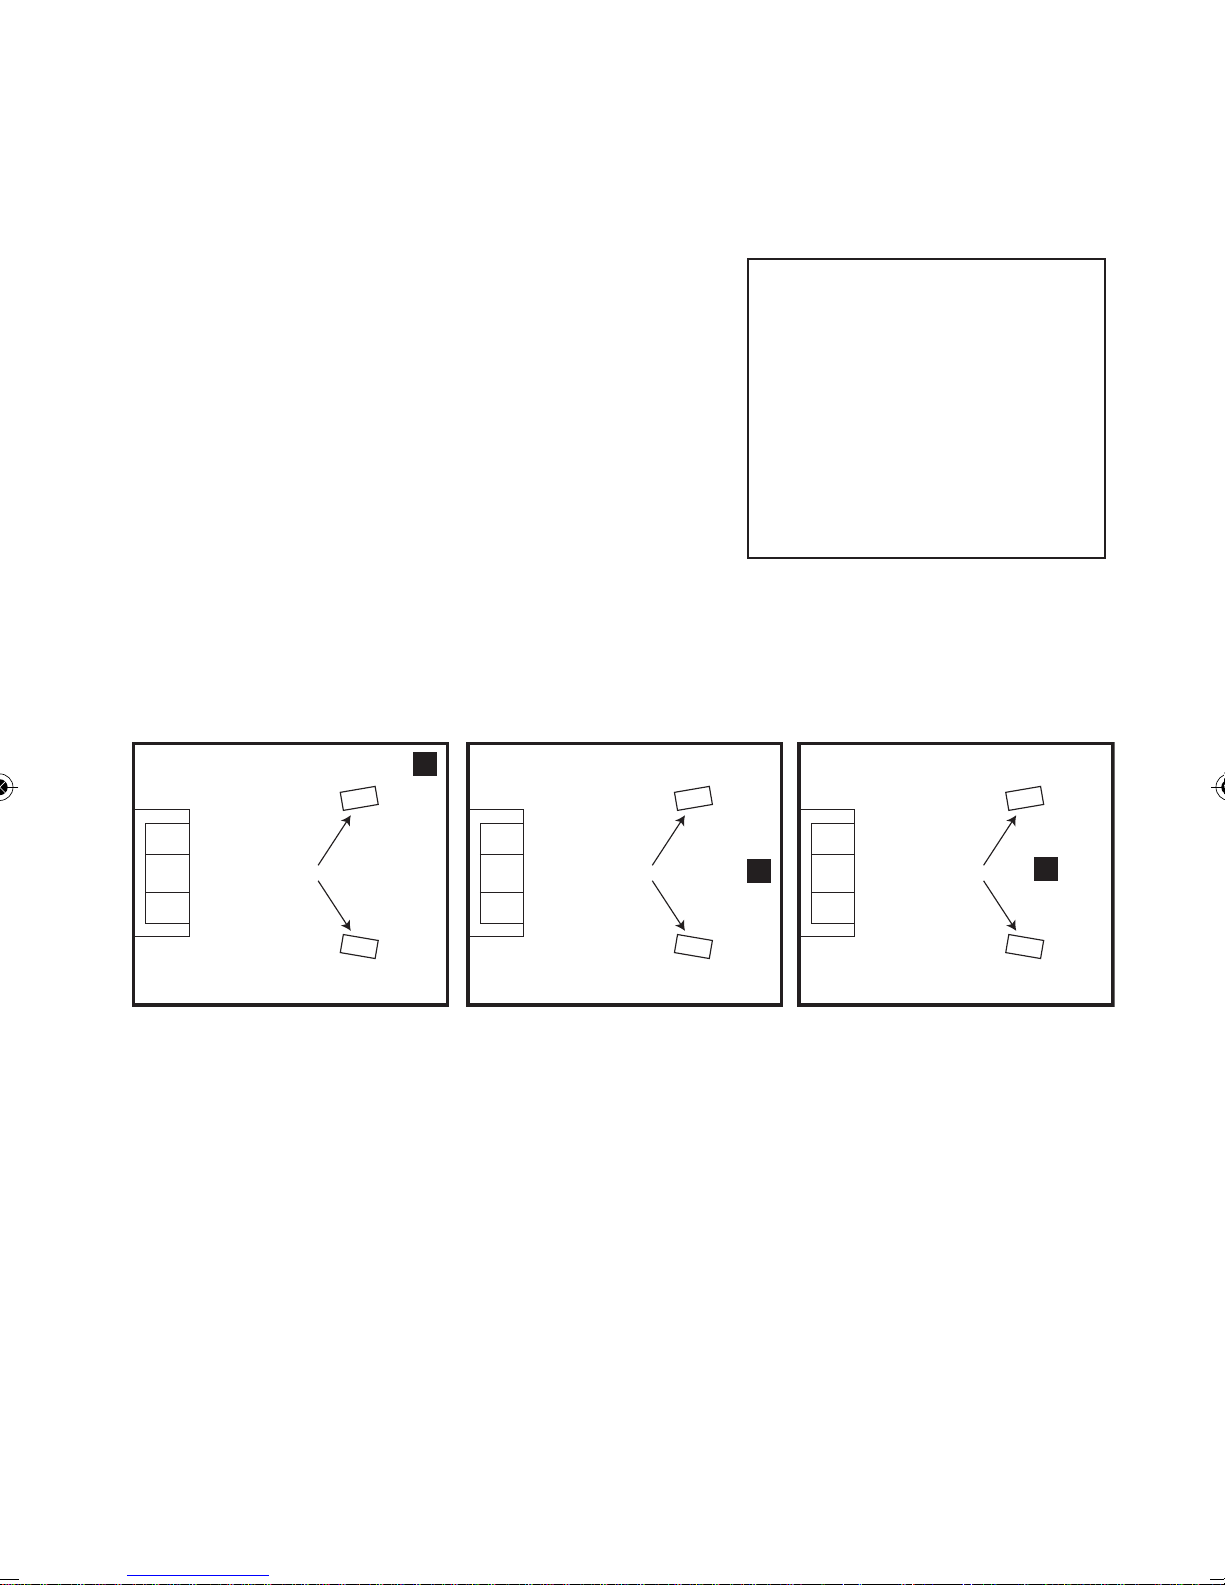
The distance between the subwoofer and the walls will affect
the sound. Typically, placing the subwoofer close to a corner
will produce the most bass, but it may become ‘boomy’ or
badly defined.
Placing the subwoofer near a wall but away from corners will produce less bass but
with better accuracy. Placement further into the room away from walls will produce
the least bass but with the best accuracy.
Caution
Richter subwoofers have a builtin amplifier and must have
adequate ventilation for cooling
purposes. Do not place the
subwoofer near heat sources, or
anything that might obstruct
ventilation.
We urge you to experiment with various subwoofer placements in your listening
room to find the position that provides deep, smooth and well defined bass. Often
moving the subwoofer even a metre or so can make a difference. Remember to use
familiar recordings with plenty of low-frequency signal when testing locations.
Main speakers
Subwoofer
Main speakers
Subwoofer
Main speakers
Subwoofer
Most bass output but may
be boomy
Moderate bass output with
smoother performance
Less bass output but with
most controlled
performance
Page 8

Setup and calibration
For best results when setting up your system, take your normal listening
position and have another person perform the following adjustments.
Since every room has different acoustics, it will take a bit of trial-and-error to
get your subwoofer sounding its best.
First set the Thor to either Theatre or Music mode (with the THEATRE/MUSIC
switch) depending on which you will use most often.
Set the subwoofer volume dial to the minimum position. Set the frequency
dial to 35Hz. Set any loudness, bass and treble controls on other equipment to
a neutral position (Loudness OFF).
Play a music track or video you are familiar with.
Gradually turn the subwoofer volume up until its deep bass blends well with
your main/satellite speakers.
Slowly turn the subwoofer frequency control up to reach the best mid-bass
blend with your main/satellite speakers. The smaller your main speakers, the
higher this will usually be. If the bass becomes boomy or ill-defined, you have
gone too far and should turn the Frequency Control down until the sound
regains balance.
Adjust the Phase switch so the best bass is achieved. This switch compensates
for relative distances between subwoofer, listener, other speakers and room
acoustics.
P
R
O
U
D
L
Y
A
U
S
T
R
A
L
I
A
N
S
I
N
C
E
1
9
8
6
61 2 4962 1594
www.richter.com.au
Richter Acoustics Pty Ltd
PO Box 578
Hamilton NSW
Australia 2303
 Loading...