

Page 1
TRF3601FD
Page 2
REFRIGERATOR WITH ICE
AND WATER DISPENSER
TRF3601FD
Page 3

3 Structure
and function
s
TABLE OF CONTENTS
1 Safety warnings
1.1
War ning
1.2
Meani ng s of safe ty w arnin g sy mbols
1.3
Elect ri city re la ted war nings
1.4
War nings for using
1.5
War nings for plac em ent
1.6
War nings fo r e ne rgy
1.7
War nings for disp os al
2 Proper us e of the refrigerator
2.1
Place me nt
2.2
Level li ng feet
2.3
Level li ng door
2.4
Door h andles
2.5
Adjus tm ent o f c antilev er rac k
2.6
Insta ll ing Fi lter
2.7
Insta ll ing th e w ater l ine
2.8
Chang in g the Li gh t
2.9
Start in g
1-2
4-5
10
11
18
19
19
3
3
4
5
5
6
7
8
9
3.1
Key comp on en ts
3.2
Funct io ns
3.3
Fetch in g w at er and I ce
3.4 Disas se mbly of refri ge ra tor door
4 Maintenance and care of the refrigerator
4.1
Overa ll clean in g
4.2
Clean in g of door tray
Cl
eaning of drawe rs
4.3
4.4
Clean in g of ice sto rage box
4.5
Defro st ing
4.6
Out of o peratio n
••
5 Trouble shooting
5.1
Troub le s ho ot in g
6 Warranty
14-15
16-18
19
20
21
21
22
23
24
24
25
27
Page 4
1 SAFETY WARNINGS
1.1 Warning
Warning ri sk o f fire / fl am mable mat erials:
THIS appliance is intended to be used in household and similar applications such as staff kitchen
areas in shops, offices and other working environments; farm houses and by clients in hotels, motels
and other residential type environments; bed and breakfast type environments; catering and similar nonretail applications.
THIS appliance is not intended for use by persons (including children) with reduced physical,
sensory or mental capabilities, or lack of experience and knowledge, unless they have been given
supervision or instruction concerning use of the appliance by a person responsible for their safety.)
Children should be supervised to ensure that they do not play with the appliance.
IF the supply cord is damaged, it must be replaced by the manufacturer, its service agent or similarly
qualified persons in order to avoid a hazard.
DO not store explosive substances such as aerosol cans with a flammable propellant in this
appliance.
THE appliance has to be unplugged after use and before carrying out user maintenance on the
appliance.
WARNING
clear of obstruction.
Keep ventilation openings, in the appliance enclosure or in the built-in structure,
:
WARNING: Do not use mechanical devices or other means to accelerate the defrosting
process, other than those recommended by the manufacturer.
WARNING: Do not damage the refrigerant circuit.
WARNING: Do not use electrical appliances inside the food storage compartments of the
appliance, unless they are of the type recommended by the manufacturer.
WARNING: Please abandon the refrigerator according to local regulators for it use flammable
blowing gas and refrigerant.
WARNING: When positioning the appliance, ensure the supply cord is not trapped or
damaged.
WARNING: Do
rear of the appliance.
not locate multiple portable socket-outlets or portable power supplies at the
DO not use extension cords or ungrounded(two prong)adapters.
WARNING: Risk of child entrapment. Before you throw away your old refrigerator or freezer:
-Take off the doors.
-Leave the shelves in place so that children may not easily climb inside.
THE
installation of accessory.
refrigerator must be disconnected from the source of electrical supply before attempting the
1
Page 5

1 SAFETY WARNINGS
REFRIGERANT and cyclopentane foaming material used for the appliance are
flammable. Therefore, when the appliance is scrapped, it shall be kept away from any fire source and
be recovered by a special recovering company with corresponding qualification other than be disposed
by combustion, so as to prevent damage to the environment or any other harm.
CHILDREN should be supervised to ensure that they do not play with the appliance.
WARNING: To avoid a hazard due to instability of the appliance, it must be fixed in
accordance with the instructions.
WARNING: Connect to potable water supply only. (Suitable for ice making machine)
TO Prevent A Child From Being Entrapped, Keep Out Of Reach Of Children And Not In The Vicinity
Of Freezer (Or Refrigerator).″(Suitable for products with locks)
Minimum/Maximum inlet water pressure, 30/100 PSIG.
WARNING: Connect to potable water supply only.
2
Page 6
1 SAFETY WARNINGS
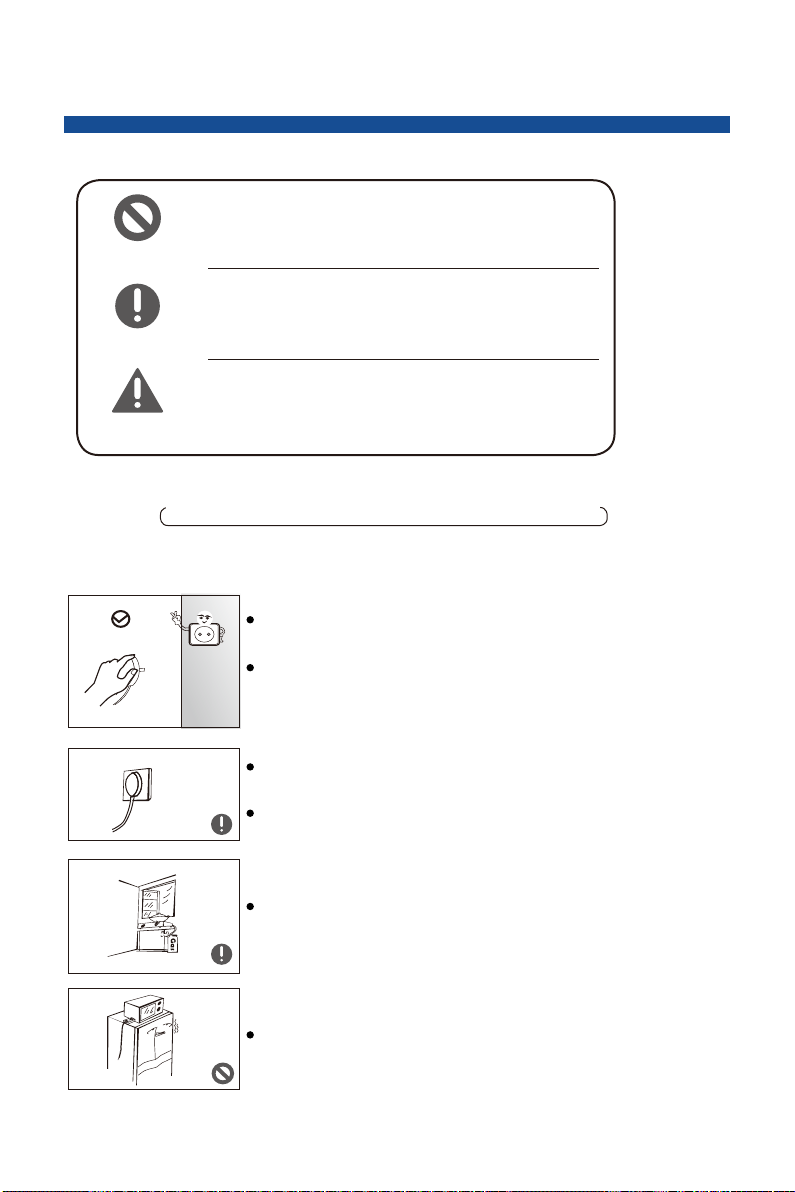
1.2 Meanin g o f safety warning sy mbols
This is a proh ib it ion sym bo l.
Any inc ompli an ce with ins tructio ns m arked w it h
this sy mb ol may re su lt i n dam ag e to t he prod uc t
Prohibiti on s ymbol
War ning sy mb ol
Note sy mb ol
1.3 Ele ctricity rela ted warning s
or endang er t he p erson al s afety of th e user.
This is a w ar ning symb ol .
It is requi re d to o perat e in s trict obs ervan ce o f
instr uc tions mar ke d with th is s ymbol ; or o therwise
damag e to t he prod uc t or p erson al i njury m ay b e caused.
This is a c au tioni ng s ymbol.
Instr uc tions mar ke d with th is s ymbol r eq uire spec ia l cauti on .
Insuf ficie n
or dama ge t o the pro du ct .
This ma nu al contai ns l ots of im po rtant s af ety inf or mation
which s ha ll be obs er ve d by the us er s.
t caution m ay result i n sl ight or m od erate inj ur y,
Do not pull the power cord when pulling the power plug of the
refrigerator. Please firmly grasp the plug and pull out it from the
socket directly.
To ensure safe use, do not damage the power cord or use the
power cord when it is damaged or worn.
Please use a dedicated power socket and the power socket shall
not be shared with other electrical appliances.the power plug should
be firmly contacted with the socket or else fires might be caused.
Please ensure that the grounding electrode of the power socket is
equipped with a reliable grounding line.
Please turn off the valve of the leaking gas and then open the doors
and windows in case of leakage of gas and other flammable gases.
Do not unplug the refrigerator and other electrical appliances
considering that spark may cause a fire.
Do not us e el ectri ca l applia nces on the t op o f the applian ce ,
unles s th ey are of the t yp e recommen de d by t he manu fa cture r.
3
Page 7
1 SAFETY WARNINGS
1.4 Warnings for using
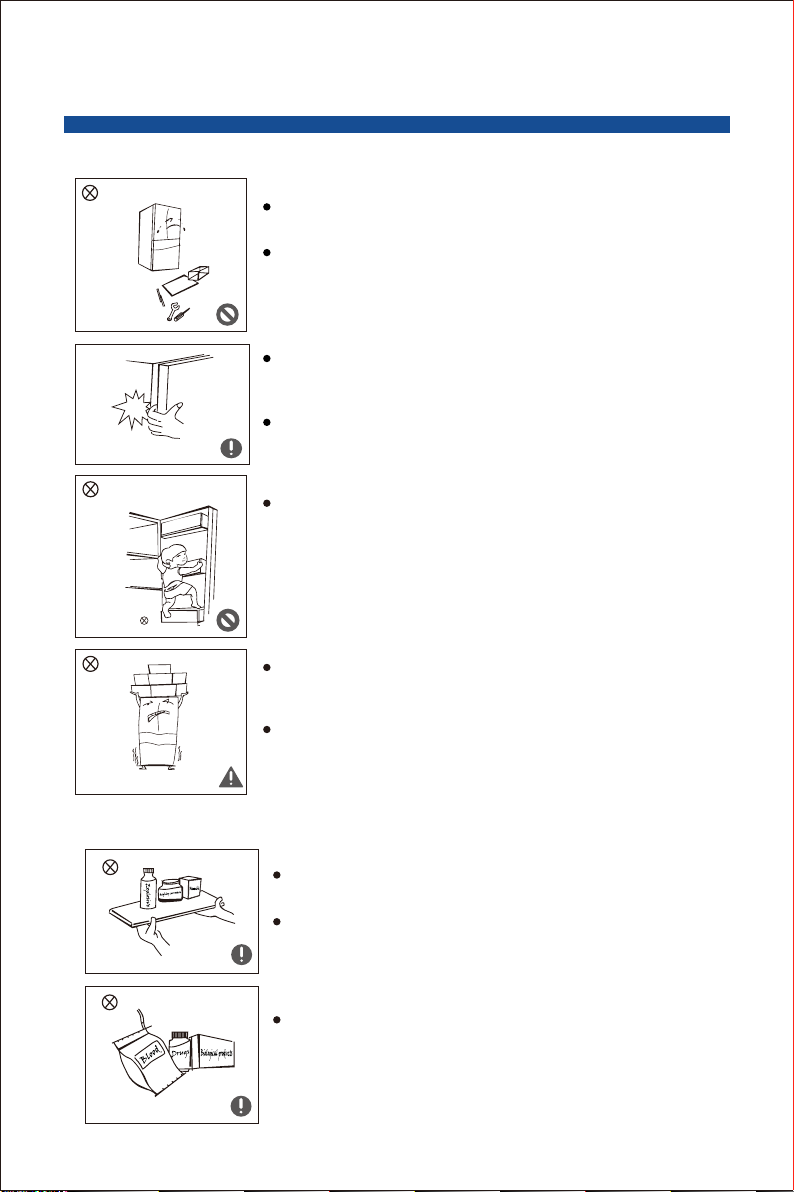
Do not arbi trari ly d isass embl e or r econs tr uct the r ef rigera tor, nor
damage the ref rigeran t circuit ; ma intenan ce o f th e appliance mus t
be conducted by a specialist.
Damage d power c or d must be r epla ce d by the ma nu factu re r, its
maint enan ce d epartme nt o r related p ro fessiona ls i n orde r to avoi d
danger.
The gaps between refrigerator doors and between doors and refrigerator
body are small, be noted not to put your hand in these areas to prevent
from squeezing the finger. Please be gentle when close the refrigerator
door to avoid falling articles.
Do not pick foods or containers with wet hands in the freezing chamber
when the refrigerator is running, especially metal containers in order to
avoid frostbite.
Do not allow any child to get into or climb the refrigerator; otherwise
suffocation or falling injury of the child may be caused.
Do not place heavy objects on the top of the refrigerator considering
that objects may fall when close or open the door, and accidental
injuries might be caused.
Please pull out the plug in case of power failure or cleaning. Do not
connect the freezer to power supply within five minutes to prevent
damages to the compressor due to successive starts.
1.5 Warnings for placement of items
Do not put flammable, explosive, volatile and highly corrosive items
in the refrigerator to prevent damages to the product or fire accidents.
Do not place flammable items near the refrigerator to avoid fires.
The refrigerator is intended for household use, such as storage of foods;
it shall not be used for other purposes, such as storage of blood, drugs
or biological products, etc.
4
Page 8
1 SAFETY WARNINGS
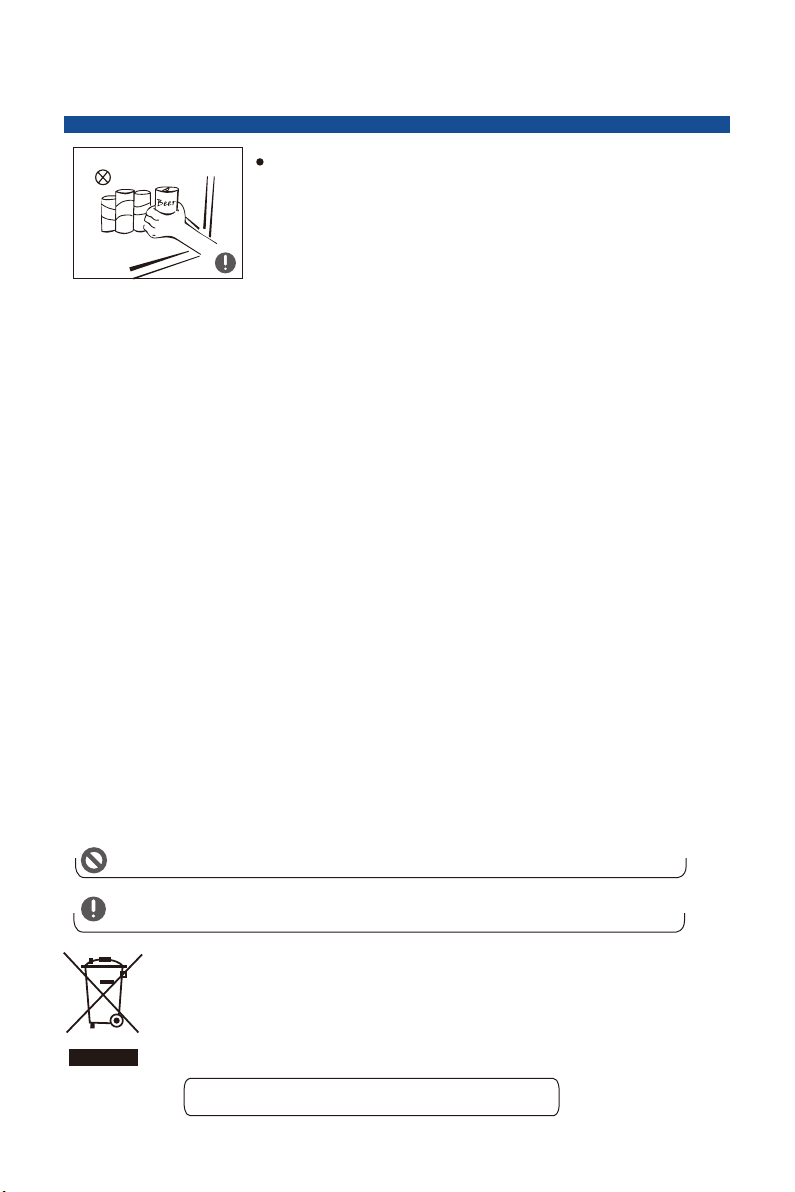
Freez in g chamb er
Do not st or e beer, beve rage or oth er f luid co nt ained in bo tt les or
enclo se d contain er s in the fr ee zing ch am ber of the re frige ra to r;
or othe rw ise the bot tl es or enc lo sed con ta iners may c rack due to
freez in g to cause da mages.
1.6 Warnings for energy
Warning for energy
1)Refrigerating appliances might not operate consistently (possibility of defrosting of contents or
temperature becoming too warm in the frozen food compartment) when sited for an extended period of
time below the cold end of the range of temperatures for which the refrigerating appliance is designed.
2)The fact that effervescent drinks should not be stored in food freezer compartments or cabinets or in
low-temperature compartments or cabinets, and that some products such as water ices should not be
consumed too cold;
3)The need to not exceed the storage time(s) recommended by the food manufacturers for any kind of
food and particularly for commercially quick-frozen food in food-freezer and frozen-food storage
compartments or cabinets;
4)The precautions necessary to prevent an undue rise in the temperature of the frozen food while
defrosting the refrigerating appliance, such as wrapping the frozen food in several layers of newspaper.
5)The fact that a rise in temperature of the frozen food during manual defrosting, maintenance or
cleaning could shorten the storage life.
6)The necessity that, for doors or lids fitted with locks and keys, the keys be kept out of the reach of
children and not in the vicinity of the refrigerating appliance, in order to prevent children from being
locked inside.
Energy saving tips
The app li ance shou ld b e locat ed i n the coo le st area of th e ro om, awa y fr om heat p ro ducing
appliances or he ating duc ts , and out o f th e direc t su nligh t.
Let hot f oo ds cool to ro om t emper at ure bef or e placing i n th e appli an ce. Overlo ad in g the app li an ce
force s th e compr es so r to run lo ng er. Food s th at freeze t oo s lowly m ay l ose qua li ty, or spo il.
Be sure t o wr ap foods prop er ly, and wi pe c ontai ne rs dry be fo re placin g th em in the appl ia nce.
This cu ts d
Appli an ce storag e bi n shoul d no t be line d wi th a lum in um f oil, wa x pa per, or pape r towe ling.
Liner s in terfere w it h cold ai r ci rcula ti on, makin g th e appli an ce less e fficien t.
Organ iz e an d label f oo d to redu ce d oor ope ni ngs and ext en ded sea rc hes. Re mo ve as many
items a s ne eded at one t im e, and cl os e the doo r as s oon as poss ible.
own on fros t build -u p in side th e ap plian ce .
1.7 Warnings for disposal
Refrigerant and cyclopentane foaming material used for the refrigerator are flammable.
Therefore, when the refrigerator is scrapped, it shall be kept away from any fire source and
be recovered by a special recovering company with corresponding qualification other than
be disposed by combustion, so as to prevent damage to the environment or any other harm.
When the refrigerator is scrapped, disassemble the doors, and remove gasket of door and
shelves; put the doors and shelves in a proper place, so as to prevent trapping of any child.
Correct Disposal of this product:
This marking indicates that this product should not be disposed with other household
wastes throughout the EU. To prevent possible harm to the environment or human health
from uncontrolled waste disposal, recycle it responsibly to promote the sustainable reuse
of material resources. To return your used device, please use the return and collection
systems or contact the retailer where the product was purchased. They can take this
product for environmental safe recycling.
This refrigerator can not be hooked up to a GFCI outlet.
5
Page 9
2 PROPER USE OF REFRIGERATORS
2.1 Placemen t
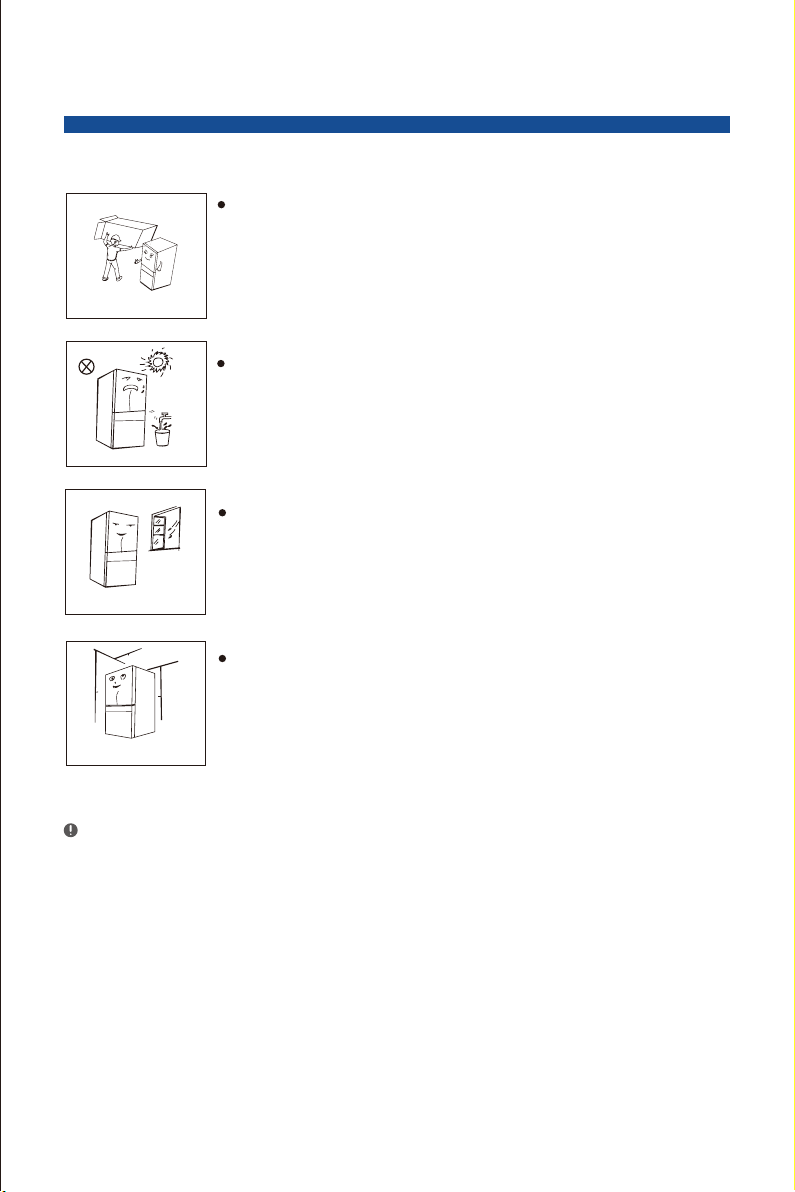
Keep the refrigerator upright to avoid being extruded or vibrated during
transportation. Avoid over 45 degrees during tilt angle handling.
Avoid excessive stress on the door or top cover when the refrigerator is
moved; in addition, it may deform.
Before use, remove all packing materials, including bottom cushions,foam
pads and tapes inside of the refrigerator;tear off the protective film on the
doors and the refrigerator body.
Keep away from heat and avoid direct sunlight. Do not place the freezer in
moist or watery places to prevent rust or reduction of insulating effect.
The refrigerator is placed in a well-ventilated indoor place; the ground shall
be flat, and sturdy (rotate left or right to adjust the wheel for levelling if unstable).
30cm
10cm
10cm
Precautions before installation:
Before installation or adjusting of accessories, it shall be ensured that the refrigerator is
disconnected from power.
Precautions shall be taken to prevent fall of the handle from causing any personal injury.
6
The top space of the refrigerator shall be greater than 30cm, and the refrigerator
should be placed against a wall with a free distance more than10cm to facilitate
the heat dissipation.
Page 10
2 PROPER USE OF REFRIGERATORS
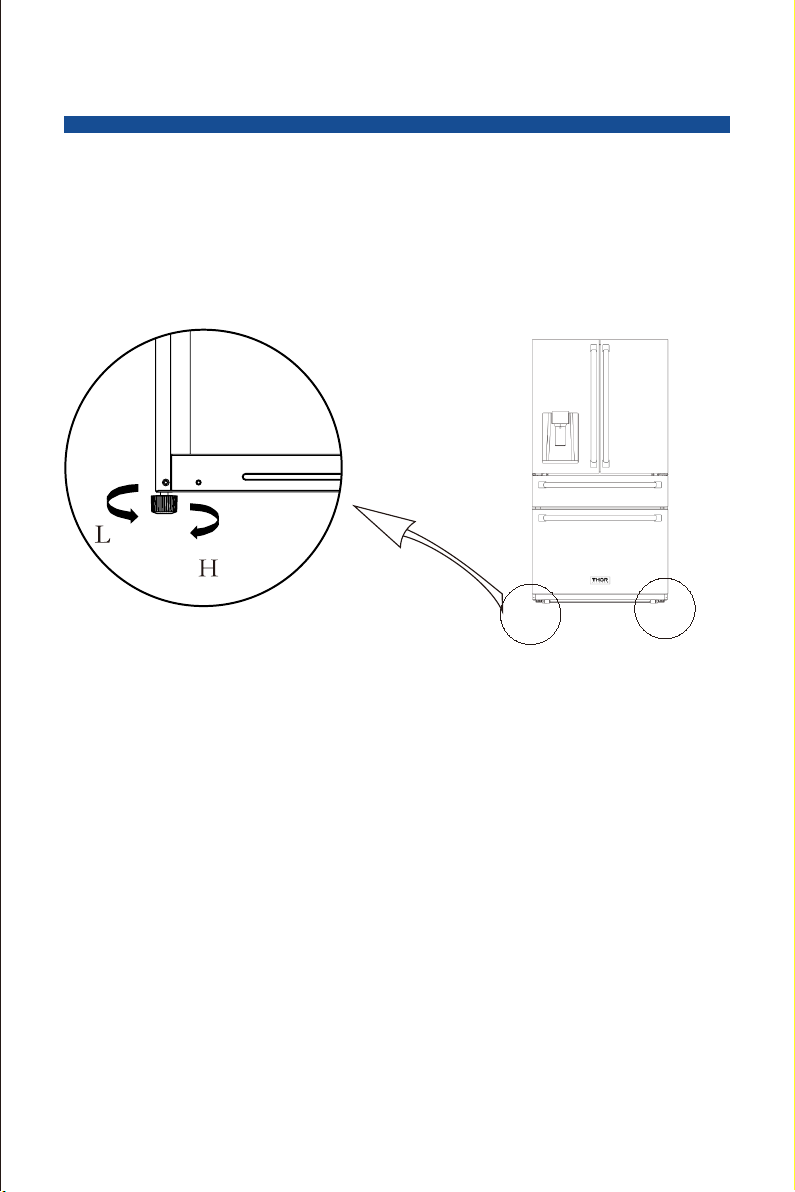
2.2 Levelling fee t
(The p ictur e ab ove is on ly f or refere nce. Th e ac tual co nf igura ti on will dep en d on
the phy si cal pro du ct o r state me nt by the d is tribu to r)
Adjus ti ng proced ures:
a. Turn th e fe et clockw is e to the ref rige ra tor;raise
b. Turn th e fe et counte rclockw is e to lowe r th e refrige ra to r;
c. Adjus t th e rig ht and le ft fe et ba sed on the proc edures abov e to a horizo nt al leve l.
7
Page 11
2 PROPER USE OF REFRIGERATORS
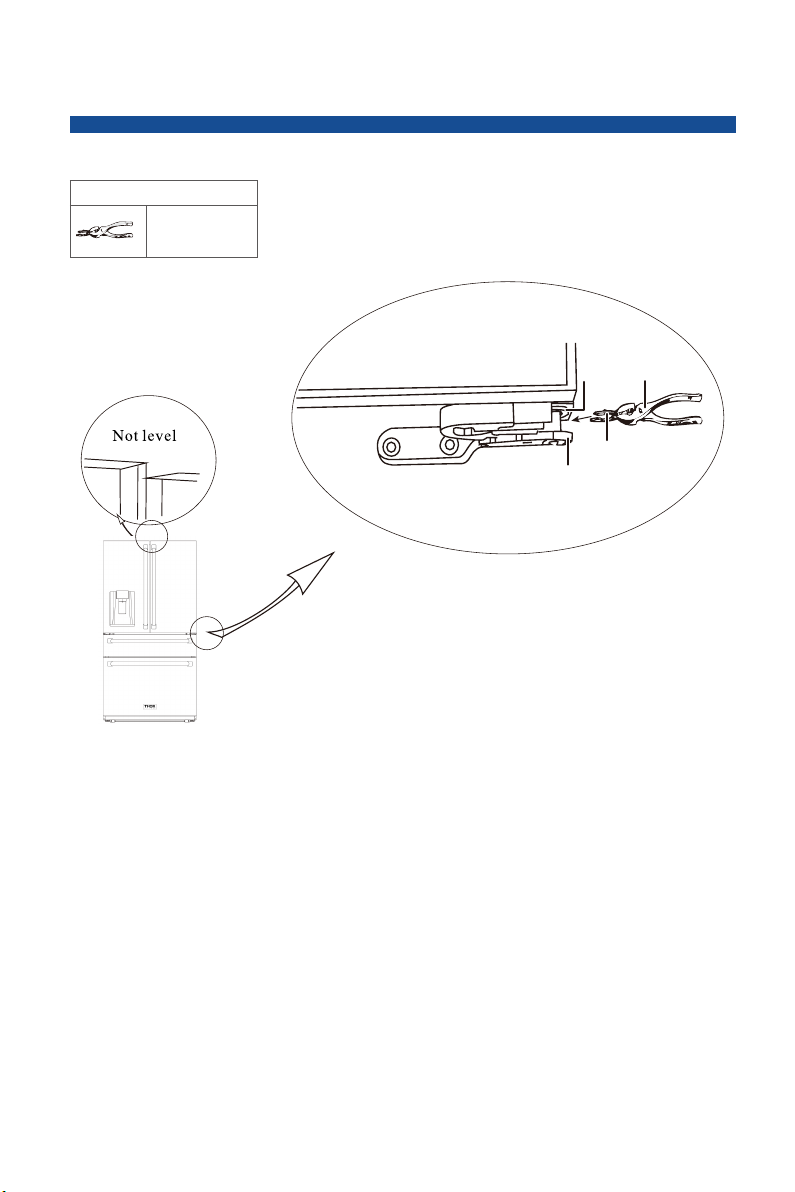
2.3 Levelling doo r
List of t oo ls to be provid ed b y the use r
plier
Hinge
grommet
Fastener ring-
Lower hinge
Pliers
(The pictur e ab ove is on ly f or refere nce. Th e ac tual co nf igura ti on will dep en d on
the phy si cal pro du ct o r state me nt by the d is tribu to r)
1) Rais e th e lower doo r up t o the lev el o f the hig he r door.
2) Inse rt t he supplied f as tener-ring by usi ng p lier in t he g ap betw ee n the hinge-grommet
8
.and the l ow er hinge The num be r of fast en-ri ng s you wil l ne ed t o ins er t depends o n th e gap.
Page 12
2 PROPER USE OF REFRIGERATORS
2.4 Door handles
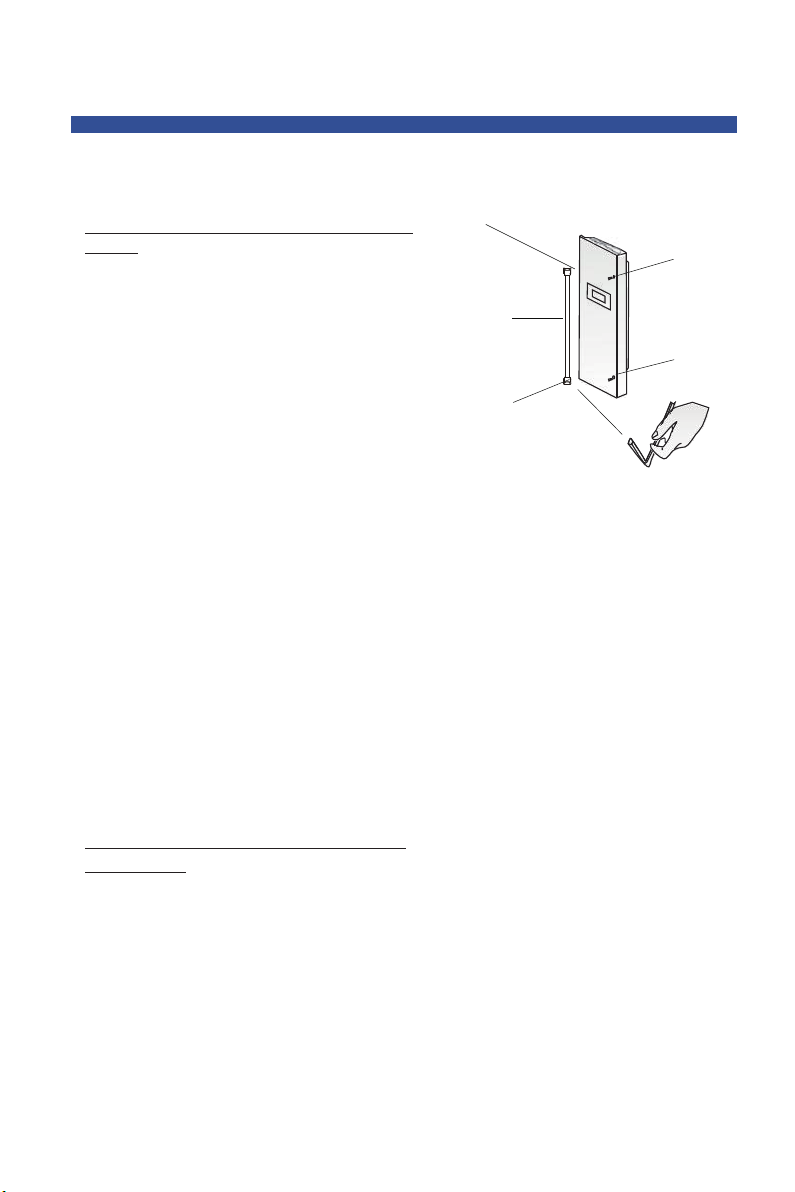
Assembly Instructions of Cold Storage Door
Handle:
1. Take the handle set bolts out from the
refrigerator, use cross recessed
screwdriver to set the bolt on the door.
Fix it tight with all the screw thread
twisted through the hole, as shown in
the figure;
2. After the first step is completed, take
the Cold storage door handle out from
the box, place it as per direction shown
in the figure (Note: i.e. the direction
which both screw holes on the handle
are close to the edge), and hang the
handle above the set bolt;
3. Use the small hexagon spanner supplied
in the box to set the handle fixing
socket head cap screws into both the
small screwed holes on the handle.
After they are screwed down, gently
shake the handle to test if the handles
are well erected.
Inner socket head cap
screw for handle fixing
Chilling chamber
door handle
Inner socket head cap
screw for handle fixing
Scheme of installation of
cold storage door handle
Bolt
Bolt
Assembly Instructions of The Refrigeration
Door Handle:
The assembly steps of the refrigeration door
handle are same as the cold storage door
handle. Please note, the direction of tapping
holds are downward to the ground when
assemble the refrigerator.
9
Page 13
2 PROPER USE OF REFRIGERATORS
2.5 Adjus tment of cantilever rack
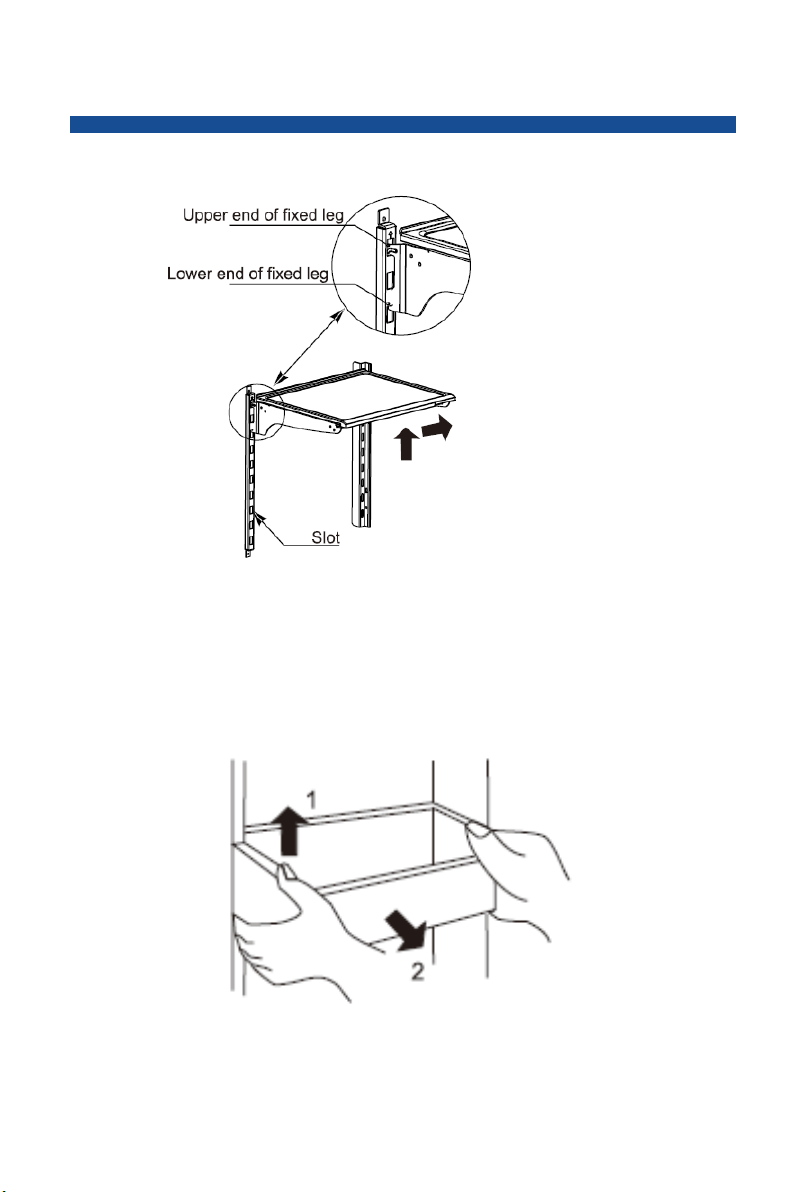
Adjustment of cantilever rack
The cantilever rack could be adjusted to the proper height as required by food.
Please adjust the cantilever rack by following the arrows as shown in the diagram.
Raise it upward first and then take it out by tilting it upward. During installation,
put the upper end of the fixed leg into one of the upper slots on the supporting iron first
and then put the lower end of the fixed leg into the third slot on the lower part of the supporting iron.
Height adjustment and cleaning of door-mounted bottle rack
Raise the bottle rack in t he direction, hold it with both hands and take it out in the direction.
After cleaning, you can inst all the rack in the reverse order and you c an also adjust the
height of the rack.
10
Page 14
2 PROPER USE OF REFRIGERATORS
2.6 Installing Filter
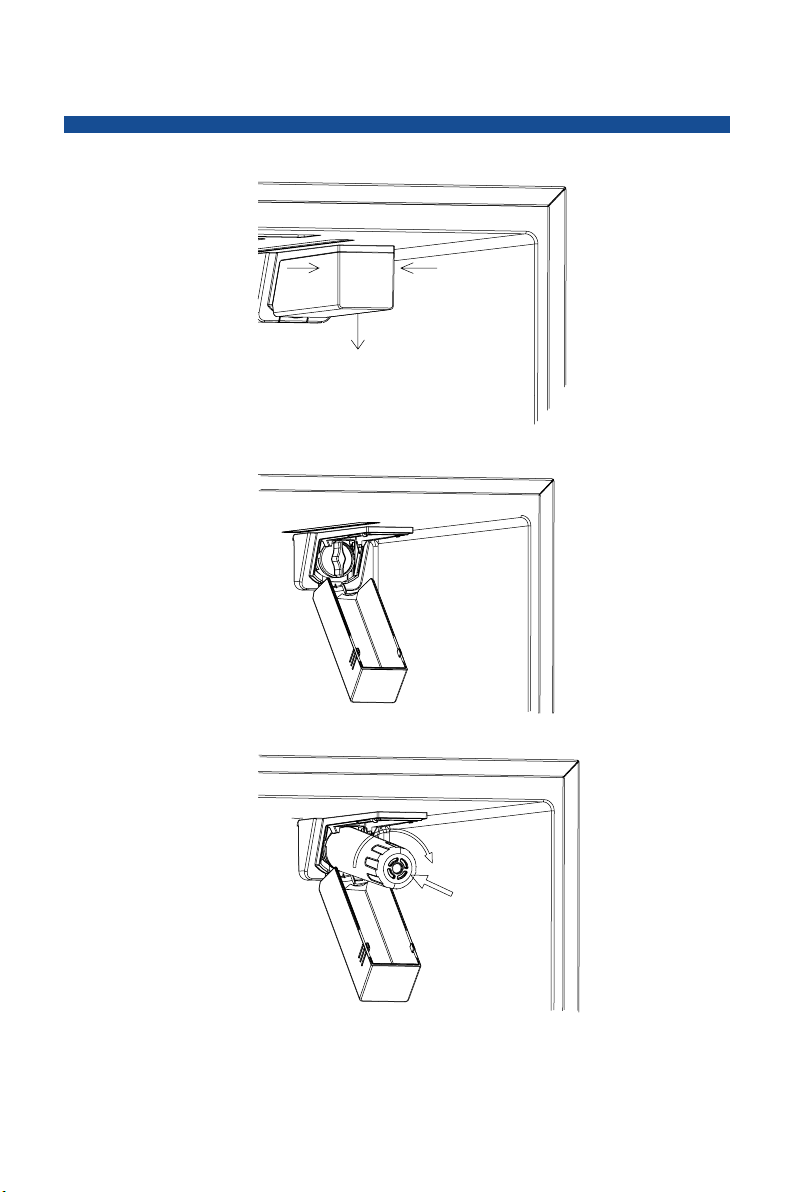
1.When the refrigerator is used for the first time, press down the marks on both sides of the filter cover
by hand and open the filter cover downward;
2.Then rotate the dustproof plug anticlockwise and remove the dustproof plug;
3.Remove t he e xterior package of the filt er, rotate the f ilter clockwise and press the filt er
element, and install the filt er element at the joint position of the refrigerator f ilter until the filter
element can not rota te ;
4.When the filter sign luminaire in the display panel is on, it prompts to replace the filter element.
The method of removing the filter element is the same as that of removing the dustproof plug;
The filter is recommended to be replaced every half a year.
5.
11
Page 15
2 PROPER USE OF REFRIGERATORS
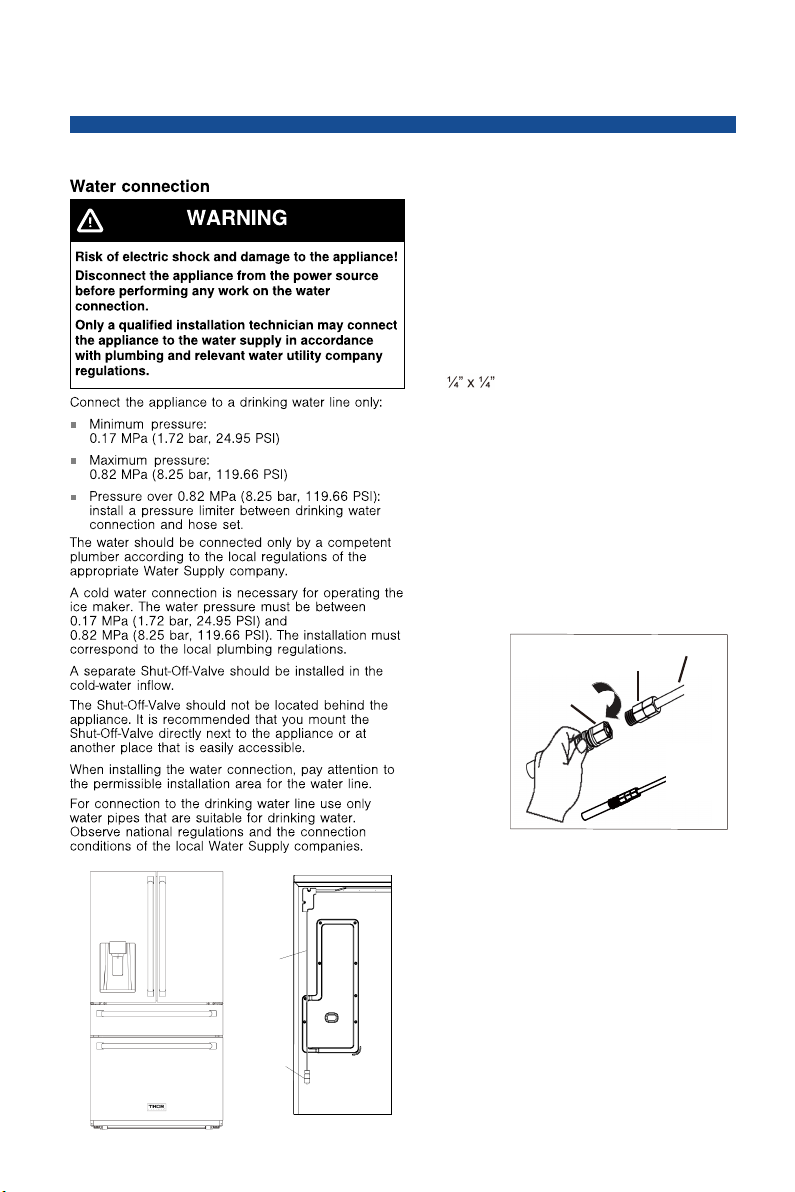
2.7 Ins talling the water line
Connecting the water line
Most homes are equipped with water line
installation parts. If yours is not or needs
replacing, water line installation kits are
available to purchase from
BSH part number 00646836 or from a
hardware store/dealer.
1 Shut off the main water supply line..
2 Install a shut off valve and water line. -
compression thread (UNS 7/16-24),
accessible with product in place. Refer to
local code and instructions with water line
installation kit (not included).
3 Connect the newly installed water supply .
line (C) to the refrigerator water inlet
connector (B), tighten using tool.
4 Gently tug on the supply waterline to .
ensure a proper fit and risk of damage when
pulling or pushing the unit for cleaning.
5 Turn main water back on and check for
.
leaks.
A
B
C
A
B
12
Page 16
2 PROPER USE OF REFRIGERATORS
2.8 Chang ing the Light
Any replacement or maintenance of the LED lamps is intended to be made by
the manufacturer, its service agent or similar qualified person.
2. 9 St arting to use
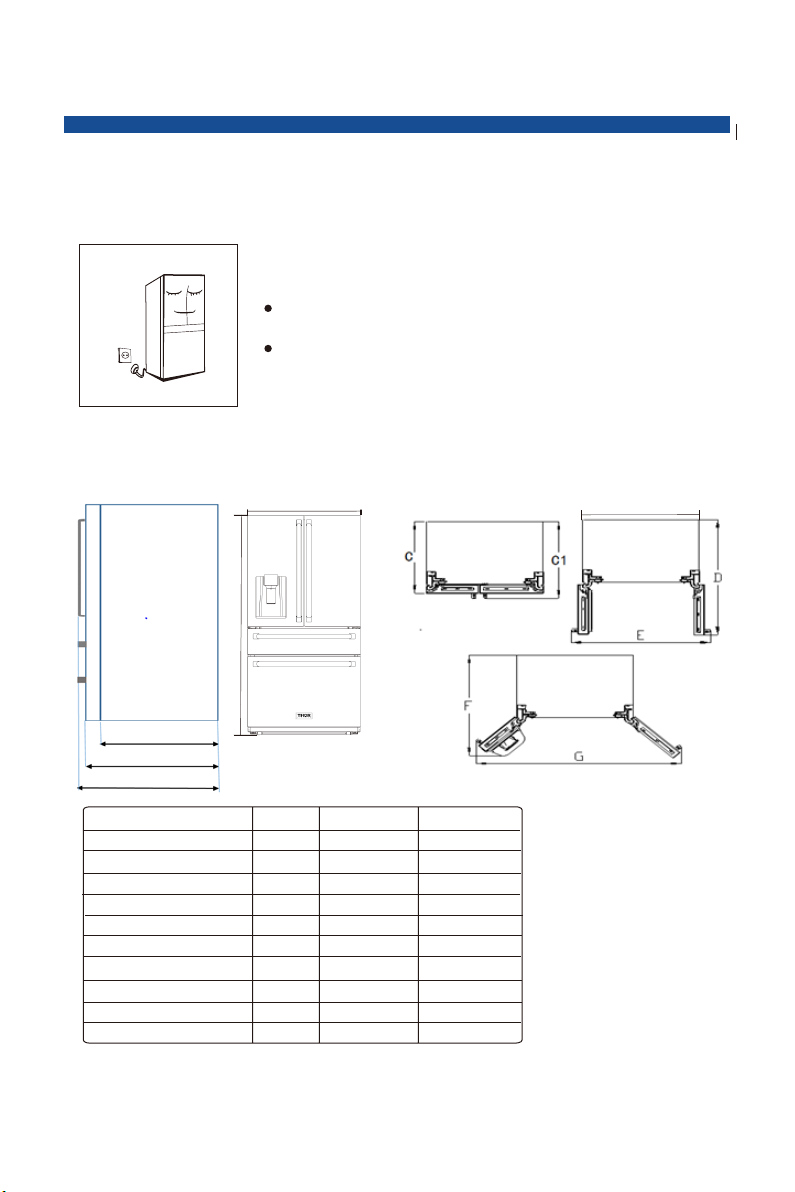
Before initial start, keep the refrigerator still for two hours
before connecting it to power supply.
Before putting any fresh or frozen foods, the refrigerator shall have run
for 2-3 hours, or for above 4 hours in summer when the ambient
temperature is high.
C2
C
C1
Heigh t
Width
Depth w it hout Do or s
with Ha nd les
Depth
Depth
Door op en 9 0° Dept h
Door op en 9 0° Widt h
Door op en 1 22° Dep th
Door op en 1 22° Wid th
B
A
CODE
A
B
C2
C1
C
D
E
F
G
SIZE (I N)
13/16”
69
35 13/16”
24 7/16”
30 15/16”
29
3/16”
43
44 1/4”
42 3/16”
60
SIZE(mm )
1772. 7
910
620
785.5
737
1096. 5
1124
1072
1524
H
H 90535 5/8”Width
13
Page 17
3 STRUCTURE AND FUNCTIONS
3.1 Key components
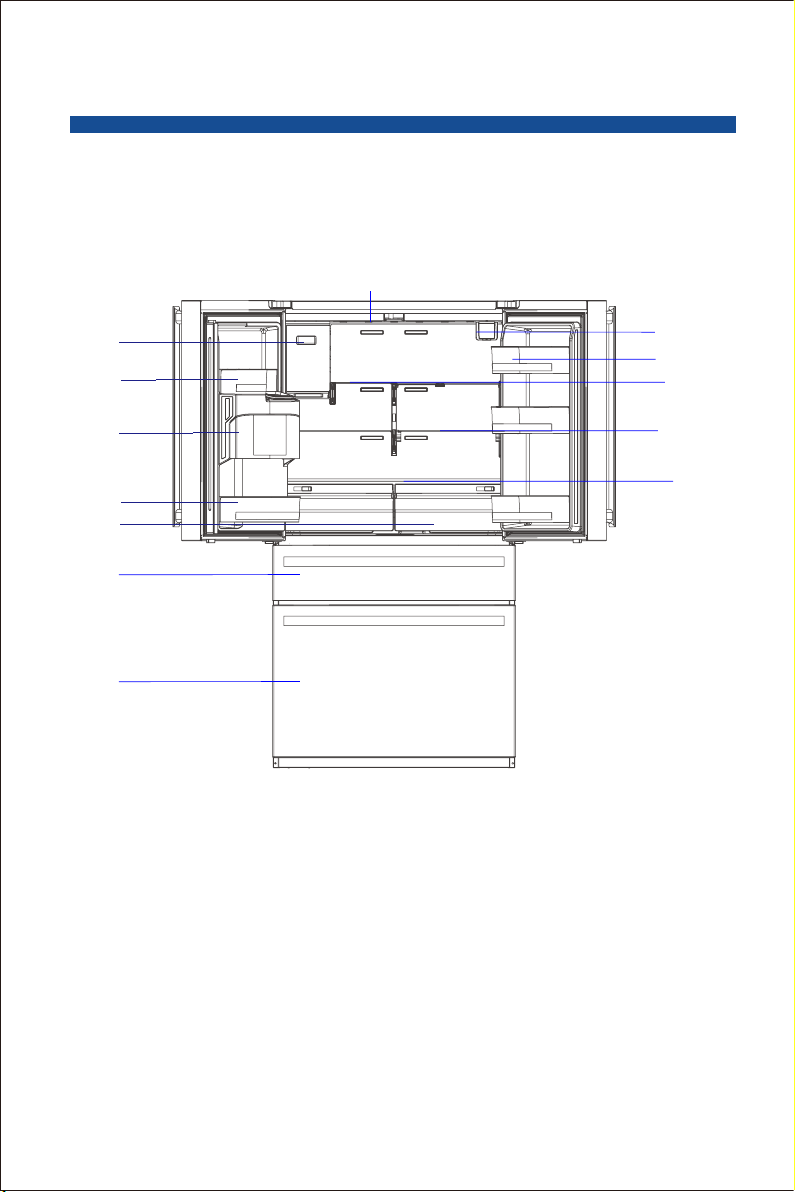
(Refrigera ting chamber)
LED lighting
Ice maker
Door tray
Turnover box
Door tray
Two vegetable
case
Flex Drawer
Freezer Drawer
(The picture above is only for reference. The actual conf iguration will depend on
the physical product or statement by the distributor)
Filter
Door tray
Shelf
Shelf
Shelf
14
Page 18
3 STRUCTURE AND FUNCTIONS
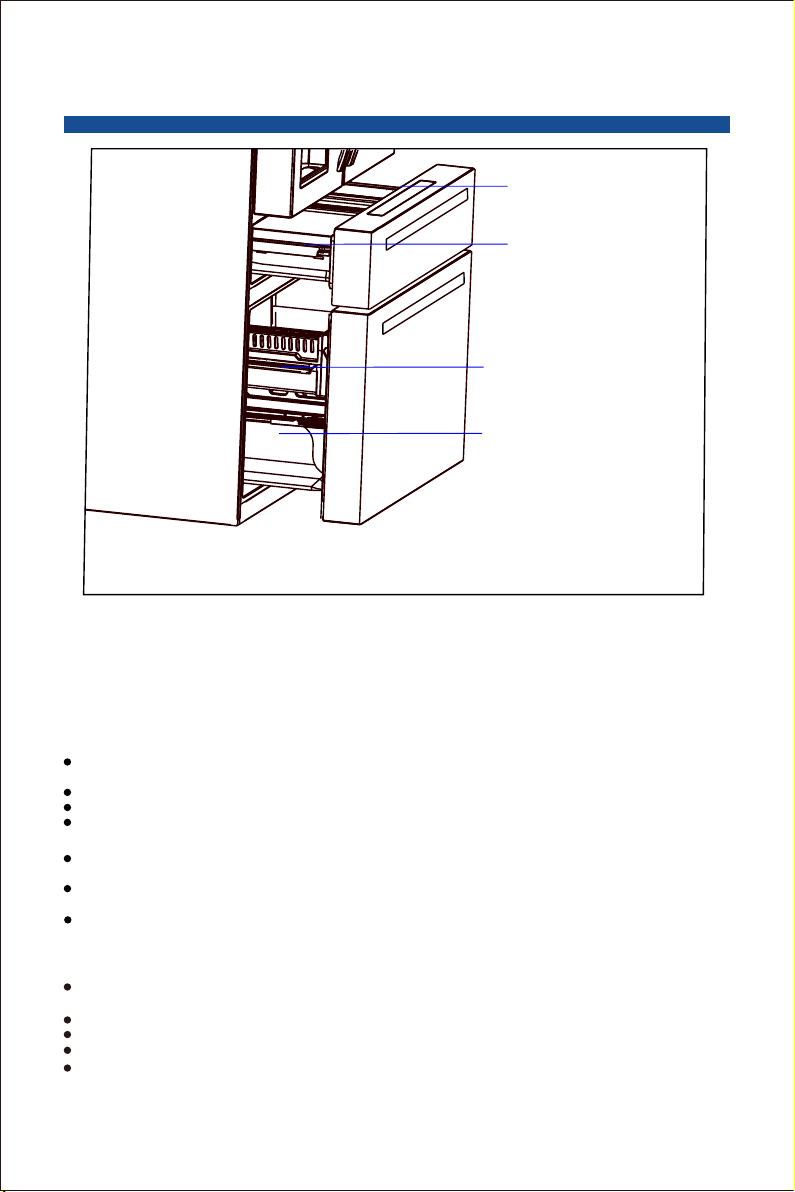
Dispay scr ee n
Flex Drawe r
Upper free ze r drawer
Lower free ze r drawer
(The picture above is only for reference. Th e ac tu al c on figur at io n wi ll depe nd on
the physical product or statement by the distributor)
Refrigerating chamber
The Refrigerating Chamber is suitable for storage of a variety of fruits, vegetables, beverages and
other food consumed in the short term.
Cooking foods shall not be put in the refrigerating chamber until cooled to room temperature.
Foods are recommended to be sealed up before putting into the refrigerator.
The glass shelves can be adjusted up or down for a reasonable amount of storage space and easy use.
Freezing chamber
The low temperature freezing chamber may keep food fresh for a long time and it is mainly used to
store frozen foods and making ice.
The freezing chamber is suitable for storage of meat, fish, rice balls and other foods not to be
consumed in short term.
Chunks of meat are preferably to be divided into small pieces for quick freezing and easy access.
Please be noted food shall be consumed within the shelf time.
Flex Drawer
The flex drawer temperature can be adjusted in -1 °C/30 °F, 1 °C /34 °F, 3 °C /37 °F and 5 °C /4 °F,
and the appropriate temperature can be selected according to the needs of different foods.
When flex drawer temperature is set at - 1 °C /30 °F, it is suitable to store meat.
When flex drawer temperature is set at 1 °C /34 °F, it is suitable to store drinks.
When flex drawer temperature is set at 3 °C / 37 °F, it is suitable to store cooked food.
When flex drainer temperature is
set at 5 °C / 41 °F, it is suitable to storered wine.
15
Page 19
3 STRUCTURE AND FUNCTIONS
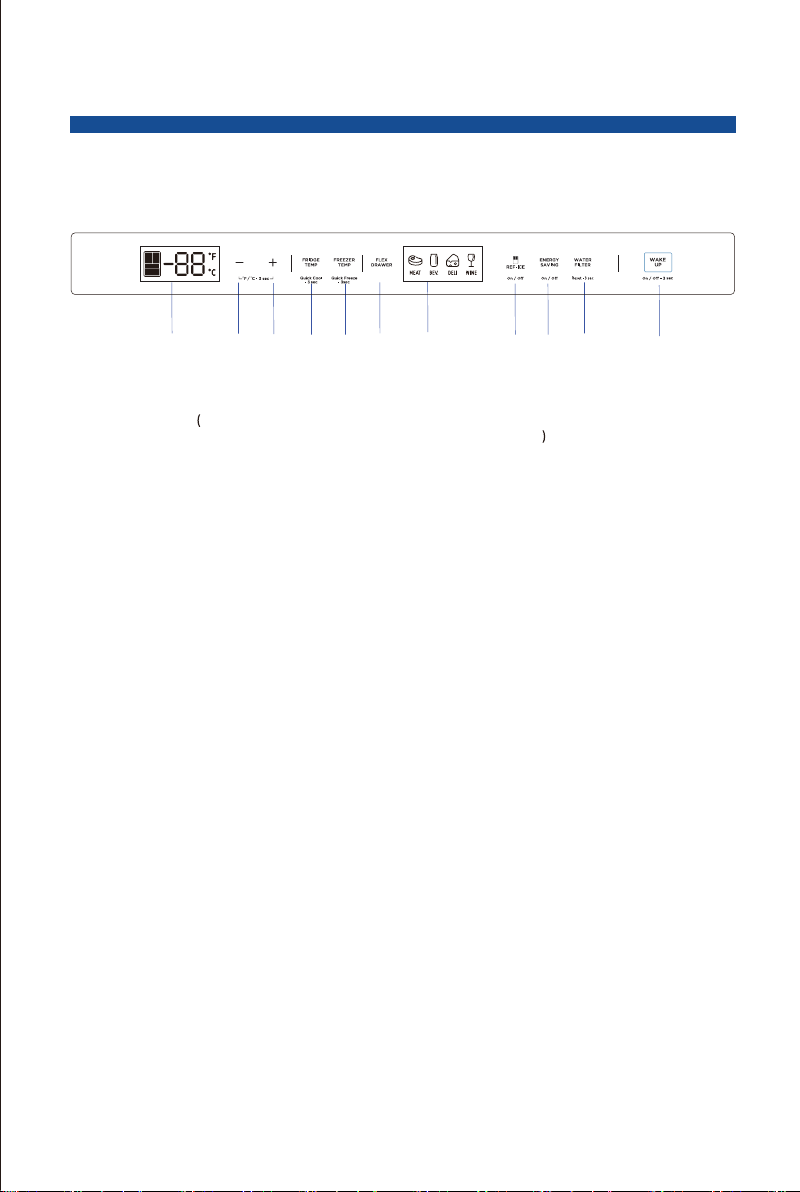
3.2 Function s
A
B
①
The pic tu re abov e is o nly for r ef erenc e. The ac tu al conf igura ti on w ill dep end on
the phy si cal pro du ct or sta te ment by t he d istri bu tor
C
E
D
②
F
H
I
J
Display screen
Operation key
②① Temperature zone display Temperature shift gear
A. Temperature downward B. Temperature upward C. Refrigerating chamber button
D. Freezing chamber button E. Flex Drawer button
H. Filter prompt I. Energy saving Mode J. Lock button
F. Initial
button
for refrigerating the madeice
Display
1) Main display control (display control on drawer door)
When the power is on for the first time, the icons will be semi-bright and fully displayed and scrolled from
left to right.
Then the icons will be fully highlighted and fully displayed for 3 seconds. At the same time, the start-up bell
will ring, and then the display will enter normal operation. (When the refrigerator is energized for the first
power, the temperature of refrigerating chamber, freezing chamber and flex drawer is set at 39°F/0°F/37°F
respectively).
Under normal conditions, if there is no door opening action and no key operation for 30 seconds, then the
display will be locked, and the display will be off after 30 seconds at locking status;
When the display screen is not on, if any key is pressed, the display screen will be on normally;
2) Distributor display and control
When the refrigerator is energized for the first time, the distributor display and control will be fully displayed
for 3 seconds and then it enters the normal operation display (water outlet function is default option when
the refrigerator is energized for the first time);
Locking and unlocking
In the unlocking state, press and hold the locking key for 3 seconds to enter the locking state and the
locking buzzer beeps.
In the locking state, press and hold the locking key for 3 seconds to enter the unlocking state and the
unlocking buzzer beeps.
If no key is pressed after 30 seconds, the display screen enters the locking state automatically.
Temperature setting of refrigerating chamber
Press the refrigerating key to select the refrigerating temperature zone, and then press the“-” and “+”
temperature regulation keys to adjust the temperature of the refrigerating chamber. The“-” key is pressed
once the temperature will drop by 1°C/1°F. After the temperature reaches 1°C/34 °F, the“-” key will be
invalid no matter how it is pressed.
The “+” key is pressed once the temperature will rise by 1°C/1°F. After the temperature reaches 7°C/44 °F,
the “-” key will be invalid no matter how it is pressed. The temperature setting range of refrigerating
chamber 1°C /34 °F ~ 7 °C/44 °F. The setting will take effect after locking.
16
Page 20
3 STRUCTURE AND FUNCTIONS
Temperature setting of flex drawer
Press the flex drawer key to select temperature shift zone, and press the temperature shift key
again to adjust the temperature of flex drawer. The temperature shift key is pressed once, the
temperature will be increased by 1 gear, When the temperature is increased to WINE (4th
gear), press the temperature shift key again, the temperature will return to MEAT(1st gear).
The corresponding temperature settings of each gear are MEAT(-1°C/30°F), BEV (1°C/34°F),
DELI (3°C/37°F), and WINE (5 °C/ 41°F).The settings will take effect after locking.
Temperature setting of freezing chamber
Press the freezing key to select the freezing temperature zone, and then press the“-” and “+”
temperature regulation keys to adjust the temperature of the freezing chamber. The“-” key is
pressed once the temperature will drop by 1°C/1°F. After the temperature reaches -22°C/-7 °F,
the“-” key will be invalid no matter how it is pressed. The “+” key is pressed once the
temperature will rise by 1°C/1°F.
After the temperature reaches -14°C/7 °F, the “-” key will be invalid no matter how it is pressed.
The temperature setting range of freezing chamber -22°C /-7 °F ~ -14 °C/7 °F. The setting will
take effect after locking.
Switching between Fahrenheit temperature and Celsius temperature
The composite key of “+” and “-” is pressed for 3s, Fahrenheit temperature and Celsius temperature are
switched and it will take effect after locking;
State setting of distributor
Touch the key of the corresponding mode to select ice cube mode / water drainage mode / ice breaking
mode.
After the corresponding function is selected, the indicator light of the corresponding mode will be on. Water
will be drained out immediately after water drainage mode is selected. Ice is drained out 3 seconds after the
switch of ice cube mode /ice breaking mode is pressed.
Control of distributor lamp
When the distributor switch is switched on, the distributor lamp will be on; when the distributor switch is
disconnected, the distributor lamp will be off after 3S delay;
Press the REF-ICE key to turn on the backlight and the refrigerating ice maker; press the REF-ICE key
again to turn off the backlight and the refrigerating ice maker. It will take effect after locking;
Note: When the refrigerating ice maker is on, the ice maker will turn over the ice into the ice making
chamber if the ice storage box is removed and the ice maker is currently turning over the ice;
Tips for replacing filter
When the filter is used for more than 150 days and the backlight is always on, or when the filter is used for
more than 180 days and the backlight flashes, press WATER-FILTER key for 3s to clear the alarm settings
and re-time it.
The buzzer rings for 3 times at the same time.
Mode setting
Quick cooling mode
Press and hold the refrigeration key for 3s to enter the quick cooling mode. At the same time, the icon of the
refrigerating chamber turns blue. The quick cooling mode will take effect after being locked;
At the time of setting the quick cooling mode, the temperature of refrigerating chamber is automatically set
at 1°C/34°F;
when the quick cooling mode is exited, the set temperature of the refrigerating chamber automatically
returns to the set temperature before the quick cooling mode.
Quick-freezing mode
Press and hold the freezing key to enter the quick cooling mode. At the same time, the icon of the freezing
chamber turns blue. The quick cooling mode will take effect after being locked;
At the time of setting the quick cooling mode, the temperature of refrigerating chamber is automatically set
at -22°C/-8°F;
when the quick cooling mode is exited, the set temperature of the refrigerating chamber automatically
returns to the set temperature before the quick cooling mode.
17
Page 21
3 STRUCTURE AND FUNCTIONS
ECO mode
Press ENERGY SAVING key to enter the ECO mode, and the backlight will be on; the quick-freezing mode
is cancelled at the same time. The quick freezing is controlled at - 14°C/7°F and refrigerating at 7°C/45°F.
Press the ENERGY SAVING key again to exit the ECO mode, the backlight will be off, and the temperature
of freezing and refrigerating will return to the set temperature before entering the ECO mode. The mode will
take effect after locking;
Anti-condensation heater strip
The anti-condensation heater strip could be turned on and off via combined button, by pressing
“ENERGY SAVING +FREEZER-TEMP” for 3 seconds, the Fahrenheit symbol will blink, it will take effect
by pressing the locking key, and the anti-condensation heater strip will be turned off;
When the anti-condensation heater strip is off, by pressing “ENERGY SAVING +FREEZER-TEMP” for 3
seconds, the Fahrenheit symbol will no long blink, it will take effect by pressing the locking key, and the
anti-condensation heater strip will be turned on;
The on and off anti-condensation heater strip are for the inspection and maintenance convenience; users
shall not easily turn off the anti-condensation heater strip, as it will cause the risk of condensation.
Fault
When there is a fault, the tube displays the fault code (cycle display after locking), and the buzzer rings the alarm
sound; press any key when unlocking or locking,the alarm sound can be released; after the corresponding
sensor / ice maker fault is eliminated by maintenance, the tube will clear the corresponding fault status code;
When any door is opened for more than 2 minutes, the buzzer will sound an alarm sound; when the door is
locked / unlocked, press any key to clear the alarm sound, or close all doors,the alarm sound is released.
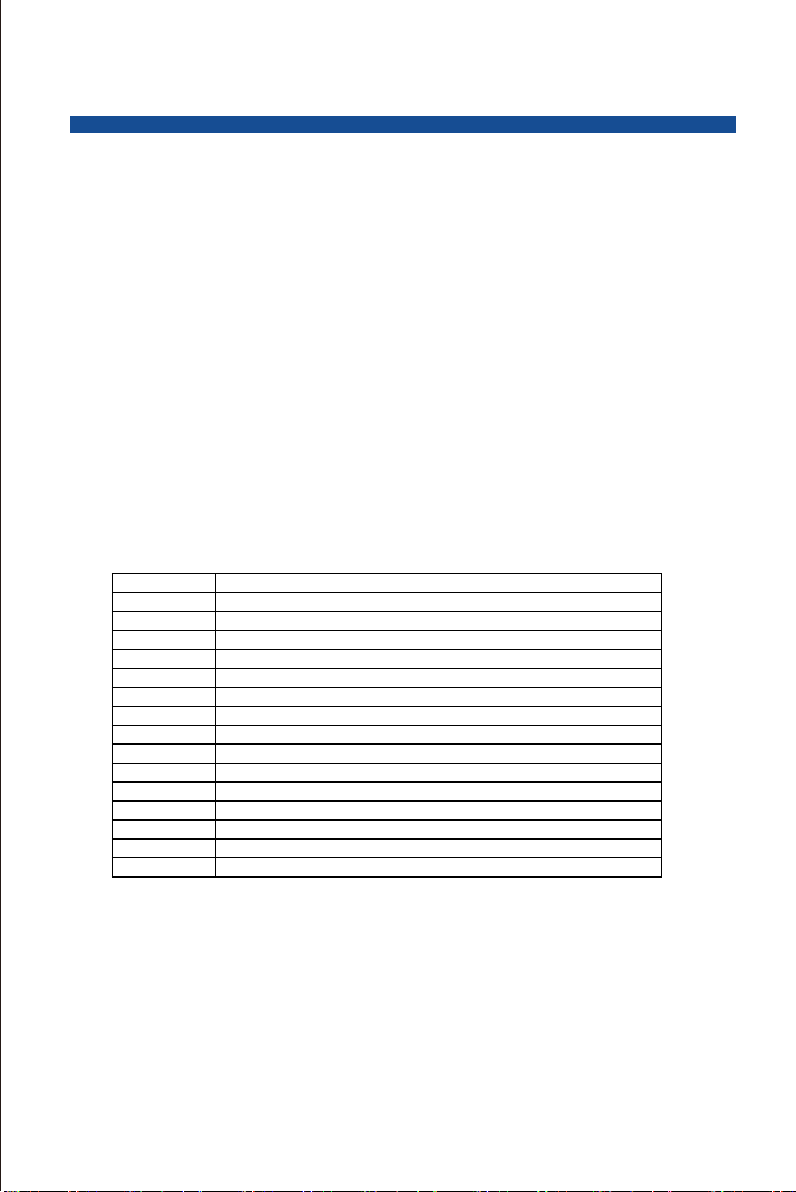
Fault code Fault name
EH The humidity sensor fails
F5 Refrigerating ice maker fails to turn over ice
F4 The sensor at the bottom of refrigerating ice maker fails
CC The defrosting sensor in ice making chamber fails
C9 The sensor in ice making chamber fails
CA The communication between main control board and ice making board fails
F6 The initialization of refrigerating ice maker fails
E0 The initialization of freezing ice maker fails
E1 The temperature sensor in the refrigerating chamber fails
E2 The temperature sensor in the freezing chamber fails
E3 The sensor of the Flex Drawer fails
E4 Frosting sensor for refrigerating fails
E5 Frosting sensor for freezing fails
E6 The communication between display board and main control board fails
E7 The ambient temperature fails
18
Page 22
3 STRUCTURE AND FUNCTIONS
3.3 Fet ching wate r and Ice
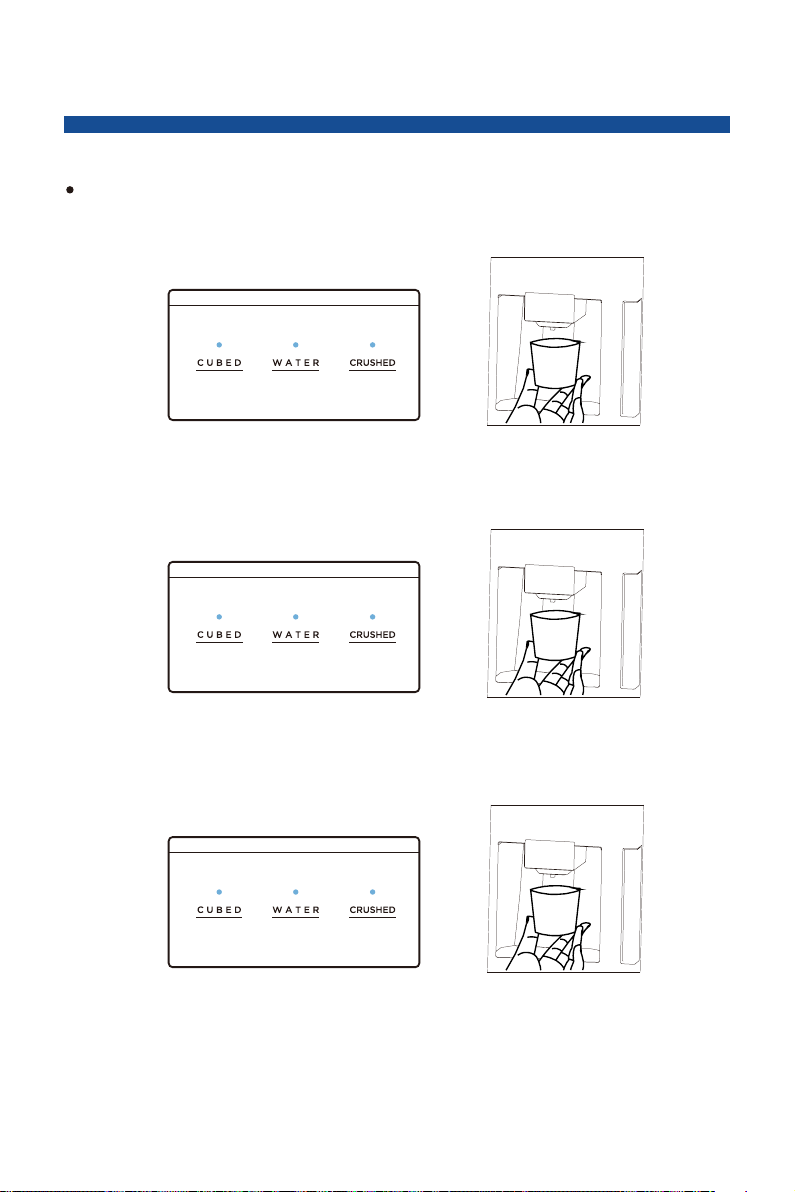
The ice/water dispenser is located on the outside of refrigerating chamber door. It offers a choice of
cubed or crushed ice, or cold water. The dispenser only works when the refrigerating chamber door is
closed.
1) Fetching cold water
a、Keep pressing the buttons WATER until the indicator turns on.
b、Push the container in the direction of fetching water cushion,Cold water starts to flow into the
container. Remove the container from fetching water cushion and end the exporting of water.
Fetching crushed ice2)
Keep pressing the buttons of CRUSHED until the signal turns up.
Make the container tight with mouth of water dispenser to prevent the side jet.
Press the container in the direction of fetching water cushion . Fill the container with crushed ice.
Remove the container from fetching water cushion and end the exporting of water.
3) Fetching ice cubes
Keep pressing the buttons CUBED until the signal lights up.
Push the container in the direction of fetching water cushion.
Ice cubes start to fall into the container.
Remove the container from fetching water cushion and end the exporting of ice.
(The picture above is only for ref erence. The actual configurat ion will depend on
the physical product or sta tement by the distributo r)
19
Page 23
3 STRUCTURE AND FUNCTIONS
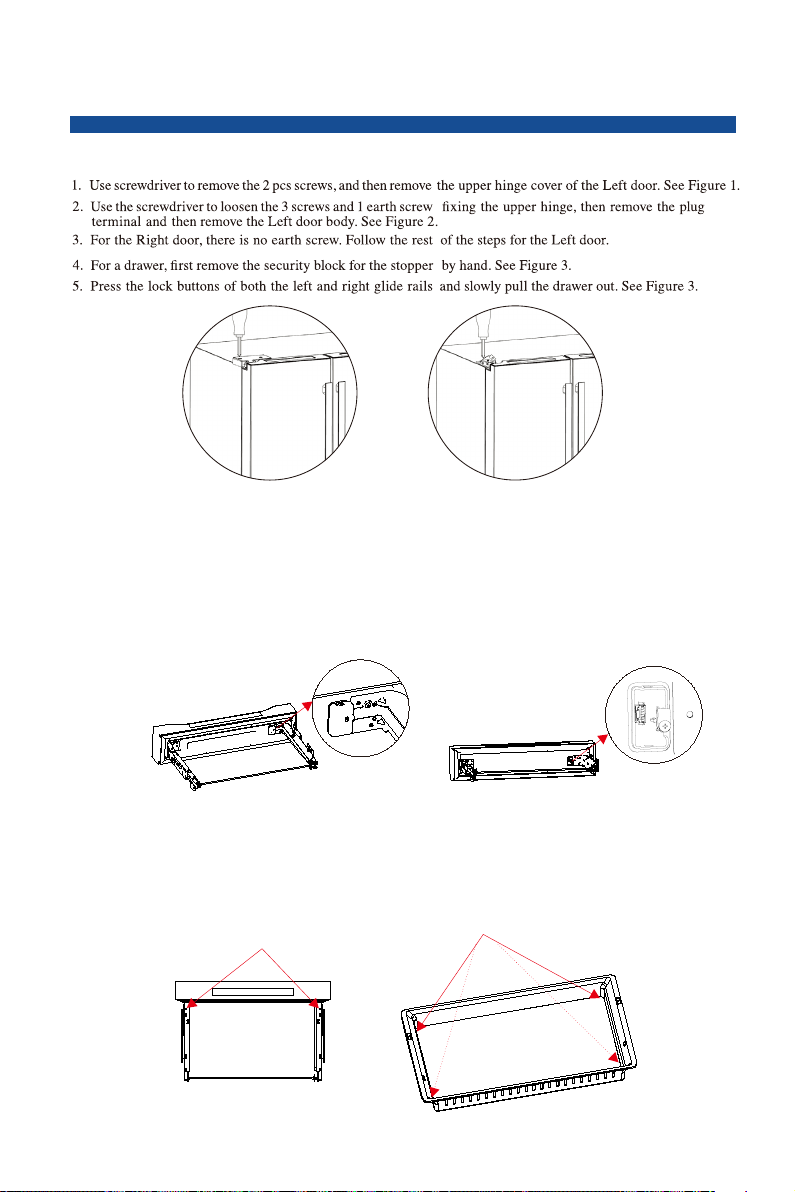
3.4 Disassembly of refrigerator door
Method for disa ssembly of variable temperature door:
1. Remove t he variable t emperature drawer;
2. Pull the variable temperat ure door t o the maximum strok e, demount harness co ver with
screwdriver or electronic runner for screw f ixation, and remove the harness cov er;
3. Demount harness wit h screwdriver or electronic runner for fix at ion and clamping with screw,
and unplug the connecting terminal;
4. Demount the screw on t he left and right slideway support with screwdriver or electronic
runner, and it is best for one person to hold t he door against falling in the proce ss;
5. Lift the door to a certain angle wit h both hands and pull back, and then the variable
temperature door disass embly can be achieved.
Method for disassembly o f freezing door:
1. Remove t he feezing drawer;
2. Demount the sc rew on t he left and right slideway support with screwdriver or elect ronic
runner, and it is best for one person to hold t he door
3. Lift the door to a certain angle wit h both hands and pull back, and then the variable
temperature door disass embly can be achieved.
screw
20
against falling in the proce ss;
disassembly of freezing door
Page 24
4. MAINTENANCE AND CARE OF THE REFRIGERATORS
4.1 Overall cleaning
Dusts behind the refrigerator and on the ground shall be timely cleaned to improve the cooling effect and
energy saving.
Check the door gasket regularly to make sure there are no debris. Clean the door gasket with a soft cloth
dampened with soapy water or diluted detergent.
The interior of the refrigerator should be cleaned regularly to avoid odor.
Please turn off the power before cleaning interior, remove all foods, drinks ,shelves, drawers, etc.
Use a soft cloth or sponge to clean the inside of the refrigerator, with two tablespoons of baking soda and
a quart of warm water. Then rinse with water and wipe clean. After cleaning, open the door and let it dry
naturally before turning on the power.
For areas that are difficult to clean in the refrigerator (such as narrow sandwiches, gaps or corners), it is
recommended to wipe them regularly with a soft rag, soft brush, etc. and when necessary, combined with
some auxiliary tools (such as thin sticks) to ensure no contaminants or bacterials accumulation in these
areas.
Do not use soap, detergent, scrub powder, spray cleaner, etc., as these may cause odors in the interior
of the refrigerator or contaminated food.
Clean the bottle frame, shelves and drawers with a soft cloth dampened with soapy water or diluted
detergent. Dry with a soft cloth or dry naturally.
Wipe the outer surface of the refrigerator with a soft cloth dampened with soapy water, detergent, etc.,
and then wipe dry.
Do not use hard brushes, clean steel balls, wire brushes, abrasives
(such as toothpastes), organic solvents (such as alcohol, acetone,
banana oil, etc.), boiling water, acid or alkaline items, which may
damage the fridge surface and interior. Boiling water and organic
solvents such as benzene may deform or damage plastic parts.
Do not rinse directly with water or other liquids during cleaning to
avoid short circuits or affect electrical insulation after immersion.
.
fect and
Pleas e unpl ug t he refriger at or f or defr os t and cleaning.
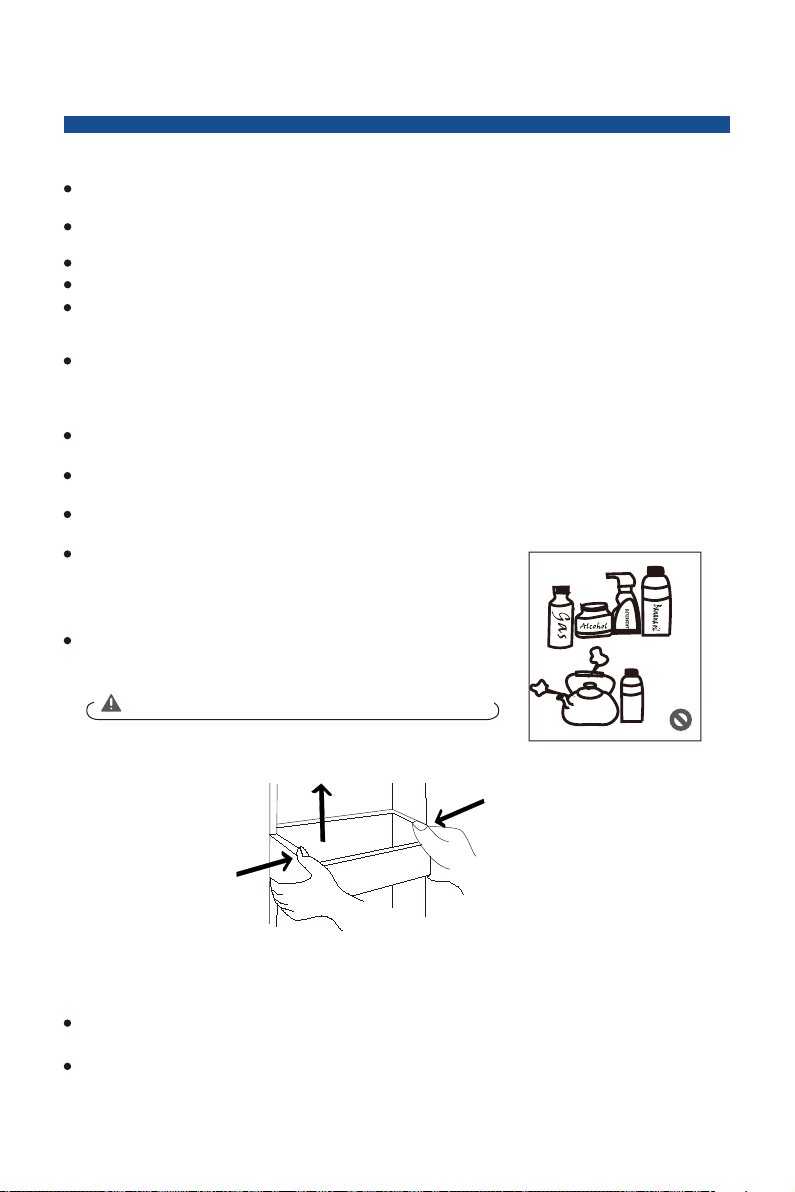
Cleaning of door tray
4.2
(The picture above is only for reference. Th e ac tu al c on figur at io n wi ll depe nd on
the physical product or statement by th e distributor)
According to the direction arrow in the figure below, use both hands to squeeze the tray,
and push it upward, then you can take it out.
After washing the tray having been taken out, you can adjust its installing height
in accordance with your requirement.
21
Page 25
4. MAINTENANCE AND CARE OF THE REFRIGERATORS
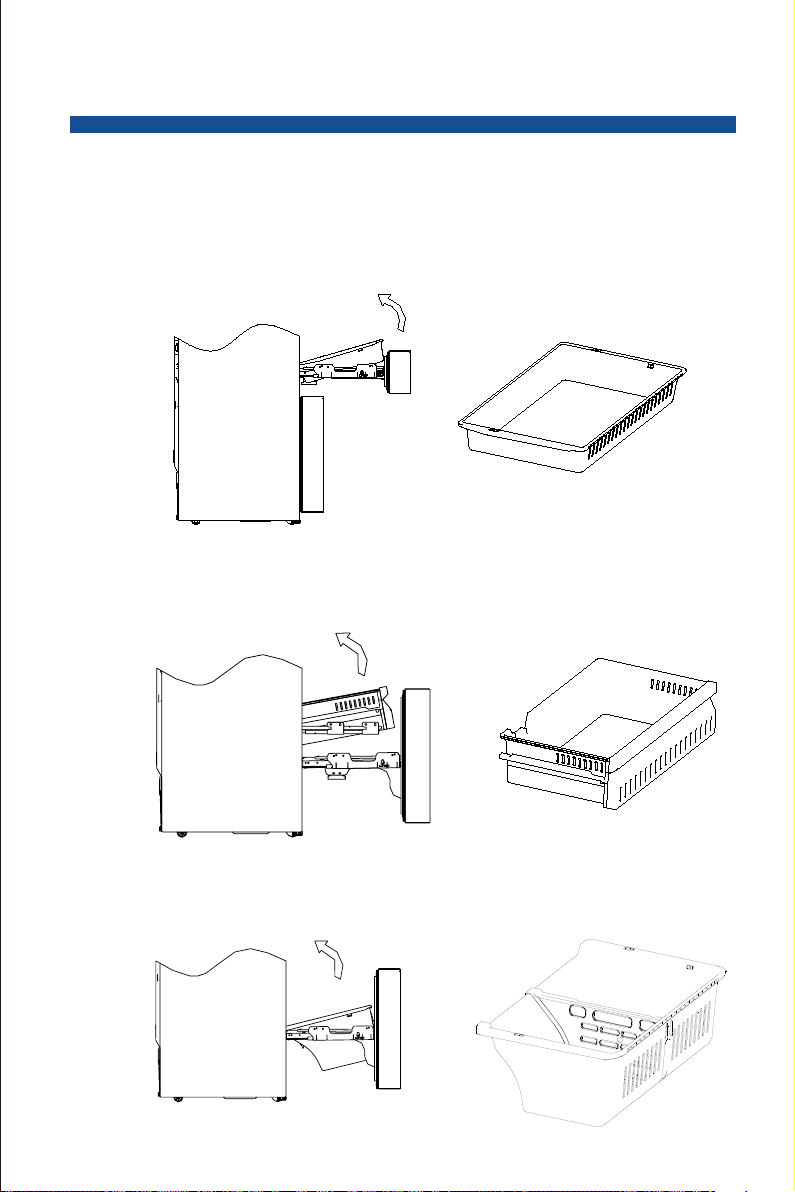
4.3 Cleaning of drawers
Drawing and stretching variable temperature drawer
Open the variable temperature door to the maximum stroke, hold the left and right sides of the variable
temperature drawer with both hands, lift the tail, exert a little force to pull the whole drawer back for about 15mm
until the support claw of the slide rail is separated from the drawer, then lift the front end of the drawer at a
certain angle, hold the drawer and move horizontally to the inside of the chamber, and then rotate it back and up
to remove the drawer.
Upper freezer drawer
Open the freezing chamber door to the maximum stroke, lift the tail of the upper drawer of the freezing chamber,
pull the slide rail so that it can not jump, push the drawer forward to separate the drawer from the support claw
of the slide rail. Separate the drawer on the side from the support claw of the slide rail with the same method.
Rotate the drawer it back and up to remove it after the slide rail support is separated from the drawer.
Upper freezer drawer
Open the freezing chamber door to the maximum stroke, hold the left and right sides of the lower drawer of the
freezing chamber, lift the tail of the drawer to pull the whole drawer about 15mm to the external side of the
chamber until the sliding rail support claw is separated from the drawer, and rotate the drawer back and up to
take it out.
22
Page 26
4. MAINTENANCE AND CARE OF THE REFRIGERATORS
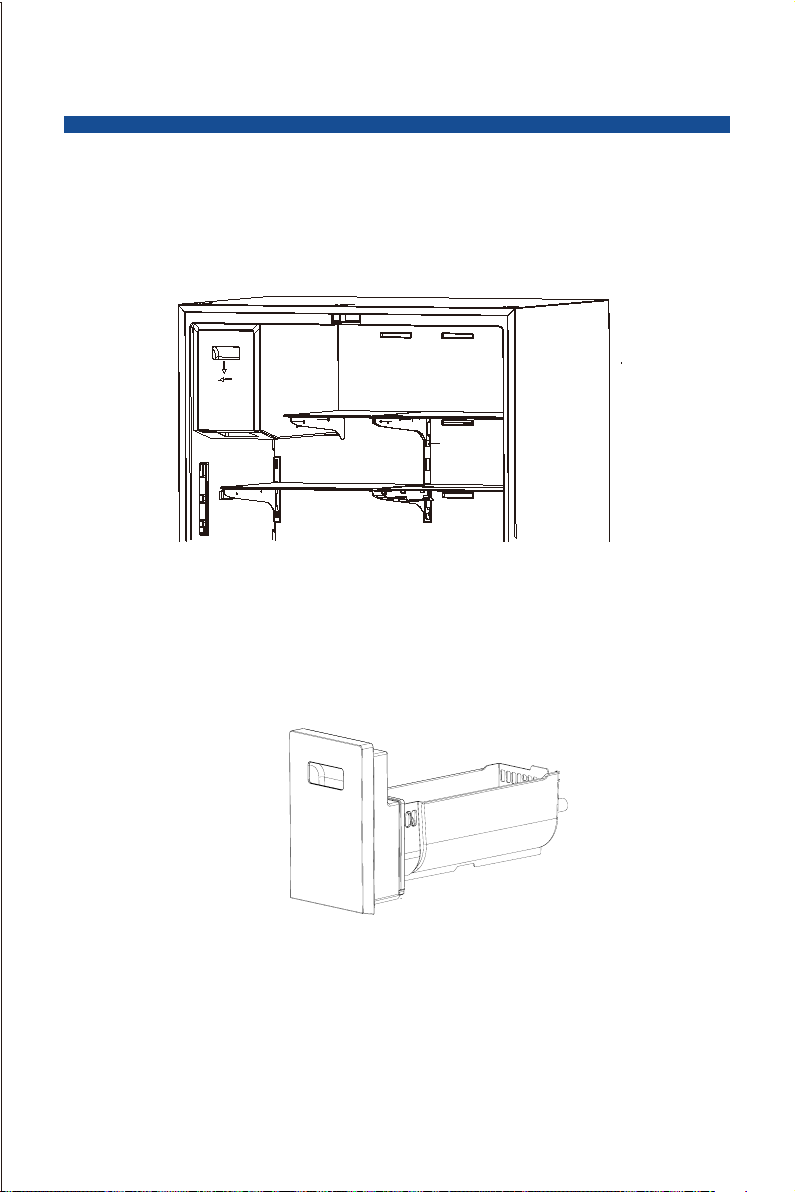
4.4 Cleaning of ice storage box
When you need to use a lot of ice, or take ice abnormally, or need to clean the ice storage box, you can take out
the ice storage box, but please put it back in time.
1. Hold the button of the ice storage box with your hand, press it gently, and then pull it out horizontally;
2. Push the ice storage box in slightly after cleaning.
Note: Please remove the ice in time which falls in the ice making chamber during pulling out.
23
Page 27
4. MAINTENANCE AND CARE OF THE REFRIGERATORS
4.5 Defrosting
The refrigerator is made based on the air-cooling principle and thus has automatic
defrosting function. Frost formed due to change of season or temperature may also
be manually removed by disconnection of the appliance from power supply
or by wiping with a dry towel.
4.6 Out of operation
Power failure: In case of power failure, even if it is in summer, foods inside the appliance can be kept for
several hours; during the power failure, the times of door opening shall be reduced, and no more fresh
food shall be put into the appliance.
Long-time nonuse: The appliance shall be unplugged and then cleaned; then the doors are left open
to prevent odor.
Moving: Before the refrigerator is moved, take all objects inside out, fix the glass partitions, vegetable
holder, freezing chamber drawers and etc. with tape, and tighten the levelling feet; close the doors and
fix them with tape. During moving, the appliance shall not be laid upside down or horizontally, or be
vibrated;
the inclination during movement shall be no more than 45°.
24
Page 28
5 TROUBLE SHOOTING
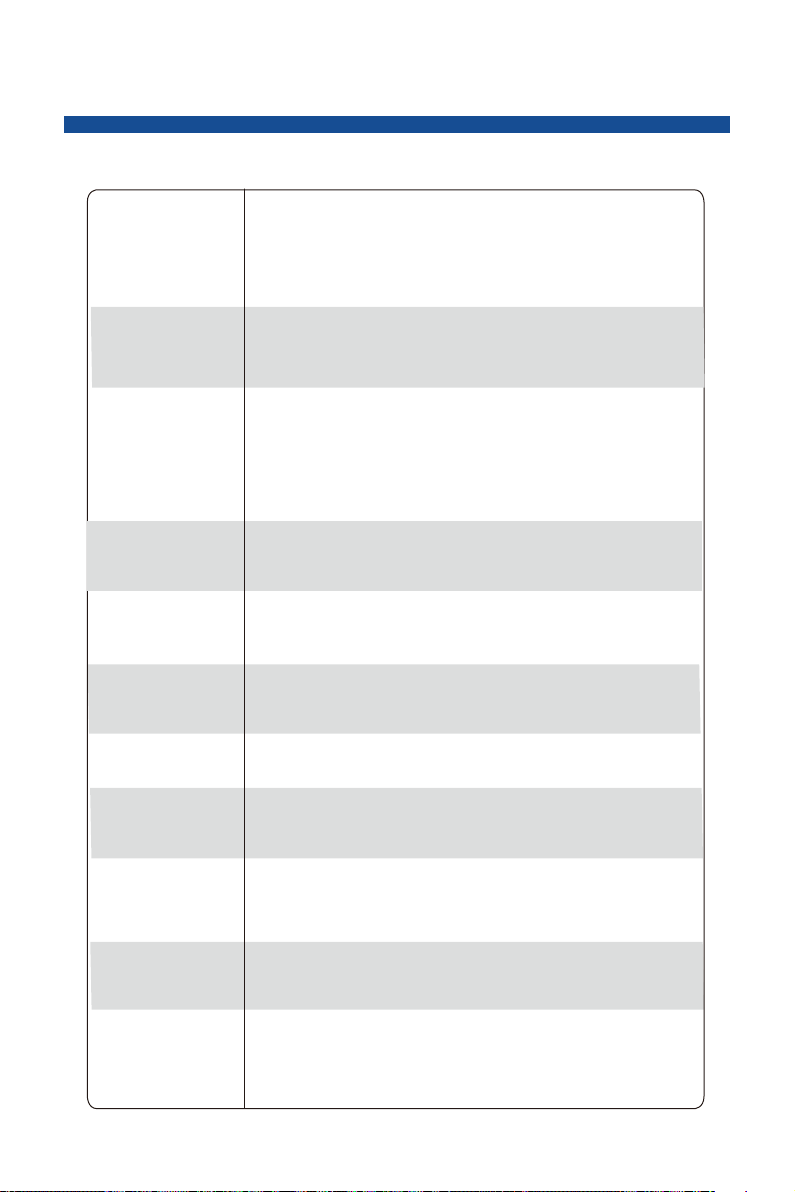
5 1You may try to solve the following simple problems by yourself.•
If them cannot be solved, please contact the after-sales department.
Check whether the appliance is connected to power or
Failed operation
Odor
Long-time operation
of the compressor
Light fails to get lit
Doors cannot be
properly closed
Loud noise
whether the plug is in well contact
Check whether the voltage is too low
Check whether there is a power failure or partial circuits have tripped
Odorous foods shall be tightly wrapped
Check whether there is any rotten food
Clean the inside of the refrigerator
Long operation of the refrigerator is normal in summer
when the ambient temperature is high
It is not suggestible having too much food in the appliance at the same time
Food shall get cool before being put into the appliance
The doors are opened too frequently
Check whether the refrigerator is connected to power supply and
whether the illuminating light is damaged
Have the light replaced by a specialist
The door is stuck by food packages
Too much food is placed
The refrigerator is tilted
Check whether the floor is level and whether the refrigerator is placed stably
Check whether accessories are placed at proper locations
Door se al f ails to
be tigh t
Wat er pan ov er flows
Hot hou si ng
Surfa ce c onden satio n
Abnormal noi se
Remove foreign m at ters on the d oor seal
Heat th e do or seal and t he n cool it f or r estor at ion
(or blo w it w ith an elec tr ical drie r or u se a hot to we l for heati ng)
There i s to o much food i n th e chamber or f oo d st ored co nt ains
too muc h wa ter,result in g in heav y de frostin g
The doo rs a re not closed proper ly, res ultin g in f rosting d ue t o entry
of air an d increase d wa ter due to de fr ostin g
Heat di ss ipation o f th e built -i n condenser via th e hous ing, whic h is nor mal
When ho us ing becom es h ot due to h ig h ambien t temperature ,
storage of to o mu ch food o r sh utdow n of t he compresso r is s hut dow n,
provide sou nd v entil at ion to fa ci litate he at d issip at ion
Condensation on the exterior surface and door seals of the refrigerator
is normal when the ambient humidity is too high. Just wipe the condensate
with a clean towel.
Buzz: The compressor may produce buzzes during operation, and the buzzes
are loud particularly upon start or stop. This is normal.
Creak: Refrigerant flowing inside of the appliance may produce creak,
which is normal.
25
Page 29
5 TROUBLE SHOOTING
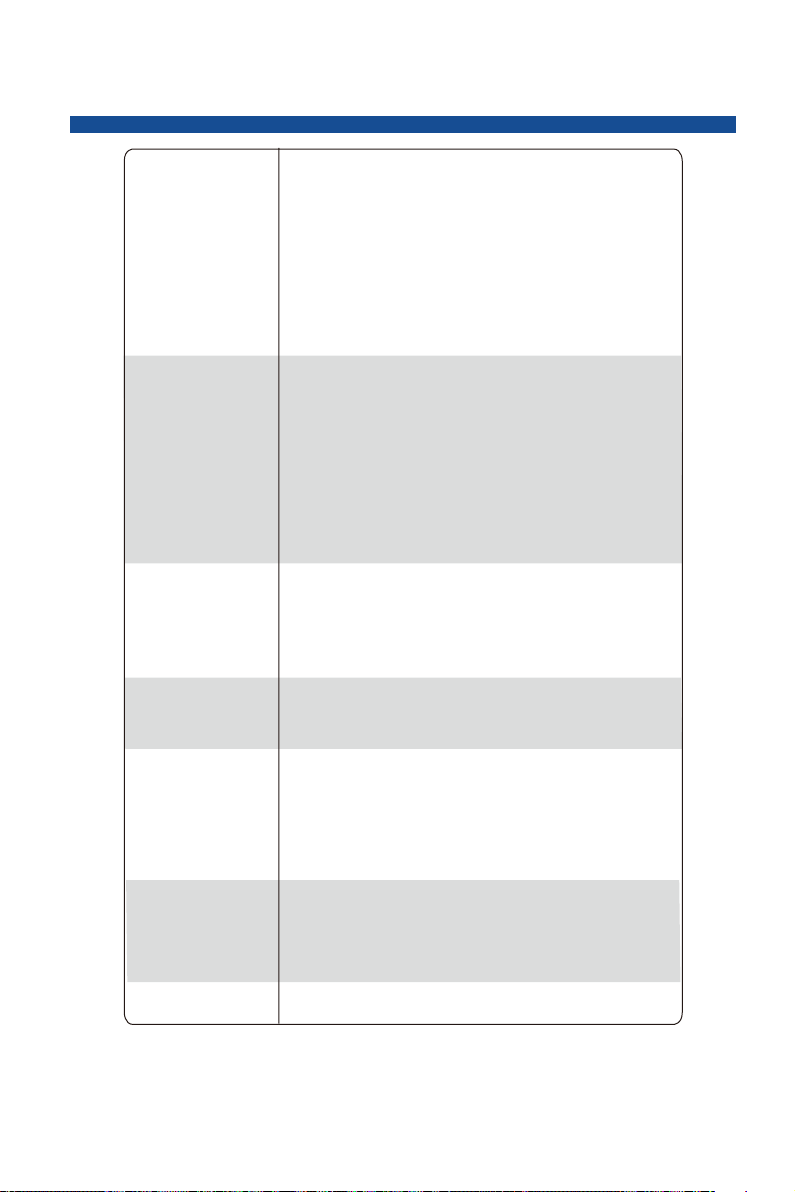
After you install the water line and start the refrigerator, it takes
12 hours to start ice making
Please turn on the ice making function (see the UI instructions)
Ice maker does
not make ice
No ice is drained out
Check whether the water pressure meets 30-100psi and whether
the water line is connected normally,
Check whether the water supply valve is open and whether the
water pipe is bent
Check whether the ice storage box is installed,
Check whether there is ice in the ice storage box.
Check whether the ice melts and adheres. If the ice is not used for
a long time, please empty the ice storage box and turn off the ice maker.
Check whether the water line is connected normally, whether the water
supply valve is opened, and whether the water pipe is bent.
The ice discharging function can only be used when the refrigerating
chamber door is closed.
Check whether the ice storage box is installed.
Check whether the ice storage box is installed,
No water is discharged
out
The speed of draining
water out is slow
Water drips from the
water dispenser
The water tastes bad
26
Check whether the water line is connected normally, whether the water
supply valve is opened, and whether the water pipe is bent.
The filter or dustproof plug must be installed before water can be discharged.
Check whether the filter or dustproof plug is installed in place.
Check whether the water pressure meets 30-100psi
Please replace the filter
It is normal that a few drops of water drips from the water dispenser.
However, if water keeps dripping, please check the connection of the
water line.
If the refrigerator is not used for more than four days, drain at least one gallon
of water
Replace the filter in time.
Page 30
6 WARRANTY
Warranty&Service
This product has been manufactured by Thor Group, 4651 E Airport Dr, Ontario, CA 91761
For Customer Service, please call (877) 288 - 8099
For the most up to date warranty and service policy, please refer to our website
WWW.THORKITCHEN.COM/WARRANTY-REGISTRATION
For in-warranty service requests, please visit our website at
WWW.THORKITCHEN.COM/SERVICE
Please Note: You must provide proof of purchase or installation date for any inwarranty service requests
27
Page 31
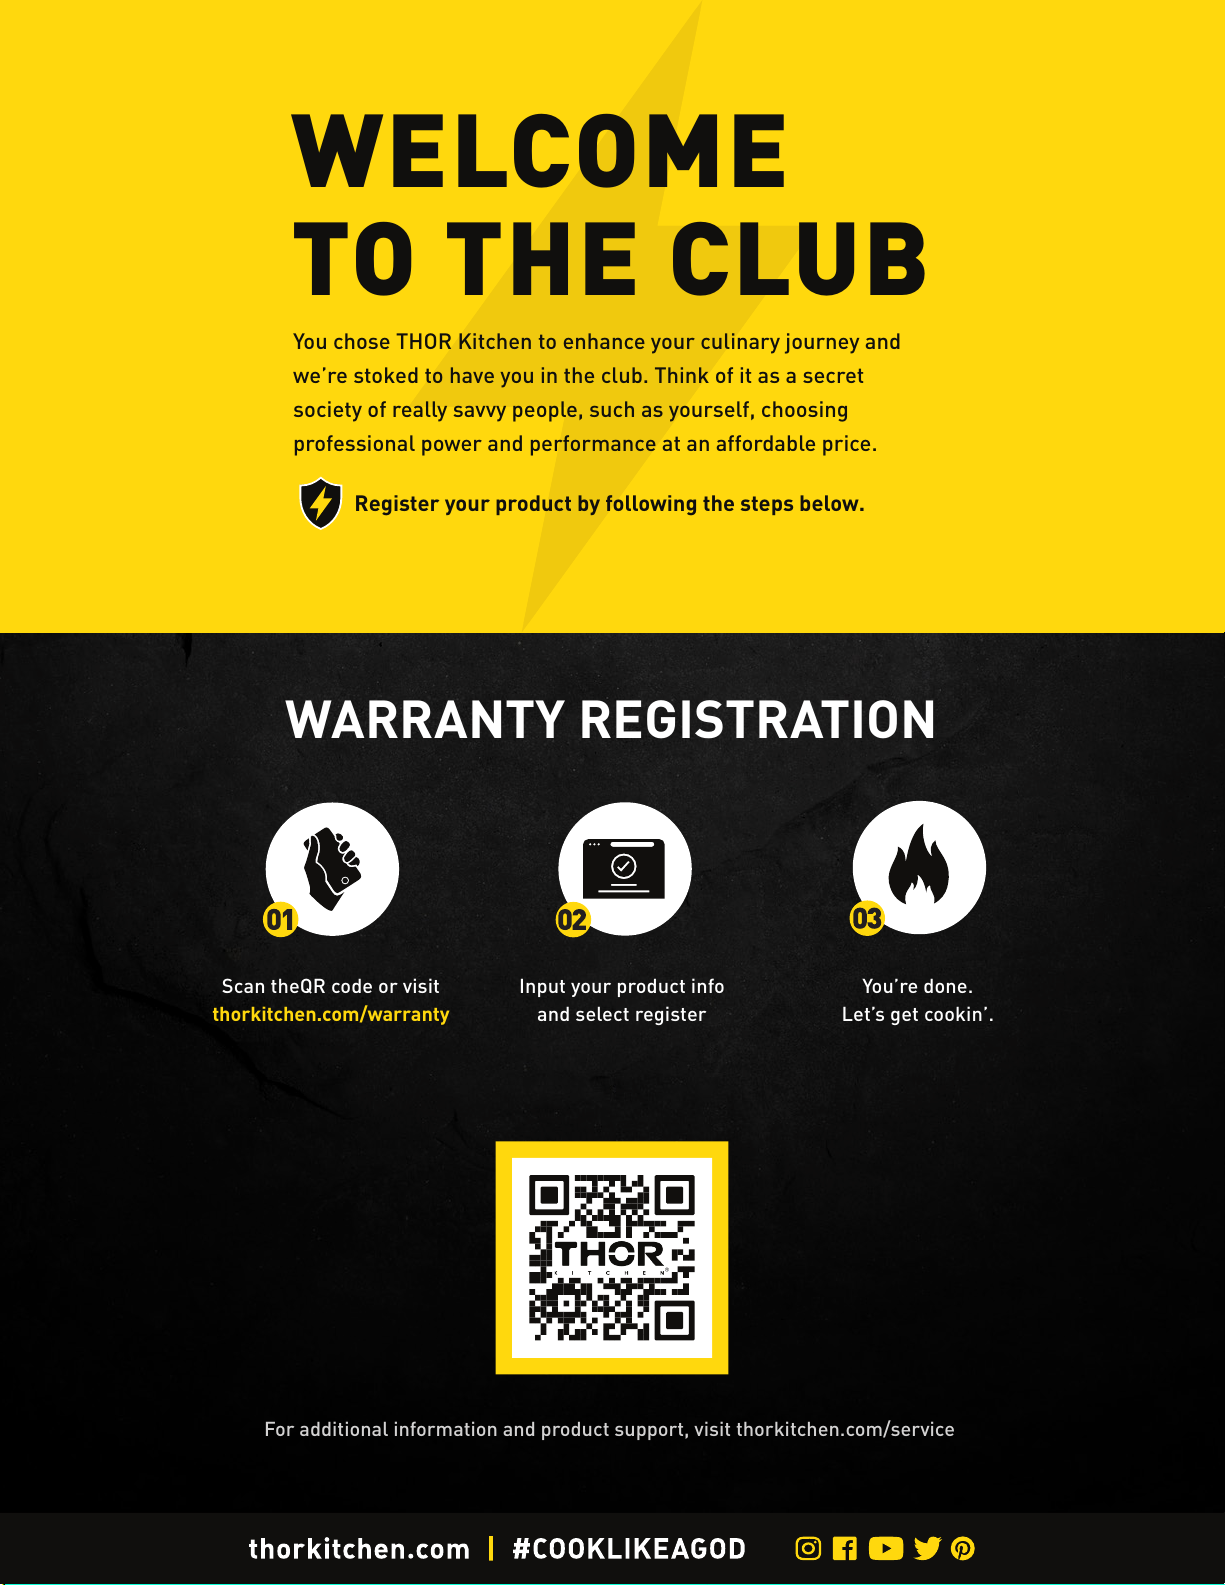
WELCOME
TO THE CLUB
You chose THOR Kitchen to enhance your culinary journey and
we’re stoked to have you in the club. Think of it as a secret
society of really savvy people, such as yourself, choosing
professional power and performance at an affordable price.
Register your product by following the steps below.
WARRANTY REGISTRATION
Scan theQR code or visit
thorkitchen.com/warranty
Input your product info
and select register
You’r e do ne.
Let’s get cookin’.
For additional information and product support, visit thorkitchen.com/service
 Loading...