

Page 1

COOK
LIKE
TRE 3001 | 3601
A
GOD
TRE MODELS
Page 2

USE AND CARE MANUAL
30” TILT PANEL
GAS RANGE
TRE MODELS
TRE 3001 | TRE 3601
Page 3

TABLE OF CONTENTS
BEFORE YOU BEGIN ......................................................................................................... 2
ANTI-TIP DEVICE .............................................................................................................. 2
IMPORTANT SAFETY INSTRUCTIONS .............................................................................. 3
Important safety instructions ........................................................................................... 3
What you need to know about safety instructions ............................................................ 3
For your safety .................................................................................................................. 3
Important safety instructions ........................................................................................... 4
Surface cooking units ....................................................................................................... 4
Electrical safety ................................................................................................................ 4
Child safety ....................................................................................................................... 4
Oven .................................................................................................................................. 5
Ventilating hood ................................................................................................................ 5
Glass/ceramic cooking surfaces ...................................................................................... 5
Critical installation warnings ........................................................................................... 5
Usage cautions ................................................................................................................. 6
PRODUCT DIMENSION ...................................................................................................... 7
Checking the installation site ........................................................................................... 7
PREPARING TO INSTALL THE RANGE .............................................................................. 8
Minimum dimensions ....................................................................................................... 8
CONNECTING THE POWER ............................................................................................... 8
KD INSTALLATION PROCEDURES .................................................................................. 10
RUBBER PAD INSTALLATION ON BACK PANEL ............................................................. 11
INTRODUCING YOUR NEW RANGE ................................................................................. 11
Before you begin ............................................................................................................. 12
Energy saving tips ........................................................................................................... 12
COOKTOP COOKING ........................................................................................................ 12
Page 4

TABLE OF CONTENTS
POSITIONING THE OVEN RACKS ................................................................................... 14
OPERATING THE OVEN .................................................................................................. 15
Oven burmer use ........................................................................................................... 15
Broil bumer use ............................................................................................................. 15
Oven cooking safety guidelines ..................................................................................... 15
Oven function ................................................................................................................. 15
Broiler operation ............................................................................................................ 16
Cleaning and maintenance ........................................................................................... 17
Cleaning stainless steel surfaces .................................................................................. 17
Cleaning the oven racks ................................................................................................ 17
Cleaning the oven door .................................................................................................. 17
Cleaning the surface burner control knobs ................................................................... 17
Removing the Oven Door .............................................................................................. 19
Removing the oven door ................................................................................................ 19
Replacing the oven door ................................................................................................ 19
Trouble shooting ........................................................................................................... 20
Installtion ....................................................................................................................... 20
Cooktop .......................................................................................................................... 20
Oven ............................................................................................................................... 21
Information code ............................................................................................................ 21
Warranty and Service .................................................................................................... 22
Warranty and service ..................................................................................................... 22
Warranties and duration ................................................................................................ 22
Thor group will pay for ................................................................................................... 22
Thor group will not pay for ............................................................................................. 22
Warranty and product registration ................................................................................ 23
Warranty notification ..................................................................................................... 23
Warranty and product registration ................................................................................ 23
Page 5

BEFORE YOU BEGIN
READ THESE INSTRUCTIONS COMPLETELY AND CAREFULLY.
IMPORTANT NOTE TO THE INSTALLER
• Read all instructions contained in these installation instructions before installing the range.
• Remove all packing materials from the oven compartments before connecting the electric
supply to the range.
• Observe all governing codes and ordinances.
• Be sure to leave these instructions with the consumer.
• Installation of this appliance requires basic mechanical skills.
• Proper installation is the responsibility of the installer.
• Product failure due to improper installation is not covered under the Warranty.
IMPORTANT NOTE TO THE CONSUMER
• Keep these instructions with your user manual for future reference.
• As when using any appliance generating heat, there are certain safety precautions you
should follow.
• Be sure your range is installed and grounded properly by a qualified installer or service
technician.
• Make sure the wall coverings around the range withstand the heat generated by the range.
• Cabinet storage space above the surface burners should be a minimum of 30 in. (76.2 cm).
IMPORTANT NOTE TO THE SERVICER
• The electrical diagram is attached to the back of the range.
2
Page 6

ANTITIP DEVICE
WARNING
To reduce the risk of tipping the range,the range must be secured by a properly installed
Anti-Tip device.AFTER THERANGEHAS BEEN INSTALLED,CONFIRM THATTHE
ANTI-TIP DEVICE HAS BEEN PROPERLY INSTALLED AND VERIFY THAT THE
ANTITIP DEVICE IS PROPERLY ENGAGED.
a) If the anti-tip device is not installed, a child or adult can tip the range and be killed.
b) Verify that the anti-tip device has been properly installed and engaged at the rearright
(or rearleft) of the range bottom.
c) If you move the range and then move it back into place, ensure the anti tip device is
re-engaged at the right or left rear of the range bottom.
d) Do not operate the range without the anti-tip device in place and engaged.
e) Failure to do so can result in death or serious burns to children or adults.
WARNING
Do not step, lean, or sit on the doors of the range. You can cause the range to tip,
resulting in burns or serious injuries.
Confirm that the Anti-Tip device is installed properly. Then, to verify that the Anti-Tip
device is engaged, grasp the top rear edge of the range and carefully attempt to tilt
it forward. The Anti-Tip device should prevent the range from tilting forward more
than a few inches.
If you pull the range out from the wall for any reason, make sure the anti tip device
is properly engaged when you push the range back against the wall. If it is not,
there is a risk of the range tipping over and causing injury if you or a child stand, sit,
or lean on the open door.
Never completely removethe leveling legs. If you remove the leveling legs, the
range will not be secured to the anti-tip device properly.
2
Page 7

IMPORTANT SAFETY INSTRUCTIONS
California proposition 65 warning
CAUTION
Cancer and Reproductive Harm-www.P65Warnings.ca.gov.
Important Safety instructions
Read and follow all instructions before using your oven to prevent the risk of fire, electric
shock, personal injury, or damage when using the range.This guide does not cover all possible
conditions that may occur. Always contact your service agent or manufacturer about problems
that you do not understand.
What you need to know about safety instructions
Warnings and Important Safety Instructions in this manual do not cover all possible conditions
and situations that may occur.
It is your responsibility to use common sense, caution, and care when installing, maintaining,
and operating your oven.
Important safety symbols and precautions
What the icons and signs in this user manual mean:
WARNING
Hazards or unsafe practices that may result in severe personal injury or death.
CAUTION
Hazards or unsafe practices that may result in minor personal injury or property damage.
CAUTION
To reduce the risk of fire, explosion, electric shock, or personal injury when using you oven,
follow these basic safety precautions.
Do NOT attempt
Do NOT disassemble
Do NOT touch
Follow Directions Explicitly
Unplug From Wall Socket
Make sure the Machine is Grounded to Prevent Electric Shock
Call Service Center for help
NOTE
These warning signs are here to prevent injury to you and others. Please follow them explicitly.
After reading this section, keep it in a safe place for future reference.
3
Page 8

IMPORTANT SAFETY INSTRUCTIONS
For your safety
When using electrical appliances, you should follow basic safety precautions, including the
following:
CAUTION
• Use this appliance only for its intended purpose as described in this Owner’s Manual.
• Potentially hot surfaces include the cooktop, areas facing the cooktop, oven vent opening,
surfaces near the opening, crevices around the oven door.
Be sure your appliance is properly installed and grounded by a qualified technician. User servicing
- Do not repair or replace any part of the appliance unless specifically recommended in this
manual. All other servicing should be referred to a qualified technician.
Always disconnect the power to the appliance before servicing by removing the fuse or switching
off the circuit breaker.
• Do not enter the oven.
• Do not store items of interest to children in cabinets above a range or on the back guard of a
range. Children climbing on the range to reach items could be seriously injured
• Do not leave children alone. Never leave children alone or unattended in an area where this
appliance is in use. They should never be allowed to sit or stand on any part of the appliance.
• Never use your appliance for warming or heating the room.
• Do not use water on grease fires. Turn off the oven to avoid spreading the flames.
Smother the fire or flames by closing the door or use a dry chemical, baking soda, or foam
type extinguisher.
• Avoid scratching or impacting glass doors, cooktops or control panels. Doing so may
lead to glass breakage. Do not cook on a product with broken glass. Shock, fire, or cuts may
occur.
• Do not lean on the range as you may turn the control knobs inattentively.
Important safety instructions
• Storage in or on the appliance. Do not store flammable materials in the oven or near the
surface units. Be sure all packing materials are removed from the appliance before operating it.
• Keep plastics, clothes, and paper away from parts of the appliance that may become hot.
• Wear proper apparel. Never wear loose-fitting or hanging garments while using the appliance.
• Use only dry potholders. Placing moist or damp potholders on hot surfaces may result in burns
from steam. Do not let the potholder touch hot heating elements. Do not use a towel or other
bulky cloth.
• Teach children not to play with the controls or any other part of the range.
• For your safety, do not use high-pressure water cleaners or steam jet cleaners.
• The appliance is not intended for use by persons (including children) with reduced physical,
sensory or mental capabilities, or lack of experience and knowledge, unless they have been
given supervision or instruction concerning use of the appliance by a person responsible for
their safety.
3
Page 9

IMPORTANT SAFETY INSTRUCTIONS
Surface cooking units
• Never leave surface units unattended at high heat settings. Boilovers cause smoking and
greasy spillovers that may ignite.
• Protective Liners – Do not use aluminum foil to line surface unit drip bowls or oven bottoms,
except as suggested in the manual. Improper installation of these liners
may result in a risk of electric shock or fire.
• To avoid oil spillover and fire, use a minimum amount of oil when shallow pan-frying and
avoid cooking frozen foods with excessive amounts of ice.
• Do not operate the cooktop without cookware. If the cooktop operates without cookware, the
control knobs will become hot.
• Never use the glass cooktop surface as a cutting board.
• Use care when touching the cooktop. The glass surface of the cooktop will retain heat after
the controls have been turned off.
• Be careful when placing spoons or other stirring utensils on the glass cooktop surface when
it is in use. They may become hot and could cause burns.
• Use proper pan sizes. This appliance is equipped with surface units of different size. Select
pots and pans that have flat bottoms large enough to cover the surface area of the heating
element. Using undersized cookware will expose a portion of the heating element to direct
contact and may result in the ignition of clothing. Matching the size of the pot or pan to the
burner will also improve efficiency.
• Utensil Handles Should Be Turned Inward and Not Extend Over Adjacent Surface Units.
• To reduce the risk of burns, ignition of flammable materials, or spillage due to unintentional
contact with utensils, position utensil handles so that they are turned inward and do not
extend over adjacent surface units.
• Glazed cooking utensils. Only certain types of glass, glass/ ceramic, ceramic, earthenware,
or other glazed cookware can be used for rangetop service without breaking due to sudden
changes in temperature.
• Be sure you know which control knob operates each surface unit. Make sure you turned on
the correct surface unit.
• Always turn the surface units off before removing cookware.
• When preparing flaming foods under the hood, turn the fan on.
• Keep an eye on foods being fried at high or medium high heat settings.
• Do not store heavy items above the cooktop surface that mcould fall and damage it.
• Do not Use Decorative Surface Element Covers – If an element is accidentally turned on,
the decorative cover will become hot and possibly melt. Burns will occur if the hot covers are
touched. Damage may also be done to the cooktop.
4
Page 10

IMPORTANT SAFETY INSTRUCTIONS
Electrical safety
• Proper Installation - Be sure your appliance is properly installed and grounded by a qualified
technician.
• Flush - mounted appliances may be operated only after they have been installed in cabinets
and workplaces that conform to the relevant standards. This ensures that the appliances are
installed in compliance with the appropriate safety standards.
• If your appliance malfunctions or if fractures, cracks, or splits appear:
- switch off all cooking zones
- unplug the range from the AC wall outlet
- contact your local service center.
WARNING
If the surface is cracked, switch off and unplug the appliance to avoid the possibility of electrical
shock. Do not use your cooktop until the glass surface has been replaced.
WARNING
• Ensure that the appliance is switched off before replacing the lamp to avoid the possibility of
electric shock.
• The range should not be placed on a base.
Child safety
WARNING
• This appliance is not intended for use by young children or infirm persons without the
adequate supervision of a responsible adult.
• Young children should be supervised to ensure that they do not play with the appliance.
• Keep children away from the door when opening or closing it as they may bump themselves on
the door or catch their fingers in the door.
• The cooking zones will become hot when you cook. To keep small children from being burned,
always keep them away from the appliance while you are cooking.
WARNING
Accessible parts may become hot during use. To avoid burns, young children should be kept away.
4
Page 11

IMPORTANT SAFETY INSTRUCTIONS
Oven
• DO NOT TOUCH THE HEATING ELEMENTS OR INTERIOR SURFACES OF THE OVEN. Heating
elements may be hot even though they are dark in color. Interior surfaces of an oven
become hot enough to cause burns. During and after use, do not touch or let clothing or other
flammable materials contact the heating elements or interior surfaces of the oven until they
have had sufficient time to cool. Other surfaces of the appliance may become hot enough to
cause burns. Among these surfaces are oven vent openings and surfaces near these
openings, the oven door, and the window of the oven door.
• Do not heat unopened food containers. The build-up of pressure may cause the container to
burst and result in injury.
• Do not use the oven to dry newspapers. If overheated, newspapers can catch on fire.
• Do not use the oven for a storage area. Items stored in an oven can ignite.
• Use care when opening the door. Let hot air or steam escape before you remove food from or
put food into the oven.
• Protective liners. Do not use aluminum foil to line the oven bottoms, except as suggested in
the manual. Improper installation of these liners may result in a risk of electric shock or fire.
• Keep oven vent ducts unobstructed. The oven vent is located above the right rear surface unit.
This area could become hot during oven use. Never block this vent or place plastic or heat sensitive items on it.
• Placement of oven racks. Always place oven racks in the desired location while the oven is
cool. If the rack must be moved while the oven is hot, use potholders. Do not let the
potholders come in contact with the hot heating element in the oven.
• Do not allow aluminum foil or a meat probe to contact the heating elements.
• During use, the appliance becomes hot. Care should be taken to avoid touching heating
elements inside the oven.
• Do not use harsh abrasive cleaners or sharp metal scrapers to clean the oven door glass.
They can scratch the surface which may result in the glass shattering.
WARNING
Do not attempt to operate the oven during a power failure. If the power fails, alwaysturn the
oven off. If the oven is not turned off and the power returns, the oven may begin to operate
again. Food left unattended could catch fire or spoil.
5
Page 12

IMPORTANT SAFETY INSTRUCTIONS
Oven Ventilating hood
• Clean ventilating hoods frequently. Do not let grease accumulate on the hood or filter.
• When flaming foods under the hood, turn the fan on.
Glass/ceramic cooking surfaces
• DO NOT TOUCH SURFACE UNITS OR AREAS NEAR UNITS. Surface units may be hot even
though they are dark in color.Areas near surface units may become hot enough to cause
burns. During and after use, do not touch, or let clothing or other flammable materials
contact the surface units or areas near the units until they have had sufficient time to cool.
Among these areas are the cook-top and the facing of the cook-top.
• Do not cook on a broken cooktop. If the cooktop should break, cleaning solutions and
spillovers may penetrate the broken cook-top and create a risk of electric shock. Contact a
qualified technician immediately.
Clean the cooktop with caution. If a wet sponge or cloth is used to wipe spills on a hot cooking
area, be careful to avoid steam burns. Some cleaners can produce noxious fumes if applied to
a hot surface.
Critical installation warnings
WARNING
• This appliance must be installed by a qualified technician or service company.
- Failing to have a qualified technician install the range may result in electric shock, fire, an
explosion, problems with the product, or injury.
• Unpack the oven, remove all packaging material and examine the oven for any damage such
as dents on the interior or exterior of the oven, broken door latches, cracks in the door, or a
door that is not lined up correctly. If there is any damage, do not operate the oven and notify
your dealer immediately.
• Plug the power cord into a properly grounded outlet with the proper configuration. Your oven
should be the only item connected to this circuit.
• Keep all packaging materials out of the reach of children. Children may use them for play
and injure themselves.
• Install your appliance on a level and hard floor that can support its weight.
- Failing to do so may result in abnormal vibrations, noise, or problems with the
product.
5
Page 13

IMPORTANT SAFETY INSTRUCTIONS
• This appliance must be properly grounded.
• Do not ground the appliance to a gas pipe, plastic water pipe, or telephone line.
- This may result in electric shock, fire, an explosion, or problems with the product
• Do not cut or remove the ground prong from the power cord under any circumstances.
• Connect the oven to a circuit that provides the correct amperage.
• Do not install this appliance in a humid, oily or dusty location, or in a location exposed to
direct sunlight or water (rain drops).
- This may result in electric shock or fire.
• Do not use a damaged power cord or loose wall socket.
- This may result in electric shock or fire.
• Do not pull or excessively bend the power cord.
• Do not twist or tie the power cord.
• Do not hook the power cord over a metal object, place a heavy object on the power cord, or
insert the power cord between objects.
- This may result in electric shock or fire.
If the power cord is damaged, contact your nearest service center.
Usage cautions
CAUTION
• If the surface is cracked, turn the appliance off.
- Failing to do so may result in electric shock.
• Dishes and containers can become hot. Handle with care.
• Hot foods and steam can cause burns. Carefully remove container coverings, directing the
steam away your hands and face.
• Remove lids from baby food jars before heating. After heating baby food, stir well to distribute
the heat evenly. Always test the temperature by tasting before feeding the baby. The glass jar
or the surface of the food may appear to be cooler than the interior, which can be hot enough
to burn an infant’s mouth.
• Take care as beverages or food may be very hot after heating.
- Especially when feeding a child. Check that it has cooled sufficiently.
• Take care when heating liquids such as water or other beverages.
- Make sure to stir during or after cooking.
- Avoid using a slippery container with a narrow neck.
- Wait at least 30 seconds after heating before removing the heated liquid.
- Failing to do so may result in an abrupt overflow of the contents and cause burns.
6
Page 14

IMPORTANT SAFETY INSTRUCTIONS
• Do not stand on top of the appliance or place objects (such as laundry, oven cover, lighted
candles, lighted cigarettes, dishes, chemicals, metal objects, etc.) on the appliance.
- Items, such as a cloth, may get caught in the door.
- This may result in electric shock, fire, problems with the product, or injury.
• Do not operate the appliance with wet hands.
- This may result in electric shock.
• Do not spray volatile substances such as insecticide onto the surface of the appliance.
- As well as being harmful to humans, it may also result in electric shock, fire, or problems
with the product.
• Do not put your face or body close to the appliance while cooking or when opening the door
just after cooking.
- Take care that children do not come too close to the appliance.
- Failing to do so may result in children burning themselves.
• Do not place food or heavy objects over the edge of the oven door.
- If you open the door, the food or object may fall and this may result in burns or injury.
• Do not abruptly cool the door, the inside of the appliance, or a dish by pouring water over it
during or just after cooking.
- This may result in damage to the appliance. The steam or water spray may result in burns or
injury.
• Do not operate while empty except for self-cleaning.
• Do not defrost frozen beverages in narrow-necked bottles. The bottles can break.
• Do not scratch the glass of the oven door with a sharp object.
- This may result in the glass being damaged or broken.
• Do not store anything directly on top of the appliance when it is in operation.
• Do not use sealed containers. Remove seals and lids before cooking. Sealed containers can
explode due to the build up of pressure even after the oven has been turned off.
• Take care that food you are cooking in the oven does not come into contact with the heating
element.
- This may result in fire.
• Do not over-heat food.
- Overheating food may result in fire.
6
Page 15
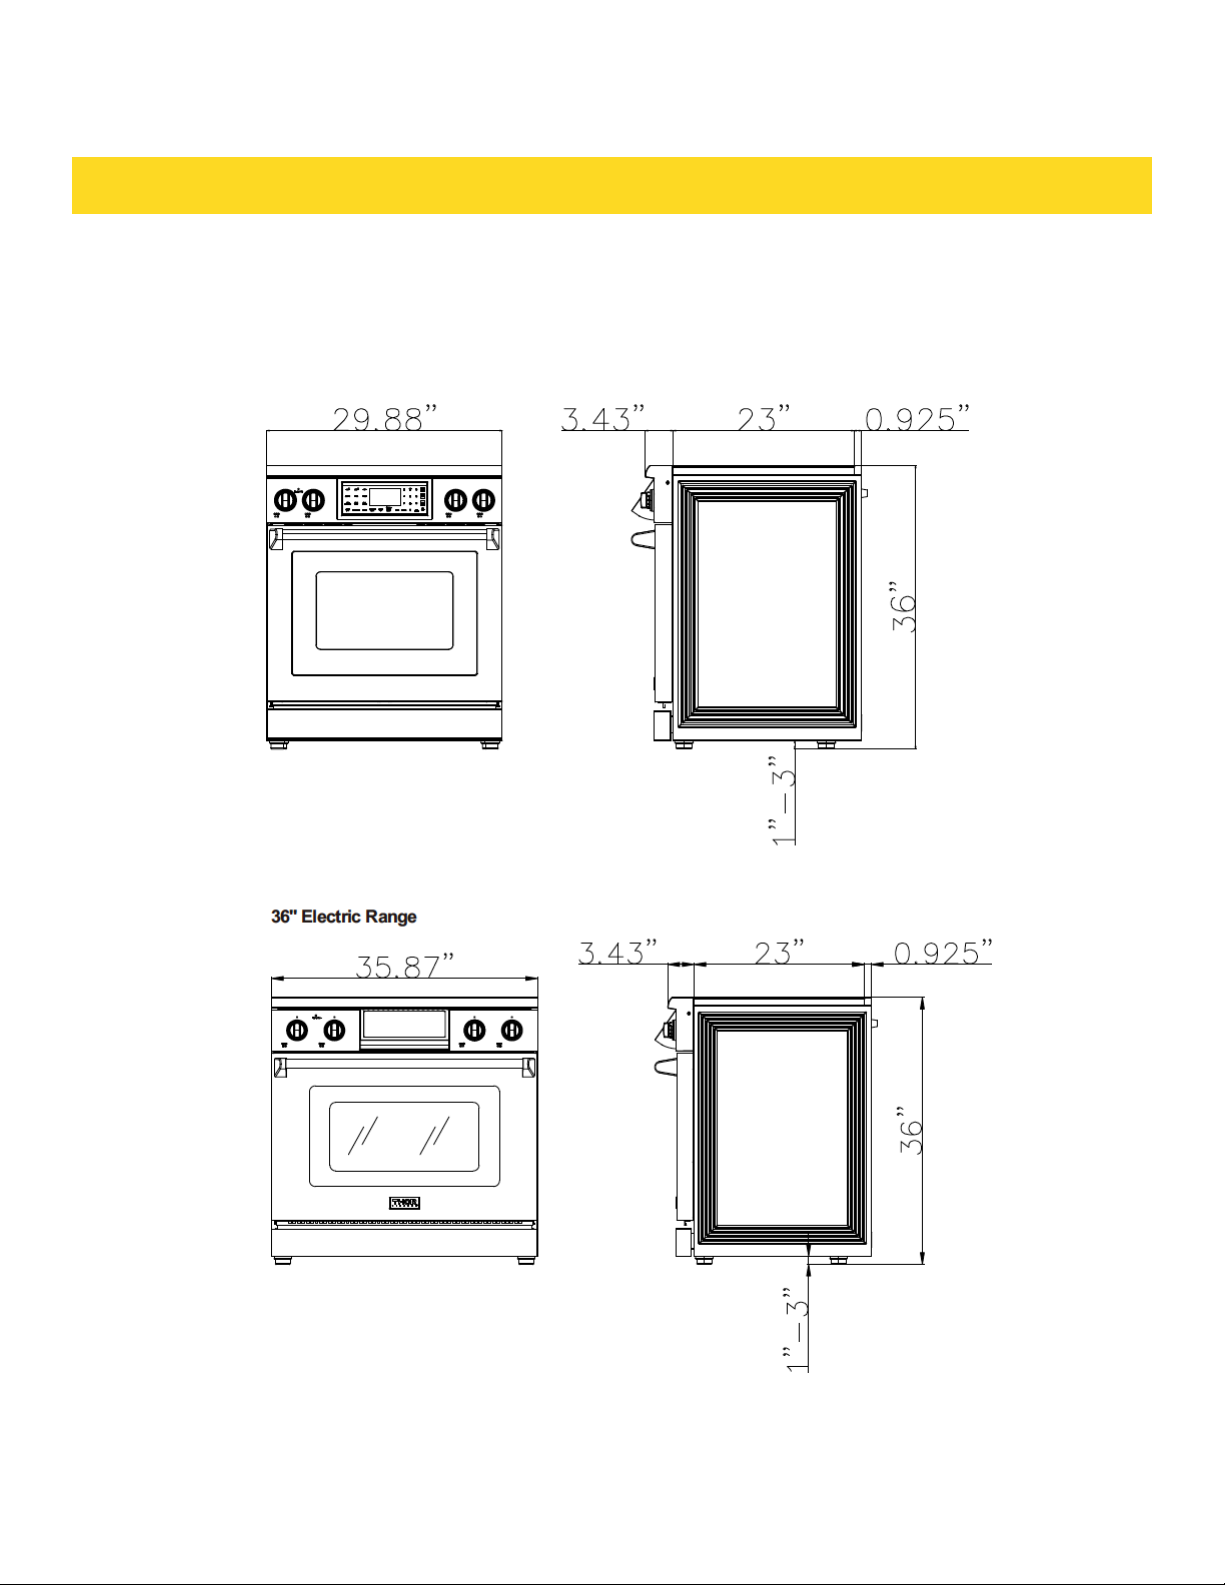
PRODUCT DIMENSION
30'' Electric Range
7
Page 16
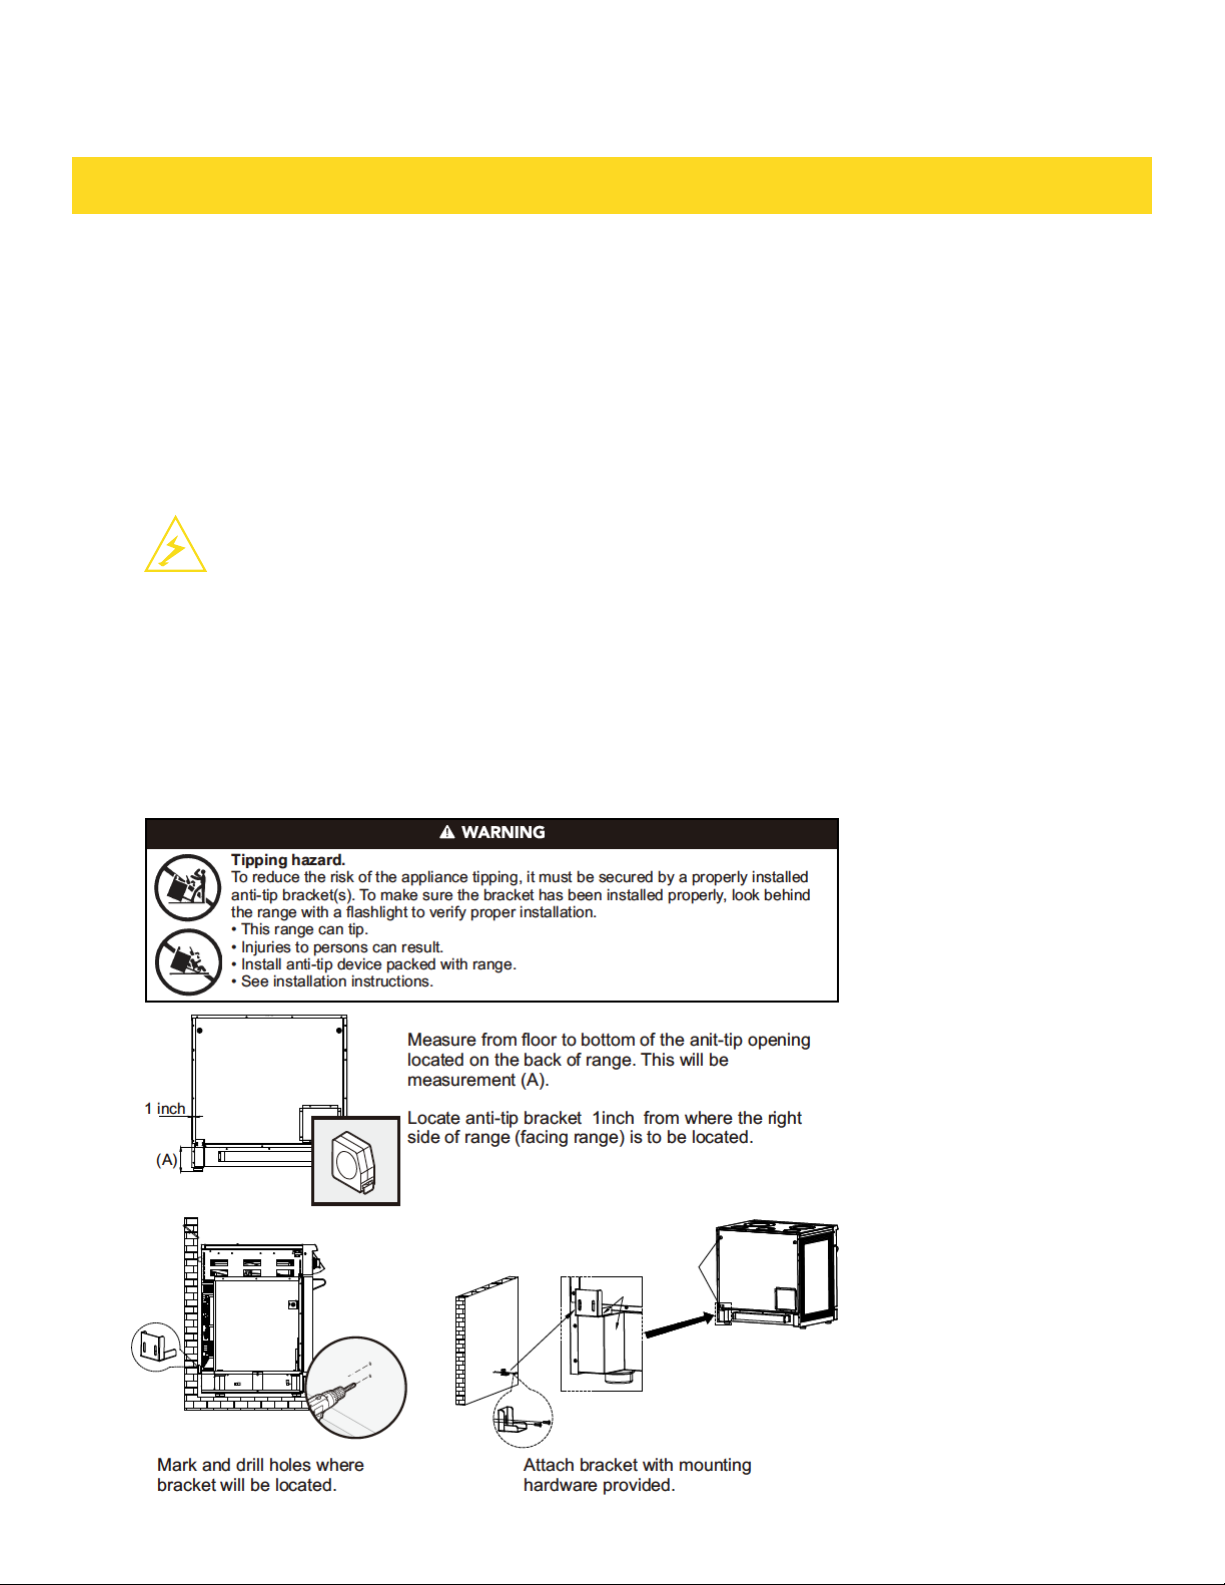
PRODUCT DIMENSION
Checking the installation site
Clearances and dimensions
To install the range, refer to the following figure.
For installation in CANADA, a Free-standing range is not to be installed closer than 12mm from
any adjacent surface.
CAUTION
This range has been designed to comply with the maximum allowable wood cabinet temperatures of 194°F. Makesurethewall covering,countertops and cabinetsaround the range can
withstand the heat (up to 194 °F) generated by the range. If not, discoloration, delamination or
melting may occur.
Anti-tip Device Installation - Wall Mount
7
Page 17
PREPARING TO INSTALL THE RANGE
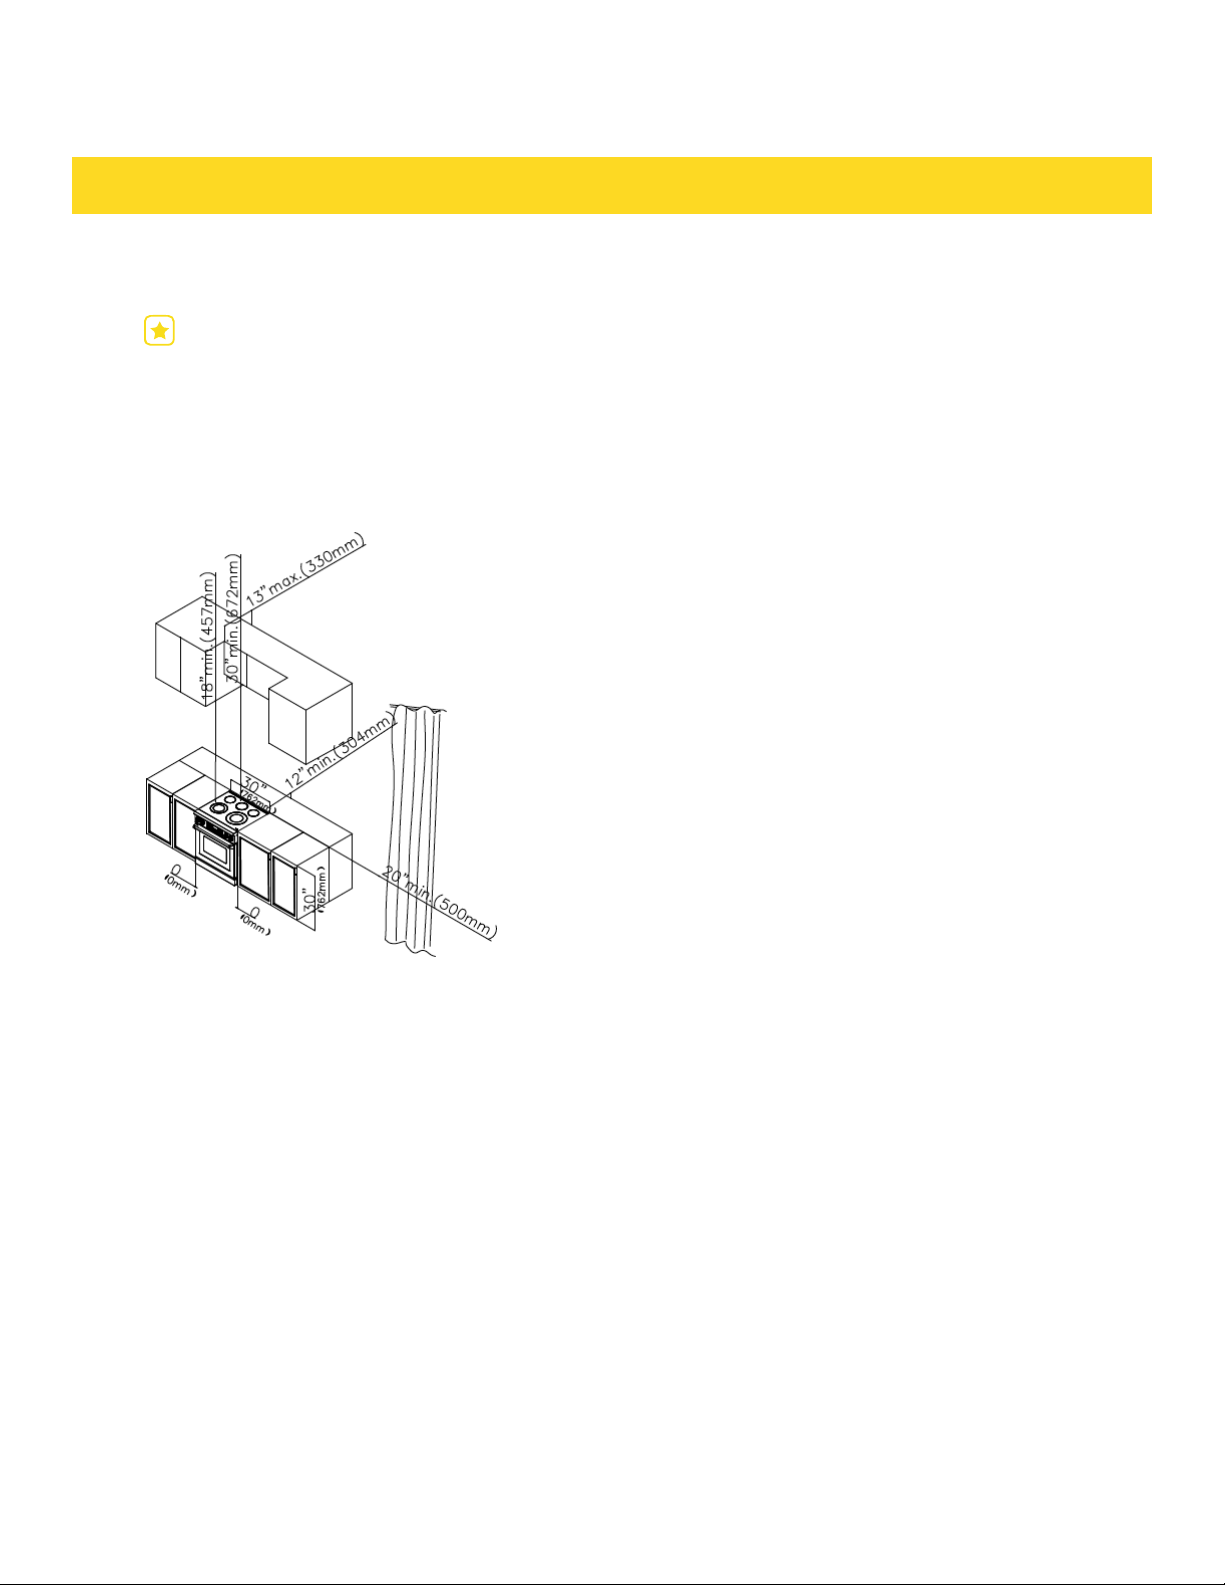
Minimum dimensions
IMPORTANT
To eliminate the risk of burns or fire caused by reaching over heated surface units, cabinet
storage space located above the surface units should be avoided. If cabinet storage is to be provided, the risk can be reduced by installing a range hood that projects horizontally a minimum
of 5" beyond the bottom of the cabinets.
MINIMUM DIMENSIONS BETWEEN COOKTOP,
WALLS AND ABOVE THE COOKTOP:
A: Make sure the wall covering, countertop,
flooring and cabinets around the range can
withstand the heat (up to 200°F) generated by
the range.
B: Allow 30” minimum clearance between
surface units and bottom of unprotected wood
or metal cabinet, or allow a 24" minimum when
bottom of wood or metal cabinet is protected by
no less than 1/4" thick flame retardant millboard covered with not less than No 28 MSG
sheet metal, (.015"), .015” thick stainless steel,
.024" aluminum or .020" copper.
C: This appliance has been approved for 0"
spacing to adjacent surfaces above the cooktop.
However, a 6" minimum spacing to surfaces
less than 15" above the cooktop and adjacent
cabinet is recommended to reduce exposure
to steam, grease splatter and heat. To reduce
the risk of burns or fire when reaching over hot
surface elements, cabinet storage space above
the cooktop should be avoided. If cabinet storage space is to be provided above the cooktop,
the risk can be reduced by installing a range
hood that projects at least 5" beyond the front
of the cabinets. Cabinets installed above the
cooktop must be no deeper than 16".
D: Allow 24"/30"/36" (depensing on your range
width) minimun clearance between right and
left cabinets.
8
Page 18

CONNECTING THE POWER
Step 1. Meeting Electrical Connection Requirements
CAUTION
For personal safety, do not use an extension cord with this appliance.
Remove house fuse or open circuit breaker before beginning installation.
This appliance must be supplied with the proper voltage and frequency, and connected to an
individual properly grounded branch circuit, protected by a circuit breaker or fuse having amperage as
specified on the rating plate. The rating plate is located on the right of oven door.
We recommend you have the electrical wiring and hookup of your range connected by a qualified
electrician. After installation, have the electrician show you where your main range disconnect is
located.
Check with your local utilities for electrical codes which apply in your area.
Failure to wire your oven according to governing codes could result in a hazardous condition. If there are
no local codes, your range must be wired and fused to meet the requirements of the National Electrical
Code, ANSI/NFPA No.70–Latest Edition.
Effective January 1,1996, the National Electrical Codere quires that new construction (not existing)
utilize a 4-conductor connection to an electric range.
When installing an electric range in new construction, follow Steps for 4-wire connection.
You must use a 3-wire or 4-wire, single-phase A.C. 208Y/120 Volt or 240/120 Volt, 60 hertz electrical
system.
If the electrical service provided does not meet the above specifications, have a licensed electrician
install an approved outlet.
Use only a 3-conductor or a 4-conductor UL-listed range cord. These cords maybe provided with ring
terminals on wire and a strain relief device.
A range cord rated at 40 amps with 125/250 minimum volt range is required. A 50 amp range cord is
not recommended but if used, it should be marked for use with no minal 13⁄8" diameter connection
openings. Care should be taken to center the cable and strain relief within the knock out hole to keep the
edge from damaging the cable.
NOTE
This appliance is manufactured ready to be installed with a 4-wire cord set.
Step 2. Power Cord
1. Remove the rear terminal block cover and loosen the 6 screws with a screwdriver. The
terminal block will then be accessible. Do not discard these screws.
Page 19
CONNECTING THE POWER
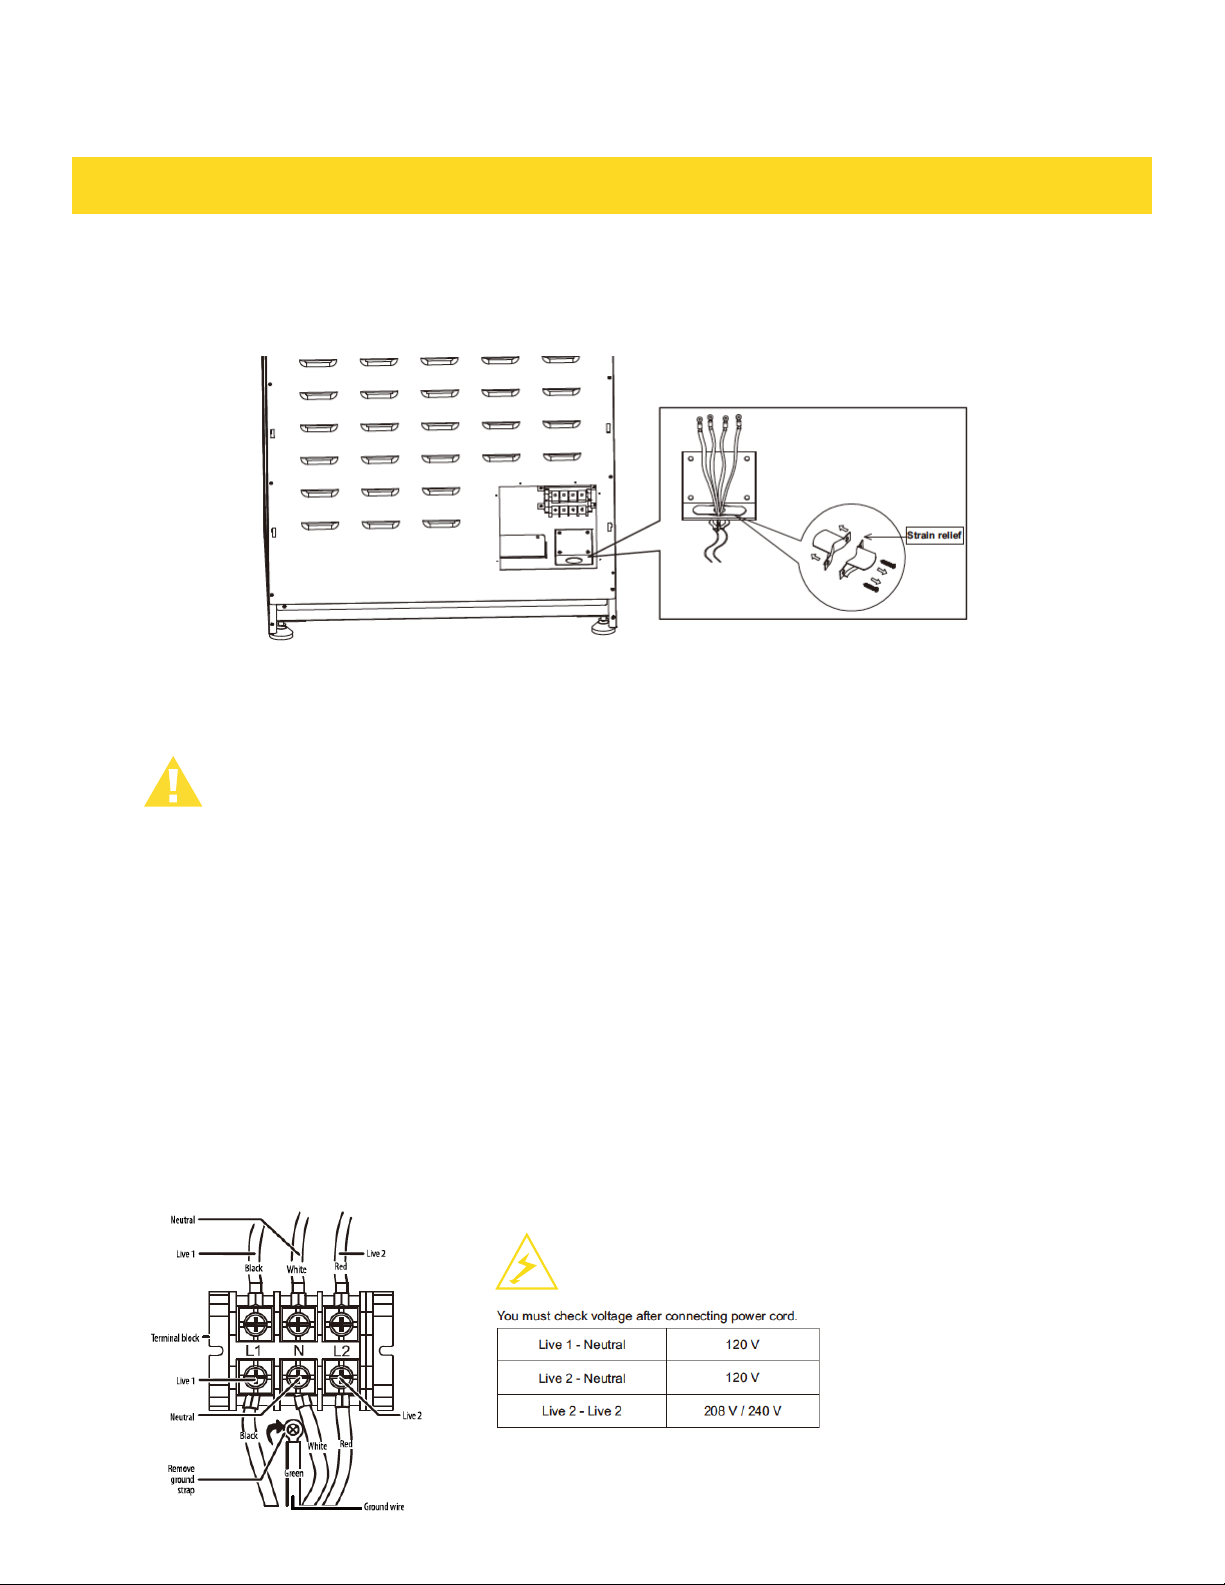
2. For power cord installations only, hook the strain relief over the power cord hole located
below the rear of the drawer body. Insert the power cord through the strain relief and tighten
the device.
• You must install the power cord with a strain relief.
• Attach the strain relief to the opening in conduit connection plate.
STEP 3. 4-WIRE POWER CORD INSTALLATION
WARNING
Electrical Shock Hazard
Electrical ground is required on this appliance.
Do not connect to the electrical supply until appliance is permanently grounded.
Disconnect power to the circuit breaker or fuse box before making the electrical connection.
This appliance must be connected to a grounded, metallic, permanent wiring system, or
a grounding connector should be connected to the grounding terminal or wire lead on the
appliance. Failure to do any of the above could result in a fire, personal injury or electrical
shock. See below for more information on electrical grounding.
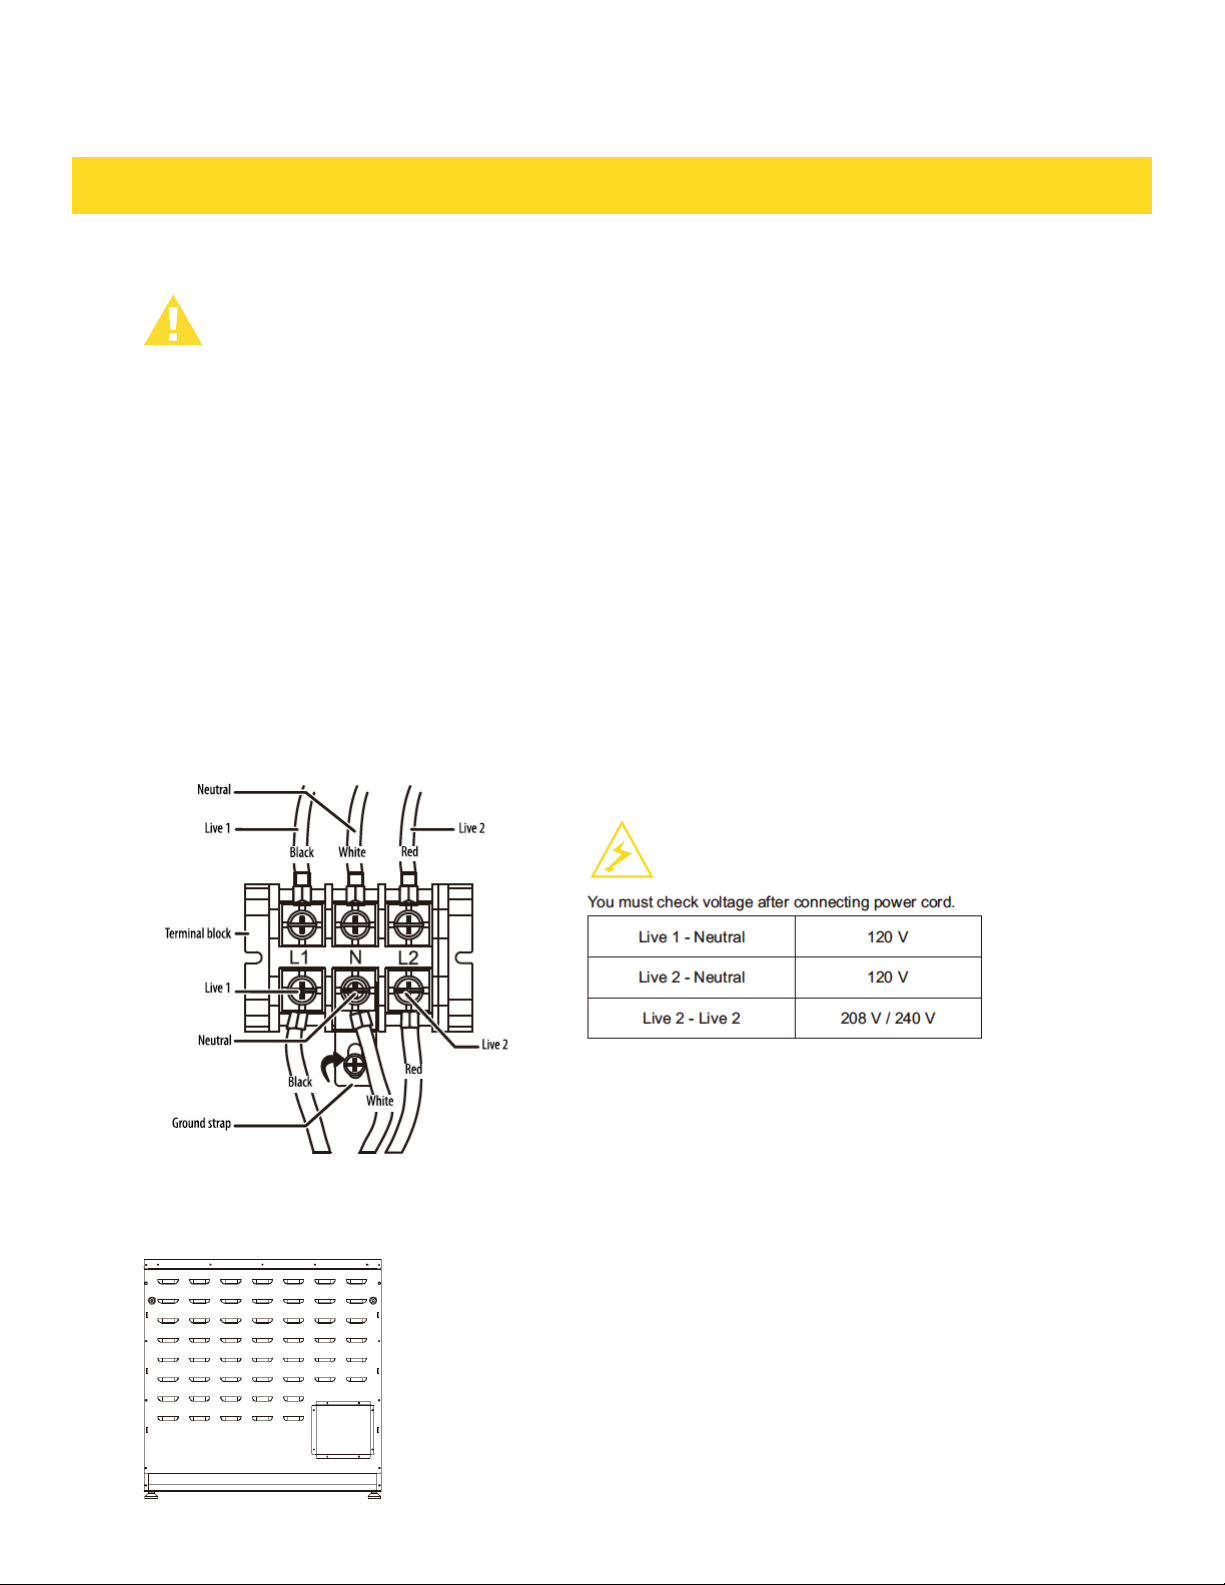
A. Remove the 4 lower terminal screws from the terminal block.
B. Insert the 4 terminal screws through each power cord terminal and into the lower terminals
of the terminal block. Be certain that match the wire and terminals by color.
C. Tighten screws securely into the terminal block.
CAUTION
Page 20
CONNECTING THE POWER
Step 4 3-wire power cord
WARNING
Electrical Shock Hazard
Electrical ground is required on this appliance.
Do not connect to the electrical supply until appliance is permanently grounded.
Disconnect power to the circuit breaker or fuse box before making the electrical connection.
This appliance must be connected to a grounded, metallic, permanent wiring system, or
a grounding connector should be connected to the grounding terminal or wire lead on the
appliance. Failure to do any of the above could result in a fire, personal injury or electrical
shock. See below for more information on electrical grounding.
A.Remove the 4 lower terminal screws from the terminal block.
B.Insert the Green ground terminals together with white one.
C.Insert the 3 terminal screws through each power cord terminal and into the lower terminals
of the terminal block. Be certain that match the wire and terminals by color.
D.Tighten screws securely into the terminal block.
CAUTION
Step 5. Replacing the terminal block cover
Replace the terminal block cover on the range back and tighten the screw
Page 21
KD INSTALLATION PROCEDURES
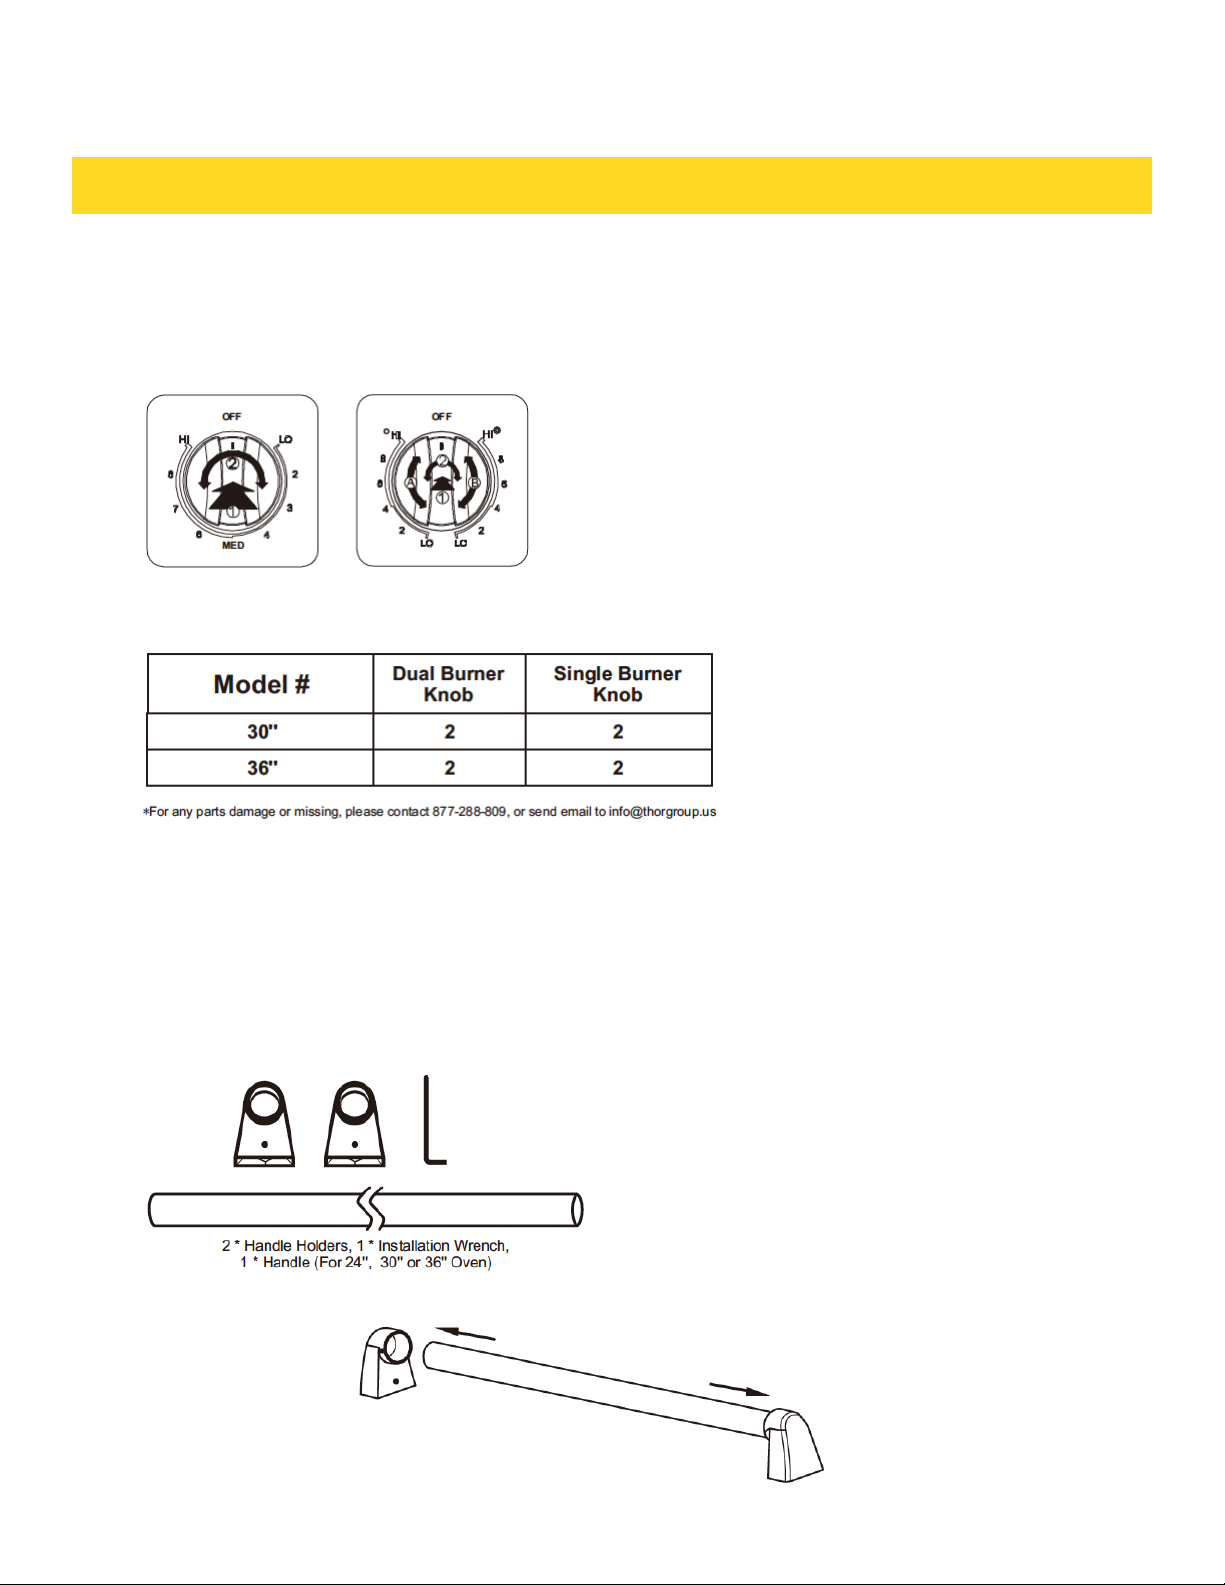
Your Thor Kitchen range might have a KD Knob + handle design that need to be installed.
Please Follow up the following procedures for Knob + Oven door handle installation.
1. Check the knobs
2. See the sheet for the number of each knobs
3. Find the right knobs for each shaft on the range. Push the knob in to fully attach the shaftand
make sure there’s no friction between knobs and bezels.
Your Thor range might have a KD handle that needs to be installed. Please Follow up the following procedures for the oven door handle installation
1. Check your Installation Kits for Door Handles
2. Connect door handle holders to each side of the handle
Page 22
KD INSTALLATION PROCEDURES
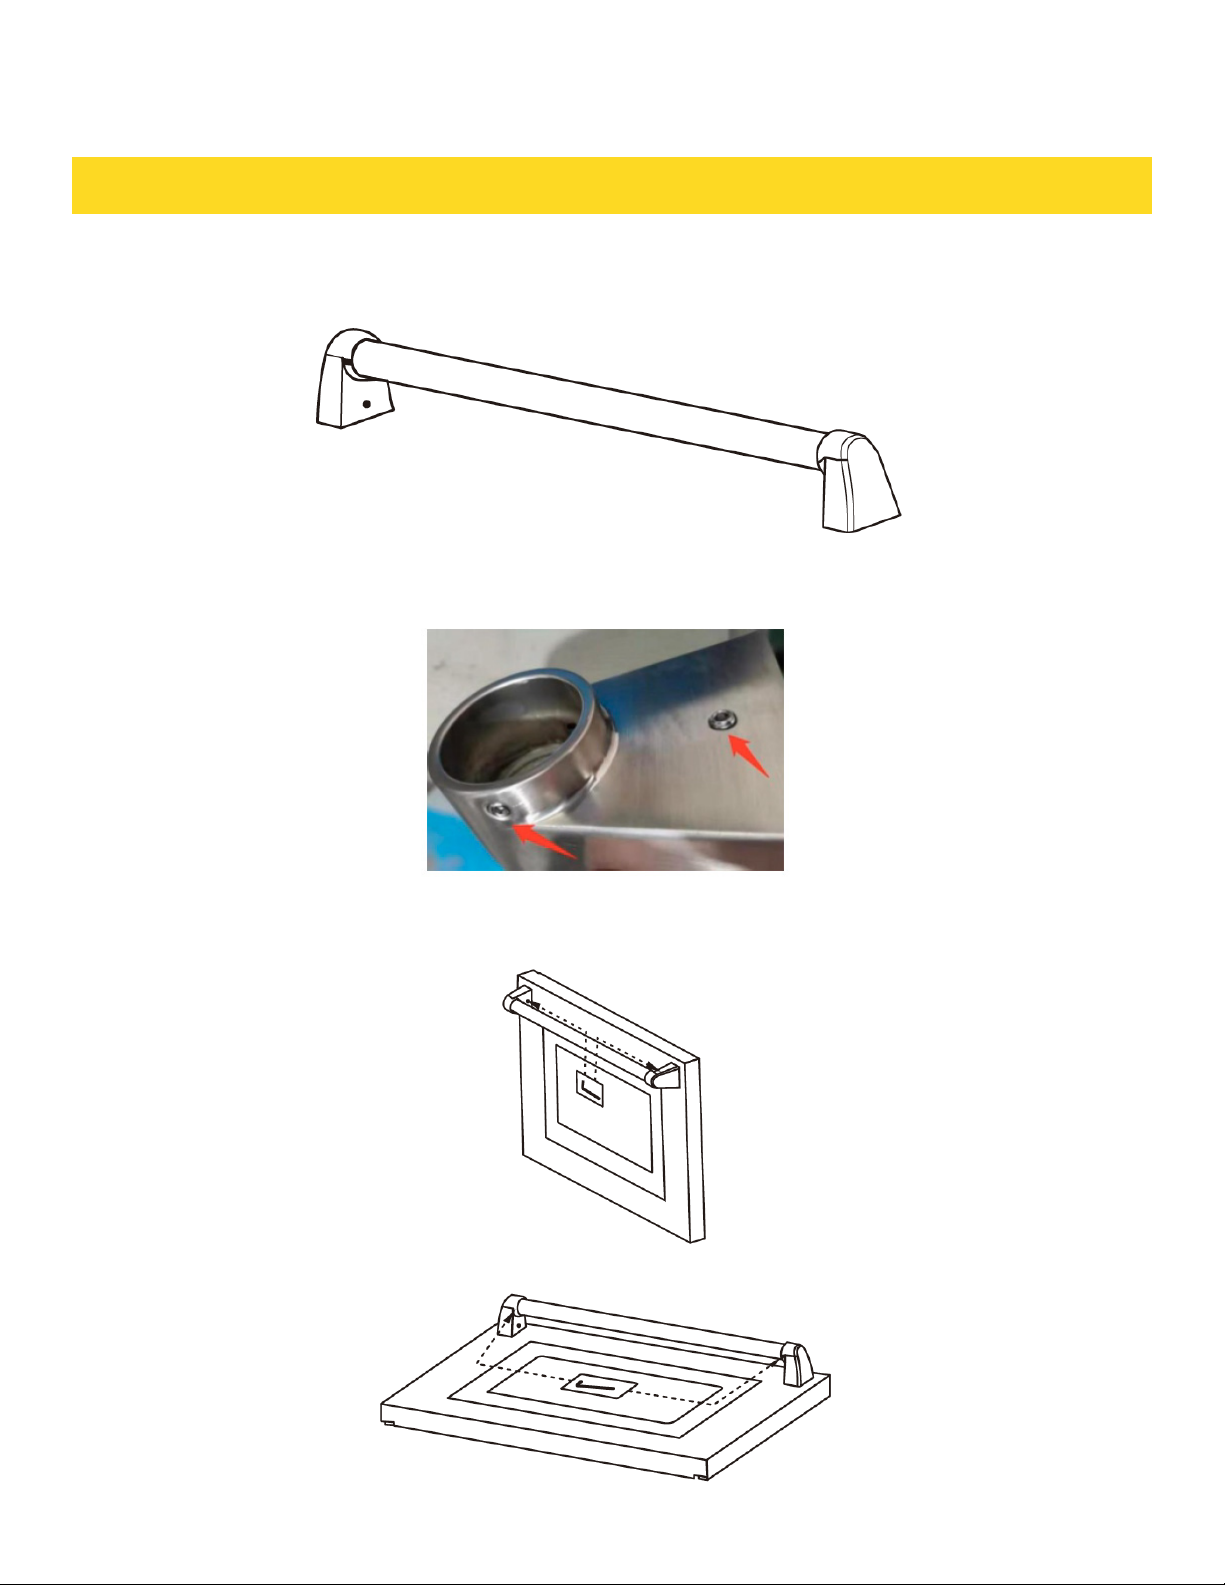
3. Secure the oven handle with two screws on each door handle holder ( if not, handle might be
loose. )
4. Secure the oven handle with two screws on each door handle holder (if not, handle might be
loose)
5. Lay the door handle against to the oven door and fit it on the connection part, and use the
wrench to get the door handle holder tight;
6. Use the wrench to tighten the door handle holders.
Page 23
RUBBER PAD INSTALLATION ON BACK PANEL
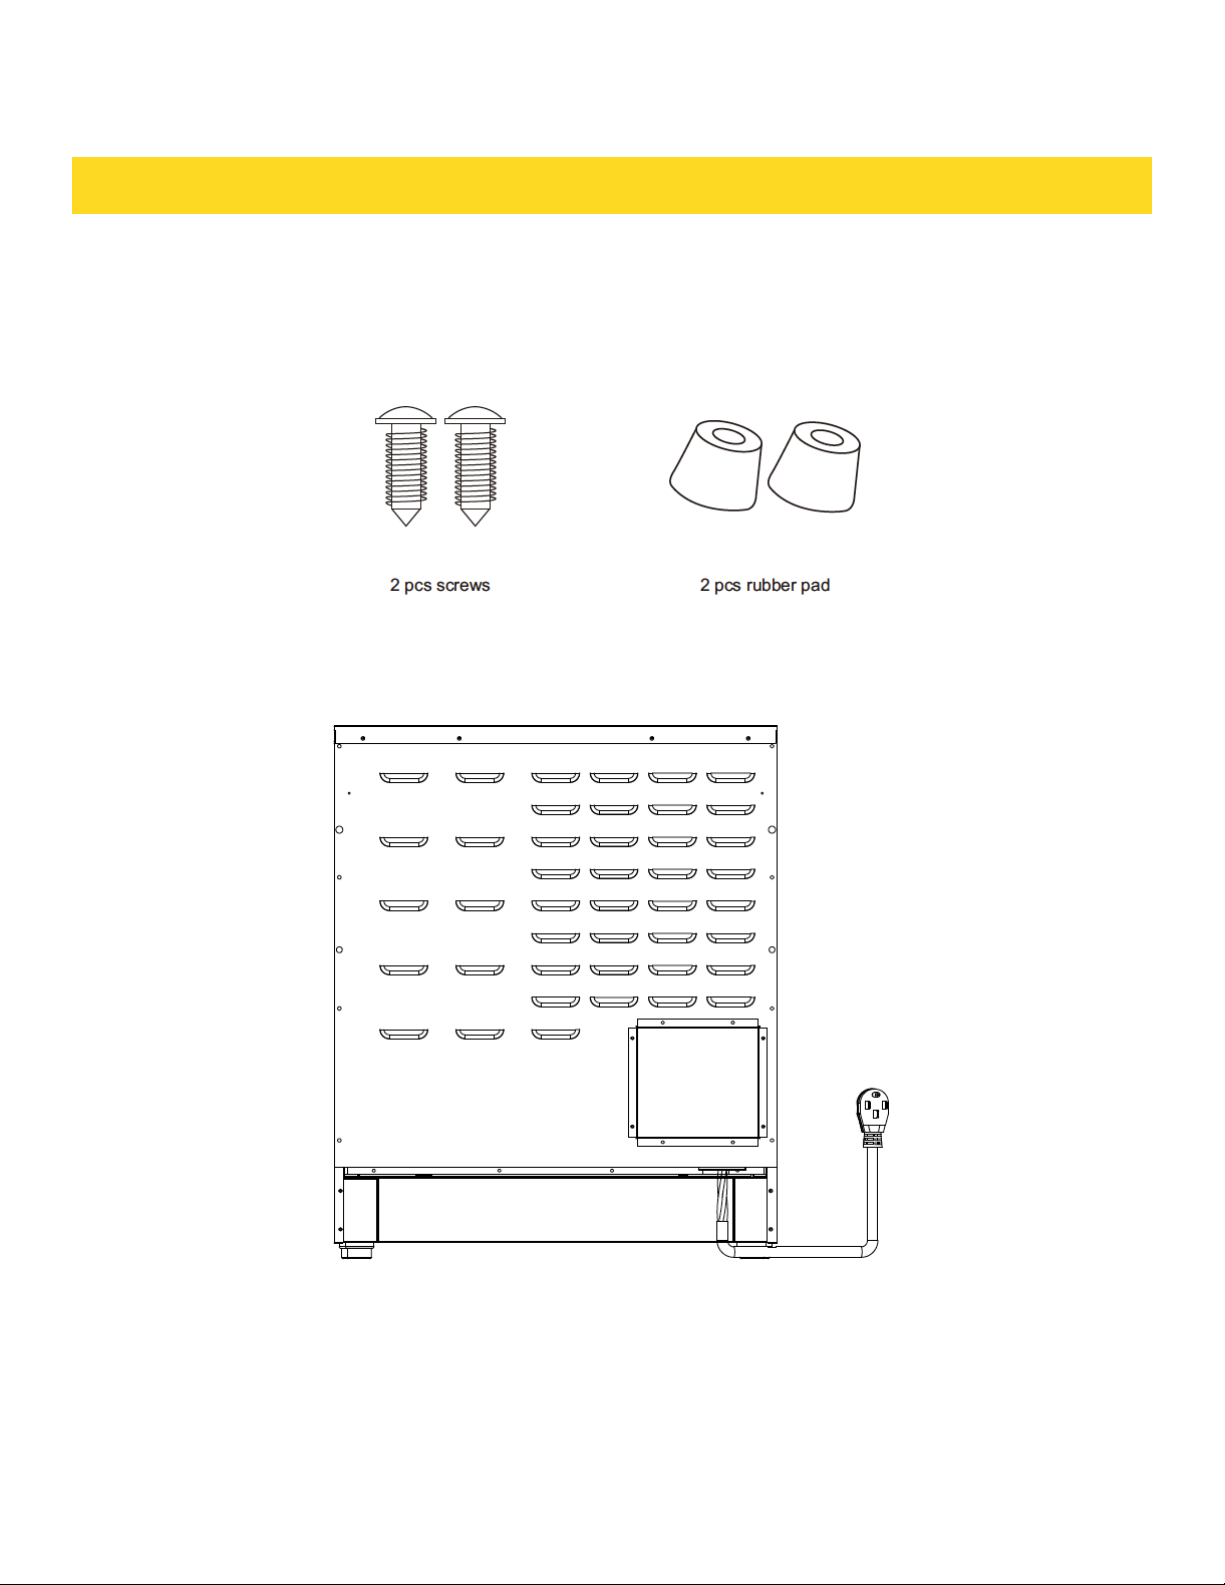
To Prevent the range too close to the wall, there are 2 plastic pads offered with the 30/36 inch
overview user's manual, please find the accessories and follow the below steps
1. check the installation kit packed with manual.
2. Install 2 pcs rubber pad as showed above
Page 24
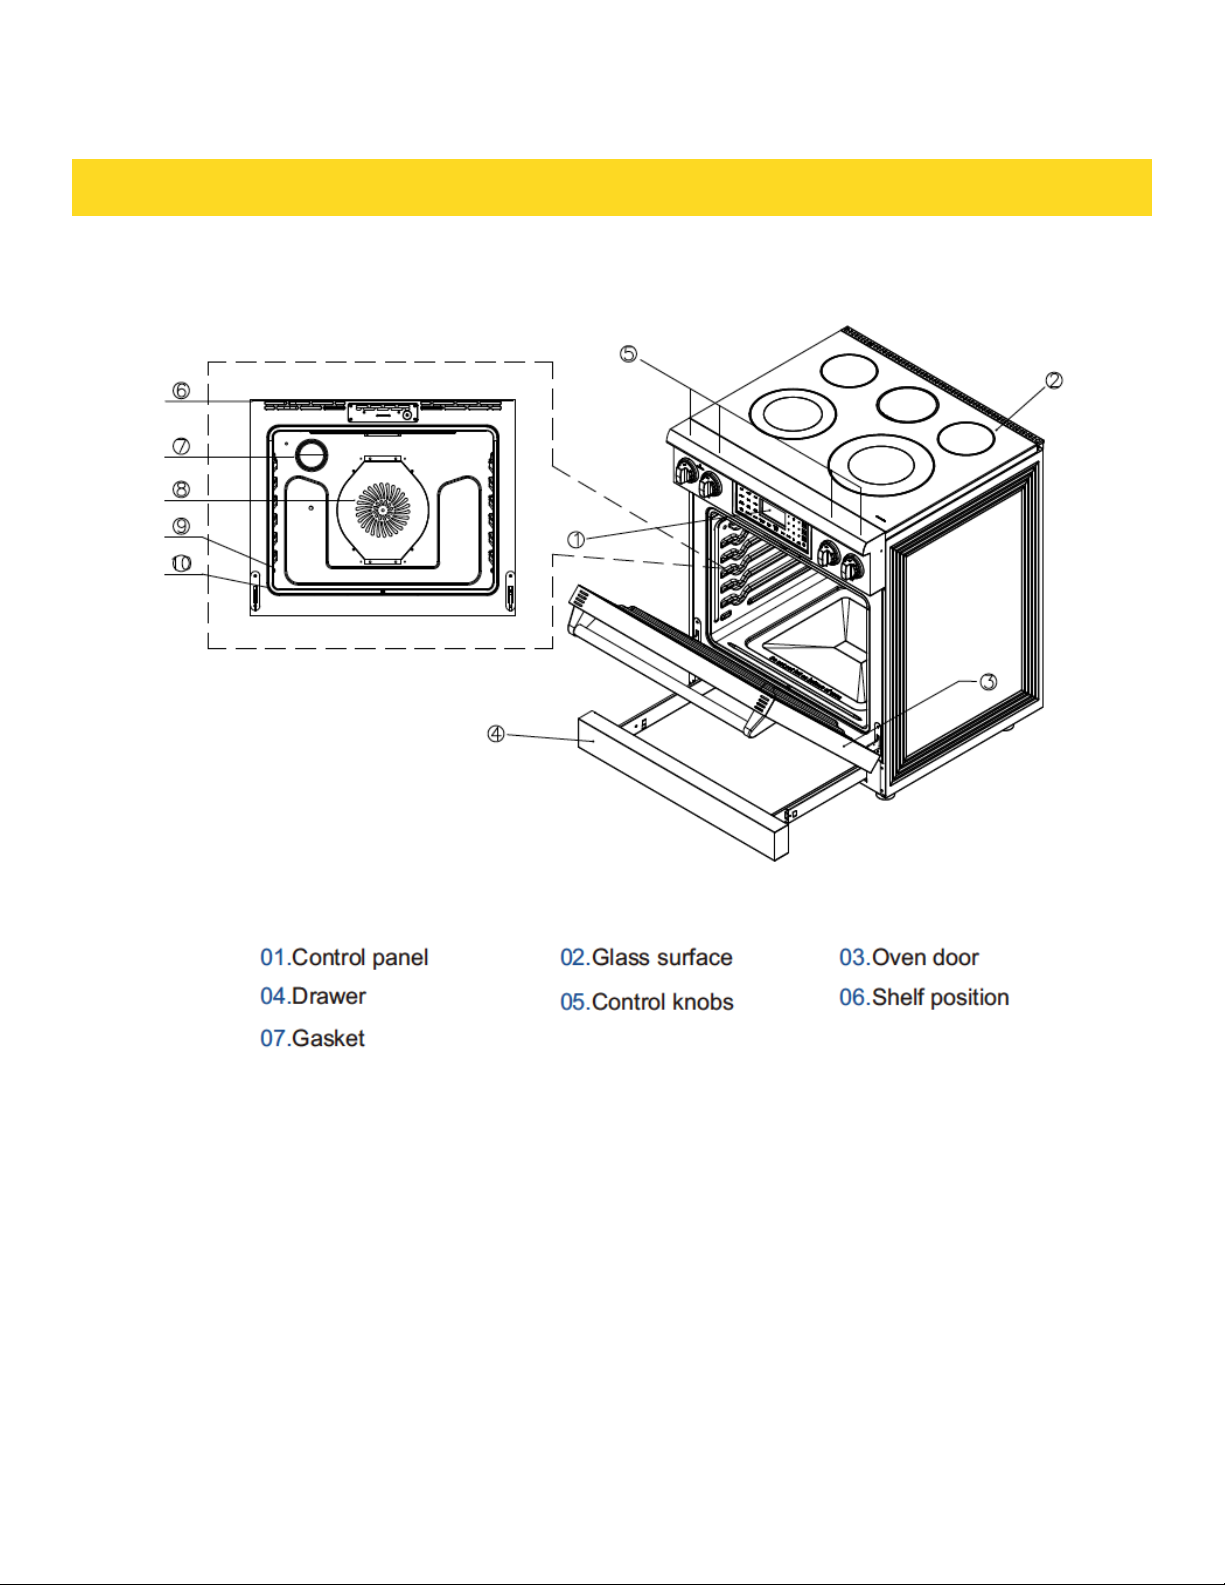
INTRODUCING YOUR NEW RANGE
30/36 inch overview
Page 25
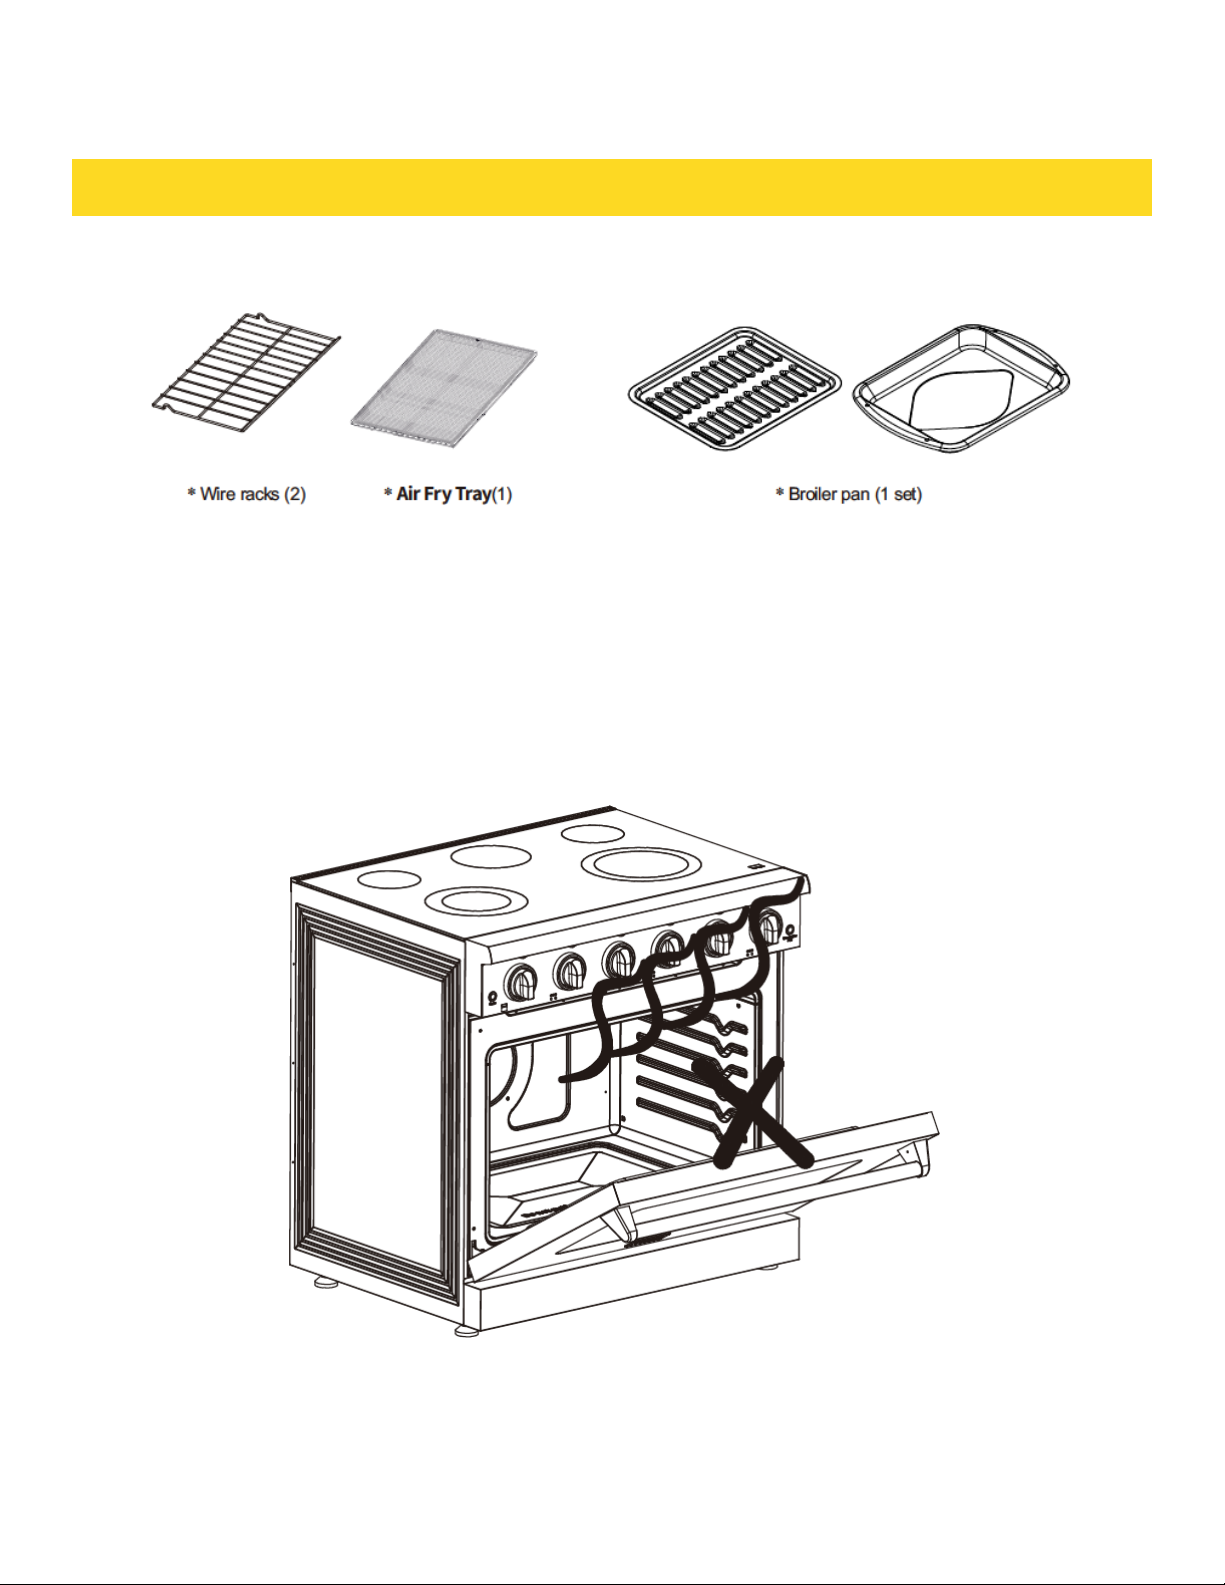
INTRODUCING YOUR NEW RANGE
What’s included with your range
Before you begin
Clean the oven thoroughly before using it for the first time. Then, remove the accessories, set
the oven to bake, and then run the oven at 350 °F for 30 minutes. There will be a distinctive
odor. This is normal. Ensure your kitchen is well ventilated during this conditioning period.
Energy Saving Tips
• During cooking, the oven door should remain closed except when you turn food over. Do not
open the door frequently during cooking to maintain the oven temperature and to save energy.
• Whenever possible, cook more than one item at a time.
Page 26

COOKTOP COOKING
CAUTION
BEFORE COOKING
• Do not use the glass cooktop surface as a cutting board.
• Do not place or store items that can melt or catch fire on the glass cooktop, even when it is
not being used.
• Turn the surface units on only after placing cookware on them.
• Do not store heavy items above the cooktop surface. They could fall and damage it.
CAUTION
DURING COOKING
• Do not place aluminum foil or plastic items such as salt and pepper shakers,spoon holders,
or plastic wrappings on the range when it is in use. The hot air from the vent could melt
plastics or ignite flammable items.
• Make sure the correct surface unit is turned on.
• Never cook directly on the glass. Always use cookware.
• Always place the pan in the center of the surface unit you are cooking on.
• Never leave surface units unattended while using a high heat setting.Boilovers cause
smoking and greasy spillovers that may catch on fire.
• Turn the surface units off before removing cookware.
• Do not use plastic wrap to cover food. Plastic may melt onto the surface and be very difficult
to remove.
CAUTION
AFTER COOKING
• Do not touch the surface units until they have cooled down.
• The surfacemay be still be hotandburnsmay occurif youtouchtheglass surface before it has
cooled down sufficiently.
• Immediately clean spills on the cooking area to prevent a tough cleaners, chorelater.
About the radiant surface elements The temperature rises gradually and evenly. As the temperature rises, the radiant element will glow red. To maintain the selected setting, the element will cycle on and off.
The heating element retains enough heat to provide a uniform and consistent heat during the off cycle.
For efficient cooking, turn off the element several minutes before cooking is complete. This will allow
residual heat to complete the cooking process.
NOTE
Radiant elements have a limiter that allows the element to cycle ON and OFF, even at the HI
setting.This helps to prevent damage to the ceramic cooktop. Cycling at the HI settingis norma
land can occur if the cookware is too small for the radiant element or if the cookware bottom is
not flat.
Page 27
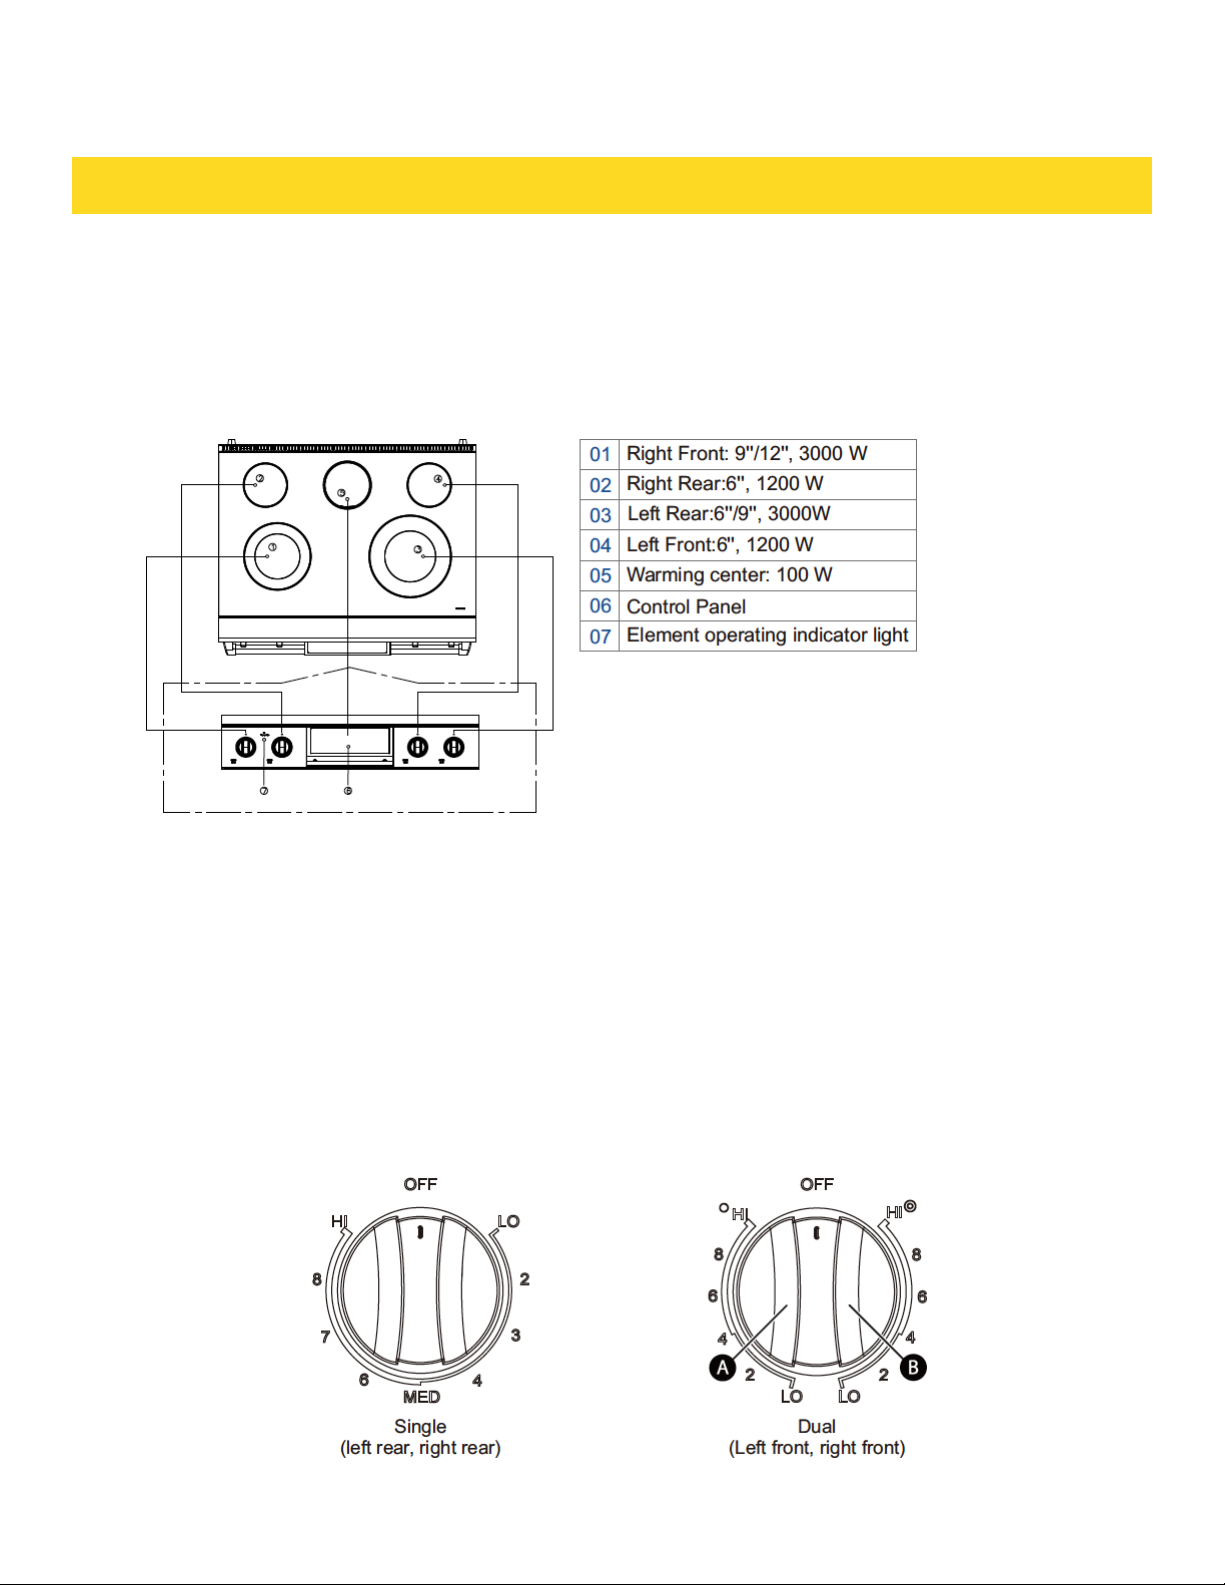
COOKTOP COOKING
Location of the radiant surface elements and controls
The radiant control knobs operate the radiant surface elements on the cooktop as
shown below.
30 inch and 36 inch
Cooking areas
The cooking areas on your range are identified by permanent circles on the glass cooking surface. For the most efficient cooking, fit the pan size to the element size. Pans should not extend
more than .5 to 1 in. (1.3 to 2.5 cm) beyond the cooking area. When a control is turned on, you
can see a glow through the glass cooking surface.The element cycles on and off to maintain
the preset heat setting, even at high settings. For more information about the correct types of
cookware, see Using the correct cookware on page 25.
Using a surface burner control knob
Page 28
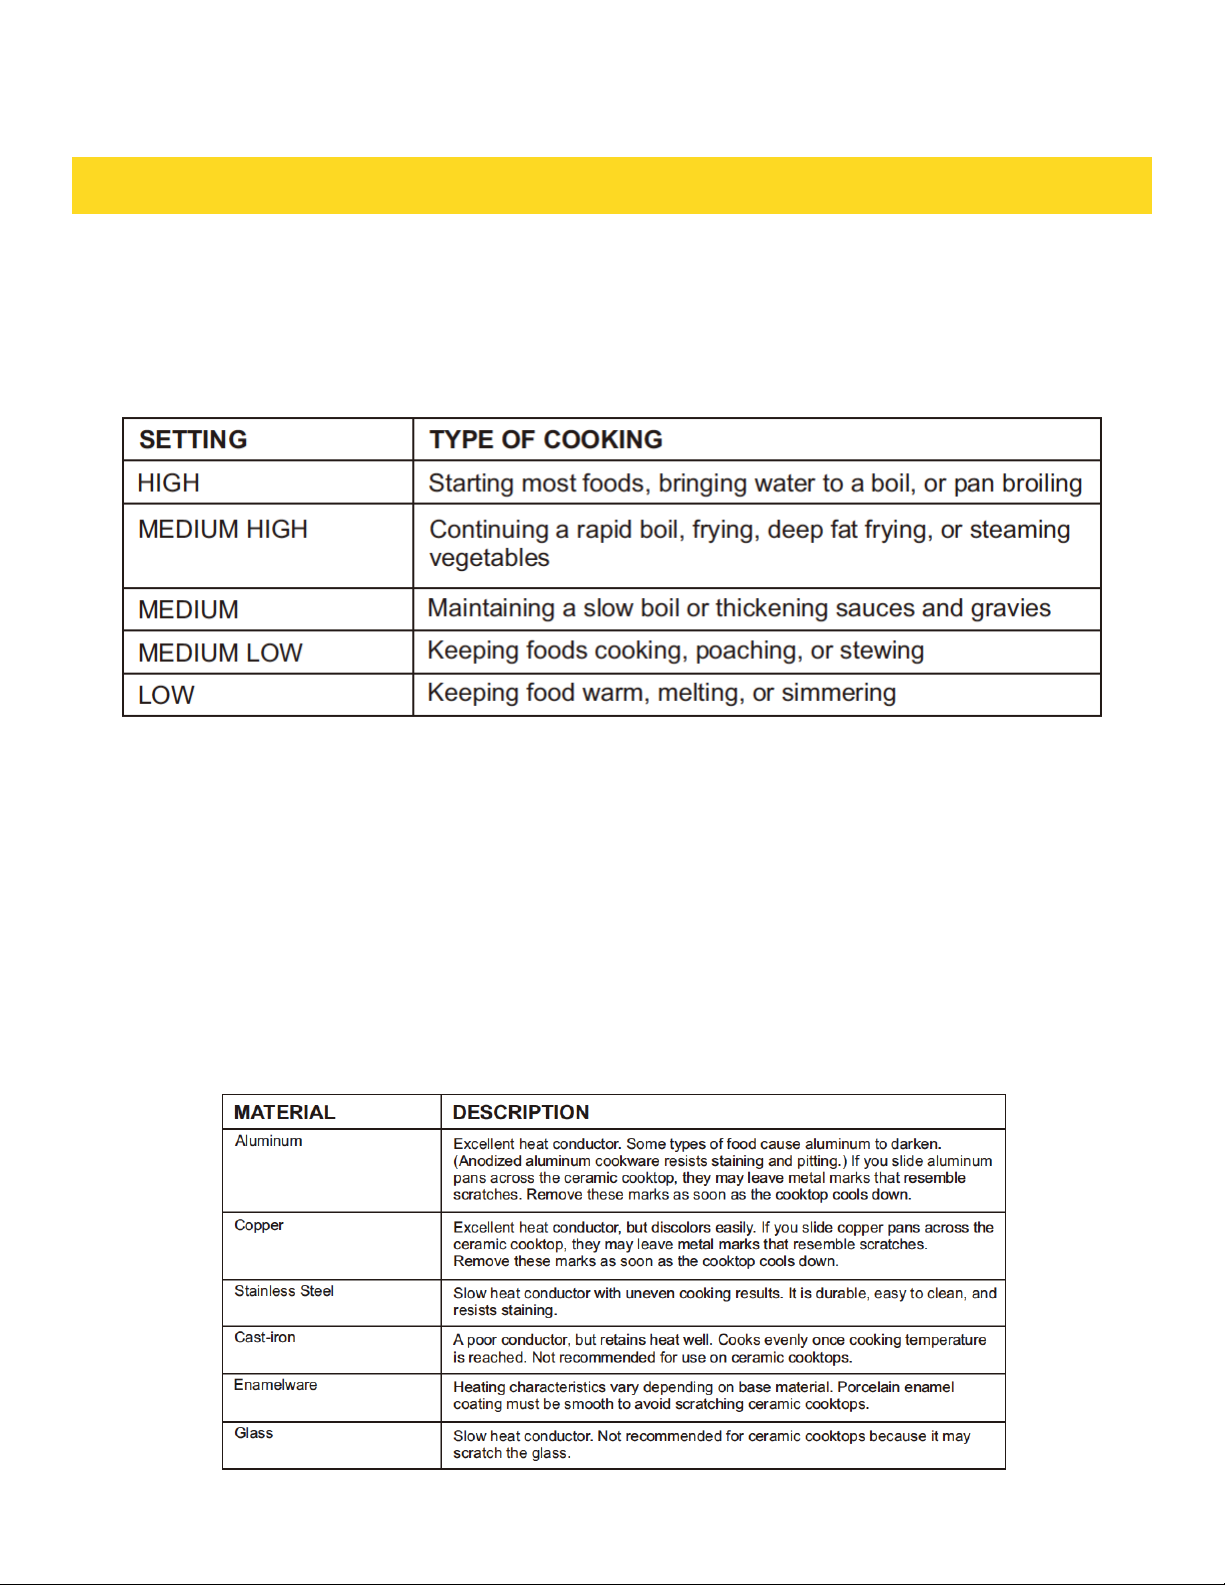
COOKTOP COOKING
1. Push the knob in.
2. For the left and right rear burners, turn knob in either direction to the setting you want.
3. For the left and right front dual burners,turn in either direction to the setting you want.
Position A : Single burner Position B : Dual burner
Using the correct cookware can prevent many problems, such as uneven cooking or extended
cooking times. Look for the following pan characteristics:
• Flat bottom and straight sides
• Tight-fitting lid
• Weight of handle does not tilt pan
• Pan is well-balanced
• Pan size matches the amount of food being prepared and the size of the surface burner.
• Made of material that conducts heat well.
What your cookware is made of determines how evenly and quickly heat is transferred from the
surface burner to the pan bottom.
Page 29

COOKTOP COOKING
Protecting the ceramic cooktop Cleaning
• Clean the cooktop before using it for the first time.
• Clean your cooktop daily or after each use. This helps keep your cooktop looking good and
can prevent damage.
• If a spillover occurs while you are cooking, immediately clean the spill from the cooking area
while it is hot to prevent a tough cleaning chore later. Using extreme care, wipe the spill with
a clean dry towel.
• Do not let spills remain on the cooking area or the cooktop trim for a long period of time.
• Do not use abrasive cleansing powders or scouring pads because they can scratch the
cooktop.
• Do not use chlorine bleach, ammonia, or other cleansers not specifically recommended for
use on a glass ceramic surface.
Preventing marks and scratches
• Do not use glass cookware. It may scratch the cooktop.
• Do not place a trivet or wok ring between the cooktop and the pan. These items can mark or
scratch the cooktop.
• Make sure that the cooktop and the pan bottoms are clean.
• Do not slide metal pans across the cooktop.
Preventing stains
• Do not use a soiled dish cloth or sponge to clean the cooktop surface. They may leave
a film, which may cause stains on the cooking surface after the area is heated.
• Continuously cooking on a soiled surface can result in a permanent stain.
Preventing other damage
• Do not let plastic, sugar, or foods with high sugar content melt onto the hot cooktop.
Should this happen, clean immediately.
• Do not let a pan boil dry. This may damage the cooktop and the pan.
• Do not use the cooktop as a work surface or cutting board.
Page 30
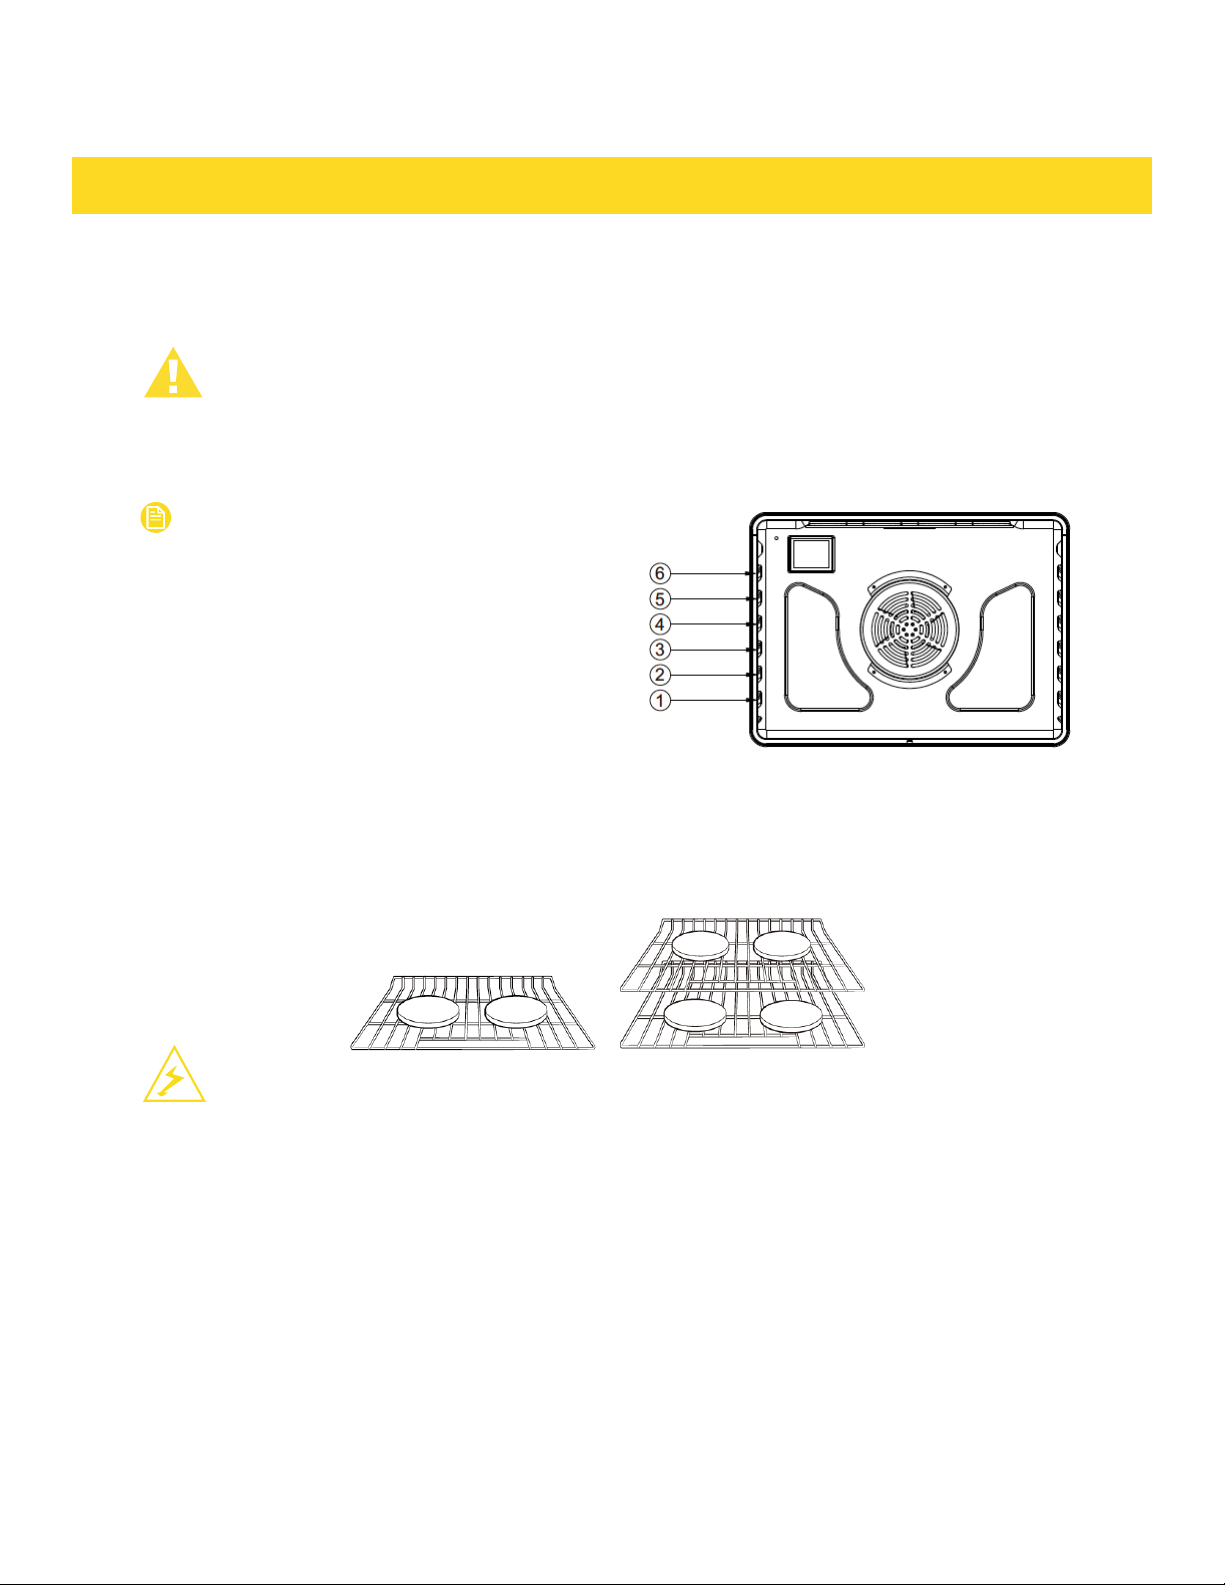
POSITIONING THE OVEN RACKS
You can remove and reposition the oven racks in any of the six rack positions. Each oven
rack has a built-in stop to prevent it from accidentally being pulled completely out. Correct
positioning of the oven racks provides the best cooking results.
WARNING
Stand away from the oven when opening the oven door. Escaping hot air or steam can burn
your hands, face, or eyes. Let hot air or steam escape before removing or replacing food.
NOTE
The rack position above 6 is not usable.
• Centering the baking pans in the oven produces better cooking results.
• When baking multiple items, make sure that you leave a 1 to 1.5 in. (2.5 to 3.8 cm) space
around each item.
• When baking or fan baking on a single rack, place the oven rack in positions 3 or 4.
• When baking or fan baking on multiple racks, place the oven racks in positions 3 and 5. Place
two pans in the rear of the top rack and the other two pans in the front of the bottom rack.
CAUTION
• Do not cover an oven rack with aluminum foil. This disturbs the heat circulation and results in poor
baking.
• Do not place aluminum foil on the oven bottom because it could cause damage.
• Arrange the oven racks only when the oven is cool.
• When placing an oven rack in the top most rack position, make sure that the rack is stably situated on
the embossed stop.
Removing an oven rack
1. Pull the rack straight out until it stops.
2. Lift the front of the oven rack and pull to remove it from the oven.
Replacing an oven rack
1. Place the back edge of the rack on the a rack support.
2. Lift the front of the rack and slide it into the oven.
Page 31
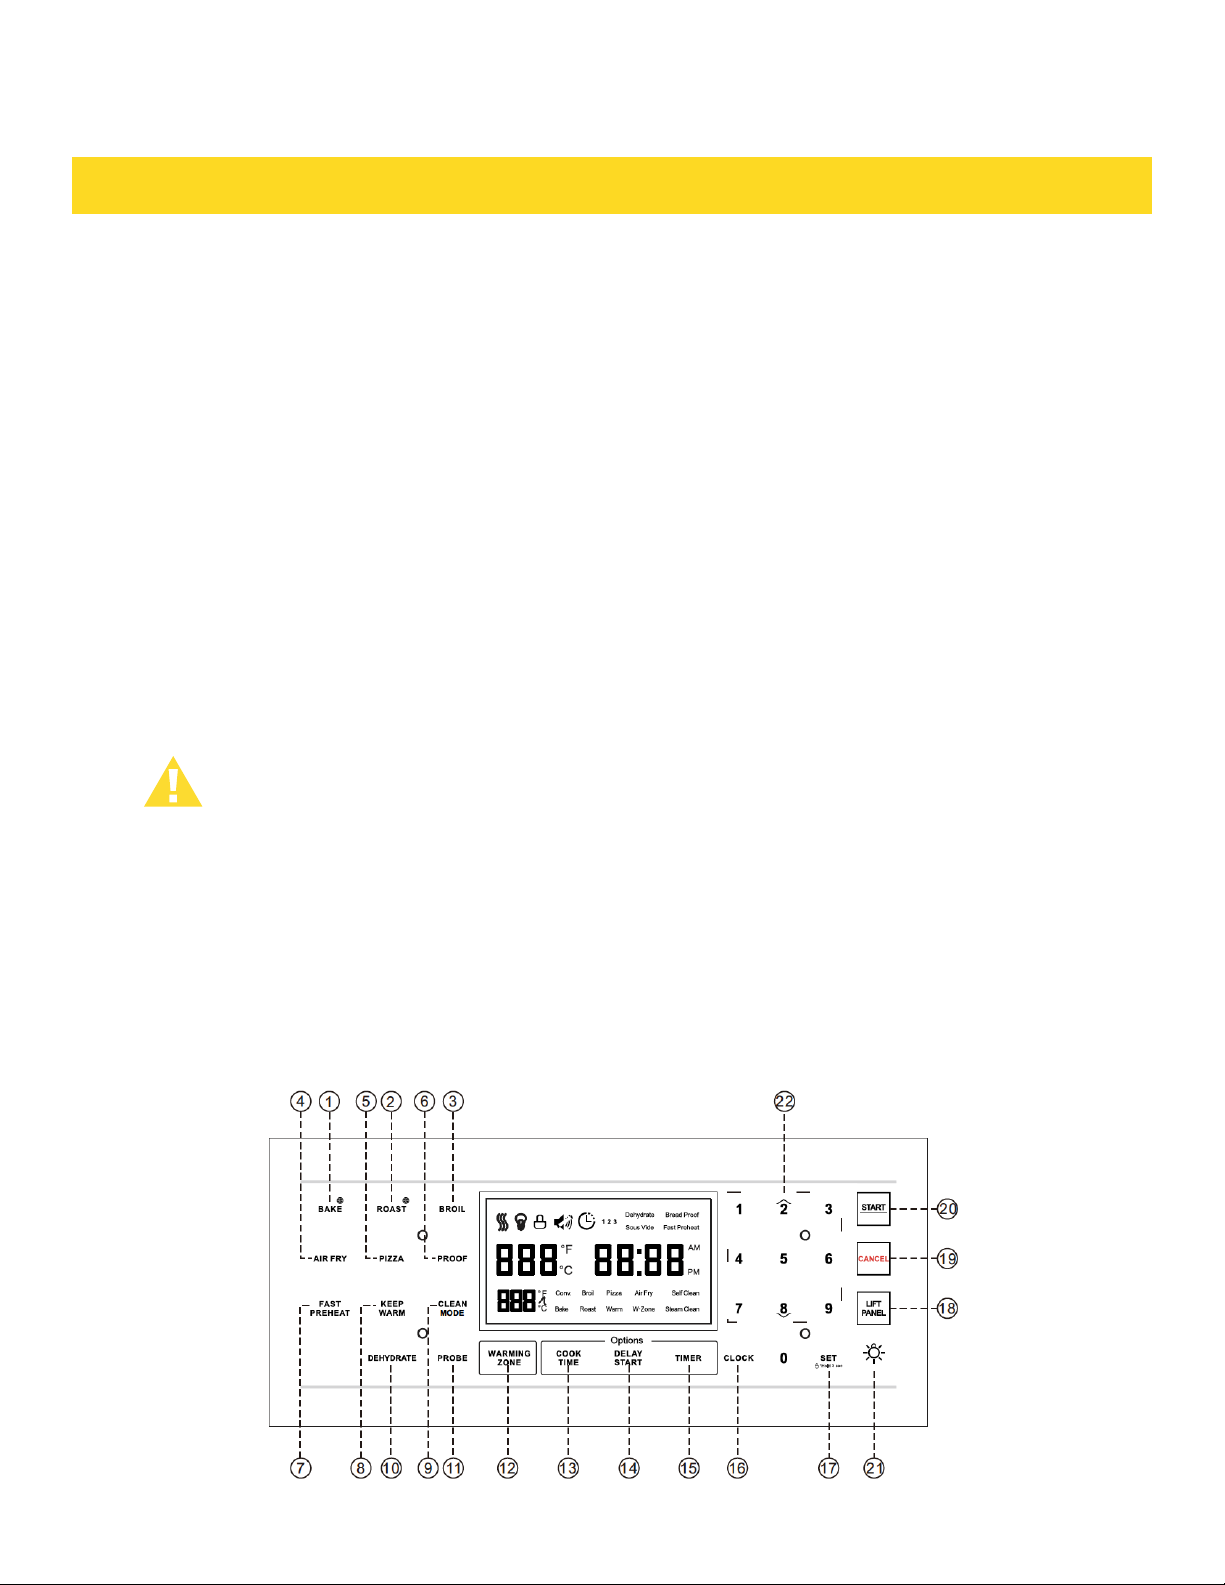
OERATING THE OVEN
Oven Cooking Safety Guidelines
√ Do not block the ducts on the rear of the range when cooking in the oven. It is important that
the flow of moist warm air from the oven and fresh air into the oven
burner never be interrupted. Avoid touching the vent opening or nearby surfaces during oven
or broiler operation because they are hot. Do not pace plastics, paper or other items that could
melt or burn near the oven vent.
√ Use all the oven modes with the oven door closed.
√ Never use aluminum foil to cover the oven shelves or to line the floor of the oven. The trapped
heat can irreversibly damage the enamel and may even cause afire.
√ Do not place water, ice, or any dish or tray directly on the oven floor, as this will irreversibly
damage the enamel.
√ Do not cover the slotted grid of the broil/roast pan with aluminum foil. This will catch the
grease and could cause fire.
√ Do not use plastic wrap or wax paper in the oven.
√ For food safety reasons, do not leave food in the oven for longer than two hours before and
after cooking or defrosting. This is to avoid contamination by organisms which may cause food
poisoning. Take care during warmer weather.
WARNING
√ According to the United Sates Department of Agriculture: DO NOT hold foods at
temperatures between 40°F to 140°F more than 2 hours. Cooking raw foods below 275°F is not
recommended.
√ Never cover any slots, holes or passages in the oven bottom or cover an entire rack with
materials such as aluminum foil. Doing so blocks air flow through the oven and may cause
carbon monoxide poisoning. Aluminum foil lining may also trap heat, causing a fire hazard.
Oven function
Page 32

OERATING THE OVEN
1. key: This touch key is used to enter the setting of Bake and Convection Bake
functions. In the standby mode, touch “ ” to enter the Bake function setting mode, touch
again to enter the Convection Bake function setting mode, and touch will re-enter the
Bake function setting mode.
2. : Turns on the fan while roasting. Provides more consistent heat by circulating the air
inside the oven while baking. Cooks large cuts of meat.
3. Broil: Turns on the Broil function. Cooks foods using the top oven element only. You can
select Broil Hi or Broil Low. Press once to cook using the High heat mode. Press twice to
cook using the Low heat mode.
4. Air Fry: Turn the Air Fry mode on and off.
5. Pizza: Use to select the Pizza function of the oven.
6. Proof: Use to select the bread proof function of the oven.
7. Fast Preheat: Use to select the Fast Preheat function of the oven.
8. Keep Warm: Keeps the oven warm after cooking. This lowers the oven temperature and
maintains it at 150° F (65° C) up to three hours.
9. Clean: Turns on the Oven Clean feature. Steam clean and self-clean are optional.The
selfcleaning mode can adjust the third gear according to the pollution depth, the 2 gear is 3
hours, the 3 gear is 5 hours, and the 1 gear is 2 hours. The default is 2 gears and the working
time is 3 hours.
10. Dehydrate: Use to select the dehydrate function of the oven.
11. Probe: Used to set the working temperature of the food probe function.
12. Warming zone: Turns the 100 W warming center on the cooktop on or off.After pressing the
Warming zone key, use the numeric keys 1, 2, and 3 to adjust the working gear.
13. Cook time: Turns on the Cook Time function. Use the number pads to set the amount of
time you want your food to cook. The oven automatically shuts off when the time has elapsed.
14. Delay Start: Sets the oven to start and stop automatically. Use with the Bake, Convection Bake,
Convection Roast, or Cook Time functions.
15. Timer: Turns on the kitchen timer for the amount of time you want.
16. Clock: Press to turn on the clock set feature, then set the current time.
17. Set/Child lock: Setting function of the oven. Press and hold for three seconds to turn off the
control panel touch pads to prevent the oven from accidentally being turned on. Touch pads
stay locked until you turn this function off.
18. Lift Panel: Used to lift and lowering the oven control panel
19. Cancel: Cancels all oven operations except the clock and timer.
20. Start: Starts the oven cooking, cleaning, or timing functions.
21. Oven Light: Turns the oven light on or off.
22. Numbers: Sets times, temperatures, and preset oven functions.
Page 33

OPERATING THE OVEN
3. Preheat the oven to the temperature stated in the recipe. Depending on the temperatureand
the size of the oven, preheating will vary. For better cooking performance and exact oven
cavity temperature, preheating time will be 10 mins per 100 Degrees.
4. Arrange pans and food items evenly on the shelves. Make sure pans do not touch each
other or the sides of the oven. When baking a single item, always center the item on the
oven shelf. If baking on multiple shelves, make sure you stagger items on the shelves so
that one is never directly above another.
5. When baking using convection, either reduce the temperature stated in the recipe and leave
the baking time unchanged or reduce the baking time by several minutes and leave the
temperature unchanged. For foods with a baking time of over an hour, reducing both the
temperature and time slightly may give the best results.
6. Dark metal baking pans or those with a dull finish absorb heat faster than shiny pans, and
are excellent for pies and breads, or anything that needs browning or a crisper crust.
7. A shiny finish may work best for foods that require lighter, delicate browning (e.g. cakes and
cookies), as it reflects some heat and gives a less intense bakingsurface.
8. Avoid opening the oven door frequently during baking.
* For best results use the broiler pan. The pan is used to catch grease spills and has a cover
to prevent grease splatter.
* The convection fan circulates heated air over and the around the food being roasted,
sealingjuices quickly for a moist and tender product while, at the same time, creating a rich
golden-brown exterior.
* Use the broil/roast pan and slotted grid supplied with the range when roasting to elevate the
meat on a metal roasting rack. This allows hot air to circulate around the meat, browning it
more evenly like a rotisserie. A suitable roasting rack can be purchased through your HRG
distributer or by calling Customer Care.
* When roasting larger items like a whole turkey, use only the pan and grid for greater stability.
Convection defrost
With temperature control off, a motorized fan in the rear of the oven circulates air. The fan
accelerates natural defrosting of the food without heat. To avoid illness and food waste, do not
allow defrost food to remain in the oven for more than two hours without being cooked.
Defrosting
To thaw uncooked frozen food, set the oven temperature to 100-150°F. Once thawed, cook
the food immediately and do not refreeze.
To prevent liquid from thawing food dripping on the oven floor, be sure any uncooked food is
tightly wrapped in foil and/or placed in a heat proof container.
Convection dehydration
With the temperature control on 175°F, warm air is radiated from the bake burners on the
bottom of the oven cavity and is circulated by a motorized fan in the rear of the oven.
The food dries by evaporation. Drying foods inhibits microbial growth and retains certain
enzymes.
Page 34

OERATING THE OVEN
Broiler operation
CAUTION
Door must be closed during broiler operation. Broiling is a method of cooking tender cuts of meat
directly under the infrared broiler in the oven. Broiling in the oven is accomplished with the oven door
closed. It is normal and necessary for some smoke to be present to give the food a broiled flavor. If you
open the oven door to check the food, have it open for as short a time as possible. This is to prevent the
control panel from overheating and prevents meltedknobs. Use both the broil/roast pan and slotted grid
supplied. The grid helps to reduce smoking and splatter by letting grease drip into the bottom of the pan,
away from intense heat. To prevent food sticking, spray the grid with a light coating of non-stick cookingspray.
Preheating
Preheating is suggested when searing rare steaks (Remove the broiler pan before preheating with the
infrared broiler. Foods will stick to hot metal). To preheat, turn the “Oven” selector knob to the “Broil”
position. Wait for the burner to become hot, approximately 2 minutes. Preheating is not necessary when
broiling meat well-done.
To broil
Broil one side until the food is browned; turn and cook on the second side. Season and serve.
Always pull the rack out to the “stop” position before turning or removing food.
Setting Broil
The “Oven” selector knob controls the Broil feature. When broiling, heat radiates downward from the
oven broiler for even coverage. The Broil feature temperature is 500°F (260°C).
The broil pan and insert used together allow dripping grease to drain and be kept away from the highheat of the oven broiler. DO NOT use the broil pan without theinsert.
DO NOT cover the broil pan insert with foil. The exposed grease could catch fire.To set the oven to Broil:
1. Place the broiler pan insert on the broiler pan. Then place the food on the broiler pan insert.
2. Arrange the interior oven rack and place the broiler pan on the rack. Be sure to center the
broiler pan and position directly under the broil burner. If preheating the broil burner first,
position the broiler pan after the broil burner is preheated.
3. Turn selector knob to Broil.
The oven indicator light will remain on until the selector knob is turned to the off position or
the temperature control cycles off.
To broil
Broil one side until the food is browned; turn and cook on the second side. Season and serve.
Always pull the rack out to the “stop” position before turning or removing food.
Broiling guidelines
Choose a suitable shelf position. To ensure that meat is cooked through rather than just browned on the
outside, broil thick pieces of meat and poultry on shelf positions 2 or 3. Use shelf position 4 for thinner
items that need less cooking time like steaks, chops, or hamburger patties. When finishing off meals by
browning the top under the broiler, use metal or glass-ceramic bakeware. Do not use heatproof glass or
earthenware, as these cannot withstand the intense heat of the broiler. Center the item in the oven, so
that it is directly under the broiler.
Page 35

CLEANING AND MAINTENANCE
WARNING
• Always make sure that the controls are off and all surfaces are cool before removing or
cleaning any of the range parts. This will prevent you from getting burned.
• If your range is pulled out from the wall for any reason, make sure that the anti-tip device is
reengaged after your range has been pushed back into place. Failure to take this precaution
could result in your range tipping and personal injury.
Cleaning stainless steel surfaces
CAUTION
Do not use a steel-wool pad or abrasive cleaners on stainless steel surfaces. Abrasive pads and
cleaners will scratch the surface and damage the finish.
NOTE
To prevent any discolorations or grease stains, we recommend that you clean and remove any
spills, spots, and grease from your range after each use.
1. Place a small amount of a stainless steel appliance cleaner or polish on a damp cloth or
damp paper towel.
2. Clean a small area, rubbing with the grain of the stainless steel, if applicable.
3. Dry and buff with a clean, dry paper towel or soft cloth.
4. Repeat as necessary.
CAUTION
• Do not use a steel-wool pad or abrasive cleaners on stainless steel surfaces. Abrasive pads
and cleaners will scratch the surface and damage the finish.
• If you previously used a mineral oil-based stainless steel appliance cleaner, wash the surface
with dish washing liquid and water before using the stainless steel cleaner or polish.
Cleaning the oven racks
Clean by hand in hot, soapy water with a plastic or soap-filled scouring pad, then dry with a soft
cloth.
If a rack becomes difficult to slide, rub the side rails with wax paper or a cloth containing a
small amount of cooking oil. This helps the rack slide more easily in the tracks.
Page 36
CLEANING AND MAINTENANCE
Cleaning the oven door
CAUTION
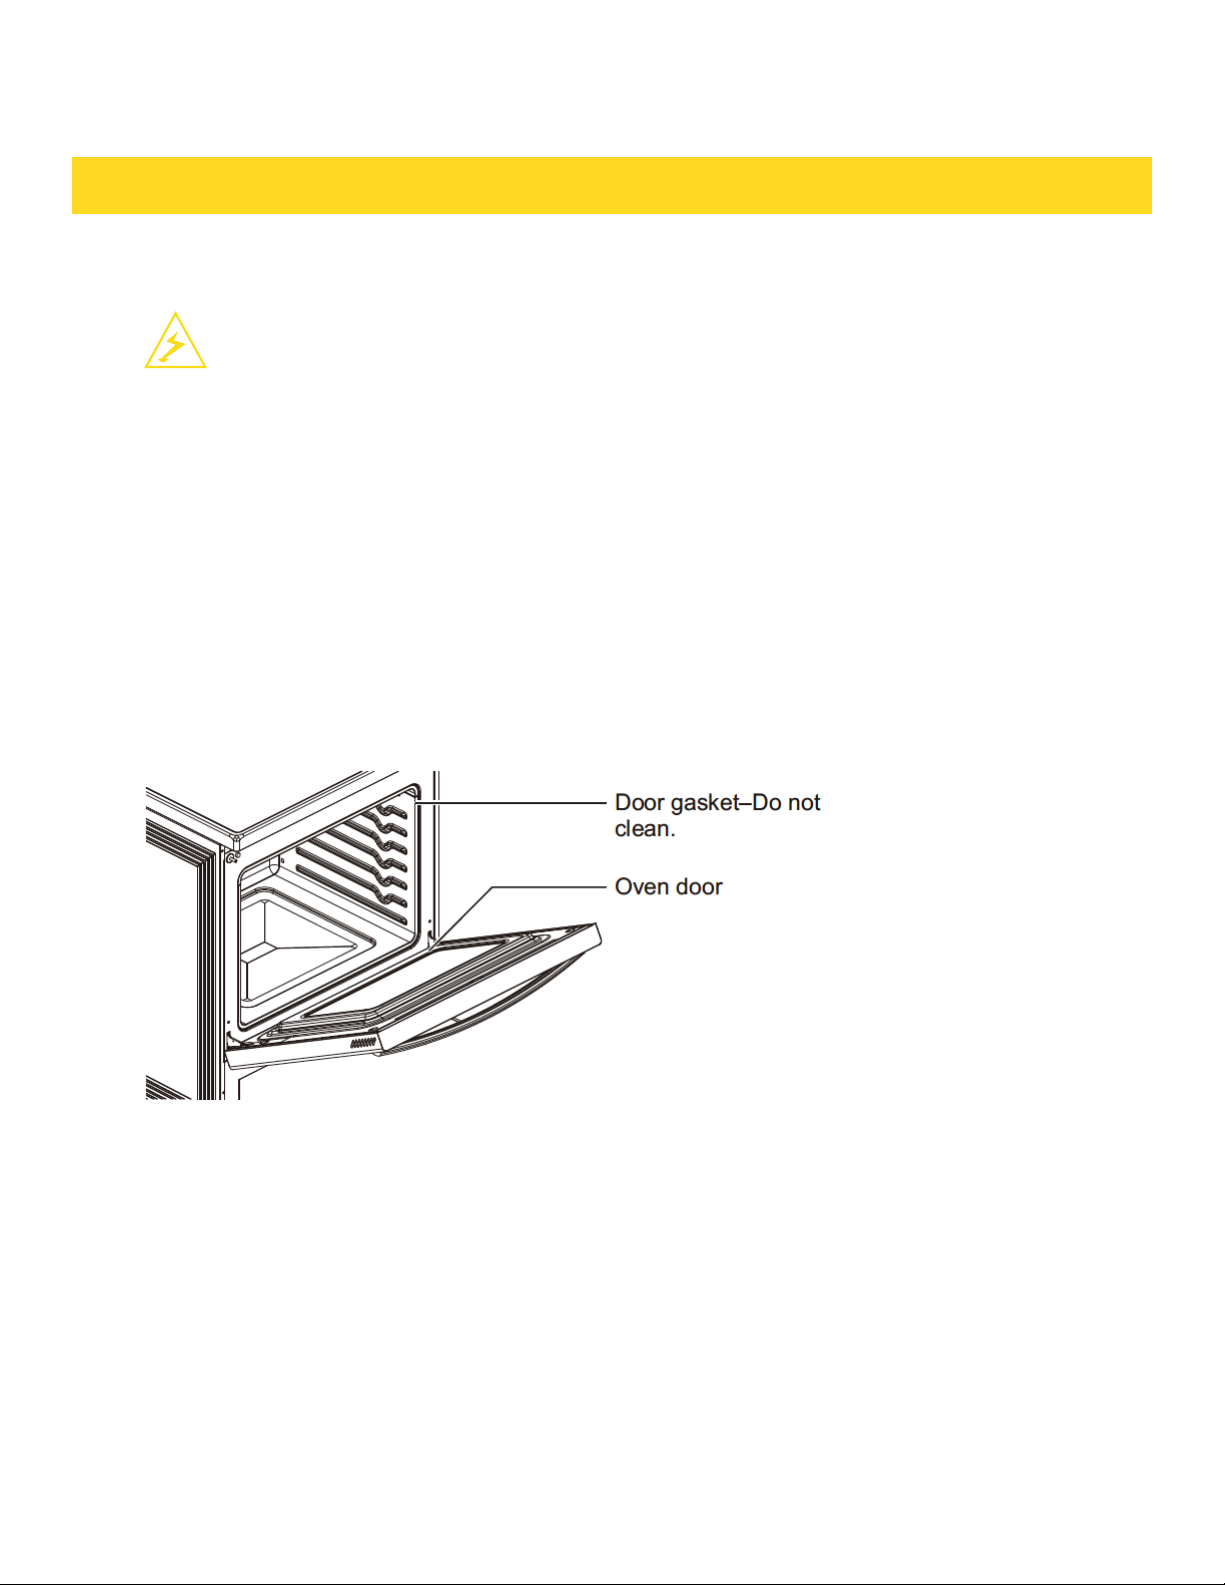
• DO NOT clean the oven door gasket. The oven door gasket is made of a woven material which
is essential for a good seal. Care should be taken not to rub, damage, or remove this gasket.
• DO NOT immerse the door in water.
• DO NOT spray or let water or the glass cleaner to enter the door vents.
• DO NOT use oven cleaners, cleaning powders, or any harsh abrasive cleaning materials on
the outside of the oven door.
The oven door has multiple surfaces that require different cleaning techniques.
The gasket on the oven door frame should never be cleaned or moved to clean other
surfaces. The gasket is made of woven material which is essential for a good heat seal.
1. Clean the inside door surface by hand with hot, soapy water and a soapy plastic scouring
pad. Do not let moisture get inside the door assembly.
2. Rinse and dry thoroughly with a clean, soft cloth.
3. Clean the outside door stainless steel surfaces by following the instructions in Cleaning
stainless steel surfaces on page 35.
4. Clean the glass window with glass cleaner or warm, soapy water with a thorough rinse. Do
not let moisture get inside the door assembly
Page 37

CLEANING AND MAINTENANCE
Cleaning the surface burner control knobs
WARNING
Do not use spray cleaners on the surface burner control panel. Spray entering the valve
holes could contact electrical components resulting in death, personal injury, or product
damage.
1. Make sure that all surface burner knobs are in the OFF position.
2. Pull the control knobs straight off the surface burner control valve stems. Do not clean the
control knobs in a dishwasher. They are not dishwasher-safe.
3. Clean the knobs in warm, soapy water. Rinse and completely dry all surfaces (including back
and stem hole).
4. Clean stainless steel surfaces with a stainless steel cleaner on a damp, soft cloth.
5. Replace the control knobs in the OFF position by pushing them straight onto the control valve
stems.
Cleaning the cooktop
The cooktop surface is a porcelain-enamel surface. To prevent this surface from becoming dull,
wipe up and clean spills as they happen. Foods with a lot of acid (for example, tomatoes, sauerkraut, and fruit juices) or foods with high sugar content can cause dull spots if allowed to set.
CAUTION
• Do not use a steel-wool pad or abrasive cleaners on stainless steel surfaces. Abrasive pads
and cleaners will scratch the surface and damage the finish.
• Carefully check the bottoms of pans for roughness that may scratch the cooktop.
Normal daily use cleaning
NOTE
Daily use of a ceramic cooktop cleaner helps keep the cooktop looking new.
Use only a ceramic cooktop cleaner. Other creams may not be as effective. By following
these steps, you can maintain and protect the surface of the glass cooktop.
Before using the cooktop for the first time, clean it with a ceramic cooktop cleaner. This
helps protect the top and makes cleanup easier.
1. Shake the cleaning cream well, then apply a few drops of cleaner directly on the cooktop.
2. Use a paper towel or a cleaning pad for ceramic cooktops to clean the entire cooktop surface.
3. Use a dry cloth or paper towel to remove all cleaning residue. You do not need to rinse.
Page 38

CLEANING AND MAINTENANCE
Cleaning sugary spills and melted plastics
NOTE
If pitting or indentations in the glass surface have already occurred, they can’t be
repaired.The cooktop glass will have to be replaced.
Sugary spillovers (such jellies, fudge, candy, and syrups) or melted plastics can cause
pitting of the cooktop surface. This is not covered under the warranty.
You should clean the spill while it is still hot. Take special care when removing hot
substances.
When using a scraper, make sure that it is new and the razor blade is still sharp. Do not
use a dull or nicked blade.
1.Turn off all surface burners. Remove hot pans.
2.Wearing an oven mitt, use a single-edge, razor-blade scraper to move the spill to a cool area
of the cooktop. Remove the spill with paper towels.
3.Wait until the cooktop has cooled, then remove any remaining spillover. Don’t use the surface
burners again until all of the residue has been completely removed.
Removing burned-on residue
1. Make sure that all surface burners are turned off, then let the cooktop cool.
2. Spread a few drops of ceramic cooktop cleaner on the entire burned residue area.
3. Using a cleaning pad for ceramic cooktops, rub the residue area. Apply pressure as needed.
4. If any residue remains, repeat the steps listed above as needed.
5. For additional protection, after all residue has been removed, polish the entire surface with a
ceramic cooktop cleaner and a paper towel.
Removing heavy, burned-on residue
1. Make sure that all surface burners are turned off, then let the cooktop cool.
2. Use a single-edge, razor-blade scraper at approximately a 45° angle against the glass
surface and scrape the residue. You need to apply remove the residue. Do not scrape the seal.
3. After scraping with the scraper, spread a few drops of ceramic cooktop cleaner on the
entire burned residue area. Use the cleaning pad to remove any remaining residue.
4. For additional protection, after all residue has been removed, polish the entire surface
with a ceramic cooktop cleaner and a paper towel.
Cleaning the cooktop seal
• Lay a wet cloth on the seal for a few minutes, then wipe clean with a nonabrasive cleaner.
Page 39
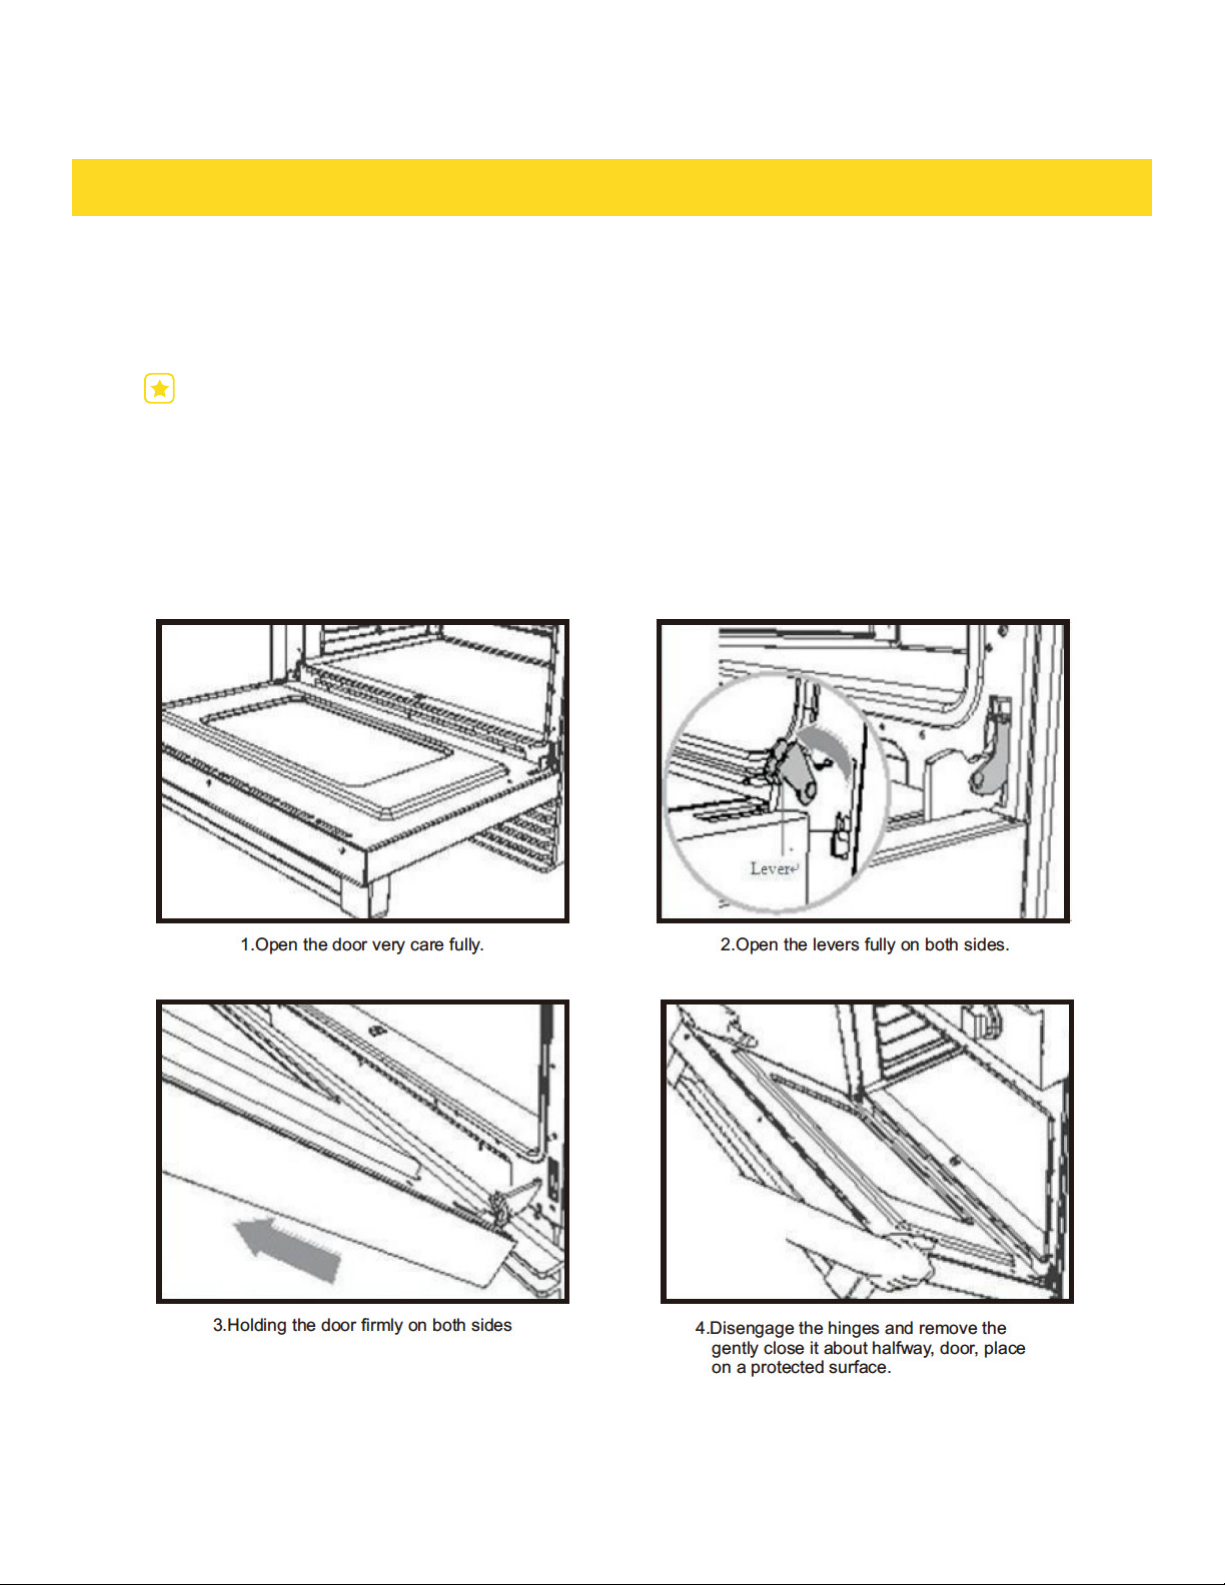
REMOVE THE OVEN DOOR
Removing and replacing the oven door
Do not lift the oven door by its handle.Doing so may damage the door. Make sure the oven and
the door are cool before you begin to remove the door.
IMPORTANT
Before removing the door,make sure there is a large enough clear,protected surface in the
kitchen to rest the door on.
The oven door is heavy!
Removing the oven door
Page 40
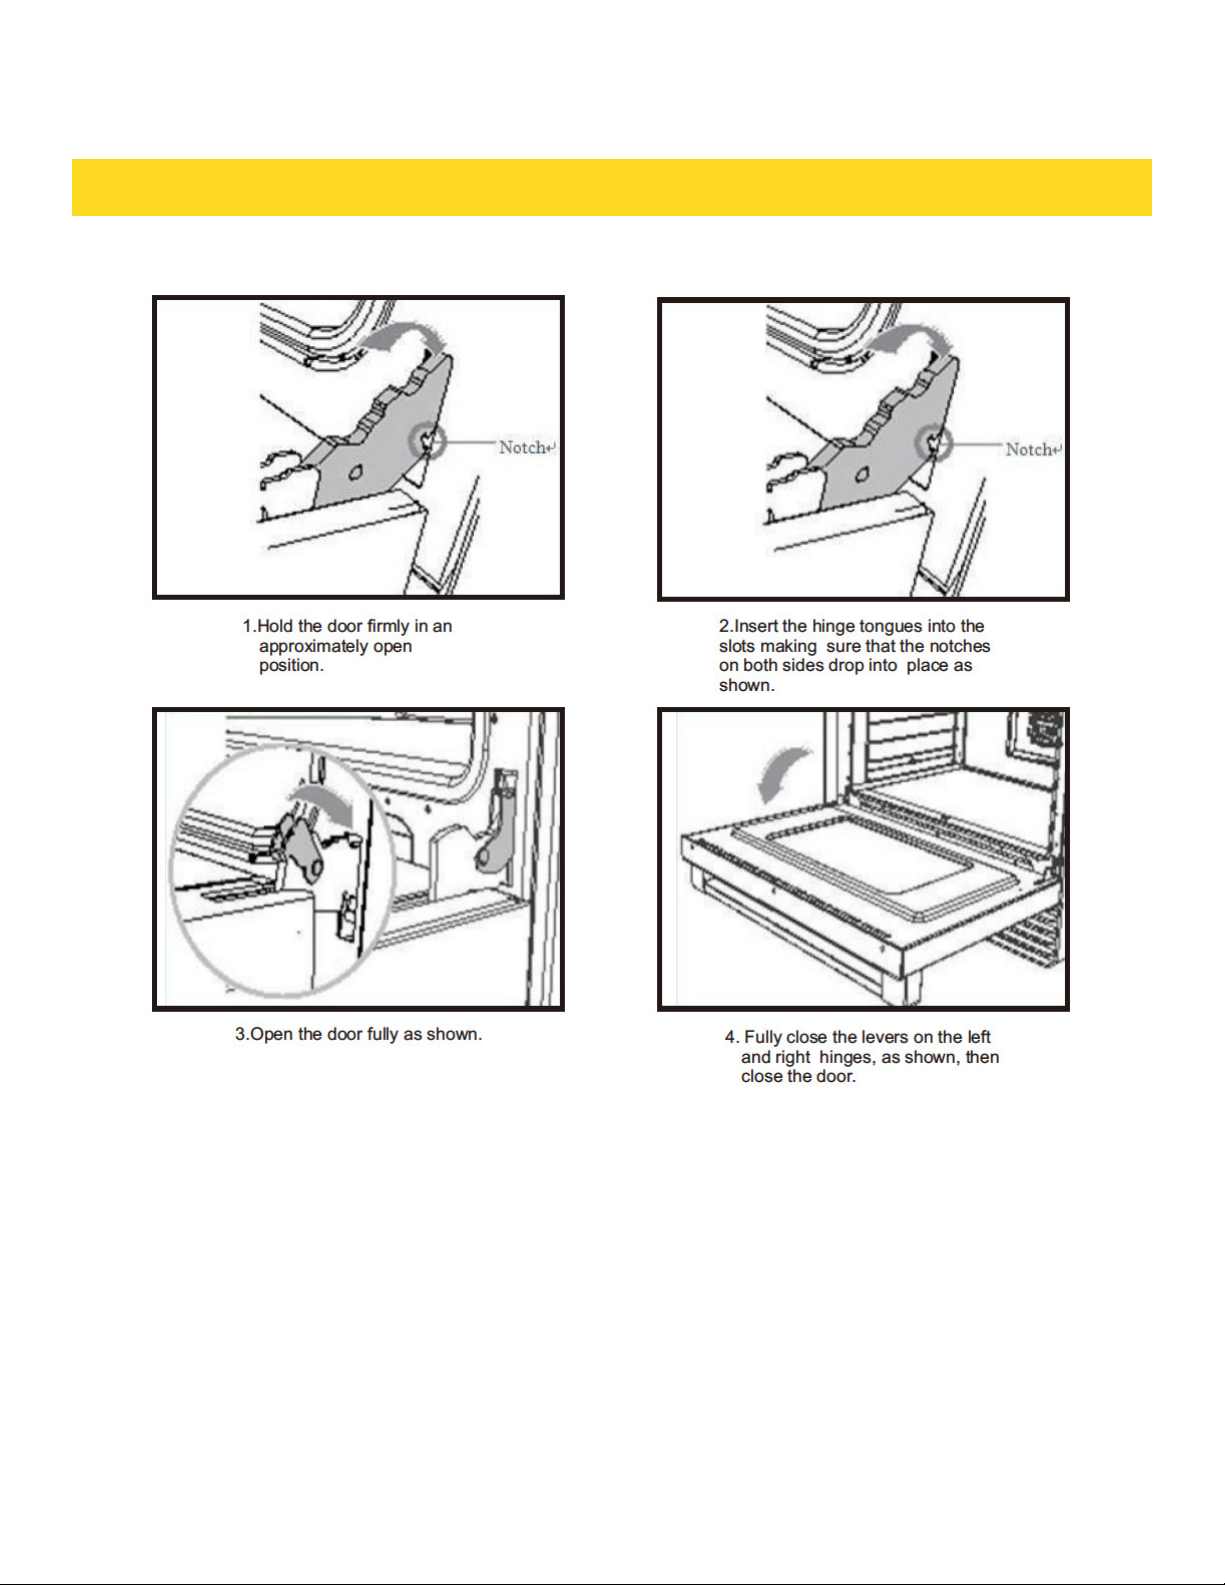
REMOVE THE OVEN DOOR
Replacing the oven door
Page 41
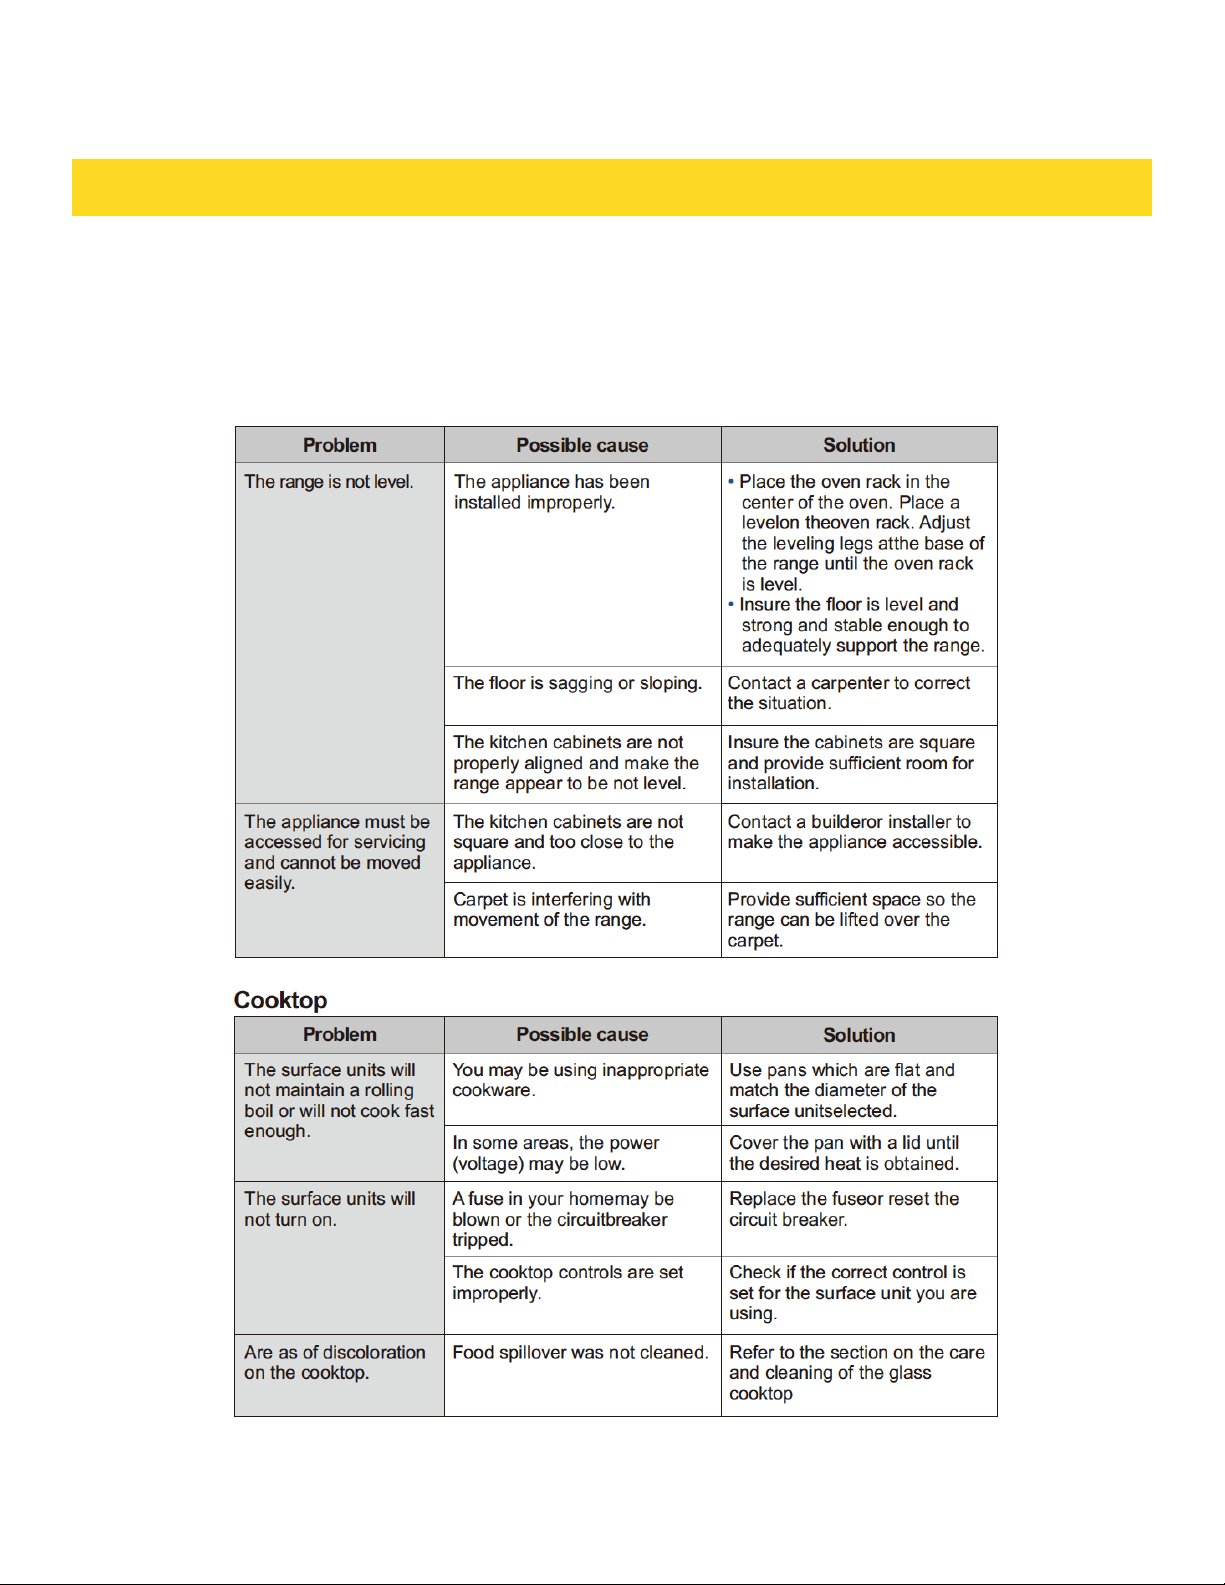
TROUBLE SHOOTING
Thorkitchen works hard to ensure that you don’t have problems with your new gas range. If you
experience a problem, look first for a solution in the table below. If, after trying the suggested
solution, you’re still having trouble, call Thorkitchen at 877-288-8099.
Installtion
Page 42
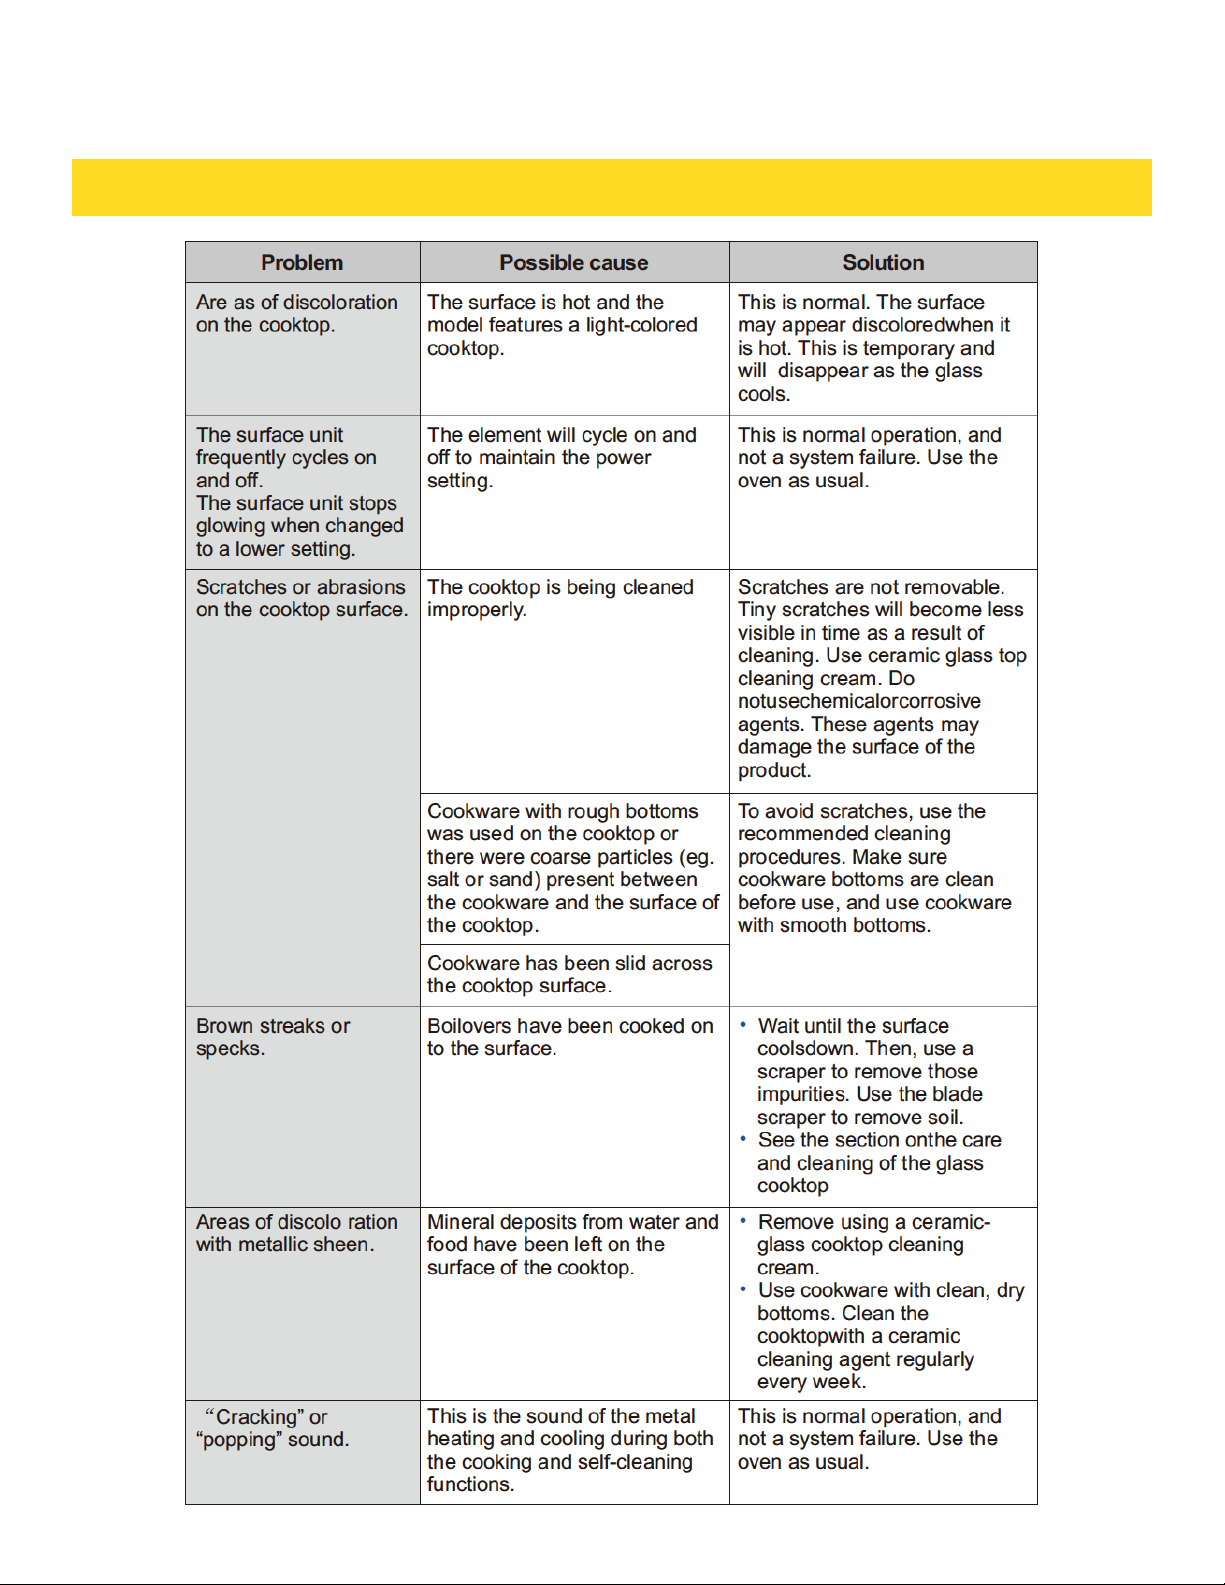
TROUBLE SHOOTING
Page 43
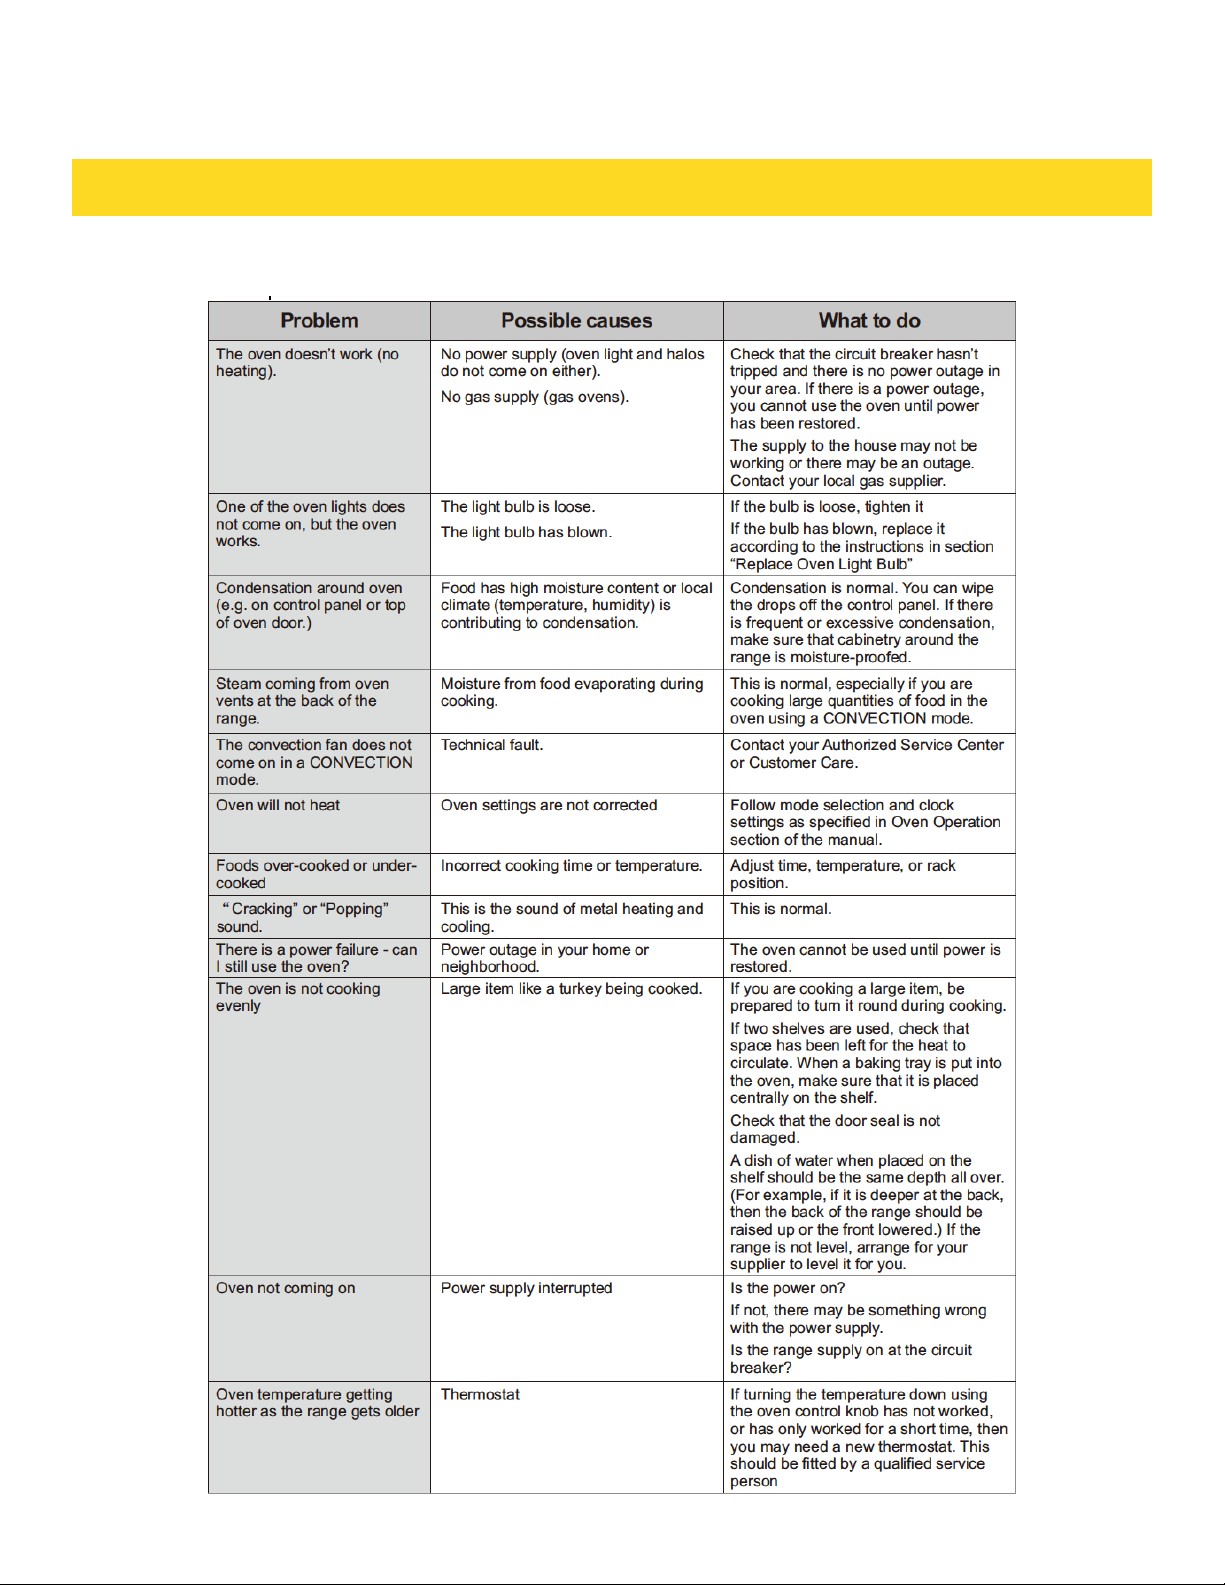
TROUBLE SHOOTING
Oven
Page 44
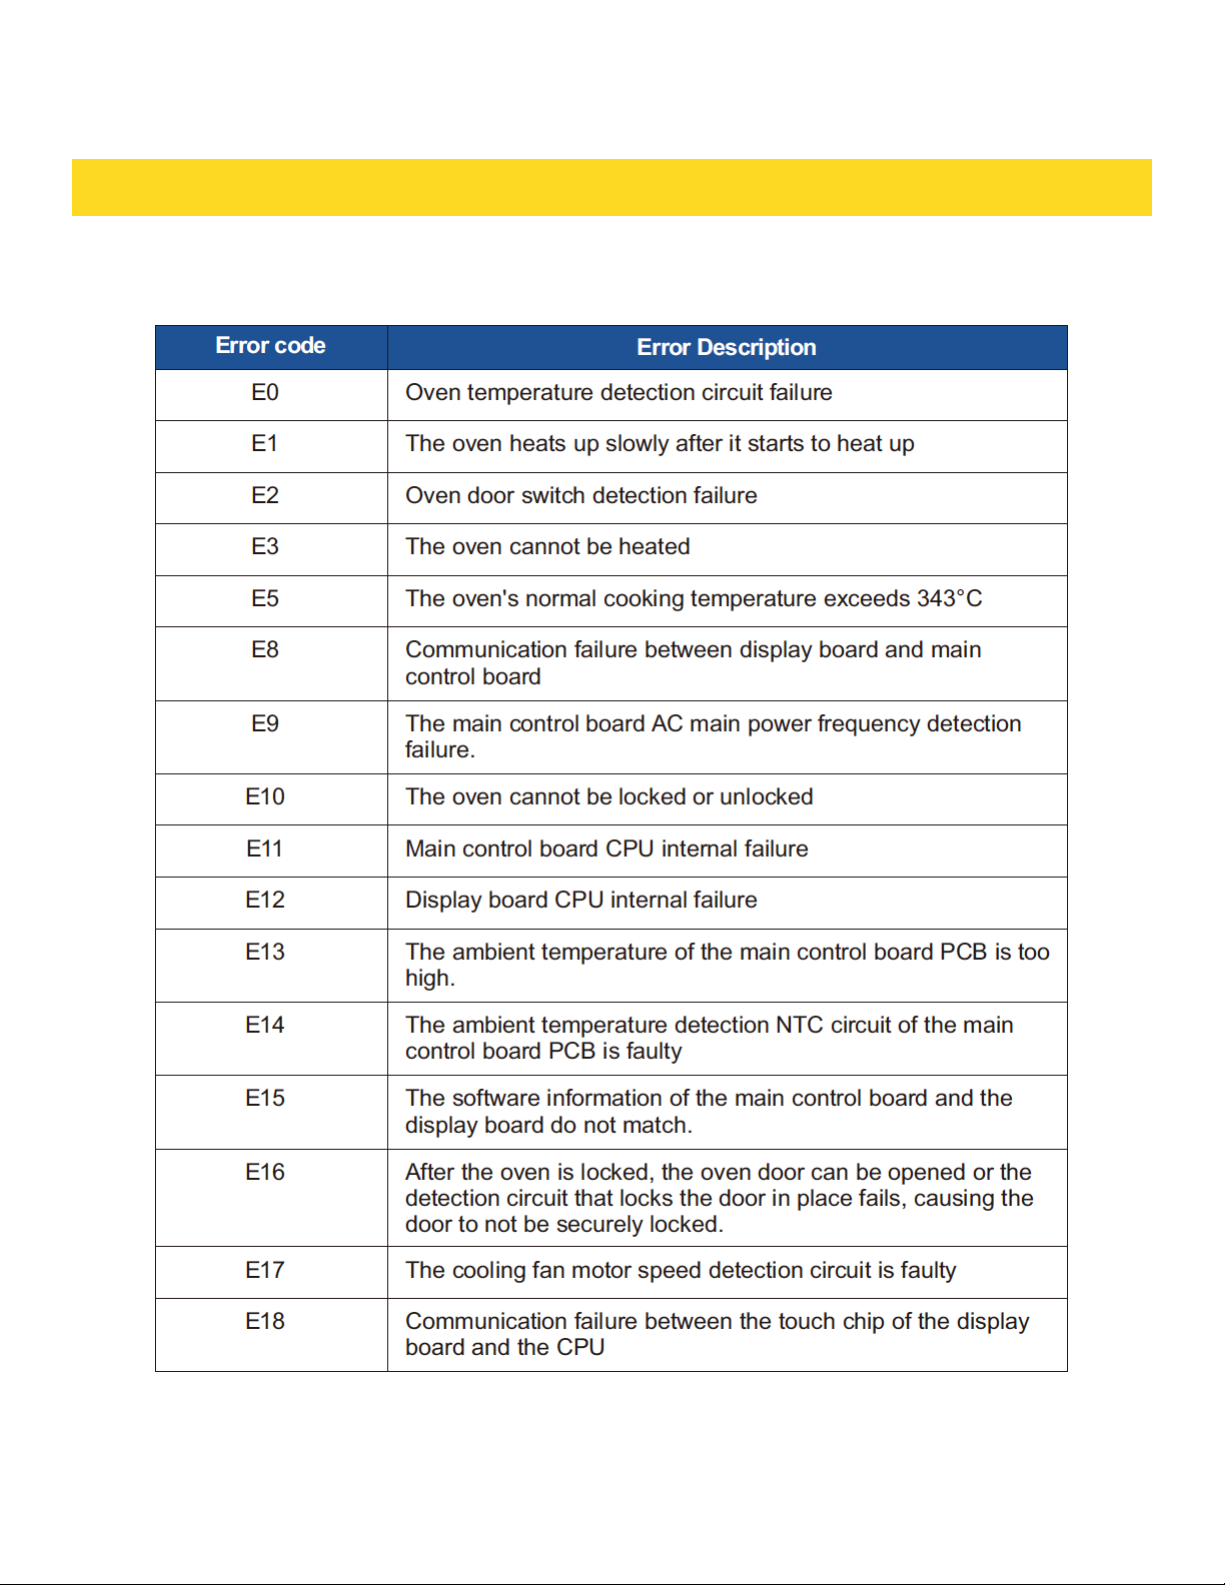
TROUBLE SHOOTING
Information code
Page 45

WARRANTY AND SERVICE
Warranty and service
This product has been manufactured by Thor Group, 4651 E Airport Drive, Ontario, CA
91761.
Thor Group disclaims all express warranties except for the following: This warranty applies to
products purchased and located in the United States. Products purchased or located outside
this area are excluded. The warranty does not apply to damage resulting from abuse, accident,
natural disaster, loss of electrical power to the product for any reason, alteration, outdoor use,
improper installation, and improper operation, repair or service of the product by anyone other
than an authorized Thor Group, service agency or representative.
Warranties and duration
Warranty:2 year parts and labor
If your Thor Kitchen product is used in other than Single Family Residential Usage, this will
be considered commercial usage and product will carry a 6-month parts and labor warranty
(6-month Parts Warranty for the products with parts labor warranty only) from the date of
purchase.
Implied warranties terminate upon expiration of the limited warranty. Some states do not
allow limitations on how long implied warranty lasts, so the above limitation may not apply to
your implied warranty.
Warranties and duration
Warranty:2 year parts and labor
If your Thor Kitchen product is used in other than Single Family Residential Usage, this will
be considered commercial usage and product will carry a 6-month parts and labor warranty
(6-month Parts Warranty for the products with parts labor warranty only) from the date of purchase.
Implied warranties terminate upon expiration of the limited warranty. Some states do not allow
limitations on how long implied warranty lasts, so the above limitation may not apply to your
implied warranty.
Thor Group will pay for
All repair labor and cost of replacement parts found to be defective due to material and
workmanship. Service must be provided by a Thor Group Authorized Service Agency during
normal working hours. For a Service Agency nearest you, please call 877-288-8099.
Thor Group will pay for
Implied warranties terminate upon expiration of the limited warranty. Some states do not
allow limitations on how long implied warranty lasts, so the above limitation may not apply to
your implied warranty. Thor Group will not pay for: This limited warranty does not cover:
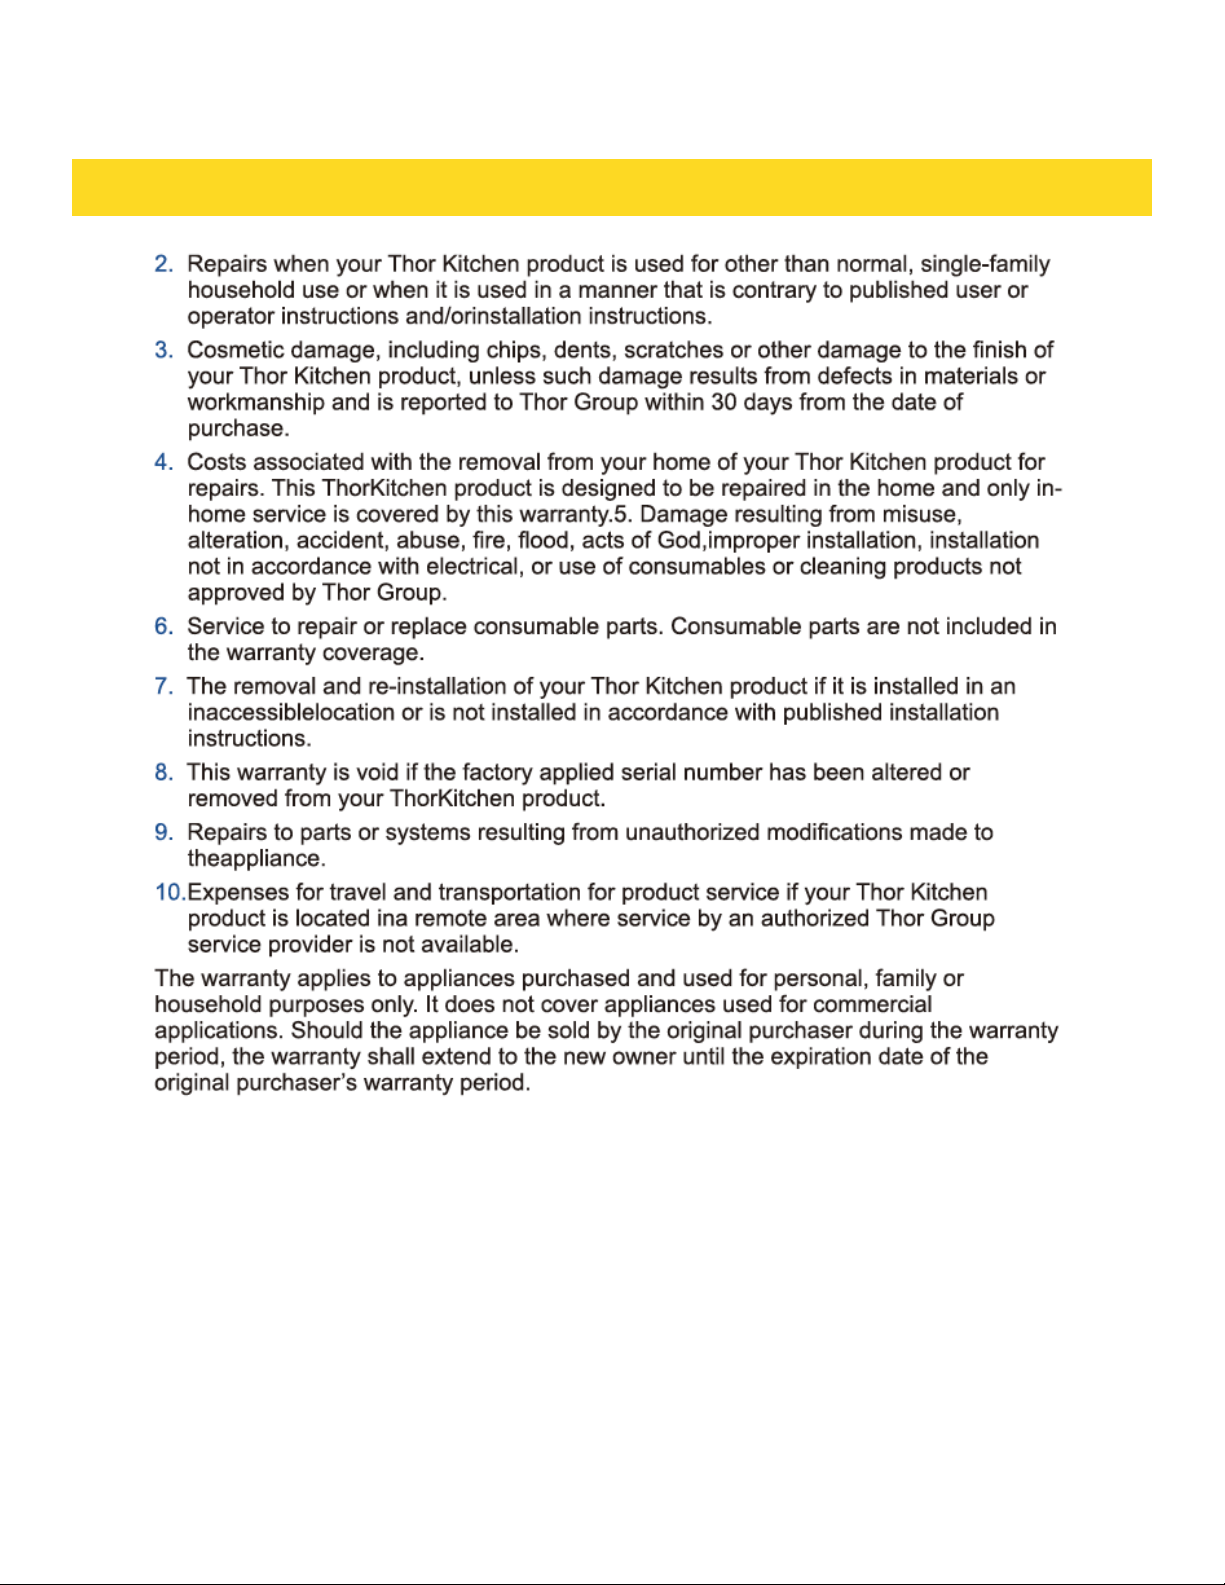
1. Service to instruct you on how to use your Thor Kitchen product to correct house wiring,
replace orrepair house fuses. Service to correct the installation of your Thor Kitchen product.
Page 46
WARRANTY AND SERVICE
Page 47
WARRANTY AND SERVICE
Page 48

WARRANTY AND SERVICE
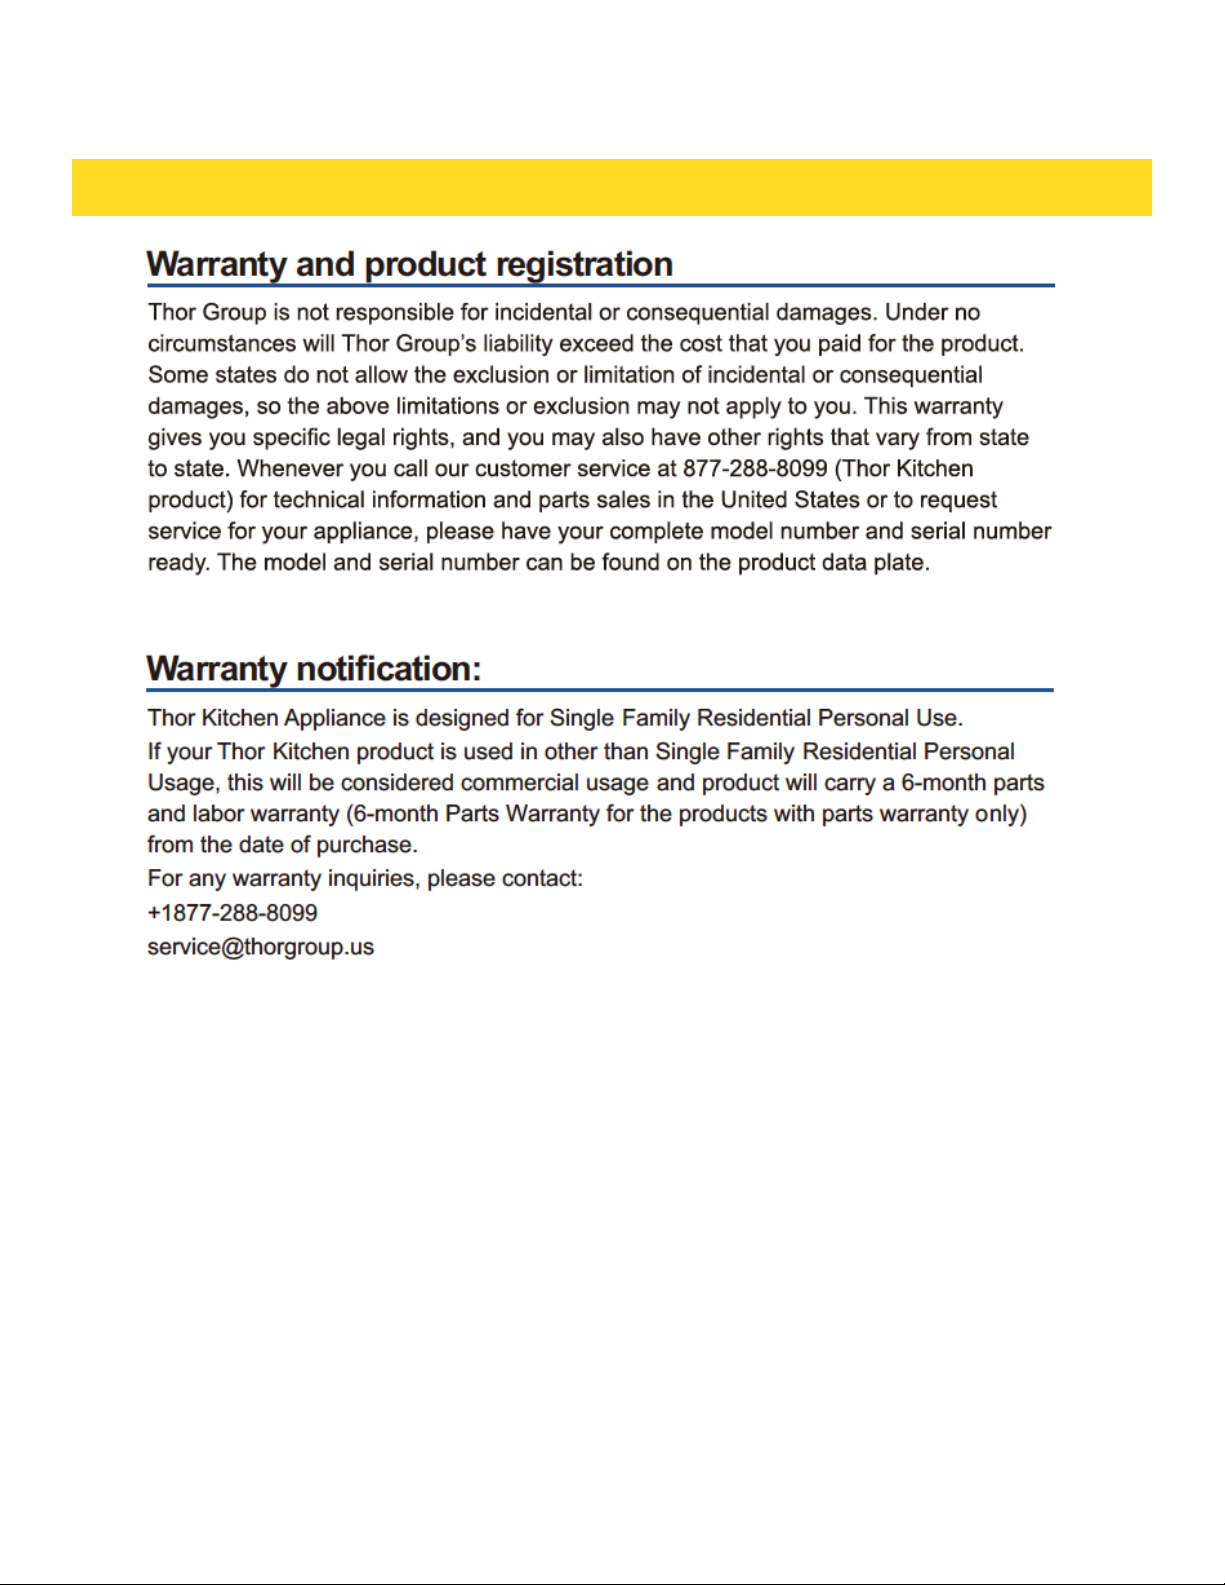
Warranty and product registration
Thor Group is not responsible for incidental or consequential damages. Under no
circumstances will Thor Group’s liability exceed the cost that you paid for the product.
Some states do not allow the exclusion or limitation of incidental or consequential
damages, so the above limitations or exclusion may not apply to you.
This warranty gives you specific legal rights, and you may also have other rights that
vary from state to state. Whenever you call our customer service at 877-288-8099 (Thor
Kitchen RANGE for technical information and parts sales in the United States or to
request service for your appliance, please have your complete model number and serial
number ready. The model and serialnumber can be found on the product data plate.
Please enter the information requested in the spaces provided.
Model No._______________________
Date of Purchase _________________
Dealer__________________________
Town___________________________
Serial No._______________________
Purchaser_______________________
Suburb _________________________
Country_________________________
Note: You must provide proof of purchased or installation date for in-warranty service.
Page 49
WARRANTY AND SERVICE
Page 50
WELCOME
TO THE CLUB
You chose THOR Kitchen to enhance your culinary journey and
we’re stoked to have you in the club. Think of it as a secret
society of really savvy people, such as yourself, choosing
professional power and performance at an affordable price.
Register your product by following the steps below.
WARRANTY REGISTRATION
Scan theQR code or visit
thorkitchen.com/warranty
Input your product info
and select register
You’re done.
Let’s get cookin’.
WARRANTY NEED PARTS?
 Loading...