


1
FOREWORD
This manual is applicable to the Thor Series F-RF 1310nm Transmitters for 900 MHz signals.
This guide describes the product's function characteristics, technique parameters, installation and
debugging procedures. For insuring the equipment can be successfully installed and safely work,
please carefully read the manual before using this equipment, and adhere strictly to the
prescriptive operation steps of this manual for installation and debugging. This will prevent
unnecessary damage to the equipment or harm to the operator. If there is question, please contact
Thor directly.
Special Notice:
1. The optical transmitter is professional broadcast equipment, and its installation and
debugging must be performed by special technician. Users should read this manual before
operating to prevent damage to the equipment by faulty operation or human injury.
2. There is invisible laser bean from Fiber output, which if direct shined at eyes will cause
permanent damage.
3. Earthing first before turning on the power and being sure that the rack mount and the outlet
are earthed as well (Earthing resistance should be less than 4Ω), will prevent damage to the
laser by static.
4. For insuring the equipment can work stably for the long-term, please insure that the input
voltage is of a stable waveform, in some cases it may be necessary to use a UPS power
supply to provide constant and steady power. The environmental conditions are also very
important for the longevity of the equipment. Ideal conditions are 25 degrees Celsius with
low humidity.
2
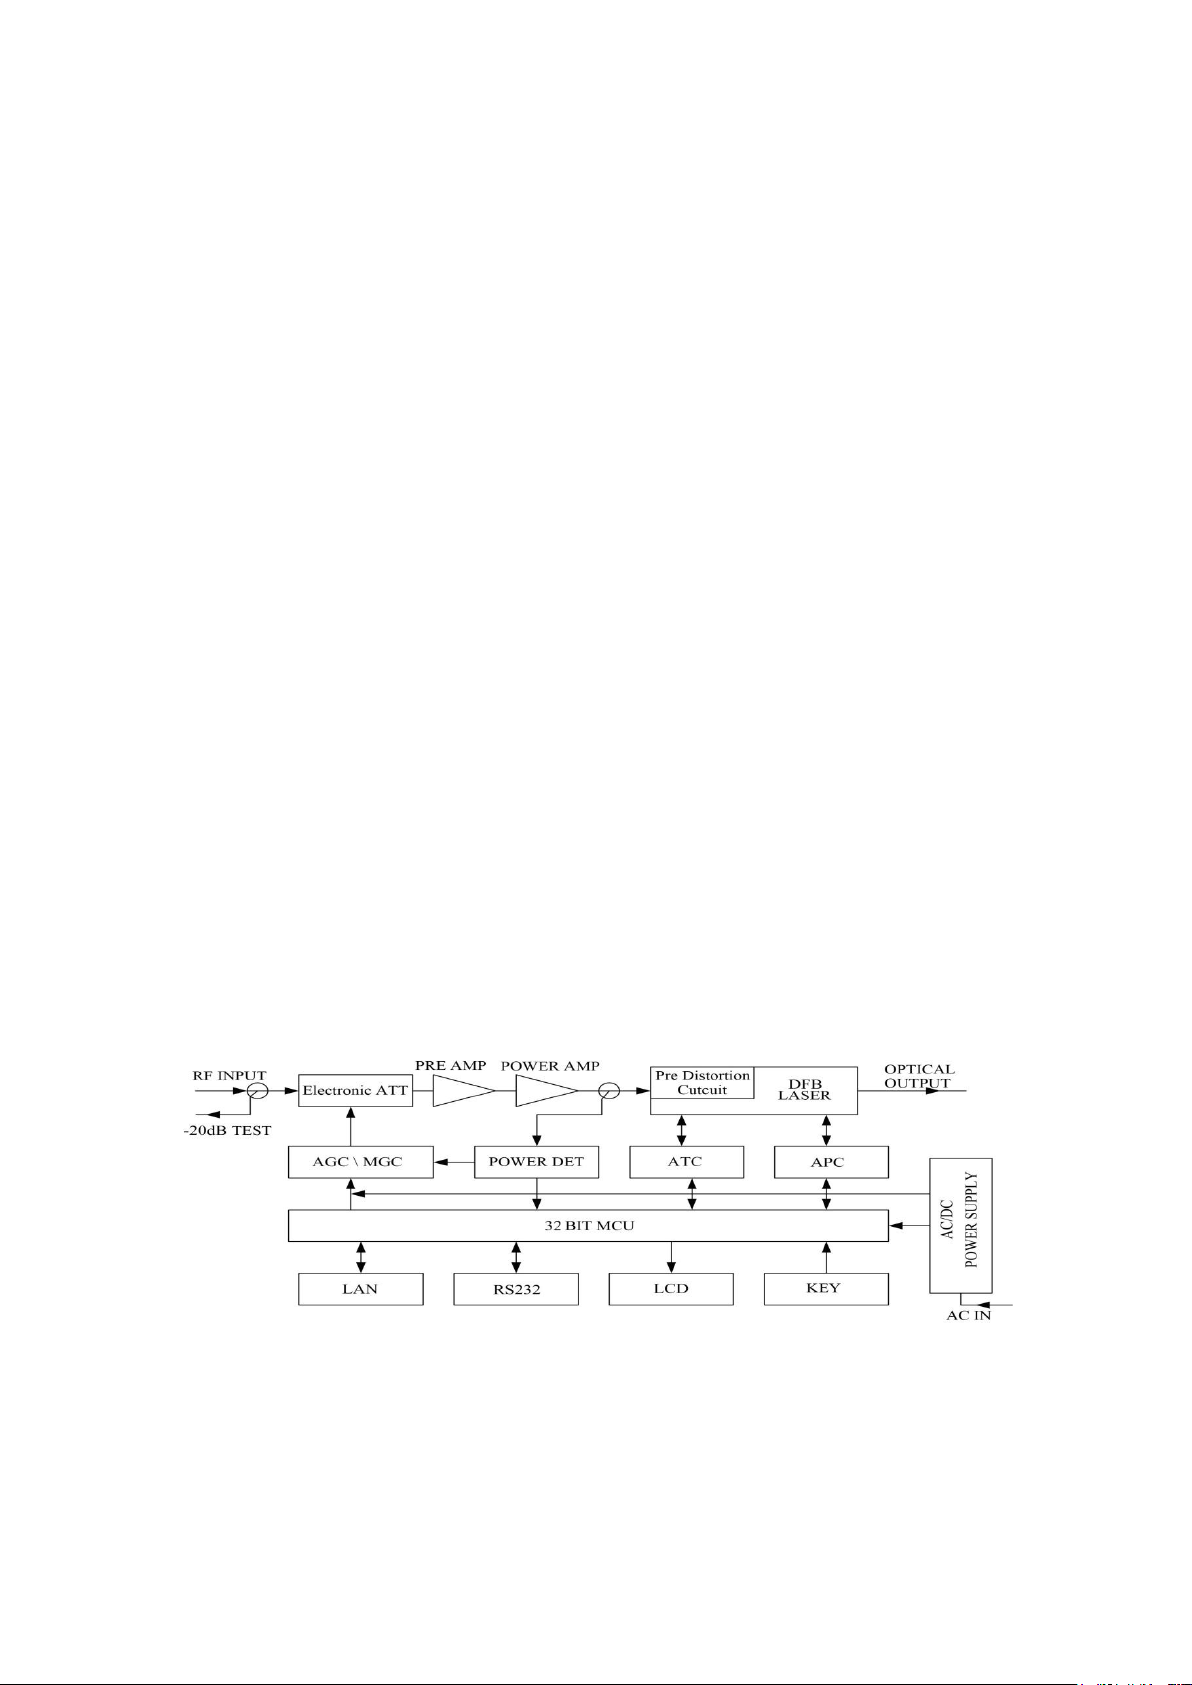
1. Product Summary
Thor F-RF series laser transmitters are used to create CATV HFC networks, and primarily are
used for TV video signal, digital TV signal, telephone voice signal and data (or compressed data)
signal long-distance fiber transmission. This product uses high performance DFB laser transmitter
as the light source. Our RF drive adopts RF power digital automatic process techniques and
advanced RF pre-distortion circuit developed by our company. A built-in microprocessor
automatic monitoring system insures the system functions stably.
2. Functional Characteristics
1. Based on a high performance DFB laser with a narrow spectrum, good linearity and high
output power.
2. RF drive adopting RF power digital automatic processing techniques, can according to the
level of input RF signal and number of channels (15-84channels), automatically process drive
level power, making the C/N, CTB and CSO always in best worth, insure product function;
and be steady of output level.
3. Advance multi-frequency RF pre-distortion technique with an arsenide kalium component
drastically improves CTB and CSO, the most important parameter of CATV, and heightens
C/N at the same time.
4. Built-in microprocessor automatically monitors circuitry and can in real-time accurately
monitor optical output power and temperature of the laser to insure stable optical output
power, and prolong the working life of the laser.
5. Built-in blue VFD monitor on front panel can accurately display the equipment's working
status and parameters.
6. 19″ 1U height standard rack mount, equipped standard IEEE802.3 10Base-T Ethernet
network port and RS232 network port, can monitor equipment status in real time through the
network.
7. Support GB/T 20030-2005HFC Network control management protocol
3. Principle Drawing
4. Technique Parameter
4.1 Link path test condition
Special Note: Equipment technique parameters in this manual are given according to the test
methodology of GY/T143-2000 CATV system amplitude modulation laser transmitter and
receiver enter the net technique condition and measure method, and gained under its prescriptive
test condition.

3
Item
Unit
Technique Parameter
Optical Power
mW
4 6 8
10
12
14
16
18
20
22
24
26
Optical Link Path Loss
dB
7 9 10
11
11.8
12.5
13
13.6
14
14.4
14.8
15.1
Optical Wave Length
Nm
1550±20
Type of Laser
DFB
Optical modulation mode
Direct Optical Intension modulation
Optical connector Type FC/APC, SC/APC
Frequency Range
MHz
47-750/862
RF Input Level
dBuV
72-88
Flatness In Band
dB
±0.75
RF Input Impedance
Ω
75
Input Reflection Loss
dB
≥ 16(47-550MHz); ≥ 14(550-750/862MHz)
C/CSO
dB
≥ 60
C/CTB
dB
≥ 65
C/N
dB
≥ 51
AGC Control Range
dB
±5
MGC Control Range
dB
0-10
Power Voltage
V
AC 110V-250V(50Hz or 60Hz)
Power Consumption
W
30
Operation Temperature
℃
0 -- 45
Store Temperature
℃
-20 -- +65
Relative Humidity % Max 95% no condensation
Dimension
mm
483(L)×380(W)×44(H)
Optic
power
Optical Loss(dB)
4 5 6 7 8 9 10
11
12
13
14
15
16
17
18
4mW
53.8
52.8
51.8
51
50.1
49.2
48.2
6mW
53.0
52.0
51.0
50.1
49.1
48.1
8mW
52.8
51.9
51.0
50.1
49.2
48.2
10mW
52.9
51.9
51.0
50.1
49.1
48.2
12mW
52.7
51.8
50.8
49.9
49.0
48.0
14mW
52.4
51.5
50.5
49.5
48.6
47.8
Test conditions:
Test link path is formed of standard fiber and standard optical receiver. Under the condition of
prescriptive link loss, set 84 PAL-D test source TV channel signals at 750MHz, when optical
receiver input optical power being -1dBm, measure C/ CTB, C/ CSO, C/ N.
4.2 Technique Parameter Table
Optical Link Path C/N Parameter:
4
16mW
52.0
51.0
50.1
49.1
48.1
18mW
52.5
51.6
50.6
49.7
48.7
47.9
20mW
51.9
51.0
50.0
49.0
48.0
22mW
52.2
51.4
50.4
49.4
48.6
47.8
24mW
51.5
50.3
49.2
48.5
47.7
26mW
51.5
50.2
49.2
48.5
47.6
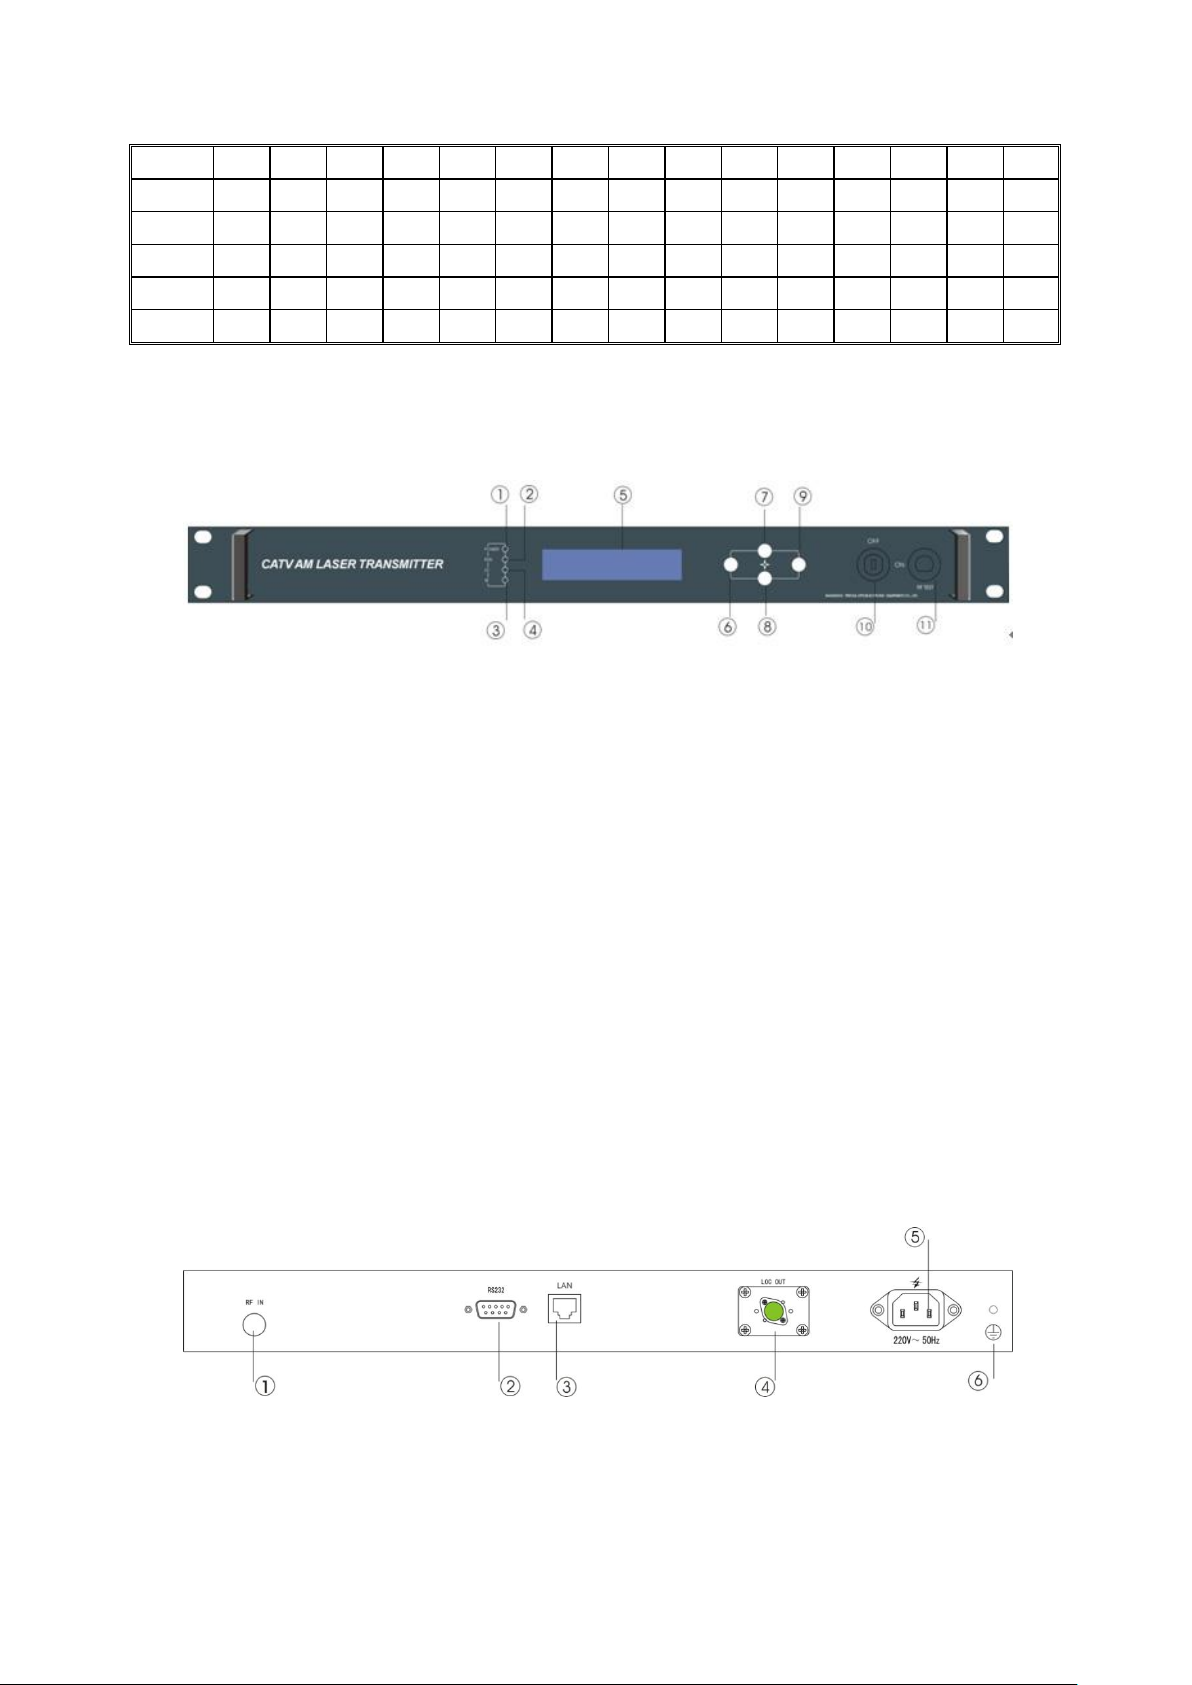
5. Exterior function explanation
5.1 Front panel description
Front panel sketch map
1. Power indicator: when the power inside is working, the light is on.
2. Equipment operating indicator: equipment works: LED blinks by 1Hz frequency.
3. LD laser operating status indicator: red light shows that the laser does not work and each
parameter is normal; when the red light is flashing, it shows that this equipment is at fault.
The faulted reason can be looked up in the alarm list of the show menu. When the green light
is on, it shows that laser is working normally.
4. RF status indicator: Green light: normally operation; Red light: laser abnormity.
5. The 160×32 crystal liquid display: this displays all parameters.
6. Withdraw or cancel key.
7. Up and increase key.
8. Down and decrease key.
9. Confirmation key
10. Laser switch key: Control work status of the laser. “ON” indicate laser is turn on, “OF”
indicate laser is turn off. When powering on the unit, the key must be OFF, after power on
self test, the laser can be turned on when the display indicates the unit is ready.
11. Input RF signal Test port: -20dB RF Test Port
5.2 Back panel explanation
Back panel elucidation
1. RF input
2. RS232 interface: use for various network management parameter allocations.
3. LAN interface: match with IEEE802.3 10Base-T interface, use for network management.

5
4. Optical signal output: Optical signal output port has two interfaces: FC/APC and SC/APC.
Content
Function
Laser Output
Laser Bias
Laser Temperature
Tec Cooling
RF Channel Number
There is invisible laser bean from Fiber output when laser works, which direct shining at eye
will cause permanence burn.
5. Power in
6. Case Earthing: Connection the equipment and earth.
5.3 Display Parameter Explanation
1) Lock is off
2) Lock is on
3) Enter the system
4) Push ENT key into menu
5) Sub-menu of parameter
Current Input optic power and output optic power
1. Parameter menu 2.Setting menu 3. Alarm menu
Push ENT key into menu

6
Input RF
RF Control Mode
AGC Ref
MGC ATT
+5V Read
-5V Read
+24V Read
S/N
Box Temperature
IP Address
Subnet Mask
Net Gateway
Mac
Software Version
6) Setting menu

7
Push ENT key into menu
Content
Function
Set Laser Output Unit
Set Buzzer Alarm
Set RF Control Mode: AGC or MGC
Set MGC ATT
Set AGC Ref
Set Channel Number
Set RF Input Low Alarm
Set RF Input High Alarm
Set Laser Output Low Alarm
Set Laser Output High Alarm
Set Laser Temp Low Alarm
Set Laser Temp High Alarm

8
Set +5V Low Alarm
Set +5V High Alarm
Set -5V Low Alarm
Set -5V High Alarm
Set +24V Low Alarm
Set +24V High Alarm
Set Local IP Address
Set Subnet Mask
Set Gateway
Restore Factory Config
7) Alarm menu
Push ENT key into menu

9
7. Installation and Debugging
Breakdown Problems
Breakdown cause
Resolution method
After turn on the power,
VFD monitor and LED no
display.
Switch power can’t normal start,
equipment DC power supply
abnormal.
Check power supply whether
normal(~AC160V~250V), if power
voltage normal, maybe switch power
module fault, contact franchises or our
company.
After turning on the power,
VFD monitor has no
display, but power LED is
on.
Micro-processor doesn’t work.
Please contact with the dealer or our
company.
7.1 Unpack and Check
1. Insure the package not is defaced. If have any damnification or water mark, please
contact local franchiser or conveyancer.
2. After unpacking, check equipments and accessories according to package list. Any
question, please contact local franchiser or our company.
3. If you think equipment has been damaged, please don't electrify avoid worse damage.
Please contact local franchiser or our company.
7.2 Instruments and tools
An optical power meter
A digital multimeter
A standard fiber test jumper (FC/APC or SC/APC)
Some waterless alcohol and nosocomial degrease cotton
7.3 Installation steps
1. Before installing the equipment, please read the operation manual carefully and install
the equipment according to the operation manual. Notice: install the equipment is not
according to the operation manual, which leads to man-made faults and other results, our
company will not take the responsibilities and the service of free fix.
2. Fix equipment on rack mount and earthing. (earthing resistance <4Ω).
3. Check voltage by digital multimeter whether accord with requirement and to be sure
laser lock is OFF. Then turn on power.
4. Connect RF signal and turn key to ON, till laser work LD turns to green, then the
equipment began to work. This time you can push STATUS keys on front panel to watch
parameters.
5. Connect optical power meter to optical output of the equipment with a standard test
jumper, then measure optical output power, affirm optical output power is same to value
shown on front panel;(when test the optic power, ensuring the optic power is within
1310nm. Ensure fiber test jumper is standard fiber test jumper, and each active
Connector is not polluted), remove standard fiber test jumper and optical power meter;
connect the equipment to network. The equipment has been installed.
8. FAQ

10
After turning on the power,
output optical power
displayed on the front
panel and laser status LED
are normal, but real tested
output power is on the low
side
1. Test jumper quality not good
2. Optical active connector or
adapter maybe polluted
3. China tube in adapter maybe
damaged
1. Change good test jumper.
2. Clean polluted fiber active
connector or adapter. Detailed
operation method refers to “optical
fiber active connector clean and
maintenance method”.
3.Change damaged adapter
After connecting to
network, figure of optical
connector has obvious
netlines or big optical
point
1. Receive optical power at optical
connector too high, result in
output level of optical receive
module too high, RF signal
inter-modulation index become
worse
2. RF signal of input optical
transmitter higher than the AGC
control range, result in
inter-modulation index become
worse.
3. Inter-modulation index of input
optical transmitter RF signal in
originally bad.
1. Check optical receive power of
optical connector and adjust
properly
2. Check input level of optical
transmitter RF signal and adjust
to the range that equipment
required.(Right RF input level is
72-88BuV)
3. Check inter-modulation index of
input optical transmitter RF
signal
After connecting to the
network, figure of optical
connector has obvious
noise problems
1. Optical connector receives
optical power not enough cause
C/N drop
2. RF signal level of input optical
transmitter too low, result in
laser modulation depth not
enough.
3. System link path C/N too low
1. Clean fiber active connector or
adapter to ensure optical
connector receives optical power.
For detailed operation method
refer to “optical fiber active
connector clean and maintenance
method”
2. Check RF signal level of the input
optical transmitter and adjust to
the range that the equipment
requires (72-88dBuV). When
number of input channel less than
15, setup NGC control mode
3. Check C/N of system link with
frequency analysis instrument
and adjust properly to insure C/N
of link signal higher than 51dB
After connecting to
network, figure of some
optical connector channel
has obvious noise point or
ripple
There’s open circuit interfere or
strong interfere signal invade in
optical connector.
1. Check if there’s a strong signal
origin at the optical connector’s
place to avoid strong signal
interference.
connector whether there’s shielded
net or bad shield of RF connector

11
3. Close the units cover to insure
good shield. If possible, set shielded
cover at optical connector and
earthing the shielded cover
After connecting to the
network, the optical
channel has obvious noise
problems.
C/N ratio index of some channels too
low
Check C/N ratio of the channel signal
and do some proper adjustment.
After connecting the
equipment, the signal has
obvious noise problems
Interference of power alternating
current wave caused by bad
equipment earthing or power supply
problems.
Check the equipment’s earthing,
insure every unit on the rack has good
earthing with resistance <4Ω.
After connecting
equipment, received
optical power at optical
connector is abnormal.
Output RF signal is also
not standard, but output
optical power is normal
1. Optical fiber active connector
wrong matched. Maybe APC
connector match PC connector,
under these conditions there
are optical reflections.
Optical active connector or adapters
were badly polluted, or adapter was
damaged.
1. Check type of optical fiber active
connector, choose APC connector to
insure optical signal transmits
normally.
2. Wash polluted optical active
connector or adapter. Detailed
operation method refers to optical
fiber active connector clean and
maintenance method.
9. Service
a) Our company's promises: Guarantee for thirteen month (start from the production
date showed on S/N ), we will fix any equipment problems. If the fault is found to
be caused by user error, there may be a charge for these repairs.
b) If the equipment at fault, immediately contact local distributor or our company
customer service centre.
c) Equipment at fault that is repaired locally must be fixed by a special technician to
avoid further damage.
d) Special caution: if the user has altered the equipment, our company will not offer
free repair. We will repair the equipment, but the end user is responsible for cost.
The clean and maintenance method of the head of fiber active connector
During the operation of optical equipment, each active fiber may be polluted by dust or dirt,
resulting in optical link path loss. If optical receive power and output level of the receiver decline,
you should clean and maintain active fiber connector. Introduce some clean methods:
Carefully screw off the active fiber connector from the adapter. Take care to avoid
aiming at the human body or eye, this can result in harm to the body.

12
Use degreaser or alcohol cotton to wash carefully, after finishing let the surfaces dry for
two to three minutes before reconnecting.
Cleaned optical active connector should be connected to optical power meter to measure
out optical power, to confirm that it has been properly cleaned.
When the cleaned optical active connector screwed back to adapter, care should be taken
to avoid damaging the connector with excessive force.
The fiber active connector should be cleaned in pairs. If optical power is on the low side
after cleaning, the connector on the other end of the fiber may need to be cleaned.
Use compressed air or degrease alcohol cotton to wash the adapter carefully. When using
compressed air, aim the muzzle at the tube of the adapter to clean off any dust. When
use degreasing alcohol cotton, wiping motion needs to be consistent, otherwise the
connector won’t be properly cleaned
Special notice:
a. In the process of cleaning the fiber optic connector, you should avoid direct exposure to
the eye, which will cause permanent damage!!!!
b. Use proper force to install the fiber optic active connector, or the ceramic tape in the
adaptor will lead to failure. Once the ceramic tape is broken, the output optical power will
decrease rapidly. If you turn the fiber optic active connector slightly, the output optical power
changes obviously.
c. Please operate the optical fiber under the condition of close the pump laser. Or the big
output power will lead to burn the joint of the output optical fiber, which will reduce the
output power.
 Loading...