

Page 1

T32E32DU
T32ED33DU
T39ED33DHU
T42E32DHU
Page 2
LCD-cov 16/10/03 10:44 Page 2
Page 3
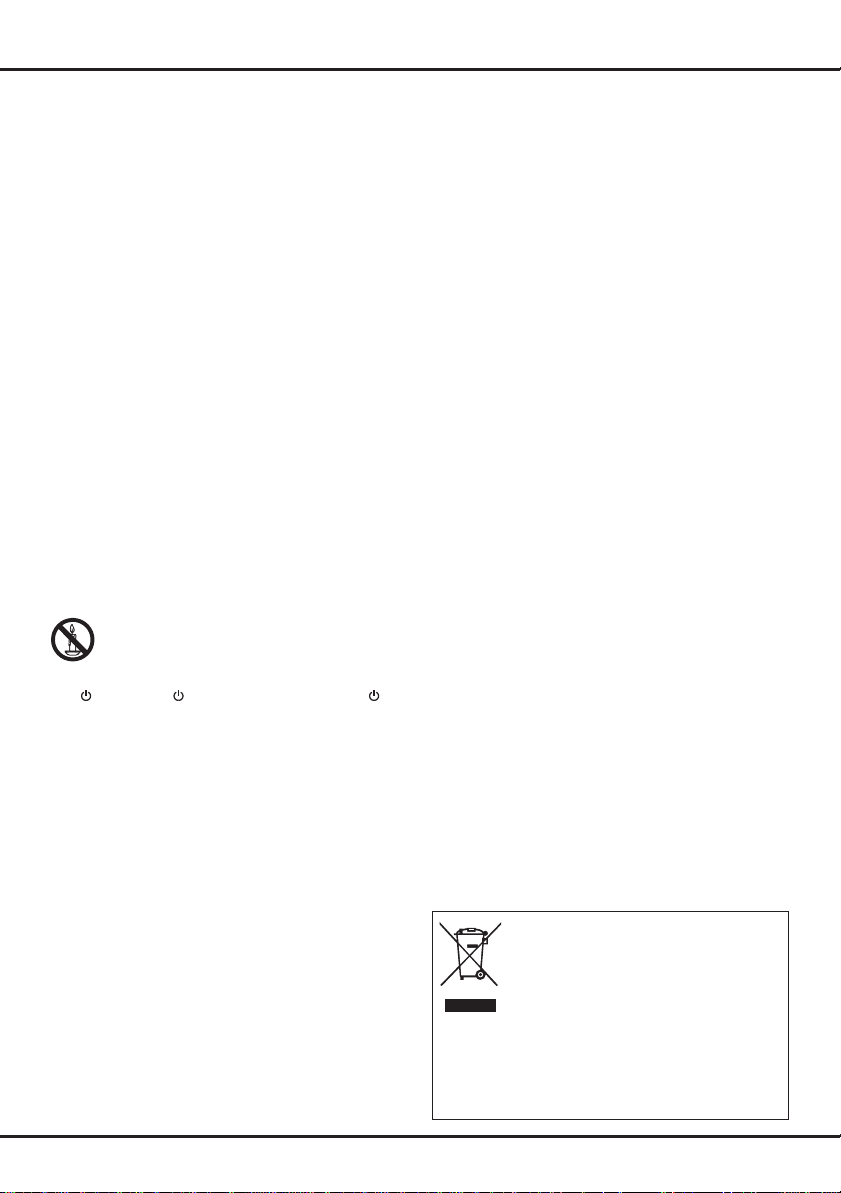
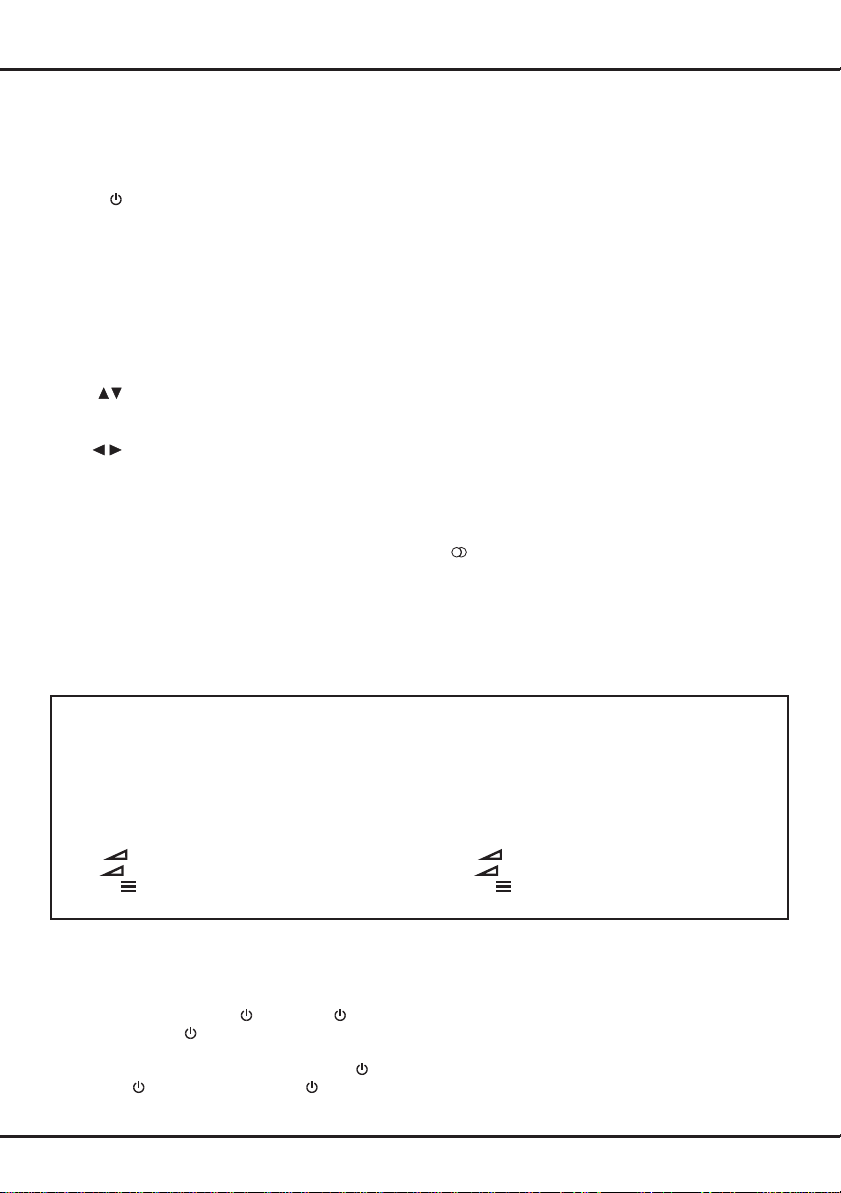
On screen display
Figure 1 Figure 2
Figure 3 Figure 4
Figure 5
Options
Back
Exit
Select
Enter
Software update
Auto standby
4 Hours
Channel install
Automatic search
Automatic update
Analog manual scan
Air manual installation
Clean channel list
Back
Exit
Select
Enter
Back
Exit
Select
Subtitle
Subtitle
Digital subtitle language
Digital subtitle language 2nd
Subtitle type
On
English
English
Normal
Picture
Sound
PAP
Options
USB
Timer
Lock
Setup
Initial setup
Welcome to use the Wizard for Initial Setup !!
Please press [OK] to start the wizard.
Welcome
Page 4
Chapter 1
Getting started
Important information
Safety
Ensure that your domestic mains supply voltage
matches the voltage indicated on the identication
sticker located at the back of your set. Where the
mains plug or an appliance coupler is used as
disconnect device, the disconnect device shall remain
readily operable.
On certain models, the light indicator is located at the
side of the TV set. The absence of a light indication
at the front does not mean that the TV set is fully
disconnected from the mains. To disconnect the TV
set completely, the mains plug must be pulled out.
The TV set’s components are sensitive to heat. The
maximum ambient temperature
º
35
Celsius. Do not cover the vents at the back or
sides of the TV set. Leave sufcient space around
it to allow adequate ventilation. Install the appliance
away from any source of heat (replace, etc.) or
appliances creating strong magnetic or electric elds.
Moisture
not exceed
exposed to dripping or splashing and no objects
lled with liquids,
on the apparatus. Moving the set from a cold place to
a warm one can cause condensation on the screen
(and on some components inside the TV set). Let the
condensation evaporate before switching the TV set
on again.
The or
button on the remote control can be used to switch it
on and put it into standby mode. If you are
to be watching the TV for a lengthy period of time
switch it off completely by removing the plug from the
mains power socket.
During
disconnect the TV set from the mains and aerial so
that it is not affected by electrical or electromagnetic
surges that could damage it. For this reason, keep
the
be
Unplug
off a
under any circumstances, open the TV set yourself,
as you run the risk of an
in rooms where the set is installed should
85%
humidity.
such as vases, shall be placed
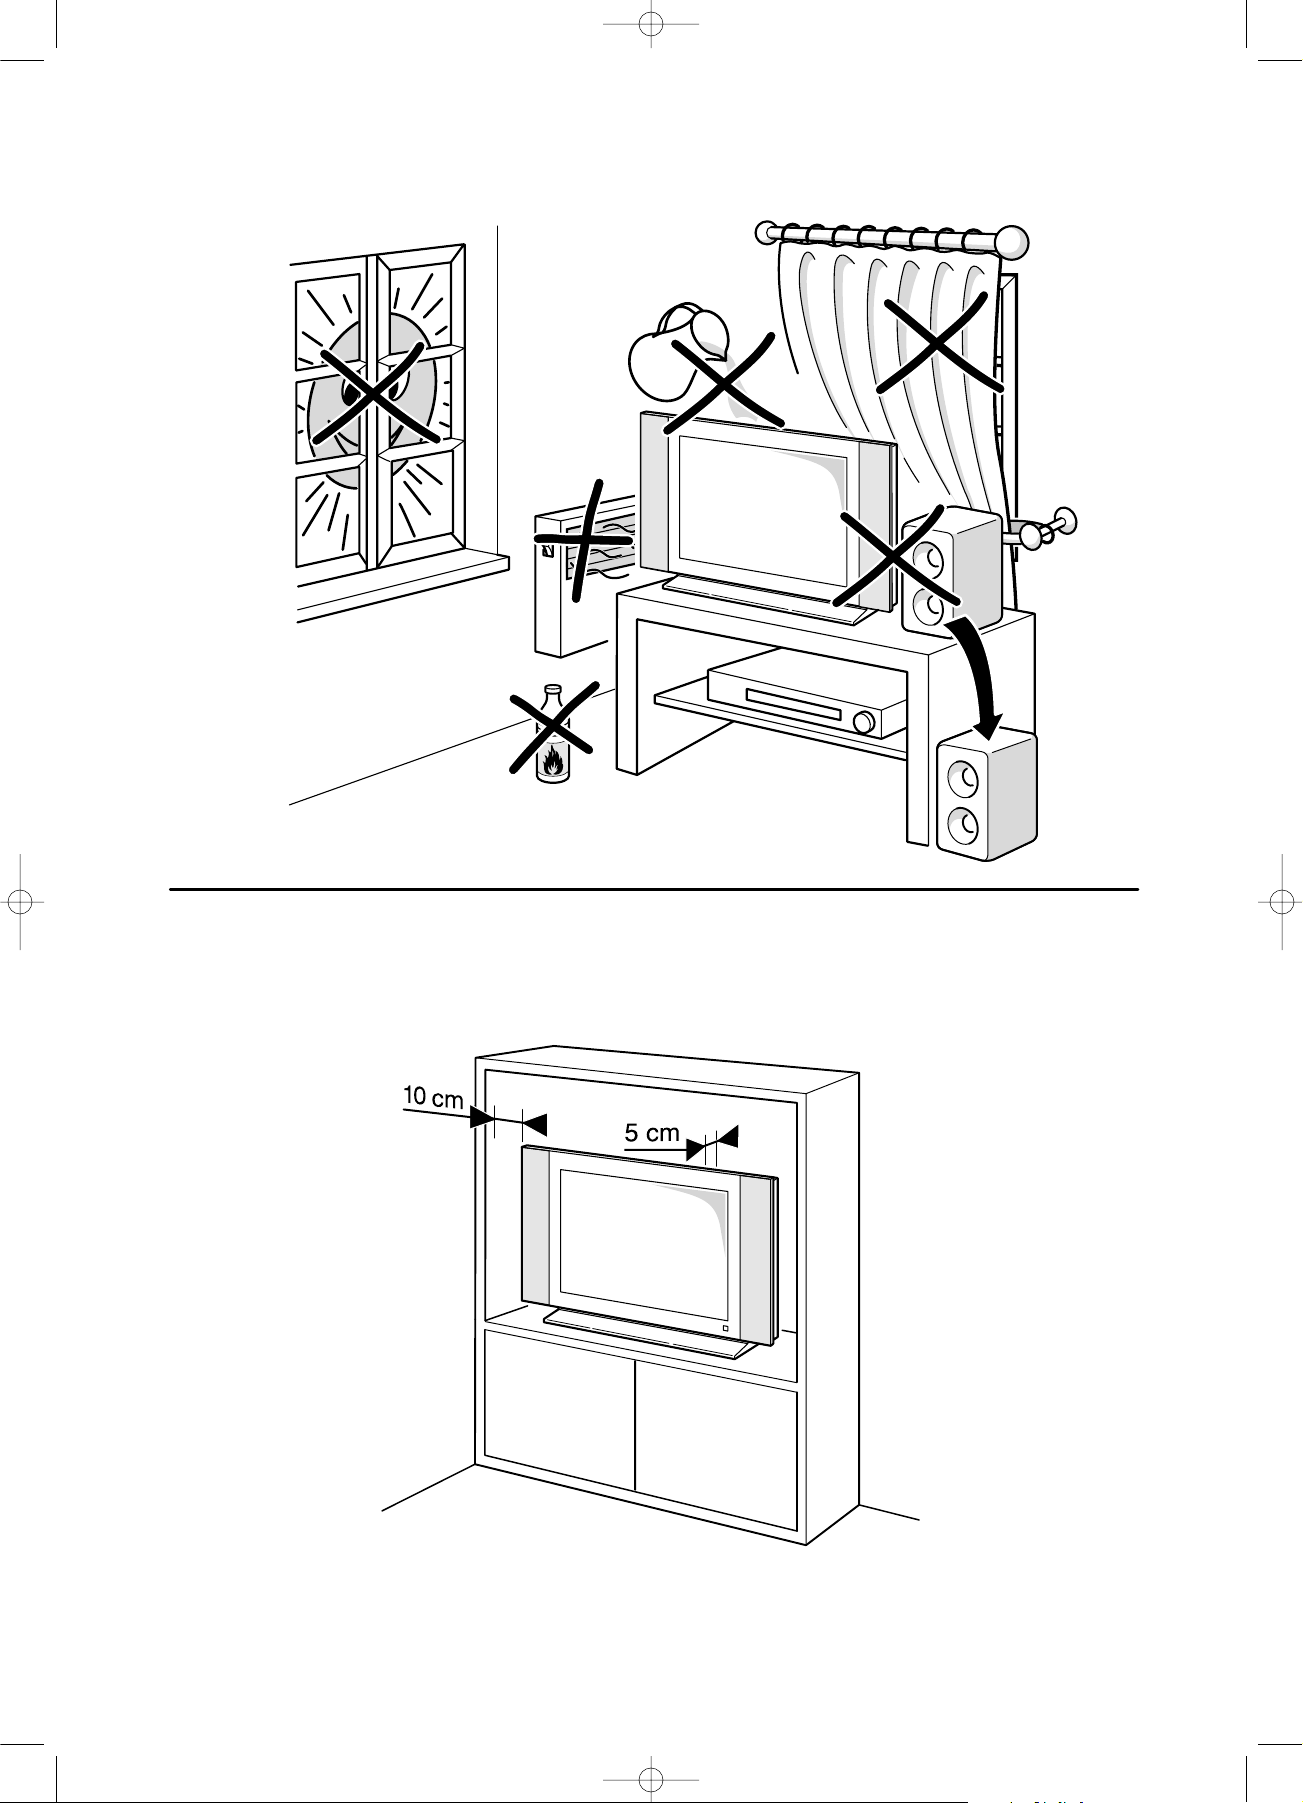
WARNING
To prevent the spread of re, keep candles or
other open ames away from this product at
all times.
POWER
thunderstorms
mains and aerial sockets
disconnected
the TV set immediately if you notice it giving
smell of burning
/ button on the TV set or the
, we recommend that you
, if necessary.
or
should not exceed
Apparatus shall not be
not going
accessible so they can
smoke
. You must never,
electric shock
in doing so.
TV screen
The TV screen used in this product is made of glass.
Therefore, it can break when the product is dropped
or impacted upon by other objects.
The TV screen is a very high technology product,
giving you nely detailed pictures. Occasionally, a few
nonactive pixels may appear on the screen as a xed
point of blue, green or red. This does not affect the
performance of your product.
Care
Use a glass-cleaning product to clean the screen and
a soft cloth and mild detergent to clean the rest of the
set.
Important:
and abrasive products may damage the screen.
Dust the vents at the back and sides regularly. Using
solvents, abrasive or alcohol-based products could
damage the TV set. If an object or liquid enters the
appliance, unplug it immediately and have it checked
by an authorized engineer. Never open the appliance
yourself since this may put you at risk or damage the
appliance.
Using strong detergents, alcohol-based
Hanging the TV set on the wall
Warning: This operation requires two people.
To ensure a safe installation, observe the following
safety notes:
Check that the wall can support the weight of the TV •
set and wall mount assembly.
Follow the mounting instructions provided with the •
wall mount. For certain models, make sure to screw
the hexagonal VESA wall mounting screw bosses
(and screws) provided with the set into the nuts for
the wall mount at the back of your set before your
wall mounting.
The TV set must be installed on a vertical wall.•
Make sure to use only screws suitable for the •
material of the wall.
Make sure that the TV set cables are placed so that •
there is not danger of tripping over them.
All other safety instructions about our TV sets are also
applicable here.
,
Handling the TV set on the table
Before setting up your television set, make sure that
the surface you want to put the set on can support its
weight.
Do not place the set on an unstable surface (e.g.
moving shelf, very edge of a unit) and make sure that
the front of the television set does not overhang the
surface it is standing on.
This product is designed and manufactured
with high quality materials and components
which can be recycled and reused.
This symbol means that electrical and
elec
tronic equipment, at their end-of-life,
should be disposed of separately from
Please, dispose of this equipment at your local community
waste collection/recycling centre. In the European Union
there are separate collection systems for used electrical
and electronic product. Please, help us to conserve the
environment we live in!
your household waste.
EN
1
Page 5
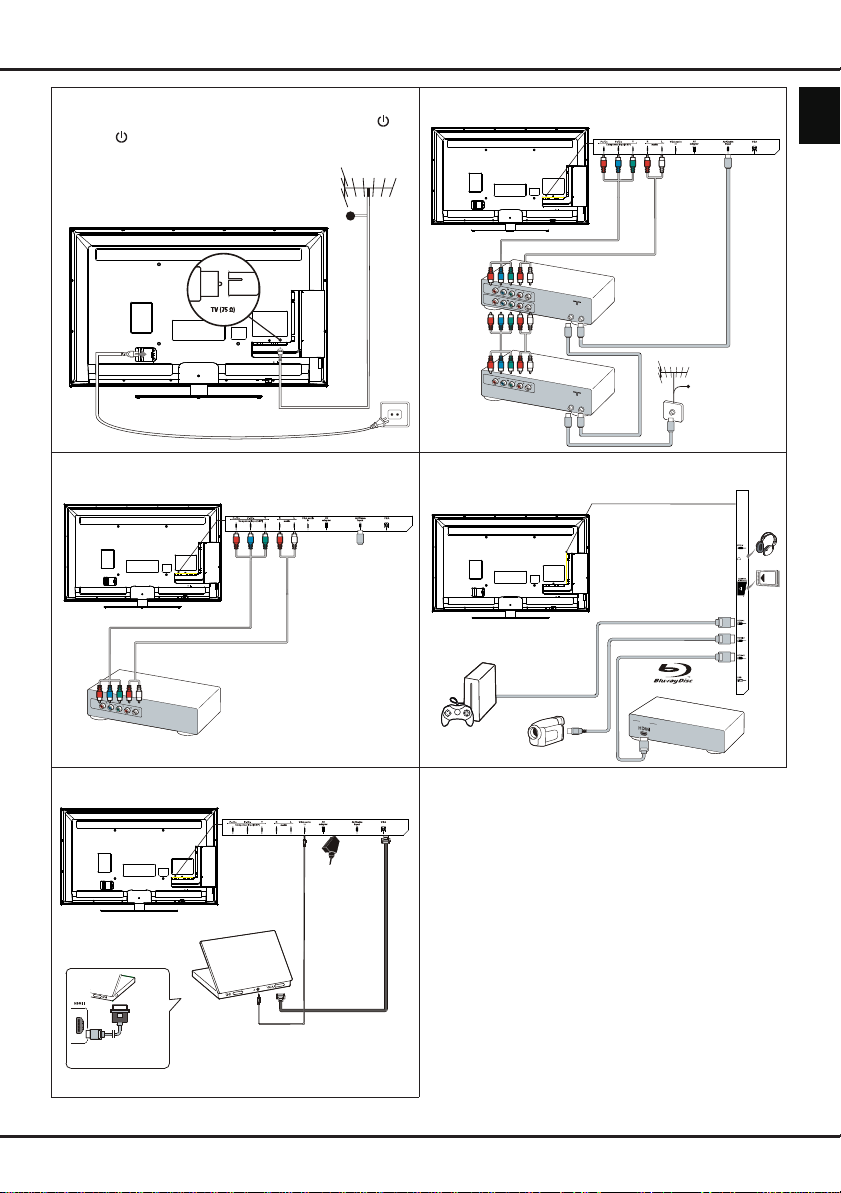
OU
T
OUT
OUT
IN
ANTENNA
IN
OUT
OUT
IN
ANTENNA
OUT
Getting started
Connect the power and antenna
To switch on TV after connecting power cord, press or
POWER
/ .
Note: Position of power socket varies according to TV model.
DVD recorder, cable receiver
TV
On certain models, you have to turn on
the power switch rst.
Cable
DVD
recorder
Set-top
box
Note: Disconnect the
power cord before
connecting devices.
Cable
DVD player, home theatre system Blu-ray Disc player, headphones, HD game
TV
console & HD camcorder
TV
Notes:
- Excessive sound pressure
from earphones and
headphones can cause
hearing loss.
- Number of HDMI may vary.
- USB connector is for data
input from USB storage
devices.
English
PC
TV
Or use an HDMI
connection.
PC
Note:
Before connecting a PC, set the PC
monitor refresh rate to 60Hz.
DVD player/
Home theatre system
Blu-ray Disc player
HD game console
HD Camcorder
Notes:
- The gures are for representation only.
- Not all connections available on all models.
- The location of the power socket on the TV may
vary according to TV model.
- The positions and names of the function buttons
and connectors on the TV may vary according to
TV model.
2
EN
Page 6
Getting started
Remote control functions
Most of your television's functions are available via the menus that appear on the screen. The remote control
supplied with your set can be used to navigate through the menus and to congure all the general settings.
Option
Source
Guide
/*
Zoom+/-
To select connected devices.
Standby / quit standby.
0-9
To select a channel, page or setting.
ECO
To select desired power saving mode.
To toggle the Electronic Programme
Guide on or off (only available for digital
channels).
Menu
To access the main menu; to return to the
previous menu.
Exit
To exit the menu structure or Teletext.
To navigate in the main menu; to select
menu options; to switch to the previous or
next photo, song or video in USB function.
To navigate in the main menu; to set
functions and change values. ► can
also be used to open the corresponding
submenu.
* To select the picture format.
Note: You are recommended to use the full
screen mode. Do not use the display mode
with black bars on both sides of the picture
(such as 4:3) for long time, otherwise the
TV screen may be damaged permanently.
OK
To open the corresponding submenu and
activate a setting in menus; to freeze/
unfreeze the picture in digital TV mode.
SUBTITLE
To display the function menu to perform
certain operations; to display the Teletext
page in different modes.
Return
To return to the previous channel; to return
to the previous menu in USB function.
V+/-
To control the volume.
Info
To display programme information, if
available.
Mute
To switch the sound off and back on again.
P+/-
To change channels.
TEXT
To toggle Teletext on or off.
To select a subtitle language available for
selected digital TV programme.
LIST
To display channel list.
TV
To access TV mode.
Colour
To select tasks or Teletext pages. The
red button can also be used for MHEG
buttons
function.
Lang
To select a sound type available for
selected analogue TV programme; to
select an audio language available for
selected digital TV programme.
Important:
Batteries shall not be exposed to excessive heat such as sunshine, re or the like. If the batteries in your remote
control are run down you can use the buttons on your TV set. In TV mode, they have the same functions as the
corresponding buttons on the remote control. In the menus they have the following functions:
For models with OK button on the set: For models without OK button on the set:
PR+ or PR ▲
PR- or PR ▼
VOL+, + or VOL ►
VOL-, - or VOL ◄
MENU or Menu MENU or Menu
▲
▼
►
◄
PR+ or PR ▲
PR- or PR ▼
VOL+, + or VOL ►
VOL-, - or VOL ◄
►
◄ &
▲
▼
OK
OK OK
Switch the TV on and off
1.
When powered on, the TV will be turned on
directly or be in standby mode. If the TV is in
standby mode, press the or
POWER/
button
on the set or the button on the remote control to
turn it on.
2.
To put the TV into standby mode, press the or
POWER/
button on the set or the button on the
remote control. The TV set remains powered up,
but with low energy consumption.
3.
To switch off the TV, unplug the mains socket from
the mains outlet.
(*On certain models, you have to turn on the power
switch rst.)
3
EN
Page 7

Chapter 2
Install channels
Initial setup
Initial setup involves selecting all the settings required
to be able to search for and store all the analogue
and digital channels you can receive.
Make sure that the television is switched on and
follow all the steps in turn specied hereafter.
Note: If the channel search retrieved only the
analogue channels it could be caused by poor
broadcasting and therefore is not covered
by manufacturer warranty. Manufacturers
cannot be held responsible for lack of or poor
broadcasting in some areas.
The rst time you switch the set on, the
wizard opens, which guides you through the initial
setup process. (Refer to Figure 1.) Press OK to start
your initial setup.
1.
2.
3.
▲/▼
Press
OK/►
Press
OK/►
Note: If you select
Press
Cable
- Select
• Press
• Press
- Select
• Press
• Press
to select your language, then press
to enter the next step.
▲/▼
to select your country, then press
to enter the next step.
enter the
in order to set a password. Use the digit
buttons to enter a four-digit number for your
password. (0000 is too simple to be set as
your password.) Re-enter the same code
to conrm the password. After that, you will
enter the next step automatically. (In this
step, you can only press ◄ to return to the
previous step.)
▲/▼
.
Air
OK/►
▲/▼
to start the automatic search for all DVB-T digital
and/or analogue channels.
Cable
OK/►
▲/▼
to directly start your initial setup or enter below
step.
• Select
all DVB-C digital and analogue channels.
• You may select another advanced scan
mode if available (for example,
Quick
or
information as described below. Use the digit
buttons to adjust the values for frequency,
symbol rate and network ID; use ◄/► to
select a modulation mode.
• Press OK to start initial setup relating to all
DVB-C digital and analogue channels.
France
Password setting
to select your tuner mode
.
to enter.
to select
.
to enter.
to select
Full
if available to search for and store
), then congure proper cable
, you will have to
Scan
Scan
Initial setup
menu here
Air
, then press
, then press
Advanced
or
OK/►
OK/►
Note: To prevent the channel setup process from
being interrupted, wait for the message
4.
5.
6.
7.
- In this step, you can also press ◄ to return to the
indicating that the setup is complete.
Before starting the scanning, you can also select
Skip scan
During the setup, you can follow the hints available
at the bottom of the screen to return to the previous
step by pressing ◄. Or press
interrupt the search halfway.
Once the automatic search ends, the set enters the
next step automatically. Press
location
your selection and enter the last step.
- In this step, you can press OK to exit the initial
setup. The channels are arranged in a preset
order. If you wish to skip channels, modify the
preset order or rename channels, select
Organiser
previous step.
to skip the initial setup process.
Exit
to exit or
▲/▼
Shop
and press
or
Home
. Press
OK/►
to select your
OK/►
to enter.
to conrm
Setup >
Automatically install channels
This section describes how to search and store
channels automatically. Instructions are for both
analogue and digital channels.
1.
2.
3.
Menu
Press
Setup > Language > Menu language
◄/► to select your desired menu language.
Press
select
country. The TV installs and arranges channels
according to your country.
Press
◄/► to select
- Select
• Press ▲/▼ to select
press
• Select
then press
• Press OK to skip the country selection and
enter the next step. Or use ◄/► to reselect
your country, then press OK to enter.
• Select
then press
search, which relates to all DVB-T digital and/or
analogue channels.
- Select
• Press ▲/▼ to select
press
• Select
display
• Press OK to skip the country selection and
enter the next step. Or use ◄/► to reselect
your country, then press OK to enter.
• - Select
on the remote control and select
Menu
to return to
Country
, then press ◄/► to select your
▲/▼
to select
Air
Air
.
OK/►
to enter.
Automatic search
OK/►
Digital & Analog, Digital
OK/►
Cable
.
OK/►
to enter.
Automatic search
Automatic search
Digital & Analog
enter. Select your scan mode if available and
Setup
Tuner mode
Cable
or
.
Channel install
(Refer to Figure 2.),
to display
to start the automatic
Channel install
, then press
.
, then press
. Press
▲/▼
, press
, then press
, and
Automatic search
Analog
or
, and
OK/►
OK/►
to
,
to
to
English
.
EN
4
Page 8

Chapter 3 & 4
Use your TV & Use more of your TV
congure proper cable information in the same
way as in Initial setup. Select
OK/►
to start your automatic search relating to
all DVB-C digital and analogue channels.
Digital
- Select
as above to start your automatic search
relating to all DVB-C digital channels.
- Select
your automatic search relating to all analogue
channels.
4.
The search may take a few minutes. During the
process, you can press
5.
Once the automatic search ends, press
return to the previous step or press OK to restart
your channel search.
6.
After the automatic search, channels are arranged
in a preset order. You can skip channels, modify
the preset order or rename channels.
, then follow the same process
Analog
, then press
Menu
Scan
and press
OK/►
to start
to abort halfway.
Menu
Use your TV
Access channels
Using the digit buttons:
digit buttons to access the channels.
Using the PR+/- or P+/- buttons:
channels.
press the corresponding
scroll through the
Watch connected devices
Repeatedly press
OK
on the TV set to toggle between TV and other
input sources. To resume TV viewing, press any
digit button to enter the channel, while
through all TV channels and other input sources.
Note: Not all models have OK button on the set.
Source
on the remote control or
P+/-
will cycle
Volume
Volume control: use the
on the TV set or
increase or decrease the volume.
Sound mute: press the
mute the sound. Press this button again or the V+
button to restore it.
Use TV menu
1.
2.
3.
4.
5.
Menu
Press
Figure 3.)
Press ▲/▼/◄/► to select the desired item, then
OK
press
In submenus, use ▲/▼ to select menu options,
use ◄/► to set functions or change values. Use
OK
corresponding submenu.
Press
Press
to open the corresponding submenu.
to activate a setting. Use
Menu
Exit
to close the menu.
VOL+/-
V+/-
buttons on the remote control to
Mute
s
to display the main menu. (Refer to
to return to the previous menu.
VOL
or
◄/► buttons
button to temporarily
OK/►
to open the
Note: Some options may not be available for
certain signal sources.
Select menu language
Y ou can choose your preferred menu language
following the instructions below.
to
1.
2.
3.
4.
5.
Menu
Press
Press
to enter.
Select
Select
your desired language to display the menus.
Press
to display the main menu.
▲/▼/
◄/► to select
Language
Menu language
Exit
and press
and press ◄/► to select
to close the menu.
Setup
OK/►
Use more of your TV
Setup your favourite channels
Y ou can create four lists of your favourite TV channels.
1.
2.
3.
4.
5.
LIST.
Press
Press the yellow button to enter
selection
you want to set up your favourite channels. Then
press OK to enter the selected list.
Press the blue button to start editing your favourite
list. Press ▲/▼ to scroll through the channel list
and press OK to select or deselect it.
Repeat this procedure to setup other favourite
channels.
Press
. Press ▲/▼ to select the favourite list
LIST/Exit
to exit.
ECO dynamic backlight
1.
2.
3.
Shortcut operation
control to perform the same function mentioned above.
Motion enhance
Menu
Press
Picture > ECO dynamic back light
Press ◄/► to select desired power saving mode
to achieve the desired power saving effect. The
Picture
set to
Press
on the remote control and select
preset
Personal
option under
Exit
simultaneously.
to close the menu.
: Press
Picture
ECO
on the remote
(* not available for some
models)
This function provides more sharpness to moving
pictures and launches the desired demonstration.
1.
2.
3.
Menu
Press
Picture > Advanced video > Motion enhance
Press OK/► to enter.
Select different options:
Effect
-
sharp at all times; however, very small details
may fade slightly at high speed. You can also
choose the low or middle levels to reduce the
motion compensation.
on the remote control and select
: Choose the high level to keep the picture
, then press OK
to enter.
Channel list
.
will now be
.
EN
5
Page 9

Use more of your TV
Demo partition
-
want to demo the effect of motion enhancement.
Demo
-
4.
: Start the demo by pressing OK/►.
Exit
Press
: Select the mode in which you
to close the menu.
PAP function
To display the pictures from different source inputs
side by side. Note that one window is for both
analogue and digital TV inputs, the other is for VGA,
HDMI and CMP inputs. (Note: Not available for AV-
Scart on both windows.)
1.
2.
3.
4.
5.
6.
Menu
Press
Select
Select the
off PAP function.
Select
TV window.
Press ◄/► to toggle the focus window.
When the focus is on the TV window, the digit
buttons and
the other window,
sources.
to display the main menu.
PAP
and press OK to enter.
PAP
option, and press ◄/► to turn on/
TV position
, press ◄/► to reposition the
P+/-
work in TV. When the focus is on
P+/-
switches available external
Use subtitles
You can enable subtitles for each TV channel.
Subtitles are broadcast via Teletext or DVB-T/DVB-C
digital broadcasts. With digital broadcasts, you have
the additional option of selecting a preferred subtitle
language.
Turn on/off subtitles
1.
2.
3.
Enable subtitle languages on digital TV channels
1.
2.
3.
4.
5.
Shortcut operation
control to directly select a subtitle language available
for the selected digital TV programme.
Select a subtitle type on digital TV channels
1.
Menu
Press
Options > Subtitle.
Press
Select the
On/Off
Press
Options > Subtitle > Digital subtitle language.
Press ◄/► to select a subtitle language as your
preferred language.
Press
2nd.
Press ◄/► to select a secondary subtitle language.
Press
Press
Options > Subtitle > Subtitle type.
on the remote control and select
OK/►
to enter. (Refer to Figure 4.)
Subtitle
to turn on/off subtitles.
Menu
▲/▼
Exit
Menu
option, and press ◄/► to select
on the remote control and select
to select
to close the menu.
Digital subtitle language
SUBTITLE
: Press
on the remote control and select
on the remote
2.
Press ◄/► to select a subtitle type. You can select
Hearing impaired
subtitles with your selected language.
to display the hearing impaired
Select decoding page language in Teletext
Menu
Press
> Decoding page language
language in which Teletext will display.
on the remote control and select
. Select a proper type of
Options
Digital Teletext language
For digital TV channels, your TV could zap to a
service with multiple initial Teletext pages in different
languages. This function allows you to select an
available language as primary language, which
relates to different initial Teletext pages.
Menu
Press
> Digital teletext language
on the remote control and select
. Press ◄/► to select.
Options
SPDIF type
Connect to an audio device through the
output. Press
Options > SPDIF type
from the list for digital programmes.
- If the current programme outputs sound in
format, then either
- If the current programme does not output sound
Dolby D
in
Otherwise no sound will be output.
- Select
device connected to the
Note: The options you may choose depend on the
Menu
on the remote control and select
. Select a proper sound type
PCM
Dolby D
or
format, only
Off
to turn off the audio output from the audio
programme you are watching. If you select
PCM
and the sound is ahead of the picture,
you can select
menu and press ◄/► to adjust the delay time
to synchronize the sound with the picture.
PCM
can be selected.
SPDIF
SPDIF delay
SPDIF
can be selected.
output.
from the
Dolby D
Options
T-Link
To search for CEC devices connected to the HDMI
sockets in your TV and enable one-touch play and
one-touch standby between CEC devices.
Enable or disable T-Link
1.
2.
Use one-touch play
One-touch play enables you to press the play button
on, for example, your DVD remote control. This starts
playback on your DVD device and automatically
switches your TV to the correct source, displaying DVD
content.
Menu
Press
Options > T-Link
Press ◄/► to select On or
on the remote control, then select
.
Off
.
English
EN
6
Page 10

Use more of your TV
Use system standby
System standby enables you to press the button on,
for example, your TV remote control. This switches
your TV and all connected HDMI devices to standby
mode.
Network update
Menu
Press
Options > Network update
or disable the Network update function.
- When this function is on, the TV will automatically
update channels if your DTV service provider
updates his DTV network.
- When this function is off, you need to run the
channel search again to get new channels or
remove unavailable channels if your DTV service
provider adds or removes channels from their DTV
network.
on the remote control, then select
. Select
On/off
to enable
Common interface
Encrypted digital TV channels can be decoded with a
common interface module and a card provided by a
digital TV service operator.
The common interface module may enable several
digital services, depending on the operator and
services you choose (for example, pay TV). Contact
your digital TV service operator for more information
about services and terms.
Use the common interface module
WARNING: Switch off your TV before inserting a
common interface module. Be sure to follow the
instruction described below. Wrong insertion of a
common interface module may damage both the
module and your TV.
1.
Following the directions printed on the common
interface module, gently insert the module into the
common interface slot on the TV.
2.
Push the module in as far as it will go.
3.
Turn on the TV and wait for the common interface
function to be activated. This may take several
minutes.
N
ote: Do not remove the common interface module
from the slot. Removing the module will
deactivate the digital services.
Access common interface services
After inserting and activating the common interface
module, press
Options > Common interface
This menu option is only available if the common
interface module is correctly inserted and activated.
On-screen applications and content are provided by
your digital TV service operator.
Menu
on the remote control and select
.
Software update
Menu
Press
Options > Software update
(Refer to Figure 5.)
Current version
-
software.
Product name
-
set.
Serial number
-
number of your set.
OAD
-
latest version of the software if available. Select
OAD
• Use ◄/► to select
• Select No under
• Select
on the remote control and select
: Checks the current version of the
: Displays the product name of your
(if available): Displays the serial
(over air download): Enables you to install the
and press OK/► to enter.
to automatically download the latest software if
available. After the software has been downloaded
successfully, you will be prompted to decide if you
want to install it right now. If yes, follow the onscreen instructions to complete your installation.
You can also select to ignore the installation here.
automatic download.
Manual OAD download
to start manual scanning the latest software.
Follow the on-screen instructions to complete.
During the scan, press
the process.
. Press OK/► to enter.
Yes
Auto download
Auto download
under
OK/Exit
to decline the
and press OK/►
to cancel or exit
Change to Shop or Home mode
1.
2.
3.
Menu
Press
Options > Location
Press
Press
Note: According to the regulation of European
on the remote control and select
◄/►
to select your location
Exit
to exit.
Commission 2009/125/EC, in Home mode, TV
will be put into standby mode automatically if
there is no operation in 4 hours. This feature
can be deactivated in
.
Options
Shop
menu.
or
Home
MHEG function
Some digital TV broadcasters offer dedicated digital
text or interactive services (for example, BBC1).
These services work like normal Teletext with the
addition of number, colour and navigation buttons.
1.
2.
3.
4.
5.
6.
7.
Menu
Press
Options > Subtitle > Subtitle
Press
Note: MHEG and subtitles are mutually exclusive
Press the red button or
Press ▲/▼/◄/► to select or highlight items.
Press OK to conrm or activate.
Press one of the colour buttons to select an option.
Press
on the remote control and select
◄/►
and cannot coexist on the same screen. If
Subtitle
TEXT
Subtitle
to set
is set to On, MHEG will not appear.
Exit
or
to exit.
.
Off
to
.
TEXT
on the remote control.
.
EN
7
Page 11

View photos, play music and watch videos from
a USB storage device
Your TV is tted with a USB connector that enables you
to view photos, listen to music or watch videos stored
on a USB storage device.
Supported le formats:
Photo JPEG
Music MP3
Video AVI, MP4, MPG, MPEG, TS…
Notes: Some USB keys and USB products like
digital cameras or mobile phones are not fully
compatible with USB 2.0 standard so they
may not work with the TV multimedia player.
Not all USB keys or devices are compatible
with the USB function. Not all above formats
are supported. The encoding formats of your
les will determine whether or not they can be
used.
When a USB device is detected, it enters the
center
menu directly. (Alternative: Select
main menu and press OK to enter
Photo
To display photos, if available.
1.
2.
3.
4.
5.
6.
Music
To playback music, if available.
1.
Media center > Photo
Select
enter the main le content browser.
In the main le content browser, use ▲/▼/◄/► to
select a photo or an inner le folder.
Select an inner le folder, press OK to enter a sub
le content browser.
Use ▲/▼/◄/► to select a photo in either main or
sub le content browser, press
the photo menu in folder mode.
Sort:
-
Sort folders and photos by modication Date
or Name.
Edit:
-
Copy, paste or delete a selected photo.
Parser:
-
Select a photo, press OK to watch, and a slide
show begins from the selected photo. Press OK to
pause the photo if you want to rotate the paused
photo. Press
in the browser mode. You can play, pause or
rotate the photo, select different play modes and
displaying effects, etc.
Press the related buttons on the remote control
to perform the available functions shown on the
function bar at the bottom of the TV screen.
Select
enter the main le content browser.
You can select
photos from all sub le folders.
Menu
to display the photo menu
Media center > Music
Media center
, then press OK to
Menu
Recursive
, then press OK to
Media
USB
in the
to display
to display
.)
Use more of your TV
2.
Use ▲/▼/◄/► to select a song in either main or
sub le content browser in the same way as in
photo display function, press
music menu in folder mode.
Sort:
-
Sort folders and songs by Name, Genre,
Artist or Album.
Edit:
-
Copy, paste or delete a selected song.
Parser:
-
3.
Select a song, press OK to play, and automatic
playback begins from the selected song. Press
Menu
mode. You can play or pause the song, select
different play modes, etc.
-
-
4.
Press the related buttons on the remote control
to perform the available functions shown on the
function bar at the bottom of the TV screen.
Video
To watch videos, if available.
1.
Select
enter the main le content browser.
2.
Use ▲/▼/◄/► to select a video in either main
or sub le content browser in the same way as in
photo display function, press
video menu in folder mode.
-
-
-
3.
Select a video, press OK to watch, and automatic
playback begins from the selected video. Press
Menu
mode. You can play or pause the video, select
different play modes, screen modes and preset
picture settings, etc.
4.
Press the related buttons on the remote control
to perform the available functions shown on the
function bar at the bottom of the TV screen.
You can select
songs from all sub le folders.
to display the music menu in the browser
Show lyrics:
with lyrics. Select it and use ◄/► to turn on/off
lyrics synchronized display.
Audio only:
music with the screen turned off. Any key press
will turn the screen on.
Sort:
modication Date or Name.
Edit:
Parser:
videos from all sub le folders.
This option is available for the songs
Select and press OK to listen to the
Media center > Video
Sort folders and videos by Type,
Copy, paste or delete a selected video.
You can select
to display the video menu in the browser
Time detection
You can detect the time from digital channels through
following operations.
1.
2.
Menu
Press
Timer
Press ◄/► to select On.
on the remote control and select
Clock
>
Auto synchronization
>
Menu
to display the
Recursive
Recursive
to display
, then press OK to
Menu
to display the
to display
.
English
EN
8
Page 12

Use more of your TV
Assign a channel decoder
Decoders that decode analogue channels can
be connected to the AV connector. Assign the TV
channel as a channel to be decoded. Then assign the
connection where the decoder is connected.
1.
2.
3.
4.
5.
Menu
Press
Setup > Decode
Press
Press
Press OK to select or unselect the channel.
Press
on the remote control and select
OK/►
▲/▼
Menu
.
to enter the list.
to select the channel to decode.
to return to the previous menu.
Diagnostics on digital TV channels
1.
2.
Menu
Press
Setup > Diagnostics
Press OK/► to display some signal information on
the current digital channel, such as signal strength,
frequency, etc.
on the remote control and select
.
Time shift
Allows you to record the TV programme so that you will
not miss the favourite part even if you go out. Before
you use the function, connect a USB device to the TV
rst. For the rst time, you should do the disk setup for
the USB device.
1.
2.
3.
4.
5.
6.
Menu
Press
Setup > Time shift
Press ◄/► to select On to switch on the time shift
function, then press
Press
Time shift
Follow the directions on the screen to do the
setup.
After the disk setup is done, press
select
Press OK to display the time shift menu.
- Press the red button to pause the picture and
begin the time shift.
- Press the red button to play the recorded part.
- When the time shift menu disappears and only the
timing of the time shift remains on the screen, you
can press the red button or OK to access the time
shift menu.
- Press the green button to fast backward or the
yellow button to fast forward.
- Press the blue button to quit the time shift
function.
Notes:
- Before you connect the USB device to the TV,
make sure you have backed up the data in the
device to avoid the loss of your important data due
to unforeseen malfunction.
on the remote control and select
.
Exit
Option
on the remote control and select
, then press OK to conrm.
Time shift
to close the menu.
.
Option
and
- We recommend you use a USB device with free
capacity above 1GB and disk speed faster than
5.0MB/sec.
- The bigger the le size for time shift, the longer
the recording time.
- If you change the channel in time shift mode, a
message prompts you to select
can select
execute the channel change.
Yes
to exit the time shift function and
Yes
or No. You
Reset shop
Allows you to reset the TV to factory default settings.
1.
2.
3.
4.
5.
Menu
Press
Setup
Select
Use the digit buttons to enter the password.
Press ◄/► to select OK and press OK to conrm.
The
related instructions.
on the remote control and select
, then press OK to conrm.
Reset shop
Initial setup
and press OK/► to enter.
menu appears. Follow the
Customising the input settings
You can congure your TV according to the
equipment you connect to it.
1.
2.
3.
4.
5.
After conguring, the selected source label will be
displayed after the name of the related connector in
the source list when pressing
control or OK on the TV set.
Note: Not all models have OK button on the set.
Menu
Press
Setup > Input settings
Press
Press
is connected to.
Press ◄/► to select the type of apparatus
attached to this connector.
Press
on the remote control and select
OK/►
to enter
▲/▼
to select a connector your equipment
Menu
to return to the
.
Input settings
Setup
Source
.
menu.
on the remote
Use Electronic programme guide
EPG is an on-screen guide that displays scheduled
TV programmes. You can navigate, select, view and
record programmes.
1.
2.
Guide
Press
and Next EPG
you to get information about the current or next
programme playing on each channel. Navigate
through the different programmes using the
navigation buttons on the remote control.
Use the colour buttons to view the
Prev day
-
Next day
-
View detail
-
this programme if available.
Type lter
-
digital TV programmes.
on the remote control, the
menu will appear, which allows
(Red): List the previous day’s EPG.
(Green): List the next day’s EPG.
(Yellow): Display the description of
(Blue): Programme guide lter for
Now
8 Days EPG
.
EN
9
Page 13

Use more of your TV
• Press the blue button to display the
programmes’ type and subtype lists.
• Navigate through the different types and
subtypes using the navigation buttons on the
remote control.
• Select one or more types, which you want to
highlight from the
deselect). A checkmark will appear to the left of
the type when selected. When you select a type,
all its subtypes will be selected accordingly.
• Also, you can select some desired subtypes
without selecting any type rst.
• Press the blue button to exit the type and
subtype list.
• After ltering, all your desired digital TV
programmes will be highlighted.
Add schedule
-
remote control to bring up the
menu. For details on scheduled recording, refer
Schedule list
to the
3.
Guide/Exit
Press
the selected channel.
Type
list, press OK to select (or
(Option): Press
section.
to exit the EPG and switch to
Option
on the
Schedule list
PVR (Personal Video Recorder)
Allows you to record your favourite TV programme.
Before you use the function, connect a USB memory
device to the set rst.
Note: Due to specic country requirements, the PVR
function is not available for Finland.
1.
2.
3.
4.
5.
Option
Press
Quick access > PVR
Press
Press:
- the red button to start recording, the record le
is put into a PVR folder in
and named after the channel number;
- the green button to stop recording manually; if
the recording duration nishes, the recording will
stop automatically.
▲/▼/
-
In recording, PVR mini pane will also show on the
screen to indicate the recording progress.
To watch the recorded programme, exit PVR mode
rst and go to
folder PVR, then select the related record le.
Press OK to play. (It is the same if you record a
digital radio programme).
Notes:
- When CI+ card is used, PVR function will be
disabled.
- Only available for digital channels.
- Only supports USB memory device of FAT32
format.
- Before you connect the USB device to the set,
make sure you have backed up the data in the
on the remote control and select
OK/
► to enter.
◄/► to adjust the recording duration.
.
Media center > Video
Media center > Video
. Select the
device to avoid the loss of your important data
due to unforeseen malfunction.
- The bigger the USB device memory size for the
PVR function, the longer the recording time.
- If you want to change channel or signal source
during recording, store the recording data before
changing the channel or source.
- The set cannot play les normally if the
parameters of the le exceed the limitations of
the system, the le format is not supported, the
le is damaged, or the le cannot be decoded.
- Do not disconnect the USB memory device when
the system is reading a le or transmitting data,
otherwise the system or the device may be
damaged.
Schedule list
This function is used to perform scheduled recording.
1.
2.
3.
-
-
-
-
-
-
4.
5.
6.
7.
Notes for password in Parental Control Lock function:
- The default password is 1234. You can change it to a
- The super password is 0423. If you forget your code,
10
EN
Option
Press
Quick access > Schedule list
Press
To add a schedule into your schedule list, press
the red button rst to display
Channel number
channel number.
Start date
recording date.
Start time
Stop time
Schedule type
• Set
switch to the scheduled programme when the
time you have set comes. When time is out and
you do not execute any operation, the dialog box
will disappear and no further operation will be
executed.
• Set
your scheduled recording when the time you
have set comes. When time is out and you do
not execute any operation, scheduled recording
will start automatically.
Repeat type
recording.
Press
add the schedule you set into your schedule list.
Press the red button to repeat above procedures
to add another schedule.
If you wish to edit or delete a schedule, select it
and press OK to enter.
Press
new one.
enter the super password to override any existing codes.
Design and specications are subject to change without notice.
on the remote control and select
OK/►
to display the schedule list.
: use
: use the digit buttons to set the
: set the starting time of the recording.
: set the stopping time of the recording.
Reminder
Record
▲/▼/
Exit
:
to be reminded that you can
to check if you really want to start
: set different repeat modes for the
◄/► to select
to close the menu.
.
Schedule list
◄/►
to select the
Add
, then press OK to
English
. Then,
Page 14

Глава 1
Начало работы
Важная информация
Безопасность
Убедитесь, что напряжение в бытовой сети переменного
тока соответствует напряжению, указанному на
идентификационной наклейке, на тыльной стороне
телевизора. Если в качестве устройства отключения
используется сетевой штепсель или удлинитель, то к ним
должен быть обеспечен легкий доступ.
В отдельных моделях световые индикаторы расположены
на боковой стороне телевизора. Отсутствие световой
индикации на передней стороне не означает, что телевизор
отключен от сети. Для полного отключения телевизора
необходимо вынуть штепсель.
Компоненты телевизора чувствительны к нагреванию.
Максимальная температура окружающей среды не
должна превышать 35°С. Не закрывайте вентиляционные
отверстия на тыльной и боковых сторонах корпуса
телевизора. Для обеспечения достаточной вентиляции
следует оставить вокруг прибора достаточно свободного
места. Не устанавливайте телевизор вблизи источников
тепла (таких как камин и тому подобные) или устройств,
создающих сильные магнитные или электрические поля.
Влажность в помещении, в котором установлен телевизор,
не должна превышать 85%. Следует избегать попадания
на устройство влаги и брызг; не следует устанавливать
на него объекты, заполненные жидкостью, например,
вазы. Перемещение телевизора из холодного помещения
в теплое может привести к конденсации влаги на экране, а
также на некоторых компонентах внутри телевизора. В этом
случае перед включением телевизора следует дождаться
высыхания влаги.
ВНИМАНИЕ!
Во избежание пожара не размещайте данное
изделие в непосредственной близости от свечей и
других источников открытого огня.
Кнопки или POWER/ на телевизоре или кнопка на
пульте ДУ могут быть использованы для его включения и
для перевода в режим ожидания. При длительном простое
телевизора рекомендуется, полностью отключить его,
вынув штепсельную вилку из розетки сети электропитания.
Во время грозы рекомендуется отключить телевизор
от сети электропитания и антенны, чтобы исключить
воздействие на него потенциально опасных электрических
и электромагнитных импульсов. В связи с этим следует
размещать сетевые розетки и антенные гнезда с учетом
возможности легкого доступа и быстрого отключения
телевизора при необходимости.
Следует немедленно отключить телевизор, если Вы
почувствовали запах гари или увидели дым. Никогда и
ни при каких-обстоятельствах не следует самостоятельно
открывать телевизор, поскольку при этом существует риск
поражения электрическим током.
ТВ экран
ТВ экран, используемый в этом изделии, изготовлен из
стекла. Поэтому при падении или соударении с другими
предметами он может разбиться.
ТВ экран является очень высоко технологичным изделием,
обеспечивающим изображение с высококачественным
разрешением. Иногда могут появиться несколько неактивных
пикселей (точки синего, зеленого и красного цветов). Это не
влияет на качество работы этого изделия.
Уход
Для очистки экрана следует использовать очищающие
средства, предназначенные для чистки стекол, а для
остальных частей телевизора – мягкую ткань и мягкое
моющее средство.
Важная информация: Применение сильных моющих
средств, содержащих спирт, и абразивные вещества может
привести к повреждению экрана.
Регулярно удаляйте пыль с вентиляционных отверстий
с тыльной стороны и по бокам телевизора. Применение
растворителей, а также спиртосодержащих и
абразивных продуктов, может привести к повреждению
телевизора. В случае попадания внутрь телевизора
какого-либо постороннего предмета или жидкости
следует незамедлительно выключить его и пригласить
квалифицированного технического специалиста для
проверки работоспособности телевизора. Никогда не
открывайте устройство самостоятельно, поскольку при
этом возникает риск травмирования пользователя или
повреждения телевизора.
Укрепление телевизора на стене
Внимание: Для выполнения этой операции
требуются два человека.
Для обеспечения безопасной установки следует иметь в
виду следующие замечания:
• Убедитесь, что стена может выдержать вес телевизора и
настенного крепления.
• Следуйте инструкциям по настенной установке.
Перед монтажом на стену для некоторых моделей
удостоверьтесь в прочности крепления, ввинтив
шестиугольные винты VESA в дюбеля (и винты), в гайки
стенного монтажа с задней панели вашего устройства.
• Телевизор следует устанавливать на вертикальной стене.
• Следует использовать только монтажные винты,
соответствующие материалу стены.
• Телевизионные кабели следует разместить таким
образом, чтобы они не препятствовали движению людей.
Можно использовать информацию по безопасности из
любых инструкций, выпускаемых для наших телевизоров.
Установка телевизора на столе
Перед установкой телевизора убедитесь, что поверхность,
на которую он устанавливается, может выдержать его вес.
Не следует размещать телевизор на неустойчивом
основании, например, на передвижных полках или на самом
краю секции. Также необходимо следить, чтобы передняя
часть телевизора не выступала за пределы поверхности, на
которой он установлен.
Данный продукт произведен из
высококачественных материалов и
компонентов, пригодных для переработки и
повторного использования.
Этот символ указывает на необходимость
утилизировать электрические и электронные
компоненты, входящие в состав прибора,
Это устройство следует утилизировать в местном центре
по сбору и переработке отходов. В Евросоюзе приняты
комплексы мер по сбору и утилизации использованных
электрических и электронных устройств. Давайте
сохраним окружающую среду совместными усилиями!
отдельно от бытовых отходов.
RU
1
Page 15

OU
T
OUT
OUT
IN
ANTENNA
IN
OUT
OUT
IN
ANTENNA
OUT
Начало работы
Подключение электропитания и антенны
Для включения телевизора после присоединения сетевого
шнура нажмите кнопку или POWER/ .
Примечание: Положение розетки для разных моделей
телевизора может различаться.
На определенных моделях Вы
должны сначала включить систему
основным выключателем.
Антенный кабель
DVD-рекордер, приемник кабельноro TB
TB
Примечание:
DVD-
проигрыватель
Приставка
Подключайте
к телевизору
дополнительные
модули только
при отключенном
питании.
Антенный кабель
DVD-проигрыватель, домашний кинотеатр Blu-ray Disc плейер, наушники, HD игровая
TB
консоль и HD камкордер
TB
Примечания:
- Избыточное давление в
наушниках может вызвать
потерю слуха.
- Число соединений HDMI
может быть разным.
- USB разъемы для перекачки
данных от USB памяти.
Русский
ПК
TB
Либо используйте
HDMI-соединение.
DVD-проигрыватель/
Домашний кинотеатр
ПК
Примечание:
Перед подключением ПК установите
частоту обновления изображения
монитора ПК значение 60 Гц.
Blu-ray Disc плейер
HD игровая
RU
консоль
Примечания:
2
HD камкордер
- Рисунки представлены только в качестве примеров.
- Показанные соединения доступны не во всех моделях.
- Расположение гнезда электропитания на корпусе
телевизора зависит от модели телевизора.
- Для разных моделей телевизора функциональные кнопки
и соединители могут быть расположены по-разному и
имеют разные названия.
Page 16

Начало работы
Функции пульта дистанционного управления
Доступ к большинству функций телевизора можно получить через меню, которые появляются на экране. Поставляемый
вместе с телевизором пульт дистанционного управления можно использовать для переходов от одного меню к другому и для
настройки всех основных параметров.
Source Выбрать подключенные устройства.
Ждущий режим/выход из ждущего режима.
0-9 Для выбора канала, страницы или настройки.
ECO Чтобы выбрать нужный режим ожидания
(экономии электроэнергии).
Guide Для переключения программ EPG
(Электронные программы передач)
Menu Доступ к основному меню; возврат к
предыдущему меню.
Exit Для выхода из меню или Телетекста.
Для перемещения по главному меню. Для
выбора параметров меню; переключаться
на предыдущее или предшествующее Фото,
песни или видео при использовании USBустройства.
Для перемещения по главному меню. Для
/*Zoom+/-
Важная информация:
Не допускайте перегрева элемента питания, например, под действием солнечных лучей в жаркий день и т.п. В случае
выхода из строя элементов питания в пульте дистанционного управления можно использовать кнопки управления,
расположенные на корпусе телевизора. В режиме ТВ функции блока управления и кнопок на корпусе. В меню они имеют
следующие функции:
установки функций и изменения значений;
► можно также использовать для входа в
соответствующее подменю.
*Для выбора формата изображения.
Примечание: Рекомендуется использовать
полноэкранный режим. Не следует
длительное время использовать режим
просмотра 4:3 (черные вертикальные
полосы по обеим сторонам экрана), это
может привести к повреждению экрана на
TB.
OK Для входа в соответственное подменю
и активизации настройки в меню. Для
блокировки/разблокировки изображения при
цифровом режиме.
Option Демонстрировать функциональное меню
для выполнения отдельных операций;
демонстрировать страницу Телетекста в
разных режимах.
Return Для возврата в предыдущий канал; для
возврата в предыдущее меню в USB- функции.
V+/- Регулировать громкость.
Info Для просмотра информации о программе,
если информация доступна.
Mute Для выключения и включения звука.
P+/- Для переключения каналов.
TEXT Для переключения в режим Телетекста или
выхода из него
SUBTITLE Для выбора языка субтитров, доступного в
выбранной цифровой ТВ программе.
LIST Для показа списка каналов.
TV Для доступа к режиму TB.
Цветные
Выбирать задания или страницы
кнопки
Телетекста. Красная кнопка может также
быть использована для функции MHEG
(мультимедиа и гипермедиа).
Для выбора типа звука выбранной аналоговой
Lang
телепрограммы. Для выбора языка звукового
сопровождения выбранной цифровой
телепрограммы.
Для моделей с кнопкой OK на корпусе: Для моделей без кнопки OK на корпусе:
PR+ или PR ▲ ▲ PR+ или PR ▲ ►
PR- или PR ▼ ▼ PR- или PR ▼ ◄ & OK
VOL+, + или VOL ► ► VOL+, + или VOL ► ▲
VOL-, - или VOL ◄ ◄ VOL-, - или VOL ◄ ▼
MENU или Menu MENU или Menu
OK OK
Включить/выключить ТВ
1. ТВ включается в рабочий или в режим готовности. Для
переключения из режима готовности в рабочий режим
нажмите или POWER/ на приемнике либо на ПДУ.
2. Для переключения ТВ в режим готовности нажмите
или POWER/ на приемнике или на ПДУ. ТВ остается
подпитанным, но с малым потреблением.
3. Для полного отключения ТВ выньте вилку из розетки.
(*На определенных моделях Вы должны сначала включить
систему основным выключателем.)
3
RU
Page 17

Глава 2
Настройка каналов
Первичная установка
Первичная установка включает все необходимые настройки
для поиска и сохранения всех доступных аналоговых или
цифровых каналов.
Убедитесь в том, что телевизор включен, и выполняйте
последовательно следующие шаги.
Примечание: Если поиск каналов обнаруживает только
Первый раз, когда Вы включаете систему, появляется
мастер Initial setup (Первоначальные настройки), который
дает Вам указания по процессу выполнения первичной
установки. (См. рисунок 1.) Нажмите кнопку OK, чтобы
запустить процесс первичной установки.
1. Выберите опцию языка, используя кнопки ▲/▼, а затем
2. Выбирайте страну с помощью кнопок ▲/▼, потом
3. Нажмите ▲/▼ выбрав режим радио Air (Радио),
4. Перед началом сканирования вы можете выбрать
аналоговые каналы, возможно, это от
плохого вещания и непокрыто гарантией
изготовителей. Изготовители не отвечают
за качество вещания в некоторых областях.
нажмите кнопку OK/► для перехода к следующему шагу.
нажмите кнопки OK/► для перехода к следующему
шагу.
Примечание: Если вы выбрали France (Франция),
кабельный или Cable (Кабель).
- Выберите Air (Радио)
• Нажмите OK/►.
• Нажмите ▲/▼ для выбора Scan (Поиск), потом
нажмите OK/► для начала автоматического поиска
всех цифровых и/или аналоговых DVB-T каналов.
- Выберите Cable (Кабель).
• Нажмите OK/►.
• Нажимайте кнопки ▲/▼ для выбора Scan (Поиск),
затем нажмите кнопку OK/►, чтобы напрямую
запустить процесс первичной установки или перейти
к следующему шагу.
• Выберите Full (Полный), если хотите выполнить
• Вы можете выбрать другой режим сканирования
• Нажмите OK для начала всех аналоговых и DVB-C
Примечание: Чтобы предотвратить прерывание
Skip scan (Пропустить поиск) для пропуска начального
процесса установки.
вы должны войти в Password setting
(Установка пароля) для установки пароля.
Используйте цифровые кнопки для ввода
4-x значного числа в качестве Вашего
пароля. (0000 слишком слабый пароль.)
Повторно вводить тот же самый номер
для подтверждения ввода пароля. После
того, как Вы ввели пароль, переход к
следующему шагу осуществляется
автоматически. (В этом случае Вы
можете нажать только кнопку ◄, чтобы
вернуться к предыдущему шагу).
поиск и сохранить в памяти все цифровые канала
DVB-C и все аналоговые каналы.
(например, Advanced (Дополнительно) или Quick
(Быстрый)), затем конфигурируйте информацию
кабеля, как описано ниже. Цифровыми кнопками
установите частоту, скорость передачи и сетевой
ID; кнопками ◄/► выберите режим модуляции.
цифровых каналов.
процесса настройки канала, подождите
появления сообщения об успешном
завершении настройки.
5. Во время настройки пользователь может использовать
подсказки внизу экрана для возврата к предыдущему
действию нажатием кнопки ◄. Или использовать кнопку
Exit для выхода или прерывания поиска в процессе его
выполнения.
6. После окончания автоматического поиска устройство
переходит автоматически к следующему шагу.
Нажмите ▲/▼ для выбора Вашего местоположения
Shop (Магазин) или Home (Дом). Нажмите OK/►
для подтверждения Вашего выбора и перехода к
следующему шагу.
7. - На данном этапе можно нажать кнопку OK для
выхода из начальной настройки. Каналы останутся в
предварительно заданном порядке. Если Вы хотите
пропустить/изменить предварительно заданный
порядок следования или переименовать каналы,
выберите Setup > Organiser (Настройка > Органайзер)
и нажмите OK/► для входа в меню.
- На данном этапе можно также нажать ◄ для возврата
к предыдущему действию.
Автоматическая настройка каналов
В данном разделе описывается, как искать и
сохранять каналы автоматически. Данные инструкции
распространяются как на аналоговые, так и на цифровые
каналы.
1. Нажмите кнопку Menu на пульте дистанционного
управления и выберите Setup > Language > Menu
language (Настройка > Язык > Выбор языка). нажмите
кнопку ◄/► для выбора желаемого языка.
2. Нажмите кнопку Menu, чтобы вернуться в Setup
(Настройка), нажимайте кнопки ▲/▼ выбора Country
(Страна), затем нажмите кнопку ◄/►, чтобы выбрать
Вашу страну. Телевизор настроит и расположит каналы
в соответствии с порядком трансляции, который принят
в Вашей стране.
3. Нажимайте кнопки ▲/▼ для выбора режима Tuner mode
(Режим тюнера), затем кнопками ◄/► выберите Air
(Радио) или Cable (Кабель).
- Выберите Air (Радио)
• Нажимайте кнопки ▲/▼ для выбора Channel install
(Каналы) и кнопку OK/► для подтверждения.
• Выберите Automatic search (Автопоиск) (см. Рис.
2.), нажмите OK/► для индикации Automatic search
(Автопоиск).
• Нажмите кнопку OK, чтобы сбросить выбор страны
и перейти к следующему шагу. Или используйте
◄/►, для повторного выбора Вашей страны, затем
нажмите кнопку OK, чтобы войти в это меню.
• Выберите опцию Digital & Analog (Цифровой
и Аналоговый), Digital (Цифровой) и Analog
(Аналоговый), затем нажмите кнопку OK/►для
начала автоматического процесса, который будет
иметь отношение ко всем каналам DVB-T цифровым
и/или аналоговым.
- Выберите Cable (Кабель).
• Нажимайте кнопки ▲/▼ для выбора Channel install
(Каналы) и кнопку OK/► для подтверждения.
• Выберите Automatic search (Автопоиск), нажмите
OK/► для появления на экране индикации Automatic
search (Автопоиск).
• Нажмите кнопку OK, чтобы сбросить выбор страны
и перейти к следующему шагу. Или используйте
◄/►, для повторного выбора Вашей страны, затем
нажмите кнопку OK, чтобы войти в это меню.
Русский
RU
4
Page 18

Глава 3 и 4
Основные операции
Дополнительные функции
• Выберите опцию Digital & Analog (Цифровой
и Аналоговый), Digital (Цифровой) и Analog
(Аналоговый), затем нажмите OK/► для
перехода к следующему шагу. Выберите режим
сканирования, если это необходимо, и правильное
конфигурирование кабельной информации тем же
способом, что и в экране Initial setup (Первичная
установка). Выберите Scan (Поиск), затем нажмите
OK/►для начала автоматического сканирования всех
DVB-C цифровых и аналоговых каналов.
- Выберите Digital (Цифровой), затем проделайте, как
сказано выше для автоматического поиска всех DVB-C
цифровых каналов.
- Выберите режим Analog (Аналоговый), затем нажмите
кнопку OK/►, чтобы начать автоматический поиск всех
аналоговых каналов.
4. Поиск может занять несколько минут. В данном
процессе Вы можете отменять поиск на нажатием Menu.
5. Когда автоматический поиск был выполнен, нажмите
Menu для возврата к предыдущему шагу или нажмите
кнопку OK для повторного сканирования каналов.
6. После автоматического поиска все каналы будут
размещены в очереди согласно предварительной
настройке. Вы можете пропускать ненужные каналы,
изменять данный список или переименовать каналы.
Основные операции
Доступ к каналам
С помощью цифровых кнопок: нажмите соответствующие
цифровые кнопки для доступа к каналам.
Использование кнопок PR+/- или P+/- для того, чтобы:
пролистывать каналы.
Просмотр подключенных устройств
Повторно нажимайте Source дистанционного управления
или OK телевизора для переключения между телевизором
и другими входными источниками. Для возобновления
просмотра ТВ нажмите любую цифровую кнопку для входа в
канал, при этом нажатие кнопки P+/- позволит переходить от
канала к каналу и другим источникам сигнала.
Примечание: Не все модели имеют кнопку OK на
корпусе.
Громкость звука
Регулировка громкости: для увеличения или уменьшения
громкости звука используйте кнопки VOL+/- или VOL◄/►
на корпусе телевизора или кнопки V+/- на пульте
дистанционного управления.
Приглушение звука: нажмите кнопку Mute, чтобы временно
отключить звук. Для восстановления звука нажмите эту
кнопку еще раз или нажмите кнопку V+.
Использование ТВ меню
1. Нажмите кнопку Menu для вывода главного меню. (См.
рисунок 3.)
2. С помощью кнопок ▲/▼/◄/► выберите нужный пункт,
а затем нажмите OK, чтобы открыть соответствующее
подменю.
3. В подменю используйте ▲/▼ для выбора опции
меню, используйте ◄/► для установки функций или
изменения величин параметров. Используйте OK для
активизации настройки. Используйте OK/► для входа в
соответствующее подменю.
4. Для возврата в предыдущее меню нажмите кнопку
Menu.
5. Нажмите Exit для выхода из меню.
Примечание: Для некоторых источников сигнала
некоторые опции не действуют.
Выберите меню установки языка
Вы можете выбрать предпочитаемый Вами язык меню,
выполняя инструкции, которые были приведены ниже.
1. Нажмите кнопку Menu для вывода главного меню.
2. Нажимайте кнопки ▲/▼/◄/► для выбора Setup
(Настройка), потом нажмите кнопку OK для входа.
3. Выберите пункт Language (Язык) и нажмите кнопку
OK/►.
4. Выберите Menu language (Язык меню) и нажмите кнопку
◄/► для выбора языка меню.
5. Нажмите Exit для выхода из меню.
Дополнительные функции
Создание списка любимых каналов
Можно создать 4 списка ваших любимых телеканалов.
1. Нажмите LIST.
2. Нажмите на кнопку желтого цвета для входа в Channel
list selection (Выбор списка избранного). С помощью
кнопок ▲/▼ выберите список каналов, которые Вы
хотите изменить. Затем нажмите OK для входа в
выбранный Вами список.
3. Нажмите кнопку синего цвета для начала
редактирования ваших любимых каналов из списка.
С помощью кнопок ▲/▼ прокручивайте каналы и
нажимайте кнопку OK, чтобы выбрать или отменить
канал.
4. Повторите данное действие для настройки других
любимых каналов.
5. Нажмите LIST/Exit, чтобы выйти.
Динамическая подсветка ECO
1. Нажмите кнопку Menu на пульте дистанционного
управления и выберите Picture > ECO dynamic back
light (Видео > Динамич. подсветка ЭКО).
2. Кнопками ◄/► выберите режим экономного
потребления. Опция Picture preset (Режим
изображения) под Picture (Видео) самостоятельно
установится на Personal (Личное).
3. Нажмите Exit для выхода из меню.
При помощи клавиши быстрого доступа: Нажмите кнопку
ECO на пульте дистанционного управления для той же
упомянутой выше функции.
Улучшенное отображение движения
(* не доступно при некоторых моделях)
При использовании этой функции обеспечивается более
высокая четкость фильмов и предоставляется желаемая
демонстрация.
1. На пульте дистанционного управления, нажмите Menu
и выберите пункт Picture > Advanced video > Motion
enhance (Картинка > Доп. парам. видео > Улучшенное
движение).
2. Чтобы войти, нажмите OK/►.
3. Выберите нужный параметр:
- Effect (Эффект): Выбор высокого (high) уровня
гарантирует четкость картинки в любой момент
времени; однако при высокой скорости возможна
небольшая расплывчатость мелких деталей. Вы
также можете выбрать низкий или средний уровни для
сокращения компенсации движения.
RU
5
Page 19

Дополнительные функции
- Demo partition (Демонстрационный раздел):
Позволяет выбрать режим, в котором будет проходить
демонстрация эффекта улучшенного движения.
- Demo (Демонстрация): Чтобы начать демонстрацию,
нажмите OK/►.
4. Чтобы закрыть меню, нажмите Exit.
Функция PAP
Для показа изображения, получаемого от разных
источников, одновременно. Одно окно предназначено для
аналогового или цифрового ТВ сигнала, а другое – для
сигналов VGA, HDMI и CMP. (Примечание: Не доступно для
AV-Scart обоих windows.)
1. Нажмите кнопку Menu для вывода главного меню.
2. Выберите PAP и нажмите кнопку OK для ввода.
3. Выберите опцию PAP, потом нажмите кнопку ◄/► для
вкл/выкл функции PAP.
4. Выберите TV position (положение экрана), нажмите
кнопку ◄/► для изменения положения экрана ТВ.
5. Нажимайте кнопки ◄/► для изменения фокуса окна.
6. Когда фокус а окне ТВ, цифровые кнопки и P+/-
работают в ТВ. Когда фокус в другом окне, P+/- доступен
для внешних источников.
Использование субтитров
Вы можете использовать субтитры для цифровых ТВ каналов. Субтитры передаются через телетекст или DVB-T/
DVB-C цифровых передач. С помощью цифровых передач
Вы можете получить дополнительную возможность выбора
языка субтитров.
Вкл/Выкл субтитров
1. Нажмите Menu на пульте дистанционного управления и
выберите Options > Subtitle (Опции >Субтитры).
2. Нажмите OK/►. (См. рисунок 4.)
3. Выберите опцию Subtitle (Субтитры), нажмите кнопку
◄/► и выберите On/Off (Вкл./Выкл) для включения/
выключения субтитров.
Выбор языка субтитров для цифровых
телеканалов
1. Нажмите кнопку Menu на пульте дистанционного
управления и выберите Options > Subtitle > Digital
subtitle language (Опции > Субтитры > Язык субтитров
цифрового канала).
2. Нажмите кнопки ◄/► для выбора языка субтитров.
3. Нажмите ▲/▼ для выбора Digital subtitle language 2nd
(Второй язык субтитров цифрового канала).
4. Нажмите кнопку ◄/► для выбора второго языка
субтитров.
5. Нажмите Exit для выхода из меню.
При помощи клавиши быстрого доступа: Нажмите
зеленую кнопку SUBTITLE на пульте дистанционного
управления для определения языков субтитров, доступных
для выбранной цифровой ТВ-программы).
Выбрать тип субтитров цифрового ТВ-канала
1. Нажмите Menu на пульте дистанционного управления
и выберите Options > Subtitle > Subtitle type (Опции >
Субтитр >Тип субтитров).
2. Кнопками ◄/► выберите тип субтитров. Вы можете
выбрать Hearing impaired (Для слабого слуха) для
воспроизведения с субтитрами выбранного языка.
Выбор языка страницы декодирования в
Телетексте
Нажмите кнопку Menu на пульте дистанционного
управления и выберите Options > Decoding page language
(Опции > Язык страницы декодирования). Выберите язык, на
котором будет воспроизведен Телетекст.
Язык цифрового Телетекста
Для цифровых каналов телевизор может переключиться
на сервис с множеством исходных страниц телетекста на
разных языках. Данная функция позволяет установить
необходимый язык как для основной, так и для других
страниц телетекста.
Нажмите кнопку Menu на пульте дистанционного
управления и выберите Options > Digital teletext language
(Опции > Язык цифрового телетекста). Выберите язык
кнопками ◄/►.
Тип SPDIF
Подключите аудиоустройство через выход SPDIF. Нажмите
кнопку Menu на пульте дистанционного управления и
выберите Options > SPDIF type (Опции >Тип SPDIF).
Выберите подходящий тип звука из списка для цифровых
программ.
- Если звук текущей программы выводится в формате
Dolby D, то можно выбрать форматы или PCM, или
Dolby D.
- Если звук текущей программы передается не в
формате Dolby D, то можно выбирать только PCM. В
противном случае воспроизведения звука не будет.
- Выберите Off (Выкл) для остановки воспроизведения
звука от аудиоустройства, подключенного к выходу
SPDIF.
Примечание. Опции, которые Вы можете выбрать,
зависят от конкретной программы.
Если вы выбрали PCM, а звук опережает
изображение, выберите SPDIF delay
(Задержка SPDIF) из меню Options
(Опции) и кнопками ◄/► установите
время задержки для синхронизации звука
и изображения.
Т-линк
Для поиска устройств CEC, подключенных в HDMI-разъемы
вашего телевизора, используйте функции воспроизведения
и остановки одним нажатием кнопки.
Использовать или не использовать Т-линк
1. Нажмите кнопку Menu на пульте дистанционного
управления, потом выберите Options > T-Link
(Опции >Т-линк).
2. Нажмите кнопку ◄/► для выбора On (Вкл) или Off
(Выкл).
Использование воспроизведения «одним
касанием»
Функция воспроизведения «одним касанием» позволяет
начать воспроизведение путем нажатия кнопки Вкл,
например, на пульте дистанционного управления
вашего DVD плейера. Данной операцией будет
запущено воспроизведение Вашего DVD-плейера, и Ваш
телевизор будет автоматически переключен на источник
воспроизводящий DVD.
Использование System standby (Система режима
ожидания)
Ждущий режим включается нажатием кнопки ,
например, на пульте дистанционного управления
Русский
RU
6
Page 20

Дополнительные функции
телевизором. Происходит переключение телевизора и всех
подсоединенных HDMI-устройств в режим ожидания.
Обновление сети
Нажмите Menu на пульте дистанционного контроля, затем
выберите Options > Network update (Опции > Обновление
сети). Выбором On/off (Вкл./Выкл.) включите или выключите
функцию обновления сети.
- Если эта функция включена, ТВ автоматически обновит
каналы, если ваш DTV провайдер обновит его DTV сеть.
- Если эта функция выключена, вам нужно прогнать каналы
для подключения новых или удаления недействующих
каналов, если ваш DTV провайдер подключает или
снимает каналы со своей DTV сети.
Стандартный интерфейс
Закодированные цифровые ТВ-каналы могут быть
декодированы с помощью модуля стандартного интерфейса
и карты, предложенной оператором цифрового ТВ.
Модуль стандартного интерфейса может обеспечивать
несколько цифровых сервисов, это зависит от оператора
и выбранного Вами сервиса (например, платный ТВ).
Свяжитесь с оператором ТВ-сервиса для получения
подробной информации.
Использование модуля стандартного
интерфейса
ПРЕДУПРЕЖДЕНИЕ: Перед установкой
модуля стандартного интерфейса выключите
телевизор. Обязательно соблюдайте
следующие инструкции. Неправильная
установка модуля может повредить и модуль и
Ваш телевизор.
1. Вставляйте модуль в специально предназначенный
для него слот на панели телевизора, соблюдая
осторожность и направление, указанное на модуле.
2. Нажимайте на модуль до упора.
3. Включите телевизор и дождитесь, пока интерфейс не
будет активирован. Это может занять несколько минут.
Примечание: Не удаляйте модуль из слота. Удаление
модуля может деактивировать цифровое
устройство.
Доступ к сервисам стандартного интерфейса
После установки и активирования модуля стандартного
интерфейса нажмите кнопку Menu на пульте
дистанционного управления и выберите Options > Common
interface (Опции > Стандартный интерфейс).
Опции меню доступны только тогда, когда модуль
стандартного интерфейса был правильно установлен
и активирован. Содержание, появляющееся на экране,
зависит от Вашей телевизионной компании
Обновление ПО
Нажмите Menu на пульте дистанционного управления
и выберите Options > Software update (Параметры >
Обновление ПО). Нажмите OK/►. (См. рисунок 5.)
- Current version (Текущая версия): Проверка текущей
версии программного обеспечения.
- Product name (Наименование): Название изделия вашего
комплекта.
- Serial number (Серийный номер) (если имеется):
Серийный номер вашего комплекта.
- OAD (OAD) (загрузка через антенну): Эта опция дает Вам
возможность установить новую версию программного
обеспечения, если она есть в наличии. Выберите OAD
(OAD) и нажмите OK/► для входа.
• Используя кнопки ◄/►, выберите Yes (Да) для опции
Auto download (Автозагрузка), чтобы автоматически
загрузить последнюю версию программного
обеспечения, если это возможно. После того, как
программное обеспечение было успешно загружено,
Вам будет предложено решить, хотите ли Вы установить
его прямо сейчас. Если да, то выполняйте указания,
которые будут появляться на экране для правильного
выполнения Вашей установки. Вы также можете выбрать
отмену обновления в данный момент.
• Выберите No (Нет) для опции Auto download
(Автозагрузка), чтобы отменить автоматическую
загрузку.
• Выберите опцию Manual OAD download (Ручная
загрузка OAD) и нажмите кнопку OK/► для пуска ручного
сканирования последнего программного обеспечения.
Выполняйте инструкции, которые будут появляться
на экране, для завершения этой процедуры. Во время
поиска нажатием OK/Exit можно отменить поиск или
выйти из процесса.
Изменение режима Shop или Home
1. Нажмите кнопку Menu на пульте дистанционного
управления и выберите Options > Location (Опции >
Местонахождение).
2. С помощью кнопок ◄/► выберите местоположение
Shop (Магазин) или Home (Дом).
3. Нажмите Exit, чтобы выйти.
Примечание: В соответствии с распоряжением
Европейской Комиссии 2009/125/EC, в
домашнем использовании ТВ должен
автоматически переключаться в режим
ожидания, если с ним не производятся
операции в течение 4 часов. Эта функция
может быть деактивирована в меню в
пункте Options (Опции).
Функция MHEG
Некоторые цифровые телевещательные компании
предлагают специализированный цифровой текст или
интерактивные службы (например, BBC1). Данные службы
работают как обычный телетекст с добавлением кнопок
номера, цвета и клавиш перемещения.
1. Нажмите Menu на пульте дистанционного управления
и выберите Options > Subtitle > Subtitle (Опции >
Субтитры > Субтитры).
2. С помощью кнопок ◄/► выберите для Subtitle
(Субтитры) режим Off (Выкл.).
Примечание: Функция MHEG и субтитры исключают
3. Нажмите красную кнопку или кнопку TEXT на пульте.
4. С помощью кнопок ▲/▼/◄/► выберите или подсветите
значения.
5. Нажмите OK для подтверждения или активации.
6. Для выбора параметра нажмите одну из цветных кнопок.
7. Нажмите TEXT или Exit для выхода.
друг друга и не могут одновременно
находиться на экране. Если функция
Subtitle (Субтитры) находится в режиме
On (Вкл.), функция MHEG не появится на
экране.
RU
7
Page 21

Дополнительные функции
Просмотр фотографий и фильмов,
воспроизведение музыки, хранящихся в памяти
USB-накопителей.
Имеющийся на телевизоре USB-разъем позволяет
подключать к нему накопители памяти. Вы можете
просматривать фильмы и фотографии на экране
телевизора, а также использовать его для прослушивания
музыки.
Поддерживаемые файловые форматы:
Фото JPEG
Музыка MP3
Видео AVI, MP4, MPG, MPEG, TS…
Примечание: Некоторые USB-накопители и USB-
Когда USB-устройство обнаружено системой, оно
становится видно в меню Media center (Медиа-Центр)
(Альтернатива: Выберите USB (USB) в основном меню и
нажмите OK для входа в Media center (Медиа-Центр).).
устройства, такие как цифровые камеры
или мобильные телефоны, не полностью
совместимы со стандартом USB 2.0,
поэтому они могут не работать с
мультимедийным плейером телевизора.
Не все USB-накопители или функциями
USB-устройства совместимы с
функциями USB. Не все перечисленные
выше форматы поддерживаются.
Декодированные форматы Ваших
файлов будут определять - могут они
использоваться или нет.
Фото
Для показа доступных изображений.
1. Выберите Media center > Photo (Медиа центр > Фото),
затем нажмите кнопку OK, чтобы войти основного меню
программы просмотра содержимого основного файла.
2. В программе просмотра содержания основного файла
кнопками ▲/▼/◄/► выберите фото или внутреннюю
папку с файлами.
3. Выберите папку с вложенными файлами, нажмите
кнопку ОK, чтобы открыть эту папку в окне навигатора.
4. Используйте кнопки ▲/▼/◄/► для выбора файла с
фотографией в основном или дополнительном файле
программы просмотра, затем нажмите кнопку Menu для
отображения меню фото в режиме отображения папок.
- Sort (Сортировать): Сортировка папок и фотографий
по дате изменения или наименованию файла.
- Edit (Редактирование): Копирование, вставка или
удаление выбранного фото.
- Parser (Парсер): Вы можете выбрать опцию Recursive
(Рекурсивное) для отображения фотографий из все
папок нижнего уровня.
5. Выберите фото, нажмите OK, слайд-шоу начнется
с выбранного фото. Если хотите повращать фото,
нажмите OK. В режиме браузера фото меню вызывается
кнопкой Menu. Вы сможете показать, паузировать, либо
вращать фото, выбирать режим показа, эффекты и т.д..
6. Нажмите соответствующие кнопки на пульте
дистанционного управления для выполнения возможных
функций, которые показаны в функциональной строке в
нижней части ТВ экрана.
Музыка
Для воспроизведения доступных аудиофайлов.
1. Выберите Media center > Music (Медиа-Центр >
Музыка). Потом нажмите кнопку OK для входа в
основной навигатор файлов.
2. Используя кнопки ▲/▼/◄/► выберите запись либо
в основном окне навигатора, либо в его окнах более
низкого уровня точно таким же способом, что и при
использовании функции отображения фотографий,
нажмите кнопку Menu для отображения музыкального
меню в режиме папок.
- Sort (Сортировать): Сортировка папок и записей песен
по следующим признакам - Name (Наименование),
Genre (Жанр), Artist (Исполнитель) или Album (Альбом).
- Edit (Редактирование): Копирование, вставка или
удаление выбранной записи.
- Parser (Парсер): Вы можете выбрать опцию Recursive
(Рекурсивное) для отображения записей из всех папок
нижнего уровня.
3. Выберите песню, нажмите OK для воспроизведения,
воспроизведение аудиофайлов начнется автоматически,
с заданной песни. нажмите кнопку Menu для
отображения музыкального меню фотографий в режиме
навигатора. Вы можете выбрать воспроизведение или
паузу при воспроизведении песни, выбрать другой
режим воспроизведения, и т.п.
- Show lyrics (Показать текст): Эта опция доступна
для песенных текстов. Кнопками ◄/► установите
синхронность текста.
- Audio only (Только звук): Выберите и нажмите OK
для прослушивания музыки при выключенном экране.
Нажатием любой кнопки включите экран снова.
4. Нажмите соответствующие кнопки на пульте
дистанционного управления для выполнения возможных
функций, которые показаны в функциональной строке в
нижней части ТВ экрана.
Видео
Для просмотра доступных видеофайлов.
1. Выберите Media center > Video (Медиа-Центр > Видео),
нажмите кнопку OK для перехода к просмотру файлов с
помощью файлового навигатора.
2. Используя кнопки ▲/▼/◄/► выберите видео либо в
основном окне навигатора, либо в его окнах более
низкого уровня точно таким же способом, что и при
использовании функции отображения фотографий, и
нажмите кнопку Menu для отображения музыкального
меню в режиме папок.
- Sort (Сортировать): Сортировка папок и видео файлов
по типу, дате изменения или наименованию.
- Edit (Редактирование): Копирование, вставка или
удаление выбранного видео файла.
- Parser (Парсер): Вы можете выбрать опцию Recursive
(Рекурсивное) для отображения видеофайлов из все
папок нижнего уровня.
3. Выберите видео, нажмите OK для просмотра,
воспроизведение начнется автоматически, начиная с
выбранного видеофайла. нажмите кнопку Menu для
отображения меню видеофайлов в режиме навигатора.
Вы можете выбрать воспроизведение или паузу,
выбрать различные режимы воспроизведения, режим
экрана и заданные установки изображения и т.п.
4. Нажмите соответствующие кнопки на пульте
дистанционного управления для выполнения возможных
функций, которые показаны в функциональной строке в
нижней части ТВ экрана.
Определение времени
Для цифровых каналов пользователь может установить
отображение времени на экране телевизора следующим
образом.
Русский
RU
8
Page 22

Дополнительные функции
1. Нажмите кнопку Menu на пульте дистанционного
управления и выберите Timer > Clock > Auto
synchronization (Таймер > Часы > Авто синхронизация).
2. Нажмите кнопки ◄/► для выбора On (Вкл).
Назначение декодера канала
Декодеры для аналогичных каналов могут быть
подсоединены к разъему AV. Назначьте данный ТВ-канал
как декодируемый. Потом назначьте разъем, к которому
подключен декодер.
1. Нажмите Menu на пульте дистанционного управления и
выберите Setup > Decode (Настройка > Декодирование).
2. Нажмите OK/► для входа в список.
3. Нажмите кнопки ▲/▼ и выберите канал для
декодирования.
4. Нажмите кнопку OK для выбора или отмены выбора
канала.
5. Для возврата в предыдущее меню нажмите кнопку
Menu.
Диагностика цифровых телеканалов
1. Нажмите кнопку Menu на пульте дистанционного
управления и выберите Setup > Diagnostics
(Настройка > Диагностика).
2. Нажмите OK/► для отображения сигнальной
информации о текущем цифровом канале, такой как
мощность сигнала, частота и пр.
Сдвиг времени
Эта функция дает возможность записать ТВ-программу
таким образом, чтобы Вы не пропустите нужную
передачу даже в том случае, когда Вас нет дома. Перед
использованием данной функции следует убедиться
сначала, что к ТВ-приемнику подключено устройство USB.
При первом подключении выполнить настройку устройства
USB с инсталляционного диска.
1. Нажать кнопку Menu на пульте дистанционного
управления и выбрать опцию Setup > Time shift
(Настройка > Сдвиг времени).
2. Нажимать кнопку ◄/► для выбора опции On (Вкл.),
чтобы включить опцию сдвига времени, затем нажать
кнопку Exit, чтобы закрыть меню.
3. Нажать кнопку Option на пульте дистанционного
управления и выбрать опцию Time shift (Сдвиг
времени), а затем нажать кнопку OK, чтобы подтвердить
выбор.
4. Следует выполнять указания, которые будут появляться
на экране в процессе настройки.
5. После завершения настройки диска нажать кнопку
Option и выбрать опцию Time shift (Сдвиг времени).
6. Нажать кнопку OK, чтобы выбрать меню функции сдвига
времени.
- Нажать красную кнопку, чтобы сделать паузу при
воспроизведении изображения и начать ввод сдвига
времени.
- Нажать красную кнопку, чтобы выполнить
воспроизведение записанного отрывка.
- Когда исчезнет меню таймера и останется только
счетчик, можете нажать красную кнопку или OK для
доступа к меню таймера.
- Нажать зеленую кнопку для быстрой перемотки назад
или желтую кнопку для быстрой перемотки вперед.
- Нажать синюю кнопку, чтобы выйти из функции сдвига
времени.
Примечания:
- Перед подключением USB устройства к ТВ,
удостоверьтесь, что данные устройства сохранены.
Так вы избежите потерю информации.
- Рекомендуем использовать USB устройство со
свободным файлом более 1Гбайт и скоростью диска
более 5 Мбит/с.
- Чем больше размер файла – тем больше время
записи.
- Если вы переключаете канал в сдвиге времени,
появится сообщение Yes (Да) или No (Нет). Выбрав
Yes (Да), вы можете выйти из функции сдвига
времени и переключить канал.
Перезаписать участок
Позволяет сбросить настройки на вашем телевизоре к
значениям, заданным производителем по умолчанию.
1. Нажмите кнопку Menu на пульте дистанционного
управления и выберите Setup (Настройка), затем
нажмите OK для подтверждения.
2. Выберите функцию Reset shop (Перезаписать участок)
и нажмите OK/► для входа.
3. Для ввода пароля используйте цифровые кнопки.
4. С помощью кнопок ◄/► выберите OK и нажмите OK для
подтверждения.
5. Появится меню Initial setup (Первоначальные
настройки). Следуйте соответствующим инструкциям.
Изменение параметров ввода
Вы можете конфигурировать Ваш ТВ в соответствии с
подключенным к нему оборудованием.
1. Нажмите кнопку Menu на пункте дистанционного
управления и выберите Setup > Input settings
(Настройка > Настройки ввода).
2. Нажмите OK/► для входа в Input settings (Настройки
ввода).
3. Нажмите ▲/▼ для выбора соединителя, с помощью
которого подключается оборудование.
4. Нажмите кнопку ◄/► для выбора типа аппаратуры,
соединенной с этим соединителем.
5. Нажмите Menu для возврата в меню Setup (Настройка).
После выполнения конфигурирования, выбранная метка
источника будет отображаться после наименования
соответствующего гнезда в списке источников сигналов
после нажатия кнопки Source на пульте дистанционного
управления или кнопки OK на телевизоре.
Примечание: Не все модели имеют кнопку OK на
корпусе.
Использование гида EPG
(электронной программы передач)
С помощью EPG можно вызвать список телепередач.
С помощью EPG Вы можете искать, выбирать и
просматривать программы.
1. Нажмите Guide на ПДУ, появится меню Now and
Next EPG (EPG (электронный гид)), позволяющий
информировать о текущей и следующей программе
каждого канала. Переключение каналов с помощью
навигационных кнопок.
2. Для показа 8 Days EPG (программы EPG на 8 дней)
пользуйтесь разноцветными кнопками.
- Prev day (Предыдущий день) (кнопка красного цвета):
Выводит программу EPG предыдущего дня.
- Next day (Следующий день) (кнопка зеленого цвета):
Выводит программу EPG следующего дня.
RU
9
Page 23

Дополнительные функции
- View detail (Показать подробности) Если есть,
выведите описание данной программы на экран.
- Type lter (Тип фильтра) (кнопка синего цвета): Фильтр
гида программ для цифровых ТВ каналов.
• Нажмите синюю кнопку для показа типа программ и
списка субтитров.
• С помощью кнопок гида на пульте дистанционного
управления выбирайте разные типы программ и
субтитров.
• Выберите один или больше типов, которые Вы
хотите пометить в списке Type (Тип), потом нажмите
OK для выбора (или не выбирать). При этом слева от
выбранного типа появится отметка. При выборе типа,
Вы автоматически выбираете и все его подтипы.
• Также, пользователь может выбирать среди
подтипов, не делая предварительного выбора типа.
• Нажмите синюю кнопку для выхода из списка типов и
подтипов.
• После фильтрования будут отмечены все ваши
любимые ТВ - программы.
- Add schedule (Добавь график) (Option): Нажмите
Option на дистанционном управлении для вызова
меню Schedule list (Список по графику). Для
подробностей по записи графиков обратитесь к
разделуСписок по графику.
3. Нажмите Guide/Exit для выхода из EPG и переключения
на выбранный канал.
PVR (Personal Video Recorder)
(Персональный видеомагнитофон)
Позволяет записать любимые ТВ программы. Перед
включением включите USB память.
Примечание: Из-за специфических национальных
1. Нажмите на пульте дистанционного управления Option и
2. Нажмите OK/►.
3. Нажмите:
4. Во время записи, появится PVR миниокошко,
5. Чтобы просмотреть записанную программу, надо
требований ПВ недоступен в Финляндии.
выберите Quick access > PVR (быстрый доступ > PVR).
- красную кнопку для начала записи записанный файл
будет в PVR папке Media center > Video (МедиаЦентр > Видео) и поименована номером канала;
- зеленую кнопку остановить запись.
- ▲/▼/◄/► регулировка записи.
показывающее процесс записи.
сначала выйти из режима PVR и войти в режим
Media center > Video (Медиа-центр > Видео).
Выбрать папку PVR, затем выбрать соответствующий
записанный файл. Нажать кнопку OK, чтобы начать
воспроизведение. (Такой же порядок действий
выполняется, если пользователь записывает цифровую
радио программу).
Примечания:
- При использовании карточки CI+ функция PVR
отключается.
- Доступно только для цифровых каналов.
- Поддерживает только USB память формата FAT32.
- Перед подключением USB устройства
удостоверьтесь, что вы записали данные и
не потеряете важные данные из-за плохого
функционирования.
- ем больше размер памяти USB устройства для
функции PVR, тем больше время записи.
- Если вы хотите сменить канал или источник
во время записи, сохраните информацию перед
переключением.
- Воспроизведение невозможно, если объем файла
превышает предельно допустимое значение, не
поддерживается формат, есть повреждения файла,
а также при неудачном декодировании.
- Не отключайте USB память во время читки или
передачи, иначе система или устройство могут
быть повреждены.
Список выполнения записей по расписанию
Эта функция используется для выполнения записей по
расписанию.
1. Нажмите кнопку Option на пульте дистанционного
управления и выберите опцию Quick access > Schedule
list (Быстрый доступ > Список видеозаписей).
2. Нажмите кнопку OK/► для отображения списка записей.
3. Для добавления записей в Ваш список, нажмите сначала
красную кнопку для отображения Schedule list (Список
записей по расписанию). Затем,
- Channel number (Номер канала): используя кнопки
◄/► выберите номер канала.
- Start date (Дата начала записи): Используйте
цифровые кнопки для ввода даты начала записи.
- Start time (Время старта): установите время начала
записи.
- Stop time (Время остановки записи): установите время
остановки записи.
- Schedule type (Тип расписания):
• Включите Reminder (Напомнить), который Вам
напомнит, когда надо включиться в график, для
которого Вы установили время. Если оно истечет,
а Вы не совершили никакого действия, диалоговое
окно исчезнет и не будут предприняты никакие
другие действия.
• Включите Record (Рекорд), когда решите проверить
настройку графика и когда подойдет время,
которое Вы установили. Если время истечет, а Вы
не совершили никакого действия, запись графика
начнет автоматически.
- Repeat type (Тип повторения): установите различные
режимы повторной записи.
4. Нажимайте кнопки ▲/▼/◄/► для выбора Add
(Добавить), затем нажмите кнопку OK, чтобы выполнить
добавление Вашей установки в Ваш список записей по
расписанию.
5. Нажмите красную кнопку, чтобы повторить приведенные
выше процедуры и занести другую позицию в
расписание.
6. Если Вы хотите отредактировать или удалить запись
из расписания, то надо выбрать эту запись и нажмите
кнопку OK, чтобы войти.
7. Нажмите Exit для выхода из меню.
Примечания по паролю в функции Parental Control Lock
(Замок родительской блокировки):
- Пароль по умолчанию: 1234. Пользователь может
изменить его на любой другой.
- Супер пароль 0423. Если вы забыли свой пароль, введите
супер пароль для перехода через любой пароль.
Дизайн и характеристики могут быть изменены без уведомления.
Русский
RU
10
Page 24

IF+/-
IF+/-
CEC
IF+/-
Serial TS in
Power supply
SOC
ADC
HDMI RECEIVER
CVBS DECODER
3D COMB FILTER
MPEG4 DECODER
SCALER
HDMI1
HDMI2
HDMI3
HDMI 1.3
SWITCH
(4 IN 1)
TMDS
I/F
VGA In
Scart
DVB-T/C
Tuner
YPbPr
Audio in
Head
phone
USB
LVDS
DDR
DDR
JTA
G
CI
Socket
Parallel
TS
CI Interface
IP/GPIO
FLASH
AUDIO
AMP
USB
VGA
Audio
In
4052
IR
KEY
Panel
LV
DS
DDR3
Nor
Flash
64Mbit
Audio Amp.
Spdif
Out
Speaker
YPbPr in
MEMC
Flash
DDR3
DDR
JTAG
LVDS IN
LVDS TX A
LVDS TX B
FLASH
GPIO
LV
DS LVDS
Panel
LV
DS
Page 25

Технические характеристики моделей
1. Жидкокристаллическая панель
Видимый размер экрана, мм
Размер по диагонали, см
Яркость, кд/м
Угол обзора, градусов
Разрешение экрана, пикселей
Срок службы, лет
Количество цветов
2. Питание
Входное напряжение
Потребляемая мощность, Вт
Потребляемая мощность (в режиме
ожидания), Вт
3. Внешние входы
Антенный
AV
SCART
USB
VGA
HDMI
Компонентный YPbPr
оловные телефоны
Г
4. Совместимость
Система цветности
ПК
5. Формат экрана
6. Система управления пользователя
7. Звуковая мощность (RMS)
8. Размеры, мм
9. Масса (нетто), кг
10. Рабочая температура,
11. Рабочая влажность, %
12. Температура хранения,
13. Влажность хранения, %
2
T32E32DU
697.7 х 392.3
80
450
178\178
T32ED33DU
697.7 х 392.3
80
300
178\178
T39ED33DHU
853.9 х 480.3
99
300
176\176
1366 x 768
3
16,7 млн. цветов
AC ~ 220-240 В, 50Гц
70
90 70
< 1 Вт
75 Ом \ PAL, SECAM, B/G, D/K, I\ NICAM\ DVB -T, DVB - C
2
1
1
1
Тип А HDMIх3
1
1
2
1
1
1
Тип А HDMIх3
1
1
PAL/SECAM/NTSC
VGA\ SVGA\ XGA
2
1
1
Тип А HDMIх3
1
16/9
ПДУ + меню
2х 5 Вт
183х 764x 538
9.7
2х 5 Вт
183х 764x 538
9.7
2х 8 Вт
187х 964x 694
12.2
5 ~ 35
20 ~ 80
-15 ~ 45
10 ~ 80
T42E32DHU
930.2 х 523.3
107
400
178\178
1920 x 1080
100
2
11
1
1
Тип А HDMIх3
1
11
2х 8 Вт
231х 996x 683
14.5
Примечание:
1. Технические характеристики телевизора, указанные в этом руководстве, могут быть изменены без предварительного
уведомления.
2. Рисунки и изображения экрана, указанные в данном руководстве приведены в качестве объяснительного примера, и
могут незначительно отличаться от реальных операций. Изменения дизайна выполняются без предварительного
уведомления.
3. Жидкокристаллическая панель изготавливается с помощью высокопрецизионной технологии, позволяя вам отчетливо
видеть мелкие детали изображения. Иногда на экране может появиться несколько неактивных элементов изображения в
виде фиксированных точек белого, синего, зеленого, красного или черного цвета. Это не влияет на эффективность
работы устройства, не является неисправностью и не подлежит сервисному обслуживанию.
КОМПЛЕКТАЦИЯ:
•Телевизор – 1 шт.
•Пульт дистанционного управления – 1 шт.
•Батареи ААА – 2 шт.
•Руководство пользователя – 1 шт.
•Переходник на SCART – 1 шт.
•Саморезы крепления опоры - комплект.
•Винты настенного крепления - 2 шт *
•Гарантийный талон – 1 шт.
* - только для модели T42E32DHU
 Loading...