

Page 1

Руководство по эксплуатации
Модель:
T19E29U T19E27U
T22E29U T24E27U
T24E29U T22E27U
Телевизор цветного изображения
с жидкокристаллическим экраном
со светодиодной подсветкой
Page 2

Table of Contents
Chapter 1: Introduction
Precautions .........................................................................................................................................
Product .............................................................................................................................................
Power and Plug ................................................................................................................................
Power Cord and Signal Cable ..........................................................................................................
Use Environment ..............................................................................................................................
Cleaning ...........................................................................................................................................
Hanging the TV Set on the Wall .......................................................................................................
Buttons on the TV
Sockets ................................................................................................................................................
Remote Control Functions .................................................................................................................
Chapter 2: General Operation
Switching on .......................................................................................................................................
Switching off ........................................................................................................................................
Automatic Channel Set-up .................................................................................................................
Smart Channel Set-up ........................................................................................................................
Manual Channel Set-up ......................................................................................................................
Fine Tuning a Channel .......................................................................................................................
Setting the Sound System.................................................................................................................
Programme Edit..................................................................................................................................
...............................................................................................................................
3
3
3
3
3
3
3
4
4
6
7
7
8
8
8
8
8
8
Chapter 3: Advanced Functions
Adjusting the Picture ............................................................................................................................
Adjusting the Sound ...........................................................................................................................
Function Settings ................................................................................................................................
Selecting a Signal Source ..................................................................................................................
Geometry Settings ..............................................................................................................................
USB Functions ....................................................................................................................................
Chapter 4: Other Information
Troubleshooting ..................................................................................................................................
2
9
10
10
11
12
12
14
Page 3
Chapter 1
Introduction
Precautions
Read all of the instructions before operating the set.
Keep these instructions well for future use.
Product
Do not block or cover the ventilation openings on the
back cover.
Do not push objects of any kind into this unit through
the cabinet slots as they could touch the current
carrying parts or short-circuit parts, resulting in fire,
electric shock, or damage to the unit.
Do not attempt to open the cabinet
. There are no parts inside you can service by
damage
yourself. Refer all servicing to qualified personnel.
Do not touch the screen surface with fingers as this
may scratch or mar the TV screen.
Do not impact the TV screen with hard pressure as
this may damage the TV screen severely.
Power and Plug
Unplug the set under the following conditions:
- If the set will not be used for a long period of time.
- If the power cord or the power outlet/plug is damaged.
- Follow the instructions to install and adjust the
product. Adjust those controls that are covered in this
operating instructions as improper adjustment of other
controls may result in damage. If this happens, unplug
the set and refer to the service personnel.
- If the set is subject to impact or has been dropped to
have the cabinet damaged.
Where the mains plug or an appliance coupler is
used as disconnect device, the disconnect device
shall remain readily operable.
(* Where an all-pole mains switch is used as the
disconnect device, the switch shall remain readily
operable.)
Power Cord and Signal Cable
Do not allow anything to rest on or roll over the power
cord and the signal cable.
Protect the power cord and the signal cable from being
trampled.
Do not overload the power cord or the power outlet.
Do not expose the power cord and the signal cable to
moisture.
as this may cause
Use Environment
Do not place the set on an unstable cart, stand, or table.
Place the set on a place that allows good ventilation.
Do not use the set near damp, and cold areas. Protect
the set from overheating.
Keep the set away from direct sunlight.
Apparatus shall not be exposed to dripping or splashing
and no objects filled with liquids, such as vases, shall be
placed on the apparatus.
Do not use the set near dust place.
Cleaning
Dust the set by wiping the screen and the cabinet with
a soft, clean cloth or some special liquid cleaner.
Do not apply excessive force to the screen when
cleaning.
Do not use water or other chemical cleaner to clean the
screen as this may damage the surface of the TV
screen.
Hanging the TV Set on the Wall
Warning: This operation requires two people.
To ensure a safe installation, observe the following safety
notes:
Check that the wall can support the weight of the TV
set and wall mount assembly.
Follow the mounting instructions provided with the wall
mount.
The TV set must be installed on a vertical wall.
Make sure to use only screws suitable for the material
of the wall.
Make sure that the TV set cables are placed so that
there is not danger of tripping over them.
All other safety instructions about our TV sets are also
applicable here.
Note
Graphics contained within this publication are
presentation only.
3
Page 4
Introduction
Buttons on the TV
1. CH+/- (CHANNEL UP/DOWN) button
Scans up/down through the channel list. In the menu system, they act like the up/down direction buttons on the
remote and adjust menu controls.
2
. VOL+/- (VOLUME UP/DOWN) button
Increases/decreases the volume. In the menu system, they act like the right/left direction buttons on the
remote and adjust menu controls
. MENU ( ) button
3
Brings up the main menu or press to return to the previous menu.
SOURCE ( ) button
Press to select a signal source.
5. POWER ( )button (Note: For some models, the POWER button is not available.)
Turns the TV on or standby.
Note: The location and names of the function buttons and power button on the TV may vary according to TV model.
and not all buttons available on all models.
Sockets
Note: The location and names of the sockets on the TV may vary according to
TV model, and not all sockets available on all models.
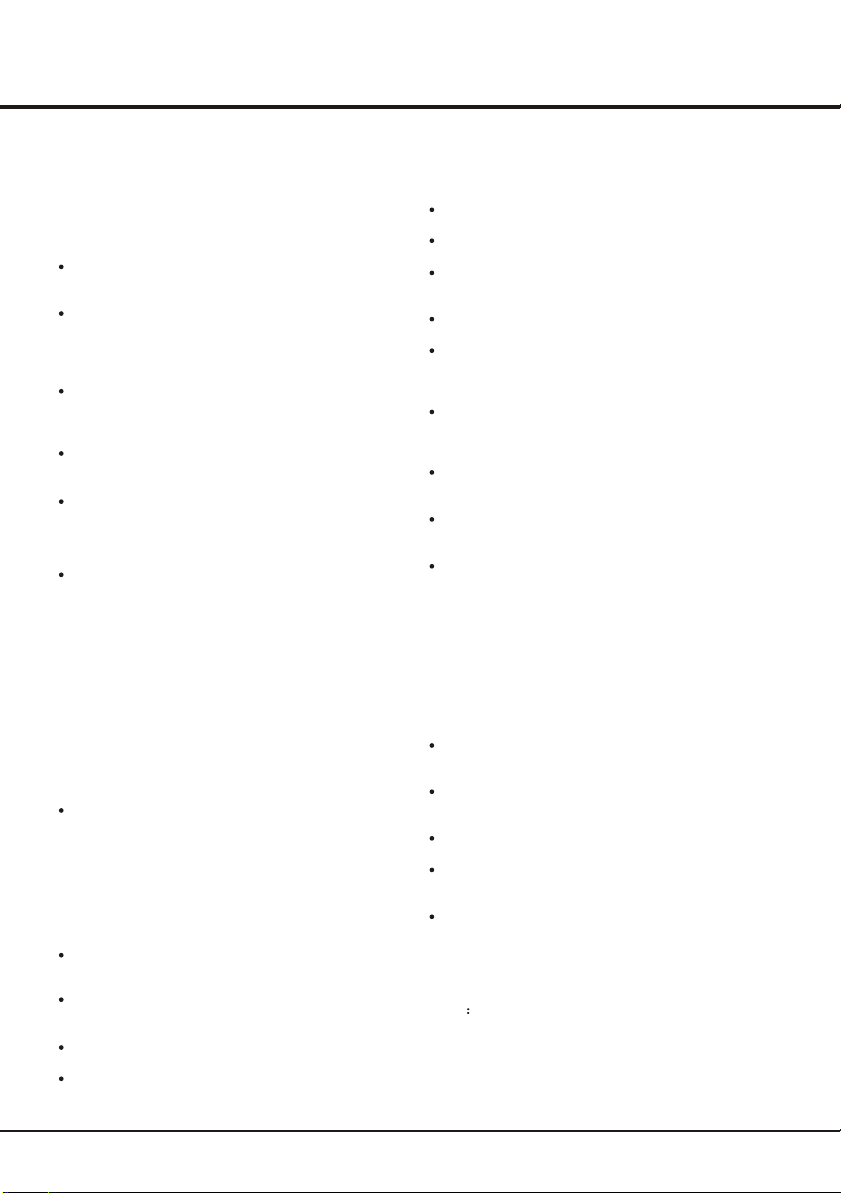
HDMI IN (input)
HDMI IN
The HDMI can be used to connect a
PC with a compatible video card installed, certain DVD players or a high-definition
compatible digital satellite decoder. This socket p
connection that carries both video and audio data by way of an integrated mini-plug
cable.
(High-Definition Multimedia Interface) socket
rovides an uncompressed digital
AV 1 IN
VIDEO
AUDIO
USB
AV 1 RCA audio + video sockets (input)
L
R
The AV 1 IN sockets can be used to connect a range of equipment, including video
recorders, camcorders, decoders, satellite receivers, DVD players, or games
consoles. The VIDEO IN socket provides
USB socket (input)
The socket can be used to connect an USB device.
Note: The number of USB sockets on the TV may vary according to TV model.
Headphone socket (output)
This socket can be used to connect headphones or stereo earphones.
Warning: Excessive sound pressure from earphones and headphones can
cause hearing loss..
4
composite video connection.
Page 5
Introduction
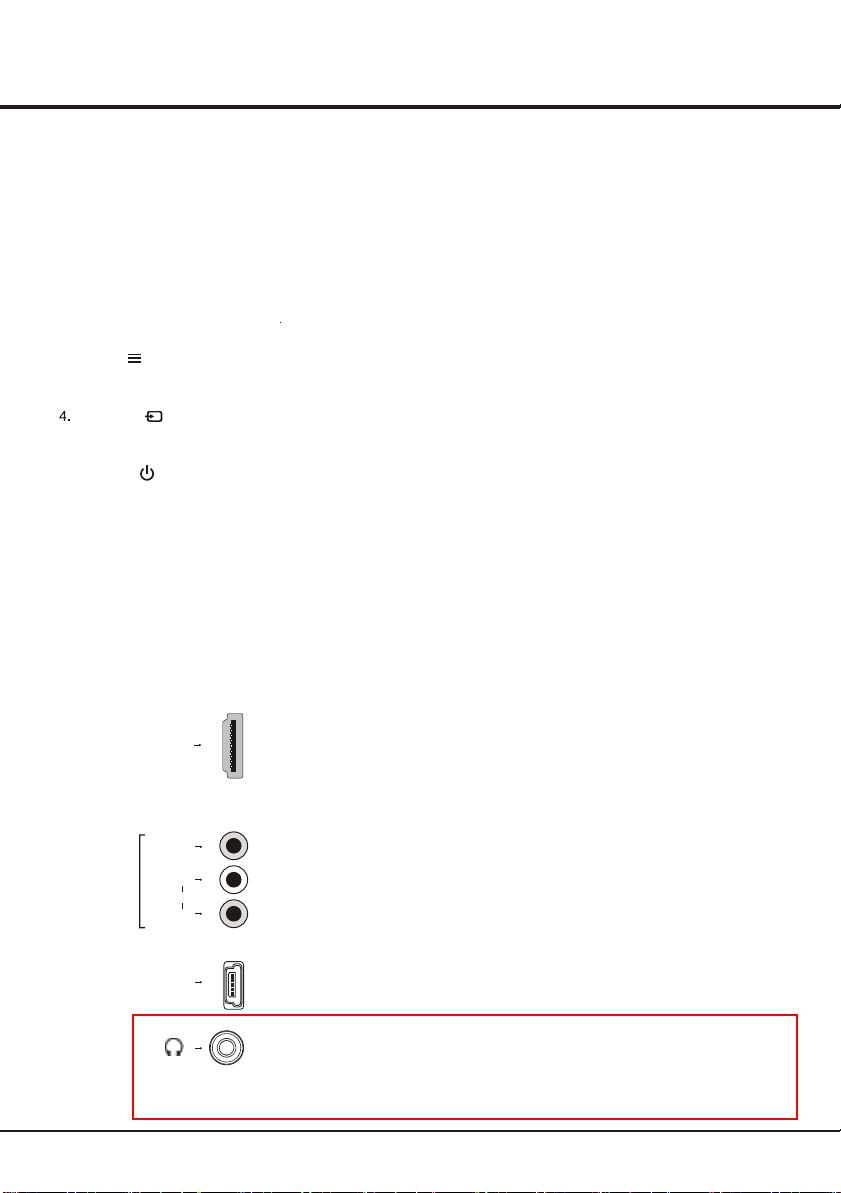
COMPONENT
IN
(Y PB PR)
AV 2 IN
VIDEO
OUT
AUDIO
OUT
adapter
or
AUDIO
OUT
PR/CR
PB/CB
Y/VIDEO
CMP/VGA
AUDIO IN
Y/VIDEO
CMP/VGA
AUDIO IN
VGA
Use an RCA video cable to connect your TV to a compatible video receiver.
The AUDIO OUT adapter socket can be used to connect a audio adapter cable with
AUDIO L&R OUT sockets.
R
L
Use an RCA audio cable to connect your TV to a compatible audio receiver.
YPBPR component sockets (input)
These YPBPR sockets can be used to connect a device that has component video
sockets, such as a DVD player. The component sockets can recognize if the device
you're connecting to is Y PB PR compatible or Y CB CR compatible. The component
sockets provide excellent picture quality because the video is separated into three
R
L
separate parts.
AV 2 RCA audio + video sockets (input)
The AV 2 IN sockets can be used to connect a range of equipment, including video
RR
LL
recorders, camcorders, decoders, satellite receivers, DVD players, or games
consoles. The VIDEO IN socket provides
Note:
AV2 shares video(Y/VIDEO) and audio sockets with YPBPR.
composite video connection.
VGA socket (input)
This socket can be used to connect a computer.
Note: VGA shares the same audio sockets with YPBPR.
ANTENNA IN
SPDIF
ANTENNA IN socket (input)
This socket can be used to connect the outside aerial or cable network.
SPDIF socket (output)
This SPDIF socket can be used to connect a compatible digital audio receiver.
5
Page 6
Text
VOL CH
RC3000M13
Introduction
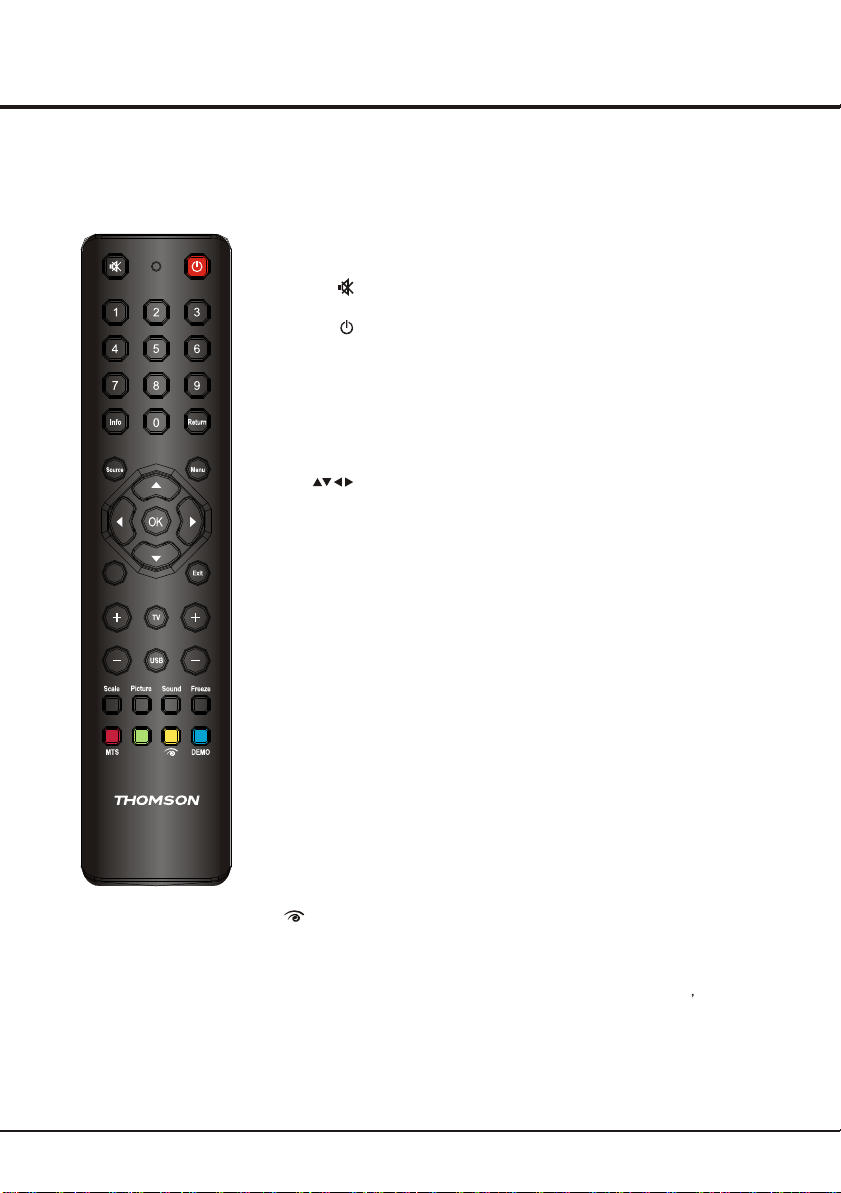
Remote Control Functions
Most of your television's functions are available via the menus that appear on the
screen. The remote control supplied with your set can be used to navigate through
the menus and to configure all the general settings.
(MUTE) Reduces the TV's volume to its minimum level. Press again
to restore the volume.
(On/Off button) Turns the TV on or off.
0-9 (numeric buttons) Enters channel numbers.
Displays the status information.
Info
Returns to the previous channel in TV mode.
Return
Source Press to select a signal source.
Menu Brings up the menu system.
(up, down, left and right direction buttons) Highlights different items
in the menu system and adjusts the menu controls.
Confirms your selection.
OK
Text
Toggles between Text, Mix, PAT and TV mode.
Note: For some models, there is no teletext function, and this button
is not supported.
Exit Exits the menu system or teletext mode.
VOL +/- Increases or decreases the TV's volume.
TV Access the TV mode.
Access the USB mode.
USB
CH +/- Scans up or down through the current channel list. For some models
with teletext function, The two buttons can be used to browse
previous page or next page of teletext.
Scale
Picture Toggles through the picture preset settings: User, Soft, Standard
Sound Toggles through the sound modes: User, Standard, News and Movie.
Freeze Freezes the picture.
MTS button
DEMO button
Colored buttons
Selects the picture size: Standard, Full, , Wide Screen, Zoom,
Original
Expand, and Natural if available.
and Bright.
Toggles through available MTS settings: Stereo, NICAM Mono,
DUAL1, DUAL2, or Mono in TV mode.
No function. button
No function.
Operates corresponding button on the teletext page.
Note: For some models, there is no teletext function and these
color buttons are not supported.
Subtitle
6
Page 7
Chapter 2
General Operation
Switching on
Follow the instructions on this page on how to switch on your TV set and the remote
control before going on to following pages describing how to use the channel set-up
procedure.
1. Insert two AAA batteries in the remote control.
Precautions on using batteries:
- Only use the battery types specified.
- Make sure you use the correct polarity.
- Do not mix new and used batteries.
- Do not use rechargeable batteries.
-
Do not expose batteries to excessive heat such as sunshine, fire or the like,
throw them in a fire, recharge them or try to open them, as this could cause
them to leak or explode.
- Remove the batteries from the remote control if you are not using it for a long
period of time.
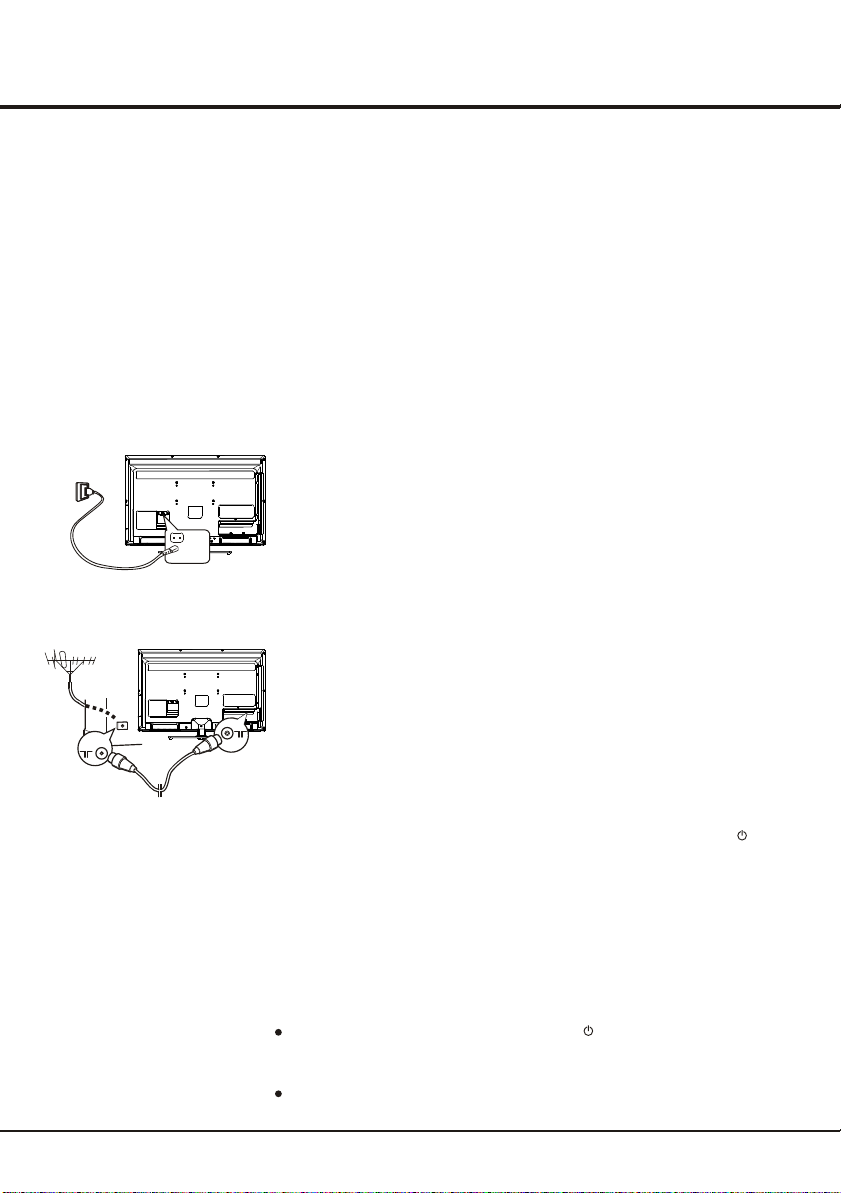
2. Connect the power cable FIRST to the television, THEN to a mains socket.
(Note: If the power cable is connected to the television, please only connect the
power cable to the mains socket.)
Your TV set should only be connected to an AC supply. It must not be connected
to a DC supply. If the plug is detached from the cable, do not, under any
circumstances, connect it to a mains socket, as there is a risk of electric shock.
Note: The figures are for representation only. The location of the power socket at
the back of the television might differ depending on the model.
3. Connect an outside aerial to the ANTENNA IN socket at the back of the TV set.
The aerial socket (75 OHM - VHF / UHF / cable) can be used for connecting
an external aerial or other equipment fitted.
4. When powered on, the TV will be turned on directly or be in standby.
If the power indicator lights up, the TV set is in standby mode. Press the
button on the remote control or on the TV set (if available) to turn on the TV.
Switching off
To put the TV set into standby mode, press the button on the remote control
or on the TV (if available), the TV set remains powered up, but with low energy
consumption.
To switch off the TV set, unplug the mains socket from the mains outlet.
7
Page 8
General Operation
Automatic Channel Set-up
Channel set-up involves selecting all the settings required
to be able to search for and store all the channels you can
receive. Make sure that the television is switched on and
follow all the steps in turn specified hereafter.
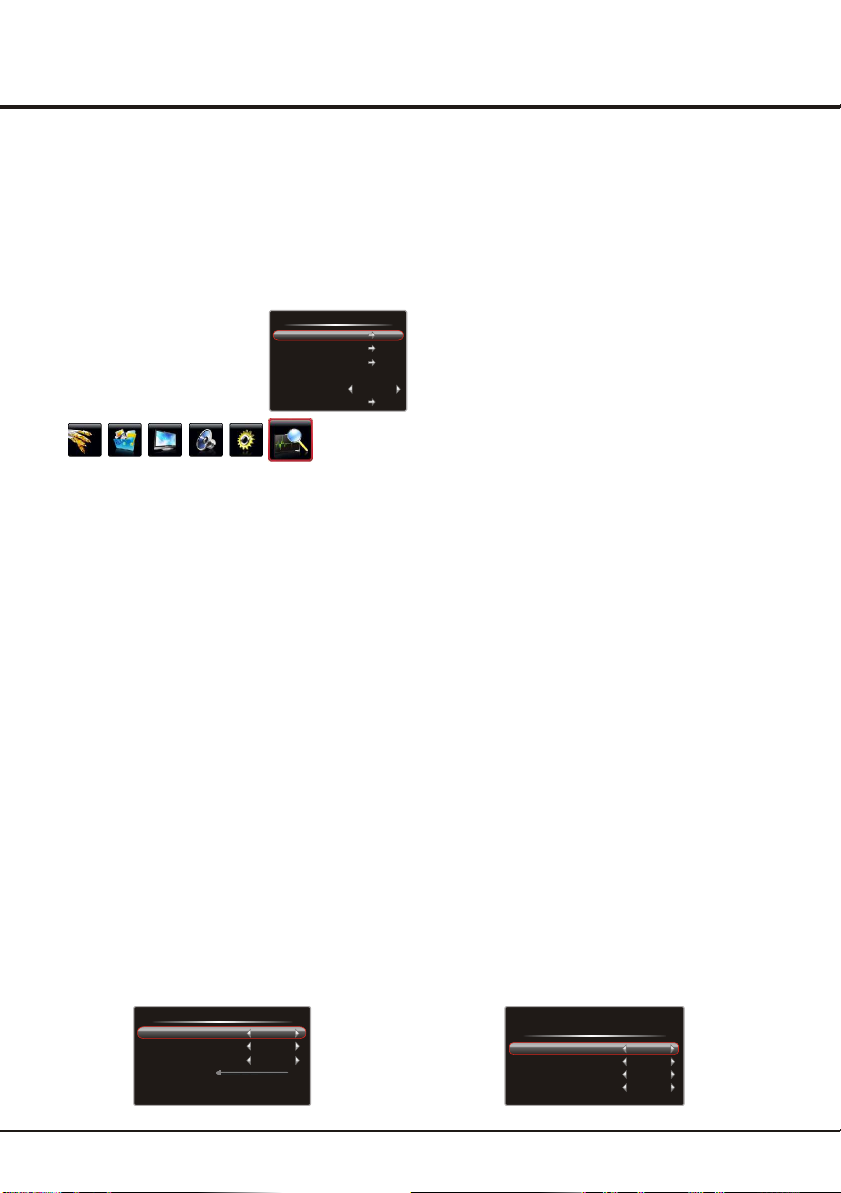
Display the menu by pressing the Menu button. Press the
left or direction button to select the Channel icon
right
and press the or down direction or OK button to enter
the Channel menu.
Press the up or down direction button to select
1. the
Auto Tuning option.
2. Press the direction or OK button to start channel
search.
Note: Depending on the number of channels you
receive, it may take several minutes for the channel
search to finish. If you want to interrupt the process,
press the Menu button. The channels already found
will be stored.
3.
Channels are arranged in a pre-set order. Refer to the
following sections if you want to fine tune or skip a
channel, or swap two channels.
up
right
Channel
Auto Tuning
Smart Tuning
Manual Tuning
Fine-Tune
Sound System
Prog. Edit
42.25 Mhz
D/K
Smart Channel Set-up
This operation will keep all the existed channels and add
newly found channels to the end of the channel list.
1. Activate the Channel menu and p
direction button to select
2. Press the direction or OK button to start smart
tuning.
Note: If you want to interrupt the process, press the
Menu button. The channels already found will be
stored.
right
ress the up or down
the Smart Tuning option.
Manual Channel Set-up
Follow the below procedure if you find that some channels
have not been stored after the automatic set-up as well
as the intelligent set-up.
Manual Tuning
Channel Number
Frequency Range
Frequency
Search
Menu key to return Exit key to exit
1
VHFL
49.70 Mhz
0%
1. Activate the Channel Number menu and p
or down direction button to select
option.
2. Press the direction or OK button to enter the
Manual Tuning menu.
3. Select the Channel Number option and press the
or right
store the channel that will be found.
4. If necessary, press the up or down direction button to
select the Frequency Range option and
or right
and VHFL.
5. Press the up or down direction button to select
Frequency option and press the
button to search manually.
6.
Press Menu to return or Exit to close the menu.
right
irection button to select a channel number to
d
direction button to toggle among VHFH, UHF
the
the Manual Tuning
left or right
Fine Tuning a Channel
If the picture is not clear you can fine tune the channel.
1. Activate the Channel menu and p
down direction button to select
ress the up or
the Fine-Tune option.
2. Press the left or right direction button to fine tuning
3. Press Menu to return or Exit to close the menu.
Setting the Sound System
1. Activate the Channel menu and p
direction button to select
2. Press the direction or OK button to display the
selectable options.
3. Press the up or down direction button to
appropriate sound system: D/K, I, B/G or M.
.
4 Press Menu to return or Exit to close the menu.
right
ress the up or down
the Sound System option.
Programme Edit
You can use this function to skip a channel or swap two
channels.
1. Activate the Channel menu and p
direction button to select
2. Press the right direction or OK button to enter the
Prog. Edit menu.
Cur. Channel
Target Channel
Skip
Swap
the Prog. Edit option.
Prog. Edit
ress the up or down
1
1
Yes
?
ress the up
press the
direction
select an
left
left
8
Page 9
General Operation
Skipping a Channel
If a channel was stored twice or its reception is poor, you
can simply skip it. The skipped channels can not be
selected by pressing the CH +/- buttons.
1. select the
Press the up or down direction button to
Cur. Channel option and press the left or right
direction button to select the channel number to be
skipped.
2. Press the up or down direction button to select
Skip option and press the left or right
to select Yes.
the
direction button
3. Press Menu to return or Exit to close the menu.
Chapter 3
Adjusting the Picture
The menus for adjusting the picture are used to obtain the
best picture setting according to your preference, the type
of programme you are watching and the ambient lighting.
Display the menu by pressing the Menu button. Press the
left or right direction button to select the Picture icon and
press the or down direction or OK button to enter up
the Picture menu. The Picture options are as below:
Picture
Backlight
Picture Mode
Scale
Brightness
Contrast
Saturation
Sharpness
Hue
Color Temp.
Dynamic Contrast
Light Sensor
Natural Light
Note: Some options may be not available for certain
signal sources.
Backlight: this option can be used to adjust the
brightness of the backlight, depending on room lighting.
Use the left or right direction button to adjust.
Picture Mode: use the direction or OK right
display the selectable options, then press the up or down
direction button to scroll
Settings: User, Soft, Standard and Bright,
the right direction or OK button to confirm.
Note: When selecting
Backlight will restore to the defaulted setting in
factory. You are recommended to use the Bright mode
for vivid palette.
through the picture preset
Standard, Bright, Soft, the
100
Standard
Full
50
50
50
50
0
Standard
Off
Off
Off
button to
and press
Swapping Two Channels
1. select the
Press the up or down direction button to
Cur. Channel option and press the left or right
direction button to select a channel number.
2. Press the up or down direction button to select
Target Channel option and press the left or right
direction button to select the channel number to be
swapped.
3. Press the up or down direction button to select
Swap option and press the left, right
button to swap.
Scale: use the direction or OK
the selectable options, then press the up or down direction
button to scroll
Subtitle
Natural.
certain signal sources.) And press the right direction or OK
button to confirm.
Note:You are recommended to use the Full screen mode.
Do not use the display mode with black bands on both
sides of the picture (such as Standard) for long time,
otherwise the TV screen may be damaged permanently.
Brightness: adjusts the brightness of the picture.
Contrast: adjusts the difference between the light and
dark areas of the picture.
Saturation: adjusts the richness of color.
Sharpness: adjusts the crispness of the edges in the
picture.
Hue: adjusts the balance between the red and green
levels.
Note: Hue is available to be adjusted only when the
system of the video signal is NTSC.
Color Temp. (Color Temperature): adjusts the color
temperature of the picture. Use the direction or OK
button to display the selectable options, then press the up
or down direction button to scroll the color settings:
Cool for a more blue palette of picture colors; Standard and
Warm for a more red palette of picture colors
Dynamic Contrast
contrast automatically.
Light Sensor: press the left or right direction button to
select On or Off. When On is selected, the unit is in power
saving mode and can automatically adjust the backlight
according to the intensity of ambient light. Meanwhile, the
Backlight and Natural Light options in Picture menu are
.
not adjustable. At the same time, the Natural Light is
automatically set to Off. When Off is selected, the Backlight
and Natural Light options will be adjustable again.
Note: For some models, this option is not available.
Advanced Functions
right
button to display
through the picture size: Standard, Full,
, Wide Screen, Zoom, Expand,
(Note: some options may be not selectable for
: turns on this option to adjust the
right
through
the
the
direction or OK
Original and
.
9
Page 10
Advanced Functions
Natural Light : turns on this option to adjust the
brightness of the backlight according to the content of the
inputted signal automatically, so as to optimize the picture
quality and decrease the power consumption.
Press Menu to return or Exit to close the menu.
Adjusting the Sound
Display the menu by pressing the Menu button. Press
the left or right direction button to select the Sound icon
and press the or down direction or OK button to display
the Sound menu. The Sound options are as below:
Sound Effect: use the direction or OK
display the selectable options, then press the up or down
direction button to scroll
and User, Standard, News, Movie.
Bass: decreases or increases the bass of the TV using
the left or right direction button.
Treble: decreases or increases the treble of the TV using
the left or right direction button.
Balance: use the direction button to balance
the sound between the left and right speakers.
Smart Volume: turns on this option to keep the same
sound level for all channels.
up
right
left or right
Sound
Sound Effect
Bass
Treble
Balance
Smart Volume
Scene Mode
Standard
50
50
0
Off
Desk Top
button to
through the sound preset settings:
Function Settings
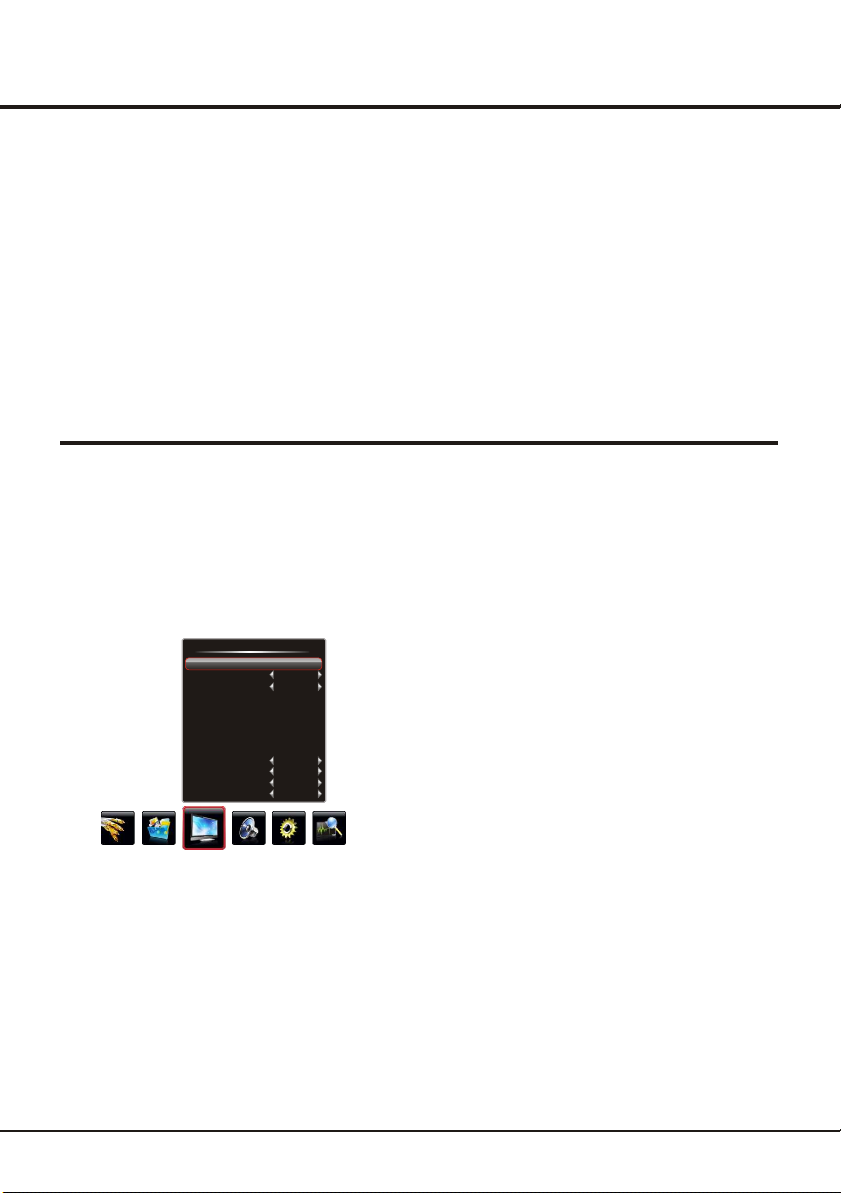
Display the menu by pressing the Menu button. Press the
left or right direction button to select the Setting icon
and press the up or down direction or OK button to enter
the Setting menu. The Setting options are as below:
Setting
Smart Switch
Language
DNR
Color System
Watch Time Limit
Time Setting
Sleep Time
Default
Note: Some options may be not available for certain
signal sources.
Smart Switch : button to
display the selectable options, then press the up or down
direction button to scroll the setting
or Switch.
confirm.
Switch: if an equipment, e.g. a DVD player, has been
connected to the sockets on the TV set and turned on,
e.g. AV1 sockets, the TV set will switch to that signal
source automatically (AV1 for this example).
Display: if an equipment, e.g. a DVD player, has been
connected to the sockets on the TV set and turned on,
e.g. AV1 sockets, the TV set will display a prompt
message on the screen. You can select Yes to switch
that signal source (AV1 for this example) or No to
to
ignore the prompt.
Off: disables the Smart Switch function.
Note: For HDMI source, the smart switch function is
available only when using a HDMI cable to connect the
equipment which turned on. And the smart switch function
is not available for AV2 source, because AV2 shares video
(Y/VIDEO) and audio sockets with YPBPR.
Language: use the direction or OK right
the selectable options.
Note: The available languages might differ depending
on the model.
use the direction or OK
right
And press the right direction or OK button to
through : Off, Display
button to display
Display
English
Standard
Auto
Off
No
Scene Mode: use the direction or OK
display the selectable options, then press the up or down
direction button to scroll the scene preset setting:
Desk Top, Hang Up.
right
button to
through
Press Menu to return or Exit to close the menu.
DNR (Dynamic Noise Reduction) : Improves the quality
of the picture in the case of poor reception. U
direction or OK
then press the up or down direction button to scroll
Off, Low, Standard and Strong.
button to display the selectable options,
se the
right
through
10
Page 11

Color System: use the right direction or OK button
to display the selectable options, then press the up or
down direction button to scroll though the color systems.
And press OK button to confirm.
Watch Time Limit: Press the right or OK button to enter,
then use the number buttons to input the password (The
default is 0000). Then press the left or right direction
button to select the limit time. To cancel the limit, select
Off. And you can also change the password: select the
Change Password item and press the right direction or
OK button to enter, then enter a new password twice.
Time Setting: Press the up or down direction button to
select the Time Setting item, then press the right
direction or OK button to enter.
Current Time: Press up, down direction button to select
the item and press OK to enter a submenu for time setting.
Press the left and right direction or number buttons to
set the Hour, Minute and Second for the current time.
Turnon Time: Press up, down direction button to select
the item and press OK to enter a submenu for time
setting. Press the left and right direction or number
buttons to set the Hour, Minute and Second for the
turn on time.
Wake Channel: Press the left and right direction or
number buttons to set a wake-up channel number.
Wake source: se the direction or OK
display the selectable options, then press the up or
down direction button to scroll all available
the right direction or
Note: The available color system might differ depending
on the model.
Note: If you forget the password, press the red button
and blue button, then press 0000 to override any existing
codes.
Setting
Smart Switch
Language
DNR
Color System
Watch Time Limit
Time Setting
Sleep Time
Default
signal sources.
Note: Only when the Wake source is TV, the
Wake Channel can be available.
Display
English
Standardl
U button to
Auto
Off
No
right
Current Time
Turnon Time
Wake Channel
Wake Source
Turnon Mode
Turnoff Time
Turnoff Mode
00:36:08
00:00:00
001
TV
Off
00:00:00
Off
through
To disable this function, select Off.
Turnoff Time: Press up, down direction button to select
the item and press OK to enter a submenu for time
setting. Press the left and right direction or number
buttons to set the Hour, Minute and Second for the
turn off time.
Turnoff Mode: select the times to turn off the TV at a
specific time. Use the direction or OK
display the selectable options, then press the up or
down direction button to scroll
On.
Sleep Time: sets a period of time after which the TV
set goes into standby mode, use the left or right
direction button to set the period (120 minutes maximum).
Default: restores all the settings to defaulted
settings in factory.
right
button to
through Off, Once and
Press Menu to return or Exit to close the menu.
Selecting a Signal Source
Display the menu by pressing the Menu button. Press the
left or right direction button to select the Source icon and
press the or down direction or OK button to enter the
up
Source menu.
Source
TV
AV 1
AV 2
HDMI2
HDMI2
HDMI
PC
YPBPR
1. Press the up, down, left or right direction button to
select your desired source.
Note: The available source might differ depending
on the model.
2. Press the OK button to confirm the selection.
Note: You can press the Source button on the remote
control to switch the source. But if the Smart Switch
function is activated, pressing the Source button can
switch among the sources with signal only.
Turnon Mode: select the times to turn on the TV at a
specific time. Use the direction or OK
display the selectable options, then press the up or down
direction button to scroll
right
button to
through Off, Once and On.
11
Page 12

Advanced Functions
Geometry Settings
Display the menu by pressing the Menu button. Press
the left or right direction button to select the Geometry
icon and press the or down direction or OK button to
enter the Geometry menu.
Note: This function is only available in PC mode.
Auto Setting: press the direction or OK button to
adjust the picture's position, phase and clock automatically.
The menu will auto exit when finishing the adjusting.
Phase: adjusts the picture if there is flicker of screen
letters, color misalignment, or blurring.
up
right
Geometry
Auto Setting
Phase
Manual Clock
H Position
V Position
50
50
0
60
Manual Clock: adjusts the clock sync of the picture.
H Position (Horizontal Position): adjusts the picture's
position left or right.
V Position (Vertical Position): adjusts the picture's
position upward or downward.
Press Menu to return or Exit to close the menu.
USB Functions
Connect a USB device to a USB socket and display the
main menu by pressing the Menu button, then select the
Multimedia icon and press the up or down direction or
OK button to enter the Multimedia menu.
Notes:
In USB disk catalog, pressing Menu can display
Multimedia menu and you can press the up or down
direction button to toggle among Film Show, Photo
Show, Music Show and Auto Play, then press the OK
button to confirm.
The short keys of USB include: the up, down, left, right
direction buttons, OK, Picture, Sound, Info, VOL+/- , etc.
Multimedia
Film Show
Photo Show
Music Show
Auto Play
Playing Film:
1. Select Film Show item, then press the right or OK
button to enter the USB device.
2. Press the left or right direction button to select the USB
disk symbol and press the OK button to enter the
selected disk.
3. Press the up, down, left or right direction button to select
a movie file, then press OK to play it.
4. When playing a movie, you can press the Menu button to
display the play console. For the play console, press the
left or right direction button to select an icon, then press
the OK button to confirm.
The play console includes:
FF(Fast Forward), Prev, Next, Stop, Repeat Mode, AB Repeat
setting, Info, SF(Slow Forward), Step Play, Time Search,
Brightness and Contrast.
5. Select the Stop icon in play console and press OK or
press Exit to return.
Play/Pause, FB( Fast Backward),
Showing Photo:
1. Select Photo Show item, then press the right or OK
button to enter the USB device.
2. Press the left or right direction button to select the USB
disk symbol and press the OK button to enter the
selected disk.
3. Press the up, down, left or right direction button to
select your desired picture file and press OK to show.
4. When showing pictures, you can press the Menu button
to display the play console. For the play console, press
the left or right direction button to select an icon, then
press the OK button to confirm.
The play console includes:
Rotate Right, Rotate Left, Zoom In, Zoom Out, Repeat
Mode, Brightness, Contrast and Info.
5. Select the Stop icon in play console, and press OK or
press Exit to return.
Play/Pause, Prev, Next, Stop,
Playing Music:
1. select Music Show item, then press the right or OK
button to enter the USB device.
2. Press the left or right direction button to select the USB
disk symbol and press the OK button to enter the
selected disk.
12
Page 13

Advanced Functions
3. Press the up, down, left or right direction button to
select your desired music file and press OK to play it.
4. When playing music, press the Menu button to
display the play console. For the play console, press
the left or right direction button to select an icon, then
press the OK button to confirm.
The play console includes:
Backward), FF(Fast Forward), Prev, Next, Stop, Repeat
Mode, Mute, Time Search and Info.
5. Select the Stop icon in play console, and press OK or
press Exit to return.
Play/Pause, FB( Fast
Auto Play
1. Select the Auto Play item and press right direction or
OK button to enter the USB device.
2. Press the left or right direction button to select the USB
disk symbol and press the OK button to auto play.
Note: This function is only available when the pictures
and music are synchronously located in the USB root
catalog.
3. Press Exit to return the USB root catalog.
Attention and Frequently Asked Questions:
Attention:
1. Some non-standard mobile storage device maybe
cannot be recognized. Please change to use the
standard device.
This system supports the following file formats:
2.
Picture format:
Video format:
MPEG2 MPEG1
Audio format:
Note: For coding files, there are many kinds nonstandard coding method, so this system can not be
guaranteed to support the file formats using any coding
method.
Frequently Asked Questions:
1. Under the following conditions, this system cannot
decode the file and the file cannot be play normally:
-The parameters of file, such as the pixel of picture,
code rate of audio and video file, sampling rate of
audio file, exceed the limit of the system;
-The format of file is not matched or the file is harmed.
Note: The code rate this system supports does not
exceed 20Mbps.
2. Hot plug: Do not disconnection when the system is
reading or transmitting data, avoid damaging the
system or the device.
JPEG BMP.
H.264 RM/RMVB MPEG4
MP3.
, etc..
3. Pay attention to the power supply of the device when
you are using a mobile hard disk or a digital camera.
If the power supply is not sufficient or not stable, you
may encounter problems during operating or can not
operate at all. In this case, please restart the device,
or unplug the device and plug it again, and ensure that
its power supply is normal.
4. The system supports standard USB1.1 and USB2.0
devices, such as standard U-disks, MP3 players,
mobile hard disks, etc..
5. For obtaining better audio and video quality, suggests
to use the external device which accords with USB2.0
standard.
6. When playing the video with high compression ratio,
these phenomenons, such as picture standstill and
menu long time response, are normal.
7. For some USB device with power supply, such as large
size hard disk, MP4, etc., Suggests using it with power
to avoid electric power shortage.
file, such as the pixel of picture, code rate of audio and
video file, sampling rate of audio file, exceed the limit
of the system;
13
The parameters of
Page 14

Chapter 4
Troubleshooting
Most problems you encounter with your TV can be
corrected by consulting the following troubleshooting list.
No picture, no sound
1. Check if the fuse or circuit breaker is working.
2. Plug another electrical device into the outlet to make
sure it is working or turned on.
3. Power plug is in a bad contact with the outlet.
4. Check the signal source.
No color
1. Change the color system.
2. Adjust the saturation.
3. Try another channel. Black-white program may be
received.
Remote control does not work
1. Change the batteries.
2. Batteries are not installed correctly.
3. Main power is not connected.
No picture, normal sound
1. Adjust the brightness and contrast.
2. Broadcasting failure may happen.
Normal picture, no sound
1. Press the Vol+ button to increase volume.
2. Volume is set to mute, press the mute button to restore
sound.
3. Change the sound system.
4. Broadcasting failure may happen.
Unorderly ripples on the picture
It is usually caused by local interference, such as cars,
daylight lamps and hair driers. Adjust the antenna to
minimize the interference.
Blank screen in VGA mode
Perhaps the TV can not recognize the resolution set by
the PC. Suggest to change to the best resolution or other
standard resolutions of the Windows system.
Snowy dots and interference
If the antenna is located in the fringe area of a television
signal where the signal is weak, the picture may be marred
by dots. When the signal is extremely weak, it may be
necessary to install a special antenna to improve the
reception.
Other Information
1. Adjust the position and orientation of the indoor/outdoor
antenna.
2. Check the connection of antenna.
3. Fine tune the channel.
4. Try another channel. Broadcasting failure may happen.
Ignition
Black spots or horizontal streaks appear, or the picture
flutters or drifts. This is usually caused by interference
from car ignition system, neon lamps, electric drills, or
other electrical appliance.
Ghost
Ghosts are caused by the television signal following two
paths. One is the direct path, the other is reflected from
tall buildings, hills, or other objects. Changing the direction
or position of the antenna may improve the reception.
Radio frequency interference
This interference produces moving ripples or diagonal
streaks, and in some case, loss of contrast in the picture.
Find out and remove the radio interference source.
14
Page 15

Содержание
Раздел 1: Введение
Меры предосторожности ................................................................................................................
Прибор ............................................................................................................................................
....................................................................................................
Электропитание и подключение
Сетевой шнур и сигнальный кабель
Среда использования
.....................................................................................................................
..............................................................................................................................................Чистка
Настенный монтаж ТВ
Кнопки на ТВ
Разъёмы..............................................................................................................................................
Функции пульта дистанционного управления ............................................................................
......................................................................................................................
.....................................................................................................
Раздел 2 Основные операции:
Включение
Выключение .......................................................................................................................................
Автоматическая настройка каналов ..............................................................................................
Умная настройка каналов.. ..............................................................................................................
Ручной поиск каналов ......................................................................................................................
Точная настройка каналов ..............................................................................................................
Настройка звуковой системы .........................................................................................................
Редактирование каналов .................................................................................................................
..........................................................................................................................................
..............................................................................................
3
3
3
3
3
3
3
4
4
6
7
7
8
8
8
8
8
8
Раздел 3 Расширенные функции:
Настройка изображения
Настройка звука .................................................................................................................................
Функциональные установки ...........................................................................................................
Выбор источника сигнала ...........................................................................................................
Геометрические установки ..............................................................................................................
Функции USB .. ........................................................................................................................... .........
.............................................................................................................
Раздел 4 Другая информация:
Устранение неисправностей ...........................................................................................................
Технические характеристики ..........................................................................................................
Комплектация
...................................................................................................................................
2
9
10
10
11
12
12
14
15
15
Page 16

Page 17

Разъем головных телефонов (выход)
Этот разъём может быть использован для подключения головных телефонов.
Примечание: Чрезмерная громкость звука в наушниках может привести к
потере слуха.
Page 18

Введение
COMPONENT
IN
(Y P
B PR)
AV 2 IN
VIDEO
OUT
AUDIO
OUT
adapter
AUDIO
OUT
PR/CR
P
B/CB
Y/VIDEO
CMP/VGA
AUDIO IN
Y/VIDEO
CMP/VGA
AUDIO IN
VGA
или вариант
R
L
R
L
R
L
Разъем Видео (выход)
Используйте RCA кабель для подключения видео устройства.
Разъём аудио адаптера/ переходника (выход звука)
Примечание: Разъём аудио адаптера служит для подключения с помощью
прилагаемого переходника звуковоспроизводящего устройства.
Используйте RCA кабель для подключения звуковоспроизводящего устройства.
Компонентный разъём YPBPR (вход)
Эти разъёмы YPBPR используются для подключения устройств с
компонентными видео разъёмами, таких как DVD плеер. Компонентные
разъёмы способны распознать, является ли вами подключаемое устройство
совместимое с YPBPR. Компонентные разъёмы обеспечивают отличное
изображение, поскольку видео разделяется на три отдельные части.
Разъёмы AV2 RCA аудио + видео (вход)
Эти выходные AV2 IN разъёмы могут быть использованы для подключения
разных устройств, в том числе видеомагнитофонов, видеокамер, декодеров,
сателлитов, DVD плееров или игровых приставок. Разъём VIDEO IN
обеспечивает комбинированное видеоподключение.
Примечание: Для AV2 необходимо видео и аудио разъёмы с YPBPR.
Разъём VGA (вход)
Для подключения к гнезду видеовыхода на вашем ПК.
Примечание: VGA пользуется такими же разъёмами с YPBPR.
ANTENNA IN
SPDIF
Разъём ANTENNA IN
Для подключения к системе телевизионной антенны или кабеля.
Разъём SPDIF (выход)
Разъём SPDIF может быть использован для подключения совместимого
цифрового аудио приёмника.
5
Page 19

Text
VOLCH
RC3000M13
о
Page 20

Раздел 2
Основные операции
Включение
настройки пульта
Для правильного включения ТВ
дистанционного управления соблюдайте инструкции, приведённые в
настоящей странице.
1. Вставьте две батареи ААА в пульт дистанционного управления.
Примечания в использовании батареи:
- нельзя использовать батареи другого формата
- соблюдайте полярность батареи
- нельзя использовать старые батареи вместе с новыми
- не используйте перезаряжённые батареи
- нельзя нагревать батареи питания, подвергать их воздействию ярких
солнечных лучей или огня.
- если пульт не используется долгое время, необходимо извлечь батареи из
отсека, чтобы избежать опасности вытекания батарей
2. Во-первых, вставьте электрокабель в прибор, потом в основной разъём.
(Примечание: если кабель питания уже подключен к телевизору, вставьте
кабель в основной разъём).
Ваш ТВ должен быть подключен только к источнику переменного тока.
Его нельзя подключать к источнику постоянного тока. Если штепсельная
вилка отсоединяется от кабеля, ни при каких условиях не подключайте её к
розетке, так как существует риск поражения электрическим током.
3. Подключение антенны к разъёму ANTENNA IN на задней панели
телевизора.
Сопротивление антенного входа этого ТВ прибора равно 75 Ом. 75–омный
коаксиальный кабель антенны диапазона МВ/ДМВ может подсоединяться к
гнезду антенного кабеля напрямую.
4. После включения телевизор будет либо в режиме ожидания, либо в режиме
просмотра.
На пульте дистанционного управления нажмите кнопку POWER, включается
режим просмотра ТВ или режим ожидания (индикатор светится).
Примечание: Рисунки приведены только в качестве примера.
Расположение основного разъёма может меняться в зависимости от
модели телевизора.
или
Выключение
Если Вы хотите отключить телевизор на некоторое время, снова
нажмите кнопку POWER на ПДУ или на передней панели телевизора.
Е
сли Вы хотите полностью отключить телевизор, отключите вилку из
сети переменного тока.
Примечание:
время (например, когда вы отправляетесь в отпуск. Выключите телевизор
из электросети).
Не оставляйте ваш ТВ в режиме ожидания на долгое
7
Page 21
Основные операции
Автоматическая настройка каналов
Настройка каналов – это возможность выбора всех
параметров, необходимых для удобного поиска и
сохранения всех необходимых каналов.
С помощью кнопки Меню выберите экранное меню.
Нажмите кнопку влево или вправо для выбора
символа каналов и нажмите кнопку вверх/вниз или ОК
для входа в меню настройки каналов.
Канал
Авто. настройка
Умный поиск
Ручной поиск
Точная настр.
Система звука
Настройка кан.
1. Нажимайте кнопки вверх/вниз для входа в меню
«Авто. настройка ».
2. Нажмите кнопки вправо или ОК для запуска поиска
канала.
Примечание: В зависимости от количества
возможных каналов, потребуется несколько минут
для завершения поиска. Если вы хотите
прекратить процесс, нажмите кнопку Меню. Когда
поиск всех каналов завершен, все каналы
сохраняются.
3. Каналы располагаются в установленном порядке.
Если вы хотите настроить точно, пропустить или
поменять каналы, обратитесь к следующим разделам.
42.2 5 мГц
D /K
Умный поиск каналов
Эта операция сохраняет все имеющиеся каналы и
включает новые найденные каналы в конец списка.
1. Включите меню Каналов и кнопками вверх/вниз
выберите опцию «Умный поиск».
2. Нажмите кнопку вправо или ОК для запуска
настройки.
Примечание: Если вы хотите прекратить процесс,
нажмите кнопку Меню. Когда поиск всех каналов
завершен, все каналы сохраняются.
Ручной поиск каналов
1. В режиме аналогового сигнала для входа в
соответствующее меню выберите «Ручной поиск
».
2. Выберите пункт «Номер канала» и кнопками вправо
или влево выберите номер, на котором будет сохранен
найденный канал.
3. При необходимости нажмите кнопку вверх/вниз для
выбора опции «Диапазон частот» и кнопки
вправо/влево для переключения VHFH, UHF или
VHFL диапазонов.
4. Кнопками вверх/вниз можете выбрать опцию
Частота и кнопками вправо/влево ручным способом
настроить частоту.
5. Нажмите Меню для возвращения в предыдущее
меню или EXIT для выхода из меню.
Точная настройка каналов
В случае неудовлетворительного приема сигнала или
звука выбранного канала, выберите пункт «Точная настр.»
при помощи которого, вы можете получить
удовлетворительное изображение или звук.
1. Включите меню Каналов и кнопками вверх/вниз
выберите опцию «Точная настр.
2. Нажмите кнопку вправо/влево или ОК для запуска
точной настройки.
3. Нажмите Меню для возвращения в предыдущее
меню или EXIT для выхода из меню.
».
Настройка звуковой системы
1. Включите меню Каналов и кнопками вверх/вниз
выберите опцию «Система звука».
2. Нажмите кнопку вправо или ОК для отображения
всех возможных настроек.
3. Нажмите кнопку вверх/вниз для выбора
необходимой звуковой системы: DK, BG, I или M.
4. Нажмите Меню для возвращения в предыдущее
меню или EXIT для выхода из меню.
Редактирование каналов
Эту функцию вы можете использовать для пропуска
канала или перестановки двух каналов.
1. Включите меню Каналов и кнопками вверх/вниз
выберите опцию «Настройка кан.
2. Нажмите кнопку вправо или ОК для входа в
выбранное меню.
».
Следуйте нижеприведённой процедуре если вы
обнаружите, что не все каналы сохраняются после
автоматической настройки.
Ручной поиск
Номер канала
Диап-н частот
Частота
Поиск
Menu -Возврат Exit - Выход
1
VHFL
49.70 Mhz
0%
Настройка кан.
Да
1
1
?
Текущий канал
Измен. канал
Пропуск кан.
Обмен
8
Page 22

Пропуск канала
Если канал был сохранён дважды или плохой сигнал
его приёма. вы можете его просто пропустить.
Пропущенные каналы не могут быть выбраны при
помощи кнопок СН+/-.
1. Кнопками вверх/вниз можете выбрать опцию
Текущего канала, затем кнопками вправо/влево
выберите номер пропускаемого канала.
2. Кнопками вверх/вниз выберите опцию Пропуск и
нажмите кнопку влево/вправо для выбора
подтверждения.
3. Нажмите Меню для возвращения в предыдущее
меню или EXIT для выхода из меню.
Основные операции
Замена двух каналов
1. Кнопками вверх/вниз можете выбрать опцию
Текущего канала, затем кнопками вправо/влево
выберите номер канала.
2. Нажимайте кнопку вверх/вниз для выбора
аналогового канала, который нужно переместить, для
перемещения нажмите кнопку влево/вправо и
выберите номер канала, с которым необходимо
текущий канал поменять местами.
3. Кнопками вверх/вниз выберите опцию Обмен и
нажмите кнопку влево/вправо или ОК для замены
каналов.
Раздел 3
Настройка изображения
Меню настройки изображения используется для
получения лучшей картинки, в зависимости от ваших
предпочтений и окружающего освещения.
Вызовите на экран меню при помощи кнопки Меню.
Кнопкой вправо/влево выберите символ Изображения
и кнопкой вверх/вниз или ОК выберите меню
Изображения. Ниже указаны опции изображения:
Примечание: Некоторые настройки недоступны
для конкретного источника сигнала или модели ТВ.
Настройка фоновой подсветки: Эта
может быть использована для настройки
яркости фоновой подсветки в зависимости от
освещения комнаты. Для настройки используйте
кнопки влево/вправо.
Картинка: При нажатии кнопок вправо или ОК
отображаются возможные варианты для выбора.
Затем нажмите кнопки вверх/вниз для просмотра
установленных настроек: стандартный, мягкий, яркий
и индивидуальный. Затем кнопками вправо или ОК
подтвердите свой выбор.
Примечание: При выборе стандартного, светлого,
мягкого режима изображения, отменяются
заводские настройки. Рекомендуется использовать
яркий режим изображения.
Размер изобр.: При нажатии кнопок вправо или ОК
отображаются возможные варианты для выбора.
Затем нажмите кнопки вверх/вниз для просмотра
установленных настроек: стандартный, полный,
субтитры, широкий экран, увеличение
изображения, расширенный и натуральный.
Изображение
Подсветка
Картинка
Размер изобр.
Яркость
Контраст.
Цветность
Резкость
Оттенок
Цветовая темп.
Динам.контраст.
Датчик света
Естеств. свет
100
Стандарт.
Полный
50
50
50
50
0
Стандарт.
Выкл.
Выкл.
Выкл.
опция
Расширенные функции
(Примечание: Некоторые настройки недоступны для
конкретного источника сигнала). Затем кнопками
вправо или ОК подтвердите свой выбор.
Примечание: Рекомендуется использовать режим
полного экрана. В течение длительного времени не
используйте режим с чёрными полосами по обеим
сторонам экрана (такие как при Стандартном
режиме), в противном случае экран может быть
При выборе увеличения изображения, нажатием
кнопки
вправо/влево вы можете
просматриваемое
Настройка яркости изображения: выберите
необходимую яркость картинки.
Настройка контрастности картинки. В опции
«Контраст» настройте соотношение светлого и темного
между объектами и фоном.
Цветность: настройте насыщенность цветовой
гаммы.
Настройка резкости изображения: настройте
чёткость изображения по своему желанию.
Оттенок изображения: настройте баланс между
красным и зелёным уровнями изображения.
Примечание:
Цветовая температура: настройте температуру цвета.
При нажатии кнопок вправо или ОК отображаются позиции
выбора .
просмотра установленных настроек: Холодный –
палитра синих оттенков изображения; Нормальный и
Тёплый для палитры красных оттенков изображения.
изображение.
Настраивается только для сигнала NTSC
Затем нажмите кнопки вверх/вниз для
уменьшить/увеличить
Динам. контраст.: при включении опции контрастность
регулируется автоматически.
Датчик света: для включения\ отключения нажмите кнопки
вправо\влево. Во включеном режиме подсветка регулируется
автоматически, сберегая энергию. Во включеном режиме
пункты Подсветка и Естественное освещение не регулируются.
В зависимости от модификации функция может отсутствовать.
Естеств. свет: включение опции естественного освещения
позволяет настроить яркость подсветки в зависимости от
содержания входного сигнала; это оптимизирует
качество изображения и снижает энергопотребление.
Нажмите Меню для возвращения в предыдущее меню
или EXIT для выхода из меню
9
повреждён.
Page 23

Page 24

Page 25

Page 26

Расширенные функции
4. Во время воспроизведения музыки Вы можете нажать
кнопку Меню для изображения на экране консоли
воспроизведения. Для выбора значка консоли
воспроизведения используйте кнопки
Для подтверждения выбора нажмите кнопку ОК.
Консоль воспроизведения включает следующие функции:
воспроизведение/пауза, перемотка назад и вперед,
предыдущий, следующий, стоп, режим повтора,
отключение звука, список файлов для воспроизведения,
информация и время перехода.
5. Выберите значок Стоп на консоли воспроизведения,
нажмите ОК или Выход для возврата.
Автоматическое воспроизведение:
1. Выберите пункт Автоматическое воспроизведение. При
помощи кнопки «вправо» или ОК войдите в USB устройство.
2. При помощи кнопок вправо\влево выберете символ USB
диска и нажмите ОК для автоматического воспроизведения.
Примечание: данная функция доступна только в том
случае, если в каталоге USB устройства одновременно
находятся файлы с изображениями и музыкой.
3. Нажмите Выход для возврата в каталог USB устройства.
вправо\влево.
Часто задаваемые вопросы:
Внимание:
1. Некоторые нестандартные мобильные устройства
хранения данных могут не опознаваться. Пожалуйста,
используйте стандартные устройства.
2. Данная система поддерживает следующие форматы
файлов:
Форматы изображений: JPEG, BMP.
Видео-форматы: H.264, RM/RMVB, MPEG4, MPEG2,
Аудио-форматы: MP3.
Примечание: для кодированных файлов существует
большое количество нестандартных методов кодирования,
поэтому данная система может не поддерживать форматы
файлов с использованием какого-либо метода
кодирования.
MPEG1.
3. Обратите внимание на подключение электропитания
устройства во время использования мобильного
жесткого диска или цифровой камеры. При
недостаточном или нестабильном электропитании,
возможно возникновение проблем во время работы или
приостановление работы системы. В данном случае
необходимо перезагрузить устройство или отключить
его от источника питания и подключить заново.
Убедитесь в том, что источник питания находится в
нормальном состоянии.
4. Система поддерживает стандартные устройства типа
USB1.1 и USB2.0, например, стандартные U-диски,
плееры MP3, мобильные жесткие диски и т.д.
5. Для достижения лучшего качества аудио и видео,
рекомендуется использовать внешнее устройство,
которое сочетается со стандартным USB2.0.
При воспроизведении видео с высоким коэффициентом
6.
сжатия, такие явления, как задержка в показе
изображения или продолжительная загрузка меню,
являются нормальными.
7.
Некоторые устройства USB с источником питания
(например, жесткий диск с большим объемом памяти,
МР4 и др.) рекомендуется использовать с питанием во
избежание недостаточного количества электропитания.
Параметры файла (например, количество пикселей
изображения, кодовая скорость аудио и видео файлов,
частота выборки аудио файла) могут быть ограничены
системой.
.
Наиболее часто задаваемые вопросы:
1. При следующих условиях система не может
декодировать файл и надлежащим образом его
воспроизвести:
· Параметры файла (например, количество пикселей
изображения, кодовая скорость аудио и видео файлов,
частота выборки аудио файла) превышают допустимые
размеры системы;
· Неподходящий формат файла или поврежденный
файл.
Примечание: поддержив
скорость не должна превышать 20 Mbps.
2. Активное соединение: не отсоединяйте устройство во
время считывания или передачи данных; избегайте
повреждения системы или устройства.
аемая данной системой
кодовая
13
Page 27

Page 28

Технические характеристики моделей
1. Жидкокристаллическая панель
Размер по диагонали, см
Яркость, кд/м
Угол обзора, градусов
Разрешение экрана, пикселей
Срок службы, лет
Количество цветов
2. Питание
Входное напряжение
Потребляемая мощность, Вт
Потребляемая мощность (в режиме
ожидания), Вт
3. Внешние входы
Антенный
AV
SCART
USB
VGA
HDMI
Компонентный YPbPr
Головные телефоны
4. Совместимость
Система цветности
ПК
5. Формат экрана
6. Система управления пользователя
7. Звуковая мощность (RMS)
8. Размеры, мм
9. Масса (нетто), кг
10. Рабочая температура,
11. Рабочая влажность, %
12. Температура хранения,
13. Влажность хранения, %
2
T19E27U
47
230
178\170
20
2
- -
1
1
Тип А HDMIх1
1
-
2х 3 Вт
456x334x157
2.9
T19E29U
47
230
178\170
Тип А HDMIх1
2х 3 Вт
456x328x160
3.4
T22E27U
55
T22E29U
55
230 230
178\170
178\170
1366 x 768
3
16,7 млн. цветов
AC ~ 220-240 В, 50Гц
25 20
25
< 1 Вт
75 Ом \ PAL, SECAM, B/G, D/K, I\ NICAM
2
1
1
1
-
2
- -
1
1
Тип А HDMIх1
1
-
PAL/SECAM/NTSC
VGA\ SVGA\ XGA
2
1
1
Тип А HDMIх1
1
-
16/9
ПДУ + меню
2х 3 Вт
528x377x187
3.6
2х 3 Вт
528x370x187
5 ~ 35
20 ~ 80
-15 ~ 45
10 ~ 80
T24E27U
61
230
178\178
T24E29U
61
230
178\178
35 35
2 2
- -
1 1
1
Тип А HDMIх1
1
-
2х 3 Вт
582x404x187 582x397x187
4
3.8 4.2
1
Тип А HDMIх1
1
-
2х 3 Вт
Примечание:
1. Технические характеристики телевизора, указанные в этом руководстве, могут быть изменены без предварительного уведомления.
2. Рисунки и изображения экрана, указанные в данном руководстве приведены в качестве объяснительного примера, и могут незначительно отличаться от
реальных операций. Изменения дизайна выполняются без предварительного уведомления.
3. Жидкокристаллическая панель изготавливается с помощью высокопрецизионной технологии, позволяя вам отчетливо видеть мелкие детали изображения.
Иногда на экране может появиться несколько неактивных элементов изображения в виде фиксированных точек белого, синего, зеленого, красного или черного
цвета. Это не влияет на эффективность работы устройства, не является неисправностью и не подлежит сервисному обслуживанию.
КОМПЛЕКТАЦИЯ:
•Телевизор – 1 шт.
•Пульт дистанционного управления – 1 шт.
•Батареи ААА – 2 шт.
•Руководство пользователя – 1 шт.
•Переходник AUDIO OUT – 1 шт. *
•Саморезы крепления опоры - комплект.
•Гарантийный талон – 1 шт.
* - в зависимости от модификации может
отсутствовать
Page 29

Page 30

Page 31

Page 32

www.tvthomson.ru
Look, Listen & Live
 Loading...