

Page 1
Verizon
Digital Cordless
Telephone
T1960
USER
GUIDE
R9
Page 2
y
s
Welcome To Your
Verizon T1960 Digital
Cordless Telephone With
Graphical Color Display
• Large, easy to read color graphics
screen
•
Caller-ID and Caller-ID With Call
Waiting
Lets you see who is calling and keeps
track of unanswered calls
•
Voicemail indicator on base and
handset
Lets you know when you have
voicemail in your voicemail box
•
One button access for Voicemail
•
Special access to Network Services
such as Call Waiting Deluxe, Director
Assistance, Repeat Dialing, Call
Forwarding
150 Name and Number Phonebook
•
•
50 Name and Number Received Calls
list
•
20 Number Dialed Calls list (redial)
Add up to 4 additional handsets to a
•
base
No need for additional wiring
•
Handsets have individual phonebook
•
Handsets include intercom features
Speakerphone in the handset
•
•
10 selectable ring tones, with 8
polyphonic tones
•
Alarm Clock feature
R9
Page 3

Important Instructions & Information
Important Instructions &
Information
This User Guide provides you with
all the information you need to get
the most from your phone.
You must first set up your phone
before you can use it. This doesn’t
take long and is easy to do. Just
follow the simple instructions on the
next few pages.
Need help?
If you have any problems setting up or
using your Verizon T1960 telephone,
please contact the Thomson product
support center at:
1-800-448-0329
Alternatively, you may find the answer
in ‘T1960 Troubleshooting Tips’ on
page 53 at the back of this guide.
Did you receive
everything?
T1960 base
•
T1960 handset
•
• 2 x NiMH AAA
rechargeable
batteries
Battery compartment
•
cover
AC power adapter
•
• Telephone line cord
• Belt clip
In addition:
If you have purchased
one or more additional
handsets (T1961), you
will have received the
following for each
additional handset:
• T1961 handset
T1961 charger
•
2 x NiMH AAA
•
rechargeable
batteries
Battery compartment
•
cover
AC power adapter
•
Belt clip
•
3
R9
Page 4

Important Instructions & Information
4
Important Safety Instructions
To reduce the risk of fire, electric shock or injury when using your telephone
equipment, basic safety precautions should always be followed:
1. Do not use this product near water, for example, near a bathtub, washbowl,
kitchen sink, laundry tub, or in a wet basement, or near a swimming pool.
2. Avoid using the telephone (other than a cordless type) during an electrical
storm. There may be a remote risk of electrical shock from lightning.
3. Do not use the telephone to report a gas leak in the vicinity of the leak.
4. Use only the AC adapter, power cord, and batteries indicated in this manual.
Do not dispose of batteries in a fire. They may explode. Check with local
codes for possible special disposal instructions.
SAVE THESE INSTRUCTIONS
R9
Page 5

Important Instructions & Information
5
Battery Safety Instructions
CAUTION: Risk of Explosion if the Batteries are Replaced by
an Incorrect Type. Dispose of Used Batteries According to the
Instructions.
1. Use only the following type and size handset batteries: DC 1.2V, 750 mAh, NiMH
(Nickel Metal Hydride), AAA size batteries (2 per handset).
2. When inserting the batteries into the product, the proper polarity or direction must
be observed. Reverse insertion of the batteries can cause charging that may result
in leakage or explosion.
3. Do not dispose of the batteries in a fire. The cell may explode. Check with local
codes for possible special disposal instructions.
4. Do not open or mutilate the batteries. Released electrolyte is corrosive and may
cause damage to the eyes and skin. It may be toxic if swallowed.
5. Exercise care in handling the battery in order not to short the battery with
conduction material such as rings, bracelets and keys. The battery or conductor
may overheat and cause burns.
6. Recharge only the batteries provided with, or identified for use with, this product.
The battery may leak corrosive electrolyte or explode if it is not the correct type.
7. Do not attempt to rejuvenate the batteries provided with, or identified for use with,
this product by heating them. Sudden release of the electrolyte may occur causing
damage to the eyes or skin.
8. Remove the batteries from the product if the product will not be used for a long
period of time (over 30 days) since during this time the batteries may leak in the
product.
9. Discard dead batteries as soon as possible since dead batteries are more likely to
leak in the product.
10. Do not store this product, or the batteries provided, in high temperature areas.
Batteries that are stored in a freezer or refrigerator for the purpose of extending
shelf life should be stabilized at room temperature prior to use.
11. Disconnect telephone lines before installing batteries.
12. When replacing batteries, all batteries should be replaced at the same time. Mixing
fresh and discharged batteries could increase internal cell pressure and rupture the
discharged batteries.
R9
Page 6

Important Instructions & Information
6
Equipment Approval Information
Your telephone equipment is approved for connection to the Public Switch Telephone Network
and is in compliance with parts 15 and 68, FCC Rules and Regulations and the Technical
Requirements for Telephone Terminal Equipment published by the Administrative Council for
Terminal Attachments (ACTA).
1. Notification to the Local Telephone Company
On the bottom of this equipment is a label indicating, among other information, the UL
number and Ringer Equivalence Number (REN) for the equipment. You must, upon
request, provide this information to your telephone company.
The REN is useful in determining the number of devices you may have connected on your
telephone line and still have all of the devices ring when your telephone number is called.
In most (but not all) areas, the sum of the RENs of all devices connected to one line
should not exceed 5. To be certain of the number of devices you may have connected to
your line as determined by the REN, you should contact your local telephone company.
NOTES
• This equipment may not be used on coin service provided by the telephone
company.
•
Party lines are subject to state tariffs and therefore you may not be able to use your
own telephone equipment if you are on a party line. Check with your local
telephone company.
Rights of the Telephone Company
2.
Should your equipment cause trouble on your line which may harm the telephone
network, the telephone company shall, where practicable, notify you that temporary
discontinuance of service may be required. Where prior notice is not practicable and the
circumstances warrant such action, the telephone company may temporarily discontinue
service immediately. In case of such temporary discontinuance, the telephone company
must: (1) promptly notify you of such temporary discontinuance; (2) Afford you the
opportunity to correct the situation; and (3) inform you of the right to bring a complaint to
the commission pursuant to procedures set forth in Subpart E of Part 68, FCC Rules and
Regulations.
The telephone company may make changes in its communications facilities, equipment,
operations or procedures where such action is required in the operation of its business and
not inconsistent with FCC Rules and Regulations. If these changes are expected to affect
the use or performance of your telephone equipment, the telephone company must give
you adequate notice, in writing, to allow you to maintain uninterrupted service.
Hearing Aid Compatibility
This telephone system meets the FCC requirements for Hearing Aid Compatibility.
R9
Page 7
The installation of the base unit should allow at least 20 centimeter between the base and persons to be in
compliance with FCC RF exposure guidelines. For body worn operation, the portable part (handset) has
been tested and meets FCC RF exposure guidelines.
This device must not be co-located or operating in conjunction with any other antenna or transmitter. The
changes or modifications not expressly approved by the party responsible for compliance could void the
user’s authority to operate the equipment.
Important Instructions & Information
7
Interference Information
This device complies with part 15 of the FCC rules and regulations. Operation is subject to the
following two conditions: (1) This device may not cause harmful interference; and (2) This device
must accept any interference received, including interference that may cause undesirable operation.
This equipment has been tested and found to comply with the limits for a Class B digital device,
pursuant to Part 15 of the FCC rules. These limits are designed to provide reasonable protection
against harmful interference in a residential installation.
This equipment generates, uses, and can radiate radio frequency energy and, if not installed and
used in accordance with the instructions, may cause harmful interference to radio communications.
However, there is no guarantee that interference will not occur in a particular installation.
If this equipment does cause harmful interference to radio or television reception, which can be
determined by turning the equipment off and on, the user is encouraged to try to correct the
interference by one or more of the following measures:
• Reorient or relocate the receiving antenna (that is, the antenna for radio or television that
is “receiving” the interference).
•
Reorient or relocate and increase the separation between the telecommunications
equipment and receiving antenna.
•
Connect the telecommunications equipment into an outlet on a circuit different from that
to which the equipment with the receiving antenna is connected.
If these measures do not eliminate the interference, please consult your dealer or an experienced
radio/television technician for additional suggestions.
Notice: Changes or modifications not expressly approved by the party responsible for compliance
could void the user’s authority to operate the equipment.
R9
Page 8

8
In This Guide
Important Instructions & Information ________________ 3
Getting Started _________________________________ 12
Location .........................................................................12
Setting Up ......................................................................13
Handset to Base Registration.........................................14
Range Indicator..............................................................14
Setting the Date and Time .............................................14
Getting To Know The T1960 ______________________ 16
The Handset ...................................................................16
The Base ........................................................................17
The Display....................................................................18
The Menu Map...............................................................19
Navigating The Menu ....................................................20
Using The T1960: Simple and Easy ________________ 21
Answer a Call.................................................................21
Make a Call....................................................................21
Speakerphone.................................................................22
Dialed Calls List (Redial) ..............................................23
Mute ...............................................................................23
Paging ............................................................................24
User Set Keypad Lock ...................................................24
Intercom Calls................................................................25
Transfer a Call ...............................................................26
Caller on Hold................................................................26
T1960 Phonebook (Names) _______________________ 27
Add a Name Entry Manually .........................................27
R9
Page 9

In This Guide
9
Add Entry from a Call List ............................................27
Dial.................................................................................28
Edit Names and Numbers ..............................................28
Delete an Entry ..............................................................28
Add A Ringtone .............................................................28
Verizon Calling Features _________________________ 29
Managing Your Calls.....................................................29
Caller-ID ........................................................................29
Call Waiting...................................................................30
Caller-ID With Call Waiting..........................................30
Call Waiting Deluxe ......................................................31
Voicemail.......................................................................34
Optional Calling Features ..............................................36
T1960 Handset Settings __________________________ 37
Handset Name................................................................37
Language........................................................................37
Menu Color ....................................................................38
Auto Talk .......................................................................38
Area Codes.....................................................................39
Beep Tones ....................................................................40
T1960 Base Settings _____________________________ 41
Base Ringtone ................................................................41
Base Volume..................................................................41
Handset Priority .............................................................42
System PIN ....................................................................42
T1960 Call Lists ________________________________ 43
Managing Telephone Numbers......................................43
R9
Page 10

In This Guide
10
Access Call Lists Via the Menu.....................................43
Call Lists Options ..........................................................44
Dial a Selected Entry .....................................................45
Delete Calls List.............................................................46
T1960 Melody Settings __________________________ 47
Handset Ringtone...........................................................47
Handset Ringer Volume.................................................47
T1960 Time Settings ____________________________ 48
Automatically Setting Date and Time ...........................48
Manually Setting Date and Time...................................48
Time Format (12 hr or 24 hr).........................................48
Use Your Phone as an Alarm Clock. .............................49
Additional Handsets and Bases ____________________ 50
Register a New T1960 Handset .....................................50
Register Handset with an Additional Base ....................51
Selecting a Base .............................................................51
De-register a Handset.....................................................52
T1960 Troubleshooting Tips ______________________ 53
Need Help? ....................................................................53
Caller ID ........................................................................53
Hearing Aid Noise .........................................................53
Telephone.......................................................................54
R9
Page 11

In This Guide
(This Page Left Intentionally Blank)
11
R9
Page 12

12
Getting Started
Getting Started
Location
You need to place your T1960 within 6 feet
of the AC power outlet and telephone socket
so that the cables will reach.
Make sure it is at least 3 feet away from
other electrical and metal appliances to
avoid interference issues.
Your T1960 works by sending radio signals
between the handset and base. The
strength of the signal depends on where you
locate the base. Putting it as high as
possible and separated as much as possible
from other radio devices and metal objects
ensures the best signal.
WARNING
Do not place your T1960 in
the bathroom or other
humid areas.
IMPORTANT
Do not connect the
telephone line until the
handset is fully charged.
The base must be plugged
into the AC power at all
times.
Battery charging light
The red charging light on
the base stays on while the
handset is on the base,
even when the batteries
are fully charged.
Talk/Standby time
Under ideal conditions, fully
charged handset batteries
should give up to 4 hours
talk time or 80 hours
standby time on a single
charge.
Battery low warning
When the handset battery
symbol is empty and
flashing (see page 18), you
will hear a warning beep.
Start recharging your
handset right away.
When charging the battery,
level bars are animated.
R9
Page 13
Getting Started
Battery performance
When the batteries are fully
charged the battery
indicator will display green
bars. To keep your
batteries in the best
condition, leave the
handset off the base for a
few hours at a time (after
the initial 16 hour charge).
Please note however, that
new NiMH batteries do not
reach full capacity until they
have been in normal use
for several days.
The charge capacity of
rechargeable batteries will
reduce with time as they
wear out, thereby reducing
the talk and standby time of
the handset. Eventually
the batteries may need to
be replaced.
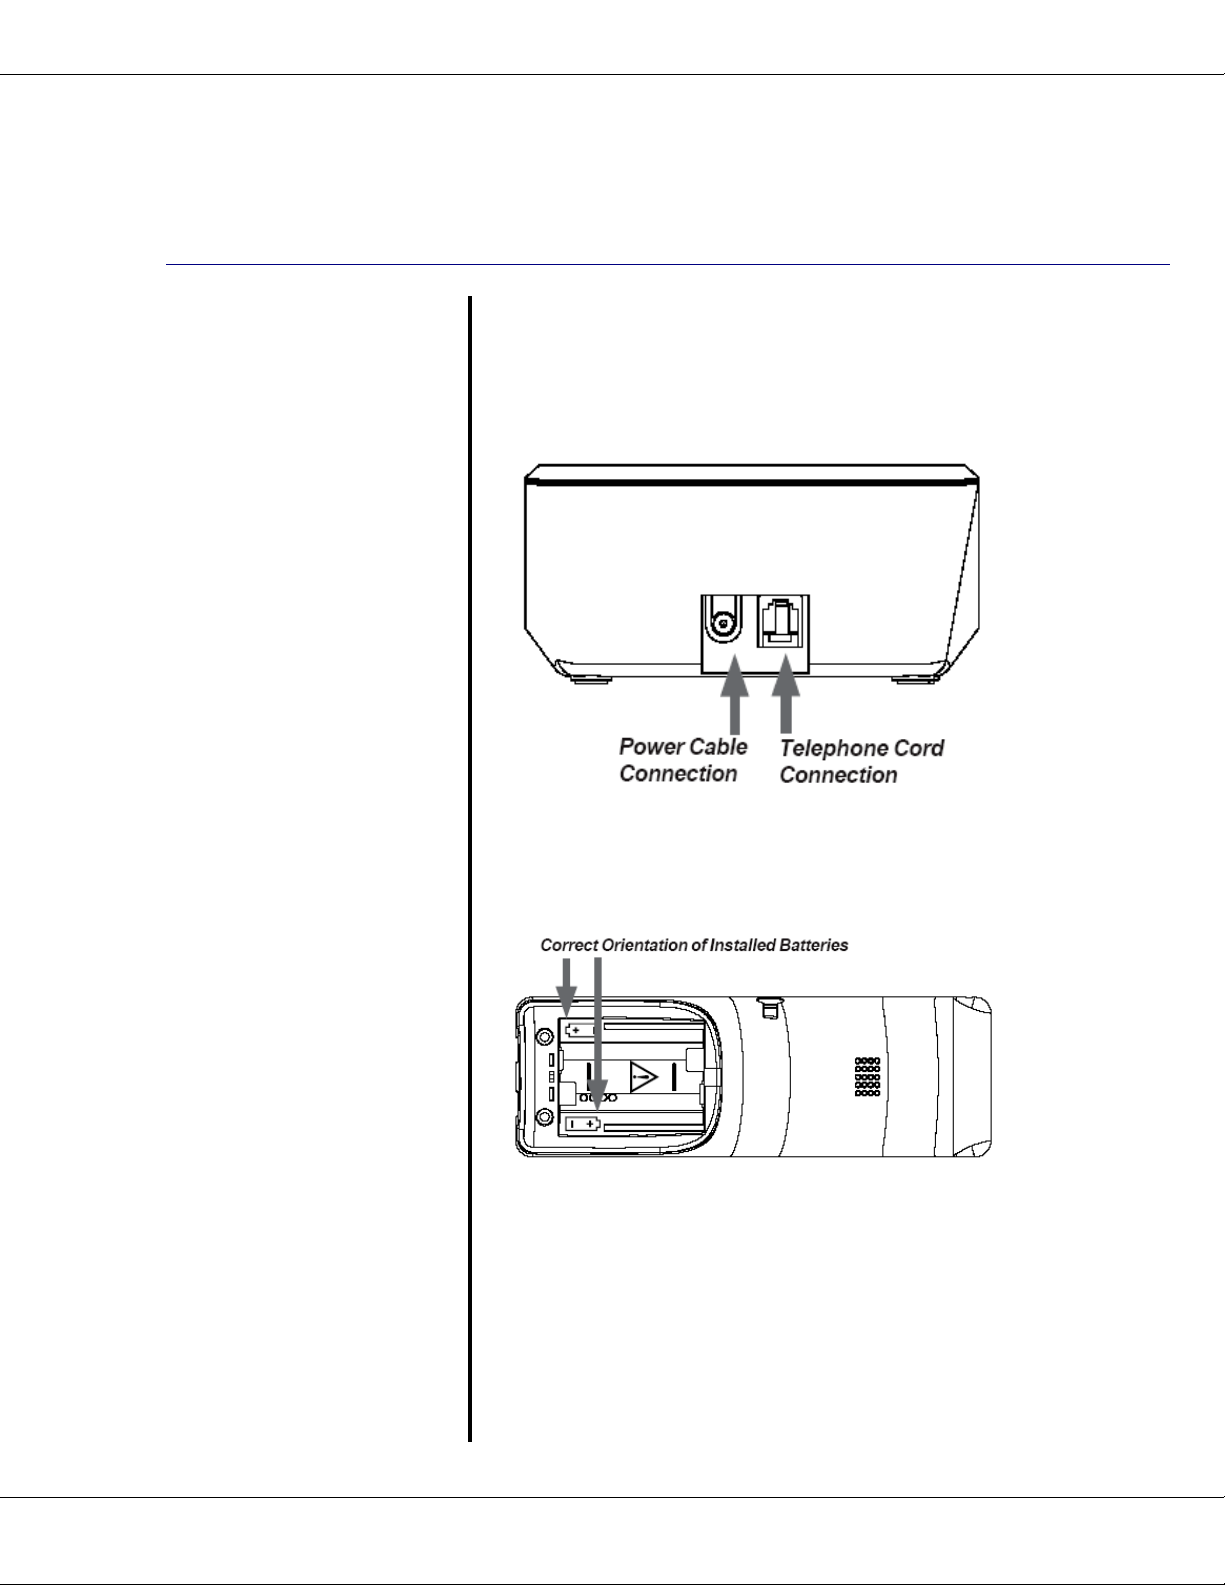
Setting Up
1. Plug the power cable into the base.
2. Plug the AC power adapter into an
electrical wall outlet
3. Insert the 2 x AAA NiMH batteries
supplied into the handset, paying
attention to the polarity. Slide the
battery compartment cover into place.
13
4. Charge the handset for at least 16 hours
by placing it on the base. The red
“CHARGE” light is on when the handset
is in the charger and stays on even after
the batteries are fully charged.
5. After 16 hours, plug the telephone line
cord into the wall socket and your
T1960 telephone is now ready for use.
R9
Page 14

Getting Started
14
Handset to Base Registration
The handset is pre-registered to the base as
‘Handset 1’. For information regarding
registering additional handsets to the base
see page 50.
Range Indicator
The symbol on your handset display
indicates when you are in range of the base.
If the symbol flashes and you hear a
warning beep, you are out of range and will
need to move closer to the base.
Setting the Date and Time
If you have subscribed to the Caller-ID
service, the time and date will be set
automatically when you receive your first
call. You can also set the time manually.
(See page 48).
Your Verizon T1960 is now ready
for use.
Replacing batteries
Use only rechargeable 750
mAh AAA Nickel Metal
Hydride (NiMH) batteries.
Replacement batteries
may be obtained
commercially from a
retail battery supplier.
See page 5 for important
battery replacement
information.
NOTE: The RBRC seal on
the battery used in your
Thomson Inc. product
indicates that we are
participating in a
program to collect and
recycle the rechargeable
battery (or batteries).
For more information go
to the RBRC web site at
www.rbrc.org or call
1-800-8-BATTERY or
contact a local recycling
center.
Handset range
The T1960 range between
the base and handset will
vary greatly depending on
the location of the base.
When there is no clear line
of sight between the base
and handset, e.g., the base
is indoors and the handset
is either indoors or
outdoors, the range may be
reduced.
R9
Page 15

Getting Started
Ensure the charger is
connected to the AC power
outlet at all times.
If you have purchased
additional handsets:
On each charger:
1. Connect the AC power adapter to the
charger.
2. Plug the AC power adapter into an
electrical wall outlet.
On each additional handset:
3. Insert the 2 x AAA NiMH batteries
supplied into the handset, paying
attention to the polarity (See page 13).
Slide the battery compartment cover
15
into place.
4. If the batteries have enough charge the
handset will power-up with “Not
Registered” on the display.
5. Charge the handset for at least 16
hours.
Once fully charged, your additional
handset(s) are required to be registered to
the base. See page 50.
Your additional handsets are now ready
for use.
R9
Page 16
16
Getting To Know The T1960
Getting To Know The T1960
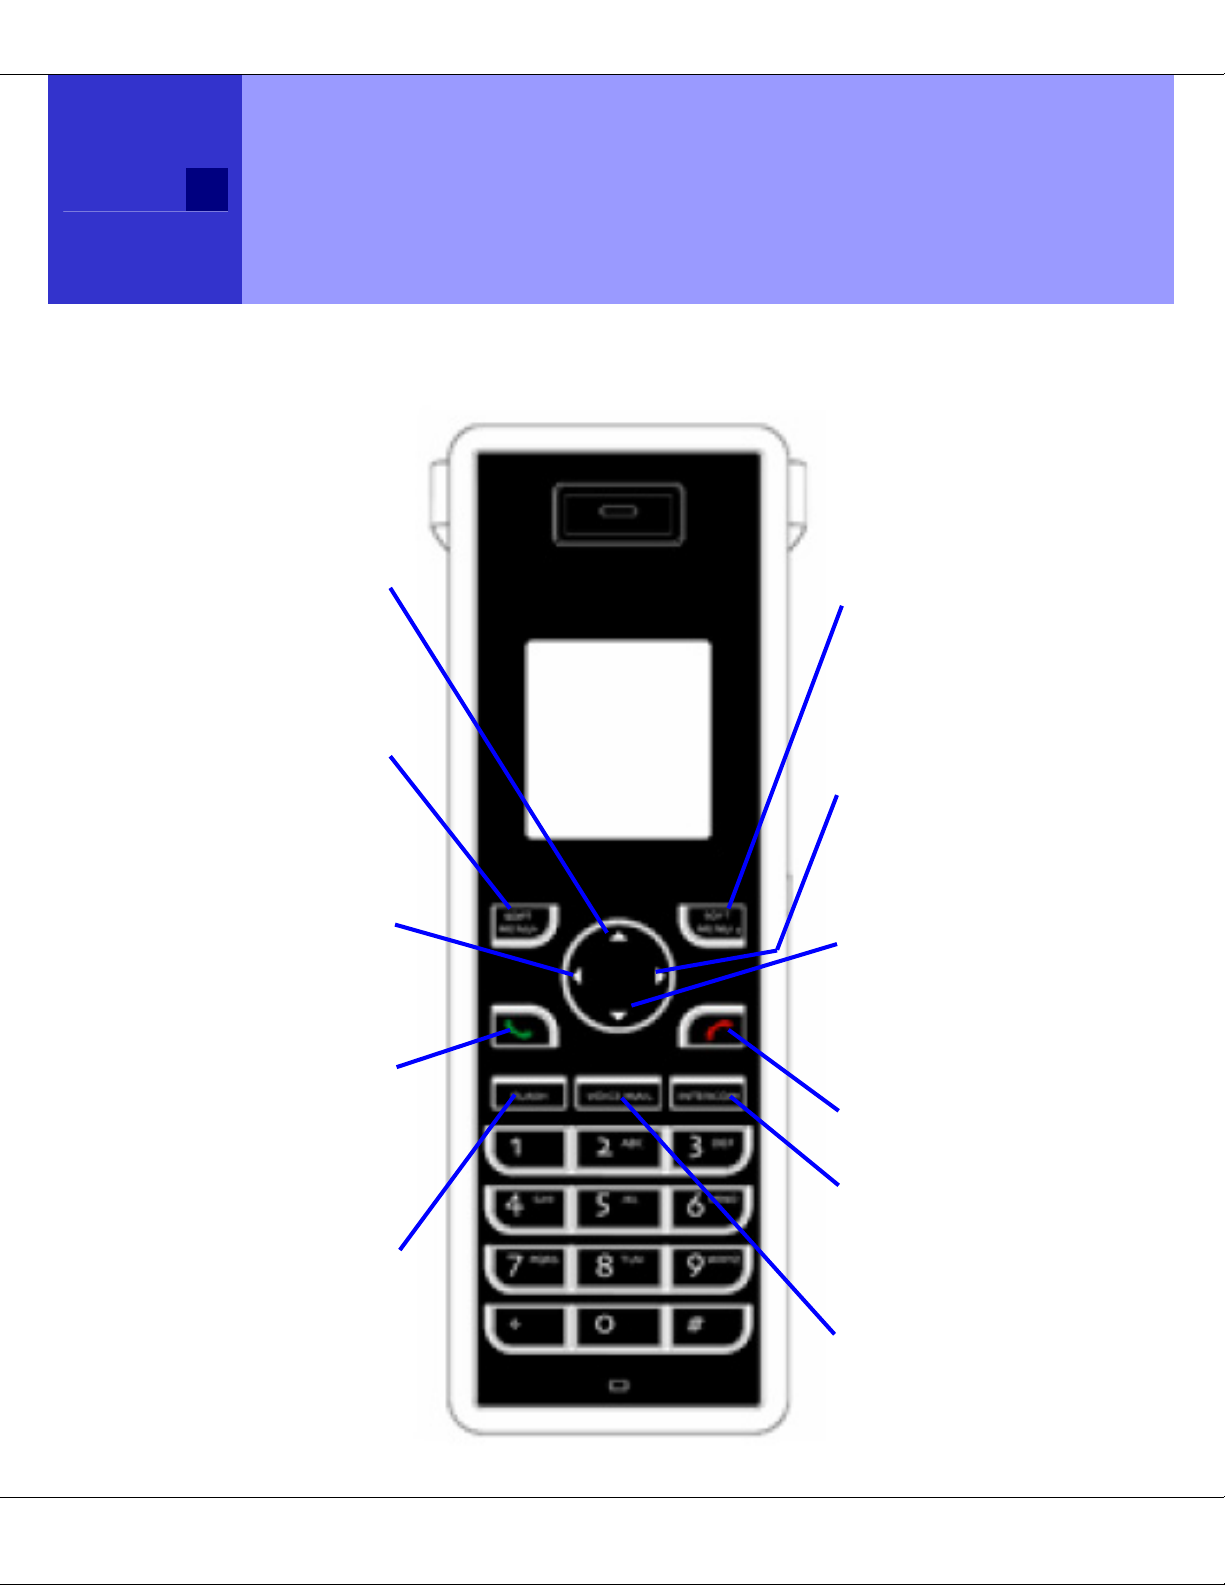
The Handset
Navigation Keys
Scroll / Dialed Calls List
Scroll through options.
From the idle display, press
the ‘up’ button to open the
“Dialed Calls” list.
Left “Soft Menu1” Key
On-Screen Options
Open the menu and select
an option.
(pages 18 & 19)
Volume Control - Down
Press the ‘left’ key to
decrease the volume level
for calls, ringer tones, and
the alarm.
Press to make calls.
Press twice for
speakerphone.
(page 21)
FLASH
Flash is used for Caller-ID
With Call Waiting,
3-Way Calling, etc.
(page 29)
Talk
Right “Soft Menu2”Key
On-Screen Options
From the idle display, open the
phone book “Names” and
select the options shown on
the screen.
(pages 18 & 19)
Volume Control - Up
Press the ‘right’ key to
increase the volume level for
calls, ringer tones, and the
alarm.
Navigation Keys
Scroll / Received Calls List
Scroll through options.
From the idle display, press
the ‘down’ button to open the
“Received Calls” list.
End Call
Press to end call / hang-up.
INTERCOM
Intercom lets you make calls
between handsets registered
to the base.
(page 24)
VOICE MAIL
One-touch voicemail access.
(page 34)
R9
Page 17
Getting To Know The T1960
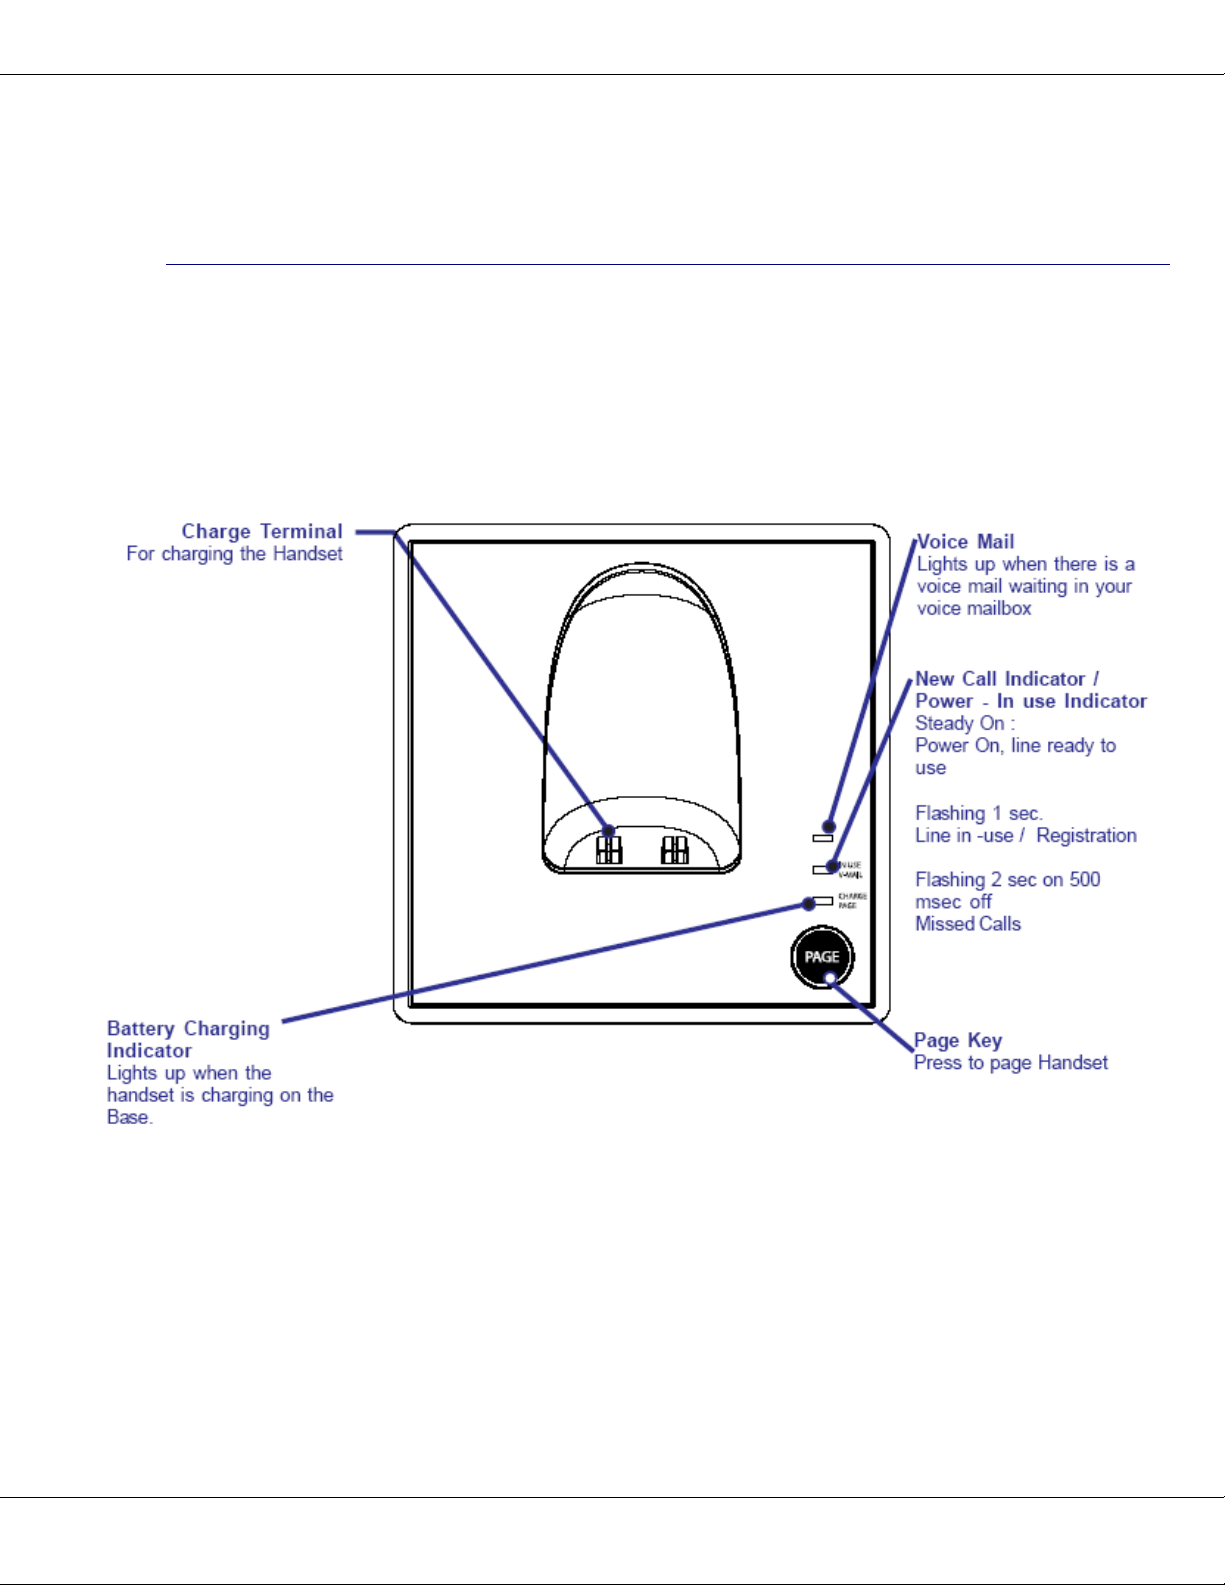
17
The Base
R9
Page 18

Getting To Know The T1960
18
The Display
The handset idle display is shown below
R9
Page 19

Getting To Know The T1960
19
The Menu Map
The menu option icons are accessed by pressing the MENU (SOFT
MENU1 key) from the idle display.
Time Settings
(page 48)
Set Date & Time
•
Time format
•
• Alarm
Melody (Handset)
(page 47)
• Ringtone
• Ring Volume
Calling Features
(page 29)
• Directory assistance
Call return
•
• Repeat dialing
• Call forwarding
VoiceMail Access #
•
Call Waiting Deluxe
•
Handset Settings
(page 37)
Handset Name
•
Language
•
• Menu Color
• Auto Talk
Beep Tones
•
• Area Codes
Call Lists
(page 43)
• Received Calls
• Dialed Calls
Delete Calls List
•
Registration
(page 50)
• Register Handset
Select Base
•
• De-register
Base Settings
(page 41)
Base Ringtone
•
Base Volume
•
• Handset Priority
• System PIN
Default Settings
•
Names (Phonebook)
(page 27)
• Find Entry
• Add Entry
Delete all phonebook
•
R9
Page 20

Getting To Know The T1960
20
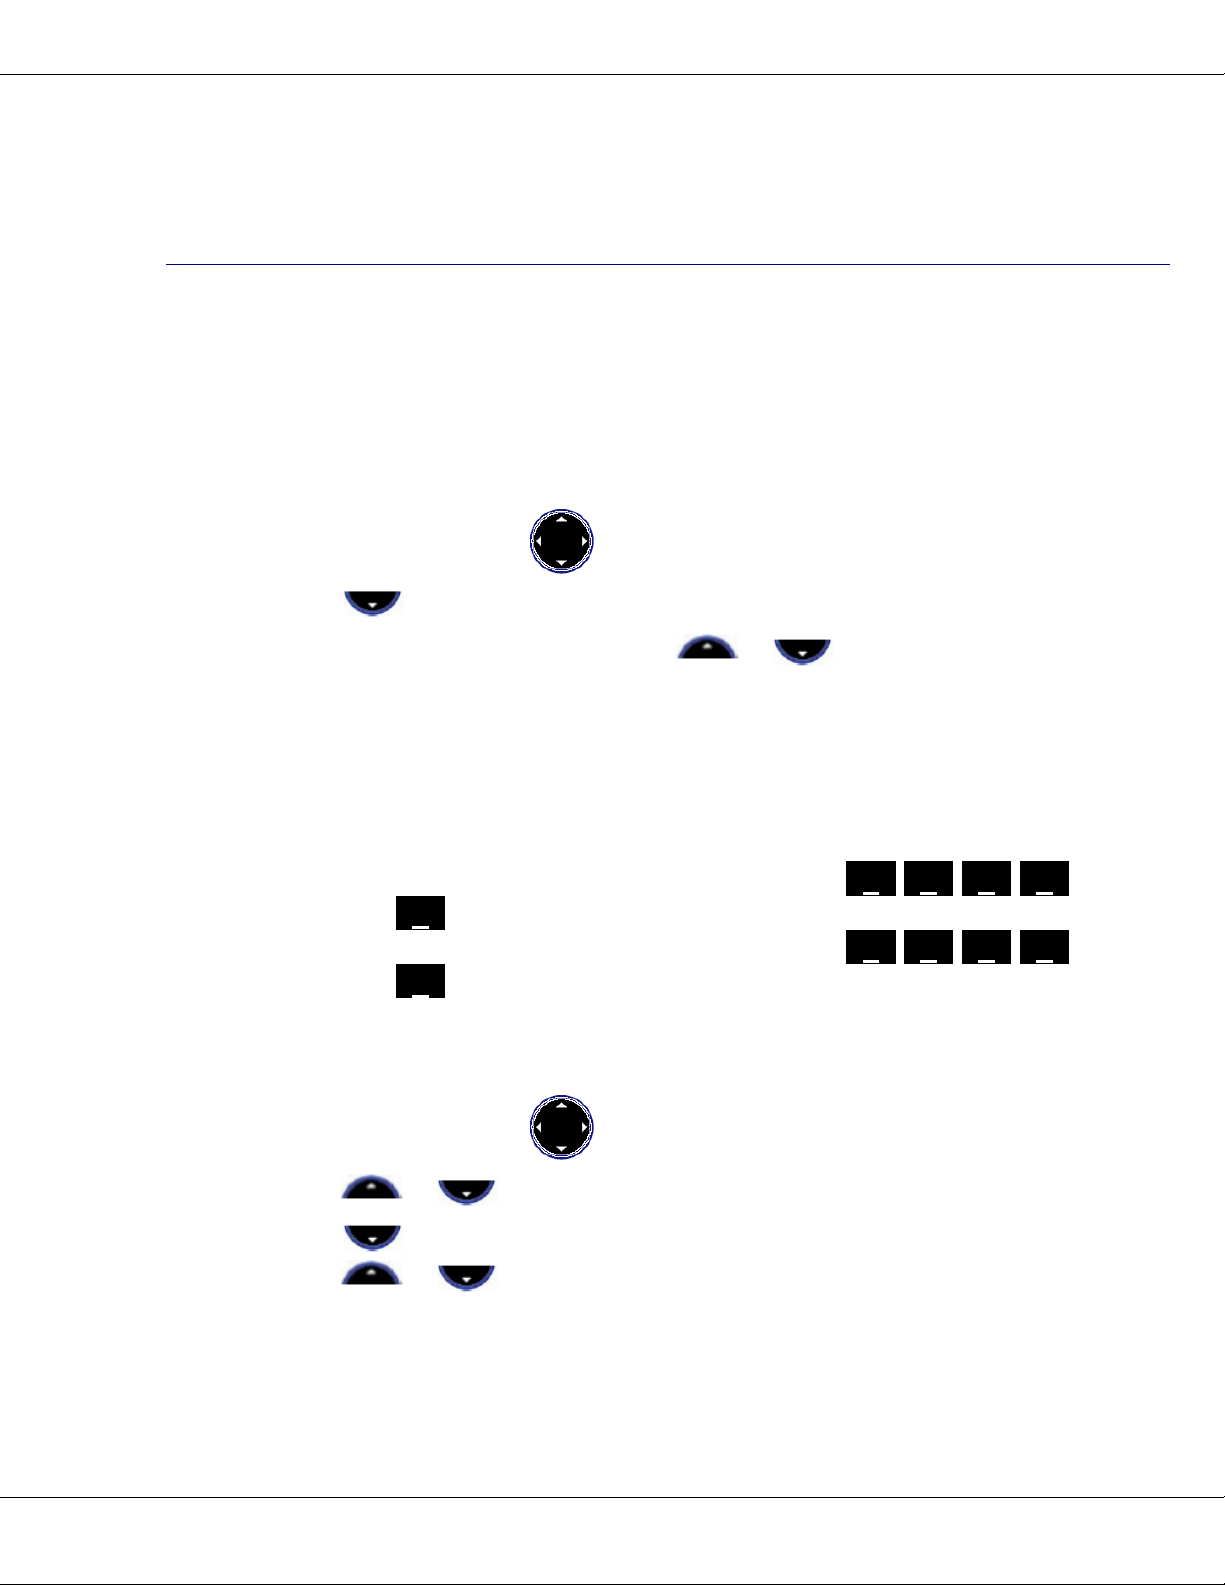
Navigating The Menu
Your T1960 has a menu system that is easy
to use. Each menu leads to a list of options.
When the handset is in standby, press the
Menu
option button
menu. Press the
option you want, then press OK
For example to change the handset ringer
volume for intercom calls:
to open the main
to scroll to the menu
.
up/down, left/right
The
Navigation keys are
located on the big dial
button in the center of the
handset.
buttons are located to the
sides of the Navigation
keys:
Option
select
1. Press Menu then scroll
to Melody,
then press OK.
2. Scroll
.
OK
3. Scroll
to Ring Volume, then press
to Internal Calls, then
press OK.
4. The current setting is displayed. Press
to decrease or to increase the
volume. The ring tone is played at each
level you select. Press OK to confirm.
Exit / back one level in the menu
To go back to the previous level in the
menu, press Back
To cancel and return to standby at any time,
press
and hold Back
If no button is pressed for 60 seconds, the
handset returns to the standby idle display
automatically.
.
.
You select the option
displayed by pressing the
Option button below it.
For example, from the Idle
display, select
pressing the option button
below
display.
Names
Names
by
on the
R9
Page 21

Using The T1960
Using The T1960: Simple and Easy
21
Answer a Call
If Auto-Talk is ‘On’ (default, see page 38), and the handset is
ringing while in the base or charge cradle, simply pickup the
handset and the phone will answer the call automatically.
If the handset is not in the charge cradle, or Auto-Talk is ‘Off’, press
to answer the call.
Providing you have subscribed to your network’s Caller-ID service,
the caller’s number and name is displayed after the first ring.
Make a Call
Press then dial the number you want to call.
- Or -
Preparatory dialing
Enter the phone number first. If you make a mistake, press Clear
to delete the last digit entered or multiple times to clear all
digits. When you are finished entering the phone number, press
to call the phone number you entered and shown on the
display.
Call timer
The display shows the duration of the current call. After you hang
up, the total call time is shown briefly.
End a call
Press or simply place the handset back on the base or
charge cradle.
R9
Page 22

Using The T1960
22
Speakerphone
Speakerphone lets you talk to your caller
without holding the handset to your ear. It
also enables other people in the room to
listen to both sides of your conversation.
Making a speakerphone call
1. Press (i.e., press 2 times for
speakerphone mode). Dial the number.
Your call can be heard over the
handset’s loudspeaker.
2. To switch back to the handset at any
time, press
again (i.e.,
switches between handset and
speakerphone mode).
3. Press
to end the call.
Adjust handset / speakerphone
volume
You can switch to
speakerphone at any time
during a call. Just press
.
When in speakerphone
mode, to switch back to
handset mode, press
.
When in speakerphone
mode, the display shows
During a call, press or to select the
volume level. Two bars is the minimum and
full bars is the maximum.
the
icon.
R9
Page 23

Using The T1960
Answer a call in speakerphone
When the phone rings:
Press
for speakerphone mode). The sound comes through the handset
loudspeaker.
If you want to switch the call to the handset earpiece, press
If Auto-talk is ‘On’ (default, see page 38), and the handset is ringing
while in the base or charge cradle, simply lift up the handset and then
press
, short pause, then press again (i.e., press 2 times
.
to enable the speakerphone.
23
Dialed Calls List (Redial)
You can view and redial up to 20 of the last numbers called. To
redial a number from the Dialed Calls list:
1. Press
2. Scroll
3. Press
See page 43 for more details regarding available options from the
Dialed Calls list.
to enter the Dialed Calls list.
or until the number you want is displayed.
to dial the number.
Mute
During a call, you can talk to someone nearby without your caller
hearing you.
1. During the call, press Mute
When Mute On is active, your caller cannot hear you.
2. Press Off to return to your caller.
. The display shows
Mute On
.
R9
Page 24

Using The T1960
24
Paging
You can use the button on the base
to page all registered handsets to locate a
missing handset.
1. Press
handset(s) ring. The display shows
Paging.
on the base. The
You cannot make any calls,
including 911 emergency
2. Press
again,
press any
or
button on the handset, to stop the
handsets ringing.
User Set Keypad Lock
You can lock the keypad to prevent
accidental dialing while carrying or handling
the handset.
1. Press
screen shows Keypad Locked and the
padlock symbol appears.
2. Press Unlock
then Yes to unlock the keypad.
(#)
and hold
until the
(SOFT MENU1)
calls, while the User Set
keypad is locked.
Answer incoming calls by
pressing
The
while the keypad is locked.
icon is displayed
as normal.
R9
Page 25

Using The T1960
Intercom Calls
If you have two or more T1960 handsets registered to your base
can make intercom calls between the handsets without using the
telephone line. Two handsets can be engaged in an intercom call
while a third handset is making a regular telephone call.
, you
25
Call Another Handset
1. Press (INTERCOM) then the handset number (1-5) you
want to call.
2. Press
3. Press
on the called handset to answer the intercom call.
to end the intercom call.
3-Way Conversations
You can place a caller on hold (a regular telephone call), Intercom to
another handset, and then make a conference call between all three
parties.
1. During a regular telephone call, press
put your call on hold. Enter the handset number (1-5) you want
to join on the call.
2. When the other handset answers, press
seconds to start the 3-Way (conference) call. If the other
handset does not answer, press
speak to the caller on hold.
3. Press
to hang up.
(INTERCOM) again to
(INTERCOM) to
(#) for at least 2
R9
Page 26

Using The T1960
26
Transfer a Call
You can transfer a caller (a regular telephone call) to another
handset.
During the call:
1. Press
2. Enter the handset number (1-5) you want to transfer the call to.
3. When the other handset answers you can tell them they have a
call, then press
If the other handset does not answer, or you decide not to
transfer the call, press
resume talking to your caller.
(INTERCOM) to put your call on hold.
. The call is then transferred.
(INTERCOM) to cancel and
Caller on Hold
You can put a call on hold, talk to another handset user, and then
resume your call.
During a call:
1. Press (INTERCOM) to put your call on hold.
2. Enter the handset number (1-5) you want to intercom call.
3. Press
to your regular call.
4. If either intercom handset ends the call, the remaining handset
will be automatically reconnected to the previously held call (i.e.,
similar to the Call Transfer feature).
(INTERCOM) to end the intercom call and return
R9
Page 27

T1960 Phonebook (Names)
Name Display
When the last 7 digits of a
received Caller-ID
telephone number matches
the last 7 digits of a number
in the Phonebook,
associated with that number
in the Phonebook will be
displayed instead of the
name received by Caller-ID.
Writing tips
Use the keypad letters to
enter names.
Use
to switch between upper and
lower case letters.
For example, to store TOM:
the name
(INTERCOM)
T1960 Phonebook (Names)
Your Own Phonebook Directory
Each T1960 Handset can store up to 150 names and
numbers. Names can be up to 16 characters long
and numbers up to 20 digits.
Add a Name Entry Manually
1. Press Menu then scroll to Names. Press OK.
2. Scroll
OK.
3. Use the keypad to enter the name, then press
.
OK
4. Use the keypad to enter the number, and then
press OK. Note: To add a 2 second pause or
multiple pauses to your number, press the
to highlight Add Entry, then press
27
1. Press
(INTERCOM) to select
upper case letters.
2. Press
enter T.
3. Press
times to enter O.
4. Press
enter M.
Press
character entered.
Phonebook Full
If the phonebook becomes
full when adding entries, the
display shows
and then returns to standby.
Clear
to delete the last
once to
three
once
Memory Full
to
or navigation key for 1 second. P
will be added to the number.
5. The screen shows the Names menu.
6. Press and hold
Back to return to standby.
Add Entry from a Call List
When reviewing a Call List (Received, or Dialed) a
call entry can be automatically copied into the
Phonebook.
1. With a call entry highlighted, press Options.
2. Scroll
. Highlight the number format to be saved
OK
then press OK.
3. Name then Number information can be modified
by using the Clear button, or if no change is
desired, press OK to save the information
without changes. A confirmation display and
beep will be provided when the entry is saved.
to highlight Add Entry then press
R9
Page 28

T1960 Phonebook (Names)
28
Dial
1. Press
the keypad to enter the first letter of the name (e.g. press
times
there is more than one ‘S‘ entry.
3. Press
Names
for names beginning with ‘S‘), then scroll to the desired name if
then scroll or to the name you want or use
four
to dial the number associated with the selected name.
Edit Names and Numbers
1. Press Names then scroll or to the name you want to
edit, then press
press OK. Edit Entry is highlighted. Press OK.
2. The Edit Entry screen is displayed. Press Clear to delete or use
or to position the cursor. Use the keypad to change the
name. Press OK.
3. Edit the number then press OK. Display returns to the list of
names.
4. Press
and hold
Options
Back to return to standby.
. Scroll
to Edit or Delete then
Delete an Entry
1. Press Names then scroll or to the name you want to
delete, then press Options. Scroll
press OK. Scroll
2. Scroll
3. Press Yes to confirm or No to cancel.
4. Press
and hold
to Delete Entry then press OK.
Back to return to standby.
to Delete Entry then press OK.
to Edit or Delete then
Add A Ringtone
1. Press Names then scroll or to the name you want to
have a special ring tone played when that person calls you, then
press Options.
2. Scroll
3. Scroll
4. Press
and hold
Ringtone
to
or to choose a ring tone, then press OK.
Back to return to standby.
then press OK.
R9
Page 29

Verizon Calling Features
CALLER-ID
Information
Sometimes the number and
/ or name information is not
sent by the network. In this
case you will see:
• BLOCKED CALL
When the caller has chosen
to not send (block) their
caller information.
• BLOCKED NUMBER or
NAME
When only the number or
name has been blocked.
UNKNOWN CALLER
•
When caller information is
not available in the network.
• UNKNOWN NUMBER or
NAME
When only the number or
name is not available.
• INCOMPLETE DATA
When no valid Caller-ID
data was received.
Make sure you have
subscribed to the Caller-ID
service.
IMPORTANT
The Caller-ID information is
sent on the telephone line
after the first ring signal. To
ensure your Caller-ID
information is received you
should wait until after the
start of the second ring to
answer incoming calls.
Verizon Calling Features
Managing Your Calls.
You may subscribe to any of the following
Verizon services for which your T1960
telephone has been designed to make these
services easy to use.
• Caller-ID
• Caller-ID With Call Waiting
• Call Waiting Deluxe
•
Voicemail
• 3-Way Calling
Fast access to Verizon Optional Calling
Feature services which may be available:
•
Directory Assistance
•
Call Return
•
Repeat Dialing
• Call Forwarding
•
Voice Mail Access # and Voice
Mail Indicator
Caller-ID
If you subscribe to the Caller-ID service,
after the first ring, or after the Call Waiting
tone, you will see the number and name of
who is calling you on your handset display,
as well as the time and date of their call.
Normally, the number displayed will be a 10digit format (3-digit area code + 7-digit
phone number). If the Area Codes are
programmed (see page 39), the number
displayed can be shown as either a 7-digit,
10-digit, or 11-digit number for easier
recognition of a Local or Long Distance call.
29
R9
Page 30

Verizon Calling Features
30
Call Waiting
The Verizon Call Waiting service provides
you with a special alerting tone when a
caller is trying to call you while you are
already on a call. You can press the
‘FLASH’ button to put the current call on
hold and speak with the Call Waiting caller.
Pressing the ‘FLASH’ button again will
toggle the call between the original caller
and the Call Waiting caller.
Caller-ID With Call Waiting
The Caller-ID With Call Waiting (CIDCW)
service blends the best of Call Waiting and
Caller-ID services by showing you who is
calling while you are already on a call. This
service can be very useful to allow you to
use your telephone without worrying about
missing an important call. Because the
caller's number and name are displayed,
you can decide whether to put your current
call on hold and answer the new waiting
call, or ignore the new waiting call and
continue talking on the current call.
When you have subscribed to CIDCW and a
new call is received while you are already
on a call, you will hear a special alerting
signal and then the caller's information will
be displayed.
See the information on the sidebar on
this page regarding Call Waiting Deluxe
menus.
IMPORTANT
To use the Verizon calling
features you will first need to
subscribe to the desired
features for which there may
be a monthly charge from
Verizon.
Call Waiting Deluxe
Call Waiting Deluxe
provides additional options
for Caller-ID with Call
Waiting. See page 31
regarding the special
menus used for Call
Waiting Deluxe. If these
menus are turned ‘ON’ then
you must use the menu
options and not the
‘FLASH’ key for Caller-ID
with Call Waiting.
If a Caller Hangs Up
If you have an active call,
and a 2
and one of these callers
hangs up, you may hear a
dialtone if you use the
waiting caller. In this case
you are ready to dial a 3-
Way call. Press
again to be connected to
the remaining caller.
If one of the callers hangsup, the T1960 may not
recognize this and may
display the incorrect caller
information on the display.
nd
call is waiting,
to connect to the
R9
Page 31

Verizon Calling Features
If You Forget a Waiting
Call
It is possible you may have
a call on hold (waiting) and
finish your conversation
with one caller and hang
up. In this case, the phone
should ring again with the
call from the waiting caller.
CALL WAITING DELUXE
Menu Activation
You may or may not have
the Call Waiting Deluxe
service available on your
telephone line. You can
turn the Call Waiting
Deluxe menu pop-up On or
Off to match your
telephone services.
CALL WAITING DELUXE
Information
When you have subscribed
to the Caller-ID With Call
Waiting (CIDCW) service
you may also have access
to the Call Waiting Deluxe
(CWDX) options. When a
CIDCW call is received, the
regular CIDCW service
only allows you to answer
the new call while placing
the original call on hold.
Call Waiting Deluxe
provides many more
options for handling the
new waiting call.
Connecting To The New Caller
1. Press (FLASH) to put the
current call on hold and be connected to
the waiting call.
2. Press
(FLASH) again to
reconnect to the original call and put the
nd
caller on hold.
2
3. Press
between the first and second caller.
(FLASH) to toggle
Call Waiting Deluxe
Activate Call Waiting Deluxe Menu
The T1960 provides the ability to turn the
Call Waiting Deluxe menus On or Off to
match the services you may have on your
telephone line.
1. Press Menu then use
to select
Calling Features option. Press OK.
2. Press
to highlight the
Call
Waiting Deluxe option. Press OK.
3. Press
Press OK.
to highlight On or Off.
Call Waiting Deluxe Pop-Up Menu
The Call Waiting Deluxe options will "popup" on the display when a CIDCW call is
received. You will have about 20 seconds
in the Call Waiting State to make a
selection before the CIDCW call is
automatically forwarded or given a busy
signal by the network.
31
R9
Page 32

Verizon Calling Features
32
CALL WAITING STATE
The following options are available during
the
Call Waiting State
press
or then press OK when
. To see all options
the option you want is highlighted:
• Answer
Used to answer the new call and put the
current call on hold. This changes the
menus to the ‘Held State’ (see page 33).
• Please Hold
The network will send a message to the
CIDCW caller asking to please wait on the
line. This puts the CIDCW call on hold
allowing you to answer the call when you
are ready. This changes the menus to the
‘Held State’ (see page 33).
• Conference
The network will connect all three (you, the
1st call, and the CIDCW call) just like a 3Way call. This changes the menus to the
‘Conference State’ (see page 33).
• Forward to Voicemail
The network will immediately forward the
CIDCW call to your network voicemail. You
must subscribe to Verizon's voicemail
service for this option to function.
CALL WAITING STATE
Information
The Call Waiting State is
entered when the CIDCW
call is received. The
network will stay in the Call
Waiting State for
approximately 20 seconds.
You must make a selection
from the pop-up menu
within 20 seconds or the
CIDCW call will get busy or
forward treatment.
The Call Waiting State
options are:
Answer
Please Hold
Conference
Forward to Voicemail
Drop & Answer
Tell Busy
• Drop & Answer
The CIDCW call is connected and the 1st
(original) call is dropped by the network.
• Tell Busy
The network will send a message to the
CIDCW caller that the line is busy, and then
the CIDCW caller will hear a busy signal.
R9
Page 33

Verizon Calling Features
HELD STATE
Information
When Answer or Please
Hold is selected in
response to a CIDCW call,
the Call Waiting Deluxe
service is then in the
State
. This means that
one caller is on hold while
you are connected to the
other caller. The
State
options are:
Held
Held
HELD STATE
There are options available on the T1960
display while in the Held State.
• Return to held call
Toggles connection between the 1st and
2nd call. The caller you are not talking to is
placed on hold.
• Drop & Return to cal
Drops the current call and connects to the
33
held call.
Return to held call
Drop & Return to cal
Conference
CONFERENCE STATE
Information
When Conference is
selected in response to a
CIDCW call, the Call
Waiting Deluxe service is
then in the
State
. This means all 3
(you, original call, and the
CIDCW call) are connected
together. The
State
options are:
Conference
Conference
• Conference
The network will connect all three (you, the
original call, and CIDCW call) just like a 3Way call (also see the Conference State
menu options).
CONFERENCE STATE
There are options available on the T1960
display while in the Conference State.
• Drop original caller
Drops the original call and stays connected
to the CIDCW call.
Drop second caller
•
Drops the CIDCW call and stays connected
to the original call.
Drop original caller
Drop second caller
R9
Page 34

Verizon Calling Features
34
VOICEMAIL
Information
Voicemail is a network
service that will take voice
messages from callers
when you are not home,
when you are already on a
call and the line is busy, or
when you do not wish to
answer the telephone. This
is similar to an answering
machine. Unlike an
answering machine though,
the voicemail service will
also take messages from
callers that call when you
are using the telephone
line
. This is a very useful
feature that an answering
machine cannot provide.
Most of the voicemail
system prompts are
provided audibly to guide
you through the various
options for set-up of
outgoing messages and
other options, and for the
most often used feature,
which is listening to the
saved messages.
Voicemail
The T1960 includes the following features to
help make using your network Voicemail service
easy.
• A Voicemail indicator light on both the base
and all handsets
• One-button access to call the Voicemail
system to check your messages
Voicemail Indicator
If you have Voicemail waiting, the T1960 will
alert you to the Voicemail by:
1. A blinking light on the base
2. Each handset display will flash the
backlighting
Voicemail System Access
Once the correct Voicemail System access
number is programmed (or use the default
access number = *98), simply press
(VOICE MAIL) to automatically call the
voicemail system.
R9
Page 35

Verizon Calling Features
Voicemail Access Number
The Voicemail system has an access number to retrieve your
messages. The default number is *98
programmed into the T1960) which is the access number for most
systems.
To change the access number:
1. Press Menu then use
.
OK
2. Press
OK. You will see the present setting and the Clear option to
change the number.
or to highlight VoiceMail Access #. Press
to select Calling Features. Press
(default number pre-
35
Note: To add a 2 second Pause or multiple pauses to your number,
press and hold the
will be added to your number. This is useful if you wish to add your
security code to the access number, e.g.,
or navigation key for 1 second. A ‘P‘
*98PPPP123456.
R9
Page 36

Verizon Calling Features
36
VERIZON SERVICES
Directory assistance
Dials 411 when selected.
Call return
Dials *69 when ‘On’ is
selected. This service is
used to automatically call
back the last person to call
you. If the line is busy, the
network will continue to
check the busy status of the
last number you called for
30 to 45 minutes. When the
line becomes free, the
network will ring your phone
with a special ring and
display the Caller-ID of the
person you are trying to
reach. ‘Off’ (*89) is used to
cancel an active Call
Return.
Repeat dialing
Dials *66 when ‘On’ is
selected. This service
works similarly to the Call
Return service except the
last number you have called
is called or checked for
busy status. ‘Off’ (*86) is
used to cancel an active
Repeat Dialing.
Call forwarding
Turns forwarding on with
72# (then user entered
forwarding number) or Off
with 73#. See the Verizon
services guide for more
information on this service.
Optional Calling Features
Fast access to Verizon Optional Calling
Feature services which are designed to
save you time and make connecting a call
easier. The T1960 includes a Calling
Feature menu to have the codes for these
services dialed for you so you do not have
to remember the code for each service.
To access the Calling Features menu:
1. Press
Calling Features option. Press
2. Press
the following options then press OK:
• Directory assistance
• Call return
• Repeat dialing
• Call forwarding
Directory Assistance dials 411 when
selected. The other services require you to
select either On or Off.
3. Press
Off. Press
When On or Off is selected (by pressing OK
when an option is highlighted) the T1960 will
dial the required code for you to activate, or
deactivate, the selected service.
Menu
then use
to select
OK
or to highlight one of
or to highlight On or
.
OK
.
R9
Page 37

T1960 Handset Settings
T1960 Handset Settings
Make your phone work the way
you want
The Handset menu lets you set preferences
for each handset.
Handset Name
To change the handset name (default =
Handset):
1. Press Menu, then use
Handset menu then press
Handset Name
2.
is highlighted. Press OK.
3. Press Clear several times to erase the
current name. Enter the new handset
name you want using the keypad 1-9, 0
keys (see sidebar on page 27). If you
make a mistake press Clear. When
entered, press
OK
to save.
Language
Choose the display language – English,
Français, or, Español:
1. Press Menu, then use
Handset menu. Press OK.
2. Scroll
OK. Press
to Language then press
or to highlight
to select
.
OK
to select
Handset Settings Options
Handset Name
Language
Menu Color
Auto Talk
Beep Tones
Area Codes
HANDSET NAME
Information
You can change the name
displayed on your
Handset’s display, e.g., to
“Peter”, “Kitchen”, etc. The
name can be up to 8
characters long. The
Handset number cannot be
changed.
Handset Default Settings
Handset
name
Volume
Control
Setting
Auto
Talk
Beep
Tones
Area
Codes
37
Handset
1
On
All On
Empty
the language you want then press OK to
select, or Back to return to the previous
menu.
Press
and hold
Back to return to standby.
R9
Page 38

T1960 Handset Settings
38
AUTO TALK
Information
The default is On.
Setting Auto Talk = On will
make the handset
automatically answer the
incoming call when the
handset is ringing and lifted
from the base or charger.
Menu Color
You can select Blue, Green or Red:
1. Press Menu, then use
Handset
2. Scroll
OK
3. Scroll
menu. Press OK.
to Menu Color then press
.
or to highlight the
to select
color you want then press Save.
4. Press
and hold Back
to return to
standby.
Auto Talk
You can turn the auto-talk feature On or Off.
The default is On. To change this setting:
1. Press Menu, then use
Handset. Press OK.
to select
(Same as pressing
If Auto Talk = Off, you must
press
call after the handset is
lifted from the base or
charger.
to answer the
)
2. Scroll
3. Press
to
or to highlight On or
. Press OK.
Auto Talk
Off. Press OK.
4. Press and hold Back to return to
standby.
R9
Page 39

T1960 Handset Settings
Area Codes
Set the Local and Regional Are Codes:
1. Press Menu, then use
Handset Press OK.
2. Scroll
3. Press
to Area Codes. Press OK.
or to highlight Local
Area Code or Regional Area Code.
Press OK.
4. Enter the 3-digit number. If you make a
mistake press Clear. Press OK to
confirm.
5. Press
and hold
Back to return to
standby.
Local Area Code (7-Digit Dialing)
If the Local Area Code matches the first 3
digits of the Caller-ID number, then the
first 3 digits are removed and 7 digits is
displayed for dialing.
Regional Area Codes (10-Digit Dialing)
Up to 5 Regional Area Codes can be set.
If any of the Regional Area Codes match
the first 3 digits of the Caller-ID number,
then the 10-digit number is displayed for
dialing.
Long Distance (11-Digit Dialing)
If neither the programmed Local Area
Code, nor any of the programmed
Regional Area Codes, match the first 3
digits of the 10-digit Caller-ID, then the
telephone number is formatted as 11digits (1+ Caller-ID number).
to select
Area Codes
Information
The T1960 can dial
numbers back directly from
the Caller-ID entered into
the Received Calls list.
Most often, Caller-ID is
received with 10 digits (3digit area code + 7-digit
phone number) regardless
of how many digits need to
be dialed to call that
number. The most
prevalent dialing plans in
use are 7-digit (normal 7digit phone number), 11digit (1+area-code+7-digits)
and 10-digits (area-code+7digits). When dialing back
from the T1960 Received
Calls list, the T1960 will try
to figure out if 7, 10, or 11
digits should be dialed.
This is accomplished by
entering area codes as
settings.
There is a "Local Area
Code" and 5 "Regional
Area Code" settings
available. The area code
settings work for displaying
and dialing back numbers
only when the Caller-ID
received is 10 digits. If the
Caller-ID is anything other
than 10 digits, the Area
Code settings are not used
to pre-format the displayed
or dialed number.
39
R9
Page 40

T1960 Handset Settings
40
Beep Tones
Information
The default is On.
The T1960 will play a
tone when a key is
pressed, Battery low is
detected, and Out of range
is detected.
Beep Tones
You can turn off the beep tones for Key
press, Low Battery, or Out Of Range.
The default is On. To change this setting:
1. Press Menu, then use
Handset
Press OK.
to select
2. Scroll
3. Press
to Beep tones. Press
or to highlight
beep, Low battery, or Out of range
Press OK.
4. Press
or to highlight Off or
On. Press OK.
OK
Key
.
.
R9
Page 41

T1960 Base Settings
T1960 Base Settings
Base Settings Options
41
You Have The Controls
Base Ringtone
Choose from 5 ringer tones and melodies:
1. Press Menu then use
Base Settings
Press OK.
2. Press OK to select Base Ringtone.
3. Scroll
or or to select the
Ringtone you want. As you highlight
each option, you hear a quick sample of
the ringing melody.
4. Press OK to set the selected Ringtone.
Base Volume
to select
Base Ringtone
Base Ring Volume
Handset Priority
System PIN
Default Settings
Base Default Settings
Base
Ringtone
Base Ring
Volume
Handset
Priority
System
PIN
5
3
All
0000
There are five ringer volume levels and Off:
1. Press Menu then use
Base Settings Press
2. Press
to highlight
OK
to select
.
Base Volume
then press OK.
3. Scroll
to increase or to decrease
volume then press OK to confirm.
R9
Page 42

T1960 Base Settings
42
HANDSET PRIORITY
Information
Normally, if you have more
than one handset
registered to your base,
they all ring at the same
time. However, you can
set one of them to ring
before the others, so that
calls can always be
answered at one handset
first.
Protecting your settings
When entering a PIN the
digits are shown as
asterisks.
Keep track of your PIN
If you change the System
PIN, keep a record of the
new number by writing in
the space provided on the
last page of this User
Guide. You need your
System PIN for registering
handsets and for some
other optional settings.
If you enter the PIN
incorrectly the screen
shows Incorrect PIN.
Handset Priority
The default setting is for all registered
handsets to ring at the same time. To set
one handset to ring before the others:
1. Press Menu then use
Base Settings. Press
2. Press
Priority
to highlight Handset
then press OK.
to select
OK.
All Handsets
is highlighted.
3. Scroll
press OK. Scroll
to Select Handset then
or to the
Handset # you want to ring first. Press
.
OK
4. Scroll
or to select the
number of rings at the handset before
the other handsets start ringing (2, 4, 6).
Press OK to confirm.
System PIN
The System PIN is used for registering and
de-registering handsets.
The default System PIN is 0000.
1. Press Menu then use
Base Settings Press OK.
2. Press
to highlight System PIN
then press OK.
3. Enter Old PIN: is displayed. Enter PIN
then press
4.
Enter New PIN:
OK
.
is displayed. Enter the
new PIN (1 to 8 digits) then press OK.
5. Confirm New PIN is displayed. Enter
new PIN again then press OK to confirm
your new PIN.
to select
R9
Page 43

T1960 Call Lists
T1960 Call Lists
Managing Telephone Numbers
The T1960 allows you to review your
Received Calls and Dialed Calls, and to
delete calls from the call lists. You can also
select a caller from one of the lists to call
back, or add an entry to the Phonebook.
Access Call Lists Via the Menu
1. Press Menu, Calls Lists is highlighted.
Press OK to enter the Calls Lists.
2. Scroll or to highlight and
select
Received calls, Dialed calls
Delete Calls List. Press OK to enter.
3. If you selected Received Calls or
Dialed Calls, scroll to any call record
then press
•
Call
•
Delete
•
Add Entry
Options
. You can select:
OR
4. If you selected Delete Calls List you
can select:
• Received Calls
•
Dialed Calls
•
All Calls
5. Scroll
to select the option you
want then press OK.
OR
Press Back to return to the previous
screen.
or
Missed Calls
If you don’t answer a call
on with a T1960 handset,
the Caller-ID information
will be saved in the
Received Calls list and the
number of missed calls will
be displayed on the Main
Display.
CALL LISTS
Received Calls
Shows the Caller-ID
information for incoming
calls. A maximum of 50
calls can be stored in the
Received Calls list.
Dialed Calls
Shows the number dialed
for the last 20 outgoing
calls made from your
handset.
A
the Received Calls list
indicates a new caller.
If a call is received when
the Calls List is full, the
oldest entry will be
replaced with the Caller-ID
information for the new
caller.
next to an entry in
43
R9
Page 44

T1960 Call Lists
44
Another Way To Access
The Call Lists
To access the Received
Calls or Dialed Calls list
using the navigation
buttons from the idle
display:
1. Press for the
OR
Received Calls list.
Call Lists Options
When a call is highlighted from a call list,
select
Options,
then press
or
to highlight your choice of:
Call – To dial or format and
dial a selected phone
number.
Delete – To delete the list entry.
2. Press
Dialed Calls list
(outgoing calls made).
for the
Add Entry – To create an entry in
the phonebook. You
can add or edit a name
then press OK, or to
store the displayed
name press
OK
. The
number is displayed.
Edit(format) the number
(if necessary). Press
OK to store the number.
R9
Page 45

T1960 Call Lists
Dial a Selected Entry
From the Received Calls list:
1. Press
entry.
2. Press
OR
If the Area code has been set, you may need to format the number
for correct dialing, under some circumstances. To format a number:
1. Press Options then select Call and OK to display the number.
2. You can format the number to be either:
•
• 10-Digits (Area-Code+ Number, Regional)
• 11-Digits (1+Area-Code+Number, Long Distance)
7-Digits (7-digit number only, Local)
or to scroll through the list and highlight an
. The T1960 will dial the displayed number.
45
3. Press
4. Press OK to dial the highlighted number.
From the Dialed Calls list:
1. Press
previously dialed number.
2. Press
If the Area Code has not been set the T1960 will only
displayed number after you press Call. You cannot format a number
unless the Area Code has been set.
See page 39 for information about setting Area Codes for the T1960.
or to change from 7 - 10 - 11 digit formatting.
or to scroll through the list and highlight a
the T1960 will dial the displayed number.
dial the
R9
Page 46

T1960 Call Lists
46
Delete Calls List
You can completely delete one or all of the calls lists:
1. Press Menu, Calls Lists is highlighted. Press OK to enter the
Calls Lists.
2. Scroll
Scroll to select the list(s) you want to delete:
Received calls (Incoming calls)
Dialed calls
All Calls (All calls for the two call lists above)
3. Press OK.
4. Press Yes to delete or No to cancel.
or to
(Outgoing calls made)
Delete Calls List
then press OK.
R9
Page 47

T1960 Melody Settings
RINGTONE
Information
You can choose from 10
different melodies for
external (regular) or
internal (intercom) calls.
The default Ringtone for
external calls is Melody 10.
The default Ringtone for
internal calls is Melody 5.
RING VOLUME
Information
There are five handset
ringer volume levels and
off. If you select Ringer
off, calls will still ring at the
base and the handset
display will indicate
incoming calls.
If you select Ringer off,
the “ringer off” icon is
shown on the right side of
the display.
Handset Melody
Default Settings
External
Ringtone
melody
Internal
Ringer
melody
Handset
ringer
volume
10
5
3
T1960 Melody Settings
Handset Ringtone
To set the Handset Ringtone:
1. Press
Menu
Melody. Press
Ringtone
2.
or
Internal Calls. Press OK.
3. Scroll
want. A sample is played. Press OK to
confirm.
4. Press and hold Back to return to standby.
Handset Ringer Volume
To set the Handset Ring Volume:
1. Press
Handset. Press
2. Scroll
3. The current setting is displayed. Press
to increase or
Press OK to confirm.
4. Press
Menu
and hold
, then use
.
OK
to select
is highlighted. Press OK. Press
to select External Calls or
or to the melody you
, then use
.
OK
to select
to Ring Volume then press OK.
to decrease the volume.
Back to return to standby.
47
R9
Page 48

48
*IMPORTANT
If you have subscribed to
your network’s Caller-ID
service the date and time
will be set automatically
when you receive your first
call and you will not need to
set the date and time
manually, although this is
an option. However the
Date and Time will be
updated whenever a CallerID is received.
12-HOUR and 24-HOUR
TIME FORMAT
Information
When entering a time into
the T1960 you must use the
12-hour time formatting
(setting AM or PM as
appropriate) whether the
time format selected is 12hour or 24-hour. For
example to set the time to
9:30 am (i.e., 09:30 in 24hour format), you would
enter
‘#’ to toggle select AM. To
enter a time of 9:30 pm (i.e.,
21:30 in 24-hour format),
you would enter
then press ‘#’ to toggle
select PM.
ALARM ON INDICATOR
When the alarm is turned
on, the
next to the display time.
T1960 Time Settings
T1960 Time Settings
Automatically Setting Date and Time
The Date and Time are automatically updated
when a call with Caller-ID is received.
Manually Setting Date and Time
If you do not have Caller-ID you can set the
Date and Time as follows:
1. Press Menu, then use
settings then press OK.
2. Set Date & Time is highlighted. Press
Set Date
9 3 0
0
and then press
0
9 3 0
icon is shown
and
3. Enter the date, e.g., _0_ _4_ _2_ _2_ for
April 22
Set Time
Enter the time in the 12-hour format. For
2:30pm (or 14:30 in 24-hour format), press
_2_ _3_ _0_ then press _#_ to toggle select
‘PM’. Press
For 2:30am, press
press _#_ to toggle select ‘AM’. Press
confirm.
Time Format (12 hr or 24 hr)
1. The display time can be displayed as 12
hour or 24 hour format.
2. Press Menu then use
Settings. Press
highlight Time format then press OK.
3. Highlight 12 Hour or 24 Hour then press
OK.
nd
. Press OK to confirm.
OK
to confirm.
_ _2_ _3_ _0_
_0
. Press
OK
to select
then
OK
to select
to
Time
OK
_0
to
Time
.
_
R9
Page 49
T1960 Time Settings
49
Use Your Phone as an Alarm Clock.
You can use the T1960 as an Alarm clock. You can have a different
alarm setting for each handset registered to the base. The alarm rings
only at the handset programmed, not at the base or any other handset.
Set Alarm
1. Press Menu then use to select Time Settings. Press OK.
2. Press
3. Press
option you want, press OK to confirm:
On Once – alarm goes off just once
On Daily – alarm goes off the same time each day
OK
to highlight
to select On/Off. Scroll
Alarm
then press OK.
or
to highlight the
Off – turn the alarm off
4. Enter the time you want the alarm to go off in the 12-hour format.
•
For 2:30pm (i.e., 14:30 in 24-hour format), press
then press _#_ to toggle select ‘PM’. Press OK to confirm.
•
For 2:30am (i.e., 02:30 in 24-hour format), press
then press _#_ to toggle select ‘AM’. Press
OK
_ _2_ _3_ _0_
_0
_ _2_ _3_ _0_
_0
to confirm.
Alarm tone
Choose from 4 alarm melodies:
1. Press Menu then use
2. Scroll
3. Press
4. Scroll
Tone 4), then press OK to confirm.
or
to highlight Set Alarm Tone, then press OK.
or to select the Alarm Tone you want (Tone 1 to
to highlight Alarm. Press
to select Time Settings then press OK.
OK.
Turn the alarm off
When the alarm sounds, press any button on the handset to turn the
alarm off.
R9
Page 50

50
Information
You can create phonebook
entries and adjust some
handset settings such as
ringer melody and volume
on an unregistered handset
or out of range handset.
IMPORTANT
Before registration, make
sure the handset batteries
are fully charged and that
you are close to the base.
BASE REGISTRATION
Information
After a handset is registered
with a base, the handset
reverts to standby and is
given the first available
handset number. You can
now use the handset. The
handset number is
determined by the base so
you cannot change it.
Information
All of the bases that a
handset is registered to are
indicated by a
Additional Handsets and Bases
Additional Handsets and
Bases
Expanding your system is easy.
Up to Five handsets can be registered and
operated from one T1960 base. You can
make internal (intercom) calls between two
handsets while a third handset is making an
external (telephone line) call. Each handset
can be registered on up to four bases. If you
buy new handsets to use with your T1960
you will have to register them to the base
before they can be used.
Register a New T1960 Handset
First, on the base:
1. Press and hold
approximately 5 seconds until you hear
the base “beep-beep”. The Power/In
Use light will blink fast.
Next on the handset
:
2. Press Menu, then scroll
Registration then press OK.
3. Register Handset is highlighted. Press
OK.
4. Base 1 is then highlighted. Press OK.
5. Enter the base’s System PIN (originally
0000). Press OK.
.
6. The handset will search for the base.
This may take up to a minute. Then the
handset will beep and the display will
show the base ID number. Press OK to
confirm. The handset displays; ‘
Registered’.
(on the base) for
to
Handset
R9
Page 51

Additional Handsets and Bases
Register Handset with an
Additional Base
To register the handset with another base:
First, on the base
1. Press and hold
base “beep-beep”.
Next on the handset
2. Press Menu then scroll
Registration then press OK.
Register Handset
3.
.
OK
4. Scroll
:
until you hear the
:
to
is highlighted. Press
to select the base, e.g.,
MULTIPLE BASES
Information
A handset registered with
one base can then be
registered with up to three
more bases, e.g., Home
office line, 2
etc.
You can switch your T1960
handset between bases.
The handset must first be
registered with each base
individually.
nd
home line,
51
Base 2. Press OK.
5. Enter the selected base’s System PIN
(originally 0000). Press OK.
6. The handset will search for the base.
This may take up to a minute. Then the
handset will beep and the display will
show the base ID number. Press
OK
confirm. The handset screen then
shows; ‘Handset Registered’. The
handset is now ready for use.
Selecting a Base
To select a base for the handset to use:
1. Press Menu then scroll
Registration. Press
2. Scroll
to Select Base then press
OK
.
OK. The current base being used is
highlighted.
to
to
3. Scroll
you want. Press
or to select the base
.
OK
R9
Page 52

Additional Handsets and Bases
52
DE-REGISTER HANDSET
Information
A registered handset
cannot be de-registered by
itself, it must be deregistered from another
handset.
Example
If there are three handsets
registered with a base,
(Handset 1, Handset 2, and
Handset 3) and you wish
for Handset 2 to be deregistered. Then you must
use Handset 1 or Handset
3 to de-register it.
:
De-register a Handset
You can use one handset to de-register
another handset from the same base.
1. Press Menu then scroll
Registration. P
2. Scroll
to De-register. Press
ress OK.
3. Enter the system PIN (originally 0000)
then press
. The screen lists all
OK
handsets registered to the base.
4. Scroll
or to select the
handset you want to de-register then
press OK.
5. Press Yes to confirm or Back to return
to the previous display listing the
handsets.
to
OK
.
R9
Page 53

T1960 Troubleshooting Tips
53
T1960 Troubleshooting Tips
Need Help?
If you have any problems setting up or using your Verizon T1960
telephone, please contact the Thomson product support center at:
1-800-448-0329
Caller ID
Problem & Solution
Caller ID “Incomplete Data” message
•
The unit displays this message if it detects anything other than valid
Caller ID information after a ringing signal.
•
Are you subscribed to Verizon’s Caller ID service?
Hearing Aid Noise
Please note that the T1960 works by sending radio signals between the
base and handset. These signals may interfere with some hearing aids,
causing a humming noise.
R9
Page 54

Troubleshooting Tips
54
Telephone
Problem & Solution
Base power LED is not on
Make sure the base is connected to a working non-switched electrical outlet.
•
Make sure the power cord is properly connected to the base in the correct jack.
•
No display on handset and base power LED is On
Are the handset batteries fully charged? Charge the batteries for 16 hours or replace
•
the batteries.
Make sure the batteries are properly installed.
•
No dial tone but handset display works after full charge
Ensure the telephone cord is connected at both ends.
•
Does the handset indicate out of range? If so move closer to the base.
•
Does another phone work with the same cord and wall jack?
•
Handset or base does not ring
Ensure the telephone cord is connected at both ends.
•
Does the handset indicate out of range? If so move closer to the base.
•
Does another phone work with the same cord and wall jack?
•
Ensure that the Ringer Volume is not set to OFF.
•
Poor reception between handset and base
Too close to metal appliances such as microwave, refrigerator, stove, etc.
•
Baby monitor or other device is using the same frequency (1.9 GHz).
•
Handset battery is low. See battery indicator and place on charger.
•
Out of range, excessive distance and / or objects (walls) between handset and base
•
(unit beeps).
Cannot dial out
Keypad may be locked. If the padlock icon is on, press unlock in order to deactivate
•
the lock to enable the keypad. (Page 24)
R9
Page 55

General Information
55
System Pin Number:
Default = 0000
R9
 Loading...