

Page 1

TM
CABLE SATELLITE
TELECOM
TERRESTRIAL
User's Guide
Page 2

B
O
X
A
DSL
1
2
3
We congratulate you and let us thank you for your purchase!
In order to let you have the best from telephony and Radios Internet, your Symbio will update itself automatically. You just need to:
1. Connect the power of the base.
2. Give internet access to the base (by
connecting Ethernet cable to your modem
and your base).
3. Insert the battery into handset battery
compartment.
Your Symbio will manage the updates automatically.
This operation can last between 5 or 15 minutes according to the speed of your internet connection and the updates available.
To indicate the update is finished, " Download complete" is displayed.
In the event of accidental interruption, please check the connections (internet connection and
power cables). The update will be started again in an automatic way. You cannot use Symbio
during the update.
To get the best from Symbio, we recommend you to spend few minutes to go through the remaining part of this user guide.
Page 3

CONTENTS OF THE BOX
Your Symbio box contains:
- 1 handset
- 1 charger
- 1 remote DECT base
- 1 rechargeable Li-Ion battery
- 1 base power supply (black power adapter)
- 1 handset power supply (white power adapter)
- 1 phone line connector cord (RJ11 and standard plug)
- 1 Ethernet cable (RJ45)
- 1 user's guide
- 1 quick installation guide
In order to understand the key features of your Symbio, we recommend that you read this guide carefully, including all the safety
instructions, before using the product. We also recommend that you inform other members of your family (and especially your children)
of the detailed warnings given in this guide.
Parents and other adults with responsibility for very young children should ensure that these children do not put unsuitable or dangerous
metal or plastic objects or items into their mouths.
Note: If your Symbio is connected to the Internet, you may download software updates for the base and handset.
Applying these updates and the improvements they contain may slightly modify the menus shown in this user's guide.
Page 4

Context keys: these keys are used to access the
contextual functions (as shown on the
handset screen).
- press the left key to confirm,
- press the right key to cancel.
- Answer
- Activate the Hands-free function
- Hang up
- Return to the welcome screen
- Flash key (long press): lets you switch
between calls (where this service is
included in your telecoms service provider
contract)
- When writing: provides access to a
selection of symbols
When writing: lets you insert a space
- Long press: inserts a pause when dialling
When writing: selects CAPITALS/lower case
characters
- Long press: selects character numbers
#
*
R
The handset keys
Browser and menu keys:
Browser wheel:
Rotate:
- To access the call list from the
welcome screen
- To raise and lower the earpiece
volume during a call, the incoming
ringer volume and the radio volume
- To scroll through the on-screen menu
options
Press:
- To confirm, access the menu,
read/stop in Radio mode, etc.
Radio key:
Turns on the Radio
function
Headphone/
Stereo
connection
socket + power
input
Please note: pressing the wheel has the same effect as pressing
the left (contextual) key
Page 5

Display and associated icons
Handset search key: press once to make the handset
ring.
Handset registration (long press of 8 seconds).
Base LEDs:
Internet Led (blue):
Off: cable not connected
On steady: cable connected and Internet access active (IP
address allocated)
On flashing: cable connected, but no IP address allocated
Wireless Led (blue):
Off: handset not registered
On flashing (slow): communication in progress
On flashing (fast): handset in registration mode
On steady: the wireless link is available
On/Off Led (green):
Off: the base is not connected
On steady: the base is on
On flashing (fast): base starting up
The LEDs flash in succession when your base is updating.
Indicates whether the handset is within or outside
range of the base
Indicates the battery charge level
Ringer muted
Alarm
Hands-free
Mute function activated
Voice message (where this service is included in your
telecoms service provider contract)
In the call list:
Incoming call
Outgoing call
Missed call
On the base
Page 6

Thomson Telecom - Sales and Marketing Departments
Head office: 46, quai Alphonse Le Gallo- 92100 Boulogne Billancourt - France
Joint-stock company with capital of 130 037 460 € - 390 546 059 RCS Nanterre
© Thomson Telecom 2008 - Reproduction prohibited. Photos are non-contractual
The manufacturer reserves the right to modify the specifications of its products in order to make technical improvements or
comply with new regulations.
SYMBIO and THOMSON are registered trademarks
July 2008
Page 7

1. USING THE PHONE . . . . . . . . . . . . . . . . . . . . . . . . . . . . . . . . . . . . . . . . . . . . . . . . . . . . . . . . . . . . . . . . . . . . . . . . . . . 3
2. FIRST USE . . . . . . . . . . . . . . . . . . . . . . . . . . . . . . . . . . . . . . . . . . . . . . . . . . . . . . . . . . . . . . . . . . . . . . . . . . . . . . . . . . 6
2.1 Precautions . . . . . . . . . . . . . . . . . . . . . . . . . . . . . . . . . . . . . . . . . . . . . . . . . . . . . . . . . . . . . . . . . . . . . . . . . . . . . . . . . . . . 6
2.2 Installing the base . . . . . . . . . . . . . . . . . . . . . . . . . . . . . . . . . . . . . . . . . . . . . . . . . . . . . . . . . . . . . . . . . . . . . . . . . . . . . . . 7
2.3 Installing the handset . . . . . . . . . . . . . . . . . . . . . . . . . . . . . . . . . . . . . . . . . . . . . . . . . . . . . . . . . . . . . . . . . . . . . . . . . . . . 8
2.4 Installing the charger . . . . . . . . . . . . . . . . . . . . . . . . . . . . . . . . . . . . . . . . . . . . . . . . . . . . . . . . . . . . . . . . . . . . . . . . . . . . 9
3. USING THE PHONE . . . . . . . . . . . . . . . . . . . . . . . . . . . . . . . . . . . . . . . . . . . . . . . . . . . . . . . . . . . . . . . . . . . . . . . . . . . 10
3.1 Making a call . . . . . . . . . . . . . . . . . . . . . . . . . . . . . . . . . . . . . . . . . . . . . . . . . . . . . . . . . . . . . . . . . . . . . . . . . . . . . . . . . . 10
3.2 Calling a number from the phonebook . . . . . . . . . . . . . . . . . . . . . . . . . . . . . . . . . . . . . . . . . . . . . . . . . . . . . . . . . . . . . . 10
3.3 Calling a number from the call list . . . . . . . . . . . . . . . . . . . . . . . . . . . . . . . . . . . . . . . . . . . . . . . . . . . . . . . . . . . . . . . . . . 10
3.4 Receiving a call . . . . . . . . . . . . . . . . . . . . . . . . . . . . . . . . . . . . . . . . . . . . . . . . . . . . . . . . . . . . . . . . . . . . . . . . . . . . . . . . . 11
3.5 During a call . . . . . . . . . . . . . . . . . . . . . . . . . . . . . . . . . . . . . . . . . . . . . . . . . . . . . . . . . . . . . . . . . . . . . . . . . . . . . . . . . . . 12
3.6 Using the hands-free function . . . . . . . . . . . . . . . . . . . . . . . . . . . . . . . . . . . . . . . . . . . . . . . . . . . . . . . . . . . . . . . . . . . . . 12
3.7 Redialling one of the last numbers called (Redial) . . . . . . . . . . . . . . . . . . . . . . . . . . . . . . . . . . . . . . . . . . . . . . . . . . . . . 13
4. USING THE PHONEBOOK . . . . . . . . . . . . . . . . . . . . . . . . . . . . . . . . . . . . . . . . . . . . . . . . . . . . . . . . . . . . . . . . . . . . . 13
4.1 Adding a contact . . . . . . . . . . . . . . . . . . . . . . . . . . . . . . . . . . . . . . . . . . . . . . . . . . . . . . . . . . . . . . . . . . . . . . . . . . . . . . . . 13
4.2 Editing a contact . . . . . . . . . . . . . . . . . . . . . . . . . . . . . . . . . . . . . . . . . . . . . . . . . . . . . . . . . . . . . . . . . . . . . . . . . . . . . . . . 14
4.3 Deleting a contact . . . . . . . . . . . . . . . . . . . . . . . . . . . . . . . . . . . . . . . . . . . . . . . . . . . . . . . . . . . . . . . . . . . . . . . . . . . . . . . 15
5. IDENTIFYING CALLERS . . . . . . . . . . . . . . . . . . . . . . . . . . . . . . . . . . . . . . . . . . . . . . . . . . . . . . . . . . . . . . . . . . . . . . . 16
5.1 Understanding caller identification data . . . . . . . . . . . . . . . . . . . . . . . . . . . . . . . . . . . . . . . . . . . . . . . . . . . . . . . . . . . . . 16
5.2 Viewing the call list . . . . . . . . . . . . . . . . . . . . . . . . . . . . . . . . . . . . . . . . . . . . . . . . . . . . . . . . . . . . . . . . . . . . . . . . . . . . . 16
5.3 Calling back a caller listed in the log . . . . . . . . . . . . . . . . . . . . . . . . . . . . . . . . . . . . . . . . . . . . . . . . . . . . . . . . . . . . . . . . 17
5.4 Deleting an entry from the list . . . . . . . . . . . . . . . . . . . . . . . . . . . . . . . . . . . . . . . . . . . . . . . . . . . . . . . . . . . . . . . . . . . . . 18
5.5 Saving a call log contact in the phonebook . . . . . . . . . . . . . . . . . . . . . . . . . . . . . . . . . . . . . . . . . . . . . . . . . . . . . . . . . . . 18
6. CUSTOMIZING YOUR HANDSET . . . . . . . . . . . . . . . . . . . . . . . . . . . . . . . . . . . . . . . . . . . . . . . . . . . . . . . . . . . . . . . 19
6.1 Selecting a ringtone . . . . . . . . . . . . . . . . . . . . . . . . . . . . . . . . . . . . . . . . . . . . . . . . . . . . . . . . . . . . . . . . . . . . . . . . . . . . 19
6.2 Adjusting the ringer volume . . . . . . . . . . . . . . . . . . . . . . . . . . . . . . . . . . . . . . . . . . . . . . . . . . . . . . . . . . . . . . . . . . . . . . . 19
6.3 Selecting wallpaper . . . . . . . . . . . . . . . . . . . . . . . . . . . . . . . . . . . . . . . . . . . . . . . . . . . . . . . . . . . . . . . . . . . . . . . . . . . . . 19
6.4 Selecting the display language . . . . . . . . . . . . . . . . . . . . . . . . . . . . . . . . . . . . . . . . . . . . . . . . . . . . . . . . . . . . . . . . . . . . . 20
6.5 Contrast . . . . . . . . . . . . . . . . . . . . . . . . . . . . . . . . . . . . . . . . . . . . . . . . . . . . . . . . . . . . . . . . . . . . . . . . . . . . . . . . . . . . . . . 20
1
Page 8

6.6 Beep tones . . . . . . . . . . . . . . . . . . . . . . . . . . . . . . . . . . . . . . . . . . . . . . . . . . . . . . . . . . . . . . . . . . . . . . . . . . . . . . . . . . . . . 21
6.7 Auto Talk . . . . . . . . . . . . . . . . . . . . . . . . . . . . . . . . . . . . . . . . . . . . . . . . . . . . . . . . . . . . . . . . . . . . . . . . . . . . . . . . . . . . . . 22
6.8 Setting the time and date . . . . . . . . . . . . . . . . . . . . . . . . . . . . . . . . . . . . . . . . . . . . . . . . . . . . . . . . . . . . . . . . . . . . . . . . . 23
6.9 Restoring the default settings . . . . . . . . . . . . . . . . . . . . . . . . . . . . . . . . . . . . . . . . . . . . . . . . . . . . . . . . . . . . . . . . . . . . . 23
6.10 Clock . . . . . . . . . . . . . . . . . . . . . . . . . . . . . . . . . . . . . . . . . . . . . . . . . . . . . . . . . . . . . . . . . . . . . . . . . . . . . . . . . . . . . . . . . 24
7. ALARM . . . . . . . . . . . . . . . . . . . . . . . . . . . . . . . . . . . . . . . . . . . . . . . . . . . . . . . . . . . . . . . . . . . . . . . . . . . . . . . . . . . . . 25
7.1 Setting an alarm . . . . . . . . . . . . . . . . . . . . . . . . . . . . . . . . . . . . . . . . . . . . . . . . . . . . . . . . . . . . . . . . . . . . . . . . . . . . . . . . 25
7.2 Customizing the alarm ringer . . . . . . . . . . . . . . . . . . . . . . . . . . . . . . . . . . . . . . . . . . . . . . . . . . . . . . . . . . . . . . . . . . . . . . 25
8. WEB PAGE CONFIGURATION . . . . . . . . . . . . . . . . . . . . . . . . . . . . . . . . . . . . . . . . . . . . . . . . . . . . . . . . . . . . . . . . . 26
8.1 Accessing the configuration web pages . . . . . . . . . . . . . . . . . . . . . . . . . . . . . . . . . . . . . . . . . . . . . . . . . . . . . . . . . . . . . 26
8.2 Configuring the web page display language . . . . . . . . . . . . . . . . . . . . . . . . . . . . . . . . . . . . . . . . . . . . . . . . . . . . . . . . . . 27
8.3 Advanced network configuration . . . . . . . . . . . . . . . . . . . . . . . . . . . . . . . . . . . . . . . . . . . . . . . . . . . . . . . . . . . . . . . . . . . 27
9. USING THE RADIO . . . . . . . . . . . . . . . . . . . . . . . . . . . . . . . . . . . . . . . . . . . . . . . . . . . . . . . . . . . . . . . . . . . . . . . . . . . 28
9.1 Turning your radio on/off at the station last listened to . . . . . . . . . . . . . . . . . . . . . . . . . . . . . . . . . . . . . . . . . . . . . . . . . 28
9.2 Adjusting the volume in radio mode . . . . . . . . . . . . . . . . . . . . . . . . . . . . . . . . . . . . . . . . . . . . . . . . . . . . . . . . . . . . . . . . . 31
9.3 Selecting a radio station . . . . . . . . . . . . . . . . . . . . . . . . . . . . . . . . . . . . . . . . . . . . . . . . . . . . . . . . . . . . . . . . . . . . . . . . . . 31
9.4 Presets . . . . . . . . . . . . . . . . . . . . . . . . . . . . . . . . . . . . . . . . . . . . . . . . . . . . . . . . . . . . . . . . . . . . . . . . . . . . . . . . . . . . . . . . 35
10. USING YOUR PHONE WITH MULTIPLE HANDSETS . . . . . . . . . . . . . . . . . . . . . . . . . . . . . . . . . . . . . . . . . . . . . . . 36
10.1 Registering/Re-registering an extra handset . . . . . . . . . . . . . . . . . . . . . . . . . . . . . . . . . . . . . . . . . . . . . . . . . . . . . . . . . . 36
10.2 Selecting a base . . . . . . . . . . . . . . . . . . . . . . . . . . . . . . . . . . . . . . . . . . . . . . . . . . . . . . . . . . . . . . . . . . . . . . . . . . . . . . . . 37
10.3 De-registering a handset . . . . . . . . . . . . . . . . . . . . . . . . . . . . . . . . . . . . . . . . . . . . . . . . . . . . . . . . . . . . . . . . . . . . . . . . . 38
10.4 Making/Taking an internal call . . . . . . . . . . . . . . . . . . . . . . . . . . . . . . . . . . . . . . . . . . . . . . . . . . . . . . . . . . . . . . . . . . . . . 38
10.5 Taking an external call during an internal call . . . . . . . . . . . . . . . . . . . . . . . . . . . . . . . . . . . . . . . . . . . . . . . . . . . . . . . . . 39
11. TROUBLESHOOTING . . . . . . . . . . . . . . . . . . . . . . . . . . . . . . . . . . . . . . . . . . . . . . . . . . . . . . . . . . . . . . . . . . . . . . . . . 40
12. TECHNICAL SPECIFICATIONS . . . . . . . . . . . . . . . . . . . . . . . . . . . . . . . . . . . . . . . . . . . . . . . . . . . . . . . . . . . . . . . . . 43
13. SAFETY . . . . . . . . . . . . . . . . . . . . . . . . . . . . . . . . . . . . . . . . . . . . . . . . . . . . . . . . . . . . . . . . . . . . . . . . . . . . . . . . . . . . . 44
14. ENVIRONMENT . . . . . . . . . . . . . . . . . . . . . . . . . . . . . . . . . . . . . . . . . . . . . . . . . . . . . . . . . . . . . . . . . . . . . . . . . . . . . . 46
2
2
Page 9

1. USING THE PHONE
The screen on your Symbio phone automatically adjusts its format to
suit the position of the handset.
The wheel lets you:
- scroll through the detail of each screen,
- confirm your selection with a light press,
- access the call list.
Every time a new parameter is entered, there is an audible beep
(unless this function has been turned off (cf. Chapter 6.6)).
Pressing the wheel has the same effect as pressing the left context
key.
Context keys: the function performed by these two keys depends on which screen you are in.
This is shown in the labels at the bottom of the screen.
In the example shown here (main screen):
- the left context key takes you to the Menu,
- the right (context) key takes you to your Names.
3
Page 10

Menu structure
4
4
NAMES
CALLS LISTS
IMAGES & SOUNDS
Find Entry
Add Entry
Phonebook Status
Delete All Phonebook
Dialled Calls
Missed Calls
Receive Calls
Ringtone
Ring Volume
Beep Tones
Picture
External Calls (choice of 8 ringtones)
Internal Calls (choice of 8 ringtones)
Key Beep (on/off)
Low Battery (on /off)
Out of Range (on/off)
Notify (on/Off)
Page 11

5
TIME SETTINGS
SETTINGS
Set Date & Time
Handset Settings
Alarm
Regisration
Base Settings
Default Settings
See Chapter 9 “Using the Radio”
Activate / Deactivate
Alam Tone
Language
Ear Volume
Contrast
Auto Talk
Clock
Handset Update
Register Handset
Select Base
De-Register
System PIN
Base IP address
RADIO
Page 12

2. FIRST USE
To use your Symbio to listen to Internet radio, you must have a working broadband connection (please refer to the user manual supplied
with your broadband router or modem).
Your Symbio is
a standard appliance designed for transmitting and receiving telephone calls. It has been designed and manufactured
for connection
to public telecommunications network. To use it, you must have a broadband Internet connection (ADSL box, cable
service, etc.) with an unlimited telephone service or a standard telephone service supply contract.
This phone requires an electrical power supply to operate.
2.1 PRECAUTIONS
As with any radio link, the quality of communication depends on the position of the equipment and the environment in which it is used.
Your Symbio must be kept away from sources of excessive heat (radiators, direct sunlight, etc.) and protected against vibration and
dust. Never allow your phone to come into contact with water, other liquids or aerosols. To reduce the risk of interference and maximise
reception, take particular care not to install the base in the immediate vicinity of windows, large metal objects, reinforced concrete,
televisions, music centres, halogen lamps, other heat sources, fluorescent lighting, burglar alarms, microwave ovens, computers, etc.
To clean your phone, use an antistatic cloth lightly moistened with water.
6
6
Page 13

2.2 INSTALLING THE BASE
The Symbio handset is pre-registered with its base.
A.
Connect the phone cord to your phone socket.
B. Connect the Ethernet cable to an Ethernet socket on your broadband
Internet access point.
C. Power up the unit by plugging the black (9V 600 mA) power adapter to the
base and a mains power socket.
Once the base is connected, the Symbio will commence a synchronisation sequence, during which the 3 LEDs will flash. On
completion, the LEDs remain on, but stop flashing: -
Internet (blue):
- Phone (blue):
- On/Off (green):
For more detailed information, please refer to the "On the base" section earlier in this guide.
If your Internet connection is working correctly, the time will update itself automatically. Please refer to Chapter 6.8 "Setting the time
and date" for details on manual setting.
B
O
X
A
D
S
L
A.B.C.
or
7
Rear view of base
Page 14

2.3 INSTALLING THE HANDSET
Insert the battery pack into its housing in the handset, ensuring that it is the right way round.
Check that the screen lights up, then replace the cover.
Wait for about 1 minute to allow the system to start up.
When your handset is registered to its base, the screen displays the figure "1" alongside the symbol.
!
Make sure you install the battery pack and fit the cover the right way round:
- position the 3 metal contacts of the battery pack against the 3 blade contacts,
- ensure that the notches on the cover are the right way round (1 notch on one side, and 2 on the other).
Warning: Only use rechargeable battery packs with specifications exactly the same as those supplied with the product.
The use of a non- rechargeable or incompatible battery pack may damage the product and may be hazardous to health (please
refer to Chapter 12 "Technical specifications").
8
8
Page 15

2.4 INSTALLING THE CHARGER
There are 2 options for connecting the white (5V 1000 mA) power adapter:
Once this installation is complete, we recommend that you leave the phone on the charger for 6 hours before using it in order to
maximise battery performance and life.
!
The white power adapter (supplied in the pack) should be connected only to the handset or charger. In no event
must it be connected to the headphone socket of a different product.
radio
Power supply to the handset
Power supply to the charger
9
Page 16

3. USING THE PHONE
3.1 MAKING A CALL
Direct dialling
Press the (green) key to get a line and dial the number.
Press the (red) key to hang up.
Pre-dialling
Dial the number and press the (green) key.
3.2 CALLING A NUMBER FROM THE PHONEBOOK
In the welcome screen, select "Names" by pressing the right (context) key.
If you have contacts, use the wheel to select the contact you want to call and press the (green) key.
Please refer to Chapter 4.1 "Adding a contact" for details of how to add contacts.
3.3 CALLING A NUMBER FROM THE CALL LIST
Check that you are in the main screen, then turn the wheel to access the call list.
10
Page 17

Select the number you want to call and press the (green) key.
or
In the welcome screen, select "Menu" by pressing the wheel (or the left context key).
Select "Calls Lists" and confirm by pressing "Ok".
Select the number from the list and press the (green) key.
3.4 RECEIVING A CALL
When you receive a call, answer it by pressing the (green) key.
or
If the handset is on its charger and the "Auto Talk" function is activated, pick it up and answer the call directly. If not, press the
(green) key (cf. Chapter 6.7 "Auto Talk").
Note: If you receive an incoming call whilst listening to the radio, the radio will switch off and you can take the call. Press the
(green) key to take the call.
11
Page 18
3.5 DURING A CALL
You can:
Adjust the volume:
You can change the volume using the wheel on the right-hand side of the handset.
Activating the Mute function (microphone mute):
Press the
"Mute" key at any time during the call to put the other party on hold while you speak to someone else in the room. The
other party cannot then hear you.
Press the same key again to reactivate the microphone.
To speak to a second caller:
Providing you have subscribed to your network provider’s call waiting service, you can take a second call whilst you are already on
a call. When a second incoming call is received, your handset will beep.
Press and hold the key,
only or followed by or (following the instructions provided by your phone line provider).
3.6 USING THE HANDS-FREE FUNCTION
You can switch to hands-free mode at any time during a call by pressing the green key .
The icon is then displayed on-screen.
Press the (green) key again to deactivate the hands-free function.
Use the wheel to adjust the volume in hands-free mode.
*
R
1
2
ABC
12
Page 19
3.7 REDIALLING ONE OF THE LAST NUMBERS CALLED (REDIAL)
The last numbers called are stored in the call list and identified by the icon . For more information, please refer to Chapter 5.2.
4. USING THE PHONEBOOK
You can store a name (up to 20 characters) and three numbers (up to 20 figures each) for each contact.
You can add new contacts and edit or delete existing contacts.
4.1 ADDING A CONTACT
In the welcome screen, select "Menu" by pressing the wheel (or the left context key).
Select "Names" and confirm by pressing "Ok".
Select "Add Entry" and confirm by pressing "Ok".
Select "Name:" and press key beneath "Edit".
Use the keypad to enter the name and confirm by pressing "Ok".
You then have the option to store 3 types of number: business, home and mobile.
13
Page 20

Select the category you want (business, home or mobile) and press the context key beneath "Edit" and enter the number.
Confirm by pressing "Ok" and end by end by pressing "Save" (right context key).
4.2 EDITING A CONTACT
In the welcome screen, select "Names" by pressing the right (context) key.
Select the contact to edit.
Press beneath "Options", select "Edit Entry" and confirm by pressing "Ok".
To edit the name:
Select the name to edit and press the key beneath "Edit".
Delete using the key beneath "Delete", re-type the name and confirm by pressing "Ok".
To edit the number:
Select the number to edit (home, etc.) and press the key beneath "Edit", then delete it by pressing the "Delete" key and re-type the
number. Confirm by pressing "Ok".
End by pressing "Save".
14
Page 21

4.3 DELETING A CONTACT
4.3.1 To delete one contact
In the welcome screen, select "Names" by pressing the right (context) key.
Select the contact to be deleted and press the key beneath "Options". Select "Delete Entry" and confirm by pressing "Ok".
Confirm your selection by pressing "Yes".
4.3.2 To delete all contacts
In the welcome screen, select "Menu" by pressing the left context key.
Select "Names" and confirm by pressing "Ok".
Select "Delete All Phonebook" and confirm by pressing "Ok".
Confirm your selection by pressing "Yes".
15
Page 22

5. IDENTIFYING CALLERS
5.1 UNDERSTANDING CALLER IDENTIFICATION DATA
If you subscribe to your network provider’s "Caller number identification" service, you can see who is calling you before you take the
call. If you subscribe to the "Call waiting" service as well, the same identification process applies to calls received when you are already
on a call. The last 50 calls made and received are logged automatically, together with number, date and time.
The following messages may be displayed on-screen during the call:
- the caller’s name and number, if the caller’s number is stored in your phonebook or forwarded by the network,
- the caller’s number, where this is forwarded by the network,
- "Withheld" if the caller is using the secrecy function, or "Unavailable" if the network does not forward the name or number,
- "External Call" if you do not subscribe to the "Caller number identification" service.
5.2 VIEWING THE CALL LIST
If you subscribe to your network provider’s "Caller number identification" service, your Symbio phone will store details of the last 50
calls made and received, together with their date and time.
16
Page 23
Calls received and answered are identified using this icon:
Missed calls are identified using this icon:
Calls made are identified using this icon:
To access the call list
Option 1:
In the welcome screen, turn the wheel.
Use the wheel to scroll through the list.
Option 2:
In the welcome screen, select "Menu". Select "Calls Lists" and confirm by pressing "Ok".
Use the wheel to scroll through the list.
5.3 CALLING BACK A CALLER LISTED IN THE LOG
Turn the wheel to select the list.
Select a call and press the (green) key.
17
Page 24

5.4 DELETING AN ENTRY FROM THE LIST
Turn the wheel to select the list.
Select a call, then press the key beneath "Options".
Select "Delete" and confirm by pressing "Ok".
5.5 SAVING A CALL LOG CONTACT IN THE PHONEBOOK
Turn the wheel to select the list.
Select the contact to be saved.
Press the key beneath "Options".
Select "Add Entry" and confirm by pressing "Ok".
Select the category (home, business or mobile) in which you want to save the contact and confirm by pressing "Ok".
Then select "Name:" and press the key beneath "Edit".
Type in the name of the contact, confirm by pressing "Ok" and end by pressing "Save".
18
Page 25

6. CUSTOMIZING YOUR HANDSET
6.1 SELECTING A RINGTONE
In the welcome screen, select "Menu" by pressing the left context key. Select "Images & Sounds" and confirm by pressing "Ok".
Select "Ringtone" and confirm by pressing "Ok".
Select "External Calls" or "Internal Calls" and confirm by pressing "Ok".
Select the ringtone you want and confirm by pressing the key beneath "Use".
6.2 ADJUSTING THE RINGER VOLUME
In the welcome screen, select "Menu" by pressing the left context key. Select "Images & Sounds" and confirm by pressing "Ok".
Select "Ring Volume" and confirm by pressing "Ok".
Use the wheel to adjust the volume and confirm by pressing "Ok".
6.3 SELECTING WALLPAPER
In the welcome screen, select "Menu" by pressing the left context key. Select "Images & Sounds" and confirm by pressing "Ok".
19
Page 26

Select "Picture" and confirm by pressing "Ok".
Use the wheel to scroll through wallpaper options.
Select the wallpaper you want and confirm by pressing the key beneath "Use".
6.4 SELECTING THE DISPLAY LANGUAGE
In the welcome screen, select "Menu" by pressing the left context key. Select "Settings" and confirm by pressing "Ok".
Select “
Handset Settings” and confirm by pressing "Ok".
Select "Language" and confirm by pressing "Ok".
Use the wheel to select the language you want and confirm by pressing "Ok".
6.5 CONTRAST
In the welcome screen, select "Menu" by pressing the left context key. Select "Settings" and confirm by pressing "Ok".
Select “
Handset Settings” and confirm by pressing "Ok".
Select "Contrast" and confirm by pressing "Ok".
Use the wheel to adjust the contrast and confirm by pressing "Ok".
20
Page 27

6.6 BEEP TONES
To turn beep tones on (or off):
Key:
In the welcome screen, select "Menu" by pressing the left context key. Select "Images & Sounds" and confirm by pressing "Ok".
Select "Beep Tones" and confirm by pressing "Ok".
Select "Key Beep" and confirm by pressing "Ok".
Select "Off" and confirm by pressing "Ok".
Low battery:
In the welcome screen, select "Menu" by pressing the left context key. Select "Images & Sounds" and confirm by pressing "Ok".
Select "Beep Tones" and confirm by pressing "Ok".
Select "Low Battery" and confirm by pressing "Ok".
Select "Off" and confirm by pressing "Ok".
Out of range:
In the welcome screen, select "Menu" by pressing the left context key. Select "Images & Sounds" and confirm by pressing "Ok".
Select "Beep Tones" and confirm by pressing "Ok".
21
Page 28

Select "Out Of Range" and confirm by pressing "Ok".
Select "Off" and confirm by pressing "Ok".
Notifications:
In the welcome screen, select "Menu" by pressing the left context key. Select "Images & Sounds" and confirm by pressing "Ok".
Select "Beep Tones" and confirm by pressing "Ok".
Select "Notify" and confirm by pressing "Ok".
Select "Off" and confirm by pressing "Ok".
6.7 AUTO TALK
In the welcome screen, select "Menu" by pressing the left context key. Select "Settings" and confirm by pressing "Ok".
Select “
Handset Settings” and confirm by pressing "Ok".
Select "Auto Talk" and confirm by pressing "Ok".
Select "Off" (or "On") and confirm by pressing "Ok".
22
Page 29

6.8 SETTING THE TIME AND DATE
In the welcome screen, select "Menu" by pressing the left context key. Select "Time Settings" and confirm by pressing "Ok".
Select "Set Date & Time" and confirm by pressing "Ok".
The date will be displayed first.
Use the keypad to change the date and confirm by pressing "Ok".
The time will then be displayed.
Change the time and confirm by pressing "Ok".
6.9 RESTORING THE DEFAULT SETTINGS
This option allows you to restore the handset to its original default settings. This procedure will reset the base PIN (0000 by default).
However, all the numbers stored in the phonebook, the call log and the most recently-dialled numbers list will be retained.
In the welcome screen, select "Menu" by pressing the left context key. Select "Settings" and confirm by pressing "Ok".
Select "Default Settings" and confirm by pressing "Ok".
Enter the PIN (0000 by default) and confirm by pressing "Ok".
23
Page 30

6.10 CLOCK
To turn on (or Off) the display of the clock in standby:
In the welcome screen, select "Menu" by pressing the left context key. Select "Settings" and confirm by pressing "Ok".
Select "Handset Settings” and confirm by pressing “OK”.
Select “Clock” and confirm by pressing "Ok".
Select “Off” (or “On”) and confirm by pressing “OK”.
24
Page 31

7. ALARM
7.1 SETTING AN ALARM
In the welcome screen, select "Menu" by pressing the left context key. Select "Time Settings" and confirm by pressing "Ok".
Select "Alarm" and confirm by pressing "Ok".
Select "Activate/Deactivate" and confirm by pressing "Ok".
Select the alarm frequency (once or daily…) and confirm by pressing "Ok".
Enter the alarm time and confirm by pressing "Ok".
7.2 CUSTOMIZING THE ALARM RINGER
In the welcome screen, select "Menu" by pressing the left context key. Select "Time Settings" and confirm by pressing "Ok".
Select "Alarm" and confirm by pressing "Ok".
Select "Alarm Tone" and confirm by pressing "Ok".
Select the ringer type (radio or ringtone).
Confirm by pressing "Ok".
Please note: If you select a radio channel that proves to be unavailable, a ringtone will be played instead.
25
Page 32

8. WEB PAGE CONFIGURATION
Your Symbio has web pages that enable you to adjust certain advanced settings, receive support or find out about new features.
8.1 ACCESSING THE CONFIGURATION WEB PAGES
Open the web browser on a computer connected to the same local network as the Symbio base and enter your Symbio IP address in
the URL field.
In the welcome screen, select "Menu" by pressing the left context key. Select "Settings" and confirm by pressing "Ok".
Select "Base Settings" and confirm by pressing "Ok".
Select "Base IP address".
Please note: The base IP address is made up of 4 groups of figures separated by full stops, e.g. 192.168.1.10.
In this example, all you have to do is enter http://192.168.1.10 in the URL field of your web browser (as you would for a web site).
26
Page 33
8.2 CONFIGURING THE WEB PAGE DISPLAY LANGUAGE
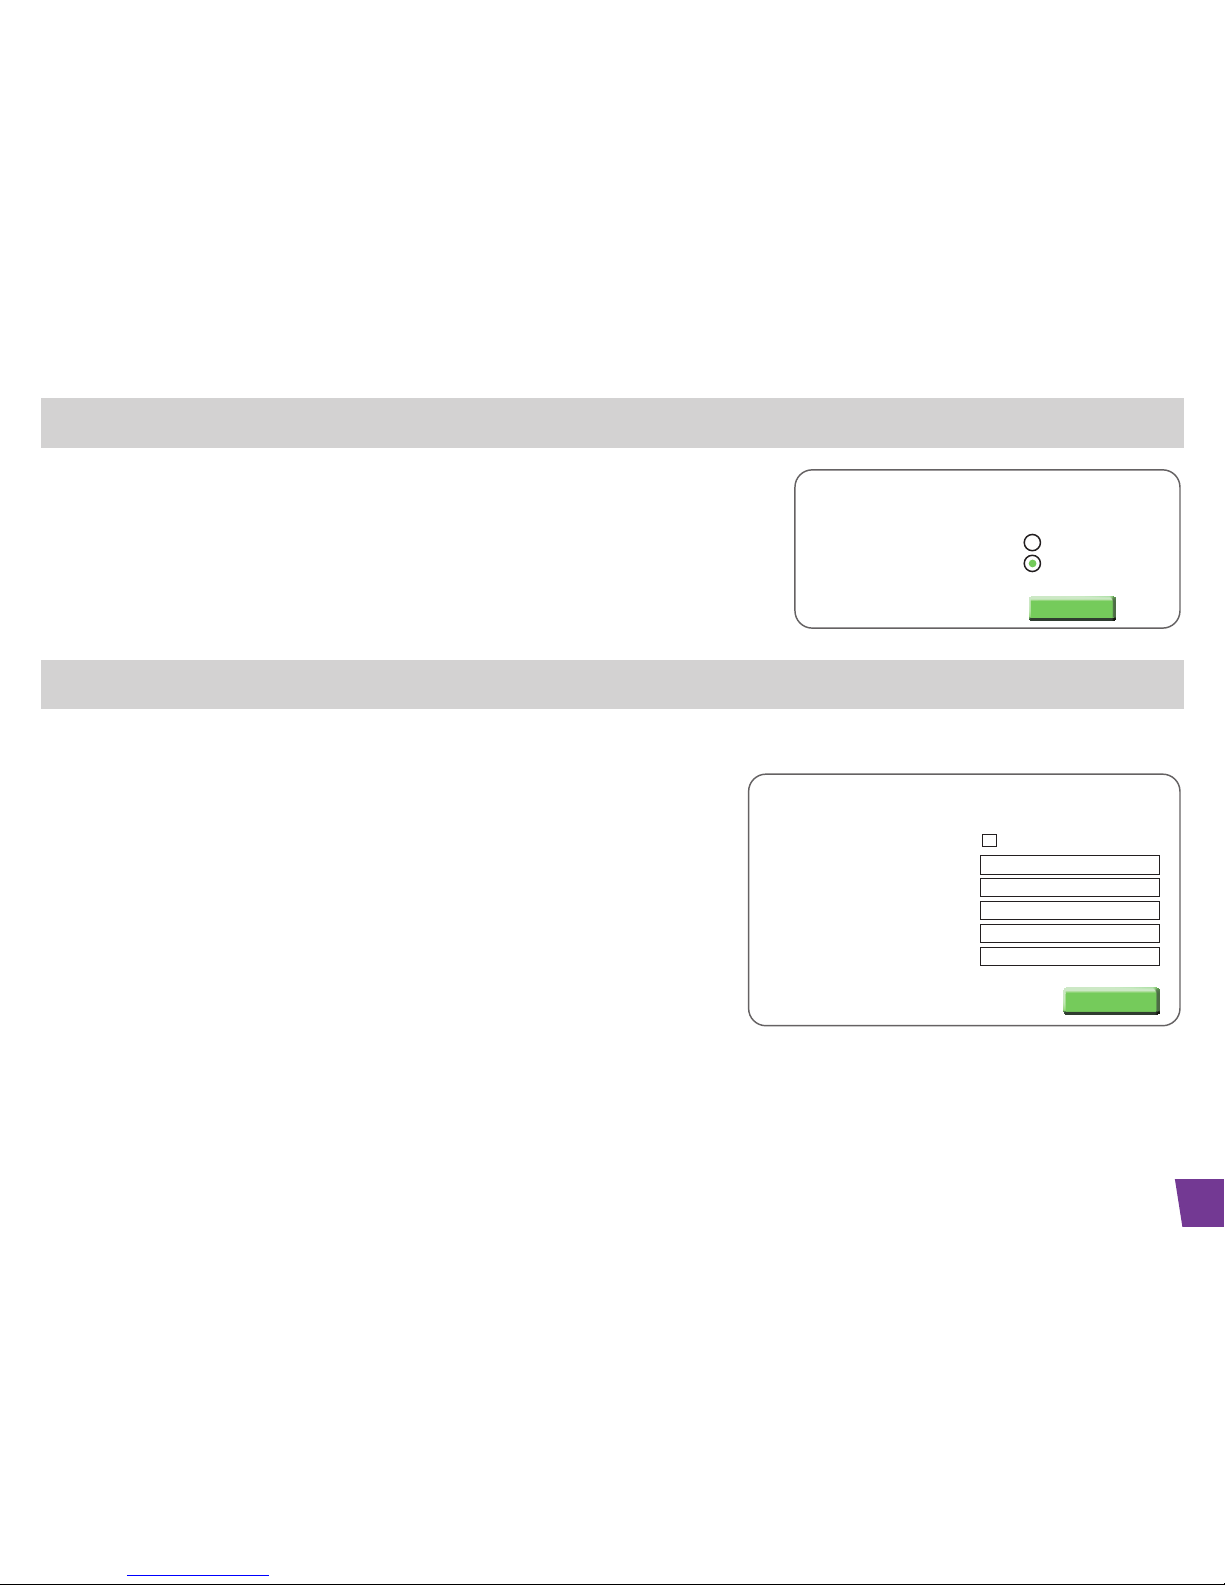
You can click on "Language Settings" on the right-hand side of the page to link to
the Symbio web page display language configuration page.
8.3 ADVANCED NETWORK CONFIGURATION
By default, your Symbio will try to retrieve an IP address automatically via the
Ethernet cable in "DHCP Client" mode.
If your installation requires manual adjustment, click on "
Network Parameters" to
go to the network parameters configuration page.
To enter a manual configuration, check the "DHCP Client" box. You can then
configure the IP address of the Symbio base, the default bridge, or the DNS
server(s) (use commas to separate IP addresses if you have several DNS servers),
the LAN IP address and the local address filter.
An example is shown on the web page, so all you need to do is replace the values
as required.
Lastly, click on "
Submit" to confirm and apply the settings.
For more information, please contact your Internet Service Provider or the manufacturer of your internet access hardware.
Language Settings
Select a Langeuage
Apply
Francais
English
Network Parameters
DHCP Client
LAN IP address
Default geteway
DNS Server 1
Broadcast LAN IP address
Subet mask
192.168.1.133
192.168.1.1
203.198.23.208,203.198.3
192.168.1.255
255.255.255.0
Submit
27
Page 34
9. USING THE RADIO
This section explains how to use your Symbio as an Internet radio receiver (for web radio stations).
The Internet radio function of your Symbio is clearly identified by the use of a green screen background.
The radio selection menus may change following updates of your unit or during the life of the product to reflect changes in web radio
broadcasts and bring you new web radio-associated services.
You can switch to Internet radio mode in two ways:
- Using the dedicated radio key on the side of the unit (between the wheel and the power input/sound output socket).
or
- Select "Menu" followed by "Radio".
9.1 TURNING YOUR RADIO ON/OFF AT THE STATION LAST LISTENED TO
In the welcome screen, press to turn on the radio.
If you had been listening to a radio station previously, this station will be automatically selected and played.
Press the same key to turn off the radio and leave Internet radio mode.
You can also leave Internet radio mode by pressing the (red) key.
radio
radio
28
Page 35

From the play screen (cf. next page), you can play or pause the selected radio station by pressing the wheel or the left context key.
The screen and radio button then reflect this status.
When you are listening to a radio station, the radio button lights up:
Regardless of the Internet radio mode screen displayed, you can return to the play screen at any time by pressing the key (after
30 seconds of inactivity in Internet radio mode, the Symbio will return automatically to the play screen).
The first time you switch on the radio, simply select the station you want to listen to (see next section).
When you are in the play screen, a long press on any keypad key (0 to 9) will create a station preset (cf. Chapter 9.4 "Presets").
#
radio
29
Page 36
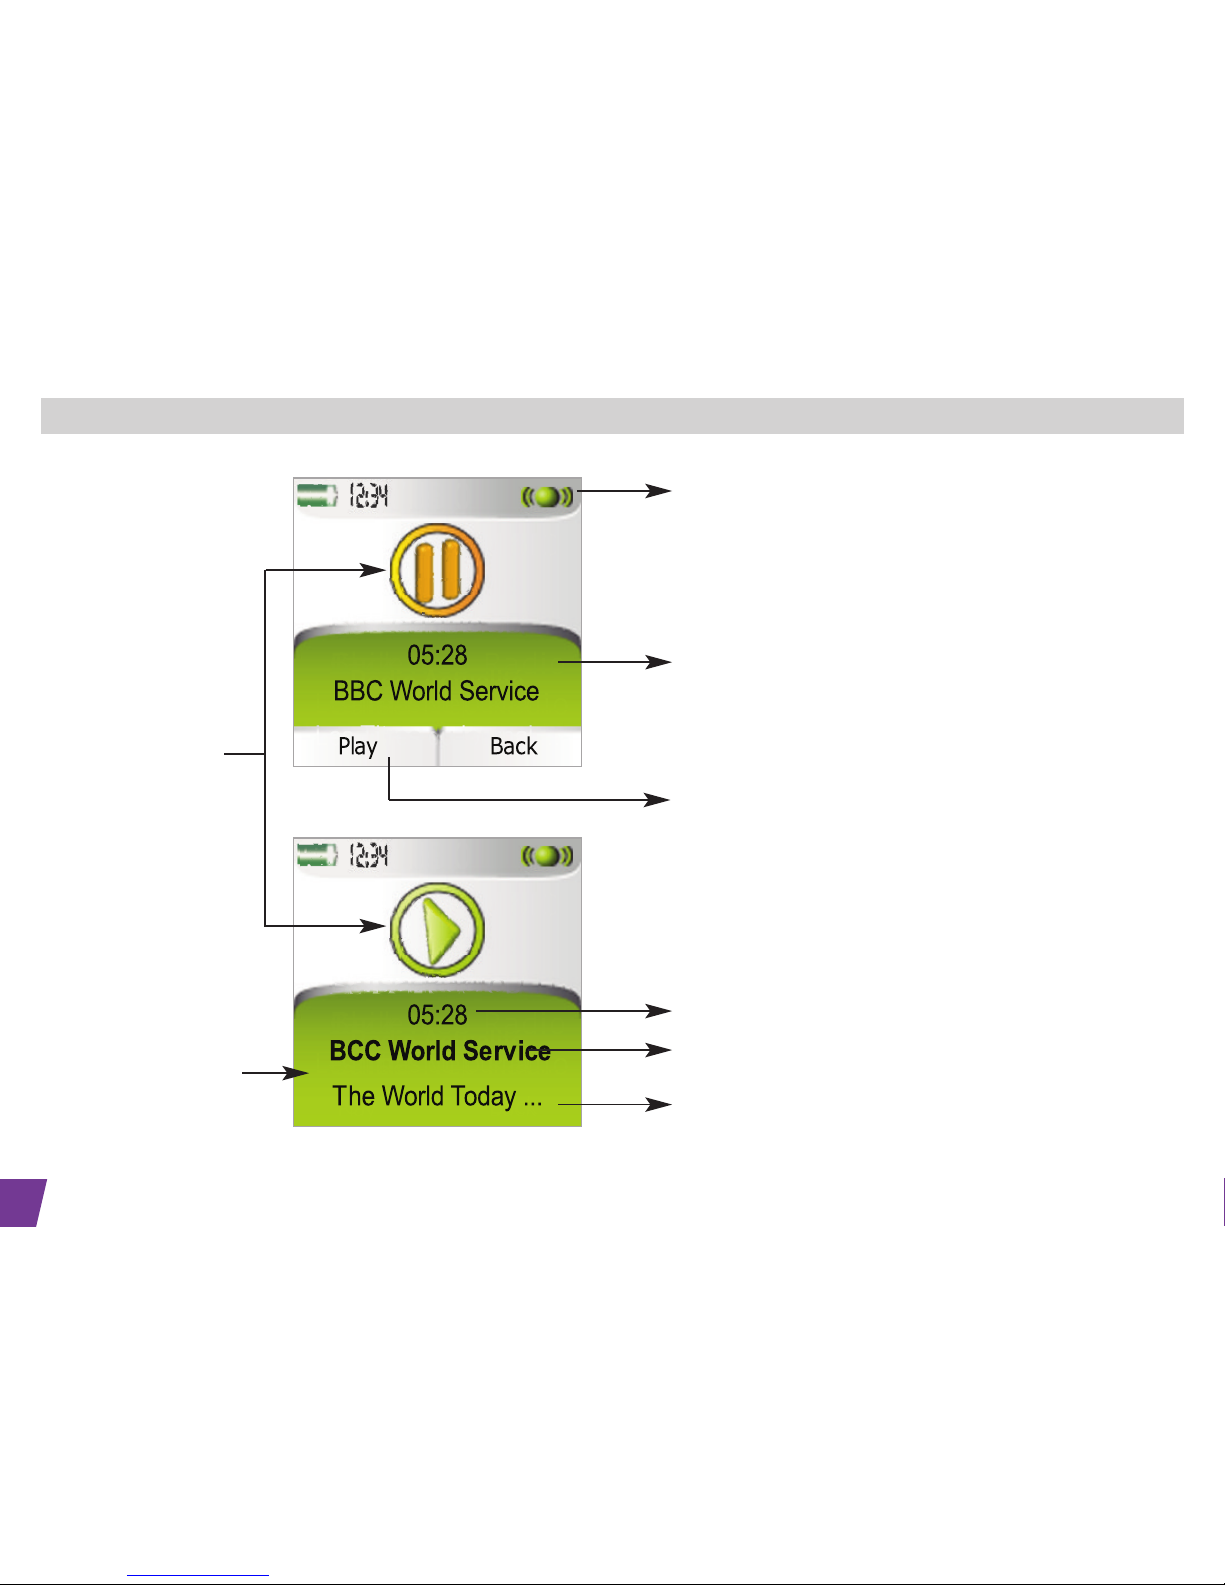
Description of the play screen:
30
Context keys.
Remember: pressing the wheel has the same effect as
pressing the left context key
Phone icon information area
Green wallpaper indicating Internet radio mode
In horizontal mode, the
context keys disappear
to leave more room for
the display
Radio listening time
Radio status: play or
pause
Internet radio station ID
Information about the current broadcast (availability varies
from station to station)
Page 37
9.2 ADJUSTING THE VOLUME IN RADIO MODE
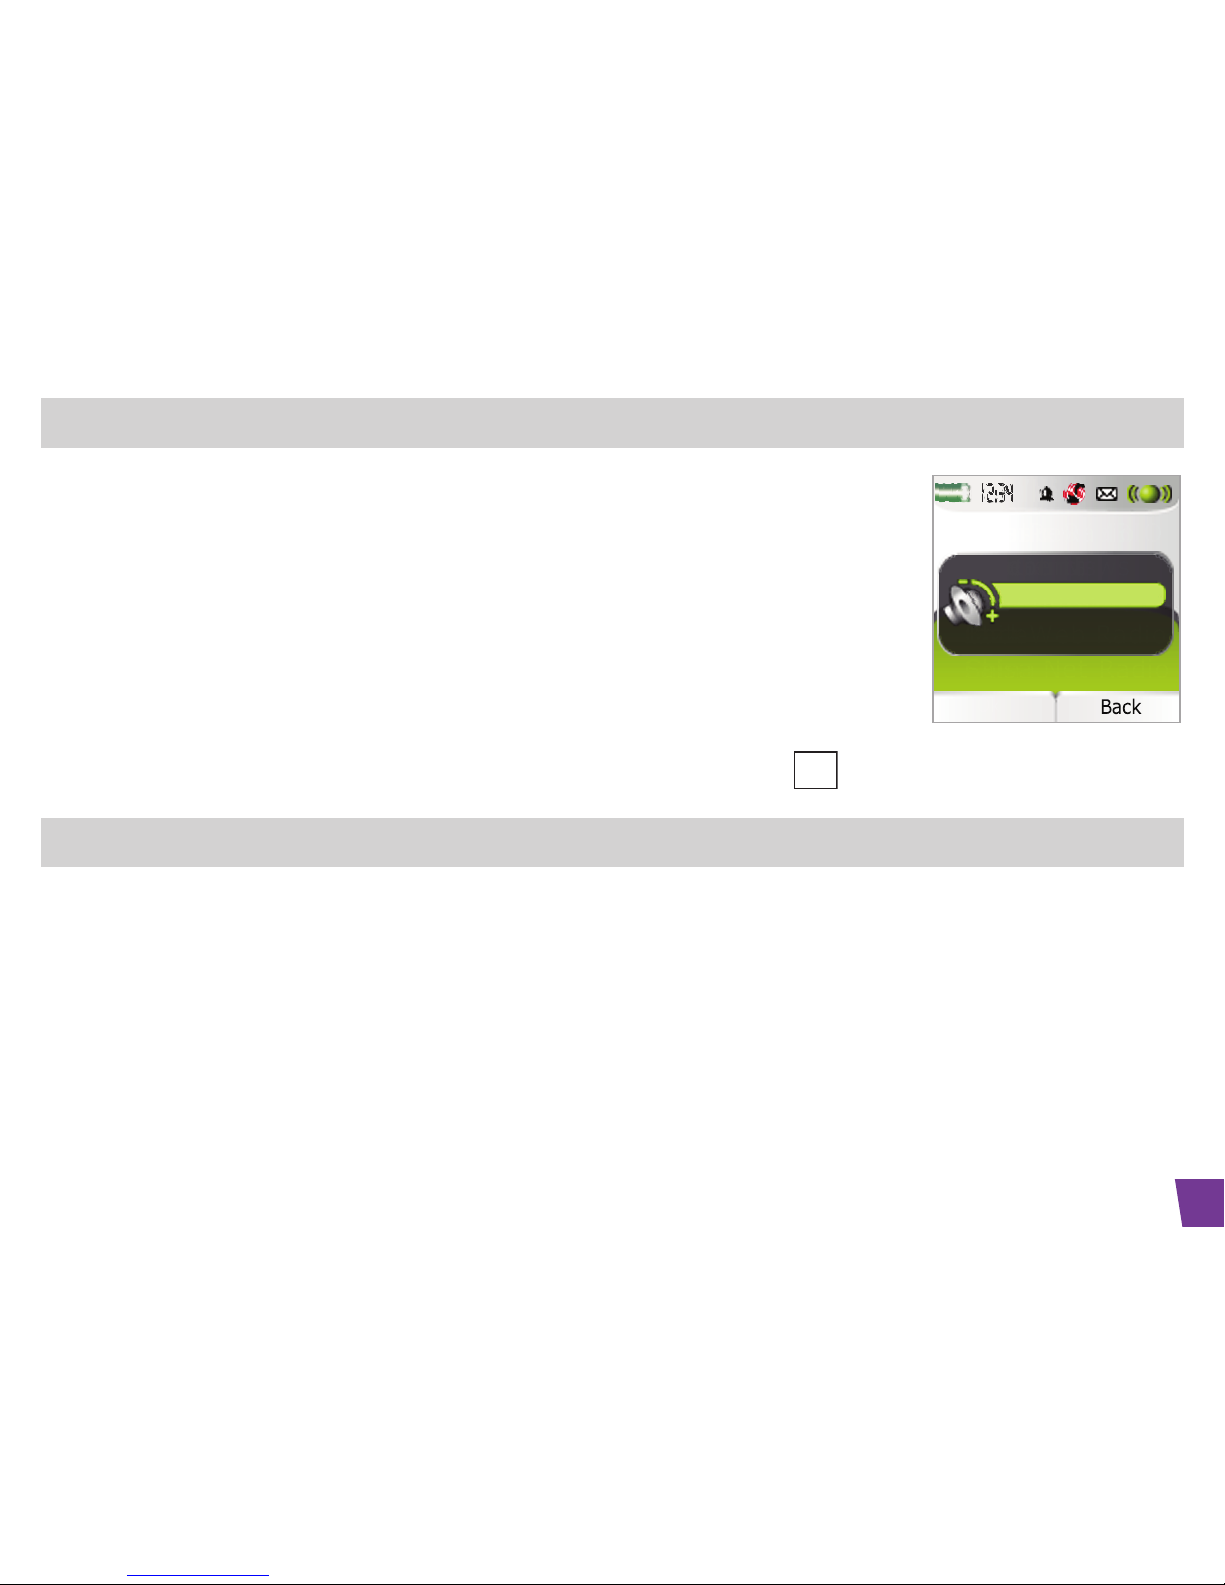
In the play screen, you can use the wheel to increase or reduce the volume. A volume
scale is then displayed to show the level selected.
This volume level will then be used automatically the next time the Symbio is used
in Radio mode.
Tip: to go straight back to the play screen from another Internet radio mode, just press .
9.3 SELECTING A RADIO STATION
Symbio updates and categorises the list of Internet radio stations every 24 hours on power-up (as long as the Internet connection is
working correctly).
The radio station categories may therefore change over time to reflect changes in web radio broadcasts (you can ask for a station to
be added via the Symbio Support web page).
This section illustrates a series of easy-to-follow examples of how to select an Internet radio station from your Symbio.
#
31
Page 38

32
You can select radio stations in a number of different ways:
If you’re already listening to one station, you can press the right context key ("Back") to browse the Internet radio station selection
menus.
In the welcome screen, select "Menu" by pressing the wheel or the left context key. Select "Radio".
This takes you to the Internet radio station selection menu.
You can select your radio station:
- By Country.
- By Genre (classical, hip hop, etc.).
- From amongst those previously selected.
- From amongst those saved as presets (cf. Chapter 9.4 "Presets").
Page 39
33
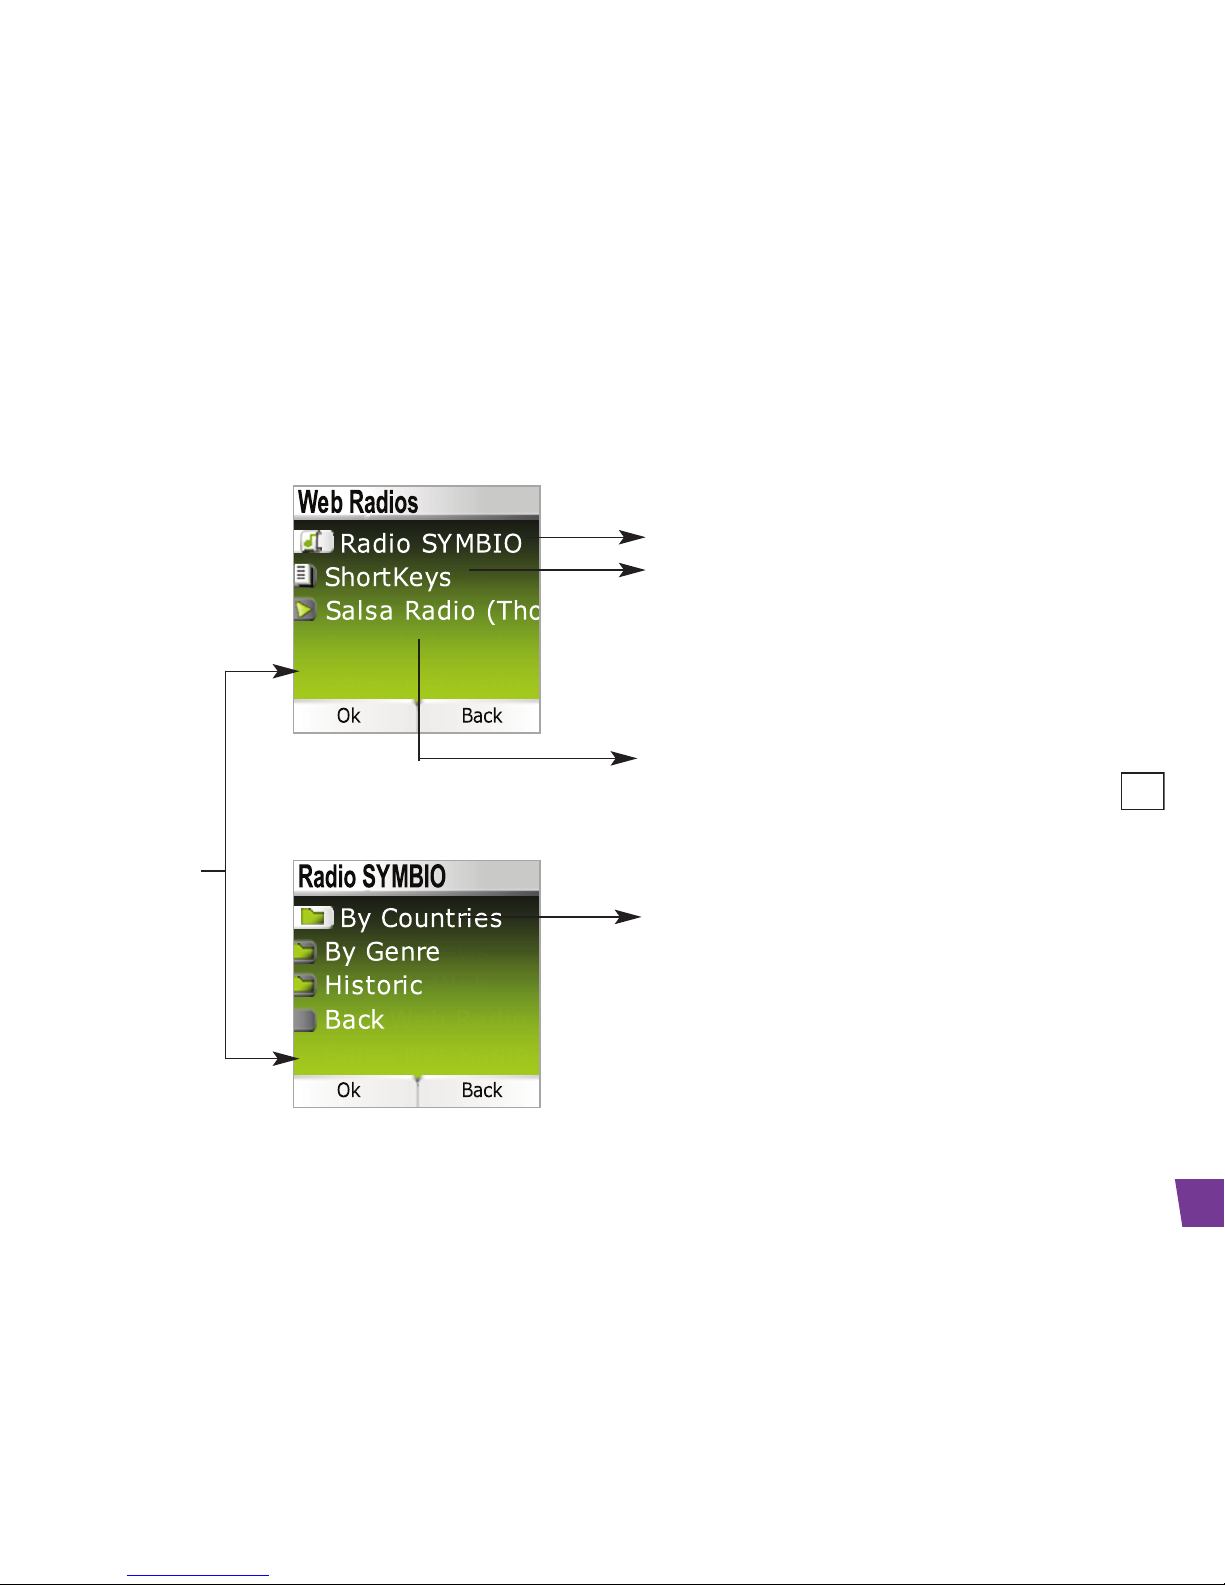
The example illustrates the process of browsing the selection menus (these screens shown may differ slightly from those of your own
Symbio):
Category selection screen
Takes you to the lists of radio stations
Takes you to the list of presets (cf. Chapter 9.4).
Radio stations for which a shortcut has been saved (0 to 9)
will play as soon as you press the appropriate key in Internet
radio mode
Displays the radio status (play or pause) and takes you to the
play screen (which you can also access by pressing the
key)
#
Green wallpaper
indicates
Internet radio
mode
Page 40
34
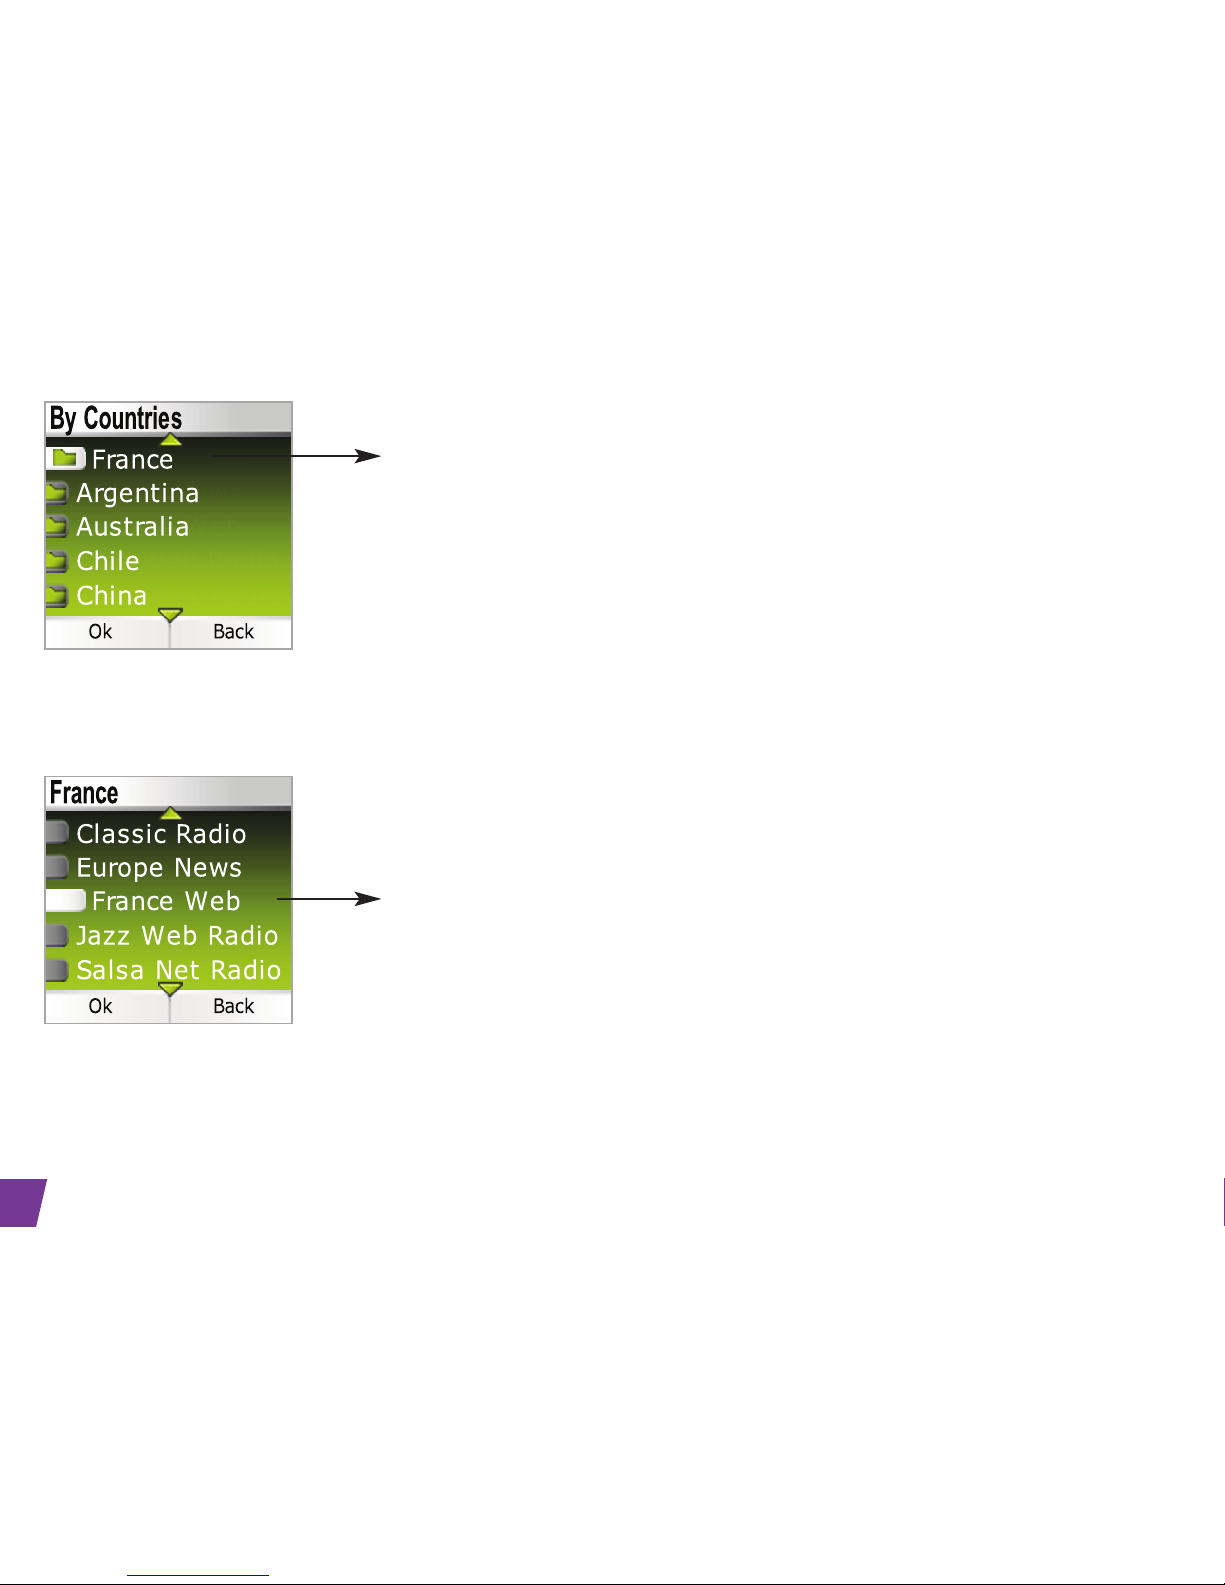
Example of country listing.
France is displayed first, followed by all the other countries and regions in
alphabetical order.
Radio station selection screen:
- When you select a radio station (by pressing the left context key ("Ok") or the
wheel) the Symbio will switch to the play screen and begin to play.
- If the selected radio station is unavailable, or you have no Internet access, an
explanatory message will be displayed.
Page 41
35
9.4 PRESETS
Regardless of which Internet radio mode screen you may be in, you can listen to any of your 10 favourite Internet radio stations by
pressing the appropriate pre-programmed key (0 to 9).
Remember: You can switch to radio mode by pressing the radio key or by selecting the "Radio" menu: .
To save a radio preset for the station selected in the play screen, all you need to do is hold down one of the number keys (0 to 9).
If the number key you select was already preset to a different station, your new selection will replace the previous preset.
You can view the list of your favourite radio stations by selecting the "Presets" line from the station selection screen. Your 10 favourite
stations are then listed by name on-screen, with gaps in positions where no preset has yet been entered.
Tip: if you want to be woken up by your favourite radio station, it’s easy to choose one of your favourites (cf. Chapter 7.2).
radio
Page 42
10.
USING YOUR PHONE WITH MULTIPLE HANDSETS
10.1 REGISTERING/RE-REGISTERING AN EXTRA HANDSET
You can have up to 5 handsets registered to your Symbio base. If you already have 5 handsets registered and you want to change one
of them, you must uninstall it before installing the replacement handset.
On the base:
Switch the base to registration mode by holding down the key until you hear 2 beeps.
The blue LED on the base then flashes. Your Symbio phone base is now ready to register a new handset. Registration
must be made within 90 seconds of hearing the 2 beeps.
On the handset:
Select "Menu" by pressing the wheel (or the left context key).
Select "Settings" and confirm by pressing "Ok".
Select "Registration" and confirm by pressing "Ok".
Select "Register Handset" and confirm by pressing "Ok".
Select the base to be associated with this handset (1 to 4) and confirm by pressing "Ok".
PAGE
36
Page 43

37
Enter the system PIN (0000 by default) and confirm by pressing "Ok"..
Wait a few seconds until you hear a single beep.
Your handset is now registered.
10.2 SELECTING A BASE
Each handset may be registered to 4 different Symbio bases.
!
If you register your Symbio with a non-Symbio base, you will not be able to access the Radio function.
To change base:
Select "Menu" by pressing the wheel (or the left context key).
Select "Settings" and confirm by pressing "Ok".
Select "Registration" and confirm by pressing "Ok".
Select "Select Base" and confirm by pressing "Ok".
Use the wheel to select the number of the base (1 to 4) and confirm by pressing "Ok".
The bases to which the handset is registered are identified by the symbol.
Page 44

10.3 DE-REGISTERING A HANDSET
Handsets can only be de-registered from another handset.
Select "Menu" by pressing the wheel (or the left context key).
Select "Settings" and confirm by pressing "Ok".
Select "Registration" and confirm by pressing "Ok".
Select "De-Register" and confirm by pressing "Ok".
Enter the secret system PIN (0000 by default) and confirm by pressing "Ok".
Use the wheel to select the handset to be de-registered and confirm by pressing "Ok".
10.4
MAKING/TAKING AN INTERNAL CALL
Making an internal call
On the keypad, press the number of the internal handset you want to call (1 to 5) and press the (green) key.
Taking an internal call
When you receive an internal call, the screen displays the number of the calling handset and "Internal Call".
38
Page 45
39
Press the (green) key to take the call.
To hang up at the end of the call, press the (red) key.
10.5 TAKING AN EXTERNAL CALL DURING AN INTERNAL CALL
Even when you are on an internal call to another handset, you can still take external calls.
To take the external call:
Press the (red) key.
This interrupts the internal call.
Then press the (green) key.
You are now taking the external call.
Page 46
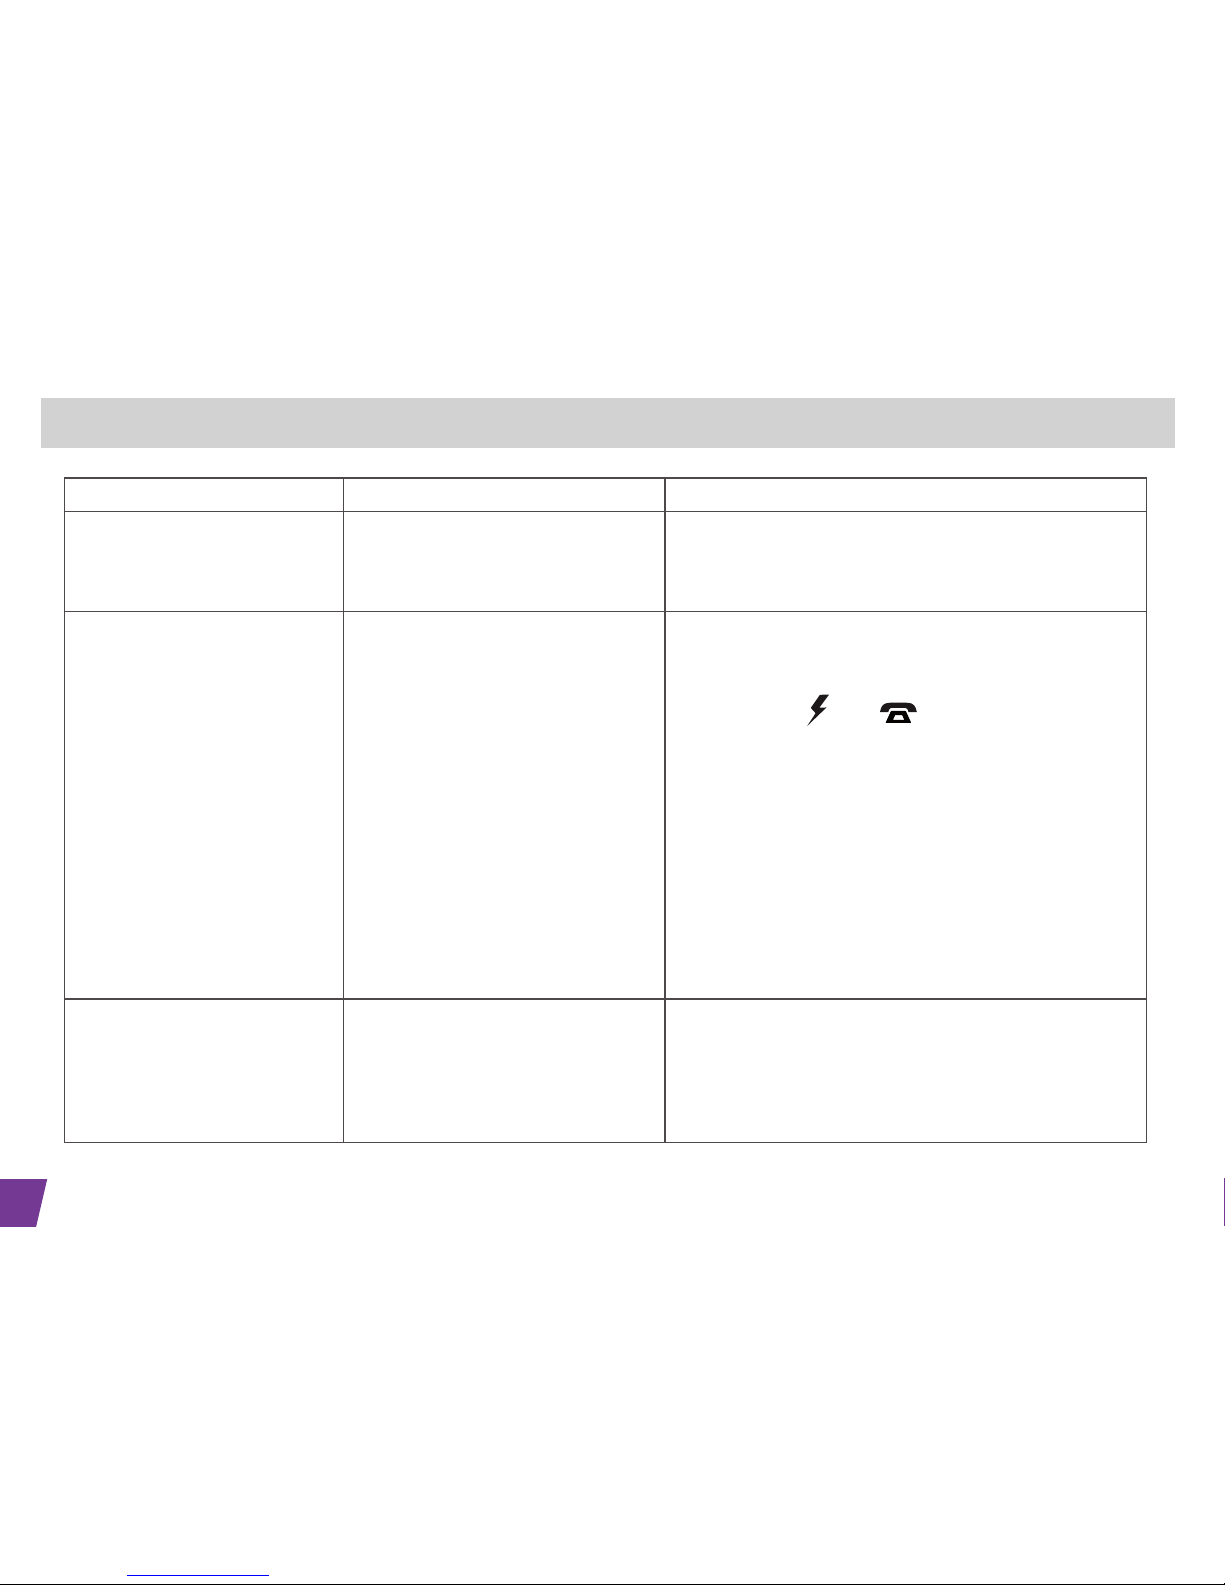
11. TROUBLESHOOTING
40
Problem Possible cause Solution
You can hear interference on
the line.
The handset is out of range of the
base, or too close to an electrical
appliance
Check that is not sounding the range limit beep tone
(cf. Chapter 6.6 “Beep tones”).
You can’t make calls The Symbio base is not properly
connected or has no power supply.
Check that the base is properly connect to your phone
socket (or ADSL box if you have an unlimited telephone
service contract).
Check that the and LEDs are on and not flashing (If this is not the case, then check the power supply to the base and wait for it to restart).
Check that you handset is properly registered ( the
registration icon is displayed in the top right of the
welcome screen).
Check that the broadband phone service is activated on
your line or wait for your internet connection to be restored (this may take several hours). If the problem persists, contact your ISP support service.
The LEDs are flashing in
sequence.
Your base is updating. Your base software be updated within a few minutes.
The base will then restart automatically.
You can use your base again once the LEDs stop flashing.
Page 47
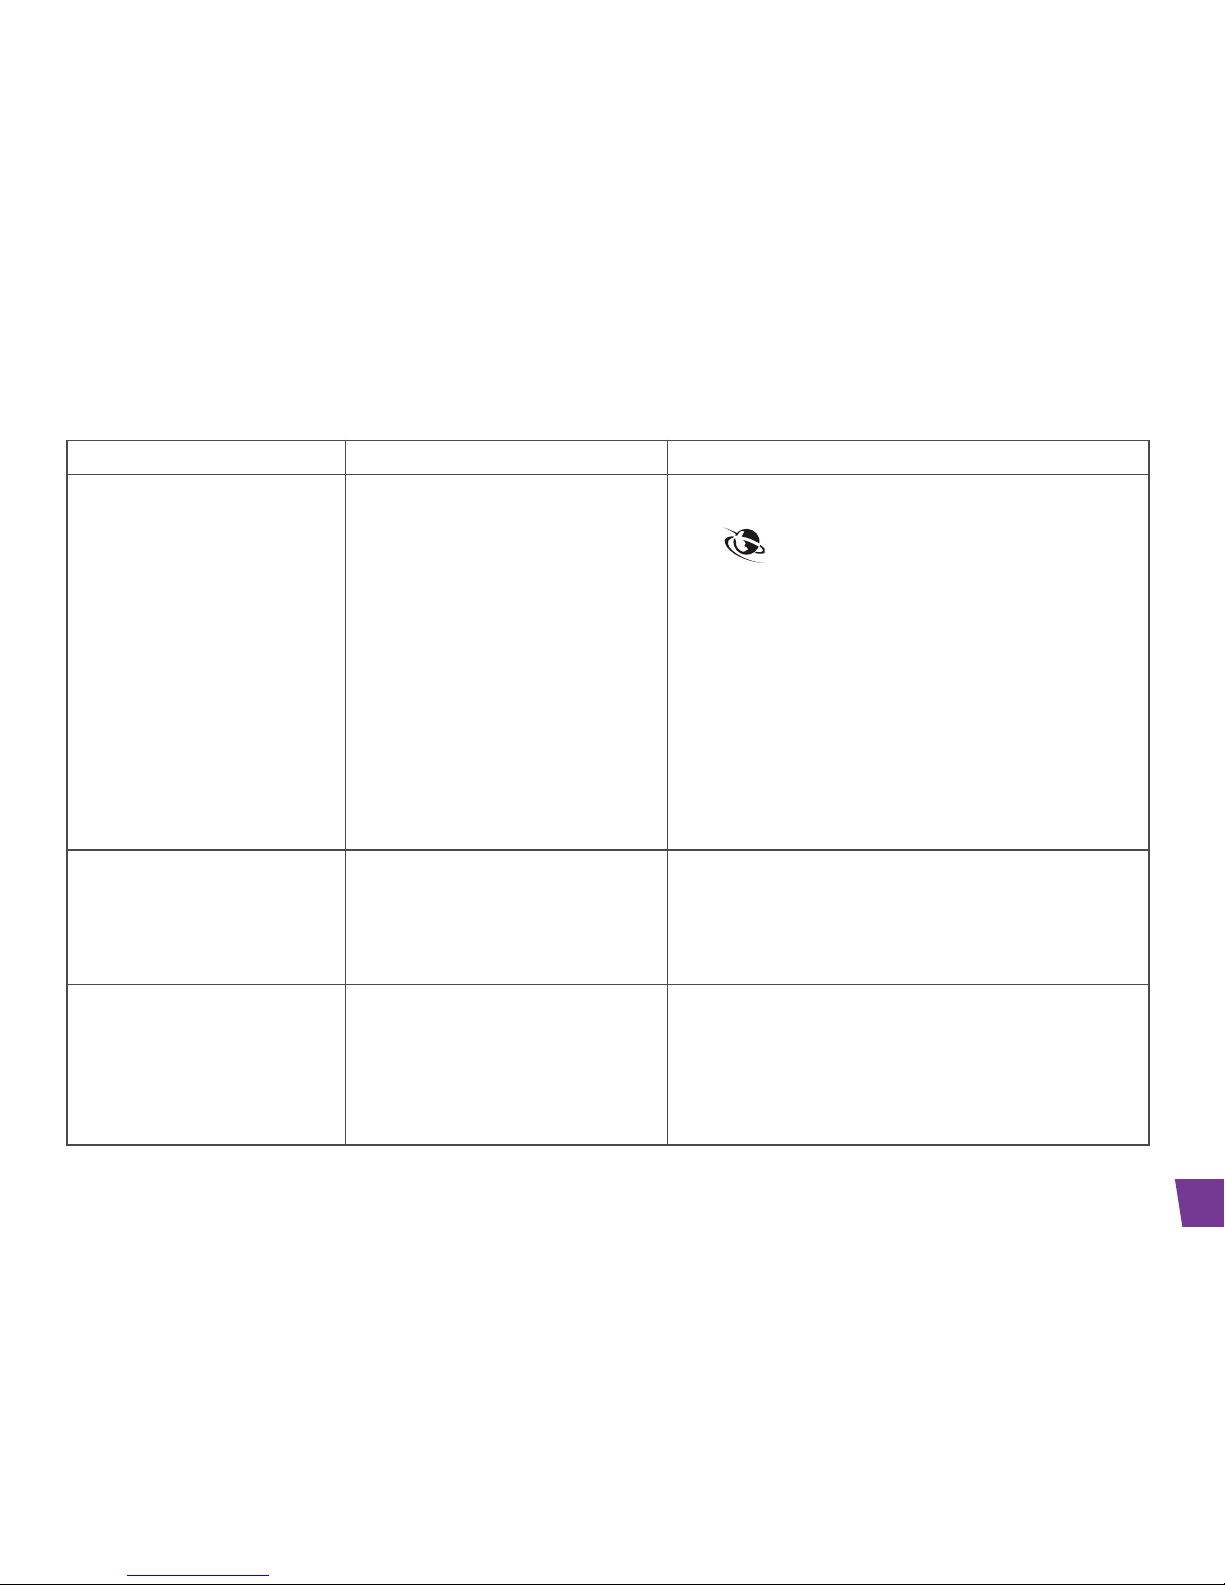
41
Problem Possible cause Solution
You can’t listen to an internet
radio station.
The Symbio base is not properly
connected to the internet, or the station you want is temporarily unavailable.
Check that your Ethernet cable is properly connected to
your ADSL box.
If the LED is flashing quickly, check that your box
can supply the Symbio base with an IP address.
If, when you switch to “Radio” mode, you see an error
message indicating an internet connection problem,
check whether the other devices connected to your box
can access the internet.
If you can enter the “Radio mode play screen, but the
radio station you want doesn’t work, it is possible theat
internet radio is temporatily unavailable. Don’t hesitate
to notify us of this problem using the support form (cf.
Chapter 13).
You Symbio handset doesn’t
ring when trhere is an incoming
call.
The Symbio base is not properly
connected or has no power supply.
The “Incoming call” ringer volume is
set to set to zero.
Check that you have a dialling tone (cf. “ You can’t
make calls” in this troubleshooting section).
Check that the ringer volume is not set to zero (cf.
Chapter 6.2).
The screen appears frozen. and
the keypad has stopped responding.
A low battery status or hard impact
is preeventing the Symbio from working.
It is possible to force the handset to restart by holding
down the red button for approximately 5 seconds. If the
screen remains black, press the red button again to
turn the handset on.
Also check the battery orientation and charge level.
Page 48
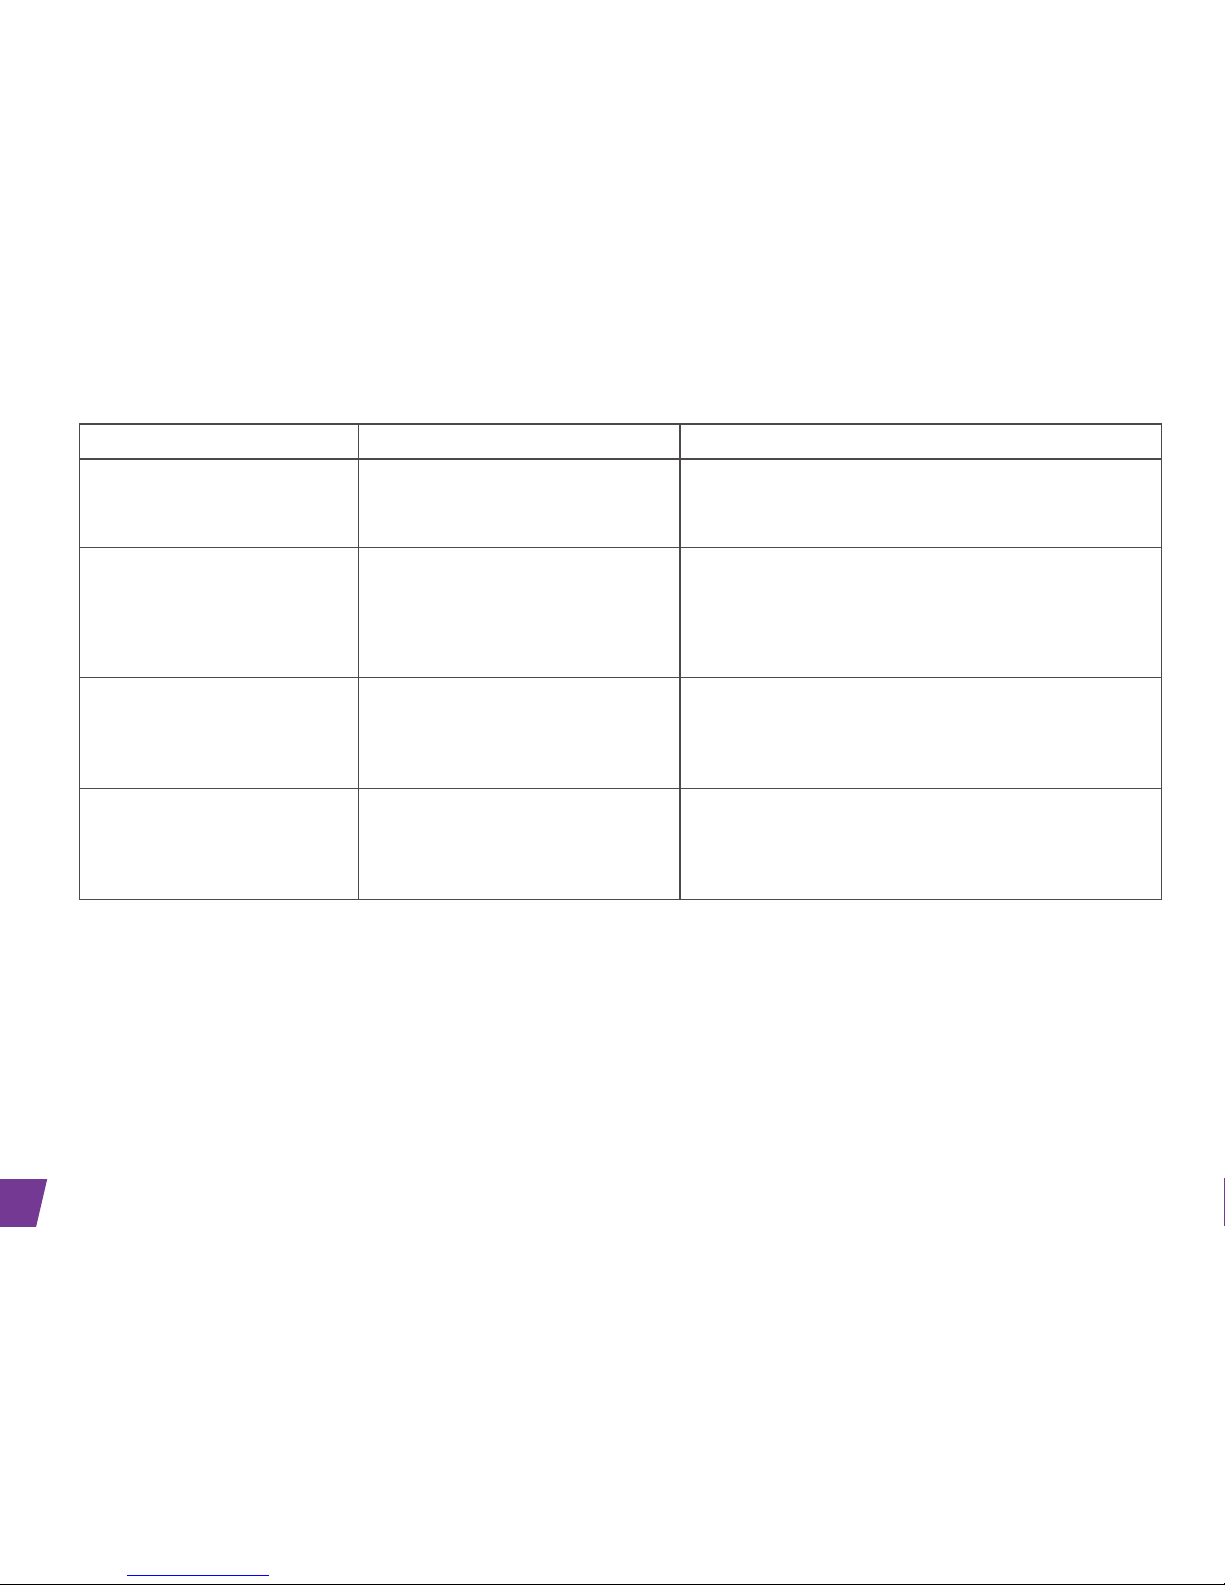
42
Problem Possible cause Solution
You can’t add a contact to the
phonebook.
The phonebook is full. The maximum
capacity of the phonebook is 200
contacts.
Delete unwanted old contacts to make room for new
ones
The time display has reverted
to 00:00.
The Symbio base has been turned
off or restarted, and the internet
connection is not working corretly.
If the internet connection is working, the time will be
updated automatically.
You can reset the rime manually or call your Symbio to
trigger an automatic time update.
the screen stays black, even
when you use the wheel or
keypad.
The batteries need charging or the
battery is missing.
Put the handset on its charger..
The screen stays black, even
when you use the wheel or
keypad.
The batteries need charging or the
battery is missing.
Put the handset on its charger.
Page 49
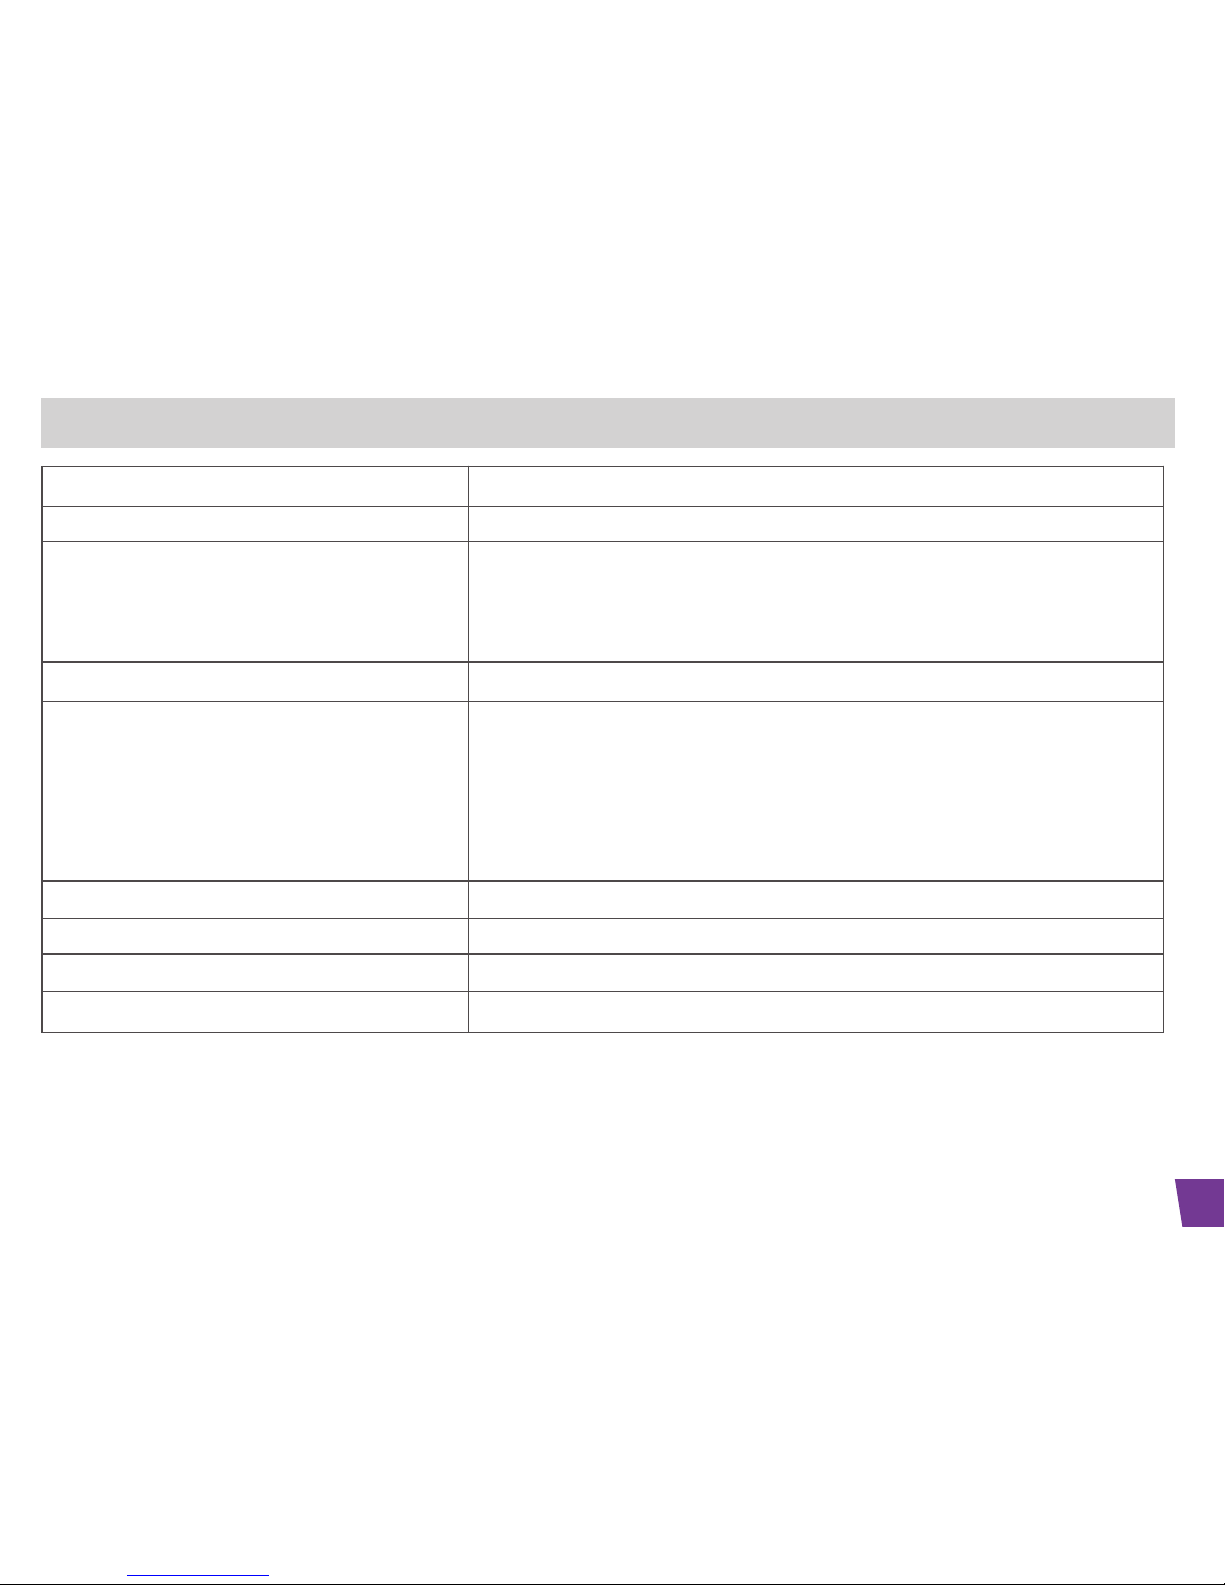
43
12. TECHNICAL SPECIFICATIONS
Free fied range Up to 300 metres*
Indoor range Up to 50 metres*
Handset battery life
(average)
6 hours (average value for medium-high volume) / up to 100 hours ( low volume);
12 hours in handset / mode**
8 hours call time**
100 hours standby**
Number of handsets 1 supplied. The base may be used with up to 5 handsets
Electrical connection Powered from charger or direct to handset ( white power adapter unit):
- Input: 100-240V AC 50/60 Hz
- Output: 5V DC 1000mA
Base power supply ( black power adapter):
- Input: 100-240V AC 50/60 Hz
- Output: 9V DC 600 mA
Rechargeable battery 1X3.7V / 800 mAh Li-ion polymer rechargeable.
Freqrency range 1880-1900 MHz.
RF power output 250 mW
Operating temperature range
0-40oC
* Varies according to envieronment
** Actual values depend on the initial battery charge level.
Page 50

13. SAFETY
In the event of danger, the mains adapter acts as 230 V power isolating device. It should therefore, as a precaution, be installed close
to the appliance and be easily accessible. To disconnect the device from the primary power source, the mains adapter must be removed
from the 230 V AC / 50 Hz socket.
If the mains adapter fails, it must be replaced by an identical model.
If not connected to the mains power, or if there is a mains power failure, the cordless handset will cease to function.
You will then be unable to make or receive calls in the event of an emergency.
This is why we recommend that you also keep a conventional telephone – one that doesn’t require a power supply – as a backup.
Do not attempt to open the batteries, as they contain chemical substances. In the event of leakage, avoid contact with the skin, eyes,
nose and mouth. In the event of contact, rinse the affected part for about twenty minutes with running water and seek urgent medical
attention. Clean the product with absorbent paper or a dry cloth and contact your reseller for replacement batteries.
!
Do not use your telephone to notify a gas leak when standing in the vicinity of the leak.
It is recommended that you avoid using this device during electrical storms.
Thomson Telecom hereby declares that the Symbio telephone complies with the essential requirements and other applicable
provisions of European directive 1999/5/EC.
This device is intended for connection to a TRT3 (telecommunications network voltage) telephone line.
European Community declaration of compliance:
44
Page 51
45
Thomson Telecom declares that the Symbio telephone complies with the essential requirements and relevant provisions of European
Directive 1999/5/CE.
You may download the full declaration of compliance from the following web site: www.thomson.net.
The CE product logo indicates that the product concerned complies with the essential requirements of all applicable directives.
Page 52

46
14. ENVIRONMENT
This symbol means that your inoperative electronic appliance must be collected separately and not mixed with the
household waste. The European Union has implemented a specific collection and recycling system for which producers are
responsible.
This appliance has been designed and manufactured with high quality materials and components that can be recycled and
reused. Electrical and electronic appliances are liable to contain parts that are necessary in order for the system to work properly but
which can become a health and environmental hazard if they are not handled or disposed of in the proper way. Consequently, please
do not throw out your inoperative appliance with the household waste.
If you are the owner of the appliance, you must deposit it at the appropriate local collection point or leave it with the vendor when
buying a new appliance.
- If you are a professional user, please follow your supplier's instructions.
- If the appliance is rented to you or left in your care, please contact your service provider.
Please help us protect the environment in which we live!
Used handset batteries must be disposed of in compliance with current environmental protection regulations. Comply with your local
regulations. You should return your batteries to your reseller or dispose of them at an approved recycling centre.
Page 53

47
Page 54

48
 Loading...