

Page 1

User Manual
Thomson Telecom
« Société par Actions Simplifiée » with a capital of 130 037 460 €
RCS Nanterre 390 546 059
46, quai Alphonse Le Gallo
92100 Boulogne Billancourt
France
Tel : 33 (0) 1 141 86 50 00
Fax : 33 (0) 1 141 86 66 50
www.speedtouchpartner.com
Copyright © THOMSON 2005
All Rights reserved.
Page 2

VoIP Business Phone User Manual
Copyright © 2005 THOMSO N
-All rights reserved-.
European Community Declaration of Conformity
This equipment complies with the requirements relating to electromagnetic compatibility, EN55022 Class B for
ITE and EN55024.
This meets the essential protection requirements of the European Council Directive 89/336/EEC on the
approximation of the laws of the Member States relating to electromagnetic compatibility.
Thomson Telecom declares that this ST 2020 IP Phone is in compliance with the essential requirements and other
relevant provisions of Directive 1999/5/EC.
You can download the declaration of conformity on
www.speedtouchpartner.com.
The CE logo involves the conformity of the product with the essential requirements of implemented directives.
Northern America Federal Communications Commission (FCC) Statement
This equipment generates, uses and can radiate radio frequency energy and, if not installed and used in accordance
with the instructions in this manual, may cause interference to radio communications. This equipment has been
tested and found to comply with the limits for a Class B digital device pursuant to Subpart J of Part 15 of FCC
rules, which are designed to provide reasonable protection against radio interference when operated in a
commercial environment. Operation of this equipment in a residential area is likely to cause interference, in which
case the user, at his own expense, will be required to take whatever measures are necessary to correct the interface.
Copyright Notice & Trademarks
© Thomson 2005. All rights reserved. Thomson Telecom reserves the right to alter material or technical
specification of its products without prior notice.
SpeedTouch and Thomson are registered trademarks. Various elements (including but not limited to trademarks,
service marks, designs, logos and copyrighted material) shown on this User Guide are protected by intellectual
property or other rights.
- Page 2 -
Page 3

VoIP Business Phone User Manual
Copyright ©2005 THOMSON All rights reserved.
WARNING!
- Page 3 -
1. Read these installation instructions carefully before connecting the IP
phone to its power source.
!
2. Equally, incorrect reassembly could cause electric shock on re-use of
the appliance.
3. Do not expose the IP Phone to Fire, direct sunlight or excessive heat.
4. Do not expose the IP Phone to rain or moisture and do not allow it to
come into contact with water.
5. Do not install the IP phone in an environment likely to present a THREAT
OF IMPACT.
6. You may clean the IP phone using a fine damp cloth. Never use solvents
(such as trichloroethylene or acetone), which may damage the phone’s
plastic surface and LCD screen. Never spray the phone with any
cleaning product whatsoever.
7. The IP phone is designed to work in temperatures from 0
o
C to 45oC.
8. The IP phone must be installed at least 1 meter from radio frequency
equipment, such as TVs, radios, hi-fi or video equipment (which radiate
electromagnetic fields).
9. The IP Phone must be powered using the power adaptor provided with
the package. If you do use an alternative power adaptor, it must comply
with the following standards:
- EN60950, CE mark, U/L
- Output: 5VDC /600mA.
- Input: 100V/60Hz to 230V/50Hz.
Any damage caused to the IP Phone as a result of using unsupported
power adaptors will not be covered by the manufacturer’s warranty.
10. Do not connect the LAN/PC ports to any network other than an Ethernet
network.
11. Do not work on the system or connect or disconnect cables during
lightning storms.
12. Before working on any system fitted with an ON/OFF switch, turn OFF
the power and unplug the power cord.
13. No repair can by performed by the customer, if you experience trouble
with this equipment for repair or warranty information, please contact
your administrator.
Thomson disclaims all responsibility in the event of use that does not
comply with the present instructions.
Product disposal warning:
Ultimate disposal of this product should be handled in accordance with
national laws and regulations.
Page 4

VoIP Business Phone User Manual
Copyright © 2005 THOMSO N
-All rights reserved-.
- Page 4 -
Contents
Chapter 1 Introduction.........................................................................................................5
1.1 PACK CONTENTS............................................................................................................5
1.2 GENERAL PRODUCT OVERVIEW .....................................................................................6
1.3 INSTALLATION................................................................................................................9
1.4 TURNI NG ON THE PHONE ..............................................................................................10
1.5 LCD DISPLAY..............................................................................................................11
1.6 KEYPAD INPUT CONVENTIONS.....................................................................................12
1.7 DESCRIPTIO NS OF FUNCTION KEYS..............................................................................14
Chapter 2 Phone Services...................................................................................................16
2.1 PLACING A CALL..........................................................................................................16
2.2 ANSWERING A CALL ....................................................................................................17
2.3 ADJUSTING THE VOICE VOLUME..................................................................................17
2.4 SPEED DIALING A CALL ...............................................................................................18
2.5 REDIALING THE LAST DIALED NUMBER ......................................................................19
2.6 PHONEBOOK ................................................................................................................19
2.7 MUTING A CALL...........................................................................................................20
2.8 HOLDING A CALL OR HANDLING MULTI-LINES ............................................................20
2.9 FORW ARDING A CALL...................................................................................................21
2.10 TRANSFERRING A CALL (ATTENDED TRANSFER)...........................................................21
2.11 ACCESSING VOICE MAIL .............................................................................................21
Chapter 3 Configuration through LCD............................................................................22
3.1 CONFIGURATION THROUGH LCD MENUS ....................................................................22
3.2 CALL MODE AND CONFIG MODE .................................................................................22
3.3 DETAILED LCD MENU SETTINGS ................................................................................23
Chapter 4 User Configuration via Web Interface............................................................26
4.1 CONFIGURATION VIA WEB INTERFACE .........................................................................26
4.2 OPTIONS AVAILABLE VIA IP PHONE WEB INTERFACE ...................................................27
Appendix A................................................................................................................................32
Page 5

VoIP Business Phone User Manual
Copyright ©2005 THOMSON All rights reserved.
Chapter 1 Introduction
The SpeedTouch 2020 is a VoIP phone that is SIP compliant and can be used with any SIP
compliant PBX, Softswitch or IP Centrex solutions of the market. It addresses the need for a
cost effective IP solution, helping VoIP to be a viable, attractive option for small or large
offices environment. It can be powered over the same Ethernet cable that delivers the data
packets, eliminating the need for a separate Ethernet link and dedicated AC power outlet.
The SpeedTouch 2020 includes the main following features:
¾ 2-line LCD display
¾ Connectivity: Integrated 2 port 10/100 Ethernet switch
¾ Phone services:
• Multiline, Call Forward, Call Transfer (attended), Call Hold, Redial
• Group listening
• Message Waiting Indicator
• Speedial
• Phonebook
• Caller ID display
¾ Audio extension connection: Integrated headset RJ9 port
¾ Multiple power options: power over Ethernet 802.3af and external power supply
adaptor
¾ VoIP Standard: SIP V2 (RFC 3261)
¾ Web browser interface for configuration
[Remark]: This user guide is based on firmware 2.0.4.15, you can download the latest of user
guide on www.speedtouchpartner.com
1.1 Pack Contents
1. IP phone base unit
2. Handset with a coiled cord
3. Power adaptor
4. 3 Memory key Stickers
5. Wall mounting kit
6. User Manual
- Page 5 -
Page 6

VoIP Business Phone User Manual
Copyright © 2005 THOMSO N
-All rights reserved-.
1.2 General Product Overview
Figure 1.1 shows the IP phone from above. Please refer to Table 1.1 for the name of each
numbered feature and a brief description of its function.
Figure 1.1 Phone user panel
- Page 6 -
Page 7

VoIP Business Phone User Manual
Copyright ©2005 THOMSON All rights reserved.
Definition of functional keys
Part # Feature Description
1
Base The base unit is the main body of the IP Phone.
2
Handset For making/receiving calls or retrieving voice
messages.
3
LCD Screen The LCD Screen displays phone settings, phone
numbers, call status, etc.
4
[menu]
Menu key: Press to enter the Menu mode to visualize
configuration options.
5
[vol-]
Press to:
- Select/validate on-screen items.
- Decrease volume.
- Delete characters
6
[OK]
Press to:
- Select/validate on-screen items.
- Enter/Confirm control key.
7
[vol+]
Press to:
- Select/validate on-screen items.
- Increase volume.
- Control upper/lowercase of characters.
8
[C]
Press to quit from the current page and go back to the
previous page without changing any settings.
9
Speed dial sticker Attach the Speed dial sticker here
10~14 [m1] to [m5]
Memory keys
These memory keys are used as Speed dial keys : #1 to
#5
15 [1]...[9], [*],[0],[#]
Press to:
- Dial number
- Enter names (phonebook, speed dial)
16,17
[MUTE] key: Press to mute/un-mute the current call.
[SPKR] key: Press to enable/disable the group listening
feature. To hook off in the idle mode.
18,19
[TRANSF] key: Press to transfer (attended transfer) a
call.
[REDIAL] key: Press to redial the last number dialed.
20,21
[HOLD] key: Press to put the current call on hold.
[MULTILINE] key: Press to switch directly between 2
lines (one line is kept on hold).
22,23
[MSG] key: Message Retrieval key to access to the
Voice Mail System.
[PBOOK] key: Press to enter the Phone book.
Table 1.1 Definition of functional keys
- Page 7 -
Page 8

VoIP Business Phone User Manual
Copyright © 2005 THOMSO N
-All rights reserved-.
Description of LED status
Part # LED Color Static OFF Static ON Blinking
(ON/OFF)
24
MSG
Green
No new
message
N/A Flashes slowly to
indicate new voice
message received.
25
Headset /
Handset
Red
Default
Mode Headset:
During call
Mode Handset:
During call only if
group listening is
active.
Headset/Handset
Mode:
Ringing cadence on
incoming call
Group listening in
active cadence
26
MUTE
Green
MUTE is
off.
MUTE on. Blinking status
27
SYS
Red
Ready
Booting:
During Firmware
booting
Booting:
Slow blinking
during DHCP
process.
Fast blinking
during SIP
registration
Running mode
(after rebooting):
Slow blinking
when IP
connection is
down.
Fast blinking
when SIP
connection is
down.
- Page 8 -
Page 9

VoIP Business Phone User Manual
Copyright ©2005 THOMSON All rights reserved.
1.3 Installation
Before installation, please complete the following checklist:
Handset Connection:
Connect the handset to the main unit using the coiled cord.
Figure 1.2 Connect the handset to the IP phone base unit
Cable Connections:
A number of ports are provided on the rear and left side panels of the IP phone (see
following figures).
Figure 1.3 IP Phone rear and left side panel connections
(1) Use an Ethernet (CAT-5) cable to connect the LAN port to an Internet equipment.
In PoE (Power over Ethernet) office environment, the IP phone can be powered
from a power switch via an Ethernet cable, in which case the external power
adaptor is not needed.
(2) If the switch is not PoE switch, plug the power adaptor cord into the DC jack
socket at the back of the IP phone, then plug the wall pack into a wall outlet.
- Page 9 -
Power
PC
WAN/LAN switch Power Adaptor Headset Set to L/H position Outlet
Page 10

VoIP Business Phone User Manual
Copyright © 2005 THOMSO N
-All rights reserved-.
(3) If you are using the IP phone with a PC, use an Ethernet cable to connect the LAN
port of your PC to the PC port on the back of the IP phone using an Ethernet
cable
(4) If you will be using a headset, plug the RJ9 headset connector into the headset
jack port on the left side of the IP phone. Remember to set the switch on the left
side of the IP Phone to the headset to disable the handset and enable the headset.
Wall mounting:
If you would prefer to mount the phone on a wall, please move on to the following steps:
(1) Use the screws and wall plugs supplied as part of the wall-mount kit contained in the pack.
Drill the wall and secure the mounting screws at the correct spacing (please refer to the
mounting holes on the back of the IP phone).
(2) Mount the base (without handset) onto the screw heads.
(3) Remove the “Latch” from the on-hook handset position of the base (see below).
(4) Reverse it and replace it in its slot.
(5) Connect the Handset to the base unit and hang it in the on-hook position.
- Page 10
Correct wall-mounting positions
Figure 1.3 Mounting IP phone on the wall
1.4 Turning on the phone
When the IP phone is turned on, the system will boot up and the following information
will be displayed on the LCD screen.
LCD Screen Description
Booting…
ST2020 Vx.y.z
When the system is initializing, all the settings
held in Flash memory are loaded and the
firmware version number is displayed (where
Vx.y.z is the current version number).
TEL: 1001
Mon May 10 08:24
Register Failed
Request Timeout
When the booting has been successful, the
LCD screen displays the phone number and
date/time.
If the booting fails after contacting the server,
the phone displays “Register failed: request
timeout”.
Page 11
VoIP Business Phone User Manual
Copyright ©2005 THOMSON All rights reserved.
1.5 LCD Display
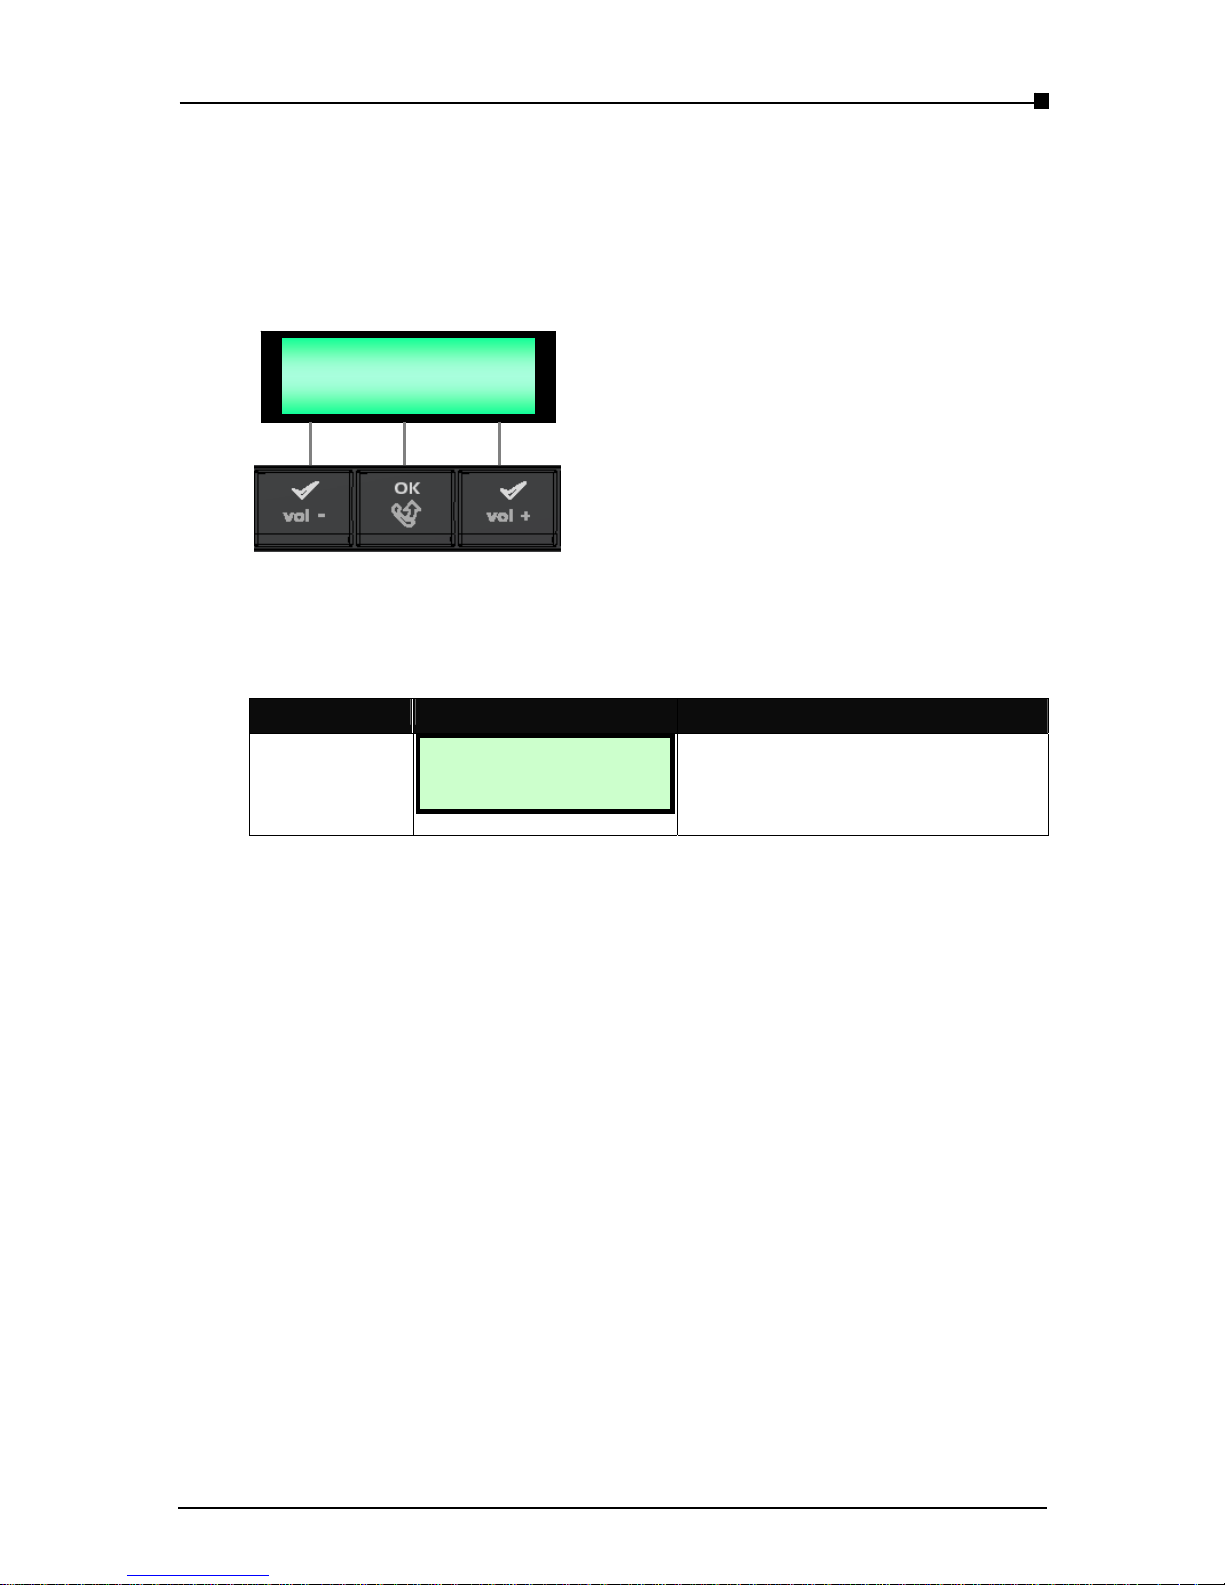
The Figure 1.4 illustrates the IP phone LCD Display. This display offers 2 lines of 16
characters each. All call status, line status and configuration information is displayed here. In
configuration mode, three content-sensitive soft keys shown below are used to select the
options displayed on the LCD screen.
- Page 11 -
Menu:
Acct Phone Next
Figure 1.4 IP Phone LCD Display
When the registration of IP phone is successful, the following message will be displayed
LED Status LCD Screen Description of Action
All LEDs will go
OFF.
TEL: 1006
Sep 21 TUE 10 :24
The LCD screen will display the phone
number (ex: 1006), time & date.
Page 12
VoIP Business Phone User Manual
Copyright © 2005 THOMSO N
-All rights reserved-.
1.6 Keypad Input Conventions
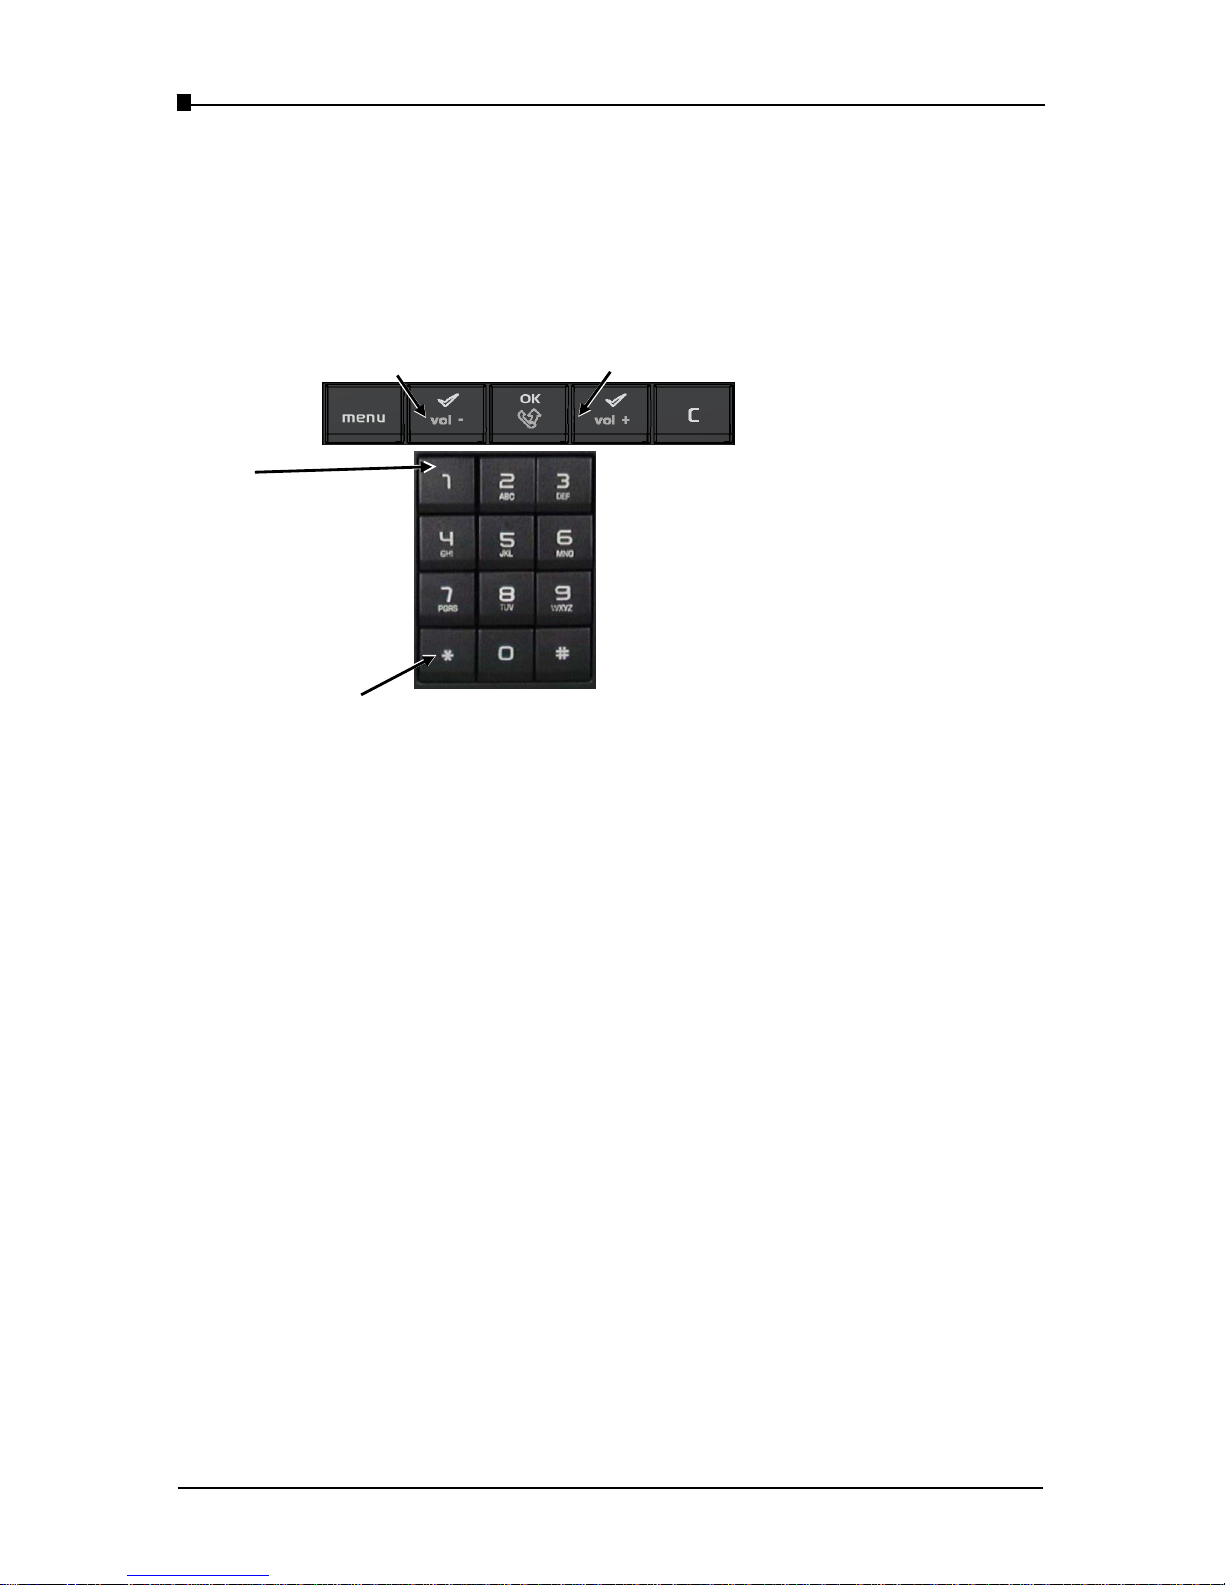
Figure 1.5 illustrates the Keypad used for dialing and input editing. In editing mode, user may
input either numbers or “A to Z” characters using the main keypad. Press the [vol+] key to
toggle between upper/lowercase letters and numbers. For displaying special characters, please
repeatedly press the [1] key. It will appear “@” , “- “ , “+” , “ “ , “(“ , “)” , “_” , “.” , “1”, “*”.
- Page 12
Backspace Upper/Lowercase & Shift-right
1; in editing mode:
1.1.1 S
p
ecial
*; or editing mode:
1.1.2 IP address”.”
Figure1.5. IP Phone keypad
Use the [vol-] and [vol+] keys to move the cursor. To delete characters, please use [vol-] key.
Press the [OK] key to confirm. Pressing the [*] key will display on the LCD screen the “.”
character required when entering URLs or IP addresses.
[Notes]:
- The character entered in the cells before the first slash are written without pressing the
[vol+] key.
- The character entered in the cells after the first slash are written by pressing first
ONCE the [vol+] key.
- The character entered in the cells after the second slash are written by pressing first
TWICE the [vol+] key.
Page 13

VoIP Business Phone User Manual
Copyright ©2005 THOMSON All rights reserved.
- Page 13 -
key 1x 2x 3x 4x 5x 6x 7x 8x 9x 10x
1 @/@/1 -/-/1 +/+/1 space ( ) _ . 1 *
2 a/A/2 b/B/2 c/C/2
3 d/D/3 e/E/3 f/F/4
4 g/G/4 h/H/4 i/I/4
5 j/J/ k/K/5 l/L/5
6 m/M/6 n/N/6 o/O/6
7 p/P/7 q/Q/7 r/R/7 s/S/7
8 t/T/8 u/U/8 v/V/8
9 w/W/9 x/X/9 y/Y/9 z/Z/9
0 :/:/0 :/:/0 :/:/0 :/:/0 :/:/0 :/:/0 :/:/0 :/:/0:/:/0 :/:/0
* * * * * * * * * * *
# # # # # # # # # # #
Table 1.2 Character input table
[Examples]:
- How to enter “ i “?
Press 3 times the “ 4 ” key.
- How to enter “ N ” ?
Press first the [vol+] key, then press twice the “ 6 ” key.
- How to enter “ 6 ” ?
Press first [vol+] key twice, then press 3 times the “ 6 ” key.
[Notes]:
If you want to enter a character before the first slash, press the corresponding key as many
times as indicated in the column.
If you want to enter a character between two slash, press ONCE the [vol+] key, then press
the corresponding key as many times as indicated in the column.
If you want to enter a character after the second slash, press TWICE the [vol+] key, then
press the corresponding key as many times as indicated in the column.
Page 14

VoIP Business Phone User Manual
Copyright © 2005 THOMSO N
-All rights reserved-.
- Page 14
1.7 Description of Function Keys
[menu]
Press this key to enter LCD screen Menu mode. Press [C] key to exit.
For Web interface management, press this key first and then select Config option. When
the phone enters “Config” mode, you can then access its Web page for configuration or
upgrades.
[Soft keys]: [vol-], [vol+] and [OK]
There are 3 soft keys, each associated by vertical lines to the LCD screen. These soft keys
are used to select the corresponding item displayed. Press the key corresponding to
“Next” to display the next group of selectable options (if any).
[vol-] [vol+]
These 2 keys are used to adjust speakerphone or handset volume.
In configuration mode, [vol+] key can be used to control the cursor, and [vol+] key can
be used to toggle between uppercase/lowercase letters and numbers.
[OK]
This key also forms part of the soft key array. Press this key to enter editing mode or
confirm settings in the current page.
[C]
Press this key to cancel current setting(s) and return to the previous page without making
changes.
[Speed Dial buttons m1, m2, m3, m4 and m5]
These buttons are used as Speed dial keys to memorize phone numbers or telephony
services access numbers.
[REDIAL]
Press this key to redial the last number dialed.
[TRANSF]
Press this key to complete a transfer between two phones.
[SPKR]
Press this key to enable or disable the Speakerphone function.
[MUTE]
Press this key to mute the phone. When muted, the “Mute” LED will start blinking in
green. When mute is cancelled, the Mute LED will go off.
Page 15

VoIP Business Phone User Manual
Copyright ©2005 THOMSON All rights reserved.
- Page 15 -
[HOLD]
Press this key to put the current call on hold. When a call is held, the “HOLDING:”
message is displayed on the LCD screen. Press the key again to retrieve the call.
This key is also used to switch between simultaneous calls (broker call).
[MULTILINE]
Press this key to switch directly between two lines.
[MSG]
Press this key to access to the Voice Mail System.
[PBOOK]
Press this key to enter the Phone book.
Page 16
VoIP Business Phone User Manual
Copyright © 2005 THOMSO N
-All rights reserved-.
Chapter 2 Phone Services
2.1 Placing a Call
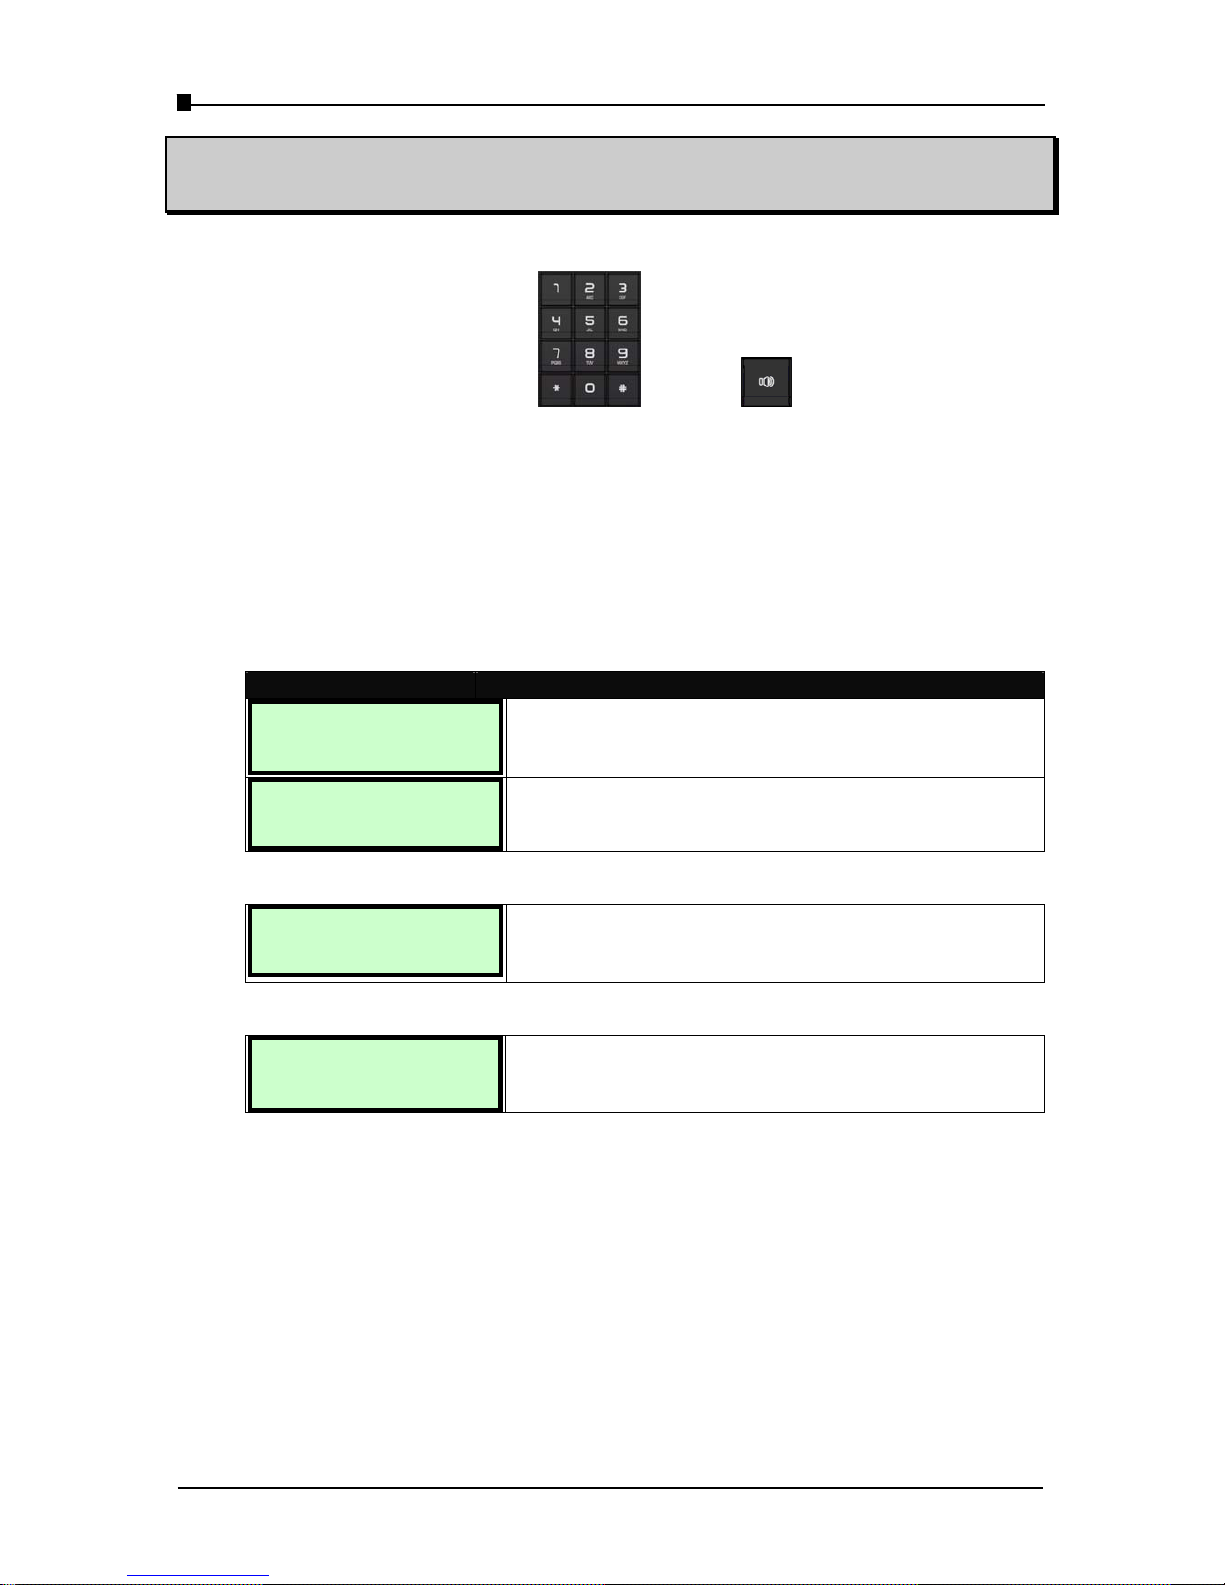
The following keys are here:
Phone number SPKR
[Using the handset]
- Upon picking up the Handset, Dial Tone is given to the user
- Dial the phone number.
- After the calling party picks up the phone, you can start the conversation.
- Then hang-up the handset to end the call.
- The corresponding LCD screen messages are as follows:
LCD Screen Description of Action
Dialing:
XXXX
User may dial the phone number. Then dial
[OK].
Calling …
XXXX
During Call Setup, “Calling” message is displayed.
Hang Up the Call:
TEL: 1006
Mon May 10 08:24
When hanging up the call, the standby mode message is
displayed again.
Phone Busy condition:
Response:
Busy here
If callee’s phone is off hook or is using and not available, a
busy message and tone will be presented to the user.
[Using the Headset]
- Before using the headset, turn the headset/handset switch (on the left side of IP phone)
to “headset” location.
- Then pick up the handset and put aside to place a call and then talk to the party
through the headset. If you want to end the call, please hang-on the handset.
[Note]: Remember that the Hook switch is still used for the call control of Headset.
- During conversation with Headset, the [SPKR] key is still available for
Headset/Group listening toggle control.
- Page 16
Page 17
VoIP Business Phone User Manual
Copyright ©2005 THOMSON All rights reserved.
[Group listening]
- Pick up the handset and put it aside to place a call.
- Press the [SPKR] key on the phone, to activate the group listening.
- To put an end to the group listening press again the [SPKR] key
2.2 Answering a Call
[Using Handset]
- On hearing the ring tone, you will see the Caller ID (diplay name) on the LCD
display. You may then take the call or refuse it.
- Pick up the handset to accept the call
- Hang-up the handset again to end the call.
- The corresponding LCD screen messages are as follows:
LCD Screen Description of Action
XXXX
Ringing…
When a call is coming, the username (Caller ID) is
displayed on the LCD screen.
XXXX
Connected
When you pick up the handset, the call will be established
and you can start talking.
2.3 Adjusting the Voice Volume
The following keys are used:
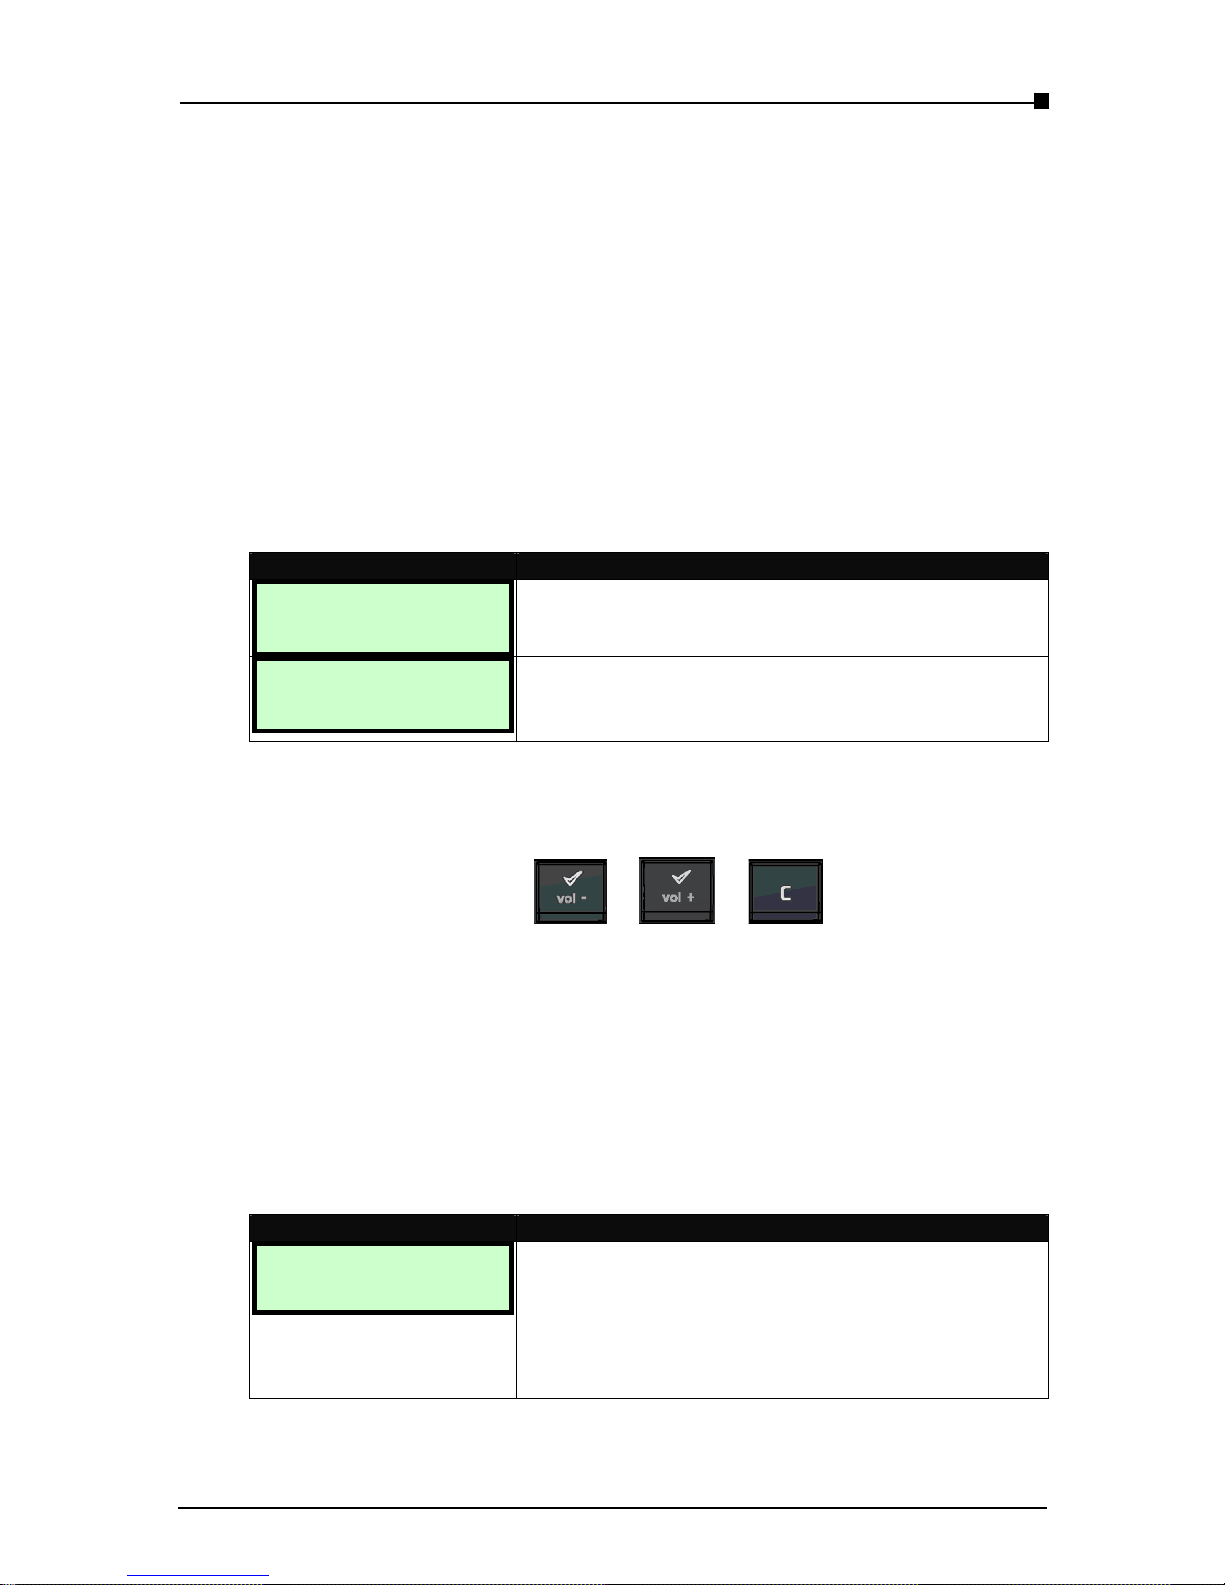
[vol-] [vol+] CANCEL
[Adjusting Voice Volume with the idle State]
- There is a simple way for users to adjust the local tone volume level of speaker.
Under idle state, let the Handset still on the cradle and press the [vol-] or [vol+] keys
to decrease or increase the local tone volume of speaker. It will also affect the ringer
tone output volume levels.
- The corresponding LCD screen message is as follows:
LCD Screen Description of Action
Volume: 4
Press the corresponding soft keys to select:
[vol-]: to decrease the volume.
[vol+]: to increase the volume.
Current Ringer volume value: say “4”, is increased and
shown on the screen.
[C]: to return to idle state.
- Page 17 -
Page 18
VoIP Business Phone User Manual
Copyright © 2005 THOMSO N
-All rights reserved-.
[Adjust the Volume during A Call]
When an incoming call is received, the user may adjust the ringer volume by pressing
the [vol-] or [vol+] keys to decrease or increase the volume of the handset, headset or
speakerphone if you are in group listening mode. When you press the adjusting volume
keys, the corresponding LCD screen message is as follows:
LCD Screen Description of Action
Volume: 5
When an incoming call is received, you may press:
[vol-]: to decrease the ringer volume
[vol+]: to increase the ringer volume
When a call is in progress, you also may directly press the [vol-] or [vol+] keys to
decrease or increase the volume of handset, headset or speakerphone. Once you have
pressed the volume adjustable keys, the corresponding LCD screen message is as
follows:
LCD Screen Description of Action
Volume: 3
Pick up the call by Handset or Speakerphone. During the
conversation, you may press:
[vol-]: to decrease the voice volume
[vol+]: to increase the voice volume
2.4 Speed Dialing a Call
The following keys are used:
m1 m2 m3 m4 m5 SPKR
[Speed Dial]
- Before using Speed dial, please refer to Chapter 3 or Chapter 4 which explain how to
enter your Speed dial numbers. These are mapped to the [m1] to [m5] keys.
- After hooking off or press the [SPKR] key, pressing any of the [m1] to [m5] keys
dials the stored number immediately.
- During conversation or in idle mode, this function is invalid.
- The corresponding LCD screen message is as follows:
LED status LCD Screen Description
SPKR-LED:
OFF
Dial:
XXXX
When pressing a [mn] key, the phone places a
call with memorized number.
- Page 18
Page 19
VoIP Business Phone User Manual
Copyright ©2005 THOMSON All rights reserved.
2.5 Redialing the Last Dialed Number
The following keys are used:
REDIAL SPKR
[Redial]
- In idle mode, if there is a last dialed number in memory, when you hook off or press
the [SPKR] key first and then press the [REDIAL] key, this number will be dialed
immediately. There is no use to use [OK] to validate this dial.
- During conversation or in idle mode, this function is invalid.
- For the LCD message, please refer to the following description.
LCD Screen Description
Dialing:
XXXX
Press the [REDIAL] key to make an
immediate call to the last dialed number.
2.6 Phonebook
The following key is used:
PHONEBOOK
- Press [PHONEBOOK] key to enter phonebook.
LCD Screen Description
[1]
Press the [vol-] and [vol+] keys to navigate
the [1] to [20] phone numbers saved in the
phone book
[C]: to return to previous status
[Remark]: You can edit the phonebook through LCD Menu but you can not do it through the
Web.
- Page 19 -
Page 20
VoIP Business Phone User Manual
Copyright © 2005 THOMSO N
-All rights reserved-.
2.7 Muting a Call
The following key is used:
MUTE
[MUTE / Re-MUTE a Call]
- During a call, you can press the [MUTE] key to prevent the calling party from
hearing what you or someone else in the room is saying.
- To disable this function, press the [MUTE] key again.
- The corresponding LCD screen messages are as follows:
LCD Screen Description
Microphone Mute:
Active
When pressing the [MUTE] key on the phone, the voice
is muted and not to sent to the party. “Active” message is
shown on the screen for one second. The mute LED is on.
Microphone Mute:
Inactive
When a [MUTE] key is pressed again, the voice is
recovered. “Inactive” message is shown on the screen for
one second. The mute LED is off.
2.8 Holding a Call or Handling Multi-lines
The following keys are used:
HOLD MULTILINE
[Hold a Call/Switch between 2 lines]
While in a call, you can press the [HOLD] key to put the current call on hold.
a) To return to the call, press the [HOLD] key again.
LCD Screen Description
Dialing: HOLD
Press [HOLD] key during a call and the LCD screen will
display “Hold”.
Press [HOLD] key again, and the phone will retrieve the
first call.
b) Place a second call
- During the call if you want to switch between Call#1 and Call#2 use the
[Multiline] key .
- During a call with 2 lines, Call#1 in hold and Call#2 in communication,
if Call#2 off-hook, press the [Multiline] key to retrieve Call#1.
- Page 20
Page 21
VoIP Business Phone User Manual
Copyright ©2005 THOMSON All rights reserved.
2.9 Forwarding a Call
The following keys are used:
menu [vol-] [ OK ] [Vol+] CANCEL
[Forward a Call]
- There are 3 types for call forward: unconditional, busy, and no reply.
- Before using Call Forwarding, please refer to section 3.3 LCD Phone Menu page to
set your type of Call Forward and the forwarded URL. After configuration, the Call
Forward gets effective immediately.
- No matter what with Handset/Headset or Speakerphone, when anybody calls you, the
call will be forwarded to the forwarded phone.
- The corresponding LCD screen message is as follows:
LCD Screen Description
XXXX
Calling …
When a wall is coming, the call will be automatically
forwarded to the target phone in accordance with the
forward type: unconditional, busy, and no answer.
2.10 Transferring a call (Attended transfer)
The following keys are used:
TRANSFER phone numbers [OK] HOLD
[Transfer a Call]
- When A calls B, if A would transfer this call to C, A should press [HOLD] key.
- Then upon hearing dial tone, input the phone number of C and press [OK] key to let B
establish a new session with C.
- After all these steps, A can hang up the phone then press [TRANS] key to establish the
call between B and C.
2.11 Accessing V oice Mails
The following keys are used:
MSG [OK]
[Access Voice Mails - MWI]
- When a new voice message is received, the MSG LED on the phone will flash
constantly in idle state until you press [MSG] key.
- When you press the [MSG] key, the phone will place a call to the voice message
system. Once you are connected to the voice mail system, you can retrieve your mails.
- Once the process is completed, you may hang up the phone.
- Page 21 -
Page 22
VoIP Business Phone User Manual
Copyright © 2005 THOMSO N
-All rights reserved-.
- Page 22
Chapter 3 Configuration through LCD
3.1 Configuration through LCD Menus
The LCD screen features a 2-line display of 16 characters for configuring the IP phone. The
following description explains how to operate and configure the IP phone using the LCD menu.
3.2 Call Mode and Config Mode
- Call Mode: to allow the user to make and take calls, look at phonebook, redial a call,
speeddial a call and call to voice mail.
- Config Mode: to allow the customization of the phone settings using the LCD screen or
Web interface.
[Remark]: LCD screen function is available in both Call Mode and Config Mode. But if you
want to change settings of the IP phone, you must enter into the Config Mode.
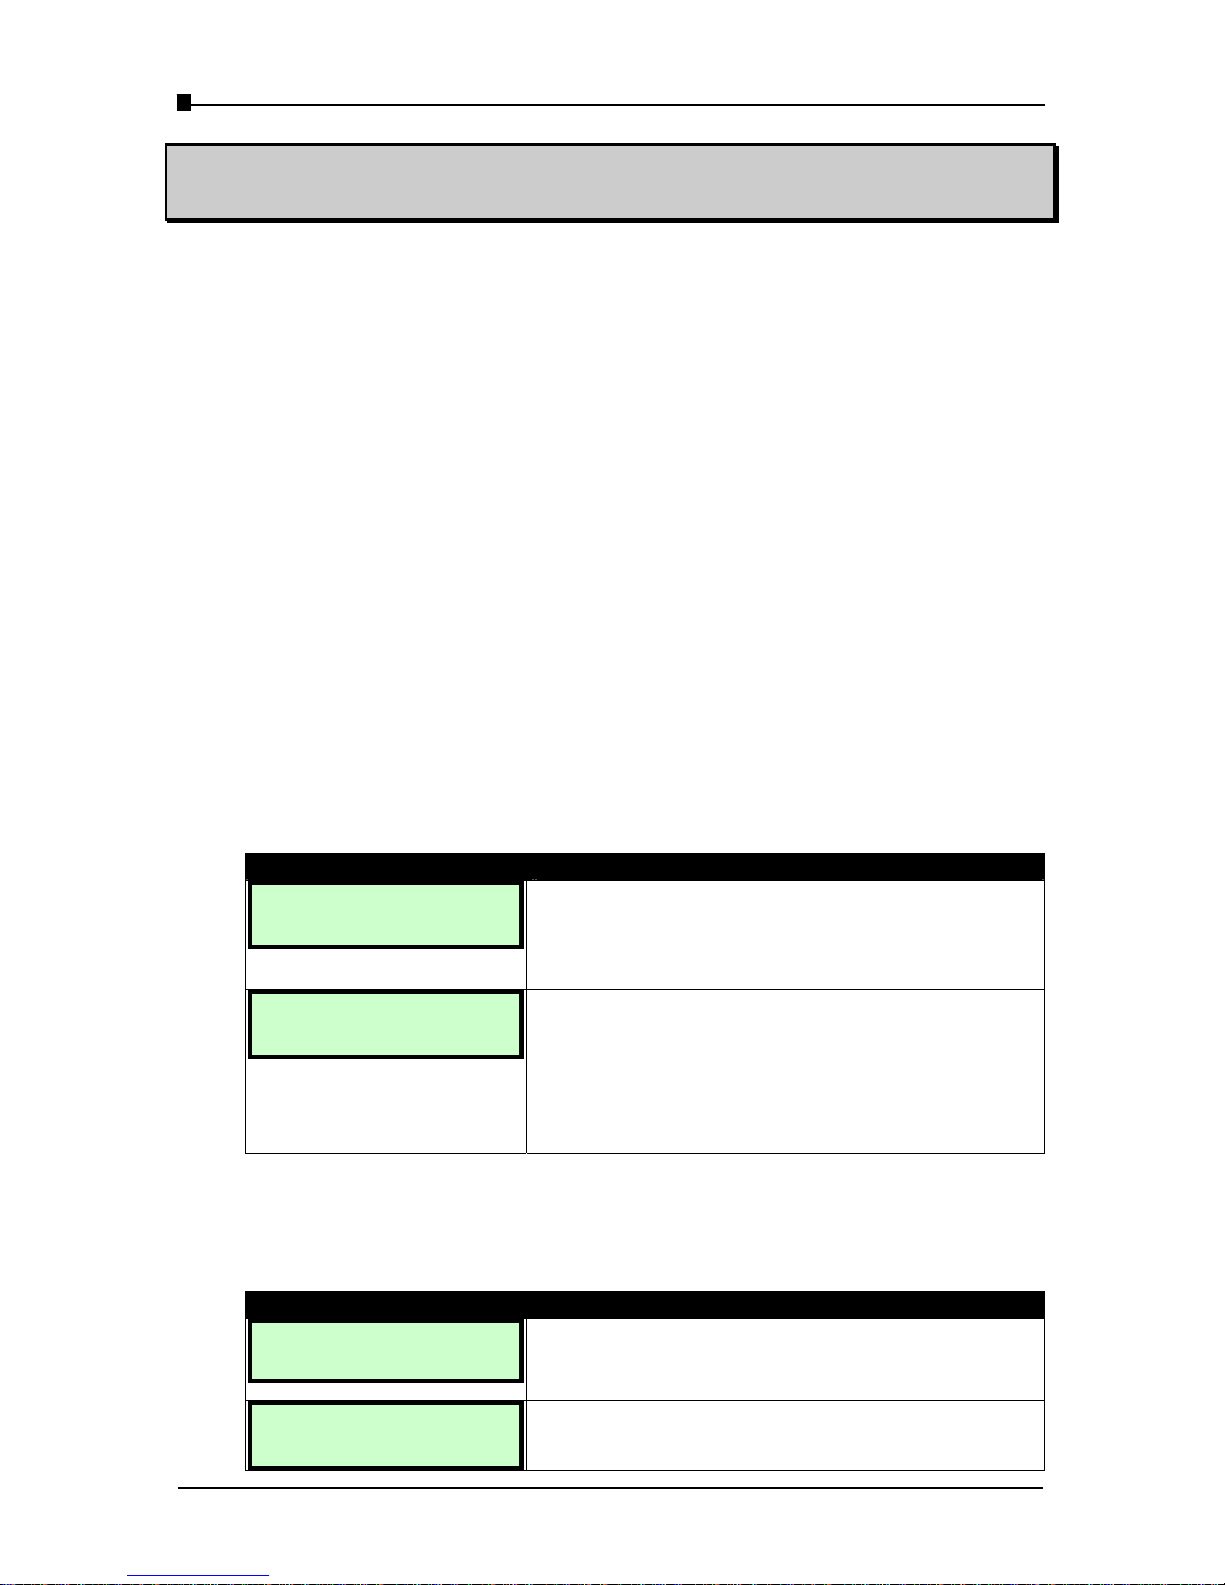
3.2.1 Call Mode Menu
Once the IP phone is up and running, press the [menu] key to display the following Call
Mode Menu:
LCD Screen Description For User Action
MENU:
Info Config
Press the corresponding soft keys to select:
• Info: to display IP Phone information.
• Config: to enter “Config mode”.
• [C]: to return to the idle state.
Info:
IP Status Vers
Press the corresponding soft keys to select:
• IP: to display the phone IP address
• Status: to check whether the phone has
registered successfully.
• Vers: to display the firmware version
• [C]: to go back to the upper state.
3.2.2 Configuration Menu
Selecting the [Config] option takes the user to configuration mode.
LCD Screen Description For User Action
Config mode…
The LCD screen will display this message when the
system switches to config mode. Do not operate any
other functions while this message is being displayed.
Ready for Config
10.0.0.17
Having successfully entered Config mode, the phone IP
address is displayed.
Page 23
VoIP Business Phone User Manual
Copyright ©2005 THOMSON All rights reserved.
- Page 23 -
3.3 Detailed LCD Menu Settings
In Config Mode, press the [menu] key to configure the IP phone or press the
[phonebook] key to configure his phonebook.
[Remark]: Admin settings are only be configured by administrator
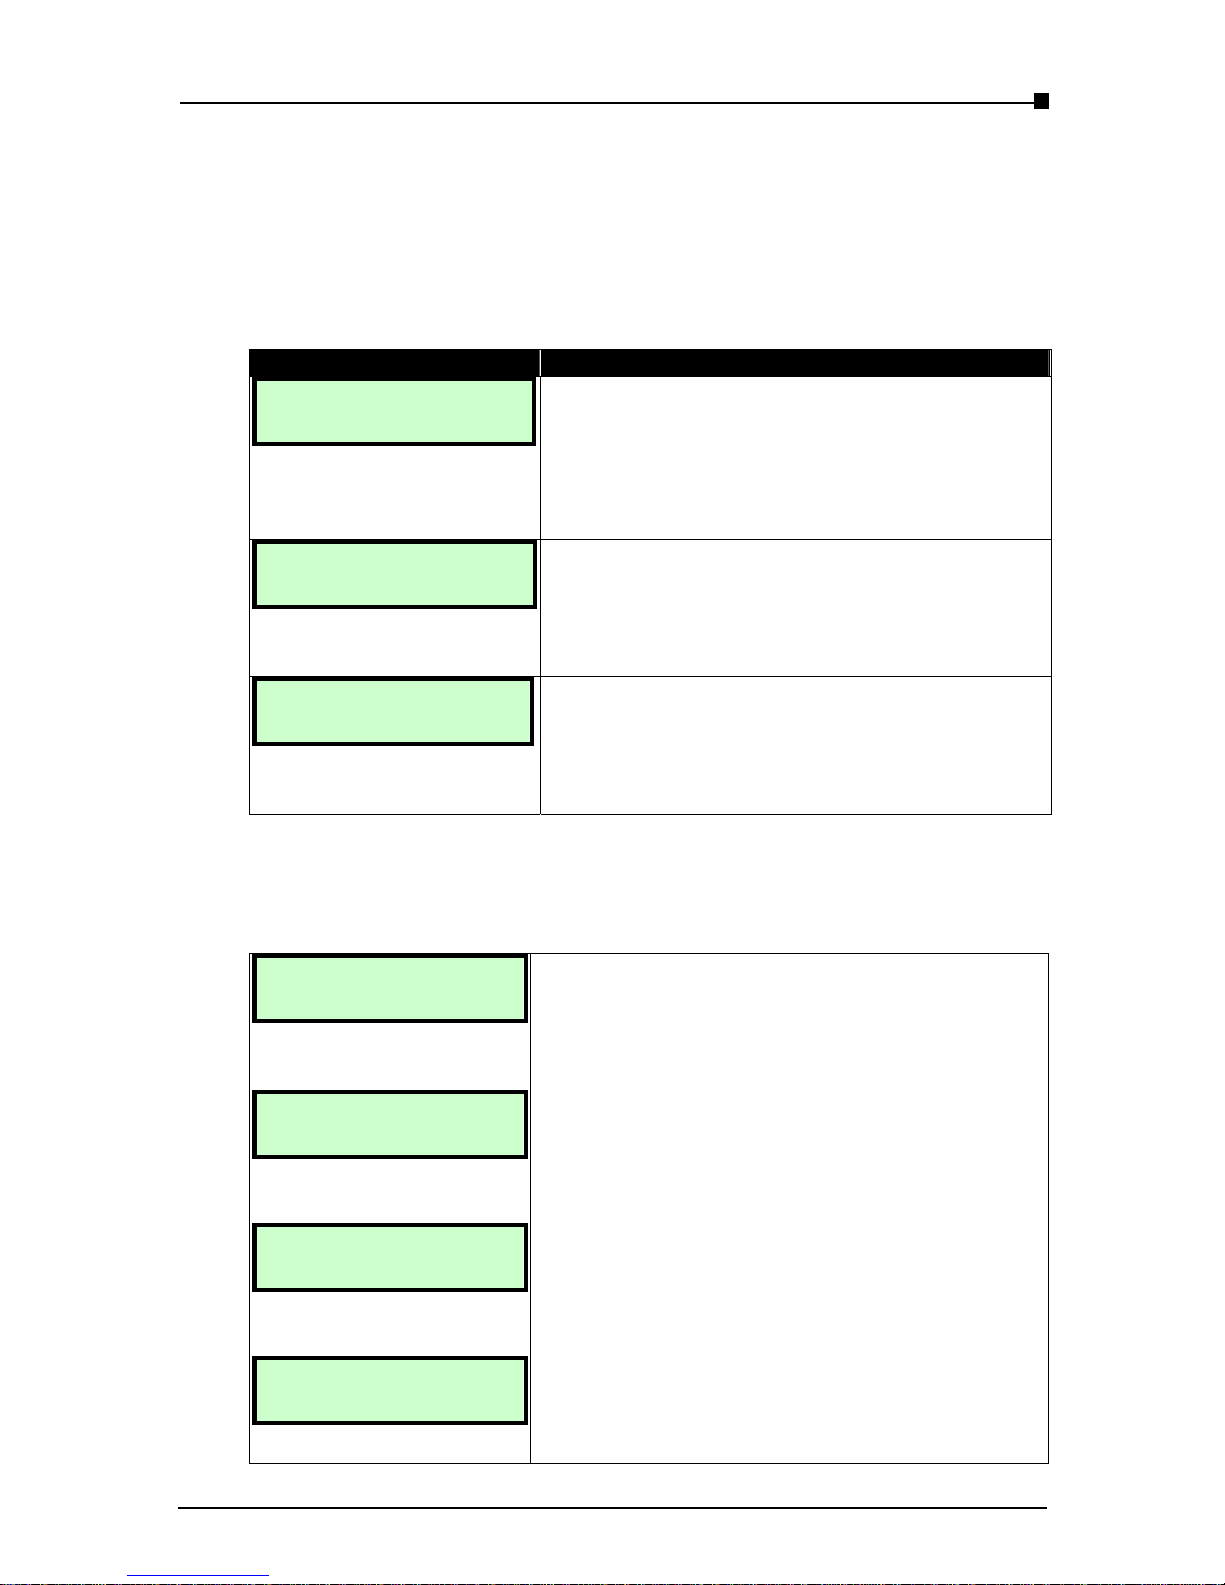
[Main Menu] in Config Mode:
LCD Screen Description For User Action
MENU:
Acct Phone Next
Press the corresponding soft keys to select:
• Acct: to set the SIP acco unt settings of IP phone.
• Phone: to set the phone settings (volume, call
forward)
• Next: to go to the next page.
• [C]: to return to the previous page.
MENU:
Speed User Next
Press the corresponding soft keys to select:
• Speed: to set the Speed dial numbers.
• User: to set the user settings and password.
• Next: to go to the next page.
• [C]: to return to the previous page.
MENU:
Boot Admin Home
Press the corresponding soft keys to select:
• Boot: to reboot the phone.
• Admin: to set admin settings
• Home: to return to the home page.
• [C]: to return to the previous page.
[Remark]: When editing address string, press [Vol+] to switch between lowercase,
uppercase and number input. Once all configurations are finalized, reboot the IP phone.
[Acct Menu]
Acct:
Authu Authp Home
Press:
• Authu: to set the SIP authentication user.
• Authp: to set the SIP authentication password.
• Home: to return to the home page
• [C]: to return to the previous page.
SIP Proxy:
192.168.10.99
Press:
Alphanumeric keys and [*]: to edit SIP proxy IP
address.
• [OK]: to confirm the setting.
• [C]: to return to the previous page.
SIP Auth. user:
1003
Press:
Alphanumeric keys: to edit the authentication user
name.
• [OK]: to confirm the setting.
• [C]: to return to the previous page.
SIP Auth. Pwd:
0000
Press:
Alphanumeric keys: to edit the authentication password.
• [OK]: to confirm the setting.
• [C]: to return to the previous page.
Page 24
VoIP Business Phone User Manual
Copyright © 2005 THOMSO N
-All rights reserved-.
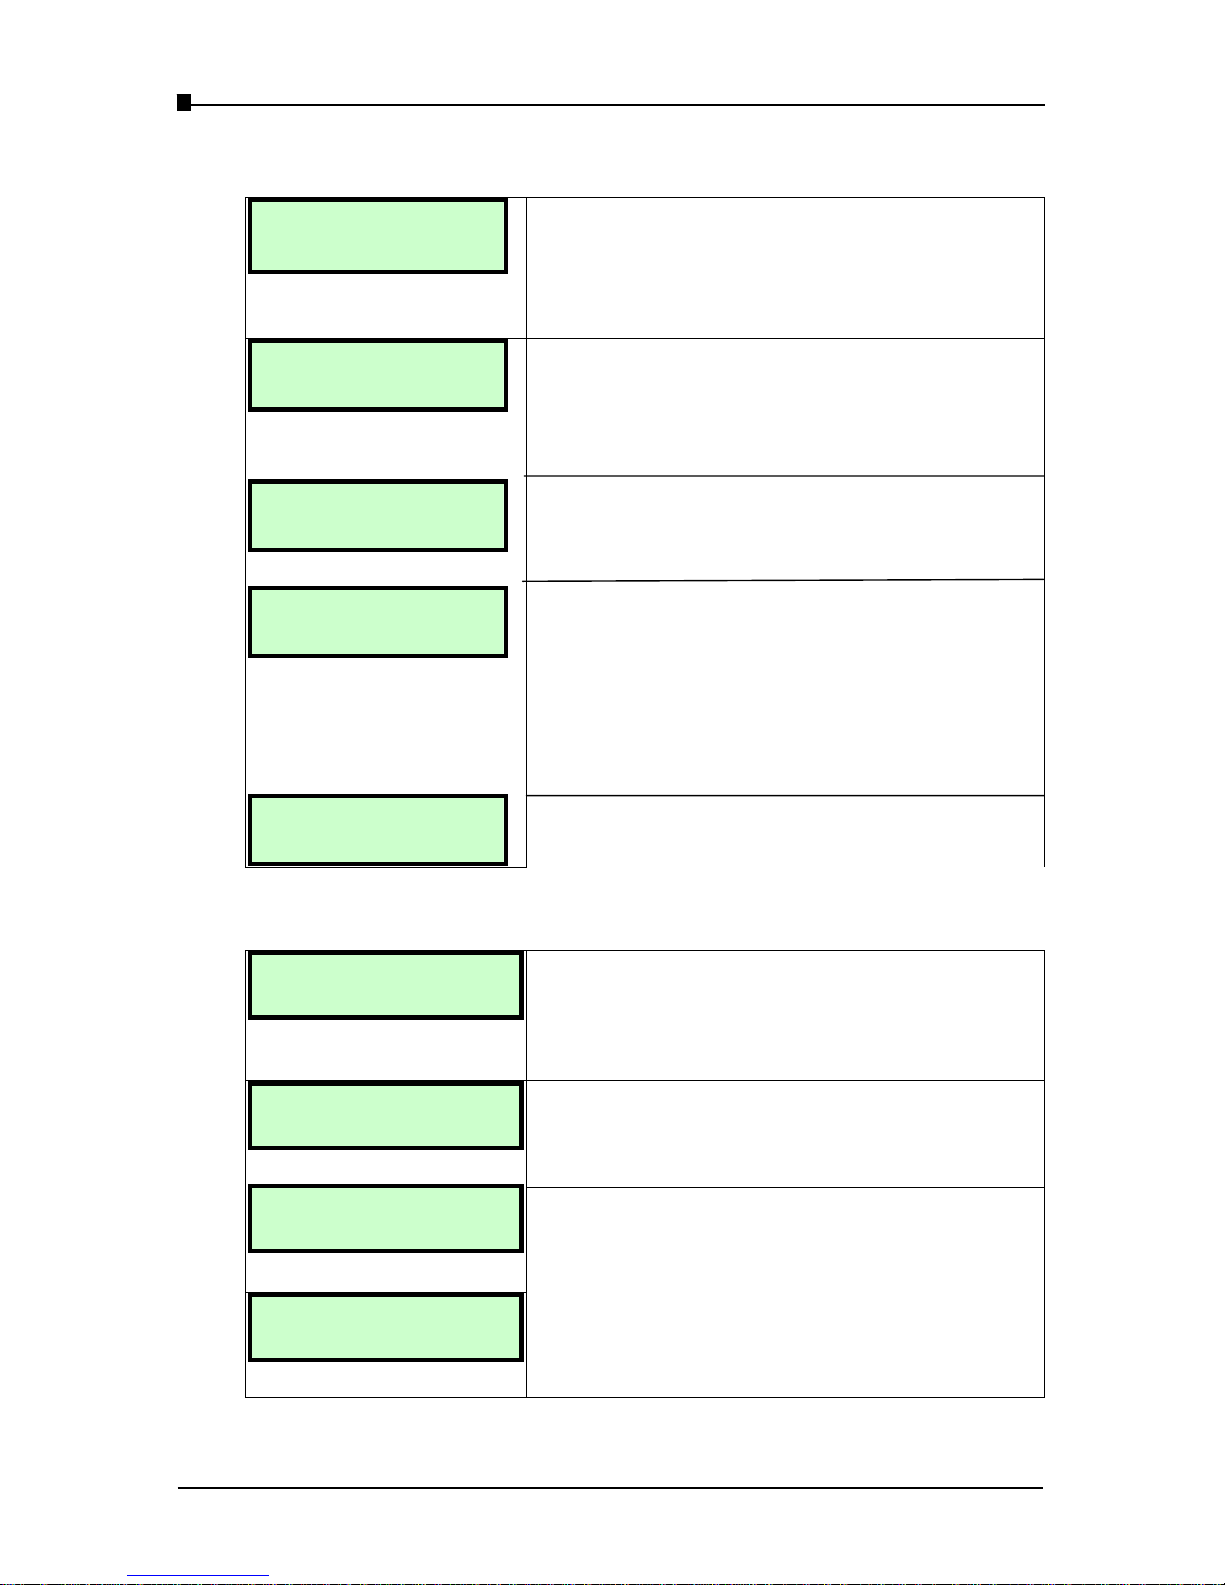
[Phone Menu]
Phone:
Volume CFwd Home
Press the corresponding soft keys to select:
• Volume: to set handset and speaker volume.
• CFwd: to set up call forward
• Home: to return to the main phone settings page.
• [C]: to return to the previous page.
Volume:
SPK/o HS/o HS/in
Call Forward
Type URL Back
C-FWD T ype:
< Disable>
C-FWD URL:
Press the corresponding soft keys to select:
• SPK/o: to set the speaker output volume.
• HS/o: to set the handset output volume.
• HS/in: to set the handset input volume.
• [C]: to return to the previous page.
Press the corresponding soft keys to select:
• Type: to set up the call forward type
• URL: to set up the call forward URL
• [C]: to return to the previous page.
Press the [vol+] key to set the types of call forward
feature:
• Disable: to disable the call forward
• Unconditional: to set up the unconditional call
forward
• Busy: to set up the busy call forward
• No answer: to set up no answer call forward
• [C]: to return to the previous page.
Press the alphanumeric key to set the call forward URL.
- Page 24
[Speed dial Menu]
Speeddial:
Num1 Num2 Next
Press the corresponding soft keys:
Num1: to edit the speed dial number 1
Num2: to edit the speed dial number 2
Next: to next page.
[C]: to go back to the upper page.
Speeddial:
Num3 Num4 Next
Speeddial:
N m5 Home u
Press the corresponding soft keys:
Num3: to edit the speed dial number 3
Num4: to edit the speed dial number 4
[C]: to go back to the upper page.
Press the corresponding soft keys:
Num5: to edit the speed dial number 5
Home: to return to the main speed dial settings page.
[C]: to go back to the upper page.
Speed Number1:
237
Press the corresponding soft keys:
Alphanumeric keys: to edit the speed dial number.
[OK]: to confirm the settings.
[C]: to go back to the upper page.
Page 25
VoIP Business Phone User Manual
Copyright ©2005 THOMSON All rights reserved.
- Page 25 -
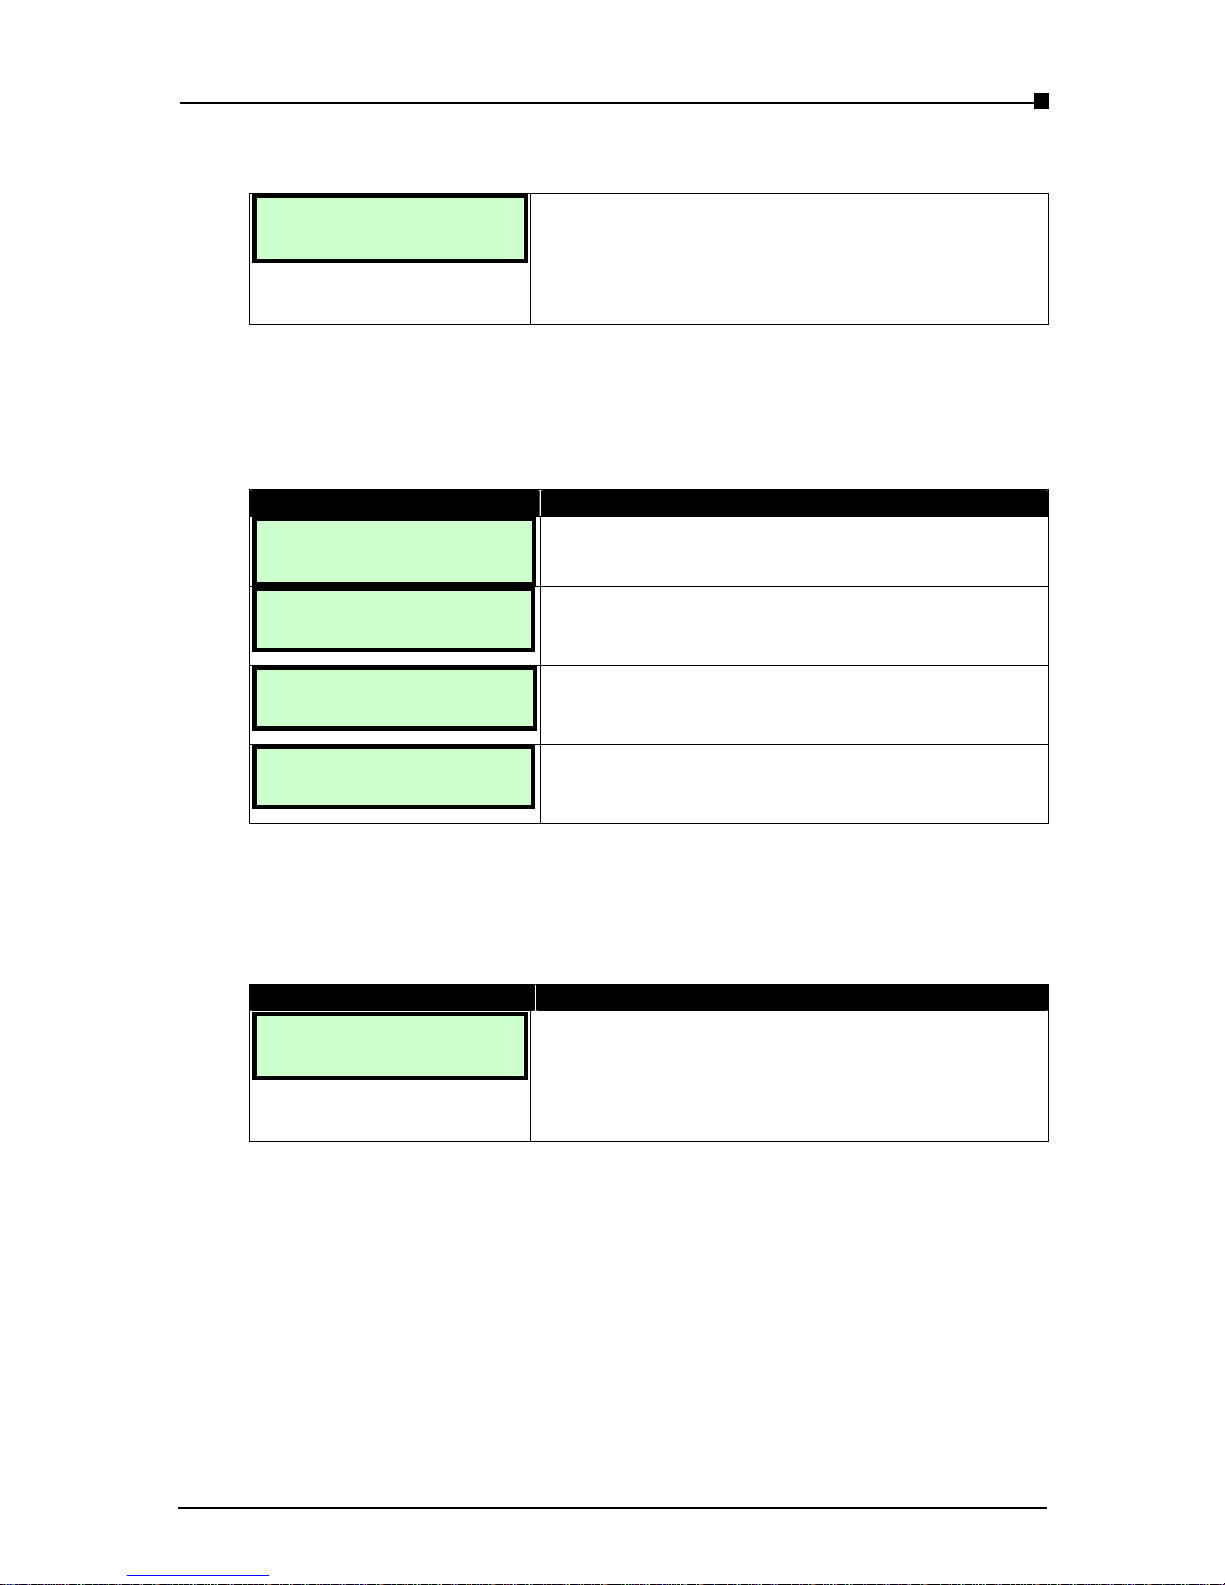
[
User Menu]
User:
User Pswd Back
Press the corresponding soft keys:
User: to set the user name
Pswd: to set the user password
Back: to return to the upper page
[C]: to go back to the upper page.
[Phonebook]
When the IP phone is in Config mode, you may press [phonebook] key to enter
phonebook.
LCD Screen Description For User Action
Ready for Config
10.0.0.147
Press [phonebook] key to enter the phonebook.
[1]
Choose the entry you want to edit.
Press [menu] key to enter the editing mode.
[C]: to go back to the upper page.
Editing name :
Enter the name of your entry and press [OK]
to confirm the settings.
[C]: to go back to the upper page.
Editing number :
Enter the number of your entry and press
[OK] to confirm the settings.
[C]: to go back to the upper page.
After phone, speeddial and phonebook configuration, you may use reboot to save changes
and restart the IP phone.
[Reboot] in Config Mode:
LCD Screen Description For User Action
Reboot:
Yes No
Press the corresponding soft keys:
Yes: to save the changed settings and reboot the IP
phone.
No: to go back to the upper page.
[C]: to go back to the upper page.
Page 26
VoIP Business Phone User Manual
Copyright © 2005 THOMSO N
-All rights reserved-.
Chapter 4 User Configuration via Web Interface
4.1 Configuration via Web Interface
The web interface is available only when the phone is in config mode. To enter config mode, select
[menu] Æ [Config] and wait for the following LCD display:
Ready for Config
10.0.0.147
Alternatively, you can hold down the menu button as you power-off/ power-on the phone and you
will directly start in Config mode. Or hold down menu button while you power-on if the phone was
off.
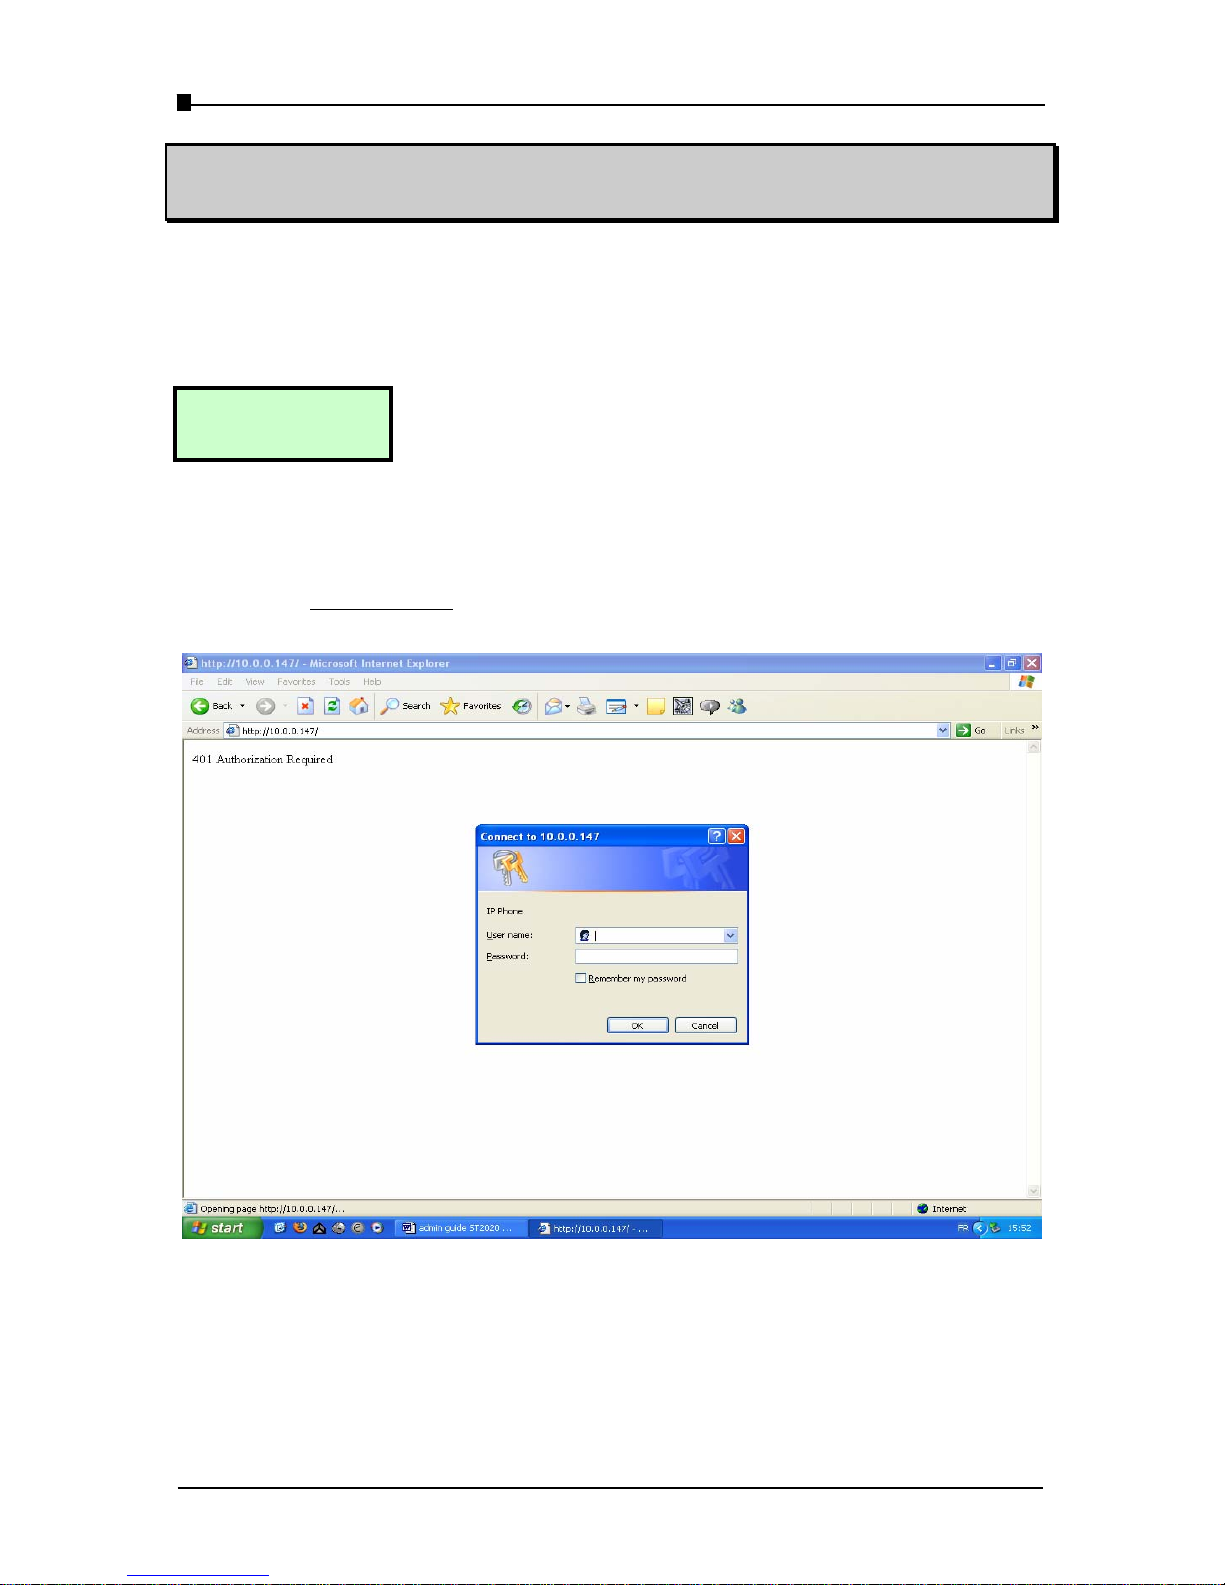
To access the web interface, you must open an http web browser and enter the phone IP address.
(For example: http://10.0.0.147
. Once the Enter key has been pressed, the browser will ask for a
user name and password)
Table 4.1 Connection page
Enter User name & password.
• User name: user
• Password: (leave it blank)
- Page 26
Page 27
VoIP Business Phone User Manual
Copyright ©2005 THOMSON All rights reserved.
4.2 Options available via IP Phone Web Interface
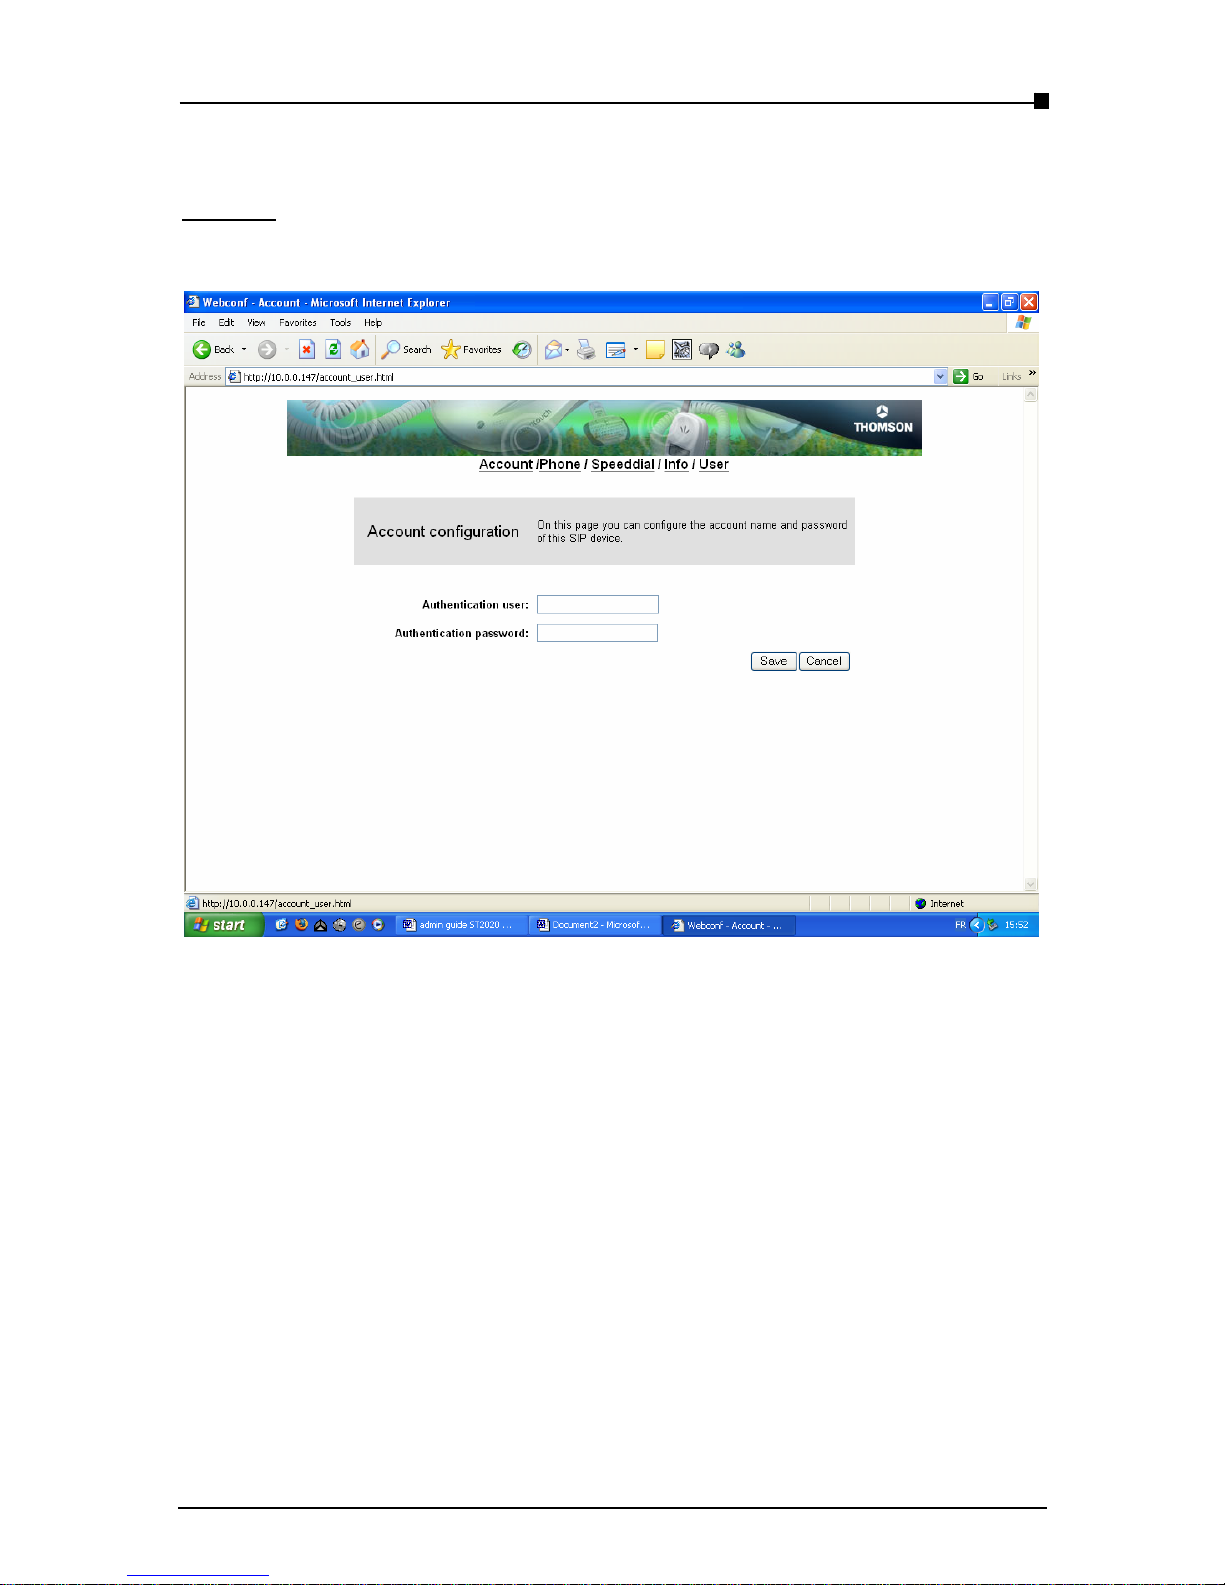
Account:
This page allows you to configure the Account settings of this SIP device.
Table 4.2 Account setup page
z Save: saves the new settings entered into this page.
z Cancel: cancels all changes made to settings in this page.
z Authentification user: sets the authentification user name for SIP server
z Authentification password: sets the authentification password for SIP server
- Page 27 -
Page 28
VoIP Business Phone User Manual
Copyright © 2005 THOMSO N
-All rights reserved-.
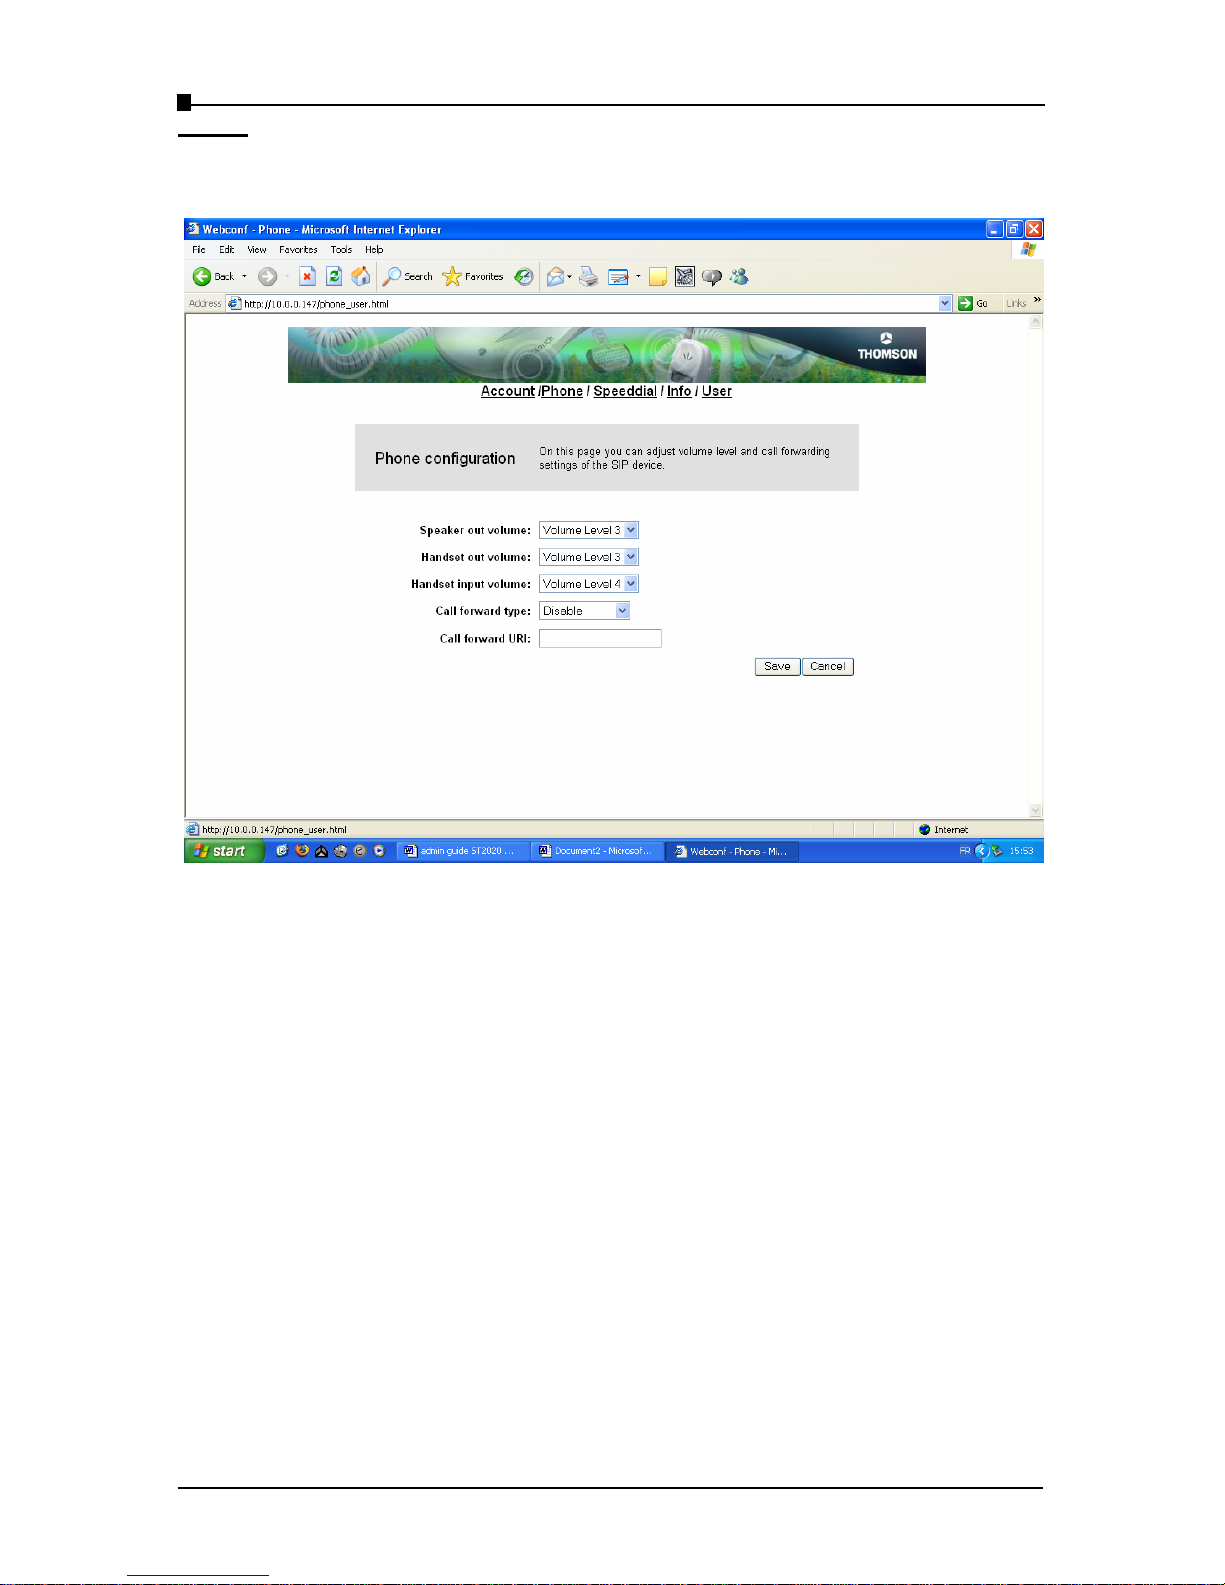
Phone:
This page allows you to adjust phone settings.
Table 4.3 Phone setup page
z Speaker out volume: sets the speaker output volume level. (default setting Æ Vo l um e
Level 3)
z Handset out volume: sets the handset output volume level (default setting Æ Vo lu me
Level 3)
z Handset input volume: sets the Handset volume level (default setting Æ Volume Level 4)
z Call forward type: sets the call forward type.
z Call forward URL: sets the call forward URL.
z Save: saves the new settings entered into this page.
z Cancel: cancels all changes made to settings in this page.
- Page 28
Page 29
VoIP Business Phone User Manual
Copyright ©2005 THOMSON All rights reserved.
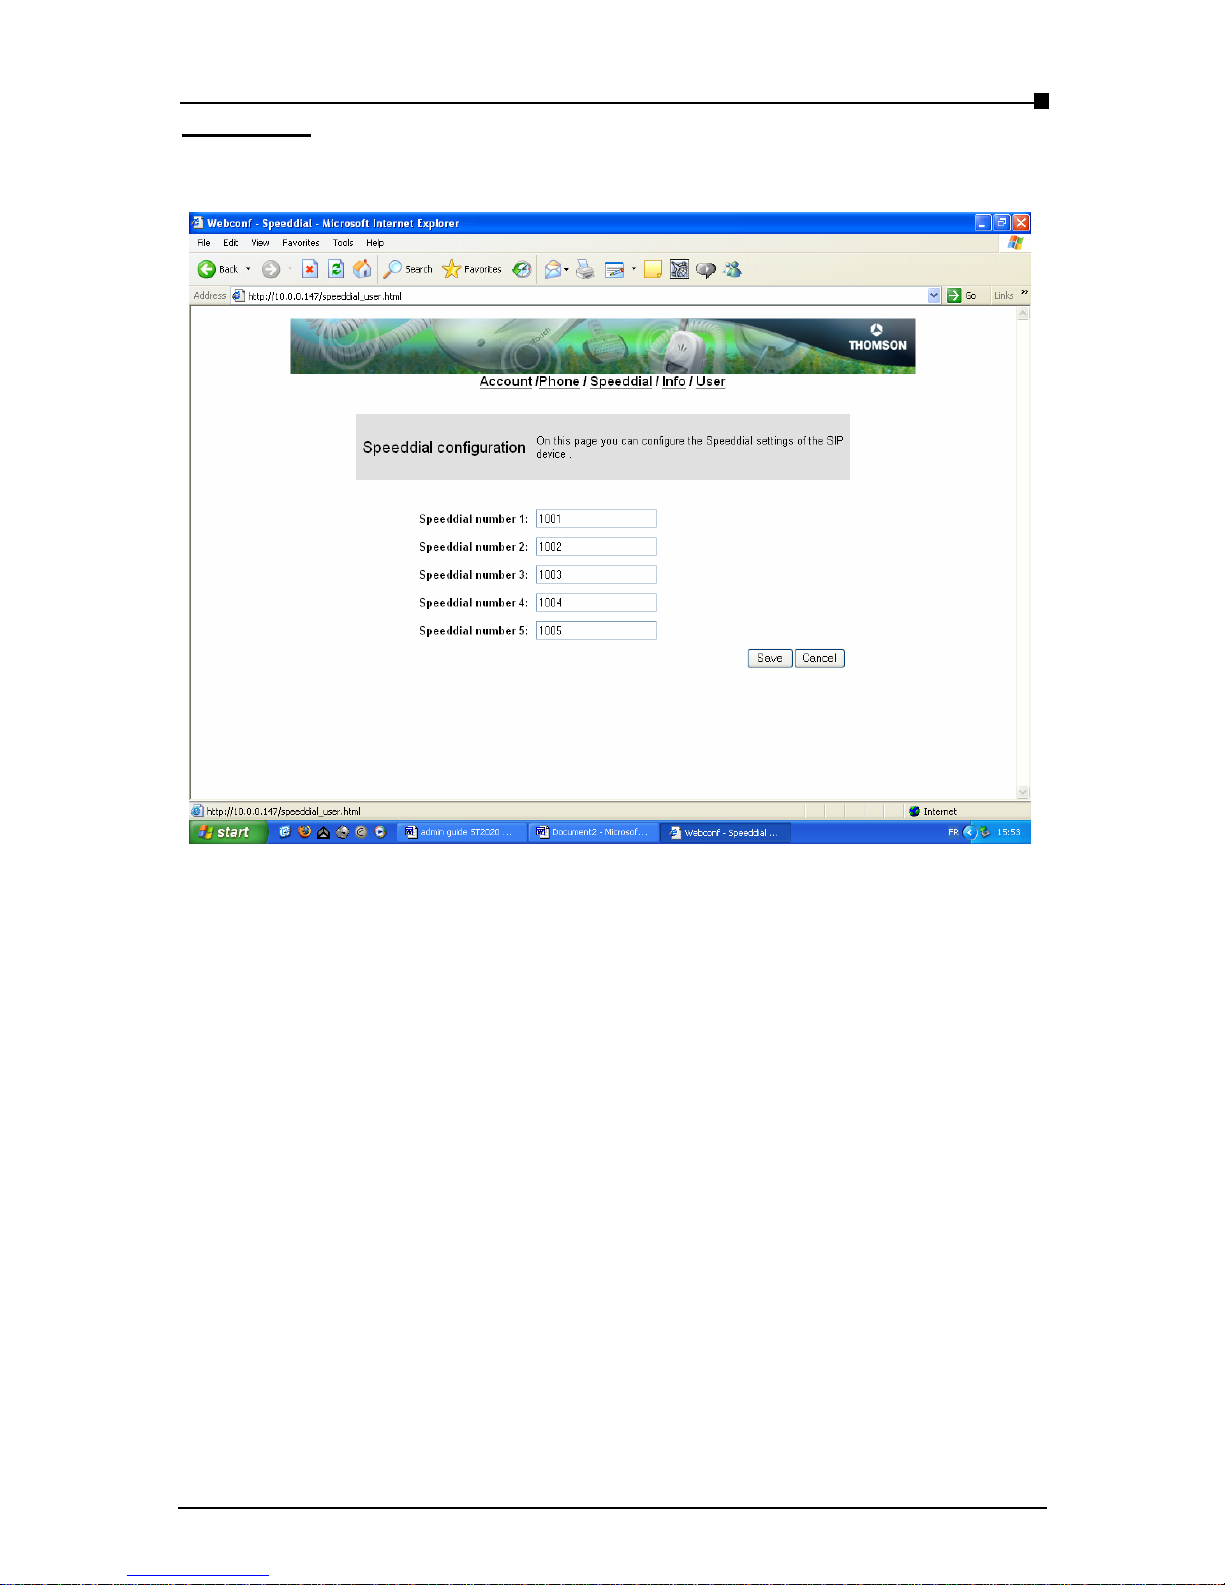
Speed Dial:
This page allows you to configure the Speed dial numbers for this SIP device.
Table 4.4 Speed dial page
z Speeddial number 1: sets the Speed dial number 1 to program button 1.
z Speeddial number 2: sets the Speed dial number 2 to program button 2.
z Speeddial number 3: sets the Speed dial number 3 to program button 3.
z Speeddial number 4: sets the Speed dial number 4 to program button 4.
z Speeddial number 5: sets the Speed dial number 5 to program button 5.
z Save: saves the new setting in this page.
z Cancel: cancels all changes made to settings in this page.
- Page 29 -
Page 30
VoIP Business Phone User Manual
Copyright © 2005 THOMSO N
-All rights reserved-.
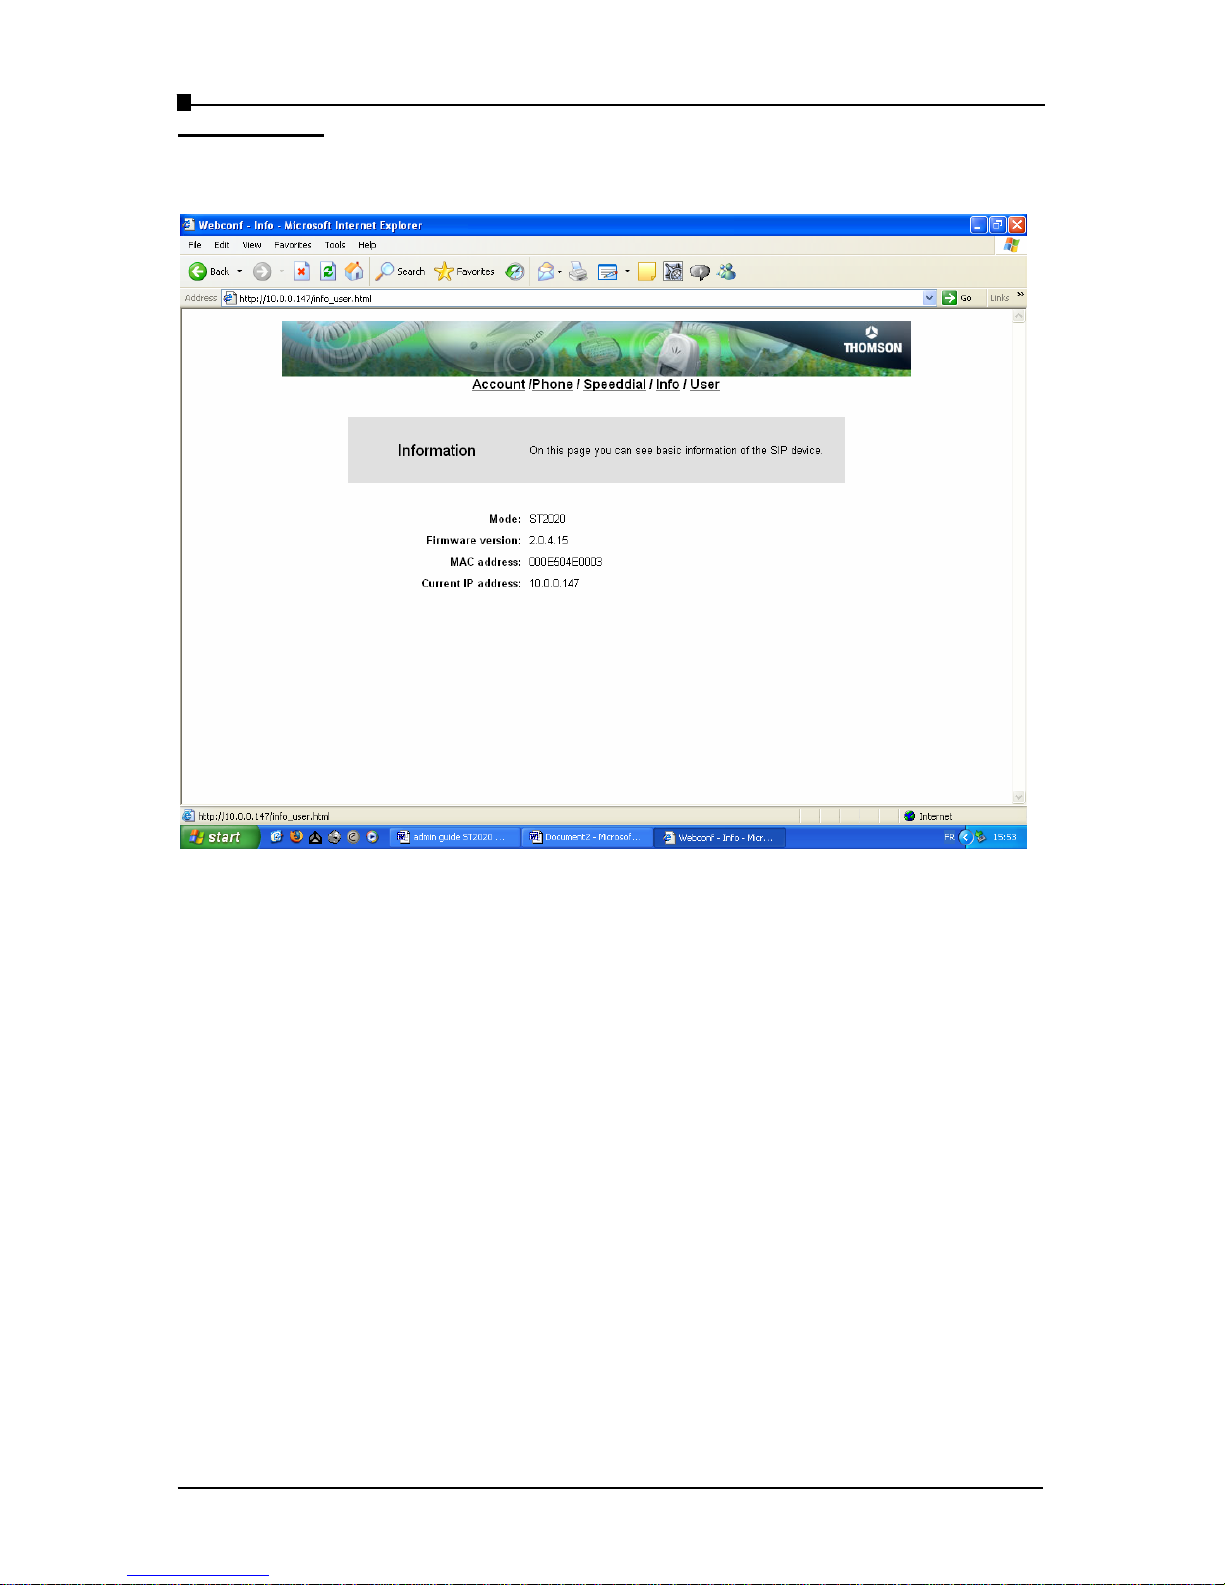
Information:
This page allows you to view the current IP phone firmware version and MAC address.
Table 4.5 Information page
Mode: displays the mode info of this product.
Firmware Version: displays the version info of this product.
MAC address: displays the MAC address info of this product.
Current IP Address: displays the current IP address.
This page displays the current mode and firmware version of the device.
- Page 30
Page 31
VoIP Business Phone User Manual
Copyright ©2005 THOMSON All rights reserved.
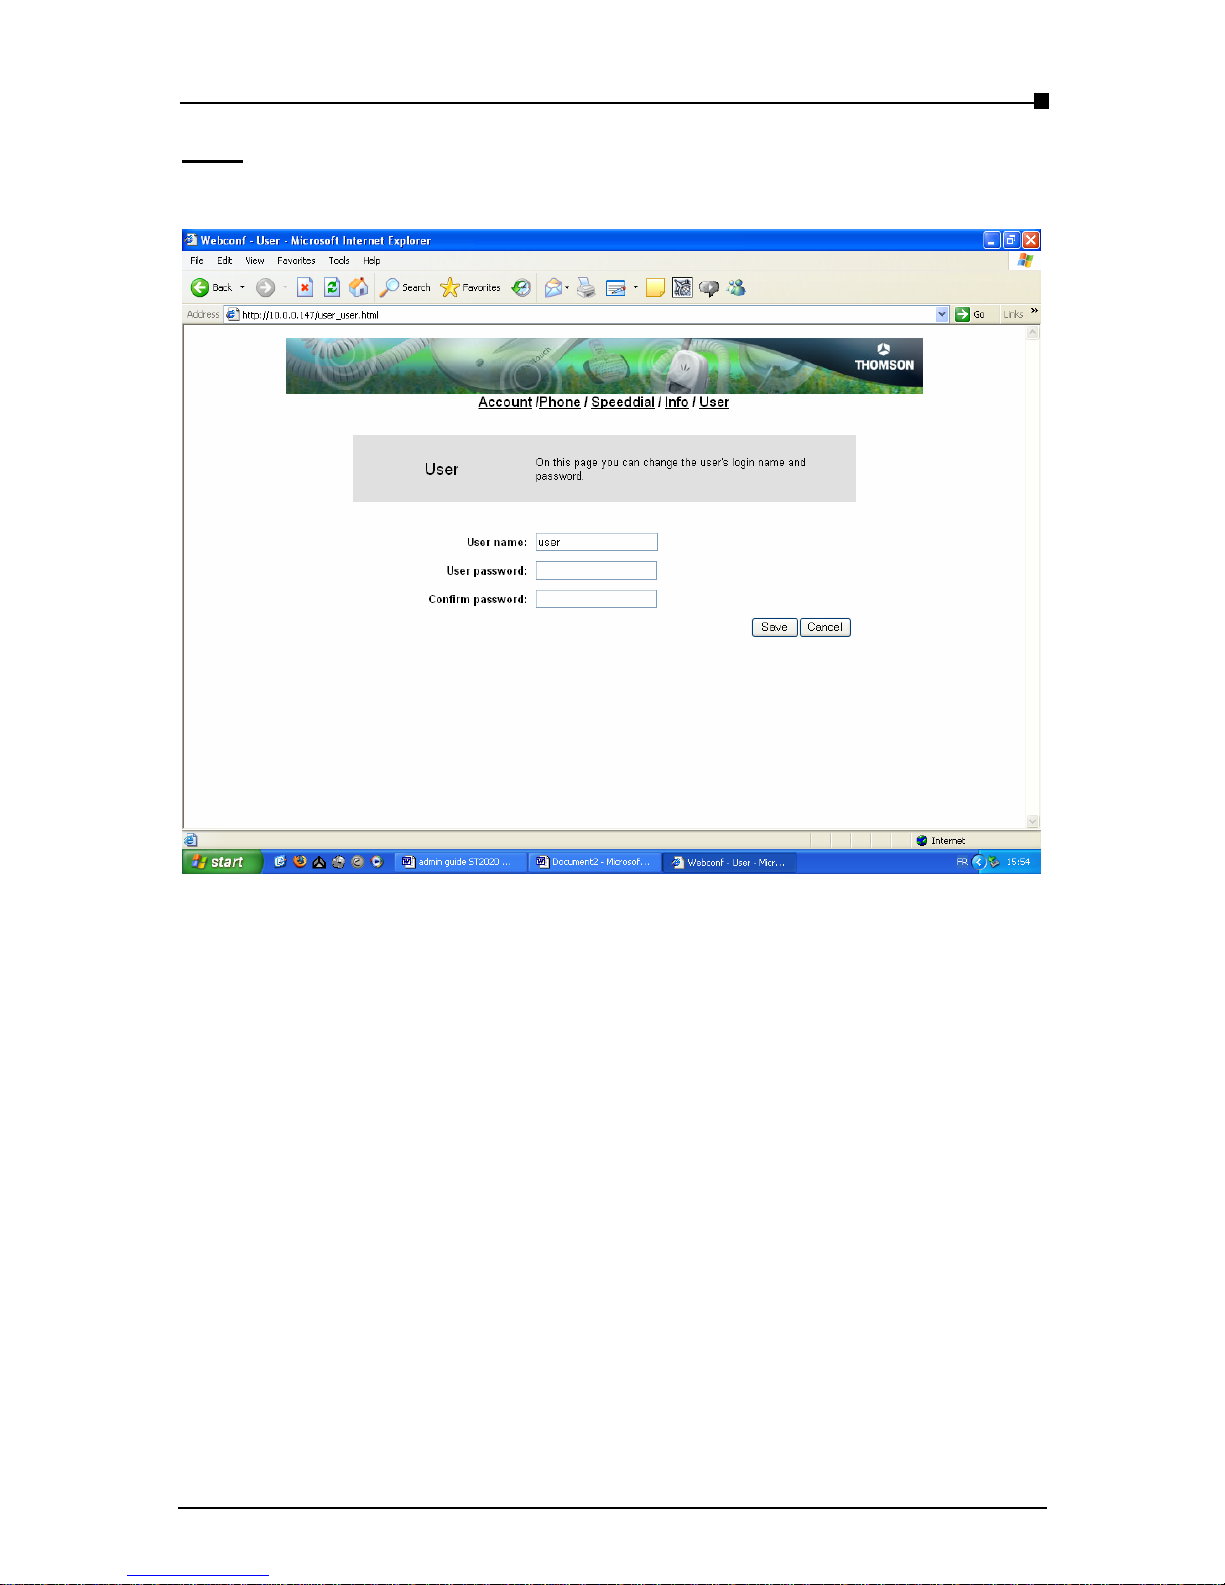
User:
On this page, you can change the user name and password.
Table 4.6 User page
User name: sets the user account name of webpage.
User password: sets the user account password.
Confirm password: confirms the user account password.
- Page 31 -
Page 32

VoIP Business Phone User Manual
Copyright © 2005 THOMSO N
-All rights reserved-.
- Page 32
Appendix A
FAQ:
1. How do I access the web interface?
Answer: The web interface is normally disabled in call mode (normal operation). To access
the web interface, users and administrators must first switch from call mode to config mode.
This can be done either by powering the phone off and on again while holding down the menu
button, or by pressing the menu button and selecting config.
2. Why can’t I register with the SIP proxy?
Answer: Check the SIP proxy settings and refer to your VoIP service provider.
3. How do I enter numbers onto the LCD screen?
Answer: Press [Vol+] once and the input method switches to “uppercase”
Press [Vol+] twice and the input method switches to “number”
Press [Vol+] again and the input method switches to “lowercase”
4. Why does my IP phone stay in the “Booting” screen?
Answer:
This means that the IP phone is not initiating properly. The reason may be a DHCP
or SIP registration failure. Please check your network and IP Phone configurations (SIP
settings and Network settings).
Page 33

VoIP Business Phone User Manual
Copyright ©2005 THOMSON All rights reserved.
The specifications and information regarding the Products in this document are subject to
change without prior notice.
March 2005
DC: 931022R3-2020ST-A
- Page 33 -
 Loading...