

Page 1
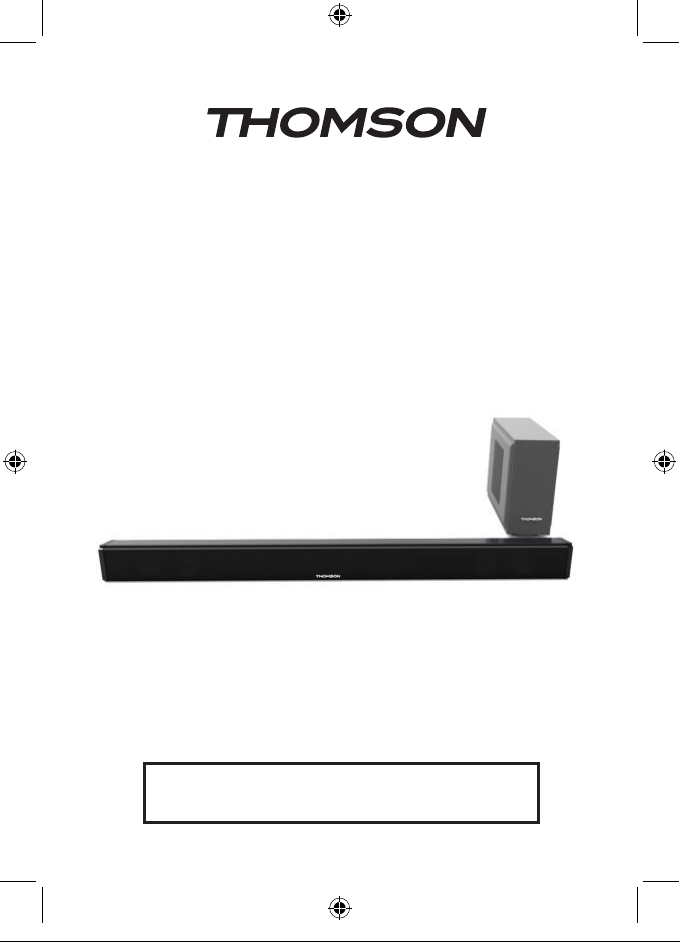
SB100BT (SYSTEME 2.0) /
SB200BT (SYSTEME 2.1 - avec caisson de graves)
BLUETOOTH / USB / OPTIQUE / AUDIO IN
MODE D'EMPLOI
LISEZ COMPLÈTEMENT CE MANUEL D’UTILISATION AVANT
D’UTILISER CET APPAREIL ET CONSERVEZ CE LIVRET POUR
VOUS Y RÉFÉRER ULTÉRIEUREMENT.
BBI_SB100BT/SB200BT_1606_Ver1
Page 2
Table des matières
Démarrage 1
Avertissements et précautions de sécurité 1
Entretien du produit 2
Respect de l’environnement 2
Conformité 2
Spécications techniques 3
Contenu de l’emballage 3
Description des pièces 3
Changement de la pile 4
Pour commencer 5
Utilisation 5
Support mural pour votre barre de son 7
Remarque 8
Démarrage
• Enlevez l’appareil du carton d’emballage.
• Enlevez tous les matériaux d’emballage du produit.
• Placez les matériaux d’emballage dans le carton puis rangez-le ou jetez-le dans un endroit approprié.
Avertissements et précautions de sécurité
Lisez et comprenez toutes les instructions avant d’utiliser ce produit. Si un dommage est causé par un
non-respect des instructions, la garantie ne couvrira pas un tel dommage.
Sécurité
Avertissement
• Ne retirez jamais le boîtier de cet appareil.
• Ne lubriez jamais aucun composant de cet appareil.
• Ne placez jamais cet appareil sur un autre équipement électrique.
• Veillez à ce que l’appareil ne soit pas exposé à la lumière directe du soleil, à une
amme nue ni à une source de chaleur.
• Ne regardez jamais directement le faisceau laser à l’intérieur de cet appareil.
• Veillez à toujours pouvoir accéder facilement au câble d’alimentation, à la che ou
à l’adaptateur pour débrancher l’appareil de l’alimentation.
1. Lisez ces instructions.
2. Conservez ces instructions.
3. Prenez en compte tous les avertissements.
4. Respectez toutes les instructions.
5. N’utilisez pas cet appareil à proximité d’un point d’eau.
6. Nettoyez l’appareil exclusivement avec un chiffon sec.
7. N’obstruez aucun des orices de ventilation du produit. Installez l’appareil en respectant les
instructions du fabricant.
8. Ne placez pas l’appareil près d’une source de chaleur, par exemple un radiateur, une grille de
distribution d’air chaud, un réchaud/cuisinière et tout autre appareil (y compris les amplicateurs)
produisant de la chaleur.
9. Disposez le câble de manière à ce qu’il ne puisse pas être piétiné ou écrasé, notamment au niveau
de la che, de la prise de courant et du connecteur de branchement sur l’appareil.
10. Utilisez uniquement les pièces de rechange/accessoires spéciés par le fabricant.
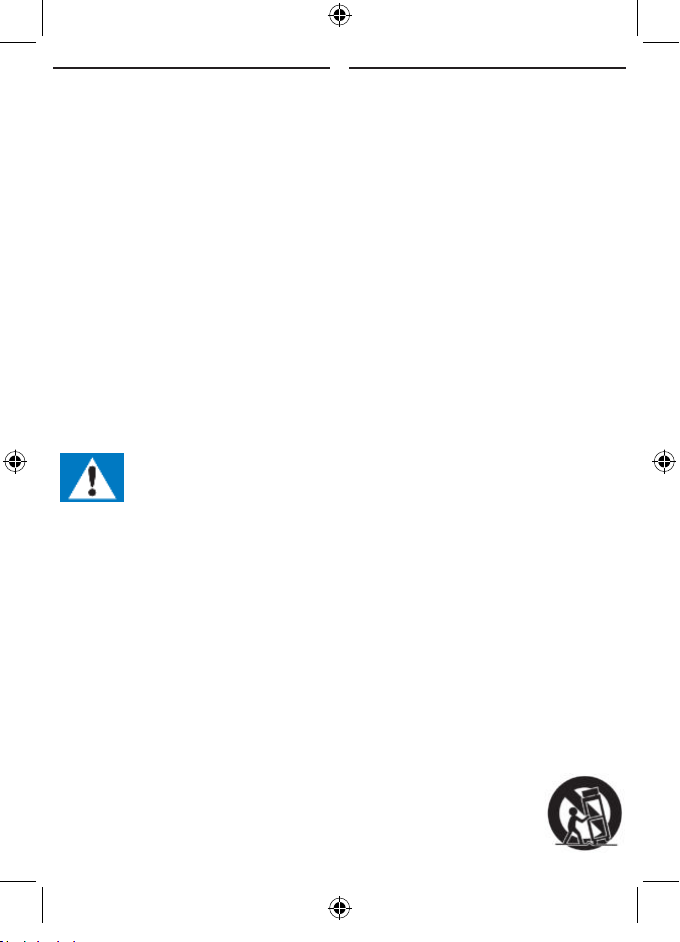
11. Utilisez uniquement un chariot, un socle, un trépied, un support ou une table
spécié par le fabricant ou vendu avec l’appareil. Lorsque vous utilisez un chariot,
soyez prudent(e) lorsque vous déplacez le chariot avec l’appareil pour éviter toute
blessure due à un basculement.
Débranchez l’appareil durant les orages et avant toute période d’inutilisation prolongée.
12.
- FR 1 -
Page 3
13. Toute réparation doit être conée à un réparateur qualié. Faites systématiquement réviser
le produit s’il a été endommagé de quelque manière que ce soit, par exemple si son câble
d’alimentation ou sa che est endommagé, si un liquide s’est déversé sur l’appareil, si des objets
sont tombés dessus, si l’appareil a été exposé à la pluie ou à l’humidité, s’il ne fonctionne plus
correctement ou s’il est tombé.
14. L’appareil ne doit pas être exposé à des égouttements ou des éclaboussures.
15. Ne placez aucune source de danger sur l’appareil (par exemple, un objet rempli de liquide ou une
bougie allumée).
16. Si la prise d’alimentation ou le coupleur de l’unité est utilisé comme système de déconnexion, le
système de déconnexion doit rester facilement accessible.
17. Assurez-vous qu’il y a assez d’espace libre autour de l’appareil pour la ventilation.
18. Les piles (ou bloc de piles ou batterie) ne doivent pas être exposées à une chaleur excessive,
comme la lumière du soleil, le feu, etc.
19. Des piles appropriées doivent être insérées dans l'appareil pour qu'il puisse fonctionner
correctement.
20. Utilisez exclusivement les piles recommandées.
21. La polarité doit être respectée pour éviter un court-circuit.
22. N’utilisez pas simultanément des piles neuves et usagées.
23. N’utilisez pas simultanément des piles alcalines, standards (carbone-zinc) et des batteries
rechargeables (nickel-cadmium).
24. Ne rechargez pas et n'essayez pas d'ouvrir les piles. Ne jetez pas les batteries dans un feu.
25. Changez toutes les piles en même temps par des piles neuves identiques.
26. Retirez les piles avant toute période d'inutilisation prolongée.
Entretien du produit
1. Débranchez toujours l’appareil avant de le nettoyer et quand vous ne l’utilisez pas.
2. N’écoutez pas la musique à un niveau sonore excessif, car cela pourrait provoquer une perte
d’acuité auditive ou endommager l’appareil.
3. N’utilisez pas cet appareil dans un environnement humide ou mouillé.
4. Débranchez toujours l’appareil de la prise secteur avant de le nettoyer. Nettoyez le produit avec un
chiffon doux, humide et sans ouate. N’utilisez pas de produit nettoyant agressif ou abrasif.
Respect de l’environnement
Votre produit est conçu et fabriqué avec des matériaux et composants de haute
qualité qui peuvent être recyclés et réutilisés.
Votre produit contient des piles relevant de la Directive Européenne 2006/66/CE qui
ne peuvent être jetées avec les ordures ménagères. Veuillez vous informer sur les
réglementations locales concernant la collecte séparée des piles car une mise au
rebut correcte permet d’empêcher les conséquences négatives sur l’environnement
et sur la santé humaine.
Lorsque ce symbole d’une poubelle barrée sur roues se trouve sur un produit, cela
signie que le produit est couvert par la Directive Européenne 2002/96/CE. Veuillez
vous informer du système local de collecte séparée pour les produits électriques
et électroniques. Veuillez agir selon les règles locales et ne jetez pas vos anciens
produits avec les ordures ménagères. En assurant l’élimination de ce produit, vous
aidez également à prévenir les conséquences potentiellement négatives pour
l’environnement et la santé humaine.
- FR 2 -
Page 4
Conformité
Ce produit est conforme aux exigences des directives de l’Union Européenne relatives
aux interférences radio.
Spécications techniques
• Alimentation : 230 V~ 50 Hz
• Puissance totale : 65 W
• Sensibilité d’entrée :
Entrée Aux 700 mV. Entrée Ligne 700 mV
• Impédance des haut-parleurs : 8 ohms
• Rapport signal/bruit (A) : 75 dB
Contenu de l’emballage
Vériez et identiez le contenu de l’emballage :
• Barre de Son et Caisson de Graves
(option pour SB200BT seulement)
• Télécommande
• Notice d’utilisation
Description des pièces
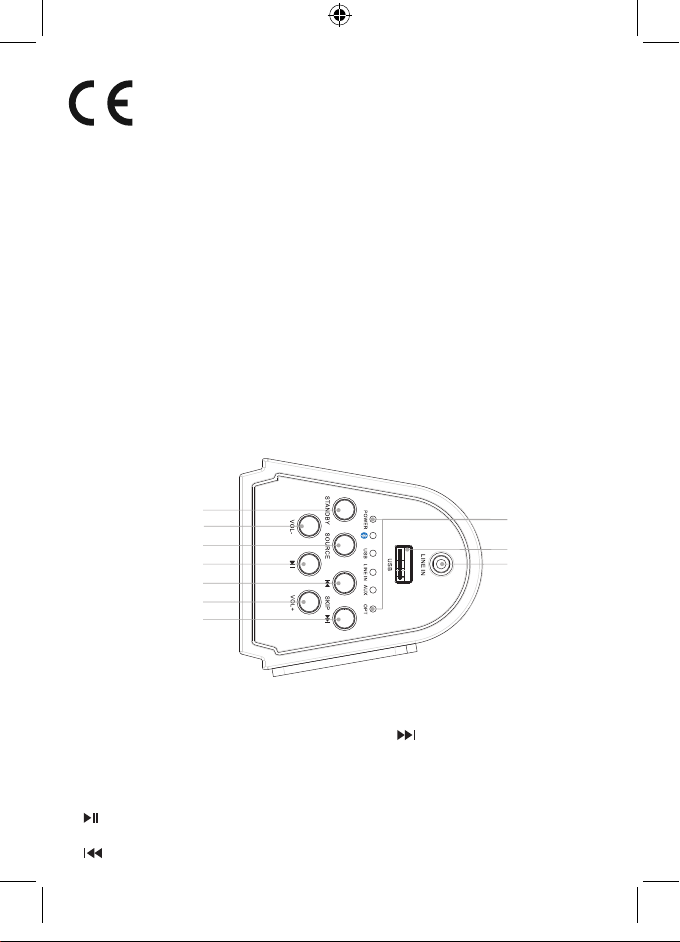
Description de l'unité principale
• THD (1 kHz, 1 W) : 0,5 %
• Réponse en fréquence : 20 Hz-20 kHz
• Puissance de sortie audio totale :
- SB100BT=30W
- SB200BT=50W
• Câble RCA
• Câble Line-in
• Câble audio pour caisson de graves
1
2
3
4
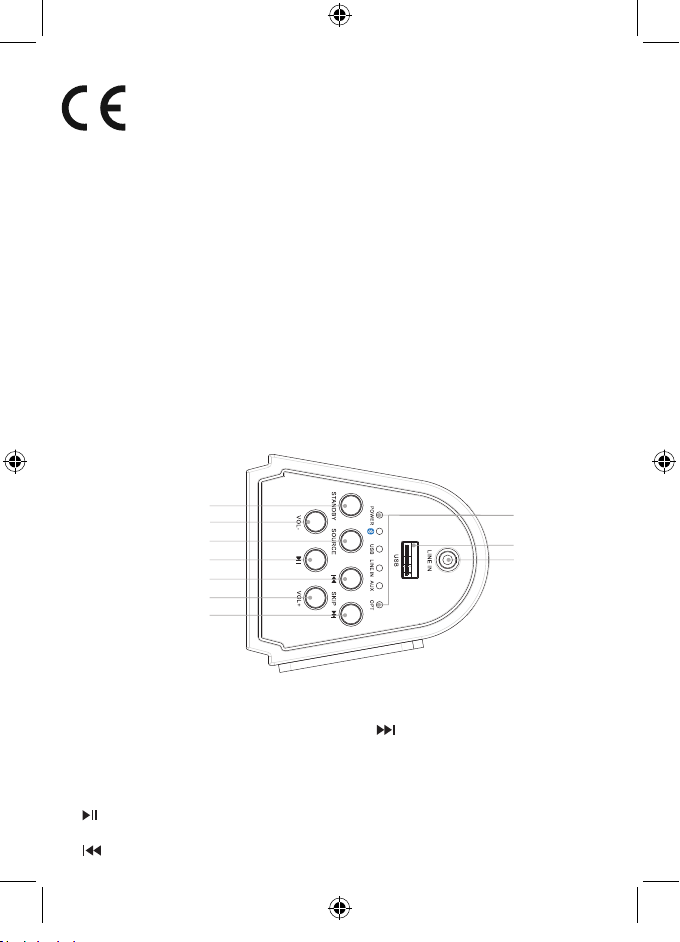
1. Standby (Veille)
Allumer l’appareil ou le mettre en veille.
2. VOL -
Baisser le volume.
3. Source
Sélectionner une source : Bluetooth, USB,
Entrée AUDIO
4.
Démarrer la lecture ou la mettre en pause.
5
6
7
5.
Sauter au morceau précédent.
- FR 3 -
10
6. VOL +
Monter le volume.
7.
Sauter au morceau suivant.
8. Voyant LED
Afcher le statut actuel.
9. Port USB
10. Entrée Audio
Brancher une source audio externe.
8
9
Page 5
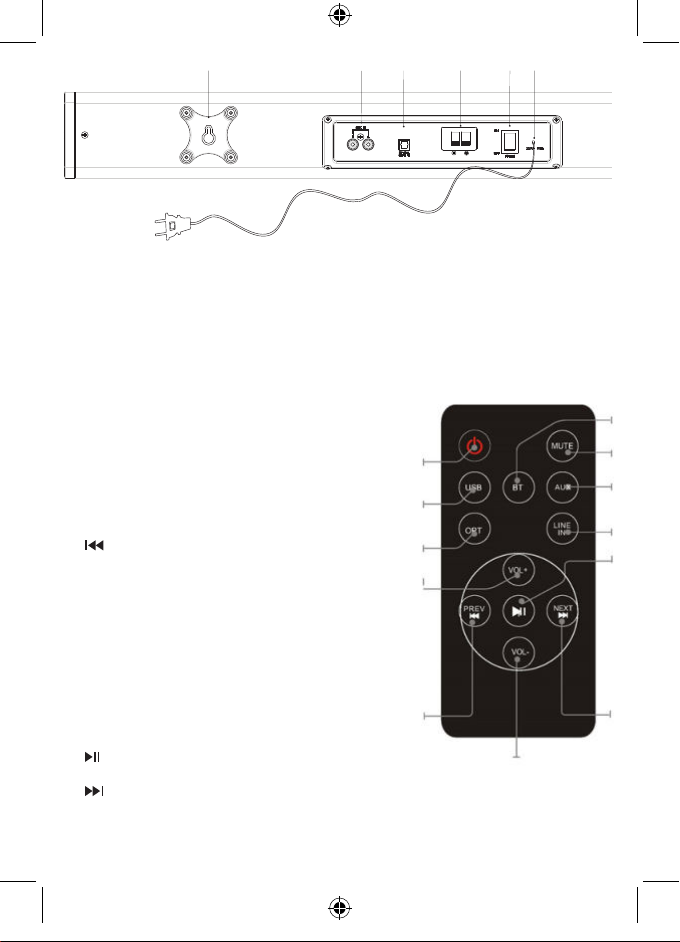
11
12
13
14
(Only for
SB200BT)
SUB OUT
16
15
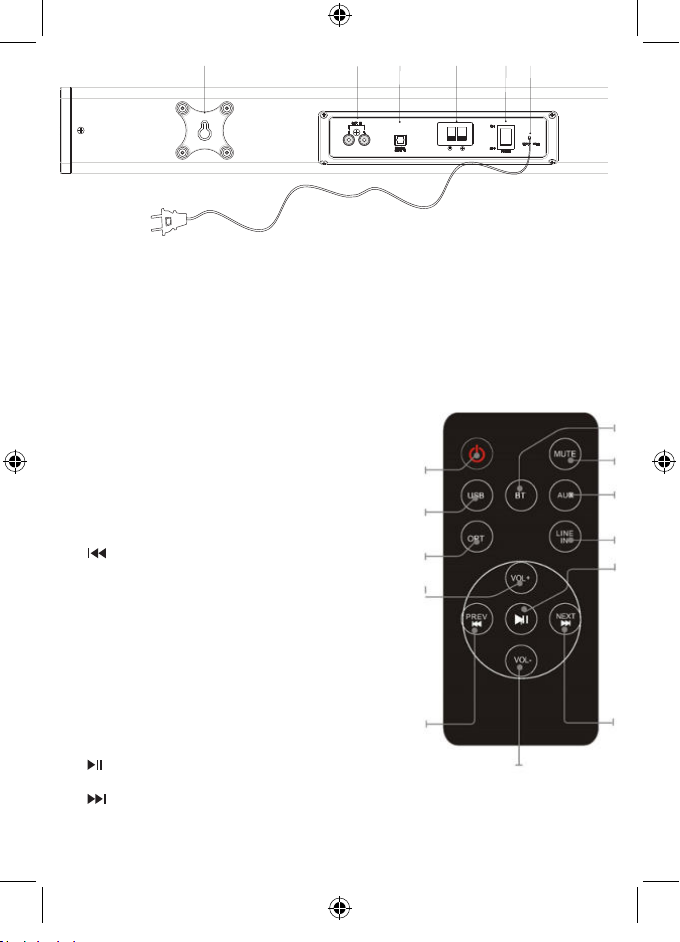
11. Support de xation murale
12. Entrée AUX
Brancher une source audio externe.
13. Entrée Optique
Brancher une source audio numérique
optique.
Description de la télécommande
1. POWER (Marche/Arrêt)
Allumer ou éteindre l'appareil.
2. USB
Sélectionner le mode USB.
3. OPT
Sélectionner le mode Optique.
4. VOLUME+
Monter le volume.
5.
Sauter au morceau précédent.
6. VOLUME-
Baisser le volume.
7. BT
Sélectionner le mode Bluetooth.
8. MUTE (Sourdine)
Désactiver ou réactiver le son.
9. AUX
Sélectionner le mode Aux.
10. LINE IN (Entrée ligne)
Sélectionner le mode Ligne.
11.
Démarrer la lecture ou la mettre en pause.
12.
Sauter au morceau suivant.
14. Sortie pour Caisson de Graves
(option pour SB200BT seulement)
15. Bouton marche/arrêt
Allumer ou éteindre l'appareil.
16. Cordon d’alimentation
1
2
3
4
5
6
7
8
9
10
11
12
- FR 4 -
Page 6
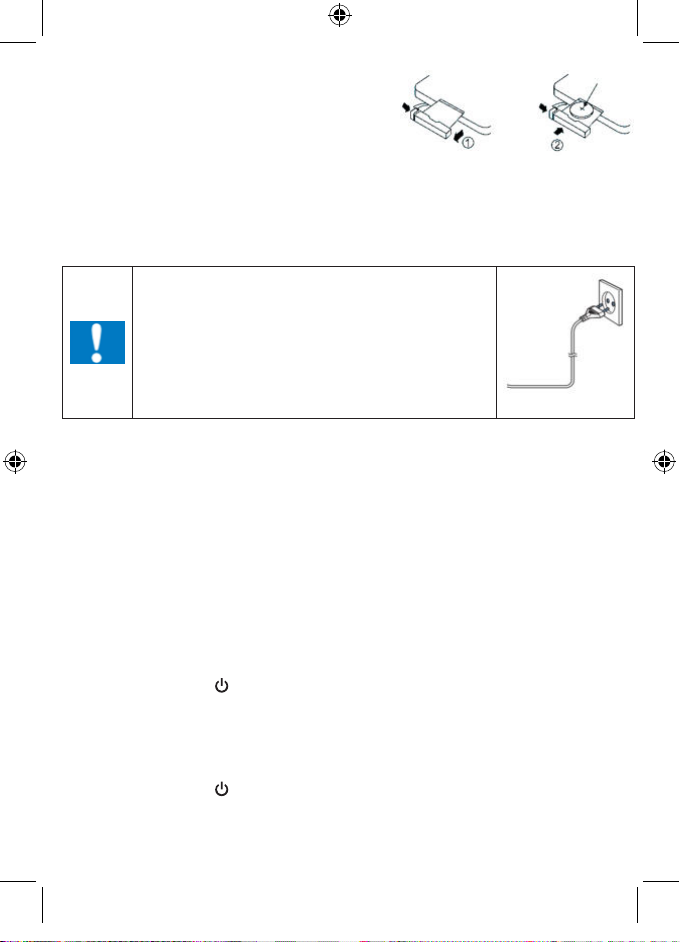
Changement de la pile
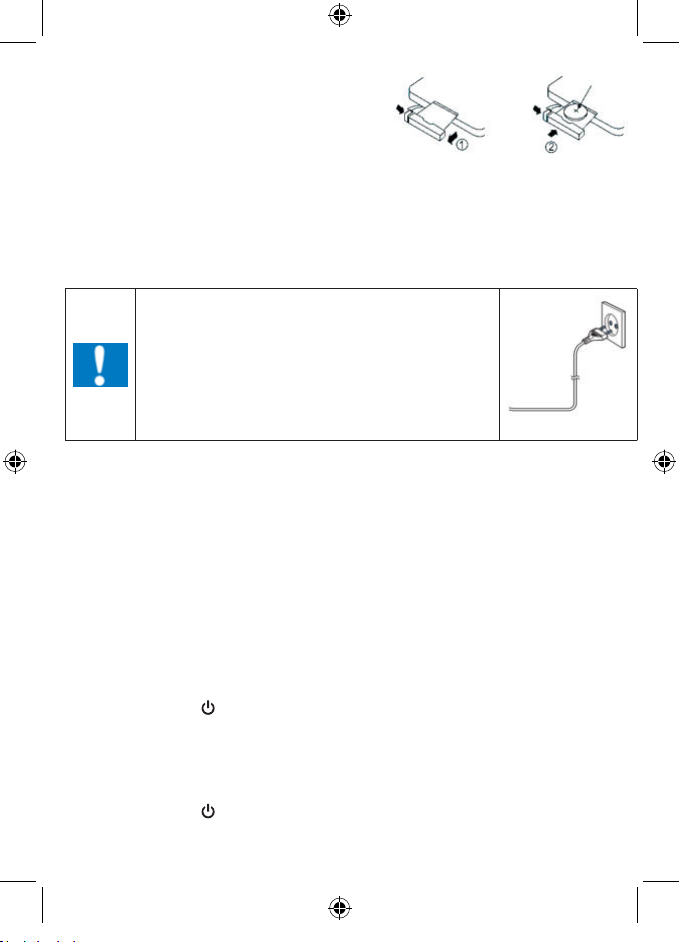
La télécommande fonctionne avec des piles boutons
au lithium de 3V CR2025. Lorsque la télécommande
ne marche plus, les piles ont besoin d'être changées.
Procédez de la manière suivante:
• Appuyez sur le bouton latéral du couvercle des piles
pour l'ouvrir et faire sortir le porte-piles.
• Mettez la pile neuve en faisant attention à orienter les pôles dans le bon sens.
• Remettez en place le porte-pile en le poussant jusqu'à entendre un déclic.
ATTENTION: Il existe un risque d'explosion si les piles ne sont pas insérées dans le bon sens.
Pour commencer
Alimentation
ATTENTION
Positionnez l’appareil à l’endroit désiré et déroulez le câble d’alimentation. Branchez le câble dans la
prise d’alimentation et mettez l’appareil en marche.
Mode de veille automatique
• Risque de détérioration du produit ! Vériez que la tension
du secteur correspond à la tension indiquée sur la plaque
signalétique de l’appareil.
• Risque de choc électrique ! Pour débrancher le câble CA,
tirez toujours sur la che de l’adaptateur. Ne tirez jamais sur
le câble.
• Avant de brancher le câble d’alimentation CA, vériez que
tous les autres branchements ont été effectués.
Lors de la lecture de supports audio d’un appareil connecté, la tour se met automatiquement en veille si:
• Aucun bouton n’est pressé pendant 10 minutes,
• Aucune lecture audio n’est activée à partir d’un appareil connecté pendant 10 minutes.
CR2025
Utilisation
Lecture depuis une source audio externe
Vous pouvez diffuser le signal fourni par une source audio externe (par exemple un lecteur MP3) via
cet appareil.
Entrée Optique (nécessite un câble optique)
1. Branchez un câble optique dans l’entrée Optique du panneau arrière. Branchez l’autre che du
câble optique dans une source audio numérique.
2. Appuyez sur la touche
3. Appuyez sur la touche SOURCE pour sélectionner le mode Optique.
4. Utilisez les commandes de la source connectée pour démarrer la lecture audio via l'appareil.
Entrée Ligne (nécessite un câble 3,5 mm)
1. Branchez un câble 3,5 mm dans l’entrée Ligne du panneau supérieur. Branchez l’autre che du
câble 3,5 mm dans un lecteur MP3 ou une autre source audio.
2. Appuyez sur la touche
3. Appuyez sur la touche SOURCE pour sélectionner le mode Ligne.
4. Utilisez les commandes de la source connectée pour démarrer la lecture audio via l'appareil.
pour allumer l’appareil.
pour allumer l’appareil.
- FR 5 -
Page 7

Entrée RCA auxiliaire (nécessite un câble RCA)
1. Branchez un câble RCA dans l'entrée Aux. Branchez l'autre che du câble RCA dans la sortie
audio de votre lecteur DVD, d’une chaîne stéréo, d’une console de jeux ou d’un téléviseur.
2. Appuyez sur le bouton marche/arrêt pour allumer l'appareil.
3. Appuyez sur la touche SOURCE pour sélectionner le mode Aux.
4. Utilisez les commandes de la source connectée pour démarrer la lecture audio via l'appareil.
Utiliser l'entrée USB
1. Branchez une clé USB dans le port USB.
2. Appuyez sur la touche SOURCE pour sélectionner le mode USB, l'appareil peut démarrer la
lecture automatiquement.
3. Appuyez sur
4. Appuyez sur VOL+/VOL– pour régler le volume.
Remarques :
/ pour sélectionner un morceau.
• Le port USB est un équipement sensible qui peut rendre le fonctionnement de l'appareil instable.
Mode Bluetooth
A. Couplage avec un téléphone portable Bluetooth
Vériez que votre téléphone portable comporte la fonction Bluetooth. Les étapes de couplage
spéciques peuvent différer selon le modèle de téléphone portable. Consultez la notice d'utilisation
de votre téléphone portable pour plus de détails. Généralement, la procédure de couplage est la
suivante :
1. Maintenez le SB100BT/SB200BT et le téléphone portable Bluetooth à moins de 1 m l'un de l'autre
pendant le couplage.
2. Appuyez sur la touche
Bluetooth.
3. Allumez la fonction Bluetooth de votre téléphone portable et recherchez les périphériques
Bluetooth. Une fois la recherche terminée, sélectionnez « SB100BT/SB200BT » dans la liste des
périphériques Bluetooth.
4. Selon les indications qui s'afchent, saisissez le mot de passe ou le code PIN « 0000 », puis
appuyez sur « OUI » ou « Conrmer ».
5. Une fois le couplage réussi, sélectionnez « SB100BT/SB200BT » dans la liste des périphériques
Bluetooth, puis appuyez sur « Connecter ».
B. Couplage avec un émetteur stéréo Bluetooth
Les différents émetteurs Bluetooth ont des procédures de couplage différentes. Consultez la notice
d'utilisation de votre émetteur Bluetooth pour plus de détails. Généralement, la procédure de couplage
est la suivante :
1. Maintenez l'émetteur Bluetooth et le SB100BT/SB200BT à moins de 1 m l'un de l'autre pendant
le couplage.
2. Appuyez sur la touche
Bluetooth.
3. Allumez votre émetteur Bluetooth et laissez-le entrer dans le mode de couplage.
4. L'émetteur recherche et se connecte automatiquement au SB100BT/SB200BT. Une fois la
connexion établie, le son Bluetooth change.
, puis appuyez sur la touche SOURCE pour sélectionner le mode
, puis appuyez sur la touche SOURCE pour sélectionner le mode
Remarques :
• Le SB100BT/SB200BT retourne dans le mode de couplage automatiquement après la déconnexion
C. Contrôler la lecture audio
Connexion avec un émetteur Bluetooth ou un téléphone portable A2DP.
1. Connectez votre téléphone portable ou émetteur Bluetooth au SB100BT/SB200BT.
2. Vous pouvez maintenant écouter votre musique via le SB100BT/SB200BT après avoir démarré
la lecture.
- FR 6 -
Page 8
3. Appuyez sur Vol+ pour monter le volume ou sur Vol- pour le baisser.
4. Appuyez sur
5. Appuyez sur
pour sauter au morceau précédent.
pour sauter au morceau suivant.
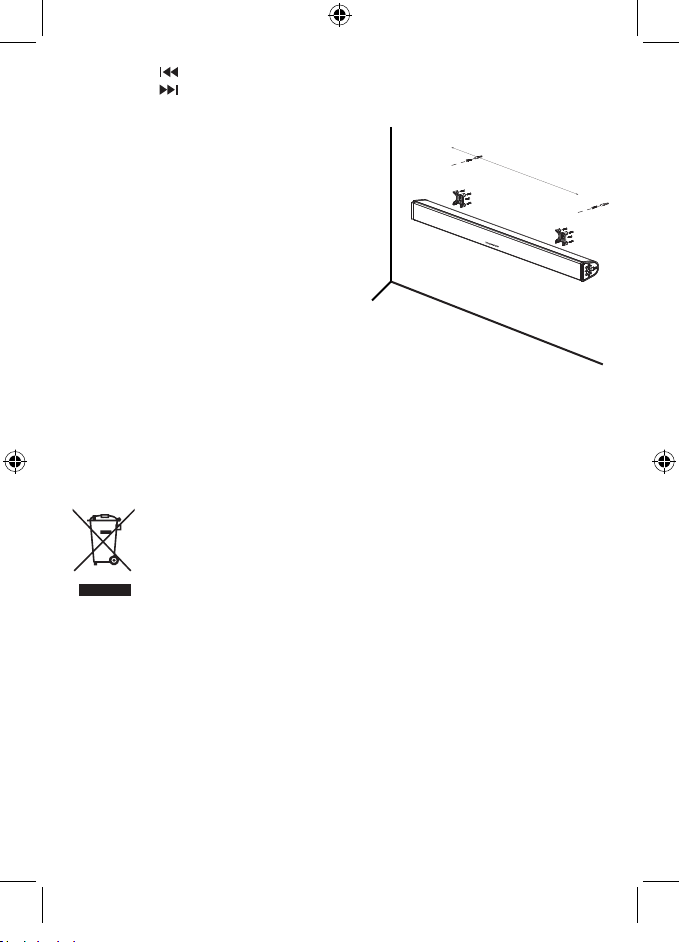
Support mural pour votre barre de son
Décollez l'adhésif et utilisez le kit de xation murale
pour xer votre barre de son sur le mur.
Kit de xation murale
680m
m
1. 2 supports muraux
2. 8 vis (pour barre de son et support)
3. 8 capuchons EVA pour vis
4. 2 vis longues
5. 2 chevilles murales
Vous aurez besoin :
1. Perceuse électrique
2. Tournevis
3. Crayon
4. Niveau à bulle
Remarque : Utilisez le niveau à bulle pour garantir que les supports de xation murale sont à
l'horizontale.
1. Décollez l'adhésif au dos de la plaque arrière, vissez 4 vis et le support sur la barre de son, et
recouvrez les vis avec les capuchons EVA.
2. Marquez les trous à percer.
3. Percez les trous aux points marqués, puis insérez les chevilles murales.
4. Vissez 2 vis dans le mur, puis accrochez la barre de son et vériez qu'elle est stable.
Remarque:
• An d’économiser l’énergie, lorsque l’appareil n’émet aucune sortie sonore pendant un certain
temps, il se mettra automatiquement en mode de veille. Il peut alors être remis en marche en
utilisant à nouveau le bouton d’alimentation.
• S’il y a un appel entrant alors que le système SB100BT/SB200BT est connecté à votre téléphone
portable pour une lecture musicale, la musique est immédiatement mise en pause lorsque vous
répondez à l’appel et la lecture reprendra une fois l’appel terminé (selon le type de téléphone
portable, la lecture pourra parfois rester en pause après la n de l’appel).
• Le mot Bluetooth
Inc. et toute utilisation de ces marques par Bigben Interactive est sous licence. Les autres marques
et noms commerciaux appartiennent à leurs propriétaires respectifs.
• THOMSON est une marque déposée de TECHNICOLOR SA ou de ses liales utilisée sous licence
par Bigben Interactive.
Ne pas éliminer les appareils électriques et électroniques dans les déchets ménagers.
• Les apporter à un point de collecte.
• Certaines pièces contenues dans ces appareils peuvent être dangereuses pour la
santé et pour l’environnement.
®
, la marque et le logo sont des marques déposées appartenant à Bluetooth SIG,
- FR 7 -
Page 9
• Bigben Interactive SA déclare par la présente que l’appareil SB100BT/SB200BT est conforme
aux exigences essentielles de la directive 1995/5/EC du Parlement européen et du Conseil du 9
Mars 1999 sur les équipements hertziens, les équipements terminaux de télécommunications et la
reconnaissance mutuelle de leur conformité.
Pour télécharger la version complète de cette déclaration, veuillez vous rendre sur notre site internet,
http://www.bigben.fr/support, dans la section Déclaration de conformité.
Importé par BIGBEN INTERACTIVE SA
396, Rue de la Voyette
CRT2 – FRETIN
CS 90414
59814 LESQUIN Cedex - France
www.bigben.eu
Fabriqué en Chine
Importateur : Bigben Interactive FRANCE
396, Rue de la Voyette, C.R.T. 2 Fretin,
CS 90414 - 59814 LESQUIN Cedex
Bigben Interactive DEUTSCHLAND GmbH
Walter Gropius Str. 28, 50126 Bergheim, Deutschland
Bigben Interactive BELGIUM
Avenue Ernest Solvay, 1480 Tubize, Belgique
Bigben Interactive NEDERLAND b.v.
Franciscusweg 249-3B, 1216 SG Hilversum, Nederland
Bigben Interactive SPAIN S.L.
C/ Musgo 5, 2ª planta, 28023 Madrid, Spain
Bigben Interactive ITALIA s.r.l
Corso Sempione 221, 20025 Legnano - MI, Italia
FABRIQUÉ EN CHINE / MADE IN CHINA
HOTLINE
FRANCE, du lu ndi au vendr edi (sauf j ours féri és) :
9h00-19h00 ou suppor t@thomsonaudiovideo.eu
DEUTSCHLAND, Mont ag bis Sonnt ag von 8:00 bis 24:00 Uhr
09001-84 30 44*
Mobilf unknetz en nicht möglic h)
*Minderjährige müssen vorher einen Erziehungsberechtigten um Erlaubnis fragen.
BELGI QUE / NEDERL AND, klantenservice@bigben-interactive.nl
(0,49 €/Min. aus dem deu tschen Fes tnetz, An rufe aus allen
oder support@bigben-interactive.de
customerservice@bigben-interactive.be
ESPAÑA, sat@bigbeninteractive.es
ITALIA, suppor t@bigbeninteractive.it
www.bigben.eu
- FR 8 -
Page 10
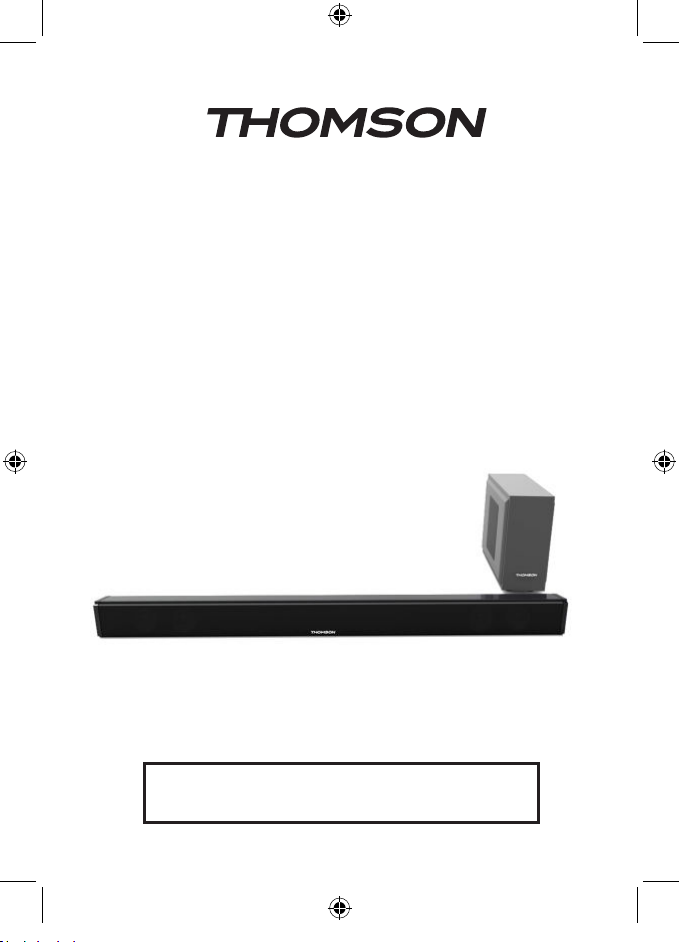
SB100BT (SYSTEME 2.0) /
SB200BT (SYSTEME 2.1 with subwoofer)
BLUETOOTH / USB / OPTICAL / AUDIO IN
OPERATING INSTRUCTIONS
PLEASE READ THIS USER MANUAL COMPLETELY BEFORE
OPERATING THIS UNIT AND RETAIN THIS BOOKLET FOR
FUTURE REFERENCE.
BBI_SB100BT/SB200BT_1606_Ver1
Page 11
Contents
Setting Started 1
Safety and Notice 1
Care for your product 2
Care of the environment 2
Compliance 2
Technical specications 3
What’s in the box 3
Description of Parts 3
Replacing battery 4
Get started 5
Use 5
Wall mounting for your sound bar 7
Remarks 8
Setting Started
• Remove the appliance from the box.
• Remove any packaging from the product.
• Place the packaging inside the box and either or dispose of safely.
Safety and Notice
Read and understand all instructions before you use this product. If damage is caused by failure to
follow the instructions, the warranty does not apply.
Safety
Warning
• Never remove the casing of this apparatus.
• Never lubricate any part of this apparatus.
• Never place this apparatus on other electrical equipment.
1. Read these instructions.
2. Keep these instructions.
3. Heed all warnings.
4. Follow all instructions.
5. Do not use this apparatus near water.
6. Clean only with dry cloth.
7. Do not block any ventilation openings. Install in accordance with the manufacturer’s instructions.
8. Do not install near any heat sources such as radiators, heat registers, stoves, or other apparatus
(including ampliers) that produce heat.
9. Protect the power cord from being walked on or pinched, particularly at plugs, convenience
receptacles, and the Point where they exit from the apparatus.
10. Only use attachments/accessories specied by the manufacturer.
11. Use only with the cart, stand, tripod, bracket, or table specied by the manufacturer
or sold with the apparatus. When a cart is used, use caution when moving the cart/
apparatus combination to avoid injury from tip-over.
12. Unplug this apparatus during lightning storms or when unused for long periods of time.
13. Refer all servicing to qualied service personnel. Servicing is required when the apparatus has
been damaged in anyway, such as power-supply cord or plug is damaged, liquid has been spilled
or objects have fallen into the apparatus, apparatus has been exposed to rain or moisture, does
not operate normally, or has been dropped.
• Keep this apparatus away from direct sunlight, naked Fames or heat.
• Never look into the laser beam inside this apparatus.
• Ensure that you always have easy access to the power cord, plug or adaptor to
disconnect this apparatus from the power.
- EN 1 -
Page 12
14. Apparatus shall not be exposed to dripping or splashing.
15. Do not place any sources of danger on the apparatus (e.g. liquid lled objects, lighted candles).
16. Where the MAINS plug or an appliance coupler is used as the disconnect device, the disconnect
device shall remain readily operable.
17. Make sure there is enough free space around the product for ventilation.
18. Batteries (battery pack or batteries installed) shall not be exposed to excessive heat such as
sunshine, re or the like.
19. The appliance must equipped with the appropriate batteries in order to function properly.
20. Only recommended batteries should be used.
21. Polarity must be respected in such a way as to avoid any short.
22. Don’t mix used and new batteries.
23. Don’t mix alkaline, standard (carbon-zinc) and rechargeable (nickel-cadmium) batteries.
24. Don’t recharge or try to open the batteries. Don’t throw the batteries in re.
25. Replace all batteries at the same time with new, identical batteries.
26. Remove the batteries when unused for a long time.
Care for your product
1. Always unplug the appliance when not in use and before cleaning.
2. Do not play music at excessive volume levels as damage to hearing and or the equipment may
occur.
3. Do not use this unit in wet or damp conditions.
4. Always disconnect the unit from the mains power supply before cleaning. Clean the appliance with
a soft, damp, lint free cloth. Do not use abrasives or harsh cleaners.
Care of the environment
Your product is designed and manufactured with high quality materials and
components, which can be recycled and reused.
Your product contains batteries covered by the European Directive 2006/66/EC, which
cannot be disposed with normal household waste. Please inform yourself about
the local rules on separate collection of batteries because correct disposal helps to
Compliance
prevent negative consequences for the environmental and human health.
When this crossed-out wheeled bin symbol is attached to a product it means that the
product is covered by the European Directive 2002/96/EC. Please inform yourself
about the local separate collection system for electrical and electronic products.
Please act according to your local rules and do not dispose of your old products with
your normal household waste. Correct disposal of your old product helps to prevent
potential negative consequences for the environment and human health.
This product complies with the radio interference requirements of the Europe
Community.
- EN 2 -
Page 13
Technical specications
• Power supply: 230V~ 50Hz
• Total consumption: 65W
• Input sensitivity:
AUX IN 700MV, LINE IN 700MV
• Speakers impedance: 8ohm
What’s in the box
Check and identify the contents of your package:
• Sound Bar and Subwoofer
(Option for SB200BT only)
• Remote control
• User manual
Description of Parts
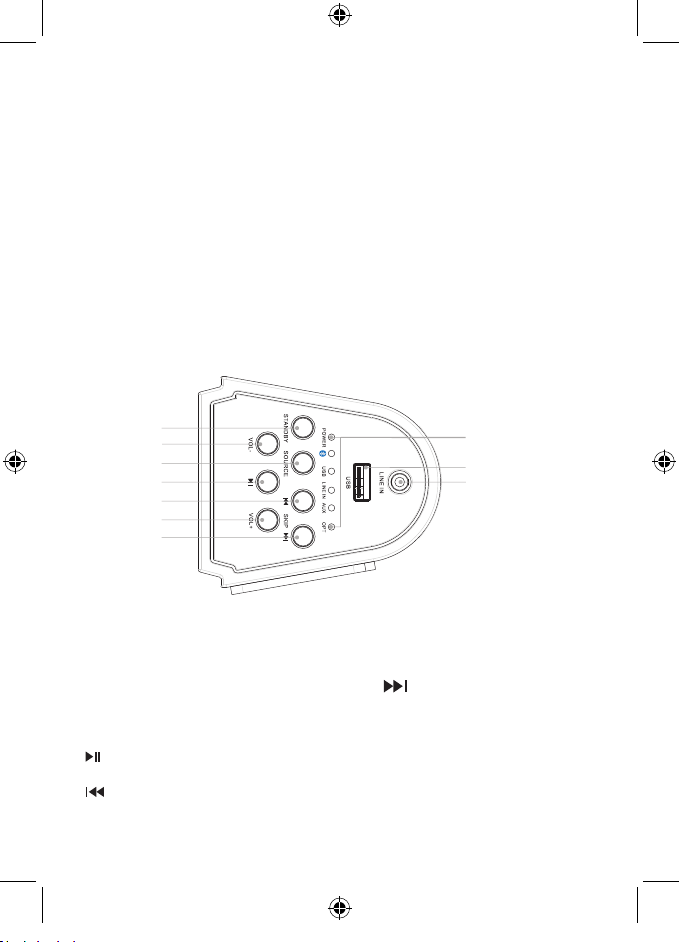
Overview of the main unit
• S/N (A): 75db
• THD(1kHz,1W): 0.5%
• Frequency response: 20Hz-20KHz
• Total music output:
- SB100BT=30W
- SB200BT=50W
• RCA cable
• Line in cable
• Audio cable for sub
1
2
3
4
1. Standby
Turn on the unit, switch to Standby mode
2. VOL -
Adjust the Volume-
3. Source
Select a source: Bluetooth, USB, AUDIO IN
4.
Start or pause play
5.
Skip to the previous track
5
6
7
6. VOL +
Adjust the Volume+
7.
8. LED indicator
9. USB socket
10. Audio in
- EN 3 -
8
9
10
Skip to the next track
Show the current status
Connect an external audio device
Page 14
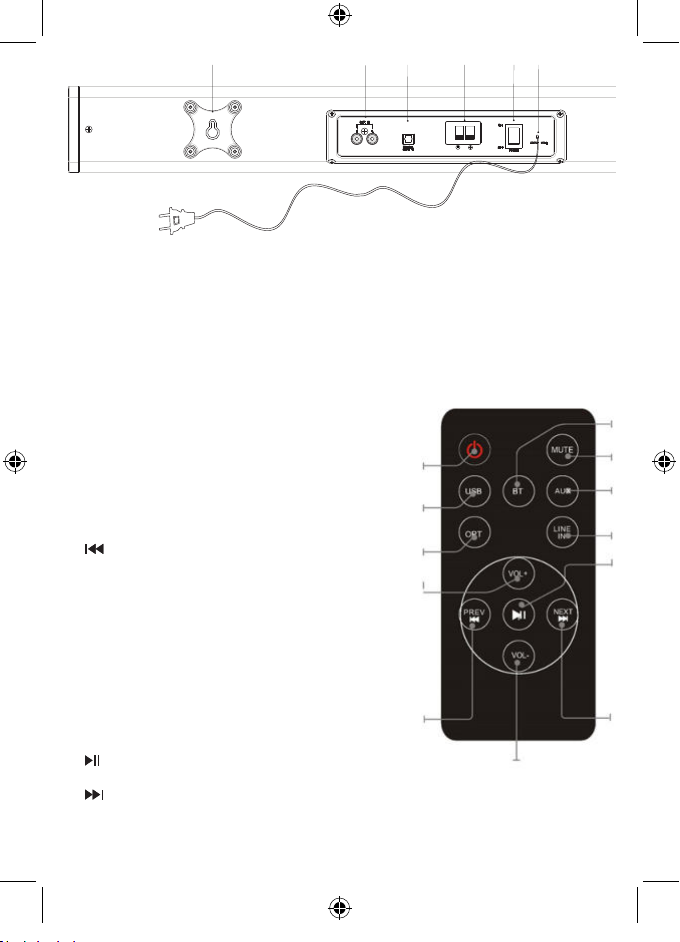
11
12
13
14
(Only for
SB200BT)
SUB OUT
16
15
11. Wall mount bracket
12. AUX in
Connect an external audio device
13. Optical in
Connect an Optical digital audio input
Overview of Remote Control
Overview of Remote Control
1. POWER
1. POWER
Press to power the tower off and on
Press to power the tower off and on
2. USB
2. USB
Press to USB mode
Press to USB mode
3. OPT
3. OPT
Press to Optical input mode
Press to Optical input mode
4. VOLUME+
4. VOLUME+
Press to adjust the volume+
Press to adjust the volume+
5.
5.
Skip to the previous track
Skip to the previous track
6. VOLUME-
6. VOLUME-
Press to adjust the volume-
Press to adjust the volume-
7. BT
7. BT
Press to Bluetooth mode
Press to Bluetooth mode
8. MUTE
8. MUTE
Press to Mute or restore volume
Press to Mute or restore volume
9. AUX
9. AUX
Press to Aux input mode
Press to Aux input mode
10. LINE IN
10. LINE IN
Press to Line input mode
Press to Line input mode
11.
11.
start or pause play
start or pause play
12.
12.
Skip to the next track
Skip to the next track
14. Subwoofer out (Option for SB200BT only)
15. Power switch
Switch power on/off
16. Ac~ power cable
1
1
2
2
3
3
4
4
5
5
6
6
7
7
8
8
9
9
10
10
11
11
12
12
- EN 4 -
Page 15
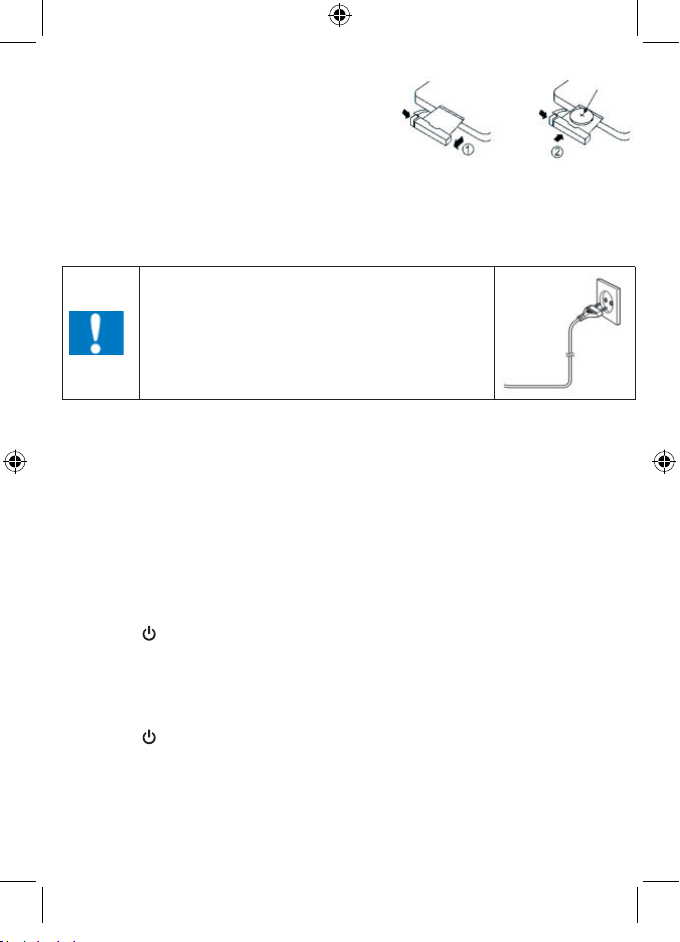
Replacing battery
Replacing battery
The remote control works with lithium button cell
The remote control works with lithium button cell
CR2025 3V batteries. When the remote no longer
CR2025 3V batteries. When the remote no longer
works you need to replace the batteries as follows:
works you need to replace the batteries as follows:
• Press the tab on the side of the battery cover to
• Press the tab on the side of the battery cover to
release it and allow the battery support to come out.
release it and allow the battery support to come out.
• Replace the battery paying attention to the correct
• Replace the battery paying attention to the correct
orientation of the poles.
orientation of the poles.
• Replace the battery support pushing it inside until you hear a “click”.
• Replace the battery support pushing it inside until you hear a “click”.
ATTENTION: Danger of explosion if batteries are not inserted correct.
ATTENTION: Danger of explosion if batteries are not inserted correct.
Get started
Power
CR2025
CR2025
CAUTION
• Risk of product damager! Make sure that the power voltage
corresponds to the voltage printed on the back label.
• Risk of electric shock! When you unplug the AC power cord
Place the unit in the desired position and unravel the mains cable. Insert the cable into the supply
socket and switch on if applicable.
Auto standby
When playing media from a connected device, the Tower automatically switches to standby if:
• No button is pressed for 10 minutes,
• No audio from a connected device for 10 minutes.
always pull the plug from the socket. Never pull the cord.
• Before connecting the AC power cord, ensure you have
completed all other connections.
Use
Play from external audio
You can play from an external audio device such as MP3 player through this unit.
Optical in Jack (Requires an optical cable)
1. Connect an Optical cable to the optical jack on back panel. Connect the other end of the Optical
cable to the digital audio device.
2. Press the
3. Press the SOURCE button to switch to Optical In mode.
4. Use the controls on the connected device to begin playing audio routed through the unit.
Line in Jack (Requires a 3.5mm cable)
1. Connect a 3.5mm cable to the Line jack on top panel. Connect the other end of the 3.5mm cable
to an Mp3 player or other audio device.
2. Press the
3. Press the SOURCE button to switch to Line In mode.
4. Use the controls on the connected device to begin playing audio routed through the unit.
button to turn the unit on.
button to turn the unit on.
- EN 5 -
Page 16
Auxiliary Input RCA (Requires an RCA cable)
1. Connect an RCA cable to the Auxiliary Input. Connect the other end of the RCA cable to the audio
output on your DVD player, stereo system, gaming system or television.
2. Press the power button to turn the unit on.
3. Press the SOURCE button to switch to Aux In mode.
4. Use the controls on the connected device to begin playing audio routed through the unit.
Using the USB input
1. Plug your USB ash drive to the USB socket.
2. Press SOURCE button to select USB mode, the unit can play automatically.
3. press the
/ to select track.
4. Press the VOL+/VOL– to adjust the volume.
Remarks:
• USB port is easy to sensitive equipment, will cause the equipment work is not stable.
Bluetooth Mode
A. Pairing with a Bluetooth cell phone
Please make sure your cell phone is Bluetooth-enabled. Specic pairing steps may vary with different
cell phones. Please refer to the user manual of your cell phone for further information. The general
pairing steps are as follows:
1. Keep SB100BT/SB200BT and Bluetooth cell phone within 1 meter when pairing.
2. Press
3. Switch on your cell phone’s Bluetooth function and search for Bluetooth devices. After the search
4. According to indication, enter password or PIN No: “0000” and press “Yes” or “conrm”.
5. After successful pairing, select “SB100BT/SB200BT” from the Bluetooth device list and press
button, and press the SOURCE to select the Bluetooth mode.
is completed, select “SB100BT/SB200BT” from the Bluetooth device list.
“connect”.
B. Pairing with a Bluetooth stereo transmitter
Different Bluetooth transmitters have different pairing ways. Please refer to the user manual of your
Bluetooth transmitter for further information. The general pairing steps are as follows:
1. Keep SB100BT/SB200BT and Bluetooth transmitter within 1 meter when pairing.
2. Press
3. Switch on your Bluetooth transmitter and let it enter pairing mode.
4. The transmitter will search and connect with SB100BT/SB200BT automatically. After successful
Remarks:
• SB100BT/SB200BT will return to pairing mode automatically after disconnecting from a Bluetooth
button, and press the SOURCE to select the Bluetooth mode.
connecting, the Bluetooth voice will change when connected successfully.
device.
C. Music Playback
Connecting with a A2DP cell phone or Bluetooth transmitter.
1. Connect your cell phone or Bluetooth transmitter with SB100BT/SB200BT.
2. You can listen to your music from SB100BT/SB200BT now when playing it back.
3. Press Vol+ to turn up the volume, press Vol- to turn down the volume.
4. Press
5. Press
to skip to the previous song.
to skip to the next song.
- EN 6 -
Page 17
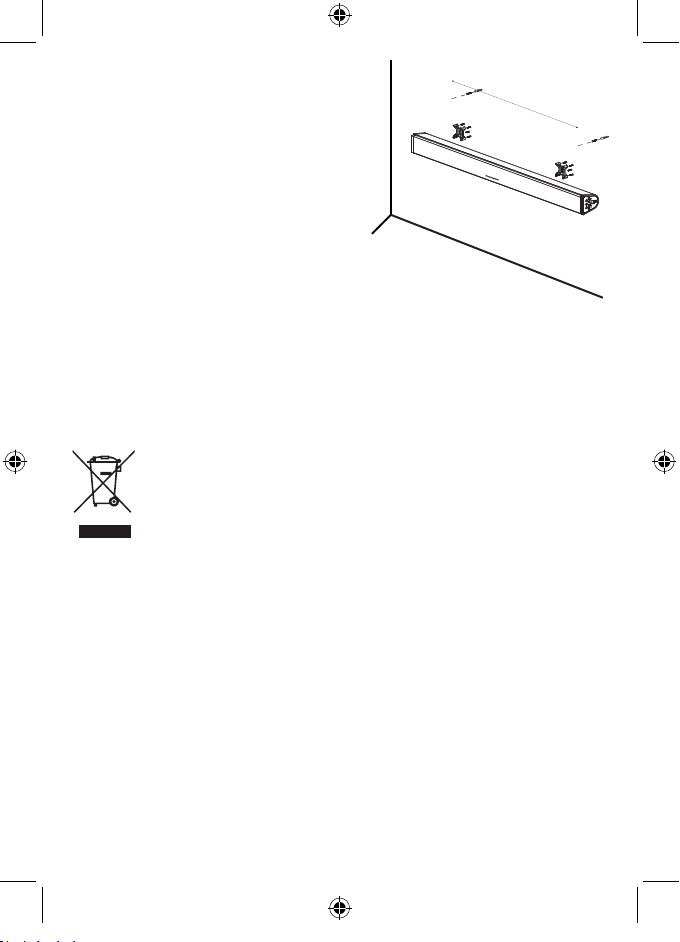
Wall mounting for your sound bar
Please tear off the sticker, Use the wall attachment
kit to mount your sound bar on the wall.
Wall attachment kit
1. 2 wall brackets
2. 8 attachment screws (for sound bar with bracket)
3. 8 EVA cover the screw
4. 2 long screws
5. 2 wall anchors
You will need:
1. Electric drill
2. Screwdriver
3. Pencil
4. Spirit level
Note: Use the spirit level to ensure the wall mount plate are both horizontal.
1. Tear off the sticker on back plate, screw in the 4 screws with bracket to the sound bar, and take
the EVA cover the screws.
2. Mark the holes to be drilled.
3. Drill holes at the marketed points then insert the wall anchors.
4. Screw in the 2 screws to the wall, then attach the sound bar and make sur it is stable.
Remarks:
Don’t discard the electrical and electronic appliances in the regular waste disposal.
• Take them to a collection point.
• In order to save energy when the unit has no sound output for a while, the unit will be switched to
stand-by automatically. It can be switched ON by using the POWER selector again.
• If there is an incoming call while SB100BT/SB200BT is connected to your cell phone for music
playback, it will pause at once when you answer the call and resume after the call ended. (Sometimes
it will pause after end the call, it depend on your cell phone.)
• The Bluetooth® word, mark and logo are registered trademarks owned by Bluetooth SIG, Inc. and
any use of such marks by Bigben Interactive is under license. Other trademarks and trade names
are those of their respective owners.
• THOMSON is a trademark of TECHNICOLOR SA or its afliates used under license to Bigben
Interactive.
• Some components in these appliances may be hazardous to health and the
environment.
68
0m
m
- EN 7 -
Page 18
• Hereby, Bigben Interactive SA, declares that the SB100BT/SB200BT device complies with the
essential requirements of the directive 1995/5/EC of the European Parliament and of the Council
of 9 March 1999 on radio equipment and telecommunications terminal equipment and the mutual
recognition of their conformity.
To download the full statement, please visit our website:
and the section <<declaration of conformity>>.
http://www.bigben-interactive.co.uk/support
Imported by BIGBEN INTERACTIVE SA
396, Rue de la Voyette
CRT2 - FRETIN
CS 90414
59814 LESQUIN Cedex - France
www.bigben.eu
Made in China
Importateur : Bigben Interactive FRANCE
396, Rue de la Voyette, C.R.T. 2 Fretin,
CS 90414 - 59814 LESQUIN Cedex
Bigben Interactive DEUTSCHLAND GmbH
Walter Gropius Str. 28, 50126 Bergheim, Deutschland
Bigben Interactive BELGIUM
Avenue Ernest Solvay, 1480 Tubize, Belgique
Bigben Interactive NEDERLAND b.v.
Franciscusweg 249-3B, 1216 SG Hilversum, Nederland
Bigben Interactive SPAIN S.L.
C/ Musgo 5, 2ª planta, 28023 Madrid, Spain
Bigben Interactive ITALIA s.r.l
Corso Sempione 221, 20025 Legnano - MI, Italia
FABRIQUÉ EN CHINE / MADE IN CHINA
HOTLINE
FRANCE, du lu ndi au vendr edi (sauf j ours féri és) :
9h00-19h00 ou suppor t@thomsonaudiovideo.eu
DEUTSCHLAND, Mont ag bis Sonnt ag von 8:00 bis 24:00 Uhr
09001-84 30 44*
Mobilf unknetz en nicht möglic h)
*Minderjährige müssen vorher einen Erziehungsberechtigten um Erlaubnis fragen.
BELGI QUE / NEDERL AND, klantenservice@bigben-interactive.nl
(0,49 €/Min. aus dem deu tschen Fes tnetz, An rufe aus allen
oder support@bigben-interactive.de
customerservice@bigben-interactive.be
ESPAÑA, sat@bigbeninteractive.es
ITALIA, suppor t@bigbeninteractive.it
www.bigben.eu
- EN 8 -
Page 19
SB100BT (SYSTEME 2.0) /
SB200BT (SYSTEME 2.1 con subwoofer)
BLUETOOTH / USB / OPTICAL / AUDIO IN
INSTRUCCIONES DE FUNCIONAMIENTO
LE ROGAMOS QUE LEA ÍNTEGRAMENTE EL PRESENTE MANUAL DEL
USUARIO ANTES DE UTILIZAR EL EQUIPO Y QUE LO CONSERVE PARA
PODER CONSULTARLO EN EL FUTURO.
Page 20
Contenido
Inicio 1
Medidas de seguridad y advertencias 1
Cuidado del producto 2
Cuidado del medioambiente 2
Conformidad 2
Especicaciones técnicas 3
Contenido del embalaje 3
Descripción de componentes 3
Sustitución de la pila 4
Cómo comenzar 5
Uso 5
Montaje mural para su barra de sonido 7
Nota 8
Inicio
• Saque el aparato del embalaje.
• Retire todo el material de embalaje del producto.
• Coloque el material de embalaje dentro de la caja y deséchelo todo de forma segura.
Medidas de seguridad y advertencias
Lea y entienda las instrucciones antes de usar este producto. Si el producto resultara dañado por
incumplimiento de las instrucciones, la garantía quedaría anulada.
Seguridad
1. Lea estas instrucciones.
2. Conserve estas instrucciones.
3. Preste atención a todas las advertencias.
4. Siga todas las instrucciones.
5. No use este aparato cerca del agua.
6. Limpie el aparato solo con un paño seco.
7. No bloquee las ranuras de ventilación. Instale el aparato de acuerdo a las instrucciones del
fabricante.
8. No instale el aparato cerca de fuentes de calor, tales como radiadores, calentadores, cocinas o
cualquier otro aparato (incluso amplicadores) que produzca calor.
9. Coloque el cable de alimentación de forma que no se pueda pisar o pinzar, especialmente a la
altura de los enchufes, tomas de corriente y otros puntos de salida del aparato.
10. Use solo complementos/accesorios recomendados por el fabricante.
11. Use solamente el carrito, pie, trípode, soporte o mesa especicados por el
fabricante o vendidos con el aparato. Cuando se usa un carrito, tome cuidado al
moverlo junto con el aparato para evitar lesiones personales llegara a volcarse.
12. Desenchufe el aparato cuando haya tormentas eléctricas o si no va a utilizarse
durante largos periodos de tiempo.
¡Advertencia!
• No abra nunca la carcasa de este aparato.
• No lubrique nunca ninguna de las piezas de este aparato.
• No coloque nunca este aparato sobre otros equipos eléctricos.
• Mantenga este aparato alejado de la luz directa del sol, de llamas desnudas o de
fuentes de calor.
• No mire nunca directamente al rayo láser ubicado dentro del aparato.
• Compruebe que el cable, el enchufe o el adaptador para desconectar este aparato
de la toma de corriente están siempre fácilmente accesibles.
- ES 1 -
Page 21
13. El aparato debe ser reparado siempre por personal autorizado. Lleve el aparato
a reparar si se ha dañado en modo alguno: cuando el cable de alimentación o el enchufe están
deteriorados, si le ha caído líquido o algún objeto se ha introducido en su interior, si ha quedado
expuesto a la lluvia o a la humedad, si no funciona con normalidad o se ha caído al suelo.
14. No exponga el aparato a goteos o salpicaduras de líquidos.
15. No coloque ningún tipo de objeto que pueda presentar un peligro sobre el aparato (por ejemplo:
recipientes con líquidos o velas encendidas).
16. Cuando se use el enchufe de la TOMA DE CORRIENTE o el acoplador del aparato como sistema
de desconexión, el dispositivo de desconexión debe estar siempre fácilmente accesible.
17. Compruebe que haya siempre suciente espacio libre alrededor del aparato para su ventilación.
18. Las pilas (pack de pilas o pilas instaladas) no deben estar expuestas al calor excesivo, a la luz del
sol, al fuego o similares.
19. Este aparato deberá equiparse con las pilas adecuadas para que funcione correctamente.
20. Únicamente deberán utilizarse las pilas recomendadas.
21. Deberá respetarse la polaridad para evitar cualquier cortocircuito.
22. No mezcle pilas usadas y nuevas.
23. No mezcle pilas alcalinas, estándar (carbono-cinc) y recargables (níquel-cadmio).
24. No recargue ni intente abrir las pilas. No arroje las pilas al fuego.
25. Sustituya todas las pilas al mismo tiempo por unas pilas nuevas e idénticas.
26. Retire las pilas cuando no piense utilizar el producto durante un período de tiempo prolongado.
Cuidado del producto
1. Desenchufe siempre el aparato cuando no esté usándolo y antes de limpiarlo.
2. No reproduzca música a un nivel de volumen excesivo ya que puede dañarse el oído o el aparato.
3. No use este aparato en lugares mojados o húmedos.
4. Desenchufe siempre el aparato de la toma de corriente antes de limpiarlo. Limpie el aparato con
un paño suave, húmedo y sin bras. No use productos de limpieza abrasivos o ásperos.
Cuidado del medioambiente
Este producto está diseñado y fabricado con materiales y componentes de alta
calidad que pueden reciclarse o reutilizarse.
Este producto contiene pilas que cumplen con la Directiva europea 2006/66/CE y que
no se pueden desechar junto con la basura doméstica. Infórmese sobre la normativa
local relacionada con la recolección separada de pilas usadas ya que al eliminarse
de forma correcta se evitan consecuencias negativas sobre el medioambiente y la
salud humana.
Cuando el producto posee el símbolo de un contenedor con ruedas tachado signica
que se encuentra conforme con la Directiva europea 2002/96/CE. Infórmese sobre el
sistema local de recolección separado de productos eléctricos y electrónicos. Siga la
normativa local y no deseche los productos usados junto con los residuos domésticos.
Una eliminación correcta de este producto ayuda a evitar las consecuencias negativas
para el medioambiente y la salud humana.
- ES 2 -
Page 22
Conformidad
Este producto es conforme con los requisitos de radiointerferencias de la Comunidad
Europea.
Especicaciones técnicas
• Alimentación: 230 V ~ 50 Hz
• Consumo total: 65 W
• Sensibilidad de entrada:
AUX IN 700 MV, LINE IN 700 MV
• Impedancia de los altavoces: 8 ohmios
Contenido del embalaje
Compruebe e identique el contenido del embalaje:
• Barra de sonido y subwoofer
(Opción para SB200BT únicamente)
• Mando a distancia
• Manual del usuario
Descripción de componentes
Presentación general de la unidad principal
• S/R (A): 75 db
• THD (1 kHz, 1 W): 0,5%
• Respuesta de frecuencia: 20 Hz-20 KHz
• Salida de música total:
- SB100BT=30W
- SB200BT=50W
• Cable de RCA
• Cable de entrada de línea
• Cable de audio para subwoofer
1
2
3
4
5
6
7
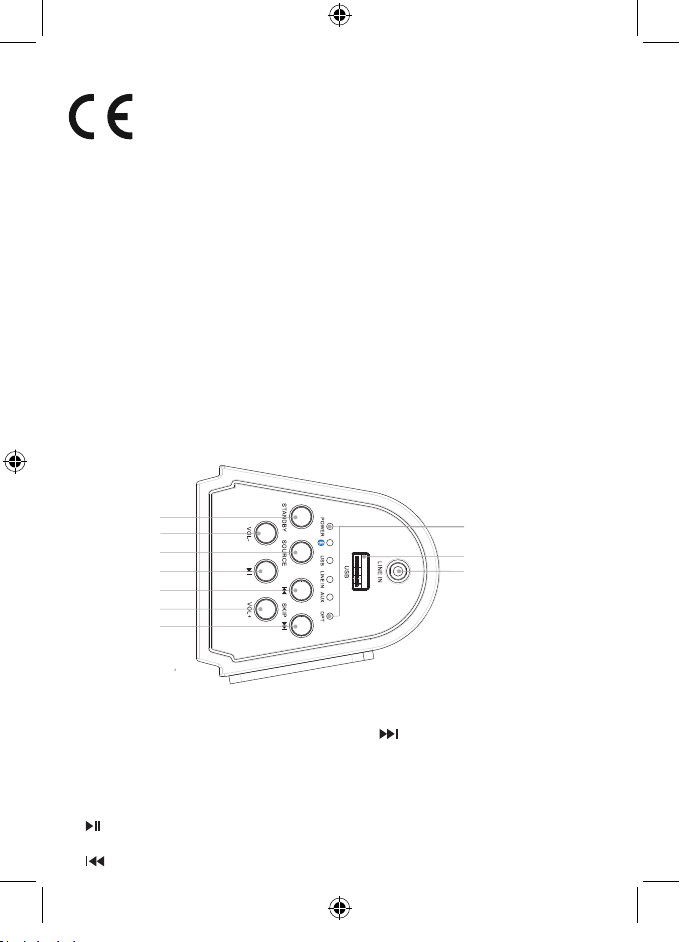
1. Standby
Encender la unidad, cambiar al modo en
espera
2. VOL -
Ajustar el volumen-
3. Source
Seleccionar una fuente: Bluetooth, USB,
AUDIO IN
4.
Iniciar o pausar la reproducción
5.
Saltar a la pista anterior
6. VOL +
Ajustar el volumen+
7.
Saltar a la pista siguiente
8. Indicador LED
Ver el estado actual
9. Puerto USB
10. Entrada de audio
Conecte un dispositivo de audio externo
- ES 3 -
8
9
10
Page 23
11
12
13
14
(Only for
SB200BT)
SUB OUT
16
15
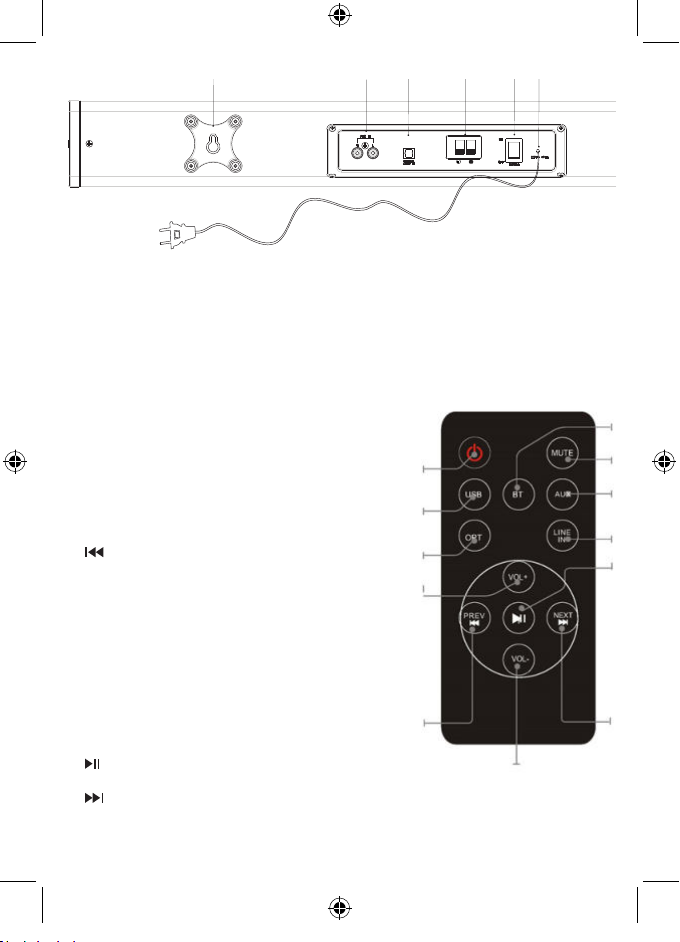
11. Soporte de montaje mural
12. Entrada AUX
Conecte un dispositivo de audio externo
13. Entrada óptica
Conecte una entrada de audio digital óptica
Presentación general del mando a distancia
1. POWER
Pulse para apagar y encender la unidad.
2. USB
Pulse para el modo USB
3. OPT
Pulse para el modo de entrada óptica
4. VOLUME +
Pulse para ajustar el volumen+
5.
Saltar a la pista anterior
6. VOLUME-
Pulse para ajustar de volumen-
7. BT
Pulse para el modo Bluetooth
8. MUTE
Pulse para silenciar o restaurar el volumen
9. AUX
Pulse para el modo de entrada auxiliar
10. LINE IN
Pulse para el modo de entrada de línea
11.
Iniciar o pausar la reproducción.
12.
Saltar a la pista siguiente
14. Salida de subwoofer
(Opción para SB200BT únicamente)
15. Interruptor de encendido
Interruptor de encendido/apagado
16. Cable de alimentación de CA
1
2
3
4
5
6
7
8
9
10
11
12
- ES 4 -
Page 24
Sustitución de la pila
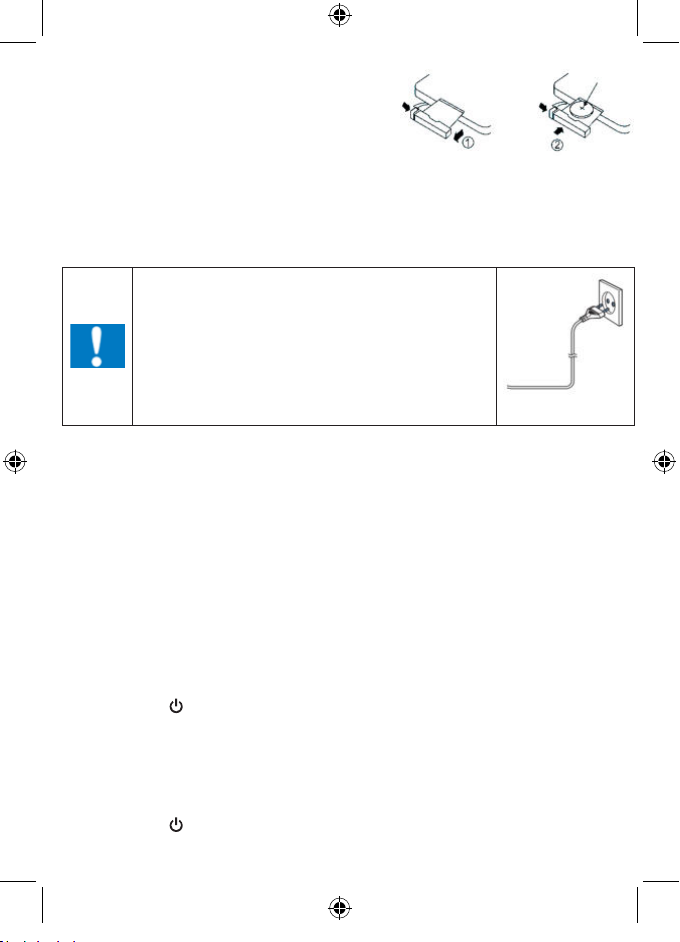
El mando a distancia funciona con pilas de litio de botón
CR2025 de 3 V. Cuando el mando a distancia deje de
funcionar, necesitará cambiar la pila del modo siguiente:
• Pulse la pestaña del lateral de la tapa de la pila para
liberarla y permitir que el soporte de la pila salga.
• Sustituya la pila prestando atención a la orientación
correcta de los polos.
• Vuelva a colocar el soporte de la pila empujándolo al interior hasta oír un “clic”.
ATENCIÓN: Peligro de explosión si las pilas no se insertan correctamente.
Cómo comenzar
Alimentación
PRECAUCIÓN
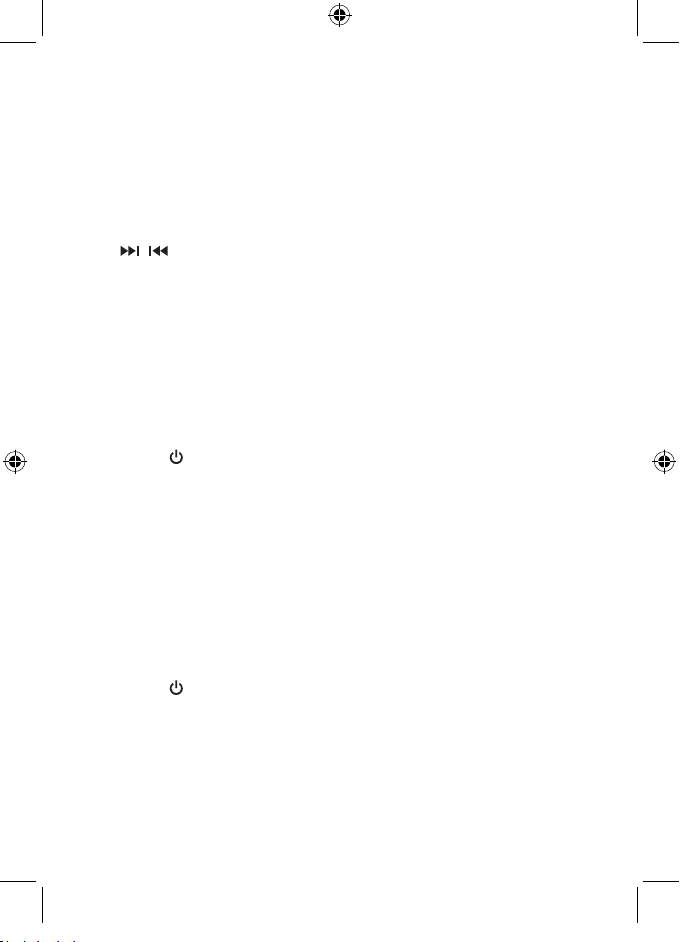
• ¡Riesgo de dañar el producto! Compruebe que el voltaje de
la toma de corriente se corresponde con el voltaje indicado
Coloque el aparato en la ubicación deseada y extienda el cable de alimentación. Inserte el cable en la
toma de corriente y encienda el aparato si fuera aplicable.
Standby automático
Cuando reproduzca medios desde un dispositivo conectado, la torre cambiará automáticamente al
modo en espera si:
• no se presiona ningún botón durante 10 minutos.
en la etiqueta ubicada en la parte posterior del aparato.
• ¡Riesgo de descargas eléctricas! Al desenchufar el cable
de alimentación de la toma de corriente tire siempre del
enchufe. No tire nunca del cable.
• Antes de conectar el cable de alimentación a la toma de
corriente, compruebe que ha completado todas las demás
conexiones.
• no se reproduce ningún archivo de audio durante 10 minutos desde un dispositivo conectado.
Uso
Reproducción de audio externo
Podrá reproducir desde un dispositivo de audio externo, como por ejemplo un reproductor de MP3, a
través de esta unidad.
Conector de entrada óptica (requiere un cable óptico)
1. Conecte un cable óptico al conector de entrada óptica del panel superior. Conecte el otro extremo
del cable óptico a un dispositivo de audio digital.
2. Pulse el botón
para encender la unidad.
3. Pulse el botón SOURCE para cambiar al modo Optical In (Entrada óptica).
4. Utilice los controles del dispositivo conectado para iniciar la reproducción de audio encaminada
a través de la unidad.
Conector de entrada de línea (requiere un cable con una clavija de 3,5 mm)
1. Conecte un cable con una clavija de 3,5 mm al conector de entrada de línea del panel superior.
Conecte el otro extremo del cable de 3,5 mm a un reproductor de MP3 u otro dispositivo de audio.
2. Pulse el botón
para encender la unidad.
3. Pulse el botón SOURCE para cambiar al modo Line In (Entrada de línea).
4. Utilice los controles del dispositivo conectado para iniciar la reproducción de audio encaminada
a través de la unidad.
- ES 5 -
CR2025
Page 25
RCA de entrada auxiliar (requiere un cable de RCA)
1. Conecte un cable de RCA a la entrada auxiliar. Conecte el otro extremo del cable de RCA a la
salida de audio de su reproductor de DVD, cadena estéreo, videoconsola o televisor.
2. Pulse el botón de encendido para encender la unidad.
3. Pulse el botón SOURCE para cambiar al modo Aux In (Entrada auxiliar).
4. Utilice los controles del dispositivo conectado para iniciar la reproducción de audio encaminada
a través de la unidad.
Utilización de la entrada de USB
1. Conecte su unidad ash USB al conector de USB.
2. Pulse el botón SOURCE para seleccionar el modo USB. La unidad podrá reproducirse
automáticamente.
3. Pulse
/ para seleccionar la pista.
4. Pulse VOL+/VOL- para ajustar el volumen.
Notas:
• El puerto USB es muy sensible y podría hacer que el funcionamiento del equipo no sea estable.
Modo Bluetooth
A. Emparejamiento con un teléfono móvil Bluetooth
Asegúrese de que su teléfono móvil dispone de la funcionalidad Bluetooth. Los pasos especícos
para el emparejamiento pueden variar en función de los diferentes teléfonos móviles. Consulte el
manual del usuario de su teléfono móvil para obtener más información. Los pasos generales para el
emparejamiento son los siguientes:
1. Mantenga el SB100BT/SB200BT y el teléfono móvil Bluetooth a una distancia inferior a 1 metro
para realizar el emparejamiento.
2. Pulse el botón
3. Active la función Bluetooth de su teléfono móvil y realice una búsqueda de dispositivos Bluetooth.
Una vez nalizada la búsqueda, seleccione “SB100BT/SB200BT” en la lista de dispositivos
Bluetooth.
4. De acuerdo con las instrucciones, introduzca la contraseña o el nº de PIN: “0000” y pulse “Yes”
(Sí) o “Conrm” (Conrmar).
5. Una vez realizado el emparejamiento de forma satisfactoria, seleccione “SB100BT/SB200BT” en
la lista de dispositivos Bluetooth y pulse “Connect” (Conectar).
B. Emparejamiento con un transmisor estéreo Bluetooth
Los distintos transmisores Bluetooth tienen diferentes formas de emparejamiento. Consulte el manual
del usuario de su transmisor Bluetooth para obtener más información. Los pasos generales para el
emparejamiento son los siguientes:
1. Mantenga el SB100BT/SB200BT y el transmisor Bluetooth a una distancia inferior a 1 metro para
realizar el emparejamiento.
2. Pulse el botón
, y pulse SOURCE para seleccionar el modo Bluetooth.
, y pulse SOURCE para seleccionar el modo Bluetooth.
3. Encienda su transmisor Bluetooth y permita que entre en el modo de emparejamiento.
4. El transmisor buscará y se conectará con el SB100BT/SB200BT automáticamente. Tras la
conexión con éxito, la voz de Bluetooth cambiará.
Notas:
• El SB100BT/SB200BT volverá automáticamente al modo de emparejamiento tras desconectarse
de un dispositivo Bluetooth.
C. Reproducción de música
Conexión con un teléfono móvil A2DP o un transmisor Bluetooth.
1. Conecte su teléfono móvil o transmisor Bluetooth con el SB100BT/SB200BT.
2. Ahora podrá escuchar su música desde el SB100BT/SB200BT cuando la reproduzca.
- ES 6 -
Page 26
3. Pulse Vol+ para subir el volumen o Vol- para bajarlo.
4. Pulse
5. Pulse
para saltar a la canción anterior.
para saltar a la canción siguiente.
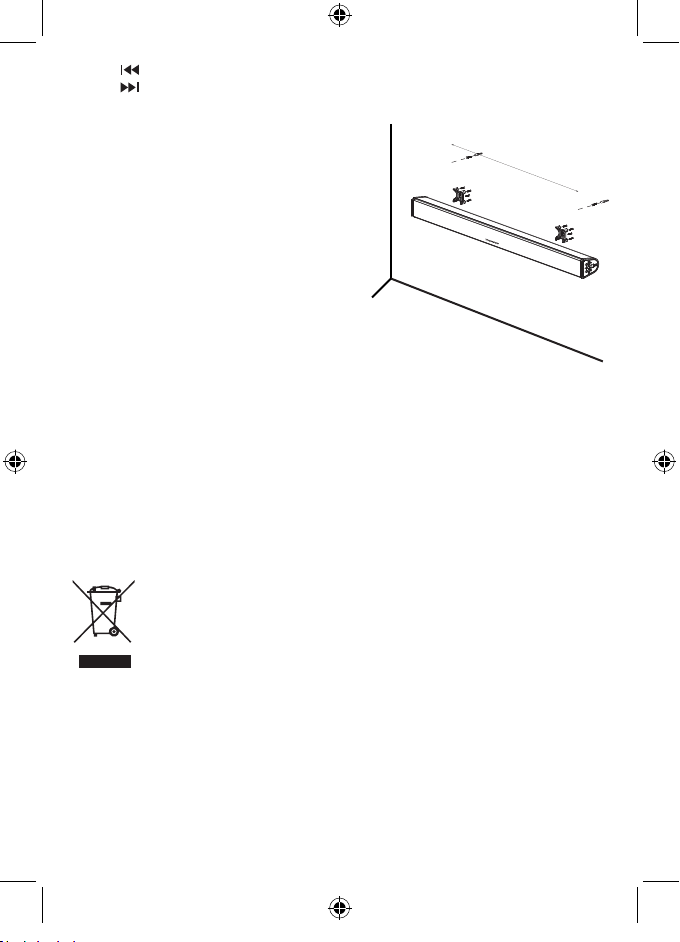
Montaje mural para su barra de sonido
Quite la pegatina y utilice el kit de montaje mural
para montar su barra de sonido sobre la pared.
Kit de montaje mural
1. 2 soportes murales
2. 8 tornillos de jación (para la barra de sonido
con el soporte)
3. 8 tapas de EVA para los tornillos
4. 2 tornillos largos
5. 2 anclajes murales
Necesitará:
1. Taladro eléctrico
2. Destornillador
3. Lápiz
4. Nivel de burbuja
Nota: Utilice el nivel de burbuja para asegurarse de que las dos placas de montaje mural quedan
horizontales.
1. Quite la pegatina de la placa posterior, atornille los 4 tornillos con el soporte a la barra de sonido
y coloque las tapas de EVA sobre los tornillos.
2. Marque los oricios que desee taladrar.
3. Taladre los oricios en los puntos marcados y, a continuación, inserte los anclajes murales.
4. Atornille los 2 tornillos a la pared y, a continuación, acople la barra de sonido y asegúrese de
que queda estable.
Nota:
680m
m
No tire los aparatos eléctricos o electrónicos a la basura normal.
• Llévelos a un punto de recogida para este material, ya que algunas
• piezas de estos aparatos pueden ser dañinos para la salud o el medio ambiente.
• Para ahorrar energía, si el aparato cesa su actividad durante rato, se apagará y entrará en modo
standby automáticamente. Se puede volver a encender mediante el selector de ENCENDIDO.
• Si hubiera una llamada entrante mientras el teléfono móvil está conectado al SB100BT/SB200BT
para reproducir música, la reproducción se pausará inmediatamente cuando responda a la llamada
y se reanudará una vez nalizada la misma. (A veces quedará pausado después de nalizar la
llamada. Esto dependerá de su tipo de teléfono).
• La palabra Bluetooth
Bluetooth SIG, Inc. y cualquier uso de tales marcas por Bigben Interactive se hace bajo licencia.
Otras marcas y nombres comerciales pertenecen a sus respectivos propietarios.
• THOMSON es una marca comercial de TECHNICOLOR SA o sus aliados usada por Bigben
Interactive bajo licencia.
®
, la marca y el logotipo son marcas comerciales registradas propiedad de
- ES 7 -
Page 27
• Por la presente, Bigben Interactive SA declara que el dispositivo del SB100BT/SB200BT cumple
con los requisitos de la directriz 1995/5/EC del Parlamento Europeo y del Consejo del 9 de marzo de
1999 de equipos de radio y equipos de terminales de telecomunicación así como el reconocimiento
mutuo de su conformidad.
Para descargar la declaración al completo, por favor, visita nuestra página web:
dentro de la sección declaración de conformidad.
http://www.bigben.eu
Importado por BIGBEN INTERACTIVE SA
396, Rue de la Voyette
CRT2 - FRETIN
CS 90414
59814 LESQUIN Cedex - Francia
www.bigben.eu
Fabricado en China
Importateur : Bigben Interactive FRANCE
396, Rue de la Voyette, C.R.T. 2 Fretin,
CS 90414 - 59814 LESQUIN Cedex
Bigben Interactive DEUTSCHLAND GmbH
Walter Gropius Str. 28, 50126 Bergheim, Deutschland
Bigben Interactive BELGIUM
Avenue Ernest Solvay, 1480 Tubize, Belgique
Bigben Interactive NEDERLAND b.v.
Franciscusweg 249-3B, 1216 SG Hilversum, Nederland
Bigben Interactive SPAIN S.L.
C/ Musgo 5, 2ª planta, 28023 Madrid, Spain
Bigben Interactive ITALIA s.r.l
Corso Sempione 221, 20025 Legnano - MI, Italia
FABRIQUÉ EN CHINE / MADE IN CHINA
HOTLINE
FRANCE, du lu ndi au vendr edi (sauf j ours féri és) :
9h00-19h00 ou suppor t@thomsonaudiovideo.eu
DEUTSCHLAND, Mont ag bis Sonnt ag von 8:00 bis 24:00 Uhr
09001-84 30 44*
Mobilf unknetz en nicht möglic h)
*Minderjährige müssen vorher einen Erziehungsberechtigten um Erlaubnis fragen.
BELGI QUE / NEDERL AND, klantenservice@bigben-interactive.nl
(0,49 €/Min. aus dem deu tschen Fes tnetz, An rufe aus allen
oder support@bigben-interactive.de
customerservice@bigben-interactive.be
ESPAÑA, sat@bigbeninteractive.es
ITALIA, suppor t@bigbeninteractive.it
www.bigben.eu
- ES 8 -
Page 28
SB100BT (SISTEMA 2.0) /
SB200BT (SISTEMA 2.1 con subwoofer)
BLUETOOTH / USB / INGRESSO OTTICO /
INGRESSO AUDIO
ISTRUZIONI D’USO
PRIMA DI UTILIZZARE L’APPARECCHIO, LEGGERE PER
INTERO IL PRESENTE MANUALE E CONSERVARLO
PER CONSULTAZIONI FUTURE.
BBI_SB100BT/SB200BT_1606_Ver1
Page 29
Indice
Per iniziare 1
Avvertenze di sicurezza ed altre informazioni 1
Manutenzione del prodotto 2
Protezione dell’ambiente 2
Conformità 2
Speciche tecniche 3
Contenuto della confezione 3
Descrizione delle parti 3
Sostituzione della batteria 4
Guida al primo utilizzo 5
Funzionamento 5
Montaggio a muro della sound bar 7
Nota 8
Per iniziare
• Estrarre l’apparecchiatura dalla confezione.
• Rimuovere tutti i materiali di imballaggio dal prodotto.
• Rimettere i materiali di imballaggio nella confezione o smaltirli in modo adeguato.
Avvertenze di sicurezza ed altre informazioni
Leggere con attenzione tutte le istruzioni prima di utilizzare questo prodotto. La garanzia decade in
caso di danni causati dalla mancata osservanza delle istruzioni.
Sicurezza
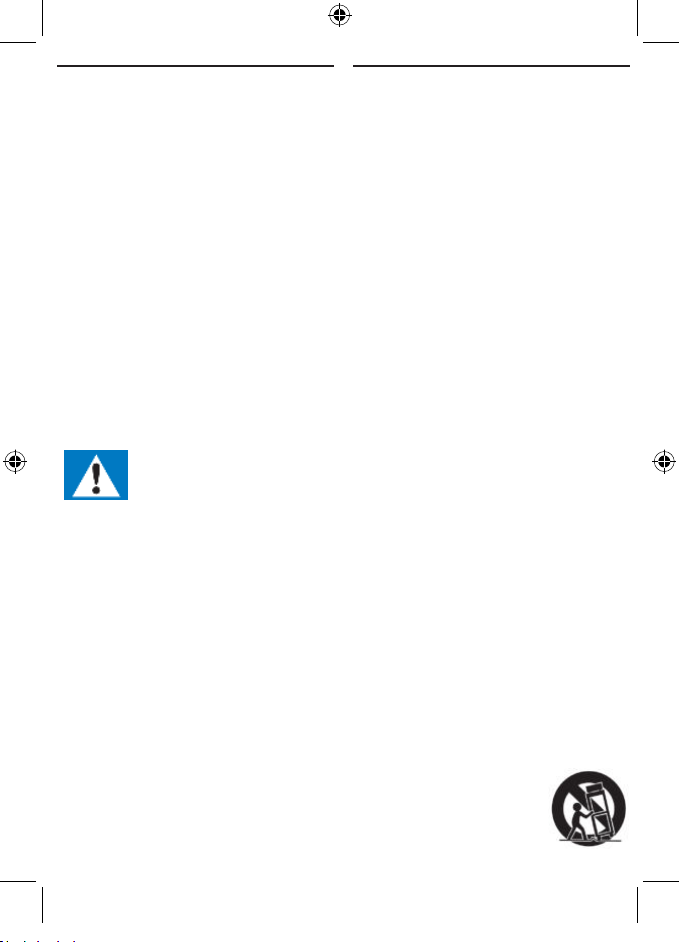
1. Leggere queste istruzioni.
2. Conservare queste istruzioni.
3. Rispettare tutte le avvertenze.
4. Seguire tutte le istruzioni.
5. Non utilizzare l’apparecchiatura vicino all’acqua.
6. Pulire solo con un panno asciutto.
7. Non ostruire le aperture di ventilazione. Installare in conformità con le istruzioni del produttore.
8. Non installare vicino a fonti di calore come radiatori, termosifoni, stufe o altri apparecchi (inclusi gli
amplicatori) che producono calore.
9. Proteggere il cavo di alimentazione dall’essere calpestato o schiacciato, particolarmente in
corrispondenza di spine, prese di corrente e del punto in cui esce dall’apparecchiatura.
10. Utilizzare solo accessori specicati dal produttore.
11. Utilizzare solo con il carrello, il supporto, il treppiede, la staffa od il tavolo specicati
dal produttore o venduti con l’apparecchio. Se si usa un carrello, prestare
attenzione quando si sposta l’insieme carrello/apparecchio per evitare il pericolo
che si ribaltino.
12. Scollegare il dispositivo durante i temporali o se non viene utilizzato per lunghi
periodi di tempo.
Avvertenza
• Non rimuovere l’alloggiamento dell’apparecchiatura.
• Non lubricare nessun componente dell’apparecchiatura.
• Non posizionare l’apparecchiatura sopra altri dispositivi elettrici.
• Tenere l’apparecchiatura lontana dalla luce solare diretta, da amme libere e da
sorgenti di calore.
• Non guardare direttamente il raggio laser all’interno di questo apparecchio.
• Assicurarsi di poter sempre raggiungere facilmente il cavo di alimentazione, la
spina o l’adattatore per scollegare l’apparecchio dall’alimentazione elettrica.
- IT 1 -
Page 30
13. Per qualsiasi intervento di assistenza, rivolgersi a tecnici qualicati. L’assistenza è necessaria
quando l’apparecchio ha subito in qualche modo dei danni, per esempio se il cavo di alimentazione
o la spina sono danneggiati, se è stato versato del liquido o sono caduti degli oggetti dell’apparato,
se l’apparecchio è stato esposto a pioggia o umidità, se non funziona normalmente o è caduto.
14. L’apparecchio non deve essere esposto a spruzzi o gocce d’acqua.
15. Non collocare sull’apparecchio eventuali fonti di pericolo (per esempio contenitori con liquidi,
candele accese).
16. Quando per scollegare la tensione di rete si usa la spina o un accoppiatore, il dispositivo di
disconnessione deve essere sempre comodo da raggiungere.
17. Assicurarsi che vi sia sufciente spazio libero attorno al prodotto per la ventilazione.
18. Le batterie (batterie singole o pacco batterie) non devono essere esposte a calore eccessivo come
luce solare diretta, fuoco o simili.
19. L'apparecchio deve essere dotato delle batterie appropriate per funzionare correttamente.
20. Usare esclusivamente le batterie raccomandate.
21. Rispettare la corretta polarità per evitare il rischio di corto circuito.
22. Non mischiare batterie nuove e batterie vecchie.
23. Non mischiare batterie alcaline, standard (zinco-carbone) e ricaricabili (nichel-cadmio).
24. Non ricaricare o tentare di aprire le batterie. Non gettare le batterie nel fuoco.
25. Sostituire tutte le batterie contemporaneamente con batterie nuove e identiche.
26. Rimuovere le batterie in previsione di un lungo periodo di inutilizzo.
Manutenzione del prodotto
1. Scollegare sempre l’apparecchio quando non in uso e prima della pulizia.
2. Non riprodurre musica a volume troppo elevato per evitare il rischio di danni all’udito e/o
all’apparecchio stesso.
3. Non utilizzare l’apparecchio in condizioni di eccessiva umidità.
4. Scollegare sempre l’apparecchio dalla rete di alimentazione prima della pulizia. Pulire l’apparecchio
con un panno morbido, umido e privo di lanugine. Non utilizzare detergenti abrasivi o caustici.
Protezione dell’ambiente
Il prodotto è stato progettato e fabbricato con materiali e componenti di alta qualità
che possono essere riciclati e riutilizzati.
Il prodotto contiene batterie che in base alla direttiva europea 2006/66/CE non possono
essere smaltite assieme ai normali riuti domestici. Informarsi sulle normative locali
relative alla raccolta differenziata delle batterie in quanto il loro corretto smaltimento
permette di evitare conseguenze negative per l’ambiente e la salute.
Il simbolo del bidone della spazzatura barrato da una croce indica che il prodotto
è soggetto alla direttiva europea 2002/96/CE. Si prega di informarsi sul sistema di
raccolta differenziata per i riuti RAEE (prodotti elettrici ed elettronici). Attenersi alle
normative locali e non smaltire i vecchi prodotti con i normali riuti domestici. Lo
smaltimento corretto del prodotto aiuta a prevenire potenziali conseguenze negative
per l’ambiente e la salute.
- IT 2 -
Page 31
Conformità
Questo prodotto è conforme ai requisiti dell'Unione europea sulle interferenze radio.
Speciche tecniche
• Alimentazione elettrica: 230 V~ 50 Hz
• Consumo totale: 65 W
• Sensibilità in ingresso:
AUX-IN 700 MV, LINE-IN 700 MV
• Impedenza altoparlanti: 8 ohm
Contenuto della confezione
Controllare e identicare il contenuto della confezione:
• Sound bar e subwoofer
(Opzionale solo per SB200BT)
• Telecomando
• Manuale di istruzioni
Descrizione delle parti
Panoramica dell'unità principale
• S/N (A): 75 db
• THD (1 kHz,1 W): 0,5%
• Risposta in frequenza: 20 Hz-20 KHz
• Uscita totale audio:
- SB100BT=30W
- SB200BT=50W
• Cavo RCA
• Cavo Line-in
• Cavo audio per subwoofer
1
2
3
4
5
6
7
1. Standby
Accende l'unità, attiva la modalità di standby
2. VOL -
Premere per diminuire il volume
3. Source
Selezione della sorgente audio: Bluetooth,
USB, Ingresso audio
4.
Avvio o pausa della riproduzione
5.
Passaggio alla traccia precedente
6. VOL +
Premere per aumentare il volume.
7.
Passaggio alla traccia successiva
8. Spia di stato
Mostra lo stato corrente
9. Porta USB
10. Ingresso audio
Collegamento a un dispositivo audio esterno
- IT 3 -
8
9
10
Page 32
11
11. Staffa di montaggio a muro
12. Ingresso ausiliario
Collegamento a un dispositivo audio esterno
13. Ingresso ottico
Collegamento a un dispositivo audio digitale
ottico
Panoramica del telecomando
1. ACCENSIONE
Premere per accendere e spegnere la torre
2. USB
Premere per attivare la modalità USB
3. OPT
Premere per attivare la modalità di ingresso ottico
4. VOLUME+
Premere per aumentare il volume
5.
Passaggio alla traccia precedente
6. VOLUME-
Premere per diminuire il volume
7. BT
Premere per attivare la modalità Bluetooth
8. MUTE
Premere per disattivare o riattivare il suono
9. AUX
Premere per attivare la modalità di ingresso ausiliario
10. LINE IN
Premere per attivare la modalità di ingresso linea
11.
Avvio o pausa della riproduzione
12.
Passaggio alla traccia successiva
12
13
14
(Only for
SB200BT)
SUB OUT
14. Uscita subwoofer
(Opzionale solo per SB200BT)
16
15
15. Interruttore di alimentazione
Accensione/Spegnimento
16. Cavo di alimentazione CA
1
2
3
4
5
6
7
8
9
10
11
12
- IT 4 -
Page 33
Sostituzione della batteria
Il telecomando funziona con batterie al litio CR2025 3V.
Se il telecomando non funziona più, ciò signica che è
necessario sostituire le batterie come di seguito:
• Premere la linguetta sul lato del vano batterie per
sganciare il coperchio del vano.
• Sostituire la batteria prestando attenzione al corretto
orientamento dei poli.
• Reinserire il coperchio del vano batterie premendolo no a udire un "clic".
ATTENZIONE: pericolo di esplosione in caso di inserimento errato delle batterie.
Guida al primo utilizzo
CR2025
Accensione
ATTENZIONE
• Rischio di danneggiare il prodotto! Assicurarsi che la
Collocare l’unità nella posizione desiderata e srotolare il cavo di alimentazione. Inserire il cavo nella
presa di alimentazione e accendere l’interruttore, se applicabile.
Auto standby
Durante la riproduzione di contenuti multimediali da un dispositivo connesso, l’apparecchio entra
automaticamente in modalità standby se:
tensione di alimentazione corrisponda a quella indicata
sull’etichetta sul retro.
• Rischio di scossa elettrica! Quando si stacca il cavo di
alimentazione CA, afferrare la spina per estrarla dalla presa
di corrente. Non tirare mai il cavo di alimentazione.
• Prima di collegare il cavo di alimentazione CA, accertarsi di
aver eseguito tutti gli altri collegamenti.
• Non viene premuto nessun tasto per 10 minuti,
• Non si riceve nessuna riproduzione audio/video da un dispositivo collegato per 10 minuti.
Funzionamento
Riproduzione di audio esterno
È possibile riprodurre audio da dispositivi esterni, ad esempio lettori MP3, attraverso questa unità.
Jack ingresso ottico (richiede un cavo da 3,5 mm)
1. Collegare un cavo ottico da 3,5 mm al jack ottico sul pannello posteriore. Collegare l'altra estremità
del cavo ottico al dispositivo audio digitale.
2. Premere il pulsante
per accendere l'unità.
3. Premere il pulsante SOURCE per selezionare la modalità di ingresso ottico (Optical In).
4. Usare i controlli sul dispositivo collegato per riprodurre l'audio attraverso l'unità.
Jack ingresso linea (richiede un cavo da 3,5 mm)
1. Collegare un cavo da 3,5 mm al jack di ingresso linea (Line) sul pannello superiore. Collegare
l'altra estremità del cavo da 3,5 mm al lettore MP3 o a un altro dispositivo audio.
2. Premere il pulsante
per accendere l'unità.
3. Premere il pulsante SOURCE per selezionare la modalità di ingresso linea (Line in).
4. Usare i controlli sul dispositivo collegato per riprodurre l'audio attraverso l'unità.
- IT 5 -
Page 34
Ingresso ausiliario RCA (richiede un cavo RCA)
1. Collegare un cavo RCA all'ingresso ausiliario. Collegare l'altra estremità del cavo RCA all'uscita
audio di un lettore DVD, impianto stereo, console di videogiochi o televisione.
2. Premere il pulsante di accensione per accendere l'unità.
3. Premere il pulsante SOURCE per selezionare la modalità di ingresso ausiliario (Aux In).
4. Usare i controlli sul dispositivo collegato per riprodurre l'audio attraverso l'unità.
Ingresso USB
1. Collegare un supporto USB alla porta USB.
2. Premere il pulsante SOURCE per selezionare la modalità USB; l'unità inizierà automaticamente
la riproduzione.
3. Premere
/ per selezionare una traccia.
4. Premere VOL +/VOL- per regolare il volume.
Nota:
• la porta USB/SD è molto sensibile e richiede un dispositivo stabile.
Modalità Bluetooth
A. Abbinamento con un dispositivo mobile Bluetooth
Accertarsi di aver attivato la funzione Bluetooth sul proprio dispositivo mobile. La procedura di
abbinamento può variare in base al tipo di dispositivo. Fare riferimento al manuale di istruzioni del
dispositivo mobile per ulteriori informazioni. La procedura di abbinamento generale è descritta di
seguito.
1. Mantenere l'unità SB100BT/SB200BT e il dispositivo Bluetooth a meno di 1 metro di distanza
durante l'abbinamento.
2. Premere il pulsante
3. Attivare la funzione Bluetooth sul dispositivo mobile e avviare la ricerca dei dispositivi Bluetooth.
Al termine della ricerca, selezionare "SB100BT/SB200BT" dall'elenco dei dispositivi Bluetooth.
4. Seguire le istruzioni; se viene richiesta una password o un codice PIN, inserire "0000" e premere
"Sì" o "Conferma".
5. Dopo l'abbinamento, selezionare "SB100BT/SB200BT" dall'elenco dei dispositivi Bluetooth e
premere "Connetti".
B. Abbinamento con un trasmettitore stereo Bluetooth
La procedura di abbinamento può variare in base al tipo di trasmettitore Bluetooth. Fare riferimento al
manuale di istruzioni del trasmettitore Bluetooth per ulteriori informazioni. La procedura di abbinamento
generale è descritta di seguito.
1. Mantenere l'unità SB100BT/SB200BT e il trasmettitore Bluetooth a meno di 1 metro di distanza
durante l'abbinamento.
2. Premere il pulsante
3. Accendere il proprio trasmettitore Bluetooth e attivare la modalità di abbinamento.
4. Il trasmettitore cercherà l'unità SB100BT/SB200BT e si abbinerà automaticamente. Dopo
l'abbinamento, la voce Bluetooth cambierà.
Nota:
• l'unità SB100BT/SB200BT tornerà automaticamente alla modalità di abbinamento dopo aver
scollegato un dispositivo Bluetooth.
e premere SOURCE per selezionare la modalità Bluetooth.
e premere SOURCE per selezionare la modalità Bluetooth.
- IT 6 -
Page 35
C. Riproduzione audio
Collegamento a un telefono cellulare A2DP o un trasmettitore Bluetooth
1. Collegare il telefono cellulare o il trasmettitore Bluetooth all'unità SB100BT/SB200BT.
2. Ora è possibile ascoltare l'audio attraverso l'unità SB100BT/SB200BT durante la riproduzione.
3. Premere Vol+ per aumentare il volume, premere Vol- per diminuire il volume.
4. Premere
5. Premere
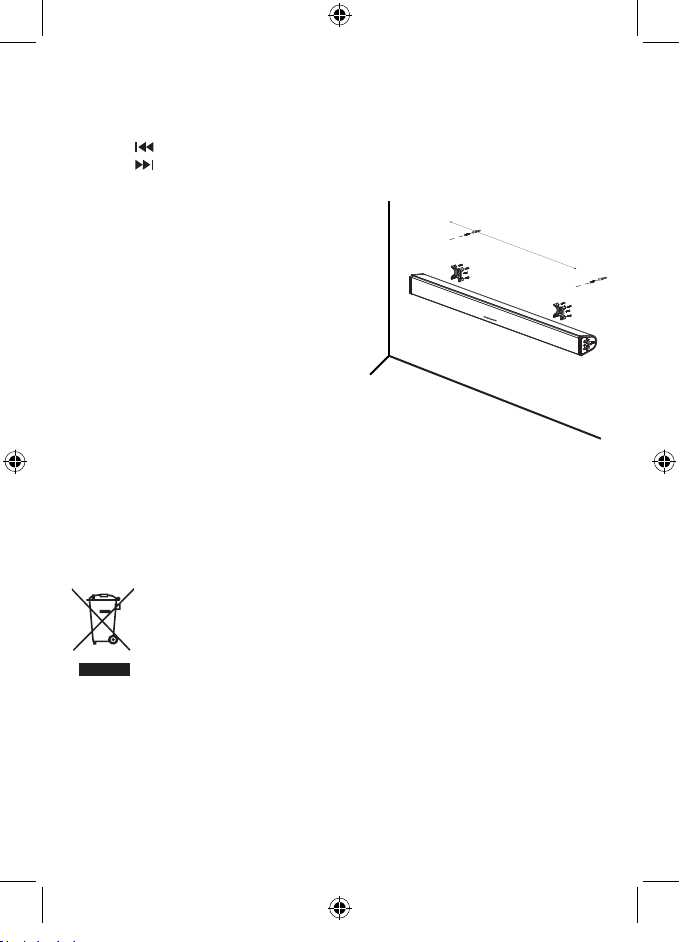
Montaggio a muro della sound bar
Staccare l'adesivo e usare il kit di montaggio a muro
per ssare la sound bar alla parete.
Kit di montaggio a muro
per passare alla traccia precedente.
per passare alla traccia successiva.
6
8
0mm
1. 2 staffe a muro
2. 8 viti di ssaggio (per la sound bar con staffa)
3. 8 coperture in EVA per viti
4. 2 viti lunghe
5. 2 tasselli
Sono necessari:
1. Trapano elettrico
2. Cacciavite
3. Matita
4. Livella
Nota: usare la livella per assicurarsi che la piastra di montaggio a muro sia orizzontale.
1. Staccare l'adesivo dalla piastra, avvitare la piastra alla sound bar con 4 viti e rimuovere la
copertura EVA dalle viti.
2. Segnare i fori da praticare.
3. Praticare i fori con il trapano e inserire i tasselli.
4. Avvitare le 2 viti al muro, quindi ssare la sound bar e assicurarsi che sia stabile.
Nota:
Non gettare gli apparecchi elettrici ed elettronici tra i riuti indifferenziati.
• Depositare gli apparecchi presso un apposito punto di raccolta.
• Alcuni componenti contenuti in questi apparecchi possono essere pericolosi per la
salute e per l’ambiente.
• Per risparmiare energia, quando l’unità non emette uscita audio per un certo periodo di tempo,
l’unità passa automaticamente in modalità stand-by. Può essere riaccesa utilizzando il selettore di
alimentazione.
• Se c’è una chiamata in arrivo mentre SB100BT/SB200BT è collegato al proprio telefono cellulare
per la riproduzione musicale, questa andrà in pausa e verrà ripresa alla ne della telefonata. (A volte
rimarrà in pausa dopo il termine della chiamata, dipende dal telefono cellulare.)
• Il marchio, il logo e la parola Bluetooth® sono marchi registrati di proprietà di Bluetooth SIG, Inc. e
l’uso di tali marchi da parte di Bigben Interactive è sotto licenza. Altri marchi e nomi commerciali
sono di proprietà dei rispettivi titolari.
• THOMSON è un marchio registrato di TECHNICOLOR SA o dei suoi afliati, utilizzato su licenza da
Bigben Interactive.
- IT 7 -
Page 36
• Con la presente, Bigben Interactive SA dichiara che il dispositivo di SB100BT/SB200BT è conforme
ai requisiti fondamentali della direttiva 1995/5/CE del Parlamento Europeo e del Consiglio avente
data 9 marzo 1999 sulle apparecchiature radio e sui terminali di telecomunicazione, nonché sul
reciproco riconoscimento della loro conformità.
Per scaricare la dichiarazione completa, visitare il nostro sito Web all’indirizzo:
http://www.bigbeninteractive.it/support, nella sezione relativa alla dichiarazione di conformità.
Importato da BIGBEN INTERACTIVE SA
396, Rue de la Voyette
CRT2 - FRETIN
CS 90414
59814 LESQUIN Cedex - Francia
www.bigben.eu
Prodotto in Cina
Importateur : Bigben Interactive FRANCE
396, Rue de la Voyette, C.R.T. 2 Fretin,
CS 90414 - 59814 LESQUIN Cedex
Bigben Interactive DEUTSCHLAND GmbH
Walter Gropius Str. 28, 50126 Bergheim, Deutschland
Bigben Interactive BELGIUM
Avenue Ernest Solvay, 1480 Tubize, Belgique
Bigben Interactive NEDERLAND b.v.
Franciscusweg 249-3B, 1216 SG Hilversum, Nederland
Bigben Interactive SPAIN S.L.
C/ Musgo 5, 2ª planta, 28023 Madrid, Spain
Bigben Interactive ITALIA s.r.l
Corso Sempione 221, 20025 Legnano - MI, Italia
FABRIQUÉ EN CHINE / MADE IN CHINA
HOTLINE
FRANCE, du lu ndi au vendr edi (sauf j ours féri és) :
9h00-19h00 ou suppor t@thomsonaudiovideo.eu
DEUTSCHLAND, Mont ag bis Sonnt ag von 8:00 bis 24:00 Uhr
09001-84 30 44*
Mobilf unknetz en nicht möglic h)
*Minderjährige müssen vorher einen Erziehungsberechtigten um Erlaubnis fragen.
BELGI QUE / NEDERL AND, klantenservice@bigben-interactive.nl
(0,49 €/Min. aus dem deu tschen Fes tnetz, An rufe aus allen
oder support@bigben-interactive.de
customerservice@bigben-interactive.be
ESPAÑA, sat@bigbeninteractive.es
ITALIA, suppor t@bigbeninteractive.it
www.bigben.eu
- IT 8 -
Page 37
SB100BT (SISTEMA 2.0) /
SB200BT (SISTEMA 2.1 com subwoofer)
BLUETOOTH / USB / ÓTICO / ENTRADA DE ÁUDIO
INSTRUÇÕES DE FUNCIONAMENTO
LEIA ESTE MANUAL DE UTILIZADOR COMPLETAMENTE ANTES
UTILIZAR ESTA UNIDADE E MANTENHA ESTE FOLHETO PARA
REFERÊNCIA FUTURA.
BBI_SB100BT/SB200BT_1606_Ver1
Page 38
Índice
Comçar 1
Instruções de segurança 1
Cuidados com o produto 2
Cuidados com o ambiente 2
Conformidade 2
Características técnicas 3
O que se encontra na caixa 3
Descrição das peças 3
Substituir a pilha 4
Iniciar 5
Utilização 5
Montar a sua barra de som na parede 7
Nota 8
Começar
• Retire o aparelho da caixa.
• Retire quaisquer materiais de empacotamento do produto.
• Coloque o material de empacotamento dentro da caixa e guarde-o ou elimine-o com segurança.
Instruções de segurança
Leia e compreenda todas as instruções antes de usar este produto. Se ocorrerem danos causados
pelo não seguimento das instruções, a garantia perde a sua validade.
Segurança
Aviso
• Nunca retire a estrutura deste aparelho.
• Nunca lubrique nenhuma peça deste aparelho.
• Nunca coloque este aparelho dentro de outro equipamento elétrico.
• Mantenha este aparelho afastado da luz direta do sol, chamas sem proteção ou
calor.
• Nunca olhe para o raio laser dentro deste aparelho.
• Certique-se de que acede facilmente ao o da alimentação, cha ou adaptador
para desligar este aparelho da alimentação.
1. Leia estas instruções.
2. Guarde estas instruções.
3. Tenha atenção a todos os avisos.
4. Siga todas as instruções.
5. Não use este aparelho perto de água.
6. Limpe apenas com um pano seco.
7. Não bloqueie quaisquer aberturas de ventilação. Instale de acordo com as instruções do fabricante.
8. Não instale próximo de fontes de calor, tais como radiadores, registadores de calor, fornos ou
outros aparelhos (incluindo amplicadores) que produzam calor.
9. Proteja o o da alimentação para que não seja calcado ou esmagado, especialmente nas chas,
recetáculos e no ponto de onde saem do aparelho.
10. Use apenas acessórios especicados pelo fabricante.
11. Use apenas com o carrinho, suporte, tripé ou mesa especicados pelo fabricante
ou vendidos com o aparelho. Quando usar um carrinho, tenha cuidado quando
mover o carrinho/aparelho, para evitar lesões devido a quedas.
12. Desligue a cha da tomada durante trovoadas ou quando não usar o aparelho
durante um longo período de tempo.
- PT 1 -
Page 39
13. Todas as reparações devem ser feitas por pessoal qualicado. São necessárias
reparações quando o aparelho tiver sido danicado de alguma forma, tal como o o da alimentação
ou a cha estiverem estragados, se derramarem líquidos ou caírem objetos no aparelho, o
aparelho ter sido exposto à chuva ou humidade, não funcionar normalmente ou tiver caído.
14. O aparelho não deve ser exposto a pingos ou salpicos.
15. Não coloque quaisquer fontes perigosas em cima do aparelho (por ex., objetos cheios de líquido,
velas acesas).
16. Quando usar a cha da alimentação ou um acoplador para desligar o aparelho, este deverá
permanecer pronto a ser utilizado.
17. Certique-se de que tem espaço livre suciente em redor do produto para a ventilação.
18. As pilhas (conjunto de pilhas ou pilhas instaladas) não devem ser expostas a calor em excesso,
como luz solar direta, fogo ou algo semelhante.
19. Tem de inserir as pilhas corretas, para que o aparelho funcione corretamente.
20. Só deverá usar as pilhas recomendadas.
21. Respeite a polaridade, para evitar um curto-circuito.
22. Não misture pilhas novas com pilhas usadas.
23. Não misture pilhas alcalinas, normais (carbono-zinco), ou recarregáveis (níquel cádmio)
24. Não recarregue nem tente abrir as pilhas. Não atire pilhas gastas para o fogo.
25. Substitua todas as pilhas em simultâneo por umas novas e idênticas.
26. Retire as pilhas quando não as usar durante um longo período de tempo.
Cuidados com o produto
1. Retire sempre a cha da tomada quando não usar o aparelho e antes de proceder à limpeza.
2. Não reproduza música com um nível de volume excessivo, pois podem ocorrer lesões auditivas
ou danos no aparelho.
3. Não use esta unidade em condições de humidade.
4. Retire sempre a cha da tomada antes de proceder à limpeza. Limpe o aparelho com um pano
suave ligeiramente embebido em água e sem linho. Não use produtos abrasivos nem detergentes
fortes.
Cuidados com o ambiente
O seu produto foi criado e fabricado com materiais e componentes de alta qualidade,
que podem ser reciclados e reutilizados.
O seu produto contém pilhas abrangidas pela Diretiva Europeia 2006/66/CE que não
podem ser eliminadas juntamente com o lixo doméstico comum. Informe-se acerca
das normas locais relativas à recolha em separado de pilhas, pois uma eliminação
correta ajuda a prevenir consequências negativas para o ambiente e para a saúde
humana.
Quando este símbolo de um caixote do lixo com uma cruz vier no produto, signica
que o produto é abrangido pela Diretiva Europeia 2002/96/CE. Por favor, informe-se
acerca do sistema de recolha em separado para produtos elétricos e eletrónicos. Aja
de acordo com as regras locais e não elimine o seu produto antigo juntamente com
o lixo doméstico comum. A eliminação correta do seu velho produto ajuda a prevenir
potenciais consequências negativas para o ambiente e para a saúde humana.
- PT 2 -
Page 40
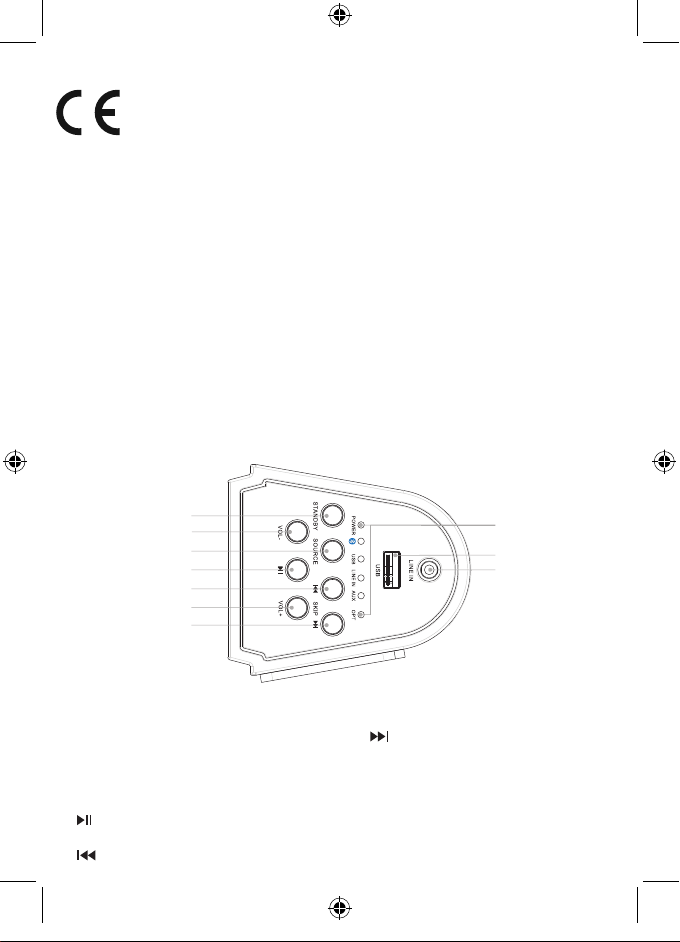
Conformidade
Este produto encontra-se em conformidade com os requerimentos das interferências
de rádio da União Europeia.
Características técnicas
• Alimentação: 230V~ 50Hz
• Consumo total: 65W
• Sensibilidade de entrada:
AUX IN 700MV, LINE IN 700MV
• Impedância dos altifalantes: 8ohm
O que se encontra na caixa
Verique e identique o conteúdo da caixa:
• Barra de som e Subwoofer
(Opção apenas para SB200BT)
• Telecomando
• Manual do Utilizador
Descrição das peças
Vista pormenorizada da unidade principal
• S/N (A): 75db
• THD (1kHz,1W): 0,5%
• Resposta de frequência: 20Hz-20KHz
• Saída total de música:
- SB100BT=30W
- SB200BT=50W
• Cabo RCA
• Cabo Line in
• Cabo de áudio para subwoofer
1
2
3
4
5
6
7
1. Inativo
Ligue a unidade e passe para o modo inativo
2. VOL -
Diminua o volume
3. Fonte
Selecione uma fonte: Bluetooth, USB,
ENTRADA DE ÁUDIO
4.
Iniciar ou fazer uma pausa na reprodução
5.
Passar para a faixa anterior
6. VOL +
Aumente o volume
7.
Passar para a faixa seguinte
8. Indicador LED
Apresenta o estado atual
9. Entrada USB
10. Entrada de áudio
Ligue um dispositivo de áudio externo
- PT 3 -
8
9
10
Page 41
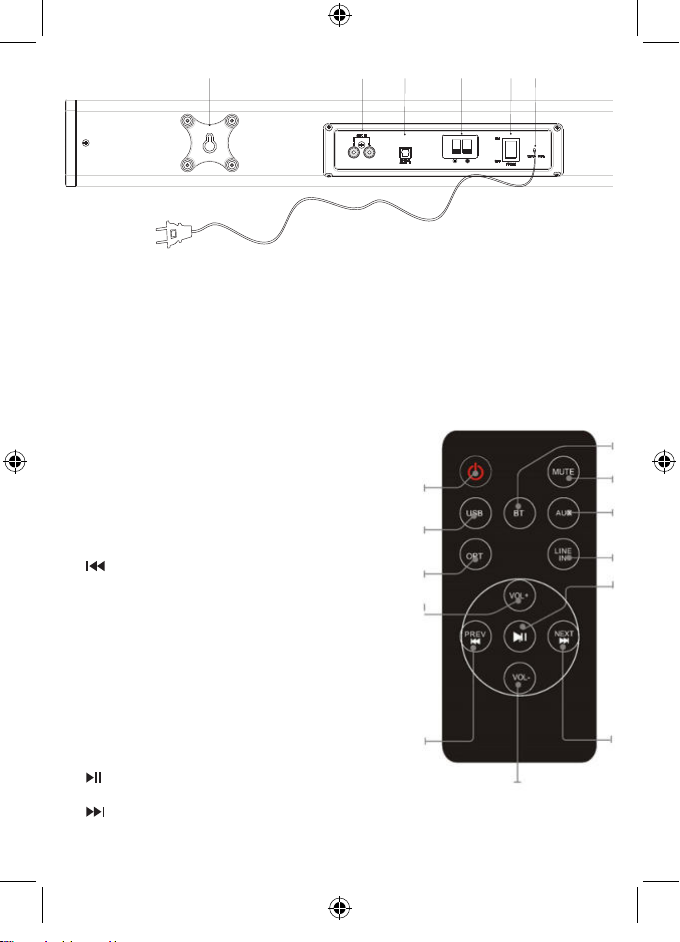
11
12
13
14
(Only for
SB200BT)
SUB OUT
16
15
11. Suporte de montagem na parede
12. Entrada auxiliar
Ligue um dispositivo de áudio externo
13. Entrada ótica
Ligue uma entrada de áudio digital ótica
Vista pormenorizada do telecomando
1. POWER
Prima para ligar e desligar a torre
2. USB
Prima para entrar no modo USB
3. OPT
Prima para entrar no modo de entrada ótica
4. VOLUME+
Prima para ajustar o volume+
5.
Passar para a faixa anterior
6. VOLUME-
Prima para ajustar o volume-
7. BT
Prima para entrar no modo Bluetooth
8. MUTE
Prima para desligar o som ou restaurar o volume
9. AUX
Prima para entrar no modo de entrada auxiliar
10. LINE IN
Prima para entrar no modo de entrada Line-in
11.
Iniciar ou fazer uma pausa na reprodução
12.
Passar para a faixa seguinte
14. Saída do subwoofer
(Opção apenas para SB200BT)
15. Interruptor da energia
Ligar/desligar
16. Fio da alimentação AC
1
2
3
4
5
6
7
8
9
10
11
12
- PT 3 -
Page 42
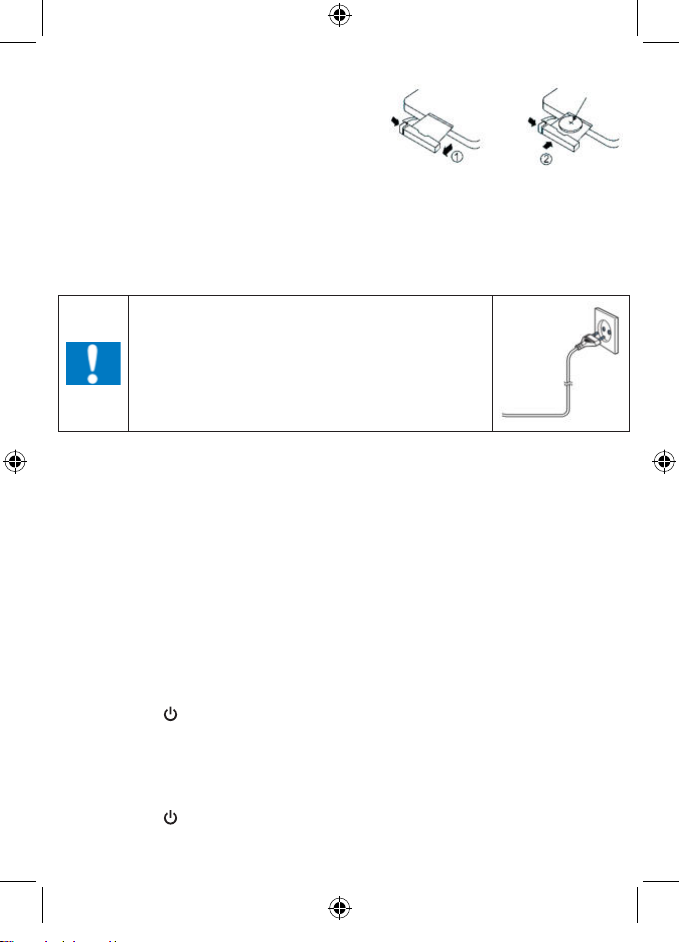
Substituir a pilha
O telecomando funciona com uma pilha do tipo botão
CR2025 de 3V. Quando o telecomando deixar de
funcionar, tem de substituir a pilha do seguinte modo:
• Prima a aba na parte lateral da tampa do
compartimento da pilha para a libertar e permita que
o suporte da pilha saia.
• Substitua a pilha, prestando atenção à correta orientação dos pólos.
• Volte a colocar o suporte da pilha, empurrando-o para dentro até ouvir um "clique".
ATENÇÃO: Perigo de explosão se a pilha não for inserida corretamente.
CR2025
Iniciar
Alimentação
CUIDADO
• Risco de danos no produto! Certique-se de que a voltagem
da alimentação corresponde à voltagem impressa na
etiqueta traseira.
• Risco de choque elétrico! Quando desliga a alimentação
CA, retire sempre a cha da tomada. Nunca puxe o o.
• Antes de ligar o o da alimentação CA, certique-se de que
Coloque a unidade na posição desejada e desenrole o o da alimentação. Insira a cha na tomada e
ligue, se aplicável.
Espera automática
Quando reproduzir média a partir de um dispositivo conetado, a Torre passa automaticamente para o
modo de espera se:
• Não premir qualquer botão durante 10 minutos.
• Não houver áudio a partir de um dispositivo conetado durante 10 minutos.
completou todas as outras ligações.
Utilização
Reproduzir a partir de um dispositivo de áudio externo
Pode reproduzir a partir de um dispositivo de áudio externo, como um leitor de MP3, através desta
unidade.
Entrada ótica (requer um cabo ótico)
1. Ligue um cabo ótico à entrada ótica no painel traseiro. Ligue a outra extremidade do cabo ótico a
um dispositivo de áudio digital.
2. Prima o botão
3. Prima o botão SOURCE para passar para o modo de entrada ótica.
4. Use os controlos no dispositivo conetado para começar a reproduzir áudio através da unidade.
Entrada Line-in (Requer um cabo de 3,5 mm)
1. Ligue um cabo de 3,5 mm à entrada Line-in no painel superior. Ligue a outra extremidade do cabo
de 3,5 mm num leitor de MP3 ou outro dispositivo de áudio.
2. Prima o botão
3. Prima o botão SOURCE para passar para o modo Line-in.
4. Use os controlos no dispositivo conetado para começar a reproduzir áudio através da unidade.
para ligar a unidade.
para ligar a unidade.
- PT 5 -
Page 43
Entrada auxiliar RCA (Requer um cabo RCA)
1. Ligue um cabo RCA na entrada auxiliar. Ligue a outra extremidade do cabo RCA na saída de
áudio do seu leitor de DVD, sistema de som, sistema de jogos ou televisão.
2. Prima o botão da energia para ligar a unidade.
3. Prima o botão SOURCE para passar para o modo auxiliar.
4. Use os controlos no dispositivo conetado para começar a reproduzir áudio através da unidade.
Usar a entrada USB
1. Ligue a sua unidade de disco USB na entrada USB.
2. Prima repetidamente SOURCE para selecionar o modo USB. A unidade pode reproduzir
automaticamente.
3. Prima
4. Prima VOL+/VOL- para ajustar o volume.
Notas:
• A porta USB é sensível. Uma má utilização pode tornar o funcionamento do equipamento instável.
Modo Bluetooth
A. Emparelhar com um telemóvel com Bluetooth
Certique-se de que o seu telemóvel tem o Bluetooth ativado. Os passos de emparelhamento
especícos podem variar de acordo com o telemóvel. Consulte o manual do seu telemóvel para obter
mais informações. Os principais passos de emparelhamento são os seguintes:
1. Mantenha o SB100BT/SB200BT e o telemóvel com Bluetooth a menos de 1 metro quando efetuar
2. Prima o botão
3. Ligue a função Bluetooth do seu telemóvel e procure por dispositivos Bluetooth. Quando a busca
4. De acordo com a indicação, insira a palavra-passe ou o PIN nº: "0000" e prima "Sim" ou "Conrmar".
5. Após um emparelhamento efetuado com sucesso, selecione "SB100BT/SB200BT" a partir da
B. Emparelhar com um transmissor estéreo Bluetooth
Diferentes transmissores Bluetooth têm diferentes modos de emparelhamento. Consulte o manual
de utilização do seu transmissor Bluetooth para obter mais informações. Os principais passos de
emparelhamento são os seguintes:
1. Mantenha o SB100BT/SB200BT e o transmissor Bluetooth a menos de 1 metro quando efetuar
2. Prima o botão
3. Ligue o seu transmissor Bluetooth e deixe-o entrar no modo de emparelhamento.
4. O transmissor procura e efetua automaticamente a conexão ao SB100BT/SB200BT. Após uma
Notas:
• O SB100BT/SB200BT volta automaticamente ao modo de emparelhamento após se desconetar de
um dispositivo Bluetooth.
/ para selecionar a faixa.
o emparelhamento.
e prima SOURCE para selecionar o modo Bluetooth.
estiver completa, selecione "SB100BT/SB200BT" na lista de dispositivos Bluetooth.
lista de dispositivos Bluetooth e prima "Conetar".
o emparelhamento.
e prima SOURCE para selecionar o modo Bluetooth.
conexão efetuada com sucesso, a voz por Bluetooth muda.
- PT 6 -
Page 44
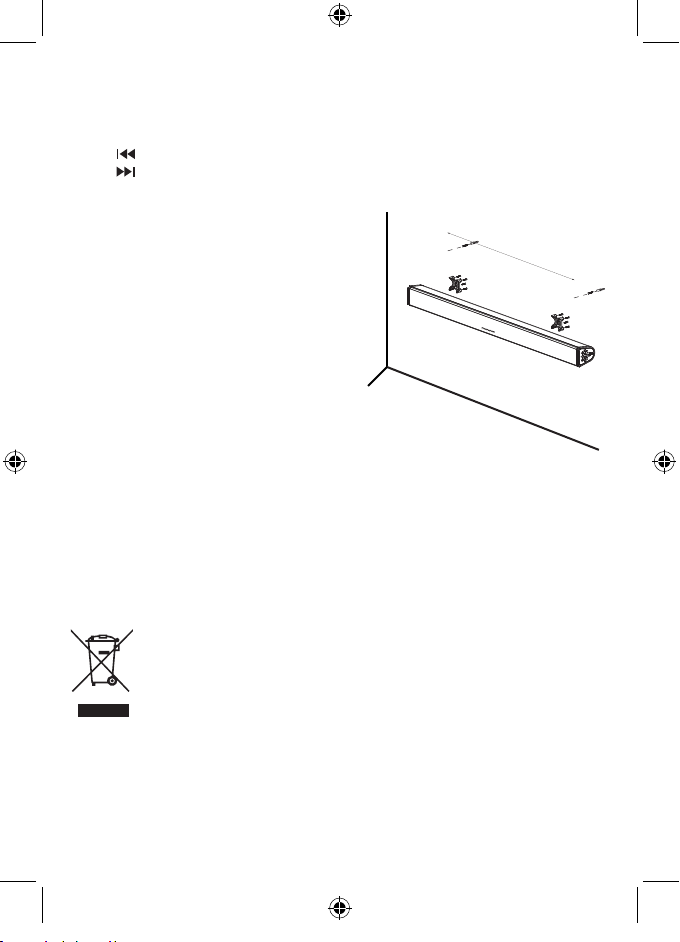
C. Reprodução de música
Efetuar a conexão com um telemóvel A2DP ou transmissor Bluetooth
1. Efetue a conexão do seu telemóvel ou transmissor Bluetooth ao SB100BT/SB200BT.
2. Pode ouvir a sua música a partir do SB100BT/SB200BT quando a reproduzir.
3. Prima Vol+ para aumentar o volume, e prima Vol- para diminuir o volume.
4. Prima
5. Prima
para passar para a música anterior.
para passar para a música seguinte.
Montar a sua barra de som na parede
Retire o autocolante e use o kit de xação na parede
para montar a barra de som na parede.
Kit de xação na parede
6
80mm
1. 2 suportes de parede
2. 8 parafusos de xação (para barra de som com
suporte)
3. 8 coberturas EVA para os parafusos
4. 2 parafusos compridos
5. 2 ganchos de parede
Precisa de:
1. Berbequim elétrico
2. Chave de fendas
3. Lápis
4. Nível de bolha
Nota: Use um nível de bolha para se certicar de que a placa de montagem na parede está na
horizontal.
1. Retire o autocolante na placa traseira, enrosque os 4 parafusos com suporte à barra de som e
coloque a cobertura EVA nos parafusos.
2. Assinale os orifícios a serem perfurados.
3. Faça os buracos nos pontos assinalados e insira os ganchos de parede.
4. Aparafuse os 2 parafusos na parede e xe a barra de som. Certique-se de que ca estável.
Nota:
Não deite fora os aparelhos elétricos e eletrónicos no caixote de lixo normal.
• Entregue-os no ponto de recolha.
• Algumas partes deste aparelho podem ser perigosas para a saúde e para o ambiente.
• De modo a poupar energia quando a unidade não emitir som durante algum tempo, a unidade entra
automaticamente no modo de espera. Pode ligá-la usando novamente o botão da energia.
• Se receber uma chamada enquanto o SB100BT/SB200BT estiver conetado ao seu telemóvel para
reproduzir música, a música para quando atender a chamada e volta a tocar quando a chamada
terminar. (Por vezes, faz uma pausa após o nal da chamada, dependendo do seu telemóvel.)
• A palavra Bluetooth® e logótipos são marcas registadas da Bluetooth SIG, Inc. Qualquer uso de tais
marcas é efetuado sob licença da Bigben Interactive. Outras marcas registadas e nomes comerciais
pertencem aos respetivos proprietários.
- PT 7 -
Page 45
• THOMSON é uma marca comercial da TECHNICOLOR SA ou dos seus aliados, usada sob licença
pela Bigben Interactive.
• Por este meio, a Bigben Interactive SA declara que o aparelho SB100BT/SB200BT cumpre com os
requisitos essenciais da diretiva 1995/5/EC do Parlamento Europeu e do Conselho de 9 de Março
de 1999 sobre equipamento rádio e terminais de telecomunicações e o reconhecimento mútuo da
sua conformidade.
Para descarregar a declaração completa, por favor consulte o nosso website:
secção declaração de conformidade.
Importado pela BIGBEN INTERACTIVE SA
396, Rue de la Voyette
CRT2 - FRETIN
CS 90414
59814 LESQUIN Cedex - França
www.bigben.eu
Fabricado na China
http://www.bigben.eu na
Importateur : Bigben Interactive FRANCE
396, Rue de la Voyette, C.R.T. 2 Fretin,
CS 90414 - 59814 LESQUIN Cedex
Bigben Interactive DEUTSCHLAND GmbH
Walter Gropius Str. 28, 50126 Bergheim, Deutschland
Bigben Interactive BELGIUM
Avenue Ernest Solvay, 1480 Tubize, Belgique
Bigben Interactive NEDERLAND b.v.
Franciscusweg 249-3B, 1216 SG Hilversum, Nederland
Bigben Interactive SPAIN S.L.
C/ Musgo 5, 2ª planta, 28023 Madrid, Spain
Bigben Interactive ITALIA s.r.l
Corso Sempione 221, 20025 Legnano - MI, Italia
FABRIQUÉ EN CHINE / MADE IN CHINA
HOTLINE
FRANCE, du lu ndi au vendr edi (sauf j ours féri és) :
9h00-19h00 ou suppor t@thomsonaudiovideo.eu
DEUTSCHLAND, Mont ag bis Sonnt ag von 8:00 bis 24:00 Uhr
09001-84 30 44*
Mobilf unknetz en nicht möglic h)
*Minderjährige müssen vorher einen Erziehungsberechtigten um Erlaubnis fragen.
BELGI QUE / NEDERL AND, klantenservice@bigben-interactive.nl
(0,49 €/Min. aus dem deu tschen Fes tnetz, An rufe aus allen
oder support@bigben-interactive.de
customerservice@bigben-interactive.be
ESPAÑA, sat@bigbeninteractive.es
ITALIA, suppor t@bigbeninteractive.it
www.bigben.eu
- PT 8 -
Page 46
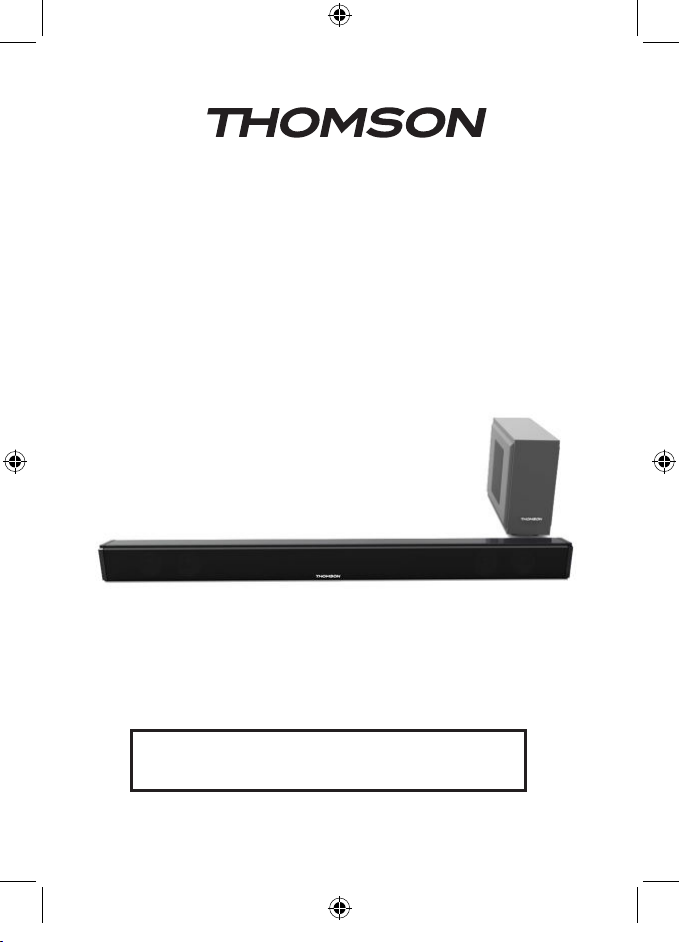
SB100BT (SYSTEM 2.0) /
SB200BT (SYSTEM 2.1 mit Subwoofer)
BLUETOOTH / USB / OPTICAL / AUDIO IN
BEDIENUNGSANLEITUNG
BITTE LESEN SIE DIESE BETRIEBSANLEITUNG VOR GEBRAUCH
DES PRODUKTES SORGFÄLTIG DURCH UND BEWAHREN SIE SIE
ANSCHLIEßEND ZU NACHSCHLAGEZWECKEN AUF.
BBI_SB100BT/SB200BT_1606_Ver1
Page 47
Inhalt
Erste Schritte 1
Sicherheit und Hinweise 1
Produktpege 2
Umweltschutz 2
Compliance 2
Technische Daten 3
Packungsinhalt 3
Beschreibung der Teile 3
Batterie austauschen 4
Los gehts 5
Benutzung 5
Wandbefestigung für Ihre Sound-Bar 7
Anmerkung 8
Erste Schritte
• Sound Tower aus dem Karton herausnehmen.
• Sämtliches Verpackungsmaterial vom Produkt entfernen.
• Verpackungsmaterial im Karton aufbewahren oder sicher entsorgen.
Sicherheit und Hinweise
Alle Anweisungen vor Benutzung des Produkts lesen und nachvollziehen. Treten Schäden aufgrund
von Nichtbeachtung der Anweisungen auf, wird die Garantie gegenstandslos.
Sicherheit
Warnhinweise
• Niemals das Gehäuse des Geräts entfernen.
• Niemals Teile des Geräts mit Schmiermittel behandeln.
• Niemals das Gerät auf anderen elektrischen Vorrichtungen aufstellen.
• Gerät vor direkter Sonneneinstrahlung, offenen Flammen und Hitze schützen.
• Niemals in den Laserstrahl im Inneren des Geräts blicken.
• Stets einfachen Zugang zu Stromkabel, Netzstecker und Netzadapter sicherstellen,
damit das Gerät vom Strom getrennt werden kann.
1. Anweisungen lesen.
2. Anweisungen aufbewahren.
3. Alle Warnungen beachten.
4. Alle Anweisungen befolgen.
5. Gerät nicht in der Nähe von Wasser verwenden.
6. Nur mit einem trockenen Tuch reinigen.
7. Lüftungsöffnungen nicht blockieren. Gemäß den Angaben des Herstellers aufstellen.
8. Nicht in der Nähe von Wärmequellen aufstellen, wie Heizkörper, Heizlüfter, Öfen oder anderen
Geräten (einschließlich Verstärker), die Wärme erzeugen.
9. Stromkabel vor Belastungen durch Quetschen und Einklemmen schützen, insbesondere an
Steckern, Mehrfachsteckdosen und den Austrittsstellen aus dem Gerät.
10. Erweiterungen/Zubehör nur wie vom Hersteller angegeben verwenden.
11. Nur in Verbindung mit Rollwagen, Ständern, Stativen, Halterungen oder Tischen
verwenden, die vom Hersteller angegeben wurden oder mit dem Gerät verkauft
werden. Bei Verwendung eines Rollwagens ist Vorsicht beim Verschieben des
Wagens/Geräts geboten, um Verletzungen durch umfallende Teile zu verhindern.
12. Bei Gewitter oder längerer Nichtbenutzung Gerät vom Netzstrom trennen.
13. Service-Reparaturen nur von qualiziertem Fachpersonal durchführen lassen. Eine ServiceReparatur ist nötig, wenn das Gerät in irgendeiner Weise beschädigt wurde, z. B. bei Schäden
- DE 1 -
Page 48
an Stromkabel oder Netzstecker, nach dem Verschütten von Flüssigkeiten über dem Gerät, nach
dem Aufprall von Objekten auf dem Gerät, nach Kontakt mit Regen oder Feuchtigkeit, bei nicht
ordnungsgemäßer Funktionsweise oder nach dem Herunterfallen des Geräts.
14. Das Gerät darf keinen Tropfen oder Spritzern ausgesetzt werden.
15. Keine Gefahrenquellen (z. B. mit Flüssigkeit gefüllte Objekte, brennende Kerzen) auf das Gerät stellen.
16. Wenn eine Wandsteckdose oder ein Geräteadapter zum Anschluss des Geräts verwendet wird,
muss dieser Anschluss stets zugänglich bleiben.
17. Um das Produkt herum muss genügend Freiraum zur Luftzirkulation bleiben.
18. Batterien (integrierte Akkupacks oder Batterien) dürfen keiner übermäßigen Hitze ausgesetzt
werden, wie Sonneneinstrahlung, offenes Feuer o. Ä.
19. Für eine ordnungsgemäße Funktionsweise müssen geeignete Batterien in das Gerät eingelegt
werden.
20. Es dürfen ausschließlich die empfohlenen Batterien verwendet werden.
21. Die Polung muss entsprechend berücksichtigt werden, um einen Kurzschluss zu vermeiden.
22. Kombinieren Sie keine gebrauchten mit neuen Batterien.
23. Kombinieren Sie keine Alkali-, Standard- (Kohle-Zink) oder wiederauadbare (Nickel-Cadmium)
Batterien miteinander.
24. Laden Sie die Batterien nicht wieder auf und versuchen Sie nicht, die Batterien zu öffnen. Werfen
Sie die Batterien nicht ins Feuer.
25. Ersetzen Sie alle Batterien zur gleichen Zeit mit neuen, identischen Batterien.
26. Entfernen Sie die Batterien, wenn diese für einen langen Zeitraum nicht genutzt wurden.
Produktpege
1. Das Gerät muss stets von der Steckdose getrennt werden, wenn es nicht in Betrieb ist oder
gereinigt werden soll.
2. Musik nicht mit übermäßiger Lautstärke hören, da dies dem Gehör und/oder dem Gerät schaden
kann.
3. Gerät nicht im nassen oder feuchten Zustand verwenden.
4. Gerät vor der Reinigung stets von der Netzstromversorgung trennen. Gerät mit einem weichen,
feuchten, usenfreien Tuch reinigen. Keine Scheuermittel oder aggressiven Reinigungsmittel
verwenden.
Umweltschutz
Das Produkt wurde mit qualitativ hochwertigen Werkstoffen und Komponenten
konzipiert und hergestellt, die recycelt und wiederverwendet werden können.
Ihr Produkt enthält Batterien, für die die europäische Richtlinie 2006/66/EG gilt und die
nicht mit den normalen Haushaltsabfällen entsorgt werden dürfen. Bitte informieren
Sie sich über die örtlichen Vorschriften bezüglich der getrennten Sammlung von
Batterien, da eine ordnungsgemäße Entsorgung dazu beiträgt, Umweltschäden zu
verhindern und Ihre Gesundheit zu schützen.
Dieses Symbol einer durchgestrichenen Mülltonne auf Rädern auf einem Produkt
weist daraufhin, dass für das Produkt die europäische Richtlinie 2002/96/EG gilt.
Bitte informieren Sie sich über das örtliche Abfalltrennsystem für elektrische und
elektronische Produkte. Bitte richten Sie sich nach den in Ihrer Region geltenden
Vorschriften für die Abfalltrennung und entsorgen Sie Ihre alten Produkte nicht mit Ihren
normalen Haushaltsabfällen. Die Entsorgung alter Produkte hilft, Umweltschäden zu
verhindern und Ihre Gesundheit zu schützen.
- DE 2 -
Page 49
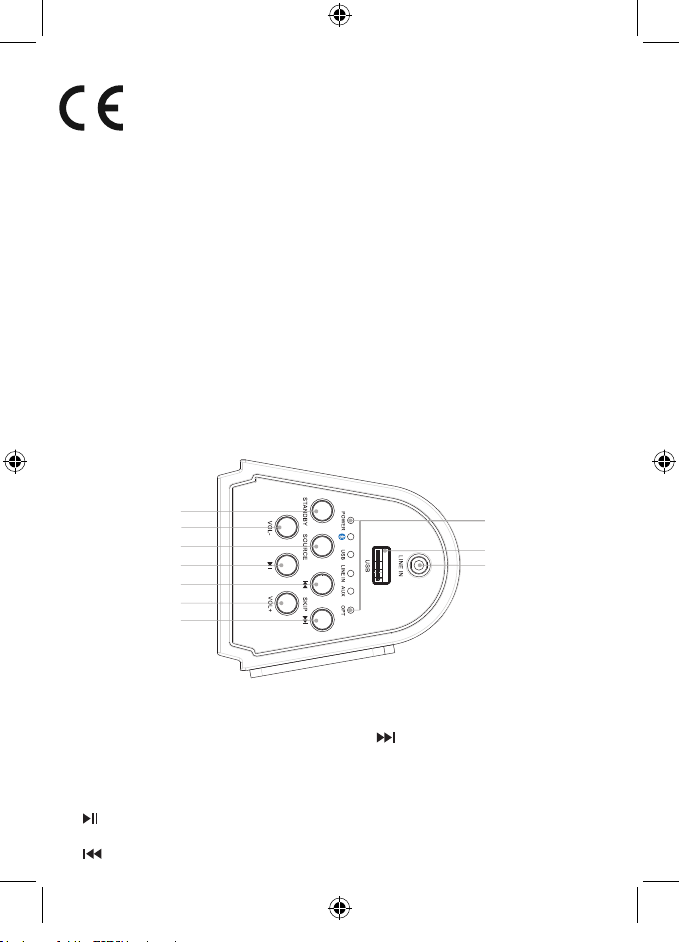
Compliance
Dieses Produkt entspricht den Bestimmungen für Funkstörungen der Europäischen
Gemeinschaft.
Technische Daten
• Stromversorgung: 230V~ 50Hz
• Gesamtverbrauch: 65W
• Eingangsempndlichkeit:
AUX IN 700MV, LINE IN 700MV
• Impedanz der Lautsprecher: 8 Ohm
Packungsinhalt
Folgender Verpackungsinhalt ist enthalten:
• Sound-Bar und Subwoofer
(Option nur für SB200BT)
• Fernbedienung
• Bedienungsanleitung
Beschreibung der Teile
Übersicht Hauptgerät
• S/N (A): 75db
• THD(1kHz,1W): 0,5%
• Frequenzgang: 20Hz-20KHz
• Musikwiedergabe insgesamt:
- SB100BT=30W
- SB200BT=50W
• RCA-Kabel
• Line In-Kabel
• Audio-Kabel für Sub
1
2
3
4
5
6
7
1. Standby
Anschalten des Geräts, Wechsel in den
Stand-by-Modus
2. VOL -
Anpassung der Lautstärke (Leiser)
3. Source
Auswahl der Wiedergabequelle
4.
Start oder Pause der Wiedergabe
5.
Springen zum vorherigen Titel
6. VOL +
Anpassung der Lautstärke (Lauter)
7.
Springen zum nächsten Titel
8. LED-Anzeige
Zeigt den aktuellen Status an
9. USB-Buchse
10. LINE IN
Anschluss für ein externes Audio-Gerät
(3,5mm Klinkenstecker)
- DE 3 -
8
9
10
Page 50
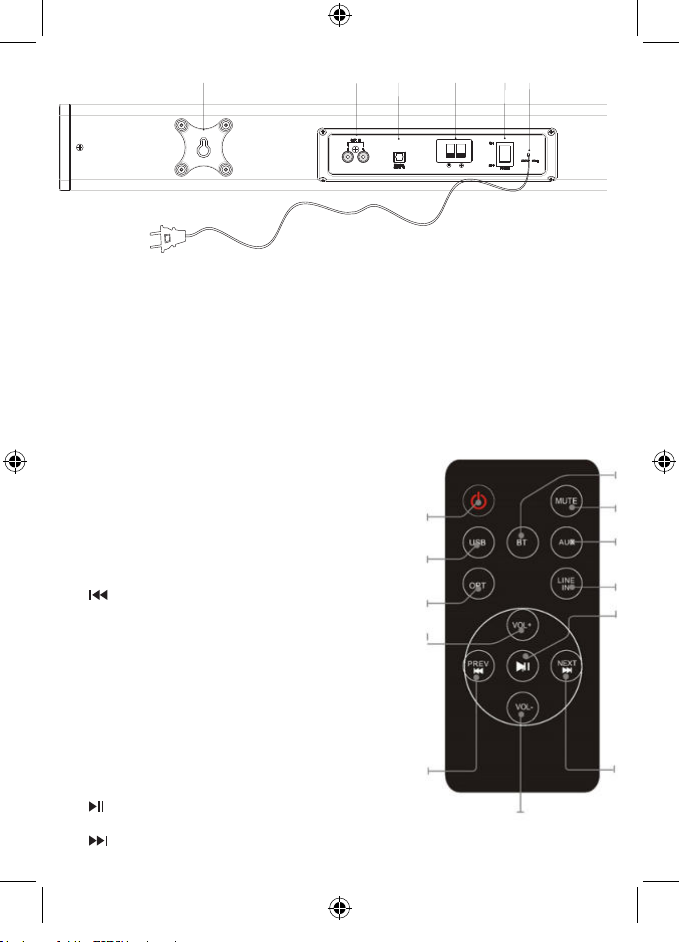
11
12
13
14
(Only for
SB200BT)
SUB OUT
16
15
11. Wandhalterung
12. AUX in
Anschluss für ein externes Audio-Gerät
(RCA/Cinch)
13. Optischer Eingang
Anschluss eines optisch-digitalen
Audioeingangs
Übersicht Fernbedienung
1. POWER
Anschalten des Geräts, Wechsel in den Stand-by-Modus
2. USB
Auswahl der Wiedergabequelle: USB
3. OPT
Auswahl der Wiedergabequelle: Optischer Eingang
4. VOL +
Anpassung der Lautstärke (Lauter)
5.
Springen zum vorherigen Titel
6. VOL -
Anpassung der Lautstärke (Leiser)
7. BT
Auswahl der Wiedergabequelle: Bluetooth
8. MUTE
Stummschaltung oder Wiederherstellung der Lautstärke
9. AUX
Auswahl der Wiedergabequelle: AUX IN
10. LINE-IN
Auswahl der Wiedergabequelle: LINE IN
11.
Start oder Pause der Wiedergabe
12.
Springen zum nächsten Titel
- DE 4 -
14. Subwoofer-Ausgang
(Option nur für SB200BT)
15. Netzschalter
Ein-/Ausschalten
16. AC-Netzkabel
1
2
3
4
5
7
8
9
10
11
12
6
Page 51
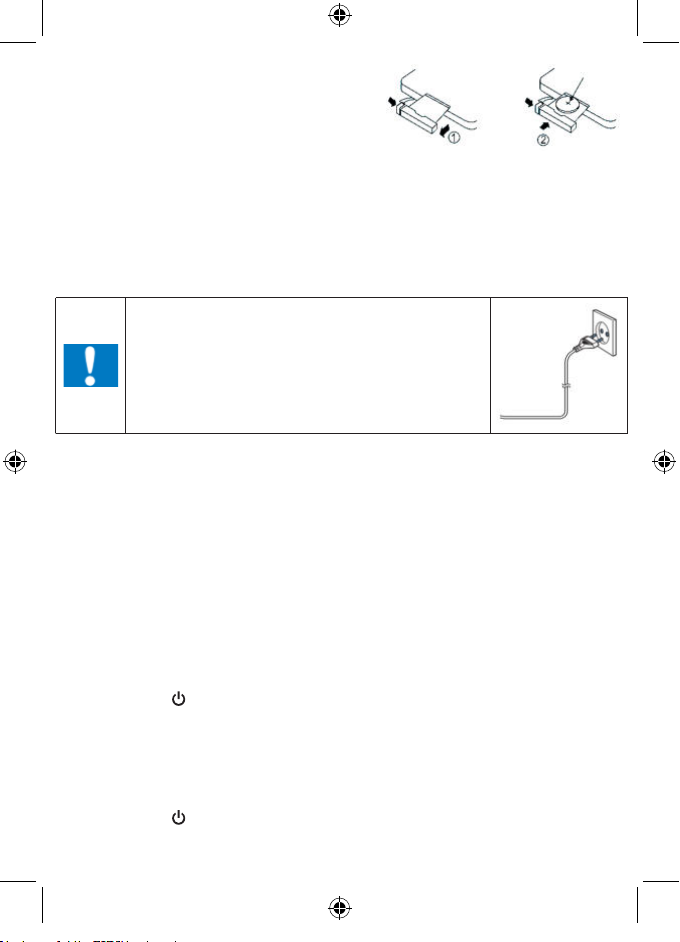
Batterie austauschen
Die Fernbedienung arbeitet mit Lithium-Knopfzellen
CR2025 3V. Wenn die Fernbedienung nicht mehr
funktioniert, müssen Sie die Batterien folgendermaßen
austauschen:
• Drücken Sie auf die Lasche an der Seite der Batterieabdeckung, um die Abdeckung zu lösen und
die Batteriehalterung herausnehmen zu können.
• Ersetzen Sie die Batterie und beachten Sie dabei die richtige Ausrichtung der Batteriepole.
• Setzen Sie die Batteriehalterung wieder ein, indem Sie sie hineindrücken bis ein Klicken zu hören ist.
ACHTUNG: Es besteht Explosionsgefahr, wenn die Batterien nicht richtig eingesetzt sind.
CR2025
Los gehts
Ein/Aus
VORSICHT
• Risiko eines Produktschadens! Die Stromspannung muss der
Spannungsangabe auf dem Rückseitenetikett entsprechen.
• Risiko eines Stromschlags! Beim Trennen des
Wechselstromkabels stets den Stecker aus der Steckdose
ziehen. Niemals am Kabel ziehen.
• Vor dem Einstecken des Wechselstromkabels überprüfen,
Gerät am gewünschten Ort aufstellen und Stromkabel abwickeln. Kabelstecker in die Steckdose
stecken und Gerät anschalten.
Auto-Stand-by
Wenn Medien von einem angeschlossenen Gerät abgespielt werden, dann springt der Tower
automatisch in den Standby-Modus wenn:
• 10 Minuten lang keine Taste gedrückt wurde,
• 10 Minuten lang keine Musik von einem angeschlossenen Gerät abgeschlossen wurde.
dass alle anderen Anschlüsse verbunden sind.
Benutzung
Von einem externen Audio-Gerät abspielen
Mit diesem Gerät können Sie von einem externen Audio-Gerät abspielen (z.B. MP3-Player)
Optical In-Buchse (ein entsprechendes Kabel wird benötigt)
1. Schließen Sie ein Optical-Kabel für den Optischen Eingang hinten an die Buchse an. Verbinden
Sie das andere Ende des Optical-Kabels mit dem digitalen Audio-Gerät.
2. Drücken Sie die
3. Drücken Sie die SOURCE Taste, um in den Optical In-Modus zu wechseln.
4. Betätigen Sie die Regler am verbundenen Gerät, um die Audio-Datei abzuspielen, die von der
Einheit weitergeleitet wird.
Line In-Buchse (ein 3,5mm Kabel wird benötigt)
1. Schließen Sie ein 3,5mm Kabel an die Line-Buchse auf der Oberblende an. Verbinden Sie das
andere Ende des 3,5mm Kabels mit einem MP3-Player oder einem anderen Audio-Gerät.
2. Drücken Sie die
3. Drücken Sie die SOURCE Taste, um in den Line In-Modus zu wechseln.
4. Betätigen Sie die Regler am verbundenen Gerät, um die Audio-Datei abzuspielen, die von der
Einheit weitergeleitet wird.
Taste, um das Gerät einzuschalten.
Taste, um das Gerät einzuschalten.
- DE 5 -
Page 52
Auxiliary Input RCA (es wird ein RCA-Kabel benötigt)
1. Verbinden Sie ein RCA-Kabel mit dem Auxiliary Input. Verbinden Sie das andere Ende des RCA-
Kabels mit dem Audio-Ausgang an Ihrem DVD-Player, der Musikanlage, Spielekonsole oder dem
Fernsehgerät.
2. Drücken Sie die Power-Taste, um das Gerät einzuschalten.
3. Drücken Sie die SOURCE Taste, um in den Aux In-Modus zu wechseln.
4. Betätigen Sie die Regler am verbundenen Gerät, um die Audio-Datei abzuspielen, die von der
Einheit weitergeleitet wird.
Benutzung des USB-Anschlusses
1. Stecken Sie Ihren USB-Stick in die USB-Buchse.
2. Drücken Sie die SOURCE Taste, um den USB-Modus auszuwählen; das Gerät kann automatisch
abspielen.
3. Drücken Sie
4. Drücken Sie VOL+/VOL– , um die Lautstärke anzupassen.
Hinweise:
• Der USB-Port ist ein empndlicher Anschluss, was zur instabilen Funktionsweise führen kann.
Bluetooth Modus
A. Verbindung mit einem Bluetooth-Mobiltelefon
Bitte vergewissern Sie sich, dass Ihr Mobiltelefon Bluetooth-fähig ist. Die jeweiligen Schritte zur
Verbindung können sich je nach Mobiltelefon unterscheiden. Bitte lesen Sie die Bedienungsanleitung
Ihres Mobiltelefons, um ausführlichere Informationen zu erhalten. Üblicherweise wird die Verbindung
folgendermaßen hergestellt:
1. Halten Sie während des Verbindungsaufbaus zwischen SB100BT/SB200BT und dem Bluetooth
Ihres Mobiltelefons maximal 1 Meter Abstand.
2. Drücken Sie
3. Aktivieren Sie die Bluetooth-Funktion Ihres Mobiltelefons und suchen Sie nach Bluetooth-Geräten.
Nachdem die Suche abgeschlossen ist, wählen Sie “SB100BT/SB200BT” auf der Liste der
Bluetooth-Geräte.
4. Befolgen Sie die Anzeige und geben Sie das Passwort oder die PIN-Nr. ein: “0000” und drücken
Sie „Ja“ oder „Bestätigen“.
5. Nachdem die Verbindung erfolgreich hergestellt wurde, wählen Sie “SB100BT/SB200BT” auf der
Liste der Bluetooth-Geräte und drücken „Verbinden“.
B. Verbindung mit einem Bluetooth-Stereosender
Unterschiedliche Bluetooth-Sender haben unterschiedliche Verbindungsmethoden. Bitte lesen Sie
die Bedienungsanleitung Ihres Bluetooth-Senders, um ausführlichere Informationen zu erhalten.
Üblicherweise wird die Verbindung folgendermaßen hergestellt:
1. Halten Sie während des Verbindungsaufbaus zwischen SB100BT/SB200BT und dem Bluetooth-
Sender maximal 1 Meter Abstand.
2. Drücken Sie
3. Schalten Sie Ihren Bluetooth-Sender ein und aktivieren Sie den Modus für den Verbindungsaufbau.
4. Der Sender sucht und verbindet sich automatisch mit SB100BT/SB200BT. Nach erfolgreicher
Verbindung ändert sich die Bluetooth-Wiedergabe.
Hinweise:
• SB100BT/SB200BT wechselt automatisch in den Verbindungsmodus zurück nachdem die
Verbindung zu einem Bluetooth-Gerät unterbrochen wurde.
/ , um den Track auszuwählen.
und dann die SOURCE Taste, um den Bluetooth-Modus auszuwählen.
und dann die SOURCE Taste, um den Bluetooth-Modus auszuwählen.
- DE 6 -
Page 53
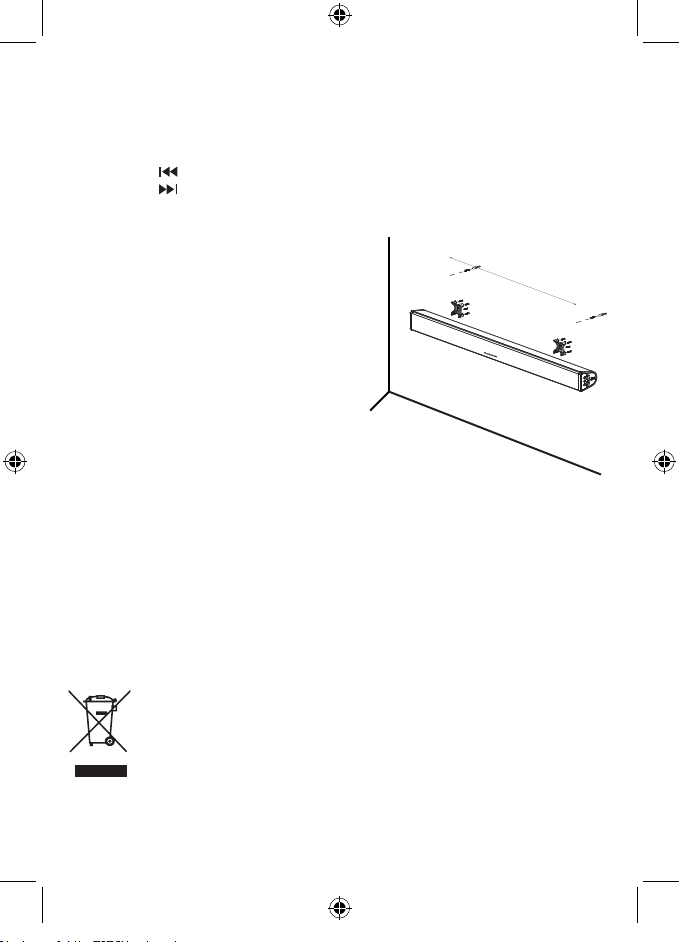
C. Musik-Wiedergabe
Verbindung mit einem A2DP-Mobiltelefon oder Bluetooth-Sender
1. Verbinden Sie Ihr Mobiltelefon oder Ihren Bluetooth-Sender mit SB100BT/SB200BT.
2. Sie können Ihre Musik jetzt von SB100BT/SB200BT aus anhören, wenn Sie sie abspielen.
3. Drücken Sie Vol+ , um die Lautstärke hochzudrehen und drücken Sie Vol- , um die Lautstärke zu
senken.
4. Drücken Sie
5. Drücken Sie
, um zum vorherigen Song zu springen.
, um zum nächsten Song zu springen.
Wandbefestigung für Ihre Sound-Bar
Bitte entfernen Sie das Etikett und verwenden Sie
den Bausatz, um Ihre Sound-Bar an der Wand zu
befestigen.
680m
m
Wandbefestigungs-Bausatz
1. 2 Wandhalter
2. 8 Befestigungsschrauben (für Sound-Bar mit
Halterung)
3. 8 EVA Verschlussschrauben
4. 2 lange Schrauben
5. 2 Wandanker
Sie brauchen:
1. Bohrmaschine
2. Schraubenzieher
3. Bleistift
4. Wasserwaage
Hinweis: Benutzen Sie die Wasserwaage, um sicherzustellen, dass beide Wandmontageplatten
horizontal verlaufen.
1. Entfernen Sie das Etikett an der hinteren Platte, schrauben Sie die 4 Schrauben mit der
Halterung an die Sound-Bar und verwenden Sie EVA, um die Schrauben abzudecken.
2. Markieren Sie die Löcher, die gebohrt werden müssen.
3. Bohren Sie die Löcher an den markierten Punkten und setzen Sie die Wandanker ein.
4. Verschrauben Sie die 2 Schrauben an der Wand, befestigen Sie die Sound-Bar und
vergewissern Sie sich, dass alles stabil ist.
Anmerkung:
Bitte entsorgen Sie elektrische und elektronische Geräte nicht in den Hausmüll.
• Bringen Sie sie zu einer entsprechenden Sammelstelle.
• Einige Komponenten in diesen Geräten können gesundheits- und umweltschädlich
sein.
• Zum Energiesparen schaltet das Gerät automatisch in Stand-by, wenn für eine gewisse Zeit keine
Audio-Wiedergabe erfolgt. Es kann durch Verwendung des POWER-Schalters wieder eingeschaltet
werden.
- DE 7 -
Page 54
• Bei einem eingehenden Anruf während der Verbindung von SB100BT/SB200BT mit einem Handy
zur Musikwiedergabe unterbricht der Tower die Wiedergabe, wenn der Anruf angenommen wird, und
setzt die Wiedergabe fort, wenn das Gespräch beendet wurde. (Gelegentlich bleibt das Programm
nach Beenden des Anrufs angehalten, je nach Handy.)
• Das Wort Bluetooth
und jegliche Verwendung dieser Zeichen durch Bigben Interactive geschieht unter Lizenz. Andere
Handelsmarken und Handelsnamen sind Eigentum der jeweiligen Besitzer.
• THOMSON ist eine Handelsmarke von TECHNICOLOR SA und seinen Tochtergesellschaften und
wird von Bigben Interactive unter Lizenz verwendet.
• Hiermit erklärt Bigben Interactive SA, dass das SB100BT/SB200BT den wesentlichen Anforderungen
der Direktive 1995/5/EC des Europäischen Parlaments und des Rates vom 9. März 1999 über Funkund Telekommunikationsausrüstung entspricht und mit dieser konform ist.
Die vollständige Erklärung ndet sich auf unserer Website
Abschnitt zur Konformitätserklärung.
Importiert von BIGBEN INTERACTIVE SA
396, Rue de la Voyette
CRT2 - FRETIN
CS 90414
59814 LESQUIN Cedex - Frankreich
www.bigben.eu
Hergestellt in China
®
, Marke und Logo sind eingetragene Handelsmarken von Bluetooth SIG, Inc.
http://www.bigben-interactive.de/support im
Importateur : Bigben Interactive FRANCE
396, Rue de la Voyette, C.R.T. 2 Fretin,
CS 90414 - 59814 LESQUIN Cedex
Bigben Interactive DEUTSCHLAND GmbH
Walter Gropius Str. 28, 50126 Bergheim, Deutschland
Bigben Interactive BELGIUM
Avenue Ernest Solvay, 1480 Tubize, Belgique
Bigben Interactive NEDERLAND b.v.
Franciscusweg 249-3B, 1216 SG Hilversum, Nederland
Bigben Interactive SPAIN S.L.
C/ Musgo 5, 2ª planta, 28023 Madrid, Spain
Bigben Interactive ITALIA s.r.l
Corso Sempione 221, 20025 Legnano - MI, Italia
FABRIQUÉ EN CHINE / MADE IN CHINA
HOTLINE
FRANCE, du lu ndi au vendr edi (sauf j ours féri és) :
9h00-19h00 ou suppor t@thomsonaudiovideo.eu
DEUTSCHLAND, Mont ag bis Sonnt ag von 8:00 bis 24:00 Uhr
09001-84 30 44*
Mobilf unknetz en nicht möglic h)
*Minderjährige müssen vorher einen Erziehungsberechtigten um Erlaubnis fragen.
BELGI QUE / NEDERL AND, klantenservice@bigben-interactive.nl
(0,49 €/Min. aus dem deu tschen Fes tnetz, An rufe aus allen
oder support@bigben-interactive.de
customerservice@bigben-interactive.be
ESPAÑA, sat@bigbeninteractive.es
ITALIA, suppor t@bigbeninteractive.it
www.bigben.eu
- DE 8 -
Page 55
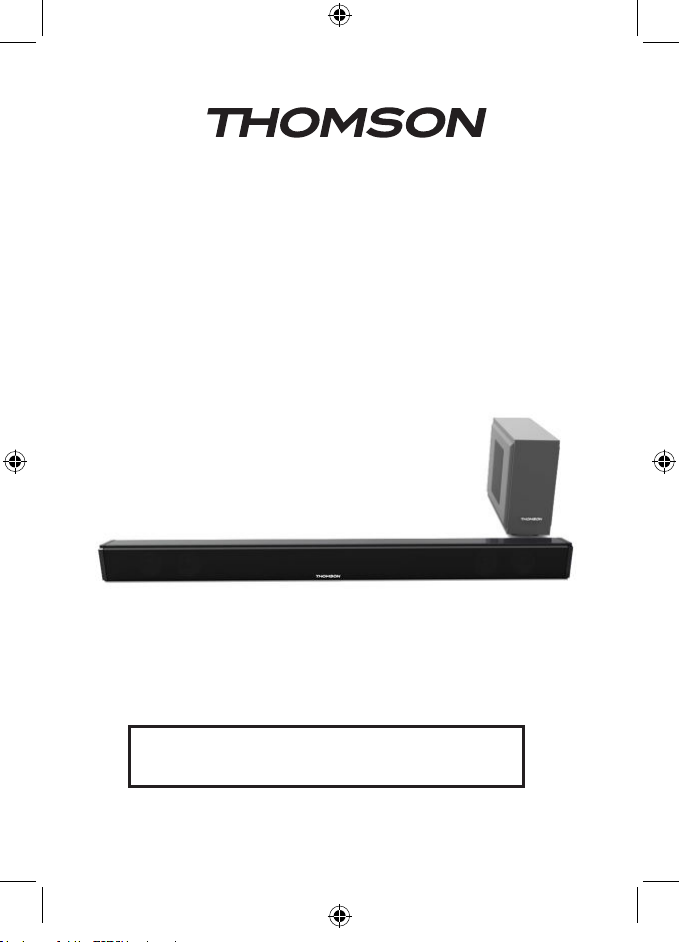
SB100BT (SYSTEEM 2.0) /
SB200BT (SYSTEEM 2.1 met subwoofer)
BLUETOOTH / USB / OPTICAL / AUDIO IN
VEILIGHEIDSINSTRUCTIES
LEES DEZE GEBRUIKSAANWIJZING VOLLEDIG DOOR ALVORENS
DEZE EENHEID TE BEDIENEN, EN BEWAAR DIT BOEKJE VOOR UW
ADMINISTRATIE.
BBI_SB100BT/SB200BT_1606_Ver1
Page 56
Inhoud
Aan de slag 1
Veiligheidsvoorschriften 1
Uw product op de juiste manier gebruiken 2
Houd rekening met het milieu 2
Overeenstemming 2
Technische gegevens 3
Inhoud van de verpakking 3
Beschrijving van de onderdelen 3
De batterij vervangen 4
Aan de slag 5
Werking 5
Uw soundbar op de muur monteren 7
Let op 8
Aan de slag
• Haal het toestel uit de doos.
• Verwijder al het verpakkingsmateriaal van het product.
• Plaats het verpakkingsmateriaal in de doos en bewaar of verwijder het op een correcte en veilige
manier.
Veiligheidsvoorschriften
Lees en begrijp alle instructies voordat u dit product in gebruik neemt. De garantie is ongeldig voor
schade die wordt veroorzaakt door het negeren van de instructies.
Veiligheid
Waarschuwing
• Verwijder nooit de behuizing van dit apparaat.
• Smeer nooit een onderdeel van dit apparaat.
• Plaats dit apparaat nooit op andere elektrische apparaten.
• Houd dit apparaat uit de buurt van direct zonlicht, open vlammen of warmte.
• Kijk nooit in de laserstraal binnenin dit apparaat.
• Zorg dat het snoer, stekker of adapter altijd eenvoudig bereikbaar zijn zodat u het
apparaat indien nodig snel van de voeding kunt ontkoppelen.
1. Lees deze gebruiksaanwijzing.
2. Bewaar deze gebruiksaanwijzing.
3. Houd rekening met alle waarschuwingen.
4. Bevolg alle instructies.
5. Gebruik dit apparaat niet in de buurt van water.
6. Maak het apparaat alleen schoon met een droge doek.
7. Zorg dat de ventilatieopeningen niet worden geblokkeerd. Installeer het apparaat volgens de
instructies van de fabrikant.
8. Installeer het apparaat niet in de buurt van warmtebronnen zoals radiatoren, warmteafvoeren,
kachels of andere warmteproducerende apparaten (waaronder versterkers).
9. Bescherm het snoer tegen knikken, vooral bij de stekker, het stopcontact en het punt waar het
snoer uit het apparaat komt, en zorg dat er niet over het snoer gelopen kan worden.
10. Gebruik alleen hulpstukken/accessoires die door de fabrikant zijn aanbevolen.
11. Gebruik het apparaat alleen met de wagen, standaard, driepoot, beugel of tafel
die door de fabrikant wordt aangegeven of die samen met het apparaat wordt
verkocht. Wanneer een wagen wordt gebruikt, wees voorzichtig wanneer u de
wagen met het geïnstalleerde apparaat verplaatst om letsel veroorzaakt door het
omvallen van het apparaat te voorkomen.
12. Haal de stekker uit het stopcontact tijdens onweer of als u het apparaat gedurende een lange
periode niet zult gebruiken.
- NL 1 -
Page 57
13. Laat alle reparaties door een vakbekwame reparateur uitvoeren. Reparaties zijn nodig als
het apparaat beschadigd is, bijv. als het snoer of de stekker beschadigd is, als er vloeistoffen
of voorwerpen in het apparaat zijn terechtgekomen, als het apparaat aan regen of vocht is
blootgesteld, niet normaal functioneert of als het is gevallen.
14. Stel het apparaat niet bloot aan drup- of spatwater.
15. Plaats geen voorwerpen die gevaar kunnen opleveren op het apparaat (bijv. met water gevulde
vazen, aangestoken kaarsen).
16. Wanneer de netstekker of connector als stroomonderbreker wordt gebruikt, moet deze
stroomonderbreker gemakkelijk te bedienen zijn.
17. Zorg voor voldoende vrije ruimte rondom het product voor een goede ventilatie.
18. Stel batterijen (geïnstalleerde accu’s of batterijen) nooit bloot aan overmatige warmte zoals
zonlicht, vuur, etc.
19. Het apparaat moet van de gepaste batterijen worden voorzien om juist te werken.
20. Gebruik alleen de batterijen die zijn aanbevolen.
21. Houd rekening met de juiste polariteit om kortsluiting te vermijden.
22. Meng geen oude met nieuwe batterijen.
23. Meng geen alkaline, standaard (koolstof-zink) of oplaadbare (nikkel-cadmium) batterijen.
24. Probeer niet om wegwerpbatterijen opnieuw op te laden of te openen. Gooi geen batterijen in vuur.
25. Vervang alle batterijen tegelijkertijd door nieuwe, identieke batterijen.
26. Haal de batterijen uit als u het product gedurende een lange periode niet zult gebruiken.
Uw product op de juiste manier gebruiken
1. Trek altijd de stekker uit het stopcontact als het apparaat niet wordt gebruikt en vóór reiniging.
2. Speel geen muziek af op een zeer hoog volume, dit kan gehoorbeschadiging of schade aan het
apparaat veroorzaken.
3. Gebruik dit toestel niet in een vochtige of natte omgeving.
4. Haal altijd de stekker uit het stopcontact voordat u het apparaat schoonmaakt. Maak het apparaat
schoon met een zachte, vochtige en pluisvrije doek. Gebruik geen oplosmiddelen of agressieve
schoonmaakmiddelen.
Houd rekening met het milieu
Uw product is ontworpen en gemaakt met hoogwaardige materialen en componenten
die gerecycled en opnieuw gebruikt kunnen worden.
Uw product bevat batterijen die onder de Europese Richtlijn 2006/66/EG vallen en
niet met het gewone huisafval weggegooid mogen worden. Vraag uw gemeente om
advies over hoe batterijen op een juiste manier weg te gooien. Een juiste verwijdering
helpt negatieve gevolgen voor het milieu en de menselijke gezondheid te voorkomen.
Als dit ‘doorgekruiste vuilnisbak’-symbool op een product is vermeld, geeft dit aan
dat het product onder de Europese richtlijn 2002/96/EG valt. Informeer u over het
inzamelsysteem voor elektrische en elektronische producten dat in uw gemeente
van kracht is. Verwijder uw afgedankt product in overeenstemming met de lokale
wetgeving en gooi het niet met uw normale huisafval weg. Door te zorgen voor een
juiste verwijdering van uw afgedankt product helpt u mogelijke negatieve gevolgen
voor het milieu en de menselijke gezondheid te voorkomen.
- NL 2 -
Page 58
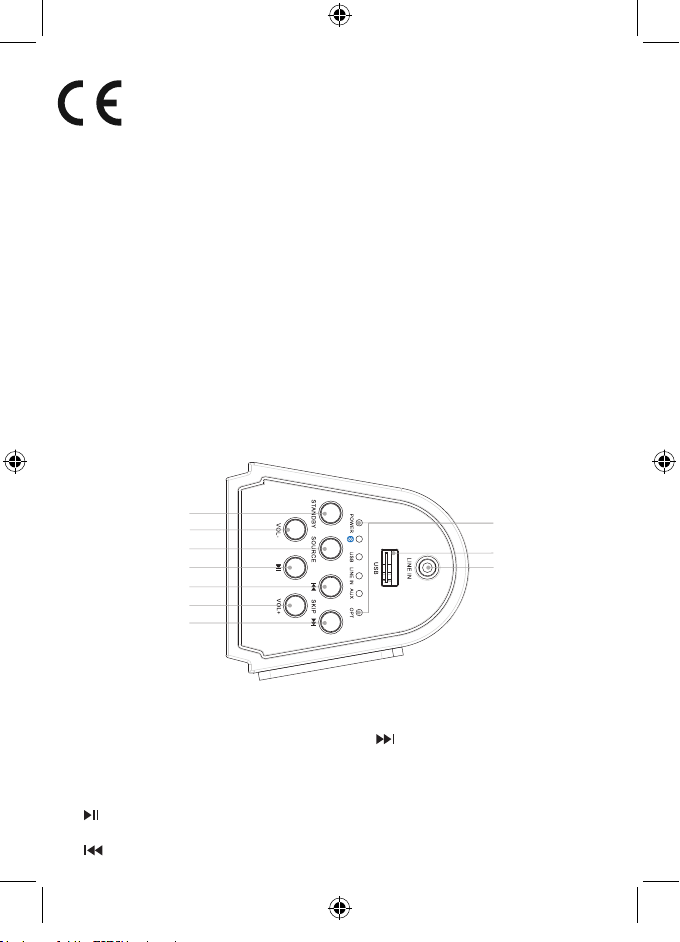
Overeenstemming
Dit product is in overeenstemming met de voorschriften inzake radiostoring van de
Europese Gemeenschap.
Technische gegevens
• Voeding: 230V~ 50Hz
• Totaal stroomverbruik: 65W
• Ingangsgevoeligheid:
AUX IN 700MV, LINE IN 700MV
• Impedantie luidspreker: 8ohm
• S/N (A): 75db
• THD(1kHz,1W): 0,5%
• Frequentierespons: 20Hz-20KHz
• Totaal muziekvermogen:
Inhoud van de verpakking
Controleer en identiceer de inhoud van uw verpakking:
• Soundbar en subwoofer
(Optie alleen voor SB200BT)
• Afstandsbediening
• Gebruiksaanwijzing
• RCA-kabel
• Line in-kabel
• Audiokabel voor sub
Beschrijving van de onderdelen
Overzicht van het apparaat
- SB100BT=30W
- SB200BT=50W
1
2
3
4
5
6
7
1. Standby
Het toestel inschakelen of in stand-by zetten
2. VOL -
Het volume verlagen
3. Source
Een bron selecteren: Bluetooth, USB,
AUDIO IN
4.
Het afspelen starten of onderbreken
5.
Naar de vorige track gaan
6. VOL +
Het volume verhogen
7.
Naar de volgende track gaan
8. LED-controlelampje
De huidige status tonen
9. USB-aansluiting
10. Audio in
Een extern apparaat aansluiten
- NL 3 -
8
9
10
Page 59
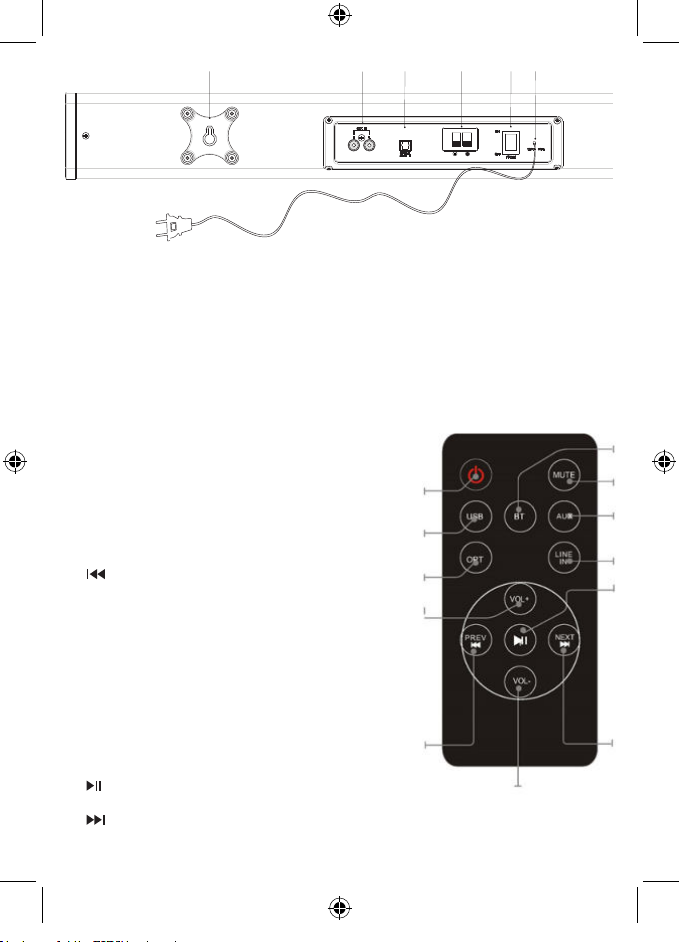
11
12
13
14
(Only for
SB200BT)
SUB OUT
16
15
11. Muurbeugel
12. AUX in
14. Subwoofer out (Optie alleen voor SB200BT)
15. Aan/uit-schakelaar
Een extern apparaat aansluiten
13. Optisch in
Aansluiting op een optische digitale audio-
ingang
16. Wisselstroomkabel
Overzicht van de afstandsbediening
1. POWER
Druk om de toren in of uit te schakelen
2. USB
Druk naar de USB-modus
3. OPT
Druk naar de optische ingangsmodus
4. VOLUME+
Druk om het volume te verhogen
5.
Naar de vorige track gaan
6. VOLUME-
Druk om het volume te verlagen
7. BT
Druk naar de Bluetoothmodus
8. MUTE
Druk om het volume te dempen of het volume te herstellen
9. AUX
Druk naar de Aux ingangsmodus
10. LINE IN
Druk naar de Line ingangsmodus
11.
Het afspelen starten of onderbreken
12.
Naar de volgende track gaan
In-/uitschakelen
1
2
3
4
5
7
8
9
10
11
12
6
- NL 4 -
Page 60
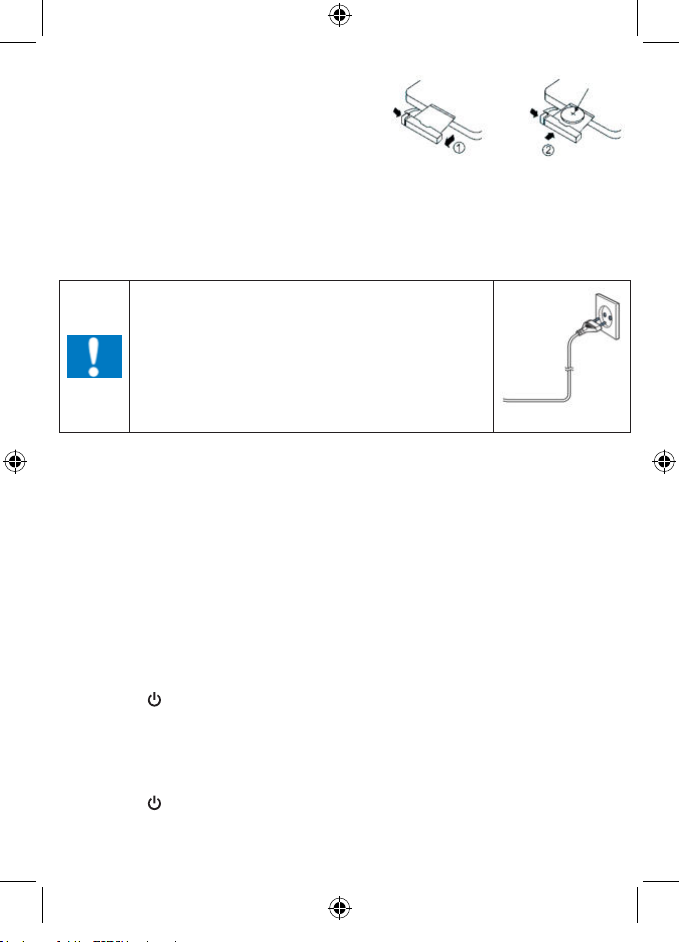
De batterij vervangen
De afstandsbediening werkt met lithium CR2025 3V
knoopcelbatterijen. Als de afstandsbediening niet langer
werkt, vervang de batterijen als volgt:
• Druk op het lipje aan de zijkant van het batterijdeksel
om het af te halen en trek de batterijhouder uit.
• Vervang de batterij. Houd hierbij rekening met de juiste polariteit.
• Duw de batterijhouder opnieuw in de afstandsbediening totdat u een “klik” hoort.
OPGELET: Er is explosiegevaar als de batterijen op een verkeerde manier wordt geplaatst.
CR2025
Aan de slag
Voeding
OPGELET
• Risico op schade aan het product! Zorg dat de netspanning
overeenstemt met de spanning die op het zwarte label is
vermeld.
• Risico op een elektrische schok! Haal altijd de stekker uit het
stopcontact door de stekker vast te houden en eruit te halen,
en nooit door aan het snoer te trekken.
• Voordat u de stekker in het stopcontact steekt, controleer of
Plaats het toestel in de gewenste positie en wikkel het snoer af. Steek de stekker in het stopcontact
en, indien gewenst, schakel het toestel in.
Automatisch stand-by
Tijdens het afspelen van media vanaf een aangesloten apparaat, gaat de toren automatisch in standby wanneer:
• Er gedurende 10 minuten geen enkele knop wordt ingedrukt,
• Er gedurende 10 minuten geen audio vanaf een aangesloten apparaat wordt afgespeeld.
alle andere aansluitingen gemaakt zijn.
Werking
Vanaf een extern audioapparaat afspelen
U kunt via dit toestel naar media vanaf een extern audioapparaat, zoals een MP3-speler, luisteren.
Optische ingangsaansluiting (Vereist een optische kabel)
1. Sluit een optische kabel aan op de optische aansluiting op het achterpaneel. Sluit het ander
uiteinde van de optische kabel aan op een digitaal audioapparaat.
2. Druk op de
3. Druk op de SOURCE knop om naar de Optische In-modus te schakelen.
4. Gebruik de regelknoppen op het verbonden apparaat om audio vanaf het toestel af te spelen.
Line In-aansluiting (vereist een 3,5mm kabel)
1. Sluit een 3,5mm kabel aan op de Line In-aansluiting op het bovenpaneel. Sluit het ander uiteinde
van de 3,5mm kabel aan op een MP3-speler of een ander audioapparaat.
2. Druk op de
3. Druk op de SOURCE knop om naar de Line In-modus te schakelen.
4. Gebruik de regelknoppen op het verbonden apparaat om audio vanaf het toestel af te spelen.
knop om het toestel in te schakelen.
knop om het toestel in te schakelen.
- NL 5 -
Page 61
Auxiliare ingang RCA (Vereist een RCA-kabel)
1. Sluit een RCA-kabel aan op de AUX-ingang. Sluit het ander uiteinde van de RCA-kabel aan op de
audio-uitgang van uw DVD-speler, stereosysteem, spelconsole of televisie.
2. Druk op de Aan/uit-knop om het toestel in te schakelen.
3. Druk op de SOURCE knop om naar de Aux In-modus te schakelen.
4. Gebruik de regelknoppen op het verbonden apparaat om audio vanaf het toestel af te spelen.
De USB-ingang gebruiken
1. Steek uw USB-ashstation in de USB-poort.
2. Druk herhaaldelijk op SOURCE om de USB-modus te selecteren en de audio wordt automatisch
afgespeeld.
3. Druk op
4. Druk op VOL+/VOL– om het volume te regelen.
Opmerkingen:
• De USB-poort is zeer gevoelig, sluit het apparaat goed aan voor een juiste werking.
Bluetoothmodus
A. Een koppeling met een Bluetooth-geactiveerde mobiele telefoon maken
Zorg dat uw mobiele telefoon Bluetooth-geactiveerd is. De uit te voeren koppelingsstappen kunnen
afwijken naargelang het type van mobiele telefoon. Zie de gebruiksaanwijzing van uw mobiele telefoon
voor meer informatie. Hieronder vindt u de algemene koppelingsstappen:
1. Houd de SB100BT/SB200BT en de Bluetooth-geactiveerde mobiele telefoon tijdens het koppelen
binnen een afstand van 1 meter van elkaar.
2. Druk op de
3. Schakel de Bluetoothfunctie op uw mobiele telefoon in en zoek naar Bluetooth-apparaten. Zodra
het zoeken is voltooid, kunt u “SB100BT/SB200BT” uit de lijst met Bluetooth-apparaten uitkiezen.
4. Wanneer aangegeven, voer het wachtwoord of PIN-nr.: “0000” in en druk op “Yes” (ja) of "conrm"
(bevestigen).
5. Na een succesvolle koppeling kunt u "SB100BT/SB200BT" in de lijst met Bluetooth-apparaten
uitkiezen en vervolgens op “connect” (verbinden) drukken.
B. Een koppeling met een Bluetooth-stereozender maken
De uit te voeren koppelingsstappen kunnen afwijken naargelang het type Bluetooth-zender. Zie de
gebruiksaanwijzing van uw Bluetooth-zender voor meer informatie. Hieronder vindt u de algemene
koppelingsstappen:
1. Houd de SB100BT/SB200BT en de Bluetooth-zender tijdens het koppelen binnen een afstand van
1 meter van elkaar.
2. Druk op de
3. Schakel uw Bluetooth-zender in en open de koppelingsmodus.
4. De zender zoekt en verbindt automatisch met de SB100BT/SB200BT. De Bluetooth-stem wijzigt
zodra de verbinding succesvol is.
Opmerkingen:
• De SB100BT/SB200BT keert automatisch terug naar de koppelingsmodus na het ontkoppelen van
een Bluetooth-apparaat.
/ om een track te selecteren.
knop en vervolgens op de SOURCE knop om de Bluetoothmodus te selecteren.
knop en vervolgens op de SOURCE knop om de Bluetoothmodus te selecteren.
- NL 6 -
Page 62
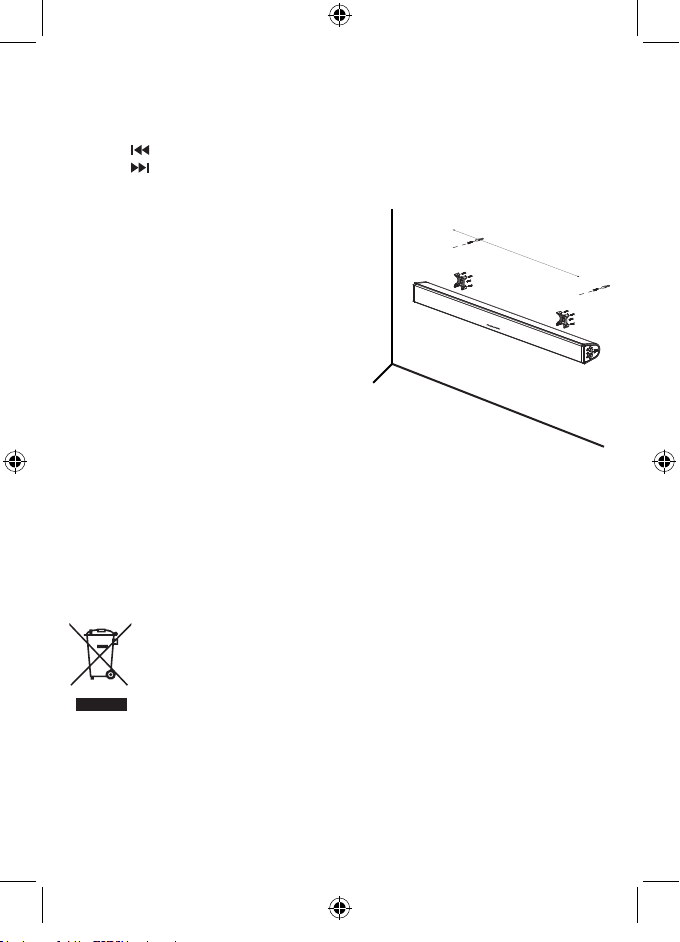
C. Muziek afspelen
Een verbinding met een A2DP mobiele telefoon of Bluetooth-zender maken
1. Verbind uw mobiele telefoon of Bluetooth-zender met de SB100BT/SB200BT.
2. U kunt nu naar muziek vanaf de SB100BT/SB200BT luisteren.
3. Druk op Vol+ om het volume te verhogen of op Vol- om het volume te verlagen.
4. Druk op
5. Druk op
om naar het vorig liedje te gaan.
om naar het volgend liedje te gaan.
Uw soundbar op de muur monteren
Verwijder de sticker. Gebruik de muurmontageset
om uw soundbar op de muur te monteren.
Muurmontageset
6
8
0mm
1. 2 muurbeugels
2. 8 vastzetschroeven (voor soundbar met beugel)
3. 8 EVA schroefdoppen
4. 2 lange schroeven
5. 2 pluggen
Benodigdheden:
1. Elektrische boormachine
2. Schroevendraaier
3. Potlood
4. Waterpas
Opmerking: Controleer of beide muurmontageplaten zich op dezelfde hoogte bevinden met behulp
van een waterpas.
1. Verwijder de sticker van de achterkant, schroef de beugel met behulp van de 4 schroeven vast
op de soundbar en breng de EVA doppen vervolgens over de schroeven aan.
2. Markeer de te boren gaten.
3. Boor gaten in de markeringen en breng vervolgens de pluggen in.
4. Schroef de 2 lange schroeven in de muur. Bevestig vervolgens de soundbar. Zorg dat deze
stabiel is.
Let op:
Gooi elektrische en elektronische apparaten niet in een normale vuilnisbak.
• Breng ze naar een verzamelpunt.
• Sommige onderdelen in deze apparatuur kunnen gevaarlijk zijn voor de gezondheid
en het milieu.
• Het apparaat gaat automatisch in stand-by na een bepaalde periode van inactiviteit om energie te
besparen. U kunt het apparaat opnieuw inschakelen met behulp van de AAN/UIT-knop.
• Als er een inkomend telefoongesprek is terwijl de SB100BT/SB200BT met uw mobiele telefoon
voor het afspelen van muziek is verbonden, wordt het afspelen automatisch onderbroken wanneer
u het telefoongesprek beantwoordt en wordt het hervat zodra u het telefoongesprek beëindigt.
(Afhankelijk van het type van uw mobiele telefoon is het mogelijk dat het afspelen na het beëindigen
van de oproep nog onderbroken is.)
- NL 7 -
Page 63
• Het Bluetooth® woord, merk en logo zijn geregistreerde handelsmerken die eigendom zijn van
Bluetooth SIG, Inc. en elk gebruik van deze merken door Bigben Interactive is onder licentie. Andere
handelsmerken en handelsnamen zijn eigendom van hun respectievelijke eigenaars.
• THOMSON is een handelsmerk van TECHNICOLOR SA of zijn partnerbedrijven en wordt gebruikt
onder licentie van Bigben Interactive.
• Bij deze verklaart Bigben Interactive SA dat de SB100BT/SB200BT in overeenstemming is met
de essentiële vereisten van richtlijn 1995/5/EC van het Europees Parlement en van de Raad van
9 maart 1999 betreffende radio- en terminalmateriaal voor telecommunicatie, en de wederzijdse
erkenning van hun conformiteit.
Bezoek onze website om de volledige verklaring te lezen:
het gedeelte Verklaring van conformiteit.
Geïmporteerd door BIGBEN INTERACTIVE SA
396, Rue de la Voyette
CRT2 – FRETIN
CS 90414
59814 LESQUIN Cedex – Frankrijk
www.bigben.eu
Gemaakt in China
http://www.bigbeninteractive.nl/support in
Importateur : Bigben Interactive FRANCE
396, Rue de la Voyette, C.R.T. 2 Fretin,
CS 90414 - 59814 LESQUIN Cedex
Bigben Interactive DEUTSCHLAND GmbH
Walter Gropius Str. 28, 50126 Bergheim, Deutschland
Bigben Interactive BELGIUM
Avenue Ernest Solvay, 1480 Tubize, Belgique
Bigben Interactive NEDERLAND b.v.
Franciscusweg 249-3B, 1216 SG Hilversum, Nederland
Bigben Interactive SPAIN S.L.
C/ Musgo 5, 2ª planta, 28023 Madrid, Spain
Bigben Interactive ITALIA s.r.l
Corso Sempione 221, 20025 Legnano - MI, Italia
FABRIQUÉ EN CHINE / MADE IN CHINA
HOTLINE
FRANCE, du lu ndi au vendr edi (sauf j ours féri és) :
9h00-19h00 ou suppor t@thomsonaudiovideo.eu
DEUTSCHLAND, Mont ag bis Sonnt ag von 8:00 bis 24:00 Uhr
09001-84 30 44*
Mobilf unknetz en nicht möglic h)
*Minderjährige müssen vorher einen Erziehungsberechtigten um Erlaubnis fragen.
BELGI QUE / NEDERL AND, klantenservice@bigben-interactive.nl
(0,49 €/Min. aus dem deu tschen Fes tnetz, An rufe aus allen
oder support@bigben-interactive.de
customerservice@bigben-interactive.be
ESPAÑA, sat@bigbeninteractive.es
ITALIA, suppor t@bigbeninteractive.it
www.bigben.eu
- NL 8 -
Page 64
BBI_SB100BT/SB200BT_1606_Ver1
 Loading...