

Page 1

8GB 17.75cm (7”) Touch screen Tablet PC
Model No.
: QM735-8G
User Manual
Page 2
Please read this instruction manual carefully before connecting or
operating the product. Save it for future reference.
Page 3

Table of Contents
1 OUTLOOK DESCRIPTIO N ...................................... .................................................. ................................ 2
2 POWER BUTTON USAGE .................................................... ................................................... ................. 2
3 TOUCH-SCREEN NAVIGATION ....... ................................................... ..................................................... 2
4 USING MICRO SD CARD .......................................................... ........................................... ..................... 2
5 GETTING STARTED .............................. ................................................... ................................................. 3
6 DESKTOP ............................................................. .................................................. ................................... 4
7 APPLICATION MANAGEMENT ............................................. ...................................................... ............. 4
8 CLOCK ................... .................................................. .......................................................... ........................ 5
9APP MARKET .............................. ...................................................... ......................................................... 7
10 BROWSER .............. ...................................................... ...................................................... ..................... 7
11 CALENDAR ......................................... .................................................. .................................................. 8
12 CAMERA ................. ...................................................... .......................................................... ................. 8
13 RECORDER ............................................................................. .......................................................... ...... 8
14 GMAIL ........................................................................................................................................ .............. 8
15 FILE MANAGER ........................................................... ................................................... ...................... 12
16 MUSIC ............................................................................... ............................................................. ........ 12
17VIDEO ...................... ............................................................................ ................................................... 13
18 SETTINGS .................. .................................................. .......................................................... ............... 14
FREQUENTLY ASKED QUESTIONS .............. .................................... .................................... ................... 15
BATTERY MANAGEMENT ........................................................ .................................................. ............... 16
IMPORTANT SAFETY PRECAUTIONS ............................ ...................................................... ................... 16
1
Page 4
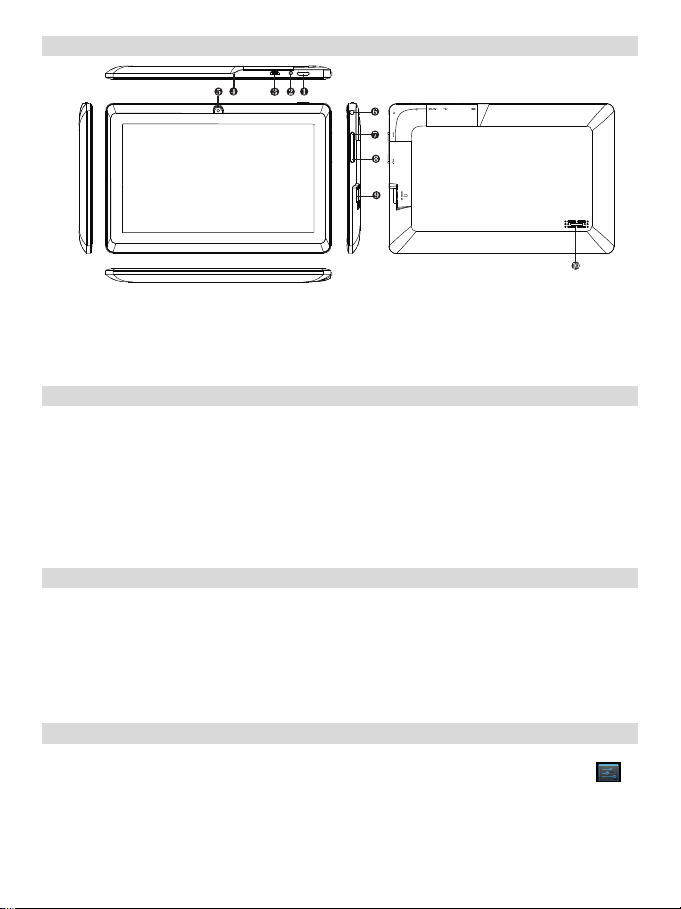
1 Outlook Description
1) Power 2) DC Interface 3) Micro USB Interface 4) Mic 5) Camera
6) Headphone Interface 7) Volume “+” 8) Volum e “-” 9) TF Card Interface 10) Speaker
2 Power Button Usage
Tur n On : Press the power button and hold for 3 seconds.
Turn Off: Press the power button and hold for 3 seconds, →tap Power off→ tap OK.
Screen lock and Un lock: Press the power button quickly to lock and try again to unlock .
Force Shutdown: If device does not respond, press and hold the power button for 7 seconds. (Note: If it is not
necessary, we don’t suggest use Force Shutdown. You should follow the steps to perform the shutdown. Force
shutdown may lead to unpredictable system errors)
RESET: Press the Reset key to reset the device. Reset will make the device reb oot, the effect is equivale nt to force
shutdown after boot, please use caution.
3 Touch-Screen Navigation
The touch-screen allows for quick, eas y and convenient navigation.
You can use the touch-scree n refer to the follo wing method through t he user guide.
Tap: Quick tap & release on an item on the screen.
Finger slide: Touch & slide your finger across the screen and then release.
Touch & hold: Touch and hold in place approx 2 seconds, and then release to display an options window.
☆ To avoid scratching or crushing, do not place objects on the touch screen surface.
4 Using micro SD Card
The device supp orts a maximum 32G B micro SD card
☆
Insert your card into the micro SD slot until it clicks into place. It’s OK
Remove micro SD Card: Close all applications or documents which ha ve been opened on the c ard. Tap →
Settings → Storage, U-disk & device storage → Unmount SD card. Press the card lightly; it is partially ejected
allowing you to pull the card out.
☆ Don’t insert and remove the U- disk repeatedly in a short time, as th is may cause damage to the card.
☆ We recommend using major brands of memory cards to avoid inc ompatibility.
(not included).
2
Page 5
5 Getting Started
Charge the device
☆ You can charge the battery usi ng the adapter.
☆ You can use the device while the battery is charging, although the charging time is longer when operating and
charging at the same t ime.
Plug the power adapter into an electrical wall outlet, and then connect to the device to fully charge the battery
before use ( Filled with about 4 hours).
Turn the device on:Press the power button and hold for 3 seconds.
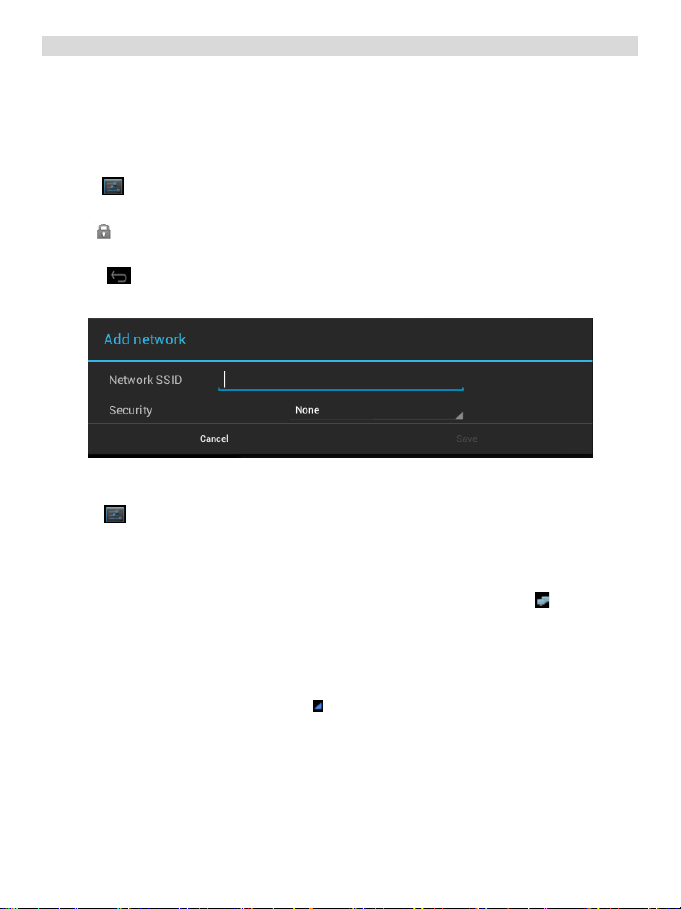
Wi-Fi Network Setup:Since man y features require a Wi-Fi connection, we recommend you set up your Wi-Fi network
now.
1) Tap
2) Select Wi-Fi to turn on.
3) Tap the desired network which you want to connect, → enter the Network Password if applicable, → tap
4) Tap
☆ If your Wi-Fi network is set as hidden, it won’t be found by the auto scan. Tap Add Wi-Fi network and follow the
prompts to add your network.
, → Settings, → Wireless & network.
The device automatically scans and lists all local Wi-Fi Network found.
A indicates secure networks that require login name/password to connect.
Connect.
to return to the Desktop screen.
in the lower-right
“ ”
3
Ethernet connection settings:
Micro Interface connect to the OTG cable (not included), the other side interface connect to the Ethernet adapter 1、
and connect to the network cable.
2、Tap
3、Check the ”Use Ethernet”.
4、Click the "Advanced Configure", you can choose to check the "dynamic allocation", the default network
automatically assigns IP addresses, check on and you can connect Ethernet; you can also uncheck the "dynamic
allocation", by manually entering IP address, subnet mask, default gateway, DNS server, and other information can
also be connected to Ethernet.
5、After the Ethernet connection is successful, it will appear th e Ethernet connection symbol
corner.
3G network settings:
First of all, according to network services provider to buy the 3G wireless network card.
Micro Interface connect to the OTG cable (not included), the other side i nterface connect to the 3G dongle
1、
and plug in the effective 3G card.
2、The system automatically senses the 3G network, while 3G network the c onnection is successful, will appear in
the lower-right corner of the 3G connection s ymbol
Setting → more→Ethernet.
→
Page 6
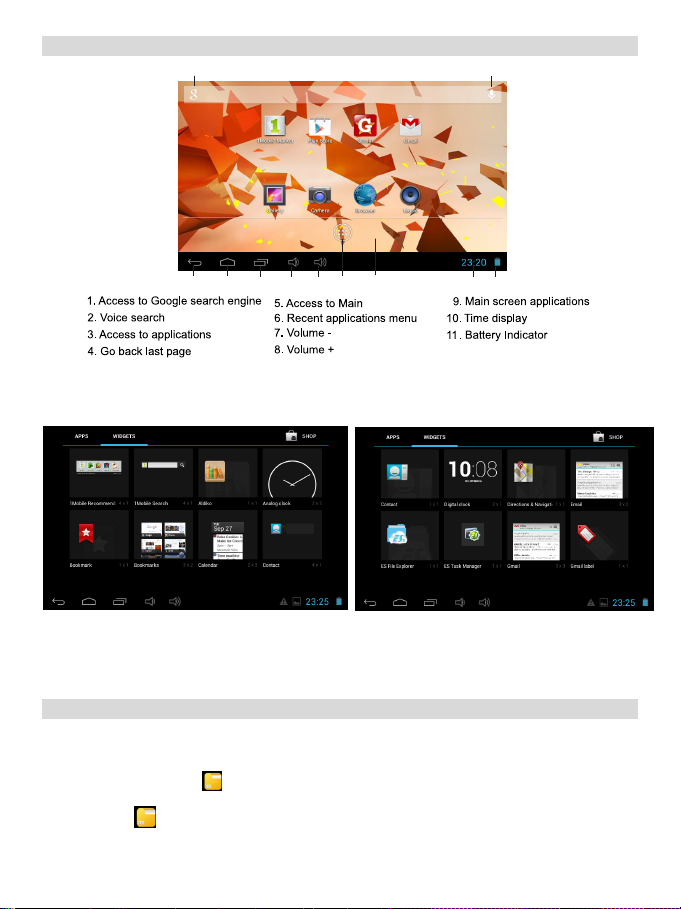
6 DESKTOP
1 2
4 5
Widget:Click "widget" button, there will be a lot of application widget icon , you can select the icon which will appear in
the home page as the shortcut. You will quickly get to the program.
☆
Tap on any application icon to la unch it.
☆ Touch, hold and then slide icons to other reposition on the screen.
☆ Touch, hold and slide icons onto “× ” to remove them from the Desktop screen.
7 Application Management
Install Android Applications
☆ There are many interesting and free Android applications that can be found on the web. Just launch your web
browser and do a search for “Android applications”.
Purchased or free Android applications that you ha ve downloaded to your computer can be installed quickly &
easily on your Tablet usin g the
1) Copy the .apk files that you want to install onto a SD card or USB device, → insert or connect to your Device.
Tap the
2)
File Manager application icon.
File Manager application.
7
6
9
3
8
Screen
4
10
11
Page 7

3) Tap
4) Tap on a .apk file → Install.
The application is installed and th e application icon is added to the Appl ications s creen.
5) Tap Open to launch t he application no w, or tap Done to return to the File Manager screen.
Download Android Applications direct from a Website
You can download Android applications directly from websites, and then quickly and easily install them on your
device.
1) Tap the
2) Enter the desired website URL, and tap the dow nload link for the application you want to install on your
device.
3) After the download is complete, touch & hold on the download file (in the Download history screen), → tap
Open → Install.
Uninstalling Android Applications
You can also quickly and easily uninstall the Android applications that you have installed.
1) Tap
2) Tap the application you want to uninstall, → Uninstall.
3) Tap OK to confirm the Uninstall.
or and locate the folder in which the .apk application files were saved.
Web application icon to launch the internet browser.
→ Settings → Applications → Manage applications.
8 Clock
Tap the Clock application icon. You can see the time and date. Alarm clock、count down、stopwatch feature can
also set multiple.
Alarm
Add Alarm
1.Tap
Set alarm → Add alarm.
2.Set up your alar m as desired.
3.Tap OK.
4.Turn on the right switch of the alarm clock which need to be enabled.
Shut Off Alarm Alert
When a scheduled alarm is activated, a pop-up window with the alarm title appears.
Drop
to if you want to be reminded a gain in 10 minutes .
Drop to to cancel the alert.
Turn Alarm on
1.In the Alarm list, find the desire alarm.
2.The switch button to open the alarm clock on the right side ,the switch button from to .
5
Page 8

Edit Alarm
1.Enter the alarm list ,c lick the alarm time to edit.
2.After editing, tap OK.
Delete Alarm
Enter the alarm list ,drag left or right to delete the alarm you want to delete.
Countdown
Add countdown
Count down icon to enter the countdown interface.
1.Tap
2.After set a time,Tap Start.
☆If user has set a countdo wn,please tap bellow the interface to continue to add a new countdown.
Edit countdown
1.Tap
2.Tap Stop to pause countdown.
3.After pause countdown,tap to reset countdown.
4.Tap to add tags to countdown.
Delete countdown
In countdown interfac e,tap to delete the corresponding c ountdown.
Stopwatch
Start stopw atch
1.Tap
2.Tap Start to start the stopwatch.
Pause、Restart stopwatch
to add one minute countdown time.
Stopwatch icon to enter the stopwatch interface.
6
Page 9

1.In the course of the stopwatch,tap Stop to pause stopwatch.
2.After pause stopwatch,tap
Lap times
In the course of the stopwatch,tap
Share timing results
After pause stopwatch,tap to search the timing results on Google or sent through Gmail.
to reset stopwatch.
to record the lap times.
9 APP MARKET
The App Market has many applications that you can quickly and easily download to your Tablet.
Download Applications
1) Tap the Play store application icon.
☆ The first time, you are pro mpted for your App Market login information. If you have not yet registered a google
account, tap Register. Otherwise, tap Login and enter your login information and then tap Login again.
2) You can select applications from the default Featured grou p, by Categories, Top (latest, hottest, rand om), or
search by name.
3) Tap on an application, → Download.
4) After the app is downloaded, tap Install.
5) Tap Open to launch no w, or Done to return to the Play store screen.
History:After downloading apps, tap on History to manage the ins talled applicatio ns. You can add an d/or view
comments from other users, launch apps, and uninstall them.
10 BROWSER
Users can connect to the Internet through a browser.
Click the browser icon on the Desktop , and then you can open the Web browser.
7
Page 10

11 CALENDAR
Tap the Calendar application icon.
For the first time using the Calendar, you need to add an Exchange account. Enter account email address and
password. Click Next and follow the prompts to complete the account configuration. Then you can use the Calendar
(Note: we generally recommend that Gmail account, test server for: m.google. com)
Add Event
1) On the Calendar screen, tap on the date to which you want to add an event.
2) Tap on the event time, → tap in each entry field to enter the desired event information.
3) Tap Done.
12 CAMERA
Tap the
In
Tak e Vid eos
13 RECORDER
14 Gmail
information for the first time. Gmail need network support, please ensure that the network E-mail link to normal.
leeming9865@gmail.com as an example. As shown below:
Camera application icon.
Camera → tap
1) The picture will be saved.
2) Slide to left enter Camera to scan the picture.
3) Press Back to the Camera.
4) Tap
1) Tap switch to video, and you can take videos.
2) Tap
3) The video will be saved.
4) Slide to left enter Camera to play the video.
5) Press Back to the Camera.
6) Tap
7) Tap
1) Tap the recorder icon.
2) Tap the record icon to start recording.
3) Tap the record icon to stop record.
4) Tap the play button to pla y the voice of recording.
☆ Gmail is support the go ogle account.
In the main menu or desktop, tap the icon
You can sign in your Gmail account, you also can build a ne w account. Here we build an account
to exit the Camera and back to the Desktop.
to begin and tap again to stop.
switch back to camera.
to exit the Camera and back to the Desktop
to take the picture.
to ente r the ‘Gmail’ client. It’s required to configur e the account
8
Page 11

You can tap “new”, As shown below:
After that, you can select “Next”, you need to create email address. As shown below:
9
Page 12

Later it is appear” Recovery information” interface, you need to fill in another email account to make sure while
you lose your password, you also have a reset link to a different address. Next you also need to answer a security
question.As shown below:
After that select “Ne xt”, you need to accept the service. As shown below:
After that select ”I accept”, the two interface will appear;
10
Page 13

Select "Next", the G mail account has fini shed, which will automatically load the Gmail, a mailing list is as
follows:
You can check you Gmail through choosing one of the check bar, in where you can also put up “Reply”, “delete”,
“Search”, and C lick on button on the right top corner, can be set account message, as shown below:,
11
Page 14

15 FILE MANAGER
Tap the File Manager application icon to view the files on all storage devices (Internal memory, SD card,
USB device), and to quickly & easily install Android application on your Tablet.
Use the icons across the top of the screen as follows:
Local disk (Internal memory) Your SD card
Return previous folder Search
Copy Media between Computer and Tablet
Yo u can use the File Manager to copy files between an external storage devices and your computer. You can first
copy the desired files onto a SD card or USB device or directly use an USB c able to connect the device and the
computer and then copy files.
☆ The internal device storage is titled “Local Disk”, a memory card “SD card”, and a USB storage device is titled
“USB disk”.
☆ The instructions below are for copying from a SD card or USB storage device into the device. You can use the
same method to copy from the device to a SD card or USB storage device, and then connect the storage
device to your computer to transfer the f iles into the desired folder on your computer.
1) Tap the
2) Tap the menu and t hen tap the “Multiple Select”, finally, hold in the folder/file you want to copy, → tap
Copy.
3) Tap on the Internal Memory, → tap on the folder into which you want to copy the file, → tap menu
→ select the “Multiple Select” → tap Paste.
Delete files:Tap menu → select the “Multiple Select” → tap and hold on the folder/file you want to delete, → tap
Delete → OK to confirm t he deletion.
16 MUSIC
☆ Au dio file formats supported: .
When no music files in the audio player p laylist, the system will automatically loa d the music files f rom the card to
the audio player playlist after turning on the audio player .The playlist as shown in the above figure:
or to display the contents of your storage device.
MP3, WMA, AC3, WAV etc
USB disk
Menu
Yo u can pass the audio files by the way of synchronous USB, or access to audio files by inserting the SD card
which it is already full of audio files. You can also download the audio file through the network.
Select the appropriate tab key, you can see for example "Artist", "album", "songs" and ot her interfaces. Select a
song to play.
12
Page 15

17 VIDEO
Video file formats supported: 1080P, MKV, AVI etc.
☆
Picture file formats supported: JPEG, BMP, GIF, PNG, TIFF.
☆
Play Video
In the main menu or desktop, tap the icon to ent er “Video” interface, on where it will list all the video files and
image files. As shown be low:
Select the video files into video player interface. You can choose "Play", "Stop," "fast forward", "rewind", "progress
bar" and other c ontrol keys to contro l the playback prog ress.
13
Page 16

18 SETTINGS
Wireless &
networks
Sound
Display
Screenshot
Setting
Storage
Battery Show the batter y current status.
Apps
Location
services
Security
Language & language Select the language and region according to your location.
Wi-Fi Turn on Wi-Fi.
Data usage A list of the data at that time use and mobile data flow conditions.
more
Volumes
Default
notification
sound
Touch sounds Select to enable a sound when making a screen selection.
Screen lock
sound
Brightness
wallpaper
Sleep Choose the sleep time.
Day dream Tap to set the day dream.
Font size Choose the font size.
Gsensor
calibration
Screenshot
Setting
Total space,
Available space
Unmount storage
TF card/U-disk
downloaded
On sd card Tap in see the application which it is on the sd card and manage it.
Running Tap in see the application which it is running and manage it.
All
Add Account You can add new account.
Access to my
location
Wi-Fi & mobile
network locat ion
Screen lock Lock screen with None, a pattern, PIN, Slide, Face Unlock.
Owner info Show owner info on lock screen,
Make passwo rd
visible
Device
administrators
Unknown
sources
Verify apps Disallow or warm before installation of apps that may cause harm.
Trusted
credentials
Install from SD
card
Set up Airplane m ode, VPN, portable ho tspot , Ethernet, Mob ile
networks.
To adjust t he Media volume, Alarms volume and Notifications
volume. Tap & slide slider and then tap OK.
Select desired ringtone sound.
Play sounds when locking and unlocking the screen.
Tap & slide the slider to adjust the screen brightness as desired, and
then tap OK.
You can choose dynamic wallpaper, wallpaper and super clear
player set wallpaper.
Tap to see the G sensor calibration.
Select delay time to captu re the screen ; Set the location of
screenshot storage; Show the screenshot button in the statusbar.
It values appears when a TF card/U-disk is inserted in device.
When the TF card/U-disk is inserted, tap it to safety remove the TF
card/U-disk.
Tap in see the application which it is downloads from website and
manage it.
Tap in see the application which it is all applications and manage
them.
Let apps that have aske d your permission use your location
information.
Let apps use Google location service to estimate your location faster.
Anonymous location data will be collected and sent to Google.
Choose √ or not to make the password visible.
View or deactivate devic e administrators.
Allow installation of non-Market apps.
Display trusted CA certificates.
Install certificates from SD card.
the
14
Page 17
Input
Back up and
reset
Accounts Add account Add your personal accounts.
Date & time
Accessibility Services Set up the par ameter of the system.
Developer
options
About tablet
Frequently Asked Questions
Android
Q: W hat Android OS version is on my Device? A: 4.2.2
Basic Device Functionary
Email
Media Cards
Q: Which med ia cards are compatible w ith my Device?
Spell checker Tick, automatic spelling correction, conversely, is not.
Personal
dictionary
Android keyboard Onscreen keyboard settings
Voice Search Set up the language of the voice search.
Pointer speed Adjust the pointer speed.
Back up my data
Factory data
reset
Automatic Date
& time
Automatic time
zone
Set date Set the date.
Set time Set the time.
Select time zone Select the time zone.
Use
24-hour format
choose date
format
Tap to see the developer options.
Q: Do I have to charge the battery before use?
A: You should charge the battery for at least 4 hours, but you can use the device while it’s charging.
Use the include power adapter to charge; this device can be charged via the USB cable.
Q: Can I use any of my personal email addresses to send/receive email?
A: The device supp orts POP3 and SMTP accou nts. Some free email acc ounts are not suppor ted on
mobile devices. Check with your email provider to see if you account is supported.
A: micro SD cards.
You can add words to a personal dictionary, words that may not be
included in the default dictionary.
Back up app data, Wi-Fi passwords, and other setting to Google
servicers
Tap to reset the device to its initia l factory state, erasin g all data and
downloaded applications. Tap Reset
Device to proceed with reset, or tap
previous screen.
WARNING! The following will be erased during the factory reset:
~ Google account
~System and application data and settings
~ Downloaded applications
The factory reset will NOT erased:
~ Current system software and bundled applications
~ SD card files, such as music or photos
Using the value of the network can be synchronized with the network
time
Use network-provided time zone.
You can choose to use 24-hour format or 12-hour format.
You can select the date format.
View Status (Batter y, W i-Fi, etc), Battery use, Legal information,
Model number, Android version, Kernel version and Build number.
15
to cancel and return to
Page 18

Music
Q: How do I add music files to my device?
A: Copy the music files from your computer onto a SD card or USB storage device, and th en use
Photos
Video
Wi-Fi
Battery Management
The battery is not fully charged out of the box, so it is recommended that you charge the battery for at least 4
hours before you start to use the device.
The rechargeable battery is designed and manufactured to be used and recharged frequently. As with all
batteries, the capacity of the battery reduces each time it is charged/d epleted. However, you can still try to prolong the
battery’s lifetime by following the su ggestions below:
● Use your Tablet at least once a week.
● Charge th e battery regularl y and fully.
● Never leave the battery fully discharged for a long period of time.
● Always keep the device and the battery away from heat.
Charge battery
Plug the power adapter into an electrical wall outlet, and then con nect to the device to fully charge the battery
before use.
A fully discharged battery tak es approximately 4 hour s to fully charge, but you ca n use the device while plu gged
in when desired.
Important Safety Precautions
Always follow these basic safety precautions when us ing your Tablet. This reduces the risk of fire, electric shock,
and injury.
Clean your device
Treat the screen gent ly. To clean f ingerprints or dust fr om the screen, we rec ommend using a soft, non-abrasive
cloth such as a camera lens cloth.
the File Browser application to copy the files into the device.
Q: How do I add photo files to my device?
A: Copy the photo files from your computer onto a SD card or USB stora ge device, and then use the
File Browser application to copy the files into the device.
Q: Can I play YouTube videos on my device?
A: Yes. You can tap the YouTube application icon to quick access videos.
Q: How do I add video file s to my device?
A: Copy the video files from your computer onto a SD card or USB storage device, and then use the
File Browser application to copy the files into the device.
Q: Do I need a Wi-Fi adapter to connect to the Internet?
A: No. The Wi-Fi adapter is built-in to the device.
Inconsistent with th e physical specifi cations, please pr evail in kind.
● Ple ase do not place the prod uct in hot environment . The highest temperatur e is at 37°.
● Only use the product be low the altitude of 2 000 meters.
● Do not use the product in the tropical conditions.
☆ You can also charge the battery using the USB cable.
● Do not expose this product to rain or moisture.
● Keep the device out of direct sunlight and heat sources.
● Protect the power cord. Route power cords so that they are not likely to be walked on or pinched
by items placed on or against them. Pay particular attention to the point where the cord attaches
to the device.
● Only use the AC adapter included with the device. Using any other power adapter voids your
warranty.
● Do not remove the cover. There are no user-serviceable parts inside.
16
 Loading...