

Page 1
1
Model No.: QM734-2
User Manual
Please read this instruction manual carefully before connecting or
operating the product. Save it for future reference.
Page 2

2
Contents
Page
Important Safety Precautions .................................................................................................................................4
Attention: ...................................................................................................................................................................5
Important Notice .......................................................................................................................................................5
Caution ......................................................................................................................................................................5
Charge the Battery...................................................................................................................................................5
Installing a Micro SD memory Card ......................................................................................................................6
Connecting to the Earphone ..................................................................................................................................7
TABLET PC View.....................................................................................................................................................7
Home Screen ............................................................................................................................................................8
PACKAGE CONTENTS ..........................................................................................................................................8
Power On/Off ............................................................................................................................................................8
Desktop .....................................................................................................................................................................9
Standby mode (Screen off mode) .........................................................................................................................9
Navigating the Touch Screen .................................................................................................................................9
System settings ........................................................................................................................................................9
1. Wireless & networks ......................................................................................................................................10
2. Sound ..............................................................................................................................................................10
3. Display ............................................................................................................................................................. 11
4. Storage ............................................................................................................................................................ 11
5. Battery ............................................................................................................................................................. 11
6. Apps .................................................................................................................................................................12
7. Account & sync...............................................................................................................................................12
8. Location services ...........................................................................................................................................12
9. Security............................................................................................................................................................12
10. Language & Input .......................................................................................................................................13
11. Back up and reset .........................................................................................................................................13
12. Date & time ....................................................................................................................................................14
13. Accessibility .................................................................................................................................................14
14. Developer options ......................................................................................................................................14
15. About tablet .................................................................................................................................................15
Connecting the Tablet with a computer ..............................................................................................................15
How to install Applications (.apk file) into the device........................................................................................15
How to Delete Applications (.apk file) from the device .....................................................................................16
How to make desktop icons .................................................................................................................................16
Change Input Method ............................................................................................................................................17
Main Menu ..............................................................................................................................................................18
1. Browser ...........................................................................................................................................................18
2. Voice Search ...................................................................................................................................................19
3. Play Store ........................................................................................................................................................19
4. YouTube ..........................................................................................................................................................20
5. Gmail ..............................................................................................................................................................20
Page 3

3
6. Email ...............................................................................................................................................................21
7. Camera ..........................................................................................................................................................22
8. Sound Recorder ............................................................................................................................................24
9. Super-HD Player...........................................................................................................................................24
10. Music Player ................................................................................................................................................25
11. File Manager ...............................................................................................................................................25
12. Search ..........................................................................................................................................................26
13. Power ...........................................................................................................................................................26
14. Clock ............................................................................................................................................................26
15. Calculator.....................................................................................................................................................27
16. Getjar ...........................................................................................................................................................27
Trouble Shooting ....................................................................................................................................................28
Specifications .........................................................................................................................................................29
Page 4

4
Important Safety Precautions
-The product shall not be exposed to dripping or splashing and no objects filled with liquids, such as
vases, shall be placed over the product. Dry location use only.
-No naked flames sources, such as candles, should be placed over or near the product.
-Never use the device while driving or when operating any vehicle as this could cause accidents. It is
also against the law in many areas. Take care when using the player outdoors, especially when
crossing the street.
-Earphone cables may be hazardous to young children. Store the product carefully when it is not in
use.
-Listen at a moderate volume. Do not listen to music at very high volumes using the earphones as this
can permanently damage your hearing.
-To establish a safe volume level. Set your volume control at a low setting. Slowly increase the sound
until you can hear it comfortably and clearly, without distortion.
-Listen for reasonable periods of time: Prolonged exposure to sound can also cause hearing loss, be
sure to use your equipment reasonably and take appropriate breaks.
-Keep the device clean and never store it next to a heat source or in dirty, humid or wet places. Keep it
out of direct sunlight.
-Do not put the device in high temperature places (over 40ºC), especially not in a car with the windows
closed in summer.
-Keep the device away from strong magnetic fields.
-Press the device’s buttons gently. Pressing them or the screen too hard can damage the device.
-Do not use the device in an electronics-prohibited area, such as in an airplane.
-Do not use the device in an extremely dry environment as this can lead to static discharge, which can
damage the device.
-Do not subject the product to harsh impacts. Do not drop the appliance. This may result in damage to
the product.
-Do not attempt to dismantle or repair this unit yourself. Repairs should only be performed by qualified
personnel.
-Ensure that your earphones are inserted into the device before it is switched on. Inserting them
afterwards can potentially damage the earphones and the device.
-Do not allow your device to be submerged in water. Do not expose headphone socket or the device to
water, as water entering the set may cause major damage.
-Active mobile phones in the vicinity may cause interference.
-We will not be responsible for any memory loss caused by product damage, repairs or other reasons.
Please operate the unit correctly as stated in this manual.
-Disconnect the appliance from the power source when cleaning.
-In order to prevent program failure, never disconnect the device suddenly from a PC during file
Page 5
5
transfers.
-Use a slightly dampened lint-free cloth to clean this appliance. Do not dismantle the device or use
alcohol, thinners or benzene to clean the surface of the device.
-The supplier or retailer accepts no liability for lost, corrupted or damaged data. It remains the
responsibility of the user to ensure that they perform consistent data backups during the use of this
product.
-This product is not intended for commercial use. It is for household use only.
Attention:
-We have done our best to produce a complete and accurate manual. However, we cannot ensure that
there are no errors or omissions during the printing process.
-We cannot take responsibility for any damages caused by unauthorised attempts to upgrade software
or for any data corruption while the product is being repaired.
-The stated memory capacity includes operating system software.
Important Notice
- If the device is non-responsive or an application is frozen hold the power button for 7 seconds to
perform a reset.
- When the performance of the device is slow after using some applications, it is recommended to close
running applications via the Settings menu.
Caution
- Only use the approved power adaptor (DC5V 2A) that is provided with the device. Using a different
power adaptor may cause damage to the device.
-The device is equipped with a high performance processor. It may produce heat in the cabinet if used
for long periods.
Charge the Battery
Before using the device for the first time or when the battery has been unused for an extended period,
you must charge the battery. It will take about 2.5 hours to fully charge the battery with the adaptor
provided. After the first charge the device may be used whilst charging.
There are no User serviceable parts, including the battery, within the device.
Use only approved chargers and cables. Unapproved chargers or cables may cause batteries to explode
or damage your device.
When the battery is low the device will emit a warning tone and show a low battery message. Recharge
your battery to continue using your device.
If the battery is completely discharged the device may not turn on for several minutes, even while it is
charging. Allow a depleted battery to charge for at least a few minutes before you try to turn on the
Page 6

6
device. The playback time of the battery has about 3hours when the product is played video file and
using the headphone, which depends on the volume level and played files.
! Connecting the power adaptor improperly may cause serious damage to the device or power
adapter. Any damage caused by misuse is not covered by the warranty.
-Plug the power adapter into a power outlet after connecting the tablet with your power adaptor.
-If the device receives an unstable power supply while charging, the touch screen may not function. If
this happens, unplug the power adaptor from the device.
-The device may heat up while charging. This is normal and should not affect your device’s lifespan or
performance.
- When the battery is fully charged, first turn off the power at the electrical socket, unplug the power
adapter from the device and then unplug the power adapter from the electrical socket.
To save energy always turn off the power at the electrical socket and unplug the power adapter when not
in use.
Battery Indicator
The Battery icon in the Status Bar indicates the battery power level. When the level is at 15% or less the
device will give a warning to charge the battery. Continuing to operate the device without recharging will
result in the device powering off.
Reduce the battery consumption
Your device provides options that help you save battery power. By customizing these options and
deactivating features in the background, you can use the device longer between charges:
-When you are not using your device, switch to sleep mode by pressing the Power key.
-Close unnecessary applications with the task manager.
-Deactivate the Wi-Fi feature.
-Deactivate auto-syncing of applications.
-Decrease the backlight time.
-Decrease the brightness of the display.
Installing a Micro SD memory Card
-You can extend the memory capacity of your device by adding a micro SD memory card. Insert the
micro SD card into the slot as shown in the illustration.
-The player is compatible up to a 32GB Micro SD card. Do not force the memory card into the slot. Insert
the memory card with the contacts facing the front (screen side) of the player. Lightly press the card end
inwards again to eject the card.
-Do not remove the card when the player is transferring or playing files. To prevent loss of data or
damage to the memory card un-mount the card before removing it from the device.
- Some micro SD memory card brands may not be fully
compatible with your device.
Page 7
7
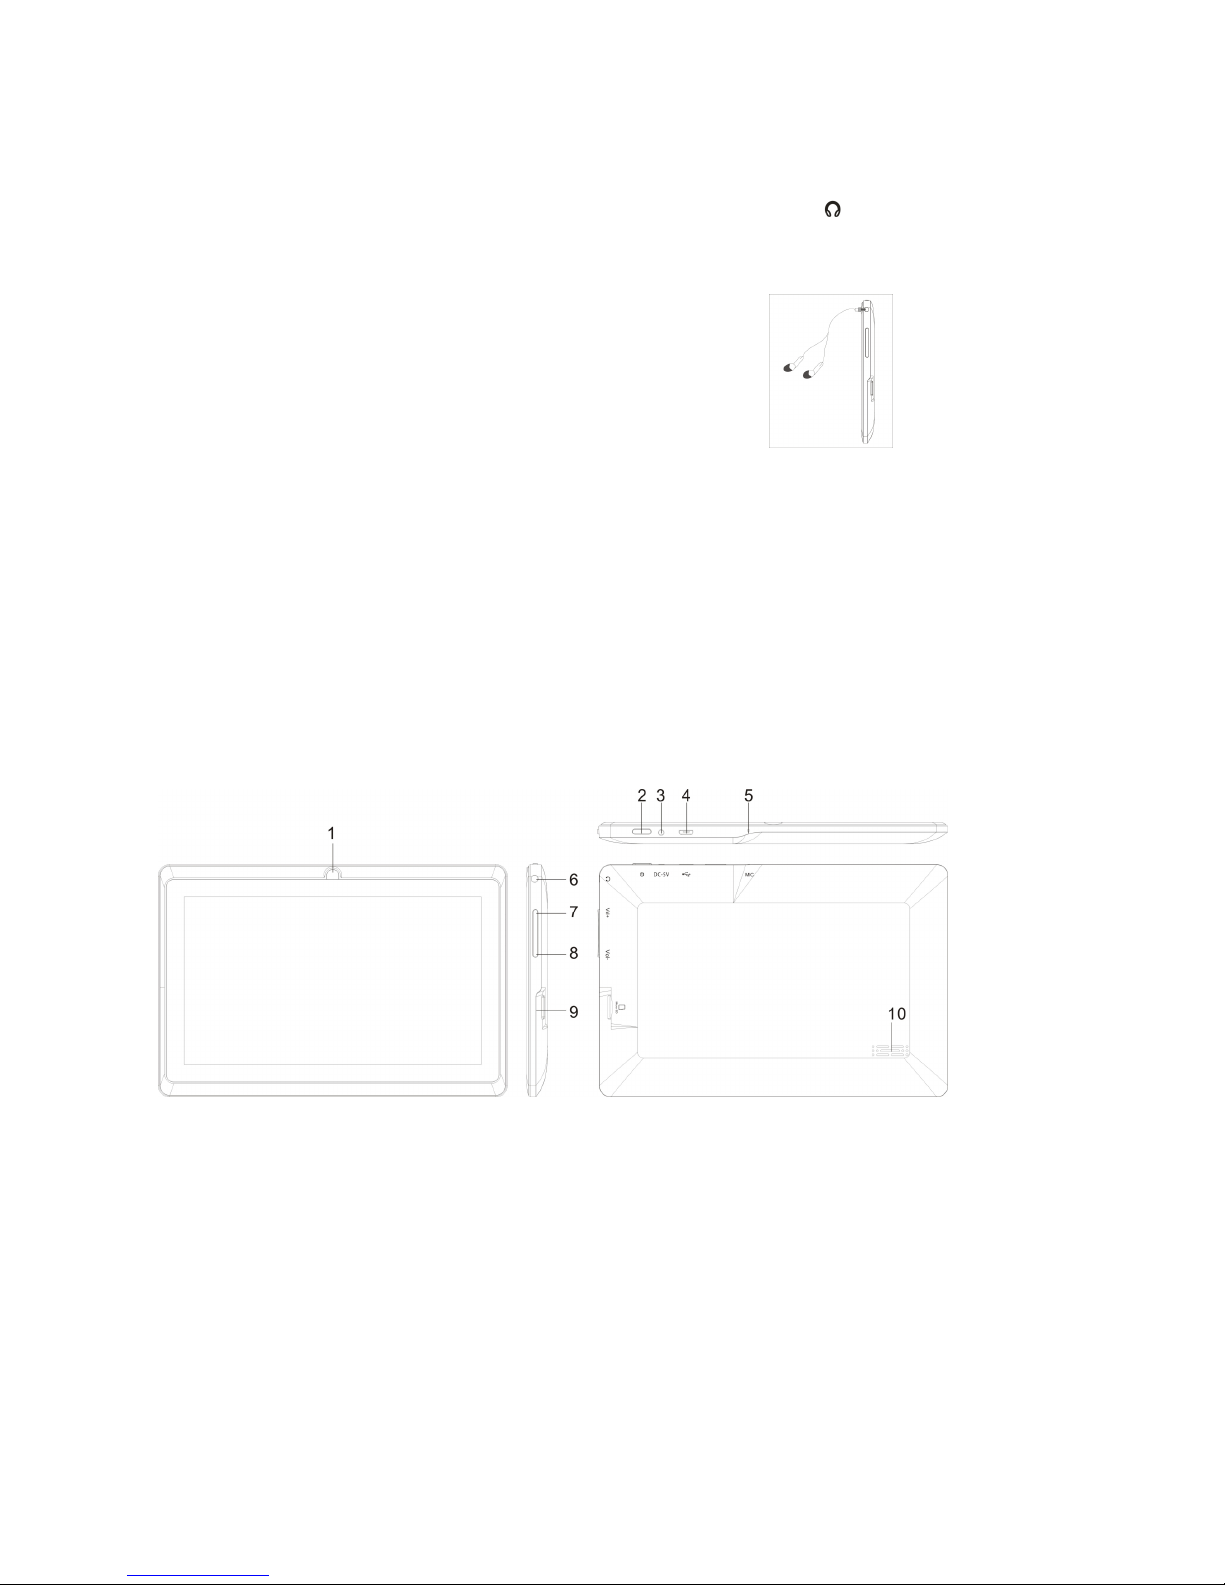
Connecting to the Earphone
Insert your earphone (not included) into the device 3.5mm earphone jack on the side of the unit.
Power ON the device, select your favorite music or video and adjust the volume to a comfortable listening
level.
Note:
1. When headphone/earphone is connected to the earphone jack, the main speakers will be
automatically muted.
2. Be sure that your device is set at a low volume level before connecting the headphone/earphone.
3. Increase the volume gradually for comfortable listening.
Caution: Listening at high volumes for a long period could cause hearing loss.
TABLET PC View
1. Front Camera Lens. 6. Earphone Socket 3.5mm.
2. Power on/off /reset lock button. 7. Vol+ button.
3. DC in Socket: 5V 2A. 8. Vol- butto
n.
4. USB Socket: connect the unit to PC 9. Slot Micro SD card
5. Built in MIC 10. Built in speaker
Page 8
8
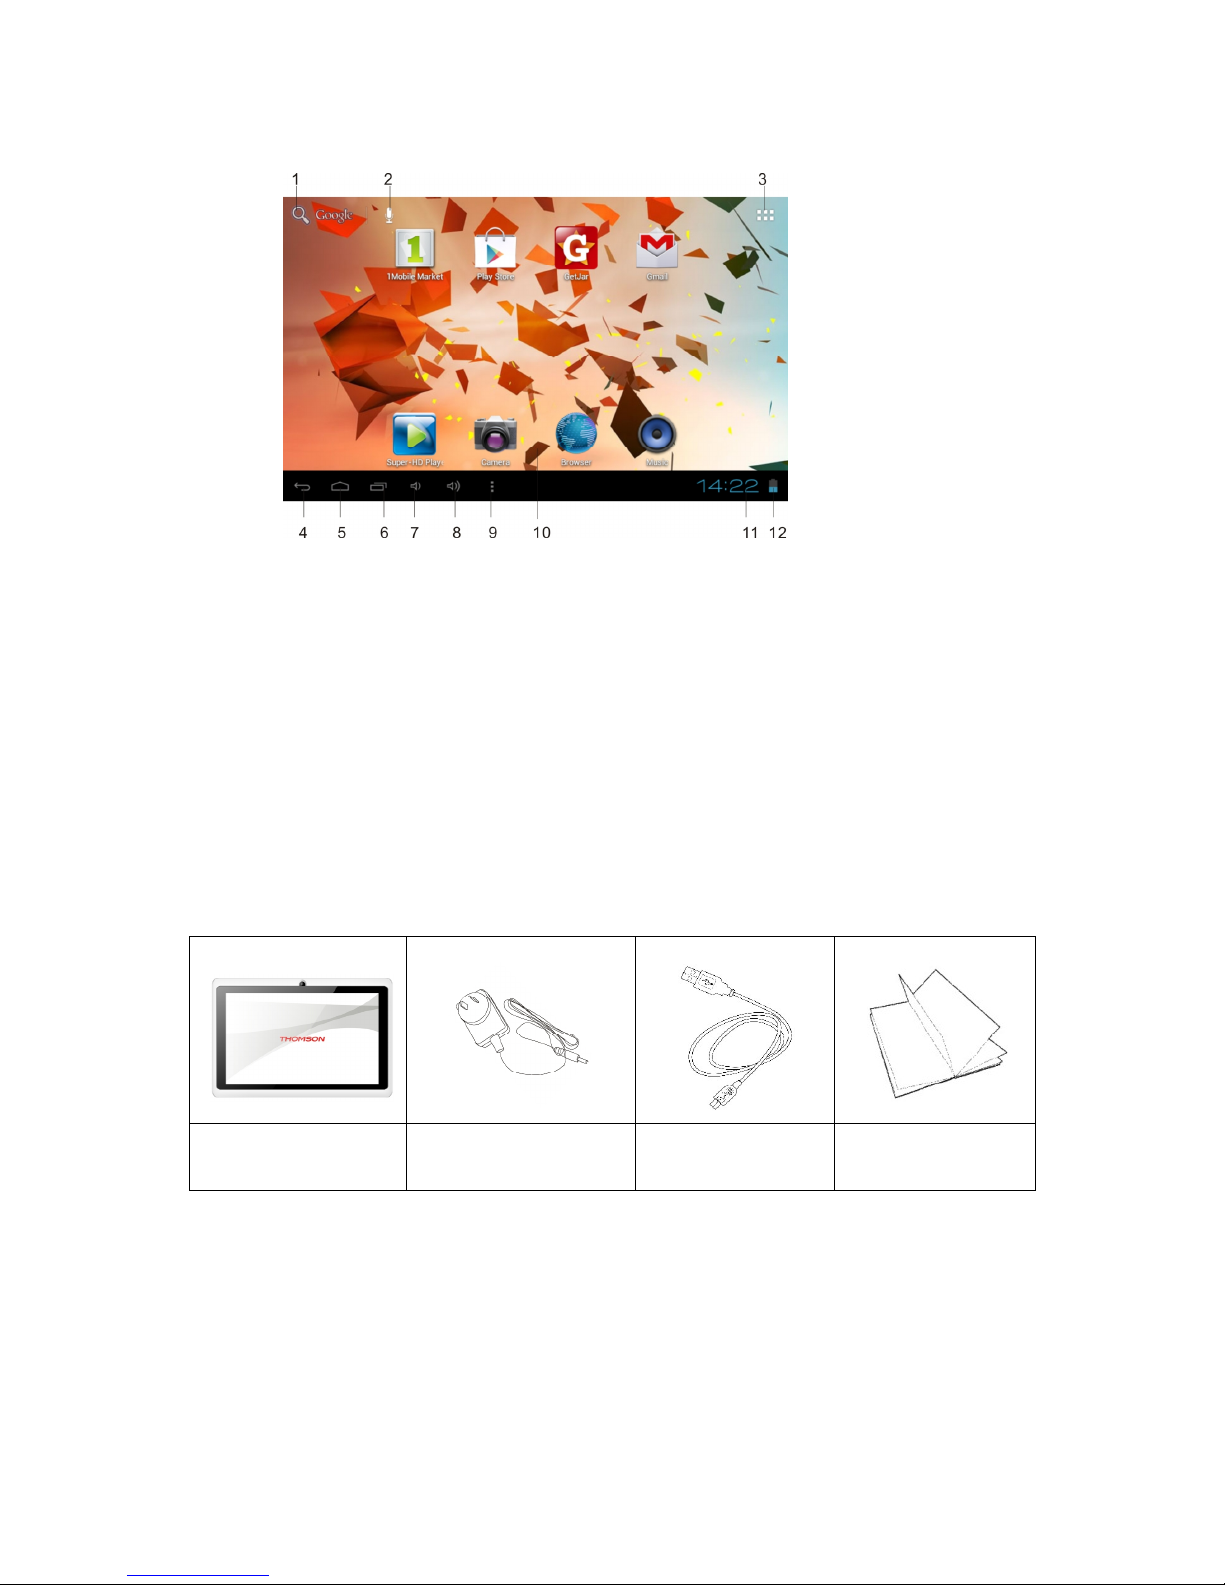
Home Screen
1. Access to Google search engine 7. Vol-
2. Voice search 8. Vol+
3. Access to applications 9. Menu
4. Go back last page 10. Main screen applications
5. Access to Main Menu 11. Time display
6. Recent applications menu 12. Battery Indicator
PACKAGE CONTENTS
Check your product box and make sure the below items are included, the supplied items are designed
only for your device and may not be compatible wiht other devices, other accessories may not be
compatible with your device.
, , ,
Power On/Off
To turn ON the device press and hold the Power button for about 4 seconds. The Operating System may
take a few moments to load. Touch the Lock icon and slide to the right in order to unlock the screen.
To reset the device press and hold the Power button for about 7 seconds.
To turn OFF the device press and hold the Power button for about 4 seconds.
Tablet PC
AC Adaptor
USB cable
User Manual
Page 9
9
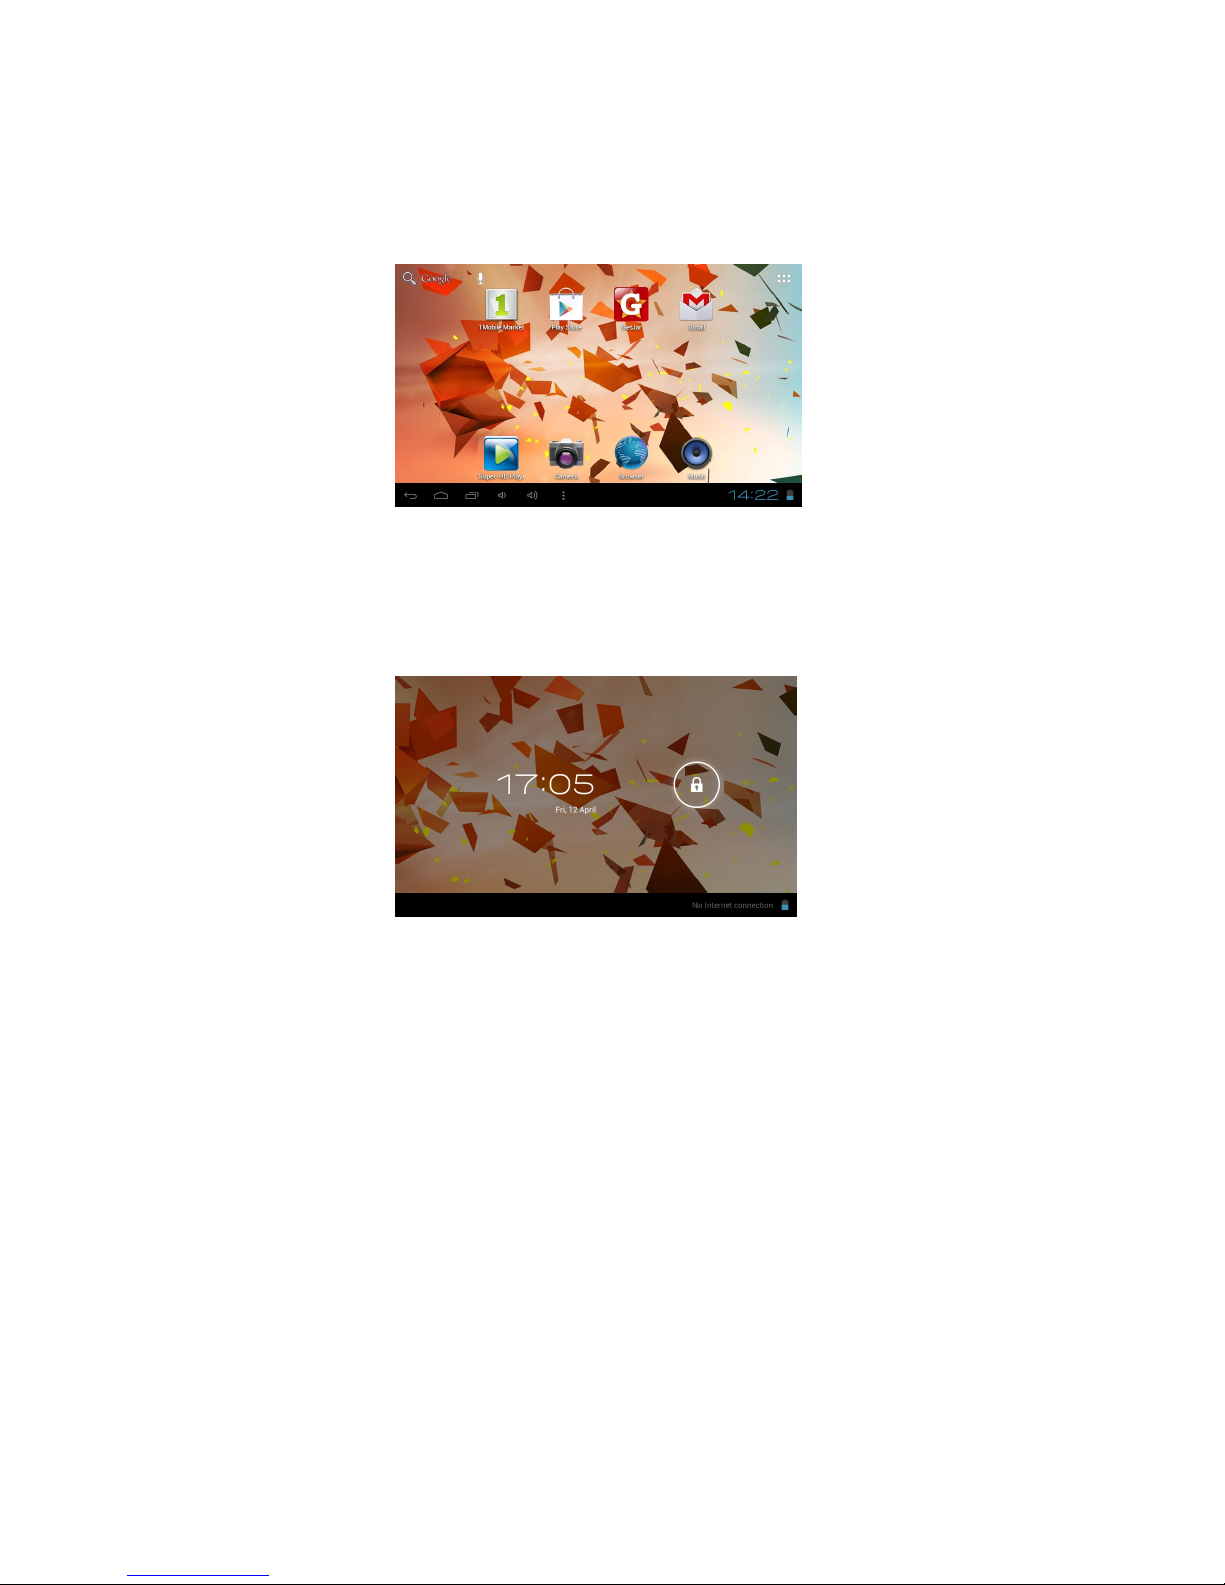
Desktop
After turning on the device the home screen displays with primary shortcuts, App shortcut icons, Widgets
and the Status Bar.
Standby mode (Screen off mode)
To lock the touch screen press the Power button, to unlock press again.
Touch the Lock icon and slide to the right in order to unlock the screen.
Navigating the Touch Screen
On the Touch Screen you may –
• Touch an icon to select or launch the App
• Touch and Hold an icon to activate a pop up menu or create a shortcut
• Swipe or Slide your finger across the screen to unlock the screen or scroll through screens or
menus
• Pinch two fingers together or spread them apart to zoom in or out of an image
System settings
On the desktop, press menu button on the Status Bar and select the system settings icon.
Or press in the bottom right corner of the screen and select the system settings icon to enter the system
settings.
Page 10

10
1. Wireless & networks
- The Wi-Fi settings tab is selected as default.
- Press the Wi-Fi Status indicator to enable or disable Wi-Fi. When Wi-Fi is enabled the device will
scan for available networks. Select the appropriate, available Wi-Fi network to be used, enter the
network password if prompted (tap in the password area to open the keyboard). Some encrypted
networks need a valid key to be entered.
- Select connect to connect to the Wi-Fi network.
2. Sound
To change the audio settings on your device. You can also click the volume icons within the Status
Bar or the volume controls on the side of the unit to adjust volume.
Volumes: Adjust the volume for Music and Media, Ringtones and Alarms on your device.
Silent mode: Select Off to switch off the silent function, select the Mute option to set the Silent mode
of your device’s system.
Default notifications: Select a tone to alert you to events.
Touch sounds: Set the device to alert you when you select an application or option.
Screen lock sound: Set the device to alert you when you lock or unlock the touch screen.
Page 11

11
3. Display
Change the settings to control the display and backlight on your device.
Brightness: Adjust the brightness of the display.
Wallpaper: Select a background image for the Home screen from Live Wallpapers, Super-HD
Player or Wallpapers.
Auto-rotate Screen: Select to Auto-rotate screen or not.
Sleep: Set Sleep time options between 15 seconds and 30 minutes or never sleep.
Font size: Change the font size for the display.
Accelerometer coordinate system: Set to Default or Special coordinate system.
Screen adaption: Use to adjust size of the display screen for some games
4. Storage
Note: The actual available capacity of the internal memory is less than the specified capacity
because the operating system and default applications occupy part of the memory.
- View memory information for your device and memory card.
- Enable Media Scanning
- Erase Storage
- Un-mount the SD card or USB device for safe removal.
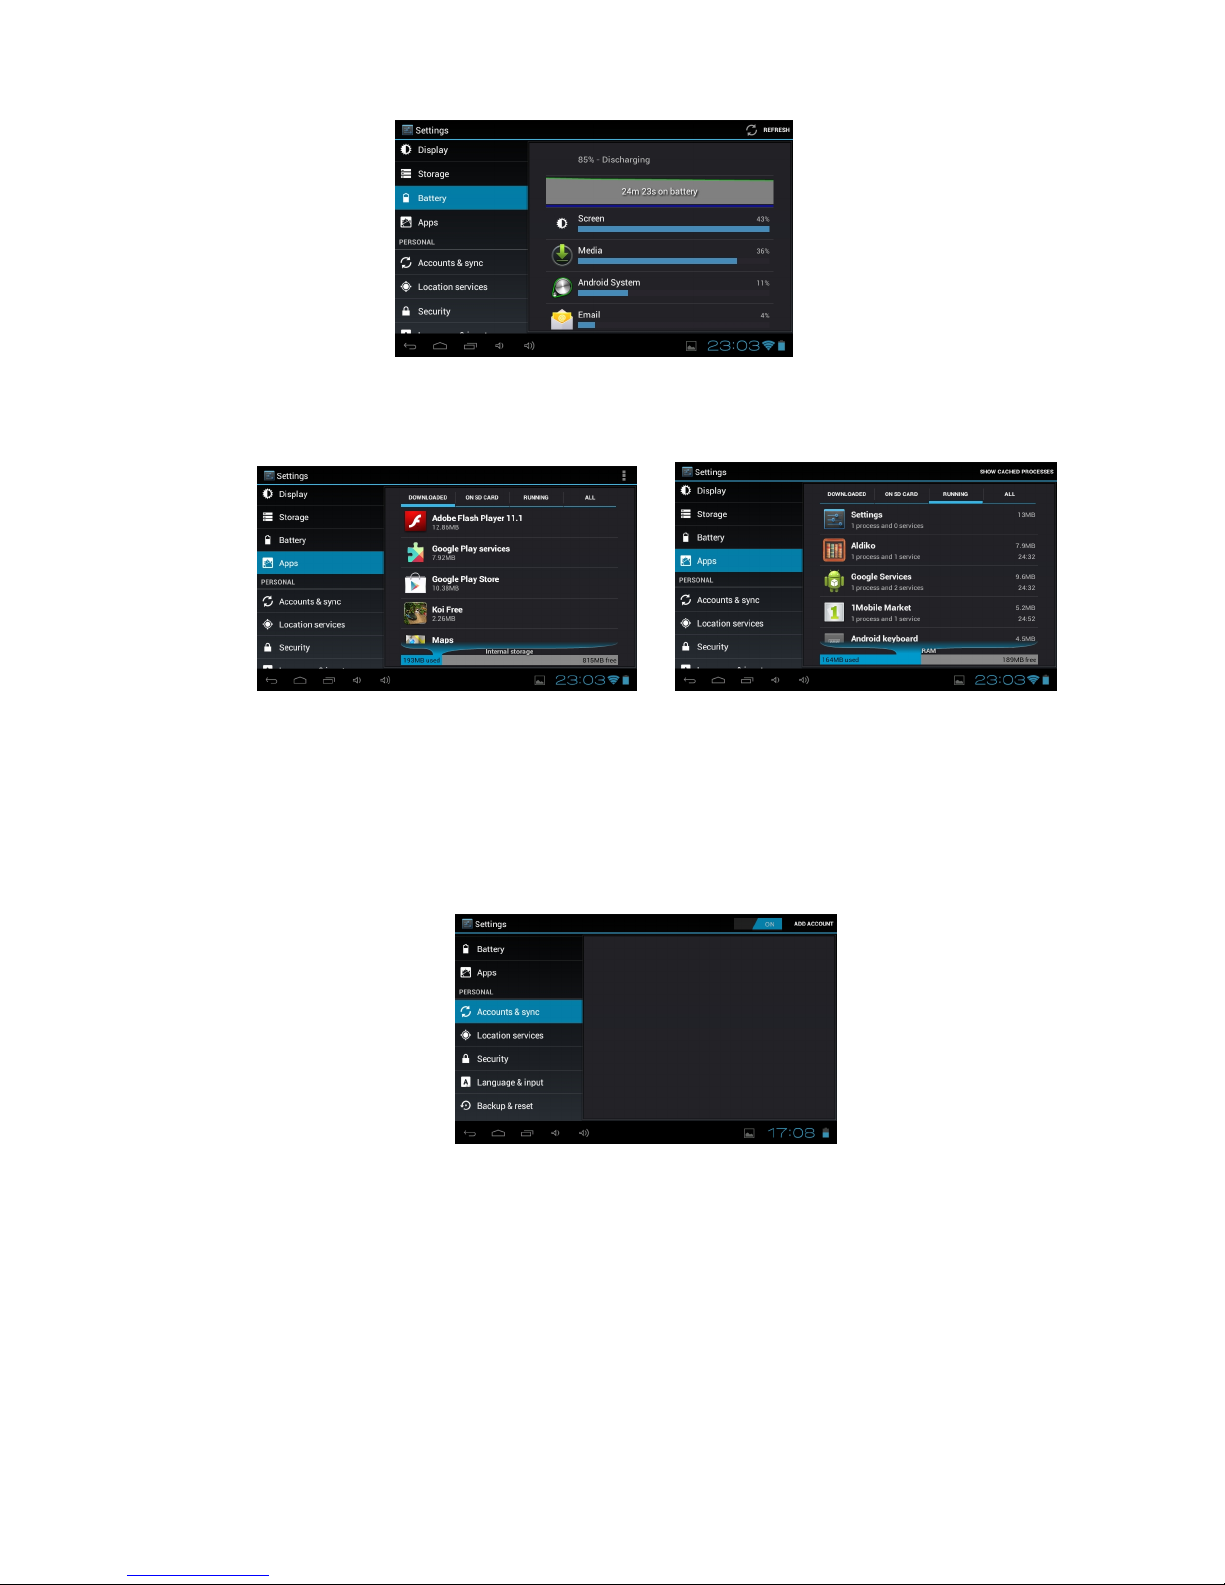
5. Battery
View the amount of battery power consumed by processes and applications currently running on
your device.
Page 12
12
6. Apps
View and manage the applications on your device.
View and control the currently running processes and services.
7. Account & sync
Used to Create and manage your email and Gmail accounts. After connecting to the Wi-Fi
network, the e-mailing system synchronizes your account with the device. Emails are
automatically downloaded into the device.
To set up your Accounts touch ADD ACCOUNT on the top right of the Home Screen, select the
account type and follow the prompts to enter your account details and complete the set up.
8. Location services
Change the settings for location services.
Google’s location service: Set to use Wi-Fi and/or mobile networks for finding your location.
Location and Google search: Set the device to use your current location
9. Security
Change the settings for securing your device.
Screen lock: Protect your device from unauthorized use by creating a personal screen unlock
pattern.
Owner Info: Show owner info on lock screen, type text to display on the lock screen.
Make passwords visible: Set to show your passwords as you enter them.
Page 13

13
Device administrators: View the administrators you have approved for your device. You can allow
device administrators to apply new policies to your device.
Unknown sources: Set to download applications from any source. If you do not select this option,
you can download applications only from Play Store.
Trusted credentials: Set to use certificates and credentials to ensure the secure use of
applications.
Install from SD card: Install encrypted certificates that are saved on a memory card.
Clear credentials: Delete credentials from the device and reset the password.
10. Language & Input
Change the settings for languages and text input.
Language: Select a display language
Spelling correction: Select to correct spelling automatically.
Personal dictionary: Add the words in the user dictionary.
Keyboard & input method: If you need other languages besides English on the keyboard, press
the relevant keyboard and enter the chosen Keyboard settings, select Keyboards, press the
language you need.
Default: Select a text input method.
Android keyboard: Change keyboard settings.
Voice search
-Language: Select a language for Google voice recognition.
-Safe Search: Select Off, Moderate or Strict for this option.
-Block offensive words: Set to hide offensive words from voice search results.
Text-to-speech output
-Pico TTS: Select the speech synthesis engine.
-Speech rate: Select a speed for the TTS feature.
-Listen to an example: Listen to the spoken text for an example.
Pointer speed: Adjust the pointer speed for the mouse or track pad connected to your device.
11. Back up and reset
Change the settings for managing settings and data.
Back up my data: Set to back up your settings and application data to the Google server.
Backup account: Set up or edit your Google backup account.
Automatic restore: Set to restore your settings and application data when you must reinstall an
application.
Factory data reset: Reset your settings to the factory defaults and delete all your data.
Recovery Mode: Reboot into the system in Recovery Mode. this function can clear the data or
system upgrade.
Page 14

14
12. Date & time
Change the settings to control how time and date appears on your device.
If the battery remains fully discharged or removed from the device, the time and date will be reset.
Automatic date and time: Set to receive time information from the network and update the time
and date automatically.
-Set date: Set the current date manually.
-Set time: Set the current time manually.
Automatic time zone: Set to receive time zone information from the network when you move
across time zones.
-Select time zone: Select a time zone.
Use 24-hour format: Set to show the time in 24-hour format or 12-hour format.
Select date format: Select a date format. Change the setting to control time and date appears on
your device.
13. Accessibility
Accessibility services are special features for those with physical challenges. Change the settings to
improve accessibility to the device’s interface and features.
Services: Select the installed service.
System Large text: Select to large the text display.
Speak passwords: Select to allow the speak passwords.
Touch & Hold delay: Set the recognition time for touching and holding the screen.
Install web scripts: Select to allow or not allow install scripts from Google that make their web
content more accessible.
14. Developer options
Activate and change the settings for application development.
USB debugging: Activate USB debugging mode to connect your device to a computer with a USB
cable..
Stay awake: Set the screen to remain on while you are charging the battery.
Allow mock locations: Allow mock locations and service information to be sent to a Location
Manager service for testing.
HDCP checking: Use HDCP checking for DRM content.
Desktop backup password: Set Desktop backup password.
Strict mode enabled: Flash screen when apps do long operations on main thread.
Show pointer location: Set to show the coordinates and traces of the pointer when you touch the
screen.
Show touches: Set to show the pointer when you touch the screen.
Show screen updates: Set to flash areas of the screen when they are updated.
Show CPU usage: Show current CPU usage.
Force GPU rendering: Set to use 2D hardware acceleration to improve graphic performance.
Window animation scale: Select a speed for opening and closing pop-up windows.
Transition animation scale: Select a speed for switching between screens.
Do not keep activities: Set to end a running application when you launch a new application.
Background processes Limit: Set to limit the number of processes that can run in the background.
Show all ANRs: Set the device to alert you to unresponsive applications that are running in the
background.
Page 15

15
15. About tablet
View information about your device, such as model number and version.
Connecting the Tablet with a computer
Connect the device to the PC with the supplied USB cable. Ensure the device is turned ON
and unlocked. On the main desktop touch the right side of the status bar on the bottom of
the desktop.
On the pop up screen touch “USB connected” to open the USB Mass Storage window and touch “Turn
on USB storage” to mount the tablet. The device will be recognized in Windows Explorer of the PC and
can be used as an external storage device.
After you have finished transferring files press “Turn off USB storage” to un-mount it.
How to install Applications (.apk file) into the device
Method 1.
Page 16

16
1. Connect the device to the internet. See [1.Wireless & networks] above for directions on how to
connect to the internet.
2. Run “Play Store” and search for the applications you want to install.
3. Follow the instruction on the screen for installation. The device will install the application
automatically.
Note: in order to perform this task you may be prompted to set up a Google account before
applications can be downloaded.
Method 2.
1. With your computer, search for application files (.apk) that you want to install on to the device.
2. Download the file (.apk) to your computer.
3. Connect the device with your computer.
See above [Connecting the Tablet with a computer.]
4. Copy and paste the .apk file on to the device and disconnect it from your computer. You should
place Apps in the downloaded folder or similar in order that they can be easily located later.
5. Run the file browser or explorer App and browse to the .apk file that was copied to the device.
6. Press the file and follow the instructions on the screen to install.
Note
Applications should only be downloaded by an adult at least 18 years of age or at the age of maturity in
the jurisdiction where you reside. In case of any problems including legal issues resulting from the
user’s own decision, the manufacturer and authorized agents shall not be held responsible.
How to Delete Applications (.apk file) from the device
Touch the setting icon in the main menu, scroll to and select “Apps”, in the “Downloaded” tab select the
APK file you want to delete, press and hold on the icon to display the pop-up menu, press “Uninstall” to
remove the application.
All installed applications are listed. Press Uninstall to delete the selected application.
How to make desktop icons
Press the Menu icon on the upper right side of the desktop to display the Apps and Widgets
interface.
Page 17

17
Creating App Shortcuts
Touch and hold the desired APK icon to place a shortcut on the desktop.
Widgets
Either scroll right to left with your finger or touch the Widgets tab to view the installed widgets. Touch and
hold the desired WIDGET icon to place a shortcut on the desktop.
Change Input Method
If your device was installed with other input methods such as an external mouse, track pad,
keyboard or games controller you may change the settings to suit under the Language and input
section in Settings.
Page 18

18
Select the installed keyboard, then the keyboard will appear with your desired language you installed.
Main Menu
1. Browser
You may incur additional charges for accessing the Internet and downloading media files. For
details, contact your service provider.
Browse a webpage
1. In the application list, select Browser.
2. To access a specific webpage, select the URL field, enter the web address, and then select Go.
3. Navigate web pages with the following keys:
Function
1 1. Enter a web address or a keyword.
2 2. View your bookmarks, saved pages, and recent Internet history
3 3. Access web browser options.
4
While browsing a webpage, access the following options:
- To zoom in or out, place two fingers on the screen and slowly spread them apart or pinch them
together. To return to the original size, double-tap the screen.
- To open a new window without saving your browsing data, select → New incognito tab.
- To refresh the current webpage → Refresh.
Page 19

19
- To view your bookmarks history, select → Bookmarks.
- To save the current webpage by selecting → Saved to bookmarks.
- To send a web address to others, select → Share page.
- To search for text on a webpage, select → Find on page.
- To switch to the desktop site, select → Request desktop site.
- To save the current webpage for reading offline, select →Save for offline reading.
- To change the browser settings, select → Settings.
Bookmark your favourite webpage
If you know the address of a webpage, you can add a bookmark manually.
1. In the application list, select Browser.
2. Enter a web address or navigate to a webpage.
3. Select , press Saved to bookmarks.
4. Enter a name for the bookmark and select OK.
Download a file from the Internet
When you download files or applications from the Internet, your device saves them to the internal
memory. Files you download from the Internet can include viruses that will damage your device. To
reduce this risk, only download files from sources you trust. Some media files include Digital Rights
Management to protect copyrights. This protection may prevent you from downloading, copying,
modifying, or transferring some files.
1. In the application list, select Browser.
2. Search for a file or application and download it to the device.
2. Voice Search
Search for information by voice
This feature may be unavailable depending on your region or service provider.
1. In the application list, select Voice Search.
2. Select and say a keyword into your device’s microphone. The device searches for web pages
related to the keyword.
3. Select a search result.
3. Play Store
Your device’s functionality can be extended by installing additional applications. Play Store provides
a quick and easy way to shop for mobile applications.
- This feature may be unavailable depending on your region or service provider.
- Your device will save user files from downloaded applications to the internal memory.
Download an application
1. In the application list, select Play Store.
2. Search for an application and download it to the device. When the download is complete, the
device will install the application automatically.
Page 20

20
4. YouTube
Learn to view and upload videos via the YouTube™ video sharing service.
This feature may be unavailable depending on your region or service provider.
Play a video
1. In the application list, select YouTube.
2. Select a video.
3. Control playback with the following keys:
Pause or resume playback.
2 Scan forwards or backwards in the file by dragging the bar.
3 Play the video on the full screen.
Upload a video
1. In the application list, select YouTube.
2. Select your Google account if it is linked to YouTube. Alternatively, you can select Sign in and
set up an account to sign in to YouTube.
3. Select → a category → a video
If you are uploading a video for the first time, select a network type to upload a video.
4. Enter the details of the upload and select Upload.
5. Gmail
Learn to send or view email messages via the Google Mail™ webmail service.
- This feature may be unavailable depending on your region or service provider.
- This feature may be labeled differently depending on your region or service provider.
Send an email message
1. In the application list, select Gmail → .
2. Select the recipient field and enter an email address.
3. Select the subject field and enter a subject.
4. Select the text field and enter your email text.
5. Select and attach a file.
6. To send the message, select SEND.
If you are offline or outside your service area, the message will be held in the message thread until
you are online and inside your service area.
View an email message
1. In the application list, select Gmail.
Page 21

21
2. Select to update the message list.
3. Select an email message.
From the message view, use the following options:
- To move to the next or previous message, scroll right or left.
- To reply to the message, select .
- To reply to the message and include all recipients, select .
- To forward the message to others, select .
- To add the message to the favourites list, select .
- To archive the message, select .
- To delete the message, select .
- To add a label to the message, select .
- To mark the message as unread, select
- To mark the message as unimportant, select → Mark as not important.
- To hide the message, select → Mute. To view hidden messages, select All mail from the label
list.
- To add the message to the spam list, select → Report spam.
- To change the email settings, select → Settings.
The options available may vary depending on the email account or device’s orientation.
6. Email
Send or view email messages via your personal or company email account.
Set up an email account
1. In the application list, select Email.
2. Enter your email address and password.
3. Select Next. To enter account details manually, select Manual setup.
4. Follow the on-screen instructions.
When you are finished setting up the email account, email messages will be downloaded to your
device. If you have created two or more accounts, you can switch between them. Select an account
name at the top of the screen, and then select the account from which you want to retrieve
messages.
Send an email message
1. In the application list, select Email → .
2. Add recipients:
-Enter email addresses manually and separate them with a semicolon or a comma.
Page 22

22
-Select email addresses from your contact list by selecting .
3. Select the subject field and enter a subject.
4. Select the text field and enter your email text.
5. Select and attach a file.
6. To send the message, select SEND.
If you are offline or outside your service area, the message will be held in the message thread until
you are online and inside your service area.
View an email message
1. In the application list, select Email.
2. Select to update the message list.
3. Select an email message.
From the message view, use the following options:
- To move to the next or previous message, select or .
- To create a new message, select .
- To reply to the message, select .
- To reply to the message and include all recipients, select .
- To forward the message to others, select .
- To delete the message, select .
- To mark the message as unread, select → Mark as unread.
- To move the message to another folder, select Move to.
- To change the email settings, select → Settings.
- To save an attachment to your device, select the attachment tab → SAVE.
The options available may vary depending on the email account or device’s orientation.
7. Camera
Take and view photos and videos. Front facing camera perfect for VoIP calls.
- The camera turns off automatically when you do not use it for a specified period.
- The memory capacity may differ depending on the scene or shooting conditions.
Take a photo
1. In the application list, select Camera.
2. Rotate the device to the landscape view.
3. Aim the camera lens at the subject and make any necessary adjustments.
4. To zoom in, press and hold the “+/-“ bar on the screen and slowly to move up. To zoom out, press
and hold the “+/-“ bar on the screen and slowly to move down.
Page 23

23
5. Click the camera shutter to take photos.
6. Press icon and set the White balance for the camera
7. Press icon and set the Exposure for the camera.
8. Press icon to adjust the camera setting
How to Exit the Camera?
Touch the right down corner on the screen, it will pop-up the function bar ,press
or icon to exit the camera.
Page 24

24
Video recording
1. In the application list, select Camera.
2. Rotate the device to the landscape view.
3. Drag the slider to switch to the camcorder.
4. Aim the lens at the subject and make any necessary adjustments.
5. To zoom in, press and hold the “+/-“ bar on the screen and slowly to move up. To zoom out, press
and hold the “+/-“ bar on the screen and slowly to move down.
6. Click the camera shutter to start recording.
7. Select to stop recording.
The video is saved automatically in the File Manager. The camcorder may not be able to properly
record videos on memory cards with slow transfer speeds.
8. Sound Recorder
1. In the application list, select the Sound Recorder .
2. Click the to start recording.
3. Click the to stop recording.
4. Select to view the recording message.
5. Click Done to save the recording message in the File Manager, click Discard.to discard the
recording message and exit the recording mode automatically.
9. Super-HD Player
To use the video player.
- Some file formats are not supported depending on the device’s software.
- If a file size exceeds the memory available, an error may occur when you try to open the file.
- Playback quality may vary by content type.
- Some files may not play properly depending on how they are encoded.
Play a video
1. In the application list, select Super-HD Player.
2. Select a video in the Camera or Micro SD card and play.
3. Control playback with the following keys:
Page 25

25
/ :Increase or decrease the volume.
4 / :Skip to the preview or next file.
5 / :Pause or restart playback
6 :Video details checking.
:Exit the current video file
10. Music Player
Learn to listen to your favourite music while on the go.
- Some file formats are not supported depending on the device’s software.
- If a file size exceeds the memory available, an error may occur when you try to open the file.
- Playback quality may vary by content type.
- Some files may not play properly depending on how they are encoded.
Add music files to your device
Start by transferring files to your device or memory card:
- Download from the Internet.
- Download from a computer.
Play music
1. In the application list, select Music Player .
2. Select a music category to open the music player screen.
- Click to play the preview music, long press to fast reverse.
- Click to pause the music, icon turn to , press it and back to the normal music playing.
- Click to play the next music, long press to fast forward.
- Click to display the present playing list.
- Click
to select the random playing mode.
- Click to select the repeat playing mode.
11. File Manager
Learn to access various types of files saved in your device.
- Some file formats are not supported depending on the device’s software.
Page 26

26
- If a file size exceeds the memory available, an error may occur when you try to open the file.
View a file
1. In the application list, select File Manager.
2. Select a folder from device memory or Micro SD card.
- To move up one level in the file directory, select or .
- To return to the Home directory, select the .
3. Select a file.
From the folder list, access the following options, the first icon shows the files in the built in
memory of you tablet, the second icon shows the files in your extend Micro SD card if it is insert; The
third icon is the USB host1 (you can use a USB cable to connect your USB device to your tablet to
extend the memory, the USB cable is not supplied)
12. Search
Search for information
This feature may be unavailable depending on your region or service provider.
1. In the application list, select Search.
2. Enter a keyword. The device searches for webpages related to the keyword..
3. Select a search result.
13. Power
To power off your device
1. In the application list, select Power.
2. A screen as below pop-up, select ok to shut down your device, select Cancel to exit the
operation.
14. Clock
Set and control alarms for important events.
Set an alarm
Page 27

27
1. In the application list, select Clock.
2. Select Alarm set.
3. Select to set and add alarm.
4. Set the details of the alarm.
5. When you are finished, select Ok.
To deactivate an alarm, select the clock icon next to the alarm. To delete an alarm, enter the alarm
and select Delete.
Stop an alarm
When the alarm sounds,
- To stop the alarm, select Dismiss.
- Select Snooze to sleep for 10 more minutes.
15. Calculator
Perform Arithmetic calculations with your device.
Perform a calculation
1. In the application list, select Calculator.
2. Use the keys on the screen to perform basic calculations.
Rotate the device to the landscape view to use the scientific calculator.
16. Getjar
Your device’s functionality can be extended by installing additional applications. Getjar
provides a quick and easy way to shop for mobile applications.
- This feature may be unavailable depending on your region or service provider.
- Your device will save user files from downloaded applications to the internal memory.
Download an application
1. In the application list, select Getjar.
2. Search for an application and download it to the device. When the download is complete, the
device will install the application automatically.
Page 28

28
Trouble Shooting
Device cannot boot up.
1. Check the battery power.
2. Connect adaptor and check again.
After startup, the opening logo appears and then the device shuts down.
1. Insufficient battery power, please recharge.
Cannot hear sound through the earphones.
1. Please check if the volume has been set to “0”.
2. Check the music file for damage or corruption. Play another track to confirm. If the file has been
damaged it may cause serious noise or popping sounds.
Cannot copy file or play music.
1. Please check the connection between the computer and the device. Confirm that the tablet is
mounted and recognized as a storage device by the PC.
2. Check the memory storage to see if the space is full
3. Check the USB cable for damage
4. Check if the USB connection is disconnected
Tablet does not turn on
1. Make sure that you hold down power button for at least 4 seconds.
2. Make sure that Battery is charged
Battery runs out quickly.
1. Make sure tablet is fully charged before use
2. Battery life depends on the type of usage.
3. Using Wi-Fi and playing back video will cause the battery to drain quicker.
4. Refer to “reduce the battery consumption” at the beginning of this Manual
Apps won’t install or can’t transfer Apps from computer to tablet device.
1. Check in main settings menu under security options
2. If it is a non-market application you must have this checked under ”unknown source”
Eg Some .apk files are not market Apps.
Screen scratches easily.
1. Make sure the screen is always free from dirt and dust before use.
2. Do not use sharp or solid pointer accessories. Must be suitable for LCD touch screen use.
It is recommended to install a screen protector where heavy use is expected in order to protect the
screen surface.
Page 29

29
Specifications
OS Android 4.0 ICS
CPU ARM cortex A8 processor
SDRAM
DDR3 512MB (3D accelerator possible for 4D games)
Display 17.75cm (7") TFT 800*480 Capacitive touch panel
Screen size
17.75cm (7”) widescreen (16:9) [17.5cm (6.89”) viewable screen
size]
Multi-touch
screen 5 point multi-touch
Flash memory
4GB (the stated memory capacity includes operating system
software)
Audio port 3.5ø earphones
USB port
1 x 5pin micro USB port (support USB host and OTG)
IO PORTS
DC port 5V, 2A
Micro SD Micro SD card up to 32GB (support SDHC)
OTG port Same with micro USB port
Button Power, VOL-, VOL+,
Supported file
formats
Image JPG, JPEG, BMP
Video AVI, MOV, RM/RMVB, FLV,3GP, MPEG.
Music MP3、WMA、APE、FLAC、OGG、WAV
Note: Some video file formats are not supported, depending on the device’s
software.
Speaker
1.5W, Frequency response : 20Hz – 20k Hz, N/S : >85%
G-sensor Yes
Camera 0.3M pixel (front),
Wi-Fi 802.11b/g/n
Power Adaptor Input: 100-240V~50/60Hz, output: 5V -2000mA
Battery 3.7V Li-Polymer 2800mA
Dimension 181.1x120x10.6mm
3G Support external 3G
Language English
Speaker
1.5W, Frequency response : 20Hz – 20k Hz, N/S : >85%
NOTE: As a result of continual improvements, the design and specifications of this product are subject to
change without notice and may differ slightly from the unit illustrated on the packaging.
 Loading...