

Page 1
Digital Cordless Telephone
User Manual
OPALE
TH-070-DR
TH-070-DRW
TH-072-DR2
TH-072-DRW2
Please read and retain these instructions.
Page 2

2
Summary
Getting started
Important 4
Installing the telephone base 5
Operating range of the handset 5
Signal strength 5
Installing and charging the battery 5
Low battery warning 5
Battery performance 6
Package contents 6
Presentation of your telephone
Handset 7
LCD screen of the handset 9
Telephone base 9
Using the telephone
Switching on the handset 10
Dialing an external call 10
Ending a call 10
Answering a call 11
Using the menu 11
Putting a call on hold 11
Adjusting the volume of the receiver 12
Redialing a number 12
Deleting a number from the redial list 12
Deleting all numbers from the redial list 12
Saving a redial number to the phonebook 12
Keypad lock 13
Find Handset 13
Phonebook
Adding a new contact 13
Dialing a call from the phonebook 14
Editing a contact 14
Deleting a contact 14
Internal calls
Dialing an internal call (for multiple handsets models only) 14
Answering an internal call 15
Transferring an external call to another handset 15
Conference mode 15
Call log
Opening the call log 15
Dialing a number from the call log 16
Saving an entry from the call log to the phonebook 16
Deleting an entry from the call log 16
Deleting all entries from the call log 16
Page 3

3
Handset Settings
Beep settings 16
Adjusting the ringer volume 17
Selecting the ringtone 17
Auto answer on/off 17
Changing the handset name 17
Changing the language 18
Direct memory 18
Locking the keypad by menu 18
Setting the date 18
Setting the time 18
Setting the alarm clock 18
Telephone Base Settings
Adjusting the ringer volume 19
Selecting the ringtone 19
Changing the PIN code 19
Changing the dialing mode 19
Changing the flash time 19
Restoring factory settings 19
Resetting the telephone in case of emergency 19
Eco mode 20
Registering handsets to telephone bases
Registering a handset 20
De-registering a handset 20
Answering Machine
Activating/deactivating the answering machine 21
Outgoing message 21
Changing the answer mode 21
Recording a memo 21
Setting the outgoing message 21
Recording your own OGM 21
Playing and deleting messages 22
Setting the day 23
Changing the answer delay 23
Remote access code 23
Checking messages remotely 23
Accessing your answering system from another phone 23
Call screening 23
Troubleshooting 24
Declaration of conformity 25
Page 4

4
Getting started
IMPORTANT SAFETY INSTRUCTIONS
Please read carefully and keep these instructions with the product.
Important
o Avoid interposing any metal objects (clip, key, etc.) between the battery contacts and charging contacts.
o Your telephone may have a slight chance of being damaged by lightning. Unplug the telephone base from the
mains and disconnect the telephone line during a thunderstorm.
o Do not use the telephone in the vicinity of a gas leak.
o Do not use the handset near any intensive care medical equipment. People with pacemakers should consult
their doctor or cardiologist before using this telephone.
o Clean your telephone with a dry, soft, lint-free cloth. Do not use any cleaning agents or solvents, especially
aggressive ones.
o Exchanges between the telephone base and handset being carried out by radio signals, wearers of hearing
aids may be bothered by a small buzz.
o Your telephone may interfere with other electrical appliances such as answering machine, television, radio,
clock radio or computer when it is sufficiently close to such equipment. To avoid this, place the telephone base
at least one meter away from other electrical appliances.
o We do not guarantee privacy of communications through your telephone.
o The receiver of the handset may attract small metal objects (staples, pins, etc). Be careful when placing the
handset near these items.
o Your telephone does not work in case of power failure and by consequence cannot be used for emergency
calls. To avoid such inconvenience, always keep a traditional corded telephone in your home.
o To prevent electric shock, do not use your telephone during a thunderstorm. Refer to the information printed
on your telephone directory.
o You can connect this product to a PSTN telephone line or an analog PBX extension port.
Warning: Connecting this telephone to a digital PBX extension port may cause damage.
o Install your telephone close to an easily accessible electrical outlet.
o Do not overload wall outlets and extension cords as this may cause a fire or electric shock.
o To eliminate any voltage within the telephone, unplug the power cord from the mains.
o If the telephone will not be used for a long period of time, unplug the adapter to save power.
o If the power cord of the adapter is damaged, do not try to replace or repair it. Discard the adapter.
o Observe the polarity indicated while installing the batteries.
o It is dangerous to use other battery types or non-rechargeable batteries: they can cause interference and/or
damage to the product. The manufacturer shall not be liable for any damages caused by such non-compliance.
o Do not use a charger other than the one supplied with the telephone; otherwise the batteries can be damaged.
o Do not immerse a battery in water and do not throw it in a fire.
oThe socket-outlet shall be installed near the equipment and shall be easily accessible.
CAUTION
Only use the telephone base with the supplied power adapter.
Failure to observe the correct polarity or voltage of the adapter may cause damage to the telephone base.
For phone models OPALE TH-070-DR and TH-070-DRW:
Adapter for the telephone base: MN-A002-A080
Input: 100-240V~ 50Hz 200mA
Output: DC 7.5 300mA
For phone models OPALE TH-072-DR2 and TH-072-DRW2:
Adapter for the telephone base: MN-A002-A081
Input: 100-240V~ 50Hz 200mA
Output: DC 7.5 200mA
Page 5
5
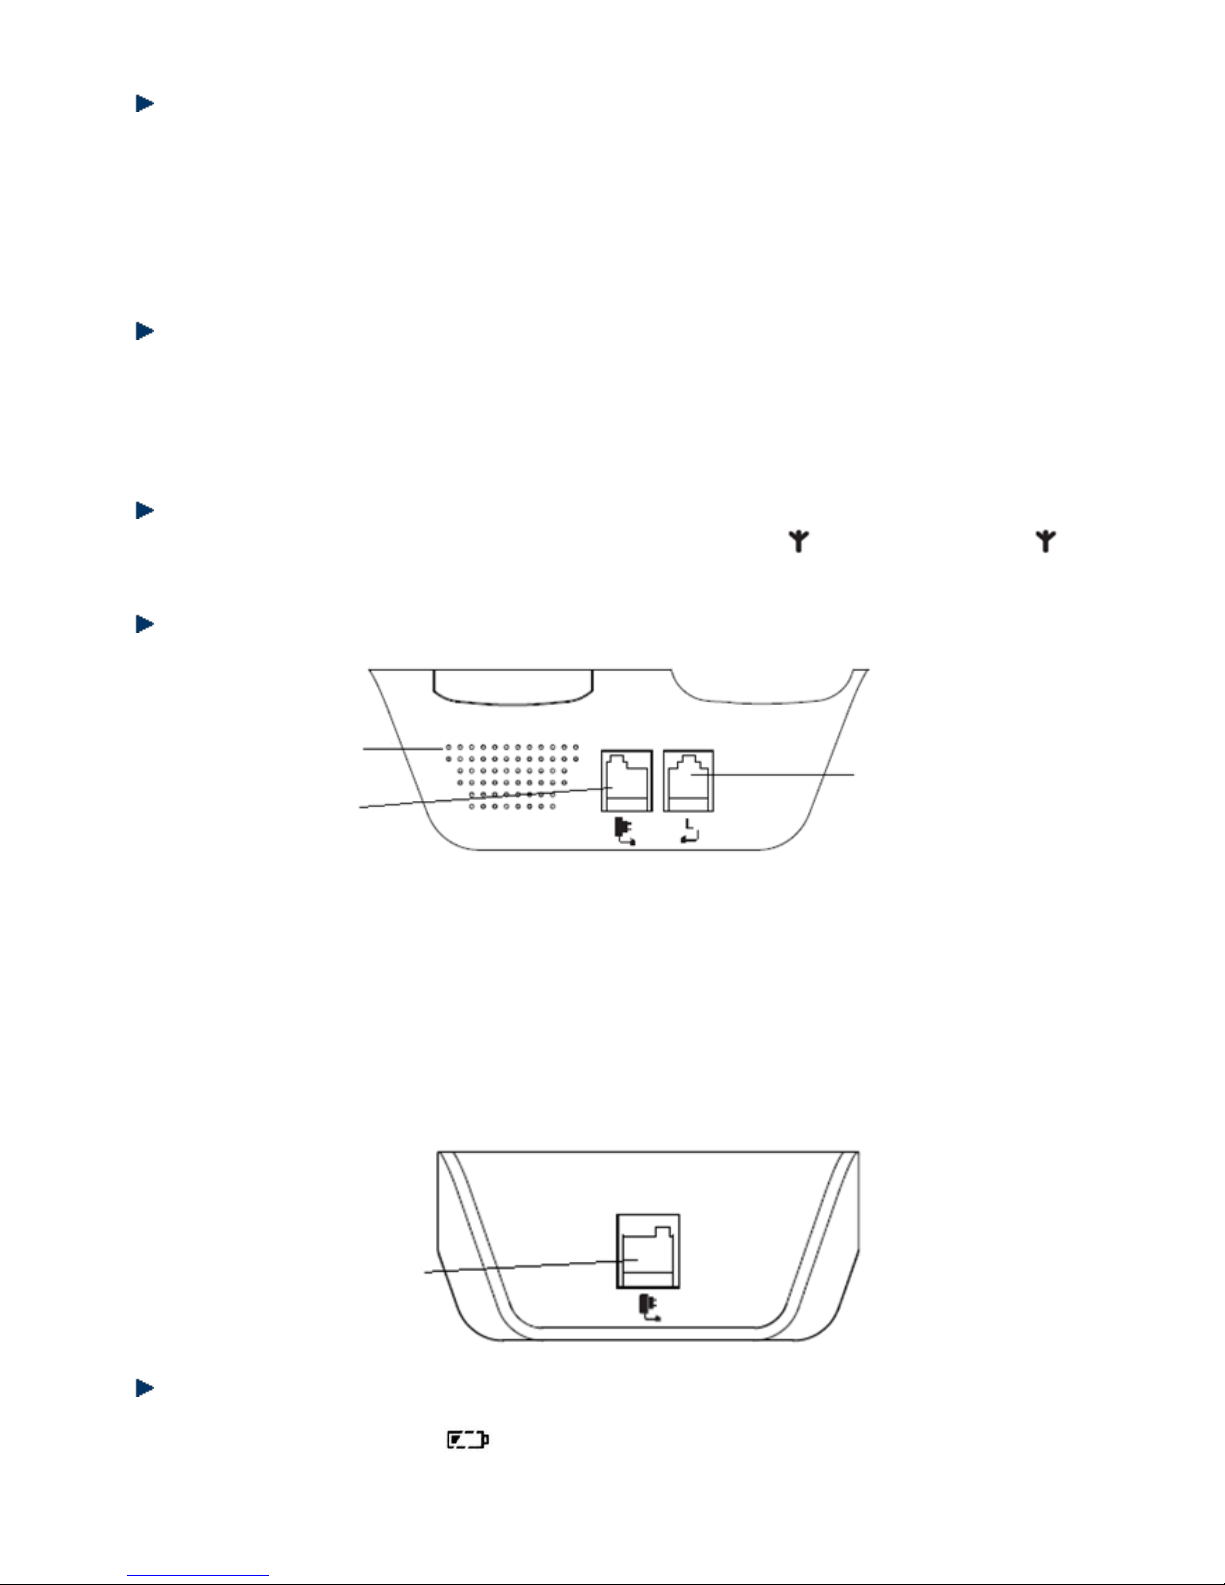
Installing the telephone base
Given the length of the cable, you must install the telephone base no more than 2 meters from an electrical
outlet and a telephone wall jack. The telephone base should also be placed at least 1 meter away from other
electrical appliances in order to avoid interference. The handset exchanges radio signals with the telephone
base. The strength of these signals depends on the position of the base. You can obtain a stronger signal by
placing the base higher.
Operating range of the handset
The operating range of your telephone is 300 meters outdoors without obstructions between the
telephone base and handset. Obstructions reduce the operating range. When the telephone base is
located indoors, while the handset is indoors or outdoors, the operating range is reduced to 50 meters.
Thick concrete walls reduce the operating range significantly.
Signal strength
When the handset is within the operating range of the telephone base, appears on the screen. flashes
when the handset is out of range. Get closer to the telephone base to turn off this indicator.
Installing and charging the battery
1. Insert the plug of the supplied adapter to the back of the telephone base and the other end into an
electrical outlet.
2. Plug the telephone line cord to the back of the telephone base and the other end into a telephone wall
jack.
3. Insert the rechargeable Ni-MH batteries supplied into the handset by following the correct polarity as
indicated. Close the battery compartment.
4. Place the handset on the telephone base and let the batteries charge for 24 hours before using it for the
first time.
Charger (only for duo phone models TH-072-DR2 / TH-072-DRW2)
Low battery warning
When the batteries are very low, flashes on the handset screen and a warning beep will sound
every minute to prompt you to recharge the batteries.
Loudspeaker
Adapter Jack
Telephone Jack
Adapter Jack
Page 6

6
Battery performance
When fully charged, the batteries offer approximately 12 hours of talk time and 250 hours of standby time
under ideal conditions. Please note that a new battery reaches its full capacity after several days of normal
use.
The battery capacity decreases over time, reducing the talk time and standby time. Replace the batteries if
necessary.
The batteries and the handset will become hot during charging. This is normal.
Tip
When you are not using your handset, place it on the charger so that you can always have fully
charged batteries.
WARNING
DO NOT USE STANDARD OR ALKALINE BATTERIES. THEY MAY EXPLODE AND CAUSE INJURY.
ONLY USE RECHARGEABLE NI-MH BATTERIES AS INDICATED IN THIS USER MANUAL.
Risk of explosion if you use incompatible batteries.
Never use non-rechargeable batteries. Use only batteries that are identical to the ones supplied with
your telephone.
• Never use alkaline or lithium batteries.
• Do not throw a battery into a fire.
• Do not open or damage batteries. Electrolyte is corrosive and can cause irritation to eyes and skin.
It is also toxic and must not be swallowed.
• If you must handle the batteries, avoid them from coming into contact with metal objects. This may
cause short circuit or overheating and you may burn yourself.
• Do not attempt to recharge the batteries by heating. The battery electrolyte may leak, and may
irritate your eyes or skin.
• Observe the polarity indicated. Reversing the polarity of the battery may result in electrolyte
leakage and explosion.
• Remove the batteries if you do not intend to use your phone for several months.
• Do not use any other telephone base for charging the handset – the batteries can be damaged.
Warning: Danger of explosion if batteries are incorrectly installed.
Use only NiMH batteries. The autonomy for the handsets indicated is based on the original capacity of the
batteries.
Dispose of used batteries according to the instructions of your local authorities.
Package contents
The box of phone model TH-070-DR / TH-070-DRW contains the following:
Quantity
Telephone base
1
Cordless handset
1
AC adapter
1
Telephone cable
1
User manual
1
Rechargeable 1.2V Ni-MH battery (550mAh)
2
Page 7
7
The box of duo phone model TH-072-DR2 / TH-072-DRW2 contains the following:
Quantity
Telephone base
1
Charger
1
Cordless handset
2
AC adapter
2
Telephone cable
1
User manual
1
Rechargeable 1.2V Ni-MH battery (550mAh)
4
Important:
YOU ARE USING A BROADBAND OR ADSL LINE
To ensure proper functioning of your telephone, you need to install a filter (not supplied) between the
telephone wall jack and the telephone base. Without this filter, you may experience interference to the
phone and loss of broadband signal. Consult the instructions to install the filter properly.
Presentation of your telephone
Handset
Page 8

8
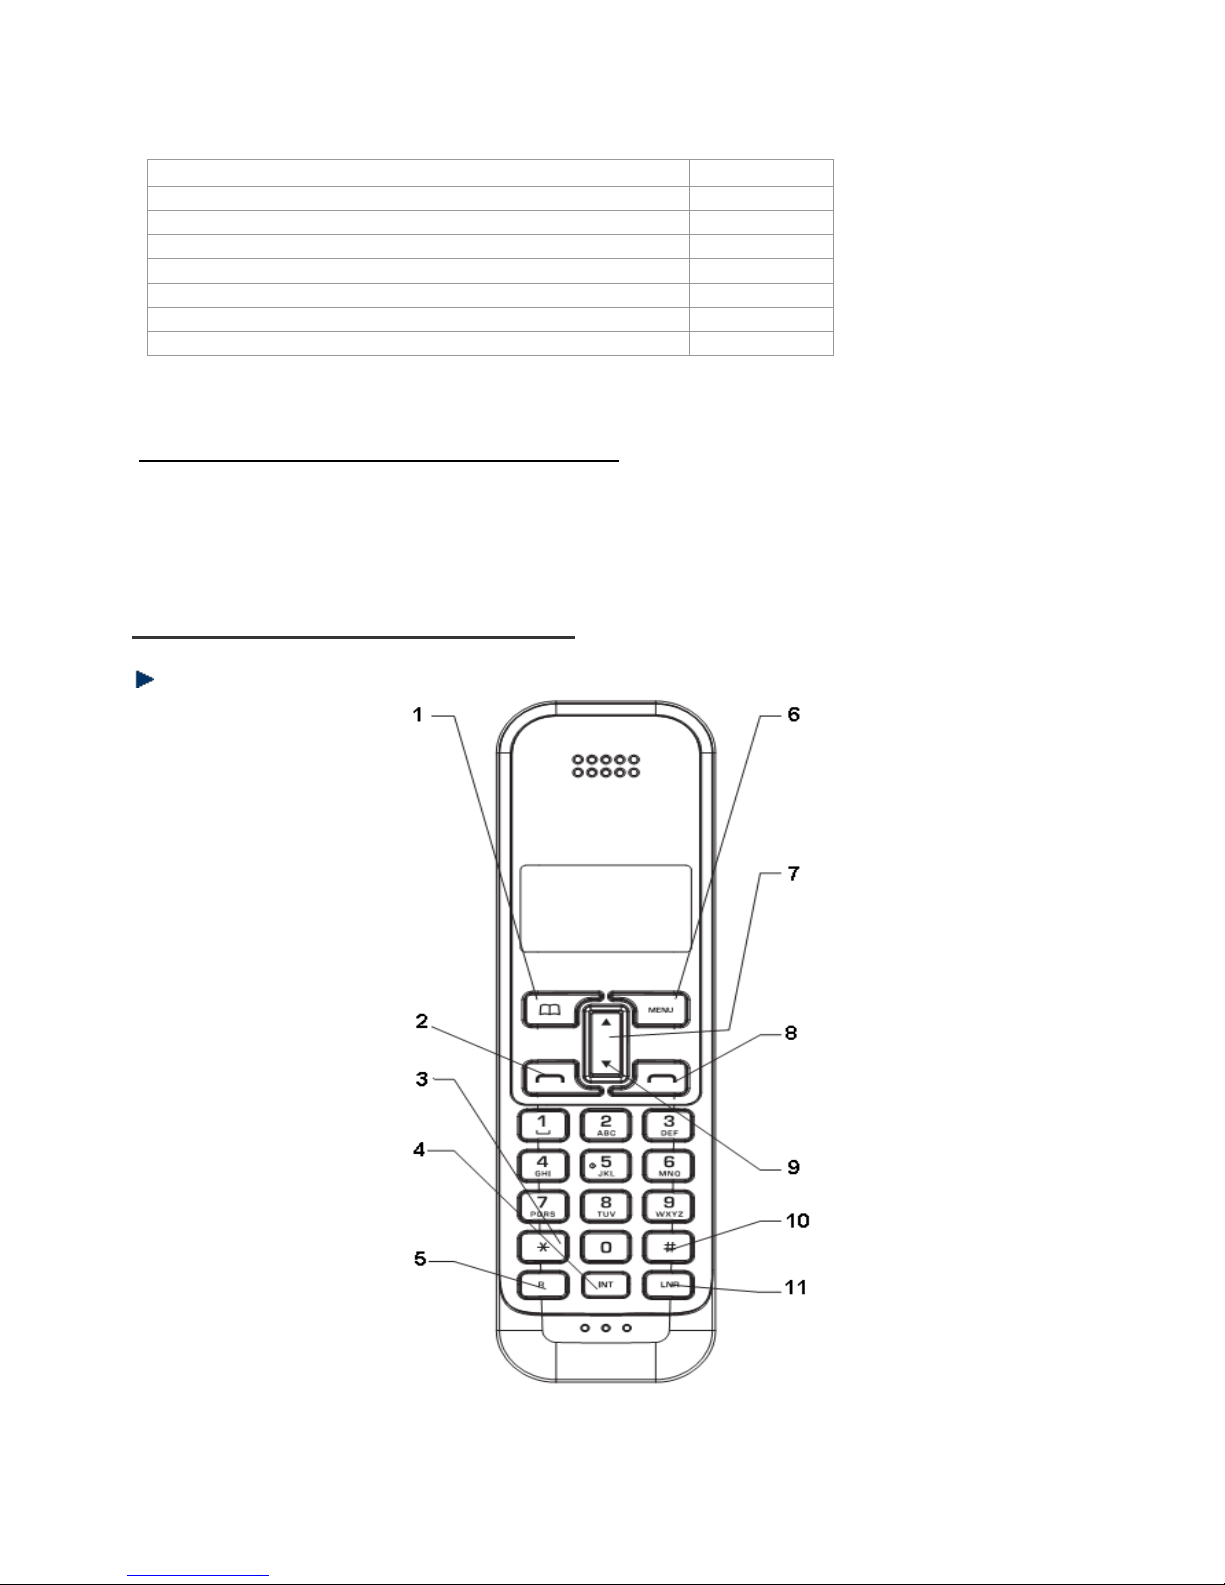
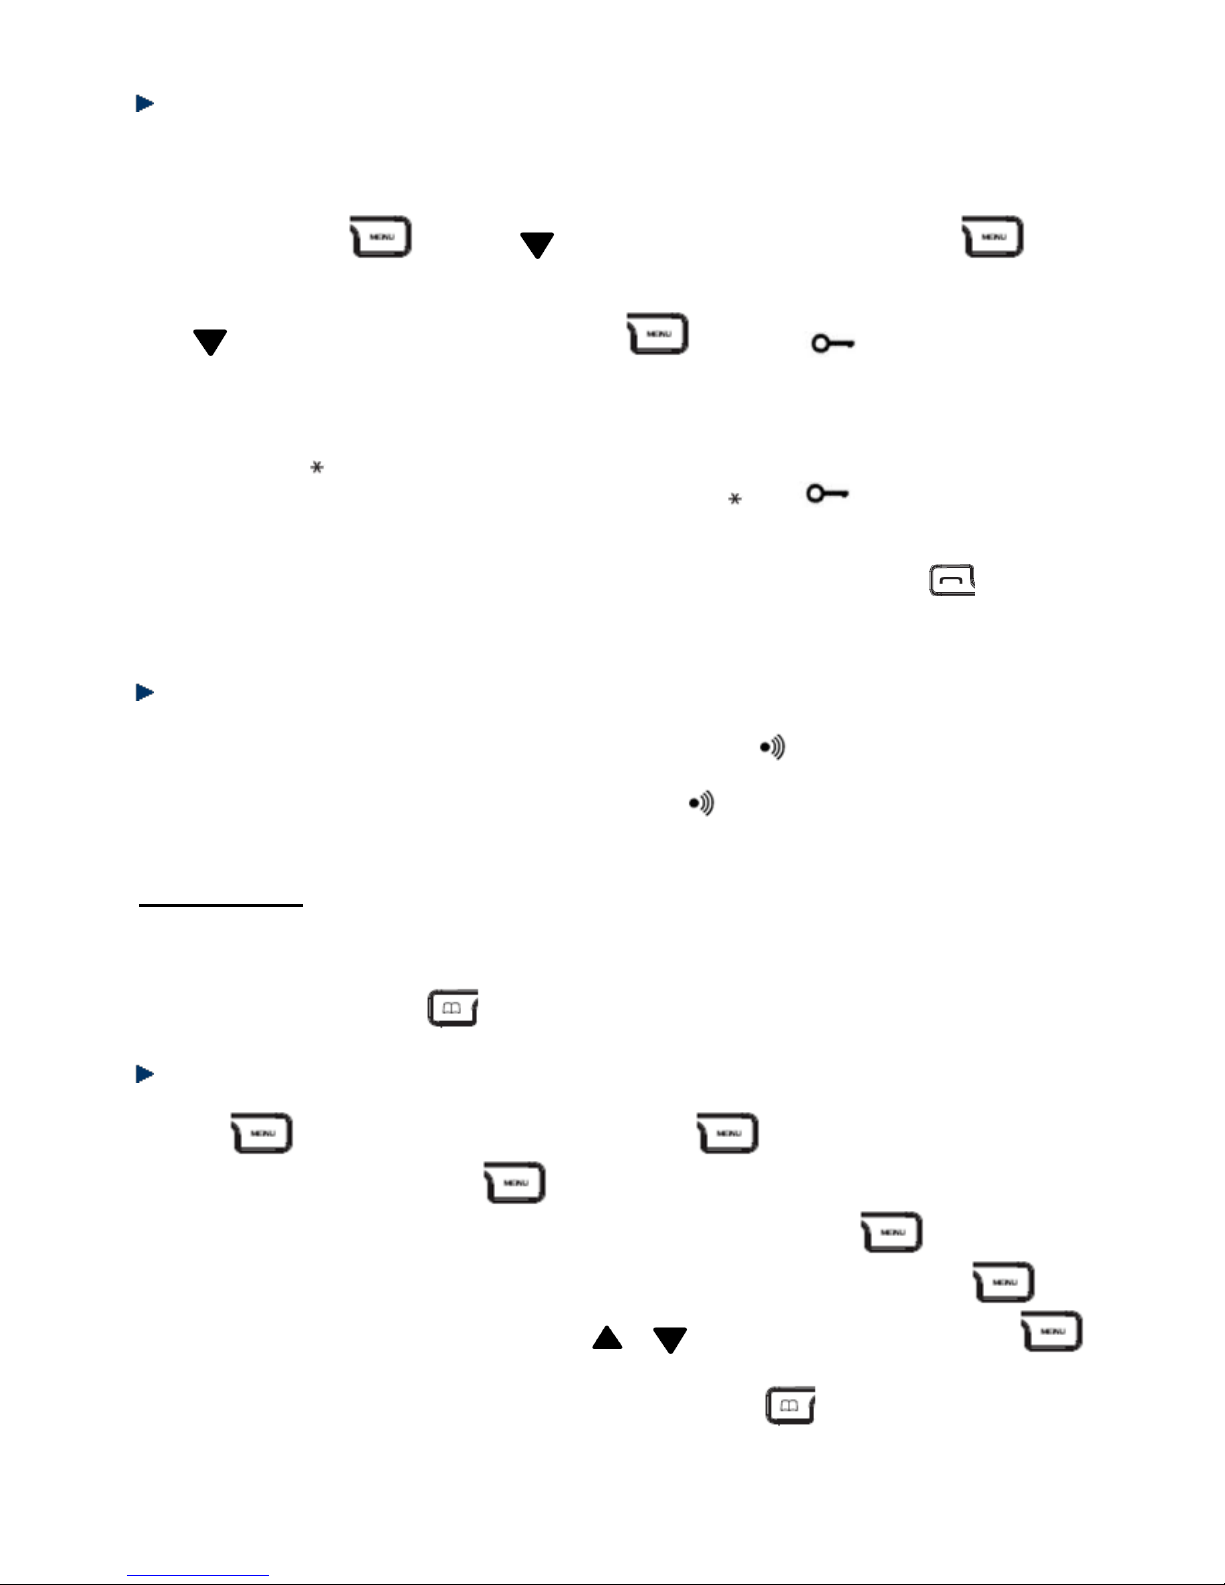
1 Phonebook/Clear/Back
Press to open the phonebook.
In menu mode, press to return to the previous menu; press and hold to exit and return to standby mode.
When inputting an entry, press to erase letters or numbers.
When consulting the call log or redial list, press to delete an entry; press and hold to delete all entries.
2 Talk
Press to dial or to answer a call.
3 */ Key Lock
Press and hold to lock or unlock the keys.
4 Int
Press to begin an internal call or to transfer a call to another handset registered to the same telephone base.
5 Recall
Press to use special functions provided by your telephone service provider such as call forwarding.
6 Menu/OK/Mute
Press to access the main menu.
On the menu, press to select an option or confirm a selection/entry.
During a call, press to mute the microphone so that the caller cannot hear you.
7 Up/Down
Used to scroll through the menu, call log, redial list and phonebook.
During a call, use these keys to adjust the volume.
8 End Call/Power
Press to end a call.
When viewing or editing the redial list or call log, press to exit and return to standby mode.
Press and hold to turn the handset on or off.
9 Call Log
Press to open and expand the call log.
10 Pause
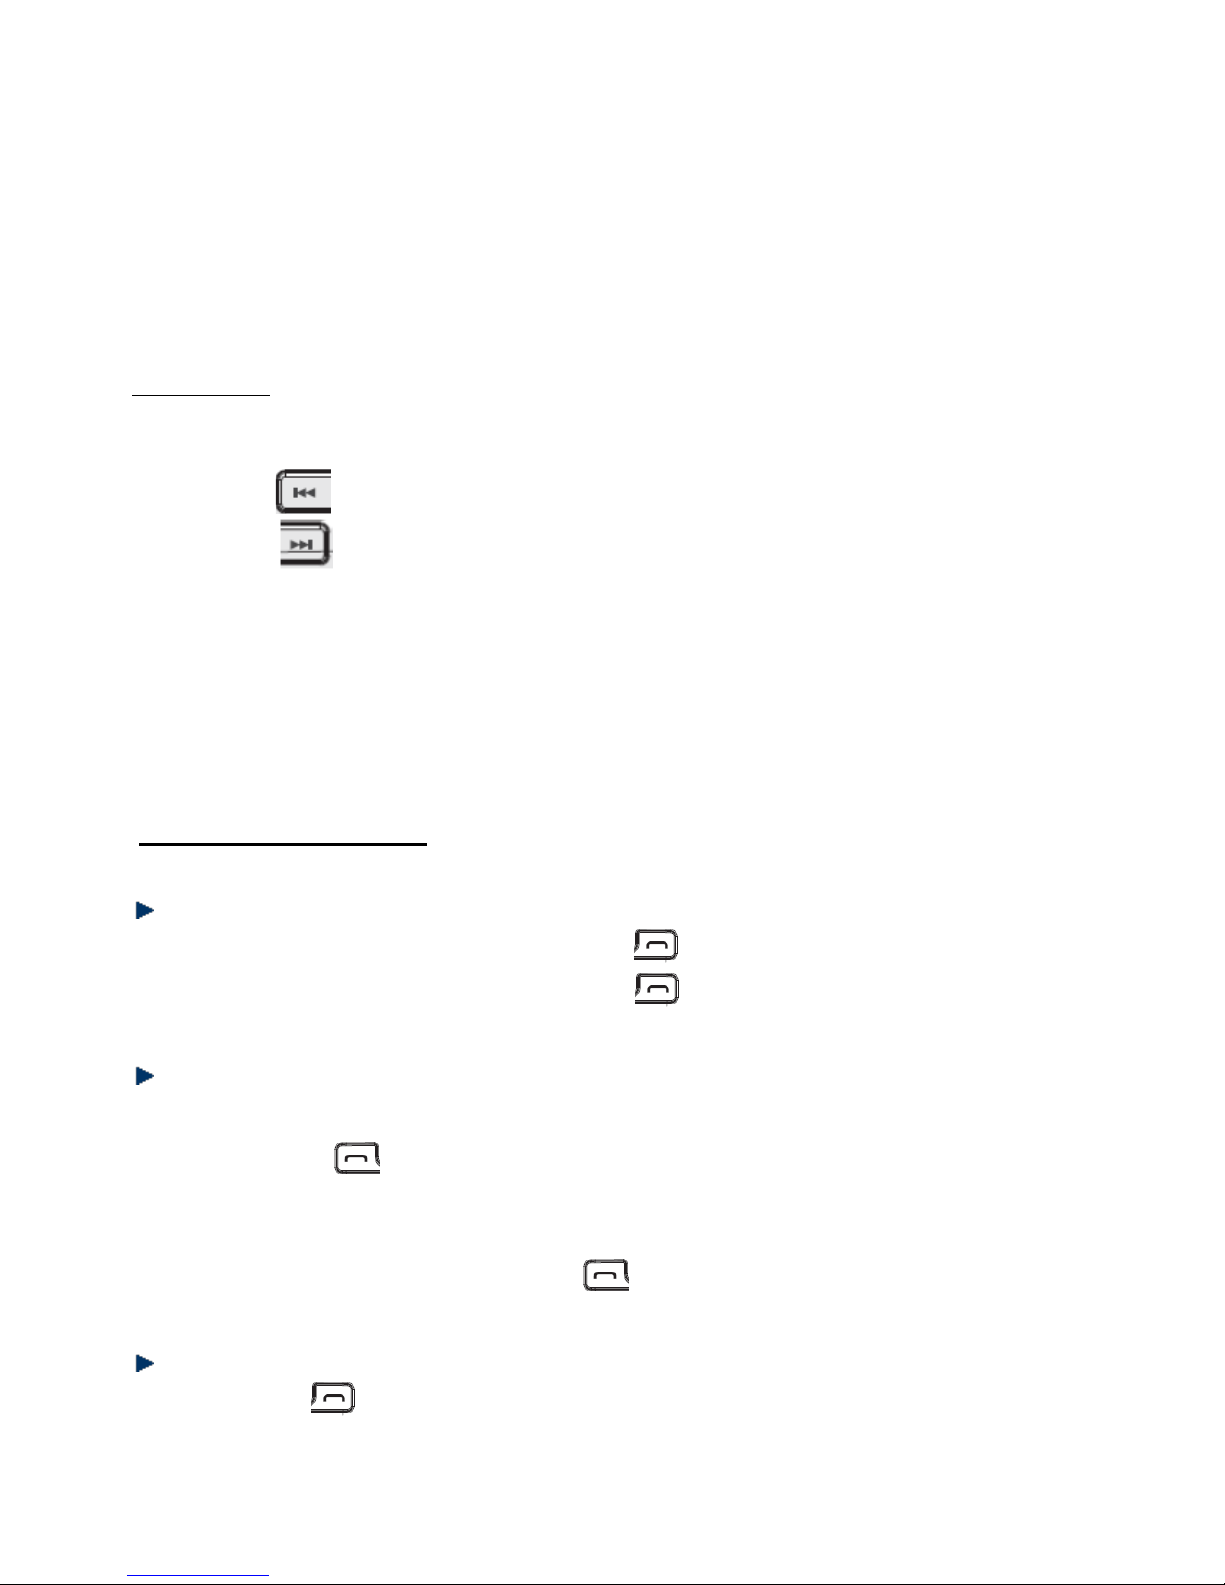
Press to insert a dialing pause when entering or storing a number.
11 Redial List
Press to access the redial list.
Page 9
9
LCD screen of the handset
Handset screen icons
Flashes to indicate an incoming external call
External call in progress
Flashes to indicate an incoming internal call
Internal call in progress
Conference call
Indicates the signal strength.
Flashes when the handset is out of range or
when it is not registered to the telephone base.
Eco mode
Opens the menu
Answering system activated
Opens the phonebook
Flashes to indicate new entry on call log
Answered call (when viewing the call log) *
Missed call (when viewing the call log) *
Key lock
The displayed number exceeds 12 digits
Battery full
Battery level 2
Battery level 1 (low battery)
Flashing – battery almost empty
* To use this feature, you need to subscribe to the caller ID service of your telephone service provider.
Telephone base
1 Delete
Press to delete saved messages during playback or to check the current remote access code.
2 Volume +/-
Press to adjust the volume of the speaker.
3 OGM (Outgoing Message)
Press to hear the current OGM.
Press and hold to record your own OGM.
Page 10
10
4 Handset Locator
Press to locate a handset.
Use this button to register handset(s) to the telephone base.
5 New Message Indicator
It flashes when you have new message(s), while you are recording a message or operating the answering
system remotely.
It also flashes when the handset is in use.
6 Play/Pause
Press once to play new messages.
Press and hold to listen to all messages (including previously checked messages).
7 Previous/Next
Press to go to the next or previous message
Press and hold to turn the message alert on or off.
Press and hold to modify the answer delay setting.
8 Stop
Press to stop message playback.
Press to check the date and time.
9 On/Off
Press to turn the answering system on or off.
Press to play the current OGM.
Using the telephone
Switching on the handset
When your handset is off, press and hold the red key until the screen turns on.
To switch off the handset, press and hold the red key until the screen turns off.
Dialing an external call
Direct dialing:
Press the green key to take the line and then key in the number.
Predialing:
Enter a phone number and press the green key to dial the number.
Ending a call
Press the red key OR place the handset on the telephone base or charger to end the call directly.
Page 11

11
Answering a call
If the handset is not on the charger when the phone rings, press the green key to answer the call.
If the Auto-answer feature is activated and the handset is on the charger or on the telephone base
when the phone rings, simply pick up the handset to answer the call.
NOTES:
Call Timer
After 15 seconds of a call, the screen displays the elapsed time. The total call duration is also shown at
the end of the call.
Caller ID Display
To use this function, you must first subscribe to the caller ID service of your telephone service provider.
If you have already saved the telephone number to the phonebook, the caller’s name will also be
displayed.
Using the menu
All functions and settings can be accessed from the menu.
The menu options are shown below:
PLAY
MESSAGES
PHONEBOOK
TAM
SETTINGS
SETUP
HANDSET
DATE-TIME
REGISTER
New MSG
All MSG
Add entry
Edit entry
Delete entry
Ans On/Off
Ans mode
Rec memo
Set OGM
Set day
Ans delay
Remote code
Base volume
Base melody
Del Handset
PIN code
Dial mode
Flash time
Default
Eco mode
Beep
Int ring vol
Ext ring vol
Int melody
Ext melody
Auto answer
Handset name
Language
Direct memory
Key lock
Date set
Clock set
Alarm set
Select base
Register base
Press to enter the menu. appears on the screen.
Press or to scroll through the menu.
To select an option, press .
To return to the previous menu, press .
Putting a call on hold
You can mute the microphone so that the caller cannot hear what you say to the one next to you.
During a call: Press to deactivate the microphone. The caller can no longer hear you.
Press again to reactivate the microphone.
Page 12

12
Adjusting the volume of the receiver
You can adjust the receiver volume.
During a call, press to increase and to decrease the volume.
Redialing a number
The last 10 telephone numbers you dialed are stored on the redial list. For numbers already saved on
the phonebook, the contact’s name appears instead of the telephone number.
Dialing a call from the redial list
1. Press to open the redial list.
2. Press or to select the desired number or name.
3. Press the green key to dial the number.
Deleting a number from the redial list
1. Press to open the redial list.
2. Press or to select the desired entry.
3. Press then the screen displays DELETE?
4. Press to confirm or to cancel.
Deleting all numbers from the redial list
1. Press to open the redial list.
2. Press and hold then the screen displays DELETE ALL?
3. Press to confirm or to cancel.
Saving a redial number to the phonebook
1. Press to open the redial list.
2. Press or to select the desired number or name.
3. Press and the screen displays ADD? Press to confirm.
4. The screen displays NAME? Use dial pad keys to enter the name for the contact. Then press
to confirm.
5. The telephone number is displayed. You may edit it if necessary. After that, press to
confirm the number. The screen displays MELODY 1.
6. Press or to select a ringtone and then press to confirm and save the contact.
Page 13
13
Keypad lock
You can lock the keys on the handset to avoid accidentally pressing one of them when you are not
using the handset.
To lock the keys, press then press until the screen displays HANDSET. Press to
confirm.
Press to select the option KEYLOCK then press to confirm. will appear on the
screen.
-- OR -Press and hold the key.
To unlock the keypad, press any dial pad key and then press the key. will disappear from the
screen.
To answer a call, there is no need to unlock the keypad. Simply press the GREEN key or pick up
the handset.
Find Handset
If you do not remember where you have placed your handset, press on the telephone base to
locate it. The paging tone sounds on all the handsets registered to the telephone base. To stop the
paging tone, press any dial pad key on the handset or press on the telephone base.
Phonebook
Your handset can store up to 50 contacts. Each contact can contain a telephone number of up to 20
digits and a name of up to 12 characters.
To open the phonebook, press .
Adding a new contact
1. Press , the screen displays PHONEBOOK. Press again.
2. The screen displays ADD? Press to continue.
3. The screen displays NAME? Enter the name of the contact and then press .
4. The screen displays NUMBER? Enter the phone number of the contact and then press .
5. MELODY 1 is displayed on the screen. Press or to select a ringtone and then press to
confirm. The contact is saved on the phonebook
The screen displays ADD? You may then enter another contact or two times to return to
standby.
Page 14

14
Dialing a call from the phonebook
Press to open the phonebook. appears on the screen.
Press or to select the contact you want to call. You may enter the first letter of the name to search
for the contact.
Press the GREEN key to dial the number. Otherwise, press to display the number or RED
key to return to standby mode.
Editing a contact
1. Press , then . The screen displays PHONEBOOK. Press to open the phonebook.
2. Press to select the option EDIT and press
3. Press or to select the contact you want to edit. You may also search for the contact by entering
the first letter of the name. Press to continue.
4. To modify the name of the contact, press to erase the existing entry then key in the new name.
Press to confirm.
5. To modify the telephone number, press to erase the existing entry then key in the new number.
Press to confirm.
6. You may select a new melody for the contact. Press to confirm.
7. The screen displays ADD. You can now enter a new number or name or press the RED key to return to
standby mode.
Deleting a contact
1. Press . The screen displays PHONEBOOK. Press again to open the phonebook.
2. Press to select the option DELETE and press .
3. Press or to select the contact you want to delete. You may also search for the contact by entering
the first letter of the name. Press and the screen displays CONFIRM?
4. Press again to confirm or to cancel.
Internal calls
This function is available only if you have registered at least 2 handsets to the telephone base.
It allows you to make internal calls, transfer external calls from one handset to another and use the
conference mode.
Dialing an internal call
Press then enter the handset number (1-5) you wish to call.
appears on the screen to indicate an internal call.
Page 15

15
Answering an internal call
The screen displays to indicate an internal call and the handset number that calls you.
Press the GREEN key to answer the call.
Transferring an external call to another handset
1. During a call, press . The external call is automatically placed on hold.
2. Enter the handset number to which you want to transfer the call.
3. When the handset answers, press the RED key to transfer the call.
4. If the handset does not answer, press to return to the external call.
Conference mode
The conference feature allows two handsets to communicate with an external call. It does not require any
subscription to your telephone service provider.
1. During a call, press . The external call is automatically placed on hold.
2. Enter the handset number you want to invite to the conversation.
3. When the handset answers, press to start three-party conversation.
appears on the screen to indicate that you are in conference mode.
4. If the handset does not answer, press to return to the external call.
5. Press the RED key to end the call.
Call log
You must subscribe to the caller ID service of your telephone service provider in order to use this feature on
your telephone. When someone calls, his/her phone number is displayed on the handset screen.
If this number is already stored in your phonebook, the name of the caller will also appear.
(It is important to save the area code of the telephone numbers in the phonebook.)
The 40 most recent answered calls are listed on the call log with the telephone number, date and time of
call.
The call log also shows your missed calls.
When a new call is received in the call log, the icon will flash in standby mode to alert you.
Once you have checked the call log, will disappear but will remain on the display.
The call log is shared by the telephone base and all registered handsets. When the list is full, the most
recent records automatically replace the oldest ones.
You can open the call log by pressing .
Opening the call log
1. Press to open the call log. If the log contains no records, the screen displays EMPTY.
Press or to scroll through the list. indicates answered calls while indicates missed
calls. If the telephone number is already stored in the phonebook, the screen will toggle between the
caller’s name and the telephone number.
Page 16

16
2. Press to display the telephone number.
Press again to display the time and date of the call.
Press one more time to select the option to save the number to the phonebook.
Dialing a number from the call log
1. Press to open the call log. Scroll through the list with and .
Select the telephone number or name you want to call.
2. Press the GREEN key to dial the selected number.
Saving an entry from the call log to the phonebook
1. Press to open the call log. Scroll through the list with and .
2. Select the telephone number you want to save to the phonebook.
3. Press to display the date and time of call. Then press again and the screen displays
ADD? Confirm by pressing .
4. The screen displays NAME? Use dial pad keys to enter the name and then press .
5. The telephone number is displayed. Modify it if necessary then press to confirm.
6. Select a ringtone with and then press to save the contact.
Deleting an entry from the call log
1. Press to open the call log. Scroll through the list with and .
Select the telephone number you want to delete.
2. Press and the screen displays DELETE?
3. Press to confirm or to cancel.
Deleting all entries from the call log
1. Press to open the call log.
2. Press and hold and the screen displays DELETE ALL?
3. Press to confirm or to cancel.
Handset Settings
Beep settings
Keypad Beep
1. Press then to select HANDSET then press .
2. The screen displays BEEP. Press to continue.
3. The screen displays KEYTONE. Press to continue.
Page 17

17
4. Press and to select ON or OFF then press to confirm.
Low battery warning beep
1. Press then to select HANDSET then press .
2. The screen displays BEEP. Press to continue.
3. Press to select LOW BATTERY and press .
4. Press and to select ON or OFF then press to confirm.
Out of range warning beep
1. Press then to select HANDSET then press .
2. The screen displays BEEP. Press to continue.
3. Press to select OUT RANGE then press .
4. Press and to select ON or OFF then press to confirm.
Adjusting the ringer volume
1. Press then to select HANDSET and press .
2. Press to select INT RING VOL or EXT RING VOL then press .
3. Press and to select the ringer volume (you can set ringer volume from 1 to 5 or off).
4. Press to confirm or to return to the previous menu.
Selecting the ringtone
1. Press then to select HANDSET and press .
2. Press to select EXT MELODY or INT MELODY and press .
3. Press and to select the ringtone (you can choose from 5 melodies).
4. Press to confirm or to return to the previous menu.
Auto answer on/off
1. Press then to select HANDSET then press .
2. Press to select AUTO ANSWER and press .
3. Press and to select ON or OFF and press to confirm.
Changing the handset name
1. Press then to select HANDSET then press .
2. Press to select HANDSET NAME and press .
Page 18

18
3. Enter the new name and press to confirm.
The handset name will be displayed for 20 seconds until you press a key.
Changing the language
1. Press then to select HANDSET then press .
2. Press to select LANGUAGE and press .
3. Press and to select the preferred language and press to confirm.
Direct memory
This feature allows you to dial preset numbers by long pressing the 1 or 2 key.
1. Press then to select HANDSET then press .
2. Press to select DIRECT MEMORY and press .
3. Press and to select MEMORY 1 or MEMORY 2, then press to enter the telephone
number.
Locking the keypad by menu
1. Press then to select HANDSET then press .
2. Press to select KEYLOCK and press to lock the keys. appears on the screen.
3. You may also lock the keypad by long pressing the key
To unlock the keypad, press any key and then press the key within 3 seconds. will disappear from
the screen.
Setting the date
1. Press then to select DATE-TIME and press .
2. The screen displays DATE SET, Press .
3. Use dial pad keys to enter the date. For example, enter 12–08 for August 12th and press to
confirm.
Setting the time
1. Press then to select DATE-TIME and press .
2. Press to select CLOCK SET then press .
3. Use dial pad keys to enter the time, e.g. 18–30 for 18:30 and press to confirm.
Setting the alarm clock
1. Press then to select DATE-TIME and press .
2. Press to select ALARM SET then press MENU.
3. Press and to select ON or OFF and press to confirm.
4. After activating the alarm clock, use dial pad keys to set the alarm time, e.g. 07--30 for 7: 30 am.
Page 19
19
Telephone Base Setting
Adjusting the base ringer volume
1. Press then to select SETUP and press .
2. The screen displays BASE VOLUME. Press to continue.
3. Press and to select the ringer volume (you can set from volume 1 to 5, or turn the ringer off).
4. Press to confirm or to return to the previous menu.
Selecting the ringtone
1. Press then to select SETUP. and press .
2. Press to select BASE MELODY and press .
3. Press and to select the ringtone (you can choose from 5 melodies).
4. Press to confirm or to return to the previous menu.
Changing the PIN code
The 4-digit PIN code is required for changing the settings of the telephone base and for registering/deregistering a handset. The default PIN code is “0000”.
1. Press MENU, then DOWN to select SETUP.
2. Press DOWN to select PIN CODE and press MENU.
3. Enter the 4-digit PIN (default PIN is “0000”) and press MENU.
4. Enter your new PIN code and press MENU.
5. Enter your new PIN code again and press MENU to confirm.
Changing the dialing mode
1. Press MENU, then DOWN to select SETUP and press MENU.
2. Press DOWN to select DIAL MODE and press MENU.
3. Press UP and DOWN to select TONE or PULSE then press MENU to confirm.
Changing the flash time
1. Press MENU, then DOWN to select SETUP and press MENU.
2. Press DOWN to select FLASH TIME.
3. Press UP and DOWN button to select the new flash time. (Setting 1 = SHORT; Setting 2 = LONG)
4. Press MENU to confirm.
Restoring factory settings
You can restore the factory settings for the telephone base at any time.
1. Press MENU, then DOWN to select SETUP and press MENU.
2. Press DOWN to select DEFAULT and press MENU.
3. Enter the 4-digit PIN code (default PIN is “0000”) and press MENU.
4. The screen displays CONFIRM? Press MENU to confirm or to return to the previous menu.
The phone automatically switches off and then turns on again. The default settings are restored.
Resetting the telephone in case of emergency
If you have lost your PIN, you can restore the default settings as described below:
1. Remove and replace the handset batteries.
2. Press and hold the key while reinserting the batteries.
3. Display shows DEFAULT. Press MENU.
Page 20

20
Eco mode
This feature saves power consumption and reduces radio waves emission.
The indoor and outdoor operating ranges will be reduced in eco mode.
You may access the Eco Mode via MENU > SETUP > ECO MODE.
Registering handsets to telephone bases
Registering a handset
The supplied handset is by default registered to the telephone base. You can register up to 5 handsets to a
base.
1. On the telephone base: Press and hold for about 3 seconds. When you hear two beeps, the
telephone base is switched to registration mode. You have 90 seconds to register a handset.
2. On the handset: Press MENU, then DOWN to select REGISTER and press MENU.
3. Press DOWN to select REG BASE and press MENU.
4. Enter the telephone base number (1-4). If the number flashes, that means it is already in use.
5. When the handset looks for the signal from the telephone base, the screen displays SEARCHING and
the identification number of the telephone base.
6. The screen will prompt you to enter the PIN code. Key in the PIN (default is “0000”) and press MENU to
confirm. A confirmation tone sounds and the handset is now registered.
If the telephone base cannot be found after a few seconds, the handset returns to standby mode. Try to
register again.
When the handset is registered to the telephone base, a number is automatically assigned to it.
The number is displayed on the screen and will be used for internal calls.
If registration does not work:
- Try selecting a different telephone base number.
- Make sure there is no electrical equipment nearby that could disrupt the signal.
Registering a handset of another brand to an OPALE telephone base
The DECT GAP only supports basic telephony functions between different brands/types of handsets and
telephone bases.
Certain functions, such as the caller ID display, may not be supported.
Selecting the telephone base
When your handset is registered to several telephone bases, e.g. at the office and at home, you can select
to which telephone base you want to connect.
If you select the AUTO mode, your handset will automatically search for and connect to the telephone base
with the strongest signal.
1. Press MENU, then press DOWN to select REGISTER and press MENU.
2. The screen displays SELECT BASE. Press MENU.
3. All telephone bases to which your handset is registered are displayed, e.g. BASE 1 2 3 4. The registered
telephone base number flashes.
4. Enter the telephone base number you want to use; otherwise, press UP or DOWN to select AUTO then
press MENU to confirm.
When the handset is registered to the telephone base, a confirmation tone will sound.
De-registering a handset
You can use a handset to de-register another one and cannot de-register the handset you are using.
Press MENU, then press DOWN to select SETUP and press MENU.
Use UP or DOWN to select DEL HANDSET. Press MENU to confirm.
Enter the PIN (default is “0000”). After that, enter the handset number. You will hear a confirmation beep
and the display returns to the DEL HANDSET menu.
Page 21

21
Answering Machine
You can use the answering machine menu on the handset to access and modify the settings for all the
answering functions.
Activating/deactivating the answering machine
1. Press MENU to enter the menu.
2. Use the navigation keys to select
TAM SETTINGS
and press MENU.
3. The screen displays
ANS ON/OFF
. Press MENU in order to select.
4. Use the navigation keys to select ON or
OFF
and then press MENU to confirm.
5. A confirmation tone sounds. Press the RED key to return to standby mode.
You can also turn the answering system on or off by directly pressing the ON/OFF button on the telephone
base.
When the answering system is deactivated, it does immediately answer an incoming call. It answers after 20
rings to enable remote access.
Outgoing messages (OGMs)
The phone comes with two pre-recorded outgoing messages for different answer modes.
There are 2 answer modes:
Answer Only
and
Answer and Record (Ans & Record)
. By default, the answer
mode is
Answer and Record
, which allows a caller to leave a message on the answering system. You may
change it to
Answer Only
mode, which does not allow callers to leave messages.
Changing the answer mode
1. Press MENU to enter the menu.
2. Use the navigation keys to select
TAM SETTINGS
and press MENU.
3. Use the navigation keys to select
ANS MODE
and press MENU to select.
4. Use the navigation keys to select
ANS ONLY
or
ANS AND REC
then press MENU to confirm.
Recording a memo
1. Press MENU to enter the menu.
2. Use the navigation keys to select
TAM SETTINGS
and press MENU.
3. Use the navigation keys to select
MEMO REC
and press MENU to continue. After the announcement
message, save your memo and then confirm by pressing the # key.
Setting the outgoing message
The answering system has pre-recorded greeting messages for the two answer modes: Answer and Record
or Answer Only. You may record your own greetings.
If you have deleted your own messages, the answering system will use the pre-recorded messages
automatically.
* To listen to the greeting message: press the
OGM
button on the telephone base or use the handset to go
to:
MENU > TAM SETTINGS > OGM SETTING > PLAY OGM
Recording your own OGM
You may replace the pre-recorded greetings by your personalized messages.
1. Press MENU to enter the menu.
2. Use the navigation keys to select
TAM SETTINGS
and press MENU
3. Use the navigation keys to select
OGM SETTING
then press MENU to continue.
4. Use the navigation keys to select
RECORD OGM
and press MENU to confirm. Then select the answer
mode:
ANS ONLY
or
ANS AND REC
. Press MENU to confirm.
5. After the long beep, record your own message and then confirm by pressing the # key.
* To delete your recorded message and use the pre-recorded OGM:
MENU > TAM SETTINGS > OGM SETTING > DELETE OGM
Page 22

22
Playing and deleting messages
Using the telephone base:
Press , the number of new messages is announced then new messages will be played.
-- OR -Press and hold , the number of all messages (new and old) is announced and played (oldest messages
first).
During playback:
Press to pause. You will hear a beep every 10 seconds. Press the button again to resume playback.
Press to play the next message.
Press once to repeat the current message.
Press twice to hear the previous message.
Press to delete the current message. You will hear “Message deleted”.
Press and hold to fast-forward playback. The messages will be played at 1.5 time of normal speed.
Release the button to resume playback at normal speed.
Note: To delete a message, press the X button during playback. At the end of playback, the answering
machine will count down 8 seconds and then delete the message. You will hear the confirmation tone.
At the end of playback, you will hear “End of messages”. To delete all messages, press . You then have
8 seconds to press in order to delete all messages. You hear “All messages deleted”.
Using the handset:
1. Press MENU. The screen displays PLAY MESSAGES. Press MENU to confirm.
2. The phone then indicates NEW MSG and the number of new messages. Press MENU to play only the
new messages. Or press DOWN to select ALL MSG and then press MENU to play all your messages.
You need to pick up the handset to hear the message(s).
During playback:
Press UP or DOWN to adjust the playback volume.
Press 1 or 4 once to repeat the current message.
Press 1 or 4 twice to play the previous message.
Press the 3 or 6 to play the next message.
Press to delete the current message. You will hear “Message deleted”.
At the end of playback:
You will hear “End of messages”. To delete all the messages, press .
To delete all messages, press . You will hear “All messages deleted”. If you do not press any button to
confirm during the countdown, the screen returns to standby mode and the messages which you have
selected for deletion will be retained.
Page 23

23
Setting the day
1. Press MENU, then DOWN to select TAM SETTINGS then MENU. After that, select DAY SETTING and
press MENU.
2. Select the current day (from Monday to Sunday) and press MENU to confirm.
Changing the answer delay
You can specify the number of rings before which the answering machine takes the call and plays your
outgoing message. You can set the delay to be two to nine rings, or select Eco mode.
1. Press MENU and then use UP or DOWN button to select TAM SETTINGS.
2. Press MENU and then use UP or DOWN button to select ANS DELAY.
3. Press MENU and select 2 to 9 rings or ECO.
4. Press MENU to confirm.
* If you have selected the
ECO (Time saver)
mode, the answering system will answer after 2 rings when you
have new messages, while it will answer after 5 rings when there are no new messages.
Therefore, if the telephone rings more than two times, it means there are no new messages and you can
hang up and save calling charges.
Remote access code
You can check messages on your answering system even when you are away from home by calling from
another telephone. The access code is by default 000.
To check whether the code has been changed, press the X button on the telephone base.
Checking messages remotely
1. When you are away from home, dial your home number using another telephone. The answering system
answers and starts playing your greeting.
2. During the greeting message, press the key then dial the remote access code (by default 000).
Accessing your answering machine from another phone
Once communication is established with the answering machine, you can use the following functions by
pressing the corresponding dial pad keys:
Key
Functions
1
Access the main menu
2
Play all messages
3
Play new messages
4
Return to the last message
5
Delete the currently played message
6
Go to next message
7
Turn on or off the answering machine
8
Play the OGM menu
9
Set a new security code
Call screening
This function allows you to hear the caller when he is leaving a message. You can then decide whether to
pick up the phone and speak to him/her directly.
To adjust the speaker volume during call screening, use + and - buttons on the telephone base.
The handset screen displays
SCREEN?
Press MENU to begin screening the call via handset.
To answer the call, press the GREEN key .
Page 24

24
Troubleshooting
Problem
Possible Causes
Suggestions
No dial tone in the
handset.
1. The telephone base is not connected
properly.
2. The handset is too far from the
telephone base.
3. The batteries are dead.
4. The batteries are installed with the
polarity reversed.
5. The handset is not registered.
1. Check the mains and telephone line
connection of the telephone base.
2. Get closer to the telephone base.
3. Recharge the batteries.
4. Reinstall the batteries by following the
correct +/- polarity as indicated.
5. Register the handset.
The antenna icon
flashes.
1. The handset is not registered to the
telephone base.
2. The handset is out of range.
3. The telephone base is not connected
properly.
1. Register the handset.
2. Get closer to the telephone base.
3. Check the mains connection and the
telephone line connection of the telephone
base.
No dial tone when
the handset is
placed on the
charger.
1. You have not put the handset on the
charger correctly.
2. Charger contacts are dirty.
3. The telephone base is not connected
to the mains.
4. The handset is off.
1. Remove the handset from the charger and
place it correctly.
2. Clean the battery contacts with a clean dry
cloth.
3. Check the mains connection of the
telephone base.
4. Clean the battery.
The handset is left
on the charger for
24 hours but the
battery indicator is
still empty.
1. The handset battery is defective.
2. You have not put the handset on the
charger correctly.
3. You have not installed the battery
correctly.
4. The telephone base is not connected
properly.
1. Install a new AAA rechargeable Ni-MH
battery.
2. Check that the battery icon is animated
while charging.
3. Reinstall the batteries by following the
correct +/- polarity as indicated
4. Check the mains connection of the
telephone base.
No icon is displayed
on the screen.
1. The battery is empty.
2. The telephone base is not connected
properly.
1. RECHARGE the battery.
2. Make sure the telephone base is properly
CONNECTED.
Poor audio quality
(crackles, echo,
etc.)
1. Interference with nearby electrical
equipment.
2. The walls in which the telephone
base is located are thick.
3. The handset is too far from the
telephone base.
4. You are using a broadband/ADSL
line and have not installed a filter (not
supplied) into the wall outlet used for
your telephone.
5. The telephone line is defective.
1. Try installing the telephone in another
location, sufficiently far away from other
electrical appliances.
2. Install the telephone base in another room
or use an extension cord.
3. Get closer to the telephone base.
4. Install an ADSL filter between the telephone
wall jack and the telephone line cable
connected to the base.
5. Ask your operator to check your telephone
line.
The phone does not
ring when there is
an incoming call.
1. You have disabled the ringer.
2. Too many phones share the same
telephone line.
3. You have not connected the
telephone base.
1. Activate the ringer.
2. Disconnect some phones from the
telephone line.
3. Check the connections of the telephone
base.
The keys do not
work.
The keys are locked
Unlock the keys.
Busy tone & call in
progress indicator
turned on
1. Another handset is using the line.
2. Check the mains connection.
1. Check ALL handsets and end all calls.
2. Check the telephone line connection of the
telephone base.
Cannot register a
handset.
You have already registered the
maximum number of handsets (5) to
the telephone base.
De-register handsets that you are not using
and try again.
The battery icon
does not turn on
when the handset is
placed on the
telephone base.
1. Defective battery contacts
2. Dirty battery contacts
3. Fully charged battery
1. Adjust the position of the handset.
2. Clean the battery contacts with a dry cloth.
3. You can leave the handset on the base even
when the battery is fully charged.
Page 25

25
Cannot save
contact in the
phonebook.
The phonebook is full.
Delete contacts that you do not use.
Cannot save a
message on the
answering system.
1. The answering system is full.
2. You are in Answer Only mode.
1. Play the messages and then delete them.
2. Set the answering system to Answer and
Record mode
Cannot replay old
messages of the
answering system
Press and hold the button on the telephone base in order to listen to all
messages (short press this button to listen to new messages only).
The day of the
messages left on
the answering
system is not
correct.
The day of the answering system needs to be set separately from the telephone. To set
the day of the answering system, press MENU, then DOWN to select ANS MACHINE.
After that, select SET DAY and press MENU. Select the current day from Monday to
Sunday and press MENU to confirm.
Note:
If none of the above suggestions solves your problems, try unplugging the telephone base from the mains
and removing the batteries from all handsets. Wait 15 minutes and then reconnect everything.
Declaration of conformity
This appliance complies with the essential requirements and other provisions of Directive
1995/5/EC.
The declaration of conformity is available at: www.logisav.fr
This logo on the product indicates that it is an appliance whose treatment as waste falls within the
framework of Directive 2002/96/EC of 27 January 2003 on waste electrical and electronic equipment
(WEEE).
The presence of hazardous substances in electrical and electronic equipment may have potential effects on
the environment and human health in the reprocessing cycle of this product
Therefore, at the end of service life of this appliance, you should not dispose of it as normal household waste.
As an end-user, your role is vital in the cycle of reuse, recycling and other forms of recovery of waste
electrical and electronic equipment. Recycling and collection systems are made available by local authorities
and distributors.
You have an obligation to use the collection systems at your disposal.
Used batteries shall be deposited at an appropriate collection point. Never dispose of batteries with normal
household waste.
Imported by ADMEA, 12 Rue Jules Ferry, 93110 Rosny sous bois, France.
THOMSON is a trademark of Technicolor SA used under license by ADMEA.
 Loading...