


Thomson Lyra
Personal Jukebox
User’s Guide
PDP2840
It is important to read this instruction book prior to using your new product for the first time.
2
This symbol indicates
"dangerous voltage"
inside the product that
presents a risk of electric
shock or personal injury.
WARNING
To reduce the
risk of fire or
electric shock,
do not expose
this product or
AC charger to
rain or
moisture.
To reduce the risk of electric shock, do
not remove cover (or back). No user
serviceable parts inside. Refer servicing
to qualified service personnel.
This symbol indicates
important instructions
accompanying the
product.
CAUTION
RISK OF ELECTRIC
SHOCK DO NOT OPEN
Important Information
To reduce risk of injury, charge only rechargeable batteries recommended by the
manufacturer for this product. Other types of batteries may burst causing damage and
personal injury.
Sound Pressure Control
Les articles de loi L44.5 et 44.6 du code de la santé publique, modifiés par
l’article 2 de la loi du 28 Mai 1996 imposent une puissance acoustique
maximale de 100 décibels. Le casque livré ( code 55700930 ) et votre
appareil respectent la législation en vigueur.
A pleine puissance, l’écoute prolongée du baladeur peut endommager
l’oreille de l’utilisateur.
Service
This product should be serviced only by those specially trained in appropriate servicing
techniques. For instructions on how to obtain service, refer to the warranty in this guide.
Product Registration
Please fill out the product registration card and return it immediately. Returning this card
allows us to contact you if needed.
Product Information
Keep your sales receipt for proof of purchase to obtain warranty parts and service and
attach it here. Record the serial number and model numbers — both numbers are
located on the product.
Model No. ___________________________ Serial No. _______________________________
Purchase Date _______________________ Place of purchase ________________________
Battery can only be repaired or replaced by qualified service
personnel.

Table of Contents
3
Table of Contents
Important Information ...................................................................... 2
Sound Pressure Control......................................................................................................... 2
Service .................................................................................................................................... 2
Product Registration ............................................................................................................. 2
Product Information .............................................................................................................. 2
Table of Contents............................................................................... 3
Before You Begin ............................................................................... 5
Unpacking Your Unit .............................................................................................................5
Things to consider before you get started... ....................................................................... 6
Computer System Requirements ................................................................................. 6
Warning ........................................................................................................................ 6
Caution .......................................................................................................................... 6
Caution While Driving .................................................................................................. 6
Back up your data ........................................................................................................ 7
Important Battery Information ............................................................................................ 7
Insert the Included CD-ROM into CD-ROM Drive ................................................................ 8
Installing Software Components ......................................................................................... 9
Install the USB Driver & System Applications (Windows 98SE and Me Only) ........... 9
Install System Applications (Windows 2000 or XP) .................................................. 10
Install MusicMatch Jukebox ....................................................................................... 10
Install MusicMatch Plug-in ......................................................................................... 12
Install Additional Services .......................................................................................... 13
Launch the MusicMatch software ............................................................................. 13
Connecting Lyra HD to the Computer....................................................................... 14
Transferring Files to Lyra Personal Jukebox ...................................................................... 14
Transfer Files via MusicMatch Jukebox ..................................................................... 15
Create Pre-defined Playlists and Transferring them to the Jukebox ....................... 16
Transfer Files via Windows Explorer (Drag and Drop) ............................................. 16
Disconnecting Your Lyra from the Computer .................................................................... 17
System Tray Applications .................................................................................................... 18
Profile .......................................................................................................................... 18
Updating System File .................................................................................................. 19
Verify User Playlists..................................................................................................... 19
LyraSync....................................................................................................................... 20
System Selections ............................................................................................... 21

Table of Contents
4
Lyra•Jukebox ................................................................................... 22
Overview of General Controls ............................................................................................ 22
Front View................................................................................................................... 22
Navigation Controls .......................................................................................... 22
Playback Controls .............................................................................................. 23
Side View..................................................................................................................... 23
Top view ...................................................................................................................... 23
Display Overview ................................................................................................................24
Menu Navigation ........................................................................................................ 25
Basic Operation ................................................................................................................... 25
Playback Operation .................................................................................................... 26
Step-by-Step Example ................................................................................................ 27
Navigation Menu ........................................................................................................ 29
Additional Features .............................................................................................................31
My Selection ............................................................................................................... 31
Likes ............................................................................................................................. 32
Dislikes ........................................................................................................................32
View User Playlists ...................................................................................................... 33
Pre-defined Playlists ................................................................................................... 34
All Files ........................................................................................................................ 34
Additional Menu .................................................................................................................35
Settings ....................................................................................................................... 35
Profiler ........................................................................................................................41
Connecting your Lyra HD to your Car Stereo .................................................................... 42
Connecting Your Lyra Personal Jukebox on your stereo system ..................................... 43
Check for Updates ...............................................................................................................44
Portable Hard Drive Capability ........................................................................................... 44
Tips and Troubleshooting ................................................................................................... 45
FAQ (Frequently Asked Questions) .................................................................................... 46
Specifications & System Requirements .............................................................................. 46
Hardware ........................................................................................................... 46
Hard Disc ............................................................................................................ 47
Software ............................................................................................................. 47
Power Supply ..................................................................................................... 47
PC Hardware Requirements .............................................................................. 47
Accessories ......................................................................................................... 48
Miscellaneous Specifications ............................................................................. 48
Repair Centers - Hungary ................................................................ 49
Repair Centers - Poland ................................................................... 50
Repair Centers - Russia .................................................................... 51
Repair Centers - Czech Republic ..................................................... 53

Before You Begin
5
Unpacking Your Unit
Your Lyra Personal Jukebox came with everything you need to make music portable —
all of the items shown below should have been packed in the box with your Lyra
Personal Jukebox.
Lyra Personal Jukebox
M
u
s
i
c
M
a
n
a
g
e
m
e
n
t
S
o
f
t
w
a
r
e
Music Management CD
Contains the Lyra Personal Jukebox Applications &
MusicMatch Jukebox software
AC/DC adapter charger
e.clipzTM Clip-on headphones
Go to page 28 for instructions.
Mini USB cable
Plug the small end into the USB on your Lyra Personal Jukebox,
and plug the other end into your computer’s USB port. Go to
page 14 for connection details.
Car adapter kit
Car cord adapter / cassette adapter
Go to page 42 for instructions.
Line out cable — connects Lyra Jukebox to your audio system.
For details, go to page 43.
Illustrations contained within this publication are for representation only and subject to change.
L
R
LIKE
DISLIKE
MENU
SELECT
Plug adaptor 2.5mm to 3.5 mm
Before You Begin
3.5 mm
2.5 mm

6
Before You Begin
Things to consider before you get started...
Computer System Requirements
• Pentium 233MHz or higher (Pentium II 300 MHz or higher recommended)
Macintosh iMac G3 or higher
•Windows
®
98SE, Me, 2000, or XP
Mac OS X Version 10.1.5 or higher
• Internet Explorer 4.0 or higher
• Internet access
•4 MB free hard disk space for the software plus 0.5 MB for every minute of CD
quality music you store on your hard drive.
• 32MB RAM (64 MB recommended)
• CD-ROM drive capable of digital audio extraction
• USB port (USB 2.0 recommended)
• Installed sound card
• 16-bit color video card
Warning
Use of this product is for your personal use only. Unauthorized recording or duplication
of copyrighted material may infringe upon the rights of third parties and may be contrary
to copyright laws.
Caution
• Keep product out of direct sunlight. Exposure to direct sunlight or extreme heat
(such as inside a parked car) may cause damage or malfunction.
• Do not expose to rain or moisture.
Caution While Driving
Use of headphones while operating an automobile or moving vehicle is not
recommended and is unlawful in some states and areas. Be careful and attentive on the
road. Stop operation of the unit if you find it disruptive or distracting while driving.

Before You Begin
7
Back up your data
As with any portable device that has a hard drive or rotating magnetic media, you should
back up the drive regularly. RCA and Thomson are not responsible for lost data.
Important Battery Information
• The battery used in this device may present a risk of fire or chemical burn if
mistreated. Do not separately recharge, disassemble, heat above 100C (212F), or
incinerate.
• Battery replacement should only be made by trained technicians. Refer to
Thomson warranty card for details.
• Do not attempt to open the unit. No user servicable parts inside.
•To reduce risk of injury, charge only rechargeable batteries recommended by the
manufacturer for this product. Other types of batteries may burst causing damage
and personal injury.
• Keep the unit away from children. Do not disassemble or dispose product in fire.
• Use only the specified chargers which were packaged with the product. Use of
another charger may present a risk of fire or explosion.
• Keep charger plugged in to the device for at least 30 minutes before attempting to
operate the device if battery is completely run down and is insufficient to power up
the device.

8
Getting Started: Software Setup
The Music Management CD supplied with your Lyra Personal Jukebox contains all of the
necessary software components you need for your Lyra Personal Jukebox work properly.
These components do the following:
• install USB driver for Windows 98SE/Me users (Refer to page 9)
• enable you to transfer files from your computer to your Lyra Personal Jukebox
•profile, format and sort the contents, update the system files (Refer to page 18)
• use the MusicMatch Jukebox software to organize your music collection and transfer
the music to your Lyra Personal Jukebox
The MusicMatch Jukebox™ software compresses audio files (from music CDs) to the mp3,
mp3PRO or Windows Media Audio (WMA) format so you can play them on your Lyra
Personal Jukebox. The MusicMatch software also enables you to download files from the
internet that are already compressed and then transfer those files to your Lyra Personal
Jukebox (or play the music on your computer).
Insert the Included CD-ROM into CD-ROM Drive
Note: To Windows 98SE, Me users: Do not connect your Lyra Personal Jukebox to
your computer before you have installed the required drivers.
1. Turn on your computer and place the Music Management CD that came with your
Lyra Personal Jukebox into your computer.
IMPORTANT : Don’t connect the USB cable to the PC or Lyra Personal Jukebox
before or during the driver installation.
If you’re running Windows 2000 or XP no additional drivers are required.
If you’re running Windows 98SE/Me, you
must install the USB drivers from the
CD-ROM in order for the Lyra Personal Jukebox to function properly.
2. If the setup screen does not appear, double click My Computer, double click your
CD-ROM drive icon, and double click Install to run the installer.

Getting Started: Software Setup
9
4. Click on the software component you want to
install. See next Section for details.
Installing Software Components
Install the USB Driver & System Applications (Windows 98SE
and Me Only)
For Windows 98SE and Me systems, you need to install a USB driver before your
computer can recognize your Lyra Personal Jukebox.
1. Click Install USB Driver & System Tray
Applications to install the required driver for
your Lyra Personal Jukebox.
2. Follow the on-screen instructions to install all
necessary files.
3. Click Finish to complete installation and return
to the startup screen.
Note: You may be required to restart your
systerm after installation is complete.
3. Select your Lyra model (PDP2840) on the startup
screen and click Install to access installation
programs corresponding to your Lyra device.

10
Getting Started: Software Setup
Install System Applications (Windows 2000 or XP)
Install MusicMatch Jukebox
MusicMatch Jukebox is a music management software used to organize and manage
digital audio files and can be used to transfer the music to your Lyra Personal
Jukebox.
1. Click Install MusicMatch Jukebox to run the
MusicMatch setup program.
Wait while the installation program begins. It
may take up to 20 seconds for the installer to
start.
Note: It is recommended to uninstall any
previous installations of the MusicMatch
Jukebox software before proceeding.
After the uninstall process has been
completed, delete the C:\Program
Files\MusicMatch folder from Windows and
where C:\Program Files is the path where the
previous version of the software was
installed.
If you do not wish to uninstall the previous
MusicMatch Jukebox software, go to “Install
MusicMatch Plug-in” on page 13.
1. Click Install System Application to install
applications that will help you better manage
your Lyra Jukebox.
2. Follow the on-screen instructions to install all
necessary files.
3. Click Finish to complete installation and return
to the startup screen.
(Refer to page 18 for further system application
details)
Getting Started: Software Setup
11
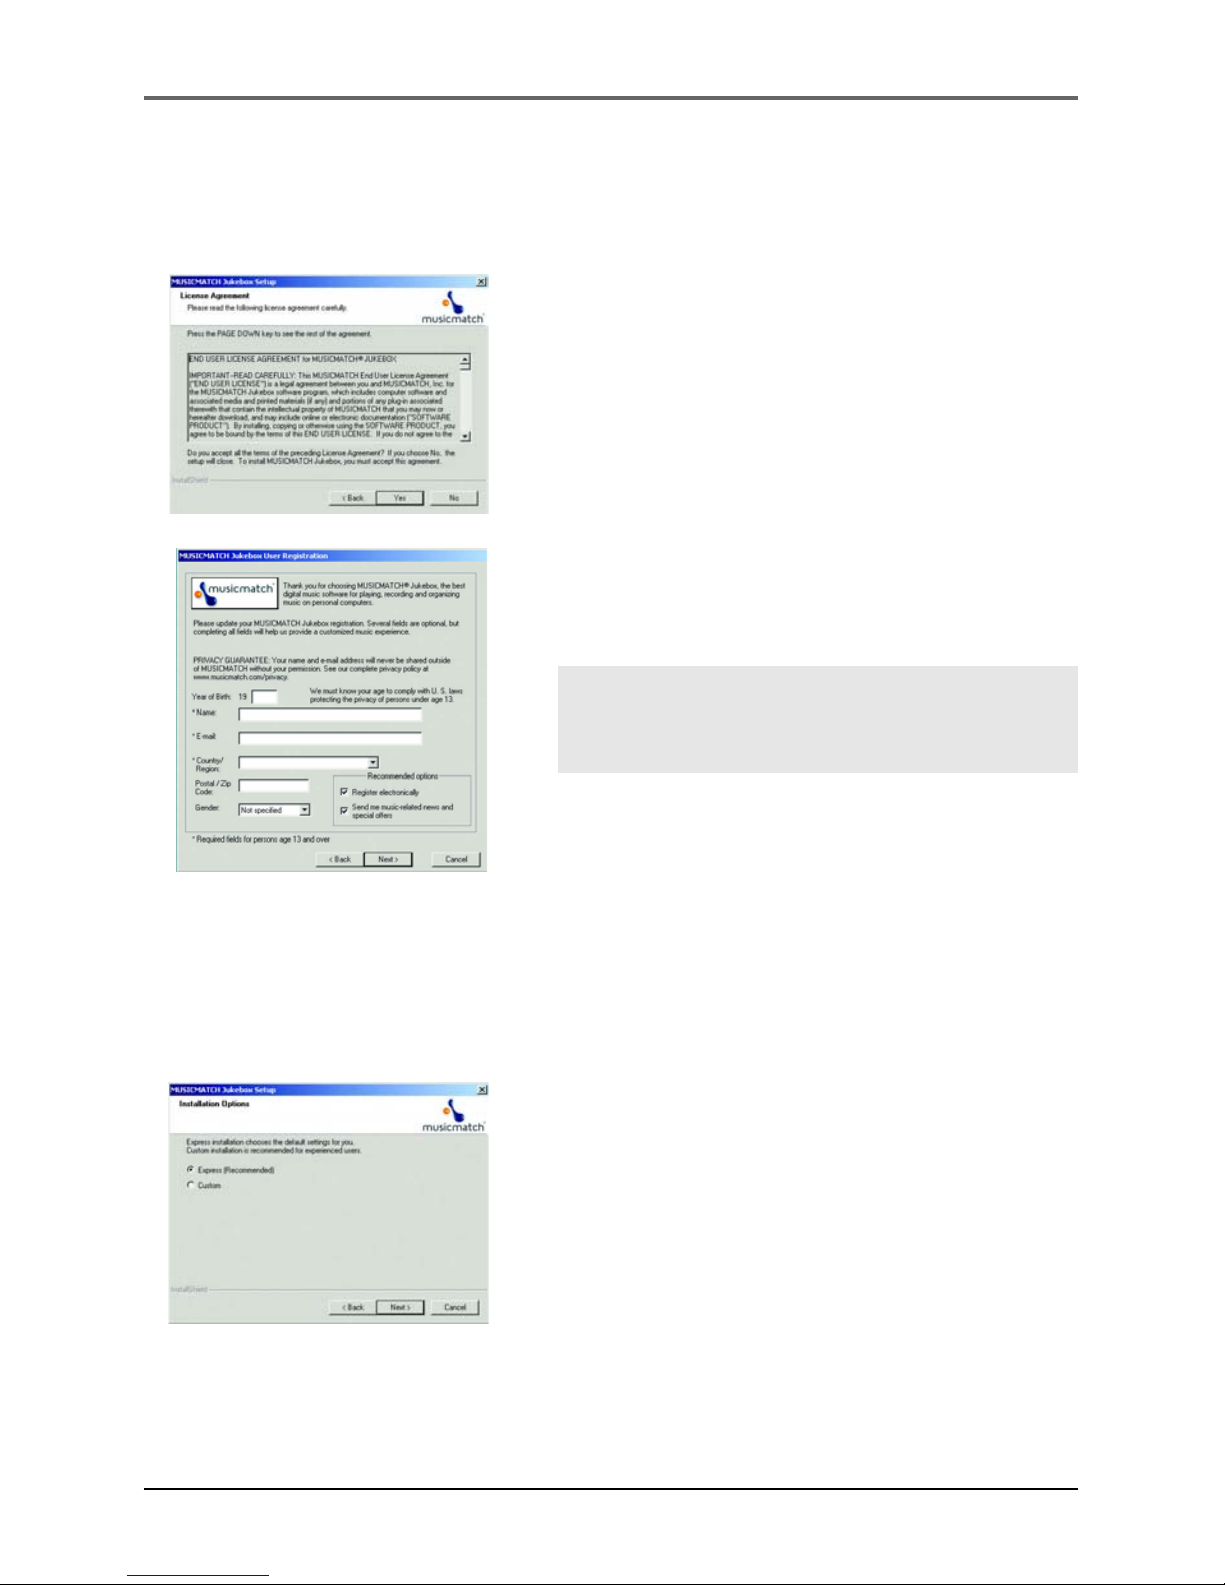
2. The Welcome Screen appears, click Next to
continue and show the License Agreement.
3. After you’ve read the license agreement, click
Yes to accept (to continue, you must click Yes),
or No to decline. If you click Yes, the User
Registration Information screen appears.
4. Enter your name, e-mail address, postal code,
country, year of birth and sex (male or female).
Click Next to continue.
Note: You must enter an e-mail address to
proceed. If you do not have an e-mail
address, enter yourname@home.com.
5. The Personalize Music Recommendation screen
appears. Read the screen to determine if you
want to use this feature or not. You can change
the settings later. Select Yes or No and click Next
to continue.
6. The Installation Options screen appears. Select
Express Setup and click Next to continue.
The Installation begins.
12
Getting Started: Software Setup
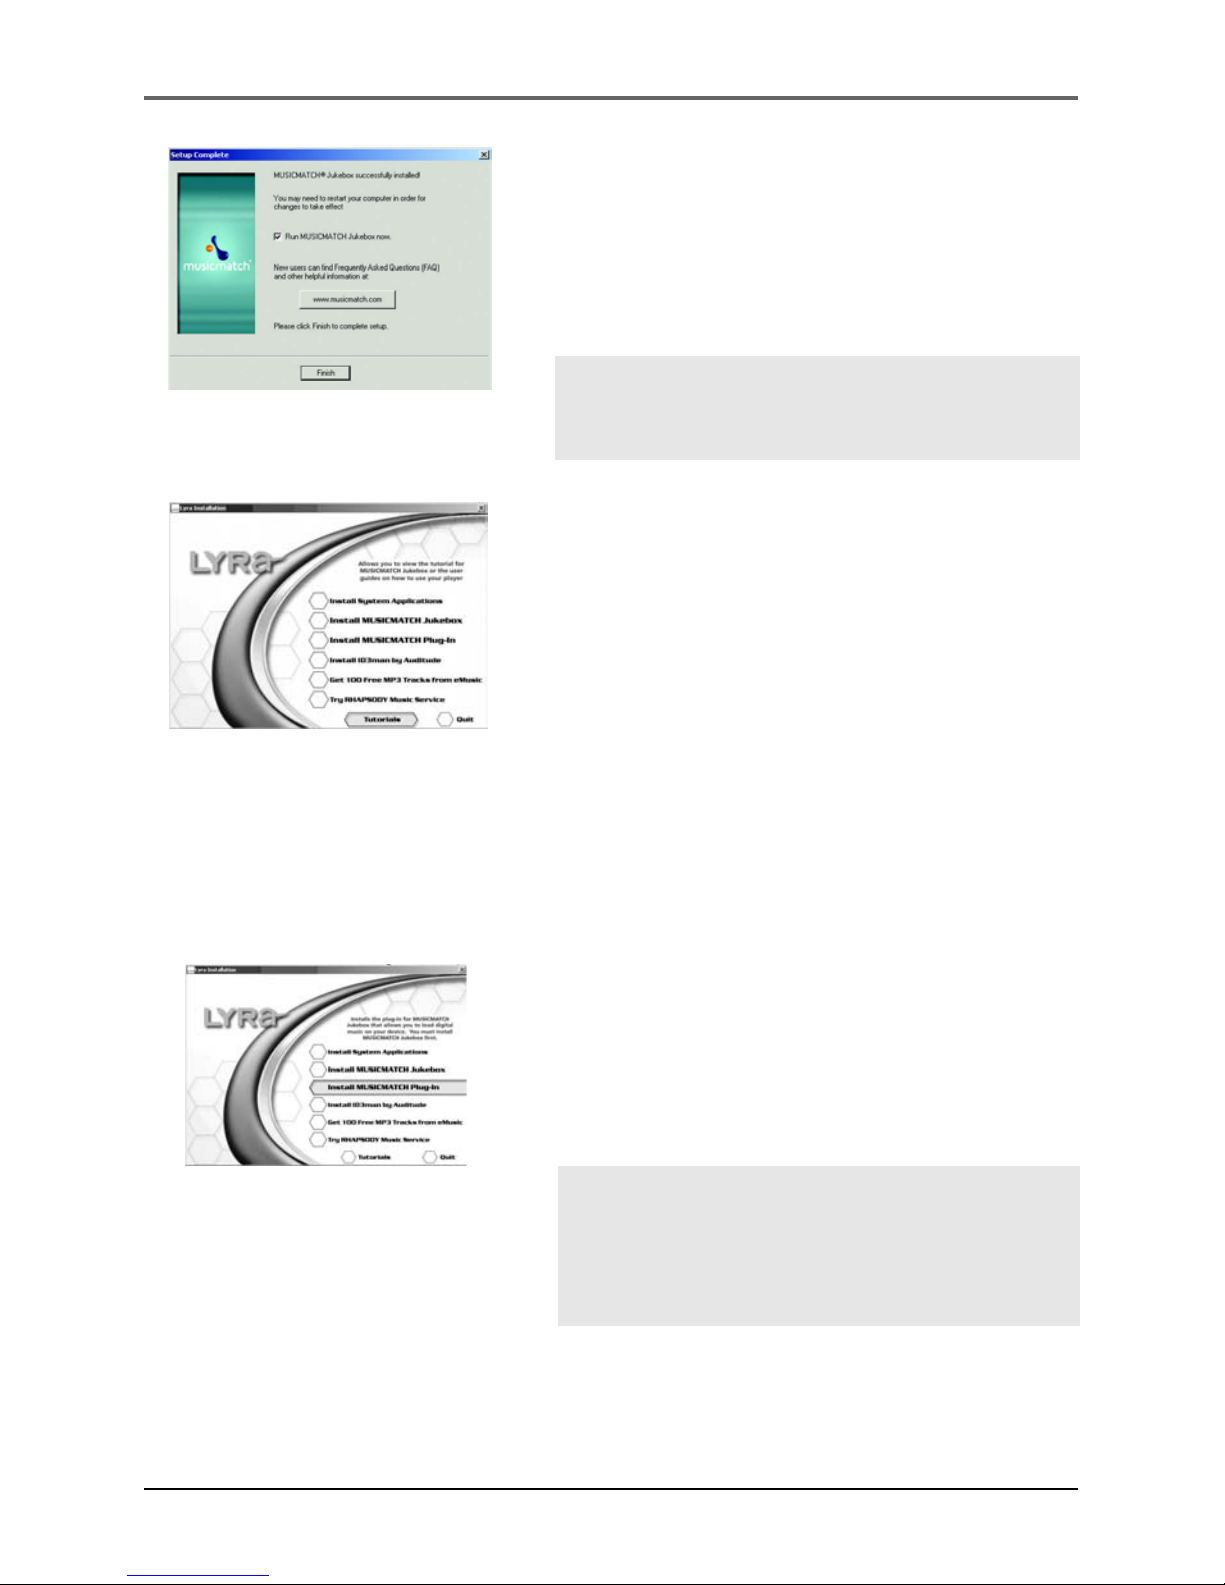
7. After installation is complete, click Finish.
8. If necessary, close the main setup screen.
9. Some computers might require you to restart
your computer. If this is necessary, a dialog box
will appear on the computer screen.
Note: As with any device that has a hard
drive, you must back up the drive. RCA and
Thomson are not responsible for lost data.
For more information on MusicMatch Jukebox, click
Tutorials on the CD or go to www.musicmatch.com.
Install MusicMatch Plug-in
MusicMatch requires a plug-in for your particular device in order to transfer files from
your computer to your Lyra Personal Jukebox.
1. Click Install MusicMatch Plug-in.
2. Follow the on-screen instructions to install all
necessary files.
3. Click Finish to complete installation and return
to startup screen.
Note: If MusicMatch Jukebox Software is
already running, you may need to shut
down and restart the software in order for
newly installed Lyra plug-in to be properly
recognized.
After plug-in has been installed, launch the
MusicMatch Jukebox Software.
Getting Started: Software Setup
13
Install Additional Services
Click on Install ID3man by Auditude, Get 100 Free mp3 Tracks from eMusic or Try
Rhapsody Music services for additional digital music services provided by our partners.
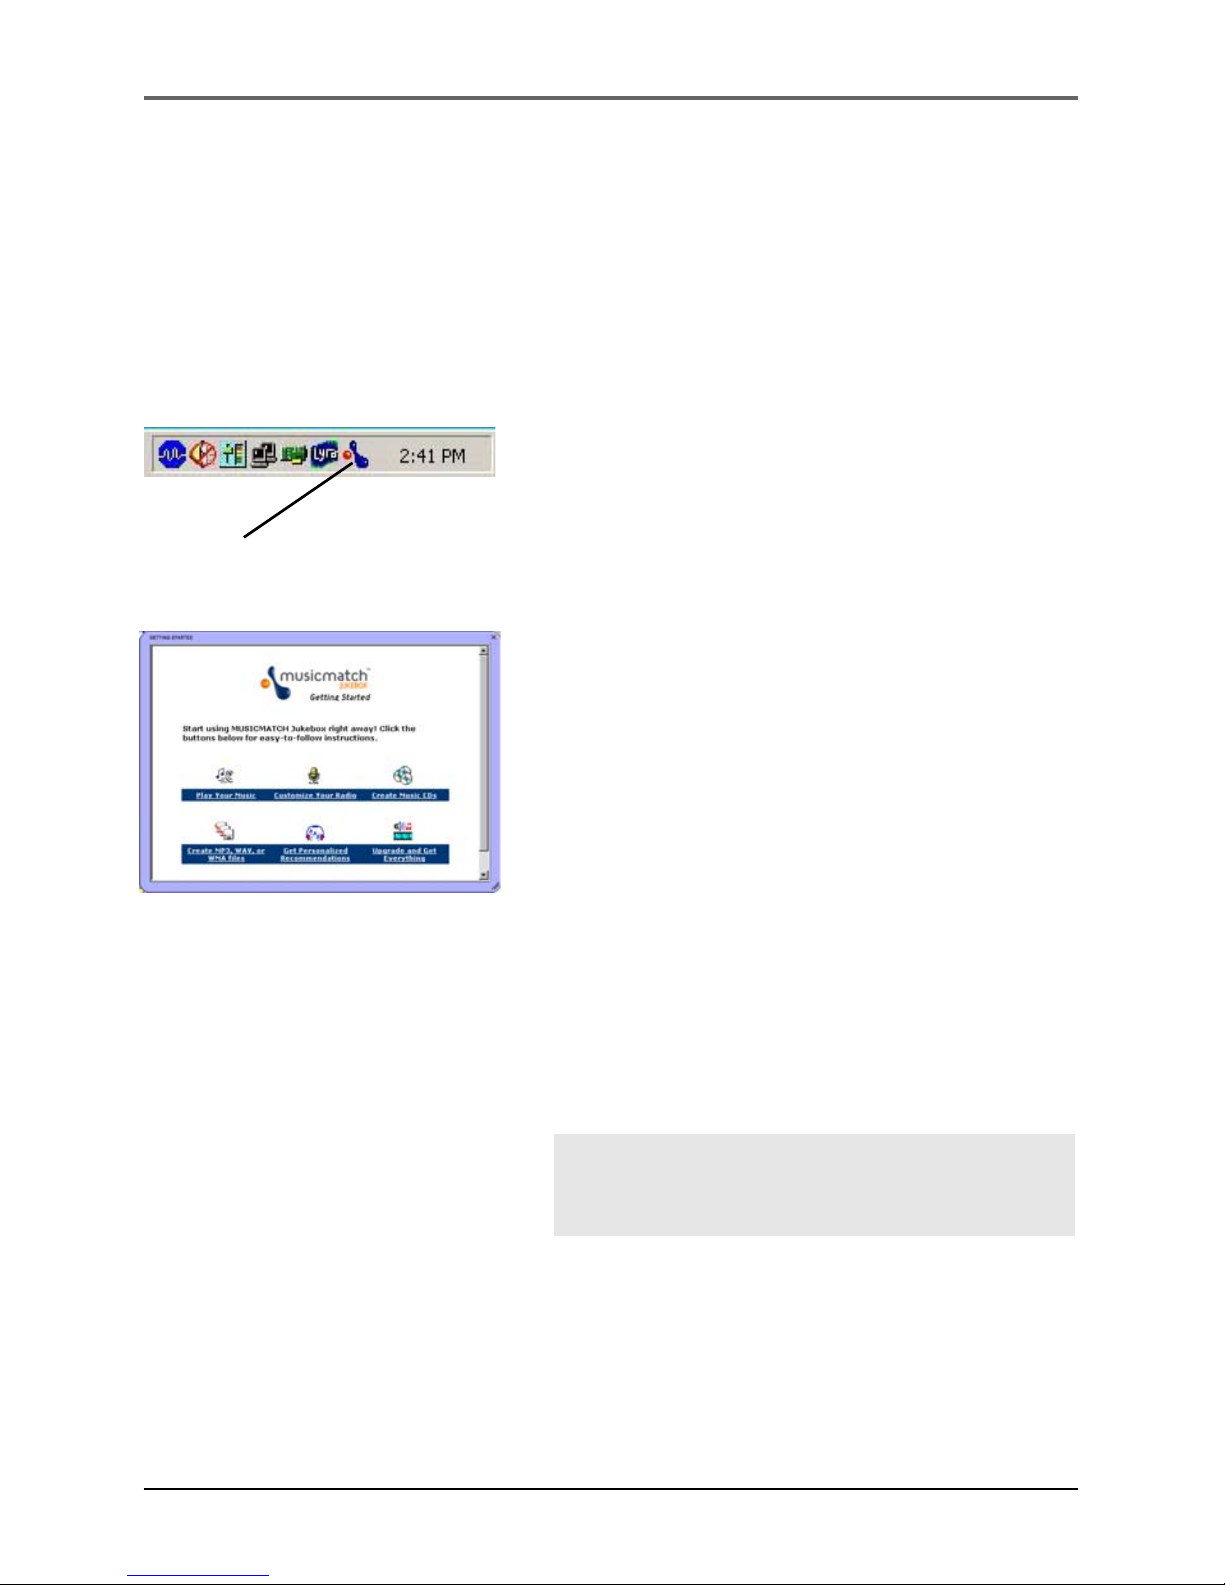
2. Start the MusicMatch Jukebox software (click on
the MusicMatch icon in your system tray or on
your desktop).
3. The first time you launch MusicMatch, a Getting
Started screen appears providing information
about MusicMatch and the software.
4. Detailed information, Getting Started tips, and
troubleshooting are available through the Help
menu and the MusicMatch internet site (accessed
from the Help and Site menus). We recommend
you familiarize yourself with the MusicMatch
Welcome Tips and view the On-line FAQs
before using and recording files.
Note: Logging onto the internet while using
MusicMatch Jukebox takes advantage of all
its features.
Launch the MusicMatch software
The MusicMatch icon found in
your computer’s system tray.
The MusicMatch software converts audio files to the
mp3, mp3PRO and WMA format so you can play
them on your Lyra Jukebox.
1. Remove the Music Management CD from your
computer.
14
Getting Started: Software Setup
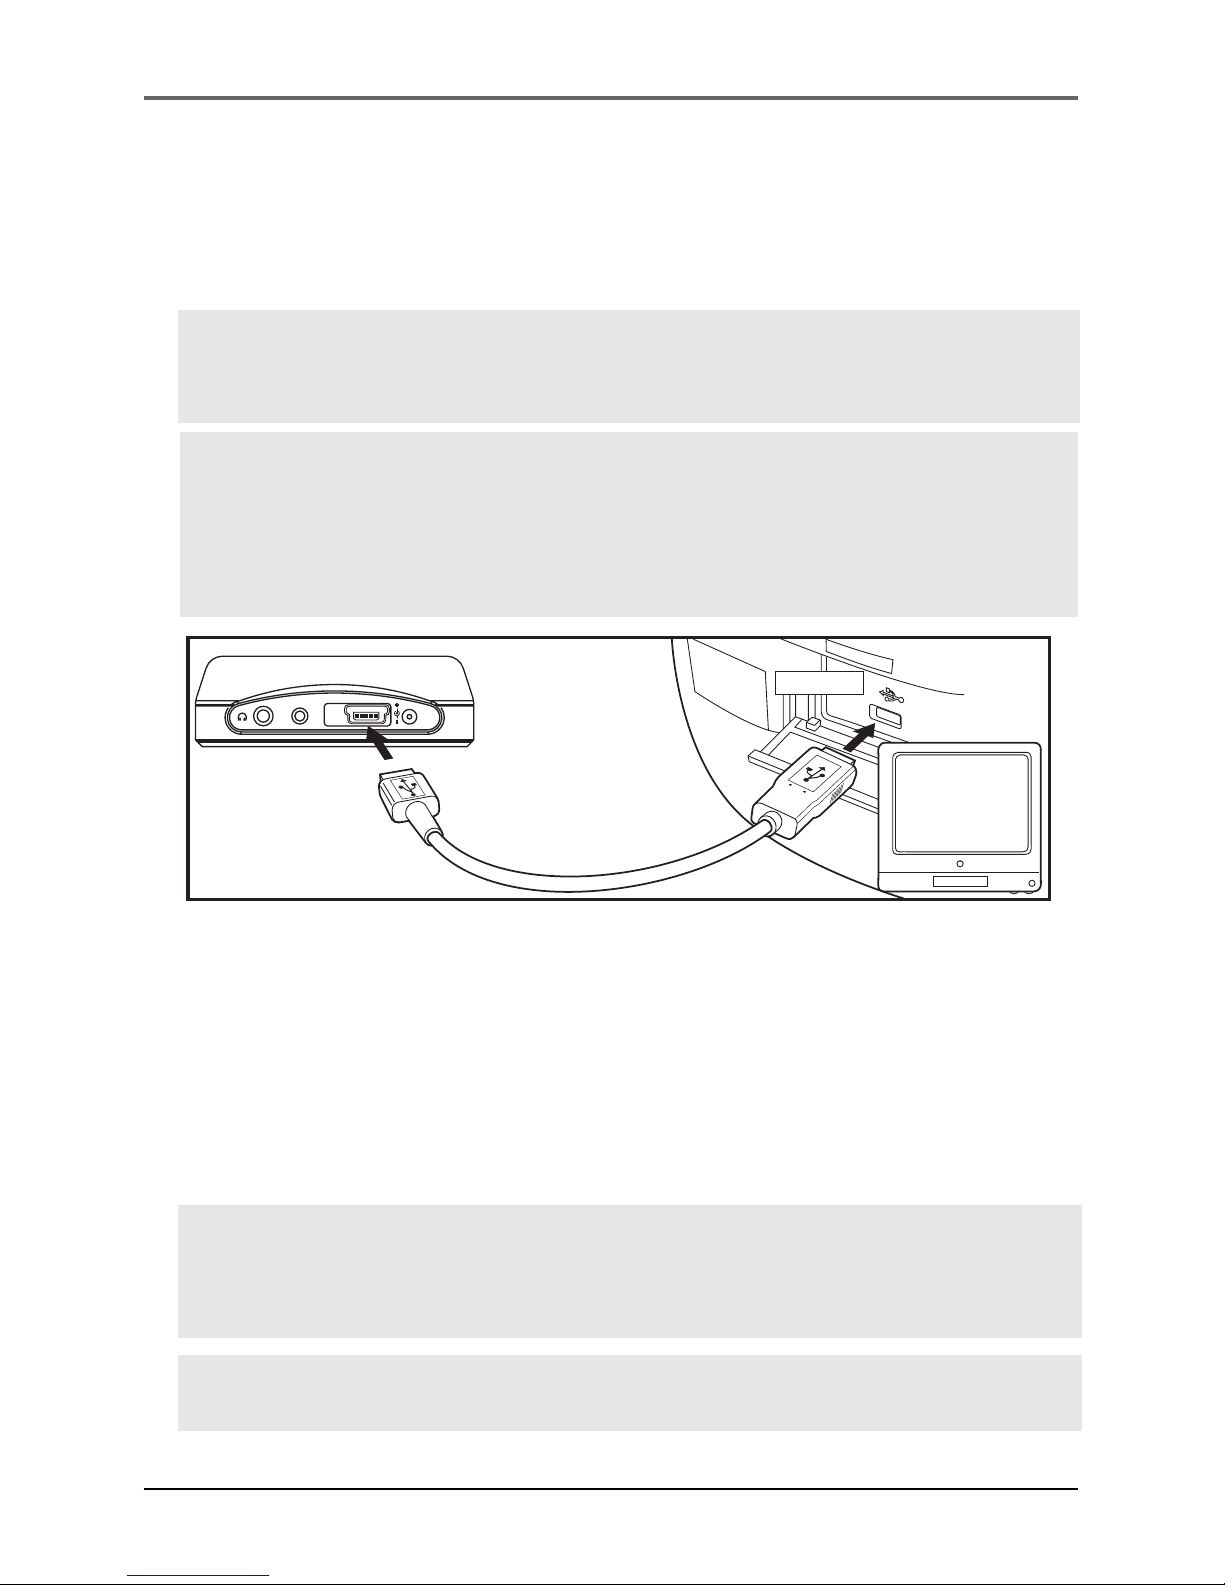
Connecting Lyra HD to the Computer
Connect the Lyra Personal Jukebox to your computer with the mini USB cable provided.
Turn on the unit by pressing the ON/OFF button. The Lyra Personal Jukebox will appear
as a Removal Disk drive letter.
Note: It might take several seconds for the device (the Lyra Personal Jukebox) to
be detected, especially in Windows 2000/XP. Click Refresh in My Computer or
Explorer to make sure the device has been detected.
Note: The Lyra Personal Jukebox is capable of transferring files at hi-speed mode
of USB 2.0. This is up to 40 times faster than USB 1.1. If USB 2.0 port is available
on your computer, use it to connect to your Lyra Personal Jukebox. The Lyra
Jukebox is still backward compatible with the older USB 1.1 ports. However, you
will not be able to take full advantage of the potential speed increase.
Transferring Files to Lyra Personal Jukebox
You can transfer files to your Lyra Personal Jukebox via MusicMatch Jukebox or via
Windows Explorer.
If your Lyra Jukebox isn’t already connected to your computer, connect the Lyra Jukebox
to the computer using the provided USB cable as illustrated above.
Note: The USB port acts as a power source for your Lyra Personal Jukebox.
Under most circumstances, it supplies enough power to keep the Jukebox running;
however, because power supply varies from computer to computer, it is best to
connect the supplied AC/DC adapter to ensure optimal operations.
Note: Do not disconnect the USB cable during music download. Doing so may
corrupt system files or the files being downloaded.
COMPUTER
USB PORT
LINE OUT
LYRA PERSONAL
JUKEBOX
(TOP VIEW)
DC IN
5V

Getting Started: Software Setup
15
Transfer Files via MusicMatch Jukebox
1. Drag and drop desired tracks from the Music Library to the Playlist display.
2. From the menu area, select Files/Send to Portable
Device to display the Portable Device Manager
screen. Under the Attached Portable Devices
item, select the Lyra Personal Audio Player item
associated with your Lyra Personal device.
3. Select the playlist item and drag it to the Lyra
Personal Audio Player. The songs in the playlist
will now be automatically transferred to your
Lyra Personal Jukebox.
Note: If your Lyra Personal Jukebox doesn’t
appear in the Portable Device Manager area,
click the REFRESH button.
During transfer a progress indicator appears in
the Portable Device Manager screen, and “Do
not unplug” flashes in the Lyra Personal
Jukebox’s LCD.
When the transfer is finished, the Lyra Personal
Jukebox Profiler application automatically runs so it
can sort/profile the newly transferred files.
Caution: Make sure all data are transferred
to the Lyra Personal Jukebox before
unplugging the USB cable.
If you’re running Windows 2000, you must
stop the device before unplugging it. Click
the
icon (the Unplug or Eject hardware
icon) from the system tray and select the USB
Mass Storage device for the drive letter
associated with the Lyra Personal Jukebox,
and click STOP. See the Windows Help for
details about the Unplug or Eject Hardware
topic.
USB 2.0
Hi-speed capable
connected...
Do not unplug
16
Getting Started: Software Setup
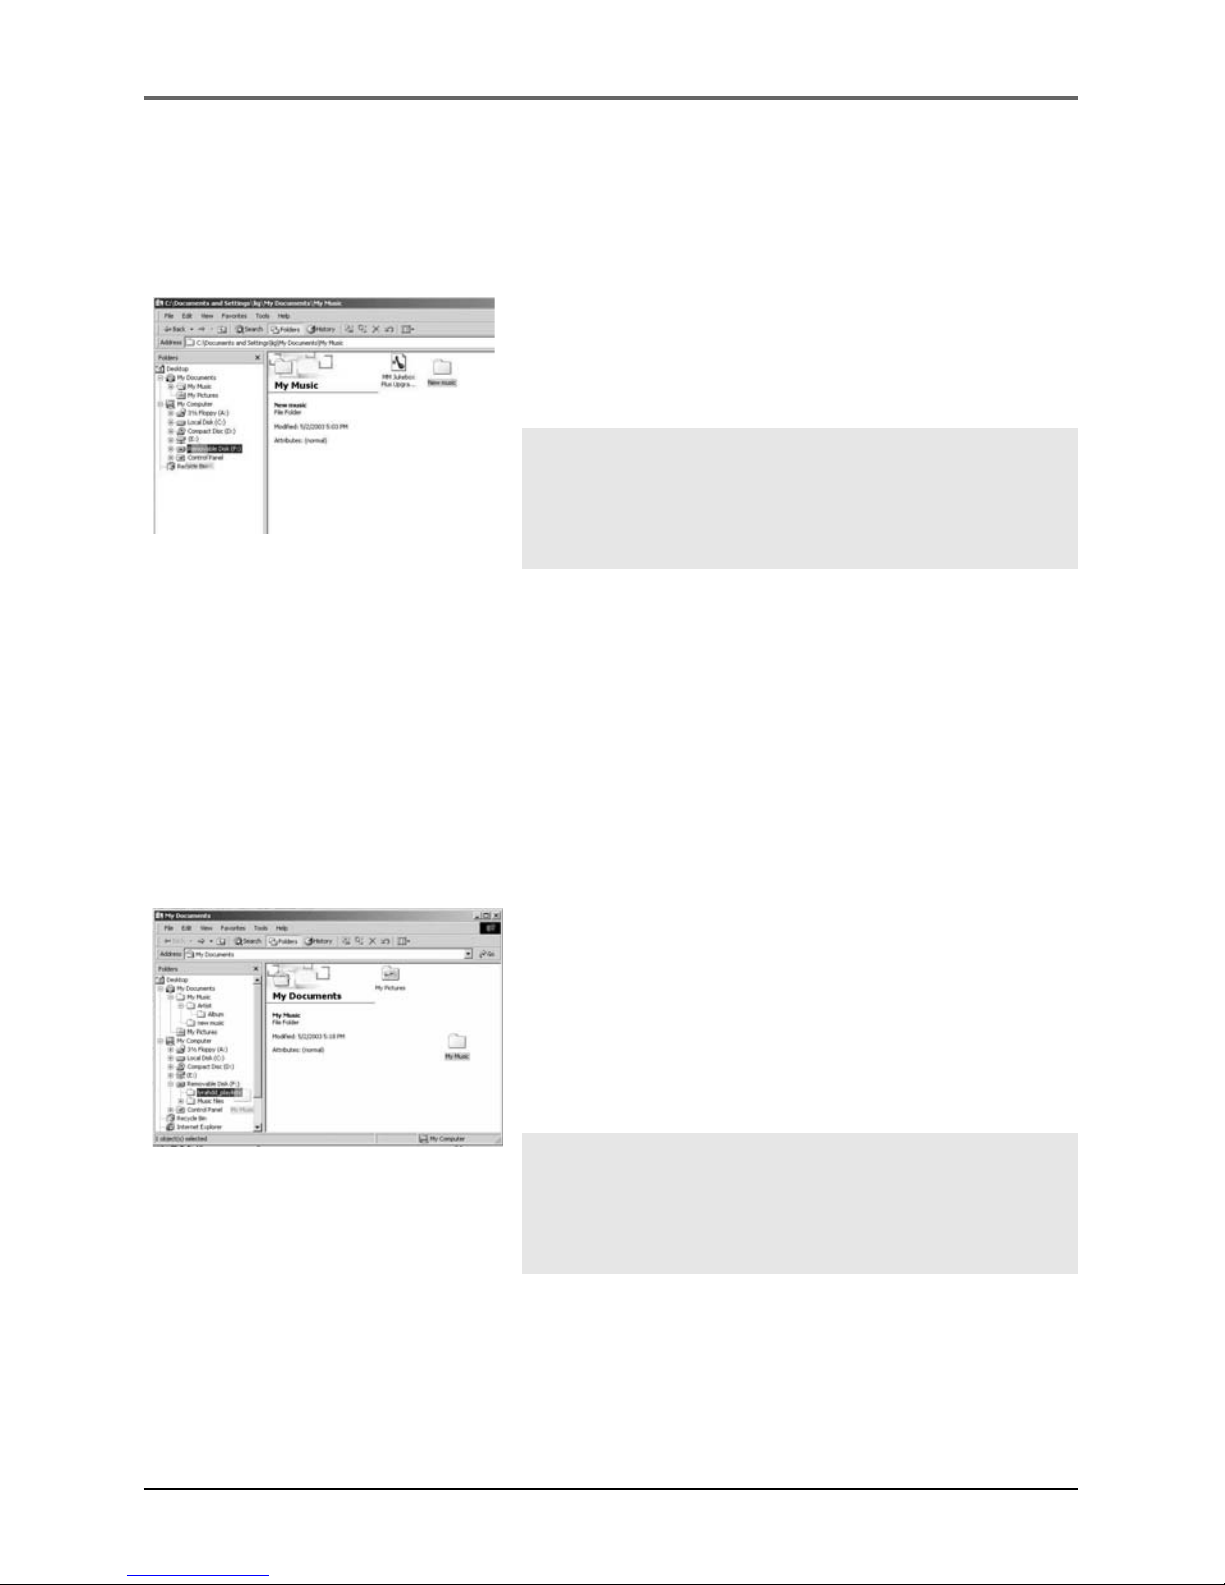
Transfer Files via Windows Explorer (Drag and Drop)
If your Lyra Personal Jukebox isn’t already connected to your computer, connect the Lyra
Personal Jukebox to the computer using the provided USB cable as illustrated on page
14.
From Windows Explorer, highlight all the files/folders
you want to transfer to your Lyra Personal Jukebox
and drag them to the drive letter that is associated
with it.
Note: You must profile your contents after
file transfer in order for the new files to
appear in the Navigation Menus. Refer to
page 18 for profiling details.
Create Pre-defined Playlists and Transferring them to the
Jukebox
Pre-defined playlists may be created on your PC using applications such as MusicMatch
Jukebox, WinAmp, etc. Refer to the MusicMatch Jukebox User Manual for details. Note
that only playlists created with songs stored on the Lyra Personal Jukebox will work on
the Lyra. Use Windows Explorer to transfer pre-defined playlists to your Lyra Personal
Jukebox.
If your Lyra Personal Jukebox isn’t already connected
to your computer, connect it using the provided USB
cable.
From Windows Explorer, highlight the pre-defined
playlists that you have created and drag them to the
lyrahdd_playlists directory in the drive letter
associated with your Lyra Personal Jukebox.
Note: You must profile your contents after
file transfer in order for the new files to
appear in the Navigation Menus. Refer to
page 18 for profiling details.
Getting Started: Software Setup
17
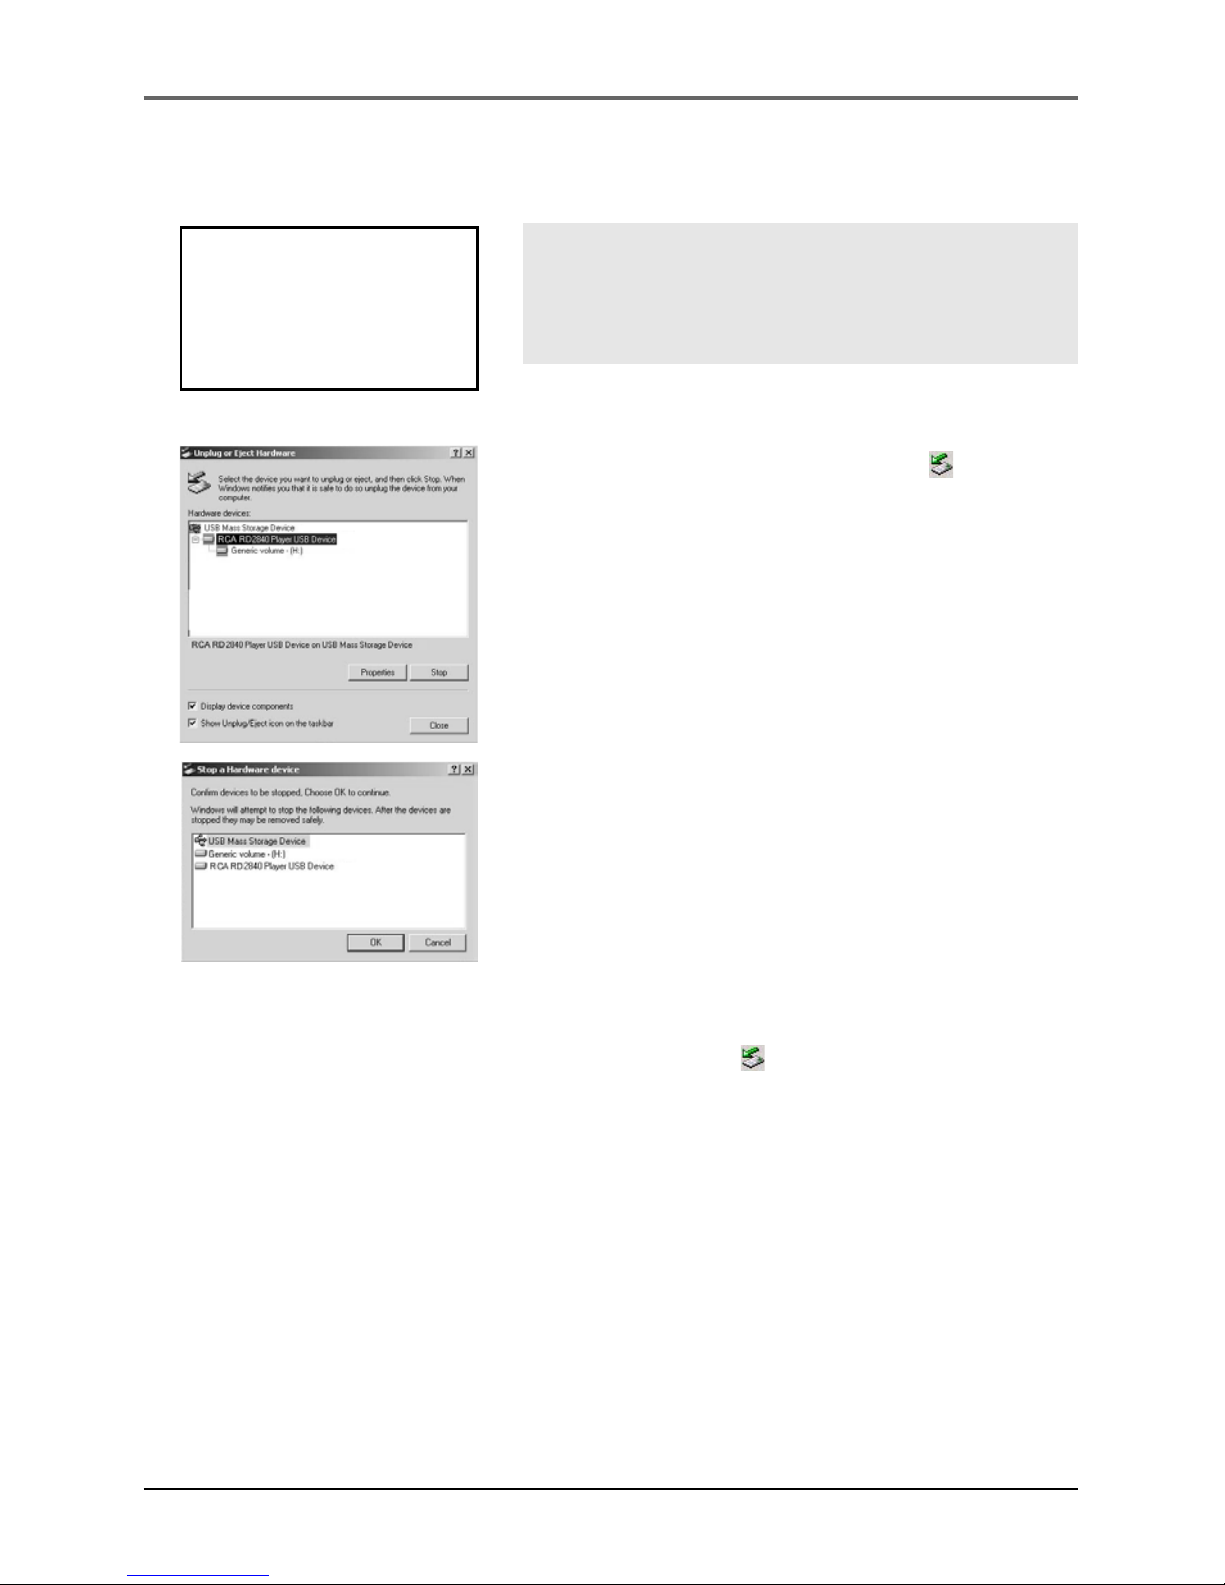
Disconnecting Your Lyra from the Computer
Note: Before disconnecting the USB cable
from the computer or the Lyra Personal
Jukebox, be sure the “Safe to unplug”
message is displayed.
From the System Tray, left click on the icon and
select Unplug or eject hardware. The Unplug or Eject
Hardware screen appears. Select the drive
corresponding to your Lyra Personal player and click
Stop.
The Stop a Hardware device screen appears. Select
the device to be stopped again for confirmation and
click OK.
You can also stop your Lyra Personal Jukebox by
right clicking on the icon from the system tray
and selecting the drive corresponding to your player.
USB 2.0
Hi-speed capable
connected...
Safe to unplug
 Loading...