

Page 1

FR GUIDE D’INSTALLATION ET D’UTILISATION
EN GUIDE TO INSTALLATION AND USE
DE EINBAU- UND BETRIEBSANLEITUNG
Table de cuisson
Cooking Hob
Kochfeld
Page 2

2
Chère Cliente, Cher Client,
Vous venez d’acquérir une table THOMSON et nous vous en remercions. Fort de toute l’expérience que nous avons accumulée au fil des
années, nous avons conçu cet appareil pour vous faciliter la vie en vous
apportant performances, simplicité d’utilisation et qualité. Vous trouverez également dans la gamme des produits THOMSON, choix de fours,
de fours à micro-ondes, de hottes aspirantes, de lave-vaisselle, de lavelinge, de sèche-linge, de réfrigérateurs et congélateurs que vous pourrez
coordonner à votre nouvelle TABLE DE CUISSON THOMSON.
Bien entendu, dans un souci permanent de satisfaire le mieux possible
vos exigences vis à vis de nos produits, notre service consommateurs
est à votre disposition et à votre écoute pour répondre à toutes vos
questions ou suggestions.
THOMSON
Dans le souci d'une amélioration constante de nos produits, nous nous
réservons le droit d'apporter à leurs caractéristiques techniques, fonctionnelles ou esthétiques toutes modifications liées à leur évolution.
Important
AAvvaanntt dd’’iinnssttaalllleerr eett dd’’uuttiilliisseerr vvoottrree aappppaarreeiill,, vveeuuiilllleezz lliirree aatttteennttiivveemmeenntt ccee
gguuiiddee dd’’iinnssttaallllaattiioonn
eett dd’’uuttiilliissaattiioonn qquuii vvoouuss ppeerrmmeettttrraa ddee vvoouuss ffaammiilliiaarriisseerr ttrrèèss rraa--
ppiiddeemmeenntt aavveecc ssoonn ffoonnccttiioonnnneemmeenntt..
FR
02
18
34
EN
DE
Page 3

SOMMAIRE
FR
3
• Consigns de sécurité
_________________________________________________
04
• Respect de l’environnement
___________________________________________
04
• Description de votre appareil
__________________________________________
05
1 / INSTALLATION DE VOTRE APPAREIL
• Choix de l’emplacement
______________________________________________
06
• Encastrement
_______________________________________________________
06
• Branchement
_______________________________________________________
07
2 / UTILISATION DE VOTRE APPAREIL
• Description de votre dessus
____________________________________________
08
• Récipiant pour l’induction
______________________________________________
09
• Quelle zone de cuisson utiliser en fonction de votre récipient
_______________
09
• Récipiant pour la vitrocéramique
________________________________________
10
• Description des commandes
___________________________________________
11
• Mise en marche
______________________________________________________
11
• Arrêt
_______________________________________________________________
11
• Réglage de puissance
_________________________________________________
11
• Zone double
_________________________________________________________
11
• Réglage de minuterie
__________________________________________________
11
• Utilisation “sécurité enfants”
___________________________________________
12
• Sécurités en fonctionnement des zones induction
_________________________
13
• Sécurités en fonctionnement de la table
__________________________________
13
3 / ENTRETIEN COURANT DE VOTRE APPAREIL
• Préserver votre appareil
______________________________________________
14
• Entretenir votre appareil
______________________________________________
14
4 / MESSAGES PARTICULIERS, INCIDENTS
• A la mise en service
__________________________________________________
15
• A la mise en marche
_________________________________________________
15
• En cours d’utilisation
_________________________________________________
15
5 / TABLEAU DE CUISSON
• Tableau de cuisson par plats
__________________________________________
16-17
Page 4
FR
4
CONSIGNES DE SÉCURITÉ
Nous avons conçu cette table de cuisson
pour une utilisation par des particuliers dans
un lieu d’habitation.
Ces tables de cuisson destinées exclusivement à la cuisson des boissons et denrées alimentaires ne contiennent aucun composant à
base d’amiante.
••
Chaleur résiduelle
Une zone de cuisson peut rester chaude quelques minutes après son utilisation.
Un “HH” s’affiche durant cette période.
Evitez alors de toucher les zones concernées.
Attention
Sur les zones de cuisson radiant, ne
pas toucher ces zones, risque de brûlures.
Apres une coupure de courant prolongée, un
autre affichage lumineux peut apparaitre, il
s’éteindra après un appui sur une touche
quelconque.Néanmoins, la température des
zones de cuisson radiant peut rester élevée.
••
Sécurité enfant
Votre table possède une sécurité enfant qui
verrouille son utilisation à l’arrêt ou en cours
de cuisson (voir chapitre : utilisation de la sécurité enfant).
Ne pas oublier de déverrouiller avant réutilisation.
••
Pour les utilisateurs de stimula-
teurs cardiaques et implants actifs
.
Le fonctionnement de la table est conforme
aux normes de perturbations électromagnétiques en vigueur et répond ainsi parfaitement
aux exigences légales (directives
89/336/CEE).
Pour qu’il n’y ait pas d’interférences entre votre table de cuisson et un stimulateur cardiaque, il faut que ce dernier soit conçu et réglé
en conformité avec la réglementation qui le
concerne.
A cet égard, nous ne pouvons vous garantir
que la seule conformité de notre propre produit.
En ce qui concerne celle du stimulateur cardiaque ou d’éventuelles incompatibilités, vous
pouvez vous renseigner auprès de son fabricant ou votre médecin traitant.
Danger électrique
Assurez-vous que le câble d’alimentation d’un appareil électrique branché à proximité de la table, n’est pas en contact avec
les zones de cuisson.
Si une fêlure dans la surface du verre apparait, déconnectez immédiatement votre appareil pour éviter un risque de choc électrique.
Pour cela enlevez les fusibles ou actionnez
le disjoncteur.
Ne plus utiliser votre table avant changement du dessus verre
.
Attention
Ne pas regarder fixement les lampes
halogènes* des zones de cuisson.
*suivant modele
••
RESPECT DE
L’ENVIRONNEMENT
••
— Les matériaux d'emballage de cet appareil
sont recyclables. Participez à leur recyclage
et contribuez ainsi à la protection de l'environnement en les déposant dans les conteneurs
municipaux prévus à cet effet.
— Votre appareil contient également
de nombreux matériaux recyclables. Il est donc marqué de ce logo
afin de vous indiquer que les appareils usagés ne doivent pas être
mélangés avec d'autres déchets.
Le recyclage des appareils qu'orga-
nise votre fabricant sera ainsi réalisé dans les meilleures conditions, conformément à la directive européenne 2002/96/CE
sur les déchets d'équipements électriques et
électroniques. Adressez-vous à votre mairie
ou à votre revendeur pour connaître les points
de collecte des appareils usagés les plus proches de votre domicile.
— Nous vous remercions pour votre collaboration à la protection de l'environnement.
Page 5
5
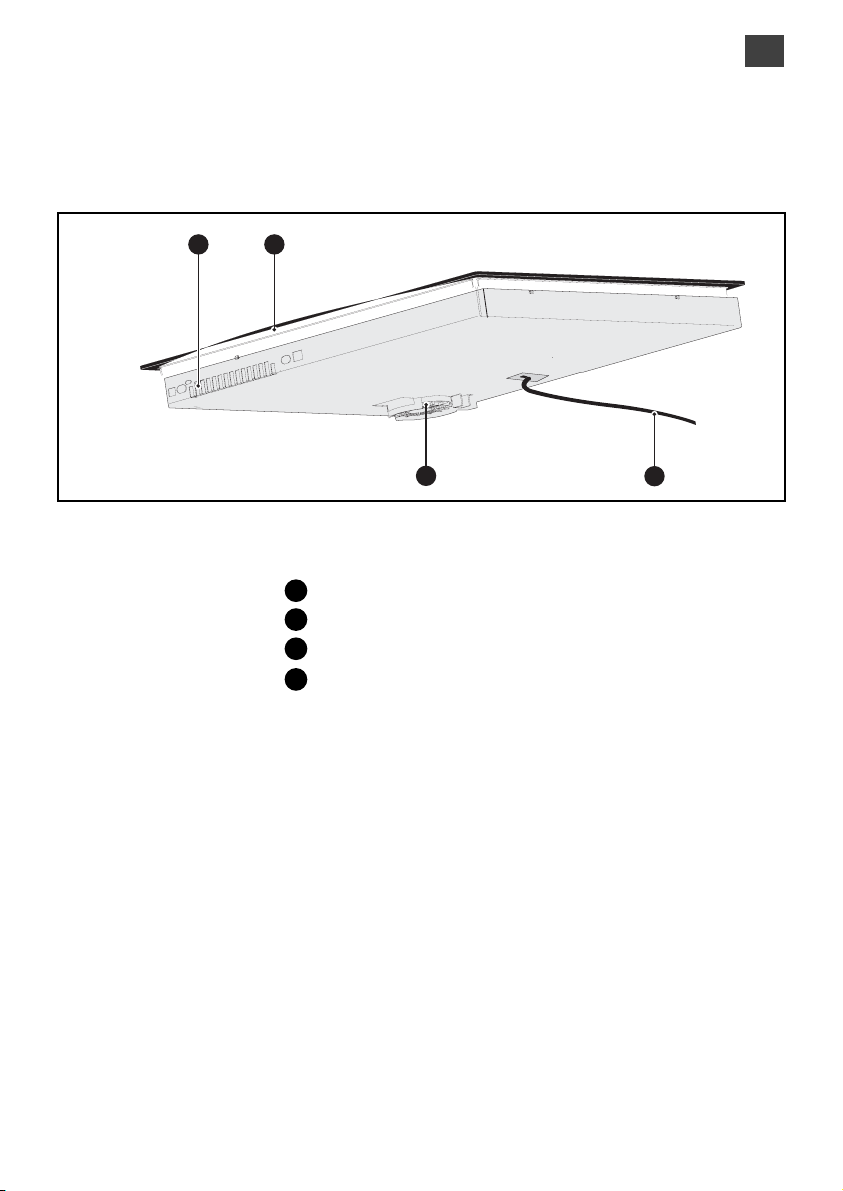
DESCRIPTION DE VOTRE APPAREIL
B
C
A
D
Entrée d’air
Sortie d’air
Verre vitrocéramique
Cordon d’alimentation
A
B
C
••
D
FR
Page 6
6
Conseil
Si votre four est situé sous votre table
de cuisson, les sécurités thermiques de la
table interdisent l’utilisation simultanée de
celle-ci et du four en mode pyrolyse.
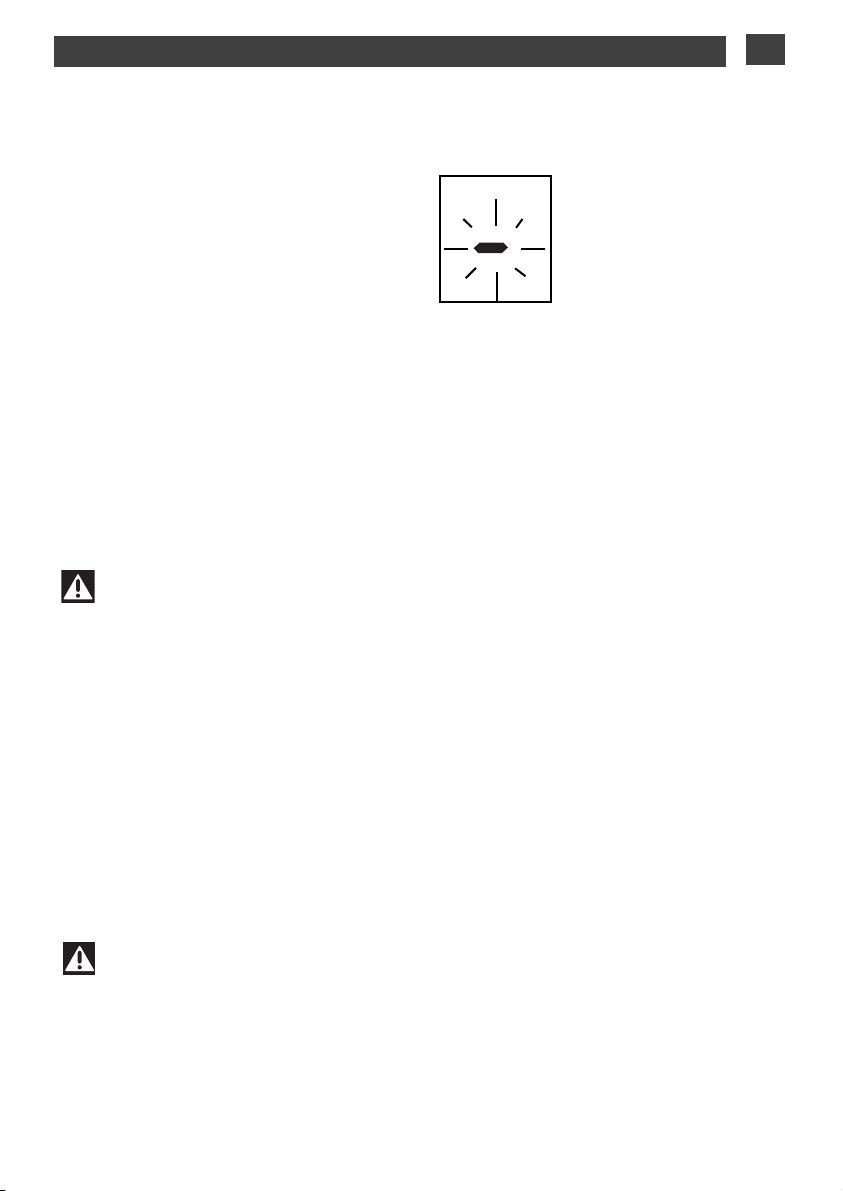
Votre table est équipée d'un système de
sécurité anti-surchauffe.
Cette sécurité peut par exemple être activée en cas d'installation au-dessus d'un
four insuffisamment isolé. Des petits traits
s'affichent alors dans les zones de commande. Dans ce cas, nous vous recommandons d'augmenter l'aération de votre table
de cuisson en pratiquant une ouverture sur
le côté de votre meuble (8cm x 5cm),et/ou
vous pouvez également installer le kit
d'isolation four disponible en SAV .
Attention
Veillez impérativement à ce que les
entrées d’air situées sous votre appareil de
cuisson restent toujours bien dégagées.
Dans tous les cas d’installation, votre table
à induction a besoin d’une bonne aération.
FR 1 / INSTALLATION DE VOTRE APPAREIL
••
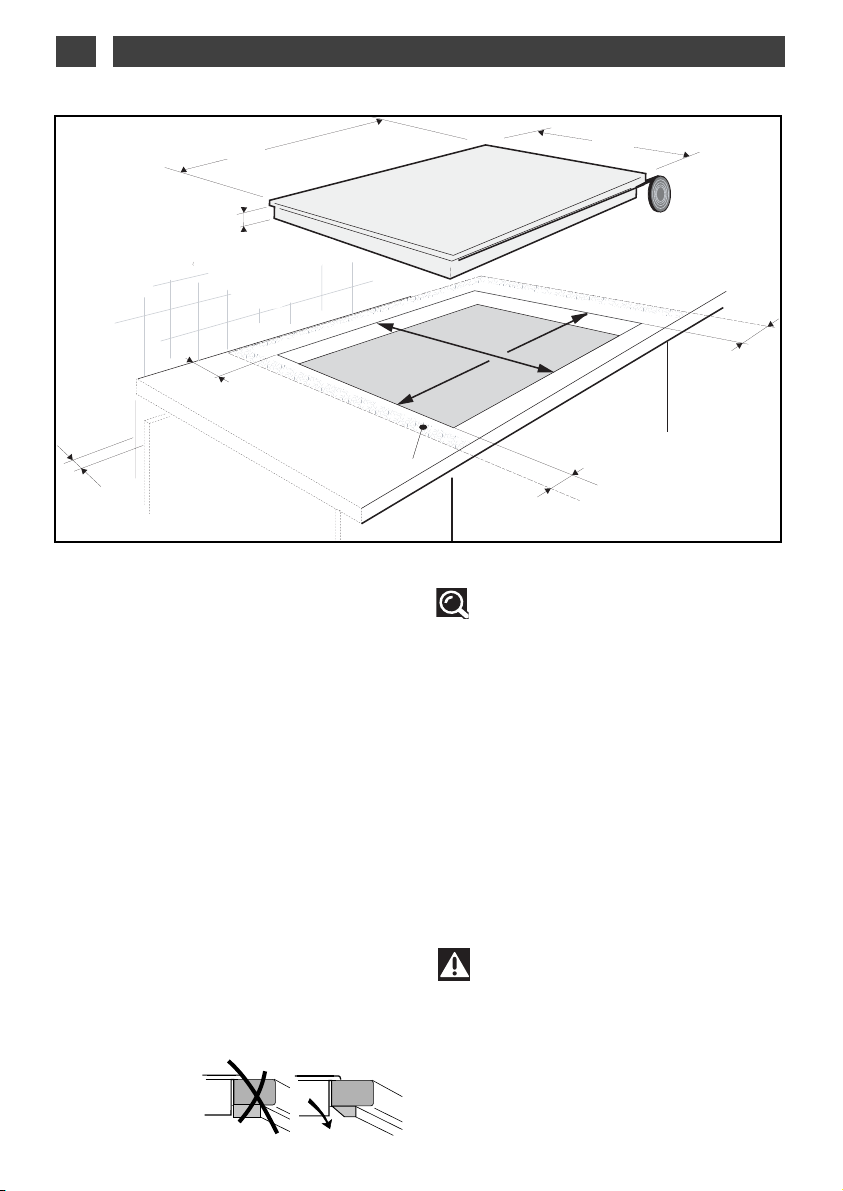
CHOIX DE L’EMPLACEMENT
Votre appareil doit être placé de manière à ce
que la fiche de prise de courant soit accessible.
La distance entre le bord de votre appareil et
le mur (ou cloison) latéral ou arrière doit être
au minimum de 4 cm (zone A).
Votre appareil peut être encastré sans aucune
contrainte au dessus d’un meuble, d’un four
ou d’un appareil électroménager encastrable.
Vérifiez seulement que les entrées d’air et
sorties d’air soient bien dégagées (voir chapitre “description de votre appareil”).
ENCASTREMENT
Se conformer au croquis ci-dessus.
Collez le joint mousse en dessous de votre
appareil en suivant le pourtour des surfaces
en appui sur votre plan de travail . Il assurera
ainsi une bonne étanchéité avec le plan de travail.
Fixez les clips sur la table*.
*Suivant modèle,
vide sanitaire
5511
••
5588
4499
5566
66,,44
Sur les modeles 80cm s’assurer que la traverse du
meuble ne bloque pas le
passage de l’air. Au besoin,
pratiquez un biseau.
4 cm
4 cm
4 cm
A
4 cm
Page 7

11 //
INSTALLATION DE VOTRE APPAREIL
FR
7
Séparez les 2 fils de phase L1, L2 avant branchement.
NNeeuuttrree
TTeerrrree
PPhhaassee
NN
LL
Vert / jaune
Bleu
Noir-gris
Marron
NNeeuuttrree
TTeerrrree
PPhhaassee
NN
LL11
LL22
Bleu
Vert / jaune
Noir-gris
Marron
•
Branchement 220-240V
~
Attention
Si le câble est endommagé, il doit
être remplacé par le fabricant, son service
après vente ou une personne de qualification similaire afin d’éviter un danger.
Lors d’un branchement 400 V 2N triphasé,
en cas de dysfonctionnement de votre table,
vérifiez que le fil neutre est bien connecté.
Ces tables doivent être branchées sur le
réseau par l’intermédiaire d’une prise de courant conforme à la publication CEI 60083 ou
d’un dispositif à coupure omnipolaire
conforme aux règles d’installations en
vigueur.
A la mise sous tension de votre table, ou
après une coupure de courant prolongée, un
codage lumineux apparaît sur le clavier de
commande. Attendez 30 secondes environ
que ces informations disparaissent pour utiliser votre table (Cet affichage est normal et il
est réservé le cas échéant à votre service
après vente. En aucun cas l’utilisateur de la
table ne doit en tenir compte).
BRANCHEMENT
••
NNeeuuttrree
TTeerrrree
PPhhaassee
NN
LL
Vert / jaune
Bleu
Marron
•
Branchement 400V 2N
~
-
16A
32A
16A
Séparez les fils avant branchement.
NNeeuuttrree
TTeerrrree
PPhhaassee
NN11
LL11
LL22
Bleu
Vert / jaune
Noir-gris
Marron
•
Branchement 2x230V 2L+2N
~
-
16A
NN22
•
Branchement 400V 3
~
-
16A
Page 8

22 //
UTILISATION DE VOTRE APPAREILFR
8
1166 ccmm
50 W à 2000 W
DESCRIPTION DE VOTRE DESSUS
••
ICKT656
1133//2200 ccmm
750/1700 W
2211 ccmm
50 W à 31100 W
1188 ccmm
1500 W
7967
9932
INDUCTION
BOOSTER
INDUCTION
BOOSTER
Page 9
22 //
UTILISATION DE VOTRE APPAREIL
FR
9
Conseil
Pour vérifier si votre récipient
convient :
Posez-le sur une zone de cuisson en puissance 4.
Si l’afficheur reste fixe, votre récipient est
compatible.
S’il clignote, votre récipient n’est pas utilisable en induction.
Vous pouvez aussi vous servir d’un aimant.
S’il « accroche » le fond du récipient, il est
compatible avec l’induction.
Zone de Récipient à utiliser
cuisson*
1166 ccmm 1100 .......... 1188 ccmm
1188 ccmm 1122 .......... 2222 ccmm
2211 ccmm 1188 .......... 2244 ccmm
2288 ccmm 1122 .......... 3322 ccmm
••
QUELLE ZONE DE CUISSON
UTILISER EN FONCTION DE
VOTRE RÉCIPIENT ?
••
RÉCIPIENTS POUR L’INDUCTION
••
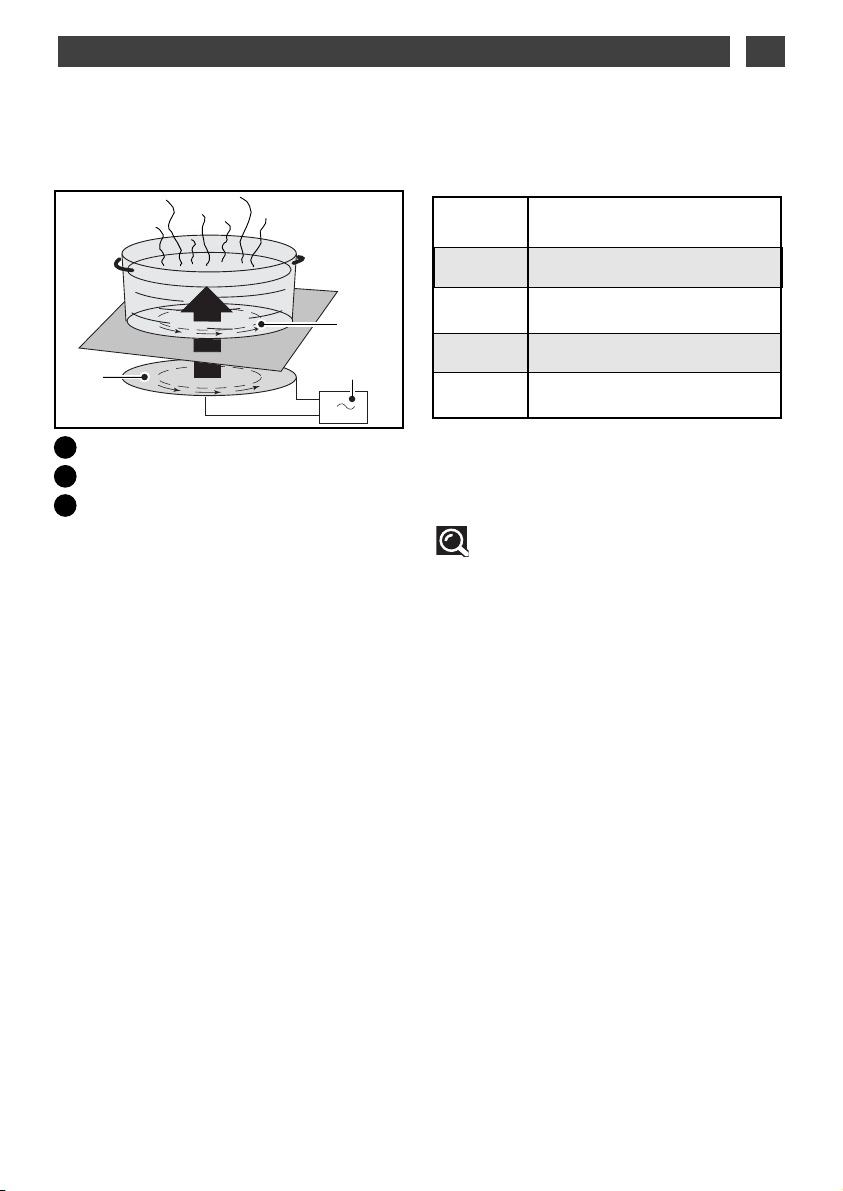
Principe de l’induction
Le principe de l'induction repose sur un phénomène magnétique.
Lorsque vous posez votre récipient sur une
zone de cuisson et que vous mettez en marche, les circuits électroniques de votre table
de cuisson produisent des courants " induits”
dans le fond du récipient et élèvent instantanément sa température. Cette chaleur est
alors transmise aux aliments qui mijotent ou
sont saisis en fonction de vos réglages.
••
Les récipients
La plupart des récipients sont compatibles
avec l'induction.
Seuls le verre, la terre, l'aluminium sans fond
spécial, le cuivre et certains inox non magnétiques ne fonctionnement pas avec la cuisson
induction.
Nous vous suggérons de choisir des récipients à fond épais et plat. La chaleur sera
mieux répartie et la cuisson plus homogène.
C
B
A
**
suivant modèle
Inducteur
Circuit électronique
Courants induits
A
B
C
+
-
Page 10

2 / UTILISATION DE VOTRE APPAREILFR
10
RECIPIENTS POUR LA
VITROCÉRAMIQUE
••
Les récipients
Ils doivent être conçus pour la cuisine électrique.
Leur fond doit être plat.
Utilisez de préférence des récipients en :
- Acier inoxydable avec fond trimétal épais ou
“sandwich”.
- Aluminium avec fond lisse épais.
- Acier émaillé
••
Utilisation
Un réglage supérieur est nécessaire en cas :
- de quantités importantes
- de cuissons avec un récipient non couvert
- d’emploi d’une casserole en verre ou en
céramique.
Un réglage inférieur est nécessaire en cas :
- de cuisson d’aliment ayant tendance à brûler
facilement (commencer avec un réglage plus
faible, le réglage pouvant être augmenté si
nécessaire).
- de débordement (retirez le couvercle ou
enlevez la casserole, puis baissez le
réglage).
••
Economie d’énergie :
Pour finir la cuisson, mettre sur la position 0,
en laissant le récipient en place pour utiliser la
chaleur accumulée.(vous ferez ainsi des économies d’énergie).
Utilisez un couvercle le plus souvent possible
pour réduire les pertes de chaleur par évaporation.
••
Régulation automatique des foyers
Les foyers se régulent automatiquement, ils
s’allument et s’éteignent pour maintenir la
puissance sélectionnée. Ainsi, la température
reste homogène et adaptée à la cuisson de
vos aliments.
La fréquence de régulation varie selon la puissance sélectionnée.
Conseil
Utilisez un récipient de taille adaptée.
Le diamètre du fond du récipient doit être
égal ou supérieur à la zone sérigraphiée
Ne laissez pas un récipient vide sur une
zone de cuisson.
Ne laissez pas un récipient contenant de
l’huile ou de la graisse chaude sans surveillance sur une zone de cuisson.
••
Page 11

FR
11
22 //
UTILISATION DE VOTRE APPAREIL
••
••
MISE EN MARCHE
Appuyez sur la touche marche/arrêt de la
zone à utiliser. Un affichage
00
clignotant et un
bip signale que la zone est allumée. Vous pouvez alors régler la puissance désirée.
Sans demande de puissance de votre part, la
zone de cuisson s’éteindra automatiquement.
ARRÊT
Appuyez sur la touche marche/arrêt de la
zone utilisée ou sur la touche
“
--
”
de la puis-
sance jusqu’à affichage
00..
RÉGLAGE DE LA PUISSANCE
Appuyez sur la touche “+” ou “-” pour régler
votre niveau de puissance de 1 à P (puissance
maximum).
Lors de la mise en marche vous pouvez passer directement en puissance maximum “P”
en appuyant sur la touche
“
--
”
DESCRIPTION DES COMMAN
DES
••
Touches de marche/arrêt.
Touches de puissance
Touches de minuterie.
A
B
C
C
A
B
••
ZZOONNEE DDOOUUBBLLEE
Pour activer la zone additionnelle:
- Mettre la zone principale en fonctionnement.
- Appuyez simultanement sur les touches de
puissance “-” et “+” de la zone de cuisson, un
bip et un “EE” sur l’afficheur confirme votre
commande.
- Réglez la puissance .
Pour désactiver la zone additionnelle:
- Appuyez simultanement sur les touches de
puissance “-” et “+” de la zone de cuisson.
••
REGLAGE DE LA MINUTERIE
Une minuterie tournante est disponible pour
l’ensemble des zones de cuisson et s’affecte
sur une seule zone de cuisson à la fois
Par appuis successifs sur la touche vous
sélectionnez la zone de cuisson où vous voulez affecter la minuterie.
Le symbole tournant et la minuterie peut être
affecté uniquement sur les zones en fonctionnement.
P
our utiliser la minut
erie :
- Mettez la zone de cuisson en fonctionnement et réglez la puissance.
- Positionnez le symbole tournant sur cette
zone de cuisson.
- Réglez la durée par appui sur “
+
“ ou “--”, un
point s’allume sur l’afficheur de puissance
pour confirmer votre manoeuvre.
La minuterie ne décompte que si la zone de
cuisson est recouverte d’un récipient.
En fin de cuisson, la zone s’éteind, la minuterie indique 00et un
bbiipp
vous prévient.
- Appuyez sur la touche “++” ou “--” de minuterie pour arrêter ce bip.
P
our modifier les réglages de minuterie :
Appuyez sur les touches “++” ou “-” de la minuterie.
P
our arrêter la minuterie :
Appuyez plusieurs secondes simultanément
sur les touches “++” et “-” de la minuterie ou sur
la touche “--” de la minuterie jusqu’à 00.
P
our modifier l’attribution de la minuterie :
- Arrêtez la minuterie en cours.
- Par appuis successifs sur la touche affectez la à une nouvelle zone de cuisson en fonctionnement.
••
Page 12
22 //
UTILISATION DE VOTRE APPAREIL
FR
12
UTILISATION “SÉCURITÉ ENFANTS”
Votre table de cuisson possède
une sécurité enfants qui verrouille les commandes à l’arrêt
(pour le nettoyage par exemple)
ou en cours de cuisson (pour
préserver vos réglages).
Pour des raisons de sécurité, seule la touche
“arrêt” est toujours active et autorise la coupure d’une zone de chauffe même verrouillée.
••
Comment verrouiller ?
Maintenez appuyée la touche de verrouillage
jusqu’à ce que la led placée au dessus s’allume et qu’un bip confirme votre manoeuvre .
--
la table est verrouillée en marche
La led placée au dessus de la touche de verrouillage est allumée.
Le symbole s’affiche quand vous appuyez
sur les touches de
ppuuiissssaannccee
ou de
mmiinnuutteerriiee
du foyer en fonctionnement.
Le symbole s’affiche quand vous appuyez
sur les touches “
mmaarrcchhee//aarrrrêêtt””
d’un foyer
éteint.
Cette affichage s’éteindra au bout de quelques secondes
,
••
la table est verrouillée à l’arrêt
La led au dessus de la touche de verrouillage
est éteinte,une impulsion courte sur cette touche allume la led .
Le symbole
et la led
s’affichent quand vous
appuyez sur une touche
mmaarrcchhee // aarrrrêêtt
de
n’importe quelle zone.
••
Comment déverrouiller ?
Appuyez sur la touche de verrouillage
jusqu’à
l’extinction de la led
et d’un double bip confir-
ment votre manoeuvre
.
Conseil
Pensez à déverrouiller votre table
avant réutilisation (voir chapitre “utilisation
sécurité enfants”).
••
Page 13
FR
13
2 / UTILISATION DE VOTRE APPAREIL
SÉCURITÉS EN FONCTIONNEMENT DES ZONES INDUCTION
•Limiteur de température
Chaque zone de cuisson est équipée d’un
capteur de sécurité qui surveille en permanence la température du fond du récipient. En
cas d’oubli d’un récipient vide sur une zone
de cuisson allumée, ce capteur adapte automatiquement la puissance délivrée par la table et évite ainsi tout risque de détérioration
de l’ustensile ou de la table.
•Sécurité “petits objets”
Un objet de petite dimension (comme une
fourchette, une cuillère ou une bague, …) posé
seul sur la table, n'est pas détecté comme un
récipient.
L’affichage clignote et aucune puissance n'est
délivrée.
Attention
Plusieurs objets de petites dimensions
peuvent être détectés sur une zone de cuisson comme un récipient.
L’affichage de puissance est fixe : une puissance peut être délivrée et chauffer ces objets.
SÉCURITÉS EN FONCTIONNEMENT DE LA TABLE
•Chaleur résiduelle
Après une utilisation intensive, la zone de
cuisson que vous venez d’utiliser peut rester
chaude quelques minutes.
Un “HH” s’affiche durant cette période.
Evitez alors de toucher les zones concernées.
Attention
Sur les zones de cuisson radiant, ne
pas toucher ces zones,
rriissqquuee ddee bbrrûûlluurreess..
•Protection en cas de débordement
L’arrêt de la table (avec affichage du symbole ci-contre)
peut être déclenché dans un
des 3 cas suivants :
--
Débordement qui recouvre les touches de
commande.
--
Chiffon mouillé posé sur les touches.
--
Objet métallique posé sur les touches de
commande.
Nettoyez ou enlevez l’objet et relancez la cuisson.
•Auto-Stop system
Si vous oubliez d’éteindre une préparation,
votre table de cuisson est équipée d’une
fonction de sécurité
““AAuuttoo--SSttoopp ssyysstteemm””
qui
coupe automatiquement, la zone de cuisson
oubliée, après un temps prédéfini (compris
entre 1 et 10 heures suivant la puissance utilisée).
En cas de déclenchement de cette sécurité,
la coupure de la zone de cuisson est signalée
par l’affichage “
AASS
”ou “AA” dans la zone de
commande et un “bip” sonore est émis pendant 2 minutes environ. Il vous suffit d’appuyer sur une touche quelconque des commandes pour l’arrêter.
Un double bip sonore confirmera votre
manoeuvre.
••
••
Page 14
FR
14
33 //
ENTRETIEN COURANT DE VOTRE APPAREIL
PRÉSERVER VOTRE APPAREIL
Evitez les chocs avec les récipients :
La surface verre vitrocéramique est très résistante, mais n’est toutefois pas incassable.
Ne pas poser de couvercle chaud à plat sur
votre table de cuisson. Un effet ‘ventouse’
risquerait d’endommager le dessus vitrocéramique.
Evitez les frottements de récipients qui peuvent à la longue générer une dégradation du
décor sur le dessus vitrocéramique.
Evitez de poser des récipients sur votre cadre
ou enjoliveur (suivant modèle).
Evitez les récipients à fonds rugueux ou bosselés : ils peuvent retenir et transporter des
matières qui provoqueront des tâches ou des
rayures sur votre table.
Ces défauts qui n’entraînent pas un non
fonctionnement ou une inaptitude à l’usage,
n’entrent pas dans le cadre de la garantie.
ENTRETENIR VOTRE APPAREIL
Ne rangez pas dans le meuble situé sous
votre table de cuisson vos produits d’entretien ou produits inflammables.
Ne réchauffez pas une boîte de conserve fermée, elle risque d’éclater.
Cette précaution est valable bien sûr pour
tous les modes de cuisson.
Pour la cuisson, n’utilisez jamais de feuille
de papier d’aluminium. Ne déposez jamais
des produits emballés avec de l’aluminium,
ou en barquette d’aluminium sur votre table
de cuisson.
L’aluminium fondrait et endommagerait définitivement votre appareil de cuisson.
La table de cuisson ne doit pas servir à entreposer quoi que ce soit (allumage intempestif,
rayure, ...).
Un nettoyeur vapeur ne doit pas être utilisé.
Le jet de vapeur peut endommager votre
table.
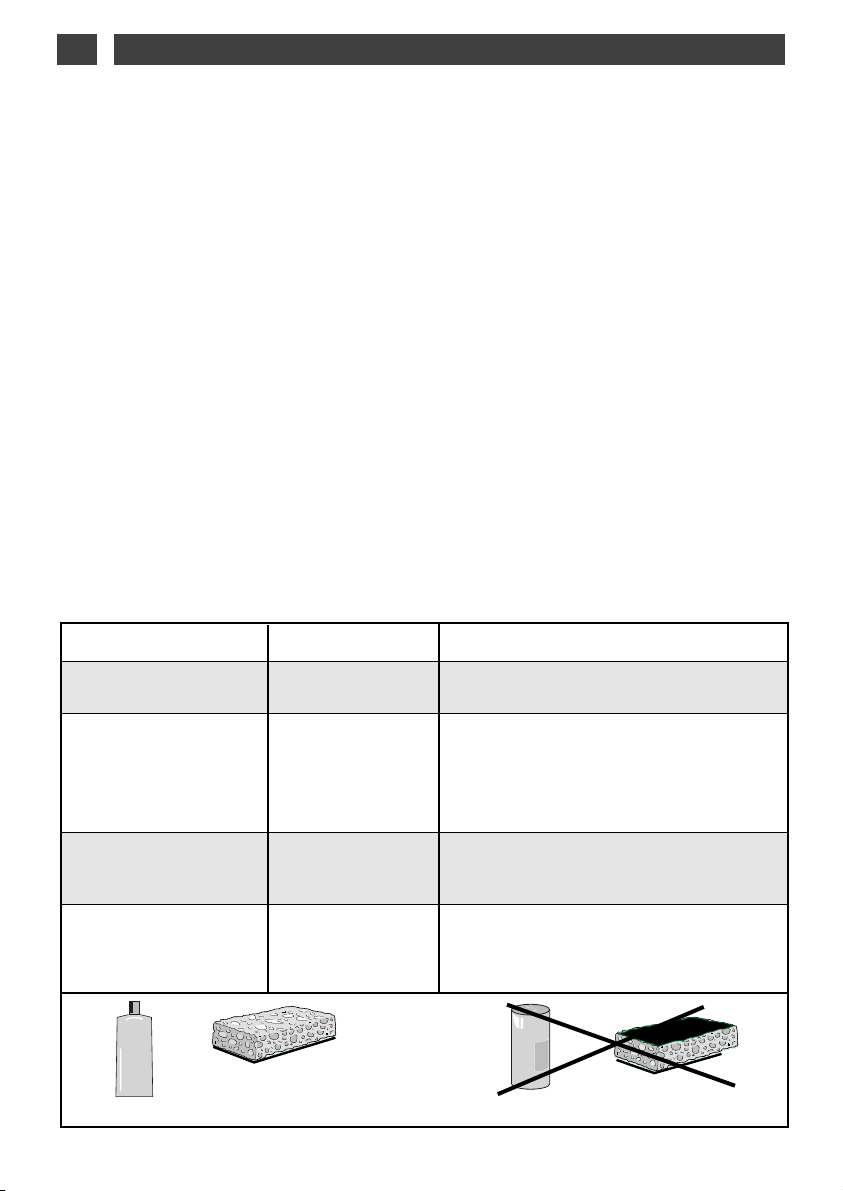
TTYYPPEESS DDEE SSAALLIISSSSUURREESS
Légères.
Accumulation de salissures recuites.
Débordements sucrés,
plastiques fondus.
Auréoles et traces de
calcaire.
Colorations métalliques
brillantes.
Entretien hebdomadaire.
CCOOMMMMEENNTT PPRROOCCEEDDEERR ??
Bien détremper la zone à nettoyer avec de
l’eau chaude, puis essuyez.
Bien détremper la zone à nettoyer avec de
l’eau chaude, utilisez un racloir spécial
verre pour dégrossir, finir avec le côté
grattoir d’une éponge sanitaire, puis
essuyez.
Appliquez du vinaigre d’alcool blanc
chaud sur la salissure, laisser agir,
essuyez avec un chiffon doux.
Appliquez sur la surface un produit spécial verre vitrocéramique, de préférence
comportant du silicone (effet protecteur).
UUTTIILLIISSEEZZ
Eponges sanitaires.
Eponges sanitaires.
Racloir spécial
verre.
Vinaigre d’alcool
blanc.
Produit spécial
verre vitrocéramique.
crème
éponge sanitaire
spéciale vaisselle délicate
éponge abrasive
poudre
••
••
Page 15
44 //
MESSAGES PARTICULIERS, INCIDENTS
FR
15
Attention
En cas de cassure, fêlure ou fissure même légère du verre vitrocéramique,
déconnectez immédiatement votre appareil pour éviter un risque de choc électrique.
Contactez le Service Après-Vente.
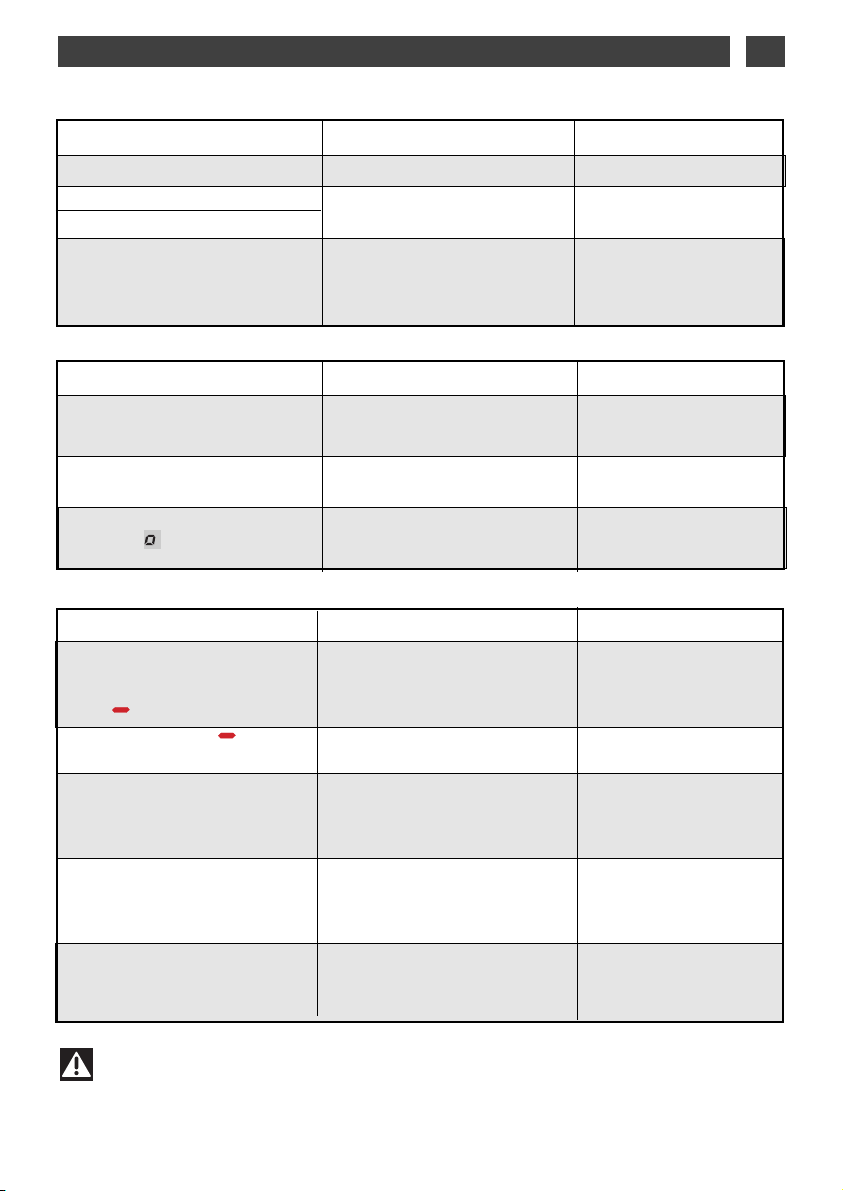
VOUS CONSTATEZ QUE : LES CAUSES POSSIBLES : QUE FAUT-IL FAIRE :
Un affichage lumineux apparaît.
Votre installation disjoncte.
Un seul côté fonctionne.
La table dégage une odeur lors
des premières cuissons.
Fonctionnement normal.
Le branchement de votre
table est défectueux.
Appareil neuf.
Rien.
Vérifiez sa conformité.
Voir chapitre branchement.
Faites chauffer chaque
zone pendant 1/2 heure
avec une casserole
pleine d’eau.
La table ne fonctionne pas et
les afficheurs lumineux sur le
clavier restent éteints.
La table ne fonctionne pas et
un autre message s’affiche.
La table ne fonctionne pas,
l’in-
formation s’affiche.
L’appareil n'est pas alimenté.
L’alimentation ou le raccordement est défectueux.
Le circuit électronique fonctionne mal.
La table est verrouillée
Inspectez les fusibles et
le disjoncteur électrique.
Faites appel au Service
Après-Vente.
Voir chapitre utilisation
sécurité enfant
La table s’est arrêtée de fonctionner et elle émet un “BIP”
toutes les 10 secondes environ
et un ou F7 s’affichent.
Une série de petits ou F7
s’affiche.
Après avoir mis en fonctionnement une zone de chauffe, les
voyants lumineux du clavier
continuent de clignoter.
Les casseroles font du bruit
lors de la cuisson.
Votre table émet un cliquetis
lors de la cuisson.
La ventilation continue quelques minutes après l'arrêt de
votre table.
Il y a eu un débordement ou un
objet encombre le clavier de
commande.
Les circuits électroniques se
sont échauffés.
Le récipient utilisé n’est pas
adapté pour l’induction ou est
d’un diamètre inférieur à 12 cm
(10 cm sur foyer 16 cm).
Normal avec certains types de
récipient.
Cela est dû au passage de l’énergie de la table vers
le récipient.
Refroidissement de l’électronique.
Fonctionnement normal.
Nettoyez ou enlevez
l’objet et relancez la
cuisson.
Voir chapitre encastrement.
Voir chapitre récipients
pour l’induction.
Rien. Il n‘y a pas de
risque, ni pour votre
table de cuisson ni
pour votre récipient.
Rien.
•En cours d’utilisation
•A la mise en marche
•A la mise en service
VOUS CONSTATEZ QUE : LES CAUSES POSSIBLES : QUE FAUT -IL FAIRE :
VOUS CONSTATEZ QUE : LES CAUSES POSSIBLES : QUE FAUT -IL FAIRE :
Page 16

FR
16
5 / TABLEAU DE CUISSON
BOUILLONS
POTAGES EPAIS
COURT-BOUILLON
SURGELÉS
EPAISSE À BASE DE FARINE
AU BEURRE AVEC ŒUFS
(BÉARNAISE, HOLLANDAISE)
SAUCES PRÉPARÉES
ENDIVES, ÉPINARDS
LÉGUMES SECS
POMMES DE TERRE À L'EAU
POMMES DE TERRE RISSOLÉES
POMMES DE TERRE SAUTÉES
DÉCONGÉLATION DE LÉGUMES
VIANDES PEU ÉPAISSES
STEAKS POELÉS
GRILLADE
(GRIL FONTE)
F
RITES SURGELÉES
FRITES FRAÎCHES
AUTO-CUISEUR
(DÈS LE CHUCHOTEMENT)
COMPOTES
CRÊPES
CRÈME ANGLAISE
CHOCOLAT FONDU
CONFITURES
LAIT
ŒUFS SUR LE PLAT
PÂTES
PETITS POTS DE BÉBÉ
(BAIN MARIE)
RAGOÛTS
RIZ CRÉOLE
RIZ AU LAIT
FFRRIIRREE CCUUIIRREE//DDOORREERR CCUUIIRREE//MMIIJJOOTTEERR TTEENNIIRR
PORTER À REPRISE D’ÉBULLITION
AAUU
ÉBULLITION
ÉBULLITION PETITS BOUILLONS
CCHHAAUUDD
SOUPES
POISSONS
SAUCE
LÉGUMES
VIANDE
FRITURE
VARIANTES
INDUCTION
••
PP 99 88 77 66 55 44 33 22 11
PP 99 88 77 66 55 44 33 22 11
PP 99 88 77 66 55 44 33 22 1
1
Page 17

FR
17
5 / TABLEAU DE CUISSON
BOUILLONS
POTAGES EPAIS
COURT-BOUILLON
SURGELÉS
EPAISSE À BASE DE FARINE
AU BEURRE AVEC ŒUFS
(BÉARNAISE,
HOLLANDAISE)
SAUCES PRÉPARÉES
ENDIVES, ÉPINARDS
LÉGUMES SECS
POMMES DE TERRE À L'EAU
POMMES DE TERRE RISSOLÉES
POMMES DE TERRE SAUTÉES
DÉCONGÉLATION DE LÉGUMES
VIANDES PEU ÉPAISSES
STEAKS POELÉS
GRILLADE (GRIL FONTE)
F
RITES SURGELÉES
FRITES FRAÎCHES
AUTO
-CUISEUR
(DÈS LE CHUCHOTEMENT
)
COMPOTES
CRÊPES
CRÈME ANGLAISE
CHOCOLAT FONDU
CONFITURES
LAIT
ŒUFS SUR LE PLAT
PÂTES
PETITS POTS DE BÉBÉ
(BAIN MARIE)
RAGOÛTS
RIZ CRÉOLE
RIZ AU LAIT
FFRRIIRREE CCUUIIRREE//DDOORREERR CCUUIIRREE//MMIIJJOOTTEERR TTEENNIIRR
PORTER À REPRISE D
’ÉBULLITION
AAUU
ÉBULLITION
ÉBULLITION PETITS BOUILLONS
CCHHAAUUDD
SOUPES
POISSONS
SAUCE
LÉGUMES
VIANDE
FRITURE
VARIANTES
VITROCERAMIQUE
••
PP 99 88 77 66 55 44 33 22 11
PP 99 88 77 66 55 44 33 22 11
PP 99 88 77 66 55 44 33 22 1
1
Page 18

18
FR
02
18
34
EN
DE
Dear Customer,
We are grateful that you have acquired a cooking hob from the THOMSON product range. You will also find a wide choice of ovens, microwave ovens, ventilation hoods, laundry dryers, washing machines, dishwashers, fridges and freezers, that you can coordinate with your new
THOMSON cooking hob.
Of course, we always wish to meet your requirements regarding our products as best we can, and our customer services are therefore at your
disposal and ready to listen and answer any questions or suggestions
you may have.
For all our products, as well as useful and additional information, you
can also visit our website.
THOMSON
As part of our commitment to constantly improving our products, we
reserve the right to make changes to them based on technical advances
to their technical and functional features and appearance.
Warning
Before installing and using your appliance, please carefully read this
Guide to Installation and Use, which will allow you to quickly familiarise yourself with its operation.
Page 19

EN
TABLE OF CONTENTS
• Safety Guidelines
____________________________________________________
20
• Environmental Protection
_____________________________________________
20
• Description of Your Appliance
_________________________________________
21
1 / INSTALLING YOUR APPLIANCE
• Proper positioning
___________________________________________________
22
• Build in
____________________________________________________________
22
• Hook-up
___________________________________________________________
23
2 / USING YOUR APPLIANCE
• Description of the top
_________________________________________________
24
• Cookware for induction
_______________________________________________
25
• Which cooking zone should you use based on your cookware?
_____________
25
• Vitroceramic cookware
_______________________________________________
26
• Description of control panel
___________________________________________
26
• Powering on
________________________________________________________
26
• Stop
_______________________________________________________________
26
• Adjusting the power
_________________________________________________
26
• Double zone
________________________________________________________
26
• Setting the timer
_____________________________________________________
26
• Using the "child safety device"
_________________________________________
28
• Safeties of induction zones during operation
_____________________________
29
• Hob safeties during operation
________________________________________
29
3 / DAILY CARE OF YOUR APPLIANCE
• Protecting your appliance
_____________________________________________
30
• Maintaining your appliance
____________________________________________
30
4 / SPECIAL MESSAGES, DIFFICULTIES
• During initial use
____________________________________________________
31
• When powering on
___________________________________________________
31
• During operation
____________________________________________________
31
5 / COOKING CHART
• Cooking chart for food types
__________________________________________
32-33
19
Page 20

EN
20
This appliance's packaging material is recyclable. Help recycle it and protect the environment by dropping it off in the municipal receptacles provided for this purpose.
Your appliance also contains a
great amount of recyclable material. It is marked with this label to
indicate the used appliances that
should not be mixed with other
waste. This way, the appliance recy-
cling organised by your manufacturer will be done under the best possible
conditions, in compliance with European
Directive 2002/96/EC on Waste Electrical and
Electronic Equipment. Contact your town hall
or your retailer for the used appliance collection points closest to your home.
We thank you doing your part to protect the
environment.
FFoorr AAuussttrraalliiaa oonnllyy ::
- Young children should be supervised to ensure that they do not play with the appliance.
- The appliance is not intended for use by young children or infirm person without supervision.
- If the supply cord is damaged, it must be replaced by the manufacturer or its service agent or
a similarly qualified person in order to avoid hazard.
- Do not install the product if you see any damage on it.
FFoorr SSeerrvviiccee iissssuueess,, pphhoonnee nnuummbbeerr :: 11330000 555533 772200,, ffaaxx nnuummbbeerr :: 11330000 555533 771199
SAFETY GUIDELINES
We have designed this cooking hob for use by
private persons in their homes.
These cooking hobs are meant to be used
exclusively for cooking beverages and foodstuffs and do not contain any asbestos-based
materials.
••
Residual heat
A cooking zone can remain hot for several
minutes after use.
An
""HH""
is displayed during this period.
Avoid touching the hot areas during this time.
••
Child safety device
Your hob is equipped with a child safety
device that locks its operation after use or
during cooking (See "Using the Child
Safety Device" section).
Do not forget to unlock it before using the
hob again.
••
For users of pacemakers and
active implants
The functioning of the hob conforms to current electromagnetic interference standards
and thus is in total compliance with legal
requirements (89/336/CEE directives).
In order to avoid interference between your
cooking hob and a pacemaker, your pacemaker must be designed and programmed in
compliance with the regulations that apply to
it.
Consequently, we can only guarantee that our
own product is compliant.
With regard to the compliance of the pacemaker or any potential incompatibility, you can
obtain information from the manufacturer or
your attending physician.
Electrical Danger
Ensure that the power cables of any
electrical appliances plugged in close to
the hob are not in contact with the cooking
zones.
If a crack appears in the glass worktop,
immediately disconnect your appliance to
avoid the risk of electric shock.
To do this, remove the fuses or use the circuit breaker.
Do not use your hob until you have replaced the glass worktop.
Warning
DDoo nnoott ssttaarree ffoorr aannyy lleennggtthh ooff ttiimmee aatt tthhee hhaalloo--
ggeenn llaammppss iinn tthhee ccooookkiinngg zzoonneess..
••
ENVIRONMENTAL PROTECTION
••
Page 21

EN
21
DESCRIPTION OF YOUR APPLIANCE
Air intake
Air outlet
Vitroceramic glass
Power cord
A
B
C
••
D
B
C
A
D
Page 22

EN
22
11
/ INSTALLING YOUR APPLIANCE
Tip
If your oven is located below your hob,
the hob's thermal safety measures forbid
the simultaneous use of the hob and the
pyrolysis program of your oven.
Your hob is equipped with an anti-overheating safety device.
This safety can be activated, for example,
when the hob is installed over an oven that
is not sufficiently insulated. If this occurs, a
series of small lines appear in the control
panel. In this case, we recommend that you
increase the ventilation of your hob by creating an opening in the side of your cabinet
(8 cm x 5 cm) and/or that you install the
oven insulation kit (reference 75X1652) that
is available from the Post-Sales Service
Department.
Warning
You must ensure that the air intakes
located under your cooking appliance
remain clear at all times.
For all types of installation, your induction
hob needs proper ventilation.
••
PROPER POSITIONING
Your appliance should be positioned so that
the plug-in unit is accessible.
The distance between the edge of your
appliance and the side and rear walls (or partitions) must be at least four centimetres (area
A).
Your appliance can be easily integrated above
a cabinet, an oven or a build-in-ready household appliance. You must simply ensure that
the air intakes and air outlets are clear (See
"Description of Your Appliance" section).
BUILD-IN
Follow the diagram above.
Glue the foam seal underneath your appliance
by following the outline of the worktop upon
which your appliance will rest. This will allow
you to achieve an airtight seal with the worktop.
Attach the clips to the hob.*
**
depending on the model
ventilation
space
5511
••
4499
2266,,55 -- 5566 -- 7755
2288,,88--5588--7777
66..44
For models and 80cm, make
sure that the cross member of
the unit does not block the
flow of air. If necessary, use a
bevel.
4 cm
4 cm
4 cm
A
4 cm
Page 23

EN
23
11
/ INSTALLING YOUR APPLIANCE
Separate the two phase wires (L1 and L2)
before hooking up.
NNeeuuttrraall
EEaarrtthh
PPhhaassee
NN
LL
Green/yellow
Blue
Black-grey
Brown
NNeeuuttrraall
EEaarrtthh
PPhhaassee
NN
LL11
LL22
Blue
Green/yellow
Black-grey
Brown
•
220-240 V monophase hook-up ~ -
Warning
If the power cable is damaged, it
should be replaced by the manufacturer, its
after-sales service department or by a person with similar qualifications to avoid danger.
For a 400 V 2N triphase hook-up, if your hob
malfunctions, check that the neutral conductor is properly connected.
These hobs must be connected to the power
grid via an electrical outlet that complies with
EIC publication 60083 or an all-pole cut-off
device that complies with installation regulations in effect.
When power is first supplied to your hob, or
after an extended power outage, an indicator
light will appear on the control panel. It automatically disappears after approximately 30
seconds, or as soon as any touch control on
the control panel is pressed. This display is
normal and, if needed, serves as an indication
to the after-sales service staff. In all cases,
the user of the hob should disregard it.
HOOK-UP
••
NNeeuuttrraall
EEaarrtthh
PPhhaassee
NN
LL
Green/yellow
Blue
Brown
•
hook-up 400V 2N
~
-
16A
32A
16A
Separate the wires before hooking up.
NNeeuuttrraall
EEaarrtthh
PPhhaassee
NN11
LL11
LL22
Blue
Green/yellow
Black-grey
Brown
•
hook-up 2x230V 2L+2N
~
-
16A
NN22
•
hook-up 400V 3
~
-
16A
Page 24

EN
24
22
/ USING YOUR APPLIANCE
DESCRIPTION OF THE TOP
••
1166 ccmm
50 W à 2000 W
ICKT656
1133//2200 ccmm
750/1700 W
2211 ccmm
50 W à 31100 W
1188 ccmm
1500 W
7967
9932
INDUCTION
BOOSTER
INDUCTION
BOOSTER
Page 25

EN
25
22
/ USING YOUR APPLIANCE
Tip
To check the suitability of your cookware:
Place the vessel on a cooking zone at
power level 4.
If the display remains on, your cookware is
compatible.
If the display flashes, your cookware cannot
be used with induction cooking.
You can also use a magnet to test the cookware.
If a magnet "sticks" to the bottom of the
cookware, it is compatible with induction.
••
WHICH COOKING ZONE
SHOULD YOU USE BASED ON
YOUR COOKWARE?
••
COOKWARE FOR INDUCTION
••
The induction principle
The principle of induction is based on a
magnetic phenomenon.
When you place your cookware on a cooking
zone and you turn it on, the electronic boards
in your cooking hob produce "induced" currents in the bottom of the cookware and instantly raise its température. This heat is then
transferred to the food, which is simmered or
seared depending on your settings.
••
Cookware
Most cookware is compatible with induction.
Only glass, terra cotta, aluminium without a
special finish on the bottom, copper and
some non-magnetic stainless steels do not
work with induction cooking.
We recommend that you select cookware
with a thick, flat bottom. The heat will be distributed better and cooking will be more uniform.
C
B
A
Inductor
Electronic board
Induced electric current
A
B
C
Cooking Cookware to use
zone
1166 ccmm 1100 .......... 1188 ccmm
1188 ccmm 1122 .......... 2222 ccmm
2211 ccmm 1188 .......... 2244 ccmm
2233 ccmm 1122............ 2266 ccmm
2288 ccmm 1122 .......... 3322 c
cmm
+
-
Page 26

EN
26
22
/ USING YOUR APPLIANCE
VITROCERAMIC COOKWARE
••
Cookware
They must be designed for electric cooking.
They must have flat bases.
Preferably use the following types of cookware:
- Stainless steel with thick trimetal or "sandwich" base.
- Aluminium with smooth, thick base.
- Enamelled steel
••
Use
A higher setting is necessary in the event of:
- abundant quantities
- cooking with uncovered cookware
- use of a glass or ceramic pot.
A lower setting is necessary in the event of:
- cooking food that tends to burn easily
(begin with a low setting, as it can be increased if necessary).
- overflow (remove the cover or the pot then
lower the setting).
••
Energy economy:
To end cooking, place on position 0, leaving
the cookware in place to use the heat accumulated (this way you will save energy).
Use a cover as often as possible to reduce
heat loss through evaporation.
••
Automatic cooking zone setting
The cooking zones set automatically, they
switch on and off to maintain the selected
power. This way, the temperature remains
consistent and suited to the food you are cooking.
The setting frequency varies according to
selected power.
Tip
Use cookware of appropriate
size.The diameter of the cookware base
must be equal or superior to the printed
zone
Do not leave an empty pan on a cooking.
Do not leave a pan containing hot fat or oil
unattended on a cooking zone.
••
Page 27

EN
27
22
/ USING YOUR APPLIANCE
POWERING ON
Press the start/stop button for the cooking
zone you want to use. A flashing 0 and a beep
indicate that the cooking zone is on. You can
then choose the desired power level.
If you do not select a power level, the cooking
zone will automatically turn itself off.
STOP
Press the start/stop button for the cooking
zone used or the power "
--
" button until 00is
displayed.
ADJUSTING THE POWER
Press the + or - power button to adjust the
power level from 1 to P (maximum power).
When it is switched on you can move directly
to maximum power "P" by pressing the "
--
" but-
ton.
••
••
DESCRIPTION OF THE CONTROL
PANEL
••
Start/stop touch control.
Power touch controls.
Timer touch controls.
A
B
C
••
DOUBLE ZONE
To turn on the additional zone:
- Turn on the main zone.
- Press the “-” and “+” power controls for the
cooking zone simultaneously, a beep and an
“E” on the display confirms the instruction.
- Setting the power.
To turn off the additional zone:
- Press the “-” and “+” power controls for the
cooking zone simultaneously, you will hear a
beep and the “EE” on the display disappears
confirming the instruction.
••
ADJUSTING THE TIMER
There is a timer for each cooking zone.
Use the button to select the cooking zone
on which you would like to use the timer.
If you press this button several times, a rotating symbol will show which cooking zone the
timer is being used for.
The timer may only be used for one cooking
zone at a time.
To use the timer:
- turn on the cooking zone
- select the rotating symbol for this cooking
zone.
The timer only operates if there is something
on the cooking zone.
- adjust the timing by pressing “
+
“ on the
timer (or “--” adjusting from 99,98,97,...min).
As soon as you release the button, the power
display will show the power of the cooking
zone or a
“t”
.
When you have finished cooking, the cooking
zone turns itself off, the timer shows 00and a
bbiipp
sounds. Press any button to stop the bip.
- To change the timer settings, press the - or +
buttons on the timer.
- To stop the timer, press the button.
- To use the timer on a different cooking zone,
choose a new use by pressing the button
several times.
When the previous timing stops, set your timing for the new cooking zone using the "+" or
"-" buttons.
••
DESCRIPTION DES COMMAN
DES
C
A
B
Page 28

EN
28
22
/ USING YOUR APPLIANCE
USING THE "CHILD SAFETY DEVICE"
Your cooking hob is equipped
with a child safety device that
locks its operation after use
(e.g. so the hob can be cleaned)
or during cooking (e.g. to guard
your settings).
For safety reasons, the "off" touch control is
always active and allows you to shut off a heating zone, even if it is locked.
••
How do you lock the hob?
Keep the lock button pressed until the LED
above lights up and a “BIP” is heard .
- hob locked in use
the led above the key lights up
The symbol is displayed when you press
power or timer buttons on the cooking zone in
use .
The symbol
is displayed when you press
on ON/OFF button on a unused cooking zone.
- unused hob locked
The symbol
is displayed when you press
on ON/OFF button on a unused cooking zone.
••
How do you unlock?
Press the lock button until the LED goes out
and dobble beep is heard.
Warning
Remember to unlock your hob before
using it again (See the "Using the Child
Safety Device" section).
Page 29

EN
29
22
/ USING YOUR APPLIANCE
SAFETIES OF INDUCTION ZONES DURING OPERATION
•Temperature limiter
Each cooking zone is equipped with a safety
sensor that constantly monitors the temperature of the bottom of the cookware. In the
event that an empty vessel is left on a cooking
zone that is on, this sensor automatically
adjusts the power output of the hob, thereby
avoiding any risk of damage to the cookware
or the hob.
•"Small Items" safety
A small object (such as a fork, a spoon, a ring,
etc.) left alone on the hob is not detected as a
piece of cookware.
The display flashes and no heat is produced.
Warning
Several small objects together on a
cooking zone may be detected as cookware.
If the display remains on: power may be
supplied and the objects may be heated.
HOB SAFETIES DURING OPERATION
•Residual heat
After intensive use, the cooking zone that you
have just used can remain hot for several minutes.
An
""HH""
is displayed during this period.
Avoid touching the hot areas during this time.
Warning
Do not touch glowing cooking zones,
burn risk.
•Protection against overflows
The hob may shut down (with
the adjacent symbol in the
display) automatically in any
of these three situations:
--
Overflow that spills onto the touch controls.
- Damp towel placed over the touch controls.
- Metallic object placed on the touch controls.
Clean the hob or remove the object, then
begin cooking again.
•Auto-Stop system
If you forget to switch off a cooking zone,
your hob has an "
AAuuttoo--SSttoopp ssyysstteemm
" safety
function which automaticallty cuts off the
power to the cooking zone, after a predefined
period (between 1 and 10 hours depending
on the power used).
If this safety system is used, the cutoff to the
cooking zone is displayed as "
AASS
" or "AA" on
the control panel and a "bip" sounds for about
2 minutes. Simply press any of the control
buttons to stop this.
A double beep will confirm your action.
••
Page 30

EN
30
33
/ DAILY CARE OF YOUR APPLIANCE
PROTECTING YOUR APPLIANCE
Avoid hard shocks from cookware:
The vitroceramic glass worktop is very sturdy;
however, it is not unbreakable.
Do not place any hot lids flat on your cooking
hob. A suction effect may damage the vitroceramic surface.
Avoid dragging cookware across the surface,
which may in the long-term result in the
degradation of the decorative finish of the
vitroceramic top.
Avoid placing cookware on the frame or cover
(depending on the model).
Avoid using cookware with rough or bumpy
bottoms: they can capture and transfer particles that may produce stains or scratches on
your hob.
These defects that do not result in
appliance malfunction or do not make it
unsuitable for use are not covered by the
warranty.
MAINTAINING YOUR APPLIANCE
Do not store cleaning products or flammable
products in the cabinet underneath your cooking hob.
Do not heat unopened canned goods; they
may burst.
Of course, this precaution applies to all types
of cooking.
Never use a sheet of aluminium for cooking.
Never place items wrapped in aluminium foil
or packaged in aluminium dishes on your cooking hob.
The aluminium will melt and permanently
damage your cooking appliance.
Objects not intended for cooking should
never be placed on the hob (risk of powering
on, scratches, etc.).
Steam cleaning should never be used. The
steam jet could damage your hob.
TTYYPPEE OOFF SSTTAAIINNSS//SSPPOOTTSS
Light.
Accumulation of bakedon soil.
Overflow of sugary preparations, melted plastic.
Rings and hard water
residue.
Shiny metallic streaks.
Weekly maintenance.
WWHHAATT TTOO DDOO
Thoroughly moisten the zone to be cleaned with hot water, then wipe off.
Thoroughly moisten the zone to be cleaned with hot water. Use a scraper for
glass to remove the large bits, follow with
the rough side of a disinfectant sponge,
and then wipe off.
Apply warm white vinegar to the stain, let
stand, then wipe with a soft cloth.
Apply a cleaning agent for vitroceramic
glass (preferable one with silicone for its
protective properties) to the surface.
UUSSEE
Disinfectant sponges.
Disinfectant sponges.
Scraper for glass.
White spirit vinegar.
Cleaning agent for
vitroceramic glass.
Cream
Special disinfectant sponge
for delicate dishes
Scouring sponge
Powder
••
••
Page 31

EN
31
44
/ SPECIAL MESSAGES, DIFFICULTIES
Warning
In the event that there is a break, crack or opening--even minor--in the vitroceramic
glass, immediately disconnect your appliance to avoid the risk of electric shock.
Contact the After-Sales Service Department.
YOU OBSERVE THAT: POSSIBLE CAUSES: WHAT SHOULD YOU DO:
An indicator light appears.
Your installation blows a fuse.
Only one side works.
The hob produces an odour
during the first cooking sessions.
Working normally.
The electrical hook-up of your
hob is incorrect.
New appliance.
Nothing.
Verify the connections.
See the "Hook-Up" section.
Operate each cooking
zone for 30 minutes with a
saucepan full of water.
The hob stops working and it
emits a beep approximately
every 10 seconds and a or
"F7" is displayed.
A series of small or "F7" is
displayed.
After turning on a heating zone,
the indicator lights on the
control panel continue to flash.
The saucepans make noise
during cooking.
Your hob makes a clicking
sound during cooking.
The fan continues to function a
few minutes after your hob is
turned off.
There was an overflow or an
object is in contact with the
control panel.
The electronic boards heated
up.
The cookware used is not suitable for induction or is less
than 12 cm in diameter (10 cm
for the 16-cm cooking zone).
This is normal with some types
of cookware. This is caused by
the transfer of energy from the
hob to the cookware.
Cooling of the electronic components.
Working normally.
Clean the hob or remove
the object, then begin
cooking again.
See "Built-In" section.
See section on cookware
for induction.
Nothing. There is no risk,
neither to your hob nor to
your cookware.
Nothing.
•During operation
•During initial use
YOU OBSERVE THAT: POSSIBLE CAUSES: WHAT SHOULD YOU DO:
The hob is not working and the
indicator lights on the control
panel are not on.
The table is not working and
another message is displayed.
The hob does not function, the
information
is displayed.
The appliance is not receiving
electricity. The electrical supply is defective or the hook-up
is incorrect.
The electronic board is functioning poorly.
The hob is locked.
Inspect the electrical circuit breaker and fuses.
Call the After-Sales
Service Department.
See chapter on using the
child safety system.
•When powering on
YOU OBSERVE THAT: POSSIBLE CAUSES: WHAT SHOULD YOU DO:
Page 32

EN
32
55
/ COOKING CHART
INDUCTION
••
BROTHS
THICK SOUPS
COURT BOUILLON
FROZEN FOODS
THICK, FLOUR
-BASED
BUTTER-BASED WITH EGGS
(BEARNAISE, HOLLANDAISE
)
PREPARED SAUCES
ENDIVES, SPINACH
DRIED BEANS
BOILED POTATOES
GOLDEN BROWN POTATOES
SAUTEED POTATOES
DEFROSTING VEGETABLES
MEAT, NOT TOO THICK
STEAKS, IN SKILLET
GRILLED MEATS (CAST IRON GRILL)
FROZEN FRENCH FRIES
FRESH FRENCH FRIES
PRESSURE COOKER
(ONCE IT STARTS WHISTLING)
COMPOTES
CRÊPES
CRÈME ANGLAISE
MELTED CHOCOLATE
JAMS
MILK
EGGS, FRIED
PASTA
JARS OF BABY FOOD
(DOUBLE BOILER)
M
EAT STEW
S
PANISH RICE
R
ICE PUDDING
FFRRYY CCOOOOKK//BBRROOWWNN CCOOOOKK//SSIIMMMMEERR KKEEEEPP
BRING TO RETURN TO BOILING
WWAARRMM
A BOIL BOILING LIGHT BROTHS
SOUPS
FISH
SAUCE
VEGETABLES
MEAT
FRYING
MISCELLA-
NEOUS
PP 99 88 77 66 55 44 33 22 11
PP 99 88 77 66 55 44 33 22 11
PP 99 88 77 66 55 44 33 2
2 11
Page 33

EN
33
55
/ COOKING CHART
VITROCERAMIC
••
BROTHS
THICK SOUPS
COURT BOUILLON
FROZEN FOODS
THICK, FLOUR-BASED
BUTTER-BASED WITH EGGS
(BEARNAISE, HOLLANDAISE)
PREPARED SAUCES
ENDIVES, SPINACH
DRIED BEANS
BOILED POTATOES
GOLDEN BROWN POTATOES
SAUTEED POTATOES
DEFROSTING VEGETABLES
MEAT
, NOT TOO THICK
STEAKS, IN SKILLET
GRILLED MEATS (CAST IRON GRILL)
FROZEN FRENCH FRIES
FRESH FRENCH FRIES
PRESSURE COOKER
(ONCE IT STARTS WHISTLING)
COMPOTES
CRÊPES
CRÈME ANGLAISE
MELTED CHOCOLATE
JAMS
MILK
EGGS, FRIED
PASTA
JARS OF BABY FOOD
(DOUBLE BOILER)
MEAT STEW
SPANISH RICE
RICE PUDDING
FFRRYY CCOOOOKK//BBRROOWWNN CCOOOOKK//SSIIMMMMEERR KKEEEEPP
BRING TO RETURN TO BOILING
WWAARRMM
A BOIL BOILING LIGHT BROTHS
SOUPS
FISH
SAUCE
VEGETABLES
MEAT
FRYING
MISCELLA-
NEOUS
PP 99 88 77 66 55 44 33 22 11
PP 99 88 77 66 55 44 33 22 11
PP 99 88 77 66 55 44 33 2
2 11
Page 34

34
Liebe Kundin, lieber Kunde,
Sie haben soeben ein Kochfeld von THOMSON erworben, und wir danken Ihnen dafür.
Aufgrund der Erfahrungen, die wir über die Jahre hinweg haben sammeln können, haben wir ein leistungsfähiges, einfach zu benutzendes
und qualitativ hochwertiges Gerät entwickelt, das Ihnen das Leben
erleichtern soll. In der THOMSON Produktpalette finden Sie auch eine
breite Auswahl an Backöfen, Dunstabzugshauben, Waschmaschinen,
Wäschetrocknern, Geschirrspülern und Kühl- und Gefrierschränken, die
Sie mit Ihrem neuen THOMSON Kochfeld abstimmen können.
Im ständigen Bemühen, Ihre Anforderungen an unsere Produkte optimal
zu erfüllen, steht Ihnen unser Verbraucherservice für Fragen und
Anregungen immer zur Verfügung.
THOMSON
Da wir unsere Produkte ständig verbessern möchten, behalten wir uns
das Recht vor, ihre technischen, funktionellen und ästhetischen
Merkmale zu verändern, damit sie mit der technischen Weiterentwicklung
Schritt halten.
Wichtig
SSiiee ssoolllltteenn vvoorr ddeemm EEiinnbbaauu uunndd ddeerr BBeennuuttzzuunngg ddeess GGeerräättss ddiieessee EEiinnbbaauu--
uunndd BBeettrriieebbssaannlleeiittuunngg aauuffmmeerrkks
saamm dduurrcchhlleesseenn,, ddaammiitt SSiiee ssiicchh sseehhrr rraasscchh mmiitt
ddeemm BBeettrriieebb vveerrttrraauutt mmaacchheenn kköönnnneenn..
FR
02
18
34
EN
DE
Page 35

35
DE
INHALT
• Sicherheitshinweise
___________________________________________________
36
• Umweltschutz
________________________________________________________
36
• Beschreibung des Gerätes
_____________________________________________
37
1 / EINBAU DES GERÄTS
• Wahl des Aufstellungsortes ____________________________________________ 38
• Einbau ______________________________________________________________ 38
• Anschluss ___________________________________________________________ 39
2 / BENUTZUNG DES GERÄTS
• Beschreibung der Oberseite
____________________________________________
40
• Kochgeschirr für Induktionswärme
______________________________________
41
• Welche Kochzone für welches Kochgeschirr?
_____________________________
41
• Beschreibung der Bedienvorrichtungen
__________________________________
42
• Einschaltung
_________________________________________________________
42
• Stopp
_______________________________________________________________
42
• Leistungseinstellung
__________________________________________________
42
• Einstellung des Kurzzeitweckers
________________________________________
42
• Nutzung der „Kindersicherung“
_________________________________________
43
• Betriebssicherheiten
__________________________________________________
44
3 / REGELMÄSSIGE PFLEGE IHRES GERÄTS
• Erhaltung des Gerätes
_________________________________________________
45
• Pflege des Gerätes
___________________________________________________
45
4 / BESONDERE MELDUNGEN, STÖRFÄLLE
• Bei der Inbetriebnahme
________________________________________________
46
• Bei Einschaltung
_____________________________________________________
46
• Während der Benutzung
_______________________________________________
46
5 / KOCHTABELLE
• Kochtabelle nach Gerichten
____________________________________________
47
Page 36

36
DE
SICHERHEITSHINWEISE
Dieses Kochfeld wurde für den Gebrauch
durch Privatpersonen in einer Wohnung konzipiert.
Diese Kochfelder sind ausschließlich für das
Zubereiten von Getränken und Speisen
bestimmt und enthalten keinerlei asbesthaltige
Bestandteile.
••
Restwärme
Eine Kochzone kann auch einige Minuten
nach ihrer Benutzung heiß bleiben.
Ein „HH“ wird während dieser Zeit angezeigt.
Die betroffenen Zonen dann nicht berühren.
••
Kindersicherung
Das Kochfeld verfügt über eine Kindersicherung, die die Benutzung nach Abschaltung
oder während des Kochvorgangs sperrt
(siehe Kapitel: Nutzung der Kindersicherung).
Die Freigabe vor erneuter Benutzung nicht
vergessen.
••
Für Benutzer mit Herzschrittmachern
und aktiven Implantaten
.
Der Betrieb des Kochfeldes erfüllt die gültigen Normen über elektromagnetische
Störungen und entspricht somit vollkommen
den gesetzlichen Anforderungen (Richtlinien
89/336/EWG).
Der Pacemaker muß in Übereinstimmung mit
der ihn betreffenden Vorschrift konzipiert und
eingestellt sein, damit Interferenzen zwischen
dem Kochfeld und dem Herzschrittmacher
verhindert werden.
In dieser Hinsicht kann nur die Konformität
unseres eigenen Produkts bestätigt werden.
Bezüglich der Konformität des Pacemakers
und eventueller Nichtverträglichkeiten können Sie sich bei seinem Hersteller oder Ihrem
behandelnden Arzt erkundigen.
Elektrische Gefahr
Sicher gehen, dass kein in der Nähe des
Kochfeldes angeschlossenes Stromkabel
eines elektrischen Geräts mit den
Kochzonen in Berührung kommt.
Wenn in der Glasoberfläche des Kochfeldes
ein Riss auftreten sollte, das Gerät sofort
abschalten, um die Gefahr eines
Stromschlags auszuschließen.
Auscultant Sie hierzu die Sicherungen aus
oder trennen Sie das Gerät vom Netz.
Das Kochfeld erst wieder benutzen, wenn
die Glasoberfläche ausgetauscht wurde
.
••
UMWELTSCHUTZ
••
— Das Verpackungsmaterial des Gerätes ist
wiederverwertbar. Führen Sie es der
Wiederverwertung zu und leisten Sie einen
Beitrag zum Umweltschutz, indem Sie es in
den dazu vorgesehenen Containern Ihrer
Gemeinde entsorgen.
— In das Gerät wurden viele wiederverwertbare Materialien eingebaut.
Dieses Logo bedeutet, dass
Altgeräte nicht mit anderen
Abfällen zu mischen sind. Die vom
Hersteller organisierte Wiederverwertung erfolgt unter optimalen
Bedingungen und hält die europäische Richtlinie 2002/96/EG für Abfälle aus
elektrischen und elektronischen Geräten ein.
Fragen Sie in der Gemeindeverwaltung oder
bei Ihrem Händler nach den nächstgelegenen
Sammelpunkten für Altgeräte.
— Wir danken für Ihren Beitrag zum
Umweltschutz.
Page 37

37
DE
BESCHREIBUNG DES GERÄTES
Lufteintritt
Luftaustritt
Glaskeramisches Glas
Stromkabel
A
B
C
••
D
B
C
A
D
Page 38

DE
38
Empfehlung
Wenn unter dem Kochfeld ein Backofen eingebaut ist, untersagen die Wärmesicherheiten des Kochfeldes dessen gleichzeitige Benutzung, wenn der Backofen im Pyrolysebetrieb ist.
Das Kochfeld verfügt über ein Sicherheitssystem gegen Überhitzung.
Dieses Sicherheitssystem kann zum Beispiel
bei Einbau über einem ungenügend isolierten Backofen aktiviert werden. Dann werden
in den Bedienfeldern kleine Striche angezeigt. Es wird empfohlen, in diesem Fall mit
Hilfe einer kleinen an der Möbelseite eingebrachten Öffnung (8 cm x 5 cm) die Belüftung des Kochfeldes zu verstärken und/oder
den beim Kundendienst erhältlichen Bausatz
für die Isolierung von Backöfen einzubauen.
Achtung
Unbedingt darauf achten, dass die unter
dem Kochfeld vorhandenen Lufteintritte
immer ganz freiliegen.
Das Induktionskochfeld benötigt bei allen
Einbauarten eine gute Belüftung.
11
/ EINBAU DES GERÄTS
••
WAHL DES AUFSTELLUNGSORTES
Das Gerät muss so platziert werden, dass der
Stecker in der Steckdose zugänglich bleibt.
Der Abstand zwischen der Gerätekante und
der seitlichen Wand (oder Trennwand) muss
mindestens 4 cm betragen (Zone A).
Das Gerät kann ohne weitere Auflagen über
einem Möbel, einem Backofen oder einem
einbaubaren Elektrogerät eingebaut werden.
Es ist nur zu prüfen, dass die Luftein- und –
ausgänge unbehindert freiliegen (siehe
Kapitel „Beschreibung des Geräts“).
EINBAU
Beachten Sie beim Einbau oben abgebildete
Skizze. Um einen dichten Abschluss des
Kochfelds mit der Arbeitsfläche zu gewährleisten, kleben Sie entlang der aufliegenden
Kanten des Geräts die Schaumdichtung auf.
Befestigen Sie die Clips am Kochfeld (modellabhängig).
Belüftungs-
hohlraum
5511
••
2288,,88--5588--7777
4499
2266,,55 -- 5566 -- 7755
Bei 80cm-Modellen sicherstellen, dass die Querstrebe
des Möbels die Luftzufuhr
nicht behindert. Falls erforderlich, abschrägen.
66,,44
4 cm
4 cm
A
4 cm
4 cm
Page 39

DE
39
11
/ EINBAU DES GERÄTS
Die 2 Phasendrähte L1 und L2 vor dem
Anschluss trennen.
NNuulllllleeiitteerr
EErrdduunngg
PPhhaassee
NN
LL
Grün / Gelb
Blau
Schwarzgrau
Braun
NNuulllllleeiitteerr EErrdduunnggPPhhaassee
NN
LL11
LL22
Blau
Grün / Gelb
Schwarzgrau
Braun
•
Anschluss 220-240V
~
Achtung
Um jegliche Gefahr auszuschalten,
muss ein beschädigtes Kabel vom
Hersteller, dem Kundendienst oder einer
Person vergleichbarer Qualifizierung ausgetauscht werden.
Bei Fehlfunktion des Kochfeldes mit 400 V 2N
dreiphasigem Anschluss prüfen, ob der
Nulleiter richtig angeschlossen ist.
Diese Kochfelder müssen über eine Steckdose gemäß IEC 60083 Veröffentlichung oder
mit einer omnipolaren Abschaltvorrichtung
nach den gültigen Einbauregeln an das Netz
angeschlossen werden.
Bei Einschaltung des Kochfeldes oder nach
längerem Stromausfall erscheint ein
Leuchtcode auf der Bedientastatur. Warten
Sie etwa 30 Sekunden, bis die Anzeige
erlischt, bevor Sie Ihr Kochfeld benutzen
(Diese Anzeige ist normal und dient ggf.
Ihrem Kundendienst. Der Benutzer des
Kochfeldes braucht sie auf keinen Fall
berücksichtigen.)
ANSCHLUSS
••
NNuulllllleeiitteerr
EErrdduunngg
PPhhaassee
NN
LL
Grün / Gelb
Blau
Braun
•
Anschluss 400V 2N
~
-
16A
32A
16A
Trennen Sie die Drähte vor dem Anschließen.
NNuulllllleeiitteerr EErrdduunnggPPhhaassee
NN11
LL11
LL22
Blau
Grün / Gelb
Schwarzgrau
Braun
•
Anschluss 2 x 230 V 2L+2N
~
-
16 A
NN22
•
Anschluss 400 V 3
~
-
16A
Page 40

DE
40
22
/ BENUTZUNG DES GERÄTS
BESCHREIBUNG DER OBERSEITE
••
BOOSTER
INDUCTION
BOOSTER
INDUCTION
7967
9932
1166 ccmm
50 W à 2000 W
ICKT656
1133//2200 ccmm
750/1700 W
2211 ccmm
50 W à 31100 W
1188 ccmm
1500 W
Page 41

41
DE
22
/ BENUTZUNG DES GERÄTS
Empfehlung
Überprüfung der Eignung des
Kochgeschirrs:
Stellen Sie es auf eine Kochzone bei
Heizleistung 4.
Bei feststehender Anzeige ist das
Kochgeschirr geeignet.
Bei blinkender Anzeige kann das
Kochgeschirr nicht mit Induktion benutzt
werden.
Man kann auch einen Magneten benutzen.
Wenn er am Behälterboden haftet, ist der
Behälter mit der Induktion verträglich.
Koch- Geeignetes Kochgeschirr
vorgang*
1166 ccmm 1100 .......... 1188 ccmm
1188 ccmm 1122 .......... 2222 ccmm
2211 ccmm 1188 .......... 2244 ccmm
2233 ccmm 1122............ 2266 ccmm
2288 ccmm 1122 .......... 3322 c
cmm
••
WELCHE KOCHZONE FÜR WELCHES KOCHGESCHIRR?
••
KOCHGESCHIRR FÜR
INDUKTIONSWÄRME
••
Das Prinzip der Induktion
Das Prinzip der Induktion beruht auf einem
magnetischen Vorgang.
Wenn Kochgeschirr auf eine Kochzone
gestellt und diese dann eingeschaltet wird,
erzeugen die elektronischen Schaltkreise des
Kochfeldes „Induktionsströme“ im Boden des
Kochgeschirrs und erhöhen sofort seine
Temperatur. Diese Hitze wird dann an die
Speisen weitergeleitet, die gemäß Ihren
Einstellungen gekocht oder gebraten werden.
••
Das Kochgeschirr
Das meiste Kochgeschirr eignet sich für das
Induktionskochen. Lediglich Glas, Steingut,
Aluminium ohne Spezialboden, Kupfer und
einige nichtmagnetische Stähle sind nicht für
das Induktionskochen geeignet. Wir empfehlen die Verwendung von dicken und flachen
Böden. Die Hitze wird besser verteilt und der
Kochvorgang ist homogener.
C
B
A
**
in Abhängigkeit vom Modell
Induktor
Elektronischer Schaltkreis
Induktionsströme
A
B
C
+
-
Page 42

DE
EINSTELLUNG DES KURZZEITWECKERS
Für sämtliche Kochzonen ist ein Kurzzeitwecker
verfügbar, die jedoch immer nur einer einzigen
Kochzone zugeordnet werden kann.
Durch aufeinanderfolgendes Drücken der Taste
wählen Sie diejenige Kochzone, der der
Kurzzeitwecker zugeordnet werden soll.
Das rotierende Symbol und der Kurzzeitwecker
können nur in Betrieb befindlichen Zonen zugeordnet werden.
Benutzung der Sc
haltuhr:
- Schalten Sie die Kochzone ein und regeln Sie
die Leistung.
- Das rotierende Symbol auf diese Kochzone
drehen.
- Die Dauer durch Drücken auf „
+
“ oder „--“ einstellen. Zur Bestätigung Ihrer Einstellung leuchtet an der Leistungsanzeige ein Punkt auf.
Der Kurzzeitwecker läuft nur, wenn ein
Kochgefäß auf der Kochzone steht.
Am Ende der Kochzeit schaltet die Kochzone
sich aus, der Kurzzeitwecker zeigt 00an und ein
SSiiggnnaallttoonn
ertönt.
- Um den Signalton auszuschalten, drücken Sie
auf eine der Tasten„++“ oder „--“.
Änder
ung der Einstellungen des Kurzzeitwekkers:
Die Tasten “++” oder “-” des Kurzzeitweckers
drücken.
A
usschalten des Kurzzeitweckers:
Einige Sekunden gleichzeitig die Tasten „++“ und
„-“ des Kurzzeitweckers oder die Taste „--“ des
Kurzzeitweckers bis 00drücken.
Änder
ung der Zuordnung des Kurzzeitweckers:
- Schalten Sie den Kurzzeitwecker aus.
- Durch aufeinanderfolgendes Drücken der Taste
weisen Sie sie einer neuen in Betrieb befind-
lichen Kochzone zu.
22
/ BENUTZUNG DES GERÄTS
EINSCHALTUNG
Die Ein-/Aus-Taste der Zone drücken, die benutzt
werden soll. Eine blinkende
00
und ein Signalton
zeigen an, dass die Zone eingeschaltet ist. Dann
kann die gewünschte Leistung eingestellt werden.
Wenn keine Leistung eingestellt wird, schaltet sich
die Kochzone automatisch wieder ab.
STOPP
Die Taste Ein/Aus der verwendeten Zone oder die
Tas te „
--
“ der Leistung drücken, bis
00
angezeigt
wird.
LEISTUNGSEINSTELLUNG
Die Taste „+“ oder „-“ zur Einstellung der Leistung
von 1 bis P (maximale Leistung) drücken.
Nach dem Einschalten können Sie durch
Druck auf die Taste „
--
“ direkt auf maximale
Leistung „P“ schalten
SEITLICH ERWEITERTE KOCHZONE
Um die seitliche Erweiterung einzuschalten,
- schalten Sie zunächst die Kochzone selbst ein
- drücken Sie gleichzeitig auf die Leistungstasten
"-" und "+" der Kochzone. Ein Piepton und ein "E"
auf der Anzeige bestätigen Ihre Auswahl.
- Regeln Sie die Leistung entsprechend nach.
Um die seitliche Erweiterung auszuschalten,
- drücken Sie gleichzeitig auf die
Leistungstasten "-" und "+" der Kochzone.
••
••
BESCHREIBUNG DER
BEDIENVORRICHTUNGEN
••
Ein-/Aus-Tasten.
Leistungstasten.
Tasten des Kurzzeitweckers
••
A
B
C
C
A
B
Empfehlung
Vorzugsweise gegenüberliegende
Kochzonen benutzen.
Benutzen Sie eine Kochzone bei maximaler
Leistung und schalten eine andere
Kochzone auf der gleichen Seite hinzu, wird
die Leistung der ersten automatisch reduziert. Dies wird durch die Leistungsanzeiger
entsprechend angezeigt.
••
••
42
Page 43

DE
22
/ BENUTZUNG DES GERÄTS
Nutzung der „Kindersicherung“
Das Kochfeld verfügt über eine
Kindersicherung, die die
Bedientasten im abgeschalteten
Zustand (zum Beispiel für die
Reinigung) oder beim Kochen
(damit die Einstellungen erhalten bleiben)
sperrt.
Aus Sicherheitsgründen ist nur die „Aus“Taste immer aktiv und lässt die auch die
Abschaltung einer gesperrten Heizzone zu.
••
Verriegelung
Verriegelungstaste drücken, bis die
Kontrollleuchte darüber aufleuchtet und ein
Signalton die Einstellung bestätigt.
••
Verriegelung des Kochfelds wäh-
rend des Betriebs
Die Anzeige der in Betrieb befindlichen
Kochzonen zeigt abwechselnd die Leistung
und das Verriegelungssymbol .
Wenn Sie auf die Tasten
LLeeiissttuunngg
oder
KKuurrzzzzeeiittwweecckkeerr
der in Betrieb befindlichen
Zonen drücken, leuchtet die LED der
Verriegelung
auf und erlischt nach einigen
Sekunden
,
Lediglich die Taste „Stopp“ ist immer aktiviert.
Bei den nicht in Betrieb befindlichen
Kochzonen leuchten bei Drücken der Tasten
„
EEiinn//AAuuss““
das Symbol und die Tasten.
Nach einigen Sekunden verlöscht die
Anzeige
,
••
Das Kochfeld ist im ausgeschalteten
Zustand verriegelt
Die über der Taste liegende LED-Anzeige für
die Verriegelung leuchtet nicht. Durch kurzen
Impuls auf diese Taste leuchtet die LED.Die
Kontrollleuchte oberhalb der VerriegelungsTaste leuchtet nicht. Ein kurzer
Druck auf die Taste lässt die Kontrollleuchte
aufleuchten. Wenn Sie die Ein/Aus-Taste einer
der Kochzonen betätigen, leuchtet die
Kontrollleuchte sowie das Symbol [ S Y M B
O L ] in der Anzeige der jeweiligen Kochzone.
••
Entriegelung
Die Verriegelungstaste lang drücken, bis die
Kontrollleuchte
erlischt
und ein doppelter
Signalton die Einstellung bestätigt
.
Empfehlung
Vor der erneuten Benutzung an die
Entriegelung des Kochfeldes denken (siehe
Kapitel: „Nutzung der Kindersicherung“).
••
43
Page 44

44
DE
22
/ BENUTZUNG DES GERÄTS
BETRIEBSSICHERHEITEN
•Restwärme
Nach intensiver Benutzung kann die gerade
benutzte Kochzone auch noch einige Minuten
danach heiß bleiben.
Ein „HH“ wird während dieser Zeit angezeigt.
Die betroffenen Zonen dann nicht berühren.
•Temperaturbegrenzer
Jede Kochzone ist mit einem
Sicherheitsfühler ausgerüstet, der die
Temperatur des Behälterbodens ständig
überwacht. Wenn ein leerer Behälter auf einer
eingeschalteten Kochzone vergessen wird,
passt diese Sonde automatisch die vom
Kochfeld abgegebene Leistung an und vermeidet somit, dass Kochgeschirr oder
Kochfeld beschädigt werden.
•Sicherheit „kleine Gegenstände“
Ein auf das Kochfeld gelegter kleiner
Gegenstand (z. B. Gabel, Löffel oder Ring, …)
wird nicht als Kochgeschirr erkannt.
Die Anzeige blinkt, und es wird keinerlei
Strom abgegeben.
Achtung
Mehrere kleine Gegenstände auf
einer Kochzone können als Kochgeschirr
erkannt werden.
Die Leistungsanzeige leuchtet: Es kann
Strom abgegeben werden und zur
Erhitzung dieser Gegenstände führen.
•Überlaufschutz
In einem der 3 nachfolgend
aufgeführten Fälle kann sich
das Kochfeld ausschalten, ein
Symbol aufleuchten (s. Abbildung) und ein Signalton (modellabhängig) ertönen:
--
Überlaufen über die Bedientasten.
--
Feuchter Lappen auf den Tasten.
--
Metallgegenstand auf den Bedientasten.
Reinigen oder Gegenstand entfernen und den
Kochvorgang wieder starten.
•Auto-Stopp System
Das Kochfeld ist mit einem
„„AAuuttoo--SSttoopppp
SSyysstteemm““
ausgerüstet,das die betroffene
Kochzone nach einer voreingestellten Zeit
automatisch abschaltet (je nach eingestellter
Leistung zwischen 1 und 10 Stunden), wenn
das Abschalten einer Kochzone vergessen
wurde.
Wenn diese Sicherung ausgelöst wird, wird
das Ausschalten der Kochzone durch die
Anzeige „
AASS
“ oder „AA“ im Bedienfeld und
einen Signalton über etwa 2 Minuten angezeigt. Zur Abschaltung eine beliebige Taste
drücken.
Ein doppelter Signalton bestätigt die
Einstellung.
TON..TON
••
Page 45

45
VVEERRSSCCHHMMUUTTZZUUNNGGSS AARRTTEENN BBEENNUUTTZZEENN SSIIEE VVOORRGGEEHHEENNSS WWEEIISSEE
Leicht Küchenschwämme. Die zu reinigende Zone gut mit heißem
Wasser aufweichen, dann abwischen.
Ansammlung von mehrfach
gekochten Verschmutzungen.
Überlaufen von zuckerhaltigen Flüssigkeiten, geschmolzener Kunststoff.
Küchenschwämme.
Spezialschaber für
Glas.
Die zu reinigende Zone gut mit heißem
Wasser aufweichen, mit einem
Spezialschaber für Glas vorbearbeiten,
mit der Scheuerseite eines
Haushaltsschwamms weiterbearbeiten
und dann abwischen.
Fleckenränder und
Kalkspuren.
Weißen Alkoholessig. Weißen Alkoholessig auf die
Verschmutzung aufbringen, wirken lassen, mit einem weichen Lappen abwischen.
Glänzende
Metallverfärbungen.
Wöchentliche Pflege.
Spezialprodukt für
Glaskeramikfelder.
Auf die Oberfläche ein am besten silikonhaltiges (Schutzwirkung)
Spezialprodukt für Glaskeramikfelder
aufbringen.
DE
33
/ REGELMÄSSIGE PFLEGE IHRES GERÄTS
ERHALTUNG DES GERÄTES
. Stoßeinwirkung durch Kochgeschirr vermeiden:
Die glaskeramische Oberfläche ist sehr widerstandsfähig, jedoch nicht unzerbrechlich.
. Keinen heißen Deckel flach auf das Kochfeld
legen. Ein „Saugnapf“-Effekt könnte die glaskeramische Oberfläche beschädigen.
. Reibung von Gefäßen auf der Glaskeramikfläche vermeiden, da auf Dauer ihr Dekor
beschädigt werden kann.
. Kein Kochgeschirr auf Rahmen oder
Zierleiste (modellabhängig) stellen.
. Behälter mit rauem oder verbeultem Boden
vermeiden: An ihnen können Materialien haften, die zu Flecken oder Kratzern auf dem
Kochfeld führen.
Derartige Beschädigungen schränken die
Verwendbarkeit des Geräts nicht ein und sind
kein Sachmangel. Sie sind von der Garantie
ausgeschlossen.
PFLEGE DES GERÄTES
. Im Möbel unter dem Kochfeld keine
Haushaltsprodukte oder entzündlichen Stoffe
aufbewahren.
. Keine geschlossene Konservendose erhitzen,
sie könnte platzen.
Diese Vorsichtsmaßnahme gilt natürlich für
jeden Kochmodus.
. Nie Alu-Folie zum Kochen benutzen. Niemals
in Aluminium oder in einer Aluminiumschale
verpackte Produkte auf dem Kochfeld abstellen.
Das Aluminium würde schmelzen und das
Kochfeld nachhaltig beschädigen.
. Das Kochfeld darf nicht als vorübergehende
Abstellfläche benutzt werden (ungewollte
Einschaltung, Kratzer, …).
. Keinen Dampfreiniger benutzen. Der
Dampfstrahl kann das Kochfeld beschädigen.
••
••
Creme
Haushaltsschwamm
besonders für empfindliches Geschirr
Scheuerschwamm
Pulver
Page 46

46
DE
44
/ BESONDERE MELDUNGEN, STÖRFÄLLE
Achtung
Bei Bruch, Sprung oder auch nur leichtem Riss des glaskeramischen Glases das
Gerät sofort vom Netz trennen, um elektrische Schläge zu verhindern.
Wenden Sie sich an den Kundendienst.
•Während der Benutzung
•Bei Einschaltung
•Bei der Inbetriebnahme
SIE STELLEN FEST, DASS... MÖGLICHE URSACHEN: WAS IST ZU TUN:
Eine Leuchtanzeige erscheint. Normalbetrieb. Nichts, die Leuchtanzeige
erlischt nach 30 Sekunden.
Die Anlage schaltet sich aus.
Der Anschluss des Kochfeldes ist
fehlerhaft.
Die Konformität überprüfen.
Siehe Kapitel „Anschluss“.
Es funktioniert nur eine Seite.
Bei den ersten Kochvorgängen gibt
das Kochfeld einen Geruch ab.
Neugerät. Einen mit Wasser gefüllten
Topf 1/2 Stunde auf jeder
Kochzone erhitzen.
SIE STELLEN FEST, DASS... MÖGLICHE URSACHEN: WAS IST ZU TUN:
Das Kochfeld funktioniert nicht und
die Leuchtanzeigen der Tastatur
leuchten nicht auf.
Das Gerät wird nicht mit Strom
versorgt. Die Versorgung oder der
Anschluss ist fehlerhaft.
Die Sicherungen und den
elektrischen Leistungsschalter
überprüfen.
Das Kochfeld funktioniert nicht, und
es wird eine andere Meldung angezeigt.
Der elektronische Schaltkreis
funktioniert nicht richtig.
Den Kundendienst rufen.
Das Kochfeld funktioniert nicht, die
Meldung oder wird angezeigt.
Das Kochfeld ist verriegelt. Siehe Kapitel „Nutzung der
Kindersicherung“.
SIE STELLEN FEST, DASS... MÖGLICHE URSACHEN: WAS IST ZU TUN:
Das Kochfeld hat sich ausgeschaltet
und gibt ca. alle 10 Sekunden einen
Signalton ab und ein oder F7
wird angezeigt.
Etwas ist übergelaufen oder ein
Gegenstand behindert die
Bedientastatur.
Reinigen oder Gegenstand
entfernen und den
Kochvorgang wieder starten.
Eine Reihe kleiner oder F7 wird
angezeigt.
Die elektronischen Schaltkreise
haben sich überhitzt.
Siehe Kapitel „Einbau“.
Nach der Inbetriebnahme einer
Kochzone blinken die
Leuchtanzeigen der Tastatur weiterhin.
Das benutzte Kochgeschirr ist
nicht für Induktion geeignet oder
hat einen Durchmesser von unter
12 cm (10 cm auf Zone 16 cm).
Siehe Kapitel „Kochgeschirr
für Induktion“.
Die Kochtöpfe machen beim
Kochen Geräusche.
Das Kochfeld klickt beim Kochen.
Normal bei gewissen Gefäßtypen.
Dies ist auf die Übertragung der
Energie vom Kochfeld zum Gefäß
zurückzuführen.
Nichts. Es besteht keinerlei
Gefahr, weder für das
Kochfeld, noch für das
Gefäß.
Die Belüftung läuft nach
Abschaltung des Kochfeldes noch
einige Minuten weiter.
Abkühlen der Elektronik.
Normalbetrieb.
Nichts.
Page 47

DE
55
/ KOCHTABELLE
BRÜHE
DICKE SUPPEN
WÜRZIGE BRÜHE
GEFRIERGUT
DICKE SAUCEN AUF
MEHLSCHWITZENBASIS
MIT BUTTER UND EIERN
(BEARNAISE, H
OLLANDAISE)
ZUBEREITETE SOßEN
CHICOREE, SPINAT
TROCKENGEMÜSE
GEKOCHTE KARTOFFELN
BRATKARTOFFELN
BRATKARTOFFELN
AUFTAUEN VON GEMÜSE
DÜNN GESCHNITTENES FLEISCH
GEBRATENES
STEAK
GRILLGUT (GUSSEISENGRILL)
TIEFGEKÜHLTE POMMES FRITES
FRISCHE
POMMES FRITES
SCHNELLKOCHTOPF
(SOBALD EIN LEICHTES ZISCHEN ERTÖNT)
KOMPOTT
PFANNKUCHEN
ENGLISCHE CREME
GESCHMOLZENE SCHOKOLADE
MARMELADE
MILCH
SPIEGELEIER
NUDELN
BABYGLÄSCHEN (WASSERBAD)
R
AGOUT
K
REOLISCHER REIS
M
ILCHREIS
FFRRIITTTTIIEERREENN // KKOOCCHHEENN//BBRRAAUUNNEENN GGAARREENN//KKÖÖCCHHEELLNN WWAARRMM
BBRRAATTEENN
ERNEUT ZUM
HHAALLTTEENN
ZUM KOCHEN BRINGEN
AUFKOCHEN KLEINER
BRÜHEN
SUPPEN
FISCHGERICHTE
SOSSEN
GEMÜSE
FLEISCH
FRITTIERGUT
VARIANTEN
PP 99 88 77 66 55 44 33 22 11
PP 99 88 77 66 55 44 33 22 11
PP 99 88 77 66 55
44 33 22 11
KOCHTABELLE NACH GERICHTEN
••
47
Page 48

48
9999664455002211
12/07
FFaaggoorrBBrraannddtt SSAASS,, -- PPääcchhtteerr -- KKaappiittaallggeesseellllsscchhaafftt iinn vveerreeiinnffaacchhtteerr FFoorrmm,, FFiirrmmeennkkaappiittaall 2200 000000 000000 EEuurroo HHaannddeellss--
uunndd GGeesseellllsscchhaaffttssrreeggiisstteerr NNaanntteerrrree 444400 330033 119966
 Loading...