

Page 1
GPS 280 / GPS 281
ENGLISH
ITALIANO
ESPAÑOL
Page 2
Manual for Personal
Navigation Devices
GPS 280 / GPS 281
Page 3

EN
2
CONTENTS
TYPOGRAPHIC CONVENTIONS ..........................................3
ICONS .........................................................................................4
Key features .....................................................................................................................5
STARTING THE APPLICATION ..............................................6
DETAILED DESCRIPTION .......................................................7
Using the map ..................................................................................................................7
Tracking mode and selection mode
Choosing and finding locations ...................................................................................9
Choosing a location on the map
Search for an address
Searching for and choosing POIs
Browse or search a guide
Favourites
Navigating ...................................................................................................................... 19
Navigation screen
Options during navigation
Planning a route ........................................................................................................... 22
Settings ........................................................................................................................... 24
Route options
Language
Map settings
Map
OPTIONAL FEATURES ..........................................................28
Guides ............................................................................................................................ 28
Traffic Message Channel (TMC) ............................................................................... 28
Route Recording .......................................................................................................... 29
Speed Camera Alert .................................................................................................... 29
SMART2GO™ SETUP ASSISTANT .......................................30
FREQUENTLY ASKED QUESTIONS ....................................32
INDEX .......................................................................................33
COPYRIGHT AND LICENSE NOTES ...................................35
Contents
Page 4

EN
3
TYPOGRAPHIC CONVENTIONS
Bold
Items you must select, such as menu options, command buttons, or items in a list.
••••
• Bullet
Step-by-step procedures. You can follow these instructions to complete a specific task.
••••
Comment
Especially important or remarkable information.
••••
Monospace
Information that you must type, or information like folders and filenames.
••••
CAPITALS
Names of keys on the keyboard. For example, SHIFT, CTRL, or ALT.
Typographic conventions
Page 5
EN
4
ICONS
The following icons and symbols are used throughout the application:
Icon Name Function
Menu icon Opens a menu with various options.
Back icon Go back to the previous screen.
Navigation icon Start navigation.
Search icon Opens a search screen.
Confirmation icon Apply settings. Select/deselect all.
Exit icon
Exit the application. Only visible in the
tracking mode (see “Tracking mode and
selection mode” on page 7).
GPS icon
Press this icon to move map back to your
GPS position. Only visible in the selection
mode (see “Tracking mode and selection
mode” on page 7.
Icons
Page 6

EN
5
INTRODUCTION
You have chosen a cutting-edge navigation system. Congratulations! Please enjoy using it.
This navigation system leads you straight to your destination, whether you are travelling
by car or on foot. You may navigate and plan your route with an easy to use and intuitive
interface, just by using your finger. You may also use this application to plan your trip to suit
your personal preferences and interests and to save interesting destinations before you set
off on your trip. This manual leads you through the main features of the system.
Key features
• Cross-border navigation in Europe through 1 GB map of Europe (optional
feature)
• Dynamic Traffic Information, TMC (optional feature)
• Real pedestrian mode
• Look-ahead search function
• State-of-the art polygon view of individual houses for selected European cities
(optional feature)
• Earth browsing
• Unique night mode
• Improved guidance engine
• Premium content through branded guides (optional feature)
Introduction
Page 7
EN
6
STARTING THE APPLICATION
Charge your device and place it in a position with an unobstructed view to the sky to
create your first satellite connection. In the car this will usually be on the dashboard. It may
take a few minutes to establish the first connection.
• Switch on the unit and tap on NAVI or NAVIGATION in the first screen.
• If more than one language is available on your device, you are prompted to
choose your language.
After the application loads, a screen with safety precautions will be shown. Please read
them carefully. Afterwards, you can choose to hide these notes for future start-ups.
You will be presented an earth view of your country. Please enjoy while you fly over your
country and “touch down” on your current location. (You can also choose to skip this intro
by tapping on the screen.)
At the end of your journey, the map will be shown.
Starting the application
Page 8
EN
7
DETAILED DESCRIPTION
This chapter describes the functions of your Personal Navigation Device in detail. On the
following pages you will learn how to
- Use the map (see page 7)
- Find and choose locations (see page 9)
- Navigate to your destination (see page 19)
- Use the route planner (see page 22)
- Configure the application (see page 24)
Using the map
The map is the core component of your Personal Navigation Device. It will be centred on
your current location by default, provided you have a GPS connection. You can browse the
map, display information about the different locations shown on it and e.g. choose them for
routing and navigating.
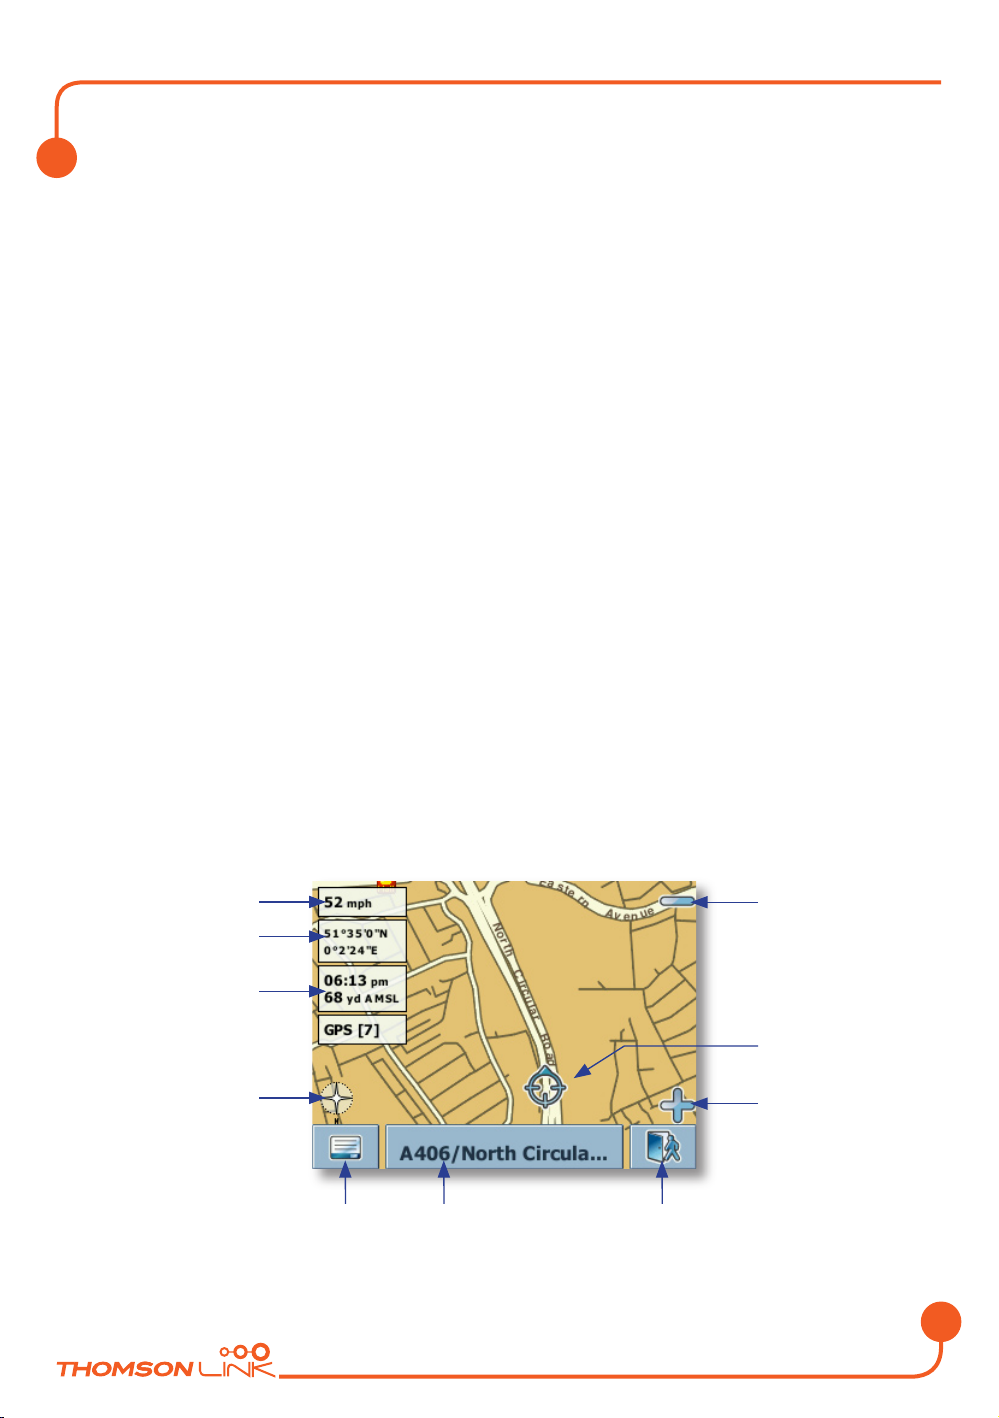
Tracking mode and selection mode
The map knows two basic states, the tracking and the selection mode.
In the tracking mode, the map follows your actual position (GPS position), displaying
information about your geographic position, your speed, etc:
Speed
Geographic
coordinates
Time
Elevation above
meain sea level
GPS status
Compass rose
Menu
Zoom out
GPS position
Zoom in
Exit applicationInfo box
Detailed description
Page 9
EN
8
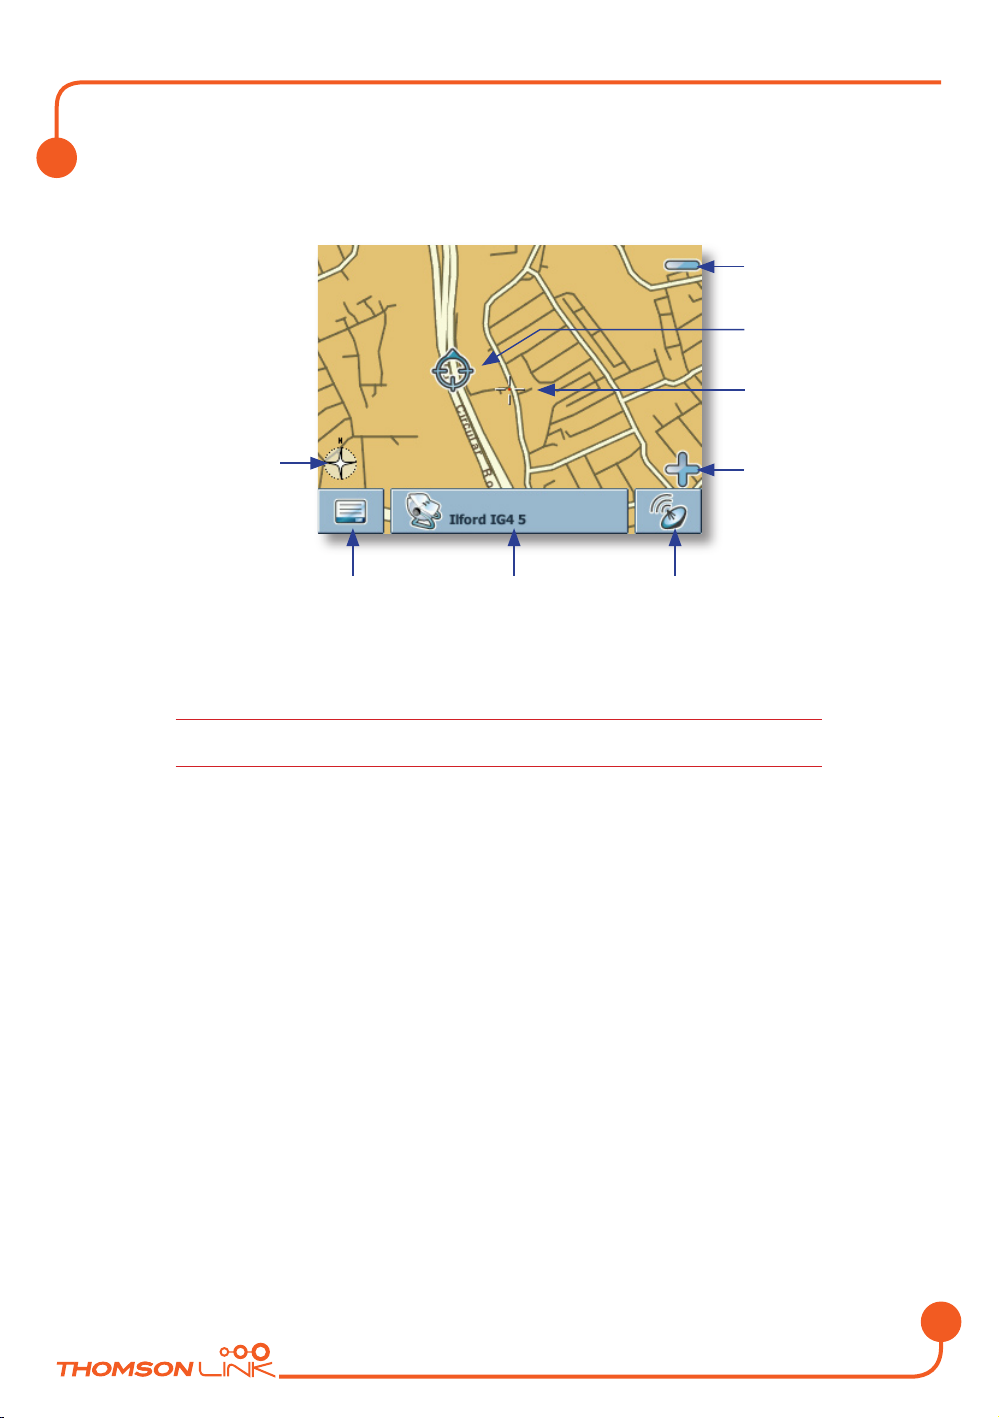
As soon as you browse the map, you enter the selection mode:
Compass rose
Menu icon
Info box Tracking icon
Zoom out
Current (GPS)
position
Zoom in
Cursor
• Use a pen or your finger to browse the map. The actual position will be identified
by a cursor.
Clicking on an icon on the map opens an overlay window with information about the
selected item.
• To zoom in or out, press the + or - icons. As soon as you press one of the icons,
the zoom slider will be shown, which can be used for smooth zooming.
• With the compass icon (in the bottom left hand corner) you may adjust the
orientation.
• If you want to return to the tracking mode, press the tracking icon. To exit the
application, press this button again.
Detailed description
Page 10
EN
9
Choosing and finding locations
This section describes the different ways of finding and choosing locations. You may choose
locations on the map, search for an address, choose a favourite (like home and work
address, your bookmarks and recently visited locations), and browse POI directories and
guides.
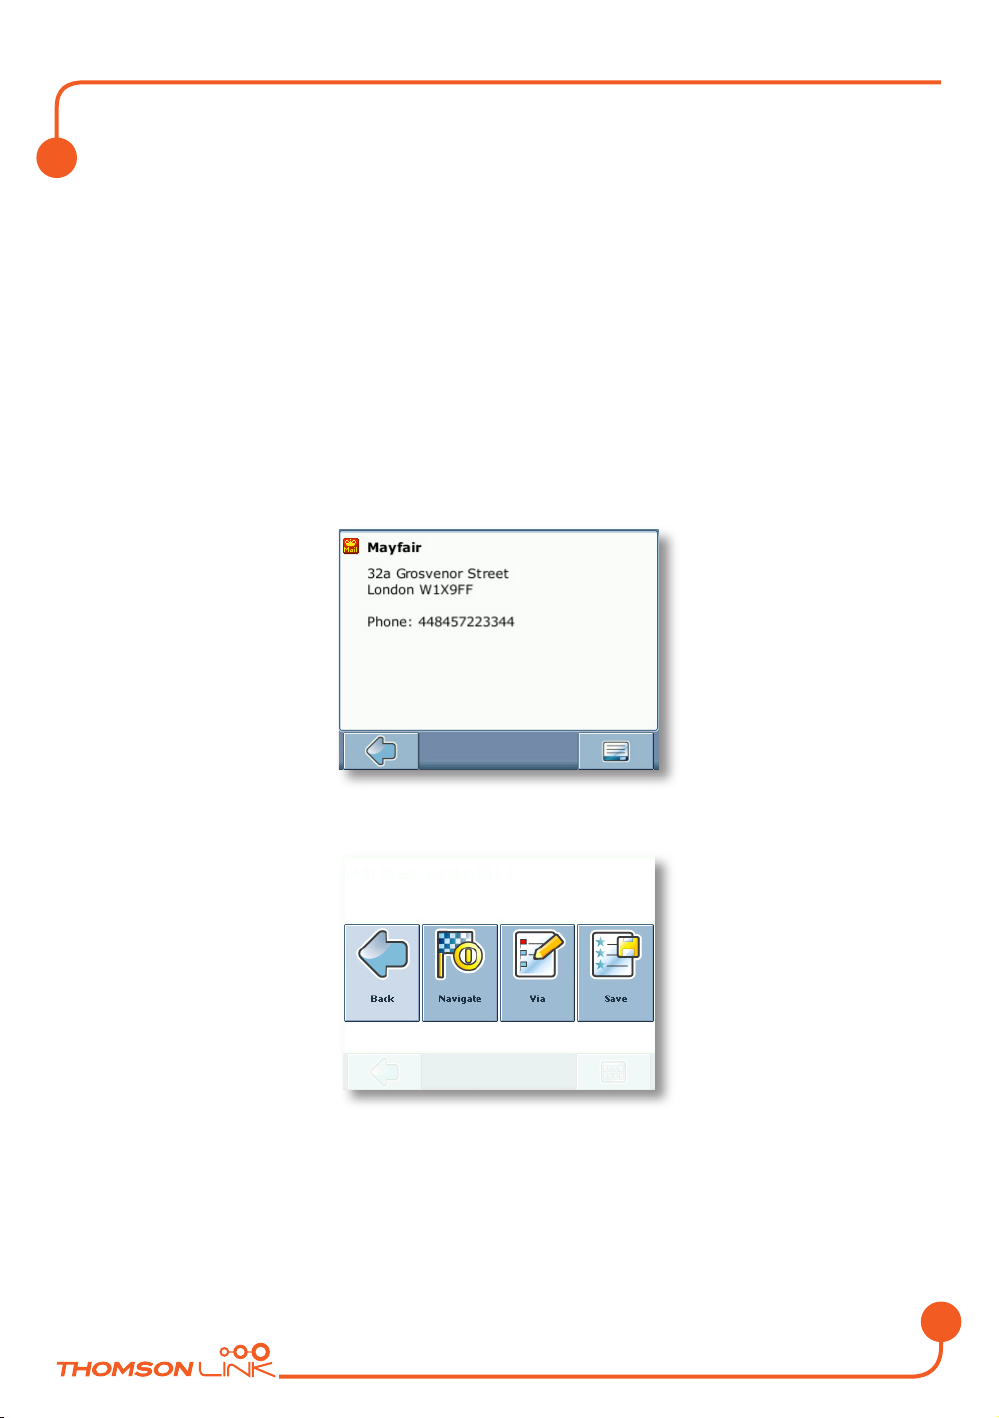
Choosing a location on the map
• Point the cursor at any place on the map. The name of a selected location/street
will be shown in the info box.
• Press that info box to open a screen with details:
By pressing the menu icon you can access to further options:
• Press Navigate to navigate to the location (see “Navigating” on page 19).
• Press Via to use the location for routing (see “Planning a route” on page 22).
• Press Save to save the location as a bookmark (see “Favourites” on page 16).
Detailed description
Page 11
EN
10
Search for an address
Through the address search you can find an address by entering information about the
desired target (street and town/city). You may then select a hit from the results list and use
the address found for different purposes, like pinpointing it on a map, planning your route,
and navigating.
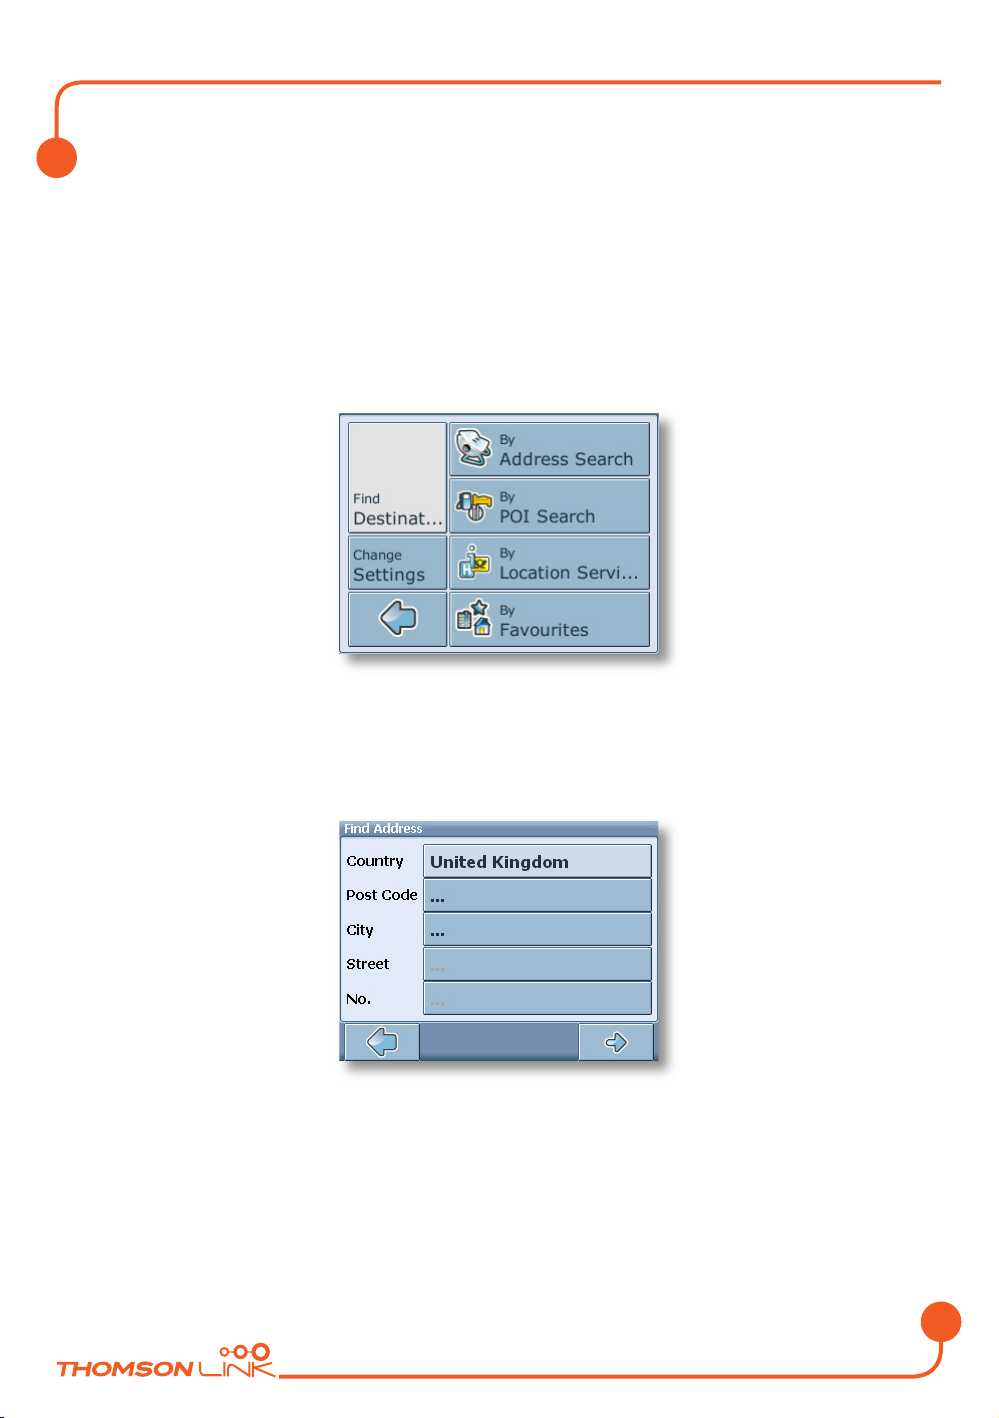
• On the map, select the menu icon.
The main menu will be opened:
• Select Find Destination.
• Select By Address Search.
The Find Address window will be displayed:
Enter the appropriate data to find your address.
Detailed description
Page 12
EN
11
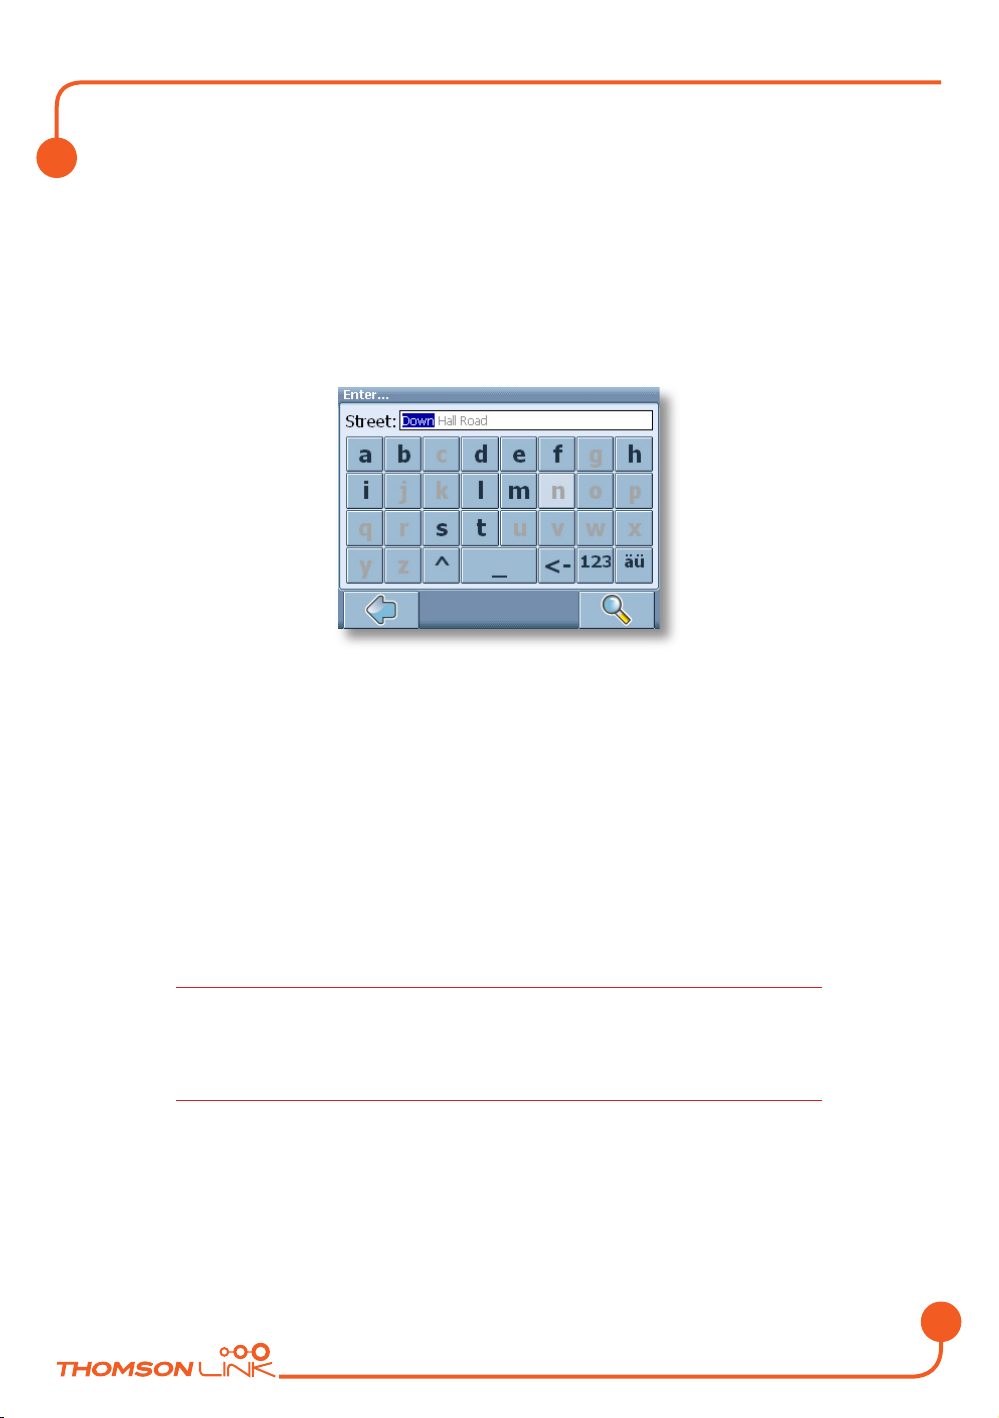
How to search
Your Personal Navigation Device offers a convenient interactive look-ahead search
function to prevent misspelling. Only keys that lead to a search result can be pressed – all
others are greyed out!
• Enter the first character.
You will see that the some keys on the keypad turn grey. You can only choose black keys:
• Enter the second character.
Again, some keys will turn grey, others will turn black, depending on your choice.
• Keep on entering characters until you have narrowed down the search to only
one result.
OR
• Press the search icon (magnifying glass).
A result list will be displayed.
• Choose the appropriate entry from the list.
Switch between letter and number mode by pressing 123 or ABC. Switch between
upper case and lower case by pressing ^.
If at any point you want to backspace and delete characters, press the backspace
button <- on screen. To add a space, press the space bar _.
Detailed description
Page 13

EN
12
Set the country
• Press Country to select your city.
• Choose your country from the list.
The Country field will be populated with the name of the chosen country.
Enter a post code
Instead of a city you may enter a post code.
• Press Post Code to enter a post code.
• Enter the post code of the town/city you are looking for.
• Press the search icon (magnifying glass).
A hit list will be displayed.
• Choose the appropriate town/city from the list.
You will return to the Find Address screen. The City and Post Code fields will be
populated with the chosen city/post code.
You can also enter a unique 7-digit postal code. In that case, you do not need to enter
a street name. (Optional feature).
Search for the city
• Press City to select a city.
Search for the city, as described above.
A result list will be displayed.
• Choose the appropriate town/city from the list.
You will return to the Find Address screen. The City field will be populated with the
name of the chosen town/city.
Search for the street
• Press Street to select a street.
Search for the street, as described above.
A result list will be displayed.
• Choose the appropriate street from the list.
You will return to the Find Address screen. It will be filled with the previously found data.
Additionally you may enter the number.
Detailed description
Page 14
EN
13
Navigate to the address found
Once you have narrowed down your search to a unique address, you can start navigation.
• Press the forward arrow.
The address will be displayed in the navigation map. Here you can choose to be guided to
the address, use it for route planning, etc. (see “Navigating” on page 19).
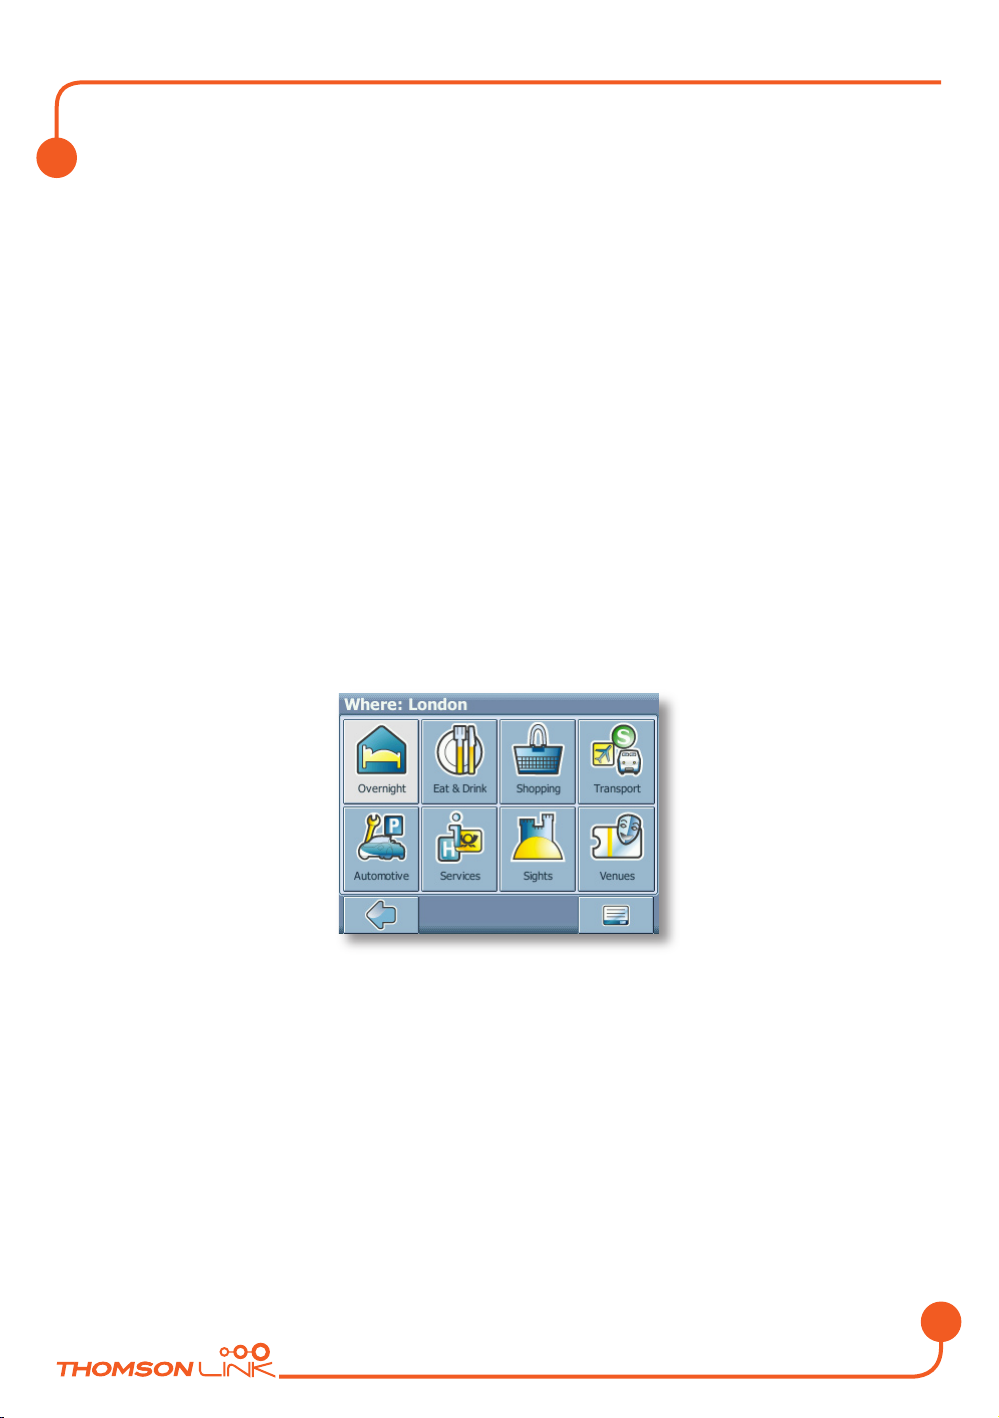
Searching for and choosing POIs
With the POI finder you can quickly find points of interest like petrol stations and
restaurants that are chosen from a database of millions of POI, either nearby or at a
remote location.
• On the map, select the menu icon.
• On the following screen, select Find Destination.
• Select By POI.
A menu of POI categories will be shown:
In the title bar of this screen, you might see an address. You will be presented POIs that are
close to this location.
• Select the menu icon to select another address as a starting point for the POI
selection (see “Search for an address” on page 10).
The newly selected address will be shown in the title bar of the POI categories screen.
You can now browse the POIs by categories or search for a certain POI.
Detailed description
Page 15
EN
14
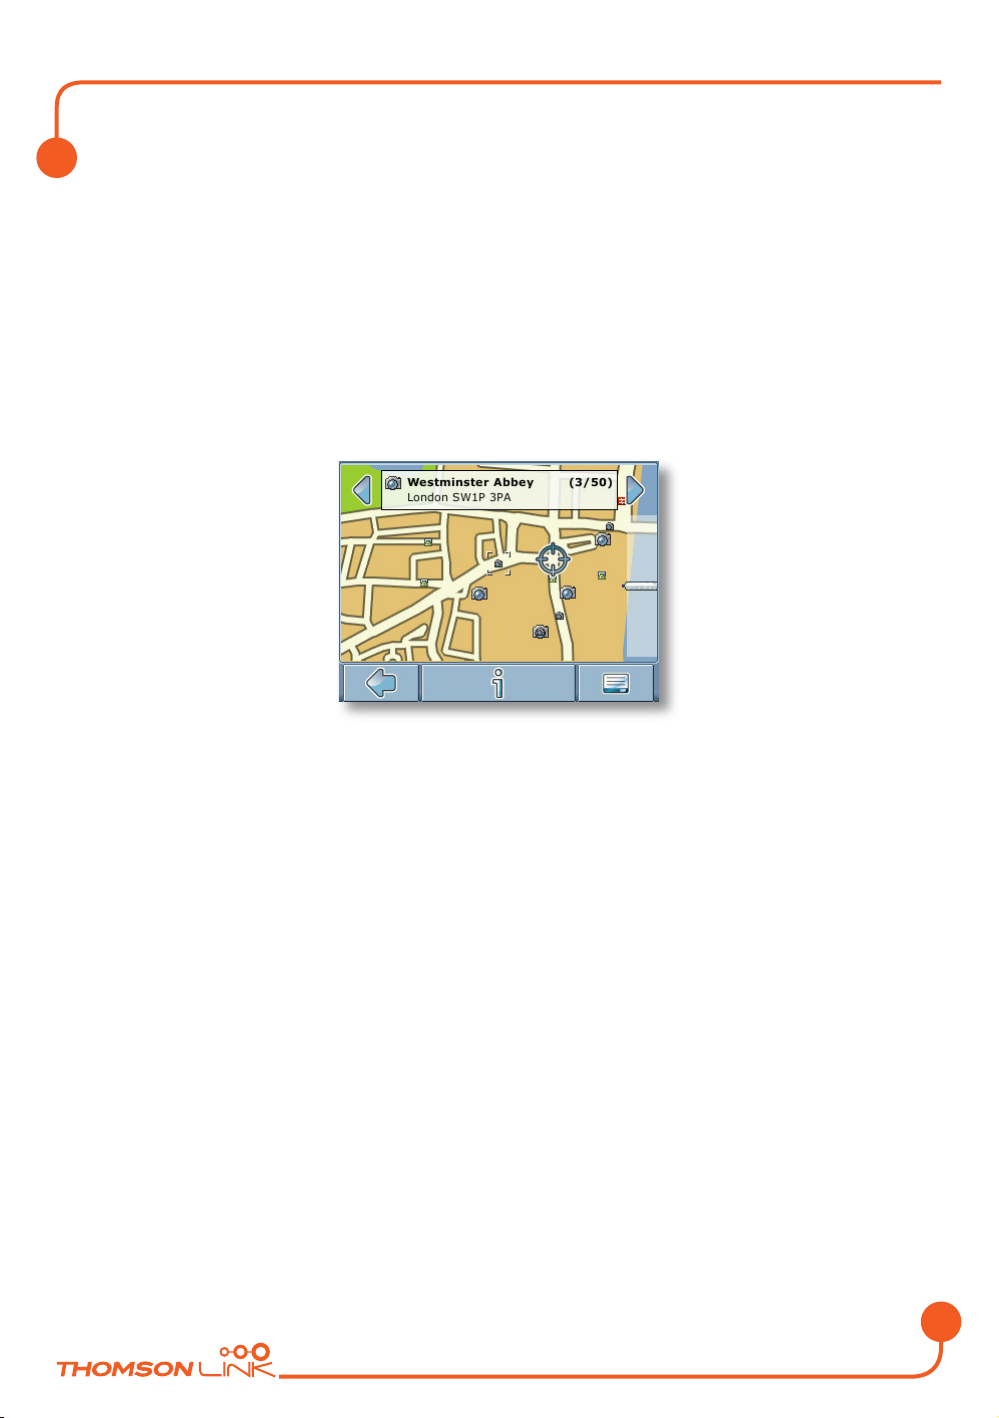
Choosing a POI
• Choose the desired POI category.
A menu with subcategories will be shown.
• Choose a subcategory.
A list of POIs will be shown.
• Select a POI by clicking on it.
The location will be shown on the map:
• Press the arrows next to the location’s name to switch between results.
• Press i to open a screen with details about the location.
By pressing the menu icon you access to a set of actions:
• Press Navigate to navigate to the location (see “Navigating” on page 19).
• Press Via to use the location for routing (see “Planning a route” on page 22).
• Press Save to save the location as a bookmark (see “Favourites” on page 16).
• Press On Map to show the location on the main map.
Searching for a POI
Press the magnifying glass.
• In the search window, enter a search term (at least three characters), and start
searching by pressing the right arrow.
A list of POIs will be shown.
• Select a POI by clicking on it.
The POI will be shown on the map, as described above.
Detailed description
Page 16
EN
15
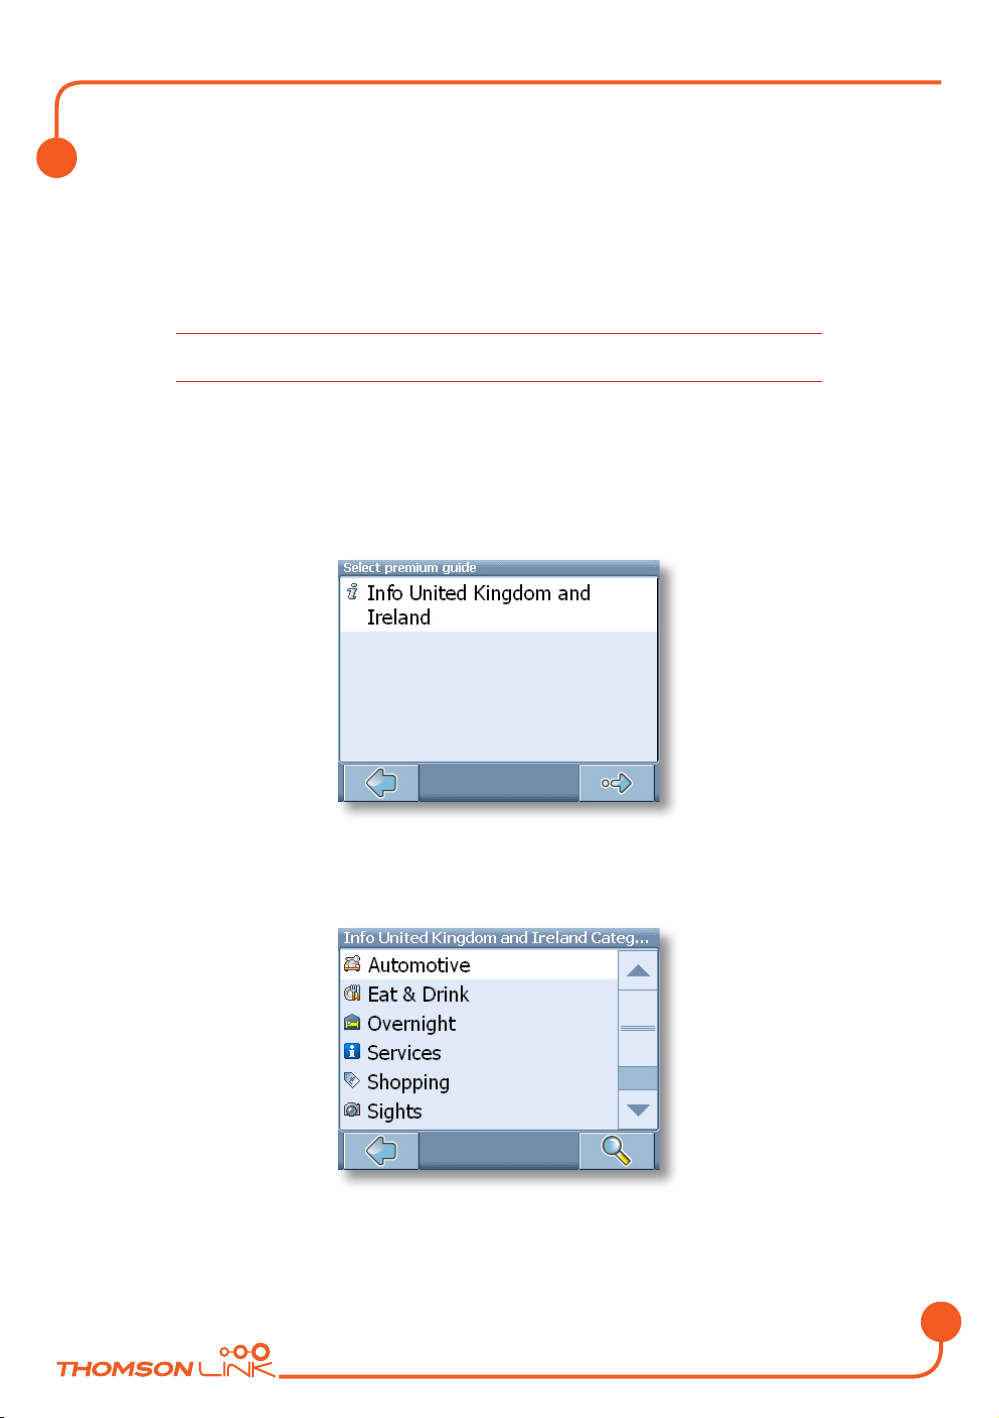
Browse or search a guide
Within the POI menu you will see the guides, an optional and highly recommendable
feature. Branded travel/city guides will help you to find out what is nearby and will give you
valuable information about attractions, restaurants, hotels, etc. with detailed descriptions.
You may use the items contained in the guides for navigation or save them as bookmarks.
Guides are an optional feature and may be purchased at www.thomsonlink.com
(Digital Store / GPS).
• On the map, select the menu icon.
• On the following screen, select Find Destination.
• Select By Location Service.
The guide list will be shown:
• Select the guide you wish to use by clicking on it.
The categories page of the chosen guide will be displayed:
You can now browse the guide by categories or search the guide.
Detailed description
Page 17

EN
16
Search the guide
• Press the search icon (magnifying glass).
• In the search window, enter a search term (at least three characters), and start
searching by pressing the search icon (magnifying glass).
The hit list will be displayed.
• Select a location by clicking on it.
The location will be shown on the map.
• Press the arrows next to the location’s name to switch between results.
• Press i to open a screen with details about the location.
By pressing the menu icon you access to a set of actions:
• Press Navigate to navigate to the location (see “Navigating” on page 19).
• Press Via to use the location for routing (see “Planning a route” on page 22).
• Press Save to save the location as a bookmark (see “Favourites” on page 16).
• Press On Map to show the location on the main map.
Browse the guide by categories
On the categories page you may select from the different categories of the Guide (e.g.
restaurants, hotels, bars, museums etc.).
• Use the up and down arrows to scroll in the list.
Some guides also offer subcategories.
• Click on a category or subcategory to search for relevant items.
The search results will be shown in the hit list, sorted by distance.
• Select an entry by tapping on it.
• The location will be shown on the map, as described above.
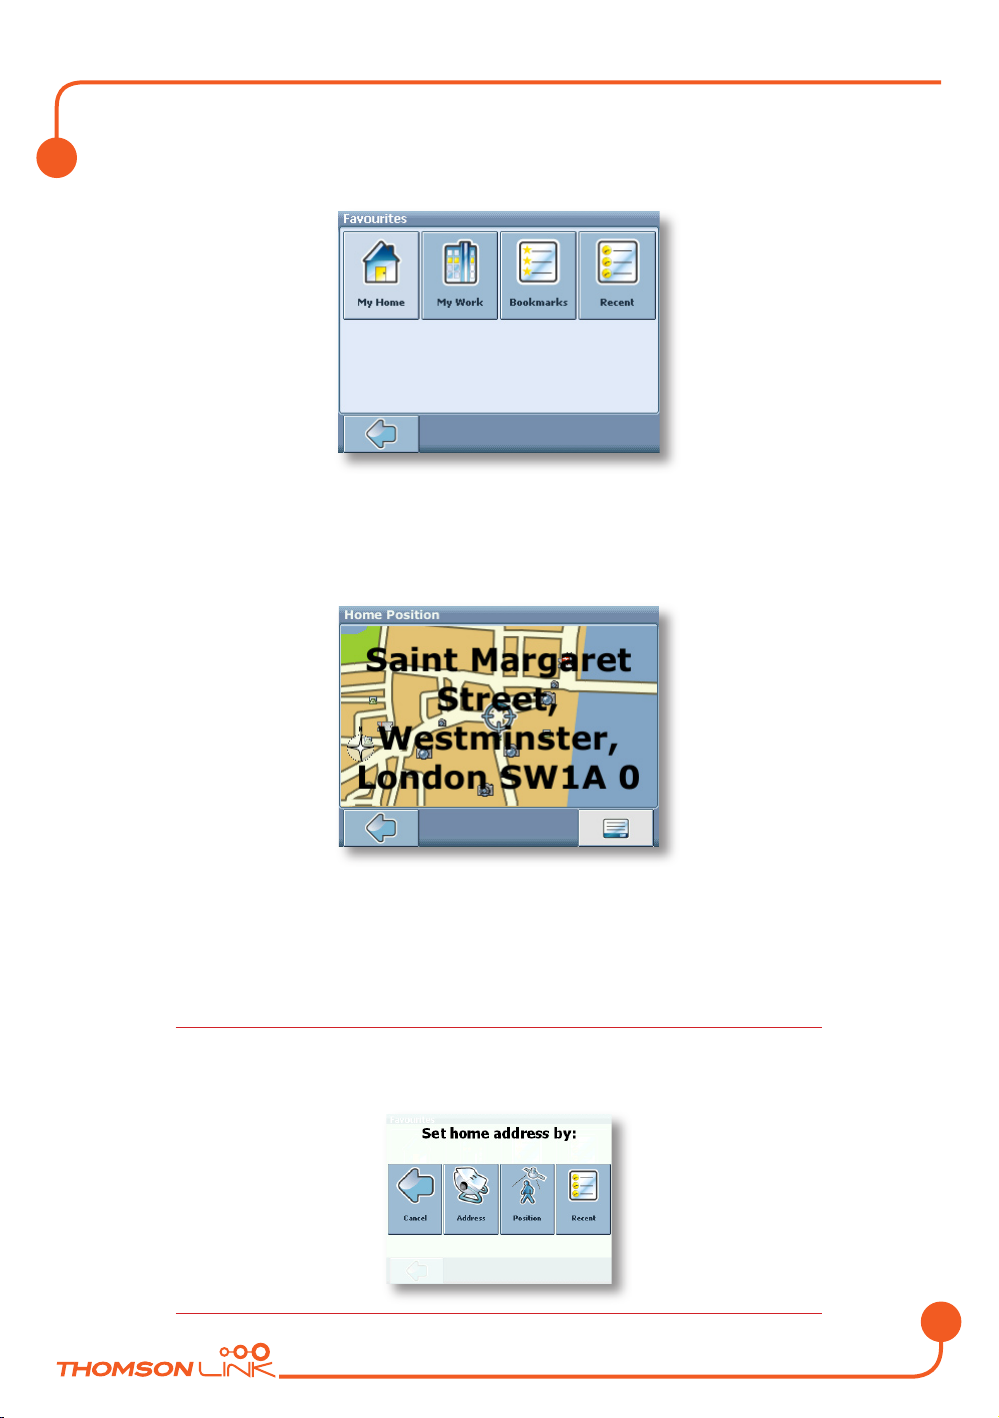
Favourites
Use your frequently used or favourite destinations for guidance. You can choose among
your home, your work place, a set of personal bookmarks, and recently visited locations.
• On the map, select the menu icon.
• On the following screen, select Find Destination.
• Select By Favourites.
Detailed description
Page 18
EN
17
The Favourites menu will show on the screen:
My Home
• Press My Home.
Your home address will be displayed on a map:
• Select the menu icon.
• On the following screen, choose Navigate to be guided to your home address
(press Change or Delete if you want to change/delete your home address).
Navigation will start immediately.
If no home address has been set, you are prompted to do so. You can choose it by
searching for an address, through your current GPS position or by choosing a recently
visited location.
Detailed description
Page 19
EN
18
My Work
• By pressing My Work, your work address will be displayed on a map.
• Select the menu icon.
• On the following screen, choose Navigate to be guided to your work address
(press Change or Delete if you want to change/delete your work address).
Navigation will start immediately.
If no work address has been set, you are prompted to do so. You can choose it by
searching for an address, through your current GPS position or by choosing a recently
visited location.
Bookmarks
The bookmarks list contains the destinations you have saved as favourites (from the guides,
by choosing it on a map, etc.). This means that you do not need to perform repeated
searches for those destinations.
• Press Bookmarks.
The bookmark list will show on the screen:
Use the up and down arrows to scroll up and down in the list.
• Select an item by clicking on it.
The location will be shown on the map.
• Press the arrows next to the location’s name to switch between results.
• Press i to open a screen with details about the location.
By pressing the menu icon you access to a set of actions:
• Press Navigate to navigate to the location (see “Navigating” on page 19).
Detailed description
Page 20

EN
19
• Press Via to use the location for routing (see “Planning a route” on page 22).
• Press On Map to show the location on the main map.
All user information like e.g. settings, bookmarks and recently visited locations will be
stored on the memory card and not on the device.
Recent
By pressing Recent a list of recently visited or looked-up destinations will be opened.
• Press Recent.
The list of recent items will show on the screen.
Use the up and down arrows to scroll up and down in the list.
• Select an item by clicking on it.
The location will be shown on the map.
• Press the arrows next to the location’s name to switch between results.
• Press i to open a screen with details about the location.
By pressing the menu icon you access to a set of actions:
• Press Navigate to navigate to the location (see “Navigating” on page 19).
• Press Via to use the location for routing (see “Planning a route” on page 22).
• Press Save to save the location as a bookmark (see “Favourites” on page 16).
• Press On Map to show the location on the main map.
Navigating
The powerful navigation capabilities of smart2go™ guide you along the shortest or
quickest route from A to B – with voice commands and in 3D.
This section describes the navigation feature.
See “Choosing a location on the map” on page 4 for information about choosing
elements on the map. See “Choosing and finding locations” on page 10 for information
about finding and choosing addresses, POIs, and locations inside a guide.
• Choose a location on the map or through Find Destination, and press
Navigate in the respective menu.
Detailed description
Page 21
EN
20
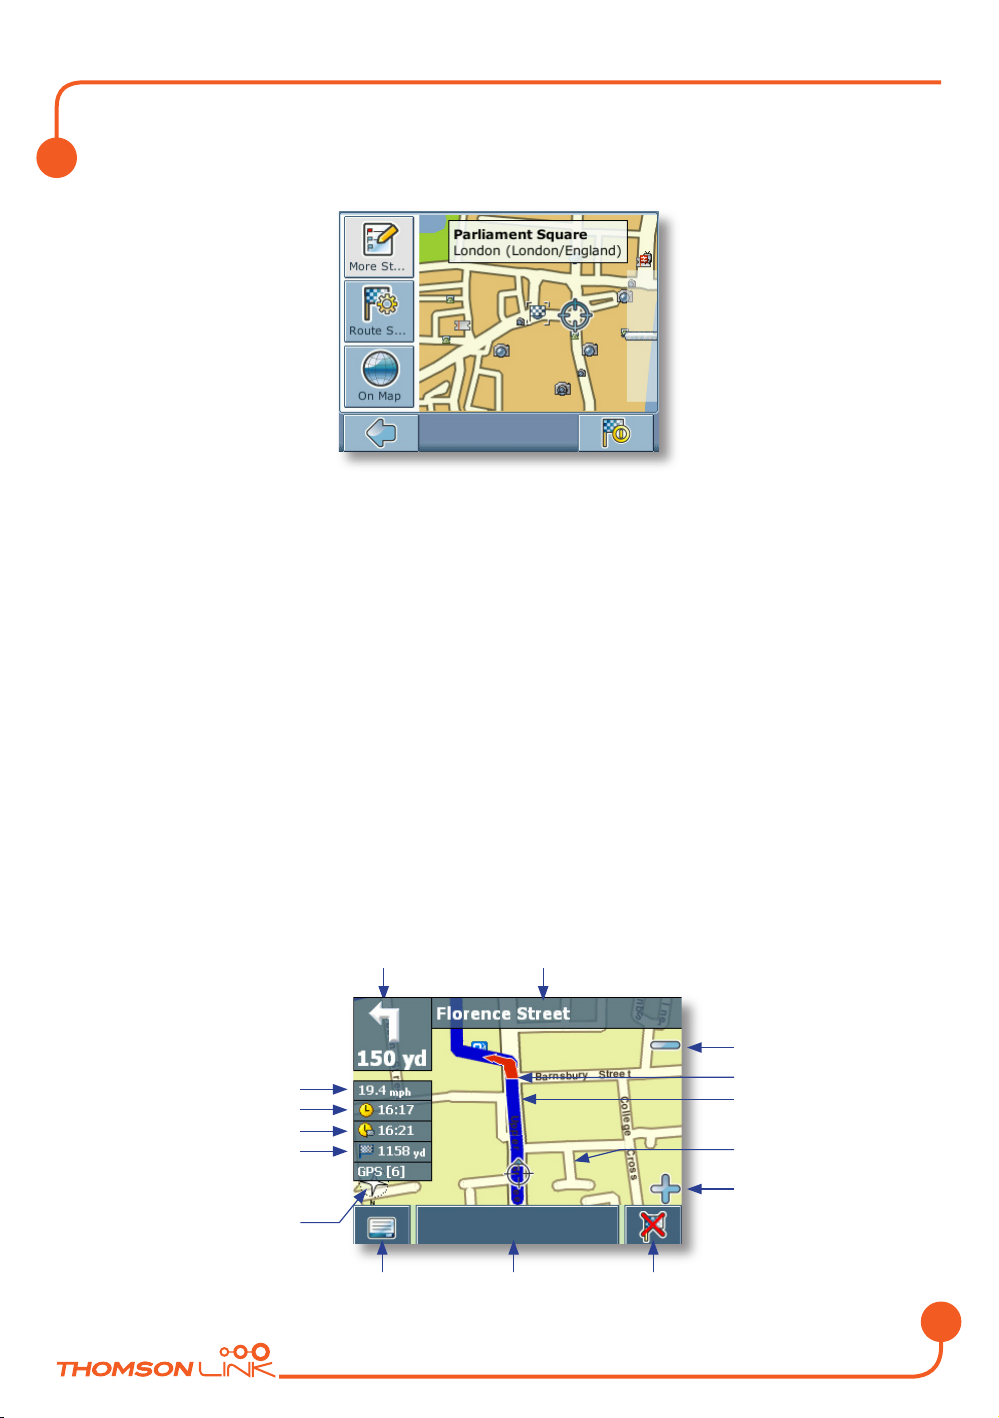
The location will be shown in the navigation map:
• Press the navigation icon to be guided to the location.
• Press More Stopovers to use the location for routing (see “Planning a route”
on page 22).
• Press Route Settings to alter the guidance settings (see “Route options” on
page 25).
• Press On Map to show the location on the map.
Your route will be calculated. The navigation screen will be displayed.
Navigation screen
On the navigation screen, the route will be shown in blue. The red arrow will indicate the
direction of your next manoeuvre. Crosshairs identify your current position. When you
come up to a turn or other manoeuvre, you will hear a voice command at the appropriate
time.
For one-way streets, the transit direction is indicated with a red arrow.
Manoeuvre icon
Distance to next manouvre
Next turn/junction/
exit no
Zoom out
Direction
Route
Current position
Zoom in
Menu icon Info box Stop navigation
OR
Follow route again
Speed
Distance to destination
GPS infot
Compass rose
Current time
Arrival time
Detailed description
Page 22

EN
21
Options during navigation
You can browse the map even while navigating. This way you can easily choose a new
destination if you change your mind. However, navigation will not be interrupted – you
will be still guided through voice commands. Press the back icon to follow the route on
screen again.
Menu options
• Select the menu icon while navigating to open a set of navigation options:
Here you will find the following items:
Route Settings
Change the guidance options, as described in “Route options” on page 25.
Settings
Open a menu with map settings, as described in Map settings on page 26.
Here you can also toggle between map and arrow mode for guidance.
When you change to the arrow mode, the navigation screen will not show the map but
only an arrow indicating the upcoming manoeuvre.
Detailed description
Page 23

EN
22
Volume
Alter the volume of the voice commands.
Info box options
• Select the info box while navigating to open a set of navigation options:
Alt. route :
With this option, you can choose to block the calculated route for a given distance (e. g.
0.5 km) and force an alternative route. Simply tap on the icon which shows the desired
distance. Your route will be recalculated, and the previous route will be discarded for the
given distance.
Save
Save your actual position as a bookmark.
List of waypoints
Opens a list of the waypoints on your itinerary.
Search
You can redirect your route by choosing a point of interest (POI), like a petrol station.
All user information like e.g. settings, bookmarks and recently visited locations will be
stored on the memory card and not on the device.
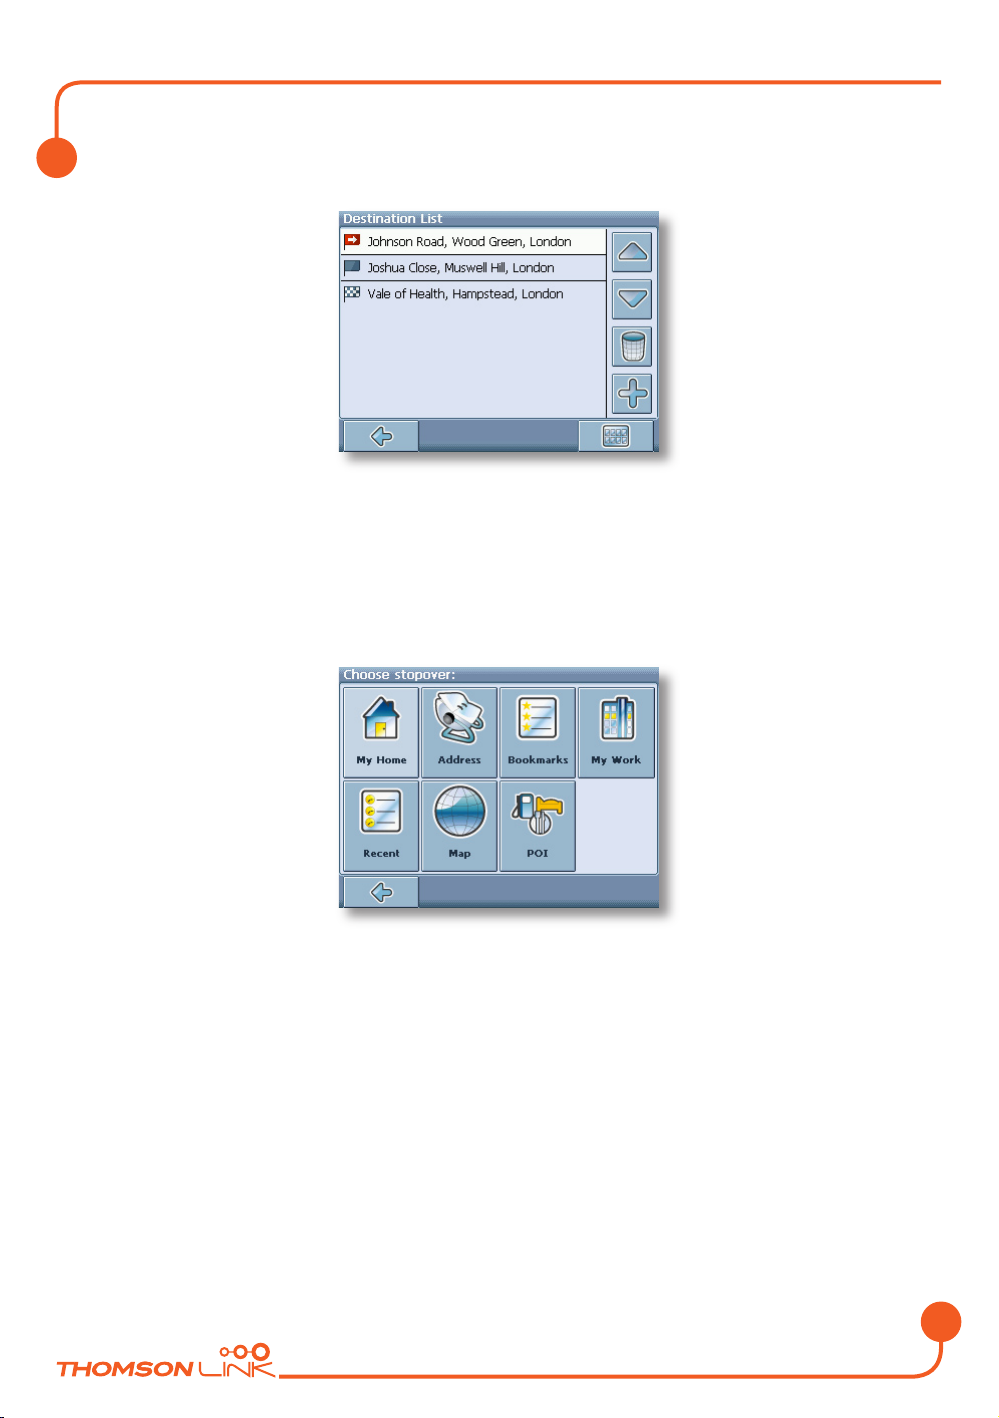
Planning a route
This section describes the route planning feature. This feature allows you to plan your
route in advance, choosing multiple stopovers along your journey.
See “Choosing a location on the map” on page 4 for information about choosing
elements on the map. See “Choosing and finding locations” on page 9 for information
about finding and choosing addresses, POIs, and locations inside a guide.
• Choose a location on the map or through Find Destination, and press Via in
the respective menu.
Detailed description
Page 24
EN
23
• The Destination List will be displayed:
The location will be added to the Destination List.
• Press the + icon to add another stopover.
You will switch to the Choose stopover screen. You may choose stopovers like your
home or work addresses, a bookmark, a point of interest, a recent location or by searching
for an address or pinpointing a destination on the map.
Once you have added stopovers (with the + icon) and returned to the Destination List,
you have several options:
• With the + icon you can choose additional stopovers.
• To change the order of the stopovers, select a stopover and then use the up and
down arrows to move it up/down in the list.
• With the trash icon you can delete a selected stopover.
Detailed description
Page 25
EN
24
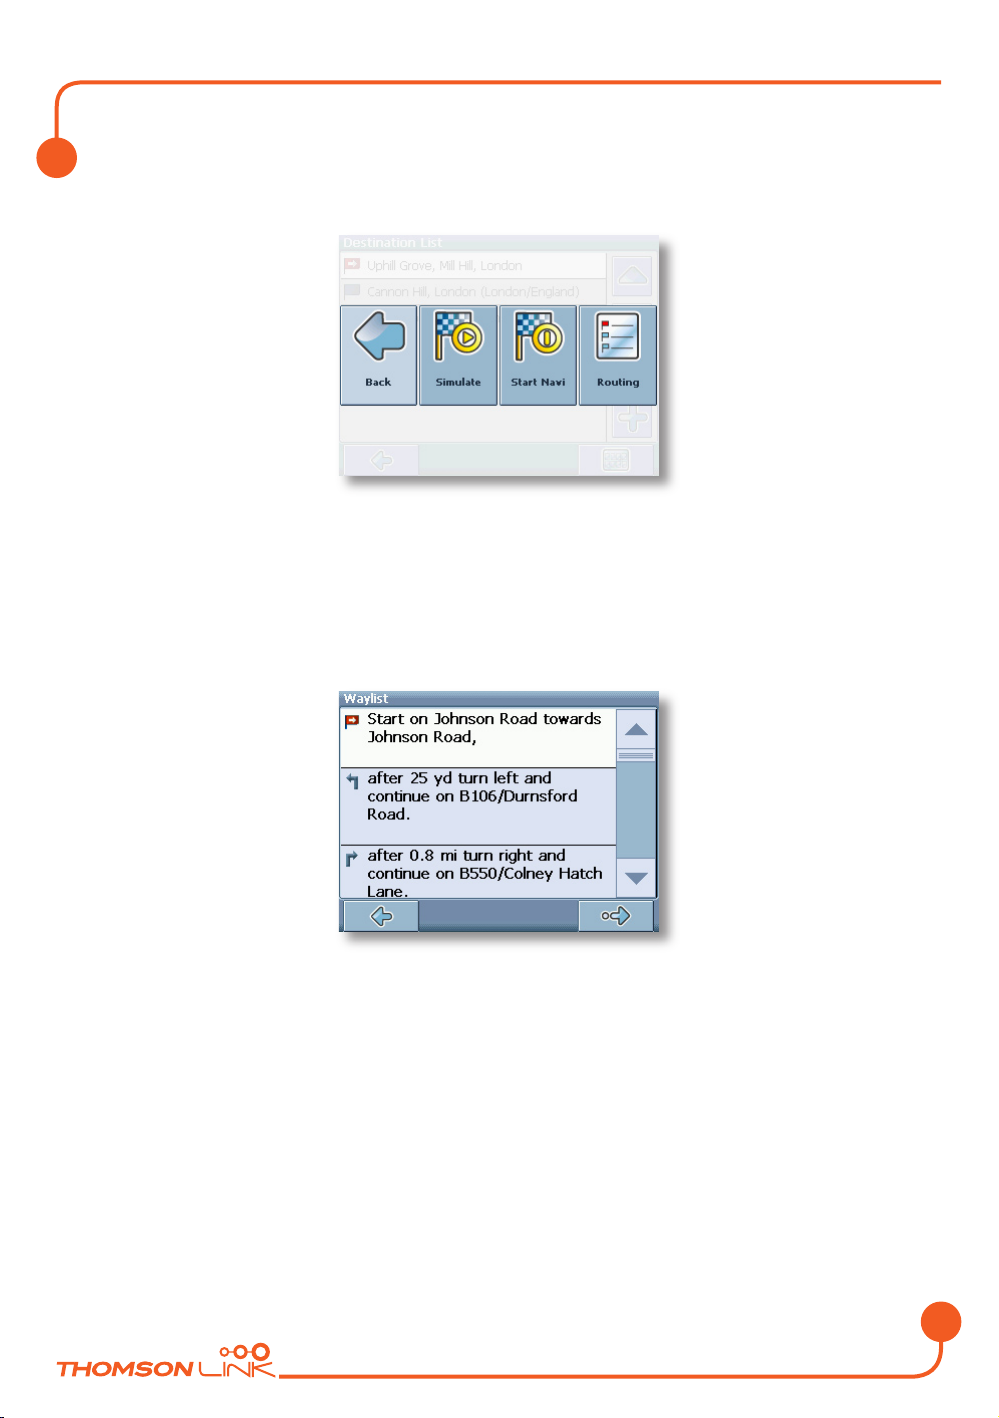
Once you have chosen your route, you have several options. You reach those options by
pressing the menu icon (bottom right-hand corner of the screen).
• Press Simulate to simulate the route to come.
• Press Start Navi to start guidance. The display will switch to the navigation map.
• With Routing the system will calculate your route. The Route Summary will
be displayed. Tap on one of the items in the Route Summary to display the
Waylist. Tap again to show the map view.
Settings
You can configure your Personal Navigation Device to suit your needs. When it comes to
navigating, you can, for example, choose to avoid or allow toll roads or ferries or select
your mode of transportation, like a fast or slow car, a scooter or even your own feet.
You can also edit several display settings, like 2D or 3D mode, day or night mode, map
complexity, etc.
• On the map, select the menu icon.
Detailed description
Page 26

EN
25
• Select Change Settings.
The main menu will be opened:
Route options
• Choose Change Route Options to change the route options.
The window with the route settings will be displayed:
• To switch between the modes just touch the icons. These will toggle so you can
quickly see the activated settings.
You can choose among the following options: Mode of transportation (fast car, slow car,
motorbike, pedestrian, etc.), fastest or shortest route, allow or avoid toll roads, motorways,
and ferries. You can also choose the distance unit (miles/kilometres).
The London Congestion Zone in Central London is regarded as a toll road by your
navigation system. Therefore, if you choose to avoid toll roads, you will not be guided
through this zone. However, there will be no warning if you enter this zone accidentally.
Once you have chosen your settings, press the confirmation icon to return to the main
menu.
Detailed description
Page 27
EN
26
Mode of transportation – overview
Fast – assumes fast driving on highways. Choosing this option will slightly favour highways
in the routing choice
Slow – assumes slower driving on highways. Choosing this option will reduce the
preference for highways in the routing choice
Bike – takes into account bike paths and blocks highways where bikes are prohibited.
Motorbike – takes into account motorbike restrictions, where applicable.
Scooter – takes into account scooter restrictions, where applicable.
Van – takes into account van restrictions, where applicable.
Pedestrian – provides true pedestrian routing including full access to one-way streets
and pedestrian zones, where possible.
Language
• Choose Change Language to select the language of your navigation system.
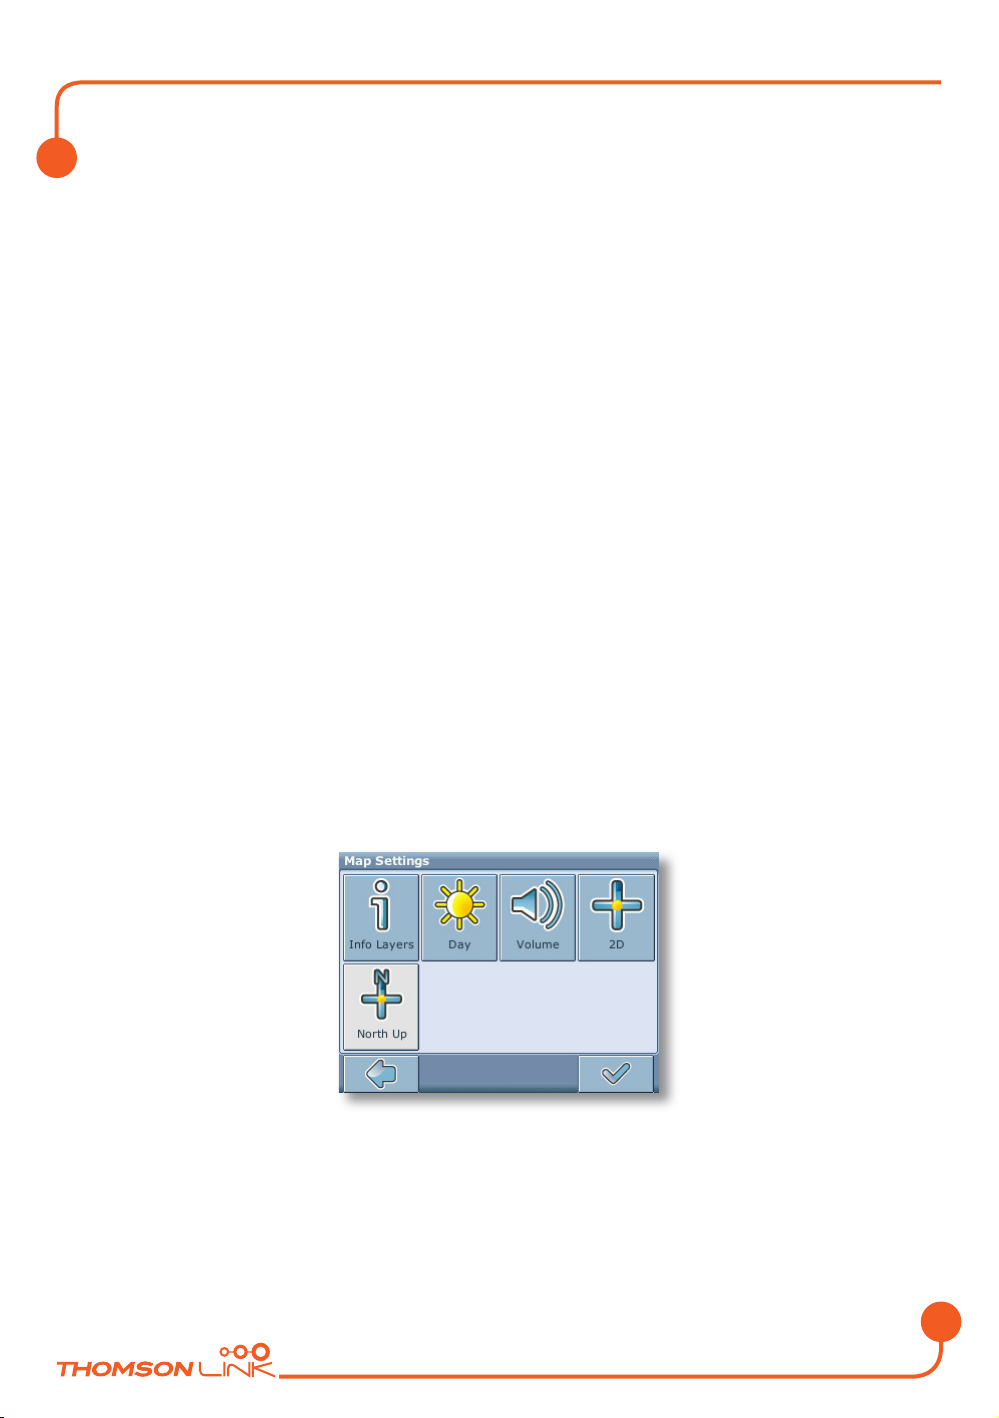
Map settings
• Choose Change Map Settings to change the map settings.
The window with the map settings will be shown:
• Toggle between night and day mode by pressing the corresponding icon.
• Toggle between 2D and 3D mode by pressing the corresponding icon.
Detailed description
Page 28
EN
27
• Choose Track Up to optimize the map orientation during navigation. Choose
North up to keep the map oriented to the north.
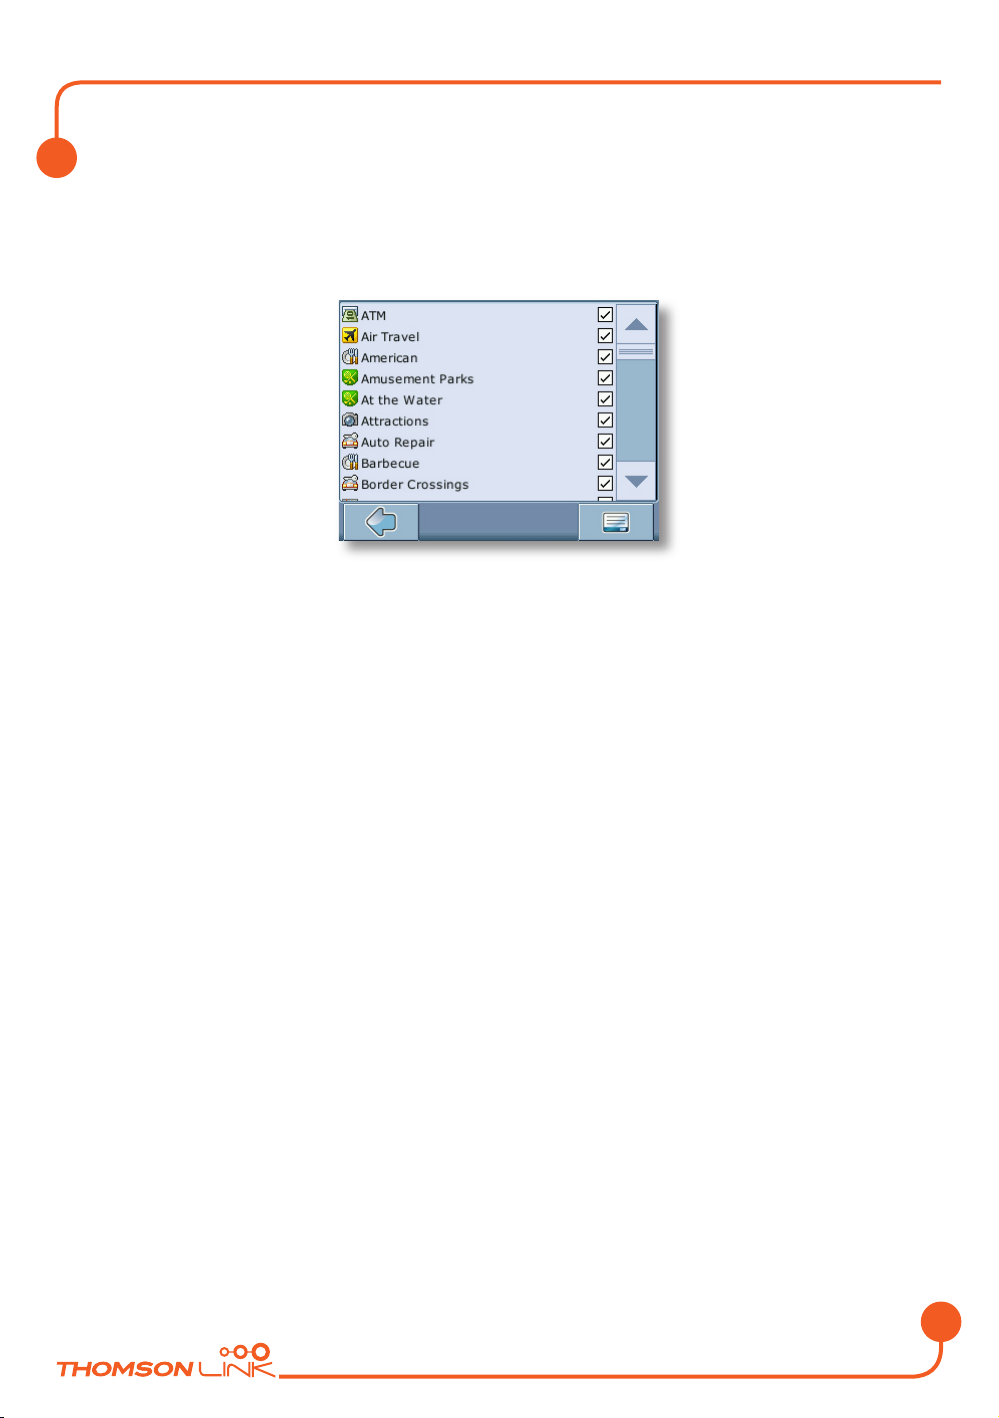
• Choose Info Layers to choose which kinds of elements are to be shown on the
map:
• Check the boxes of any category you want to have displayed on the map.
Uncheck those that should be hidden.
• Press the confirmation icon in the bottom right-hand corner to select/deselect all
categories.
• Press the arrow icon to return.
Map
• Select Choose Maps to select a map.
If you have map data for different regions/cities on your memory card, tap on the name of
the current region (e. g. London). All available maps on the memory card will be listed. You
can choose the desired region by simply tapping on its name.
Detailed description
Page 29

EN
28
OPTIONAL FEATURES
You can further enhance your Personal Navigation Device through a set of optional
features. The following features are available as options for your navigation system:
• Guides
• Traffic Message Channel (TMC)
• Route Recording
• Speed Camera Alert
Guides
At www.thomsonlink.com (Digital Store / GPS) you can find lots of valuable
information services, including directory services, WiFi hotspot locators, and city guides.
City guides contain detailed information about locations, such as descriptions, contact
information, prices, opening times, etc.
To purchase the guides and to learn how to download them, please go to
www.thomsonlink.com (Digital Store / GPS).
To learn how to use the guides, see “Searching for and choosing POIs” on page 13.
Traffic Message Channel (TMC)
Depending on your device, you may upgrade your navigation system and receive dynamic
traffic information (Traffic Message Channel, TMC).
• On the map, select the menu icon.
The main menu will be opened.
• On the following screen, select Change Settings.
• Select Change Route Options.
The window showing the guidance settings will be displayed.
• Press the TMC button (transmitter icon) to switch between the TMC settings
Automatic, Manual and Off.
Detailed description
Page 30

EN
29
With the Automatic option, your Personal Navigation Device will automatically guide
you around all the traffic jams on your route. With the Manual option your navigation
system will alert you about traffic jams and ask you if you would like to switch to an
alternate route.
During navigation, you can also choose to show a list of upcoming traffic jams.
• Touch the screen during guidance.
The settings screen will be displayed.
• Pressing Traffic Info shows a list of traffic jams. Traffic jams along your route will
be displayed in red.
Route Recording
The route recording function enables you to record your routes. You may save your traces
and import them in all kind of NMEA programs. By that you can e.g. document your trips.
• To do so, tap the display during navigation and select Record on.
Your route will be stored until you press the button again.
• Press the back icon to step back to the navigation screen.
Speed Camera Alert
With the speed camera function you can choose to detect and display speed cameras
along your way.
• On the map, select the menu icon.
The main menu will be opened.
• On the following screen, select Change Settings.
• Select Change Route Options.
• Press SpeedCam until the SpeedCam icon appears in its activated state.
In the event that speed cameras are located on your journey a warning will be received.
For each camera you will receive two alerts. Each alert consists of an audible beep and a
message displayed on screen telling you the camera type and distance from it.
Options
Page 31

EN
30
SMART2GO™ SETUP ASSISTANT
With the smart2go™ Setup Assistant you can choose and save your map and guide data
on a memory card for use with a supported handheld device. The smart2go™ Setup
Assistant installs those data on the memory card, together with the program files of your
navigation software and the voice files for guidance.
• Place the supplied CD or DVD in the CD/DVD slot of your computer. The Setup
Assistant will pop up automatically.
• Select the language of the installation program, and press OK.
You will see the welcome page.
• Click Next.
• Please read the End-User License Agreement and accept it by clicking I Agree. If
you do not accept the terms of the End-User License Agreement, click Cancel
to exit the Setup Assistant.
• Please choose the regions whose map and guide data you want to copy to your
memory card. Choose also the voice files used for guidance, and click Next to
install the files.
Smart2go™ Setup Assistant
Page 32

EN
31
On the left, the space required for the data on your memory card will be shown. Please
make sure that there is enough space left on your memory card.
You are prompted to insert your memory card into your card reader. If your system
cannot determine the path to your memory card automatically, you are prompted to enter
it manually.
The selected data will be copied to your memory card. Please do not close the
smart2go™ Setup Assistant nor remove your memory card until the data transfer process
is completed and you are prompted to do so.
Please keep in mind that the smart2go™ Setup Assistant will override all map data
contained on your memory card. Your preferences, including personal bookmarks, as
well as your premium content (e. g. Guides) remain unaltered.
Smart2go™ Setup Assistant
Page 33

EN
32
FREQUENTLY ASKED QUESTIONS
I can’t find an address.
Please make sure you have correctly spelled your entry. If you do not know how an
address is spelled correctly, simply enter the parts of the address, you know for sure (e.g.
“Lond”, “Leic” for Leicester Square in London). Then browse in the result list and look for
the address. Also make sure that the city in which you are looking for an address is correct.
Sometimes the official postal address differs from the address you are looking for. In that
case, search for an address nearby that you know of and browse on the map.
If you find the address on the map but you can not find it while searching for it, please let
us know via xxx.
There is a failure in the map / POIs are missing.
If you detect an error in the map data (e.g. a street is missing completely), we would like to
inform our map data provider. Please let us know via xxx.
I have problems to get a GPS fix.
If you have problems getting a satellite fix with the GPS (you can see how many satellites
are being received on the main menu at the bottom left) please make sure, that you are
outside and the GPS antenna has a good visibility to the open sky. Some models also
do support an additional external active antenna. Please also consult with the hardware
manual of your device to get further information of how to obtain a GPS fix.
Where can I get technical support?
Please contact the manufacturer or your retail store.
Where can I get software updates?
Please contact the manufacturer or your retail store for information about software
updates.
Where can I get additional maps and guides?
Please visit the download shop at www.thomsonlink.com (Digital Store / GPS).
Frequently asked questions
Page 34

EN
33
INDEX
Index
A
Address
set as destination 10
Alternative route
enforce 22
Arrow mode 21
B
Block route 22
Bookmarks
Memory Card 19
set as destination 18
C
Change region 27
Choose destination
Address 10
Bookmarks 18
Guides 15
look-ahead search 10
My Home 17
My Work 18
POI 13
Recent locations 19
Close application 8
Compass
adjust orientation 8
D
Day mode
toggle 26
Delete
Stopover 23
Destination List
Route planning 23
E
Exit application 8
F
Ferries
avoid/allow 25
I
Info Layers
Map 27
L
Language 26
London Congestion Zone
Settings 25
Look-ahead search 10
M
Main menu 10
Settings 25
Map 6
choose 27
Compass icon 8
Info Layers 27
selection mode 8
tracking mode 7
Zoom slider 8
Map settings 26
Memory Card
save Bookmarks 19
save settings 22
More Stopovers
command 20
Motorways
avoid/allow 25
My Home
set as destination 17
My Work
set as destination 18
Page 35

EN
34
Index
N
Navigate
command 9, 14, 16, 18, 19
Navigation 19
command 20
Navigation screen 20
Night mode
toggle 26
O
On Map
command 14, 16, 19, 20
P
Pedestrian 25
POI
Redirect route 22
R
Recent location
set as destination 19
Route 25
Route planning 22
Choose stopover 23
Route Summary 24
simulate 24
Waylist 24
Route Settings
command 20
S
Save
command 9, 14, 16, 19
Search
POI 22
Selection mode 8
Settings
Change region 27
choose maps 27
Ferries 25
Language 26
London Congestion Zone 25
main menu 25
Map settings 26
Memory Card 22
Motorways 25
Pedestrians 25
Route 25
Toll roads 25
Simulate
Route 24
Stopover
choose for route planning 23
Delete 23
Summary
Route planning 24
T
TMC 29
Toll roads
avoid/allow 25
Tracking mode 7
Traffic Info 29
Traffic jams 29
V
Via
command 9, 14, 16, 19
W
Waylist
Route planning 24
Z
Zoom slider 8
Page 36

EN
35
Copyright and license notes
COPYRIGHT AND LICENSE NOTES
Copyright for this manual: © gate5 AG, 2006. All rights reserved.
Portions of the software are copyright © 1996-2002 The FreeType Project
(www.freetype.org). All rights reserved.
Page 37

GPS 280 / GPS 281
THOMSON Sales Europe
46, quai A. Le Gallo
92648 Boulogne Cedex
FRANCE
322 019 464 RCS NANTERRE
http://www.smart2go.com
0022we01 © Copyright THOMSON 2006
Page 38

Manuale dell’utente per
dispositivi personali di
navigazione
GPS 280 / GPS 281
Page 39

IT
38
SOMMARIO
CONVENZIONI TIPOGRAFICHE .........................................39
ICONE .......................................................................................40
INTRODUZIONE .....................................................................41
Caratteristiche principali ...........................................................................................41
AVVIO DELL’APPLICAZIONE ...............................................42
DESCRIZIONE DETTAGLIATA .............................................43
Utilizzo della mappa .................................................................................................... 43
Modalità di tracking e modalità di selezione
Individuazione e selezione delle località ................................................................. 45
Selezione di una località sulla mappa
Ricerca di un indirizzo
Ricerca e selezione dei punti di interesse
Esplorazione o ricerca all’interno di una guida
Favoriti
Navigazione ................................................................................................................... 55
Schermata di navigazione
Opzioni durante la navigazione
Pianificazione di un itinerario .................................................................................... 58
Opzioni .......................................................................................................................... 60
Opzioni itinerario
Lingua
Opzioni mappa
Mappa
FUNZIONI OPZIONALI64
Guide .............................................................................................................................. 64
Informazioni aggiornate sulla viabilità (TMC) ........................................................ 64
Registrazione degli itinerari ....................................................................................... 65
Avviso di autovelox ..................................................................................................... 65
INSTALLAZIONE GUIDATA SMART2GO™ ........................66
DOMANDE FREQUENTI ........................................................68
INDICE ......................................................................................69
COPYRIGHT E NOTE SULLA LICENZA .............................71
Sommario
Page 40

IT
39
CONVENZIONI TIPOGRAFICHE
Grassetto
Elementi da selezionare, ad esempio opzioni di menu, pulsanti di comandi o elementi di un
elenco.
••••
• Elenco puntato
Passaggi delle procedure. Queste istruzioni consentono di completare un’attività specifica.
••••
Comment
Informazioni particolarmente importanti o rilevanti.
••••
Monospace
Informazioni da digitare oppure nomi di file o cartelle.
••••
MAIUSCOLE
Nomi di tasti sulla tastiera. Ad esempio, MAIUSC, CTRL o ALT.
Convenzioni tipografiche
Page 41

IT
40
ICONE
Nell’applicazione vengono utilizzati i simboli e le icone elencati di seguito:
Icona Nome Funzione
Icona del menu
Consente di visualizzare un menu con
diverse opzioni.
Icona Indietro
Consente di tornare alla schermata
precedente.
Icona Navigazione Consente di avviare la navigazione.
Icona Ricerca
Consente di aprire una schermata di
ricerca.
Icona di conferma
Consente di applicare le impostazioni,
nonché di selezionare o deselezionare
tutto.
Icona Esci
Consente di uscire dall’applicazione.
Visualizzabile solo in modalità di tracking
(vedere “Modalità di tracking e modalità di
selezione” a pagina 43).
Icona GPS
Consente di tornare nella mappa alla
posizione GPS. Visualizzabile solo in
modalità di selezione (vedere “Modalità
di tracking e modalità di selezione” a
pagina 7.
Icone
Page 42

IT
41
INTRODUZIONE
Avete scelto un sistema di navigazione all’avanguardia. È stata un’ottima scelta. Sicuramente
avrete modo di apprezzare il prodotto. Questo sistema di navigazione vi condurrà
direttamente alla vostra destinazione, sia in auto che a piedi. Potrete navigare e pianificare il
vostro itinerario tramite un’interfaccia intuitiva e di facile utilizzo, utilizzando semplicemente
un dito. Inoltre, questa applicazione vi consentirà di pianificare il viaggio in base alle vostre
esigenze e preferenze personali, nonché di memorizzare le destinazioni di interesse prima
di mettervi in viaggio. In questo manuale verranno illustrate le principali caratteristiche del
sistema.
Caratteristiche principali
• Navigazione oltre confine grazie a 1 GB di mappe dell'Europa (funzione
opzionale)
• Informazioni aggiornate sulla viabilità, TMC (funzione opzionale)
• Modalità pedonale
• Funzione di ricerca con completamento automatico della digitazione
• Visualizzazione 3D di alto livello delle singole case nelle città europee selezionate
(funzione opzionale)
• Esplorazione terrestre
• Modalità Notte eccezionale
• Modulo di navigazione migliorato
• Contenuto di qualità superiore grazie a rinomate guide (funzione opzionale)
Introduzione
Page 43

IT
42
AVVIO DELL’APPLICAZIONE
Accendere il dispositivo, posizionarlo con una visuale libera verso l’alto e stabilire un primo
collegamento via satellite. In auto è consigliabile appoggiare il dispositivo sul cruscotto. Il
primo collegamento può richiedere alcuni minuti.
• Attivare l'unità e toccare NAVI o NAVIGAZIONE sulla schermata iniziale.
• Se sul dispositivo sono disponibili più lingue, verrà richiesto di sceglierne una.
Dopo il caricamento dell’applicazione, verrà visualizzata una schermata in cui sono illustrate
alcune norme di sicurezza. Leggerle attentamente. In seguito, sarà possibile scegliere di non
visualizzarle all’avvio successivo.
Verrà visualizzata un’immagine satellitare del proprio Paese. Sarà quindi possibile godersi
il panorama sorvolando il Paese e “atterrare” nella posizione corrente. (Si può anche
scegliere di ignorare l’introduzione toccando la schermata).
Al termine del viaggio, verrà visualizzata la mappa.
Avvio dell’applicazione
Page 44

IT
43
DESCRIZIONE DETTAGLIATA
In questo capitolo vengono fornite informazioni dettagliate sulle funzioni del dispositivo
personale di navigazione. Nelle pagine seguenti verranno illustrati gli argomenti riportati di
seguito:
- Utilizzo della mappa (vedere a pagina 43)
- Individuazione e selezione delle località (vedere a pagina 45)
- Navigazione alla destinazione specificata (vedere a pagina 45)
- Utilizzo della pianificazione dell’itinerario (vedere a pagina 58)
- Configurazione dell’applicazione (vedere a pagina 60)
Utilizzo della mappa
La mappa è il componente principale del dispositivo personale di navigazione. Per
impostazione predefinita, verrà centrata sulla posizione corrente, a condizione che sia
disponibile una connessione GPS. È possibile esplorare la mappa, ottenere informazioni
sulle diverse località visualizzate e perfino sceglierle per l’itinerario e la navigazione.
Modalità di tracking e modalità di selezione
Nella mappa sono disponibili due stati di base, la modalità di tracking e la modalità di
selezione.
Nella modalità di tracking, la mappa segue la posizione corrente (posizione GPS),
visualizzando le informazioni sulla posizione geografica, la velocità e così via:
Velocità
Coordinate
geografiche
Ora
Altitudine sul
livello del mare
Stato GPS
Bussola
Menu
Riduci
visualizzazione
Posizione GPS
Ingrandisci
visualizzazione
Uscita
dall’applicazione
Finestra informativa
Descrizione dettagliata
Page 45

IT
44
Durante l’esplorazione della mappa, è possibile immettere la modalità di selezione:
Bussola
Icona del menu
Finestra informativa Icona di tracking
Riduci visualizzazione
Posizione (GPS)
corrente
Ingrandisci
visualizzazione
Cursore
• Per esplorare la mappa, utilizzare una penna o il dito. La posizione corrente sarà
identificata da un cursore.
Se viene selezionata un’icona sulla mappa verrà aperta una finestra sovrapposta
contenente informazioni sull’elemento selezionato.
• Per ingrandire o ridurre la visualizzazione, premere l'icona + o -. Verrà visualizzato
il cursore dello zoom, che può essere utilizzato per ingrandire o ridurre
gradatamente la visualizzazione.
• L'icona Bussola (nell’angolo inferiore sinistro) consente di regolare l’orientazione
della mappa.
• Per tornare alla modalità di tracking, premere l’icona corrispondente. Per uscire
dall’applicazione, premere nuovamente il pulsante.
Descrizione dettagliata
Page 46

IT
45
Individuazione e selezione delle località
In questa sezione vengono descritte le diverse modalità per individuare e selezionare le
località. È possibile scegliere le località sulla mappa, cercare un indirizzo, scegliere un
favorito (ad esempio l‘indirizzo di casa e di lavoro, i favoriti e i luoghi visitati di recente) ed
esplorare le directory Dintorni e le guide.
Selezione di una località sulla mappa
• Spostare il cursore su qualsiasi punto della mappa. Nella finestra informativa verrà
visualizzato il nome della località o della via selezionata.
• Premere la finestra informativa per aprire la schermata contenente i dettagli:
Per accedere a opzioni aggiuntive, premere l’icona del menu:
• Premere Naviga per impostare un itinerario in base alla località specificata
(vedere “Navigazione” a pagina 55).
• Premere Tramite per utilizzare la località per l’itinerario (vedere “Pianificazione
di un itinerario” a pagina 58).
• Premere Salva per salvare la località tra i Favoriti (vedere “Favoriti” a pagina 52).
Descrizione dettagliata
Page 47

IT
46
Ricerca di un indirizzo
La Ricerca di indirizzo consente di individuare un indirizzo tramite l’immissione di
informazioni sulla destinazione desiderata (quali la via, il paese o la città). Sarà quindi
possibile selezionare uno dei risultati visualizzati in un elenco e utilizzare l’indirizzo per
diversi scopi, ad esempio per individuare la destinazione su una mappa, per pianificare
l’itinerario e per la navigazione.
• Sulla mappa selezionare l'icona del menu.
Verrà visualizzato il Menù inizio:
• Selezionare Cercare destinazione.
• Selezionare In ricerca di indirizzo.
Verrà visualizzata la finestra Indirizzo:
Immettere i dati appropriati per individuare l’indirizzo desiderato.
Modalità di ricerca
Il dispositivo personale di navigazione offre una funzione di ricerca pratica e interattiva con
completamento automatico della digitazione per evitare errori di ortografia. È possibile
premere solo i pulsanti che consentono di ottenere risultati di ricerca. Tutti gli altri pulsanti
sono disattivati.
Descrizione dettagliata
Page 48

IT
47
• Immettere il primo carattere.
Alcuni pulsanti sulla tastiera verranno disattivati e sarà possibile scegliere solo i pulsanti
attivi:
• Immettere il secondo carattere.
In base alla scelta effettuata, alcuni pulsanti verranno disattivati.
• Continuare a immettere caratteri fino a limitare la ricerca a un unico risultato.
OPPURE
• Premere l'icona di ricerca (lente di ingrandimento).
Verrà visualizzato un elenco di risultati.
• Scegliere la voce desiderata dall'elenco.
Per passare dalla modalità alfabetica a quella numerica, premere 123 o ABC. Per
passare dai caratteri maiuscoli a quelli minuscoli, premere ^.
Se in qualsiasi momento si desidera cancellare un carattere digitato, premere il
pulsante Indietro <- sulla schermata. Per aggiungere uno spazio, premere il pulsante _.
Descrizione dettagliata
Page 49

IT
48
Impostazione del Paese
• Per selezionare il Paese desiderato premere Paese.
• Scegliere il Paese dall'elenco.
Il campo Paese verrà compilato con il nome del Paese selezionato.
Immissione di un codice postale
Invece del nome di una città è possibile utilizzare anche un codice postale.
• Per immettere un codice postale, premere Centro CAP.
• Immettere il codice postale del paese o della città che si sta cercando.
• Premere l'icona di ricerca (lente di ingrandimento).
Verrà visualizzato un elenco di risultati.
• Scegliere il paese o la città desiderata dall’elenco.
Verrà visualizzata la schermata Indirizzo, I campi Città e Centro CAP verranno
compilati con la città e il codice postale selezionati.
È inoltre possibile immettere un codice di avviamento postale univoco a 7 cifre. In
questo caso non è necessario immettere una via. (Funzione opzionale).
Ricerca della città
• Per selezionare la città desiderata premere Città.
Cercare la città in base alla procedura illustrata in precedenza.
Verrà visualizzato un elenco di risultati.
• Scegliere il paese o la città desiderata dall’elenco.
Verrà visualizzata la schermata Indirizzo, Il campo Città verrà compilato con il nome del
paese o della città selezionata.
Ricerca della via
• Per immettere la via, selezionare Via.
Cercare la via in base alla procedura illustrata in precedenza.
Verrà visualizzato un elenco di risultati.
• Scegliere la via desiderata dall'elenco.
Verrà visualizzata la schermata Indirizzo, compilata con i dati individuati.
È possibile immettere anche il numero civico.
Descrizione dettagliata
Page 50

IT
49
Impostazione di un itinerario in base a un indirizzo specifico
Dopo aver limitato la ricerca a un indirizzo univoco, è possibile avviare la navigazione.
• Premere la freccia Avanti.
Sulla mappa di navigazione verrà visualizzato l’indirizzo. Sarà quindi possibile scegliere di
essere condotti a tale indirizzo, di utilizzarlo per la pianificazione dell’itinerario e così via
(vedere “Navigazione” a pagina 55).
Ricerca e selezione dei punti di interesse
La ricerca Dintorni consente di individuare rapidamente i punti di interesse nelle
vicinanze, quali aree di servizio e ristoranti, scelti da un database di milioni di punti di
interesse situati nelle vicinanze o in località distanti.
• Sulla mappa selezionare l'icona del menu.
• Nella schermata successiva selezionare Cercare destinazione.
• Selezionare In ricerca PdI.
Verrà visualizzato un menu contenente le categorie dei punti di interesse:
Nella barra del titolo della schermata verrà visualizzato un indirizzo. Verranno elencati i
punti di interesse situati nelle vicinanze rispetto a tale località.
• Selezionare l'icona del puntatore per scegliere un altro indirizzo come punto di
partenza per la selezione dei punti di interesse (vedere "Ricerca di un indirizzo" a
pagina 46).
Il nuovo indirizzo selezionato verrà visualizzato nella barra del titolo della schermata delle
categorie dei punti di interesse.
È possibile esplorare i punti di interesse per categorie oppure cercare un determinato
punto di interesse.
Descrizione dettagliata
Page 51

IT
50
Selezione di un punto di interesse
• Selezionare la categoria dei punti di interesse desiderata.
Verrà visualizzato un menu contenente delle sottocategorie.
• Sceglierne una.
Verrà visualizzato un elenco dei punti di interesse.
• Per selezionare un punto di interesse, è sufficiente toccarlo.
La località verrà visualizzata sulla mappa:
• Premere le frecce accanto al nome della località per scorrere i risultati.
• Premere i per visualizzare una schermata contenente dettagli sulla località.
Premere l’icona del menu per accedere a diverse opzioni:
• Premere Naviga per impostare un itinerario in base alla località specificata
(vedere “Navigazione” a pagina 55).
• Premere Tramite per utilizzare la località per l’itinerario (vedere “Pianificazione
di un itinerario” a pagina 58).
• Premere Salva per salvare la località tra i Favoriti (vedere “Favoriti” a pagina 52).
• Premere Sulla mappa per visualizzare la località sulla mappa principale.
Ricerca di un punto di interesse
Premere la lente di ingrandimento.
• Nella finestra di ricerca immettere un termine da cercare (almeno tre caratteri) e
avviare la ricerca premendo la freccia a destra.
Verrà visualizzato un elenco dei punti di interesse.
• Per selezionare un punto di interesse, è sufficiente toccarlo.
Il punto di interesse verrà visualizzato sulla mappa, come illustrato in precedenza.
Descrizione dettagliata
Page 52

IT
51
Esplorazione o ricerca all’interno di una guida
All’interno del menu Dintorni, è inoltre possibile accedere alle guide, una funzione
opzionale estremamente utile. Grazie a rinomate guide turistiche, è possibile esplorare
i dintorni e ottenere informazioni utili e descrizioni dettagliate su attrazioni turistiche,
ristoranti, hotel e così via. È possibile utilizzare gli elementi contenuti nelle guide per la
navigazione oppure salvarli tra i Favoriti.
Le guide sono una funzione opzionale e possono essere acquistate all’indirizzo
www.thomsonlink.com (rubrica Digital Store / GPS).
• Sulla mappa selezionare l'icona del menu.
• Nella schermata successiva selezionare Cercare destinazione.
• Selezionare In servizi locali.
Verrà visualizzato l’elenco delle guide:
• Per selezionare la guida desiderata è sufficiente toccare il nome corrispondente.
Verrà visualizzata la pagina delle categorie relative alla guida selezionata:
Sarà quindi possibile esplorare la guida per categorie oppure effettuare una ricerca
all’interno della guida.
Descrizione dettagliata
Page 53

IT
52
Ricerca all’interno della guida
• Premere l'icona di ricerca (lente di ingrandimento).
• Nella finestra di ricerca immettere un termine da cercare (almeno tre caratteri) e
avviare la ricerca premendo l'icona corrispondente (lente di ingrandimento).
Verrà visualizzato l’elenco dei risultati.
• Per selezionare una località, è sufficiente toccarla.
La località verrà visualizzata sulla mappa.
• Premere le frecce accanto al nome della località per scorrere i risultati.
• Premere i per visualizzare una schermata contenente dettagli sulla località.
Premere l’icona del menu per accedere a diverse opzioni:
• Premere Naviga per impostare un itinerario in base alla località specificata
(vedere “Navigazione” a pagina 55).
• Premere Tramite per utilizzare la località per l’itinerario (vedere “Pianificazione
di un itinerario” a pagina 58).
• Premere Salva per salvare la località tra i Favoriti (vedere “Favoriti” a pagina 52).
• Premere Sulla mappa per visualizzare la località sulla mappa principale.
Esplorazione della guida per categorie
Nella pagina delle categorie è possibile selezionare diverse categorie disponibili nella guida
(quali ristoranti, hotel, bar, musei e così via).
• Utilizzare le frecce SU e GIÙ per scorrere l’elenco.
Alcune guide contengono anche delle sottocategorie.
• Fare clic su una categoria o sottocategoria per cercare gli elementi desiderati.
Verrà visualizzato un elenco contenente i risultati della ricerca ordinati per distanza.
• Per selezionare una voce, è sufficiente toccarla.
• La località verrà visualizzata sulla mappa, come illustrato in precedenza.
Favoriti
Per la guida è possibile impostare le destinazioni preferite o quelle più utilizzate, scegliendo
tra l’indirizzo di casa o del posto di lavoro, un insieme di favoriti e i luoghi visitati di recente.
• Sulla mappa selezionare l'icona del menu.
• Nella schermata successiva selezionare Cercare destinazione.
• Selezionare In Favoriti.
Descrizione dettagliata
Page 54

IT
53
Sul display verrà visualizzata la schermata Favoriti:
Mia Casa
• Premere Mia Casa.
Sulla mappa verrà visualizzato l’indirizzo di casa:
• Selezionare l'icona del menu.
• Nella schermata seguente scegliere Naviga per essere condotto all‘indirizzo di
casa (per modificarlo o eliminarlo, premere Modifica o Elimina).
Verrà avviata immediatamente la navigazione.
Se non è stato impostato alcun indirizzo di casa, verrà richiesto di eseguire questa
operazione. È possibile sceglierlo eseguendo la ricerca di un indirizzo, tramite la
posizione GPS corrente oppure selezionando un luogo visitato di recente.
Descrizione dettagliata
Page 55

IT
54
Mio Lavoro
• Premendo Mio Lavoro, sulla mappa verrà visualizzato l’indirizzo di lavoro.
• Selezionare l'icona del menu.
• Nella schermata seguente scegliere Naviga per essere condotto all‘indirizzo di
lavoro (per modificarlo o eliminarlo, premere Modifica o Elimina).
Verrà avviata immediatamente la navigazione.
Se non è stato impostato alcun indirizzo del luogo di lavoro, verrà richiesto di eseguire
questa operazione. È possibile sceglierlo eseguendo la ricerca di un indirizzo, tramite la
posizione GPS corrente oppure selezionando un luogo visitato di recente.
Favoriti
L’elenco dei Favoriti contiene le destinazioni salvate come Favoriti (dalle guide,
selezionandole su una mappa e così via). Ciò significa che non è necessario eseguire una
nuova ricerca per tali destinazioni.
• Premere Favoriti.
Sul display verrà visualizzato l’elenco dei Favoriti:
Usare le frecce SU e GIÙ per scorrere l’elenco.
• Per selezionare un elemento, è sufficiente toccarlo.
La località verrà visualizzata sulla mappa.
• Premere le frecce accanto al nome della località per scorrere i risultati.
• Premere i per visualizzare una schermata contenente dettagli sulla località.
Premere l’icona del menu per accedere a diverse opzioni:
• Premere Naviga per impostare un itinerario in base alla località specificata
(vedere “Navigazione” a pagina 55).
Descrizione dettagliata
Page 56

IT
55
• Premere Tramite per utilizzare la località per l’itinerario (vedere “Pianificazione
di un itinerario” a pagina 58).
• Premere Sulla mappa per visualizzare la località sulla mappa principale.
Tutte le informazioni quali Opzioni, Favoriti e luoghi visitati di recente verranno
memorizzate sulla scheda di memoria e non sul dispositivo.
Recente
Premendo Recente verrà visualizzato un elenco contenente le destinazioni visitate o
cercate di recente.
• Premere Recente.
Sul display verrà visualizzato l’elenco degli oggetti recenti.
Usare le frecce SU e GIÙ per scorrere l’elenco.
• Per selezionare un elemento, è sufficiente toccarlo.
La località verrà visualizzata sulla mappa.
• Premere le frecce accanto al nome della località per scorrere i risultati.
• Premere i per visualizzare una schermata contenente dettagli sulla località.
Premere l’icona del menu per accedere a diverse opzioni:
• Premere Naviga per impostare un itinerario in base alla località specificata
(vedere “Navigazione” a pagina 55).
• Premere Tramite per utilizzare la località per l’itinerario (vedere “Pianificazione
di un itinerario” a pagina 58).
• Premere Salva per salvare la località tra i Favoriti (vedere “Favoriti” a pagina 52).
• Premere Sulla mappa per visualizzare la località sulla mappa principale.
Navigazione
Le eccezionali funzionalità di navigazione di smart2go™ consentono di arrivare dal punto
A al punto B in base al percorso più breve o più veloce, fornendo anche comandi vocali e
una visualizzazione 3D.
In questa sezione viene descritta la funzionalità di navigazione.
Per informazioni sulla selezione di elementi sulla mappa, vedere “Selezione di una
località sulla mappa” a pagina 39. Per informazioni sull’individuazione e la selezione di
indirizzi, punti di interesse e località all’interno di una guida, vedere “Individuazione e
selezione delle località” a pagina 45.
• Selezionare una località sulla mappa oppure tramite Cercare destinazione,
quindi premere Naviga nel relativo menu.
Descrizione dettagliata
Page 57

IT
56
La località verrà visualizzata sulla mappa di navigazione:
• Per essere condotti alla località desiderata, premere l’icona di navigazione.
• Premere Più destinationi per utilizzare la località per l’itinerario (vedere
“Pianificazione di un itinerario” a pagina 58).
• Premere Opzioni di Guida per modificare le opzioni di guida (vedere “Opzioni
itinerario” a pagina 61).
• Premere Sulla mappa per visualizzare la località sulla mappa.
L’itinerario verrà elaborato e verrà visualizzata la schermata di navigazione.
Schermata di navigazione
Sulla schermata di navigazione, l’itinerario verrà visualizzato in blu. La freccia rossa indicherà
la direzione della manovra successiva, mentre i puntatori segnaleranno la posizione
corrente. In prossimità di una svolta o di un altro tipo di manovra, verrà riprodotto un
comando vocale al momento opportuno.
Nelle strade a senso unico, la direzione di transito è indicata con una freccia rossa.
Icona di manovra
Distanza alla prossima
manovra
Svolta/raccordo/n.
uscita successivi
Riduci visualizzazione
Direzione
Itinerario
Posizione corrente
Ingrandisci
visualizzazione
Icona del menu Finestra
informativa
Stop Navigazione
OPPURE
Segui di nuovo itinerario
Velocità
Distanza alla
destinazione
Stato GPS
Bussola
Ora corrente
Ora di arrivo
Descrizione dettagliata
Page 58

IT
57
Opzioni durante la navigazione
È possibile esplorare la mappa anche durante la navigazione. Ciò consente di
selezionare una nuova destinazione se si desidera modificare l’itinerario. La navigazione
non verrà interrotta e continueranno a essere forniti comandi vocali. Per seguire di
nuovo l’itinerario sulla schermata, premere l’icona Indietro.
Opzioni di menu
• Selezionare l'icona del menu per visualizzare un insieme di opzioni di navigazione:
Verranno visualizzati i seguenti elementi:
Opzioni di Guida
Consente di modificare le opzioni di guida, come illustrato in “Opzioni itinerario” a
pagina 61.
Opzioni
Consente di accedere a un menu contenente le opzioni della mappa, come illustrato in
Opzioni mappa a pagina 62.
Inoltre, consente di passare dalla mappa alla modalità Frecce per la guida.
Quando si passa alla modalità Frecce, nel sistema di navigazione non viene più
visualizzata la mappa ma solo una freccia indicante la manovra successiva.
Descrizione dettagliata
Page 59

IT
58
Volume
Consente di modificare il volume dei comandi vocali.
Opzioni della finestra informativa
• Selezionare la finestra informativa durante la navigazione per visualizzare un
insieme di opzioni di navigazione:
Alternativa:
Questa opzione consente di bloccare l‘itinerario elaborato in base a una distanza
specificata (ad esempio 0,5 km) e di utilizzarne uno alternativo. È sufficiente toccare l’icona
che indica la distanza desiderata. L’itinerario verrà elaborato di nuovo e quello precedente
per la distanza specificata verrà annullato.
Salva
Consente di salvare la posizione corrente tra i Favoriti.
Punti di passaggio
Consente di visualizzare i punti di passaggio lungo l’itinerario.
Ricerca
Consente di reimpostare il proprio percorso scegliendo un punto di interesse (POI), ad
esempio un’area di servizio.
Tutte le informazioni quali Opzioni, Favoriti e luoghi visitati di recente verranno
memorizzate sulla scheda di memoria e non sul dispositivo.
Pianificazione di un itinerario
In questa sezione viene descritta la funzione di pianificazione dell’itinerario. Questa
funzione consente di pianificare il proprio itinerario in anticipo, impostando diverse tappe
lungo il percorso.
Per informazioni sulla selezione di elementi sulla mappa, vedere “Selezione di una
località sulla mappa” a pagina 45. Per informazioni sull’individuazione e la selezione di
indirizzi, punti di interesse e località all’interno di una guida, vedere “Individuazione e
selezione delle località” a pagina 45.
• Selezionare una località sulla mappa oppure tramite Cercare destinazione,
quindi premere Tramite nel relativo menu.
Descrizione dettagliata
Page 60

IT
59
• Verrà visualizzata la Lista delle destinazioni:
La località verrà aggiunta alla Lista delle destinazioni.
• Per aggiungere un'ulteriore tappa, premere l'icona +.
Verrà visualizzata la schermata Seleziona tappa. È possibile selezionare tappe quali
l’indirizzo di casa o del luogo di lavoro, un favorito, un punto di interesse, una destinazione
recente oppure cercare un indirizzo o individuare una destinazione sulla mappa.
Dopo aver aggiunto le tappe (tramite l’icona +) ed essere tornati alla Lista delle
destinazioni, è possibile selezionare diverse opzioni:
• L'icona + consente di scegliere ulteriori tappe.
• Per modificare l'ordine delle tappe, selezionare una tappa, quindi utilizzare le
frecce SU e GIÙ per scorrere l’elenco.
• L'icona del cestino consente di eliminare una tappa selezionata.
Descrizione dettagliata
Page 61

IT
60
Dopo aver scelto l’itinerario, è possibile selezionare diverse opzioni. Per visualizzarle,
premere l’icona del menu (angolo inferiore destro della schermata).
• Simula consente di simulare l‘itinerario pianificato.
• Premere Avvia Navi per avviare il sistema di navigazione. Sul display verrà
visualizzata la mappa di navigazione.
• Itinerario consente di elaborare l’itinerario. Verrà visualizzata la schermata
Sommario del percorso. Toccare uno degli elementi del Sommario del
percorso per visualizzare il Passaggio. Toccarlo di nuovo per accedere alla
visualizzazione della mappa.
Opzioni
È possibile configurare il dispositivo personale di navigazione in base alle proprie esigenze.
Durante la navigazione, ad esempio, è possibile scegliere di utilizzare o meno strade a
pagamento o traghetti oppure selezionare la modalità di trasporto desiderata (automobile
veloce o lenta, scooter, a piedi e così via). È inoltre possibile modificare diverse opzioni di
visualizzazione, ad esempio la modalità 2D o 3D, la modalità Giorno o Notte, il grado di
complessità della mappa e così via.
• Sulla mappa selezionare l'icona del menu.
Descrizione dettagliata
Page 62

IT
61
• Selezionare Modifica opzioni.
Verrà visualizzato il Menù inizio.
Opzioni itinerario
• Selezionare Modifica opzioni itinerario per modificare le opzioni
dell’itinerario.
Verrà visualizzata la finestra contenente le opzioni dell’itinerario:
• Per passare da una modalità all’altra, è sufficiente toccare le icone. Queste
verranno attivate, rendendo facilmente visibili le impostazioni attive.
È possibile scegliere tra le seguenti opzioni: modalità di trasporto (automobile veloce o
lenta, motocicletta, a piedi e così via), percorso più veloce o più breve, utilizzo o meno di
strade a pagamento, autostrade e traghetti. È inoltre possibile scegliere l’unità di misura
della distanza (miglia/km).
Ad esempio, la London Congestion Zone, nel centro della città, è considerata una
strada a pagamento in quanto soggetta a tassazione. Pertanto, se si sceglie di evitare
le strade a pagamento, non si verrà condotti in questa zona. Tuttavia, non verrà inviato
alcun avviso se si entra in tale zona accidentalmente.
Dopo aver scelto le opzioni desiderate, premere l’icona di conferma per tornare al Menù
inizio.
Descrizione dettagliata
Page 63

IT
62
Modalità di trasporto: panoramica
Veloce: presuppone una guida veloce sulle autostrade. Se viene selezionata questa
opzione, nella scelta dell’itinerario verranno favorite le autostrade.
Lento: presuppone una guida più lenta sulle autostrade. Se viene selezionata questa
opzione, nella scelta dell’itinerario verranno evitate le autostrade.
Bici: vengono prese in considerazione le piste ciclabili e viene bloccata la scelta di
autostrade, poiché le biciclette non possono circolarvi.
Moto: se applicabili, vengono prese in considerazione le limitazioni per le moto.
Motorino: se applicabili, vengono prese in considerazione le limitazioni per i motorini.
Bus: se applicabili, vengono prese in considerazione le limitazioni per i bus.
Pedonale: vengono forniti itinerari per i pedoni, incluso l’accesso completo alle strade a
senso unico e alle aree pedonali, se presenti.
Lingua
• Scegliere Modifica Lingua per selezionare la lingua che verrà utilizzata nel
sistema di navigazione.
Opzioni mappa
• Scegliere Modifica opzioni mappa per modificare le opzioni della mappa.
Verrà visualizzata la finestra contenente le opzioni della mappa:
• Per passare dalla modalità Notte alla modalità Giorno e viceversa, premere l’icona
corrispondente.
• Per passare dalla modalità 2D alla modalità 3D e viceversa, premere l’icona
corrispondente.
Descrizione dettagliata
Page 64

IT
63
• Scegliere Direz. auto su per ottimizzare l’orientazione della mappa durante la
navigazione. Scegliere Nord su per mantenere l’orientazione della mappa verso il
Nord.
• Per scegliere il tipo di elementi da visualizzare sulla mappa, selezionare Info
mappa:
• Per visualizzare determinate categorie sulla mappa, selezionare le caselle
corrispondenti. Deselezionare invece quelle corrispondenti a categorie che non
devono essere visualizzate.
• Per selezionare o deselezionare tutte le categorie, premere l'icona di conferma
nell'angolo inferiore destro.
• Premere l'icona della freccia per tornare alla schermata precedente.
Mappa
• Scegliere Selezionare mappe per selezionare una mappa.
Se nella scheda di memoria sono disponibili mappe di altre regioni o città, toccare il nome
della regione desiderata (ad esempio, Lazio). Verranno elencate tutte le mappe disponibili
sulla scheda di memoria. Per scegliere la regione desiderata sarà sufficiente toccare il nome
corrispondente.
Descrizione dettagliata
Page 65

IT
64
FUNZIONI OPZIONALI
È possibile ottimizzare ulteriormente il dispositivo personale di navigazione grazie a un set
di funzioni opzionali. Di seguito sono elencate le funzioni opzionali disponibili per il sistema
di navigazione:
• Guide
• Informazioni aggiornate sulla viabilità (TMC)
• Registrazione degli itinerari
• Avviso di autovelox
Guide
All’indirizzo www.thomsonlink.com (rubrica Digital Store / GPS) sono disponibili numerosi
servizi di informazioni utili, che includono i servizi di directory, le indicazioni delle aree
dotate di copertura WiFi e le guide delle città. Le guide delle città contengono informazioni
dettagliate sulle località, quali descrizioni, informazioni di contatto, prezzi, orari di apertura e
così via.
Per acquistare le guide e per informazioni sulle modalità di download, vedere
www.thomsonlink.com (rubrica Digital Store / GPS).
Per informazioni sull’utilizzo delle guide, vedere “Ricerca e selezione dei punti di interesse”
Informazioni aggiornate sulla viabilità (TMC)
In base al dispositivo utilizzato, è possibile aggiornare il sistema di navigazione e ricevere
informazioni aggiornate sulla viabilità (TMC, Traffic Message Channel).
• Sulla mappa selezionare l'icona del menu.
Verrà visualizzato il Menù inizio.
• Nella schermata successiva selezionare Modifica opzioni.
• Scegliere Modifica opzioni itinerario.
Verrà visualizzata la finestra contenente le opzioni di guida.
• Premere il pulsante relativo alla funzione TMC (icona del trasmettitore) per
attivare l'opzione Autom., Manuale o Spento.
Descrizione dettagliata
a pagina 49.
Page 66

IT
65
Se viene attivata l’opzione Autom., l’utente verrà condotto automaticamente lungo il
percorso evitando gli ingorghi di traffico. Se invece viene attivata la funzione Manuale,
l’utente verrà avvisato della presenza di eventuali ingorghi e avrà la possibilità di scegliere se
utilizzare un itinerario alternativo.
Durante la navigazione, è anche possibile scegliere di visualizzare un elenco degli ingorghi di
traffico lungo il percorso.
• Toccare la schermata durante la guida.
Verrà visualizzata la schermata delle opzioni.
• Premere Info Traffico per visualizzare un elenco degli ingorghi di traffico, che
verranno segnalati in rosso lungo il percorso.
Registrazione degli itinerari
La funzione di registrazione degli itinerari consente di memorizzare i propri itinerari. È
possibile salvare i percorsi e importarli con tutti i tipi di programmi NMEA. È possibile ad
esempio documentare i propri viaggi.
• A questo scopo è sufficiente toccare il display durante la navigazione e
selezionare Registrare.
L’itinerario verrà memorizzato finché il pulsante non viene toccato di nuovo.
• Premere la freccia Indietro per tornare alla schermata di navigazione.
Avviso di autovelox
La funzione di avviso di autovelox consente di individuare e visualizzare gli autovelox situati
lungo il percorso.
• Sulla mappa selezionare l'icona del menu.
Verrà visualizzato il Menù inizio.
• Nella schermata successiva selezionare Modifica opzioni.
• Scegliere Modifica opzioni itinerario.
• Premere Autovelox per visualizzare l’icona corrispondente e attivare la relativa
funzione.
Nel caso in cui siano presenti degli autovelox lungo il percorso verrà inviato un avviso. Per
ogni autovelox verranno inviati due avvisi. Ogni avviso è rappresentato da un “bip” sonoro
e da un messaggio visualizzato a schermo, in cui viene indicato il tipo di autovelox e la
distanza a cui è collocato.
Opzioni
Page 67

IT
66
INSTALLAZIONE GUIDATA SMART2GO™
Con l’Installazione guidata smart2go™ è possibile scegliere di salvare i dati relativi alle
mappe e alle guide su una scheda di memoria per utilizzarli con un dispositivo palmare
supportato. Questi dati verranno installati nella scheda di memoria insieme ai file di
programma del software di navigazione e ai file audio da utilizzare come guida.
• Inserire il CD o DVD fornito con smart2go™ nell’unità CD-ROM/DVD del
computer. L’Installazione guidata verrà avviata automaticamente.
• Selezionare la lingua del programma di installazione, quindi scegliere OK.
Verrà visualizzata la pagina di benvenuto.
• Selezionare Successivo.
• Leggere il contratto di licenza e accettarlo scegliendo Accetto. Se non si
accettano i termini del contratto di licenza, scegliere Annulla per uscire
dall’Installazione guidata.
• Scegliere le regioni delle quali si desidera copiare i dati relativi alle mappe e
alle guide nella scheda di memoria. Scegliere inoltre i file audio utilizzati per la
navigazione, quindi scegliere Successivo per installare i file.
Installazione guidata smart2go™
Page 68

IT
67
A sinistra verrà visualizzata la quantità di spazio richiesta per memorizzare i dati nella
scheda di memoria. Assicurarsi che la scheda di memoria disponga di spazio libero
sufficiente.
Verrà richiesto di inserire la scheda di memoria nell’apposito lettore. Se il sistema non è in
grado di determinare automaticamente il percorso della scheda di memoria, verrà richiesto
di immetterlo manualmente.
I dati selezionati verranno copiati nella scheda di memoria. Non chiudere l’Installazione
guidata smart2go™ e non rimuovere la scheda di memoria finché il trasferimento dei dati
non sarà stato completato e non verrà visualizzata la relativa richiesta.
Notare che con l’Installazione guidata smart2go™ tutti i dati relativi alle mappe
contenuti nella scheda di memoria verranno sovrascritti. Le impostazioni personalizzate,
compresi i Favoriti e il contenuto premium (ad esempio le guide) non verranno
modificati.
Installazione guidata smart2go™
Page 69

IT
68
DOMANDE FREQUENTI
Non riesco a trovare un indirizzo.
Assicurarsi di aver digitato i dati correttamente. Se non si è sicuri di come si scriva
correttamente un indirizzo, è sufficiente immettere le parti dell’indirizzo di cui si è certi
(ad esempio “Rom”, “Pietr” per Piazza San Pietro a Roma). Esplorare quindi l‘elenco
dei risultati e cercare l‘indirizzo. Assicurarsi inoltre che il nome della città in cui si cerca
l’indirizzo sia corretto. A volte è possibile che l’indirizzo postale originale sia diverso da
quello che si sta cercando. In tal caso, cercare un indirizzo conosciuto nelle vicinanze ed
esplorare la mappa.
Se l’indirizzo viene individuato sulla mappa ma non si riesce a trovarlo durante la ricerca, vi
preghiamo di comunicarcelo al nostro indirizzo di posta elettronica xxx.
C’è un errore nella mappa / Non è segnalato un POI.
Se viene rilevato un errore nella mappa (ad esempio, una via non viene segnalata),
informeremo il nostro provider di dati sulle mappe. Vi preghiamo pertanto di comunicarci
eventuali errori al nostro indirizzo di posta elettronica xxx.
Ho problemi nel ricevere un segnale GPS costante.
Se si verificano dei problemi relativi alla ricezione di un segnale GPS costante dal satellite
(è possibile visualizzare il numero di satelliti che il navigatore riesce a ricevere nella parte
inferiore sinistra del menu inizio), assicurarsi di essere all’esterno e che l’antenna GPS
sia orientata verso l’alto. Alcuni modelli supportano anche un’ulteriore antenna esterna
attiva. Consultare anche il manuale dell’hardware del dispositivo per ottenere informazioni
aggiuntive su come ricevere un segnale GPS costante.
Dove posso ottenere supporto tecnico?
Contattare il produttore o il proprio rivenditore.
Dove posso ottenere gli aggiornamenti del software?
Per informazioni relative agli aggiornamenti software, contattare il produttore o il proprio
rivenditore.
Dove posso ottenere mappe e guide aggiuntive?
Visitare il negozio online all’indirizzo www.thomsonlink.com (rubrica Digital Store / GPS).
Domande frequenti
Page 70

IT
69
INDICE
Indice
A
Alternativa
Utilizza 58
Autostrade
Evita/consenti 61
A piedi 61
B
Blocca percorso 58
Bussola
Regola orientazione 44
C
Cambia regione 63
Chiusura dell’applicazione 44
Cursore dello zoom 44
E
Elimina
Tappa 59
F
Favoriti
Imposta come destinazione 54
Scheda di memoria 55
I
Indirizzo
Imposta come destinazione 46
Info mappa
Mappa 63
Info Traffico 65
Ingorghi di traffico 65
Itinerario 61
L
Lingua 62
Lista delle destinazioni
Pianificazione dell’itinerario 59
London Congestion Zone
Opzioni 61
Luoghi recenti
Imposta come destinazione 55
M
Mappa 42
Cursore dello zoom 44
Icona Bussola 44
Info mappa 63
Modalità di selezione 44
Modalità di tracking 43
Scegli 63
Menù inizio 46
Opzioni 61
Mia Casa
Imposta come destinazione 53
Mio Lavoro
Imposta come destinazione 54
Modalità 2D
Attiva 62
Modalità 3D
Attiva 62
Modalità di selezione 44
Modalità di tracking 43
Modalità Frecce 57
Modalità Giorno
Attiva 62
Modalità Notte
Attiva 62
N
Naviga
Comando 45, 50, 52, 54, 55
Navigazione 55
Comando 56
Page 71

IT
70
Indice
O
Opzioni
Autostrade 61
A piedi 61
Cambia regione 63
Itinerario 61
Lingua 62
London Congestion Zone 61
Menù inizio 61
Opzioni della mappa 62
Pedaggio 61
Scegli mappe 63
Scheda di memoria 58
Traghetti 61
Opzioni della mappa 62
Opzioni di Guida
Comando 56
P
Passaggio
Pianificazione dell’itinerario 60
Pedaggio
Evita/consenti 61
Più destinazioni
comando 56
Pianificazione dell’itinerario 58
Passaggio 60
Seleziona tappa 59
Simula 60
Sommario del percorso 60
Punto di interesse
Reimposta percorso 58
R
Ricerca
Punto di interesse 58
Ricerca con completamento
automatico della digitazione 46
S
Salva
Comando 45, 50, 52, 55
Scheda di memoria
Salva Favoriti 55
Salva opzioni 58
Schermata di navigazione 56
Seleziona destinazione
Dintorni 49
Favoriti 54
Guide 51
Indirizzo 46
Luoghi recenti 55
Mia Casa 53
Mio Lavoro 54
Ricerca con completamento
automatico della digitazione 46
Simula
Itinerario 60
Sommario del percorso
Pianificazione dell’itinerario 60
Sulla mappa
Comando 50, 52, 55, 56
T
Tappa
Elimina 59
Seleziona per pianificazione
dell’itinerario 59
TMC 65
Traghetti
Evita/consenti 61
Tramite
Comando 45, 50, 52, 55
U
Uscita dall’applicazione 44
Page 72

IT
71
Copyright e note sulla licenza
COPYRIGHT E NOTE SULLA LICENZA
Copyright del manuale: © gate5 AG, 2006. Tutti i diritti riservati.
Parti del software sono protette dal copyright © 1996-2002 The FreeType Project
(www.freetype.org). Tutti i diritti riservati.
Page 73

THOMSON Sales Europe
46, quai A. Le Gallo
92648 Boulogne Cedex
FRANCE
322 019 464 RCS NANTERRE
http://www.smart2go.com
0025we01 © Copyright THOMSON 2006
GPS 280 / GPS 281
Page 74

Manual para dispositivos
de navegación personal
GPS 280 / GPS 281
Page 75

ES
74
CONTENIDO
CONVENCIONES TIPOGRÁFICAS ......................................75
ICONOS ....................................................................................76
INTRODUCCIÓN ....................................................................77
Características clave ................................................................................................... 77
INICIO DE LA APLICACIÓN .................................................78
DESCRIPCIÓN DETALLADA .................................................79
Uso del mapa ................................................................................................................ 79
Modo de seguimiento y modo de selección
Elección y búsqueda de ubicaciones ........................................................................ 81
Selección de una ubicación en el mapa
Búsqueda de direcciones
Búsqueda y selección de PDI
Examen o búsqueda de guías
Personal
Navegación .................................................................................................................... 91
Pantalla de navegación
Planificación de rutas .................................................................................................. 94
Ajustes ............................................................................................................................ 96
Opciones de ruta
Idioma
Ajustes de mapa
Mapa
CARACTERÍSTICAS OPCIONALES .................................. 100
Guías ............................................................................................................................. 100
Canal de mensajes de tráfico (TMC) .................................................................... 100
Grabación de ruta ..................................................................................................... 101
Alerta de radar ........................................................................................................... 101
ASISTENTE DE INSTALACIÓN DE SMART2GO™ ........ 102
PREGUNTAS FRECUENTES ............................................... 104
ÍNDICE ................................................................................... 105
NOTAS DE LICENCIA Y DE DERECHOS DE AUTOR ..... 107
Contenido
Page 76

ES
75
CONVENCIONES TIPOGRÁFICAS
Negrita
Elementos que se eligen o seleccionan como, por ejemplo, opciones de menú, botones de
comandos o elementos de listas.
••••
• Viñeta
Procedimientos detallados paso a paso. Se trata de instrucciones que se siguen para
realizar una tarea concreta.
••••
Observación
Información de especial importancia o trascendencia.
••••
Monoespaciado
Información que se debe introducir o información como nombres de carpetas y archivos.
••••
MAYÚSCULAS
Nombres de teclas del teclado, por ejemplo, MAYÚS, CTRL o ALT.
Convenciones tipográficas
Page 77

ES
76
ICONOS
En la aplicación se emplean los iconos y símbolos siguientes:
Icono Nombre Función
Menú
Permite abrir un menú con diversas
opciones.
Atrás Se usa para volver a la pantalla anterior.
Navegación Permite iniciar la navegación.
Buscar Sirve para abrir una pantalla de búsqueda.
Confirmación
Permite aplicar los ajustes. También se usa
para seleccionar o deseleccionar todo.
Salir
Permite salir de la aplicación. Sólo es
visible en el modo de seguimiento
(consulte “Modo de seguimiento y modo
de selección” en la página 80).
GPS
Pulse este icono para volver a ver su
posición en el mapa. Sólo es visible en el
modo de selección (consulte “Modo de
seguimiento y modo de selección” en la
página 80.
Iconos
Page 78

ES
77
INTRODUCCIÓN
¡Felicidades! Ha elegido un sistema de navegación de última generación. Deseamos que
lo disfrute. Este sistema de navegación le guía directo a su destino, ya se desplace a pie o
en automóvil. Puede navegar y planificar su ruta mediante una interfaz intuitiva y fácil de
usar, usando sólo un dedo. Además, esta aplicación le permite planificar su viaje según sus
preferencias e intereses personales y guardar destinos interesantes antes de iniciar su viaje.
Este manual le ayudará a descubrir las principales características del sistema.
Características clave
• Navegación transfronteriza en Europa gracias al mapa de 1 GB disponible para
este continente (característica opcional)
• Información dinámica del tráfico, TMC (característica opcional)
• Modo de peatón real
• Función de búsqueda anticipada
• Innovadora vista en polígono de casas individuales en ciudades europeas
seleccionadas (característica opcional)
• Exploración en vista de satélite
• Modo nocturno único
• Motor de guiado mejorado
• Contenido premium a través de guías de marca (característica opcional)
Introducción
Page 79

ES
78
INICIO DE LA APLICACIÓN
Cargue el dispositivo y colóquelo en una posición sin ningún obstáculo de cara al cielo
para establecer su primera conexión vía satélite. En coche, se recomienda colocarlo
encima de la guantera o del cuadro de mandos. El establecimiento de la primera conexión
puede tardar algunos minutos.
• Encienda la unidad y toque NAVI o NAVEGACIÓN en la primera pantalla.
• Si su dispositivo cuenta con más de un idioma, se le solicitará que seleccione uno.
Una vez que la aplicación se carga, aparecerá una pantalla con advertencias de seguridad.
Léalas atentamente. En sesiones posteriores puede elegir que estas notas no aparezcan
cada vez que inicie el dispositivo.
Aparecerá una vista de satélite de su país. Disfrute sobrevolando su país y “aterrice” en su
ubicación actual (también puede elegir pasar por alto esta introducción con sólo tocar la
pantalla).
Al final de su viaje, aparecerá el mapa.
Inicio de la aplicación
Page 80

ES
79
DESCRIPCIÓN DETALLADA
Este capítulo describe en detalle las funciones de su dispositivo de navegación personal. En
las siguientes páginas aprenderá a:
- Usar el mapa (consulte la página 80)
- Buscar y seleccionar ubicaciones (consulte la página 82)
- Navegar hasta su destino (consulte la página 92)
- Utilizar el planificador de rutas (consulte la página 95)
- Configurar la aplicación (consulte la página 97)
Uso del mapa
El mapa es el componente principal del dispositivo de navegación personal. Aparece
centrado en su ubicación actual de manera predeterminada, siempre que cuente con una
conexión GPS. Puede explorar el mapa o ver información sobre las diferentes ubicaciones
que aparecen en él y, por ejemplo, seleccionarlas para mostrar rutas y navegar por ellas.
Modo de seguimiento y modo de selección
El mapa posee dos modos básicos: el modo de seguimiento y el modo de selección.
En el modo de seguimiento, el mapa sigue la posición real (posición GPS) y muestra la
localización geográfica o la velocidad, entre otros datos:
Velocidad
Coordenadas
geográficas
Hora
Altitud (sobre el
nivel del mar)
Estado de GPS
Brújula
Menú
Alejar
Posición GPS
Acercar
Salida de la
aplicación
Cuadro de
información
Descripción detallada
Page 81

ES
80
Al comenzar a explorar el mapa, se activa el modo de selección:
Brújula
Menú
Cuadro de
información
Icono de
seguimiento
Alejar
Posición (GPS)
actual
Acercar
Cursor
• Examine el mapa con un bolígrafo o con el dedo. La posición real se identifica
mediante un cursor.
Al pulsar cualquier icono del mapa, se abre una ventana superpuesta con información
sobre el elemento seleccionado.
• Para acercar o alejar la imagen, pulse los iconos + o -, respectivamente. En cuanto
pulse uno de los iconos, aparece el controlador del zoom, que sirve para ajustar
el zoom de forma más gradual.
• Con el icono de la brújula (en la esquina inferior izquierda), puede ajustar la
orientación.
• Si desea volver al modo de seguimiento, pulse el icono de seguimiento. Para salir
de la aplicación, pulse de nuevo este botón.
Descripción detallada
Page 82

ES
81
Elección y búsqueda de ubicaciones
Esta sección describe las diferentes formas de buscar y seleccionar ubicaciones. Puede
elegir ubicaciones en el mapa, buscar direcciones o escoger un destino almacenado
como personal (como la dirección de su casa o su trabajo, sus favoritos o lugares
visitados recientemente), además de explorar guías y directorios PDI.
Selección de una ubicación en el mapa
• Sitúe el cursor en cualquier lugar del mapa. El nombre de la ubicación o la calle
seleccionada aparecerá en el cuadro de información.
• Pulse el cuadro de información para que se abra una pantalla con información
detallada:
Al pulsar el icono de menú, accede a las siguientes opciones:
• Pulse Navegar para navegar hasta la ubicación (consulte “Navegación” en la
página 92).
• Pulse Vía para mostrar rutas a la ubicación (consulte “Planificación de rutas” en la
página 95).
• Pulse Guardar para guardar la ubicación como favorito (consulte “Personal” en
la página 89).
Descripción detallada
Page 83

ES
82
Búsqueda de direcciones
La búsqueda de dirección le permite encontrar direcciones introduciendo información
acerca del destino deseado (calle y localidad). A continuación, puede seleccionar uno de
los resultados de la lista y usar la dirección encontrada para distintos fines: señalarla en el
mapa, planificar una ruta o navegar por ella.
• En el mapa, elija el icono de menú.
Se abrirá el menú de inicio:
• Seleccione Encontrar destino.
• Elija Vía búsqueda dirección.
Aparecerá la ventana Dirección:
Introduzca los datos necesarios para encontrar su dirección.
Procedimiento de búsqueda
El dispositivo de navegación personal incluye una función de búsqueda interactiva
anticipada para evitar la introducción de datos con errores ortográficos. Sólo están
disponibles las teclas con las que se pueden obtener resultados; las demás están atenuadas.
Descripción detallada
Page 84

ES
83
• Introduzca el primer carácter.
Observará que algunas de las teclas del teclado se vuelven de color gris. Sólo puede
escoger las teclas negras:
• Introduzca el segundo carácter.
Una vez más, algunas teclas se volverán de color gris mientras que otras continuarán de
color negro, según la elección realizada.
• Continúe introduciendo caracteres hasta que la búsqueda se reduzca a un solo
resultado.
O BIEN
• Pulse el icono de búsqueda (lupa).
Aparecerá una lista de resultados.
• Escoja la entrada apropiada de la lista.
Para alternar entre el modo numérico y el alfabético, pulse 123 o ABC . Para alternar
entre mayúsculas y minúsculas, pulse ^.
Si en cualquier punto necesita retroceder y borrar caracteres, pulse el botón de
retroceso <- que aparece en pantalla. Para añadir un espacio, pulse la barra
espaciadora _.
Descripción detallada
Page 85

ES
84
Establecimiento del país
• Pulse País para seleccionar su ciudad.
• Escoja su país de la lista.
El campo País se rellenará con el nombre del país seleccionado.
Introducción del código postal
En lugar de la ciudad, puede introducir el código postal.
• Pulse Código Postal para introducir un código postal.
• Introduzca el código postal de la localidad/ciudad que busca.
• Pulse el icono de búsqueda (lupa).
Aparecerá una lista de resultados.
• Escoja la localidad/ciudad apropiada de la lista.
Volverá a la pantalla Dirección. Los campos Ciudad y Código Postal se rellenarán con
la ciudad o el código postal que haya elegido.
También puede introducir un código postal único de siete dígitos. En tal caso, no
necesita introducir un nombre de calle (característica opcional).
Búsqueda de la ciudad
• Pulse Ciudad para seleccionar su ciudad.
Busque la ciudad tal como se ha explicado antes.
Aparecerá una lista de resultados.
• Escoja la localidad/ciudad apropiada de la lista.
Volverá a la pantalla Dirección. El campo Ciudad se rellenará con el nombre de la
localidad/ciudad escogida.
Búsqueda de la calle
• Pulse Calle para seleccionar una calle.
Busque la calle tal como se ha explicado antes.
Aparecerá una lista de resultados.
• Escoja la calle apropiada de la lista.
Volverá a la pantalla Dirección. Ésta se habrá rellenado de forma automática con los
datos encontrados.
Además, puede introducir el número.
Descripción detallada
Page 86

ES
85
Navegación hasta la dirección encontrada
Una vez que ha acotado su búsqueda a una única dirección, puede empezar a navegar.
• Pulse la fecha hacia adelante.
La dirección aparecerá en el mapa de navegación. En este punto puede seleccionar que
se le guíe hasta la dirección, utilizar la dirección para la planificación de rutas, etc. (consulte
“Navegación” en la página 92).
Búsqueda y selección de PDI
Mediante el buscador de PDI, puede encontrar rápidamente puntos de interés como
gasolineras y restaurantes, escogidos de una base de datos compuesta por millones de PDI
ubicados cerca y lejos del lugar en que se encuentra.
• En el mapa, elija el icono de menú.
• En la siguiente pantalla, seleccione Encontrar destino.
• Elija Vía puntos de interés.
Aparecerá un menú con las categorías de PDI:
Es posible que aparezca una dirección en la barra de título de esta pantalla. En ese caso, se
muestran los PDI cercanos a la ubicación.
• Pulse el icono del menú si desea elegir otra dirección como punto inicial para la
selección de PDI (consulte “Búsqueda de direcciones” en la página 83).
La nueva dirección seleccionada aparecerá en la barra de título de la pantalla de categorías
de PDI.
Ahora puede examinar los PDI por categorías o buscar un PDI determinado.
Descripción detallada
Page 87

ES
86
Selección de PDI
• Elija la categoría de PDI que prefiera.
Aparecerá un menú con subcategorías.
• Escoja una subcategoría.
Aparecerá una lista de PDI.
• Para seleccionar un PDI, púlselo.
La ubicación aparecerá en el mapa:
• Pulse las flechas que se muestran junto al nombre de la ubicación para alternar
entre los diferentes resultados.
• Pulse i para abrir una pantalla con detalles sobre la ubicación.
Al pulsar el icono de menú, accede a diferentes acciones:
• Pulse Navegar para navegar hasta la ubicación (consulte “Navegación” en la
página 92).
• Pulse Vía para mostrar rutas a la ubicación (consulte “Planificación de rutas” en la
página 95).
• Pulse Guardar para guardar la ubicación como favorito (consulte “Personal” en
la página 89).
• Pulse En el mapa para que se presente la ubicación en el mapa principal.
Búsqueda de PDI
Pulse la lupa.
• En la ventana de búsqueda, introduzca un término de búsqueda (debe tener al
menos tres caracteres); para empezar a buscar, pulse la flecha a la derecha.
Aparecerá una lista de PDI.
• Para seleccionar un PDI, púlselo.
El PDI aparecerá en el mapa tal como se ha explicado antes.
Descripción detallada
Page 88

ES
87
Examen o búsqueda de guías
En el menú de PDI verá las guías, una característica opcional muy recomendable. Las
guías de viajes/ciudades de marca le ayudarán a descubrir qué hay en las cercanías y le
ofrecerán información valiosa acerca de atracciones turísticas, restaurantes, hoteles, etc.
con descripciones detalladas. Puede utilizar los elementos que aparecen en las guías para
navegar o bien puede guardarlos como favoritos.
Las guías son una característica opcional que puede adquirir en www.thomsonlink.com
(sección Digital Store / GPS).
• En el mapa, elija el icono de menú.
• En la siguiente pantalla, seleccione Encontrar destino.
• Elija Vía servicios.
Aparecerá la lista de guías:
• Para seleccionar la guía que desee utilizar, púlsela.
Aparecerá la página de categorías de la guía seleccionada:
Ahora puede explorar la guía por categorías o buscar en la guía completa.
Descripción detallada
Page 89

ES
88
Búsqueda en la guía
• Pulse el icono de búsqueda (lupa).
• En la ventana de búsqueda, introduzca un término de búsqueda (debe tener al
menos tres caracteres); para empezar a buscar, pulse el icono de búsqueda (lupa).
Aparecerá la lista de resultados.
• Para seleccionar una ubicación, púlsela.
La ubicación aparecerá en el mapa.
• Pulse las flechas que se muestran junto al nombre de la ubicación para alternar
entre los diferentes resultados.
• Pulse i para abrir una pantalla con detalles sobre la ubicación.
Al pulsar el icono de menú, accede a diferentes acciones:
• Pulse Navegar para navegar hasta la ubicación (consulte “Navegación” en la
página 92).
• Pulse Vía para mostrar rutas a la ubicación (consulte “Planificación de rutas” en la
página 95).
• Pulse Guardar para guardar la ubicación como favorito (consulte “Personal” en
la página 89).
• Pulse En el mapa para que se presente la ubicación en el mapa principal.
Exploración de la guía por categorías
En la página de categorías puede seleccionar alguna de las diferentes categorías de la guía
(por ejemplo, restaurantes, hoteles, bares, museos, etc.).
• Utilice las flechas hacia arriba y hacia abajo para desplazarse por la lista.
Algunas guías también cuentan con subcategorías.
• Pulse la categoría o subcategoría que le interese para buscar los elementos
correspondientes.
Los resultados de la búsqueda aparecerán en la lista de resultados ordenados por distancia.
• Para seleccionar una entrada, tóquela.
• La ubicación aparecerá en el mapa tal como se ha explicado antes.
Personal
Utilice sus destinos personales o frecuentes como guía. Puede escoger entre su hogar,
su lugar de trabajo, un juego de favoritos personales y los lugares que ha visitado
recientemente.
• En el mapa, elija el icono de menú.
• En la siguiente pantalla, seleccione Encontrar destino.
• Elija Vía personal.
Descripción detallada
Page 90

ES
89
Aparecerá en pantalla el menú Personal:
Mi Casa
• Pulse Mi Casa.
La dirección de su hogar aparecerá en un mapa:
• Elija el icono de menú.
• En la siguiente pantalla, escoja Navegar para ser guiado hasta su hogar (pulse
Cambiar o Borrar si desea cambiar/borrar la dirección de su casa).
La navegación empezará de inmediato.
Si no ha establecido la dirección de su hogar, el sistema le pedirá que lo haga. Puede
elegirla buscando una dirección, mediante su posición GPS actual o bien eligiendo un
lugar que haya visitado recientemente.
Descripción detallada
Page 91

ES
90
Trabajo
• Al pulsar Trabajo, la dirección de su trabajo aparecerá en un mapa.
• Elija el icono de menú.
• En la siguiente pantalla, escoja Navegar para ser guiado hasta su trabajo (pulse
Cambiar o Borrar si desea cambiar/borrar la dirección de su trabajo).
La navegación empezará de inmediato.
Si no ha establecido la dirección de su trabajo, el sistema le pedirá que lo haga. Puede
elegirla buscando una dirección, mediante su posición GPS actual o bien eligiendo un
lugar que haya visitado recientemente.
Favoritos
La lista de favoritos contiene los destinos que ha guardado como favoritos (desde las
guías, eligiéndolos en un mapa, etc.). Esto significa que no necesita volver a buscar dichos
destinos.
• Pulse Favoritos.
La lista de favoritos aparecerá en pantalla:
Utilice las flechas hacia arriba y hacia abajo para desplazarse por la lista.
• Para seleccionar un elemento, púlselo.
La ubicación aparecerá en el mapa.
• Pulse las flechas que se muestran junto al nombre de la ubicación para alternar
entre los diferentes resultados.
• Pulse i para abrir una pantalla con detalles sobre la ubicación.
Al pulsar el icono de menú, accede a diferentes acciones:
• Pulse Navegar para navegar hasta la ubicación (consulte “Navegación” en la
página 92).
Descripción detallada
Page 92

ES
91
• Pulse Vía para mostrar rutas a la ubicación (consulte “Planificación de rutas” en la
página 95).
• Pulse En el mapa para que se presente la ubicación en el mapa principal.
Toda información del usuario como, por ejemplo, los ajustes, los favoritos y los lugares
visitados recientemente, se almacenará en la tarjeta de memoria, no en el dispositivo.
Últimos
Al pulsar Últimos, se abrirá una lista de destinos visitados o buscados recientemente.
• Pulse Últimos.
La lista de los últimos elementos aparecerá en pantalla.
Utilice las flechas hacia arriba y hacia abajo para desplazarse por la lista.
• Para seleccionar un elemento, púlselo.
La ubicación aparecerá en el mapa.
• Pulse las flechas que se muestran junto al nombre de la ubicación para alternar
entre los diferentes resultados.
• Pulse i para abrir una pantalla con detalles sobre la ubicación.
Al pulsar el icono de menú, accede a diferentes acciones:
• Pulse Navegar para navegar hasta la ubicación (consulte “Navegación” en la
página 92).
• Pulse Vía para mostrar rutas a la ubicación (consulte “Planificación de rutas” en la
página 95).
• Pulse Guardar para guardar la ubicación como favorito (consulte “Personal” en
la página 89).
• Pulse En el mapa para que se presente la ubicación en el mapa principal.
Navegación
Las potentes capacidades de navegación de smart2go™ le guían por el camino más corto
o más rápido de A a B mediante comandos de voz y en tres dimensiones.
Esta sección describe la función de navegación.
Consulte “Selección de una ubicación en el mapa” en la página 76 para obtener
más información sobre la selección de elementos en el mapa. Consulte “Las calles
de dirección única se visualizarán con una flecha roja, que además indica la dirección
permitida.” en la página 82 para obtener información sobre la búsqueda y la selección
de direcciones, PDI y ubicaciones en las guías.
• Escoja una ubicación en el mapa o mediante Encontrar destino y, a
continuación, pulse Navegar en el menú correspondiente.
Descripción detallada
Page 93

ES
92
La ubicación aparecerá en el mapa de navegación:
• Pulse el icono de navegación para que se le guíe hasta la ubicación.
• Pulse Más puntos para mostrar rutas a la ubicación (consulte “Planificación de
rutas” en la página 95).
• Pulse Ajustes de ruta para modificar los ajustes del guiado (consulte “Opciones
de ruta” en la página 98).
• Pulse En el mapa para que se presente la ubicación en el mapa.
Se calculará la ruta. Aparecerá la pantalla de navegación.
Pantalla de navegación
En la pantalla de navegación, aparecerá la ruta en color azul. La flecha roja indicará la
dirección de su próxima maniobra. Los cursores indican su posición actual. Cuando vaya
a doblar una esquina o realizar otra maniobra, oirá un comando de voz en el momento
indicado.
En el caso de calles de un solo sentido, la dirección del tránsito se indica con una flecha roja.
Icono de maniobra
Distancia a la siguiente
aniobra
N° de giro/cruce/
salida siguiente
Alejar
Ruta
Dirección
Posición GPS
Acercar
Menú Cuadro de
información
Detener navegación
O
seguir ruta de nuevo
Velocidad
Distancia al
destino
Info de GPS
Brújula
Hora actual
Hora de llegada
Descripción detallada
Page 94

ES
93
Opciones durante la navegación
Puede examinar el mapa incluso durante la navegación. De este modo, puede escoger
con facilidad otro destino si cambia de idea. A pesar de ello, la navegación no se
interrumpe sino que aún se le guía mediante comandos de voz. Pulse el icono de
retroceso para volver a seguir la ruta que aparece en la pantalla.
Opciones de menú
• Elija el icono del menú durante la navegación para ver las opciones de navegación:
En esta pantalla encontrará los siguientes elementos:
Ajustes de ruta
Cambia las opciones de guiado, tal como se describe en “Opciones de ruta” en la página
98.
Ajustes
Abre un menú con ajustes de mapa, tal como se describe en Ajustes de mapa en la
página 99.
Aquí también puede alternar entre el modo de mapa y el modo de flecha para el guiado.
Cuando cambie al modo de flecha, la pantalla de navegación no mostrará el mapa
sino sólo una flecha que indica la siguiente maniobra.
Descripción detallada
Page 95

ES
94
Volumen
Ajusta el volumen de los comandos de voz.
Opciones del cuadro de información
• Elija el cuadro de información durante la navegación para ver las opciones de
navegación:
Ruta altern.
Con esta opción, puede elegir bloquear la ruta calculada para una cierta distancia (por
ejemplo, 0,5 km) y cumplir una ruta alternativa. Simplemente toque el icono que muestra
la distancia deseada. Se volverá a calcular su ruta y la ruta anterior se descartará para la
distancia en cuestión.
Guardar
Guarda su posición actual como un favorito.
Detalles
Muestra una lista con los puntos en la ruta del itinerario.
Buscar
Puede trazar una nueva ruta eligiendo un punto de interés (PDI), como una gasolinera.
Toda información del usuario como, por ejemplo, los ajustes, los favoritos y los lugares
visitados recientemente, se almacenará en la tarjeta de memoria, no en el dispositivo.
Planificación de rutas
Esta sección describe la característica de planificación de ruta. Esta característica le permite
planificar su ruta por adelantado, seleccionando múltiples puntos de trayecto durante su
viaje.
Consulte “Selección de una ubicación en el mapa” en la página 82 para obtener
más información sobre la selección de elementos en el mapa. Consulte “Elección
y búsqueda de ubicaciones” en la página 82 para obtener información sobre la
búsqueda y la selección de direcciones, PDI y ubicaciones en las guías.
• Escoja una ubicación en el mapa o mediante Encontrar destino y, a
continuación, pulse Vía en el menú correspondiente.
Descripción detallada
Page 96

ES
95
• Aparecerá la Lista de destinos:
La ubicación se añadirá a Lista de Destinos.
• Pulse el icono + para añadir otro punto de trayecto.
Accederá a la pantalla Escoger punto de trayecto:. Puede escoger puntos de trayecto
como su hogar o su lugar de trabajo, un favorito, un punto de interés, un lugar visitado
recientemente o bien buscar una dirección o señalar un destino en el mapa.
Una vez que ha añadido puntos de trayecto (con el icono +) y ha vuelto a Lista de
Destinos, tendrá varias opciones:
• Con el icono + puede escoger puntos de trayecto adicionales.
• Para cambiar el orden de los puntos de trayecto, seleccione un punto de trayecto
y use las flechas hacia arriba y hacia abajo para subirlo/bajarlo en la lista.
• Con el icono de la papelera puede borrar un punto de trayecto seleccionado.
Descripción detallada
Page 97

ES
96
Una vez que ha elegido su ruta, tiene varias opciones. Para verlas, pulse el icono del menú
(en la esquina inferior derecha de la pantalla).
• Pulse Simulación para simular la ruta que realizará.
• Pulse Iniciar Navi para iniciar la guía. La pantalla cambiará al mapa de
navegación.
• Con Mostrar ruta, el sistema calculará su ruta. Aparecerá Resumen de
ruta. Toque uno de los elementos del Resumen de ruta para visualizar los
Detalles. Vuelva a tocar para que aparezca la vista del mapa.
Ajustes
Puede configurar su dispositivo de navegación personal para adaptarlo a sus necesidades.
Por ejemplo, al navegar, puede elegir evitar o permitir los peajes o ferries o bien seleccionar
su modo de transporte, como un automóvil lento o rápido, un scooter o incluso a pie.
También puede modificar diversos ajustes de pantalla, como el modo 2D o 3D, el modo
diurno o nocturno, el nivel de complejidad del mapa, etc.
• En el mapa, elija el icono de menú.
Descripción detallada
Page 98

ES
97
• Elija Cambiar Ajustes.
Se abrirá el menú de inicio:
Opciones de ruta
• Escoja Cambiar opciones de ruta para cambiar las opciones de ruta.
Aparecerá la ventana con los ajustes de ruta:
• Para alternar entre los modos, simplemente toque los iconos. Éstos alternarán
para que vea rápidamente qué ajustes están activados.
Puede elegir entre las siguientes opciones: Modo de transporte (automóvil rápido,
automóvil lento, moto, peatón, etc.), ruta más larga o más corta, evitar o permitir
peajes, autopistas y ferries. También puede elegir la unidad para indicar distancias (millas/
kilómetros).
Nuestro sistema de navegación considera la zona de congestión de Londres del centro
de Londres como un peaje. Por lo tanto, si elige evitar los peajes, no se le guiará por
esta zona. Sin embargo, no habrá aviso si accede accidentalmente a esta zona.
Una vez elegidos los ajustes, pulse el icono de confirmación para regresar al menú de
inicio.
Descripción detallada
Page 99

ES
98
Modo de transporte: visión general
Rápido: presupone la conducción rápida en autopistas. Al elegir esta opción, se dará una
ligera preferencia a las autopistas en la selección de rutas.
Lento: presupone la conducción lenta en autopistas. Al seleccionar esta opción, disminuirá
la preferencia de las autopistas en la selección de rutas.
Bici: tiene en cuenta los carriles bici y bloquea las autopistas en las que no se permite la
circulación en bicicleta.
Moto: tiene en cuenta las restricciones para motocicletas, si procede.
Scooter: tiene en cuenta las restricciones para scooter, si procede.
Caravana: tiene en cuenta las restricciones para caravanas, si procede.
Peatón: proporciona auténticas rutas peatonales incluyendo el acceso completo a calles
de sentido único y zonas peatonales, donde sea posible.
Idioma
• Escoja Cambiar idioma para seleccionar el idioma de su sistema de
navegación.
Ajustes de mapa
• Escoja Cambiar ajustes de mapa para cambiar los ajustes del mapa.
Aparecerá la ventana con los ajustes de mapa:
• Para alternar entre los modos diurno y nocturno, pulse el icono correspondiente.
• Para alternar entre los modos 2D y 3D, pulse el icono correspondiente.
Descripción detallada
Page 100

ES
99
• Escoja Hacia dest. para optimizar la orientación del mapa durante la navegación.
Escoja Norte arriba para mantener el mapa orientado hacia el norte.
• Elija Info mapa para elegir qué tipo de elementos aparecerán en el mapa:
• Active las casillas de las categorías que desea ver en el mapa. Desactive las que
desea ocultar.
• Pulse el icono de confirmación que aparece en la esquina inferior derecha para
seleccionar o deseleccionar todas las categorías.
• Pulse el icono de flecha para volver.
Mapa
• Elija Escoger mapas para seleccionar un mapa.
Si tiene datos de mapas para diferentes regiones/ciudades en su tarjeta de memoria, toque
el nombre de la región actual (por ejemplo, Londres). Aparecerá una lista de todos los
mapas disponibles en la tarjeta de memoria. Para elegir la región que desea, simplemente
toque su nombre.
Descripción detallada
 Loading...