

Page 1

DIGITAL TERRESTRIAL
RECEIVER
FDT 2000
8510 FDT2000 Rev2 inc scart 17/2/03 6:26 pm Page 1
Page 2
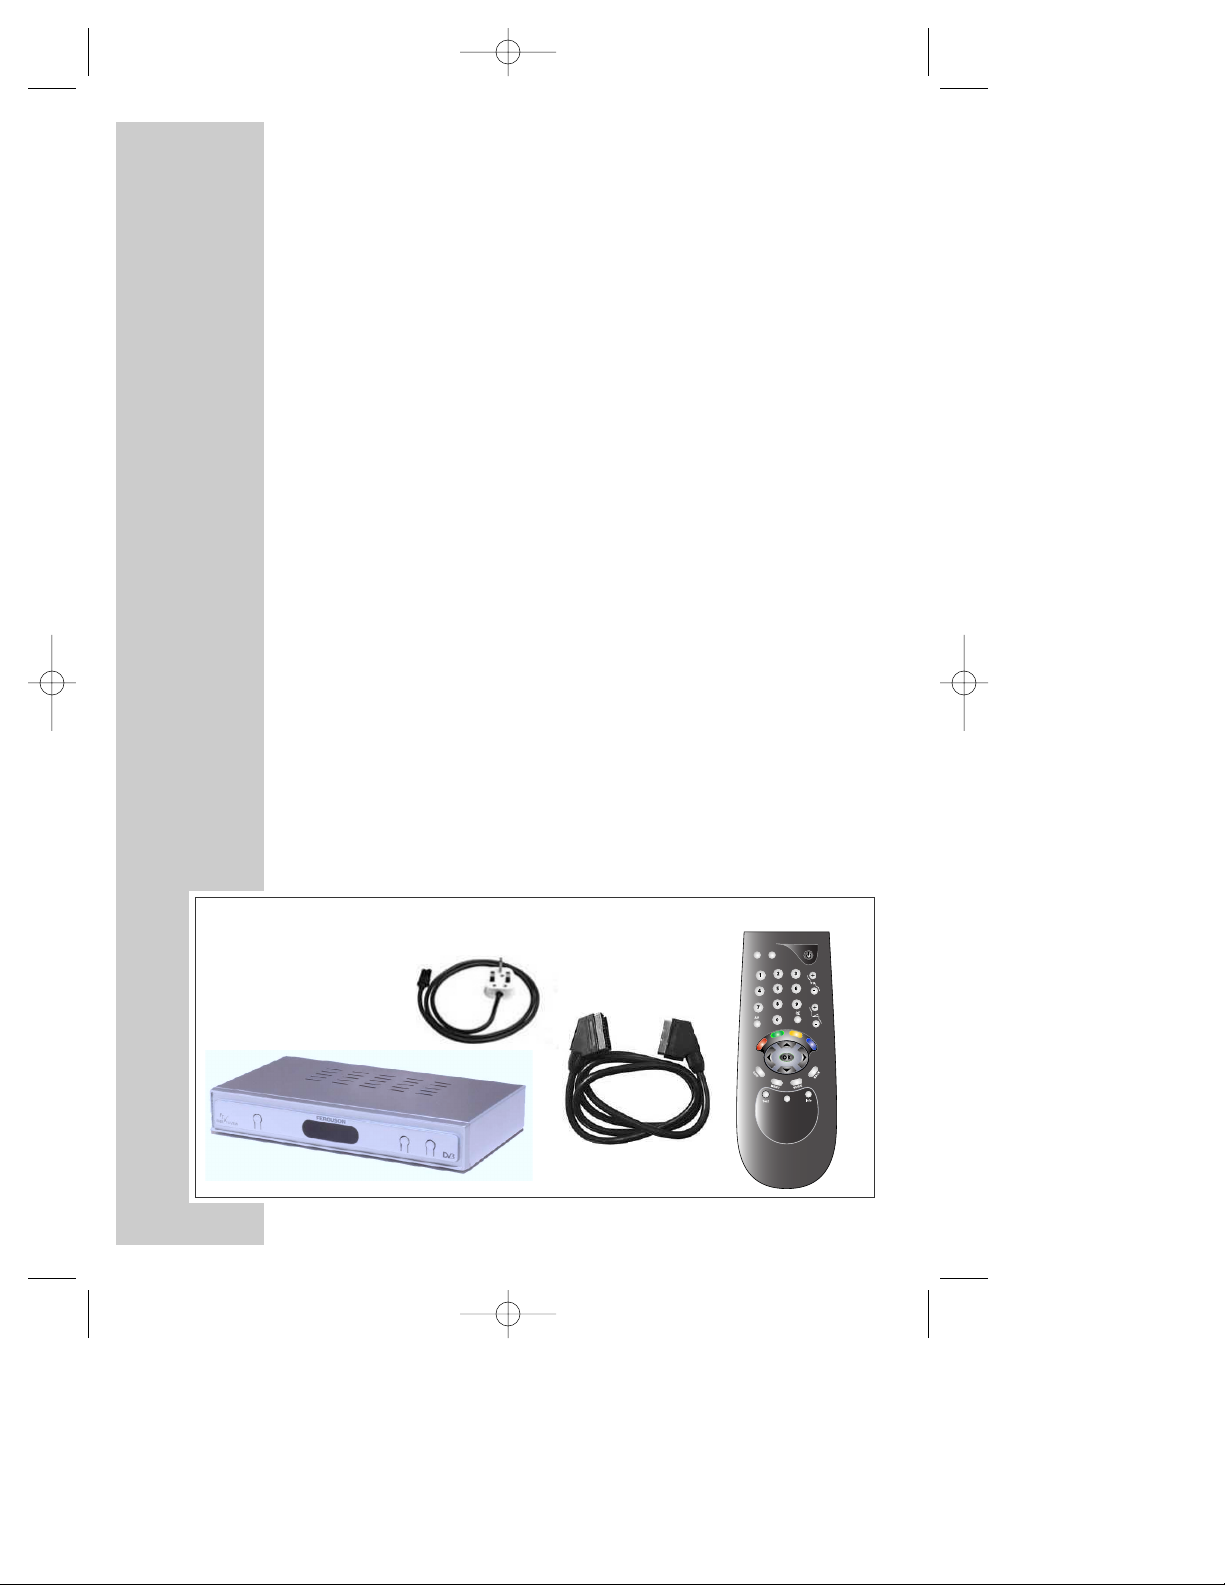
ACCESSORIES
Operation Manual
2 x AAA batteries
Guarantee Card
FDT 2000
Remote Control
Power Cord
Scart Lead
2
CONTENTS
2 Accessories
3 Safety Information
4 Connections
5 Remote Control Handset
6 Tuning the Receiver
7 Advanced Setup
8 Program Information
9 Lists and interactive services
10 Timer Programming and Recording
11 Parental Controls
12 Upgrading your Receiver
13 Other Information
14 Trouble Shooting and Information
15 Your Guarantee
8510 FDT2000 Rev2 inc scart 17/2/03 6:26 pm Page 2
Page 3

SAFETY INFORMATION
In order that you may enjoy this product for a long time it is important
that you observe the following points when installing and operating
your receiver
● This receiver is intended for the reception of TV picture and sound
signals. Any other application is expressly prohibited.
● Do not expose the receiver to any moisture. The receiver is intended
for use in dry rooms. If you wish to operate it in the open air, make
absolutely sure that it is protected against moisture (rain, splashes, etc.).
● Do not place any object filled with water (vases or similar) on the
receiver.
● Place the receiver on a flat and hard surface. Do not place any
objects (e.g. newspapers) on the receiver.
● If placed in an enclosed unit, the all-round distance between the
receiver and the sides of the unit must be at least 10cm.
● Do not place the receiver in the immediate vicinity of a heat source
or in direct sunlight as this would prevent appropriate cooling.
● During a thunderstorm it is recommended that you disconnect the
receiver from the mains and aerial to prevent damage from
lightning strikes.
● Never open the receiver as this will invalidate your guarantee.
● Do not dispose of used batteries in normal waste. Please dispose of
them at appropriate collection points.
● If you are not using the receiver for a long time (including
overnight), please switch it off at the mains. This saves energy. Note
that any software upgrades can take place at night at your request.
● This product has been constructed with the environment in mind.
There is a minimum of plastic parts and the packaging is largely
made from recycled paper. It is also disassembly-friendly allowing
for easy recycling at the end of its life.
3
Congratulations on your choice of this state-of-the-art Digital Free to
View Receiver. We hope you will enjoy all the new features this
technology brings to your home for many years. Your dealer should
have checked your postcode for reception, but the availability of
Digital Signals does depend on the transmitter(s) available to your
receiving aerial. If you have any doubt about this availability, please
contact your dealer, or have a look on the following internet website:-
www.freeview.co.uk
INTRODUCTION
8510 FDT2000 Rev2 inc scart 17/2/03 6:26 pm Page 3
Page 4
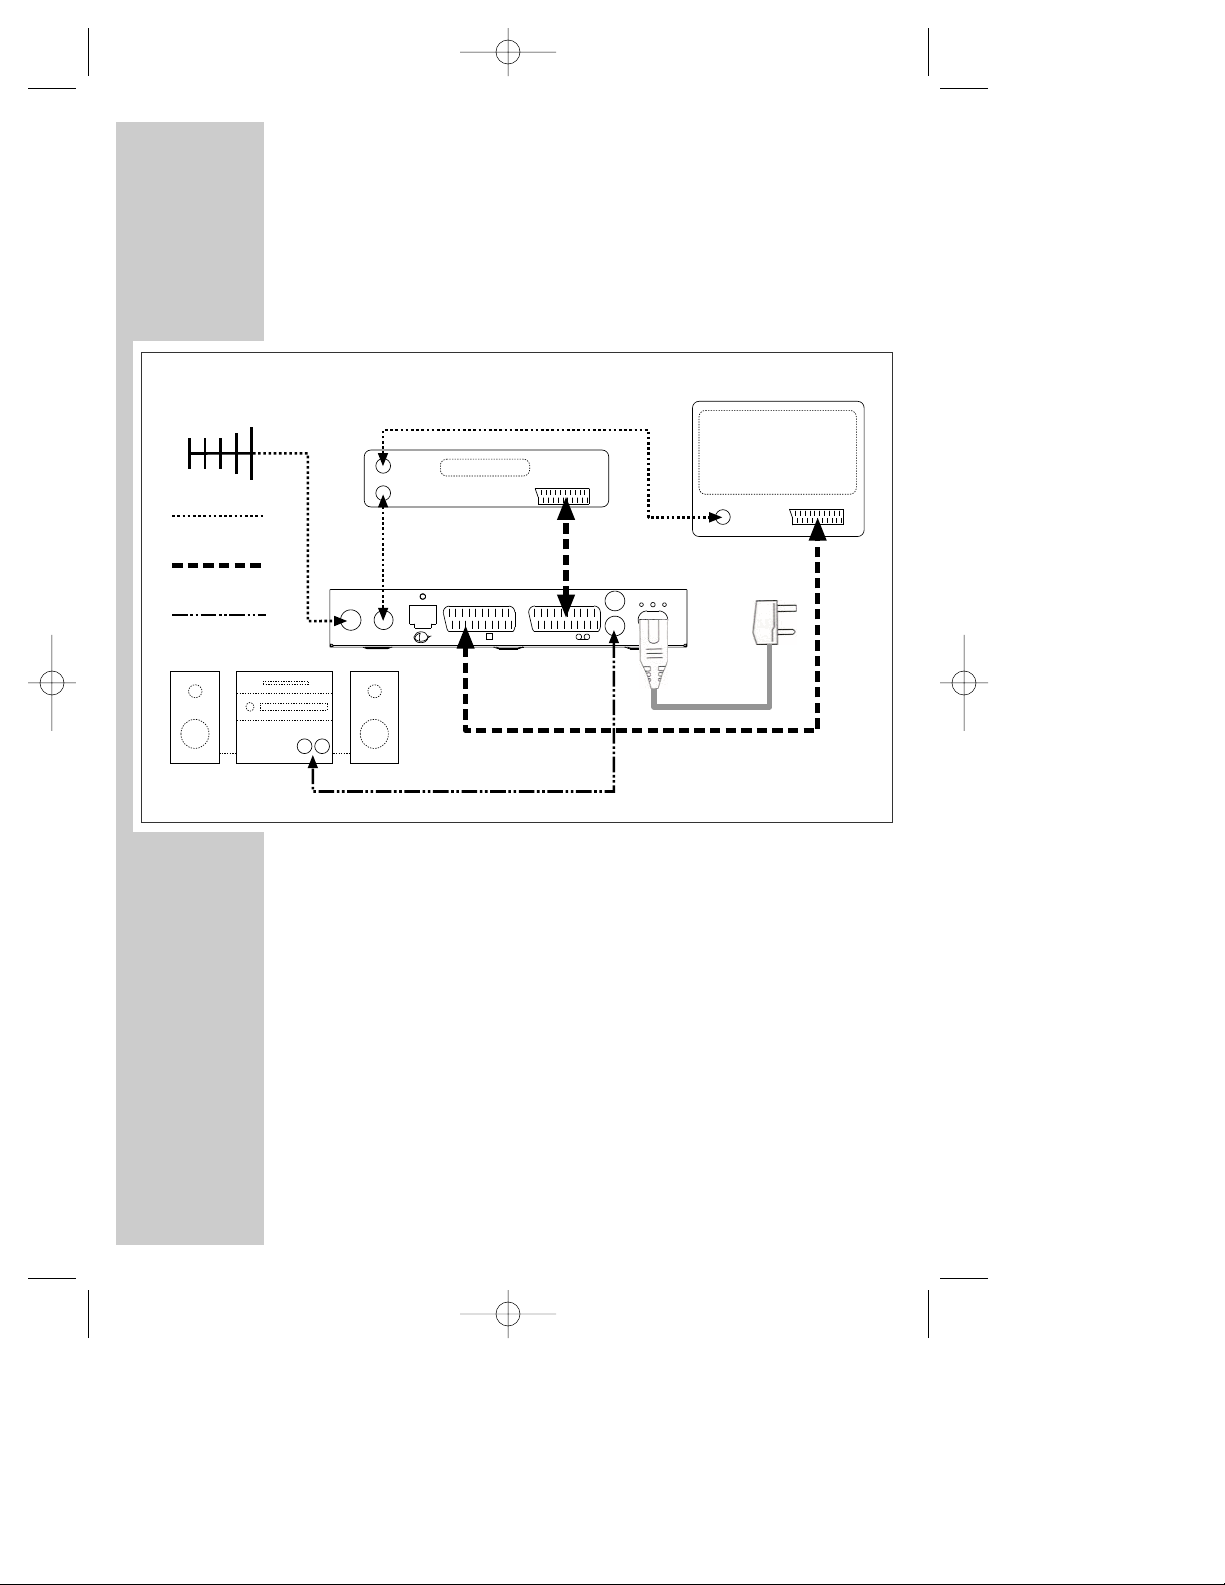
RF IN
RF LOOP
THROUGH
TV
MAINS
INPUT
RECEIVER
Aerial IN
Scart IN
TV
Aerial IN
Aerial OUT
VCR
SCART
Aerial Leads
VCR
L
R
Scart Leads
HI FI
AUX IN
L R
Phono Leads
CONNECTIONS
How to connect the aerial, scart and co-axial cables
Caution : Always disconnect the receiver from the mains supply before
you connect it to any other equipment.
1. Connect the cable of your TV aerial to the »RF IN« socket on the rear of the
receiver.
2. Connect scart and other cables as shown in the diagram above.
It is strongly recommended that the product be connected via scart
leads to your TV and VCR.
4
8510 FDT2000 Rev2 inc scart 17/2/03 6:26 pm Page 4
Page 5
Insert the batteries into the handset making note of the polarity.
Always point the remote control at the receiver.
The remote control
Switches the receiver in/out of
stand-by mode.
Numeric keys for various inputs.
Switches to the next channel, position
step by step.
Access main menu.
Enter / Exit teletext.
Access TV-Guide.
Calls up the Information Banner.
Quit the menu system.
Select previous menu.
Select various functions in the menus.
Select various functions in the menus.
Confirms selections made from the
menus.
Coloured keys for Teletext information.
REMOTE CONTROL
▼/▲
▼
▲
/
Red
Blue
Green
Yellow
5
8510 FDT2000 Rev2 inc scart 17/2/03 6:27 pm Page 5
Page 6
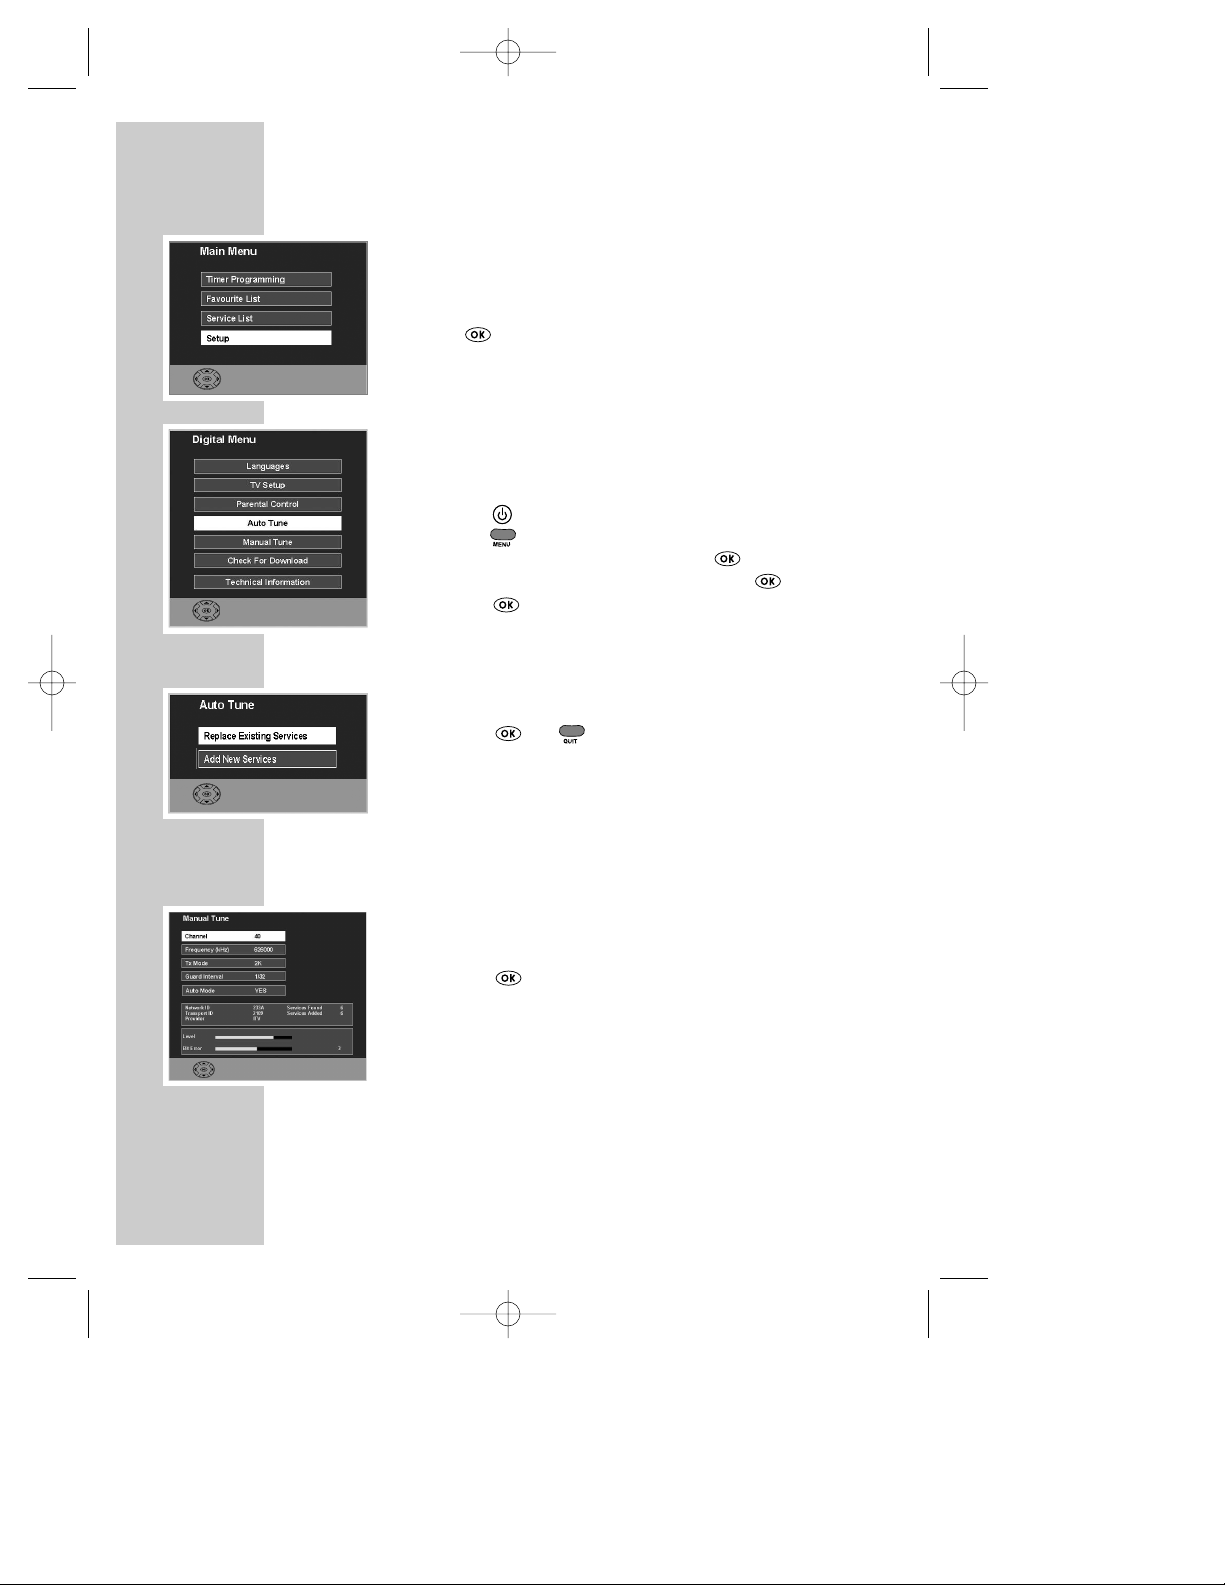
6
Start up
Once the mains has been connected to the receiver, it will
take up to15 seconds to start up. If this is the first time
installation, a menu will automatically appear.
Press when prompted.
If this is not the first time, follow the steps below :-
Auto tune
Once the receiver has been connected to the aerial and
television, the receiver can now be tuned in.
1. Press on the handset to turn the receiver on.
2. Press .
3. Select SETUP with ▲ / ▼ and press .
4. Select AUTO TUNE with ▼ / ▲ and press .
5. Press to select REPLACE EXISTING SERVICES.
Now wait while the receiver searches for all the available
services, this may take a few minutes.
The receiver will place the services in numerical order.
6. Press or to exit the menu. Alternatively
see later in the guide how to sort your Service List.
As new services become available, upgrade the SERVICE
LIST by selecting the ADD NEW SERVICES option or, when
major changes occur, use REPLACE EXISTING SERVICES
option.
Manual tune
This allows an advanced user to manually tune services.
1. Select MANUAL TUNE from the SETUP menu and
press .
2. Now enter the channel number to be tuned.
This menu also shows the aerial signal strength. The Level
bar shows GREEN for good, YELLOW for poor, or RED for
bad signals. The higher the Bit Error number, the better the
signal is.
By changing AUTO MODE to NO, it is possible to change
other reception parameters.
TUNING THE RECEIVER
●
Back●Quit
●
Back●Quit
●
Back●Quit
●
Back●Quit
8510 FDT2000 Rev2 inc scart 17/2/03 6:27 pm Page 6
Page 7
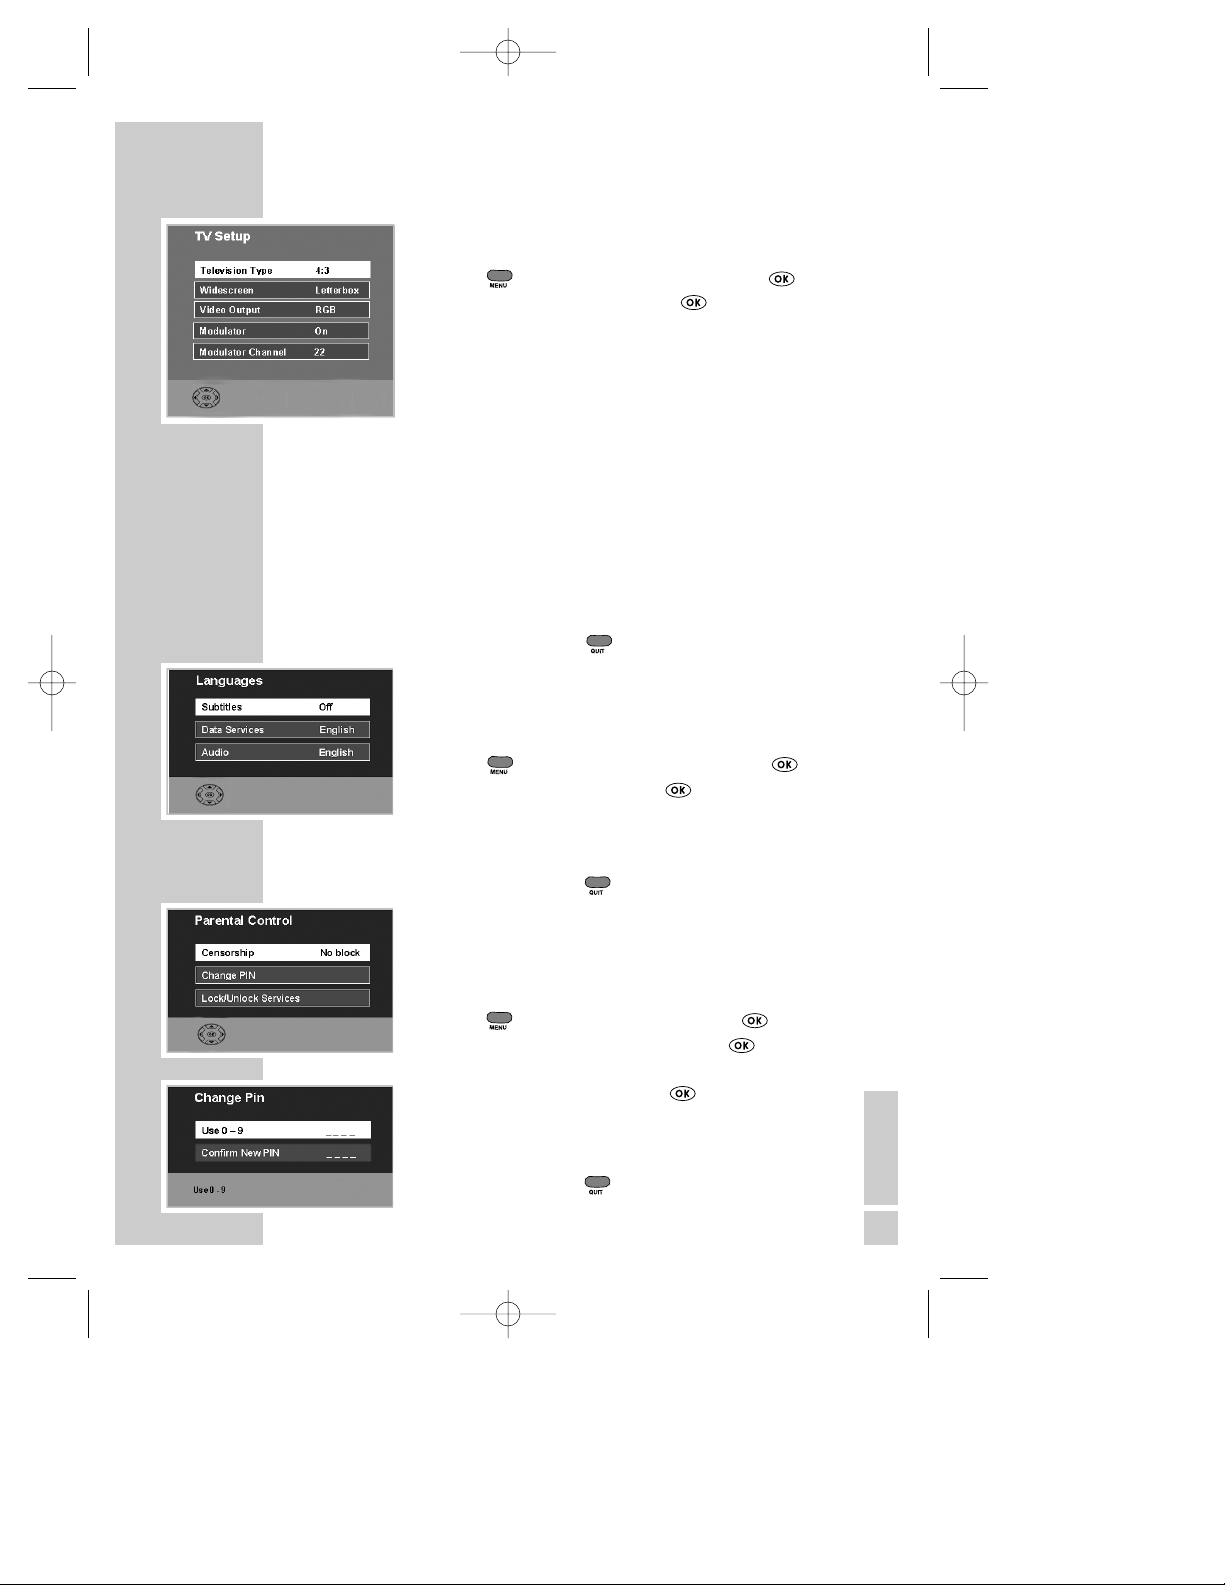
TV Setup
You can choose how pictures are displayed on your TV.
1. Press , select the SETUP menu and press .
2. Now select TV SETUP and press .
3. Now choose the type of TV screen you have. Use ◊/ÿ
and choose 16:9 for a widescreen TV or 4:3 for a
conventional one.
4. The Widescreen option chooses how widescreen images
are shown on a conventional (4:3) TV. Use ÿ
and choose from Letterbox, Centre Cutout (centre
action only shown) or Full Frame (stretched).
5. Use to turn the RF Modulator On or Off.
6. The Modulator Channel is set by the factory to CH22. If
you wish to change the channel you tune your TV to (in
order to avoid interference), use to adjust it.
7. Now choose the Video Output mode. Use◊/ÿ to
choose from RGB (best quality pictures for TVs that
support it) or PAL (suitable for all other TV sets).
8. To exit menu press .
Languages
You can choose your desired languages for Sound, Subtitles
and Interactive (data) Services, where more than just English
is being transmitted.
1. Press , select the SETUP menu and press .
2. Select LANGUAGES and press .
3. Select Subtitles, Data Services or Audio using ▲ / ▼.
4. Use
◊/ÿ to choose the desired language or Off to
suppress Subtitles.
5. To exit menu press .
PIN number
You can choose a PIN (Personal Identification Number) for
use with parental controls. The receiver was originally
programmed with 1234. It is recommended that you change
this for your own number.
1. Press , select SETUP menu and press .
2. Select PARENTAL CONTROL and press .
3. Now enter the current PIN ****.
4. Select CHANGE PIN and press .
5. Use 0..9 to enter a new PIN.
6. Use 0..9 to confirm new PIN. When confirmed, this
number is now stored. KEEP THIS NUMBER SAFE!
7. To exit menu press .
ADVANCED SETUP
●
Back●Quit
●
Back●Quit
●
Back●Quit
▼
▲
/
▼
▲
/
▼
▲
/
▼
▲
/
▼
▲
/
▼
▲
/
●
Back●Quit
7
8510 FDT2000 Rev2 inc scart 17/2/03 6:27 pm Page 7
Page 8

8
TV guide
The TV guide shows details of programs whilst allowing you to watch a smaller
picture of the selected service.
To access the guide press .
Move up and down the channel listings using ▲ / ▼ keys,
you can move a page at a time by using Pr+/Pr- keys.
Find out what’s on NOW or NEXT using keys.
Press to view the selected channel.
When in the NEXT menu, you can set a reminder for a
program you wish to view later. Select the program you
wish to view and press green. REM appears alongside
the program. A prompt will appear on screen when the program is about to
start, press to select the program or to cancel.
Information banner
To view information about the program you are currently viewing, press the
button.
One press shows a small amount of information a second
press shows more details about the current program.
The icons represent the following information :-
MHEG - Interactive service available
U - The certificate issued for the current program
SUB - Subtitles available
While the information banner is on display, you can view
details for the next program. Do this by pressing .
You can also view details for other channels. Search
through the listings using the ▲ / ▼ keys.
Press the button again to remove the banner.
PROGRAM INFORMATION
●
Info
●
Back
▼
▼
▲
/
●
Info
●
Info
8510 FDT2000 Rev2 inc scart 17/2/03 6:27 pm Page 8
Page 9

Service List
This list contains all the services that were tuned in during an Auto tune
or Manual tune. You can delete services that you do not want or you can
add them to your Favourite List for easier selection.
1. Press , select SERVICE LIST and press .
2. Select a service using ▲ / ▼ keys.
3. To delete the selected service, press red. (Once
deleted, you must repeat manual/auto tune to view)
4. To add a service to the Favourite List, select the
service and then press blue until “YES” is shown.
5. To remove a service from the Favourite List press
blue until “NO” is shown.
6. Press to view the selected service.
Favourite List
All Free-to-View services are automatically set to favourites after a
Manual or Auto tune. This list determines the order in which services are
selected when using the Pr+/Pr- keys. So for the example below, when
watching ITV1, pressing Pr+ would select BBC TWO.
To reorder the list,
1. Press , select FAVOURITE LIST and press .
2. Select the service you wish to move with ▲ / ▼ and
press blue. (The service will be highlighted in
red)
3. Now move the service using ▲ / ▼ to your desired
location and press blue to store it in position.
4. Repeat this process until the list is how you wish it.
5. To exit menu, press .
The favourite channels are now set to suit your
personal requirements. To view channels that are not
selected as favourites, use TV Guide, Service List or
enter the channel number directly via the remote control, 0..9.
Teletext and interactive services
If your chosen channel has Teletext (MHEG) features use to access
them. To return to normal viewing press again. Some services offer
interactive features, details of these and how to use them will appear on
screen as they occur.
LISTS AND INTERACTIVE SERVICES
●
Delete●Favourite
●
Back●Quit
●
Move
9
8510 FDT2000 Rev2 inc scart 17/2/03 6:27 pm Page 9
Page 10

10
TIMER PROGRAMMING AND
RECORDING
To record an analogue channel ensure that the aerial connections to your VCR
are as shown in the connection diagram and use the VCR as normal.
To record a digital channel, connect the receiver directly to your VCR via the
VCR scart socket on the rear of the receiver (see connection diagram). Please
consult your VCR user manual for details on recording via AV or AUX inputs.
For RF recordings select tuned channel on the VCR.
The TIMER PROGRAMMING function enables the receiver to :-
● Automatically switch to your pre-selected channels at
pre-selected times.
● Start Auto Record on the VCR (where the VCR supports scart
automatic recording function, see your VCR manual for details
on this.)
NOTE: The system may not accept a start time less than 5 minutes ahead of
the current clock time displayed in the menu.
1. Press , select TIMER PROGRAMMING and press
.
2. Using ▲ / ▼ select a free event, or select an event you
wish to alter and press .
3. Using select the program you wish to record or
use 0..9 to enter the number directly, e.g. 003.
4. Press ▼ to select the date and enter the date directly
using 0..9 or use to choose.
5. Press ▼ to select the time and enter the start time
directly using 0..9 or use to choose.
6. Press ▼ to select the duration and enter the length of
the program using 0..9 or use to choose.
7. Press ▼ to select repeat. Press to choose from
WEEKLY, DAILY, MON-FRI, MON-SAT or NO.
8. Press ▼ to select subtitles. Press to choose YES or
NO.
9. When the details are correct, press to store
them.
10. To exit menu, press .
If a mistake has been made during DETAIL ENTRY, an error message will be
displayed at the bottom of the screen. For instance, in the event of 2
programmes being entered with similar start times, then an EVENT CLASH
error message will be displayed. If any errors are found during this stage, the
system will not allow any further progress.
When the Timer Event has been activated, both RED and GREEN LEDs will be
lit for the duration of the event. A suitably equipped VCR will record
automatically during this time. Please note that unless your VCR supports
automatic scart recording YOU MUST ALSO SET THE VCR TIMER.
In order to delete an entry you no longer need, position the cursor over the
entry to be removed in the TIMER PROGRAMMING menu and press red.
Cancel an event at any time by pressing . Press again to confirm.
●
Back●Quit
●
Back●Quit
▼
▲
/
▼
▲
/
▼
▲
/
▼
▲
/
▼
▼
8510 FDT2000 Rev2 inc scart 17/2/03 6:27 pm Page 10
Page 11

You can use PARENTAL CONTROL to create viewing restrictions on your
receiver. First create your own Personal Identification Number (PIN) as shown
in the Advanced Setup section of this guide. You can now create censorship
levels or Lock out channels completely.
Press , select PARENTAL CONTROL and press .
Now enter your PIN. The menu will appear.
Censorship
If the censorship level does not match the censorship
rating of the program, access will be denied, the user is
prompted for the PIN before access is granted.
Press to set the censorship level to NO BLOCK, AGE 5,
AGE 10, AGE 15, AGE 18, TOTAL BLOCK.
Lock services
From the PARENTAL CONTROL menu, select LOCK/UNLOCK
SERVICES and press .
To Lock/Unlock services scroll through the list of services
with ▲ / ▼ and Lock/Unlock the highlighted service with
pres.
To exit menu press .
To view a locked channel the PIN must be entered. Once
entered, all locked channels will be unlocked until the
receiver is next in standby.
Should any censored or locked channel be selected using
the TIMER PROGRAMMING function, you must enter the
PIN before the event is stored.
Should any channel be censored or locked after the
TIMER PROGRAMMING function has been set, you will
be prompted for the PIN before access is granted.
Entering an incorrect PIN will only allow the status of the
channel to be displayed upon a blank screen.
PARENTAL CONTROLS
●
Back●Quit
●
Back●Quit
●
Quit
▼
11
8510 FDT2000 Rev2 inc scart 17/2/03 6:27 pm Page 11
Page 12
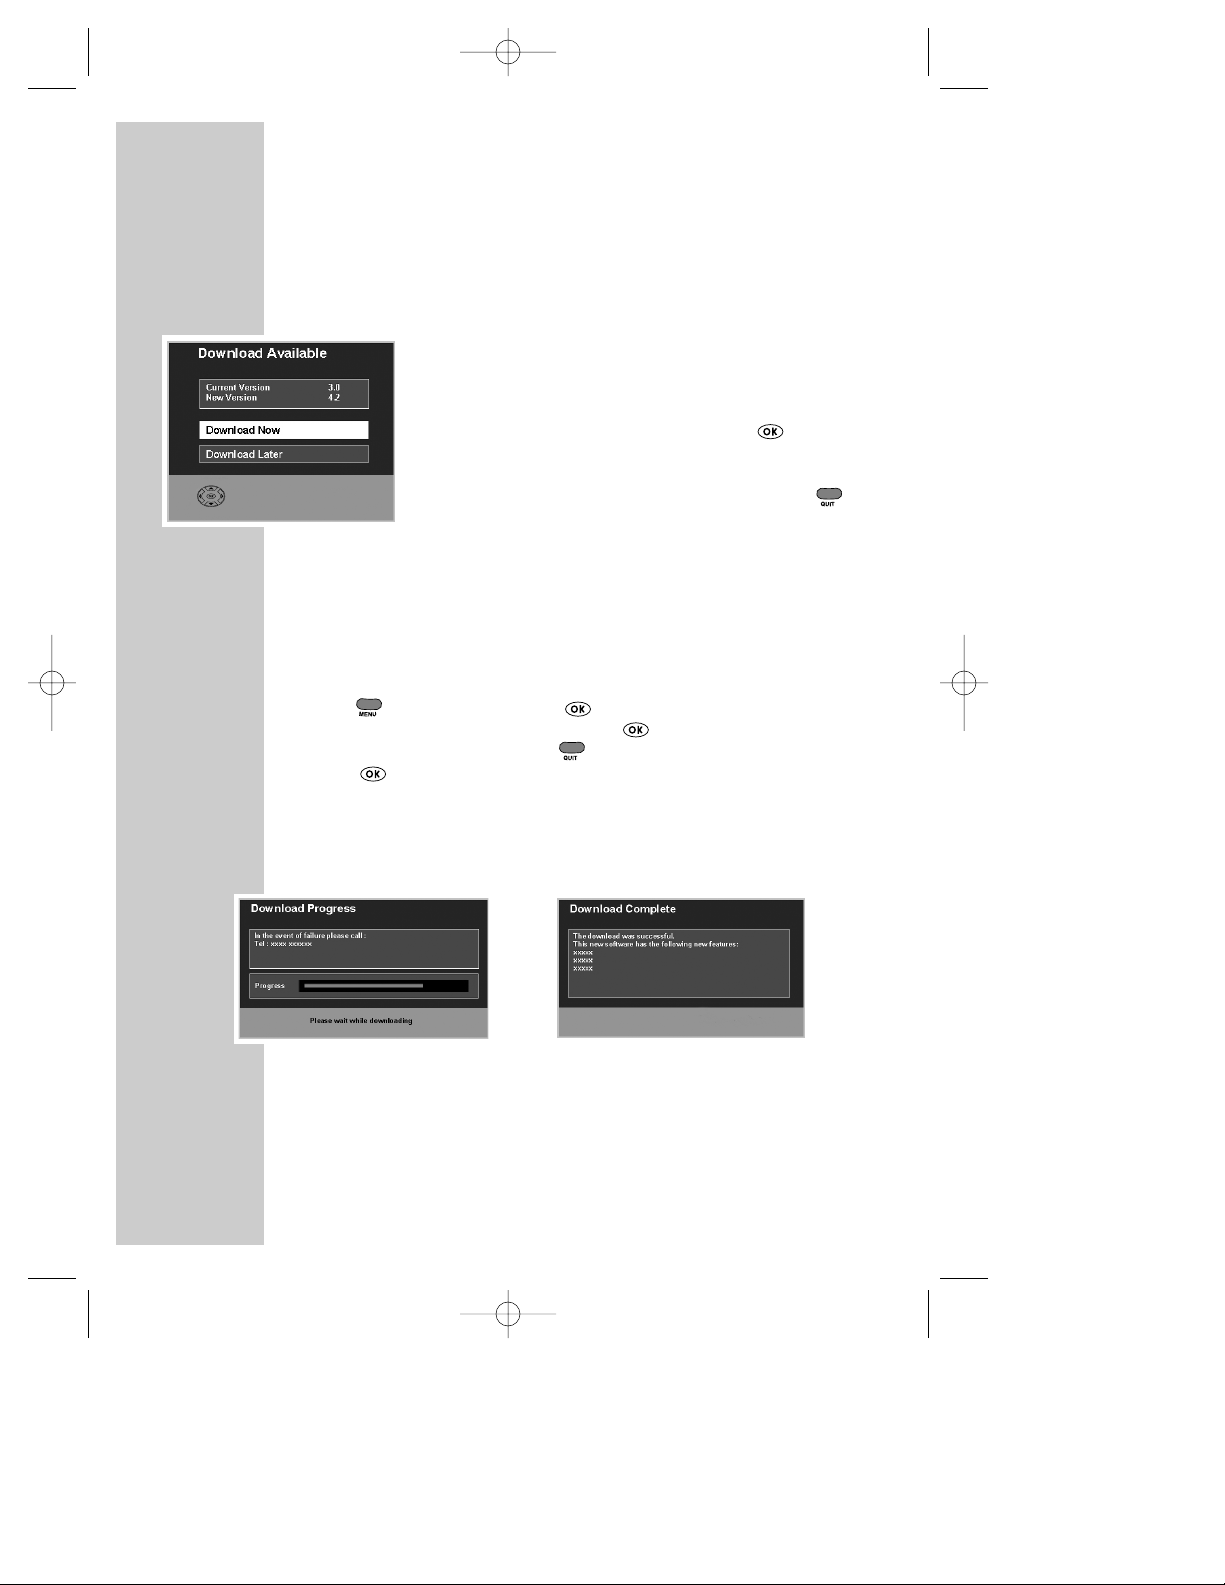
From time to time new services are launched which may require your receiver
to be upgraded with new software before you can use them. Sometimes new
features may be introduced to enhance your receiver.
Notification
This menu is automatically displayed when a new “OverAir-Download” is detected after switch on. You now have
three options.
● To start the download immediately, press .
● Select DOWNLOAD LATER to set a timer event to
receive the new software during the night.
● Refuse the download at this time by pressing .
(However, the download may be re-detected and
indicated the next time you switch on.) It is highly
recommended that you keep your receiver up to date.
Check for download
You can manually check to see if new software is available for download. If
there is one available, you will see the download menu as above.
To check:-
1. Press , select SETUP and press .
2. Select CHECK FOR DOWNLOAD and press .
3. If no download is available, press to exit.
4. Press to start. Alternatively, schedule the download for later.
The download can take up to 20 minutes so please be patient. After the
download, details about the new software will be displayed for you. There may
also be a telephone number to call in case of any difficulty.
If the download fails, try again later.
During part of the download, DO NOT switch off the receiver, this warning is
displayed on screen.
12
UPGRADING YOUR RECEIVER
●
Quit
●
Quit
8510 FDT2000 Rev2 inc scart 17/2/03 6:27 pm Page 12
Page 13
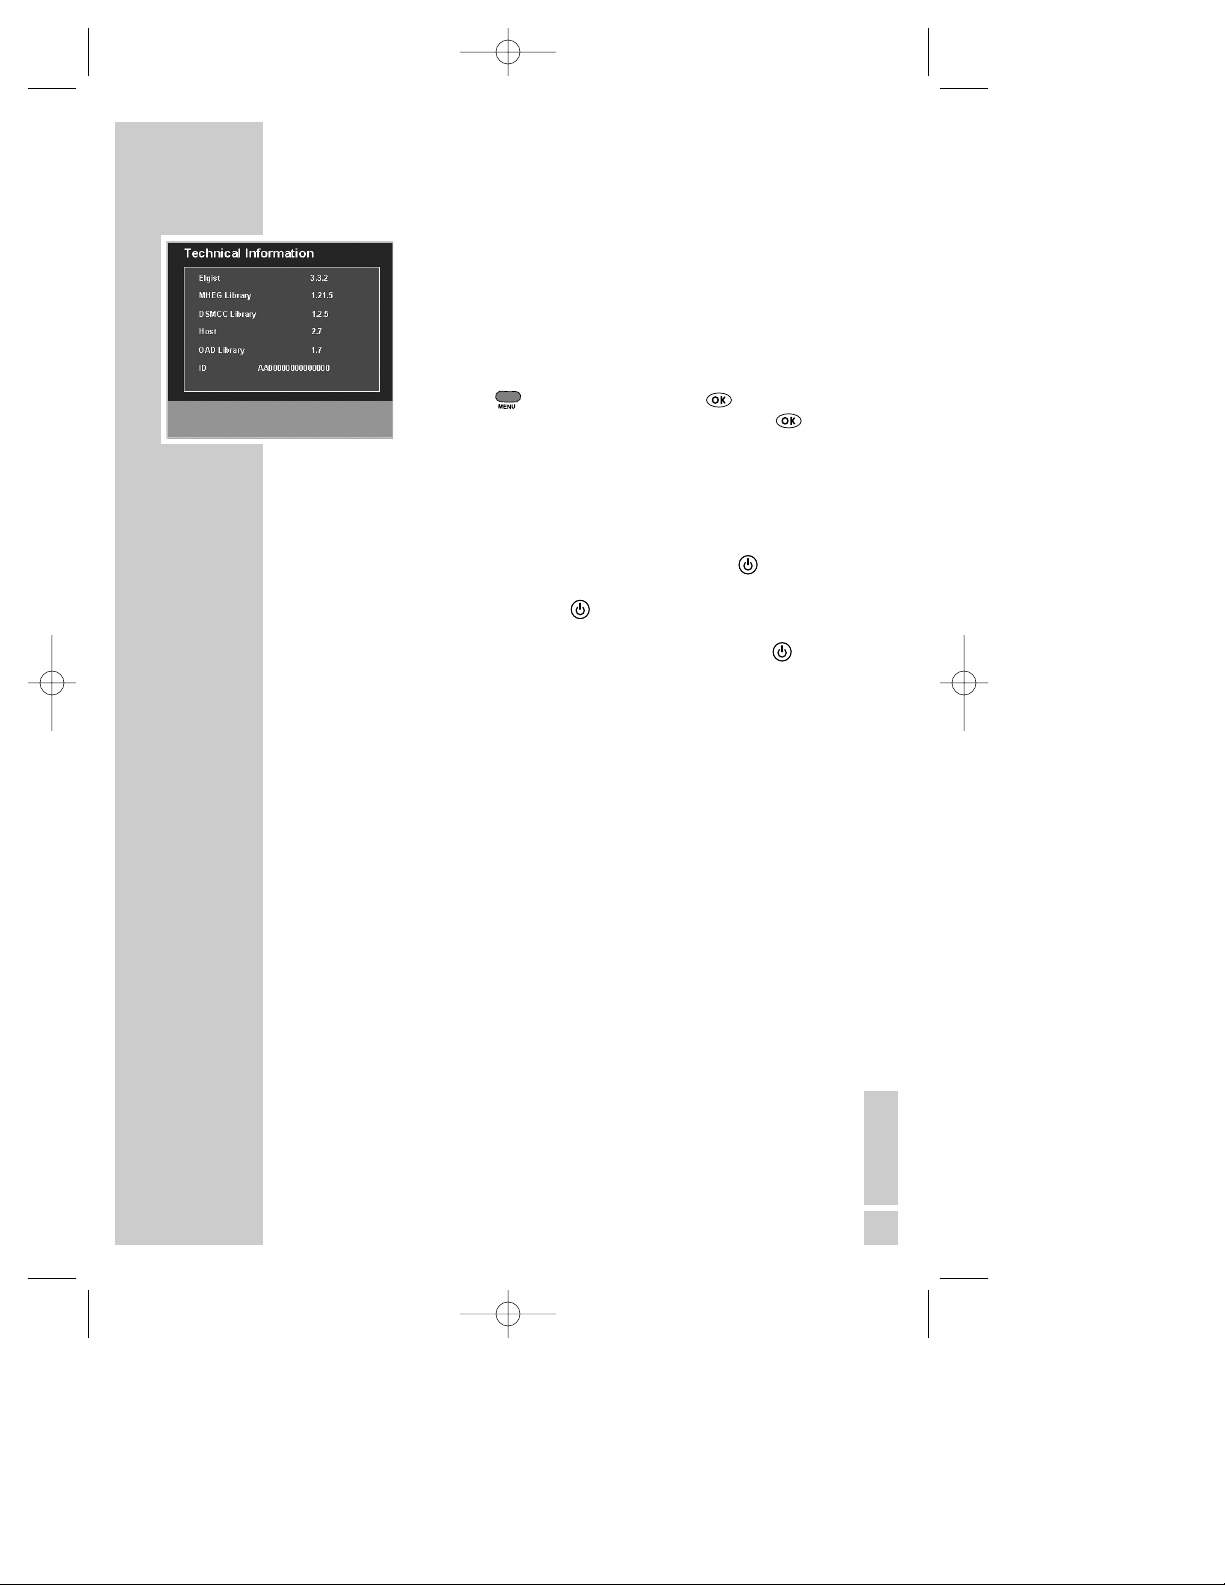
Technical information details
The technical information screen displays the hardware
and software information of the receiver. This
information may be required by the service agent or
service call operator.
1. Press , select SETUP and press .
2. Select TECHNICAL INFORMATION and press .
Electricity Consumption - Saving Energy!
The Receiver will always switch to standby when you press the key, but will
still use energy running other functions of the receiver. To minimise this
energy drain, if you press and hold the key, the Receiver will switch off all
functions. In this mode the Receiver only uses a tiny amount of energy, but it
will take a little longer to switch on. In this mode you must use the button
on the front of the unit to switch it back on. This returns the unit to normal
standby and you can now use the remote control as normal. This low power
standby mode will also interrupt the aerial signal, making analogue TV viewing
or recording impossible.
Optional extras
In addition to a VCR being used along side the receiver, a remote IR extender
(mouse) may be installed. This gives you the advantage of placing the receiver
out of view, leaving only the mouse on display.
When used in conjunction with a remote control, the mouse allows the full use
of receiver functions.
Alternatively press +/- on the mouse to scroll through the channels.
Cleaning your receiver
Dust will collect on the unit and can be removed with dry clean cloth. Do not
spray any substance on the unit.
OTHER INFORMATION
●
Back●Quit
13
8510 FDT2000 Rev2 inc scart 17/2/03 6:27 pm Page 13
Page 14

Trouble Shooting
Not every picture or sound problem is caused by a defect in your Digital
Terrestrial Receiver. Leads having been accidentally pulled out or worn out
batteries in the remote control can also cause impairment.
If the following measures do not bring about satisfactory results, consult an
authorised dealer.
Technical Information
This product fulfils the European directives 89/336/EEC, 73/23/EEC and
93/68/EEC. This device conforms to the safety regulation DIN EN 60065 (VDE
0860) and therefore the international safety regulation IEC 60065.
You may not open the Digital Terrestrial Receiver. The manufacturer accepts no
liability for damage resulting from improper handling
Mains voltage: Power consumption:
230V~, 50/60Hz Operating ~10W. Low power standby <
1
/
2
W
Ambient temperature: Audio Format:
+10°C to 35°C Analogue : Stereo Sound
Dimensions and weight
Dimensions : W x H x D - 252 x 43 x 153mm
Weight : Approx. 0.7Kg
Video: Audio:
Signal to noise : 73dB Signal-to-noise : 95dB
Video jitter : 1ns Interchannel isolation : 90dB
THD : 0.03%
14
TROUBLE SHOOTING AND
TECHNICAL INFORMATION
FAULT CAUSE/REMEDY
Receiver does not Unit is in low power standby. Press Standby button on unit.
respond to the Point the remote control directly at the receiver.
remote control Remove all obstacles which may impair the path of the
remote control signal.
Check or replace the remote control batteries.
No Picture Check all connections at the rear of the unit
Disrupted Picture Check RF IN connection. Ensure cables to TV are inserted
correctly
Select AV channel on TV set
Replace aerial outlet plate with shielded type
No Sound Check all connections at rear of unit
No Power Check mains plug is inserted correctly and receiver is
switched on
8510 FDT2000 Rev2 inc scart 17/2/03 6:27 pm Page 14
Page 15

15
8510 FDT2000 Rev2 inc scart 17/2/03 6:27 pm Page 15
Page 16

THOMSON sales UK
30 Tower Hill
West Malling
Kent ME19 4NQ
http://www.thomson-europe.com
3569851000
8510 FDT2000 Rev2 inc scart 17/2/03 6:27 pm Page 16
 Loading...