

Page 1
FV 400 L
VHS VIDEO RECORDER
OPERATING INSTRUCTIONS
Page 2
Guarantee
The type and production number of your appliance ar e printed on the guarantee certificate deliver ed
with your video recorder. Keep this certificate as well as the invoice. These documents are
indispensable for claiming your guarantee rights.
• All repairs during the guarantee period must be carried out by an authorised technician
representing our brand.
• If this condition is not met, your rights will no longer be valid.
• Never open the appliance yourself, since this may be dangerous for you or damage the
equipment.
• Thomson Multimédia is not liable if the video recorder is used other than in accordance
with this manual.
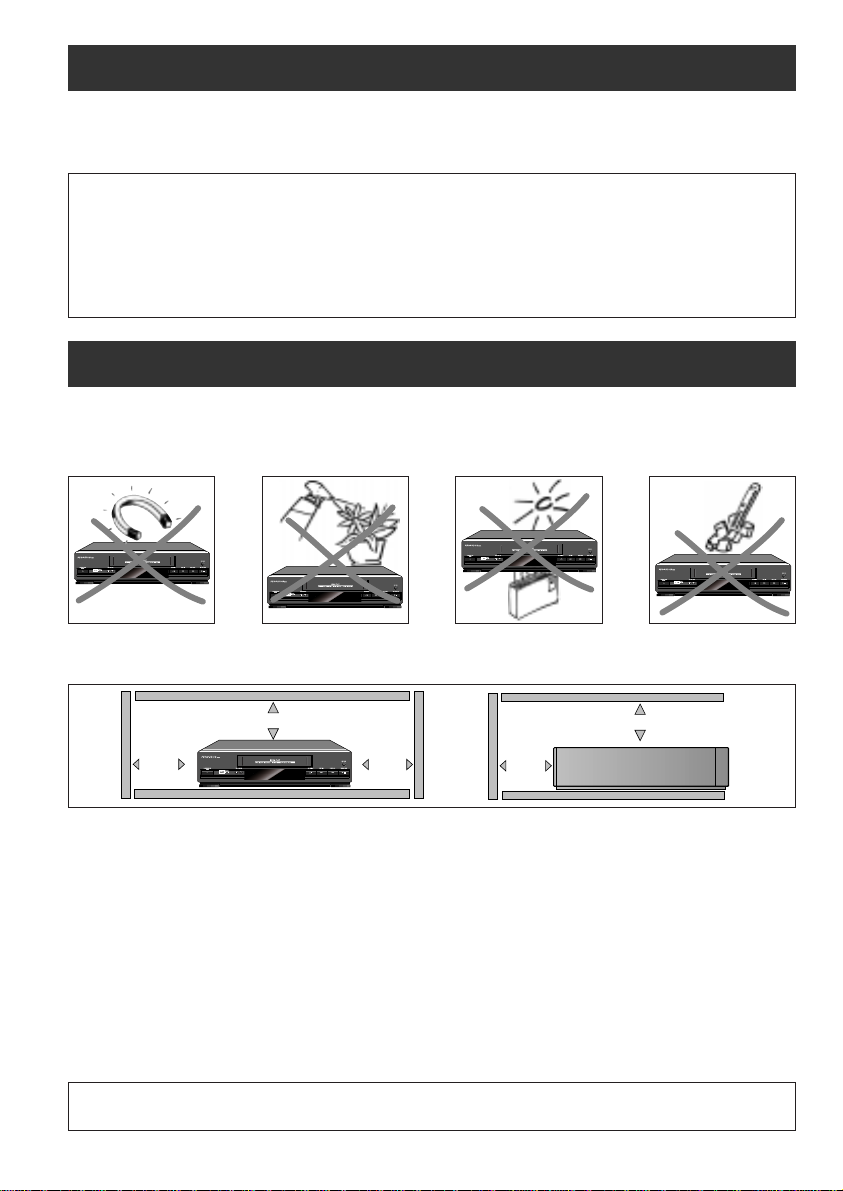
Precautions
Setting up - Ensure that the mains supply in your house complies with that indicated on the
identification sticker located on the back of your appliance.Install the video recorder horizontally,
away from any source of heat (fireplace) or appliances creating strong magnetic or electric fields.
If you install your video recor der in a purpose-built unit,check that the air vents ar e not obstructed.
Allow a clearance of 10 cm on either side and at the rear of the appliance and at least 7 cm above.
10 cm
7 cm
10 cm
10 cm
7 cm
Use - If your appliance,or a cassette,has been stored in a very cold atmosphere for a certain amount
of time (transported during winter for example),wait approximately 2 hours before using y our video
recorder.The openings located on the top and the bottom are for ventilation purposes.They should
not be obstructed.In the event of lightning, the appliance should be disconnected from the external
aerial.
Even when the on/off switch is off,the video recorder is not completely cut off from the mains. To
disconnect it completely,it is necessar y to remove the mains plug from the mains socket.
Under no circumstances should this appliance be put to industrial use. It is designed solely for
domestic operation.
Please use the supplied power cord only (it comes with a special interference filter).
Maintenance - Use a dry, clean, soft cloth. Do not use any scouring agents, solvents or abrasive
products, etc. If an object or liquid enters inside the appliance, unplug it immediately and have it
checked by an authorised technician.
It is illegal to make total or partial copies of recordings protected by copyright laws without explicit
permission of the copyright holder.
1
Page 3
Some information before you start
3A
Mains connection
This video is suitable for use on A.C. mains supply, 220-240 V - 50 Hz only.
It must not be connected to D.C. mains.
Note: The mains lead of the video is fitted with a moulded plug. If the mains sockets are not
compatible or if for any reason the plug is removed please follow the directions below.
The moulded plug cannot be rewired and if removed must be disposed of safely.
Do NOT
under any circumstances plug the severed plug into any mains socket as this could
result in an electric shock.
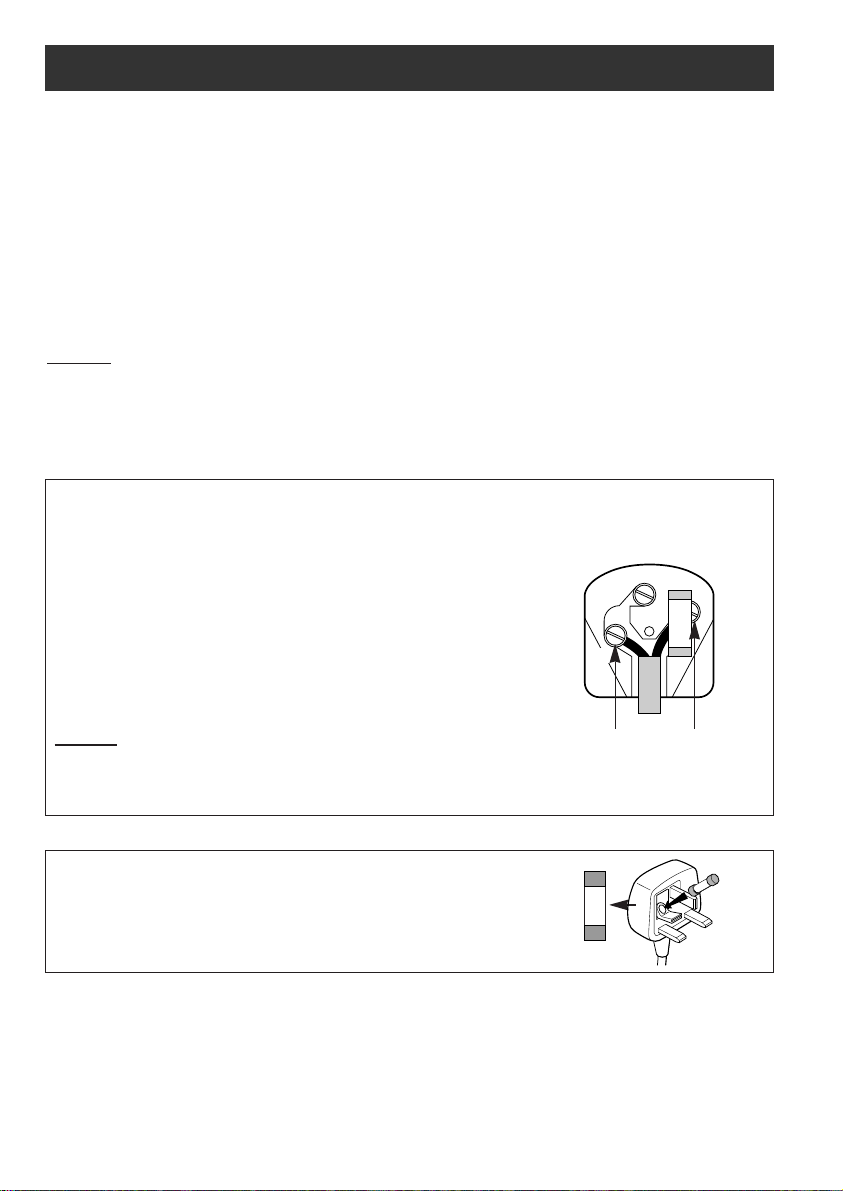
Important!
If the plug is removed rewire new plug as follows: The wires in the
mains plug are coloured in accordance with the following code:
BLUE - NEUTRAL
BROWN - LIVE
As the colours of the wires in the mains lead of this apparatus
may not correspond with the coloured markings identifying the
terminals in your plug, proceed as follows:
BLUE wire to the terminal coded N (Neutral) or coloured black.
BROWN wire to the terminal coded L (Live) or coloured red.
Do NOT
is marked by the letter E or by the safety symbol
make any connection to the terminal in the plug which
l or coloured
green and yellow.
A fused plug must be fitted with a 3A fuse approved
by ASTA or BSI to BS 1362 and fuse covers must always be
securely replaced.
If your Video Recorder does not work, the fuse may be blown.
E
N
BLUE BROWN
3A
L
3A
The OFF button BBon the remote control does not completely disconnect the unit from the
!
mains supply but switches operating power on and off.
2
Page 4

Contents
Guarantee . . . . . . . . . . . . . . . . . . . . . . . . . . . . . . . . . . . . . . . . . . . . . . . . . . . . . . . .1
Precautions . . . . . . . . . . . . . . . . . . . . . . . . . . . . . . . . . . . . . . . . . . . . . . . . . . . . . . .1
Some information before you start . . . . . . . . . . . . . . . . . . . . . . . . . . . . . . . . . . . .2
Before you start . . . . . . . . . . . . . . . . . . . . . . . . . . . . . . . . . . . . . . . . . . . . . . . . . . .4
Loading and ejecting a cassette . . . . . . . . . . . . . . . . . . . . . . . . . . . . . . . . . . . . . . .4
Principles of operation . . . . . . . . . . . . . . . . . . . . . . . . . . . . . . . . . . . . . . . . . . . . . .5
Connections . . . . . . . . . . . . . . . . . . . . . . . . . . . . . . . . . . . . . . . . . . . . . . . . . . . . . .6
VCR set-up . . . . . . . . . . . . . . . . . . . . . . . . . . . . . . . . . . . . . . . . . . . . . . . . . . . . . . .7
Tuning in the television and automatic channel set-up . . . . . . . . . . . . . . . . . . . 7-8
Setting of date and time . . . . . . . . . . . . . . . . . . . . . . . . . . . . . . . . . . . . . . . . . . . . .8
Sorting your channels . . . . . . . . . . . . . . . . . . . . . . . . . . . . . . . . . . . . . . . . . . . . . . .9
Manual channel set-up . . . . . . . . . . . . . . . . . . . . . . . . . . . . . . . . . . . . . . . . . . . . . .10
Operating basic VCR functions . . . . . . . . . . . . . . . . . . . . . . . . . . . . . . . . . . . .11-12
Making an immediate recording of a TV programme . . . . . . . . . . . . . . . . . . . . .13
Programming of a recording . . . . . . . . . . . . . . . . . . . . . . . . . . . . . . . . . . . . . .13-14
Erasing a timer . . . . . . . . . . . . . . . . . . . . . . . . . . . . . . . . . . . . . . . . . . . . . . . . . . .15
Preferences menu . . . . . . . . . . . . . . . . . . . . . . . . . . . . . . . . . . . . . . . . . . . . . . . . .15
Controlling the TV set . . . . . . . . . . . . . . . . . . . . . . . . . . . . . . . . . . . . . . . . . . . . . .16
Immediate deletion of status information . . . . . . . . . . . . . . . . . . . . . . . . . . . . . .16
Transition to the year 2000 . . . . . . . . . . . . . . . . . . . . . . . . . . . . . . . . . . . . . . . . . .17
Playing an NTSC tape . . . . . . . . . . . . . . . . . . . . . . . . . . . . . . . . . . . . . . . . . . . . . .17
Index / counters . . . . . . . . . . . . . . . . . . . . . . . . . . . . . . . . . . . . . . . . . . . . . . . . . . .17
Prevention of External timer recording . . . . . . . . . . . . . . . . . . . . . . . . . . . . . . . .17
External timer recording . . . . . . . . . . . . . . . . . . . . . . . . . . . . . . . . . . . . . . . . . . .17
Technical features . . . . . . . . . . . . . . . . . . . . . . . . . . . . . . . . . . . . . . . . . . . . . . . . .18
Identifying and correcting problems . . . . . . . . . . . . . . . . . . . . . . . . . . . . . . . . . . .18
3
Page 5
Before you start
-
+
SIZE AAA 1,5 V 0%MERCURY
GREENELL
EXTRA HEAVY DUTY
-
+
SIZE AAA 1,5 V 0%MERCURY
GREENELL
EXTRA HEAVY DUTY
OPERATING INSTRUCTIONS
FV 401 L
V
VHS VIDEO RECORDER
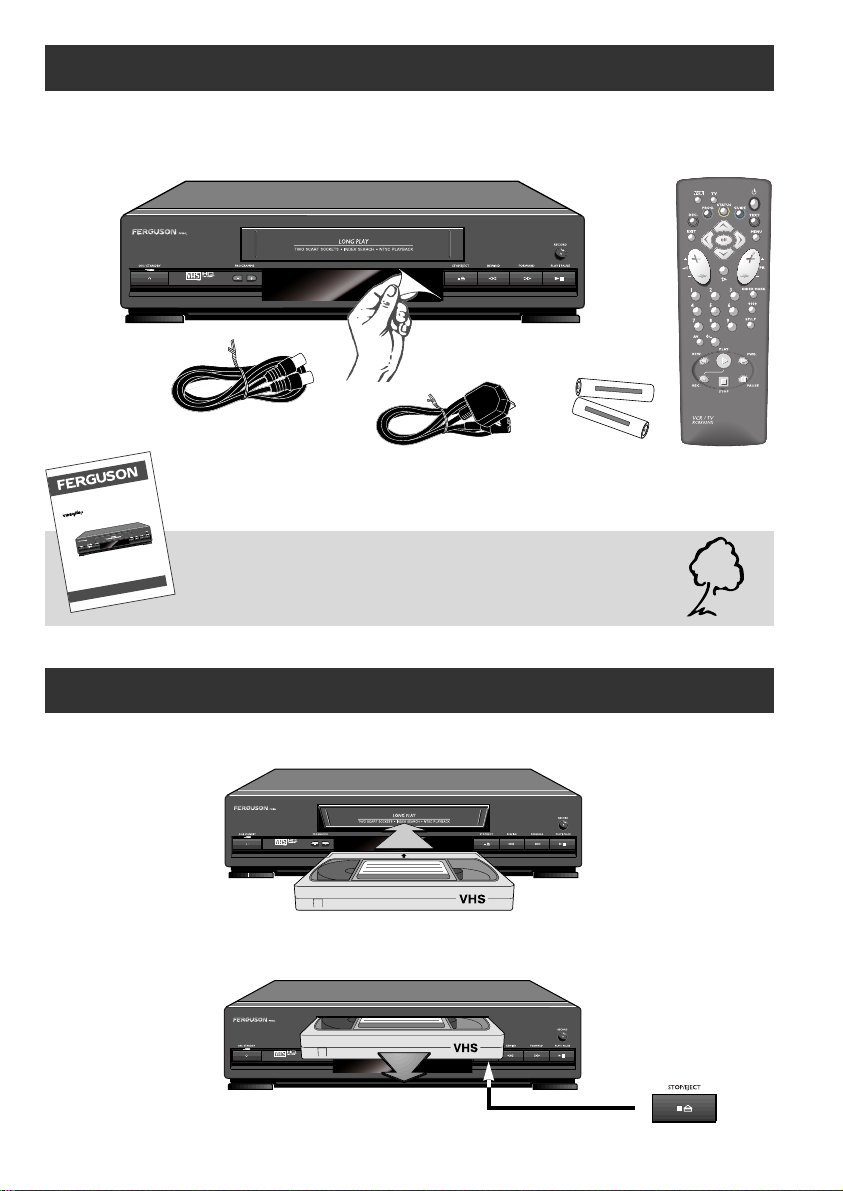
Remove all the packaging and protective films.Before setting up your video recorder, you should
have all the following elements in your possession.
R.F. lead
Mains lead
User manual
In order to respect the environment we have printed
this manual on unbleached recycling paper.
Remote control
and batteries
Loading a cassette.
Ejecting a cassette.
Loading and ejecting a cassette
4
Page 6
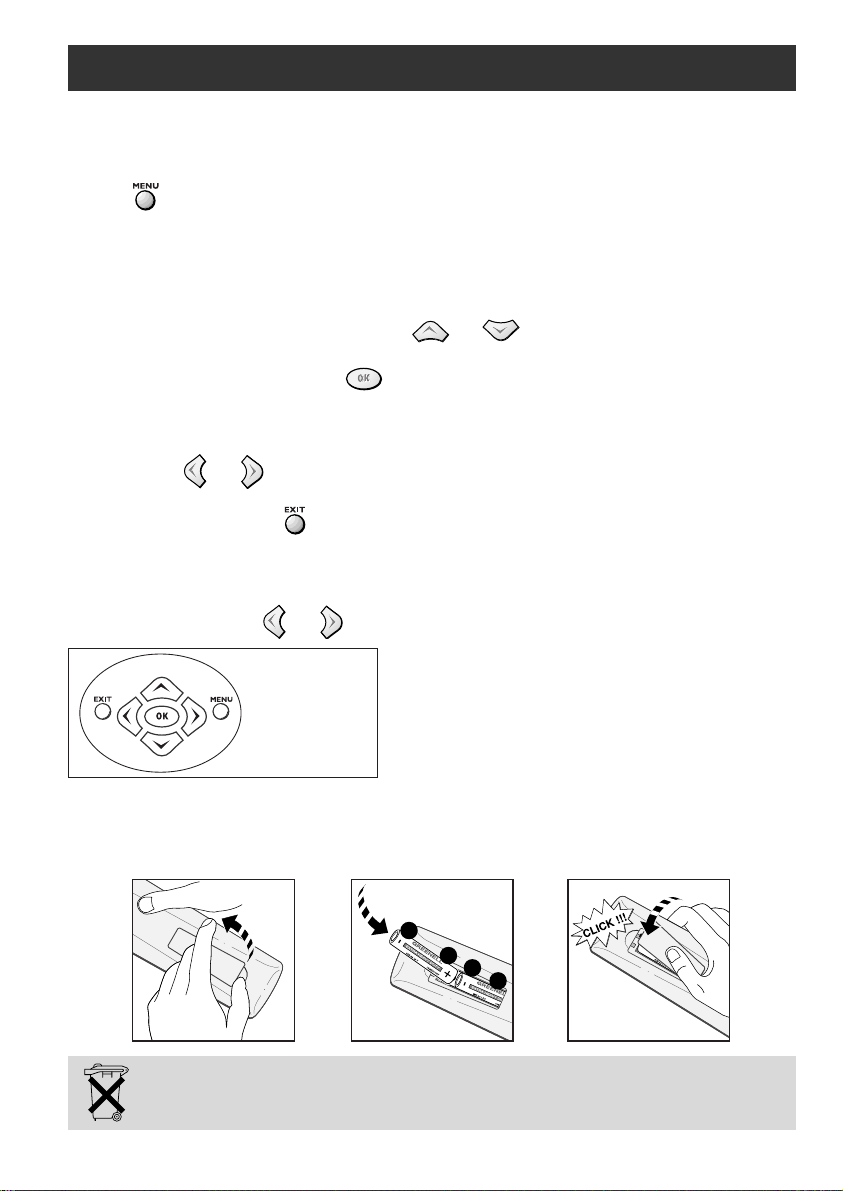
Principles of operation
Always point the remote control at the video recorder.
CALLING UP A MENU
The key on the remote control calls up the menu which enables you to use the features
of your VCR and to adjust it.
NAVIGATION WITHIN THE MENUS
1 - To choose a function, select a line with or .
2 - To confirm your choice, press .
3 - To make an adjustment (i.e.to select an option, increase or decrease a given value),
use the or keys.
4 - To exit a menu, press key .
Example: The symbols
To select an option, press or keys.
C or B displayed on the screen indicate that an option is available.
IN THIS MANUAL
V
C
OK
B
W
EXIT MENU
FIT THE BATTERIES
1
Please respect the environment! Before throwing any batteries away, consult your
distributor who may be able to take them back for specific recycling.
2 3
–
+
–
+
5
Page 7

BASIC CONNECTIONS
Connections
3
Disconnect the outside aerial cable from the TV set and reconnect it to the RF IN socket on
1
your video recorder.
2
Connect the TV set to the video recorder (RF OUT socket) with the supplied aerial cable.
Connect the video recorder to a mains socket with the mains lead.The display on the video
3
1
2
recorder comes on.
FURTHER CONNECTIONS
To view and/or copy pictures from a connected AV unit.
Video disk player
TV set
Other video recorder
Satellite receiver
Display the control screen with STATUS key and select socket AV1 or AV2 with the AV
key on the remote control.
6
Decoder
DVD
Camcorder
Page 8

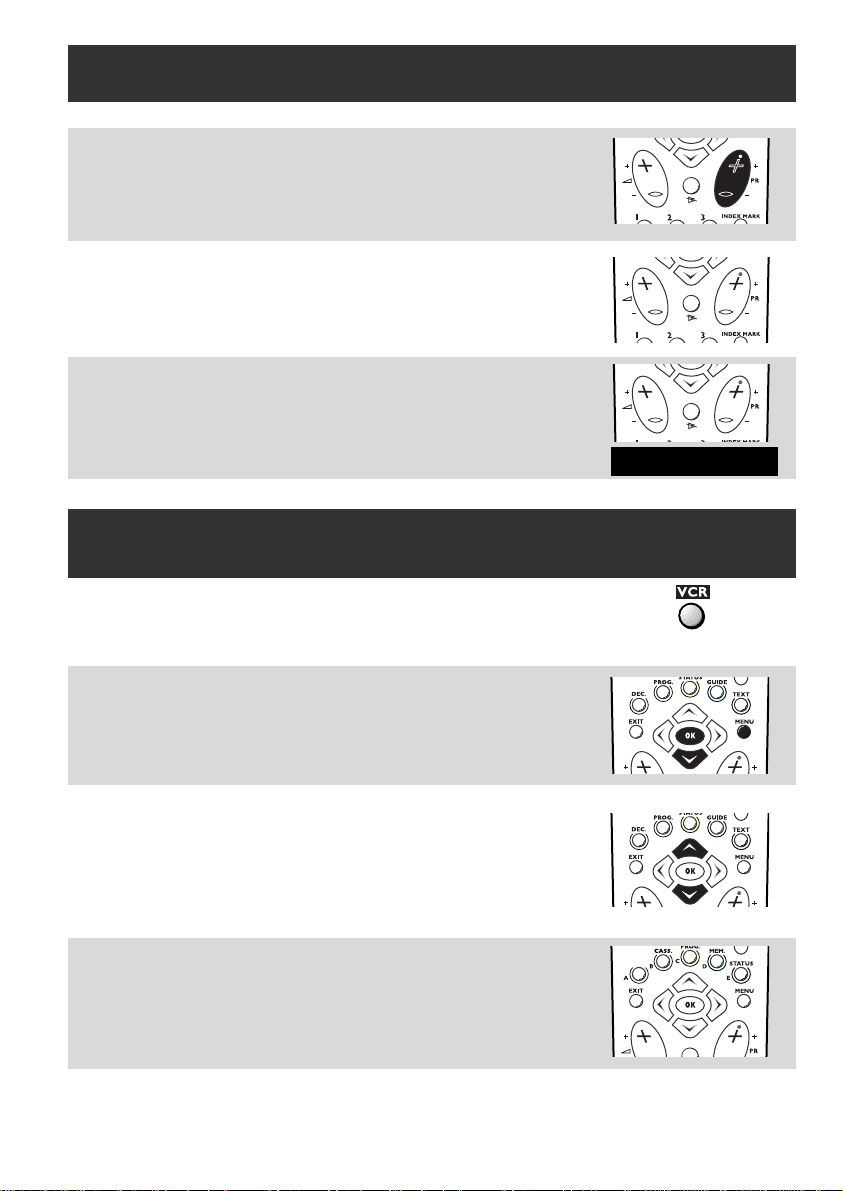
VCR set-up
Upon completion of the basic connections described on the previous page
To set up your VCR, you will need the user manual of your TV set.We
recommend that you proceed step by step with all stages up to and
including page 7.
1
Press the VCR key on the
remote control.
Hold down the MENU key on the
remote control until
2
on the VCR display.
Please wait until the VCR has found a
channel for transmitting the pictures to
the TV set (within the channel range
3
from 21 to 69).
After a certain time, the VCR
indicates the output channel on
4
its display.
CCHH -- --
comes up
Press OK to continue
5
Tuning in the television and automatic channel set-up
For a terrestrial analogue pay TV decoder see page 10
Switch on your TV and select an unused
TV programme number.
1
Get your TV User Manual.
2
The main functions of your remote control can be found on the VCR front.
!
7
Page 9

From the TV User Manual, follow the
instructions to find the VCR signal.
3
As soon as you have found the output channel of the VCR, a
message comes up on the TV screen.
Note:When the picture quality is poor (snowy or torn image), c hange the
4
output channel of the VCR with the PR+/PR- keys (when doing so,the
picture will disappear until you return the TV set to the new c hannel.
Store the output signal found on an unused TV programme
number,following your TV instruction book.
Note:Remember this TV programme number as you will have to use it to
5
watch the playback of your VCR tapes or TV programme.
Press OK key.
6
You will be informed by a message that your VCR is searching and
storing the channels that can be received in your region.
7
You’ll have to wait a while until this procedure is completed.
8
Setting of date and time
Date and time may not be correct
If date and time are correct,press EXIT to
leave the menus.
1
If not,set the clock by means of the number keys (0 to
9).Press key B,type in time and date in the following
2
order: hour,minutes, day,month, year.
Confirm with OK and press EXIT to leave.
3
8
Page 10

Sorting your channels
To ease identification of the channels, have a TV magazine to hand.
Press the VCR key on your remote control.
Automatic channel set-up assigns the programme numbers in a
pre-defined order.These programme numbers may not match
the usual order (BBC 1 on Pr 1).
Press the MENU key.
The Installation line is already selected.
Press OK.
1
Select Channel swapping
and confirm with OK.
When the proposed number matches
the picture displayed,press OK to go
2
to the next channel.
Should the channel number not match
the TV picture,scroll the channels with
3
the
CC / BB
keys.
When the number matches the TV picture,
press OK to confirm and go to the next
channel.
4
To delete a channel, press 0000.
5
When all channels are sorted,
press EXIT to leave the menus.
6
9
Page 11

Manual channel set-up
Press the VCR key on your remote control.
Press the MENU key.
The Installation line is already selected.Press OK.
1
Select Manual set up,and confirm with OK.
With W first select Reception and then choose
CH or CC with C or B (CH stands for the
channels received via your aerial antenna and CC
2
for the cable network programmes).
Press W to select the Autosearch line.
3
To star t channel search, press C or B (you may also
make a direct input with the number keys 0 to 9).
4
When a channel is found,the picture appears.
If the picture quality is poor:
Make use of the fine-tuning (</>)
5
with WW,then
If the programme is scrambled (i.e you need a
decoder),press the DEC.key on the remote control
6
(the symbol is then displayed on the screen).
Select Pr and give the channel a number with the
0 to 9 keys (example:0, 1 for PrI).
7
Press OK to store this number.
8
CC
or BB.
10
Page 12

If you wish to continue with channel set-up,
repeat steps 2 to 8,otherwise press EXIT.
9
Operating basic VCR functions
Press the VCR key on your remote control.
To switch the VCR or put it into standby:
BB
press the
Playing back a video tape:
Press the PLAY key.
Stopping video tape playback:
Press the STOP key.
key.
Making a forward search on a video tape:
Press the FWD.key while in playback mode.
Press the key again to accelerate the search
(Search may be in black and white).
Making a backward search on a video tape:
Press the REW. key while in playback mode.
Press the key again to accelerate the search
(Search may be in black and white).
Pausing the picture on a video tape:
Press the PAUSE key while in playback mode
(Note there is no picture in SP mode pause).
When a menu is displayed on the screen, you cannot activate your VCRÕs main functions (play,
rewind).
!
11
Page 13

Releasing the pause mode on
a video tape:
Press the PLAY key.
Winding a tape forwards:
Press the FWD.key while in stop mode.
Rewinding a video tape:
Press the REW. key while in stop mode.
If the picture is poor (tracking):
Press PR+ / PR- key (VCR in play or pause).
Restore the standard setting with 0000 key
(If you cannot improve the picture,the tape may be faulty).
To display the information screen (source,SP/LP,
counter status):
press the STATUS key.
Press EXIT to leave.
Selecting standard play (SP) or long play (LP):
Press the SP/LP key.
Watching the TV channels installed in
your VCR:
Press the digit (0-9) or PR+ / PR- keys.
When a menu is displayed on the screen, you cannot activate your VCRÕs main functions (play,
rewind).
!
12
Page 14
Making an immediate recording of a TV programme
Press the digit (0-9) or PR+ / PR- keys to select the TV
programme to be recorded.
1
Press the REC. key with
a video tape inserted.
2
To star t recording, press the REC
or the PLAY key again.
Note:an information screen comes up on your TV,but it will not be
3
recorded on the tape.To delete this screen,press the EXIT key.
Programming of a recording
Press the VCR key on your remote control.
Pr1MMSP 0 : 11 : 27
Press the MENU key.
Select Record timer with WW,
1
and confirm with OK.
Press VVor WWbutton to select an empty timer
recording menu line.
2
Note:Otherwise go to page 15 to erase an existing timer recording.
Press number keys (0-9) to timer record TV programmes
(0,1 for Pr1) ,or press AV key to timer record record
an entered input (e.g. satellite connected by SCART
3
cable).
13
Page 15

Use the number keys (0-9) to enter the start and
stop time.
Note:make sure that the start and stop times do not overlap
4
another timer recording.
Press number keys (0-9) to enter the Date of the timer
recording in day and month format.
5
Press OK key to select between Once,Monday to Friday
(5/7) or Weekly (1/7) timer recording.
6
Press SP/LP key to select between Standard Play
or Long Play recording.
Note:Long Play enables you to record twice the length on
7
the same tape with reduced quality.
8
9
10
Press OK to confirm the timer recording.
To set another timer recording, repeat step 2-8.
Otherwise press EXIT button to leave menu.
Turn the VCR off (standby).
14
Page 16

Erasing a timer
Press the VCR key on your remote control.
Press the MENU key.
Select Record timer with WW,
1
and confirm with OK.
Press VVor WWkey until the menu line
you wish to erase is selected.
2
Press 0000 key to permanently erase
the timer recording menu line selected.
3
Press EXIT key to leave menu.
4
Preferences menu
To customise the VCR settings according to preferences,to
automate some functions,to complete your programming
or to change settings.
Press the MENU key. Select Preferences with WW,
and confirm with OK.
To decrease the power consumption of your VCR in
standby (the clock is not displayed):
use WWto select the Eco mode line, then tick the box (
with the OK key.
Press EXIT key to leave menu.
15
þ)
Page 17

Controlling the TV set
Your remote control can be used for controlling certain functions of most of our
brand of TV sets.For this, you need to enter one of the following codes:000 for
the most recent sets and 001 for the others.Depending on the type of TV set you
own,this remote control may not be compatible or certain functions may not be
available.
Storing the TV code:
- Press the TV key on your remote control.
- Hold down the MENU key on your remote control and
key in one of the following codes:000 or 001.
- Release the MENU key.
To control the TV set:
- press the TV key on the remote control first.
To switch the TV on or to switch into standby:
BB
- press
These keys have the same functions as the
corresponding ones on the remote control
of the TV set.
To choose the TV programme:
- make use of these keys.
key.
To adjust the volume:
- make use of the aa-/+ key on the remote control.
To switch the sound off:
- press this key.
To select the SCART connector and watch the
pictures from the set connected to this connector:
- make use of the AV key.
Immediate deletion of status information
When playing your recordings,information is displayed on the screen for a number
of seconds. This information can be immediately cleared with the EXIT key.
16
Page 18

Transition to the year 2000
VHS
VHS
On December 31st 1999 at midnight,the clock of your video recorder will
switch over to the year 2000.However, should it be disconnected from the mains
at that moment,you will have to change the year manually.
Press the MENU key.
Select Clock set with WW,and confirm with OK.
1
With the keys
199- and press 2.To replace the other digits,proceed
2
likewise.Store by pressing OK.
CC / BB
,position the cursor on the 1 of
Playing an NTSC tape
NTSC is the TV standard used in the United States,Japan and other countries.Your
video recorder can play VHS-NTSC tapes but your TV set must be compatible.
Most PAL TV sets correctly reproduce NTSC tape pictures.
Index / counters
The index system marks sequences on the tape to help you find them easily.At the
beginning of each recording,the video recorder automatically marks an index on
the tape.
Use C/B to go to the next or previous index mark (no menu on screen).
The counter indicates the time elapsed in hours,minutes and seconds (status
menu).Counting star ts upon loading of the cassette or the position 00h00m00s of
the counter.To reset the counter to zero (0:00/00),press key 0000.
Prevention of unwanted recording
To avoid erasing one of your tapes by accidental over-recording, we recommend you
protect them by breaking the security tab.To reuse a protected tape, just stick a piece of
adhesive tape on this place.
Unprotected
Protected
External timer recording
Recording of a programme can be triggered by a satellite receiver or another
appliance designed for the purpose (control voltage applied to pin 8) and connected
to socket AV1 or AV2 with a SCART cable. This avoids having to programme both set.
Programme the connected set and in the video recorder programming menu select
AV1 or AV2 as appropriate without entering a start or stop time.This will make a
permanently active timer ready to respond to a trigger from the connected set.
17
Page 19

Technical features
Mains supply 200 to 240 V ±10% - 50/60 Hz
Consumed power 16 W when ON - 4 W in the eco mode
Clock backup approx.30 minutes
Dimensions (W/H/D) 393 x 94 x 278 mm
Weight approx.4.0 kg
Functioning conditions +5°C to +40°C - Surrounding humidity:80 % maximum
Tape heads video:2 rotary heads
Tuner PLL Type
Reception band I-III-IV Terrestrial (aerial)
Frequency ranges 45 to 855,25 MHz
Colour system PAL
Reception norm I
Number of storable programme 99
Modulator UHF
Remote control Infrared 33 Khz - Batteries 2 x 1,5 V (AA)
Menu language English
Automatic functions On (using any key)
Tapes VHS format - Rewinding time: 130s with E 180
audio:1 fixed head (mono linear track)
Inter-band (cable network)
Hyper-band (cable network)
Playing of an NTSC tape on PAL 60 Hz TV
Channel 21 to 69 - Pre-set at the factory on channel 60
Standard
I
Play (with protected tape)
Rewinding (at the end of the tape)
Identifying and correcting problems
If you have any problems,check the counter measure for each symptoms listed below.If the problem persists,note your VCR
Model Number and Serial Number which can be found on the back of your VCR. Contact your nearest authorized service
centre or dealer for assistance.
VCR cannot be turned on. 1.Make sure the power cord plug is inserted in an AC power outlet.
Intermittent or no remote operation. 1.Aim the remote control directly at the VCR.Nothing should be blocking the
Snowy picture.
Noisy sound.
Dotted lines or stripes Spotted picture
(crosstalk.) Lines or streaks in picture
(interference).
Double images or“ghosts”. 1.A highly directional antenna may improve the Picture. This may be caused by
Good picture.
Noisy sound.
2.Ensure the Power On/Off switch is on.
remote control and the VCR.
2.Use new batteries. The batteries in the remote control may be weak or dead.
1.Check your aerial or cable VCR connection.
2.Check the antenna connection on the VCR and on the wall.
1.This may be caused by local interference (e.g. cars, neon signs,hair dryers, personal
computer,audio devices, handphone, radio stations,etc.).Try moving the interfering
equipment or adjust the aerial antenna.
reflections from nearby mountains or building.
1.Check the transmission standard selected for the current VCR programme.
No picture.
No.sound.
Recording is impossible: 1.See if the safety tab of the cassette isn’t broken.
1.Ensure the power On/Off switch is on.
2.Check the antenna connection.
2.Check if you have properly performed the steps for the preparation of your
recording as set out on page 13.
In our efforts to improve the quality of our products, we reserve the right to change their features.
The information contained in these instructions are therefore liable to change and are not contractual.
18
R8323UR/GB/MR-BEI/910
Page 20

Guarantee
FOR COMPLETION BY THE PURCHASER
This guarantee is automatically effective from
the date of purchase of the equipment. The
appropriate sections should be completed by
the dealer and purchaser at the time of
purchase.
This guarantee should then be retained by the
purchaser and kept safely so that it may be
referred to and produced if required should a
claim be made during the guarantee period.
Terms of Guarantee
1. The component parts used in this equipment
are guaranteed against failure due to faulty
material or workmanship for a period of one
year from the date of purchase.
2. Should the equipment fail to operate
satisfactorily it should be reported to the
dealer from whom it was purchased who will
normally be able to provide service and
make any claim under guarantee on your
behalf.
3. If it proves impossible to contact the dealer
you should contact the Thomson multimedia
Sales U.K. Limited Service Depot for advice
stating the model and serial numbers, date
of purchase, and the name and address of
the dealer from whom it was bought.
4. The guarantee is effective in the United
Kingdom only.
5. Thomson multimedia Sales U.K. Limited,
reserves the right to vary the specification
of the equipment without notice.
Purchaser's Name.........................................
Address.........................................................
......................................................................
......................................................................
PLEASE NOTE: It will not be necessary for
the dealer or purchaser to return this
guarantee to Thomson multimedia Sales
U.K. Limited when making a claim under
guarantee, unless requested to do so,
provided that the model and serial numbers,
date of sale, and the purchaser's name and
address are quoted on the order or advice
note.
FOR COMPLETION BY THE DEALER
MODEL No .................................................
SERIAL No. ................................................
DATE OF PURCHASE...............................
Dealer's Stamp or Name and Address
This Guarantee in no way affects any statutory right of a
consumer.
THOMSON multimedia Sales U.K. Limited
Crown Road
Enfield
Middlesex
EN1 1DZ
FERGUSON is a registered trade-mark
This publication is printed on 100% recycled paper.
Réalisation : BEI • 10-99
21039230
 Loading...