

Page 1
Chapter 1
Getting started
Important information
Safety
Ensure that your domestic mains supply voltage
matches the voltage indicated on the identication
sticker located at the back of your set. Where the
mains plug or an appliance coupler is used as
disconnect device, the disconnect device shall remain
readily operable.
On certain models, the light indicator is located at the
side of the TV set. The absence of a light indication
at the front does not mean that the TV set is fully
disconnected from the mains. To disconnect the TV
set completely, the mains plug must be pulled out.
The TV set’s components are sensitive to heat. The
maximum ambient temperature should not exceed
º
Celsius. Do not cover the vents at the back or
35
sides of the TV set. Leave sufcient space around
it to allow adequate ventilation. Install the appliance
away from any source of heat (replace, ...) or
appliances creating strong magnetic or electric elds.
Moisture in rooms where the set is installed should
not exceed 85% humidity. Apparatus shall not be
exposed to dripping or splashing and no objects
lled with liquids, such as vases, shall be placed
on the apparatus. Moving the set from a cold place to
a warm one can cause condensation on the screen
(and on some components inside the TV set). Let the
condensation evaporate before switching the TV set
on again.
WARNING
To prevent the spread of re, keep candles or
other open ames away from this product at
all times.
or POWER/ button on the TV set or the
The
button on the remote control can be used to switch it
on and put it into standby mode. If you are not going
to be watching the TV for a lengthy period of time,
switch it off completely by removing the plug from the
mains power socket.
During thunderstorms, we recommend that you
disconnect the TV set from the mains and aerial so
that it is not affected by electrical or electromagnetic
surges that could damage it. For this reason, keep
the mains and aerial sockets accessible so they can
be disconnected, if necessary.
Unplug the TV set immediately if you notice it giving
off a smell of burning or smoke. You must never,
under any circumstances, open the TV set yourself,
as you run the risk of an electric shock in doing so.
TV screen
The TV screen used in this product is made of glass.
Therefore, it can break when the product is dropped
or impacted upon by other objects.
The TV screen is a very high technology product,
giving you nely detailed pictures. Occasionally, a few
nonactive pixels may appear on the screen as a xed
point of blue, green or red. This does not affect the
performance of your product.
Care
Use a glass-cleaning product to clean the screen and
a soft cloth and mild detergent to clean the rest of the
set.
Important: Using strong detergents, alcohol-based
and abrasive products may damage the screen.
Dust the vents at the back and sides regularly. Using
solvents, abrasive or alcohol-based products could
damage the TV set. If an object or liquid enters inside
the appliance, unplug it immediately and have it
checked by an authorized engineer. Never open the
appliance yourself since this may put you at risk or
damage the appliance.
Hanging the TV set on the wall
Warning: This operation requires two people.
To ensure a safe installation, observe the following
safety notes:
Check that the wall can support the weight of the TV •
set and wall mount assembly.
Follow the mounting instructions provided with the •
wall mount. For certain models, make sure to screw
the hexagonal VESA wall mounting screw bosses
(and screws) provided with the set into the nuts for
the wall mount at the back of your set before your
wall mounting.
The TV set must be installed on a vertical wall.•
Make sure to use only screws suitable for the •
material of the wall.
Make sure that the TV set cables are placed so that •
there is not danger of tripping over them.
All other safety instructions about our TV sets are
also applicable here.
Handling the TV set on the table
Before setting up your television set, make sure that
the surface you want to put the set on can support its
weight.
Don’t place the set on an unstable surface (e.g.
moving shelf, very edge of a unit) and make sure that
the front of the television set does not overhang the
surface it is sitting on.
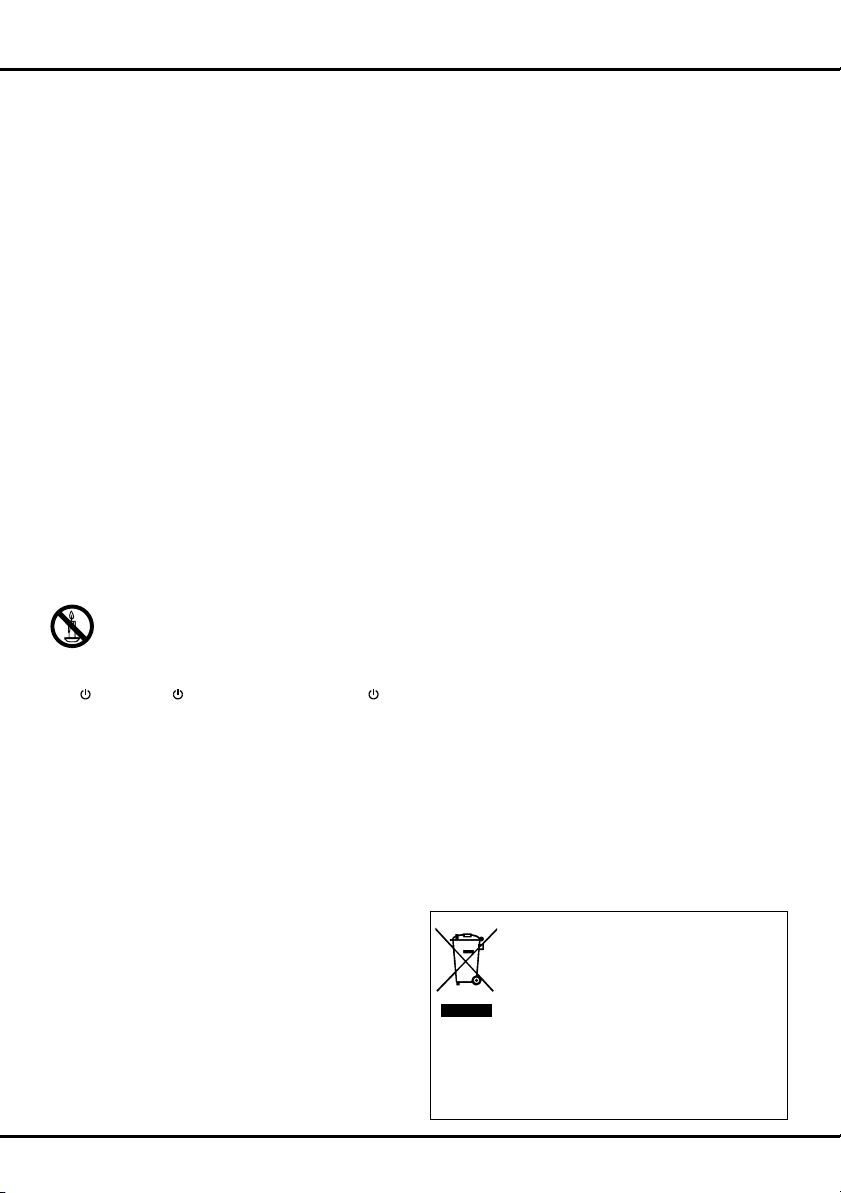
This product is designed and manufactured
with high quality materials and components
which can be recycled and reused.
This symbol means that electrical and
elec
tronic equipment, at their end-of-life,
should be disposed of separately from
Please, dispose of this equipment at your local community
waste collection/recycling centre. In the European Union
there are separate collection systems for used electrical
and electronic product. Please, help us to conserve the
environment we live in!
your household waste.
EN 1
Page 2
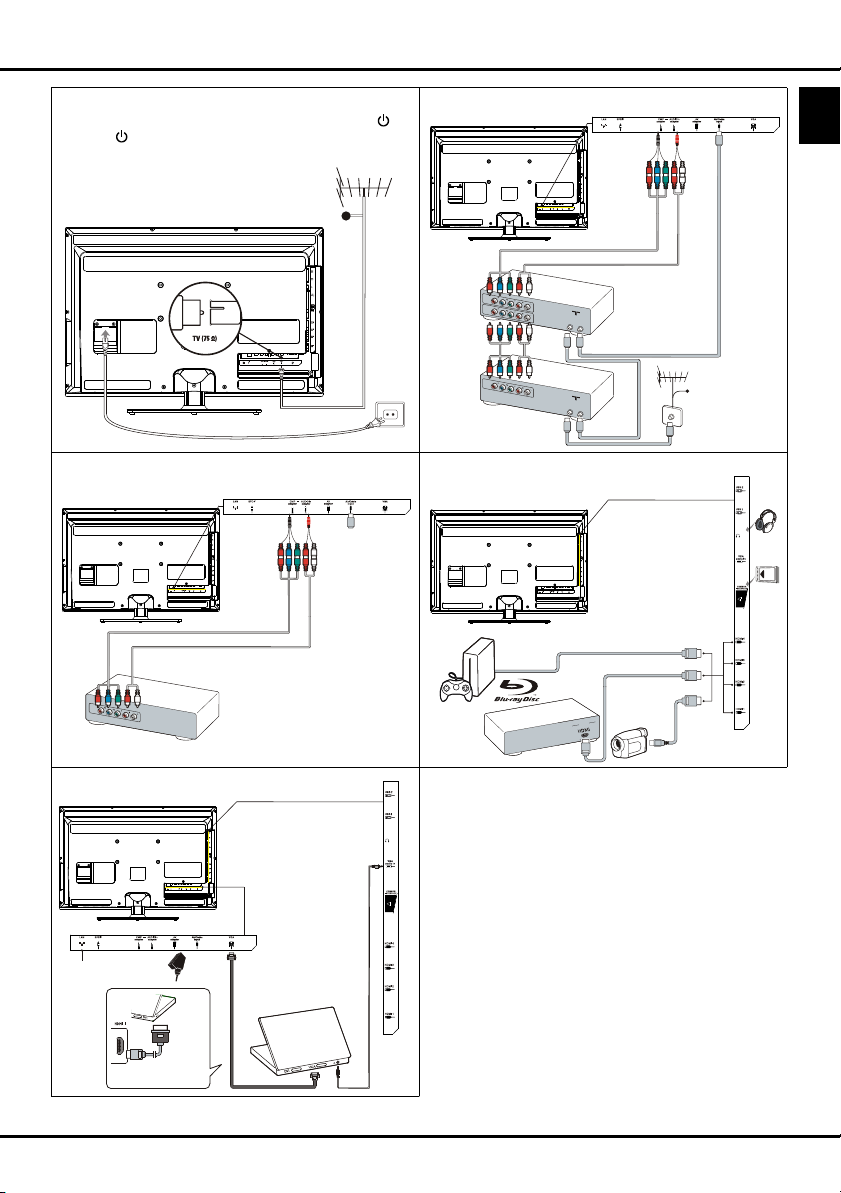
Getting started
OUT
OUT
IN
ANTENNA
IN
OUT
OUT
IN
ANTENNA
OUT
OU
T
Connect the power and antenna
To switch on TV after connecting power cord, press or
POWER/
Note: Position of power socket varies according to TV model.
.
DVD recorder, cable receiver
TV
On certain models, you have to turn on
the power switch rst.
Cable
Note: Disconnect the
DVD
recorder
Set-top
box
power cord before
connecting devices.
Cable
DVD player, home theatre system Blu-ray Disc player, headphones, HD game
TV
console & HD camcorder
TV
HD game
console
Notes:
- USB connectors are for data
input from USB storage
devices.
- Excessive sound pressure
from earphones and
headphones can cause
hearing loss.
- Number of HDMI may vary.
English
PC
TV
Network
connection
Or use an HDMI
connection.
DVD player/
Home theatre system
Note: Before connecting a
PC, set the PC monitor
refresh rate to 60Hz.
PC
Blu-ray Disc
player
HD Camcorder
Notes:
- The gures are for representation only.
- Not all connections available on all models.
- The location of the power socket on the TV may
vary according to TV model.
- The positions and names of the function buttons
and connectors on the TV may vary according to
TV model.
EN 2
Page 3
Getting started
Remote control functions
Most of your television's functions are available via the menus that appear on the screen. The remote control
supplied with your set can be used to navigate through the menus and to congure all the general settings.
Source
0-9
ECO
Guide
Menu
Exit
/*Zoom+/-
OK
To select connected devices.
Standby / quit standby.
To select a channel, page or setting.
To select desired power saving mode.
To toggle the Electronic Programme
Guide on or off (only available for digital
channels).
To access the main menu; to return to the
previous menu.
To exit the menu structure or Teletext.
To navigate in the main menu; to select
menu options; to switch to the previous or
next photo, song or video in USB function.
To navigate in the main menu; to set
functions and change values. ► can
also be used to open the corresponding
submenu.
* To select the picture format.
Note: You are recommended to use the full
screen mode. Do not use the display mode
with black bars on both sides of the picture
(such as 4:3) for long time, otherwise the
TV screen may be damaged permanently.
To open the corresponding submenu and
activate a setting in menus; to freeze/
SUBTITLE
unfreeze the picture in digital TV mode.
Option
To display the function menu to perform
certain operations; to display the Teletext
page in different mode.
Return
To return to the previous channel; to return
to the previous menu in USB function.
V+/-
To control the volume.
Info
To display programme information, if
available.
Mute
To switch the sound off and back on again.
P+/-
To change channels.
TEXT
To toggle Teletext on or off.
To select a subtitle language available for
selected digital TV programme.
LIST
To display channel list.
TV
To access TV mode.
Colour
To select tasks or Teletext pages. The
red button can also be used for MHEG
buttons
function.
Lang
To select a sound type available for
selected analog TV programme; to select
an audio language available for selected
digital TV programme.
Important:
Battery shall not be exposed to excessive heat such as sunshine, re or the like. If the batteries in your remote
control are run down you can use the buttons on your TV set. In TV mode, they have the same functions as the
corresponding buttons on the remote control. In the menus they have the following functions:
For models with OK button on the set: For models without OK button on the set:
PR+ or PR ▲ ▲ PR+ or PR ▲ ►
PR- or PR ▼ ▼ PR- or PR ▼ ◄ & OK
VOL+,
VOL-,
MENU or
+ or VOL ► ► VOL+, + or VOL ► ▲
- or VOL ◄ ◄ VOL-, - or VOL ◄ ▼
Menu MENU or Menu
OK OK
Switching on/off and standby mode
Switch on/off your TV
When powered on, the TV will be turned on directly.
To switch it off, unplug the mains socket from the
mains outlet.
Switch to standby
Press the
button on the remote control. The TV set remains
or POWER/ button on the set or the
powered up, but with low energy consumption.
Switch on from standby
Press the
or POWER/ button on the set or the
button on the remote control to switch the television
on at the last channel in the last mode, i.e. analog or
digital, or AV programme you were watching.
(*On certain models, you have to turn on the power
switch rst.)
EN 3
Page 4

Chapter 2
Install channels
Initial setup
Initial setup involves selecting all the settings required
to be able to search for and store all the analog and
digital channels you can receive.
Make sure that the television is switched on and
follow all the steps in turn specied hereafter.
Note: TV channels search retrieved only the analog
chanels could be caused by poor broadcasting
and therefore is not covered by manufacturer
warranty. Manufacturer cannot be held
responsible for lack or poor broadcasting in
some areas.
The rst time you switch the set on, the Initial setup
wizard opens, which guides you through the initial
setup process. (Refer to Figure 1.) Press OK to start
your initial setup.
1. Press ▲/▼ to select your language, then press
OK/► to enter the next step.
2. Press ▲/▼ to select your country, then press
OK/► to enter the next step.
Note: When select France, you will have to
enter the Password setting menu here
in order to set a password. Use the digit
buttons to enter a four-digit number for your
password. (0000 is too simple to be set as
your password.) Re-enter the same code
to conrm the password. After that, you will
enter the next step automatically. (In this
step, you can only press ◄ to return to the
previous step.)
3. Press ▲/▼ to select your tuner mode Air or
Cable.
- Select Air.
• Press OK/► to enter.
• Press ▲/▼ to select Scan, then press OK/► to
automatically start the search relating to initial
setup for all DVB-T digital and analog channels.
- Select Cable.
• Press OK/► to enter.
• Press ▲/▼ to select Scan, then press OK/►
to directly start your initial setup or enter below
step.
• Select Full if available to search for and store
all DVB-C digital and analog channels.
• You may select other advanced scan mode if
available (for example, Advanced or Quick),
then congure proper cable information as
described below. Use the digit buttons to
adjust the values of frequency, symbol rate
and network ID; use ◄/► to select certain
modulation mode.
• Press OK to start initial setup relating to all
DVB-C digital and analog channels.
Note: To prevent the channel setup process from
being interrupted, wait for the message
4. Before start the scanning, you can also select Skip
indicating that the setup is complete.
scan to skip the initial setup progress.
5. During the setup, you can follow the hints available
at the bottom of the screen to return to the previous
step by pressing ◄. Or press Exit to exit or
interrupt the search halfway.
6. Once the automatic search ends, the set enters
the next step automatically. You can press ▲/▼ to
select your location Shop or Home. Press OK/► to
conrm your selection and enter the last step.
7. - In this step, you can press OK to exit the initial
setup. The channels are arranged in a preset
order. If you wish to skip channels, modify the
preset order or rename channels, select
Setup > Organiser and press OK/► to enter.
- In this step, you can also press ◄ to return to the
previous step.
Automatically install channels
This section describes how to search and store
channels automatically. Instructions are for both
analog and digital channels.
1. Press Menu on the remote control and select
Setup > Language > Menu language. Press
◄/► to select your desired menu language.
2. Press Menu to return to Setup, press ▲/▼ to
select Country, then press ◄/► to select your
country. The TV installs and arranges channels
according to your country.
3. Press ▲/▼ to select Tuner mode, then press
◄/► to select Air or Cable.
- Select Air.
• Press ▲/▼ to select Channel install, and
press OK/► to enter.
• Select Automatic search (Refer to Figure 2.),
then press OK/► to display Automatic search.
• Press OK to skip the country selection and
enter the next step. Or use ◄/► to reselect
your country, then press OK to enter.
• Select Digital & Analog, Digital or Analog,
then press OK/► to start the automatic search,
which relates to all DVB-T digital and/or analog
channels.
- Select Cable.
• Press ▲/▼ to select Channel install, and
press OK/► to enter.
• Select Automatic search, then press OK/► to
display Automatic search.
• Press OK to skip the country selection and
enter the next step. Or use ◄/► to reselect
your country, then press OK to enter.
• - Select Digital & Analog, then press OK/► to
enter. Select your scan mode if available and
congure proper cable information in the same
way as in Initial setup. Select Scan and press
English
EN 4
Page 5

Chapter 3 & 4
Use your TV & Use more of your TV
OK/► to start your automatic search relating to
all DVB-C digital and analog channels.
- Select Digital, then follow the similar process
described above to start your automatic search
relating to all DVB-C digital channels.
- Select Analog, then press OK/► to start
your automatic search relating to all analog
channels.
4. The search may take a few minutes. During the
process, you can press Menu to abort halfway.
5. Once the automatic search ends, press Menu to
return to the previous step or press OK to restart
your channel search.
6. After the automatic search, channels are arranged
in a preset order. You can skip channels, modify
the preset order or rename channels.
Use your TV
Access channels
Using the digit buttons: press the corresponding
digit buttons to access the channels.
Using the PR+/- or P+/- buttons: scroll through the
channels.
Watch connected devices
Press Source on the remote control or OK on the TV
set to switch between TV and other input sources.
To resume TV viewing, press any digit button to
enter the channel, while P+/- will cycle through all TV
channels and other input sources.
Note: Not all models have OK button on the set.
Volume
Volume control: use the VOL+/- or VOL◄/► buttons
on the TV set or V+/- buttons on the remote control to
increase or decrease the volume.
Sound mute: press the Mute button to temporarily
mute the sound. Press this button again or the V+
button to restore it.
Use TV menu
1. Press Menu to display the main menu. (Refer to
Figure 3.)
2. Press ▲/▼/◄/ ►to select the desired item, then
press OK to open the corresponding submenu.
3. In submenus, use ▲/▼ to select menu options,
use ◄/ ► to set functions or change values. Use
OK to activate a setting. Use OK/► to open the
corresponding submenu.
4. Press Menu to return to the previous menu.
5. Press Exit to close the menu.
Note: Some options may be not available for
certain signal sources.
s
Select menu language
You can choose your preferred menu language
following below instructions.
1. Press Menu to display the main menu.
2. Press ▲/▼/◄/ ►to select Setup, then press OK
to enter.
3. Select Language and press OK/► to enter.
4. Select Menu language and press ◄/► to select
your desired language to display the menus.
5. Press Exit to close the menu.
Use more of your TV
Setup your favourite channels
You can create four lists of your favourite TV channels.
1. Press LIST.
2. Press the yellow button to enter Channel list
selection. Press ▲/▼ to select the favourite list
you want to set up your favourite channels. Then
press OK to enter the selected list.
3. Press the blue button to start to edit your favourite
list. Press ▲/▼ to scroll through the channel list
and press OK to select or unselect it.
4. Repeat this procedure to setup other favourite
channels.
5. Press LIST/Exit to exit.
ECO dynamic backlight
1.
Press Menu on the remote control and select
Picture > ECO dynamic back light.
2.
Press ◄/► to select desired power saving mode
to achieve desired power saving effect. At this time
the Picture preset option under Picture will be
set at Personal synchronically.
3. Press Exit to close the menu.
Shortcut operation: Press ECO on the remote
control to perform the same function mentioned above.
PAP function
To display the pictures from different source inputs
side by side. Note that one window is for both analog
and digital TV inputs, the other is for VGA, HDMI
and CMP inputs. (Note:AV input is invalid for both
windows.)
1. Press Menu to display the main menu.
2. Select PAP and press OK to enter.
3. Select the PAP option, and press ◄/► to turn on/
off PAP function.
4. Select TV position, press ◄/► to reposition the
TV window.
5. Press ◄/► to toggle the focus window.
6. When focus on TV window, the digit buttons and
P+/- work in TV. When focus on the other window,
P+/- can change available extension sources.
EN 5
Page 6

Use more of your TV
Use subtitles
You can enable subtitles for each TV channel.
Subtitles are broadcast via Teletext or DVB-T/DVB-C
digital broadcasts. With digital broadcasts, you have
the additional option of selecting a preferred subtitle
language.
Turn on/off subtitles
1.
Press Menu on the remote control and select
Options > Subtitle.
2.
Press OK/► to enter. (Refer to Figure 4.)
3.
Select the Subtitle option, and press ◄/► to select
On/Off to turn on/off subtitles.
Enable subtitle languages on digital TV channels
1. Press Menu on the remote control and select
Options > Subtitle > Digital subtitle language.
2. Press ◄/► to select a subtitle language as your
preferred language.
3. Press ▲/▼ to select Digital subtitle language
2nd.
4. Press ◄/► to select a secondary subtitle language.
5. Press Exit to close the menu.
Shortcut operation: Press SUBTITLE on the remote
control to directly select a subtitle language available
for selected digital TV programme.
Select a subtitle type on digital TV channels
1. Press Menu on the remote control and select
Options > Subtitle > Subtitle type.
2. Press ◄/► to select a subtitle type. You can select
Hearing impaired to display the hearing impaired
subtitle with your selected language.
Select decoding page language in Teletext
Press Menu on the remote control and select
Options > Decoding page language. Select a
proper type of language in which Teletext will display.
Digital Teletext language
For digital TV channels, your TV could zap to a
service with multiple initial Teletext pages in different
languages. This function allows you to select an
available language as primary language which relates
to different initial Teletext page.
Press Menu on the remote control and select Options
> Digital teletext language. Press ◄/► to select.
- If the current programme outputs sound in Dolby D
format, then either PCM or Dolby D can be selected.
- If the current programme does not output sound
in Dolby D format, only PCM can be selected.
Otherwise no sound will be output.
- Select Off to turn off the audio output from the audio
device connected to the SPDIF output.
Note: The options you may choose depend on the
programme you are watching. If you select PCM
and the sound output is prior to the picture,
you can select SPDIF Delay from the Options
menu and press ◄/► to adjust the delay time
to synchronize the sound with the picture.
T-Link
To search for CEC devices connected to the HDMI
sockets in your TV and enable one-touch play and
one-touch standby between CEC devices.
Enable or disable T-Link
1. Press Menu on the remote control, then select
Options > T-Link.
2. Press ◄/► to select On or Off.
Use one-touch play
One-touch play enables you to press the play button
on, for example, your DVD remote control. This starts
playback on your DVD device and automatically
switches your TV to the correct source, displaying DVD
content.
Use system standby
System standby enables you to press the
for example, your TV remote control. This switches
your TV and all connected HDMI devices to standby
mode.
button on,
Network update
Press Menu on the remote control, then select
Options > Network update. Select On/off to enable
or disable the Network update function.
- When this function is on, the TV will automatically
update channels if your DTV service provider
updates his DTV network.
- When this function is off, you need to run channel
searching again to get new channels or remove
unavailable channels if your DTV service provider
adds or removes channels from their DTV network.
English
SPDIF type
Connect to an audio device through the SPDIF
output. Press Menu on the remote control and select
Options > SPDIF type. Select a proper sound type
from the list for digital programmes.
Common interface
Scrambled digital TV channels can be decoded with
a common interface module and a card provided by a
digital TV service operator.
The common interface module may enable several
digital services, depending on the operator and
EN 6
Page 7

Use more of your TV
services you choose (for example, pay TV). Contact
your digital TV service operator for more information
about services and terms.
Use the common interface module
WARNING: Switch off your TV before inserting a
common interface module. Be sure to follow the
instruction described below. Wrong insertion of a
common interface module may damage both the
module and your TV.
1.
Following the directions printed on the common
interface module, gently insert the module into the
common interface slot on the TV.
2.
Push the module in as far as it will go.
3.
Turn on the TV and wait for the common interface
function to be activated. This may take several
minutes.
N
ote: Do not remove the common interface module
from the slot. Removing the module will
deactivate the digital services.
Access common interface services
After inserting and activating the common interface
module, press Menu on the remote control and select
Options > Common interface.
This menu option is only available if the common
interface module is correctly inserted and activated.
On-screen applications and content are provided by
your digital TV service operator.
Software update
Press Menu on the remote control and select
Options > Software update. Press OK/► to enter.
(Refer to Figure 5.)
- Current version: Checks the current version of the
software.
- Product name: Displays the product name of your
set.
- Serial number(if available): Displays the serial
number of your set.
- OAD(over air download): Enables you to install the
latest version of the software if available. Select
OAD and press OK/► to enter the Setup menu.
• Use ◄/► to select Yes under Auto download
to automatically download the latest software if
available. After the software has been downloaded
successfully, you will be prompted to decide if you
want to install it right now. If yes, follow the hints
on the screen to complete your installation. You
can also select to ignore the installation here.
• Select No under Auto download to decline the
automatic download.
• Select Manual OAD download and press OK/►
to start manual scanning the latest software.
Follow the hints on the screen to complete. During
the scan, press OK/Exit to cancel or exit the
process.
Change to Shop or Home mode
1. Press Menu on the remote control and select
Options > Location.
2. Press ◄/► to select your location Shop or Home.
3. Press Exit to exit.
MHEG function
Some digital TV broadcasters offer dedicated digital
text or interactive services (for example, BBC1).
These services work like normal Teletext with the
addition of number, colour and navigation buttons.
1. Press Menu on the remote control and select
Options > Subtitle > Subtitle.
2. Press ◄/► to set Subtitle to Off.
Note: MHEG and subtitles are mutually exclusive
and cannot coexist on the same screen. If
Subtitle is set to On, MHEG will not appear.
3. Press the red button or TEXT on the remote control.
4. Press ▲/▼/◄/► to select or highlight items.
5. Press OK to conrm or activate.
6. Press one of the colour buttons to select an option.
7. Press TEXT or Exit to exit.
View photos, play music and watch videos from
a USB storage device
Your TV is tted with a USB connector that enables you
to view photos, listen to music or watch videos stored
on a USB storage device.
Supported le formats:
Photo JPEG
Music MP3
Video AVI, MP4, MPG, MPEG, TS, DIVX, MKV…
Notes: Some USB keys and USB products like
digital cameras or mobile phones are not
fully compatible with USB 2.0 standard so it
may not work with the TV multimedia player.
Not all USB keys or devices are compatible
for the USB function. Not all above formats
are supported. The encoding formats of your
les will determine whether or not they can be
used.
When a USB device is detected, it enters the Media
center menu directly.
Photo
To display photos if available.
1. Select Media center > Photo, then press OK to
enter the main le content browser.
2. In the main le content browser, use ▲/▼/◄/► to
select a photo or an inner le folder.
EN 7
Page 8

Use more of your TV
3. Select an inner le folder, press OK to enter a sub
le content browser.
4. Use ▲/▼/◄/► to select a photo in either main or
sub le content browser, press Menu to display
the photo menu in the folder mode.
- Sort: Sort folders and photos by modication Date
or Name.
- Edit: Copy, paste or delete a selected photo.
- Parser: You can select Recursive to display
photos from all sub le folders.
5. Select a photo, press OK to watch, and a slide
show begins from the selected photo. Press
OK to pause the photo if you want to rotate the
paused photo. Press Menu to display the photo
menu in the browser mode. You can play, pause
or rotate the photo, select different play mode and
displaying effect, etc..
6. Press the related buttons on the remote control
to perform the available functions shown on the
function bar at the bottom of the TV screen.
Music
To playback music if available.
1. Select Media center > Music, then press OK to
enter the main le content browser.
2. Use ▲/▼/◄/► to select a song in either main or
sub le content browser in the same way as in
photo display function, press Menu to display the
music menu in the folder mode.
- Sort: Sort folders and songs by Name, Genre,
Artist or Album.
- Edit: Copy, paste or delete a selected song.
- Parser: You can select Recursive to display
songs from all sub le folders.
3. Select a song, press OK to play, and an automatic
playback begins from the selected song. Press
Menu to display the music menu in the browser
mode. You can play or pause the song, select
different play mode, etc..
4. Press the related buttons on the remote control
to perform the available functions shown on the
function bar at the bottom of the TV screen.
Video
To watch videos if available.
1. Select Media center > Video, then press OK to
enter the main le content browser.
2. Use ▲/▼/◄/► to select a video in either main
or sub le content browser in the same way as in
photo display function, press Menu to display the
video menu in the folder mode.
- Sort: Sort folders and videos by Type,
modication Date or Name.
- Edit: Copy, paste or delete a selected video.
- Parser: You can select Recursive to display
videos from all sub le folders.
3. Select a video, press OK to watch, and an
automatic playback begins from the selected
video. Press Menu to display the video menu in
the browser mode. You can play or pause the
video, select different play mode, screen mode
and preset picture settings, etc..
4. Press the related buttons on the remote control
to perform the available functions shown on the
function bar at the bottom of the TV screen.
DivX video
ABOUT DIVX VIDEO: DivX® is a digital video format
created by DivX, Inc. This is an ofcial DivX Certied®
device that plays DivX video. Visit divx.com for more
information and software tools to convert your les
into DivX video.
ABOUT DIVX VIDEO-ON-DEMAND: This DivX
Certied® device must be registered in order to play
purchased DivX Video-on-Demand (VOD) movies.
Obtain your registration code:
• Press Menu on the remote control.
• Select Options > DivX(R) registration.
• Press OK/► and your registration code will be
displayed.
Go to vod.divx.com for more information on how to
complete your registration.
Deregister your TV:
If you wish to deregister your TV,
• Press Menu on the remote control.
• Select Options > DivX(R) deactivation.
• Press OK/► and a message will guide you.
DivX®, DivX Certied®, DivX Plus™ HD and
associated logos are trademarks of DivX, Inc. and are
used under license.
Time detection
You can detect the time from digital channels through
following operations.
1. Press Menu on the remote control and select
Timer > Clock > Auto synchronization.
2. Press ◄/► to select On.
Assign a channel decoder
Decoders that decode analog channels can be
connected to AV connector. Assign the TV channel as
a channel to be decoded. Then assign the connection
where the decoder is connected.
1. Press Menu on the remote control and select
Setup > Decode.
2. Press OK/► to enter the list.
3. Press ▲/▼ to select the channel to decode.
4. Press OK to select or unselect the channel.
5. Press Menu to return to the previous menu.
English
EN 8
Page 9

Use more of your TV
Diagnostics on digital TV channels
1. Press Menu on the remote control and select
Setup > Diagnostics.
2. Press OK/► to display some signal information
on current digital channel, such as signal strength,
frequency, etc..
Time shift
Allows you to record the TV programme so that you
won’t miss the favourite part even if you go out. Before
you use the function, connect a USB device to the TV
rst. For the rst time, you should do the disk setup for
the USB device.
1. Press Menu on the remote control and select
Setup > Time shift.
2. Press ◄/► to select On to switch on the time shift
function, then press Exit to close the menu.
3. Press Option on the remote control and select
Time shift, then press OK to conrm.
4. Follow the directions on the screen to do the
setup.
5. After the disk setup is done, press Option and
select Time shift.
6. Press OK to display the time shift menu.
- Press the red button to pause the picture and
begin the time shift.
- Press the red button to play the recorded part.
- When the time shift menu disappears and only the
timing of the time shift remains on the screen, you
can press the red button or OK to call out the time
shift menu.
- Press the green button to fast backward or the
yellow button to fast forward.
- Press the blue button to quit the time shift
function.
Notes:
- Before you plug the USB device to TV, make
sure you have backed up the data in the device
to avoid the unusual performance make your
important data lost.
- We recommend you use a USB device with the
free le size bigger than 1Gb and disk speed
faster than 5.0M/sec.
- The bigger le size for time shift, the longer you
can record the programme.
- If changing channel in time shifting, a message
prompts to let you select Yes or No. You can
select Yes to exit the time shift function and
execute the channel change.
Reset shop
Allows you to reset the TV to factory default settings.
1. Press Menu on the remote control and select
Setup, then press OK to conrm.
2. Select Reset shop and press OK/► to enter.
3. Use the digit buttons to enter the password to
enter.
4. Press ◄/► to select OK and press OK to conrm.
5. The Initial setup menu appears. Follow the
related instructions.
Customising the input settings
You can congure your TV according to the
equipment you connect to it.
1. Press Menu on the remote control and select
Setup > Input settings.
2. Press OK/► to enter Input settings.
3. Press ▲/▼ to select a connector your equipment
is connected to.
4. Press ◄/► to select the type of apparatus
attached to this connector.
5. Press Menu to return to the Setup menu.
After conguring, the selected source label will be
displayed after the name of the related connector in
the source list when pressing Source on the remote
control or OK on the TV set.
Note: Not all models have OK button on the set.
Use Electronic programme guide
EPG is an on-screen guide that displays scheduled
TV programmes. You can navigate, select and view
programmes.
1. Press Guide on the remote control, the Now and
Next EPG menu will appear, which allows you
to get the knowledge about the current or next
programme playing on each channel. Navigate
through the different programmes using navigation
buttons on the remote control.
2. Use the colour buttons to view 8 Days EPG.
- Prev day(Red): List the previous day’s EPG.
- Next day(Green): List the next day’s EPG.
- View detail(Yellow): Display the description
about this programme if available.
- Type lter(Blue): Programme guide lter for
digital TV programmes.
• Press the blue button to display the
programmes’s type and subtype list.
• Navigate through the different types and
subtypes using navigation buttons on the
remote control.
• Select one or more types which you want to
highlight from the Type list, press OK to select (or
unselect). A checkmark will appear to the left of
the type when selected. When you select a type,
all its subtypes will be selected accordingly.
• Also, user can select some desired subtypes
without selecting any type rst.
• Press the blue button to exit the type and
EN 9
Page 10

Use more of your TV
subtype list.
• After ltering, all your desired digital TV
programmes will be highlighted.
3. Press Guide/Exit to exit the EPG and switch to
the selected channel.
PVR(Personal Video Recorder)
Allows you to record your favourite TV programme.
Before you use the function, connect a USB memory
device to the set rst.
Note: Due to specic country requirements, the PVR
function is not available for Finland.
1. Press Option on the remote control and select
Quick access > PVR.
2. Press OK/► to enter.
3. Press:
- the red button to start recording, the record le
is put into a PVR folder in Media center > Video
and named after the channel number;
- the green button to stop recording manually; if
the recording duration nishes, the recording will
stop automatically.
- ▲/▼/◄/ ► to adjust the recording duration.
4. In recording, PVR mini pane will also show on the
screen to indicate the recording progress.
5. To watch the recorded programme, exit PVR mode
rst and go to Media center > Video. Select the
folder PVR, then select the related record le.
Press OK to play. (It is the same if you record a
digital radio programme).
Notes:
- When CI+ card is used, PVR function will be
disabled.
- Only available for digital channels.
- Only support USB memory device of FAT32
format.
- Before you plug the USB device to the set, make
sure you have backed up the data in the device
to avoid the loss of your important data due to
unforeseen malfunction.
- The bigger size of USB memory device for
PVR function, the longer you can record the
programme.
- If changing channel or signal source in recording,
store the recording data and execute the channel
or signal source change.
- The set can not play les normally if the
parameters of the le exceed the limitations of
the system, the le format is not supported, the
le is damaged, or the le can not be decoded
- Do not unplug the USB memory device when
the system is reading a le or transmitting data,
otherwise the system or the device may be
damaged.
Schedule list
This function is used to perform scheduled recording.
1. Press Option on the remote control and select
Quick access > Schedule list.
2. Press OK/► to display the schedule list.
3. To add a schedule into your schedule list, press
the red button rst to display Schedule list. Then,
- Channel number: use ◄/► to select the
channel number.
- Start date: use the digit buttons to set the
recording date.
- Start time: set the starting time of recording.
- Stop time: set the stopping time of recording.
- Schedule type:
• set Reminder to inform you that you can switch
to the scheduled programme when the time you
set comes. When time out and you don’t execute
any operation, the dialog box will disappear and
no further operation will be executed.
• set Record to check if you really want to start
your scheduled recording when the time you set
comes. When time out and you don’t execute
any operation, scheduled recording will start
automatically.
- Repeat type: set different repeat mode of
recording.
4. Press ▲/▼/◄/ ► to select Add, then press OK to
add the schedule you set into your schedule list.
5. Press the red button to repeat above procedures
to add another schedule.
6. If you wish to edit or delete a schedule, select it
and press OK to enter.
7. Press Exit to close the menu.
Share & See
Note: This manual covers products with either Share
& See or DLNA function. Share & See is DLNA-
compatible.
Connecting to a wired network
To be able to use the Share & See advanced function
of your TV, you will need a wired connection to a
router. This requires a network cable (or Ethernet
cable) to be connected to your router. The other end
of the cable is to be connected to your LAN (local
area network) port on your TV.
Connect your PC to your router, too. Follow the
steps in turn specied hereafter, then you can enjoy
recorded video, picture, music and/or text les saved
on your PC.
Network setup
1. Press Menu on the remote control and select
Options > Network > Conguration > Internet
connection. Press ◄/► to select On.
2. Select Options > Network > Applications >
English
EN 10
Page 11

Share & See, then press ◄/► to select On.
3. Select Options > Network > Conguration > IP
setting, then press OK/► to enter the IP setting
menu.
- Set Address type to Auto, it will acquire and
enter the needed IP address automatically.
- You can follow below steps to enter your IP
address manually.
• Set Address type to Manual, then press ▼ to
go to the rst entry eld.
• Enter the IP address, Subnet mask, Default
gateway, Primary DNS and Secondary DNS
values. Use the digit buttons to enter numbers
and the arrow buttons to move from one entry
eld to another.
4. Select Options > Network > Conguration >
Connection test, then press OK/► to check the
Internet connectivity. If success, Share & See
will be on. Otherwise, you need to check if the
IP address is available and/or if you’ve already
allowed your TV to share the designated les on
your PC.
5. Select Options > Network > Conguration
> Information, then press OK/► to display
the information on current connection, such as
Interface, Address type, IP address, etc..
Adding media from your PC for sharing
Install a DLNA media server in your PC. The simple
and familiar server you may install is Microsoft
Windows Media Player 11.
1. Open Microsoft Windows Media Player 11.
- Select Library > Media sharing.
- Check the checkbox Share my media to.
- Select the icon of the TV set connected to your
PC.
- Select Allow to allow the TV set to access your
PC, and select OK to enable your allowing.
Note: You can push Settings button to customize
your desired settings.
2. - Select Library > Add to Libray.
- Select your personal folders or folders of other
users that you can access for sharing.
- Select Add and press OK to enable your adding.
Share & See application
Press Menu on the remote control and select USB,
then press OK to launch Share & See applications.
Stopping Share & See function
1. Select Options > Network > Conguration >
Internet connection, and set it to Off.
2. Or select Options > Network > Applications >
Share & See, and set it to Off.
new one.
- The super password is 0423. If you forget your code,
enter the super password to override any existing
codes.
Notes for password in Parental Control Lock function:
- The default password is 1234. You can change it to a
Design and specications are subject to change without notice.
EN 11
 Loading...