

Page 1
SERVICE MANUAL
DOCUMENTATION TECHNIQUE
TECHNISCHE DOKUMENTATION
DOCUMENTAZIONE TECNICA
DOCUMENTACION TECNICA
No copying, translation, modification on other use authorized. All rights reserved worldwide. • Tous droits de reproduction, de traduction, d'adaptation et d'exécution réservés pour tous les pays. • Sämtliche Urheberrechte an diesen Texten und Zeichnungen stehen uns zu. Nachdrucke,
Vervielfältigungen - auch auszugsweise - nur mit unserer vorherigen Zustimmung zulässig. Alle Rechte vorbehalten. • I diritti di riproduzione, di traduzione, e esecuzione sono riservati per tutti i paesi. • Derechos de reproduccion, de traduccion, de adaptacion y de ejecucion reservados para todos los paises.
WARNING : Before servicing this chassis please read the safety recommendations.
ATTENTION : Avant toute intervention sur ce châssis, lire les recommandations de sécurité.
ACHTUNG : Vor jedem Eingriff auf diesem Chassis, die Sicherheitsvorschriften lesen.
ATTENZIONE : Prima di intervenire sullo chassis, leggere le norme di sicurezza.
IMPORTANTE : Antes de cualquier intervención, leer las recomendaciones de seguridad.
- 0604
42WB03SW
TV
Plasma
Page 2
Indicates critical safety components, and identical components should be used for replacement. Only then can the
operational safety be garanteed.
Le remplacement des éléments de sécurité (repérés avec le symbole ) par des composants non homologués selon la
Norme CEI 65 entraine la non-conformité de l'appareil. Dans ce cas, la responsabilité du fabricant n'est plus engagée.
Wenn Sicherheitsteile (mit dem Symbol gekennzeichnet) nicht durch Original - Ersatzteile ersetzt werden, erlischt die
Haftung des Herstellers.
La sostituzione dei componenti di sicurezza (evidenziati con il segno ) con componenti non omologati secondo la
norma CEI 65 comporta la non conformitá dell'apparecchio. In tal caso è "esclusa la responsabilità " del costruttore.
La sustitución de elementos de seguridad (marcados con el simbolo ) por componentes no homologados segun la
norma CEI 65, provoca la no conformidad del aparato. En ese caso, el fabricante cesa de ser responsable.
MEASUREMENT CONDITIONS - CONDITIONS DE MESURES - MESSBEDINGUNGEN
CONDIZIONI DI MISURA - CONDICIONES DE MEDIDAS
RICEVITORE :
In UHF, livello d'entrata 1 mV, monoscopio barre :
- PAL, norma G. bianco 100%.
Via SCART, livello d'entrata 1 Vpp, monoscopio barre :
Colore, Contrasto, Luminositá media, Suono minimo.
Programma selezionato PR 01.
Tensioni continue rilevate rispetto alla massa con un voltmetro digitale.
RECEIVER :
On UHF,input level : 1 mV, bar test pattern :
- PAL, I standard, 100% white.
Via the scart socket, input level : 1 Vpp, bar test pattern :
Colour, contrast and brightness at mid-position, sound at minimum.
Programme selected : PR 01.
DC voltages measured between the point and earth using a digital
voltmeter.
EMPFÄNGER :
Bei UHF Eingangspegel 1 mV, Farbbalken :
- PAL, Norm G, Weiss 100%.
Über die Scartbuchse : Eingangspegel 1 Vss, Farbbalken :
Farbe, Kontrast, Helligkeit in der Mitte des Bereichs, Ton auf Minimum.
Zugeordnetes Programm PR 01.
Gleichspannungen mit einem digitalen Voltmeter zur Masse gemessen.
RECEPTEUR :
En UHF, niveau d'entrée 1 mV mire de barres
- SECAM, Norm L, Blanc 100%.
Par la prise Péritélévision, niveau d'entrée 1 Vcc, mire de barres .
Couleur, contraste, lumière à mi-course, son minimum.
Programme affecté PR 01.
Tensions continues relevées par rapport à la masse avec un
voltmètre numérique.
RECEPTOR :
En UHF, nivel de entrada 1 mV, mira de barras :
- PAL, norma G, blanco 100%.
Por la toma Peritelevision, nivel de entrada 1 Vpp mira de barra.
Color, Contraste, luz a mitad de carrera, Sonido minimo.
Programa afectado PR 01.
Tensiones continuas marcadas en relacion a la masa con un voltimetro digital.
Do not disconnect modules when they are energized!
Repairs on power supply section are to be carried out only with isolating transformer.
Ne pas retirer les modules lorsqu' ils sont sous tension. N'effectuer les travaux de maintenance sur la partie reliée
au secteur (Switch Mode) qu'au travers d'un transformateur d'isolement.
Module nicht bei eingeschaltetem Gerät entfernen!
Servicearbeiten am Netzteil nur unter Verwendung eines Regeltrenntrafos durchführen.
Non scollegare le piastre quando sono alimentate!
Per le riparazioni sulla sezione alimentatore, utilizzare un trasformatore isolatore.
No desconectar los módulos cuando están activados. Las reparaciones en la sección de alimentación de energía
deben ser ejecutadas solamente con un transformador de separación.
Page 3

First issue 06 / 04 3
Page
SAFETY PRECAUTIONS . . . . . . . . . . . . . . . . . . . . . . . . . . . . . . . . . . . . . . . . . . . . . . . . . . . . . . . . . . 4
DISASSEMBLY
Removing the leg tube assembly . . . . . . . . . . . . . . . . . . . . . . . . . . . . . . . . . . . . . . . . . . . . . . . . .6
Removing the rear cover . . . . . . . . . . . . . . . . . . . . . . . . . . . . . . . . . . . . . . . . . . . . . . . . . . . . . . . . 7
Removing the filter . . . . . . . . . . . . . . . . . . . . . . . . . . . . . . . . . . . . . . . . . . . . . . . . . . . . . . . . . . . . . 8
TROUBLESHOOTING
No power . . . . . . . . . . . . . . . . . . . . . . . . . . . . . . . . . . . . . . . . . . . . . . . . . . . . . . . . . . . . . . . . . . .10
No picture . . . . . . . . . . . . . . . . . . . . . . . . . . . . . . . . . . . . . . . . . . . . . . . . . . . . . . . . . . . . . . . . . . . 11
Vertical line fail . . . . . . . . . . . . . . . . . . . . . . . . . . . . . . . . . . . . . . . . . . . . . . . . . . . . . . . . . . . . . . 12
Horizontal line fail . . . . . . . . . . . . . . . . . . . . . . . . . . . . . . . . . . . . . . . . . . . . . . . . . . . . . . . . . . . . 13
No command . . . . . . . . . . . . . . . . . . . . . . . . . . . . . . . . . . . . . . . . . . . . . . . . . . . . . . . . . . . . . . . . 14
ADJUSTMENTS
Power (PLG-421) . . . . . . . . . . . . . . . . . . . . . . . . . . . . . . . . . . . . . . . . . . . . . . . . . . . . . . . . . . . . . 15
Power (DGK-420W) . . . . . . . . . . . . . . . . . . . . . . . . . . . . . . . . . . . . . . . . . . . . . . . . . . . . . . . . . . . 16
Color temperature in DVI mode . . . . . . . . . . . . . . . . . . . . . . . . . . . . . . . . . . . . . . . . . . . . . . . . . .16
Color temperature in RGB mode . . . . . . . . . . . . . . . . . . . . . . . . . . . . . . . . . . . . . . . . . . . . . . . . . 18
SPECIFICATIONS . . . . . . . . . . . . . . . . . . . . . . . . . . . . . . . . . . . . . . . . . . . . . . . . . . . . . . . . . . . . . . . 20
APPENDIX A . . . . . . . . . . . . . . . . . . . . . . . . . . . . . . . . . . . . . . . . . . . . . . . . . . . . . . . . . . . . . . . . . . . .22
WIRING DIAGRAM . . . . . . . . . . . . . . . . . . . . . . . . . . . . . . . . . . . . . . . . . . . . . . . . . . . . . . . . . . . . . . .24
CONTENTS
Page 4
4 First issue 06 /04
IMPORTANT SAFETY PRECAUTIONS
1. Before returning an instrument to the customer, always make a safety check of the entire instrument, including the
following items, but not limited to them.
a. Be sure that no built-in protective devices are defective and/or have been defeated during servicing. (1) Protective
shields are provided on this chassis to protect both the technician and the customer. Correctly replace all missing
protective shields, including any removed for servicing convenience. (2) When reinstalling the chassis and/or other
assembly in the cabinet, be sure to put back in place all protective devices, including, but not limited to, non-metallic
control knobs, insulating fishpapers, adjustment and compartment covers/shields, and isolation resistor/capacitor
networks. Do not operate this instrument or permit it to be operated without all protective devices correctly
installed and functioning.
b. Be sure that there are no cabinet openings through which an adult or child might be able to insert their fingers and
contact a hazardous voltage. Such opening include, but are not limited to (1) spacing between the picture tube and
the cabinet mask, (2) excessively wide cabinet ventilation slots, and (3) an improperly fitted and/or incorrectly
secured cabinet back cover.
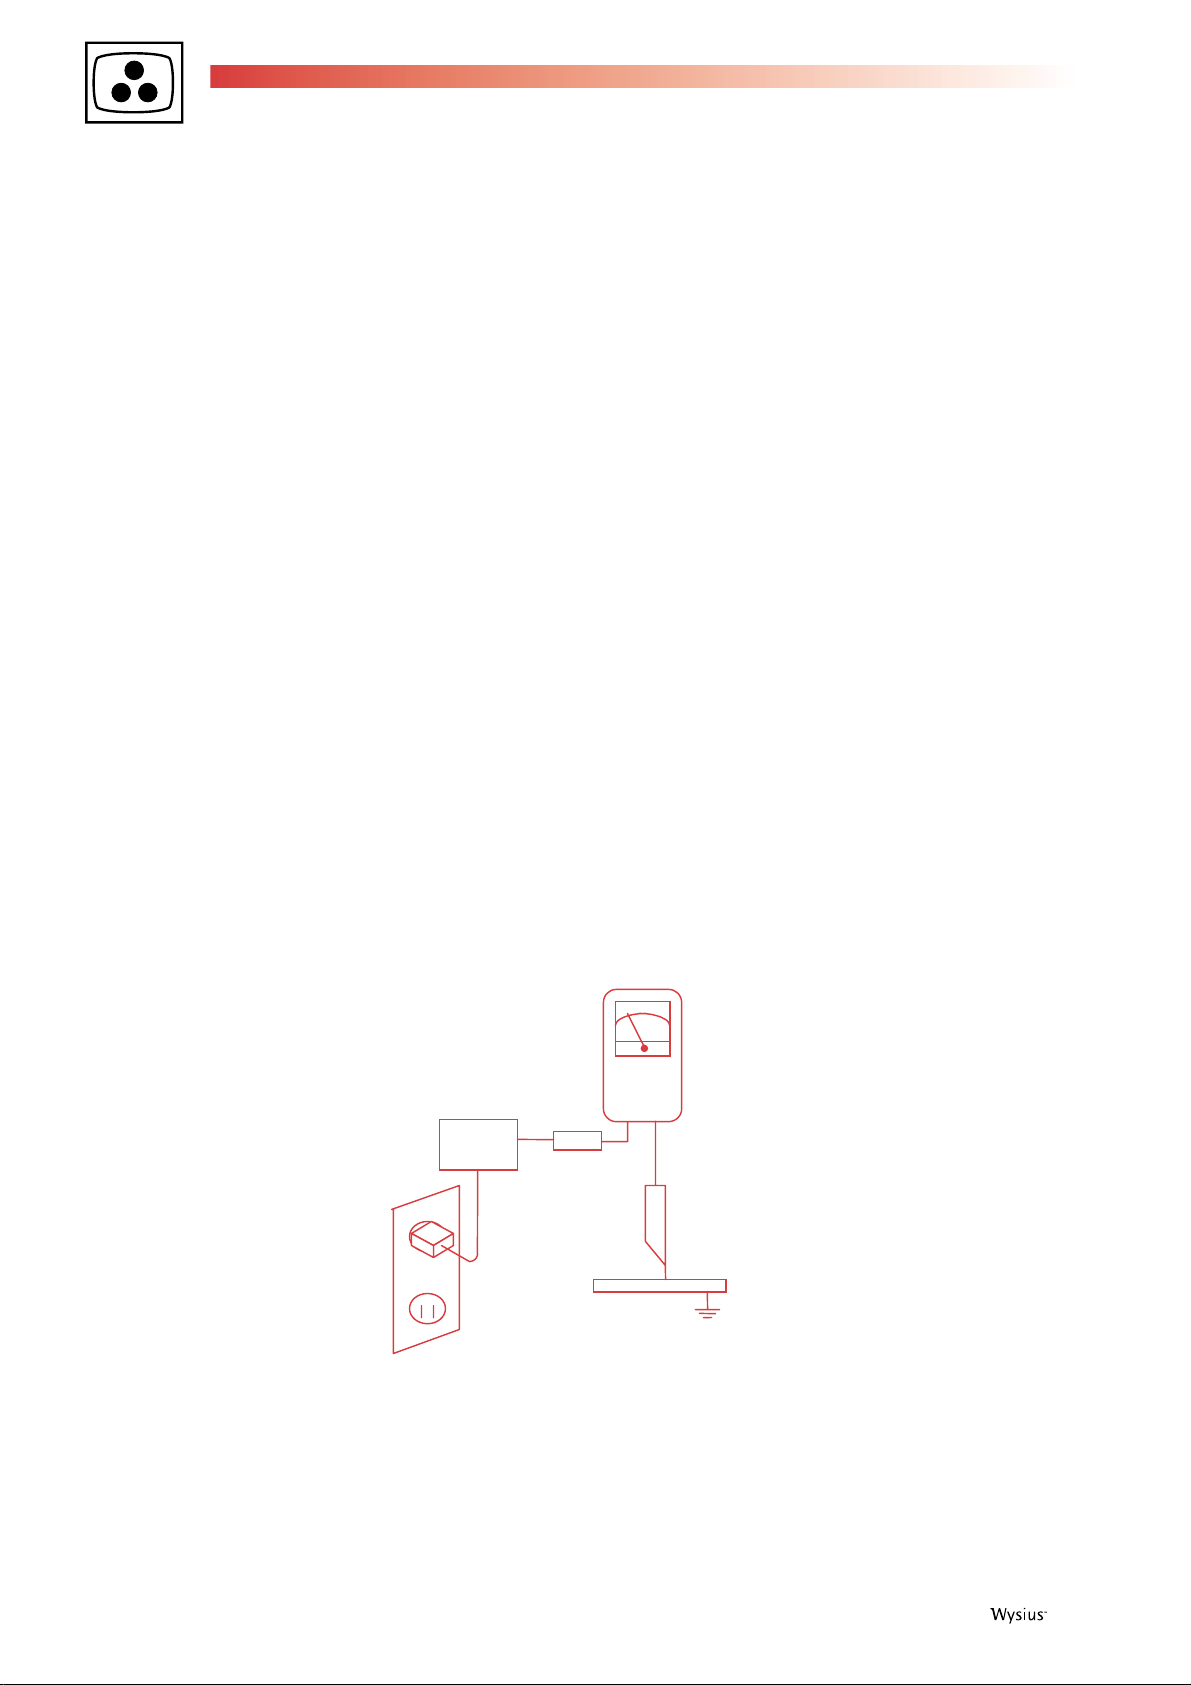
c. Leakage Current Hot Check: With the instrument completely reassembled, plug the AC line cord directly into a 230V
AC outlet. (Do not use an isolation transformer during this test.) Use a leakage current tester or a metering system.
With the instrument AC, first switch ON and then OFF. Measure from a known earth ground (metal waterpipe,
conduit, etc.) to all exposed metal parts of the instrument (antennas, handle bracket, metal cabinet, screwheads,
metallic overlays, control shafts, etc.), especially any exposed metal parts that offer an electrical return path to the
chassis. Any current measured must not exceed 3.5 mA. Reverse the instrument power cord plug in the outlet and
repeat test. ANY MEASUREMENTS NOT WITHIN THE LIMITS SPECIFIED HEREIN INDICATE A POTENTIAL
SHOCK HAZARD THAT MUST BE ELIMINATED BEFORE RETURNING THE INSTRUMENT TO THE
CUSTOMER.
2. Read and comply with all caution and safety-related notes on or inside the Monitor cabinet, on the Projection Monitor
chassis or on the picture tube.
+-
Test all exposed
metal surfaces
3. Wire cord
Also test with
plug reversed
(using AC adapter
plug as required)
Device
under
test
Earth ground
Leakage
current
tester
AC Leakage test
(Reading
should not
be above
3.5 mA)
Page 5

First issue 06 / 04 5
3. Design Alteration Warning: Do not alter or add to the mechanical or electrical design of this unit. Design alterations and
additions, including, but not limited to, circuit modifications and the addition of the items such as auxiliary audio and/or
video output connections might alter the safety characteristics of this Projection Monitor and create a hazard to the user.
Any design alterations or additions will void the manufacturer's warranty and will make you, the service, responsible for
personal injury or property damage resulting therefrom.
4. Hot Chassis Warning:
a. Some Monitor chassis are electrically connected directly to one conductor of the AC power cord and may be safely
serviced without an isolation transformer only if the AC power plug is inserted so that the chassis is connected to the
ground side of the AC power source. To confirm that the AC power plug is inserted correctly, with an AC voltmeter
measure between the chassis and a known earth ground. If a voltage reading in excess of 1.0V is obtained, remove
and reinsert the AC power plug in opposite polarity and again measure the voltage potential between the chassis
and a known earth ground.
b. Some Monitor chassis normally have 85V AC (RMS.), between chassis and earth ground regardless of the AC plug
polarity. These chassis can be safely serviced only with an isolation transformer inserted in the power line between
the receiver and the AC power source, for both personnel and test equipment protection.
c. Some Projection Monitor chassis have a secondary ground system in addition to the main chassis ground. This
secondary ground system is not isolated from the AC power line. Insulating material that must not be defeated or
altered electrically separates the two ground systems.
5. Observe original lead dress. Take extra care to assure correct lead dress in the following areas:
a. near sharp edges,
b. near thermally hot parts (be sure that leads and components do not touch thermally hot parts),
c. the AC supply,
d. high voltage,
e. antenna wiring. Always inspect in all areas for pinched, out-of-place, or frayed wiring. Do not change spacing
between components and between components and the printed-circuit board. Check AC powers cord for damage.
6. Components, parts, and/or wiring that appear to have overheated or are otherwise damaged should be replaced with
components, parts, or wiring that meet original specifications. Additionally, determine the cause of overheating and/or
damage and, if necessary, take corrective action to remove any potential safety hazard.
7. PRODUCT SAFETY NOTICE: Many Monitor electrical and mechanical parts have special safety-related characteristics
some of which are often not evident from visual inspection, nor can the protection they give necessarily be obtained by
replacing them with components rated for higher voltage, wattage, etc. Parts that have special safety characteristics are
identified in this service data by shading with a mark on schematics. Use of a substitute replacement part that does not
have the same safety characteristics as the recommended replacement part in this service data parts list might create
shock, fire, and/or other hazards.
Page 6

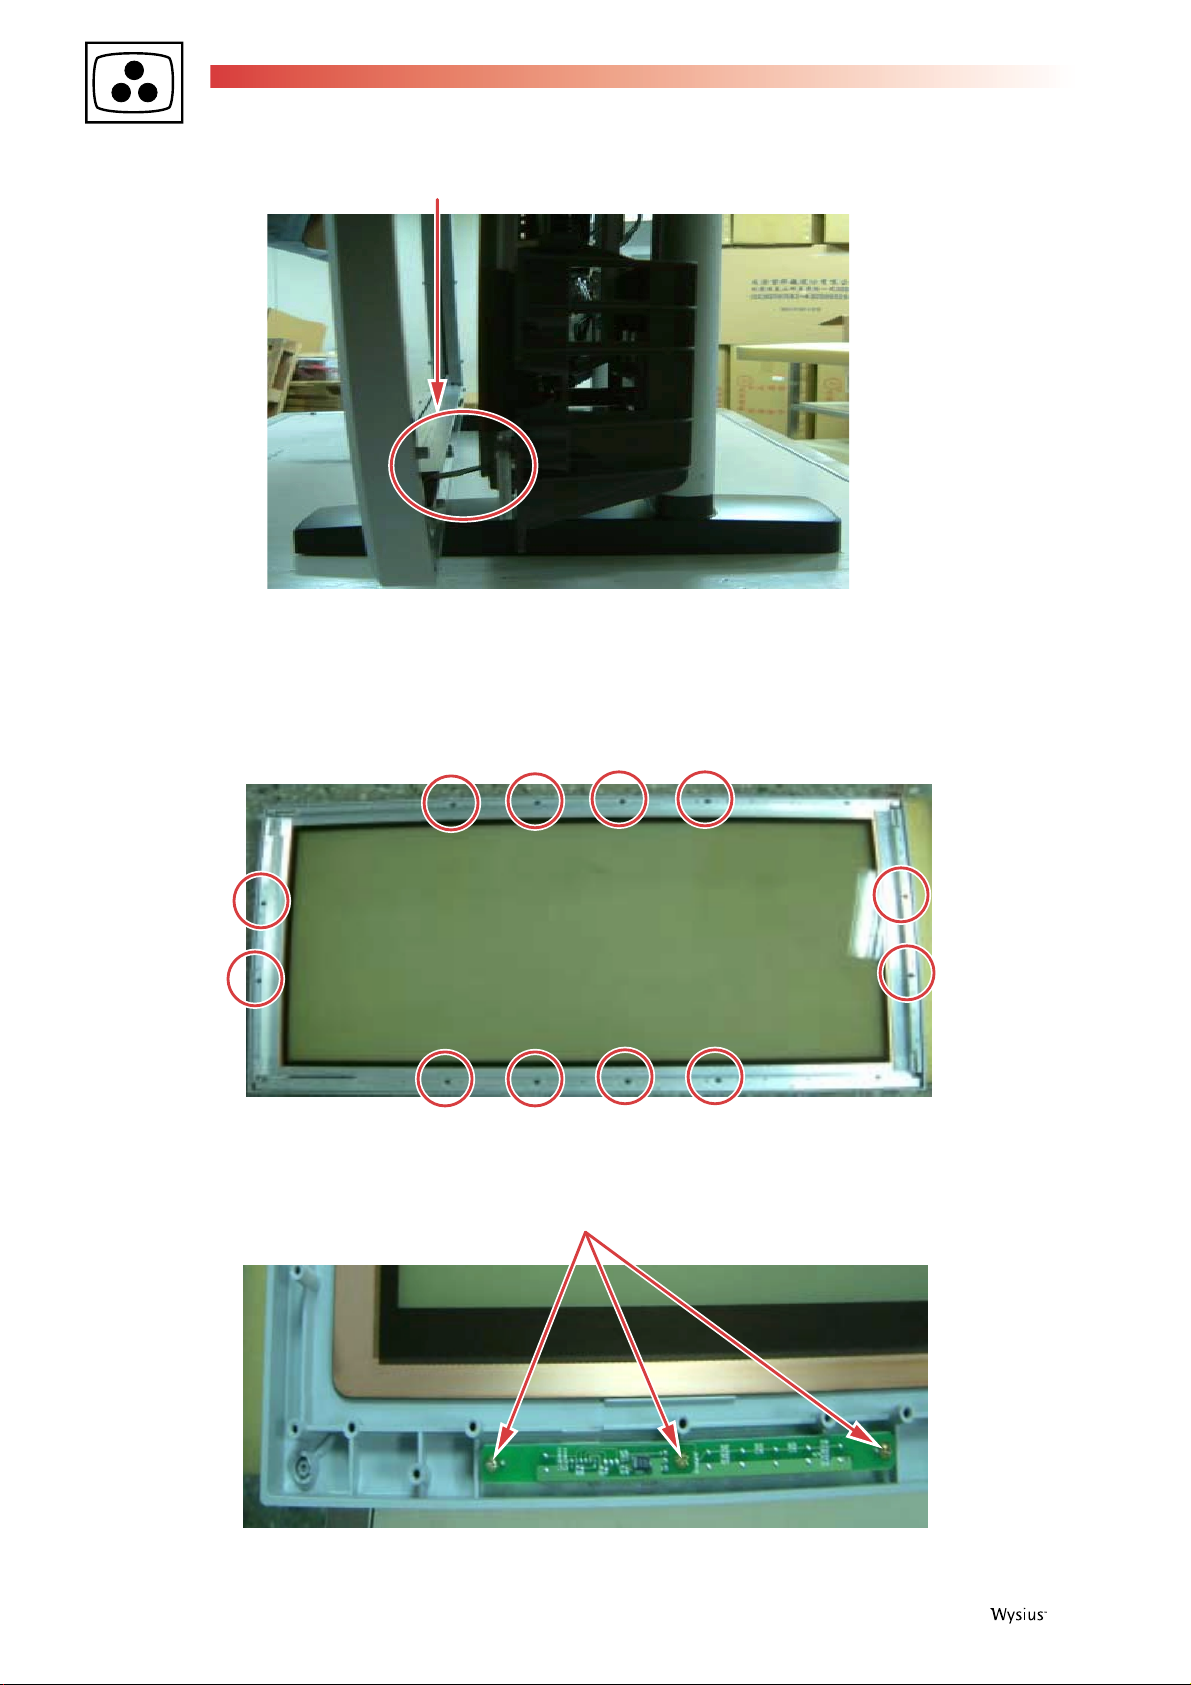
1. Removing the Leg Tube Assembly
Unscrew 4 screws from "Leg Tube Assembly." (Specification of screw driver is 15± 2kg), see fig.1
Push the "Leg Tube Assembly." downward to unlock and pull it away from unit, then unscrew 4 screws from rear cover.
(Specification of screw -driver is 15± 2 kg),
6 First issue 06 /04
Fig. 1
Fig. 2
HOW TO EXCHANGE THE MASK & PANEL PROCEDURE
Page 7
First issue 06 / 04 7
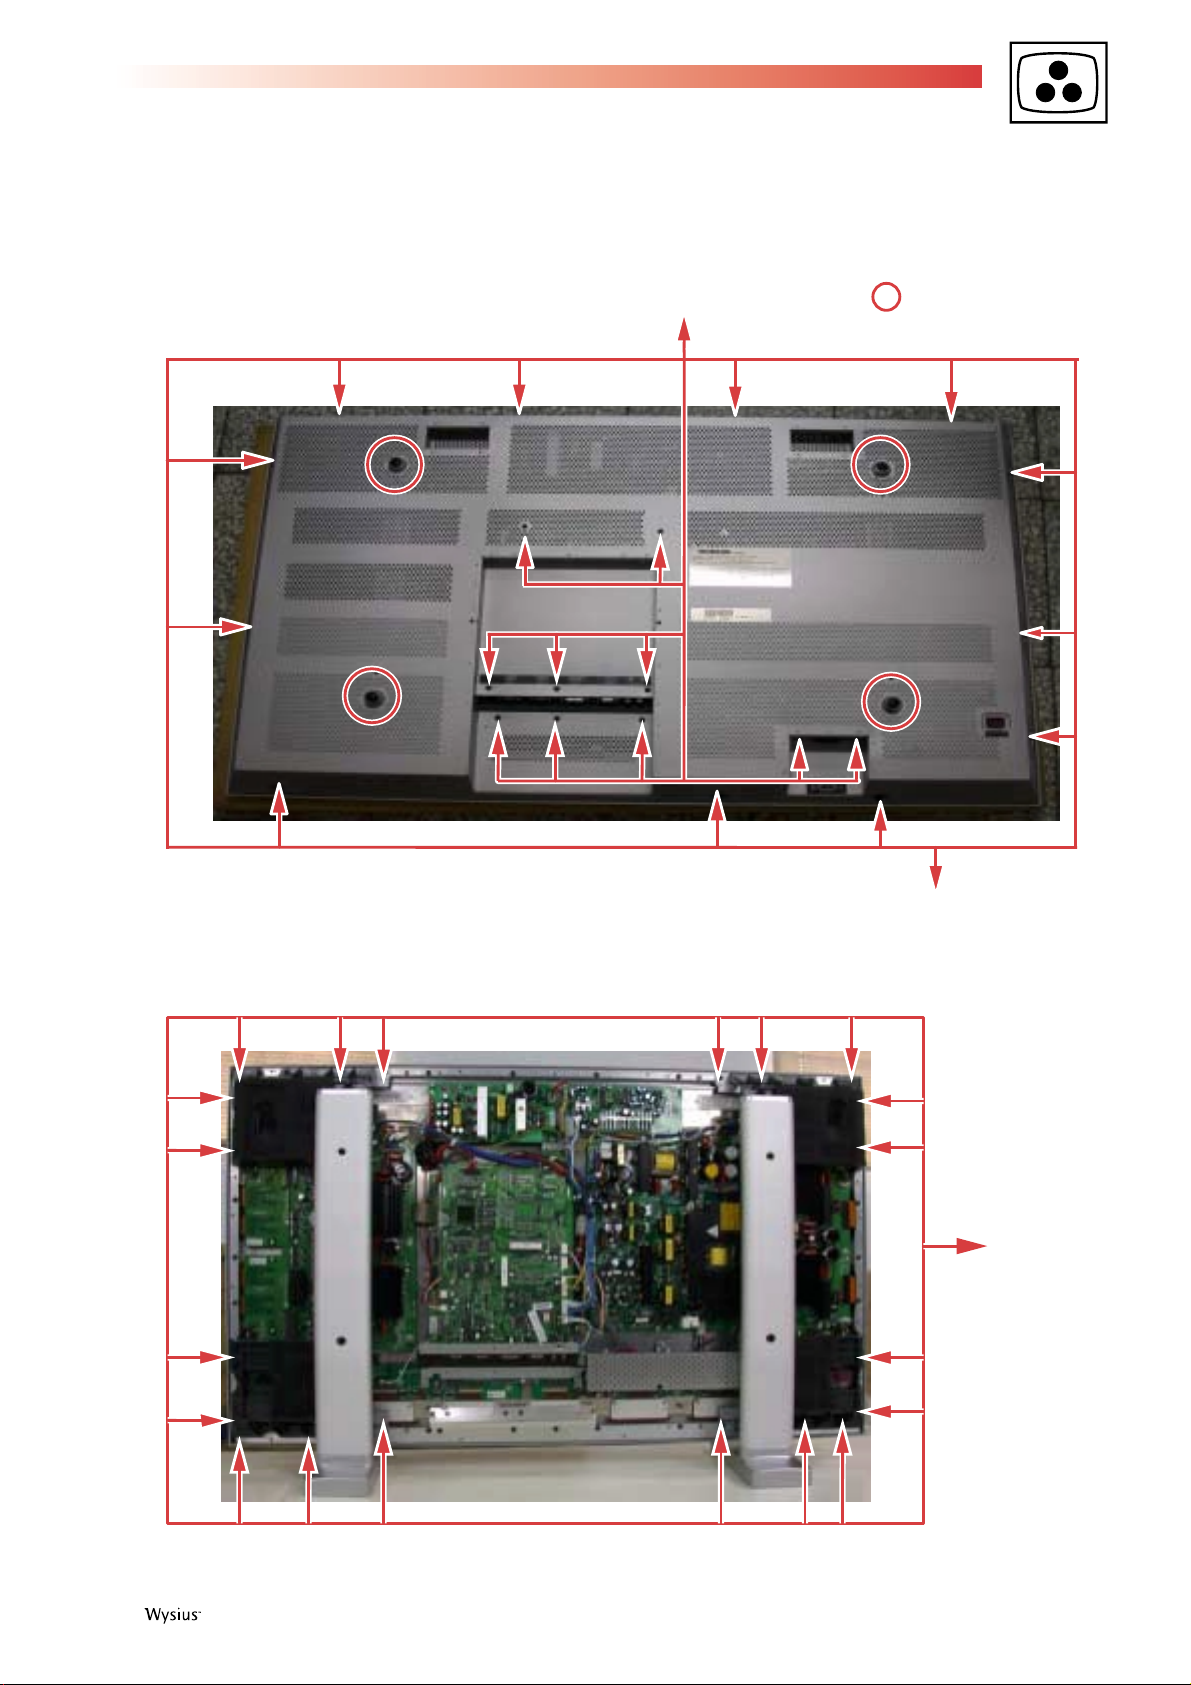
2. Removing the rear cover
Unscrew 12 screws from rear cover, see red arrow (Specification of screw driver is 15± 2 kg)
Unscrew 8 screws from rear cover, and unscrew 2 screws from AC power socket, see red arrow (Specification of screw driver
is 9± 1 kg)
Unscrew 4 screws from rear cover, see red circle (Specification of screw driver is 15± 2 kg)
3. Removing the screws from panel:
Unscrew 20 pieces of screw from panel site (Specification of screw driver is 15± 2 kg)
10 screws
12 screws
4 screws
Fig. 3
20 screws
Fig. 4
Page 8
8 First issue 06 /04
4. Removing the Mask and the J5 cable from PCB
5. Removing the filter
Unscrew 10 screws from mask (Specification of screw driver is 15± 2 kg), then remove four angles that hold the PDP filter. (Be
careful: Please do not bump or scrape when handling the PDP filter.)
Before putting panel back clean PDP filter make sure it's free from dust.
Unscrew 3 screws and remove control board
3 screws
Fig. 6
Fig. 7
J5
Fig. 5
Page 9

First issue 06 / 04 9
Remove the Control buttons from old Mask and reinstall them on the new Mask.
Please to aim at red arrow to guide and there is have a channel when you put down glass back to new mask
Assemble 4 irons back to mask. Be careful: When you lock up 4 irons that screws should be to lock up on "SL&G" point.
6. Proceed in reverse order to re-assemble
Control buttons
Fig. 8
Fig. 9
Top side
Top bottom
Fig. 10
Page 10

10 First issue 06 /04
TROUBLESHOOTING
No power
Switch the
power on
Check "Power Switch" module
Not correct
Correct
Replace
"Power Switch"
module
Replace
"Main Power"
module
End
End
Page 11

First issue 06 / 04 11
No picture
Check Image board
Correct
Replace
PDP module
End
Not correct
Replace
Image board
End
Page 12

12 First issue 06 /04
Vertical line fail
Check XR Board
Correct
Check Logic Board
Correct
Not correct
Not correct
Replace
XR
Board
End
Replace
Logic
Board
End
Replace
PDP module
End
Page 13

First issue 06 / 04 13
Horizontal line fail
Check Y-SUS Board
Correct
Check Y DRV-Top
Correct
Check Y DRV-Bottom
Correct
Not correct
Not correct
Not correct
Replace
Y-SUS
Board
End
Replace
Y DRV-Top
End
Replace Y
DRV-Bottom
End
Check Z-SUS Board
Correct
Replace
PDP module
End
Not correct
Replace
Z-SUS
Board
End
Page 14

14 First issue 06 /04
No command
Switch the
power on
Check remote control
Correct
Check Front Button
Control Board
Correct
Not correct
Not correct
Replace the
battery or the
remote control
End
Replace
Front Button
Control Board
End
Replace Image
Board
End
Page 15

First issue 06 / 04 15
ADJUSTMENTS
PANEL voltage adjustment
1.1 Origin Power (PLG-421)
1. POWER ON
2. Signal Source: No (black screen).
3. Connect Digital Voltage Meter (-) to Panel GND. Connect Digital Voltage Meter (+) to Plug CN806 Pin#10 and adjust the VA
(Variable Resistor RV204) value to the VA value recorded on the Panel Voltage Label ± 0.5VDC (VA ± 0.5VDC= value adjusted).
4. Connect Digital Voltage Meter (-) to Panel GND. Connect Digital Voltage Meter (+) to Plug CN806 Pin#1 and adjust the VS
(Variable Resistor RV203) value to the VS value recorded on the Panel Voltage Label ± 0.5VDC (VS ± 0.5VDC= value adjusted).
Remark: The Panel Voltage Label is located at the upper- right corner of the panel.
CN806
RV203
RV204
Page 16

16 First issue 06 /04
1.2 Dae Gil Power (DGK-420W)
1. POWER ON
2. Signal Source: No (black screen).
3. Connect Digital Voltage Meter (-) to Panel GND. Connect Digital Voltage Meter (+) to Plug CN806 Pin#10 and adjust the VA
(Variable Resistor) value to the VA value recorded on the Panel Voltage Label ± 0.5VDC (VA ± 0.5VDC= value adjusted).
4. Connect Digital Voltage Meter (-) to Panel GND. Connect Digital Voltage Meter (+) to Plug CN806 Pin#1 and adjust the VS
(Variable Resistor) value to the VS value recorded on the Panel Voltage Label ± 0.5VDC (VS ± 0.5VDC= value adjusted).
Remark: The Panel Voltage Label is located at the upper-right corner of the panel.
Color Temperature Adjustment
1.1 Color Temperature setting in DVI Mode
1. Turn on PDP set and warm up for over 30 minutes.
Page 17

First issue 06 / 04 17
2. Turn on Color Analyzer CA-100 and reset CA-100.
3. Switch PDP input signal source to DVI mode.
4. Set up Video Pattern Generator (Astro, Model= VG-828H).
Timing set = 640 x 480 @ 60Hz;
Video = Panel Link (the DVI output mode)
Connect PDP DVI input connector with Astro to receive DVI signal.
5. Dark level and bright level center block definition:
A. Dark level center block definition:
[WINDOW]
Mode %
Format 1 Window
Flicker None
Size H/V 28.5/34.0 (%)
Analog R/G/B 25/25/25 (10 IRE white output pattern)
B. Bright level center block definition:
[WINDOW]
Mode %
Format 1 Window
Flicker None
Size H/V 28.5/34.0 (%)
Analog R/G/B 153/153/153 (60 IRE white output pattern)
6. There are 2 different modes (DVI and RGB) color temperature setting; there are 3 different color temperatures (7180K,
8680K and 10180K) in each mode. Each color temperature needs to adjust dark level, bright level, and R, G, B.
The OSD menu for color temperature factory setting can be viewed by following the ”Factory Setting Procedure”.
Factory Setting Procedure:
A. Press (Zoom -) key for over 5 seconds and release.
B. Press (Zoom+) key for over 5 seconds and release.
C. Press ”ok” key.
D. Factory setting OSD menu shows up. The values shown up on the OSD menu are the factory default setting values.
The factory default setting values differ from each PDP panel module. The color temperature factory setting OSD menus
are as the following:
*Note: When adjusting the color temperature, please note
what is the input source and what input the PDP is, the input
source and the PDP input mode should be the same.
7. Put the color analyzer CA-100 in the center of the screen.
A. 7180K
DV I -CT : 718 0
K
[x : 3 0 8 y : 2 9 8]
GA IN B IAS
RG B RG B
xx xx xx xx xx xx
xx xx
B. 8680K
DV I -CT : 868 0
o
K
[x : 2 8 8 y : 3 0 1]
GA IN B IAS
RG B RG B
xx xx xx xx xx xx
xx xx
C. 10180K
DV I -CT :10180
o
K
[x : 2 7 0 y : 2 9 2]
GA IN B IAS
RG B RG B
xx xx xx xx xx xx
xx xx
Page 18

18 First issue 06 /04
1.2 Adjusting procedure
1. Receive Astro VG-828H DVI dark level center block signal (10 IRE), follow the ”Factory Setting Procedure” to go into
factory setting mode and you will see the 7180K color temperature setting OSD menu.
2. 7180K dark level center block adjustment procedure:
A. Press (Zoom -) or (Zoom+) key in remote control to select G-BIAS, and adjust Y=0.35 FL±0.1FL
B. Press(Zoom -) or (Zoom+) key in remote control to select R-BIAS, and adjust x=308±15FL
C. Press (Zoom -) or (Zoom+) key in remote control to select B-BIAS, and adjust y=298±15FL
D. Adjust R/G/B-BIAS, make sure the final value x=308±15FL, y=298±15FL, Y=0.35FL±0.1FL
3. 7180K bright level center block adjustment procedure:
(Please set Astro VG-828H DVI bright level center block signal to 60 IRE)
A. Press (Zoom -) or (Zoom+) key in remote control to select G-GAIN, and adjust Y=40±2FL
B. Press (Zoom -) or (Zoom+) key in remote control to select R-GAIN, and adjust x=308±15FL
C. Press (Zoom -) or (Zoom+) key in remote control to select B-GAIN, and adjust y=298±15F
D. Adjust R/G/B-GAIN, make sure the final value x=308±15FL, y=298±15FL, Y=40±2FL.
E. Press (Zoom+) key in remote control to select GAIN Gamma, and then press (Zoom -) or (Zoom+) key to adjust to Y=40
F. Press (Zoom+) key in remote control to select BIAS Gamma, and then press (Zoom -) or (Zoom+) key to adjust to Y=0.35
4. When you want to go ahead for next color temperature setting, double check the Gamma values, make sure GAIN
Gamma and BIAS Gamma values are correct, and then press the ”ok” key in remote control. For each color temperature
setting, please repeat the procedure (1)-(3). Only x and y value will change in different color temperature mode (in 8680K,
x=288, y=301; in 10180K, x=270, y=292) and Y values are all the same in each color temperature mode (dark level Y=0.35,
bright level Y=40).
2.1 Color Temperature setting in RGB Mode
1. Turn on Color Analyzer CA-100 and reset CA-100.
2. Switch PDP input signal source to RGB mode.
3. Set up Video Pattern Generator (Astro, Model= VG-828H).
Timing set = 640 x 480 @ 60Hz;
Video = Analog (the RGB output mode)
Connect PDP RGB input connector with Astro to receive RGB signal.
4. Dark level and bright level center block definition:
A. Dark level center block definition:
[WINDOW]
Mode %
Format 1 Window
Flicker None
Size H/V 28.5/34.0 (%)
Analog R/G/B 25/25/25 (10 IRE white output pattern)
B. Bright level center block definition:
[WINDOW]
Mode %
Format 1 Window
Flicker None
Size H/V 28.5/34.0 (%)
Analog R/G/B 153/153/153 (60 IRE white output pattern)
5. There are 2 different modes (DVI and RGB) need color temperature setting; there are 3 different color temperatures
(7180K, 8680K and 10180K) in each mode. Each color temperature needs to adjust dark level, bright level, and R, G, B.
The OSD menu for color temperature factory setting can be viewed by following the ”Factory Setting Procedure”.
Page 19

First issue 06 / 04 19
Factory Setting Procedure:
A. Press (Zoom -) key for over 5 seconds and release.
B. Press (Zoom+) key for over 5 seconds and release.
C. Press ”ok” key.
D. Factory setting OSD menu shows up.
The values showed up on the OSD menu are the factory default setting values. The factory default setting values differ from
each PDP panel module. The color temperature factory setting OSD menus are as the following:
*Note: GAIN Gamma and BIAS Gamma have no function
under RGB mode.
*Note: When adjusting the color temperature, please note
what is the input source and what input the PDP is, the
input source and the PDP input mode should be the same.
6. Put the color analyzer CA-100 in the center of the screen.
2.2 Adjusting procedure:
1. Receive Astro VG-828H RGB dark level center block signal (10 IRE), follow the ”Factory Setting Procedure” to go into
factory setting mode and you will see the 7180K color temperature setting OSD menu.
2. 7180K dark level center block adjustment procedure:
A. Press (Zoom -) or (Zoom+) key in remote control to select G-BIAS, and adjust Y=0.35 FL±0.1FL
B. Press (Zoom -) or (Zoom+) key in remote control to select R-BIAS, and adjust x=308±15FL
C. Press (Zoom -) or (Zoom+) key in remote control to select B-BIAS, and adjust y=298±15FL
D. Adjust R/G/B-BIAS, make sure the final value x=308±15FL, y=298±15FL, Y=0.35FL±0.1FL
3. 7180K bright level center block adjustment procedure:
(Please set Astro VG-828H RGB bright level center block signal to 60 IRE)
A. Press (Zoom -) or (Zoom+) key in remote control to select G-GAIN, and adjust Y=40±2FL
B. Press (Zoom -) or (Zoom+) key in remote control to select R-GAIN, and adjust x=308±15FL
C. Press (Zoom -) or (Zoom+) key in remote control to select B-GAIN, and adjust y=298±15F
D. Adjust R/G/B-GAIN, make sure the final value x=308±15FL, y=298±15FL, Y=40±2FL.
4. When you want to go ahead for next color temperature setting, double check the Gamma values, make sure GAIN Gamma
and BIAS Gamma values are correct, and then press the ”ok” key in remote control. For each color temperature setting,
please repeat the procedure (1)-(3). Only x and y value will change in different color temperature mode (in 8680K, x=288,
y=301; in 10180K, x=270, y=292) and Y values are all the same in each color temperature mode (dark level Y=0.35, bright
level Y=40).
A. 7180K
RGB -CT : 7 1 8 0
[x :308 y :298]
GA IN B IAS
RG B RG B
xx xx Xx xx xx xx
o
K
xx xx
B. 8680K
RGB -CT : 8 6 8 0
[x :288 y :301]
GA IN B IAS
RG B R
GB
Xx xx Xx xx xx xx
xx xx
K
RGB -CT: 1
[x :270 y :
GA IN B
RG B R
xx xx xx x xx xx
xx xx
0180
:292]
IAS
GB
o
(GAIN Gamma) (BIAS Gamma)
C. 10180K
o
K
Page 20

SPECIFICATIONS
Pin assignments
D-SUB Connector
DVI-Connector
20 First issue 06 /04
Pin Pin PinSignal Signal Signal
11 15
15
1
2
RED
GREEN
6
7
RED GND
GREEN GND
11
12
GND
SDA
610
3
4
5
BLUE
GND
GND
BLUE GND
8
9
10
NC
GND
13
14
15
H_SYNC
V_SYNC
SCL
15
Pin Pin PinSignal Signal Signal
1
2
3
4
5
6
TMDS Data 2-
TMDS Data 2+
TMDS Data
2/4Shield
TMDS Data 4-
TMDS Data 4+
DDC Clock
9
1
9
10
11
12
13
14
TMDS Data 1-
TMDS Data 1+
TMDS Data
1/3 Shield
TMDS Data 3-
TMDS Data 3+
+5V Power
17
18
19
20
21
22
TMDS Data 0-
TMDS Data 0+
TMDS Data
0/5 Shield
TMDS Data 5-
TMDS Data 5+
TMDS Clock
Shield
824
7
8
DDC Data
NC
15
16
GND (for +5V)
Hot Plug
Detect
23
24
TMDS Clock+
TMDS Clock-
Page 21

Mode list for RGB / DVI
Note: 1.* : DVI is not supported.
2. Mode 24 to 26 are for use with Apple Macintosh computers.
First issue 06 / 04 21
Refresh Horizontal Vertical Vertical Horizontal
Mode No Resolution Rate Frequency Frequency Sync Sync Dot rate
Polarity Polarity
(Hz) (K Hz) (Hz) (TTL) (TTL) (MHz)
1 640(VGA)x480 60 31.5 59.94 - - 25.175
2 640(VGA)x480 72 37.9 72.81 - - 31.500
3 640(VGA)x480 75 37.5 75 - - 31.500
4 640(VGA)x480 85 43.3 85.01 - - 36.000
5 800(SVGA)x600 56 35.1 56.25 + + 36.000
6 800(SVGA)x600 60 37.9 60.317 + + 40.000
7 800(SVGA)x600 72 48.1 72.19 + + 50.000
8 800(SVGA)x600 75 46.9 75 + + 49.500
9 800(SVGA)x600 85 53.7 85.06 + + 56.250
10 1024(XGA)x768 60 48.4 60.01 - - 65.000
11 1024(XGA)x768 70 56.5 70.07 - - 75.000
12 1024(XGA)x768 75 60.0 75.03 + + 78.750
13 1024(XGA)x768 85 68.7 84.99 + + 94.500
14 1280(SXGA)x1024 60 63.98 60.02 + + 108.00
15* 1280(SXGA)x1024 75 79.98 75.03 + + 135.00
16* 1280(SXGA)x1024 85 91.15 85.02 + + 157.50
18 720(DOS)x400 70 31.46 70.08 + - 28.320
19 640(VGA)x480 50 31.5 50 - - 25.175
20* 1280(HDTV)x720P 60 45.15 60 - - 74.250
21* 1920(HDTV)x1080I 60(I) 33.75 60 - - 74.250
22 640(VGA)x350 70 31.50 70 - + 25.175
23 852(WGA)x480 60 31.413 59.835 - - 30.00
24 640x480 67 35.00 66.67 - - 30.240
25 832 x 624 75 49.73 74.55 - - 57.283
26 1152 x 870 75 68.68 75.06 - - 100.000
Page 22

22 First issue 06 /04
APPENDIX A : Preset Timing Chart
Item Description:
A Total time
B Active display area including borders
C Active display area excluding borders
D Left/Top border
E Right/bottom border
F Blanking time
G Front porch
H Sync -width
I Back porch
Mode No 1 2 3 4 5 6 7 8 9
Resolution
&
Refresh Rate
Pixel 25.175 31.5 31.5 36 36 40 50 49.5 56.25 MHz
Horizontal visible 640 640 640 640 800 800 800 800 800 Dots
Horizontal total 800 832 840 832 1024 1056 1040 1056 1048 Dots
Horizontal front porch 16 24 16 56 24 40 56 16 32 Dots
Horizontal sync 96 40 64 56 72 128 120 80 64 Dots
Horizontal back porch 48 128 120 80 128 88 64 160 152 Dots
Horiz blanking time 160 192 200 192 224 256 240 256 248 Dots
Vertical visible 480 480 480 480 600 600 600 600 600 Lines
Vertical total 525 520 500 509 625 628 666 625 631 Lines
Vertical front porch 10 9 1 1 1 1 37 1 1 Lines
Vertical sync 2 3 3 3 2 4 6 3 3 Lines
Vertical back porch 33 28 16 25 22 23 23 21 27 Lines
Vertical blanking time 45 40 20 29 25 28 66 25 31 Lines
Horizontal frequency 31.469 37.9 37.5 43.3 35.1 37.9 48.1 46.9 53.7 KHz
Vertical frequency 59.94 72.81 75 85.01 56.25 60.317 72.19 75 85.06 Hz
Vertical sync polarity - - - - + + + + + TTL
Horiz sync polarity - - - - + + + + + TTL
Dot rate 25.175 31.5 31.5 36 36 40 50 49.5 56.25 MHz
640
480
60
640
480
72
640
480
75
640
480
85
800
600
56
800
600
60
800
600
72
800
600
75
800
600
85
Hz
Page 23

First issue 06 / 04 23
Mode No 10 11 12 13 14 15 16 18 19
Resolution
&
Refresh Rate
1024
768
60
1024
768
70
1024
768
75
1024
768
85
1280
1024
60
1280
1024
75
1280
1024
85
720
400
70
640
480
50 Hz
Pixel 65 75 78.75 94.5 108 135 157.5 28.320 25.175 MHz
Horizontal visible 1024 1024 1024 1024 1280 1280 1280 720 640 Dots
Horizontal total 1344 1328 1312 1376 1688 1688 1728 900 800 Dots
Horizontal front porch 24 24 16 48 48 16 64 18 16 Dots
Horizontal sync 136 136 96 96 112 144 160 108 96 Dots
Horizontal back porch 160 144 176 208 248 248 224 54 48 Dots
Horiz blanking time 320 304 288 352 408 408 448 180 160 Dots
Vertical visible 768 768 768 768 1024 1024 1024 400 480 Lines
Vertical total 806 806 800 808 1066 1066 1072 449 629 Lines
Vertical front porch 3 3 1 1 1 1 1 12 62 Lines
Vertical sync 6 6 3 3 3 3 3 2 2 Lines
Vertical back porch 29 29 28 36 38 38 44 35 85 Lines
Vertical blanking time 38 38 32 40 42 42 48 49 149 Lines
Horizontal frequency 48.4 56.5 60 68.7 63.98 79.98 91.15 31.46 31.5 KHz
Vertical frequency 60.01 70.07 75.03 84.99 60.02 75.03 85.02 70.08 50 Hz
Vertical sync polarity - - + + + + + + - TTL
Horiz sync polarity - - + + + + + - - TTL
Dot rate 65 75 78.75 94.5 108 135 157.5 28.32 25.175 MHz
Mode No 20 21 22 23 24 25 26
Resolution
&
Refresh Rate
1280
720P
60
1920
1080I
60I
640
350
70
852
480
60
640
480
67
832
624
75
1152
870
75
Hz
Pixel 74.250 74.25 25.175 30 30.240 57.283 100.000 MHz
Horizontal visible 1280 1920 640 852 640 832 1152 Dots
Horizontal total 1650 2200 800 955 864 1152 1456 Dots
Horizontal front porch 70 44 16 19 64 32 32 Dots
Horizontal sync 40 44 96 48 64 64 128 Dots
Horizontal back porch 260 192 48 36 96 224 144 Dots
Horiz blanking time 370 280 160 103 224 320 304 Dots
Vertical visible 720 540 350 480 480 624 870 Lines
Vertical total 750 562.5 449 525 525 667 915 Lines
Vertical front porch 5 3 37 10 3 1 3 Lines
Vertical sync 5 2 2 2 3 3 3 Lines
Vertical back porch 20 18 60 33 39 39 39 Lines
Vertical blanking time 30 23 99 45 45 43 45 Lines
Horizontal frequency 45.00 33.75 31.50 31.413 35 49.73 68.68 KHz
Vertical frequency 60 60 70 59.835 66.67 74.55 75.06 Hz
Vertical sync polarity - - - - - - - TTL
Horiz sync polarity - - + - - - - TTL
Dot rate 74.25 74.25 25.175 30 30.240 57.283 100.000 MHz
Page 24

First issue 06 / 04 24
WIRING DIAGRAM
PDP Module
AV Module
Board(with
Tuner)
Assy
JP2
Front
Button
Control
Board
Assy
JP1
JA3
Y DRV_TOP
Y DRV_BOTTOM
Y-SUS
Audio
Amplifier
Board Ass'y
(TMDS)
J1
JP4
JP5
J15
(9V)
J25
(5V)
JA2
JA1
Image Board
Ass'y
J14
(5V,SB DET)
J21
(24V,9V)
J28
(RLYON VSON)
J12
(Audio Signal)
J11
(Audio DC,Supply)
(Key)
CN803
CN802/CN809
Main Power
CN801
J5
AC_IN
CN02
CN03
Z-SUS
P21
Logic Board
AC Filter
Power
SW
AC IN
XR BOARD
Page 25

The description and characteristics given here are of informative significance only, and non committal. To keep up the high quality of our products, we reserve the right to
make any changes or improvement without previous notice. • Les descriptions et caractéristiques figurant sur ce document sont données à titre d'information et non
d'engagement. En effet, soucieux de la qualité de nos produits, nous nous réservons le droit d'effectuer, sans préavis, toute modification ou amélioration. • Die
Beschreibungen und Daten in dieser Anleitung dienen nur zur Information und sind nicht bindend. Um die Qualität unserer Produkte ständig zu verbessern, behalten wir uns
das Recht auf Änderungen vor. • Le descrizioni e le caratteristiche date su questo documento sono fornite a semplice titolo informativo e senza impegno. Ci riserviamo il
diritto di eseguire, senza preavviso, qualsiasi modifica o miglioramento. • Las descripciones y características que figuran en este documento se dan a título de información y
no de compromiso. En efecto, en bien de la calidad de nuestros productos, nos reservamos el derecho de efectuar, sin previo aviso, cualquier modificación o mejora.
Thomson multimedia Sales Europe - S.A. au capital de 115 273 710 - Siège : 46, quai Alphonse Le Gallo 92100 Boulogne France - RCS Nanterre B 322 019 464
Thomson multimedia
Sales France
46, quai Alphonse Le Gallo
92648 Boulogne cedex
Tel.
: 01 41 86 60 00
Internet : www.thomson-network.com
Thomson multimedia
Sales UK Limited
30 T ower Vie w
Kings Hill, West Malling
Kent ME19 4NQ (England)
Tel. : 44 (0) 173 252 0920
Thomson multimedia
Sales Italy S.p.A.
Via Leonardo da Vinci,43
20090 Trezzano sul naviglio (Milano)
Tel.
: (02) 48 414 111
Thomson multimedia
Scandinavia AB
Florettgatan 29 C
S-25467 Helsingborg (Sweden)
Tel. : 042 25 75 00
Thomson multimedia
Switzerland
Seewenweg 5
CH-4153 Reinach
Tel.
: (61) 716 96 60
Thomson
Consumer Electronics Poland
ul.Gen.L. Okulickiego 7/9
05-500 Piaseczno (Varsovie)
Tel.
: (22) 757 10 80
Thomson multimedia
Hungary KFT
Lajos u. 78. II.em.
H-1036 Budapest
Tel.
: 00 36 14 5334/80
Thomson multimedia
Czech s.r.o.
ul. Dopravaku - dum Genius 1
Dolni Chabry
CZ - 18400 Prague 8
Tel.
: (2) 688 67 70
Thomson multimedia
Sales Germany GmbH & Co oHG
Karl-Wiechert-Allee 74
30625 Hannover
Thomson multimedia
Sales Spain
Avenida Isla Graciosa, 1
Edificio Áncora
Parque Empresarial La Marina
28700 San Sebastián de los Reyes (Madrid)
Tel. : (91) 384 14 19
Thomson multimedia
Sales Portugal
Avenida da Boavista, 3521
4106 Porto
Tel. : (2) 26 18 76 41
This technical documentation is for use by maintenance technicians only
Documentation technique exclusivement destinée aux professionnels de la maintenance
Diese Angaben und Hinweise sind ausschließlich für den Service des Fachhändlers bestimmt
Documentazione tecnica destinata esclusivamente ai tecnici dell'assistenza
Documentación técnica destinada exclusivamente a los profesionales de mantenimiento
 Loading...