


Swifty 2
Bedienungsanleitung – Reha-Buggy Swifty 2 .......................................... 6
User manual – Rehab stroller Swifty 2 ................................................... 16
Manuel de l‘utilisateur – Poussette de rééducation Swifty 2 .................... 26
Manual del usuario – Silla de rehabilitación Swifty 2 ............................ 36
Manual de instruções – Carrinho de reabilitação Swifty 2 ...................... 46
Manuale d‘uso – Passeggino posturale Swifty 2 ....................................... 56
Gebruikershandleiding – Revalidatiebuggy Swifty 2 ................................ 66
Download actuele handleiding: www.thomashilfen.com
Bruksanvisning – Rehab-barnsittvagn Swifty 2 ......................................... 76
Download av den aktuella bruksanvisningen: www.thomashilfen.com
Podręcznik dla użytkownika – Dziecięcego wózka rehabilitacyjnego Swifty 2 86
Pobierz aktualną instrukcję: www.thomashilfen.com
Korisnički priručnik – Rehabilitacijska kolica Swifty 2 ........................... 96
Preuzimanje trenutačnih uputa: www.thomashilfen.com
Swifty 2
2
(1) (2) (3)
Swifty 2
(4) (5) (6)
(7) (8) (9)
(10) (11) (12)
3
Swifty 2
(13) (14) (15)
(16) (17) (18)
(19) (20) (21)
(22) (23)
4
(24) (25) (26)
Preferred Zone
Optional Zone
30˚
45˚
Swifty 2
(27) (28)
75˚
5

Bedienungsanleitung – Swifty 2
Sehr geehrter Swifty 2-Nutzer,
der Swifty 2 Reha-Buggy ist ein modernes, hochwertiges Medizinprodukt, das durch sein ansprechendes Äußeres besticht. Ganz gezielt sind hier die Ideen von Eltern mit einbezogen worden, die das tägliche Handling von Reha-Produkten und auch die Bedürfnisse ihrer Kinder an solche Hilfsmittel kennen.
Reha muss eben nicht unbedingt nach Reha aussehen, trotzdem erfüllt Swifty 2 alle Anforderungen an einen guten
Reha-Buggy: Die Unterschenkellänge lässt sich stufenlos verstellen, hochwertige Materialien und ein fester Sitz sorgen
für Bequemlichkeit und sicheres Handling. Durch sein geringes Gewicht und die Schwenkräder ist dieser Reha-Buggy
trotz der hohen maximalen Belastbarkeit besonders wendig. Er lässt sich leicht und schnell zusammenfalten und kann
einfach in jedem Kofferraum verstaut werden.
Damit die Handhabung des Swifty 2 Reha-Buggys für Sie und besonders auch für das Kind sicher, praktisch und komfortabel ist, lesen Sie bitte zuerst diese Bedienungsanleitung.
Sollten Sie trotzdem noch Fragen oder Probleme haben, wenden Sie sich bitte an Ihren zuständigen Fachhandel oder
direkt an uns.
Wir möchten Sie in diesem Zusammenhang auch auf unsere Internet-Seite www.thomashilfen.de aufmerksam machen,
auf der Sie aktuelle Informationen abrufen können und wichtige Produktsicherheitshinweise oder Informationen zu
etwaigen Produktrückrufen erhalten.
Unsere Adresse: Thomas Hilfen für Körperbehinderte
GmbH & Co. Medico KG
Walkmühlenstraße 1
D - 27432 Bremervörde
Telefon: 04761 8860
www.thomashilfen.de
Inhalt Seite
Sicherheitstechnische Kontrollen und Wartungsintervalle .................................................................................. 7
Zweckbestimmung und Einsatzorte .................................................................................................................. 7
Allgemeine Sicherheitshinweise ........................................................................................................................ 8
Anwendungsrisiken und Kontraindikationen ..................................................................................................... 9
Symbole und Warnschilder .............................................................................................................................. 9
Technische Daten und Varianten ...................................................................................................................... 10
Lieferumfang .................................................................................................................................................... 10
Grundausstattung ............................................................................................................................................. 10
Aufstellen und Montage ................................................................................................................................... 10
Einstellmöglichkeiten ........................................................................................................................................ 12
Feststellbremsfunktion ...................................................................................................................................... 12
Feststellfunktion der Vorderräder ...................................................................................................................... 12
Montage der Gurte .......................................................................................................................................... 12
Ankipphilfe ...................................................................................................................................................... 12
Transport ......................................................................................................................................................... 12
Nutzung als Sitz in einem Motorfahrzeug ......................................................................................................... 13
Produkt- / Seriennummer ................................................................................................................................. 14
Reinigungs-, Desinfektions- und Pflegehinweise ............................................................................................... 14
Wiedereinsatz
Garantiebedingungen / CE - Kennzeichnung ..................................................................................................... 14
Wartungsplan - jährliche Inspektion / Wiedereinsatz ........................................................................................ 15
.......................................................................................................................................... 14
6

Bedienungsanleitung – Swifty 2
Sicherheitstechnische Kontrollen und Wartungsintervalle
Sollten Sie ein Problem bei der Durchführung der regelmäßigen Kontrolle feststellen, benachrichtigen Sie bitte sofort
Ihren Fachhändler vor Ort oder Thomashilfen.
Regelmäßige / tägliche Wartung
Angehörige und Betreuer können die folgenden Wartungsarbeiten einfach durchführen. Der mitgelieferte Inbusschlüssel
wird zum Feststellen der Fußstütze benötigt.
1. Den Reha-Buggy bei Nässe immer trocken abwischen. Nach Nutzung nie feucht abstellen.
2. Stellen Sie sicher, dass die beiden Inbusschrauben an der Fußstütze vorhanden sind und prüfen Sie täglich mit dem
Inbusschlüssel, ob die Schrauben fest angezogen sind.
3. Kontrollieren Sie, ob alle Muttern, Bolzen und Schrauben fest angezogen sind (täglich).
4. Kontrollieren Sie die Funktionsfähigkeit der Rückenlehne, des Faltmechanismusses und der Ruheposition (wöchentlich).
5. Kontrollieren Sie vor der Benutzung des Reha-Buggys immer die Funktionsfähigkeit der Bremse.
6. Reinigen Sie bei Bedarf den Rahmen des Reha-Buggys (Empfehlung: mindestens einmal pro Woche).
7. Stellen Sie sicher, dass der Plastikstopfen vom Faltmechanismus fest in der richtigen Position ist (täglich, Abb. 1).
Halbjährliche Wartung
Die folgenden Wartungsarbeiten sollten von einem Händler mit entsprechendem Fachwissen oder einer autorisierten
Reparaturwerkstatt durchgeführt werden. Wenn Sie bedeutende Fehler oder Fehlfunktionen feststellen, benutzen Sie
den Reha-Buggy solange nicht, bis die Fehler behoben sind.
1. Falten Sie den Reha-Buggy auseinander und zusammen und kontrollieren Sie dabei, ob alle Bewegungsabläufe während des Faltens einwandfrei funktionieren. Prüfen Sie, ob der Rahmen irgendwelche Schäden aufweist.
2. Kontrollieren Sie die Funktionsfähigkeit und Einstellmöglichkeiten des Reha-Buggys und besonders die Verstellbarkeit
der Rückenlehne.
3. Prüfen Sie Muttern, Schrauben, Scharniere und Rahmenstopfen auf deren Festigkeit und allgemeinen Zustand.
4. Prüfen Sie die Bremse auf Abnutzung, Schäden und Funktionsfähigkeit.
5. Prüfen Sie, ob in den Reifen scharfe Gegenstände stecken und ob Schnitte oder Risse vorhanden sind.
6. Prüfen Sie Räder und Radgabeln auf übermäßige Abnutzung.
7. Kontrollieren Sie, ob die Vorderräder und Hinterräder frei beweglich sind und sicher laufen. Entfernen Sie Staub,
Sand oder andere Verschmutzungen mit einem trockenen, fusselfreien Lappen.
8. Prüfen Sie die Funktion der Radfeststeller.
9. Kontrollieren Sie alle Plastikteile auf Verformungen oder Brüche.
Zweckbestimmung und Einsatzorte
Der Swifty 2 Reha-Buggy ist für den Transfer (max. Schritttempo) von behinderten Kindern durch deren Eltern oder andere, geeignete Hilfspersonen auf festem ebenem Grund im Innen- und Außenbereich geeignet. Der Swifty 2 Reha-Buggy darf nicht zweckentfremdet werden (z.B. als Transportmittel für weitere Kinder, Einkaufslasten, etc.).
Um der Begleitperson eine ergonomische Nutzung zu ermöglichen, kann der Schiebegriff in der Höhe verstellt werden.
Swifty 2 ist für den Transport von Kindern in Kraftfahrzeugen / Behindertentransportwagen (BTW) nach ISO 7176-19
sowie ANSI/RESNA WC 4 section 19 zugelassen.
7

Bedienungsanleitung – Swifty 2
Bitte beachten Sie folgende Sicherheitshinweise
• Lesen Sie sich vor Erstgebrauch die Bedienungsanleitung sorgfältig durch oder lassen Sie sich diese bei Leseschwierigkeiten vorlesen. Sollte die Bedienungsanleitung verlorengegangen sein, können Sie sich diese im Download-Bereich unserer Internetseite www.thomashilfen.de jederzeit herunterladen. Das hinterlegte PDF-Dokument kann auch
im vergrößerten Format dargestellt werden.
• Wir empfehlen Ihnen, die Unterschenkellänge mindestens alle 3 Monate den aktuellen Körpermaßen Ihres Kindes
anzupassen. Dies sollte gegebenenfalls unter Zuhilfenahme Ihres Therapeuten / Orthopädietechnikers geschehen.
• Ihr Kind sollte immer mit dem H-Gurt (Grundausstattung) oder mit einem anderen Rückhaltegurt (als Zubehör erhältlich) gesichert sein.
• ACHTUNG: Nasse Räder können die Bremswirkung beeinträchtigen. Bei einem Stopp oder längeren Halt sollten Sie
den Reha-Buggy mit der Fußbremse feststellen, sodass ein unbeabsichtigtes Wegrollen vermieden wird.
• WICHTIG: Lassen Sie nicht die Bremse angezogen, wenn der Reha-Buggy für längere Zeit nicht benutzt wird. Die
Hinterräder könnten ansonsten durch die ständig angezogene Bremse beschädigt werden.
• ACHTUNG: Der Spalt zwischen Fahrgestell und Auslösestange der Bremse kann möglicherweise eine Klemmgefahr
für Kleidung und Gliedmaßen im Fußbereich sein.
• ACHTUNG: Der Spalt zwischen dem Sitz des Swifty 2 und dem Fahrgestellrahmen kann möglicherweise eine
Klemmgefahr für Kleidung und Gliedmaßen im Sitzbereich sein.
• ACHTUNG: Der Spalt zwischen der Sitzseitenführung des Swifty 2 und dem Rückenbogenrohr kann möglicherweise eine Klemmgefahr für Kleidung und Gliedmaßen im Sitzbereich sein.
• ACHTUNG: Der Spalt zwischen Fußstützenplatte und Fußstützenrohr kann möglicherweise eine Klemmgefahr für
Kleidung und Gliedmaßen im Fußbereich sein.
• Bitte überlasten Sie Ihren Swifty 2 Reha-Buggy nicht und beachten Sie das maximale Nutzergewicht (s. technische
Daten).
• Reflektierende Kleidung macht Sie und Ihr Kind auch bei Dunkelheit für andere Verkehrsteilnehmer sichtbar - nutzen
Sie diesen Vorteil.
• Heben Sie den Reha-Buggy nur an fest verschweißten oder verschraubten Bauteilen an. (Vorderrahmenrohr über den
Vorderrädern, Hinterachse, Schiebegriffe / Schiebebügel)
• Bei einer hohen Sonneneinstrahlung kann es auf dem schwarzen Polster zu hohen Oberflächentemperaturen kommen. Dann besteht bei Berührung Verbrennungsgefahr an Rücken und Beinen! Achten Sie deshalb grundsätzlich
darauf, dass Swifty 2 nicht diesen Hitzequellen bei Benutzung und Lagerung ausgesetzt ist und benutzen Sie ihn
erst, wenn er ausreichend abgekühlt ist!
• Achten Sie darauf, dass Sie sich beim Hochklappen der Fußstütze, Verstellen der Rückenlehne sowie Auseinanderund Zusammenfalten des Reha-Buggys nicht verletzen.
• Am Reha-Buggy befestigte schwere Taschen oder Einkaufsnetze erhöhen die Kippgefahr. Nutzen Sie den Korb (als
Zubehör erhältlich) unter der Sitzeinheit.
• Bitte beachten Sie im Umgang mit dem Reha-Buggy – besonders beim Auseinander- und Zusammenfalten – die
Empfehlungen in dieser Bedienungsanleitung.
• Kind bitte nie unbeaufsichtigt im Swifty 2 Reha-Buggy lassen.
• Beim Hineinsetzen und Herausnehmen des Kindes muss die Feststellbremse des Reha-Buggys betätigt sein.
• Lassen Sie Ihr Kind beim Ein- und Aussteigen in oder aus dem Reha-Buggy nicht unbeaufsichtigt, bei zu starker Belastung der Fußstütze besteht die Gefahr des Abrutschens oder des Kippens.
• Bitte halten Sie Ihre Kinder von der Kunststoff-Verpackung fern, es besteht Erstickungsgefahr.
• Es darf nur ein Kind im Reha-Buggy platziert werden.
8

Bedienungsanleitung – Swifty 2
Anwendungsrisiken und Kontraindikationen
Bei sachgerechtem Gebrauch können Risiken bei der Anwendung ausgeschlossen werden. Kontraindikationen sind nicht
bekannt. Das für Swifty 2 verwendete Polstermaterial ist „schwer entflammbar“, geprüft nach DIN EN 1021-1 sowie DIN
EN 1021-2.
Das Ausmaß der Beständigkeit gegen Entzündung bei Werkstoffen und Baugruppen wurde normgerecht geprüft und als
unbedenklich bewertet.
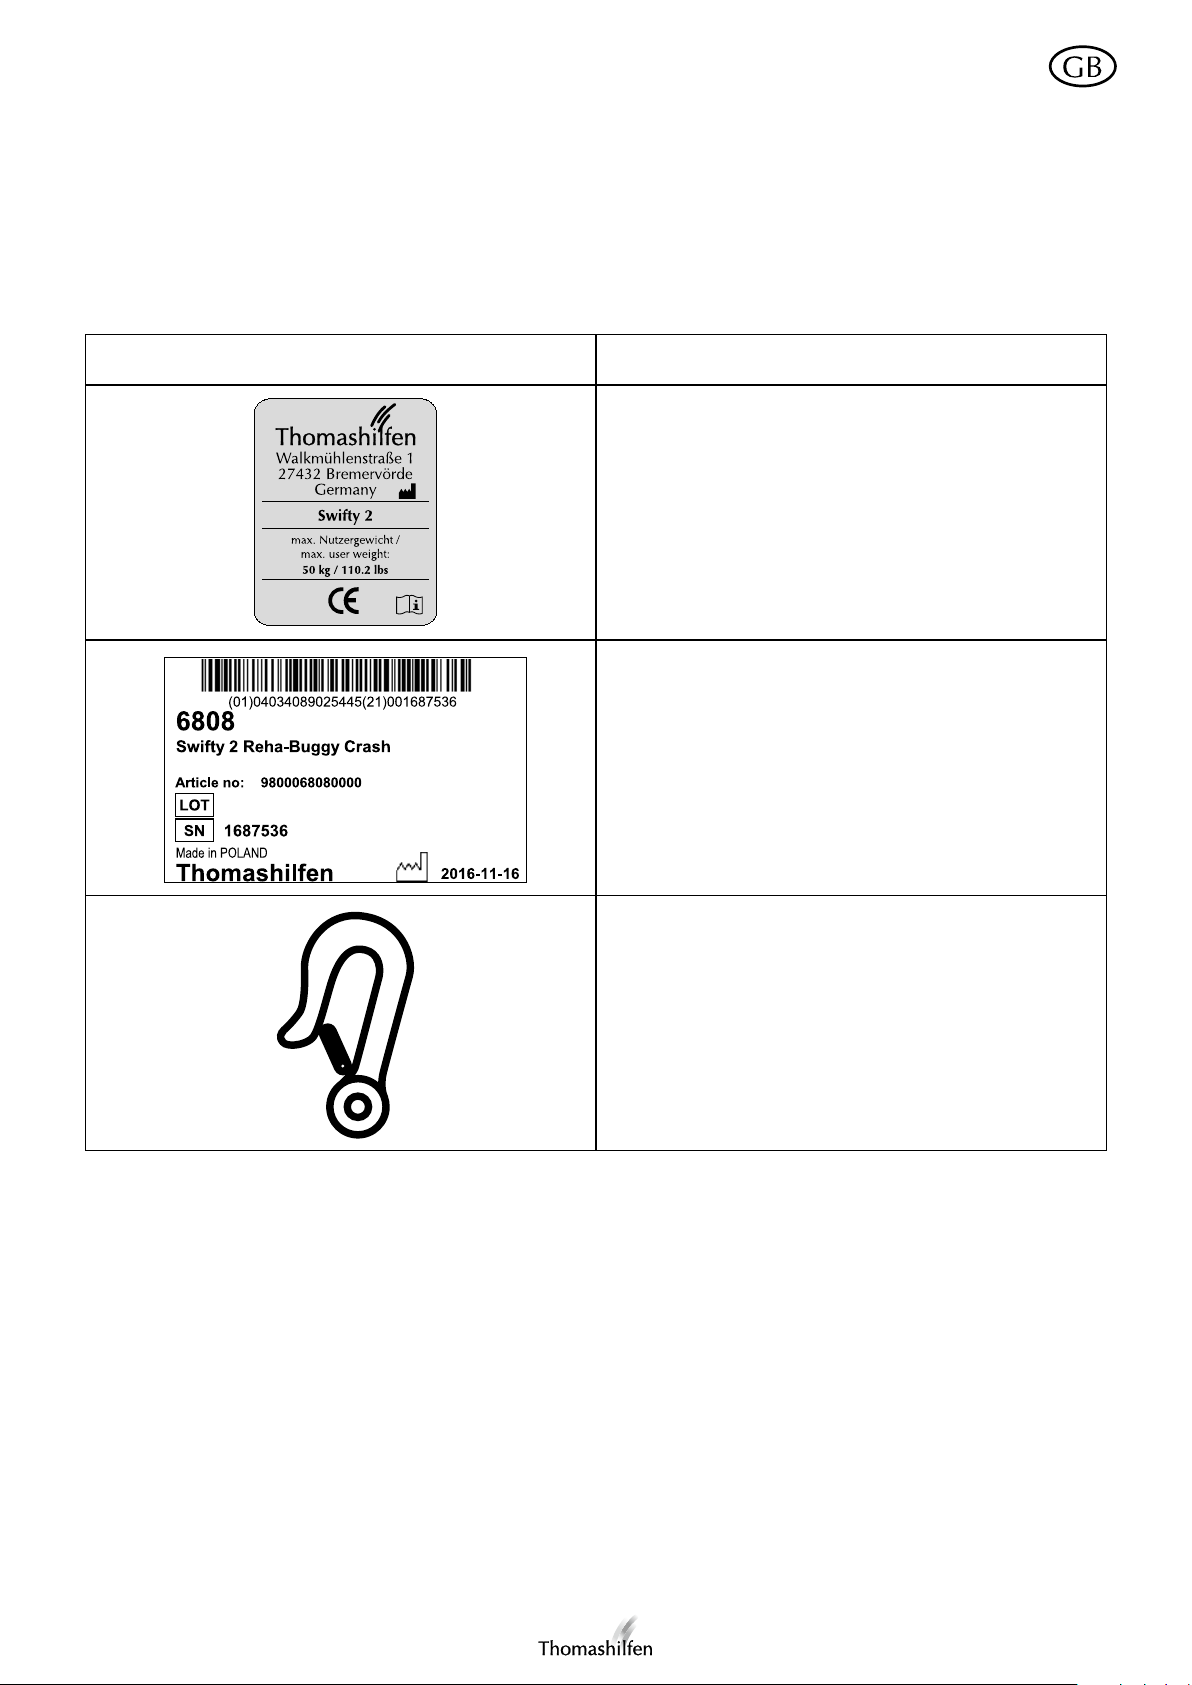
Symbole und Warnschilder
Aufkleber Bedeutung
Typenschilder/Belastbarkeitsaufkleber
Das Typenschild ist unter der Sitzfläche angebracht.
Auf dem Typenschild findet sich die Angabe des
Herstellers inkl. Anschrift, die Typenbezeichnung, die
maximale Belastbarkeit sowie das CE-Kennzeichen.
Strichcode-Label
Das Strichcode-Label ist unter der Sitzfläche angebracht.
Auf dem Strichcode-Label ist die Artikelnummer, Bezeichnung, Seriennummer sowie das Herstellungsdatum
des Produktes angegeben.
Kennzeichnet die 4 Befestigungspunkte am Swifty 2 zur
Sicherung im Behindertentransportwagen (BTW).
9

Bedienungsanleitung – Swifty 2
Technische Daten und Varianten
Swifty 2
Sitztiefe 375 mm
Sitzbreite 395 mm
Rückenhöhe 700 mm
Unterschenkellänge 210 - 370 mm
Seitenführung (B x H) 250 x 160 mm
Hüftwinkel 90° - 100°
Fußwinkel 90°
Sitzkantelung fix + 20°
Sichere Kippneigung bis maximal 10°
Größe Fußstütze (B x T) 310 x 200 mm
Gesamtmaße (L x B x H) 980 x 670 x 1130 mm
Faltmaße (L x B x H) 790 x 670 x 490 mm
Schiebegriffhöhe 820 - 1240 mm
Wendekreis 1260 mm
Radgröße (vorne (Schwenkräder) / hinten) 180 mm / 250 mm
Radbreite (vorne (Schwenkräder) / hinten) 45 mm / 50 mm
Gewicht 18,2 kg
max. Nutzergewicht 50 kg
max. Belastbarkeit Korb (Zubehör) 3 kg
Der Swifty 2 Reha-Buggy ist in der folgenden Variante erhältlich:
Artikel-Nr. Bezeichnung Ausstattung
6808 Swifty 2 Reha-Buggy Crash Reha-Buggy inkl. Polster, H-Gurt und Fußstütze; ausge-
stattet und zugelassen für die Nutzung als Sitz in einem
Motorfahrzeug
Lieferumfang
Der Swifty 2 Reha-Buggy wird vormontiert geliefert. Swifty 2 ist werksseitig mit Sitz- und Rückenpolster sowie den Sitzseitenführungspolstern bezogen. Darüber hinaus liegen Swifty 2 eine Bedienungsanleitung sowie ein Inbusschlüssel bei.
Der Inbusschlüssel wird für die Höhenverstellung der Fußstütze benötigt.
Grundausstattung
Leichtes und faltbares Fahrgestell mit integrierter Sitzeinheit; H-Gurt; flammenhemmender Bezugsstoff; atmungsaktives
Polster; hüftwinkelverstellbare Rückenlehne; schwenkbare Vorderräder inkl. Lenkstopp; pannensichere EVA-Bereifung;
höhenverstellbare und abklappbare Fußstütze; Fuß-Feststellbremse; höhenverstellbarer Schiebegriff.
Aufstellen und Montage
Die Einstellungen / Anpassungen sind grundsätzlich durch geschulte bzw. eingewiesene Fachleute (z.B. Medizinprodukteberater des Sanitätsfachhandels) vorzunehmen.
Zur ersten Inbetriebnahme von Swifty 2 ist kein Werkzeug erforderlich, außer dem im Lieferumfang enthaltenen Inbusschlüssel.
Die Montage / Demontage des Zubehörs erfolgt mit handelsüblichem Werkzeug. Separate Montage- und Bedienungsanleitungen liegen dem Zubehör bei. Sollten diese fehlen, können Sie sich die Anleitungen im Download-Bereich unserer Internet-Seite www.thomashilfen.de jederzeit herunterladen.
10

Bedienungsanleitung – Swifty 2
Falten
HINWEIS: Achten Sie darauf, dass der Reha-Buggy während des Faltens nicht auf den Boden fällt, um ein Verbiegen
des Gestells und Beschädigungen zu vermeiden. Stellen Sie sicher, dass der Plastikstopfen vom Faltmechanismus in der
richtigen Position ist (höheres Ende des Stopfens zeigt zur Rückseite des Reha-Buggys). (Abb. 1)
Auseinanderfalten
Der Swifty 2 Reha-Buggy ist an beiden Schiebegriffgelenken mit einer Faltsicherung versehen. Zum Auseinanderfalten
muss die Faltsicherung auf jeder Seite über einen der Druckknöpfe gelöst werden. (Abb. 2) Anschließend den Buggy
oben und seitlich am Schiebegriff fassen und mit einer schwungvollen Bewegung nach oben ziehen (die Verriegelungsschieber rasten hörbar ein). Den Klemmhebel am Rücken lösen und den gewünschten Rückenwinkel einstellen (siehe
Rückenlehnenverstellung). Den höhenverstellbaren Schiebegriff durch Betätigen der seitlichen Druckknöpfe in die
gewünschte Position einstellen. (Abb. 3)
Zusammenfalten (kleinstes Faltmaß)
Den Klemmhebel am Rücken lösen. Die Verriegelungsschieber am Schiebegriff hochziehen (rechts und links) (Abb. 1)
und den rechts montierten Sicherheitsbügel festhalten. Mit dem Oberkörper den Schiebegriff nach vorne drücken und
den Buggy nach vorne zusammenfalten. (Abb. 4) Die Rückenlehne nach unten drücken und den Klemmhebel wieder
anziehen. Den Schiebegriff auf die Rückenlehne herunterklappen.
Über die Faltsicherung kann ein unbeabsichtigtes Auseinanderfalten des Swifty 2 Reha-Buggys verhindert werden.
Hierzu auf jeder Seite einen Druckknopf der Faltsicherung lösen (Abb. 2), das Gurtband um den Vorderrahmen führen
und den Druckknopf wieder schließen. Nun kann Swifty 2 an den Rohren des Gestells sicher gegriffen und transportiert
werden.
Sitz- und Rückenpolster
Das Sitz- und Rückenpolster besteht aus einem Teil. Es wird so über die Rückenlehne gezogen, dass das rote Swifty
Logo nach vorne zeigt und der untere Teil des Polsters auf der Sitzfläche zum Liegen kommt. Die Rückseite des Polsters
ist zweigeteilt und wird mit einem Reißverschluss geschlossen. Führen Sie die beiden Hälften der Polsterrückseite unter
dem Rückenbügel der Swifty 2 durch. (Abb. 5) Ziehen Sie das Polster in Position und schließen Sie den Reißverschluss.
(Abb. 6) Abschließend wird der Klettverschluss am unteren Ende des Rückens geschlossen. (Abb. 7)
Sitzseitenführungspolster
Die Öffnung der Sitzseitenführungspolster soll jeweils nach außen / vorne zeigen. (Abb. 8) Ziehen Sie das Polster über
die Sitzseitenführung. (Abb. 9) Schließen Sie den Reißverschluss. (Abb. 10)
H-Gurt
Der Swifty 2 Reha-Buggy ist standardmäßig mit einem H-Gurt ausgestattet.
Gurtverschluss öffnen
Zum Öffnen des H-Gurtes den roten Druckknopf (1) gedrückt halten, den Clip-Verschluss (2 und 3) öffnen und den
Gurt lösen (Kindersicherung). (Abb. 11)
Anpassung der Schultergurthöhe
Den Reißverschluss am Rückenpolster hinten öffnen. Die oberen Klappschnallen öffnen und die Gurte von vorne rausziehen. Das Rückenpolster in gewünschter Höhe an der abgesteppten Naht auftrennen. Gurte durch die entstandenen
Schlitze führen und wieder in den Klappschnallen befestigen. Polster wieder schließen. (Abb. 12-13)
H-Gurt abnehmen
Den Reißverschluss am Rückenpolster hinten öffnen. Die Klappschnallen öffnen und den H-Gurt von vorne rausziehen.
11

Bedienungsanleitung – Swifty 2
Wetterdachhalter
Swifty 2 ist standardmäßig mit Wetterdachhaltern ausgestattet. (Abb. 14) Das Wetterdach ist als Zubehör erhältlich.
Einstellmöglichkeiten
Rückenlehnenverstellung
Den Klemmhebel am Rücken lösen, den gewünschten Hüftwinkel durch Verschieben des Rückenbügels auf der Rückenschiene einstellen und den Hebel wieder feststellen. (Abb. 15)
Unterschenkellänge
Die Inbusschrauben (3 mm) rechts und links hinten an den Rohrführungen der Fußstütze lösen. Die Fußstütze durch
Verschieben auf dem Rahmenrohr in die gewünschte Position bringen und die Schrauben wieder fest anziehen. (Abb.
16)
Fußstütze
Die Fußstütze ist nach oben klappbar, um Kindern den Transfer in den Buggy zu erleichtern. (Abb. 17)
Feststellbremsfunktion
Zum Feststellen der Bremse den Fuß auf den Bremsbügel setzen und ihn nach unten drücken. Sie lösen die Bremse
indem Sie den Fuß unter den Bremsbügel setzen und nach oben schieben. (Abb. 18)
Feststellfunktion der Vorderräder
Feststellen: Das Vorderrad gerade ausrichten und den Arretierungsschnäpper einschnappen lassen (rastet hörbar ein).
Lösen: Den Arretierungsschnäpper herausziehen und mit einer Drehung um 90° fixieren. (Abb. 19)
Montage der Gurte
Das Rückenpolster je nach gewünschter Anbringungshöhe in den abgesteppten Nähten auftrennen.
Die zwei oberen Gurte durch die Öffnungen im Polster führen und durch die Schlitze in der Rückenplatte stecken.
(Abb. 12) Den Reißverschluss hinten vom Rückenpolster öffnen und anschließend die Gurte in die Klappschnallen
führen und die gewünschte Gurtlänge einstellen. (Abb. 13) Die beiden unteren Gurtenden können hinten an der Rückenplatte mit Klappschnallen befestigt werden. (Abb. 20) Die Gurte rechts und links neben dem Rückenpolster zu der
entsprechenden Klappschnalle führen und befestigen. Rückenpolster wieder schließen. (Abb. 6-7)
TIPP: Zusätzlich kann die Gurtlänge auch vorne eingestellt werden. Dazu am D-Ring ziehen, um den Gurt zu kürzen.
Die vorderen Gurte des 4-Punkt Beckengurtes werden rechts und links mit einer Klappschnalle unter der Sitzfläche befestigt. Den Gurt zwischen Seitenführung und Sitzplatte durchführen und in die Klappschnalle stecken und befestigen.
(Abb. 21-22)
Ankipphilfe (Zubehör)
Den Fuß auf die Ankipphilfe stellen, mit beiden Händen den Reha-Buggy festhalten und ankippen. (Abb. 23)
Transport
Der Swifty 2 Reha-Buggy kann für den Transport zusammengefaltet im Kofferraum eines Fahrzeuges verstaut werden.
Beachten Sie hierbei die Hinweise zum Zusammenfalten des Reha-Buggys und nutzen Sie die Faltsicherung, um unbeabsichtigtes Auseinanderfalten zu vermeiden.
Der Swifty 2 Reha-Buggy kann an den seitlichen Rahmenteilen angehoben werden oder an der Hinterachse.
12

Bedienungsanleitung – Swifty 2
Nutzung als Sitz in einem Motorfahrzeug
Der Swifty 2 Reha-Buggy in der Variante „Crash“ hat erfolgreich den Crash-Test entsprechend der internationalen Norm
ISO 7176/19 und ANSI/RESNA WC 4 section 19 bestanden und kann als Sitz in einem Motorfahrzeug genutzt werden.
WICHTIG: Wenn Swifty 2 als Sitz in einem Motorfahrzeug genutzt werden soll, müssen folgende Anweisungen befolgt werden.
Der Swifty 2 Reha-Buggy ist für einen Transport in Vorwärts-Richtung entwickelt. Wann immer es möglich ist, sollte der
Benutzer auf einen der Fahrzeugsitze umgesetzt und das installierte Gurtsystem angelegt werden. Verwenden Sie nur
Fahrgestell- / Personenbegurtungssysteme um den Swifty 2 Reha-Buggy am Boden des Fahrzeugs zu sichern, die der
Norm ISO 10542 entsprechen.
Die 4 Befestigungspunkte am Swifty 2 sind mit folgendem Symbol gekennzeichnet:
Vorbereitungen an Swifty 2 für den Transport:
1. Entfernen Sie folgende Teile (wenn montiert): Abduktionsblock, Therapietisch, Wetterschutzdach, Sonnenschirm,
Handbogen und Inhalte im Korb.
2. Positionieren Sie den Buggy im Fahrzeug korrekt über den installierten Schienen in Vorwärts-Richtung. Betätigen Sie
die Feststellbremse.
3. Stellen Sie sicher, dass die Hüftwinkelverstellung fixiert ist.
Befestigung des Swifty 2 in einem Motorfahrzeug:
1. Der Reha-Buggy muss mit einem 4-Punkt-Gurtsystem (nach ISO 10542-2, SAE 2249 oder DIN 75078/2) sicher im
Fahrzeug befestigt werden. (Hersteller dieser Gurtsysteme sind z.B. Unwin Safety Systems und Q’Straint)
2. Der Fahrer und / oder der Assistent sollten mit der Benutzung dieser Gurtsysteme / Rückhaltesysteme vertraut sein.
3. Die zwei vorderen Gurte (Karabinerhaken) müssen links und rechts in den Stahl-Ringen über der Vorderradgabel
befestigt werden. (Abb. 24)
4. Die beiden hinteren Gurte (Karabinerhaken) müssen an den zwei Sicherheits-Ösen am Hinterrahmen befestigt werden. (Abb. 25)
Rückhaltesystem anlegen:
1. Der Crash-Test wurde mit dem H-Gurt (Teil der Grundausstattung) durchgeführt. Dieser H-Gurt sollte unter dem
Gurt des Rückhaltesystems verwendet werden.
2. Der Benutzer muss mit einem zugelassenen Rückhaltesystem gesichert werden. Thomashilfen empfiehlt die Verwendung eines Automatikgurtes oder eines 3-Punkt-Rückhaltesystems, bei dem Beckengurt und Schultergurt voneinander getrennt werden können. Dies ist notwendig, um das Rückhaltesystem korrekt durch das Gestell der Swifty 2
führen zu können. (Hersteller z.B.: Unwin Safety Systems und AMF-Bruns)
3. Der Fahrer und / oder der Assistent sollten mit der Benutzung dieser Gurtsysteme / Rückhaltesysteme vertraut sein.
4. Der Beckengurt des Benutzers muss ohne Kontakt am Bauch des Benutzers flach am Becken geführt werden. Die
Beckengurtführung sollte rechts und links zwischen der Seitenführung und dem Benutzer verlaufen. (Abb. 26)
5. Der Beckengurt darf nicht durch Teile des Reha-Buggys (Seitenteile, Räder) vom Nutzer ferngehalten werden. (Abb. 27)
HINWEIS: Das Gurtband darf nicht verdreht eingesetzt werden.
6. Der Winkel vom Beckengurt sollte zwischen 30° und 75° liegen. (Abb. 28)
7. Der Beckengurt sollte so eng wie möglich, aber auch komfortabel an den Benutzer angepasst werden.
8. Der Oberkörpergurt des Rückhaltesystems muss an der Fahrzeug-Wand in der Höhe so befestigt werden, dass
sichergestellt ist, dass das Gurtband in der Mitte der Schulter vom Benutzer liegt und unter dem Schiebegriff verläuft.
(Abb. 27)
HINWEIS: Nur ein Schultergurt, der an der Seitenwand des Fahrzeuges befestigt ist, entspricht den aktuellen Anforderungen um den Benutzer sicher zu begurten.
13

Bedienungsanleitung – Swifty 2
Produkt- / Seriennummer
Zum Erhalt der richtigen Ersatzteile bzw. für mögliche technische Rückrufe benötigen wir grundsätzlich die Angabe
der Seriennummer und die genaue Artikelnummer.
Artikel-Nummer
Die Seriennummer und auch die Artikelnummer des Swifty
2 Reha-Buggys befindet sich auf dem Strichcode-Label, das
unter dem Sitz angebracht ist.
Serien- / ChargenNummer
Reinigungs-, Desinfektions- und Pflegehinweise
Das Untergestell ist aus hochwertigem Stahlrohr hergestellt. Dieses ist mit einer widerstandsfähigen Pulvereinbrennlackierung beschichtet und kann mit handelsüblichen Seifen (Neutralseife) gereinigt und desinfiziert werden.
Desinfektion
Reinigen Sie vor der Desinfektion die Polster und Griffe. Wischen Sie alle Teile des Produktes mit Desinfektionsmittel
feucht ab. Es sollten ausschließlich Mittel auf Wasserbasis verwendet werden. Bei der Desinfektion sind die Anwendungshinweise des entsprechenden Herstellers zu beachten.
Polster
Alle Polster sind mit wenigen Handgriffen leicht abzunehmen. Der 100% Trevira CS Stoff ist ein hochwertiges Gewebe,
das bis 40°C waschbar ist. Die Polster sind separat zu waschen und die Klettbänder sind vor dem Waschen abzudecken
bzw. zu schließen. Bitte beachten Sie hierzu auch den Pflegehinweis.
Wir weisen darauf hin, dass auch hochwertige Stoffe durch dauerhafte und intensive Sonneneinstrahlung oder häufiges
Waschen ausbleichen können. Das Polster ist schwer entflammbar (EN1021-1 und EN 1021-2).
Klettverschlüsse
Um die Funktionsfähigkeit der Klettverschlüsse zu erhalten, die Klettbänder mit einer Bürste ab und zu reinigen. Beim
Waschen die Klettbänder immer schließen.
Wiedereinsatz
Swifty 2 ist zum Wiedereinsatz geeignet. Dieses Reha-Produkt unterliegt aber außergewöhnlichen Beanspruchungen.
Aufgrund von Marktbeobachtungen und dem Stand der Technik haben wir die Produktlebensdauer bei sachgemäßem
Gebrauch und unter Einbeziehung der Service- und Wartungsarbeiten auf 4 Jahre kalkuliert. Zeiten der Einlagerung
beim Fachhandel sind ausgenommen.
Bei entsprechender Pflege und Wartung (siehe Wartungsplan) ist das Produkt auch deutlich über diesen Zeitraum hinaus zuverlässig.
Für den Wiedereinsatz ist das Produkt grundsätzlich immer sorgfältig zu reinigen und zu desinfizieren. Der Zustand ist
von geschultem Fachpersonal auf Verschleiß und Beschädigungen hin zu prüfen. Beanstandungen müssen behoben
werden, um einen weiteren sicheren Gebrauch des Reha-Buggys zu gewährleisten.
Ist der Reha-Buggy aufgrund seines Zustandes nicht mehr verwendungsfähig, kann er beim örtlich zuständigen Entsorgungsunternehmen recycelt werden.
Garantiebedingungen / CE - Kennzeichnung
Thomashilfen bietet Ihnen ab Kaufdatum eine 3-jahrige Garantie auf alle Rahmenteile. Die Garantie umfasst alle Ansprüche, die die Funktion beeinträchtigen. Ausgenommen sind Schäden, die durch unsachgemäße Handhabung (z. B.
Überbelastung) sowie natürlichen Verschleiß entstehen.
Swifty 2 entspricht den Anforderungen der europäischen Norm EN 12182 und EN 12183 und ist mit einer CE-Kennzeichnung versehen.
Wir wünschen Ihnen viel Freude an Ihrem Swifty 2 Reha-Buggy!
14

Bedienungsanleitung – Swifty 2
Wartungsplan - jährliche Inspektion / Wiedereinsatz
Vorbereitung
Eine Bedienungsanleitung muss dem Produkt beiliegen. Sollte keine verfügbar sein, fordern Sie diese beim Hersteller an.
Machen Sie sich mit den Funktionen des Produktes vertraut. Sollten Sie das Produkt nicht kennen, studieren Sie vor der
Prüfung die Bedienungsanleitung. Reinigen Sie das Produkt vor Prüfbeginn. Beachten Sie ggf. in der Bedienungsanleitung enthaltene Pflegeanweisungen und produktspezifische Prüfanweisungen.
Bereich
Pos.
1 Sitz I/W I/W I/W
2 Winkelverstellung I/W I/W I/W
3 Höhenverstellung I/W I/W I/W
4 Sitz-Polster I W
5 Fehlende Kappen und Stopfen I/W
6 Rücken I/W I/W I/W
7 Winkelverstellung I/W I/W I/W
8 Höhenverstellung I/W I/W I/W
9 Rücken-Polster I W
10 Schiebebügel I/W I/W I/W
11 Schiebebügelüberzug I W
12 Untergestell I/W I/W I/W
13 Bereifung I I I W
14 Feststellbremse I/W I/W I/W
15 Kopfstütze I/W I/W I/W
16 Kopfstützen-Polster I W
17 Thoraxpelotten I/W I/W I/W
18 Thoraxpelotten-Polster I W
19 Armlehnen I/W I/W I/W
20 Armauflagen I W
21 Hüftpelotten I/W I/W I/W
22 Hüftpelotten-Polster I W
23 Abduktionskeil I/W I/W I/W
24 Abduktionskeil-Polster I W
25 Tibiapelotten I/W I/W I/W
26 Tibiapelotten-Polster I W
27 Therapietisch I/W I/W I/W
28 Begurtung I/W I/W I/W
Die Wartung wurde durchgeführt von: am:
= Prüfung erledigt
Optionen
(I = Inspektion / W = Wiedereinsatz)
Funktion Beschädigung Verformung Ersetzen
Service und Reparaturen am Reha-Wagen dürfen nur vom Fachhandel durchgeführt werden. Der Benutzer dieses
Reha-Hilfsmittels hat darauf zu achten, dass die vorgeschriebenen Inspektionen / Wartungen regelmäßig und rechtzeitig erfolgen. Ist ein Schaden erkennbar, muss der Nutzer aktiv informieren und den Schaden sofort durch Fachpersonal
beheben lassen. Für Reparaturen dürfen ausschließlich Original-Ersatzteile verwendet werden (die Liste der Austausch- /
Ersatzteile finden Sie im Download-Bereich auf unserer Internet-Seite www.thomashilfen.de).
Demontagen / Montagen von Ersatzteilen dürfen grundsätzlich nur durch Fachpersonal durchgeführt werden! Bei erforderlichen Rücksendungen an Ihren Fachhandel achten Sie bitte darauf, das Fahrgestell transportsicher zu verpacken.
15

User manual – Swifty 2
Dear Swifty 2 user,
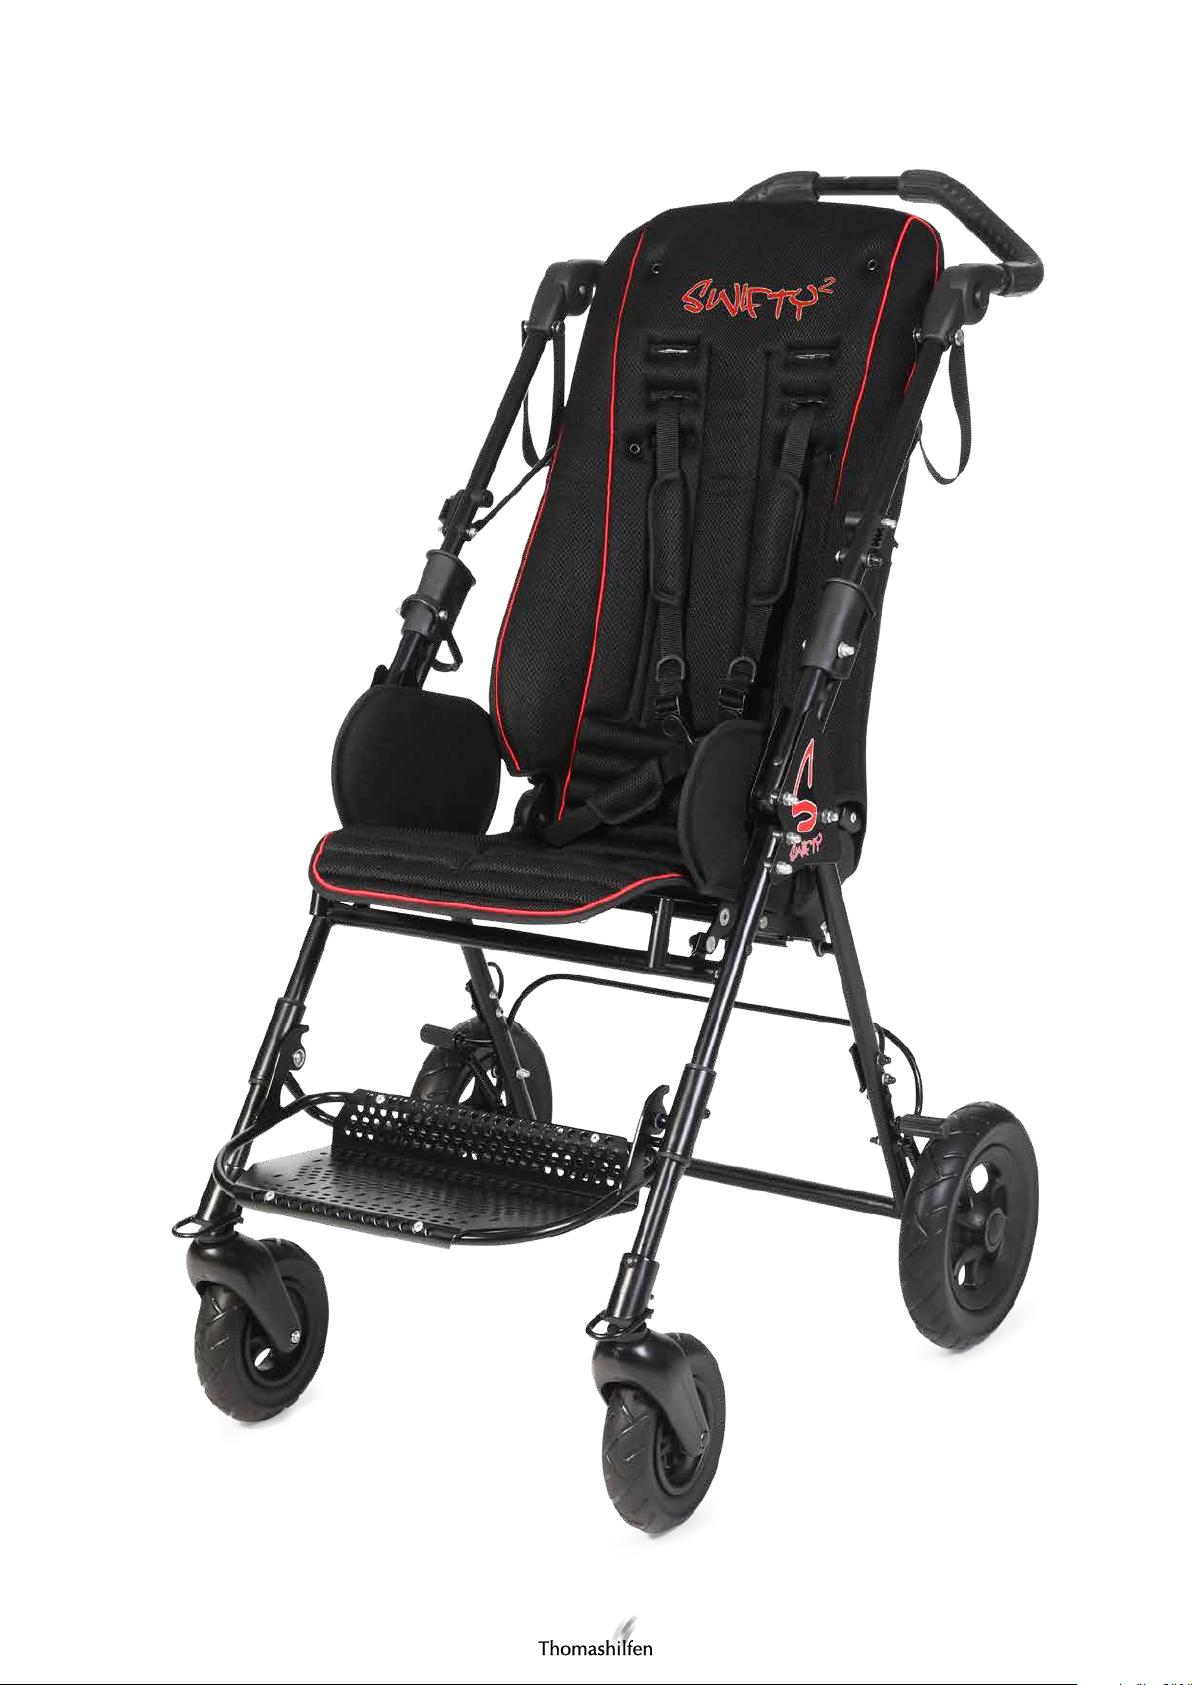
The Swifty 2 rehab stroller is a modern, high-quality medical product that wins people over due to its appealing exterior. The ideas of parents who are familiar with the daily handling of rehab products as well as the needs of their children
for such aids have been specifically included in the design.
Rehab does not have to look like rehab; nevertheless, the Swifty 2 fulfills all the requirements for a good rehab stroller:
the lower leg length can be infinitely adjusted, while high-quality materials and a firm fit ensure comfort and safe
handling. Due to its low weight and the swivel wheels, this rehab stroller is particularly maneuverable despite the high
maximum load capacity. It can be folded easily and quickly and can easily be stowed in any trunk.
To ensure that the handling of the Swifty 2 rehab stroller is safe, convenient and comfortable for you and especially for
your child, please read this user manual first.
If you still have any questions or problems, please call your local dealer or contact us directly.
We want to take this opportunity to draw your attention to our Internet site www.thomashilfen.com, where you can find
the latest information and important product safety information, as well as information about any product recalls.
Our address: Thomas Hilfen für Körperbehinderte Our address for customers in the USA:
GmbH & Co. Medico KG ExoMotion LLC, dba Thomashilfen
Walkmühlenstraße 1 7936 Occidental Ave S
27432 Bremervörde Seattle WA 98108
Germany USA
phone: +49 (0) 4761 886-68 or -63 phone: 866 870 2122 (toll free in U.S.)
www.thomashilfen.com www.thomashilfen.us
Contents Page
Safety checks and maintenance intervals .......................................................................................................... 17
Purpose and areas of application ...................................................................................................................... 17
General notes regarding safety ......................................................................................................................... 18
Application risks and contraindications ............................................................................................................ 19
Symbols and warning signs .............................................................................................................................. 19
Specifications and versions .............................................................................................................................. 20
Scope of delivery ............................................................................................................................................. 20
Basic equipment ............................................................................................................................................. 20
Setup and assembly ......................................................................................................................................... 20
Adjustments ..................................................................................................................................................... 22
Parking brake function ..................................................................................................................................... 22
Parking brake function for the front wheels ...................................................................................................... 22
Attaching the belts ........................................................................................................................................... 22
Tip assist .......................................................................................................................................................... 22
Transport ......................................................................................................................................................... 22
Use as a seat in a motor vehicle ...................................................................................................................... 23
Product / serial number .................................................................................................................................... 24
Cleaning, disinfection and care ........................................................................................................................ 24
Warranty terms / CE label ................................................................................................................................ 24
Maintenance schedule – annual inspection / reutilization ................................................................................. 25
16

User manual – Swifty 2
Safety checks and maintenance intervals
If you experience a problem when performing the regular checks, please contact your local dealer or Thomashilfen immediately.
Regular / daily maintenance
Relatives and caregivers can easily perform the following maintenance tasks. The included Allen key is needed to lock
the footrest.
1. Always wipe the rehab stroller dry with a dry cloth. Never store the buggy when it is damp.
2. Make sure that the two Allen keys are present on the footrest; use them every day to check that the screws are tight.
3. Check that all nuts, bolts and screws are tight (daily).
4. Check the functioning of the backrest, the folding mechanism and the rest position (weekly).
5. Always check the functioning of the brake before using the rehab stroller.
6. If necessary, clean the rehab stroller frame (recommendation: at least once a week).
7. Make sure that the plastic plug of the folding mechanism is firmly in the correct position (daily, Fig. 1).
Semi-annual maintenance
The following maintenance should be carried out by a dealer with appropriate knowledge or by an authorized repair
shop. If you notice any significant errors or malfunctions, do not use the rehab stroller until the faults have been eliminated.
1. Fold and unfold the rehab stroller and check that all movement sequences function properly during folding. Check
whether the frame has any damage.
2. Check the functionality and adjustment possibilities of the rehab stroller, especially the adjustability of the backrest.
3. Check nuts, bolts, hinges and frame plugs for their tightness and general condition.
4. Check the brakes for wear, damage and proper functioning.
5. Check whether there are sharp objects in the tires and whether cuts or cracks are present.
6. Check the wheels and wheel forks for excessive wear.
7. Check whether the front and rear wheels can move freely and turn safely. Remove dust, sand or other dirt with a
dry, lint-free cloth.
8. Check the functioning of the wheel locks.
9. Check all plastic parts for deformations or fractures.
Purpose and areas of application
The Swifty 2 rehab stroller is suitable for the transport (at no more than walking speed) of disabled children by their
parents or other suitable assistants on firm, level surfaces indoors and outdoors. The Swifty 2 rehab stroller must not be
used for other purposes (e.g. as a means of transportation for additional children, shopping bags, etc.).
In order to allow the accompanying person to use the buggy ergonomically, the height of the push bar can be adjusted.
The Swifty 2 is approved for the transport of children in motor vehicles / disabled transport vehicles according to ISO
7176-19 and ANSI/RESNA WC 4 section 19.
17

User manual – Swifty 2
Please observe the following notes regarding safety
• Before using the product for the first time, read the user manual carefully; if you have poor eyesight, have someone
read it to you. If the user manual is lost, you can download it at any time in the download area of our website
www.thomashilfen.com. The PDF document available there can also be displayed at a larger size.
• We recommend that you adjust the lower leg length at least every 3 months to match your child’s current size. If
necessary, this should be done with the help of your therapist / orthopedic technician.
• Your child should always be secured with the H-belt (basic equipment) or with another restraint belt (available as an
accessory).
• CAUTION: Wet wheels can affect the brakes. When stopping for a long period, you should lock the rehab stroller
using the foot brake, thus preventing the buggy from unintentionally rolling away.
• IMPORTANT: Do not keep the brake applied when the rehab stroller is not being used for an extended period of
time. Otherwise, the rear wheels could be damaged by the constantly applied brake.
• CAUTION: The gap chassis and the release rod of the brake may pose a risk of getting clothes and limbs caught in
the foot area.
• CAUTION: The gap between the seat of the Swifty 2 and the chassis frame may pose a risk of getting clothes and
limbs caught in the seat area.
• CAUTION: The gap between the seat side guide of the Swifty 2 and the back arch tube may pose a risk of getting
clothes and limbs caught in the seat area.
• CAUTION: The gap between the footrest plate and the footrest tube may pose a risk of getting clothes and limbs
caught in the foot area.
• Please do not overload your Swifty 2 rehab stroller and observe the maximum load capacity (see the specifications).
• In the dark, reflective clothing makes you and your child more visible for other road users – make use of this advantage.
• Lift the rehab stroller only using firmly welded or screwed-on components (front frame tube above the front wheels,
rear axle, push handles / push bar)
• Intense sunlight may excessively heat up the black pads. In this case, there is the risk of burning on the back and legs
upon contact! Therefore, always ensure that the Swifty 2 is not exposed to intense sunlight during use and storage;
use it only when it has cooled sufficiently!
• Make sure that you do not injure yourself when folding the footrest up, adjusting the backrest, and folding and unfolding the rehab stroller.
• Attaching heavy bags or string bags to the rehab stroller increases the risk of tipping. Use the basket (available as an
accessory) under the seat unit.
• When handling the rehab stroller, especially when folding and unfolding it, heed the recommendations in the user
manual.
• Do not leave your child unattended in the Swifty 2 rehab stroller.
• When placing your child into the buggy and removing him or her, the rehab stroller’s parking brake must be applied.
• Do not leave your child unattended when he or she is getting into or out of the rehab stroller; if the footrest is subjected to an excessive load, there is a risk of slipping or tipping.
• Please keep your children away from the plastic packaging; there is a danger of suffocation.
• Only one child at a time may be placed in the rehab stroller.
18
User manual – Swifty 2
Application risks and contraindications
When used appropriately, risks for the application can be excluded. Contraindications are not known. The padding material used in the Swifty 2 is “flame retardant” and has been tested according to DIN EN 1021-1 and DIN EN 1021-2.
The degree of resistance to inflammation in materials and components has been tested according to standards and
deemed to be safe.
Symbols and warning signs
Sticker Meaning
Specification labels / loading capacity stickers
The specification label is attached at the bottom of the
seat.
The specification label includes the name of the manufacturer, including the address; the type designation; the
maximum loading capacity; and the CE label.
Bar code label
The bar code label is attached under the seat.
The bar code label includes the item number, designati-
on, serial number and production date of the product.
Identifies the 4 attachment points on the Swifty 2 for
securing in a disabled transport vehicle.
19

User manual – Swifty 2
Specifications and versions
Swifty 2
Seat depth 375 mm / 14.8"
Seat width 395 mm / 15.6"
Back height 700 mm / 27.6"
Lower leg length 210 - 370 mm / 8.3 - 14.6"
Side guide (W x H) 250 x 160 mm / 9.8 x 6.3"
Hip angle 90° - 100°
Foot angle 90°
Seat angle, fixed + 20°
Safe tilting up to a maximum of 10°
Size of footrest (W x D) 310 x 200 mm / 12.2 x 7.9"
Overall dimensions (L x W x H) 980 x 670 x 1130 mm / 38.6 x 26.4 x 44.5"
Dimensions when folded (L x W x H) 790 x 670 x 490 mm / 31.1 x 26.4 x 19.3"
Push bar height 820 - 1240 mm / 32.3 - 48.8"
Turning circle 1260 mm / 49.6"
Wheel size (front (swivelling wheels) / rear) 180 mm / 250 mm / 7.1" / 9.8"
Wheel width (front (swivelling wheels) / rear) 45 mm / 50 mm / 1.8" / 2"
Weight 18,2 kg / 40.1 lb
Max. user weight 50 kg / 110.2 lb
Max. load capacity of the basket (accessory) 3 kg / 6.6 lb
The Swifty 2 rehab stroller is available in the following versions:
Artikel-Nr. Designation Equipment
6808 Swifty 2 rehab stroller, Crash Rehab stroller, incl. pads, H-belt and footrest; equipped and
approved for use as a seat in a motor vehicle
Scope of delivery
The Swifty 2 rehab stroller is delivered pre-assembled. The Swifty 2 is factory-fitted with seat and back pads as well as
seat side guide pads. In addition, the Swifty 2 is supplied with a user manual and an Allen key. The Allen key is required
for the height adjustment of the footrest.
Basic equipment
Lightweight and foldable chassis with integrated seat unit; H-belt; flame-retardant cover material; breathable pads; backrest with an adjustable hip angle; swiveling front wheels with steering stop; puncture-proof EVA tires; height-adjustable
and foldable footrest; foot-operated parking brake; height-adjustable push bar.
Setup and assembly
The settings / adjustments must always be made by trained / instructed professionals (such as medical product consultants of specialist medical dealers).
No tools are required when using the Swifty 2 for the first time, except for the Allen key that is included in the scope of
delivery.
The accessories are attached / removed using commercially available tools. Separate installation and operating instructions are included with the accessories. If these are missing, you can download the instructions from the download
section of our website www.thomashilfen.com at any time.
20

User manual – Swifty 2
Folding
NOTE: Be careful not to drop the rehab stroller onto the floor during folding to avoid bending and damaging the frame.
Make sure the plastic plug of the folding mechanism is in the correct position (higher end of the plug is pointing to the
rear of the rehab stroller). (Fig. 1)
Folding open
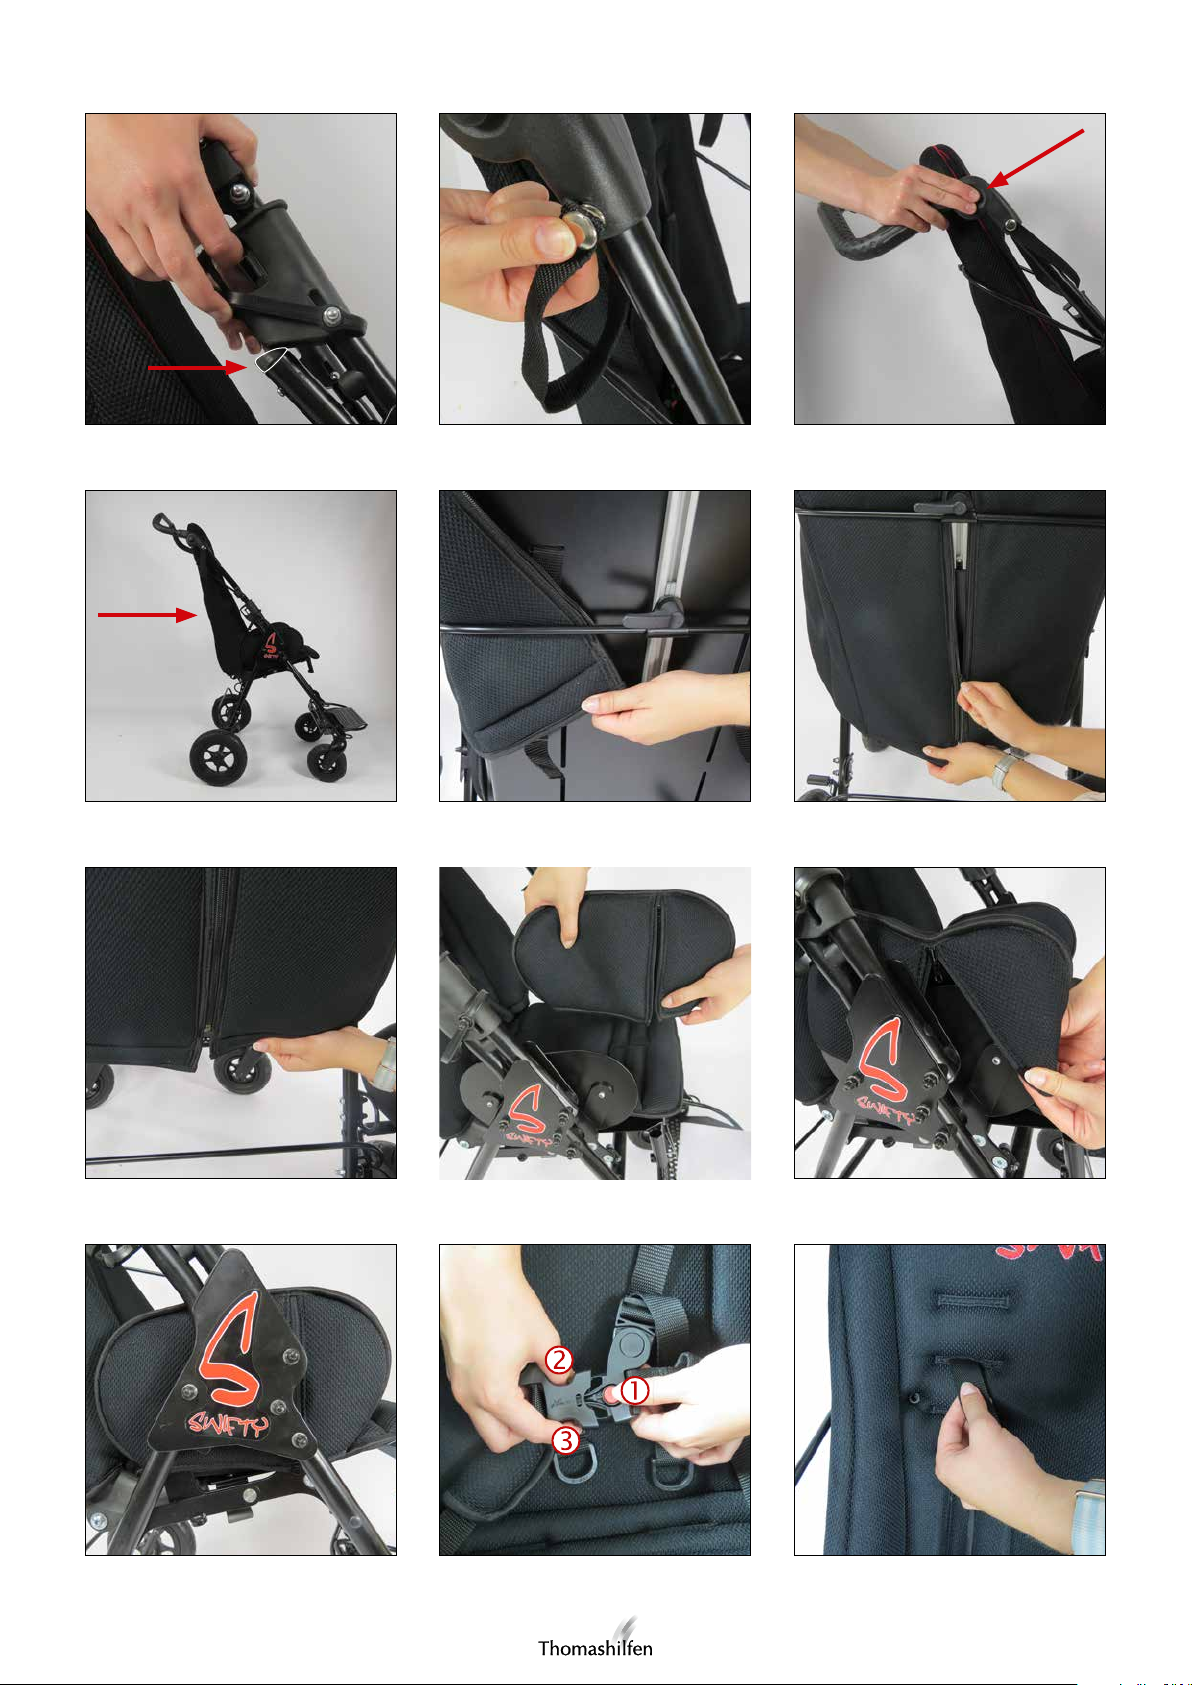
The Swifty 2 rehab stroller is equipped with a folding safety device on both push bar joints. To fold it open, the folding
safety device must be released on each side by means of one of the pushbuttons (Fig. 2). Then hold the buggy on the
top and on the side using the push bar and pull it upwards with a swinging movement (the locking slide audibly engages). Loosen the clamping lever at the back and adjust the desired back angle (see the section on backrest adjustment).
Adjust the height-adjustable push bar to the desired position by pressing the side pushbuttons (Fig. 3).
Folding closed (smallest folded size)
Loosen the clamping lever at the back. Pull up the locking slides on the push bar (right and left). (Fig. 1) and hold onto
the safety bow mounted on the right-hand side. Using your upper body, push the push bar forward and fold the buggy
closed in a forward direction (Fig. 4). Press the backrest downwards and tighten the clamping lever again. Fold down
the push bar on the backrest.
The folding lock can be used to prevent accidental unfolding of the Swifty 2 rehab stroller. For this purpose, release the
button on each side of the folding lock (fig. 2), guide the strap around the front frame and push the button closed again.
Now the Swifty 2 can be securely gripped and transported using the tubes of the frame.
Seat and back pads
The seat and back pads consist of a single unit. It is pulled over the backrest in such a manner that the red Swifty logo
is at the front and the lower part of the pad comes to rest on the seat. The rear of the pad is divided into two parts and
is closed with a zipper. Guide the two halves of the pad’s back under the Swifty 2’s rear bow (Fig. 5). Pull the pad into
place and close the zipper (Fig. 6). Finally, close the Velcro closure at the lower end of the back (Figure 7).
Seat side guide pad
The opening of each seat side guide pad should point outwards/forwards. (Fig. 8) Pull the pad over the seat side guide
(Fig. 9). Close the zipper. (Fig. 10)
H-belt
The Swifty 2 rehab stroller is equipped with an H-belt as standard equipment.
Opening the belt buckle
To open the H-belt, press and hold the red pushbutton (1), open the clip lock (2 and 3) and release the belt (child safety
lock). (Fig. 11)
Adjusting the shoulder belt height
Open the zipper on the back pad. Open the upper folding buckles and pull the belts out from the front. Undo the back
pad to the desired height using the stitched seam. Pull the straps through the resulting slots and secure them again in the
folding buckles. Close the pad again. (Figs. 12-13)
Removing the H-belt
Open the zipper on the back pad. Open the folding buckles and pull out the H-belt from the front.
21

User manual – Swifty 2
Sun and rain cover holders
The Swifty 2 is equipped with holders for a sun and rain cover as standard. (Fig. 14) The sun and rain cover itself is
available as an accessory.
Adjustment options
Backrest adjustment
Loosen the clamping lever on the back, adjust the desired hip angle by sliding the back bow on the back rail, and retighten the lever. (Fig. 15)
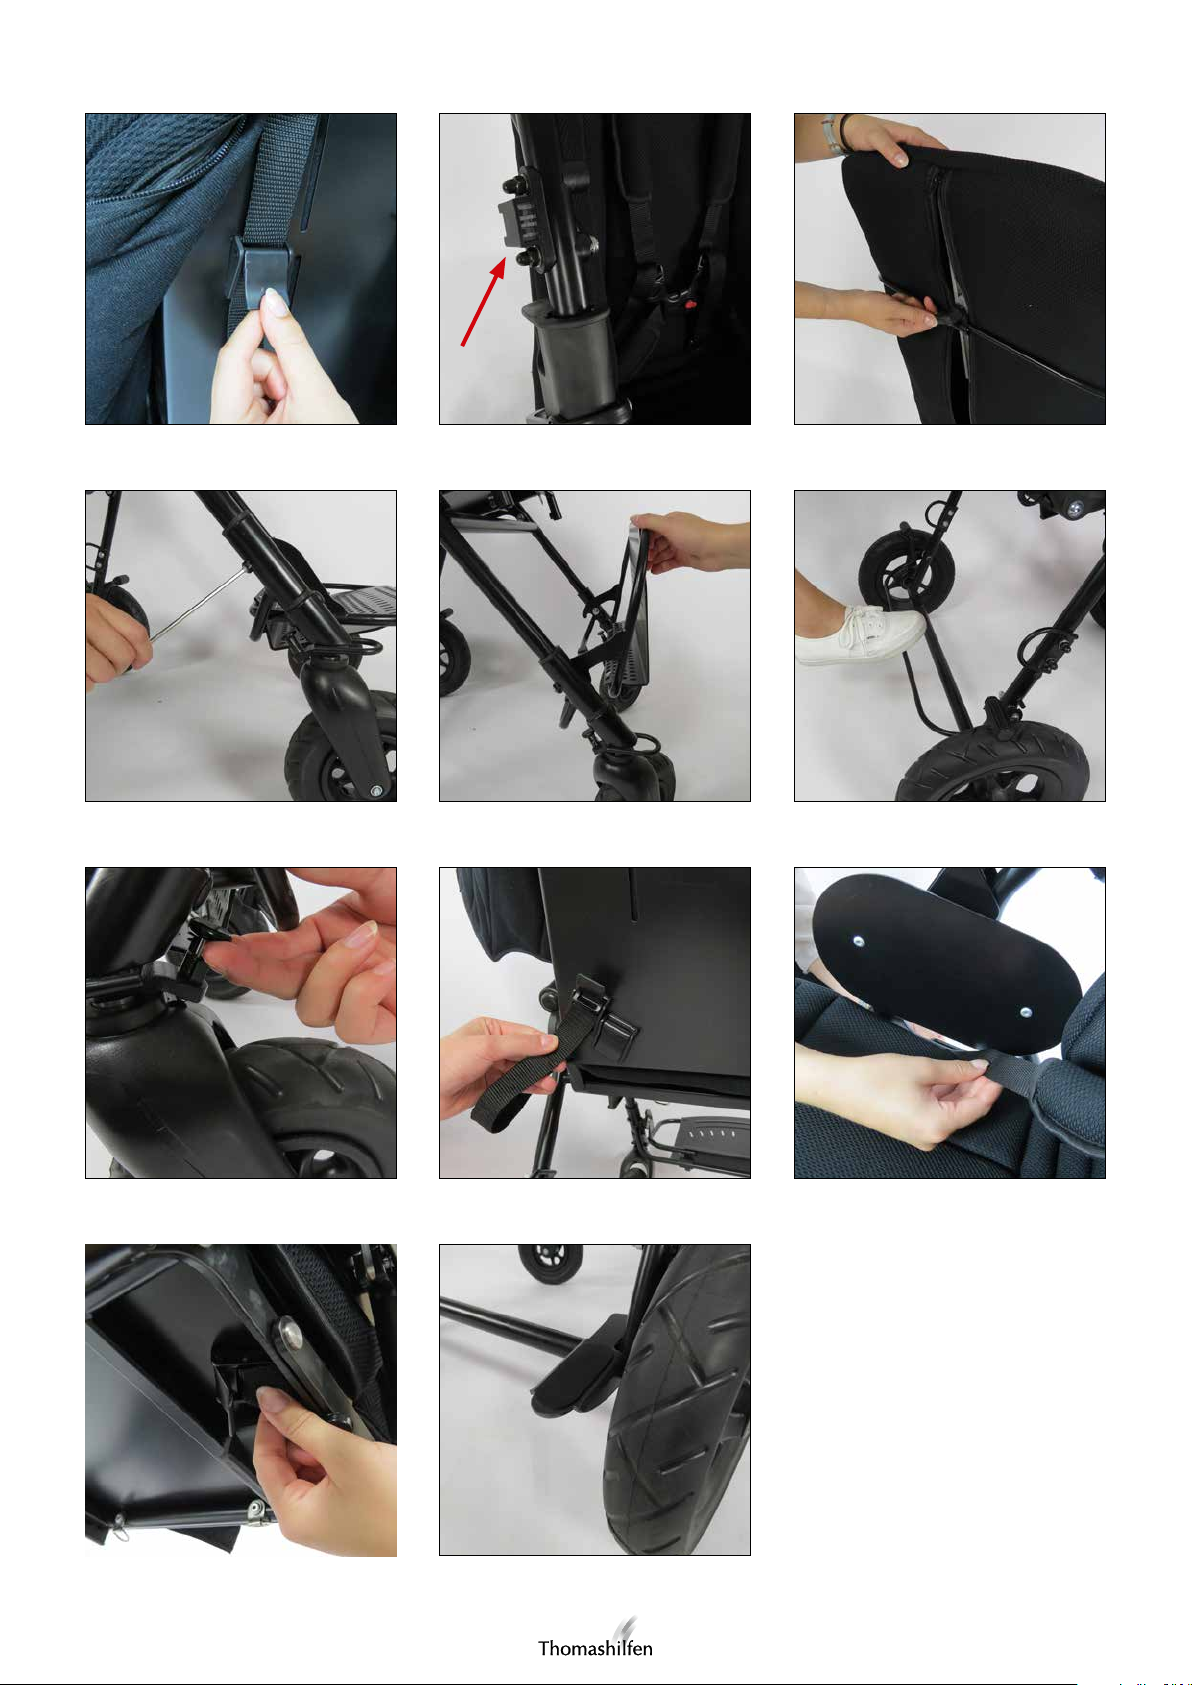
Lower leg length
Unscrew the Allen keys (3 mm) on the right and left rear of the footrest tube guides. Move the footrest to the desired
position by sliding it on the frame tube and tighten the screws again. (Fig. 16)
Footrest
The footrest can be folded upwards to make it easier for children to get into the buggy. (Fig. 17)
Parking brake function
To lock the brake, place your foot on the brake bow and push it down. Release the brake by placing your foot under the
brake bow and pulling it upwards. (Fig. 18)
Parking brake function for the front wheels
Tightening: Turn the front wheel so that it is straight and let the locking latch bolt snap in (it clicks audibly).
Releasing: Pull out the locking latch bolt and lock it with a 90° rotation. (Fig. 19)
Attaching the belts
Using the stitched seams, undo the back pads depending on the required height of attachment.
Guide the two upper belts through the openings in the pad and insert them through the slots in the back plate. (Fig. 12)
Open the zipper at the back of the back pads and then insert the belts into the folding buckles and adjust the desired
belt length. (Fig. 13) The two lower ends of the belt can be fastened to the back of the back plate using folding buckles.
(Fig. 20) Guide the straps to the right and left of the back pad and secure them. Close the back pad again. (Figs. 6-7)
TIP: The belt length can also be adjusted at the front. To do this, pull the D-ring to shorten the belt.
The front belts of the 4-point pelvis belt are attached on the right and left under the seat using a folding buckle. Guide
the belt between the side guide and the seat plate, insert it into the folding buckle, and tighten it. (Figs. 21-22)
Tip assist (accessory)
Place your foot on the tip assist, hold the rehab stroller with both hands, and tip it. (Fig. 23)
Transport
The Swifty 2 rehab stroller can be folded up for transport in a vehicle trunk. Heed the instructions for folding the rehab
stroller use the folding lock to avoid unintentional unfolding.
The Swifty 2 rehab stroller can be lifted on the side parts of the frame or on the rear axle.
22

User manual – Swifty 2
Use as a seat in a motor vehicle
The “Crash” version of the Swifty 2 rehab stroller has successfully passed the crash test according to the international
ISO 7176/19 standard as well as ANSI / RESNA WC 4, section 19 and can be used as a seat in a motor vehicle.
IMPORTANT: If the Swifty 2 is to be used as a seat in a motor vehicle, the following instructions are to be heeded.
The Swifty 2 rehab stroller has been designed for transport in the forward direction. Whenever possible, the user should
be placed on one of the vehicle seats and the installed restraint system should be used. Use only chassis / passenger
restraint systems that are in accordance with ISO 10542 to secure the Swifty 2 rehab stroller to the floor of the vehicle.
The 4 attachment points on the Swifty 2 are indicated by the following symbol:
Preparing the Swifty 2 for transport:
1. Remove the following parts (if attached); abduction block, tray, sun and rain cover, sun umbrella, grip rail, and the
contents of the basket.
2. Use the installed rails to correctly position the buggy in the forward direction in the vehicle. Actuate the parking
brake.
3. Make sure that the hip angle adjuster is fixed.
Fastening the Swifty 2 in a motor vehicle:
1. The rehab stroller must be safely secured in the vehicle using a 4-point belt system (according to ISO 10542-2,
SAE 2249 or DIN 75078/2). (The manufacturers of these belt systems are, for example, Unwin Safety Systems und
Q’Straint.)
2. The driver and / or the assistant should be familiar with the use of these belt / restraint systems.
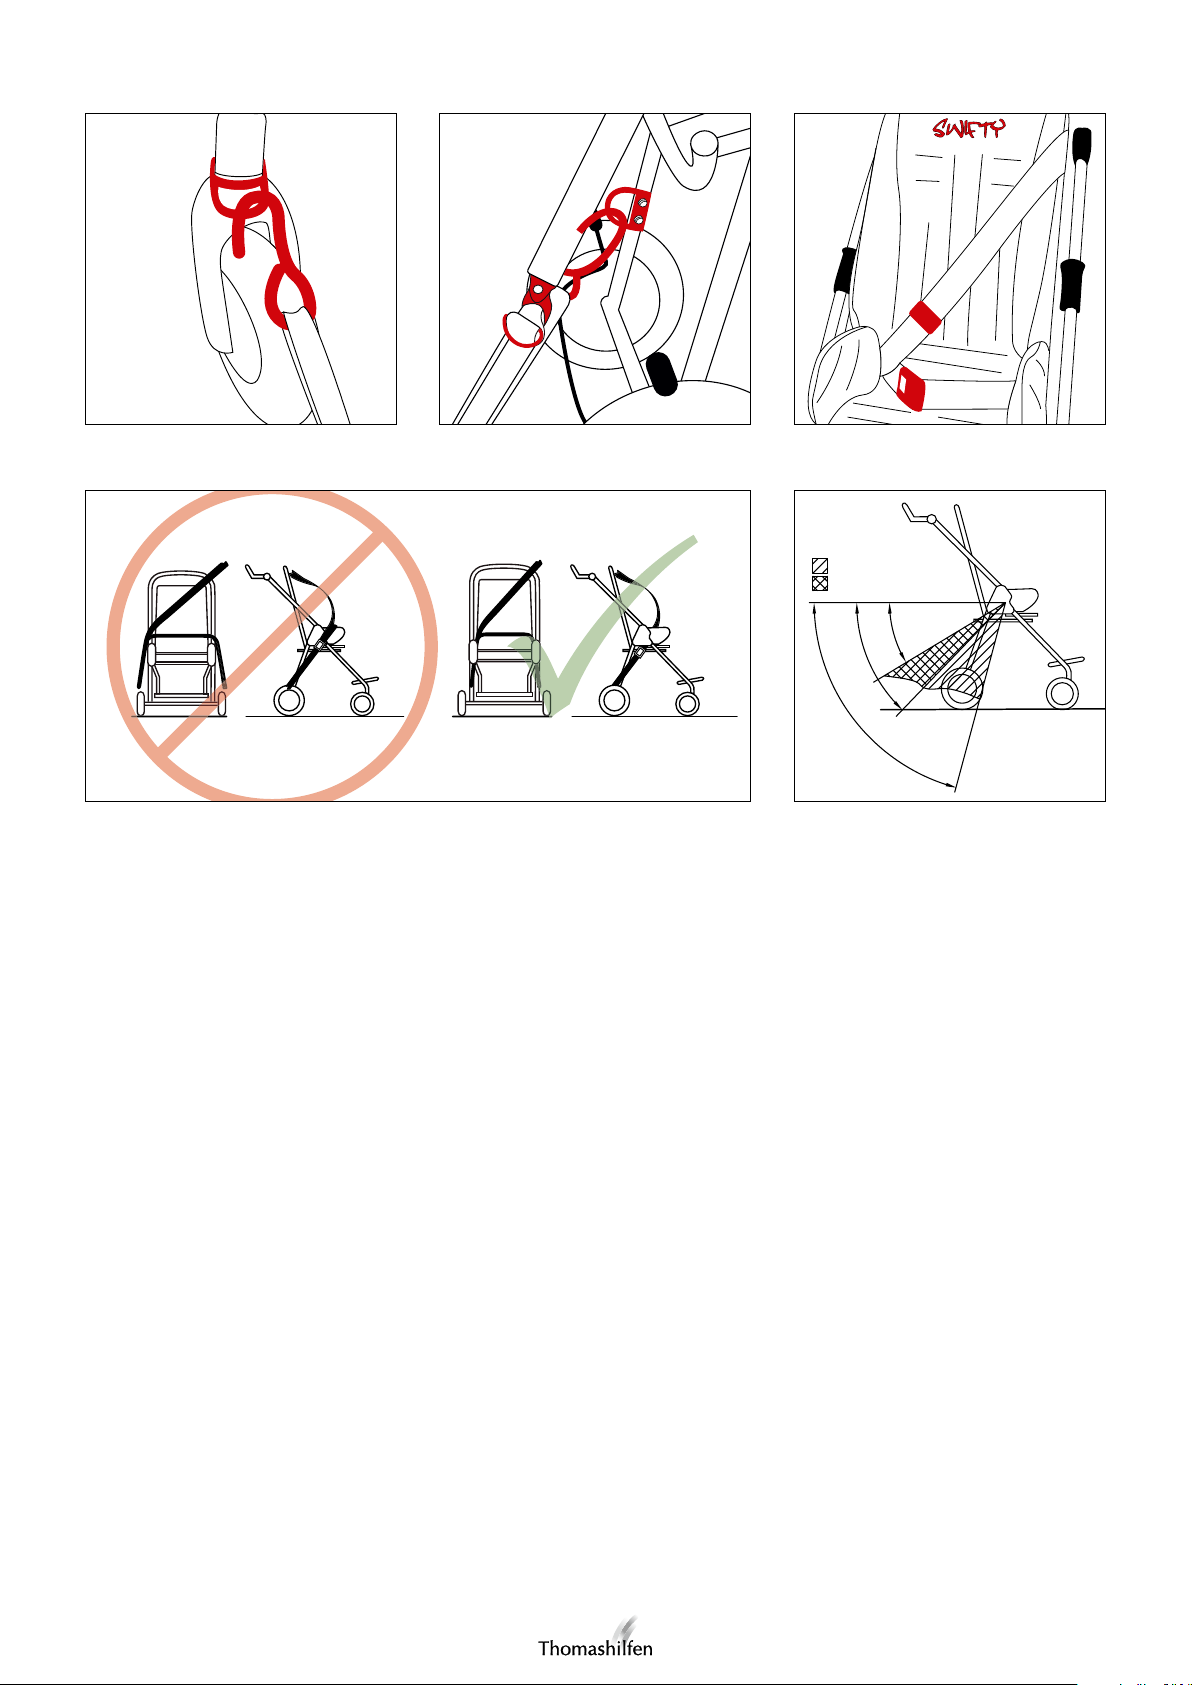
3. The two front belts (snap hook) must be attached to the left and right steel rings above the front wheel fork. (Fig. 24)
4. The two rear belts (snap hook) must be attached to the two safety tie-down kits on the rear frame. (Fig. 25)
Applying the restraint system:
1. The crash test was carried out with the H-belt (included in the scope of delivery). This H-belt should be used under the
belt of the restraint system.
2. The user must be secured with an approved restraint system. Thomashilfen recommends using an automatic belt or a
3-point restraint system, in which the pelvis belt and the shoulder belt can be separated from each other. This is necessary to be able to properly guide the restraint system through the frame of the Swifty 2. (Manufacturers of such systems
include Unwin Safety Systems and AMF-Bruns.)
3. The driver and / or the assistant should be familiar with the use of these belt / restraint systems.
4. The user’s pelvis belt must be positioned flat on the user’s pelvis without contacting the abdomen. The pelvis belt
should extend between the side guide and the user on the right and left sides. (Fig. 26)
5. The pelvis belt must not be separated from the user by parts of the rehab stroller (sides, wheels) (Fig. 27)
NOTE: The belt must not be used when it is twisted.
6. The angle of the pelvis belt should be between 30° and 75°. (Fig. 28)
7. The pelvis belt should be as tight as possible, but should also be comfortable for the user.
8. The upper body belt of the restraint system must be fastened to the vehicle wall at a height so that it is ensured that
the belt is located in the middle of the user’s shoulder and passes under the push handle. (Fig. 27)
NOTE: Only a shoulder belt that is fastened to the side wall of the vehicle satisfies the current requirements for safely
restraining the user.
23

User manual – Swifty 2
Product / serial number
To obtain the correct spare parts or for any technical callbacks that may be required, we always need you to provide
us with the serial number and the precise item number.
Item code
The serial number and the item number of the Swifty 2
rehab stroller are located on the bar code label that is attached under the seat.
Serial / batch number
Cleaning, disinfection and care
The chassis is made of high-quality steel tubes. These are coated with durable powder stove enameling that can be
cleaned and disinfected with commercial (neutral) soaps.
Disinfection
Clean the pads and handles before disinfecting. Wipe all parts of the product with a cloth that is damp with disinfectant.
Only water-based disinfectants should be used. When disinfecting, the manufacturer’s application instructions must be
heeded.
Pads
All pads can be easily removed in just a few steps. The 100% Trevira CS fabric is a high-quality fabric that is washable up to 40 °C. The pads are to be washed separately; the Velcro strips have to be covered or closed before washing.
Please also pay attention to the care instructions.
We would like to point out that even high-quality fabrics can fade if subjected to continuous and intensive sun exposure
or frequent washing. The pads are flame-retardant (EN1021-1 and EN 1021-2).
Velcro closures
To maintain the functionality of the Velcro closures, clean the Velcro strips with a brush every now and then. Always
close the Velcro strips during washing.
Warranty terms / CE label
Thomashilfen offers a 3-year warranty on all frame parts from the date of purchase. The warranty covers any claims affecting the functions. Excluded is damage that arises due to improper handling (e.g. overloading) as well as normal wear.
The Swifty 2 meets the requirements of European standards EN 12182 and EN 12183 and is provided with a CE label.
We hope you enjoy using your Swifty 2 rehab stroller!
24

User manual – Swifty 2
Maintenance schedule – annual inspection / reutilization
Preparation
A user manual must accompany the product. If none is present, please order one from the manufacturer. Familiarize
yourself with the functions of the product. If you are not familiar with the product, read the instructions carefully before
the inspection. Clean the product before the inspection. If necessary, heed the care instructions and product-specific
inspection instructions in the user manual.
Area
Item
1 Seat I/R I/R I/R
2 Angle adjustment I/R I/R I/R
3 Height adjustment I/R I/R I/R
4 Seat cushion I R
5 Missing caps and plugs I/R
6 Back I/R I/R I/R
7 Angle adjustment I/R I/R I/R
8 Height adjustment I/R I/R I/R
9 Back cushion I R
10 Push bar I/R I/R I/R
11 Push bar cover I R
12 Chassis I/R I/R I/R
13 Tires I I I R
14 Hand brake I/R I/R I/R
15 Headrest I/R I/R I/R
16 Headrest cushion I R
17 Lateral trunk support I/R I/R I/R
18 Lateral trunk support cushions I R
19 Armrests I/R I/R I/R
20 Arm supports I R
21 Lateral hip support I/R I/R I/R
22 Lateral hip support cushions I R
23 Abduction wedge I/R I/R I/R
24 Abduction wedge cushion I R
25 Lateral tibia support I/R I/R I/R
26 Lateral tibia support cushion I R
27 Tray I/R I/R I/R
28 Belts I/R I/R I/R
Maintenance was carried out on:
= Inspection performed
Options
(I = Inspection / R = Reutilization)
Function Damage Warping Replace
Service and repairs to the rehab stroller may be carried out only by qualified personnel. The user of this rehab aid must
ensure that the required inspections / maintenance be carried out regularly and on schedule. If damage is evident, the
user must actively inform the qualified personnel and have the damage repaired immediately. Only original spare parts
may be used for repairs (the list of replacement / spare parts can be found in the download area on our website
www.thomashilfen.com).
Removal / attachment of spare parts must always be performed by qualified personnel only! If it is necessary to return
the product to your dealer, please make sure that you pack the chassis so that it can be transported without damage.
25

Manuel de l‘utilisateur – Swifty 2
Cher utilisateur de la poussette Swifty 2,
La poussette de rééducation Swifty 2 est un produit médical moderne de haute qualité et d‘une esthétique séduisante.
Ont été intégrées de façon tout à fait ciblée, dans le produit, les idées de parents qui connaissent la manutention quotidienne des produits de rééducation et aussi les besoins de leurs enfants relativement à de tels produits d‘aide.
De par son aspect, un produit de rééducation ne doit pas forcément rappeler qu‘il s‘agit d‘un tel produit, ce qui n‘empêche pas la Swifty 2 de remplir toutes les exigences visant une bonne poussette de rééducation : La longueur des
jambes se laisse régler progressivement, des matériaux de haute qualité et une assise ferme veillent au confort et à une
manutention sûre. Grâce à son faible poids, à ses roulettes avant pivotantes et malgré la charge maximale élevée qu‘elle
peut supporter, cette poussette de rééducation est particulièrement maniable. Elle se laisse replier vite, facilement et
vient se loger simplement dans le coffre du véhicule.
Afin que le maniement de la poussette de rééducation Swifty 2 soit sûr, pratique et confortable pour vous et en particulier aussi pour l‘enfant, veuillez commencer par lire ce manuel de l‘utilisateur.
S‘il vous reste malgré tout des questions à poser ou en présence de problèmes, veuillez s.v.p. vous adresser au commerce spécialisé compétent ou directement à nous.
Dans ce contexte, nous souhaitons aussi attirer votre attention sur notre site Internet www.thomashilfen.com sur lequel
vous pourrez consulter des informations actuelles ainsi que des consignes de sécurité importantes, ou des informations
relatives à d‘éventuels rappels de produits.
Notre adresse: Thomas Hilfen für Körperbehinderte
GmbH & Co. Medico KG
Walkmühlenstraße 1
D - 27432 Bremervörde
Téléphone.: +49 (0) 4761 886-68 ou -63
www.thomashilfen.com
Sommaire Page
Contrôles technico-sécuritaires et intervalles de maintenance ........................................................................... 27
Domaine d‘utilisation et lieux d‘utilisation ........................................................................................................ 27
Consignes de sécurité générales ....................................................................................................................... 28
Risques durant l‘utilisation et contre-indications ............................................................................................... 29
Symboles et panneaux d‘avertissement ............................................................................................................. 29
Caractéristiques techniques et variantes ............................................................................................................ 30
Matériel livré ................................................................................................................................................... 30
Équipement de base ......................................................................................................................................... 30
Mise en place et montage ................................................................................................................................ 30
Possibilités de réglages ..................................................................................................................................... 32
Fonction de frein de stationnement .................................................................................................................. 32
Fonction d‘immobilisation des roues avant ....................................................................................................... 32
Montage des ceintures ..................................................................................................................................... 32
Aide au basculement ....................................................................................................................................... 32
Transport ......................................................................................................................................................... 32
Utilisation comme siège dans un véhicule motorisé .......................................................................................... 33
Numéro du produit / de série ........................................................................................................................... 34
Consignes de nettoyage, de désinfection et d‘entretien ..................................................................................... 34
Conditions de la garantie / Marquage CE .......................................................................................................... 34
Plan de maintenance - Inspection annuelle / Remise en service ........................................................................ 35
26

Manuel de l‘utilisateur – Swifty 2
Contrôles technico-sécuritaires et intervalles de maintenance
Si vous deviez rencontrer des problèmes lors du contrôle régulier, veuillez s.v.p. prévenir immédiatement votre revendeur sur place ou Thomashilfen.
Maintenance régulière / quotidienne
Les parents, proches et accompagnateurs peuvent effectuer facilement les travaux de maintenance suivants. La clé hexagonale mâle livrée d‘origine sert à immobiliser le repose-pieds
1. Si la poussette de rééducation s‘est mouillée, toujours l‘essuyer avec un chiffon sec. Après l‘utilisation, ne jamais la
ranger encore mouillée.
2. Assurez-vous que les deux vis à 6 pans creux sont présentes sur le repose-pieds et vérifiez quotidiennement avec la
clé hexagonale mâle si les vis sont fermement serrées.
3. Contrôlez (chaque jour) que tous les écrous, boulons et vis sont fermement serrés.
4. Contrôlez (chaque semaine) la fonctionnalité du dossier, du mécanisme de pliage et de la position de repos.
5. Avant d‘utiliser la poussette de rééducation, vérifiez toujours la fonctionnalité du frein.
6. Si nécessaire, nettoyez le cadre de la poussette de rééducation (recommandation : au moins une fois par semaine).
7. Assurez-vous que le bouchon en plastique du mécanisme de pliage est fermement sur la position correcte (chaque
jour, fig. 1).
Maintenance semestrielle
Les travaux de maintenance suivants devraient être effectués par un revendeur détenant les connaissances techniques
correspondantes, ou par un atelier de réparation agréé. Si vous constatez des défauts ou dysfonctionnements importants, cessez d‘utiliser la poussette de rééducation tant que les défauts n‘ont pas été supprimés.
1. Dépliez puis repliez la poussette de rééducation et contrôlez ce faisant que tous les mouvements de (dé)pliage se
déroulent impeccablement. Vérifiez si le cadre présente des dégâts quelconques.
2. Contrôlez la fonctionnalité et les possibilités de réglage de la poussette de rééducation et en particulier l‘ajustabilité
du dossier.
3. Vérifiez les écrous, vis, charnières et bouchons du cadre (fixation ferme et leur état en général).
4. Vérifiez si le frein est usé, présente des dégâts et fonctionne.
5. Vérifiez si des objets tranchants sont enfoncés dans les pneus, si ces derniers présentent des entailles ou fissures.
6. Vérifiez si les roues et fourches de roues présentent une usure excessive.
7. Contrôlez si les roues avant et les roues arrière se déplacent librement et tournent de manière sûre. Retirez la poussière, le sable et d‘autres souillures avec un chiffon sec ne peluchant pas.
8. Vérifiez le fonctionnement des freins de stationnement aux roues.
9. Contrôlez, sur toutes les pièces en plastique, la présence de déformations ou cassures.
Domaine d‘utilisation et lieux d‘utilisation
La poussette de rééducation Swifty 2 est destinée au transfert (au maximum au pas) d‘enfants handicapés par leurs
parents ou par d‘autres personnes assistantes adéquates sur un sol dur et plat, à l‘intérieur de locaux et à l‘extérieur. La
poussette de rééducation Swifty 2 ne doit pas être utilisée à des fins autres (par ex. pour transporter d‘autres enfants, les
courses, etc.).
Pour permettre une utilisation ergonomique à la personne accompagnatrice, il est possible d‘ajuster la hauteur du guidon de poussée.
Swifty 2 est homologué pour le transport d‘enfants dans des véhicules motorisés / véhicules de transport d‘handicapés
(VTH) selon ISO 7176-19 ainsi que selon ANSI/RESNA WC 4 section 19.
27

Manuel de l‘utilisateur – Swifty 2
Veuillez respecter les consignes de sécurité suivantes
• Avant la première utilisation, veuillez lire le mode d‘emploi attentivement et entièrement ou, en cas de difficultés de
lecture, faites-le vous lire par une autre personne. Si vous avez perdu le mode d‘emploi, vous pouvez le télécharger
à tout moment depuis l‘espace à cet effet sur notre site Internet www.thomashilfen.com. Le document PDF placé sur
le site peut également être affiché sous un format agrandi.
• Nous vous recommandons d‘adapter au moins tous les 3 mois la longueur des jambes aux mensurations actuelles de
votre enfant. Il faudra le cas échéant effectuer cette opération avec l‘aide de votre thérapeute / technicien orthopédique.
• Votre enfant doit toujours être sécurisé avec la ceinture en H (équipement de base) ou avec une autre ceinture de
retenue (disponible en option).
• ATTENTION : Les roues mouillées peuvent pénaliser l‘effet de freinage. En cas d‘arrêt de courte ou de longue durée,
immobilisez la poussette de rééducation via le frein au pied afin d‘empêcher qu‘elle se mette à rouler toute seule.
• IMPORTANT : Ne laissez pas le frein serré si la poussette de rééducation doit rester assez longtemps sans servir. Les
roues arrière risquent sinon d‘être endommagées par le frein serré en permanence.
• ATTENTION : L‘interstice entre le châssis et la barre de déclenchement du frein peut créer un risque de coincement
des vêtements et des membres dans la zone des pieds.
• ATTENTION : L‘interstice entre le siège de la Swifty 2 et le châssis roulant peut créer un risque de coincement des
vêtements et des membres dans la zone du siège.
• ATTENTION : L‘interstice entre le guidage latéral du siège de la Swifty 2 et le tube incurvé du dossier peut créer un
risque de coincement des vêtements et des membres dans la zone du siège.
• ATTENTION : L‘interstice entre la plaque repose-pieds et le tube de repose-pieds peut créer un risque de coincement des vêtements et des membres dans la zone des pieds.
• Ne surchargez pas la poussette de rééducation Swifty 2 et respectez le poids maximal de l‘utilisateur (cf. les caractéristiques techniques).
• Des vêtements réfléchissant vous rendront, vous et votre enfant, mieux visibles dans l‘obscurité par rapport aux
autres usagers de la route. Profitez de cet avantage.
• Ne soulevez la poussette de rééducation que par ses composants fermement soudés ou vissés. (Tube du cadre avant
au-dessus des roues avant, essieu arrière, poignées de poussée/guidon de poussée)
• En cas d‘ensoleillement intense, les températures à la surface des rembourrages noirs peuvent être élevées. Dans ce
cas, il existe en cas de contact un risque de brûlures du dos et des jambes ! Pour cette raison, veillez fondamentalement à ce que la Swifty 2 ne soit pas exposée à ces sources de chaleur en cas d‘utilisation et de stockage, et ne
l‘utilisez qu‘après qu‘elle a suffisamment refroidi.
• Veillez à ne pas vous blesser au moment de rabattre le repose-pieds vers le haut, d‘ajuster le dossier ainsi que de
déplier et replier la poussette de rééducation.
• Les sacs et filets de course lourds fixés contre la poussette de rééducation accroissent le risque de renversement.
Utilisez le panier (disponible comme accessoire) sous l‘unité d‘assise.
• Pendant le maniement de la poussette de rééducation (en particulier lors du dépliage et du pliage), veuillez respecter
les recommandations figurant dans le présent manuel de l‘utilisateur.
• Ne laissez jamais l‘enfant sans surveillance dans la poussette de rééducation Swifty 2.
• Avant de placer l‘enfant dans la poussette et de l‘en retirer, il faut actionner le frein de stationnement de la poussette
de rééducation.
• Ne laissez jamais votre enfant sans surveillance au moment de monter dans la poussette de rééducation ou d‘en
descendre : si le repose-pied subit une trop forte charge, il y a risque de glissement ou de renversement.
• Ne permettez jamais à vos enfants de jouer avec l‘emballage en plastique, ils risquent de s‘étouffer.
• Il ne faut jamais placer plus d‘un enfant dans la poussette de rééducation.
28
Manuel de l‘utilisateur – Swifty 2
Risques durant l‘utilisation et contre-indications
Si l‘utilisation est conforme, il est possible d‘exclure des risques pendant l‘utilisation. Aucune contre-indication n‘est
connue. Le matériau de rembourrage utilisé pour la Swifty 2 a été vérifié selon DIN EN 1021-1 et DIN EN 1021-2, et est
classé « difficilement inflammable ».
L‘ampleur de la résistance à l‘inflammation des matériaux et sous-ensembles a été contrôlée conformément aux normes
et jugée comme étant sans conséquence.
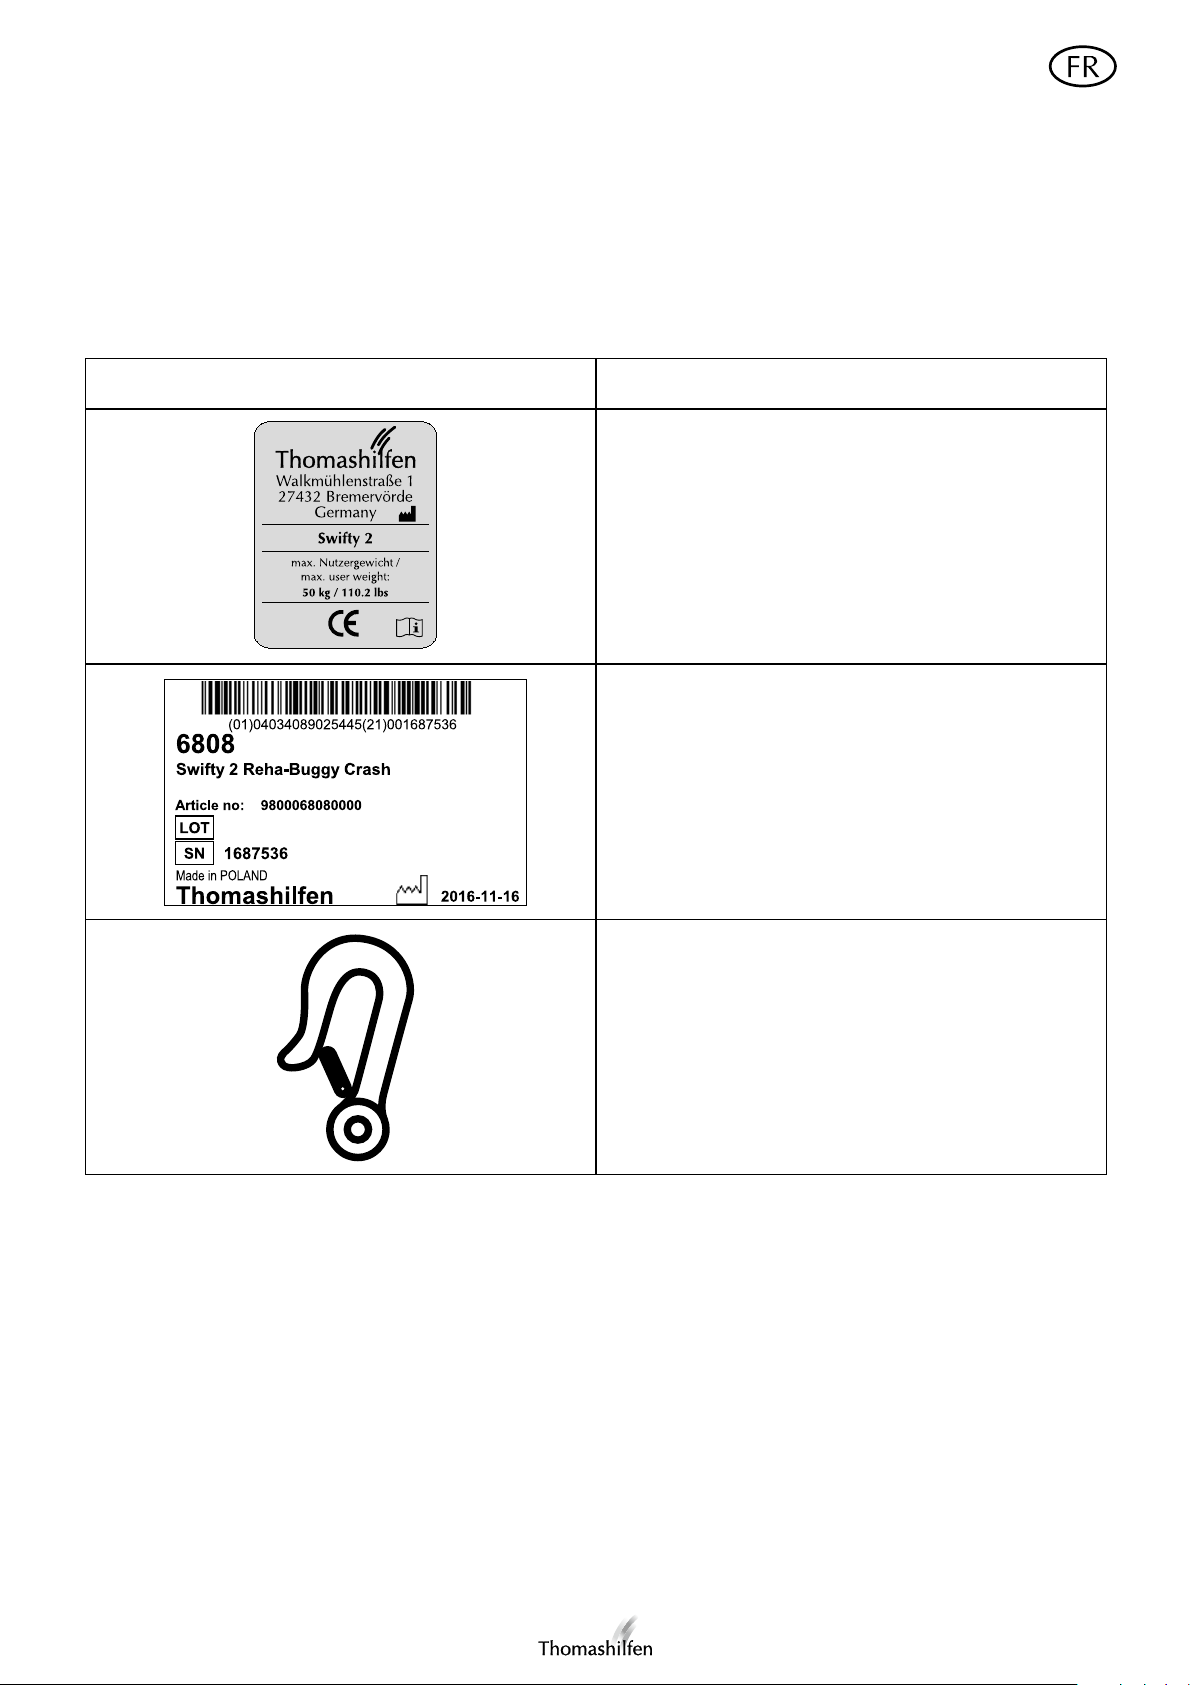
Symboles et panneaux d‘avertissement
Autocollants Signification
Plaques signalétiques / Autocollants mentionnant
la charge admissible
La plaque signalétique a été fixée sous la surface d‘assise.
Sur la plaque signalétique sont mentionnés le fabricant,
son adresse, la désignation du type, la charge maximale
supportable ainsi que le label CE.
Étiquette à code barres
L‘étiquette à code barres a été fixée sous la surface
d‘assise.
Sur l‘étiquette à code barres figurent le numéro de
référence, la désignation, le numéro de série ainsi que
la date de fabrication du produit.
Désigne les 4 points de fixation prévus sur la Swifty 2
pour la sécuriser dans le véhicule de transport d‘handicapés (VTH).
29

Manuel de l‘utilisateur – Swifty 2
Caractéristiques techniques et variantes
Swifty 2
Profondeur du siège 375 mm
Largeur du siège 395 mm
Hauteur du dossier 700 mm
Longueur au niveau des jambes inférieures 210 - 370 mm
Guidage latéral (l x h) 250 x 160 mm
Angle au niveau des hanches 90° - 100°
Angle au niveau des pieds 90°
Inclinaison du siège (fixe) + 20°
Inclinaison sûre jusqu‘à un maximum de 10°
Taille du repose-pieds (l x h) 310 x 200 mm
Dimensions totales (L x l x h) 980 x 670 x 1130 mm
Dimensions après pliage (L x l x h) 790 x 670 x 490 mm
Hauteur du guidon de poussée 820 - 1240 mm
Rayon de braquage 1260 mm
Taille des roues (avant [roues pivotantes] / arrière) 180 mm / 250 mm
Largeur des roues (avant [roues pivotantes] / arrière) 45 mm / 50 mm
Poids 18,2 kg
Poids max. de l‘utilisateur 50 kg
Charge maximale dans le panier (accessoire) 3 kg
La poussette de rééducation Swifty 2 est disponible en plusieurs variantes :
N° de réf. Désignation Équipement
6808 Poussette de rééducation Swifty 2 Crash Poussette de rééducation avec rembourrage, ceinture en H
et repose-pieds ; équipée et homologuée pour l‘utilisation
comme siège dans un véhicule motorisé.
Matériel livré
La poussette de rééducation Swifty 2 est livrée prémontée. En usine, la Swifty 2 a été dotée des rembourrages d‘assise et
de dossier ainsi que des rembourrages au niveau des guidages latéraux de siège. En outre, la Swifty 2 est accompagnée
d‘un mode d‘emploi ainsi que d‘une clé hexagonale mâle. Cette clé est nécessaire pour régler la hauteur des reposepieds.
Équipement de base
Châssis léger et pliable à unité d‘assise intégrée ; ceinture en H ; matériau de housse inhibiteur de la flamme ; rembourrages respirants ; dossier à angle des hanches ajustable ; roues avant pivotantes, avec blocage de direction ; pneus EVA
increvables ; repose-pieds réglable en hauteur et repliable ; frein de stationnement au pied, guidon de transport ajustable en hauteur.
Mise en place et montage
Les réglages / adaptations sont fondamentalement réservés à des spécialistes dûment formés et instruits (par ex. conseillers en produits médicaux du commerce des produits médicaux).
Lors de la première mise en service de Swifty 2 et du châssis, aucun outil n‘est nécessaire hormis la clé hexagonale
mâle livrée d‘origine.
Le montage / démontage des accessoires a lieu avec l‘outillage en vente habituelle dans le commerce. Des notices de
montage et modes d‘emploi ont été joints aux accessoires. Si ces documents devaient manquer, vous pourrez les télécharger à tout moment sur l‘espace téléchargement de notre site Internet www.thomashilfen.com.
30

Manuel de l‘utilisateur – Swifty 2
Pliage
REMARQUE : Pendant le pliage, veillez à ce que la poussette de rééducation ne chute pas sur le sol, ceci pour empê-
cher de voiler le châssis et des dégâts. Assurez-vous que le bouchon en plastique du mécanisme de pliage se trouve sur
la position correcte (l‘extrémité supérieure du bouchon regarde vers le dos de la poussette de rééducation). (Fig. 1)
Dépliage
La poussette de rééducation Swifty 2 est munie, au niveau des deux articulations du guidon, d‘une sécurisation du
pliage. Pour déplier, il faut défaire la sécurisation de pliage de chaque côté par le biais de l‘un des boutons-poussoirs.
(Fig. 2) Ensuite, saisir la poussette en haut et latéralement par le guidon de poussée et, d‘un mouvement énergique, la
tirer vers le haut (les curseurs de verrouillage encrantent audiblement). Desserrer le levier de bridage au dos et régler le
dossier sur l‘angle voulu (cf. Ajustage du dossier). Actionner les boutons-poussoirs latéraux pour amener le guidon de
poussée réglable en hauteur sur la position voulue. (Fig. 3)
Pliage (dimensions minimum après pliage)
Desserrer le levier de bridage au dos. Sur le guidon de poussée, tirer le curseur de verrouillage vers le haut (sur les côtés
droit et gauche) (fig. 1) puis retenir l‘étrier de sécurité monté à droite. Avec le torse, pousser le guidon vers l‘avant et
plier la poussette vers l‘avant. (Fig. 4) Pousser le dossier vers le bas puis resserrer le levier de bridage. Replier le guidon
de poussée vers le bas sur le dossier.
La sécurisation du pliage permet d‘empêcher un dépliage involontaire de la poussette de rééducation Swifty 2. À cette
fin, défaire un bouton-poussoir de la sécurisation de pliage (fig. 2) de chaque côté, faire passer la ceinture autour du
cadre avant puis refermer le bouton-poussoir. Maintenant, il est possible de saisir et transporter la Swifty 2 par les tubes
du châssis.
Rembourrage de l‘assise et du dossier
Le rembourrage du siège et du dossier est tout d‘une pièce. On l‘enfile sur le dossier de sorte que le logo Swifty rouge
regarde vers l‘avant et que la partie inférieure du rembourrage vienne reposer sur la surface d‘assise. Le dos du rembourrage est divisé en deux et se referme au moyen d‘une fermeture à glissières. Faites passer les deux moitiés du dos
du rembourrage sous l‘étrier dorsal de la Swifty 2. (Fig. 5) Tirez le rembourrage jusqu‘en position puis fermez la fermeture à glissières. (Fig. 6) Pour terminer, fermer la fermeture à bande Velcro à l‘extrémité inférieure du dos. (Fig. 7)
Rembourrages du guidage latéral du siège
L‘orifice des rembourrages du guidage latéral du siège doit regarder chaque fois vers l‘extérieur / l‘avant. (Fig. 8) Enfilez
le rembourrage sur le guidage latéral du siège. (Fig. 9) Fermez la fermeture à glissières. (Fig. 10)
Ceinture en H
La poussette de rééducation Swifty 2 est équipée standard d‘une ceinture en H.
Ouvrir la fermeture de ceinture
Pour ouvrir la ceinture en H, maintenir le bouton-poussoir (1) rouge appuyé, ouvrir la fermeture à clip (2 et 3) et détacher la ceinture (sécurité enfant). (Fig. 11)
Adapter la hauteur de ceinture aux épaules
Défaire la fermeture à glissières située à l‘arrière du rembourrage du dossier. Ouvrir les boucles à déclic supérieures et
extraire les ceintures par l‘avant. Ouvrir le rembourrage du dossier à la hauteur voulue, au niveau de la couture surpiquée. Faire passer les ceintures par les fentes apparues puis les refixer dans les boucles basculantes Refermer le rembourrage. (Fig. 12-13)
Retirer la ceinture en H
Défaire la fermeture à glissières située à l‘arrière du rembourrage du dossier. Ouvrir les boucles basculantes et extraire la
ceinture en H par l‘avant.
31

Manuel de l‘utilisateur – Swifty 2
Support de capote contre les intempéries
Swifty 2 est équipé standard de supports de capote contre les intempéries. (Fig. 14) La capote contre les intempéries est
disponible en option.
Possibilités de réglages
Modification de réglage du dossier
Détacher le levier de bridage au dos, régler l‘angle des hanches en déplaçant l‘étrier dorsal sur le rail dorsal puis réimmobiliser le levier. (Fig. 15)
Longueur au niveau des jambes inférieures
Desserrer les vis à 6 pans creux (3 mm) sur les côtés droits et gauches contre les guidages tubulaires du repose-pieds.
Déplacer le repose-pied sur le tube de cadre pour l‘amener sur la position souhaitée puis revisser les vis à fond. (Fig. 16)
Repose-pieds
Le repose-pieds est repliable vers le haut pour faciliter le transfert dans la poussette. (Fig. 17)
Fonction de frein de stationnement
Pour serrer le frein, poser le pied sur l‘étrier de frein et pousser vers le bas. Pour desserrer le frein, posez le pied sous
l‘étrier de frein puis déplacez-le vers le haut. (Fig. 18)
Fonction d‘immobilisation des roues avant
Serrer : Aligner la roue avant sur le sens de marche puis faire encranter le loqueteau de retenue à déclic (elle encrante
audiblement)
Desserrer : Extraire le loqueteau de retenue puis l‘immobiliser par une rotation à 90°. (Fig. 19)
Montage des ceintures
En fonction de la hauteur de fixation souhaitée, défaire le rembourrage du dossier au niveau des coutures surpiquées.
Suivant la taille de l‘enfant, faire passer les deux ceintures par les orifices ménagés dans le rembourrage puis les faire
passer par les fentes ménagées dans la plaque dorsale avant. (Fig. 12) Ouvrir la fermeture à glissières derrière le rembourrage du dossier puis faire passer les ceintures dans les boucles basculantes et régler les ceintures sur la longueur
voulue. (Fig. 13) Les deux extrémités inférieures de ceinture peuvent être fixées à l‘arrière contre la plaque dorsale au
moyen de boucles basculantes. (Fig. 20) Amener les ceintures sur les côtés droit et gauche du rembourrage dorsal vers
la boucle basculante correspondante puis les fixer. Refermer le rembourrage du dossier (Fig. 6-7)
ASTUCE: En plus, il est également possible de régler la longueur de ceinture à l‘avant. À cette fin, tirer la boucle en D
pour raccourcir la ceinture.
Les ceintures avant de la ceinture abdominale à 4 points se fixent également sur les côtés droit et gauche sous la surface
du siège à l‘aide d‘une boucle basculante. Faire passer la ceinture entre le guidage latéral et la plaque de siège puis
l‘introduire dans la boucle basculante et la fixer ensuite. (Fig. 21-22)
Aide au basculement (accessoire)
Placer le pied sur l‘aide au basculement, retenir la poussette de rééducation avec les deux mains et entamer le basculement. (Fig. 23)
Transport
En vue du transport, la poussette de rééducation Swifty 2 peut être repliée puis rangée dans le coffre d‘un véhicule.
Veuillez ce faisant respecter les consignes relatives au pliage de la poussette de rééducation et utilisez la sécurisation du
pliage pour empêcher un dépliage involontaire.
La poussette de rééducation Swifty 2 peut être soulevée par les pièces latérales du cadre ou par l‘essieu arrière.
32

Manuel de l‘utilisateur – Swifty 2
Utilisation comme siège dans un véhicule motorisé
La poussette de rééducation Swifty 2 en variante « Crash » a passé avec succès le crash-test conformément à la norme
internationale ISO 7176/19 et à la norme ANSI/RESNA WC 4 section 19, raison pour laquelle elle peut être utilisée
comme siège dans un véhicule motorisé.
IMPORTANT: Si la Swifty 2 doit être utilisée comme siège dans un véhicule motorisé, il faut respecter les instructions suivantes.
La poussette de rééducation Swifty 2 a été développée pour le transport dans le sens avant. Chaque fois que possible,
l‘utilisateur doit être transféré sur l‘un des sièges du véhicule et attaché avec le système de ceinture installé. Pour fixer
la poussette de rééducation Swifty 2 au plancher du véhicule, n‘utilisez que des systèmes de ceinture connectés au
châssis / pour harnacher des personnes, qui sont conformes à la norme ISO 10542.
Les 4 points de fixation sur la Swifty 2 sont repérés par les symboles suivants :
Préparatifs sur la Swifty 2 pour la transporter :
1. Retirez les pièces suivantes (si montées) : Bloc d‘abduction, tablette thérapeutique, capotage contre les intempéries,
ombrelle, guidon et contenus dans le panier.
2. Positionnez correctement la poussette dans le véhicule via les rails installés, dans le sens de la marche avant. Actionnez le frein de stationnement.
3. Assurez-vous que le dispositif de réglage d‘angle des hanches est allumé.
Fixation de la Swifty 2 dans un véhicule à moteur :
1. La poussette de rééducation doit être fixée de manière sûre contre le véhicule avec un système de ceinture à 4
points (selon ISO 10542-2, SAE 2249 ou DIN 75078/2). (Les fabricants de ces systèmes de ceinture sont par ex.
Unwin Safety Systems et Q‘Straint)
2. Le conducteur et/ou l‘assistant devraient être familiarisés avec l‘utilisation de ces systèmes de ceintures / systèmes de retenue.
3. Les deux ceintures avant (mousqueton) doivent être fixés à gauche et à droite dans les bagues en acier situées audessus de la fourche de roue avant. (Fig. 24)
4. Les deux ceintures arrière (mousqueton) doivent être fixées contre les deux œillets de sécurité contre le cadre
arrière. (Fig. 25)
Enfiler le système de retenue
1. Le crash-test a été effectué avec la ceinture en H (elle fait partie de l‘équipement de base) Cette ceinture en H
devrait être utilisée sous la ceinture du système de retenue.
2. L‘utilisateur doit être sécurisé avec un système de retenue homologué. Thomashilfen recommande d‘utiliser une
ceinture automatique ou un système de retenue en 3 points dans lequel la ceinture au bassin et celle aux épaules
peuvent être séparées l‘une de l‘autre. C‘est nécessaire pour pouvoir faire passer le système de retenue correctement
par le châssis de la Swifty 2. (Fabricants : par ex. Unwind Safety Systems et AMF-Bruns)
3. Le conducteur et/ou l‘assistant devraient être familiarisés avec l‘utilisation de ces systèmes de ceintures / systèmes de retenue.
4. La ceinture au bassin de l‘utilisateur doit appliquer à plat contre le bassin de ce dernier, sans contact avec le ventre.
La ceinture au bassin doit circuler à droite et à gauche entre le guidage latéral et l‘utilisateur. (Fig. 26)
5. La ceinture au bassin ne doit pas être maintenue éloignée de l‘utilisateur par des pièces de la poussette de rééducation (pièces latérales, roues). (Fig. 27)
REMARQUE: Ne pas tordre la bande plate formant la ceinture en la mettant en place.
6. L‘angle de la ceinture au bassin doit être compris entre 30° et 75°. (Fig. 28)
7. La ceinture au bassin doit épouser le plus possible la morphologie de l‘utilisateur sans toutefois que ce dernier ne
ressente d‘inconfort.
8. La ceinture au thorax du système de retenue doit être fixée, contre la paroi du véhicule, à une hauteur assurant que
la bande formant la ceinture se trouve au milieu de l‘épaule de l‘utilisateur et passe sous le guidon. (Fig. 27)
REMARQUE: Seule une ceinture aux épaules qui est fixée contre la paroi latérale du véhicule se conforme aux exigences actuelles et permet d‘attacher l‘utilisateur de manière sûre.
33

Manuel de l‘utilisateur – Swifty 2
Numéro du produit / de série
Pour obtenir les pièces de rechange correctes ou lors de
possibles rappels techniques possibles, nous avons fondamentalement besoin que vous nous indiquiez le numéro de
série et le numéro de référence exact de l›article.
Le numéro de série et le numéro de référence de la poussette de rééducation Swifty 2 se trouvent sur l›étiquette à
code-barres apposée sous le siège.
Numéro d‘article
Numéro de série /
de lot
Consignes de nettoyage, de désinfection et d’entretien
Le châssis a été fabriqué en tube d‘acier de haute qualité. Le châssis est revêtu d‘une peinture émaillée résistante qu’il
est possible de nettoyer et de désinfecter avec des savons en vente habituelle dans le commerce.
Désinfection
Avant la désinfection, lavez les rembourrages et les poignées. Essuyez toutes les pièces du produit avec un produit
désinfectant. Il ne faut utiliser que des produits à base d›eau. Lors de la désinfection, il faut respecter les consignes
d›utilisation du fabricant correspondant.
Rembourrages
Tous les rembourrages s‘enlèvent facilement, en quelques gestes. Le matériau 100 % Trevira CS est un textile de haute
qualité lavable jusqu’à 40 °C. Les rembourrages sont à laver séparément ; avant le lavage, il faut recouvrir ou fermer les
bandes Velcro. Veuillez aussi respecter la consigne d‘entretien à ce sujet.
Nous attirons votre attention sur le fait que les tissus de haute qualité peuvent se décolorer suite à un rayonnement
solaire permanent et intensif ou à des lavages fréquents. Le rembourrage est difficilement inflammable (EN 1021-1 et EN
1021-2).
Fermetures à bande Velcro
Pour que les fermetures à bande Velcro demeurent opérationnelles, nettoyer les bandes Velcro de temps en temps avec
une brosse. Lors du lavage, toujours fermer les bandes Velcro ou les recouvrir.
Conditions de la garantie / Marquage CE
À compter de la date d›achat, Thomashilfen vous offre 3 ans de garantie sur toutes les pièces du cadre. La garantie comprend tous les recours en restriction de fonctionnement. Ne sont pas couverts par la garantie les dommages provoqués
par un maniement incorrect (surcharge par ex.), ainsi que l›usure naturelle.
Swifty 2 répond aux exigences des normes européennes EN 12182 et EN 12183 et arbore également un label CE.
Nous vous souhaitons beaucoup d›agréments à l›usage de votre poussette de rééducation Swifty 2 !
34

Manuel de l‘utilisateur – Swifty 2
Plan de maintenance - Inspection annuelle / Remise en service
Préparatifs
Un mode d‘emploi doit avoir été joint au produit. Si ce n‘est pas le cas, veuillez le demander auprès du fabricant. Familiarisez-vous avec les fonctions du produit. Si vous ne connaissez pas le produit, étudiez bien le mode d‘emploi avant le
contrôle. Nettoyez le produit avant de commencer le contrôle. Veuillez respecter les instructions d‘entretien et instructions de contrôle spécifiques au produit éventuellement énoncées dans le mode d‘emploi.
Zone
Pos.
1 Siège I/R I/R I/R
2 Modification de l'angle I/R I/R I/R
3 Réglage en hauteur I/R I/R I/R
4 Rembourrage siège I R
5 Caches et bouchons manquants I/R
6 Dos I/R I/R I/R
7 Modification de l'angle I/R I/R I/R
8 Réglage en hauteur I/R I/R I/R
9 Rembourrage dos I R
10 Barre de poussée I/R I/R I/R
11 Enrobage barre de poussée I R
12 Châssis inférieur I/R I/R I/R
13 Pneumatiques I I I R
14 Frein de stationnement I/R I/R I/R
15 Appuie-tête I/R I/R I/R
16 Rembourrage d'appuie-tête I R
17 Pelotes thoraciques I/R I/R I/R
18 Rembourrage pelotes thoraciques I R
19 Accoudoirs I/R I/R I/R
20 Garnitures d'appui des bras I R
21 Pelotes au niveau des hanches I/R I/R I/R
22
23 Cale d'abduction I/R I/R I/R
24 Rembourrage de cale d'abduction I R
25 Pelotes au niveau des tibias I/R I/R I/R
26 Rembourrage au niveau des tibias I R
27 Tablette de thérapie I/R I/R I/R
28 Ceintures I/R I/R I/R
L'opération de maintenance a été réalisée le :
= Contrôle terminé
Options
Rembourrage des pelotes au niveau des hanches
(I = Inspection / R = Remise en service)
Fonction Endomm. Déform. Remplacer
I R
Les opérations de SAV et de réparation sur le fauteuil de rééducation ne doivent être réalisées que par le commerce
spécialisé. L‘utilisateur de ce fauteuil de rééducation doit veiller à ce que les inspections / maintenances prescrites soient
effectuées régulièrement et à temps. Si un dommage a été détecté, l‘utilisateur doit le notifier spontanément et faire
immédiatement supprimer le dommage par du personnel qualifié. Lors des réparations ne doivent être utilisés que des
pièces de rechange d‘origine (la liste des pièces en échange standard / pièces de rechange se trouve dans l‘espace Téléchargement sur notre site Internet www.thomashilfen.com).
Les opérations de démontage / montage sont exclusivement réservées à du personnel qualifié ! Si vous devez effectuer
un renvoi à votre revendeur spécialisé, veillez bien à emballer le châssis de façon sûre en vue du transport.
35

Manual del usuario – Swifty 2
Estimado usuario de Swifty 2:
La silla de rehabilitación Swifty 2 es un producto médico moderno y de gran calidad que seduce por su atractivo diseño. En su concepción se han integrado las ideas de los padres, que conocen el manejo diario de productos de rehabilitación y las necesidades de sus hijos respecto a este tipo de productos.
Los productos de rehabilitación no tienen por qué tener un diseño que revele su uso y, sin embargo, Swifty 2 cumple
todos los requisitos de una buena silla de rehabilitación: la longitud de la pantorrilla se puede ajustar gradualmente, los
materiales de gran calidad y la firmeza de su estructura aseguran la comodidad y un manejo seguro. Debido a su peso
ligero y sus ruedas oscilantes, esta silla de rehabilitación resulta muy manejable a pesar de su gran robustez. Se pliega
de forma fácil y rápida y se puede guardar en cualquier maletero.
Para que el manejo de la silla de rehabilitación Swifty 2 sea cómodo, práctico y seguro para usted y, en especial, para el
niño, lea primero este manual del usuario.
Si tiene alguna duda o problema, diríjase a su distribuidor especializado o contacte directamente con nosotros.
A tal efecto, le remitimos también a nuestra página web www.thomashilfen.com, en la que encontrará información
actualizada e importantes indicaciones de seguridad para nuestros productos, o información sobre posibles retiradas de
productos.
Nuestra dirección: Thomas Hilfen für Körperbehinderte
GmbH & Co. Medico KG
Walkmühlenstraße 1
D - 27432 Bremervörde
Teléfono.: +49 (0) 4761 886-68 o -63
www.thomashilfen.com
Índice Página
Exámenes técnicos de seguridad e intervalos de mantenimiento ....................................................................... 37
Finalidad y lugares de uso ................................................................................................................................ 37
Normas generales de seguridad........................................................................................................................ 38
Riesgos de aplicación y contraindicaciones ...................................................................................................... 39
Símbolos y letreros .......................................................................................................................................... 39
Datos técnicos y variantes ................................................................................................................................ 40
Contenido del suministro ................................................................................................................................. 40
Equipamiento básico ........................................................................................................................................ 40
Colocación y montaje ...................................................................................................................................... 40
Posibilidades de ajuste ..................................................................................................................................... 42
Función de freno de retención ......................................................................................................................... 42
Función de retención de las ruedas delanteras .................................................................................................. 42
Montaje de los cinturones ................................................................................................................................ 42
Soporte de inclinación ..................................................................................................................................... 42
Transporte ....................................................................................................................................................... 42
Uso como asiento en un vehículo a motor ....................................................................................................... 43
Número de producto / de serie ........................................................................................................................ 44
Instrucciones de limpieza, desinfección y cuidados .......................................................................................... 44
Condiciones de garantía / símbolo CE .............................................................................................................. 44
Plan de mantenimiento – inspección anual / reutilización ................................................................................. 45
36

Manual del usuario – Swifty 2
Exámenes técnicos de seguridad e intervalos de mantenimiento
Si detecta algún problema en la realización de los exámenes periódicos, informe inmediatamente a su distribuidor local
o a Thomashilfen.
Mantenimiento periódico / diario
Los familiares y cuidadores pueden desempeñar fácilmente las siguientes tareas de mantenimiento. La llave Allen incluida es necesaria para fijar los reposapiés.
1. Seque siempre la silla de rehabilitación cuando se haya mojado. No la guarde húmeda después de usarla.
2. Asegúrese de que los dos tornillos Allen estén montados en los reposapiés y compruebe diariamente, con la llave
Allen, si los tornillos están bien apretados.
3. Compruebe si todas las tuercas, los pernos y los tornillos están bien apretados (a diario).
4. Compruebe la funcionalidad del respaldo, del mecanismo de plegado y de la posición de reposo (semanalmente).
5. Antes de usar la silla de rehabilitación, compruebe siempre el buen funcionamiento de los frenos.
6. Cuando sea necesario, limpie el bastidor de la silla de rehabilitación (recomendación: como mínimo, una vez a la
semana).
7. Asegúrese de que el tapón de plástico del mecanismo de plegado esté fijado en la posición correcta (a diario, fig. 1).
Mantenimiento semestral
Las siguientes tareas de mantenimiento se deben encomendar a un distribuidor con el conocimiento especializado correspondiente o a un taller de reparaciones autorizado. Si detecta defectos o problemas de funcionamiento importantes,
no use la silla de rehabilitación hasta que se hayan subsanado dichos defectos.
1. Despliegue la silla de rehabilitación y vuelva a plegarla comprobando si todos los movimientos se pueden efectuar
sin problemas. Examine si el bastidor presenta algún tipo de daño.
2. Compruebe la funcionalidad y las posibilidades de ajuste de la silla de rehabilitación y, especialmente, el ajuste del
respaldo.
3. Compruebe la firmeza y el estado general de tuercas, tornillos, bisagras y tapones.
4. Examine los frenos para detectar desgaste, daños y problemas de funcionamiento.
5. Compruebe si hay objetos afilados en las ruedas o si presentan cortes o grietas.
6. Examine las ruedas y las horquillas para detectar un posible desgaste excesivo.
7. Compruebe si las ruedas delanteras y traseras se mueven libremente y de forma segura. Elimine el polvo, la arena u
otras impurezas con un trapo seco sin pelusas.
8. Compruebe el funcionamiento de los bloqueos de las ruedas.
9. Examine todas las piezas de plástico para detectar deformaciones o roturas.
Finalidad y lugares de uso
La silla de rehabilitación Swifty 2 está diseñada para el traslado (máx. a velocidad de paseo) de niños con discapacidad
por parte de sus padres u otros auxiliares adecuados sobre un terreno firme y llano, tanto en interior o en exterior. La
silla de rehabilitación Swifty 2 no se debe usar para otros fines (p. ej. como medio de transporte para varios niños, para
transportar la compra, etc.).
A fin de permitir un uso ergonómico para el acompañante, se puede ajustar la altura del manillar deslizante.
Swifty 2 está homologada para el traslado de niños en vehículos a motor / vehículos para discapacitados conforme a
ISO 7176-19 y ANSI/RESNA WC 4 sección 19.
37

Manual del usuario – Swifty 2
Por favor, observe las siguientes instrucciones de seguridad
• Antes de usar la silla por primera vez, lea atentamente el manual del usuario o, si tiene dificultades de visión, pida
que se lo lean en voz alta. Si se pierde el manual del usuario, puede descargarlo cuando desee en el área de descargas de nuestra página web www.thomashilfen.com. El documento en PDF guardado también se puede visualizar en
formato ampliado.
• Le recomendamos adaptar la longitud de las piernas a las medidas reales del niño, al menos, una vez cada 3 meses.
Si corresponde, hágalo con ayuda de su terapeuta /técnico en ortopedia.
• Su niño debe estar siempre sujeto con el cinturón H (equipamiento estándar) o con otro cinturón de retención (disponible como accesorio).
• ATENCIÓN: Las ruedas mojadas puede dificultar la acción de los frenos. Al parar o en una pausa prolongada, sujete
la silla de rehabilitación con el freno de pie, para evitar que salga rodando de manera imprevista.
• IMPORTANTE: No deje el freno puesto si no va a usar la silla de rehabilitación durante un periodo prolongado. De
lo contrario, el freno constantemente activado puede dañar las ruedas traseras.
• ATENCIÓN: En el hueco entre el bastidor y la barra de activación de los frenos pueden engancharse prendas de
ropa o partes del cuerpo en la zona de los pies.
• ATENCIÓN: En el hueco entre el asiento de la Swifty 2 y el bastidor pueden engancharse prendas de ropa o partes
del cuerpo en la zona del asiento.
• ATENCIÓN: En el hueco entre los laterales del asiento de la Swifty 2 y el tubo trasero pueden engancharse prendas
de ropa o partes del cuerpo en la zona del asiento.
• ATENCIÓN: En el hueco entre el reposapiés y el tubo soporte del reposapiés pueden engancharse prendas de ropa
o partes del cuerpo en la zona de los pies.
• No sobrecargue su silla de rehabilitación Swifty y respete el peso máximo del usuario (ver datos técnicos).
• Las prendas reflectantes permiten que otros participantes del tráfico rodado puedan verles a usted y al niño en la
oscuridad – haga uso de ellas.
• Para levantar la silla de rehabilitación, sujétela mediante piezas soldadas o atornilladas. (Tubo del bastidor delantero
sobre las ruedas delanteras, eje trasero, manillar / barra de empuje)
• Si la luz solar es intensa, la tapicería negra puede alcanzar temperaturas superficiales muy altas, lo que implica
riesgo de quemaduras por contacto en la espalda y las piernas. Por eso, asegúrese siempre de que Swifty 2 no esté
expuesta a estas fuentes de calor durante su uso y almacenamiento, y no la use hasta que se haya enfriado suficientemente.
• Asegúrese de no lesionarse al subir los reposapiés, ajustar el respaldo o desplegar y plegar la silla.
• Si cuelga bolsas pesadas o redes de compra de la silla de rehabilitación, aumenta el riesgo de vuelco. Use la cesta
(disponible como accesorio) situada bajo la silla.
• Cuando use la silla de rehabilitación, especialmente al desmontarla y montarla, siga las recomendaciones de este
manual del usuario.
• Nunca deje al niño en la silla de rehabilitación Swifty 2 sin supervisión.
• Al colocar y sacar al niño, el freno de bloqueo de la silla de rehabilitación debe estar activado.
• No deje que el niño suba o baje de la silla de rehabilitación sin supervisión. Si se apoya excesivamente en el reposapiés existe riesgo de resbalar o volcar.
• Mantenga a los niños alejados del embalaje de plástico: existe riesgo de asfixia.
• Solo se puede colocar a un niño en la silla de rehabilitación.
38

Manual del usuario – Swifty 2
Riesgos de aplicación y contraindicaciones
Con un uso adecuado se pueden descartar los riesgos de su aplicación. No se conocen contraindicaciones. El material
de tapizado de la Swifty 2 es “difícilmente inflamable”, probado conforme a DIN EN 1021-1 y DIN EN 1021-2.
La resistencia contra la ignición en materiales y componentes se ha comprobado conforme a la normativa. Los materiales y componentes se han considerado inocuos.
Símbolos y letreros
Pegatina Significado
Placa de características/pegatina con capacidad
de carga
La placa de características se encuentra situada bajo el
asiento.
En la placa de características se indica el fabricante, incluyendo la dirección, el nombre del modelo, la carga
máxima admisible y el símbolo CE.
Etiqueta con el código de barras
La etiqueta del código de barras se encuentra situada
bajo el asiento.
En la etiqueta con el código de barras se indica el
número de artículo, el nombre, el número de serie y la
fecha de fabricación del producto.
Marca los 4 puntos de fijación de la Swifty 2 para fijarla
al vehículo de transporte de discapacitados.
39

Manual del usuario – Swifty 2
Datos técnicos y variantes
Swifty 2
Profundidad del asiento 375 mm
Anchura del asiento 395 mm
Altura del respaldo 700 mm
Longitud de la pierna 210 - 370 mm
Guía lateral (anch. x alt.) 250 x 160 mm
Ángulo de la cadera 90° - 100°
Ángulo del pie 90°
Inclinación del asiento fijo + 20°
Inclinación segura de vuelco hasta un máximo de 10°
Tamaño reposapiés (ancho x prof.) 310 x 200 mm
Dimensiones totales (long x an x alt) 980 x 670 x 1130 mm
Dimensiones plegada (long x an x alt) 790 x 670 x 490 mm
Altura del manillar 820 - 1240 mm
Radio de giro 1260 mm
Tamaño de la rueda (delantera (ruedas oscilantes) / trasera) 180 mm / 250 mm
Anchura de la rueda (delantera (ruedas oscilantes) / trasera) 45 mm / 50 mm
Peso 18,2 kg
Peso máx. del usuario 50 kg
Carga máxima de la cesta (accesorio) 3 kg
La silla de rehabilitación Swifty 2 se puede adquirir en las siguientes variantes:
Nº de artículo Denominación Equipamiento
6808 Silla de rehabilitación Swifty 2 Crash Silla de rehabilitación incluyendo tapicería, cinturón en H
y reposapiés; equipada y homologada para su uso como
asiento en un vehículo a motor
Contenido del suministro
La silla de rehabilitación Swifty 2 se suministra premontada. Swifty 2 incluye, de fábrica, la tapicería del asiento y del
respaldo, así como las tapicerías de las guías laterales del asiento. Además, Swifty 2 incluye un manual del usuario y
una llave Allen. La llave Allen es necesaria para ajustar la altura de los reposapiés.
Equipamiento básico
Bastidor ligero y plegable con asiento integrado; cinturón en H; funda ignífuga; tapicería transpirable; respaldo con
ajuste del ángulo de la cadera; ruedas delanteras oscilantes con bloqueo; neumáticos de EVA a prueba de pinchazos;
reposapiés ajustables en altura y plegables; freno de bloqueo de pie; manillar ajustable en altura.
Colocación y montaje
Los ajustes / adaptaciones se deben encomendar siempre a profesionales con la debida formación o instrucción (p. ej.
asesores de productos médicos del comercio sanitario).
Para la primera puesta en servicio de la Swifty 2 no se requieren más herramientas que la llave Allen incluida en el
suministro.
El montaje / desmontaje de los accesorios se realiza con herramientas ordinarias. Los accesorios se suministran con
instrucciones independientes de montaje y uso. En caso de no estar incluidas, encontrará los manuales en el área de
descargas de nuestra página web www.thomashilfen.com.
40

Manual del usuario – Swifty 2
Plegado
NOTA: Asegúrese de que la silla de rehabilitación no se caiga al suelo mientras la pliega, para evitar que se combe o
se dañe el bastidor. Asegúrese de que el tapón de plástico del mecanismo de plegado esté en la posición correcta (el
extremo superior del tapón está orientado al respaldo de la silla de rehabilitación). (fig. 1)
Desplegado
La silla de rehabilitación Swifty 2 tiene un seguro de plegado en las articulaciones del manillar. Para desplegarla, se
debe liberar el seguro por cada lado, pulsando uno de los botones (fig. 2). A continuación, sujete la silla por arriba y
por un lateral y, con un movimiento oscilante, tire hacia arriba (se oye cómo encaja el pasador). Suelte la palanca del
respaldo y ajuste el ángulo deseado para la espalda (véase el ajuste del respaldo). Ajuste la posición deseada del manillar ajustable en altura pulsando los botones laterales (fig. 3).
Plegado para guardar (tamaño mínimo)
Suelte la palanca del respaldo. Tire de los pasadores del manillar (a derecha e izquierda) (fig. 1) y sujete el arco de seguridad montado a la derecha. Con la mitad superior, presione el manillar hacia delante y pliegue la silla hacia delante.
(fig. 4) Presione el respaldo hacia abajo y vuelva a fijar la palanca. Pliegue el manillar hacia abajo sobre el respaldo.
El seguro de plegado permite evitar que la silla de rehabilitación Swifty 2 se abra inesperadamente. A tal efecto, suelte a
cada lado un botón del seguro de plegado (fig. 2), pase el cinturón alrededor del bastidor delantero y cierre de nuevo el
botón. Ahora, Swifty 2 se puede sujetar con seguridad y transportar por los tubos del bastidor.
Tapizado del asiento y el respaldo
El tapizado del asiento y el respaldo es de una pieza. Se coloca cubriendo el respaldo de modo que el logotipo rojo de
Swifty quede situado hacia delante y la parte inferior del tapizado esté situada sobre el asiento. El respaldo del tapizado
está dividido en dos y se cierra con una cremallera. Pase las dos mitades de la parte posterior del tapizado bajo el arco
posterior de Swifty 2. (fig. 5) Ponga el tapizado en posición y cierre la cremallera. (fig. 6) Finalmente, se cierra el velcro
en la parte inferior del respaldo. (fig. 7)
Tapizado de las guías laterales
La abertura del tapizado de las guías laterales del asiento debe quedar orientada hacia fuera / delante. (Fig. 8). Pase el
tapizado sobre la guía lateral del asiento. (Fig. 9). Cierre la cremallera. (Fig. 10)
Cinturón en H
La silla de rehabilitación Swifty 2 está equipada, de serie, con un cinturón en H.
Abrir el cinturón
Para abrir el cinturón en H, mantenga pulsado el botón rojo (1), abrir el cierre de clip (2 y 3) y soltar el cinturón (sujeción para niños). (Fig. 11)
Adaptación de la altura del cinturón de los hombros
Abra la cremallera del tapizado por detrás. Abra la hebilla superior y sacar el cinturón desde delante. Separe el tapizado
a la altura deseada por la costura pespunteada. Pase el cinturón por las ranuras creadas y vuelva a fijarlo en las hebillas.
Cierre de nuevo el acolchado. (Fig. 12-13)
Retirar el cinturón en H
Abra la cremallera del tapizado por detrás. Abra las hebillas y saque el cinturón en H desde delante.
41

Manual del usuario – Swifty 2
Soporte del techo
Swifty 2 está equipada, de serie, con soportes para el techo (fig. 14). El techo se puede adquirir como accesorio.
Posibilidades de ajuste
Ajuste del respaldo
Suelte la palanca del respaldo, ajuste el ángulo deseado para la cadera desplazando el arco de la espalda sobre los
rieles y vuelva a fijar la palanca. (Fig. 15)
Longitud de la pierna
Suelte los tornillos Allen (3 mm) de la parte posterior derecha e izquierda de las guías de los tubos de los reposapiés.
Ponga los reposapiés en la posición deseada desplazándolos por el tubo del bastidor y apriete de nuevo los tornillos.
(Fig. 16)
Reposapiés
Los reposapiés se pliegan hacia arriba para facilitar que los niños suban o bajen de la silla. (Fig. 17)
Función de freno de retención
Para fijar el freno, coloque el pie en el arco del freno y presione hacia abajo. Para soltar el freno, coloque el pie bajo el
arco y empújelo hacia arriba. (fig. 18)
Función de retención de las ruedas delanteras
Bloqueo: Oriente la rueda delantera recta y deje que el bloqueo encaje (se oye).
Para soltar: Saque el bloqueo y fíjelo girándolo 90º. (fig. 19)
Montaje de los cinturones
Separe el tapizado del respaldo según la altura de colocación deseada en las costuras pespunteadas.
Pase los dos cinturones superiores por las aberturas del tapizado e insértelos por las ranuras del panel del respaldo.
(Fig. 12) Abra la cremallera posterior del tapizado y, a continuación, meta los cinturones en las hebillas y ajústelos a la
longitud deseada. (Fig. 13) Los dos extremos inferiores de los cinturones se pueden fijar por la parte posterior al panel
del respaldo con las hebillas (Fig. 20) Pase los cinturones a izquierda y derecha junto al tapizado del respaldo por las
hebillas correspondientes y fíjelos. Cierre de nuevo el tapizado del respaldo. (Fig. 6-7)
SUGERENCIA: La longitud de los cinturones también se puede ajustar por delante. Para ello, tire del aro en D para
acortar el cinturón.
Los cinturones delanteros del cinturón abdominal de 4 puntos se fijan a izquierda y derecha con una hebilla bajo el
asiento. Pase el cinturón entre la guía lateral y el panel del asiento, insértelo en la hebilla y fíjelo. (Fig. 21-22)
Soporte de inclinación (accesorio)
Coloque el pie sobre el soporte de inclinación, sujete la silla de rehabilitación con ambas manos e inclínela. (Fig. 23)
Transporte
La silla de rehabilitación Swifty 2 se puede plegar y guardar en un maletero para su transporte. A tal efecto, siga las instrucciones de plegado de la silla de rehabilitación para guardarla y use el seguro de plegado para evitar que se despliegue inesperadamente.
La silla de rehabilitación Swifty 2 se puede levantar sujetándola por los laterales del bastidor o por el eje trasero.
42

Manual del usuario – Swifty 2
Uso como asiento en un vehículo a motor
La silla de rehabilitación Swifty 2 en la variedad “Crash” ha superado con éxito la prueba de choque según la norma
internacional ISO 7176/19 y ANSI/RESNA WC 4, sección 19, y se puede usar como asiento en un vehículo a motor.
IMPORTANTE: Si se va a usar la Swifty 2 como asiento en un vehículo a motor, se deben seguir estas instrucciones.
La silla de rehabilitación Swifty 2 está diseñada para el transporte en el sentido de la marcha. Siempre que sea posible,
el usuario debe pasar a un asiento del vehículo y usar el sistema de cinturones instalado. Use únicamente sistemas de
cinturones para bastidores / personas que sirvan para fijar la silla de rehabilitación Swifty 2 al suelo del vehículo y que
cumplan la norma ISO 10542.
Los 4 puntos de fijación de la Swifty 2 aparecen marcados con el siguiente símbolo:
Preparativos en la Swifty 2 para el transporte:
1. Retire las siguientes piezas (si están montadas): bloque de abducción, mesa de terapia, techo protector, parasol,
asidero y contenido de la cesta.
2. Coloque la silla correctamente en el vehículo usando los raíles instalados en el sentido de la marcha. Active el freno
de bloqueo.
3. Asegúrese de que el ajuste del ángulo de la cadera esté fijado.
Fijación de la Swifty 2 en un vehículo a motor:
1. La silla de rehabilitación se debe fijar firmemente al vehículo con un sistema de cinturones de 4 puntos de anclaje
(según ISO 10542-2, SAE 2249 o DIN 75078/2). (Algunos fabricantes de estos sistemas de cinturones son, p. ej. Unwin Safety Systems y Q’Straint)
2. El conductor y/o el asistente deben estar familiarizados con el uso de estos sistemas de cinturones / de retención.
3. Los dos cinturones delanteros (con mosquetones) se deben fijar a izquierda y derecha en las argollas de acero sobre
la horquilla de las ruedas delanteras. (fig. 24)
4. Los dos cinturones posteriores (con mosquetones) se deben fijar a las dos argollas de seguridad del bastidor trasero.
(fig. 25)
Colocación del sistema de retención:
1. La prueba de impacto se realizó con el cinturón en H (parte del equipamiento básico). Este cinturón en H se debe usar
bajo el cinturón del sistema de retención.
2. El usuario debe estar sujeto con un sistema de retención homologado. Thomashilfen recomienda usar un cinturón
automático o un sistema de retención de 3 puntos, en el que el cinturón abdominal y el de hombro puedan separarse
entre sí. Es necesario para pasar correctamente el sistema de retención por el bastidor de la Swifty 2. (Fabricantes, p.
ej.: Unwin Safety Systems y AMF-Bruns)
3. El conductor y/o el asistente deben estar familiarizados con el uso de estos sistemas de cinturones / de retención.
4. El cinturón abdominal del usuario debe pasar plano sobre la pelvis sin contactar con el abdomen del usuario. La guía
del cinturón abdominal debe pasar a izquierda y derecha entre la guía lateral y el usuario. (Fig. 26)
5. Ninguna pieza de la silla de rehabilitación (laterales, ruedas) debe separar el cinturón abdominal del usuario. (Fig. 27)
NOTA: El cinturón no se debe colocar retorcido.
6. El ángulo del cinturón abdominal debe estar entre 30° y 75°. (Fig. 28)
7. El cinturón abdominal debe adaptarse lo más ajustado posible al usuario, sin que deje de resultar cómodo.
8. El cinturón torácico del sistema de retención se debe ajustar en altura a la pared del vehículo de modo que se garantice que el cinturón pase por el centro del hombro del usuario y bajo el manillar. (Fig. 27)
NOTA: Solo los cinturones de hombro fijados al lateral del vehículo cumplirán los requisitos actuales para retener al
usuario con seguridad.
43

Manual del usuario – Swifty 2
Número de producto / de serie
Para recibir los repuestos adecuados o para posibles consultas técnicas, necesitamos que se indique siempre el número
de serie y el número de artículo exacto.
Número de artículo
El número de serie y el número de artículo de la silla de
rehabilitación Swifty 2 se encuentra en la etiqueta con el
código de barras, colocada bajo el asiento.
Número de serie /
lote
Instrucciones de limpieza, desinfección y cuidados
El bastidor es de tubos de acero de gran calidad, revestidos con una pintura de polvo al fuego muy resistente y se puede limpiar y desinfectar con un jabón neutro convencional.
Desinfección
Limpie la tapicería y los mangos antes de desinfectarlos. Pase un paño humedecido en desinfectante por todas las piezas del producto. Debe emplearse únicamente un limpiador de base acuosa. En la desinfección se deben observar las
instrucciones de uso del fabricante correspondiente.
Tapizado
Todo el tapizado se puede retirar con muy pocas maniobras. La tela 100% Trevira CS es un tejido de gran calidad, lavable a 40°C. Los tapizados se deben lavar por separado y las tiras de velcro se cubrirán o cerrarán antes de lavarlas. Siga
las instrucciones de lavado.
Les informamos de que incluso las telas de gran calidad pueden perder color por la acción intensa y permanente de los
rayos de sol o los lavados frecuentes. El tapizado es difícilmente inflamable (EN1021-1 y EN 1021-2).
Velcro
Para mantener la funcionalidad del velcro, limpie de vez en cuando las tiras de velcro con un cepillo. Cierre siempre el
velcro antes de lavarlo.
Condiciones de la garantía / símbolo CE
Thomashilfen le ofrece, a partir de la fecha de compra, 3 años de garantía para todas las piezas del bastidor. La garantía incluye todas las reclamaciones que afectan al funcionamiento. Quedan descartados los daños producidos por un
manejo inadecuado (p. ej. sobrecarga) o desgaste natural.
Swifty 2 cumple los requisitos de la norma europea EN 12182 y EN 12183 y lleva incorporado el símbolo CE.
¡Deseamos que disfrute de su silla de rehabilitación Swifty 2!
44

Manual del usuario – Swifty 2
Plan de mantenimiento – inspección anual/ reutilización
Preparación
El producto debe incluir un manual del usuario. Si no es así, pídalo al fabricante. Familiarícese con las funciones del
producto. Si no conoce el producto, antes de probarlo estudie las instrucciones. Limpie el producto antes de inspeccionarlo. Si corresponde, observe las instrucciones de limpieza y las instrucciones de comprobación específicas del
producto incluidas en el manual del usuario.
Área
Pos.
1 Asiento I/R I/R I/R
2 Ajuste del ángulo I/R I/R I/R
3 Ajuste de la altura I/R I/R I/R
4 Acolchado del asiento I R
5 Tapas y tapones faltantes I/R
6 Respaldo I/R I/R I/R
7 Ajuste del ángulo I/R I/R I/R
8 Ajuste de la altura I/R I/R I/R
9 Acolchado del respaldo I R
10 Manillar I/R I/R I/R
11 Funda del manillar I R
12 Bastidor I/R I/R I/R
13 Ruedas I I I R
14 Freno de retención I/R I/R I/R
15 Reposacabezas I/R I/R I/R
16 Acolchado del reposacabezas I R
17 Soporte torácico I/R I/R I/R
18 Acolchado del soporte torácico I R
19 Reposabrazos I/R I/R I/R
20 Soportes brazos I R
21 Soporte pélvico I/R I/R I/R
22 Acolchado del soporte pélvico I R
23 Cuña de separación I/R I/R I/R
24 Acolchado de la cuña de separación I R
25 Soporte de la tibia I/R I/R I/R
26 Acolchado del soporte de la tibia I R
27 Bandeja de terapias I/R I/R I/R
28 Cinturones I/R I/R I/R
Se ha realizado el mantenimiento: con fecha:
= Revisión tramitada
Opciones
(I = Inspección / R = Reutilización)
Funcionamiento Daños Deformación Sustituir
El servicio técnico y las reparaciones en el carrito de rehabilitación se encomendarán exclusivamente al comercio especializado. El usuario de este producto de rehabilitación debe asegurarse de que las inspecciones y el mantenimiento
descritos se realicen periódicamente y a tiempo. Si detecta un daño, el usuario debe informar activamente y encargar a
un profesional su inmediata reparación. En las reparaciones se emplearán exclusivamente repuestos originales (encontrará la lista de repuestos en el área de Descargas (Download) de nuestra página web www.thomashilfen.com).
Solo se permitirá a personal especializado desmontar/montar las piezas de repuesto. Si es necesario devolver el producto a su comercio especializado, asegúrese de embalar correctamente el bastidor para su transporte.
45

Manual de instruções – Swifty 2
Caro(a) Utilizador(a) do Swifty 2,
O carrinho de reabilitação Swifty 2 é um produto medicinal moderno de elevada qualidade que se destaca pela sua
atratividade. As ideias dos pais foram propositadamente incluídas neste projeto, pois são eles que manuseiam diariamente os produtos de reabilitação e sabem quais são as necessidades dos seus filhos na utilização destes meios auxiliares.
A reabilitação não necessita de ser impreterivelmente evidenciada e o Swifty 2 cumpre, mesmo assim, com as exigências de um bom carrinho de reabilitação. O comprimento de pernas regulável sem escalonamentos, os materiais de
elevada qualidade e um assento bem fixo tornam o manuseamento confortável e seguro. O reduzido peso e as rodas
giratórias tornam este carrinho de reabilitação particularmente manobrável, não obstante a sua elevada capacidade de
carga máxima. É muito simples e rápido de dobrar e arruma-se com facilidade em qualquer porta-bagagens.
Leia primeiro as presentes instruções de utilização para que o manuseamento do carrinho de reabilitação Swifty 2 seja
prático e confortável para si e particularmente para a criança.
Caso, mesmo assim, tenha questões a colocar ou algum tipo de dificuldade, dirija-se à sua loja especializada ou diretamente aos nossos serviços.
Consequentemente pretendemos remete-lo(a) para a nossa página na internet em www.thomashilfen.com, na qual
pode consultar informações atualizadas, assim como importantes instruções de segurança relativas aos produtos ou
informar-se sobre eventuais recolhas de produto.
A nossa direção: Thomas Hilfen für Körperbehinderte
GmbH & Co. Medico KG
Walkmühlenstraße 1
D - 27432 Bremervörde
phone: +49 (0) 4761 886-68 o -63
www.thomashilfen.com
Conteúdo Página
Controlos técnicos de segurança e intervalos de manutenção ........................................................................... 47
Determinação da finalidade e dos locais de utilização ...................................................................................... 47
Indicações de segurança gerais ........................................................................................................................ 48
Riscos de utilização e contraindicações ............................................................................................................ 49
Símbolos e etiquetas de aviso .......................................................................................................................... 49
Dados técnicos e variantes ............................................................................................................................... 50
Composição e fornecimento ............................................................................................................................ 50
Equipamento básico ......................................................................................................................................... 50
Edificação e montagem .................................................................................................................................... 50
Possibilidades de regulação .............................................................................................................................. 52
Função de travão de imobilização .................................................................................................................... 52
Função de imobilização das rodas dianteiras .................................................................................................... 52
Montagem dos cintos ....................................................................................................................................... 52
Dispositivo auxiliar de inclinação ..................................................................................................................... 52
Transporte ....................................................................................................................................................... 52
Utilização como assento num veículo motorizado ............................................................................................ 53
Número de produto/série ................................................................................................................................. 54
Indicações de limpeza, desinfeção e conservação ............................................................................................ 54
Condições da garantia / Identificação CE .......................................................................................................... 54
Plano de manutenção – Inspeção anual / reutilização ....................................................................................... 55
46

Manual de instruções – Swifty 2
Controlos técnicos de segurança e intervalos de manutenção
Caso detete um problema aquando do controlo regular, informe imediatamente a sua loja especializada ou a Thomashilfen.
Manutenção regular/diária
Os familiares e cuidadores podem efetuar os seguintes trabalhos de manutenção simples. A chave sextavada interior,
juntamente fornecida, é necessária para a fixação do apoio dos pés.
1. Caso o carrinho de reabilitação se tenha molhado, seque-o sempre com um pano. Nunca arrume o carrinho molhado após a sua utilização.
2. Assegure-se de que ambos os parafusos sextavados se encontram no apoio dos pés e verifique, diariamente, com a
chave sextavada interior, se os parafusos estão bem apertados.
3. Verifique se todas as porcas, pinos e parafusos estão bem apertados (diariamente).
4. Verifique o funcionamento do encosto das costas, do mecanismo de dobragem e da posição de descanso (semanalmente).
5. Verifique o funcionamento dos travões sempre antes de utilizar o carrinho de reabilitação.
6. Limpe a estrutura do carrinho de reabilitação sempre que necessário (recomenda-se pelo menos uma vez por semana).
7. Assegure-se de que o tampão de plástico do mecanismo de dobragem se encontra fixamente seguro na posição
correta (diariamente, Fig. 1).
Manutenção semestral
Os seguintes trabalhos de manutenção deverão ser executados por uma loja que disponha do conhecimento técnico
competente ou uma oficina de reparação autorizada. Se detetar importantes falhas ou problemas de funcionamento, no
carrinho de reabilitação, não o utilize até que os mesmos tenham sido eliminados.
1. Desdobre e volte a dobrar o carrinho de reabilitação e verifique se todos os movimentos durante essa operação
funcionam sem qualquer perturbação. Verifique se a estrutura apresenta alguns danos.
2. Verifique o funcionamento e as possibilidades de regulação do carrinho de reabilitação e, particularmente, a capacidade de regulação do encosto para as costas.
3. Verifique as porcas, parafusos, dobradiças e os tampões da estrutura quanto às suas fixações e ao estado geral dos
mesmos.
4. Verifique o travão quanto a desgaste, a danos e em termos de funcionamento.
5. Verifique se as rodas contêm objetos cortantes e se existem cortes ou rasgos nas mesmas.
6. Verifique se as rodas e os garfos das rodas estão demasiados desgastados.
7. Verifique se as rodas dianteiras e traseiras rodam livremente e em segurança. Remova pó, areia ou outras sujidades
com um pano seco, sem pelos.
8. Verifique o funcionamento dos travões de imobilização das rodas.
9. Verifique todas as partes de plástico quanto a deformações e ruturas.
Determinação da finalidade e dos locais de utilização
O carrinho de reabilitação Swifty 2 é adequado para o transporte de crianças com deficiência (no máximo à velocidade
de passo), sendo conduzido pelos pais ou por outras pessoas habilitadas para o efeito, sobre chão resistente e plano,
tanto em zonas interiores como em exteriores. O carrinho de reabilitação Swifty 2 não pode ser utilizado para outros
fins (p. ex. para transportar outras crianças ou carregar com compras, etc.).
No sentido de proporcionar ao acompanhante uma utilização ergonómica, o punho para empurrar o carrinho pode ser
regulado em altura.
O Swifty 2 está licenciado para ser utilizado no transporte de crianças em veículos automóveis/veículos de transporte
de pessoas com deficiência, segundo a norma ISO 7176-19 e a ANSI/RESNA WC 4, secção 19.
47

Manual de instruções – Swifty 2
Atenda às seguintes indicações de segurança
• Antes da primeira utilização, leia cuidadosamente as instruções ou peça que lhas leiam, em caso de dificuldades de
leitura. Caso as instruções de utilização tenham sido perdidas, em qualquer altura pode descarregar as mesmas da
zona de downloads na nossa página de internet www.thomashilfen.com. O documento disponibilizado em formato
de PDF também pode ser apresentado em tamanho ampliado.
• Recomendamos-lhe ajustar o comprimento das pernas a cada 3 meses, para que o mesmo se ajuste à estatura
atualizada do corpo da sua criança. Isto deverá, se necessário, ocorrer mediante auxílio do seu terapeuta/técnico
ortopedista.
• A sua criança deverá ficar sempre segura pela ação do cinto tipo H (equipamento básico) ou através de outro cinto
de retenção (disponível como acessório).
• ATENÇÃO: Rodas molhadas podem limitar a capacidade de ação do travão. Quando parar de empurrar ou fizer
uma paragem mais prolongada deverá segurar o carrinho de reabilitação com o travão de imobilização acionado
pelo pé, para que se evite um deslizamento involuntário do mesmo.
• IMPORTANTE: Não deixe o travão acionado quando o carrinho de reabilitação não estiver a ser utilizado durante
um período de tempo mais prolongado. Caso contrário, as rodas traseiras poderão sofrer danos por causa do travão
estar permanentemente acionado.
• ATENÇÃO: O intervalo entre a estrutura e a barra que espoleta o travão pode representar um possível perigo de
prender a roupa ou os membros na zona dos pés.
• ATENÇÃO: O intervalo entre o assento do Swifty 2 e a estrutura do carrinho pode representar um possível perigo de
prender a roupa ou os membros na zona do assento.
• ATENÇÃO: O intervalo entre a guia lateral do assento do Swifty 2 e o tubo da barra das costas pode representar um
possível perigo de prender a roupa ou os membros na zona do assento.
• ATENÇÃO: O intervalo entre a placa dos apoios dos pés e o tubo dos apoios dos pés pode representar um possível
perigo de prender a roupa e os membros na zona dos pés.
• Não sobrecarregue o carrinho de reabilitação Swifty 2 e atenda ao peso de utilização máximo permitido (vide os
dados técnicos).
• A utilização de roupa refletora torna-o(a), a si e à sua criança, mesmo no escuro, visíveis aos outros participantes no
trânsito. Aproveite esta vantagem.
• Levante o carrinho de reabilitação apenas pelos componentes soldados ou aparafusados. (Tubo da estrutura dianteira localizado sobre as rodas dianteiras, eixo traseiro, punhos/pegas de empurrar).
• Com uma elevada radiação solar, a almofada preta pode vir a apresentar temperaturas de superfície elevadas. Nesse
caso existe o perigo de queimaduras nas costas e nas pernas aquando do contacto! Como tal, por princípio, tenha
o cuidado de não utilizar e arrumar o Swifty 2 em locais que estejam expostos a fontes térmicas e utilize-o apenas
quando já tiver suficientemente arrefecido.
• Tenha o cuidado de não se aleijar quando dobrar para cima o apoio dos pés, ao alterar a posição do encosto das
costas, assim como quando dobrar ou desdobrar o carrinho de reabilitação.
• Bolsas pesadas ou sacos de compras presos ao carrinho de reabilitação aumentam o perigo de o fazer tombar. Utilize o cesto (disponível como acessório) situado debaixo do assento.
• Repare, aquando do manuseamento do carrinho de reabilitação, particularmente ao dobrar e desdobrar do mesmo,
nas recomendações constantes destas instruções de utilização.
• Nunca deixe a criança sem supervisão no carrinho de reabilitação Swifty 2.
• Quando colocar ou retirar a criança do carrinho de reabilitação terá de ter o travão de imobilização do carrinho de
reabilitação acionado.
• Não deixe a sua criança sem supervisão aquando da entrada ou saída do carrinho de reabilitação, pois caso se faça
demasiado peso sobre o apoio dos pés, existe o perigo de escorregar ou de tombar.
• Mantenha as suas crianças longe das embalagens de plástico, pois existe o perigo de asfixia.
• Só pode ser colocada uma criança no carrinho de reabilitação.
48

Manual de instruções – Swifty 2
Riscos de utilização e contraindicações
Utilizado de modo adequado, podem-se excluir os riscos aquando da utilização do carrinho. Desconhecem-se quaisquer contraindicações. O material de almofada utilizado no Swifty 2 é «dificilmente inflamável», testado de acordo com
DIN EN 1021-1, assim como DIN EN 1021-2.
A capacidade de resistência contra inflamações de materiais e componentes foi testada de acordo com as normas e
considerada inócua.
Símbolos e etiquetas de aviso
Autocolantes Significado
Etiquetas dos modelos/Autocolantes relativos à
capacidade de carga
A etiqueta do modelo está colocada debaixo do assento.
A etiqueta do modelo indica o fabricante, incluindo a
direção, a identificação do modelo, a carga máxima
permitida e a identificação CE.
Código de barras
O código de barras está colocado debaixo do assento.
O código de barras contém a referência do artigo, a
designação, o número de série, assim como a data de
fabrico do produto.
Identifica os 4 pontos de fixação no Swifty 2 para garantir a segurança no carrinho de transporte de pessoas
com deficiência.
49

Manual de instruções – Swifty 2
Dados técnicos e variantes
Swifty 2
Profundidade do assento 375 mm
Largura do assento 395 mm
Altura do encosto 700 mm
Comprimento das pernas 210 - 370 mm
Guia lateral (L x A) 250 x 160 mm
Ângulo da anca 90° - 100°
Ângulo do pé 90°
Inclinação do encosto fixo + 20°
Inclinação segura contra tombos no máximo até 10°
Apoio grande dos pés (L x P) 310 x 200 mm
Medidas totais (C x L x A) 980 x 670 x 1130 mm
Medidas dobrado (C x L x A) 790 x 670 x 490 mm
Altura do punho de empurrar 820 - 1240 mm
Raio de viragem 1260 mm
Tamanho da roda (dianteira (rodas giratórias)/traseira) 180 mm / 250 mm
Largura da roda (dianteira (rodas giratórias)/traseira) 45 mm / 50 mm
Peso 18,2 kg
Peso máximo do utilizador 50 kg
Capacidade de carga máxima do cesto (acessório) 3 kg
O carrinho de reabilitação Swifty 2 está disponível na seguinte variante:
Nº do artigo Designação Equipamento
6808 Carrinho de reabilitação Swifty 2 Crash Carrinho de reabilitação, incluindo almofada, cinto tipo H e
apoio para os pés; equipado e licenciado para a utilização
como assento num veículo motorizado.
Composição do fornecimento
O carrinho de reabilitação Swifty 2 vem fornecido no estado pré-montado. O Swifty 2 vem almofadado de fábrica,
tanto no assento, como nas costas, assim como com as almofadas das guias laterais do assento colocadas. Além disso,
o Swifty 2 traz as instruções de utilização e uma chave sextavada interior. A chave sextavada interior é necessária para
regular a altura do apoio dos pés.
Equipamento básico
Estrutura rolante leve e dobrável com assento integrado; cinto tipo H; material de revestimento inibidor de chamas;
almofada de respiração ativa; encosto de costas regulável em termos do ângulo da anca; rodas dianteiras giratórias
incluindo travamento do giro; rodas em EVA seguras contra falhas; apoio dos pés regulável em altura e retirável; travão
de imobilização com o pé; punho de empurrar regulável em altura.
Edificação e montagem
As regulações/adaptações, por princípio, são executadas por técnicos especializados e formados (p. ex. pelos consultores de produtos medicinais do comércio especializado em saúde).
Para a primeira utilização do Swifty 2 não é necessário nenhuma ferramenta, para além da chave sextavada interior
juntamente fornecida.
A montagem e desmontagem dos acessórios é efetuada com ferramenta convencional. Os acessórios trazem instruções
de montagem e de utilização próprias. Na falta das mesmas, poderá descarregá-las, em qualquer altura, na zona de
downloads da nossa página de internet www.thomashilfen.com.
50

Manual de instruções – Swifty 2
Dobrar
AVISO: Ao dobrar o carrinho de reabilitação, tenha o cuidado de não o deixar cair no chão, evitando que se dobre a
estrutura e eventuais danos. Certifique-se de que o tampão de plástico do mecanismo de dobragem está colocado na
posição certa (a extremidade superior do tampão fica virada para o lado de trás do carrinho de reabilitação). (Fig. 1).
Desdobrar
O carrinho de reabilitação Swifty 2 dispõe, em ambas as articulações do punho de empurrar, de uma proteção contra
a dobragem. Para se desdobrar o mesmo há que soltar a proteção contra a dobragem, em ambos os lados, através de
um dos botões de pressão. (Fig. 2). Em seguida, agarre em cima, lateralmente, no punho de empurrar do carrinho e,
através de um movimento repentino, puxe-o para cima (os engates encaixam de modo audível). Solte a haste de aperto
nas costas para poder ajustar o ângulo desejado (vide regulação do encosto das costas). Ajuste o punho de empurrar
regulável em altura para a posição desejada, através do acionamento dos botões de pressão laterais. (Fig. 3).
Dobrar para o menor tamanho
Solte a haste de aperto nas costas. Puxe para cima os engates do punho de empurrar (lado direito e esquerdo) (Fig. 1) e
segure na haste de segurança montada do lado direito. Com o tronco pressione o punho de empurrar e dobre o carrinho para a frente. (Fig.4). Pressione o encosto das costas para baixo e volte a apertar a haste de aperto. Recline o punho
de empurrar sobre o encosto das costas.
Através da proteção contra a dobragem pode-se evitar uma abertura involuntária do carrinho de reabilitação Swifty 2.
Para tal, solta-se, de ambos os lados, um botão de pressão (Fig. 2), passa-se o cinto em torno da estrutura dianteira e
volta-se a fechar o botão de pressão. Agora pode-se agarrar nos tubos da estrutura e transportar o Swifty 2 com segurança.
Almofada do assento e das costas
A almofada do assento e das costas é constituída por uma peça apenas. A mesma é puxada sobre o encosto das costas
de modo a que o logotipo vermelho do Swifty aponte para a frente e a parte mais baixa da almofada assente na superfície de assento. O lado dorsal da almofada é dividido em duas partes e é fechado através de um fecho de correr. Passe
ambas as partes do lado dorsal da almofada por debaixo da haste dorsal do Swifty 2. (Fig. 5) Puxe a almofada para a
sua posição e feche o fecho de correr. (Fig. 6). Para concluir, feche o fecho de velcro na extremidade mais baixa das
costas. (Fig. 7).
Almofada de guia lateral do assento
A abertura das almofadas de guia lateral do assento devem respetivamente apontar para o lado exterior/frente. (Fig. 8).
Puxe a almofada sobre a guia lateral do assento. (Fig. 9). Feche o fecho de correr. (Fig. 10).
Cinto tipo H
O carrinho de reabilitação Swifty 2 vem com um cinto tipo H como equipamento básico.
Abrir o fecho do cinto
Para abrir o cinto tipo H, mantenha o botão de pressão vermelho (1) premido, abra o fecho clip (2 e 3) e solte o cinto
(proteção da criança). (Fig. 11).
Adaptar a altura de ombros do cinto
Abra o fecho de correr na parte de trás da almofada das costas. Abra as fivelas superiores e retire os cintos puxando
pelo lado da frente. Na altura pretendida, abra a almofada das costas junto à cosedura. Enfie os cintos através das frinchas criadas e volte a fixá-los nas fivelas. Volte a fechar a almofada. (Fig. 12-13).
Retirar o cinto tipo H
Abra o fecho de correr na parte de trás da almofada das costas. Abra as fivelas e retire o cinto tipo H pela parte da
frente.
51

Manual de instruções – Swifty 2
Suporte da proteção contra intempérie
O equipamento standard do Swifty 2 vem equipado com suporte de proteção contra intempérie. (Fig. 14). A proteção
contra intempérie está disponível como acessório.
Possibilidades de regulação
Regulação do encosto das costas
Solte a haste de aperto nas costas, ajuste o desejado ângulo de anca através do deslocamento da haste dorsal sobre a
calha de guia traseira e volte a fixar a haste. (Fig. 15).
Comprimento das pernas
Do lado direito e esquerdo, solte os parafusos sextavados (3 mm) situados nas guias tubulares do apoio dos pés. Através
do deslocamento pelo tubo da estrutura, coloque o apoio dos pés na posição pretendida e volte a apertar os parafusos.
(Fig. 16).
Apoio dos pés
O apoio dos pés é basculável para cima para facilitar a entrada das crianças no carrinho. (Fig. 17).
Função de travão de imobilização
Para fixar o travão, coloque o pé sobre a barra de travão e pressione-a para baixo. Para soltar o travão, coloque o pé
debaixo da barra de travão e puxe-a para cima. (Fig. 18).
Função de imobilização das rodas dianteiras
Imobilizar: coloque a roda dianteira virada para a frente e engate o travão (engata de modo audível).
Soltar: retire o engate do travão e fixe-o mediante uma rotação de 90º. (Fig. 19).
Montagem dos cintos
Conforme a altura pretendida, abra a almofada de encosto junto à cosedura.
Os dois cintos superiores deverão ser enfiados pelas aberturas da almofada e perpassados pelas ranhuras da placa dor-
sal. (Fig. 12). Abra o fecho de correr atrás da almofada das costas e, em seguida, enfie os cintos nas fivelas, ajustando
o comprimento desejado para o cinto. (Fig. 13). Ambas as extremidades inferiores do cinto podem ser fixadas na parte
detrás à placa dorsal, através das fivelas. (Fig. 20) Leve os cintos, do lado direito e esquerdo da almofada das costas,
para a respetiva fivela e fixe-os. Volte a fechar a almofada das costas. (Fig. 6-7).
TIPO: o comprimento dos cintos pode ser adicionalmente ajustado pelo lado da frente. Para tal, puxe pelo anel em
forma de D para poder encurtar o cinto.
Os cintos dianteiros do cinto subabdominal de 4 pontos são fixados, do lado direito e esquerdo, mediante uma fivela
debaixo do assento. Enfie o cinto entre a guia lateral e a placa de assento e encaixe-o na fivela de modo fixo. (Fig. 21-
22).
Dispositivo auxiliar de inclinação (acessório)
Colocar o pé no dispositivo auxiliar de inclinação, segurar a cadeira de passeio postural com ambas as mãos e incliná-
-la. (Fig. 23).
Transporte
Para ser transportado, o carrinho de reabilitação Swifty 2 pode ser dobrado e arrumado no porta-bagagens de um veículo automóvel. Relativamente a este assunto, tome nota das indicações relativas à dobragem do carrinho de reabilitação e utilize a proteção contra dobragem para evitar uma abertura involuntária do mesmo.
O carrinho de reabilitação Swifty 2 pode ser levantado pelas partes laterais da estrutura ou através do eixo traseiro.
52

Manual de instruções – Swifty 2
Utilização como assento em veículos motorizados
O carrinho de transporte Swifty 2, na variante «Crash», ficou aprovado no «Crash Test», de acordo com as normais internacionais ISO 7176/19 e ANSI/RESNA WC 4 secção 19 e pode ser utilizado como assento em veículos motorizados.
IMPORTANTE: Se o Swifty 2 for para ser usado num veículo motorizado, devem-se observar as seguintes indicações.
O carrinho de reabilitação Swifty 2 está desenvolvido para o transporte no sentido frontal. Sempre que possível, o utilizador deve ser colocado num dos bancos do veículo automóvel e deve ser colocado o sistema de cinto de segurança
instalado. Para prender o carrinho de reabilitação Swifty 2 ao veículo automóvel utilize apenas sistemas de cintos de
segurança para pessoas, presos ao chassi, que correspondam à norma ISO 10542.
Os 4 pontos de fixação no Swifty 2 estão identificados com o seguinte símbolo:
Preparação do Swifty 2 para o transporte:
1. Remova as seguintes peças (se estiverem montadas): bloco de abdução, mesa de terapia, proteção contra a intempérie, chapéu-de-sol, barra de proteção e conteúdos do cesto.
2. Posicione o carrinho no veículo automóvel corretamente sobre as guias instaladas na direção frontal. Acione o travão de imobilização.
3. Certifique-se de que a regulação do ângulo da anca está apertada.
Fixação do Swifty 2 num veículo motorizado:
1. O carrinho de reabilitação tem de ser fixado no veículo de modo seguro, mediante um sistema de cintos de 4 pontos (de acordo com a ISO 10542-2, SAE 2249 ou DIN 75078/2). (Os fabricantes destes sistemas de cintos são p. ex.
Unwin Safety Systems e Q’Straint).
2. O condutor e/ou assistente deverá estar familiarizado com a utilização destes sistemas de cintos/sistemas de retenção.
3. Os dois cintos dianteiros (mosquetões) têm de ser fixados nas argolas de aço, sobre o garfo da roda dianteira, à direita e à esquerda. (Fig. 24).
4. Ambos os cintos traseiros (mosquetões) têm de ser fixados às duas ilhós na estrutura dorsal. (Fig. 25).
Colocar o sistema de retenção:
1. O «Crash Test» foi realizado com o cinto tipo H (incluído no equipamento básico). Este cinto tipo H deverá ser utilizado debaixo do cinto do sistema de retenção.
2. O utilizador tem de ficar segurado por um sistema de retenção licenciado. A Thomashilfen recomenda a utilização
de um cinto automático ou de um sistema de retenção de 3 pontos, no qual o cinto subabdominal e o cinto do ombro podem ser separados um do outro. Isto é necessário para que o sistema de retenção possa ser enfiado de forma
correta através do quadro dos Swifty 2. (Os fabricantes são, por exemplo, Unwin Safety Systems e AMF-Bruns).
3. O condutor e/ou assistente deverá estar familiarizado com a utilização destes sistemas de cintos/sistemas de retenção.
4. O cinto subabdominal terá de ser colocado de modo plano na zona da pelve, sem ter contacto com a barriga. As guias
do cinto subabdominal deverão passar, do lado direito e do esquerdo, entre a guia lateral e o utilizador. (Fig. 26).
5. O cinto subabdominal não pode ficar afastado do utilizador por meio de peças do carrinho de reabilitação (peças
laterais, rodas). (Fig. 27).
AVISO: O cinto não pode ser colocado de modo torcido.
6. O ângulo do cinto subabdominal deverá situar-se entre os 30 º e os 75 º graus. (Fig. 28).
7. O cinto deverá ficar tão apertado quando possível, mas de modo a que o utilizador se sinta confortável.
8. O cinto de tronco do sistema de retenção tem de ficar fixado à parede do veículo na parte alta, de modo a assegurar
que o cinto se situe no meio dos ombros do utilizador e que passe debaixo da lingueta de empurrar. (Fig. 27).
AVISO: Apenas um cinto de ombros que esteja fixado na parede lateral do veículo corresponde às exigências atuais,
em termos de fixação do utilizador de modo seguro.
53

Manual de instruções – Swifty 2
Número de produto/série
Para receber as peças sobresselentes corretas ou para
eventuais consultas técnicas necessitamos, por princípio, do
número de série e da exata referência do artigo.
Número do artigo
O número de série e a referência do artigo do carrinho de
reabilitação Swifty 2 encontram-se na etiqueta do código
de barras que está colocado debaixo do assento..
Número de série /
lote
Indicações de limpeza, desinfeção e conservação
A estrutura inferior é produzida em tubo de aço de elevada qualidade. Este é revestido com uma termolacagem pulverizada resistente e pode ser limpo e desinfetado com sabões convencionais (sabão neutro).
Desinfeção
Limpe as almofadas e os punhos antes da desinfeção. Passe um pano húmido com uma solução desinfetante sobre todos os componentes. Devem-se usar produtos exclusivamente à base de água. Aquando da desinfeção há que respeitar
as indicações de utilização do respetivo fabricante.
Almofadas
Todas as almofadas são facilmente retiráveis. O material 100% Trevira CS é um tecido de alta qualidade, lavável até 40
°C. As almofadas têm de ser lavadas em separado e os fechos de velcro têm de ser tapados ou fechados antes da dita
lavagem. Relativamente a este assunto, consulte também as indicações de conservação.
Avisamos para o facto de mesmo os materiais de elevada qualidade poderem empalidecer, devido à intensa radiação
solar ou às frequentes lavagens. A almofada é dificilmente inflamável (EN1021-1 e EN1021-2).
Fechos em velcro
Para que se conserve a operacionalidade dos fechos de velcro, deve-se limpar os mesmos com uma escova. Aquando
da lavagem, tenha os fechos de velcro sempre fechados.
Condições da garantia/Identificação CE
A Thomashilfen oferece-lhe uma garantia de 3 anos em todas as peças estruturais, vigorando a partir da data de aquisição do produto. A garantia abrange todas as exigências que são relativas a limitações de funcionamento. Excluem-se os
danos causados por manuseamento inapropriado (p. ex. excesso de carga), assim como o desgaste natural.
O Swifty 2 corresponde às exigências da norma europeia EN 12182 e EN 12183 e dispõe de uma identificação CE.
Desejamos-lhe muita satisfação na utilização do seu Swifty 2.
54

Manual de instruções – Swifty 2
Plano de manutenção - inspeção anual/reutilização
Preparação
O produto tem de ser acompanhado por um manual de instruções. Se não for disponibilizado nenhum, peça-o junto do
fabricante. Familiarize-se com as funções do produto. Se não conhecer o produto, estude o manual de instrução antes
da verificação. Limpe o produto antes do início da verificação. Se necessário, respeite as instruções de manutenção e as
instruções de controlo específicas do produto incluídas no manual de instruções.
Área
Pos.
1 Assento I/R I/R I/R
2 Ajuste do ângulo I/R I/R I/R
3 Ajuste da altura I/R I/R I/R
4 Almofada para assento I R
5 Tampões ou tecido em falta I/R
6 Costas I/R I/R I/R
7 Ajuste do ângulo I/R I/R I/R
8 Ajuste da altura I/R I/R I/R
9 Almofada para costas I R
10 Barra de empurrar I/R I/R I/R
11 Cobertura da barra de empurrar I R
12 Chassis I/R I/R I/R
13 Pneus I I I R
14 Travão de imobilização I/R I/R I/R
15 Apoio para cabeça I/R I/R I/R
16 Almofada para apoios para cabeça I R
17 Suportes torácicos laterais I/R I/R I/R
18 Almofadas para suportes torácicos laterais I R
19 Apoios de braços I/R I/R I/R
20 Almofadas para apoios de braços I R
21 Suportes de ancas I/R I/R I/R
22 Almofadas para suportes de ancas I R
23 Cunha de abdução I/R I/R I/R
24 Almofadas para cunha de abdução I R
25 Suportes para tíbia I/R I/R I/R
26 Almofadas para suportes para tíbia I R
27 Mesa terapêutica I/R I/R I/R
28 Sistema de retenção (cintas) I/R I/R I/R
A manutenção foi realizada a:
= Verificação efetuada
Opções
(I = Inspeção / R = Reutilização)
Função Danos Deform. Substituição
As assistências e as reparações na cadeira de passeio postural só podem ser realizadas pela loja de produtos ortopédicos. O utilizador deste meio auxiliar de reabilitação tem de prestar atenção para que as inspeções/manutenções
prescritas sejam efetuadas de forma regular e atempada. Se for identificados algum dano, o utilizador tem de informar
ativamente e deve deixar que esse mesmo dano seja imediatamente reparado pelo pessoal técnico especializado. Para
efetuar as reparações, devem ser utilizadas exclusivamente peças de substituição originais (encontra a lista das peças de
reposição/de substituição na área de transferência da nossa página de Internet, www.thomashilfen.com).
As desmontagens/montagens de peças de substituição devem ser obrigatoriamente realizadas por pessoal técnico
especializado! Em caso de devolução necessária à sua loja de produtos ortopédicos, certifique-se de que o chassis é
embalado de forma a ser transportado em segurança.
55

Manuale d’uso – Swifty 2
Gentile utilizzatore del passeggino Swifty 2,
il passeggino posturale Swifty 2 è un moderno prodotto medicale di ottima qualità, che convince per la sua eleganza
estetica. Nella progettazione ci siamo avvalsi delle idee dei genitori che ogni giorno utilizzano prodotti riabilitativi e che
quindi conoscono le esigenze dei figli che questi mezzi ausiliari devono essere in grado di soddisfare.
Gli articoli posturali non devono avere necessariamente l’aspetto di articoli riabilitativi; ciò nonostante il passeggino
Swifty 2 soddisfa tutti i requisiti previsti per un buon passeggino posturale: la lunghezza delle gambe regolabile in continuo, l’impiego di materiali di alta qualità e una seduta molto stabile assicurano comodità e movimentazione sicura. Grazie al peso ridotto e alle ruote piroettanti, questo passeggino posturale è particolarmente maneggevole pur avendo una
portata massima molto alta. Può essere piegato con facilità e rapidità e si infila tranquillamente in qualsiasi bagagliaio.
La invitiamo a leggere innanzitutto il presente manuale d’uso per rendere l’utilizzo del passeggino posturale Swifty 2
sicuro, pratico e confortevole per lei e in particolare per il suo bambino.
Per qualsiasi domanda o problema potrà rivolgersi al rivenditore specializzato o direttamente a noi.
Con l‘occasione la invitiamo a consultare anche il nostro sito Internet www.thomashilfen.com sul quale potrà trovare in-
formazioni aggiornate, importanti avvertenze di sicurezza sul prodotto o informazioni su eventuali richiami di prodotti.
Il nostro indirizzo: Thomas Hilfen für Körperbehinderte
GmbH & Co. Medico KG
Walkmühlenstraße 1
D - 27432 Bremervörde
Teléfono.: +49 (0) 4761 886-68 o -63
www.thomashilfen.com
Indice Pagina
Controlli tecnici di sicurezza e intervalli di manutenzione ................................................................................ 57
Uso previsto e luoghi d‘impiego ....................................................................................................................... 57
Avvertenze di sicurezza generali ...................................................................................................................... 58
Rischi correlati all‘utilizzo e controindicazioni .................................................................................................. 59
Simboli e segnaletica ....................................................................................................................................... 59
Dati tecnici e varianti ....................................................................................................................................... 60
Estensione della fornitura ................................................................................................................................. 60
Dotazione base ............................................................................................................................................... 60
Apertura e montaggio ...................................................................................................................................... 60
Possibilità di regolazione .................................................................................................................................. 62
Freno di stazionamento .................................................................................................................................... 62
Blocco direzionale delle ruote anteriori ............................................................................................................ 62
Montaggio delle cinghie ................................................................................................................................... 62
Dispositivo di basculamento ............................................................................................................................ 62
Trasporto ......................................................................................................................................................... 62
Utilizzo come sistema di seduta in autoveicolo ................................................................................................ 63
Codice prodotto / Numero di serie ................................................................................................................... 64
Indicazioni per la pulizia, la disinfezione e la cura ............................................................................................ 64
Condizioni di garanzia / marchio CE ................................................................................................................ 64
Schema di manutenzione - Ispezione annuale / Riutilizzo ................................................................................. 65
56

Manuale d’uso – Swifty 2
Controlli tecnici di sicurezza e intervalli di manutenzione
Se dovesse riscontrare un problema durante il controllo regolare, lo segnali subito al rivenditore locale o alla Thomashilfen.
Manutenzione ordinaria / giornaliera
I famigliari e gli assistenti possono eseguire in semplicità i seguenti interventi di manutenzione. La chiave a brugola
fornita a corredo serve per stringere il supporto per i piedi.
1. In caso di umidità asciugare sempre il passeggino posturale. Dopo l’utilizzo non ritirarlo mai bagnato.
2. Controllare che le due viti a brugola siano presenti suo supporto per i piedi e ogni giorno verificare con la chiave a
brugola che siano ben strette.
3. Controllare che tutti i dadi, i bulloni e le viti siano ben stretti (ogni giorno).
4. Controllare la funzionalità dello schienale, del meccanismo di chiusura e della posizione di riposo (una volta alla
settimana).
5. Prima di utilizzare il passeggino posturale controllare sempre la funzionalità del freno.
6. Se necessario, pulire il telaio del passeggino posturale (raccomandazione: almeno una volta alla settimana).
7. Assicurarsi che il tappo di plastica del meccanismo di chiusura sia ben fermo nella posizione giusta (una volta al
giorno, Fig. 1).
Manutenzione semestrale
I seguenti interventi di manutenzione devono essere eseguiti da un rivenditore competente o da un’officina di riparazione autorizzata. Se si riscontrano difetti significativi o malfunzionamenti, non utilizzare il passeggino posturale fino a
quando il difetto non è stato eliminato.
1. Aprire e chiudere il passeggino posturale e controllare se durante l’operazione tutti i movimenti vengono eseguiti
alla perfezione. Controllare se il telaio è danneggiato.
2. Controllare la funzionalità e le regolazioni del passeggino, in particolare la regolazione dello schienale.
3. Controllare che dadi, viti, cerniere e tappi del telaio siano ben stretti e in buone condizioni.
4. Controllare che il freno non sia consumato né danneggiato e che funzioni correttamente.
5. Controllare se nelle gomme sono presenti oggetti taglienti, tagli o fessure.
6. Controllare che le ruote e le forcelle non siano eccessivamente usurate.
7. Controllare se le ruote anteriori e quelle posteriori si muovono liberamente e sono ben scorrevoli. Rimuovere la
polvere, la sabbia e altre impurità utilizzando uno strofinaccio asciutto e senza pelucchi.
8. Controllare il funzionamento del freno delle ruote.
9. Controllare che tutti i particolari in plastica non siano deformati né rotti.
Uso previsto e luoghi d‘impiego
Il passeggino posturale Swifty 2 è indicato per il trasporto di bambini disabili in luoghi chiusi o all’aperto, su terreno
solido e piano (velocità massima a passo d’uomo), da parte dei genitori o di personale ausiliario idoneo. Il passeggino
posturale Swifty 2 non può essere utilizzato per scopi non previsti (ad es. come mezzo di trasporto per altri bambini,
borse della spesa, ecc.).
Per consentire agli accompagnatori un impiego ergonomico, è possibile regolare l’altezza del maniglione di spinta.
Swifty 2 è omologato per il trasporto di bambini in veicoli/veicoli per trasporto disabili a norma ISO 7176-19 e ANSI/
RESNA WC 4 sezione 19.
57

Manuale d’uso – Swifty 2
Rispettare le seguenti avvertenze di sicurezza
• Prima del primo utilizzo leggere attentamente il manuale d‘uso o, in caso di difficoltà di lettura, farselo leggere. In
caso di smarrimento del manuale d‘uso, è possibile scaricarlo in qualsiasi momento dall‘area download del nostro
sito Internet www.thomashilfen.com. Il documento PDF può essere visualizzato anche in formato ingrandito.
• Consigliamo di adattare la lunghezza delle gambe alle dimensioni attuali del bambino almeno una volta ogni 3 mesi.
Eventualmente farsi aiutare dal terapeuta o dal tecnico ortopedico.
• Assicurare sempre il bambino con la cinghia a bretellaggio (dotazione base) o con un altro tipo di cintura (disponibile come accessorio).
• ATTENZIONE: Le ruote bagnate possono ridurre l’azione frenante. Quando ci si ferma o durante una sosta prolungata, bloccare il passeggino posturale con il freno a pedale in modo da impedire che si muova accidentalmente.
• IMPORTANTE: In caso di inutilizzo prolungato non lasciare il freno tirato. Il freno sempre tirato potrebbe danneggiare le ruote posteriori.
• ATTENZIONE: La fessura tra il telaio e l‘asta di sgancio del freno può comportare un pericolo di schiacciamento per
abbigliamento e arti nell‘area dei piedi.
• ATTENZIONE: La fessura tra la seduta del passeggino Swifty 2 e l‘incastellatura del telaio può comportare un pericolo di schiacciamento per abbigliamento e arti nell‘area della seduta.
• ATTENZIONE: La fessura tra la guida laterale della seduta del passeggino Swifty 2 e il tubo curvo dello schienale
può comportare un pericolo di schiacciamento per abbigliamento e arti nell‘area della seduta.
• ATTENZIONE: La fessura tra la piastra poggiapiedi e il tubo poggiapiedi può comportare un pericolo di schiacciamento per abbigliamento e arti nell‘area dei piedi.
• Non sovraccaricare il passeggino posturale Swifty 2 e rispettare la portata massima (v. dati tecnici).
• L‘abbigliamento ad alta visibilità rende voi e il vostro bambino visibili agli altri utenti della strada anche nell’oscurità sfruttate questo vantaggio.
• Sollevare il passeggino posturale afferrando solo i componenti saldati o avvitati saldamente (tubo del telaio anteriore
sopra le ruote anteriori, asse posteriore, manopole/barra di spinta).
• In caso di esposizione al sole in giorni caldi, l’imbottitura nera può raggiungere temperature elevate. In caso di contatto sussiste pertanto il pericolo di ustioni al dorso e alle gambe! Fare quindi attenzione che il passeggino posturale
Swifty 2 in linea di principio non sia esposto a tali fonti di calore durante l‘uso e utilizzarlo solo quando si è sufficientemente raffreddato.
• Fare attenzione a non ferirsi aprendo o ripiegando il passeggino posturale, sollevando il supporto per i piedi o regolando lo schienale.
• Appendere borse pesanti o retine per la spesa al passeggino aumenta il rischio di ribaltamento. Utilizzare il cestello
(disponibile come accessorio) sotto l’unità di seduta.
• Durante l‘utilizzo del passeggino posturale (in particolare quando si apre e si ripiega) rispettare le raccomandazioni
contenute nel manuale d’uso.
• Non lasciare mai il bambino nel passeggino Swifty 2 senza sorveglianza.
• Prima di inserire e togliere il bambino dal passeggino posturale, azionare il freno.
• Non lasciare mai il bambino senza sorveglianza quando sale o scende dal passeggino posturale, se il supporto per i
piedi viene caricato troppo c‘è il pericolo che il passeggino scivoli o si ribalti.
• Tenere i bambini lontani dall’imballaggio in plastica: pericolo di soffocamento.
• Nel passeggino posturale può essere collocato un solo bambino.
58

Manuale d’uso – Swifty 2
Rischi correlati all‘utilizzo e controindicazioni
Un impiego corretto esclude qualsiasi rischio. Non sono note controindicazioni. Il materiale d‘imbottitura utilizzato per
Swifty 2 è „difficilmente infiammabile“, testato secondo la normativa DIN EN 1021-1 e DIN EN 1021-2.
La resistenza alla combustione per materiali e componenti è stata testata in conformità alle norme e valutata come non
pericolosa.
Simboli e segnaletica
Adesivi Significato
Targhette dati/Adesivo carico ammissibile
La targhetta dati si trova sotto la superficie della seduta.
La targhetta dati riporta il fabbricante con il relativo in-
dirizzo, il modello, la portata massima e il marchio CE.
Etichetta con codice a barre
L‘etichetta con codice a barre si trova sotto la superficie
di seduta.
Sull‘etichetta con codice a barre sono riportati il codice
articolo, la denominazione, il numero di serie e la data
di fabbricazione.
Indica i quattro punti di fissaggio sul passeggino Swifty
2 per il bloccaggio in veicoli per trasporto disabili.
59

Manuale d’uso – Swifty 2
Dati tecnici e varianti
Swifty 2
Profondità di seduta 375 mm
Larghezza di seduta 395 mm
Altezza dello schienale 700 mm
Lunghezza delle gambe 210 - 370 mm
Guida laterale (largh. x alt.) 250 x 160 mm
Angolazione del bacino 90° - 100°
Angolazione dei piedi 90°
Inclinazione della seduta fissa + 20°
Inclinazione massima 10°
Dimensioni del poggiapiedi (largh. x prof.) 310 x 200 mm
Dimensioni complessive (lungh. x largh. x alt.) 980 x 670 x 1130 mm
Dimensioni da chiuso (lungh. x largh. x alt.) 790 x 670 x 490 mm
Altezza del maniglione di spinta 820 - 1240 mm
Ingombro di sterzata 1260 mm
Dimensioni ruote (anteriori (piroettanti)/posteriori) 180 mm / 250 mm
Diametro ruote (anteriori (piroettanti)/posteriori) 45 mm / 50 mm
Peso 18,2 kg
Portata max. 50 kg
Portata max. del cestello (accessorio) 3 kg
Il passeggino posturale Swifty 2 è disponibile nelle versioni seguenti:
Cod. articolo Denominazione Dotazione
6808 Passeggino posturale Swifty 2 Crash Passeggino posturale inclusa imbottitura, cintura a bretellag-
gio e supporto per i piedi, dotato e omologato per l‘utilizzo
come sistema di seduta in autoveicolo
Estensione della fornitura
Il passeggino posturale Swifty 2 viene fornito preassemblato. Swifty 2 è provvisto in fabbrica dell‘imbottitura della seduta e di quella delle guide laterali della seduta. Swifty 2 viene inoltre consegnato corredato di manuale d‘uso e chiave a
brugola, necessaria per regolare l‘altezza dei supporti per i piedi.
Dotazione base
Telaio base leggero e pieghevole con unità di seduta integrata; cintura di bretellaggio; rivestimento ignifugo; imbottitura
traspirante; schienale con angolazione del bacino regolabile; ruote anteriori piroettanti con blocco direzionale; ruote
pneumatiche EVA antiforatura; supporto per i piedi ribaltabile e regolabile in altezza; freno di stazionamento; maniglione di spinta regolabile in altezza.
Apertura e montaggio
In linea di massima le regolazioni e gli adattamenti devono essere effettuati da personale esperto qualificato o istruito
(ad es. consulente di prodotti medicinali del rivenditore specializzato in articoli sanitari).
la prima messa in funzione del passeggino Swifty 2 non sono necessari attrezzi, se non la chiave a brugola fornita a
corredo.
Il montaggio e lo smontaggio degli accessori avvengono con attrezzi reperibili in commercio. Gli accessori sono corredati di manuale d‘uso e di montaggio specifici. In assenza dei manuali, questi potranno essere scaricati in qualsiasi
momento dall‘area download del nostro sito Internet www.thomashilfen.com.
60

Manuale d’uso – Swifty 2
Apertura e chiusura del telaio
NOTA: Evitare che, durante la chiusura o l’apertura, il passeggino posturale batta sul pavimento e causi danni al telaio
o cedimenti. Assicurarsi che il tappo di plastica del meccanismo di chiusura si trovi nella posizione giusta (l’estremità
superiore del tappo deve essere rivolta verso il lato posteriore del passeggino posturale) (Fig. 1).
Apertura
Entrambi gli snodi del maniglione di spinta del passeggino posturale Swifty 2 sono provvisti di una sicura. Per aprire il
passeggino è necessario sganciare la sicura su ogni lato, tramite uno dei pulsanti (Fig. 2). Afferrare quindi il passeggino
di sopra e di lato con il maniglione di spinta, quindi tirare verso l’alto eseguendo un movimento ondulare (i cursori di
bloccaggio si innestano e si sente lo scatto). Allentare la leva di serraggio sul dorso e regolare l’angolazione desiderata
per lo schienale (v. regolazione dello schienale). Azionando i pulsanti laterali regolare il maniglione di spinta nella posizione desiderata (Fig. 3).
Chiusura (dimensione minima da chiuso)
Allentare la leva di serraggio sul dorso. Tirare verso l’alto i cursori di bloccaggio presenti sul maniglione di spinta (a
destra e a sinistra) (Fig. 1) e fissare la staffa di sicurezza montata a destra. Con il torace spingere il maniglione di spinta
in avanti e chiudere il passeggino in avanti (Fig. 4). Spingere lo schienale verso il basso e tirare nuovamente la leva di
serraggio. Abbassare il maniglione di spinta sullo schienale.
La sicura permette di evitare l’apertura non intenzionale del passeggino posturale Swifty 2. Sganciare un pulsante della
sicura su ogni lato (Fig. 2), portare la cinghia attorno al telaio anteriore, quindi richiudere il pulsante. A questo punto è
possibile afferrare in sicurezza il passeggino Swifty 2 dai tubi del telaio e trasportarlo.
Imbottitura della seduta e dello schienale
L’imbottitura della seduta e dello schienale è un unico pezzo. Viene infilata sullo schienale con il logo Swifty rosso
davanti e la parte inferiore appoggiata sulla superficie di seduta. Il lato posteriore dell’imbottitura è diviso in due parti e
si chiude con una cerniera lampo. Infilare le due metà della parte posteriore dell’imbottitura sotto la staffa posteriore del
passeggino Swifty 2 (Fig. 5). Portare l’imbottitura in posizione e chiudere la cerniera lampo (Fig. 6). Chiudere infine il
velcro all’estremità inferiore dello schienale (Fig. 7).
Imbottitura delle guide laterali della seduta
L’apertura dell’imbottitura delle guide laterali della seduta deve sempre essere rivolta verso l’esterno/davanti (Fig. 8).
Infilare l’imbottitura in posizione sopra la guida laterale (Fig. 9). Chiudere la cerniera lampo (Fig. 10).
Cintura a bretellaggio
Il passeggino posturale Swifty 2 è dotato di una cintura a bretellaggio.
Apertura della cintura
Per aprire la cintura a bretellaggio tenere premuto il pulsante rosso (1), premere i lati della chiusura a gancio (2 e 3) e
sganciare la cintura (sicura per bambini) (Fig. 11).
Regolazione dell’altezza della cintura
Aprire la chiusura lampo dell’imbottitura posteriore. Aprire le fibbie superiori ed estrarre le cinture da davanti. Staccare
l’imbottitura posteriore all’altezza desiderata, nel punto in cui è presente la cucitura impunturata. Far passare le cinghie
attraverso le fessure, quindi fissarle nuovamente alle fibbie. Chiudere nuovamente l’imbottitura (Fig. 12-13).
Rimozione della cintura a bretellaggio
Aprire la chiusura lampo dell’imbottitura posteriore. Aprire le fibbie ed estrarre la cintura da davanti.
61

Manuale d’uso – Swifty 2
Supporto per cappottina parapioggia
Swifty 2 è dotato di serie di supporti per cappottina parapioggia (Fig. 14). La cappottina parapioggia è disponibile come
accessorio.
Possibilità di regolazione
Regolazione dello schienale
Allentare la leva di serraggio sullo schienale; spostando la staffa posteriore sulla guida regolare l’angolazione del bacino
desiderata, quindi stringere nuovamente la leva (Fig. 15).
Lunghezza delle gambe
Allentare le viti a brugola (3 mm) presenti dietro le guide tubolari destra e sinistra del supporto per i piedi. Spostandoli
sul tubo del telaio portare il supporto per i piedi nella posizione desiderata, quindi stringere nuovamente le viti (Fig. 16).
Supporto per i piedi
Il supporto per i piedi può essere piegato in alto per semplificare la salita sul passeggino (Fig. 17).
Freno di stazionamento
Per bloccare il freno mettere il piede sulla barra del freno e premere verso il basso. Per rilasciare il freno mettere il piede sotto la barra del freno e spingere verso l‘alto (Fig. 18).
Blocco direzionale delle ruote anteriori
Blocco: allineare la ruota anteriore e fissare il perno di bloccaggio (si innesta in modo udibile).
Allentamento: estrarre il perno di bloccaggio e fissarlo ruotandolo di 90° (Fig. 19).
Montaggio delle cinghie
A seconda dell’altezza a cui si desidera applicare la cinghia, separare l’imbottitura in corrispondenza delle cuciture
impunturate.
Far passare le due cinghie superiori attraverso le aperture nell‘imbottitura e infilarle nella fessura sulla placca dorsale Fig.
12). Aprire la chiusura lampo dell’imbottitura posteriore, quindi infilare le cinghie nelle fibbie e regolare la lunghezza
desiderata (Fig. 13). Le due estremità della cinghia inferiore si possono fissare con le fibbie dietro la placca dorsale (Fig.
20). Infilare le cinghie a destra e a sinistra, accanto all‘imbottitura dello schienale, sulla rispettiva fibbia e fissarle. Chiu-
dere nuovamente l’imbottitura (Fig. 6-7).
SUGGERIMENTO: La lunghezza delle cinghie può essere regolata anche da davanti. A tal scopo tirare l‘anello D per
accorciare la cinghia.
Anche le cinghie anteriori della cintura pelvica a 4 punti si fissano con una fibbia a destra e a sinistra sotto l’unità di
seduta. Infilare la cinghia tra la guida laterale e la piastra della seduta, inserirla nella fibbia e fissarla (Fig. 21-22).)
Dispositivo di basculamento (accessori)
Appoggiare il piede sul pedale, tenere il passeggino posturale con entrambe le mani e sollevare (Fig. 23).
Trasporto
Il passeggino posturale Swifty 2 può essere piegato e trasportato nel bagagliaio di un veicolo. Seguire le avvertenze su
come piegare il passeggino posturale e utilizzare la sicura per evitare che il passeggino si apra inavvertitamente.
Il passeggino posturale Swifty 2 può essere sollevato afferrandolo per gli elementi laterali del telaio o dall’asse posteriore.
62

Manuale d’uso – Swifty 2
Utilizzo come sistema di seduta in autoveicolo
Nella variante “Crash” il passeggino posturale Swifty 2 ha superato il crash test conforme alla norma internazionale ISO
7176/19 e ANSI/RESNA WC 4 sezione 19 e può pertanto essere utilizzato come seduta in un veicolo.
IMPORTANTE: Quando il passeggino Swifty 2 viene utilizzato come seduta in un motoveicolo, attenersi alle istruzioni
seguenti.
Il passeggino posturale Swifty 2 è stato concepito per il trasporto in senso di marcia. Se possibile, l‘utilizzatore dovrebbe
essere trasferito su un sedile del veicolo e utilizzare le cinture di sicurezza installate. Per bloccare il passeggino posturale Swifty 2 al fondo del veicolo, utilizzare solo sistemi di ritenuta per telaio/persone conformi alla norma ISO 10542.
I quattro punti di fissaggio presenti sul passeggino Swifty 2 sono contrassegnati dal simbolo seguente:
Preparativi del passeggino Swifty 2 per il trasporto
1. Rimuovere i particolari seguenti (se montati); cuneo di abduzione, vassoio, protezione clima, ombrello parasole,
impugnatura di sicurezza e contenuto del cestello.
2. Posizionare correttamente il passeggino posturale nel veicolo sopra le guide installate, in direzione di marcia. Azionare il freno di stazionamento.
3. Assicurarsi che l‘angolazione delle anche sia bloccata.
Fissaggio del passeggino Swifty 2 in un veicolo:
1. Il passeggino posturale deve essere fissato al veicolo con un sistema di bretellaggio a quattro punti (a norma ISO
10542-2, SAE 2249 o DIN 75078/2) (questi sistemi di ritenuta sono prodotti ad es. da Unwin Safety Systems e
Q’Straint).
2. Il conducente e/o l‘assistente devono conoscere bene questi sistemi di ritenuta / cinture.
3. Le due cinture anteriori (gancio a moschettone) devono essere fissate agli anelli di acciaio a destra e a sinistra sopra
la forcella delle ruote anteriori (Fig. 24).
4. Le due cinture posteriori (gancio a moschettone) devono essere fissate ai due occhielli di sicurezza sul telaio posteriore (Fig. 25).
Come utilizzare il sistema di ritenuta:
1. Il crash test è stato eseguito con la cintura a bretellaggio (che fa parte della dotazione base). La cintura a bretellaggio
deve essere utilizzata sotto la cintura del sistema di ritenuta.
2. L‘utilizzatore deve essere bloccato con un sistema di ritenuta omologato. Thomashilfen consiglia di utilizzare una
cintura automatica o un sistema di ritenuta a tre punti, in cui è possibile separare la cintura pelvica dalla bretella. Ciò è
necessario per potere infilare correttamente il sistema di ritenuta attraverso il telaio del passeggino Swifty 2. (fabbricanti, ad es. Unwin Safety Systems e AMF-Bruns)
3. Il conducente e/o l‘assistente devono conoscere bene questi sistemi di ritenuta / cinture.
4. La cintura pelvica deve essere posizionata piatta sulla zona pelvica, senza contatto con l‘addome. La guida della cintura
pelvica deve passare a destra e a sinistra tra la guida laterale e l‘utilizzatore (Fig. 26).
5. Tra la cintura pelvica e l‘utilizzatore non ci devono essere particolari del passeggino posturale (lati, ruote) (Fig. 27).
NOTA: Non utilizzare la cintura ritorta.
6. La cintura pelvica deve avere un‘angolazione compresa tra 30° e 75° (Fig. 28).
7. Applicare la cintura pelvica abbastanza stretta, ma comunque comoda per l‘utilizzatore.
8. La cintura toracica del sistema di ritenuta deve essere fissata alla parete del veicolo in modo da assicurare che la
cinghia sia al centro delle spalle e passi sotto il maniglione di spinta (Fig. 27).
NOTA: Solo la cintura fissata alla parete laterale del veicolo è conforme ai requisiti attuali previsti per il bloccaggio
sicuro dell‘utente.
63

Manuale d’uso – Swifty 2
Codice prodotto / Numero di serie
Per ricevere i pezzi di ricambio corretti o per eventuali
chiarimenti tecnici abbiamo bisogno dell›indicazione del
numero di serie e del codice esatto dell›articolo.
Codice dell‘articolo
Il numero di serie e il codice articolo del passeggino posturale Swifty 2 si trovano sull›etichetta con codice a barre
applicata sotto il sedile.
Numero di serie /
lotto
Indicazioni per la pulizia, la disinfezione e la cura
Il telaio base è fabbricato con un tubo in acciaio di ottima qualità, rivestito con una resistente verniciatura a forno, lavabile con un sapone (neutro) normalmente reperibile in commercio e disinfettabile.
Disinfezione
Prima di procedere alla disinfezione pulire imbottiture e impugnature. Su tutti i particolari del prodotto passare un panno inumidito con disinfettante. Utilizzare solo prodotti a base di acqua. Per la disinfezione attenersi alle avvertenze del
fabbricante del prodotto.
Imbottiture
Tutte le imbottiture sono facili da rimuovere con pochi gesti. Il tessuto 100% Trevira CS è di alta qualità, lavabile a
40°C. Lavare le imbottiture separatamente e, prima del lavaggio, coprire o chiudere il velcro. Attenersi alle avvertenze
per la cura.
Si fa notare che anche i tessuti di alta qualità potrebbero sbiadire se esposti a lungo e intensamente ai raggi solari o per
il lavaggio frequente. L‘imbottitura è difficilmente infiammabile (EN 1021-1 ed EN 1021-2).
Chiusure in velcro
Per mantenere la funzionalità delle chiusure in velcro pulire di tanto in tanto i nastri in velcro con una spazzola. Chiudere sempre i nastri in velcro prima del lavaggio.
Condizioni di garanzia / marchio CE
Thomashilfen prevede un periodo di garanzia di tre anni a decorrere dalla data d›acquisto su tutti i particolari del telaio.
La garanzia comprende tutte le rivendicazioni per problemi che compromettono la funzione. Sono esclusi i danni attribuibili a utilizzo improprio (ad es. il carico eccessivo) come pure alla naturale usura.
Swifty 2 è conforme ai requisiti delle norme europee EN 12182 e EN 12183 ed è provvisto del marchio CE.
Buon divertimento con il passeggino posturale Swifty 2!
64

Manuale d’uso – Swifty 2
Schema di manutenzione - Ispezione annuale / Riutilizzo
Preparazione
Il prodotto deve essere fornito con il manuale d‘uso. In mancanza del manuale, richiederlo all‘azienda produttrice.
Prendere dimestichezza con il funzionamento del prodotto. Si consiglia a chi non conoscesse il prodotto di studiare il
manuale d‘uso prima di esaminare il prodotto. Prima di iniziare, pulire il prodotto. Rispettare le istruzioni per la cura del
passeggino e le avvertenze di controllo specifiche del prodotto.
Settore
Pos.
1 Seduta I/R I/R I/R
2 Regolazione angolazione I/R I/R I/R
3 Regolazione altezza I/R I/R I/R
4 Imbottitura seduta I R
5 Cappucci e tappi mancanti I/R
6 Schienale I/R I/R I/R
7 Regolazione angolazione I/R I/R I/R
8 Regolazione altezza I/R I/R I/R
9 Imbottitura schienale I R
10 Braccio di spinta I/R I/R I/R
11 Rivestimento braccio di spinta I R
12 Telaio base I/R I/R I/R
13 Ruote pneumatiche I I I R
14 Freno I/R I/R I/R
15 Poggiatesta I/R I/R I/R
16 Imbottitura poggiatesta I R
17 Cuscinetti per il torace I/R I/R I/R
18 Imbottitura cuscinetti per il torace I R
19 Braccioli I/R I/R I/R
20 Supporti per braccia I R
21 Cuscinetti per le anche I/R I/R I/R
22 Imbottitura cuscinetti per le anche I R
23 Cuneo di abduzione I/R I/R I/R
24 Imbottitura cuneo di abduzione I R
25 Cuscinetti tibiali I/R I/R I/R
26 Imbottitura cuscinetti tibiali I R
27 Vassoio I/R I/R I/R
28 Bretellaggio I/R I/R I/R
La manutenzione è stata eseguita il:
= Controllo eseguito
Opzioni
(I = Ispezione / R = Riutilizzo)
Funzione Danneggiamento Deformazione Sostituire
Gli interventi di assistenza e riparazioni sul passeggino posturale devono essere eseguiti solo da personale specializzato.
L‘utilizzatore di questi ausili posturali deve verificare che gli interventi di ispezione/manutenzione prescritti siano eseguiti regolarmente. In presenza di un danno, l‘utilizzatore lo dovrà segnalare e fare eliminare immediatamente da personale
tecnico. Per le riparazioni utilizzare esclusivamente ricambi originali (l‘elenco dei ricambi originali si trova nell‘area
download del nostro sito Internet www.thomashilfen.com).
Le operazioni di smontaggio/montaggio di ricambi devono essere eseguite esclusivamente da personale tecnico! Per le
spedizioni al proprio rivenditore specializzato, imballare il telaio in modo che non subisca danni durante il trasporto.
65

Gebruikershandleiding – Swifty 2
Geachte Swifty 2-gebruiker,
De Swifty 2 revalidatiebuggy is een modern, hoogwaardig medisch product met een uitermate aantrekkelijk design. Bij
deze buggy is heel gericht geluisterd naar de ideeën van ouders die dagelijks met revalidatieproducten werken en die
precies weten, welke behoeften hun kinderen hebben als het om dergelijke medische hulpmiddelen gaat.
Revalidatie hoeft er niet als revalidatie uit te zien, maar toch vervult Swifty 2 alle vereisten aan een goede revalidatiebuggy: de onderbeenlengte kan variabel versteld worden, hoogwaardige materialen en een stevige zitting zorgen voor
gemak en comfortabele handling. Dankzij het geringe gewicht en de zwenkbare wielen is deze revalidatiebuggy –
ondanks de hoge maximale belastbaarheid – uitermate wendbaar. Hij is snel en gemakkelijk op te vouwen en past heel
eenvoudig in elke kofferbak.
Lees a.u.b. eerst de handleiding van de Swifty 2 revalidatiebuggy door zodat het gebruik van de buggy voor u en vooral
voor het kind veilig, handig en comfortabel is.
Mocht u na het lezen van de handleiding nog vragen of problemen hebben, kunt u te allen tijde contact opnemen met
de voor u verantwoordelijke vakhandelaar of direct met ons.
Wij willen u in verband hiermee ook attenderen op onze internetpagina www.thomashilfen.com waar u altijd actuele
informatie en belangrijke veiligheidsinstructies kunt vinden en informatie krijgt over eventuele terugroepacties i.v.m.
onze producten.
Ons adres: Thomas Hilfen für Körperbehinderte
GmbH & Co. Medico KG
Walkmühlenstraße 1
D - 27432 Bremervörde
Telefoon: +49 (0) 4761 886-68 of -63
www.thomashilfen.com
Inhoud pagina
Veiligheidstechnische controles en onderhoudsintervallen ................................................................................ 67
Doelmatig gebruik en toepassingsgebieden ...................................................................................................... 67
Algemene veiligheidsinstructies ........................................................................................................................ 68
Gebruiksrisico‘s en contra-indicaties ................................................................................................................ 69
Symbolen en waarschuwingsborden ................................................................................................................ 69
Technische gegevens en uitvoeringen ............................................................................................................... 70
Leveringsomvang ............................................................................................................................................. 70
Basisuitvoering ................................................................................................................................................. 70
Plaatsing en montage ....................................................................................................................................... 70
Instelmogelijkheden ......................................................................................................................................... 72
Werking van de vastzetrem .............................................................................................................................. 72
Vastzetfunctie van de voorwielen .................................................................................................................... 72
Montage van de gordels ................................................................................................................................... 72
Kantelhulp ....................................................................................................................................................... 72
Transport ......................................................................................................................................................... 72
Gebruik als stoel in een motorvoertuig ............................................................................................................. 73
Product- / serienummer .................................................................................................................................... 74
Reinigings-, desinfectie- en verzorgingstips ....................................................................................................... 74
Garantievoorwaarden / CE-keurmerk................................................................................................................ 74
Onderhoudsschema – jaarlijkse inspectie / hernieuwd gebruik ......................................................................... 75
66

Gebruikershandleiding – Swifty 2
Veiligheidstechnische controles en onderhoudsintervallen
Mocht u bij uw regelmatige controle een probleem constateren, kunt u het best onmiddellijk contact opnemen met uw
speciaalzaak ter plekke of met Thomashilfen.
Regelmatig / dagelijks onderhoud
Familieleden en hulpverleners kunnen de volgende onderhoudswerkzaamheden gemakkelijk uitvoeren. De bijgeleverde
inbussleutel is nodig voor het vastzetten van de voetensteun.
1. Een natte revalidatiebuggy moeten altijd worden drooggewreven. Zet de buggy na gebruik nooit nat weg.
2. Waarborg dat de beide inbusschroeven aan de voetensteun voorhanden zijn en controleer dagelijks met de inbussleutel of de schroeven nog goed vastzitten.
3. Controleer of alle moeren, schroeven en bouten nog goed vastzitten (dagelijks).
4. Controleer de werking van de rugleuning, het vouwmechanisme en de rustpositie (wekelijks).
5. Controleer vóór het gebruik altijd de remwerking van de revalidatiebuggy.
6. Reinig zo nodig het frame van de revalidatiebuggy (aanbevolen: minstens eenmaal per week).
7. Waarborg dat de plastic stop van het vouwmechanisme vast zit in de juiste positie (dagelijks, afb. 1).
Halfjaarlijks onderhoud
De volgende werkzaamheden moeten worden uitgevoerd door een handelaar met dienovereenkomstige vakkennis of
door een geautoriseerde reparatiewerkplaats. Gebruik de revalidatiebuggy niet als u ernstige gebreken of defecten constateert, maar laat hem eerst repareren.
1. Klap de revalidatiebuggy open en weer dicht en controleer daarbij of alle bewegingen tijdens het in- en uitklappen
goed functioneren. Controleer of het frame schade vertoont.
2. Controleer de werking en de instelmogelijkheden van de revalidatiebuggy en daarbij vooral de verstelbaarheid van
de rugleuning.
3. Controleer moeren, schroeven, scharnieren en framestoppen op vaste montage en algemene toestand.
4. Controleer de rem op slijtage, schade en werking.
5. Controleer of scherpe voorwerpen in de banden zijn gedrongen en of scheuren of sneden te zien zijn.
6. Controleer de wielen en de wielvorken op overmatige slijtage.
7. Controleer de soepele en veilige werking van voor- en achterwielen. Verwijder stof, zand en andere verontreinigingen met een droge, pluisvrije doek.
8. Controleer de werking van de wielremmen.
9. Controleer alle plastic onderdelen op vervormingen of breuken.
Doelmatig gebruik en toepassingsgebieden
De Swifty 2 revalidatiebuggy is bedoeld voor het op vaste ondergrond binnen en buiten vervoeren (max. stapvoets) van
gehandicapte kinderen door hun ouders, hulpverleners of andere geschikte helpers. De Swifty 2 revalidatiebuggy mag
niet ondoelmatig gebruikt worden (bijv. als transportmiddel voor nog meer kinderen, boodschappentassen enz.).
Voor het ergonomische gebruik door de hulpverlener kan de duwstang in hoogte versteld worden.
Swifty 2 is goedgekeurd voor het transport van kinderen in motorvoertuigen / gehandicaptentaxi‘s (GT) volgens ISO
7176-19 en ANSI/RESNA WC 4 section 19.
67

Gebruikershandleiding – Swifty 2
Let op de volgende veiligheidsinstructies
• Lees vóór het eerste gebruik de gebruiksaanwijzing zorgvuldig door of laat u deze bij leesproblemen voorlezen. Als
u de handleiding mocht hebben verloren, kunt u deze altijd in onze downloadrubriek opnieuw downloaden onder
www.thomashilfen.com. Het daar opgeslagen pdf-document kan ook vergroot worden weergegeven.
• Wij adviseren, de onderbeenlengte minimaal om de 3 maanden aan te passen aan de actuele lichaamsmaten van
uw kind. Neem hiervoor eventueel contact op met uw therapeut / orthopedisch technicus.
• Uw kind moet altijd door middel van de H-gordel (basisuitvoering) of een ander gordelsysteem (als toebehoren
verkrijgbaar) beveiligd zijn.
• LET OP! Natte wielen kunnen de remwerking belemmeren. Bij een stop of een langer oponthoud is het raadzaam
om de revalidatiebuggy op de voetrem te zetten, zodat hij niet kan wegrollen.
• BELANGRIJK: Laat de rem niet aangetrokken blijven als de revalidatiebuggy gedurende langere tijd niet wordt gebruikt. De wielen kunnen dan namelijk door de voortdurend aangetrokken remmen beschadigd raken.
• LET OP! Bij de spleet tussen onderstel en remstang bestaat een mogelijk gevaar voor inklemmen, bijv. van kledingstukken of voeten.
• LET OP! Bij de spleet tussen de zitting van de Swifty 2 en het frame bestaat mogelijk gevaar voor inklemmen, bijv.
van kledingstukken of ledematen.
• LET OP! Bij de spleet tussen de zitting van de Swifty 2 en de rugleuningbuis bestaat mogelijk gevaar voor inklemmen, bijv. van kledingstukken of ledematen.
• LET OP! Bij de spleet tussen voetensteun en voetensteunbuis bestaat mogelijk gevaar voor inklemmen, bijv. van
kledingstukken of ledematen.
• Overbelast uw Swifty 2 revalidatiebuggy niet en neem de maximale belading in acht (zie technische gegevens).
• Met reflecterende kleding zijn u en uw kind ook in het donker beter zichtbaar voor andere verkeersdeelnemers –
maak gebruik van dit voordeel.
• Til de revalidatiebuggy alléén op aan vastgelaste of -geschroefde onderdelen (voorframebuis boven de voorwielen,
achteras, duwstang).
• In geval van sterke zonnestraling kunnen op de zwarte kussenelementen hoge oppervlaktetemperaturen ontstaan.
In dat geval bestaat gevaar voor verbrandingen aan de rug en de benen! Zorg er dus altijd voor dat de Swifty 2 bij
gebruik en opslag niet wordt blootgesteld aan deze hittebronnen en gebruik hem, als het toch gebeurt, pas weer als
hij voldoende is afgekoeld!
• Let op dat u zich niet verwondt bij het omhoog klappen van de voetensteun, verstellen van de rugleuning en het
open- en dichtklappen van de revalidatiebuggy.
• Aan de revalidatiebuggy bevestigde zware tassen of boodschappennetten verhogen het kantelgevaar. Maak gebruik
van de (als toebehoren verkrijgbare) mand onder de zitting.
• Neem bij de omgang met de revalidatiebuggy en vooral bij het in- en uitklappen de adviezen in de handleiding in
acht.
• Laat uw kind nooit zonder toezicht achter in de Swifty 2 revalidatiebuggy.
• Wanneer u het kind in de revalidatiebuggy zet of eruit haalt, moeten de wielen geremd zijn.
• Houd bij het in- en uitstappen in of uit de revalidatiebuggy altijd toezicht op uw kind. Wanneer de voetensteun te
sterk belast wordt, bestaat gevaar voor wegglijden of kantelen.
• Houd kinderen van de kunststofverpakking verwijderd, hier bestaat gevaar voor verstikking.
• De revalidatiebuggy is slechts berekend op één kind.
68

Gebruikershandleiding – Swifty 2
Gebruiksrisico‘s en contra-indicaties
Bij doelmatig gebruik kunnen risico‘s tijdens het gebruik worden uitgesloten. Contra-indicaties zijn niet bekend. Het
voor de Swifty 2 gebruikte bekledingsmateriaal is ‚moeilijk ontvlambaar‘, gecontroleerd volgens DIN EN 1021-1 en DIN
1021-2.
De mate van bestendigheid tegen ontbranding bij materialen en bouwgroepen werd volgens de norm gecontroleerd en
als ongevaarlijk geclassificeerd.
Symbolen en waarschuwingsborden
Stickers Betekenis
Typeplaten / belastbaarheidssticker
Het typeplaatje is onder de zitting aangebracht.
Op de typeplaat vindt u de naam en het adres van de
fabrikant, de type-aanduiding, de maximale belastbaarheid en het CE-keurmerk.
Label met streepjescode
Het label met de streepjescode is onder de zitting
aangebracht.
Op het label met de streepjescode staan het artikelnummer, de aanduiding, het serienummer en de productiedatum van het product.
Aanduiding van de vier bevestigingspunten aan de Swifty 2 voor de borging in een gehandicaptentaxi (GT).
69

Gebruikershandleiding – Swifty 2
Technische gegevens en uitvoeringen
Swifty 2
Zitdiepte 375 mm
Zitbreedte 395 mm
Rugleuninghoogte 700 mm
Onderbeenlengte 210 - 370 mm
Zijgeleiding (B x H) 250 x 160 mm
Heuphoek 90° - 100°
Voethoek 90°
Zittingkanteling fix + 20°
Veilige zithoek tot maximaal 10°
Grootte voetensteun (B x D) 310 x 200 mm
Totale afmetingen (L x B x H) 980 x 670 x 1130 mm
Vouwmaten (L x B x H) 790 x 670 x 490 mm
Duwstanghoogte 820 - 1240 mm
Draaicirkel 1260 mm
Wielmaat (voor (zwenkwielen) / achter) 180 mm / 250 mm
Wielbreedte (voor (zwenkwielen) / achter) 45 mm / 50 mm
Gewicht 18,2 kg
Max. gebruikersgewicht 50 kg
max. belastbaarheid mand (toebehoren) 3 kg
De Swifty 2 revalidatiebuggy is verkrijgbaar in de volgende varianten:
Artikelnr. Aanduiding Uitrusting
6808 Swifty 2 revalidatiebuggy Crash Revalidatiebuggy incl. bekleding, H-gordel en voetensteun;
uitgerust en goedgekeurd voor het gebruik als stoeltje in
een motorvoertuig
Leveringsomvang
De Swifty 2 revalidatiebuggy wordt voorgemonteerd geleverd. De zitting, de rugleuning en de zijpelotten van de Swifty
2 zijn in de fabriek voorzien van bekleding. Bovendien zijn bij de Swifty 2 een handleiding en een inbussleutel gevoegd. De inbussleutel is nodig voor het in hoogte verstellen van de voetensteun.
Basisuitvoering
Eenvoudig en opvouwbaar frame met geïntegreerde ziteenheid, H-gordel, vlamremmende bekleding, luchtdoorlatende kussens, via heuphoek verstelbare rugleuning, zwenkbare voorwielen incl. stuurstop, panneveilige EVA-banden; in
hoogte verstelbare en wegklapbare voetensteun; vastzetrem met voetbediening, in hoogte verstelbare duwstang.
Plaatsing en montage
De instellingen / aanpassingen dienen altijd te worden uitgevoerd door geschoolde resp. geïnstrueerde vakmensen (bijv.
adviseurs voor medische producten van de speciaalzaak).
Voor de eerste ingebruikname van de Swifty 2 is geen gereedschap vereist behalve de inbussleutel die bij de levering is
inbegrepen.
Het toebehoren wordt gemonteerd/gedemonteerd met gangbaar gereedschap. Bij het toebehoren zijn handleidingen
gevoegd voor de afzonderlijke montage / demontage. Als deze onverhoopt mochten ontbreken, kunt u ze altijd downloaden via onze downloadrubriek onder www.thomashilfen.com.
70

Gebruikershandleiding – Swifty 2
Inklappen
BELANGRIJK: Let op dat de revalidatiebuggy tijdens het dichtklappen niet op de grond valt, zodat het frame niet ver-
bogen wordt en geen schade ontstaat. Waarborg dat de kunststof stop van het vouwmechanisme in de juiste positie zit
(hogere uiteinde van de stop wijst naar de achterkant van de revalidatiebuggy) (afb. 1).
Uitklappen
De Swifty 2 revalidatiebuggy is aan beide duwstangscharnieren voorzien van een inklapborging. Voor het openklappen
moet de inklapborging aan elke zijde via een van de drukknoppen ontgrendeld worden. (afb. 2) Vervolgens pakt u de
buggy boven en opzij aan de duwstang beet en trekt hem met een soepele beweging naar boven (u hoort de vergrendelingstoets vastklikken). Haal de klemhendel aan de rugplaat los en stel de gewenste rughoek in (zie ‚Instellen van de
rugleuning‘). Stel de in hoogte verstelbare duwstang door het bedienen van de drukknoppen opzij in op de gewenste
hoogte (afb. 3).
Dichtklappen (kleinste vouwmaat)
Haal de klemhendel aan de rugplaat los. Trek de vergrendelingsschuif aan de duwstang omhoog (rechts en links) (afb.
1) en houd de rechts gemonteerde veiligheidsbeugel vast. Druk de duwstang met uw bovenlichaam voren en klap de
buggy naar voren dicht (afb. 4). Druk de rugleuning omlaag en trek de klemhendel weer aan. Klap de duwstang terug
tot op de rugleuning.
Via de inklapborging kunt u het ongewenst openklappen van de Swifty 2 revalidatiebuggy voorkomen. Hiervoor maakt
u de drukknop van de inklapborging aan beide zijden los (afb. 2), legt de gordel om het voorframe en sluit de drukknoppen weer. Nu kunt u de Swifty 2 veilig aan de framebuizen optillen en transporteren.
Zitting- en rugbekleding
De bekleding van zitting en rugleuning bestaat uit één deel. Deze wordt zodanig over de rugleuning geschoven dat het
rode Swifty-logo naar voren wijst en het onderste deel van de bekleding op de zitting komt te liggen. De achterzijde van
de bekleding is in tweeën gedeeld en wordt gesloten met een ritssluiting. Voer de beide helften van de rugleuning-achterzijde onder de rugbeugel van de Swifty 2 door (afb. 5). Trek de bekleding in de juiste positie en sluit de rits (afb. 6).
Vervolgens sluit u de klitsluiting aan het onderste gedeelte van de rugleuning (afb. 7).
Zijpelotten
De opening van de zijpelotten moet steeds naar buiten / voren wijzen (afb. 8). Trek de bekleding over de zijpelotten
(afb. 9). Sluit de rits (afb. 10).
H-gordel
De Swifty 2 revalidatiebuggy is standaard voorzien van een H-gordel.
Gordelslot openen
Houd voor het openen van de H-gordel de rode drukknop (1) ingedrukt, open de clipsluiting (2 en 3) en maak de gordel los (kinderbeveiliging) (afb. 11).
Aanpassing van de schoudergordel
Open de rits achter aan het rugkussen. Open de bovenste klapgespen en trek de gordels er naar voren uit. Haal het rugkussen op de gewenste hoogte langs de doorgestikte naad los. Steek de gordels door de ontstane sleuven en bevestig ze
weer in de klapgespen. Sluit het kussen weer (afb. 12-13).
H-gordel verwijderen
Open de rits achter aan het rugkussen. Open de klapgespen en trek de H-gordel er naar voren uit.
71

Gebruikershandleiding – Swifty 2
Luifelhouders
De Swifty 2 is standaard uitgerust met luifelhouders (afb. 14). De luifel is verkrijgbaar als toebehoren.
Instelmogelijkheden
Verstelling van de rugleuning
Haal de klemhendel aan de rugplaat los, stel de gewenste heuphoek in door de rugbeugel op de rugrail te verschuiven
en klem de hendel weer vast (afb. 15).
Onderbeenlengte
Draai de inbusschroeven (3 mm) rechts en links achter aan de buisgeleidingen van de voetensteun los. Breng de voetensteun in de gewenste positie door deze op de framebuis te verschuiven en draai daarna de schroeven weer vast (afb.
16).
Voetensteun
De voetensteun kan naar boven geklapt worden om kinderen het instappen in de buggy te vergemakkelijken (afb. 17).
Werking van de vastzetrem
Voor het vastzetten van de rem zet u de voet op de rembeugel en drukt hem omlaag. U lost de rem door uw voet onder de rembeugel te zetten en deze naar boven te schuiven (afb. 18).
Vastzetfunctie van de voorwielen
Vastzetten: lijn het voorwiel recht uit en laat de borgpal vastklikken (hoorbaar!).
Lossen: trek de borgpal eruit en zet hem vast met een 90°-draai (afb. 19).
Montage van de gordels
Haal het rugkussen al naargelang de gewenste montagehoogte langs de doorgestikte naden los.
Schuif de twee bovenste gordels door de openingen in het kussen en steek ze door de sleuven in de rugplaat (afb. 12).
Open de rits aan de achterzijde van het rugkussen, schuif vervolgens de gordels in de klapgespen en stel de gewenste
gordellengte in (afb. 13). U kunt de beide onderste uiteinden van de gordels met behulp van klapgespen aan de achterzijde van de rugplaat bevestigen (afb. 20). Voer de gordels links en rechts langs het rugkussen naar de gewenste klapgesp en bevestig ze. Sluit het rugkussen weer (afb. 6-7).
TIP: U kunt de gordels ook aan de voorzijde verstellen. Trek aan de D-ring om de gordels in te korten.
De voorste gordels van de vierpunts heupgordel worden rechts en links met behulp van een klapgesp onder de zitting
bevestigd. Schuif de gordel tussen zijgeleiding en zitplaat door, steek hem in de klapgesp en bevestig hem (afb. 21-22).
Kantelhulp (toebehoren)
Zet de voet op de kantelhulp, houd de revalidatiebuggy met beide handen vast en kantel hem vervolgens (afb. 23).
Transport
De Swifty 2 revalidatiebuggy past voor het transport dichtgeklapt in de kofferruimte van uw auto. Let hierbij op de aanwijzingen voor het inklappen van de revalidatiebuggy en maak gebruik van de inklapborging om abusievelijk uitklappen
te voorkomen.
De Swifty 2 revalidatiebuggy kan aan de framedelen opzij of aan de achteras worden opgetild.
72

Gebruikershandleiding – Swifty 2
Gebruik als stoel in een motorvoertuig
De Swifty 2 revalidatiebuggy in de uitvoering ‚Crash‘ heeft de crashtest volgens de internationale normen ISO 7176/19
en ANSI/RESNA WC 4 section 19 met succes doorstaan en kan als stoel in een motorvoertuig worden gebruikt.
BELANGRIJK: Als de Swifty 2 als stoeltje in een motorvoertuig moet worden gebruikt, moet u daarvoor de volgende
punten in acht nemen.
De Swifty 2 revalidatiebuggy is alleen bedoeld voor transport in de rijrichting. Waar dat mogelijk is, moet de gebruiker
bij voorkeur worden overgezet naar een van de autostoelen en daar beveiligd worden met behulp van het autogordelsysteem. Gebruik alleen volgens ISO 10542 goedgekeurde gordelsystemen voor onderstellen of personen om de Swifty
2 revalidatiebuggy aan de vloer van het voertuig te bevestigen.
De 4 bevestigingspunten aan de Swifty 2 zijn gekenmerkt met het volgende symbool:
Transportvoorbereidingen aan de Swifty 2:
1. Verwijder de volgende delen (indien gemonteerd): abductieblok, therapietafel, luifel, zonnescherm, handboog en
inhouden uit de mand.
2. Plaats de buggy via de geïnstalleerde rails correct en in rijrichting in het voertuig. Trek de vastzetrem aan.
3. Overtuig u ervan dat de heuphoekverstelling is vastgezet.
Bevestiging van de Swifty 2 in een motorvoertuig:
1. De revalidatiebuggy moet met een vierpunts gordelsysteem (volgens ISO 10542-2, SAE 2249 of DIN 75078/2) veilig in
het voertuig bevestigd worden. (Deze gordelsystemen worden o.a. gemaakt door Unwin Safety Systems en Q’Straint)
2. De bestuurder en / of assistent moet(en) vertrouwd zijn in de omgang met deze gordelsystemen / veiligheidssystemen.
3. De twee voorste gordels (karabijnhaken) moeten links en rechts in de stalen ringen boven de voorwielvork bevestigd
worden (afb. 24).
4. De beide achterste gordels (karabijnhaken) moeten aan de twee veiligheidsogen van het achterframe bevestigd worden (afb. 25).
Gordelsysteem bevestigen
1. De crashtest werd uitgevoerd met de H-gordel (deel van de basisuitvoering). Deze H-gordel moet onder de gordel van
het gordelsysteem worden gebruikt.
2. De gebruiker moet worden beveiligd met een goedgekeurd gordelsysteem. Thomashilfen adviseert het gebruik van een
automatische gordel of een driepuntsgordel waarbij de heupgordel en de schoudergordel van elkaar kunnen worden
gescheiden. Dat is nodig om het gordelsysteem correct door het frame van de Swifty 2 te kunnen leiden (fabrikant bijv.:
Unwin Safety Systems en AMF-Bruns).
3. De bestuurder en / of assistent moet(en) vertrouwd zijn in de omgang met deze gordelsystemen / veiligheidssystemen.
4. De heupgordel van de gebruiker moet zonder contact met de buik van de gebruiker vlak langs het bekken worden
geleid. De heupgordelgeleiding moet rechts en links tussen de zijgeleiding en de gebruiker verlopen (afb. 26).
5. De heupgordel mag niet van de gebruiker weg worden gehouden door delen van de revalidatiebuggy (zijelementen,
wielen) (afb. 27).
BELANGRIJK: De gordel mag niet gedraaid worden aangebracht.
6. De hoek van de heupgordel moet tussen 30° en 75° liggen (afb. 28).
7. De heupgordel moet zo strak mogelijk sluiten, maar moet wel aan het comfort van de gebruiker worden aangepast.
8. De schoudergordel van het gordelsysteem moet aan de voertuigwand op een zodanige hoogte worden bevestigd dat
de gordel bij de gebruiker over het midden van de schouder ligt en onder de duwstang verloopt (afb. 27).
BELANGRIJK: Alleen een schoudergordel die aan de zijwand van het voertuig bevestigd is, voldoet aan de huidige
vereisten voor een veilige borging van de gebruiker.
73

Gebruikershandleiding – Swifty 2
Product- / serienummer
Voor uw bestelling van de juiste reserveonderdelen of eventuele technische terugroepacties dient u altijd het serienummer en het exacte artikelnummer te vermelden.
Artikelnummer
U vindt het serie- en het artikelnummer van de Swifty 2 revalidatiebuggy op het label met de streepjescode dat onder
de zitting is aangebracht.
Serie- /
chargenummer
Reinigings-, desinfectie- en verzorgingstips
Het onderstel is vervaardigd van hoogwaardige stalen buizen. Het is gecoat met een robuuste moffellak die met in de
handel verkrijgbare zeep (neutrale zeep) gereinigd en gedesinfecteerd kan worden.
Desinfectie
Reinig de kussens en grepen vóór de desinfectie. Veeg alle delen van het product vochtig af met een desinfectiemiddel.
Hier mogen uitsluitend middelen op waterbasis worden gebruikt. Bij de desinfectie dient u de gebruiksvoorschriften van
de betreffende fabrikant in acht te nemen.
Kussens
Alle kussens kunnen met een paar handgrepen eenvoudig worden verwijderd. De 100 % trevira CS-stof is een hoogwaardig materiaal dat bij max. 40 °C kan worden gewassen. De kussens moeten apart worden gewassen en de klittenbanden moeten vóór het wassen worden gesloten / afgedekt. Zie daartoe ook de wasvoorschriften.
Wij wijzen erop dat ook hoogwaardige stoffen kunnen verbleken door constante en intensieve zonnestraling of door
frequent wassen. De bekleding is moeilijk ontvlambaar (EN 1021-1 en EN 1021-2).
Klittenbandsluitingen
Reinig de klittenbanden af en toe af met een borstel om de functie van de klittenbandsluitingen te behouden. Sluit de
klittenbanden altijd vóór het wassen.
Garantievoorwaarden / CE-keurmerk
Thomashilfen biedt op alle frame-onderdelen 3 jaar garantie vanaf de koopdatum. De garantie geldt voor alle gebreken
die de functie belemmeren. Hiervan uitgezonderd is schade die terug te voeren is op ondoelmatig gebruik (bijv. overbelasting) en natuurlijke slijtage.
Swifty 2 voldoet aan de eisen van de Europese normen EN 12182 en 12183 en is voorzien van een CE-keurmerk.
Wij wensen u veel plezier met uw nieuwe Swifty 2 revalidatiebuggy!
74

Gebruikershandleiding – Swifty 2
Onderhoudsschema – jaarlijkse inspectie / hernieuwd gebruik
Voorbereiding
Bij het product moet een handleiding gevoegd zijn. Indien dat niet het geval is, kunt u deze bij de fabrikant aanvragen.
Maak u vertrouwd met de functies van het product. Als u het product niet kent, kunt u de handleiding beter lezen vóór
de controle. Reinig het product voordat u het controleert. Neem eventueel in de handleiding beschreven reinigings- en
productspecifieke controle-aanwijzingen in acht.
Rubriek
Pos.
1 Zitting I/HG I/HG I/HG
2 Hoek instellen I/HG I/HG I/HG
3 Hoogteverstelling I/HG I/HG I/HG
4 Zitkussen I HG
5 Ontbrekende kappen en stoppen I/HG
6 Rug I/HG I/HG I/HG
7 Hoek instellen I/HG I/HG I/HG
8 Hoogteverstelling I/HG I/HG I/HG
9 Rugkussen I HG
10 Schuifbeugel I/HG I/HG I/HG
11 Schuifbeugelovertrek I HG
12 Frame I/HG I/HG I/HG
13 Banden I I I HG
14 Handrem I/HG I/HG I/HG
15 Hoofdsteun I/HG I/HG I/HG
16 Hoofdsteunkussen I HG
17 Thoraxpelotten I/HG I/HG I/HG
18 Bekleding thoraxpelotten I HG
19 Armleuningen I/HG I/HG I/HG
20 Armsteunen I HG
21 Heuppelotten I/HG I/HG I/HG
22 Bekleding heuppelotten I HG
23 Abductieblok I/HG I/HG I/HG
24 Bekleding abductieblok I HG
25 Tibiapelotten I/HG I/HG I/HG
26 Bekleding tibiapelotten I HG
27 Therapietafel I/HG I/HG I/HG
28 Gordelsysteem I/HG I/HG I/HG
Het onderhoud werd uitgevoerd op:
= controle afgehandeld
Opties
(I = Inspectie / HG = Hernieuwd Gebruik)
Functie Beschad. Vervormd Vervangen
Service en reparatie aan de revalidatiestoel mogen alleen worden uitgevoerd door personeel van de speciaalzaak.
De gebruiker van dit revalidatiemiddel dient erop toe te zien dat de voorgeschreven inspecties / onderhoudsbeurten
regelmatig en op tijd worden uitgevoerd. Bij een zichtbare / merkbare schade dient de gebruiker de speciaalzaak te
informeren en de schade onmiddellijk te laten verhelpen door vakpersoneel. Voor reparaties mogen uitsluitend originele
onderdelen worden gebruikt (voor de stuklijst en de onderdelenlijst verwijzen wij naar de downloadrubriek op onze
internetpagina www.thomashifen.com).
Demontage en montage van reserveonderdelen mogen alléén worden uitgevoerd door vakpersoneel! Bij noodzakelijke
retourzendingen naar uw speciaalzaak dient u ervoor te zorgen dat het onderstel transportveilig verpakt wordt.
75

Bruksanvisning – Swifty 2
Kära Swifty 2 användare!
Rehab-barnsittvagnen Swifty 2 är en modern och mycket högvärdig medicinprodukt i riktigt snygg design. Den har
utformats i samråd med föräldrar som dagligen använder rehab-produkter och som vet vilka behov barnen har.
En rehab-produkt behöver inte alltid se ut som en sådan, utan den kan samtidigt som den uppfyller alla behov och
säkerhetskrav som ställs på en rehab-produkt även ha en riktigt snygg design – precis som vår Swifty 2: Längden för
underbenen är steglöst inställbar, den är tillverkad av högvärdiga material och den stabila sittdelen är både bekväm och
säker. Tack vare den låga vikten och de svängbara hjulen är denna rehab-sittvagn ovanligt lättmanövrerad trots den
höga maximala belastningen. Den kan fällas ihop enkelt och snabbt och får plats i varje bagageutrymme.
Vänligen läs först noga igenom denna bruksanvisning, så att användningen av din nya Swifty 2 rehab-sittvagn är säker,
praktisk och bekväm både för dig och för ditt barn.
Om du ändå skulle ha någon fråga eller något problem så hjälper din återförsäljare gärna till eller också är du naturligtvis alltid välkommen att kontakta oss direkt.
Du kan också gärna besöka oss på vår hemsida www.thomashilfen.com. Här finns både aktuella informationer och
viktiga säkerhetsinstruktioner om våra produkter.
Vår adress: Thomas Hilfen für Körperbehinderte
GmbH & Co. Medico KG
Walkmühlenstraße 1
D - 27432 Bremervörde
Tel.: +49 (0) 4761 886-68 eller -63
www.thomashilfen.com
Innehåll Sida
Säkerhetstekniska kontroller och serviceintervaller ............................................................................................ 77
Ändamålsenlig användning .............................................................................................................................. 77
Allmänna säkerhetsinformationer ..................................................................................................................... 78
Användningsrisker och kontraindikationer ........................................................................................................ 79
Symboler och varningsskyltar ........................................................................................................................... 79
Tekniska informationer och varianter ................................................................................................................ 80
Leveransomfattning .......................................................................................................................................... 80
Standardutrustning ........................................................................................................................................... 80
Uppställning och montering ............................................................................................................................. 80
Inställningsmöjligheter ...................................................................................................................................... 82
Parkeringsbromsen ........................................................................................................................................... 82
Parkeringsbromsen för framhjulen .................................................................................................................... 82
Montera säkerhetsbältena ................................................................................................................................ 82
Tipp-stöd ......................................................................................................................................................... 82
Transport ......................................................................................................................................................... 82
Användning som stol i bilen ............................................................................................................................. 83
Produkt-/serienummer ..................................................................................................................................... 84
Rengöring, desinficering och skötsel ................................................................................................................. 84
Garantivillkor / CE-märkning ............................................................................................................................ 84
Service-/underhållsschema – årlig inspektion/återanvändning ........................................................................... 85
76

Bruksanvisning – Swifty 2
Säkerhetstekniska kontroller och serviceintervaller
Om du skulle ha något problem med de regelbundna kontrollerna vänligen vänd dig omgående till din återförsäljare eller kontakta Thomashilfen.
Regelbunden/daglig service
Anhöriga eller vårdpersonalen kan utan problem utföra nedan nämnda service. Insexnyckeln som ingår i köpet används
för att fixera fotstödet.
1. Torka alltid din rehab-sittvagn om den har blivit våt eller fuktig. Ställ aldrig ifrån dig den utan att först ha torkat av
den ordentligt.
2. Kontrollera att de båda insexskruvarna finns på fotstödet och kontrollera också dagligen med hjälp av insexnyckeln
att de verkligen är ordentligt åtdragna.
3. Kontrollera att alla muttrar, bultar och skruvar är ordentligt åtdragna (varje dag).
4. Kontrollera att ryggstödet, mekanismen för att fälla ihop sittvagnen och viloläget fungerar som det ska (varje vecka).
5. Kontrollera alltid varje gång innan du använder rehab-sittvagnen att bromsen fungerar absolut felfritt.
6. Rengör rehab-sittvagnens ram resp. stomme regelbundet (vi rekommenderar att göra det minst en gång i veckan).
7. Kontrollera att plastproppen på mekanismen för att fälla ihop sittvagnen sitter fast ordentligt i rätt läge (varje dag, se
bild 1).
Service varje halvår
Alla servicearbeten som nämns nedan ska utföras av din återförsäljare som har den fackkunskap som behövs eller också
ska den utföras på en auktoriserad reparationsverkstad. Om du skulle märka att det är något fel på rehab-sittvagnen eller
att något inte fungerar riktigt så får du inte använda den så länge tills respektive fel har åtgärdats.
1. Fäll upp rehab-sittvagnen och fäll sedan ihop den igen för att kontrollera att alla rörelser fungerar felfritt. Kontrollera
också om ramen eventuellt har tagit skada på något sätt.
2. Kontrollera rehab-sittvagnens olika funktioner och inställningsmöjligheter och i synnerhet ryggstödets olika inställningar.
3. Kontrollera alla muttrar, skruvar, gångjärn och proppar att de är sitter stadigt på plats och att de inte har tagit skada.
4. Kontrollera om bromsen är sliten, om den är skadad och att den fungerar som den ska.
5. Kontrollera däcken, i synnerhet att inga vassa föremål har fastnat i dem och det inte finns några sprickor.
6. Kontrollera hjulen och hjulgaffeln om de är slitna.
7. Kontrollera att både fram- och bakhjulen är lättmanövrerade och fungerar som de ska. Torka bort damm, sand och
annan smuts med en torr trasa som inte luddar.
8. Kontrollera hjullåsningens funktion.
9. Kontrollera alla plastdelar om de är deformerade eller spruckna.
Ändamålsenlig användning
Rehab-sittvagnen Swifty 2 ska användas av föräldrar eller andra lämpliga stödpersoner för att transportera ett barn
med funktionshinder. Den kan användas på ett stadigt underlag både inom- och utomhus (med max. gånghastighet).
Rehab-sittvagnen Swifty 2 får inte användas för andra ändamål (t.ex. som transportmedel för ytterligare barn eller för att
transportera dina inköp, etc.).
För optimal ergonomi är handtaget inställbart i höjdled så att det känns bekvämt oberoende av hur lång du är.
Swifty 2 är godkänd för transport av barn i bilen/handikapsanpassade fordon enligt ISO 7176-19 samt enligt ANSI/
RESNA WC 4 sektion 19.
77

Bruksanvisning – Swifty 2
Vänligen beakta följande säkerhetsinformationer
• Läs noga igenom bruksanvisningen eller be någon att läsa upp den för dig innan du använder sittvagnen första
gången. Om du skulle ha tappat bort bruksanvisningen så kan du ladda ner den på vår hemsida www.thomashilfen.
com Våra PDF-dokument kan du också ta fram i förstorat format.
• Vi rekommenderar att du anpassar underbenens längd minst var 3:e månad till barnets kroppslängd. Kontakta gärna
din terapeut/ortopeditekniker för att få hjälp med detta.
• Säkra ditt barn alltid med ett så kallat H-bälte, d.v.s. ett hängslebälte (standardutrustning) eller med ett annat säkerhetsbälte (finns som extra tillbehör).
• VARNING: Om hjulen är våta så kan etta påverka bromsfunktionen. Om du stannar till eller gör ett längre stopp är
det viktigt att låsa rehab-sittvagnen med fotbromsen resp. parkeringsbromsen så att den inte kan rulla iväg okontrollerat.
• VIKTIGT: Ha inte bromsen åtdragen om du ställer ifrån dig rehab-sittvangen och inte använder den en längre tid.
Bakhjulen kan ta skada om handbromsen ständigt är åtdragen.
• VARNING: Spalten mellan underdelen och utlösningsstången för bromsen kan eventuellt innebära en risk att
klämma sig eller att man fastnar med kläderna i området kring fötterna.
• VARNING: Spalten mellan sittdelen på Swifty 2 och underdelens ram kan eventuellt innebära en risk att klämma sig
eller att man fastnar med kläderna i området kring sittdelen.
• VARNING: Spalten mellan sittdelens sidostöd och ryggdelens böjda rör kan eventuellt innebära en risk att klämma
sig eller att man fastnar med kläderna i området kring sittdelen.
• VARNING: Spalten mellan fotstödsplattan och fotstödsröret kan eventuellt innebära en risk att klämma sig eller att
man fastnar med kläderna i området kring fötterna.
• Överbelasta aldrig din rehab-sittvagn Swifty 2, beakta den maximala vikt som anges (se Tekniska informationer).
• Reflekterande kläder ger både dig och ditt barn mer säkerhet i trafiken när det är mörkt ute – ha alltså på dig lämpliga kläder och använd reflexer.
• Ta endast tag i rehab-sittvagnen på de ställen som är hopsvetsade eller där den är ordentligt hopskruvad när du lyfter
upp den (alltså den främre ramens rör ovanför framhjulen, bakaxeln, handtaget/bygeln).
• Observera att de svarta dynorna kan bli mycket varma om sittvagnen står i direkt solljus. Det finns då risk att bränna
sig i ryggen och på benen! Se därför alltid till att din Swifty 2 inte står i närheten av någon värmekälla, varken när du
använder den eller ställer ifrån dig den. Använd sittvagnen först när den har svalnat ifall den har blivit för varm!
• Beakta också risken att skada sig när du fäller upp fotstödet, ställer in ryggstödet eller när du fäller upp resp. fäller
ihop rehab-sittvagnen.
• Tänk på att risken att rehab-sittvagnen välter är större om du hänger tunga väskor eller kassar på den. Använd i stället om möjligt korgen under sittdelen (finns som extra tillbehör).
• Beakta alltid också våra rekommendationer i denna bruksanvisning när du använder rehab-sittvagnen – särskilt när
du fäller upp resp. fäller ihop den.
• Lämna aldrig ditt barn utan uppsikt i rehab-sittvagnen Swifty 2.
• Fotbromsen resp. parkeringsbromsen ska alltid vara åtdragen när du sätter ner ditt barn i sittvagnen eller tar upp
barnet.
• Lämna aldrig ditt barn utan uppsikt när det sätter sig i rehab-sittvagnen eller kliver ur den. Om fotstödet belastas för
mycket finns risk att det tippar å sidan eller att barnet glider ner från fotstödet.
• Se till att ditt barn inte kommer åt plastförpackningen, en plastförpackning innebär alltid en risk för kvävning.
• Endast ett barn får använda rehab-sittvagnen åt gången.
78

Bruksanvisning – Swifty 2
Användningsrisker och kontraindikationer
Om rehab-sittvagnen används på ändamålsenligt och föreskrivet sätt finns inga risker i och med användningen. Kontraindikationer är inte kända. Materialet som dynorna är tillverkade av är ”svårt antändbart” och testat enligt DIN EN
1021-1 och DIN EN 1021-2.
Materialens och komponenternas beständighet gentemot antändning har testats enligt respektive standarder och normer
och de har bedömts att vara ofarliga.
Symboler och varningsskyltar
Dekaler Innebörd
Märkskyltar/dekaler som anger den maximala
belastningen
Märkskylten befinner sig under sittdelen.
På märkskylten finns uppgifter om tillverkaren inkl.
adressen, typbeteckningen och om den max. tillåtna
belastningen samt en CE-märkning.
Streckkod-etiketten
Streckkod-etiketten befinner sig under sittdelen.
På streckkod-etiketten finns sittvagnens artikelnummer,
beteckning, serienummer samt produktens tillverkningsdatum.
Märkning av de 4 fästpunkterna på Swifty 2 där den ska
säkras i ett handikapsanpassat fordon.
79

Bruksanvisning – Swifty 2
Tekniska informationer och varianter
Swifty 2
Sittdjup 375 mm
Sittbredd 395 mm
Rygghöjd 700 mm
Underbenslängd 210 - 370 mm
Sidostöd (b x h) 250 x 160 mm
Höftvinkel 90° - 100°
Fotvinkel 90°
Sittvinkel fast + 20°
Säker tipplutning upp till max. 10°
Storlek fotstöd (b x d) 310 x 200 mm
Sammanlagt mått (l x b x h) 980 x 670 x 1130 mm
Mått hopfälld (l x b x h) 790 x 670 x 490 mm
Handtagshöjd 820 - 1240 mm
Radie 1260 mm
Hjulstorlek (fram (svänghjul)/bak) 180 mm / 250 mm
Hjulbredd (fram (svänghjul)/bak) 45 mm / 50 mm
Vikt 18,2 kg
Barnets max. vikt 50 kg
Korgens (extra tillbehör) max. belastning 3 kg
Rehab-sittvagnen Swifty 2 finns i följande varianter:
Artikelnummer Beteckning Utrustning
6808 Swifty 2 Rehab-sittvagnen Crash Rehab-sittvagnen inkl. dynor, H-bälte och fotstöd; utrustad
och godkänd för användning i bilen
Leveransomfattning
Rehab-sittvagnen Swifty 2 är förmonterad när den levereras. Swifty 2 är vid leveransen utrustad med sitt- och ryggdynor
samt med dynor i sidan. Dessutom ingår en bruksanvisning och en insexnyckel. Insexnyckeln behöver du för att anpassa
fotstödet i höjdled.
Standardutrustning
Hopfällbar sittvagn med inbyggd sittdel, H-bälte, flamhämmande klädsel, andningsaktiva dynor, ryggstöd med inställbar
höftvinkel, svängbara framhjul inkl. styrstopp, EVA-däck med punkteringsskydd, i höjdled inställbart och fällbart fotstöd,
fot-parkeringsbroms och i höjdled inställbart handtag.
Uppställning och montering
Endast fackpersonal (till exempel konsulter för medicinprodukter eller personer med liknande kunskap) få ställa in/anpassa rehab-sittvagnen.
Man behöver inga andra verktyg än insexnyckeln som igår i leveransen för att kunna använda rehab-sittvagnen Swifty 2.
För monteringen/demonteringen av extra tillbehör behöver man endast konventionella verktyg, alltså inga specialverk-
tyg. Tillsammans med det extra tillbehöret får man också alltid en separat monterings- och bruksanvisning. Om den
skulle saknas kan du ladda ner den på vår hemsida www.thomashilfen.com.
80

Bruksanvisning – Swifty 2
Fälla upp/fälla ihop rehab-sittvagnen
OBSERVERA: Se alltid till att rehab-sittvagnen inte faller i golvet/marken när du fäller upp resp. fäller ihop den eftersom
stommen eller andra delar på den annars skulle kunna ta skada. Kontrollera alltid att plastproppen för mekanismen för
att fälla upp resp. fälla ihop sittvagnen har rätt läge (proppens ände som är lite högre ska visa i riktning mot rehab-sittvagnens baksida) (se bild 1).
Fälla upp rehab-sittvagnen
Rehab-sittvagnen Swifty 2 har en låsningsfunktion vid handtagets båda ledpunkter. För att fälla upp sittvagnen måste du
öppna låsningsfunktionen med hjälp av en tryckknap på vardera sidan (bild 2). Ta sedan tag i sittvagnen upptill och på
sidan på hantaget och dra den med en snabb rörelse uppåt (förreglingarna går i lås med ett tydligt ljud). Lossa klämspaken på ryggdelen och ställ in den önskade vinkeln på ryggstödet (se avsnittet om hur du ställer in ryggstödet). Ställ nu in
handtaget på önskad höjd genom att trycka på tryckknapparna på sidan (bild 3)
Fälla ihop rehab-sittvagnen (minsta hopfällda mått)
Lossa klämspaken på ryggdelen. Dra upp förreglingarna på handtaget (till vänster och höger) (bild 1) och håll i den på
höger sida monterade säkerhetsbygeln. Tryck nu med framkroppen handtaget framåt och fäll ihop sittvagnen i riktning
framåt (bild 4). Tryck ner ryggstödet och dra åt klämspaken igen och fäll sedan ner handtaget mot ryggstödet.
Ovan nämnda låsningsfunktion förhindrar att rehab-sittvagnen Swifty 2 kan fällas upp okontrollerat. För att aktivera
denna funktion lossar du tryckknappen på vardera sidan (bild 2), drar bältet runt den främre ramen och stänger båda
tryckknapparna igen. Nu kan du transportera Swifty 2 utan risk att den fälls upp okontrollerat.
Sits- och ryggdynan
Sits- och ryggdynan är en enda del. Dra den så över ryggstödet, att den röda Swifty logotypen visar i riktning framåt och
att dynans nedre del ligger på sittdelen. Dynans baksida är tvådelad och stängs med en dragkedja. Skjut båda delarna av
den tvådelade baksidan in under ryggdelens bygel (bild 5), dra i dynan tills den har rätt läge och stäng sedan dragkedjan
(bild 6). Nu behöver du bara stänga kardborrebanden nertill på ryggdelen (bild 7).
Stöddynorna på sidan
Öppningen på stöddynorna på sidan ska visa i riktning utåt/framåt (bild 8). Dra dynan över sidostöden (bild 9) och stäng
dragkedjan (bild 10).
H-bälte
Rehab-sittvagnen Swifty 2 har som standard ett H-bälte (hängslebälte).
Öppna bälteslåset
För att öppna H-bältet håller du den röda tryckknappen (1) nertryckt, öppnar klick-låset (2 och 3) och tar sedan loss
bältet (barnsäkring) (bild 11).
Ställa in höjden på axelbältet
Öppna dragkedjan bak på ryggdynan. Öppna de övre spännena och dra ut båda axelbälten framifrån. Sprätta upp sömmen på ryggdynan på den önskade höjden. Dra nu bältena genom denna öppning och fäst dem i spännena igen. Stäng
till dynan igen (bild 12-13)
Ta bort H-bältet
Öppna dragkedjan bak på ryggdynan. Öppna spännena och dra ut hängslebältet framifrån.
81

Bruksanvisning – Swifty 2
Suffletthållare
Swifty 2 har som standard suffletthållare (bild 14). Suffletten finns som extra tillbehör).
Inställningsmöjligheter
Ställa in ryggstödet
Lossa klämspaken på ryggdelen, ställ in den önskade höftvinkeln genom att förskjuta ryggdelens bygel på ryggskenan
och dra sedan åt klämspaken igen (bild 15).
Underbenslängden
Lossa insexskruvarna (3 mm) till vänster och höger baktill på fotstödets rörstyrningar. Ställ fotstödet i den önskade positionen genom att förskjuta det på ramens rör. Dra sedan åt skruvarna ordentligt igen (bild 16).
Fotstödet
Fotstödet kan fällas upp för att det ska vara enklare för barnet att ta sig upp i sittvagnen (bild 17).
Parkeringsbromsen
För att låsa bromsen ställer du ena foten på bromsbygeln och trycker sedan ner den. För att lossa bromsen igen går du
med foten under bromsbygeln och trycker den uppåt (bild 18).
Parkeringsbromsen för framhjulen
Låsa bromsen: Se till att hjulet står rakt fram och låt snäpplåset gå i lås (du hör ett tydligt ljud).
Lossa bromsen: Dra i snäpplåset och fixera det genom att vrida det 90° (bild 19).
Montera säkerhetsbältena
Sprätta upp sömmarna på ryggdynan på den önskade monteringshöjden.
Dra de båda övre bältena genom öppningarna i dynan och in i öppningar på ryggplattan (bild 12). Öppna dragkedjan
bak på ryggdynan, skjut sedan de båda bältena in i spännena och ställ in den önskade bälteslängden (bild 13). De båda
nedre ändarna kan du fästa med spännen baktill på ryggplattan (bild 20). Dra nu bältena till vänster och höger bredvid
ryggdynan till respektive spänne och fäst dem där. Stäng ryggdynan igen (bild 6-7).
TIPS: Du kan dessutom ställa in bälteslängden framtill. Dra i D-ringen för att göra bältet kortare.
De främre bältena på 4-punktsbältet fäster du till vänster och höger med ett spänne under sittdelen. Dra bältet mellan
sidostödet och sitsen, skjut in det i spännet och fäst det (bild 21-22).
Tipp-stöd (extra tillbehör)
Ställe ena foten på tipp-stödet, håll i rehab-sittvagnen med båda händerna och tippa den (bild 23).
Transport
Rehab-sittvagnen Swifty 2 kan fällas ihop så att det är enkelt att transportera den i bagageutrymmet, se avsnittet om hur
du fäller ihop rehab-sittvagnen, och använd alltid låsningsfunktionen som förhindrar att den kan fällas upp okontrollerat.
Rehab-sittvagnen Swifty 2 kan du lyfta upp antingen genom att ta tag i ramens sidodelar eller i bakaxeln.
82

Bruksanvisning – Swifty 2
Användning som stol i bilen
Rehab-sittvagnen Swifty 2 i varianten ”Crash“ har godkänts i krocktester enligt den internationella standarden ISO
7176/19 och ANSI/RESNA WC 4 sektion 19 och får därför användas även som stol i en bil.
VIKTIGT: Om du vill använda din Swifty 2 som stol i bilen är det viktigt att du följer anvisningarna nedan.
Rehab-sittvagnen Swifty 2 är konstruerad att stå i riktning framåt i bilen. Om det är möjligt ska den som använder sittvagnen flyttas till en plats på baksätet och det i bilen installerade bältessystemet användas. Använd endast ett chassibältessystem/andra personsäkerhetssystem som stämmer överens med ISO 10542 för att säkra rehab-sittvagnen Swifty 2 på
golvet i bilen.
De 4 fästpunkterna på Swifty 2 är märkta med följande symbol:
Förbereda Swifty 2 för transport i bilen:
1. Ta bort följande delar (om dessa är monterade): abduktionsblocket, terapibordet, suffletten, parasollet, handbågen
och allt som ligger i korgen.
2. Positionera sittvagnen i riktning framåt och exakt över de installerade skenorna. Lås parkeringsbromsen.
3. Kontrollera att höftvinkelinställningen är fixerad.
Fästa Swifty 2 i bilen:
1. Rehab-sittvagnen ska fästas i bilen på säkert sätt med hjälp av ett 4-punktsbältessystem (enligt ISO 10542-2, SAE
2249 eller DIN 75078/2) (tillverkare av dessa bältessystem är bl.a. Unwin Safety Systems och Q’Straint)
2. Föraren och/eller assistenten ska ha kunskap om hur dessa bältessystem fungerar och hur de används.
3. Fäst det båda främre bältena (karbinhakar) till vänster och höger i stålringarna ovanför framhjulsgaffeln (bild 24).
4. Fäst det båda bakre bältena (karbinhakar) i de två säkerhetsöglorna på bakramen (bild 25).
Fasthållningssystemet:
1. Krock-testet genomfördes med ett H-bälte (ingår i standardutrustningen). Detta H-bälte ska användas under fasthållningsanordningens bälte.
2. Den som använder sittvagnen ska säkras med ett godkänt fasthållningssystem. Thomashilfen rekommenderar att
använda ett automatikbälte eller ett 3-punktsfasthållningssystem där höftbältet och axelbältet kan skiljas från varandra.
Detta är viktigt för att på säkert sätt kunna dra fasthållningssystemet genom stommen på sittvagnen Swifty 2 (tillverkare
ör bl.a. Unwin Safety Systems och AMF-Bruns).
3. Föraren och/eller assistenten ska ha kunskap om hur dessa bältessystem/fasthållningssystem fungerar och hur de används.
4. Höftbältet ska anligga platt på höften utan kontakt med magen. Höftbältet ska gå till vänster och höger mellan sidostödet och den som använder bältet (bild 26).
5. Höftbältet får inte hållas på avstånd från kroppen genom delar på rehab-sittvagnen (sidodelar, hjulen) (bild 27).
OBSERVERA: Kontrollera alltid att ingen av de enskilda bältena är snedvriden.
6. Höftbältet ska ha en vinkel på mellan 30° och 75° (bild 28).
7. Anpassa höftbältet så, att det visserligen anligger så nära kroppen som möjligt men att det också känns bekvämt för
en som använder det.
8. Fasthållningssystemets bälte för överkroppen ska fästa på en sådan höjd på bilväggen, att det är säkerställt att bältet
går över mitten på axeln på den som använder bältet och under sittvagnen handtag (bild 27)
OBSERVERA: Endast ett axelbälte som är också är fäst i bilens sidovägg uppfyller de aktuella kraven för en säker persontransport.
83

Bruksanvisning – Swifty 2
Produkt-/serienummer
Om du skulle behöva någon reservdel resp. om du har
någon teknisk fråga är det viktigt att du anger både serienumret och artikelnumret.
Artikel-nummer
Rehab-sittvagnens serienummer och även artikelnumret
befinner sig på streckkod-etiketten under sittdelen.
Serie / batchnummer
Rengöring, desinficering och skötsel
Underdelen är tillverkad av ett högvärdigt stålrör. Det har en slitstark pulverlackering och kan rengöras med konventionell tvål (neutral tvål) samt desinficeras.
Desinficering
Rengör dynorna och handtagen innan du desinficerar dem. Torka alla delar fuktigt med ett desinfektionsmedel. Använd
endast vattenbaserade rengörings- och desinfektionsmedel. Beakta och följ respektive tillverkares instruktioner.
Dynor
Alla dynor är enkla att ta bort med bara några handgrepp. Tyget är av 100 % Trevira CS, vilket är en väv av mycket hög
kvalitet och tvättbar upp till 40°C. Tvätta dynorna separat och täck över kardborrebanden resp. stäng dem innan tvätten.
Beakta också skötselanvisningen.
Observera att även tyger av mycket hög kvalitet kan blekna om de länge utsätts för direkt solljus eller tvättas för ofta.
Dynorna är svårt antändbara (EN1021-1 och EN 1021-2).
Kardborreband
För att kardeborrebanden alltid ska fungera optimalt är det viktigt att rengöra dem regelbundet med en borste. Stäng
alltid kardborrebanden innan tvätten.
Garantivillkor / CE - märkning
Thomashilfen ger en garanti på 3 år på alla ramdelar från och med dagen som produkten köptes. Garantin innefattar alla
anspråk som hänför sig till funktionen. Garantin gäller emellertid inte för skador som har orsakats av felaktig användning
(t.ex. överberlastning) och inte heller för skador som har orsakats av naturligt slitage.
Swifty 2 stämmer överens med den europeiska standarden EN 12182 och EN 12183 och är CE-märkt.
Vi önskar dig stor glädje med din nya rehab-sittvagn Swifty 2!
84

Bruksanvisning – Swifty 2
Service-/underhållsschema – årlig inspektion/återanvändning
Förberedande åtgärder
Det ska alltid följa med en bruksanvisning för produkten. Om den skulle saknas kan du beställa den hos tillverkaren. Informera dig om produktens olika funktioner. Om du inte känner till produkten tidigare så är det viktigt att du först noga
läser igenom bruksanvisningen. Rengör produkten innan du börjar med inspektionen. Beakta alla sköteselråd samt alla
produktspecifika inspektionsanvisningar i bruksanvisningen.
Område
Pos.
1 Sits I/ Å I/Å I/Å
2 Vinkelinställning I/ Å I/Å I/Å
3 Höjdinställning I/Å I/Å I/Å
4 Dyna för sitsen I Å
5 Kåpor och proppar som saknas I/Å
6 Ryggstöd I/Å I/Å I/Å
7 Vinkelinställning I/Å I/Å I/Å
8 Höjdinställning I/Å I/Å I/Å
9 Dyna för ryggstödet I Å
10 Handtag I/Å I/Å I/Å
11 Handtagsöverdrag I Å
12 Underrede I/Å I/Å I/Å
13 Däck I I I Å
14 Parkeringsbroms I/Å I/Å I/Å
15 Nackstöd I/Å I/Å I/Å
16 Dyna för nackstödet I Å
17 Toraxpelotter I/Å I/Å I/Å
18 Dyna för toraxpelotter I Å
19 Armstöd I/Å I/Å I/Å
20 Armstödets kontaktytor I Å
21 Höftpelotter I/Å I/Å I/Å
22 Dyna för höftpelotter I Å
23 Abduktionskil I/Å I/Å I/Å
24 Dyna för abduktionskilen I Å
25 Tibiapelotter I/Å I/Å I/Å
26 Dyna för tibiapelotter I Å
27 Terapibord I/Å I/Å I/Å
28 Bältessystem I/Å I/Å I/Å
Servicen har genomförts av: den:
= Inspektion genomförd
Tillval
(I = Inspektion / Å = Återanvändning)
Funktion Skada Deformering Byta ut
Service och reparationer på rehab-vagnen är något som endast en fackman resp. en fackfirma får genomföra. Den som
använder denna rehab-produkt är skyldig att se till, att alla föreskrivna inspektioner/serviceåtgärder genomförs regelbundet och i god tid. Om någon skada eller något fel upptäcks på rehab-produkten ska användaren omedelbart anmäla
detta och anlita en fackman resp. en fackfirma för att åtgärda skadan/felet. Det är endast tillåtet att använda original
reservdelar för en reparation (en förteckning på alla utbytes-/reservdelarår kan du ladda ner på vår hemsida www.thomashilfen.com).
Endast fackkunnig personal får demontera/montera reservdelar! Om produkten behövas returneras är det viktigt att
underredet förpackas så, att det inte kan ta skada under transporten.
85

Podręcznik dla użytkownika – Swifty 2
Szanowny użytkowniku wózka Swifty 2,
dziecięcy wózek rehabilitacyjny Swifty 2 to nowoczesny produkt medyczny wysokiej jakości o estetycznym wyglądzie.
Przy jego projektowaniu z przekonaniem uwzględniono sugestie rodziców zaznajomionych z codziennym korzystaniem ze sprzętu rehabilitacyjnego oraz potrzebami swoich dzieci w zakresie użytkowania takich środków pomocniczych.
Wózek wcale nie musi wyglądać jak sprzęt rehabilitacyjny. Mimo to wózek Swifty 2 spełnia wszystkie wymagania wózka rehabilitacyjnego: płynna regulacja wysokości podnóżka, wysokiej jakości materiały, stabilne i wygodne siedzisko
oraz bezpieczna obsługa. Dzięki niewielkiej wadze i obrotowym kółkom wózek ten jest bardzo zwrotny mimo wysokiej maksymalnej obciążalności. Wózek można łatwo i szybki złożyć – zmieści się on do każdego bagażnika.
Aby obsługa wózka rehabilitacyjnego Swifty 2 była dla Państwa i dla dziecka bezpieczna, praktyczna i komfortowa,
zalecamy zapoznanie się z niniejszą instrukcją obsługi.
Jeżeli mimo to będą Państwo mieli pytania lub problemy, prosimy skontaktować się ze specjalistycznym sklepem lub
bezpośrednio z nami.
Zapraszamy także do odwiedzenia naszej strony internetowej www.thomashilfen.com, gdzie znajdą Państwo aktualne informacje i ważne wskazówki dotyczące bezpieczeństwa produktów, a także informacje na temat ewentualnego
wycofania produktu.
Nasz adres: Thomas Hilfen für Körperbehinderte
GmbH & Co. Medico KG
Walkmühlenstraße 1
D - 27432 Bremervörde
Telefon: +49 (0) 4761 886-68 lub -63
www.thomashilfen.com
Treść Strona
Kontrole techniczne i okresy konserwacyjne .................................................................................................... 87
Przeznaczenie i obszary zastosowań ................................................................................................................ 87
Ogólne wskazówki bezpieczeństwa ................................................................................................................. 88
Zagrożenia wynikające z użytkowania i przeciwwskazania .............................................................................. 89
Symbole i znaki ostrzegawcze .......................................................................................................................... 89
Dane techniczne i warianty ............................................................................................................................. 90
Zakres dostawy................................................................................................................................................ 90
Wyposażenie podstawowe .............................................................................................................................. 90
Ustawienie i montaż ........................................................................................................................................ 90
Możliwości regulacji ........................................................................................................................................ 92
Funkcja hamulca postojowego ......................................................................................................................... 92
Funkcja blokady przednich kółek ..................................................................................................................... 92
Montaż pasów ................................................................................................................................................. 92
Pedał do przechylania ...................................................................................................................................... 92
Transport ......................................................................................................................................................... 92
Użycie jako siedzisko w pojeździe mechanicznym ........................................................................................... 93
Numer produktu / seryjny ................................................................................................................................ 94
Wskazówki dotyczące czyszczenia, dezynfekcji i pielęgnacji ........................................................................... 94
Warunki gwarancji / oznakowanie CE .............................................................................................................. 94
Schemat konserwacji – coroczna inspekcja / ponowne użytkowanie ................................................................ 95
86

Podręcznik dla użytkownika – Swifty 2
Kontrole techniczne i okresy konserwacyjne
W razie stwierdzenia problemu przy przeprowadzaniu regularnej kontroli należy natychmiast powiadomić lokalny
sklep specjalistyczny lub Thomashilfen.
Regularna / codzienna konserwacja
Członkowie rodziny i opiekunowie mogą w prosty sposób przeprowadzić poniższe czynności konserwacyjne. Dołączony klucz imbusowy jest potrzebny do zablokowania podnóżka..
1. W razie wilgoci wózek zawsze wytrzeć do sucha. Nigdy nie chować wózka, gdy jest wilgotny.
2. Upewnić się, czy obie śruby imbusowe przy podnóżku są na swoim miejscu i każdego dnia sprawdzać za pomocą
klucza imbusowego, czy śruby są dokręcone.
3. Sprawdzić, czy wszystkie nakrętki, trzpienie i śruby są dokręcone (codziennie).
4. Sprawdzić działanie oparcia, mechanizmu składania i pozycji spoczynkowej (co tydzień).
5. Przed użytkowaniem wózka zawsze sprawdzić działanie hamulca.
6. W razie potrzeby oczyścić ramę wózka (zalecenie: co najmniej raz w tygodniu).
7. Upewnić się, czy plastikowa zatyczka mechanizmu składania jest zamocowana we właściwej pozycji (codziennie,
rys. 1).
Konserwacja co pół roku
Poniższe czynności konserwacyjne powinien przeprowadzać sprzedawca posiadający odpowiednią wiedzę specjalistyczną lub autoryzowany warsztat naprawczy. W razie stwierdzenia poważnych usterek nie należy używać wózka
rehabilitacyjnego do czasu usunięcia tych usterek.
1. Rozłożyć wózek i sprawdzić, czy wszystkie procesy mechaniczne działają prawidłowo przy rozkładaniu. Sprawdzić,
czy na ramie nie ma żadnych uszkodzeń.
2. Sprawdzić działanie i możliwości regulacji wózka rehabilitacyjnego, w szczególności regulacji oparcia.
3. Sprawdzić nakrętki, śruby, zawiasy i zatyczki ramy pod kątem wytrzymałości i ogólnego stanu.
4. Sprawdzić hamulec pod kątem zużycia, uszkodzeń i sprawności działania.
5. Sprawdzić, czy w oponach nie utkwiły ostre przedmioty lub czy widoczne są nacięcia lub rysy.
6. Sprawdzić kółka i widelce kółek pod kątem nadmiernego zużycia.
7. Sprawdzić, czy przednie i tylne kółka mogą się swobodnie poruszać i stabilnie się toczą. Usunąć pył, piasek i inne
zabrudzenia za pomocą suchej, niestrzępiącej się ściereczki.
8. Sprawdzić działanie blokady kółek.
9. Sprawdzić wszystkie plastikowe elementy pod kątem odkształceń lub pęknięć.
Przeznaczenie i obszary zastosowań
Wózek rehabilitacyjny Swifty 2 przeznaczony jest do przewozu (maks. tempo marszu) niepełnosprawnych dzieci przez
ich rodziców lub inne osoby po stabilnym, równym podłożu w pomieszczeniach i na zewnątrz. Wózka Swifty 2 nie
wolno używać niezgodnie z jego przeznaczeniem (np. jako środka transportu dla większej liczby dzieci, do przewożenia zakupów itp.).
Aby osobie towarzyszącej umożliwić ergonomiczne użytkowanie, można wyregulować wysokość rączki.
Wózek Swifty 2 posiada zezwolenie na transport dzieci w pojazdach mechanicznych / pojazdach do przewozu osób
niepełnosprawnych (BTW) według ISO 7176-19 oraz ANSI/RESNA WC 4 sekcja 19.
87

Podręcznik dla użytkownika – Swifty 2
Przestrzegać następujących wskazówek bezpieczeństwa
• Przed pierwszym użyciem należy starannie przeczytać instrukcję obsługi lub w razie trudności z czytaniem poprosić kogoś o jej odczytanie. W razie zagubienia niniejszej instrukcji można ją w dowolnej chwili pobrać w zakładce
Downloads na naszej stronie internetowej www.thomashilfen.com. Umieszczony tam dokument w formacie PDF
można wyświetlić także w powiększonym formacie.
• Zalecamy dopasowywanie wysokości podnóżka do aktualnego wzrostu dziecka przynajmniej raz na trzy miesiące.
W razie potrzeby powinno się to odbywać przy pomocy terapeuty / technika ortopedy.
• Dziecko powinno być zawsze zapięte pasem 4-punktowym (wyposażenie podstawowe) lub innym pasem zabezpieczającym (dostępnym jako akcesoria dodatkowe).
• UWAGA : Mokre kółka mogą osłabić działanie hamulców. W razie zatrzymania lub dłuższego postoju wózka należy
zablokować wózek za pomocą hamulca nożnego, aby zabezpieczyć go przed przypadkowym stoczeniem.
• WAŻNE: Nie pozostawiać zaciągniętego hamulca, jeżeli wózek rehabilitacyjny nie jest używany przez dłuższy czas.
W przeciwnym razie tylne kółka mogą zostać uszkodzone poprzez zaciągnięty na stałe hamulec.
• UWAGA : Szczelina między podwoziem a drążkiem zwalniającym hamulca może grozić zakleszczeniem odzieży i
części ciała w obszarze stóp.
• UWAGA : Szczelina między siedziskiem wózka Swifty 2 a ramą podwozia może grozić zakleszczeniem odzieży i
części ciała w obszarze siedzenia.
• UWAGA : Szczelina między boczną prowadnicą siedziska wózka Swifty 2 a rurką pałąka oparcia może grozić zakleszczeniem odzieży i części ciała w obszarze siedzenia.
• UWAGA : Szczelina między płytą podnóżka a rurką podnóżka może grozić zakleszczeniem odzieży i części ciała w
obszarze stóp.
• Nie przeciążać wózka Swifty 2 i przestrzegać maksymalnej ładowności (patrz dane techniczne).
• Odzież odblaskowa sprawia, że zarówno opiekun, jak i dziecko są widoczni w ciemności dla innych użytkowników
ruchu drogowego, dlatego zalecamy jej stosowanie.
• Wózek wolno podnosić wyłącznie za podzespoły trwale zespawane lub skręcone (drążek ramy przedniej nad
przednimi kółkami, oś tylna, rączka wózka).
• Duże nasłonecznienie może doprowadzić do nadmiernego nagrzania się czarnej tapicerki. Zetknięcie z ciałem
grozi w takim wypadku poparzeniem pleców i nóg! Dlatego należy zawsze uważać, aby w czasie użytkowania i
przechowywania wózek nie był narażony na działanie wymienionych źródeł ciepła i korzystać z niego dopiero po
całkowitym wystudzeniu!
• Należy uważać, aby nie skaleczyć się przy rozkładaniu podnóżka, regulacji oparcia oraz rozkładaniu i składaniu
wózka rehabilitacyjnego.
• Ciężkie torby lub siatki z zakupami zamocowane na wózku zwiększają ryzyko jego przewrócenia. Należy korzystać
z kosza (dostępnego osobno) znajdującego się pod siedziskiem.
• Podczas obsługi wózka rehabilitacyjnego – w szczególności podczas rozkładania i składania – przestrzegać zaleceń
zawartych w niniejszej instrukcji obsługi.
• Nigdy nie pozostawiać dziecka w wózku Swifty 2 bez nadzoru.
• Podczas wsiadania i wysiadania z wózka hamulec postojowy musi być zaciągnięty.
• Podczas wsiadania i wysiadania z wózka nigdy nie pozostawiać dziecka bez nadzoru, przy zbyt dużym obciążeniu
podnóżka występuje ryzyko ześlizgnięcia się lub przewrócenia.
• Opakowanie z tworzywa sztucznego przechowywać w miejscu niedostępnym dla dzieci, gdyż stwarza ono niebezpieczeństwo uduszenia.
• W wózku rehabilitacyjnym może znajdować się tylko jedno dziecko.
88

Podręcznik dla użytkownika – Swifty 2
Zagrożenia wynikające z użytkowania i przeciwwskazania
Przy prawidłowym użytkowaniu można wykluczyć zagrożenia z nim związane. Przeciwwskazania nie są znane. Materiał tapicerki wózka Swifty 2 jest „trudnopalny”, skontrolowany według norm DIN EN 1021-1 oraz DIN EN 1021-2.
Stopień odporności materiałów i podzespołów na zapłon został sprawdzony zgodnie z założeniami normy i oceniony
jako niebudzący zastrzeżeń.
Symbole i znaki ostrzegawcze
Naklejka Znaczenie
Tabliczki znamionowe / naklejki z informacją o
obciążalności
Tabliczka znamionowa umieszczona jest pod siedziskiem.
Na tabliczce znamionowej znajdują się dane producenta wraz z adresem, oznaczeniem typu, maksymalną
obciążalnością oraz znakiem CE.
Etykieta z kodem kreskowym
Etykieta z kodem kreskowym umieszczona jest pod
siedziskiem.
Na etykiecie z kodem kreskowym podany jest numer
katalogowy, nazwa, numer seryjny oraz data produkcji
wózka.
Znakiem tym oznaczone są 4 punkty mocowania w
wózku Swifty 2 służące do zabezpieczenia w pojeździe
do przewozu osób niepełnosprawnych.
89

Podręcznik dla użytkownika – Swifty 2
Dane techniczne i warianty
Swifty 2
Głębokość siedziska 375 mm
Szerokość siedziska 395 mm
Wysokość oparcia 700 mm
Wysokość podnóżka 210 - 370 mm
Prowadnica boczna (szer. x wys.) 250 x 160 mm
Kąt biodrowy 90° - 100°
Kąt kolanowy 90°
Odchylenie siedziska stałe + 20°
Bezpieczne odchylenie maks. do 10°
Wymiary podnóżka (szer. x gł.) 310 x 200 mm
Wymiary całkowite (dł. x szer. x wys.) 980 x 670 x 1130 mm
Wymiary po złożeniu (dł. x szer. x wys.) 790 x 670 x 490 mm
Wysokość rączki 820 - 1240 mm
Koło skrętu 1260 mm
Wymiary kółek (przednich (obrotowych) / tylnych) 180 mm / 250 mm
Szerokość kółek (przednich (obrotowych) / tylnych) 45 mm / 50 mm
Waga 18,2 kg
Maks. waga użytkownika 50 kg
Maks. obciążalność kosza (dostępnego osobno) 3 kg
Wózek rehabilitacyjny Swifty 2 dostępny jest w następującym wariancie:
Nr katalogowy Nazwa Wyposażenie
6808 Wózek rehabilitacyjny Swifty 2 Crash Wózek rehabilitacyjny z tapicerką, pasem 4-punktowym
i podnóżkiem; wyposażony i posiadający zezwolenie do
użycia jako siedzisko w pojeździe mechanicznym
Zakres dostawy
Wózek rehabilitacyjny Swifty 2 dostarczany jest w stanie wstępnie zmontowanym. Wózek Swifty 2 jest fabrycznie
wyposażony w tapicerkę siedziska i oparcia oraz tapicerkę bocznej prowadnicy siedziska. Ponadto do wózka Swifty
2 dołączona jest instrukcja obsługi oraz klucz imbusowy. Klucz imbusowy jest potrzebny do ustawienia wysokości
podnóżka.
Wyposażenie podstawowe
Lekkie podwozie składane ze zintegrowanym siedziskiem; pas 4-punktowy; materiał pokrycia zmniejszający palność;
tapicerka oddychająca; oparcie regulowane na wysokości kąta biodrowego; kółka przednie obrotowe z blokadą; bezawaryjne opony piankowe; rozkładany podnóżek z regulacją wysokości; nożny hamulec postojowy; regulowana rączka.
Ustawienie i montaż
Ustawień / zmian mogą dokonywać tylko przeszkoleni lub poinstruowani specjaliści (np. doradcy ds. produktów medycznych w sklepach specjalistycznych).
Do rozpoczęcia użytkowania wózka Swifty 2 nie jest potrzebne żadne narzędzie oprócz objętego zakresem dostawy
klucza imbusowego.
Montaż / demontaż akcesoriów wykonuje się za pomocą narzędzi powszechnie dostępnych w sprzedaży. Oddzielne
instrukcje montażu i obsługi dołączono do poszczególnych akcesoriów. W razie zagubienia instrukcji można je w dowolnej chwili pobrać w zakładce Downloads na naszej stronie internetowej www.thomashilfen.com.
90

Podręcznik dla użytkownika – Swifty 2
Składanie
WSKAZÓWKA: Należy uważać, aby podczas składania wózka nie upadł on na ziemię, aby zapobiec wygięciu stelaża
i powstaniu uszkodzeń. Upewnić się, czy plastikowa zatyczka mechanizmu składania jest zamocowana we właściwej
pozycji (wyższy koniec zatyczki jest ustawiony w kierunku tylnej strony wózka) (rys. 1).
Rozkładanie
Wózek rehabilitacyjny Swifty 2 jest wyposażony w zabezpieczenie przed rozłożeniem na obu przegubach rączki. Aby
rozłożyć wózek, należy zwolnić zabezpieczenie przed rozłożeniem z każdej strony poprzez jeden z przycisków (rys.
2). Następnie chwycić wózek za rączkę na górze i z boku i energicznym ruchem pociągnąć do góry (suwaki blokady
zatrzasną się wydając słyszalny odgłos). Zwolnić dźwignię zaciskową na oparciu i ustawić wybrany kąt nachylenia
oparcia (patrz regulacja oparcia). Rączkę z regulacją wysokości ustawić w wybranej pozycji naciskając boczne przyciski (rys. 3).
Składanie (najmniejszy wymiar po złożeniu)
Zwolnić dźwignię zaciskową na oparciu. Pociągnąć do góry suwaki blokady na rączce (z prawej i z lewej strony)
(rys. 1) i przytrzymać zamontowany z prawej strony pałąk zabezpieczający. Górną częścią ciała przesunąć rączkę do
przodu i złożyć wózek do przodu (rys. 4). Oparcie złożyć w dół i dociągnąć dźwignię zaciskową. Rączkę położyć na
oparciu.
Zabezpieczenie przed rozłożeniem chroni wózek Swifty 2 przed przypadkowym rozłożeniem. W tym celu zwolnić
przycisk zabezpieczenia przed rozłożeniem po obu stronach (rys. 2), poprowadzić pas przez ramę przednią i ponownie
zamknąć przycisk. Po złożeniu wózek Swifty 2 można bezpiecznie chwytać za rurki stelaża i transportować.
Tapicerka siedziska i oparcia
Tapicerka siedziska i oparcia składa się z jednego elementu. Jest on tak założony na oparcie, aby czerwone logo Swifty
było widoczne z przodu, a dolna część tapicerki leżała na siedzisku. Tylna strona tapicerki jest podzielona na dwie
części połączone zamkiem błyskawicznym. Obie połówki tylnej strony tapicerki należy przełożyć pod pałąkiem oparcia wózka Swifty 2 (rys. 5). Umieścić tapicerkę w odpowiedniej pozycji i zapiąć zamek błyskawiczny (rys. 6). Następnie zapiąć zapięcie na rzep na dole oparcia (rys. 7).
Tapicerka bocznej prowadnicy siedziska
Otwór tapicerki bocznej prowadnicy siedziska powinien być widoczny na zewnątrz / z przodu (rys. 8). Przełożyć tapicerkę przez boczną prowadnicę siedziska (rys. 9). Zapiąć zamek błyskawiczny (rys. 10).
Pas 4-punktowy
Wózek rehabilitacyjny Swifty 2 jest standardowo wyposażony w pas 4-punktowy.
Otwieranie zapięcia pasa
Aby rozpiąć pas 4-punktowy, przytrzymać wciśnięty czerwony przycisk (1), otworzyć zapięcie klamrowe (2 i 3) i wysunąć pas (zabezpieczenie dziecka) (rys. 11).
Dostosowanie długości pasa naramiennego
Rozpiąć zamek błyskawiczny przy tapicerce oparcia. Otworzyć górne klamry i wysunąć pasy od przodu. Tapicerkę
oparcia rozsunąć na wybranej wysokości w miejscu szwu. Przewlec pasy przez powstałe szpary i z powrotem przymocować klamrami. Zapiąć tapicerkę (rys. 12-13).
Zdejmowanie pasa 4-punktowego
Rozpiąć zamek błyskawiczny przy tapicerce oparcia. Otworzyć klamry i wysunąć pas 4-punktowy od przodu.
91

Podręcznik dla użytkownika – Swifty 2
Uchwyty na daszek
Wózek Swifty 2 jest standardowo wyposażony w uchwyty na daszek (rys. 14). Daszek dostępny jest jako element dodatkowy.
Możliwości regulacji
Regulacja oparcia
Zwolnić dźwignię zaciskową na oparciu, ustawić wybrany kąt biodrowy przesuwając pałąk oparcia na szynie oparcia i
zablokować dźwignię (rys. 15).
Wysokość podnóżka
Poluzować śruby imbusowe (3 mm) po prawej i lewej stronie z tyłu przy prowadnicach rurek podnóżka. Podnóżek
ustawić w wybranej pozycji przesuwając go na rurce ramy, a następnie z powrotem dokręcić śruby (rys. 16).
Podnóżek
Podnóżek można złożyć do góry, aby ułatwić dziecku wsiadanie do wózka (rys. 17).
Funkcja hamulca postojowego
Aby zablokować hamulec, ustawić stopę na pałąku hamulca i nacisnąć w dół. Aby zwolnić hamulec, umieścić stopę
pod pałąkiem hamulca i przesunąć do góry (rys. 18).
Funkcja blokady przednich kółek
Blokada: Przednie kółko ustawić prosto i zapiąć zatrzaski blokujące (słyszalne zatrzaśnięcie).
Zwalnianie blokady: Wysunąć zatrzaski blokujące, obrócić o 90° i zablokować w tej pozycji (rys. 19).
Montaż pasów
Tapicerkę oparcia rozsunąć na wybranej wysokości mocowania w miejscu szwu.
Dwa górne pasy przewlec przez otwory w tapicerce i włożyć przez szpary w tapicerce oparcia (rys. 12). Rozpiąć
zamek błyskawiczny z tyłu tapicerki oparcia, a następnie wsunąć pasy w klamry i ustawić wybraną długość pasa (rys.
13). Oba dolne końce pasa z tyłu za tapicerką oparcia przymocować klamrami (rys. 20). Z prawej i z lewej strony prze-
prowadzić pasy obok tapicerki oparcia do odpowiedniej klamry i przymocować. Zapiąć tapicerkę oparcia (rys. 6-7).
WSKAZÓWKA: Dodatkowo można także ustawić długość pasów z przodu. W tym celu pociągnąć za pierścień w
kształcie litery D, aby skrócić pas..
Przednie pasy 4-punktowego pasa miednicowego mocowane są z prawej i lewej strony za pomocą klamry pod siedziskiem. Pas przeprowadzić między prowadnicą boczną a siedziskiem i włożyć w klamrę, a następnie przymocować (rys.
21-22).
Pedał do przechylania (akcesoria)
Ustawić stopę na pedale do przechylania, obiema rękami przytrzymać wózek i przechylić (rys. 23).
Transport
Wózek rehabilitacyjny Swifty 2 można złożyć i przewozić w bagażniku pojazdu. Należy przy tym przestrzegać wskazówek dotyczących składania wózka i użyć zabezpieczenia przed rozłożeniem, aby zapobiec przypadkowemu rozłożeniu.
Wózek rehabilitacyjny Swifty 2 można unieść chwytając go za boczne elementy ramy lub za oś tylną.
92

Podręcznik dla użytkownika – Swifty 2
Użycie jako siedzisko w pojeździe mechanicznym
Wózek rehabilitacyjny Swifty 2 w wariancie „Crash” pomyślnie przeszedł test zderzeniowy zgodnie z międzynarodową
normą ISO 7176/19 i ANSI/RESNA WC 4 sekcja 19 i może być używany jako siedzisko w pojeździe mechanicznym.
WAŻNE: Jeżeli wózek Swifty 2 ma być używany jako siedzisko w pojeździe mechanicznym, należy przestrzegać poniższych wskazówek.
Wózek rehabilitacyjny Swifty 2 przeznaczony jest do przewozu w kierunku do przodu. Jeżeli tylko jest to możliwe,
należy przesadzić użytkownika na jedno z siedzeń w pojeździe i zapiąć zainstalowanym systemem pasów. W celu zabezpieczenia wózka Swifty 2 na podłodze pojazdu stosować tylko systemy podwozia/pasów bezpieczeństwa spełniające normę ISO 10542.
4 punkty mocowania wózka Swifty 2 oznaczone są następującym symbolem:
Przygotowanie wózka Swifty 2 do transportu:
1. Zdjąć następujące elementy (jeżeli są zamontowane): blok abdukcyjny, stolik terapeutyczny, daszek, parasol, pałąk i
zawartość koszyka.
2. Prawidłowo zamocować wózek w pojeździe za pomocą zainstalowanych szyn w kierunku jazdy do przodu. Zaciągnąć hamulec postojowy.
3. Upewnić się, czy regulacja kąta biodrowego jest zablokowana.
Umieszczanie wózka Swifty 2 w pojeździe mechanicznym:
1. Wózek rehabilitacyjny musi być bezpiecznie zamocowany w pojeździe za pomocą 4-punktowego systemu pasów (według
ISO 10542-2, SAE 2249 lub DIN 75078/2) (producentami takich systemów pasów są np. Unwin Safety Systems i Q’Straint).
2. Kierowca i / lub asystent powinien być zaznajomiony z zasadami stosowania tych systemów pasów / systemów mocowania.
3. Dwa przednie pasy (karabińczyki) należy przymocować z lewej i z prawej strony do pierścieni stalowych nad widelcem przedniego kółka (rys. 24).
4. Oba tylne pasy (karabińczyki) należy przymocować do dwóch oczek zabezpieczających na tylnej ramie (rys. 25).
Zakładanie systemu mocowania:
1. Test zderzeniowy został przeprowadzony z zastosowaniem pasa 4-punktowego (element wyposażenia podstawowego). Pasa tego należy użyć pod pasem systemu mocowania.
2. Użytkownik musi być zabezpieczony atestowanym systemem mocowania. Thomashilfen zaleca stosowanie pasa automatycznego lub 3-punktowego systemu mocowania, w ramach którego można oddzielić pas miednicowy od pasa
naramiennego. Jest to konieczne, aby prawidłowo przeprowadzić system mocowania przez podwozie wózka Swifty
2 (producenci np.: Unwin Safety Systems i AMF-Bruns).
3. Kierowca i / lub asystent powinien być zaznajomiony z zasadami stosowania tych systemów pasów / systemów mocowania.
4. Pas miednicowy użytkownika należy poprowadzić płasko przez miednicę użytkownika bez kontaktu z brzuchem
użytkownika. Z prawej i z lewej strony pas miednicowy powinien przebiegać między prowadnicą boczną a użytkownikiem (rys. 26).
5. Pas miednicowy nie może być odsunięty od użytkownika przez elementy wózka (elementy boczne, kółka) (rys. 27).
WSKAZÓWKA: Pas nie może być przekręcony.
6. Kąt pasa miednicowego powinien wynosić między 30° a 75° (rys. 28).
7. Pas biodrowy powinien być tak dopasowany, aby przylegał jak najciaśniej, a zarazem wygodnie dla użytkownika.
8. Pas systemu mocowania obejmujący klatkę piersiową należy przymocować do ściany pojazdu na takiej wysokości,
aby zapewnić położenie pasa na środku ramienia użytkownika i jego przebieg pod rączką (rys. 27).
WSKAZÓWKA: Tylko pas naramienny przymocowany do ściany bocznej pojazdu odpowiada aktualnym wymaganiom
w zakresie prawidłowego zapięcia użytkownika.
93

Podręcznik dla użytkownika – Swifty 2
Numer produktu / seryjny
W celu zamówienia odpowiednich części zamiennych lub
w razie ewentualnych pytań technicznych należy podawać
numer seryjny i dokładny numer katalogowy.
Numer artykulu
Numer seryjny oraz numer katalogowy wózka rehabilitacyjnego Swifty 2 znajduje się na etykiecie z kodem kreskowym umieszczonej pod siedzeniem.
Numer seryjny / partii
Wskazówki dotyczące czyszczenia, dezynfekcji i pielęgnacji
Podwozie wyprodukowano z wysokiej jakości rurek stalowych. Posiadają one powłokę proszkową i mogą być czyszczone i dezynfekowane dostępnym w handlu mydłem (mydło neutralne).
Dezynfekcja
Przed zdezynfekowaniem oczyścić tapicerkę i uchwyty. Wszystkie elementy wózka wytrzeć ściereczką zwilżoną
środkiem dezynfekcyjnym. Należy stosować wyłącznie środki na bazie wody. Podczas dezynfekcji należy przestrzegać
właściwych wskazówek producenta.
Tapicerka
Wszystkie elementy tapicerki można łatwo zdjąć kilkoma ruchami. Materiał Trevira CS 100% jest tkaniną wysokogatunkową, którą można prać w temperaturze maks. 40°C. Tapicerkę należy prać oddzielnie, a przed praniem zakryć lub
zapiąć rzepy. Należy także przestrzegać wskazówek pielęgnacji.
Zwracamy uwagę na fakt, że nawet materiały dobrej jakości mogą wyblaknąć z powodu ciągłego i intensywnego działania promieni słonecznych lub częstego prania. Tapicerka jest trudnopalna (EN1021-1 i EN 1021-2).
Zapięcia na rzepy
Aby na długo zapewnić funkcjonalność zapięć na rzepy, od czasu do czasu przeczyścić je szczoteczką. Podczas prania
rzepy muszą być zawsze zapięte.
Warunki gwarancji / oznakowanie CE
Firma Thomashilfen oferuje 3-letnią gwarancję (licząc od daty zakupu) na wszystkie elementy ramy. Gwarancja obejmuje wszystkie wady ograniczające prawidłowe działanie. Gwarancja nie obejmuje szkód powstałych w wyniku nieprawidłowego użytkowania (np. przeciążenia) oraz naturalnego zużycia.
Wózek Swifty 2 spełnia wymagania normy europejskiej EN 12182 i EN 12183 i posiada oznaczenie CE.
Życzymy satysfakcji z użytkowania wózka rehabilitacyjnego Swifty 2!
94

Podręcznik dla użytkownika – Swifty 2
Schemat konserwacji – coroczna inspekcja / ponowne użytkowanie
Przygotowanie
Do produktu powinna być dołączona instrukcja obsługi. Jeżeli jej nie ma, należy uzyskać ją od producenta. Należy
zapoznać się z funkcjami produktu. Jeżeli nie znają Państwo produktu, prosimy zapoznać się z instrukcją obsługi przed
rozpoczęciem kontroli. Przed rozpoczęciem kontroli oczyścić produkt. Przestrzegać ewentualnych zawartych w instrukcji obsługi wskazówek pielęgnacji i specyficznych dla produktu wskazówek inspekcji.
Obszar
Poz.
10 Rączka I/P I/P I/P
11 Pokrycie rączki I P
12 Podwozie I/P I/P I/P
13 Opony I I I P
14 Hamulec postojowy I/P I/P I/P
15 Zagłówek I/P I/P I/P
16 Tapicerka zagłówka I P
17 Nakładki do stabilizacji klatki piersiowej I/P I/P I/P
18 Tapicerka nakładek do stabilizacji klatki piersiowej I P
19 Oparcia I/P I/P I/P
20 Podłokietniki I P
21 Nakładki biodrowe I/P I/P I/P
22 Tapicerka nakładek biodrowych I P
23 Klin abdukcyjny I/P I/P I/P
24 Tapicerka klina abdukcyjnego I P
25 Nakładki na kości piszczelowe I/P I/P I/P
26 Tapicerka nakładek na kości piszczelowe I P
27 Stolik terapeutyczny I/P I/P I/P
28 Pasy I/P I/P I/P
Konserwacja została przeprowadzona przez: dnia:
= przeprowadzono kontrolę
1 Siedzisko I/P I/P I/P
2 Regulacja kąta I/P I/P I/P
3 Regulacja wysokości I/P I/P I/P
4 Tapicerka siedziska I P
5 Brak nakładek i zatyczek I/P
6 Oparcie I/P I/P I/P
7 Regulacja kąta I/P I/P I/P
8 Regulacja wysokości I/P I/P I/P
9 Tapicerka oparcia I P
Opcje
(I = Inspekcja / P = Ponowne użytkowanie)
Funkcja Uszkodzenie Odkształcenie Wymiana
Serwis i naprawę wózka rehabilitacyjnego może przeprowadzać wyłącznie specjalista. Użytkownik pomocniczego
sprzętu rehabilitacyjnego musi zadbać o regularne i terminowe przeprowadzanie zalecanych przeglądów / konserwacji.
W razie stwierdzenia uszkodzenia użytkownik musi poinformować specjalistę i zlecić mu natychmiastowe usunięcie
tego uszkodzenia. Do naprawy mogą być używane wyłącznie oryginalne części zamienne (wykaz części wymiennych /
zamiennych znajduje się w zakładce Downloads na naszej stronie internetowej www.thomashilfen.com).
Demontaż / montaż części zamiennych może przeprowadzać tylko specjalistyczny personel! Jeśli wymagana jest wysyłka sprzętu do właściwego sklepu specjalistycznego, należy pamiętać o odpowiednim zabezpieczeniu podwozia do
celów transportu.
95

Korisnički priručnik – Swifty 2
Poštovani korisnici kolica Swifty 2,
rehabilitacijska kolica Swifty 2 moderan su, iznimno kvalitetan medicinski proizvod koji se ističe svojim atraktivnim
izgledom. Ovdje su konkretno uključene i ideje roditelja koji su upoznati sa svakodnevnim rukovanjem rehabilitacijskim
proizvodima te s potrebama svoje djece za ovakvim pomagalima.
Rehabilitacija ne mora nužno izgledati kao rehabilitacija, a Swifty 2 ipak ispunjava sve zahtjeve za dobra rehabilitacijska
kolica: Duljinu potkoljenice možete nestupnjevito namjestiti, a iznimno kvalitetni materijali i čvrsto sjedalo zaslužni su
za udobnost i sigurno rukovanje. Zahvaljujući svojoj maloj težini i okretnim kotačima ova rehabilitacijska kolica osobito
su okretna, unatoč maksimalnoj opteretivosti. Mogu se lako i brzo sklopiti te se jednostavno spremiti u svaki prtljažnik.
Prvo pročitajte ove upute za upotrebu da bi rukovanje rehabilitacijskim kolicima Swifty 2 bilo sigurno, praktično i ugodno za vas, a osobito za dijete.
Ako ćete ipak imati još pitanja ili problema, obratite se nadležnoj specijaliziranoj trgovini ili izravno nama.
U vezi s tim želimo vam obratiti pozornost na našu internetsku stranicu www.thomashilfen.com s koje možete preuzeti
najnovije informacije i dobiti važne sigurnosne napomene o proizvodu ili informacije o mogućim povlačenjima proizvoda.
Naša adresa: Thomas Hilfen für Körperbehinderte
GmbH & Co. Medico KG
Walkmühlenstraße 1
D - 27432 Bremervörde
Tel.: +49 (0) 4761 886-68 ili -63
www.thomashilfen.com
Sadržaj Stranica
Sigurnosno-tehničke kontrole i intervali održavanja .......................................................................................... 97
Namjenska upotreba i mjesta upotrebe ............................................................................................................ 97
Opće sigurnosne napomene ............................................................................................................................ 98
Rizici primjene i kontraindikacije ..................................................................................................................... 99
Simboli i natpisi upozorenja ............................................................................................................................. 99
Tehnički podaci i varijante ............................................................................................................................... 100
Opseg isporuke ................................................................................................................................................ 100
Osnovna oprema ............................................................................................................................................. 100
Postavljanje i montaža ..................................................................................................................................... 100
Mogućnosti namještanja .................................................................................................................................. 102
Funkcija kočnice .............................................................................................................................................. 102
Funkcija zaključavanja prednjih kotača............................................................................................................. 102
Postavljanje pojaseva ....................................................................................................................................... 102
Pomagalo za naginjanje ................................................................................................................................... 102
Transport ......................................................................................................................................................... 102
Upotreba kao sjedalo u motornom vozilu ......................................................................................................... 103
Broj proizvoda / serijski broj............................................................................................................................. 104
Napomene o čišćenju, dezinfekciji i održavanju ............................................................................................... 104
Uvjeti jamstva / oznaka CE ............................................................................................................................... 104
Plan održavanja – godišnja inspekcija / ponovna upotreba................................................................................ 105
96

Korisnički priručnik – Swifty 2
Sigurnosno-tehničke kontrole i intervali održavanja
Ako prilikom redovne kontrole utvrdite neki problem, odmah obavijestite svojeg specijaliziranog trgovca na licu mjesta
ili društvo Thomashilfen.
Redovito/svakodnevno održavanje
Rodbina i njegovatelji mogu lako vršiti sljedeće radove održavanja. Isporučeni inbus ključ potreban je da se uglavi oslonac za stopala.
1. Ako su mokra, uvijek obrišite rehabilitacijska kolica. Nakon upotrebe nikad ih ne odlagati vlažna.
2. Osigurajte da su oba inbus vijka na osloncu za stopala i svakodnevno provjeravajte inbus ključem jesu li vijci čvrsto
zategnuti.
3. Kontrolirajte jesu li čvrsto zategnute sve matice, svornjaci i vijci (svakodnevno).
4. Kontrolirajte funkcioniraju li naslon za leđa, sklopivi mehanizam i položaj mirovanja (tjedno).
5. Prije upotrebe rehabilitacijskih kolica uvijek kontrolirajte radi li kočnica.
6. Po potrebi očistite okvir rehabilitacijskih kolica (preporuka: najmanje jednom tjedno).
7. Osigurajte da su plastični čepovi sklopivog mehanizma čvrsto učvršćeni u svojem položaju (svakodnevno, sl. 1).
Polugodišnje održavanje
Sljedeće radove održavanja treba provesti trgovac odgovarajućeg stručnog znanja ili ovlaštena servisna radionica. Ako
utvrdite značajne pogreške ili smetnje u radu, nemojte se koristiti rehabilitacijskim kolicima sve dok se ne ukloni pogreška.
1. Sklopite i rasklopite rehabilitacijska kolica te pritom kontrolirajte jesu li svi pokreti tijekom sklapanja mogući bez
zastajkivanja. Provjerite postoje li oštećenja na okviru.
2. Kontrolirajte rade li kolica i mogu li se namještati, a osobito je li naslon za leđa pokretljiv.
3. Provjerite čvrstoću matica, vijaka, šarki i čepova za okvir te njihovo opće stanje.
4. Provjerite je li kočnica istrošena, oštećena i funkcionalna.
5. Provjerite jesu li u gumama utaknuti oštri predmeti i postoje li rezovi ili pukotine.
6. Provjerite jesu li gume i vilice kotača prekomjerno istrošeni.
7. Kontrolirajte mogu li se prednji i stražnji kotači slobodno kretati i sigurno okretati. Uklonite prašinu, pijesak i ostala
onečišćenja suhom krpom koja ne ostavlja vlakna.
8. Provjerite funkciju kočnice na kotaču.
9. Kontrolirajte jesu li plastični dijelovi izobličeni ili prelomljeni.
Namjenska upotreba i mjesta upotrebe
Rehabilitacijska kolica Swifty 2 prikladna su za prijevoz (maks. laganim korakom) djece s invaliditetom kojima upravljaju
roditelji ili neko drugo, prikladno pomoćno osoblje na ravnom čvrstom tlu u otvorenom i zatvorenom prostoru. Rehabilitacijska kolica Swifty 2 ne smiju se zloupotrijebiti (npr. upotrebljavati kao transportno sredstvo za drugu djecu, kupovne vrećice itd.).
Da bi se pratitelju omogućila ergonomska upotreba, može se namjestiti visina pomične ručke.
Swifty 2 odobren je za prijevoz djece u motornim vozilima / vozilima za prijevoz osoba s invaliditetom prema ISO 7176-
19 i ANSI/RESNA WC 4 dio 19.
97

Korisnički priručnik – Swifty 2
Pridržavanje sljedećih sigurnosnih napomena
• Prije prve upotrebe pozorno pročitajte upute za upotrebu ili ako imate problema s čitanjem, neka vam ih netko
pročita. Ako izgubite upute za upotrebu, u svakom ih trenutku možete preuzeti s područja za preuzimanje na našoj
internetskoj stranici www.thomashilfen.com. Pohranjeni PDF-dokument može se prikazati i u uvećanom formatu.
• Preporučujemo da prilagođavate duljinu potkoljenice trenutačnim tjelesnim dimenzijama vašeg djeteta najmanje
svaka 3 mjeseca. Po potrebi to treba izvršiti uz pomoć terapeuta / ortopedskog tehničara.
• Vaše dijete treba uvijek biti pričvršćeno H-pojasom (osnovna oprema) ili drugim pridržnim pojasom (dostupan kao
dodatna oprema).
• POZOR: Mokri kotači mogu oslabiti funkciju kočenja. Prilikom zaustavljanja ili duljeg stajanja rehabilitacijska kolica
trebali biste zakočiti s pomoću nožne kočnice tako da se izbjegne nehotično pomicanje.
• VAŽNO: Ne ostavljajte aktiviranu kočnicu ako rehabilitacijska kolica nećete koristiti dulje vrijeme. Stražnji kotači
mogli bi se oštetiti zbog stalno aktivirane kočnice.
• POZOR: Razmak između podvozja i šipke za aktiviranje kočnice može predstavljati eventualnu opasnost od zahvaćanja odjeće i udova u području stopala.
• POZOR: Razmak između sjedala kolica Swifty 2 i okvira podvozja može predstavljati eventualnu opasnost od zahvaćanja odjeće i udova u području sjedenja.
• POZOR: Razmak između bočne vodilice sjedala kolica Swifty 2 i cijevi ležnog luka može predstavljati eventualnu
opasnost od zahvaćanja odjeće i udova u području sjedenja.
• POZOR: Razmak između ploče oslonca za stopala i cijevi oslonca za stopalo može predstavljati eventualnu opasnost od zahvaćanja odjeće i udova u području stopala.
• Nemojte preopterećivati svoja rehabilitacijska kolica Swifty 2 i pazite na maksimalnu težinu korisnika (v. tehničke
podatke).
• Reflektirajuća odjeća čini vas i vaše dijete u mraku bolje vidljivim za druge sudionike u prometu - iskoristite tu prednost.
• Rehabilitacijska kolica podižite samo za čvrsto zavarene elemente ili elemente pričvršćene vijcima. (cijev prednjeg
okvira iznad prednjih kotača, stražnja osovina, pomična ručka / drška za pomicanje)
• Crni jastuk može se jako zagrijati ako je izložen jakom suncu. U slučaju dodirivanja postoji opasnost od opeklina na
leđima i nogama! Pazite stoga načelno na to da se kolica Swifty 2 prilikom upotrebe i skladištenja ne izlažu ovim
izvorima topline i koristite se njima samo kada se dovoljno ohlade!
• Pazite da se ne ozlijedite prilikom otklapanja oslonca za stopala, namještanja naslona za leđa i sklapanja te rasklapanja rehabilitacijskih kolica.
• Zbog teških torba i mreže za kupovinu veća je opasnost od prevrtanja rehabilitacijskih kolica. Upotrijebite košaru
ispod sjedala (dostupna kao dodatna oprema).
• Pri rukovanju rehabilitacijskim kolicima, a osobito prilikom sklapanja i rasklapanja, pridržavajte se preporuka u ovim
uputama za upotrebu.
• Nikada ne ostavljajte dijete bez nadzora u rehabilitacijskim kolicima Swifty 2.
• Prilikom stavljanja i podizanja djeteta iz kolica treba aktivirati kočnicu rehabilitacijskih kolica.
• Dijete mora biti pod nadzorom dok ulazi ili silazi iz kolica jer u slučaju prevelikog opterećenja oslonca za noge
postoji opasnost od isklizavanja ili izvrtanja.
• Držite djecu dalje od plastične ambalaže jer postoji opasnost od gušenja.
• U rehabilitacijskim se kolicima smije nalaziti samo jedno dijete.
98

Korisnički priručnik – Swifty 2
Rizici primjene i kontraindikacije
Ako se kolica propisno upotrebljavaju, mogu se isključiti rizici prilikom primjene. Nisu poznate nikakve kontraindikacije.
Materijal za jastuk upotrijebljen za Swifty 2 „teško je zapaljiv”, ispitan prema DIN EN 1021-1 i DIN EN 1021-2.
Opseg otpornosti na vatru kod materijala i konstrukcijskih elemenata testiran je sukladno standardu i procijenjen je kao
nesumnjiv.
Simboli i natpisi upozorenja
Naljepnica Značenje
Tipska pločica / naljepnice o opteretivosti
Tipska se pločica nalazi ispod dosjedne površine.
Na tipskoj pločici navedeni su proizvođač i njegova
adresa, tipska oznaka, maksimalna opteretivost i oznaka
CE.
Naljepnica s crtičnim kodom
Naljepnica s crtičnim kodom nalazi se ispod dosjedne
površine.
Na naljepnici s crtičnim kodom navedeni su broj artikla,
naziv, serijski broj i datum proizvodnje proizvoda.
Označava 4 pričvrsne točke na kolicima Swifty 2 da bi
bila osigurana u vozilu za prijevoz osoba.
99

Korisnički priručnik – Swifty 2
Tehnički podaci i varijante
Swifty 2
Dubina sjedenja 375 mm
Širina sjedenja 395 mm
Visina leđa 700 mm
Duljina potkoljenice 210 - 370 mm
Bočna vodilica (Š x V) 250 x 160 mm
Nagib kuka 90° - 100°
Kut stopala 90°
Nagib sjedala fiksno + 20°
Siguran prekretni nagib do maksimalnog 10°
Veličina oslonaca za stopalo (Š x D) 310 x 200 mm
Ukupna masa (D x Š x V) 980 x 670 x 1130 mm
Dimenzije u preklopljenom stanju (D x Š x V) 790 x 670 x 490 mm
Visina drške za pomicanje 820 - 1240 mm
Okretni krug 1260 mm
Veličina kotača (prednji (okretni kotači) / stražnji) 180 mm / 250 mm
Širina kotača (prednji (okretni kotači) / stražnji) 45 mm / 50 mm
Težina 18,2 kg
maks. težina korisnika 50 kg
maks. opteretivost košare (dodatna oprema) 3 kg
Rehabilitacijska kolica Swifty 2 dostupna su u sljedećoj varijanti:
Br. artikla Oznaka Oprema
6808 Rehabilitacijska kolica Swifty 2 Crash Rehabilitacijska kolica uklj. jastuk, H-pojas i oslonac za
stopalo; opremljeno i odobreno za upotrebu kao sjedalo u
motornom vozilu
Opseg isporuke
Rehabilitacijska kolica Swifty 2 isporučuju se prethodno montirana. Kolica Swifty 2 tvornički su presvučena jastukom za
sjedalo i leđa te za bočne vodilice sjedala. Osim toga, kolica Swifty 2 imaju priložene upute za upotrebu i inbus ključ.
Inbus ključ potreban je za namještanje visine oslonca za stopalo.
Osnovna oprema
Lagano i sklopivo podvozje s integriranim sjedalom; H-pojas; vatrootporna presvlaka; prozračni jastuci; naslon za leđa
s namještanjem nagiba kuka; zakretni prednji kotači uključujući blokadu upravljanja; EVA gume zaštićene od smetnji;
otklopivi oslonac za noge s namještanjem visine; nožna kočnica; drška za pomicanje s namještanjem visine.
Postavljanje i montaža
Postavljanja/prilagodbe u načelu treba obavljati školovano odn. obučeno stručno osoblje (npr. medicinski savjetnici za
proizvode sanitetske specijalizirane trgovine).
Za prvu upotrebu kolica Swifty 2 nije potreban nijedan alat, osim isporučenog inbus ključa.
Montaža/demontaža pribora vrši se uobičajenim alatom. Zasebne upute za montažu i upotrebu priložene su dodatnoj
opremi. Ako ih nema, upute u svakom trenutku možete preuzeti s područja za preuzimanje na našoj internetskoj stranici www.thomashilfen.com.
100
 Loading...