

Thomashilfen RECARO Monza Reha, RECARO Monza Seatfix Reha Instructions For Assembly And Use
RECARO Monza Reha /
RECARO Monza Seatfix Reha
Group II − III
Internet Download: www.thomashilfen.com
Monterings- og brugsvejledning for Reha-Version (tilføjelse) ....................... 27
Monterings- och bruksanvisning för Reha-Version (komplettering) .............. 24
Monterings- og bruksanvisning for Reha-versjonen (tillegg) ......................... 21
Montage- en gebruiksinstructies voor Reha-versie (aanvulling) .................... 18
Istruzioni di montaggio e di utilizzo per la versione Reha (aggiunta) ........... 15
Oδηγίες Συναρμολόγησης και Χρήσης
για την Έκδοση Reha (Συμπλήρωμα) ........................................................ 36
Reha-version asennus- ja käyttöohjeet (täydennys) ...................................... 30
Instrucciones de montaje y uso para la versión Reha (complemento) ......... 12
Montage et mode d‘emploi pour la version Reha (complément) ................. 9
Instructions for assembly and use of the Reha version (supplement)........... 6
Montage- und Gebrauchsanleitung für Reha-Version (Ergänzung) ............... 3
Instructions for assembly and use of the Reha version (supplement)........... 6
Instrukcja montażu i użytkowania
fotelika w wersji rehabilitacyjnej Reha (Uzupełnienie) ................................ 33
1a 1b 2a
3a 3b 4a 4b
5a 5b 6a 6b
7a 7b 8a 8b
RECARO Monza Reha / RECARO Monza Seatfix Reha
2
8d8c 10a 10b
11b11a
2b 2c
RECARO Monza Reha – Montage- und Gebrauchsanleitung (Ergänzung)
3
RECARO Monza Reha – Montage- und Gebrauchsanleitung
Sehr geehrter RECARO Monza Reha-Nutzer,
damit die Handhabung Ihres neuen Kinder-Autositzes für Sie und besonders auch für das Kind sicher, praktisch und komfortabel ist, lesen Sie bitte zuerst diese und die
dem Sitz beiliegende Montage- und Gebrauchsanleitung.
Sollten Sie trotzdem noch Fragen oder Probleme haben, wenden Sie sich bitte an Ihren zuständigen Fachhandel oder direkt an uns.
Unsere Adresse: Thomas Hilfen für Körperbehinderte GmbH & Co. Medico KG · Walkmühlenstraße 1 · D - 27432 Bremervörde
Tel.: +49 (0)4761 8860 · www.thomashilfen.de
Allgemeine Hinweise
Bitte beachten Sie:
Sichern Sie Ihr Kind mit Sitz IMMER mit dem im Fahrzeug befindlichen 3-Punkt-Sicherheitsgurt. Der im Kindersitz integrierte 5-Punkt-Positionierungsgurt ist NICHT
sicherheitsrelevant.
Bis 50 kg Körpergewicht geeignet:
RECARO Monza Reha hat auf Basis der ECE R 44/04 Anforderungen einen Überbelastungstest bei der Dekra (Dresden) erfolgreich bestanden. Der RECARO Monza Reha
ist damit als „Rückhalteeinrichtung für spezielle Anforderungen („S“)“ zugelassen.
Auf Nummer sicher gehen mit RECARO Isofix (Modell Seatfix):
Isofix ist ein international genormtes Befestigungssystem für Kindersitze. Fahrzeugseitig sind entsprechende Isofix-Verankerungen fest mit der Karosserie verbunden. In
diese genormten Aufnahmepunkte lassen sich Autositze mit Isofix einfach und schnell verankern. Der Sitz ist so auch ohne Kind im Auto gut gesichert und muss nicht
mehr zusätzlich mit dem 3-Punkt-Sicherheitsgurt des Wagens gehalten werden. Bitte prüfen Sie vorab, ob Ihr Fahrzeug über eine Isofix-Verankerung verfügt.
Zweckbestimmung / Indikation
HMV-Nr. 26.11.06.0017 und 26.11.06.0018 (Modell Seatfix)
Der Kinder-Autositz RECARO Monza Reha / Monza Seatfix Reha ist konzipiert für den Transport von behinderten Kindern in Kraftfahrzeugen mit u.a. folgenden
Krankheitsbildern:
• infantile Cerebralparese
• Hypotoniesyndrom unklarer Genese
• Muskeldystrophie
• unterschiedlichste Syndromerkrankungen
Dieser Autositz zeichnet sich durch seine schalenförmige Gestaltung und das vorhandenen Pelottensystem aus. Er bietet hierdurch zusätzliche Unterstützung beim
sicheren Sitzen, Stabilisierung der Kopfkontrolle und stabilen Sitz im Beckenbereich, sowie einer Abstützung / Kontrolle im Fußbereich.
Der RECARO Monza Reha / Monza Seatfix Reha lässt sich deshalb sehr gut an die individuellen Bedürfnisse von behinderten Kindern anpassen.
Anwendungsrisiken / Kontraindikationen
Es sind keine Anwendungsrisiken / Kontraindikationen bekannt.
5-Punkt-Positionierungsgurt
Bitte beachten Sie:
Der 5-Punkt-Positionierungsgurt dient der Positionierung des Kindes im Autositz und schützt es nicht bei einem Unfall. Zur Sicherung des Kindes im Sitz muss immer
der im Auto vorhandene 3-Punkt-Sicherheitsgurt genutzt werden.
Änderung der Gurtlänge:
Ziehen Sie an den losen Gurtbändern, um die Gurte zu verkürzen und festzuziehen. Zur Verlängerung der Gurte kippen Sie die schwarze Spannschnalle leicht nach oben
und ziehen den Gurt dann auf die gewünschte Länge.
Zusätzlich kann die Gurtlänge bei Bedarf über die beiden Gurtösen (verschraubt) am Rücken geändert werden.
Gurtverschluss:
Drücken Sie zum Öffnen auf die rote Vertiefung des Verschlusses. Trennen Sie danach die beiden oberen Gurthalterungen. Zum Schließen des Gurtes stecken Sie die
Gurthalterungen einzeln in den Verschluss und drücken diesen zusammen, bis er mit einem hörbaren „Klick“ einrastet.
Der Bezug vom Gurtschild (Reißverschluss) ist abnehmbar und bis 30° C in der Maschine waschbar. Bitte öffnen Sie auch den Reißverschluss am unteren Gurtschild, um
den Bezug gut abnehmen zu können.
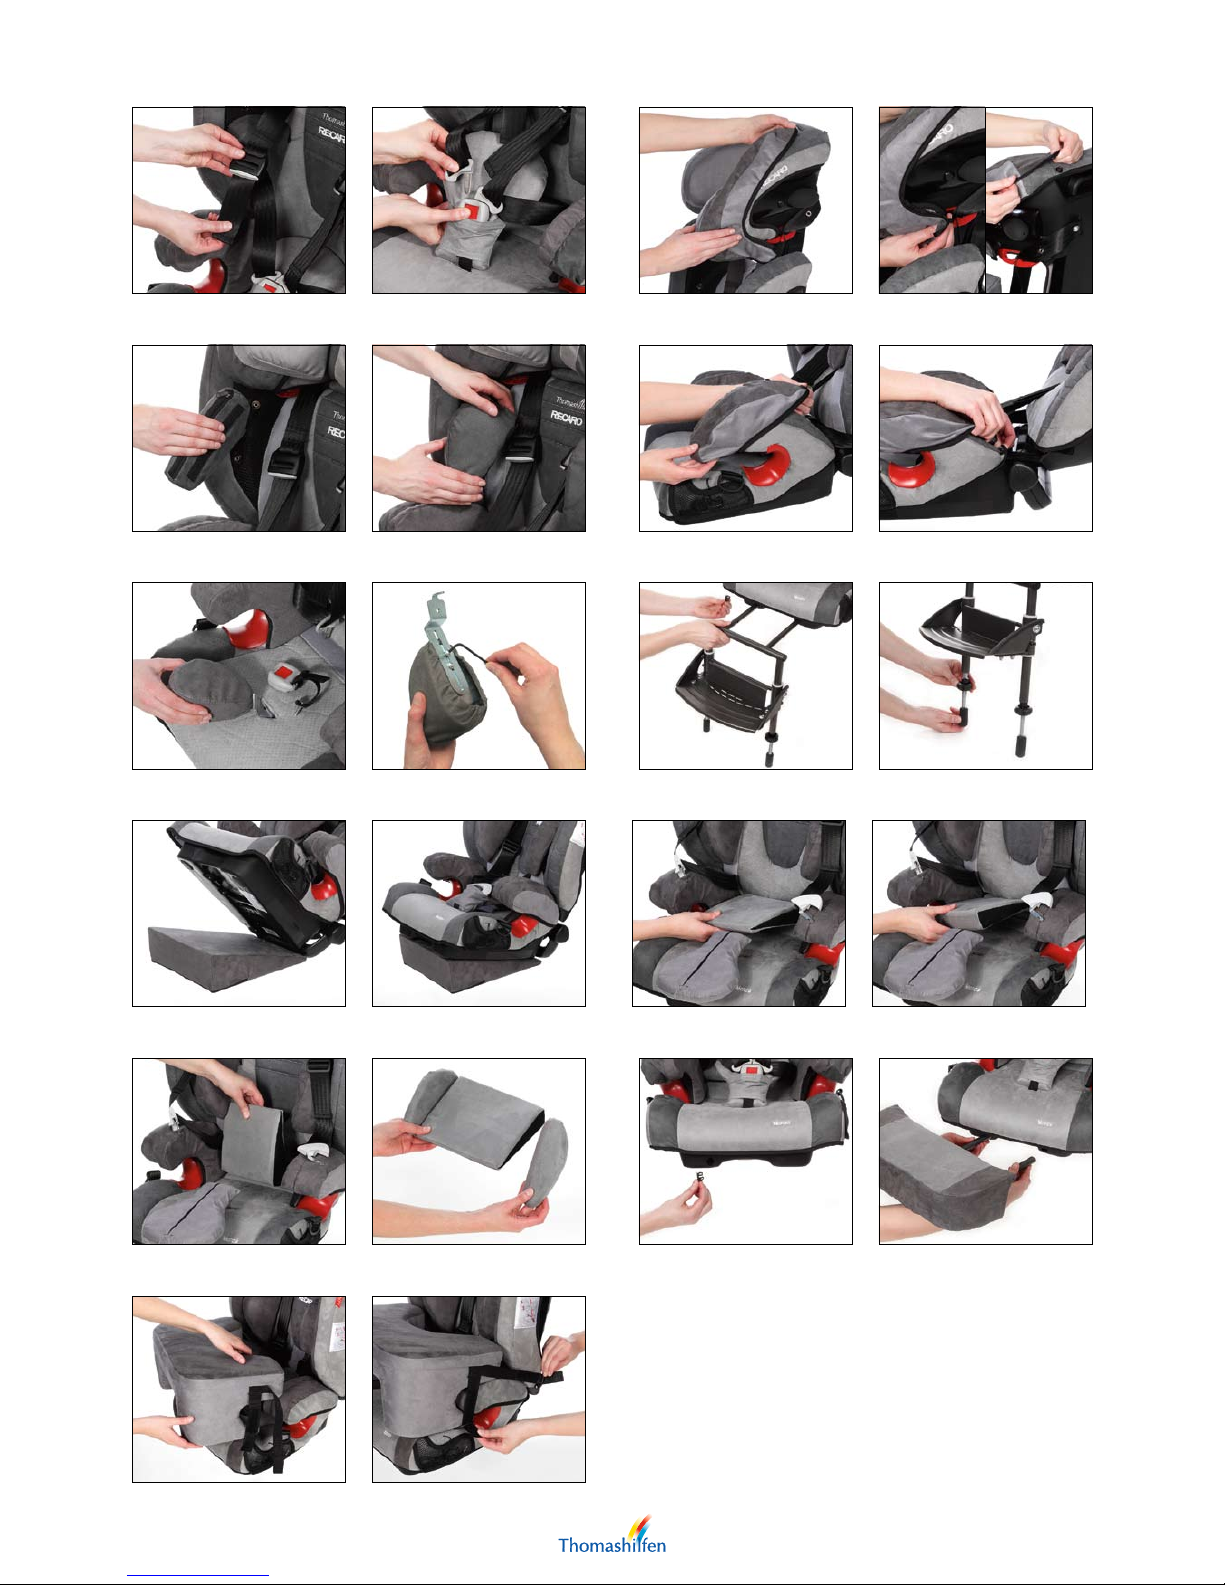
Abb. 1a: Gurtlänge ändern Abb. 1b: Gurtschloss öffnen und schließen („Klick“)
Kopfpelotten
Stellen Sie zur leichteren Anbringung der Kopfpelotten die Kopfstütze des Sitzes in die höchste Position ein. Ziehen Sie die Bezüge der Pelotten über die Seitenteile der
Kopfstütze und befestigen Sie diese oben mit dem Druckknopf. Im unteren Bereich werden die Pelotten mit einem Gummizug an der Kopfstütze befestigt.
Der Bezug ist abnehmbar (Reißverschluss) und bis 30° C in der Maschine waschbar.
Abb. 2a: Pelotten überziehen Abb. 2b: unten (a) und oben (b) befestigen
Thoraxpelotten
Die Thoraxpelotten können links und rechts im Rückenbereich mit Druckknöpfen und Klett in drei verschiedenen Höhen befestigt werden. Beginnen Sie bei der
Anbringung mit dem Druckknopf.
Durch Andrücken an die am Sitzrücken vorhandenen Flauschstreifen erreichen Sie eine bessere Fixierung.
Der Bezug ist abnehmbar (Reißverschluss) und bis 30° C in der Maschine waschbar.
Abb. 3a: Druckknopf Abb. 3b: Klettbefestigung
RECARO Monza Reha – Montage- und Gebrauchsanleitung (Ergänzung)
4
Sitz-Seitenpelotten
Stellen Sie zur leichteren Anbringung der Seitenpelotten die Rückenlehne in eine waagerechte Position. Ziehen Sie die Bezüge der Seitenpelotten über die Seitenteile der
Sitzfläche und befestigen Sie diese im hinteren Bereich mit dem Druckknopf.
Der Bezug ist abnehmbar (Reißverschluss) und bis 30° C in der Maschine waschbar.
Abb. 4a: Pelotte überziehen Abb. 4b: Druckknopf hinten
Abduktionsblock (Zubehör) Art.-Nr.: 807
Lösen Sie vor Montage des Abduktionsblocks die Inbusschraube auf der vorderen Sitzfläche, die auch den 5-Punkt-Positionierungsgurt hält und entfernen Sie das untere
Gurtband des 5-Punkt-Positionierungsgurtes.
Die Tiefeneinstellung kann über zwei Inbusschrauben auf einer Schiene unterhalb des Abduktionsblocks eingestellt werden. Passen Sie also vor der endgültigen Montage
die Tiefeneinstellung an die Beinlänge des Kindes an.
Führen Sie die Metallaufnahme des Abduktionsblocks in den vorgefertigten Schlitz unter das Schaumstoffpolster des Sitzes und haken Sie diese ein. Bohrloch und
Gewinde müssen nun übereinander liegen. Denken Sie vor dem Festschrauben des Abduktionsblocks daran, den 5-Punkt-Positionierungsgurt ebenfalls wieder mit zu
befestigen.
Hinweis: Achten Sie beim Festschrauben des Abduktionsblocks darauf, die Schraube nur leicht festzuziehen, um ein Überdrehen und damit eine Beschädigung des
Gewindes zu vermeiden.
Zur Montage benötigen Sie den beiliegenden 3 mm Inbusschlüssel.
Der Bezug ist abnehmbar (Kordel) und bis 30° C in der Maschine waschbar.
Abb. 5a: Abduktionsblock einsetzen Abb. 5b: Tiefenverstellung
Drehplatte mit Fußstützenadapter (Zubehör) Art.-Nr.: 820
Bitte beachten Sie unsere gesonderte Montageanleitung! Download: www.thomashilfen.de
Seatfix-Adapter (für Drehplatte) (Zubehör) Art.-Nr.: 818
Bitte beachten Sie unsere gesonderte Montageanleitung! Download: www.thomashilfen.de
Stabilisierungsbügel, hinten (für Drehplatte) (Zubehör) Art.-Nr.: 819
Bitte beachten Sie unsere gesonderte Montageanleitung! Download: www.thomashilfen.de
Stützfuß, vorne (für Drehplatte) (Zubehör) Art.-Nr.: 817
Bitte beachten Sie unsere gesonderte Montageanleitung! Download: www.thomashilfen.de
Rücken-Stabilisatoren (Zubehör) Art.-Nr.: 816
Die Rücken-Stabilisatoren verhindern das Abfallen des Rückens. Bitte beachten Sie unsere gesonderte Montageanleitung! Download: www.thomashilfen.de
Fußstütze, kurz 12 cm (Zubehör) Art.-Nr.: 806
Fußstütze, lang 18 cm (Zubehör) Art.-Nr.: 805
Entfernen Sie vor Montage der Fußstütze die beiden Abdeckkappen an der vorderen Unterseite des Sitzes. Drücken Sie die Rastfedern an den hinteren Enden der
Schiebestangen ein und schieben Sie die Rohre bis zum Anschlag in die Öffnungen.
Zur Stabilisierung der Fußstütze am Fahrzeugboden passen Sie die Höhe der Stützstangen durch Herein- bzw. Herausdrehen so an, dass die Stangen Bodenkontakt zu
Ihrem Fahrzeug haben. Kontern Sie anschließend die Stützstangen durch die Sterngriffe, um ein unbeabsichtigtes Herausdrehen zu verhindern. Drehen Sie hierzu die
Sterngriff-Schrauben so weit wie möglich nach oben und ziehen sie fest an.
Achtung:
Bei Verwendung der Drehplatte wird die Fußstütze in deren Fußstützenadapter aufgenommen. Sichern Sie die Fußstütze in diesem Fall grundsätzlich mit der
der Bedienungsanleitung beiliegenden Sternschraube gegen Herausfallen. Die Aufnahme hierzu (Metallblock mit Gewinde) finden Sie am linken Rohr des
Fußstützenadapters.
Unterschenkellänge:
Das Einstellen der Unterschenkellänge erfolgt über die Höhenverstellung der Fußstütze. Hierzu lösen Sie die beiden äußeren Inbus-Schrauben und ziehen Sie diese
anschließend wieder ausreichend fest.
Fußwinkel:
Lösen Sie rechts und links an der Unterseite der Fußstütze die vier Schrauben, um den gewünschten Fußwinkel über die Schienen einzustellen. Ziehen Sie anschließend
die Schrauben wieder fest.
Bitte beachten Sie: Die Fußstütze kann nicht zusammen mit der Sitztiefenverlängerung genutzt werden.
Hinweis: Soll die Fußstütze fest am Sitz verschraubt werden, bitte zusätzlich den „Adapter für Fußstütze“ (Art.-Nr. 866) verwenden.
Abb. 6a: Abdeckkappen + Stütze einführen Abb. 6b: Höhenanpassung Fahrzeug
Sitzkeil, unten (Zubehör) Art.-Nr.: 810
Der Sitzkeil wird unter dem Autositz mittig positioniert. Die hohe Kante befindet sich vorne, um eine optimale Ruheposition für das Kind zu erreichen.
Der Bezug ist abnehmbar (Reißverschluss) und bis 30° C in der Maschine waschbar.
Achtung:
Eine Verwendung des Sitzkeils zusammen mit der Drehplatte schränkt deren Funktion deutlich ein. Wir empfehlen deshalb keine gleichzeitige Verwendung von Sitzkeil
und Drehplatte.
Abb. 7a: Sitz auf Sitzkeil setzen Abb. 7b: Endposition

RECARO Monza Reha – Montage- und Gebrauchsanleitung (Ergänzung)
5
Sitzkeil, innen (Zubehör) Art.-Nr.: 809
Der Sitzkeil (innen) kann in drei verschiedenen Positionen auf der Sitzfläche befestigt werden:
1. Sie erreichen eine aktive Sitzhaltung, wenn Sie den Sitzkeil auf der Sitzfläche mit der hohen Seite nach hinten legen und festkletten.
2. Kletten Sie den Sitzkeil mit der flachen Seite im hinteren Bereich an für eine passivere Sitzposition / Ruheposition.
3. Zur Verkürzung der Sitztiefe oder für einen größeren Sitzwinkel können Sie den Sitzkeil auch aufrecht mit der breiten Seite nach unten auf die hintere Sitzfläche
kletten.
Die zwei Außenpolster zum zusätzlichen Schutz werden seitlich angeklettet.
Der Bezug ist abnehmbar (Reißverschluss) und bis 30° C in der Maschine waschbar.
Abb. 8a: aktiv Abb. 8b: passiv Abb. 8c: Rücken Abb. 8d: mit Seitenpolstern
Sitztiefenverlängerung + 13 cm (Zubehör) Art.-Nr.: 808
Entfernen Sie vor Montage der Sitztiefenverlängerung die beiden Abdeckkappen an der vorderen Unterseite des Sitzes. Drücken Sie die Rastfedern unten an den hinteren
Enden der Schiebestangen ein und schieben Sie die Rohre bis zum Anschlag in die Öffnungen.
Bitte beachten Sie:
Die Sitztiefenverlängerung kann nicht zusammen mit einer Fußstütze oder Drehplatte genutzt werden.
Der Bezug ist abnehmbar (Kordel) und bis 30° C in der Maschine waschbar.
Abb. 9a: Abdeckkappen entfernen Abb. 9b: Rastfedern eindrücken
Tisch (Zubehör) Art.-Nr.: 811
Schieben Sie den Tisch auf die beiden Seitenteile der Sitzfläche. Der Tisch wird an beiden Seiten mit je zwei Klettbändern fixiert. Ziehen Sie die Klettbänder vom Tisch
durch die Kunststoffringe am Sitz / Sitzrücken (Beckengurt).
Der Bezug ist abnehmbar (Reißverschluss) und bis 30° C in der Maschine waschbar.
Abb. 10a: Tisch aufsetzen Abb. 10b: Gurte am Sitz befestigen

6
RECARO Monza Reha – Instructions for assembly and use (supplement)
RECARO Monza Reha – Instructions for assembly and use of the Reha version
Dear RECARO Monza Reha user,
To make handling of your new children car seat safe, practical, and comfortable for both you and your child, please read these instructions and the instructions enclosed
to the seat before use.
Should you have further questions or problems, please contact your specialist dealer or us directly.
Our address: Thomas Hilfen für Körperbehinderte GmbH & Co. Medico KG · Walkmühlenstraße 1 · D - 27432 Bremervörde · Germany
Phone: +49 (0)4761 886-63 or -68 · E-Mail: info@thomashilfen.de · www.thomashilfen.com
Our address for customers in the USA: ExoMotion LLC · 309 South Cloverdale Street · Unit B 12 · Seattle WA 98108 · USA
Phone: 866 870 2122 (toll free) · Fax: 866 870 0801 (toll free) · E-Mail: info@exomotion.com · www.exomotion.com
General instructions
Please note: ALWAYS secure your child and the seat with the vehicle‘s 3-point belt. The 5-point positioning belt integrated in the seat is NOT security relevant.
• Use only for children whose weight is 15 to 50 kg / 33.1 to 110.2 lb.
• Attention! You have to use this seat always with the vehicle’s 3-point belt! DO NOT use the booster without the vehicle’s 3-point!
• When using this seat as a belt positioning booster, the shoulder portion of the vehicle’s 3-point lap / shoulder belt must be at or just above child’s shoulder!
• The integreated harness system is only for positioning child’s with special needs!
• Follow all instructions on this child restraint. Look into the written instructions located under the seat and the added instructions using for children with special needs.
• Register your child restraint with your manufacturer!
• DO NOT use the seat in a seating position with an active frontal airbag! Always install this child restraint system forward-facing!
Suitable for a body weight of up to 50 kg / 110.2 lb:
RECARO Monza Reha has successfully passed an overload test at Dekra (Dresden) on the basis of the requirements of ECE R 44/04. Thus, the RECARO Monza Reha is
approved for the use as “restraint system for special needs (“S”)”.
Play safe with RECARO Isofix (model Seatfix):
Isofix (LATCH) is an internationally standardised fastening system for children car seats. Corresponding Isofix anchor points are firmly connected to the vehicle‘s
bodywork. With Isofix children car seats can be quickly and easily anchored in these standardised fixture points. In this way, the seat is safely secured in the vehicle, even
without a child and does not have to be retained with the 3-point vehicle belt. Please check beforehand whether your car has an Isofix anchor point.
Safety warnings
WARNING! DEATH or SERIOUS INJURY can occur
• Use only with children whose weight is between 15 and 50 kg / 33.1 and 110.2 lb and height is between 94 and 150 cm / 37 and 59".
• Discontinue use of your Monza Reha child restraint that is older than six years or has been in a severe crash to prevent injury due to deterioration or hidden damage.
See date of manufacture, located on restraint.
• Use only the vehicle’s lap and shoulder belt (or “3-point”) system when restraining the child in this booster seat.
• Follow all instructions on the child restraint and in this manual. Do NOT use this child restraint system until you have read and understood the instructions in this
manual and in your vehicle owner’s manual. Do NOT let others install or use this child restraint system unless they understand how to use it.
• Do NOT make any technical modication to the child restraint system and use it only as outlined in these instructions. Otherwise, the safety function of the seat will be
reduced or completely voided.
• Do not use the Monza Reha in the front seat of a vehicle with a passenger airbag unless the airbag has been switched off. Use the child restraint only in rear seating
positions equipped with 3-point belts so that the child cannot be endangered by the front-seat passenger’s active airbag.
• According to accident statistics, children are safer when properly restrained in the rear seating positions than in the front seating positions.
• Before each use, inspect the child restraint. Make sure nothing on the child restraint is damaged, loose or broken. If anything on the restraint appears damaged, loose or
broken, do NOT use the restraint.
• Failure to follow warnings on the child restraint labels could cause serious injury or death.
• Restraint systems should be securely belted to the vehicle, even when they are not occupied, since in a crash an unsecured child restraint system may injure other
occupants.
• This restraint is NOT certied for aircraft use because this child restraint requires a lap AND shoulder belt.
• This booster is only to be used as a complete assembly of backrest and seat cushion. DO NOT use the seat cushion alone without the backrest!
• Placing your child in a hot child restraint may result in burns.
• Do NOT add accessories, toys, padding or other items to this child restraint unless provided by RECARO or THOMASHILFEN.
• This child restraint must NOT be used in the home, boats or other non-certied applications.
• NEVER use this booster seat in any vehicle seating position equipped with an active airbag unless recommended by the vehicle manufacturer.
• If a child restraint has been occupied in a crash or vehicle accident, it must be replaced; do NOT use the child restraint again. A crash can cause unseen damage and
using it again can cause serious injury or death.
• If the Monza Reha has been in a vehicle during a crash and no airbags were deployed, it does not need to be replaced.
• NEVER leave a child unattended even when sleeping.
• NEVER allow a child to play with this child restraint; it is NOT a toy.
• There is no guarantee that this child restraint will prevent injury or death in a particular crash. However, if you stress careful driving and proper use of your child
restraint, it can lower the risk of injury or death in most crashes.
General information
Extreme weather
When it is hot, we recommend the following tips to reduce possible injury or discomfort to your child:
• Park your vehicle in the shade to help keep the restraint cooler.
• Cover the child restraint with a sheet or blanket when not in use.
• ALWAYS check surface temperatures of the child restraint before placing a child in it.
When it is cold, we recommend the following tips to reduce possible injury or discomfort to your child:
• Remove the child’s bulky clothing before restraining the child in the seat. This will help belts and other safety features function properly.
• After restraining the child in the seat, cover the child and the restraint system with a blanket or their jacket to maintain warmth and comfort of the child.
For USA only: Register your new Monza Reha
Child restraints could be recalled for safety reasons. You must register this restraint to be reached in a recall. Send your name, address, email address if available, and the
restraint’s model name and manufacturing date to:
ExoMotion LLC · 309 South Cloverdale Street · Unit B 12 · Seattle WA 98108 · USA
or call: 866 870 2122 (toll free) · or register online at: www.exomotion.com (select -> “Car Seats” -> “Recaro Monza Reha”)
For recall information, call the U.S. Government’s Vehicle Safety Hotline at 1-888-327-4236 (TTY: 1-800-424-9153) or go to www.NHTSA.gov.
7
RECARO Monza Reha – Instructions for assembly and use (supplement)
Contact a Child Passenger Safety (CPS) technician.
You can nd a CPS technician in your area at www.nhtsa.dot.gov. Click on “Child Passenger Safety” and select “Certied Child Passenger Safety Technician Locator.”
Attend a car seat check-up in your area.
More information about car seat check-ups is available at www.nhtsa.dot.gov under “Child Seat Inspections” or at www.seatcheck.org. You can also call 1-855-SEAT-
CHECK to find the next or closest seat check event.
Purpose / indication
The children car seat RECARO Monza Reha / Monza Seatfix Reha is designed for the transport of children with special needs in vehicles. The clinical pictures are
amongst others:
• cerebral palsy
• hypotony syndrome of unspecic genesis
• muscular dystrophy
• different syndrome diseases
The car seat is characterized by its shell design and pad system, which provide for additional seating safety, stabilization of head and pelvis, and support/control of the
feet.
Thus, the RECARO Monza Reha / Monza Seatfix Reha meets the needs of disabled children very well.
Application risks / contraindications
No application risks / contraindications are known.
5-point positioning belt
Please note: The 5-point positioning belt helps positioning the child in the car seat and does not protect the child in the event of an accident. The 3-point belt in the car
must always be used to secure the child in the seat.
Adjusting the belt length: Pull the loose belt straps to shorten and tighten the belts. To lengthen the belts, tilt the black buckle slightly upwards and pull the belt to the
desired length.
If required, the belt length can also be adjusted with the two belt loops (bolted) at the back of the seat.
Belt buckle: Press the red dent of the buckle to open. Separate the two upper belt fasteners. To close the belt, put the belt fasteners into the buckle and push together until
they lock in place with an audible „Click“.
The cover for the crotch pad (zipper) can be removed and washed in the machine at up to 30° C / 86° F. Please undo the zip on the bottom crotch pad as well to remove
the cover.
Fig. 1a: Adjusting the belt length Fig. 1b: Opening and closing the belt buckle („Click“)
Headrest (accessory) item code: 845*
Adjust the seat‘s headrest to the highest position to facilitate attaching the headrest. Pull the covers of the supports over the side parts of the headrest and fasten them at
the top with the press button. The pads are fastened to the lower part of the headrest with an elastic rubber band.
The cover can be removed (zipper) and washed in the machine at up to
30° C / 86° F.
Fig. 2a: Attaching the headrest Fig. 2b: Fastening at bottom (a) and top (b)
* Set of removable head supports, lateral trunk supports and lateral seat supports
Lateral trunk supports (accessory) item code: 845*
The lateral trunk supports can be fastened at 3 different heights on the left and right in the back area with press buttons and Velcro. Start with the press buttons.
The supports can be fixed more firmly by pressing against the fleece strips in the back of the seat.
The cover can be removed (zipper) and washed in the machine at up to 30° C / 86° F.
Fig. 3a: Press button Fig. 3b: Velcro-fastening
* Set of removable head supports, lateral trunk supports and lateral seat supports
Lateral seat supports (accessory) item code: 845*
Adjust the backrest to a horizontal position to facilitate attachment of the lateral supports. Pull the covers of the lateral supports over the side parts of the seat surface and
attach them to the rear of the seat surface with the press button.
The cover can be removed (zipper) and washed in the machine at up to 30° C / 86° F.
Fig. 4a: Attaching the support Fig. 4b: Press button, rear
* Set of removable head supports, lateral trunk supports and seat supports
Abduction block (accessory) item code: 807
Before attaching the abduction block loosen the Allen screw on the front of the seat (holds the 5-point positioning belt, too) and remove the bottom strap of the 5-point
positioning belt.
The depth adjustment is adjusted with two Allen screws on a rail underneath the abduction block. Before final assembly you should adapt the depth adjustment to the leg
length child.
Insert the metal retainer of the abduction block into the provided slot underneath the foam padding of the seat and hook into place. The borehole and thread must lie
above one another. Remember to re-attach the 5-point positioning belt before tightening the abduction block.
Note: When tightening the abduction block, make sure to bolt the screw lightly only, to avoid overwinding of the rivet nut.
To mount the abduction block you will need the 3 mm / 0.1" Allen key provided.
The cover can be removed (cord) and washed in the machine at up to 30° C / 86° F.
Fig. 5a: Attaching the abduction block Fig. 5b: Depth adjustment

8
RECARO Monza Reha – Instructions for assembly and use (supplement)
Turning plate with footrest adapter (accessory) item code: 820
Please note our separate instructions for mounting! Download: www.thomashilfen.com
Seatfix connection (for turning plate) (accessory) item code: 818
Please note our separate instructions for mounting! Download: www.thomashilfen.com
Stabilising bow, rear (for turning plate) (accessory) item code: 819
Please note our separate instructions for mounting! Download: www.thomashilfen.com
Stand, front (for turning plate) (accessory) item code: 817
Please note our separate instructions for mounting! Download: www.thomashilfen.com
Back stabilisers (accessory) item code: 816
The back stabilisers prevent the back from dropping. Please note our separate instructions for mounting! Download: www.thomashilfen.com
Footrest, short 12 cm / 4.7" (accessory) item code: 806
Footrest, long 18 cm / 7.1" (accessory) item code: 805
Remove the two caps at the front bottom part of the seat before attaching the footrest. Press the catch springs in at the rear ends of the sliding rods and push the tubes into
the holes as far as they will go.
USA version only! Always lock the footrest to the seat with the screw provided with the user manual. The receiver for the screw is located underneath the seat.
To stabilize the footrest on the vehicle floor adjust the height of the support bars by screwing them in or out until they have contact with the vehicle. Then lock the
support bars with the hand knobs to prevent them unscrewing accidentally. Screw the hand knobs upwards as far as possible and tighten them fast.
Please note: If the turning plate is being used the footrest is attached to the footrest adapter integrated in the turning plate. In this case, make sure to always secure the
footrest against falling off with the hand knob provided with the user manual. The receiver for the hand knob (metal block with thread) is situated on the left tube of the
footrest adapter.
Lower leg length: The lower leg length is adjusted by changing the height of the footrest. Loosen both outer screws. Retighten them after each adjustment.
Foot angle: Loosen the four screws left and right on the underside of the footrest to adjust the desired foot angle with the rails. Then retighten the screws.
Please note: The footrest cannot be used in combination with the seat depth extension.
Note: If the footrest should firmly be screwed to the seat, the “footrest adapter” (item code: 866) is required.
Fig. 6a: Caps + inserting the footrest Fig. 6b: Adjusting height to vehicle
Seat wedge, bottom (accessory) item code: 810
The seat wedge is positioned centrically below the car seat. The high edge is at the front to achieve an optimum rest position of the child.
The cover can be removed (zipper) and washed in the machine at up to 30° C / 86° F.
Please note: Function of the turning plate is considerably reduced if being used in combination with the seat wedge. We therefore do not recommend using seat wedge
and turning plate at the same time.
Fig. 7a: Positioning seat on seat wedge Fig. 7b: Final position
Seat wedge, inside (accessory) item code: 809
The seat wedge (inside) can be fastened to the seat surface at 3 different positions:
1. An active posture is achieved by placing the seat wedge on the seat with the high side facing the back.
2. Velcro-fasten the seat wedge with the flat side facing rearwards for a more passive posture / rest position.
3. In order to reduce the seat depth or to achieve a bigger hip angle, you can also Velcro-fasten the seat wedge to the rear of the seat in an upright position with the broad
side facing downwards.
The two lateral pads for additional protection are Velcro-fastened to the sides.
The cover can be removed (zipper) and washed in the machine at up to 30° C / 86° F.
Fig. 8a: Active Fig. 8b: Passive Fig. 8c: Back Fig. 8d: With lateral pads
Seat depth extension + 13 cm / 5.1" (accessory) item code: 808
USA version only! Attention: Before assembly of the seat depth extension, attach the safety screw provided with the user manual to the thread on the underside of the
seat. Before removing the seat depth extension, make sure to remove this safety screw again.
Remove the two caps at the front bottom part of the seat before attaching the seat depth extension. Press the catch springs in at the rear ends of the sliding rods and push
the tubes into the holes as far as they will go.
Please note: The seat depth extension cannot be used in combination with the footrest or turning plate.
The cover can be removed (cord) and washed in the machine at up to 30° C / 86° F.
Fig. 9a: Removing caps Fig. 9b: Pressing in the catch springs
Table (accessory) item code: 811
Slide the table onto the two sides of the seat surface. The table is fastened on both sides with two Velcro strips each. Guide the Velcro strips of the table through the
plastic rings at the seat / seat back (pelvic belt).
The cover can be removed (zipper) and washed in the machine at up to 30° C / 86° F.
Fig. 10a: Attaching the table Fig. 10b: Attaching belts to seat
9
RECARO Monza Reha – Montage et mode d‘emploi (complément)
RECARO Monza Reha – Montage et mode d’emploi
Cher utilisateur du RECARO Monza Reha,
An que l’utilisation de votre nouveau siège auto soit pour vous et surtout pour votre enfant sûre, pratique et confortable, veuillez lire préalablement cette notice ainsi
que les instructions de montage et d’utilisation fournies avec le siège.
Si vous avez malgré tout des questions ou si vous rencontrez des problèmes, veuillez vous adresser à votre magasin spécialisé ou contactez-nous directement.
Notre adresse: Thomas Hilfen für Körperbehinderte GmbH & Co. Medico KG · Walkmühlenstraße 1 · D - 27432 Bremervörde · Germany
Phone: +49 (0)4761 886-63 or -68 · E-Mail: info@thomashilfen.de · www.thomashilfen.com
Remarques générales
Veuillez suivre les conseils suivants:
TOUJOURS sécuriser l’enfant dans le siège avec la ceinture de sécurité 3 points du véhicule. Le système de harnais 5 points intégré au siège auto ne garantie PAS la
sécurité de l’enfant.
Siège adapté pour un poids allant jusqu’à 50 kg:
RECARO Monza Reha a subi avec succès un test de surcharge effectué par l’organisme Dekra (Dresde) selon les normes européennes en vigueur ECE 44/04. Le RECARO
Monza Reha est pourvu ainsi d’un système de retenue homologué qui répond aux exigences des tests dynamiques (« S »).
Le gage de sécurité avec RECARO Isofix (modèle fix):
Isox est un système international de xation normé pour sièges enfants. Des points d’ancrages Isox adéquates font corps avec le châssis du véhicule. Avec Isox, les
sièges auto se laissent ainsi xés de manière simple et rapide dans ces points d’ancrages homologués. Sans enfant, le siège est également bien assuré dans la voiture et ne
doit pas être retenu en plus avec la ceinture 3 points. Veuillez vérier au préalable si votre véhicule dispose d‘un système d’ancrage Isox.
Utilisation / Indication
Le siège auto RECARO Monza Reha est conçu pour le transport dans des véhicules, d’enfants handicapés avec entre autres les signes cliniques suivants:
• paralysie cérébrale infantile
• hypotonie d’origine inconnue
• dystrophie musculaire
• atteintes syndromiques les plus diverses
Ce siège auto se distingue par sa conception en forme de coque et par le système de pelotes intégré. Il offre ainsi un soutien supplémentaire pour une position assise
sûre, la stabilisation du contrôle de la tête et un siège d’une grande stabilité dans la région du bassin, ainsi qu’un renfort / contrôle dans la zone destinés aux pieds.
Le RECARO Monza Reha est donc parfaitement adapté aux besoins individuels d’enfants handicapés.
Risques d’utilisation / Contre-indications
Il n’existe aucun risque d’utilisation / contre-indications connus.
Système de harnais 5 points
Veuillez suivre les conseils suivants:
le système de harnais 5 points permet de positionner l’enfant dans le siège auto et ne le protège pas en cas d’accident. La ceinture de sécurité 3 points du véhicule doit
être toujours utilisée pour sécuriser l’enfant dans le siège.
Modification de la longueur du harnais:
tirer sur les extrémités des sangles pour les régler et les resserrer ensuite. Pour augmenter la longueur du harnais, relever la boucle de serrage noire légèrement vers le
haut et régler la ceinture à la longueur souhaitée.
La longueur du harnais peut être également modiée en cas de besoin au moyen des deux œillets (vissés) se trouvant à l’arrière du siège.
Système de fermeture du harnais:
pour ouvrir, appuyer sur le renfoncement de couleur rouge du dispositif de fermeture. Puis séparer les deux extrémités de la partie supérieure du harnais. Pour fermer le
harnais, insérer de nouveau les deux extrémités de la partie supérieure du harnais dans le dispositif de fermeture et appuyer jusqu’à ce qu’un « clic » soit audible.
La housse de protection du harnais (fermeture éclair) est amovible et lavable à 30 ° C en machine. Veiller à ouvrir la fermeture éclair en bas de la protection an de
pouvoir l’enlever aisément.
Fig. 1a: Réglage du harnais Fig. 1b: Ouvrir le dispositif de fermeture (« clic »)
Pelotes appuie-tête (accessoire) N° de réf.: 845*
S’assurer de positionner l‘appuie-tête le plus haut possible an de faciliter le montage des pelotes. Faire glisser les housses des pelotes sur les renforts latéraux de
l‘appuie-tête et les xer en haut avec le boutonpression. Dans la partie inférieure, les pelotes sont xées à l‘appuie-tête à l’aide d’un élastique.
La housse est amovible (fermeture éclair) et lavable en machine jusqu’à 30 ° C.
Fig. 2a: Mise en place des pelotes Fig. 2b: Fixation en bas (a) et en haut (b)
* Paires de pelotes appuie-tête, de pelotes thoraciques et de pelotes latérales de l’assise
Pelotes thoraciques (accessoire) N° de réf.: 845*
Les pelotes thoraciques peuvent être xées à gauche et à droite dans la partie dorsale à 3 hauteurs différentes à l’aide de boutons-pression et de velcro. Commencer par
le bouton-pression.
Une meilleure xation est garantie en appuyant bien sur les bandes velours du dossier du siège.
La housse est amovible (fermeture éclair) et lavable en machine jusqu’à 30 ° C.
Fig. 3a: Bouton-pression Fig. 3b: Fixation velcro
* Paires de pelotes appuie-tête, de pelotes thoraciques et de pelotes latérales de l’assise
10
RECARO Monza Reha – Montage et mode d‘emploi (complément)
Pelotes latérales siège (accessoire) N° de réf.: 845*
Pour faciliter le montage des pelotes latérales, bien s’assurer que le dossier soit dans la position horizontale. Faire glisser la housse des pelotes sur les parties latérales de
l‘assise et la xer à l‘arrière avec le bouton-pression.
La housse est amovible (fermeture éclair) et lavable en machine jusqu’à 30° C.
Fig. 4a: Mise en place de la pelote Fig. 4b: Bouton-pression à l’arrière
* Paires de pelotes appuie-tête, de pelotes thoraciques et de pelotes latérales de l’assise
Jambe de force (accessoire) N° de réf.: 807
Avant de monter la jambe de force, dévisser la vis à six pans creux sur l‘avant du siège qui maintient également le système de harnais 5 points et enlever la sangle
inférieure de ce dernier.
La profondeur du siège peut être réglée à l’aide de 2 vis à six pans creux qui se trouvent en dessous de la jambe de force. Veiller donc à régler la profondeur d‘assise par
rapport à l‘enfant avant le montage dénitif.
Insérer les extrémités en métal de la jambe de force dans les fentes prévues sous le coussin en mousse du siège et accrocher. Le trou pour vis et le letage doivent être
positionnés l’un en face de l’autre. Avant de visser la jambe de force, penser à xer de nouveau le système de harnais 5 points.
Note: Lors du serrage du plot d’abduction, veillez à ne pas forcer la vis an d’éviter l’endommagement du letage.
Pour le montage vous aurez besoin de la clé à 6-pans 3 mm fournie avec le siège.
La housse est amovible et lavable en machine jusqu’à 30° C.
Fig. 5a: Placer la jambe de force Fig. 5b: Réglage de la profondeur
Plaque de rotation avec adaptateur pour repose-pied (accessoire) N° de réf.: 820
Veuillez lire notre instruction de montage spéciale! Téléchargement: www.thomashilfen.com
Raccordement Seatfix (pour la plaque de rotation) (accessoire) N° de réf.: 818
Veuillez lire notre instruction de montage spéciale! Téléchargement: www.thomashilfen.com
Etrier de stabilisation, à l’arrière (pour la plaque de rotation) (accessoire) N° de réf.: 819
Veuillez lire notre instruction de montage spéciale! Téléchargement: www.thomashilfen.com
Pied d’appui, devant (pour la plaque de rotation) (accessoire) N° de réf.: 817
Veuillez lire notre instruction de montage spéciale! Téléchargement: www.thomashilfen.com
Stabilisateurs du dos (accessoire) N° de réf.: 816
Les stabilisateurs du dos empêchent la chute du dos. Veuillez lire notre instruction de montage spéciale! Téléchargement: www.thomashilfen.com
Repose-pieds, court 12 cm (accessoire) N° de réf.: 806
Repose-pieds, long 18 cm (accessoire) N° de réf.: 805
Avant de monter le repose-pieds, enlever les deux capuchons de protection sur la face frontale inférieure du siège. Drücken Sie die Rastfedern an den hinteren Enden der
Schiebestangen ein und schieben Sie die Rohre bis zum Anschlag in die Öffnungen.
Pour la stabilisation du repose-pieds sur le plancher du véhicule, ajuster la hauteur des barres d’appui en vissant ou dévissant jusqu’à ce que les barres atteignent le
plancher du véhicule. Pousser ensuite les barres d’appui à travers les poignées-étoile an de les arrêter. Pour cela, tourner les vis des poignées-étoile le plus possible vers
le haut et bien les visser.
Attention:
lors de l’utilisation de la plaque rotative, le repose-pieds passe dans l’adaptateur de cette plaque. Dans ce cas, il est indispensable de sécuriser le repose-pieds à l’aide
des vis-étoiles jointes au mode d’emploi, an qu’il ne se détache pas par inadvertance. L’endroit correspondant (bloc de métal avec insert leté) se trouve sur le tube
gauche de l’adapteur du repose-pieds.
Longueur du bas des jambes:
l’ajustement à la longueur de la partie inférieure des jambes s’effectue au moyen du dispositif de réglage du repose-pieds. Pour cela, dévisser les deux vis moletées
extérieures et ensuite bien les resserrer.
Angle du pied:
à droite et à gauche sur la partie inférieure du repose-pieds, desserrer les 4 vis an de régler l’angle du pied souhaité à l’aide des rails. Resserrer ensuite les vis de
fixation.
Veuillez suivre les conseils suivants: le repose-pieds ne peut pas être utilisé en même temps que la rallonge pour l’assise.
Notez: Si vous souhaitez visser le repose-pied au siège, utilisez l‘ “Adaptateur pour repose-pieds“ (n° de réf. 866).
Fig. 6a: Capuchons + introduire le repose-pieds Fig. 6b: Réglage au niveau du véhicule
Coussin de rehaussement triangulaire, bas (accessoire) N° de réf.: 810
Le rehausseur triangulaire est à positionner centré sous le siège-auto. Le bord le plus haut se trouve vers l’avant an d’optimiser la position de repos pour l’enfant.
La housse est amovible (fermeture éclair) et lavable en machine jusqu’à 30 ° C.
Attention:
l’utilisation du coussin de rehaussement triangulaire avec la plaque rotative limite le bon fonctionnement de cette dernière. Nous conseillons donc de ne pas utiliser
simultanément le coussin de rehaussement triangulaire et la plaque rotative.
Fig. 7a: Placer le siège sur le coussin triangulaire Fig. 7b: Position finale
11
RECARO Monza Reha – Montage et mode d‘emploi (complément)
Coussin d’assise triangulaire (accessoire) N° de réf.: 809
Le coussin triangulaire (intérieur) peut être xé dans 3 positions différentes sur le siège:
1. La position assise est active quand vous positionnez puis xez le coussin triangulaire avec le côté le plus haut vers l‘arrière.
2. Quand vous positionnez le coussin triangulaire avec le côté le plus plat vers l’arrière, la position assise est passive / position de repos.
3. Pour réduire la profondeur de l’assise ou pour en élargir l’angle, vous pouvez aussi maintenir le coussin triangulaire avec le côté le plus large vers le bas sur la partie
arrière du siège.
Les deux renforts extérieurs sont xés sur les côtés an d’accroître la protection.
La housse est amovible (fermeture éclair) et lavable en machine jusqu’à 30° C.
Fig. 8a: Active Fig. 8b: Passive Fig. 8c: Dos Fig. 8d: Avec renforts latéraux
Prolongement en profondeur de l’assise + 13 cm (accessoire) N° de réf.: 808
Avant le montage du prolongement de l’assise, enlever les deux capuchons de protection sur le devant de la partie inférieure du siège. Appuyer sur les ressorts d’arrêt à
l‘arrière des extrémités des tiges coulissantes et pousser les tubes dans les ouvertures jusqu‘à la butée.
Veuillez suivre les conseils suivants:
la rallonge pour l’assise ne peut pas être utilisé en même temps qu’un repose-pieds ou qu’une plaque rotative.
La housse est amovible et lavable en machine jusqu’à 30°C.
Fig. 9a: Enlever les capuchons de protection Fig. 9b: Presser les ressorts d’arrêt
Tablette (accessoire) N° de réf.: 811
Faire glisser la tablette sur les deux côtés de l’assise. La tablette est xée sur les deux côtés avec respectivement deux bandes Velcro. Introduire les bandes Velcro de la
tablette dans les anneaux en plastique du siège / dossier du siège (ceinture sous-abdominale).
La housse est amovible (fermeture éclair) et lavable en machine jusqu’à 30°C.
Fig. 10a: Placer la tablette Fig. 10b: Fixer les sangles au siège
12
RECARO Monza Reha – Instrucciones de montaje y uso (complemento)
RECARO Monza Reha – Instrucciones de montaje y uso
Muy estimado usuario de RECARO Monza Reha:
Lea primero estas instrucciones de montaje y uso y las que vienen junto con el asiento, a fin de que el manejo de su nuevo asiento para niños resulte seguro, práctico y
confortable para usted y especialmente para su hijo.
En caso de tener preguntas o dificultades, diríjase por favor al representante comercial que le corresponda o contáctese directamente con nosotros.
Nuestra dirección: Thomas Hilfen für Körperbehinderte GmbH & Co. Medico KG · Walkmühlenstraße 1 · D - 27432 Bremervörde · Germany
Phone: +49 (0)4761 886-63 or -68 · E-Mail: info@thomashilfen.de · www.thomashilfen.com
Notas de carácter general
Tenga en cuenta lo siguiente:
Asegure SIEMPRE a su hijo al asiento con el cinturón de seguridad de 3 puntos que se encuentra dentro del vehículo. El cinturón para posicionamiento de 5 puntos
integrado al asiento para niños NO es importante para la seguridad.
Apto para pesos corporales de hasta 50 kg:
RECARO Monza Reha ha aprobado un test de sobrecarga en Dekra (Dresde) conforme a los requisitos ECE R 44/04. De este modo, RECARO Monza Reha está
autorizado para usarse como «dispositivo de retención ante exigencias especiales («S»)».
Vaya sobre seguro con RECARO Isofix (modelo Seatfix):
Isox es un sistema de sujeción para asientos para niños que responde a normas internacionales. En el vehículo se logra la sujeción a la carrocería con los
correspondientes anclajes Isox. Con Isox, en estos puntos de jación normados se pueden sujetar los asientos del automóvil de forma sencilla y veloz. Así, el asiento
queda bien asegurado aunque no haya niños en el automóvil y ya no es necesario sujetarlo adicionalmente con el cinturón de seguridad de 3 puntos del auto. Por favor,
verifique ante todo si su vehículo cuenta con un anclaje Isofix.
Propósito / Indicación
El asiento de auto para niños RECARO Monza Reha ha sido concebido para transportar en vehículos niños minusválidos con, por ejemplo, los siguientes cuadros:
• parálisis cerebral infantil
• síndrome de hipotensión de origen poco claro
• distroa muscular
• las más diversas enfermedades sindrómicas
Este asiento para auto se destaca por su diseño en forma de casco y el sistema de almohadillas. De esta forma, ofrece un apoyo adicional para estar sentado con
seguridad, estabilización del control de cabeza y un asiento estable de la zona pelviana, como así también apoyo / control en la zona de los pies.
Por ello, RECARO Monza Reha se adapta muy bien a las necesidades individuales de los niños minusválidos.
Riesgos de uso / Contraindicaciones
No se conocen riesgos de uso / contraindicaciones.
Cinturón para posicionamiento de 5 puntos
Tenga en cuenta lo siguiente:
El cinturón de posicionamiento de 5 puntos sirve para posicionar el niño en el asiento del auto y no da protección en caso de un accidente. Para asegurar al niño en el
asiento debe usarse siempre el cinturón de seguridad de 3 puntos disponible en el auto.
Modificación del largo del cinturón:
Tire de los extremos sueltos del cinturón para acortar los cinturones y ajustarlos. Para alargar los cinturones incline levemente la hebilla tensora negra hacia arriba y
ajuste el cinturón a la longitud deseada.
Complementariamente, y en caso de necesidad, la longitud del cinturón puede modicarse mediante sendas corchetas (atornilladas) en el dorso.
Cierre del cinturón:
Para abrir, presione sobre la cavidad roja del cierre. Luego, separe los dos soportes superiores del cinturón. Para cerrar el cinturón, vuelva a juntar los dos soportes
superiores del cinturón, introdúzcalos en el cierre arriba, y presiónelos hasta que escuche el “clic” que indica que han encastrado.
La funda de la placa del cinturón puede extraerse (cremallera) y puede lavarse en el lavarropa siempre que la temperatura del agua no supere los 30ºC. Abra también la
cremallera de la placa del cinturón inferior para poder extraer con comodidad la funda.
Fig. 1a: Modicación de la longitud del cinturón Fig. 1b: Apertura del cierre del cinturón («clic»)
Almohadillas para la cabeza (accesorio) Art. Nº: 845*
Para poder sujetar más fácilmente las almohadilles para la cabeza, lleve el apoya cabeza del asiento a la posición más elevada. Desplace las fundas de las almohadillas
por los laterales de los apoya cabeza y fíjelas arriba con el broche a presión. En la parte inferior, las almohadillas se jan al apoya cabeza con una banda elástica.
La funda puede extraerse (cremallera) y puede lavarse en el lavarropa siempre que la temperatura del agua no supere los 30ºC.
Fig. 2a: Enfundado de las almohadillas Fig. 2b: Sujeción abajo (a) y arriba (b)
* Juego de almohadillas para la cabeza, almohadillas pectorales y almohadillas laterales del asiento.
Almohadillas pectorales (accesorio) Art. Nº: 845*
Las almohadillas pectorales pueden jarse a la derecha y a la izquierda en la zona dorsal mediante broches a presión y velcro a tres alturas distintas. Comience
sujetándolas con el broche a presión.
Presionando en las tiras de frisa que se encuentran en el respaldo del asiento logrará una mejor jación.
La funda puede extraerse (cremallera) y puede lavarse en el lavarropa siempre que la temperatura del agua no supere los 30ºC.
Fig. 3a: Broche a presión Fig. 3b: Sujeción de velcro
* Juego de almohadillas para la cabeza, almohadillas pectorales y almohadillas laterales del asiento.

13
RECARO Monza Reha – Instrucciones de montaje y uso (complemento)
Almohadillas laterales del asiento (accesorio) Art. Nº: 845*
Para sujetar más fácilmente las almohadillas laterales, coloque el respaldo en posición horizontal. Desplace las fundas de las almohadillas laterales por los laterales de la
supercie de asiento y fíjelas en la parte trasera con el broche a presión.
La funda puede extraerse (cremallera) y puede lavarse en el lavarropa siempre que la temperatura del agua no supere los 30ºC.
Fig. 4a: Enfundado de la almohadilla Fig. 4b: Broche a presión trasero
* Juego de almohadillas para la cabeza, almohadillas pectorales y almohadillas laterales del asiento.
Bloque de abducción (accesorio) Art. Nº:807
Antes de montar el bloque de abducción, aoje el tornillo con cabeza hueca hexagonal ubicado en la parte delantera de la supercie de asiento y que sujeta también el
cinturón de posicionamiento de 5 puntos, y extraiga la cinta inferior del cinturón de posicionamiento de 5 puntos.
La profundidad del asiento puede regularse por medio de dos tornillos de cabeza hueca hexagonal que se deslizan por una guía debajo del bloque de abducción. Antes
del montaje definitivo, adapte la profundidad del asiento al niño.
Inserte el retén metálico del bloque de abducción en la ranura practicada debajo del colchón de espuma plástica del asiento y engánchelo. La perforación y la rosca
deben ahora estar superpuestos. Antes de atornillar el bloque de abducción procure volver a armar el cinturón de posicionamiento de 5 puntos.
Nota: Al atornillar el bloque de abducción, procure apretar el tornillo solo ligeramente para evitar un apriete excesivo y con ello el deterioro de la rosca.
Para el montaje necesitará la llave hexagonal de 3 mm que se adjunta.
La funda puede extraerse y puede lavarse en el lavarropa siempre que la temperatura del agua no supere los 30ºC.
Fig. 5a: Inserción del bloque de abducción Fig. 5b: Regulación de la profundidad
Placa giratoria con adaptador para reposapiés (accesorio) Art. Nº: 820
¡Observe nuestras instrucciones especiales de montaje! Las puede descargar: www.thomashilfen.com
Unión Seatfix (para placa giratoria) (accesorio) Art. Nº: 818
¡Observe nuestras instrucciones especiales de montaje! Las puede descargar: www.thomashilfen.com
Arco de estabilización, trasero (para la placa giratoria) (accesorio) Art. Nº: 819
¡Observe nuestras instrucciones especiales de montaje! Las puede descargar: www.thomashilfen.com
Pata soporte, delantera (para la placa giratoria) (accesorio) Art. Nº: 817
¡Observe nuestras instrucciones especiales de montaje! Las puede descargar: www.thomashilfen.com
Estabilizadores para espalda (accesorio) Art. Nº: 816
Los estabilizadores para espalda impiden el hundimiento de la espalda.
¡Observe nuestras instrucciones especiales de montaje! Las puede descargar: www.thomashilfen.com
Apoya pie corto, 12 cm (accesorio) Art. Nº: 806
Apoya pie largo, 18 cm (accesorio) Art. Nº: 805
Antes del montaje del apoya pie, extraiga las dos tapas ubicadas en la cara inferior del asiento, adelante. Presione los resortes de retén ubicados en los extremos
posteriores de las barras corredizas y desplace los tubos por los orificios hasta que hagan tope.
Para estabilizar el apoya pie en el piso del vehículo, adapte la altura de las varas de apoyo girando hacia fuera o hacia dentro de forma tal que las varas tengan contacto
con el piso de su vehículo. A continuación, ajuste con los pomos en estrella las varas de apoyo para evitar que éstas se salgan involuntariamente. Para ello, gire los
tornillos con pomo en estrella hacia arriba lo más posible y ajústelos con rmeza.
Aviso:
En caso de usar la placa giratoria, el apoya pie calza en su adaptador de apoya pie. Asegúrese de que en este caso el apoya pie no se salga jándolo con el tornillo de
cabeza en estrella que se adjunta al manual de utilización. El encaje para esto (bloque metálico con rosca) lo encontrará en el tubo izquierdo del adaptador para el
apoya pie.
Largo de la pantorrilla:
El largo de la pantorrilla se ajusta mediante la regulación de la altura del apoya pie. Para ello, aoje ambos tornillos moleteados exteriores y después vuelva a ajustarlos
suficientemente.
Ángulo del pie:
Para regular el ángulo del pie mediante las guías, afloje los cuatro tornillos a la derecha y a la izquierda en la cara inferior del apoya pie. Luego, vuelva a ajustar los
tornillos.
Tenga en cuenta lo siguiente: El apoya pie no puede utilizarse junto con el alargue de profundidad del asiento.
Nota: Si desea atornillar el apoya-pies jamente al asiento, emplee también el “Adaptador para apoya pie” (art. nº 866).
Fig. 6a: Tapas + Inserción del apoya pien Fig. 6b: Adaptación de la altura al vehículo
Cuña del asiento, abajo (accesorio) Art. Nº: 810
La cuña del asiento se ubica de forma centrada debajo del asiento del auto. El borde alto se encuentra adelante, de forma que se puede lograr una posición de descanso
óptima para el niño.
La funda puede extraerse (cremallera) y puede lavarse en el lavarropa siempre que la temperatura del agua no supere los 30ºC.
Aviso:
Al usar la cuña del asiento junto con la placa de giro se limita fuertemente el funcionamiento de ésta. Por tal motivo, recomendamos no usar la cuña del asiento y la
placa de giro al mismo tiempo.
Fig. 7a: Colocación del asiento sobre la cuña Fig. 7b: Posición nal

14
RECARO Monza Reha – Instrucciones de montaje y uso (complemento)
Cuña de asiento interior (accesorio) Art. Nº:809
La cuña del asiento (interior) puede ajustarse sobre la superficie del asiento en 3 posiciones distintas:
1. Logrará una postura activa del asiento desplazando la cuña del asiento sobre la superficie del asiento con la cara alta hacia atrás y ajustándola.
2. Para obtener una posición de asiento / descanso pasiva, ajuste la cuña del asiento con la cara plana en la parte de atrás.
3. Para disminuir la profundidad del asiento o bien para aumentar el ángulo del asiento, usted puede fijar a la superficie del asiento trasera la cuña del asiento también
derecha y con la cara ancha hacia atrás.
Los dos colchones exteriores se jan de costado para lograr una protección extra.
La funda puede extraerse (cremallera) y puede lavarse en el lavarropa siempre que la temperatura del agua no supere los 30ºC.
Fig. 8a: Activa Fig. 8b: Pasiva Fig. 8c: Dorso Fig. 8d: Con colchones laterales
Alargue de profundidad del asiento + 13 cm (accesorio) Art. Nº: 808
Antes del montaje del alargue de profundidad del asiento, extraiga las dos tapas ubicadas en la cara inferior del asiento, adelante. Presione los resortes de retén ubicados
abajo, en los extremos posteriores de las barras corredizas y desplace los tubos por los orificios hasta que hagan tope.
Tenga en cuenta lo siguiente:
El alargue de profundidad del asiento no puede utilizarse junto con un apoya pie o una placa de giro.
La funda puede extraerse y puede lavarse en el lavarropa siempre que la temperatura del agua no supere los 30ºC.
Fig. 9a: Extracción de las tapas Fig. 9b: Introducción a presión de los resortes de retén
Mesa (accesorio) Art. Nº: 811
Desplace la mesa hacia las dos partes laterales de la superficie del asiento. La mesa se fija a ambos lados con dos cintas de velcro a cada lado. Saque las cintas de velcro
de la mesa mediante los anillos plásticos del asiento / dorso del asiento (cinturón del casco).
La funda puede extraerse (cremallera) y puede lavarse en el lavarropa siempre que la temperatura del agua no supere los 30ºC.
Fig. 10a: Colocación de la mesa Fig. 10b: Asegure los cinturones al asiento

15
RECARO Monza Reha – Istruzioni di montaggio e di utilizzo (aggiunta)
RECARO Monza Reha – Istruzioni di montaggio e di utilizzo
Gentile utente di RECARO Monza Reha,
Al fine di rendere più facile per voi la manipolazione del nuovo seggiolino per auto per bambini e più sicuro, pratico e confortevole per i vostri bambini, vi preghiamo di
leggere prima con attenzione le seguenti istruzioni di utilizzo e di montaggio.
Se nonostante ciò ci sono ancora domande o problemi, si prega di rivolgersi al proprio rivenditore competente o direttamente a noi.
Il nostro indirizzo: Thomas Hilfen für Körperbehinderte GmbH & Co. Medico KG · Walkmühlenstraße 1 · D - 27432 Bremervörde · Germany
Phone: +49 (0)4761 886-63 or -68 · E-Mail: info@thomashilfen.de · www.thomashilfen.com
Indicazioni generali
Prestare attenzione:
Tenete ben saldo il vostro bambino SEMPRE con la cintura a 3 punti in dotazione del veicolo. La cintura a 5 punti integrata nel seggiolino NON è rilevante a fini della
sicurezza.
Adatto a bambini con un peso fino a 50 kg:
Il seggiolino per auto per bambini RECARO Monza Reha ha superato con successo tutti i requisiti ECE R 44/04 e i test di carico del Dekra (Dresda). Il RECARO Monza
Reha è particolarmente adatto per soggetti che hanno la cosiddetta schiena a “S”.
Scegliere a colpo sicuro con RECARO Isofix (Modello Seatfix):
Isox è un sistema di ssaggio per seggiolini conforme alle normative internazionali. Dal punto di vista dell’autoveicolo, i relativi ancoraggi Isox sono saldamente
collegati alla carrozzeria. Tramite questi punti di posizionamento, con Isox è possibile ancorare i seggiolini velocemente e semplicemente. Il seggiolino è ben assicurato
nell’autoveicolo anche senza bambino e non deve più essere ulteriormente tenuto con la cintura di sicurezza a 3 punti dell’autoveicolo. Vericare in precedenza, se il
vostro autoveicolo disponga di un ancoraggio Isofix.
Utilizzo secondo le disposizioni / indicazione
Il seggiolino per auto per bambini RECARO Monza Reha è realizzato per il trasporto su veicoli di bambini diversamente abili con i seguenti quadri clinici.
• Paresi cerebrale infantile
• Sindrome di ipotonia con genesi poco chiara
• Distroa muscolare
• Svariate sindromi patologiche
Questo seggiolino per auto si contraddistingue per la sua forma a guscio e per il sistema provvisto di cuscinetti del cinto. Esso offre quindi un ulteriore supporto mente il
bambino è seduto, favorendo la stabilizzazione e il controllo della testa, nonché una posizione salda del bacino e un controllo della zona dei piedi.
Il RECARO Monza Reha riesce quindi ad adattarsi facilmente alle esigenze individuali di bambini diversamente abili.
Rischi di applicazione / controindicazioni
Non sono conosciuti rischi di applicazione o controindicazioni.
Cintura di posizionamento a 5 punti
Prestare attenzione:
La cintura di posizionamento a 5 punti serve per il posizionamento del bambino sul seggiolino e non protegge in caso di incidenti. Per tenere il seggiolino ben saldo al
sedile, bisogna usare la cintura a 3 punti presente nel veicolo.
Modifiche alle cinture:
Tirare le cinture allentare per accorciarle e per ssarle. Per allungare la cintura, ribaltare leggermente verso l’alto la bbia nera e tirare la cintura no alla lunghezza
desiderata.
Inoltre, la lunghezza della cintura può essere modicata in base alle necessità tramite entrambi gli occhiello (avvitati) nella parte posteriore del seggiolino.
Chiusura della cintura:
Per aprire bisogna premere sulla parte rossa della chiusura. Staccare entrambi i supporti superiori della cintura. Per chiudere la cintura, ricongiungere nuovamente
entrambi i supporti superiori inserirli nella chiusura e incastrarli nchè non si sente un “click”.
Il rivestimento della protezione della cintura (chiusura lampo) essa è rimovibile e lavabile in lavatrice a 30°. Si prega di aprire la chiusura lampo nella protezione
inferiore della cintura per togliere il rivestimento.
Immagine 1a: Modificare la lunghezza delle cintura Immagine 1b: Aprire la chiusura della cintura (“click”)
Pelotte per il capo (accessorio) Art.-Nr.: 845*
Per l’inserimento più facile delle pelotte per il capo, mettere il poggiatesta del seggiolino nella posizione più alta. Inlare il rivestimento delle pelotte sulle parti laterali
del poggiatesta e fissarli in alto con il bottone automatico. Nella zona inferiore, le pelotte vengono fissate con un elastico al poggiatesta.
Il rivestimento (chiusura lampo) è rimovibile e lavabile in lavatrice a 30°.
Immagine 2a: Rivestire le pelotte Immagine 2b: Fissarle sotto (a) e sopra (b)
* Set di pelotte per il capo, il busto e per i lati del seggiolino.
Pelotte per il busto (accessorio) Art.-Nr.: 845*
Le pelotte del busto possono essere fissate a destra e sinistra nella zona della schiena con i bottoni automatici e il velcro a 3 diverse altezze. Per inserirle, occorre iniziare
con il bottone automatico.
Per mezzo della pressione sulle strisce aderenti delle presenti sullo schienale del seggiolino, si ottiene un fissaggio migliore.
Il rivestimento (chiusura lampo) è rimovibile e lavabile in lavatrice a 30°.
Immagine 3a: Bottone automatico Immagine 3b: Fissaggio con il velcro
* Set di pelotte per il capo, il busto e per i lati del seggiolino.

16
RECARO Monza Reha – Istruzioni di montaggio e di utilizzo (aggiunta)
Pelotte laterali di seduta (accessorio) Art.-Nr.: 845*
Per l’inserimento più facile delle pelotte laterali, mettere il poggiatesta del seggiolino nella posizione orizzontale. Inlare il rivestimento delle pelotte sulle parti laterali
del poggiatesta e fissarlo nella zona posteriore con il bottone automatico.
Il rivestimento (chiusura lampo) è rimovibile e lavabile in lavatrice a 30°.
Immagine 4a: Rivestire la pelotta Immagine 4b: Bottone automatico posteriore
* Set di pelotte per il capo, il busto e per i lati del seggiolino.
Blocco dell’abduzione (accessorio) Art.-Nr.: 807
Prima del montaggio del blocco dell’abduzione, togliere la vite a brugola sul piano di seduta anteriore che tiene anche la cintura di posizionamento a 5 punti e togliere
la cinghia inferiore della cintura di posizionamento a 5 punti.
La profondità di seduta può essere impostata sulla guida al di sotto del blocco dell’abduzione per mezzo delle 2 viti a brugola. Prima del montaggio denitivo, adattare
al bambino la profondità di seduta.
Introdurre e agganciare la presa di metallo del blocco dell’abduzione nell’apposita fessura sotto l’imbottitura di gommapiuma del seggiolino. Il foro e la lettatura
devono trovarsi sovrapposti. Prima di ssare il blocco dell’abduzione, occorre fare attenzione a ssare di nuovo anche la cintura a 5 punti.
Attenzione: Quando viene bloccato il cuneo di abduzione, fare attenzione a non serrare eccessivamente la vite di fissaggio.
Per il montaggio, si deve impiegare la chiave a brugola da 3 mm acclusa.
Il rivestimento è rimovibile e lavabile in lavatrice a 30°.
Immagine 5a: Inserire il blocco dell’abduzione Immagine 5b: Regolazione della profondità
Piano girevole con adattatore per poggiapiedi (accessorio) Art.-Nr.: 820
Osservare le nostre istruzioni di montaggio separate! Download: www.thomashilfen.com
Collegamento Seatfix (per piano girevole) (accessorio) Art.-Nr.: 818
Osservare le nostre istruzioni di montaggio separate! Download: www.thomashilfen.com
Staffa stabilizzatrice posteriore (per piano girevole) (accessorio) Art.-Nr.: 819
Osservare le nostre istruzioni di montaggio separate! Download: www.thomashilfen.com
Piede d‘appoggio anteriore (per piano girevole) (accessorio) Art.-Nr.: 817
Osservare le nostre istruzioni di montaggio separate! Download: www.thomashilfen.com
Stabilizzatori per la schiena (accessorio) Art.-Nr.: 816
Gli stabilizzatori per la schiena impediscono lo scivolamento della schiena. Osservare le nostre istruzioni di montaggio separate! Download: www.thomashilfen.com
Supporti per i piedi, lunghezza 12 cm (accessorio) Art.-Nr.: 806
Supporti per i piedi, lunghezza 18 cm (accessorio) Art.-Nr.: 805
Prima del montaggio dei supporti per i piedi, rimuovere entrambe le coperture nella parte anteriore e inferiore del seggiolino. Inserire le molle nelle estremità inferiori
delle aste e spostare il tubo fino a che non arriva nelle aperture.
Per stabilizzare i supporti per i piedi all’interno del veicolo, bisogna adattare l’altezza con le aste di supporto, tirandole all’interno o all’esterno no a quando non hanno
un perfetto contatto con il pianale del veicolo. Infine fissate le aste di supporto tramite le manopole a stella, in moto tale che non vengano svitate accidentalmente.
Cercare di posizionare le manopole a stella verso l’alto e stringerle il più possibile.
Attenzione:
Se si utilizza la piastra girevole, i supporti per i piedi vengono inseriti nei loro adattatori. Fissare i supporti per i piedi con le viti a stella fornite in dotazione assieme alle
istruzioni di utilizzo, pre evitare che essi cadano. Tali viti si inseriscono in un alloggiamento (blocco metallico lettato) nel tubo sinistro dell’adattatore del supporto per i
piedi.
Area dal ginocchio in giù:
Per regolare l’area che va dal ginocchio al piede si utilizza la regolazione in altezza dei supporti per i piedi. Per fare questo bisogna allentare entrambe le viti esterne a
testa zigrinata e poi stringerle bene nuovamente.
Angolo dei piedi:
Allentare a destra e sinistra nella parte laterale dei supporti per i piedi le 4 viti per raggiungere l’angolazione dei piedi desiderata attraverso le guide. Successivamente
stringere nuovamente le viti.
Prestare attenzione: I supporti per i piedi non possono essere utilizzati assieme al dispositivo per aumentare la profondità.
Indicazione: Per ssare il poggiapiedi alla seduta, si prega di utilizzare l’apposito “adattamento per il supporto per i piedi” (Art.-Nr. 866).
Immagine 6a: Inserire le coperture + i supporti Immagine 6b: Adattamento all’altezza del sedile del veicolo
Cuneo, inferiore (accessorio) Art.-Nr.: 810
Il cuneo viene posizionato in basso al centro nel sedile dell’auto. Lo spigolo superiore si trova in avanti per ottenere una posizione quanto più comoda possibile per il
bambino.
Il rivestimento (chiusura lampo) è rimovibile e lavabile in lavatrice a 30°.
Attenzione:
Utilizzando il cuneo assieme alla piastra girevole comporterà una limitazione delle funzioni della stessa. Raccomandiamo quindi di non usarli contemporaneamente.
Immagine 7a: Inserire il cuneo nel sedile Immagine 7b: Posizione finale

17
RECARO Monza Reha – Istruzioni di montaggio e di utilizzo (aggiunta)
Cuneo, interno (accessorio) Art.-Nr.: 809
Il cuscino a cuneo (interno) può essere fissato al piano di seduta in 3 diverse posizioni:
1. È possibile ottenere una postura seduta attiva quando il cuscino a cuneo viene messo sul piano di seduta e agganciato con il lato alto verso l’interno.
2. Per una posizione di seduta, oppure posizione di riposo, più passiva, agganciare il cuscino a cuneo al lato piatto della zona posteriore.
3. Per accorciare la profondità di seduta, oppure per ottenere un angolo di seduta più grande, è possibile agganciare il cuscino a cuneo anche in posizione eretta con il
lato più largo in basso sulla superficie di seduta più interna.
Per fornire una protezione supplementare, le due imbottiture esterne sono agganciate lateralmente.
Il rivestimento (chiusura lampo) è rimovibile e lavabile in lavatrice a 30°.
Immagine 8a: Posizione attiva Immagine 8b: Posizione passiva Immagine 8c: Posizione passiva Immagine 8d: Con imbottitura laterale
Allungamento della profondità di seduta + 13 cm (accessorio) Art.-Nr.: 808
Prima del montaggio dell’allungamento della profondità di seduta, togliere entrambi i cappucci protettivi che si trovano davanti sul lato inferiore del seggiolino. Premere
le molle di ritenzione sull’estremità posteriore delle guide e spingere i tubi nelle aperture no all’arresto.
Prestare attenzione:
Il dispositivo per aumentare la profondità non può essere usato assieme ai supporti per i piedi o assieme alla piastra girevole.
Il rivestimento è rimovibile e lavabile in lavatrice a 30°.
Immagine 9a: Togliere i cappucci protettivi Immagine 9b: Premere le molle di ritenzione
Tavolino (accessorio) Art.-Nr.: 811
Far scorrere il tavolino su entrambi gli elementi laterali della superficie. Il tavolino viene fissati su ambo i lati con due nastri di velcro. Far passare i nastri di velcro dal
Tavolo, attraverso gli anelli in plastica sulla parte posteriore del seggiolino (cintura per il bacino).
Il rivestimento (chiusura lampo) è rimovibile e lavabile in lavatrice a 30°.
Immagine 10a: Posizionare il tavolino Immagine 10b: Fissare la cintura

18
RECARO Monza Reha – Montage- en gebruiksinstructies (aanvulling)
RECARO Monza Reha – Montage- en gebruiksinstructies
Beste gebruiker van RECARO Monza Reha,
Lees eerst deze aanwijzingen en die van het zitje zelf om uw nieuwe kinderzitje correct te monteren en te gebruiken. Zo bent u met uw kind altijd veilig, praktisch en
comfortabel onderweg.
Indien u nog vragen of problemen hebt, richt u dan tot uw verkoper of neem rechtstreeks contact met ons op.
Ons adres: Thomas Hilfen für Körperbehinderte GmbH & Co. Medico KG · Walkmühlenstraße 1 · D - 27432 Bremervörde · Germany
Phone: +49 (0)4761 886-63 or -68 · E-Mail: info@thomashilfen.de · www.thomashilfen.com
Algemeen
Belangrijk:
Zet uw kind met stoel ALTIJD vast met de 3-puntsgordel van het voertuig. De 5-puntsgordel van de kinderstoel is NIET voldoende veilig.
Geschikt voor een lichaamsgewicht tot 50 kg:
Het autozitje RECARO Monza Reha heeft de vereisten van ECE R 44/04 in een overbelastingstest bij Dekra (Dresden) met succes doorstaan. De RECARO Monza Reha is
daarom als ruggensteun voor speciale eisen ‘S’ toegestaan.
Speel op zeker met RECARO Isofix (model Seatfix):
Isofix is een internationaal erkend bevestigingssysteem voor kinderzitjes. In de wagen zijn de respectieve Isofix-ankerpunten aan de carrosserie bevestigd. In deze
standaard bevestigingspunten kunt u een Isofix-kinderzitje makkelijk en snel bevestigen. Het kinderzitje is zo ook zonder kind in de auto bevestigd en hoeft niet meer
extra met de 3-punts-gordel van de wagen worden vastgemaakt. Controleer vooraf of uw wagen met een Isofix-bevestiging is uitgerust.
Doel / indicatie
Het kinderzitje RECARO Monza Reha is ontworpen voor het transport in motorvoertuigen van gehandicapte kinderen met onder andere de volgende aandoeningen:
• Hersenverlamming
• Hypotoniesyndroom met onduidelijke genese
• Spierdystroe
• Verschillende syndroomaandoeningen
Deze autostoel wordt gekenmerkt door zijn kuipvorm en het systeem van steunkussens. Hierdoor is het zitje uitgerust met extra ondersteuning om veilig te zitten en het
hoofd en het bekken te stabiliseren, evenals een voetensteun / voetcontrole.
De RECARO Monza Reha kan daardoor heel makkelijk aan de individuele behoeften van gehandicapte kinderen worden aangepast.
Gebruiksrisico’s / contra-indicaties
Er zijn geen gebruiksrisico’s / contra-indicaties bekend
5-puntsgordel
Belangrijk:
De 5-punts-gordel dient om het kind in het autozitje vast te zetten, maar beschermt het niet bij een ongeval. Gebruik altijd de 3-punts-veiligheidsgordel van de wagen
om het kind in het zitje vast te zetten.
De lengte van de gordel aanpassen:
Trek aan het losse uiteinde van de gordel om de gordel te verkorten en aan te spannen. Druk de zwarte spangesp wat naar achter en trek de gordel tot op de gewenste
lengte om de gordel te verlengen.
Indien nodig kan de lengte van de gordel ook worden aangepast met de twee (vergrendelde) gordelogen aan de achterkant van het zitje.
De gordel vergrendelen:
Druk op de rode knop van het slot om de gordel te openen. Haal vervolgens de twee bovenste gordelhouders uit elkaar. Breng de twee bovenste gordelhouders opnieuw
samen, steek ze bovenaan in de vergrendeling en druk ze samen tot u een ‘klik’ hoort om de gordel te vergrendelen.
De bekleding van het gordelschild (ritssluiting) is afneembaar en kan tot op 30 °C in de machine worden gewassen. Open ook de ritssluiting van het onderste
gordelschild om de bekleding makkelijker te kunnen verwijderen.
Fig. 1a: De gordellengte aanpassen. Fig. 1b: De gordel vergrendelen (‘klik’)
Hoofdsteunen (toebehoren) Artikelnr.: 845*
Zet de hoofdsteun van het kinderzitje in de hoogste positie om de kussensteunen makkelijker te kunnen bevestigen. Trek de bekleding van de kussensteunen over de
zijkant van de hoofdsteun en maak deze bovenaan met de drukknop vast. Bevestig de kussensteunen onderaan met een elastiek aan de hoofdsteun.
De bekleding is afneembaar (ritssluiting) en kan tot op 30 °C in de machine worden gewassen.
Fig. 2a: De kussensteunen aanbrengen Fig. 2b: Onderaan (a) en bovenaan (b) bevestigen
* Set bestaande uit hoofdsteunen, borststeunen en zijsteunen.
Borststeunen (toebehoren) Artikelnr.: 845*
De borststeunen kunnen op 3 verschillende hoogtes met drukknoppen en klittenband zowel links als rechts aan de rug van het zitje worden bevestigd. Bevestig ze eerst
met de drukknop.
U kunt de borststeunen nog steviger vastzetten door ze tegen de luszijde van de klittenband op de rug te drukken.
De bekleding is afneembaar (ritssluiting) en kan tot op 30 °C in de machine worden gewassen.
Fig. 3a: Drukknop Fig. 3b: Klittenband
* Set bestaande uit hoofdsteunen, borststeunen en zijsteunen.

19
RECARO Monza Reha – Montage- en gebruiksinstructies (aanvulling)
Zijsteunen (toebehoren) Artikelnr.: 845*
Zet de rug van het zitje horizontaal om de zijsteunen makkelijker te kunnen bevestigen. Trek de bekleding van de zijsteunen over de zijkanten van de zit en bevestig ze
achteraan met de drukknop.
De bekleding is afneembaar (ritssluiting) en kan tot op 30 °C in de machine worden gewassen.
Fig. 4a: Zijsteunen overtrekken Fig. 4b: Drukknop achteraan
* Set bestaande uit hoofdsteunen, borststeunen en zijsteunen.
Abductieblok (toebehoren) Artikelnr.: 807
Draai de inbusschroef, die ook de 5-punts-gordel bevestigt, vooraan op de zit los en verwijder het onderste deel van de 5-punts-gordel voor u het abductieblok monteert.
De zitdiepte kan met 2 inbusschroeven op een rail onder het abductieblok worden ingesteld. Pas de zitdiepte dus voor de definitieve montage aan het kind aan.
Steek de metalen houder van het abductieblok in de geprefabriceerde gleuf onder de schuimvulling van de zit en haak hem op de juiste plaats. Zorg ervoor dat het
boorgat en de schroefdraad nu boven elkaar liggen. Vergeet niet de 5-punts-gordel opnieuw te bevestigen voor u het abductieblok vastdraait.
Let op: Draai bij de bevestiging van het abductieblok de schroef slechts licht aan, om zo kapot draaien van de klinknagelmoer te voorkomen.
Voor de montage hebt u de bijgeleverde inbussleutel (3 mm) nodig.
De bekleding is afneembaar en kan tot op 30 °C in de machine worden gewassen.
Fig. 5a: Het abductieblok monteren Fig. 5b: De zitdiepte aanpassen
Draaiplaat met voetensteunadapter (toebehoren) Artikelnr.: 820
Neem onze aparte montagehandleiding in acht! Download: www.thomashilfen.com
Seatfix-aansluiting (voor draaiplaat) (toebehoren) Artikelnr.: 818
Neem onze aparte montagehandleiding in acht! Download: www.thomashilfen.com
Stabilisatiebeugel, achter (voor draaiplaat) (toebehoren) Artikelnr.: 819
Neem onze aparte montagehandleiding in acht! Download: www.thomashilfen.com
Steunvoet, voor (voor draaiplaat) (toebehoren) Artikelnr.: 817
Neem onze aparte montagehandleiding in acht! Download: www.thomashilfen.com
Rug-stabilisatoren (toebehoren) Artikelnr.: 816
De rug-stabilisatoren voorkomen het wegzakken van de rug. Neem onze aparte montagehandleiding in acht! Download: www.thomashilfen.com
Voetsteun, kort 12 cm (toebehoren) Artikelnr.: 806
Voetsteun, lang 18 cm (toebehoren) Artikelnr.: 805
Verwijder beide afdekkappen onderaan op de voorkant van de zit voor u de voetsteun monteert. Druk de grendelveren achteraan de schuifstangen in en schuif de buizen
tot aan de aanslag in de openingen.
Om de voetsteun op de bodem van het voertuig te stabiliseren, past u de hoogte van de steunstangen zo aan (in- of uitdraaien), zodat de stangen de vloer van uw
voertuig raken. Bevestig vervolgens de steunstangen met contramoeren door de stervormige handgreep, om te vermijden dat de stangen per ongeluk losdraaien. Draai
hiervoor de schroeven van de stervormige greep zo ver mogelijk omhoog en draai ze stevig vast.
Belangrijk:
Bij gebruik van de draaiplaat wordt de voetsteun in de voetsteunadapter opgenomen. Borg de voetsteun in dat geval met de bijgeleverde stervormige schroeven zodat hij
er niet kan uitvallen. Gebruik hiervoor een metalen blok met schroefdraad, aan de linker buis van de voetsteunadapter.
Lengte onderbeen:
U kunt de lengte van het onderbeen instellen door de hoogte van de voetsteun te verstellen. Draai hiervoor de twee buitenste kartelmoeren los en draai ze vervolgens
opnieuw vast.
Voethoek:
Draai de 4 schroeven rechts en links aan de onderkant van de voetsteun los om de gewenste voethoek met de rails in te stellen. Draai vervolgens de schroeven opnieuw
vast.
Belangrijk: U kunt de voetsteun niet in combinatie met het zitverlengstuk gebruiken.
Opmerking: Gebruik bovendien de “adapter voor voetsteun” (artikelnr. 866) als de voetensteun vast aan de stoel moet worden geschroefd.
Fig. 6a: Afdekkappen + steun insteken Fig. 6b: Hoogteregeling voertuig
Zitspie, onderaan (toebehoren) Artikelnr.: 810
De zitspie wordt in het midden onder het autozitje geplaatst, met de hoge kant vooraan zodat het kind zich in optimale rustpositie bevindt.
De bekleding is afneembaar (ritssluiting) en kan tot op 30 °C in de machine worden gewassen.
Belangrijk:
Door het gebruik van de zitspie in combinatie met de draaiplaat wordt de werking ervan aanzienlijk beperkt. Daarom is het raadzaam om de zitspie en de draaiplaat niet
samen te gebruiken.
Fig. 7a: De zit op de zitspie plaatsen Fig. 7b: Eindpositie

20
RECARO Monza Reha – Montage- en gebruiksinstructies (aanvulling)
Zitspie, binnenkant (toebehoren) Artikelnr.: 809
De zitspie (binnenkant) kan in 3 verschillende posities op de zit worden bevestigd:
1. Voor een actieve zithouding: leg de zitspie op de zit met de hoge kant naar achter en bevestig met de klittenband.
2. Voor een passievere zitpositie/rustpositie: kleef de zitspie met de platte kant naar achter.
3. Voor een verkorte zitdiepte of voor een grotere zithoek: plaats de zitspie rechtop met de brede kant naar onder en bevestig met klittenband achteraan op de zit.
Bevestig de twee buitenste kussentjes voor extra steun met klittenband aan de zijkanten.
De bekleding is afneembaar (ritssluiting) en kan tot op 30 °C in de machine worden gewassen.
Fig. 8a: Actief Fig. 8b: Passief Fig. 8c: Rug Fig. 8d: Met zijkussentjes
Zitverlengstuk + 13 cm (toebehoren) Artikelnr.: 808
Verwijder de twee afdekkappen onderaan op de voorkant van de zit voor u het zitverlengstuk monteert. Druk de veersluitingen achteraan op de uiteinden van de
schuifstangen in en schuif de buizen tot aan de aanslag in de openingen.
Belangrijk:
U kunt het zitverlengstuk niet in combinatie met de voetsteun of de draaiplaat gebruiken.
De bekleding is afneembaar en kan tot op 30 °C in de machine worden gewassen.
Fig. 9a: Afdekkappen verwijderen Fig. 9b: Veersluitingen indrukken
Tafel (toebehoren) Artikelnr.: 811
Schuif de tafel op de beide zijstukken van het zitoppervlak. De tafel wordt aan beide kanten met telkens twee klittenbanden bevestigd. Trek de klittenbanden van de tafel
door de kunststof ringen op de zit / zitrug (bekengordel).
De bekleding is afneembaar (ritssluiting) en kan tot op 30 °C in de machine worden gewassen.
Fig. 10a: De tafel monteren Fig. 10b: De gordel aan de zit bevestigen

21
RECARO Monza Reha – Monterings- og bruksanvisning (tillegg)
RECARO Monza Reha – Monterings- og bruksanvisning
Kjære bruker av RECARO Monza Reha,
for at håndteringen av ditt nye bilsete for barn kan være sikker, praktisk og komfortabel, både for deg og spesielt for barnet, er det viktig at du først tar deg tid til å lese
denne bruksanvisningen, samt den som ble levert sammen med setet.
Hvis du allikevel skulle ha spørsmål eller problemer, kan du vende deg til din faghandel eller direkte til oss.
Vår adresse Thomas Hilfen für Körperbehinderte GmbH & Co. Medico KG · Walkmühlenstraße 1 · D - 27432 Bremervörde · Germany
Phone: +49 (0)4761 886-63 or -68 · E-Mail: info@thomashilfen.de · www.thomashilfen.com
Generell informasjon:
Vær oppmerksom på følgende:
Fest alltid bilsetet som barnet sitter i med et trepunktsbelte som befinner seg i fartøyet. Barnesetets integrerte fempunktsbelte er IKKE sikkerhetsrelevant.
Egner seg for en kroppsvekt på opptil 50 kg:
Bilsetet RECARO Monza Reha har på grunnlag av ECE R 44/04 kravene bestått en overbelastningstest utført av Dekra i Dresden (Tyskland). RECARO Monza Reha er
dermed godkjent som setebelteinnretning for spesielle krav (”S”).
Du er trygg med RECARO Isofix (modell Seatfix):
Isofix er et internasjonalt, anerkjent festesystem for barneseter. I bilen finnes det tilsvarende Isofix-fester festet til karosseriet. Disse festene gjør det enkelt og raskt å feste et
barnesete med Isofix. Setet er dermed også godt sikret uten barn, og det er ikke lenger nødvendig å feste setet med bilens 3-punkts sikkerhetsbelte. Husk å kontrollere om
bilen din har Isofix-fester.
Funksjon / indikasjon
Bilsetet RECARO Monza Reha er utviklet for å transportere funksjonshemmede barn med blant annet følgende diagnoser i bil:
• Cerebral parese
• Hypotoni med ukjent opprinnelse
• Muskeldystro
• forskjellige andre syndromer
Dette bilsetet kjennetegnes av det skålformede designet og det tilhørende pelottesystemet. Ved hjelp av dette gir setet økt støtte mens man sitter trygt, stabilisering av
hodekontrollen og bekkenområdet, samt støtte/kontroll ved fotområdet.
Det er med andre ord lett å tilpasse RECARO Monza Reha i forhold til de individuelle behovene til funksjonshemmede barn.
Risikoer ved bruk / kontraindikasjoner
Det finnes ingen kjente risikoer / kontraindikasjoner.
Fempunkts sikkerhetsbelte
Vær oppmerksom på følgende:
Fempunktsbeltet sørger for at barnet sitter ordentlig i setet, det beskytter ikke barnet ved en ulykke. For å sikre barnet som sitter i setet må det alltid brukes et
trepunktsbelte som befinner seg i bilen.
Endring av beltelengden:
Dra i de løse beltebåndene for å få en kortere beltelengde og strammere belte. For å forlenge beltene vipper du stramme-/slakkemekanismen lett oppover mens du drar
beltet slik at du oppnår ønsket lengde.
I tillegg kan beltelengden ved behov forandres på seteryggen, ved hjelp av begge de fastskrudde beltefestene.
Beltets lukkemekanisme:
Trykk på den røde fordypningen i lukkemekanismen for å åpne denne. Skill deretter begge beltefestene fra hverandre. For å låse beltets lukkemekanisme fører du begge
de øvre beltefestene sammen igjen, for så å stikke disse inn på lukkemekanismens overside. Deretter presser du til beltet låses, dvs. til du hører et ”klikk”.
Beltepolstringens trekk er avtagbart og kan vaskes på inntil 30 °C i vaskemaskin. Vennligst åpne også glidelåsen på det nedre beltepolsteret for å enkelt kunne fjerne
trekket.
Figur 1a: Forandre beltets lengde Figur 1b: Åpne beltets lukkemekanisme (”klikk”)
Hodeputer (tilbehør) Artikkelnr: 845*
For å montere hodeputen i hodestøtten velges den høyeste posisjonen. Trekk trekket på puten over sidene på hodestøtten og fest det med en trykknapp øverst. På
undersiden festes putene med et elastisk bånd til hodestøtten.
Trekket er avtagbart (glidelås) og kan vaskes på inntil 30 °C i vaskemaskin.
Figur 2a: Fest putene Figur 2b: Festes under (a) og over (b)
* Sett av hodestøtte, bryststøtte og sidestøtter på sete.
Bryststøtte (tilbehør) Artikkelnr: 845*
Bryststøtten kan festes i ryggen ved hjelp av trykknapper og borrelås i tre forskjellige høyder. Begynn med å feste trykknappen. Ved å trykke på de fleecestripene som
finnes i ryggpartiet oppnår du bedre feste.
Trekket er avtagbart (glidelås) og kan vaskes på inntil 30 °C i vaskemaskin.
Figur 3a: Trykknapp Figur 3b: Borrelås
* Sett av hodestøtte, bryststøtte og sidestøtter på sete.

22
RECARO Monza Reha – Monterings- og bruksanvisning (tillegg)
Sidestøtter på sete (tilbehør) Artikkelnr: 845*
For å montere sideputene legges rygglenet vannrett. Trekk trekkene til sideputene over sidedelene på sitteflaten og fest dem bak med trykknappen.
Trekket er avtagbart (glidelås) og kan vaskes på inntil 30 °C i vaskemaskin.
Figur 4a: Trekk over putene Figur 4b: Trykknapp bak
* Sett av hodestøtte, bryststøtte og sidestøtter på sete.
Abuksjonsblokk (tilbehør) Artikkelnr: 807
Før montering av abuksjonsblokken løses umbrakoskruen foran på sitteflaten, som også holder det 5-punkt sikkerhetsbeltet. Fjern det nederste beltebåndet fra
sikkerhetsbeltet.
Sittedybden kan stilles inn via 2 umbrakoskruer på en skinne under abuksjonsblokken. Slik tilpasser du ønsket sittedybde før hele setet monteres.
Før abduksjonsblokken inn i det ferdige sporet under skumgummipolstringen på setet. Borehull og gjenger skal nå ligge over hverandre. Før du fester abuksjonsblokken,
må du huske på at det 5-punkts sikkerhetsbeltet også skal festes samtidig.
Hint: Når du fester abduksjonsklossen skal du passe på å ikke skru for hardt til slik at gjengene går i stykker.
Til monteringen trenger du den medfølgende 3 mm umbrakonøkkelen.
Trekket er avtagbart og kan vaskes på inntil 30 °C i vaskemaskin.
Figur 5a: Sett inn abuksjonsblokken Figur 5b: Regulering av sittedybde
Dreieplate med fotstøtteadapter (tilbehør) Artikkelnr: 820
Følg vår spesielle monteringsveiledning! Kan lastes ned fra internettadressen www.thomashilfen.com
Seatfix-kopling (for dreieplate) (tilbehør) Artikkelnr: 818
Følg vår spesielle monteringsveiledning! Kan lastes ned fra internettadressen www.thomashilfen.com
Stabiliseringsbøyle, bak (for dreieplate) (tilbehør) Artikkelnr: 819
Følg vår spesielle monteringsveiledning! Kan lastes ned fra internettadressen www.thomashilfen.com
Støttefot, foran (for dreieplate) (tilbehør) Artikkelnr: 817
Følg vår spesielle monteringsveiledning! Kan lastes ned fra internettadressen www.thomashilfen.com
Ryggstabilisatorer (tilbehør) Artikkelnr: 816
Ryggstabilisatorene forhindrer at ryggen faller sammen. Følg vår spesielle monteringsveiledning! Kan lastes ned fra internettadressen www.thomashilfen.com
Fotstøtte, kort, 12 cm (tilbehør) Artikkelnr: 806
Fotstøtte, lang, 18 cm (tilbehør) Artikkelnr: 805
Før monteringen av fotstøtten må begge beskyttelseshettene på den fremre undersiden av setet fjernes. Press stoppefjærene inn i skyvestengenes bakre ender, og skyv
rørene inn i åpningene til fjærene fester seg.
For å stabilisere fotstøtten på fartøyets gulv tilpasser du høyden på støttestengene ved å vri innover eller utover, slik at stengene får bakkekontakt (med gulvet). Fest
deretter støttestengene med stjernehåndtakene, for å unngå at disse vrir seg ut utilsiktet. Dette gjøres ved å dreie stjernegrepskruene så langt som mulig oppover, og ved å
stramme dem ordentlig.
Pass på:
Hvis det brukes en svingskive må fotstøtten festes i fotstøtteadapteren som tilhører denne. Sikre fotstøtten i dette tilfellet alltid med den stjerneskruen som er vedlagt
bruksanvisningen for å unngå at den faller av. Festet til dette (metallblokk med gjenger) finner du på fotstøtteadapterens venstre rør.
Legglengde:
Tilpassing av legglengden gjøres ved å stille inn høyden på fotstøtten. Dette gjøres ved å løsne begge fingerskruene, og ved å stramme disse tilstrekkelig igjen etterpå.
Fotvinkel:
Fest de fire skruene på fotstøttens underside (høyre og venstre side) for å kunne stille inn den ønskede fotvinkelen ved hjelp av skinnene. Til slutt må skruene skrus fast
igjen.
Vær oppmerksom på følgende: Fotstøtten kan ikke brukes sammen med setedybdeforlengelsen.
Anvisning: Dersom fotstøtten skal skrus fast til setet, vennligst bruk ”adapter til fotstøtten” (arikkelnr. 866).
Figur 6a: Beskyttelseshetter + innføring av fotstøtten Figur 6b: Tilpass høyden i forhold til kjøretøyet
Sittekile, til setets underside (tilbehør) Artikkelnr: 810
Sittekilen plasseres sentrert under bilsetet. Den høye kanten skal være forrest for å gi barnet en optimal hvilestilling.
Trekket er avtagbart (glidelås) og kan vaskes på inntil 30 °C i vaskemaskin.
Pass på:
Bruk av sittekile sammen med svingskiven fører til en betraktelig minskning av svingskivens funksjon. Vi anbefaler derfor ikke å bruke sittekile og svingskive samtidig.
Figur 7a: Sett setet oppå sittekilen Figur 7b: Endeposisjon

23
RECARO Monza Reha – Monterings- og bruksanvisning (tillegg)
Kilepute, innvendig (tilbehør) Artikkelnr: 809
Kileputen kan festes i tre ulike posisjoner på sitteflaten:
1. Du oppnår en aktiv sittestilling dersom kileputens høye side peker bakover.
2. Fest kileputen med den flate siden bakover dersom du ønsker en mer passiv og roligere sittestilling.
3. For å forkorte sittedybden eller for å få en større sittevinkel, kan kileputen også festes oppreist med den brede siden pekende nedover mot den bakre delen av
sitteflaten.
De to ytre polstringen som tilbyr ekstra beskyttelse festes på sidene med borrelås.
Trekket er avtagbart (glidelås) og kan vaskes på inntil 30 °C i vaskemaskin.
Figur 8a: Aktiv Figur 8b: Passiv Abb. 8c: Rygg Abb. 8d: Med sidepolstring
Sittedypdeforlengelse + 13 cm (tilbehør) Artikkelnr: 808
Før montering av sittedybdeforlengeren fjerner du begge beskyttelsesdekslene foran på setets underside. Trykk låsefjærene på undersiden av endene på skyvestengene og
skyv røret til det sitter riktig i åpningene.
Vær oppmerksom på følgende:
Setedybdeforlengelsen kan ikke brukes sammen med fotstøtten eller svingskiven.
Trekket er avtagbart og kan vaskes på inntil 30 °C i vaskemaskin.
Figur 9a: Fjern beskyttelsesdekslene Figur 9b: Trykk inn låsefjærene
Bord (tilbehør) Artikkelnr: 811
Skyv bordet på setets to sidedeler. Bordet festes på begge sider med borrelåser. Dra bordets borrelåser gjennom plastringene på setet / seteryggen (bekkenbeltet).
Trekket er avtagbart (glidelås) og kan vaskes på inntil 30 °C i vaskemaskin.
Figur 10a: Fest bordet Figur 10b: Fest borrelåsbeltene på setet

24
RECARO Monza Reha – Monterings- och bruksanvisning (komplettering)
RECARO Monza Reha – Monterings- och bruksanvisning
Ärade RECARO Monza Reha-användare,
för att hanteringen av ert nya barn-bilsäte ska vara säkert, praktiskt och bekvämt för er, och framförallt för barnet, vill vi att ni först läser denna monterings-och
bruksanvisning, samt den som följer med sätet.
Vänligen vänd er till er återförsäljare eller direkt till oss om ni fortfarande har några frågor eller problem efter att ni läst informationen.
Vår adress: Thomas Hilfen für Körperbehinderte GmbH & Co. Medico KG · Walkmühlenstraße 1 · D - 27432 Bremervörde · Germany
Phone: +49 (0)4761 886-63 or -68 · E-Mail: info@thomashilfen.de · www.thomashilfen.com
Allmänna tips
Vänligen observera:
säkra ALLTID först barnet i sätet med det 3-punktssäkerhetsbälte som finns i fordonet. Det 5-punkts säkerhetsbälte som är integrerat i barnsätet är INTE
säkerhetsrelevant.
Lämpligt för upp till 50 kg kroppsvikt:
Barn-bilsätet RECARO Monza Reha har klarat Dekras (Dresden) belastningstest i enlighet med riktlinjerna i ECE R 44/04. RECARO Monza Reha är därmed godkänt som
anordning för fasthållning enligt de speciella kraven „S“.
Extra säkerhet med RECARO Isofix (Modell Seatfix):
Isofix är ett internationellt normerat fastsättningssystem för barnstolar. På fordonssidan finns motsvarande Isofix-förankringar som hänger samman med karosseriet,
och dessa normerade fastsättningspunkter gör det enkelt och snabbt att sätta fast Isofix-stolar. Stolen sitter säkert i bilen även när barnet inte sitter i den, och fordonets
3-punktss äkerhetsbälte behövs inte längre för att fästa den. Kontrollera i förväg om din bil har en sådan Isofix-förankring.
Användningsområde / Indikation
Barn-bilsätet RECARO Monza Reha är avsett för transport i motorfordon av handikappade barn, med bl.a. följande sjukdomsbilder:
• Infantil cerebral pares
• Hypotonisyndrom med oklart ursprung
• Muskeldystro
• Olika syndromsjukdomar
Det här bilsätet kännetecknas av en skalformig utformning och ett system av dynor. Därigenom erbjuder denytterligare stöd och ett säkert sittläge, stabilisering av
huvudkontroll och stabilt säte i bäckenområdet, såväl som stöd / kontroll i fotområdet.
RECARO Monza Reha kan därför anpassas mycket väl till det handikappade barnets individuella behov.
Risker med användande / Kontraindikationer
Det föreligger inga kända risker med användande / kontraindikationer.
5-punkts positioneringsbälte
Vänligen observera:
5-punkts positioneringsbältet tjänar till positionering av barnet i bilsätet, och skyddar inte vid en olycka. För att säkra barnet i sätet måste alltid det 3-punkts
säkerhetsbälte som finns i bilen användas.
Ändring av bältets längd:
dra i de lösa bältesändarna, för att förkorta bältet och sätta fast det. För att förlänga bältet viker man det svarta spännet lätt uppåt och drar sedan bältet till önskad längd.
Dessutom kan bältets längd vid behov ändras med de båda bältesöglorna (fastskruvade) på ryggen.
Bälteslås:
För att öppna, tryck in den röda fördjupningen i låset. Dela sedan de båda övre bälteshållarna. För att stänga bältet för man samman de båda bälteshållarna igen, sticker
in dem i låset och trycker dem samman, tills man hör att de hakar fast med ett hörbart „klick“.
Bältesbrickans beklädnad (kardborrband) är avtagbart, och kan tvättas i maskin vid 30° C. Öppna även den nedre bältesbrickans kardborrband, för att lättare kunna ta av
beklädnaden.
Bild 1a: Ändra bältets längd Bild 1b: Öppna bälteslåset („Klick“)
Huvuddyna (tillbehör) Art.-Nr.: 845*
Ställ in stolens huvudstöd till högsta läget för att lättare kunna ställa in dynan. Dra dynans hölje över huvudstödets sida och sätt fast den uppe genom att trycka på
knappen. På undersidan sätts dynorna fast på huvudstödet med en gummiresår.
Överdraget är avtagbart (kardborrband) och kan tvättas i maskin vid 30° C.
Bild 2a: Dra av dynan Bild 2b: Sätt fast nertill (a) och upptill (b)
* Sats med huvuddyna,Thoraxdyna och stol-sidodyna.
Thoraxdyna (tillbehör) Art.-Nr.: 845*
Thoraxpdynor kan sättas fast till höger och vänster i ryggområdet i 3 olika höjder med knapptryck och kardborrband. Börja med knapptryck vid montering.
Genom att trycka på fleeceremsorna på stolsryggen får du en bättre fixering.
Överdraget är avtagbart (kardborrband) och kan tvättas i maskin vid 30° C.
Bild 3a: Knapptryck Bild 3b: Kardborrbandfastsättning
* Sats med huvuddyna,Thoraxdyna och stol-sidodyna.

25
RECARO Monza Reha – Monterings- och bruksanvisning (komplettering)
Stol-sidodyna (tillbehör) Art.-Nr.: 845*
Ställ in ryggstödet i vågrät position för att lättare montera sidodynorna. Dra sidodynornas höljen över stolsytans sidodelar, och sätt fast dem i det bakre området med ett
knapptryck.
Överdraget är avtagbart (kardborrband) och kan tvättas i maskin vid 30° C.
Bild 4a: Dra av dynan Bild 4b: Knapptryck baktill
* Sats med huvuddyna,Thoraxdyna och stol-sidodyna.
Abduktionsblock (tillbehör) Art.-Nr.: 807
Skruva loss den sexkantiga skruven, som även håller fast 5-punkts lägesbältet på den främre sittytan, innan montering av abduktionsblocket, och ta bort 5-punkts
lägesbältets undre bältesband.
Sittdjupet kan ställas in med hjälp av 2 sexkantiga skruvar som sitter på en skena under abduktionsblocket. Passa in barnets sittdjup före slutgiltig montering.
För in abduktionsblockets metallhållare i det färdiga utrymmet under stolens skumdyna, och haka fast den. Borrhålet och skruvfasningen måste nu ligga mitt för varandra.
Tänk på innan du skruvar fast abduktionsblocket, att 5-punkts lägesbältet ska sättas fast.
Obs: Se till att du inte drar åt skruven för hårt när du skruvar fast abduktionsblocket, så att inte gängan tar skada.
För monteringen krävs medföljande 3 mm sexkantsnyckel.
Överdraget är avtagbart och kan tvättas i maskin vid 30° C.
Bild 5a: Sätta i abduktionsblocketn Bild 5b: Inställning av djup
Monteringsplatta med fotstödsadapter (tillbehör) Art.-Nr.: 820
Observera vår särskilda monteringsanvisning! Download: www.thomashilfen.com
Seatfix-koppling (för monteringsplatta) (tillbehör) Art.-Nr.: 818
Observera vår särskilda monteringsanvisning! Download: www.thomashilfen.com
Stabiliseringsbygel, bakre (för monteringsplattan) (tillbehör) Art.-Nr.: 819
Observera vår särskilda monteringsanvisning! Download: www.thomashilfen.com
Stödfot, främre (för monteringsplattan) (tillbehör) Art.-Nr.: 817
Observera vår särskilda monteringsanvisning! Download: www.thomashilfen.com
Rygg-stabilisatorer (tillbehör) Art.-Nr.: 816
Rygg-stabilisatorerna förhindrar att ryggen sjunker ner. Observera vår särskilda monteringsanvisning! Download: www.thomashilfen.com
Fotstöd, kort 12 cm (tillbehör) Art.-Nr.: 806
Fotstöd, lång 18 cm (tillbehör) Art.-Nr.: 805
Ta bort de båda täckkåporna på sätets främre undersida innan montering av fotstödet. Tryck in stoppfjädrarna på skjutstångens backre ände, och skjut in rören tills de går
in i öppningarna.
För att göra fotstöden stabila på fordonets golv ska stödstångens höjd anpassas genom att vrida in resp. ut den, så att stången har markkontakt i fordonet. Lås därefter
stödstängerna genom stjärngreppen, för att förhindra att de vrids ur av misstag. Vrid stjärngreppsskruvarna så långt uppåt som möjligt, och dra åt ordentligt.
Varning:
vid användning av vridplatta upptagna i sin fotstödsadapter. Sätt i detta fall fotstöden mot att falla ut med den stjärnskruv som medföljer bruksanvisningen. För
uppmätning finns (metallblock med gänga) finns på fotstödsadapterns vänstra rör.
Underbenslängd:
inställning av underbenslängd sker genom att ställa in fotstödens höjd. För att göra detta lossar man de båda yttre skruvarna med räfflade huvuden, och dra sedan åt dem
tillräckligt hårt.
Fotvinkel:
Lossa de fyra skruvarna till höger och vänster på fotstödets undersida, för att ställa in den önskade fotvinkeln över skenorna. Dra sedan åt skruvarna igen.
Vänligen observera: Fotstöden kan inte användas tillsammans med förlängning av sätesdjupet.
Obs: Använd dessutom vår “Adapter för fotstöd“ (art.-nr 866) om fotstödet ska skruvas ihop med sittdelen.
Bild 6a: Föra in täckkåpor + stöd Bild 6b: Höjdjustering fordon
Sitskil, nere (tillbehör) Art.-Nr.: 810
Sitskilen positioneras i mitten under bilsätet. Den höga kanten befinner sig framtill, för att barnet ska få en optimal viloposition.
Överdraget är avtagbart (kardborrband) och kan tvättas i maskin vid 30° C.
Varning:
Användning av sitskil tillsammans med vridplattan inskränker dess funktion väsentligt. Vi rekommenderar därför inte samtidigt användande av sitskil och vridplatta.
Bild 7a: Sätta sitsen på sitskilen Bild 7b: Slutposition

26
RECARO Monza Reha – Monterings- och bruksanvisning (komplettering)
Sitskil, inre (tillbehör) Art.-Nr.: 809
Sitskilen (insida) kan sättas fast på sittytan i tre olika positioner:
1. En aktiv sitshållning erhålls genom att sätta fast sittkilen på sittytan med den höga kanten bakåt.
2. Sätt fast sitskilen med den plana sidan i det bakre området för en mer passiv sitsposition / viloposition.
3. För att minska sittdjupet eller för en ökad sittvinkel kan man sätta fast sitskilen upprätt med den breda sidan nedåt, på den bakre sittytan.
De två ytterdynorna sätts fast på sidorna för ytterligare skydd.
Överdraget är avtagbart (kardborrband) och kan tvättas i maskin vid 30° C.
Bild 8a: Aktiv Bild 8b: Passiv Bild 8c: Rygg Bild 8d: Med sidodynor
Stoldjupsförlängning + 13 cm (tillbehör) Art.-Nr.: 808
Ta bort de båda kåporna på stolens främre undersida före montering av sittdjupsförlängaren. Tryck in de båda fjädrarna undertill på skjutstångarna, och skjut stångarna
tills de passar in i öppningarna.
Vänligen observera:
Förlängning av sätesdjupet kann inte användas tillsammans med fotstöd eller vridplatta.
Överdraget är avtagbart och kan tvättas i maskin vid 30° C.
Bild 9a: Ta av kåporna Bild 9b: Trycka in fjädrarna
Bord (tillbehör) Art.-Nr.: 811
Skjut bordet på sitsytans båda sidodelar. Bordet fixeras på båda sidor med två kardborrband vardera. Dra bordets kardborrband genom plastringarna på sitsen /sätets rygg
(bäckenbälte).
Överdraget är avtagbart (kardborrband) och kan tvättas i maskin vid 30° C.
Bild 10a: Sätta fast bordet Bild 10b: Sätta fast bältet på sitsen

27
RECARO Monza Reha – Monterings- og brugsvejledning (tilføjelse)
RECARO Monza Reha – Monterings- og brugsvejledning
Kære RECARO Monza Reha-bruger,
For at håndteringen af din nye barne-autostol er sikker , praktisk og komfortabel for dig og især også for dit barn, læs venligst først denne monterings- og brugsvejledning
og den monterings- og brugsvejledning, som er vedlagt stolen.
Skulle du alligevel have spørgsmål eller problemer, henvend dig til din fagbutik eller direkte til os.
Vores adresse: Thomas Hilfen für Körperbehinderte GmbH & Co. Medico KG · Walkmühlenstraße 1 · D - 27432 Bremervörde · Germany
Phone: +49 (0)4761 886-63 or -68 · E-Mail: info@thomashilfen.de · www.thomashilfen.com
Generelle henvisninger
Bemærk venligst:
sikker ALTID dit barn med stolen med den i køretøjet tilstedeværende 3-punkts-sikkerhedssele. Den i barnestolen integrerede 5-punkts-positioneringssele er IKKE
relevant for sikkerheden.
Egnet til op til 50 kg kropsvægt:
Barneautostolen RECARO Monza Reha har hos Dekra (Dresden) bestået en overbelastingstest på basis af ECE R 44/04 kravene. RECARO Monza Reha er derfor tilladt som
tilbageholdelsesindretning til specielle krav ”S”.
Vær særlig sikker med RECARO Isofix (model Seatfix):
Isofix er et specielt norm certifiseret sikkerhedssystem til børnesæder. Osofix forankres direkte med køretøjets karosseri. I fastgørelses punktet kan autosæder med Isofix
let og hurtigt forankres. Sædets er også uden barn sikret i bilen og skal ikke fastgøres med bilens tre punkts selen. Afprøv inden om din bil har et Isofix-forankring.
Formålsbestemmelse / indikation
Barne-autostolen RECARO Monza Reha er konstrueret til transport af handicappede børn i køretøjer med bl. a. følgende sygdomsbilleder:
• infantil cerebralparese
• hypotonisyndrom af uklar genese
• muskeldystrophi
• de mest forskellige syndromsygdomme
Denne autostol udmærker sig ved sin skalformede udformning og det tilstedeværende pelottesystem. Herigennem byder den på ekstra støtte, så barnet sidder sikkert,
stabilisering af hovedkontrollen og stabilitet i bækkenområdet, samt støtte / kontrol i fodområdet.
RECARO Monza Reha er derfor nemt at tilpasse til handicappede børns individuelle behov.
Risici ved anvendelse / kontraindikationer
Der er ingen risici ved anvendelse / kontraindikationer bekendt.
5-punkts-positioneringssele
Bemærk venligst:
5-punkts-positioneringsselen tjener til positionering af barnet i autostolen og beskytter det ikke ved en trafikulykke. Til sikring af barnet i stolen er det altid nødvendigt
at bruge den i bilen tilstedeværende 3-punkts-sikkerhedssele.
Ændring af selens længde:
træk i de løse selebånd for at gøre selen kortere og for at spænde dem. For at gøre selen længere, vip det sorte spænde let opad og træk selen til den ønskede længde.
Desuden kan selens længde ved behov ændres via de to seleøskner (skruet fast) på ryggen.
Selens lukning:
For at åbne selen, tryk på den røde fordybning i lukningen. Adskil derefter de to øvre seleholdere. For at lukke selen, fører du de to seleholdere sammen igen, stikker
disse i lukningen foroven og trykker denne sammen, til den lukkes med et hørbart klik.
Seleskiltets betræk (lynlås) kan tages af og vaskes ved op til 30° C i vaskemaskinen. Åben venligst også lynlåsen ved det nedre seleskilt, for at kunne tage betrækket af.
Ill. 1a: Skift selelængde Ill. 1b: Åben selens lukning (klik)
Hovedpelotter (tilbehør) Art. nr.: 845*
For nemmest at kunne montere hovedpelotterne skal sædets sættes i den højeste position. Træk betrækket (pelotterne) henover hovedstøtternes sidedele og fastgør dem
med trykknappen.
Betrækket er aftageligt (lynlås) og kan vaskes i maskinen ved op til 30° C.
Ill. 2a: Pelotter trækkes over sidedele Ill. 2b: Fastgøres nede (a) og oppe (b)
* Sett af hovedepelotter, thoraxpelotter og sædesidepelotter
Thoraxpelotter (tilbehør) Art. nr.: 845*
Thoraxpelotterne kan i højre og venstre side af ryggen fastgøres med trykknapper og velcro i tre forskellige højder. Begynd anbringelsen med trykknapperne.
Ved at trykke på sædets velcrostriber sættes pelotterne endnu bedre fast.
Betrækket er aftageligt (lynlås) og kan vaskes i maskinen ved op til 30° C.
Ill. 3a: Trykknapper Ill. 3b: Velcro
* Sett af hovedepelotter, thoraxpelotter og sædesidepelotter

28
RECARO Monza Reha – Monterings- og brugsvejledning (tilføjelse)
Sædesidepelotter (tilbehør) Art. nr.: 845*
For nemmest at kunne anbringe sædesidepelotterne stilles ryglænet i vandret position. Træk sidepelottens betræk over siddefladen og fastgør dem bagerst med
trykknapperne.
Betrækket er aftageligt (lynlås) og kan vaskes i maskinen ved op til 30° C.
Ill. 4a: Pelotter Ill. 4b: Trykknapper bagerst
* Sett af hovedepelotter, thoraxpelotter og sædesidepelotter
Abduktionsblok (tilbehør) Art. nr.: 807
Løsn før monteringen af abduktionsblokken imbusskruen på den forreste del af siddefladen, som også holder 5-punkts-positioneringsselen og fjern den nederste del af af
selen på 5-punkts-positioneringsselen.
Siddedybden kan via 2 imbusskruer indstilles på en metal skinne under abduktionsblokken. Tilpas siddedybden inden den endegyld ige montage.
Før metalmodtageren på abduktionsblokken i åbningen under sædets skumstofpolster og sæt den i hak. Det borede hul og vinde skal ligge over hinanden. Husk på at når
abduktionsblokken skrues fast skal 5 punkts selen også fastgøres igen.
Henvisning: Vær opmærksom på når abdoktionsblokken fastskrues, at den kun skal skrues lettere fast. Hvis der overskrues kan det ødelægge gevindet.
Til monteringen skal de 3mm imbusskruer bruges.
Betrækket er aftageligt (snor) og kan vaskes i maskinen ved op til 30° C.
Ill. 5a: Abduktionsblokken sættes ind. Ill. 5b: Dybdeindstilling
Drejeplade med fodstøtteadapter (tilbehør) Art. nr.: 820
Se vores særskilte monteringsvejledning! Kan downloades på www.thomashilfen.com
Seatfix-tilslutning (til drejeplade) (tilbehør) Art. nr.: 818
Se vores særskilte monteringsvejledning! Kan downloades på www.thomashilfen.com
Stabiliseringsbøjle, bagved (til drejeplade) (tilbehør) Art. nr.: 819
Se vores særskilte monteringsvejledning! Kan downloades på www.thomashilfen.com
Støttefod, foran (til drejeplade) (tilbehør) Art. nr.: 817
Se vores særskilte monteringsvejledning! Kan downloades på www.thomashilfen.com
Rygstabilisatorer (tilbehør) Art. nr.: 816
Rygstabilisatorerne forhindrer at ryggen falder sammen. Se vores særskilte monteringsvejledning! Kan downloades på www.thomashilfen.com
Fodstøtte, kort 12 cm (tilbehør) Art. nr.: 806
Fodstøtte, lang 18 cm (tilbehør) Art. nr.: 805
Fjern inden montering af fodstøtten de to afdækningskapper foran på sædets underside. Tryk rastefjedrene i den bagerste ende af skydestangen ind og skub rørene i bund
i åbningerne.
Til stabilisering af fodstøtten i bunden af køretøjet tilpasses støttestangens højde ved at dreje den ind eller ud på en sådan måde, at stængerne får kontakt med køretøjets
bund. Konter derefter støttestængerne vha. stjernegrebene, for at undgå en uønsket uddrejning. Drej dertil stjernegrebs-skruerne så langt som muligt op og spænd dem
fast.
OBS:
ved brug af drejepladen optages fodstøtten i dens fodstøtteadapter. Sikker i så fald generelt fodstøtten med den ved betjeningsvejledningen vedlagte stjerneskrue mod at
falde ud. Optagelsen hertil (metalblok med gevind) finder du på fodstøtteadapterens venstre rør.
Underlårslængde:
Justering af underlårslængden sker via fodstøttens højdejustering. Dertil løsner du de to ydre fingerskruer og spænder dem efterfølgende fast igen.
Fodvinkel:
løsn de fire skruer til højre og venstre på fodstøttens underside for at indstille den ønskede fodvinkel via skinnerne. Spænd efterfølgende skruerne fast igen.
Bemærk venligst: fodstøtten kan ikke benyttes sammen med sædedybdeforlængelsen.
Bemærk: Hvis fodstøtten skal skrues fast på sædet, er der brug for et ”adapter til fodstøtte“ (art. nr. 866).
Ill. 6a: Indfør afdækningskappen + støtten Ill. 6b: Højdetilpasning til køretøj
Siddekile, forneden (tilbehør) Art. nr.: 810
Siddekilen anbringes midt under autostolen. Den høje kant er forest, for at opnå en optimal hvilestilling til barnet.
Betrækket er aftageligt (lynlås) og kan vaskes i maskinen ved op til 30° C.
OBS:
brug af siddekile sammen med drejepladen begrænser dennes funktion betydelig. Vi anbefaler derfor ikke at bruge siddekile og drejeplade samtidig.
Ill. 7a: Sæt stol på siddekile Ill. 7b: Slutposition

29
RECARO Monza Reha – Monterings- og brugsvejledning (tilføjelse)
Siddekile, inde (tilbehør) Art. nr.:809
Siddekilen (inde) kan fastgøres i tre forskellige positioner på sædet.
1. Du kan opnå en højere siddehældning, hvis den højeste del af siddekilen vender bagtil.
2. Fastgør siddekilen med den flade side i den bagerste del for passiv/ hvile position.
3. For at forkorte siddedybden eller opnå en større siddevinkel kan kilen også stå bagerst med den brede side nederst og sættes fast med velcro.
De to yderste polstrer for sættes fast for yderligere beskyttelse.
Betrækket er aftageligt (lynlås) og kan vaskes i maskinen ved op til 30° C.
Ill. 8a: Aktiv Ill. 8b: Passiv Abb. 8c: Ryggen Abb. 8d: Med sidepolster
Siddedybdeforlængelse + 13 cm (tilbehør) Art. nr.:808
Fjern før montering af siddedybdeforlængelsen de to afdækningsnknapper på den forreste nederste del af sædet. Tryk fjederen på nederste og bagerste del af stangen ind
og skub røret ind til åbningen af søjlen.
Bemærk venligst:
sædedybdeforlængelsen kan ikke bruges sammen med en fodstøtte eller drejeplade.
Betrækket er aftageligt (snor) og kan vaskes i maskinen ved op til 30° C.
Ill. 9a: Afdækningsknapper fjernes Ill. 9b: Fjederne trykkes ind
Bord (tilbehør) Art. nr.: 811
Skyd bordet på siddefladens to sidedele. Bordet fikseres på hver side med hhv. to burrebånd. Træk bordets burrebånd gennem sædets kunststofringe / stoleryg
(bækkensele).
Betrækket er aftageligt (lynlås) og kan vaskes i maskinen ved op til 30° C.
Ill. 10a: Sæt bordet på Ill. 10b: Fastgør selen til sædet

30
RECARO Monza Reha – Asennus- ja käyttöohje (täydennys)
RECARO Monza Reha – Asennus- ja käyttöohje
Hyvä RECARO Monza Reha -istuimen käyttäjä,
jotta uuden turvaistuimen käsittely ja käyttö sujuvat turvallisesti, käytännöllisesi ja mukavasti Sinun ja erityisesti lapsesi kannalta, lue ensin tämä sekä istuimessa kiinni
oleva asennus- ja käyttöohje.
Jos Sinulla ohjeiden lukemisen jälkeen on vielä kysyttävää tai istuimeen liittyviä ongelmia, ota yhteyttä alan ammattiliikkeeseen tai suoraan meihin.
Osoitteemme: Thomas Hilfen für Körperbehinderte GmbH & Co. Medico KG · Walkmühlenstraße 1 · D - 27432 Bremervörde · Germany
Phone: +49 (0)4761 886-63 or -68 · E-Mail: info@thomashilfen.de · www.thomashilfen.com
Yleisiä ohjeita
Huom!
Kiinnitä istuin ja lapsi AINA ajoneuvon omilla kolmipistevöillä. Turvaistuimeen integroidulla 5-pisteasettamisvyöllä EI ole turvallisuuden kannalta merkitystä.
Istuin soveltuu korkeintaan 50 kg:n painoisille lapsille:
RECARO Monza Reha noudattaa ECE 044/04 -määräyksiä ja on menestyksekkäästi läpäissyt Dekran (Dresden) ylikuormitustestin. RECARO Monza Reha on siksi
hyväksytty tukiväline (erikoisvaatimukset ”S”).
Turvallisesti RECARO Isofix (malli Seatfix) istuimen kanssa:
Isofix on kansainvälisesti normitettu lasten turvaistuinten kiinnitysjärjestelmä. Ajoneuvossa on tällöin oltava vastaavat, koriin integroidut Isofix-kiinnityspisteet. Näiden
normitettujen kiinnityspisteiden avulla Isofixturvaistuimen voi kiinnittää helposti ja nopeasti. Näin istuin on myös tyhjänä turvallisesti kiinnitetty, eikä sitä tarvitse enää
kiinnittää lisäksi auton omilla 3-pistevöillä. Tarkista etukäteen, onko autossasi Isofix-kiinnityspisteet.
Käyttötarkoitus / kenelle istuin soveltuu
Lasten RECARO Monza Reha -turvaistuin on suunniteltu liikuntavammaisten lasten kuljettamiseen moottoriajoneuvoissa. Liikuntavammaisella tarkoitetaan lasta, jolla on
esim. jokin seuraavista sairauksista:
• aivohalvaus
• selvittämättömästä syystä johtuva hypotonia
• lihasdystroa
• muut syndroomat
Tämä turvaistuin on tavallisista istuimista poiketen kuperanmallinen ja siinä on erityinen tukijärjestelmä. Siksi se tukee lasta paremmin: lapsi istuu turvallisemmin ja
hänen päänsä pysyy vakaammin paikoillaan. Lisäksi lonkanalue sekä jalat ovat paremmin tuettuina.
RECARO Monza Reha -istuinta voi mainiosti mukauttaa yksilöllisesti vastaamaan lapsen tarpeita.
Istuimen käyttöön liittyvät riskit
Mitään istuimeen käyttöön liittyviä riskejä ei tunneta.
5-pisteasettamisvyö
Huom!
Istuimen 5-pistevöiden tehtävä on pitää lapsi oikeassa asennossa istuimessa, eivätkä ne suojaa lasta onnettomuuden sattuessa. Jotta lapsi on turvallisesti istuimessa,
istuin ja lapsi on aina kiinnitettävä ajoneuvon omilla turvavöillä.
Vyön pituuden muuttaminen:
Lyhentääksesi vyötä vedä vapaista vyönpäistä ja sen jälkeen kiristä vyö. Kun haluat pidentää vyötä, kallista mustaa kiristyssolkea kevyesti ylöspäin ja vedä sen jälkeen
vyötä haluamasi pituiseksi.
Vyön pituutta voi tarpeen vaatiessa lisätä tai vähentää myös muuttamalla istuimen takana olevia vyösilmukoita (ruuvattu).
Vyölukko:
Avataksesi vyön paina lukon punaista, syvennettyä kohtaa. Sen jälkeen erota molemmat, ylemmät vyökiinnittimet toisistaan. Vyö suljetaan niin, että molemmat ylemmät
vyökiinnittimet liitetään jälleen yhteen ja työnnetään yhtä aikaa ylhäällä olevaan lukkoon samalla painaen osia yhteen, kunnes vyö loksahtaa kuuluvasti (klik-ääni) kiinni.
Kankaisen vyösuojuksen (vetoketjullinen) voi irrottaa ja pestä koneessa korkeintaan 30 asteessa. Myös alempi vyösuojus on avattava, jotta kankaan saa irrotettua.
Kuva 1a: Vyön pituuden muuttaminen Kuva 1b: Vyön lukituksen avaaminen (”klik”)
Päätuet (lisävaruste) Tuotenro.: 845*
Jotta päätukien kiinnittäminen olisi helpompaa, istuimen säädettävä päänoja kannattaa siirtää ylimpään asentoonsa. Vedä tukien suojukset päänojan sivuosien yli ja
kiinnitä suojat ylhäältä painonapin avulla. Tuet kiinnitetään alapuolelta kuminauhojen avulla päänojaan.
Suojuksen (vetoketjullinen) voi irrottaa ja pestä koneessa korkeintaan 30 asteessa.
Kuva 2a: Tukien kiinnittäminen Kuva 2b: Kiinnitys alhaalta (a) ja ylhäältä (b)
* Päätuki-, rintakehätuki- ja istuinosan sivutukisarjat.
Rintakehätuet (lisävaruste) Tuotenro.: 845*
Rintakehän tuet voidaan kiinnittää selkäosan vasemmalta ja oikealta puolelta painonapilla ja tarralla 3 eri korkeuteen. Aloita kiinnitys sulkemalla painonappi.
Painamalla istuimen selkäpuolella olevia fleeceraitoja saa aikaan pitävämmän kiinnityksen.
Suojuksen (vetoketjullinen) voi irrottaa ja pestä koneessa korkeintaan 30 asteessa.
Kuva 3a: Painonappi Kuva 3b: Tarrakiinnitys
* Päätuki-, rintakehätuki- ja istuinosan sivutukisarjat.

31
RECARO Monza Reha – Asennus- ja käyttöohje (täydennys)
Istuinosan sivutuet (lisävaruste) Tuotenro.: 845*
Jotta sivutukien kiinnitys olisi helpompaa, aseta selkänoja vaakatasoon. Vedä sivutukien suojukset istumaosan sivuosien yli ja kiinnitä suojat takaosasta painonapin avulla.
Suojuksen (vetoketjullinen) voi irrottaa ja pestä koneessa korkeintaan 30 asteessa.
Kuva 4a: Tukien kiinnittäminen Kuva 4b: Takaosan painonappi
* Päätuki-, rintakehätuki- ja istuinosan sivutukisarjat.
Loitonnusosa (lisävaruste) Tuotenro.: 807
Irrota ennen loitonnusosan asentamista 5-pistevöitä pitävä kuusiokoloruuvi istuinosan etupuolelta ja irrota alempi 5-pisteasettamisvyön vyöhihna.
Istumakorkeutta voidaan säätää 2 kuusiokoloruuvin avulla yhtä kiskoa loitonnusosaa alemmaksi. Sovita istumakorkeus lapsen kokoon ennen lopullista asentamista.
Vie loitonnusosan metallipidike etukäteen tehtyyn uraan istuimen vaahtomuovipehmusteen alla ja kiinnitä pidike. Reiän ja kierteen tulisi nyt olla päällekkäin. Huomioi
ennen loitonnusosan kiinni ruuvaamista, että kiinnität takaisin myös 5-pisteasettamisvyön.
Huom: Haarakiilaa kiristettäessä, väännä ruuvia vain kevyesti välttääksesi kierteen vaurioitumista.
Asennusta varten tarvitset istuimen mukana tulevan 3 mm:n kuusiokoloavaimen.
Suojuksen voi irrottaa ja pestä koneessa korkeintaan 30 asteessa.
Kuva 5a: Loitonnusosan asettaminen Kuva 5b: Korkeuden säätö
Kääntölevy ja jalkatuen adapteri (lisävaruste) Tuotenro.: 820
Noudata asennusohjeita! Ohjeet voi ladata osoitteesta www.thomashilfen.com
Seatfix-kiinnitys (kääntölevyä varten) (lisävaruste) Tuotenro.: 818
Noudata asennusohjeita! Ohjeet voi ladata osoitteesta www.thomashilfen.com
Tukisanka, takana (kääntölevyä varten) (lisävaruste) Tuotenro.: 819
Noudata asennusohjeita! Ohjeet voi ladata osoitteesta www.thomashilfen.com
Tukijalka, edessä (kääntölevyä varten) (lisävaruste) Tuotenro.: 817
Noudata asennusohjeita! Ohjeet voi ladata osoitteesta www.thomashilfen.com
Selän vahvistajat (lisävaruste) Tuotenro.: 816
Selän vahvistajat ehkäisevät selän lihasten heikkenemistä. Noudata asennusohjeita! Ohjeet voi ladata osoitteesta www.thomashilfen.com
Lyhyet jalkatuet, 12 cm (lisävaruste) Tuotenro.: 806
Pitkät jalkatuet, 18 cm (lisävaruste) Tuotenro.: 805
Irrota ennen jalkatukien asennusta molemmat edessä istuimen alapuolella olevat suojaholkit. Paina sisäänpäin lukitusjousia kiskotankojen takapäädyissä ja työnnä putkia
aukon vasteeseen asti.
Jalkatukien pysymiseksi vakaasti ajoneuvon lattiaa vasten sovita tukitankojen korkeus sisään- ja ulospäin kääntämällä niin, että tangot osuvat ajoneuvon lattiaan.
Varmista sen jälkeen tukitangot kiristimellä, jotteivät ne vahingossa löysty. Käännä kiristintä mahdollisimman tiukasti ja mahdollisimman pitkälle ylöspäin.
Huom:
kääntölevyä käytettäessä jalkatuet ovat jalkatukisovittimissa. Varmista tässä tapauksessa istuimen mukana tulevilla kiristysruuveilla käyttöohjeen mukaisesti jalkatukien
paikoillaan pysyminen. Tätä varten jalkatukisovittimen vasemmassa putkessa on kierteinen metalliosa.
Jalkakulma:
Kun jalkatukien alapuolella vasemmalla ja oikealla olevat 4 ruuvia löysätään, voidaan asettaa haluttu jalkakulma kiskojen avulla. Tämän jälkeen ruuvit on jälleen
kiristettävä.
Tärkeää!
Varmista istuimen mukana tulevilla kiristysruuveilla käyttöohjeen mukaisesti jalkatukien paikoillaan pysyminen. Tätä varten jalkatukisovittimen vasemmassa putkessa on
kierteinen metalliosa.
Huom! Jalkatukia ei voi käyttää yhdessä istumakorkeusjatkeen kanssa.
Huomautus: Jos jalkatuki ruuvataan kiinni istuimeen, käytä lisäksi ”sovitin jalkatukea varten“ (tuote-nro. 866).
Kuva 6a: Tukien liittäminen + holkit Kuva 6b: Korkeuden säätö ajoneuvon mukaisesti
Alaistuinkiila (lisävaruste) Tuotenro.: 810
Istuinkiila asetetaan turvaistuimen alle keskelle. Korkea reuna on edessä, jotta lapsi saa parhaimman mahdollisen lepoasennon.
Suojuksen (vetoketjullinen) voi irrottaa ja pestä koneessa korkeintaan 30 asteessa.
Huom:
Istuinkiilan käyttäminen yhdessä kääntölevyn kanssa heikentää huomattavasti näiden toimintaa. Emme siksi suosittele istuinkiilan ja kääntölevyn käyttämistä
samanaikaisesti.
Kuva 7a: Istuimen asettaminen istuinkiilaan Kuva 7b: Lopullinen asento

32
RECARO Monza Reha – Asennus- ja käyttöohje (täydennys)
Sisäistuinkiila (lisävaruste) Tuotenro.: 809
Sisäistuinkiila voidaan kiinnittää 3 eri asentoon istuinosaan:
1. Aktiivinen istuinasento saavutetaan, kun istuinkiila kiinnitetään istuinosaan niin, että korkea puoli on takana.
2. Kiinnitä tarran avulla istuinkiila niin, että matala puoli on taempana, jos haluat, että lapsi on passiivisemmassa asennossa / lepoasennossa.
3. Jos istumakorkeutta halutaan pienentää tai istumakulmaa kasvattaa, istuinkiila voidaan myös kiinnittää pystysuoraan istuinosan takaosaan niin, että leveä sivu osoittaa
alaspäin.
Kaksi ulkopehmustetta kiinnitetään tarroilla lisäsuojaksi.
Suojuksen (vetoketjullinen) voi irrottaa ja pestä koneessa korkeintaan 30 asteessa.
Kuva 8a: Aktiivinen Kuva 8b: Passiivinen Kuva 8c: Selkä Kuva 8d: Sivupehmusteet
Istumakorkeusjatke + 13 cm (lisävaruste) Tuotenro.: 808
Irrota ennen istumakorkeusjatkeen asennusta molemmat edessä istuimen alapuolella olevat suojaholkit. Paina sisäänpäin lukitusjousia alhaalla kiskotankojen
takapäädyissä ja työnnä putkia aukon vasteeseen asti.
Huom:
Istumakorkeusjatketta ei voida käyttää yhdessä jalkatukien tai kääntölevyn kanssa.
Suojuksen voi irrottaa ja pestä koneessa korkeintaan 30 asteessa.
Kuva 9a: Suojaholkkien irrottaminen Kuva 9b: Lukitusjousten painaminen sisään
Pöytä (lisävaruste) Tuotenro.: 811
Työnnä pöytää istuinosan molempiin sivuosiin. Pöytä kiinnitetään molemmilta puolilta kahden tarranauhan avulla. Vedä tarranauhat pöydästä istuimen / istuimen
selkäosan (lantiovyö) muovirenkaiden läpi.
Suojuksen (vetoketjullinen) voi irrottaa ja pestä koneessa korkeintaan 30 asteessa.
Kuva 10a: Pöydän asettaminen Kuva 10b: Istuimen vyön kiinnittäminen

33
RECARO Monza Reha – Instrukcja montażu i użytkowania (uzupełnienie)
RECARO Monza Reha – Instrukcja montażu i użytkowania
Szanowni Użytkownicy fotelika samochodowego RECARO Monza Reha,
aby użytkowanie Waszego nowego fotelika samochodowego było dla Państwa, a w szczególności dla dziecka bezpieczne, praktyczne i wygodne, należy najpierw
przeczytać niniejszą instrukcję oraz dołączoną do fotelika instrukcję montażu i użytkowania.
Jeśli mimo tego mielibyście Państwo pytania lub wystąpiłyby problemy, prosimy o zwrócenie się do właściwego sklepu specjalistycznego lub bezpośrednio do nas.
Nasz adres: Thomas Hilfen für Körperbehinderte GmbH & Co. Medico KG · Walkmühlenstraße 1 · D - 27432 Bremervörde · Germany
Phone: +49 (0)4761 886-63 or -68 · E-Mail: info@thomashilfen.de · www.thomashilfen.com
Wskazówki ogólne
Należy pamiętać:
Zapinać dziecko wraz z fotelikiem ZAWSZE za pomocą 3-punktowego pasa bezpieczeństwa znajdującego się w samochodzie. Zintegrowany w foteliku
samochodowym 5-punktowy pas bezpieczeństwa NIE jest istotny dla bezpieczeństwa.
Odpowiedni dla dzieci o wadze do 50 kg:
Fotelik samochodowy RECARO Monza Reha przeszedł pomyślnie testy przeciążenia przeprowadzone przez Dekra (Drezno) zgodnie z wymaganiami normy ECE R
44/04. Fotelik samochodowy RECARO Monza Reha został tym samym dopuszczony jako „urządzenie zabezpieczające pasażerów zgodnie z wymaganiami specjalnymi
(„S“)”
Przygotowanie na każdą ewentualność RECARO Isox (model Seatx):
Isox jest międzynarodowym znormalizowanym system mocowania fotelików samochodowych. W samochodach występują odpowiednie mocowania Isox połączone
na stałe z nadwoziem. Do tych znormalizowanych punktów można łatwo i szybko przymocować foteliki dziecięce wyposażone w system mocowania Isox. W ten
sposób fotelik, także bez siedzącego w nim dziecka, jest dobrze zabezpieczony w samochodzie i nie trzeba go dodatkowo mocować za pomocą samochodowego
3-punktowego pasa bezpieczeństwa. Należy sprawdzić, czy samochód jest wyposażony w mocowanie Isox.
Przeznaczenie / Wskazania
Fotelik samochodowy rehabilitacyjny RECARO Monza Reha został zaprojektowany do przewożenia w samochodach dzieci niepełnosprawnych między innymi z
następującymi jednostkami chorobowymi:
• dziecięcym porażeniem mózgowym
• zespołem obniżonego napięcia mięśniowego o nieustalonej przyczynie
• dystroą mięśni
• najróżniejszymi zespołami chorobowymi
Ten fotelik samochodowy odznacza się kubełkowym kształtem i posiadanym systemem poduszek. Dzięki temu zapewnia on dodatkowe podparcie podczas
bezpiecznego siedzenia, stabilizację i kontrolę trzymania głowy i stabilne osadzenie w obszarze bioder, jak również podparcie / kontrolę w obszarze nóg.
Dlatego też fotelik samochodowy RECARO Monza Reha można bardzo dobrze dostosować do indywidualnych potrzeb dzieci niepełnosprawnych.
Zagrożenia wynikające zastosowania / Przeciwwskazania
Nie są znane żadne zagrożenia wynikające z zastosowania / przeciwwskazania.
5-punktowy pas pozycjonujący
Należy pamiętać:
5-punktowy pas pozycjonujący służy do trzymania pozycji dziecka w foteliku samochodowym i nie chroni go w razie wypadku. Do zabezpieczenia dziecka w foteliku
samochodowym należy używać zawsze istniejącego w samochodzie 3-punktowego pasa bezpieczeństwa.
Zmiana długości pasa:
aby skrócić i naprężyć pasy należy pociągnąć za luźne taśmy pasa. Aby wydłużyć pasy należy odchylić czarną skuwkę lekko do góry a następnie wyciągnąć pas na
żądaną długość.
Ponadto długość pasa można zmienić w razie potrzeby za pomocą obydwu uchwytów pasa (przykręconych) na oparciu.
Zamek pasa:
Celem otwarcia nacisnąć na czerwone zagłębienie zamka. Następnie wyjąć obydwa zaczepy pasa. Celem zamknięcia pasa złączyć razem obydwa górne zaczepy,
włożyć je do zamka i nacisnąć je razem dopóki nie rozlegnie się słyszalne kliknięcie zamka.
Pokrowiec osłony pasa można zdejmować (Zamek błyskawiczny) i prać w pralce w temperaturze do 30°C. Należy również rozpiąć zamek błyskawiczny na dolnej
osłonie pasa, aby móc wygodnie zdjąć pokrowiec.
Rys. 1a: Zmiana długości pasa Rys. 1b: Otwieranie zamka pasa („Kliknięcie“)
Poduszki boczne głowy (wyposażenie dodatkowe) Nr art.: 845*
W celu łatwiejszego założenia bocznych poduszek głowy, zagłówek fotelika podnieść w najwyższe położenie. Obicia poduszek bocznych przeciągnąć przez elementy
boczne zagłówka i przymocować je na górze guzikiem. Na dole poduszki mocuje się gumką do zagłówka.
Pokrowiec jest zdejmowany (Zamek błyskawiczny) i można go prać w pralce w temperaturze do 30°C.
Rys. 2a: Naciąganie poduszek Rys. 2b: Mocowanie na dole (a) i na dole (b)
* Zestaw poduszek bocznych głowy, klatki piersiowej i siedziska.
Poduszki boczne klatki piersiowej (wyposażenie dodatkowe) Nr art.:845*
Poduszki boczne klatki piersiowej można przymocować z lewej i z prawej strony w okolicy pleców za pomocą guzików i przylepca w 3 różnych wysokościach.
Mocowanie zacząć od zapięcia guzika.
Najlepsze mocowanie można osiągnąć poprzez pociągnięcia z występujące z tyłu fotelika taśmy.
Pokrowiec jest zdejmowany (Zamek błyskawiczny) i można go prać w pralce w temperaturze do 30°C.
Rys. 3a: Guzik Rys. 3b: Mocowanie na przylepiec
* Zestaw poduszek bocznych głowy, klatki piersiowej i siedziska.

34
RECARO Monza Reha – Instrukcja montażu i użytkowania (uzupełnienie)
Poduszki boczne siedziska (wyposażenie dodatkowe) Nr art.: 845*
W celu łatwiejszego założenia poduszek bocznych oparcie ustawić w poziomie. Obicia poduszek bocznych przeciągnąć przez elementy boczne siedziska i
przymocować je z tyłu guzikiem.
Pokrowiec jest zdejmowany (Zamek błyskawiczny) i można go prać w pralce w temperaturze do 30°C.
Rys. 4a: Naciąganie poduszek Rys. 4b: Guzik z tyłu
* Zestaw poduszek bocznych głowy, klatki piersiowej i siedziska.
Klin korekcyjny bioder (wyposażenie dodatkowe) Nr art.: 807
Przed przystąpieniem do montażu klina korekcyjnego bioder odkręcić śrubę imbusową w części przedniej siedziska, przytrzymującą również pas 5-punktowy i odłączyć
pas dolny.
Głębokość siedziska można regulować za pomocą 2 śrub imbusowych na szynie pod wkładem korekcyjnym do bioder. Należy więc przed ostatecznym montażem
dostosować do dziecka głębokość siedziska.
Metalowe mocowanie klina korekcyjnego bioder wsunąć w przeznaczoną do tego szczelinę pod obiciem piankowym fotelika i zaczepić je. Otwór i gwint muszą się
nakładać. Przed przykręceniem klina korekcyjnego do bioder trzeba mieć na uwadze, że należy również ponownie przymocować pas 5-punktowy.
Wskazówka: Montując klin odwodzący należy dokręcić śrubkę z odpowiednią siłą tak, aby nie doprowadzić do przekręcenia gwintu.
Do przeprowadzenia montażu potrzebny będzie klucz imbusowy 3 mm, który jest dołączony do fotelika.
Pokrowiec jest zdejmowany i można go prać w pralce w temperaturze do 30°C.
Rys. 5a: Zakładanie klina korekcyjnego bioder Rys. 5b: Regulacja głębokości
Płyta obrotowa z adapterem na podnóżek (wyposażenie dodatkowe) Nr art.: 820
Prosimy o zwrócenie uwagi na instrukcję montażu, której ściągnięcie możliwe jest na stronie www.thomashilfen.com
Element łączący Seatx (do płyty obrotowej) (wyposażenie dodatkowe) Nr art.: 818
Prosimy o zwrócenie uwagi na instrukcję montażu, której ściągnięcie możliwe jest na stronie www.thomashilfen.com
Pałąk stabilizujący, tylny (do płyty obrotowej) (wyposażenie dodatkowe) Nr art.: 819
Prosimy o zwrócenie uwagi na instrukcję montażu, której ściągnięcie możliwe jest na stronie www.thomashilfen.com
Podpora, przednia (do płyty obrotowej) (wyposażenie dodatkowe) Nr art.: 817
Prosimy o zwrócenie uwagi na instrukcję montażu, której ściągnięcie możliwe jest na stronie www.thomashilfen.com
Stabilizatory oparcia (wyposażenie dodatkowe) Nr art.: 816
Stabilizatory oparcia zapobiegają opadnięcie oparcia. Prosimy o zwrócenie uwagi na instrukcję montażu, której ściągnięcie możliwe jest na stronie
www.thomashilfen.com
Podnóżek krótki 12 cm (wyposażenie dodatkowe) Nr art.: 806
Podnóżek krótki 18 cm (wyposażenie dodatkowe) Nr art.: 805
Przed montażem podnóżka należy zdjąć obydwie pokrywki na przedniej spodniej stronie siedziska fotelika. Wcisnąć sprężyny ustalające na tylnych końcach prętów
przesuwnych i wsunąć rurki do otworów aż do oporu.
Celem oparcia podnóżka na podłodze samochodu należy dostosować wysokość prętów wsporczych poprzez ich wkręcanie i wykręcanie tak, by pręty opierały się o
podłogę samochodu. Następnie unieruchomić pręty wsporcze za pomocą pokręteł gwiazdowych, aby zapobiec ich niezamierzonemu wykręceniu. Przekręcić w tym
celu śruby z pokrętłami gwiazdowymi jak najdalej do góry i je mocno dokręcić.
Uwaga:
W przypadku zastosowania płyty obrotowej podnóżek mocowany jest do jego adaptera. W tym wypadku należy zasadniczo zabezpieczyć podnóżek przed
wypadnięciem za pomocą śruby z pokrętłem gwiazdowym, która jest załączona do instrukcji obsługi. Potrzebne do tego zamocowanie (Blok metalowy z gwintem)
znajduje się na lewej rurce adaptera podpory nóg.
Długość nóg:
Ustawienie długości nóg odbywa się poprzez przestawienie wysokości podnóżka. W tym celu należy poluzować obydwie zewnętrzne śruby radełkowane, a po
przestawieniu dokręcić je ponownie dostatecznie mocno.
Nachylenie stóp:
Poluzować cztery śruby z prawej i lewej strony na spodzie podnóżka, aby nastawić żądany kąt nachylenia stóp nad szynami. Następnie dokręcić z powrotem śruby.
Należy pamiętać: Podnóżka nie można używać razem z przedłużeniem głębokości fotelika.
Wskazówka: Jeżeli podnóżek ma być przykręcony na stałe do siedzenia, należy dodatkowo zastosować „adapter podnóżka” (nr art. 866).
Rys. 6a: Zakładanie pokrywek + podnóżka Rys. 6b: Dostosowanie do wysokości w samochodzie
Podkładka klinowa fotelika, pod spodem (wyposażenie dodatkowe) Nr art.: 810
Podkładkę klinową fotelika podkłada się w środku pod fotelik. Wysoka krawędź winna znajdować się z przodu, aby uzyskać optymalną pozycję spoczynkową dla
dziecka.
Pokrowiec jest zdejmowany (Zamek błyskawiczny) i można go prać w pralce w temperaturze do 30°C.
Uwaga:
Użycie podkładki klinowej razem z płytą obrotową ogranicza znacznie jej funkcję. Dlatego też zalecamy, aby nie używać równocześnie podkładki klinowej i płyty
obrotowej.
Rys. 7a: Nakładanie fotelika na podkładkę klinową Rys. 7b: Pozycja krańcowa

35
RECARO Monza Reha – Instrukcja montażu i użytkowania (uzupełnienie)
Podkładka, wewnętrzna (wyposażenie dodatkowe) Nr art.: 809
Podkładkę (wewnątrz) można przymocować na siedzisku w 3 różnych położeniach:
1. Poprzez położenie podkładki wyższą stroną skierowaną w tył i przyczepienie przylepcem można uzyskać aktywną pozycje siedzenia.
2. Poprzez położenie podkładki płaską stroną do tyłu i przyklejenie na przylepiec można uzyskać bardziej nieruchomą pozycję / pozycję spoczynkową.
3. W celu skrócenia głębokości siedziska lub zwiększenia kąta nachylenia siedzenia, podstawkę można przykleić na tylnym siedzeniu prosto szerszą stroną w dół.
W celu uzyskania dodatkowej ochrony, z boku przykleja się dwa obicia zewnętrzne.
Pokrowiec jest zdejmowany (Zamek błyskawiczny) i można go prać w pralce w temperaturze do 30°C.
Rys. 8a: Aktywne Rys. 8b: Spoczynkowe Rys. 8c: Leżenie Rys. 8d: Z obiciami bocznymi
Przedłużenie głębokości siedziska +13 cm (wyposażenie dodatkowe) Nr art.: 808
Przed przystąpieniem do montażu przedłużenia głębokości siedziska zdjąć obie przykrywki z przedniej części spodu fotelika. Wcisnąć sprężyny ustalające na dole w
tylnych końcówkach drążków przesuwnych, a następnie wsunąć rurki do oporu w otwory.
Należy pamiętać:
Przedłużenie głębokości fotelika nie może być używane razem z podporą nóg lub płytą obrotową.
Pokrowiec jest zdejmowany i można go prać w pralce w temperaturze do 30°C.
Rys. 9a: Odczepianie przykrywek Rys. 9b: Wciskanie sprężyn
Stolik (wyposażenie dodatkowe) Nr art.: 811
Nasunąć stolik na obydwa oparcia boczne powierzchni siedziska. Stół mocowany jest po każdej stronie za pomocą dwóch taśm zapięcia na rzepy. Przełożyć taśmy
zapięcia na rzepy stołu przez pierścienie z tworzywa sztucznego na foteliku oparciu fotelika (pas biodrowy).
Pokrowiec jest zdejmowany (Zamek błyskawiczny) i można go prać w pralce w temperaturze do 30°C.
Rys. 10a: Nakładanie stolika Rys. 10b: Mocowanie pasów na foteliku

36
RECARO Monza Reha – Oδηγίες Συναρμολόγησης και Χρήσης (Συμπλήρωμα)
RECARO Monza Reha – Οδηγίες Συναρμολόγησης και Χρήσης
Αγαπητέ χρήστη του RECARO Monza Reha,
Για να γίνει η χρησιμοποίηση του νέου παιδικού σας καθίσματος αυτοκινήτου ασφαλής, άνετη και πρακτική, τόσο για εσάς όσο και για το παιδί σας,
παρακαλούμε πρώτα να διαβάσετε αυτές καθώς και τις δίπλα στο κάθισμα οδηγίες συναρμολόγησης και χρήσης.
Αν εξακολουθείτε να έχετε ερωτήσεις ή ανακύπτουν προβλήματα, παρακαλούμε να απευθυνθείτε στον ειδικό έμπορο ή κατ’ ευθείαν σε μας.
Η διεύθυνσή μας: Thomas Hilfen für Körperbehinderte GmbH & Co. Medico KG · Walkmühlenstraße 1 · D - 27432 Bremervörde · Germany
Phone: +49 (0)4761 886-63 or -68 · E-Mail: info@thomashilfen.de · www.thomashilfen.com
Γενικές Υποδείξεις
Παρακαλούμε προσέξτε:
Ασφαλίστε το παιδί σας με το κάθισμα πάντα με την ζώνη τριών σημείων που βρίσκεται στο όχημα. Η ενσωματωμένη στο παιδικό κάθισμα ζώνη
τοποθέτησης 5 σημείων δεν αφορά την ασφάλεια.
Κατάλληλο για βάρος μέχρι 50 κιλά:
Το RECARO Monza Reha έχει υποστεί επιτυχώς δοκιμασία φόρτισης από την Decra (Δρέσδη) σύμφωνα και με τις κοινοτικές απαιτήσεις της ΕCE R 44/04. Έτσι το
RECARO Monza Reha επιτρέπεται για ειδικές συνθήκες κατηγορίας „S”.
Mείνετε ασφαλείς με το RECARO Isofix (μοντέλο Seatfix):
Το Isofix είναι ένα διεθνώς στανταρνταρισμένο σύστημα καθήλωσης για παιδικά καθίσματα αυτοκινήτου. Αντίστοιχα σημεία στερέωσης του Isofix αρμόζουν
στερεά στο σκελετό του οχήματος. Παιδικά καθίσματα αυτοκινήτου γρήγορα και εύκολα μπορούν να στερεωθούν σε αυτά τα προτυπωμένα σημεία στερέωσης
με το Isofix. Έτσι το κάθισμα ακόμα και χωρίς το παιδί είναι ασφαλές στη θέση του και χωρίς την ανάγκη να κρατηθεί με τη ζώνη ασφαλείας τριών σημείων.
Παρακαλούμε να ελέγξετε εκ των προτέρων αν το όχημά σας είναι εφοδιασμένο με ένα σύστημα στερέωσης Isofix.
Σκοπός / Ενδείξεις
Το παιδικό κάθισμα RECARO Monza Reha έχει συλληφθεί για τη μεταφορά σε οχήματα παιδιών με ειδικές ανάγκες και με τις ακόλουθες κλινικές εικόνες:
• Παιδική Εγκεφαλική Παράλυση
• Σύνδρομο Υποτονίας Ασαφούς Προελεύσεως
• Μυϊκή Δυστροφία
• Διάφορα Κλινικά Σύνδρομα
Αυτό το παιδικό κάθισμα διακρίνεται για την κελυφωτή του διαμόρφωση και το σύστημα νάρθηκά του. Παρέχει λοιπόν επιπλέον υποστήριξη κατά το ασφαλές
κάθισμα, σταθεροποίηση των σημείων ελέγχου της κεφαλής και σταθερότητα στην περιοχή της κοιλιάς, όπως επίσης και υποστήριξη στην περιοχή των ποδών.
Το κάθισμα RECARO Monza Reha μπορεί λοιπόν εύκολα να προσαρμοστεί στις ιδιαίτερες απαιτήσεις παιδιών με ειδικές ανάγκες.
Κίνδυνοι κατά τη Χρήση / Αντενδείξεις
Δεν υπάρχουν γνωστές αντενδείξεις ή κίνδυνοι κατά τη χρήση.
Ζώνη Τοποθέτησης 5 σημείων
Παρακαλούμε προσέξτε:
H Ζώνη Τοποθέτησης 5 σημείων χρησιμεύει για την τοποθέτηση του παιδιού στο κάθισμα του αυτοκινήτου και δεν προστατεύει το παιδί σε περίπτωση
ατυχήματος. Για ασφάλεια του παιδιού πρέπει πάντα να χρησιμοποιείται η διαθέσιμη στο αυτοκίνητο ζώνη τριών σημείων.
Αλλαγή του μήκους της ζώνης:
Τραβήξτε τα χαλαρά λουριά της ζώνης για να ελαττώσετε το μήκος και να ασφαλίσετε τη ζώνη. Για να μεγαλώσετε το μήκος της ζώνης φέρτε την μαύρη πόρπη
τάσης προς τα πάνω κι τραβήξτε τη ζώνη στο επιθυμητό μήκος. Επιπρόσθετα μπορεί σε περίπτωση ανάγκης το μήκος της ζώνης να τροποποιηθεί από τα στη
ράχη βιδωμένα σημεία της ζώνης.
Ασφάλιση της ζώνης:
Πιέστε στην κόκκινη εμβάθυνση της ασφάλισης. Ξεχωρίστε μετά τα δύο πάνω κρατήματα της ζώνης . Για να κλείσετε τη ζώνη φέρτε τα δύο κρατήματα πάλι
μαζί, βάλτε τα πάνω στην ασφάλιση και πιέστε μέχρι που να ακουστεί χαρακτηριστικό „κλικ“.
Η επένδυση της ασπίδας της ζώνης αφαιρείται και μπορεί να πλυθεί στο πλυντήριο μέχρι 30° C. Παρακαλούμε ανοίξτε και το φερμουάρ στο κάτω μέρος της
ασπίδας της ζώνης για να αφαιρεθεί καλά το ύφασμα.
Εικ. 1α: Αλλαγή του μήκους της ζώνης Εικ. 1β: Άνοιγμα τησ ζώνης („Κλικ“)
Υποστήριγμα κεφαλής (προσκέφαλο) (Αξεσουάρ) Αντ. Νο: 845*
Για ευκολότερη τοποθέτηση των στηριγμάτων της κεφαλής προσαρμόστε το προσκέφαλο του καθίσματος στην υψηλότερη δυνατή θέση. Τραβήξτε τα
καλύμματα των στηριγμάτων πάνω από τα πλάγια του προσκεφάλου και συνδέστε τα στην κορυφή με την αγκράφα. Στο κατώτερο τμήμα τα στηρίγματα
στερεώνονται στο προσκέφαλο με ελαστική ταινία.
Η επένδυση μπορεί να αφαιρεθεί (φερμουάρ) και να πλυθεί στο πλυντήριο μέχρι τους 30° C.
Εικ. 2α: Τοποθέτηση των στηριγμάτων Εικ. 2β: Ασφάλιση πάνω (α) και κάτω (β)
* Σύνολο στηριγμάτων κεφαλής, κορμού και πλαγίων στηριγμάτων καθίσματος.
Στηρίγματα κορμού (Αξεσουάρ) Αντ. Νο: 845*
Τα πλάγια στηρίγματα του κορμού μπορούν να ασφαλιστούν σε 3 διαφορετικά ύψη, δεξιά και αριστερά στην περιοχή της πλάτης, με αγκράφες και Velcro.
Αρχίστε τοποθετώντας τις αγκράφες.
Τα στηρίγματα ασφαλίζονται καλύτερα αν πιέσετε επί των ταινιών Velcro στη ράχη του καθίσματος.
Η επένδυση μπορεί να αφαιρεθεί (φερμουάρ) και να πλυθεί στο πλυντήριο μέχρι τους 30° C.
Εικ. 3α: Αγκράφα Εικ. 3β: Velcro
* Σύνολο στηριγμάτων κεφαλής, κορμού και πλαγίων στηριγμάτων καθίσματος.

37
RECARO Monza Reha – Oδηγίες Συναρμολόγησης και Χρήσης (Συμπλήρωμα)
Πλάγια στηρίγματα του καθίσματος (Αξεσουάρ) Αντ. Νο: 845*
Για μεγαλύτερη διευκόλυνση της προσαρμογής των πλάγιων στηριγμάτων φέρετε την πλάτη του καθίσματος σε οριζόντια θέση. Τραβήξτε τα καλύμματα των
πλαγίων στηριγμάτων πάνω από τα πλάγια του καθίσματος και στερεώστε στο πίσω μέρος με την αγκράφα.
Η επένδυση μπορεί να αφαιρεθεί (φερμουάρ) και να πλυθεί στο πλυντήριο μέχρι τους 30° C.
Εικ. 4α: Στήριγμα προς τα πάνω Εικ. 4β: Αγκράφα στο πίσω μέρος
* Σύνολο στηριγμάτων κεφαλής, κορμού και πλαγίων στηριγμάτων καθίσματος.
Αναστολέας απαγωγής (Αξεσουάρ) Αντ. Νο: 807
Πριν τοποθετήσετε τον αναστολέα απαγωγής, χαλαρώστε τη βίδα Allen στο μπροστινό τμήμα του καθίσματος που επίσης κρατά την ζώνη τοποθέτησης 5
σημείων και αφαιρέστε το κάτω λουρί της ζώνης τοποθέτησης 5 σημείων.
Προσαρμόστε το βάθος του καθίσματος με 2 βίδες Allen σε μια ράβδο κάτω από τον αναστολέα απαγωγής. Πριν την τελική συναρμολόγηση θα πρέπει να
προσαρμόσετε το βάθος του καθίσματος στο παιδί.
Εισάγετε τον μεταλλικό χαλινό του αναστολέα απαγωγής στην προκατασκευασμένη σχισμή κάτω από την επένδυση αφρού του καθίσματος και γαντζώστε εκεί.
Η διανοιγμένη οπή και το σπείρωμα θα πρέπει τώρα να βρίσκονται το ένα πάνω από το άλλο. Θυμηθείτε να αντικαταστήσετε τη ζώνη τοποθέτησης 5 σημείων
πριν στερεώσετε τον αναστολέα απαγωγής στη θέση του.
ΠΡΟΣΟΧΗ: ΟΤΑΝ ΣΦΙΓΓΕΤΕ ΤΟ ΔΙΑΧΩΡΙΣΤΙΚΟ ΣΚΕΛΩΝ,ΣΙΓΟΥΡΕΥΤΕΙΤΕ ΟΤΙ ΤΟ ΒΙΔΩΝΕΤΕ ΧΑΛΑΡΑ,ΓΙΑ ΝΑ ΑΠΟΦΥΓΕΤΕ ΤΗΝ ΥΠΕΡΒΟΛΙΚΗ ΠΕΡΙΣΤΡΟΦΗ ΤΟΥ
ΠΕΡΤΣΙΝΙΟΥ.
Για την εγκατάσταση θα χρειαστείτε το εγκλειόμενο κλειδί Allen των 3 mm.
Η επένδυση μπορεί να αφαιρεθεί και να πλυθεί στο πλυντήριο μέχρι τους 30° C.
Εικ. 5α: Τοποθέτηση του αναστολέα απαγωγής Εικ. 5β: Προσαρμογή του βάθους
Περιστρεφόμενη πλάκα με προσαρμογέα στηρίγματος ποδιών (Αξεσουάρ) Αντ. Νο: 820
Παρακαλώ προσέξτε τις ξεχωριστές οδηγίες στις προσαρμογές! Προβείτε στην ιστοσελίδα μας www.thomashilfen.com
Σύνδεση Seatfix (για την περιστρεφόμενη πλάκα) (Αξεσουάρ) Αντ. Νο: 818
Παρακαλώ προσέξτε τις ξεχωριστές οδηγίες στις προσαρμογές! Προβείτε στην ιστοσελίδα μας www.thomashilfen.com
Βραχίονας σταθεροποίησης, πίσω (για περιστρεφόμενη πλάκα) (Αξεσουάρ) Αντ. Νο: 819
Παρακαλώ προσέξτε τις ξεχωριστές οδηγίες στις προσαρμογές! Προβείτε στην ιστοσελίδα μας www.thomashilfen.com
Πόδι στήριγμα μπροστά (για περιστρεφόμενη πλάκα) (Αξεσουάρ) Αντ. Νο: 817
Παρακαλώ προσέξτε τις ξεχωριστές οδηγίες στις προσαρμογές! Προβείτε στην ιστοσελίδα μας www.thomashilfen.com
Σταθεροποιητές πλάτης (Αξεσουάρ) Αντ. Νο: 816
Σταθεροποιητές πλάτης (αποτρέπει την κλίση της πλάτης προς τα πίσω). Παρακαλώ προσέξτε τις ξεχωριστές οδηγίες στις προσαρμογές! Προβείτε στην
ιστοσελίδα μας www.thomashilfen.com
Υποπόδιο, κοντό 12 cm (Αξεσουάρ) Αντ. Νο: 806
Υποπόδιο, μακρύ 18 cm (Αξεσουάρ) Αντ. Νο: 805
Απομακρύνετε πριν το μοντάρισμα του υποποδίου και τις δύο τάπες από την πρόσθια κάτω μεριά του καθίσματος. Πιέστε τις ασφάλειες στο πίσω άκρο των
ράβδων ολίσθησης και ωθήστε τους σωλήνες μέχρι να έλθουν στα ανοίγματα.
Για να σταθεροποιήσετε το υποπόδιο στο έδαφος του οχήματος, προσαρμόστε το ύψος των ράβδων του υποποδίου, γυρίζοντάς τες προς τα μέσα ή προς τα
έξω, ώστε οι ράβδοι να ακουμπάνε στο έδαφος του οχήματος. Τελικά ασφαλίστε τις ράβδους με τις αστεροειδείς εμπλοκές για να εμποδίσετε περιστροφή προς
τα έξω. Περιστρέψτε τις αστεροειδείς εμπλοκές όσο το δυνατόν πιο πολύ προς τα πάνω και στερεώστε τις καλά.
Προσοχή:
Χρησιμοποιώντας τον περιστρεφόμενο δίσκο το υποπόδιο εμπλέκεται στον προσαρμογέα υποποδίου του δίσκου. Ασφαλίστε σε αυτή την περίπτωση το
υποπόδιο από πτώση με την αστεροειδή βίδα που έρχεται μαζί με τις οδηγίες χρήσης. Τη σχετική φωτογραφία (μεταλλικό μπλοκ με νήμα) θα βρείτε στον
αριστερό σωλήνα του προσαρμογέα υποποδίου.
Μήκος Κάτω Άκρων:
Η προσαρμογή του μήκους των κάτω άκρων γίνεται με την προσαρμογή ύψους του υποποδίου. Έτσι χαλαρώστε και τις δύο εξωτερικές πριτσινωτές βίδες και
μετά τραβήξτε τις ξανά μαζί στερεά.
Γωνία των ποδιών:
Χαλαρώστε δεξιά και αριστερά στην κάτω επιφάνεια του υποποδίου τις τέσσερεις βίδες για να καθορίσετε την επιθυμητή γωνία των ποδιών πάνω από τις
ράβδους. Μετά ξαναστερεώστε τις βίδες.
Παρακαλούμε προσέξτε: Το υποπόδιο δεν μπορεί να χρησιμοποιηθεί μαζί με την επέκταση βάθους του καθίσματος.
Υπόδειξη: Εάν θέλετε να βιδωθεί το στήριγμα των ποδιών σταθερά στο κάθισμα, παρακαλούμε να χρησιμοποιήσετε επιπροσθέτως τον „προσαρμογέα για το
στήριγμα ποδιών“ (αρ.είδους 866).
Εικ. 6α: Τάπες + Εισαγωγή υποποδίου Εικ. 6β: Προσαρμογή στο ύψος οχήματος

38
RECARO Monza Reha – Oδηγίες Συναρμολόγησης και Χρήσης (Συμπλήρωμα)
Σφήνα, κάτω (Αξεσουάρ) Αντ. Νο: 810
Η σφήνα του καθίσματος τοποθετείται κάτω από το κάθισμα του οχήματος. Η ψηλή επιφάνεια τοποθετείται μπροστά, ώστε να εξασφαλίζεται η θέση
ανάπαυσης του παιδιού.
Η επένδυση μπορεί να αφαιρεθεί (φερμουάρ) και να πλυθεί στο πλυντήριο μέχρι τους 30° C.
Προσοχή:
Χρήση της σφήνας του καθίσματος μαζί με τον περιστρεφόμενο δίσκο περιορίζει σημαντικά τη λειτουργικότητα και των δύο. Δεν συνιστούμε λοιπόν την
ταυτόχρονη χρήση τους.
Εικ. 7α: Τοποθέτηση καθίσματος πάνω στη σφήνα Εικ. 7β: Τελική θέση
Σφήνα καθίσματος, εσωτερική (Αξεσουάρ) Αντ. Νο: 809
H σφήνα (εσωτερικά) μπορεί να προσαρμοστεί στο κάθισμα σε 3 διαφορετικές θέσεις:
1. Μια ενεργός στάση επιτυγχάνεται με την τοποθέτηση της σφήνας με την υψηλή πλευρά προς τα πίσω και στερέωση σε αυτή τη θέση.
2. Προσαρμόστε την σφήνα με την επίπεδη πλευρά προς τα πίσω για μια στάση πιό παθητική / ανάπαυσης.
3. Για να μικρύνετε το βάθος του καθίσματος ή για μεγαλύτερη γωνία καθίσματος μπορείτε να βάλετε την σφήνα πίσω από το κάθισμα σε ορθία θέση, με το
πλατύ μέρος προς τα κάτω.
Για επιπλέον προστασία τα δύο εξωτερικά μαξιλάρια εφαρμόζονται στα πλάγια.
Η επένδυση μπορεί να αφαιρεθεί (φερμουάρ) και να πλυθεί στο πλυντήριο μέχρι τους 30° C.
Εικ. 8α: Ενεργητική Εικ. 8β: Παθητική στάση Εικ. 8γ: Πλάτη Εικ. 8δ: Mε πλάγια μαξιλάρια
Ενίσχυση βάθους του καθίσματος +13 εκατοστά (Αξεσουάρ) Αντ. Νο: 808
Aφαιρέστε τις δύο τάπες από την προσθία κάτω πλευρά του καθίσματος πριν τοποθετήσετε την ενίσχυση βάθους καθίσματος. Πιέστε τα ελατήρια κρατήματος
στην πίσω μεριά των ράβδων ολίσθησης και ωθήστε τους σωλήνες στα ανοίγματα μέχρι που να σταματήσουν.
Παρακαλούμε προσέξτε:
Η προσαρμογή βάθους του καθίσματος δεν μπορεί χρησιμοποιηθεί με υποπόδιο ή με περιστρεφόμενο δίσκο.
Η επένδυση μπορεί να αφαιρεθεί και να πλυθεί στο πλυντήριο μέχρι τους 30° C.
Εικ. 9α: Αφαιρέστε τις τάπες Εικ. 9β: Ωθήστε τα ελατήρια κρατήματος
Τραπέζι (Αξεσουάρ) Αντ. Νο: 811
Κυλήστε το τραπέζι στα δύο πλάγια τμήματα της επιφάνειας του καθίσματος. Το τραπέζι στερεώνεται στις δύο πλευρές με δύο ταινίες προσκόλλησης. Τραβήξτε
τις ταινίες από το τραπέζι δια των δακτυλίων από συνθετικό υλικό στο κάθισμα / ράχη καθίσματος (Ζώνη κοιλιάς).
Η επένδυση μπορεί να αφαιρεθεί (φερμουάρ) και να πλυθεί στο πλυντήριο μέχρι τους 30° C.
Εικ. 10α: Έκπτυξη τραπεζιού Εικ. 10β: Ασφάλιση ζώνης στο κάθισμα


Item code: 95566, status: 09/2011, subject to technical alterations
Member of the International
Support Association for the
Rehabilitation of Children and Youths e.V.
Thomas Hilfen für Körperbehinderte GmbH & Co. Medico KG
Walkmühlenstraße 1 · D - 27432 Bremervörde · Germany
Phone: +49 (0) 47 61 / 88 60 · Fax: +49 (0) 47 61 / 8 86-19
E-Mail: info@thomashilfen.de · www.thomashilfen.com
 Loading...