

Thomashilfen tRide, EASyS, Swifty, EASyS Modular, EASyS Advantage Assembly Instructions Manual
...
Jastučići za grudni koš, fleksibilni s prsnim remenom
Uputa za montažu – Pribora
Poduszki na klatkę piersiową, elastyczne z pasem piersiowym
Instrukcja montażu – Osprzęt
Rintakehätuet, joustavalla vyöllä
Asennusohje – Lisätarvike
Thoraxpelotter, fleksibel med brystbælte
Montage-vejledning – Tilbehør
Bröstkorgsstöd, mjukt med bröstsele
Monteringsanvisning – Tillbehör
Sidestøtter, fleksible med brystbelte
Monteringsanvisning – Tilbehør
Thoraxpelotten, flexibel met borstfixatie
Montage handleiding – Accessoires
Supporti del busto, flessibili con cinghia pettorale
Istruzioni di montaggio – Accessori
Apoios para o tórax, flexíveis com cinto para o peito
Instruções de montagem – Acessórios
Soporte torácico, flexible con cinturón de pecho
Instrucciones de montaje – Accesorios
Cales-tronc latéraux, flexibles avec sangle thoracique
Notice de montage – Accessoires
Lateral trunk supports, flexible with chest belt
Assembly instructions – Accessory
Thoraxpelotten, flexibel mit Brustgurt
Montageanleitung – Zubehör
tRide · EASyS · EASyS Modular · Swifty

2
Thoraxpelotten, flexibel mit Brustgurt Art.-Nr.: 6633
Das Rückenpolster verfügt über zwei lange senkrechte Schlitze. Durch diese Schlitze
werden die Thoraxpelotten geführt, um sie am Rücken befestigen zu können. Das Polster der
Thoraxpelotten muss auch während der Montage befestigt bleiben. Das lose Polsterende an der
Innenseite der Pelotten kann jedoch zur einfacheren Montage hochgeklappt werden. (Abb. 1)
Die Thoraxpelotten durch den Spalt im Rückenpolster schieben. Der äußere Teil des
Rückenpolsters liegt jeweils unter der Pelotte, während der mittlere Teil des Rückenpolsters
über der Pelotte sitzt. (Abb. 2)
Eine Schraube durch den oberen Schlitz der Thoraxpelotte und den gewünschten Längsschlitz
in der Rückenlehne führen. Die Verbindung mit einer Sterngriffmutter sichern. Diesen Schritt
mit dem zweiten Schlitz der Thoraxpelotte wiederholen. Wichtig ist, dass die obere Schraube
zunächst nur leicht angezogen wird. Dies erleichtert das Anziehen der unteren Schraube.
(Abb. 3)
Die Thoraxpelotten in die gewünschte Position bringen und beide Schrauben fest anziehen.
Das lose Ende des Thoraxpelottenbezugs wird unter den mittleren Teil des Rückenpolsters
gelegt. (Abb. 4)
Die Pelotten können durch vorsichtiges Biegen individuell angepasst / verformt werden. Den
Brustgurt mit dem Clip-Verschluss schließen. Die Gurtlänge kann an beiden Seiten individuell
eingestellt werden.
21
43
3
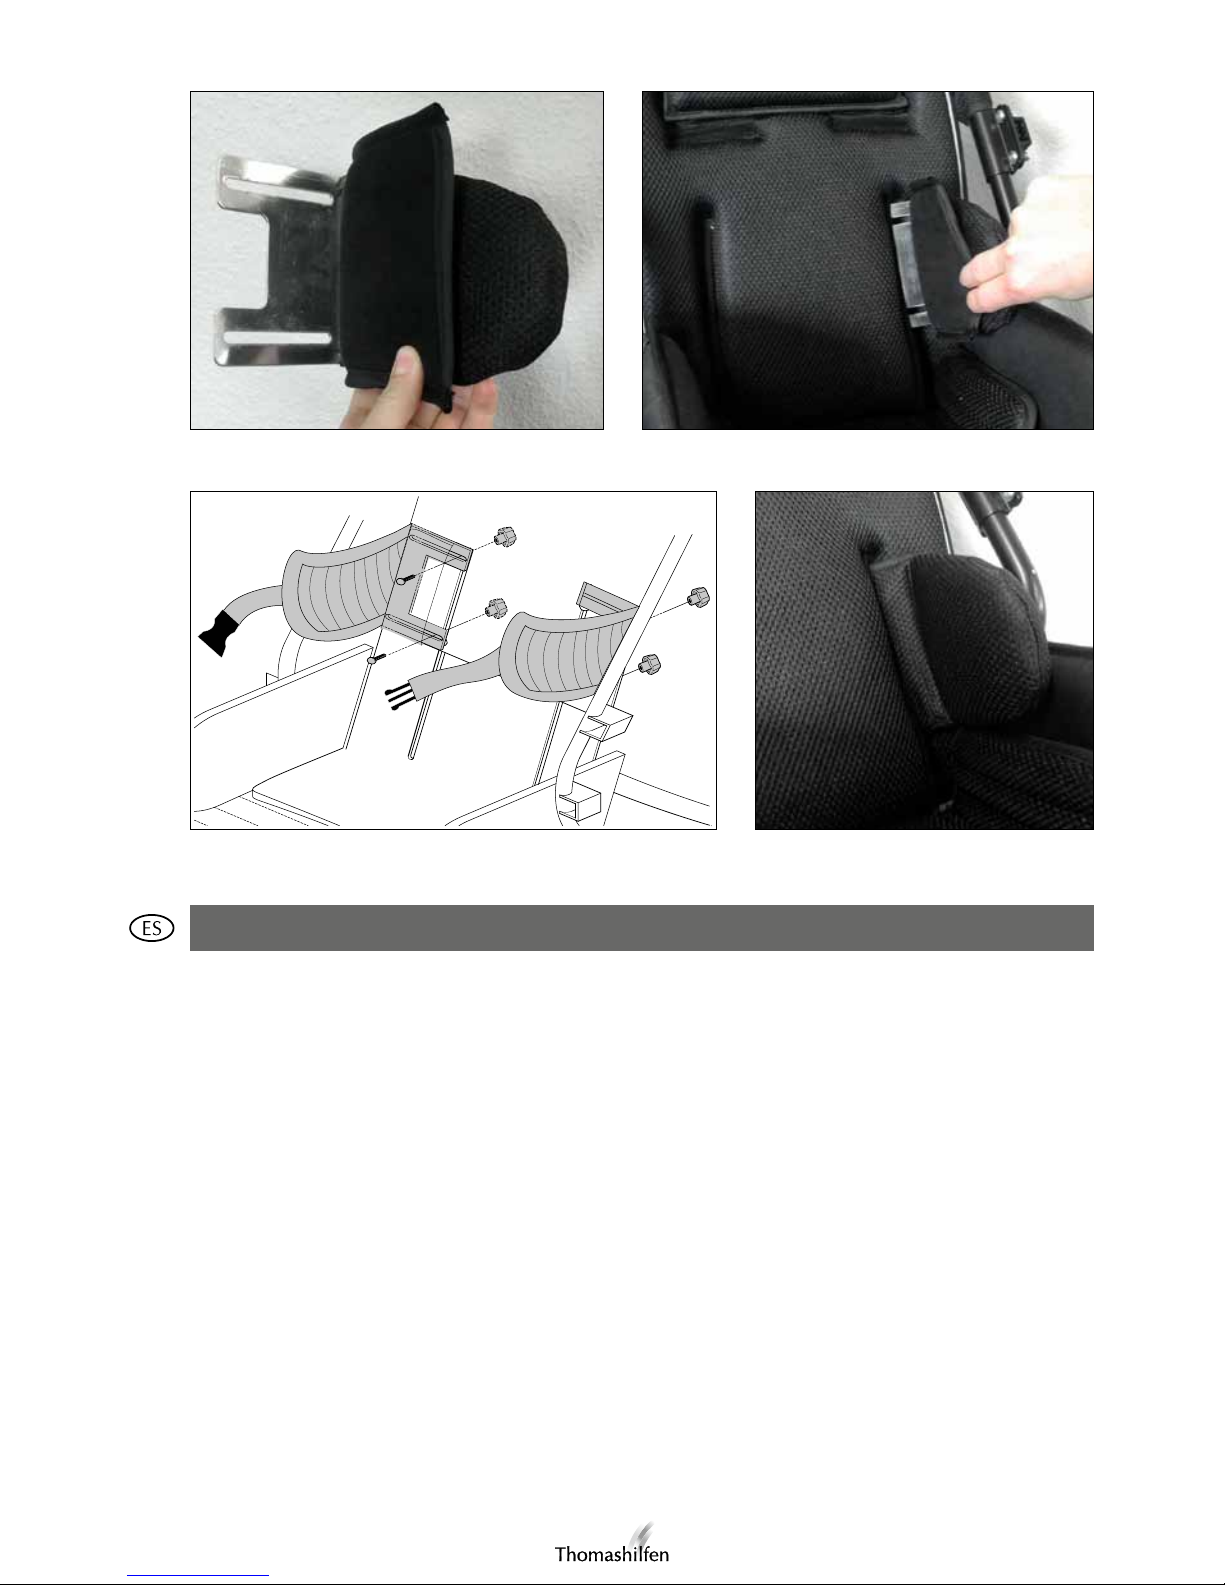
Lateral trunk supports, flexible with chest belt Item code: 6633
In the back padding you will find two long, vertical slots. The Lateral trunk supports are led
through these slots to fasten them to the backrest. The padding of the lateral trunk supports has
to remain on the supports while mounting them on the backrest. The loose end of the padding
at the inner side of the lateral trunk supports can be lifted for easier mounting. (fig. 1)
Please lead the lateral trunk support through the slot in the back padding. The outer part of
the back padding should lie under the lateral trunk support while the middle part of the back
padding should cover the support. (fig. 2)
Insert one screw in the upper slot of the lateral trunk support and the preferred vertical slot in
the back rest. Secure the screw with one of the star nuts. Repeat this procedure with the lower
slot in the lateral trunk support. It is important to tighten the first screw only slightly. This makes
it easier to tighten the second screw. (fig. 3)
Bring the lateral trunk supports into the preferred position and then tighten both screws. Put
the loose end of the lateral trunk support padding under the middle part of the back padding.
(fig. 4)
You can adapt the supports individually by carefully bending them. Close the chest belt with
the buckle. The belt length is individually adjustable on both sides.
Cales-tronc latéraux, flexibles avec sangle thoracique N° d’art.: 6633
Le coussin dorsal dispose de deux longues fentes verticales. Les cales-tronc sont introduits par
les fentes pour pouvoir les fixer au dossier. Le coussin des cales-tronc doit rester fixé même
durant le montage. Le bout non fixé du coussin à l‘intérieur de l‘appuie-tête peut cependant
être rabattu vers le haut pour faciliter le montage. (fig. 1)
Introduire pour cela les cales-tronc à travers la fente du coussin dorsal. La partie extérieure
du coussin dorsal se trouve sous le cale-tronc, alors que la partie médiane repose sur le caletronc. (fig. 2)
Introduire une vis à travers la fente supérieure du cale-tronc et la fente longitudinale souhaitée
du dossier. Serrer à l‘aide d‘un écrou à ailettes. Répéter cette opération avec la deuxième fente
du cale-tronc.
Il est important de ne serrer que légèrement la vis supérieure. Ceci facilitera le serrage de la
vis inférieure. (fig. 3)
Mettre le cales-tronc dans la position souhaitée et serrer les deux vis à fond. Mettre le bout non
fixé de la housse du cale-tronc sous la partie médiane du coussin dorsal. (fig. 4)
Vous pouvez adapter les appuis individuellement en les pliant ou déformant sans forcer. Fermer
la sangle thoracique avec le clip. La longueur de la sangle peut être réglée individuellement
des deux côtés.
4
Soporte torácico, flexible con cinturón de pecho N° de Art.: 6633
El acolchado del respaldo presenta dos ranuras verticales largas. Los soportes torácicos se
pasan por estas ranuras para poder fijarlas al respaldo. El acolchado de los soportes torácicos
debe permanecer fijado también durante el montaje. Para facilitar el montaje, el extremo
suelto del acolchado en el lado interior de los soportes se puede plegar hacia arriba. (fig. 1)
Deslizar las almohadillas torácicas por la ranura del acolchado del respaldo. La parte exterior
del acolchado del respaldo se encuentra por debajo del soporte, mientras que la parte central
del acolchado del respaldo se encuentra por encima de la misma. (fig. 2)
Pasar un tornillo por la ranura superior del soporte torácico y por la ranura longitudinal
deseada en el respaldo. Fijar la unión con una tuerca de mando de estrella. Repetir este paso
con la segunda ranura del soporte torácico. Es importante, al principio, apretar el tornillo
superior solo ligeramente. De esta forma resulta más fácil apretar el tornillo inferior. (fig. 3)
Colocar los soportes torácicos en la posición deseada y apretar bien ambos tornillos. El
extremo suelto de la funda del soporte torácico se coloca por debajo de la parte central del
acolchado del respaldo. (fig. 4)
Los soportes pueden ser ajustados individualmente flexionándolos con cuidado (deformación).
Cierre el cinturón de pecho mediante el cierre clip. La longitud del cinturón puede ser
ajustada individualmente en ambos lados.
21
43

5
Apoios para o tórax, flexíveis com cinto para o peito Art.-N.º: 6633
O estofo para as costas apresenta duas grandes fendas verticais. Através destas fendas faz-se
passar os apoios para o tórax, a fim de os poder fixar às costas. Os estofos do apoio para o tórax
devem manter-se fixos mesmo durante a montagem. Para facilitar a montagem, a extremidade
solta do estofo no lado de dentro dos apoios pode ser dobrada para cima. (fig. 1)
Passar os apoios para o tórax pelas fendas no estofo das costas. A parte exterior do estofo das
costas encontra-se sob o apoio enquanto a parte média do estofo das costas fica por cima do
apoio. (fig. 2)
Introduzir um parafuso através da fenda superior do apoio para o tórax e pela fenda
longitudinal desejada no encosto. Fixar a união com a maçaneta em estrela. Repetir esta fase
na segunda fenda do apoio para o tórax. É importante apertar primeiro o parafuso superior
apenas ligeiramente. Assim facilita-se a fixação do segundo parafuso. (fig. 3)
Colocar os apoios para o tórax na posição desejada e apertar firmemente os dois parafusos. A
extremidade solta do revestimento dos apoios para o tórax é colocada sob a parte central do
estofo para as costas. (fig. 4)
Os apoios podem ser ajustados individualmente fletindo-os cuidadosamente. Prender
o cinto para o peito com o fecho com clip. O comprimento do cinto pode ser ajustado
individualmente de cada lado.
Supporti del busto, flessibili con cinghia pettorale Art. nr.: 6633
L’imbottitura dello schienale ha due fessure lunghe. I supporti per il busto vengono infilati
in queste fessure, per poterli fissare alla schiena. Il cuscino dei supporti per il busto deve
rimanere fisso anche durante il montaggio. L’estremità libera del cuscino, sul lato interno dei
supporti, può però essere aperta, per facilitare il montaggio. (ill. 1)
Infilare i supporti per il busto nello spazio nell’imbottitura dello schienale. La parte esterna
dell’imbottitura dello schienale si trova di volta in volta sotto il supporto, mentre la parte
centrale dell’imbottitura dello schienale sta sul supporto. (ill. 2)
Inserire una vite nella fessura in alto del supporto del busto e infilare nello schienale la fessura
longitudinale desiderata. Il raccordo deve essere fissato con un dado a stella. Ripetere con la
seconda fessura del supporto del busto. È importante che la vite in alto sia serrata solo poco
all’inizio. Questo facilita il serraggio della vite in basso. (ill. 3)
Mettere i supporti del busto nella posizione desiderata e serrare bene le due viti. L’estremità
libera della fodera del supporto per il busto viene messa sotto la parte centrale dell’imbottitura
dello schienale. (ill. 4)
Piegando i supporti con cautela, è possibile regolarli individualmente (adattando la forma).
Allacciare la cinghia pettorale con la chiusura a clip. La lunghezza della cinghia può essere
regolata singolarmente da entrambi i lati.

6
21
43
Thoraxpelotten, flexibel met borstfixatie Art.nr.: 6633
Het rugkussen beschikt over twee lange verticale gleuven. Door deze gleuven worden de
thoraxpelotten geleid om ze aan de rug te kunnen bevestigen. Het kussen van de thoraxpelotten
moet ook tijdens de montage bevestigd blijven. Het losse kussenuiteinde aan de binnenzijde
van de pelotten kan echter voor een eenvoudigere montage omhoog geklapt worden. (afb. 1)
De thoraxpelotten door de spleet in het rugkussen schuiven. Het buitenste gedeelte van het
rugkussen ligt telkens onder de pelotte, terwijl het middelste gedeelte van het rugkussen boven
de pelotte zit. (afb. 2)
Een schroef door de bovenste gleuf van de thoraxpelotte en door de gewenste langsgleuf in de
rugleuning brengen. De verbinding met een stergreepmoer borgen. Deze stap met de tweede
gleuf van de thoraxpelotte herhalen. Belangrijk is dat de bovenste schroef in eerste instantie
lichtjes aangedraaid wordt. Dit vergemakkelijkt het aandraaien van de onderste schroef. (afb.
3)
De thoraxpelotten in de gewenste positie brengen en beide schroeven vast aandraaien. Het
losse uiteinde van de thoraxpelottehoes wordt onder het middelste gedeelte van het rugkussen
gelegd. (afb. 4)
Door voorzichtig de pelotten te buigen kunnen deze individueel aangepast (vervormd)
worden. Sluit de borstfixatie met behulp van de clipsluiting. De lengte van de gordel kan aan
bijde zijden individueel ingesteld worden.

7
Sidestøtter, fleksible med brystbelte Art.-nr.: 6633
Ryggpolsteret har to lange loddrette slisser. Gjennom disse slissene føres sidestøttene for å
kunne feste dem på ryggen. Polsteret på sidestøttene må også være festet under monteringen.
Den løse enden til polsteret på innsiden av støttene kan imidlertid foldes opp for en enklere
montering. (fig. 1)
Skyv sidestøttene gjennom slissen i ryggpolsteret. Den ytre delen av ryggpolsteret ligger
henholdsvis under støtten, mens den midtre delen av ryggpolsteret sitter over støtten. (fig. 2)
Før en skrue gjennom den øvre slissen til sidestøtten og den ønskede langsgående slissen i
rygglenet. Sikre forbindelsen med en mutter med stjernegrep. Gjenta dette skrittet med den
andre slissen til sidestøtten. Det er viktig at den øvre skruen først bare trekkes lett til. Dette gjør
det lettere å trekke til den nedre skruen. (fig. 3)
Plasser sidestøtten i ønsket posisjon og trekk begge skruene fast til. Legg den løse enden til
sidestøttens trekk under den midtre delen til ryggpolsteret. (fig. 4)
Støttene kan tilpasses individuelt ved å bøye (omforme) dem forsiktig og brystbeltet låses med
spennen. Beltelengden kan innstilles individuelt på begge sidene.
Bröstkorgsstöd, mjukt med bröstsele Art.-nr: 6633
Ryggdynan har två långa lodräta spår. Genom dessa spår förs bröstkorgsstöden för att kunna
fästa dem i ryggen. Bröstkorgsstödens dyna skall också förbli fäst under monteringen. Den
lösa dynänden på insidan av stöden kan dock fällas upp för att förenkla monteringen. (bild 1)
Skjut bröstkorgsstöden genom spalten i ryggdynan. Ryggdynans yttre del ligger under stödet,
medan ryggdynans mellersta del sitter ovanför stödet. (bild 2)
För en skruv genom bröstkorgsstödets övre spår och för det önskade längsgående spåret
i ryggstödet. Säkra förbindelsen med en stjärnfingermutter. Upprepa detta steg med
bröstkorgsstödets andra spår. Det är viktigt att den övre skruven till att börja med bara dras åt
lätt. Det underlättar åtdragningen av den undre skruven. (bild 3)
Sätt bröstkorgsstöden i önskad position och skruva åt båda skruvarna väl. Den lösa änden till
bröstkorgsstödets överdrag läggs under ryggdynans mittersta del. (bild 4)
Genom att försiktigt böja stöden, kan de anpassas (formas) individuellt. Stäng bröstselen med
spännet. Selens längd kan ställas in separat på båda sidorna.

8
21
43
Thoraxpelotter, fleksibel med brystbælte Art.-Nr.: 6633
Der er to lange, lodrette slidser i rygpolstringen. Thoraxpelotterne føres gennem disse slidser og
fastgøres på ryggen. Thoraxpelotternes polstring skal blive siddende og må ikke løsnes under
monteringen. Enden af den løse polstring på indersiden af støtterne kan vippes op, for at gøre
monteringen nemmere. (fig. 1)
Thoraxpelotterne skubbes gennem spalten i rygpolstringen. Den udvendige del af rygpolstringen
ligger altid under pelotten, mens den midterste del af rygpolstringen sidder over pelotten.
(fig. 2)
Stik en skrue gennem thoraxpelottens øverste slids og en af de lodrette slidser i ryglænet.
Forbindelsen sikres med en stjernegrebsmøtrik. Dette trin gentages med den anden af
thoraxpelottens slidser. Det er vigtigt, at den øverste skrue i første omgang kun strammes en
smule. Så er det nemmere at stramme den nederste skrue. (fig. 3)
Thoraxpelotterne placeres i den ønskede stilling og begge skruer strammes godt. Den løse ende
af thoraxpelottens betræk lægges under den midterste del af rygpolstringen. (fig. 4)
Pelotterne kan tilpasses individuelt (deformeres) ved forsigtig bøjning. Brystbæltet lukkes med
Clip-lås. Bæltelængden kan ved begge sider indstilles individuelt.

9
Rintakehätuet, joustavalla vyöllä Tuotenro: 6633
Selkätyynyssä on kaksi pitkää slitsiä. Rintakehätuet pujotetaan näiden läpi, jotta ne voidaan
kiinnittää selkään. Rintakehätukien tyynyjen on oltava asennuksen aikana kiinnitettyinä.
Irtonainen tyynynpää tuen sisäpuolella voidaan kuitenkin kääntää helpompaa asennusta varten
ylös. (Kuva 1)
Rintakehätuet työnnetään selkätyynyssä olevan aukon läpi. Selkätyynyn ulommainen osa
sijaitsee aina tuen alla, kun taas tyynyn keskiosa on tuen päällä. (Kuva 2)
Ruuvi viedään rintakehätuen ylemmän aukon ja selkänojassa valitun pitkittäisaukon läpi.
Kiinnitys toisiinsa tapahtuu tähtipäämutterilla. Sama toistetaan myös toiseen rintakehätukeen.
Tärkeää on, että ylempää ruuvia kiristetään aluksi vain vähän. Se helpottaa alemman ruuvin
kiristämistä. (Kuva 3)
Rintakehätuet asennetaan haluttuun asentoon ja molemmat ruuvit kiristetään. Rintakehätuen
päällysteen irtonainen osa asetetaan selkänojan keskiosan alle. (Kuva 4)
Tukien asentoa voi sovitella vielä yksilöllisesti. Tuki lukitaan klipsillä. Vyön pituutta säädetään
yksilöllisesti molemmin puolin.
Poduszki na klatkę piersiową, elastyczne z pasem piersiowym
Nr katalogowy: 6633
Tapicerka oparcia zawiera dwa długie pionowe rowki. Przez te rowki prowadzone są
poduszki na klatkę piersiową, aby móc je przymocować na plecach. Tapicerka poduszek na
klatkę piersiową musi być przymocowana także podczas montażu. Luźna końcówka tapicerki
na stronie wewnętrznej poduszki może być przechylona w górę dla łatwiejszego montażu.
(Rys. 1)
Przesunąć poduszki na klatkę piersiową przez szczelinę w tapicerce oparcia. Zewnętrzna
część tapicerki oparcia jest położona pod poduszką, podczas gdy środkowa część tapicerki
oparcia jest położona na poduszce. (Rys. 2)
Przeprowadzić śrubę przez górny rowek poduszki na klatkę piersiową oraz przez pożądany
rowek podłużny w oparciu. Przykręcić za pomocą nakrętek skrzydełkowych. Powtórzyć tą
czynność z drugim rowkiem poduszki do klatki piersiowej. Ważne jest, aby górna śruba
została najpierw tylko lekko dokręcona. To ułatwia dokręcenie dolnej śruby. (Rys. 3)
Ustawić poduszki do klatki piersiowej w pożądanej opozycji i dokręcić obie śruby. Luźna
końcówka powłoki poduszki na klatkę piersiową zostaje ułożona pod środkową część
tapicerki oparcia. (Rys. 4)
Poprzez ostrożne zginanie poduszki można dopasować (ukształtować) indywidualnie. Zapiąć
pas biodrowy na klips. Długość pasów można ustawić indywidualnie po obu stronach.

10
21
43
Jastučići za grudni koš, fleksibilni s prsnim remenom Kat. br.: 6633
Leđni jastuk ima dva duga okomita izreza. Kroz te ureze provlače se jastučići za grudni koš
kako bi mogli biti pričvršćeni na leđa. Jastučići za grudni koš trebaju se pričvrstiti i tijekom
montaže. Slobodan kraj jastuka na unutarnjoj strani može se otklopiti radi jednostavnijeg
postavljanja jastučića. (sl. 1)
Jastučiće za grudni koš ugurajte kroz otvor u leđnom jastuku. Vanjski dio leđnog jastuka
položen je ispod jastučića, dok je središnji dio leđnog jastuka iznad jastučića. (sl. 2)
Provucite vijak kroz gornji otvor jastučića za grudni koš i željeni uzdužni izrez u leđnom
naslonu. Osigurajte spoj sa zvjezdastom maticom. Ponovite ovaj korak s drugim izrezom
jastučića za grudni koš. Važno je da se najprije malo zategne gornji vijak. To olakšava
pritezanje donjeg vijka. (sl. 3)
Jastučiće za grudni koš namjestite u željeni položaj i čvrsto pritegnite oba vijka. Slobodan
kraj presvlake jastučića za grudni koš polaže se ispod središnjeg dijela leđnog jastuka. (sl. 4)
Jastučići se mogu zasebno podesiti/izobličiti pažljivim zakretanjem. Prsni remen zatvorite
kopčom. Duljina remena može se zasebno podesiti na jednoj i drugoj strani.


Thomas Hilfen für Körperbehinderte GmbH & Co. Medico KG · Walkmühlenstr. 1 · D - 27432 Bremervörde · Germany
Phone: +49 (0) 47 61 / 88 60 · Fax: +49 (0) 47 61 / 8 86-19 · info@thomashilfen.de · www.thomashilfen.com
Mitglied in der Internationalen
Fördergemeinschaft für Kinderund Jugendrehabilitation e.V.
Art.-Nr. / Item code: 95542, Stand / status: 07/2013, technische Änderungen vorbehalten / subject to technical alterations
 Loading...