


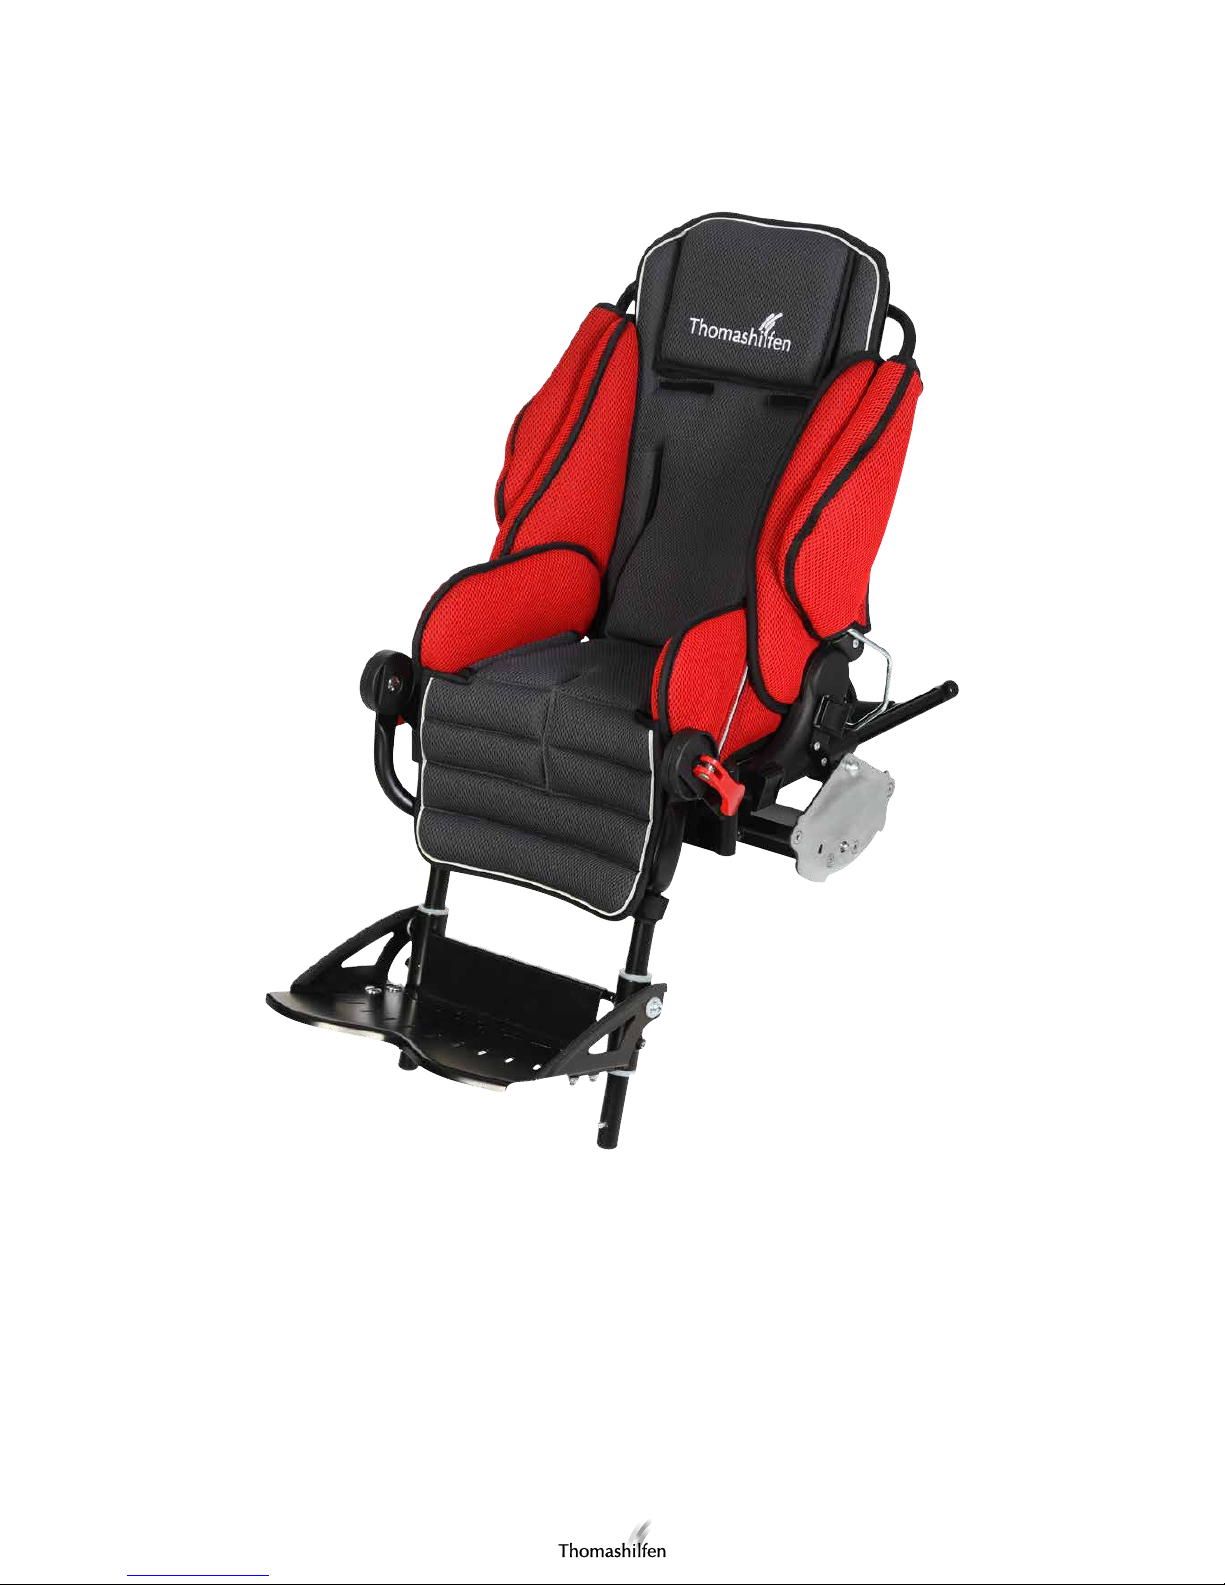
EASyS Advantage
User
manual – EASyS Advantage seat unit
2
(1) (2) (3)
(4) (5) (6)
(10) (11) (12)
(7) (8) (9)
3
(22) (23) (24)
(13) (14) (15)
(16) (17) (18)
(19) (20) (21)
4
(25) (26) (27)
(28) (29) (30)
(31) (32) (33)
5

User manual – EASyS Advantage seat unit
Dear user of the EASyS Advantage:
The EASyS Advantage seat unit you have purchased is an innovative product made by Thomashilfen. After several years
of research, a new seating concept for rehab strollers has been developed; this is one of the safest and most advanced
seating systems on the market.
Please read this user manual in order to ensure that the handling of the EASyS Advantage seat unit – on the chassis of
your choice – is safe, practical and comfortable for you, and especially for your child.
If you still have any questions or problems, please call your local dealer or contact us directly.
We want to take this opportunity to draw your attention to our website www.thomashilfen.com, where you can find the
latest information and important product safety information, as well as information about any product recalls.
Our address: Thomas Hilfen für Körperbehinderte Our address for customers in the USA:
GmbH & Co. Medico KG ExoMotion LLC, dba Thomashilfen
Walkmühlenstraße 1 7936 Occidental Ave S
27432 Bremervörde Seattle WA 98108
Germany USA
phone: +49 (0) 4761 886-68 or -63 phone: 866 870 2122 (toll free in U.S.)
www.thomashilfen.com www.thomashilfen.us
Table of Contents Page
Purpose and areas of application ......................................................................................................................
6
Safety checks and maintenance interval ...........................................................................................................
7
General notes regarding safety .........................................................................................................................
7
Application risks and contraindications ............................................................................................................
7
Symbols and warning signs ..............................................................................................................................
8
Specifications and versions ..............................................................................................................................
8
Scope of delivery .............................................................................................................................................
9
Basic equipment of the seat unit .......................................................................................................................
9
Setup and assembly .........................................................................................................................................
9
Possible settings ...............................................................................................................................................
10-
11
Attaching the belts ...........................................................................................................................................
11
Transport .........................................................................................................................................................
1
1
Product / serial number ....................................................................................................................................
12
Cleaning, disinfection and care ........................................................................................................................
12
Warranty terms / CE label ................................................................................................................................
12
Maintenance schedule – annual inspection ......................................................................................................
13
Purpose and areas of application
When combined with a matching chassis, the EASyS Advantage seat unit is suitable for the transport (no more than
walking speed) of children with disabilities by their parents or other suitable assistants indoors and outdoors. The seat
unit, in conjunction with the A chassis Advantage, must not be used for other purposes (for example, as a transport
vehicle for more children, for shopping bags, etc.).
When used with the “Crash” version of the A chassis Advantage, the EASyS Advantage has been approved for transporting children in motor vehicles and vans for disabled people in accordance with ISO 7176-19 and ANSI / RESNA WC 19.
6

User manual – EASyS Advantage seat unit
Safety checks and maintenance intervals
A visual inspection of all the operating controls and fastening screws should be carried out each month by a qualified
specialist. The sliding carriage should be kept free of sand.
Please remember to tighten screws, nuts and clamping levers after each adjustment.
Please observe the following notes regarding safety
• Before using the product for the first time, read the user manual carefully; if you have poor eyesight, have someone
read it to you. If the user manual is lost, you can download it at any time in the download area of our website
www.thomashilfen.com. The stored PDF document can also be displayed at a larger size.
• We recommend that you adapt the settings of the EASyS Advantage to your child’s current body measurements at
least every 3 months. If necessary, this can also be done with the help of your therapist / orthopedic technician.
• IMPORTANT: Always secure the child using the 2-point pelvis belt or a different retaining belt (sold separately);
never leave the child unattended in the rehab stroller.
• CAUTION: The gap between the chassis and the brake release rod may pose a risk of getting clothes and limbs
caught in the area of the feet.
• CAUTION: The gap between the seat and the chassis may pose a risk of getting clothes and limbs caught in the seat
area.
• CAUTION: Sunlight, electric heaters or other heat sources may excessively warm up the seat / rehab stroller. In this
case, there is the risk of burning your back and legs upon contact! Therefore, always ensure that the seat / rehab
stroller is not exposed to these heat sources during use and storage; use it only when it has cooled sufficiently.
• CAUTION: When stopping for a long period, you should lock the rehab stroller using the foot brake, thus preventing
the stroller from unintentionally rolling away.
• Please do not overload your rehab stroller and observe the maximum load capacity
• (see the specifications).
• In the dark, reflective clothing makes you and your child more visible for other road users.
• Attaching heavy bags or string bags to the stroller increases the risk of tipping. Use the basket on the chassis.
• When handling the EASyS Advantage seat unit (especially when folding and unfolding it), heed the recommendations in the user manual.
• Please keep your children away from the packaging; there is a danger of suffocation.
• Only one child at a time may be placed in the rehab stroller.
Previous market experience has not shown any dangerous combinations of devices with the seat unit.
Application risks and contraindications
When used appropriately, risks for the application can be excluded. Contraindications are not known. The cushioning
material used in the EASyS Advantage is “flame retardant” and has been tested according to DIN EN 1021-2.
The degree of resistance to inflammation in materials and components was tested according to standards and deemed
to be safe.
7

User manual – EASyS Advantage seat unit
Symbols and warning signs
Sticker Meaning
Specification labels / loading capacity stickers
The specification label of the seat unit is attached at the
bottom of the seat.
The specification label includes the name of the manufacturer, including the address; the type designation, the
maximum loading capacity and the CE label.
Bar code label
The bar code label is attached under the seat of the seat
unit.
The bar code label includes the item number, designation, serial number and production date of the product.
Specifications and versions
EASyS Advantage seat system EASyS Advantage size 1 EASyS Advantage size 2
Seat depth 190 - 300 mm / 7.5 - 11.8" 270 - 380 mm / 10.6 - 15"
Seat width 190 - 310 mm / 7.5 - 12.2" 250 - 370 mm / 9.8 - 14.6"
Back height 415 - 680 mm / 16.3 - 26.8" 550 - 740 mm / 21.7 - 29.1"
Lower leg length 175 - 290 mm / 6.9 - 11.4" 210 - 370 mm / 8.3 - 14.6"
Hip angle 90° to 180° 90° to 180°
Knee angle 90° to 180° 90° to 180°
Foot angle 78° to 100° 78° to 100°
Turning range of seat 180° 180°
Seat tilt-in-space (on A chassis Advantage) -10° to +35° -10° to +35°
Size of hip guide (w x h) 230 x 120 mm / 9.1 x 4.7" 300 x 150 mm / 11.8 x 5.9"
Size of footrest (w x d) 280 x 180 mm / 11 x 7.1" 320 x 210 mm / 12.6 x 8.3"
Overall dimensions 995 x 595 x 1140 mm 1070 x 690 x 1200 mm
(on A chassis Advantage) (l x w x h) 39.2 x 23.4 x 44.9" 42.1 x 27.2 x 47.2"
Folded dimensions 820 x 595 x 425 mm 860 x 690 x 550 mm
(on A chassis Advantage) (l x w x h) 32.3 x 23.4 x 16.7" 33.9 x 27.2 x 21.7"
Weight (seat) 9 kg / 19.8 lb 10.4 kg / 22.9 lb
Max. user weight (seat) 35 kg / 77.2 lb 40 kg / 88.2 lb
The EASyS Advantage seat unit is available in the following versions:
Item No. Designation Equipment
6609/7 EASyS Advantage seat unit size 1 Seat unit including cushioning and footrest
6709/7 EASyS Advantage seat unit size 2 Seat unit including cushioning and footrest
8

User manual – EASyS Advantage seat unit
Scope of delivery
The EASyS Advantage seat unit is delivered pre-assembled. If the seat unit was ordered together with the A chassis Advantage, the seat unit is already mounted to the chassis upon delivery. The seat unit has been upholstered at the factory
with seat and back cushions. The additional pad is attached under the seat cushion. In addition, the seat unit is supplied
with a user manual and an Allen wrench. The Allen wrench is required for adjusting the height of the footrest.
Basic equipment of the seat unit
BSS (Balance Safety System) – safety seat; physiological pivot points in the hip and knee joints; breathable seat and back
cushions as well as side pads with safety reflectors; additional pad for more comfort; body side guide; angle-adjustable,
foldable and height-adjustable foot support; holder for sun and rain cover without leg blanket; infinite adjustment of the
back height, hip angle, seat depth and seat width; easily accessible setting by means of star screws.
Setup and assembly
The settings / adjustments must always be made by trained / instructed professionals (such as medical product consultants of specialist medical dealers). Using the release lever, the seat can be removed from the A chassis Advantage
without tools. It is important that the release lever remains actuated while inserting and removing the seat unit. No tools
are required when using the seat unit and the chassis for the first time, except for the Allen wrench that is included in
the scope of delivery.
The accessories are attached / removed using commercially available tools. Separate installation and operating instructions are included with the accessories. If these are missing, you can download the instructions from the download
section of our website www.thomashilfen.com at any time.
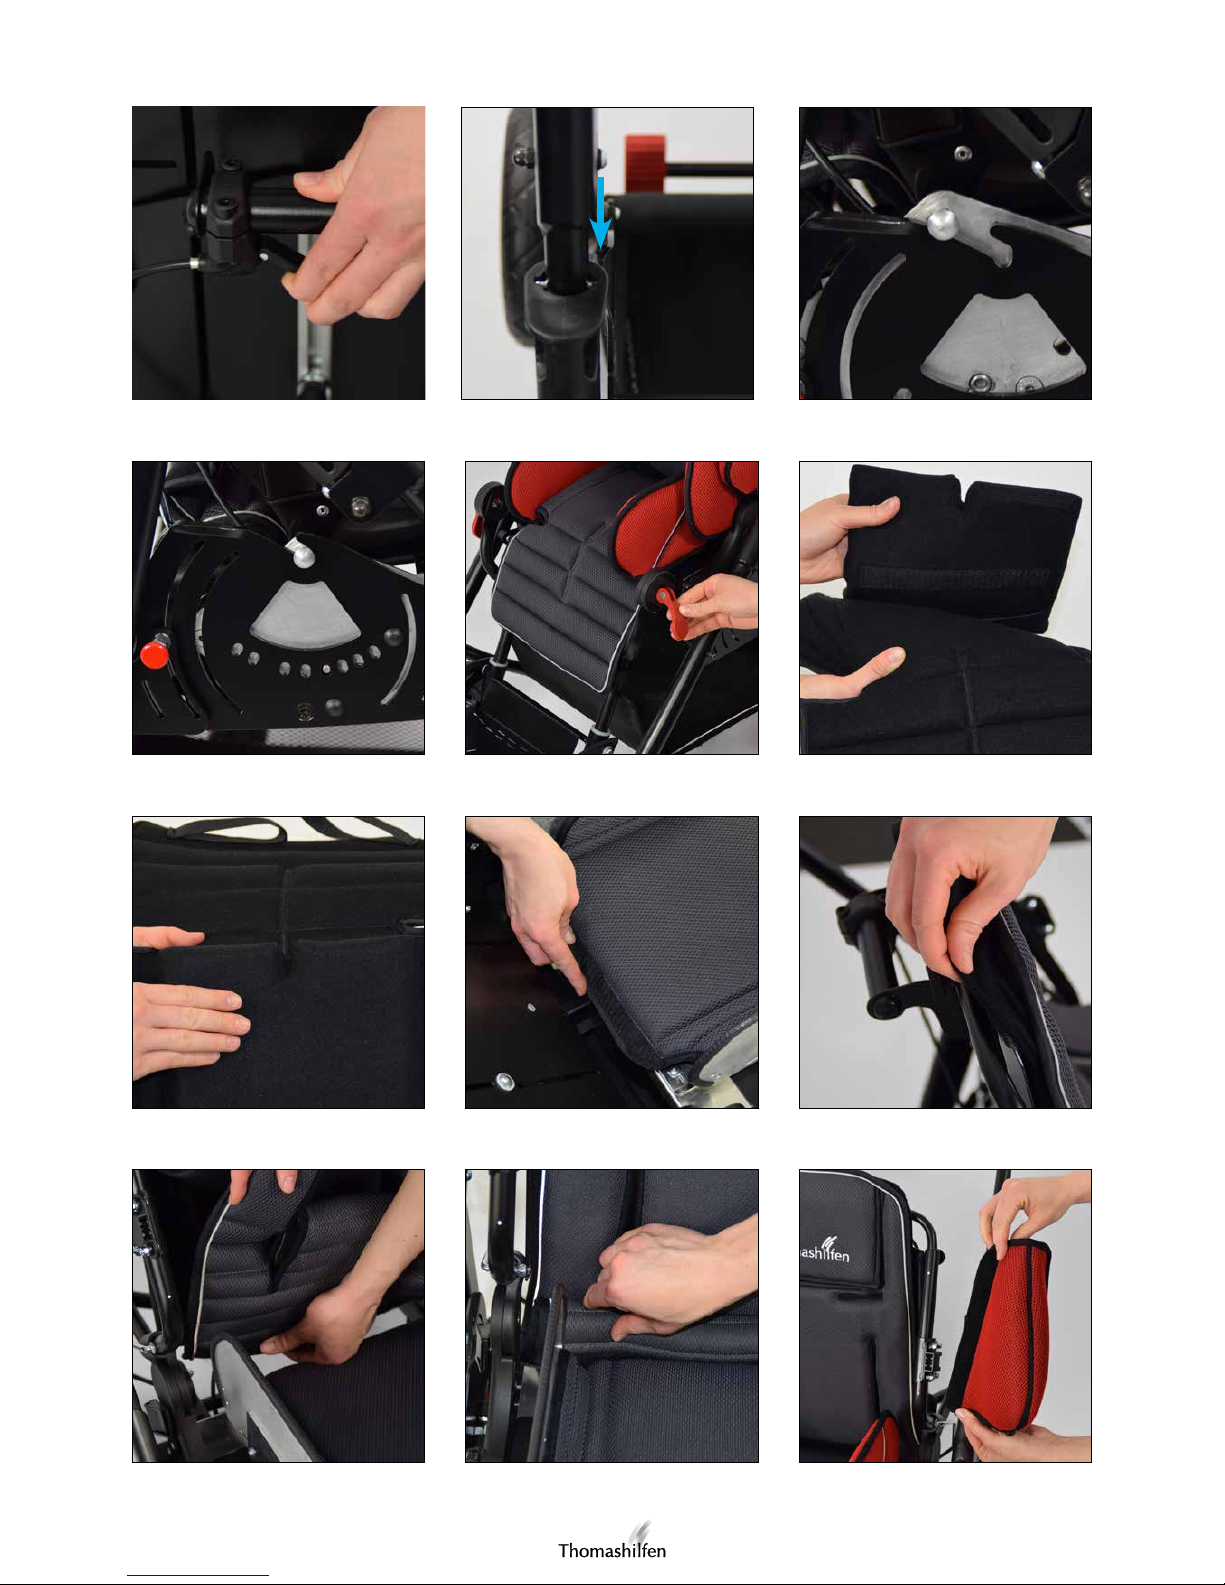
Inserting the seat unit
Activate the release lever on the backrest and insert the seat unit into the chassis from above (Fig. 1). Make sure that the
buttons on the sides of the seat unit between the folding joint and the connecting strap of the rear frame and the sliding
support are properly threaded through (Fig. 2). Now guide the buttons on the sides of the seat unit into the receiving
slots on the sides of the chassis (Fig. 3) and let the seat unit slide into position (Fig. 4). When you release the trigger, the
seat unit engages into the closest position of the hole matrix.
CAUTION: Always ensure that the locking pins on both sides of the seat unit engage firmly into a hole in the hole matrix.
Removing the seat unit
To remove the seat unit, actuate the release lever and pull the seat unit upwards out of the frame (Fig. 1). Make sure that
the buttons on the sides of the seat unit between the folding joint and the connecting strap of the rear frame and the
sliding support are properly threaded through (Fig. 2).
Attaching the footrest
The footrest must be fastened to the knee joints. To do this, align the ratchet joints and fasten them to the screws (from
the inside), the saddles (from the outside) and the eccentric levers (from the outside; Fig. 5).
Seat cushion
The seat cushion consists of two elements: the main gray cushion as well as a black additional pad for more comfort.
The additional pad is attached with Velcro to the underside of the main cushion (Fig. 6). In this regard, pay attention
that the notch in the additional pad is facing forward (Fig. 7). Fasten the seat cover by firmly attaching it to the rear end
of the seat plate using the Velcro flap (Fig. 8). The lower two Velcro straps are wrapped around the tubes of the footrest.
If necessary, the additional pad can be removed.
9

User manual – EASyS Advantage seat unit
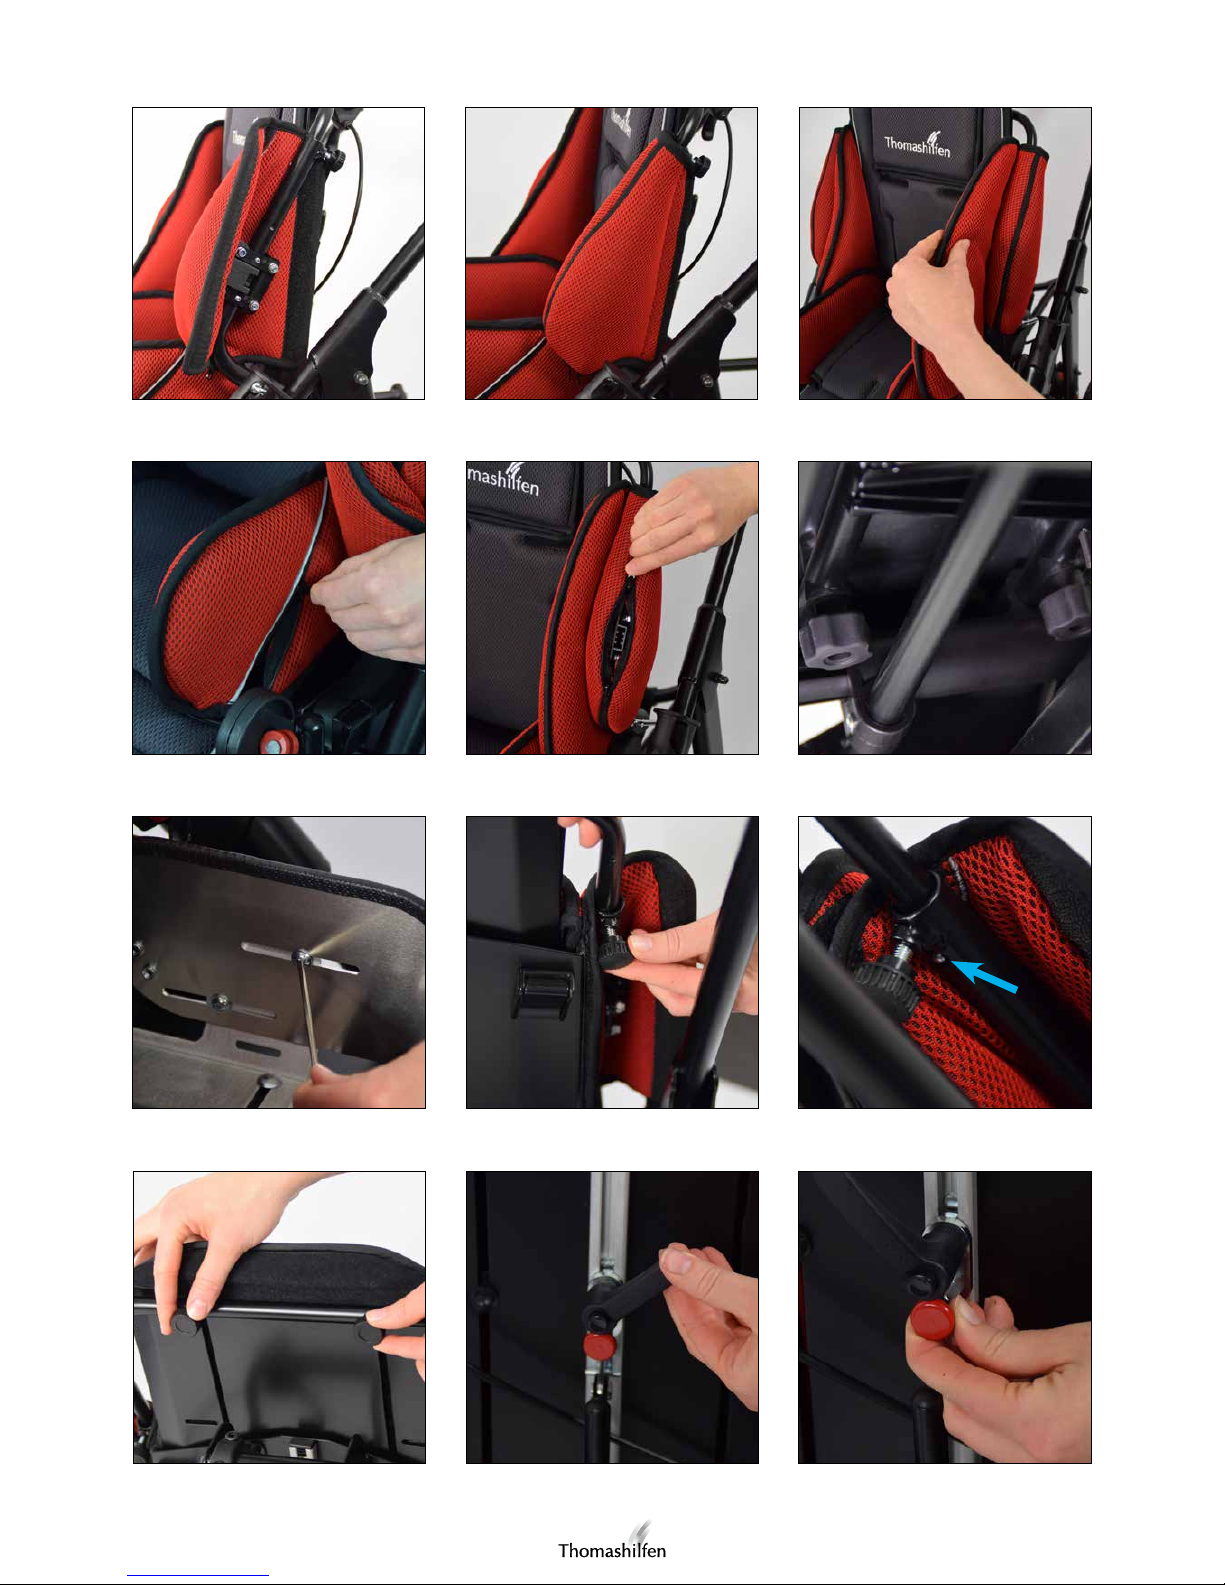
Backrest upholstery
The backrest upholstery is attached at the top of the back plate, as is the Velcro strip on the back plate (Fig. 9). The
lower part of the backrest upholstery is inserted to the rear between the seat and the back (Fig. 10). The lower end is
provided with Velcro and is attached to the rear end of the seat plate to close the gap between the seat and the back
(Fig . 11) .
Side cushion
Place each of the shorter cushions of the two side cushion pairs over the side tubes so that the Velcro is facing inward
(Fig. 12). The Velcro fastener is located on the outside of the back plate curve. Attach the cushion in such a manner that
the upper edge of the cushion on the back ends just below the thumbscrew (Fig. 13). Then attach the rear of the cushion with Velcro (Fig. 14). The zippers of the shorter side cushion can be positioned inwards if necessary.
Velcro each of the longer cushions to the inside of the back plate curve. The longer cushions are attached at a height
where they are flush with the top end of the outer side cushions (Fig. 15).
Lateral seat upholstery
The lateral seat upholstery can be opened with a zipper. It is pulled over the seat side guides in such a manner that the
reflective strip on the outside runs from the rear / top to the front / bottom (Fig. 16).
Holders for sun and rain cover without leg blanket
The EASyS Advantage comes with holders for the sun and rain cover (without leg blanket) as standard (Fig. 17). Their
height can be adjusted as required. To do so, loosen the screws of the holders for the sun and rain cover and move it on
the tubes into the desired position. Then tighten the screws firmly again.
Possible settings
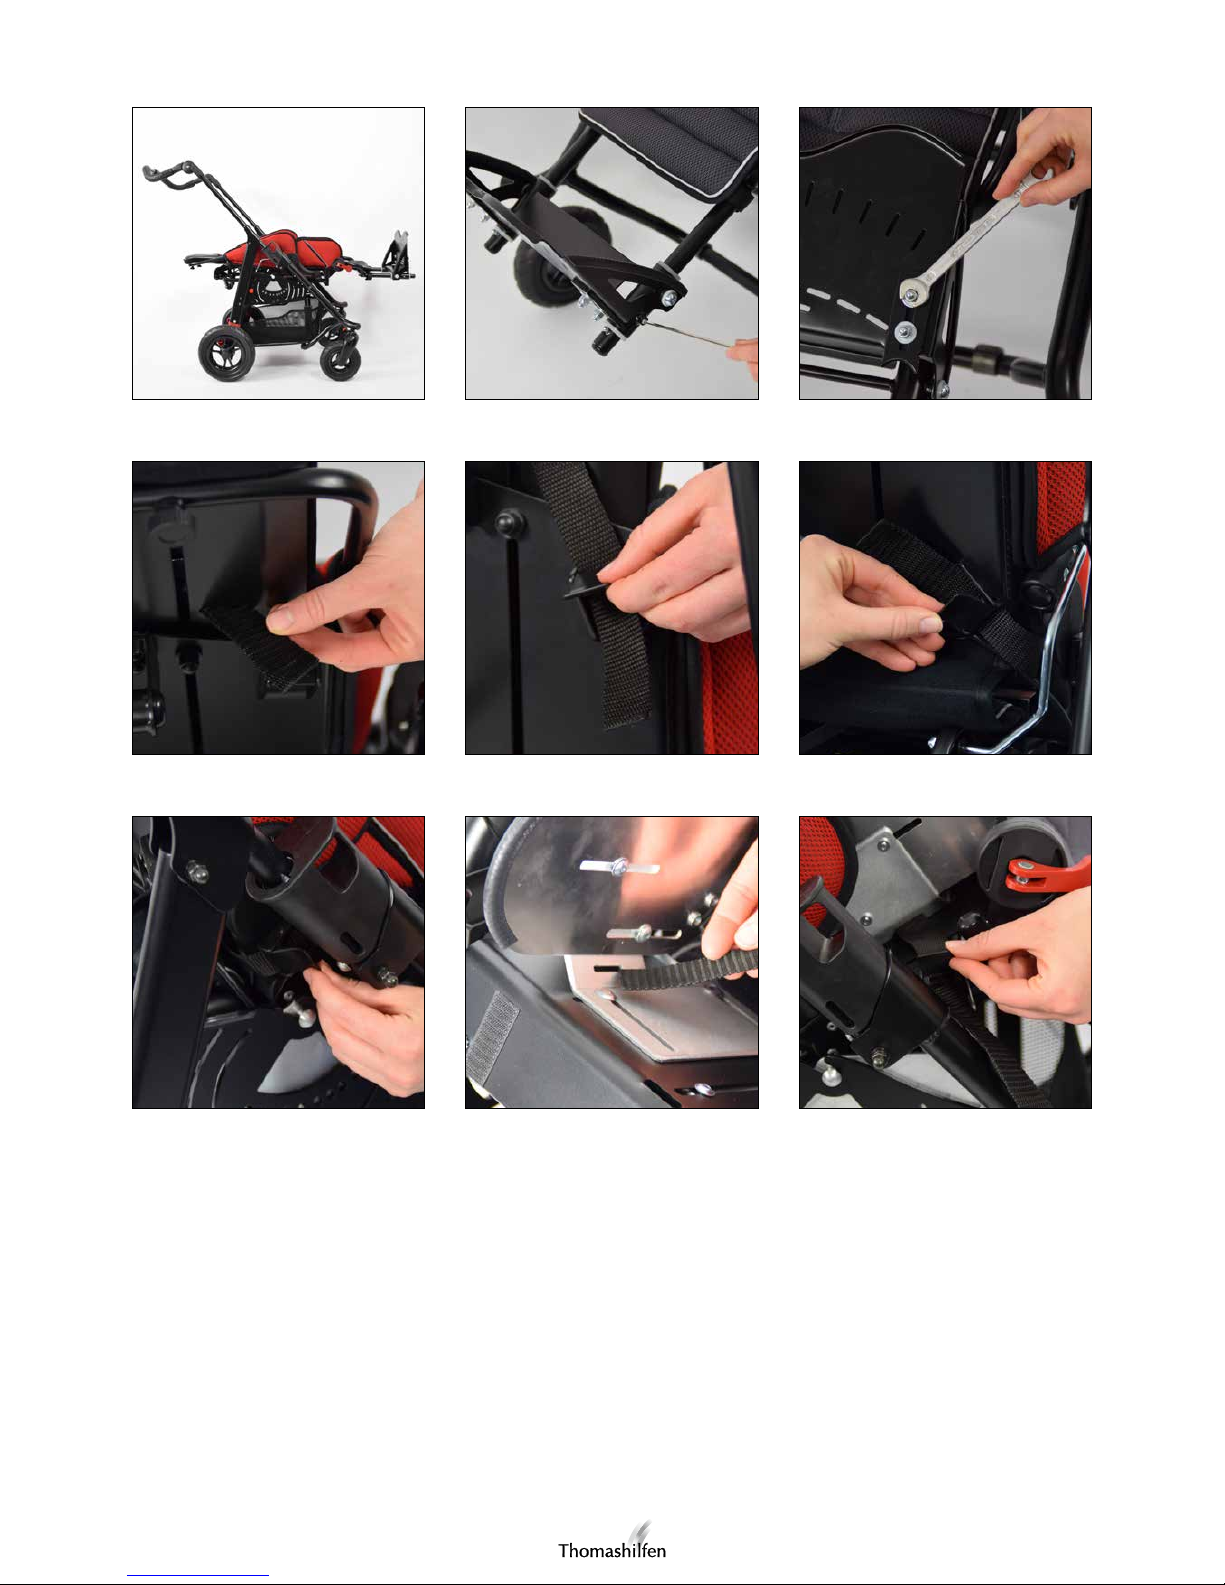
Seat width
To adjust the seat width, loosen the four soft-touch nuts under the seat of the EASyS Advantage and move the side elements accordingly (Fig. 18). Then retighten the nuts. If the seat depth is set to the minimum depth, the maximum adjustable seat width depends on the gap before the lateral seat upholstery of the back.
Seat depth
Loosen the two front soft-touch nuts under the seat of the EASyS Advantage and pull the seat plate forwards (Fig. 18).
Then retighten the nuts.
TIP: To easily adjust the seat depth, use one hand to grip the front edge of the seat and use the other to hold the lower
end of the back (in the center) steady. The depth of the seat side guide can also be adjusted. To do so, open the cushions of the seat side guides with the zippers and remove them. Loosen the two screws, set the desired depth and retighten the screws (Fig. 19).
Back height
Loosen the two thumbscrews on the side tubes (Fig. 20). Now the height of the backrest can be infinitely adjusted up
to the engagement point (spring pins engage with a click). To reduce the back height, press the spring pins below the
thumbscrews and slide the back plate downwards to the desired height (Fig. 21).
To achieve the maximum back height, also loosen both thumbscrews on the upper cross bar and pull the back plate
upwards (Fig. 22). Then retighten all the thumbscrews.
TIP: The extended tubular bar provides additional safety for children who are predominantly transported in the horizontal position.
1
0

User manual – EASyS Advantage seat unit
Angle of recline
Loosen the clamping lever on the backrest (Fig. 23) and remove the safety pin below the lever (Fig. 24). Now the backrest can be brought into the desired position. The seat unit automatically slides forwards on the rails, moving the center
of gravity (Fig. 25). It must be ensured that the pin clicks back into place. Finally, retighten the clamping lever after the
position has been set.
Note: The seat units have a different number of holes for the safety pin on the backrest (EASyS Advantage 1: 2 holes;
EASyS Advantage 2: 4 holes).
When transporting the rehab stroller in a vehicle, the safety pin must always engage into the lowermost hole (90° seat
angle). The other holes can be used to set other commonly used seat angles.
Lower leg length
The grub screws on the side of the footrest can be loosened using the Allen wrench (SW 3; Fig. 26). Now the footrest
can be adjusted infinitely. Then the grub screws must be retightened.
Foot angle
Loosen the four screws on the right and left of the underside of the footrest, adjust the desired foot angle, and then
retighten the screws. You will need a 10 mm box wrench or combination wrench (Fig. 27).
Knee angle
Set the knee angle by loosening the red eccentric lever on both knee joints (Fig. 5).
TIP: The footrest can be folded up to simplify getting into and out of the stroller.
Attaching the belts
Depending on the size of the child, guide the two upper belts through the openings in the cushioning and insert them
through the slots in the frontmost back plate (Fig. 28). Then guide the belts into the buckles and adjust the desired belt
length (Fig. 29).
The two bottom ends of the belts can be attached with buckles to the rear of the back plate or to the plastic element on
the side (Figs. 30-31). Guide the belts to the left and right of the backrest upholstery and continue to the corresponding
buckle, and then fasten them.
The front belts of the 4-point lap belt are also attached to the plastic element on the right and left sides using a buckle.
Guide the belt through the slot in the seat side guide, insert it into the buckle, and fasten it (Figs. 32-33).
TIP: In addition, the belt length can be adjusted at the front; to do so, pull on the D-ring to shorten the belt.
Transport
The EASyS Advantage seat unit, together with the A chassis Advantage, can be folded up for transport in a vehicle trunk.
Heed the instructions for folding the rehab wagon and use the lock for folding to avoid unintentional unfolding.
The seat unit and chassis can be separated so that their weights can be lifted separately. In this regard, please refer to
the instructions for removing the seat unit.
To ensure the simplest possible handling, use one hand to grab the seat unit by the handle on the backrest, to which the
release lever for the seat tilting is also attached (Fig. 1). With the other hand, grab the front edge of the seat.
11

User manual – EASyS Advantage seat unit
Product / serial number
To obtain the correct spare parts or for any technical callbacks that may be required, we always need you to provide
us with the serial number and the precise item number.
The serial number and the item number of the EASyS Advantage seat unit are located on the bar code label that is
attached under the seat.
Cleaning, disinfection and care
Disinfection
Before disinfection, clean all the cushions and handles. Wipe all parts of the product with a cloth that is damp with disinfectant. Only water-based disinfectants should be used. When disinfecting, the manufacturer’s application instructions
must be heeded.
Cushions
All cushions can be easily removed in a few simple steps. The 100% Trevira CS material is a high-quality fabric that is
washable up to 40 °C. The cushions should be washed separately; the Velcro straps must be covered before washing.
Please also refer to the care instructions.
We would like to point out that even high-quality fabrics can fade as a result of continuous and intensive sunlight or
frequent washing. The cushions are flame-retardant (EN 1021-2).
Velcro fasteners
In order to maintain the functionality of the Velcro fasteners, brush off the Velcro strips from time to time. When washing the Velcro straps, always close and cover them.
Warranty terms / CE label
Thomashilfen offers a 3-year warranty on all frame parts from the date of purchase. The warranty covers any claims
affecting the functioning. Excluded is damage that arises due to improper handling (e.g. overloading) as well as normal
wear.
The EASyS Advantage meets the requirements of European standard EN 12182 and EN 12183 and is provided with a CE
label.
We hope you enjoy your EASyS Advantage rehab stroller!
Serial / batch number
Item code
12

User manual – EASyS Advantage seat unit
Maintenance schedule – annual inspection / reutilization
Preparation
A user manual must accompany the product. If none is present, please order one from the manufacturer. Familiarize
yourself with the functions of the product. If you are not familiar with the product, read the instructions carefully before
the inspection. Clean the product before the inspection. If necessary, heed the care instructions and product-specific
inspection instructions in the user manual.
Item
Area
= Inspection performed
(I = Inspection / R = Reutilization)
Function Damage Warping Replace
1 Seat I/R I/R I/R
2 Angle adjustment I/R I/R I/R
3 Height adjustment I/R I/R I/R
4 Seat cushion I R
5 Missing caps and plugs I/R
6 Back I/R I/R I/R
7 Angle adjustment I/R I/R I/R
8 Height adjustment I/R I/R I/R
9 Back cushion I R
10 Push bar I/R I/R I/R
11 Push bar cover I R
12 Chassis I/R I/R I/R
13 Tires I I I R
14 Hand brake I/R I/R I/R
Options
15 Headrest I/R I/R I/R
16 Headrest cushion I R
17 Lateral trunk support I/R I/R I/R
18 Lateral trunk support cushions I R
19 Armrests I/R I/R I/R
20 Arm supports I R
21 Lateral hip support I/R I/R I/R
22 Lateral hip support cushions I R
23 Abduction wedge I/R I/R I/R
24 Abduction wedge cushion I R
25 Lateral tibia support I/R I/R I/R
26 Lateral tibia support cushion I R
27 Tray I/R I/R I/R
28 Belts I/R I/R I/R
Maintenance was carried out on:
Service and repairs to the rehab stroller may be carried out only by qualified personnel. The user of this rehab aid must
ensure that the required inspections / maintenance be carried out regularly and on schedule. If damage is evident, the
user must actively inform the qualified personnel and have the damage repaired immediately. Only original spare parts
may be used for repairs (the list of replacement / spare parts can be found in the download area on our website
www.thomashilfen.com).
Removal / attachment of spare parts must always be performed by qualified personnel only! If it is necessary to return
the product to your dealer, please make sure that you pack the chassis so that it can be transported without damage.
13

Member of the International
Support Association for the
Rehabilitation of Children and Youths e.V.
Item code: 95678, status: 2016-09-20, subject to technical alterations
Thomas Hilfen für Körperbehinderte GmbH & Co. Medico KG
Walkmühlenstraße 1 · D - 27432 Bremervörde · Germany
Phone: +49 (0) 4761 8860 · Fax: +49 (0) 4761 886-19
E-Mail: info@thomashilfen.de · www.thomashilfen.com
Specialist dealer / Institution
Tendercare Limited
 Loading...