


Railway System
I
Assembly Instructions
Build the Waterfall!
Item # 64061
tem # 64061
AGE: 3 YEARS +
AGE: 3 YEARS +
1
W2
2
X
Connect Upper Blue Waterfall Track (X)
to Blue Waterfall Door (Y).
4
V
Snap Lower Blue
Waterfall (V) into
Front Mountain
Wall-Left (W2).
3
Y
Snap Upper Blue
Waterfall Track (X)
into Front Mountain
Wall-Left (W2)
Stand up mountain wall.
Not for use with some TrackMaster™ engines.

Track Layout
O O
G2
U1
I
U2
J
J
J
G1
P
J
N
T
T
K
M M
J
N
Checklist (Items shown below not to scale)
A
X 1
G1
X 1
B
X 3
StraightHalf Straight Curve
G2
X 1
H
X 1
Q
D
C
X 1
R1
R2
U3
S
X
U4
W2
Y
W1
E
F
F
P
X 1
I
A
B
D
X 1
Sloped Straight 11/4 Valley Straight Cliff Side Curve
X 5
J
B B
E
X 1
K
X 1
F
C
F
X 3
X 6
L
N
X 2
(Level 2)
Special Function
Crossbeam
Center Bridge Arch
W1
X 1
Mountain Support
T
Rear Mountain
Wall--Right
M
X 2
Mountain Support
(Level 1)
R2
X 1
Mine Track
Trestle - Left
V
X 1
Lower Blue Waterfall Track Front Mountain Wall -- Right Front Mountain Wall -- Left
Rear Mountain
Wall--Left
Mountain Support
S
X 1
Bridge Track
(Level 3)
X 2
Mountain
Quarter Track
O
X 2
Mountain Sloped Curve
P
X 6
Crossbeam
U1
X 1
Rear Bridge
Arch -- Left
W2
X 1
Interior Mine Track
U2
X 1
Rear Bridge
Arch -- Right
X
X 1
Upper Blue
Waterfall Track
Mountain Sloped
Turn Out (R)
Q
X 1
U3
X 1
Front Bridge
Arch -- Right
Y
X 1
Blue Waterfall
Door
Top Cover
R1
X 1
Mine Track
Trestle - Left
U4
X 1
Front Bridge
Arch-- Left
Thomas

Make the Mountain!
1
W2
W1
Connect Front Mountain Wall-Right
(W1) to Front Mountain Wall-Left (W2).
3
2
R1
Connect Interior Mine Track (Q)
to Lower Blue Waterfall Track.
I
R2
Q
Insert Mountain Quarter Track (I) and
Special Function Cross Beam (H) into
Rear Mountain Wall-Right (G1).
Special
Function Crossbeam
G1
H

4
Connect Rear Mountain Wall-Right
to Interior Mine Track.
5
G1
K
Connect Mountain Slope
Turn Out (K) as shown.

Build the Bridge!
1
2
T
Attach Bridge Center Arches (T)
to Bridge Track. Insert pegs into
holes and slide toward waterfall.
S
Insert Bridge Track (S)
into Rear Mountain Wall-Right.
Leave Bridge Track angled down.
3
Attach left and right
Bridge Front Arches
(U3 and U4) to mountain.
U3
Snap Rear Mountain Wall-Left (G2)into place.
Raise Bridge Track and snap into place.
U4
G2
U2
U1

Create the Track Levels!
1
2
Level 3
Level 2
Level 1
M N O
Please note the height difference of supports
L
L
P
Connect each matching set of
Mountain Supports with crossbeams (P).
J
Use Mountain Slope Curves (J) to connect the
Rear Mountain Wall with Mountain Supports.
Snap track into crossbeams.
O
Level 3
O

3
Continue adding mountain
sloped curve track and mountain
supports as shown.
Level 3
O
M
Level 1
N
Level 2
J
D
For complete track
layout see diagram
Troubleshooting
1. For best performance Thomas (or other small engines) should not pull more than two train cars on this playset.
2. Larger engines (engines with tenders or R/C engines) should not pull more than one train car.
3. Some train cars are simply too heavy to be pulled up steep inclines. The following types of rolling stock are not
recommended for use with Action Cayon:
*Flip- feature rolling stock
*Rocky
*Hector
*Breakdown Train
Battery Instruction
Thomas
Squeeze both
sides together
to push in
tabs while
lifting up.
Requires 1 “AA” Battery (Not included)
OFF
ON
on following page.
STANDARD BATTERY PRECAUTION:
• Take special care to ensure batteries are inserted correctly.
observing (+) and (-) marks on battery and product, always follow
the battery manufacturer’s instructions.
• Removal and replacement of batteries should be carried out by an
adult or under adult supervision.
• Avoid short-circuiting the contacts in the battery compartment or
the battery terminals. Do not mix old & new batteries. Do not mix
alkaline, standard (carbon-zinc) or rechargeable (nickel-cadmium)
batteries.
• Remove dead batteries from product. Dispose of dead batteries
safely and never dispose of batteries in a fire.
• Remove batteries from product after use if storing for long
periods.
• Periodically examine product for signs of damage to electrical
parts and do not play with until damage has been properly
addressed.
• Replace the battery compartment per instruction.
• As with all small batteries, the batteries used with this toy should
be kept away from small children who might still put things in their
mouths. If a battery is swallowed, consult a physician
immediately.
• Please retain the above information for future reference.
HIT TOY COMPANY DOES NOT RECOMMEND THE USE OF
RECHARGEABLE BATTERIES FOR THIS PRODUCT.
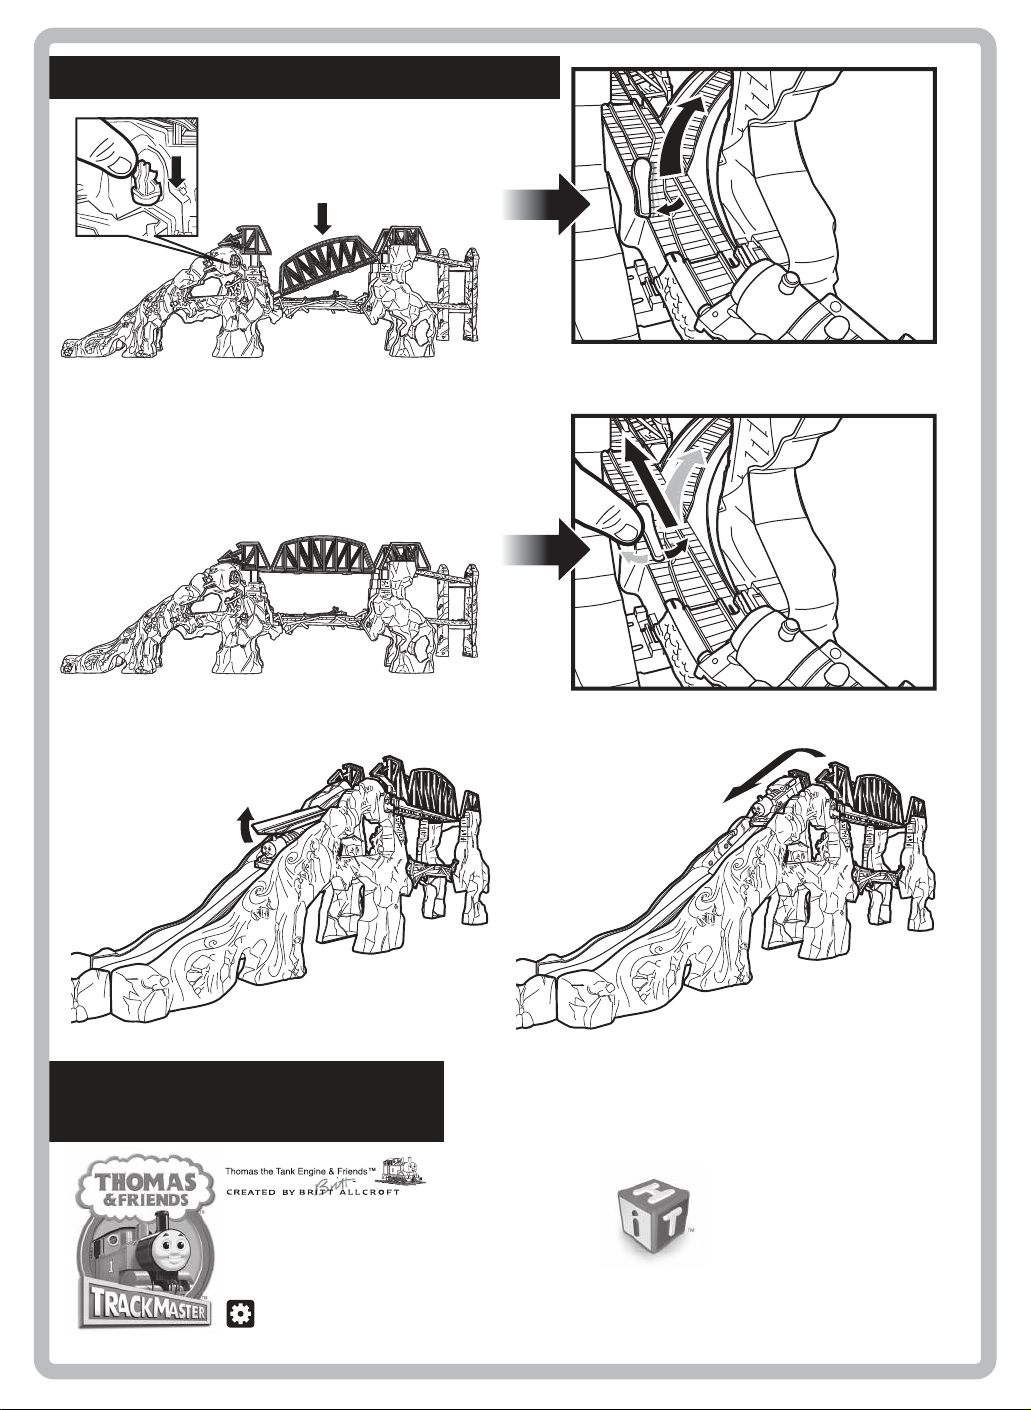
Action Canyon Instructions
Press switch to
collaspe bridge
If the bridge is not collapsed, children can decide
which direction Thomas goes by switching
the track lever right or left.
When the bridge is collapsed, the track lever will automatically
move to the left and Thomas will go up the hill.
When lever is switched to the right,
Thomas will go into the mine and
through the waterfall!
CAUTION:
To avoid the risk of entanglement, keep train
and vehicle wheels always from children’s hair.
Based on The Railway Series by The Reverend W Awdry. © 2008 Gullane (Thomas) Limited.
Thomas the Tank Engine & Friends and Thomas & Friends are trademarks of Gullane (Thomas) Limited.
Thomas the Tank Engine & Friends & Design is Reg. U.S. Pat. & Tm. Off.
© 2008 HIT Entertainment Limited. HIT and the HIT logo are trademarks of HIT Entertainment Limited.
www.thomastrackmaster.com
Please retain this address for reference.
ONLY compatible with other Thomas & Friends™
TrackMaster™ vehicles & playsets!
Railway System
NOTE: Adults should remove & discard rubber bands holding tracks together.
Move track lever to the left or the right when bridge is not collapsed.
When lever is switched to the left,
Thomas will go over the bridge and
down the waterfall!
Colors and decorations may vary. Before giving toy to child, please
dispose of packaging materials properly. This product conforms to
the safety requirements of ASTM F963.
HiT toy company
©2008 HIT TOY COMPANY
131 Sunnyside Blvd. Suite 106, Plainview, NY 11803
For questions about this or other HIT TOY products,
please contact us via e-mail at:
thomasconsumer@thomasandfriends.com
PRINTED IN CHINA
For more fun go to:
www.thomastrackmaster.com
64061-64100
 Loading...