

Page 1
THOMAS VAPORO
BUGGY
Gebrauchsanleitung 2
d
Instructions for Use 12
-
Mode d‘emploi 22
f
Gebruiksaanwijzing 32
t
RUS
`
Руководство по зксплуатации 42
Instrukcja obsługi 52
u
Instrucciones de uso 62
e
Használati utasitás 72
h
Kullanım Kılavuzu 82
z
Page 2

Inhalt Seite
1. Wichtige Sicherheitsbestimmungen . . . . . . . . . . . . . . . . . . . . . . . . . . . . . . . . . . . . . . . . . . . . . . . . . . . . 3/4
1.1 Spannungsversorgung ......................................................................3
1.2 Besondere Personengruppen ................................................................. 3
1.3 Bedienung des Geräts ....................................................................3/4
1.4 Wartung und Reinigung ..................................................................... 4
2. Einführung
2.1 Vielen Dank .............................................................................. 4
2.2 Auspacken des Geräts ...................................................................... 4
2.3 Teileidentifizierung .........................................................................4
2.4 Abbildungen: Dampfreiniger und Zubehör ......................................................5
3. Inbetriebnahme
3.1 Montage der Zubehörteile .................................................................. 6
3.1.1 Dampfschlauch ....................................................................... 6
3.1.2 Verlängerungsrohre ................................................................... 6
3.1.3 Bodendüse .......................................................................... 6
3.1.4 Zubehöradapter ....................................................................6/7
3.1.5 Punktstrahldüse ....................................................................... 7
3.1.6 Schaber ............................................................................7
3.1.7 Nylonbürsten ........................................................................ 7
3.1.8 Metallbürste.......................................................................... 7
3.1.9 Fensterdüse ..........................................................................7
3.2 Auffüllen des Wassertanks ................................................................... 7
4. Bedienung des Geräts
4.1 Anschluss an die Netzversorgung .............................................................8
4.2 Benutzung des Dampfreinigers .............................................................8/9
4.3 Nachfüllen von Wasser ..................................................................... 9
4.4 Außerbetriebnahme und Aufbewahrung ........................................................ 9
D
5. Allgemein
5.1 Reinigung und Wartung ..................................................................... 9
5.2 Entsorgung.............................................................................9/10
5.3 Fehlerbehebung ..........................................................................10
5.4 Technische Daten .........................................................................10
6. Garantie................................................................................11
Warnung: Dieser Hinweis bezieht sich auf Gefahren für den Benutzer.
Achtung: Dieser Hinweis bezieht sich auf Gefahren für das Gerät oder Objekte.
2
Page 3

1. Wichtige Sicherheitsbestim
1.1 Spannungsversorgung
• Stellen Sie vor dem Anschließen des Dampfreinigers
an das Stromnetz sicher, dass die Spannungsangabe auf dem Typenschild mit der Spannung an Ihrer
Steckdose übereinstimmt.
• Schließen Sie das Gerät ausschließlich an eine
ordnungsgemäß geerdete Steckdose an.
• Der Stecker des Geräts muss in die Steckdose passen. Es dürfen keinerlei Änderungen am Stecker
vorgenommen werden. Verwenden Sie bei Geräten,
die mit einem Schutzleiter ausgestattet sind, keine
Netzadapter. Unveränderte Stecker und passende
Steckdosen reduzieren das Risiko von Stromschlägen.
• Es wird empfohlen, das Gerät nur über Steckdosen zu
betreiben, die durch einen Fehlerstromschutzschalter
gesichert sind. Wenden Sie sich ggf. an einen Elektriker.
• Berühren Sie den Netzstecker unter keinen Umständen mit nassen Händen.
• Trennen Sie das Gerät immer vom Stromnetz, indem
Sie den Netzstecker aus der Steckdose ziehen.
Ziehen Sie dabei niemals am Kabel.
• Eine defekte Anschlussleitung ist ausschließlich durch
ein Kabel mit identischen Anschlusswerten zu ersetzen. Schicken Sie das Gerät zur Reparatur an die
THOMAS-Kundendienststelle.
• Stellen Sie bei der Verwendung eines Verlängerungskabels sicher, dass die Anschlusswerte mit denen des
Dampfreinigers übereinstimmen. Wenden Sie sich
ggf. an einen Fachhändler.
• Stellen Sie sicher, dass das Kabel keine Stolpergefahr
darstellt. Es darf nicht geknickt oder eingeklemmt
werden.
1.2 Besondere Personengruppen
• Dieses Gerät kann von Personen mit
mungen
reduzierten physischen, sensorischen
oder mentalen Fähigkeiten oder Man
gel an Erfahrung und/oder Wissen
benutzt werden, wenn sie beauf
sichtigt oder bezüglich des sicheren
Gebrauchs des Gerätes unterwiesen
wurden und die daraus resultierenden
Gefahren verstanden haben. Kinder
dürfen nicht mit dem Gerät spielen.
• Halten Sie das Gerät außerhalb der Reichweite von
Kindern, während es eingeschaltet ist oder abkühlt.
• Lassen Sie Kinder nicht mit dem Verpackungsmaterial
(Plastikfolie) spielen, es besteht Erstickungsgefahr.
1.3 Bedienung des Geräts
Vorsicht! Heißer Dampf! Verbrühungsgefahr!
• Reinigen Sie aus Sicherheitsgründen keine elektrischen
Geräte wie Backöfen, Mikrowellengeräte, Kühlschränke, Schalter und Leuchten mit dem Dampfreiniger.
• Überprüfen Sie das Gerät, die Kabel sowie die Zubehörteile regelmäßig auf Beschädigungen. Nehmen
Sie beschädigte Geräte oder Zubehörteile nicht
in Betrieb.
• Richten Sie den Dampfreiniger niemals auf Menschen, Tiere oder Pflanzen (Verbrühungsgefahr)!
Richten Sie den Dampfreiniger nicht auf elektrische
Anlagen oder Leitungen.
• Lassen Sie das Gerät nicht unbeaufsichtigt. Nach
Benutzung und bei Verlassen des Arbeitsbereichs ist
das Gerät immer auszuschalten und der Netzstecker
aus der Steckdose zu ziehen.
• Das Gerät ist mit einem Thermostat und einer Thermosicherung zum Schutz vor Überhitzung ausgestattet.
• Zubehörteile werden bei Gebrauch heiß; lassen Sie
sie deshalb vor dem Wechsel abkühlen.
• Berühren Sie keine heißen Flächen am Gerät. Es ist normal, dass der Dampfreiniger sich im Betrieb erwärmt.
• Schrauben Sie während des Betriebs niemals den
Tankverschluss ab. Der Tank steht unter Druck.
• Das Gerät darf während des Betriebs nicht um mehr
als 45° geneigt werden.
• Tauchen Sie das Gerät nie in Wasser oder andere
Flüssigkeiten ein.
• Der Dampfreiniger ist nur für den Gebrauch im Innenbereich und für Haushaltszwecke, nicht aber für den
gewerblichen Bedarf geeignet.
• Setzen Sie das Gerät niemals extremer Sonnenbestrahlung, Frost oder anderen Witterungseinflüssen
aus (Regen etc.).
Verwenden Sie das Gerät nur in Behältnissen/Becken
•
die nicht mit Wasser oder sonstigen Flüssigkeiten
gefüllt sind.
-
• Betreiben Sie das Gerät nicht mit leerem Wassertank.
Füllen Sie immer rechtzeitig Wasser nach.
• Leeren Sie den Wassertank, wenn das Gerät nicht
verwendet wird.
• Füllen Sie niemals etwas anderes als Wasser in den
Tank. Geben Sie keine Zusatzstoffe (z. B. Parfüm,
Fleckenentferner oder alkoholhaltige Mittel) in das
Wasser, da diese das Gerät beschädigen oder seine
Verwendung gefährlich machen.
• Ziehen Sie immer den Netzstecker aus der Steckdose, und lassen Sie das Gerät vollständig abkühlen,
bevor Sie Wasser nachfüllen.
• Überfüllen Sie den Tank nicht. Überschreiten Sie nicht
die vorgeschriebene maximale Füllhöhe. Verwenden
,
3
Page 4

Sie den im Lieferumfang enthaltenen Messbecher und
Trichter.
• Stellen Sie vor Gebrauch sicher, dass die Verschlusskappe des Wassertanks fest verschraubt wurde.
• Tragen Sie das Gerät ausschließlich am Griff.
• Verwenden Sie den THOMAS VAPORO Buggy nicht
für die Behandlung von Kleidungsstücken, die noch
am Körper getragen werden.
• Es ist möglich, dass gelegentlich etwas Wasser
aus der Düse tropft. Das ist vollkommen normal.
Es handelt sich dabei lediglich um Kondenswasser.
• Die Kraft und Wärme des Dampfs können sich auf
einige Materialien nachteilig auswirken. Prüfen Sie
immer zuerst an einer verdeckten Stelle, ob eine
Oberfläche für die Behandlung mit dem Gerät
geeignet ist.
• Fügen Sie bei Weitergabe des Dampfreinigers diese
Bedienungsanleitung bei.
1.4 Wartung und Reinigung
• Verwenden Sie ausschließlich Originalzubehör,
das im Lieferumfang enthalten ist.
• Reparieren Sie Schäden am Gerät, am Zubehör oder
an der Netzanschlussleitung niemals selbst. Lassen
Sie das Gerät nur durch eine autorisierte Kundendienststation prüfen und instand setzen. Veränderungen am Gerät können Ihre Gesundheit gefährden.
Sorgen Sie dafür, dass nur Original-Ersatzteile und
-Zubehör verwendet werden.
• Schalten Sie das Gerät vor der Reinigung oder
Wartung immer aus, entfernen Sie den Netzstecker,
und lassen Sie den Dampfreiniger abkühlen.
2. Einführung
2.1 Vielen Dank
Wir gratulieren Ihnen zum Erwerb des THOMAS
VAPORO Buggy. Ihr neuer Dampfreiniger ist ein vielseitiger Helfer für eine Vielzahl von Reinigungsaufgaben.
Sie können nun allein durch hohe Temperaturen hartnäckigen Schmutz schnell und vollständig von glatten
Oberflächen entfernen, z. B. von Wand- und Bodenfliesen, Arbeitsflächen, Kochutensilien, Fenstern und Spiegeln, und dabei schädliche Bakterien abtöten. Damit
ist es möglich, Anhaftungen, Schimmel, Fett, Seifenrückstände sowie festen und losen Schmutz vollständig ohne
chemische Lösungsmittel auf umweltverträgliche Weise
zu entfernen.
Wir wünschen Ihnen viel Freude beim Gebrauch.
2.2 Auspacken des Geräts
Packen Sie den Dampfreiniger und sämtliche Zubehörteile aus. Überprüfen Sie den Inhalt auf Vollständigkeit.
Bewahren Sie, wenn möglich, die Karton und die Innenverpackung auf, damit das Gerät beim Transport oder
bei einer Rückgabe im Gewährleistungsfall geschützt ist.
Entsorgen Sie sämtliche nicht mehr gebrauchten Verpackungsmaterialien ordnungsgemäß. Wenden Sie sich
unverzüglich an Ihren Händler, falls Sie beim Entpacken
Transportschäden feststellen. Das Gerät darf unter keinen Umständen in Betrieb genommen werden, falls es
dauerhafte Beschädigungen aufweist.
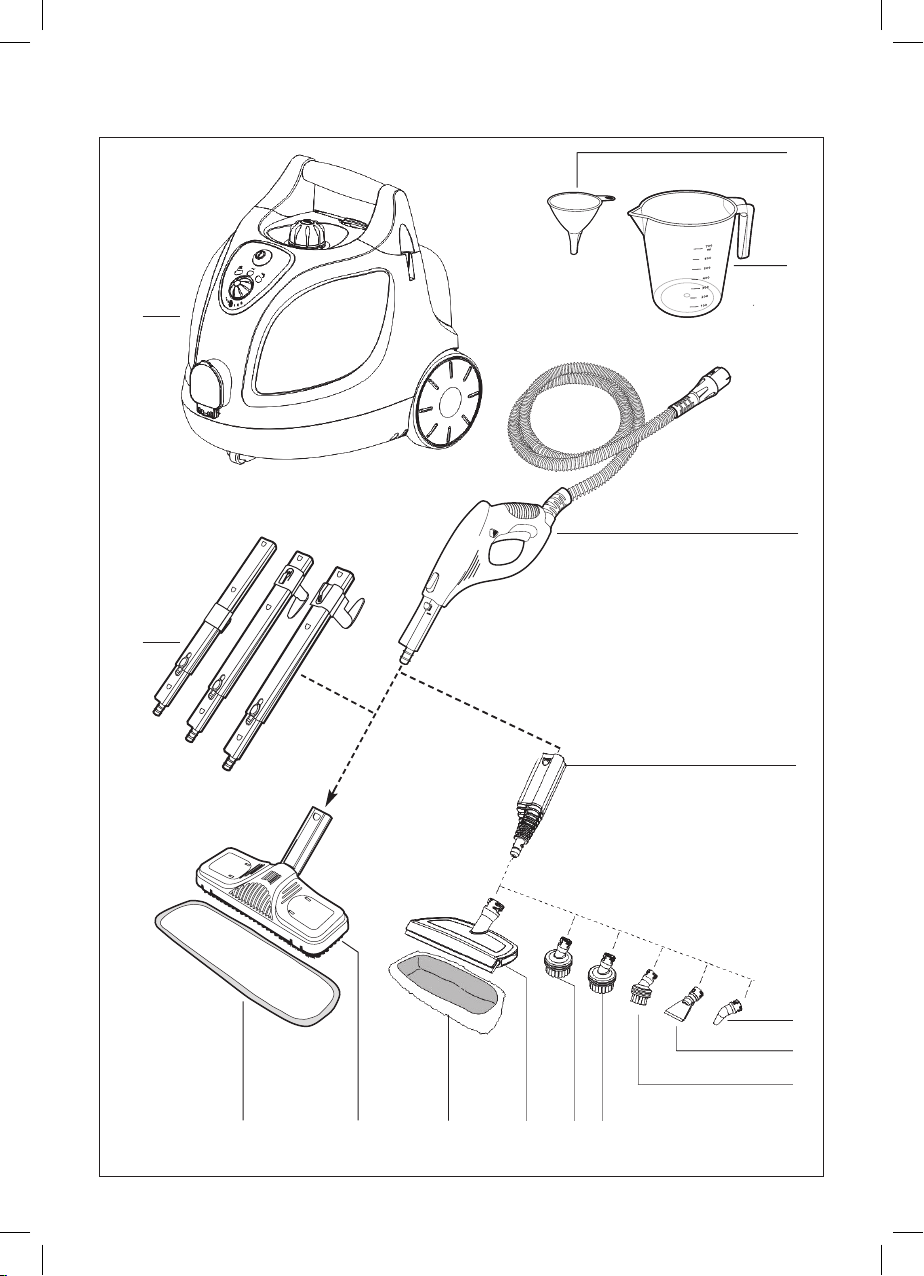
2.3 Teileidentifizierung
1 = Trichter
2 = Messbecher
3 = Dampfpistole mit Dampfschlauch und Dampfanschluss
4 = Zubehöradapter
5 = Punktstrahldüse
6 = Schaber
7 = Nylonbürste, klein
8 = Nylonbürste, groß
9 = Metallbürste
10 = Fensterdüse
11 = Reinigungstuch für Fensterdüse
12 = Bodendüse
13 = Reinigungstuch für Bodendüse
14 = 3 Verlängerungsrohre
15 = Dampfreiniger
4
Page 5

2.4 Abbildungen: Dampfreiniger und Zubehör
15
14
1
2
3
13 12 11 10 9 8
4
5
6
7
5
Page 6
3. Inbetriebnahme
3.1 Montage der Zubehörteile
Vor der Verwendung des THOMAS VAPORO Buggy
muss der Dampfschlauch mit der Dampfpistole an das
Gerät angeschlossen und das gewünschte Zubehörteil
angebracht werden. Der THOMAS VAPORO Buggy
verfügt über eine Zubehörbox, in der sich Zubehöradapter, Punktstrahldüse, Schaber, Nylonbürste klein,
Nylonbürste groß, Metallbürste, Fensterdüse und die
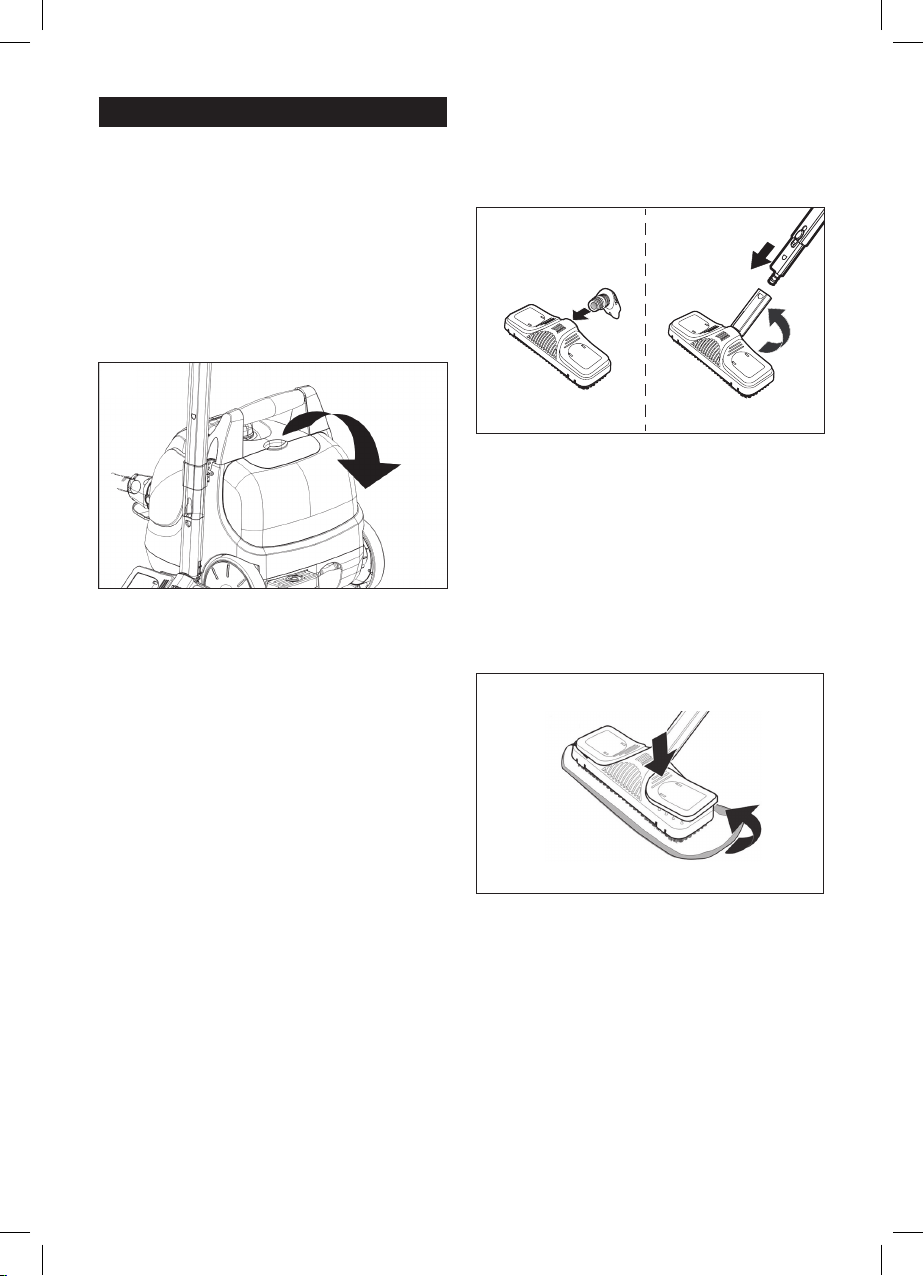
Reinigungstücher befinden. Öffnen Sie die Zubehörbox,
indem Sie den blauen Verriegelungsgriff nach oben ziehen und die transparente Abdeckung der Zubehörbox
nach vorne abklappen (Abbildung 1).
1
Entnehmen Sie das erforderliche Zubehörteil, und schließen Sie die Abdeckung. Schieben Sie den Riegel der
Abdeckung in die Aussparung, und drücken Sie ihn fest
nach unten, bis er einrastet.
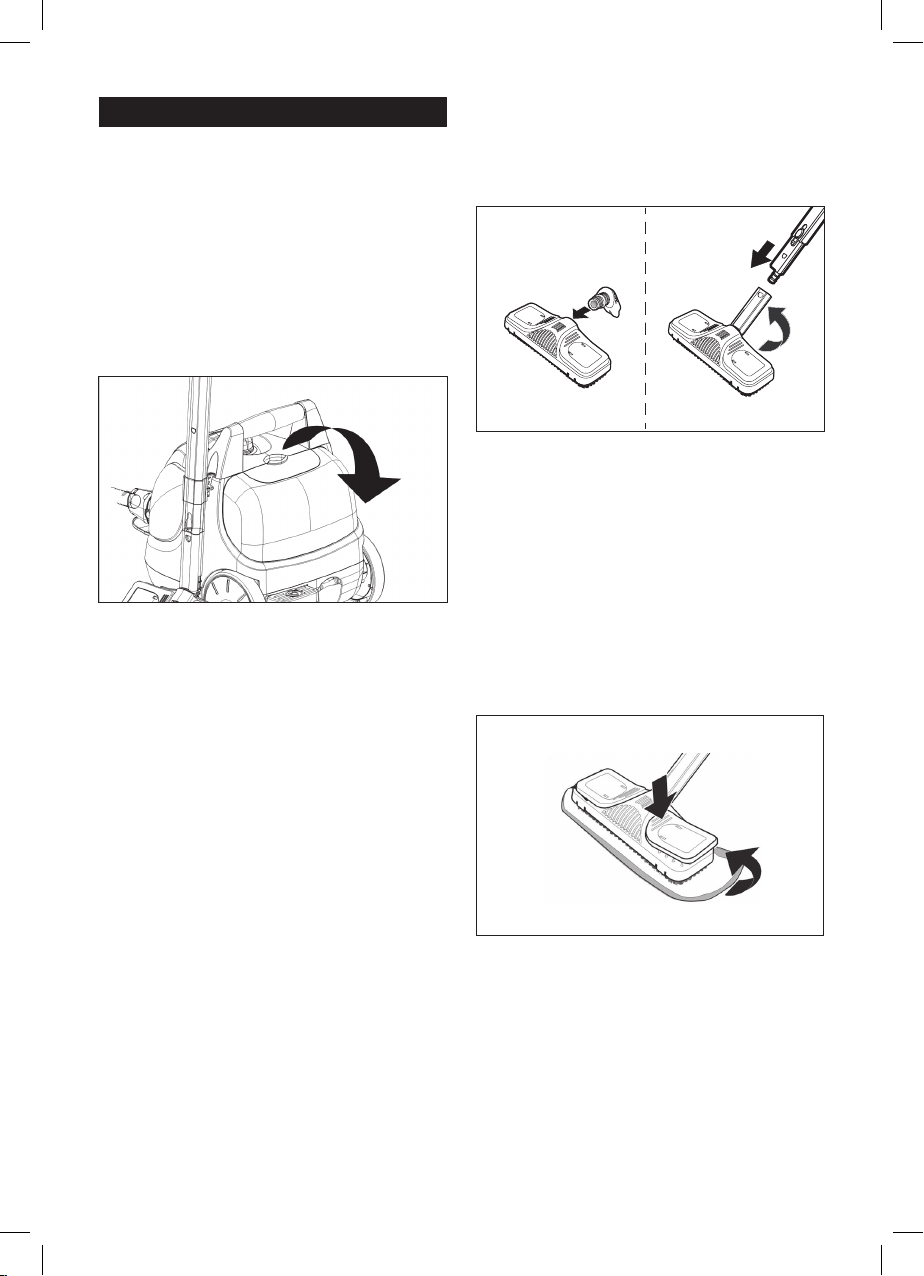
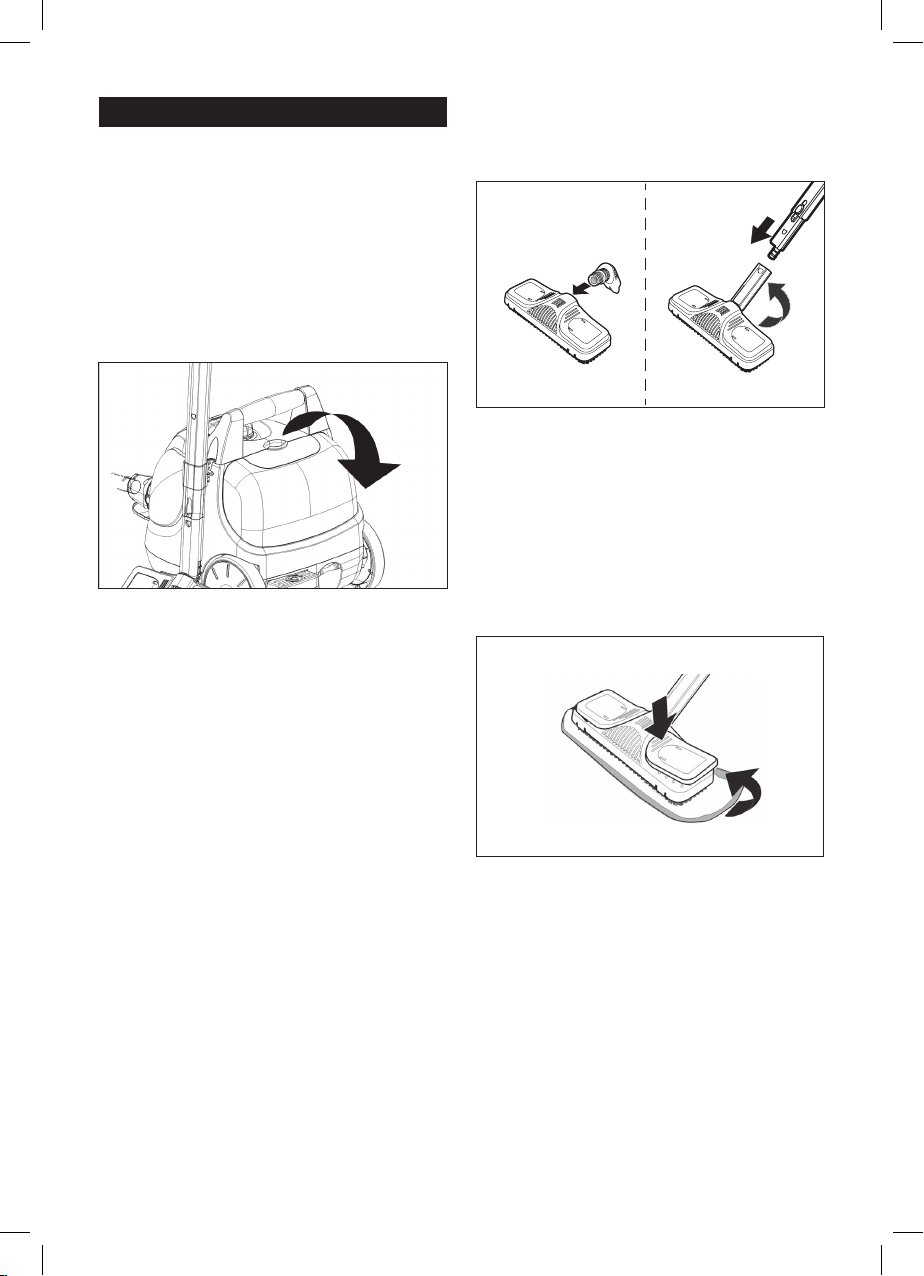
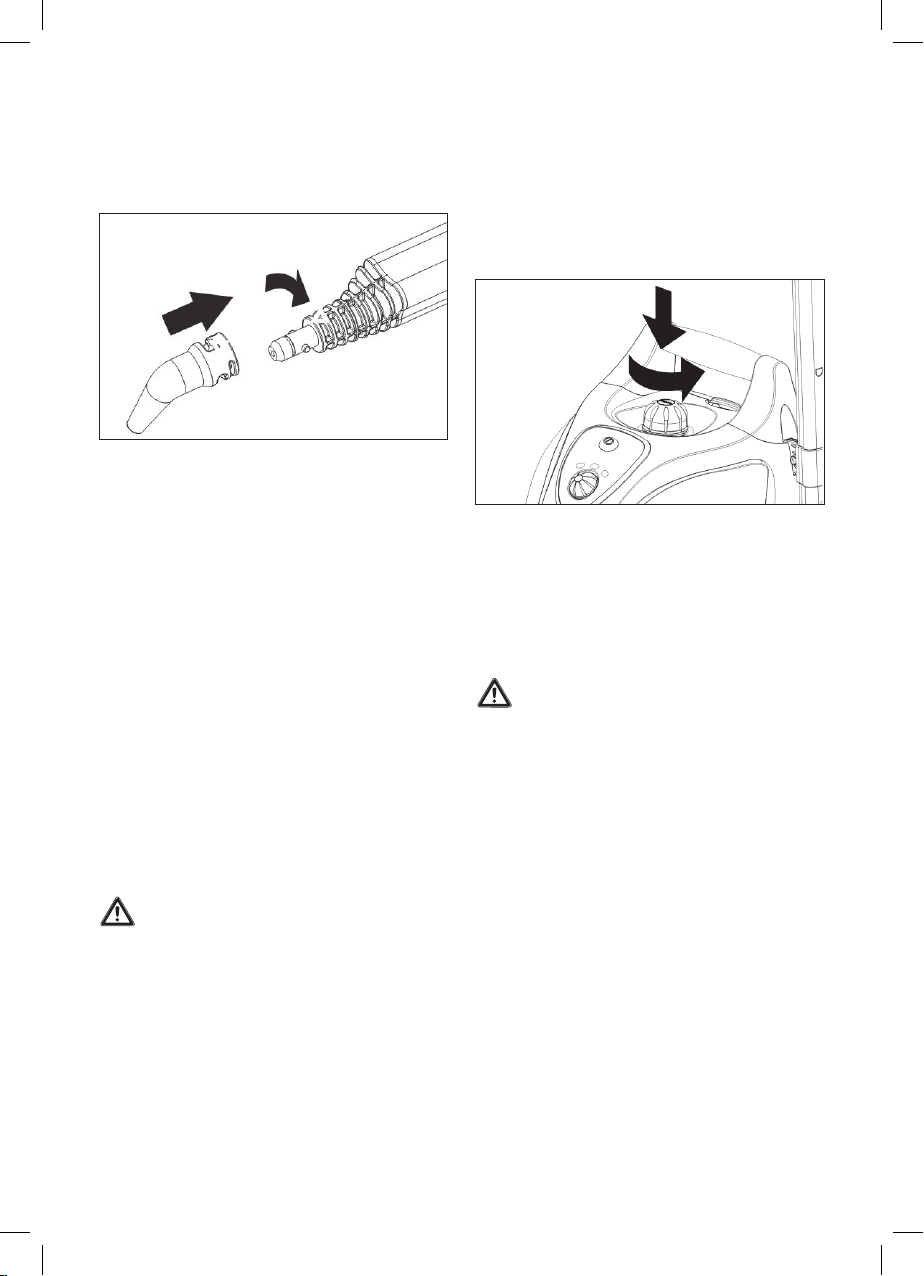
3.1.3 Bodendüse (12+13)
Die Bodendüse wird aus verpackungstechnischen Gründen mit einem separaten Anschlussstück ausgeliefert.
Setzen Sie die Anschlussstücke wie abgebildet zusammen (Abbildung 2).
2
Bringen Sie die Bodendüse am Ende des Verlängerungsrohrs an. Stellen Sie sicher, dass die Düse einrastet. Die
Bodendüse ist ideal für die Reinigung von abwaschbaren
Wand- und Bodenbelägen geeignet. Sie kann sowohl mit
als auch ohne Reinigungstuch verwendet werden. Es wird
jedoch empfohlen, das Reinigungstuch zu verwenden, um
die Beläge bei empfindlichen Oberflächen (z. B. Holz
oder Linoleum) zu schützen. Setzen Sie die Bodendüse
mittig auf das Reinigungstuch, drücken Sie die Innenseiten
der Klammern nach unten, legen Sie das überstehende
Reinigungstuch ein und lassen die Klammern wieder los
(Abbildung 3). Zum Entfernen der Bodendüse drücken
Sie den entsprechenden Entriegelungsknopf und ziehen
die Düse mit einer Abwärtsbewegung ab.
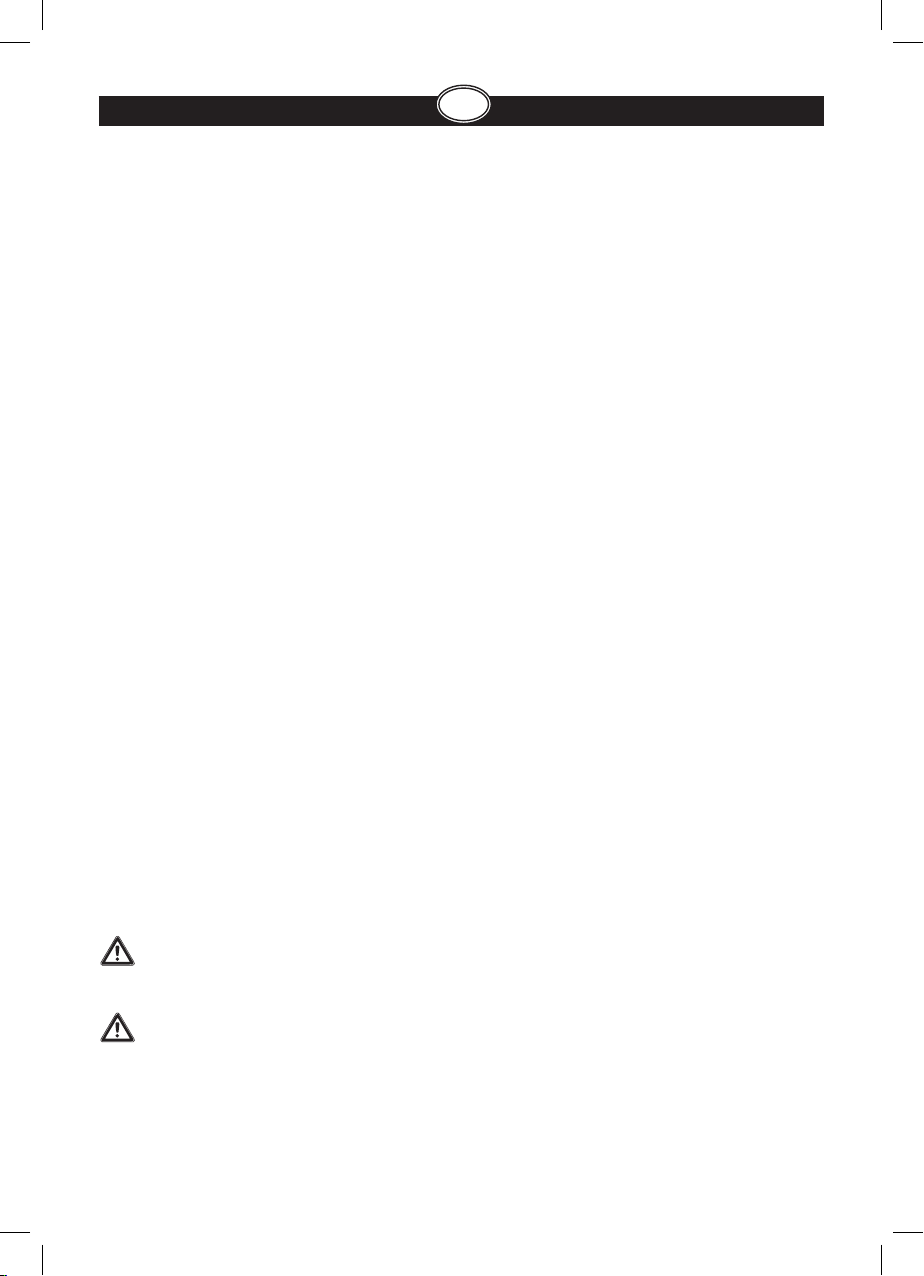
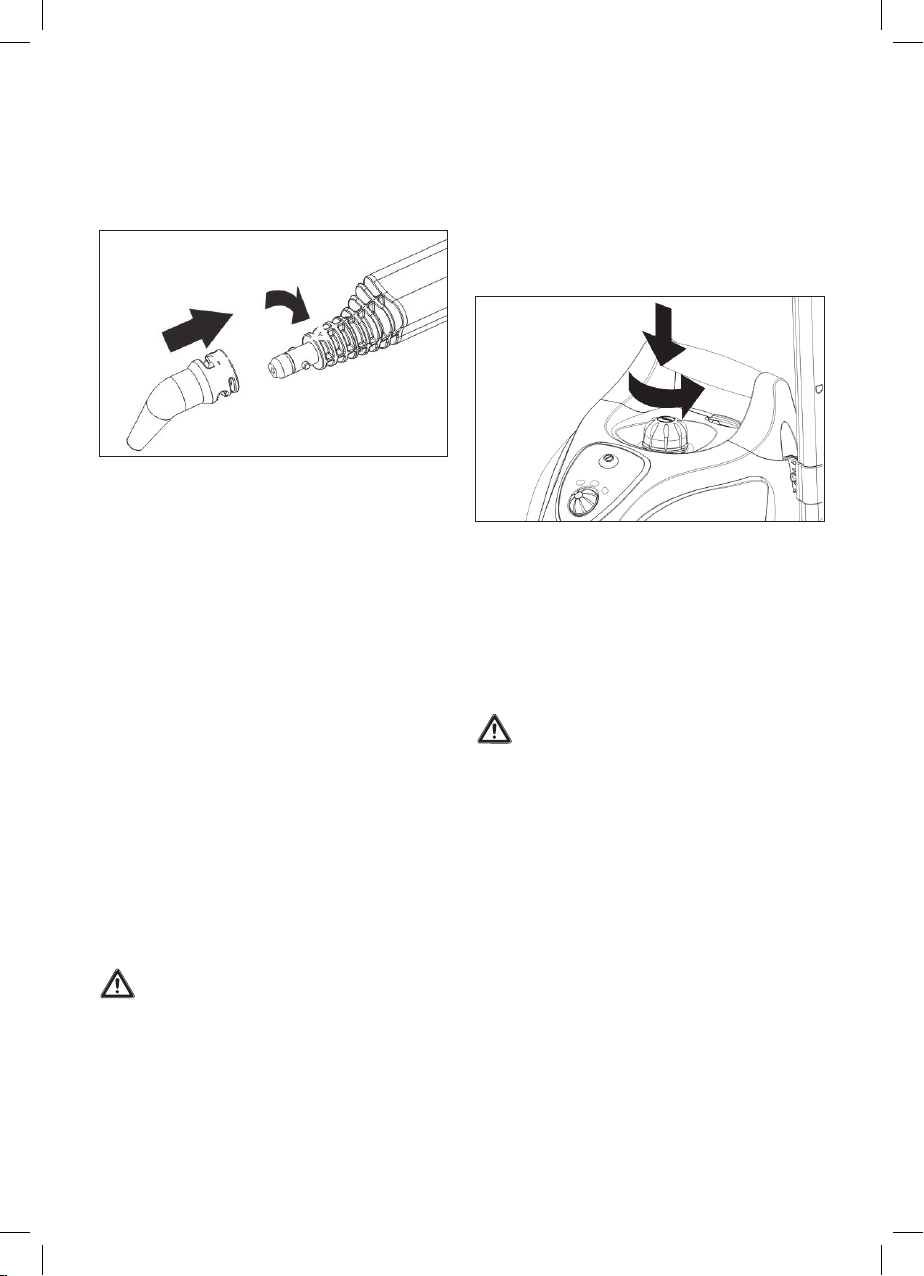
3.1.1 Dampfschlauch (3)
Schließen Sie zunächst den Dampfschlauch an den Dampfanschluss an der Vorderseite des THOMAS VAPORO Buggy
an. Klappen Sie hierfür die Gehäuseklappe nach unten,
und drücken Sie das Anschlussstück am Dampfschlauch
fest in den Anschluss, bis es einrastet.
Zum Entfernen des Dampfschlauchs drücken Sie beide
Entriegelungsknöpfe an der rechten und linken Seite
des Anschlussstücks und ziehen den Schlauch aus dem
Dampfanschluss heraus.
3.1.2 Verlängerungsrohre (14)
Bringen Sie die Verlängerungsrohre an, wenn der
Dampfreiniger zur Reinigung von Böden oder schwer
zugänglichen Bereichen verwendet werden soll.
Stecken Sie zu diesem Zweck das offene Ende des
Rohrs auf die Dampfpistole, bis der Entriegelungsknopf
einrastet. Schließen Sie je nach Bedarf zwei oder alle
drei Verlängerungsrohre an. Zum Entfernen des Verlängerungsrohrs drücken Sie den entsprechenden Entriegelungsknopf und ziehen die Rohre mit einer Abwärtsbewegung auseinander.
6
3
3.1.4 Zubehöradapter (4)
Der Dampfreiniger verfügt über zahlreiche Aufsatzdüsen, um eine möglichst effektive und gründliche Reinigung unterschiedlicher Oberflächen zu ermöglichen.
Montieren Sie zunächst den Zubehöradapter, damit das
Anbringen dieser Aufsätze am Dampfschlauch möglich
ist. Der Zubehöradapter kann sowohl an der Dampfpistole als auch am Ende eines oder mehrerer Verlängerungsrohre angebracht werden.
Stellen Sie sicher, dass der Adapter befestigt und
eingerastet ist. Drücken Sie den entsprechenden Entriegelungsknopf, und ziehen Sie die Rohre mit einer
Page 7
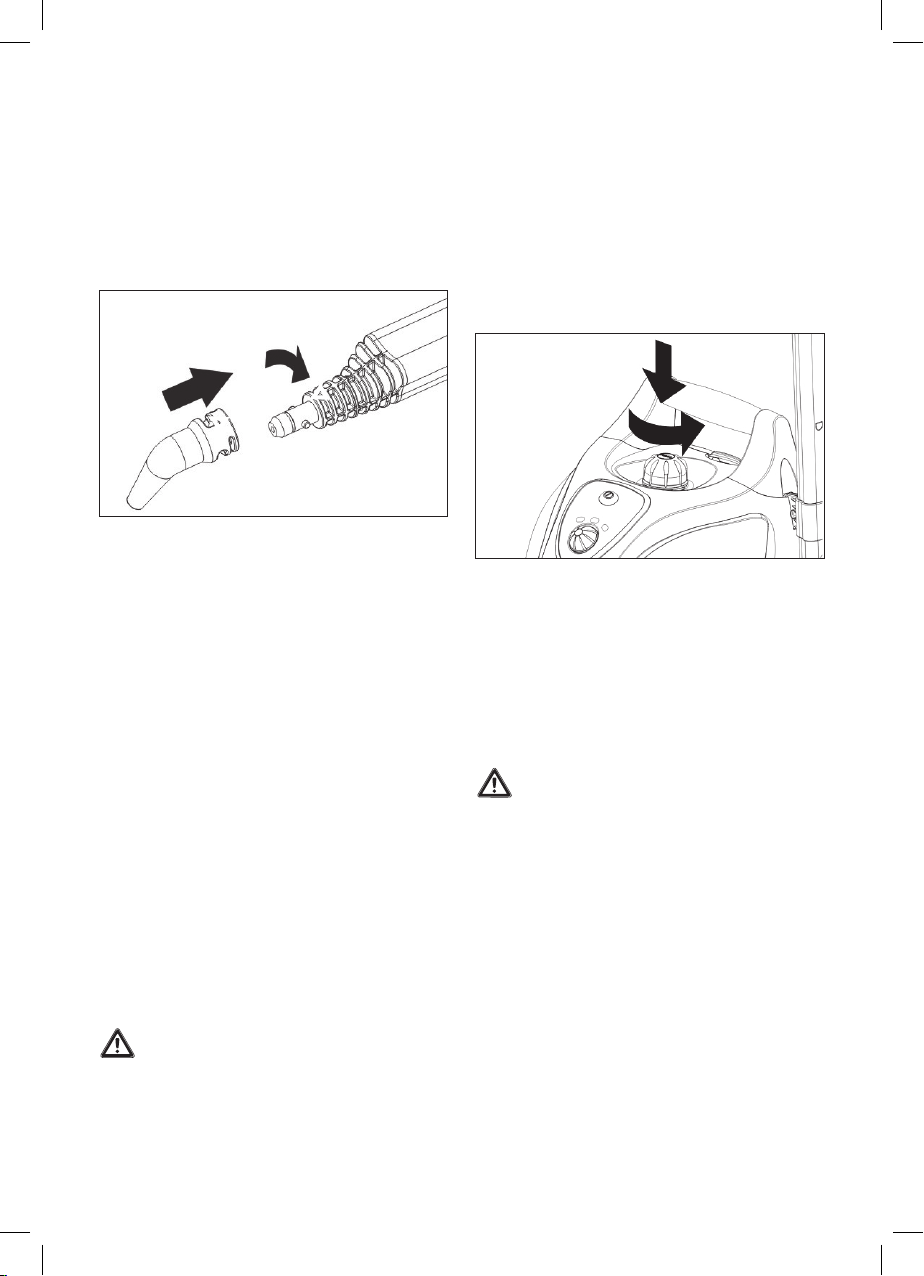
Abwärtsbewegung auseinander, um den Adapter wieder zu entfernen.
Der Zubehöradapter kann mit der Punktstrahldüse, dem
Schaber, einer der Bürstendüsen oder der Fensterdüse
verwendet werden. Schieben Sie die gewählte Düse so
auf den Zubehöradapter, dass beide Pfeile auf einer
Linie zueinander zeigen und drehen Sie sie mit einer
Vierteldrehung im Uhrzeigersinn fest (Abbildung 4).
Führen Sie die beschriebenen Schritte in umgekehrter
Reihenfolge aus, um die Düse abzunehmen.
4
3.2 Auffüllen des Wassertanks
Der THOMAS VAPORO Buggy ist mit einem integrierten
Wassertank mit einem Fassungsvermögen von 1,6 l
ausgestattet. Schalten Sie den Dampfreiniger aus, und
ziehen Sie den Netzstecker aus der Steckdose. Der
Dampfreiniger muss beim Auffüllen bzw. Nachfüllen
von Wasser immer vom Netz getrennt sein. Schrauben
Sie den Tankverschluss (Abbildung 5) ab, indem Sie
den Verschluss nach unten drücken und ihn gleichzeitig
entgegen dem Uhrzeigersinn drehen. Verwenden Sie
zum Befüllen des Wassertanks den im Lieferumfang
enthaltenen Trichter und Messbecher.
5
3.1.5 Punktstrahldüse (5)
Mithilfe dieser Düse können Sie schwer zugängliche
Bereiche wie Ecken, Fugen und Toiletten problemlos
reinigen.
3.1.6 Schaber (6)
Mit dem Schaber lässt sich hartnäckiger Schmutz
und Tapete leicht entfernen.
3.1.7 Nylonbürsten (7/8)
Zur Reinigung von starken Verschmutzungen von
z.B. Jalousien, Heizkörpern, Ventilen.
3.1.8 Metallbürste (9)
Die Metallbürste ist für starke Verschmutzungen auf
weniger empfindlichen Materialien vorgesehen,
z. B. Edelstahl oder Stein.
3.1.9 Fensterdüse (10+11)
Perfekt zum Reinigen von großen Glasflächen
(z.B. Fensterscheiben, Spiegel, u. ä.), wahlweise
mit dem entsprechenden Reinigungstuch (11).
Verwenden Sie nur reines Wasser ohne jegliche Zusatzmittel, wie z. B. Parfüm, Reinigungsmittel, Alkohol, da
diese das Gerät beschädigen und seine Verwendung
gefährlich machen können. Es wird empfohlen, destilliertes Wasser zu verwenden, um bei sehr hartem Wasser
(mit Werten von mehr als 2,5 mmol/l oder 21 °dH)
Kalkablagerungen zu verhindern. Kochen Sie andernfalls das Wasser vor Gebrauch des Geräts ab, um seine
Lebensdauer zu verlängern.
Achtung: Überschreiten Sie beim
Auffüllen des Tanks nicht die
maximale Füllmenge von 1,6 l.
Schrauben Sie den Tankverschluss wieder fest, indem Sie
ihn nach unten drücken und im Uhrzeigersinn drehen.
Tipp: Die Aufheizzeit kann verkürzt werden,
indem Sie zum Auffüllen des Tanks warmes
Wasser verwenden.
Achtung: Bei einem Temperaturschock
besteht Bruchgefahr! Wärmen Sie Glasflächen vor der Dampfreinigung vor,
indem Sie sie in einem weiten Bogen
aus einer Entfernung von 20–25 cm mit
Dampf einsprühen. Verkürzen Sie allmählich den Abstand auf 10–15 cm zur
weiteren Erwärmung der Glasfläche.
7
Page 8
4. Bedienung des Geräts
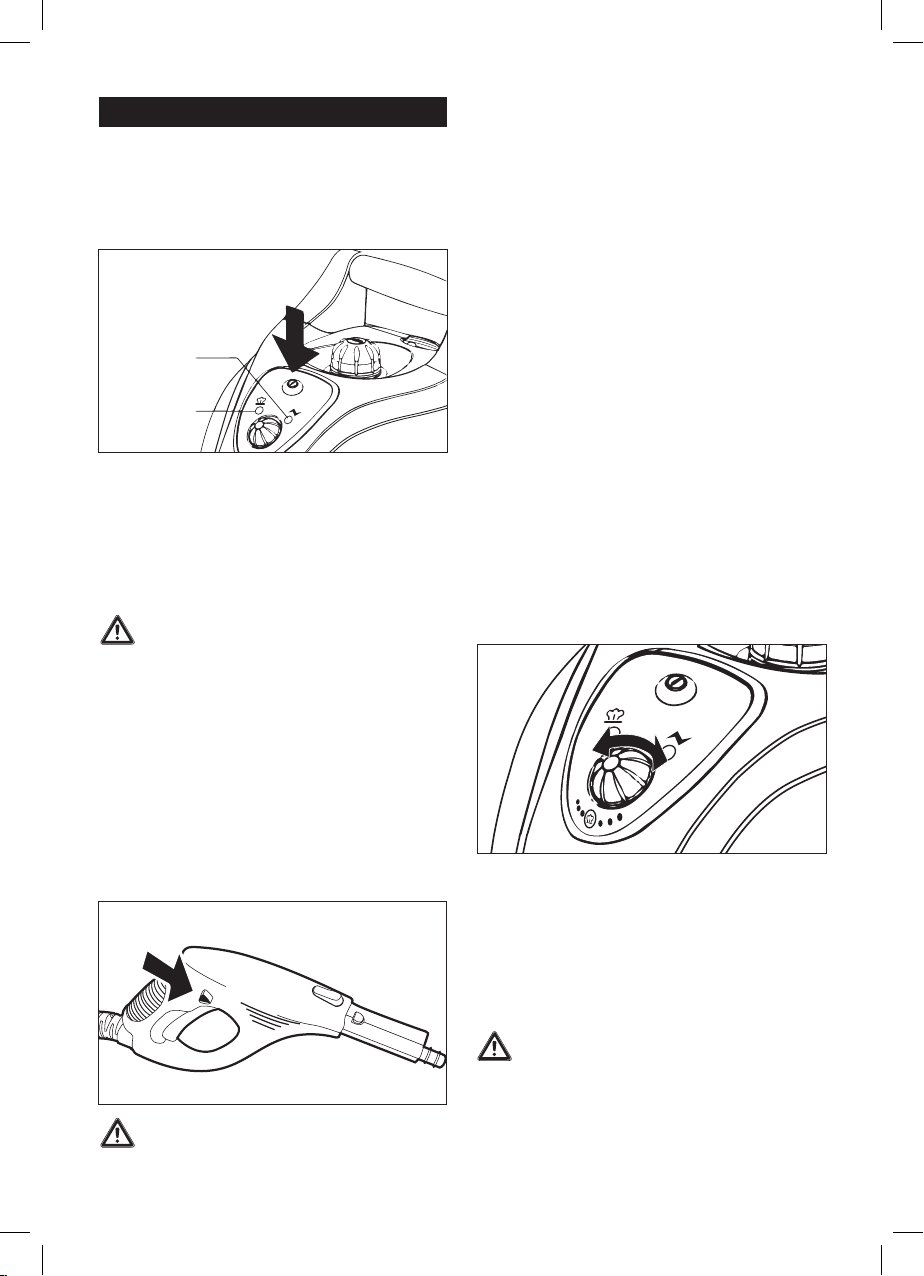
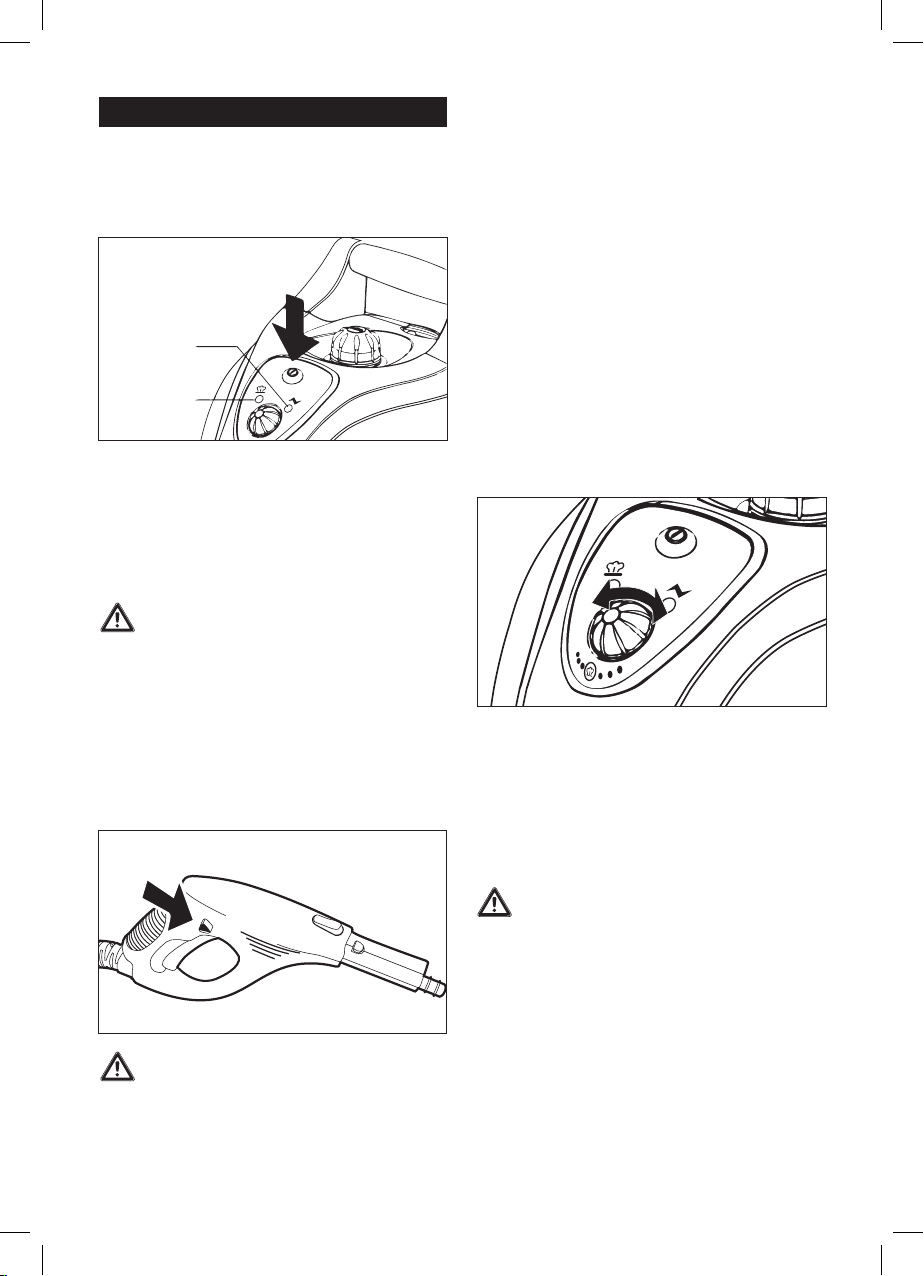
4.1 Anschluss an die Netzversorgung
Stecken Sie den Netzstecker des Dampfreinigers in eine
ordnungsgemäß angebrachte Steckdose, und schalten
Sie das Gerät durch Drücken des Ein-/Aus-Schalters
(Abbildung 6) ein.
6
Ein/Aus
Betriebskontrollleuchte
Aufheizkontrollleuchte
Oberflächen oder Stoffe, um zu überprüfen, ob sie heißem Dampf ausgesetzt
werden können.
– Der Einsatz von Dampf kann bemaltes/lackiertes Holz
bleichen.
– Dampf kann glänzenden Kunststoff entfärben.
– Acryl, Samt und Leinen reagieren äußerst empfindlich
auf die Temperatur von Dampf.
– Wenden Sie den Dampfreiniger nicht auf Dralon-
Fasern an, ohne das Material zuvor an einer verdeck-
ten Stelle zu testen.
Aus nachvollziehbaren Gründen kann der Hersteller nicht
für Schäden an Objekten, Materialien, Menschen, Tieren
oder Pflanzen verantwortlich gemacht werden, die infolge von ungeeigneter Verwendung von heißem Dampf
oder unsachgemäßem Gebrauch des Geräts auftreten.
Nach Ausschalten der Dampffunktion tritt einige Sekunden weiter Dampf aus.
Die orangefarbene Betriebsleuchte (Abbildung 6) leuchtet auf und der Dampfreiniger beginnt aufzuheizen. Die
Betriebstemperatur wird nach etwa 11 Minuten erreicht;
daraufhin erleuchtet die grüne Aufheizkontrollleuchte.
Das Gerät ist nun betriebsbereit.
4.2 Benutzung des Dampfreinigers
Warnung: Richten Sie den Dampfauslass
der Dampfpistole niemals auf Menschen,
Tiere, Pflanzen oder elektrische Anlagen
(z. B. Ofen oder Steckdose). Es besteht
die Gefahr von Verbrühungen oder
Stromschlägen!
Entsperren Sie die Verriegelungsvorrichtung (Kindersicherung), indem Sie den dreieckigen Stift auf der rechten Seite der Dampfpistole nach links schieben (Abbildung 7). Bei Betätigung der Dampftaste tritt heißer
Dampf aus. Halten Sie die Dampfpistole zunächst über
ein altes Stück Stoff, um anfänglich austretendes Sprühwasser aufzunehmen. Drücken Sie die Dampftaste, bis
der Dampf gleichmäßig austritt. Anschließend kann die
Reinigung beginnen.
7
Achtung: Testen Sie den Dampfreiniger
immer zuerst an unauffälligen bzw. nicht
sichtbaren Stellen der zu reinigenden
8
Richten Sie den Dampfauslass nicht über längere Zeit
auf eine Stelle. Lösen Sie den Schmutz, indem Sie den
Dampfstrahl vor und zurück bewegen. Die Durchsatzrate des austretenden Dampfes kann durch Drehen des
Dampfreglers reguliert und an den Verschmutzungsgrad
angepasst werden. Drehen Sie den Dampfregler im Uhrzeigersinn, damit weniger Dampf austritt, und entgegen
dem Uhrzeigersinn, um eine größere Menge Dampf zu
erzeugen (Abbildung 8).
8
Kippen oder neigen Sie das Gerät im Betrieb nicht um
mehr als 45°, und stellen Sie sicher, dass das Gerät
immer auf einer festen Unterlage steht. Ein voller Tank
reicht für eine Anwendung von maximal 50 Minuten aus.
Lassen Sie das eingeschaltete Gerät nicht unbeaufsichtigt,
und verwenden Sie ggf. die Kindersicherung, um die
Dampftaste zu sichern. Hierfür schieben Sie den dreieckigen Stift auf der linken Seite der Dampfpistole nach rechts.
Warnung: Das Gehäuse und die Zubehörteile werden während des Betriebs
heiß. Lassen Sie das Gerät vor dem
Wechsel von Zubehörteilen und Nachfüllen von Wasser abkühlen. Öffnen Sie
niemals den Tankverschluss, wenn der
Dampfreiniger eingeschaltet ist, da der
Tank unter Druck steht.
Page 9
THOMAS VAPORO Buggy ist mit einer Sicherung zum
Schutz vor Überhitzung ausgestattet. Das Gerät schaltet
sich automatisch ab, sobald es eine Temperatur von
180 °C erreicht. Auf diese Weise wird eine Überhitzung vermieden. Trennen Sie das Gerät in diesem Fall
durch Ziehen des Steckers unverzüglich vom Netz.
Das Gerät kann nach einer Abkühlphase von 30 Minuten
erneut in Betrieb genommen werden.
4.3 Nachfüllen von Wasser
Sobald die ausgestoßene Dampfmenge abnimmt,
muss der Tank aufgefüllt werden.
Schalten Sie den Dampfreiniger durch Drücken des
Ein-/Aus-Schalters aus. Die orangefarbene Betriebskontrollleuchte erlischt. Drücken Sie die Dampftaste
an der Dampfpistole, um den Restdruck abzulassen.
Verriegeln Sie die Dampfpistole anschließend. Ziehen
Sie den Netzstecker aus der Steckdose, und lassen Sie
das Gerät abkühlen. Beachten Sie, dass das Wasser
im Tank nach 5 Minuten immer noch heiß ist. Öffnen
Sie den Tankverschluss, indem Sie ihn hinunterdrücken
und entgegen dem Uhrzeigersinn drehen.
Warnung: Beim Öffnen kann heißer
Dampf austreten. Es besteht Verbrennungsgefahr durch das Gewinde der
Verschlusskappe und den Tank.
Füllen Sie den Tank mithilfe des Messbechers und
Trichters
(siehe Abschnitt 3.2 „Auffüllen des Wassertanks“) auf, und schließen Sie den Tankverschluss
wieder.
Der Dampfreiniger kann nun wieder an das Netz
angeschlossen
VAPORO Buggy ist betriebsbereit, sobald die Aufheizkontrollleuchte aufleuchtet.
4.4 Außerbetriebnahme und Aufbewahrung
Schalten Sie das Gerät aus. Die orangefarbene Betriebskontrollleuchte erlischt. Drücken Sie die Dampftaste
an der Dampfpistole, um den Restdruck abzulassen.
Sichern Sie die Dampfpistole, indem Sie den Verriegelungsstift an der linken Seite des Griffs nach rechts
schieben. Ziehen Sie den Netzstecker aus der Steckdose, und lassen Sie das Gerät abkühlen. Leeren Sie den
Wassertank, um Ablagerungen im Tank zu vermeiden.
Schließen Sie den Wassertank erst, wenn er vollständig
getrocknet ist. Der Dampfreiniger muss vollständig abgekühlt sein, bevor er verstaut wird. Bewahren Sie das Gerät
außerhalb der Reichweite von Kindern auf. Das Verlängerungsrohr mit der Bodendüse kann zur Aufbewahrung
oder für kurze Betriebspausen in die Halterung an der
Rückseite des Geräts eingesetzt werden.
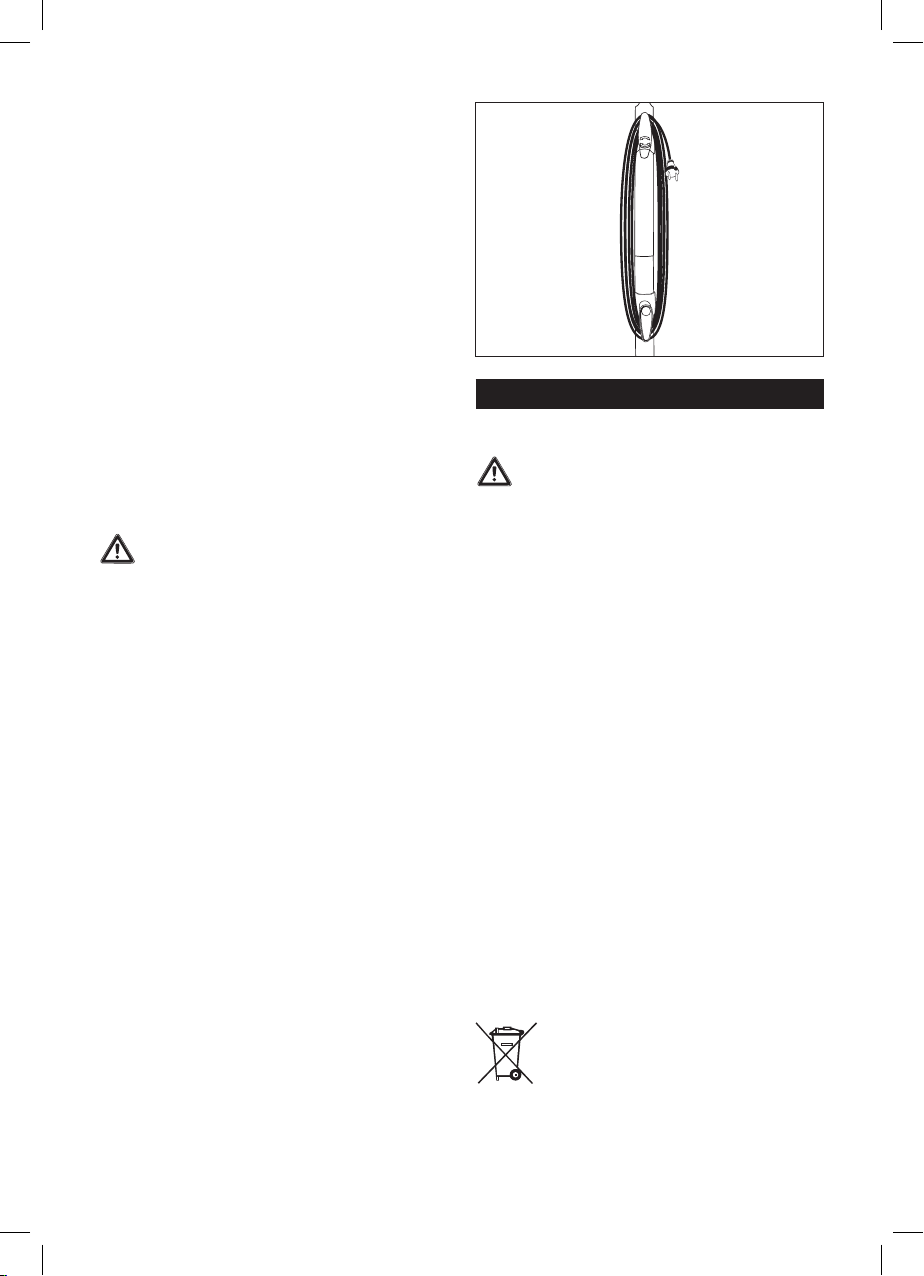
Das Anschlusskabel kann um die zwei Haken am Verlängerungsrohr umwickelt werden (Abbildung 9). Sollten
beide Haken in eine Richtung zeigen, kann der Haken
auf dem die Pfeile zu sehen sind umgedreht werden.
und eingeschaltet werden. Der THOMAS
9
5. Allgemein
5.1 Reinigung und Wartung
Warnung: Stellen Sie vor der Reinigung
oder Wartung des Dampfreinigers
sicher, dass er ausgeschaltet und
vom Netz getrennt ist.
Wischen Sie zur Reinigung des Geräts nur mit einem leicht
angefeuchteten Tuch über das Gehäuse. Verwenden Sie
keine Reinigungsmittel, Scheuermittel oder alkoholhaltigen
Mittel, da diese das Gehäuse beschädigen können.
Es wird empfohlen, den Tank spätestens nach fünfmaligem
Auffüllen auszuspülen, sofern Ihre örtliche Wasserhärte
mehr als 1,8 mmol/l (10 °dH) beträgt. Informationen zur
lokalen Wasserhärte erhalten Sie bei Ihrem Wasserversorgungsunternehmen. Es wird empfohlen, für die Reinigung
Wasser in den Tank zu füllen und diesen kräftig zu schütteln. Dadurch werden Kalkablagerungen am Boden des
Dampfreinigers gelöst. Gießen Sie das Wasser anschließend aus, und lassen Sie den Tank vollständig trocknen,
bevor Sie ihn schließen.
Zur Verlängerung der Lebensdauer des Dampfreinigers
sollte der Wassertank ungefähr alle 6 Monate mit Entkalker behandelt werden.
Legen Sie einen oder maximal zwei Entkalker-Sticks in
1 l warmes Wasser (50 °C), und füllen Sie den Wassertank damit. Lassen Sie die Lösung etwa 30 Minuten
ruhen, und gießen Sie das Wasser mit den gelösten
Ablagerungen anschließend aus. Wiederholen Sie
diesen Vorgang bei Bedarf, und spülen Sie den Wassertank anschließend aus.
5.2 Entsorgung von elektrischen
und elektronischen Geräten
An seinem Lebensende muss das Gerät nach
den geltenden Gesetzen entsorgt werden.
Es ist kein städtischer Abfall.
Das Symbol auf dem Produkt oder seiner Verpackung
weist darauf hin, dass dieses Produkt nicht als normaler
Haushaltsabfall zu behandeln ist, son dern an einem
Sammelpunkt für das Recycling von elektrischen und
elektronischen Geräten abgegeben werden muss.
9
Page 10
GB
Durch Ihren Beitrag zum korrekten Entsorgen dieses Produkts schützen Sie die Umwelt und die Gesundheit Ihrer
Mit menschen. Umwelt und Gesundheit werden durch
falsches Entsorgen gefährdet.
Weitere Informationen über das Recycling dieses Produkts
erhalten Sie von Ihrem Rathaus, Ihrer Müllabfuhr oder
5.3 Fehlerbehebung
Überprüfen Sie zunächst, ob Sie den Fehler anhand der Liste selbst beheben können, bevor Sie Ihren Dampfreiniger
an die THOMAS-Kundendienststelle schicken.
Fehler Mögliche Ursache Lösung
Die Betriebskontrollleuchte leuchtet
nicht mehr.
Das Gerät ist nicht in eine Steckdose
eingesteckt oder nicht eingeschaltet.
Die Steckdose ist defekt.
Das Netzkabel ist beschädigt.
dem Geschäft, in dem Sie das Produkt gekauft haben.
Wer das Gerät nach den Hinweisen dieses Abschnit-
tes nicht entsorgt, wird nach geltenden Gesetzen zur
Verantwortung gezogen. Wir empfehlen Ihnen, die
Verpackung zumindest während der Garantiezeit aufzubewahren.
Stecken Sie den Netzstecker in eine Steckdose, oder schalten Sie das Gerät ein.
Überprüfen Sie die Steckdose, indem
Sie den Netzstecker des Dampfreinigers
herausziehen und den Netzstecker eines
anderen Geräts einstecken.
Lassen Sie das Kabel durch die THOMASKundendienststelle austauschen.
Bei Betätigung der
Dampftaste tritt
kein Dampf aus.
Es tritt nur eine sehr kleine Menge Dampf aus.
Das Gerät benötigt viel
Zeit zum Aufheizen.
5.4 Technische Daten
Gerätetyp: Dampfreiniger
Modell: THOMAS VAPORO Buggy
Spannung: 220–240 V ~ 50/60 Hz
Nennleistungsaufnahme: 1500 W
Dampfdruck: max. 3,5 bar
Zulässiger Druck: 5 bar
Fassungsvermögen
des Wassertanks: max. 1,6 l
Dampfverfügbarkeit: Max. 50 Minuten/Tankfüllung
Die Dampftaste ist durch die
Kindersicherung verriegelt.
Der Wassertank ist leer.
Der Dampfregler ist auf die minimale
Dampfmenge eingestellt.
Es befinden sich Ablagerungen im Tank. Entkalken Sie den Wassertank (siehe
Schieben Sie den dreieckigen Stift auf der
rechten Seite der Dampfpistole nach links.
Füllen Sie Wasser nach
(siehe Abschnitt 4.3 „Nachfüllen
von Wasser“).
Drehen Sie den Dampfregler entgegen dem
Uhrzeigersinn, bis genügend Dampf austritt.
Abschnitt 5.1 „Reinigung und Wartung“).
Aufheizzeit: ca. 11 Minuten
Dampfdurchsatz: max. 40 g/min
Lärmemission: 30 dB(A) während
Geräteabmessungen: 305 x 397 x 235 mm
Gewicht: Gerät ohne Zubehör 4,5 kg
Technische Änderungen vorbehalten.
des Gebrauchs
(B x L x H)
IP X4
10
Page 11

6. Garantie
Unabhängig von den Gewährleistungsverpflichtungen
des Händlers aus dem Kaufvertrag leisten wir für dieses
Gerät Garantie gemäß nachstehenden Bedingungen:
1. Die Garantiezeit beträgt 24 Monate — gerechnet vom
Liefertag an den ersten Endabnehmer. Sie reduziert
sich bei gewerblicher Benutzung oder gleichzusetzender Beanspruchung auf 12 Monate. Zur Geltendmachung des Anspruchs ist die Vorlage eines
Kaufbeleges erforderlich.
2. Innerhalb der Garantiezeit beseitigen wir alle wesentlichen Funktionsmängel, die nachweislich auf mangelhafte Ausführung oder Materialfehler zurückzuführen
sind durch Instandsetzung der mangelhaften Teile
oder Teilersatz nach unserer Wahl; ausgetauschte
Teile gehen in unser Eigentum über. Die Garantie
erstreckt sich nicht auf leicht zerbrechliche Teile,
wie z. B. Glas, Kunststoffe, Lampen. Mängel sind uns
innerhalb der Garantiezeit unverzüglich nach Feststellung zu melden. Während der Garantiefrist werden
die zur Behebung von aufgetretenen Funktionsfehlern
benötigten Ersatzteile sowie die Kosten der angefallenen Arbeitszeit nicht berechnet. Bei unberechtigter
Inanspruchnahme unseres Kundendienstes gehen die
damit verbundenen Kosten zu Lasten des Kunden.
Instandsetzungsarbeiten beim Kunden oder am
Aufstellungsort können nur für Großgeräte verlangt
werden. Andere Geräte sind unserer nächstgelegenen Kundendienststelle oder Vertragswerkstatt zu
übergeben bzw. ins Werk zu senden.
3. Eine Garantiepflicht wird nicht ausgelöst durch geringfügige Abweichungen, die für Wert und Gebrauchstauglichkeit des Gerätes unerheblich sind, durch
Schäden aus chemischen und elektrochemischen Einwirkungen von Wasser sowie allgemein aus anomalen
Umweltbedingungen. Ein Garantieanspruch besteht
nicht bei Schäden als Folge normaler Abnutzung,
ferner nicht bei Nichtbeachtung der Gebrauchsanweisung oder unsachgemäßer Verwendung.
4. Der Garantieanspruch verliert seine Gültigkeit,
wenn von uns nicht bevollmächtigte Personen Eingriffe
oder Reparaturen an den Geräten vornehmen.
5. Garantieleistungen bewirken weder für das Gerät
noch für die eingebauten Ersatzteile eine Verlängerung oder Erneuerung der Garantiefrist: die Garantiefrist für eingebaute Ersatzteile endet mit der Garantiefrist für das ganze Gerät.
6. Weitergehende oder andere Ansprüche, insbesondere
solche auf Ersatz außerhalb des Gerätes entstandener
Schäden sind – soweit eine Haftung nicht zwingend
gesetzlich angeordnet ist – ausgeschlossen.
Auch nach Ablauf der Garantiefrist bieten wir Ihnen unsere
Kundendienstleistungen an. Bitte wenden Sie sich an Ihren
Händler oder direkt an unsere Kundendienst-Abteilung.
11
Page 12
Content Page
1. Important safety regulations ........................................................13/14
1.1 Power supply ............................................................................ 13
1.2 Special groups of people . . . . . . . . . . . . . . . . . . . . . . . . . . . . . . . . . . . . . . . . . . . . . . . . . . . . . . . . . . . . . . . . . . . 13
1.3 Unpacking the appliance ................................................................... 14
1.4 Maintenance and cleaning ................................................................. 14
2. Introduction
2.1 Thank you! .............................................................................. 14
2.2 Unpacking the appliance ................................................................... 14
2.3 Identifying the parts ....................................................................... 14
2.4 Figures: Steam cleaner and accessories ....................................................... 15
3. Starting up
3.1 Assembling the accessories ................................................................. 16
3.1.1 Steam hose . . . . . . . . . . . . . . . . . . . . . . . . . . . . . . . . . . . . . . . . . . . . . . . . . . . . . . . . . . . . . . . . . . . . . . . . . 16
3.1.2 Extension tubes ...................................................................... 16
3.1.3 Floor nozzle ........................................................................ 16
3.1.4 Accessory adaptors ............................................................... 16/17
3.1.5 Jet nozzle .......................................................................... 17
3.1.6 Scraper ............................................................................ 17
3.1.7 Nylon brushes ....................................................................... 17
3.1.8 Metal brushes ....................................................................... 17
3.1.9 Window nozzle .....................................................................17
3.2 Filling the water tank ...................................................................... 17
4. Operating the appliance
4.1 Connecting to the mains supply .............................................................. 18
4.2 Using the steam cleaner .................................................................18/19
4.3 Topping up with water .....................................................................19
4.4 Ending operation and storage ............................................................... 19
GB
5. General
5.1 Cleaning and maintenance . . . . . . . . . . . . . . . . . . . . . . . . . . . . . . . . . . . . . . . . . . . . . . . . . . . . . . . . . . . . . . . . . 19
5.2 Disposal..............................................................................19/20
5.3 Troubleshooting ..........................................................................20
5.4 Technical data............................................................................20
6. Warranty ..............................................................................21
Warning: This refers to danger to the user.
Caution: This refers to danger to the appliance or objects.
12
Page 13

1. Important safety guidelines
1.1 Power supply
• Please ensure that the voltage shown on the rating
plate matches the one on your socket before you connect the steam cleaner to your mains power supply.
• Only connect the appliance to a properly earthed
socket.
• The plug on the appliance must fit into the socket.
The plug may not be modified in any way. Do not
use adaptors with appliances that have a protective
earth. Unmodified plugs and appropriate sockets
reduce the risk of an electric shock.
• We recommend that the appliance only be operated
from a socket protected by a residual current circuitbreaker. Please consult an electrician if necessary.
• Never touch the plug with wet hands.
• Always disconnect the appliance from the mains by
removing the mains plug from the socket. Never pull
on the cable.
• A faulty connection cable may only be replaced by
a cable with identical connection values. Send the
appliance to the THOMAS Customer Service Centre
for repair.
• Ensure that the connection values match the ones
on the steam cleaner if using an extension cable.
Aska specialist dealer if necessary.
• Ensure that the cable does not become a tripping
hazard. It may not be kinked or pinched.
1.2 For special groups of people
•
This appliance can be used by
persons with reduced physical,
sensory or mental capabilities or lack
of experience and knowledge if they
have been given supervision or instruc
tion concerning use of the appliance
in a safe way and understand the
hazards involved. Children shall not
play with the appliance.
• Keep the appliance away from children while it is
switched on or cooling down.
• Do not allow children to play with the packaging
materials (plastic film) due to risk of suffocation.
1.3 Operating the appliance
Caution! Hot steam! Risk of scalding!
• For safety reasons, do not clean electrical appliances, such as ovens, microwaves, refrigerators,
switches and lights, with the steam cleaner.
• Check the appliance, cable and accessories regularly
for damage. Do not operate a damaged appliance
or damaged accessories.
• Never aim the steam cleaner at people, animals or
plants (risk of scalding). Do not aim the steam cleaner
at electrical systems or wires.
• Do not leave the appliance unattended. Always
switch off the appliance and remove the mains plug
from the socket when leaving the work area.
• The appliance is fitted with a thermostat and a thermal cut-out as protection against overheating.
• Accessories become hot during use – leave them to
cool down before changing over.
• Do not touch any hot areas on the appliance. It is normal for the steam cleaner to heat up during operation.
• Never unscrew the tank cap during use. The tank is
under pressure.
• The appliance may not be tilted by more than 45°
while operating.
• Never immerse the appliance in water or other liquids.
• The steam cleaner is only suitable for using indoors
and household purposes but not for commercial use.
• Never expose the appliance to extreme sunlight, frost
or any other weather conditions (rain etc.).
• Only use the appliance in containers/pools that are
not filled with water or other liquids.
• Do not operate the appliance without water in the
tank. Always top up with water in good time.
• Empty the water tank when the appliance is not in use.
• Never fill the tank with anything other than water.
Never put additives (such as perfume, stain remover
-
or products containing alcohol) in the water as they
may damage the appliance or make it dangerous
to use.
• Always remove the mains plug from the socket and
allow the appliance to cool down completely before
topping up with water.
• Do not overfill the tank. Do not exceed the maximum
prescribed filling level. Use the measuring jug and
funnel included in the scope of supply.
• Ensure that the cap on the water tank has been
screwed on firmly before use.
• Only carry the appliance by the handle.
• Do not use the THOMAS VAPORO Buggy to treat any
items of clothing that are still being worn on the body.
13
Page 14

• A little water may drip out of the nozzle from time to
time. This is completely normal and is merely condensation.
• The force and heat of the steam may have an adverse
effect on some materials. Always check whether a surface is suitable for treatment with the appliance by
carrying out a test beforehand on a concealed area.
• Always include these operating instructions if passing
the steam cleaner on to a third party.
1.4 Maintenance and cleaning
• Only use the original accessories that are part of the
scope of supply.
• Never attempt to repair damage to the appliance,
its accessories or the power cord yourself. Always
have the appliance inspected and repaired by an
authorised customer service facility. Modifying the
appliance can pose a danger to your health. Make
sure that only genuine spares and accessories are
used.
• Always switch off the appliance, remove the mains
plug and allow the steam cleaner to cool down
before cleaning or maintaining it.
2. Introduction
2.1 Thank you!
Congratulations on the purchase of your THOMAS
VAPORO Buggy. Your new steam cleaner is a very versatile assistant for many different cleaning tasks. Only
with the help of high-temperature steam is it possible
to remove stubborn dirt quickly and without trace from
smooth surfaces, e.g. wall and floor tiles, work surfaces,
cooking utensils, windows and mirrors and at the same
time to kill harmful bacteria. This is the environmentally
acceptable way to fully remove baked on food, mould,
grease, soap scum, solid and loose dirt without chemical solvents.
We hope you enjoy using it.
2.2 Unpacking the appliance
Unpack the steam cleaner and all the accessories.
Check the contents for completeness. If possible, keep
the box and inner packaging so that the appliance may
be protected during transport or if returned in the event
of a warranty claim. Please dispose of any packaging
material no longer required properly. Please contact
your dealer immediately if you notice any transport
damage whilst unpacking. The appliance must not be
operated under any circumstances if it has sustained
damage of any kind.
2.3 Identifying the parts
1 = Funnel
2 = Measuring jug
3 = Steam gun with steam hose and steam connector
4 = Accessory adaptor
5 = Jet nozzle
6 = Scraper
7 = Nylon brush, small
8 = Nylon brush, large
9 = Metal brush
10 = Window nozzle
11 = Cleaning cloth for window nozzle
12 = Floor nozzle
13 = Cleaning cloth for floor nozzle
14 = Extension tubes
15 = Steam cleaner
14
Page 15

2.4 Figures: Steam cleaner and accessories
15
14
1
2
3
13 12 11 10 9 8
4
5
6
7
15
Page 16
3. Starting up
3.1 Assembling the accessories
The steam hose with steam gun must be connected
to the appliance and the required accessory must be
attached before the THOMAS VAPORO Buggy can be
used. The THOMAS VAPORO Buggy has an accessories compartment which houses the accessory adaptor,
jet nozzle, scraper, small nylon brush, large nylon brush,
metal brush, window brush and cleaning cloths. Open
the accessories compartment by pulling the blue locking
handle upwards and lifting the transparent cover of the
accessories compartment off towards the front (Fig. 1)
1
Remove the required steam accessory and replace the
cover. Slide the nose of the cover into the recess above
the steam socket and press it down firmly at the back
until the cover clicks into place.
3.1.3 Floor nozzle (12+13)
The floor nozzle is supplied with a separate connector
for packaging reasons. Assemble the connector as illustrated (Fig. 2).
2
Attach the floor nozzle to the end of the extension tube.
Make sure that the nozzle clicks into place. The floor
nozzle is ideal for cleaning washable wall and floor
coverings. It may be used with or without the cleaning
cloth. However, we recommend using the cloth to protect coverings in the case of sensitive surfaces such as
wood or linoleum. Place the floor nozzle in the middle
of the cleaning cloth, press the inner sides of the clips
down, insert the overlapping cloth and let go of the
clips again (Fig. 3). Press the release button and pull
the tubes apart with a downward movement to take the
extension tube off again.
3
3.1.1 Steam hose (3)
First of all connect the steam hose to the steam socket
on the front of the THOMAS VAPORO Buggy. To do
this, flip the cover flap down and push the connector of
the steam hose firmly into the steam socket until it clicks
into place.
To remove the steam hose, press in both release buttons
on the right and left hand sides of the steam connector
and pull it out of the steam socket.
3.1.2 Extension tubes (14)
Attach the extension tubes if the steam cleaner is to be
used to clean floors or areas which are difficult to reach.
To do this, push the open end of a tube onto the steam
gun until the release button clicks into place. Add one,
two or all three extension tubes as required. Press in
the appropriate release button and pull the tubes apart
with a downward movement to take the extension tube
off again.
16
3.1.4 Accessory adaptor (4)
The steam cleaner has a range of very varied attachment nozzles to enable the most effective and thorough
cleaning of different surfaces. First assemble the accessory adaptor so that these attachments can be connected
to the steam hose. The accessory adaptor can be attached
directly to both the steam gun and the end of one or
more extension tubes.
Ensure that the adaptor is secure and has clicked into
place. Press in the release button and pull apart with
a downward movement to take the adaptor off again.
Page 17
The accessory adaptor can be used with the jet nozzle,
the scraper, one of the brush nozzles or the window
nozzle. Push the nozzle onto the accessory adaptor so
that both the arrows are pointing towards each other on
a line, and tighten it a quarter turn clockwise. Follow the
steps described in reverse order to remove the nozzles.
4
3.2 Filling the water tank
The THOMAS VAPORO Buggy has a built-in water
tank holding 1.6 litres. Switch the steam cleaner off and
remove the mains plug from the socket. The steam cleaner must always be disconnected from the mains when
filling or topping up with water. Unscrew the tank cap
(Fig. 5) by pressing the cap down and simultaneously
turning it anti-clockwise. Use the funnel and measuring
jug supplied when filling with water.
3.1.5 Jet nozzle (5)
This nozzle makes it easy to clean places that are
hard to reach, such as corners, joints and toilets.
3.1.6 Scraper (6)
Stubborn dirt and wallpaper can be easily removed
with the scraper.
3.1.7 Nylon brushes (7/8)
For cleaning very dirty objects, such as blinds, radiators,
valves.
3.1.8 Metal brushes (9)
The metal brush is suitable for heavy staining on less
sensitive materials, such as stainless steel or stone.
3.1.9 Window nozzle (10+11)
Ideal for cleaning large glass surface areas, such as window panes, mirrors, with or without the cleaning cloth (11).
5
Only fill with pure water without additives of any kind,
e.g. perfume, cleaning agents, alcohol, as they could
damage the machine and make it dangerous to use.
It is advisable to use distilled water to prevent limescale
deposits if the water is very hard (above 2.5 mmol/l or
21°dH). Otherwise, boil the water first to prolong the
service life of the appliance.
Caution: Do not exceed the maximum
quantity of 1.6 litres when filling the tank.
Screw the tank cap firmly back on by pressing down
and turning it clockwise.
Tip: The heating up time will be shortened
if warm water is used when filling.
Caution: Glass may crack if subjected
to thermal shock. Pre-heat the glass
pane before steam cleaning by spraying
steam in a wide arc from a distance
of 20-25 cm. Slowly reduce the distance
to 10-15 cm to heat the glass up further.
17
Page 18
4. Operating the appliance
4.1 Connecting to the mains supply
Plug the steam cleaner’s mains plug into a properly
installed socket and switch on the appliance by pressing
the On/Off switch (Fig. 6).
6
On/Off
Operating
pilot lamp
Heating up
pilot lamp
The orange operating light (Fig. 6) lights up and starts
heating up the steam cleaner. The operating temperature is reached after about 11 minutes and the green
heating pilot lamp lights up. The appliance is now
ready for use.
4.2 Using the steam cleaner
Warning: Never aim the steam outlet of
the steam gun at people, animals, plants
or electrical systems (e.g. ovens or sockets). There is a risk of scalding or electric
shock!
Release the locking device (child-proof device) by pushing the triangular pin on the right-hand side of the steam
gun in towards the left (Fig. 7). Hot steam now escapes
if you touch the steam button. First of all, hold the steam
gun over an old cloth to absorb any initial spray water.
Press the steam button until the steam comes out evenly.
Cleaning can now begin.
7
– Using steam may bleach painted/varnished wood.
– Steam may discolour shiny plastics.
– Acrylic, velvet and linen react very sensitively to the
temperature of steam.
– Do not use the steam cleaner on Dralon fibres without
first performing a suitability test on a concealed area.
For obvious reasons, the manufacturer cannot be held
responsible for damage to objects, materials, people,
animals or plants that occurs as a result of unsuitable
use of hot steam or improper use of the appliance.
Residual steam continues to escape for a few seconds
after switching off the steam function.
Do not aim the steam outlet at one point for too long.
Loosen the dirt by moving the steam jet backwards and
forwards. The flow rate of the steam emitted can be
regulated by turning the steam controller and can be
adjusted to the level of dirtiness. Turn the steam controller clock-wise for less steam, and anti-clockwise for more
steam (Fig. 8).
8
Do not tip or tilt the appliance by more than 45° during
use and ensure that the appliance always stands on
a firm base. One full tank is enough for a maximum of
50 minutes use. Do not leave the machine unattended
whilst switched on and if necessary use the childproof
lock to secure the steam switch. To do this, press the
triangular pin on the left-hand side of the steam gun in
to the right.
Caution: Always test the steam cleaner
first on inconspicuous or invisible areas
of the surfaces or fabrics to be cleaned
to check their tolerance to hot steam.
18
Warning: The housing and accessories
become hot during operation. Allow the
appliance to cool down before changing
the accessories and topping up the
water. Never open the tank cap whilst
the steam cleaner is switched on as the
tank is under pressure.
THOMAS VAPORO Buggy is fitted with an overheating
cut-out. The appliance switches off automatically on reaching a temperature of 180°C. This prevents overheating.
In the event of overheating, disconnect the appliance
immediately by pulling out the plug. After a cool down
phase of 30 minutes, the appliance can be used again.
Page 19

4.3 Topping up with water
The tank must be topped up if the steam flow emitted
starts to decrease.
Switch off the steam cleaner by pressing the On/Off
switch. The orange operating pilot lamp goes off.
Press the steam button on the steam gun to release the
remaining pressure. Then lock the steam gun. Remove
the mains plug from the socket and allow the appliance
to cool down. Note that the water in the tank is still hot
even after 5 minutes. Open the tank cap by pressing it
down and turning it anti-clockwise.
Warning: Hot steam may escape on
opening. There is a risk of burns from
the cap thread and the tank.
9
Top up with water using the measuring jug and funnel
(see section 3.2 “Filling the water tank”), then close the
tank cap again. The steam cleaner can now be plugged
in again and switched on. The THOMAS VAPORO Buggy
is ready for use as soon as the heating pilot lamp lights up.
4.4 Ending operation and storage
Switch off the appliance. The orange operating pilot
lamp goes off. Press the steam button on the steam gun
to release the remaining pressure. Secure the steam gun
by pushing the locking pin on the left-hand side of the
handle in to the right. Remove the mains plug from the
socket and allow the appliance to cool down. Empty
the water tank so that deposits are not able to settle.
Do not close the water tank until it has dried out completely. The steam cleaner must have cooled down completely before being put away. Store the appliance so
that it is out of the reach of children. The extension tube
with assembled floor nozzle able can be inserted in the
parking holder on the back of the appliance for storage
purposes or for short breaks whilst working.
The connection cable can be wound around the two
hooks on the extension tube (Fig.9). If the two hooks are
facing the same direction, the hook with the arrows is
turned around.
5. General
5.1 Cleaning and maintenance
Warning: Always ensure before cleaning
or maintaining the steam cleaner that
it is switched off and unplugged from
the mains.
Only clean the appliance by wiping over the housing
with a slightly moistened cloth. Do not use any cleaning
agents, abrasives or alcohol since they may damage
the housing.
We recommend that the tank be rinsed out after 5 filling
operations at the latest if your water hardness is above
1.8 mmol/l (10°dH). Information regarding local water
hardness may be obtained from your water or utility
company. We recommend filling the water tank with
water and giving it a good shake to clean it. This will
loosen any limescale that has been deposited on the bottom of the steam cleaner. Then pour out the water and
allow the tank to dry out completely before closing it.
The water tank should be treated with limescale remover
approx. every 6 months to prolong the steam cleaner’s life.
Place one or at most two limescale removal sticks in 1 litre
of warm water (50°C) and fill the water tank with it. Allow
the solution to work for approx. 30 minutes and then pour
away the water with the dissolved solids. Repeat this pro
cess if necessary and then rinse out the tank with water.
5.2 Disposing of electrical
and electronic appliances
At the end of its service life the appliance
must be disposed of in accordance with the
applicable legislation. It is not part of the
municipal waste.
The symbol on the product or on its packaging indicates
that this product may not be treated as normal household waste but must be taken to a collection point for
the recycling of electrical and electronic equipment.
-
19
Page 20
GB
By ensuring that this product is disposed of in the correct
manner you are protecting the environment and human
health. The environment and health are at risk from
incorrect disposal.
For more information about recycling this product, contact your local council, your household waste disposal
service or the shop where you purchased the product.
5.3 Troubleshooting
First of all check whether you can remedy the fault yourself by consulting this list before sending your steam cleaner
in to the THOMAS Customer Service Centre.
Fault Possible cause Remedy
The operating pilot
lamp fails to light up.
The appliance is not plugged
into a socket or is not switched on.
The socket is faulty.
The power cable is damaged
If you do not dispose of the appliance according to the
information in this paragraph, you will be held accountable by law. We advise you to keep the packaging, at
least during the warranty period.
Insert the mains plug into a socket
or switch the appliance on.
Check the socket by unplugging
the steam cleaner and plugging
in a different appliance.
Have the cable replaced by the
THOMAS Customer Service Centre.
No steam is emitted
when the steam
button is operated.
Only a very small
amount of steam
flows out.
The appliance takes
a very long time to
heat up.
5.4 Technical data
Type of appliance: Steam cleaner
Model: THOMAS VAPORO Buggy
Voltage: 220–240 V ~ 50/60 Hz
Power consumption: 1500 W
Steam pressure: Max. 3.5 bar
Permissible pressure: 5 bar
Volume of water tank: max. 1.6 litres
Steam availability: max. 50 minutes/tank
The childproof lock is preventing
release of the steam button.
The water tank is empty.
The steam controller is on minimum. Turn the steam controller anticlockwise until
The water tank is furred up. Descale the water tank
Push the triangular pin on the right-hand
side of the steam gun in to the left.
Top up with water
(see section 4.3 “Topping up with water”).
sufficient steam is emitted.
(see section 5.1 “Cleaning
and maintenance”).
Heating up time: approx. 11 minutes
Steam flow: max. 40 g/min
Noise emission: 30 dB(A) during operation
Applinace dimensions: 305 x 397 x 235 mm
(WxLxH)
Weight: Appliance without
accessories 4.5 kg
Right to technical changes reserved
IP X4
20
Page 21

6. Warranty
Independently of the warranty obligations of the dealer
arising from the sales contract, we offer the following
guarantee on the appliance according to the conditions
below:
1. The warranty period is 24 months from the day of
delivery to the first end user. This period is limited to
12 months for commercial use or equivalent operational demands. To pursue a claim, proof of purchase
must be submitted.
2. Within the warranty period we will rectify all substantial, verifiable functional inadequacies due to faulty
design or material defects by either repairing the
defective parts or replacing them at our discretion;
the exchanged parts then become our property.
The guarantee does not extend to easily broken parts
such as glass, plastic, lights. Defects must be reported
to us immediately upon detection within the warranty
period. During the warranty period, the cost of labour
and of spare parts needed to rectify the malfunctions
will not be billed. In the case of unwarranted claims
against our customer service centre, the costs incurred
will be charged to the customer. Repair work at the
customer's location or installation site can only be
requested in the case of large appliances. Other
appliances must be sent to our nearest customer service centre, authorised repair shop, or to the factory.
3. There is no warranty obligation in the case of minor
deviations from product specifications which do not
affect the value or usability of the product caused
by chemical or electro-chemical effects, or by water,
or damage generally resulting from abnormal ambient conditions. In addition, no warranty claims are
accepted for damage resulting from normal wear
and tear, or from non-observance of the user manual
or inappropriate use.
4. Any claim under warranty is also void if persons
not authorised by us undertake any modifications
or repairs to the appliance.
5. Warranty services neither extend nor renew the
warranty period for the appliance or any installed
replacement parts: the warranty period for installed
replacement parts ends along with the warranty
period for the entire appliance.
6. Additional or other claims, particularly those for
compensation for damage caused outside of the
appliance – providing there is no legally stipulated
liability for this – are excluded.
We also offer you our customer service beyond the expiry of your warranty period. Please consult your dealer
or contact our customer service department directly.
21
Page 22

Table des matières Page
1. Consignes de sécurité importantes ...................................................23/24
1.1 Alimentation électrique .....................................................................23
1.2 Groupes de personnes particuliers ...........................................................23
1.3 Utilisation de l’appareil .................................................................23/24
1.4 Maintenance et nettoyage .................................................................. 24
2. Introduction
2.1 Remerciements ...........................................................................24
2.2 Déballage de l’appareil ...................................................................24
2.3 Identification des pièces .................................................................... 24
2.4 Figures : Nettoyeur à vapeur et accessoires . . . . . . . . . . . . . . . . . . . . . . . . . . . . . . . . . . . . . . . . . . . . . . . . . . . . 25
3. Mise en service
3.1 Montage des pièces des accessoires .........................................................26
3.1.1 Flexible à vapeur .....................................................................26
3.1.2 Tubes d’extension ....................................................................26
3.1.3 Buse au sol..........................................................................26
3.1.4 Adaptateur.......................................................................26/27
3.1.5 Buse à jet ponctuel ...................................................................27
3.1.6 Racleur .............................................................................27
3.1.7 Brosses en nylon .....................................................................27
3.1.8 Brosses métalliques ................................................................... 27
3.1.9 Buse pour surface vitrée ............................................................... 27
3.2 Remplissage du réservoir d’eau . . . . . . . . . . . . . . . . . . . . . . . . . . . . . . . . . . . . . . . . . . . . . . . . . . . . . . . . . . . . . . 27
4. Utilisation de l’appareil
4.1 Raccordement à l’alimentation du secteur ......................................................28
4.2 Utilisation du nettoyeur vapeur ............................................................28/29
4.3 Appoint en eau ..........................................................................29
4.4 Mise hors service et stockage................................................................29
F
5. Généralités
5.1 Nettoyage et maintenance ..................................................................29
5.2 Recyclage ............................................................................29/30
5.3 Dépannage ..............................................................................30
5.4 Caractéristiques techniques .................................................................30
6. Garantie............................................................................... 31
Avertissement : Cette remarque attire l’attention sur les dangers encourus par l’utilisateur.
Attention : Cette remarque attire l’attention sur les dangers pour l’appareil ou les objets.
22
Page 23

1. Consignes de sécurité
1.1 Alimentation électrique
• Avant de raccorder le nettoyeur vapeur au secteur,
veiller à ce que les caractéristiques de tension sur la
plaque signalétique correspondent à la tension de
votre prise.
• Brancher l’appareil uniquement sur une prise correctement mise à la terre.
• La fiche de l’appareil doit être adaptée à la prise.
Aucune modification ne doit être apportée à la fiche.
N’utiliser aucun adaptateur secteur sur les appareils
équipés d’un conducteur de protection. Les fiches et
prises, n’ayant pas été modifiées, réduisent le risque
d’électrocution.
• Il est recommandé de n’utiliser l’appareil que sur
des prises protégées par un interrupteur différentiel.
Au besoin, contacter un électricien.
• Ne jamais toucher la fiche avec les mains humides.
• Toujours débrancher l’appareil du secteur en retirant
la fiche de la prise. Ne jamais tirer sur le câble.
• Un câble de raccordement défectueux doit uniquement
être remplacé par un câble, présentant les mêmes données de raccordement. Renvoyer l’appareil au service
client THOMAS pour la réparation.
• Lors de l’utilisation d’un câble de rallonge, veiller
à ce que les données de raccordement correspondent à celles du nettoyeur vapeur. Au besoin,
contacter un commerçant spécialisé.
• Veiller à ce que le câble ne représente aucun risque
de trébuchement. Il ne doit pas être plié ou coincé.
1.2 Groupes de personnes particuliers
•
Cet appareil peut être utilisé par
importantes
des personnes ayant des capacités
physiques, sensorielles ou mentales
réduites ou des personnes manquant
d'expérience et/ou de connais
sances, à condition que cela s'effectue
sous la surveillance d'un tiers respon
sable et/ou que lesdites personnes
aient reçu les instructions appropriées
leur permettant de se servir de l'appa
reil en toute sécurité et de comprendre
les risques qui peuvent en résulter. Ne
jamais laisser des enfants jouer avec
l'appareil.
• Tenir l’appareil hors de portée des enfants lorsqu’il
est en marche ou lors de son refroidissement.
• Ne pas laisser les enfants jouer avec le matériel
d’emballage (film plastique) : risque de suffocation.
1.3 Utilisation de l’appareil
Prudence ! Vapeur chaude ! Risque de brûlure !
• Pour des raisons de sécurité, ne nettoyer aucun
appareil électrique, tel que les fours, les micro-ondes,
les réfrigérateurs, les interrupteurs ou encore les
luminaires, avec le nettoyeur vapeur.
• Contrôler régulièrement l’endommagement de
l’appareil, des câbles ainsi que des accessoires.
Ne pas mettre en service les appareils ou accessoires
endommagés.
• Ne jamais diriger le nettoyeur vapeur vers les
personnes, les animaux ou les plantes (risque de
brûlure) ! Ne jamais diriger le nettoyeur vapeur vers
les installations ou les câbles électriques.
• Ne jamais laisser l’appareil sans surveillance. Après
l’utilisation de l’appareil ou avant de quitter la zone
de travail, toujours couper l’appareil et retirer la fiche
de la prise.
• L’appareil est équipé d’un thermostat et d’une protection thermique assurant la protection contre la
surchauffe.
• Les accessoires chauffent lors de leur utilisation ; les
laisser refroidir avant de procéder au remplacement.
• Ne toucher aucune surface chaude sur l’appareil.
Il est normal que le nettoyeur vapeur devienne chaud
lors du fonctionnement.
• Lors du fonctionnement, ne jamais dévisser l’obturateur
du réservoir. Le réservoir est sous pression.
• Lors du fonctionnement, l’appareil ne doit pas être
incliné à plus de 45°.
• Ne pas plonger l’appareil dans l’eau ou dans tout
autre liquide.
• Le nettoyeur vapeur est uniquement conçu pour une
utilisation intérieure ou dans les maisons, et non à des
fins commerciales.
• Ne jamais exposer l’appareil aux rayons du soleil,
au gel ou à toute autre intempérie (pluie, etc.).
• Utiliser l’appareil uniquement dans les réservoirs /
bassins, n’étant pas remplis d’eau ou de tout autre
-
liquide.
• Ne pas utiliser l’appareil lorsque le réservoir d’eau
est vide. Toujours faire l’appoint en eau à temps.
• Vider le réservoir d’eau lorsque l’appareil n’est pas utilisé.
• Ne jamais rien verser d’autre que de l’eau dans le
réservoir. Ne rien ajouter (par ex. parfum, détergent
23
Page 24

ou produit à base d’alcool) à l’eau afin de ne pas
endommager l’appareil ou de rendre son utilisation
dangereuse.
• Toujours retirer la fiche de la prise, et laisser l’appareil
complètement refroidir avant de faire l’appoint en eau.
• Éviter le trop-plein. Ne pas dépasser le niveau de
remplissage max. prescrit. Utiliser le bêcher ou la
trémie livré(e).
• Avant l’utilisation, veiller à ce que le bouchon
obturateur du réservoir d’eau soit bien vissé.
• Saisir l’appareil uniquement depuis la poignée.
• Ne pas utiliser le Buggy THOMAS VAPORO pour
traiter les petits vêtements, directement sur le corps.
• Il est possible qu’un peu d’eau ressorte de la buse.
Cela est tout à fait normal. Il s’agit uniquement d’eau
de condensation.
• La force et la chaleur de la vapeur peuvent être préjudiciables pour certains matériaux. Toujours vérifier
au préalable sur une petite surface et dans un endroit
fermé que l’appareil est bien adapté au traitement.
• Ce mode d’emploi doit toujours être joint au
nettoyeur vapeur.
1.4 Maintenance et nettoyage
• Utiliser uniquement les accessoires d’origine, contenus
dans la livraison.
• Ne réparez jamais vous-même les dommages qui
peuvent se présenter sur l’appareil, les accessoires
ou le câble de raccordement au secteur. De telles
réparations doivent toujours être confiées au service
technique après vente, car toute modification de
l’appareil peut porter préjudice à votre santé. Utilisez
toujours des pièces de rechange et des accessoires
de la marque d’origine
• Toujours couper l’appareil avant de procéder
aux opérations de nettoyage ou de maintenance,
le retirer de la fiche secteur, et le laisser refroidir.
2. Introduction
2.1 Remerciements
Toutes nos félicitations pour votre acquisition du Buggy
THOMAS VAPORO. Votre nouveau nettoyeur vapeur
vous sera d’une grande aide dans de nombreuses
tâches de nettoyage. Vous êtes désormais en mesure
d’éliminer vous-même, rapidement et entièrement, les
saletés tenaces des surfaces lisses, telles que le carrelage mural et au sol, les plans de travail, les ustensiles
de cuisine, les fenêtres et miroirs, en utilisant des températures élevées, et de détruire ainsi les bactéries nocives.
Il est ainsi possible d’éliminer entièrement les dépôts, les
moisissures, la graisse, les dépôts de savon ainsi que les
saletés solides sans utiliser de produits chimiques nocifs
pour l’environnement.
Nous vous souhaitons une bonne utilisation.
2.2 Déballage de l’appareil
Déballer le nettoyeur vapeur ainsi que toutes les pièces.
Contrôler l’intégralité de la livraison. Si possible, conserver le carton et l’emballage intérieur afin de protéger
l’appareil lors du transport ou du retour client. Éliminer
correctement tout le matériel d’emballage n’étant plus
utilisé. Contacter immédiatement le revendeur si des
défauts de transport sont constatés lors du déballage.
L’appareil ne doit en aucun cas être mis en service si
des défauts permanents sont constatés.
2.3 Identification des pièces
1 = Trémie
2 = Bêcher
3 = Pistolet de vapeur avec flexible et raccord de vapeur
4 = Adaptateur
5 = Buse à jet ponctuel
6 = Racleur
7 = Brosse en nylon, petite
8 = Brosse en nylon, grande
9 = Brosse métallique
10 = Buse pour surface vitrée
11 = Chiffon de nettoyage pour la buse pour surface vitrée
12 = Buse pour le sol
13 = Chiffon de nettoyage pour la buse du sol
14 = 3 tubes d’extension
15 = Nettoyeur vapeur
24
Page 25
2.4 Figures : Nettoyeur à vapeur et accessoires
15
14
1
2
3
13 12 11 10 9 8
4
5
6
7
25
Page 26
3. Mise en service
3.1 Montage des accessoires
Avant d’utiliser le Buggy THOMAS VAPORO, raccorder
le flexible à l’appareil de vapeur avec le pistolet et monter l’accessoire souhaité. Le Buggy THOMAS VAPORO
dispose d’un compartiment à accessoires, où se trouvent
l’adaptateur, la buse à jet ponctuel, la petite brosse en
nylon, la grande brosse en nylon, la brosse métallique,
la buse pour surface vitrée et les chiffons de nettoyage.
Ouvrir le compartiment à accessoires en tirant la poignée de verrouillage bleue vers le haut et en rabattant
le recouvrement transparent vers l’avant (figure 1).
1
Retirer l’accessoire correspondant et fermer le recouvrement. Glisser le verrou du dispositif de recouvrement
dans la fente et l’enfoncer vers le bas jusqu’à ce qu’il
s’enclenche.
3.1.1 Flexible à vapeur (3)
Raccorder tout d’abord le flexible à vapeur au raccord
de vapeur, à l’avant du Buggy VAPORO de THOMAS.
Replier pour cela le volet du boîtier vers le bas, et enfoncer le raccord au niveau du flexible de vapeur jusqu’à
ce qu’il s’enclenche.
Pour démonter le flexible de vapeur, enfoncer les deux
boutons de déverrouillage à droite et à gauche du
raccord et retirer le flexible du raccord de vapeur.
3.1.3 Buse au sol (12+13)
Pour des raisons techniques d’emballage, la buse au
sol est livrée avec une pièce de raccordement séparée.
Assembler les pièces de raccordement comme indiqué
(figure 2).
2
Monter la buse à l’extrémité du tube d’extension. Veiller
à ce que la buse s’enclenche correctement. La buse au
sol est idéale pour le nettoyage des revêtements muraux
ou au sol lavables. Elle peut être utilisée avec ou sans
chiffon de nettoyage. Il est toutefois recommandé d’utiliser le chiffon de nettoyage pour protéger les surfaces
délicates (par ex. bois ou lino). Positionner la buse au
centre du chiffon de nettoyage, enfoncer les parties
intérieures des attaches vers le bas, installer le chiffon
de nettoyage et relâcher les attaches (figure 3). Pour
démonter la buse au sol, enfoncer le bouton de déverrouillage correspondant et tirer la buse pour l’extraire.
3
3.1.2 Tubes d’extension (14)
Monter les tubes d’extension lorsque le nettoyeur vapeur
est utilisé pour nettoyer les sols ou les zones difficilement
accessibles. Pour cela, insérer l’extrémité ouverte du tube
sur le pistolet de vapeur jusqu’à ce que le bouton de
déverrouillage s’enclenche. Fermer deux ou bien les trois
tubes d’extension en fonction des besoins. Pour démonter le tube d’extension, enfoncer le bouton de déverrouillage correspondant et tirer les tubes pour les séparer les
uns des autres.
26
3.1.4 Adaptateur (4)
Le nettoyeur vapeur dispose de nombreuses buses, permettant un nettoyage efficace et en profondeur des différentes surfaces. Monter tout d’abord l’adaptateur afin
de permettre le montage de ces éléments sur le flexible
de vapeur. L’adaptateur peut être monté sur le pistolet
de vapeur ainsi qu’à l’extrémité d’un ou plusieurs tubes
d’extension.
Veiller à ce que le pistolet soit bien fixé et enclenché.
Enfoncer le bouton de déverrouillage correspondant
et extraire les tubes vers l’arrière pour démonter
l’adaptateur.
Page 27
L’adaptateur peut être utilisé avec la buse à jet ponctuel, le racleur, une des buses à brosse ou pour surface
vitrée. Insérer la buse sélectionnée sur l’adaptateur de
l’accessoire de manière à ce que les deux flèches soient
sur une même ligne, et serrer d’un quart de tour dans le
sens des aiguilles d’une montre (figure 4). Effectuer la
procédure inverse pour démonter la buse.
4
3.2 Remplissage du réservoir d’eau
Le Buggy THOMAS VAPORO est équipé d’un réservoir
d’eau intégré, d’une capacité de 1,6 litres. Couper le
nettoyeur vapeur et retirer le connecteur secteur de la
prise. Lors du remplissage ou de l’appoint en eau, toujours débrancher le nettoyeur vapeur du secteur. Dévisser le couvercle du réservoir (figure 5) en l’enfonçant et
en le tournant simultanément dans le sens inverse des
aiguilles d’une montre. Utiliser l’entonnoir et le bêcher
fournis pour remplir le réservoir d’eau.
3.1.5 Buse à jet ponctuel (5)
Cette buse permet de nettoyer sans soucis les zones
difficilement accessibles, telles que les coins, les joints
et les toilettes.
3.1.6 Racleur (6)
Le racleur permet d’éliminer en douceur la poussière
tenace et le papier peint.
3.1.7 Brosses en nylon (7/8)
Pour le nettoyage des éléments très sales, tels que les
stores, les chauffages, les vannes.
3.1.8 Brosses métalliques (9)
La brosse métallique est prévue pour les forts encrassement sur les matériaux peu sensibles, comme l’acier
inoxydable ou la pierre par exemple.
3.1.9 Buse pour surface vitrée (10+11)
Parfaite pour le nettoyage des grandes surfaces vitrées
(par ex. fenêtres, miroirs, etc.), au choix avec le chiffon
de nettoyage ou non (11).
5
Utiliser uniquement de l’eau pure sans additif, comme
du parfum, du détergent ou de l’alcool, afin de ne pas
endommager l’appareil ou de rendre son utilisation dangereuse. Il est recommandé d’utiliser de l’eau distillée
afin d’éviter tout dépôt calcaire lorsque l’eau est particulièrement dure (valeurs supérieures à 2,5 mmol/l ou
21 °dH). Dans le cas contraire, faire bouillir l’eau avant
d’utiliser l’appareil afin d’allonger sa durée de vie.
Attention : Lors du remplissage, ne pas
dépasser le niveau de remplissage
max de 1,6 l.
Revisser le couvercle en l’enfonçant et en le tournant
dans le sens des aiguilles d’une montre.
Conseil : Le temps de chauffe peut être réduire
en remplissant le réservoir avec de l’eau chaude.
Attention : Risque de rupture en cas de
choc thermique ! Préchauffer les surfaces
vitrées avant de procéder au nettoyage
à la vapeur, en vaporisant la vapeur
dans un vaste rayon à une distance de
20-25 cm. Réduire progressivement la
distance à 10-15 cm pour continuer
à préchauffer la surface vitrée.
27
Page 28
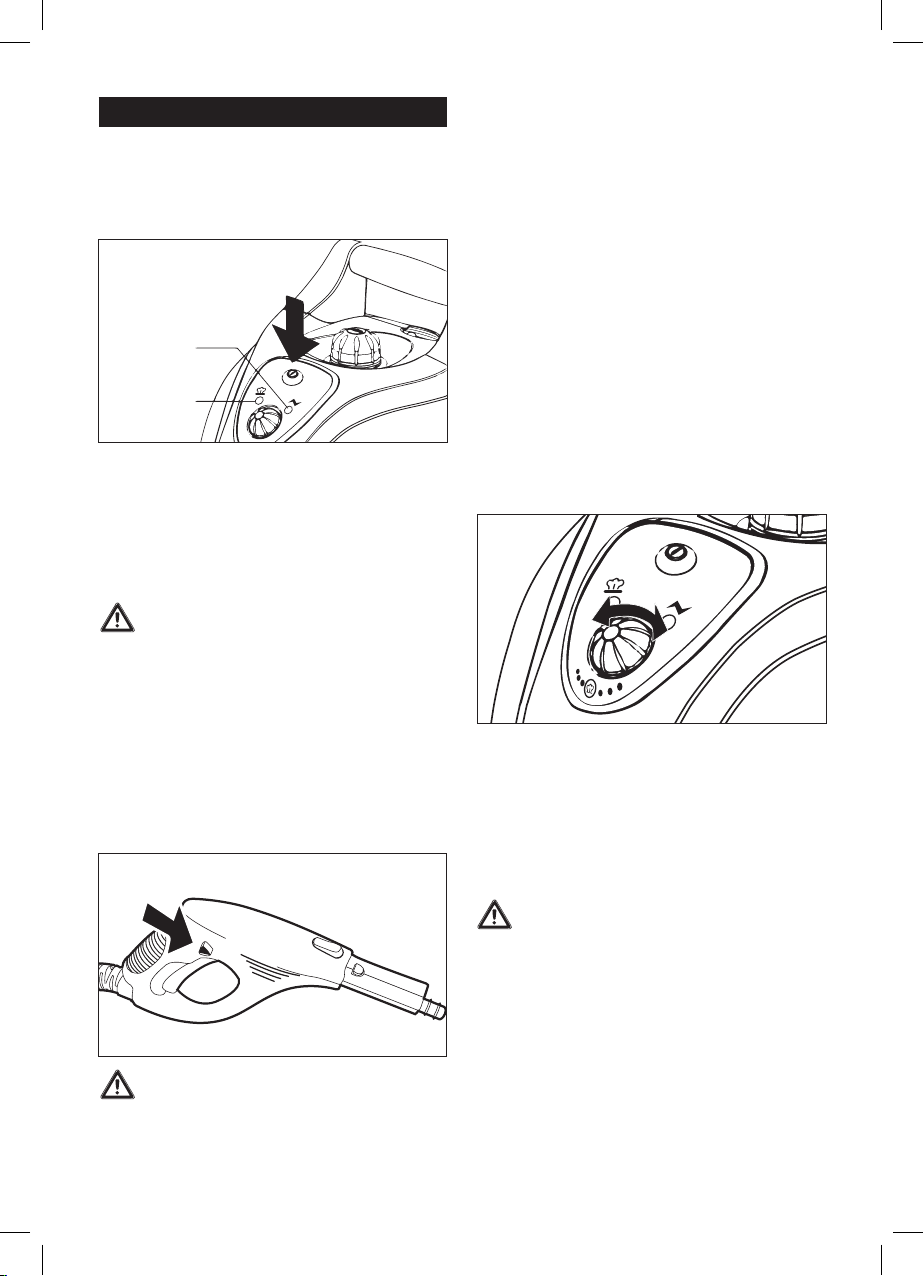
4. Utilisation de l’appareil
4.1 Raccordement à l’alimentation du secteur
Brancher la fiche secteur du nettoyeur vapeur dans
une prise correctement montée, et allumer l’appareil
en appuyant sur le bouton Marche / Arrêt (figure 6).
6
Marche/arrêt
Témoin de contrôle
de fonctionnement
Témoin de
contrôle
de chauffe
Le témoin de fonctionnement orange (figure 6) s’allume
et le nettoyeur vapeur commence à chauffer. La température de fonctionnement est atteinte au bout de
11 minutes environ ; le témoin de chauffe vert s’allume
alors. L’appareil est opérationnel.
4.2 Utilisation du nettoyeur vapeur
Avertissement : Ne jamais diriger la sortie
de vapeur du pistolet sur les personnes,
les animaux, les plantes ou les installations électriques (par ex. fours ou prises)
Risque de brûlures ou d’électrocution !
Déverrouiller le dispositif de verrouillage (protection
enfant) en déplaçant vers la gauche la tige triangulaire
à droite du pistolet (figure 7). La vapeur chaude sort en
actionnant la touche du pistolet. Maintenir tout d’abord
le pistolet de vapeur avec un vieux bout de bois afin
de récupérer l’eau pulvérisée initialement. Appuyer sur
la touche jusqu’à ce que la sortie de vapeur soit homogène. Le nettoyage peut alors commencer.
7
– L’utilisation de vapeur peut décolorer le bois peint/vernis.
– La vapeur peut décolorer les plastiques brillants.
– L’acrylique, le velours et le lin sont particulièrement
sensibles à la température de la vapeur.
– Ne pas diriger le nettoyeur vapeur sur les fibres de
dralon sans avoir testé au préalable une zone cachée.
Pour des raisons compréhensibles, le fabricant ne saura
être tenu pour responsable des dommages sur les objets,
matériaux, personnes, animaux ou plantes dus à une utilisation inappropriée de la vapeur chaude ou de l’appareil.
Une fois la fonction de vapeur coupée, de la vapeur
sort encore quelques secondes.
Ne pas diriger de manière prolongée la sortie de vapeur
sur une même zone. Éliminer la poussière en déplaçant
le jet de vapeur en avant et en arrière. Le débit de vapeur
peut être réglé et adapté au niveau d’encrassement en
tournant le régulateur de pression. Tourner le régulateur
de vapeur dans le sens des aiguilles d’une montre pour
réduire la vapeur, le tourner dans le sens inverse des
aiguilles d’une montre pour l’augmenter (figure 8).
8
.
Lors du fonctionnement, ne pas basculer ou incliner l’appareil à plus de 45° et veiller à ce qu’il se trouve toujours sur une surface stable. Un réservoir plein suffit pour
une utilisation de 50 minutes au maximum. Lorsque l’appareil est en marche, ne pas le laisser sans surveillance
et utiliser au besoin la sécurité enfant pour protéger la
touche de vapeur. Pour cela, déplacer vers la droite la
tige triangulaire à gauche du pistolet de vapeur.
Avertissement : Le boîtier et les pièces
des accessoires chauffent lors du fonctionnement. Laisser refroidir l’appareil
avant de remplacer les pièces et de
faire l’appoint en eau. Ne jamais ouvrir
le couvercle du réservoir lorsque le nettoyeur vapeur est en marche, car le
réservoir est sous pression.
Attention : Tester tout d’abord le nettoyeur
vapeur sur des zones discrètes ou invisibles des surfaces ou matières à nettoyer, afin de contrôler qu’elles soient
bien adaptées à la vapeur chaude.
28
Page 29

Le Buggy THOMAS VAPORO est dotée d’une protection
contre la surchauffe. L’appareil se coupe automatiquement dès qu’une température de 180 °C est atteinte.
Cela permet d’éviter toute surchauffe. Couper l’appareil
dans ce cas en retirant immédiatement la fiche du secteur. L’appareil peut être remis en marche après une
phase de refroidissement de 30 minutes.
4.3 Appoint en eau
Dès que la quantité de vapeur pulvérisée diminue,
le réservoir doit être rempli.
Couper le nettoyeur vapeur en actionnant le bouton
Marche/Arrêt. Le témoin de fonctionnement orange
s’éteint. Appuyer sur la touche de vapeur du pistolet
pour évacuer la vapeur résiduelle. Verrouiller ensuite le
pistolet de vapeur. Retirer la fiche de la prise, et laisser
l’appareil refroidir. Noter que l’eau dans le réservoir
est toujours chaude au bout de 5 minutes. Ouvrir le couvercle du réservoir en appuyant dessus et en le tournant
dans le sens inverse des aiguilles d’une montre.
Avertissement : De la vapeur chaude
peut s’échapper lors de l’ouverture.
Risque de brûlure avec le filetage du
bouchon de fermeture et le réservoir.
Remplir le réservoir à l’aide du bêcher et de l’entonnoir
(voir le paragraphe 3.2 « Remplissage du réservoir
d’eau »), et refermer le couvercle du réservoir. Le nettoyeur vapeur peut alors être rebranché et allumé.
Le Buggy THOMAS VAPORO est opérationnel dès
que le témoin de chauffe est allumé.
4.4 Mise hors service et stockage
Coupez l’appareil. Le témoin de fonctionnement orange
s’éteint. Appuyer sur la touche de vapeur du pistolet
pour évacuer la vapeur résiduelle. Assurer le pistolet
de vapeur en déplaçant vers la droite la tige de verrouillage à gauche de la poignée. Retirer la fiche de
la prise, et laisser l’appareil refroidir. Vider le réservoir
d’eau afin d’éviter tout dépôt à l’intérieur.
Ne fermer le réservoir que lorsqu’il est parfaitement
sec. Le nettoyeur vapeur doit être entièrement refroidi
avant d’être rangé. Tenir l’appareil hors de portée des
enfants. Le tube d’extension avec la buse au sol peut
être installé dans la fixation à l’arrière de l’appareil
en vue du stockage ou pour les petites pauses.
Le câble de raccordement peut être enroulé autour
du deuxième crochet sur le tube d’extension (figure 9).
Si les deux crochets doivent pointer dans une direction, le
crochet sur lequel se trouvent les flèches peut être tourné.
9
5. Généralités
5.1 Nettoyage et maintenance
Avertissement : Avant de procéder
au nettoyage ou à la maintenance
dunettoyeur vapeur, veiller à ce qu’il
soit éteint et débranché du secteur.
Pour nettoyer l’appareil, passer uniquement un chiffon
légèrement humide sur le boîtier. N’utiliser aucun produit
de nettoyage, produit à récurer ou produit à base d’alcool, ces derniers risqueraient d’endommager le boîtier.
Il est recommandé de purger le réservoir au plus tard
après cinq remplissages, lorsque la dureté locale de
l’eau est supérieure à 1,8 mmol/l (10 °dH). Contacter
la compagnie de distribution d’eau pour connaître la
dureté locale de l’eau. Pour le nettoyage, il est recommandé de verser de l’eau dans le réservoir et de la
remuer. Cela permet de diluer les dépôts de calcaire
au fond du nettoyeur vapeur. Évacuer ensuite l’eau,
puis laisser sécher le réservoir avant de le refermer.
Pour augmenter la durée de vie du nettoyeur à vapeur,
le réservoir d’eau doit être traité avec un détartrant tous
les 6 mois environ.
Déposer un ou au maximum deux bâtons de détartrage
dans 1l d’eau chaude (50 °C), et remplir le réservoir
avec. Laisser agir la solution pendant 30 minutes environ, et évacuer l’eau avec les dépôts dilués. Renouveler
l’opération au besoin, puis rincer le réservoir d’eau.
5.2 Recyclage des appareils
électriqueset électroniques
Lorsqu’il est en fin de vie, l’appareil doit
être recyclé conformément aux dispositions
locales. Ce n’est pas une ordure ménagère.
Le symbole sur le produit ou sur son emballage indique
qu’il ne doit pas être traité comme une ordure ménagère
résiduelle, il doit au contraire être déposé dans une station
de recyclage des appareils électriques et électroniques.
29
Page 30

GB
Cette contribution au bon recyclage du produit permet
de protéger l’environnement et la santé. Un recyclage
inapproprié est nocif pour l’environnement et la santé.
Pour plus d’informations sur le recyclage de ce produit,
contacter la mairie, la déchetterie ou le magasin, où le
produit a été acheté.
5.3 Dépannage
Contrôler tout d’abord si vous pouvez éliminer vous-même l’erreur à l’aide de la liste, avant de retourner le nettoyeur
vapeur au service client THOMAS.
Erreur Cause possible Solution
Le témoin de fonctionnement ne s’allume plus.
L’appareil n’est pas branché ou allumé.
La prise est défectueuse.
Le câble de réseau est défectueux.
Toute personne ne respectant pas les consignes de recyclage de ce paragraphe sera pénalisée. Nous recommandons de conserver l’emballage au moins pendant
la période de garantie.
Insérer la fiche dans une prise, ou allumer
l’appareil.
Contrôler la prise en retirant la fiche
du nettoyeur à vapeur et insérer
la fiche d’un autre appareil.
Faire remplacer le câble par
le service client THOMAS.
Aucune vapeur ne sort
en actionnant la touche
de vapeur.
Seule une très petite
quantité de vapeur sort.
L’appareil a besoin de
beaucoup de temps
pour chauffer.
5.4 Caractéristiques techniques
Type d’appareil : Nettoyeur à vapeur
Modèle : THOMAS VAPORO Buggy
Tension : 220–240 V ~ 50/60 Hz
Consommation
de puissance nominale : 1500 W
Pression de vapeur : max. 3,5 bars
Pression autorisée : 5 bars
Capacité du
réservoir d’eau : max. 1,6 l
Disponibilité max. 50 minutes/
de la vapeur : remplissage du réservoir
La touche de vapeur est verrouillée
parla sécurité enfant.
Le réservoir d’eau est vide.
Le régulateur de vapeur est réglé
sur la quantité minimale.
Le réservoir présente des dépôts. Détartrer le réservoir d’eau (se reporter
Déplacer vers la gauche la tige triangulaire
à droite du pistolet de vapeur.
Faire l’appoint en eau (se reporter au
paragraphe 4.3 « Appoint en eau »).
Tourner le régulateur de vapeur dans le
sens inverse des aiguilles d’une montre
jusqu’à ce que la quantité de vapeur soit
suffisante.
au paragraphe 5.1 « Nettoyage et
maintenance »).
Temps de chauffe : env. 11 minutes
Débit de vapeur : max. 40 g/min
Émissions sonores : 30 dB(A) lors
Dimensions de l’appareil :
Poids : appareil sans
Sous réserve de modification technique.
du fonctionnement
305 x 397 x 235 mm
(l x L x h)
les accessoires 4,5 kg
IP X4
30
Page 31

6. Garantie
Indépendamment des obligations de garantie du revendeur
résultant du contrat d’achat, nous offrons des prestations de
garantie pour cet appareil, selon les conditions suivantes :
1. La période de garantie est de 24 mois à compter
de la date de la livraison de l’appareil au premier
consommateur final. Si l’appareil est utilisé à des fins
commerciales/industrielles ou soumis à une sollicitation similaire, cette garantie est réduite à 12 mois.
La présentation de la facture d’achat est indispensable pour faire valoir un droit à garantie.
2. Au cours de la période couverte par la garantie, nous
procédons à l’élimination de tous les vices fonctionnels
importants de l’appareil dès lors qu’il est prouvé qu’ils
sont dus à une fabrication incorrecte ou un vice de
matériel. Ce faisant, nous pouvons à notre discrétion
soit procéder à la réparation des pièces défectueuses,
soit à un échange de ces pièces. La propriété des
pièces défectueuses échangées nous est alors transférée. La garantie ne s’étend pas aux pièces très fragiles,
telles que pièces en verre, plastiques, lampes, etc.
Tout vice constaté au cours de la période de garantie
doit nous être déclaré immédiatement après sa constatation. Au cours de la période de garantie, les pièces
de rechange nécessaires pour l’élimination des
dysfonctionnements apparus ainsi que les frais de maind’œuvre/réparation proprement dite ne sont pas facturés au client. En cas de recours injustifié à notre service
après vente, les frais encourus sont toutefois à la charge
du client. Des travaux de réparation chez le client ou
sur les lieux d’installation de l’appareil ne peuvent
être exigés que pour les gros appareils. Tous les autres
appareils doivent être envoyés au point de service
après vente ou atelier de réparation concessionnaire
le plus proche ou bien directement à notre usine.
3. Il n’existe aucune obligation de garantie en cas de
légères divergences sans importance pour la valeur
et le fonctionnement de l’appareil. De même, toute
garantie est exclue en cas de dommages dus à des
effets chimiques ou électrochimiques entraînés par
l’eau utilisée, et d’une façon générale par des conditions ambiantes anormales lors de l’exploitation.
Tout droit à garantie est exclu en cas de dommages
résultant d’une usure normale et par ailleurs en cas
de non respect du mode d’emploi ou d’utilisation
incorrecte de l’appareil.
4. Le droit à garantie devient caduc en cas d’intervention
ou de réparations de l’appareil par des personnes
non autorisées.
5. Les prestations effectuées dans le cadre de la garantie
n’entraînent aucune prolongation ou renouvellement
de la garantie accordée au départ, qu’il s’agisse de
l’appareil en entier ou des pièces de rechange qui
y ont été intégrées. Le délai de garantie pour les pièces
remplacées prend donc fin avec l’expiration du délai
de garantie de tout l’appareil.
6. Tout autre droit ou droit élargi, et notamment tout droit
à dommage-intérêt pour des dommages encourus
à côté de ceux se rapportant à l’appareil lui-même
sont exclus, à moins de dispositions impératives
légales relatives à une telle responsabilité.
Nos services après vente sont également à votre disposition après expiration du délai de garantie. Veuillez
vous adresser à votre commerçant spécialisé ou directement à l’un de nos points de service après vente.
31
Page 32

Inhoud Pagina
1. Belangrijke veiligheidsbepalingen ...................................................33/34
1.1 Voeding.................................................................................33
1.2 Bijzondere personengroepen ...............................................................33
1.3 Bediening van het apparaat .............................................................33/34
1.4 Onderhoud en reiniging ....................................................................34
2. Inleiding
2.1 Hartelijk bedankt ......................................................................... 34
2.2 Uitpakken van het apparaat .............................................................33/34
2.3 Onderdeelidentificatie .....................................................................34
2.4 Afbeeldingen: Stoomreiniger en accessoires ...................................................35
3. Inbedrijfstelling
3.1 Montage van accessoire-onderdelen .........................................................36
3.1.1 Stoomslang .........................................................................36
3.1.2 Verlengbuis .........................................................................36
3.1.3 Vloerspuitstuk .......................................................................36
3.1.4 Asseccoire-adapter ................................................................36/37
3.1.5 Puntstraalspuitstuk .................................................................... 37
3.1.6 Schraper ........................................................................... 37
3.1.7 Nylon borstels .......................................................................37
3.1.8 Staalborstel ......................................................................... 37
3.1.9 Vensterspuitstuk ...................................................................... 37
3.2 Vullen van de watertank ....................................................................37
4. Bediening van het apparaat
4.1 Aansluiting aan het elektriciteitsnet ...........................................................38
4.2 Gebruik van de stoomreiniger ............................................................38/39
4.3 Bijvullen van water ........................................................................ 39
4.4 Buitenbedrijfstelling en opslag ...............................................................39
NL
5. Algemeen
5.1 Reiniging en onderhoud ....................................................................39
5.2 Afvoer ...............................................................................39/40
5.3 Foutoplossing ............................................................................40
5.4 Technische gegevens.......................................................................40
6. Garantie............................................................................... 41
Waarschuwing: deze aanwijzing heeft betrekking op gevaren voor de gebruiker.
Pas op: deze aanwijzing heeft betrekking op gevaren voor het apparaat of objecten.
32
Page 33

1. Belangrijke veiligheidsvoorsch
1.1 Voedingsspanning
• Controleer voor het aansluiten van de stoomreiniger
aan het elektriciteitsnet, of de spanningsgegevens
op het typeplaatje overeenstemmen met de spanning
in uw stopcontact.
• Sluit het apparaat alleen aan op een volgens
de voorschriften geaard stopcontact.
• De stekker van het apparaat moet in het stopcontact
passen. Er mogen geen modificaties aan de stekker
worden uitgevoerd. Gebruik bij apparaten, die met
een veiligheidsschakelaar zijn uitgerust, geen adapter. Onveranderde stekkers en passende stopcontacten reduceren het risico voor stroomstoten.
• Het wordt aanbevolen, het apparaat alleen met stopcontacten te gebruiken, die met een foutstroombeveiligingsschakelaar zijn beveiligd. Raadpleeg indien
nodig een elektrotechnicus.
• Raak de stekker in geen geval aan met natte handen.
• Ontkoppel het apparaat altijd van het elektriciteitsnet, door de stekker uit het stopcontact te trekken.
Trek daarbij nooit aan de kabel.
• Een defecte aansluitleiding dient uitsluitend door
een kabel met identieke aansluitwaarden te worden
vervangen. Zend het apparaat voor reparatie aan
de THOMAS-klantenservice.
• Controleer voor gebruik van een verlengkabel of
de aansluitwaarden met die van de stoomreiniger
overeenstemmen. Raadpleeg indien nodig een
vakhandel.
• Controleer of de kabel geen struikelgevaar vormt.
De kabel mag niet worden geknikt of ingeklemd.
1.2 Bijzondere personengroepen
•
Dit apparaat kan door personen met
riften
gereduceerde fysische, sensorische
of mentale capaciteiten of gebrek
aan ervaring en/of kennis gebruikt
worden, wanneer zij onder toezicht
staan of met betrekking tot een veilig
gebruik van het apparaat onderwe
zen werden en de daaruit voortvloeiende gevaren begrepen hebben. Kinderen mogen niet met het apparaat
spelen.
• Houd het apparaat buiten bereik van kinderen,
terwijl deze is ingeschakeld of afkoelt.
• Laat kinderen niet met het verpakkingsmateriaal
(plasticfolie) spelen, er bestaat verstikkingsgevaar.
1.3 Bediening van het apparaat
Voorzichtig! Hete stoom!
Gevaar voor brandwonden!
• Reinig om veiligheidsredenen geen elektrische apparaten zoals ovens, magnetrons, koelkasten, schakelaars en lampen met de stoomreiniger.
• Controleer het apparaat, de kabel en de accessoires
regelmatig op schade. Neem beschadigde apparaten of accessoires niet in bedrijf.
• Richt de stoomreiniger nooit op mensen, dieren of
planten (gevaar voor brandwonden)! Richt de stoomreiniger niet op elektrische installaties of leidingen.
• Laat het apparaat niet onbeheerd. Na gebruik en bij
verlaten van het werkbereik dient het apparaat altijd
te worden uitgeschakeld en de stekker uit het stopcontact te worden getrokken.
• Het apparaat is uitgerust met een thermostaat en een
thermozekering voor de beveiliging tegen oververhitting.
• Accessoires worden bij gebruik heet; laat ze daarom
alvorens te wisselen afkoelen.
• Raak hete oppervlakken op het apparaat niet aan.
Het is normaal dat de stoomreiniger tijdens bedrijf
warm wordt.
• Schroef tijdens bedrijf nooit de tankdop open.
De tank staat onder druk.
• Het apparaat mag tijdens bedrijf niet meer dan 45°
worden gekanteld.
• Dompel het apparaat nooit onder in water of andere
vloeistoffen.
• De stoomreiniger is alleen geschikt voor gebruik
binnenshuis en huishouddoeleinden, maar niet voor
commercieel gebruik.
• Stel het apparaat nooit bloot aan extreme zonnebestraling, vorst of andere weersinvloeden (regen etc.).
• Gebruik het apparaat alleen in reservoirs/bekkens,
die niet met water of andere vloeistoffen zijn gevuld.
• Gebruik het apparaat niet met lege watertank.
Vul altijd op tijd water bij.
• Leeg de watertank, als het apparaat niet wordt gebruikt.
• Vul nooit wat anders dan water in de tank. Doe nooit
toevoegingsstoffen (zoals parfum, vlekkenmiddelen
of alcoholhoudende middelen) in het water, omdat
het apparaat daardoor beschadigd raakt of het
gebruik ervan gevaarlijk wordt.
• Trek altijd de stekker uit het stopcontact, en laat het
apparaat volledig afkoelen, alvorens water bij te vullen.
• Vul de tank niet te vol. Overschrijd de voorgeschreven
maximaal vulhoogte niet. Gebruik de meegeleverde
33
Page 34

maatbeker en trechter.
• Controleer voor gebruik of de sluitdop van de
watertank goed vast is gedraaid.
• Draag het apparaat uitsluitend aan het handvat.
• Gebruik de THOMAS VAPORO Buggy niet voor
de behandeling van kledingstukken, die nog op
hetlichaam worden gedragen.
• Het is mogelijk, dat af en toe een beetje water
uit het spuitstuk druppelt. Dat is volledig normaal.
Hetis alleen maar condenswater.
• De kracht en warmte van de stoom kunnen een nega
tieve invloed hebben op sommige materialen. Controleer altijd eerst op een geschikte plaats, of een oppervlak geschikt is voor de behandeling met het apparaat.
• Geef deze handleiding mee als de stoomreiniger van
eigenaar wisselt.
2. Inleiding
2.1 Hartelijk bedankt
Wij feliciteren u met de aanschaf van de THOMAS
VAPORO Buggy. Uw nieuwe stoomreiniger is een veelzijdig hulpmiddel voor talrijke reinigingstaken. U kun nu
alleen door hoge temperaturen hardnekkig vuil snel en
volledig van gladde oppervlakken verwijderen, bijvoorbeeld van wand- en vloertegels, werkvlakken, kookgerei, ramen en spiegels en daarbij schadelijke bacteriën
doden. Daarmee is het mogelijk zowel afzettingen,
schimmel, vet en zeepresten als vast en los vuil volledig
zonder chemisch oplosmiddel op een milieuvriendelijke
manier te verwijderen.
Wij wensen u veel plezier met uw nieuwe product.
1.4 Onderhoud en reiniging
• Gebruik uitsluitend originele accessoires, die zijn
meegeleverd.
• Repareer schade aan het apparaat, de accessoires
of de stroomkabel nooit zelf. Laat het apparaat uitsluitend door een geautoriseerde klantenservice controleren en repareren. Wijzigingen aan het apparaat
kunnen uw gezondheid in gevaar brengen. Zorg
ervoor dat uitsluitend originele reserveonderdelen en
accessoires worden gebruikt.
• Schakel het apparaat voor reiniging of onderhoud
altijd uit, verwijder de stekker en laat de stoomreiniger afkoelen.
2.2 Uitpakken van het apparaat
Pak de stoomreiniger en alle accessoires uit. Controleer
of de inhoud volledig is. Bewaar, indien mogelijk, de
doos en de binnenverpakking, zodat het apparaat bij
transport of bij teruggave in geval van een garantieclaim
wordt beschermd. Voer alle onnodige verpakkingsmaterialen af volgens de voorschriften. Neem direct contact
op met uw dealer, als u bij het uitpakken transportschade vaststelt. Het apparaat mag in geen geval in bedrijf
worden gesteld, indien blijvend beschadigd.
2.3 Onderdeelidentificatie
1 = Trechter
2 = Maatbeker
3 = Stoompistool met stoomslang en stoomaansluiting
4 = Accessoire-adapter
5 = Puntstraalspuitstuk
6 = Schraper
7 = Nylon borstel, klein
8 = Nylon borstel, groot
9 = Staalborstel
10 = Raamspuitstuk
11 = Reinigingsdoek voor raamspuitstuk
12 = Vloerspuitstuk
13 = Reinigingsdoek voor vloerspuitstuk
14 = 3 verlengbuizen
15 = Stoomreiniger
34
Page 35

2.4 Afbeeldingen: Stoomreiniger en accessoires
15
14
1
2
3
13 12 11 10 9 8
4
5
6
7
35
Page 36

3. Inbedrijfstelling
3.1 Montage van accessoire-onderdelen
Voor gebruik van de THOMAS VAPORO Buggy moet
de stoomslang met het stoompistool aan het apparaat
worden aangesloten en het gewenste accessoireonderdeel worden aangebracht. De THOMAS VAPORO
Buggy bevat een accessoirebox, waarin zich accessoire-adapters, puntstraalspuitstukken, schraper, nylon borstel klein, nylon borstel groot, staalborstel, raamspuitstuk
en de reinigingsdoeken bevinden. Open de accessoirebox door de blauwe vergrendeling naar boven te trekken en de transparante afdekking van de accessoirebox
er naar voren af te klappen (afbeelding 1).
1
Neem het vereiste accessoire-onderdeel eruit, en sluit
de afdekking. Duw de grendel van de afdekking in de
uitsparing, en druk deze vast naar onderen, tot deze
vastklikt.
3.1.3 Vloerspuitstuk (12+13)
Het vloerspuitstuk wordt om verpakkingstechnische redenen met een afzonderlijk aansluitstuk geleverd. Zet de
aansluitstukken zoals afgebeeld in elkaar (afbeelding 2).
2
Breng het vloerspuitstuk op het uiteinde van de verlengbuis aan. Zorg ervoor dat het spuitstuk vastklikt. Het
vloerspuitstuk is ideaal voor de reiniging van afwasbare
wand- en vloerbekleding. Deze kan zowel met als zonder reinigingsdoek worden gebruikt. Het wordt echter
aanbevolen de reinigingsdoek te gebruiken, om het
materiaal bij gevoelige oppervlakken (zoals hout of
linoleum) te beschermen. Plaats het vloerspuitstuk midden op de reinigingsdoek, druk de binnenkant van de
klemmen naar onderen, steek de uitstekende delen van
de reinigingsdoek ertussen en laat de klemmen weer los
(afbeelding 3). Druk voor het verwijderen van het vloerspuitstuk de desbetreffende ontgrendelingsknop in en
trek het spuitstuk er met een neerwaartse beweging af.
3
3.1.1 Stoomslang (3)
Sluit eerst de stoomslang aan op de voorkant van de
THOMAS VAPORO Buggy. Klap hiervoor de behuizingsdeksel naar onderen, en druk het aansluitstuk op
de stoomslang vast in de aansluiting, tot deze vastklikt.
Druk voor het verwijderen van de stoomslang beide ontgrendelingsknoppen aan de rechter- en linkerkant van het
aansluitstuk in en trek de slang uit de stoomaansluiting.
3.1.2 Verlengbuis (14)
Breng de verlengbuis aan, als de stoomreiniger voor de
reiniging van vloeren of moeilijk toegankelijke bereiken
moet worden gebruikt. Steek hiervoor het open einde
van de buis op het stoompistool, tot de ontgrendelingsknop vastklikt. Sluit indien nodig twee of alle drie
verlengbuizen aan. Druk voor het verwijderen van de
verlengbuis de desbetreffende ontrgrendelingsknop in
en trek de buizen met een neerwaartse beweging uit
elkaar.
36
3.1.4 Accessoire-adapter (4)
De stoomreiniger beschikt over talrijke opzetstukken,
voor een zo effectief mogelijke en grondige reiniging
van verschillende oppervlakken. Monteer eerst de
accessoire-adapter, zodat het aanbrengen van deze
opzetstukken aan de stoomslang mogelijk is. De accessoire-adapter kan zowel op het stoompistool als aan
het uiteinde van een of meerdere verlengbuizen worden
aangebracht.
Zorg ervoor dat de adapter is bevestigd en vergrendeld. Druk op de desbetreffende ontgrendelingsknop
en trek de buizen met een neerwaartse beweging uit
elkaar, om de adapter weer te verwijderen.
Page 37

De accessoire-adapter kan met het puntstraalspuitstuk,
de schraper, een van de borstelspuitstukken of met het
raamspuitstuk worden gebruikt. Duw het geselecteerde
spuitstuk op de accessoire-adapter, zodat beide pijlen
op een lijn naar elkaar wijzen en draai deze met een
kwartslag in de richting van de klok vast (afbeelding.)
Voer de beschreven stappen in omgekeerde volgorde
uit, om het spuitstuk eraf te nemen.
4
3.2 Vullen van de watertank
De THOMAS VAPORO Buggy is uitgerust met een geïntegreerde watertank met een inhoud van 1,6 l. Schakel
de stoomreiniger uit en trek de stekker uit het stopcontact.
De stoomreiniger moet bij het vullen of bijvullen van water
altijd zijn gescheiden van het elektriciteitsnet. Draai de
tankdop (afbeelding 5) eraf, door de dop naar onderen
te drukken en gelijktijdig tegen de klok in te draaien.
Gebruik voor het vullen van de watertank de meegeleverde trechter en maatbeker.
5
3.1.5 Puntstraalspuitstuk (5)
Met behulp van dit spuitstuk kunnen moeilijk toegankelijke bereiken zoals hoeken, voegen en toiletten probleemloos worden gereinigd.
3.1.6 Schraper (6)
Met de schraper kunnen hardnekkig vuil en behang
eenvoudig worden verwijderd.
3.1.7 Nylon borstels (7/8)
Voor de reiniging van sterke verontreiniging van bijvoorbeeld jaloezieën, verwarmingsradiatoren, ventielen.
3.1.8 Staalborstel (9)
De staalborstel is bedoeld voor sterke verontreinigingen
op minder gevoelige materialen, zoals bijvoorbeeld
roestvast staal of steen.
3.1.9 Raamspuitstuk (10+11)
Perfect voor het reinigen van grote glazen oppervlakken
(bijvoorbeeld ramen, spiegels, etc.), optioneel met de
desbetreffende reinigingsdoek (11).
Gebruik alleen schoon water zonder toevoegingsmiddelen, zoals parfum, reinigingsmiddel, alcohol, omdat
deze het apparaat schade kunnen toebrengen en het
gebruik ervan gevaarlijk kunnen maken. Het wordt aanbevolen, gedestilleerd water te gebruiken, om bij zeer
hard water (met waarden van meer dan 2,5 mmol/l of
21 °dH) kalkafzettingen te verhinderen. Kook het water
anders voor gebruik van het apparaat, om de levensduur van het apparaat te verlengen.
Pas op: overschrijdt bij het vullen van de
tank niet de maximale vulling van 1,6 l.
Draai de tankdop weer vast, door deze naar onderen te
drukken en met de klok mee te draaien.
Tip: de verwarmingstijd kan worden verkort,
door bij het vullen van de tank warm water
te gebruiken.
Pas op: bij een temperatuurschok
bestaat breukgevaar! Warm glazen
oppervlakken voor de stoomreiniging
voor, door deze met een grote boog op
een afstand van 20-25 cm met stoom te
besproeien. Verklein de afstand geleidelijk tot 10-15 cm voor verdere verwarming van het glasvlak.
37
Page 38

4. Bediening van het apparaat
4.1 Aansluiting aan het elektriciteitsnet
Steek de stekker van de stoomreiniger in een vakkundig
aangebracht stopcontact, en schakel het apparaat in door
op de Aan-/Uit-schakelaar (afbeelding 6) te drukken.
6
Aan/Uit
Bedrijfscontrolelamp
Verwarmingscontrolelamp
De oranje bedrijfslamp (afbeelding 6) gaat branden en
de stoomreiniger begint met verwarmen. De bedrijfstemperatuur wordt na ongeveer 11 minuten bereikt, daarna
gaat de groene verwarmingscontrolelamp branden. Het
apparaat is nu gereed voor bedrijf.
4.2 Gebruik van de stoomreiniger
Waarschuwing: richt de stoomuitlaat van
het stoompistool nooit op mensen, dieren,
planten of elektrische installaties (zoals
ovens of stopcontacten). Er bestaat gevaar
voor brandwonden of stroomschokken!
Ontgrendel de vergrendelingsinrichting (kinderbeveiliging), door de driehoekige stift aan de rechterkant van
het stoompistool naar links te duwen (afbeelding 6).
Bij bediening van de stoomknop ontsnapt stoom. Houd
het stoompistool eerst boven een oud stuk stof, om aan
het begin uitstromend sproeiwater op te vangen. Druk
de stoomknop in, tot de stoom er gelijkmatig uitkomt.
Vervolgens kan met de reiniging worden begonnen.
7
– Het gebruik van stoom kan geverfd/gelakt hout bleken.
– Stoom kan glanzende kunststof verkleuren.
– Acryl, velours en linnen reageren zeer gevoelig op
de temperatuur van stoom.
– Gebruik de stoomreiniger niet op dralon, zonder het
materiaal eerst op een geschikte plaats te testen.
Om te begrijpen redenen kan de fabrikant niet aansprakelijk worden gesteld voor schade aan objecten,
materialen, mensen, dieren of planten, die ontstaan door
ongeschikt gebruik van hete stoom of onreglementair
gebruik van het apparaat.
Na uitschakelen van de stoomfunctie blijft nog een
aantal seconden stoom ontsnappen.
Richt de stoomuitlaat niet gedurende langere tijd op
een punt. Werk het vuil los, door de stoomstraal heen
en weer te bewegen. Het debiet van de uitstromende
stoom kan door draaien van de stoomregelaar worden
geregeld en aan de verontreinigingsgraad worden
aangepast. Draai de stoomregelaar in de richting van
de klok, zodat er minder stoom uitstroomt, en tegen de
klok in, om een grotere hoeveelheid stoom te verkrijgen
(afbeelding 8).
8
Kantel het apparaat in bedrijf niet meer dan 45° en
zorg ervoor dat het apparaat altijd op een vaste ondergrond staat. Met een volle tank kan het apparaat maximaal 50 minuten worden gebruikt. Laat het ingeschakelde apparaat niet onbeheerd, en gebruik indien nodig
een kinderbeveiliging, om de stoomknop te beveiligen.
Duw hiervoor de driehoekige stift aan de linkerkant
van het stoompistool naar rechts.
Pas op: test de stoomreiniger altijd eerst
op onopvallende of niet-zichtbare plaatsen van het de reinigen oppervlakken
of stoffen, om te controleren, of ze hete
stoom verdragen.
38
Waarschuwing: de behuizing en de
accessoires worden tijdens bedrijf heet.
Laat het apparaat voor het wisselen
van accessoires en bijvullen van water
afkoelen. Open de tankdop nooit als
de stoomreiniger is ingeschakeld,
omdat de tank onder druk staat.
Page 39

THOMAS VAPORO Buggy is uitgerust met een zekering
tegen oververhitting. Het apparaat wordt automatisch
uitgeschakeld, zodra het een temperatuur van 180 °C
bereikt. Op deze manier wordt een oververhitting vermeden. Scheidt het apparaat in dit geval door trekken
van de stekker onmiddellijk van het net. Het apparaat
kan na een afkoelfase van 30 minuten opnieuw in
bedrijf worden gesteld.
4.3 Bijvullen van water
Zodra de uitgestoten hoeveelheid stoom afneemt,
moet de tank worden gevuld.
Schakel de stoomreiniger door drukken op de Aan-/
Uit-schakelaar uit. De oranje bedrijfscontrolelamp gaat
uit. Druk op de stoomknop op het stoompistool om de
restdruk af te bouwen. Vergrendel het stoompistool
daarna. Trek de stekker uit het stopcontact en laat het
apparaat volledig afkoelen. Let op dat het water in de
tank na 5 minuten nog altijd heet is. Open de tankdop
door deze omlaag te drukken en tegen de richting van
de klok te draaien.
Waarschuwing: bij het openen kan hete
stoom ontsnappen. Er bestaat verbrandingsgevaar door het schroefdraad
van de dop en de tank.
Vul de tank met behulp van de maatbeker en trechter
(zie paragraaf 3.2 „Vullen van de watertank”) en sluit
de tankdop weer. De stoomreiniger kan nu weer aan
het net worden aangesloten en worden ingeschakeld.
De THOMAS VAPORO Buggy is gereed voor bedrijf,
zodra de verwarmingscontrolelamp gaat branden.
4.4 Buitenbedrijfstelling en opslag
Schakel het apparaat uit. De oranje bedrijfscontrolelamp
gaat uit. Druk op de stoomknop op het stoompistool
om de restdruk af te bouwen. Beveilig het stoompistool
door de vergrendelingsstift aan de linkerkant van de
handgreep naar rechts te duwen. Trek de stekker uit het
stopcontact en laat het apparaat volledig afkoelen. Leeg
de watertank om afzettingen in de tank te vermijden.
Sluit de watertank pas als deze volledig is gedroogd.
De stoomreiniger moet volledig zijn afgekoeld voordat
deze wordt opgeborgen. Bewaar het apparaat buiten
bereik van kinderen. De verlengbuis met het vloerspuitstuk kan voor het bewaren of voor korte bedrijfspauzes
in de houder aan de achterkant van het apparaat worden geplaatst.
De aansluitkabel kan om de twee haken op de verlengbuis worden gewikkeld (afbeelding 9). Als beide haken
in een richting wijzen, kan de haak waarop de pijlen te
zien zijn worden omgedraaid.
9
5. Algemeen
5.1 Reiniging en onderhoud
Waarschuwing: controleer voor reiniging
van of onderhoud aan de stoomreiniger
of deze is uitgeschakeld en van het net is
gescheiden.
Veeg voor de reiniging van het apparaat alleen met een
licht vochtige doek over de behuizing. Gebruik geen
reinigingsmiddelen, schuurmiddelen of alcoholhoudende middelen, omdat de behuizing hierdoor beschadigd
kan raken.
Het wordt aanbevolen, de tank uiterlijk na vijf maal vullen
uit te spoelen, voor zover de plaatselijke waterhardheid
meer dan 1,8 mmol/l (10 dH) bedraagt. Informatie over
de lokale waterhardheid verkrijgt bij u uw waterbedrijf.
Het wordt aanbevolen, voor de reiniging water in de tank
te vullen en deze krachtig te schudden. Daardoor komen
kalkafzettingen op de bodem van de stoomreiniger los.
Giet het water er vervolgens uit, en laat de tank volledig
drogen, alvorens opnieuw aan te sluiten.
Om de levensduur van de stoomreiniger te verlengen,
dient de watertank ongeveer elke 6 maanden met ontkalkingsmiddel te worden behandeld.
Leg een of maximaal twee ontkalkingssticks in 1 l warm
water (50 °C) en vul de watertank daarmee. Laat de
oplossing ongeveer 30 minuten rusten en giet het water
met de opgeloste afzettingen er daarna uit. Herhaal dit
proces indien nodig en spoel de watertank daarna uit.
5.2 Afvoer van elektrische
en elektronische apparatuur
Aan het einde van de levensduur moet het
apparaat volgens de geldende wetten
worden afgevoerd. Het is geen huisvuil.
Het symbool op het product of de verpakking wijst erop,
dat dit product niet als normaal huisvuil dient te worden
behandeld, maar op een verzamelpunt voor het recyclen van elektrische en elektronische apparatuur moet
worden afgegeven.
39
Page 40

GB
Door uw bijdrage aan de juiste afvoer van dit product
beschermt u het milieu en de gezondheid van uw medemensen. Milieu en gezondheid worden door verkeerde
afvoer in gevaar gebracht.
Meer informatie over het recyclen van dit product vindt
u bij de gemeente, uw vuilnisophaaldienst of de winkel,
waar u het product heeft gekocht.
5.3 Foutoplossing
Controleer eerst of u de fouten aan de hand van de lijst zelf kunt oplossen, voordat u de stoomreiniger aan
de THOMAS-klantenservice zendt.
Fout Mogelijke oorzaak Oplossing
De bedrijfscontrolelamp
brandt niet meer.
Het apparaat is niet in een stopcontact
gestoken of niet ingeschakeld.
Het stopcontact is defect.
De stroomkabel is beschadigd.
Wie het apparaat na de aanwijzingen in deze para
graaf niet wegbrengt, wordt onder de geldende wetten
verantwoordelijk gesteld. Wij adviseren u, de verpakking
minimaal gedurende de garantieperiode te bewaren.
Steek de stekker in een stopcontact,
of schakel het apparaat in.
Controleer het stopcontact, door de stekker
van de stoomreiniger eruit te trekken en
de stekker van een ander apparaat erin
te steken.
Laat de kabel door de THOMAS-klantenservice vervangen.
-
Bij bediening van de
stoomknop komt er
geen stoom uit.
Er komt slechts een
kleine hoeveelheid
stoom uit.
Het apparaat heeft
veel tijd nodig om
te verwarmen.
5.4 Technische gegevens
Apparaattype: stoomreiniger
Model: THOMAS VAPORO Buggy
Spanning: 220–240 V ~ 50/60 Hz
Nominaal vermogen: 1500 W
Stoomdruk: max. 3,5 bar
Toegestane druk: 5 bar
Inhoud van
de watertank: max. 1,6 l
Stoomvervoegbaarheid: max. 50 minuten/tankvulling
De stoomknop is vergrendeld door
de kinderbeveiliging.
De watertank is leeg.
De stoomregelaar is op de minimale
stoomhoeveelheid ingesteld.
Er zijn afzettingen in de tank. Ontkalken van de watertank
Duw de driehoekige stift aan de rechterkant
van het stoompistool naar links.
Vul water bij
(zie paragraaf 4.3 „Bijvullen van water”).
Draai de stoomregelaar tegen de richting
van de klok, tot er genoeg stoom uitkomt.
(zie paragraaf 5.1 „Reiniging en onderhoud”).
Verwarmingstijd: ca. 11 minuten
Stoomdebiet: max. 40 g/min
Geluidsemissie: 30 dB(A) tijdens het gebruik
Apparaatafmetingen: 305 x 397 x 235 mm
Gewicht: apparaat zonder
Technische wijzigingen voorbehouden.
(b x l x h)
accessoires 4,5 kg
IP X4
40
Page 41

6. Garantie
Onafhankelijk van de garantieplichten van de dealer
uit het koopcontract geven wij op dit apparaat garantie
volgens onderstaande voorwaarden:
1. De garantieperiode bedraagt 24 maanden – gerekend vanaf de dag van levering aan de eindgebruiker. Bij gebruik voor bedrijfsdoeleinden of bij overeenkomstige belasting wordt de garantieperiode beperkt
tot 12 maanden. Om de aanspraak te doen gelden,
moet een aankoopbewijs worden voorgelegd.
2. Binnen de garantieperiode verhelpen wij alle wezenlijke functiegebreken die aantoonbaar aan een
gebrekkige uitvoering of materiaalfouten te wijten
zijn door de defecte onderdelen te repareren of
te vervangen; vervangen onderdelen worden ons
eigendom. De garantie geldt niet voor licht breekbare onderdelen, zoals glas, kunststoffen en lampen.
Gebreken moeten binnen de garantieperiode onmiddellijk na de vaststelling aan ons worden gemeld.
Tijdens de garantieperiode worden de reserveonderdelen en de kosten van de werkuren die nodig waren
om de storingen te verhelpen niet op u verhaald. Bij
onrechtmatige gebruikmaking van onze klantenservice zijn de daarmee verbonden kosten voor rekening van de klant. Reparatiewerkzaamheden bij de
klant of op de plaats van gebruik kunnen alleen worden verlangd voor grote apparaten. Andere apparaten moeten naar onze dichtstbijzijnde klantenservice
of servicewerkplaats worden gebracht of naar onze
fabriek worden opgestuurd.
3. Een garantieplicht wordt niet veroorzaakt door kleine
afwijkingen die onbeduidend zijn voor de waarde en
de bruikbaarheid van het apparaat, door schade als
gevolg van chemische en elektrochemische invloeden
van water, alsook van anomale omgevingsomstandigheden. Een aanspraak op garantie bestaat niet bij
schade als gevolg van normale slijtage en bij het niet
in acht nemen van de gebruiksaanwijzing of onreglementair gebruik.
4. De aanspraak op garantie verliest zijn geldigheid
als personen die niet door ons geautoriseerd zijn
reparaties aan het apparaat uitvoeren of wijzigingen
aanbrengen.
5. Werkzaamheden onder garantie leiden noch voor
het apparaat, noch voor de ingebouwde reserveonderdelen tot een verlenging of vernieuwing van de
garantieperiode: de garantieperiode voor de ingebouwde reserveonderdelen eindigt met de garantieperiode voor het volledige apparaat.
6. Verdergaande of andere aanspraken, met name
aanspraak op vergoeding van buiten het apparaat
ontstane schade, zijn – voor zover een aansprakelijkheid niet dwingend wettelijk voorgeschreven is –
uitgesloten.
Ook na afloop van de garantieperiode biedt onze klantenservice zijn diensten aan. Neem contact op met uw
dealer of direct met de klantenservice.
41
Page 42

Содержание Стр.
1. Важные указания по технике безопасности..................................43/44
1.1 Электропитание .............................................................43
1.2 Особые группы лиц ..........................................................43
1.3 Пользование прибором .....................................................43/44
1.4 Техническое обслуживание и очистка ...........................................44
2. Введение
2.1 Большое спасибо ............................................................44
2.2 Распаковка прибора .........................................................44
2.3 Наименование деталей .......................................................44
2.4 Рисунки: Пароочиститель и принадлежности .....................................45
3. Ввод в эксплуатацию
3.1 Монтаж принадлежностей ....................................................46
3.1.1 Паровой шланг ..........................................................46
3.1.2 Удлинительные трубки ...................................................46
3.1.3 Насадка для мойки полов ................................................46
3.1.4 Переходник для принадлежностей .......................................46/47
3.1.5 Точечная насадка .......................................................47
3.1.6 Скребок ...............................................................47
3.1.7 Нейлоновые щетки ......................................................47
3.1.8 Металлическая щетка ....................................................47
3.1.9 Насадка для мойки окон .................................................47
3.2 Заполнение резервуара для воды...............................................47
4. Эксплуатация прибора
4.1 Присоединение к электрической сети ...........................................48
4.2 Использование пароочистителя ..............................................48/49
4.3 Доливка воды ...............................................................49
4.4 Вывод из эксплуатации и хранение .............................................49
RUS
5. Общая информация
5.1 Очистка и техническое обслуживание ..........................................49
5.2 Утилизация ...............................................................49/50
5.3 Устранение неисправностей ...................................................50
5.4 Технические данные..........................................................50
6. Гарантия ...................................................................51
Предупреждение! Это указание относится к опасностям для пользователя.
Внимание! Это указание относится к опасностям для прибора или других объектов.
42
Page 43

1. Важные указания по технике
безопасности
1.1 Электропитание
• Перед присоединением пароочистителя
к электрической сети убедитесь в том, что
данные, приведенные на фирменной табличке,
соответствуют условиям подключения
в вашем доме.
• присоединяйте прибор только к должным
образом заземленной розетке.
• Вилка прибора должна подходить к розетке.
Запрещается выполнять какие-либо передел
ки вилки. Не используйте сетевые адаптеры
для работы приборов, оснащенных защитным
проводом. Не подвергнувшиеся переделками
вилки и подходящие розетки уменьшает
опасность поражения электрическим током.
• Рекомендуется присоединять прибор только
к розеткам, защищенным устройством
защитного отключения. При необходимости
обратитесь к электрику.
• Категорически запрещается прикасаться
в вилке сетевого провода влажными руками.
• Всегда отсоединяйте прибор от электрической
сети, вытягивая вилку из розетки. Беритесь
рукой не за кабель, а за вилку.
• Поврежденный сетевой провод всегда следу
ет заменять проводом с идентичными характеристиками. Отправьте прибор на ремонт
в офис службы сервиса THOMAS.
• При использовании удлинителя убедитесь
в том, что его характеристики соответствуют
характеристикам пароочистителя. При необхо
димости, обратитесь в торговую организацию.
• Убедитесь в том, что кабель не представляет
опасность спотыкания. Запрещается изгибать
или зажимать его.
1.2 Особые группы лиц
• Это устройство может использо-
-
ваться лицами со сниженными
физическими, сенсорными или
умственными возможностями, а
также лицами, имеющими недо
статочный опыт и/или знания,
если они находятся под над
зором или были проинструктированы о порядке безопасного
использования устройства и
познакомились с исходящими от
него опасностями. Игры детей с
устройством недопустимы.
• Не допускайте, чтобы дети играли с прибором,
когда он включен или охлаждается.
• Не допускайте, чтобы дети играли с упаковоч
ным материалом (полимерной пленкой), они
могут задохнуться!
1.3 Пользование прибором
Осторожно! Горячий пар!
Опасность получения ожогов!
• По причинам техники безопасности не очи-
-
щайте пароочистителем такие электроприборы,
как духовки, микроволновые печи, холодильники,
выключатели и светильники.
• Регулярно проверяйте прибор, кабели и
принадлежности на предмет повреждений. Не
вводите в работу приборы или принадлежности,
которые имеют повреждения.
• Не направляйте пароочиститель на людей,
,
животных или растения (опасность получения
ожогов)! Не направляйте пароочиститель на
электрооборудование или провода.
• Не оставляйте прибор без присмотра. После
окончания работы всегда выключайте прибор
и вынимайте вилку из розетки.
• Прибор оснащен термостатом и термопредо
хранителем для защиты от перегрева.
• При использовании принадлежности
нагреваются; поэтому перед заменой дайте
им охладиться.
-
• Не касайтесь горячих поверхностей прибора.
Нагрев пароочистителя во время работы
является нормальным явлением.
• Во время работы не вывинчивайте пробку
резервуара. Резервуар находится под
давлением.
• Во время работы не наклоняйте прибор более
чем на 45°.
• Не погружайте прибор в воду или другие
жидкости.
• Пароочиститель предназначен для бытового
использования во внутренних помещениях, он
не пригоден для профессионального использо
вания.
• Никогда не подвергайте прибор экстремальному солнечному облучению, морозу или другим
погодным воздействиям (дождь и т. д.).
• Не используйте прибор в емкостях/раковинах,
заполненных водой или иными жидкостями.
• Не эксплуатируйте прибор с пустым резервуа
ром для воды. Всегда своевременно доливайте воду.
• Если прибор не используется, то слейте воду
из резервуара.
-
-
-
-
43
Page 44

• Запрещается заливать в резервуар иные
жидкости, кроме воды. Не добавляйте в воду
никаких посторонних веществ (например,
духи, пятновыводители или содержащие спирт
средства), т. к. они повреждают прибор или
делают его использование опасным.
• Всегда вынимайте вилку из розетки и дайте
прибору полностью охладиться, прежде чем
долить воду.
• Не переполняйте резервуар. Не превышайте
предписанную максимальную высоту напол
нения. Используйте входящие в комплект
поставки мерный стакан и воронку.
• Перед использованием убедитесь в том, что
резьбовая пробка резервуара для воды плот
но затянута.
• Для переноски прибора используйте только
рукоятку.
• Не обрабатывайте пароочистителем THOMAS
VAPORO Buggy одежду, находящуюся на теле.
• Из насадки иногда может капать вода.
Это абсолютно нормальное явление.
Речь идет всего лишь о конденсате.
• Сила и тепло пара могут оказывать отрица
тельно воздействие на некоторые материалы.
Перед началом очистки проверьте на неза
метном месте, пригодна ли поверхность для
обработки прибором.
• При передаче пароочистителя следующему
владельцу передавайте также и это руковод
ство по эксплуатации.
1.4 Техническое обслуживание и очистка
• Используйте только принадлежности,
входящие в комплект поставки.
• Запрещается своими силами пытаться лик
видировать неисправности на устройстве,
принадлежностях или кабеле питания.
Направьте устройство в специализированную
мастерскую для проверки и ремонта. Внесе
ние конструктивных изменений в устройство
может создать опасность для вашего здоро
вья. Используйте только фирменные запчасти
и принадлежности.
• Перед очисткой или обслуживанием всегда
выключайте прибор, вынимайте вилку из
розетки и дайте пароочистителю охладиться.
2. Введение
2.1 Большое спасибо
Мы поздравляем Вас с покупкой нашего пароочистителя THOMAS VAPORO Buggy. Ваш новый
пароочиститель — универсальный помощник.
Теперь благодаря высоким температурам
Вы можете самостоятельно быстро и полностью удалять стойкие загрязнения с гладких
поверхностей, например, керамической плитки,
рабочих поверхностей, кухонной посуды, окон
и зеркал, уничтожая при этом бактерии и микроорганизмы. С его помощью можно экологично,
не используя химических растворителей, пол-
ностью удалить налеты, плесень, жир, остатки
мыла, а также разные виды загрязнений.
Желаем Вам приятной работы!
2.2 Распаковка прибора
Распакуйте пароочиститель и все принадлежности. Проверьте комплектность содержимого. При
возможности, сохраните коробку и внутреннюю
упаковку, чтобы защитить прибор при перевозке
или при возврате в гарантийном случае. Должным образом утилизируйте весь более не требуемый упаковочный материал. Если при распаковке Вы обнаруживаете повреждения, полученные при перевозке, незамедлительно обратитесь
в в торговую организацию, где Вы приобрели
-
прибор. Категорически запрещается вводить
прибор в эксплуатацию, если он имеет необратимые повреждения.
2.3 Наименование деталей
1 = Воронка
2 = Мерный стакан
Паровой пистолет с паровым шлангом и патрубком
3 =
4 = Переходник для принадлежностей
5 = Точечная насадка
6 = Скребок
7 = Нейлоновая щетка, малая
8 = Нейлоновая щетка, большая
9 = Металлическая щетка
10 = Насадка для мойки окон
11 = Тряпка для очистки для насадки для мойки окон
12 = Насадка для мойки полов
13 = Тряпка для очистки для насадки для мойки полов
14 = 3 удлинительные трубки
15 = Пароочиститель
44
Page 45

2.4 Рисунки: Пароочиститель и принадлежности
15
14
1
2
3
13 12 11 10 9 8
4
5
6
7
45
Page 46

3. Ввод в эксплуатацию
3.1 Монтаж принадлежностей
Перед использованием пароочистителя
THOMAS VAPORO Buggy паровой шланг
с паровым пистолетом необходимо присоединить к прибору и установить требуемую
принадлежность. THOMAS VAPORO Buggy
имеет ящик для принадлежностей, в котором
расположены переходник для принадлежностей, точечная насадка, скребок, малая
нейлоновая щетка, большая нейлоновая
щетка, металлическая щетка, насадка для
мойки окон и тряпки для очистки. Откройте
ящик для принадлежностей, потянув синюю
запорную кнопку вверх и откинув вперед
прозрачную крышку ящика (рис. 1).
1
Выньте требуемую принадлежность и закройте крышку. Сместите фиксатор крышки
в вырез и крепко прижмите его вниз так,
чтобы он зафиксировался.
3.1.1 Паровой шланг (3)
Вначале присоедините паровой шланг к паровому патрубку, расположенному на лицевой
стороне прибора THOMAS VAPORO Buggy.
Для этого откиньте вниз крышку корпуса
и плотно вставьте соединительный элемент
парового шланга в патрубок так, чтобы патрубок зафиксировался.
Для снятия парового шланга прижмите обе
кнопки разблокировки, расположенные
справа и слева на соединительном элементе,
и вытяните шланг из патрубка.
3.1.3 Насадка для мойки полов (12+13)
По технологическим особенностям упаковки насадка для мойки полов поставляется
с отдельным соединительным элементом.
Состыкуйте соединительные элементы,
как показано на рисунке (рис. 2).
2
Установите насадку для мойки полов на конец
удлинительной трубки. Убедитесь в том, что
насадка зафиксировалась. Насадка для мойки
полов идеально подходит для мойки моющихся
настенных и напольных покрытий. Ее можно
использовать как с тряпкой для очистки, так
и без нее. Для защиты чувствительных покры
тий (например, деревянных, линолеума) рекомендуется использовать тряпку для очистки.
Установите насадку для мойки полов по цен
тру на тряпку для очистки, прижмите внутренние стороны зажимов вниз, вложите выступающую тряпку и отпустите зажимы (рис. 3). Для
того, чтобы снять насадку для мойки полов,
нажмите соответствующую кнопку разблоки
ровки и движением вниз снимите насадку.
-
-
3
-
3.1.2 Удлинительные трубки (14)
Установите удлинительные трубки, если пароочиститель должен использоваться для мойки
пола или тяжело доступных мест. Для этой цели
наденьте открытый конец трубки на паровой
пистолет так, чтобы зафиксировалась кнопка
разблокировки. При необходимости, устано
вите две или все три удлинительные трубки.
Для того, чтобы снять удлинительную трубку,
нажмите соответствующую кнопку разблоки
ровки и движением вниз разъедините трубки.
46
-
-
3.1.4 Переходник для принадлежностей (4)
Пароочиститель имеет многочисленные
насадки, которые обеспечивают эффективную и тщательную очистку различных
поверхностей. Для того, чтобы можно было
установить эти насадки на паровой шланг,
вначале необходимо установить переходник для принадлежностей. Переходник для
принадлежностей можно установить как на
паровой пистолет, так и на конец одной или
нескольких удлинительных трубок.
Page 47

Убедитесь в том, что переходник закреплен и зафиксирован. Для снятия адаптера
нажмите соответствующую кнопку разблокировки и движением вниз разъедините трубки.
Переходник для принадлежностей может быть
использован с точечной насадкой, скребком,
одной из щеток или насадкой для мойки окон.
Наденьте выбранную насадку на переходник
так, чтобы обе стрелки находились на одной
линии, и затяните ее, повернув на четверть
оборота по часовой стрелке (рис. 4). Для сня
тия насадки выполните описанные операции
в обратной последовательности.
-
4
3.1.5 Точечная насадка (5)
С помощью этой насадки можно легко очищать
трудно доступные места, например, углы, швы
и туалеты.
С помощью этой насадки можно легко очищать
трудно доступные места, например, углы, швы
и туалеты.
3.1.6 Скребок (6)
Скребком можно легко снять стойкие загрязнения и обои.
3.1.7 Нейлоновые щетки (7/8)
Для очистки сильных загрязнений, например,
с жалюзи, радиаторов отопления, вентилей.
Внимание! При резком скачке температуры имеется опасность разрушения! Перед очисткой паром прогрейте
стеклянные поверхности, распылив
по широкой дуге пар с расстояния
20-25 см. Для дальнейшего нагрева
стеклянной поверхности постепенно
сократите расстояние до 10–15 см.
3.2 Заполнение резервуара для воды
THOMAS VAPORO Buggy оснащен встроенным
резервуаром для воды емкостью 1,6 литра.
Выключите пароочиститель и и отсоедините
вилку от штепсельной розетки. При заполнении и доливке воды пароочиститель всегда
должен быть отсоединен от сети. Вывинтите
пробку резервуара (рис. 5), нажав на нее
и одновременно вращая против часовой
стрелки. Для заполнения резервуара используйте входящие в комплект поставки воронку
и мерный стакан.
5
Используйте только чистую воду без какихлибо посторонних веществ, например, духов,
чистящих средств, спирта, т. к. они могут
повредить прибор и сделать его использование
опасным. Рекомендуется использовать дистил
лированную воду, что при слишком жесткой
воде (с параметрами свыше 2,5 ммоль/л или
21°dH) избежать отложения накипи. В ином
случае вскипятите воду перед использованием
прибора, чтобы продлить срок его службы.
-
3.1.8 Металлическая щетка (9)
Металлическая щетка предназначена для
удаления загрязнений с относительно нечувствительных материалов, например, нержавеющей стали или камня.
3.1.9 Насадка для мойки окон (10+11)
Великолепно подходит для очистки больших
стеклянных поверхностей (например для окон
ных стекол, зеркал и т. п.), может использоваться, по выбору, с тряпкой для очистки (11).
Внимание! При заполнении резервуара не превышайте максимальное
количество, равное 1,6 литра.
Затяните пробку резервуара, прижав
его и вращая по часовой стрелке.
Совет: Длительность нагрева можно
сократить, залив в резервуар теплую воду.
-
47
Page 48

4. Эксплуатация прибора
4.1 Присоединение к электрической сети
Вставьте вилку сетевого провода пароочистителя в должным образом расположенную
розетку и включите прибор выключателем
(рис. 6).
6
Выключатель
Индикатор
работы
Индикатор
нагрева
Оранжевый рабочий индикатор (рис. 6) загорается, и пароочиститель начинает нагрев.
Рабочая температура достигается приблизительно через 11 минут; после этого загорается зеленый индикатор нагрева. Теперь
прибор готов к работе.
4.2 Использование пароочистителя
Предупреждение! Не направляйте
выходное отверстие парового пистолета на людей, животных, растения
или электрооборудование (например,
печи или розетки). Имеется опасность
получения ожогов или поражения
электрическим током!
Разблокируйте блокирующее устройство
(блокировку от использования детьми), сместив треугольный штифт на правой части
парового пистолета влево (рис. 7). При нажатии на кнопку подачи пара выходит горячий
пар. Для того, чтобы собрать первоначально
выходящие брызги воды, вначале направьте
паровой пистолет на кусок старой ткани.
Нажимайте на кнопку подачи пара до тех
пор, пока пар не начнет выходить равномерно. После этого можно начать очистку.
7
очищаемые поверхности и ткани,
пригодны ли они для очистки паром.
– Пар может обесцветить раскрашенные/
лакированные деревянные покрытия.
– Пар может обесцветить блестящую пластмассу.
– Акрил, бархат и лен реагируют предельно
чувствительно на высокую температуру пара.
– Не направляйте пароочиститель на изделия
из дралонового волокна, не проверив перед
этим материал в незаметном месте.
По понятным причинам изготовитель не несет
ответственности за ущерб объектам, материа
лам, людям, животным или растениям, вызванный неподходящим применением горячего пара
или ненадлежащим использованием прибора.
После выключения функции подачи пара он
продолжает выходить еще несколько секунд.
Не направляйте струю пара долго на одно
и то же место. Растворите грязь, перемещая
струю пара вперед-назад. Расход выходящего пара можно отрегулировать вращением
регулятора количества пара и адаптировать
к степени загрязнения. Для того, чтобы
уменьшить расход пара, поверните регулятор
количества пара по часовой стрелке, и против часовой стрелки, чтобы увеличить расход
пара (рис. 8).
-
8
Во время работы не опрокидывайте и не
наклоняйте прибор на угол более 45° и сле
дите за тем, чтобы прибор всегда стоял на
прочной опоре. Полного резервуара хватает
на время использования не более 50 минут.
Не оставляйте включенный прибор без при
смотра и, при необходимости, используйте
блокировку от использования детьми, чтобы
заблокировать кнопку подачи пара. Для этого
сместите треугольный штифт на левой части
парового пистолета вправо.
-
-
Внимание! Перед началом очистки
всегда проверьте в незаметном месте
48
Предупреждение! Корпус и принадлежности во время работы нагреваются. Перед сменой принадлежностей и доливкой воды дайте прибору
охладиться. Не вывинчивайте пробку
резервуара, когда пароочиститель
включен, т. к. резервуар находится
под давлением.
Page 49

THOMAS VAPORO Buggy оснащен предохранителем для защиты от перегрева. Прибор автоматически отключается при достижении температуры 180°C. Таким образом предотвращается
перегрев. В этом случае незамедлительно отсо
едините прибор от сети, вынув вилку из розетки. Прибор можно повторно ввести в работу
после охлаждения в течении 30 минут.
4.3 Доливка воды
При уменьшении количества выходящего
пара необходимо долить воду в резервуар.
Выключите пароочиститель выключателем.
Оранжевый индикатор работы гаснет. Для
стравливания остаточного давления нажмите
кнопку подачи пара на паровом пистолете.
Затем заблокируйте паровой пистолет. Выньте
вилку из розетки и дайте прибору охладиться.
Учтите, что вода в резервуаре и через 5 минут
все еще имеет высокую температуру. Вывин
тите пробку резервуара, нажав на нее и одновременно вращая против часовой стрелки.
Предупреждение! При открытии
может выходить горячий пар. Имеется опасность получения ожогов
о резьбу пробки и резервуара.
Заполните резервуар с помощью мерного
стакана и воронки (см. раздел 3.2 «Заполнение резервуара для воды») и затяните
пробку резервуара. Теперь пароочиститель
можно снова присоединить к сети и включить. THOMAS VAPORO Buggy готов к работе,
как только загорается индикатор нагрева.
4.4 Вывод из эксплуатации и хранение
Выключите прибор. Оранжевый индикатор
работы гаснет. Для стравливания остаточного
давления нажмите кнопку подачи пара на
паровом пистолете. Заблокируйте паровой
пистолет, сместив стопорный язычок на
левой стороне ручки вправо. Выньте вилку
из розетки и дайте прибору охладиться.
Полностью слейте воду из резервуара, чтобы
предотвратить образование отложений.
Закройте резервуар для воды только после
полного его высыхания. Перед тем, как убрать
пароочиститель, дайте ему полностью охладить
ся. Храните прибор в недоступном для детей
месте. Удлинительную трубку с насадку для
мойки полов можно для хранения или при корот
ких перерывах в работе вставить в держатель,
расположенный на задней стороне прибора.
Сетевой шнур можно намотать на два крючка на удлинительной трубке (рис. 9). Если оба
крючка обращены в одном направлении, то
крючок, на котором видны стрелки, можно
развернуть.
-
9
-
5. Общая информация
5.1 Очистка и техническое обслуживание
Предупреждение! Перед очисткой
или техническим обслуживанием
пароочистителя убедитесь в том, что
он выключен и отсоединен от сети.
Для очистки прибора протрите корпус слегка
влажной тряпкой. Для очистки прибора не
используйте чистящие, абразивные или спирто
вые средства, т. к. они могут повредить корпус.
Рекомендуется прополоскать резервуар не позднее, чем после пятикратного заполнения, если
жесткость местной воды превышает 1,8 ммоль/л
(10°dH). Информацию о жесткости воды можно
получить в водоснабжающей организации. Для
очистки рекомендуется залить воду в резервуар
и сильно встряхнуть его. Благодаря этому уда
ляются отложения накипи на жней пароочистителя. Затем вылейте воду и дайте резервуару
полностью высохнуть, прежде чем закрыть его.
Для продления срока службы пароочистителя
рекомендуется приблизительно каждые 6 меся
цев удалять накипь из резервуара для воды.
Бросьте одну или максимум две таблетки для
удаления накипи в 1 литр теплой воды (50°C)
и залейте эту смесь в резервуар для воды.
Оставьте смесь действовать приблизительно на
30 минут, а затем вылейте воду с растворенны
ми отложениями. При необходимости, повторите процедуру, а затем прополощите резервуар.
5.2 Утилизация электрических
-
и электронных приборов
В конце своего срока службы прибор
-
Символ на изделии или на его упаковке указывает на то, что с этим изделием необходимо обращаться не как с бытовым мусором,
а он должен быть сдан в пункт рисайклинга
электрических и электронных приборов.
должен быть утилизирован согласно
действующим законам. Он не является обычным бытовым мусором.
-
-
-
-
49
Page 50

GB
Надлежащей утилизацией данного изделия
Вы вносите вклад в защиту окружающей
среды и здоровья людей. Окружающая среда
и здоровье людей подвергаются опасности
в результате неправильной утилизации.
Дальнейшую информацию о рисайклинге данного изделия можно получить в мэрии Вашего
города, в фирме, занимающейся уборкой
5.3 Устранение неисправностей
Прежде, чем отослать пароочиститель в офис службы сервиса THOMAS, проверьте, не удастся
ли самостоятельно устранить неисправность на основании списка.
Неисправность Возможная причина Устранение
Индикатор работы
больше не горит.
При нажатии на
кнопку подачи пара
не выходит пар.
Выходит лишь
очень небольшое
количество пара.
Прибор не соединен с сетью
или не включен.
Неисправна розетка.
Поврежден сетевой шнур.
Кнопка подачи пара заблокирована от использования детьми.
Резервуар для воды пустой.
Регулятор количества пара установлен на минимальный расход
пара.
мусора, или в магазине, где Вы купили данное
изделие.
Лица, которые не утилизируют прибор согласно указаниям данного раздела, привлекаются к ответственности по действующим законам. Мы рекомендуем сохранять упаковку
как минимум на время действия гарантии.
Вставьте вилку в розетку или
включите прибор.
Проверьте розетку, вынув вилку
пароочистителя и вставив вилку
другого прибора.
В целях замены кабеля отошлите
прибор в офис службы сервиса
THOMAS.
Сместите треугольный штифт на правой
части парового пистолета влево.
Долейте воду
(см. раздел 4.3 «Доливка воды»).
Вращайте регулятор количества
пара против часовой стрелки до
тех пор, пока не начнет выходить
достаточное количество пара.
Прибору требуется
время для нагрева.
5.4 Технические данные
Тип прибора: Пароочиститель
Модель:
Напряжение: 220 –240 В ~ 50/60 Гц
Номинальная потребляемая мощность: 1500 Вт
Давление пара: макс. 3,5 бар
Допустимое давление:
Емкость резервуара
для воды: макс. 1,6 л
Наличие пара: макс. 50 минут без
50
THOMAS VAPORO Buggy
В резервуаре имеются отложения. Удалите накипь из резервуара
5 бар
доливки воды
для воды (см. раздел 5.1 «Очистка
и техническое обслуживание»).
Длительность нагрева:
Расход пара: макс. 40 г/мин
Уровень шума: 30 дБ(А) во время
Размеры прибора: 305 x 397 x 235 мм
Вес: прибора без принад-
Возможны технические изменения.
ок. 11 минут
использования
(Ш x Д x В)
лежностей 4,5 кг
IP X4
Page 51

6. Гарантия
Независимо от гарантийных обязательств
продавца, вытекающих из договора куплипродажи, мы предоставляем гарантию для
данного прибора согласно нижеприведенным
условиям:
1. Гарантийный срок составляет 24 месяца —
отсчет времени начинается с дня поставки
первому конечному потребителю. Он сокращается при коммерческом или аналогичном
использовании прибора до 12 месяцев. Для
предъявления претензий на гарантию необходимо предоставить торговый чек.
2. Во время срока действия гарантии мы устра
няем все важнейшие неполадки в работе,
причиной которых бесспорно было недоброкачественное исполнение или дефекты
материала, по нашему выбору путем ремонта неисправных деталей или их замены.
Замененные детали переходят в нашу собственность. Гарантия не распространяется
на хрупкие детали из стекла или пластмассы, лампы. О неисправностях во время
срока гарантии необходимо немедленно
сообщать нам. Затраты на замену деталей
для устранения неисправностей в работе,
а также на рабочее время, возникшие во
время срока гарантии, не ставятся в счет.
Затраты, возникающие при неправомерном
использовании нашей службы сервиса,
несет заказчик. Работы по ремонту, выполняемые у заказчика или на месте установки,
могут быть затребованы только для крупных
приборов. Прочие приборы должны передаваться в ближайший офис службы сервиса,
в мастерскую гарантийного ремонта, или
должны отсылаться на завод.
3. Обязанность предоставления гарантии не
вызывается малозначительными отклонениями, которые не оказывают влияния на
ценность и пригодность прибора к работе,
ущербом, возникающим в результате химического и электрохимического воздействия
воды, а также при аномальных условиях
окружающей среды. Нет права на предоставление гарантии при повреждениях,
возникающих в результате обычного износа, а также при несоблюдении руководства
по эксплуатации или при ненадлежащем
использовании прибора.
-
4.
Право на предоставление гарантии теряется,
если лица, не уполномоченные нами, осуществляли
вмешательства в прибор или выпол-
няли его ремонт.
5. Гарантийные услуги не оказывают влияния
на продление или на возобновление гарантийного срока для прибора в целом или
для установленных деталей. Гарантийный
срок установленных деталей завершается
вместе с гарантийным сроком прибора
в целом.
6. Дальнейшие претензии, в особенности связанные с возмещением ущерба, возникшего вне прибора — если ответственность не
предписывается законом – исключаются.
После завершения гарантийного срока мы
предлагаем Вам услуги нашей службы сервиса. Обратитесь в торговую организацию, где
Вы приобрели прибор, или непосредственно
в нашу службу сервиса.
51
Page 52

Spis treści Strona
1. Przepisy bezpieczeństwa............................................................53/54
1.1 Napięcie ...............................................................................53
1.2 Szczególne grupy osób ....................................................................53
1.3 Obsługa urządzenia ...................................................................53/54
1.4 Konserwacja i czyszczenie.................................................................. 54
2. Wprowadzenie
2.1 Gratulacje ..............................................................................54
2.2 Rozpakowanie urządzenia .................................................................54
2.3 Identyfikacja części .......................................................................54
2.4 Ilustracje: Odkurzacz parowy i wyposażenie ................................................... 55
3. Uruchomienie
3.1 Montaż elementów wyposażenia ............................................................56
3.1.1 Przewód parowy .....................................................................56
3.1.2 Rury przedłużające ..................................................................56
3.1.3 Dysza podłogowa ...................................................................56
3.1.4 Adapter wyposażenia .............................................................56/57
3.1.5 Dysza ze strumieniem punktowym ....................................................... 57
3.1.6 Skrobak ............................................................................57
3.1.7 Szczotki nylonowe ................................................................... 57
3.1.8 Szczotki metalowe....................................................................57
3.1.9 Dysza do okien ......................................................................57
3.2 Napełnianie zbiornika na wodę.............................................................. 57
4. Obsługa urządzenia
4.1 Podłączenie do zasilania ...................................................................58
4.2 Użytkowanie odkurzacza parowego ......................................................58/59
4.3 Dolewanie wody do zbiornika .............................................................. 59
4.4 Zakończenie eksploatacji i przechowywanie ...................................................59
PL
5. Informacje ogólne
5.1 Czyszczenie i konserwacja..................................................................59
5.2 Utylizacja ............................................................................59/60
5.3 Usuwanie usterek .........................................................................60
5.4 Dane techniczne ..........................................................................60
6. Gwarancja............................................................................. 61
Ostrzeżenie: Te wskazówki dotyczą zagrożeń dla użytkowników.
Uwaga: Te wskazówki dotyczą zagrożeń dla urządzenia lub obiektów.
52
Page 53

1. Przepisy bezpieczeństwa
1.1 Zasilanie
• Przed podłączeniem odkurzacza parowego do sieci
elektrycznej należy się upewnić, że napięcie podane
na tabliczce znamionowej jest zgodne z napięciem
w gniazdku.
• Urządzenie należy podłączyć wyłącznie do prawidłowo uziemionego gniazdka.
• Wtyczka urządzenia musi pasować do gniazdka.
Nie wolno dokonywać żadnych modyfikacji wtyczki.
W urządzeniach wyposażonych w przewód uziemiający nie należy używać prostownika. Oryginalne
wtyczki i odpowiednie gniazdka zmniejszają ryzyko
porażenia prądem elektrycznym.
• Zaleca się używać urządzenie, korzystając tylko
z gniazdek zabezpieczonych wyłącznikiem ochronnym różnicowym. Jeśli to konieczne, proszę się zwrócić do elektryka.
• Pod żadnym pozorem nie wolno dotykać wtyczki
mokrymi rękami.
• Urządzenie należy zawsze odłączać od zasilania,
wyjmując wtyczkę z gniazdka. Nie wolno przy tym
nigdy ciągnąć za kabel.
• Uszkodzony przewód należy zastąpić wyłącznie przewodem o identycznych wartościach zasilania. Urządzenie należy naprawiać w serwisie firmy THOMAS.
• W przypadku korzystania z przedłużacza należy się
upewnić, że jego wartości zasilania zgadzają się
z wartościami zasilania odkurzacza parowego. Proszę się zwrócić do autoryzowanego sprzedawcy.
• Należy się upewnić, że kabel nie stwarza ryzyka
potknięcia się. Kabel nie może być zgięty ani ściśnięty.
1.2 Szczególne grupy osób
• To urządzenie może być obsługiwane
przez osoby niepełnosprawne lub nie
mające dostatecznego doświadczenia i / lub wiedzy, jeżeli pracują one
pod odpowiednim nadzorem, względ
nie zostały przeszkolone ze względu
na bezpieczne stosowanie urządze
nia i zrozumiały możliwe zagrożenia.
Dzieciom nie wolno bawić się tym
urządzeniem.
• Zalecamy jednak użytkowanie dopiero w wieku od
14 lat lub ewentualnie tylko przez osoby, które potrafią przeczytać niniejszą instrukcję obsługi i są w stanie rozpoznać niewłaściwy sposób obsługi.
• Włączone lub stygnące urządzenie powinno się
znajdować poza zasięgiem dzieci.
• Dzieciom nie wolno się bawić materiałami opakowaniowymi (folią plastikową); istnieje ryzyko uduszenia.
1.3 Obsługa urządzenia
Uwaga! Gorąca para! Zagrożenie poparzenia!
• Ze względów bezpieczeństwa odkurzacza parowego
nie wolno używać do czyszczenia urządzeń elektrycznych, takich jak: piekarniki, kuchenki mikrofalowe,
lodówki, przełączniki i lampy.
• Proszę regularnie sprawdzać, czy urządzenie, kabel
oraz elementy wyposażenia nie są uszkodzone. Nie
wolno korzystać z uszkodzonych urządzeń lub elementów wyposażenia.
• Nigdy nie wolno kierować odkurzacza parowego
w stronę ludzi, zwierząt lub roślin (istnieje ryzyko
poparzenia)! Nie wolno kierować odkurzacza parowego w stronę urządzeń i przewodów elektrycznych.
• Urządzenia nie wolno pozostawić bez nadzoru.
Po zakończeniu pracy i przed opuszczeniem miejsca
jej wykonywania należy zawsze wyłączyć urządzenie i wyciągnąć wtyczkę z gniazdka.
Urządzenie jest wyposażone w termostat i bezpiecznik
termiczny, aby zapobiec przegrzaniu.
• Elementy wyposażenia nagrzewają się w trakcie ich
używania; dlatego przed ich zmianą należy pozostawić je do ostygnięcia.
• Proszę nie dotykać gorących powierzchni urządzenia. Nagrzewanie się odkurzacza parowego w trakcie eksploatacji jest normalnym zjawiskiem.
• W trakcie działania urządzenia nie wolno odkręcać
zakrętki zbiornika. Zbiornik jest pod ciśnieniem.
• W trakcie działania urządzenia nie wolno go
przechylać pod kątem większym niż 45°.
• Nie wolno nigdy zanurzać urządzenia w wodzie
lub w innych cieczach.
-
• Odkurzacz parowy nadaje się tylko do pracy
w pomieszczeniach i do użytku domowego, a nie
do celów komercyjnych.
• Urządzenia nie wolno nigdy narażać na działanie
-
silnego promieniowania słonecznego, mrozu lub
innych warunków pogodowych (deszcz itp.).
• Urządzenie może być używane tylko w zbiornikach/
basenach, które nie są wypełnione wodą lub inną
cieczą.
• Proszę nie korzystać z urządzenia, jeżeli zbiornik na
wodę jest pusty. Należy zawsze uzupełniać wodę
w odpowiednim czasie.
• Proszę opróżnić zbiornik na wodę, gdy urządzenie
nie jest używane.
• Zbiornika nie wolno nigdy napełniać niczym innym
53
Page 54

niż woda. Proszę nie dodawać do wody żadnych
dodatków (np. perfum, odplamiaczy lub środków
zawierających alkohol), ponieważ mogą one uszkodzić urządzenie lub uczynić jego działanie niebezpiecznym.
• Przed dolaniem wody należy zawsze wyciągnąć
wtyczkę z gniazdka i pozostawić urządzenie do
całkowitego ostygnięcia.
• Nie wolno przepełnić zbiornika. Proszę nie przekraczać
zalecanego maksymalnego poziomu napełnienia. Proszę korzystać z dołączonej miarki i lejka.
• Przed użyciem proszę się upewnić, że zakrętka zbiornika na wodę jest dokładnie zakręcona.
• Przenosząc urządzenie, należy je trzymać wyłącznie
za uchwyt.
• Urządzenia THOMAS VAPORO Buggy nie wolno
używać do części garderoby założonych na ciało.
• Z dyszy może czasem kapać niewielka ilość wody.
To jest zupełnie normalne. Jest to jedynie para wodna.
• Moc i temperatura pary może negatywnie wpływać
na niektóre materiały. Należy zawsze najpierw spraw
dzić na nieeksponowanym miejscu, czy powierzchnia
nadaje się do czyszczenia za pomocą urządzenia.
• Przekazując odkurzacz parowy innemu użytkownikowi, proszę dołączyć niniejszą instrukcję obsługi.
1.4 Konserwacja i czyszczenie
• Proszę używać wyłącznie oryginalnego wyposażenia
objętego zakresem dostawy.
• Nie wolno samodzielnie naprawiać usterek urządzenia, wyposażenia ani przewodu zasilającego.
Przeglądy i naprawy urządzenia powinny być
wykonywane wyłącznie w autoryzowanych punktach
obsługi serwisowej. Modyfikacje urządzenia mogą
zagrażać zdrowiu. Należy używać tylko oryginalnych części zamiennych i akcesoriów.
• Przed czyszczeniem lub konserwacją należy zawsze
wyłączyć urządzenie, wyciągnąć wtyczkę i pozostawić odkurzacz parowy do ostygnięcia.
2. Wprowadzenie
2.1 Gratulacje
Gratulujemy Państwu nabycia odkurzacza parowego
THOMAS VAPORO Buggy. Nowy odkurzacz parowy
zapewnia wszechstronną pomoc przy wykonywaniu
licznych prac polegających na czyszczeniu. Teraz
mogą Państwo samodzielnie szybko i skutecznie usuwać oporne zabrudzenia pod wpływem wysokiej temperatury, np. z płytek ściennych, podłogowych, blatów,
przyborów kuchennych, okien i luster, zabijając jednocześnie szkodliwe bakterie. Tym samym możliwe jest
całkowite usunięcie przywierającego brudu, pleśni,
tłuszczu, śladów po mydle, a także stałych i luźnych
zanieczyszczeń bez użycia rozpuszczalników
chemicznych, w sposób przyjazny dla środowiska.
Życzymy Państwu przyjemnego użytkowania.
2.2 Rozpakowanie urządzenia
Proszę rozpakować odkurzacz parowy i wszystkie ele-
-
menty wyposażenia. Proszę sprawdzić, czy zawartość
jest kompletna. Jeśli to możliwe, proszę zachować karton
i opakowanie wewnętrzne, aby zabezpieczyć urządzenie
podczas transportu lub w przypadku zwrotu w ramach
gwarancji. Proszę odpowiednio zutylizować wszystkie już
nie używane materiały opakowaniowe. Jeżeli podczas
rozpakowywania stwierdzono uszkodzenia powstałe
w transporcie, należy niezwłocznie zwrócić się do
sprzedawcy. W żadnym wypadku nie wolno uruchamiać
urządzenia, jeśli wykazuje trwałe uszkodzenia.
2.3 Identyfikacja części
1 = Lejek
2 = Miarka
3 = Pistolet parowy z przewodem i złączem parowym
4 = Adapter wyposażenia
5 = Dysza ze strumieniem punktowym
6 = Skrobak
7 = Szczotka nylonowa, mała
8 = Szczotka nylonowa, duża
9 = Szczotka metalowa
10 = Dysza do okien
11 = Ściereczka do czyszczenia na dyszę do okien
12 = Dysza podłogowa
13 = Ściereczka do czyszczenia na dyszę podłogową
14 = 3 rury przedłużające
15 = Odkurzacz parowy
54
Page 55

2.4 Ilustracje: Odkurzacz parowy i wyposażenie
15
14
1
2
3
13 12 11 10 9 8
4
5
6
7
55
Page 56

3. Uruchomienie
3.1 Montaż elementów wyposażenia
Przed użyciem urządzenia THOMAS VAPORO Buggy
należy podłączyć przewód parowy z pistoletem parowym do urządzenia i założyć odpowiedni element
wyposażenia. THOMAS VAPORO Buggy posiada
pojemnik na akcesoria, w którym znajdują się: adapter
wyposażenia, dysza ze strumieniem punktowym, skrobak, szczotka nylonowa mała, szczotka nylonowa duża,
szczotka metalowa, dysza do okien i ściereczka do
czyszczenia. Proszę otworzyć pojemnik na akcesoria,
pociągając w górę uchwyt blokady i odchylając przezroczystą pokrywę pojemnika na akcesoria (ilustracja 1).
1
Proszę wybrać dany element wyposażenia i zamknąć
pokrywę. Proszę wsunąć blokadę pokrywy we wgłębienie i dociskać do momentu jej zatrzaśnięcia.
3.1.1 Przewód parowy (3)
Proszę najpierw podłączyć przewód parowy do przyłącza parowego z przodu urządzenia THOMAS VAPORO
Buggy. W tym celu należy opuścić w dół klapkę obudowy i włożyć złącze przewodu parowego do przyłącza
parowego; powinno być słyszalne zatrzaśnięcie.
W celu wyjęcia przewodu parowego należy nacisnąć
oba przyciski zwalniające z obu stron złącza i wyciągnąć przewód z przyłącza parowego.
3.1.3 Dysza podłogowa (12+13)
Ze względu na techniczne możliwości pakowania
dysza podłogowa jest dostarczana z osobnym złączem. Proszę połączyć ze sobą złącza, jak przedstawiono na ilustracji (ilustracja 2).
2
Proszę przymocować dyszę podłogową do końcówki
rury przedłużającej. Należy się upewnić, że dysza jest
wpasowana. Dysza podłogowa idealnie nadaje się do
czyszczenia zmywalnych powierzchni ścian i podłóg.
Możne jej używać ze ściereczką do czyszczenia lub
bez niej. Zaleca się jednak korzystanie ze ściereczki do
czyszczenia, aby chronić delikatne powierzchnie (np.
drewno lub linoleum). Dyszę podłogową należy ustawić
na środku ściereczki do czyszczenia, następnie nacisnąć wewnętrzne strony klamer, włożyć pod nie wystającą tkaninę i puścić klamry (ilustracja 3). Aby odłączyć
dyszę podłogową, należy nacisnąć odpowiedni przycisk zwalniający i wyciągnąć dyszę, kierując ją w dół.
3
3.1.2 Rury przedłużające (14)
Rury przedłużające należy przymocować, jeżeli odkurzacz
parowy będzie używany do czyszczenia podłóg lub trudno dostępnych miejsc. W tym celu należy założyć otwartą
końcówkę rury na pistolet parowy, aż zaskoczy przycisk
zwalniający. W zależności od potrzeby proszę podłączyć
dwie lub wszystkie trzy rury przedłużające. Aby odłączyć
rury przedłużające, należy nacisnąć odpowiedni przycisk
zwalniający i wyciągnąć rurę, kierując ją w dół.
56
3.1.4 Adapter wyposażenia (4)
Odkurzacz parowy jest wyposażony w wiele nakładanych dysz, które umożliwiają efektywne i dokładne
czyszczenie różnych powierzchni. Aby możliwe było
zakładanie tych nasadek na przewód parowy, należy
najpierw zamontować adapter wyposażenia. Adapter
wyposażenia można przymocować zarówno do pistoletu parowego, jak i do końcówki jednej lub kilku rur
przedłużających.
Proszę się upewnić, że adapter jest zamontowany
i wpasowany. Aby odłączyć adapter, proszę nacisnąć
odpowiedni przycisk zwalniający i wyciągnąć rurę,
kierując ją w dół.
Page 57

Adapter wyposażenia może być używany z dyszą ze
strumieniem punktowym, skrobakiem, jedną z dysz ze
szczotką lub dyszą do okien. Wybraną dyszę należy
w taki sposób nasunąć na adapter wyposażenia, aby
obie strzałki były do siebie skierowane w jednej linii.
Następnie proszę ją przekręcić w prawo o jedną czwartą obrotu (rysunek 4). Aby zdjąć dyszę, proszę wykonywać wyżej opisane czynności w odwrotnej kolejności.
4
3.2 Napełnianie zbiornika na wodę
Urządzenie THOMAS VAPORO Buggy jest wyposażone w zintegrowany zbiornik na wodę o pojemności
1,6 l. Należy wyłączyć odkurzacz parowy i wyjąć
wtyczkę z gniazdka. Odkurzacz parowy musi być
zawsze odłączony od sieci podczas napełniania lub
dolewania wody. Proszę odkręcić zakrętkę zbiornika
(ilustracja 5), naciskając ją i jednocześnie przekręcając
w lewo. Przy napełnianiu zbiornika wodą należy korzystać z załączonego lejka i miarki.
5
3.1.5 Dysza ze strumieniem punktowym (5)
Za pomocą tej dyszy można bez problemu czyścić
trudno dostępne miejsca, np. kąty, fugi i toalety.
3.1.6 Skrobak (6)
Skrobak łatwo usuwa uporczywy bród i tapety.
3.1.7 Szczotki nylonowe (7/8)
Służą do czyszczenia silnych zabrudzeń, np. z żaluzji,
kaloryferów, zaworów.
3.1.8 Szczotka metalowa (9)
Szczotka metalowa jest przeznaczona do czyszczenia
silnych zabrudzeń z bardziej odpornych materiałów,
np. stali szlachetnej lub kamienia.
3.1.9 Dysza do okien (10+11)
Idealna do czyszczenia dużych powierzchni szklanych
(np. szyb okiennych, luster itp.), ewentualnie z odpowiednią ściereczką do czyszczenia.
Proszę używać wyłącznie czystej wody bez żadnych
dodatków, np. perfum, środków czyszczących lub alkoholu, ponieważ mogą one uszkodzić urządzenie lub
uczynić jego użytkowanie niebezpiecznym Zaleca się
używanie wody destylowanej, aby zapobiec osadzaniu
się kamienia w przypadku bardzo twardej wody (o wartościach przekraczających 2,5 mmol/l lub 21°dH)
W przeciwnym razie należy zagotować wodę przed
użyciem urządzenia, aby przedłużyć jego trwałość.
Uwaga: Podczas napełniania zbiornika
nie wolno przekraczać maksymalnego
poziomu napełnienia 1,6 l.
Proszę zakręcić zakrętkę zbiornika, naciskając
ją i przekręcając w prawo.
Wskazówka: Czas nagrzewania można
skrócić, napełniając zbiornik ciepłą wodą.
Uwaga: Istnieje ryzyko pęknięcia na
skutek nagłej zmiany temperatury!
Przed czyszczeniem parą należy podgrzać powierzchnie szklane, spryskując
je szerokim łukiem parą z odległości
20–25 cm. Proszę stopniowo zmniejszać
odległość do 10–15 cm w celu dalszego
ogrzewania powierzchni szklanej.
57
Page 58

4. Obsługa urządzenia
4.1 Podłączenie do zasilania
Proszę włożyć wtyczkę odkurzacza parowego do
odpowiedniego gniazdka i włączyć urządzenie,
naciskając przełącznik (ilustracja 6).
6
Włączanie/Wyłączanie
Kontrolka
zasilania
Kontrolka
nagrzewania
Zapala się pomarańczowa kontrolka zasilania (ilustracja 6)
i odkurzacz parowy zaczyna się nagrzewać. Odpowiednia
do pracy temperatura zostaje osiągnięta po ok. 11 minutach.
Wówczas zapala się zielona kontrolka nagrzewania.
Urządzenie jest teraz gotowe do pracy.
– Zastosowanie pary może powodować blaknięcie
malowanego/lakierowanego drewna.
– Para może odbarwić błyszczący plastik.
– Akryl, aksamit i płótno są wyjątkowo nieodporne
na temperaturę pary.
– Nie wolno stosować odkurzacza parowego do czysz-
czenia tkaniny akrylowej bez uprzedniego przetesto-
wania materiału w niewidocznym miejscu.
Z oczywistych względów producent nie ponosi odpowie-
dzialności za uszkodzenia przedmiotów i materiałów,
szkody wyrządzone ludziom, zwierzętom lub roślinom
w następstwie nieprawidłowego stosowania gorącej
pary lub niewłaściwego użytkowania urządzenia.
Po wyłączeniu funkcji parowania jeszcze przez kilka
sekund wydobywa się para.
Nie należy kierować wylotu pary przez dłuższy czas
w jedno miejsce. Proszę usuwać zabrudzenia, kierując
strumień pary w przód i w tył. Ilość wyprowadzanej
pary można regulować, przekręcając regulator pary
i dostosować do stopnia zabrudzenia. Proszę przekręcić regulator pary w prawo, aby zmniejszyć ilość pary
i w lewo, aby ją zwiększyć (ilustracja 8).
4.2 Użytkowanie odkurzacza parowego
Ostrzeżenie: Nie wolno nigdy kierować
wylotu pistoletu parowego w stronę
ludzi, zwierząt, kwiatów lub urządzeń
elektrycznych (np. piekarnika lub
gniazdka). Istnieje niebezpieczeństwo
poparzenia lub porażenia prądem!
Proszę zdjąć blokadę (zabezpieczenie przed dziećmi),
przesuwając w lewo trójkątny trzpień z prawej strony
pistoletu parowego (ilustracja 7). Po naciśnięciu przycisku pary wydobywa się gorąca para. Najpierw proszę
skierować pistolet parowy na kawałek niepotrzebnej
tkaniny, aby zebrać wypływającą na początku rozpyloną wodę. Należy naciskać przycisk pary do momentu
równomiernego wydobywania się pary. Można rozpocząć czyszczenie.
7
Uwaga: Najpierw należy zawsze przetestować odkurzacz parowy na słabo
eksponowanych lub niewidocznych miejscach powierzchni lub materiałów, aby
sprawdzić ich odporność na gorącą parę.
8
W trakcie pracy urządzenia nie wolno go przewracać
ani przechylać pod kątem większym niż 45°. Należy
się upewnić, że urządzenie stoi na twardym podłożu.
Pełny zbiornik wystarcza na maks. 50 minut pracy. Nie
wolno pozostawiać włączonego urządzenia bez nadzoru. Ewentualnie proszę używać zabezpieczenia przed
dziećmi, aby zabezpieczyć przycisk pary. W tym celu
należy przesunąć w prawo trójkątny trzpień znajdujący
się po lewej stronie pistoletu parowego.
Ostrzeżenie: Obudowa i elementy
wyposażenia nagrzewają się w trakcie
działania. Przed zmianą elementów
wyposażenia lub dolaniem wody należy
pozostawić urządzenie do ostygnięcia.
Nie wolno nigdy odkręcać zakrętki
zbiornika, gdy odkurzacz parowy jest
włączony, ponieważ zbiornik jest pod
ciśnieniem.
58
Page 59

THOMAS VAPORO Buggy jest wyposażony w bezpiecznik chroniący przed przegrzaniem. Urządzenie
wyłącza się automatycznie, gdy temperatura osiągnie
180°C. W ten sposób unika się przegrzania. W takim
przypadku należy odłączyć urządzenie, niezwłocznie
wyciągając wtyczkę z gniazdka. Po fazie stygnięcia
trwającej około 30 minut można ponownie uruchomić
urządzenie.
4.3 Dolewanie wody do zbiornika
Gdy ilość wyprowadzanej pary maleje, należy uzupełnić
zbiornik.
Proszę wyłączyć odkurzacz parowy, naciskając przełącznik. Zgaśnie pomarańczowa kontrolka zasilania.
Proszę nacisnąć przycisk pary na pistolecie parowym
w celu uwolnienia ciśnienia resztkowego. Na koniec
proszę zablokować pistolet parowy. Proszę wyciągnąć
wtyczkę z gniazdka i pozostawić urządzenie do ostygnięcia. Należy pamiętać, że po upływie 5 minut woda
w zbiorniku jest wciąż gorąca. Proszę otworzyć zbiornik, naciskając zakrętkę i obracając ją w lewo.
Ostrzeżenie: Podczas otwierania może
się wydobywać gorąca para. Istnieje
niebezpieczeństwo poparzenia przez
gwint zamknięcia i zbiornik.
Proszę napełnić zbiornik za pomocą miarki i lejka
(patrz sekcja 3.2 „Napełnianie zbiornika na wodę”)
i zakręcić zakrętkę zbiornika. Teraz można znowu
podłączyć odkurzacz parowy do sieci i go włączyć.
Urządzenie THOMAS VAPORO Buggy jest gotowe
do pracy, gdy zaświeci się kontrolka nagrzewania.
4.4 Zakończenie eksploatacji i przechowywanie
Proszę wyłączyć urządzenie. Zgaśnie pomarańczowa
kontrolka zasilania. Proszę nacisnąć przycisk pary na
pistolecie parowym w celu uwolnienia ciśnienia resztkowego. Proszę zabezpieczyć pistolet parowy, przesuwając w prawo trzpień blokady po lewej stronie uchwytu.
Proszę wyciągnąć wtyczkę z gniazdka i pozostawić
urządzenie do ostygnięcia. Proszę opróżnić zbiornik
na wodę, aby zapobiec odkładaniu się osadów.
Zbiornik na wodę należy zamknąć dopiero, gdy jest
całkowicie suchy. Odkurzacz parowy musi całkiem
wystygnąć zanim zostanie spakowany. Urządzenie
należy przechowywać w miejscu niedostępnym dla
dzieci. Rurę przedłużającą z dyszą podłogową można
umieścić w zamocowaniu z tyłu urządzenia, aby ją
przechować w trakcie krótkich przerw w eksploatacji
lub po jej zakończeniu.
Przewód zasilający można owinąć wokół dwóch haczyków na rurze przedłużającej (ilustracja 9). Jeżeli oba
haczyki powinny być zwrócone w jednym kierunku,
można odwrócić haczyk, na którym widoczne są strzałki.
9
5. Informacje ogólne
5.1 Czyszczenie i konserwacja
Ostrzeżenie: Przed czyszczeniem lub
konserwacją odkurzacza parowego
należy się upewnić, że został wyłączony
i odłączony od sieci.
Urządzenie należy czyścić, wycierając jego obudowę
lekko nawilżoną ściereczką. Nie wolno używać środków
czyszczących, środków do szorowania lub zawierających alkohol, ponieważ mogą one uszkodzić obudowę.
Zaleca się płukanie zbiornika co najmniej po jego pięciokrotnym napełnieniu, jeśli twardość wody w danej
lokalizacji przekracza 1,8 mmol/l (10°dH). Informacje
dotyczące twardości wody w danej lokalizacji można
uzyskać w zakładzie wodociągowym. Aby wyczyścić
zbiornik, zaleca się napełnić go wodą i energicznie nim
potrząsnąć. W ten sposób rozpuści się osad zalegający na dnie odkurzacza parowego. Na koniec proszę
wylać wodę i pozostawić zbiornik do wyschnięcia
przed jego zamknięciem.
Aby przedłużyć trwałość odkurzacza parowego, przy
czyszczeniu zbiornika na wodę należy mniej więcej co
6 miesięcy używać odkamieniacza.
Do 1 l ciepłej wody (50°C) proszę włożyć jedną lub
maksymalnie dwie pałeczki odkamieniacza i wlać ją
do zbiornika. Proszę pozostawić roztwór na około
30 minut i wylać wodę z rozpuszczonymi osadami.
W razie potrzeby proszę powtórzyć czynność i na
koniec wypłukać zbiornik na wodę.
52. Utylizacja urządzeń elektrycznych
i elektronicznych
Po zakończeniu okresu przydatności urządzenia do użycia, należy je zutylizować zgodnie
z obowiązującymi przepisami. Nie jest to
odpad komunalny.
Symbol na produkcie lub opakowaniu wskazuje, że
tego produktu nie należy traktować jak zwykłego
odpadu z gospodarstwa domowego, lecz należy go
przekazać do punktu zbiórki urządzeń elektrycznych
lub elektronicznych przeznaczonych do recyklingu
59
Page 60

GB
Usuwając prawidłowo odpady, pomagają Państwo
chronić środowisko naturalne i zdrowie ludzi. Nieprawidłowa utylizacja zagraża środowisku i zdrowiu.
Więcej informacji na temat przetwarzania surowców wtórnych
uzyskają Państwo w urzędzie miasta, w zakładzie gospodarki
komunalnej lub w firmie, w której zakupiono produkt.
5.3 Usuwanie usterek
Proszę najpierw sprawdzić, czy możliwe jest samodzielne usunięcie usterki na podstawie poniższej listy, zanim prześlą Państwo odkurzacz parowy do serwisu THOMAS.
Usterka Możliwa przyczyna Rozwiązanie
Nie świeci się kontrolka
zasilania.
Urządzenie nie zostało podłączone do
gniazdka lub nie zostało włączone.
Gniazdko jest uszkodzone.
Przewód sieciowy jest uszkodzony.
Osoba, która utylizuje urządzenie niezgodnie ze wskazówkami niniejszej sekcji zostanie zgodnie z obowiązującymi przepisami pociągnięta do odpowiedzialności.
Zalecamy zachować opakowanie co najmniej do końca
okresu gwarancji.
Proszę włożyć wtyczkę do gniazdka lub
włączyć urządzenie.
Proszę sprawdzić gniazdko, wyjmując
wtyczkę odkurzacza parowego i wkładając wtyczkę innego urządzenia.
Proszę wymienić przewód
w serwisie THOMAS.
Po naciśnięciu przycisku
pary nie wydobywa się
para.
Wyprowadzana jest
bardzo mała ilość pary.
Urządzenie nagrzewa
się bardzo długo.
5.4 Dane techniczne
Typ urządzenia: Odkurzacz parowy
Model: THOMAS VAPORO Buggy
Napięcie: 220–240 V ~ 50/60 Hz
Pobór mocy: 1500 W
Ciśnienie pary: maks. 3,5 bar
Dozwolone ciśnienie: 5 bar
Pojemność
zbiornika na wodę: maks. 1,6 l
Dostępność pary: maks. 50 min/
Przycisk pary jest zablokowany przez
zabezpieczenie przed dziećmi.
Zbiornik na wodę jest pusty.
Regulator pary jest ustawiony
na minimalną ilość pary.
W zbiorniku jest osad. Proszę odkamienić zbiornik na wodę
napełnienie zbiornika
Należy przesunąć w lewo trójkątny trzpień
znajdujący się po prawej stronie pistoletu
parowego.
Proszę wlać wodę (patrz sekcja
4.3 „Dolewanie wody do zbiornika”).
Proszę przekręcać regulator pary w lewo
do momentu uzyskania odpowiedniej
ilości pary.
(patrz sekcja 5.1 „Czyszczenie i konserwacja”).
Czas nagrzewania: ok. 11 min
Przepływ pary: maks. 40 g/min
Emisja hałasu: 30 dB(A) w trakcie używania
Wymiary urządzenia: 305 x 397 x 235 mm
Waga: Urządzenie bez
Z zastrzeżeniem zmian technicznych.
(szer. x dł. x wys.)
wyposażenia 4,5 kg
IP X4
60
Page 61

6. Gwarancja
Niezależnie od obowiązków gwarancyjnych sprzedawcy wynikających z umowy sprzedaży, zapewniamy gwarancję na urządzenia zgodnie z poniższymi warunkami:
1. Okres gwarancji obejmuje 24 miesiące, licząc od
dnia dostawy do pierwszego użytkownika. W przypadku wykorzystywania urządzenia do celów komercyjnych lub porównywalnego obciążenia ogranicza
się ona do 12 miesięcy. Z roszczenia można skorzystać pod warunkiem przedłożenia dowodu zakupu.
2. W okresie obowiązywania gwarancji usuwamy
wszystkie istotne wady funkcjonalne wynikające
z wadliwego wykonania lub wad materiałowych,
naprawiając lub wymieniając uszkodzone części
według naszego uznania; wymienione części stają się
naszą własnością. Gwarancja nie obejmuje łatwo łamliwych części, np. szkła, plastiku lub żarówek. Usterki
należy zgłaszać niezwłocznie po ich wystąpieniu.
W okresie objętym gwarancją nie są naliczane koszty
części zamiennych potrzebnych do usunięcia wad
funkcjonalnych ani koszty wykonanej pracy. W przypadku nieuprawnionego korzystania z naszego serwisu koszty z tym związane ponosi klient. Naprawy na
miejscu u klienta lub w miejscu montażu urządzenia
mogą być wymagane tylko w przypadku dużych
urządzeń. Inne urządzenia należy przekazać do
naszego najbliższego serwisu, autoryzowanego
warsztatu lub wysłać do zakładu produkcyjnego.
3. Gwarancja nie obejmuje mniejszych zmian, które
nie mają wpływu na wartość i użyteczność wyrobu,
szkód spowodowanych przez chemiczne lub elektrochemiczne oddziaływanie wody lub niekorzystne
warunki środowiskowe. Gwarancja nie obejmuje
uszkodzeń wynikających ze zwykłego zużycia lub
niewłaściwej i niezgodnej z instrukcją obsługi.
4. Gwarancje przestaje obowiązywać w wyniku ingerencji lub napraw urządzenia przez osoby nieuprawnione.
5. Wykonanie usługi gwarancyjnej nie przedłuża ani
nie odnawia terminu gwarancji na urządzenia i wbudowane części zamienne: Okres gwarancji na wbudowane części kończy się wraz z okresem obowiązywania gwarancji na całe urządzenie.
6. Dalej idące roszczenia, w szczególności roszczenia
co do wymiany związanej ze szkodami powstałymi
poza urządzeniem – o ile nie jest to prawnie
nakazane – są wykluczone.
Również po upływie terminu obowiązywania gwarancji
oferujemy Państwu nasze usługi serwisowe. Proszę się
zwrócić do Państwa sprzedawcy lub bezpośrednio do
działu obsługi serwisowej.
61
Page 62

Contenido Página
1. Normas de seguridad importantes ..................................................63/64
1.1 Alimentación de tensión .................................................................... 63
1.2 Grupos especiales de personas .............................................................63
1.3 Manejo del aparato ....................................................................63/64
1.4 Mantenimiento y limpieza...................................................................64
2. Introducción
2.1 Agradecimiento ..........................................................................64
2.2 Desembalar el aparato .................................................................... 64
2.3 Identificación de piezas ....................................................................64
2.4 Figuras: vaporeta y accesorios ..............................................................65
3. Puesta en marcha
3.1 Montaje de los accesorios .................................................................. 66
3.1.1 Manguera de vapor .................................................................. 66
3.1.2 Tubos alargadores ...................................................................66
3.1.3 Boquilla para suelos .................................................................. 66
3.1.4 Adaptador de accesorios ...........................................................66/67
3.1.5 Boquilla de chorro concentrado ........................................................ 67
3.1.6 Rascador ........................................................................... 67
3.1.7 Cepillos de nailon .................................................................... 67
3.1.8 Cepillos de metal ..................................................................... 67
3.1.9 Boquilla para ventanas ...............................................................67
3.2 Llenar el depósito de agua ................................................................. 67
4. Manejo del aparato
4.1 Conexión a la alimentación de red ...........................................................68
4.2 Uso de la vaporeta ....................................................................68/69
4.3 Rellenar agua ............................................................................69
4.4 Puesta fuera de servicio y almacenamiento .....................................................69
E
5. Generalidades
5.1 Limpieza y mantenimiento ..................................................................69
5.2 Eliminación ...........................................................................69/70
5.3 Solución de fallos ......................................................................... 70
5.4 Datos técnicos ............................................................................70
6. Garantía...............................................................................71
Advertencia: esta indicación hace referencia a los peligros para el usuario.
Atención: esta indicación hace referencia a los peligros para el aparato o para otros objetos.
62
Page 63

1. Normas de seguridad
1.1 Alimentación de tensión
• Antes de conectar la vaporeta a la corriente, asegúrese de que la tensión indicada en la placa de
características coincida con la de la toma de red.
• Conecte el aparato únicamente a una toma con
puesta a tierra adecuada.
• El enchufe del aparato debe caber en la toma de
red. No efectúe modificaciones de ningún tipo en el
enchufe. No utilice ningún adaptador de red en los
aparatos equipados con puesta a tierra. Los enchufes
y las tomas sin modificar y del tamaño adecuado
reducen el riesgo de descargas eléctricas.
•
Se recomienda enchufar el aparato únicamente a tomas
protegidas con un interruptor de corriente de defecto.
En caso necesario, consulte con un electricista.
• No agarre en ningún caso el enchufe de red con las
manos mojadas.
• Desenchufe siempre el aparato de la corriente tirando
del enchufe, nunca del cable.
• Una conexión defectuosa solo puede sustituirse por
un cable con valores de conexión idénticos. Para su
reparación, envíe el aparato al servicio técnico de
THOMAS.
• Al usar un cable alargador, asegúrese de que los
valores de conexión coinciden con los de la vaporeta. En caso necesario, consulte con un comercio
especializado.
• Asegúrese de que no haya riesgo de tropezar con
el cable. Éste no debe quedar doblado ni aplastado.
1.2 Grupos especiales de personas
•
Las personas con discapacidad física,
importantes
sensorial o psíquica y las personas
sin experiencia o conocimiento pue
den usar este aparato siempre que
sea bajo supervisión y/o una vez se
les haya informado del uso seguro
del aparato y conozcan los peligros
potenciales. Este aparato no es apto
para jugar; mantenerlo fuera del
alcance de los niños.
• Mantenga el aparato fuera del alcance de los niños
cuando esté encendido o cuando se esté enfriando.
• No deje que los niños jueguen con el embalaje
( lámina de plástico) porque existe riesgo de asfixia.
1.3 Manejo del aparato
¡Precaución! ¡Vapor caliente!
¡Peligro de quemaduras!
• Por motivos de seguridad, no limpie con la vaporeta
aparatos eléctricos como hornos, microondas, neveras, interruptores y luces.
• Compruebe a intervalos regulares que el aparato, el
cable y los accesorios no presentan daños. Si estos
existen, no ponga el aparato o los accesorios en
funcionamiento.
• No aplique la vaporeta sobre personas, animales
o plantas (peligro de quemaduras). No aplique la
vaporeta sobre instalaciones o cables eléctricos.
• No deje que el aparato funcione sin vigilancia. Una
vez usado el aparato y cuando abandone el lugar
donde lo utilizó, desenchúfelo siempre de la corriente.
• El aparato está equipado con un termostato y un termofusible que lo protegen de un sobrecalentamiento.
• Los accesorios se calientan durante el funcionamiento; por ello, deje que se enfríen antes de cambiarlos.
• No toque las superficies calientes del aparato. Es normal
que la vaporeta se caliente durante el funcionamiento.
• No abra el tapón del depósito cuando el aparato
esté en funcionamiento. El depósito está bajo presión.
• El aparato no debe inclinarse más de 45° durante
su funcionamiento.
• No sumerja el aparato en agua o en cualquier otro
líquido.
• La vaporeta solo está indicada para su uso en interiores y para tareas domésticas, no para espacios
públicos.
• No exponga el aparato a la radiación solar directa
y muy intensa, a heladas y a otras inclemencias
meteorológicas (lluvia, etc.).
• Utilice únicamente el aparato en recipientes/pilas
que no contengan agua u otros líquidos.
• No ponga el aparato en funcionamiento con el depósito de agua vacío. Rellénelo con agua a tiempo.
• Vacíe el depósito de agua cuando no utilice el aparato.
• No rellene el depósito con algo distinto de agua.
No introduzca aditivos (p. ej. perfume, quitamanchas
o sustancias que contengan alcohol) en el agua
puesto que el aparato podría sufrir daños o incluso
suponer un peligro.
• Antes de rellenar el depósito de agua, desenchufe
el aparato y deje que se enfríe completamente.
• No llene demasiado el depósito. Evite superar el
nivel de llenado máximo predefinido. Utilice el vaso
medidor y el embudo incluidos en el volumen de
suministro.
• Antes de usar el aparato, asegúrese de que el tapón
del depósito de agua esté bien cerrado.
63
Page 64

• Agarre el aparato únicamente por su asa.
• No aplique la THOMAS VAPORO Buggy sobre
la ropa que lleve puesta.
• Es posible que gotee un poco de agua por la boquilla.
Esto es muy normal. Solo se trata de agua condensada.
• La fuerza y el calor del vapor pueden afectar de
forma perjudicial a algunos materiales. Antes de aplicar vapor, compruebe en una zona poco visible si la
superficie es adecuada para este tipo de limpieza.
• Al entregar la vaporeta a otra persona, adjunte también estas instrucciones de uso.
1.4 Mantenimiento y limpieza
• Utilice únicamente accesorios originales incluidos en
el volumen de suministro.
• No repare por su cuenta los daños en el aparato, en
los accesorios o en el cable de conexión a la red.
Permita únicamente que una oficina de atención al
cliente autorizada compruebe su aparato y realice la
puesta a punto del mismo. Las modificaciones en el
aparato pueden poner en peligro su salud. Use únicamente piezas de recambio y accesorios originales.
• Antes de limpiar el aparato o de realizar su mantenimiento, apáguelo, desenchúfelo de la corriente
y deje que se enfríe.
2. Introducción
2.1 Agradecimiento
Le estamos muy agradecidos por la compra de la
THOMAS VAPORO Buggy. Su nueva vaporeta es un
limpiador multiusos y un gran aliado para las tareas
domésticas. Gracias a la aplicación de vapor a alta
temperatura, podrá retirar de forma rápida toda la
suciedad incrustada de superficies lisas como, p. ej.,
baldosas y azulejos, mesas, utensilios de cocina, ventanas y espejos, eliminando al mismo tiempo las bacterias
nocivas. Con ella es posible eliminar a fondo y sin el
uso de disolventes químicos restos adheridos, moho,
grasa, restos de jabón y suciedad incrustada y suelta.
Y todo ello respetando el medio ambiente.
Esperamos que disfrute de todas las ventajas de este
producto.
2.2 Desembalar el aparato
Retire el embalaje de la vaporeta y de sus accesorios.
Compruebe que estén incluidas todas las piezas. En la
medida de lo posible, conserve el cartón y el embalaje
de su interior para que el aparato quede protegido en
caso de tener que transportarlo o devolverlo por motivos de garantía. Deseche correctamente los materiales
de embalaje que ya no necesite. Diríjase de inmediato
a su comercio especializado si, al desembalar el aparato, encuentra daños producidos durante el transporte.
Queda prohibido poner el aparato en funcionamiento
si éste presenta daños irreparables.
2.3 Identificación de piezas
1 = Embudo
2 = Vaso medidor
3 = Pistola de vapor con manguera y conexión para el vapor
4 = Adaptador de accesorios
5 = Boquilla de chorro concentrado
6 = Rascador
7 = Cepillo de nailon pequeño
8 = Cepillo de nailon grande
9 = Cepillo de metal
10 = Boquilla para ventanas
11 = Paño de limpieza de la boquilla para ventanas
12 = Boquilla para suelos
13 = Paño de limpieza de la boquilla para suelos
14 = 3 tubos alargadores
15 = Vaporeta
64
Page 65

2.4 Figuras: vaporeta y accesorios
15
14
1
2
3
13 12 11 10 9 8
4
5
6
7
65
Page 66

3. Puesta en marcha
3.1 Montaje de los accesorios
Antes de usar la THOMAS VAPORO Buggy deben
conectarse al aparato la manguera de vapor con la
pistola de vapor y colocarse los accesorios deseados.
La THOMAS VAPORO Buggy dispone de una caja
de accesorios que incluye: adaptador de accesorios,
boquilla de chorro concentrado, rascador, boquilla
de nailon pequeña, boquilla de nailon grande, cepillo
de metal, boquilla para ventanas y paños de limpieza.
Abra la caja de accesorios tirando hacia arriba del
asa de bloqueo azul y abatiendo hacia delante la
tapa transparente (figura 1).
1
Saque los accesorios que desee y cierre la tapa. Introduzca el cerrojo de la tapa en su ranura y pulse con
fuerza hacia abajo hasta que encaje.
3.1.3 Boquilla para suelos (12+13)
Por motivos técnicos, la boquilla para suelos se suministra embalada como una pieza de conexión por separado. Una las piezas de conexión de la forma mostrada
(figura 2).
2
Coloque la boquilla para suelos al final del tubo
alargador. Asegúrese de que ésta encaje. La boquilla
para suelos es perfecta para limpiar suelos y paredes
lavables. Ésta puede usarse con o sin paño de limpieza. Sin embargo, recomendamos utilizar el paño de
limpieza cuando la aplique sobre superficies delicadas
(p. ej. madera o linóleo) para protegerlas. Coloque la
boquilla para suelos en el centro del paño de limpieza,
presione la parte interior de las pinzas hacia abajo,
coloque el paño de limpieza de forma que sobresalga
y suelte las pinzas (figura 3). Para retirar la boquilla
para suelos, pulse el botón de para soltarla y separe
la boquilla tirando de ella hacia abajo.
3.1.1 Manguera de vapor (3)
En primer lugar, conecte la manguera de vapor a la
conexión para vapor situada en la parte delantera de
la THOMAS VAPORO Buggy. Para ello, descienda la
tapa de la carcasa y presione con fuerza el conector
de la manguera de vapor contra la conexión para
vapor hasta que encaje.
Para retirar la manguera de vapor, presione los dos
botones de desbloqueo situados a ambos lados del
conector y extraiga la manguera de la conexión
para vapor.
3.1.2 Tubos alargadores (14)
Coloque los tubos alargadores si desea utilizar la vaporeta para limpiar suelos o superficies de difícil acceso.
Para ello, conecte el extremo abierto del tubo a la
pistola de vapor hasta que encaje. En caso necesario,
conecte dos o los tres tubos alargadores. Para retirar el
tubo alargador, pulse el botón para soltarlo y separe
los tubos tirando de ellos hacia abajo.
66
3
3.1.4 Adaptador de accesorios (4)
La vaporeta dispone de numerosas boquillas para conseguir una limpieza lo más a fondo y efectiva posible
de distintas superficies. Primero monte el adaptador de
accesorios para poder colocarlos en la manguera de
vapor. El adaptador de accesorios puede colocarse
en la pistola de vapor o en el extremo de uno o varios
tubos alargadores.
Asegúrese de que el adaptador esté bien colocado
y que haya encajado. Para retirar el adaptador, pulse
el botón para soltarlo y separe los tubos tirando de
ellos hacia abajo.
Page 67

El adaptador de accesorios puede utilizarse con la
boquilla de chorro concentrado, el rascador, una de las
boquillas con cepillo o con la boquilla para ventanas.
Deslice la boquilla seleccionada en el adaptador de
accesorios de forma que las dos flechas queden en
paralelo y gírela un cuarto de vuelta en el sentido de
las agujas del reloj (figura 4). Siga a la inversa los
pasos descritos para retirar la boquilla.
4
3.2 Llenar el depósito de agua
La THOMAS VAPORO Buggy está equipada con un
depósito de agua integrado de 1,6 l de capacidad.
Desconecte siempre la vaporeta y desenchúfela de la
corriente antes de rellenar con agua el depósito. Abra
el tapón del depósito (figura 5) presionándolo hacia
abajo y girándolo al mismo tiempo en el sentido contrario a las agujas del reloj. Para rellenar el depósito utilice el vaso medidor y el embudo incluidos en el volumen
de suministro.
5
3.1.5 Boquilla de chorro concentrado (5)
Con esta boquilla podrá limpiar fácilmente zonas de
difícil acceso como esquinas, ranuras e inodoros.
3.1.6 Rascador (6)
Con el rascador podrá retirar fácilmente la suciedad
incrustada y el papel pintado.
3.1.7 Cepillos de nailon (7/8)
Para limpiar. p. ej., persianas, aparatos de calefacción
o válvulas muy sucias.
3.1.8 Cepillo de metal (9)
El cepillo de metal está indicado para materiales menos
delicados como, p. ej., acero inoxidable o piedra.
3.1.9 Boquilla para ventanas (10+11)
Perfecta para limpiar grandes superficies de cristal
(p. ej. lunas, espejos, etc.), a elegir con el paño de
limpieza correspondiente (11).
Utilice únicamente agua que no contenga aditivos
como perfume, productos de limpieza o alcohol; de
lo contrario, el aparato podría sufrir daños o incluso
suponer un peligro. Se recomienda el uso de agua destilada para evitar que se depositen restos de cal, como
ocurre con el agua muy dura (con valores superiores
a 2,5 mmol/l o 21 °dH). Si no dispone de ella, hierva
el agua antes de introducirla en el depósito para prolongar la vida útil del aparato.
Atención: al rellenar el depósito, no
supere el nivel máximo de llenado
de 1,6 l.
Vuelva a colocar el tapón presionándolo hacia abajo
y girándolo en el sentido de las agujas del reloj.
Consejo: el tiempo de calentamiento puede
reducirse si rellena el depósito con agua
caliente.
Atención: los cambios bruscos de temperatura pueden derivar en la rotura del cristal.
Precaliente las superficies de cristal antes
de limpiarlas con vapor, aplicando sobre
ellas un poco de vapor desde una distancia
entre 20–25 cm. Reduzca la distancia de
rociado hasta llegar a los 10–15 cm para
que se siga calentando el cristal.
67
Page 68

4. Manejo del aparato
4.1 Conexión a la alimentación de red
Enchufe la vaporeta en una toma adecuada y encienda
el aparato pulsando el interruptor de encendido/
apagado (figura 6).
6
Encendido/apagado
Lámpara
de servicio
Lámpara
de calentamiento
El piloto de servicio naranja (figura 6) se enciende y la
vaporeta empieza a calentarse. La temperatura de servicio se alcanzará transcurridos unos 11 minutos; a partir
de entonces se encenderá el piloto verde de calentamiento. El aparato estará ahora listo para usarse.
4.2 Uso de la vaporeta
Advertencia: no oriente nunca la salida
de vapor de la pistola hacia las personas
animales, plantas o dispositivos eléctricos
(p. ej., horno o toma de red). Existe peligro de sufrir quemaduras o descargas
eléctricas.
Suelte el dispositivo de bloqueo (seguro a prueba de
niños) desplazando hacia la izquierda la pestaña triangular situada en el lado derecho de la pistola de vapor
(figura 7). Cuando accione la tecla de vapor, el aparato rociará vapor caliente. Al principio sujete la pistola
de vapor poniendo debajo un paño para así recoger el
agua que pueda derramarse. Siga pulsando la tecla de
vapor hasta que el vapor se rocíe de forma uniforme.
A continuación podrá comenzar con la limpieza.
7
– La aplicación de vapor puede desteñir la madera
pintada o barnizada.
– El vapor puede hacer que el plástico pierda brillo.
– La fibra acrílica, el terciopelo y el lino reaccionan
de forma muy sensible a la temperatura del vapor.
– No aplique la vaporeta sobre fibras dralon sin pro-
barla antes en una superficie no visible del material.
Por motivos lógicos, el fabricante no se hace responsable
de daños en objetos, materiales, personas, animales
o plantas producidos como consecuencia del uso no
apropiado del vapor caliente o por un uso inadecuado
del aparato.
Una vez desconectada la función de vapor, dejará
de salir vapor pasados unos segundos.
No oriente la salida de vapor hacia el mismo lugar durante un largo periodo de tiempo. La suciedad se desprende
moviendo de un lado a otro el chorro de vapor. La intensidad del vapor puede variar girando el regulador de
vapor y adaptarse así al grado de suciedad. Gire el regulador de vapor en el sentido de las agujas del reloj para
que salga menos vapor y en el sentido contrario a las
agujas del reloj para que salga más vapor (figura 8).
8
,
No incline el aparato más de 45° cuando esté en funcionamiento para garantizar que éste descansa siempre
sobre un suelo firme. Con el depósito lleno, el aparato
podrá usarse como máximo durante 50 minutos. No
deje el aparato sin vigilancia cuando esté encendido
y dado el caso, utilice el seguro a prueba de niños para
bloquear la tecla de vapor. Para ello deslice hacia la
derecha la pestaña triangular situada en el lado izquierdo de la pistola de vapor.
Atención: pruebe siempre la vaporeta
en un lugar poco visible de la superficie
que desee limpiar para estar seguro de
que pueda aplicarse sin problemas el
vapor caliente.
68
Advertencia: la carcasa y los accesorios
se calientan durante el funcionamiento
del aparato. Deje que éste se enfríe
antes de cambiar los accesorios o de
rellenar el depósito con agua. No abra
nunca el tapón del depósito cuando la
vaporeta esté encendida porque éste
está bajo presión.
Page 69

La THOMAS VAPORO Buggy está equipada con un
fusible para protegerla contra el sobrecalentamiento.
El aparato se apaga automáticamente en cuanto la
temperatura alcanza 180 °C. De esta forma se evita
el sobrecalentamiento. En este caso, desenchufe el
aparato de la corriente. Éste puede volver a ponerse
en marcha pasados los 30 minutos que dura la fase
de enfriamiento.
4.3 Rellenar agua
En cuanto note una reducción de la cantidad del
vaporrociada, deberá rellenar el depósito.
Desconecte la vaporeta pulsando el interruptor de
encendido/apagado. Se apagará el piloto de servicio
naranja. Para dejar salir el vapor residual, pulse la
tecla de vapor de la pistola. A continuación, bloquee la
pistola de vapor. Desenchufe el aparato y deje que se
enfríe completamente. Tenga en cuenta que el agua del
depósito seguirá estando caliente pasados 5 minutos.
Abra el tapón del depósito presionándolo hacia abajo
y girándolo en el sentido contrario a las agujas del reloj.
Advertencia: al abrir el tapón puede
salir vapor caliente. Existe riesgo de
quemaduras al entrar en contacto con la
rosca del tapón y con el propio depósito.
Rellene el depósito con ayuda del vaso medidor y el
embudo adjuntos (véase el apartado 3.2 “Llenar el
depósito de agua”) y vuelva a cerrar el tapón. Ahora
puede volver a enchufar la vaporeta y encenderla. La
THOMAS VAPORO Buggy estará lista para funcionar
en cuanto se encienda el piloto verde de calentamiento.
4.4 Puesta fuera de servicio y almacenamiento
Apague el aparato. Se apagará el piloto de servicio
naranja. Para dejar salir el vapor residual, pulse la tecla
de vapor de la pistola. Bloquee la pistola de vapor deslizando hacia la derecha la pestaña situada en el lado
izquierdo del mango. Desenchufe el aparato y deje que
se enfríe completamente. Vacíe el depósito de agua
para evitar que se depositen restos calcáreos.
Cierre el depósito de agua una vez que se haya secado por completo. La vaporeta debe haberse enfriado
completamente antes de guardarla. Mantenga el aparato fuera del alcance de los niños. El tubo alargador
con la boquilla para suelos puede engancharse en
un soporte situado en la parte posterior del aparato
cuando desee guardarlo o cuando haga breves pausas
durante el funcionamiento.
El cable de conexión puede enrollarse alrededor de
dos ganchos situados en el tubo alargador (figura 9).
Si los dos ganchos miran hacia el mismo lado, el gancho
donde se ve la flecha podrá cambiarse de posición.
9
5. Generalidades
5.1 Limpieza y mantenimiento
Advertencia: antes de la limpieza
o del mantenimiento, asegúrese
de que la vaporeta está apagada
y desenchufada de la corriente.
Para limpiar el aparato, utilice únicamente un paño ligeramente humedecido para limpiar la carcasa. No utilice
productos de limpieza, agresivos o que contengan alcohol porque estos podrían dañar la carcasa.
Se recomienda enjuagar el depósito una vez rellenado
cinco veces, siempre que la dureza del agua supere
1,8 mmol/l (10 °dH). Consulte a su empresa suministradora de agua para más información sobre la dureza de
ésta. Para la limpieza, se recomienda rellenar el depósito con agua y agitarlo con fuerza. Así se desprenderán
los restos calcáreos acumulados en el fondo de la
vaporeta. A continuación, vacíe el agua y deje que el
depósito se seque completamente antes de cerrarlo.
Para prolongar la vida útil de la vaporeta, el depósito
debería descalcificarse aprox. cada 6 meses.
Añada una o dos pastillas descalcificadoras a 1 l de
agua caliente (50 °C) y rellene el depósito de agua
con esta mezcla. Deje actuar la solución unos 30 minutos y vacíe el agua con los restos calcáreos. Repita este
proceso en caso necesario y, a continuación, enjuague
el depósito de agua.
5.2 Eliminación de equipos
eléctricos y electrónicos
Cuando la vida útil del aparato llegue a su
fin, éste debe eliminarse conforme a las leyes
vigentes. Este producto no puede desecharse
en la basura doméstica.
El símbolo colocado sobre el producto o su embalaje
advierte de que no se trata de un residuo doméstico
convencional sino de un producto que debe depositarse
en un punto de reciclaje para equipos eléctricos y electrónicos.
69
Page 70

GB
Si elimina correctamente este producto, contribuirá
a la protección del medio ambiente y de la salud de
sus conciudadanos. La eliminación indebida entraña
riesgos para el medio ambiente y para la salud.
Si desea más información sobre el reciclaje adecuado
de este producto, consulte con su ayuntamiento, su
5.3 Solución de fallos
Primero compruebe si, en función de la lista adjunta, usted mismo puede solucionar el fallo, antes de enviar
la vaporeta al servicio técnico de THOMAS.
Fallo Posible causa Solución
El piloto se servicio no
se enciende.
Cuando acciona
la tecla de vapor
no sale vapor.
Solo sale una pequeña
cantidad de vapor.
El aparato no está enchufado
o no está encendido.
La toma de corriente está averiada.
El cable de red está dañado.
La tecla de vapor está bloqueada
con un seguro a prueba de niños.
El depósito de agua está vacío.
El regulador de vapor está ajustado
al mínimo.
empresa de recogida de basuras o con la tienda donde
adquirió el producto.
Si el aparato no se elimina siguiendo las pautas aquí descritas, recaerá sobre usted toda la responsabilidad conforme
a las leyes vigentes. Recomendamos conservar el embalaje
original, al menos hasta que sea válida la garantía.
Enchufe el aparato o enciéndalo.
Compruebe la toma de red desenchufando
la vaporeta y enchufando otro aparato en
la toma.
Envíe el cable al servicio técnico de THOMAS
para que lo sustituyan por otro.
Para ello deslice hacia la izquierda la pestaña triangular situada en el lado derecho
de la pistola de vapor.
Rellene con agua (véase el apartado
4.3 “Rellenar agua”).
Gire el regulador en el sentido contrario
a las agujas del reloj hasta que salga
vapor suficiente.
El aparato necesita
mucho tiempo para
calentarse.
5.4 Datos técnicos
Tipo de aparato: vaporeta
Modelo: THOMAS VAPORO Buggy
Tensión: 220 –240 V ~ 50/60 Hz
Potencia nominal
absorbida: 1500 W
Presión del vapor: máx. 3,5 bar
Presión admisible: 5 bar
Capacidad
del depósito de agua: máx. 1,6 l
Disponibilidad del vapor:
70
El depósito tiene restos calcáreos.
máx. 50 minutos/
llenado del depósito
Descalcifique el depósito de agua (véase el
apartado 5.1 “Limpieza y mantenimiento”).
Tiempo de calentamiento:
Rendimiento del vapor: máx. 40 g/min
Emisión de ruido: 30 dB(A) durante el uso
Dimensiones del aparato:
Peso:
Se reserva el derecho a realizar modificaciones técnicas.
aprox. 11 minutos
305 x 397 x 235 mm
(An x L x Al)
aparato sin accesorios 4,5 kg
IP X4
Page 71

6. Garantía
Independientemente de la obligación de garantía
del comercio donde adquirió el producto, el aparato
disfruta de una garantía sujeta a lo siguiente:
1. El periodo de garantía abarca 24 meses, contando
desde la fecha de entrega al primer comprador. Éste
se reduce a 12 meses en caso de un uso para fines
comerciales o un uso equiparable. Para la reclamación de la garantía es necesario presentar la factura
de compra.
2. Dentro del periodo de garantía, asumiremos todos
los fallos en el funcionamiento debido a errores de
fabricación o materiales defectuosos, y repararemos
o sustituiremos las piezas deficientes a nuestra elección; las piezas sustituidas siguen siendo de nuestra
propiedad. La garantía no se extiende a las piezas
frágiles (p. ej. cristales, plásticos, lámparas). Las averías deben ser comunicadas de inmediato dentro del
periodo de garantía. Durante el plazo de garantía
no le serán facturadas las piezas de repuesto necesarias para solucionar los fallos de funcionamiento en
cuestión ni tampoco los costes de mano de obra. En
caso de uso indebido de nuestro servicio de atención
al cliente, los costes generados se le cargarán al
cliente. Solo se pueden solicitar trabajos de mantenimiento en las instalaciones del cliente o en el lugar
de colocación del aparato en caso de aparatos
de gran tamaño. Los demás aparatos deberán ser
enviados a nuestro centro de atención al cliente más
próximo o a nuestra fábrica.
3. No habrá ninguna obligación de garantía por
pequeñas variaciones cuando éstas no afecten al
valor y a la utilidad del producto, por daños causados por la influencia química o electroquímica
del agua o por condiciones atmosféricas inusuales.
La garantía no cubre los daños resultantes de un
desgaste normal, que no estén producidos por la
inobservancia de las instrucciones de uso o por un
uso indebido.
4. La garantía pierde su validez si personas no autorizadas por nosotros efectúan cambios o reparaciones
en el aparato.
5. Las prestaciones de garantía no conllevan ni para el
aparato ni para las piezas de repuesto reequipadas
una prolongación o renovación del periodo de
garantía: el periodo de garantía para estas piezas
de repuesto finaliza con el de todo el aparato.
6. Quedan excluidas de la garantía las reclamaciones
de mayor alcance o de otro tipo, especialmente las
referentes a la indemnización por daños causados
fuera del aparato (siempre que no exista obligación
legal para ello).
Una vez cumplido el plazo de garantía, el servicio
de atención al cliente seguirá ofreciendo sus servicios.
Diríjase a su comercio especializado o directamente
a nuestro departamento de atención al cliente.
71
Page 72

Tartalom Oldal
1. Fontos biztonsági meghatározások ..................................................73/74
1.1 Feszültségellátás . . . . . . . . . . . . . . . . . . . . . . . . . . . . . . . . . . . . . . . . . . . . . . . . . . . . . . . . . . . . . . . . . . . . . . . . . . 73
1.2 Különleges személycsoportok................................................................ 73
1.3 A készülék kezelése ....................................................................73/74
1.4 Karbantartás és tisztítás .................................................................... 74
2. Bevezetés
2.1 Köszönjük!............................................................................... 74
2.2 Kicsomagolás ............................................................................ 74
2.3 Alkatrész-azonosítás ....................................................................... 74
2.4 Ábrák: Gőztisztító és tartozékok.............................................................. 75
3. Üzembe helyezés
3.1 Szerelés és tartozékok...................................................................... 76
3.1.1 Gőztömlő ........................................................................... 76
3.1.2 Hosszabbítócsövek ................................................................... 76
3.1.3 Padlófúvóka .........................................................................76
3.1.4 Tartozékadapter ..................................................................76/77
3.1.5 Pontsugárfúvóka .....................................................................77
3.1.6 Kaparó.............................................................................77
3.1.7 Műanyag kefék . . . . . . . . . . . . . . . . . . . . . . . . . . . . . . . . . . . . . . . . . . . . . . . . . . . . . . . . . . . . . . . . . . . . . . 77
3.1.8 Fémkefe ............................................................................77
3.1.9 Ablakfúvóka.........................................................................77
3.2 Víztartály feltöltése ........................................................................77
4. A készülék kezelése
4.1 Csatlakozás hálózati tápellátásra.............................................................78
4.2 A gőztisztító kezelése ...................................................................73/79
4.3 Víz utántöltése ............................................................................79
4.4 Üzemen kívül helyezés és tárolás ............................................................. 79
H
5. Általános szempontok
5.1 Tisztítás és karbantartás ....................................................................79
5.2 Ártalmatlanítás ........................................................................79/80
5.3 Hibamegszüntetés.........................................................................80
5.4 Műszaki adatok ..........................................................................80
6. Garancia ..............................................................................81
Figyelem: A megjegyzés a felhasználóval kapcsolatos veszélyekre vonatkozik.
Vigyázat: A megjegyzés a készülékkel vagy tárgyakkal kapcsolatos veszélyekre vonatkozik.
72
Page 73

1. Fontos biztonsági meghatározások
1.1 Feszültségellátás
• A gőztisztító áramhálózatra való csatlakoztatása előtt
ellenőrizze, hogy az adattáblán lévő feszültségadatok
megegyeznek-e a csatlakozóaljzat feszültségével.
• A készüléket kizárólag szabályszerűen földelt dugaszolóaljzatba csatlakoztassa.
• A készülék dugaszának illeszkednie kell a dugaszolóaljzatba. A dugaszon semmilyen módosítást nem
szabad végezni. Védővezetékkel ellátott készülékeknél hálózati adapter nem használható. Az eredeti
dugaszok és a hozzá illő dugaszolóaljzatok csökkentik az áramütés veszélyét.
•
Célszerű a készüléket csak olyan dugaszolóaljzatokon
keresztül üzemeltetni, amelyek hibaáram-védőkapcsolóval
vannak biztosítva. Adott esetben kérje villanyszerelő
segítségét.
• A hálózati dugaszt semmilyen körülmények között
ne érintse meg nedves kézzel.
• A készüléket mindig válassza le az áramhálózatról
úgy, hogy a hálózati dugaszt kihúzza a dugaszolóaljzatból. Ennek során a dugaszt soha ne a kábelnél
fogva húzza.
• A csatlakozóvezetéket annak meghibásodása esetén
kizárólag azonos csatlakozási értékekkel rendelkező
kábelre cserélje. Javítás céljából a készüléket a THOMASvevőszolgálathoz küldje be.
• Hosszabbítókábel használata esetén ellenőrizze, hogy
annak csatlakozási értékei megegyeznek-e a gőztisztítóéval. Adott esetben kérje a forgalmazó segítségét.
• Ellenőrizze, hogy a kábel nem jelent-e botlásveszélyt.
A kábelnek nem szabad sem megtörnie, sem becsípődnie.
1.2 Különleges személycsoportok
•
A jelen készüléket kezelhetik csökkent
fizikai, érzékszervi vagy mentális
képességű, ill. nem elégséges tapasz
talattal és/vagy tudással rendelkező
személyek, ha felügyelet alatt állnak
vagy eligazítást kaptak a készülék biz
tonságos használatára vonatkozóan,
és megértették az ebből eredő veszé
lyeket. Gyermekek nem játszhatnak a
készülékkel.
• A készüléket — annak bekapcsolt állapotában vagy
lehűlése során — gyermekektől távol kell tartani.
• Ne hagyja a gyermekeket a csomagolóanyaggal
(műanyag fóliával) játszani, mert fulladásveszély áll fenn.
1.3 A készülék kezelése
Vigyázat! Forró gőz! Forrázásveszély!
• Biztonsági okok miatt a gőztisztítóval ne tisztítson
elektromos készülékeket, például sütőkemencéket,
mikrohullámú készülékeket, hűtőszekrényeket, kapcsolókat és lámpákat.
• Rendszeresen ellenőrizze, hogy a készülék, a kábelek
és a tartozékok sérülésmentesek-e. A készülék vagy
a tartozékok sérülése esetén az(oka)t ne helyezze
üzembe.
• Soha ne irányítsa a gőztisztítót emberekre, állatokra
vagy növényekre (forrázásveszély)! Ne irányítsa a gőztisztítót elektromos berendezésekre vagy vezetékekre.
• Ne hagyja a készüléket felügyelet nélkül. A használat
után és a munkaterület elhagyását követően a készüléket mindig ki kell kapcsolni és a hálózati dugaszt ki
kell húzni a dugaszolóaljzatból.
• A készülék termosztáttal és hővédelemmel van felszerelve a túlmelegedés elleni védelem érdekében.
• A tartozékok a használat során forrók lesznek, ezért
azokat csere előtt hagyja lehűlni.
• Ne érintse meg a készüléken lévő forró felületeket.
A gőztisztító üzem közbeni felmelegedése normális
jelenség.
• Üzemeltetés során soha ne csavarja le a tartálysapkát. A tartály nyomás alatt áll.
• A készüléket az üzemeltetés során nem szabad
45°-nál nagyobb mértékben megdönteni.
• Soha ne merítse a készüléket vízbe vagy más folyadékba.
• A gőztisztító csak belső térben történő használatra és
csak háztartási célokra szolgál, iparszerű felhasználásra nem alkalmas.
• Soha ne tegye ki a készüléket különlegesen erős napsugárzásnak, fagynak vagy más időjárási befolyásnak (eső stb.).
• A készüléket csak olyan tárolókban / medencékben
használja, amelyek nincsenek megtöltve vízzel vagy
más folyadékkal.
• Ne üzemeltesse a készüléket üres víztartállyal. Mindig
időben töltsön utána vizet.
• Ürítse ki a víztartályt, ha a készüléket nem használja.
-
Soha ne töltsön vízen kívül mást a tartályba. Ne tegyen
•
a vízbe adalékanyagokat (például illatszert, folttisztítót
vagy alkoholtartalmú szereket), mivel ezek a készüléket
-
károsítják vagy annak használatát veszélyessé teszik.
Víz utántöltése esetén előbb mindig húzza ki a hálóza-
•
ti dugaszt a dugaszolóaljzatból, és hagyja a készüléket
teljesen lehűlni.
Ne töltse túl a tartályt. Ne lépje túl az előírt maximális
•
töltésmagasságot. Használja a mellékelt mérőpoharat
és tölcsért.
73
Page 74

•
Használat előtt ellenőrizze, hogy a víztartály zárósapkája
szorosan van-e felcsavarozva.
• A készüléket kizárólag a fogantyújánál szállítsa.
• A THOMAS VAPORO Buggy gőztisztítót ne használja
még testen hordott ruhadarabok kezeléséhez.
• Előfordulhat, hogy alkalmanként víz csöpög a fúvókából. Ez teljesen normális jelenség. Ilyenkor csupán
lecsapódó vízről (kondenzátum) van szó.
• A gőz ereje és hője néhány anyagra negatív hatással lehet. Először mindig ellenőrizze egy rejtett
helyen, hogy az adott felület alkalmas-e a készülékkel való kezelésre.
• A gőztisztító továbbadása esetén mellékelje a készülékhez jelen használati útmutatót.
1.4 Karbantartás és tisztítás
• Kizárólag a mellékelt eredeti tartozékokat használja.
• Soha ne javítsa maga a készüléken, tartozékokon
vagy a hálózati csatlakozó vezetéken észlelt hibákat.
A készüléket kizárólag az arra feljogosított vevőszolgálattal vizsgáltassa és javíttassa meg.
A készüléken eszközölt változtatások veszélyeztethetik az Ön egészségét. Ezért gondoskodjon arról,
hogy csak eredeti pótalkatrészeket és tartozékokat
használjanak.
• A tisztítás vagy karbantartás előtt mindig kapcsolja ki
a készüléket, húzza ki a hálózati dugaszt a dugaszolóaljzatból, és hagyja a gőztisztítót lehűlni.
2. Bevezetés
2.1 Köszönjük!
Gratulálunk Önnek a THOMAS VAPORO Buggy megvásárlásához. Az új gőztisztító számos tisztítási munkában
nyújt sokoldalú segítséget. Mostantól egyedül, gyorsan
és maradéktalanul távolíthatja el — magas hőmérséklet
alkalmazásával — a makacs szennyeződéseket sima felületekről (például fali és padlócsempékről, munkafelületekről, főzőeszközökről, ablakokról és tükrökről), miközben
a káros baktériumokat is elpusztítja. A készülék segítségével a lerakódásokat, penészt, zsírt, szappanmaradványokat, valamint szilárd és laza szennyeződéseket teljesen,
vegyi oldószerek használata nélkül, környezetkímélő
módon távolíthatja el.
A gőztisztító használatához sok örömöt kívánunk Önnek.
2.2 Kicsomagolás
Csomagolja ki a gőztisztítót és az összes tartozékot.
Ellenőrizze az összes szükséges rész meglétét. Lehetőség
szerint őrizze meg a dobozt és a belső csomagolást,
hogy a készülék későbbi szállítás vagy — szavatosság esetén — a visszaadás során védve legyen. Az összes már nem
használatos csomagolóanyagot szabályszerűen ártalmatlanítsa. Ha a kicsomagolás során a készüléken szállítási
sérülést állapít meg, haladéktalanul forduljon a forgalmazóhoz. A készüléket semmilyen körülmények között nem
szabad üzembe helyezni, ha tartós sérülésekkel rendelkezik.
2.3 Alkatrész-azonosítás
1 = tölcsér
2 = mérőpohár
3 = gőzpisztoly gőztömlővel és gőzcsatlakozással
4 = tartozékadapter
5 = pontsugárfúvóka
6 = kaparó
7 = műanyag kefe, kicsi
8 = műanyag kefe, nagy
9 = fémkefe
10 = ablakfúvóka
11 = ablakfúvóka tisztítókendője
12 = padlófúvóka
13 = padlófúvóka tisztítókendője
14 = 3 hosszabbítócső
15 = gőztisztító
74
Page 75

2.4 Ábrák: Gőztisztító és tartozékok
15
14
1
2
3
13 12 11 10 9 8
4
5
6
7
75
Page 76

3. Üzembe helyezés
3.1 Szerelés és tartozékok
A THOMAS VAPORO Buggy használata előtt a gőztömlőt a gőzpisztollyal együtt csatlakoztatni kell a készülékhez, és a szükséges tartozékot is fel kell szerelni.
A THOMAS VAPORO Buggy rendelkezik egy tartozékdobozzal, amelyben a tartozékadapter, a pontsugárfúvóka, a kaparó, a kis és nagy műanyag kefe, a fémkefe,
az ablakfúvóka és a tisztítókendők találhatók. A tartozékdoboz kinyitásához húzza felfelé a kék reteszelőfogantyút és billentse előrefelé a tartozékdoboz átlátszó
burkolatát (1. ábra).
1
Vegye ki a szükséges tartozékot, és zárja vissza a burkolatot. Tolja a burkolat reteszét a résbe, és nyomja
lefelé addig, hogy reteszelődjön.
3.1.3 Padlófúvóka (12+13)
A padlófúvóka — csomagolástechnikai okokból — külön
csatlatkozódarabbal rendelkezik. Állítsa össze a csatlakozódarabokat a jelzett módon (2. ábra).
2
Erősítse a padlófúvókát a hosszabbítócső végére. Ellenőrizze, hogy a fúvóka reteszelődött-e. A padlófúvóka
lemosható fal- és padlóburkolatok tisztítására kiválóan
alkalmas. Tisztítókendővel és anélkül is használható.
Ennek ellenére célszerű — az érzékeny felületek (például
fa vagy linóleum) bevonatainak védelmére — a tisztítókendőt
használni. Helyezze a padlófúvókát a tisztítókendő
közepére, nyomja a szorítók belső oldalát lefelé, helyezze be a túlnyúló tisztítókendőt és engedje el a szorítókat
(3. ábra). A padlófúvóka eltávolításához nyomja meg
a megfelelő kireteszelőgombot, és húzza ki a fúvókát
lefelé irányuló mozdulattal.
3
3.1.1 Gőztömlő (3)
Először a gőztömlőt csatlakoztassa a THOMAS VAPORO
Buggy elülső oldalán. Ehhez nyissa le a burkolaton lévő
ajtót, és nyomja be szorosan a gőztömlőn lévő csatlakozódarabot a csatlakozóba úgy, hogy az reteszelődjön.
A gőztömlő eltávolításához nyomja meg a csatlakozódarab bal és jobb oldalán lévő mindkét kireteszelőgombot, és húzza ki a gőztömlőt a gőzcsatlakozóból.
3.1.2 Hosszabbítócsövek (14)
A hosszabbítócsöveket akkor célszerű használni, ha
a gőztisztító padlók vagy nehezen hozzáférhető területek tisztítására szolgál. Ehhez csatlakoztassa a cső nyitott végét a gőzpisztolyra úgy, hogy a kireteszelőgomb
reteszelődjön. Szükség esetén csatlakoztasson két vagy
három csövet. A hosszabbítócső eltávolításához nyomja
meg a megfelelő kireteszelőgombot, és húzza ki a csöveket egymásból lefelé irányuló mozdulattal.
76
3.1.4 Tartozékadapter (4)
A gőztisztító számos tartozékfúvókával rendelkezik
különböző felületek lehetőleg hatékony és alapos tisztításához. Először a tartozékadaptert szerelje fel, amely
lehetővé teszi a tartozékfúvókák gőztömlőre való csatlakoztatását. A tartozékadapter a gőzpisztolyhoz és egy
vagy több hosszabbítócsőhöz is csatlakoztatható.
Ellenőrizze, hogy az adapter rögzítve és reteszelve van-e.
Az adapter eltávolításához nyomja meg a megfelelő kireteszelőgombot, és húzza szét a csöveket lefelé irányuló
mozgással.
Page 77

A tartozékadapter a pontsugárfúvókával, a kaparóval,
a kefés fúvókák egyikével vagy az ablakfúvókával használható. Tolja a kiválasztott fúvókát a tartozékadapterre
úgy, hogy mindkét nyíl egy vonalban egymás felé
mutasson, majd az óramutató járásával egyező irányú,
negyed fordulattal fordítsa el (4. ábra). A fúvóka levételéhez a fenti lépéseket fordított sorrendben hajtsa végre.
4
3.1.5 Pontsugárfúvóka (5)
Ezzel a fúvókával nehezen hozzáférhető területeket
(például sarkokat, fúgákat és szanitereket) tisztíthat
egyszerűen.
3.1.6 Kaparó (6)
A kaparóval makacs szennyeződéseket és tapétát távolíthat el könnyedén.
3.1.7 Műanyag kefék (7)
A műanyag kefék például zsalugáterek, fűtőtestek, szelepek nagyobb mértékű szennyeződéseinek tisztítására
alkalmasak.
3.1.8 Fémkefe (9)
A fémkefe kevésbé érzékeny anyagok (például rozsdamentes acél vagy kő) nagyobb mértékű szennyeződéseinek eltávolítására szolgál.
3.2 Víztartály feltöltése
A THOMAS VAPORO Buggy 1,6 l űrtartalmú beépített
víztartállyal van felszerelve. Kapcsolja ki a gőztisztítót,
és húzza ki a hálózati dugaszt a dugaszolóaljzatból.
A gőztisztítót a víz fel-, ill. utántöltése során mindig le
kell választani a hálózatról. Csavarja le a tartálysapkát
(5. ábra) úgy, hogy a sapkát lefelé nyomva egyidejűleg
az óramutató járásával ellentétesen elfordítja. A víztartály megtöltéséhez a mellékelt tölcsért és mérőpoharat
használja.
5
Csak tiszta vizet használjon, mindenféle adalékanyag
(például illatszer, folttisztító vagy alkoholtartalmú szerek)
nélkül, mivel ezek a készüléket károsítják vagy annak
használatát veszélyessé teszik. Célszerű desztillált vizet
használni, mert nagyon kemény víz (2,5 mmol/l vagy
21 °nk feletti értékek) esetén vízkőlerakódások keletkezhetnek. Ennek hiányában forralja fel a vizet a készülék
használata előtt — ezzel meghosszabbítja annak élettartamát.
Vigyázat: Ne lépje túl a tartály feltöltése
során az 1,6 l-es maximális töltésmenynyiséget.
Csavarja vissza szorosan a tartálysapkát úgy, hogy
lefelé nyomva egyidejűleg az óramutató járásával
egyezően elfordítja.
3.1.9 Ablakfúvóka (10+11)
Az ablakfúvóka nagy üvegfelületek (például ablaküvegek
tükör stb.) tisztítására a legalkalmasabb, akár a megfelelő tisztítókendővel (11) együtt.
Vigyázat: Hősokk esetén törésveszély
áll fenn! A gőztisztítás előtt melegítse
fel az üvegfelületeket úgy, hogy azokat
nagy ívben, 20–25 cm-es távolságból
gőzzel permetezze be. Fokozatosan
csökkentse a távolságot 10–15 cm-re
az üvegfelület további felmelegítéséhez.
Javaslat: A felmelegítési időt lerövidítheti
azáltal, hogy a tartály feltöltéséhez meleg
,
vizet használ.
77
Page 78

4. A készülék kezelése
4.1 Csatlakozás hálózati tápellátásra
Csatlakoztassa a gőztisztító hálózati dugaszát egy szabályosan elhelyezett dugaszolóaljzatba, és kapcsolja be
a készüléket a be-/kikapcsoló (6. ábra) megnyomásával.
6
Be/ki
Üzemeltetésvisszajelző
lámpa
Felfűtésvisszajelző
lámpa
Az üzemelést jelző narancsszínű lámpa (6. ábra) kigyullad és a gőztisztító megkezdi a felmelegítést. A készülék
az üzemi hőmérsékletet közelítőleg 11 perc múlva éri el;
ekkor kigyullad a zöld felfűtés-visszajelző lámpa. Mostantól a készülék üzemkész.
4.2 A gőztisztító kezelése
Figyelem: Soha ne irányítsa a gőzpisz-
toly gőzkiengedő nyílását emberekre,
állatokra, növényekre vagy elektromos
berendezésekre (például sütőkre vagy
dugaszolóaljzatokra). Forrázás vagy
áramütés veszélye áll fenn!
Reteszelje ki a reteszelőszerkezetet (gyermekbiztosítást)
úgy, hogy a gőzpisztoly jobb oldalán lévő háromszögletű csapot balra tolja (7. ábra). A gőzgomb működtetésekor forró gőz áramlik ki. A gőzpisztolyt tartsa először egy
rongy fölé, hogy az elején megjelenő permetvizet felfogja. Addig nyomja a gőzgombot, hogy a megjelenő gőz
egyenletes legyen. Ezt követően megkezdheti a tisztítást.
7
– Gőz alkalmazása a festett, ill. lakkozott fát fakíthatja.
– Gőz hatására fényes műanyagok elszíneződhetnek.
– Az akril, selyem és len különösen érzékenyen reagál
a gőz hőmérsékletére.
– Ne használja a gőztisztítót (akril) Dralon-szálat tartal-
mazó anyagokra anélkül, hogy előtte tesztelte volna
a gőz hatását egy rejtett helyen.
A gyártó — belátható okokból — nem tehető felelőssé
tárgyak, anyagok, emberek, állatok vagy növények forró
gőz nem megfelelő felhasználásából vagy a készülék
szakszerűtlen használatából eredő sérüléseiért.
A gőz kikapcsolását követően néhány másodpercig
még van gőzkiáramlás.
Ne irányítsa a gőzkiengedő nyílást hosszabb ideig egy
helyre. A szennyeződés oldásához a gőzsugarat oda-viszsza mozgassa. A kiáramló gőz mennyisége a gőzszabályozó forgatásával, a szennyezettség mértékéhez igazítva
állítható be. A gőzszabályozó óramutató járásával egyező irányú forgatásával kevesebb, míg ellenkező irányú
forgatásával több gőz engedhető ki (8. ábra).
8
A készüléket az üzemeltetés során nem szabad 45°-nál
nagyobb mértékben megdönteni vagy megbillenteni, és
biztosítsa azt is, hogy a készülék mindig szilárd talajon
álljon. Egy feltöltött tartály legfeljebb 50 perces alkalmazásra elegendő. Ne hagyja a bekapcsolt készüléket felügyelet nélkül, és a gőzgomb biztosításához használja
a gyermekbiztosítót. Ehhez tolja a gőzpisztoly bal oldalán lévő háromszögletű csapot jobbra.
Vigyázat: A gőztisztítót először mindig
a tisztítandó felületek vagy anyagok
feltűnésmentes, ill. nem látható helyein
tesztelje, ellenőrizendő, hogy azok
kitehetők-e forró gőz hatásának.
78
Figyelem: A burkolat és a tartozék alkatrészek az üzemeltetés során felforrósodnak. A tartozék alkatrészek cseréje és
a víz utántöltése előtt hagyja a készüléket lehűlni. Soha ne nyissa ki a tartálysapkát, ha a gőztisztító be van kapcsolva, mert a tartály nyomás alatt van.
A THOMAS VAPORO Buggy túlmelegedés elleni
védelemre szolgáló biztosítással van ellátva. A készülék
automatikusan kikapcsol, ha a 180 °C hőmérsékletet
eléri. Ezzel elkerülhető a túlmelegedés. Ilyen esetben
haladéktalanul válassza le a készüléket a hálózatról
a dugasz kihúzásával. A készülék 30 perces lehűlési
időszakot követően újból üzembe helyezhető.
Page 79

4.3 Víz utántöltése
Ha a kiáramló gőz mennyisége csökken, akkor a tartályt
újból fel kell tölteni.
Kapcsolja ki a gőztisztítót a be-/kikapcsoló megnyomásával. Az üzemelést jelző narancsszínű lámpa kialszik.
A maradék nyomás kiengedéséhez nyomja meg a gőzpisztolyon lévő gőzgombot. Ezt követően reteszelje a gőzpisztolyt. Húzza ki a hálózati dugaszt a dugaszolóaljzatból, és
hagyja a készüléket lehűlni. Ügyeljen arra, hogy a tartályban lévő víz 5 perc múlva is még mindig forró. Nyissa ki
a tartálysapkát úgy, hogy a sapkát lefelé nyomva egyidejűleg az óramutató járásával ellentétesen elfordítja.
Figyelem: A nyitásnál forró gőz áramolhat ki. A zárósapka és a tartály menete
miatt égési sérülés veszélye áll fenn.
Töltse meg a tartályt a mérőpohár és a tölcsér segítségével (lásd: 3.2 Víztartály feltöltése), és zárja vissza a tartálysapkát. A gőztisztító most már újból csatlakoztatható
a hálózathoz, és ismét bekapcsolható. A THOMAS
VAPORO Buggy üzemkész, amint a felfűtés-visszajelző
lámpa kigyullad.
4.4 Üzemen kívül helyezés és tárolás
Kapcsolja ki a készüléket. Az üzemelést jelző narancszszínű lámpa kialszik. A maradék nyomás kiengedéséhez
nyomja meg a gőzpisztolyon lévő gőzgombot. Biztosítsa a gőzpisztolyt úgy, hogy a fogantyú bal oldalán
lévő reteszelőcsapot jobbra tolja. Húzza ki a hálózati
dugaszt a dugaszolóaljzatból, és hagyja a készüléket
lehűlni. Ürítse ki a víztartályt a tartályban való lerakódásokat elkerülendő.
A víztartályt csak akkor zárja be, ha már teljesen kiszáradt. A gőztisztítónak a betárolás előtt teljesen le kell
hűlnie. A készüléket gyermekek által elérhetetlen helyen
tárolja. A hosszabbítócső a padlófúvókával együtt
a tároláshoz vagy rövid üzemszünetek esetén a készülék hátoldalán lévő tartóba helyezhető.
A csatlakozókábel a hosszabbítócsövön lévő két kampó
(9. ábra) köré tekerhető. Ha mindkét kampó azonos irányba néz, akkor a nyilakkal ellátott kampó megfordítható.
9
5. Általános szempontok
5.1 Tisztítás és karbantartás
Figyelem: A gőztisztító tisztítása vagy
karbantartása előtt biztosítsa, hogy
a készülék ki legyen kapcsolva és
a hálózatról le legyen választva.
A készülék tisztításához csak enyhén megnedvesített
kendővel simítsa át a burkolatot. Ne használjon tisztítószert, súrolószert vagy alkoholtartalmú szert, mert azok
a burkolatot megsérthetik.
Ha a csapvíz keménysége 1,8 mmol/l (10 °nk) értéknél
nagyobb, akkor célszerű a tartályt legkésőbb öt feltöltés
után kiöblíteni. A helyi vízkeménységről a szolgáltató
vízmű nyújt felvilágosítást. A tisztításhoz célszerű a tartályba vizet önteni és azt erőteljesen rázni. Ez feloldja
a gőztisztító alján lévő vízkőlerakódásokat. Ezt követően öntse ki a vizet, és a bezárás előtt hagyja teljesen
kiszáradni a tartályt.
A gőztisztító élettartamának meghosszabbítása érdekében
átlagosan 6 havonta kezelje a víztartályt vízkőoldóval.
Helyezzen egy vagy legfeljebb két vízkőoldó rudat 1 l
meleg vízbe (50 °C), és töltse meg azzal a víztartályt.
Hagyja az oldatot mintegy 30 percig pihenni, majd
öntse ki a vizet a feloldott lerakódásokkal együtt. Szükség esetén ismételje meg az eljárást, és végül öblítse ki
a víztartályt.
5.2 Ártalmatlanítás
Élettartama végén a készüléket a vonatkozó
törvényeknek megfelelően ártalmatlanítani
kell. A készülék nem városi hulladék.
A terméken vagy annak csomagolásán lévő jel arra utal,
hogy a termék nem szokásos háztartási hulladékként
kezelendő, hanem elektromos és elektronikus készülékek
újrahasznosítására szolgáló gyűjtőhelyen kell leadni.
79
Page 80

GB
A termék megfelelő ártalmatlanításával Ön is hozzájárul
a környezet és embertársai egészségének védelméhez.
A készülék nem megfelelő ártalmatlanítása veszélyezteti
a környezetet és az egészséget.
A termék újrahasznosítására vonatkozó további információkkal az önkormányzat, a hulladékszállító vagy
az árusító szaküzlet szolgál.
5.3 Hibamegszüntetés
Mielőtt a gőztisztítót a THOMAS-vevőszolgálatnak elküldené, előbb ellenőrizze, hogy a hibát a lista alapján önerőből
is meg tudja-e szüntetni.
Hiba Lehetséges ok Megoldás
Az üzemeltetés-visszajelző lámpa nem világít.
A készülék nincs csatlakoztatva dugaszolóaljzatba vagy nincs bekapcsolva.
A dugasz meghibásodott.
A hálózati kábel megsérült.
A készüléket — jelen szakasz útmutatása szerint — nem
ártalmatlanító személy az érvényes törvényeknek megfelelően lesz felelősségre vonva. A készülék csomagolását
célszerű legalább a garanciális idő végéig megőrizni.
Dugja be a hálózati dugaszt egy dugaszolóaljzatba, vagy kapcsolja be a készüléket.
Ellenőrizze a dugaszolóaljzatot úgy, hogy
kihúzza a gőztisztító hálózati dugaszát
és egy másik készülék hálózati dugaszát
dugja be.
Cseréltesse ki a kábelt a THOMASvevőszolgálattal.
A gőzgomb működtetésekor nem jön ki gőz.
Csak nagyon kis menynyiségű gőz áramlik ki.
A készülék sok időt
igényel a felfűtéshez.
5.4 Műszaki adatok
Készüléktípus: Gőztisztító
Modell: THOMAS VAPORO Buggy
Tápfeszültség: 220–240 V ~ 50/60 Hz
Névleges
teljesítményfelvétel: 1500 W
Gőznyomás: max. 3,5 bar
Megengedett nyomás: 5 bar
Víztartály
befogadóképessége: Max. 1,6 l
Gőzmennyiség: Max. 50 perc/tartálytöltés
A gőzgombot a gyermekbiztosítás reteszeli.
A víztartály üres.
A gőzszabályozó a legkisebb
gőzmennyiségre van beállítva.
A tartályban lerakódások vannak. Vízkőmentesítse a víztartályt
Tolja a gőzpisztoly jobb oldalán lévő
háromszögletű csapot balra.
Töltsön utána vizet
(lásd: 4.3 Víz utántöltése).
Forgassa a gőzszabályozót az óramutató
járásával ellentétes irányba addig, hogy
elegendő gőz áramoljon ki.
(lásd: 5.1 Tisztítás és karbantartás).
Felfűtésidő: kb. 11 perc
Gőzáram: max. 40 g/perc
Zajkibocsátás: 30 dB(A) használat során
Készülékméretek: 305 x 397 x 235 mm
Tömeg: Készülék tartozékok
A műszaki változtatás joga fenntartva.
(sz x h x m)
nélkül 4,5 kg
IP X4
80
Page 81

6. Garancia
A forgalmazó vételi szerződésből eredő szavatossági
kötelezettségeitől függetlenül a készülékre a következő
feltételeknek megfelelően nyújtunk garanciát:
1. A garanciaidő 24 hónap, az első fogyasztóhoz
történő kiszállítási naptól kezdődően. Ez iparszerű
használat vagy azzal egyenértékű igénybe vétel esetén 12 hónapra csökken. A szavatossági igény érvényesítéséhez be kell nyújtani a vásárlási bizonylatot.
2. A garanciaidő alatt minden — bizonyíthatóan hibás
kivitelre vagy anyaghibára visszavezethető — lényeges működési hiányosságot megszüntetünk a hibás
alkatrészek saját döntés alapján történő megjavításával vagy cseréjével; a kicserélt alkatrészek saját
tulajdonunkba mennek át. A garancia nem terjed
ki könnyen törhető alkatrészekre, mint például üveg,
műanyagok, lámpák. A hibákat a garanciaidőn belül
a megállapítást követően haladéktalanul jelenteni
kell felénk. A garanciaidő alatt a fellépő működési
hibák megszüntetéséhez szükséges pótalkatrészek,
valamint a felmerülő munkaidő költségei nem lesznek
felszámítva. A vevőszolgálat jogosulatlan igénybe
vétele esetén az ezzel kapcsolatos költségek a vevőt
terhelik. A vevőnél vagy a felállítási helyen történő
javítási munkák csak nagykészülékeknél követelhetők meg. Minden más készüléket a legközelebbi
vevőszolgálati helyen vagy szerződéses műhelyben
kell átadni, ill. a gyárba kell visszaküldeni.
3. A garanciakötelezettség nem vonatkozik a készülék
értékére és használhatóságára csekély hatással lévő
kis mértékű eltérésekre, a víz vegyi és elektrokémiai
hatásaiból eredő károkra, valamint általánosan a normálistól eltérő környezeti feltételekre. Nem áll fenn
garanciaigény normális elhasználódásból következő
károknál, továbbá a használati útmutató figyelmen
kívül hagyása vagy szakszerűtlen felhasználás esetén.
4. A garanciaigény érvényét veszti, ha a készüléken
nem általunk meghatalmazott személyek végeznek
beavatkozást vagy javítást.
5. A garanciaszolgáltatások sem a készülék, sem
a beépített pótalkatrészek vonatkozásában nem
jelentik a garanciaidő lejártának meghosszabbítását
vagy megújítását: a beépített pótalkatrészek garanciaideje a teljes készülékre érvényes garanciaidővel
egyezően jár le.
6. Minden további vagy egyéb, különösen a készüléken
kívül eső károk megtérítésére vonatkozó igény – amenynyiben
erre nincs törvényi kötelezettség – ki van zárva.
Vevőszolgálatunk a garanciaidő lejártát követően is
vevőink rendelkezésére áll. Ezzel kapcsolatban forduljon a forgalmazóhoz vagy közvetlenül saját vevőszolgálati osztályunkhoz.
81
Page 82

İçindekiler Sayfa
1. Önemli Güvenlik Talimatları .........................................................83/84
1.1 Gerilim Beslemesi ......................................................................... 83
1.2 Özel İnsan Grupları ....................................................................... 83
1.3 Cihazın Kullanılması ....................................................................83/84
1.4 Bakım ve Temizlik .........................................................................84
2. Giriş
2.1 Teşekkürler ..............................................................................84
2.2 Cihazın Ambalajının Açılması ................................................................ 84
2.3 Parça Tanımlaması ........................................................................84
2.4 Şekiller: Buharlı Temizleyici ve Aksesuarlar ..................................................... 85
3. Devreye Alma
3.1 Aksesuar Parçalarının Takılması ..............................................................86
3.1.1 Buhar Hortumu ......................................................................86
3.1.2 Uzatma Boruları . . . . . . . . . . . . . . . . . . . . . . . . . . . . . . . . . . . . . . . . . . . . . . . . . . . . . . . . . . . . . . . . . . . . . 86
3.1.3 Zemin Başlığı .......................................................................86
3.1.4 Aksesuar Adaptörü ................................................................86/87
3.1.5 Nokta Püskürtme Başlığı ............................................................... 87
3.1.6 Kazıyıcı ............................................................................87
3.1.7 Naylon Fırçalar .....................................................................87
3.1.8 Metal Fırçalar ....................................................................... 87
3.1.9 Pencere Başlığı ...................................................................... 87
3.2 Su Tankının Doldurulması ................................................................... 87
4. Cihazın Kullanılması
4.1 Şebeke Beslemesine Bağlanması .............................................................88
4.2 Buharlı Temizleyicinin Kullanılması ........................................................88/89
4.3 Su Doldurulması ..........................................................................89
4.4 Kapatılması ve Saklanması .................................................................89
TR
5. Genel Bilgiler
5.1 Temizlik ve Bakım .........................................................................89
5.2 Bertaraf . . . . . . . . . . . . . . . . . . . . . . . . . . . . . . . . . . . . . . . . . . . . . . . . . . . . . . . . . . . . . . . . . . . . . . . . . . . . . . 89/90
5.3 Hata Giderme ...........................................................................90
5.4 Teknik Bilgiler ............................................................................90
6. Garanti ................................................................................ 91
Uyarı: Bu bilgi kullanıcı için oluşabilecek tehlikelere işaret etmektedir.
Dikkat: Bu bilgi cihaz ve nesneler için oluşabilecek tehlikelere işaret etmektedir.
82
Page 83

1. Önemli Güvenlik
Uyarıları
1.3 Cihazın Kullanılması
1.1 Gerilim Beslemesi
• Buharlı temizleyiciyi elektrik şebekesine bağlamadan
önce, tip plakasındaki gerilim değerinin prizinizdeki
mevcut gerilimle aynı olmasına dikkat edin.
• Bu cihazı sadece doğru bir şekilde topraklanmış olan
bir prize takın.
• Cihazın fişi prize uygun olmalıdır. Fiş üzerinde herhangi bir değişiklik yapılmamalıdır. Bir koruyucu iletkenle
donatılmış olan cihazlarda şebeke adaptörü kullanmayın. Üzerinde değişiklik yapılmayan fişler ve uygun
prizler elektrik şoku rizikosunu azaltır.
• Bu cihazın sadece bir kaçak akım koruma şalteri olan
prizlerde kullanılması önerilmektedir. Gerektiğinde bir
elektrikçiye danışınız.
• Elleriniz ıslak ise, kesinlikle şebe fişine dokunmayınız.
• Cihazı elektrik şebekesinden ayırmak için, daima
şebeke fişini prizden çekiniz. Asla kablodan tutarak
çekmeyiniz.
• Hasar gören bir bağlantı kablosu sadece aynı bağlantı değerlerine sahip bir kablo ile değiştirilmelidir.
Onarılması gereken cihazı THOMAS müşteri hizmetlerine gönderiniz.
• Bir uzatma kablosu kullanıldığında, bu kablonun bağlantı değerlerinin buharlı temizleyici ile aynı olduğundan
emin olun. Gerektiğinde bir uzman satıcıya danışınız.
• Kablonun takılarak düşme tehlikesi oluşturmayacağından emin olun. Kablo bükülmemeli ve sıkışmamalıdır.
1.2 Özel İnsan Grupları
•
Bu cihaz fiziksel, duyumsal veya zihinsel bakımdan becerileri ya da tecrübe
ve/veya bilgileri yetersiz olan kişiler
tarafından, gözetim altında olmaları
veya cihazın güvenli kullanımı konu
sunda bilgilendirilmiş olmaları ve
cihazın kullanımından kaynaklanan
tehlikeleri anlamış olmaları halinde
kullanılabilir. Çocukların cihazla
oynamaları yasaktır.
• Cihaz kapatıldığında veya soğurken çocuklardan
uzak tutunuz.
• Çocukların ambalaj malzemesi (plastik folyo) ile
oynamalarına izin vermeyiniz. Boğulma tehlikesi
mevcuttur.
Dikkat! Sıcak buhar! Haşlanma tehlikesi!
• Bir güvenlik gereği olarak, fırınlar, mikro dalga cihazlar, buz dolapları, şalter ve lambalar gibi elektrikli
cihazları buharlı temizleyici ile temizlemeyiniz.
• Cihazda, kabloda ve aksesuar parçalarında düzenli
olarak hasar kontrolü yapınız. Hasarlı cihazları veya
aksesuar parçalarını çalıştırmayınız.
• Buharlı temizleyiciyi kesinlikle insanlara, hayvanlara
ve bitkilere doğru tutmayınız (haşlanma tehlikesi)!
Buharlı temizleyiciyi elektrikli donanımlara veya kablolara doğru tutmayınız.
• Çalışan cihazı daima gözetleyiniz. Cihaz kullanıldıktan ve çalışma alanından ayrıldıktan sonra daima
kapatılmalı ve şebeke fişi prizden çekilmelidir.
• Cihaz bir termostat ve ısıl sigorta ile fazla ısınmaya
karşı korunmaktadır.
• Aksesuar parçaları kullanıldıklarında çok ısınırlar,
değiştirmeden önce soğumalarını bekleyiniz.
• Cihazdaki sıcak parçalara dokunmayınız. Buharlı
ısıtıcının çalışırken ısınması normaldir.
• Çalışırken tankın kapağını kesinlikle açmayınız.
Tank basınç altındadır.
• Çalışmakta olan cihaz en fazla 45° eğilmelidir.
• Cihazı suya veya başka sıvılara batırmayınız.
• Buharlı temizleyici sadece iç mekanlarda ve evlerde
kullanmak için tasarlanmıştır, ticari kullanıma uygun
değildir.
• Cihazı kesinlikle aşırı güneş ışınlarına, donma tehlikesine veya başka hava koşullarına (yağmur vb.) maruz
bırakmayınız.
• Bu cihazı sadece su veya başka sıvı ile dolu olmayan
kaplarda/lavabolarda kullanınız.
• Cihazı su tankı boş olarak çalıştırmayınız.
Daima zamanında su ilave ediniz.
• Cihaz kullanılmadığında su tankını boşaltınız.
• Tanka sudan başka bir şey doldurmayınız. Suya katkı
maddeleri (örneğin, parfüm, leke çıkartıcı veya alkol
içeren maddeler) karıştırmayınız, cihaz hasar görebilir veya kullanılması tehlike oluşturabilir.
• Su doldurmadan önce, şebeke fişini prizden çıkartıp
cihazın tamamen soğumasını bekleyiniz.
• Tankı çok fazla doldurmayınız. Öngörülen maksimum
dolum yüksekliğini geçmeyiniz. Teslimat içeriğine
dahil olan ölçekli kabı ve huniyi kullanınız.
• Kullanmadan önce, su tankının kapağının iyice sıkıldığından emin olunuz.
• Cihazı tutamağından tutarak taşımayınız.
• THOMAS VAPORO Buggy'yi üzerinizde olan giysileri
temizlemek için kullanmayınız.
83
Page 84

• Başlıktan arada sırada su damlayabilir. Bu tamamen
normal bir durumdur. Bu sadece yoğuşma suyudur.
• Buhar gücü ve ısısı bazı malzemeleri olumsuz olarak
etkileyebilir. Bir yüzeyi temizlemeden önce, görünmeyen bir yerde önce deneme yaparak yüzeyin bu cihazla
temizlemeye uygun olup olmadığını tespit ediniz.
• Buharlı temizleyiciyi başkalarına verdiğinizde,
bu kullanım kılavuzunu da birlikte veriniz.
1.4 Bakım ve Temizlik
• Sadece teslimat kapsamına dahil olan orijinal
aksesuarları kullanınız.
• Cihazda, aksesuarda veya elektrik kablosunda hasarları kesinlikle kendiniz onarmayın. Cihazın sadece
yetkili bir müşteri servisinde kontrol edilmesini ve onarılmasını sağlayın.
Cihazda yapılan modifikasyonlar sağlığınıza zarar
verebilir. Sadece orijinal yedek parça ve aksesuarların kullanılmalarını sağlayın.
• Temizlenecek veya servisi yapılacak olan cihazı daima
kapatın, şebeke fişini çıkartın ve soğumasını bekleyiniz.
2. Giriş
2.1 Teşekkürler
THOMAS VAPORO Buggy temizleyiciyi satın aldığınız
için sizi tebrik ederiz. Yeni buharlı temizleyiciniz çok
sayıda temizlik görevi için çok yönlü bir yardımcıdır.
Şimdi artık sadece yüksek ısı kullanarak çıkartılması zor
olan pislikleri, duvarlar, zemin fayansları, çalışma yüzeyleri, mutfak gereçleri, camlar ve aynalar gibi düz yüzeylerden hızlı bir şekilde tamamen temizleyebilir ve zararlı
bakterileri öldürebilirsiniz. Bu sayede, tortular, küf ve pislikler tamamen ve herhangi bir kimyasal madde kullanılmadan çevre dostu olarak temizlenebilir.
Güle güle kullanınız.
2.2 Cihazın Ambalajının Açılması
Buharlı temizleyiciyi ve tüm aksesuar parçalarını ambalajlarından çıkartınız. İçeriğinin tam olduğunu kontrol
ediniz. Eğer mümkünse, cihazın taşıma esnasında veya
bir garanti durumunda iadesinde korunması için kartonları ve iç ambalajları saklayınız. Artık kullanılmayan
ambalaj malzemelerini kurallara uygun olarak atık
toplamaya veriniz. Açılan ambalajda nakliye hasarları
tespit ettiğinizde, derhal satıcınıza müracaat ediniz.
Sürekli hasarlı olan cihaz kesinlikle çalıştırılmamalıdır.
2.3 Parça Tanımlaması
1 = Huni
2 = Ölçekli kap
3 = Buhar hortumlu ve buhar bağlantılı buhar tabancası
4 = Aksesuar adaptörü
5 = Nokta püskürtme başlığı
6 = Kazıyıcı
7 = Naylon fırça, küçük
8 = Naylon fırça, büyük
9 = Metal fırça
10 = Pencere başlığı
11 = Pencere başlığı için temizleme bezi
12 = Zemin başlığı
13 = Zemin başlığı için temizleme bezi
14 = 3 uzatma borusu
15 = Buharlı temizleyici
84
Page 85

2.4 Şekiller: Buharlı Temizleyici ve Aksesuarlar
15
14
1
2
3
13 12 11 10 9 8
4
5
6
7
85
Page 86

3. Devreye Alma
3.1 Aksesuar Parçalarının Takılması
THOMAS VAPORO Buggy kullanılmadan önce, buhar
hortumu buhar tabancası ile cihaza bağlanmalı ve istenen aksesuar parçaları takılmalıdır. THOMAS VAPORO
Buggy bir aksesuar kutusuna sahiptir ve bu kutu içinde
aksesuar adaptörü, nokta püskürtme başlığı, kazıyıcı,
küçük naylon fırça, büyük naylon fırça, metal fırça, pencere başlığı ve temizlik bezleri bulunur. Aksesuar kutusunu açmak için mavi kilitleme mandalını yukarıya doğru
çekin ve aksesuar kutusunun saydam kapağını öne
doğru katlayın (Şekil 1).
1
Gerekli olan aksesuar parçasını alıp kapağı yeniden
kapatın. Kapağın sürgüsünü yuvasına itin ve yerine
oturana kadar aşağıya bastırın.
3.1.1 Buhar Hortumu (3)
Buhar hortumunu önce THOMAS VAPORO Buggy'nin
ön tarafındaki buhar bağlantısına bağlayın. Bunun için
gövde kapağını aşağıya doğru katlayın ve buhar hortumundaki bağlantı parçasını, yerine oturana kadar, sıkıca
bağlantıya bastırın.
Buhar hortumunu çıkartmak için, bağlantı parçasının
sağında ve solunda bulunan her iki kilit açma düğmesine
basın ve hortumu buhar bağlantısından dışarıya çekin.
3.1.3 Zemin Başlığı (12+13)
Zemin başlığı bir ambalajlama gereği olarak ayrı bir
bağlantı parçası ile birlikte teslim edilir. Bağlantı parçalarını şekilde gösterildiği gibi birleştirin (Şekil 2).
2
Uzatma borusunun ucuna zemin başlığını takın. Başlığın
yerine oturduğundan emin olun. Zemin başlığı yıkanabilen duvar ve zemin kaplamaları için çok uygundur. Hem
temizleme bezi ile hem de temizleme bezi olmadan kullanılabilir. Fakat, hassas kaplama yüzeylerinin (örneğin,
ahşap veya linolyum) korunması için temizleme bezinin
kullanılması önerilir. Zemin başlığını temizleme bezinin
ortasına yerleştirin, mandalların iç taraflarını aşağıya
bastırın, bezin artan taraflarını yukarıya katlayın ve mandalları bırakın (Şekil 3). Zemin başlığını çıkartmak için,
ilgili kilit açma düğmesine basın ve başlığı aşağıya
doğru çıkartın.
3
3.1.2 Uzatma Boruları (14)
Buharlı temizleyici erişilmesi zor olan yerlerde kullanılacak ise, uzatma borularını takın. Bunun için borunun
açık ucunu, kilit açma düğmesi yerine oturana kadar,
buhar tabancasına takın. Gerektiğinde iki veya her üç
uzatma borusunu da takın. Uzatma borusunu çıkartmak
için, ilgili kilit açma düğmesine basın ve boruları aşağıya doğru birbirinden çıkartın.
86
3.1.4 Aksesuar Adaptörü (4)
Buharlı temizleyici çok sayıda farklı başlığa sahiptir ve
bu sayede farklı yüzeyler mümkün olan en etkin bir şekilde temizlenebilir. Başlıkların buhar hortumuna takılabilmesi için, önce aksesuar adaptörünü takın. Aksesuar
adaptörü buhar tabancasına hem de bir veya birden
fazla uzatma borusuna takılabilir.
Adaptörün takıldığından ve yerine oturduğundan emin
olun. İlgili kilit açma düğmesine basın ve adaptörü tekrar çıkartmak için boruları aşağıya doğru çekerek birbirlerinden ayırın.
Page 87

Aksesuar adaptörü nokta püskürtme fırçası, kazıyıcı,
fırça başlıklarından biri veya pencere başlığı ile kullanılabilir. Seçilen başlığı, her iki ok aynı çizgi üzerinde birbirlerine bakacak şekilde aksesuar adaptörüne sürün ve
saat yönünde çeyrek tur döndürerek sıkın (Şekil 4). Başlığı çıkartmak için, burada açıklanan adımları ters sırada
yerine getirin.
4
3.2 Su Tankının Doldurulması
THOMAS VAPORO Buggy hacmi 1,6 l olan bir su tankı
ile donatılmıştır. Buharlı temizleyiciyi kapatın ve şebeke
fişini prizden çıkartın. Buharlı temizleyiciye su doldururken veya ilave ederken daima şebekeden ayrılmalıdır.
Tankın tapasını (Şekil 5) aşağıya doğru bastırıp aynı
zamanda saatin tersi yönde döndürerek açın. Su tankını
doldurmak için teslimat kapsamında bulunan huniyi ve
ölçekli kabı kullanınız.
5
3.1.5 Nokta Püskürtme Başlığı (5)
Bu başlık ile, erişilmesi zor olan köşeler, derzler
ve tuvaletler kolayca temizlenebilir.
3.1.6 Kazıyıcı (6)
Kazıyıcı ile sert pislikler ve duvar kağıtları kolayca
temizlenebilir.
3.1.7 Naylon Fırçalar (7/8)
Jaluzilerde, radyatörlerde, vanalarda bulunan aşırı
kirlenmeleri temizlemek için kullanılır.
3.1.8 Metal Fırça (9)
Metal fırça fazla hassas olmayan paslanmaz çelik
veya taş gibi malzemeler için öngörülmüştür.
3.1.9 Pencere Başlığı (10+11)
Büyük cam yüzeyleri (örneğin pencereler, aynalar vb.)
temizlemek için, isteğe bağlı olarak ilgili temizleme
bezi (11) ile.
Parfüm, temizlik maddesi, alkol gibi katkı maddeleri
cihazda hasar yapıp kullanılmasını tehlikeli duruma getirebileceği için kullanmadan sadece temiz su doldurun.
Çok sert sularda (sertlik derecesi 2,5 mmol/l veya
21°dH) kireç tortuları oluşmaması için, sadece damıtılmış su kullanılmalıdır. Cihazın kullanım ömrünü uzatmak
için, gerektiğinde suyu kullanmadan önce kaynatın.
Dikkat: Tankı maksimum dolum seviyesi
olan 1,6 litreden daha fazla doldurmayın.
Tankın tapasını aşağıya bastırıp saat yönünde döndürerek yeniden kapatın.
İpucu: Tanka sıcak su doldurulduğunda suyun
ısınma süresi daha da kısalır.
Dikkat: Bir ısı şokunda camın kırılma
tehlikesi vardır! Cam yüzeyleri buharla
temizlemeden önce, yaklaşık 20-25 cm
mesafeden buhar püskürterek ısıtın.
Bu mesafeyi aşamalı olarak 10-15 cm'ye
kadar azaltarak, cam yüzeyi biraz
daha ısıtın.
87
Page 88

4. Cihazın Kullanılması
4.1 Şebeke Beslemesine Bağlanması
Buharlı temizleyicinin şebeke fişini hatasız bir prize takın
ve aç-kapat anahtarına basarak cihazı çalıştırın (Şekil 6).
6
Aç/Kapat
Çalışma kontrol
lambası
Isıtma kontrol
lambası
Turuncu renkli çalışma lambası (Şekil 6) yanar ve buharlı temizleyici ısınmaya başlar. Yaklaşık 11 dakika sonra
çalışma sıcaklığına erişilir ve yeşil ısınma kontrolü lambası yanar. Cihaz artık çalışmaya hazırdır.
4.2 Buharlı Temizleyicinin Kullanılması
Uyarı: Buhar tabancasının buhar çıkışını
kesinlikle insanlara, hayvanlara veya
elektrikli donanımlara (fırın veya priz)
doğru tutmayın. Haşlanma veya elektrik
şoku tehlikesi mevcuttur!
Buhar tabancasının sağ tarafındaki üçgen pimi (Şekil 7)
sola doğru sürerek kilitleme tertibatını (çocuk emniyeti)
açın. buhar tuşuna basıldığında, sıcak buhar çıkar. Başlangıçta dışarıya çıkan püskürtme suyunu almak için eski
bir kumaş parçası kullanın. Buhar dışarıya homojen bir
şekilde çıkana kadar buhar tuşuna basın. Daha sonra
da temizliğe başlayabilirsiniz.
7
– Buhar kullanıldığında, boyanmış/verniklenmiş bir
ahşabın rengi beyazlaşır.
– Buhar parlak plastiğin rengini açabilir.
– Akrilik, kadife ve keten buhar ısısına karşı çok hassastır.
– Buharlı temizleyiciyi Dralon liflerde kullanmadan
önce, malzemeyi görünmeyen bir yerinde test edin.
Sıcak buhar veya yanlış kullanım sonucu nesnelerde,
malzemelerde, insanlarda, hayvanlarda veya bitkilerde
hasar oluşmasından üretici sorumlu tutulamaz.
Buhar işlevi kapatıldıktan bir iki saniye sonra da dışarıya
buhar çıkabilir.
Buhar çıkışını uzun bir süre devamlı aynı yere tutmayınız.
Kirleri çözmek için buhar huzmesini ileri geri hareket ettirin. Çıkan buhar hızı buhar düzenleyiciyi döndürerek
ayarlanabilir ve kirlenme derecesine uygun duruma getirilebilir. Daha az buhar için buhar miktarı ayarlayıcıyı
saat yönünde, daha fazla buhar için de saatin tersi
yönde çevirin (Şekil 8).
8
Çalışmakta olan cihazı aşağıya doğru en fazla 45°
eğin ve cihazın daima sabit bir altlık üzerinde durduğundan emin olun. Dolu bir tank maksimum 50 dakikalık
uygulama için yeterlidir. Çalışmakta olan cihazı daima
gözetim altında bulundurun ve gerektiğinde buhar tuşunu
kilitlemek için çocuk emniyetini kullanınız. Bunun için
buhar tabancasının sol tarafındaki üçgen pimi sağa
doğru sürün.
Dikkat: Temizlemek için sıcak buhar kullanıp kullanamayacağınızı tespit etmek
için buharlı temizleyiciyi önce temizlenecek yüzeyin görünmeyen bir yerine
buhar püskürtün.
88
Uyarı: Gövde ve aksesuar parçaları
çalışma esnasında çok ısınır. Aksesuar
parçalarını değiştirmeden veya su doldurmadan önce cihazın soğumasını bekleyiniz. Tank basınç altında olduğundan,
buharlı temizleyici açık durumda iken,
tankın tapasını kesinlikle açmayınız.
THOMAS VAPORO Buggy aşırı ısınmaya karşı bir sigorta
ile donatılmıştır. Sıcaklık 180°C'ye erişir erişmez cihaz
kapanır. Bu sayede cihazın çok fazla ısınması önlenir.
Bu durumda cihazın fişini çekerek derhal şebekeden
ayırın. Cihaz 30 dakikalık bir soğuma süresinden sonra
yeniden çalıştırılabilir.
Page 89

4.3 Su Doldurulması
Dışarıya çıkan buhar miktarı azaldığında, tankın
yeniden doldurulması gerekir.
Buharlı temizleyiciyi Aç/Kapat düğmesine basarak
kapatın. Turuncu renkli çalışma kontrol lambası söner.
Kalan basıncı atmak için buhar tabancasındaki buhar
tuşuna basın. Daha sonra da buhar tabancasını kilitleyin. Şebeke fişini prizden çıkartıp cihazın soğumasını
bekleyiniz. Tanktaki suyun 5 dakika sonra da halen
sıcak olduğuna dikkat ediniz. Tank tapasına basıp
saatin tersi yönde döndürerek tapayı açın.
Uyarı: Açarken dışarıya sıcak buhar
çıkabilir. Tapanın vida dişi ve tank
yanma tehlikesi oluşturabilir.
Tankı huni ve ölçek kabı üzerinden doldurun
(bkz. Bölüm 3.2 "Su Tankının Doldurulması") ve tankın
tapasını yeniden kapatın. Buharlı temizleyici şimdi yeniden şebekeye bağlanıp çalıştırılabilir. Isıtma kontrol lambası yanar yanmaz THOMAS VAPORO Buggy çalışmaya hazırdır.
4.4 Kapatılması ve Saklanması
Cihazı kapatın. Turuncu renkli çalışma kontrol lambası söner.
Kalan basıncı atmak için buhar tabancasındaki buhar tuşuna basın. Tutamağın sol tarafındaki kilitleme pimini sağa
doğru sürerek buhar tabancasını kilitleyin. Şebeke fişini prizden çıkartıp cihazın soğumasını bekleyiniz. Tankta tortulaşma olmaması için su tankını boşaltın.
Su tankını sadece tamamen kuruduktan sonra kapatın.
Buharlı temizleyiciyi kaldırmadan önce tamamen soğumasını bekleyiniz. Cihazı çocukların erişemeyeceği bir
yerde saklayın. Zemin başlıklı uzatma borusu cihazı
saklamak veya kısa çalışma molaları için cihazın arka
yüzündeki brakette bırakılabilir.
Bağlantı kablosu uzatma borusundaki iki kancaya sarılabilir (Şekil 9). Her iki kanca da aynı yöne bakıyorsa,
üzerinde oklar görünen kanca döndürülebilir.
5. Genel Bilgiler
5.1 Temizlik ve Bakım
Uyarı: Buharlı temizleyiciyi temizlemeden
veya üzerinde servis yapmadan önce,
şebekeden ayrıldığından emin olunuz.
Cihazı sadece hafif nemli bir bezle gövdesini silerek
temizleyin. Gövdeye hasar verebilecekleri için temizlik
maddesi, ovucu madde veya alkol içeren malzemeler
kullanmayınız.
Yerel şebeke suyunun sertliği 1,8 mmol/l (10°dH) ise,
tankı beş defa doldurduktan sonra, temizleyiniz. Su sertliği ile ilgili bilgileri su idarenizden alabilirsiniz. Temizlemek için tanka su doldurmanızı ve tankı hızlı bir şekilde
sallamanızı öneririz. Bu sayede buharlı temizleyicinin
tabanındaki kireç tortuları çözülür. Daha sonra da suyu
dökün ve kapatmadan önce tankın tamamen kurumasını
bekleyin.
Buharlı temizleyicinin servis ömrünün uzaması için, su
tankı her 6 ayda bir kireç çözücü ile temizlenmelidir.
1 l sıcak suya (50°C) bir veya en fazla iki kireç çözücü
atın ve su tankını doldurun. Çözeltiyi yaklaşık 30 dakika
bekletin ve çözülmüş tortuları içeren suyu dökün. Gerektiğinde bu işlemi tekrarlayın ve sonra da su tankını yıkayın.
5.2 Elektrikli ve Elektronik Cihazların
Bertaraf Edilmesi
Servis ömrünü tamamlayan cihaz yerel
yasalara uygun olarak bertaraf edilmelidir.
Bu cihaz evsel bir atık değildir.
Cihazın üstünde veya ambalajında bulunan bu işaret bu
ürünün normal evsel atıklarla birlikte atılmaması, aksine
elektrikli veya elektronik atıklar için geri dönüşüm noktalarına verilmesi gerektiğine işaret eder.
9
89
Page 90

GB
Bu ürünü atık toplamaya doğru olarak kazandırarak
çevre ve insan sağlığını korumaya katkıda bulunursunuz.
Yanlış atık bertarafı çevre ve sağlık için tehlike oluşturur.
Bu ürünün geri dönüşüme kazandırılması konusunda
ayrıntılı bilgi almak için yetkili belediyelerden, çöp topla-
5.3 Hata Giderme
Buharlı temizleyicinizi THOMAS müşteri hizmetlerine göndermeden önce bu listeye bakarak arızayı kendinizin
giderme olanağınız olup olmadığını kontrol edin.
Hata Olası nedeni Çözüm
Çalışma kontrol lambası
artık yanmıyor.
Cihaz bir prize takılı değil veya açılmamış.
Priz bozuk.
Şebeke kablosu hasarlı.
ma kurumundan veya cihazı satın aldığınız mağazadan
alabilirsiniz.
Bu cihazı bu bölümdeki bilgilere göre bertaraf etmeyen
kişiler geçerli yasalara göre cezalandırılır. Ambalajının
en az garanti süresi içerisinde saklanmasını önermekteyiz.
Şebeke fişini prize takın veya cihazı açın.
Buharlı temizleyicinin şebeke fişini çekip
yerine başka bir cihazın şebeke fişini
takarak prizi kontrol edin.
Kabloyu değiştirilmesi için THOMAS
müşteri hizmetlerine verin.
Buhar tuşuna
basıldığında,
buhar çıkmıyor.
Dışarıya çok az
miktarda buhar çıkıyor.
Cihazın ısınması
çok uzun sürüyor.
5.4 Teknik Bilgiler
Cihaz tipi: Buharlı temizleyici
Model: THOMAS VAPORO Buggy
Gerilim: 220–240 V ~ 50/60 Hz
Nominal güç tüketimi: 1500 W
Buhar basıncı: maks. 3,5 bar
İzin verilen basınç: 5 bar
Su tankının hacmi: maks. 1,6 l
Buharın hazır olma süresi:
Buhar tuşu çocuk emniyeti ile kilitlenmiş
Su tankı boş.
Buhar düzenleyici minimum buhar
miktarına ayarlanmış.
Tankta tortular var. Su tankındaki kireçleri çözün
Maks. 50 dakika/
tank dolumu
Buhar tabancasının sağ tarafındaki
üçgen pimi sola doğru sürün.
Su doldurun
(bkz. Bölüm 4.3 "Su Doldurulması").
Buhar düzenleyiciyi yeterli miktarda buhar
dışarıya çıkana kadar saatin tersi yönde
döndürün.
(bkz. Bölüm 51 "Temizlik ve Bakım")
Isınma süresi: yakl. 11 dakika
Buhar miktarı: maks 40 g/dak
Gürültü emisyonu: kullanırken 30 dB(A)
Cihazın ölçüleri: 305 x 397 x 235 mm
Ağırlık: Aksesuar hariç cihaz 4,5 kg
Teknik değişiklik yapma hakkı saklıdır.
(G x U x Y)
IP X4
90
Page 91

6. Garanti
Satıcının satış sözleşmesinde verdiği garantilerin dışında,
aşağıdaki koşullar altında ayrıca garanti vermekteyiz:
1. Garanti süresi, ilk kullanıcıya teslim edildiği tarihten
itibaren 24 aydır. Ticari veya benzeri kullanımlarda
bu süre 12 aya düşer. Garanti hakkı taleplerinde
satın alma belgesi gösterilmelidir.
2. Garanti süresi içerisinde, kusurlu üretim veya malzeme
hatalarından oluştuğu ispat edilen her türlü işlev kusurunu bizim seçimimize bağlı olarak, hatalı parçayı onararak veya kısmen değiştirerek gideriyoruz; değiştirilen
parçaların mülkiyeti bize geçer. Bu garanti cam, plastik, lambalar gibi kolay kırılabilen parçalar için geçerli
değildir. Kusurlar hakkında garanti süresi içerisinde derhal bize haber verilmelidir. Garanti süresi içerisinde,
oluşan işlev hatalarını gidermek için gerekli yedek parçalardan ve işçilik giderlerinden ücret alınmaz. Müşteri
hizmetlerimiz haksız yere kullanıldığında, oluşacak
olan tüm giderler müşteriye aittir. Müşteride veya yerleştirme yerinde onarım çalışmaları yapılması sadece
büyük cihazlar için talep edilebilir. Diğer cihazlar en
yakın müşteri hizmetleri merkezimize veya sözleşmeli
teknik servise ya da fabrikaya gönderilmelidir.
3. Cihazın kullanılabilmesini ve değerini etkilemeyen
küçük sapmalar, suyun kimyasal veya elektro kimyasal etkisi ile oluşan hasarlar ile genel anormal çevre
koşullarının sebep olduğu hasarlar garanti zorunluluğu dışındadır. Normal aşınma, kullanım kılavuzuna
dikkat etmeme veya yanlış kullanım sonucu oluşan
hasarlar da garanti kapsamına dahil değildir.
4. Tarafımızdan görevlendirilmeyen kişiler tarafından
cihazın içinin açılması veya onarımlar yapılması
durumunda garanti hakkı kaybolur.
5. Garanti haklarının kullanılmasından sonra ne cihaz
ne de takılan yedek parçalar için garanti süreleri
uzamaz: takılan yedek parçaların garanti süreleri
cihazın garanti süresi ile birlikte sona erer.
6. Bunun dışındaki her türlü garanti talebi, özellikle
cihaz dışında oluşan hasarlar için — yasal olarak
zorunlu olan sorumluluklar dışında — kabul edilmez.
Garanti süresinin dolmasından sonra da müşteri hizmetlerimizi kullanabilirsiniz. Bu konuda lütfen satıcınıza veya
doğrudan müşteri hizmetleri bölümümüze başvurunuz.
91
Page 92

GERMANY
Kundendienststellen / After Sales Service Addresses
www.robert-thomas.net
Deutschland und Schweiz:
Robert Thomas
Metall- und Elektrowerke GmbH & Co. KG
Hellerstraße 6
57290 Neunkirchen
Telefon +49 (0) 2735 - 788 - 581
+49 (0) 2735 - 788 - 583
Telefax +49 (0) 2735 - 788 - 599
E-mail: r-wilke@robert-thomas.de
www.robert-thomas.de
België:
ACEDEM SPRL
Rue Vanderkindere 87
B-1180 Bruxelles (Uccle)
Tél. +32 (0) 2 344 47 12
Fax +32 (0) 2 343 43 49
E-mail: acedem@skynet.be
www.acedem.be
New ETP
Passtraat 121
B-9100 Sint-Niklaas
Tel. +32 (0) 3 776 89 98
Fax +32 (0) 3 776 35 44
E-mail: info@newetp.be
www.newetp.be
New ETP 2
Lambrechtshoekenlaan 69
B-2170 Merksem
Tel. +32 (0) 3 321 78 48
Fax +32 (0) 3 321 28 50
E-mail: antwerpen@newetp.be
www.newetp.be
Servinter (Servilux)
Zeilstraat 12
B-3500 Hasselt
Tel. +32 (0) 78 35 34 54
Fax +32 (0) 11 28 17 91
E-mail: info@servilux.be
www.servilux.be
France:
ATOM
62, Rue Louis Petit
ZA des Pierres Blanches B.P. 53
F-59220 Denain
Tél. +33 (0) 3.27.31.88.64
Fax +33 (0) 3.27.31.78.87
E-mail: sav@atom-sa.fr
www.atom-sa.fr
Mena Toulouse Service
4, rue Jules Raimu
F-31200 Toulouse
Tél. +33 (0) 5.61.58.26.93
Fax +33 (0) 5.61.58.40.55
E-mail: mena-toulouse-service@wanadoo.fr
www.menatoulouseservice.com
Niederlande:
A. u. M. Whiteparts B.V.
Souvereinstraat 17
NL 4903 RH Oosterhout (NB)
Tel. +31 (0) 162 - 420-954
Fax +31 (0) 162 - 467-126
E-mail: info@whiteparts.nl
www.whiteparts.nl
Schweden:
Olsson & Co.
Box 106
42722 Billdal
Tel. +46 (0) 31 - 910085
Fax +46 (0) 31 - 015290
E-mail: chr.olsson@telia.com
Österreich:
Wukovits
Kaiser-Joseph-Straße 64
A-3002 Purkersdorf
Tel./Fax +43 (0) 2231/63467
E-mail: wukovits@gmx.at
Ernst Wallnöfer
Elektro-Industrievertretung
Bundesstraße 29, Neu-Rum
A-6063 Innsbruck
Tel. +43 (0) 512/263838
Fax +43 (0) 512/26383826
E-mail: office@wallnoefer-elektro.at
www.wallnoefer-elektro.at
Pölz GmbH
Brünner Straße 5
A-1210 Wien
Tel. +43 (0) 1/2785365
Fax +43 (0) 1/27853655
E-mail: info@poelz.co.at
www.poelz.co.at
Reicher
Elektro-Service
Hohenegg 17
A-8262 Ilz
Tel. +43 (0) 3385/583
Fax +43 (0) 03385/22040
E-mail: thomas.service@aon.at
Josef Pircher Betriebs GmbH
Belruptstraße 44
A-6900 Bregenz
Tel. +43 (0) 5574/42721-0
Fax +43 (0) 5574/427215
E-mail: elektrotechnik@pircher.at
www.pircher.at
Wörndl Elektro Ges.mbH
Hausgeräte Kundendienst
Gniglerstr. 18
A-5020 Salzburg
Tel. +43 (0) 662-872714
Fax +43 (0) 662-882487
E-mail: woerndl-kundendienst@aon.at
Italia:
AF ITALIA SRL
Via Monte Rosa 28
20863 Concorezzo (MB)
N° cortesia: +39 (0) 39/8951381
Tel.: +39 (0) 39/6908049
Fax: +39 (0) 39/6886853
E-mail: assistenza@afitalia.it
Hungary :
Weltech Med Co. Ltd
Iparvágány u. 2-16
1211 Budapest, Hungary
Tel. +36 (0) 1 2195435
Fax +36 (0) 1 2195436
E-mail: weltechmed@weltechmed.hu
www.weltechmed.hu
Türkiye:
İthalatçı Firma:
Hack Endüstriyel Temsilcilik Ltd. Şti.
Tekstilkent Koza Plaza, A Blok Kat: 11 No: 40
34235 Esenler – İstanbul
Müşteri Hizmetleri 444 24 93
Telefon +90 (0) 212 438 20 22
Faks +90 (0) 212 438 22 26
E-mail: info@thomas.com.tr
www.robert-thomas.de/tr
Bu cihaz ayrıca T.C. Çevre ve Orman
Bakanlığının EEE yönetmeliğine uygundur.
Servis hizmetleri, aksesuar ve yedek parça temini
için 10 yıl Garanti.
Polska:
APRA Serwis Sp. z o.o.
ul. Nadrzeczna 25A, 00-705 Warszawa
tel. +48 22 428 27 74
tel. +48 22 886 56 05
kom. +48 604 133 055
E-mail: pl-service1@robert-thomas.net
www.apraserwis.pl
Russia:
ООО "ЛОГИКА"
Бизнес Центр "Гранд Сетунь Плаза"
121596, Москва
улица Горбунова дом 2
строение 204, офис А612
Тел.: 8-800-550-5515
E-mail: ru-service1@robert-thomas.net
www.thomas.ru
Kasachstan:
ЦКО THOMAS
Казахстан, 050022 Алматы
Ул. Мауленова 123
Тел. + 7 (727) 327 25 45
E-mail: kz-service1@robert-thomas.net
www.thomaskz.kz
Ukraine:
THOMAS UA
м. Дніпропетровськ
вул. Донецьке шосе, 104
тел. (050)-533-68-88
Безкоштовна консультація
по тел. (call-back) (044) 360 20 22
E-mail: service@thomas.ua
сайт: www.thomas.ua
Rumänien:
SC SAPEL SRL
B-dul. Ficusului Nr. 10C, Sector 1
013975 Bucuresti, Romania
Tel. +40 (0) 21 233 13 45-48
Fax +40 (0) 21 232 28 05
E-mail: office@sapel.ro, office@eutron.ro
+ 7 (727) 272 72 15
www.robert-THOMAS.net
Techn. Änderungen vorbehalten
Robert Thomas
Metall- und Elektrowerke GmbH & Co. KG
Postfach 1820, 57279 Neunkirchen
Hellerstraße 6, 57290 Neunkirchen
Telefon +49 (0) 2735 - 788 - 0
Telefax +49 (0) 2735 - 788 - 519
E-mail: service@robert-thomas.de
www.robert-thomas.de
GA 09/14
 Loading...