

Page 1
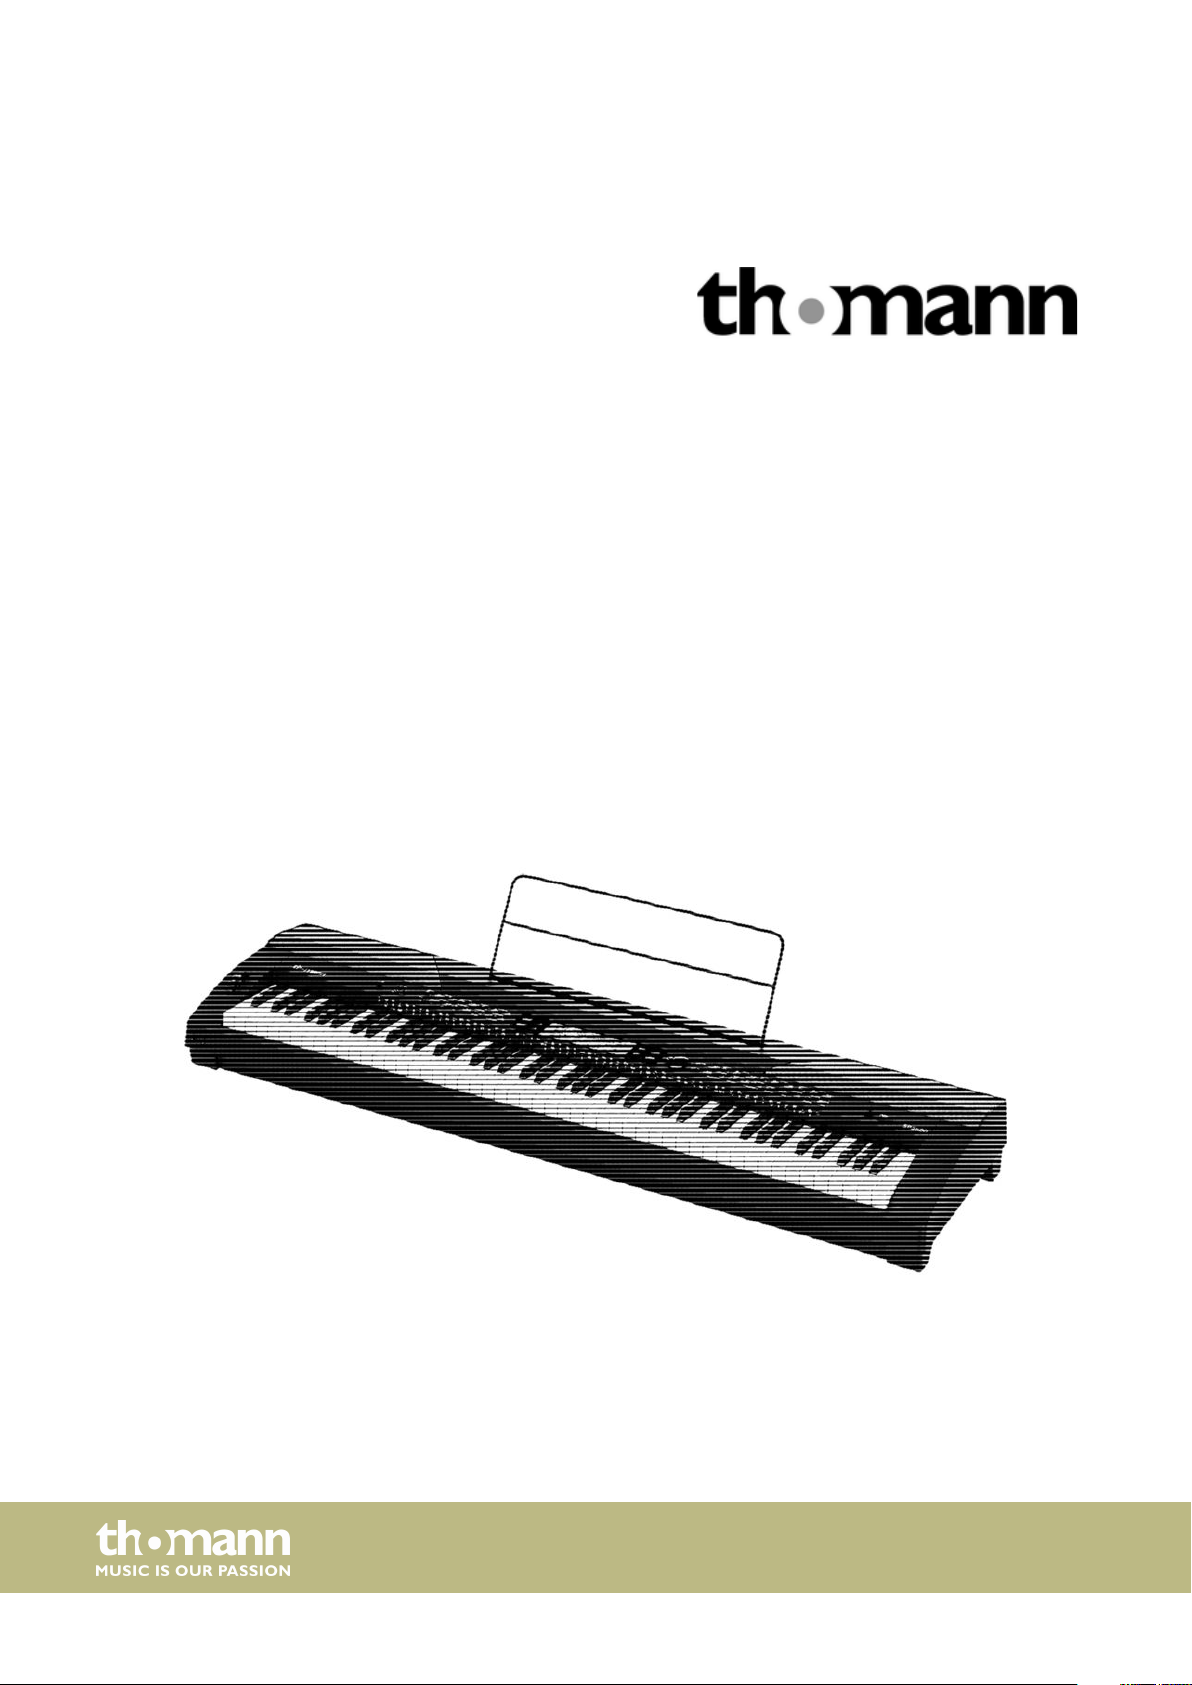
SP 5600
portable grand keyboard
user manual
Page 2

Musikhaus Thomann
Thomann GmbH
Hans-Thomann-Straße 1
96138 Burgebrach
Germany
Telephone: +49 (0) 9546 9223-0
E-mail: info@thomann.de
Internet: www.thomann.de
17.07.2020, ID: 378054 (V5)
Page 3

Table of contents
Table of contents
1 General information.............................................................................................................. 5
1.1 Further information........................................................................................................ 5
1.2 Notational conventions................................................................................................. 5
1.3 Symbols and signal words........................................................................................... 6
2 Safety instructions................................................................................................................. 7
3 Features....................................................................................................................................... 9
4 Assembly instructions........................................................................................................ 10
5 Connections and controls................................................................................................ 11
6 Connection options............................................................................................................. 16
7 Quick start guide.................................................................................................................. 18
8 Turning the keyboard on / o, setup.......................................................................... 20
8.1 Turning the keyboard on / o.................................................................................. 20
8.2 Automatic shutdown................................................................................................... 20
8.3 Adjusting the volume.................................................................................................. 20
8.4 Setting the touch sensitivity..................................................................................... 20
8.5 Sustain eect.................................................................................................................. 21
8.6 Digital eects.................................................................................................................. 21
8.7 Setting up the keyboard, Function menu............................................................ 22
8.7.1 Fine tuning................................................................................................................... 23
8.7.2 Time signature............................................................................................................ 23
8.7.3 Split point..................................................................................................................... 23
8.7.4 Pedal function............................................................................................................. 24
8.7.5 Selection Harmony setting.................................................................................... 25
8.7.6 Equalizer....................................................................................................................... 26
8.7.7 Reverb eect............................................................................................................... 26
8.7.8 Reverb volume........................................................................................................... 26
8.7.9 Chorus eect............................................................................................................... 27
8.7.10 Chorus volume......................................................................................................... 27
8.7.11 MIDI receive channel............................................................................................. 27
8.7.12 MIDI send channel.................................................................................................. 28
8.7.13 Automatic shutdown............................................................................................. 28
8.8 Loading / saving user settings................................................................................. 28
8.9 Resetting user settings................................................................................................ 29
8.10 Deleting stored recordings..................................................................................... 29
9 Operating................................................................................................................................. 30
9.1 Piano mode..................................................................................................................... 30
9.2 Transposing..................................................................................................................... 30
9.3 Playing demo sequences........................................................................................... 30
9.4 Style playing................................................................................................................... 30
9.5 Playing songs.................................................................................................................. 31
SP 5600
3
Page 4

Table of contents
9.6 Metronome..................................................................................................................... 31
9.7 Tempo............................................................................................................................... 31
9.8 Mixer.................................................................................................................................. 32
9.9 Selecting voices............................................................................................................. 32
9.10 Dual mode..................................................................................................................... 33
9.11 Split mode..................................................................................................................... 33
9.12 TWINOVA....................................................................................................................... 34
9.13 Harmony mode........................................................................................................... 34
9.14 Chord detection.......................................................................................................... 35
9.15 Chord dictionary......................................................................................................... 39
9.16 Auto Accompaniment.............................................................................................. 41
9.17 Accompaniment track volume, muting............................................................. 41
9.18 Fade in, Fade out........................................................................................................ 42
9.19 One Touch Setting..................................................................................................... 42
9.20 Performance Assistant.............................................................................................. 43
9.20.1 GUITAR mode........................................................................................................... 43
9.20.2 PIANO mode............................................................................................................. 44
9.21 Practising songs.......................................................................................................... 44
9.22 Recording function.................................................................................................... 45
9.22.1 Recording preparation.......................................................................................... 46
9.22.2 Recording................................................................................................................... 46
9.22.3 Stopping recording................................................................................................ 47
9.22.4 Playing a recording................................................................................................ 47
9.22.5 Delete recording..................................................................................................... 47
9.23 MIDI function............................................................................................................... 48
9.24 USB storage medium................................................................................................ 48
9.24.1 USB stick playback.................................................................................................. 49
9.24.2 Loading data from USB stick............................................................................... 49
9.24.3 Save data to USB stick........................................................................................... 49
9.24.4 Deleting all data on a USB stick......................................................................... 50
9.25 Reset to factory defaults.......................................................................................... 50
10 Technical specications.................................................................................................... 51
11 Plug and connection assignment................................................................................. 53
12 Troubleshooting................................................................................................................... 54
13 Appendix.................................................................................................................................. 55
13.1 Song list.......................................................................................................................... 55
13.2 Styles list........................................................................................................................ 57
13.3 Voice list......................................................................................................................... 62
13.4 Demo list........................................................................................................................ 71
13.5 MIDI implementation chart.................................................................................... 72
14 Protecting the environment........................................................................................... 74
portable grand keyboard
4
Page 5
1 General information
1.1 Further information
General information
This user manual contains important information on the safe operation of the device.
Read and follow all safety notes and all instructions. Save this manual for future refer‐
ence. Make sure that it is available to all persons using this device. If you sell the
device to another user, be sure that they also receive this manual.
Our products and user manuals are subject to a process of continuous development.
We therefore reserve the right to make changes without notice. Please refer to the
latest version of the user manual which is ready for download under
www.thomann.de.
On our website (www.thomann.de) you will nd lots of further information and
details on the following points:
1.2 Notational conventions
Letterings
Displays
Download This manual is also available as PDF le for you to download.
Keyword search
Online guides
Personal
consultation
Service
This manual uses the following notational conventions:
The letterings for connectors and controls are marked by square brackets and italics.
Examples: [VOLUME] control, [Mono] button.
Texts and values displayed on the device are marked by quotation marks and italics.
Examples: ‘24ch’ , ‘OFF’.
Use the search function in the electronic version to nd the
topics of interest for you quickly.
Our online guides provide detailed information on technical
basics and terms.
For personal consultation please contact our
technical hotline.
If you have any problems with the device the
customer service will gladly assist you.
SP 5600
5
Page 6
General information
Instructions
Cross-references
1.3 Symbols and signal words
The individual steps of an instruction are numbered consecutively. The result of a
step is indented and highlighted by an arrow.
Example:
1. Switch on the device.
2. Press [Auto].
Automatic operation is started.
ð
3. Switch o the device.
References to other locations in this manual are identied by an arrow and the speci‐
ed page number. In the electronic version of the manual, you can click the crossreference to jump to the specied location.
Example: See Ä ‘Cross-references’ on page 6.
In this section you will nd an overview of the meaning of symbols and signal words
that are used in this manual.
Signal word Meaning
DANGER! This combination of symbol and signal word indicates
an immediate dangerous situation that will result in
death or serious injury if it is not avoided.
CAUTION! This combination of symbol and signal word indicates
a possible dangerous situation that can result in minor
injury if it is not avoided.
NOTICE! This combination of symbol and signal word indicates
a possible dangerous situation that can result in mate‐
rial and environmental damage if it is not avoided.
Warning signs Type of danger
Warning – high-voltage.
Warning – danger zone.
portable grand keyboard
6
Page 7
2 Safety instructions
Safety instructions
Intended use
Safety
This device is intended to be used for electronic sound generation using a piano key‐
board. Use the device only as described in this user manual. Any other use or use
under other operating conditions is considered to be improper and may result in per‐
sonal injury or property damage. No liability will be assumed for damages resulting
from improper use.
This device may be used only by persons with sucient physical, sensorial, and intel‐
lectual abilities and having corresponding knowledge and experience. Other persons
may use this device only if they are supervised or instructed by a person who is
responsible for their safety.
DANGER!
Danger for children
Ensure that plastic bags, packaging, etc. are disposed of properly and
are not within reach of babies and young children. Choking hazard!
Ensure that children do not detach any small parts (e.g. knobs or the
like) from the unit. They could swallow the pieces and choke!
Never let children unattended use electrical devices.
DANGER!
Electric shock caused by high voltages inside
Within the device there are areas where high voltages may be present.
Never remove any covers.
There are no user-serviceable parts inside.
Do not use the device if covers, protectors or optical components are
missing or damaged.
CAUTION!
Possible hearing damage
With loudspeakers or headphones connected, the device can produce
volume levels that may cause temporary or permanent hearing impair‐
ment.
Do not operate the device permanently at a high volume level.
Decrease the volume level immediately if you experience ringing in
your ears or hearing impairment.
SP 5600
7
Page 8
Safety instructions
NOTICE!
Operating conditions
This device has been designed for indoor use only. To prevent damage,
never expose the device to any liquid or moisture. Avoid direct sunlight,
heavy dirt, and strong vibrations.
Only operate the device within the ambient conditions specied in the
chapter ‘Technical specications’ of this user manual. Avoid heavy tem‐
perature uctuations and do not switch the device on immediately after
it was exposed to temperature uctuations (for example after transport
at low outside temperatures).
Dust and dirt inside can damage the unit. When operated in harmful
ambient conditions (dust, smoke, nicotine, fog, etc.), the unit should be
maintained by qualied service personnel at regular intervals to prevent
overheating and other malfunction.
NOTICE!
External power supply
The device is powered by an external power supply. Before connecting
the external power supply, ensure that the input voltage (AC outlet)
matches the voltage rating of the device and that the AC outlet is pro‐
tected by a residual current circuit breaker. Failure to do so could result
in damage to the device and possibly the user.
Unplug the external power supply before electrical storms occur and
when the device is unused for long periods of time to reduce the risk of
electric shock or re.
portable grand keyboard
8
Page 9

3 Features
Features
n 88 keys with hammer action
n Multifunction LED display
n Pitch bend wheel
n 128-voice polyphony
n 600 voices
n 230 programmed styles, 10 user styles
n 120 programmed songs, 5 user songs
n 5 demo songs
n Reverb, Chorus and Sustain eects
n Master EQ
n Sequencer
n Accompaniment and recording function
n Learning function and chord library
n Split and duo mode
n Metronome
n Transpose function
n Built-in speakers
n USB port
n Automatic shuto
n Sustain pedal, music stand and 12 V power adapter included
SP 5600
9
Page 10
Assembly instructions
4 Assembly instructions
Unpack and check carefully there is no transportation damage before using the unit.
Keep the equipment packaging. To fully protect the product against vibration, dust
and moisture during transportation or storage use the original packaging or your
own packaging material suitable for transport or storage, respectively.
Set up the device in the desired location.
Power supply
The unit is powered by the included 12 V power supply. Make sure that the device is
turned o before you connect it to the power supply or disconnect it.
Turn the volume control counter-clockwise to minimum before connecting the
device to the power supply or to other devices. This is to protect the speakers from
damage.
Connect the cable from the power adapter outlet to the input socket [DC IN] on the
rear panel of the device. Plug the plug of the power cord into a properly wired and
earthed mains wall outlet.
10
portable grand keyboard
Page 11
5 Connections and controls
Overview
Connections and controls
1 Built-in speakers.
2 Music stand holder.
3 Control panel with function keys and display.
4 Claviature with 88 keys.
5 2 × connection sockets for headphones.
6 Pitch bend wheel for changing the pitch.
SP 5600
11
Page 12
Connections and controls
Operating panel
7 Button to turn the device on and o.
8 [VOLUME]
Rotary volume control.
9 [STYLE]
Single button function: direct Style selection.
Button function while pressing the [SHIFT] button:
n [MIXER]
To open the Mixer menu.
n [FUNCTION]
To open the Function menu.
n [HARMONY]
Enabling / disabling the Harmony mode.
n [TRANSPOSE]
Transposing the piano keys in semitone steps.
10 [START / STOP]
To start / stop the playback of demo songs or styles.
11 [SYNC START]
Enabling / disabling the Sync start function in accompaniment and recording mode.
12 [INTRO/ENDING]
Inserting an intro / ending in accompaniment mode.
12
portable grand keyboard
Page 13
Connections and controls
13 [FILL A]
Inserting Fills in accompaniment mode.
14 [FILL B]
Inserting Fills in accompaniment mode.
15 [CHORD MODE] | [FADE]
Single button function: Enabling / disabling the Chord mode.
Button function while pressing the [SHIFT] button: Enabling / disabling the Fade function in accompaniment mode.
16 [TEMPO] | [ACCOMP]
Single button function: Increasing / decreasing playback tempo.
Button function while pressing the [SHIFT] button: Setting the accompaniment track volume.
17 [PERFORM]
Enabling / disabling the Performance assistant.
18 [METRONOME]
Enabling / disabling the Metronome.
19 [SHIFT]
Enabling the second function of dual function buttons.
20 [PIANO]
Calling Piano mode.
21 Display.
22 [VOICE]
Calling Voice mode.
23 [STYLE]
Calling Style mode.
24 [DEMO]
Calling Demo mode.
25 [SONG]
Calling Song mode.
26 Jog dial for selecting functions, parameters and values.
27
| [YES]: Increasing parameter selection and displayed value by one.
| [NO]: Decreasing parameter selection and displayed value by one.
SP 5600
13
Page 14
Connections and controls
28 [VOICES]
Single button function: direct Voice selection.
Button function while pressing the [SHIFT] button:
n [DUAL]
Enabling / disabling Dual mode (Layer function).
n [LOWER]
Enabling / disabling Lower mode (Split function).
n [TOUCH]
Opening the menu to adjust the touch sensitivity of the keyboard.
n [DSP]
Turning digital eects on and o.
n [SUSTAIN]
Enabling / disabling the Sustain function.
n [DICT]
Opening chord dictionary.
n [LESSON]
Enabling / disabling the Lesson mode.
n [L]
Selecting the left hand in Lesson mode.
n [R]
Selecting the right hand in Lesson mode.
29 [BANK] | [RECORD]
Single button function: Selecting memory bank.
Button function while pressing the [SHIFT] button: Enabling / disabling the Recording mode.
30 [STORE] | [ACCOMP]
Single button function: Saving current values as user setting.
Button function while pressing the [SHIFT] button: Record enabling accompaniment track.
31 [M1] … [M6] | [MELODY 1] … [MELODY 5]
Single button function: Calling up user settings M1 … M5 (in O.T.S. mode M1 … M4).
Button function while pressing the [SHIFT] button: Record enabling melody tracks 1 … 5.
32 [O.T.S.] | [TWINOVA]
Single button function: Enabling / disabling Single-nger mode (One Touch Setting).
Button function while pressing the [SHIFT] button: Enabling / disabling the TWINOVA mode.
33 [USB DEVICE] | [OCTAVE]
Single button function: Opening the menu for adjusting the USB functions.
Button function while pressing the [SHIFT] button: Octaving the keyboard in TWINOVA mode.
34 USB interface for connecting a USB device.
14
portable grand keyboard
Page 15
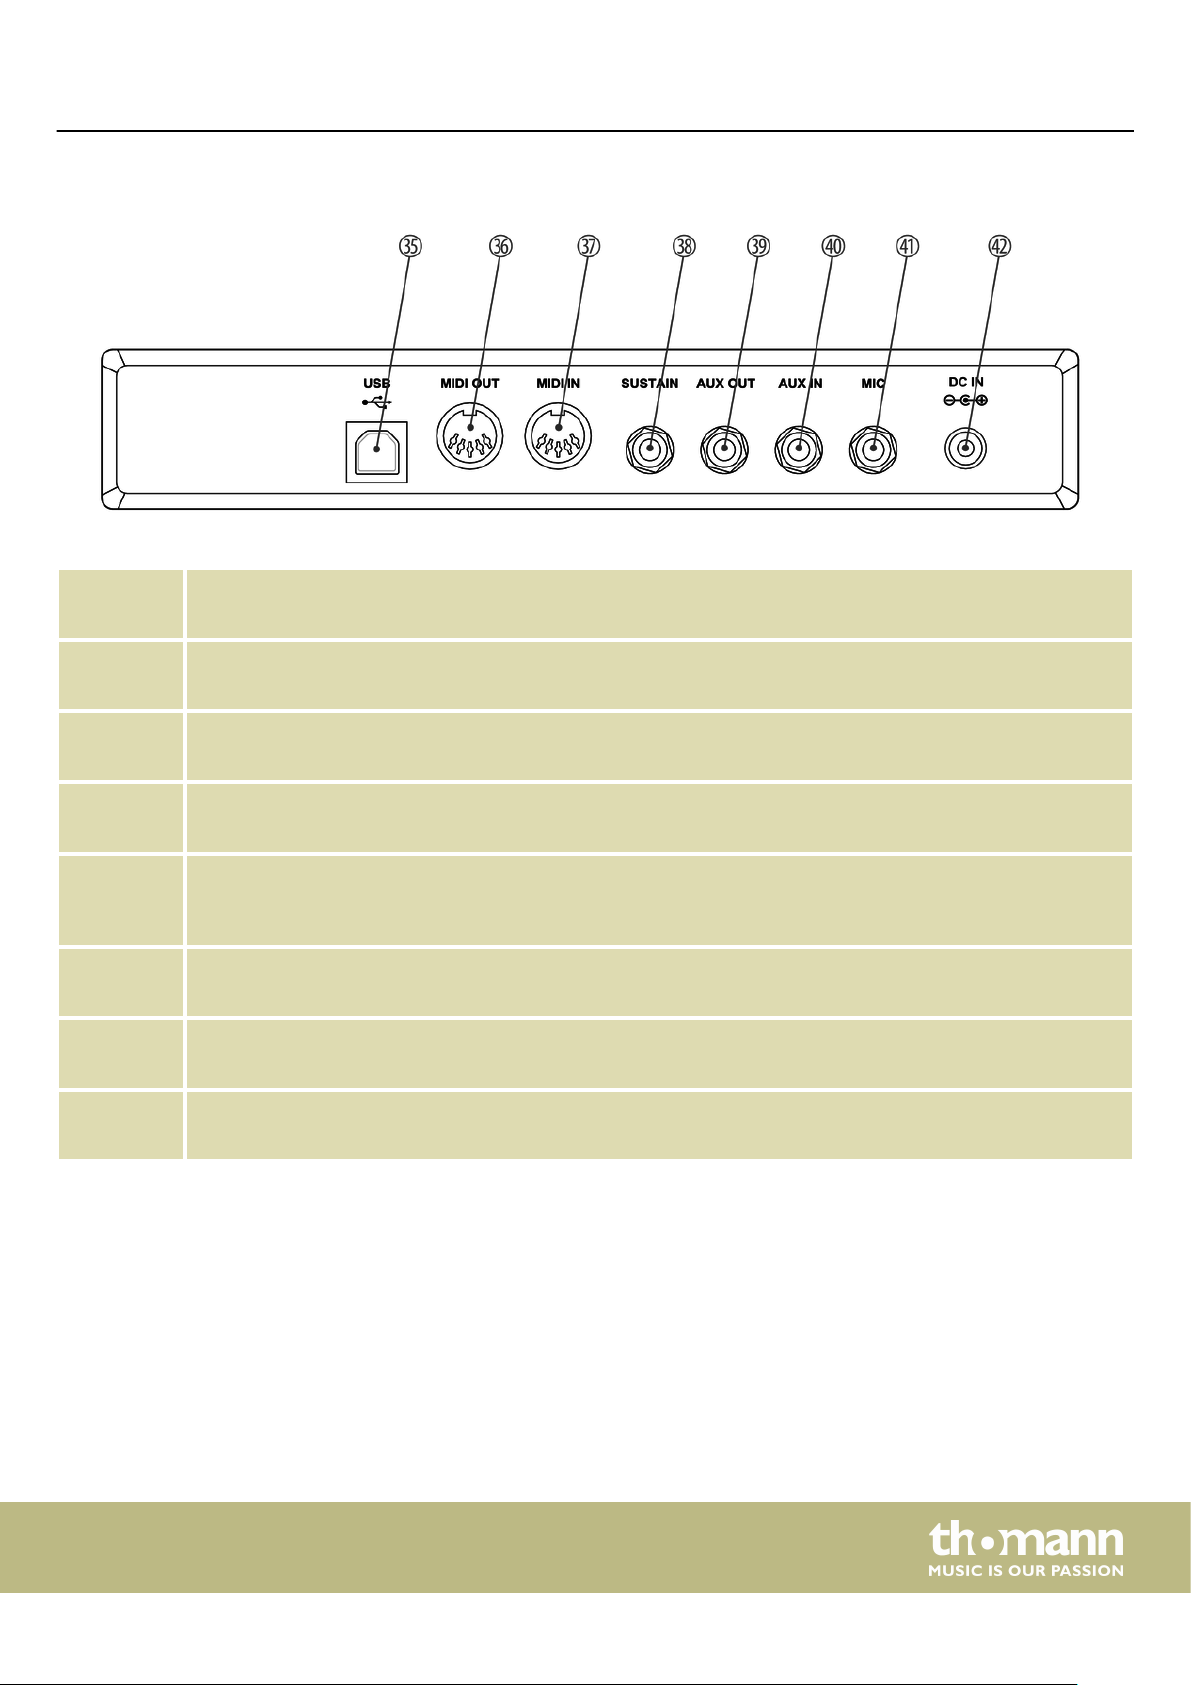
Rear panel connections
35 [USB]
USB interface to connect a computer.
36 [MIDI OUT]
MIDI out for connecting an external MIDI device.
Connections and controls
37 [MIDI IN]
MIDI in for connecting an external MIDI device.
38 [SUSTAIN]
Pedal connecting socket (1/4" phone jack).
39 [AUX OUT]
Output socket for connecting the device to an amplier, stereo system, mixer or recording device (1/4" phone
jack).
40 [AUX IN]
Input socket for connecting an external audio device (e.g. MP3 or CD player) (1/4" phone jack).
41 [MIC]
Input socket for connecting a microphone.
42 [DC IN]
Connection for the power adapter.
SP 5600
15
Page 16
Connection options
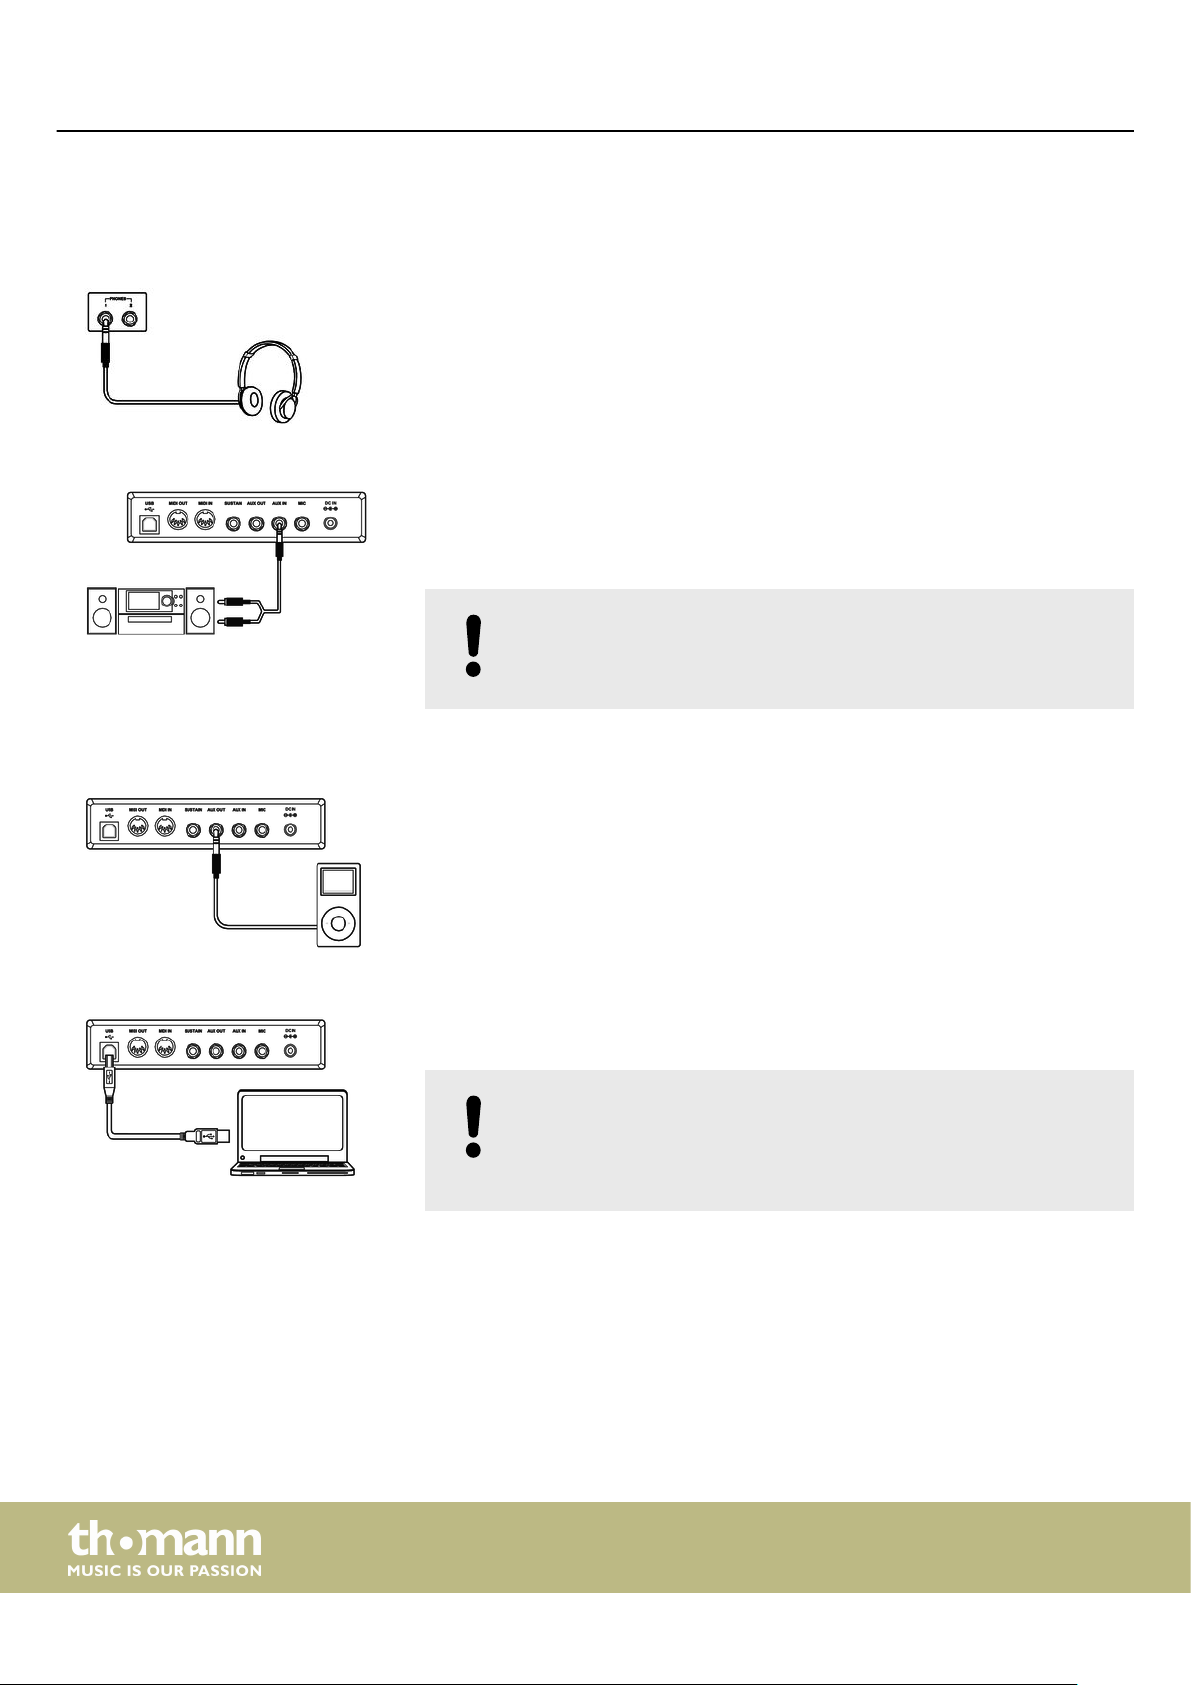
6 Connection options
Headphones
External audio devices via AUX OUT
To the left beneath the keyboard you nd the headphones outlets 1 and 2.
Connecting headphones (not supplied) to outlet 2 mutes the speakers.
When using output 1 You hear the sound through headphones and speakers.
Use the [AUX OUT] socket to connect the keyboard to an amplier, stereo device,
mixing console or recording device. Plug one end of the audio cable into the
[AUX OUT] socket on the rear panel of the keyboard and the other end into the input
of the respective audio device.
NOTICE!
To prevent damage to the speakers, turn the volume down to ‘Mini‐
mum’ before you connect other devices to the keyboard.
External audio devices via AUX IN
Computer via USB
Use the [AUX IN] socket to connect a, for example, CD or MP3 player to the keyboard.
So you can playback music through the internal speakers of the keyboard and simul‐
taneously play along to it. Plug one end of the audio cable into the [AUX IN] socket on
the rear panel of the keyboard and the other end into the output of the respective
audio device.
You can connect the keyboard to exchange data with a PC via the USB port. This also
allows the transfer of MIDI les.
NOTICE!
Do not set the USB interface as the in and output at the same time in the
computer software. Otherwise, there will be overlap when playing the
keyboard.
16
portable grand keyboard
Page 17
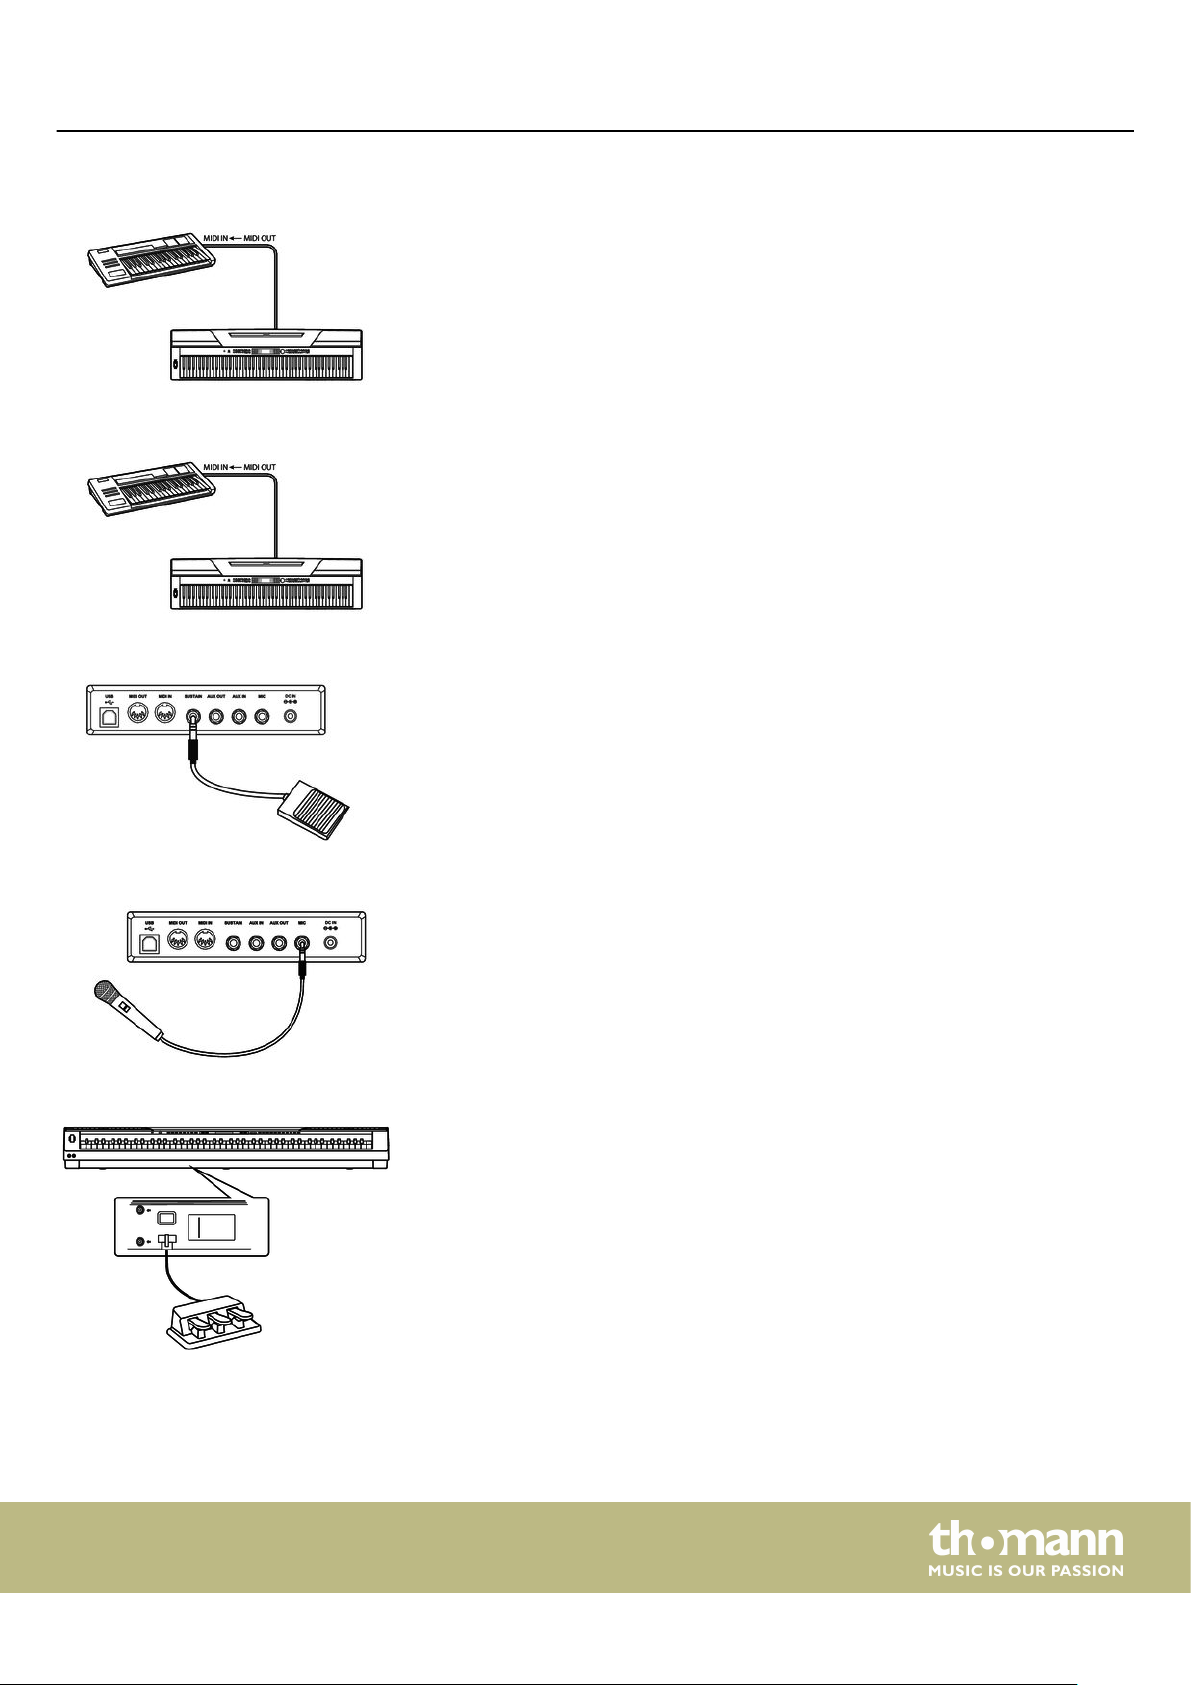
MIDI device via MIDI IN
MIDI device via MIDI OUT
Sustain pedal
Connection options
Use the MIDI interface [MIDI IN] to receive MIDI data from an external MIDI device.
Use the MIDI interface [MIDI OUT] to send MIDI data to an external MIDI device.
Use the connection socket [SUSTAIN] to connect a sustain pedal to the keyboard.
Microphone
Pedal box
Use the connection socket [MIC] to connect a dynamic microphone (1/4" jack) to the
device.
Use the connection socket on the bottom of the keyboard to connect the pedal of
the optional SP-5600 wooden stand.
SP 5600
17
Page 18
Quick start guide
7 Quick start guide
In order to provide you with a quick introduction, the main functions of the keyboard
are described in brief in this chapter. A detailed description of the setting options can
be found in the chapters Ä Chapter 9 ‘Operating’ on page 30 and Ä Chapter 8
‘Turning the keyboard on / o, setup’ on page 20.
Turning the keyboard on / o
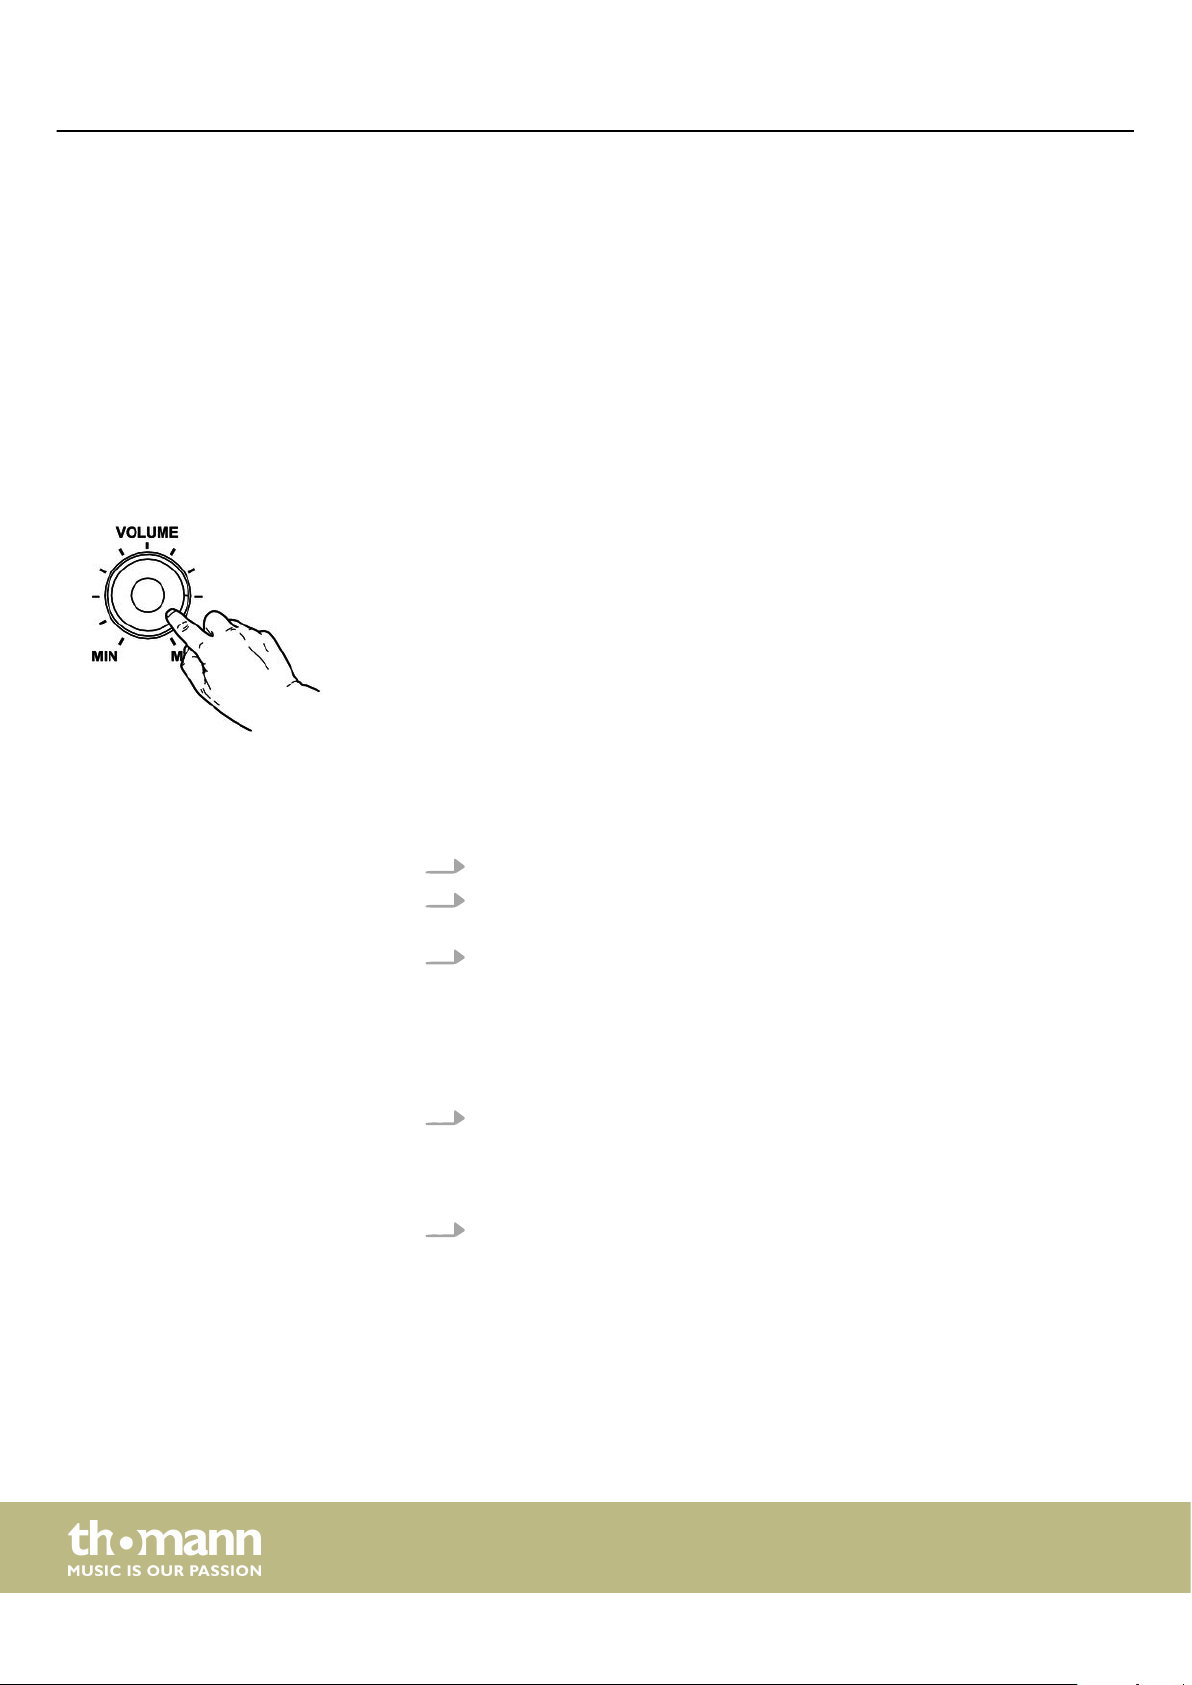
Adjusting the volume
Playing demo sequences
Press the power button on the left of the operating panel to turn the device on and
o. The display shows ‘Loading!’ . The keyboard is immediately operational.
Adjust the rotary control [VOLUME] for a pleasant volume for playback and practising.
Turn this control clockwise to increase the volume. Turn it counter-clockwise to
reduce volume.
The demo sequences stored in the device show the sound and the pitch range of the
keyboard.
1. Press [DEMO] to start playing the demo sequences in a continuous loop.
2.
Use [YES] and [NO] to toggle between the ve demo sequences (see
13.4 ‘Demo list’ on page 71).
3. Press [DEMO] again or [START/STOP] to stop playing the demo sequences.
Ä
Chapter
Playing voices
The keyboard features a selection of 600 authentic voices, see Ä Chapter 13.3 ‘Voice
list’ on page 62.
1. Press [VOICE] or one of the direct selection buttons to activate the last set or a
desired voice directly.
The display shows the name and number of the rst right hand voice (main
ð
voice), e.g. ‘VOICE R1’ , ‘001’, ‘GrandPno’.
2. Use [YES] and [NO], the jog dial or a direct select button to assign another
voice.
Press the [VOICE] button repeatedly to toggle between the upper and lower
voice of a direct selection button.
In dual and split mode, you toggle between the rst and second right hand voice and
the left hand voice by repeatedly pressing the [VOICE] button: ‘VOICE R1’ , ‘VOICE R2’
and ‘VOICE L’ , see the following chapters for Dual and Split mode.
portable grand keyboard
18
Page 19
Style playing
Playing songs
Quick start guide
The styles stored in the keyboard are used to support your own playing at perform‐
ances, while practising and recording.
1. Press [STYLE] to activate the Style mode.
2. Use [YES] and [NO], the jog wheel or a direct select button to enable the
desired style directly (see Ä Chapter 13.2 ‘Styles list’ on page 57).
3. Press [START/STOP] to start or stop style playback.
The keyboard oers a choice of 120 songs to accompany your playing at perform‐
ances, while practising and recording. In addition, ve tracks for your own recordings
are available.
1. Press [SONG] to start playing the songs in a continuous loop.
2.
Use [YES] and [NO] to toggle between the stored songs (see
‘Song list’ on page 55).
3. Press [START/STOP] to start or stop song playback.
4. Press [STYLE] or [VOICE] to exit the song mode.
Ä
Chapter 13.1
Recording songs
You can record up to ve own tracks with the keyboard and store them in the
internal memory.
1. Hold down [SHIFT] and press [RECORD] to enable the recording mode.
2. Use [YES] and [NO] or the jog dial to select a free memory location for the
recording.
3. Hold down [SHIFT] and press [RECORD] again to record-enable the keyboard.
4. The recording starts as soon as you play the rst tone or chord or press
[START/STOP].
5. Hold down [SHIFT] and press [RECORD] again to end the recording and to play
the recorded sequence in an endless loop.
6. To disable the recording mode, hold down [SHIFT] and press [RECORD].
SP 5600
19
Page 20
Turning the keyboard on / o, setup
8 Turning the keyboard on / o, setup
8.1 Turning the keyboard on / o
Press the power button on the left of the operating panel to turn the device on and
o. The display shows ‘Loading!’ . The keyboard is immediately operational.
If the display does not light up after switching on the keyboard, check the
power supply.
If you hear nothing coming from the speakers, the volume may be set to
‘minimum’.
8.2 Automatic shutdown
If the keyboard is not in use, it shuts o automatically after 30 minutes. To adjust or
deactivate the automatic shutdown, press [SHIFT] and [FUNCTION] twice. The time
window can then be set via [YES] and [NO].
To turn the device on again after an automatic shutdown, press the on / o switch to
the left of the panel.
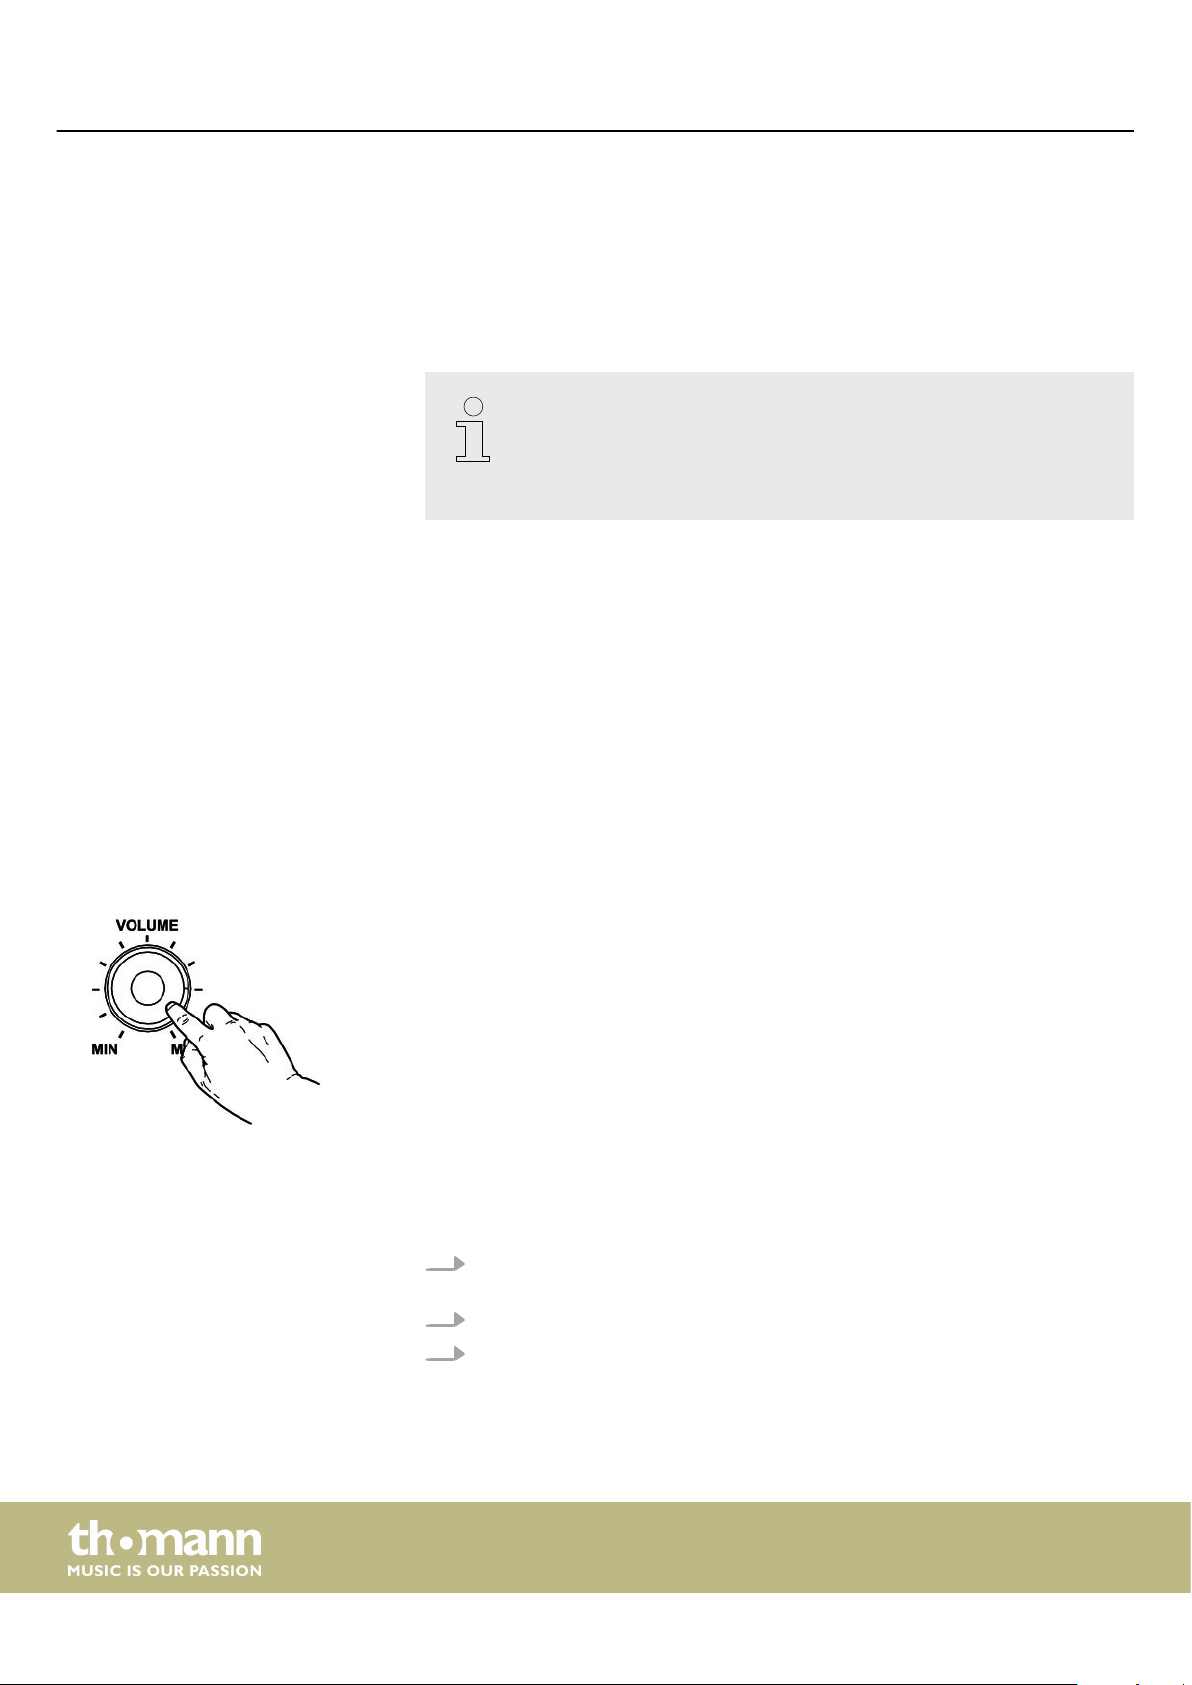
8.3 Adjusting the volume
8.4 Setting the touch sensitivity
Adjust the rotary control [VOLUME] for a pleasant volume for playback and practising.
Turn this control clockwise to increase the volume. Turn it counter-clockwise to
reduce volume.
With this function you can adjust the touch response of the keyboard at four levels.
1. Hold down [SHIFT] and press [TOUCH] to open the menu for adjusting the
touch sensitivity.
2. Adjust the touch sensitivity with [YES] and [NO] or with the jog dial.
3. Press [YES] and [NO] simultaneously to restore the default setting ‘002’ .
20
portable grand keyboard
Page 21
8.5 Sustain eect
Turning the keyboard on / o, setup
Parameter Meaning
‘OFF’ Touch sensitivity is o.
‘001’ Soft
In this setting, the volume is lower than usual even when playing
with a soft touch.
‘002’ Normal
This setting corresponds to the usual touch response of a clavia‐
ture.
‘003’ Hard
In this setting, the volume is higher than usual even when playing
with a hard touch.
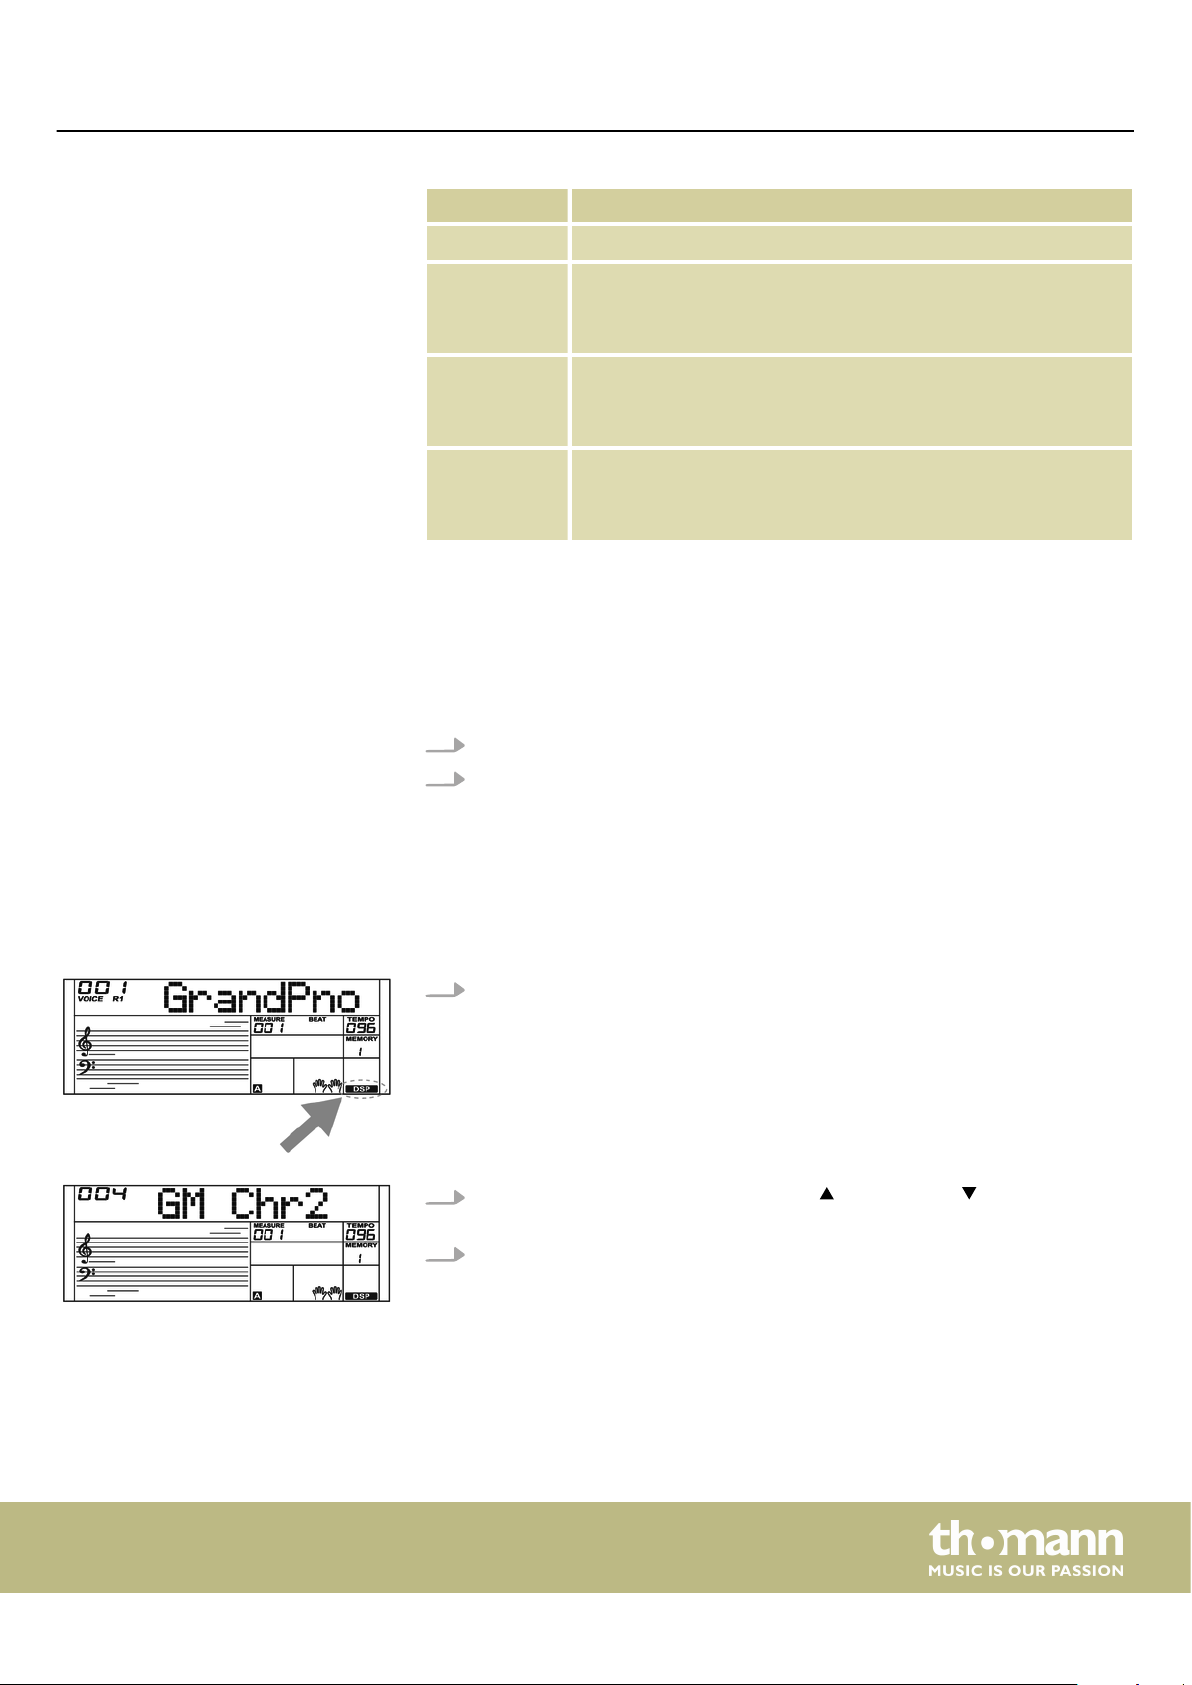
8.6 Digital eects
This feature allows you to assign a general Sustain to the keyboard. When the Sustain
function is turned on, all tones played on the keyboard linger.
1. Hold down [SHIFT] and press [RECORD] to add the eect.
2. Hold down [SHIFT] and press [RECORD] again to disable the eect.
The DSP functions let you simulate the acoustic eects under dierent environ‐
mental conditions.
1. Hold down [SHIFT] and press [DSP] to enable the function.
The icon ‘DSP’ appears on the display.
ð
2.
Hold down [SHIFT] and press [FUNCTION] or [FUNCTION] until the display
shows ‘GM Chr2’ .
3. Turn the jog dial within 3 seconds to select the desired eect.
SP 5600
21
Page 22
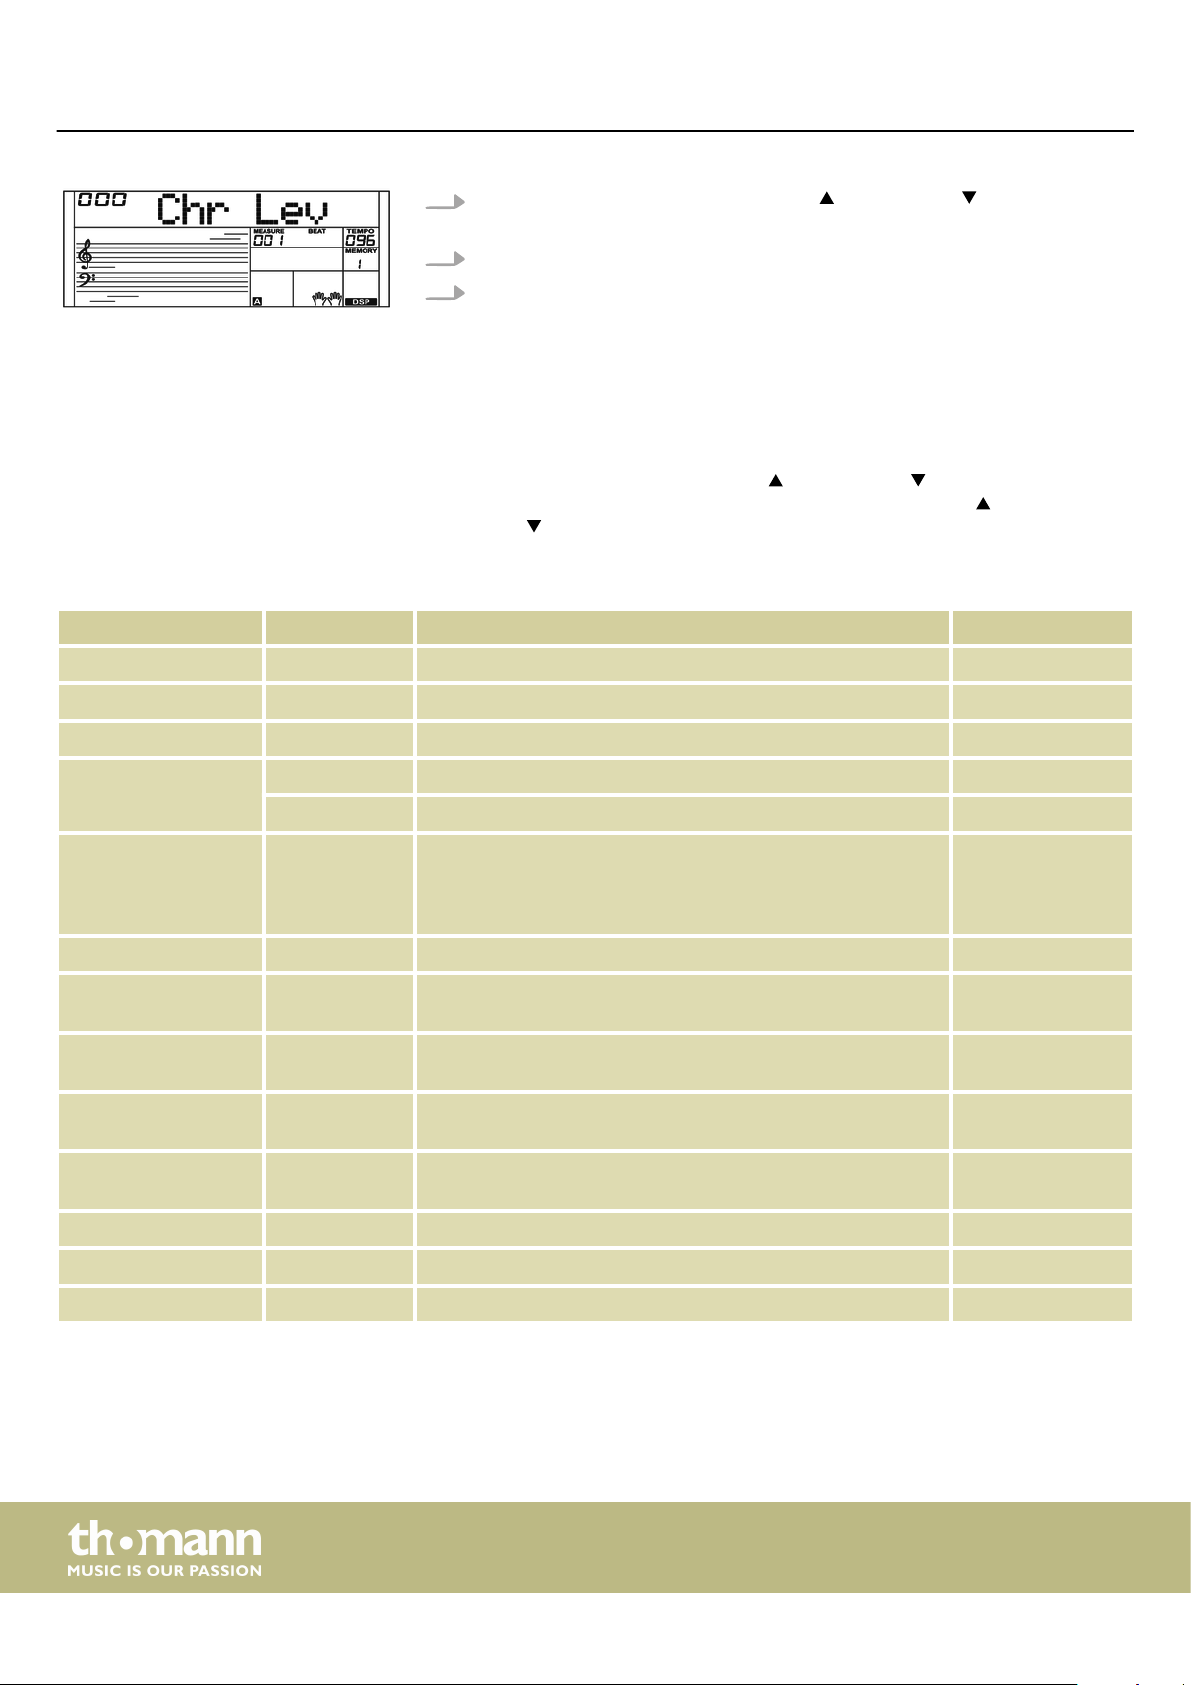
Turning the keyboard on / o, setup
4.
Hold down [SHIFT] and press [FUNCTION] or [FUNCTION] until the display
shows ‘Chr Lev’ .
5. Select with the jog dial the desired eect strength between 000…127.
6. Hold down [SHIFT] and press [DSP] again to disable the function.
The ‘DSP’ icon goes out.
ð
8.7 Setting up the keyboard, Function menu
Hold down [SHIFT] and press [FUNCTION] or [FUNCTION] to open the Function
menu. Select the desired sub menu using the buttons [FUNCTION] or
[FUNCTION] . You can then change the following parameters using the jog dial or
[YES] and [NO].
Option LCD Control range Default value
Fine tuning ‘Tune’ –50 … 50 000
Time signature ‘Beat’ 0, 2 … 9 004
Split point ‘Split Pt’ 1 … 88 034
Pedal function ‘SPd’ SUST, SOFT, St/T, MEM SUST
‘UPd’ SOFT, St/T, MEM SOFT
Selection Harmony
setting
Equalizer ‘EQ TYPE’ Pop, Rock, Class, Jazz, Dance, Reset Reset
Reverb eect ‘Rev TYPE’ Room1, Room2, Room3, Hall1, Hall2, Hall3, Chr1, Chr2, Del,
Reverb volume ‘Rev Lev’ 0 … 127 depending on the
Chorus eect ‘Chr TYPE’ Chorus1, Chorus2, GM Chr1, GM Chr2, Flanger1, Flanger2,
Chorus volume ‘Chr Lev’ 0 … 127 depending on the
MIDI receive channel ‘Midi In’ 1 … 16, ALL ALL
MIDI send channel ‘Midi Out’ 1 … 16 001
‘HAR TYPE’ Duet, Standard Trio, Full Chord, Rock Duet, Country Duet,
Country Trio, Block, 4 Close 1, 4 Close 2, 4 Open, 1+5, Octave1,
Octave2, Strum, Echo1, Echo2, Echo3, Echo4, Tremolo1,
Tremolo2, Tremolo3, Tremolo4, Trill1, Trill2, Trill3, Trill4
PanD
Rotary2
Duet
Hall1
selected voice
GM Chr2
selected voice
Automatic shuto ‘POWER OFF’ 030, 060, OFF 030
portable grand keyboard
22
Page 23
8.7.1 Fine tuning
Turning the keyboard on / o, setup
If you don't press any key within ve seconds after entering the function
menu, the menu is automatically closed.
With this function you can ne tune the entire claviature in cent steps.
1.
Use [FUNCTION] or [FUNCTION] to change into the ‘Tune’ menu. The cur‐
rent setting appears on the display.
2. Adjust the pitch using [YES] and [NO] or the jog dial in a range from –50 to +50
cents. Each time a key is pressed, the value changes by 1 cent.
3. Press [YES] and [NO] simultaneously to restore the default pitch.
8.7.2 Time signature
8.7.3 Split point
With this function you can set the time signature in a range from 0 to 9.
1.
Use [FUNCTION] or [FUNCTION] to change into the ‘Beat’ menu. The cur‐
rent setting appears on the display.
2. Adjust the time signature with [YES] and [NO] or with the jog dial.
3. Press [YES] and [NO] simultaneously to restore the time signature standard
value ‘004’ .
Using this function you can select a point to split the whole claviature into two areas.
1.
Use [FUNCTION] or [FUNCTION] to change into the ‘Split Pt’ menu. The dis‐
play shows the current setting.
2. Specify the desired split point using the buttons [YES] and [NO] or the jog dial.
The keys to the right of this point are the right hand area, the keys of the other
sides are the left hand area (chord area).
3. Press [YES] and [NO] simultaneously to restore the split point standard value
‘F#3’ .
In TWINOVA mode, the default split point is E3 (32) and can only be deter‐
mined by the user between C3 and C6 (28 to 64).
SP 5600
23
Page 24

Turning the keyboard on / o, setup
8.7.4 Pedal function
With this function you can assign the pedal function.
1.
2. Use [YES] and [NO] or the jog dial to assign the desired pedal function:
Use [FUNCTION] or [FUNCTION] to change into one of the menus ‘SPd’
(Sustain) or ‘UPd’ (Soft). The current setting appears on the display.
Sustain pedal (enclosed) Display Soft pedal (left pedal of the optional
SP-5600 stand)
Sustain pedal ‘SPd Sust’ Soft pedal ‘UPd Soft’
Soft pedal ‘SPd Soft’ Enabling / disabling the accompaniment
track
Enabling / disabling the accompaniment
track
Controlling the memory function ‘SPd Mem’
‘SPd St/T’ Controlling the memory function ‘UPd Mem’
3. Press [YES] and [NO] simultaneously to restore the pedal function standard
value ‘Soft’ or ‘Sust’ .
Display
‘UPd St/T’
24
portable grand keyboard
Page 25

8.7.5 Selection Harmony setting
Turning the keyboard on / o, setup
With this function you can pre-select a harmony setting.
1.
Use [FUNCTION] or [FUNCTION] to change into the ‘HAR TYPE’ menu. The
current setting appears on the display.
2. Use [YES] and [NO] or the jog dial to select the desired parameter:
n ‘Duet’
n ‘Standard Trio’
n ‘Full Chord’
n ‘Rock Duet’
n ‘Country Duet’
n ‘Country Trio’
n ‘Block’
n ‘4 Close 1’
n ‘4 Close 2’
n ‘4 Open’
n ‘1+5’
n ‘Octave1’
n ‘Octave2’
n ‘Strum’
n ‘Echo1’
n ‘Echo2’
n ‘Echo3’
n ‘Echo4’
n ‘Tremolo1’
n ‘Tremolo2’
n ‘Tremolo3’
n ‘Tremolo4’
n ‘Trill1’
n ‘Trill2’
n ‘Trill3’
n ‘Trill4’
3. Press [YES] and [NO] simultaneously to load the standard value ‘Duet’ .
SP 5600
25
Page 26

Turning the keyboard on / o, setup
8.7.6 Equalizer
With this function you can pre-select a certain tone colour.
1.
2. Use [YES] and [NO] or the jog dial to select the desired presetting:
3. Press [YES] and [NO] simultaneously to load the standard value ‘Reset’ (EQ o).
8.7.7 Reverb eect
Use [FUNCTION] or [FUNCTION] to change into the [EQ TYPE] menu. The
current setting appears on the display.
n ‘Pop’
n ‘Rock’
n ‘Class’
n ‘Jazz’
n ‘Dance’
n ‘Reset’
8.7.8 Reverb volume
With this function you can turn on the Reverb eect and select the eect type.
1.
Use [FUNCTION] or [FUNCTION] to change into the ‘Rev TYPE’ menu. The
current setting appears on the display.
2. Use [YES] and [NO] or the jog dial to select the desired parameter:
n ‘Room1’
n ‘Room2’
n ‘Room3’
n ‘Hall1’
n ‘Hall2’
n ‘Hall3’
n ‘Chr1’
n ‘Chr2’
n ‘Del’
n ‘PanD’
3. Press [YES] and [NO] simultaneously to load the standard value ‘Hall1’ .
With this function you can set the Reverb eects volume in a range from 0 to 127.
1.
Use [FUNCTION] or [FUNCTION] to change into the ‘RevLev’ menu. The cur‐
rent setting appears on the display.
2. Adjust the eects ratio with the buttons [YES] and [NO] or with the jog dial.
3. Press [YES] and [NO] simultaneously to reset the eects ratio to the standard
value (depending on the selected voice).
26
portable grand keyboard
Page 27

8.7.9 Chorus eect
Turning the keyboard on / o, setup
With this function you can turn on the Chorus eect and select the eect type.
1.
Use [FUNCTION] or [FUNCTION] to change into the ‘Chr TYPE’ menu. The
current setting appears on the display.
2. Use [YES] and [NO] or the jog dial to assign the desired parameter:
n ‘Chorus1’
n ‘Chorus2’
n ‘GM Chorus1’
n ‘GM Chorus2’
n ‘Flanger1’
n ‘Flanger2’
n ‘Rotary1’
n ‘Rotary2’
3. Press [YES] and [NO] simultaneously to load the standard value ‘GM Chorus2’ .
8.7.10 Chorus volume
8.7.11 MIDI receive channel
With this function you can set the Chorus eects volume in a range from 0 to 127.
1.
Use [FUNCTION] or [FUNCTION] to change into the ‘ChrLev’ menu. The cur‐
rent setting appears on the display.
2. Adjust the eects ratio with the buttons [YES] and [NO] or with the jog dial.
3. Press [YES] and [NO] simultaneously to reset the eects ratio to the standard
value (depending on the selected voice).
With this function you can determine on which channel the keyboard receives MIDI
information from other devices.
1.
Use [FUNCTION] or [FUNCTION] to change into the ‘Midi In’ menu. The cur‐
rent setting appears on the display.
2. Specify the desired MIDI receive channel using the buttons [YES] and [NO] or
the jog dial.
3. Press [YES] and [NO] simultaneously to reset channel selection to the standard
value ‘ALL’ .
SP 5600
27
Page 28

Turning the keyboard on / o, setup
8.7.12 MIDI send channel
With this function you can determine on which channel the keyboard sends MIDI
information to other devices.
1.
2. Specify the desired MIDI send channel using [YES] and [NO] or the jog dial.
3. Press [YES] and [NO] simultaneously to reset channel selection to the standard
8.7.13 Automatic shutdown
With this function you can specify whether and after what time the automatic shut‐
down of the keyboard is carried out.
1.
2. Use the buttons [YES] and [NO] or the jog dial to assign one of the following
Use [FUNCTION] or [FUNCTION] to change into the ‘Midi Out’ menu. The
current setting appears on the display.
value ‘001’ .
Use [FUNCTION] or [FUNCTION] to change into the ‘Power O’ menu. The
current setting appears on the display.
options:
3. Press [YES] and [NO] simultaneously to activate the presetting ‘030’ .
8.8 Loading / saving user settings
1. Press [BANK]. The display shows the last selected memory bank.
2. Press [BANK] again and specify the desired memory bank 1 … 8.
3. Hold down [STORE] and simultaneously press one of the [M1] to [M4] buttons.
4. Press one of the [M1] to [M6] buttons. The saved settings are then loaded from
n ‘030’ (automatic shutdown after 30 minutes)
n ‘060’ (automatic shutdown after 60 minutes)
n ‘OFF’ (automatic shutdown o).
The current settings are then stored in the respective memory location (M1 to
M6). Please note that any data previously stored there will be deleted.
the corresponding memory and replace the current settings thereby.
In O.T.S. mode, no settings can be loaded from the device memory.
28
portable grand keyboard
Page 29

8.9 Resetting user settings
Proceed as follows to reset the user settings:
1. Turn o the keyboard.
2. When turning it back on again, keep [STORE] and [M1] pressed.
8.10 Deleting stored recordings
Turning the keyboard on / o, setup
All user settings will be reset without further conrmation prompt.
ð
Deleting all recordings
Deleting certain tracks
Proceed as follows to clear the recording memory:
1. Turn o the keyboard.
2. When turning it back on again, keep [SONG] and [RECORD] pressed.
All recordings will be deleted without further conrmation prompt.
ð
Proceed as follows to delete certain tracks:
1. Hold down [SHIFT] and press [RECORD] to enable the recording mode.
2. Use [YES] and [NO] or the jog dial to select the track you want to delete (accom‐
paniment track [ACCOMP] or melody tracks [MELODY 1] … [MELODY 5]).
3. Conrm with [YES] or cancel the procedure with [NO].
All highlighted recordings will be deleted without further conrmation
ð
prompt.
SP 5600
29
Page 30

Operating
9 Operating
9.1 Piano mode
9.2 Transposing
Press [PIANO] to activate the Piano mode. The whole keyboard sounds with normal
piano voice.
With this function you can adjust the pitch of the claviature in 12 semitone steps up
or down.
1. Hold down [SHIFT] and press one of the [TRANSPOSE] buttons.
The display shows ‘Transpos’ .
ð
2. Use the [TRANSPOSE] buttons or the jog dial to adjust the keyboard pitch.
3. Press simultaneously the [TRANSPOSE] buttons or [YES] and [NO] to restore the
presetting (no transposing).
9.3 Playing demo sequences
9.4 Style playing
The demo sequences stored in the device show the sound and the pitch range of the
keyboard.
1. Press [DEMO] to start playing the demo sequences in a continuous loop.
2.
Use [YES] and [NO] to toggle between the ve demo sequences (see
13.4 ‘Demo list’ on page 71).
3. Press [DEMO] again or [START/STOP] to stop playing the demo sequences.
The styles stored in the keyboard are used to support your own playing at perform‐
ances, while practising and recording.
1. Press [STYLE] to activate the Style mode.
2. Use [YES] and [NO], the jog wheel or a direct select button to enable the
Ä
desired style directly (see
3. Press [START/STOP] to start or stop style playback.
For playing also with chord recognition, enable the function ‘Auto Bass Chord’
(A.B.C.), see Ä Chapter 9.14 ‘Chord detection’ on page 35.
Chapter 13.2 ‘Styles list’ on page 57).
Ä
Chapter
30
portable grand keyboard
Page 31

9.5 Playing songs
9.6 Metronome
Operating
The keyboard oers a choice of 120 songs to accompany your playing at perform‐
ances, while practising and recording. In addition, ve tracks for your own recordings
are available.
1. Press [SONG] to start playing the songs in a continuous loop.
2. Use [YES] and [NO] or the jog dial to toggle between the stored songs (see
Ä
Chapter 13.1 ‘Song list’ on page 55). If the selected le is empty, the display
shows the message ‘NoFile!’ and the song playback will be stopped.
3. Press [START/STOP] to start or stop song playback.
4. Press [STYLE] or [VOICE] to exit the song mode.
1. Press [METRONOME] to turn the Metronome on and o.
2. Set the desired tempo with the two function buttons [TEMPO] or the jog dial,
Ä
Chapter 9.7 ‘Tempo’ on page 31.
3.
Set the desired time signature via the functions menu, see
‘Time signature’ on page 23.
Ä
Chapter 8.7.2
9.7 Tempo
The metronome is always synchronized with the currently playing style.
All preprogrammed songs, styles and voices, and the metronome function are stored
with certain tempo information. These presets can be adjusted at any time.
1. Press the two function buttons [TEMPO] or turn the jog dial during playback or
with running metronome to adjust the desired tempo in a range from
‘30’ … ‘280’ .
2. Press the function buttons [TEMPO] simultaneously to reset the tempo to the
respective standard value.
SP 5600
31
Page 32

Operating
9.8 Mixer
This menu is used to adjust the volume of the various style elements.
1. Hold down [SHIFT] and press one of the two function buttons [MIXER] to open
the Mixer menu. The display shows the last selected option, e.g. ‘Rhythm_s’
and the last setting.
2. Use [YES] and [NO] or the jog dial to adjust the volume in a range from
‘0’ … ‘127’ .
3. Hold down [SHIFT] and press repeatedly one of the two function buttons
[MIXER] to call up and adjust the following options in succession:
n ‘Rhythm_s’
n ‘Rhythm_m’
n ‘Bass’
n ‘Chord1’
n ‘Chord2’
n ‘Chord3’
n ‘Phrase1’
n ‘Phrase2’
n ‘Upper1’
n ‘Upper2’
n ‘LOWER’
n ‘U-Disk’
9.9 Selecting voices
The keyboard features a selection of 600 authentic voices, see Ä Chapter 13.3 ‘Voice
list’ on page 62.
1. Press [VOICE] or one of the direct selection buttons to activate the last set or a
desired voice directly.
The display shows the name and number of the rst right hand voice (main
ð
voice), e.g. ‘VOICE R1’ , ‘001’ , ‘GrandPno’ .
2. Use [YES] and [NO], the jog dial or a direct select button to assign another
voice.
Press the [VOICE] button repeatedly to toggle between the upper and lower
voice of a direct selection button.
In dual and split mode, you toggle between the rst and second right hand voice and
the left hand voice by repeatedly pressing the [VOICE] button: ‘VOICE R1’ , ‘VOICE R2’
and ‘VOICE L’ , see the following chapters for Dual and Split mode.
32
portable grand keyboard
Page 33

9.10 Dual mode
Operating
In Dual mode, you can play two voices simultaneously.
1.
First, select the rst voice as described in section Ä Chapter 9.9 ‘Selecting voices’
on page 32.
2. Hold down [SHIFT] and press [ DUAL] to switch to dual mode.
The display shows the number and description of the second right hand
ð
voice, e.g. ‘VOICE R2’ , ‘186’ , ‘Strings’ .
3. Use [YES] and [NO], the jog dial or a direct select button to assign another
voice.
Press the [VOICE] button repeatedly to toggle between the upper and lower
voice of a direct selection button.
The currently set second voice appears in the display ( ‘Voice R2’ ). If you
ð
now press a key, both voices sound simultaneously.
4. Hold down [SHIFT] and press [DUAL] again to exit the dual mode.
9.11 Split mode
When the keyboard is split, the Dual mode aects only the keys to the right
of the keyboard split point.
With this function you can split the claviature into two areas and assign dierent
voices. By default, the bass voice is left of the split point.
1.
If desired, individually specify the split point as described at Ä Chapter 8.7.3
‘Split point’ on page 23.
2.
Assign the right hand voice as described in section
voices’ on page 32.
3. Hold down [SHIFT] and press [ LOWER] to switch to split mode.
4. Use [YES] and [NO], the jog dial or a direct select button to assign a voice for
the area to the left of the split point (second voice).
The currently set second voice appears in the display ( ‘Voice L’ ). You now
ð
have the opportunity to play the keyboard with two dierent voices.
5. Press [LOWER] again to exit split mode.
Ä
Chapter 9.9 ‘Selecting
SP 5600
33
Page 34

Operating
9.12 TWINOVA
In TWINOVA mode, the keyboard is divided into two areas with the same voice and
the same pitch.
1.
Select the desired voice, see Ä Chapter 9.9 ‘Selecting voices’ on page 32.
2. Hold down [SHIFT] and press [TWINOVA] to switch to TWINOVA mode.
3.
If necessary, specify a split point, see
4. If necessary, adapt the Octave area. Hold down [SHIFT] and press [OCTAVE].
The display shows ‘Octave’ .
ð
5. Use [YES] and [NO] or the jog dial to move the octave area by one octave up or
down ( ‘ –01’ … ‘+01’ ).
Press [YES] and [NO] simultaneously to restore the standard setting ‘000’ .
6. Hold down [SHIFT] and press [TWINOVA] again to exit the TWINOVA mode.
Ä
Chapter 8.7.3 ‘Split point’ on page 23.
9.13 Harmony mode
In harmony mode, suitable tones (harmonized) are automatically added to the notes
played to create polyphony.
1. Hold down [SHIFT] and press [HARMONY] to switch to harmony mode.
The [HARMONY] symbol appears on the display and the last selected Har‐
ð
mony type is displayed, e.g. ‘Duet’ .
34
portable grand keyboard
Page 35

Operating
2. Select one of the following harmony settings as described in chapter
Ä
Chapter 8.7.5 ‘Selection Harmony setting’ on page 25:
n ‘Duet’
n ‘Standard Trio’
n ‘Full Chord’
n ‘Rock Duet’
n ‘Country Duet’
n ‘Country Trio’
n ‘Block’
n ‘4 Close 1’
n ‘4 Close 2’
n ‘4 Open’
n ‘1+5’
n ‘Octave1’
n ‘Octave2’
n ‘Strum’
n ‘Echo1’
n ‘Echo2’
n ‘Echo3’
n ‘Echo4’
n ‘Tremolo1’
n ‘Tremolo2’
n ‘Tremolo3’
n ‘Tremolo4’
n ‘Trill1’
n ‘Trill2’
n ‘Trill3’
n ‘Trill4’
3. Hold down [SHIFT] and press [HARMONY] again to exit the harmony mode.
9.14 Chord detection
The Harmony settings Duet, Standard Trio, Full Chord, Rock Duet, Country
Duet, Octave, Echo, Tremolo and Trill can be activated at any time. The
other settings are only available when the chord recognition is turned on.
By default, the ‘Auto Bass Chord’ (A.B.C.) is disabled. Press the button [CHORD MODE]
to activate the function. The area to the left of the split point is already known as the
chord area. When you now play a chord, both bass and chord voices will sound
together.
SP 5600
35
Page 36

Operating
As the A.B.C. chord detection is based on the root note of the chord, some
chords that could be played according to the chord dictionary can not be
detected by A.B.C., such as B6, Bb6, Bb6(9), B6(9), Baug, Bbaug, Bbm6, Bm6,
Adim7, Bbdim7.
36
portable grand keyboard
Page 37

Operating
Single and multi-nger mode.
If the chord is played on base of the illustration for multi-nger chords below, it will
be detected as a 'multi-ngered' chord. If not, it will be detected as a 'single-nger'
chord.
n Single-nger chords
With this method, you can play chords with only one, two or three ngers within
the capabilities of the auto accompaniment. Here we show you some examples
of single nger chords (C, Cm, C7 and Cm7).
When the A.B.C. function is activated, press the keys to the left of the split
point. The chords are detected as single-nger chords.
n Multi-nger chords
With this method, you can play chords with normal ngering within the capabili‐
ties of the auto accompaniment. Here we show you 32 chords using the example
of C chords.
SP 5600
37
Page 38

Operating
n Chord basics
A chord consists of three or more notes played together. The most commonly
used chord is the triad consisting of three notes: Root, third and fth of the corre‐
sponding scale. The C major chord for example is formed from the notes C (root),
E (the third note of the C major scale), and G (the fth note of the C major scale).
In the C major chord shown, the lowest note is the root (this is the basic form of
the chord - if you play other notes of the chord as the lowest note, this is called
‘chord inversion’). The root is the central sound of the chord on which the other
chord notes are built upon. The interval between adjacent notes and the root
determines whether the result is a major or minor third.
n Chord structure
The lower interval in our triad (between root and third) determines whether the
result is a major or minor triad. In addition, we can shift the highest note by a half
step up or down to produce two additional chords.
The basic characteristic of the triad remains even if we change the order of the
notes to create dierent inversions. Consecutive chords can be softly connected
in a chord progression, e.g. by choosing suitable chord inversions (also called
‘voicings’).
38
portable grand keyboard
Page 39

Operating
n Chord names
Chord names will tell you everything you need to know about a chord. Through
the chord name, you know the root, whether it is a major, minor, or diminished
chord, whether a large or atted seventh is needed and what changes or ten‐
sions are used - all at a glance.
n Some chord types
9.15 Chord dictionary
The Chord dictionary is basically a built-in ‘Chord book’ assisting you to nd the right
tones of a chord if you e.g. know only the chord name, but not how to play it.
1. DICT 1 (chord learning mode)
Hold down [SHIFT] and press [DICT.] to call up the ‘DICT.1’ mode. In this mode,
the keys from C4 on are used to assign the chord type, and the keys from C6 to
assign the root note. If you have pressed the keys for chord type and root note,
the display shows the chord name and the individual notes in the notation
system.
For example, If you want to play a Cm7 chord, press the C6 key (root note C in
the Cm7 chord). You will hear no sound, but the root note is displayed.
Press the A4 key (chord type for minor-seventh chord, ‘m7’). You will hear no
sound, but the chord name and the notes you should play for the specied
chord appear in the display.
2. DICT 2 (chord testing mode)
Hold down [SHIFT] and press [DICT.] again to call up the ‘DICT.2’ mode. The dis‐
play shows a randomly generated chord name, but not its individual notes in
the notation system. If you play the right chord within three seconds, the next
randomly generated chord name appears. If this does not happen, the indi‐
vidual notes of the chord in the notation system appear automatically in the
display.
SP 5600
39
Page 40

Operating
In the chord dictionary, the 12 root notes and 24 chord types are presented as fol‐
lows:
Key names Root note Key names Root note
C6 C
C#6 C#/D
b
D6 D Ab6
Eb6
D#/Eb6
E6 E Bb6
F#6 F#/G
G6 G
G#/A
A6 A
A#/B
b
b
b
F6 F B6 B
Key names Chord type Key names Chord type
C4 M C5 7b9
C#4
M(9)
C#5
D4 6 D5
7(9)
7(#9)
Eb4 mM7 Eb5 7b13
E4 M7 E5 7(13)
F4 m F5
F#4
m(9)
F#5
7(#11)
dim7
G4 m6 G5 dim
Ab4 m7(9) Ab5 7aug
A4 m7 A5 aug
Bb4 m7b5 Bb5 7sus4
B4 7 B5 sus4
40
portable grand keyboard
Page 41

9.16 Auto Accompaniment
Auto accompaniment functions
Operating
The accompaniment function is controlled via four parameters: INTRO, MAIN (A, B),
FILL (A, B) and ENDING.
1. INTRO
To insert an intro, press [INTRO/ENDING] before beginning to play. Depending
on the selected Style the rhythm starts with two to four bars, followed by the
main part.
2. MAIN (A, B)
The main part consists of an accompaniment pattern with dierent sections
and is repeated until you enter a new song section (FILL or ENDING). The indi‐
vidual sections of the main part are selected via [A] and [B].
3. FILL (A, B)
Use [A] and [B] to insert two dierent ll bars. Each ll measure will be repeated
until you release the button.
4. ENDING
If you press [INTRO/ENDING] while Auto Accompaniment is activated, an
ending part suitable for the Accompaniment is started, nishing the song.
Playing with auto accompaniment
1.
Select the desired style ( Ä Chapter 9.4 ‘Style playing’ on page 30).
2. Use [CHORD MODE] to enable chord recognition.
3. Use [SYNC START] to enable Sync Start operation.
4. Press [INTRO/ENDING] to start the song with an Intro.
The character ‘A’ is ashing on the display.
ð
5. The accompaniment starts as soon as you press a key in the chord area.
6. If desired, you can use [FILL B] to insert ll measures as transition into main part
B.
The character ‘B’ is ashing on the display.
ð
7. Press [INTRO/ENDING] again to conclude the song with an Ending.
9.17 Accompaniment track volume, muting
This function allows you to adjust the volume of the accompaniment track to the
volume of the claviature or to mute the accompaniment track.
1. Setting the accompaniment track volume
Hold down [SHIFT].
Use [ACCOMP] to adjust the accompaniment track volume in a range from
0 … 127.
SP 5600
41
Page 42

Operating
9.18 Fade in, Fade out
2. Muting the accompaniment track
Hold down [SHIFT].
Press the two function buttons [ACCOMP] simultaneously to mute the accom‐
paniment track. The display shows ‘oFF’ .
3. Re-enabling the accompaniment track
Hold down [SHIFT] and press the two function buttons [ACCOMP] to re-enable
the accompaniment track.
The display returns to the set volume level of the accompaniment track,
ð
e.g. ‘100’ .
With this function you can increase the volume of the accompaniment track gradu‐
ally to the preset volume of the selected Style (Fade in) and decrease it again at the
end of the piece (Fade Out).
1. Hold down [SHIFT] and press [FADE] before starting the Style.
The volume of the Style is raised within ten seconds from zero to the
ð
preset value.
2. Hold down [SHIFT] and press [FADE] at the end of the piece.
The volume of the Style is lowered within ten seconds to zero.
ð
9.19 One Touch Setting
One Touch Setting (O.T.S. or one-key operation) is a convenient function that allows
you to immediately recongure all settings with just one single key press. This is
about rhythm-based compilations of keyboard voices. With this function, four param‐
eter types (M1 to M4) can be loaded.
1. Press [O.T.S.] to activate the function. The display shows ‘OTS’ . Press one of the
keys [M1] to [M4], then the keyboard loads the corresponding parameter types
that match the current Style. Chord recognition will automatically be switched
on.
2. Press one of the [M1] to [M4] buttons to load one of the available presets.
3. Press the [O.T.S.] button again to deactivate O.T.S. mode.
4.
The default parameters stored in O.T.S. are:
n Track on / o
n Change voice R1, R2, L
n Volume R1, R2, L
n Chorus level voice R1, R2, L
n Reverb level voice R1, R2, L
42
portable grand keyboard
Page 43

9.20 Performance Assistant
9.20.1 GUITAR mode
Operating
The ‘Performance Assistant’ is a playing aid, which allows you to simulate dierent
keyboards on the claviature.
1. Press [PERFORM] to activate the playing aid.
GUITAR mode is enabled by default. Use the jog dial to select a le.
2. Adjust the Tempo using the [TEMPO] buttons.
3. Adjust the time signature with [YES] and [NO].
In this mode, you can simulate a guitar sound on the claviature. The table shows the
various play areas.
Chord area A
Area B1
Area B2
Rhythm area C
Shift D
This area includes the keys A0 to B3 of the claviature.
The chord type appears in the display. The root of the guitar chord sounds.
This area includes the white keys C4 to B4 of the claviature.
Once the chord type is displayed, you can play several gures of broken chords with
the white keys in this area. While playing, you also have the possibility to vary the
chord played in the chord area.
This area includes the white keys C5 to A6 of the claviature.
Once the chord type is displayed, you can play a solo track with the white keys in this
area. While playing, you also have the possibility to vary the chord played in the
chord area.
This area includes the white keys C6 to G6 of the claviature.
Once the chord type is displayed, you can play a rhythm track with the white keys in
this area. While playing, you also have the possibility to vary the chord played in the
chord area.
Key C7. Press this button to shift upwards.
SP 5600
43
Page 44

Operating
9.20.2 PIANO mode
9.21 Practising songs
After enabling the playing aid, use the jog dial to change to the PIANO mode.
In this mode, the entire claviature sounds with the piano voice. The table shows the
various play areas.
Play basic chords in area A and an accompanying melody in areas B and C an.
Keys A6, B6 and C7 give you the opportunity to complete a phrase with a suitable
ending.
The keyboard oers 120 practising songs, where you can mute the right hand voice
and play this part yourself.
1. Playing and stopping practising songs
Press [SONG] to enter the playback mode for practising songs. ‘SONG’ appears
on the display and all practising songs are being played in an endless loop.
Press [START/STOP] to stop the currently playing practising song. This will not
quit the mode for practising song playback ‘SONG’ .
2. Single loop
If you press [START/STOP ] again the current song is repeated in an endless loop
until you press [START/STOP] again.
3. Selecting a practising song
Use the jog dial or [YES] and [NO] to select the desired practising song. If you
select a new practising song, the display shows rst the title in running text,
then the abbreviation.
4. Playback control
Pre-count
An Intro of dierent length will be played before playback begins. The bar dis‐
play starts with a negative value. The practising song starts with bar 1.
Fast-forward, rewind, pause
Hold down during playback to fast-forward the practising song. Use
to rewind bar by bar. Press to pause playback and again to continue the
playback at the same position. Press [START/STOP] to start the practising song
from the beginning.
Repeat function
While the practising song is playing you can set two loop marks with . Press
the button at the desired start point of the loop and again at the end point.
5. To exit practising song playback press any direct select or function button.
portable grand keyboard
44
Page 45

Operating
Lesson mode
Lesson 1 - playing in time
Lesson 2 - hitting the right notes
When practising, it is mainly important to play the right notes at the right time. In
this mode you can check your progress. Press [LESSON] in SONG mode to activate the
Lesson mode. There are three training stages. Use [R] and [L] to specify which hand
you want to practise. If you don't select a hand, the right hand will automatically be
selected.
Press [LESSON] to enter the Lesson mode. ‘LESSON 1’ appears on the display. In this
mode, it is only rated whether you play the notes at the right time, but not whether
you hit the right notes.
1. Press [START/STOP] to start practising.
2. If you have selected ‘R’ the right hand voice is muted and you have to play the
right hand yourself. As long as you are in time, you will hear the right hand
voice. If you have selected ‘L’ the left hand voice is muted and you have to play
the left hand yourself. As long as you are in time, you will hear the left hand
voice. Are both ‘L’ and ‘R’ selected the voices for both hands are muted. You
then have to play in time with both hands.
3. After completing the exercise, you will learn the result.
Press [LESSON] again to enter the Lesson mode 2. ‘LESSON 2’ appears on the display.
In this mode, it is only rated whether you hit the right notes, but not whether you
play them at the right time. The practising song continues only when you play the
right note.
1. Press [START/STOP] to start practising.
2. After completing the exercise, you will learn the result.
Lesson 3 - hitting the right notes at
the right time.
9.22 Recording function
Press [LESSON] again to enter the Lesson mode 3. ‘LESSON 3’ appears on the display.
In this mode, it is rated whether you play the right notes at the right time. The prac‐
tising song continues only when both is correct.
1. Press [START/STOP] to start practising.
2. After completing the exercise, you will learn the result.
You can record your own songs with the keyboard and save up to ve recordings as
user songs in the internal memory. Unsaved recordings are retained in the clipboard
memory after switching the keyboard o.
The recording are stored in the memory register 121 – 125.
SP 5600
45
Page 46

Operating
9.22.1 Recording preparation
Before starting the recording, you have to select a user song for saving the recording.
1. Hold down [SHIFT] and press [RECORD] to enable the recording mode.
The display shows the standard name of the rst user song ‘RecSong1’ and
ð
the sequence number.
2. Press [YES] and [NO] or turn the jog dial to select a user song you want to
record.
3. Hold down [SHIFT] and press [RECORD] again to record-enable the keyboard.
The ‘REC’ icon appears on the display.
ð
4. The recording starts as soon as you play the rst tone or chord or press
[START/STOP].
If you select the accompaniment track and A.B.C. (see Ä Chapter 9.14 ‘Chord
detection’ on page 35) is open, play an eective chord in the left area. Press
[CHORD MODE] again with open A.B.C. to enable the chord recognition for the
entire keyboard or press [START/STOP] to start recording.
9.22.1.1 Setting accompaniment/metronome, voice, tempo and tracks
1. If desired, select an accompaniment/metronome or voice and set the
recording tempo.
2. Keep [SHIFT] pressed and press [ACCOMP] (accompaniment track) or
[MELODY1] … [MELODY5] (melody tracks) to set the desired recording track.
Preset is ‘Melody1’ .
You have the option to record the accompaniment track along with a
melody track. If you want to record with accompaniment function or
a style, select again the desired chord recognition after setting the
recording mode.
If you want to use a metronome for recording, enable previously the
metronome and set the desired tempo.
9.22.2 Recording
1. The availability of the tracks is indicated by the icons on the left edge of the
display:
n Icon ashing: selected track, existing data can always be overwritten.
n Icon lights permanently: Track contains data and can play along to the
recording.
n Icon o: Track contains no data and cannot be played.
46
portable grand keyboard
Page 47

9.22.3 Stopping recording
Operating
2. Use the corresponding buttons to select the track [ACCOMP] or [MELODY1] …
[MELODY5].
During recording the device selects automatically the next empty
track next to the data containing track. If all tracks contain data,
select ‘Melody 1’ to save your recording.
To stop recording, hold down [SHIFT] and press [RECORD]. The display shows
‘Wait…’ (depending on the length of the recording) until the recording is saved.
When the full memory capacity has been reached, the recording is terminated auto‐
matically and the recorded data is saved. While storing, the indicator ashes quickly.
The display shows ‘Rec_Full’ .
After saving the device plays the recording in endless loop. Press [START/STOP] to
stop recording.
9.22.4 Playing a recording
9.22.5 Delete recording
Deleting certain tracks
Use [SONG] to change to normal playback mode and select the recording for play‐
back ( Ä Chapter 9.5 ‘Playing songs’ on page 31).
1. Hold down [SHIFT] and press [RECORD].
2. Use the jog dial to select one of the ve user songs from which you want to
delete one or more tracks.
3. Hold down [SHIFT] and press [RECORD] again.
The ‘REC’ icon appears on the display.
ð
4. Hold down [SHIFT] and keep [RECORD] pressed for two seconds.
The display shows ‘Delete?’ .
ð
SP 5600
47
Page 48

Operating
5. Release [SHIFT] and [RECORD]. Keep [SHIFT] pressed and press [ACCOMP]
(accompaniment track) or [MELODY1] … [MELODY5] (melody tracks) to select
the desired recording track you want to keep.
The Icons on the left edge of the display indicate which tracks should be kept
or deleted:
n Icon on: Track will be deleted.
n Icon o: Track will be kept.
6. Conrm with [YES] to delete the track.
All data on the selected track will be deleted.
ð
7. To cancel the process press [NO].
The device returns to state Recording preparation without deleting data.
ð
Deletes all user songs
9.23 MIDI function
9.24 USB storage medium
First switch o the device to delete all user songs.
Hold down [RECORD] and [SONG] and switch on the device.
All user songs will be deleted without further conrmation prompt.
ð
MIDI stands for ‘Musical Instrument Digital Interface’ and represents the standard
interface between a computer and electronic instruments.
You can exchange MIDI data with other MIDI devices via the MIDI and USB interfaces
of the keyboard.
The exchange of MIDI data via the USB interface is only possible with WIN
32-bit systems.
48
The keyboard supports USB ash drives with a capacity from 16 MB to 32 GB that are
formatted using the FAT 16/32 le system.
Connect a suitable USB stick with the keyboard and press [USB DEVICE] to enter the
USB menu. If the stick could be correctly initialized the display shows ‘Play’ . If an
error occurs the display shows ‘DiskErr!’ .
In Memory mode, the ‘MMKD’ folder is automatically created for all user
data.
On MIDI playback, you can adjust the volume using [MIXER] and [YES]/[NO].
portable grand keyboard
Page 49

9.24.1 USB stick playback
1. Connect the USB stick with the keyboard and open the USB menu.
2. Conrm with [YES].
3. Use the jog dial to highlight the desired directory and conrm for opening with
4. Use the jog dial to highlight the desired MIDI le and start or stop playback
9.24.2 Loading data from USB stick
1. Connect the USB stick with the keyboard and open the USB menu.
Use the jog dial to highlight the ‘Play’ option.
The display shows the available directories.
ð
[YES].
with [START/STOP].
Use the jog dial to highlight the ‘Load’ option.
Operating
9.24.3 Save data to USB stick
2. Conrm with [YES].
The display shows the available options: Loading a song ( ‘LoadSong’ ),
ð
loading a style ( ‘LoadSty’ ) and loading user settings ( ‘LoadMem’).
3. Use the jog dial to highlight the desired option and conrm with [YES].
4. Use the jog dial to highlight the song, style or user setting to be loaded and
start the procedure with [YES].
5. You can cancel the process at any time with [NO].
1. Connect the USB stick with the keyboard and open the USB menu.
Use the jog dial to highlight the ‘Save’ option.
2. Conrm with [YES].
The display shows the available options: Saving a song ( ‘SaveSong’ ), saving
ð
a style ( ‘SaveSty’ ) and saving user settings ( ‘SaveMem’).
3. Use the jog dial to highlight the desired option and conrm with [YES].
4. Use the jog dial to highlight the desired le (i.e. user song) and conrm with
[YES].
5. Use the keyboard of the device to enter a le name and conrm again with
[YES].
6. You can cancel the process at any time with [NO].
SP 5600
49
Page 50

Operating
9.24.4 Deleting all data on a USB stick
1. Connect the USB stick with the keyboard and open the USB menu.
2. Conrm with [YES].
3. Use the jog dial to highlight the desired option and conrm with [YES].
4. Use the jog dial to highlight the desired le and conrm with [YES].
5. Conrm the conrmation prompt with [YES] to delete the data.
6. You can cancel the process at any time with [NO].
9.25 Reset to factory defaults
Use the jog dial to highlight the ‘Delete’ option.
The display shows the available options: Deleting a song ( ‘UserSong’ ),
ð
deleting a style ( ‘UserSty’ ) and deleting user settings (‘UserMem’ ).
Proceed as follows to restore the factory default settings:
1. Turn o the keyboard.
2. When turning it back on again, keep the buttons [YES] and [NO] pressed.
All user songs and settings are reset or deleted without further conrma‐
ð
tion prompt. The display shows ‘Loading!’ .
If you only want to delete the stored user settings but want to keep your own record‐
ings in the memory, proceed as follows:
1. Turn o the keyboard.
2. When turning it back on again, keep [STORE] and [M1] pressed.
All user settings will be deleted without further conrmation prompt.
ð
If you only want to delete your own recordings but want to keep your changed user
settings in the memory, proceed as follows:
1. Turn o the keyboard.
2. When turning it back on again, keep [SONG] and [RECORD] pressed.
All recordings will be deleted without further conrmation prompt.
ð
50
portable grand keyboard
Page 51

Technical specications
10 Technical specications
Input connections Power supply Connector for power adapter
USB port USB type B
MIDI port DIN socket, 5-pin
AUX in 1/4" jack socket
Microphone 1/4" jack socket
Pedal box 1/4" jack socket
Output connections MIDI port DIN plug, 5-pin
AUX out 1/4" jack socket
Display Multi-functional LCD
Keyboard 88 weighted keys with hammer action
Touch sensitivity adjustable in four steps (o, soft, normal, hard)
Tonal colours Number 600
Polyphony 128-voice
Layer Left, right 1, right 2
Functions Split, duo (Twinova)
Styles Number 230
Control [START/STOP], [SYNC START], [INTRO/ENDING],
[MAIN A], [MAIN B], [FILL IN A], [FILL IN B], [A.B.C.],
[FADE IN], [FADE OUT], [ACCOMP VOLUME]
O.T.S. built-in
Chord types 32
Eects DSP on / o
Master EQ 6 presettings
Reverb 10 types, 128 levels
Chorus 8 types, 128 levels
Accompaniment function built-in
Harmony mode 26 types
Pitch adjustment Transposing –12 … +12
Octave transposing –1 … +1
Voices –50 … +50
Functions Mixer 12 tracks
Memory for user settings 8 banks, each with 6 memory locations
SP 5600
51
Page 52

Technical specications
Pedal support Sustain
Pitch bend wheel built-in
Metronome 0, 2 … 9
Tempo 30 … 280
Chord dictionary built-in
Pedals Sustain
Demo and practice songs Practising songs 120
Sequencer 5 user songs (5 melody tracks, 1 accompaniment
track)
Demo pieces 5
Amp 2 × 10 W
Speaker 2 × 10 W
2 × 20 W
Power supply
Dimensions (W × H × D) 1365 mm × 137 mm × 366 mm
Weight 13.8 kg
Colour Black
Ambient conditions Temperature range 0 °C…40 °C
Further information
Design Black
Surface Matt
Wooden keyboard No
Ivory-feel keyboard No
Auto Accompaniment Yes
Number of rhythms 230
Polyphony 128
Sounds 600
Power adapter (12 V / 2000 mA, centre positive)
Relative humidity 50 %, non-condensing
Storage medium USB MIDI
52
portable grand keyboard
Page 53

11 Plug and connection assignment
Plug and connection assignment
Introduction
Balanced and unbalanced transmis‐
sion
1/4" TS phone plug (mono, unbal‐
anced)
This chapter will help you select the right cables and plugs to connect your valuable
equipment in such a way that a perfect sound experience is ensured.
Please note these advices, because especially in ‘Sound & Light’ caution is indicated:
Even if a plug ts into the socket, an incorrect connection may result in a destroyed
power amp, a short circuit or ‘just’ in poor transmission quality!
Unbalanced transmission is mainly used in semi-professional environment and in hi
use. Instrument cables with two conductors (one core plus shielding) are typical rep‐
resentatives of the unbalanced transmission. One conductor is ground and shielding
while the signal is transmitted through the core.
Unbalanced transmission is susceptible to electromagnetic interference, especially at
low levels, such as microphone signals and when using long cables.
In a professional environment, therefore, the balanced transmission is preferred,
because this enables an undisturbed transmission of signals over long distances. In
addition to the conductors ‘Ground’ and ‘Signal’, in a balanced transmission a second
core is added. This also transfers the signal, but phase-shifted by 180°.
Since the interference aects both cores equally, by subtracting the phase-shifted
signals, the interfering signal is completely neutralized. The result is a pure signal
without any noise interference.
1/4" TRS phone plug (mono, bal‐
anced)
1 Signal
2 Ground, shielding
1 Signal (in phase, +)
2 Signal (out of phase, –)
3 Ground
SP 5600
53
Page 54

Troubleshooting
12 Troubleshooting
In the following we list a few common problems that may occur during operation.
We give you some suggestions for easy troubleshooting:
Symptom Remedy
No sound when playing the
keyboard.
Noise when using a mobile
phone.
Auto accompaniment does
not start with sync start.
Harmony mode can not be
activated.
Keyboard is not detected by
the software when connected
to a computer.
If the procedures recommended above do not succeed, please contact our Service
Center. You can nd the contact information at www.thomann.de.
Check the position of the volume control.
Check if headphone output 2 has a headphone
connected.
Check the mixer's volume setting R1 / R2 / L.
Do not place the turned on mobile phone on the
keyboard.
Keep a sucient distance from the keyboard when
using a mobile phone.
The automatic start-up of the auto accompani‐
ment along with sync start function only works
when you play a piano key in the left hand area.
Check whether a drum kit is assigned to the R1
voice. In this case, the harmony mode can not be
activated.
Check the USB cable for correct connection.
Connect the USB cable to another USB port on the
computer.
54
portable grand keyboard
Page 55

Appendix
13 Appendix
13.1 Song list
No. Name Display No. Name Display
FOLK & COUNTRY 027 La Donne Mobile DoneMble
001 Toccata Toccata 028 Serenata Serenata
002 Carry Me Back To Old Virginny Virginny 029 Bridal March Bridal
003 El Condor Pasa ElCondor 030 Can't Help Fallin' In Love InLove
004 Traumerei Traumere 031 Chanson Du Toreador Toreador
005 Aloha Oe AlohaOe 032 Danny Boy DannyBoy
006 Greensleeves Sleeves 033 Ich Liebe Dich LieDich
007 Home Sweet Home SwetHome 034 Wiegenlied 2 Wieglid2
008 Heidenroslein Heidenro 035 Spanish Serenade Serenade
009 Long Long Ago LongAgo 036 Piano Concerto Concerto
010 Die Lorelei Lorelei 037 Piano Concerto 2 Concrto2
011 Over The Waves OverWave 038 Madame Buttery Madame
012 My Darling Clementine Clemtine 039 Invitation To The Dance ToDance
013 Gwine To Run All Night Gwine 040 Wiegenlied 3 Wieglid3
014 Symphony No.6 "Pathetic" Sympony6 041 Jingle Bells JingBell
015 Oh! Susanna Susanna 042 Joy To The World JoyWorld
016 Prelude Op.28 No.15 Prelude 043 La Paloma LaPaloma
017 The House Of The Rising Sun RiseSun 044 My Bonnie MyBonnie
018 Menuet Menuet 045 La Reine De Saba Saba
GOLDEN & POP 046 La Cucaracha Cucarach
019 Vaslse Des Fleurs Fleurs 047 Little Brown Jug BrownJug
020 Fruhlingsstimmen Fruhling 048 Battle Hymn Of The Republic BatlHyme
021 Frohlicher Landmann Landmann 049 Yellow Rose Of Texas YellRose
022 Are You Lonesome Tonight? Lonesome 050 The Wabash Cannon Ball CannBall
023 Toy Symphony ToySymph 051 Annie Laurie AnnieLa
024 Auld Lang Syne LangSyne 052 Turkish March Turkish
025 Ave Maria AveMaria 053 An Die Musik Musik
026 Tales Of Homan Homan 054 Lieder Ohne Worte Op.62 No.6 Lieder
SP 5600
55
Page 56

Appendix
No. Name Display No. Name Display
055 Red River Valley RedRiver 082 Pizzicato Polka Polka
056 Die Forelle Forelle 083 Menuett Menuett
057 Symphony No. 94 "Suprise" No. 94 084 Rigoletto Rigoletto
058 Polonaise Polonais 085 Serenade Serenade
059 Rondeau Rondeau 086 Song Without Words SOngNoWd
060 Moments Musicaux Musicaux 087 Swan Swan
061 Silent Night SltNight 088 The Dying Swan DyingSwn
062 Moldau Moldau 089 Swan Lake Valse SwnWalse
063 Summertime Summer 090 The Happy Farmer HpFarmer
064 Dreaming Of Home And Mother Dreaming 091 The Sleeping Beauty SleepBty
065 Ring Ring De Banjo DeBanjo 092 La Traviata LaTravia
066 Der Lindenbaum DerLinde 093 Wiegenlied Wiegenli
067 Zigeunerweisen Zigeuner 094 Mov. 2 Adagio Non Troppo Piano
Sonata No. 9 In D
068 The Maiden's Prayer Prayer 095 Piano Sonata No. 11 In A Sonata11
069 Fur Elise FurElise 096 Prelude In C Prelude
070 Der Freischutz DerFreis 097 Chinese Dance ChDance
071 Maria! Maria! Maria! 098 Emperor Waltz Emperor
CLASSICAL 099 March Militaire Militair
072 Waves Of The Danube Danube 100 Symphony No. 40 Symphony
073 Santa Lucia SantaLuc PIANO
074 Solveig's Song Solveig 101 Hanon Piano Fingering 1 Hanon1
075 Piano Sonatan No. 8 In C Minor
(Pathetique)
076 Brahms Waltz BrmsWltz 103 Hanon Piano Fingering 3 Hanon3
077 Aida Aida 104 Hanon Piano Fingering 4 Hanon4
078 Carmen-Prelude Carmen 105 Hanon Piano Fingering 5 Hanon5
079 L'Arlesienne L'Arlesi 106 Basic Tutorial Beyer Piano 12 Beyer12
080 Ungarische Tanz Uungaris 107 Basic Tutorial Beyer Piano 13 Beyer13
Patheque 102 Hanon Piano Fingering 2 Hanon2
Sonata9
081 Mazurka Mazurka 108 Basic Tutorial Beyer Piano 14 Beyer14
portable grand keyboard
56
Page 57

Appendix
No. Name Display No. Name Display
109 Basic Tutorial Beyer Piano 15 Beyer15 115 Basic Tutorial Beyer Piano 45 Beyer45
110 Basic Tutorial Beyer Piano 18 Beyer18 116 Christmas Eve XmasEve
111 Cuckoo Cuckoo 117 Basic Tutorial Beyer Piano 50 Beyer50
112 Basic Tutorial Beyer Piano 21 Beyer21 118 Basic Tutorial Beyer Piano 52 Beyer52
113 Basic Tutorial Beyer Piano 29 Beyer29 119 Basic Tutorial Beyer Piano 55 Beyer55
114 Buttery Butery 120 Basic Tutorial Beyer Piano 59 Beyer59
13.2 Styles list
No. Name Display No. Name Display
8BEAT 021 Pop 16Beat 4 Pop16Bt4
001 8Beat Ballad 8BtBld 022 Modern 16Beat Modr16Bt
002 8Beat Piano 8BtPiano 023 16Beat Hot 16BtHot
003 8Beat 1 8Beat1 024 16Beat Modern 16BtModr
004 Guitar Pop 1 GtPop1 025 16Beat Funk 3 16BtFuk3
005 8Beat Hip Hop 8BtHiHop 026 16Beat 3 16Beat3
006 8Beat Blues Rock 8BtBluRk 027 Cool Beat CoolBeat
007 8Beat 2 8Beat2 028 16Beat Ballad 2 16BtBld2
008 Sweet Beat SweetBt 029 16Beat 4 16Beat4
009 8Beat 3 8Beat3 030 Pop Shue PopSh
010 Rhythm&Beat 2 Rhy&Bt2 POP & BALLAD
16BEAT 031 Pop Rock 1 PopRock1
011 16Beat 1 16Beat1 032 Pop Dance 1 PopDanc1
012 16Beat Funk 1 16BtFuk1 033 Pop Fusion PopFusn
013 16Beat Ballad 1 16BtBld1 034 Analog Night 1 AnalgNt1
014 16Beat R&B 16BtR&B 035 6/8 Pop 6/8Pop
015 Pop 16Beat 1 Pop16Bt1 036 Brit. Pop 1 BritPop1
016 16Beat Funk 2 16BtFuk2 037 Brit. Pop 2 BritPop2
017 16Beat Dance 16BtDanc 038 Pop Hit PopHit
018 Pop 16Beat 2 Pop16Bt2 039 Fusion Shue FusShu
019 16Beat 2 16Beat2 040 Analog Night 2 AnalgNt2
020 Pop 16Beat 3 Pop16Bt3 041 Guitar Pop 3 GtPop3
SP 5600
57
Page 58

Appendix
No. Name Display No. Name Display
042 Pop Beat PopBeat 071 New Shue NewShu
043 Soft Beat SoftBeat 072 Rock Hip Hop RkHipHop
044 60's Pop 60'sPop 073 Rock&Roll 1 R'N'R1
045 Sting Latin StigLatn 074 Rock Shue RockSh
046 R&B Ballad 1 R&BBld1 075 Rock&Roll 2 R'N'R1
047 Guitar Ballad GtBallad BALLROOM
048 Ballad Rock BaldRock 076 Tango 1 Tango1
049 Piano Pop PianoPop 077 Spain Matador Matador
050 Soft Ballad SoftBald 078 Twist 1 Twist1
051 Natural Ballad NatulBld 079 Twist 2 Twist2
052 Love Ballad LoveBald 080 Big Band Fox BandFox
053 Easy Ballad EasyBald 081 Tango 2 Tango2
054 Miami Folk MiamiBld 082 Slow Fox SlowFox
055 Slow Ballad SlowBald 083 Slow Waltz 1 SlowWlz1
056 Folk Ballad FolkBald 084 Swing Fox SwingFox
057 Pop Ballad 1 PopBald1 085 Salsa 1 Salsa1
058 Pop Ballad 2 PopBald2 086 Cha Cha 1 ChaCha1
059 EP Ballad EPBallad 087 Cha Cha 2 ChaCha2
060 New R&B Ballad NewRBBld 088 Beguine 1 Beguine1
ROCK 089 Beguine 2 Beguine2
061 Rock Rock 090 Rumba 1 Rumba1
062 New Wave NewWave 091 Samba 1 Samba1
063 Ska Ska 092 Samba 2 Samba2
064 Pop Rock 2 PopRock2 093 Jive Jive
065 Slow Rock SlowRock 094 Fox Trot FoxTrot
066 70's Rock&Roll 70'sRock DANCE
067 Folk Rock FolkRock 095 Techno 1 Techno1
068 Soft Rock SoftRock 096 Hip Hop 1 HipHop1
069 Old Rock OldRock 097 House 1 House1
070 Easy Rock EasyRock 098 Down Beat DownBeat
portable grand keyboard
58
Page 59

Appendix
No. Name Display No. Name Display
099 Progressive Progress 128 Swing Swing
100 Rap 1 Rap1 129 Latin Jazz 2 LatinJz2
101 Disco Disco 130 Fusion Fusion
102 70's Disco 70'sDisc 131 Acid Jazz AcidJazz
103 Club Dance ClubDanc 132 Cool Jazz Ballad CoolJzBd
104 Euro Dance EuroDanc 133 Swing Shue SwingS
105 Garage Garage 134 Big Band Medium BandMid
SOUL & FUNK 135 Ragtime Ragtime
106 Funk 1 Funk1 COUNTRY
107 Classic Funk ClasFunk 136 Country Pop 1 CntyPop1
108 Jay R&B JayR&B 137 Bluegrass 1 Blugras1
109 Gospel Swing GopSwing 138 8Beat Country 8BtCnty
110 Gospel Gospel 139 Modern Country ModrCnty
111 Funk 2 Funk2 140 Country Pop 2 CntyPop2
112 Electric Funk ElecFunk 141 Bluegrass 2 Blugras2
113 Groove Funk GrooveFk 142 2/4 Country 2/4Cntry
114 Rubber Funk RubberFk 143 Country Quick Steps QuickStp
115 Cool Funky ColFunky 144 Country Folk CntyFolk
116 Jazz Funk JazzFunk 145 Country Shue CnyShu
117 Groove Groove LATIN & LATIN DANCE
118 Soul Soul 146 Samba 3 Samba3
119 Hip Hop Soul HipHopSl 147 Bossa Nova BosaNova
120 Hip Hop Beat HipHopBt 148 Latin Latin
121 R&B R&B 149 New Reggae NewRegga
122 British Soul Pop BritSoul 150 Reggae Dance DanRegga
123 Latin Jazz 1 LatinJz1 151 Paso Doble Pasodobl
124 Big Band 1 BigBand1 152 Lite Bossa LteBossa
125 Dixieland 1 Dixland1 153 Latin Rock LatinRck
126 Guitar Swing 1 GtSwing1 154 Beguine 3 Beguine3
127 Broadway Big Band BwayBand 155 Slow Bolero SlBolero
SP 5600
59
Page 60

Appendix
No. Name Display No. Name Display
156 Disco Samba DscSamba 184 Sirtake Sirtake
157 Mambo Mambo 185 Dangdut Dangdut
158 Meneito Meneito 186 6/8 Flipper 6/8Flipp
159 Rumba 2 Rumba2 187 New Age NewAge
160 Rumba 3 Rumba3 188 Tarantella Tarantel
161 Lambada Lambada 189 Scottish Scottish
162 Pop Cha Cha 1 PChaCha1 190 Norteno Norteno
WALTZ & TRADITIONAL PIANIST
163 Waltz Waltz 191 Pianist 1 Pianist1
164 Old Waltz OldWaltz 192 Pianist 2 Pianist2
165 English Waltz EngWaltz 193 Pianist 3 Pianist3
166 German Waltz GemWaltz 194 March 1 March1
167 Italian Mazurka ItaMazuk 195 Italian Polka ItaPolka
168 Waltz MexWaltz 196 Slow Waltz SlwWltz
169 Vienna Waltz VinaWltz 197 Waltz 1 Waltz1
170 Slow Waltz 2 SlwWltz2 198 Waltz 2 Waltz2
171 Jazz Waltz JazzWltz 199 Waltz 3 Waltz3
172 Polka Polka 200 Vienna Waltz VinaWtz
173 6/8 March 6/8March 201 Latin Latin
174 German Polka GemPolka 202 Tango Tango
175 Party Polka PtyPolka 203 Lambada Lambada
176 Army March ArmMarch 204 Samba Samba
177 March March 205 ChaCha ChaCha
178 US March USMarch 206 Beguine Beguine
179 French Musette FMusette 207 Salsa Salsa
180 Mazurka Mazurka 208 Pop Bossa PopBossa
WORLD 209 Jazz 1 Jazz1
181 Enka Ballad EnkaBald 210 Jazz 2 Jazz2
182 Laendler Laendler 211 Jazz 3 Jazz3
183 Hawaiian Hawaiian 212 Jazz 4 Jazz4
portable grand keyboard
60
Page 61

Appendix
No. Name Display No. Name Display
213 Jazz 5 Jazz5 222 Pop 1 Pop1
214 Jazz 6 Jazz6 223 Pop 2 Pop2
215 Jazz 7 Jazz7 224 Pop 3 Pop3
216 Boogie Boogie 225 Pop 4 Pop4
217 Jive Jive 226 Ballad 1 Ballad1
218 Dixland Dixland 227 Ballad 2 Ballad2
219 Blues 1 Blues1 228 Ballad 3 Ballad3
220 Blues 2 Blues2 229 Ballad 4 Ballad4
221 Jazz Blues JazBlues 230 6/8 Ballad 2 6/8Bld2
SP 5600
61
Page 62

Appendix
13.3 Voice list
No. Name Display No. Name Display
PIANO 031 Detuned Electric Piano 2 DetunEP2
001 Acoustic Grand Piano GrandPno 032 Electric Piano E.Piano
002 Acoustic Grand Piano 2 GrandPn2 033 Electric Piano 2 E.Piano2
003 Acoustic Grand Piano 3 GrandPn3 034 Electric Piano 3 E.Piano3
004 Acoustic Grand Piano (wide) GrandPnW 035 Electric Piano 4 E.Piano4
005 Acoustic Grand Piano (dark) GrandPnD 036 Electric Piano 1 (velocity mix) E.PnoV1
006 Bright Acoustic Piano BritePno 037 Electric Piano 2 (velocity mix) E.PnoV2
007 Bright Acoustic Piano 2 BritePn2 038 60's Electric Piano 60'sEP
008 Bright Acoustic Piano 3 BritePn3 039 EP legend EPLegend
009 Bright Acoustic Piano (wide) BritePnW 040 Phase EP PhaseEP
010 Electric Grand Piano E.Grand 041 Clavi Clavi
011 Electric Grand Piano 2 E.Grand2 042 Clavi 2 Clavi2
012 Electric Grand Piano (wide) E.GrandW 043 Phase Clavi PhaseClv
013 Electric Grand Piano (dark) E.GrandD 044 Wah Clavi WahClv
014 Honky Tonk Piano HnkyTonk 045 Pulse Clavi PulseClv
015 Honky Tonk Piano 2 HnyTonk2 046 Dream EP DreamEP
016 Honky Tonk Piano (wide) HnyTonkW 047 Tremolo EP TremoEP
017 Honky Tonk Piano (dark) HnyTonkD 048 Funk EP FunkEP
018 Harpsichord Harpsi 049 Warm EP WarmEP
019 Harpsichord 2 Harpsi2 050 Choir EP ChoirEP
020 Harpsichord (octave mix) HarpsiO 051 Wah EP WahEP
021 Harpsichord (wide) HarpsiW 052 Modern EP ModernEP
022 Harpsichord (with key o) HarpsiOf 053 EP Pad EPPad
023 Octave Grand Piano OctPno 054 Celesta Celesta
024 Octave Grand Piano 2 OctPno2 055 Celesta 2 Celesta2
025 Piano & Strings Pno&Str 056 Celesta 3 Celesta3
026 Piano & Pad Pno&Pad 057 Glockenspiel Glocken
027 Piano & Choir Pno&Cho 058 Glockenspiel 2 Glocken2
028 Piano & EP Pno&EP 059 Music Box MusicBox
029 Piano & Vibraphone Pno&Vib 060 Music Box 2 MusicBox2
030 Detuned Electric Piano DetunEP 061 Music Box 3 MusicBox3
portable grand keyboard
62
Page 63

Appendix
No. Name Display No. Name Display
062 Vibraphone Vibra 093 Church Organ 3 ChurOrg3
063 Vibraphone 2 Vibra2 094 Church Organ (octave mix) ChurOrgO
064 Vibraphone (wide) VibraW 095 Detuned Church Organ DeChuOrg
065 Marimba Marimba 096 Reed Organ ReedOrgn
066 Marimba 2 Marimba2 097 Reed Organ 2 ReedOrg2
067 Marimba (wide) MarimbaW 098 Rotary Organ RotyOrgn
068 Xylophone Xylophon 099 Pu Organ PuOrgn
069 Xylophone 2 Xylopho2 100 Accordion Acordion
070 Xylophone 3 Xylopho3 101 Accordion 2 Acordin2
071 Tubular Bells TubulBel 102 Accordion 3 Acordin3
072 Tubular Bells 2 Church Bell TubulBe2 103 Harmonica Harmnica
073 Church Bell ChurBell 104 Harmonica 2 Harmnic2
074 Carillon Carillon 105 Harmonica 3 Harmnic3
075 Dulcimer Dulcimer 106 Tango Accordion TangoAcd
076 Dulcimer 2 Dulcime2 107 Tango Accordion 2 TangAcd2
077 Santur Santur GUITAR
ORGAN 108 Acoustic Guitar (nylon) NylonGtr
078 Italian 60's Organ 60'sOrgn 109 Acoustic Guitar (nylon) 2 NylonGt2
079 Drawbar Organ DrawOrgn 110 Acoustic Guitar (nylon) 3 NylonGt3
080 Drawbar Organ 2 DrawOrg2 111 Acoustic Guitar (nylon + key o) NylGtrOf
081 Detuned Drawbar Organ DeDraOrg 112 Ukulele Ukulele
082 Drawbar Organ 3 DrawOrg3 113 Acoustic Guitar (steel) SteelGtr
083 Detuned Percussive Organ DePerOrg 114 Acoustic Guitar (steel) 2 SteelGt2
084 Percussive Organ PercOrgn 115 12-Strings Guitar 12StrGtr
085 Percussive Organ 2 PercOrg2 116 Mandolin Mandolin
086 70's Percussive Organ 70'sPcOr 117 Mandolin 2 Mandoli2
087 Percussive Organ 3 PercOrg3 118 Steel Guitar with Body Sound SteelBdy
088 Rock Organ RockOrgn 119 Electric Guitar (jazz) JazzGtr
089 Rock Organ 2 RockOrg2 120 Electric Guitar (jazz) 2 JazzGtr2
090 Rock Organ 3 RockOrg3 121 Electric Guitar (pedal steel) PedalGtr
091 Church Organ ChurOrgn 122 Electric Guitar (clean) CleanGtr
092 Church Organ 2 ChurOrg2 123 Electric Guitar (clean) 2 CleanGt2
SP 5600
63
Page 64

Appendix
No. Name Display No. Name Display
124 Electric Guitar (detuned clean) DetClnGt 155 Synth Bass SynBass
125 Mid Tone Guitar MidTonGt 156 Synth Bass 2 SynBass2
126 Electric Guitar (muted) MutedGtr 157 Synth Bass 3 SynBass3
127 Electric Guitar (muted) 2 MutedGt2 158 Synth Bass 4 SynBass4
128 Electric Guitar (funky cutting) FunkGt 159 Warm Synth Bass WarmBass
129 Electric Guitar (muted velo-sw) MutVelGt 160 Resonance SynBass ResoBass
130 Jazz Man JazzMan 161 Clavi Bass ClavBass
131 Overdriven Guitar Ovrdrive 162 Hammer Hammer
132 Overdriven Guitar 2 Ovrdriv2 163 Attack Bass AtackBas
133 Guitar Pinch GtPinch 164 Synth Bass (rubber) RubbBass
134 Distortion Guitar DistGtr 165 Synth Bass (rubber) 2 RubbBas2
135 Distortion Guitar 2 DistGtr2 166 Attack Pulse AtackPls
136 Distortion Guitar (with feedback) FeedbkGt STRINGS & ORCHESTRAL
137 Guitar Feedback GtrFedbk 167 Violin Violin
138 Distorted Rhythm Guitar DistRyth 168 Violin 2 Violin2
139 Guitar Harmonics GtrHarmo 169 Violin (slow attack) SlViolin
140 Guitar Harmonics 2 GtHarmo2 170 Viola Viola
141 Velocity Nylon Guitar NylnGtVe 171 Viola 2 Viola2
BASS 172 Cello Cello
142 Acoustic Bass AcoBass 173 Cello 2 Cello2
143 Acoustic Bass 2 AcoBass2 174 Contrabass Contrabs
144 Wah Bass WahBass 175 Contrabass 2 Contrbs2
145 Electric Bass (nger) FngrBass 176 Tremolo Strings TremStr
146 Finger Slap Bass FngrSlap 177 Tremolo Strings 2 TremStr2
147 Electric Bass (pick) PickBass 178 Tremolo Strings 3 TremStr3
148 Electric Bass (pick) 2 PickBas2 179 Pizzicato Strings PizzStr
149 Fretless Bass Fretless 180 Pizzicato Strings 2 PizzStr2
150 Fretless Bass 2 Fretles2 181 Orchestral Harp Harp
151 Slap Bass SlapBass 182 Orchestral Harp 2 Harp2
152 Slap Bass 2 SlapBas2 183 Yang Chin YangChin
153 Slap Bass 3 SlapBas3 184 Timpani Timpani
154 Slap Bass 4 SlapBas4 185 Timpani 2 Timpani2
portable grand keyboard
64
Page 65

Appendix
No. Name Display No. Name Display
186 String Ensembles Strings 217 Bright Trombone BritBone
187 String Ensembles 2 Strings2 218 Tuba Tuba
188 String Ensembles 3 Strings3 219 Tuba 2 Tuba2
189 String Ensembles 4 Strings4 220 Muted Trumpet MuteTrp
190 Strings & Brass Str&Bras 221 Muted Trumpet 2 MuteTrp2
191 60's Strings 60'sStr 222 Muted Trumpet 3 MuteTrp3
192 Synth Strings SynStrs 223 French Horn FrHorn
193 Synth Strings 2 SynStrs2 224 French Horn 2 FrHorn2
194 Synth Strings 3 SynStrs3 225 French Horn 3 FrHorn3
195 Synth Strings4 SynStrs4 226 Brass Section Brass
196 Synth Strings5 SynStrs5 227 Brass Section 2 Brass2
197 Choir Aahs ChoirAah 228 Brass Section 3 Brass3
198 Choir Aahs 2 ChorAah2 229 Synth Brass SynBrass
199 Choir Aahs 3 ChorAah3 230 Synth Brass 2 SynBras2
200 Voice Oohs VoiceOoh 231 Synth Brass 3 SynBras3
201 Voice Oohs 2 VoicOoh2 232 Synth Brass 4 SynBras4
202 Humming Humming 233 Synth Brass 5 SynBras5
203 Analog Voice AnlVoice 234 Synth Brass 6 SynBras6
204 Synth Voice SynVoice 235 Synth Brass 7 SynBras7
205 Synth Voice 2 SynVoic2 236 Synth Brass 8 SynBras8
206 Orchestra Hit OrchHit 237 Analog Synth Brass AnaBrass
207 Orchestra Hit 2 OrchHit2 238 Analog Synth Brass 2 AnaBras2
208 Bass Hit Plus BassHit 239 Analog Synth Brass 3 AnaBras3
209 6th Hit 6thHit 240 Jump Brass JumpBras
210 Euro Hit EuroHit 241 Jump Brass 2 JumpBrs2
BRASS 242 Funny Funny
211 Trumpet Trumpet 243 Funny 2 Funny2
212 Trumpet 2 Trumpet2 BRASS
213 Dark Trumpet DarkTrp 244 Soprano Sax SprnoSax
214 Trombone Trombone 245 Soprano Sax 2 SprnSax2
215 Trombone 2 Trmbone2 246 Soprano Sax 3 SprnSax3
216 Trombone 3 Trmbone3 247 Alto Sax AltoSax
SP 5600
65
Page 66

Appendix
No. Name Display No. Name Display
248 Alto Sax 2 AltoSax2 279 Flute 3 Flute3
249 Alto Sax 3 AltoSax3 280 2 Flutes 2Flutes
250 Tenor Sax TenorSax 281 Recorder Recorder
251 Tenor Sax 2 TenoSax2 282 Recorder 2 Recorde2
252 Tenor Sax 3 TenoSax3 283 2 Recorders 2Records
253 Baritone Sax BariSax 284 Pan Flute PanFlute
254 Baritone Sax 2 BariSax2 285 Pan Flute 2 PanFlut2
255 Baritone Sax 3 BariSax3 286 Sweet Pan Flute SwPanFlu
256 Oboe Oboe 287 Blown Bottle Bottle
257 Oboe 2 Oboe2 288 Blown Bottle 2 Bottle2
258 Oboe 3 Oboe3 289 Shakuhachi Shakhchi
259 2 Oboes 2Oboes 290 Shakuhachi 2 Shakhch2
260 English Horn EngHorn 291 Whistle Whistle
261 English Horn 2 EngHorn2 292 Whistle 2 Whistle2
262 English Horn 3 EngHorn3 293 Ocarina Ocarina
263 2 English Horns 2EngHons 294 Ocarina 2 Ocarina2
264 Bassoon Bassoon SYNTH LEAD
265 Bassoon 2 Bassoon2 295 Lead 1 (square) SquareLd
266 Bassoon 3 Bassoon3 296 Lead 1a (square) 2 SquarLd2
267 2 Bassoons 2Basoons 297 Lead 1 (square) 3 SquarLd3
268 Clarinet Clarinet 298 Lead 1b (sine) SineLead
269 Clarinet 2 Clarine2 299 Lead 2 (sawtooth) SawLead
270 Clarinet 3 Clarine3 300 Lead 2a (sawtooth) 2 SawLead2
271 2 Clarinets 2Clarins 301 Lead 2 (sawtooth) 3 SawLead3
PIPE 302 Lead 2b (saw + pulse) SawPlsLd
272 Piccolo Piccolo 303 Lead 2c (double sawtooth) DubSawLd
273 Piccolo 2 Piccolo2 304 Lead 2d (sequenced analog) SquAnaLd
274 Piccolo 3 Piccolo3 305 Lead 2d (sequenced analog) 2 SqAnaLd2
275 2 Piccolos 2Picolos 306 Wavy Sawtooth WavySaw
276 Sweet Flute SweeFlut 307 Bauble Lead BaubleLd
277 Flute Flute 308 Super Analog SuperAna
278 Flute 2 Flute2 309 Lead 3 (calliope) CaliopLd
portable grand keyboard
66
Page 67

Appendix
No. Name Display No. Name Display
310 Lead 3 (calliope) 2 CalipLd2 342 Fifth Lead FifLead
311 Lead 4 (chi) ChiLd 343 Corrie Corrie
312 Lead 4 (chi) 2 ChiLd2 344 Quint Quint
313 Lead 4 (chi) 3 ChiLd3 SYNTH PAD
314 Lead 5 (charang) CharanLd 345 Pad 1 (new age) NewAge
315 Lead 5 (charang) 2 CharaLd2 346 Pad 1 (new age) 2 NewAge2
316 Lead 5 (charang) 3 CharaLd3 347 Pad 2 (warm) WarmPad
317 Lead 5 (charang) 4 CharaLd4 348 Pad 2 (warm) 2 WarmPad2
318 Lead 5a (wire lead) WireLead 349 Pad 2a (sine pad) SinePad
319 Lead 5a (wire lead) 2 WireLd2 350 Pad 3 (polysynth) PolySyn
320 Lead 6 (voice) VoiceLd 351 Pad 3 (polysynth) 2 PolySyn2
321 Lead 6 (voice) 2 VoiceLd2 352 Pad 3 (polysynth) 3 PolySyn3
322 Lead 7 (fths) FifthsLd 353 Pad 3 (polysynth) 4 PolySyn4
323 Lead 7 (fths) 2 FifthLd2 354 Pad 4 (choir) ChoirPad
324 Lead 8 (bass + lead) BassLead 355 Pad 4 (choir) 2 ChoirPd2
325 Lead 8 (bass + lead) 2 BasLead2 356 Pad 4a (itopia) ItopiaPd
326 Lead 8 (bass + lead) 3 BasLead3 357 Pad 5 (bowed) BowedPad
327 Lead 8a (soft wrl) SftWrlLd 358 Pad 5 (bowed) 2 BowedPd2
328 Massiness Massin 359 Pad 6 (metallic) MetalPad
329 Square Square 360 Pad 6 (metallic) 2 MetalPd2
330 Slow Square Lead SlwSquLd 361 Pad 7 (halo) HaloPad
331 Sine Solo SineSolo 362 Pad 7 (halo) 2 HaloPad2
332 Square Lead 4 SquarLd4 363 Pad 8 (sweep) SweepPad
333 Thick Square ThickSqu 364 Pad 8 (sweep) 2 SweepPd2
334 2Oscillators Lead 2OscLd 365 Pad 8 (sweep) 3 SweepPd3
335 Wavy Sawtooth 2 WavySaw2 366 Pan Pad PanPad
336 Analog Lead AnaLead 367 Pan Pad 2 PanPad2
337 Big Lead BigLead 368 Dipolar Pad DipolPad
338 Fat Lead FatLead 369 PWM Pad PWMPad
339 PWM 4th Rezz4th 370 Warmly Pad WarmlyPd
340 Delayed Lead DelyLead 371 Horn Pad HornPad
341 Delayed Lead 2 DlyLead2 372 Click Pad ClickPad
SP 5600
67
Page 68

Appendix
No. Name Display No. Name Display
373 Analog Pad AnalogPd 404 FX 7b (echo pan) EchoPan
374 80's Poly Pad 80'sPoly 405 FX 7a (echo bell) EchoBell
375 PWM 4th Soft Rezz4thS 406 FX 7a (echo bell) 2 EchoBel2
376 Synth Calliope Soft CalioLdS 407 FX 7a (echo bell) 3 EchoBel3
377 Soft Vox SoftVox 408 FX 8 (sci-) Sci-Fi
378 5th SawWave 5thSaw 409 FX 8 (sci-) 2 Sci-Fi2
379 5th Lead Soft FiftLdSf ETHNIC MISC.
380 Slow Square SlSquare 410 Sitar Sitar
381 New Year Pad NewYear 411 Sitar 2 Sitar2
382 Space Voice SpcVoice 412 Banjo Banjo
383 Rising Rising 413 Banjo 2 Banjo2
384 Congregate Congrega 414 Shamisen Shamisen
SYNTH SFX 415 Shamisen 2 Shamise2
385 FX 1 (rain) FXRain 416 Koto Koto
386 FX 1 (rain) 2 FXRain2 417 Koto 2 Koto2
387 FX 2 (soundtrack) Soundtrk 418 Taisho Koto TaishoKt
388 FX 2 (soundtrack) 2 Sondtrk2 419 Kalimba Kalimba
389 Prelude Prelude 420 Kalimba 2 Kalimba2
390 FX 3 (crystal) Crystal 421 Bag Pipe BagPipe
391 FX 3 (crystal) 2 Crystal2 422 Bag Pipe 2 BagPipe2
392 FX 3a (synth mallet) SynMalet 423 Fiddle Fiddle
393 FX 4 (atmosphere) Atmosphr 424 Fiddle 2 Fiddle2
394 FX 4 (atmosphere) 2 Atmosph2 425 Fiddle 3 Fiddle3
395 Warm Air WarmAir 426 Shanai Shanai
396 FX 5 (brightness) Bright 427 Shanai 2 Shanai2
397 Smog Smog PERCUSSIVE
398 FX 6 (goblins) Goblins 428 Tinkle Bell TnklBell
399 FX 6 (goblins) 2 Goblins2 429 Agogo Agogo
400 Choir Bell ChorBell 430 Steel Drums SteelDrm
401 Choir Bell 2 ChorBel2 431 Woodblock WoodBlok
402 FX 7 (echoes) Echoes 432 Castanets Castanet
403 FX 7 (echoes) 2 Echoes2 433 Taiko Drum TaikoDrm
portable grand keyboard
68
Page 69

Appendix
No. Name Display No. Name Display
434 Concert Bass Drum ConBasDm 466 Analog Low Conga AnLoCnga
435 Acoustic Bass Drum BassDrum 467 High Timbale HiTimbal
436 Jazz Kick JazzKick 468 Low Timbale LoTimbal
437 Side Stick SidStick 469 Cabasa Cabasa
438 Analog Rim Shot AnRiShot 470 Maracas Maracas
439 Acoustic Snare A.Snare 471 Analog Maracas AnMaracas
440 Jazz Snare JazSnare 472 Short Guiro ShGuiro
441 Brush Tap BrushTap 473 Long Guiro LoGuiro
442 Concert SD ConcetSD 474 Claves Claves
443 Hand Clap HandClap 475 Mute Cuica MuCuica
444 Tom Tom 476 Open Cuica OpCuica
445 Brush Tom BrushTom 477 Mute Triangle MuTrgle
446 Closed Hi-hat ClosedHH 478 Open Triangle OpTrgle
447 Analog Closed Hi-hat AnCloHH 479 Shaker Shaker
448 Pedal Hi-hat PedalHH 480 Mute Surdo MuSurdo
449 Open Hi-hat OpenHH 481 Open Surdo OpSurdo
450 Crash Cymbal CrashCym 482 Melodic Tom MeloTom
451 Analog Cymbal AnaCym 483 Melodic Tom 2 MeloTom2
452 Ride Cymbal RideCym 484 Synth Drum SynDrum
453 China Cymbal ChinaCym 485 Rhythm Box Tom RhythBox
454 Ride Bell RideBell 486 Electric Drum ElecDrum
455 Tambourine Tambouri 487 Reverse Cymbal RevCymbl
456 Splash Cymbal SplashCy SFX
457 Cowbell Cowbell 488 Guitar Fret Noise FretNoiz
458 Analog Cowbell AnaCowbl 489 Guitar Cutting Noise GtCtNoiz
459 High Bongo HiBongo 490 Acoustic Bass String Slap BsStSlap
460 Low Bongo LoBongo 491 Breath Noise BrthNoiz
461 Mute Hi Conga MuHiCnga 492 Flute Key Click FlKeyClk
462 Open Hi Conga OpHiCnga 493 Seashore Seashore
463 Low Conga LowConga 494 Rain Rain
464 Analog Hi Conga AnHiCnga 495 Thunder Thunder
465 Analog Mid Conga AnMiCnga 496 Wind Wind
SP 5600
69
Page 70

Appendix
No. Name Display No. Name Display
497 Stream Stream COMBINED VOICE
498 Bubble Bubble 529 Stereo Piano & Strings Pad Pn&StrPd
499 Bird Tweet Tweet 530 Stereo Piano & Choir Pn&Choir
500 Bird Tweet 2 Tweet2 531 Stereo Piano & Synth Strings Pn&SyStr
501 Dog Dog 532 Stereo Piano & Warm Pad Pn&WrmPd
502 Horse Gallop HouseGlp 533 Stereo Piano & Soft EP Pn&SfEP
503 Telephone Ring Telphone 534 FM Electric Piano FMEP
504 Telephone Ring 2 Telphon2 535 Digital Piano DigitlPn
505 Door Creaking DoorCrek 536 E.Piano & Strings EP&Str
506 Door Door 537 Piano & Acoustic Guitar EP&Str
507 Scratch Scratch 538 E.Piano & Vibraphone EP&Vibra
508 Wind Chime WindChim 539 E.Piano 2 & Pad EP2&Pad
509 Helicopter Helicptr 540 E.Piano 2 & Strings EP2&Str
510 Car Engine CarEngin 541 Harpsichord & Stereo Strings Hrps&Str
511 Car Stop CarStop 542 Music Box & Stereo Strings MBox&Str
512 Car Pass CarPass 543 Vibraphone & Stereo Strings Vib&Str
513 Car Crash CarCrash 544 Vibraphone Octave VibraOct
514 Siren Siren 545 Vibraphone & Marimba & Kalimba Vib&M&K
515 Train Train 546 Marimba & Kalimba Mar&Kal
516 Jetplane Jetplane 547 Marimba Delay MarDelay
517 Starship Starship 578 Xylophone Octave XylopOct
518 Burst Noise BurtNois 549 Organ & Stereo Strings Orgn&Str
519 Applause Applause 550 Stereo Organ & Piano Orgn&Pno
520 Laughing Laughing 551 Rock Organ & Strings RkOr&Str
521 Screaming Scream 552 Church Organ & Choir ChOr&Cho
522 Punch Punch 553 Church Organ & Strings ChOr&Str
523 Heart Beat HeartBet 554 Acoustic Guitar & Flute Gtr&Flut
524 Footsteps Footstep 555 Acoustic Guitar & Clavi Gtr&Clav
525 Gunshot Gunshot 556 24 String Guitar 24StrGtr
526 Machine Gun MachnGun 557 Steel Guitar & Warm Pad StGt&Pad
527 Lasergun Lasergun 558 Stereo Strings & Horn Str&Horn
528 Explosion Explosio 559 Orchestra Orchestr
portable grand keyboard
70
Page 71

Appendix
No. Name Display No. Name Display
560 Full Strings FullStr 581 Flute Octave FluteOct
561 Full Strings 2 FullStr2 582 Flute & Oboe Octave Fl&ObOct
562 Symphonic Symphon 583 Flute & Clarinet Octave Fl&ClOct
563 Stereo Choir & Strings Cho&Str 584 Oboe & Bassoon Oboe&Bn
564 Stereo Choir & Steel Guitar Cho&Gtr 585 Oboe & Clarinet Ob&Cl
565 3 Trumpet Loose 3Trumpet 586 Oboe & Clarinet & Bassoon Ob&Cl&Bn
566 Trombone & Stereo Strings Tomb&Str 587 Oboe Octave OboeOct
567 3 Trombones Loose 3Trmbone 588 Oboe & Clarinet Octave Ob&ClOct
568 3 Muted Trumpets Loose 3MuTrump 589 Oboe & Bassoon Octave Ob&BnOct
569 Club Brass ClubBras 590 Clarinet & Bassoon Cl&Bn
570 Brass & Woodwinds Brs&Wood 591 Clarinet & Oboe Octave Cl&ObOct
571 Woodwinds & Strings Wood&Str CHINESE INSTRUMENTS
572 Section Woods Small WoodSmal 592 Standard Set StandSet
573 Pan Flute & Strings Pad PnFl&Str 593 Room Set RoomSet
574 Koto & Shamisen Kto&Sham 594 Power Set PowerSet
575 Flute & Clarinet Flu&Clar 595 Electronic Set ElectSet
576 Flute & Oboe Flu&Oboe 596 Analog Set AnalgSet
577 Flute & Bassoon Flu&Bn 597 Jazz Set JazzSet
578 Flute & Oboe & Clarinet Fl&Ob&Cl 598 Brush Set BrushSet
579 Flute & Clarinet & Bassoon Fl&Cl&Bn 599 Orchestra Set OrcheSet
580 Flute & Oboe & Bassoon Fl&Ob&Bn 600 SFX Set SFXSet
13.4 Demo list
No. Name Display
001 Demo1 Demo1
002 Demo2 Demo2
003 Bossa Nova BosaNova
004 Fusion Fusion
005 Jazz Jazz
SP 5600
71
Page 72

Appendix
13.5 MIDI implementation chart
Function Sent Received Notes
Basic Channel Default 1 ALL
Changed 1-16 1-16
Mode Default No Mode 3
Messages No Mode 3
Altered *********** No
Note Number Note 0 – 127 0 – 127
True voice *********** 0 – 127
Velocity Note Note ON Yes, 9nH,
v = 1 – 127
Note OFF No, 9nH,
v = 0
After Touch Keys No No
Channels No No
Pitch Bend Yes Yes
Control Change 0
1
5
6
7
10
11
64
65
66
67
80
81
91
93
Yes
No
No
Yes
Yes
No
No
Yes
No
Yes
Yes
No
No
Yes
Yes
Yes, 9nH,
v = 1 – 127
Yes, 9nH,
v = 0 or 8nH,
v = 0 – 127
Yes
Yes
Yes
Yes
Yes
Yes
Yes
Yes
Yes
Yes
Yes
Yes
Yes
Yes
Yes
Bank Select
Modulation
Portamento Time
Data Entry
Volume
Pan
Expression
Sustain Pedal
Portamento ON/OFF
Sostenuto Pedal
Soft Pedal
Reverb Program
Chorus Program
Reverb Level
Chorus Level
72
120
121
123
No
No
No
portable grand keyboard
Yes
Yes
Yes
All Sound O
Reset All Controllers
All Notes O
Page 73

Function Sent Received Notes
Appendix
Program Change True # Yes
***********
System Exclusive No Yes
System Common Song Position Pointer No No
Song Select No No
Tune Request No No
System Real Time Clock Yes No
Commands No *1 No *1
Aux Messages Local ON/OFF No No
Active Sensing No Yes
System Reset No No
MIDI channel modes
POLY MONO
OMNI ON Mode 1 Mode 2
OMNI OFF Mode 3 Mode 4
Yes
0 – 127
SP 5600
73
Page 74

Protecting the environment
14 Protecting the environment
Disposal of the packaging material
For the transport and protective packaging, environmentally friendly materials have
been chosen that can be supplied to normal recycling.
Ensure that plastic bags, packaging, etc. are properly disposed of.
Do not just dispose of these materials with your normal household waste, but make
sure that they are collected for recycling. Please follow the notes and markings on
the packaging.
Disposal of your old device
This product is subject to the European Waste Electrical and Electronic Equipment
Directive (WEEE) in its currently valid version. Do not dispose with your normal
household waste.
Dispose of this device through an approved waste disposal rm or through your local
waste facility. When discarding the device, comply with the rules and regulations
that apply in your country. If in doubt, consult your local waste disposal facility.
74
portable grand keyboard
Page 75

Page 76

Musikhaus Thomann · Hans-Thomann-Straße 1 · 96138 Burgebrach · Germany · www.thomann.de
 Loading...