

Page 1
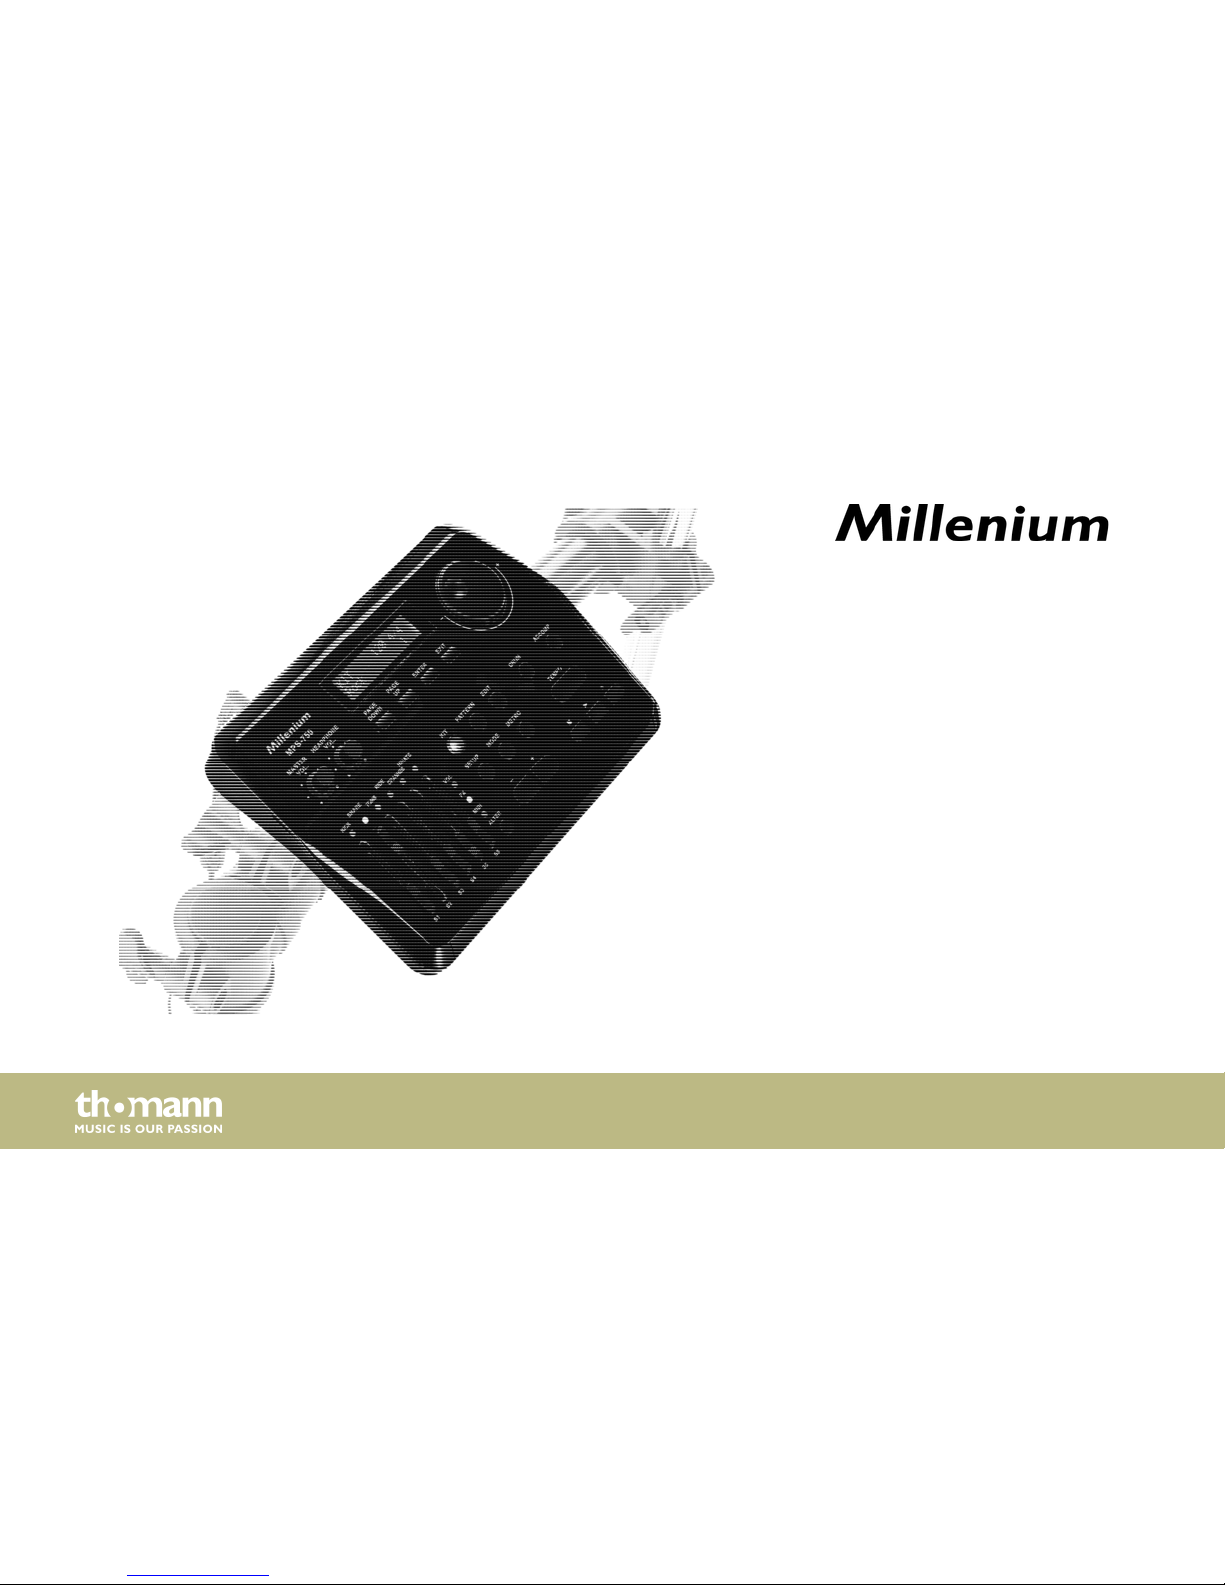
MPS-750
e-drum module
user manual
Page 2

Musikhaus Thomann
Thomann GmbH
Hans-Thomann-Straße 1
96138 Burgebrach
Germany
Telephone: +49 (0) 9546 9223-0
E-mail: [email protected]
Internet: www.thomann.de
26.02.2016, ID: 372716
Page 3
Table of contents
1 General notes............................................................................................................................................... 5
1.1 Further information........................................................................................................................... 6
1.2 Notational conventions.................................................................................................................... 7
1.3 Symbols and signal words............................................................................................................... 8
2 Safety instructions.................................................................................................................................. 10
3 Features....................................................................................................................................................... 13
4 Installation and starting up................................................................................................................ 14
5 Connections and controls................................................................................................................... 18
6 Operating.................................................................................................................................................... 24
6.1 Functions............................................................................................................................................. 24
6.2 Device settings.................................................................................................................................. 31
6.3 Reset to factory defaults................................................................................................................ 35
7 Technical specifications....................................................................................................................... 36
8 Connector and pin assignments...................................................................................................... 38
Table of contents
MPS-750
3
Page 4
9 Cleaning....................................................................................................................................................... 40
10 Protecting the environment.............................................................................................................. 41
11 Appendix..................................................................................................................................................... 42
11.1 Voice list............................................................................................................................................ 42
11.2 Kit list.................................................................................................................................................. 56
11.3 Styles.................................................................................................................................................. 57
Table of contents
e-drum module
4
Page 5
1 General notes
This manual contains important instructions for the safe operation of the unit. Read and follow
the safety instructions and all other instructions. Keep the manual for future reference. Make
sure that it is available to all those using the device. If you sell the unit please make sure that
the buyer also receives this manual.
Our products are subject to a process of continuous development. Thus, they are subject to
change.
General notes
MPS-750
5
Page 6
1.1 Further information
On our website (www.thomann.de) you will find lots of further information and details on the
following points:
Download This manual is also available as PDF file for you to download.
Keyword search
Use the search function in the electronic version to find the topics of
interest for you quickly.
Online guides
Our online guides provide detailed information on technical basics
and terms.
Personal consultation For personal consultation please contact our technical hotline.
Service
If you have any problems with the device the customer service will
gladly assist you.
General notes
e-drum module
6
Page 7
1.2 Notational conventions
This manual uses the following notational conventions:
The letterings for connectors and controls are marked by square brackets and italics.
Examples: [VOLUME] control, [Mono] button.
Texts and values displayed on the device are marked by quotation marks and italics.
Examples: ‘24ch’ , ‘OFF’.
References to other locations in this manual are identified by an arrow and the specified page
number. In the electronic version of the manual, you can click the cross-reference to jump to
the specified location.
Example: See
Ä
‘Cross-references’ on page 7.
Letterings
Displays
Cross-references
General notes
MPS-750
7
Page 8
1.3 Symbols and signal words
In this section you will find an overview of the meaning of symbols and signal words that are
used in this manual.
Signal word Meaning
DANGER! This combination of symbol and signal word indicates an
immediate dangerous situation that will result in death or
serious injury if it is not avoided.
CAUTION! This combination of symbol and signal word indicates a pos‐
sible dangerous situation that can result in minor injury if it
is not avoided.
NOTICE! This combination of symbol and signal word indicates a pos‐
sible dangerous situation that can result in material and
environmental damage if it is not avoided.
General notes
e-drum module
8
Page 9
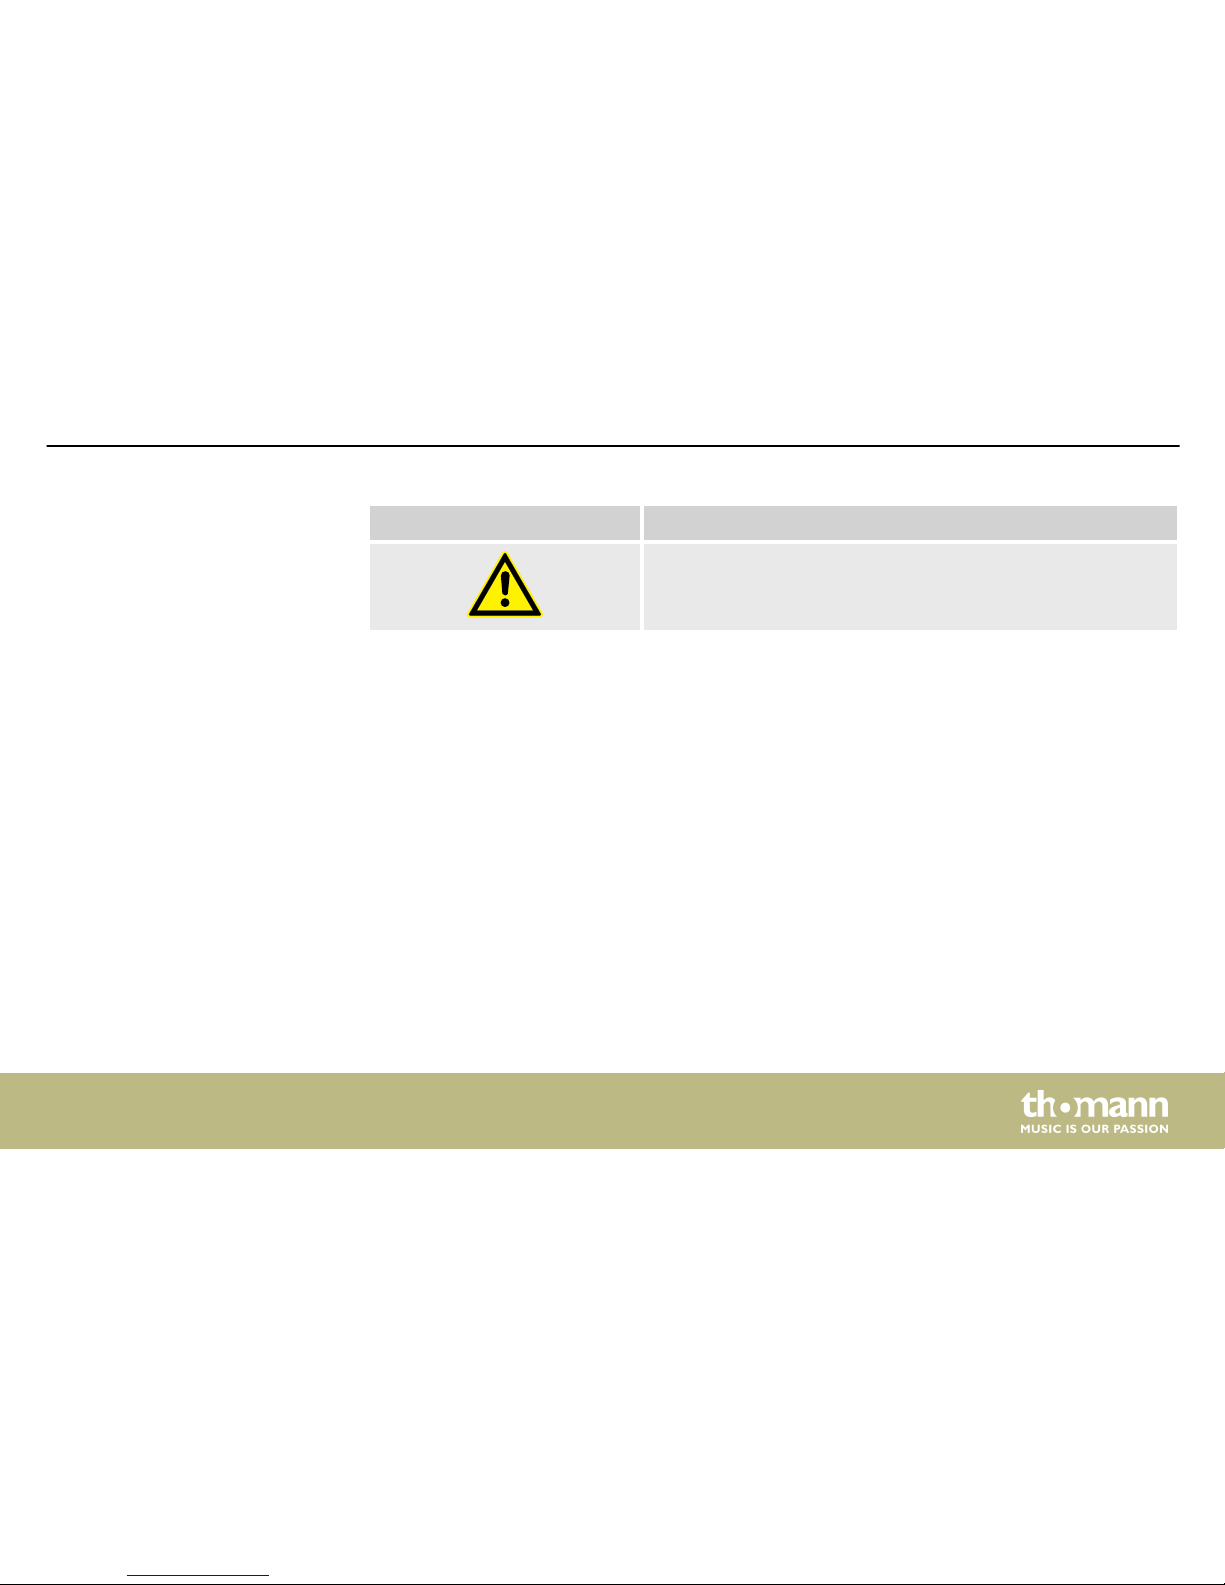
Warning signs Type of danger
Warning – danger zone.
General notes
MPS-750
9
Page 10
2 Safety instructions
Drum modules are intended to be used for converting digital trigger signals from drum pads
to various percussion sounds. Use the unit only as described in this manual. Any other use or
use under other operating conditions is considered to be improper and may result in personal
injury or property damage. No liability will be assumed for damages resulting from improper
use.
This device may be used only by persons with sufficient physical, sensorial, and intellectual
abilities and having corresponding knowledge and experience. Other persons may use this
device only if they are supervised or instructed by a person who is responsible for their safety.
Intended use
Safety instructions
e-drum module
10
Page 11
DANGER!
Danger for children
Ensure that plastic bags, packaging, etc. are disposed of properly and are not
within reach of babies and young children. Choking hazard!
Ensure that children do not detach any small parts (e.g. knobs or the like) from
the unit. They could swallow the pieces and choke!
Never let children unattended use electrical devices.
CAUTION!
Possible hearing damage
With loudspeakers or headphones connected, the device can produce volume
levels that may cause temporary or permanent hearing impairment.
Do not operate the device permanently at a high volume level. Decrease the
volume level immediately if you experience ringing in your ears or hearing
impairment.
Safety
Safety instructions
MPS-750
11
Page 12
NOTICE!
Operating conditions
This device has been designed for indoor use only. To prevent damage, never
expose the device to any liquid or moisture. Avoid direct sunlight, heavy dirt, and
strong vibrations.
NOTICE!
External power supply
The device is powered by an external power supply. Before connecting the
external power supply, ensure that the input voltage (AC outlet) matches the
voltage rating of the device and that the AC outlet is protected by a residual cur‐
rent circuit breaker. Failure to do so could result in damage to the device and pos‐
sibly the user.
Unplug the external power supply before electrical storms occur and when the
device is unused for long periods of time to reduce the risk of electric shock or
fire.
Safety instructions
e-drum module
12
Page 13
3 Features
n 431 sounds
n 40 styles
n 20 drum kits
n 20 user kits
n Metronome
n 4-band equalizer (DSP)
n Reverb effect, distortion (FX) and compressor
n Recording function
n Flexible pad assignment
n Connections: Headphones, external trigger, USB, line out, line in
n Standby function
Features
MPS-750
13
Page 14
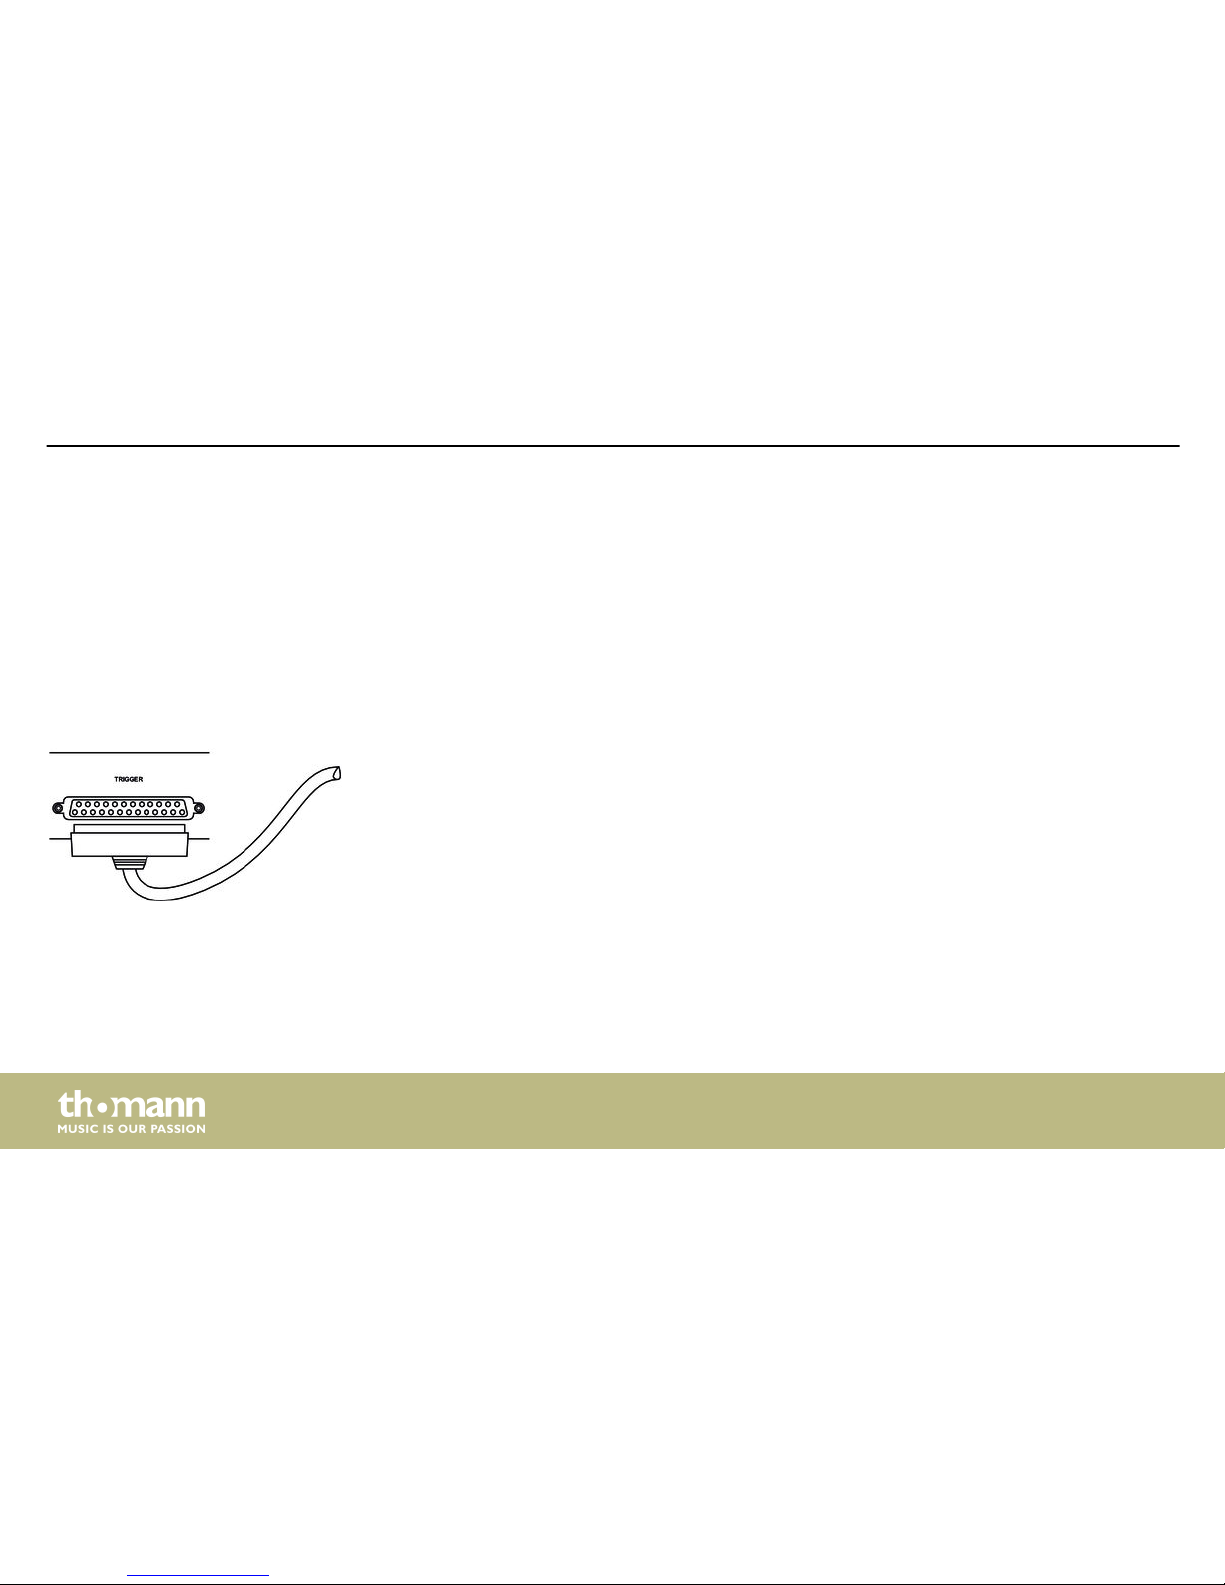
4 Installation and starting up
Rack setup and assembly of the pads and pedals are described in detail in the enclosed set
assembly guide. Finally check that all cables between the pads and the drum module have
been properly connected.
Connect the supplied D-sub plug of the pad connector cable to the D-sub input socket on the
bottom side of the drum module.
Rack setup, connecting pads
and pedals
Connecting the pads
Installation and starting up
e-drum module
14
Page 15
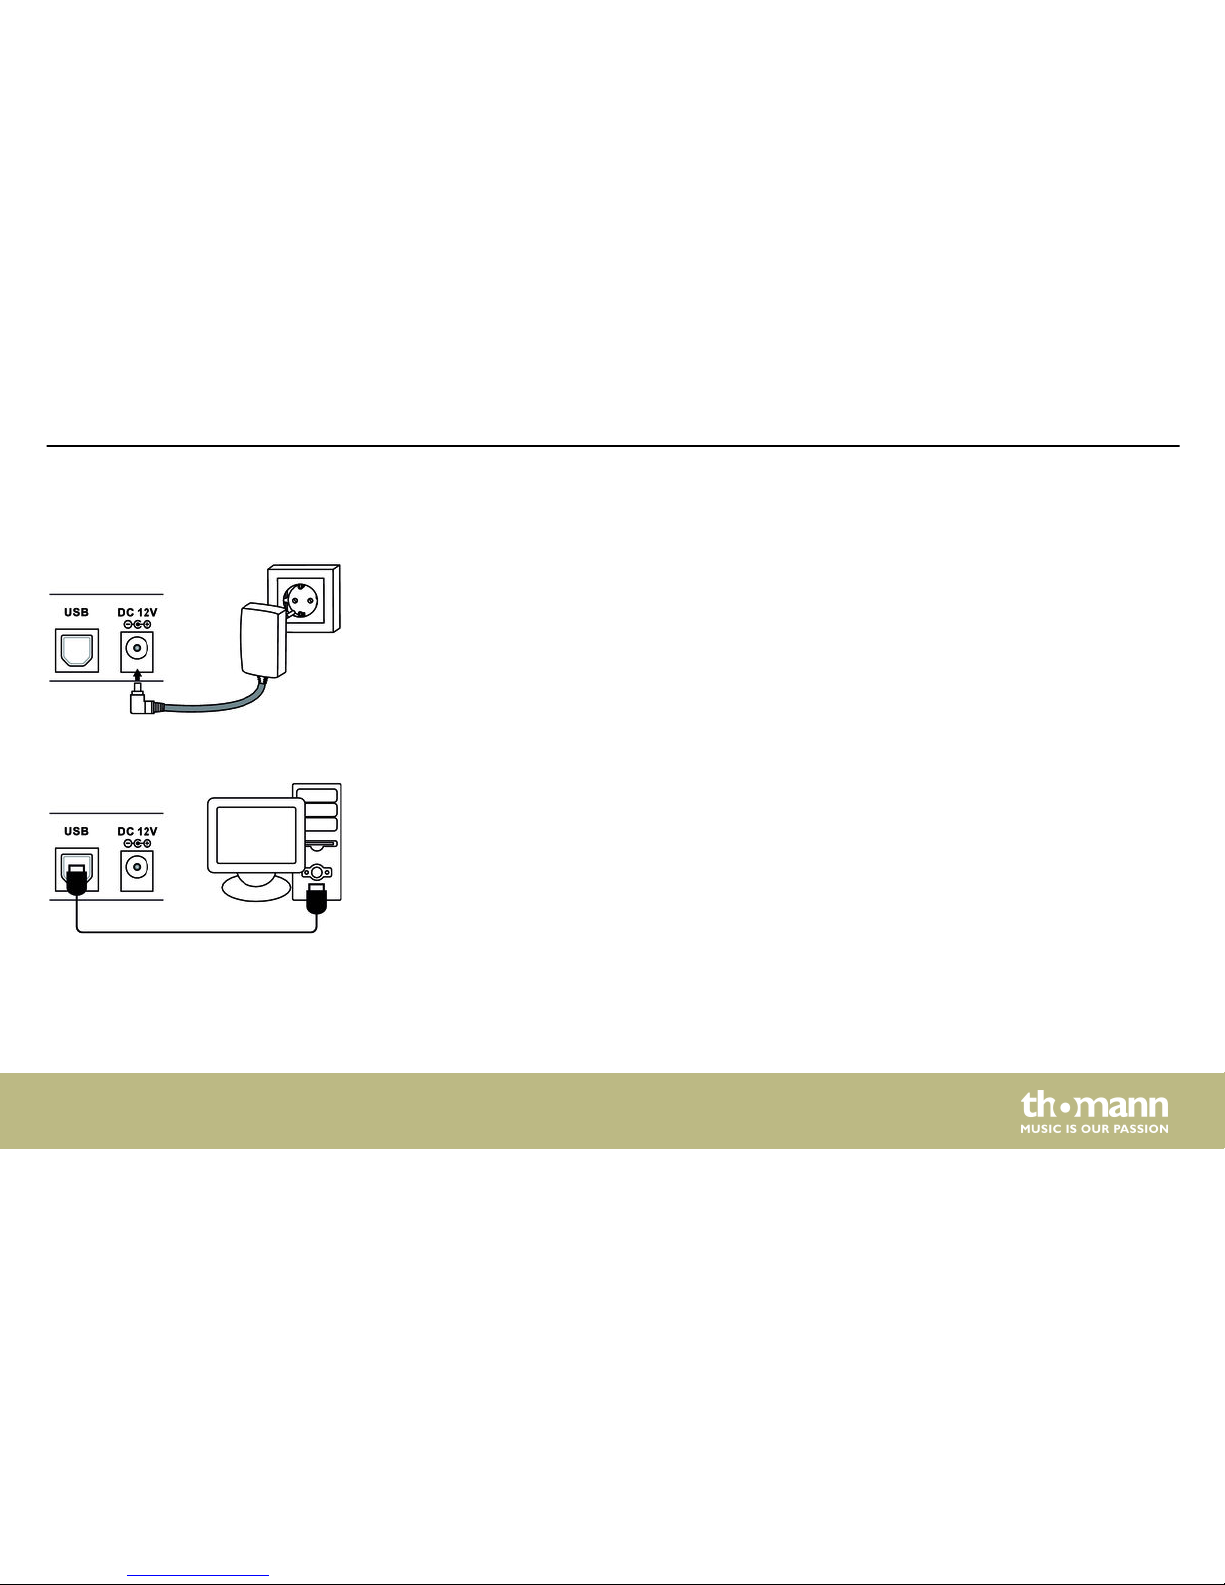
Connect the included power supply unit to the [DC 12 V] input on the rear panel of the drum
module and then put the power plug into the power outlet.
Connect your computer to the USB port on the rear panel of the drum module.
Connecting the power adapter
Connecting USB devices
Installation and starting up
MPS-750
15
Page 16
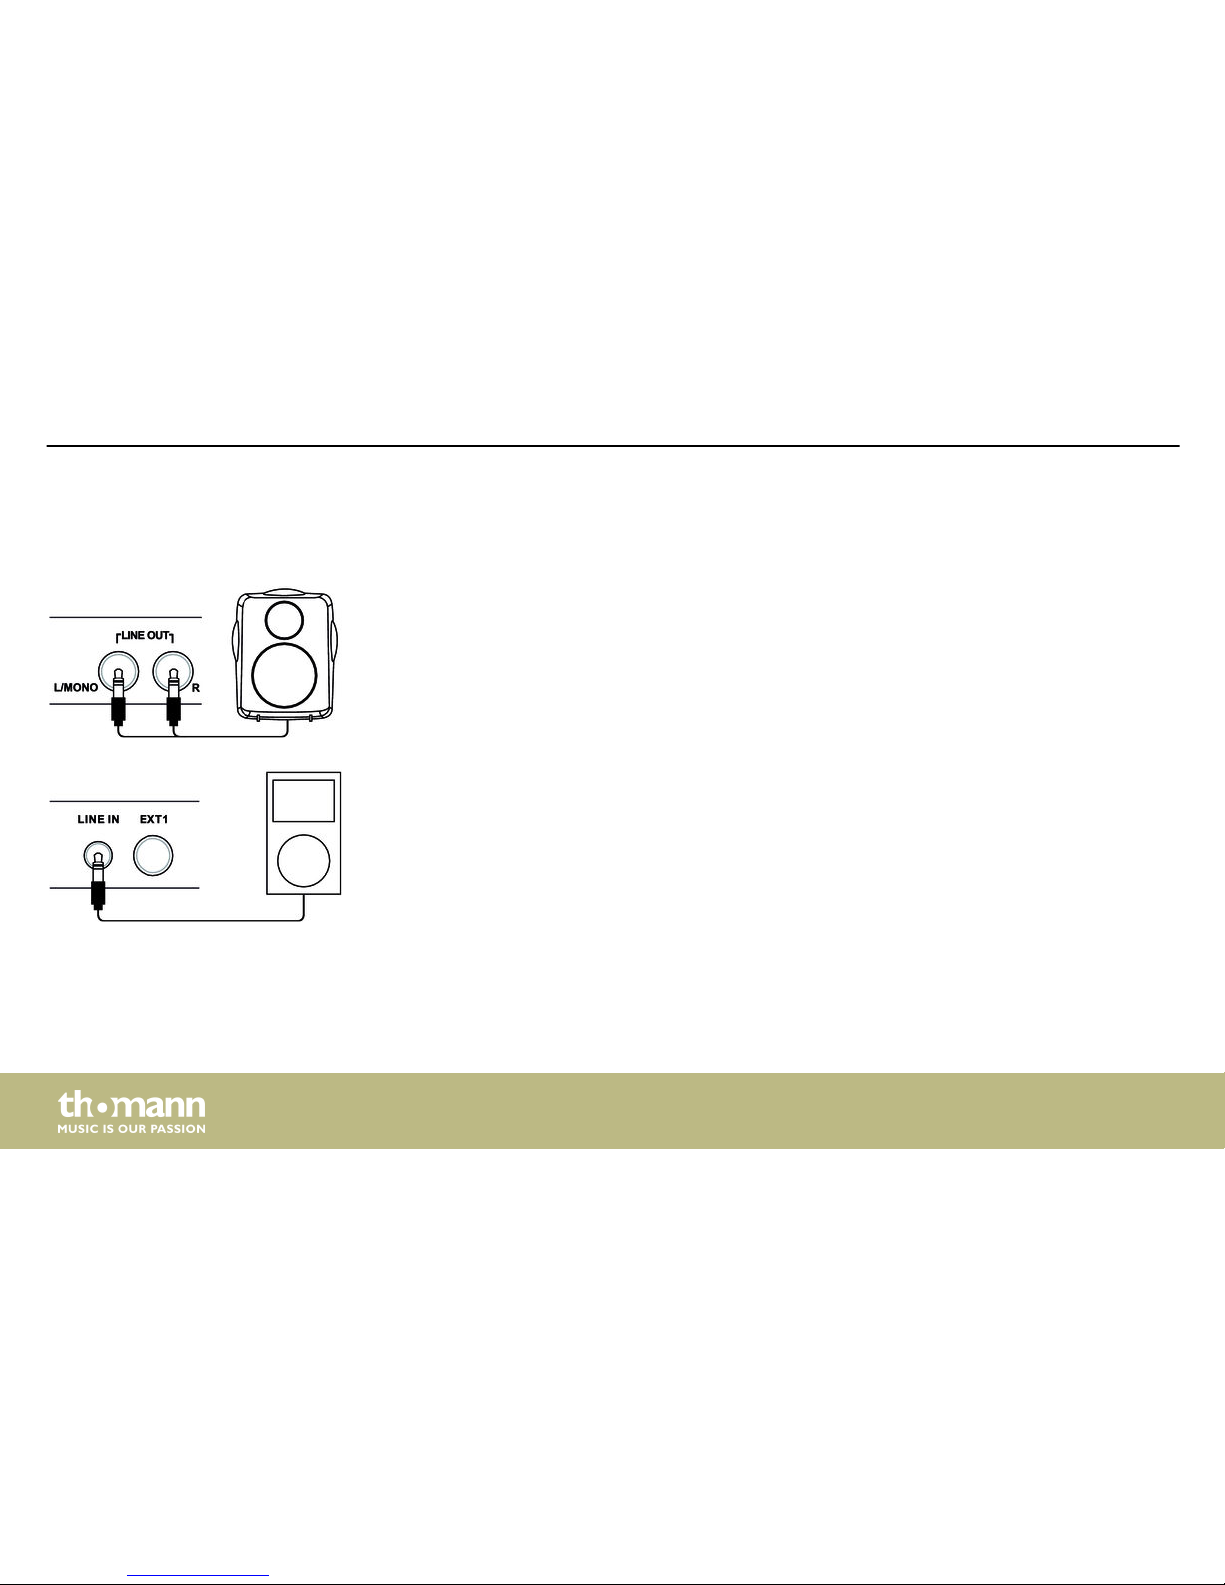
Connect the inputs of your amplifier or active monitors to the LINE OUT sockets on the rear
panel of the drum module. Connect a CD or MP3 player etc. to the LINE IN socket on the rear
panel of the drum module.
Connecting audio devices
Installation and starting up
e-drum module
16
Page 17
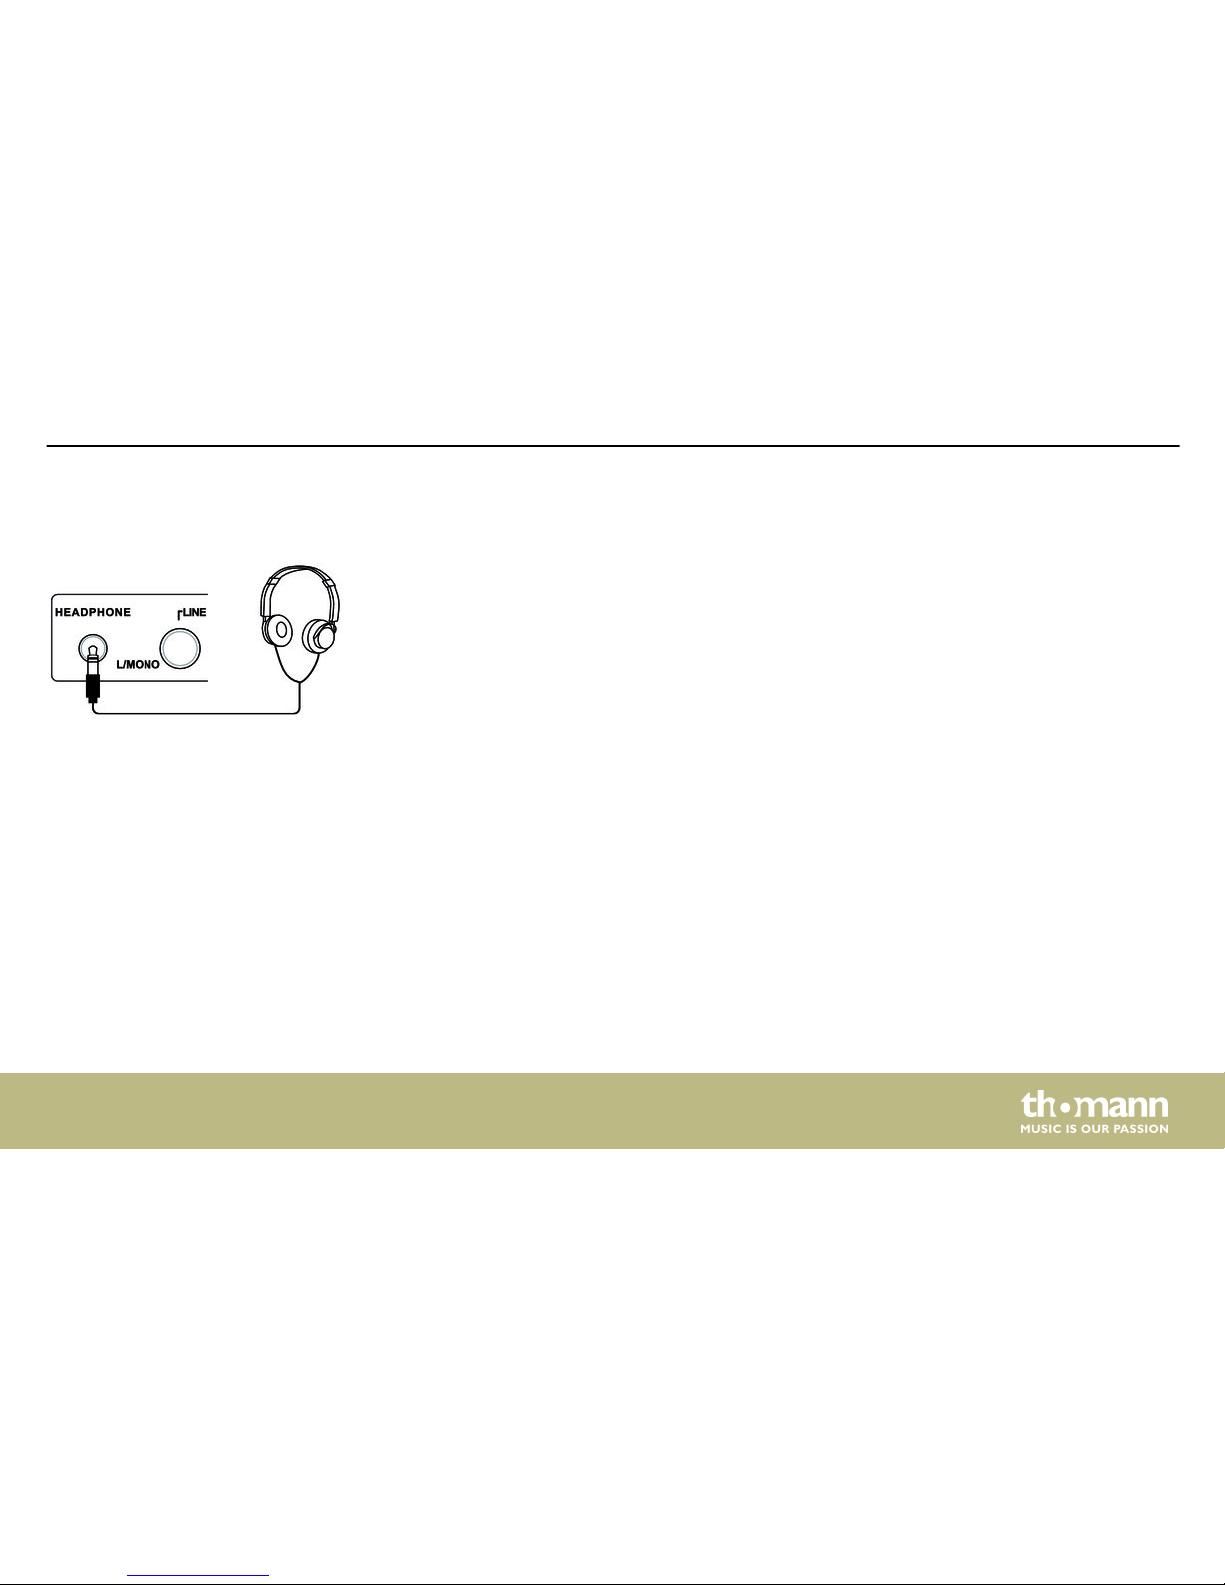
Connect your stereo headphones to the [HEADPHONE] output on the rear panel of the drum
module.
Connecting headphones
Installation and starting up
MPS-750
17
Page 18
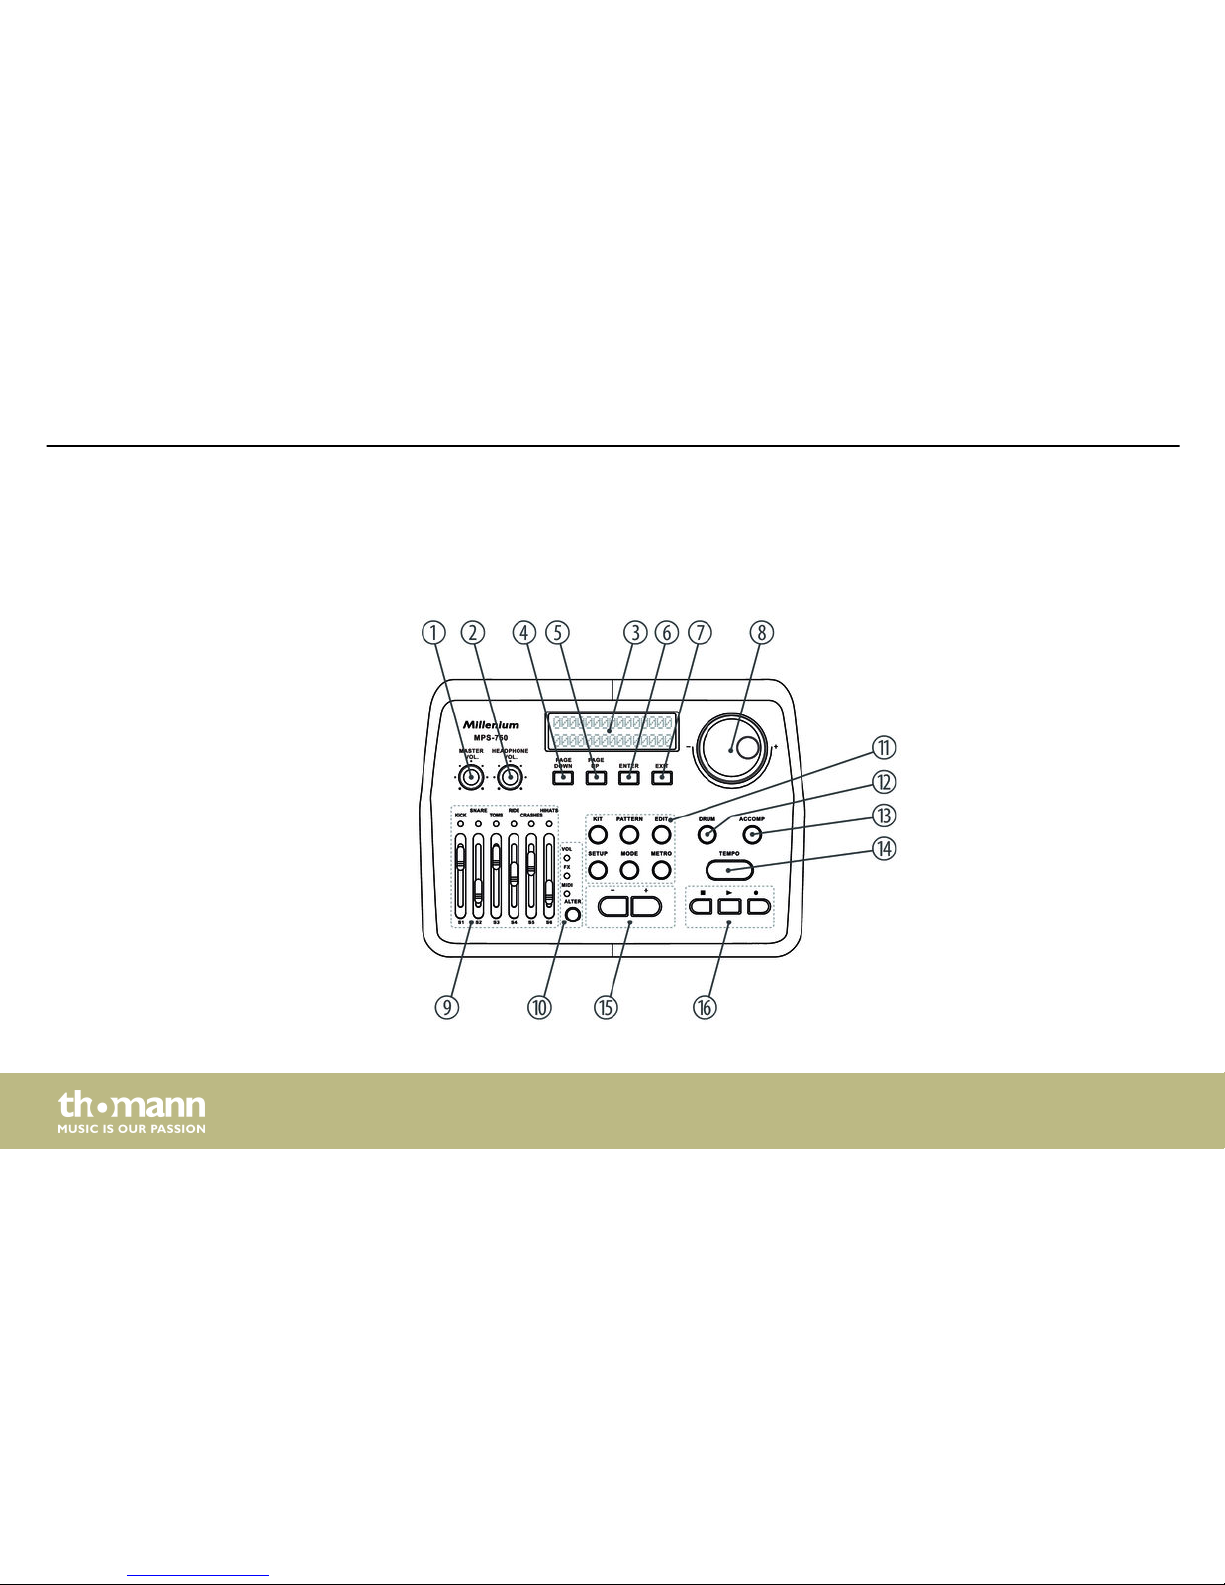
5 Connections and controls
Front panel
Connections and controls
e-drum module
18
Page 19
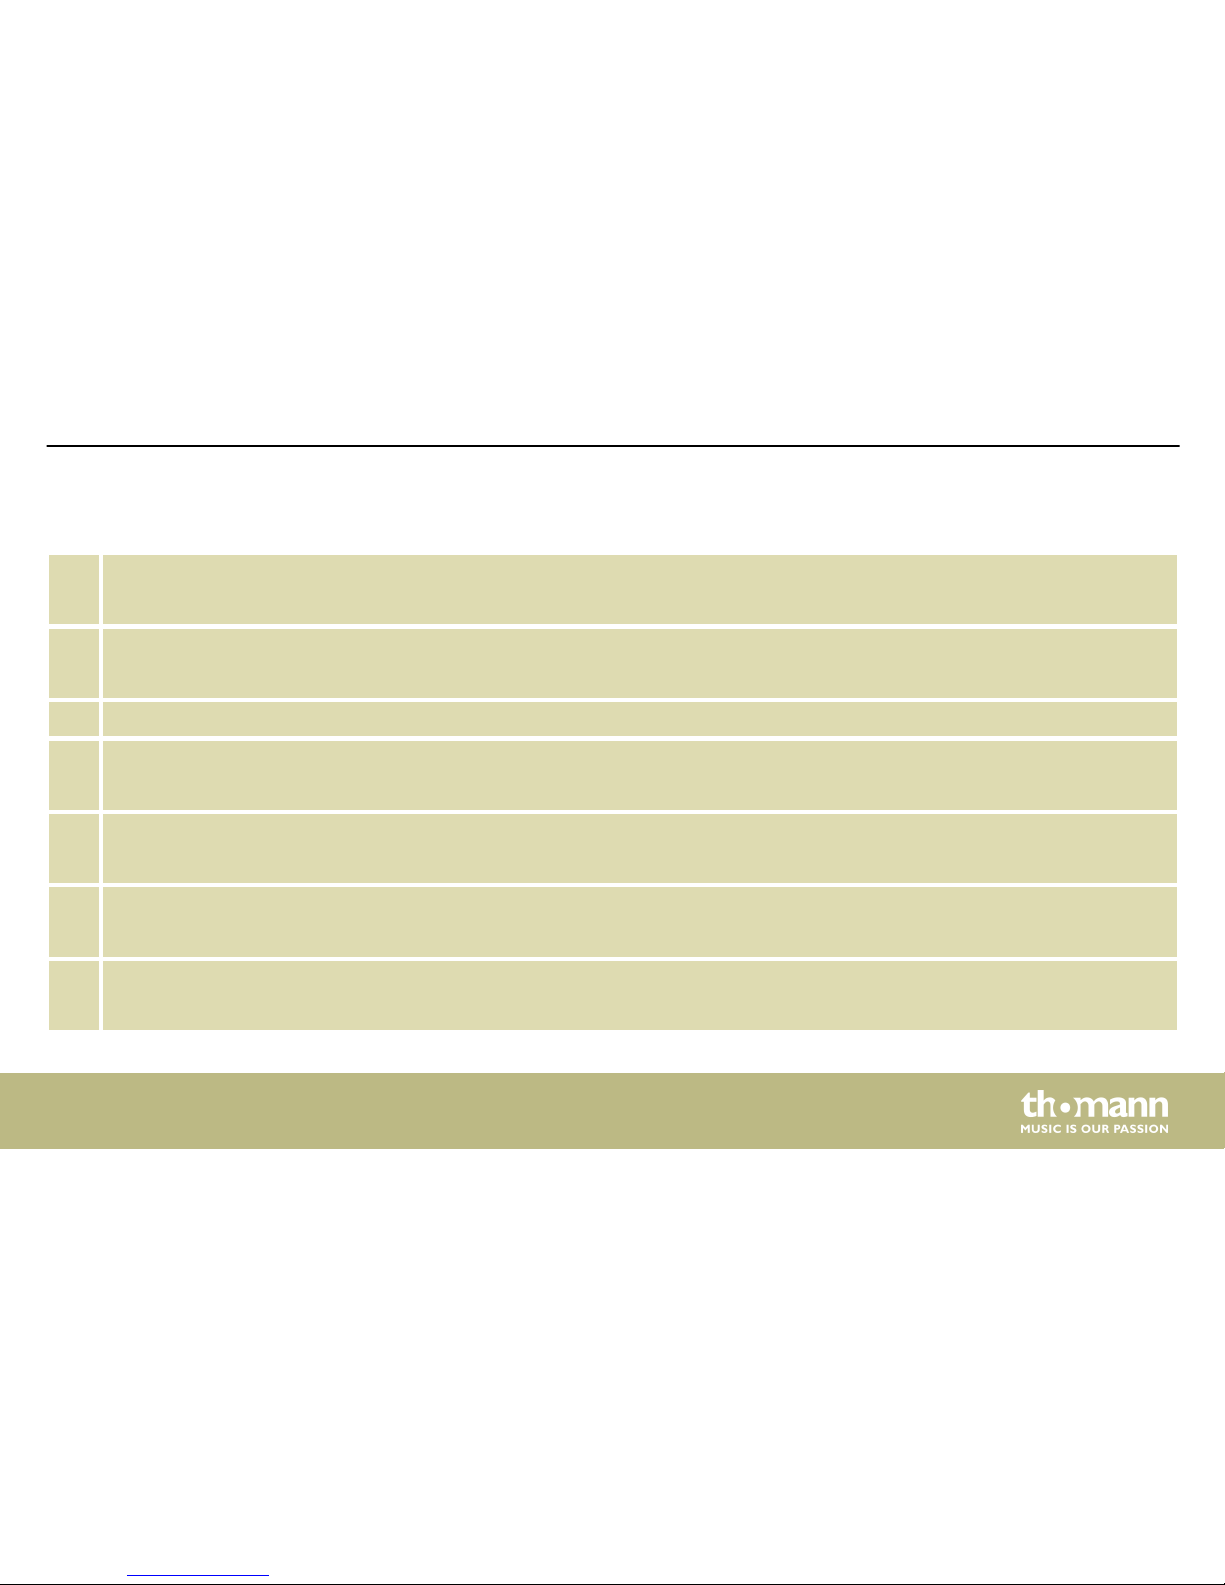
1 [MASTER VOL.]
Rotary control for adjusting the Line out volume.
2 [HEADPHONE VOL.]
Rotary control for adjusting the headphones output volume.
3 Backlit display.
4 [PAGE DOWN]
Button to scroll forward through the open menu.
5 [PAGE UP]
Button to scroll backward through the open menu.
6 [ENTER]
Enter button to confirm a selection or change.
7 [EXIT]
Return key to exit a menu or to discard changes.
Connections and controls
MPS-750
19
Page 20
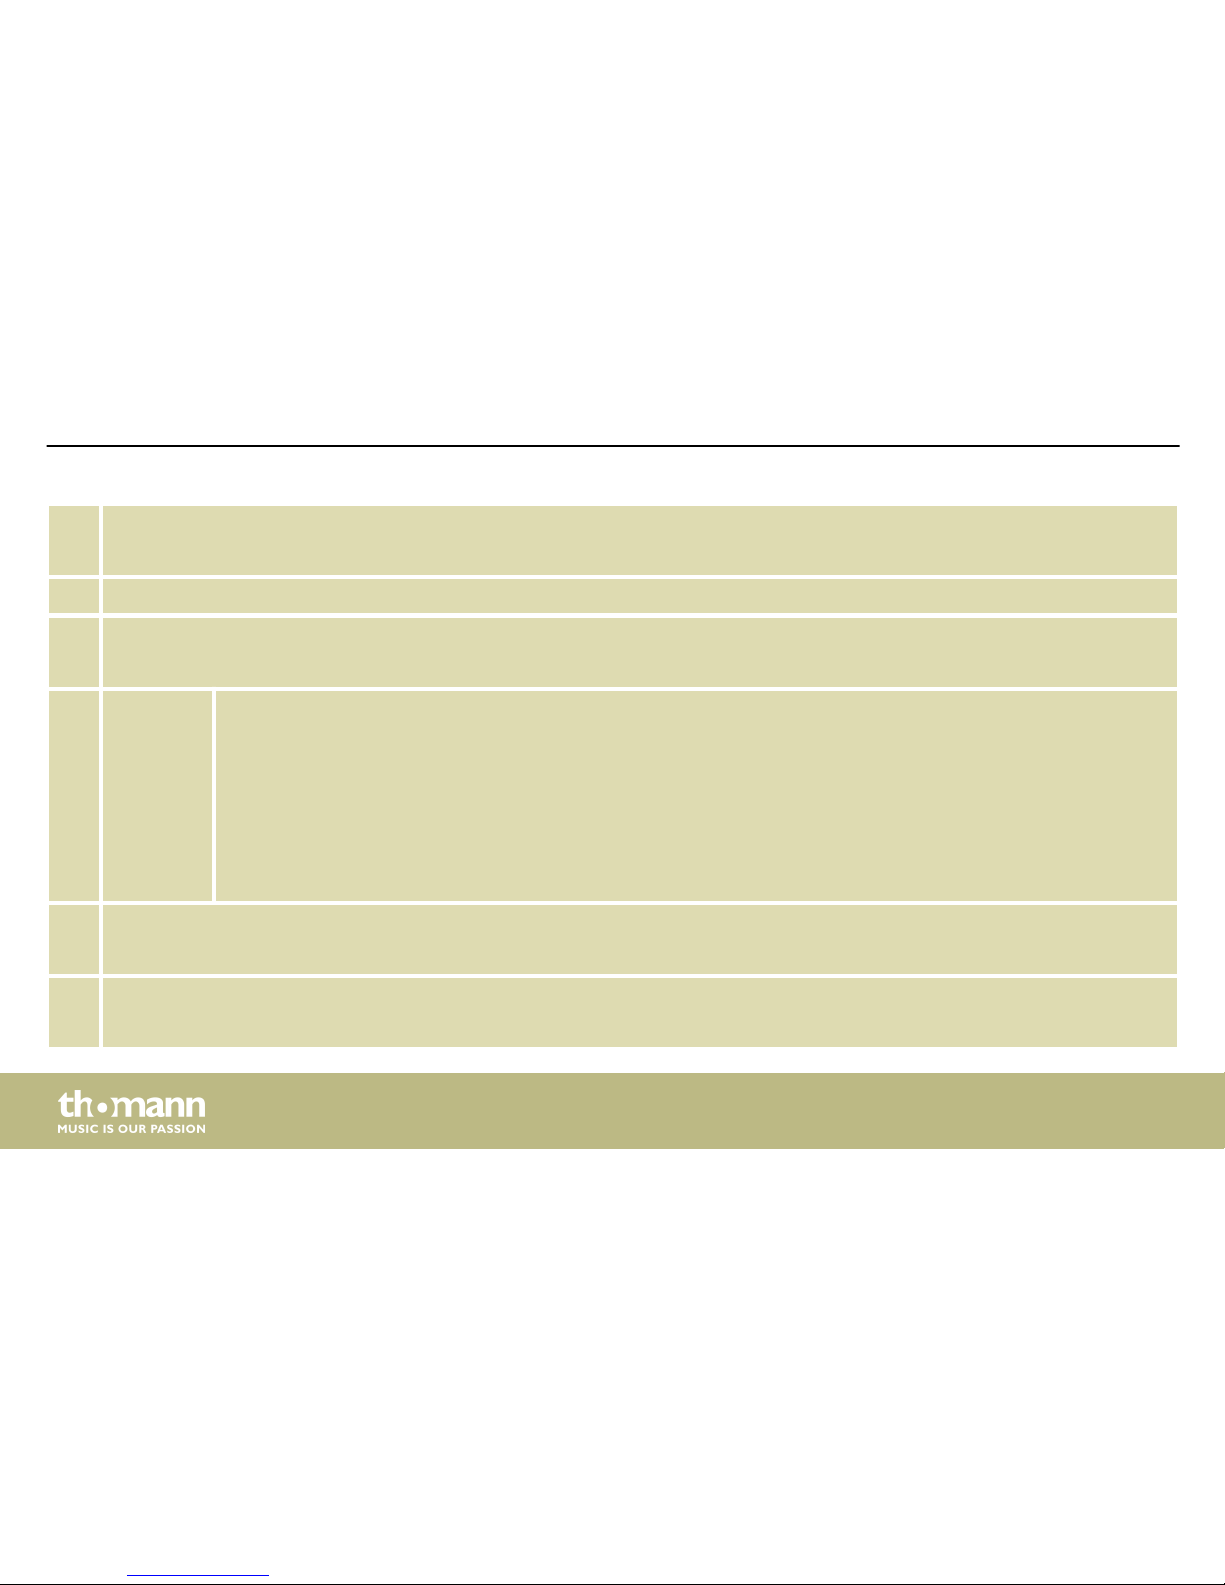
8 Rotary control [–] / [+]
Increases or decreases the value of the currently selected parameter.
9 Fader S1 … S6 for the connected pads, function depends on selection [ALTER] (10)
10 [ALTER]
Selector switch for faders function S1 … S6: Volume, FX or MIDI. The control LED of the enabled function lights up.
11 [KIT]
[PATTERN]
[EDIT]
[SETUP]
[MODE]
[METRO]
Button to activate ‘Kit’ mode.
Button to activate ‘Pattern’ mode.
Button to open the programming menu.
Button to open the device settings menu.
Button to switch between operating modes.
Turns the metronome on and off and opens the click menu.
12 [DRUM]
Button to mute the Drum track of a style.
13 [ACCOMP]
Button to mute the Accompaniment track of a style.
Connections and controls
e-drum module
20
Page 21
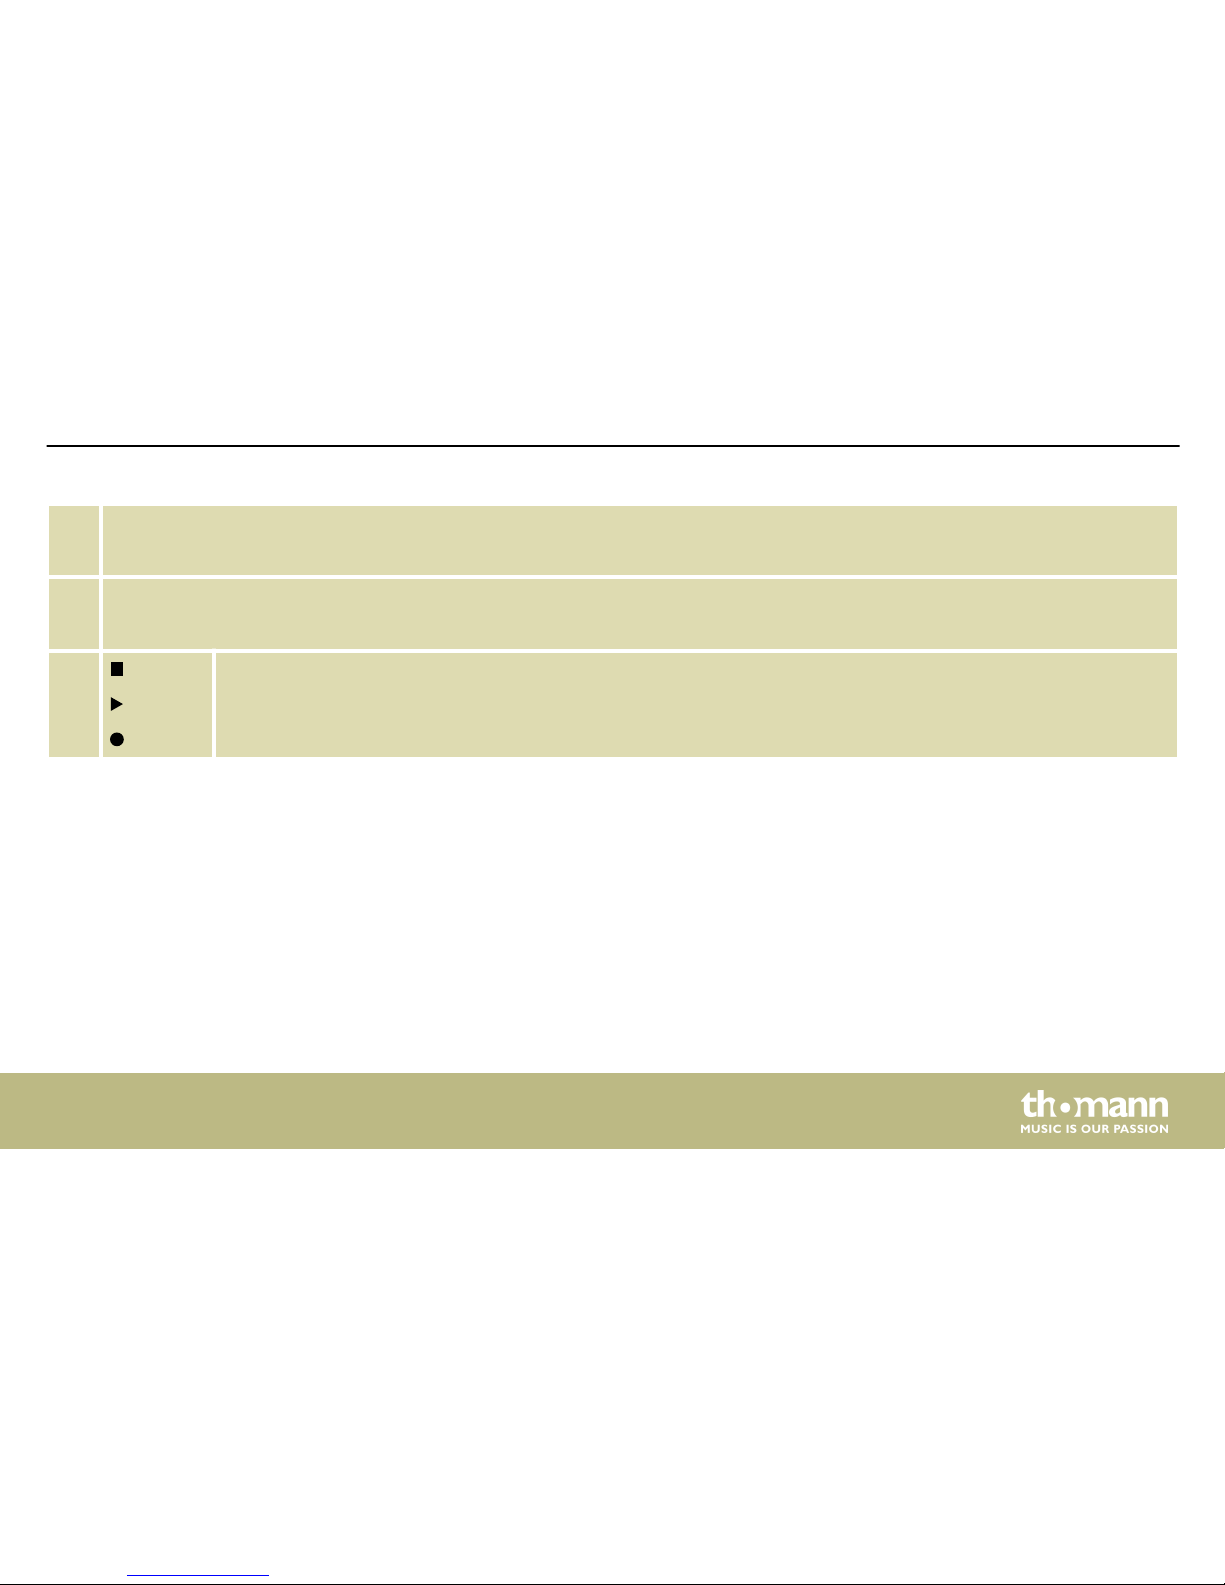
14 [TEMPO]
Button to adjust the metronome tempo and thus the tempo for recording and playback.
15 [–] | [+]
Button to increase or decrease the displayed value and to select a kit.
16 Button to end Style playback and to stop recording.
Button to start Style playback.
Button to start recording.
Connections and controls
MPS-750
21
Page 22
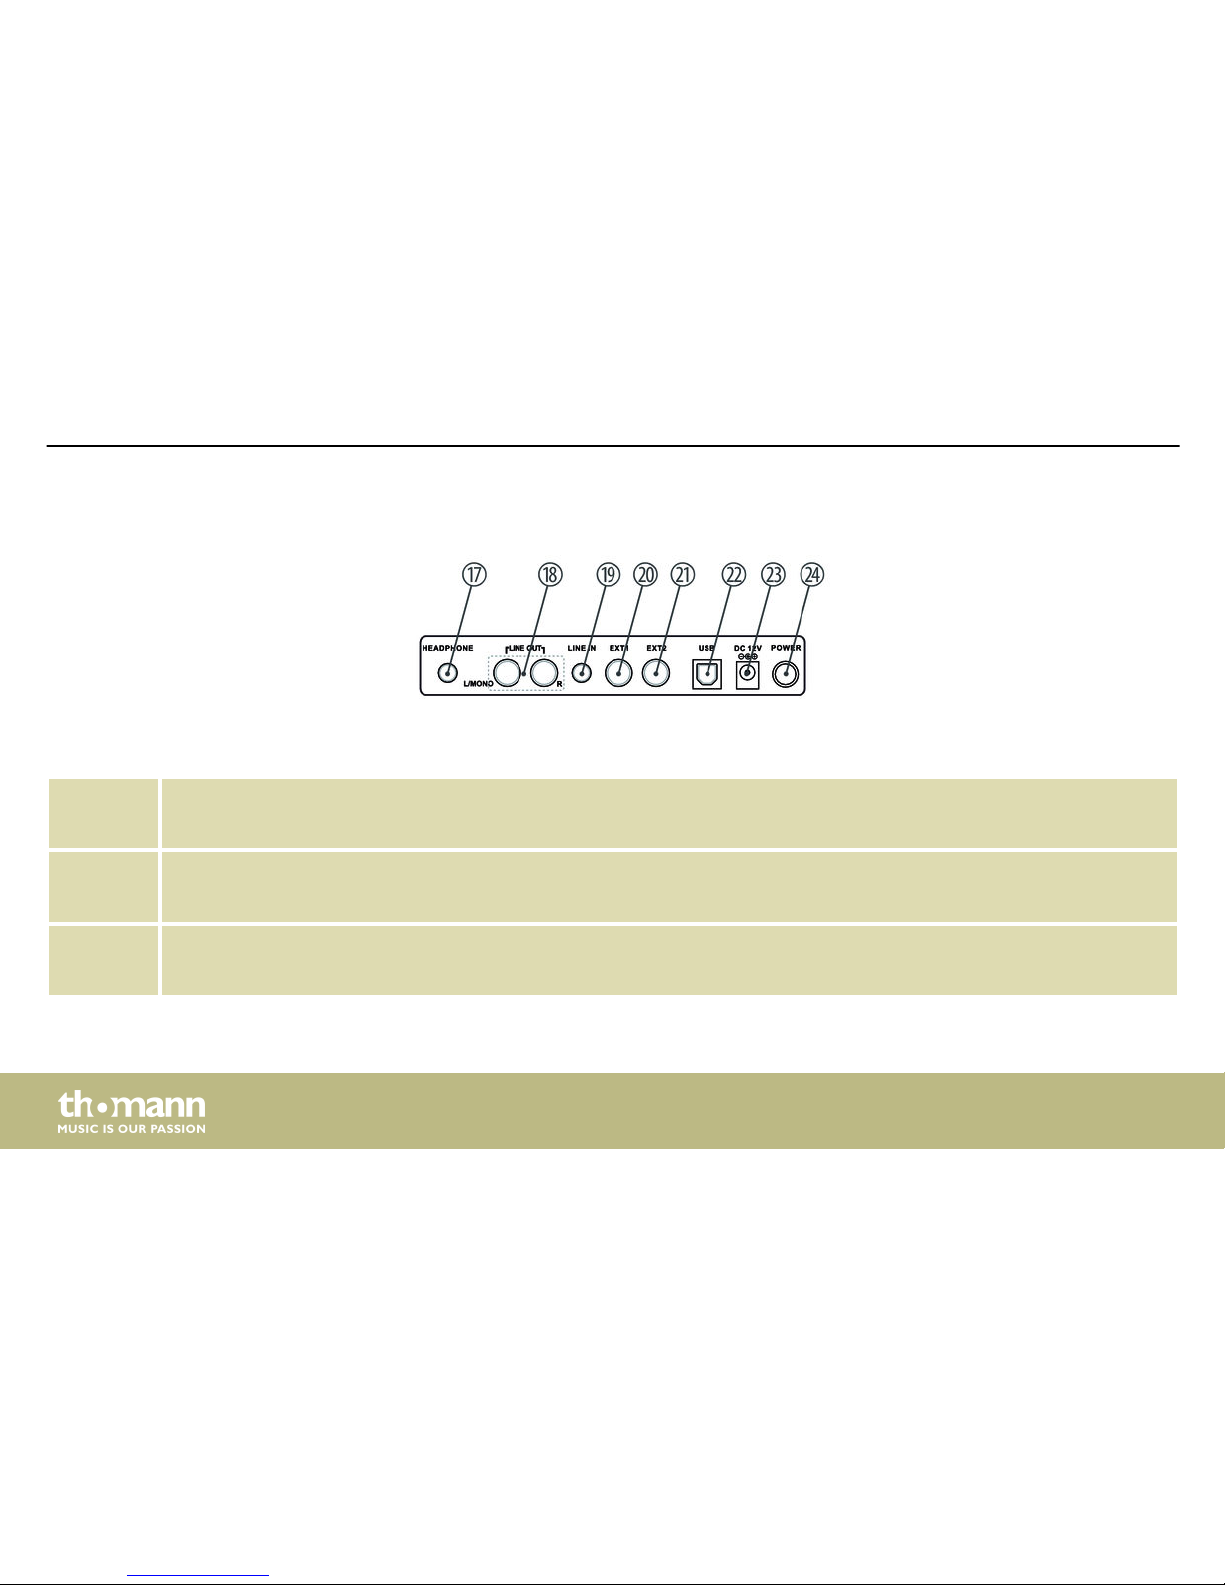
17 [HEADPHONE]
Headphones output.
18 [LINE OUT]
Output socket to connect an amplifier or active monitor (mono left, stereo left/right).
19 [LINE IN]
Input socket for connecting audio devices like CD and MP3 players, etc.
Rear panel
Connections and controls
e-drum module
22
Page 23
20 [EXT1]
Input socket for connecting an external trigger.
21 [EXT2]
Input socket for connecting an external trigger.
22 [USB]
USB port for connecting a PC with USB-MIDI interface.
23 [DC 12V]
Connection socket for the power adapter.
24 [POWER]
Main switch to turn the device on and off.
Connections and controls
MPS-750
23
Page 24
6 Operating
6.1 Functions
Check all cable connections for correct fit before turning on.
Before switching on, turn both volume controls of the drum module down to min‐
imum.
Use the main switch [POWER] on the rear panel to switch the drum module on.
The unit automatically switches to standby mode when you don't press any key or strike a con‐
nected pad for about 30 minutes. Then press the main switch [POWER] to turn the device back
on again.
A drum kit is a compilation in which a certain sound and several sound parameters are
assigned to each trigger. Selecting different drum kits lets you customise the sound of your edrum sets in seconds to the desired music genre.
Switching on
Standby function
Selecting a drum kit
Operating
e-drum module
24
Page 25
1. Press the [KIT] button.
ð
The first kit appears on the display.
2. Use the rotary control [–] / [+] to select the desired kit.
The preprogrammed sounds of the drum module can be programmed to any of the connected
pads. So you can create user kits and store them in the device. To do so proceed as follows:
1. First, call up one of the available drum kits (see previous chapter) and use [EDIT] to
switch to Edit mode.
2. Hit the pad (Trigger) to which you want to programme a certain sound or press [DRUM]
repeatedly until the desired pad is shown on the display. Additionally select the specific
trigger for multiple assigned pads.
Customising a drum kit
Operating
MPS-750
25
Page 26
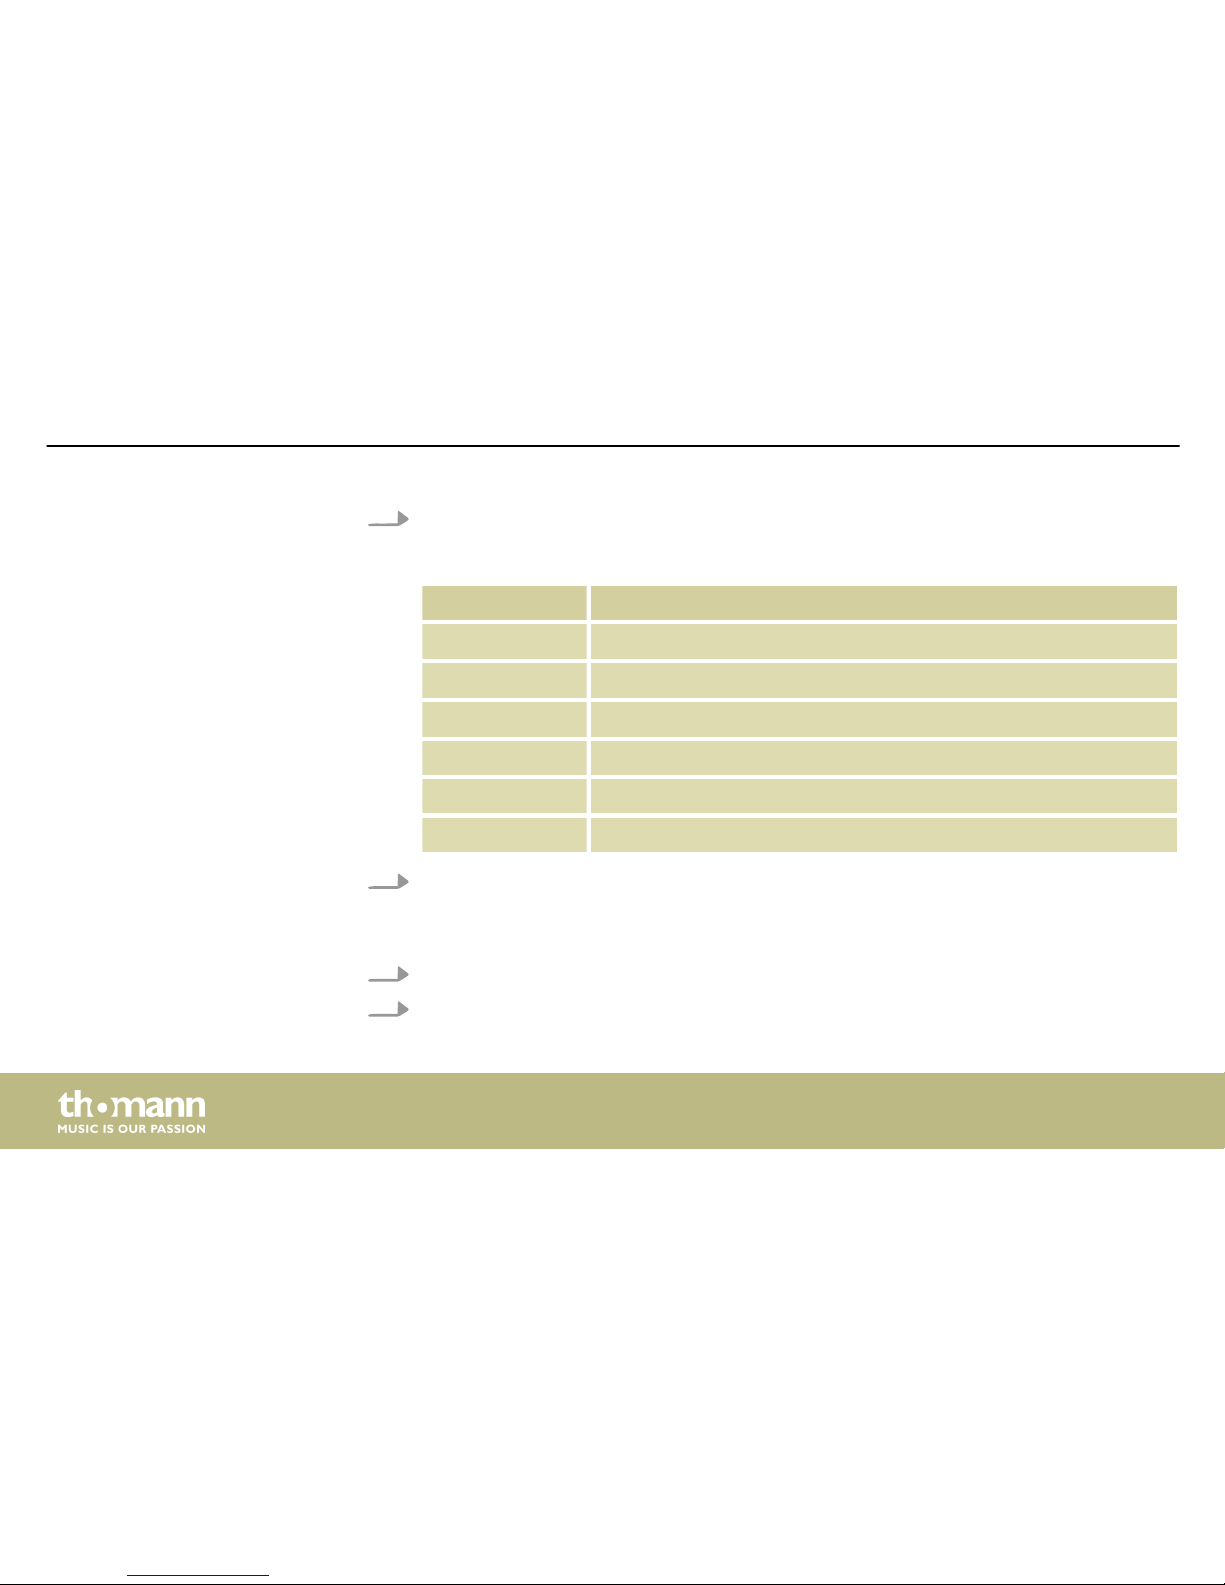
3. Use [PAGE DOWN] or [PAGE UP] to successively open the following selection menus and
use the rotary control [–] / [+] or the buttons [–] | [+] to adjust the settings for the acti‐
vated trigger.
Selection menu Value range
VOICE TYPE Kick, Snare, Tom, Ride, Crash, Hi-Hat, Metro, Extras
VOICE
Voice selection, see Ä Chapter 11.1 ‘Voice list’ on page 42
VOLUME Volume
REVERB Reverb effect
PITCH Pitch
PAN Position within the stereo signal (panorama right / left)
4. Quit the selection menu with [EXIT].
ð
Use [–] | [+] in the following saving dialogue to specify the memory location. Existing
data will be overwritten.
5. Confirm with [ENTER] or cancel saving with [EXIT].
6. Select if necessary the next trigger, to which you want to programme a sound. Use [EXIT]
to exit the Edit mode.
Operating
e-drum module
26
Page 27
Your digital drum set has a total of 40 preprogrammed Styles, which can be played individually
in the ‘Pattern’ mode.
1. Press the [PATTERN] button.
ð
The display shows the first Style in ‘01 WalkWithTree’ format.
2. Use the rotary control [–] / [+] or the buttons [–] | [+] to select the Style you want to play.
3.
Start and stop playback with the buttons and .
Press [METRO] to turn the Metronome on. Then you hear the Metronome sound. Proceed as
follows to adjust the metronome settings:
Style playing
Metronome function
Operating
MPS-750
27
Page 28
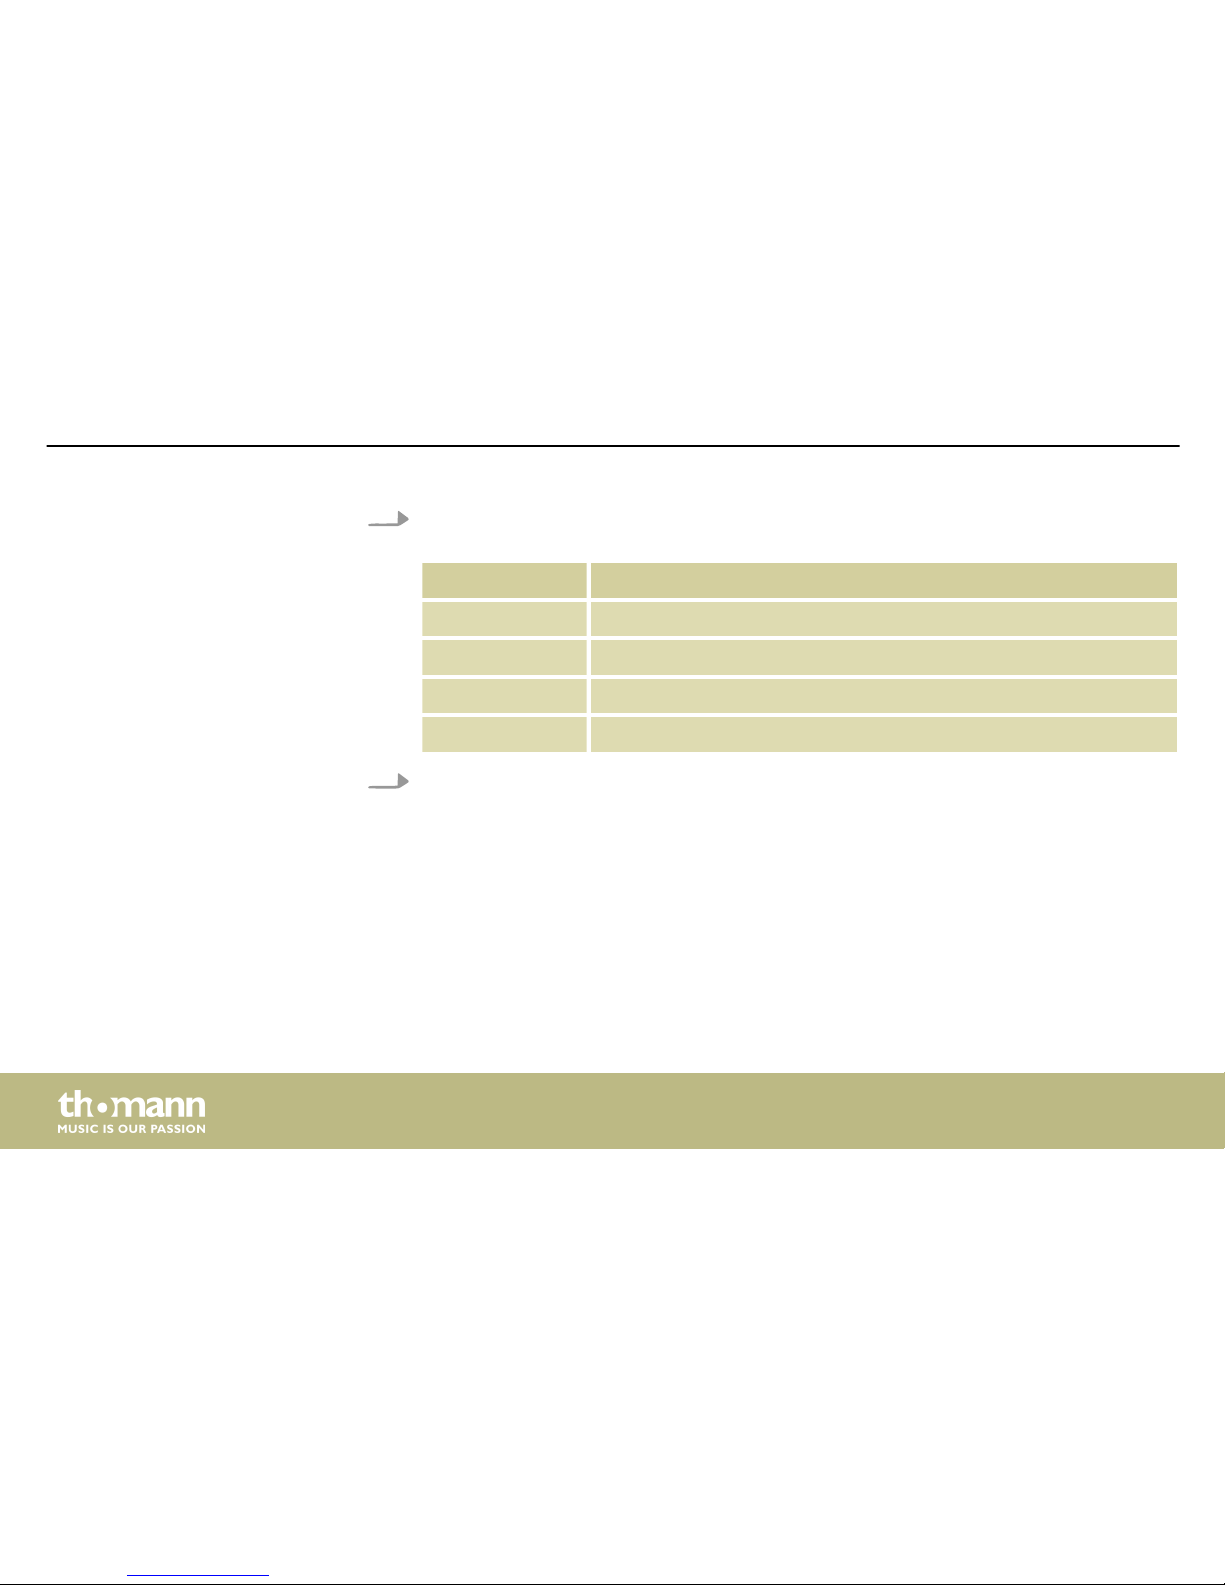
1. Use [PAGE DOWN] or [PAGE UP] to successively open the following selection menus and
use the rotary control [–] / [+] or the buttons [–] | [+] to adjust the settings as desired.
Selection menu Value range
VOLUME Volume
TEMPO Speed
TIME SIGNATURE Time signature
SOUND Metronome sound
2. Quit the selection menu with [EXIT].
The click tempo can additionally be adjusted as follows: Press [TEMPO] and adjust the tempo
using the rotary control [–] / [+].
or
Tap four times in succession and at the desired tempo the [TEMPO] button (tap tempo func‐
tion). The new value is instantly applied.
Press [METRO] again to turn the Metronome off.
Operating
e-drum module
28
Page 29
The drum module offers the possibility to record up to 15 user drum tracks in the operating
modes ‘Kit’ or ‘Pattern’. To do so proceed as follows:
1. Activate one of the operating modes ‘Kit’ or ‘Pattern’.
2.
Press the Record button to activate the Recording mode.
3. If desired, specify the metronome settings for the recording.
4.
Press the Record button again to start recording.
5.
Use the Stop button to pause the recording, and the Record button to restart it.
To finally stop recording press the Stop button twice.
ð
The display shows the message ‘Save the song to’ .
6. Use [–] | [+] to specify the memory location. Existing data will be overwritten.
7. Confirm with [ENTER] or cancel saving with [EXIT].
In ‘Pattern’ mode you can add a style.
Recording function
Operating
MPS-750
29
Page 30
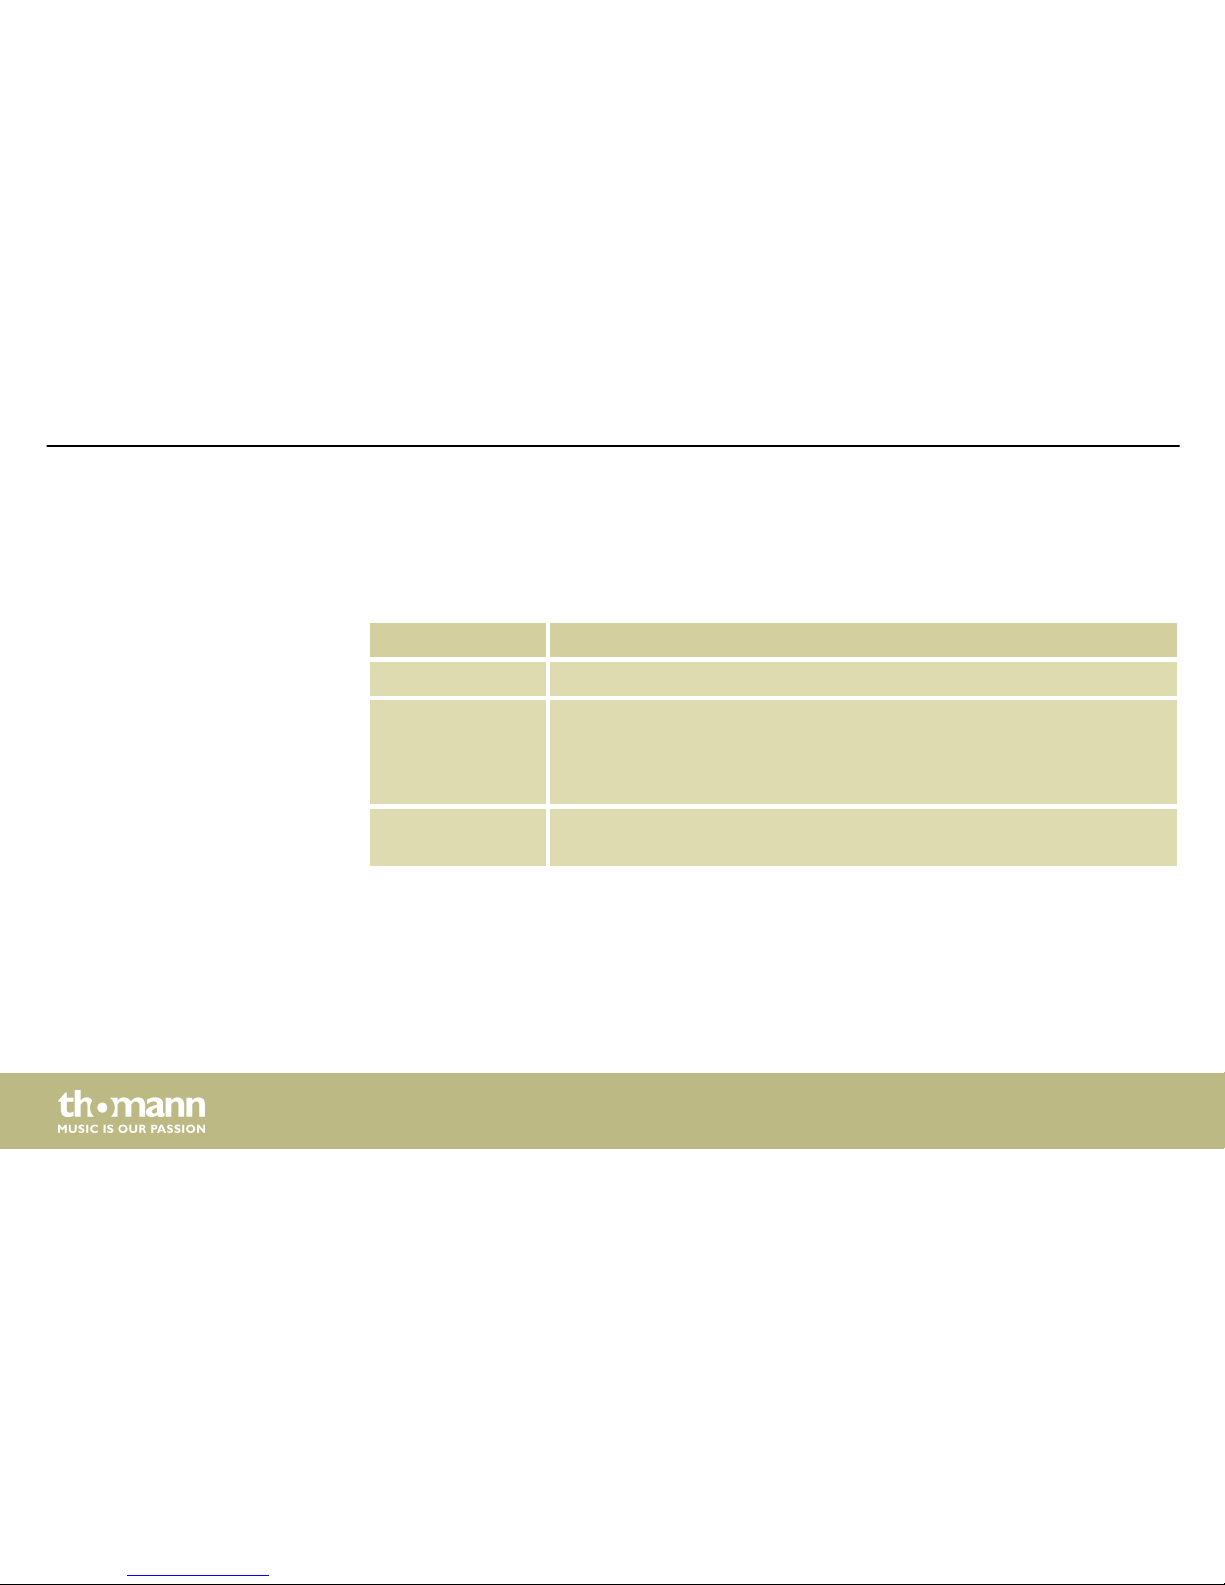
The function of faders S1 … S6 of the drum module depends on the selected operating mode.
Use [ALTER] to toggle between VOL, FX and MIDI. The control LED of the activated operating
mode lights up.
Operating mode Fader function
VOL Volume control for the assigned pad.
FX Fader S1: Reverb control
Fader S2: Compression control
Fader S3 … S6: 4-Band-EQ controls
MIDI In MIDI operation, each fader S1 … S6 is assigned to one controller, the
function is specified in the settings of the installed DAW.
Mixer function
Operating
e-drum module
30
Page 31
If you have set one of the faders to a certain value in one of the operating modes and
then repeatedly change the operating mode you first have to slide the fader over the
previously set value in the initial mode.
Example: If you set fader S1 in VOL mode to value ‘127’, then change to FX mode and
set the fader to ‘0’, then change back to VOL mode, you first have to set the fader
back to value ‘127’ to get a response.
This function prevents sudden volume jumps or changes of effect settings by moving
the faders in the three modes.
6.2 Device settings
Various device settings can be customised in the Setup menu.
Press [SETUP] to enter the menu. Use [PAGE DOWN] or [PAGE UP] to select the desired option
and use the rotary control [–] / [+] or the buttons [–] | [+] to adjust the settings as desired.
Quit the selection menu with [EXIT].
Operating
MPS-750
31
Page 32
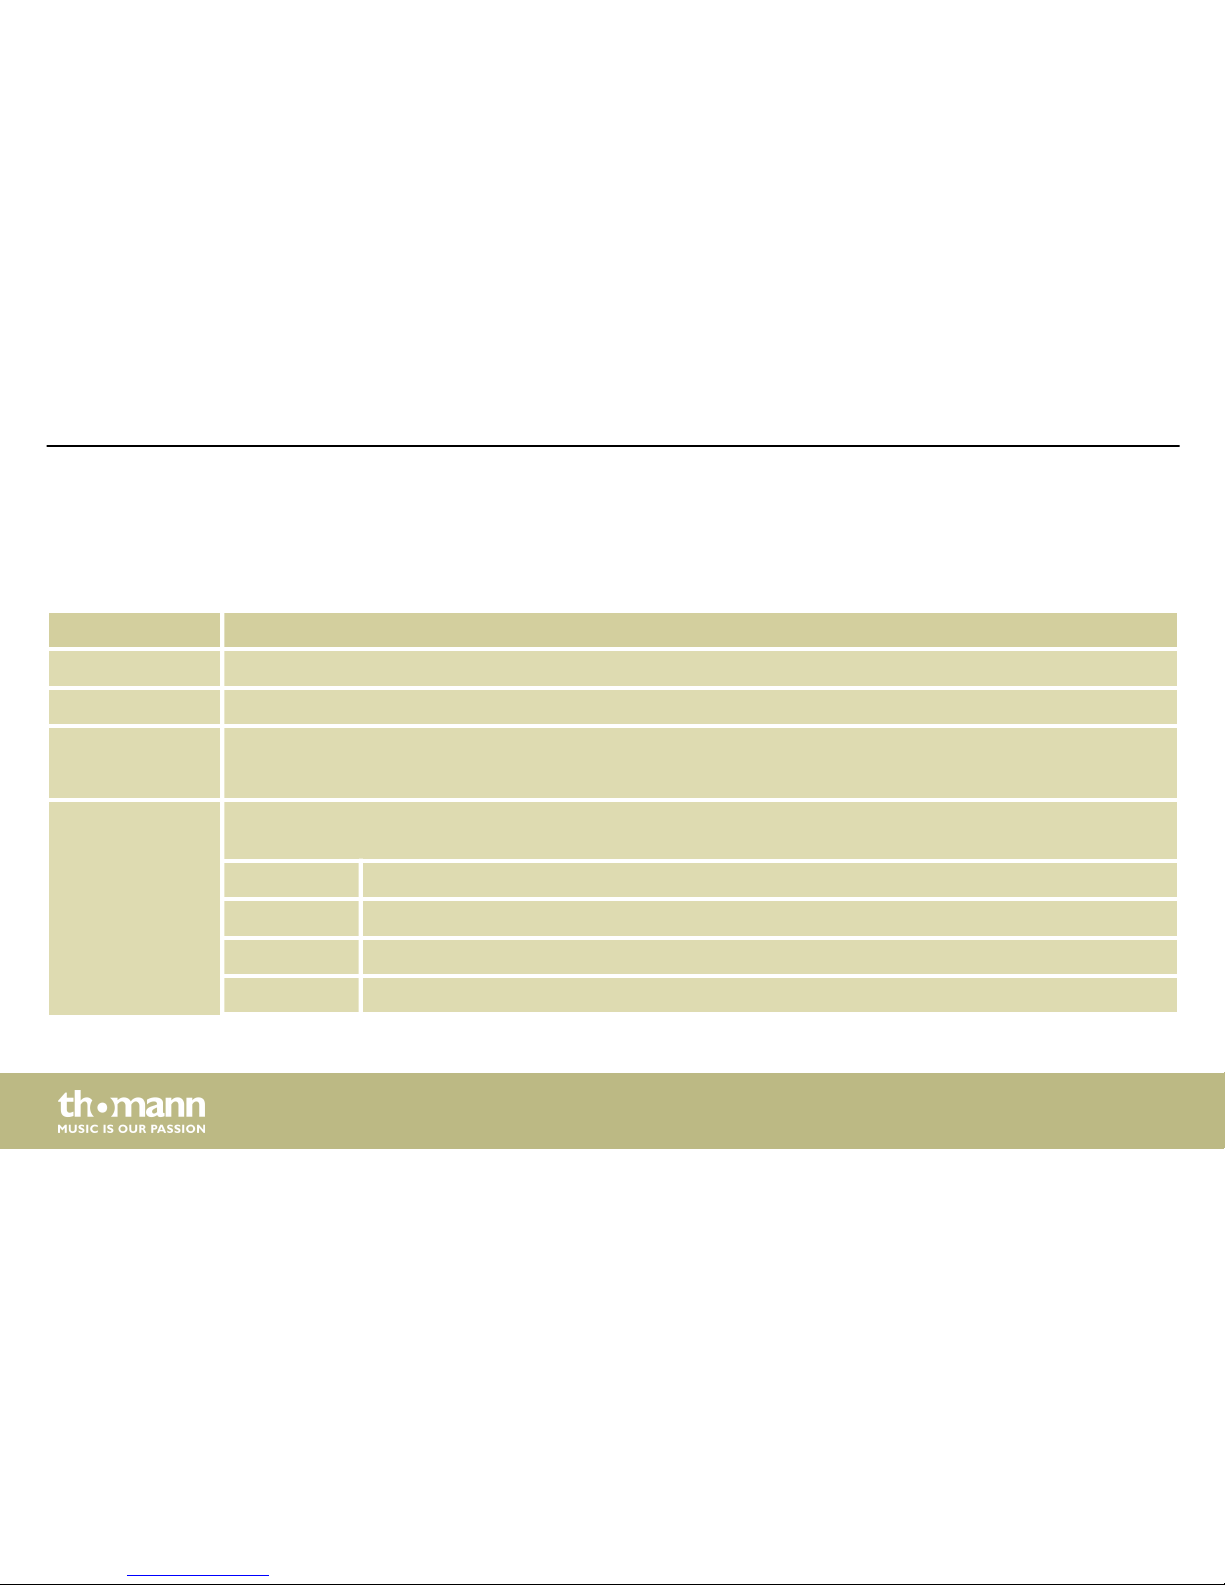
Confirm the respective security prompt with [ENTER] to accept the new value, or cancel all
changes with [EXIT].
Parameter Function
BACK VOLUME Volume preset for all Styles and Loops.
MASTER TUNE Pitch preset, on delivery set to standard A / 440 Hz.
LOCAL Set the Parameter for normal operation to ‘ON’: the module plays the programmed sound files.
Set the Parameter for MIDI operation to ‘OFF’ (low latency): the module transfers MIDI data.
FX SET Fader function preset. Make the following settings either directly with the fader or use the buttons [PAGE UP]/
[PAGE DOWN]:
Reverb Type Reverb preset (effect type), fader S1.
Dist.Pst Distortion preset (effect type).
Threshold Compressor threshold preset, fader S2.
LowFrq Preset for low frequency control range, fader S3.
Operating
e-drum module
32
Page 33
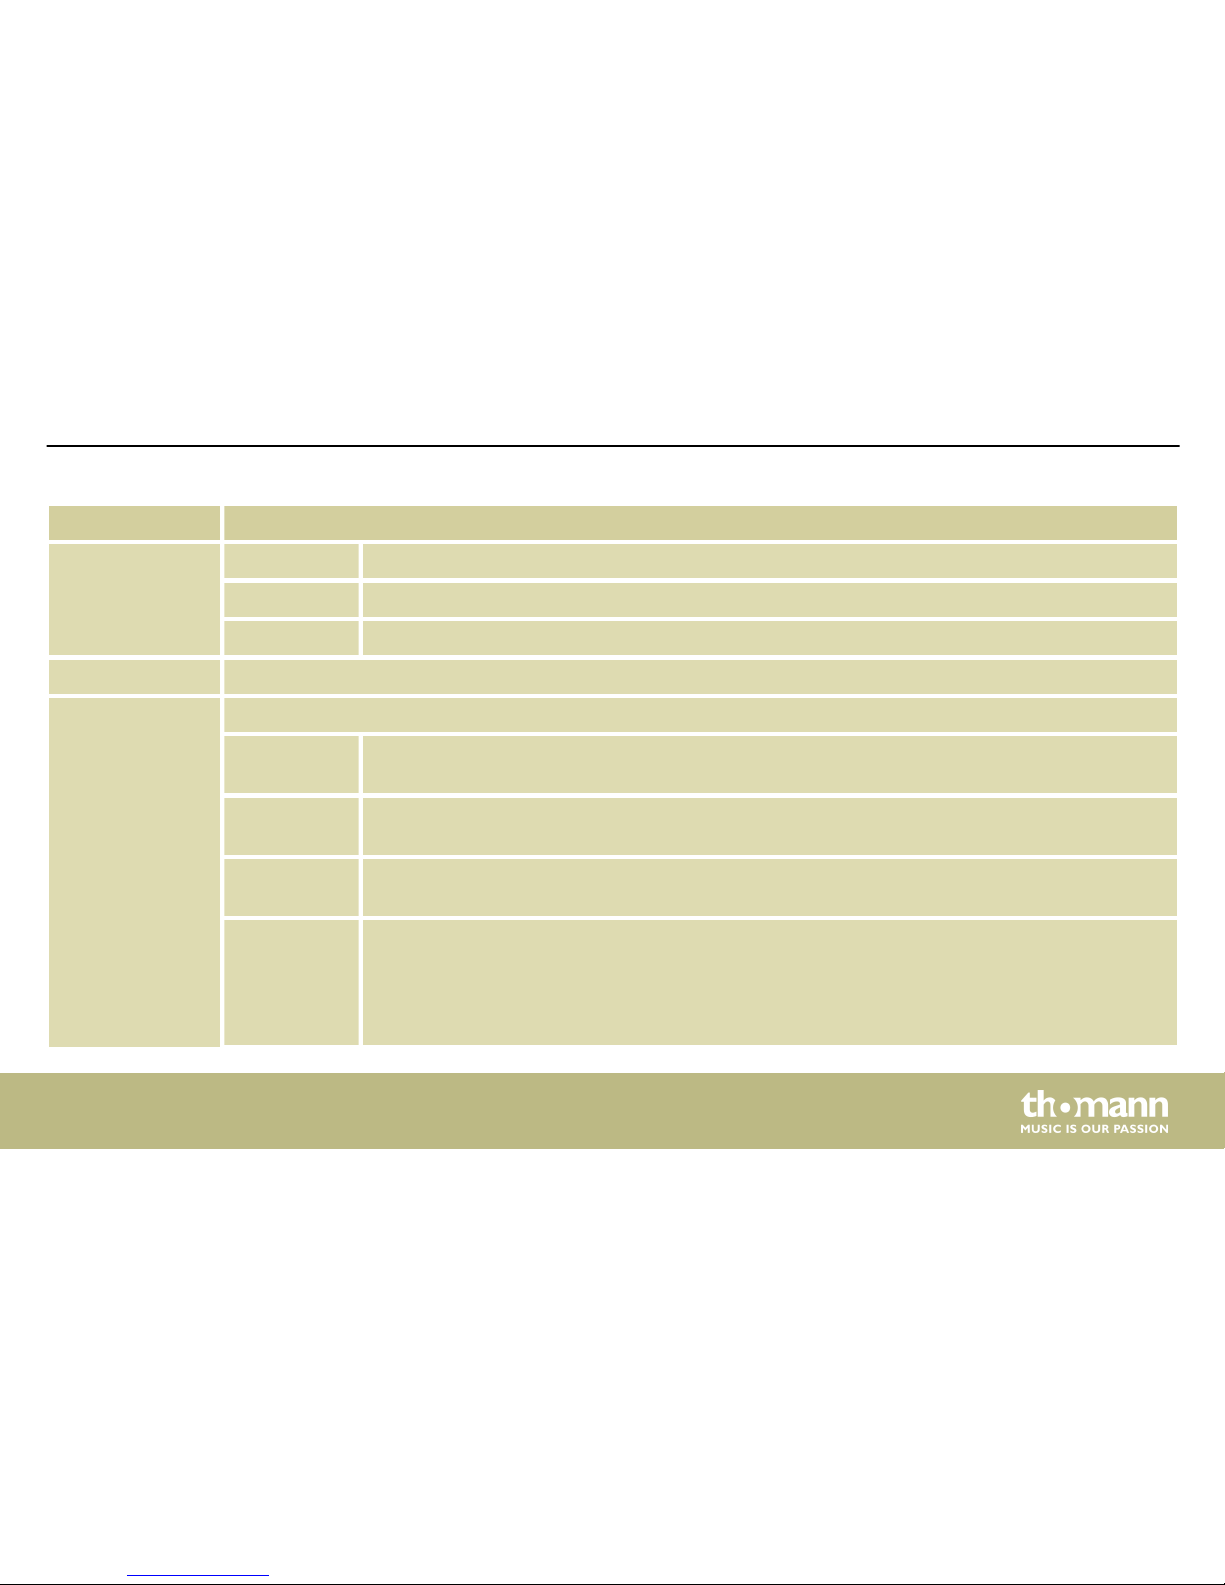
Parameter Function
LoMiFrq Preset for low mid frequency control range, fader S4.
HiMiFrq Preset for high mid frequency control range, fader S5.
HiFrq Preset for high frequency control range, fader S6.
MIDI SET Assignment of faders S1 … S6 to the MIDI controllers.
ADVANCED Pad or trigger parameter preset:
Sensitivity The touch sensitivity regulates the volume behaviour of a pad regardless of the actual strike
intensity. The higher the value, the higher the volume when playing, and vice versa.
Headroom This parameter is used to preset the level reserve between normal and maximum level when
playing the pads.
SenseTime Presetting the minimum time interval between two signals from the same trigger prevents
unwanted sound overlays by vibrations.
Trigger The trigger curve regulates the velocity, i.e. the ratio between the punch and volume. Use set‐
ting ‘Linear’ for the most natural ratio between punch and volume. Use ‘Exp’ if you want a
hard strike to cause a bigger change in volume (or dynamics). Use ‘Log’ if you want a soft
strike to cause a bigger change. With the setting ‘Spline’ the volume changes less upon a
change of the strike. High volumes are already reached at a relatively low strike intensity.
Operating
MPS-750
33
Page 34
Parameter Function
Xtalk If several pads are mounted on a rack vibrations can be transmitted to other pads when you
hit a trigger and unintentionally trigger sounds. This crosstalk can be avoided by the appro‐
priate setting. The value should be set as low as possible.
Note Send Preset for the MIDI note value which is sent in MIDI operation.
Rim Velocity This parameter regulates the volume behaviour of the rim trigger regardless of the actual
strike intensity. The higher the value, the higher the volume when playing the rim trigger, and
vice versa.
Pedal Vel. This parameter regulates the volume behaviour of the hi-hat pedal regardless of the actual
strike intensity. The higher the value, the higher the volume when stepping on the hi-hat
pedal, and vice versa.
Calib. This parameter defines the playing range of the hi-hat pedal. Fully depress the connected
pedal several times and let the pedal slowly move back to the highest position. The value
range is stored in the module and allows a more precise strike.
Split Point This parameter defines the Rim trigger response value of the snare. If you play the Rim trigger
of the snare softly you hear the Cross Stick sound. Above the response value you hear the Rim
Shot sound.
Operating
e-drum module
34
Page 35
6.3 Reset to factory defaults
Proceed as follows to reset the device to factory defaults:
1. Press the [SETUP] button and use [PAGE UP] or [PAGE DOWN] to highlight the menu item
‘RESET’ .
2. Use the rotary control [–] / [+] or the buttons [–] | [+] to highlight one of the following
options:
n ‘ Kits’ (resets drum kits)
n ‘Settings’ (resets system settings)
n ‘Xtalk’ (resets crosstalk parameter)
n ‘Songs’ (deletes user songs)
n ‘All’ (resets all settings and deletes all user songs)
3. Confirm your selection with [ENTER].
4. Restart the module.
Operating
MPS-750
35
Page 36
7 Technical specifications
Display Backlit two-line LC display
Sounds 431
Drum kits 20 preset kits
20 user kits
Styles 40
Effects Reverb, distortion, compressor
Equalizer 4-band
Technical specifications
e-drum module
36
Page 37
Connections Headphones (1/4" phone socket)
Line in (2 × 1/4" phone sockets)
Line out (1/4" phone socket)
SUB-D (pad cable connection)
USB
2 × external trigger (1/4" phone sockets)
Operating supply voltage
12 V power supply unit
Technical specifications
MPS-750
37
Page 38
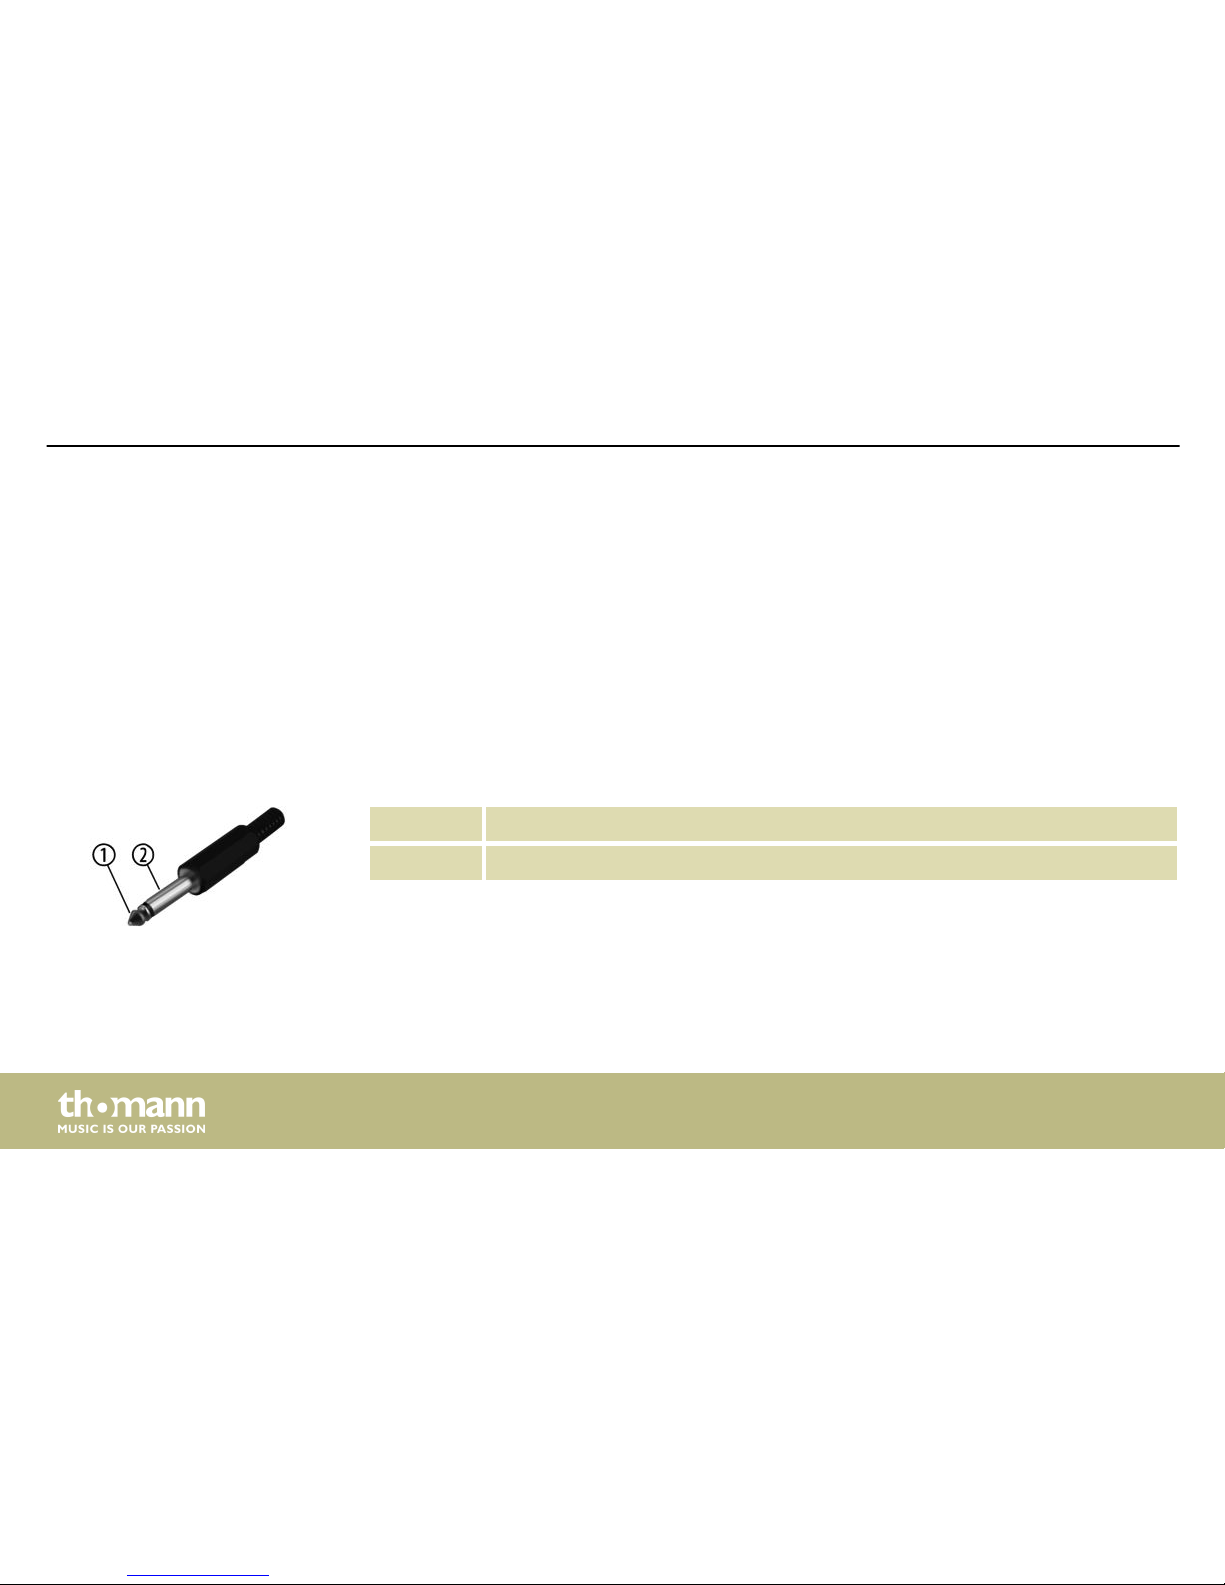
8 Connector and pin assignments
This chapter will help you select the right cables and plugs to connect your valuable equip‐
ment in such a way that a perfect sound experience is ensured.
Please note these advices, because especially in ‘Sound & Light’ caution is indicated: Even if a
plug fits into the socket, an incorrect connection may result in a destroyed power amp, a short
circuit or ‘just’ in poor transmission quality!
1 Signal
2 Ground, shielding
Introduction
1/4" TS phone plug (mono,
unbalanced)
Connector and pin assignments
e-drum module
38
Page 39
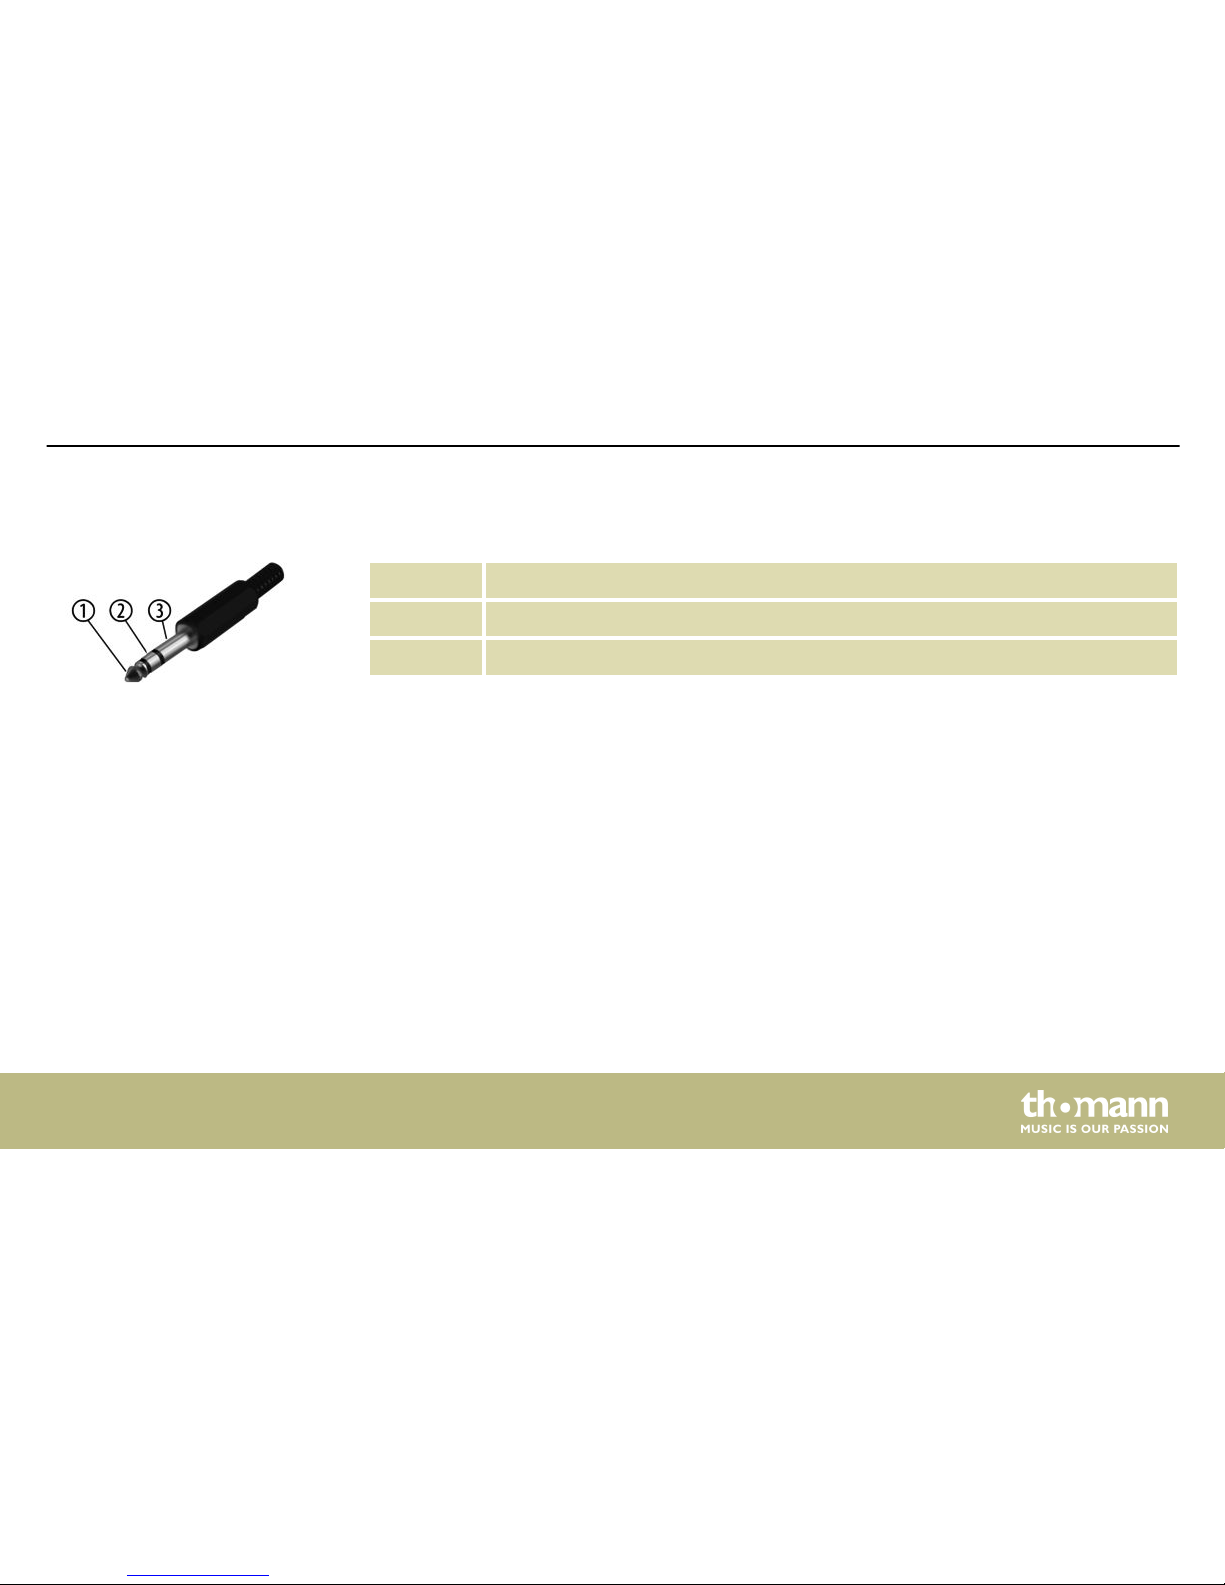
1 Signal (left)
2 Signal (right)
3 Ground
1/4" TRS phone plug (stereo,
unbalanced)
Connector and pin assignments
MPS-750
39
Page 40
9 Cleaning
Clean the device components that are accessible from the outside regularly. The cleaning fre‐
quency depends on the operating environment: damp, smoky or particularly dirty environ‐
ments can cause greater accumulation of dirt on the device components.
n Clean with a dry soft cloth.
n Stubborn dirt can be removed with a slightly dampened cloth.
n Never use solvents or alcohol for cleaning.
The fan grids of the device must be cleaned on a regular basis to remove dust and dirt. Before
cleaning, switch off the device and disconnect AC-powered devices from the mains. Use a lintfree damp cloth for cleaning. Never use solvents or alcohol for cleaning.
Device components
Fan grids
Cleaning
e-drum module
40
Page 41
10 Protecting the environment
For the transport and protective packaging, environmentally friendly materials have been
chosen that can be supplied to normal recycling.
Ensure that plastic bags, packaging, etc. are properly disposed of.
Do not just dispose of these materials with your normal household waste, but make sure that
they are collected for recycling. Please follow the notes and markings on the packaging.
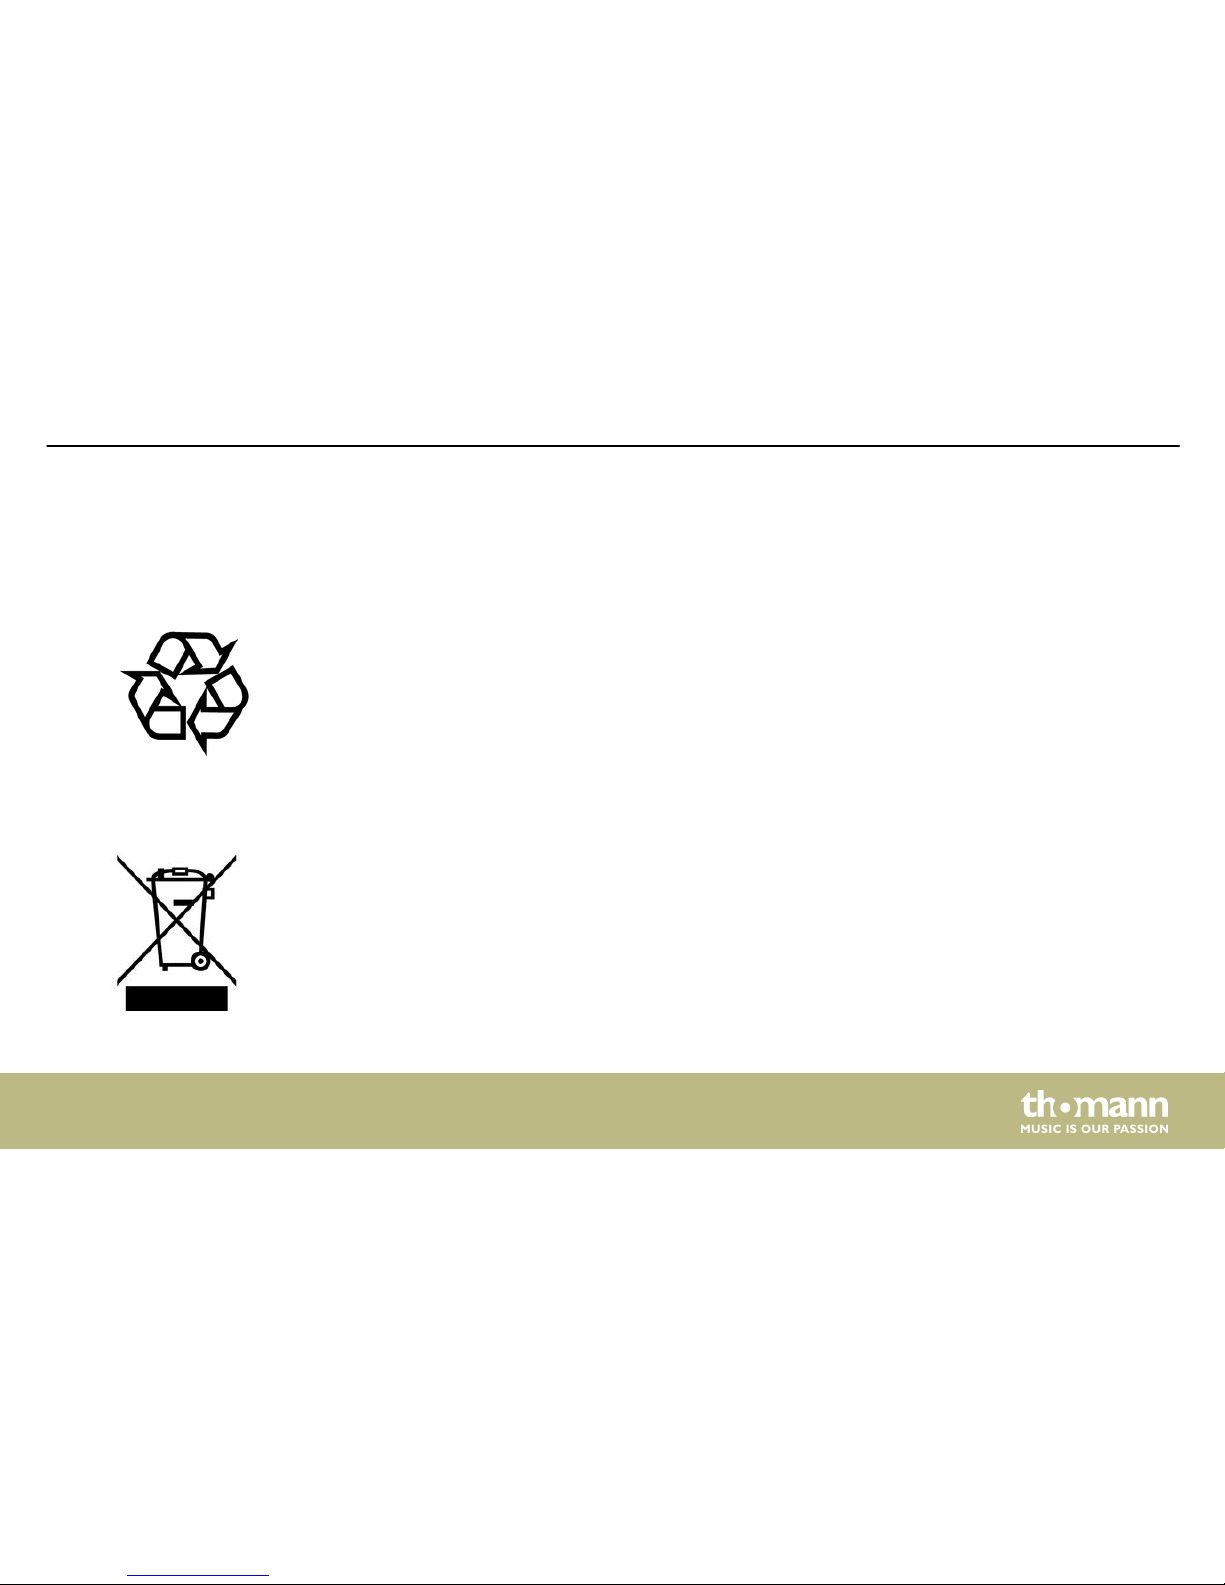
This product is subject to the European Waste Electrical and Electronic Equipment Directive
(WEEE). Do not dispose with your normal household waste.
Dispose of this device through an approved waste disposal firm or through your local waste
facility. When discarding the device, comply with the rules and regulations that apply in your
country. If in doubt, consult your local waste disposal facility.
Disposal of the packaging mate‐
rial
Disposal of your old device
Protecting the environment
MPS-750
41
Page 42
11 Appendix
11.1 Voice list
Name Name Name
KICK 8Bit 02 Techno 02
Rock House 01 Techno 03
Jazz House 02 Techno 04
Indie 01 House 03 Trance 01
Indie 02 RnB 01 Trance 02
Metal RnB 02 Trance 03
Funk 01 RnB 03 Trance 04
Funk 02 RnB 04 Trance 05
8Bit 01 Techno 01 Trap 01
Appendix
e-drum module
42
Page 43
Name Name Name
Trap 02 Vintage Jazz 02 R
Trap 03 Jungle 01 Indie 01
Trap 04 Jungle 02 Indie R 01
Trap 05 Fiesta Indie X
Pop 01 SNARE Indie 02
Pop 02 Rock Indie R 02
Pop 03 Rock R Metal
Pop 04 Rock X Metal R
Jungle Jazz 01 R Metal X
Latin Jazz X Funk 01
Session Jazz 02 Funk R 01
Appendix
MPS-750
43
Page 44
Name Name Name
Funk X 01 RnB 01 Techno C 01
Funk 02 RnB 02 Techno C 02
Funk R 02 RnB 03 Trance 01
Funk X 02 RnB 04 Trance 02
8Bit 01 RnB R 01 Trance 03
8Bit 02 RnB R 02 Trance 04
House 01 RnB X 01 Trap 01
House 02 RnB X-Stick 01 Trap 02
House 03 RnB X-Stick 02 Trap 03
House 04 Techno 01 Trap 04
House 05 Techno 02 Trap 05
Appendix
e-drum module
44
Page 45
Name Name Name
Trap 06 Brush X Jungle R
Trap 07 Latin Fiesta 01
Trap 08 Latin R 01 Fiesta R 01
Trap 09 Latin R 02 Fiesta X 01
Trap 10 Session Fiesta 02
Trap 11 Session R Fiesta R 02
Pop Session X Fiesta R 03
Pop R Vintage TOM
Pop X Vintage R Rock1
Brush Vintage X Rock1 R
Brush R Jungle Rock2
Appendix
MPS-750
45
Page 46
Name Name Name
Rock2 R Jazz4 Funk2 01
Rock3 Jazz4 R Funk3 01
Rock3 R Indie1 Funk4 01
Rock4 Indie2 Funk1 02
Rock4 R Indie3 Funk2 02
Jazz1 Indie4 Funk3 02
Jazz1 R Metal1 Funk4 02
Jazz2 Metal2 8Bit1
Jazz2 R Metal3 8Bit2
Jazz3 Metal4 8Bit3
Jazz3 R Funk1 01 8Bit4
Appendix
e-drum module
46
Page 47
Name Name Name
House1 01 House4 03 Trance3 01
House2 01 RnB1 Trance4 01
House3 01 RnB2 Trance1 02
House4 01 RnB3 Trance2 02
House1 02 RnB4 Trance3 02
House2 02 Techno1 Trance4 02
House3 02 Techno2 Trap1 01
House4 02 Techno3 Trap2 01
House1 03 Techno4 Trap3 01
House2 03 Trance1 01 Trap1 02
House3 03 Trance2 01 Trap2 02
Appendix
MPS-750
47
Page 48
Name Name Name
Trap3 02 Brush3 Vintage1 R
Pop1 Brush4 Vintage2
Pop1 R Latin1 Vintage2 R
Pop2 Latin2 Vintage3
Pop2 R Latin3 Vintage3 R
Pop3 Latin4 Vintage4
Pop3 R Session1 Vintage4 R
Pop4 Session2 Jungle1
Pop4 R Session3 Jungle1 R
Brush1 Session4 Jungle2
Brush2 Vintage1 Jungle2 R
Appendix
e-drum module
48
Page 49
Name Name Name
Jungle3 Fiesta4 R Funk 02
Jungle3 R RIDE Funk B 02
Jungle4 Rock Funk E 02
Jungle4 R Rock B Funk 01
Fiesta1 Rock E Funk B 01
Fiesta1 R Jazz Funk E 01
Fiesta2 Jazz B 8Bit
Fiesta2 R Jazz E House 01
Fiesta3 Indie House 02
Fiesta3 R Indie B House 03
Fiesta4 Indie E RnB
Appendix
MPS-750
49
Page 50
Name Name Name
Techno 01 Jungle RockSplash
Techno 02 Jungle B Jazz1
Trance Fiesta Jazz1 E 01
Pop Fiesta B Jazz2
Pop B Fiesta E Jazz2 E
Brush CRASH JazzSplash 01
Brush B Rock1 JazzSplash 02
Brush E Rock1 E Indie1 01
Session Rock2 Indie2 01
Vintage Rock2 E Indie1 02
Vintage B RockChina Indie2 02
Appendix
e-drum module
50
Page 51
Name Name Name
Funk1 02 Trap2 01 METRO
Funk2 02 Pop1 Claves
8Bit1 Pop2 Claves-Lo
8Bit2 Session1 Metro-Bell
House 01 Session2 Metro-Click
House 02 Vintage1 Metro-Beep-Hi
House 03 Vintage2 Metro-Beep-Lo
House 04 Jungle1 Cowbell
Trance1 Jungle2 Cowbell-Lo
Trance2 Fiesta1 Agogo-Hi
Trap1 01 Fiesta2 Agogo-Mid
Appendix
MPS-750
51
Page 52
Name Name Name
HI-HAT Jazz P 02 Funk C 02
Rock O Indie O 02 Funk P 02
Rock C Indie C 02 8Bit O
Rock P Indie P 02 8Bit C
Rock Half Metal O House O 01
Rock Sp Metal C House C 01
Jazz O 01 Metal P House O 02
Jazz C 01 Funk O 01 House C 02
Jazz P 01 Funk C 01 House O 03
Jazz O 02 Funk P 01 House C 03
Jazz C 02 Funk O 02 RnB O 01
Appendix
e-drum module
52
Page 53
Name Name Name
RnB C 01 Trap O 01 Brush O
RnB O 02 Trap C 01 Brush C
RnB C 02 Trap O 02 Brush P
Techno O 01 Trap C 02 Brush Half
Techno C 01 Trap O 03 Brush Sp
Techno O 02 Trap C 03 Session O
Techno C 02 Pop O Session C
Trance O 01 Pop C Session P
Trance C 01 Pop P Session Sp
Trance O 02 Pop Half Vintage O
Trance C 02 Pop Sp Vintage C
Appendix
MPS-750
53
Page 54
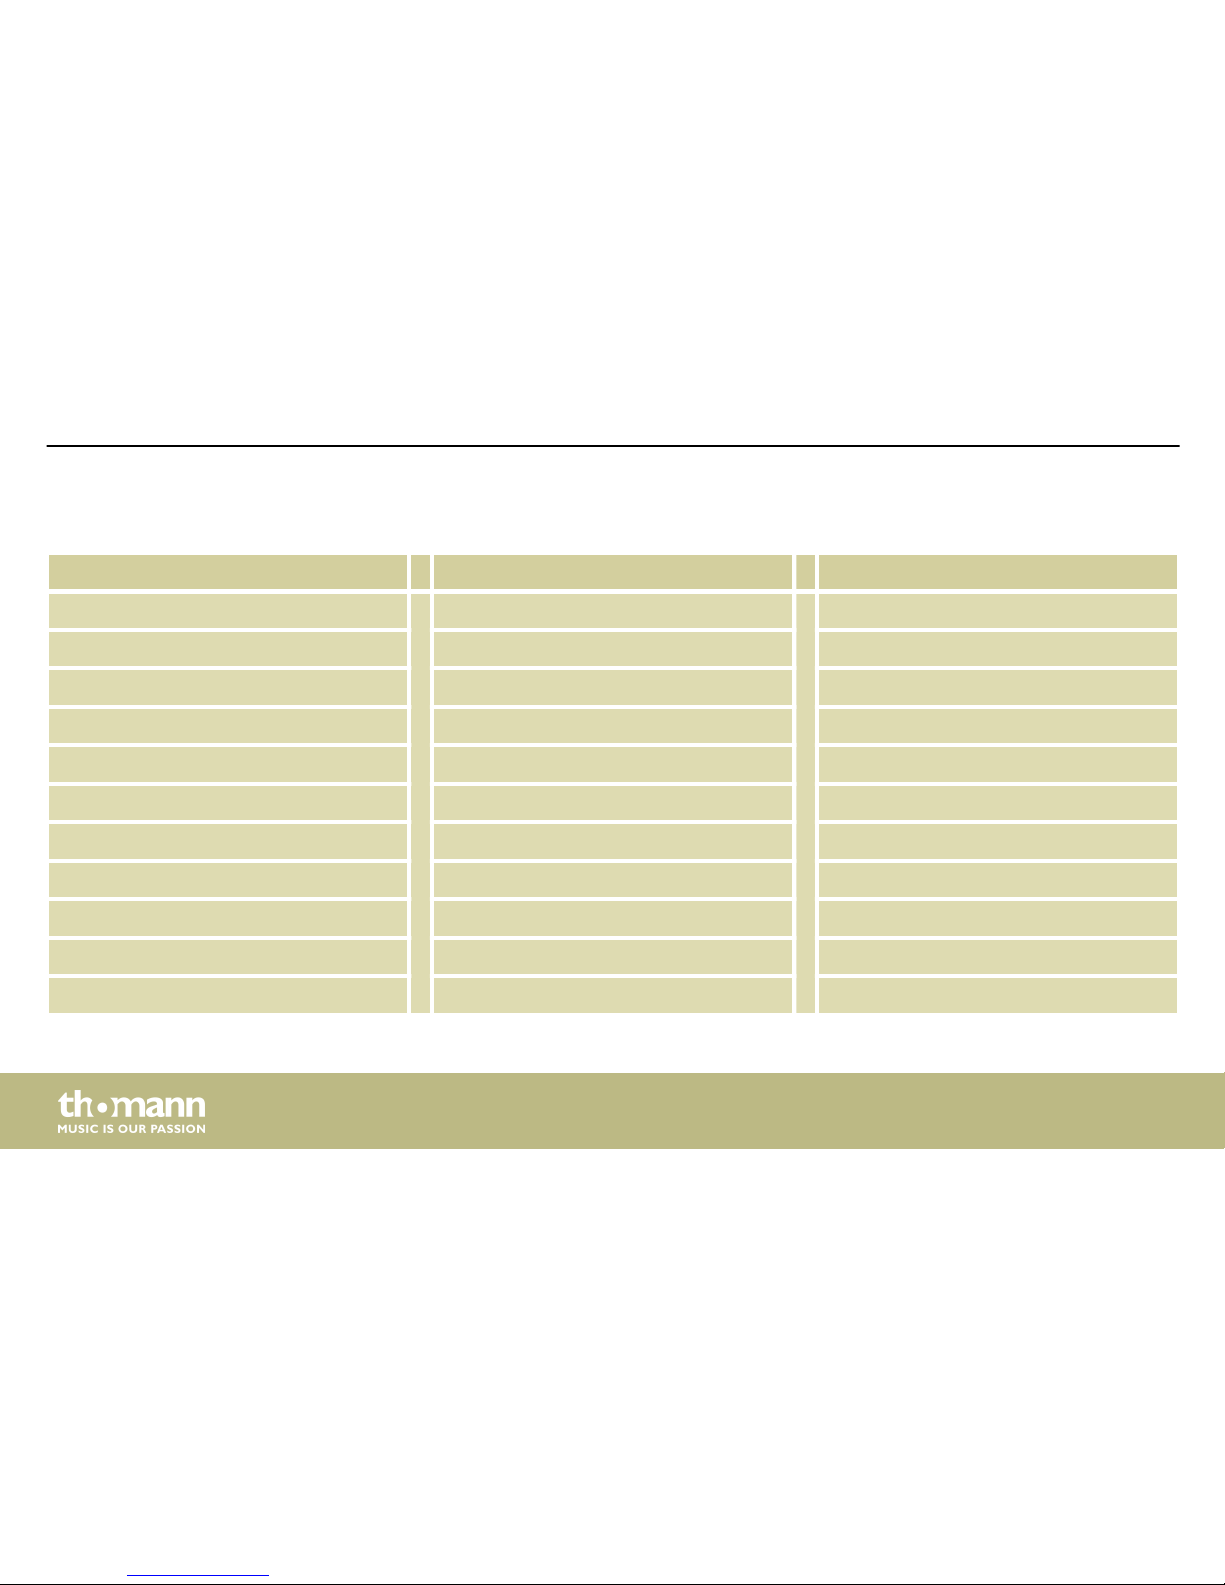
Name Name Name
Vintage P Fiesta Half HouseFX03
Vintage Half Fiesta Sp HouseFX04
Vintage Sp EXTRAS HouseFX05
Jungle O Cowbell HouseFX06
Jungle C FunkPerc01 TranceFX01
Jungle P FunkPerc02 TranceFX02
Jungle Half 8BitFX01 TranceFX03
Jungle Sp 8BitFX02 TranceFX04
Fiesta O 8BitFX03 TranceFX05
Fiesta C HouseFX01 TrapFX01
Fiesta P HouseFX02 TrapFX02
Appendix
e-drum module
54
Page 55
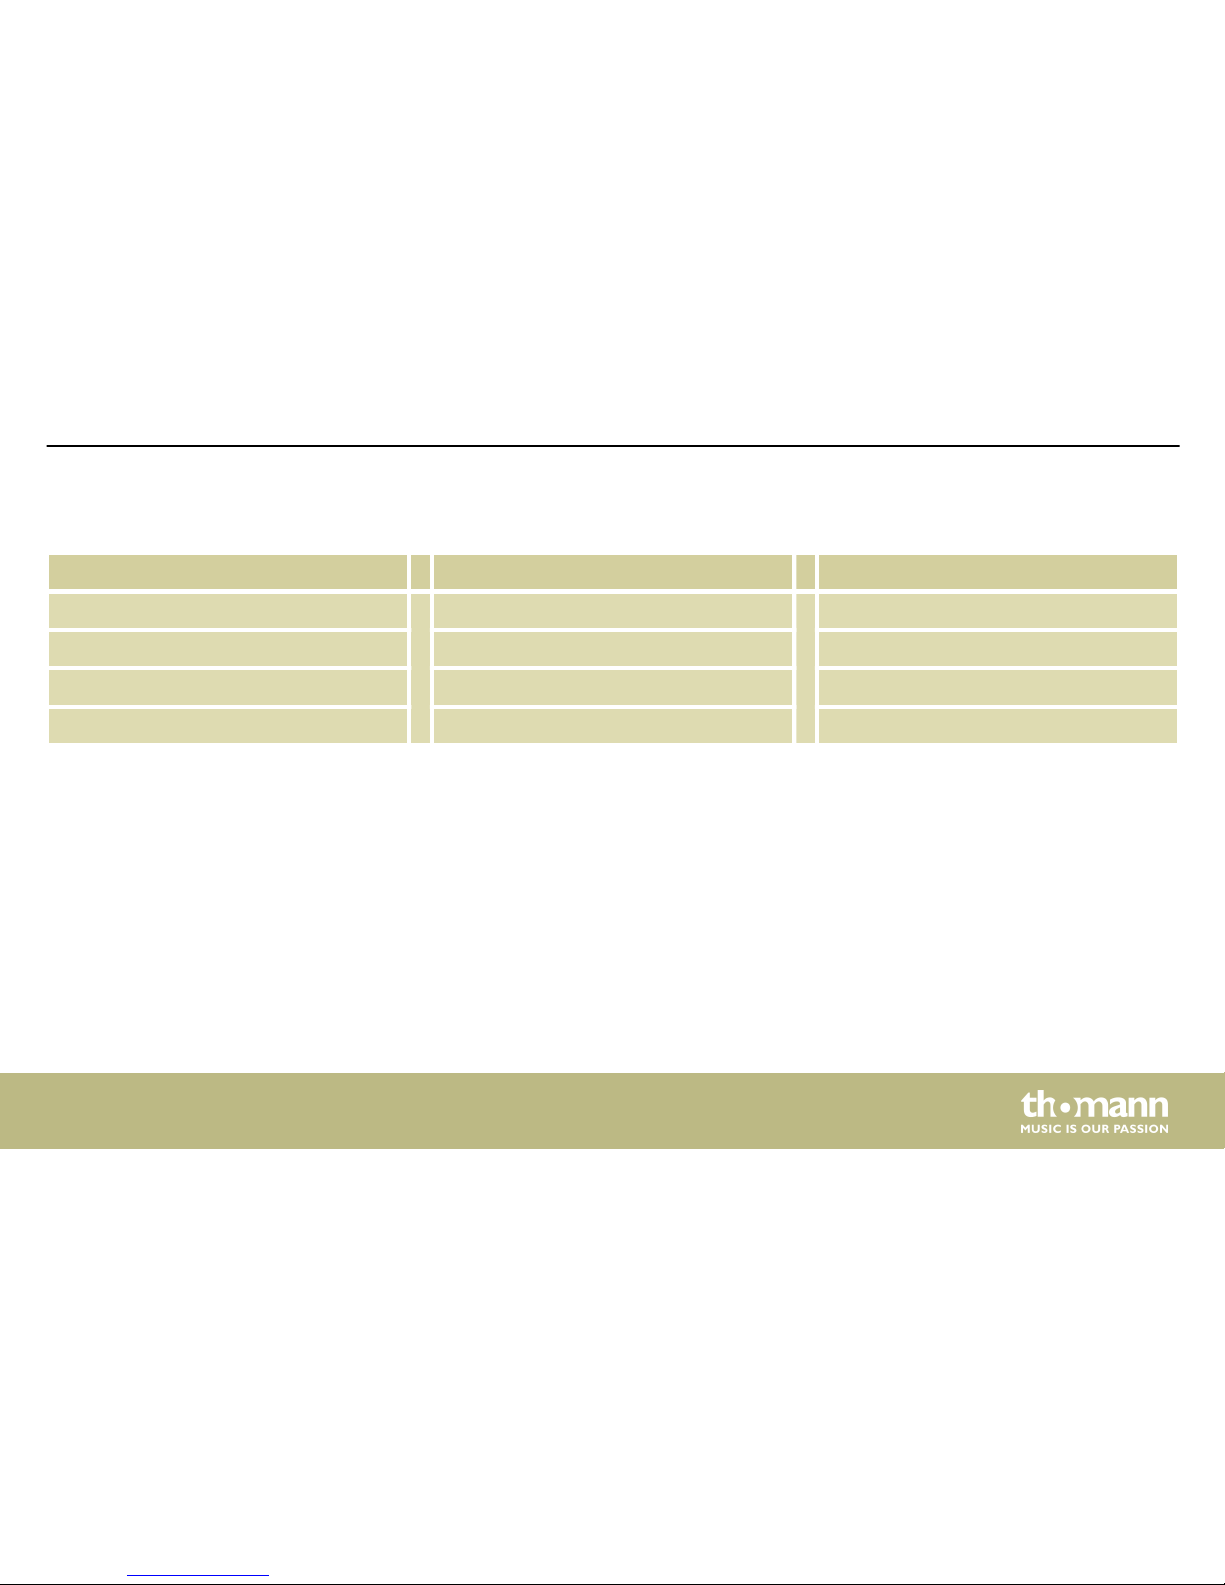
Name Name Name
El Shaker Dub FX03 Agogo02
El Co bell Dub FX04 ShakerShort
Dub FX01 Dub FX05 ShakerLong
Dub FX02 Agogo01
Appendix
MPS-750
55
Page 56
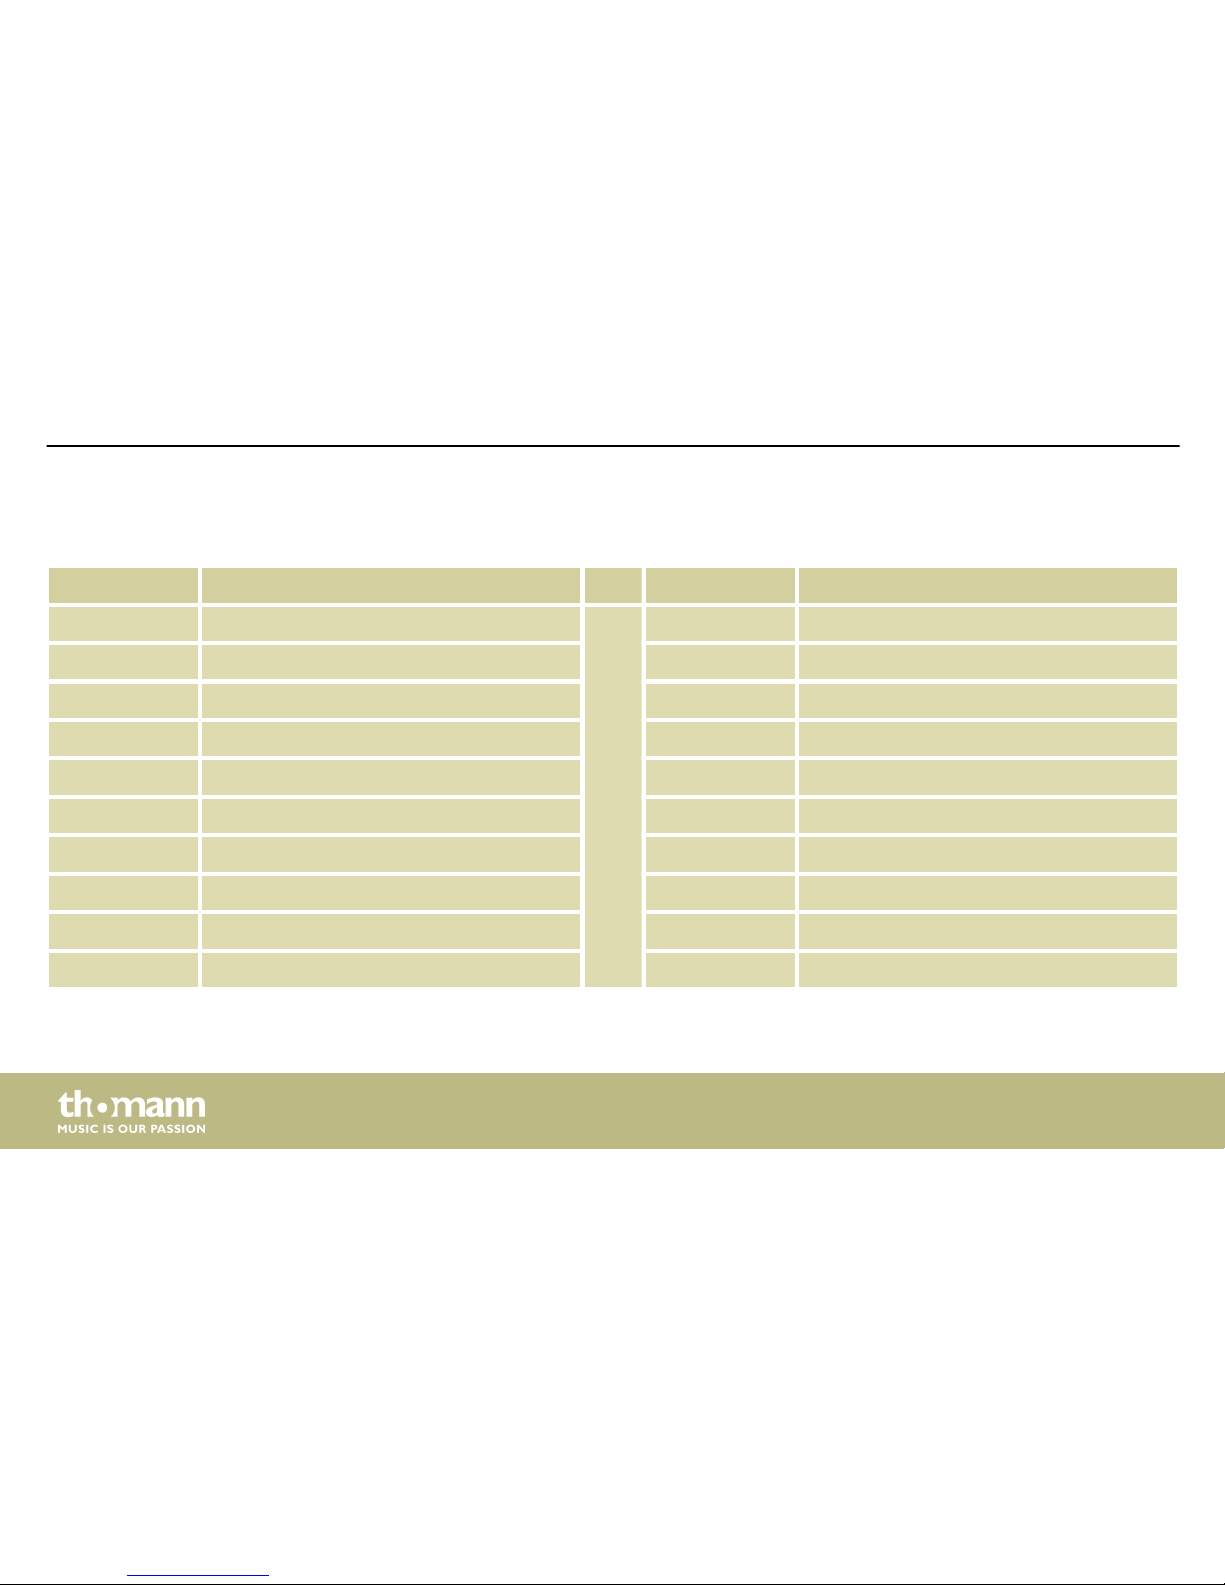
11.2 Kit list
No. Name No. Name
01 Pop 11 Fiesta
02 Funk 12 Mario
03 Popin 13 Impulse
04 Jazz 14 Loop
05 Metal 15 DirtySouth
06 Latin 1 16 Nebula
07 80s 17 Drumstep
08 Latin 2 18 Jungle
09 Brush 19 Utopia
10 Sunray 20 Bluebay
Appendix
e-drum module
56
Page 57
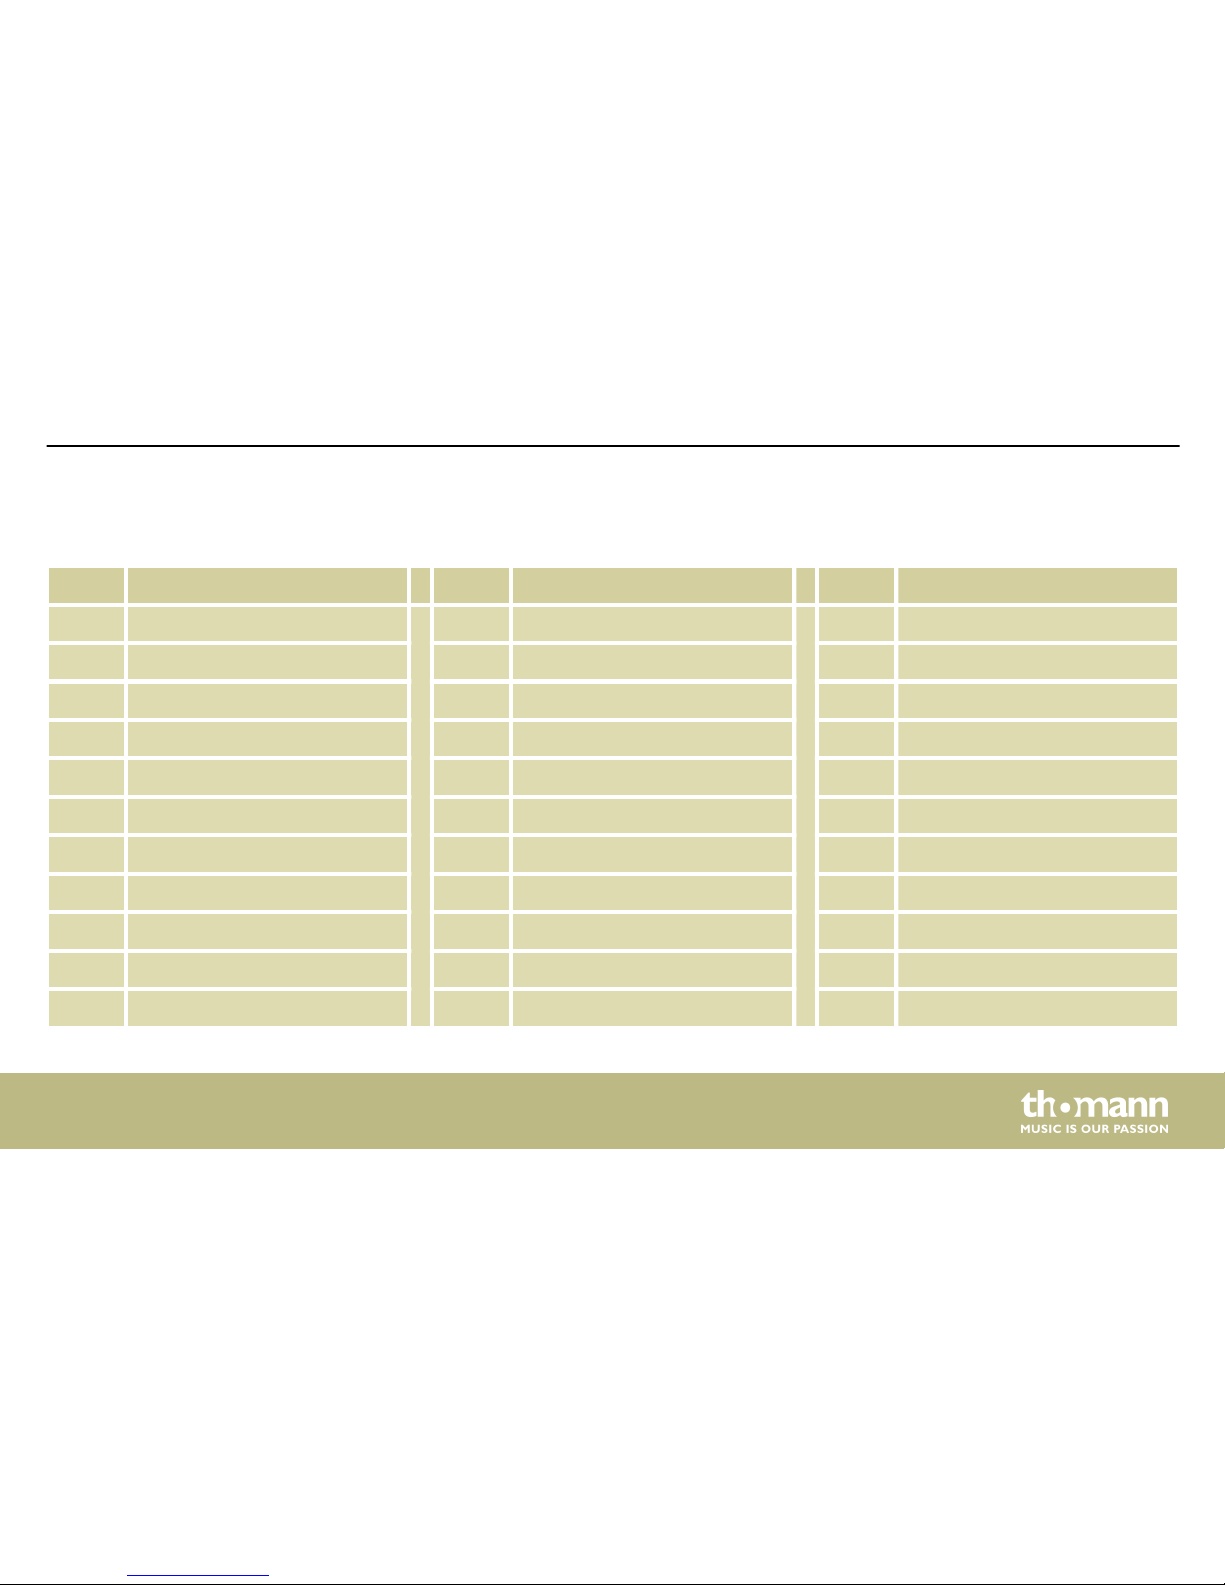
11.3 Styles
No. Name No. Name No. Name
01 WalkWithTree 12 toBeLoved 23 RockBlues
02 Soul 13 Rain 24 Fly
03 Latin 14 PopAges 25 Bossa
04 Moskau 15 ChaCha 26 Tango
05 Heart 16 Life 27 Dancing
06 Fable 17 Home 28 CryintheRain
07 theStorm 18 Latina 29 NightTrain
08 Beowulf 19 Reality 30 Arriba
09 Forever 20 SoftAmour 31 Batteries
10 Acid 21 MelodicDeath 32 Revealite
11 Arcane 22 SambaDance 33 Breathe
Appendix
MPS-750
57
Page 58
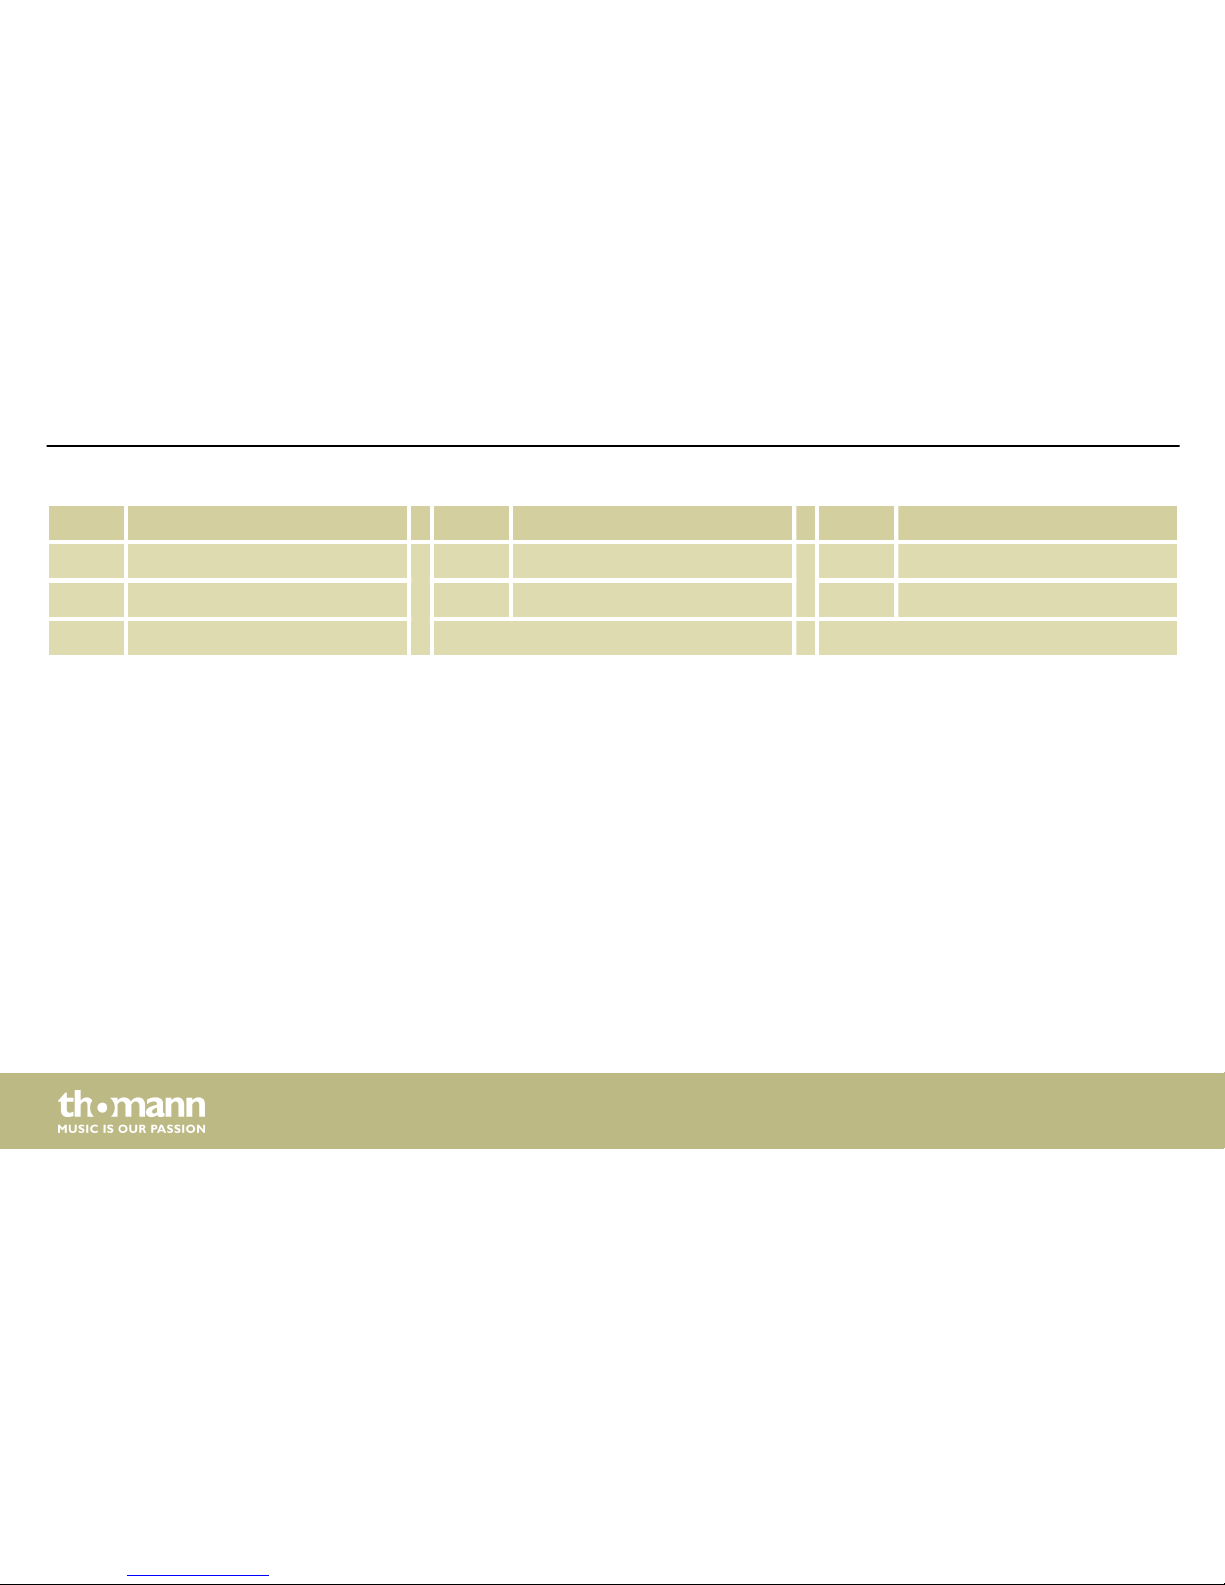
No. Name No. Name No. Name
34 BlueEyes 37 NyanCats 39 Bartender
35 HeyMan 38 Supreme 40 Celebration
36 Firerain
Appendix
e-drum module
58
Page 59

Page 60

Musikhaus Thomann · Hans-Thomann-Straße 1 · 96138 Burgebrach · Germany · www.thomann.de
 Loading...