

Page 1
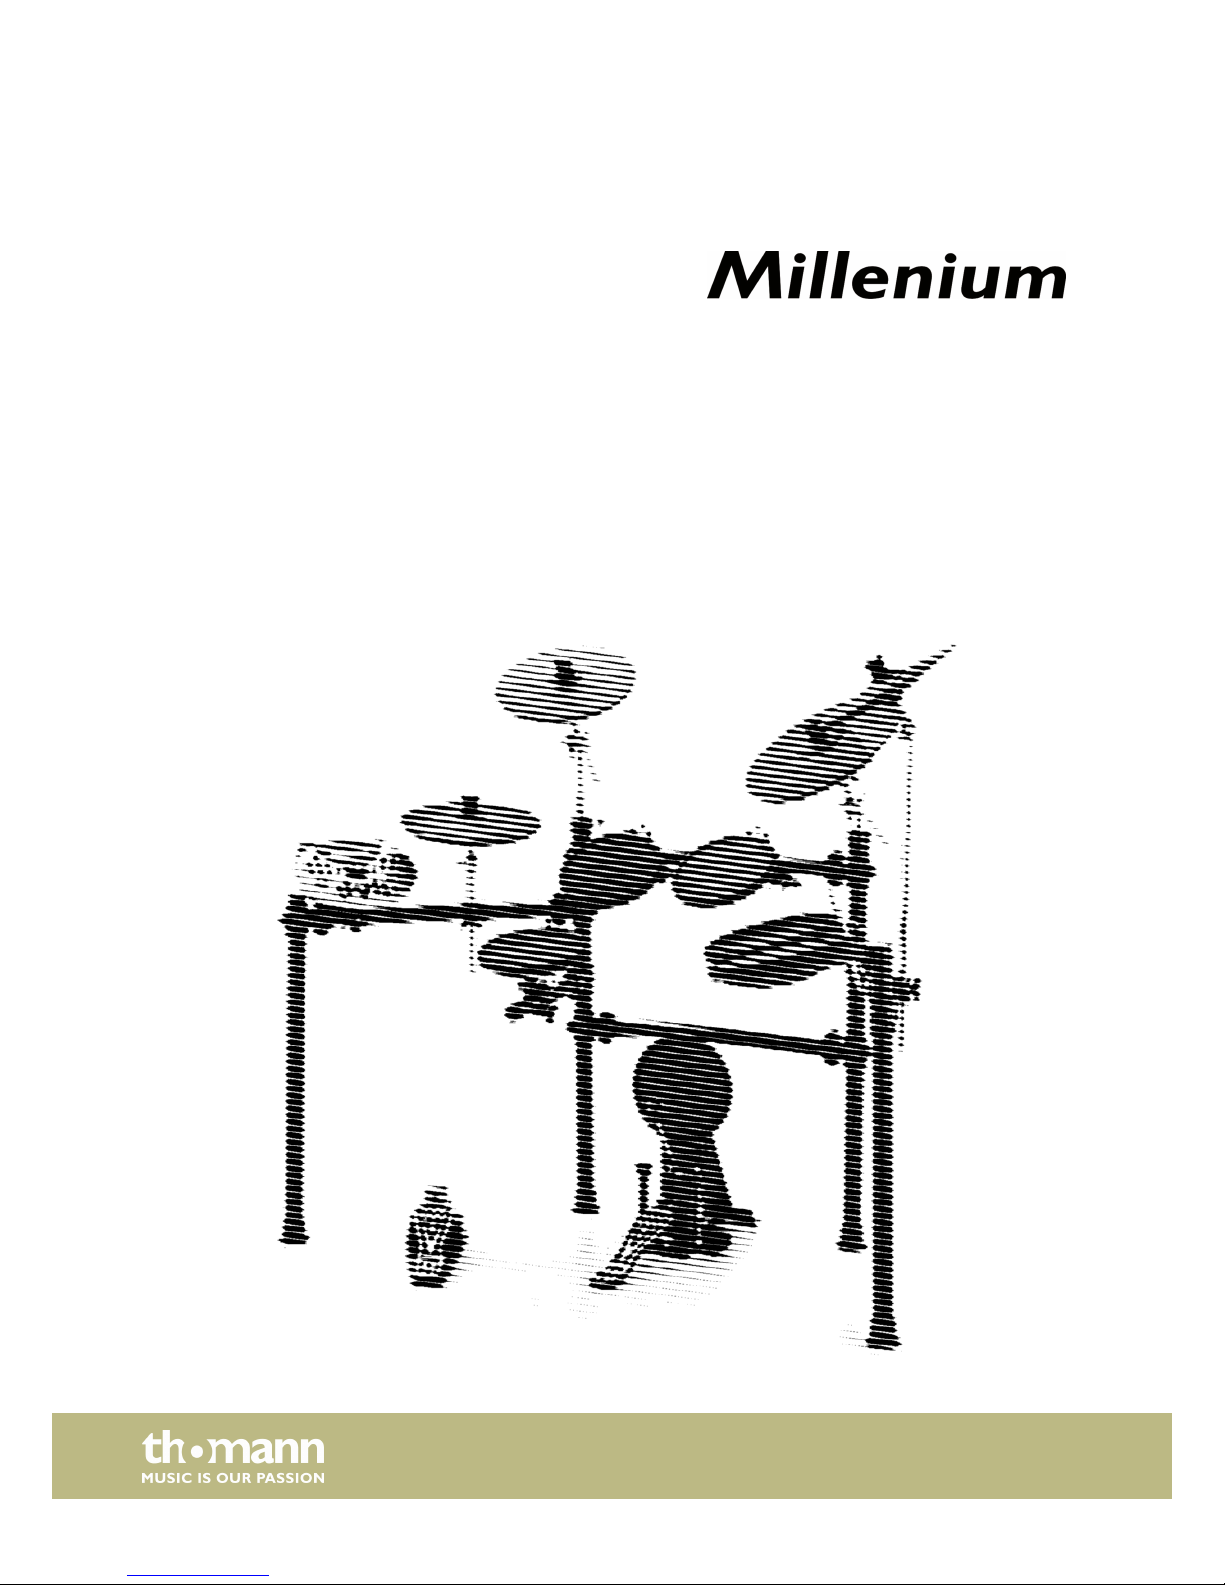
MPS-600
e-drum set
assembly instructions
Page 2

Musikhaus Thomann
Thomann GmbH
Hans-Thomann-Straße 1
96138 Burgebrach
Germany
Telephone: +49 (0) 9546 9223-0
E-mail: [email protected]
Internet: www.thomann.de
20.07.2015, ID: 230833
Page 3

Table of contents
1 Safety instructions.......................................................................................................................................................................................................... 4
2 Contents of package....................................................................................................................................................................................................... 5
3 Assembly.............................................................................................................................................................................................................................. 7
4 Protecting the environment.................................................................................................................................................................................... 13
Table of contents
MPS-600
3
Page 4
1 Safety instructions
DANGER!
Danger for children
Ensure that plastic bags, packaging, etc. are disposed of properly and are not within reach of babies and young children.
Choking hazard!
Ensure that children do not detach any small parts (e.g. knobs or the like) from the unit. They could swallow the pieces and
choke!
Never let children unattended use electrical devices.
Safety instructions
e-drum set
4
Page 5
2 Contents of package
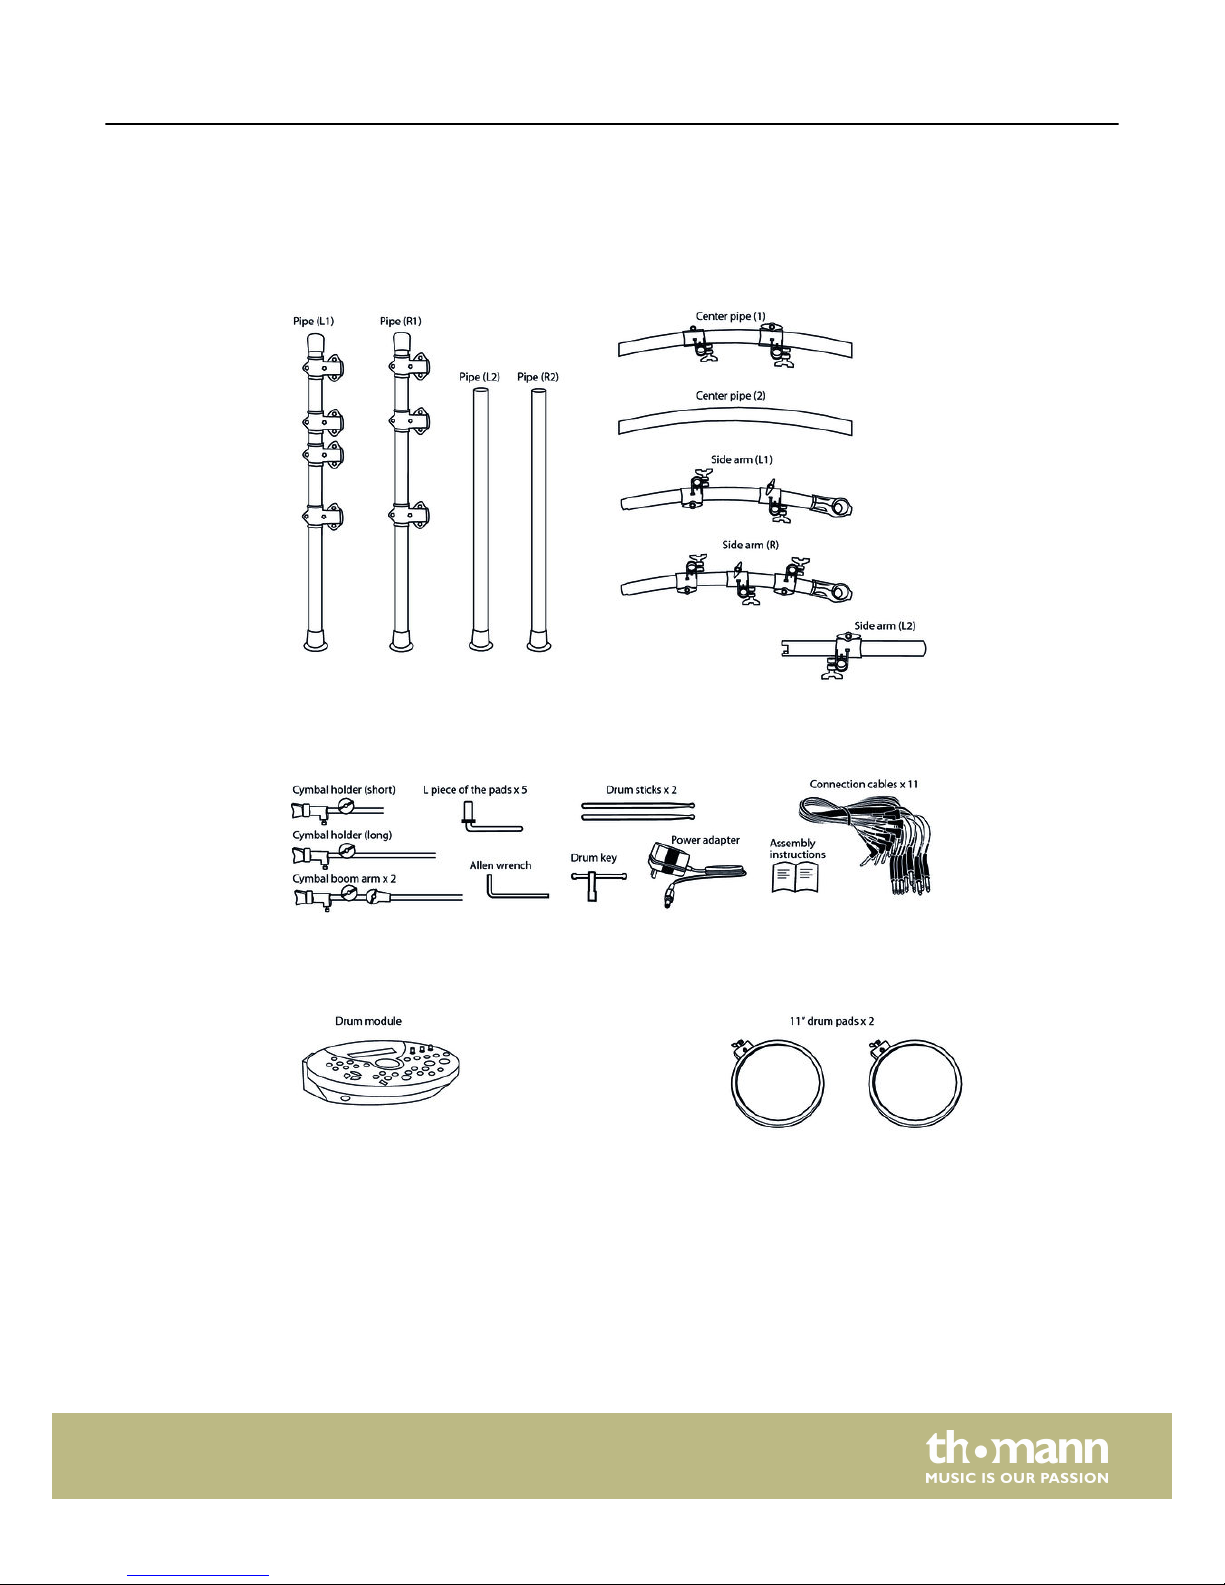
Rack components
Before you assemble your kit, make sure the contents of package is complete according to the following illustrations.
Content of the box ‘Accessory’
Content of the boxes ‘Drum Module’ and ‘11''-Drum Pads’
Contents of package
MPS-600
5
Page 6
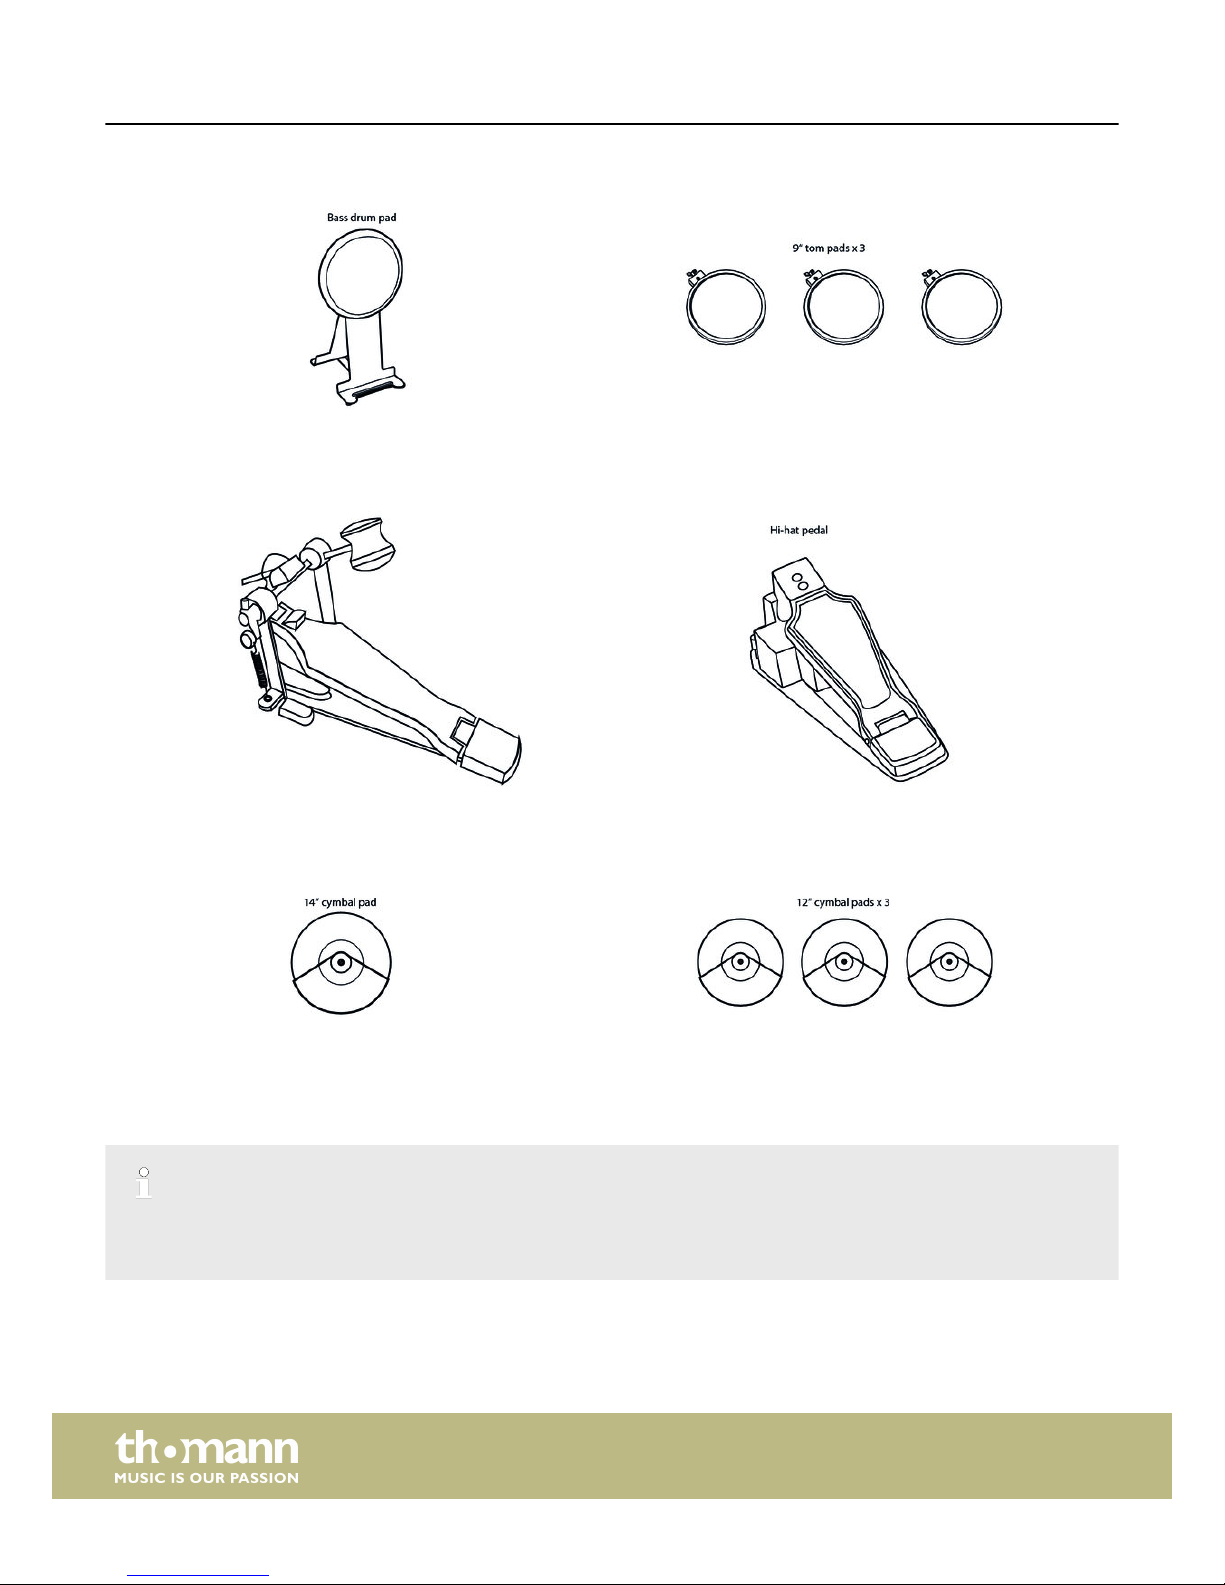
Content of the box ‘Kick Pad and 9''-Drum Pads’
Content of the boxes ‘Bass Drum Pedal’ and ‘Hi-Hat Pedal’
Content of the boxes ‘Cymbal 14''’ and ‘Cymbal 12''-Crash, 12''-Hi-Hat’
‘Pillar Box’
Without illustration. This box contains the little left side arm of the rack.
The boxes ‘Empty Box A/B/C’ are empty and just serve as packaging material.
The rack components are located in individual compartments at the bottom of the packaging carton.
Contents of package
e-drum set
6
Page 7
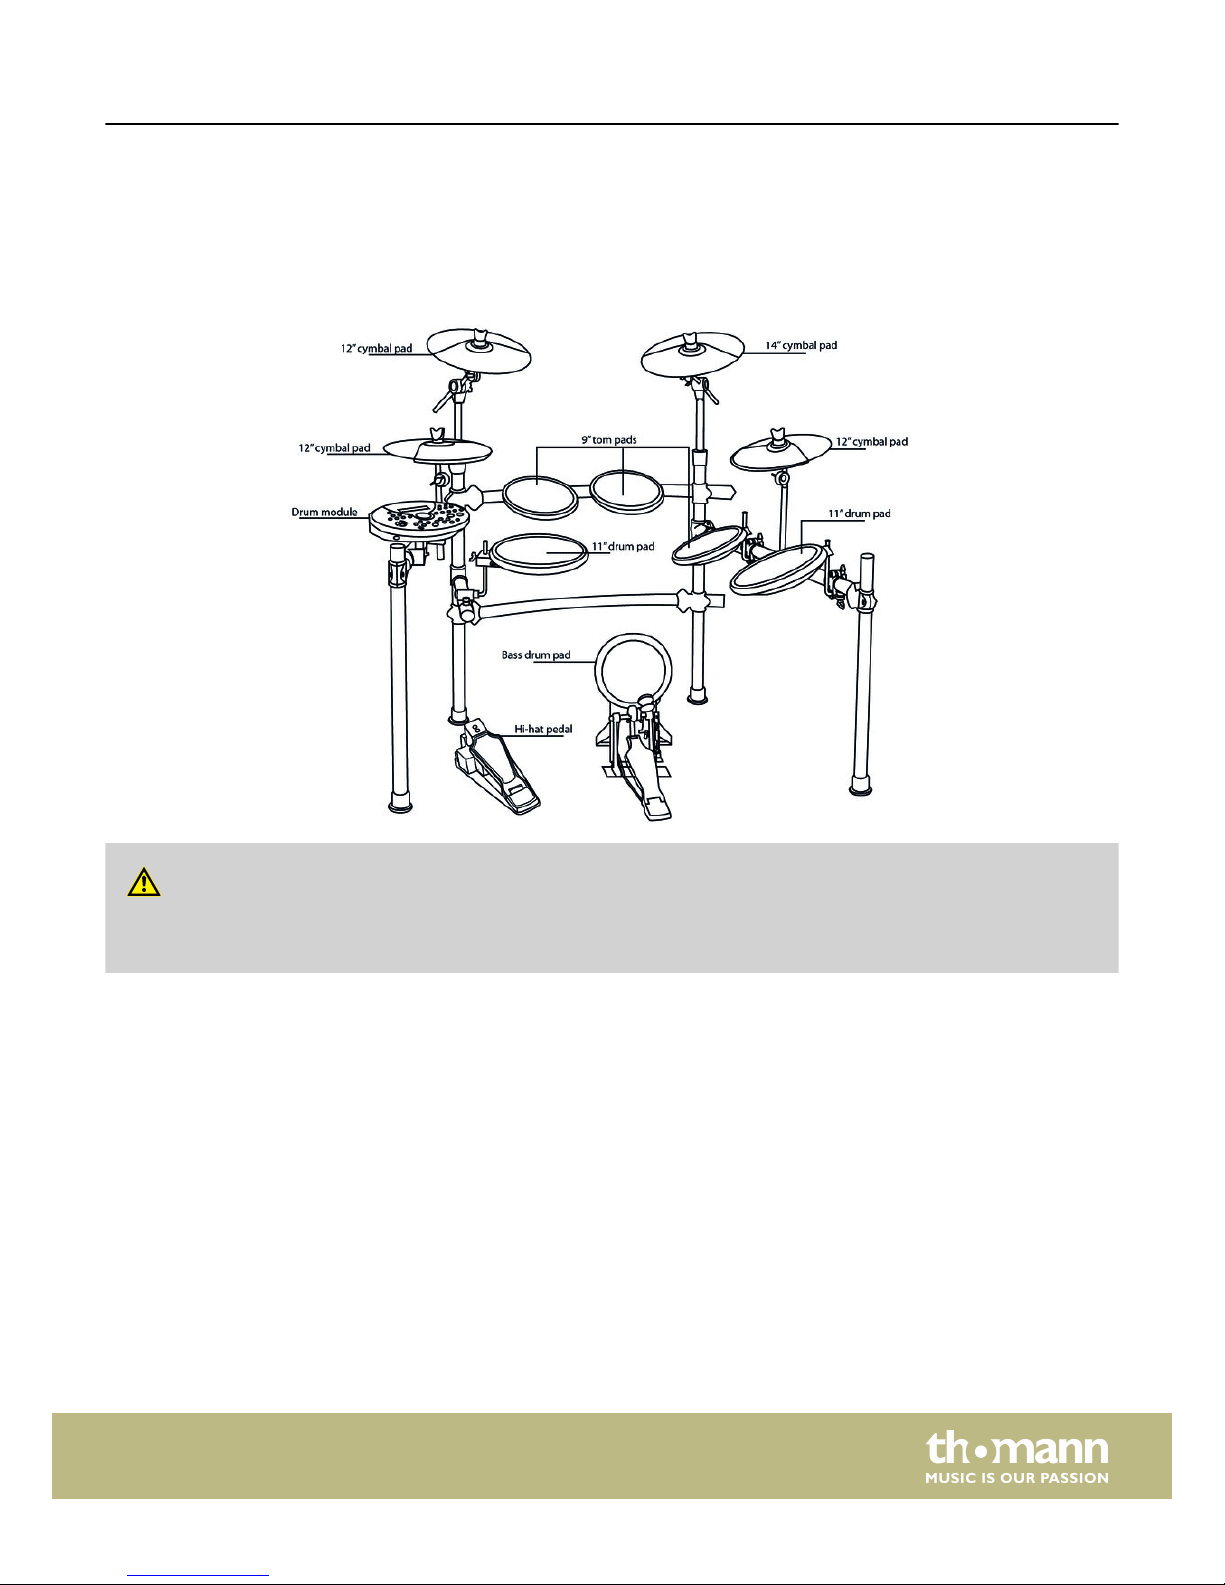
3 Assembly
Assembling the rack
Loosen the screws of each terminal with the drum key before inserting the pipes. The positions of the pads, cymbals, etc. are
shown in the table below.
CAUTION!
Danger of cuts on hands and fingers
When plugging the connections, take care for sharp edges on the metal pipes.
Assembly
MPS-600
7
Page 8
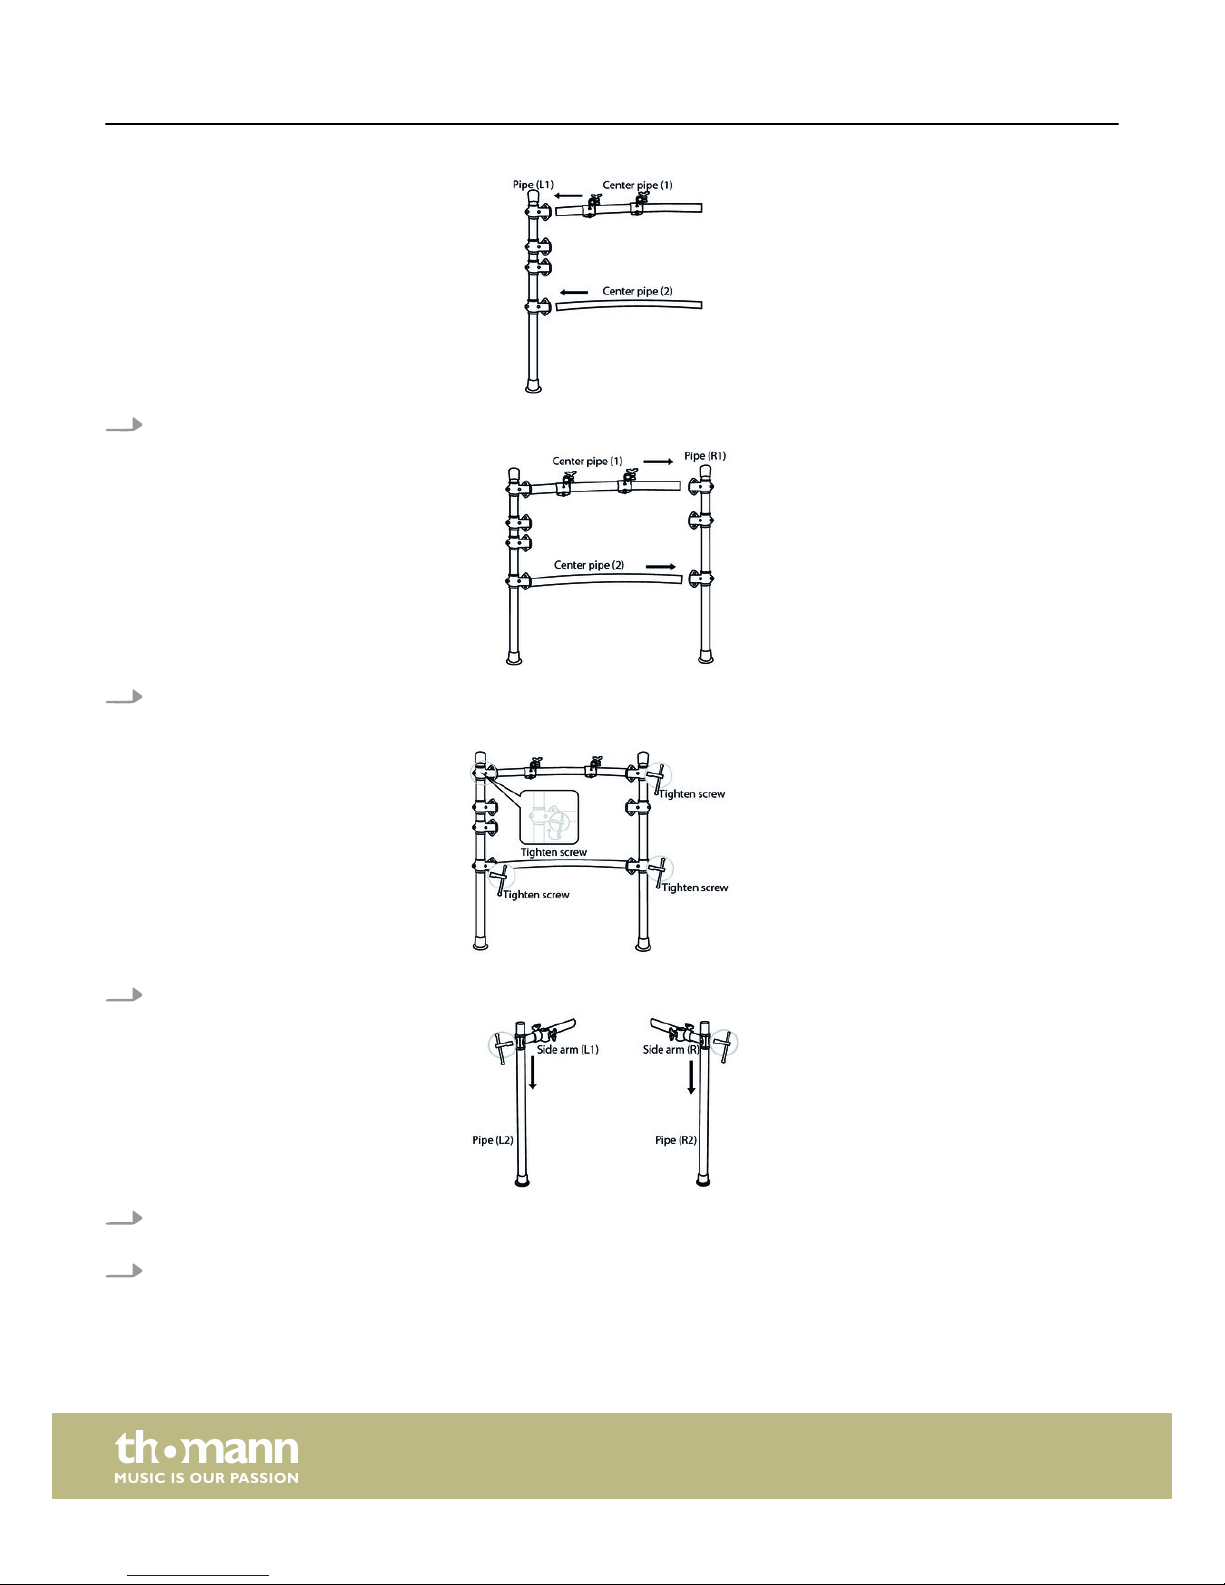
1. Connect the centre pipe (1) with the upper terminal and the centre pipe (2) with the lower terminal of the (L1).
2. Roughly align the height of the terminals on pipe (L2) according to the height of their counter-terminals on pipe (L1). Con‐
nect the centre pipe (1) to the upper terminal and connect the centre pipe (2) to the lower terminal on pipe (L2).
3. Tighten the screws of the four terminals with the drum key evenly hand-tight.
4. Connect the side arm (L1) with the terminal on pipe (L2) and tighten the screws of the terminal with the drum key evenly
hand-tight.
5. Connect the side arm (R) with the terminal on pipe (R2) and tighten the screws of the terminal with the drum key evenly
hand-tight.
Assembly
e-drum set
8
Page 9
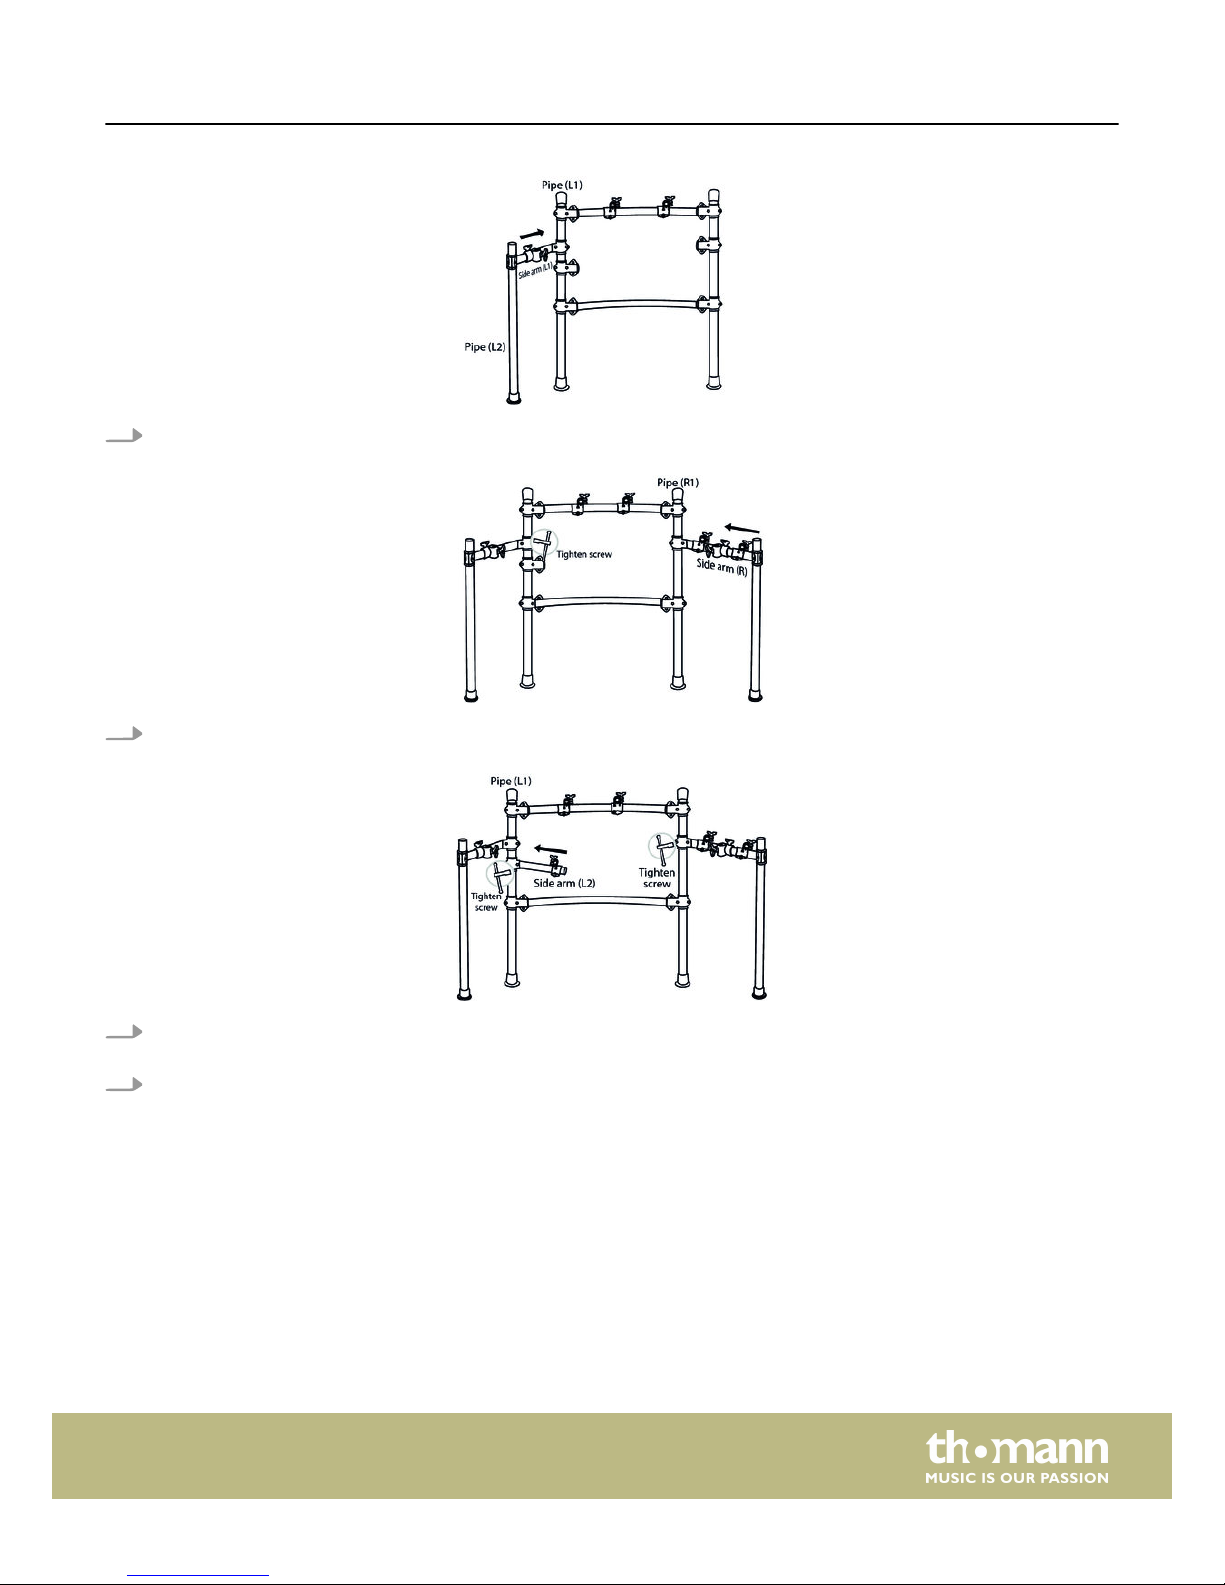
6. Connect the side arm (L1) with the terminal on pipe (L1) and tighten the screws of the terminal with the drum key firmly
and evenly hand-tight.
7. Connect the side arm (R) with the terminal on pipe (R1) and tighten the screws of the terminal with the drum key firmly and
evenly.
8. Connect the short side arm (L2) with the terminal on pipe (L1) and tighten the screws of the terminal with the drum key
firmly and evenly.
9. Position the rack horizontally and vertically to suit your needs and tighten all terminal screws with the drum key evenly.
Assembly
MPS-600
9
Page 10
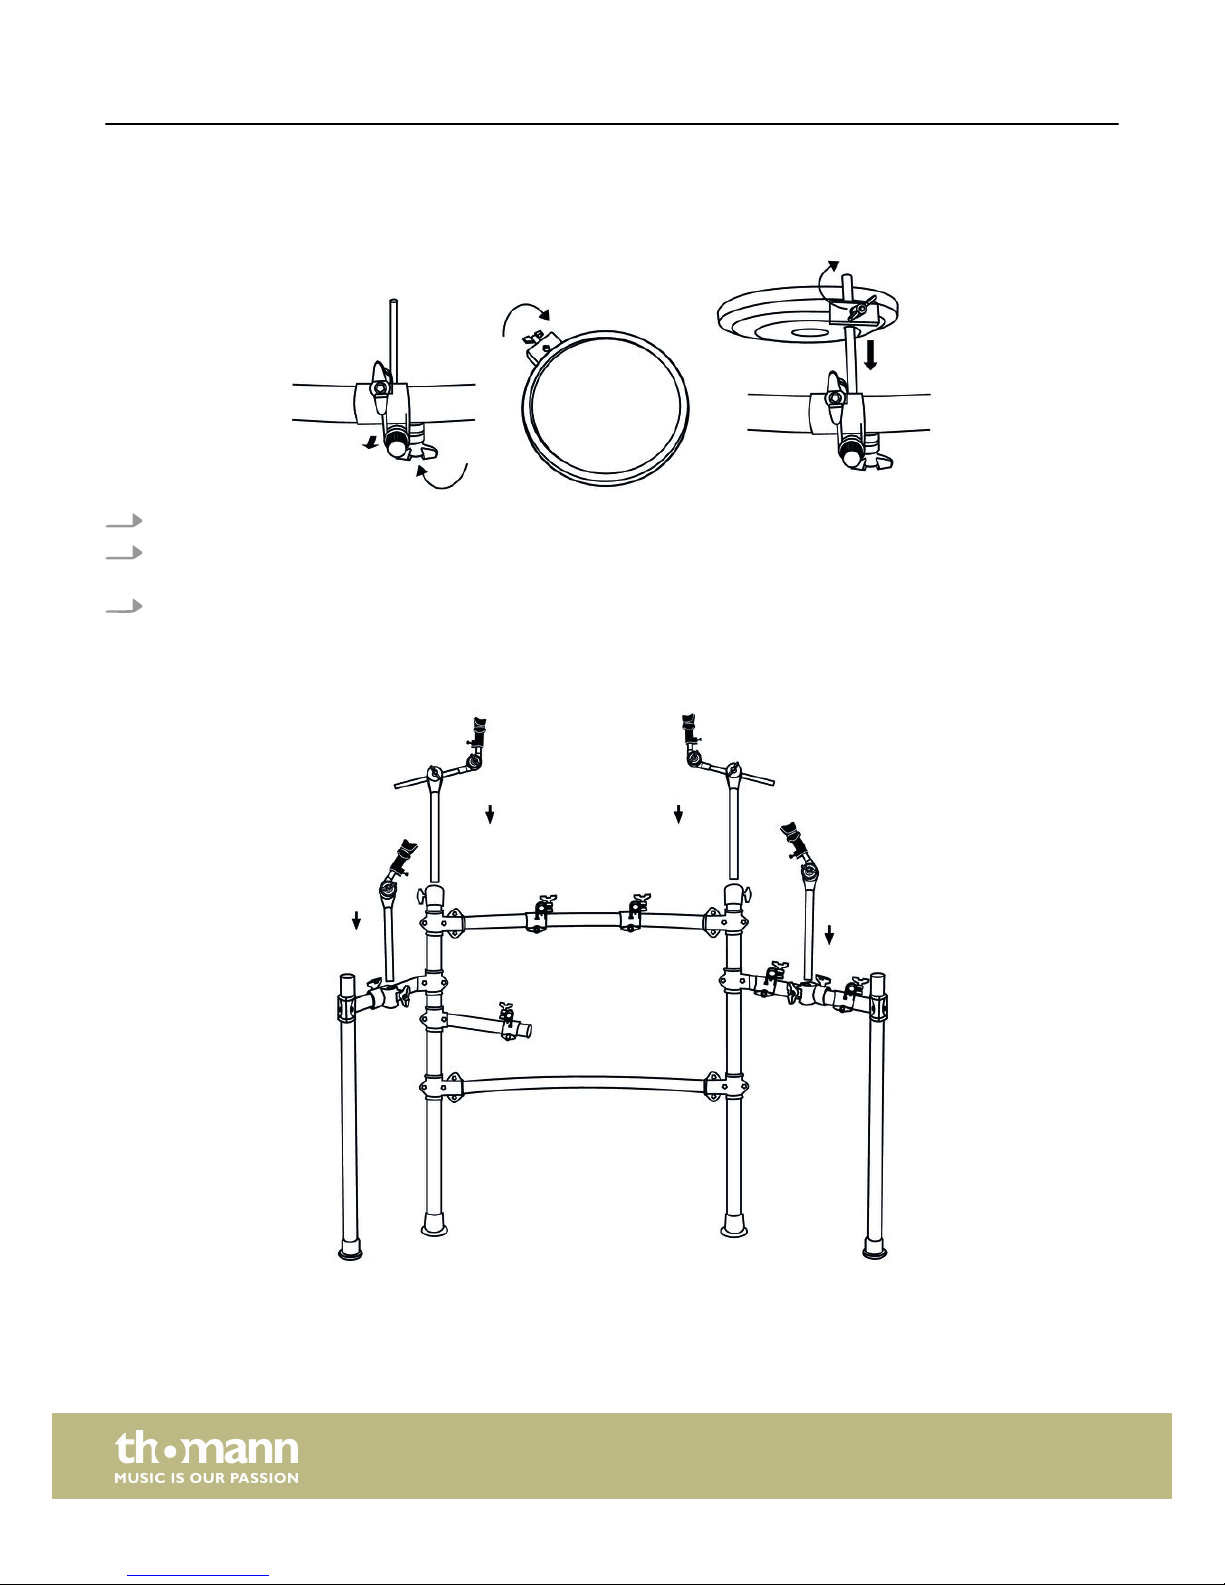
Mounting pads on the rack
1. Attach the supplied L-pieces (box "Accessory") to the five pads. First, tighten the wing nuts on the pads by hand.
2.
Then slide the plastic ends of the L-pieces up to the stop into the designated terminals on the rack, see Ä ‘Assembling the
rack’ on page 7.
3. Align the pads on the rack to meet your needs, then tighten the wing nuts of the pad brackets and the bolts of the pad
terminals on the rack evenly.
Mounting cymbals on the rack
Assembly
e-drum set
10
Page 11
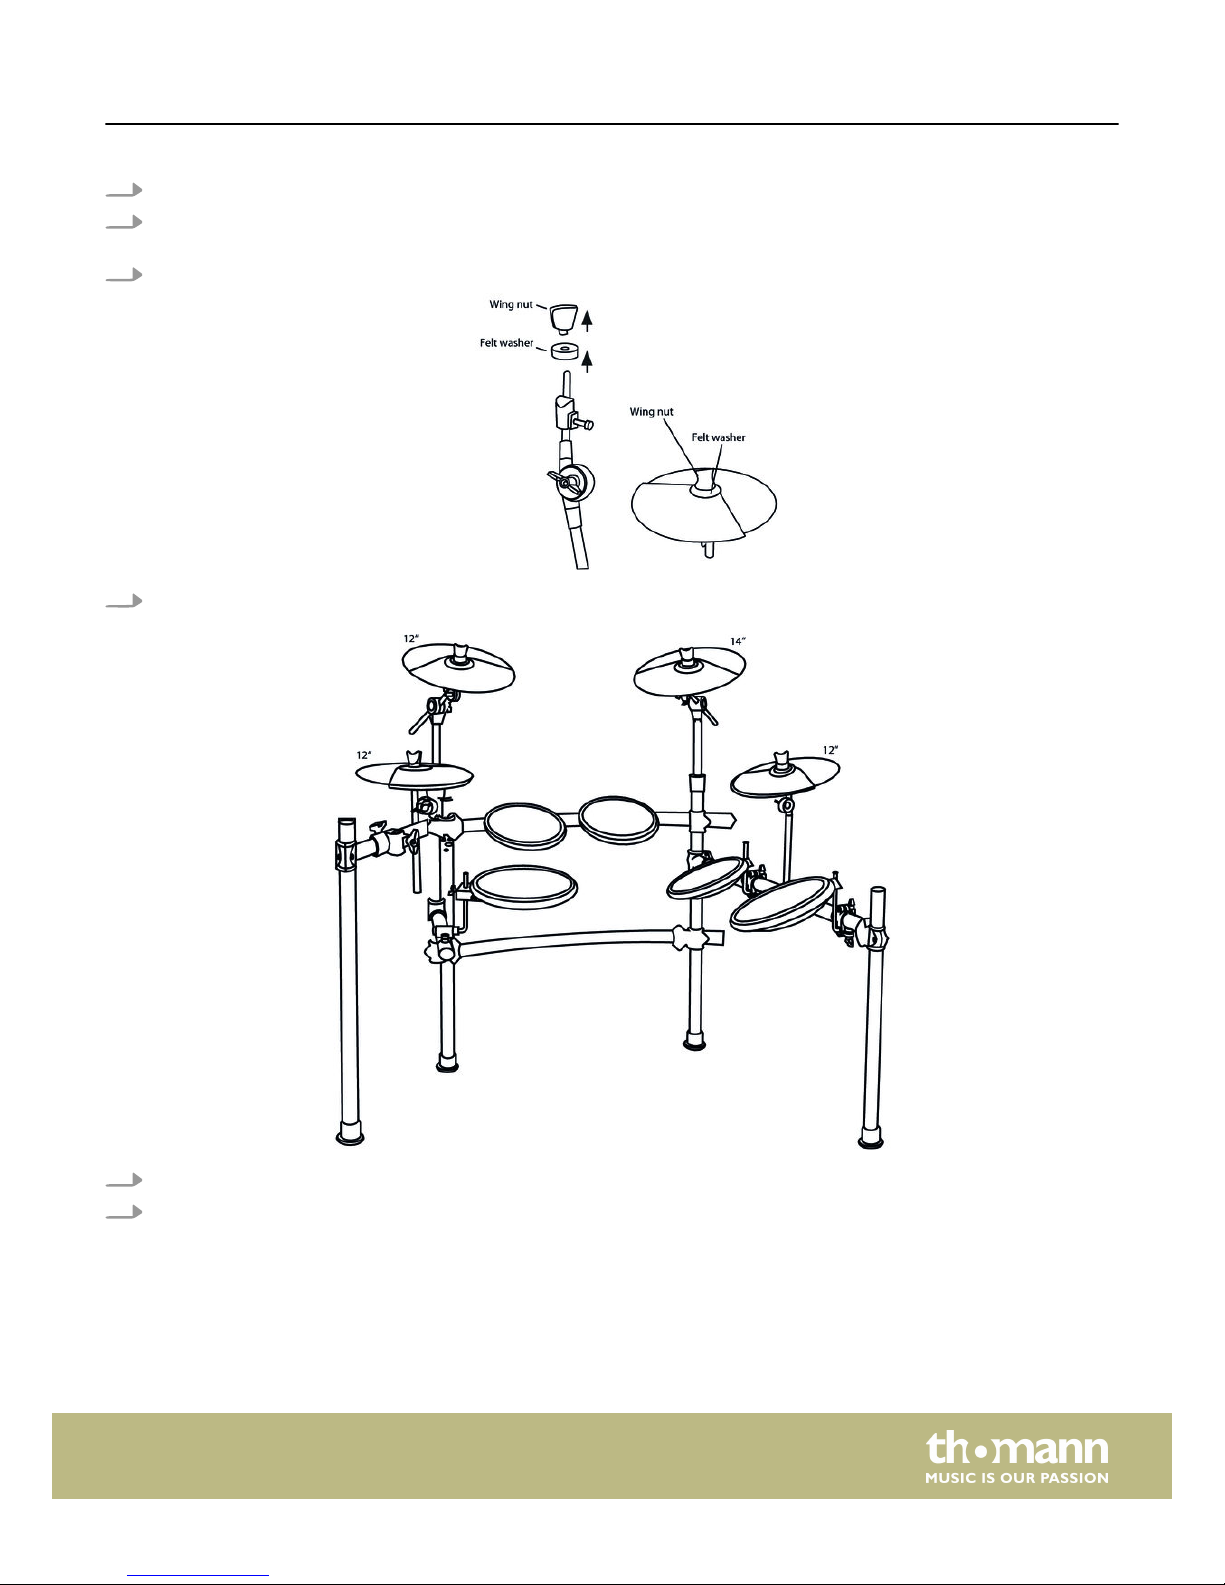
1. Put the two two-piece cymbal holder into the pipes (L1) and (R1) on the rack.
2. Place the short one-piece cymbal holder into the (from the perspective of the drummer) right unused terminal of the left
side arm.
3. Put the long one-piece cymbal holder into the unused terminal of the right side arm.
4. Unscrew the wing nuts from the cymbal holders and take the felt washer from the holders.
5. Place the four cymbals as shown in the figure on the holders.
6. Place the felt washers on the cymbals and tighten the four cymbals with the associated wing nuts on the holders.
Assembly
MPS-600
11
Page 12
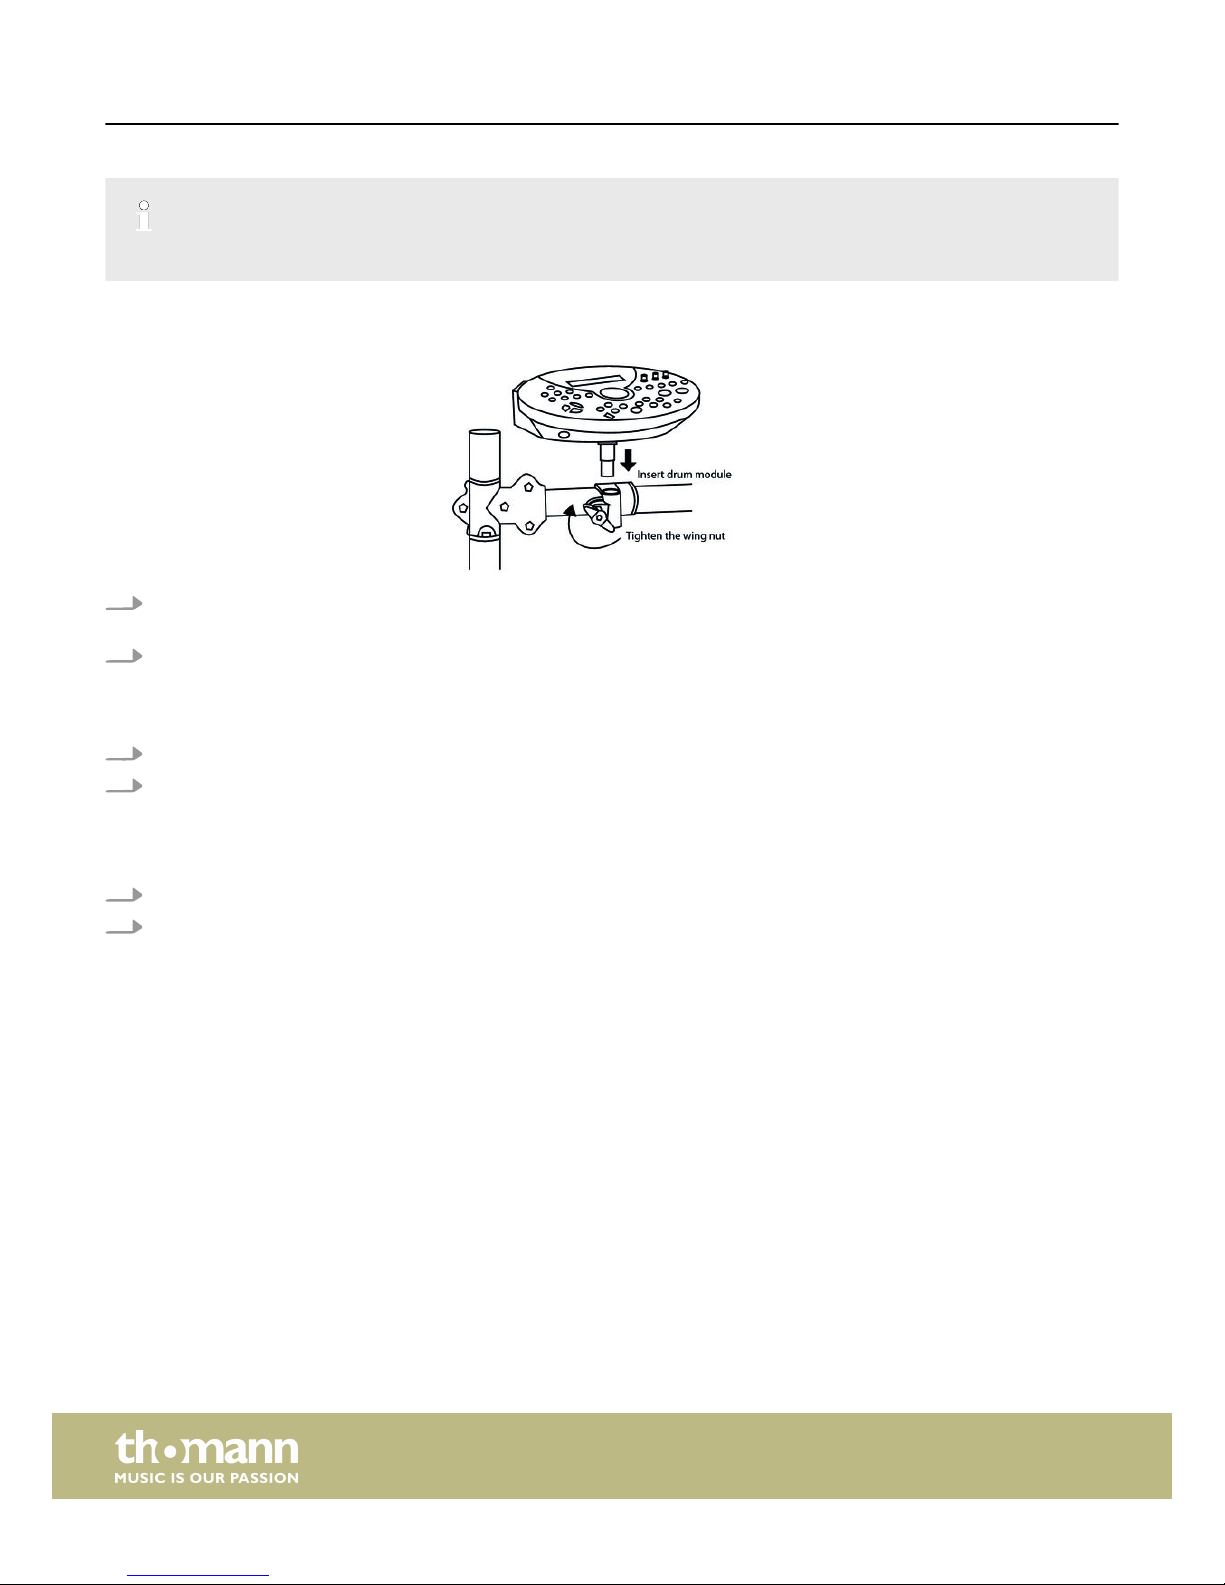
Make sure that the connector block on the underside of the cymbals is not stuck to the cylinder bolt of the counterholder.
Mounting the drum module on the rack
1. Put the drum module up to the stop into the (from the perspective of the drummer) left unused terminal of the left side
arm.
2. Align the module and tighten the wing nut of the clamp.
Mounting the kick pedal
1. Snap the two metal rods into the holes provided on the frame of the pedal.
2. Place the beater into the hole provided on the rotary head of the kick drum pedal and tighten the clamp with the drum key.
Bass drum und Hi-Hat
1. Position the bass drum pad centred under the rack. Position the pedal centred in front of the pad.
2. Place the hi-hat pedal left of the bass drum pad.
Setting up and wiring
Set up the rack, the pads and the cymbals according to your needs. As a final step, all triggers need to be wired to the drum
module. Note the labelling on the drum module and the colour markings of each cable.
Assembly
e-drum set
12
Page 13
4 Protecting the environment
Disposal of the packaging material
For the transport and protective packaging, environmentally friendly materials have been chosen that can be supplied to normal
recycling.
Ensure that plastic bags, packaging, etc. are properly disposed of.
Do not just dispose of these materials with your normal household waste, but make sure that they are collected for recycling.
Please follow the notes and markings on the packaging.
Disposal of your old device
This product is subject to the European Waste Electrical and Electronic Equipment Directive (WEEE). Do not dispose with your
normal household waste.
Dispose of this device through an approved waste disposal firm or through your local waste facility. When discarding the device,
comply with the rules and regulations that apply in your country. If in doubt, consult your local waste disposal facility.
Protecting the environment
MPS-600
13
Page 14

Notes
e-drum set
14
Page 15

Page 16

Musikhaus Thomann · Hans-Thomann-Straße 1 · 96138 Burgebrach · Germany · www.thomann.de
 Loading...