

Page 1
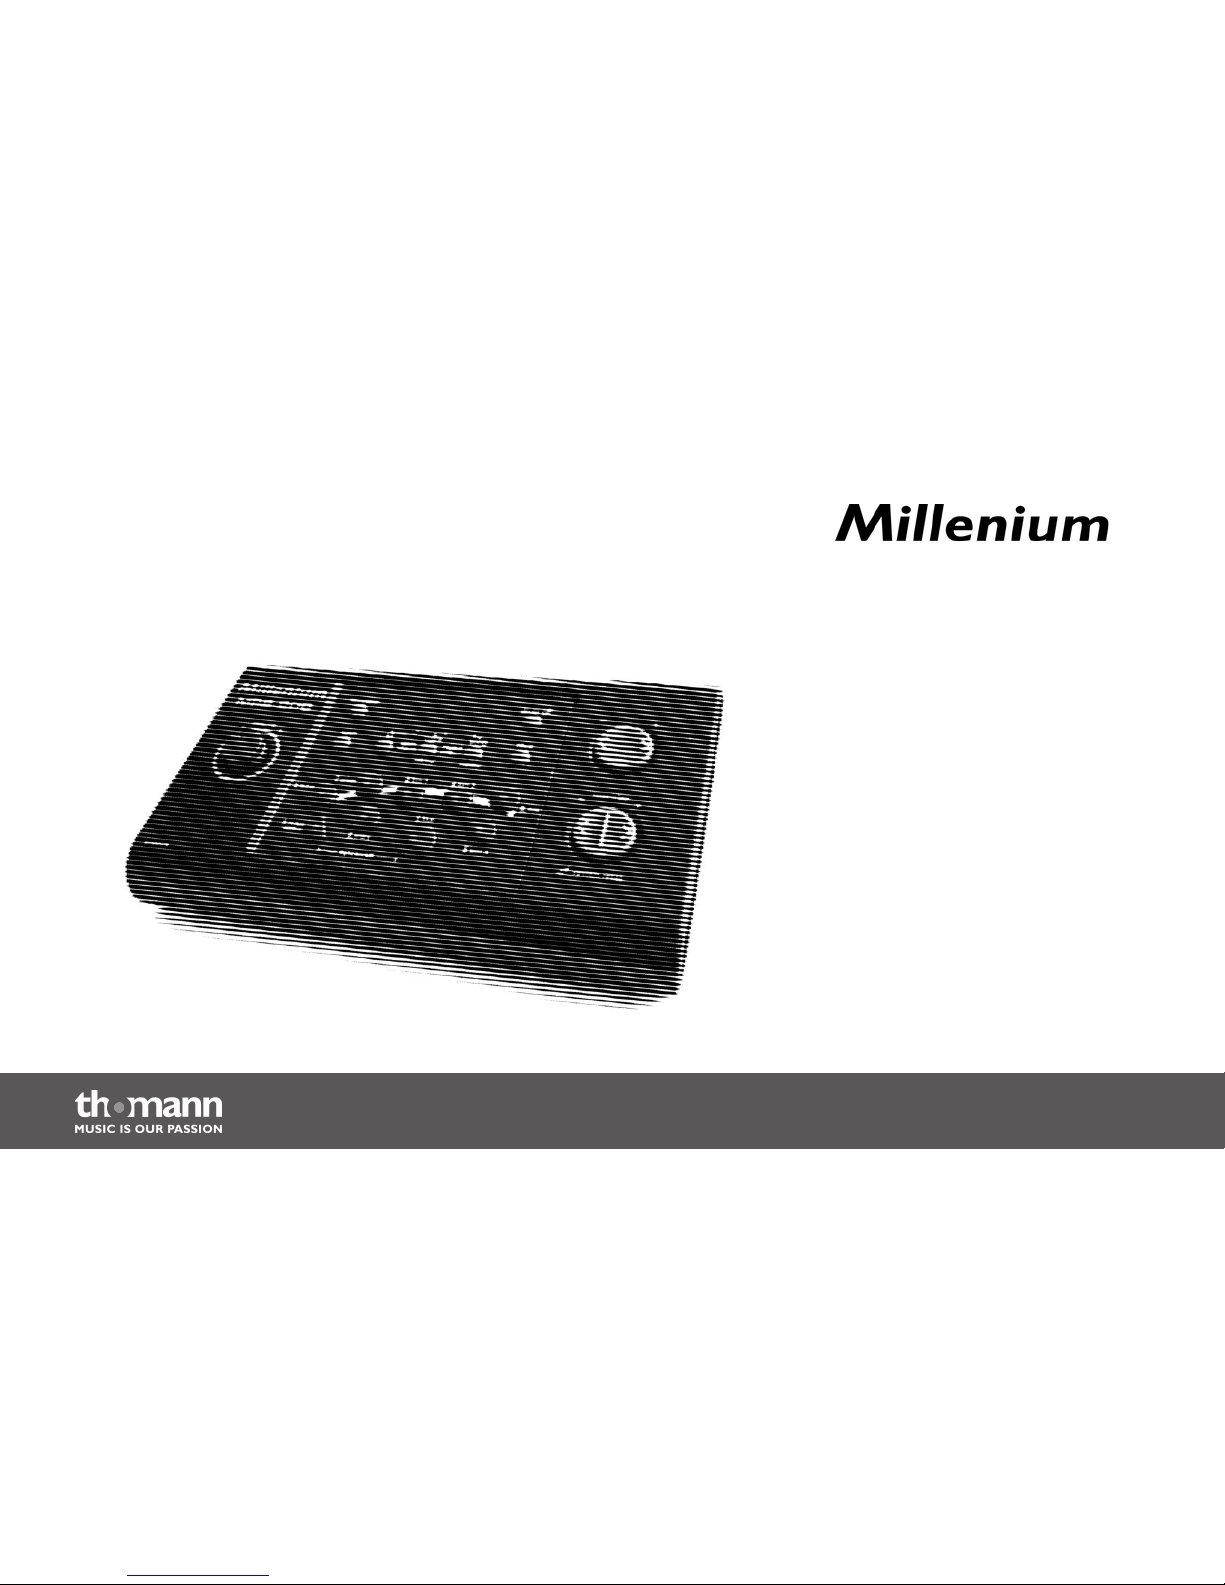
MPS-200
e-drum module
user manual
Page 2

Musikhaus Thomann e.K.
Treppendorf 30
96138 Burgebrach
Germany
Telephone: +49 (0) 9546 9223-0
E-mail: [email protected]
Internet: www.thomann.de
24.10.2013
Page 3
Table of contents
1 General notes............................................................................................................................................... 5
2 Safety instructions..................................................................................................................................... 7
3 Features....................................................................................................................................................... 10
4 Installation.................................................................................................................................................. 11
5 Operating elements............................................................................................................................... 14
6 Operation.................................................................................................................................................... 20
6.1 Functions............................................................................................................................................. 20
6.2 Playing, customising and accompanying songs.................................................................. 23
6.3 Creating drum kits........................................................................................................................... 27
6.4 Adjusting pad settings................................................................................................................... 29
7 Technical specifications....................................................................................................................... 34
8 Cleaning....................................................................................................................................................... 36
9 Protecting the environment.............................................................................................................. 37
Table of contents
MPS-200
3
Page 4
10 Appendix..................................................................................................................................................... 38
10.1 Voice list............................................................................................................................................ 38
10.2 Kit list.................................................................................................................................................. 44
10.3 Song list............................................................................................................................................. 45
10.4 MIDI implementation................................................................................................................... 48
Table of contents
e-drum module
4
Page 5
1
General notes
This user manual contains important information on safe operation of the device. Read and
follow all safety notes and all instructions. Save this manual for future reference. Make sure
that it is available to all persons using this device. If you sell the device to other users, be sure
that they also receive this manual.
Our products are subject to a process of continuous development. We therefore reserve the
right to make changes without notice.
This section provides an overview of the symbols and signal words used in this user manual.Symbols and signal words
General notes
MPS-200
5
Page 6
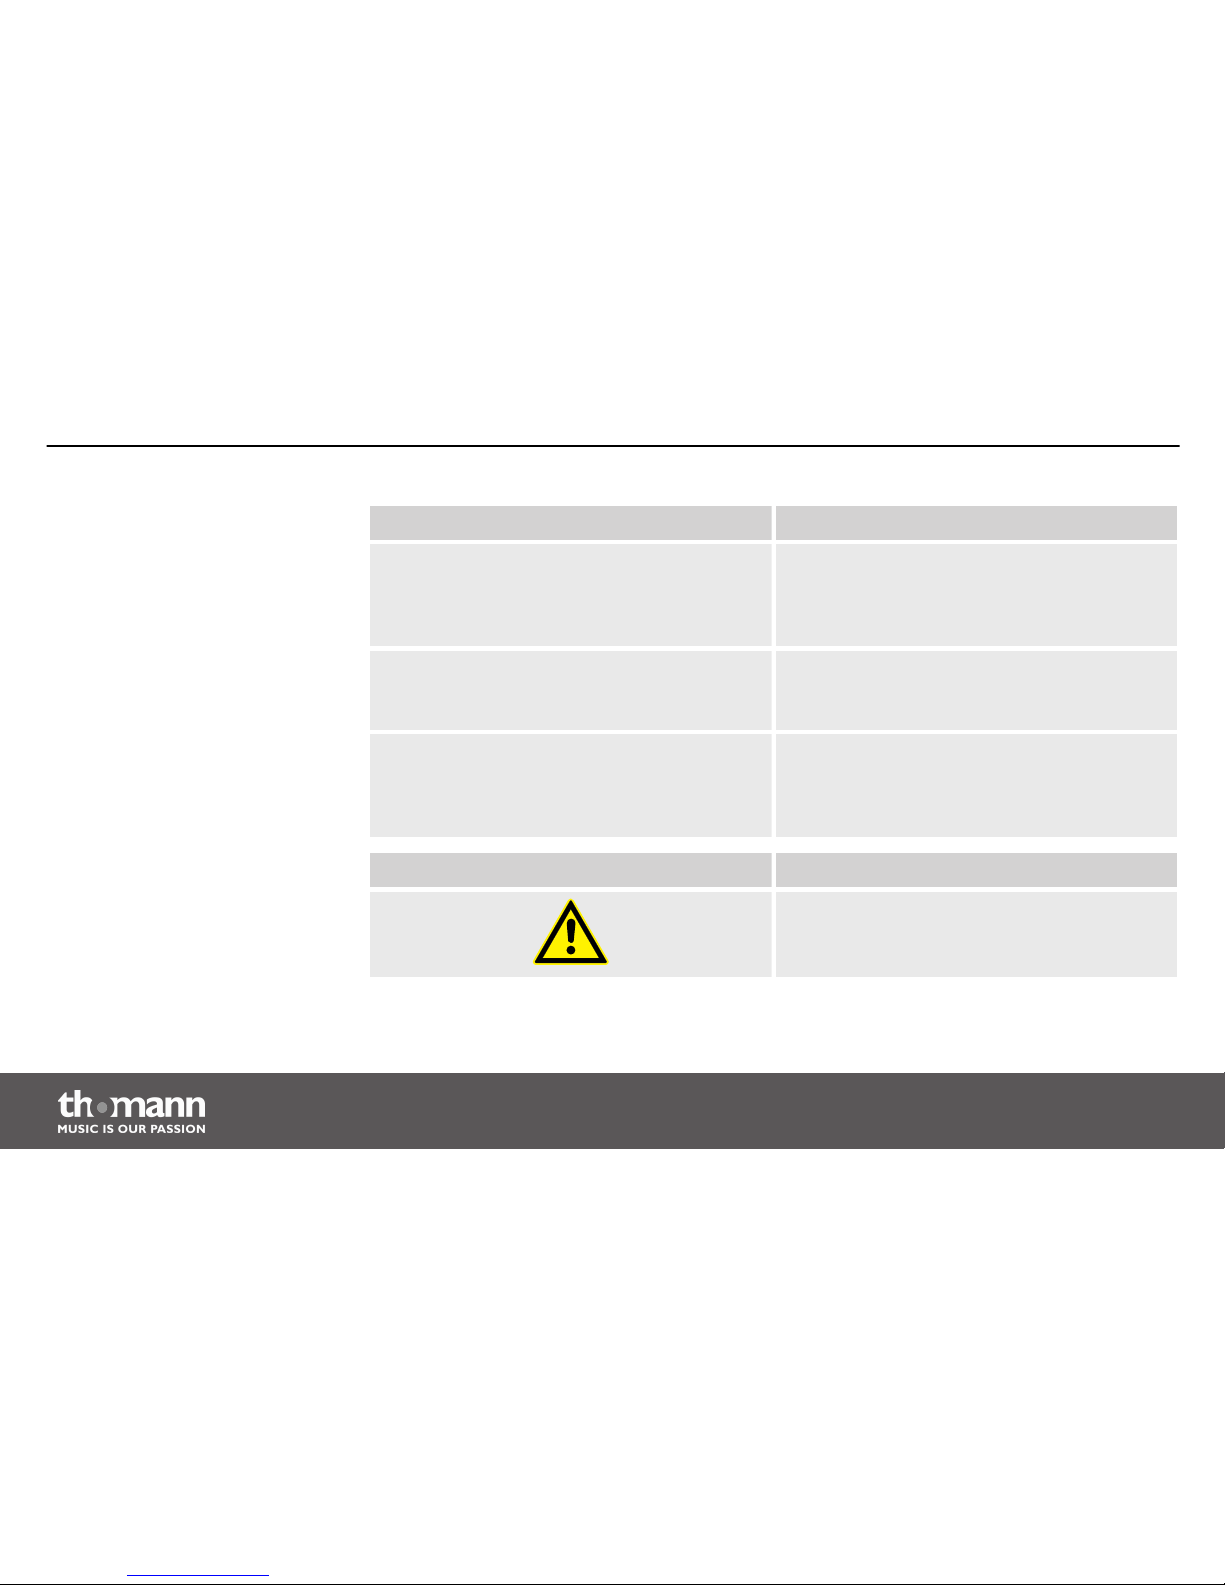
Signal word Meaning
DANGER! This combination of symbol and signal word
indicates an immediate dangerous situation
that will result in death or serious injury if it is
not avoided.
CAUTION! This combination of symbol and signal word
indicates a possible dangerous situation that
can result in minor injury if it is not avoided.
NOTICE! This combination of symbol and signal word
indicates a possible dangerous situation that
can result in material and environmental
damage if it is not avoided.
Warning signs Type of danger
Warning – danger zone.
General notes
e-drum module
6
Page 7
2
Safety instructions
Drum modules are intended to be used for converting digital trigger signals from drum pads
to various percussion sounds. Use the unit only as described in this manual. Any other use or
use under other operating conditions is considered to be improper and may result in personal
injury or property damage. No liability will be assumed for damages resulting from improper
use.
This device may be used only by persons with sufficient physical, sensorial, and intellectual
abilities and having corresponding knowledge and experience. Other persons may use this
device only if they are supervised or instructed by a person who is responsible for their safety.
Intended use
Safety instructions
MPS-200
7
Page 8
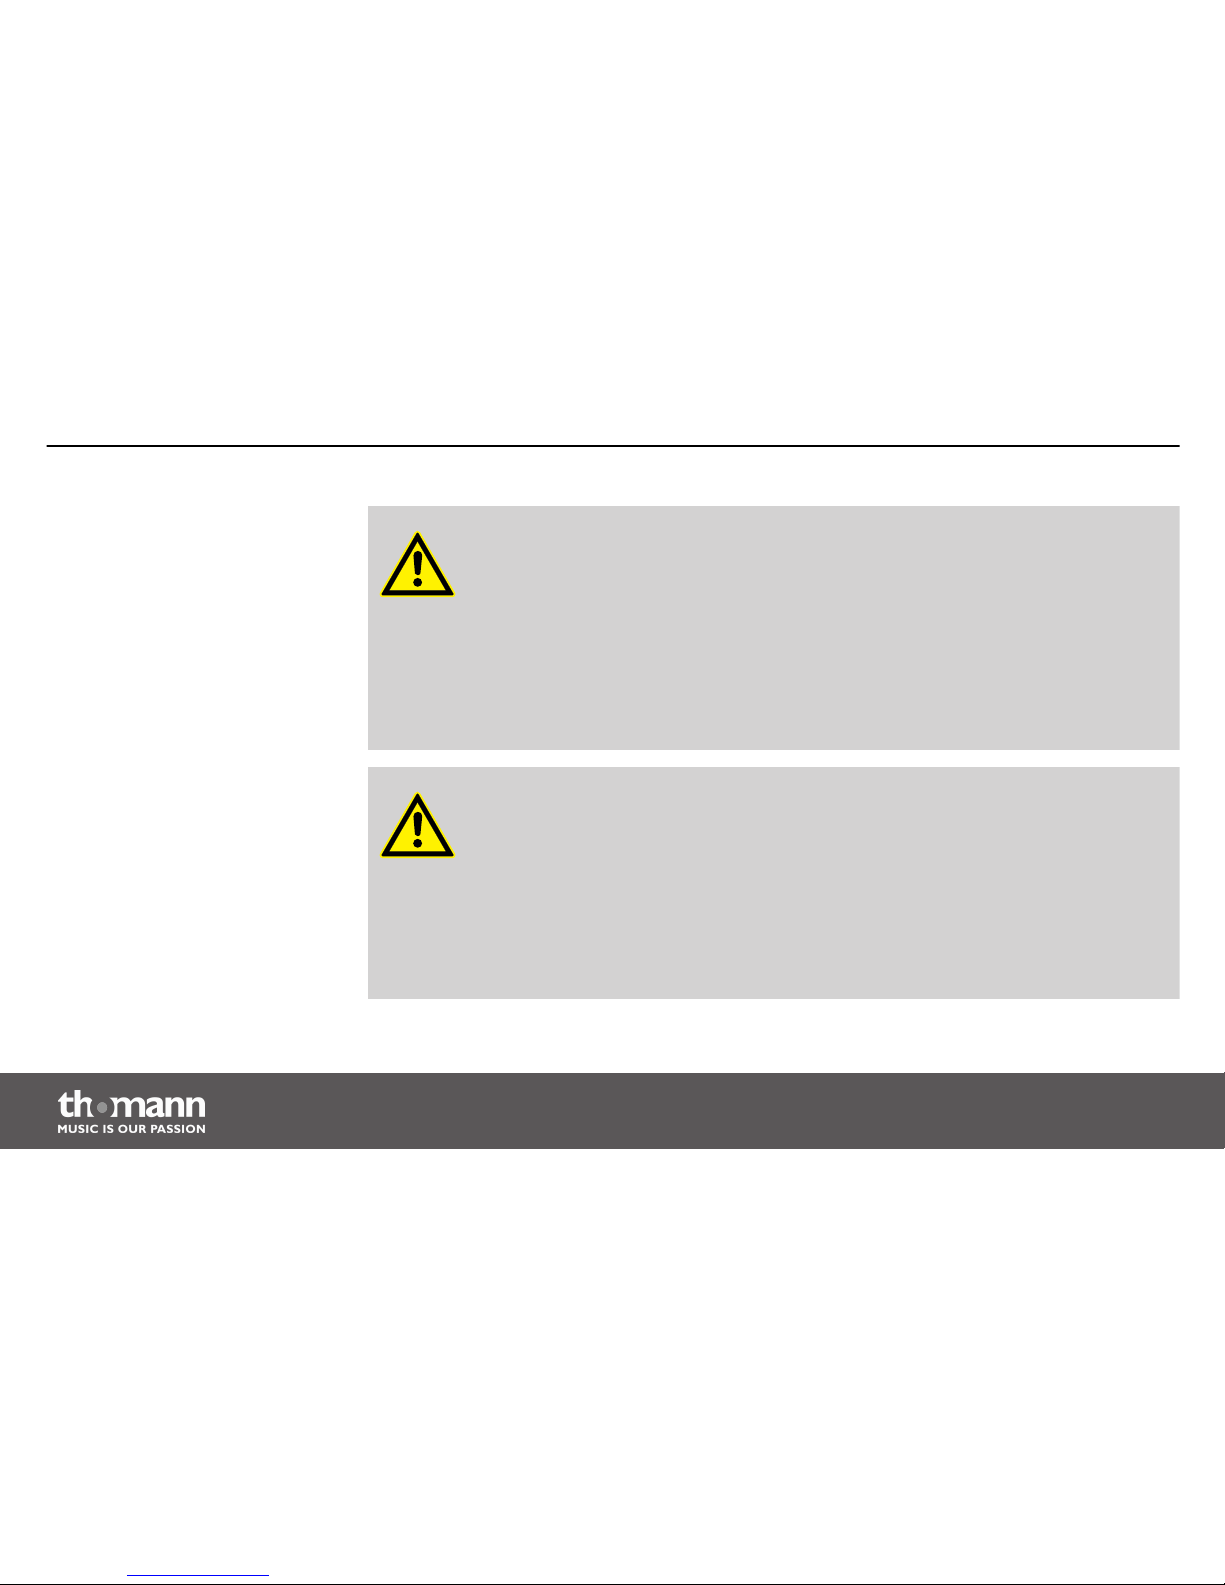
DANGER!
Danger for children
Ensure that plastic bags, packaging, etc. are disposed of properly and are not
within reach of babies and young children. Choking hazard!
Ensure that children do not detach any small parts (e.g. knobs or the like) from
the unit. They could swallow the pieces and choke!
Never let children unattended use electrical devices.
CAUTION!
Possible hearing damage
With loudspeakers or headphones connected, the device can produce volume
levels that may cause temporary or permanent hearing impairment.
Do not operate the device permanently at a high volume level. Decrease the
volume level immediately if you experience ringing in your ears or hearing
impairment.
Safety
Safety instructions
e-drum module
8
Page 9
NOTICE!
Operating conditions
This device has been designed for indoor use only. To prevent damage, never
expose the device to any liquid or moisture. Avoid direct sunlight, heavy dirt, and
strong vibrations.
NOTICE!
External power supply
The device is powered by an external power supply. Before connecting the
external power supply, ensure that the input voltage (AC outlet) matches the
voltage rating of the device and that the AC outlet is protected by a residual cur‐
rent circuit breaker. Failure to do so could result in damage to the device and pos‐
sibly the user.
Unplug the external power supply before electrical storms occur and when the
device is unused for long periods of time to reduce the risk of electric shock or
fire.
Safety instructions
MPS-200
9
Page 10
3
Features
n 215 voices
n 20 pre-installed drum kits, 10 user kits
n 50 pre-installed songs
n Click and learning function
n Flexible assignment of the pad voices
n Reverb effect and voice tuning
n Headphones, AUX and MIDI connections
Features
e-drum module
10
Page 11
4
Installation
Setup and installation of the pads and pedals are described in detail in the included setup
guide. Finally, check that all connecting cables between the pads and the drum module are
connected correctly.
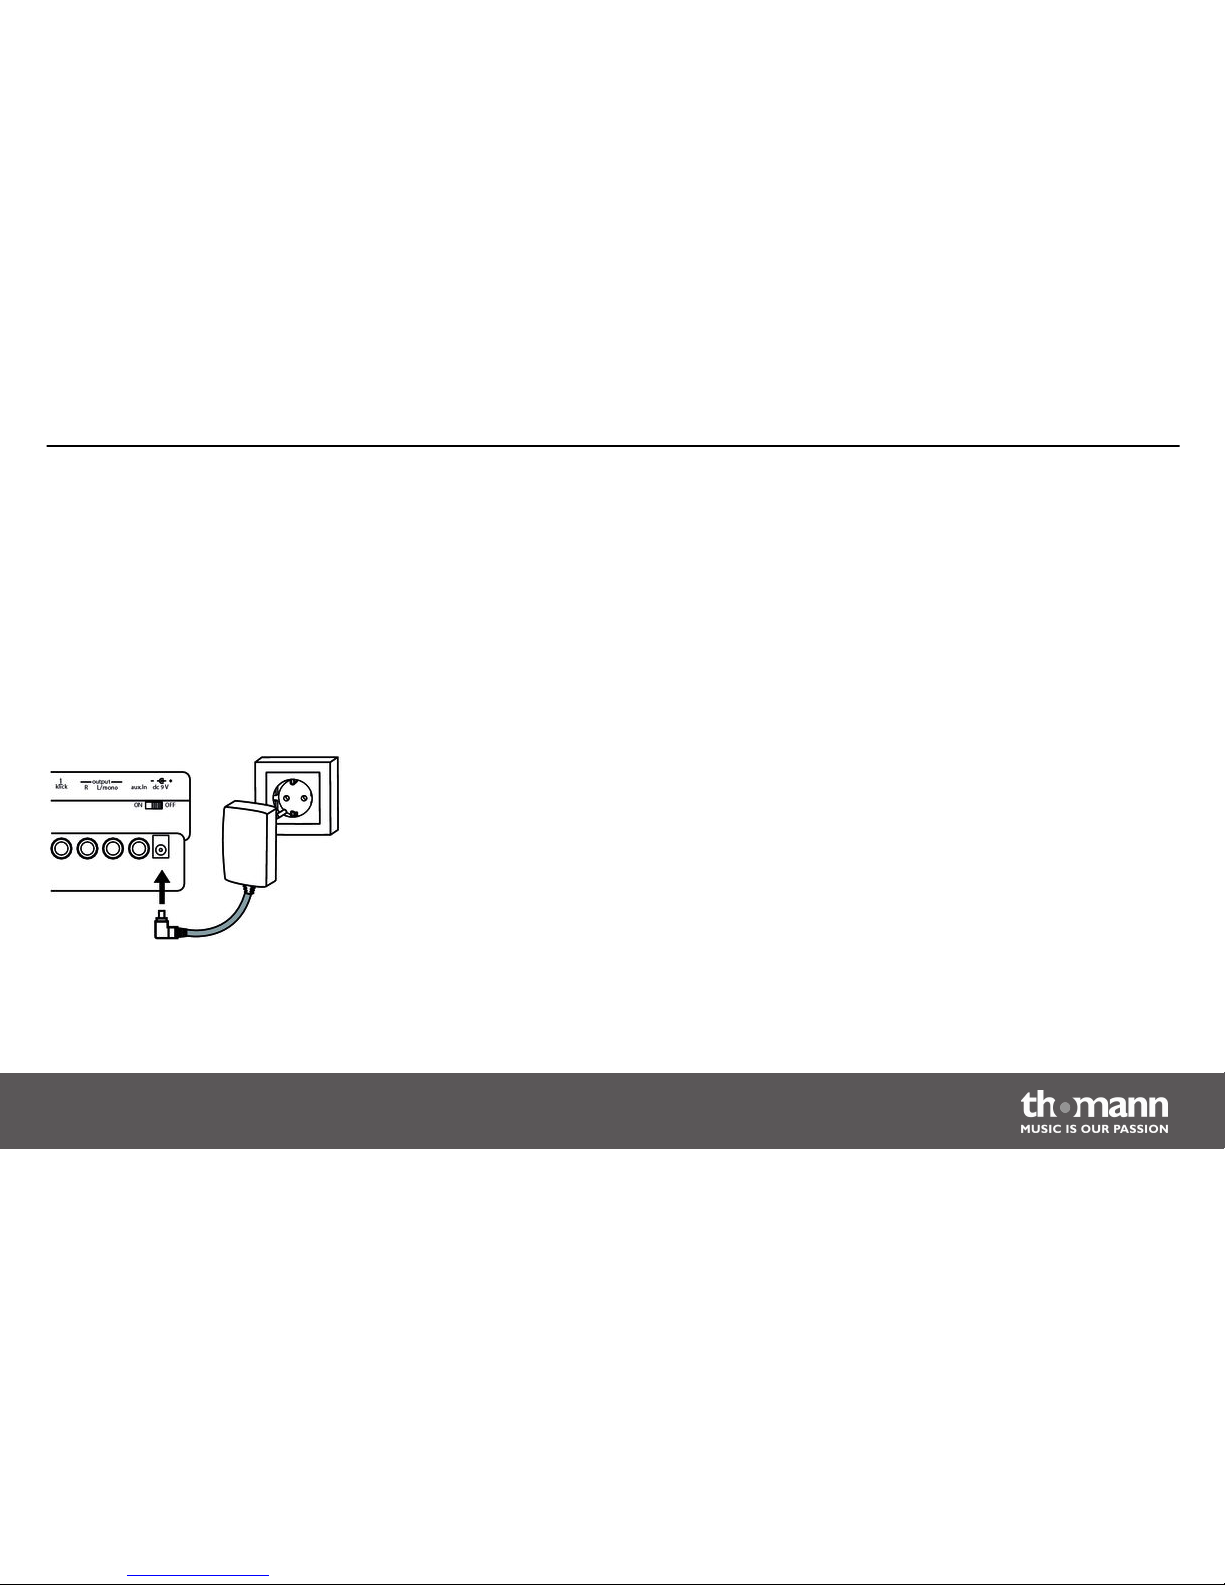
Connect the supplied power adapter to the 9 V input of the device and then insert the mains
plug into a mains wall outlet.
Setup, connecting pads and
pedals
Connecting the power supply
Installation
MPS-200
11
Page 12
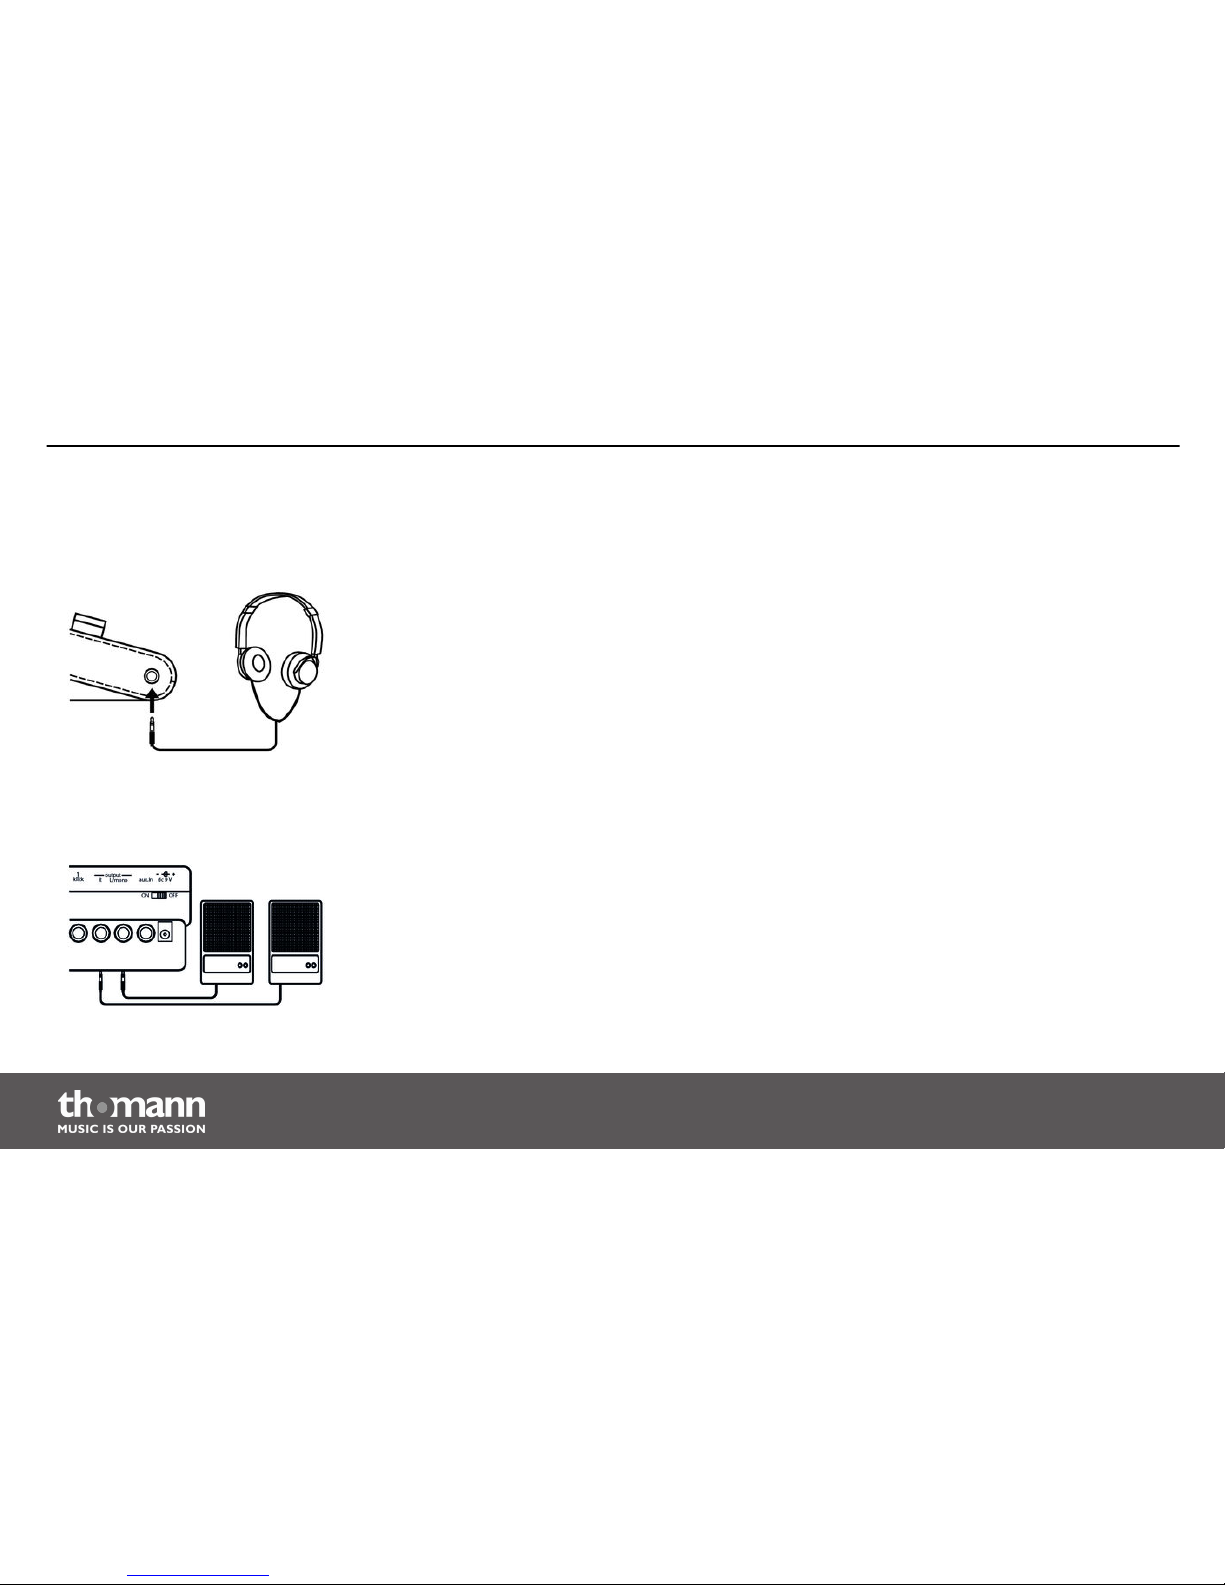
Connect your stereo headphones to the PHONES output of the drum module.
Connect the inputs of your amplifier or powered speaker to the ‘OUTPUT’ sockets of the drum
module. When using a mono amp, connect its input to the ‘L/MONO’ output socket of the
module.
Connecting headphones
Connecting audio devices
Installation
e-drum module
12
Page 13
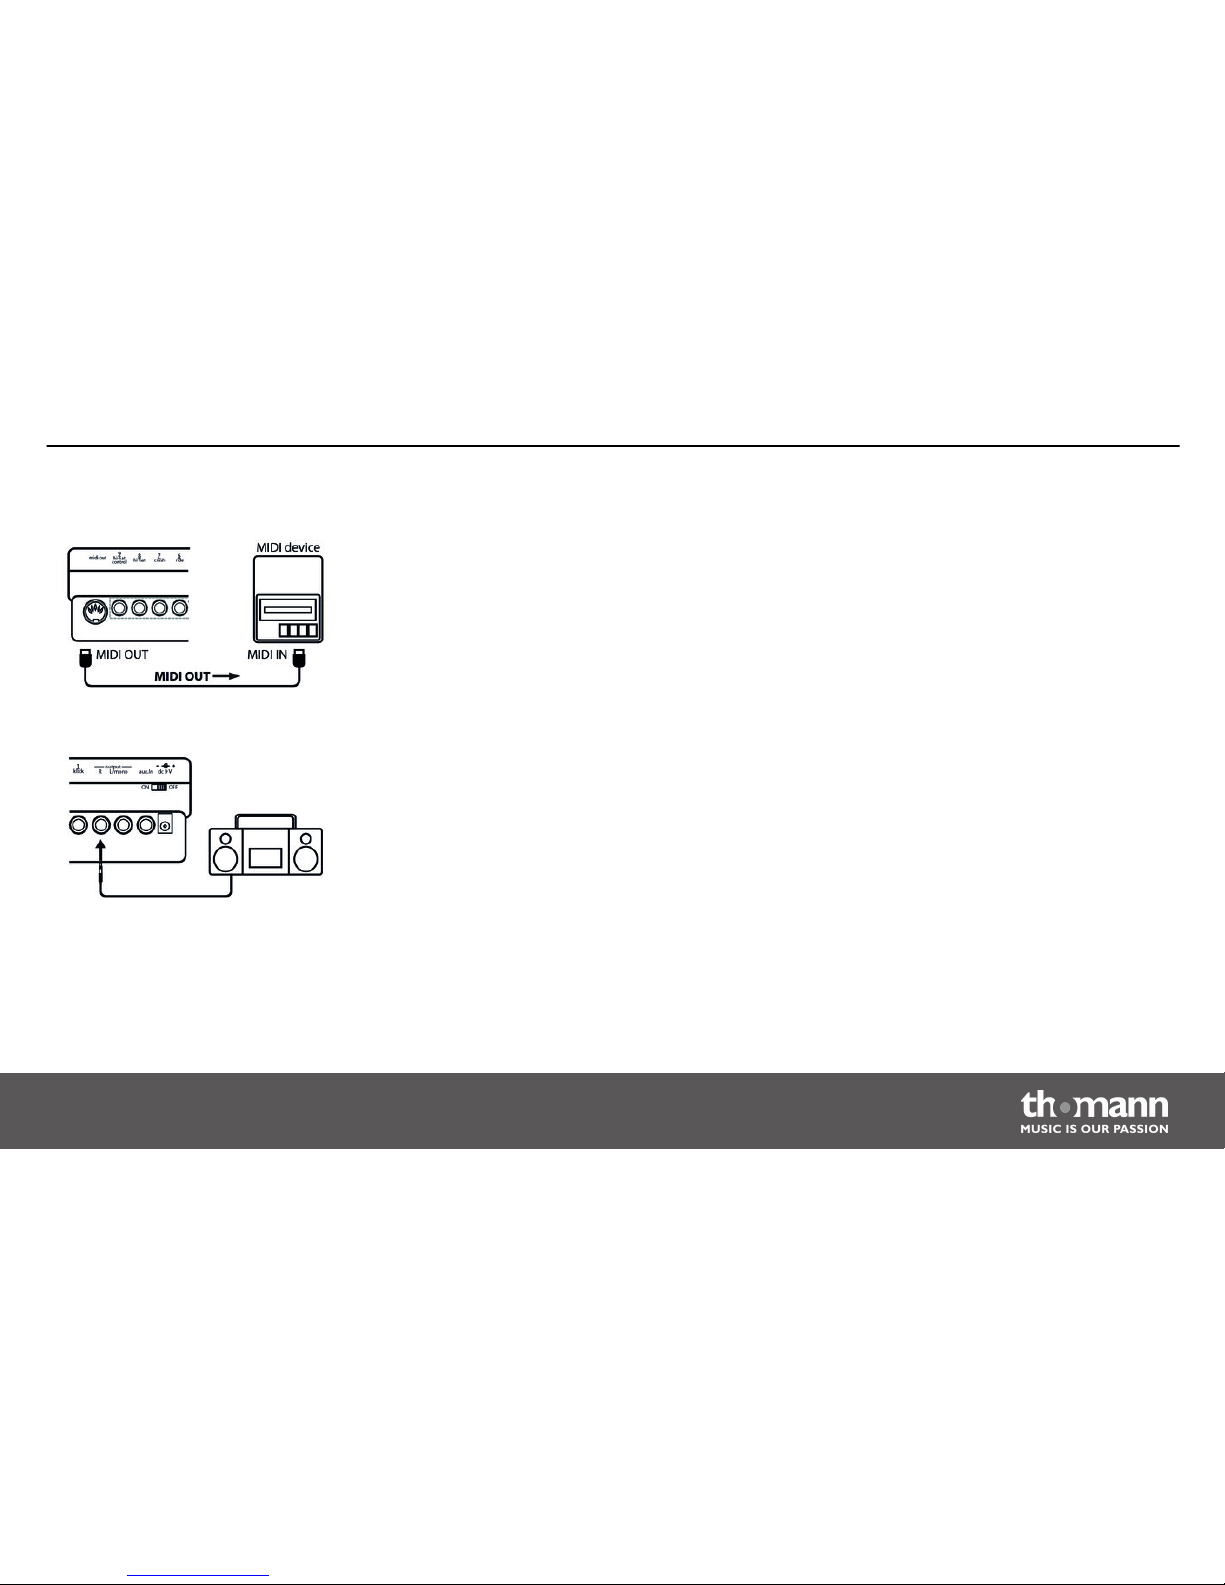
Connect external MIDI devices to the ‘MIDI IN’ connections of the drum module.
Connect CD or MP3 player to the ‘AUX IN’ input of the drum module.
Connecting MIDI devices
Connecting CD or MP3 player
Installation
MPS-200
13
Page 14
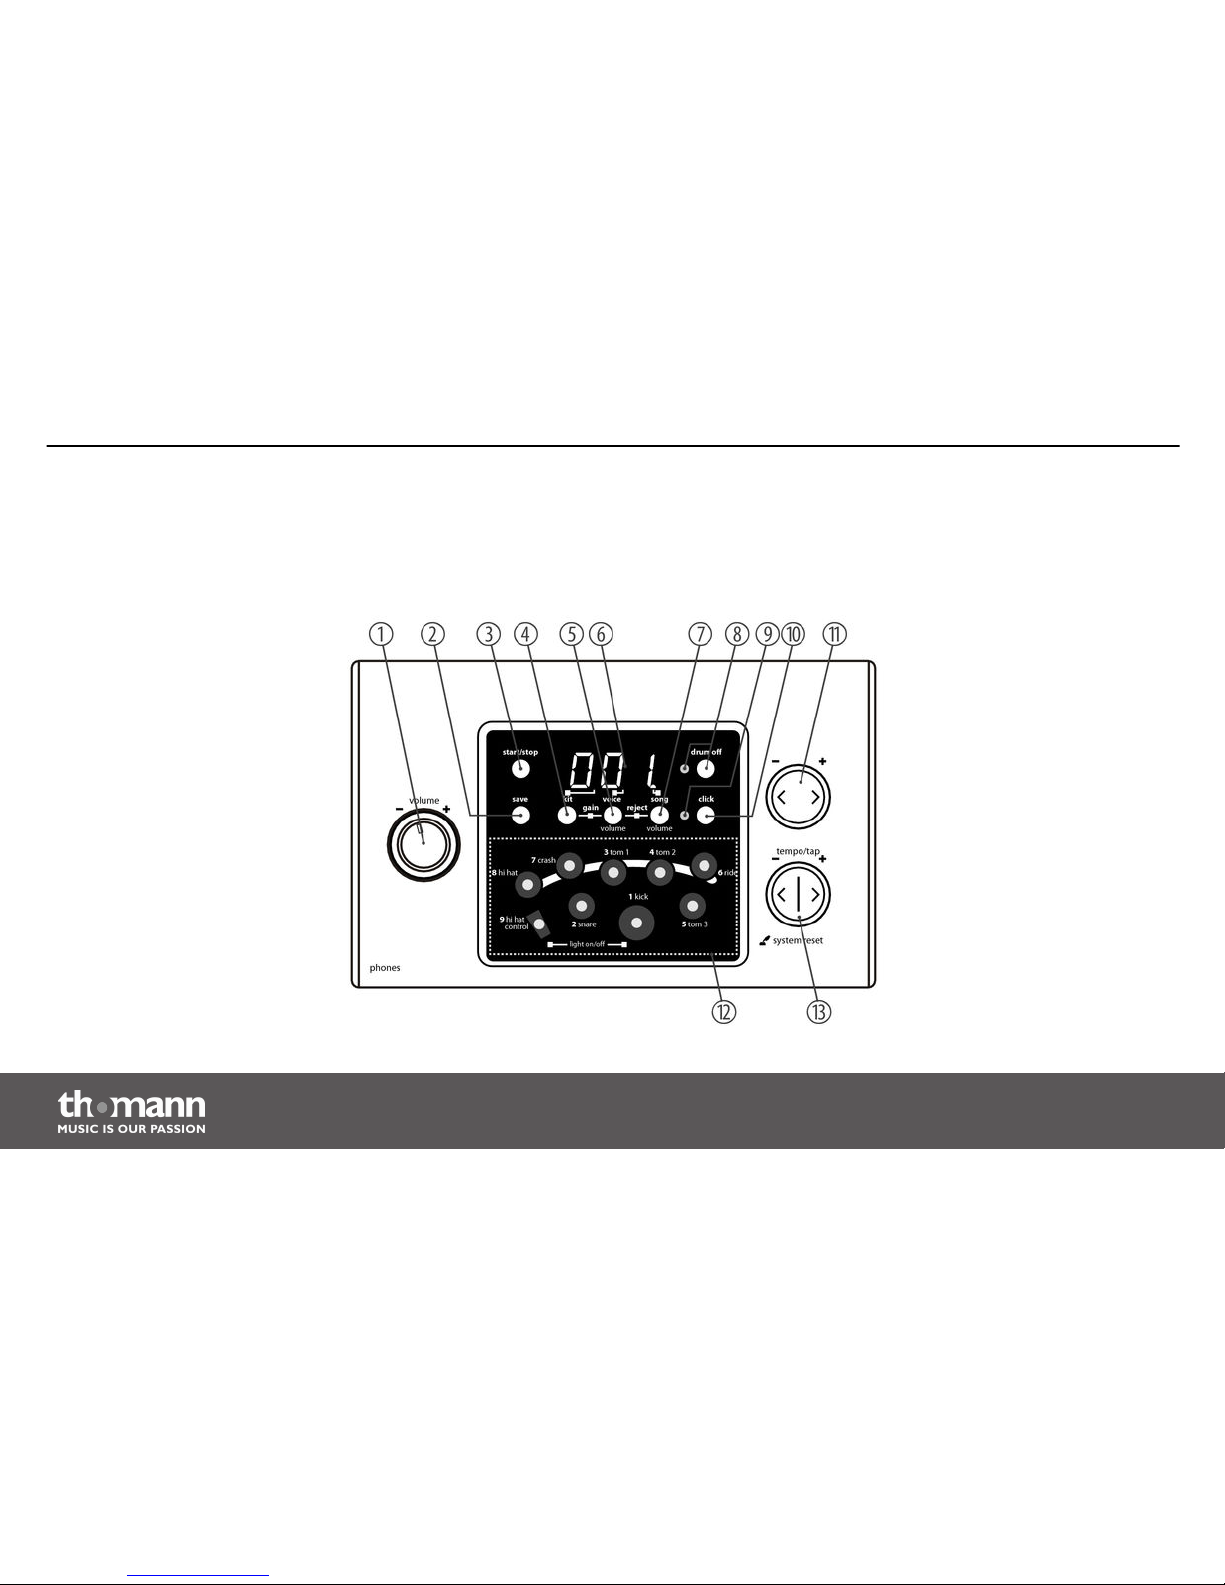
5
Operating elements
Front panel
Operating elements
e-drum module
14
Page 15
1 [volume]
Volume control for headphones and line out.
2 [save]
Button for saving settings.
3 [start/stop]
Button for starting and pausing song playback.
4 [kit]
Button for opening the kit menu.
5 [voice/volume]
Button for opening the voice menu and for volume indication.
6 3-digit LED display.
7 [song/volume]
Button for opening the song menu and for volume indication.
Operating elements
MPS-200
15
Page 16
8 [drum off]
Button for muting the drum part. The indicator LED lights up, when the part is muted.
9 Indicator LED
Flashes during playback according to metronome or current song beat.
10 [click]
Button for turning the metronome on or off.
11 [–] / [+]
Button for song and kit selection and for adjusting click and pad volume.
12 Pad selection field
Buttons with integrated indicator LED for activating and playing the pads.
13 [tempo/tap –/+]
Button for setting the metronome and playback speed and for resetting the device to factory default settings.
Operating elements
e-drum module
16
Page 17
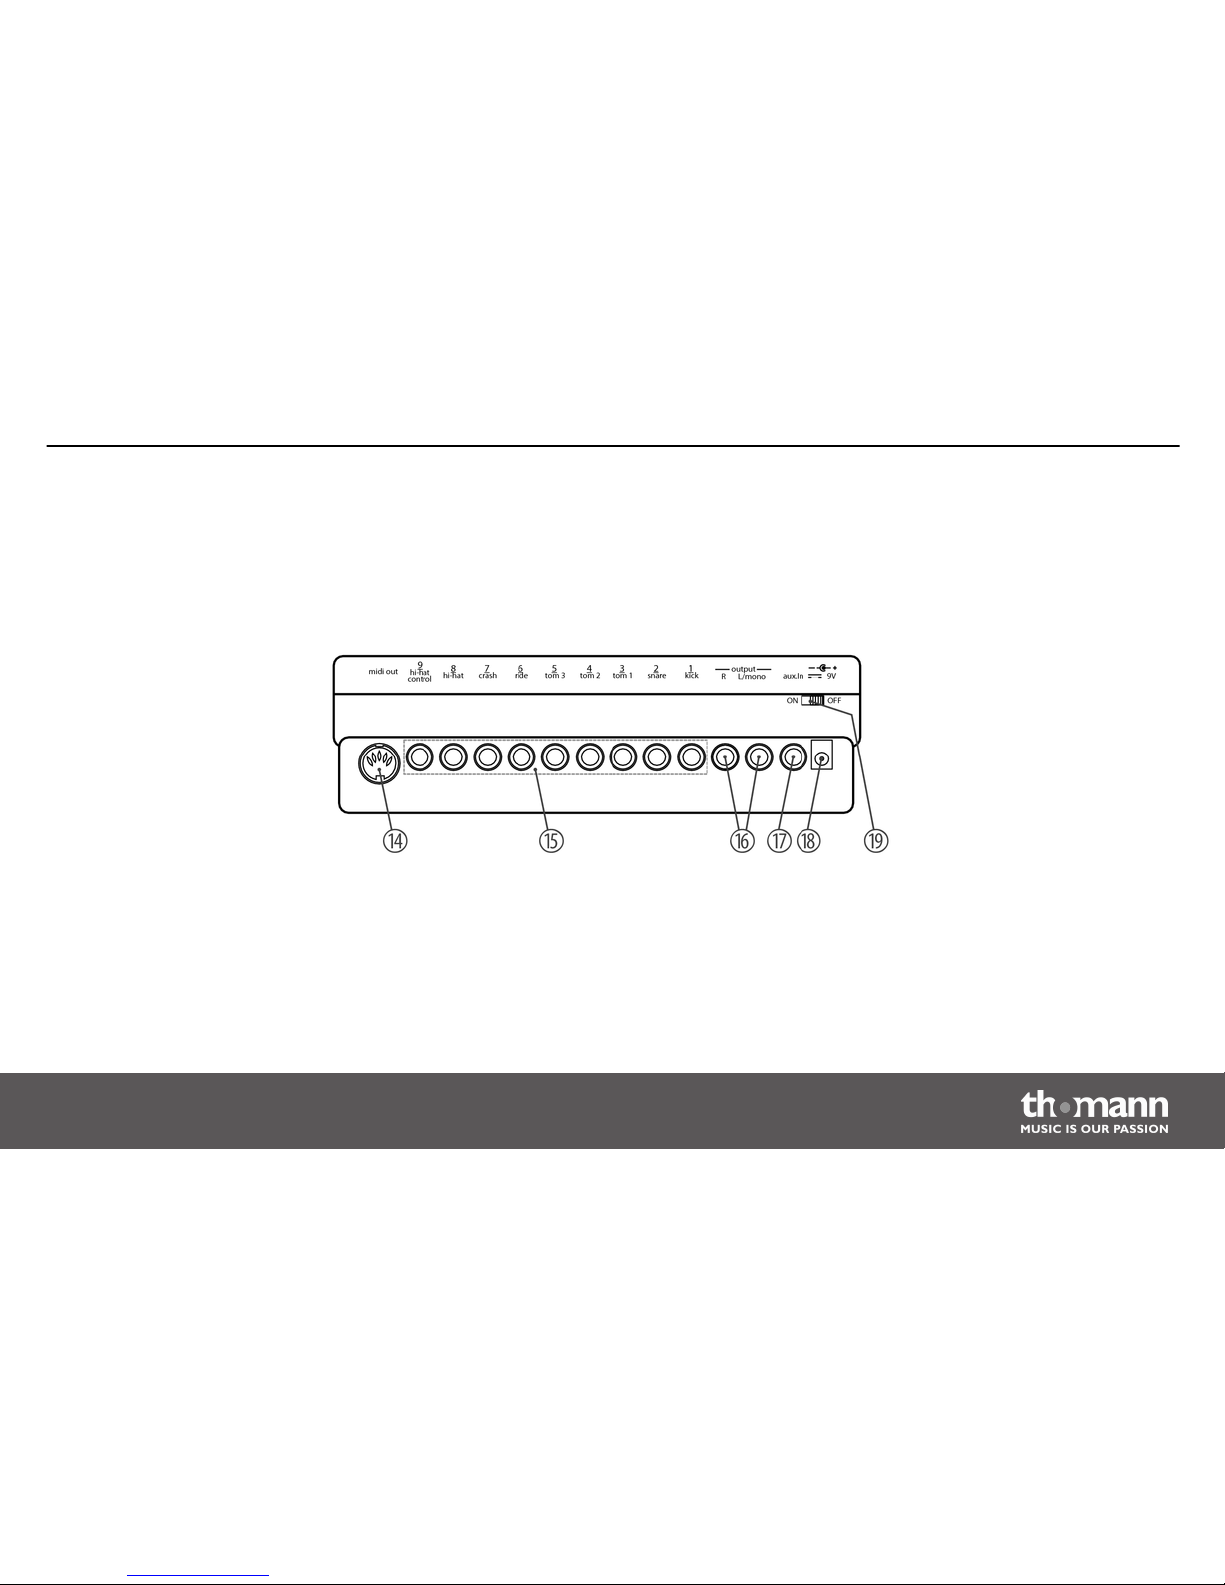
Rear panel
Operating elements
MPS-200
17
Page 18
14 midi out
Connection for an external MIDI device.
15 Connection sockets for the pads.
16 – output – R / L/mono
Output to connect active monitor speakers, mixer or power amp.
17 aux.in
Input for external audio devices like MP3 or CD player.
18 9 V
Connection socket for the power supply adapter.
19 ON / OFF
Main switch to turn the device on or off.
Operating elements
e-drum module
18
Page 19
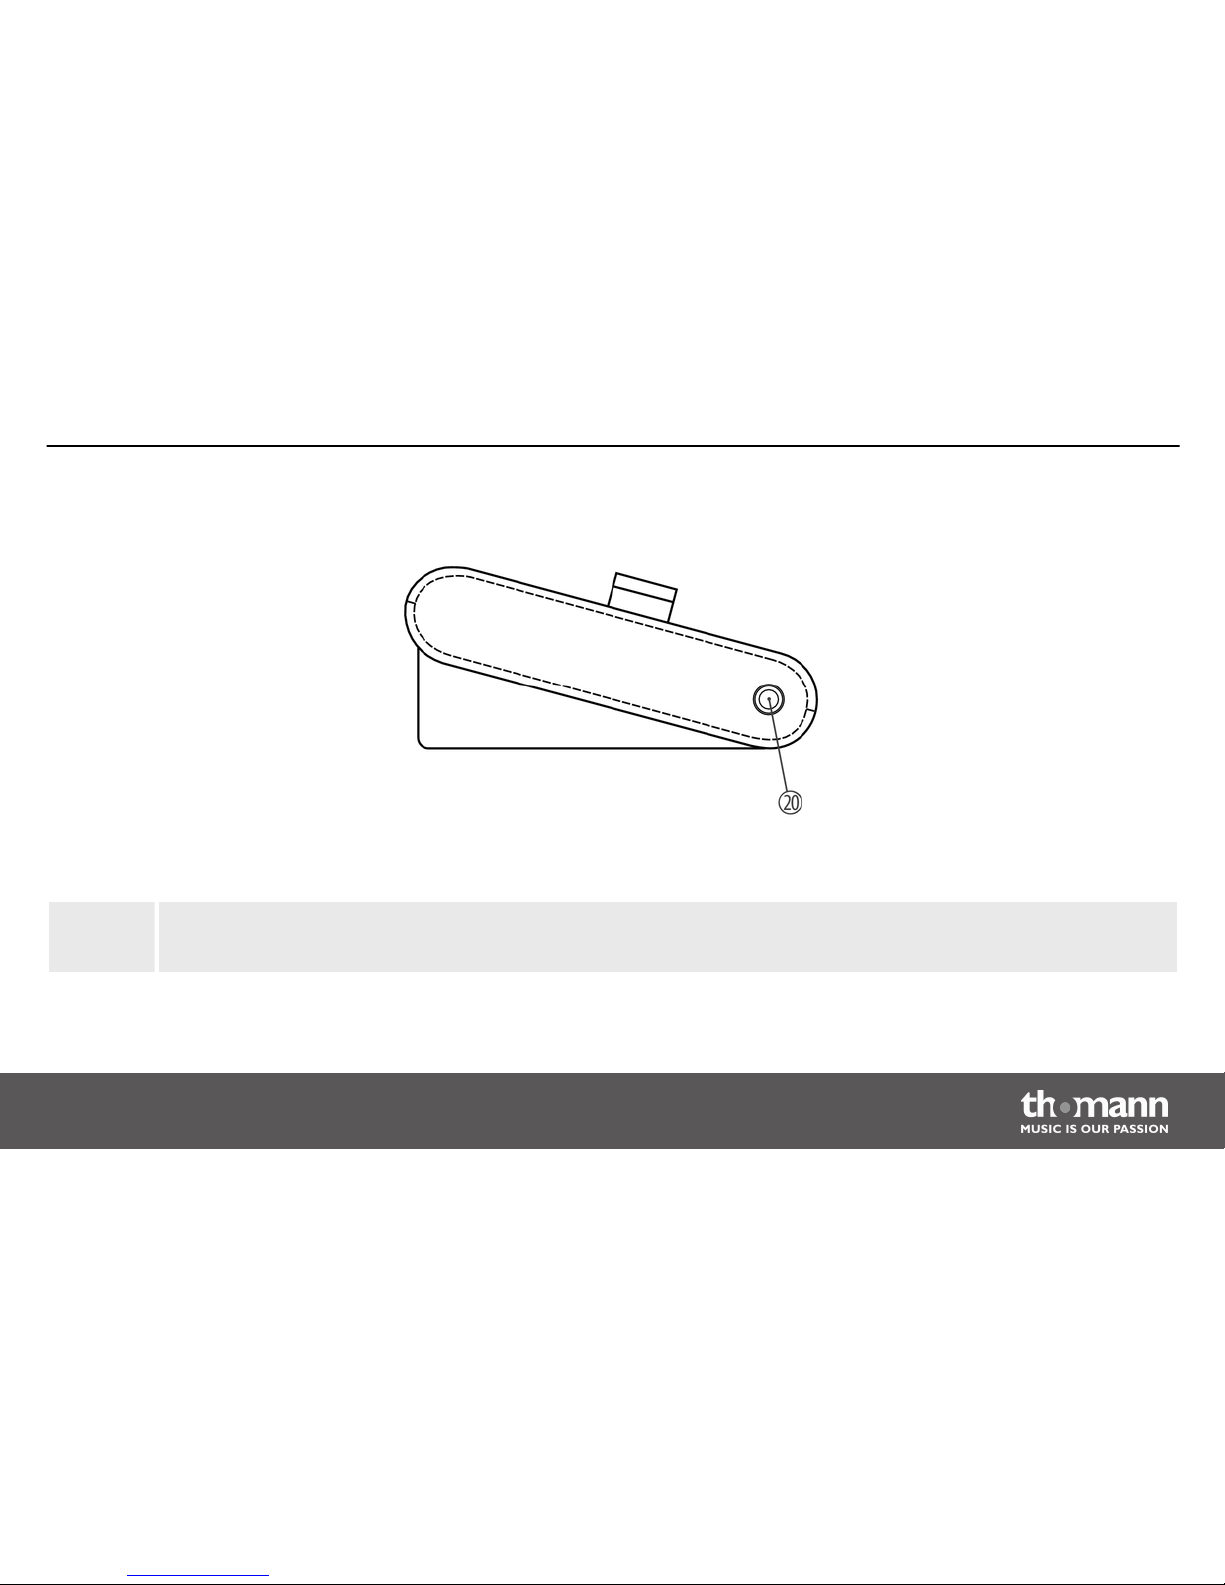
20 phones
Headphones socket.
Side view
Operating elements
MPS-200
19
Page 20
6
Operation
6.1
Functions
Use the main switch [ON/OFF] on the rear panel to turn the unit on.
Check for proper connection of all cables before switching the unit on.
Before switching the unit on, turn the [volume] control down to minimum.
Automatic switchoff
– When the device is not used, it will switch off automatically after 30 minutes. To
switch it on again, switch to the ‘OFF’ position and then to the ‘ON’ position.
Deactivating the automatic switchoff
– To deactivate the automatic switchoff, press and hold the [START/STOP] button
while you switch on the device.
Switching on
Operation
e-drum module
20
Page 21
To set the volume, hit a pad while slowly turning the [volume] control clockwise.
A drum kit is a compilation in which each trigger is assigned to a certain sound and several
sound parameters. By selecting a drum kit, you can tailor the sound of your e-drum kit in sec‐
onds to the desired style of music. In addition to the 20 preset drum kits, you can create and
save 10 user drum kits (see Ä Chapter 10.2 ‘Kit list’ on page 44).
1. Press the [kit]button.
ð
The display shows the current kit number and the KIT-LED to the right of the first
display digit lights up.
2. Use the [–] and [+] buttons to select the desired kit.
Press the [click] button to turn the Click function on or off. The indicator LED (9) of this button
is lit when the click is turned on.
Use the [–] and [+] button to change the click volume. For this purpose, keep the [click] button
pressed.
Adjusting the volume
Selecting a drum kit
Click function
Operation
MPS-200
21
Page 22
The click volume is reset to the default value when the unit is switched off.
Click speed can be adjusted in a range of 30 to 280 beats per minute using the [tempo/tap –/+]
button. Press [–] or [+] briefly to increase or decrease the indicated value by one. Keep [–] or [+]
pressed to increase or decrease the value quickly.
To reset the click speed to the default value ‘105’ press the middle of the
[tempo/tap –/+] button.
The click function can be turned on or off during playback.
The click speed is automatically adjusted to the song speed during playback.
With the learning function, you can practice each of the pre-installed songs according to your
own pace.
Learning function
Operation
e-drum module
22
Page 23
1.
Select the desired song as described here: Ä ‘Selecting a song’ on page 23.
2.
Adjust the desired tempo as described here:
Ä
‘Adjusting the playback speed’ on page 25.
3. Start the playback with [start/stop].
4. Hit the pads synchronously to the indicator LED.
To turn the learning function (display of the pads to be played via indicator LEDs) on
or off, press the buttons [hi-hat control] and [kick] simultaneously.
6.2
Playing, customising and accompanying songs
Your digital drum set offers 50 pre-installed songs in total. When turning the drum module on,
song ‘001’ is shown on the display by default.
Selecting a song
Operation
MPS-200
23
Page 24
1. Press the [song/volume] button.
ð
The display shows the song number and the Song LED lights up on the right below
in the three-digit display.
2.
Use the [–] and [+] buttons to select the desired song (see Ä Chapter 10.3 ‘Song list’
on page 45).
1. Select the desired song as described above.
2. Start or stop the playback with [start/stop].
During playback, you can turn the Click on or off as desired. For this purpose, press the
[click] button.
During playback, the indicator LED of the pads played light up. Press the
[hi-hat control] and [kick] buttons simultaneously to turn the function on or off.
Playing a song
Operation
e-drum module
24
Page 25
1. Press the [song/volume] button.
ð
The song volume is indicated in ‘Axx’ format in the display, the Song LED on the
right below in the three-digit display turns off.
2. Adjust the volume using the [–] and [+] buttons in a range of 00 to 31.
You can adjust the playback speed using the [tempo/tap –/+] button in a range of 30 to 280
beats per minute. Press the [–] or [+] briefly to increase or decrease the displayed value by one.
Keep the [–] or [+] button pressed to increase or decrease the value quickly.
To reset the playback speed to the default value (display value ‘098’) press the middle
of the [tempo/tap –/+] button.
After two seconds, the display automatically returns to the song or kit number indica‐
tion.
To accompany a song in your own tempo, the playback speed can be pre-counted using the
Tap Timer function.
Adjusting song volume
Adjusting the playback speed
Tap-Timer (pre-count function)
Operation
MPS-200
25
Page 26
1. Select the desired song.
2. Press the [tempo/tap –/+] button.
ð
The default speed of the song is indicated in the display.
3. Hit any pad – just like pre-counting – four times.
ð
The drum module then accepts the tempo of the last two pre-count hits and the
song is played with the pre-count speed.
During song playback, the Tap Timer function is not available.
Any time during song playback, the drum track can be muted.
1. Press the [drum off] button, to mute the drum sound.
ð
The indicator LED lights up when the part is muted.
2. Press the [drum off] button again to unmute the drum track.
Muting the drum sound
Operation
e-drum module
26
Page 27
6.3
Creating drum kits
The 215 pre-installed voices of the drum module can be freely programmed to the connected
pads. In other words, you can create your own drum kits and store them in the unit. The fol‐
lowing sections describe how to create your own kits.
To programme a certain voice to a pad, please proceed as follows:
1. Press the [voice/volume] button.
ð
The display indicates the current voice number.
2. Press the button of the pad you want to programme a certain voice for. Alternatively,
you can directly activate the pad by playing it.
ð
The display shows the currently assigned voice. The indicator LED of the pad lights
up.
3.
Select the desired voice using the [–]/[+] button (see Ä Chapter 10.1 ‘ Voice list’
on page 38).
4. Repeat steps 2 to 3 to assign the other pads as desired.
Assigning a voice
Operation
MPS-200
27
Page 28
You may adjust the volume of the individual pads independently from the others. To do so,
please proceed as follows:
1. Press the [voice/volume] button to change between voice number display and voice
volume display.
ð
The display shows the current volume of the selected voice in ‘Lxx’ format.
2. Press the button of the pad whose volume you want to change. Alternatively, you can
directly activate the pad by playing it.
ð
The indicator LED of the pad lights up.
3. Adjust the volume using the [–]/[+] button.
4. Repeat steps 2 to 3 to adjust the volume of the other pads as desired.
After you have assigned all the pads with the desired voices and adjusted the respective pad
volume, you can save the settings as a user kit in the unit. To do so, please proceed as follows:
1. Press the [save] button.
ð
The display shows the first unused memory slot (‘021’ ).
2. Select the desired memory slot using the [–]/[+] button (range is 021 to 030).
Adjusting the volume of the
pads
Storing settings
Operation
e-drum module
28
Page 29
3. Press the [save] button again to save your user kit as the desired number. To cancel the
storage process, press the button [voice/volume].
Any unsaved changes are discarded when you turn the drum module off.
6.4
Adjusting pad settings
You can adjust the touch sensitivity of each pad via the drum module.
1. Press the buttons [kit] and [voice/volume] simultaneously.
ð
The display shows the current touch sensitivity in ‘Exx’ format.
2. Press the button of the pad whose touch sensitivity you want to change. Alternatively,
you can directly activate the pad by playing it.
Touch sensitivity
Operation
MPS-200
29
Page 30
3. Use the [–]/[+] button to adjust the touch sensitivity in a range of 0 to 15.
4. Repeat steps 2 to 3 to adjust the touch sensitivity of the other pads as desired.
5. Press the [save] button to store the setting.
If you don't press any button on the drum module for 10 seconds, the unit automati‐
cally returns to the previous operating mode.
All unsaved changes are discarded when turning the drum module off.
When several pads are mounted on the same rack, vibrations may be transferred to other pads
and, thus, unwanted sounds are triggered when striking a pad. This crosstalk can be prevented
by the temporary suppression of the trigger signal.
1. Press the [voice/volume] and [song/volume] buttons simultaneously.
ð
The display shows the current signal suppression time in ‘Jxx’ format.
2. Press the button of the pad whose signal suppression time you want to change. Alterna‐
tively, you can directly activate the pad by playing it.
Crosstalk
Operation
e-drum module
30
Page 31
3. Adjust the signal suppression time using the [–]/[+] button in a range of 0 to 15.
4. Repeat steps 2 to 3 to adjust the signal suppression time of the other pads as desired.
5. Press the [save] button to store the setting.
The signal suppression time should be set as short as possible.
If you don't press any button on the drum module for 10 seconds, the unit automati‐
cally returns to the previous operating mode.
All unsaved changes are discarded when turning the drum module off.
You can adjust the pitch of each pad voice via the drum module.
1. Press the [voice/volume] button until the display shows the current pitch in ‘Pxx’ format.
2. Press the button of the pad whose pitch you want to shift. Alternatively, you can directly
activate the pad by playing it.
3. Shift the pitch using the [–]/[+] button in a range of 0 to 15.
4. Repeat steps 2 to 3 to adjust the pitch of the other pads as desired.
Pitch
Operation
MPS-200
31
Page 32
You can turn the reverb effect of the pad voices on or off via the drum module.
1. Press the [kit] button twice until the display shows the current setting in ‘oFF’ or ‘oN’
format.
2. Press the [–]/[+] button to turn the effect on or off.
The settings take effect immediately.
To reset the unit to factory defaults please proceed as follows:
1. Switch the device off.
2. Keep the [tempo/tap –/+] button pressed while switching the unit on.
Reverb effect
Resetting to factory defaults
Operation
e-drum module
32
Page 33
When resetting the unit to factory defaults all user settings and adjustments are irre‐
trievably deleted.
Operation
MPS-200
33
Page 34
7
Technical specifications
Number of voices 215
Drum kits 20 preset kits
10 user kits
Songs 50 preset songs
Technical specifications
e-drum module
34
Page 35
Connections Headphones (1/4" phone socket)
AUX in (1/4" phone socket)
Mono/stereo outlet (1/4" phone socket)
1 × Kick pad
1 × Snare pad
3 × Tom pads
2 × Crash pads
1 × Hi-hat
1 × Hi-hat control
MIDI out
Operating voltage supply
Power adapter (DC 9 V )
Technical specifications
MPS-200
35
Page 36
8
Cleaning
Clean the accessible parts of the device regularly. The frequency of cleaning depends on the
operating environment: moist, smoky or particularly dirty environments may cause a higher
accumulation of dirt on the components of the device.
n Use a dry soft cloth for cleaning.
n Remove stubborn stains with a slightly damp cloth.
n Never use cleaners containing alcohol or thinner.
n Never put any vinyl items on the device, as vinyl can stick to the surface or lead to its disco‐
louration.
Device parts
Cleaning
e-drum module
36
Page 37
9
Protecting the environment
For the transport and protective packaging, environmentally friendly materials have been
chosen that can be supplied to normal recycling.
Ensure that plastic bags, packaging, etc. are properly disposed of.
Do not just dispose of these materials with your normal household waste, but make sure that
they are collected for recycling. Please follow the notes and markings on the packaging.
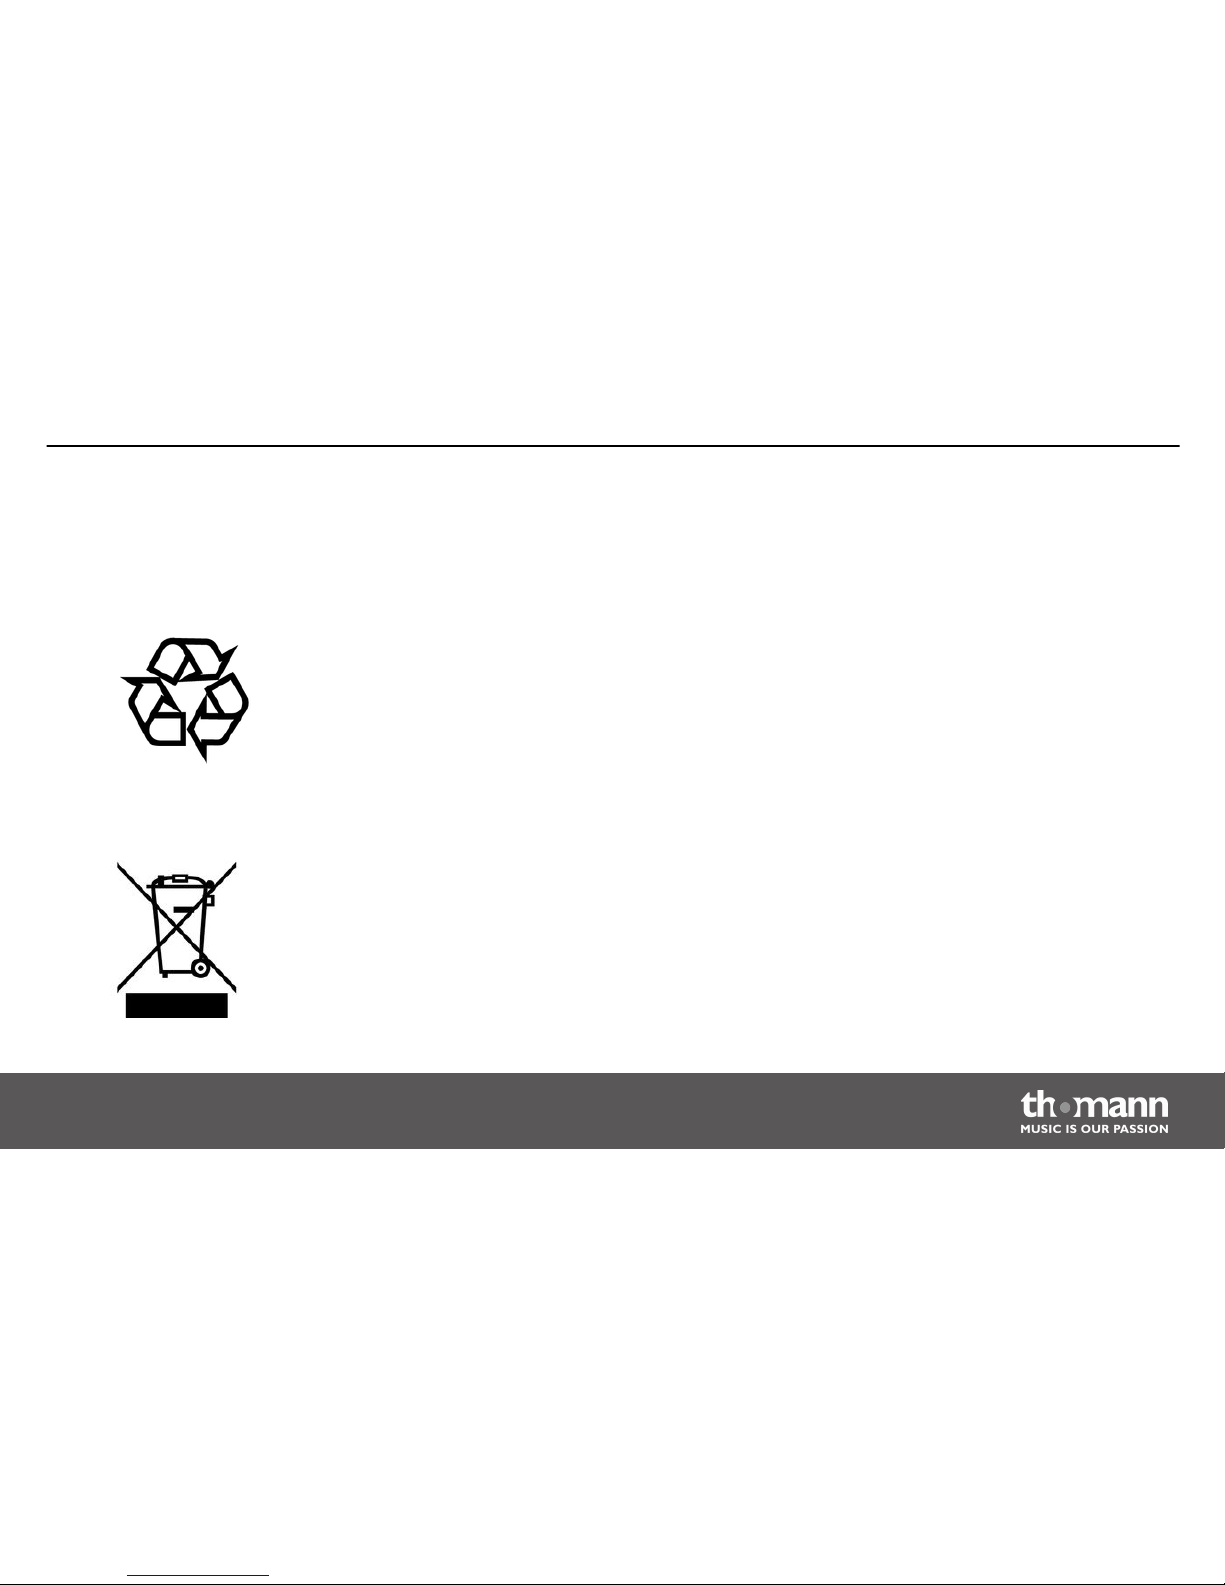
This product is subject to the European Waste Electrical and Electronic Equipment Directive
(WEEE). Do not dispose with your normal household waste.
Dispose of this device through an approved waste disposal firm or through your local waste
facility. When discarding the device, comply with the rules and regulations that apply in your
country. If in doubt, consult your local waste disposal facility.
Disposal of the packaging mate‐
rial
Disposal of your old device
Protecting the environment
MPS-200
37
Page 38
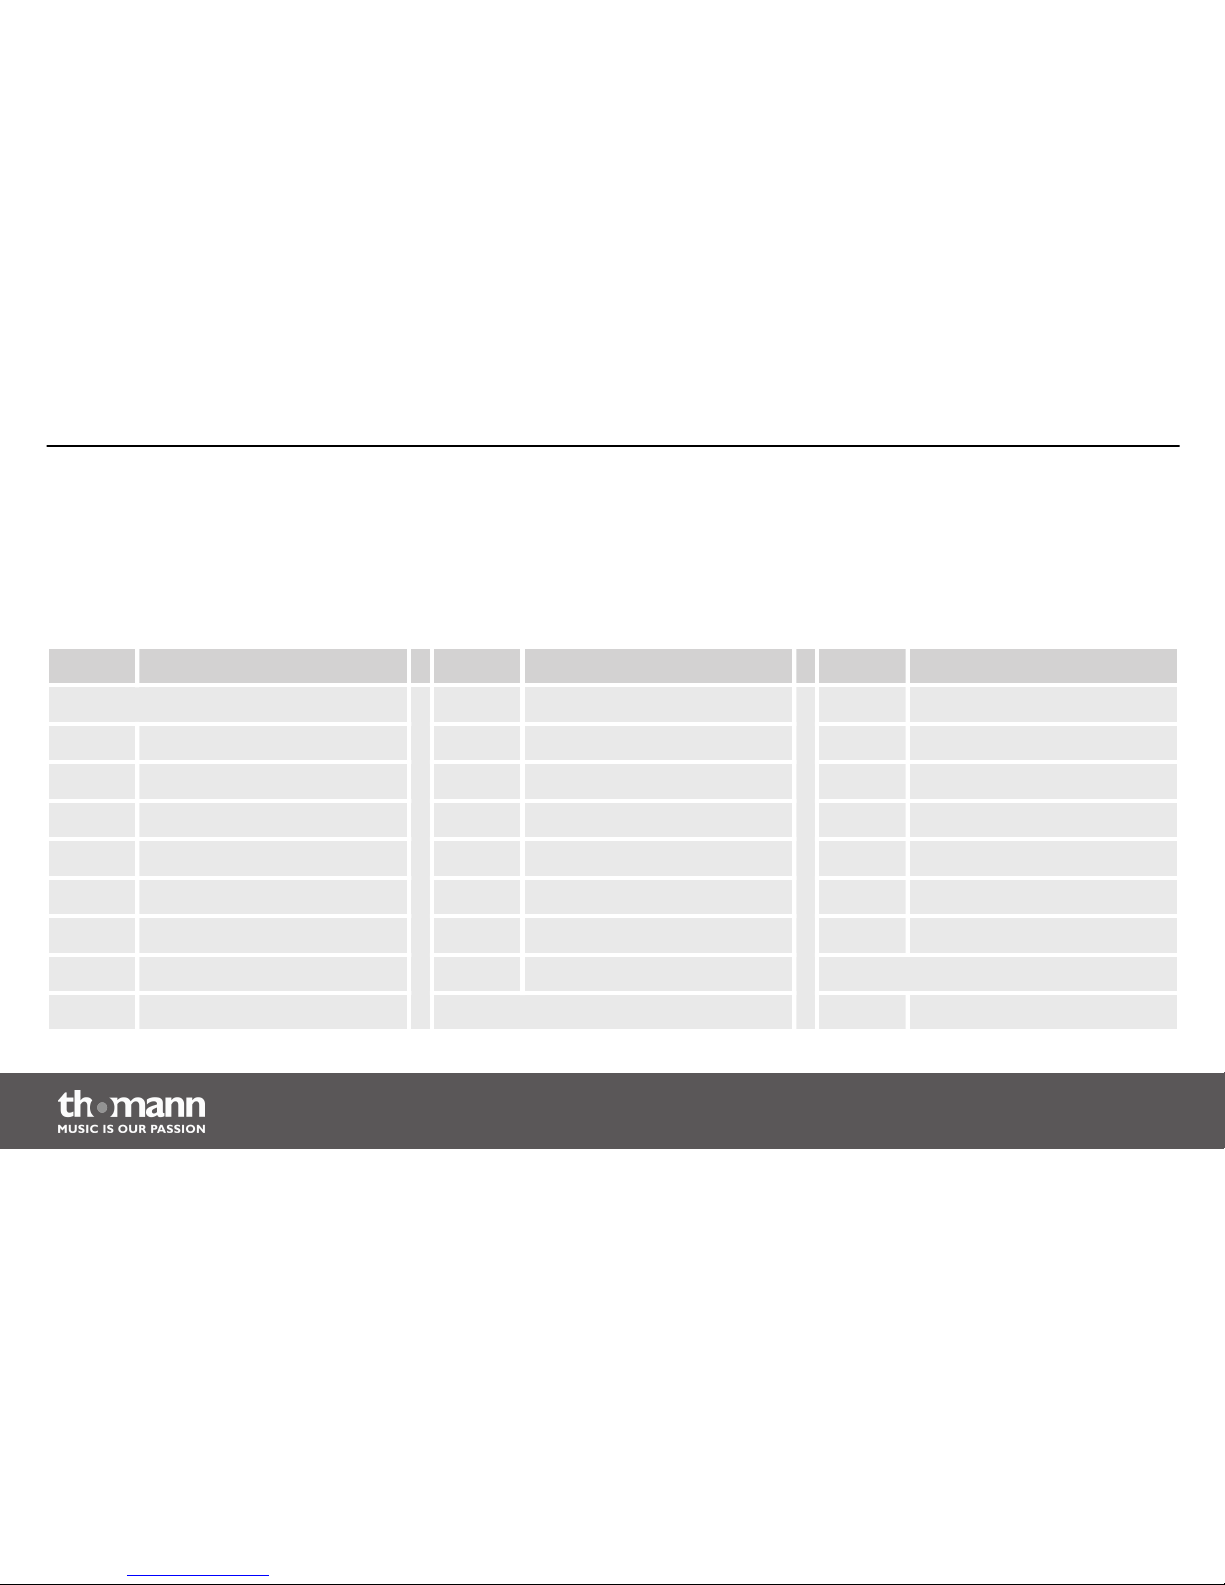
10
Appendix
10.1
Voice list
No. Name No. Name No. Name
Acoustic bass drum 009 Lo BD 017 BD-Analg
001 BD Head 010 Rock BD 1 018 MrDance 1
002 Real BD 1 011 Rock BD 3 019 MrDance 2
003 Real BD 2 012 Rock BD 4 020 MrDance 5
004 Real BD 6 013 BD-Var 3 021 Lo-BD 1
005 BD Std 1 014 BD-Var 5 022 Lo-BD 2
006 BD Std 2 015 Big Drum 1 023 Hard BD 3
007 Room BD 1 016 Big Drum 2 Acoustic snare drum
008 Room BD 2 Electronic bass drum 024 SD-Std 1
Appendix
e-drum module
38
Page 39
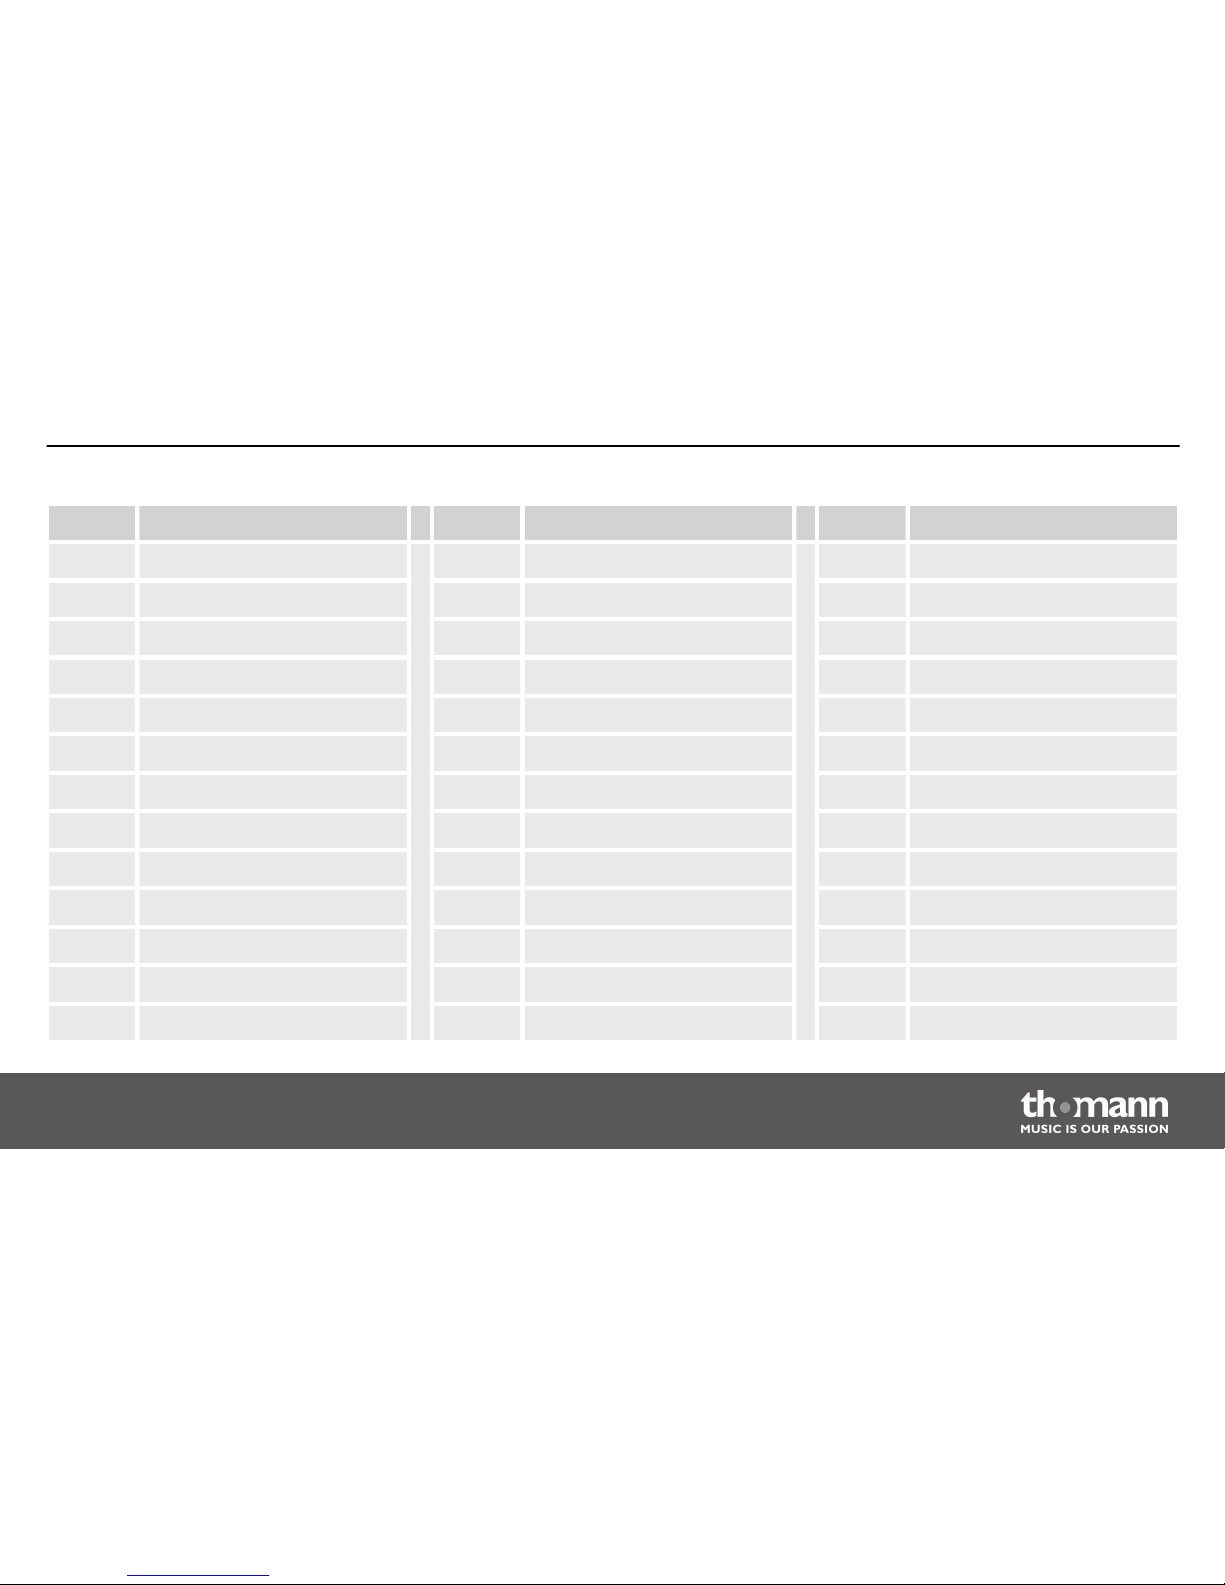
No. Name No. Name No. Name
025 SD-Std 2 038 SD-Std 22 051 SidStik 1
026 SD-Std 3 039 SD-Std 23 052 SidStik 2
027 SD-Std 4 040 SD-Std 24 053 SnarTimb
028 SD-Std 5 041 SD-Std 25 054 Brush 1
029 SD-R 1 042 SD-Std 26 055 Brush 2
030 SD-R 2 043 SD-Std 27 056 Brush 3
031 SD-R 5 044 SD-Std 28 057 Brush 5
032 Snare 1 045 SD-Std 29 058 Brush 7
033 Snare 2 046 SnareDr 1 059 Brush 8
034 Snare 4 047 SnareDr 5 060 Brush 10
035 Snare 5 048 SnareDr 6 061 Brush 13
036 Snare 6 049 SnareDr 7 062 RowDrum 1
037 SD-Std 21 050 SnareDr 8 063 RowDrum 2
Appendix
MPS-200
39
Page 40
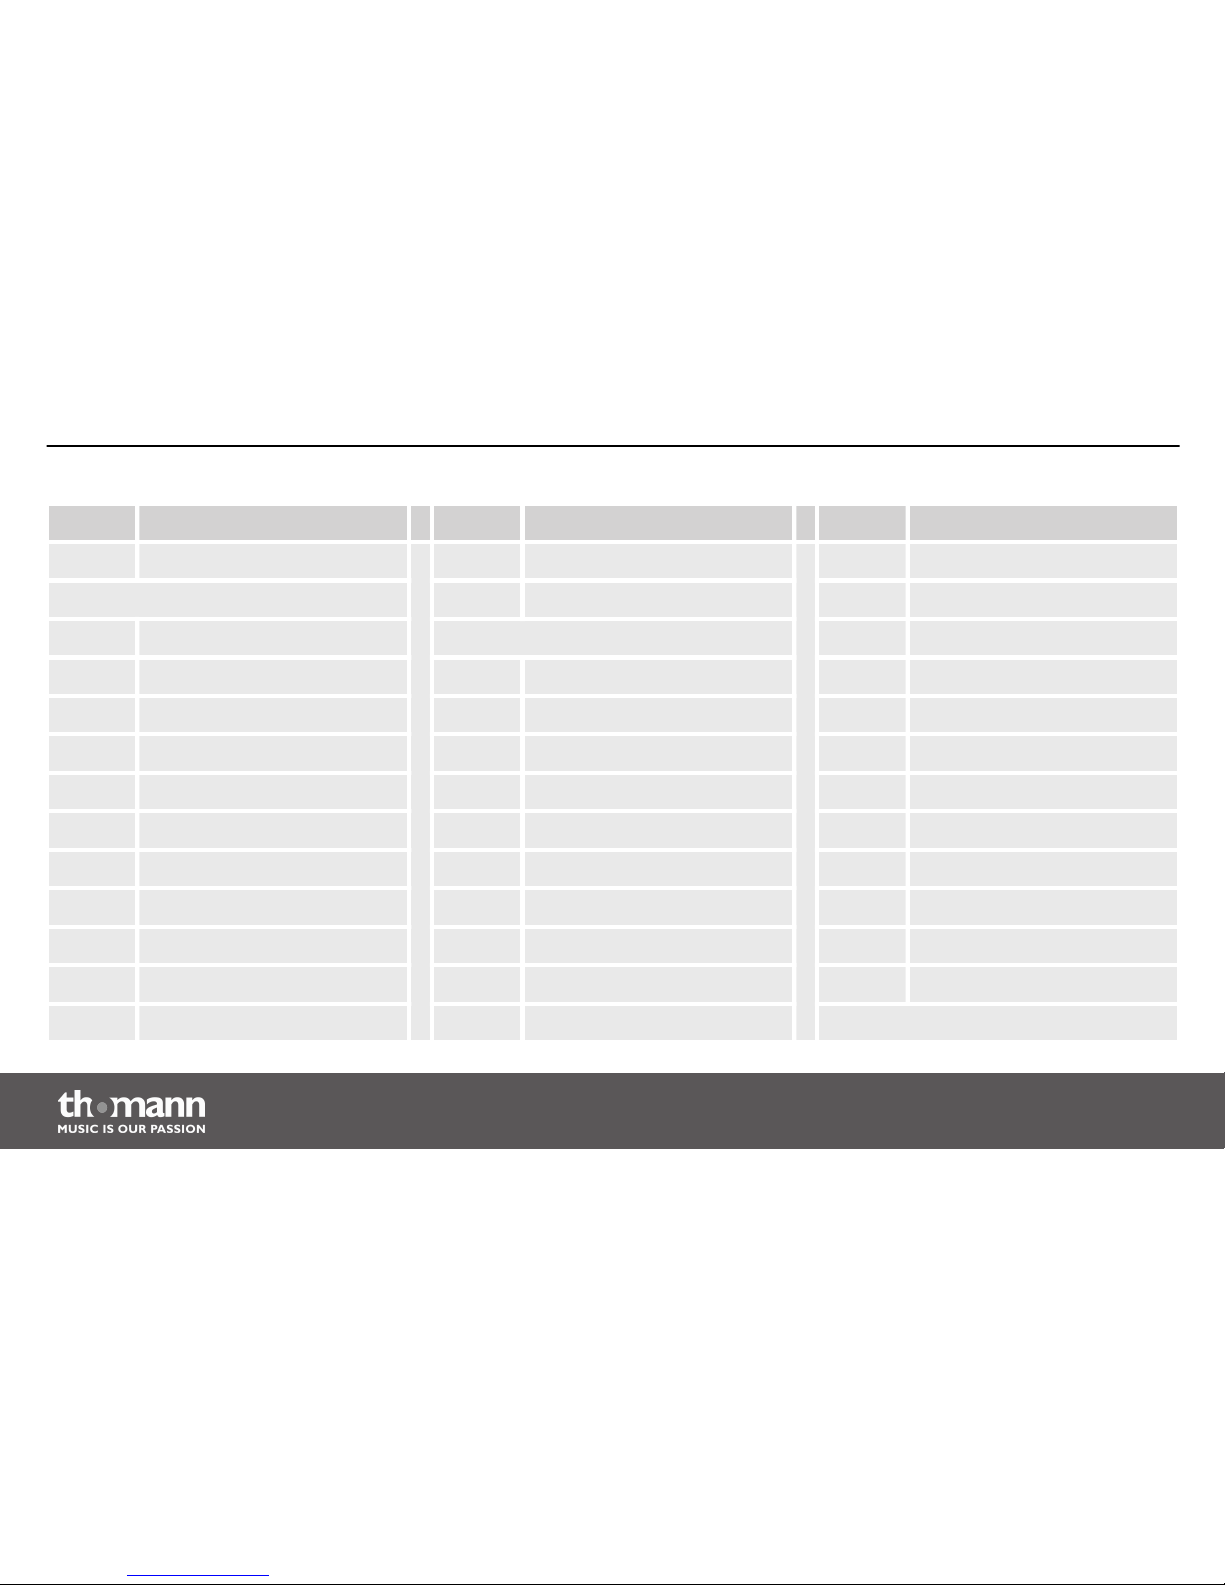
No. Name No. Name No. Name
064 RowDrum 3 076 Cool-SD 1 088 Tom-BRK H
Electronic snare drum 077 HD-SD 1 089 Tom-BRK M
065 SD-Ana 2 Acoustic tom 090 Tom-BRK L
066 SD-Ana 6 078 Tom-Std 5 091 Tom-BRK F
067 SD-Ana 7 079 Tom-Std 3 092 Tom-Rom 6
068 SD-Ana 11 080 Tom-Std 2 093 Tom-Rom 5
069 SD-Danc 5 081 Tom-Std 1 094 Tom-Rom 4
070 SD-Danc 6 082 Tom-Jaz M 095 Tom-Rom 3
071 SD-Elec 083 Tom-Jaz F 096 Tom-Rom 2
072 Syn-SD 1 084 Tom-Brs H 097 Tom-Rom 1
073 Syn-SD 7 085 Tom-Brs M 098 Tom-Rm 2 L
074 Syn-SD 8 086 Tom-Brs L 099 Tom-Rm 2 F
075 Syn-SD 11 087 Tom-Brs F Electronic tom
Appendix
e-drum module
40
Page 41
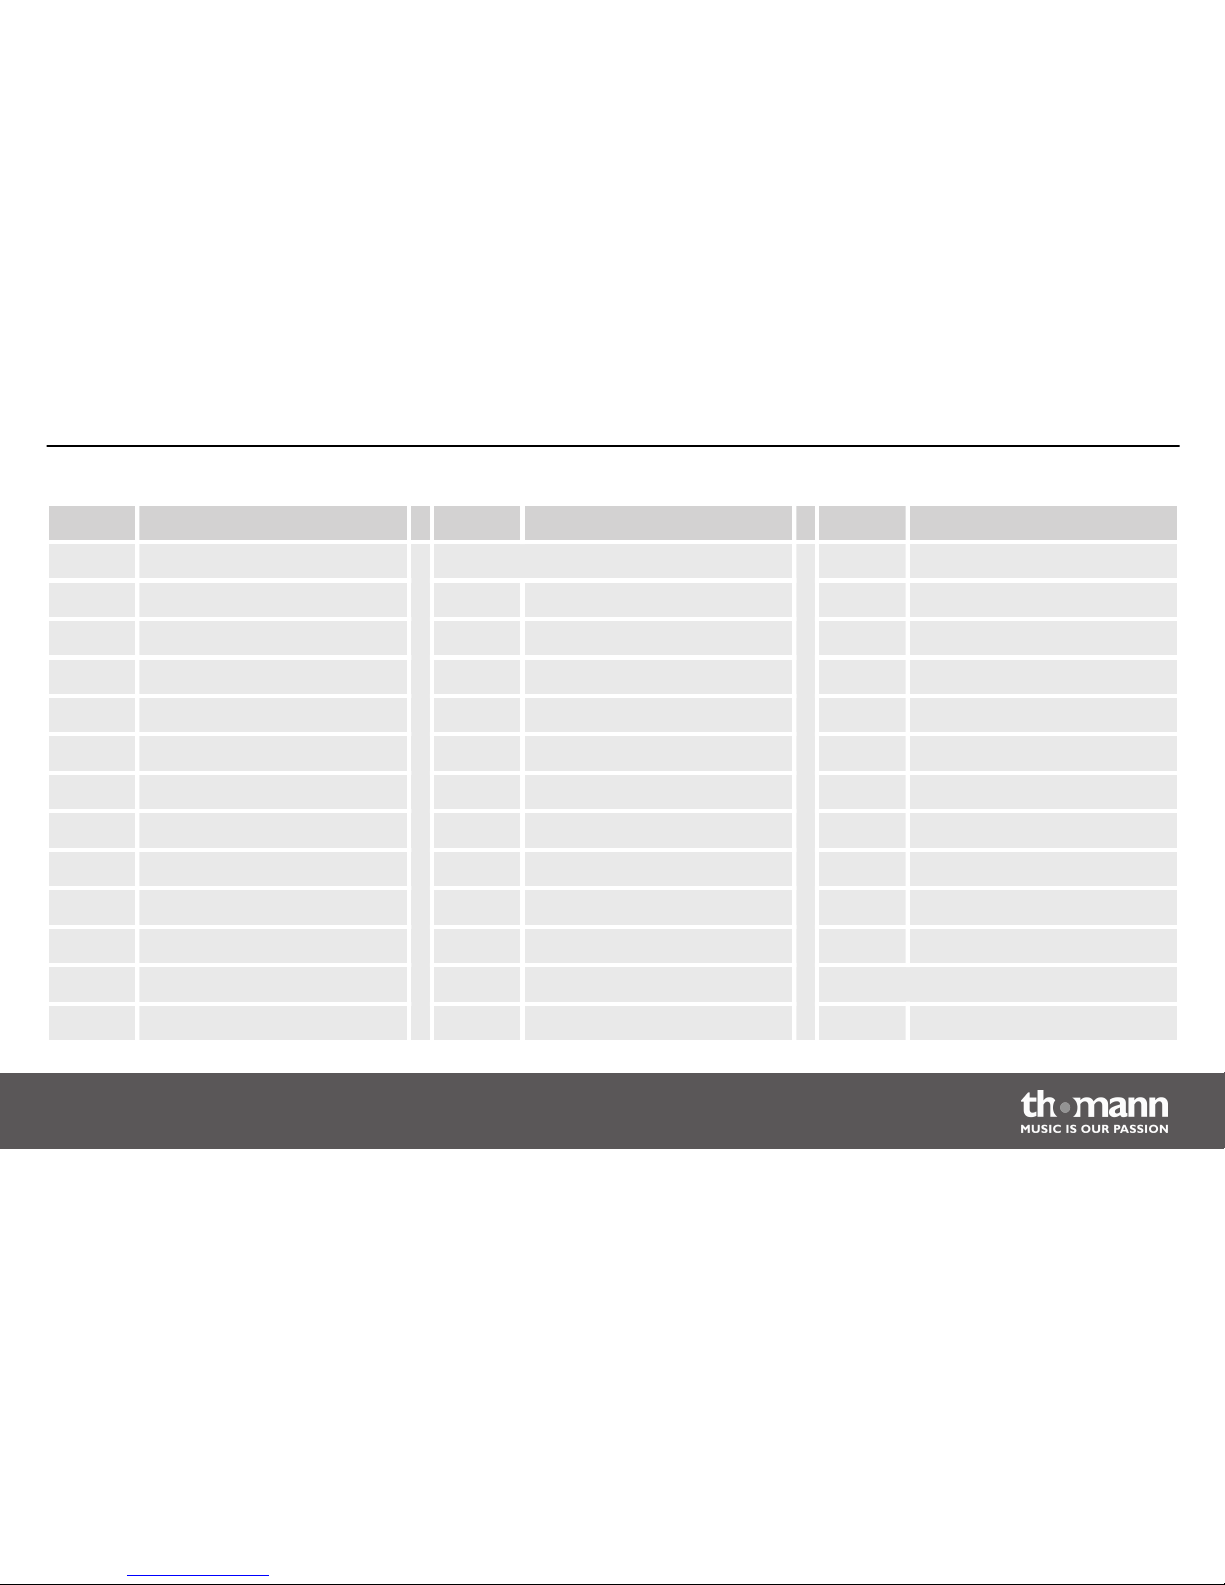
No. Name No. Name No. Name
100 TomH-A Cymbal 125 RideBStd
101 Tom-A 5 113 CrashStd 126 Splash C 1
102 Tom-A 4 114 CrashBrt 127 Cymbel 2
103 Tom-A 3 115 CrashSt 2 128 Cymbel 3
104 Tom-A 2 116 SftCrash 129 BigGong 1
105 Tom-A 1 117 CrashSt 3 130 BigGong 2
106 Tom-T 1 M 118 CrashSht 131 B.Cymbl 1
107 Tom-T 3 L 119 CrshThin 132 B.Cymbl 2
108 Tom-T 3 F 120 CrashRev 133 S.Cymbl 2
109 Tom-El 4 121 CrashRol 134 S.Cymb 2 M
110 Tom-El 3 122 CrashSt 4 135 SmalGong
111 Tom-El 2 123 RideBel 1 Hi-hat
112 Tom-El 1 124 RK Ride 2 136 H.H Cls 1
Appendix
MPS-200
41
Page 42
No. Name No. Name No. Name
137 H.H Cls 3 150 Ana Hh 1 162 Conga-Hi
138 H.H Cls 4 Percussion 163 Conga-M 1
139 H.H Opn 1 151 Agogo-1 164 Conga-M 2
140 H.HCNor 1 152 Agogo-2 165 Conga-3
141 RK HHcls 153 Bell Tre 166 Conga-4
142 H.H Opn 3 154 Bongo Hi 167 Conga-5
143 Open HH 2 155 Bongo Lo 168 CowBell 1
144 Open HH 3 156 Cabasa 1 169 CowBell 2
145 Open HH 4 157 Cabasa 2 170 Cuica H
146 RK HHOpn 158 Castanet 171 Cuica L
147 Open HH 7 159 ClapA 172 Fsnap
148 HH pedl 1 160 Clavis 1 173 Guiro 1
149 HH pedl 2 161 Clavis 2 174 Guiro 2
Appendix
e-drum module
42
Page 43
No. Name No. Name No. Name
175 HiQ 188 Tabla 4 201 Whistal
176 JingBell 189 TalkD 202 XfadeTri
177 Maracas 1 190 TalknDrD 203 Smallwod
178 Maracas 2 191 TalknDrU 204 BoardDr 1
179 MetroBel 192 TalknDrV 205 BoardDr 2
180 MetroClk 193 Tambouri 206 LotusBrd
181 Scrach 194 TimbleH 207 BanbuBrd
182 Shake 195 TimbleL 208 SouthBan
183 Surdo 1 196 TimblePH 209 B.WdFish
184 Surdo 2 197 TimblePL 210 S.WdFis 1
185 Tabla 1 198 Triangle 211 S.WdFis 2
186 Tabla 2 199 TriagMut 212 S.WdFis 3
187 Tabla 3 200 VibrSlap 213 S.WdFis 4
Appendix
MPS-200
43
Page 44
No. Name No. Name No. Name
214 ImpacBel 215 ImpaBel M
10.2
Kit list
No. Name No. Name
001 Standard 1 008 Room Stick
002 Standard 2 009 Latin 1
003 Dance 1 010 Latin 2
004 Jazz Latin 011 Jazz
005 Room 1 012 Brush 2
006 Electric 013 Dance Stick
007 Brush 014 Orchestra
Appendix
e-drum module
44
Page 45
No. Name No. Name
015 Drum & Bass 018 Ungle
016 House 019 China LuoGu
017 Rhythm & Blues 020 Oriental 1
10.3
Song list
No. Name Beat No. Name Beat
001 Guitar 4/4 006 Newage 4/4
002 Accordion Fusion 4/4 007 Reggae Funk 4/4
003 Folk Pop 4/4 008 Drum & Bass 4/4
004 Rock 4/4 009 Pop 8 Beat 4/4
005 Blues 4/4 010 Dance 4/4
Appendix
MPS-200
45
Page 46
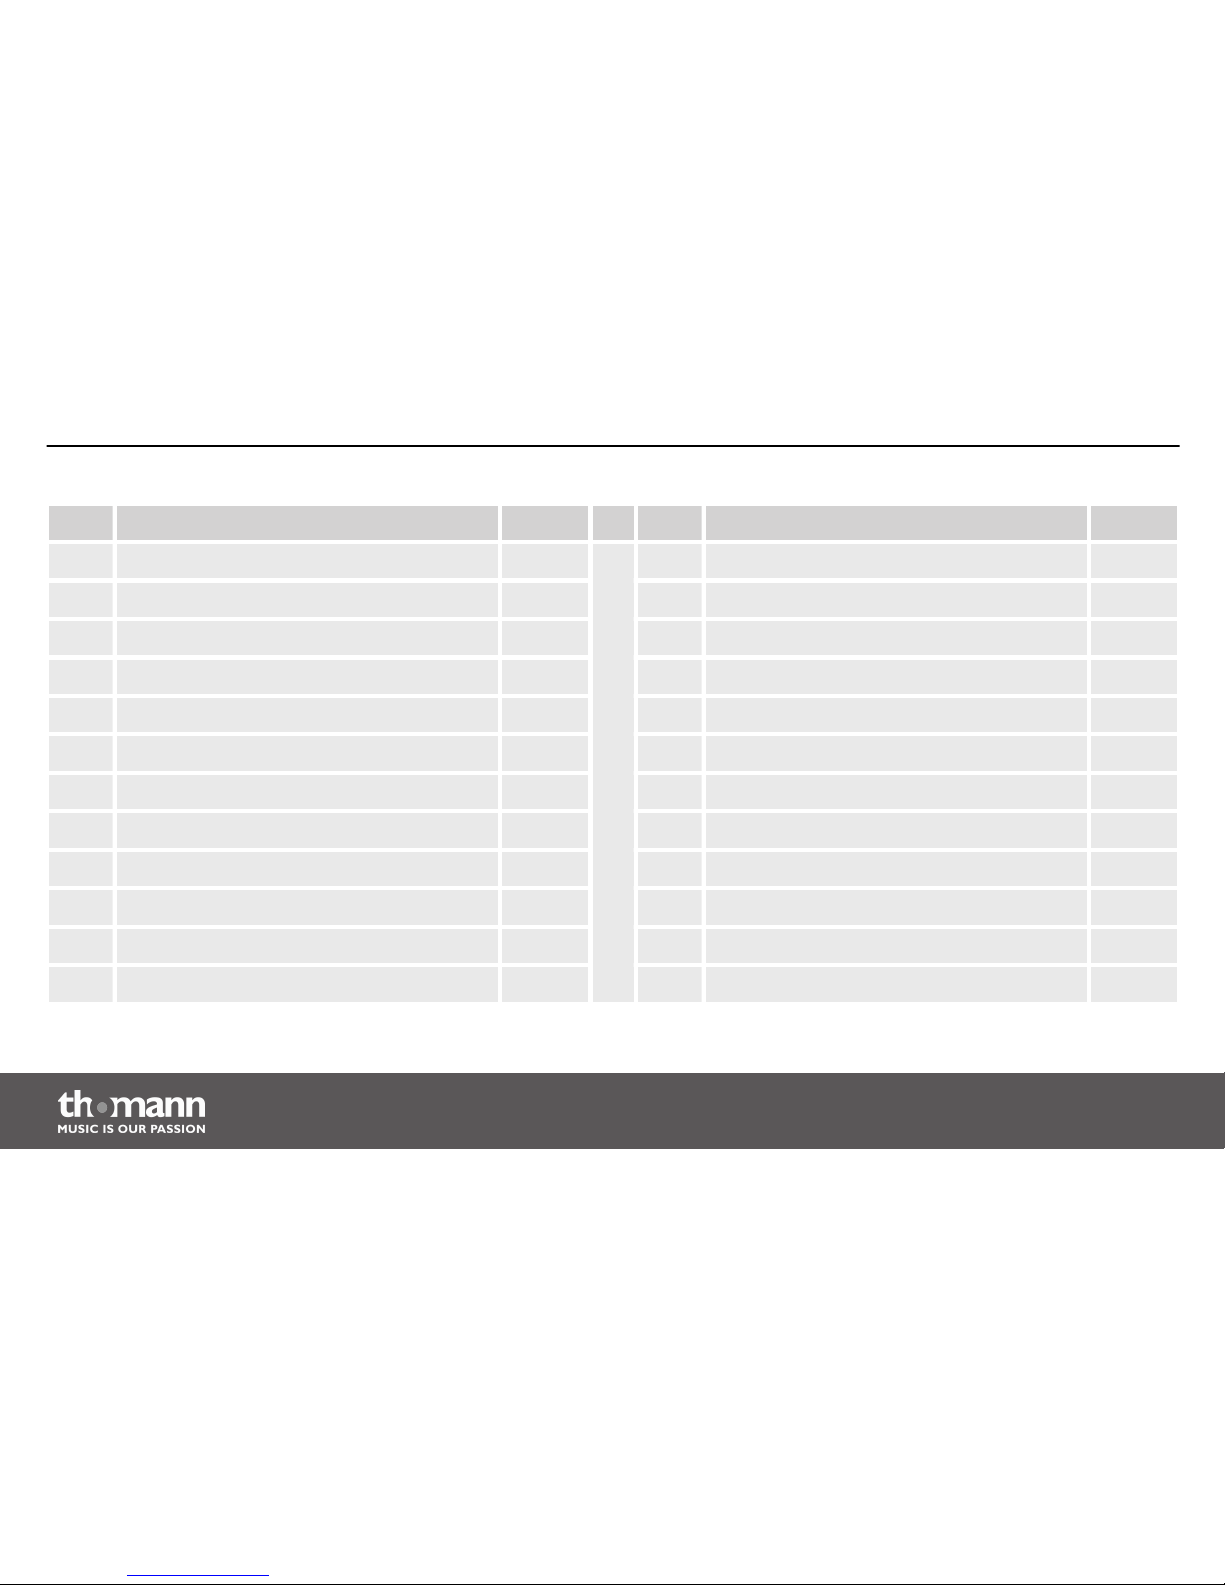
No. Name Beat No. Name Beat
011 Drk -2 4/4 023 Rock Pop 4 4/4
012 Pop 3 4/4 024 Latin 4 4/4
013 Pop 5 4/4 025 Latin 5 4/4
014 Jazz 1 4/4 026 Reggae 4/4
015 Rhythm & Blues 4 6/8 027 Shuffle 1 4/4
016 Ballad 1 4/4 028 Rhythm & Blues 3 4/4
017 Ballad 2 4/4 029 Rock 'N' Roll 1 4/4
018 Ballad 4 4/4 030 8 Beat 4 4/4
019 Ballad 5 4/4 031 8 Beat 2 4/4
020 Ballad 6 4/4 032 16 Beat 4/4
021 Waltz 3/4 033 March 4/4
022 Slow Rock 6/8, 9/8 034 Latin 6 4/4
Appendix
e-drum module
46
Page 47
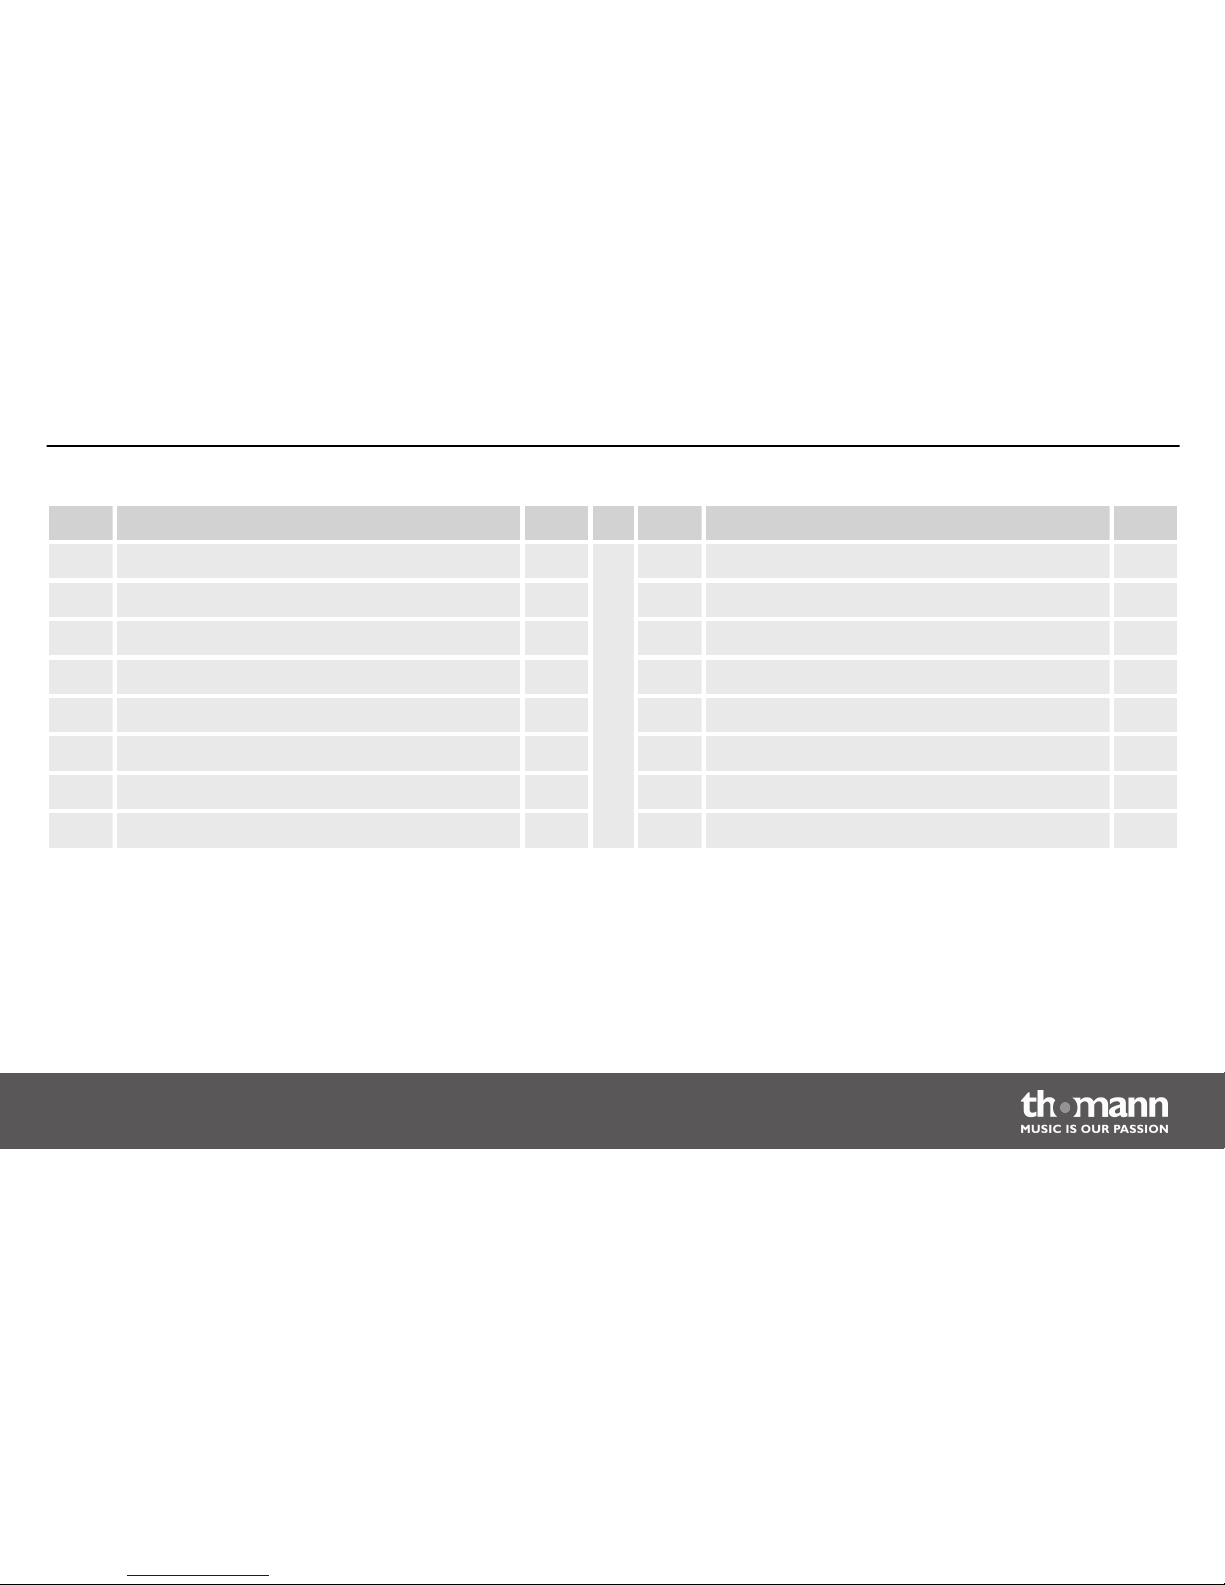
No. Name Beat No. Name Beat
035 Funk 3 4/4 043 Dance 1 4/4
036 Fusion 2 4/4 044 Dance 2 4/4
037 Rock 'N' Roll 2 4/4 045 Mambo 4/4
038 Hard Rock 3 4/4 046 Rhythm & Blues 1 4/4
039 Rock Pop 2 4/4 047 Rhythm & Blues 2 4/4
040 Funk 1 4/4 048 Ballad 3 4/4
041 Funk 4 4/4 049 Jing Opera 4/4
042 Jazz 3 6/8 050 Chinese Rhythm 2/4
Appendix
MPS-200
47
Page 48
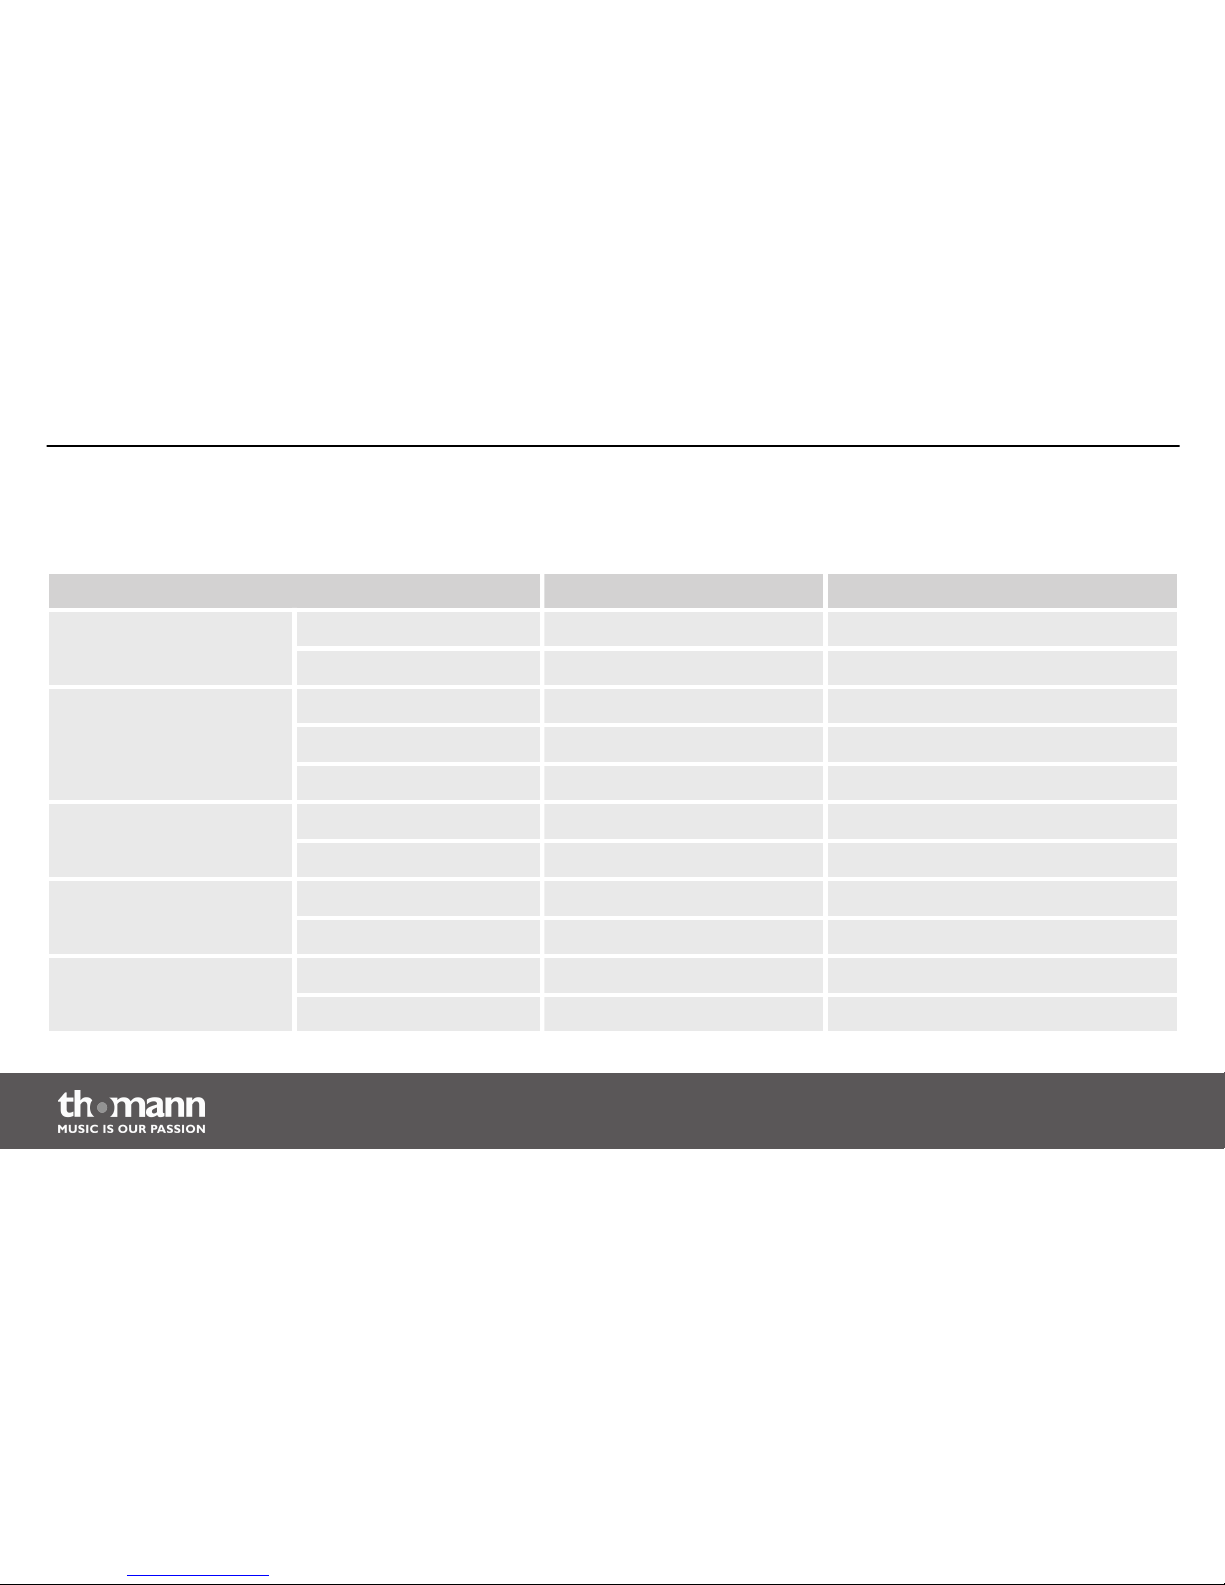
10.4
MIDI implementation
Function Transmitted Remarks
Basic channel Default Ch 10
Changed No
Mode Default No
Messages No
Altered ********
Note number True voice 0…127
********
Velocity Note ON Yes (9nH, V=1…127)
Note OFF No (9nH. V=0)
Aftertouch Keys No
Channels No
Appendix
e-drum module
48
Page 49
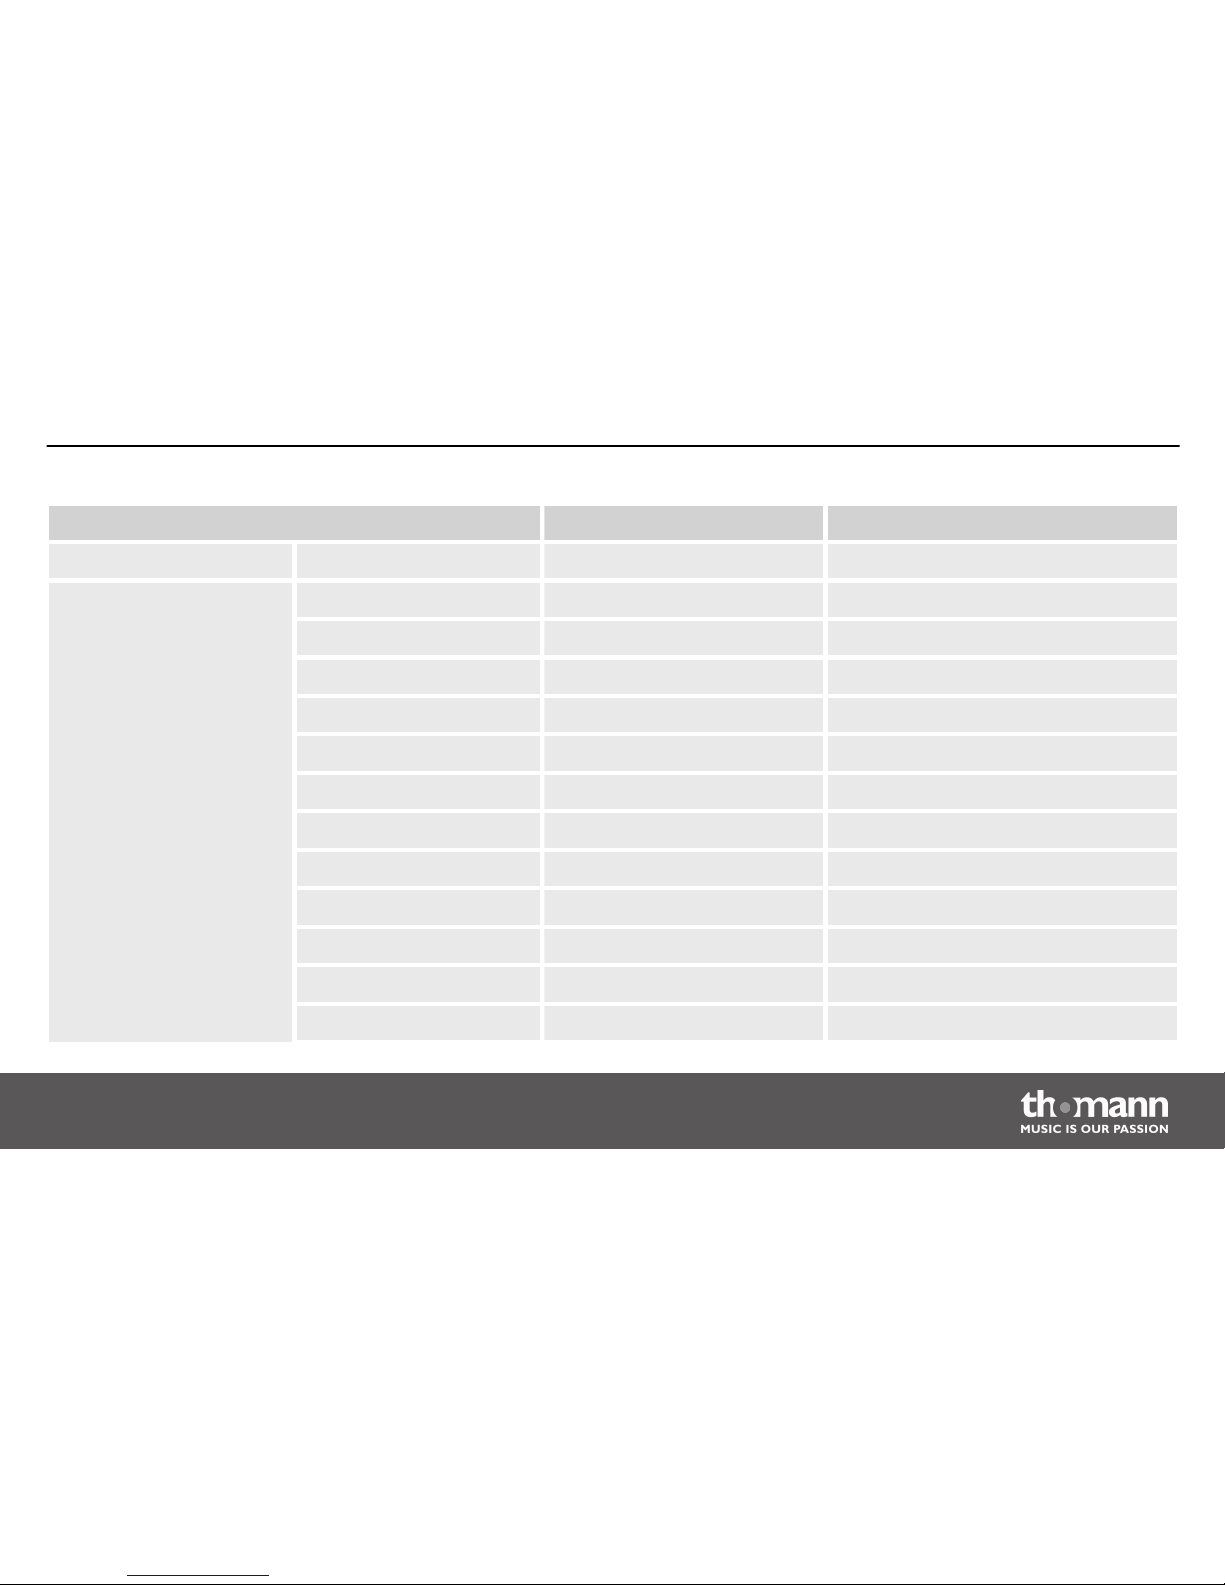
Function Transmitted Remarks
Pitch bender No
Control change 0 No Bank select
1 No Modulation
5 No Portamento time
6 No Data entry
7 No Volume
10 No Pan
11 No Expression
64 No Sustain pedal
65 No Portamento ON/OFF
66 No Sostenuto pedal
67 No Soft pedal
80 No Reverb program
Appendix
MPS-200
49
Page 50
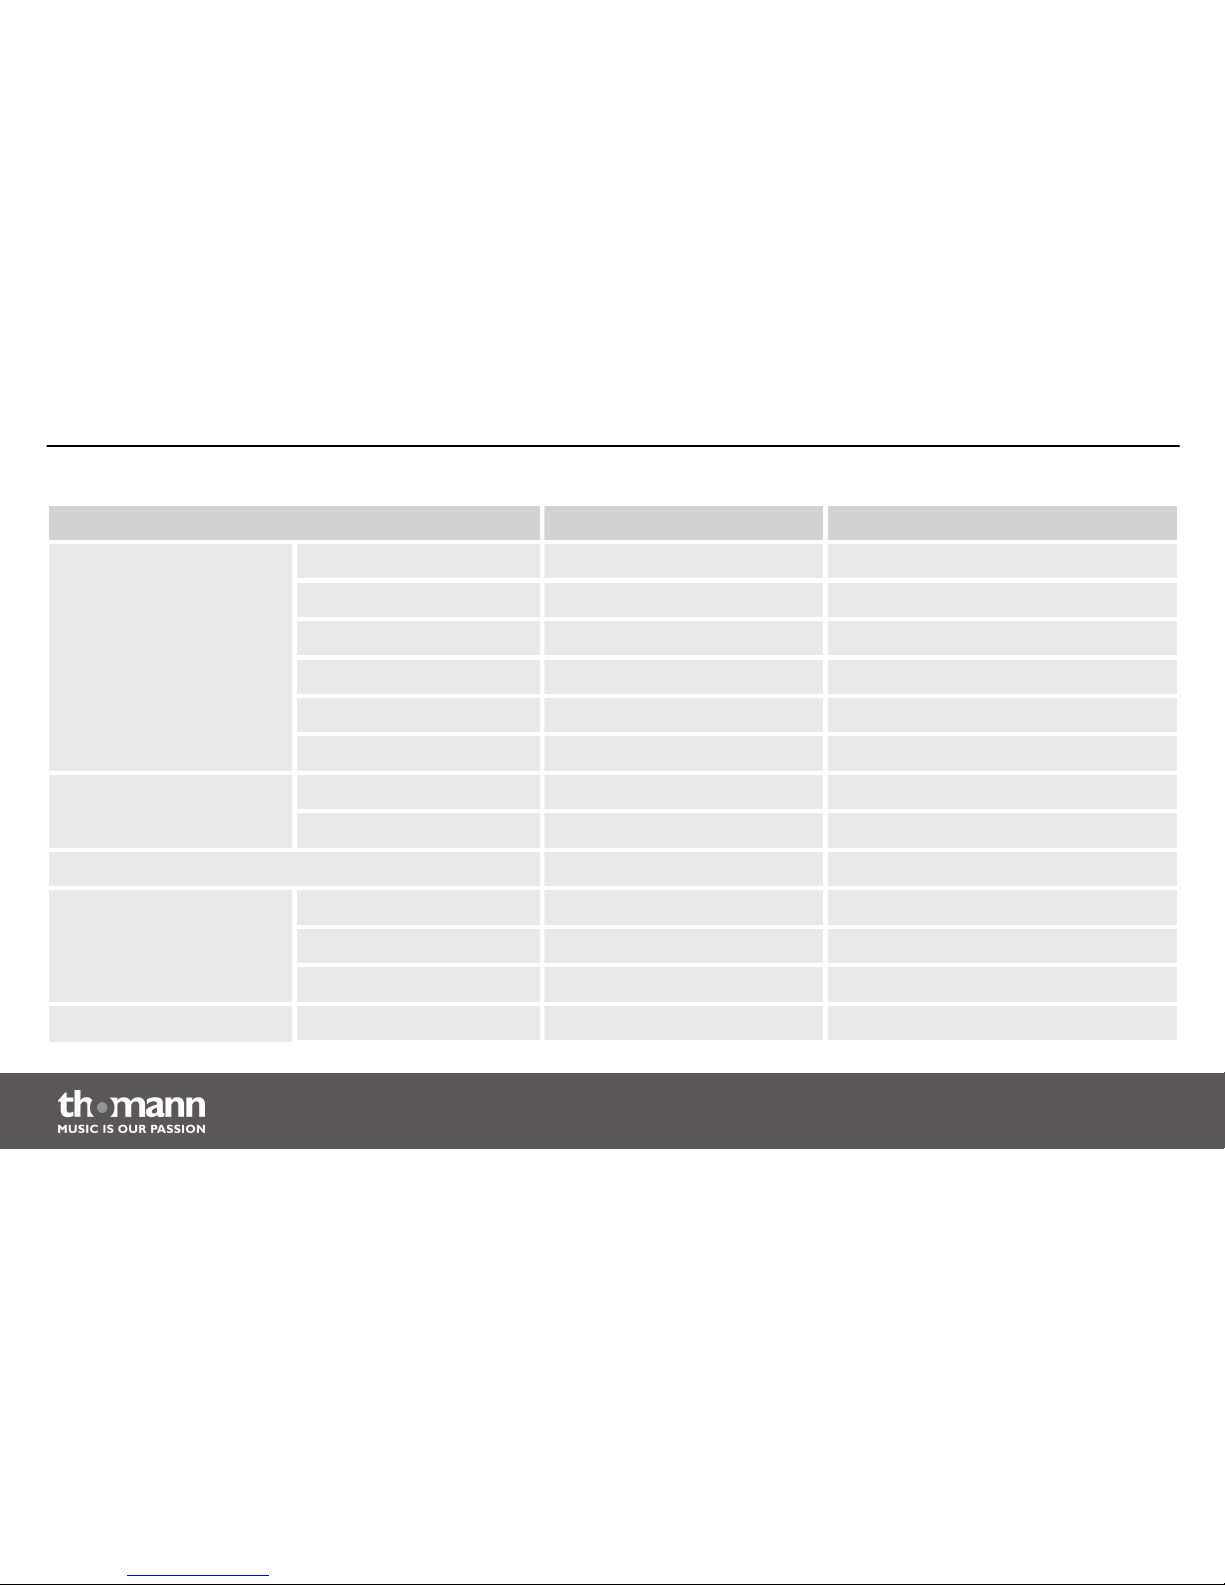
Function Transmitted Remarks
81 No Chorus program
91 No Reverb level
93 No Chorus level
120 No All Sound Off
121 No Reset All Controllers
123 No All Notes Off
Program change No
True # No
System exclusive No
System common Song Position No
Song Select No
Tune No
System real time Clock No
Appendix
e-drum module
50
Page 51
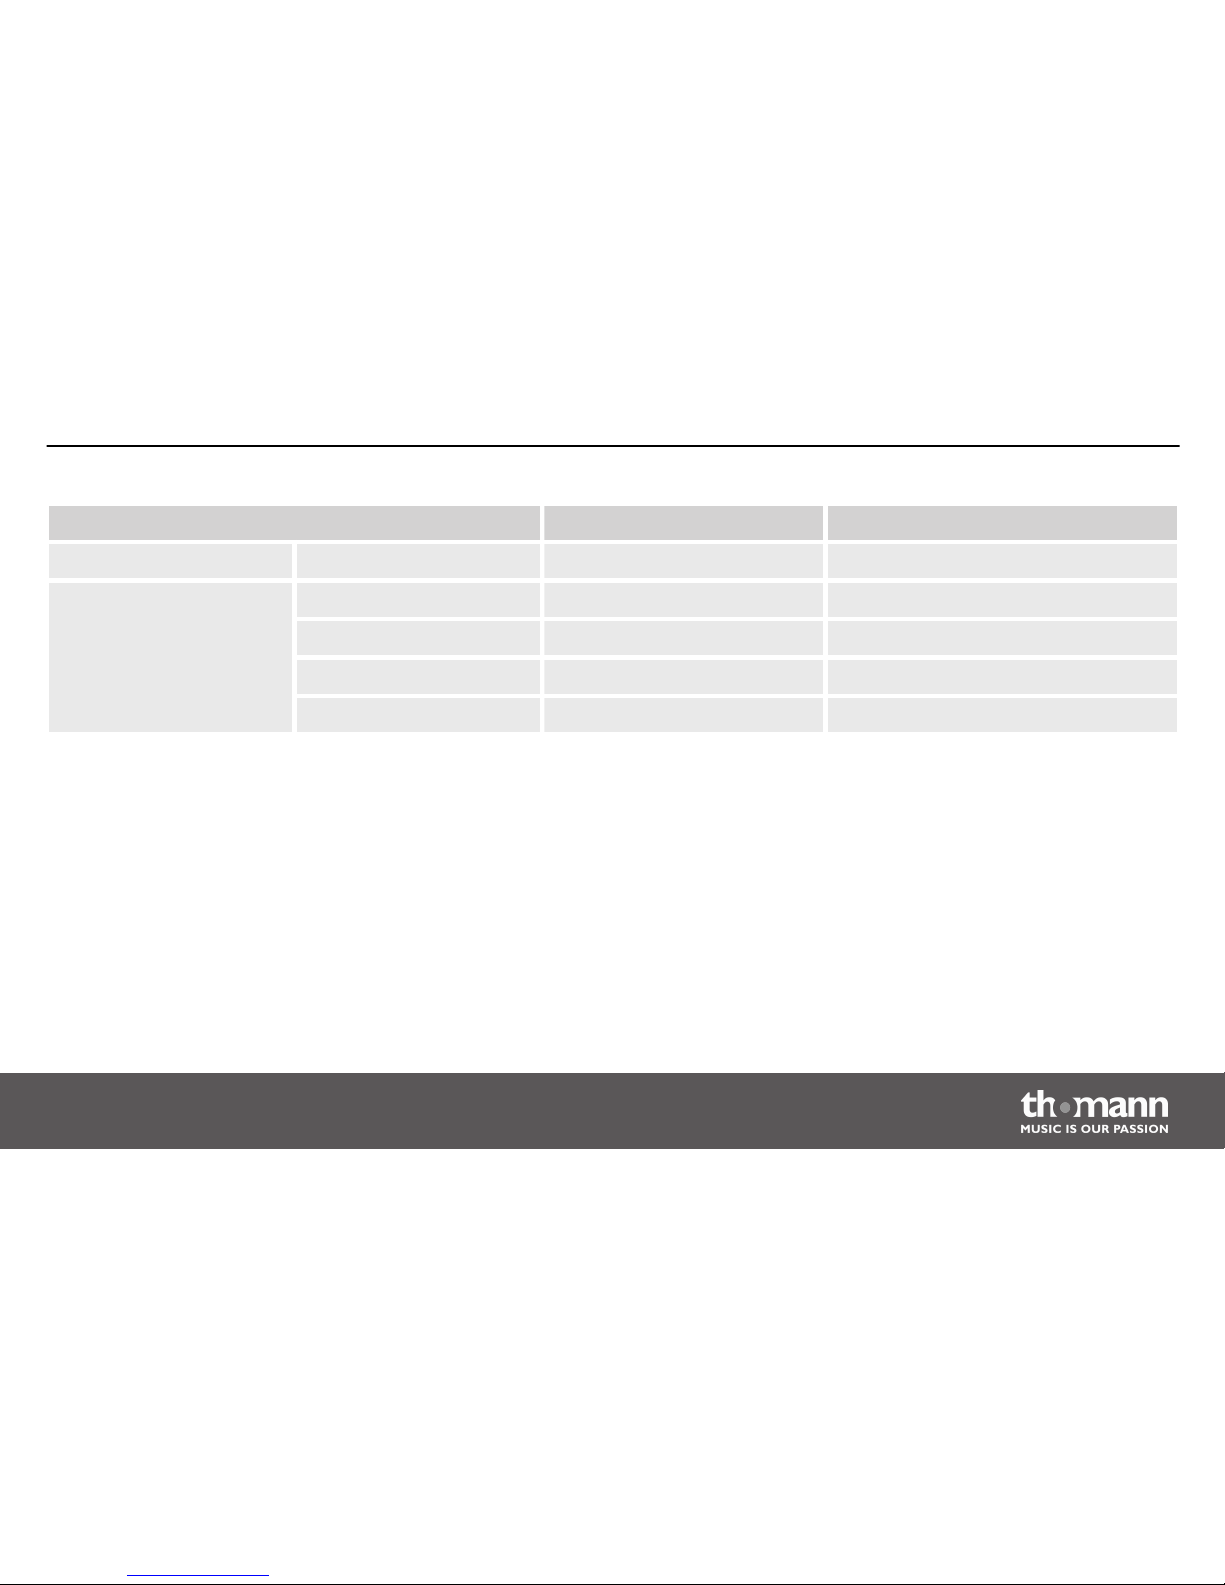
Function Transmitted Remarks
Command No
Aux messages Local ON/OFF No
All Notes OFF No
Active Sense No
System reset No
Appendix
MPS-200
51
Page 52
Notes
e-drum module
52
Page 53
Notes
MPS-200
53
Page 54
Notes
e-drum module
54
Page 55

Page 56

Musikhaus Thomann e.K. · Treppendorf 30 · 96138 Burgebrach · Germany · www.thomann.de
 Loading...