

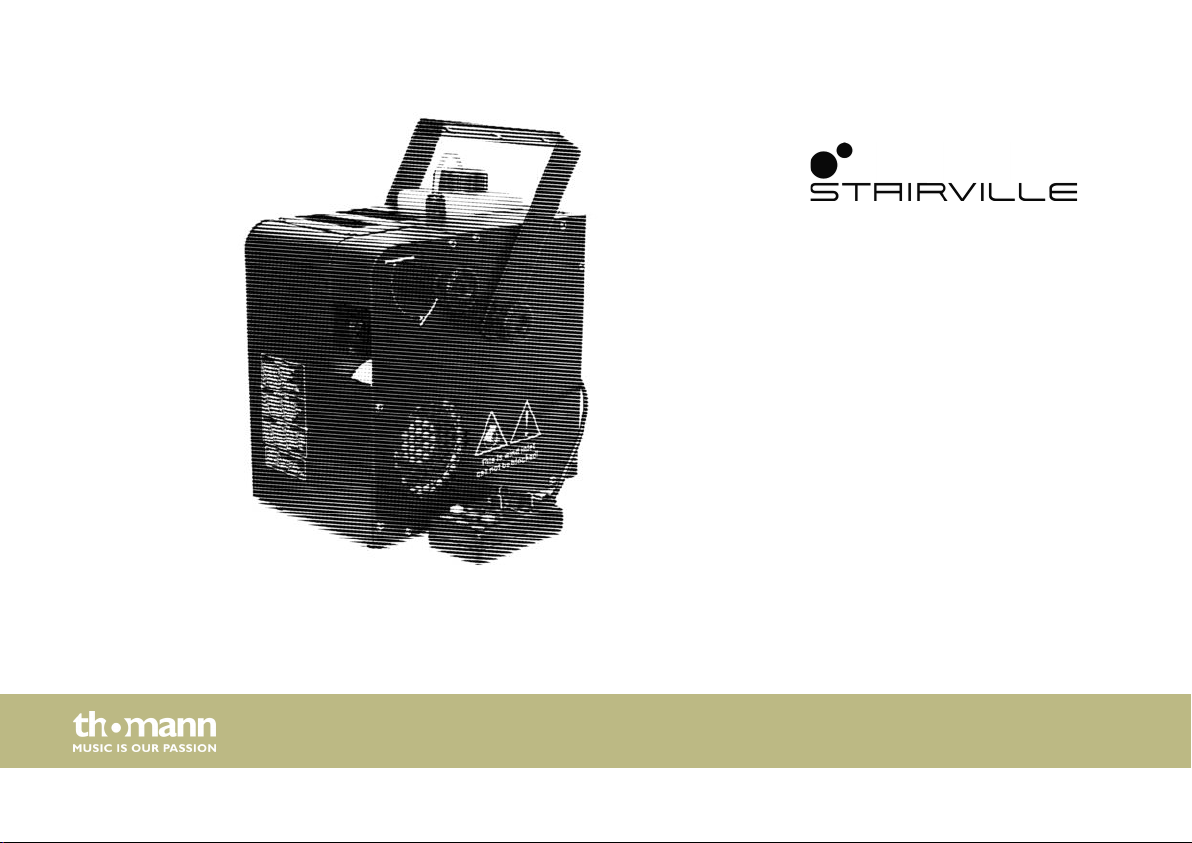
Hz-200 DMX
hazer
user manual

Musikhaus Thomann
Thomann GmbH
Hans-Thomann-Straße 1
96138 Burgebrach
Germany
Telephone: +49 (0) 9546 9223-0
E-mail: info@thomann.de
Internet: www.thomann.de
22.01.2021, ID: 326263 (V6)

Table of contents
Table of contents
1 General information................................................................................................................................. 5
1.1 Further information........................................................................................................................... 6
1.2 Notational conventions.................................................................................................................... 7
1.3 Symbols and signal words............................................................................................................... 7
2 Safety instructions.................................................................................................................................. 10
3 Features....................................................................................................................................................... 19
4 Installation.................................................................................................................................................. 20
5 Starting up.................................................................................................................................................. 21
6 Connections and operating elements........................................................................................... 23
7 Operating.................................................................................................................................................... 28
7.1 DIP switch operation....................................................................................................................... 30
7.2 Remote control operation............................................................................................................ 31
7.3 Operating mode ‘DMX’.................................................................................................................. 32
8 Technical specications....................................................................................................................... 34
Hz-200 DMX
3

Table of contents
9 Plug and connection assignments.................................................................................................. 36
10 Troubleshooting...................................................................................................................................... 37
11 Cleaning....................................................................................................................................................... 39
12 Protecting the environment.............................................................................................................. 41
hazer
4

1 General information
This user manual contains important information on the safe operation of the device. Read and
follow all safety notes and all instructions. Save this manual for future reference. Make sure
that it is available to all persons using this device. If you sell the device to another user, be sure
that they also receive this manual.
Our products and user manuals are subject to a process of continuous development. We there‐
fore reserve the right to make changes without notice. Please refer to the latest version of the
user manual which is ready for download under www.thomann.de.
General information
Hz-200 DMX
5
General information
1.1 Further information
On our website (www.thomann.de) you will nd lots of further information and details on the
following points:
Download This manual is also available as PDF le for you to download.
Keyword search
Online guides
Personal consultation For personal consultation please contact our technical hotline.
Service
Use the search function in the electronic version to nd the topics of
interest for you quickly.
Our online guides provide detailed information on technical basics
and terms.
If you have any problems with the device the customer service will
gladly assist you.
hazer
6

1.2 Notational conventions
This manual uses the following notational conventions:
General information
Letterings
Cross-references
The letterings for connectors and controls are marked by square brackets and italics.
Examples: [VOLUME] control, [Mono] button.
References to other locations in this manual are identied by an arrow and the specied page
number. In the electronic version of the manual, you can click the cross-reference to jump to
the specied location.
Example: See Ä ‘Cross-references’ on page 7.
1.3 Symbols and signal words
In this section you will nd an overview of the meaning of symbols and signal words that are
used in this manual.
Hz-200 DMX
7
General information
Signal word Meaning
DANGER! This combination of symbol and signal word indicates an
immediate dangerous situation that will result in death or
serious injury if it is not avoided.
WARNING! This combination of symbol and signal word indicates a pos‐
sible dangerous situation that can result in death or serious
injury if it is not avoided.
CAUTION! This combination of symbol and signal word indicates a pos‐
sible dangerous situation that can result in minor injury if it
is not avoided.
NOTICE! This combination of symbol and signal word indicates a pos‐
sible dangerous situation that can result in material and
environmental damage if it is not avoided.
Warning signs Type of danger
Warning – high-voltage.
hazer
8
Warning signs Type of danger
Warning – ammable substances.
Warning - slip hazard.
Warning – harmful or irritating substances.
Warning – danger zone.
General information
Hz-200 DMX
9
Safety instructions
2 Safety instructions
Intended use
Safety
10
This device is intended to be used to produce ne haze by vaporising hazer uid. Use the
device only as described in this user manual. Any other use or use under other operating con‐
ditions is considered to be improper and may result in personal injury or property damage. No
liability will be assumed for damages resulting from improper use.
This device may be used only by persons with sucient physical, sensorial, and intellectual
abilities and having corresponding knowledge and experience. Other persons may use this
device only if they are supervised or instructed by a person who is responsible for their safety.
DANGER!
Danger for children
Ensure that plastic bags, packaging, etc. are disposed of properly and are not
within reach of babies and young children. Choking hazard!
Ensure that children do not detach any small parts (e.g. knobs or the like) from
the unit. They could swallow the pieces and choke!
Never let children unattended use electrical devices.
hazer
Safety instructions
DANGER!
Electric shock caused by high voltages inside
Within the device there are areas where high voltages may be present. Never
remove any covers.
There are no user-serviceable parts inside.
Do not use the device if covers, protectors or optical components are missing or
damaged.
DANGER!
Electric shock caused by short-circuit
Always use proper ready-made insulated mains cabling (power cord) with a pro‐
tective contact plug. Do not modify the mains cable or the plug. Failure to do so
could result in electric shock/death or re. If in doubt, seek advice from a regis‐
tered electrician.
Hz-200 DMX
11
Safety instructions
WARNING!
Risk of burns from ammable liquids
The use of ammable liquids in this appliance can cause serious burns and prop‐
erty damages.
Use only approved hazer uids. Never ll ammable liquids into the container of
the device.
WARNING!
Risk of slipping caused by condensate
Hazer can produce condensate. Do not point the haze on oors. Floors and sur‐
faces can become slippery by condensed haze.
Check regularly that all oors can be accessed without slipping hazard and
remove any condensate, if necessary.
12
hazer
Safety instructions
WARNING!
Health hazard when handling hazer uid
Hazer uid contains glycols, which meet the requirements for food products. Nev‐
ertheless, uid is harmful if swallowed.
Do not induce vomiting. Get immediate medical attention. Keep hazer uid in a
safe place. Rinse the eyes upon contact with hazer uid thoroughly with water.
CAUTION!
Possible respiratory problems
The device can only be operated safely when using approved hazer uids. Using
other uids can generate toxic gases. Any claims for compensation for damages
caused by using non-approved uids are excluded.
Do not let the device produce haze in poorly ventilated areas.
Do not expose people with health problems (such as allergy-related respiratory
symptoms, asthma) to articial haze.
Hz-200 DMX
13

Safety instructions
NOTICE!
Risk of re
Do not block areas of ventilation. Do not install the device near any direct heat
source. Keep the device away from naked ames.
14
hazer

Safety instructions
NOTICE!
Operating conditions
This device has been designed for indoor use only. To prevent damage, never
expose the device to any liquid or moisture. Avoid direct sunlight, heavy dirt, and
strong vibrations.
Only operate the device within the ambient conditions specied in the chapter
‘Technical specications’ of this user manual. Avoid heavy temperature uctua‐
tions and do not switch the device on immediately after it was exposed to tem‐
perature uctuations (for example after transport at low outside temperatures).
Dust and dirt inside can damage the unit. When operated in harmful ambient
conditions (dust, smoke, nicotine, fog, etc.), the unit should be maintained by
qualied service personnel at regular intervals to prevent overheating and other
malfunction.
Hz-200 DMX
15

Safety instructions
NOTICE!
Power supply
Before connecting the device, ensure that the input voltage (AC outlet) matches
the voltage rating of the device and that the AC outlet is protected by a residual
current circuit breaker. Failure to do so could result in damage to the device and
possibly injure the user.
Unplug the device before electrical storms occur and when it is unused for long
periods of time to reduce the risk of electric shock or re.
NOTICE!
Possible damage due to installation of a wrong fuse
The use of dierent types of fuses can cause serious damage to the unit. Fire
hazard!
Only fuses of the same type may be used.
16
hazer

Safety instructions
NOTICE!
Possible staining
The plasticiser contained in the rubber feet of this product may possibly react
with the coating of your parquet, linoleum, laminate or PVC oor and after some
time cause permanent dark stains.
In case of doubt, do not put the rubber feet directly on the oor, but use felt-pad
oor protectors or a carpet.
General information about how
to safely operate fog machines
and hazers
The device was designed for use in professional event technology and works reliably when
used properly. Observe the following information:
n Follow all warnings in these operating instructions.
n Never leave the device running without supervision.
n The device is not suitable for use in private households or as a child's toy.
n Place the device on a stable, re-proof basis that is at least twice as large as the device.
n Maintain a safety distance of 1 m to ammable materials.
n The device is not intended for suspended assembly (the so-called "ying operation").
Hz-200 DMX
17

Safety instructions
n During operation, ensure that the visibility in the room does not fall below 2 m so that
everyone in the room can still orient themselves safely.
n The haze or mist generated by the device may trigger smoke alarms.
18
hazer

3 Features
Features
This hazer is suitable to be used in clubs, bars, discotheques and on stages.
Special features of the device:
n Control via DMX, integrated DIP switches or via the supplied remote control
n Suitable for mobile use due to compact design
Hz-200 DMX
19

Installation
4 Installation
Unpack and check carefully there is no transportation damage before using the unit. Keep the
equipment packaging. To fully protect the product against vibration, dust and moisture during
transportation or storage use the original packaging or your own packaging material suitable
for transport or storage, respectively.
Place the device on a stable, re-proof basis that is at least twice as large as the device. The
device requires 20 cm clearance at the sides and above. The unit should be installed horizon‐
tally, a maximum deviation of 15° is allowed.
20
hazer

5 Starting up
Starting up
Create all connections while the device is o. Use the shortest possible high-quality cables for
all connections. Take care when running the cables to prevent tripping hazards.
NOTICE!
Possible data transmission errors
For error-free operation make use of dedicated DMX cables and do not use ordi‐
nary microphone cables.
Never connect the DMX input or output to audio devices such as mixers or ampli‐
ers.
Hz-200 DMX
21

Starting up
Connections in DMX mode
Connect the DMX input of the device to the DMX output of a DMX controller or another DMX
device. Connect the output of the rst DMX device to the input of the second one, and so on
to form a daisy chain. Always ensure that the output of the last DMX device in the daisy chain
is terminated with a resistor (110 Ω, ¼ W).
hazer
22

6 Connections and operating elements
Front and rear side
Connections and operating elements
Hz-200 DMX
23

Connections and operating elements
1 Main switch to turn the device on and o.
2 IEC chassis plug with fuse holder for the power supply
3 Connection for the supplied remote control
4 [DMX IN | OUT]
DMX in and output
5 Locking screws for the mounting bracket
6 Locking screw for adjusting and xing the exhaust port.
7 Power LED (green)
This LED ashes during operation.
8 DIP switch for setting the DMX address and the haze or air output.
9 Indicator LED (red)
This LED is lit while the device is warming up. Once the required operating temperature is reached, the LED goes out.
10 Mounting bracket
24
11 Hazer uid container with screw-cap
hazer

12 Liquid level indicator.
13 Haze / air nozzle
Connections and operating elements
Hz-200 DMX
25

Connections and operating elements
Remote control
14 [TIMER]
With this button, you can turn the Timer function on or o. In this mode, the set
amount of haze / air is output in certain intervals. The corresponding LED lights
while the function is enabled.
15 [CONT]
Press this button to turn continuous operation on or o. In this mode, the set
amount of haze / air is output continuously. The corresponding LED lights while the
function is enabled.
16 [MANUAL]
Press this button to eject the maximum haze amount; set the air amount with
[WIND SET]. The associated indicator LED lights up.
17 [OUTPUT]
Rotary control to set the amount of haze to be output.
26
hazer

Connections and operating elements
18 [INTERVAL]
Rotary control to set the interval between two haze blasts.
19 [WIND SET]
Rotary control to set the amount of air to be output.
Hz-200 DMX
27

Operating
7 Operating
Filling the unit
NOTICE!
Possible damages caused by unsuitable hazer uid
Hazer uids not approved by the manufacturer may permanently damage the
unit.
Only use the hazer uids listed on www.thomann.de and follow their instructions
for use.
First, make sure the unit is disconnected from the mains.
Open the screw-cap of the liquid container and ll in the hazer uid. Make sure that no hazer
uid is spilled or gets into the device. The easiest way is using a funnel. Fill the uid container
up to the upper level indicator [FULL].
Screw the cap rmly back on.
28
hazer

Turning the unit on
Operating
NOTICE!
Fire hazard
Do not operate the machine unattended.
Connect the device to the mains and switch the device on with the main switch. The appliance
heats up, the red LED on the rear panel lights up.
As soon as the required operating temperature is reached, the red LED on the rear panel goes
out. The device is now operational.
Operation
Turning the unit o
When operating, always ensure that there is sucient hazer uid in the liquid container to
avoid no-load running.
Disconnect the device from the mains. Transport the device only when it is completely cooled
down. To avoid leaking hazer uid during transport, you should transport the device only with
empty uid container.
Remove the condensate collector pad from the haze / air outlet to dry. Put the pad back into
the haze / air outlet before using the device next time.
Hz-200 DMX
29

Operating
7.1 DIP switch operation
If you want to control the device only via the DIP switches on the rear panel, rst set the
switches 1 to 9 to [OFF] and switch 10 to [ON]. The unit then operates continuously and does
not respond to DMX commands nor the remote control. The following table presents the pos‐
sible settings.
SW9 SW8 SW7 SW6 SW4 SW3 SW2 SW1 Function
0 0 0 0 0 0 0 1 25 % haze output
0 0 0 0 0 0 1 0 50 % haze output
0 0 0 0 0 1 0 0 75 % haze output
0 0 0 0 1 0 0 0 100 % haze output
0 0 0 1 0 0 0 0 25 % air output
0 0 1 0 0 0 0 0 50 % air output
30
hazer

SW9 SW8 SW7 SW6 SW4 SW3 SW2 SW1 Function
0 1 0 0 0 0 0 0 75 % air output
1 0 0 0 0 0 0 0 100 % air output
0: DIP switch is in ‘OFF’ position. 1: DIP switch is in ‘ON’ position.
7.2 Remote control operation
If you want to control the device via remote control, set the switches 1 to 10 to [OFF]
Set the amount of haze or air as well as the interval between two pulses using the rotary con‐
trols and enable the desired function by a keystroke (see Ä Chapter 6 ‘Connections and oper‐
ating elements’ on page 23).
Operating
Hz-200 DMX
31

Operating
7.3 Operating mode ‘DMX’
Setting up the DMX address
SW9 SW8 SW7 SW6 SW5 SW4 SW3 SW2 SW1 DMX address
0 0 0 0 0 0 0 0 1 1
0 0 0 0 0 0 0 1 0 2
0 0 0 0 0 0 1 0 0 4
0 0 0 0 0 1 0 0 0 8
0 0 0 0 1 0 0 0 0 16
0 0 0 1 0 0 0 0 0 32
0 0 1 0 0 0 0 0 0 64
The value of the DIP switches 1-9 is binary coded. To set the desired DMX address, set the DIP
switches so that the sum of the resulting numbers yields the desired DMX address. Please
orient yourself by the following table:
hazer
32

SW9 SW8 SW7 SW6 SW5 SW4 SW3 SW2 SW1 DMX address
0 1 0 0 0 0 0 0 0 128
1 0 0 0 0 0 0 0 0 256
0: DIP switch is in ‘OFF’ position. 1: DIP switch is in ‘ON’ position.
Example: To set the DMX address 10 set DIP switches 2 and 4 to ‘ON’, all others to ‘OFF’. The
highest possible DMX address is 511 (all DIP switches to ‘ON’).
DIP switch 10 has no function in this mode.
DMX functions
ChannelValue Function
1 0…255 Amount of haze 0-100 %
2 0…255 Fan speed 0-100 %
Operating
Hz-200 DMX
33

Technical specications
8 Technical specications
Heater power 615 W
Warm-up time approx. 1.5 min
Fluid container capacity 1.2 l
Haze burst
Haze burst duration, max. continuously
Charging time between haze bursts continuously
Haze burst reach 3 m
Input connections Power supply IEC chassis plug C14
Output connections DMX control XLR chassis socket, 3-pin
Power consumption 600 W
approx. 34 m3/min
DMX control XLR chassis socket, 3-pin
Remote control DIN socket, 5-pin
hazer
34

Technical specications
Supply voltage
Fuse 5 mm × 20 mm, 4 A, 250 V, fast-acting
Degree of protection IP20
Height of housing / incl. lling port /
incl. bracket
Weight 7.5 kg
Ambient conditions Temperature range 0 °C…40 °C
230 V 50 Hz
280 mm / 330 mm / 380 mm (11.02 in. / 12.99 in. / 14.96 in.)
Relative humidity 50 %…55 %, non-condensing
Hz-200 DMX
35

Plug and connection assignments
9 Plug and connection assignments
Introduction
DMX connections
36
This chapter will help you select the right cables and plugs to connect your valuable equip‐
ment so that a perfect light experience is guaranteed.
Please take our tips, because especially in ‘Sound & Light’ caution is indicated: Even if a plug
ts into a socket, the result of an incorrect connection may be a destroyed DMX controller, a
short circuit or ‘just’ a not working light show!
The unit oers a 3-pin XLR socket for DMX output and a 3-pin XLR plug for DMX input. Please
refer to the drawing and table below for the pin assignment of a suitable XLR plug.
Pin Conguration
1 Ground, shielding
2 Signal inverted (DMX–, ‘cold signal’)
3 Signal (DMX+, ‘hot signal’)
hazer

10 Troubleshooting
In the following we list a few common problems that may occur during operation. We give you
some suggestions for easy troubleshooting:
Symptom Remedy
The unit does not work Check the mains connection and the main fuse.
No haze output 1. Check the uid level of the hazer uid.
2. Switch the device o and check the hose that leads into the uid container
for ow.
No response to the DMX controller 1. Check the address settings and the DMX polarity.
2. Try using another DMX controller.
3. Check to see if the DMX cables run near or alongside to high voltage cables
that may cause damage or interference to DMX interface circuits.
Troubleshooting
Hz-200 DMX
37

Troubleshooting
If the procedures recommended above do not succeed, please contact our Service Center. You
can nd the contact information at www.thomann.de.
38
hazer

11 Cleaning
Procedure
Cleaning
NOTICE!
Possible damages caused by unsuitable cleaning agents
Cleaners not approved by the manufacturer may permanently damage the unit.
Only use the fog machine cleaners listed on www.thomann.de and follow their
instructions for use.
Clean the appliance after every 30 operating hours, or if it was not in use for a longer period of
time.
1. Make sure that the device is turned o, disconnected from the mains and completely
cooled down.
2. Position the unit in a well ventilated place.
3. Insert the suction hose of the haze machine into the bottle with the fog machine
cleaner.
4. Connect the device to the mains and switch it on with the main switch.
Hz-200 DMX
39

Cleaning
5. As soon as the required operating temperature is reached, the red LED on the rear panel
goes out. The device is now operational.
Let the device produce haze with maximum output volume for about 20 seconds.
6. Insert the suction hose of the haze machine back into the fog uid container and let the
device again produce haze for about 20 seconds. This will rinse the lines.
The cleaning is completed.
ð
40
hazer

12 Protecting the environment
Disposal of the packaging mate‐
rial
For the transport and protective packaging, environmentally friendly materials have been
chosen that can be supplied to normal recycling.
Ensure that plastic bags, packaging, etc. are properly disposed of.
Do not just dispose of these materials with your normal household waste, but make sure that
they are collected for recycling. Please follow the notes and markings on the packaging.
Disposal of your old device
This product is subject to the European Waste Electrical and Electronic Equipment Directive
(WEEE) in its currently valid version. Do not dispose with your normal household waste.
Dispose of this device through an approved waste disposal rm or through your local waste
facility. When discarding the device, comply with the rules and regulations that apply in your
country. If in doubt, consult your local waste disposal facility.
Protecting the environment
Hz-200 DMX
41

Notes
42
hazer


Musikhaus Thomann · Hans-Thomann-Straße 1 · 96138 Burgebrach · Germany · www.thomann.de
 Loading...