

Page 1
DP-90
digital piano
user manual
Page 2

Musikhaus Thomann e.K.
Treppendorf 30
96138 Burgebrach
Germany
Telephone: +49 (0) 9546 9223-0
email: [email protected]
Internet: www.thomann.de
22.03.2012
Page 3

Table of contents
1 General notes............................................................................................................................ 4
2 Safety notes............................................................................................................................... 5
3 Performance characteristics.............................................................................................. 7
4 Set-up instructions................................................................................................................. 8
5 Control panel and connections..................................................................................... 11
6 Connection options............................................................................................................. 14
7 Functions.................................................................................................................................. 16
7.1 Adjust volume................................................................................................................ 16
7.2 Set brightness................................................................................................................ 16
7.3 Songs................................................................................................................................. 16
7.4 Playing.............................................................................................................................. 18
7.5 Recording a song.......................................................................................................... 20
7.6 Historic temperaments............................................................................................... 22
7.7 TWINOVA......................................................................................................................... 23
7.8 Touch sensitivity............................................................................................................ 23
7.9 Digital effects.................................................................................................................. 24
7.10 Metronome................................................................................................................... 25
7.11 Set tempo...................................................................................................................... 25
7.12 Transpose...................................................................................................................... 26
7.13 Fine tuning.................................................................................................................... 26
7.14 Beep................................................................................................................................. 26
7.15 Automatic switch-off................................................................................................. 27
7.16 Troubleshooting......................................................................................................... 27
8 Songs and demo pieces..................................................................................................... 28
9 MIDI Implementation table............................................................................................. 35
10 Technical data........................................................................................................................ 38
11 Protecting the environment........................................................................................... 39
Table of contents
DP-90
3
Page 4
1
General notes
This user manual contains important information on the safe operation of the device.
Read and follow all safety notes and all instructions. Save this manual for future refer‐
ence. Make sure that it is available to all persons using this device. If you sell the
device to another user, be sure that they also receive this manual.
Our products are subject to a process of continuous development. We therefore
reserve the right to make changes without notice.
This section gives an overview of the symbols and signal words used in this user
manual.
Signal word Meaning
DANGER! This combination of symbol and signal
word indicates an immediate dangerous
situation that will result in death or
serious injury if it is not avoided.
CAUTION! This combination of symbol and signal
word indicates a possible dangerous sit‐
uation that can result in minor injury if it
is not avoided.
NOTICE! This combination of symbol and signal
word indicates a possible dangerous sit‐
uation that can result in material and
environmental damage if it is not
avoided.
Warning signs Type of danger
Warning – high-voltage.
Warning – danger zone.
Symbols and signal words
General notes
digital piano
4
Page 5
2
Safety notes
This device is intended to be used for electronic sound generation using a piano key‐
board. Use the device only as described in this user manual. Any other use or use
under other operating conditions is considered to be improper and may result in per‐
sonal injury or property damage. No liability will be assumed for damages resulting
from improper use.
This device may be used only by persons with sufficient physical, sensorial, and intel‐
lectual abilities and having corresponding knowledge and experience. Other persons
may use this device only if they are supervised or instructed by a person who is
responsible for their safety.
DANGER!
Danger for children
Ensure that plastic bags, packaging, etc. are disposed of properly and
are not within reach of babies and young children. Choking hazard!
Ensure that children do not detach any small parts (e.g. knobs or the
like) from the unit. They could swallow the pieces and choke!
Never let children unattended use electrical devices.
DANGER!
Electric shock caused by short-circuit
Always use proper ready-made insulated two-wire mains cabling
(power cord). Do not modify the mains cable or the plug. Failure to do
so could result in electric shock/death or fire. If in doubt, seek advice
from a registered electrician.
DANGER!
Electric shock caused by high voltages inside
Within the device there are areas where high voltages may be present.
Never remove any covers.
There are no user-serviceable parts inside.
CAUTION!
Possible hearing damage
With loudspeakers or headphones connected, the device can produce
volume levels that may cause temporary or permanent hearing impair‐
ment.
Do not operate the device permanently at a high volume level.
Decrease the volume level immediately if you experience ringing in
your ears or hearing impairment.
Intended use
Safety
Safety notes
DP-90
5
Page 6
CAUTION!
Risk of injury due to heavy weight
Due to the heavy weight of the device, at least two persons are required
for transport and installation.
NOTICE!
Operating conditions
This device has been designed for indoor use only. To prevent damage,
never expose the device to any liquid or moisture. Avoid direct sunlight,
heavy dirt, and strong vibrations.
NOTICE!
Power supply
Before connecting the device, ensure that the input voltage (AC outlet)
matches the voltage rating of the device and that the AC outlet is pro‐
tected by a residual current circuit breaker. Failure to do so could result
in damage to the device and possibly injure the user.
Unplug the device before electrical storms occur and when it is unused
for long periods of time to reduce the risk of electric shock or fire.
Safety notes
digital piano
6
Page 7

3
Performance characteristics
Thank you for choosing this digital piano.
This instrument has 88 weighted hammer action keys with adjustable velocity sensi‐
tivity, based on state-of-the-art PCM technology for tone generation. It will give you
many years of pleasure in making music and playing on stage. You may also use it to
record what you are playing, or record your own accompaniment first, then play the
tune. The digital piano is not only at the latest state of the art - it also looks really
elegant and will draw all looks, no matter where you put it up. To use your instru‐
ment as well as possible, read these operating instructions carefully and try out the
different functions we introduce.
Have fun with your new instrument! We hope that it will give you pleasure for many
years to come.
Performance characteristics
DP-90
7
Page 8
4
Set-up instructions
1
2
3
4
5
6
7
8
9
10
11
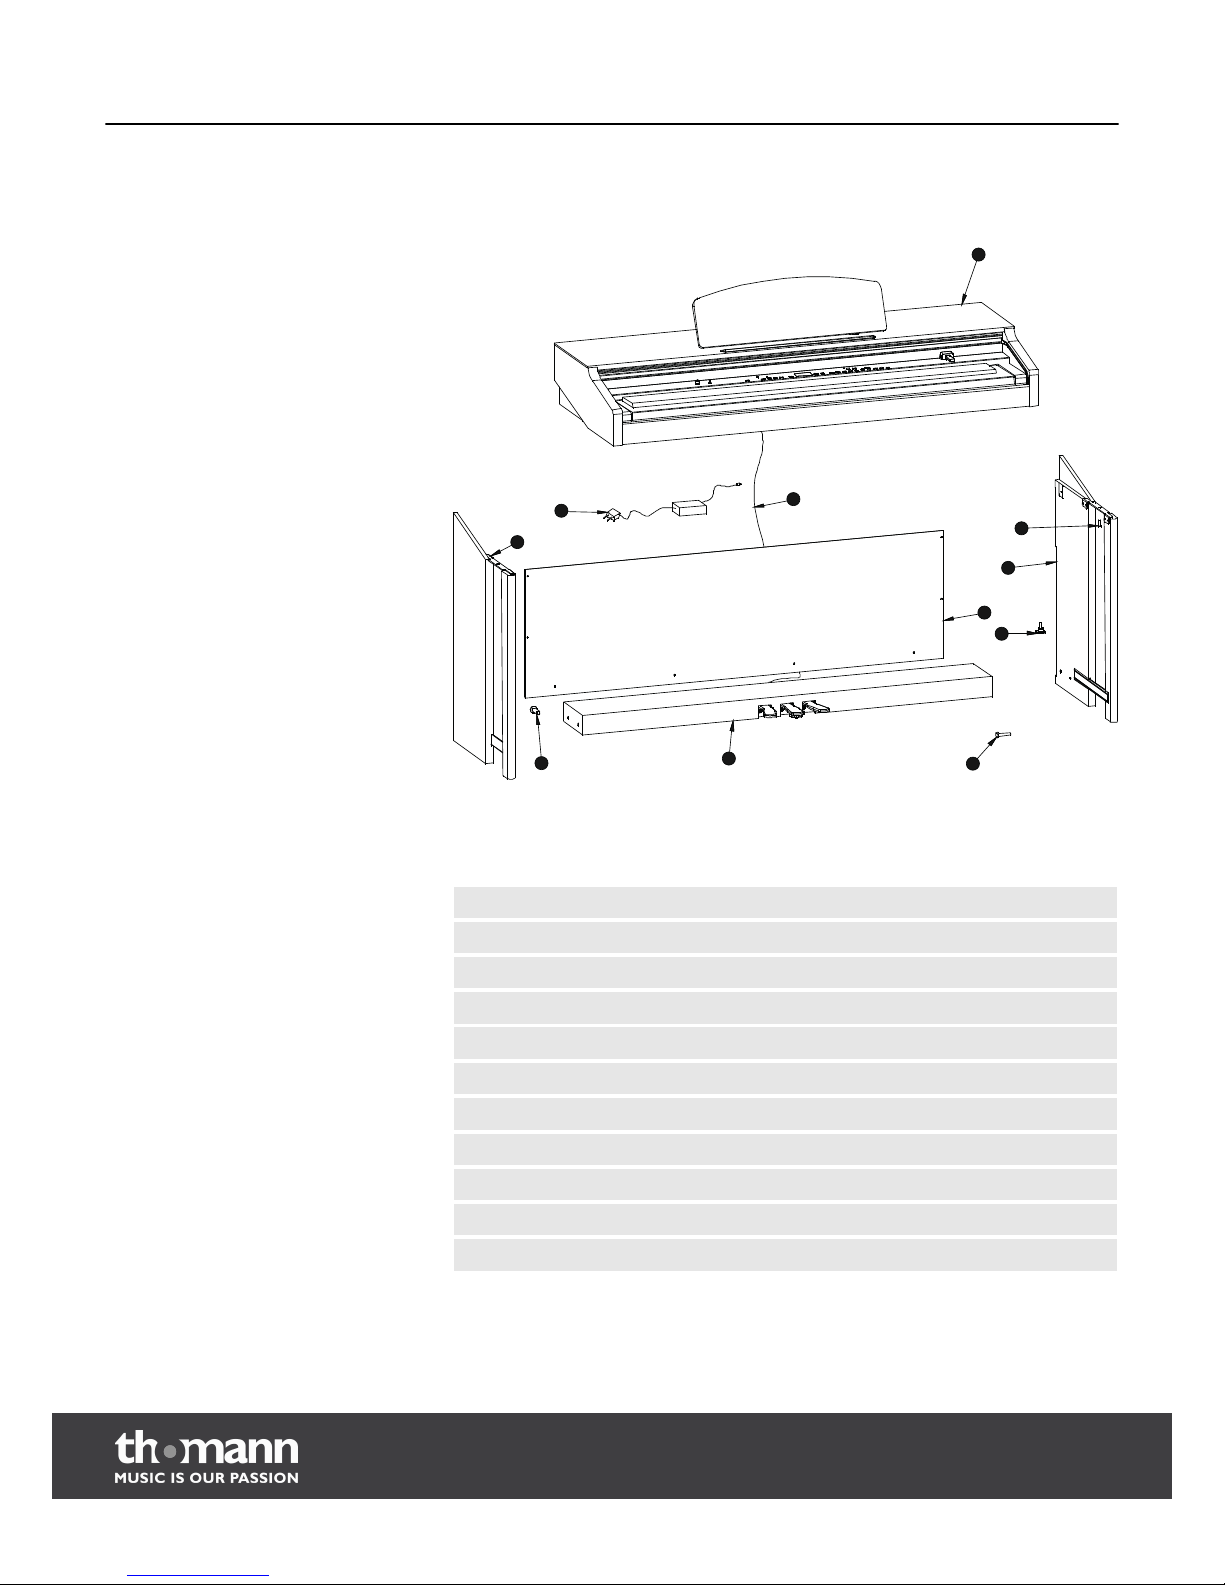
Open the packaging and verify before setting up that the entire delivery is included,
as listed below.
1. Piano body
2. Mains adapter
3. Right leg component
4. Left leg component
5. Screws 4 ´ 15 (8 pcs) to attach the rear panel skirt
6. Foot pedal unit
7. Screws M 6 ´ 25 (4 pcs)
8. Pedal cable
9. Rear panel skirt
10. Hand screws (2 pcs)
11. Screws M 6 ´ 12 (2 pcs)
Set-up instructions
digital piano
8
Page 9
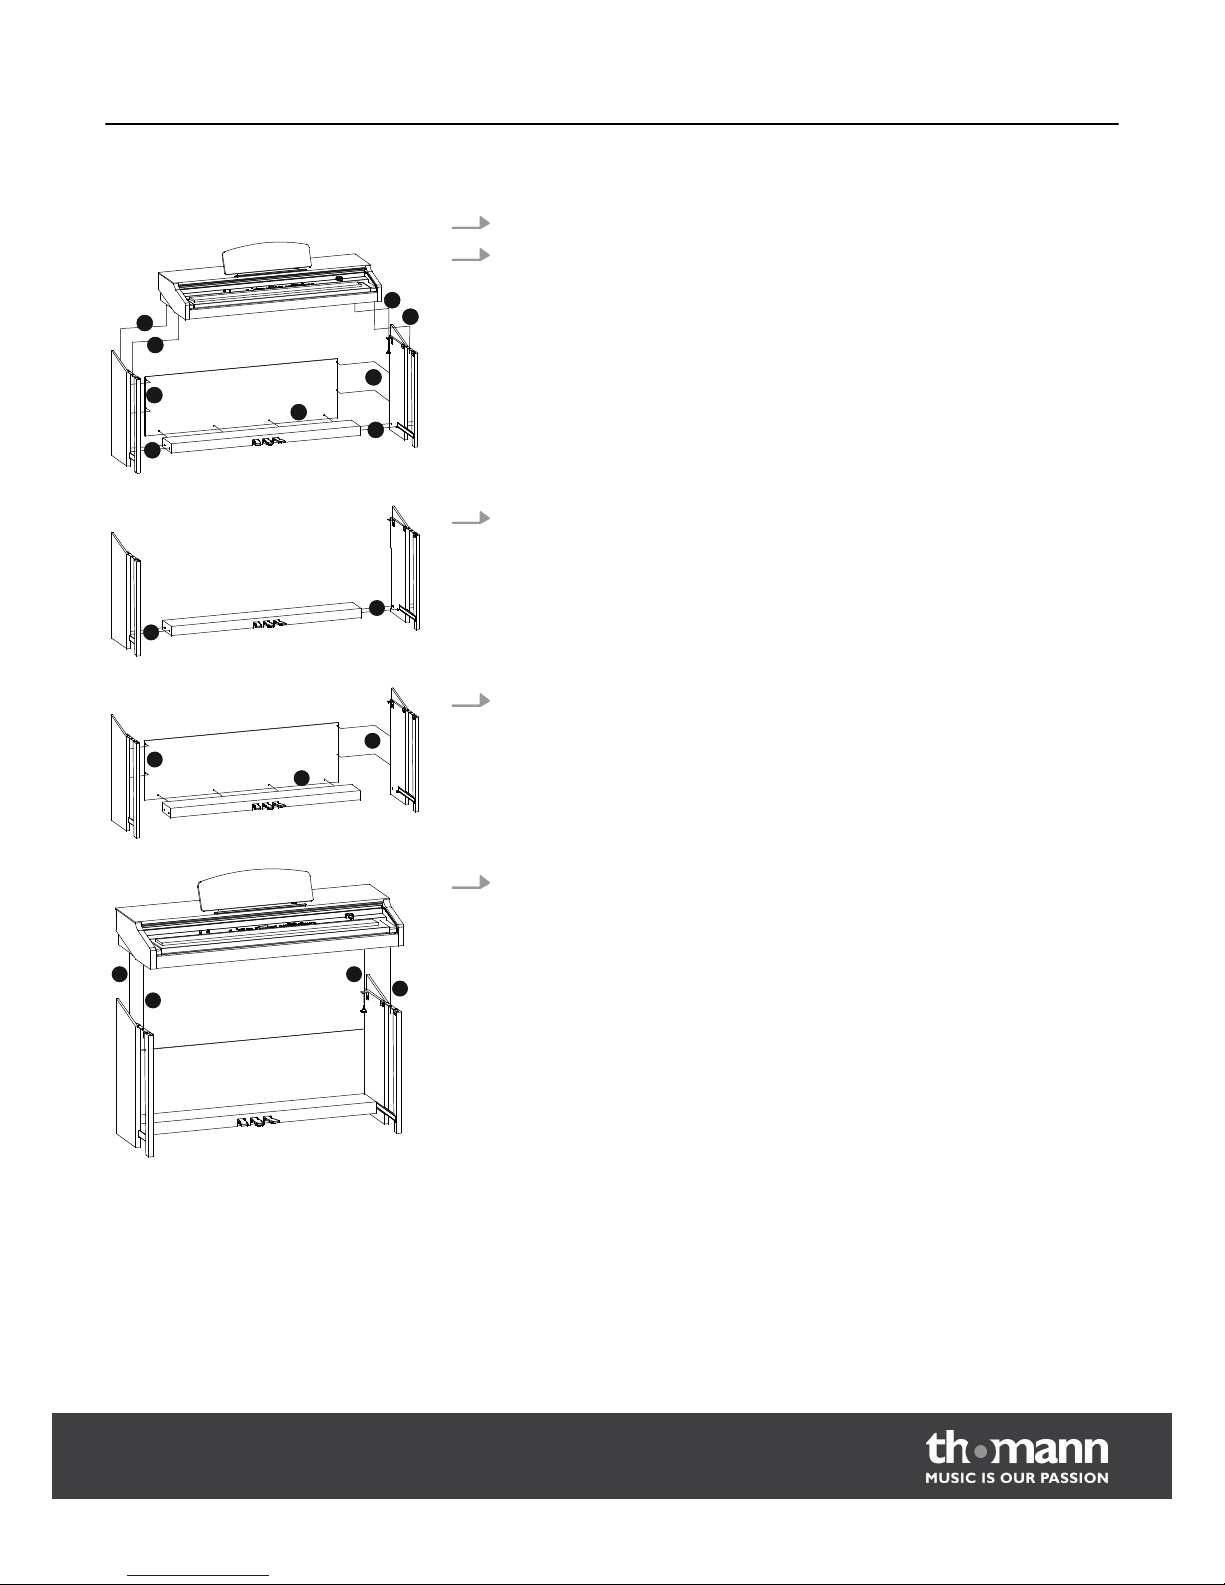
1. Set up your digital piano in proximity of a power outlet.
2. Proceed according to the figures and use only the included screws. Different
screws may damage the piano body or reduce the digital piano's stability.
n (5) Screws 4 ´ 15 (8 pcs) for attachment of the rear panel skirt
n (7) Screws M 6 ´ 25 (4 pcs)
n (10) Hand screws (2 pcs)
n (11) Screws M 6 ´ 12 (2 pcs)
3. Put the foot pedal unit (6) between the left and right leg component ((3) and
(4)) and use two screws M 6 ´ 25 (7) on either side to attach the two leg com‐
ponents to the foot pedal unit.
4.
Attach the rear panel skirt to the foot pedal unit (6) with eight screws 4 ´ 15 (5)
and to the rear of the leg components ((3) and (4)).
5. Place the piano body (1) on the frame and attach it with the two hand screws
(10) and the two screws M 6 ´ 12 (11).
Mechanic set-up
5
7
10
11
11
10
7
5
5
7
7
5
5
5
10 10
1
1
1
1
Set-up instructions
DP-90
9
Page 10
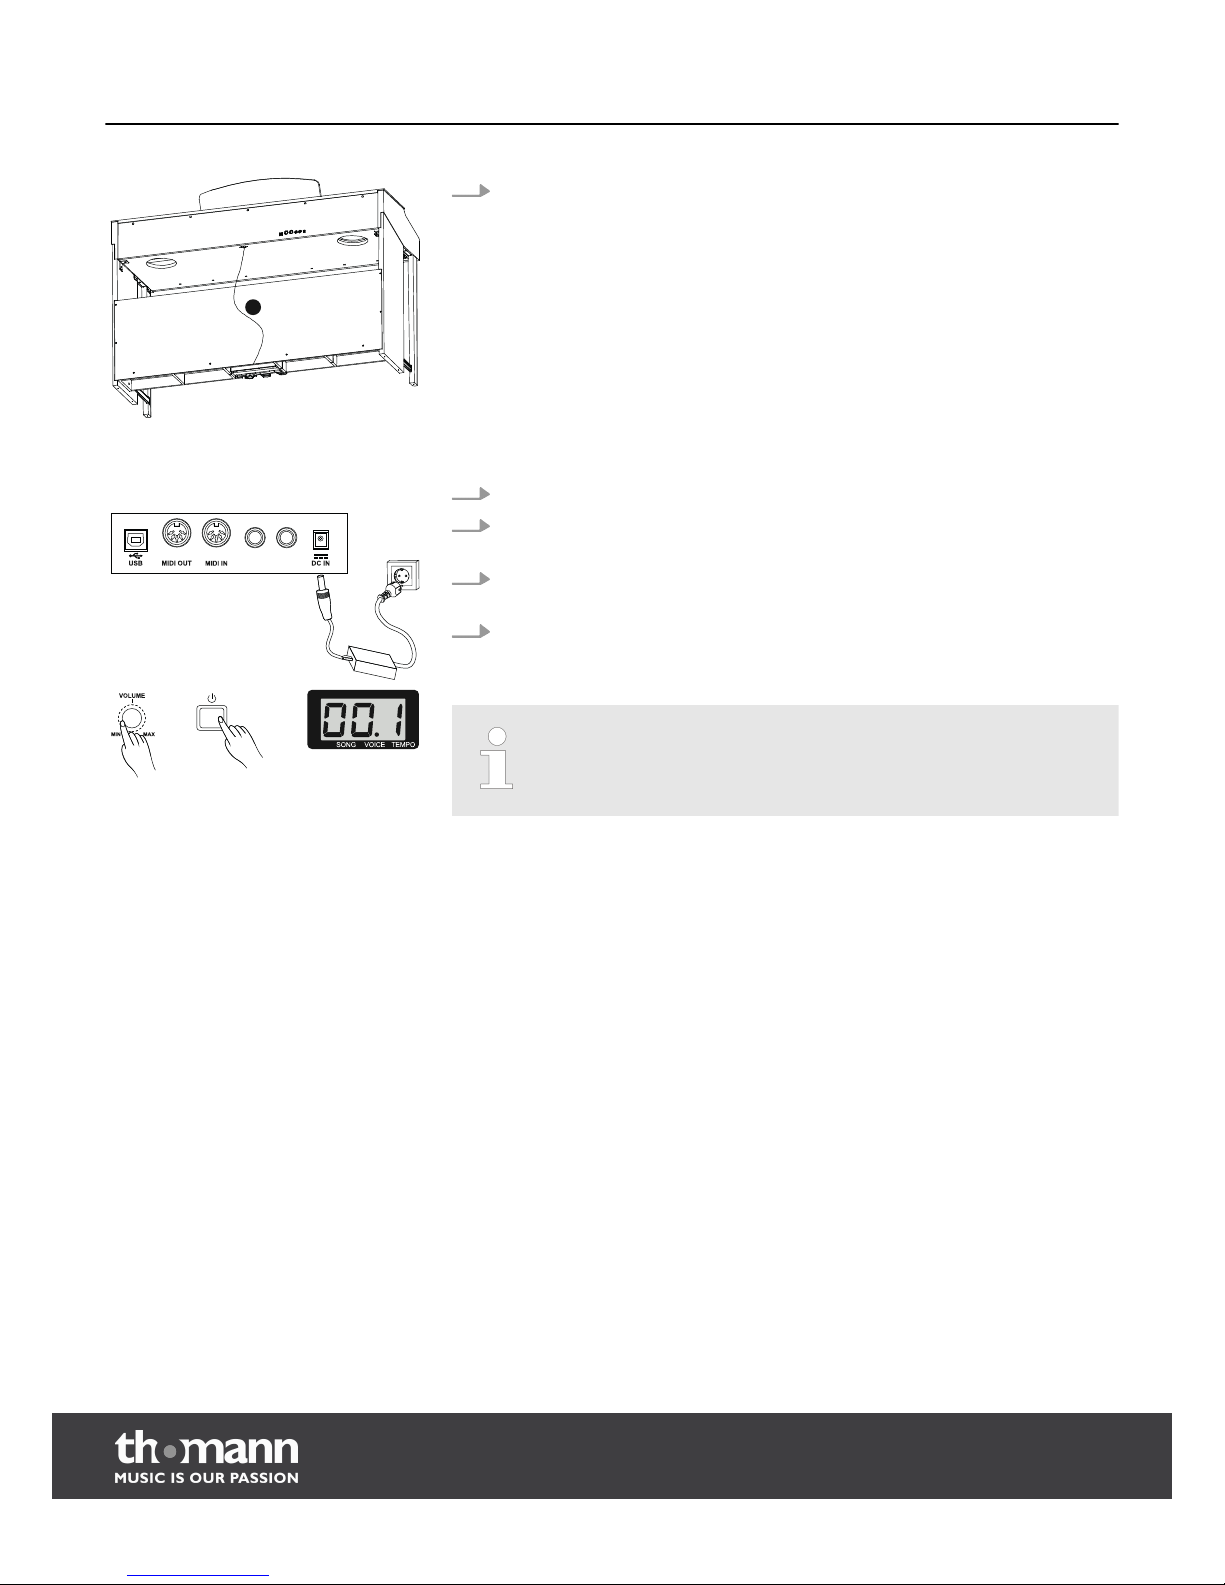
6. Connect the pedal cable to the connection in the pedal unit and the connec‐
tion below the keyboard.
1. Turn the volume control VOLUME all the way to the left.
2. Plug the mains adapter cable into the connection DC IN in the connection
panel on the rear and the mains plug into the socket.
3. Keep the button [POWER] pushed until the LED display lights up. The digital
piano is switched on.
4. With the digital piano on, keep the button [POWER] pushed again until the LED
display and other displays go out. The digital piano is off again.
In the "IDLE" mode (automatic switch-off), the digital piano switches off
automatically if not used for 30 minutes.
8
Connect the voltage supply
AUX. OUT AUX. IN
Set-up instructions
digital piano
10
Page 11
5
Control panel and connections
FUNCTION
1
2
3
4
5
6
7 8
12
10 1
1
9
1
3
ELECTRIC
PIANO
15
14
27
16
17
18
19
20
21
22
23
24
25 26
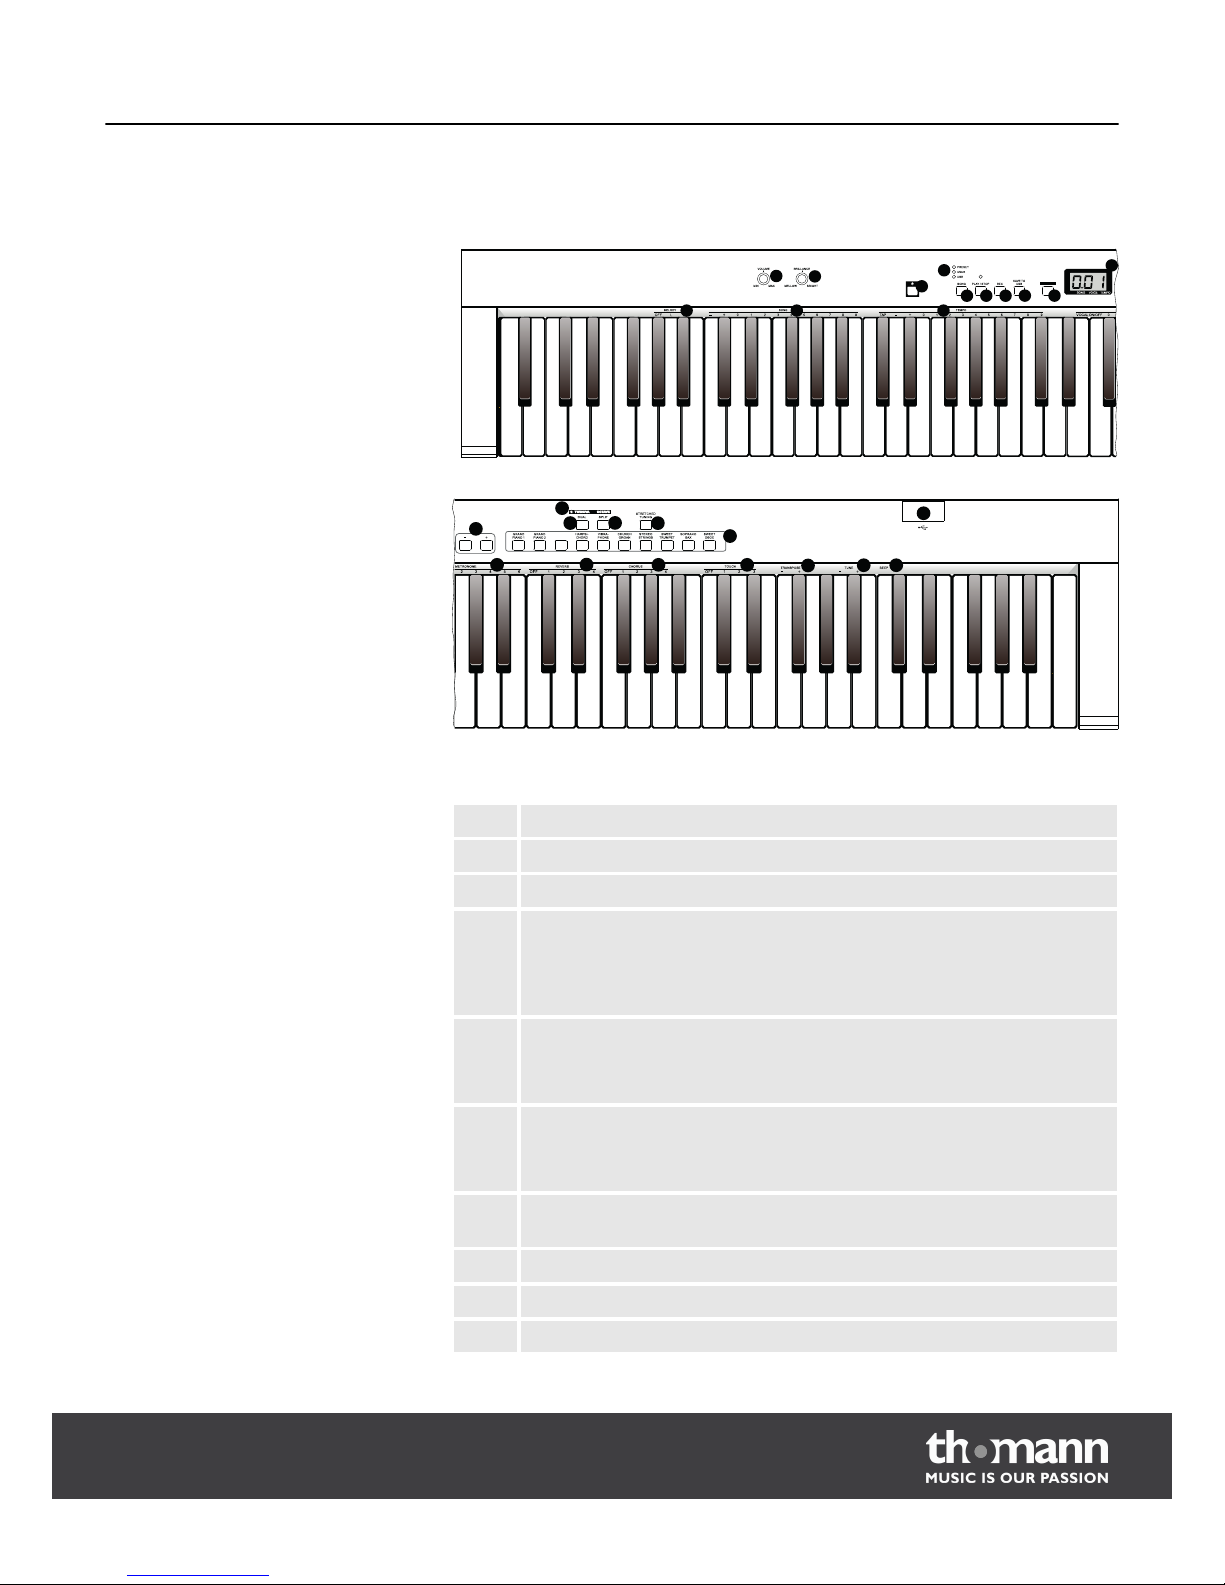
1 Button [POWER] to switch the digital piano on and off.
2 Knob control VOLUME to set the volume.
3 Knob control BRILLIANCE to adjust brightness of the sound.
4 Piano keys [MELODY] to select the left and right hand.
Keep the button [FUNCTION] pushed in the operating mode SONG and
then push the piano key [L] or [R] to select the left or right hand for the
song.
5 Piano keys SONG to select songs.
Keep the button [FUNCTION] pushed and then push one or several piano
keys in this area to select a song.
6 LED displays for songs.
Push the button [SONG] to switch the source for the corresponding song.
The respective LED lights up.
7 Button [SONG] to start the operating mode SONG or switch the source for
the song.
8 Button [PLAY/STOP] to play back or terminate songs.
9 Button [REC] to record songs.
10 Button [SAVE TO USB] to save recorded data on a USB drive.
Control panel
Control panel and connections
DP-90
11
Page 12
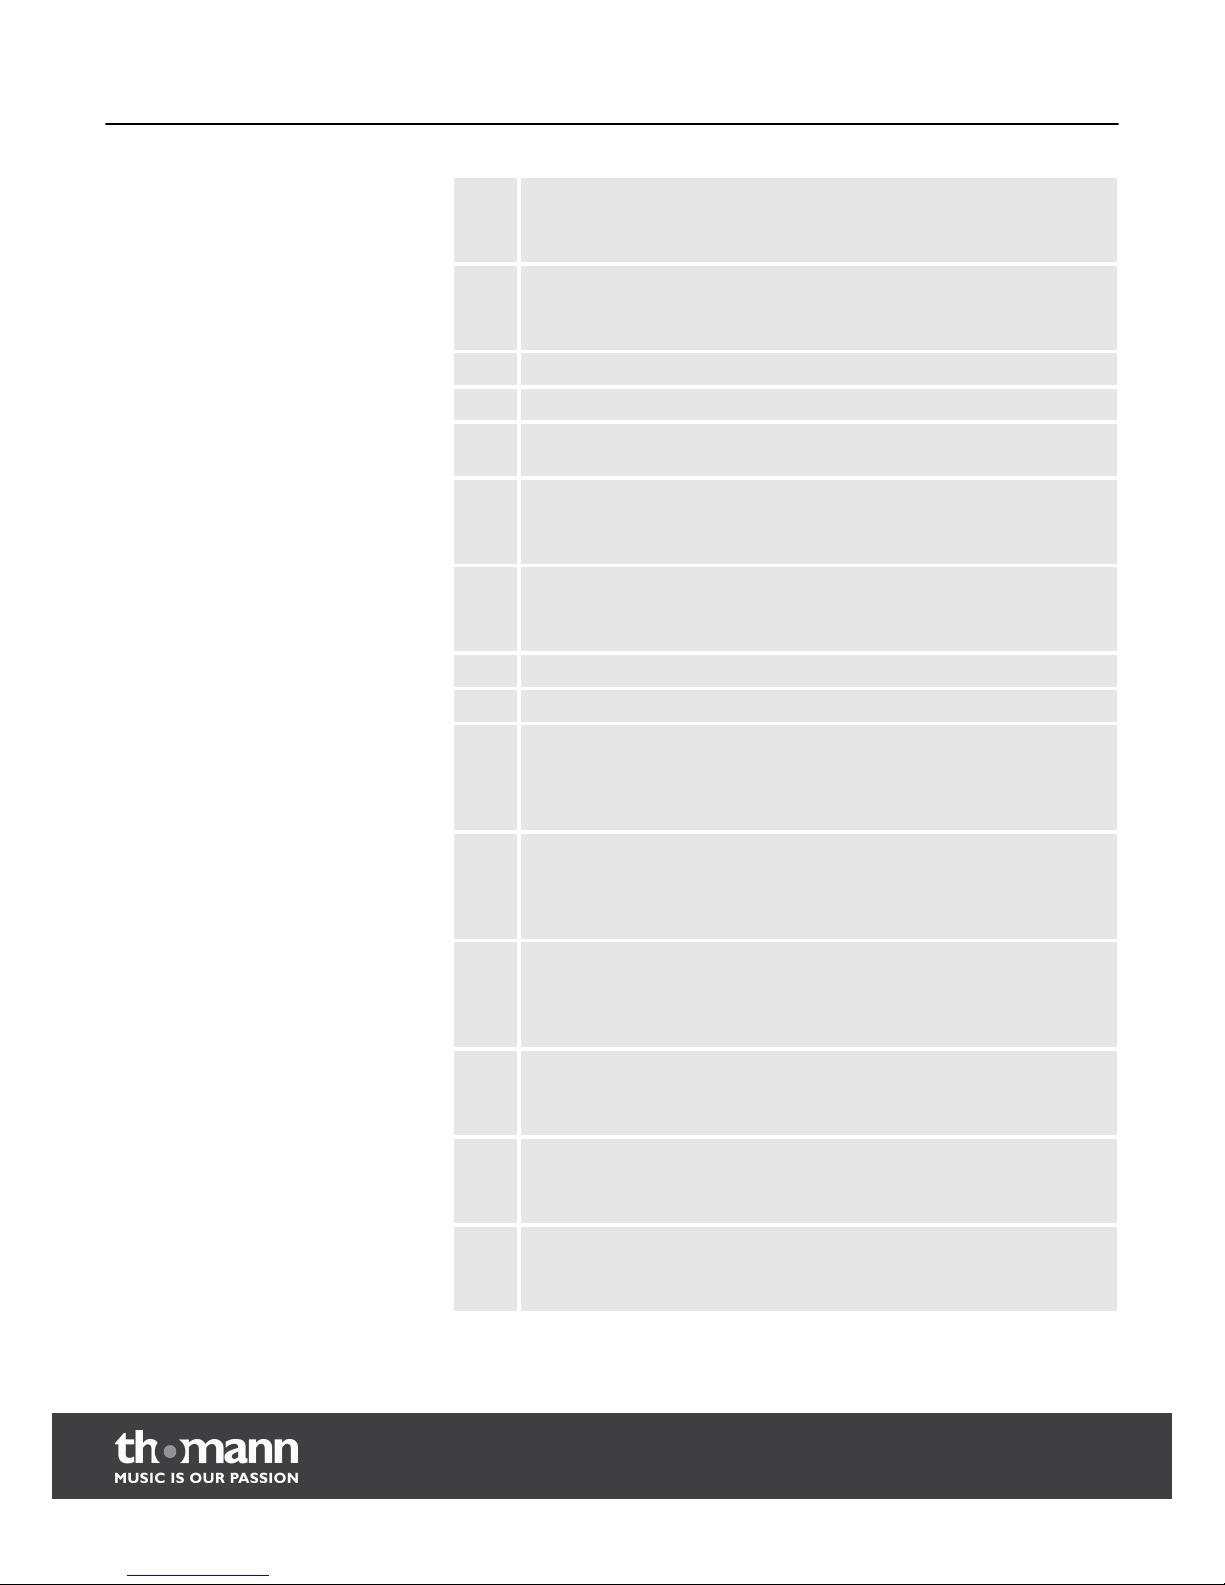
11 Button [FUNCTION]
Keep this button pushed and then push the corresponding piano keys to
call specific functions.
12 Piano keys [TEMPO] to set the tempo.
Keep the button [FUNCTION] pushed and then push a piano key in this
area to set the current tempo.
13 LED display of the current digital piano settings.
14 Buttons [+]/[–] to set the parameters.
15 LED TWINOVA shows whether the digital piano is currently in the oper‐
ating mode TWINOVA or not.
16 Button [DUAL] to switch the dual mode on and off.
With the button [FUNCTION] pushed, this button also activates and deacti‐
vates the TWINOVA operating mode.
17 Button [SPLIT] to switch the voice for the left hand on and off.
In operating mode TWINOVA, the button can also be used with the button
[FUNCTION] pushed to activate or deactivate octave transfer.
18 Button [STRETCHED TUNING] to switch historic temperaments on and off.
19 Buttons for direct selection of instrument voices.
20 Piano keys [METRONOME]
Keep the button [FUNCTION] pushed and push the piano key [ON/OFF] to
activate or deactivate the metronome or push another piano key in this
area to select a specific time signature.
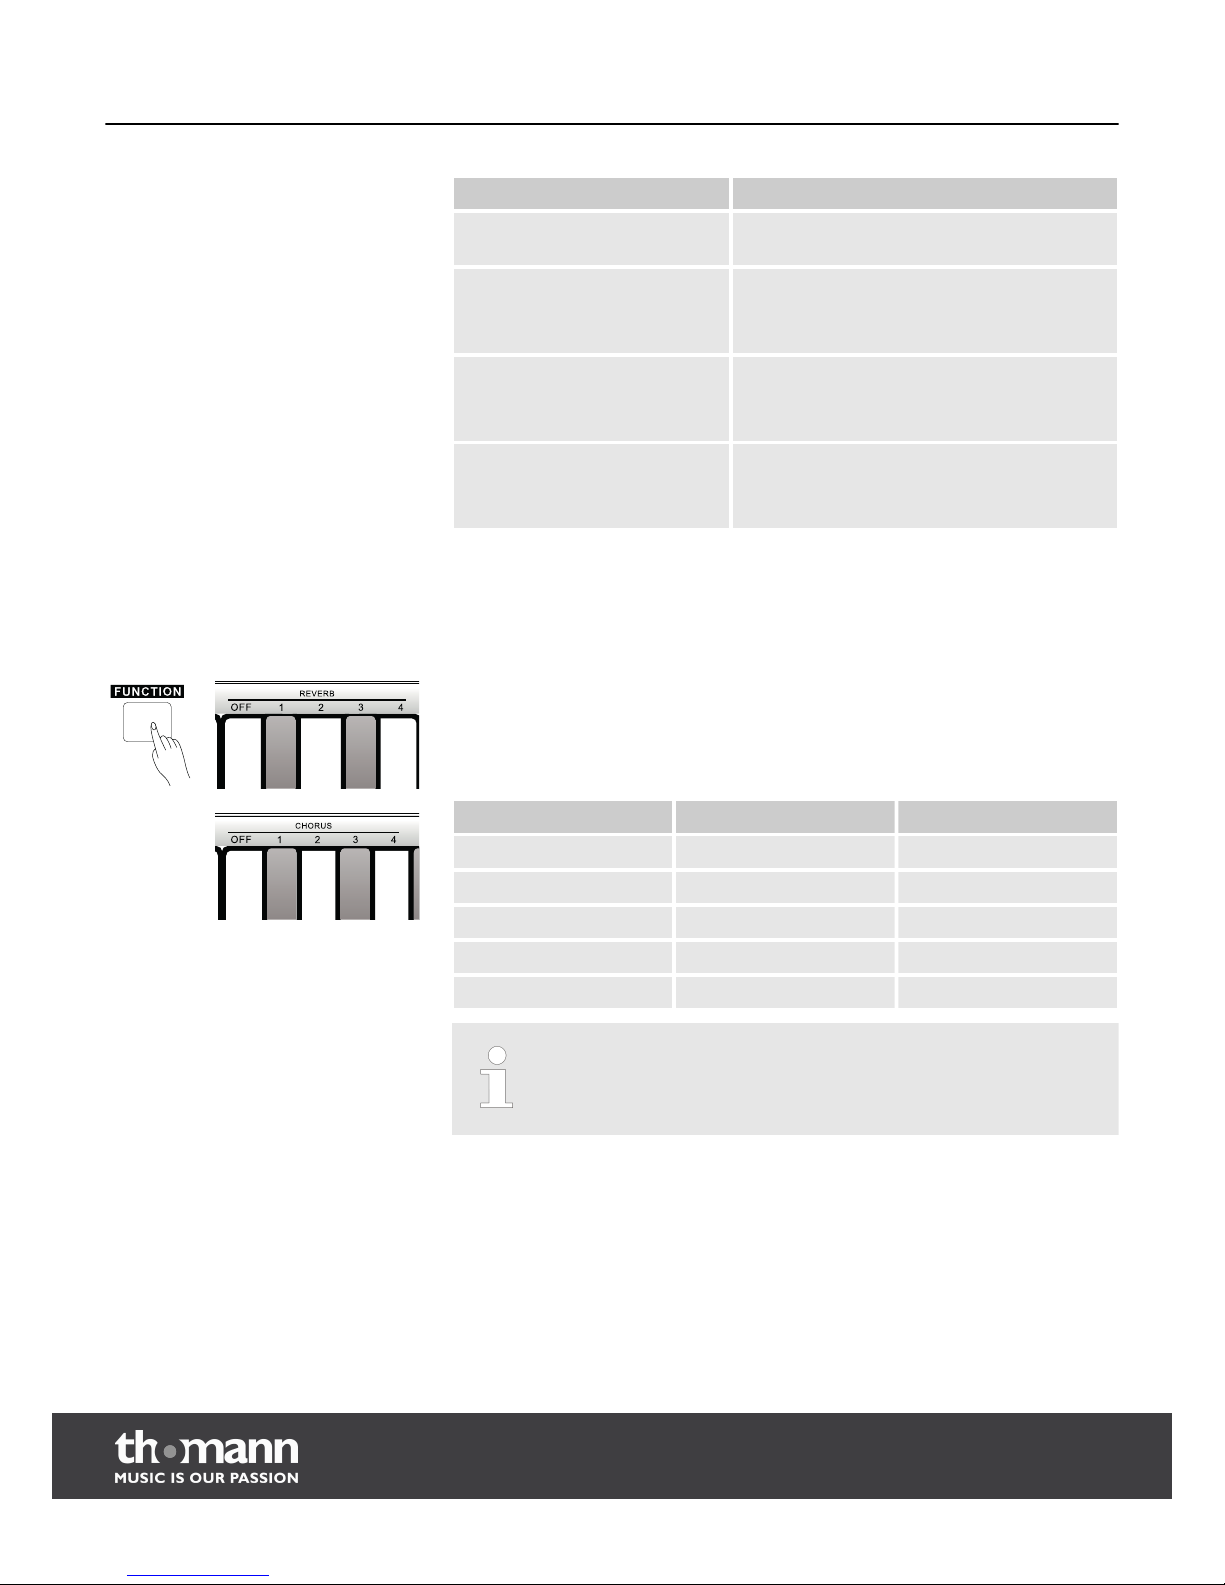
21 Piano keys [REVERB]
Keep the button [FUNCTION] pushed and then push the piano key [OFF] in
this area to switch off reverb effects or push another piano key in this area
to select a specific reverb effect.
22 Piano keys [CHORUS]
Keep the button [FUNCTION] pushed and push the piano key [OFF] in this
area to switch the chorus effect off, or push another piano key in this area
to select a specific chorus effect.
23 Piano keys [TOUCH]
Keep the button [FUNCTION] pushed and push a piano key in this area to
set the touch sensitivity of the buttons.
24 Piano keys [TRANSPOSE]
Keep the button [FUNCTION] pushed and enter the value by which you
want to transpose up or down with [+] and [–] in 12 semitone steps.
25 Piano keys [TUNE]
Keep the button [FUNCTION] pushed and perform fine tuning with the
piano keys [+] and [–].
Control panel and connections
digital piano
12
Page 13
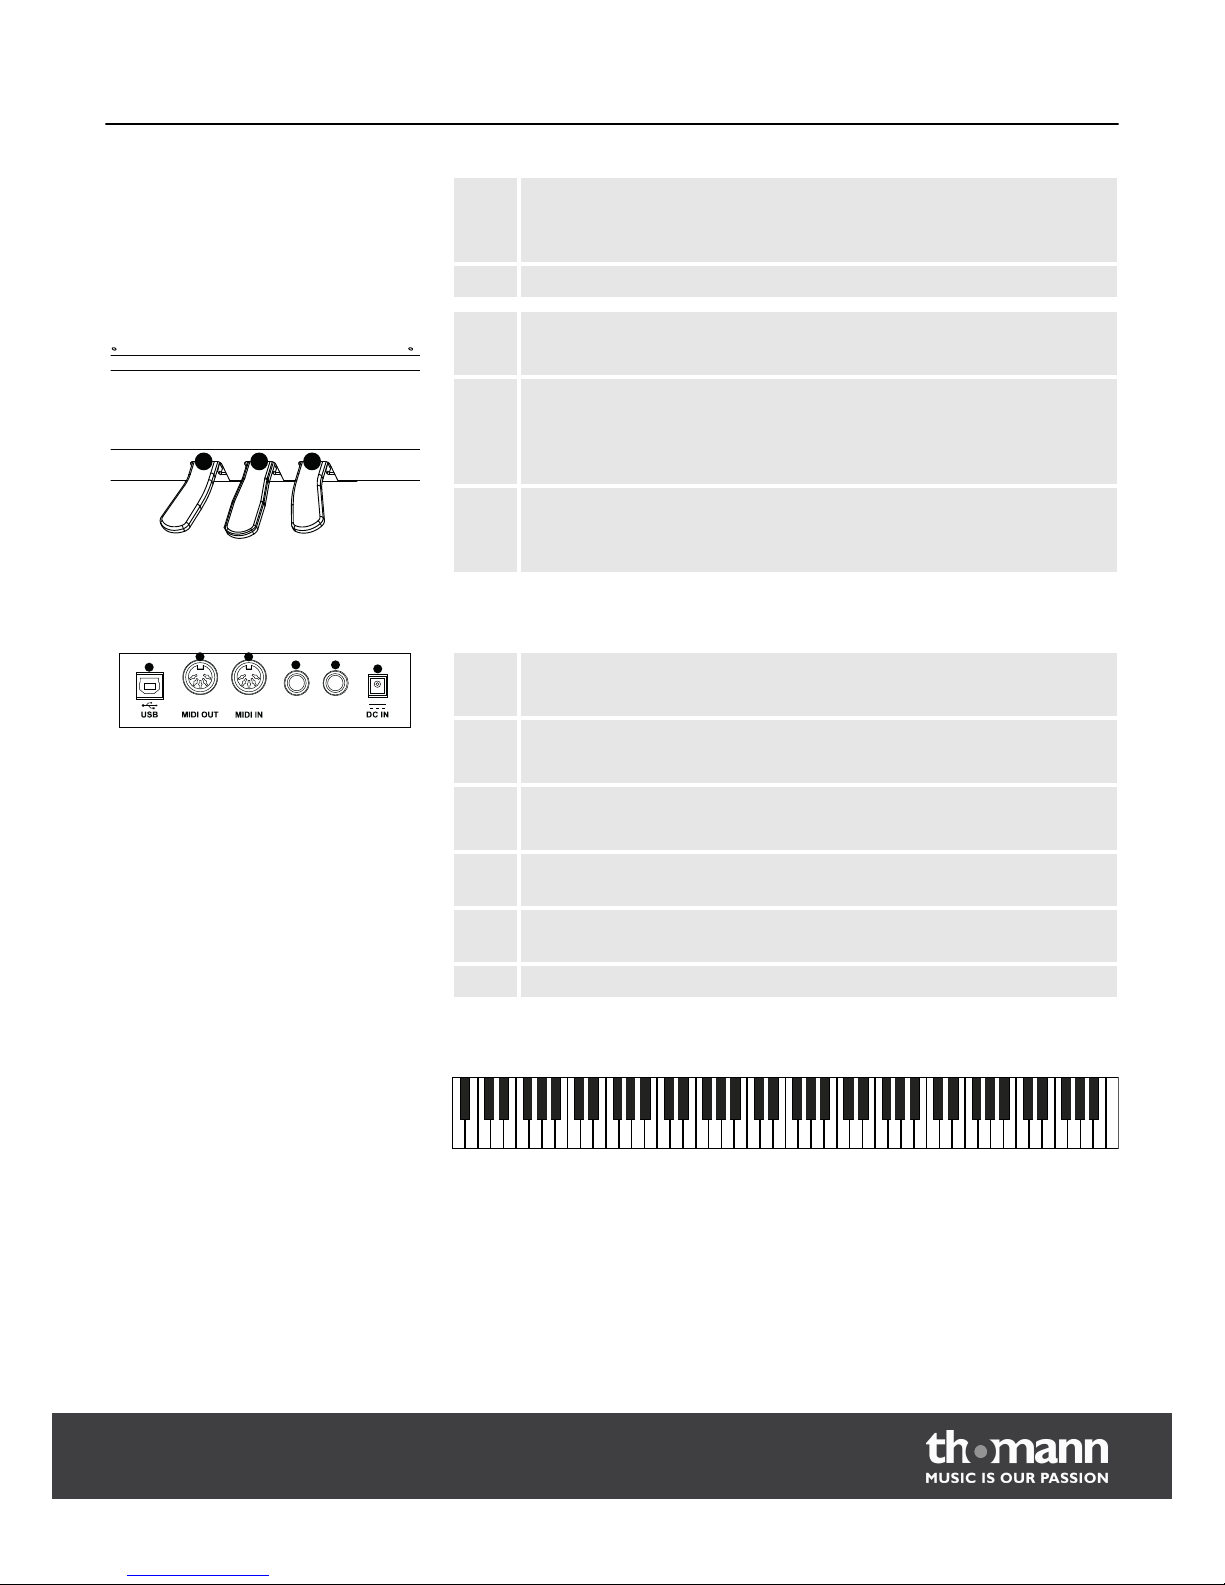
26 Piano key [BEEP]
Keep the button [FUNCTION] pushed and push this piano key to switch the
button tone for operation on or off.
27 Connection for USB drive.
28 Soft pedal
If the soft pedal is operated when playing, the keys will sound softer.
29 Sostenuto pedal
If the Sostenuto pedal is operated when playing, only those notes will be
held that are played at the same time as the pedal is operated. The pedal
will not influence the notes played afterwards.
30 Sustain pedal
If the sustain pedal is operated when playing, the keys will sound longer as if they were kept depressed.
31 USB/MIDI interface
For connection to a computer.
32 Interface MIDI OUT
Connection for MIDI-IN interface of another MIDI device.
33 Interface MIDI IN
Connection for MIDI-OUT interface of another MIDI device.
34 AUX OUT: Possibility of connecting external audio devices, such as
speakers or amplifiers.
35 AUX IN: Possibility of connecting external audio devices, such as MP3 or
CD players for use of the internal speakers.
36 Connection for mains adapter.
Keys on the keyboard are designated according to the following figure.
A 0
B 0
C 1
D 1
E 1
F 1
G 1
A 1
B 1
C 2
D 2
E 2
F 2
G 2
A 2
B 2
C 3
D 3
E 3
F 3
G 3
A 3
B 3
C 4
D 4
E 4
F 4
G 4
A 4
B 4
C 5
D 5
E 5
F 5G5A 5
B 5
C 6
D 6
E 6
F 6
G 6
A 6
B 6
C 7
D 7
E 7
F 7
G 7
A 7
B 7
C 8
28 29
30
Connections on the rear
31
32 33
34
35
36
AUX. OUT AUX. IN
Key names
Control panel and connections
DP-90
13
Page 14
6
Connection options
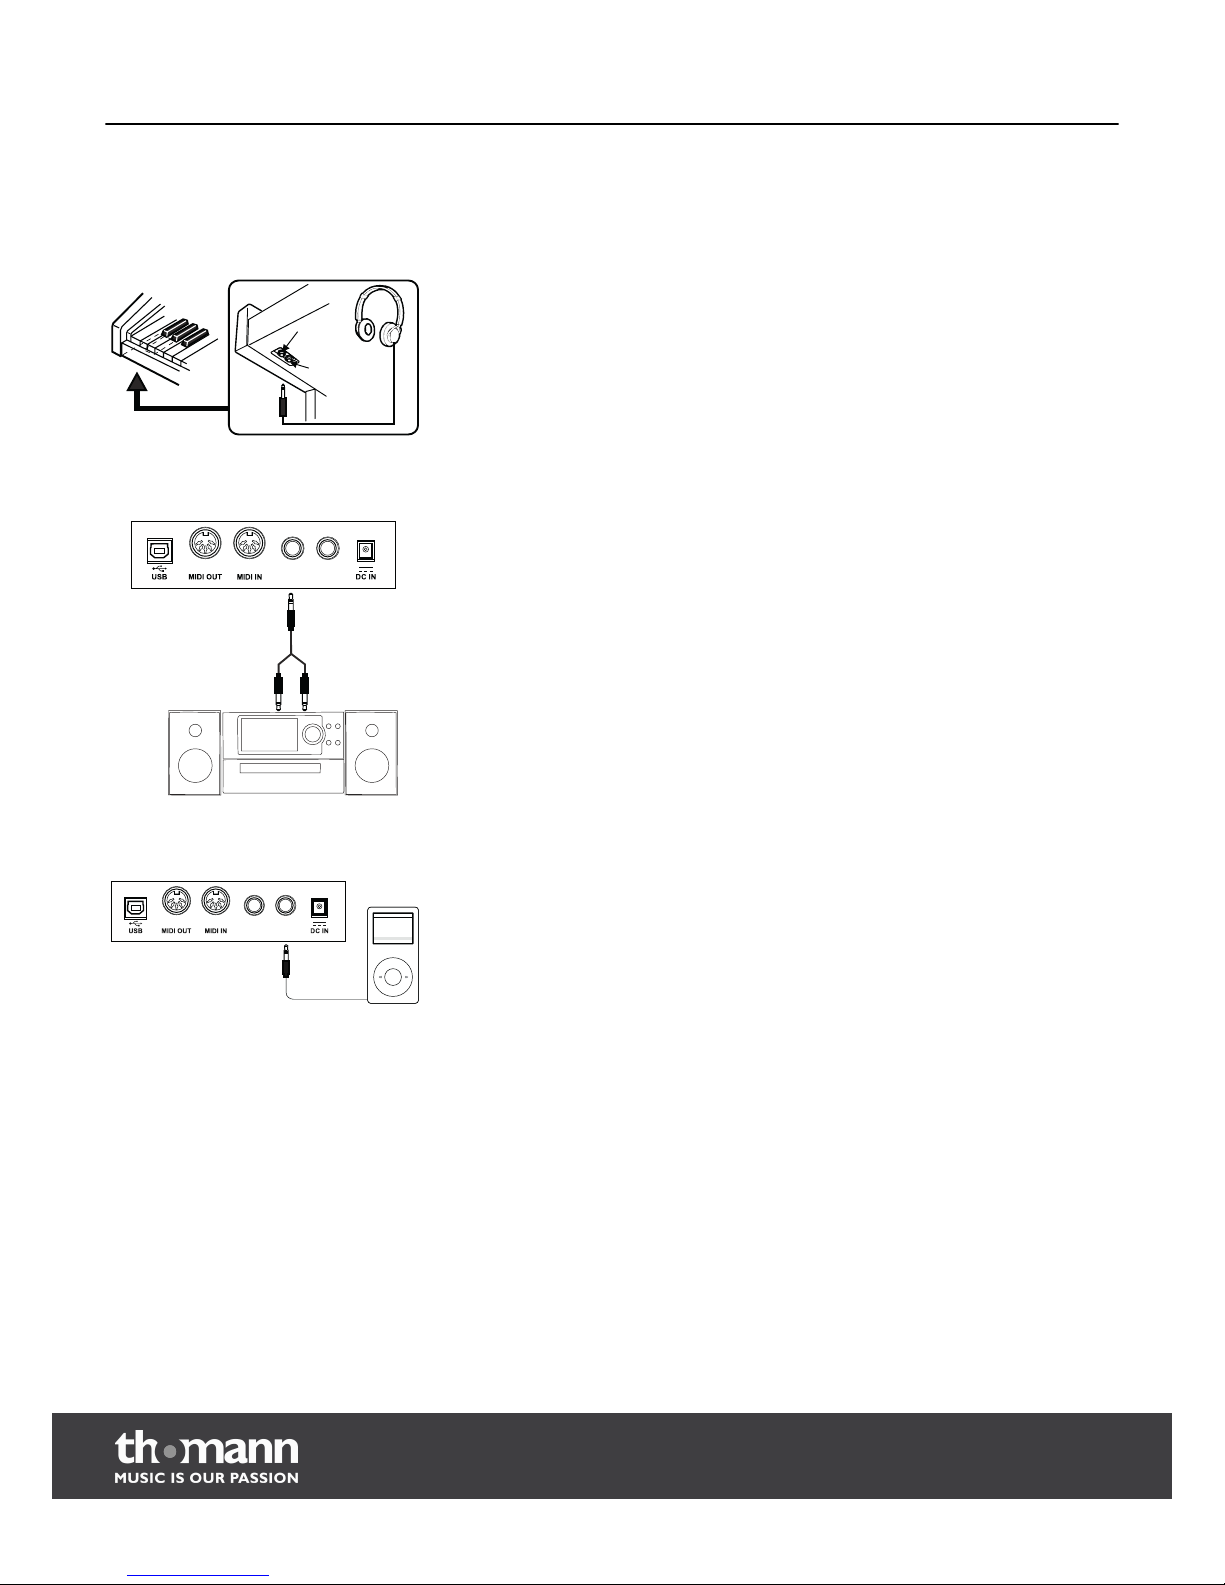
On the left, below the keyboard, there are the two headphone outputs 1 and 2.
If you connect headphones (not included) to output 2, this will deactivate the
speakers.
When using output 1, sound output through the speakers is retained.
Via the socket AUX. OUT, you may connect the digital piano to an amplifier, a stereo
system, a mixer or a recorder. Plug one end of the audio cable into the socket AUX.
OUT on the rear of the digital piano and the other end into the input of the corre‐
sponding audio device.
You can use the socket AUX. IN to connect, e.g., a CD or MP3 player to the digital
piano. This permits playback of songs via the internal speakers of the digital piano
while playing to them at the same time. Plug one end of the audio cable into the
socket AUX. IN on the rear of the digital piano and the other end into the output of
the corresponding audio device.
Headphones
Jack 1
Jack 2
External audio devices via the socket
AUX. OUT
AUX. OUT AUX. IN
External audio devices via the socket
AUX. IN
AUX. OUT AUX. IN
Connection options
digital piano
14
Page 15
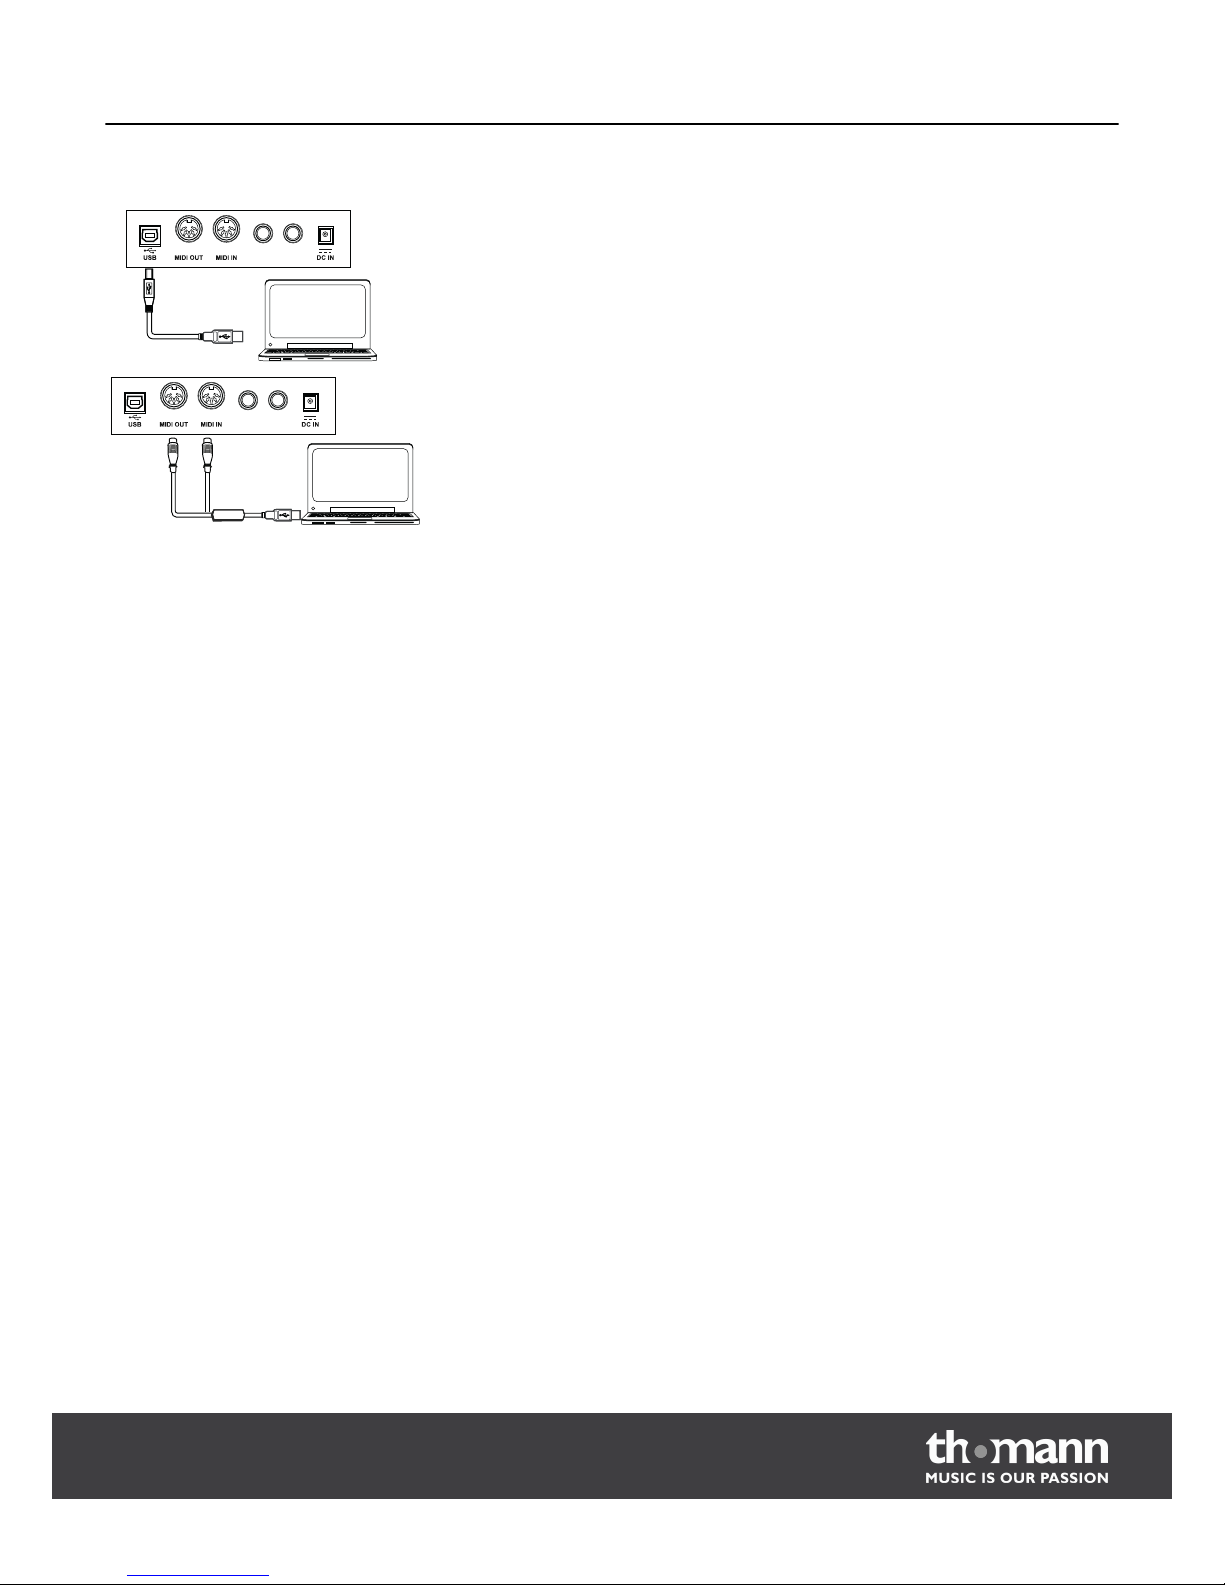
n USB/MIDI interface
The USB/MIDI interface is used to send and receive MIDI data.
n MIDI connections
MIDI means "Musical Instrument Digital Interface"; it is a global standard that
permits electronic interaction of many different instruments and sound modules.
– MIDI IN: This connection is used to receive MIDI data from other devices.
– MIDI OUT: The MIDI data generated by the digital piano are sent to other
MIDI-capable devices via this output.
Computer
AUX. OUT AUX. IN
AUX. OUT AUX. IN
Connection options
DP-90
15
Page 16
7
Functions
7.1
Adjust volume
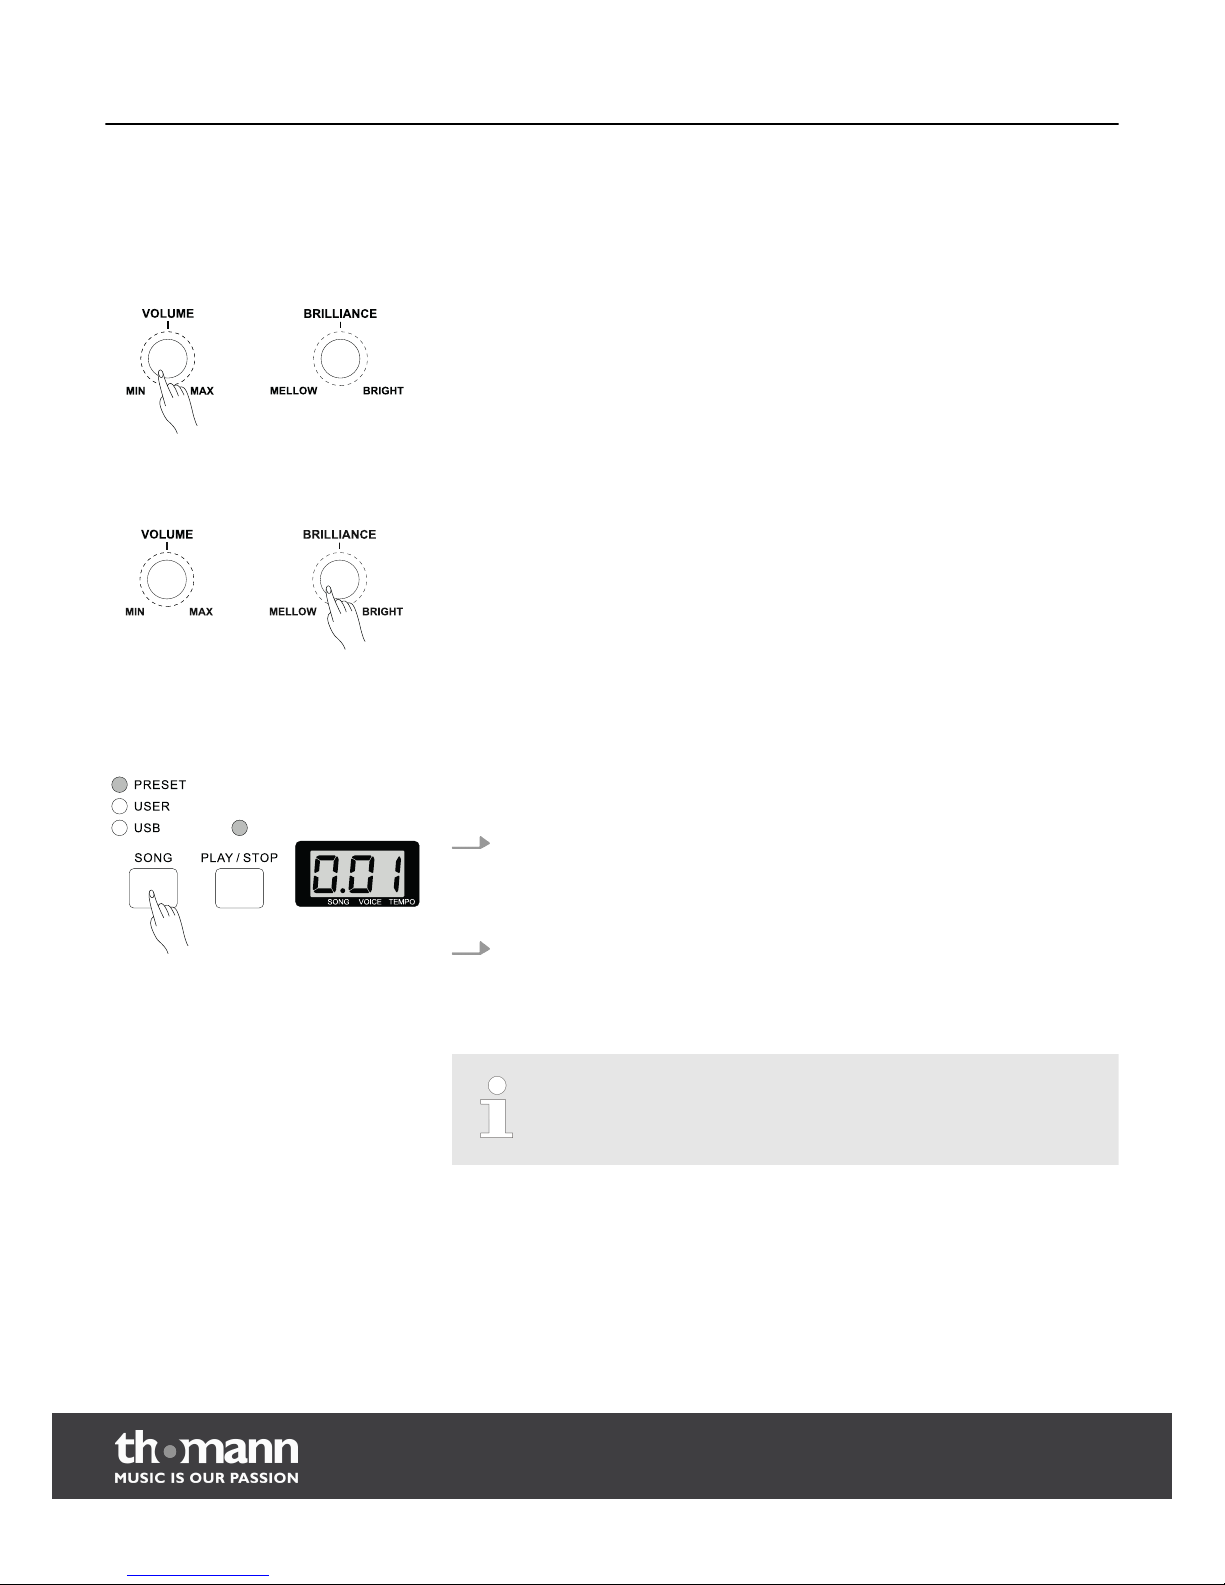
Use the knob control VOLUME (2) to set a volume that is comfortable for playback
and exercising. Turn the knob clockwise to increase volume. Turn it counter-clock‐
wise to reduce volume.
7.2
Set brightness
Use the knob control BRILLIANCE (3) to set the digital piano's sound brightness. The
sound turns softer and more mellow for the entire keyboard if you turn the control to
the left, brighter and more brilliant when you turn the control to the right. Try it out
until the sound is as you like it.
7.3
Songs
All in all, the digital piano offers 61 songs, including one that you may record on your
own. For more information, see
Ä
Chapter 8 ‘Songs and demo pieces’ on page 28
1. Play back songs in endless loop
Push the button [SONG] to switch to the mode for playing back songs. The text
‘SONG’ is lit on the LED and all songs are played back in an endless loop. The
number of the respective song is also displayed in the LED.
2. Single loop
If you start a song with the button [PLAY/STOP], this song is repeated until you
push [PLAY/STOP] again.
During playback of a song, the two-coloured display of the button
[PLAY/STOP] flashes at the rhythm and tempo of the song.
Play back song
Functions
digital piano
16
Page 17
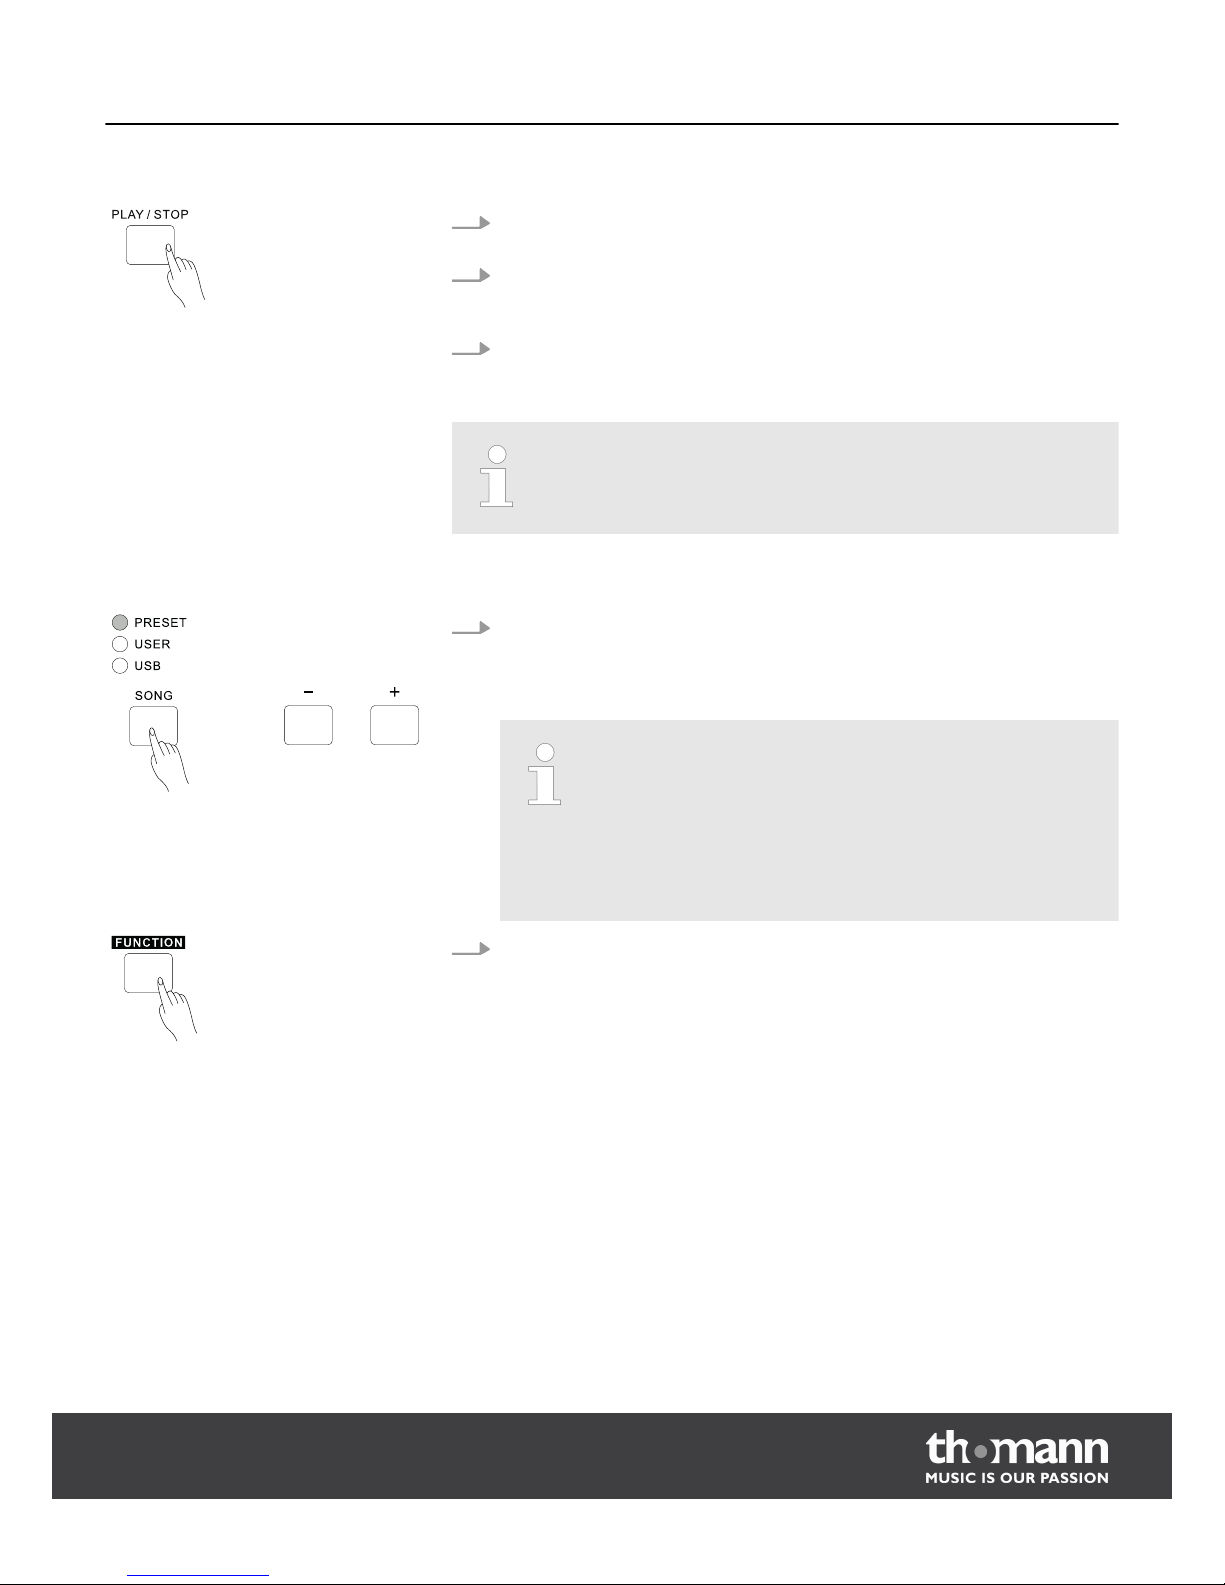
1. Push the button [PLAY/STOP] to terminate playback. The two-coloured display
stops flashing.
2. If you only have the included songs for the digital piano (i.e. no songs have
been recorded and no USB drive is connected), the button [SONG] can be
pushed to terminate playback of the currently played song.
3. Upon termination of playback, push a button for direct selection of an instru‐
ment voice to return to regular playing mode.
During and after completion of song playback, the digital piano can be
played as usual.
1. Select a source for song
During playback of a song, the source for the song can be changed by pushing
the button [SONG] repeatedly. The LED for the corresponding source ‘PRESET’,
‘USER’ or ‘USB’ lights up.
The source for songs can only be changed to ‘USB’ or ‘USER’ if a USB
drive is connected and recognised correctly, or if a song has already
been recorded.
If you only have the included songs for the digital piano (i.e. no songs
have been recorded and no USB drive is connected), the button
[SONG] will cause all songs to play back in an endless loop or termi‐
nate playback of the currently played song.
2. Select a song
Keep the button [FUNCTION] pushed and select a song with the buttons [+] or
[–].
Terminate playback
Select a song
Functions
DP-90
17
Page 18
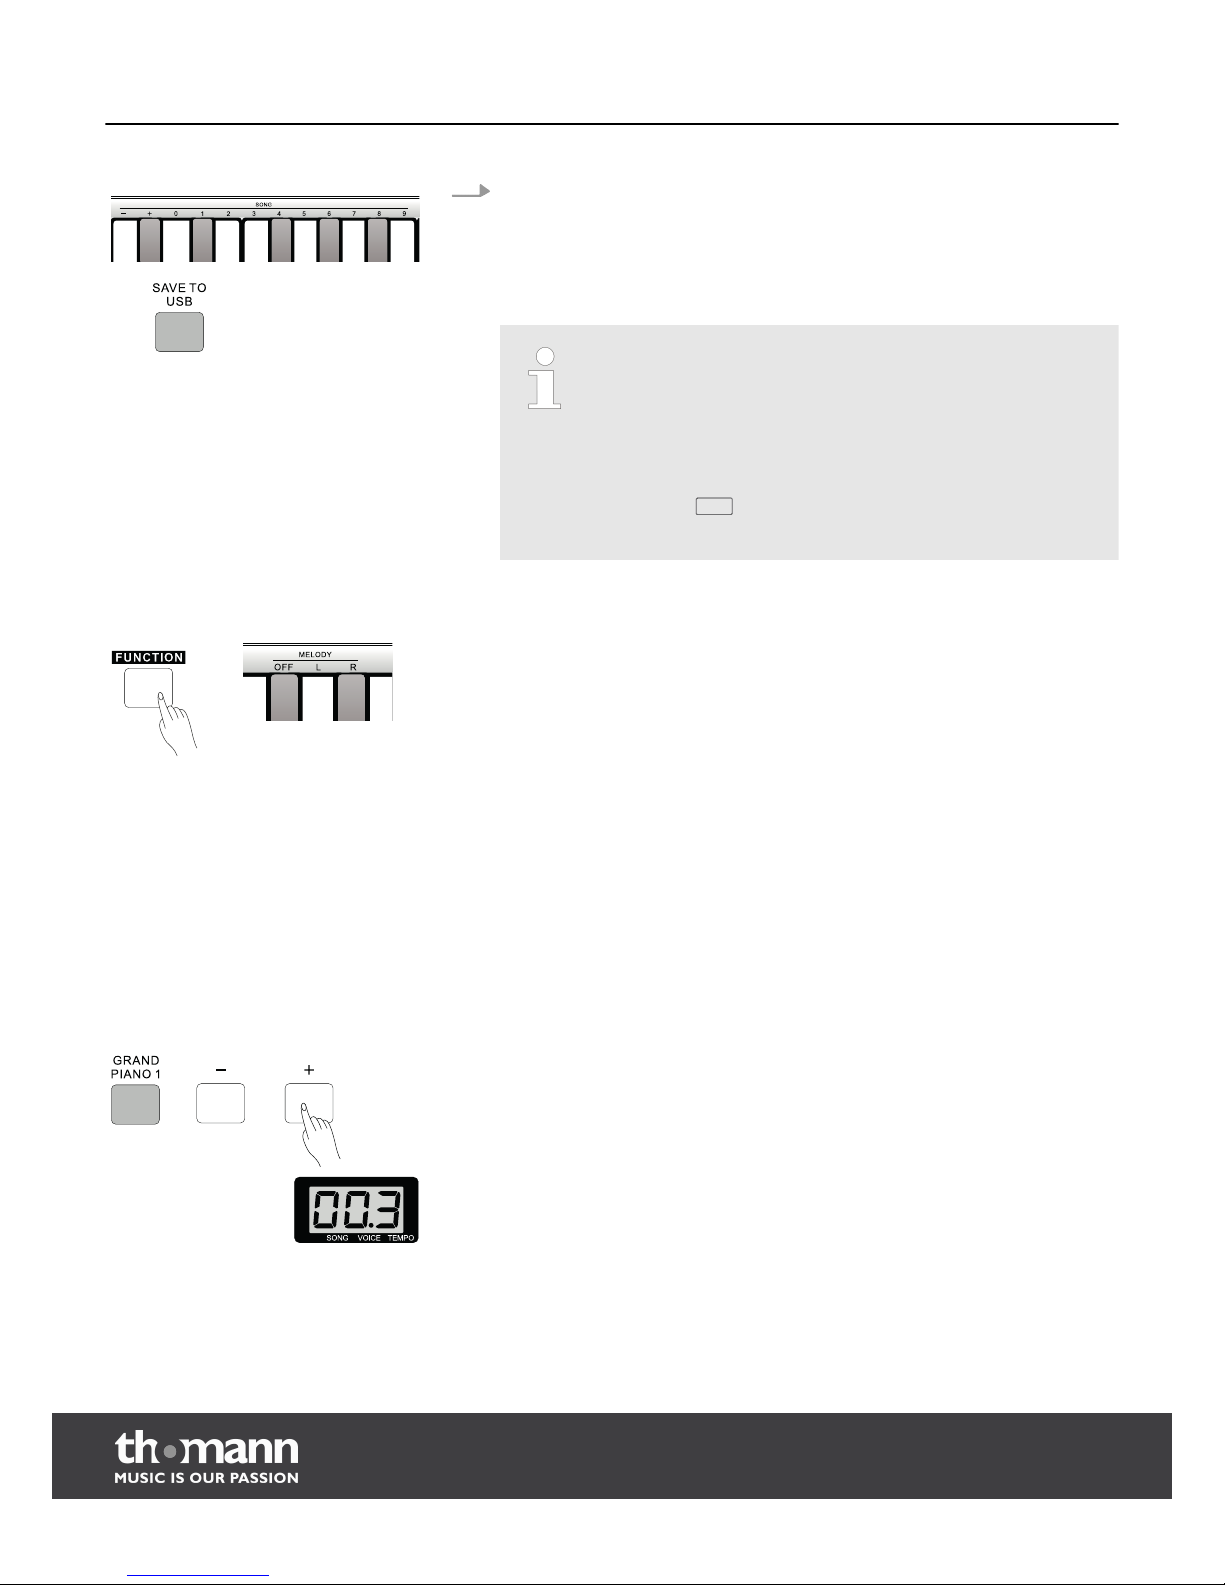
3. Select a song on the USB drive
When the digital piano has recognised the USB drive correctly, the display for
the button [SAVE TO USB] lights up. Now you may push the buttons [SONG] or
[PLAY/STOP] to play back the MIDI files in the root directory of the USB stick. If a
song is played back from the USB drive, you may select the MIDI files with the
buttons [+] or [–]. By default, the file number is ‘001’.
– Since the digital piano will recognise MIDI files only in the root
directory of the USB drive, you should put the files you want to
play there.
– The digital piano supports only MIDI files with up to 32 tracks. If a
MIDI file has more than 32 tracks, the song will be automatically
skipped in an endless loop and the next song will be played. In a
single loop, the song will not be played back and the LED display
will show
E r r
. Use the buttons [+] or [–] to select a different
song.
All 60 songs can be used for practice. Keep the button [FUNCTION] pushed in the
operating mode "SONG" and use the piano keys [L]/[R] in the area "MELODY" to select
the hand you want to practice. Push the button [OFF] to leave the practice mode
again.
7.4
Playing
The digital piano offers a selection of ten voices that can be selected right in the con‐
trol field, 128 General MIDI voices and nine additional drum sets. To use the voices
not directly available in the control field, you need to send the corresponding MIDI
bank or programme control commands to the digital piano via the MIDI-IN or USB/
MIDI interface. For detailed information on this, see
Ä
Chapter 9 ‘MIDI Implementation
table’ on page 35.
By default, the voice of the right hand is set to ‘001’.
Push one of the buttons in the control field for direct selection of an instrument
voice. In playing mode, you may also select the voice via the buttons [+]/[–]. When
the voice is selected, the number of the current voice and a dot behind the second
digit in the LED display will appear.
Practice songs
Select a voice
Functions
digital piano
18
Page 19
In playing mode, keep the button [FUNCTION] pushed and push one of the buttons in
the control field for direct selection of an instrument voice to start the demo piece for
the corresponding voice. To leave the demo mode, push one of the buttons in the
control panel to directly select an instrument voice. This selects the voice for the
right hand.
While a demo piece is played back, the buttons [SPLIT], [DUAL] and
[STRETCHED TUNING] have no function; the current setting for SPLIT and
the left hand remain unchanged, however.
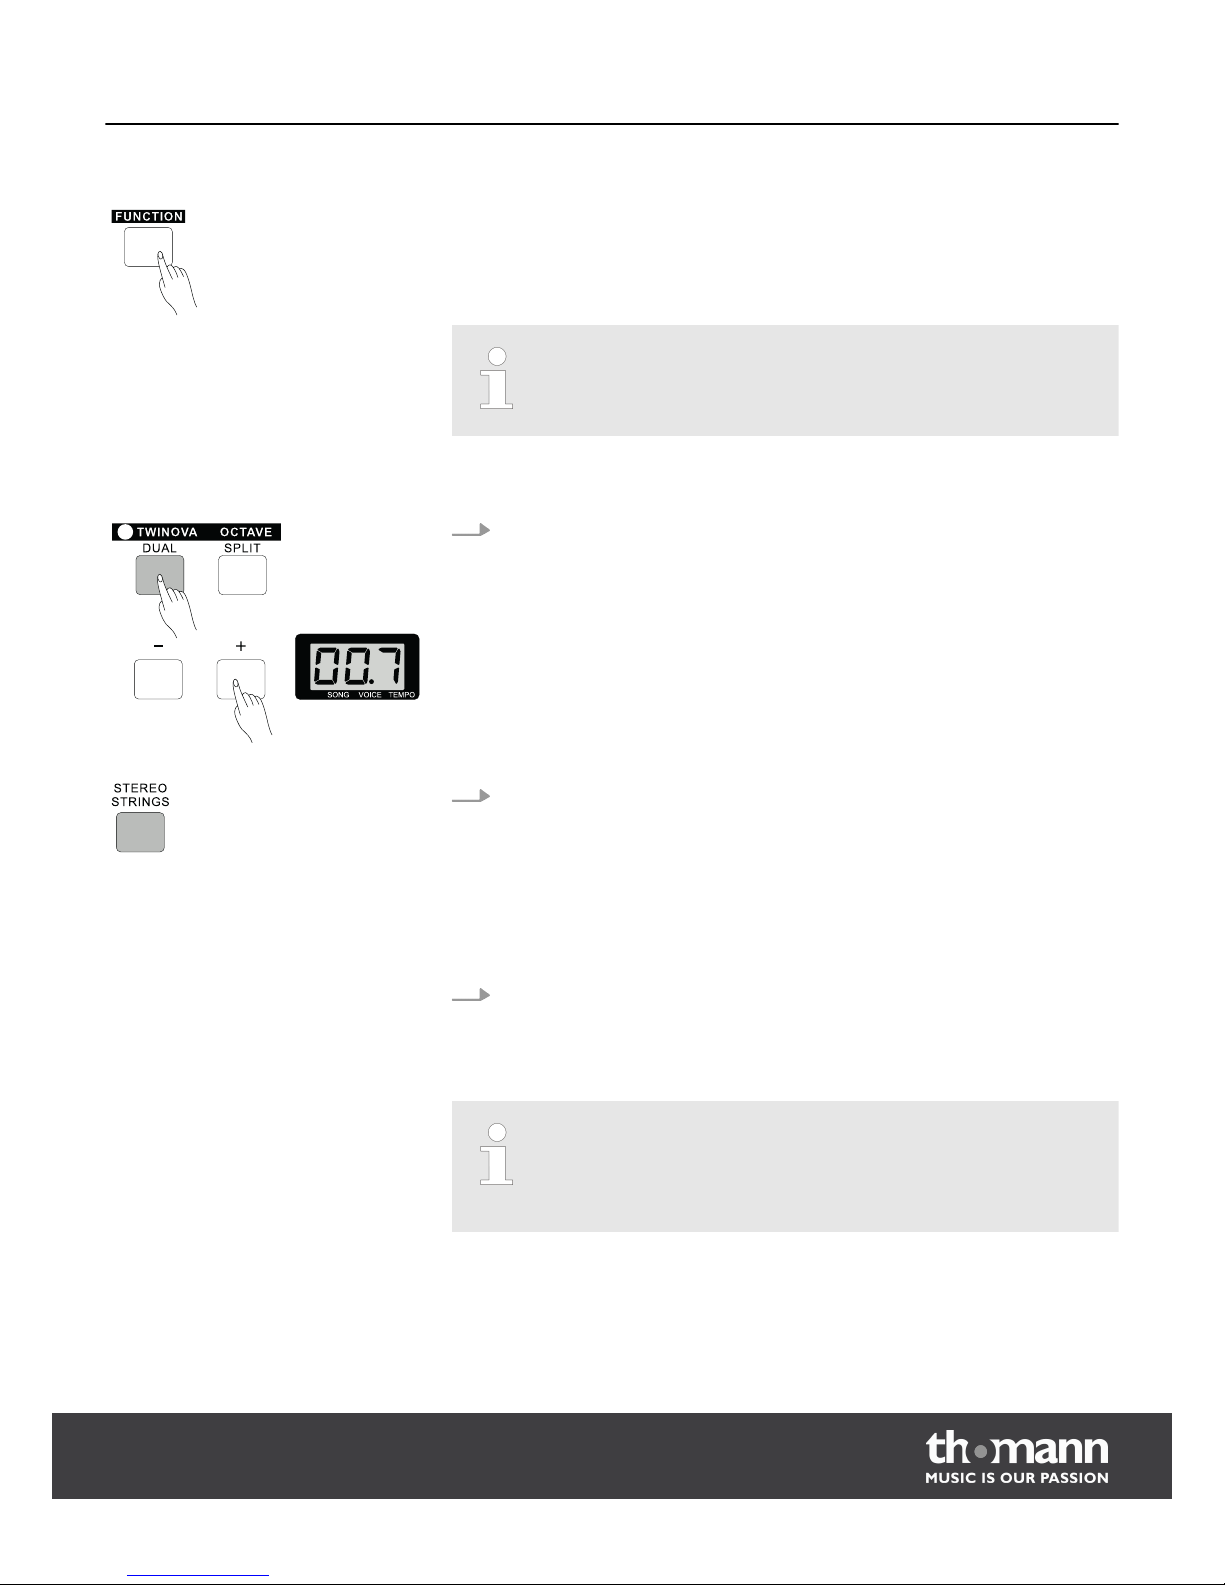
1. Activate/deactivate second voice
Push the button [DUAL] to activate or deactivate the second voice. The corre‐
sponding display for the button [DUAL] lights up or goes out.
2. Select the second voice
By default, the second voice is set to ‘007’ (string instruments).
Keeping the button [DUAL] pressed will briefly display the number of the cur‐
rent second voice in the LED display. Push one of the buttons in the control
field for direct selection of a second instrument voice. In this mode, you may
select the second voice via the buttons [+]/[–] as well. Pushing the button
[DUAL] again selects the mode for selection of the voice for the entire keyboard
again.
3. Playing two voices at once
If you have selected a first and a second voice in dual mode, you may play both
voices at once on the keyboard.
– You may only select a second voice if the display on the button [DUAL]
is lit. They will sound on the digital piano at once.
– When the voice for the left hand is active, the dual mode only applies
for the right-hand area.
Demo pieces
Two voices at once – dual mode
Functions
DP-90
19
Page 20
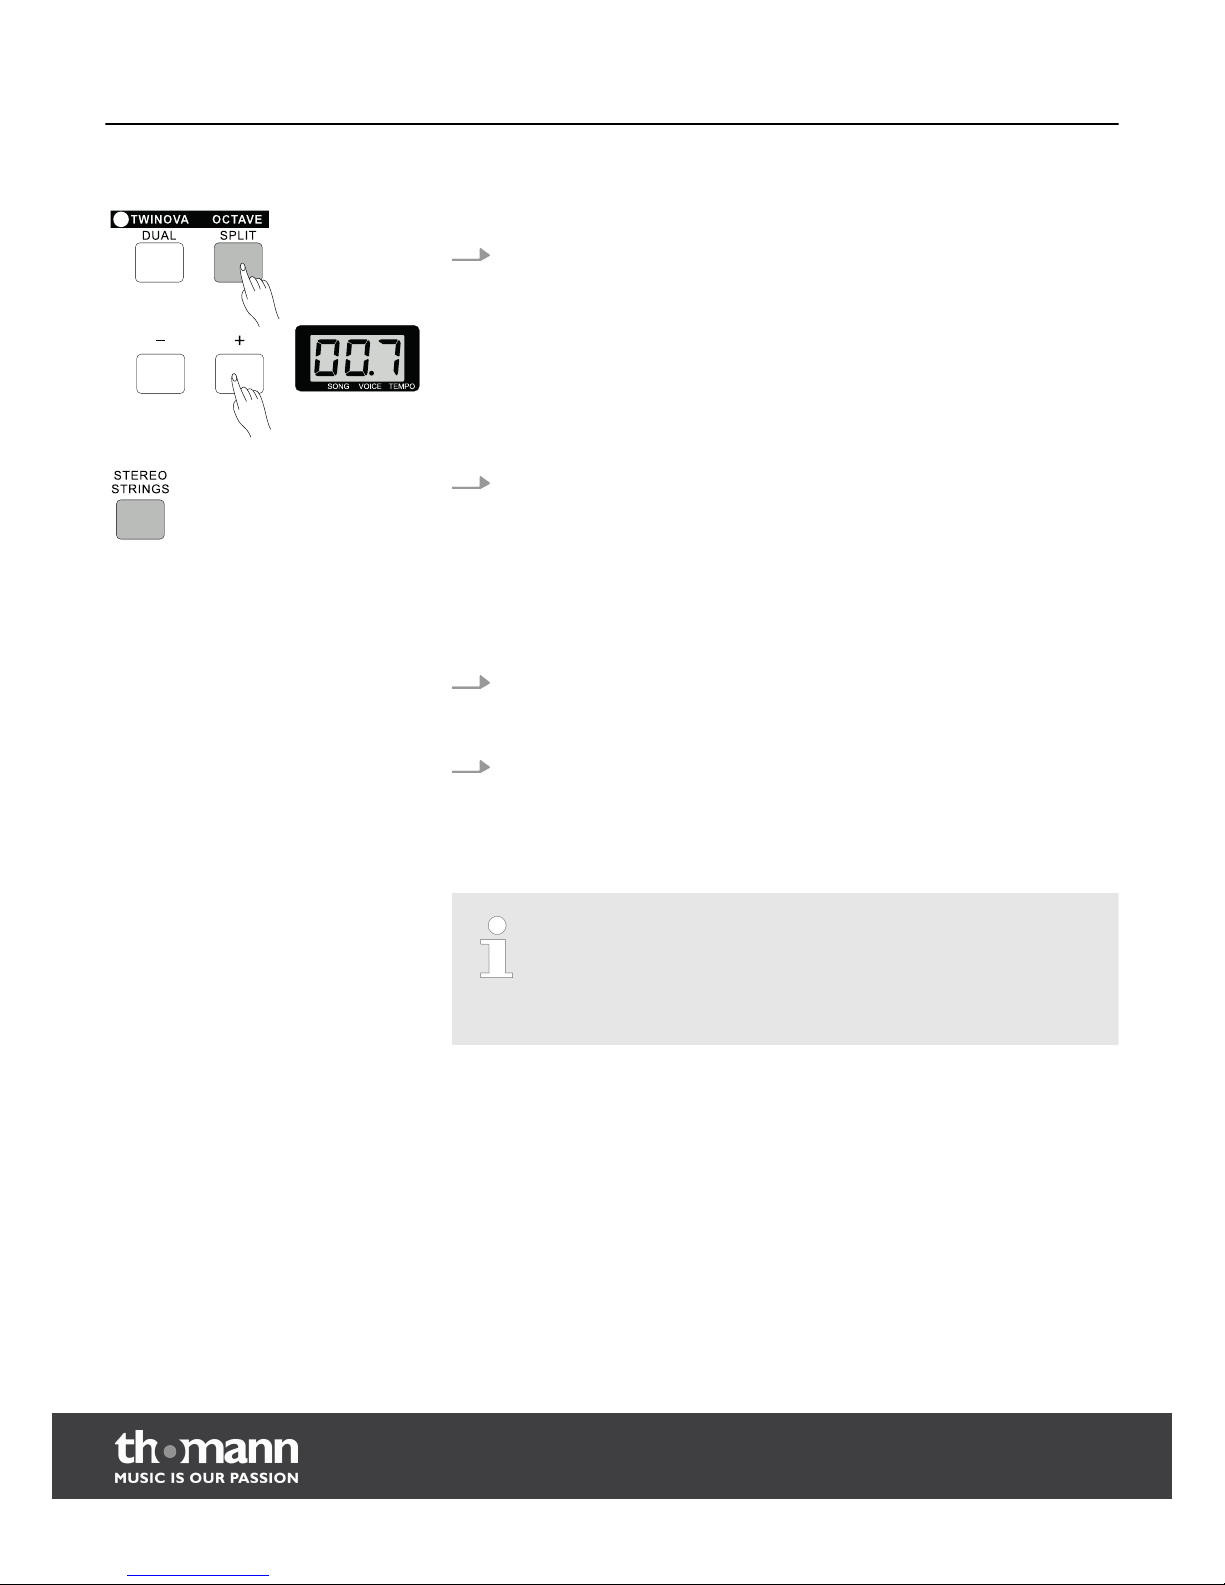
This function assigns different voices to the left and the right hand.
1. Activate/deactivate voice for the left hand
Push the button [SPLIT] to activate or deactivate the voice for the left hand. The
corresponding display for the button [SPLIT] lights up or goes out.
2. Select voice for the left hand
By default, the voice for the left hand is set to ‘007’ (string instruments).
Keeping the button [SPLIT] pushed will briefly display the number of the cur‐
rently selected voice for the left hand in the LED display. Push one of the but‐
tons in the operating field for direct selection of a voice for the left hand. In this
mode, you may also select the voice for the left hand via the buttons [+]/[–].
Pushing the button [SPLIT] again selects the mode for selection of the voice for
the entire keyboard again.
3. Playing voice for the left hand
If you have selected a voice for the left hand in this mode, you may play dif‐
ferent voices on the keyboard at once.
4. Split point
Keep the button [SPLIT] pushed and push a piano key. This specifies the split
point, i. e. the keyboard area to the left of this point applies for the left hand
and the keyboard area to the right of this point applies for the right hand.
– You will only be able to select a voice for the left hand if the display on
the button [SPLIT] is lit. It will then sound at once on the digital piano.
– The point on the keyboard that separates the left-hand area from the
right-hand area is referred to as the "split point". By default, the split
point is specified at key F#3 (34).
7.5
Recording a song
You may record a song with the digital piano. The recorded data will be retained
when you switch off the digital piano.
Voice for the left hand
Functions
digital piano
20
Page 21
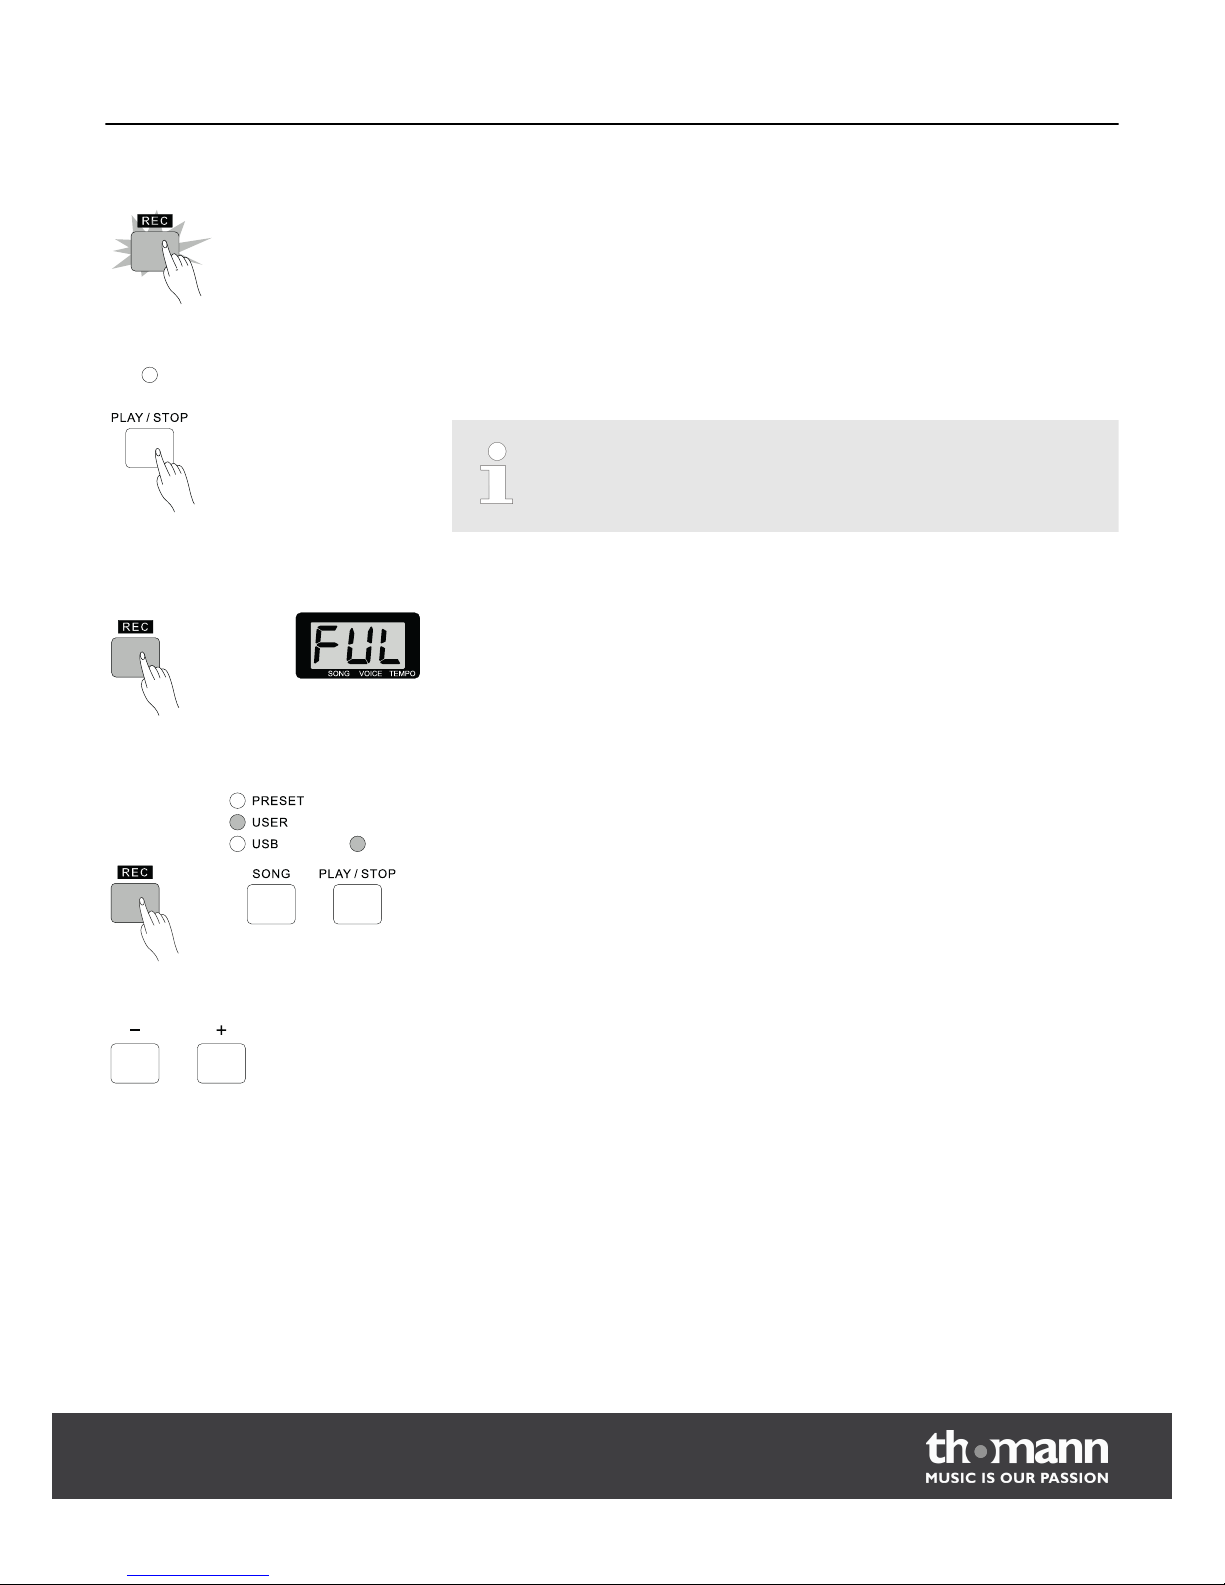
Push the button [REC]. The display on the button flashes. This means that the digital
piano is ready to record and you can set some parameters.
Push the button [PLAY/STOP] when the digital piano is ready for recording to start
recording.
If you have already recorded a song, it will be automatically overwritten.
Push the button [REC] during the recording to terminate the recording and save the
file. When the full memory capacity has been reached, the recording is terminated
automatically and the recorded data is saved. During saving, the display flashes
quickly. The display shows ‘FUL’. After saving is completed, the display goes out and
you can play back the recorded song.
During the recording, push the button [REC] to terminate the recording and start the
playback mode. The recorded song is played back in a loop and the display ‘USER’
lights up. If a song has already been recorded and you push the button [REC] again
with the piano ready to record, you will leave the recording mode and automatically
switch to the playback mode. The recorded song is played back.
Keep the buttons[+]/[–] pushed when switching on to delete the recording.
Prepare recording
Start recording
Terminate recording
Play back the recording
Delete recording
Functions
DP-90
21
Page 22
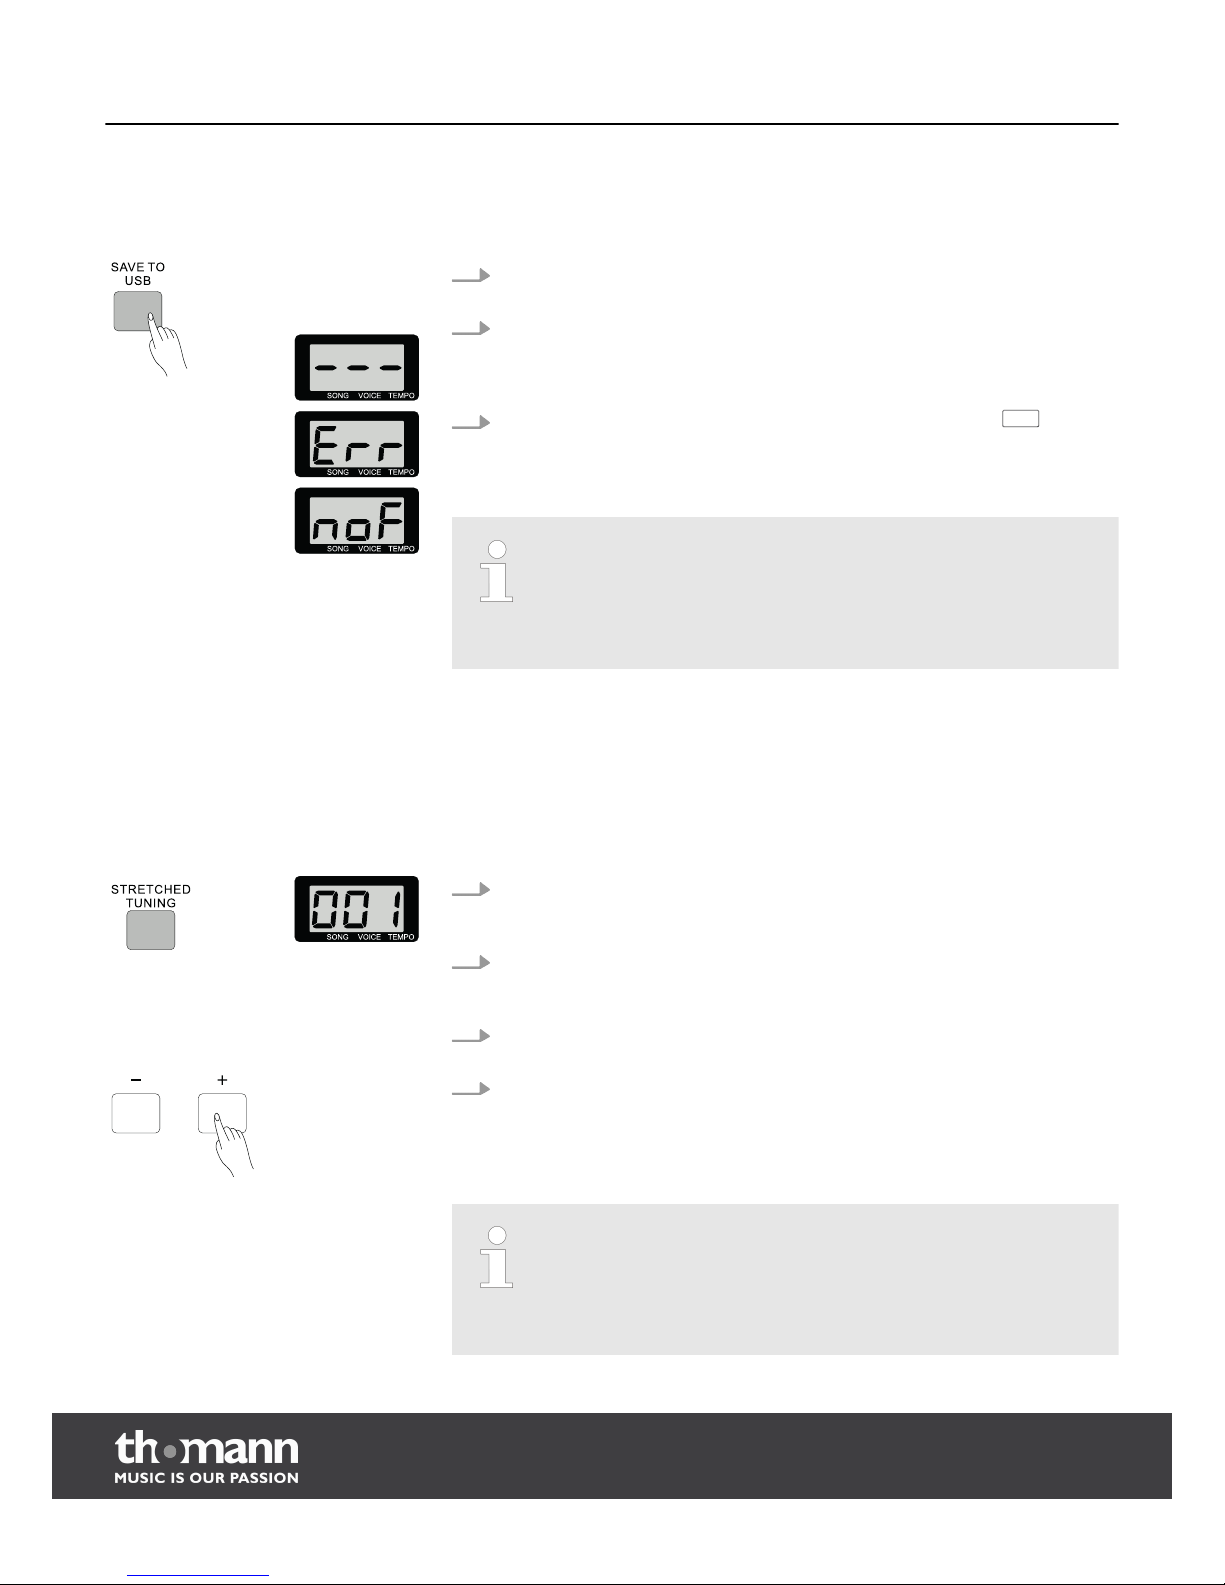
You may save the recording as a MIDI file in the root directory of the USB drive and
then play it back on a MIDI player. Proceed as follows:
1. When the digital piano has recognised the USB drive correctly, the display for
the button [SAVE TO USB] lights up.
2. Push the button [SAVE TO USB]. The recording is automatically saved as a MIDI
file in the root directory of the USB drive. During saving, the LED display ‘---’
appears. After completion of saving, the digital piano switches to automatic
deactivation mode.
3.
If you push the button [SAVE TO USB] and the LED display shows
E r r
, this
means that saving has failed. Try another USB drive or format the USB drive
and try again from step 1.
– If you push the button [SAVE TO USB] although there is no recording,
the LED display will briefly show ‘noF’, i.e. no file can be saved.
– If the LED display shows ‘---’, the data is saved. To avoid data loss, do
not remove the USB drive during this process and do not switch off the
digital piano.
7.6
Historic temperaments
This function permits experimentation with different historic temperaments if you
are playing certain types of music that were not composed based on equal tempera‐
ment.
1. Push the button [STRETCHED TUNING] to switch to the mode for historic tem‐
peraments. The display for the button lights up. By default, the historic tem‐
perament set is ‘001’ (Pythagoras).
2. In addition to the equal temperament, six other historic temperaments are
available. They are: Pythagoras, pure major, pure minor, meantone, Werck‐
meister and Kirnberger.
3. Push the button [STRETCHED TUNING] to leave the mode for historic tempera‐
ments. The display for the button goes out.
4. Keep the button [STRETCHED TUNING] pushed in the mode for historic tem‐
peraments to switch to the mode for selection of the historic temperament.
Use the buttons [+]/[–] to select the historic temperament displayed in the LED
display and the piano keys C7 to B7 to determine the root note of the key.
– Historic temperaments and the root note can only be selected if the dis‐
play for the button [STRETCHED TUNING] is lit. Then the historic tem‐
perament sounds on the digital piano.
– The historic temperament is automatically deactivated once the digital
piano switches to the mode for song playback.
Save recording to USB drive
Functions
digital piano
22
Page 23
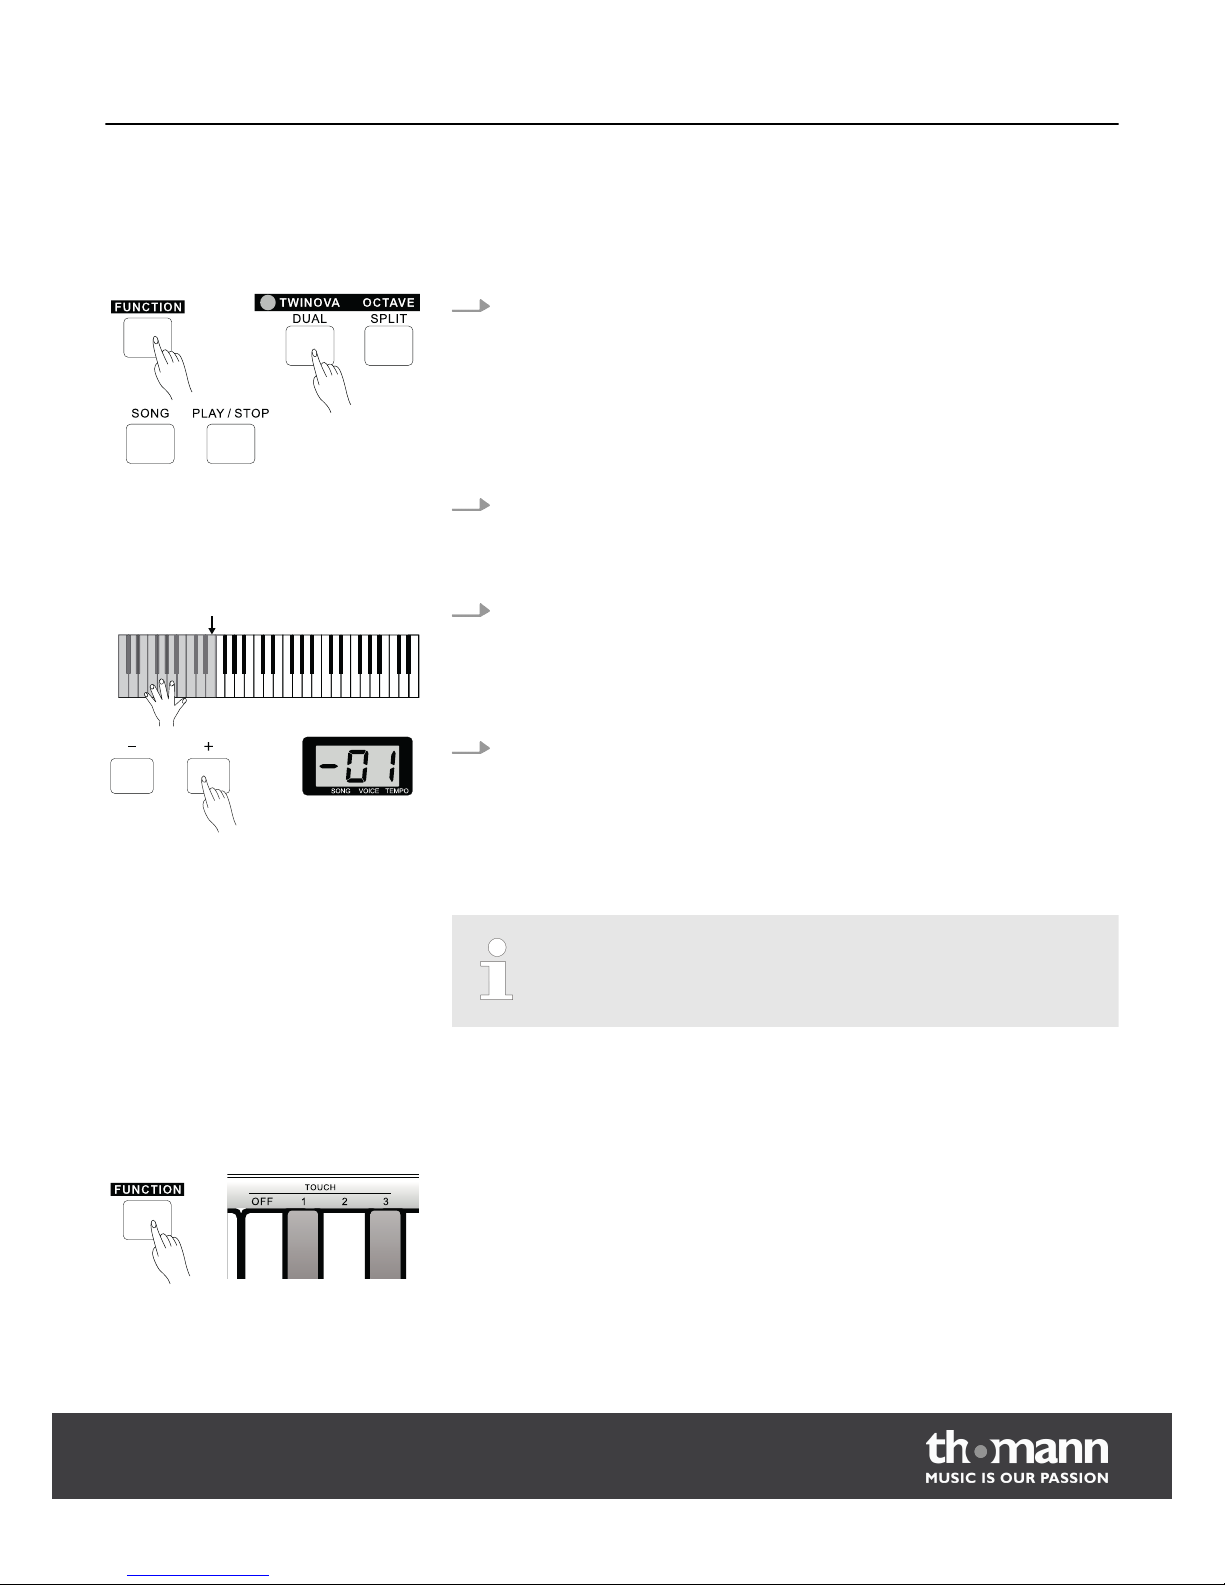
7.7
TWINOVA
In the TWINOVA mode, the keyboard is split into two areas with the same voice and
pitch.
1. Activate or deactivate TWINOVA.
Keep the button [FUNCTION] pushed and push the button [DUAL] to switch to
the mode TWINOVA. The display for this button lights up.
Keep the button [FUNCTION] pushed and push the button [DUAL] again to
leave the TWINOVA mode again. The display for this button goes out. You may
also push the buttons [SONG] or [PLAY/STOP] to leave the mode again and to
switch to the mode for song playback. In TWINOVA mode, the buttons [DUAL]
and [SPLIT] are deactivated. The split point is set to E3 (32) by default.
2. Select voice
Selecting the TWINOVA mode means that there is no difference between the
voices for the left and right hand. The buttons for direct voice selection or the
buttons [+]/[–] can be used to select the voices.
3. Set the split point
Keep the button [SPLIT] pushed in TWINOVA mode and push a piano key in the
area from C3 to C6 to set the split point for TWINOVA.
Push the button [SPLIT] again to leave the mode for setting the split point
again.
4. Octave transfer
In TWINOVA mode, keep the button [FUNCTION ] pushed and push the button
[SPLIT] to briefly switch to the octaviation mode of TWINOVA. The LED display
shows the octaviation value of TWINOVA. The buttons [+]/[–] can be used to
set the activation value of TWINOVA. If no setting is made within three sec‐
onds, the digital piano will automatically return to the TWINOVA mode.
TWINOVA is not available in the mode for song playback.
7.8
Touch sensitivity
Use this function to set the response behaviour of the keyboard in four different
stages. Keep the button [FUNCTION] pushed and push a piano key in the area
"TOUCH" to set the touch sensitivity.
The default split point is E3 32
Functions
DP-90
23
Page 24
Parameter Meaning
Piano key [OFF] Touch sensitivity off. This can be very useful
when using the organ voice.
Piano key [1] Soft
In this setting, the volume is louder than usual
even at a soft touch.
Piano key [2] Normal
Setting that corresponds to the usual response
behaviour of a keyboard.
Piano key [3] Hard
In this setting, the volume is lower than usual
even at a hard touch.
7.9
Digital effects
Use the following functions to simulate acoustic effects under different ambience
conditions.
Keep the button [FUNCTION] pushed and push the corresponding piano keys in the
areas "REVERB" and "CHORUS" to set the corresponding reverb and chorus effects.
Parameter Meaning for REVERB Meaning for CHORUS
Piano key [OFF] Echo effect off Chorus effect off
Piano key [1] Room Slight chorus effect
Piano key [2] Small concert hall Medium chorus effect
Piano key [3] Large concert hall Strong chorus effect
Piano key [4] Stadium Flanger
By default, the reverb effect is set to ‘2’ (small concert hall) and the chorus
effect is switched off.
Functions
digital piano
24
Page 25
7.10
Metronome
The metronome function can be helpful when practicing or recording songs.
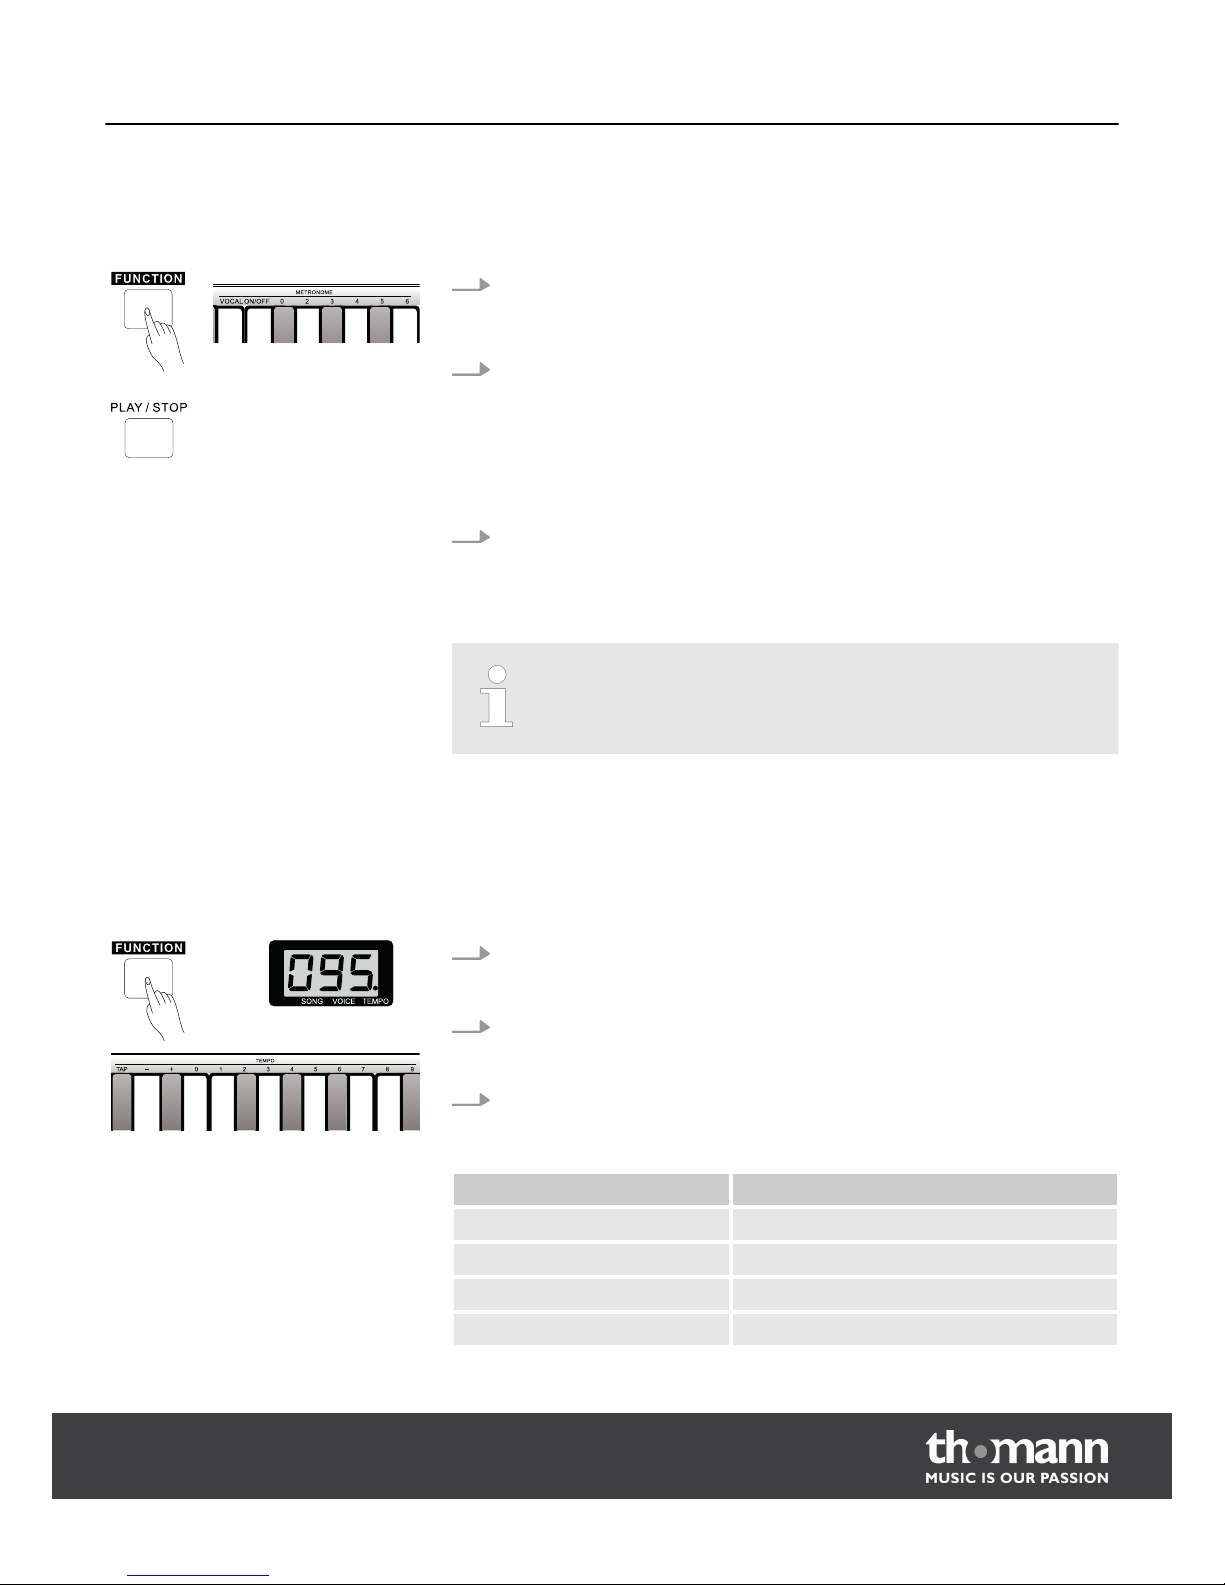
1. Switch on metronome
Keep the button [FUNCTION] pushed and push the piano key [ON/OFF] in the
METRONOME area to switch the metronome on or off.
2. Select time signature
Keep the button [FUNCTION] pushed und and select the desired time signature
with the corresponding piano key in the keyboard area METRONOME. The fol‐
lowing settings are possible: 0 (continuous metronome without emphasis of a
metering time), 2 (measure with two beats), 3 (measure with three beats), 4
(measure with four beats), 5 (measure with five beats), 6 (measure with six
beats).
3. Select metronome voice
Keep the button [FUNCTION] pushed and push the piano key [VOCAL] to select
the metronome voice. You may select a human voice or a regular voice.
The metronome function is not available in playback mode.
7.11
Set tempo
The tempo can be set in the range of 30 to 280 beats per minute. During setting, the
current value and a dot behind the third digit appear in the LED display.
1. Keep the button [FUNCTION] pushed and push the corresponding key in the
TEMPO selection area. You may change the tempo by entering it as figures
(from 0 to 9) with the piano key [TAP] or the piano keys [+]/[–].
2. Keep the button [FUNCTION] pushed and push the key [TAP] in the TEMPO
selection area within three seconds. The metronome will start with the cur‐
rently set tempo.
3. Keep the button [FUNCTION] pushed and push the keys [+] and [–] in this area
at the same time to set the tempo to ‘120’ .
Parameter Meaning
Piano key [TAP] Quick-setting tempo
Piano key [+] Increase tempo by one unit.
Piano key [–] Reduce tempo by one unit.
Piano key [0] to [9] Enter tempo as a figure with three digits.
Functions
DP-90
25
Page 26
7.12
Transpose
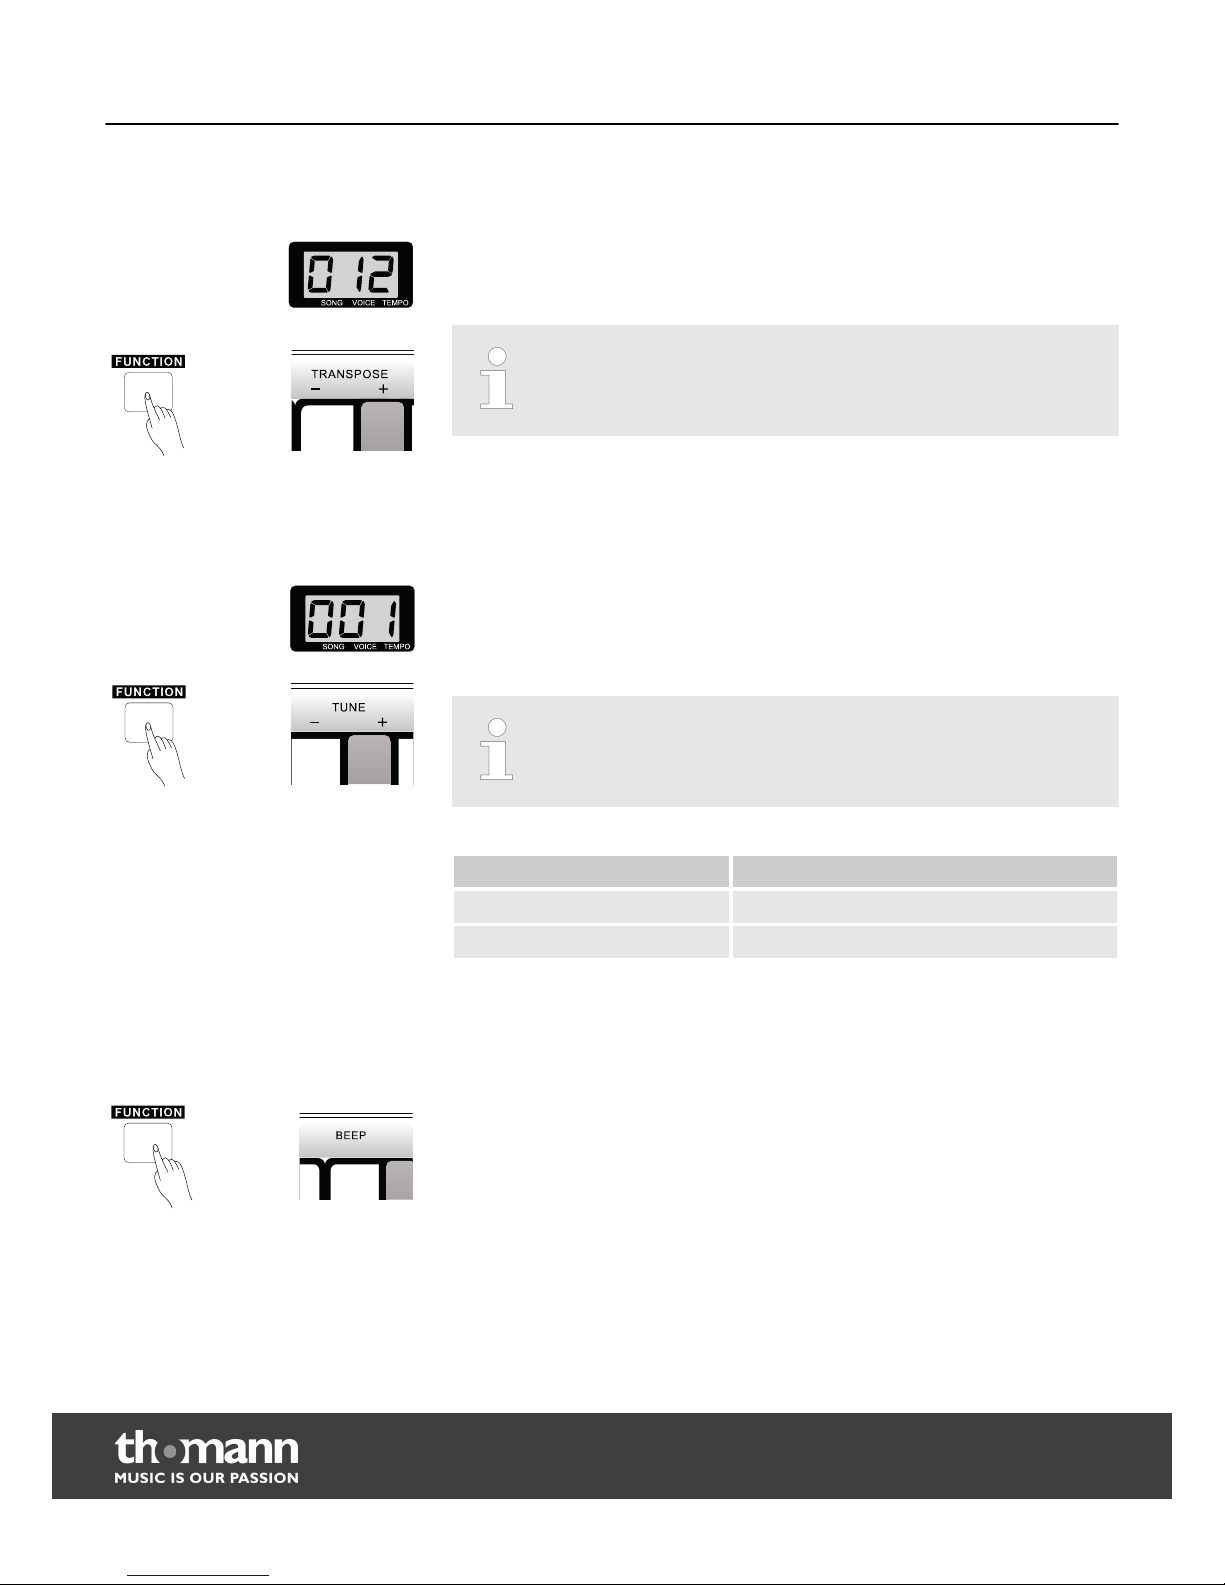
This function permits adjustment of the keyboard pitch in 12 semitones up or down.
Keep the button [FUNCTION] pushed and push the keys [+] or [–] in the area TRANS‐
POSE to adjust the pitch by one semitone up or down with each push of a button.
Push the buttons [+] and [–] in this area at the same time to restore the presetting ‘0’ (no transposition).
7.13
Fine tuning
This function permits very fine tuning of the pitch.
Keep the button [FUNCTION] pushed and push the keys [+] or [–] in the area TUNE to
adjust the pitch up or down by one unit in the area from ‘-50’ to ‘+50’ with each
push of the button. This corresponds to a pitch change of -100 to +100 cents, i.e., one
semitone up or down.
Push the buttons [+] and [–] in this area at the same time to restore the
default setting ‘0’ (no fine tuning).
Parameter Meaning
Piano key [+] Increase pitch by one unit.
Piano key [–] Reduce pitch by one unit.
7.14
Beep
This function switches the button tone on or off. By default, the button tone is on.
Keep the button [FUNCTION] pushed and push the key [BEEP] to switch the button
tone on or off.
Keeping the button [FUNCTION] pushed and switching on the button tone will cause
a tone to be issued every time you push a function button.
Functions
digital piano
26
Page 27
7.15
Automatic switch-off
With the automatic switch-off active, the digital piano is automatically switched off
after a certain time. By default, this takes place after 30 minutes.
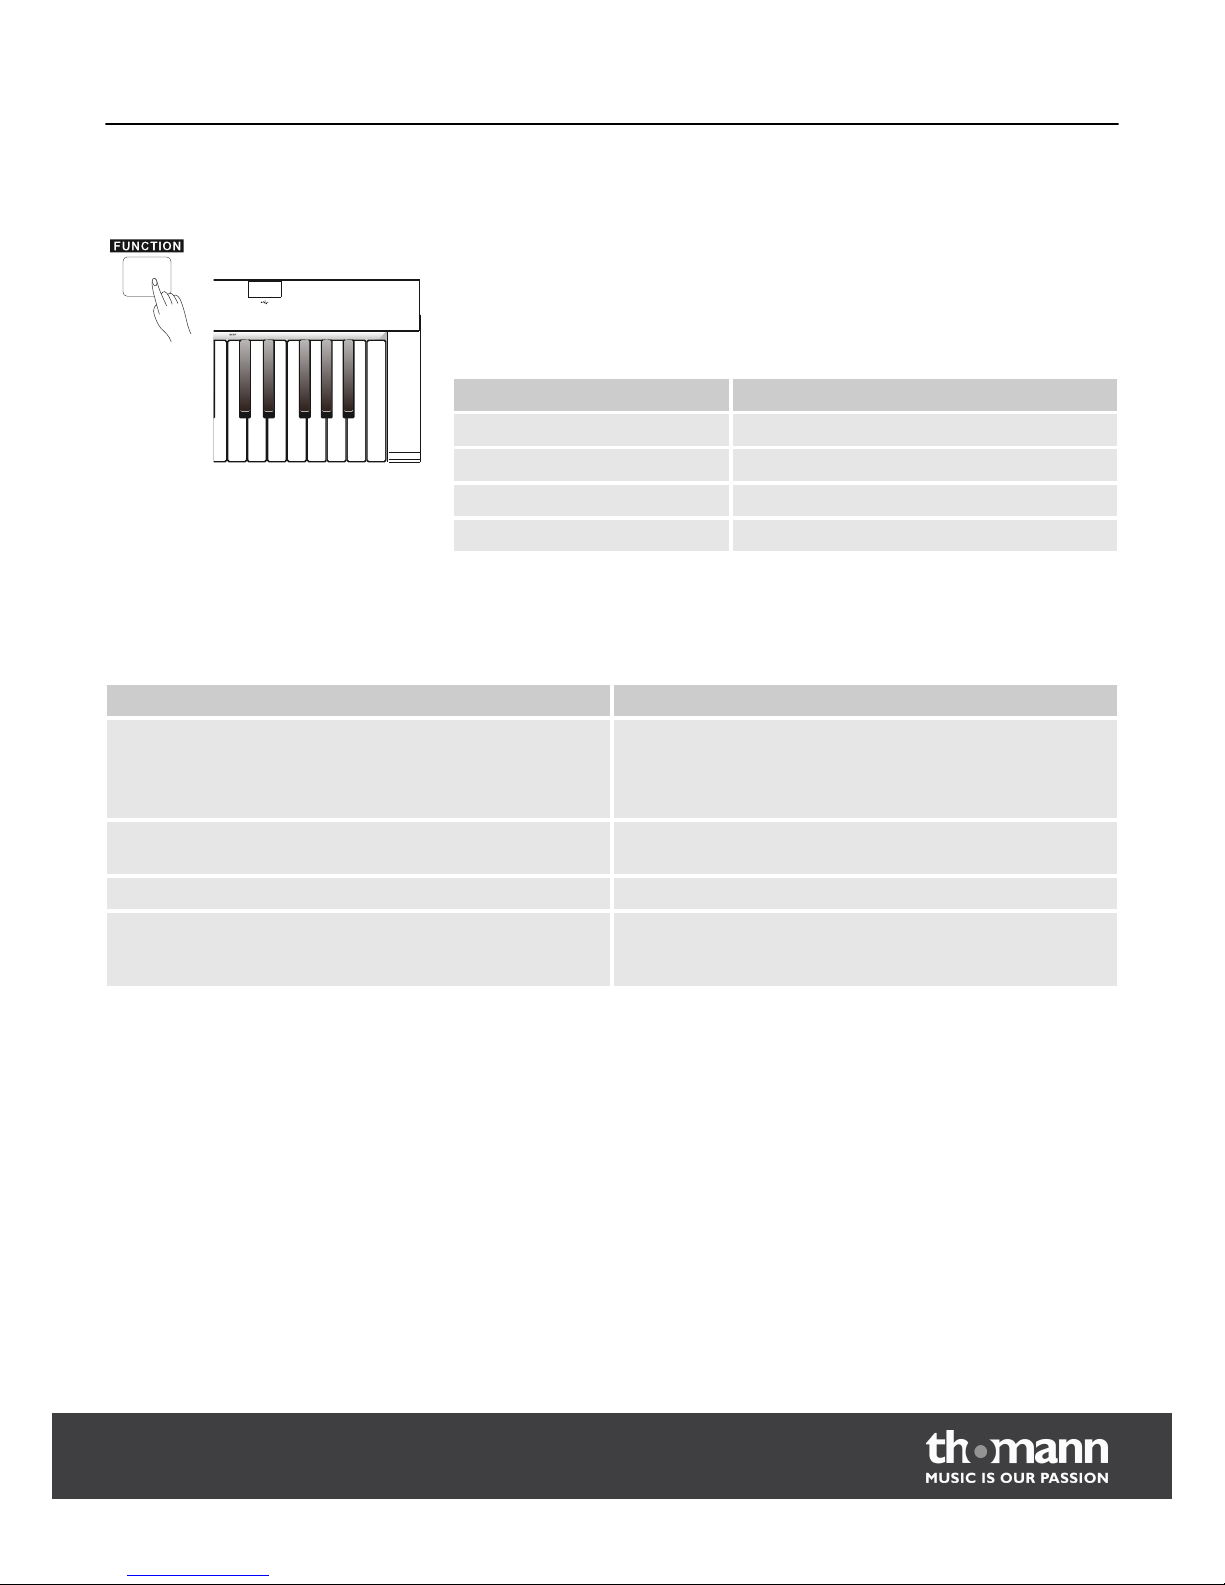
Keep the button [FUNCTION] pushed and push a piano key in the area of A7 to C8 to
set the time for the automatic switch-off.
Parameter Meaning
Piano key [A7] Automatic switch-off deactivated.
Piano key [A#7] Switch off after 5 minutes.
Piano key [B7] Switch off after 15 minutes.
Piano key [C8] Switch off after 30 minutes.
7.16
Troubleshooting
Problem Possible causes and solutions
A connected USB drive is not recognised and the display for
the button [SAVE TO USB] is not lit.
n Check that the USB drive was pushed onto the piano inter‐
face correctly.
n Check that the USB drive is OK. Re-format the drive with a
computer and try again or use another USB drive.
When switching the digital piano on and off, the speakers
make a "pop" sound.
This is normal. No reason for concern.
No sound is heard when playing on the keyboard. Ensure that the volume controller is set accordingly.
Using a mobile phone causes interference. Using a mobile phone close to the digital piano may cause
interferences. To avoid this, switch off your mobile phone or
use it only at a corresponding distance.
A7
A#7
B7
C8
Functions
DP-90
27
Page 28
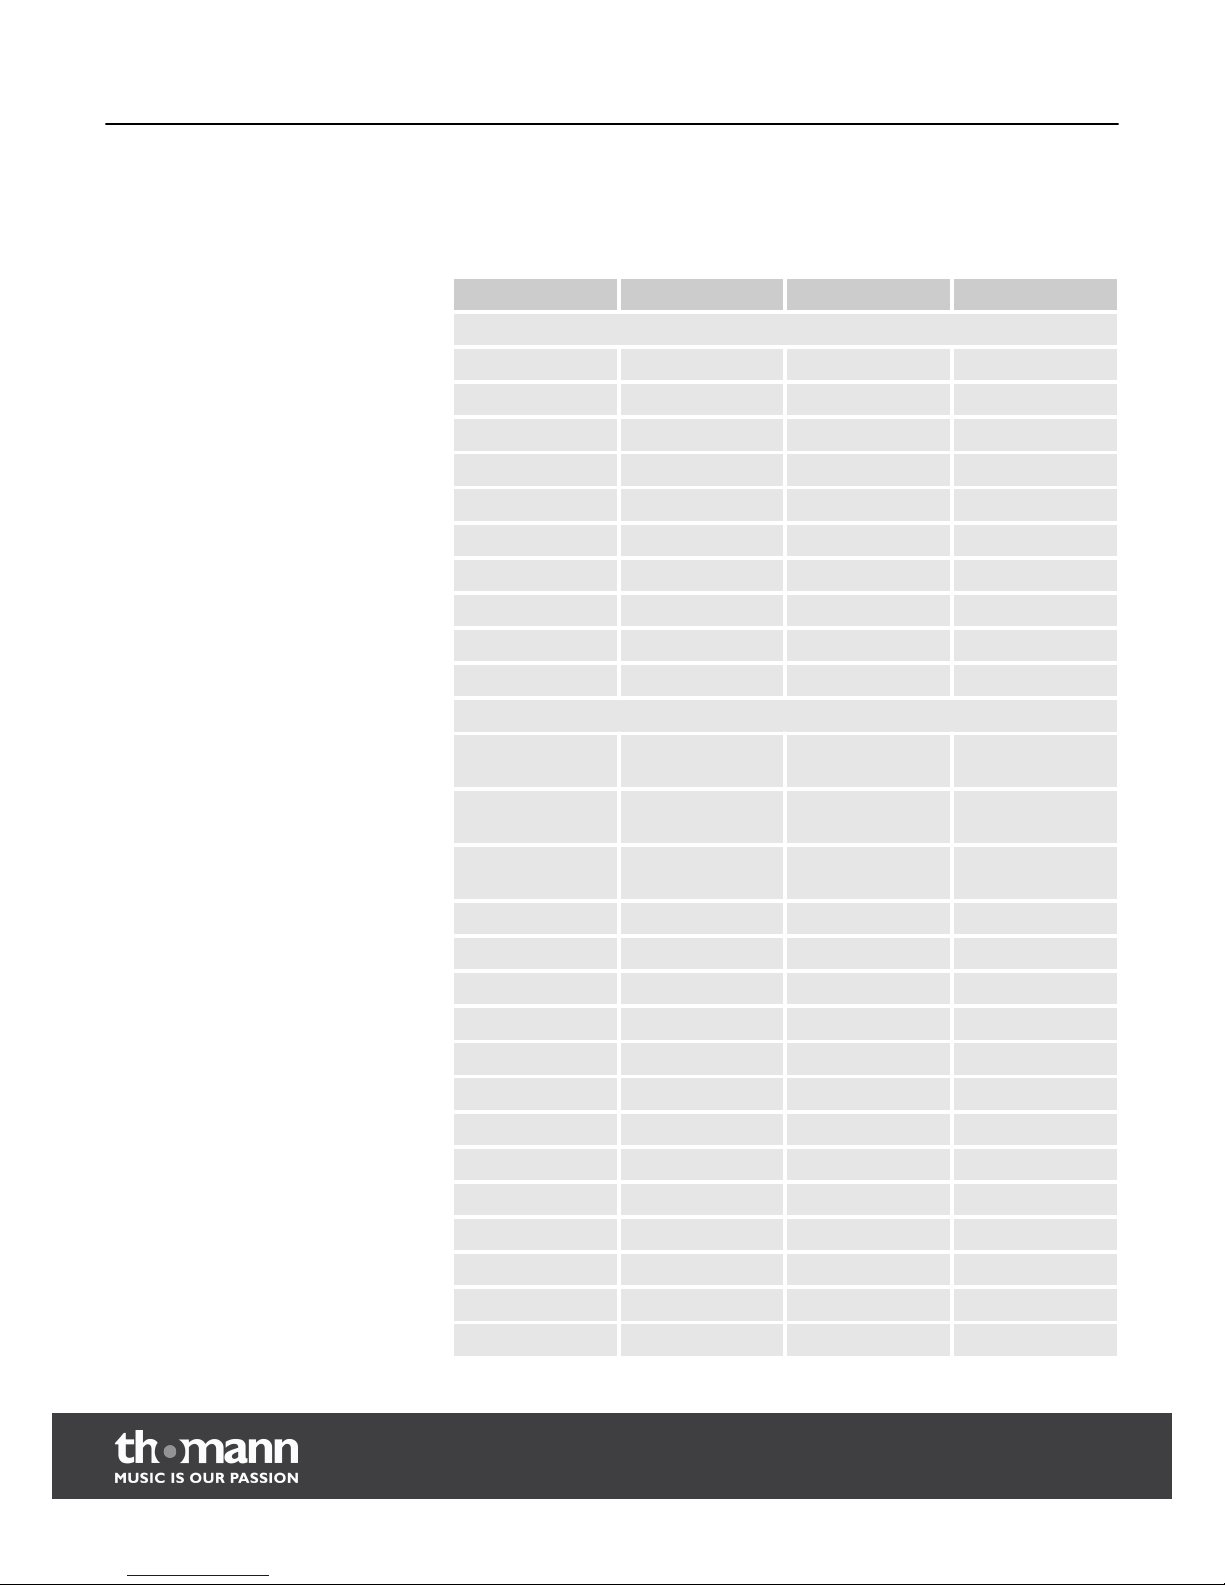
8
Songs and demo pieces
Voice List
No. Pro. Bank Name
Panel Voice List
1 0 100 Grand Piano 1
2 1 100 Grand Piano 2
3 5 100 Ele. Piano
4 6 100 Harpsichord
5 11 100 Vibraphone
6 19 100 Church Organ
7 49 100 Stereo Strings
8 56 100 Sweet Trumpet
9 64 100 Soprano Sax
10 68 100 Sweet Oboe
GM Voice List
1 0 0 Acoustic Grand
Piano
2 1 0 Bright Acoustic
Piano
3 2 0 Electric Grand
Piano
4 3 0 Honky-tonk Piano
5 4 0 Electric Piano 1
6 5 0 Electric Piano 2
7 6 0 Harpsichord
8 7 0 Clavi
9 8 0 Celesta
10 9 0 Glockenspiel
11 10 0 Music Box
12 11 0 Vibraphone
13 12 0 Marimba
14 13 0 Xylophone
15 14 0 Tubular Bells
16 15 0 Dulcimer
Songs and demo pieces
digital piano
28
Page 29
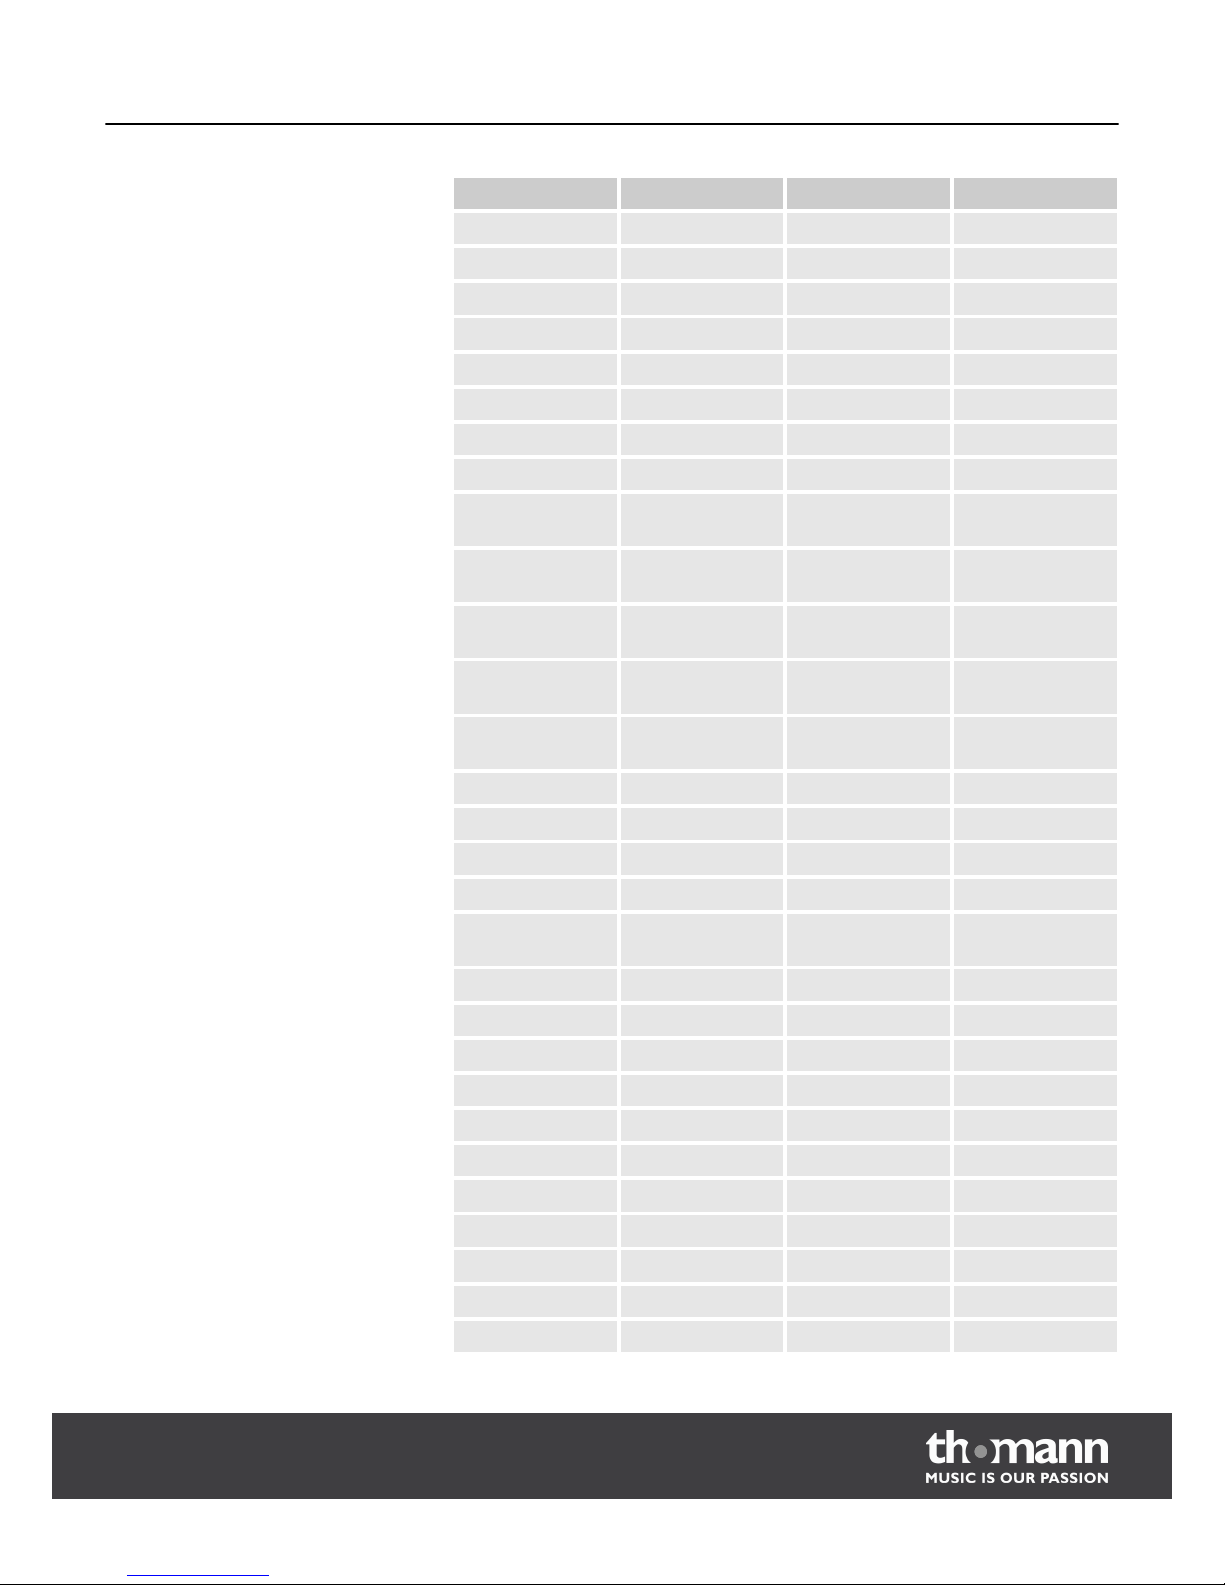
No. Pro. Bank Name
17 16 0 Drawbar Organ
18 17 0 Percussive Organ
19 18 0 Rock Organ
20 19 0 Church Organ
21 20 0 Reed Organ
22 21 0 Accordion
23 22 0 Harmonica
24 23 0 Tango Accordion
25 24 0 Acoustic Guitar
(nylon)
26 25 0 Acoustic Guitar
(steel)
27 26 0 Electric Guitar
(jazz)
28 27 0 Electric Guitar
(clean)
29 28 0 Electric Guitar
(muted)
30 29 0 Overdriven Guitar
31 30 0 Distortion Guitar
32 31 0 Guitar Harmonics
33 32 0 Acoustic Bass
34 33 0 Electric Bass
(finger)
35 34 0 Electric Bass (pick)
36 35 0 Fretless Bass
37 36 0 Slap Bass 1
38 37 0 Slap Bass 2
39 38 0 Synth Bass 1
40 39 0 Synth Bass 2
41 40 0 Violin
42 41 0 Viola
43 42 0 Cello
44 43 0 Contrabass
45 44 0 Tremolo Strings
Songs and demo pieces
DP-90
29
Page 30
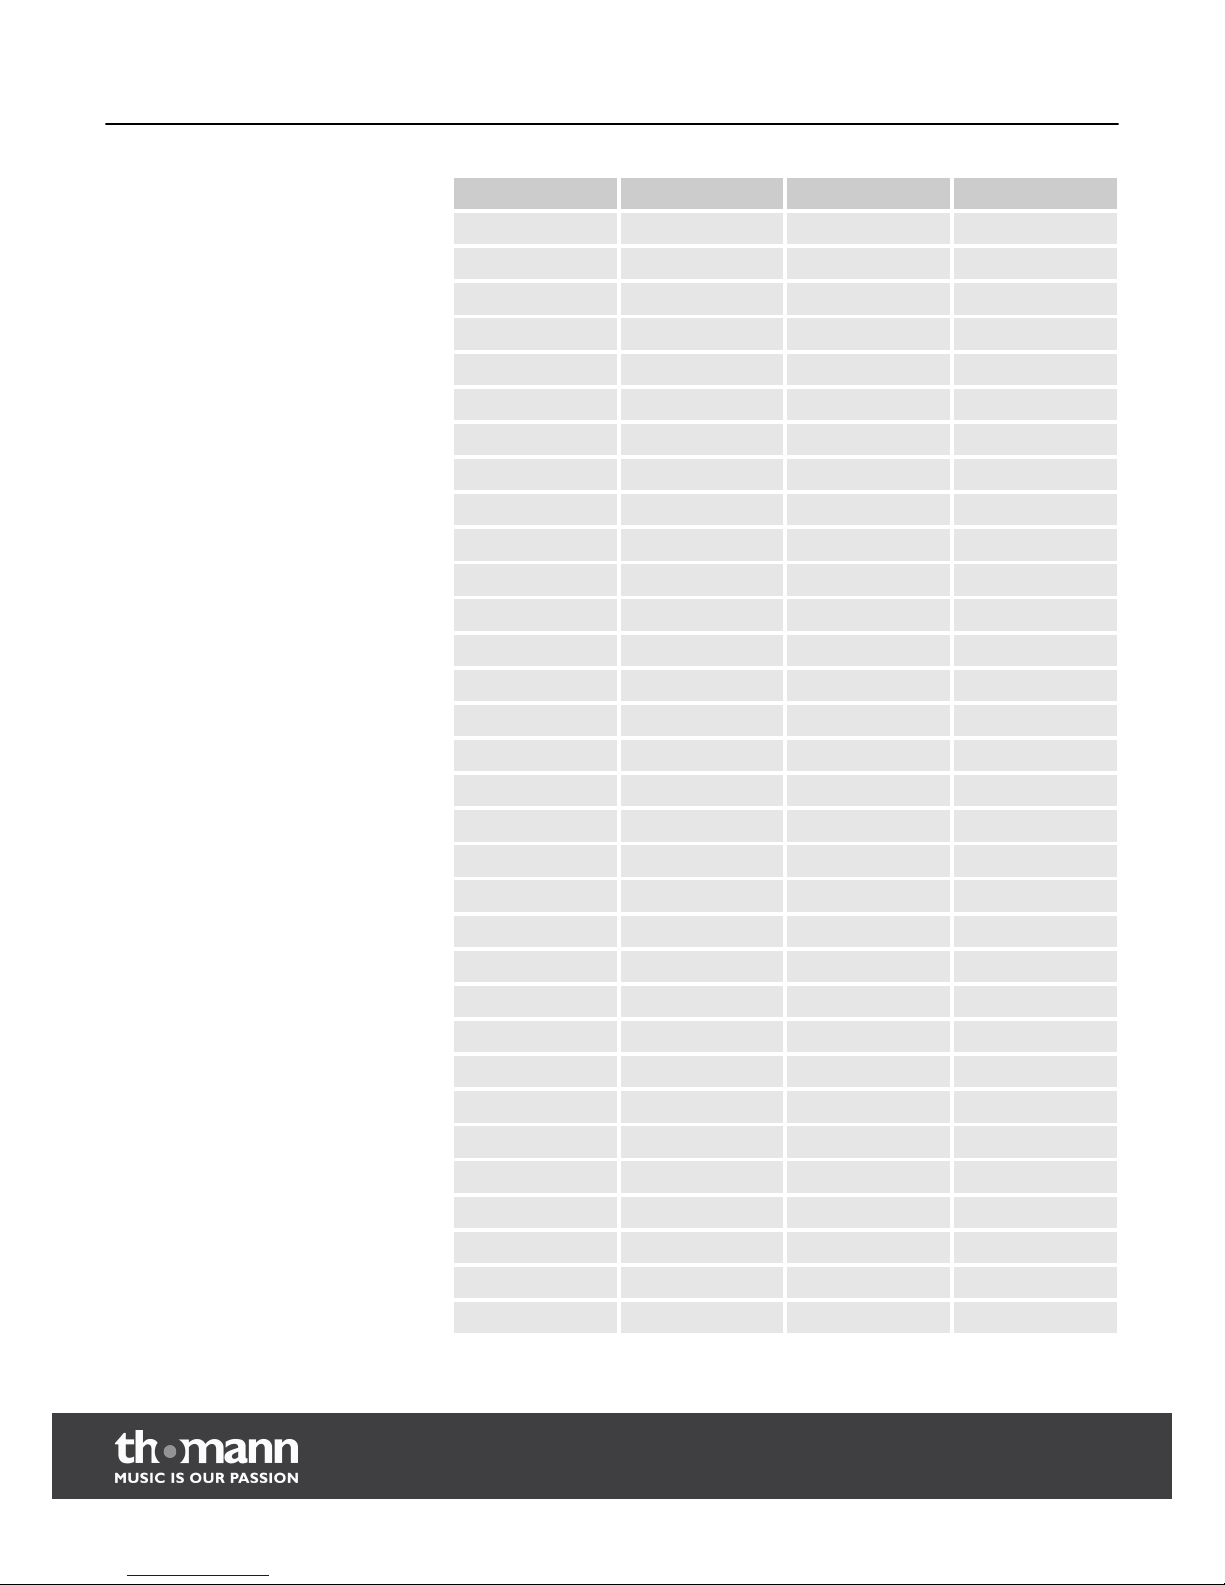
No. Pro. Bank Name
46 45 0 Pizzicato Strings
47 46 0 Orchestral Harp
48 47 0 Timpani
49 48 0 String Ensembles 1
50 49 0 String Ensembles 2
51 50 0 Synth Strings 1
52 51 0 Synth Strings 2
53 52 0 Choir Aahs
54 53 0 Voice Oohs
55 54 0 Synth Voice
56 55 0 Orchestra Hit
57 56 0 Trumpet
58 57 0 Trombone
59 58 0 Tuba
60 59 0 Muted Trumpet
61 60 0 French Horn
62 61 0 Brass Section
63 62 0 Synth Brass 1
64 63 0 Synth Brass 2
65 64 0 Soprano Sax
66 65 0 Alto Sax
67 66 0 Tenor Sax
68 67 0 Baritone Sax
69 68 0 Oboe
70 69 0 English Horn
71 70 0 Bassoon
72 71 0 Clarinet
73 72 0 Piccolo
74 73 0 Flute
75 74 0 Recorder
76 75 0 Pan Flute
77 76 0 Blown Bottle
Songs and demo pieces
digital piano
30
Page 31
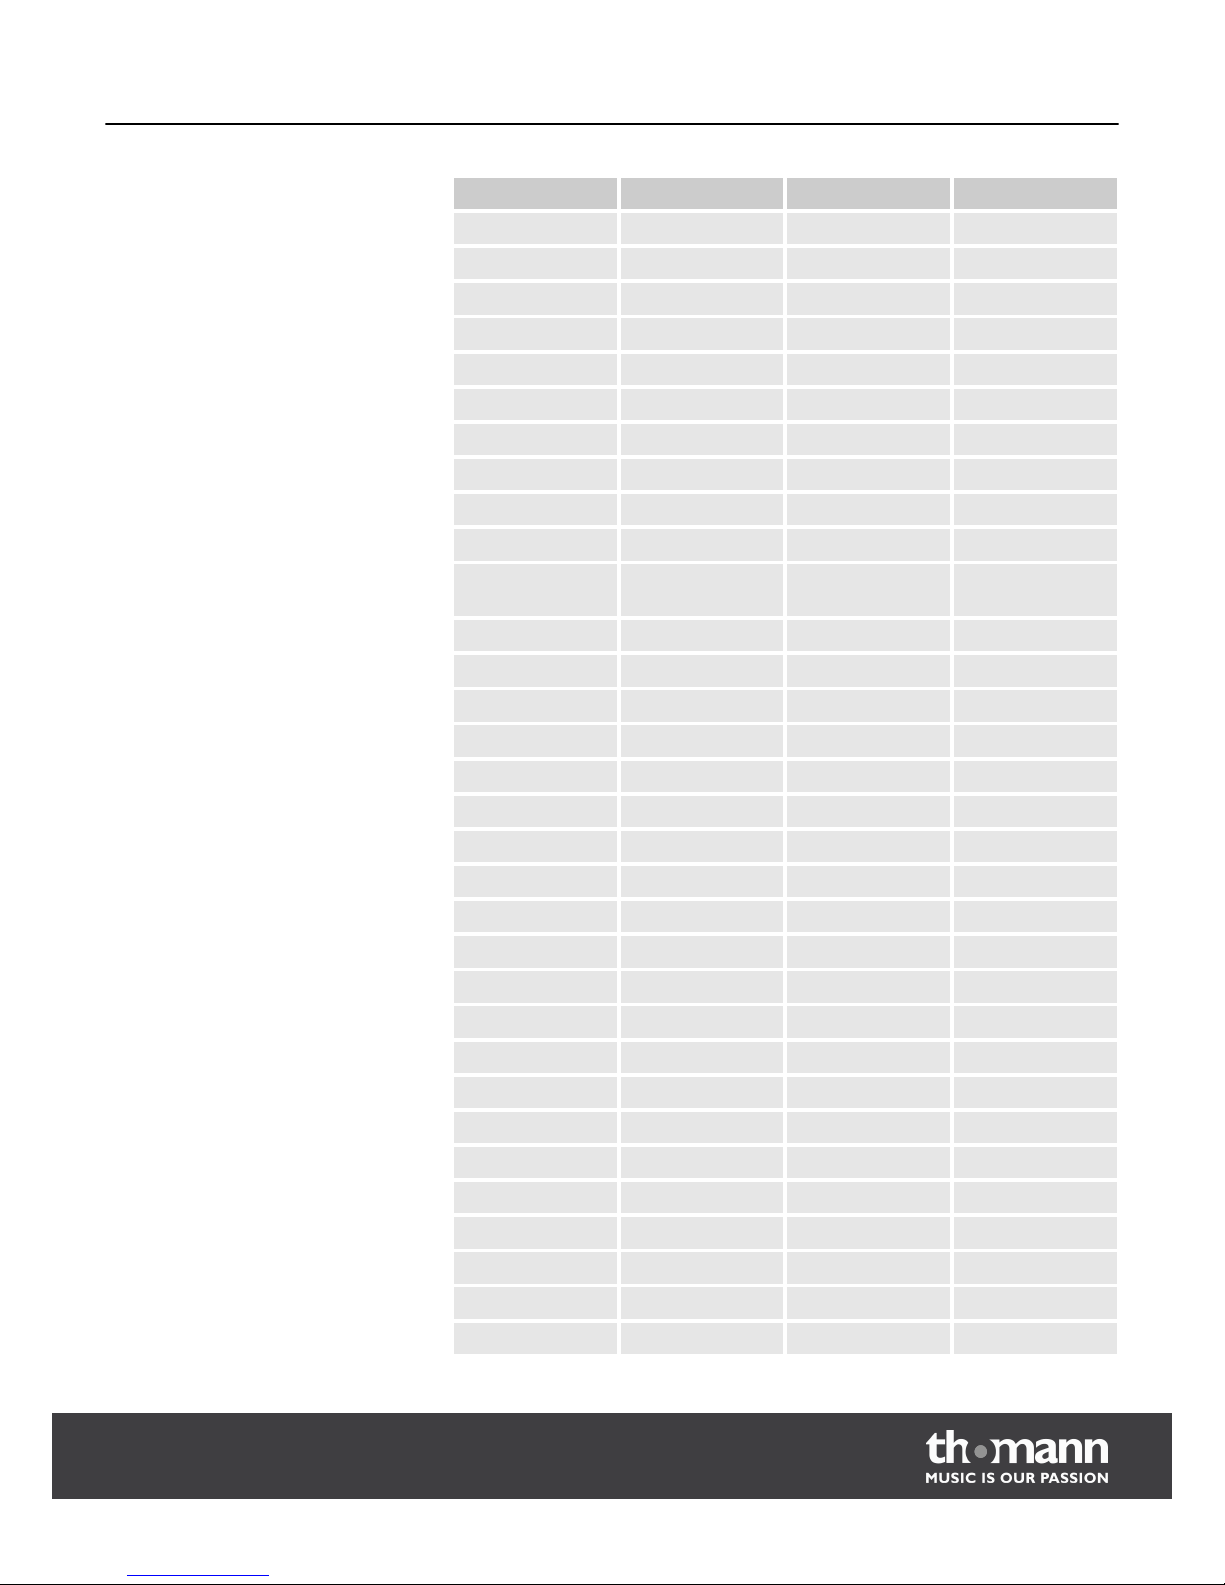
No. Pro. Bank Name
78 77 0 Shakuhachi
79 78 0 Whistle
80 79 0 Ocarina
81 80 0 Lead 1 (square)
82 81 0 Lead 2 (sawtooth)
83 82 0 Lead 3 (calliope)
84 83 0 Lead 4 (chiff)
85 84 0 Lead 5 (charang)
86 85 0 Lead 6 (voice)
87 86 0 Lead 7 (fifths)
88 87 0 Lead 8 (bass +
lead)
89 88 0 Pad 1 (new age)
90 89 0 Pad 2 (warm)
91 90 0 Pad 3 (polysynth)
92 91 0 Pad 4 (choir)
93 92 0 Pad 5 (bowed)
94 93 0 Pad 6 (metallic)
95 94 0 Pad 7 (halo)
96 95 0 Pad 8 (sweep)
97 96 0 FX 1 (rain)
98 97 0 FX 2 (soundtrack)
99 98 0 FX 3 (crystal)
100 99 0 FX 4 (atmosphere)
101 100 0 FX 5 (brightness)
102 101 0 FX 6 (goblins)
103 102 0 FX 7 (echoes)
104 103 0 FX 8 (sci-fi)
105 104 0 Sitar
106 105 0 Banjo
107 106 0 Shamisen
108 107 0 Koto
109 108 0 Kalimba
Songs and demo pieces
DP-90
31
Page 32
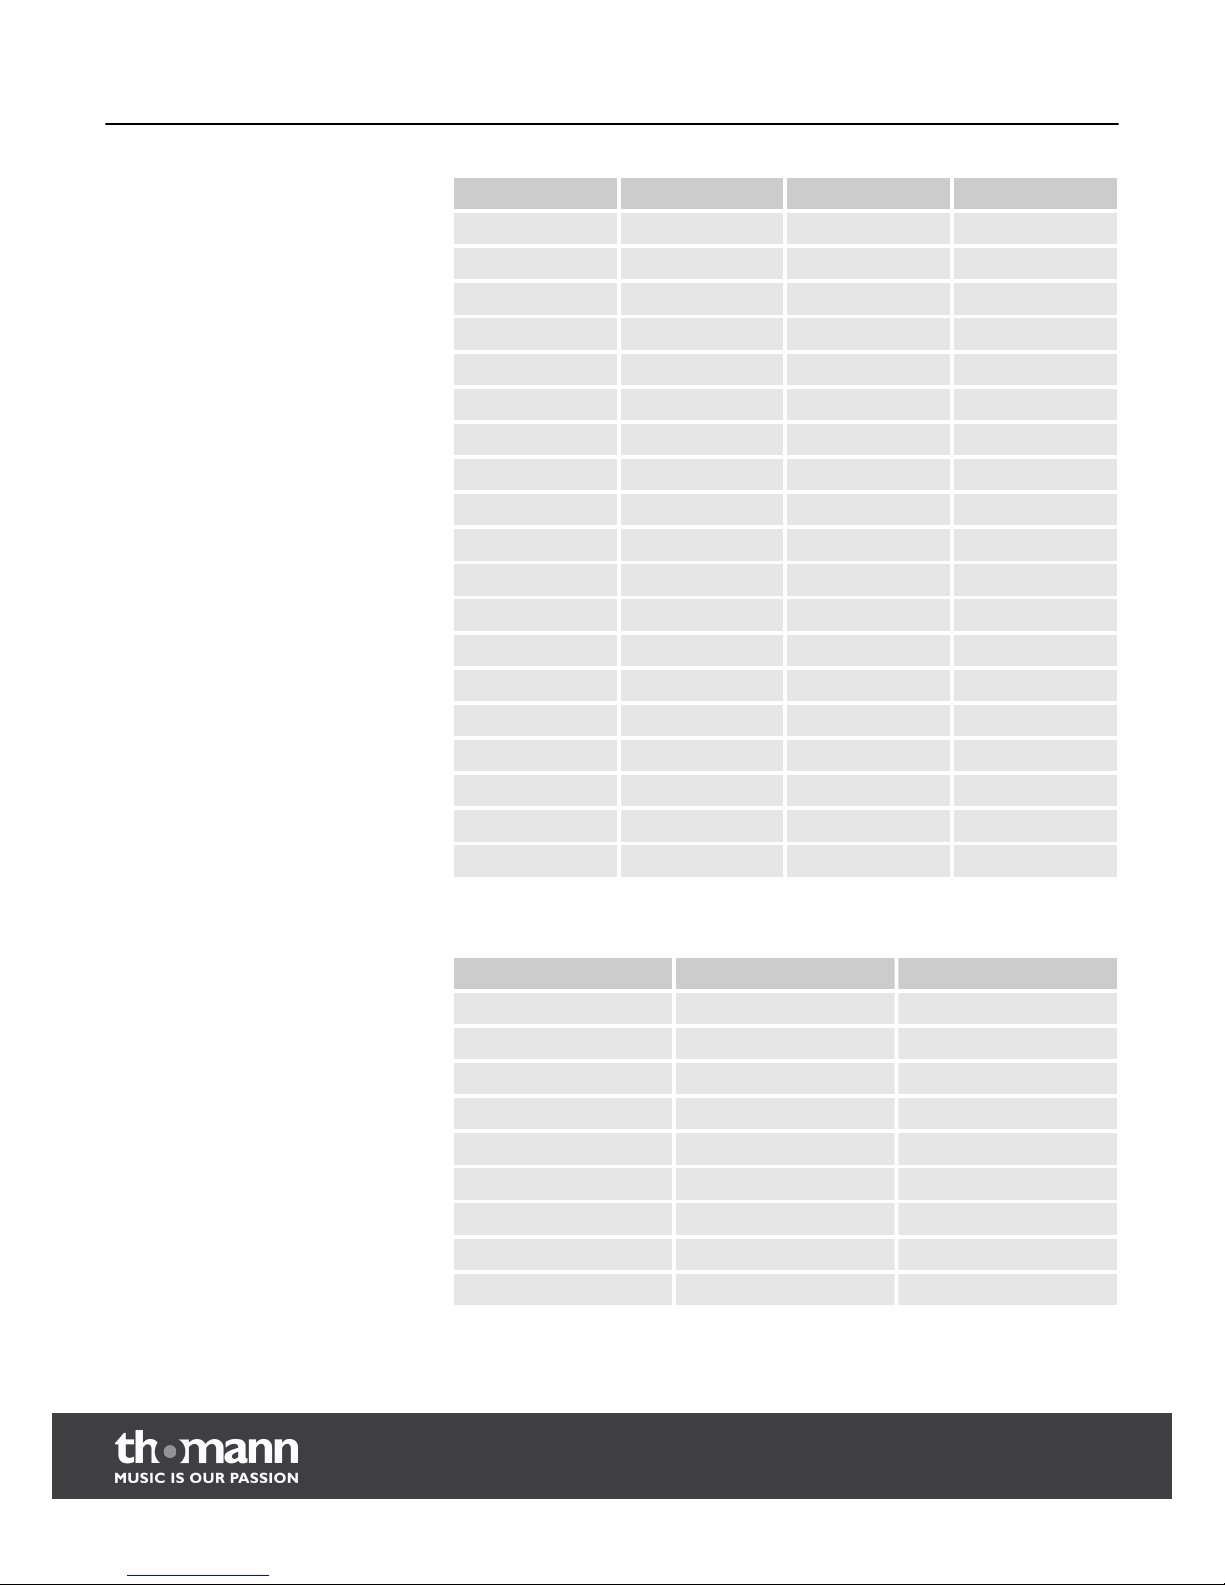
No. Pro. Bank Name
110 109 0 Bag Pipe
111 110 0 Fiddle
112 111 0 Shanai
113 112 0 Tinkle Bell
114 113 0 Agogo
115 114 0 Steel Drums
116 115 0 Woodblock
117 116 0 Taiko Drum
118 117 0 Melodic Tom
119 118 0 Synth Drum
120 119 0 Reverse Cymbal
121 120 0 Guitar Fret Noise
122 121 0 Breath Noise
123 122 0 Seashore
124 123 0 Bird Tweet
125 124 0 Telephone Ring
126 125 0 Helicopter
127 126 0 Applause
128 127 0 Gunshot
Drum Set List
No. Pro. Name
1 0 Standard Set
2 8 Room Set
3 16 Power Set
4 24 Electronic Set
5 25 Analogue Set
6 32 Jazz Set
7 40 Brush Set
8 48 Orchestra Set
9 56 SFX Set
Songs and demo pieces
digital piano
32
Page 33
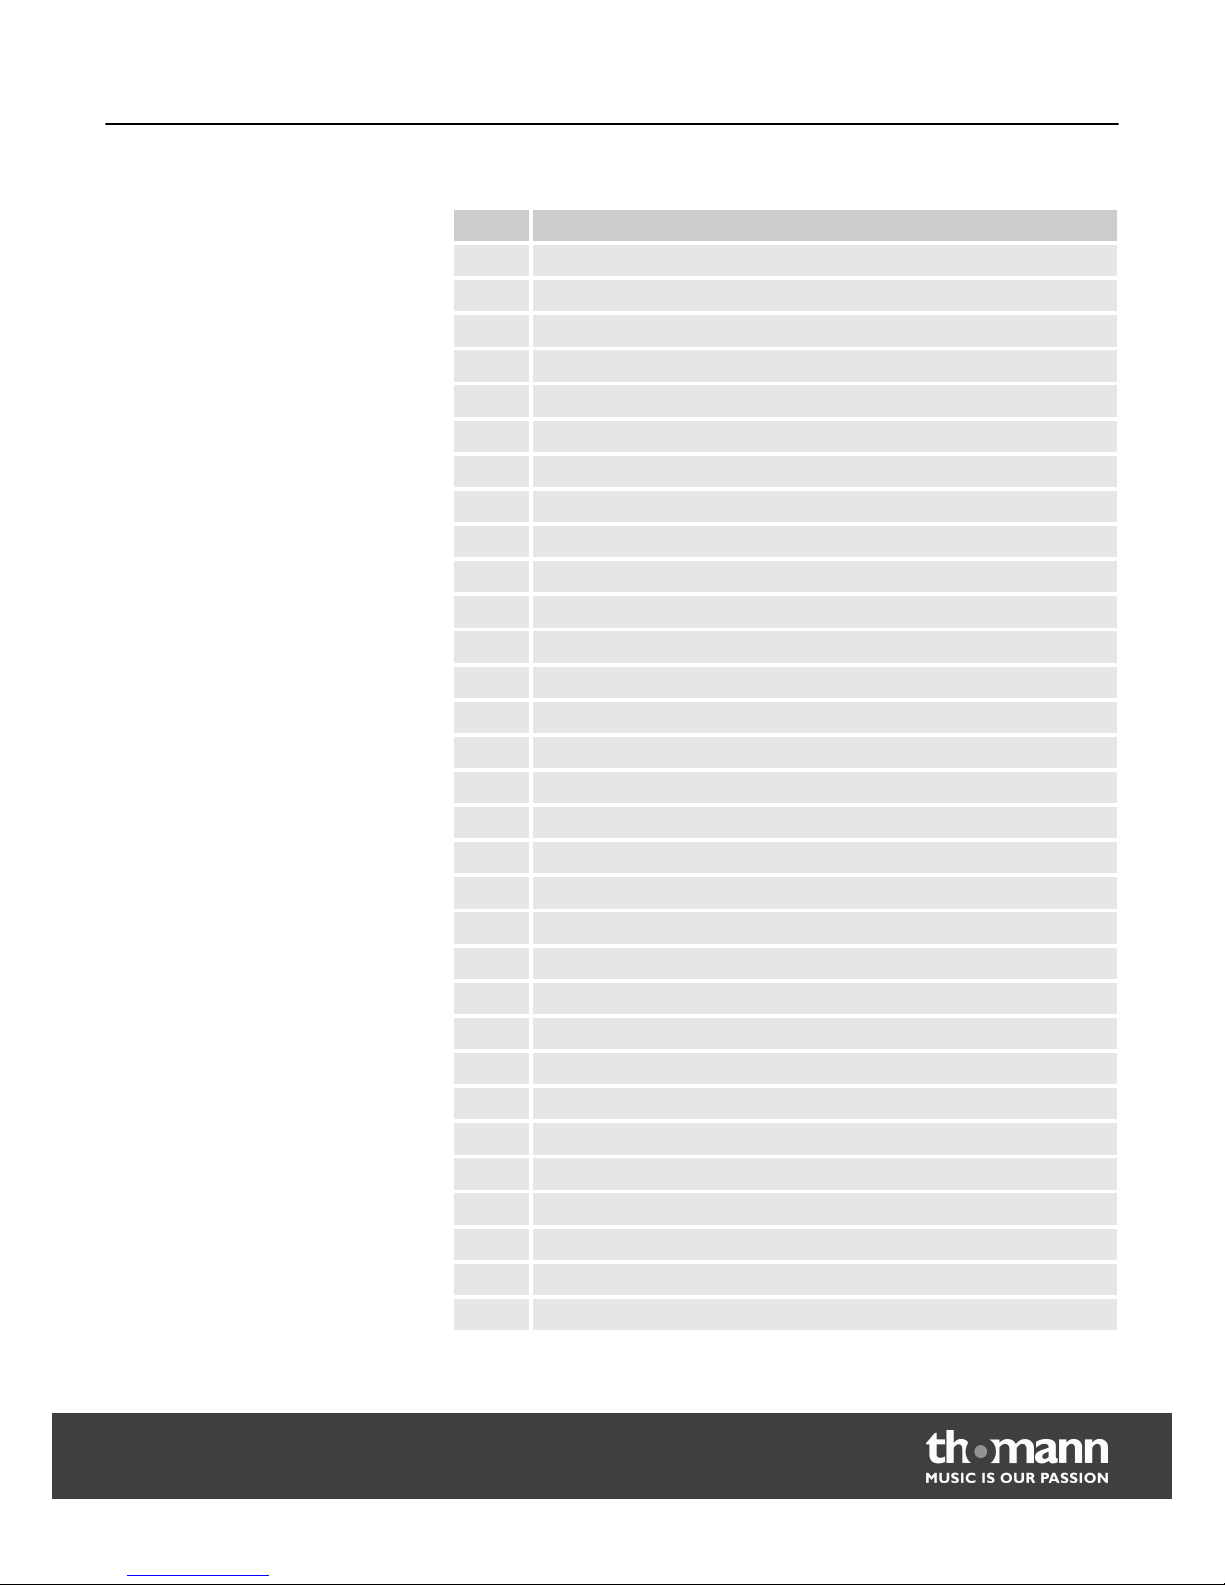
Song List
No. English Name
1 Waltz in A Flat Op.39, No.15
2 The Happy Farmer
3 Etude
4 Dance Of The Four Swans From "Swan Lake"
5 Carmen Suite No.2 Habanera
6 A Little Polish Dance
7 Jesus Saviour Pilot Me
8 Old Macdonald Had A Farm
9 O Sole Mio
10 Wedding March From "Lohengrin"
11 2-Part Invention No.13 In A Minor BWV 784
12 Turkish March
13 Italian Polka
14 Musette
15 Bourree
16 To A Wild Rose
17 Away In A Manger
18 Fur Elise
19 Marriage Of Figaro
20 Angels We Have Heard On High
21 Waltz
22 America The Beautiful
23 Did You Ever See A Lassie
24 Arabesque
25 Old France
26 Santa Claus Is Coming To Town
27 Music Box Dancer
28 Symphony No.9 In E Minor Large From "The New World"
29 Larghetto
30 French Suites
31 Mazurka
Songs and demo pieces
DP-90
33
Page 34
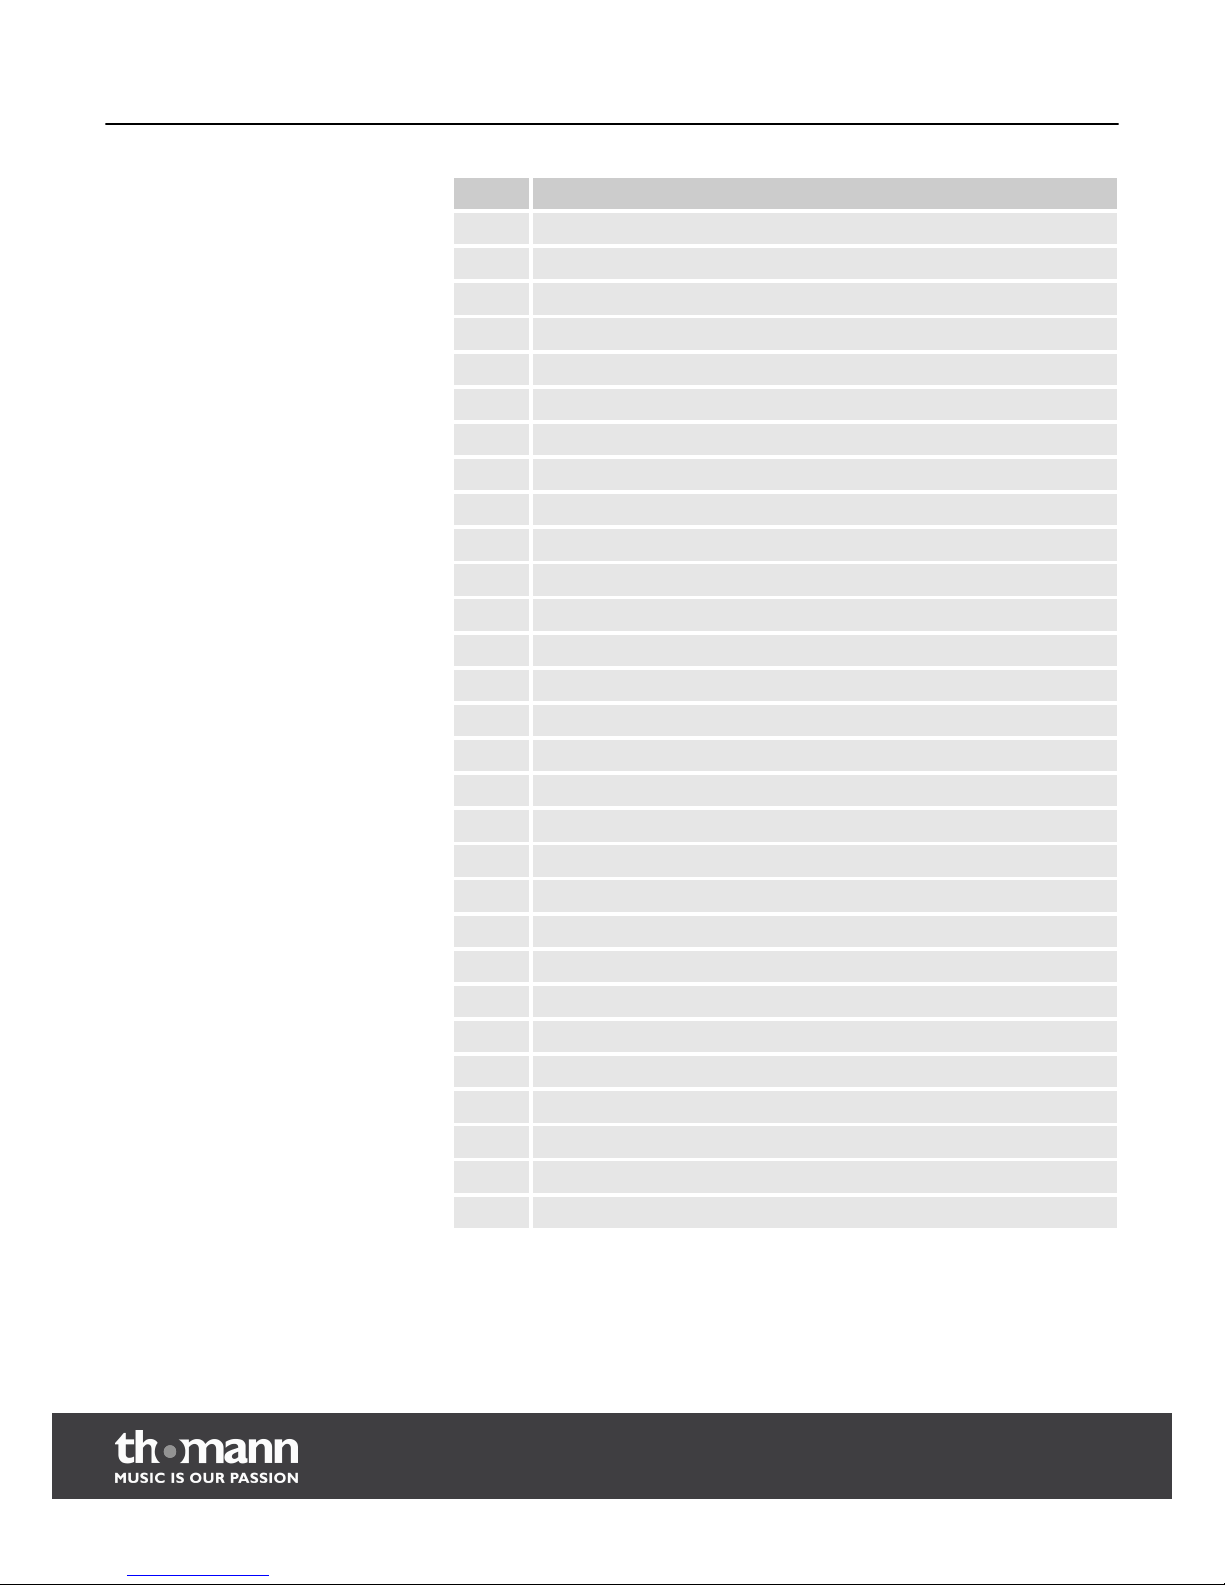
No. English Name
32 Minuet 1
33 Minuet 2
34 Minuet 3
35 Minuet In G
36 Neapolitan Song
37 Prelude
38 Salut D' Amour
39 Pizzicato Polka
40 Piano Sonata No.11 in A major K331 I. Andante grazioso
41 Songs Without Words Op30 No. 6 F sharp minor Venetian Gondola Song
42 Duke Aria From “The Rigoletto”
43 Burgmuller Op.100 No.15 - Ballade
44 Spinning Song
45 In The Theatre
46 Alfredo and Violetta Column Tower Duet
47 Come Back To Sorrento
48 Piano Sonatina In F Major
49 Tchaikovsky Waltz
50 Military March No.1 In D Major
51 Als Die Alte Mutter Mich Noch lehrte Singen
52 Etude on Leger Lines 1
53 Etude on Leger Lines 2
54 At the Ball
55 Dancing Raindrops
56 From a Story Book
57 Comin' 'Round the Mountain
58 Song of the Brook
59 Puck
60 Cotton-pickin' Fingers
Songs and demo pieces
digital piano
34
Page 35
9
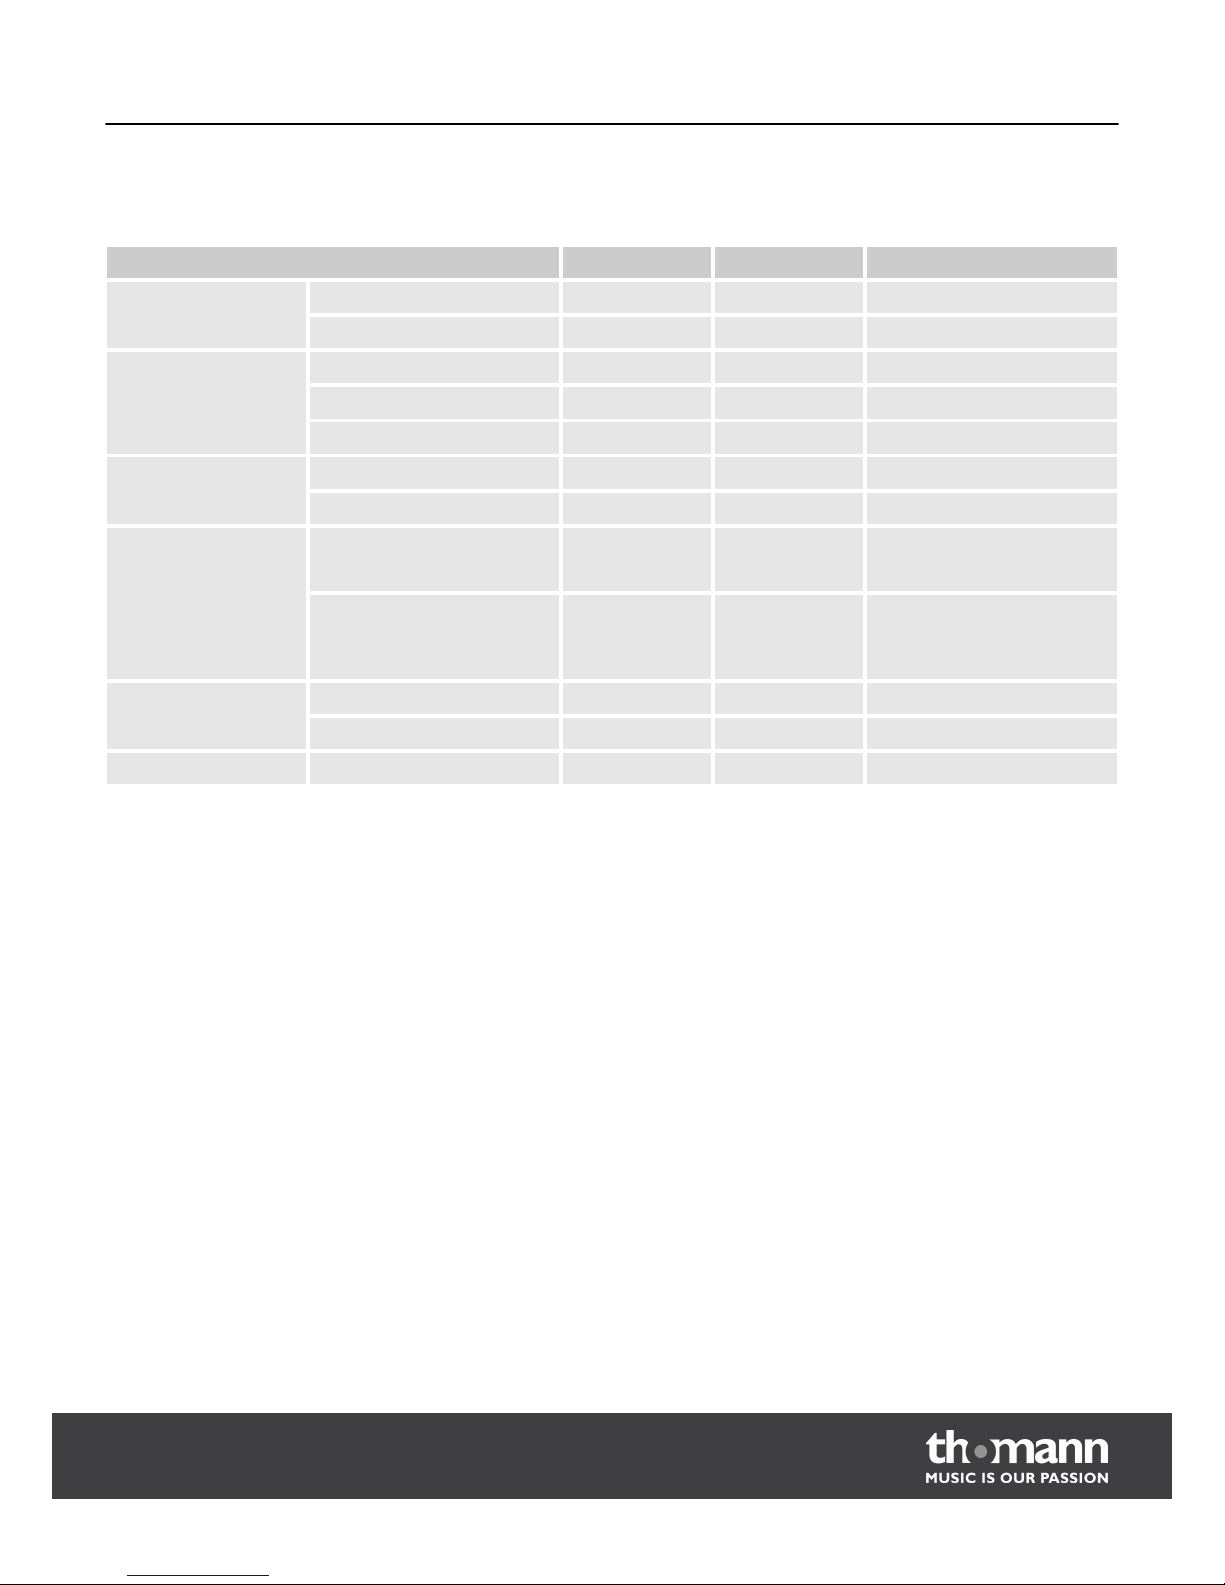
MIDI Implementation table
Function Sent Received Comments
Basic Channel Default 1 ALL
Changed 1-16 1-16
Mode Default No Mode 1
Messages No No Poly Mode only
Altered ******** ********
Note Number 0 – 127 0 – 127
True voice ******** 0 – 127
Velocity Note Note ON Yes, 9nH,
v = 1 – 127
Yes, 9nH,
v = 1 – 127
Note OFF No, 9nH,
v = 0
Yes, 9nH,
v = 0 or 8nH,
v = 0 – 127
After Touch Keys No No
Channels No No
Pitch Bend No No
MIDI Implementation table
DP-90
35
Page 36
Function Sent Received Comments
Control Change 0
1
5
6
7
10
11
64
65
66
67
80
81
91
93
120
121
123
Yes
No
No
Yes
Yes
No
No
Yes
No
Yes
Yes
No
No
Yes
Yes
No
No
Yes
Yes
Yes
Yes
Yes
Yes
Yes
Yes
Yes
Yes
Yes
Yes
Yes
Yes
Yes
Yes
Yes
Yes
Yes
Bank Select
Modulation
Portamento Time
Data Entry
Volume
Pan
Expression
Sustain Pedal
Portamento ON/OFF
Sostenuto Pedal
Soft Pedal
Reverb Program
Chorus Program
Reverb Level
Chorus Level
All Sound Off
Reset All Controllers
All Notes Off
Program Change True # Yes
********
Yes
0-127
System Exclusive No Yes
System Common Song Position Pointer No No
Song Select No No
Tune Request No No
System Real Time Clock Yes No
Commands No No
Aux Messages Local ON/OFF No Yes
ALL Notes OFF Yes Yes
Active Sensing Yes No
System Reset No Yes
Notes:
MIDI Implementation table
digital piano
36
Page 37

POLY MONO ON
OMNI ON Mode 1 Mode 2
OMNI OFF Mode 3 Mode 4
MIDI channel modes
MIDI Implementation table
DP-90
37
Page 38
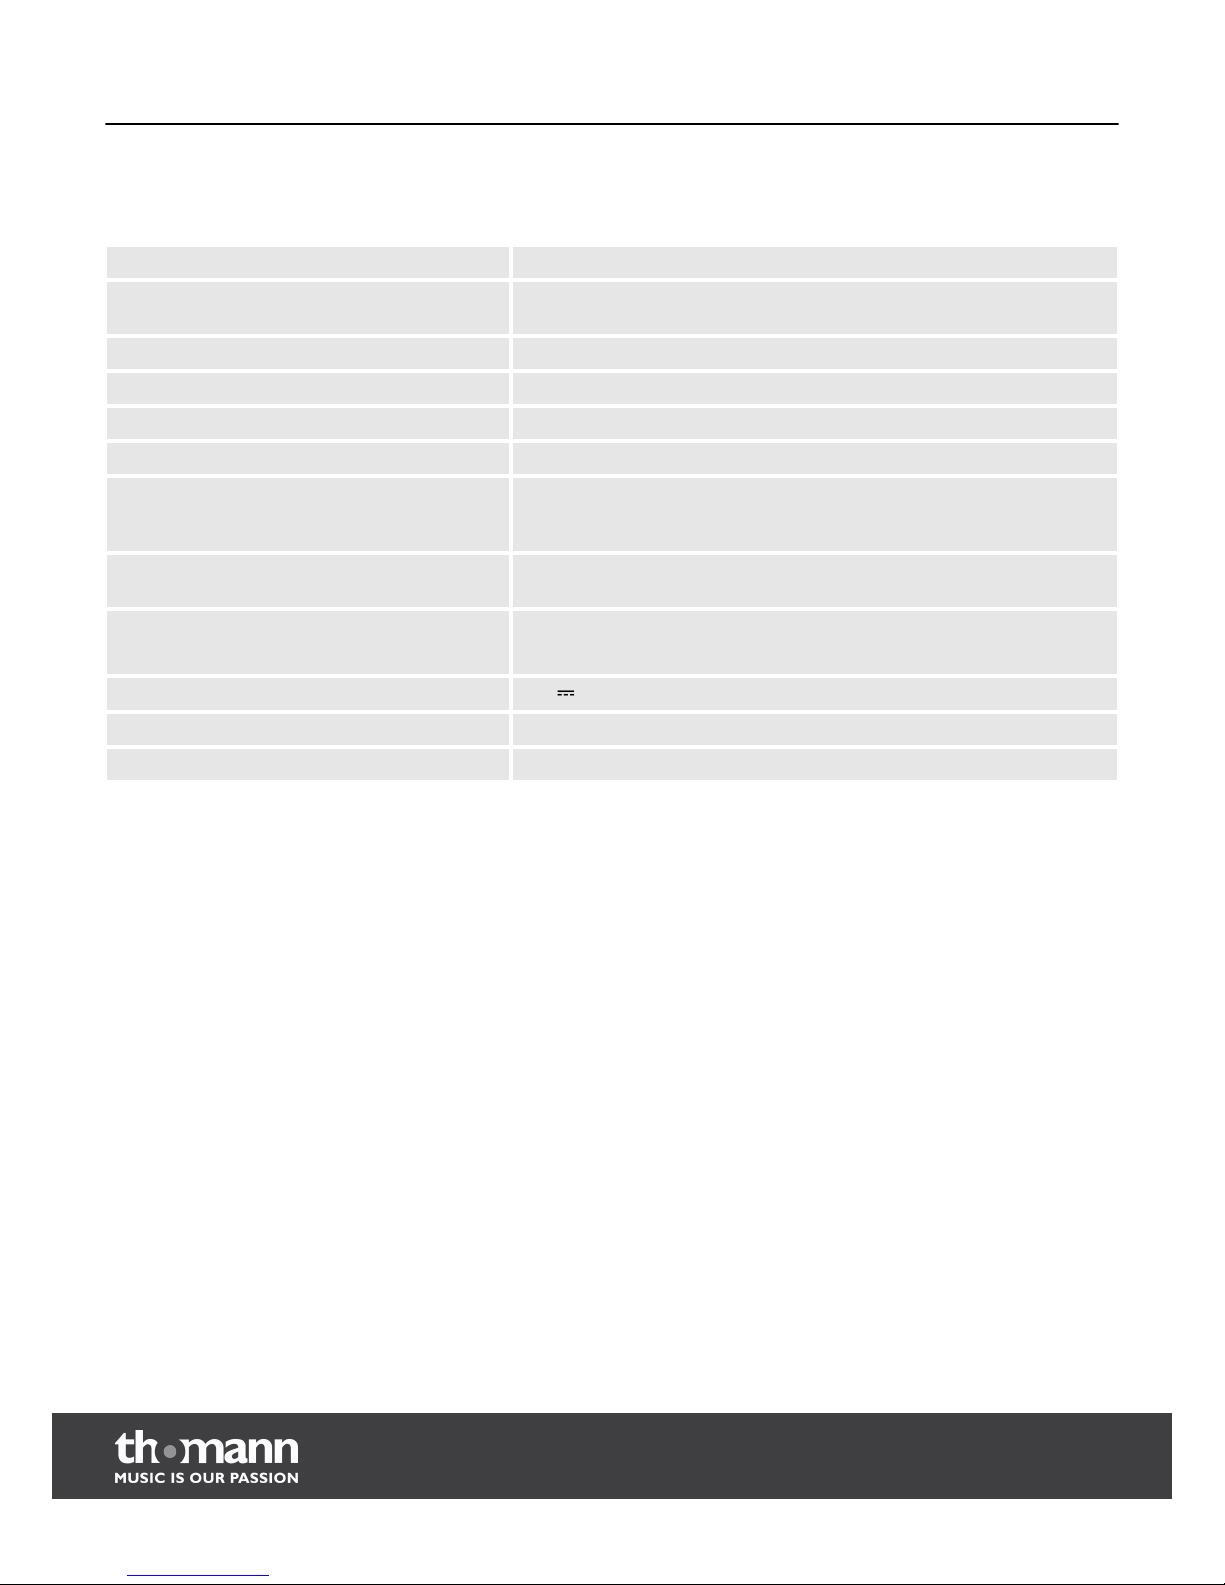
10
Technical data
Keyboard 88 weighted hammer action keys with adjustable velocity sensitivity
Voices GRAND PIANO 1/2, ELECTRIC PIANO, HARPSICHORD, VIBRAPHONE, CHURCH
ORGAN, STEREO STRINGS, SWEET TRUMPET, SOPRANO SAX , SWEET OBOE
Polyphony 128-note polyphony with effects
General MIDI 128 voices and 9 drum sets
Demos and songs 10 demos and 60 songs
Pedals Soft, Sostenuto, Sustain
Functions Recording and playback, dual and split mode, historic temperaments, TWI‐
NOVA, touch sensitivity, reverb and chorus effects, metronome, trans‐
posing, fine tuning, button tone, automatic switch-off
Connectors Voltage supply (DC IN), 2 × headphones (6.35 mm jack plug), AUX IN,
AUX OUT, USB, MIDI IN, MIDI OUT, USB-MIDI interface
Speakers 2 × 25 W, 4 Ω (tweeter)
2 × 25 W, 8 Ω (subwoofer)
Input voltage
15 V (DC)
Dimensions (W x D x H) 1590 mm × 455 mm × 645 mm (62.60 in. × 17.72 in. × 25.40 in.)
Weight 55 kg (121.25 lbs.)
Technical data
digital piano
38
Page 39
11
Protecting the environment
For the transport and protective packaging, environmentally friendly materials have
been chosen that can be supplied to normal recycling.
Ensure that plastic bags, packaging, etc. are properly disposed of.
Do not just dispose these materials with your normal household waste, but make
sure that they are fed to a recovery. Please follow the notes and markings on the
packaging.
This device is subject to the European directive 2002/96/EC.
Do not dispose the device with your normal household waste.
Dispose this device through an approved waste disposal firm or through your local
waste facility. When discarding the device, comply with the rules and regulations
that apply in your country. If in doubt, consult your local waste disposal facility.
Disposal of the packaging material
Disposal of your old device
Protecting the environment
DP-90
39
Page 40

Notes
digital piano
40
Page 41

Notes
DP-90
41
Page 42

Notes
digital piano
42
Page 43

Page 44

Musikhaus Thomann e.K. · Treppendorf 30 · 96138 Burgebrach · Germany · www.thomann.de
 Loading...