

Page 1
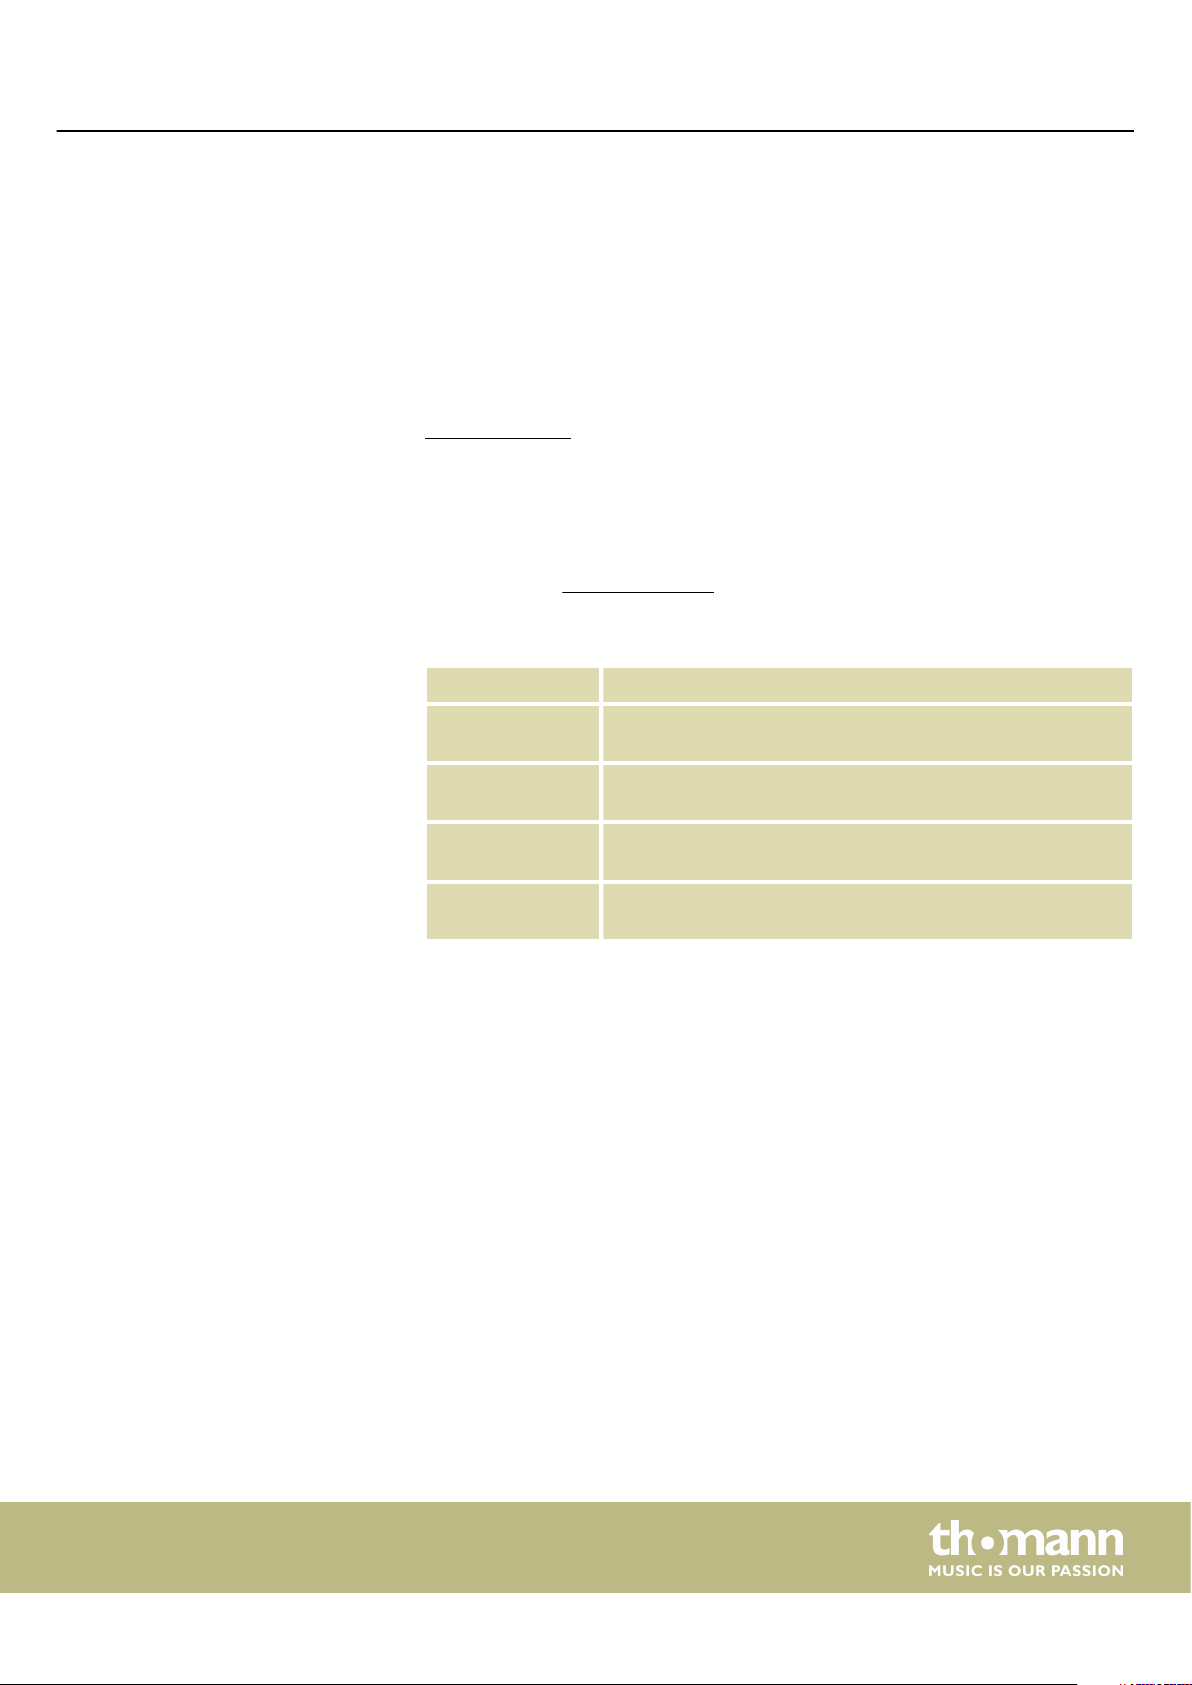
DP-28 Plus
digital piano
user manual
Page 2

Musikhaus Thomann
Thomann GmbH
Hans-Thomann-Straße 1
96138 Burgebrach
Germany
Telephone: +49 (0) 9546 9223-0
E-mail: info@thomann.de
Internet: www.thomann.de
26.02.2021, ID: 493572
Page 3

Table of contents
Table of contents
1 General information.............................................................................................................. 5
1.1 Further information........................................................................................................ 5
1.2 Notational conventions................................................................................................. 5
1.3 Symbols and signal words........................................................................................... 6
2 Safety instructions................................................................................................................. 7
3 Features....................................................................................................................................... 9
4 Assembly instructions........................................................................................................ 10
5 Control panel and connections..................................................................................... 11
6 Connection options............................................................................................................. 13
7 Switching on / o and basic operation...................................................................... 15
7.1 Switching the digital piano on................................................................................. 15
7.1.1 Normal switching on / o....................................................................................... 15
7.1.2 Automatic shuto..................................................................................................... 15
7.2 Adjusting the volume.................................................................................................. 15
7.3 Setting the tone colour............................................................................................... 15
7.4 D.A.S (Dynamic Acoustic System)........................................................................... 16
7.5 Touch velocity................................................................................................................ 16
7.6 Transposing..................................................................................................................... 17
7.7 Tuning............................................................................................................................... 17
7.8 Temperament................................................................................................................. 18
7.9 Selecting sounds........................................................................................................... 19
7.10 Layer mode and split point..................................................................................... 19
7.10.1 Setting the Layer mode........................................................................................ 19
7.10.2 Split point setting................................................................................................... 20
7.11 Metronome................................................................................................................... 21
7.12 Demo pieces................................................................................................................. 22
7.13 Tempo............................................................................................................................. 23
7.14 Digital eects............................................................................................................... 24
7.14.1 Reverb and Chorus................................................................................................. 24
7.15 TWINOVA....................................................................................................................... 24
7.16 Recording function.................................................................................................... 24
7.16.1 Recording preparation.......................................................................................... 25
7.16.2 Recording................................................................................................................... 25
7.16.3 Stopping recording................................................................................................ 25
7.16.4 Playing a recording................................................................................................ 25
7.17 Further setting options............................................................................................ 26
7.17.1 String resonance..................................................................................................... 26
7.17.2 Damper resonance................................................................................................. 26
7.17.3 Damper noise........................................................................................................... 27
7.17.4 Hammer noise.......................................................................................................... 27
7.17.5 LID simulation.......................................................................................................... 28
DP-28 Plus
3
Page 4

Table of contents
7.18 MIDI functions............................................................................................................. 28
7.18.1 What is MIDI?............................................................................................................ 28
7.18.2 USB connection....................................................................................................... 28
7.18.3 MIDI connection...................................................................................................... 29
7.18.4 Bluetooth®-MIDI connection............................................................................... 29
7.19 Operating tone............................................................................................................ 29
7.20 Factory defaults........................................................................................................... 30
8 Sound list.................................................................................................................................. 31
9 Practise and demo pieces................................................................................................. 32
10 Metronome rhythm list..................................................................................................... 34
11 MIDI implementation chart............................................................................................. 35
12 Troubleshooting................................................................................................................... 37
13 Technical specications.................................................................................................... 38
14 Plug and connection assignment................................................................................. 39
15 Protecting the environment........................................................................................... 40
digital piano
4
Page 5
1 General information
1.1 Further information
General information
This user manual contains important information on the safe operation of the device.
Read and follow all safety notes and all instructions. Save this manual for future refer‐
ence. Make sure that it is available to all persons using this device. If you sell the
device to another user, be sure that they also receive this manual.
Our products and user manuals are subject to a process of continuous development.
We therefore reserve the right to make changes without notice. Please refer to the
latest version of the user manual which is ready for download under
www.thomann.de.
On our website (www.thomann.de) you will nd lots of further information and
details on the following points:
1.2 Notational conventions
Letterings
Displays
Download This manual is also available as PDF le for you to download.
Keyword search
Online guides
Personal
consultation
Service
This manual uses the following notational conventions:
The letterings for connectors and controls are marked by square brackets and italics.
Examples: [VOLUME] control, [Mono] button.
Texts and values displayed on the device are marked by quotation marks and italics.
Examples: ‘24ch’ , ‘OFF’.
Use the search function in the electronic version to nd the
topics of interest for you quickly.
Our online guides provide detailed information on technical
basics and terms.
For personal consultation please contact our
technical hotline.
If you have any problems with the device the
customer service will gladly assist you.
DP-28 Plus
5
Page 6
General information
Instructions
Cross-references
1.3 Symbols and signal words
The individual steps of an instruction are numbered consecutively. The result of a
step is indented and highlighted by an arrow.
Example:
1. Switch on the device.
2. Press [Auto].
Automatic operation is started.
ð
3. Switch o the device.
References to other locations in this manual are identied by an arrow and the speci‐
ed page number. In the electronic version of the manual, you can click the crossreference to jump to the specied location.
Example: See Ä ‘Cross-references’ on page 6.
In this section you will nd an overview of the meaning of symbols and signal words
that are used in this manual.
Signal word Meaning
DANGER! This combination of symbol and signal word indicates
an immediate dangerous situation that will result in
death or serious injury if it is not avoided.
CAUTION! This combination of symbol and signal word indicates
a possible dangerous situation that can result in minor
injury if it is not avoided.
NOTICE! This combination of symbol and signal word indicates
a possible dangerous situation that can result in mate‐
rial and environmental damage if it is not avoided.
Warning signs Type of danger
Warning – danger zone.
digital piano
6
Page 7
2 Safety instructions
Safety instructions
Intended use
Safety
This device is intended to be used for electronic sound generation using a piano key‐
board. Use the device only as described in this user manual. Any other use or use
under other operating conditions is considered to be improper and may result in per‐
sonal injury or property damage. No liability will be assumed for damages resulting
from improper use.
This device may be used only by persons with sucient physical, sensorial, and intel‐
lectual abilities and having corresponding knowledge and experience. Other persons
may use this device only if they are supervised or instructed by a person who is
responsible for their safety.
DANGER!
Danger for children
Ensure that plastic bags, packaging, etc. are disposed of properly and
are not within reach of babies and young children. Choking hazard!
Ensure that children do not detach any small parts (e.g. knobs or the
like) from the unit. They could swallow the pieces and choke!
Never let children unattended use electrical devices.
CAUTION!
Possible hearing damage
With loudspeakers or headphones connected, the device can produce
volume levels that may cause temporary or permanent hearing impair‐
ment.
Do not operate the device permanently at a high volume level.
Decrease the volume level immediately if you experience ringing in
your ears or hearing impairment.
NOTICE!
Operating conditions
This device has been designed for indoor use only. To prevent damage,
never expose the device to any liquid or moisture. Avoid direct sunlight,
heavy dirt, and strong vibrations.
Only operate the device within the ambient conditions specied in the
chapter ‘Technical specications’ of this user manual. Avoid heavy tem‐
perature uctuations and do not switch the device on immediately after
it was exposed to temperature uctuations (for example after transport
at low outside temperatures).
Dust and dirt inside can damage the unit. When operated in harmful
ambient conditions (dust, smoke, nicotine, fog, etc.), the unit should be
maintained by qualied service personnel at regular intervals to prevent
overheating and other malfunction.
DP-28 Plus
7
Page 8
Safety instructions
NOTICE!
External power supply
The device is powered by an external power supply. Before connecting
the external power supply, ensure that the input voltage (AC outlet)
matches the voltage rating of the device and that the AC outlet is pro‐
tected by a residual current circuit breaker. Failure to do so could result
in damage to the device and possibly the user.
Unplug the external power supply before electrical storms occur and
when the device is unused for long periods of time to reduce the risk of
electric shock or re.
NOTICE!
Possible staining
The plasticiser contained in the rubber feet of this product may possibly
react with the coating of your ground and after some time cause perma‐
nent dark stains.
In case of doubt, do not put the rubber feet directly on the ground, but
use felt-pad protectors.
digital piano
8
Page 9

3 Features
Features
The digital piano is characterized by the following features:
n 88 weighted keys with hammer action
n 25 sounds
n Metronome with 50 rhythms
n 192-voice polyphony
n Layer and Split mode
n TWINOVA (duo mode)
n 100 practice and accompaniment songs
n D.A.S, Reverb and Chorus eects
n Transpose function
n Automatic shuto, deactivatable
n Built-in speakers
n Bluetooth®-MIDI, e.g. for instrument management via app (e.g. PianoToolBox)
n Connections: 2 × headphone output, MIDI out, USB-MIDI, sustain pedal, Aux IN,
Line OUT
n 12 V power supply included
n Music rest included
n Sustain pedal included
DP-28 Plus
9
Page 10
Assembly instructions
4 Assembly instructions
Unpack and check carefully there is no transportation damage before using the unit.
Keep the equipment packaging. To fully protect the product against vibration, dust
and moisture during transportation or storage use the original packaging or your
own packaging material suitable for transport or storage, respectively.
Set up the device in the desired location.
Voltage supply
The unit is powered by the included 12 V power supply. Make sure that the device is
turned o before you connect it to the power supply or disconnect it.
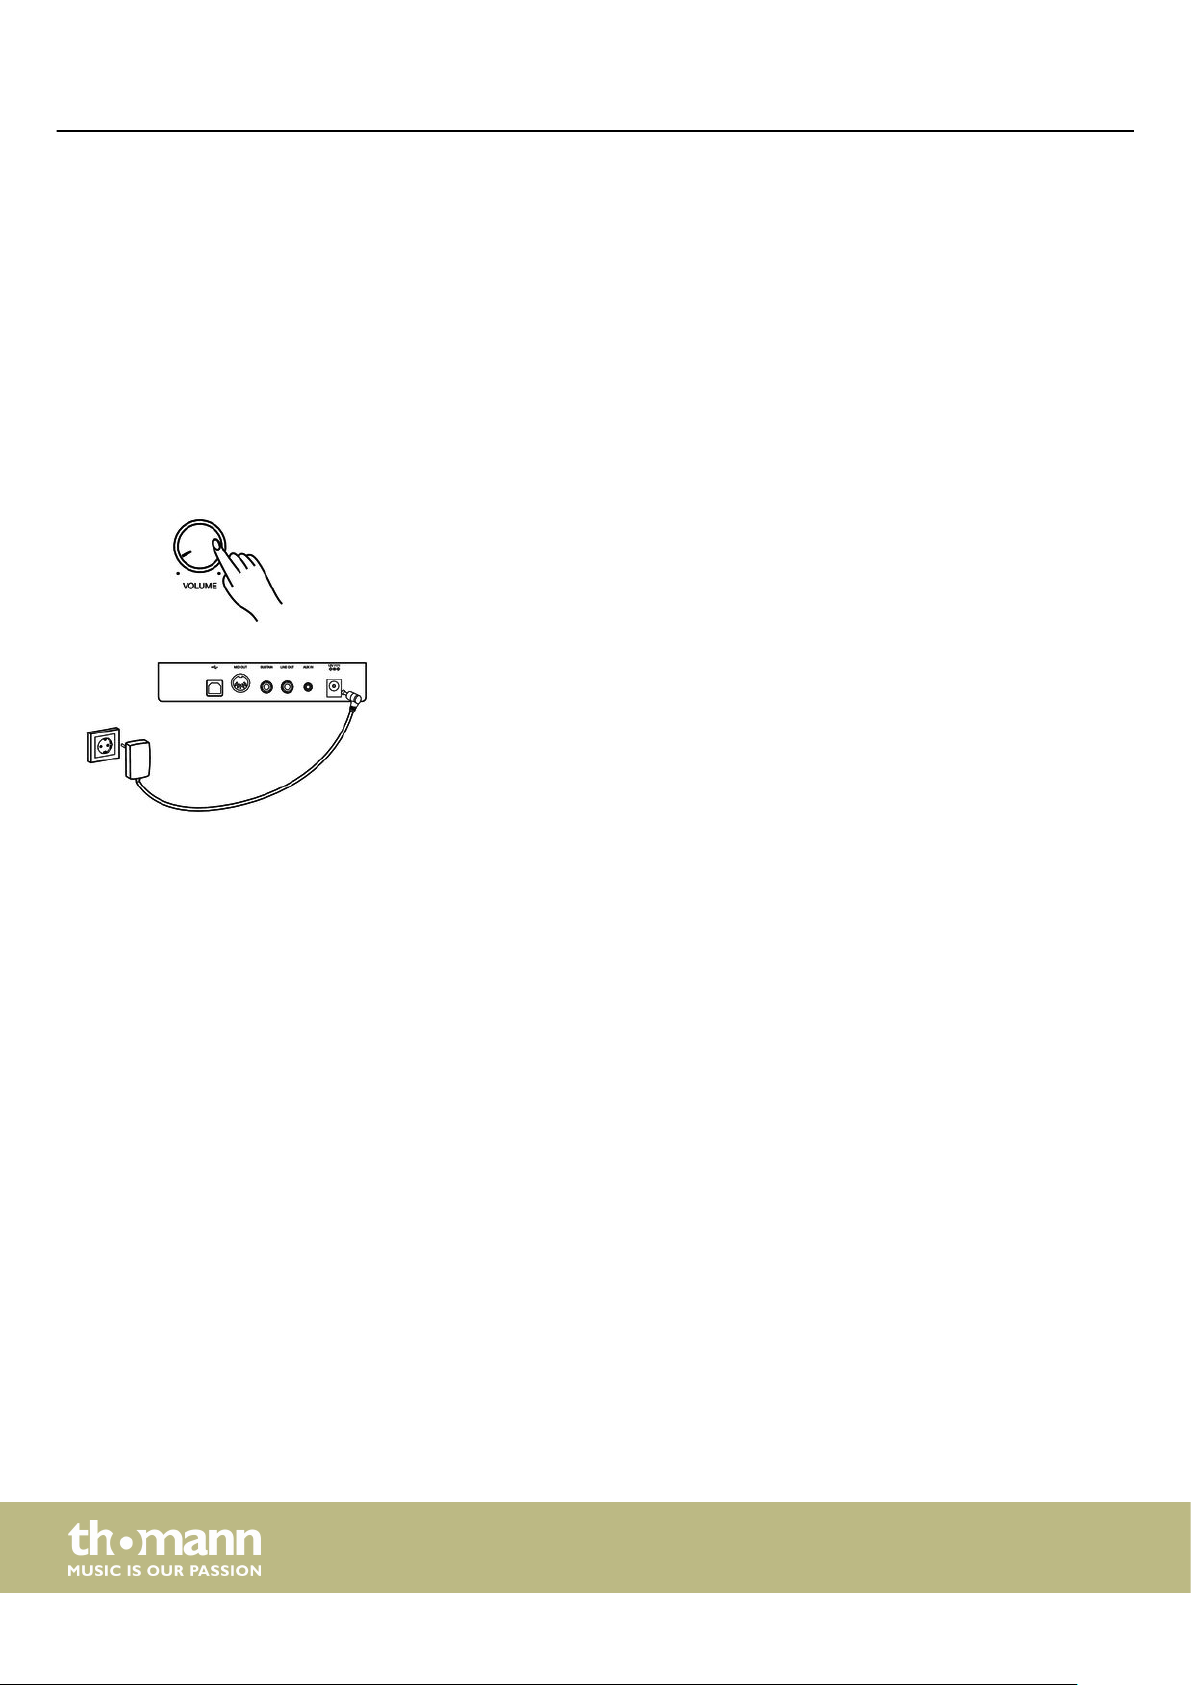
Turn the volume knob counter-clockwise to minimum before connecting the digital
piano to the power supply or to other devices. This is to protect the speakers from
damage.
Connect the cable from the power supply outlet to the input socket [12V] on the rear
panel of the piano. Plug the plug of the power cord into a properly wired and
earthed mains wall outlet.
10
digital piano
Page 11
5 Control panel and connections
Overview
Control panel and connections
Control panel
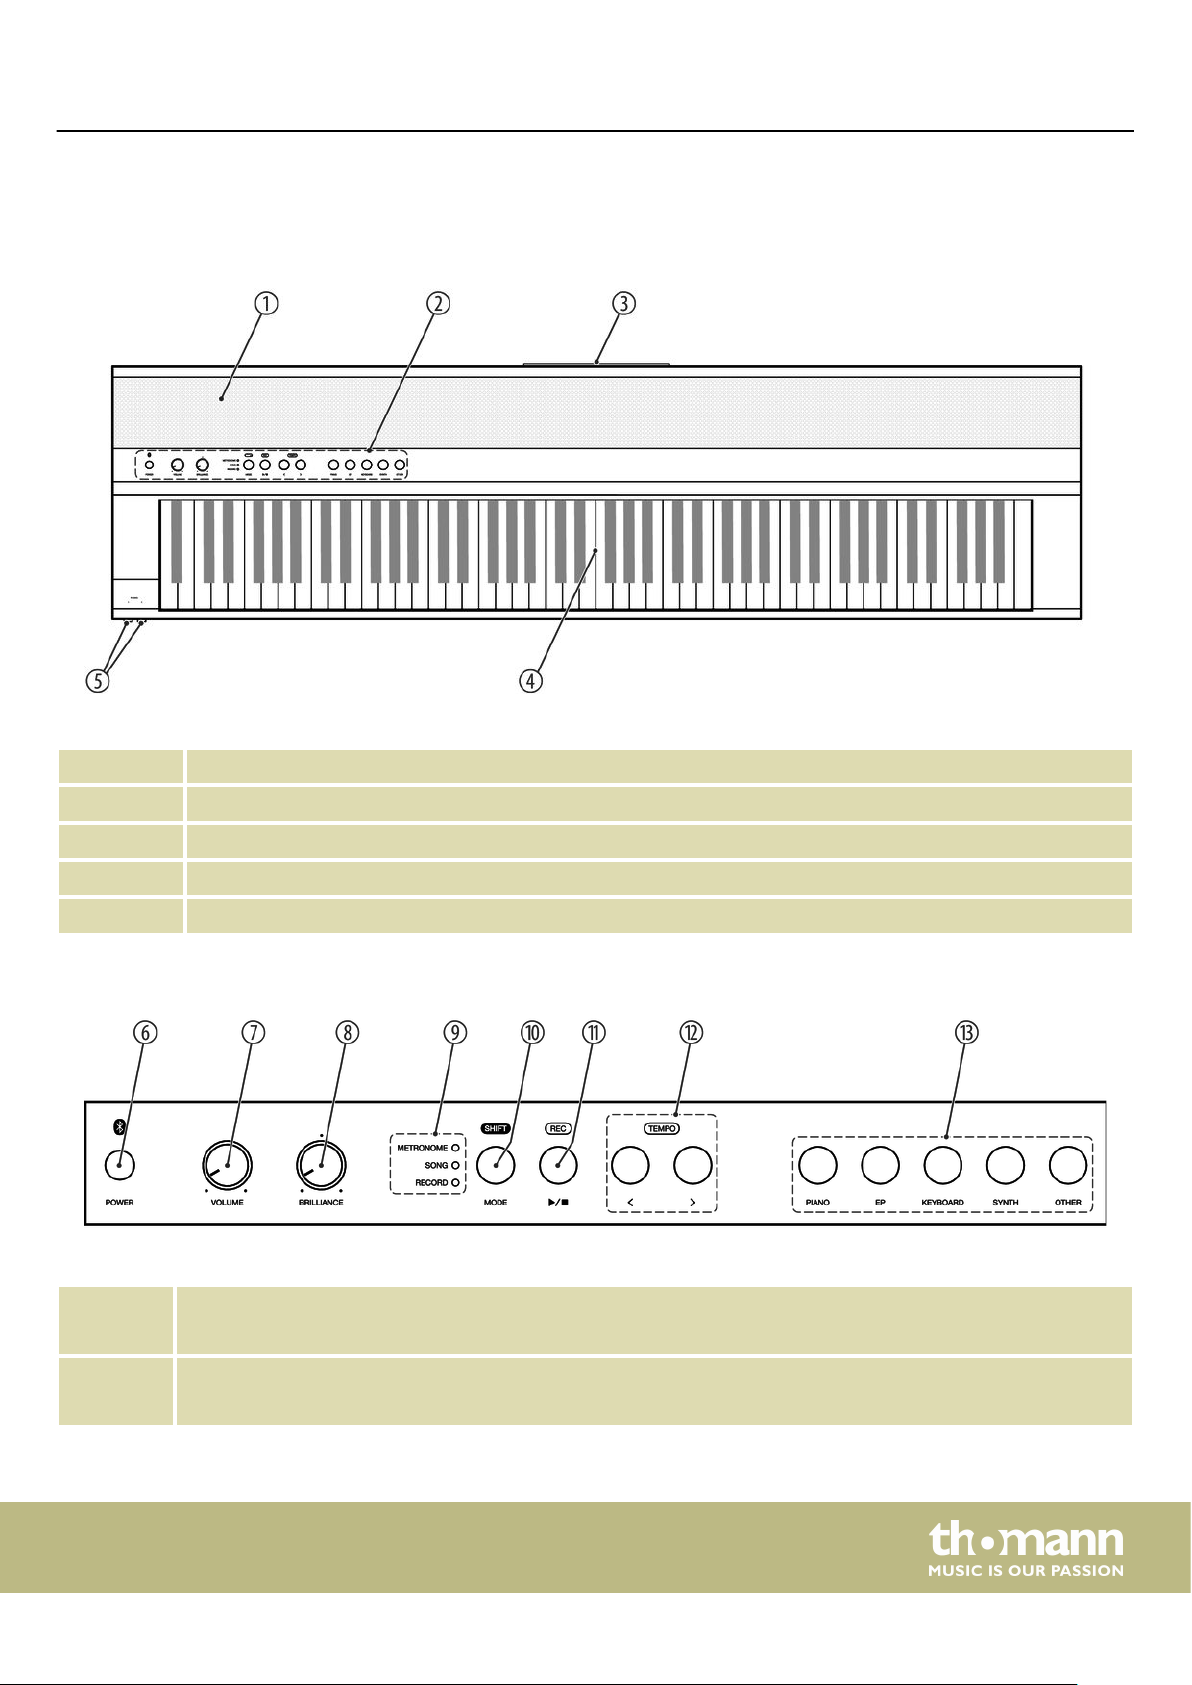
6 [POWER]
1 Built-in speakers
2 Control panel with function keys and rotary knobs.
3 Rear panel connections
4 Keyboard with 88 keys (the additional functions of the keys can be found in the attached overview)
5 2 × connection sockets for headphones
Button to turn the digital piano on and o
7 [VOLUME]
Rotary control to adjust the overall volume
DP-28 Plus
11
Page 12
Control panel and connections
8 [BRILLANCE]
Rotary control to adjust the tone colour
9 LEDs to indicate the activated mode ([METRONOME], [SONG], [RECORD])
10 [MODE]: Mode selection button (rst function)
[SHIFT]: Enables the second button function in combination with one of the buttons [11] and [12].
11
12 [<] / [>]: Buttons for setting the parameters and selecting the functions
13 [PIANO] / [EP] / [KEYBOARD] / [SYNTH] / [OTHER]
Rear panel connections
: Button to play or stop the practice and demo pieces (rst function)
[REC]: Button to activate the Recording mode (second function).
[TEMPO]: Buttons for setting the tempo during playback (second function)
Buttons for selecting a sound
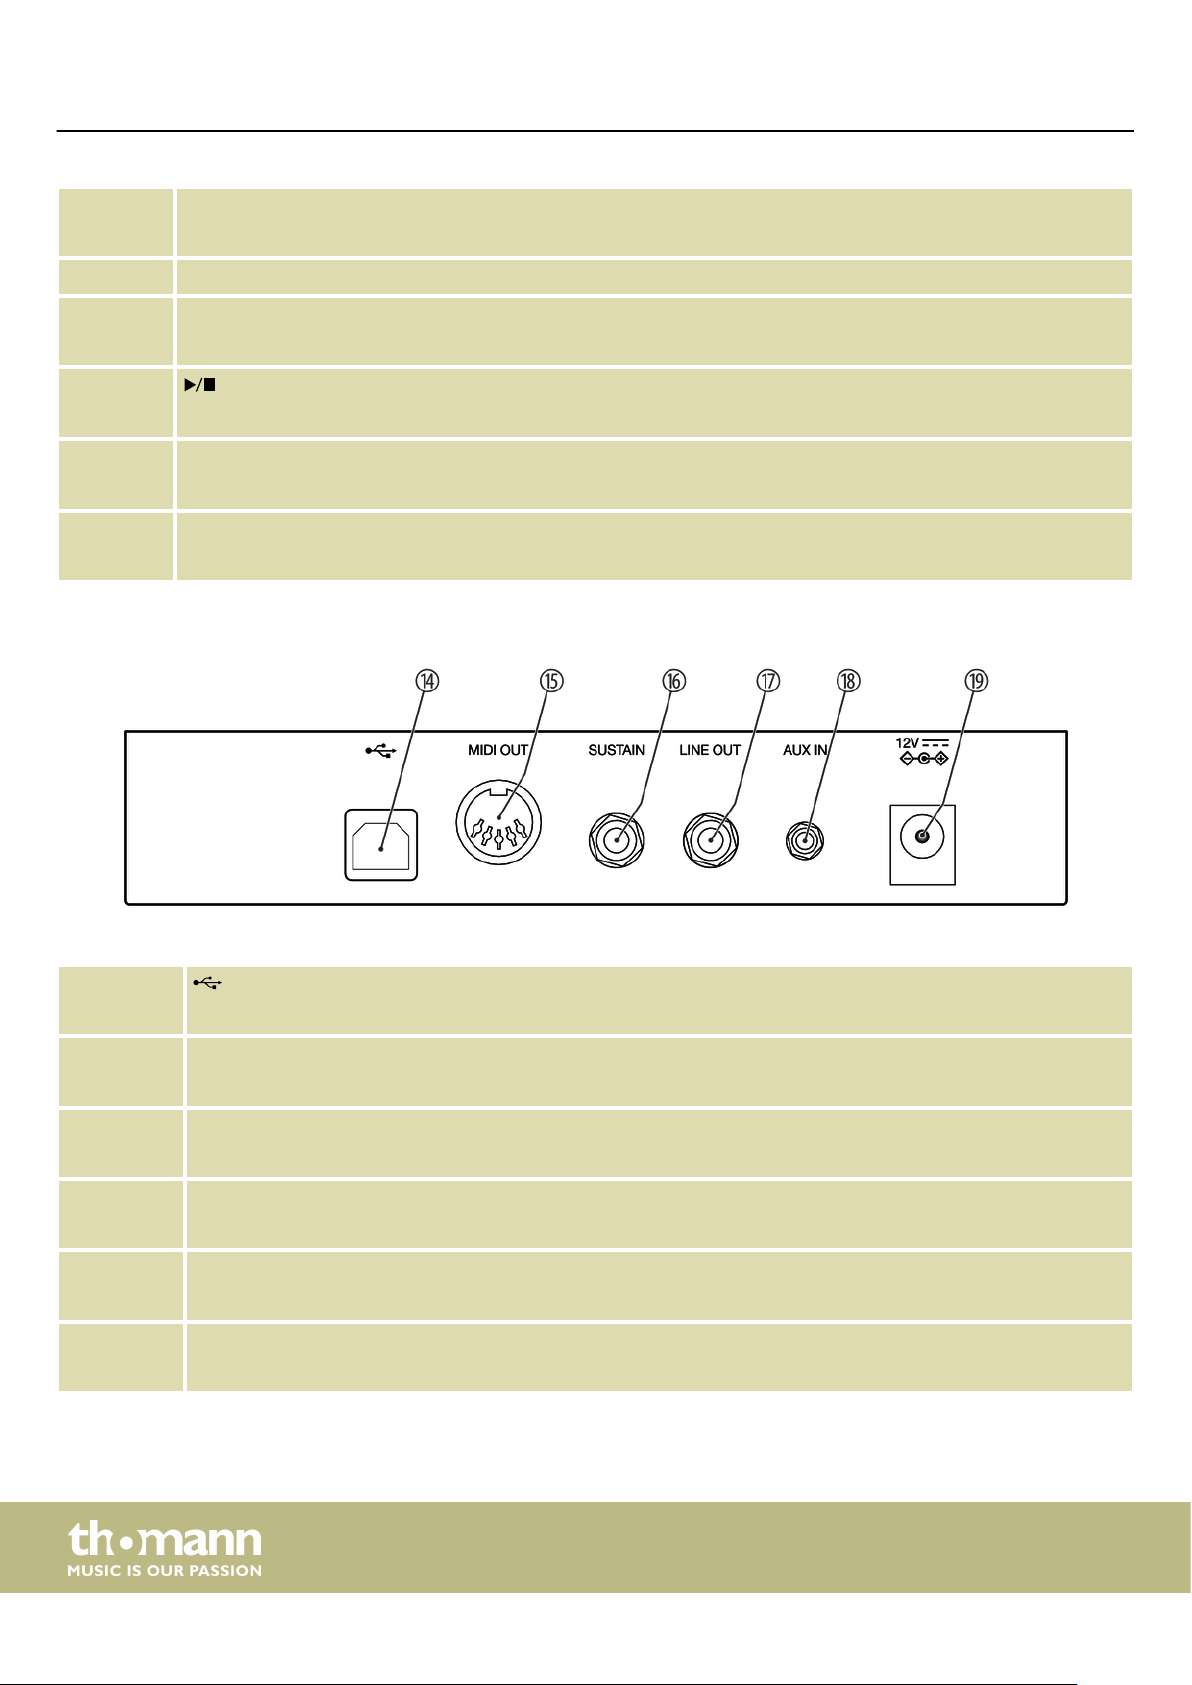
14
USB-to-host interface for connection to a computer (MIDI data)
15 [MIDI OUT]
MIDI out for connecting an external MIDI device
16 [SUSTAIN]
Sustain pedal connection (1/4" jack socket).
17 [LINE OUT]
Stereo output socket for connection to external audio equipment, e.g. a stereo system (1/4" jack socket)
18 [AUX IN]
Stereo input socket for connecting an external audio device (e.g. MP3 or CD player, 3.5 mm mini jack socket).
19 [12V]
Connection for the external power supply
digital piano
12
Page 13
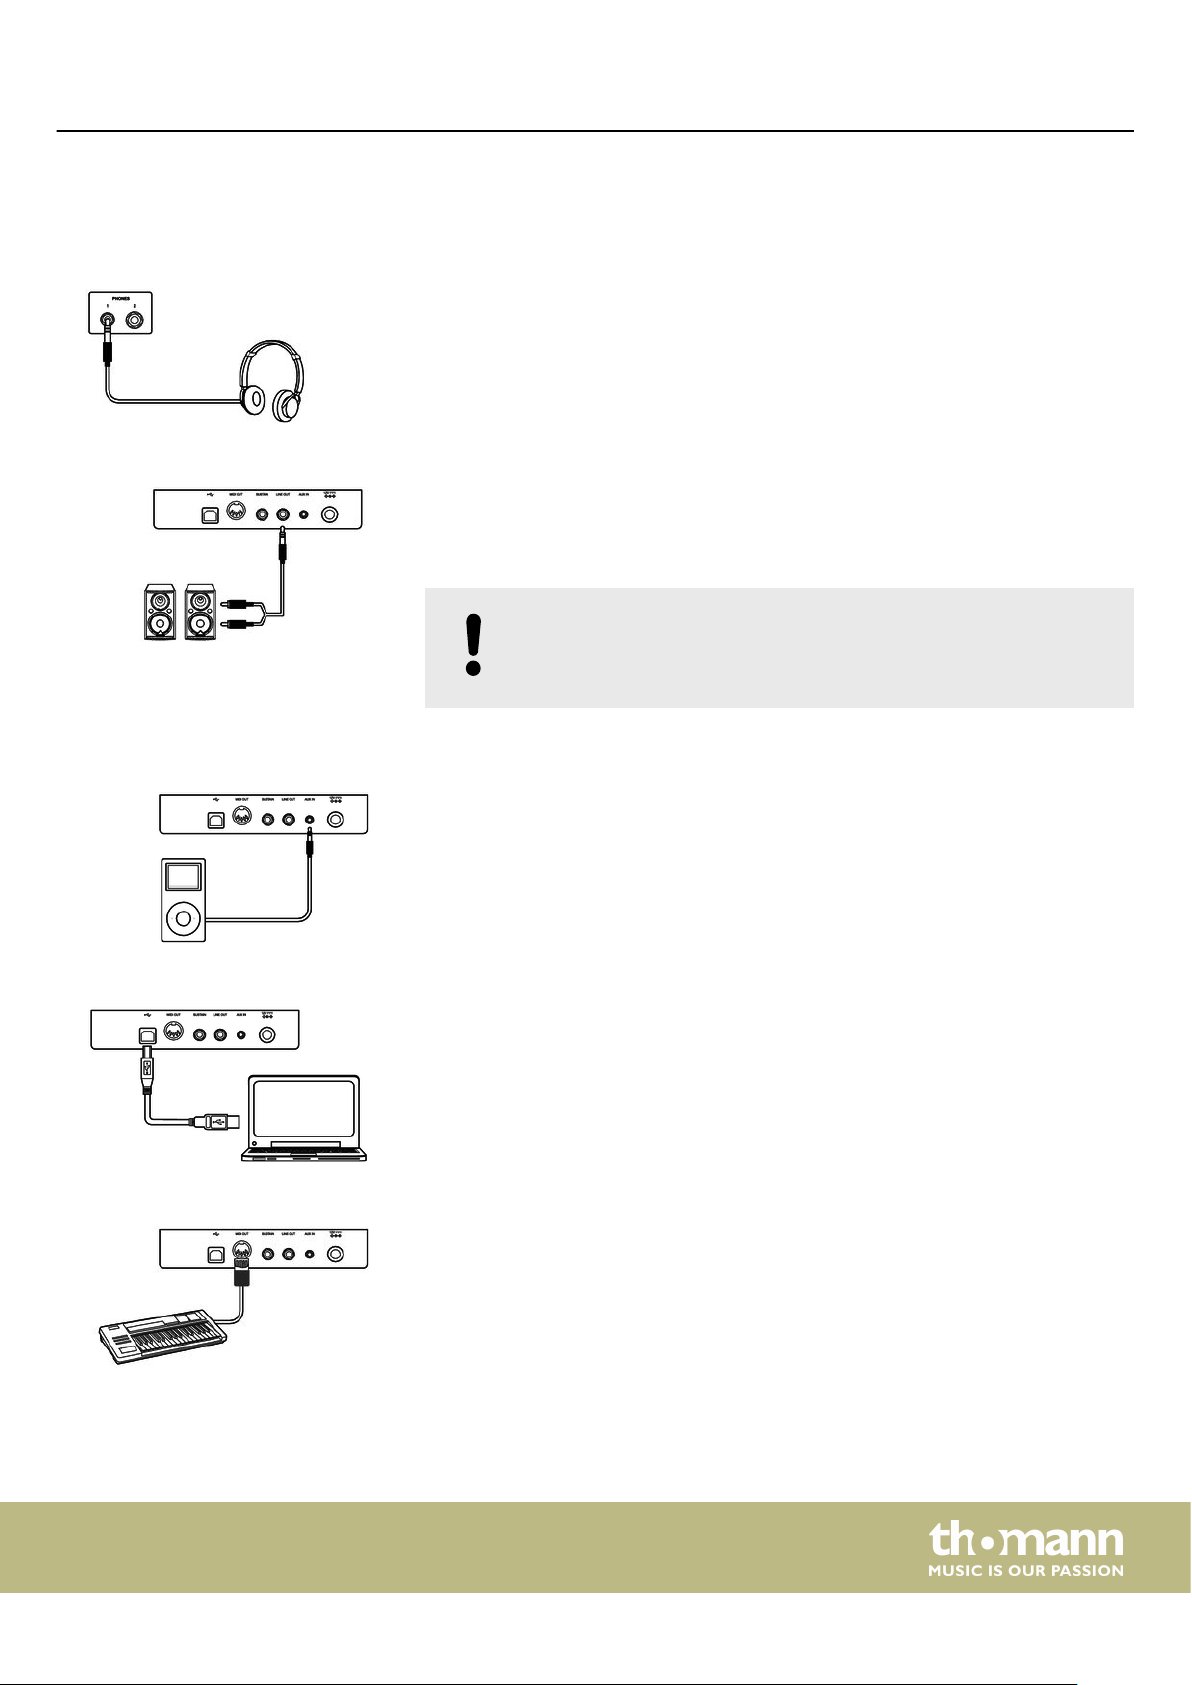
6 Connection options
Headphones
External audio devices via LINE OUT
Connection options
To the left beneath the keyboard you nd the headphones outlets 1 and 2.
Connecting headphones (not supplied) to the outputs mutes the speakers.
Use the [LINE OUT] socket to connect the digital piano to an amplier, stereo device,
mixing console or recording device. Plug one end of the audio cable into the
[LINE OUT] socket on the rear panel of the digital piano and the other end into the
input of the respective audio device.
NOTICE!
To prevent damage to the speakers, turn the volume down to ‘Mini‐
mum’ before you connect other devices to the digital piano.
External audio devices via AUX IN
Computer via USB-MIDI
MIDI device via MIDI OUT
Use the [AUX IN] socket to connect a, for example, CD or MP3 player to the digital
piano. So you can playback music through the internal speakers of the digital piano
and simultaneously play along to it. Plug one end of the audio cable into the [AUX IN]
socket on the rear panel of the digital piano and the other end into the output of the
respective audio device.
You can connect the digital piano to a PC for data exchange via the USB-to-host
interface. You can also connect the digital piano to smartphones, tablets or other
mobile devices and control it using a suitable app (e.g. PianoToolBox).
Use the MIDI interface to send MIDI data to an external MIDI device.
DP-28 Plus
13
Page 14

Connection options
Sustain pedal
Pedalry
Use the connection socket [SUSTAIN] to connect a sustain pedal to the digital piano.
Use the connection socket on the bottom of the digital piano to connect the triplepedal (Sustain, Sostenuto and Soft) of the optional Thomann original stand (item no.
352262).
14
digital piano
Page 15

7 Switching on / o and basic operation
7.1 Switching the digital piano on
7.1.1 Normal switching on / o
1. Press [POWER] to turn the digital piano on.
The LEDs of the digital piano light up. The digital piano is operational.
ð
2. Press and hold [POWER] to turn the digital piano o.
The LEDs of the digital piano turn o.
ð
7.1.2 Automatic shuto
When the digital piano is not being used for 30 minutes, it switches o automatically.
By default, the automatic switch-o is activated.
1. Press [POWER] to turn the digital piano on.
The LEDs of the digital piano light up. The digital piano is operational.
ð
Switching on / o and basic operation
7.2 Adjusting the volume
7.3 Setting the tone colour
2. Press and hold [SHIFT] and then simultaneously press the piano keys [C1] and
[C#1] to deactivate the automatic switch-o.
3. To reactivate the automatic switch-o, press and hold [SHIFT] and then simul‐
taneously press the piano keys [C1] and [C#1].
Adjust the rotary control [VOLUME] for a pleasant volume for playback and practising.
1. Turn the [VOLUME] control clockwise to increase the volume.
2. Turn the [VOLUME] control counter-clockwise to decrease the volume.
Use the [BRILLIANCE] control to set the tone colour of the digital piano.
1. Turn the [BRILLIANCE] control clockwise to adjust the treble for the entire key‐
board.
2. Turn the [BRILLIANCE] control counter-clockwise to adjust the bass for the
entire keyboard.
DP-28 Plus
15
Page 16

Switching on / o and basic operation
7.4 D.A.S (Dynamic Acoustic System)
Activate the D.A.S to automatically increase the bass and treble in conjunction with
the master volume even at low volume.
1. Hold down [SHIFT] and press the piano key [A#5].
2. To deactivate the D.A.S (Dynamic Acoustic System) again, hold down [SHIFT]
and press the piano key [A#5] again.
7.5 Touch velocity
With this function you can adjust the touch velocity of the keyboard in six dierent
levels.
1. Hold down [SHIFT] and use the piano keys [C4] and [E4] to adjust the touch
velocity. Each keystroke alters the parameter by 1.
Parameter Meaning
[1] Piano
[2] Mezzo Piano
[3] Standard
[4] Mezzo Forte
[5] Forte
2. Press and hold [SHIFT] and press the piano key [D4] to deactivate the touch
velocity.
16
digital piano
Page 17

7.6 Transposing
7.7 Tuning
Switching on / o and basic operation
With this function you can adjust the pitch of the keyboard in semitone steps (12 at
max.) up or down.
Hold down [SHIFT] and press the piano keys [F#6] … [F7] to adjust the pitch of
the keyboard up or down in 12 semitones.
With this function you can ne tune the pitch of the entire keyboard.
1. Press and hold [SHIFT] and press the piano key [B3] to activate the tuning func‐
tion.
2. Press and hold [SHIFT] and use the piano keys [C3]…[A3] to adjust the tuning in
a range of a semitone (= 100 cent). To do this, enter a four-digit value.
– If you want to change the tuning with the piano keys [C3] to [A3],
always enter it in four-digit format. For example, to set the fre‐
quency to ‘452.3 Hz’, hold down [SHIFT] and press the piano keys
[D#3], [E3], [C#3] and [D3] in succession..
– To restore the standard pitch (= 440.0 Hz), hold down [SHIFT]
and press the piano keys [D#3], [D#3], [A3] and [A3] in succes‐
sion.
3. Release [SHIFT] to conrm the adjustment.
DP-28 Plus
17
Page 18

Switching on / o and basic operation
7.8 Temperament
The digital piano has a total of three temperament settings that can be set using the
piano keys.
Piano key Meaning
[F4] EQUAL
[G4] JUST MAJOR
Hold down [SHIFT] and press one of the piano keys [F4], [G4] or [A4] to set the
desired temperature. By default, the temperament is set to ‘EQUAL’ .
The equal tempered tuning divides the octave
into 12 equal semitone steps. This tuning has
become standard over time because playing all
keys is equally possible.
A tuning process in which the intervals are
tuned without beat. This creates chords with
great sonority. For physical reasons, this only
works for the major key specied here.
Related chords have low beats, distant chords
(such as F sharp major in a pure C tuning) usu‐
ally sound very out of tune.
[A4] JUST MINOR
A tuning process in which the intervals are
tuned without beat. This creates chords with
great sonority. For physical reasons, this only
works for the minor key specied here.
Related chords have low beats, distant chords
(such as F sharp minor in a pure C tuning) usu‐
ally sound very out of tune.
Many of the functions can be easily controlled from a mobile device using
suitable apps (e.g. PianoToolBox), which can be downloaded from the App
Store® or Google Play.
18
digital piano
Page 19

7.9 Selecting sounds
The digital piano has a total of 25 sounds that can be called up using the [PIANO] /
[EP] / [KEYBOARD] / [SYNTH] / [OTHER] buttons (see Ä Chapter 8 ‘Sound list’
on page 31).
1. Press one of the [PIANO] / [EP] / [KEYBOARD] / [SYNTH] / [OTHER] buttons to
2. Press the key of the selected sound group repeatedly to determine a desired
3. To select a dierent sound group, press again one of the [PIANO] / [EP] /
7.10 Layer mode and split point
7.10.1 Setting the Layer mode
Switching on / o and basic operation
select a sound group.
The LED of the selected button lights up.
ð
variation sound in it (see Ä Chapter 8 ‘Sound list’ on page 31).
[KEYBOARD] / [SYNTH] / [OTHER] buttons .
With the layer mode you can set the "layering" of sounds.
1. Hold down one of the [PIANO] / [EP] / [KEYBOARD] / [SYNTH] / [OTHER] buttons
and then press another one for the layer (e.g. [PIANO] and [SYNTH]) to activate
the layer mode.
The LEDs of the selected buttons light up.
ð
2. Press the selected keys (e.g. [PIANO] and [SYNTH]) repeatedly to set a desired
Ä
variation sound for the selected sound groups (see
on page 31).
3. Hold down [SHIFT] and press the piano keys [A7] or [A#7] to set the octave shift
for the layer tone (SOUND R2).
4. Hold down [SHIFT] and press the piano keys [G7] or [G#7] to set the volume for
the layer tone (SOUND R2).
5. To deactivate the layer mode, hold down the button whose sound you want to
switch o (e.g. [SYNTH]) until the LED goes out.
The Layer mode is deactivated.
ð
6. To reactivate the layer mode, proceed as described in step 1.
Chapter 8 ‘Sound list’
DP-28 Plus
19
Page 20

Switching on / o and basic operation
7.10.2 Split point setting
This feature allows you to select a point that splits the entire keyboard into two sec‐
tions and to assign dierent voices to those sections. The preset split point is on
piano key [F#3].
1. Hold down two of the [PIANO] / [EP] / [KEYBOARD] / [SYNTH] / [OTHER] buttons
2. Release both buttons.
3. Press the selected keys (e.g. [PIANO] and [SYNTH]) repeatedly to set a desired
4. Hold down [SHIFT] and press the piano keys [A7] or [A#7] to set the octave shift
and press the desired piano key to which you want to assign the split point.
If you press several piano keys when assigning the split point, the last
key pressed will be set as the split point.
The LEDs of the selected buttons light up. The new setting is instantly
ð
applied.
Ä
variation sound for the selected sound groups (see
on page 31).
for the second voice (SOUND L).
Chapter 8 ‘Sound list’
5. Hold down [SHIFT] and press the piano keys [G7] or [G#7] to set the volume for
the second voice (SOUND L).
6. To disable split mode, press and hold the buttons you've selected in step 1.
The LEDs of the selected buttons turn o. Split mode is deactivated.
ð
Many of the functions can be easily controlled from a mobile device using
suitable apps (e.g. PianoToolBox), which can be downloaded from the App
Store® or Google Play.
20
digital piano
Page 21

7.11 Metronome
Switching on / o and basic operation
1. Switch on metronome
To turn on the metronome, press [MODE] repeatedly until the [METRONOME]
LED lights up.
2.
Press to start playing with the metronome.
The LED of the button ashes.
ð
3. Setting the time signature
Press [<] or [>] to set the desired time signature (see
rhythm list’ on page 34).
Alternatively, hold down [SHIFT] and set the desired time signature with the
piano keys [C3]…[A3].
– If you want to change the time signature with the piano keys [C3]
to [A3], always enter it in two-digit format. For example, to set
the time signature ‘4/4 Beat’, hold down [SHIFT] and press the
piano keys [A3] and [C#3] in succession.
4. Adjusting the volume
Hold down [SHIFT] and use the piano keys [D6] or [E6] to adjust the volume.
5. Setting the tempo
All preprogrammed time signatures contain certain tempo information. You
Ä
can set the tempo as described here
6. Turning o the metronome
Press to disable the metronome.
Alternatively, press [MODE] to switch to another mode.
The [METRONOME] LED turns o.
ð
Chapter 7.13 ‘Tempo’ on page 23.
Ä
Chapter 10 ‘Metronome
Metronome function is not available in song mode.
DP-28 Plus
21
Page 22

Switching on / o and basic operation
7.12 Demo pieces
The demo songs incorporated in the digital piano show the sound and the pitch
range of the instrument.
1. Enabling demo pieces
2.
To enable demo piece playback, press [MODE] repeatedly until the [SONG] LED
lights up.
Press to start playing demo pieces.
The LED of the
ð
3. Selecting demo pieces
These presets can be adjusted at any time in various ways.
n Press [<] or [>] to select a desired demo in steps of 1 (see Ä Chapter 9 ‘Prac‐
tise and demo pieces’ on page 32).
n Hold down [<] or [>] to set the tenth next demo piece.
For example, if the current demo track # 1 is set, press and hold [>] to
set demo track # 11.
n Hold down [SHIFT] and use the piano keys [C3] … [A3] to enter a three-digit
value to set the desired demo piece directly.
– If you want to change the desired demo piece using one of the
piano keys [C3] to [A3], always enter it in three-digit format. For
example, to set the demo track 26, press the piano keys [A3],
[C#3] and [F3] in succession.
4. Adjusting the volume
Hold down [SHIFT] and use the piano keys [D6] or [E6] to adjust the volume.
5. Setting the tempo
All preprogrammed demo pieces contain certain tempo information. You can
set the tempo as described here Ä Chapter 7.13 ‘Tempo’ on page 23.
6. Disabling demo pieces
button ashes.
22
Press to stop playing demo pieces.
Alternatively, press [MODE] to switch to another mode.
The [SONG] LED turns o.
ð
digital piano
Page 23

7.13 Tempo
Switching on / o and basic operation
All preprogrammed songs and the metronome function are stored with certain
tempo information. You can adjust the tempo in a range from ‘20’ … ‘280’. These
presets can be adjusted at any time in various ways.
1. Hold down [SHIFT] and quickly press [<] or [>] to adjust the tempo in steps of 1.
2. To set the tempo to the next tens digits, hold down [SHIFT] and press and hold
[<] or [>] until the LED of the [<] or [>] button lights up.
If the current tempo is 126 bpm, hold down [SHIFT] and press and
hold [>]. The tempo jumps immediately to 130 bpm.
3. Hold down [SHIFT] and press the piano key [B2].
Keep holding down [SHIFT] and use the piano keys [C3] … [A3] to enter a threedigit value to set the tempo directly.
– Hold down [SHIFT] and simultaneously press [<] and [>] to reset the
tempo to the default value.
– If you want to change the tempo with the piano keys [C3] to [A3],
always enter it in three-digit format. For example, to set Tempo 214,
hold down [SHIFT], press [B2] and then press the piano keys [C#3], [C3]
and [D#4] in succession.
– When playback is ended in metronome mode, the tempo is reset by
changing the time signature of the metronome.
Many of the functions can be easily controlled from a mobile device using
suitable apps (e.g. PianoToolBox), which can be downloaded from the App
Store® or Google Play.
DP-28 Plus
23
Page 24

Switching on / o and basic operation
7.14 Digital eects
7.14.1 Reverb and Chorus
With the reverb and chorus functions you can simulate acoustic eects under dif‐
ferent environmental conditions.
On delivery, the reverb and chorus of the respective sound are activated by default.
1. Hold down [SHIFT] and turn on the desired eect with the piano key [C#5]
2. Hold down [SHIFT] and press [D#5], to set the reverb type (Room or Hall).
3. Hold down [SHIFT] and adjust the eect depth in ten steps using the piano
7.15 TWINOVA
(reverb) or [F#5 ] (chorus).
keys [C5] or [D5] for reverb and [F5] or [G5] for chorus.
7.16 Recording function
In TWINOVA mode, the keyboard is divided into two areas with the same sound and
the same pitch to enable four-handed playing, for example in class. The default split
point is between [E4] and [F4].
1. Enabling TWINOVA
Hold down [SHIFT] and press piano key [C#6] to enter the TWINOVA mode.
2. Selecting a sound
The sound selected before input is set as the standard sound for both areas.
If desired, you can choose another sound though (see Ä Chapter 7.9 ‘Selecting
sounds’ on page 19).
The layer and split function and the playback of demo pieces are not avail‐
able in TWINOVA mode.
You can record a user song with the digital piano and save the recording in the
internal memory. If you record again, the saved user song will be overwritten.
24
digital piano
Page 25

7.16.1 Recording preparation
7.16.2 Recording
7.16.3 Stopping recording
Switching on / o and basic operation
To turn on the recording function, press [MODE] repeatedly until the [RECORD]
LED lights up.
1. Hold down [SHIFT] and press [REC] to start recording.
The [RECORDING] LED ashes.
ð
2. The recording starts with the rst keystroke.
The [REC] button LED ashes.
ð
7.16.4 Playing a recording
Press [REC] to pause or stop recording.
The [REC] button LED turns o.
ð
1. To turn on the recording function, press [MODE] repeatedly until the [RECORD]
LED lights up.
2.
Press to play the saved recording.
The LED of the button ashes.
ð
3.
Press again to stop the playback.
The button LED turns o.
ð
DP-28 Plus
25
Page 26

Switching on / o and basic operation
7.17 Further setting options
7.17.1 String resonance
This function simulates the resonance eects taking place in an acoustic piano.
On delivery, the string resonance is activated by default.
1. Hold down [SHIFT] and press piano key [D1] or [E1] to adjust the string reso‐
2. Hold down [SHIFT] and press piano key [D#1] to disable the string resonance.
3. Hold down [SHIFT] and press piano key [D#1] again to enable the string reso‐
nance.
nance again.
This setting is only available for sounds no. 1 … no. 4.
7.17.2 Damper resonance
This function simulates the damper resonance eects with lifted dampers taking
place in an acoustic piano.
On delivery, the damper resonance is activated by default.
1. Hold down [SHIFT] and press piano key [F1] or [G1] to adjust the damper reso‐
nance.
2. Hold down [SHIFT] and press piano key [F#1] to disable the damper resonance.
3. Hold down [SHIFT] and press piano key [F#1] again to enable the damper reso‐
nance again.
This setting is only available for sounds no. 1 … no. 4.
26
digital piano
Page 27

7.17.3 Damper noise
Switching on / o and basic operation
This function simulates the damper noise eects taking place in an acoustic piano
when dampers are lifted and lowered.
On delivery, the damper noise is activated by default.
1. Hold down [SHIFT] and press piano key [A1] or [B1] to adjust the damper noise.
2. Hold down [SHIFT] and press piano key [A#1] to disable the damper noise.
3. Hold down [SHIFT] and press piano key [A#1] again to enable the damper noise
again.
This setting is only available for sounds no. 1 … no. 4.
7.17.4 Hammer noise
This function simulates the hammer noise eects taking place in an acoustic piano
when striking the strings.
On delivery, the hammer noise is activated by default.
1. Hold down [SHIFT] and press piano key [C2] or [D2] to adjust the hammer noise.
2. Hold down [SHIFT] and press piano key [C#2] to disable the hammer noise.
3. Hold down [SHIFT] and press piano key [C#2] again to enable the hammer
noise again.
This setting is only available for sounds no. 1 … no. 4.
Many of the functions can be easily controlled from a mobile device using
suitable apps (e.g. PianoToolBox), which can be downloaded from the App
Store® or Google Play.
DP-28 Plus
27
Page 28

Switching on / o and basic operation
7.17.5 LID simulation
This function simulates the lid position of a piano or grand piano (open, half-open,
closed).
1. Hold down [SHIFT] and press piano key [F2] or [G2] to adjust the lid simulation.
2. Hold down [SHIFT] and press piano key [F#2] to disable the lid simulation.
3. Hold down [SHIFT] and press piano key [F#2] again to enable the lid simulation
again.
This setting is only available for sounds no. 1 … no. 4.
7.18 MIDI functions
7.18.1 What is MIDI?
7.18.2 USB connection
MIDI stands for ‘Musical Instrument Digital Interface’ and represents the standard
interface between a computer and electronic instruments. You can use the USB port
or the MIDI output socket of the digital piano for transferring MIDI data to a com‐
puter or other USB device.
1. Connect the USB port of the digital piano using a standard USB cable (not
included) to the USB port on your computer.
2. Observe the following instructions when connecting USB instruments to com‐
puters. Otherwise, the instrument or the computer may ‘crash’, which can
result in data loss. If a ‘crash’ should occur, turn o computer and instrument
and restart both after a few seconds.
– If the computer is in standby or hibernation, wake the computer
before connecting the USB cable.
– Establish the USB connection between computer and instrument
before turning on the instrument.
28
digital piano
Page 29

7.18.3 MIDI connection
7.18.4 Bluetooth®-MIDI connection
With the Bluetooth® connection, the digital piano can be paired with smartphones,
tablets or other mobile devices to enable a wireless MIDI connection. You will nd
suitable apps (e.g. PianoToolBox) for controlling the digital piano for your mobile
device in the App Store® or on Google Play.
1. Switch on the digital piano and the mobile device.
2. Activate the Bluetooth® connection on your mobile device.
3. Open the app on your mobile device and pair it to the digital piano ‘Piano BT
4. You can now control the digital piano from your mobile device.
5. To disconnect the Bluetooth® connection, hold down [SHIFT] and simultane‐
Switching on / o and basic operation
At MIDI connections, the device that controls other devices, is referred to as
the Master. A device that is controlled via MIDI is called Slave. Connect the MIDI
OUT of the master to the MIDI IN of the slave.
MIDI xxxx’ .
When the connection between digital piano and mobile device is estab‐
ð
lished, the LED of the [POWER] button lights up blue.
ously press the piano keys [A#0] and [B0].
7.19 Operating tone
If a setting is made using key combinations, an operating tone sounds which can be
switched on or o as required. By default, the operating tone is activated.
1. Hold down [SHIFT] and then simultaneously press the piano keys [B7] and [C8]
to deactivate the operating tone.
2. To reactivate the operating tone, hold down [SHIFT] and then simultaneously
press the piano keys [B7] and [C8].
DP-28 Plus
29
Page 30

Switching on / o and basic operation
7.20 Factory defaults
Proceed as follows to restore the factory default settings:
Hold down [SHIFT] and press the piano key [A0] to activate the factory defaults.
30
digital piano
Page 31

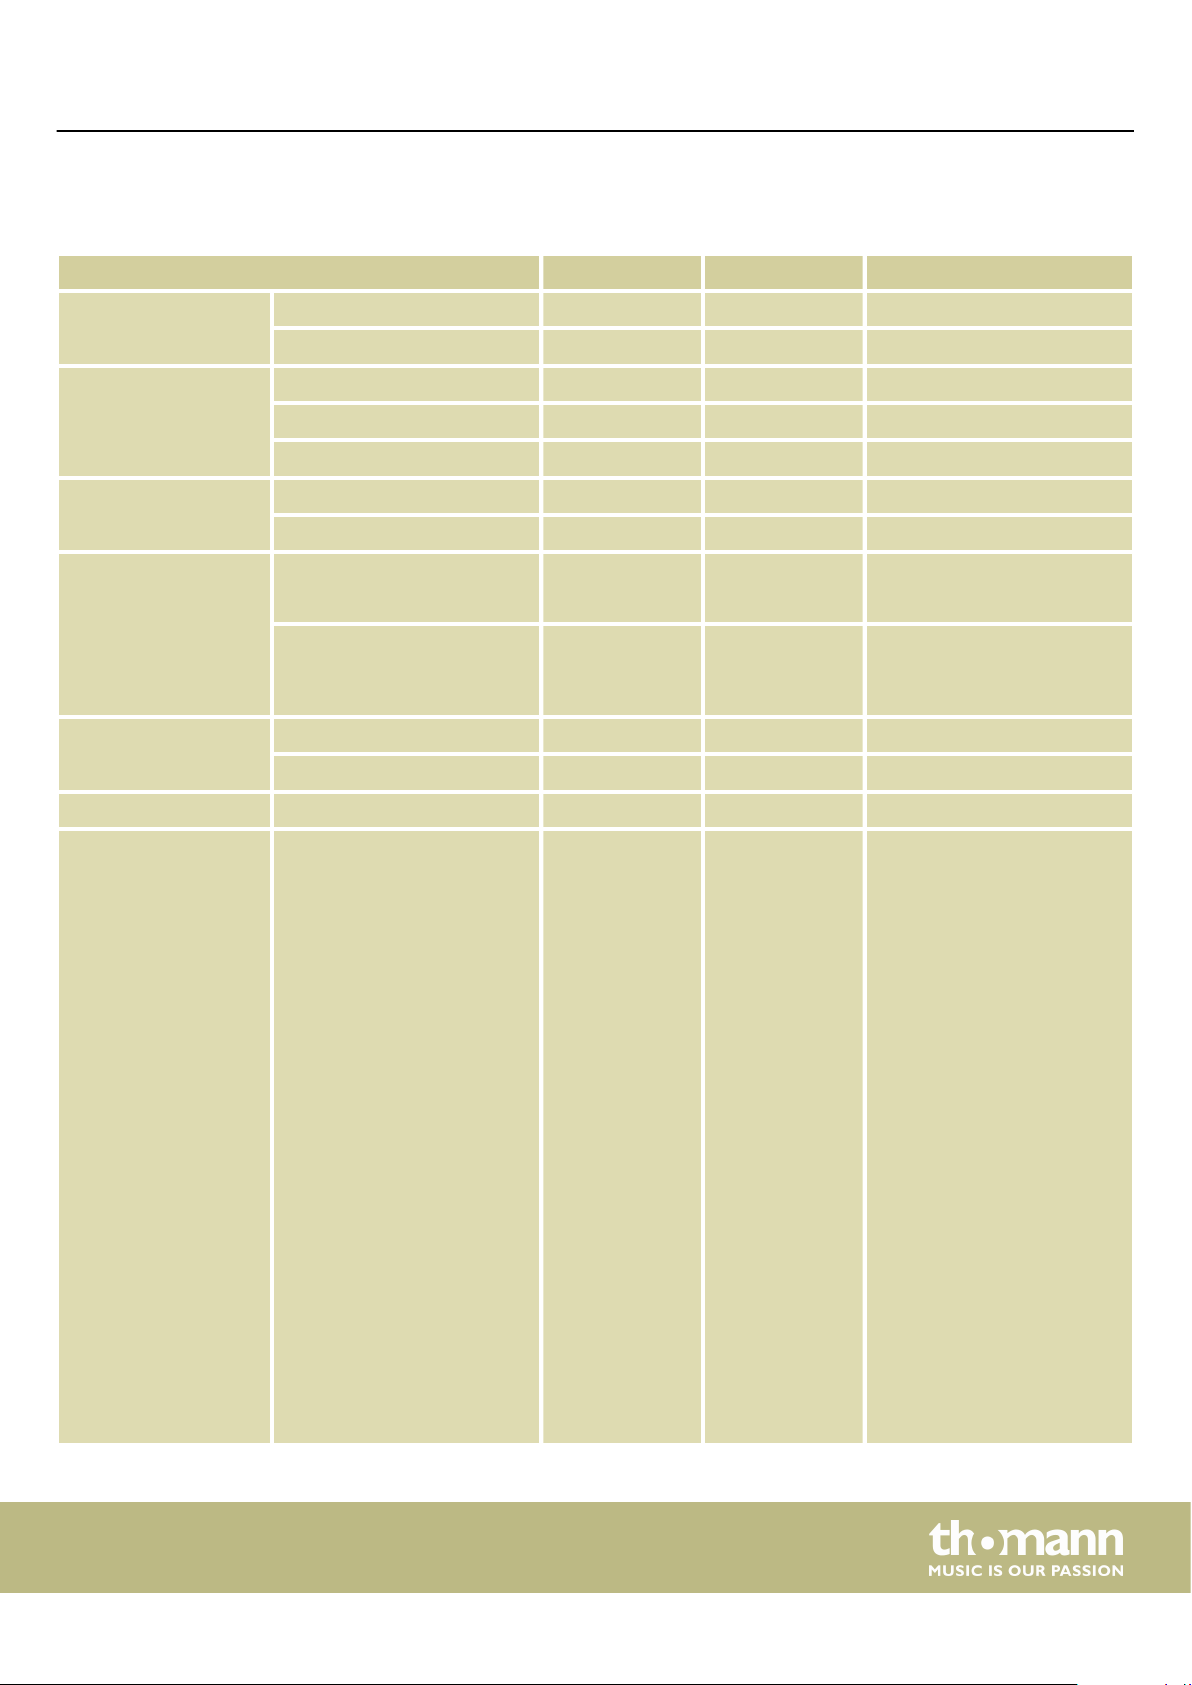
8 Sound list
No. Name No. Name No. Name
PIANO 009 Dark EP 017 Strings
001 German Grand 010 FM EP 018 Choir
002 Bright German Grand KEYBOARD 019 Square Lead
003 Japanese Grand 011 Clavinet 020 Saw Lead
004 Warm Grand 012 Harpsichord OTHER
005 Electric Grand 013 Tonewheel Organ 021 Bell
EP 014 Classic Organ 022 Celesta
006 Vintage EP 015 Church Organ 023 Nylon Guitar
007 Warm EP SYNTH 024 Electric Bass
008 Reed EP 016 Synth Pad 025 Acoustic Bass
Sound list
DP-28 Plus
31
Page 32

Practise and demo pieces
9 Practise and demo pieces
No. Name No. Name
001 Prelude In C-Sharp Major 031 The Wagtail
002 Lyrical Rondo 032 Bulie Dance
003 Rialto Ripples (Rag) 033 Tender Blossom
004 Neapolitan Song 034 Grace
005 Waltzes 035 Cherish The Memories
006 Turkish March 036 Chopsticks
007 Schos Doll’s Dance No. 2 037 Progress
008 Minuet In D Major 038 Eclogue
009 Inquietude 039 The Limpid Stream
010 Italian Polka 040 Brave Cavalier
011 The Rag-Time Dance 041 The Chatterbox
012 Piano Sonata In C Major, K.330. III 042 Tarantella
013 Piano Sonata In A Major, K.331. I 043 Frankness
014 Waltz For Piano In G-Sharp Minor 044 Tender Grieving
015 L’Arabesque 045 The Farewell
016 Austria Variation 046 The Chase
017 Schos Doll’s Dance No. 7 047 Sonata K.545
018 To A Wild Rose 048 Maple Leaves Ragtime
019 Innocence 049 The Nightingale Was Singing
020 Tchaikovsky Waltz 050 Gipsy Rondo
021 Barcarolle 051 Fountain
022 Robot Doll 052 Fur Elise
023 Consolation 053 Dove
024 Invention A 2 Voix 054 Knight
025 Minuet In G Major (BWV Anh. 114) 055 Ave Maria
026 Barcarolle 056 Prelude in G BWV902a
027 Norwegian Dance No.2 057 The Angels Singing
028 Moseta Dance 058 The Entertainer
029 The Small Gathering 059 Swallow
030 The Return 060 Minute Waltz
digital piano
32
Page 33

Practise and demo pieces
No. Name No. Name
061 Danse Des Mirlitons 081 House Of Rising
062 Wedding March 082 The Blue Bells
063 The Hip Hop’s Night 083 Beautiful Dreamer
064 Prelude And Fugue No. 30 In D Minor 084 Been A Long Time
065 Minuets In F 085 O Sole Mio
066 Red River Valley 086 Der Deitcher’s Dog
067 Troika 087 Joy To The World
068 Oh Susanna 088 Silent Night
069 Wave Of Danube 089 Ave Maria
070 Long Long Ago 090 Five Hundred Miles
071 Old Folks At Home 091 Happy New Year
072 Jambalaya 092 Like Christmas
073 Ding! Dong! 093 Jeanie With The Light Brown Hair
074 Battle Hymn 094 Music Box Dancer
075 The Old Gray Mare 095 Tell It On Mountain
076 American Patrol 096 Entertainer
077 Christmas Coming 097 Annie Laurie
078 Sipping Cider 098 Rumba Romance
079 Christmas Sound 099 The Last Rose Of Summer
080 On London Bridge 100 The Old King Cole
DP-28 Plus
33
Page 34

Metronome rhythm list
10 Metronome rhythm list
No. Name No. Name No. Name
01 Simple Count 18 70’s Rock 35 Funk 2
02 4/4 Beat 19 Texas Rock 36 Swing 1
03 2/4 Beat 20 Sweet Ballad 37 Swing 2
04 3/4 Beat 21 6/8 Soul 38 Funky Jazz
05 3/8 Beat 22 Fusion Shue 39 Bernard Shue
06 6/8 Beat 23 Adult Ballad 40 Bluegrass
07 5/4 Beat 24 Organic Ballad 41 Country Step
08 5/8 Beat 25 Tango 42 Country Folk
09 7/8 Beat 26 Slow Waltz 43 Bossa Nova
10 10/8 Beat 27 Cha Cha 44 Latin
11 8Beat 1 28 Rumba 45 Mambo
12 8Beat 2 29 Samba 46 Waltz
13 16Beat 1 30 Techno 1 47 Vienna Waltz
14 16Beat 2 31 Hip Hop 48 Polka
15 Rock 32 Techno 2 49 March
16 Ska 33 Classic Disco 50 6/8 March
17 Slow Rock 34 Funk 1
34
digital piano
Page 35
MIDI implementation chart
11 MIDI implementation chart
Function Sent Received Notes
Basic Channel Default 1 1-16
Changed 1-16 1-16
Mode Default No Mode 3
Messages No Mode 3
Altered ******** No
Note Number Note 0 – 127 0 – 127
True voice ******** 0 – 127
Velocity Note Note ON Yes, 9nH,
v = 1 – 127
Note OFF No, 9nH,
v = 0 or 8nH,
v = 0 – 127
After Touch Keys No No
Channels No No
Pitch Bend No Yes
Control Change 0
1
5
6
7
10
11
64
65
66
67
80
81
91
93
Yes
No
No
No
Yes
No
No
Yes
No
No
No
Yes
Yes
Yes
Yes
Yes, 9nH,
v = 1 – 127
Yes, 9nH,
v = 0 or 8nH,
v = 0 – 127
Yes
Yes
Yes
Yes
Yes
Yes
Yes
Yes
Yes
Yes
Yes
Yes
Yes
Yes
Yes
Bank Select
Modulation
Portamento Time
Data Entry
Volume
Pan
Expression
Sustain Pedal
Portamento ON/OFF
Sostenuto Pedal
Soft Pedal
Reverb Program
Chorus Program
Reverb Level
Chorus Level
120
121
123
No
No
No
DP-28 Plus
Yes
No
Yes
All Sound O
Reset All Controllers
All Notes O
35
Page 36

MIDI implementation chart
Function Sent Received Notes
Program Change True # Yes Yes Bank MSB, Bank LSB,
Programme
System Exclusive No Yes
System Common Song Position No No
Song Select No No
Tune Request No No
System Real Time Clock Yes No
Commands No No
Aux Messages Local ON/OFF No No
Active Sensing Yes No
System Reset No Yes
MIDI channel modes
POLY MONO
OMNI ON Mode 1 Mode 2
OMNI OFF Mode 3 Mode 4
36
digital piano
Page 37

12 Troubleshooting
Problem Possible causes and solutions
Troubleshooting
You hear a 'pop' sound from the speakers when switching the
digital piano on and o.
No sound can be heard when playing the piano. Make sure that the volume control is set appropriately.
Malfunction occurs when using a mobile phone. Using a mobile phone near the digital piano can cause inter‐
Some notes on the keyboard sound wrong. Reset the tuning to the default setting and restart the device.
The digital piano is not detected when connected to a com‐
puter.
This is normal. No need to worry.
Check if headphones are plugged into headphone output 1 or
2. Connecting headphones will mute the speakers of the dig‐
ital piano.
ference. To prevent this, turn o the mobile phone or use it
only at a safe distance.
Check the USB cable for correct connection.
Connect the USB cable to another USB port on the computer.
DP-28 Plus
37
Page 38

Technical specications
13 Technical specications
Input connections AUX IN 1 × 3.5 mm phone socket
Output connections Headphones 1 × 1/4" jack socket, 1 × 3.5 mini jack socket
MIDI OUT 1 × DIN socket, 5-pin
LINE OUT 1 × 1/4" jack socket
USB MIDI 1 × USB-to-Host interface
Pedal 1 × 1/4" jack socket
Keyboard 88 weighted keys with hammer action
Polyphony 192-voice polyphonic
Sounds 25
Styles 50
Eects Chorus, Reverb
Pedal Sustain
Demo and practice songs 100
Speaker 2 × 20 W
Voltage supply
Dimensions (W × H × D) 1365 mm × 134 mm × 366 mm
Weight 12.5 kg
Colour black
Ambient conditions Temperature range 0 °C…40 °C
Relative humidity 20 %…80 % (non-condensing)
Further information
Pitch Bend No
Modulation wheel No
Number of split zones 2
Ivory-feel keyboard No
Storage medium No
Plug-in power supply (12 V / 2000 mA , centre positive)
Stand Optional (item no. 352262)
digital piano
38
Page 39

14 Plug and connection assignment
Plug and connection assignment
Introduction
Unbalanced transmission
1/4" TRS phone plug (stereo, unbal‐
anced)
Three-pole 1/8" mini phone jack
(stereo, unbalanced)
This chapter will help you select the right cables and plugs to connect your valuable
equipment in such a way that a perfect sound experience is ensured.
Please note these advices, because especially in ‘Sound & Light’ caution is indicated:
Even if a plug ts into the socket, an incorrect connection may result in a destroyed
power amp, a short circuit or ‘just’ in poor transmission quality!
Unbalanced transmission is mainly used in semi-professional environment and in hi
use. Instrument cables with two conductors (one core plus shielding) are typical rep‐
resentatives of the unbalanced transmission. One conductor is ground and shielding
while the signal is transmitted through the core.
Unbalanced transmission is susceptible to electromagnetic interference, especially at
low levels, such as microphone signals and when using long cables.
1 Signal (left)
2 Signal (right)
3 Ground
1 Signal (left)
2 Signal (right)
3 Ground, shielding
DP-28 Plus
39
Page 40

Protecting the environment
15 Protecting the environment
Disposal of the packaging material
For the transport and protective packaging, environmentally friendly materials have
been chosen that can be supplied to normal recycling.
Ensure that plastic bags, packaging, etc. are properly disposed of.
Do not just dispose of these materials with your normal household waste, but make
sure that they are collected for recycling. Please follow the notes and markings on
the packaging.
Disposal of your old device
This product is subject to the European Waste Electrical and Electronic Equipment
Directive (WEEE) in its currently valid version. Do not dispose with your normal
household waste.
Dispose of this device through an approved waste disposal rm or through your local
waste facility. When discarding the device, comply with the rules and regulations
that apply in your country. If in doubt, consult your local waste disposal facility.
40
digital piano
Page 41

Notes
DP-28 Plus
41
Page 42

Notes
42
digital piano
Page 43

Page 44

Musikhaus Thomann · Hans-Thomann-Straße 1 · 96138 Burgebrach · Germany · www.thomann.de
 Loading...