

Page 1
ö
#
$
%
&
'
AirBorne Wi-2.4GHz Instrument
Quick Start Guide
This quick start guide contains important information on the safe operation of the
product. Read and follow the safety advice and instructions given. Retain the manual
for future reference. If you pass the product on to others please include this manual.
EN
Safety instructions
Intended use
This product is meant to be used for the wireless transmission of instrument signals.
Any other use or use under other operating conditions is considered to be improper
and may result in personal injury or property damage. No liability will be assumed for
damages resulting from improper use
.
Danger for children
Ensure that plastic bags, packaging, etc. are disposed of properly and are
not within reach of babies and young children. Choking hazard! Ensure
that children do not detach any small parts from the product. They could
swallow the pieces and choke!
Features
• Plug-n-Play transmitter and receiver set
• 2.4 GHz
• 24bit/48kHz
• 4 channels
• Range of up to 30 m
• Frequency range 20Hz - 20kHz
• Latency < 5 ms
• Auto sleep / wake up function
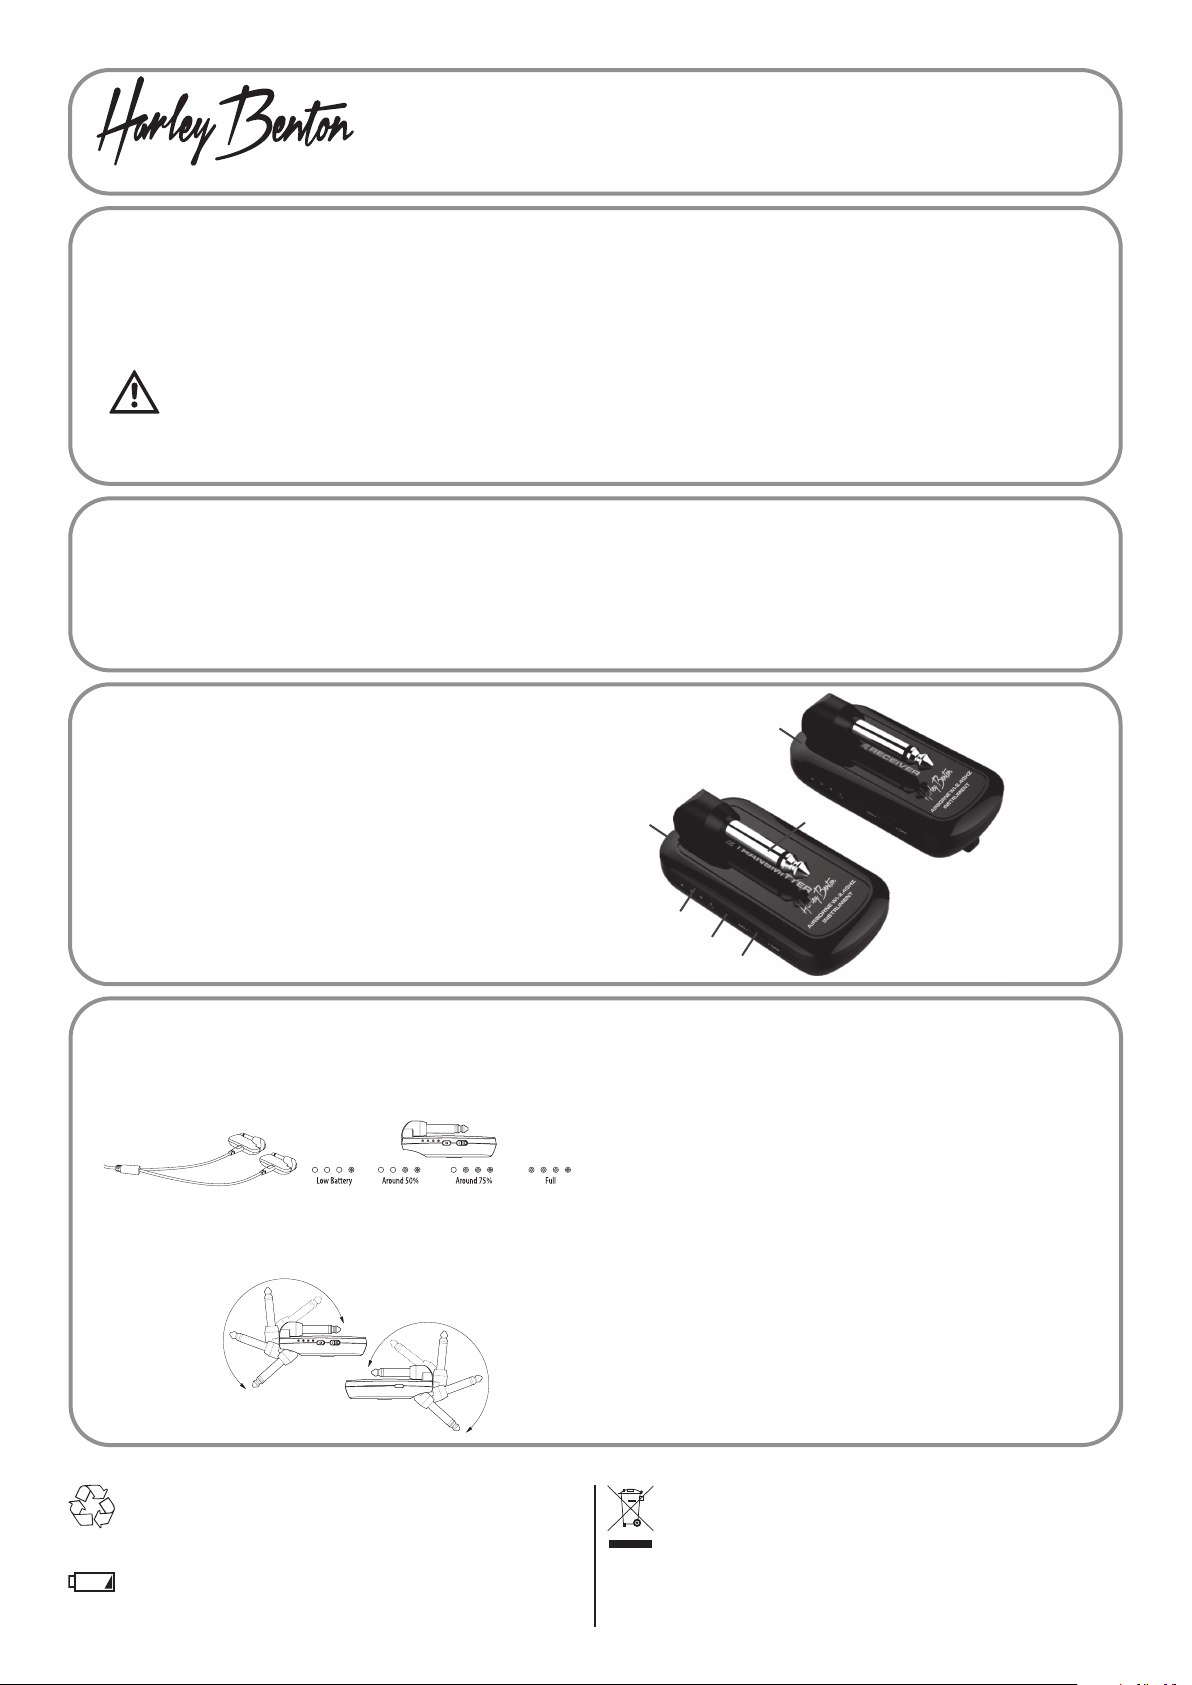
Operating elements
1 Transmitter
2 Receiver
3 1/4" phone plug
4 On / o switch
5 Channel selector
6 LED display
Electromagnetic compatibility with other electrical equipment
Using the device near radios or TV sets may cause interference. Then increase the distance
between the devices.
Where to use the product
Never use the product
• in conditions of extreme temperature or humidity
• in extremely dusty or dirty areas
• at locations where the unit can become wet
• near magnetic elds
General handling
• To prevent damage, never use force when handling the product.
• Never immerse the product in water. Just wipe it with a clean dry cloth. Do not use liquid
cleaners such as benzene, thinners or ammable cleaning agents.
• Built-in, rechargeable 750 mAh Lithium battery
• Operating time per battery charge: up to 6 hours
• LED battery display
• Plug angle adjustable in a range of 220°
• Comes with Duo-Pin USB charging cable
• Compact click system for safe transportation
• Dimensions (W×H×D): 73mm×40mm×15mm
• Weight: 50g for each transmitter or receiver
Using the product
1. To avoid interference, do not operate the device near other wireless devices, such as WiFi
routers or the like.
2. Fully charge the transmitter and receiver batteries prior to initial use using the Duo-pin
USB charging cable. When the device is switched o , the LEDs indicate the loading progress.
Duo-pin USB charging cable
When the device is switched on, the LEDs light up to indicate the charging process. To
maintain the charge capacity, the batteries must be recharged every 3 months even when
not in use. If a low battery is displayed, there will be approximately 10 minutes left to run.
At the latest then the built-in battery must be charged.
3. Fold the plug into a position suitable for the desired use:
For the transport and protective packaging, environmentally friendly materials have
been chosen that can be supplied to normal recycling. Ensure that plastic bags, packaging, etc. are properly disposed of. Do not just dispose of these materials with your
normal household waste, but make sure that they are collected for recycling. Please
follow the notes and markings on the packaging.
Remove replaceable lithium batteries from the device before disposal. Protect used
lithium batteries from short circuits, for example by covering the poles with adhesive
tape. Permanently installed lithium batteries must be disposed of together with the
device. Please inquire about a suitable acceptance point.
Thomann GmbH • Hans-Thomann-Straße 1 • 96138 Burgebrach • www.thomann.de • info@thomann.de DocID: 425040_01.12.2020
Plug the transmitter into the 1/4" phone socket of the instrument whose signal you
want to transmit. The transmitter ashes ve times. During transmission, the LED
indicator lights up.
4. Plug the receiver into the 1/4" phone input of an ampli er or e ects unit. The receiver
ashes ve times. If the data transmission is stable, the LED indicator lights up constantly. If the signal is too weak, the LED ashes. Then reduce the distance between
transmitter and receiver.
5. To switch on transmitter and receiver, set their on / o switches in the ON
position.
6. Select the same transmission channel for transmitter and receiver by pressing the
channel selection button. The default setting at power up is ‘Channel 1’. We recommend using this channel if there is no radio interference. Otherwise, try operating on
a di erent channel.
7. The transmission signals can be received by several receivers. Thus, for example, the
signal can be fed to 2 ampli ers simultaneously and a stereo sound image can be
generated.
8. To switch o transmitter and receiver, set their on / o switches in the OFF position.
This product is subject to the European Waste Electrical and Electronic Equipment Directive (WEEE) in its currently valid version. Do not dispose of your old device with your
normal household waste. Dispose of this product through an approved waste disposal
rm or through your local waste facility. Comply with the rules and regulations that
apply in your country. If in doubt, consult your local waste disposal facility.
 Loading...