

Page 1

Tisio CE
Users Guide
Page 2

Page 3

ThinPATH Systems, Inc. Tisio User’s Guide
Copyright
Copyright © 2006 & 2007 by ThinPATH Systems, Inc. The information contained in this
document is subject to change without notice. ThinPATH Systems, Inc. shall not be
liable for errors contained herein or for incidental or consequential damages in
connection with the furnishing, performance, or use of this material. This document
contains information which is protected by copyright. All rights are reserved. No part of
this document may be photocopied, reproduced, or translated to another language
without the prior written consent of ThinPATH Systems, Inc.
Trademarks
ThinPATH Systems, Tisio, Tisio Device Manager are registered trademarks of
ThinPATH Systems, Inc.
Other product and company names mentioned herein are the trademarks of their
respective owners. All terms mentioned in this book that are known to be trademarks or
service marks have been appropriately capitalized. ThinPATH Systems cannot attest to
the accuracy of this information. Use of a term in this book should not be regarded as
affecting the validity of any trademark or service mark.
Disclaimer
THE SOFTWARE PRODUCTS ARE PROVIDED “AS IS” WITHOUT WARRANTY OF ANY KIND. TO THE
MAXIMUM EXTENT PERMITTED BY APPLICABLE LAW, ThinPATH Systems FURTHER DISCLAIMS ALL
WARRANTIES, INCLUDING WITHOUT LIMITATION, ANY IMPLIED WARRANTIES OF
MERCHANTABILITY, FITNESS FOR A PARTICULAR PURPOSE AND NONINFRINGEMENT. THE ENTIRE
RISK ARISING OUT OF THE USE OR PERFORMANCE OF THE SOFTWARE PRODUCTS AND
DOCUMENTATION REMAINS WITH THE END USER.
TO THE MAXIMUM EXTENT PERMITTED BY APPLICABLE LAW, IN NO EVENT SHALL ThinPATH
Systems OR ITS SUPPLIERS BE LIABLE FOR ANY CONSEQUENTIAL, INCIDENTAL, DIRECT, INDIRECT,
SPECIAL, PUNITIVE, OR OTHER DAMAGES WHATSOEVER (INCLUDING, WITHOUT LIMITATION,
DAMAGES FOR LOSS OF BUSINESS PROFITS, BUSINESS INTERRUPTION, LOSS OF BUSINESS
INFORMATION, OR OTHER PECUNIARY LOSS) ARISING OUT OF THE USE OF OR INABILITY TO USE
THE SOFTWARE PRODUCTS OR DOCUMENTATION, EVEN IF ThinPATH Systems HAS BEEN ADVISED
OF THE POSSIBILITY OF SUCH DAMAGES. BECAUSE SOME STATES/JURISDICTIONS DO NOT
ALLOW THE EXCLUSION OR LIMITATION OF LIABILITY FOR CONSEQUENTIAL OR INCIDENTAL
DAMAGES, THE ABOVE LIMITATION MAY NOT APPLY TO YOU.
I
Page 4

ThinPATH Systems, Inc. Tisio User’s Guide
Revision History
December 2005, Tisio Users Guide, Rev. A
January 2007, Tisio Users Guide, Updated for Build 30xx
II
Page 5

ThinPATH Systems, Inc. Tisio User’s Guide
Table of Contents
Tisio User’s Guide................................................................................................................1
Tisio Basics ...........................................................................................................................1
What is a Windows-based Terminal?..............................................................................................1
What is a Client?..............................................................................................................................2
Initial Screens.......................................................................................................................3
Logon Dialog Box .......................................................................................................................4
Terminal Server Session..............................................................................................................4
If the Tisio Connection Manager Appears.......................................................................................5
If the Tisio Startup Wizard Appears................................................................................................6
The WTS Connection Wizard .........................................................................................................9
The Citrix ICA Connection Wizard............................................................................................... 12
The IE Browser Connection Wizard..............................................................................................14
The Terminal Emulator Connection Wizard..................................................................................15
Using the Tisio Connection Manager...............................................................................17
Adding or Editing Connections.....................................................................................................19
Setting the Default Connections................................................................................................20
Setting Autostart Connections...................................................................................................20
Starting Multiple Connections.......................................................................................................21
Hotkeys..........................................................................................................................................22
Cycle up through active connections in the Connection Manager................................22
Cycle down through active connections in the Connection Manager. ..........................22
Display Tisio Connection Manager Window Display.....................................................22
Logging Off...................................................................................................................................24
Disconnecting vs. Logging Off......................................................................................................25
Ending Autostart Connections.......................................................................................................25
Using the Tisio Startup Wizard........................................................................................26
License Agreement Screen ............................................................................................................26
Network Settings Screen................................................................................................................27
Host Name.................................................................................................................................27
Domain Name............................................................................................................................27
Network Adapter Settings..........................................................................................................27
Device Manager Screen.................................................................................................................28
Device Management Server....................................................................................................... 28
Testing the Device Manager Connection...................................................................................28
Display Settings Screen.................................................................................................................29
Finish Screen ................................................................................................................................. 29
III
Page 6

ThinPATH Systems, Inc. Tisio User’s Guide
Using the Tisio Connection Manager...............................................................................30
Displaying the Tisio Connection Manager..............................................................................31
Viewing active connections....................................................................................................... 31
Managing multiple connections ...............................................................................................31
Creating new RDP connections ...............................................................................................31
Creating new ICA connections ................................................................................................31
Creating new Microsoft IE Browser connections. ..................................................................32
Designating default or autostart connections.........................................................................32
Deleting connections ..................................................................................................................32
Modifying Citrix ICA Client connections................................................................................32
Modifying Microsoft IE Browser connections ........................................................................ 32
Modifying Microsoft Terminal Server client connections — changing connection
Application properties ...............................................................................................................32
Modifying Microsoft Terminal Server client connections — changing Network
Connection properties................................................................................................................33
Using the Tisio Device Properties.....................................................................................34
Introduction Tab ............................................................................................................................35
Terminal Name..........................................................................................................................35
Factory-Default.......................................................................................................................... 35
Display Settings Tab......................................................................................................................36
Desktop Area and Refresh Frequency.......................................................................................37
Hide & Show all Video Modes.................................................................................................. 38
Colors.........................................................................................................................................38
Screen Saver ..............................................................................................................................38
Power Saver...............................................................................................................................38
Modifying Display Settings.......................................................................................................38
Network Settings Tab....................................................................................................................39
Host Name.................................................................................................................................39
Domain Name............................................................................................................................39
Network Adapter Settings..........................................................................................................40
Security Tab...................................................................................................................................42
Device Manager Tab......................................................................................................................42
Device Management Server....................................................................................................... 44
Tisio Device Manager Default Settings.................................................................................45
Testing the Device Manager Connection...................................................................................45
Update Manager Tab .....................................................................................................................46
Installed Software......................................................................................................................46
Avaiable for Update...................................................................................................................46
Using Tisio Device Properties Control Panel ..................................................................47
Internet Options – IE Browser................................................................................................... 48
IV
Page 7

ThinPATH Systems, Inc. Tisio User’s Guide
Internet Options - Connections.................................................................................................48
Internet Options - Security ........................................................................................................48
Internet Options - Privacy .........................................................................................................48
Internet Options - Advanced.....................................................................................................48
Internet Options – Browser Popup........................................................................................... 49
Printers ......................................................................................................................................... 49
Terminal Server Client License.................................................................................................49
Keyboard......................................................................................................................................49
Password......................................................................................................................................49
Owner...........................................................................................................................................50
Power............................................................................................................................................50
System ..........................................................................................................................................50
Display .........................................................................................................................................50
Mouse ...........................................................................................................................................50
Mouse ...........................................................................................................................................51
Volume & Sound Properties – Volume tab ............................................................................. 51
Volume & Sound Properties – Sound tab................................................................................51
Remove Programs.......................................................................................................................51
Date & Time.................................................................................................................................51
Certificates ...................................................................................................................................51
Regional Settings.........................................................................................................................52
Network .......................................................................................................................................52
Citrix ICA Client .........................................................................................................................52
Terminal Server Client Licenses ...............................................................................................52
ThinPATH Systems LPD ...........................................................................................................52
Tisio System Recovery.......................................................................................................53
Initiating System Recovery............................................................................................................54
Start System Recovery................................................................................................................... 55
In Case of Trouble .............................................................................................................57
Display is Blank – Reset Video to VGA Mode............................................................................. 58
The Tisio IP address is set to 0.0.0.0.............................................................................................58
Fixing a Cable Problem.................................................................................................................58
Fixing an Address Problem ...........................................................................................................59
A Device Manager Update Message Appears...............................................................................60
The Screen Looks Garbled ............................................................................................................61
Error Messages Appear..................................................................................................................61
LEDs Blink on Front of Base Unit ................................................................................................62
V
Page 8

ThinPATH Systems, Inc. Tisio User’s Guide
Table of Figures
Figure 1 - Terminal Server Session.........................................................................................................4
Figure 2 - Connection Manager..............................................................................................................5
Figure 3 - Tisio Startup Wizard............................................................................................................... 6
Figure 4 - Tisio Startup Wizard, Finish...................................................................................................7
Figure 5 - Starting Tisio Connection Wizards.........................................................................................8
Figure 6 - Windows Terminal Server Wizard initial window................................................................10
Figure 7 - Tisio ICA Connection Wizard...............................................................................................12
Figure 8 - Web Browser Connection Wizard.........................................................................................14
Figure 9 - Terminal Emulation Connection Wizard..............................................................................15
Figure 10 - Tisio Connection Manager.................................................................................................17
Figure 11 - Tisio Connection Manager, Add or Edit ............................................................................ 19
Figure 12 -Tisio Boot Screen.................................................................................................................53
Figure 13- Tisio Boot Screen.................................................................................................................54
Figure 14 - Tisio Recovery Process.......................................................................................................55
VI
Page 9

ThinPATH Systems, Inc. Tisio User’s Guide
Tisio User’s Guide
This guide is for people who use Tisio terminals.
Tisio Basics
This guide describes basic operating procedures for Tisio Windowsbased terminals (WBTs).
It explains how to turn on your terminal, how to create and start
connections, and how to end your work session.
What is a Windows-based Terminal?
Your Tisio terminal is a thin client device that allows you to use
Microsoft Windows applications on servers running Microsoft
Windows 2000/2003 Terminal Services, Microsoft Windows NT 4.0,
Terminal Server Edition, Citrix Presentation Server, or Citrix
MetaFrame Server.
The Microsoft Windows servers may also be running Citrix
Presentation Server or Citrix MetaFrame Server. These Citrix
products allow connections via the ICA (Independent Computing
Architecture) protocol.
In addition, your system administrator may have added optional
software to your terminal that allows you to connect to additional
types of hosts, such as Linux and UNIX servers.
In this manual, Terminal Services refers to the Microsoft server
software, and Terminal Server host refers to the server computer.
Once you connect to a server and log on, the server’s desktop or the
application you request appears on your terminal screen and you
can begin your work session.
1
Page 10

ThinPATH Systems, Inc. Tisio User’s Guide
What is a Client?
A client is an application or device that can communicate over a
network with a server (a computer that provides services, such as
applications). The Tisio thin client is a simple device, with built-in
software, that can communicate with powerful servers.
The programs that provide the ability to connect to servers are
called connection clients. Three connection clients are included in
the software built into the Terminals: the Microsoft Terminal Server
Client, the Citrix ICA Client, and the Microsoft IE Browser. The
TisioTerminal Emulation Client can be added an option.
2
Page 11

ThinPATH Systems, Inc. Tisio User’s Guide
Initial Screens
Your initial screen may be the application that you requested. Other
possibilities are:
Windows desktop or logon information dialog.
If a connecting message briefly appears, and the Windows
desktop or logon dialog
Windows host through either a Microsoft RDP (Remote Desktop
Protocol) connection or Citrix ICA connection.
Tisio Connection Manager
If the Tisio appears, to connect to a server, select a Connection
Name and click Connect.
Tisio Startup Wizard
If the Tisio Startup Wizard
configured. You need to take further steps in order to use it.
If a Desktop or Logon Dialog Box Appears
If automatic logon has not been configured, you need to log on
before the desktop appears. This section describes the logon process
and the two desktops that are likely to appear.
appears, you are connected to a
appears, your terminal has not been
3
Page 12
ThinPATH Systems, Inc. Tisio User’s Guide
Logon Dialog Box
If a Logon Information dialog box appears:
1. Enter your user name and password.
2. If the domain in the Domain or From field is not correct, select
another from the drop-down list. If you are not sure which
domain to use, ask your system administrator.
3. Click OK.
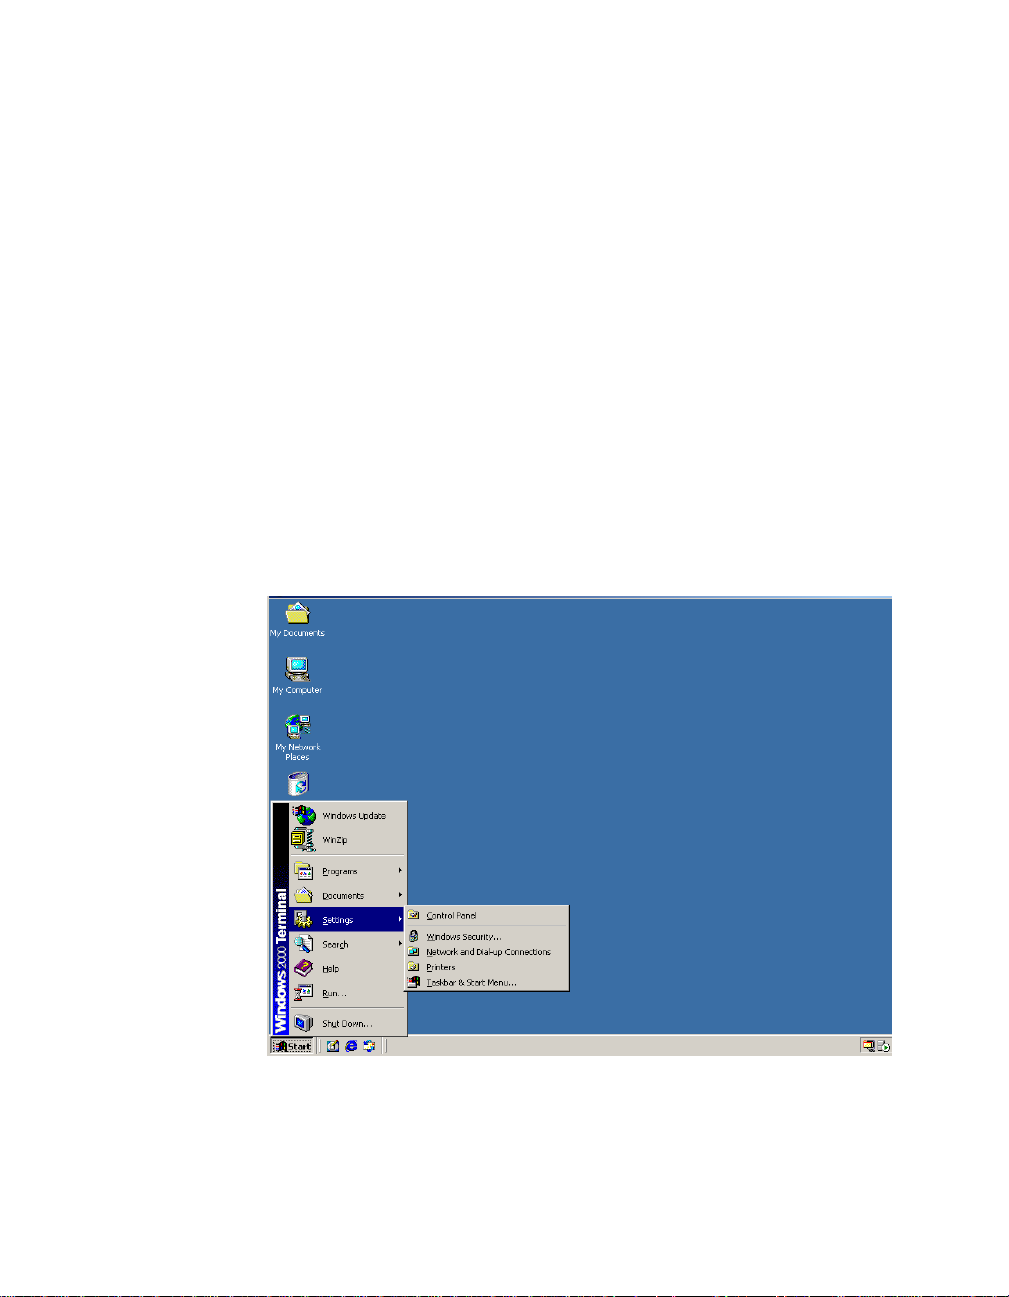
Terminal Server Session
A Terminal server session is a connection to a Windows 2000/2003,
Windows 4.0, Citrix Presentation Server or Meta Frame Desktop
Windows server. Go to Start > Programs and select the program you
wish to run.
Figure 1 - Terminal Server Session
4
Page 13
ThinPATH Systems, Inc. Tisio User’s Guide
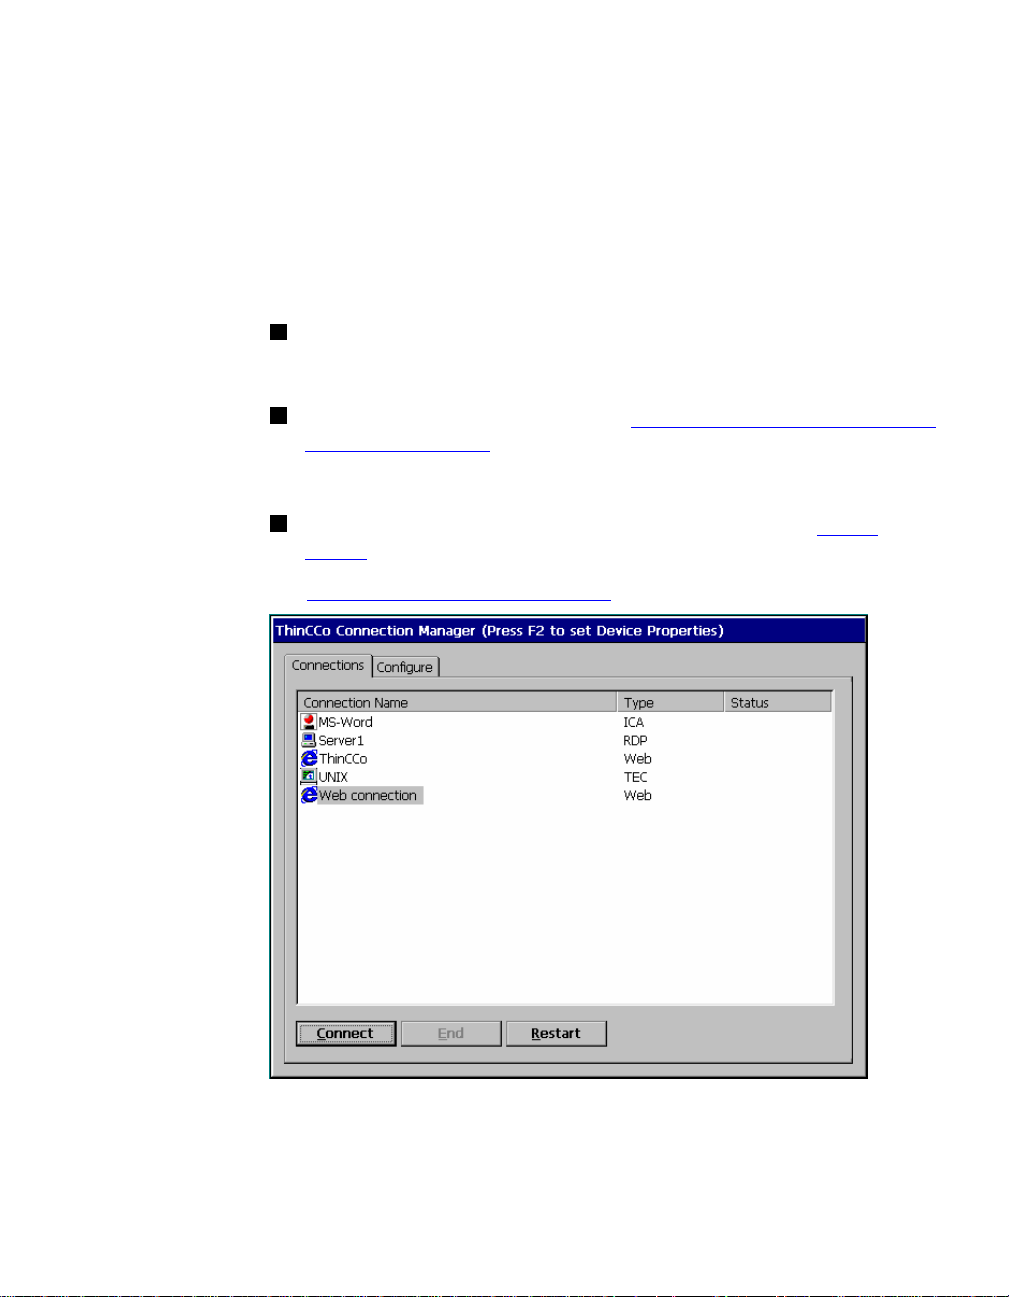
If the Tisio Connection Manager Appears
Depending on how your terminal is configured, the Connection
Manager lists one or more connections. To select a connection, select
a Connection name in the connection list and click Connect.
If the connection was defined for automatic log-on and the
server it connects to is running, the terminal makes the
connection and you are logged on.
If the connection was defined for automatic logon and automatic
application startup, and the server it connects to is running, the
terminal makes the connection, you are logged on, and your
application starts.
Otherwise the connection contacts the server and its logon
dialog appears.
See Using the Connection Manager
Figure 2 - Connection Manager
.
5
Page 14
ThinPATH Systems, Inc. Tisio User’s Guide
If the Tisio Startup Wizard Appears
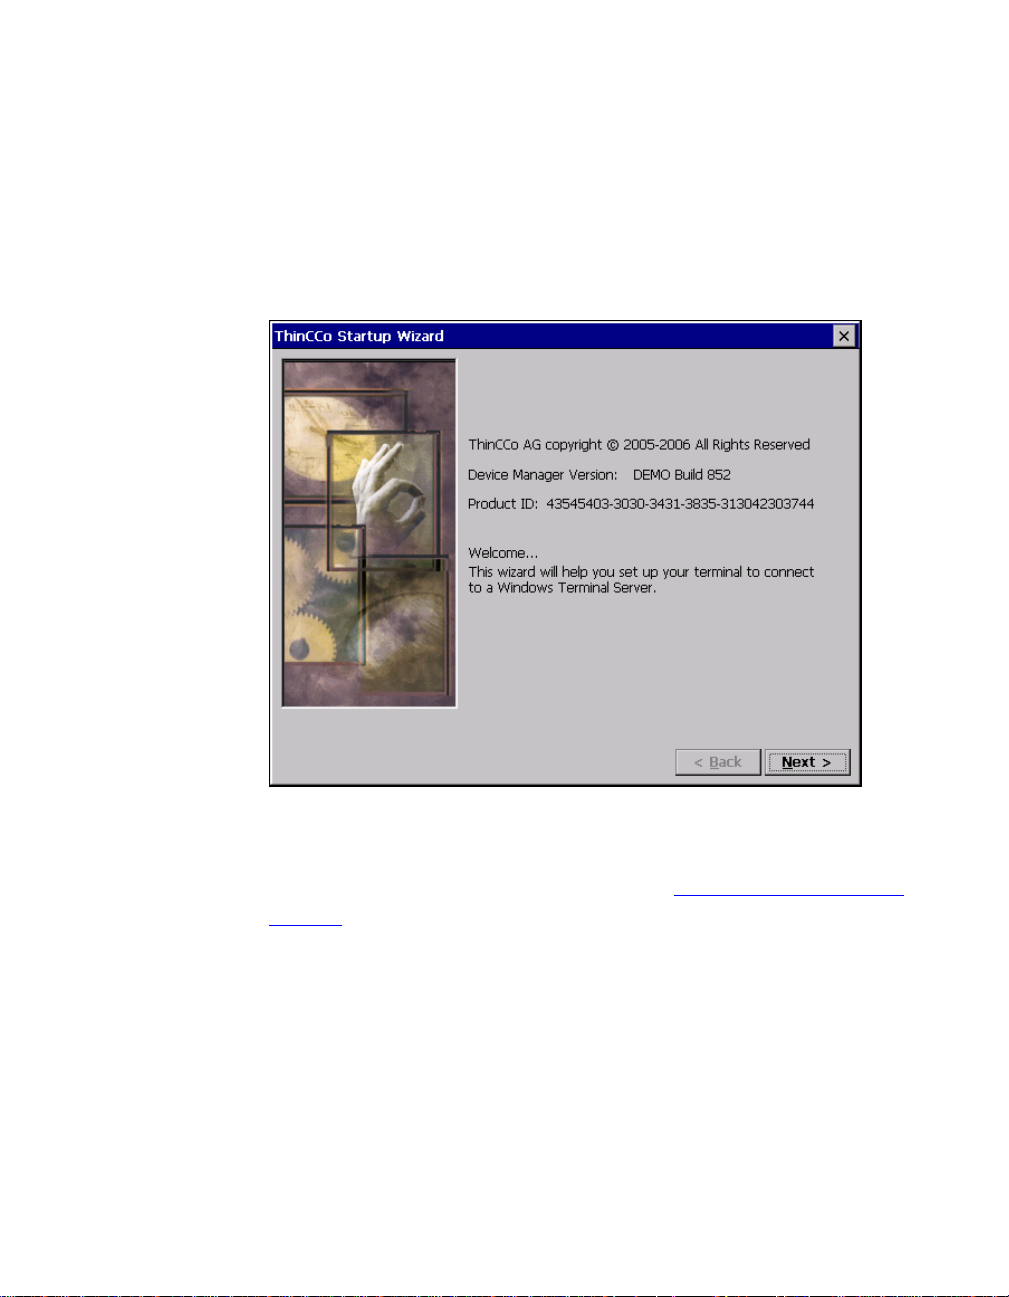
The first time a terminal starts, the Tisio Startup Wizard appears.
The Tisio Startup Wizard may also appear under other
circumstances controlled by your system administrator.
6
Figure 3 - Tisio Startup Wizard
Ask your system administrator whether you need to change any of
the data in the Setup Wizard screens. See Using the Tisio Startup
Wizard. The following instructions assume you are using the
terminal’s default values.
To page through the Setup Wizard:
1. Click Next.
2. Click Accept on the license acceptance page.
3. Click Next to accept the default Network settings after entering
a host name.
Page 15
ThinPATH Systems, Inc. Tisio User’s Guide
4. Click Next to accept the default Device Manager settings.
5. Select the Color and display resolution settings. Click Test if you
have changed the default display setting to make sure it is
visible. Click Next.
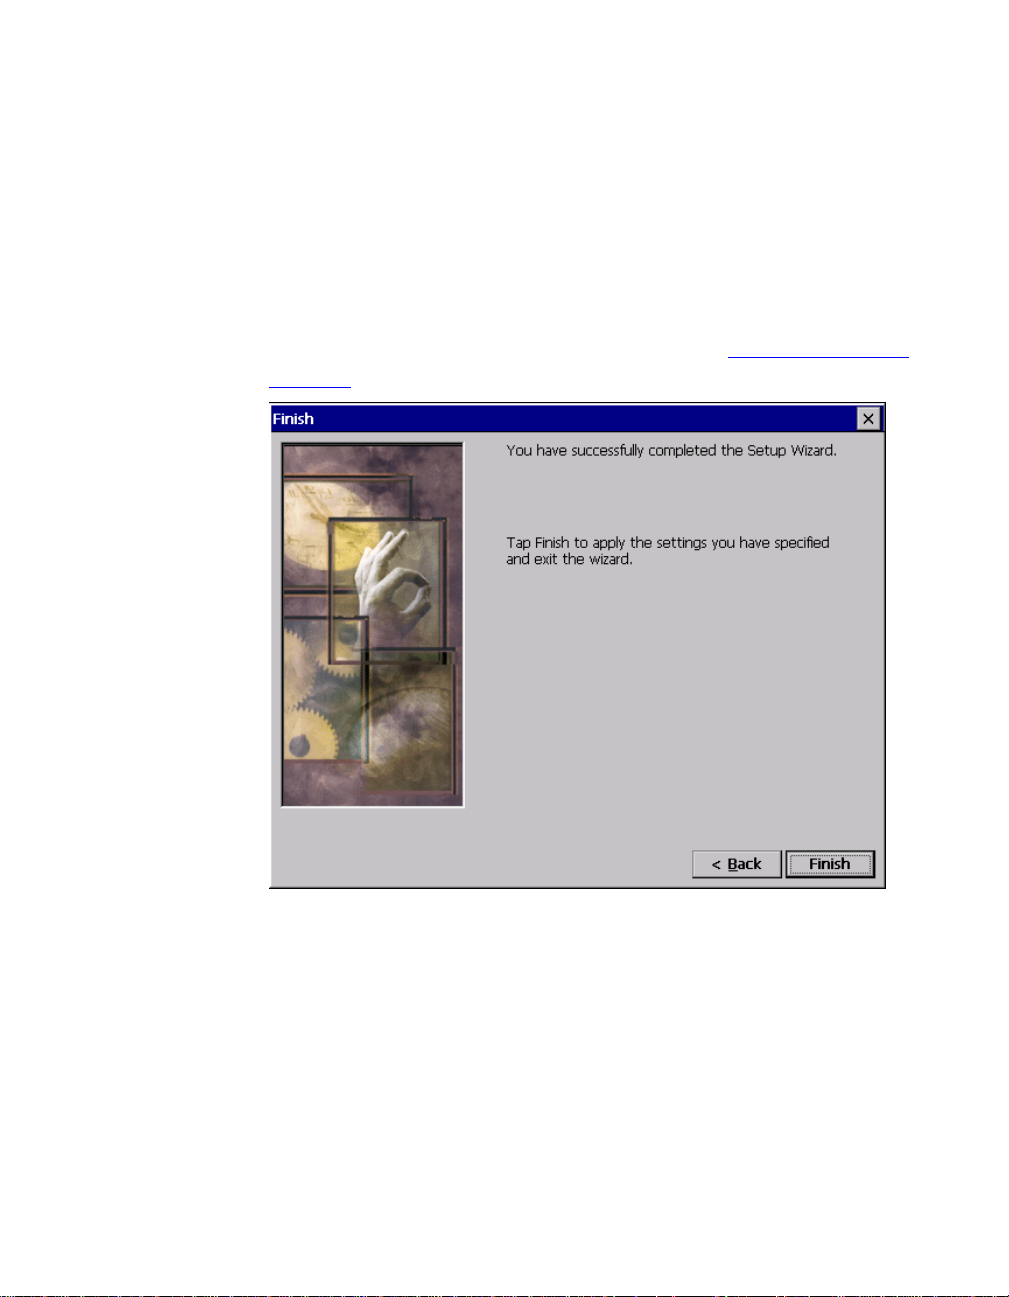
6. Click Finish.
After you finish with the Tisio Device Manager Wizard, a
Connection Wizard may appear; see details on Using Connection
Wizards.
Figure 4 - Tisio Startup Wizard, Finish
7
Page 16
ThinPATH Systems, Inc. Tisio User’s Guide
Using Connection Wizards
If your terminal has not been configured with any connections, a
connection wizard appears after you complete the Setup Wizard. A
connection wizard also appears when you add or edit a connection
in the Connection Manager.
This section describes how to configure connections with the
following wizards:
Microsoft’s WTS Connection Wizard
Citrix ICA Client’s Connection Wizard
IE Browser Connection Wizard
Note Your terminal may display other client connection wizards if
optional software has been installed such as the Pericom
Terminal Emulator Client.
Once you create a connection with a connection wizard, the Tisio
Connection Manager appears.
8
Figure 5 - Starting Tisio Connection Wizards
Page 17

ThinPATH Systems, Inc. Tisio User’s Guide
The WTS Connection Wizard
If the WTS Connection Wizard appears, create a Microsoft RDP
connection using the name or network address of a server running
Windows, Terminal Server Edition, referred to as the Terminal
Server host in this Guide.
9
Page 18
ThinPATH Systems, Inc. Tisio User’s Guide
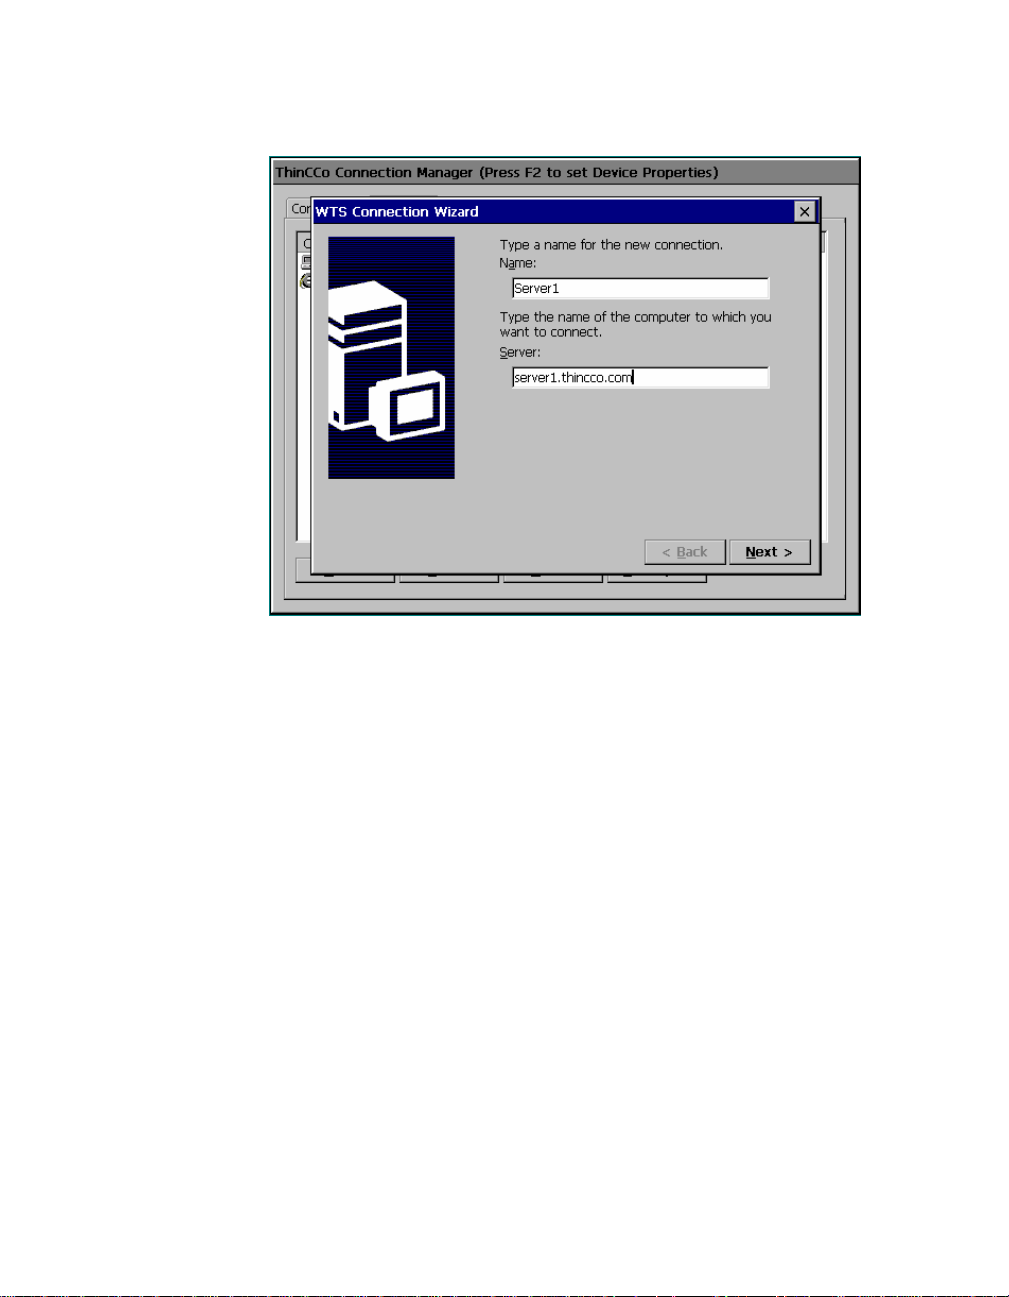
Figure 6 - Windows Terminal Server Wizard initial window
To create the connection:
1. In the first dialog box of the WTS Connection Wizard:
— Enter a brief description of the connection in the Name field.
— Enter the name or network IP (Internet Protocol) address of
a Terminal Server in the Server field and click Next.
10
Page 19

ThinPATH Systems, Inc. Tisio User’s Guide
Note If you plan to use the Tisio dial-up client to access this
connection, you may need to enter an FQDN (fully
qualified domain name, for example, ts1.thicco.com) or
IP address in the Server field.
2. The next two dialog boxes specify an automatic log on and
automatic application startup. Do not change the fields in these
dialogs unless instructed to do so by your system administrator.
Click Next each time.
3. Click Finish. The Tisio Connection Manager appears.
4. To select the connection you just created, select its Connection
name, and click Connect.
11
Page 20
ThinPATH Systems, Inc. Tisio User’s Guide
The Citrix ICA Connection Wizard
If the Citrix ICA Connection Wizard appears, create a Network or
Dial-In ICA connection to a Citrix Presentation Server, WinFrame or
MetaFrame (Terminal Server) host using the name or network
address of the host computer (server).
As with other connections, you can configure the automatic startup
of an application or a published application (ICA connections only).
A published application is one that your system administrator has
named and made available to everyone on the network.
12
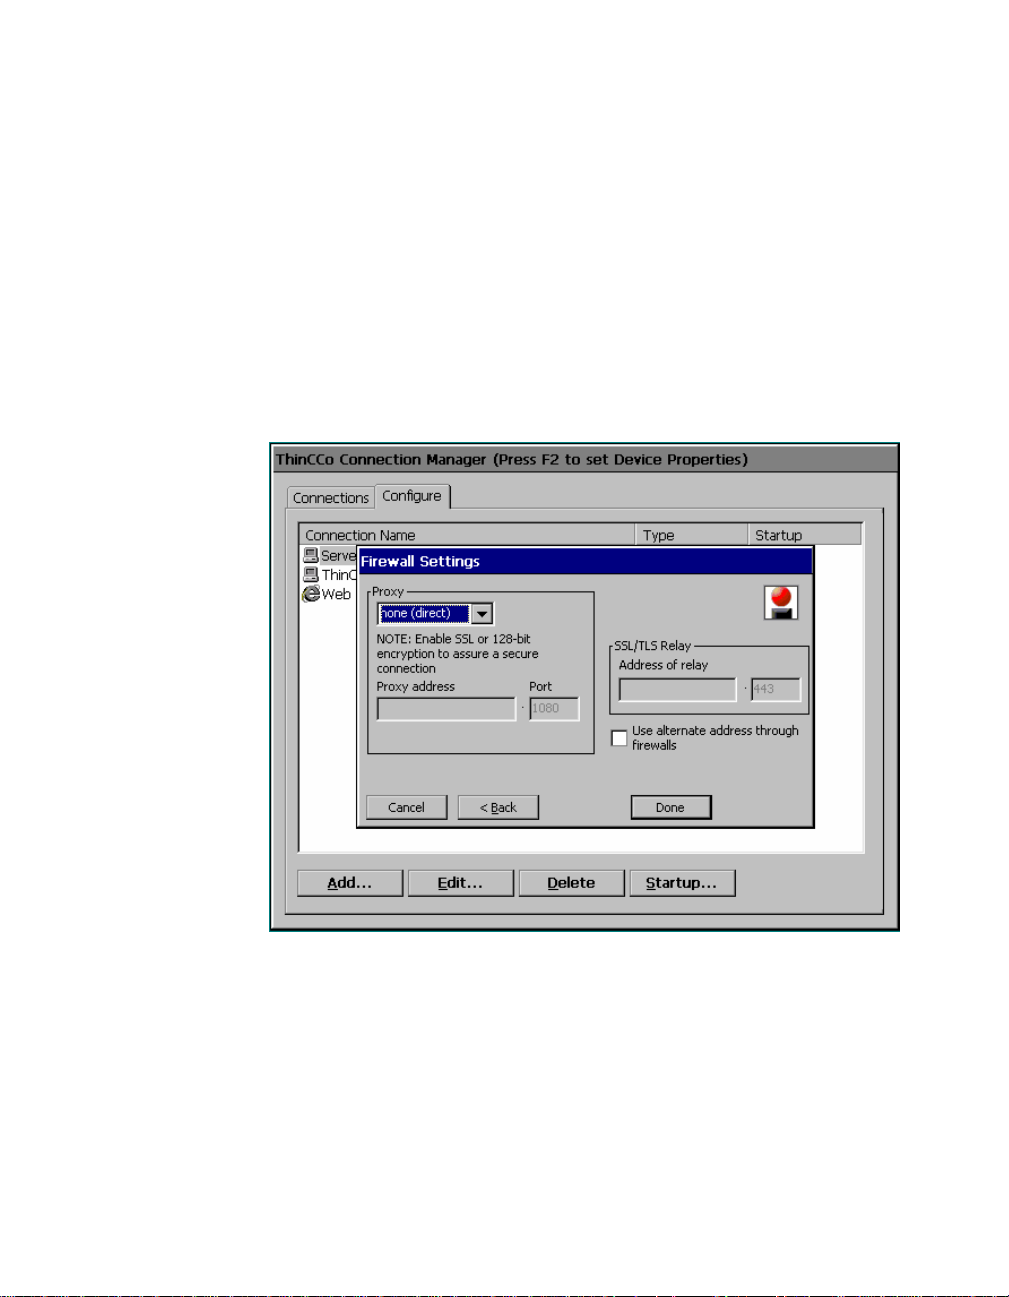
Figure 7 - Tisio ICA Connection Wizard
Page 21

ThinPATH Systems, Inc. Tisio User’s Guide
To create the connection:
1. Select a Citrix server or Published Application for your
connection. If you select Published Application, you must use
one that is listed. If no published applications are listed, select a
Citrix ICA server, or enter a Citrix server name. Click Next.
Note If you plan to use the Tisio Dial-Up client to access this
connection, the server may need to be defined with its
FQDN (fully qualified domain name, for example,
ts1.yourdomain.com) or IP address.
2. Enter a descriptive title for the connection. Click Next.
3. If desired, select an application for automatic startup. Click
Next.
4. If desired, specify logon information. Click Next.
5. Select Window Options, if needed. Click Next.
6. Select the ICA options, if needed. Click Next.
Set Compression, Sound, Speed Screen, Windows Keys, and
Encryption Level, if needed (at this time Cache and Microphone
Input cannot be configured). Click Next.
7. Select the Firewall settings. Consult your network administrator
for settings specific to your local network. Click Done. The
Connection Manager appears.
8. Select the connection you just created and click Connect.
13
Page 22
ThinPATH Systems, Inc. Tisio User’s Guide
The IE Browser Connection Wizard
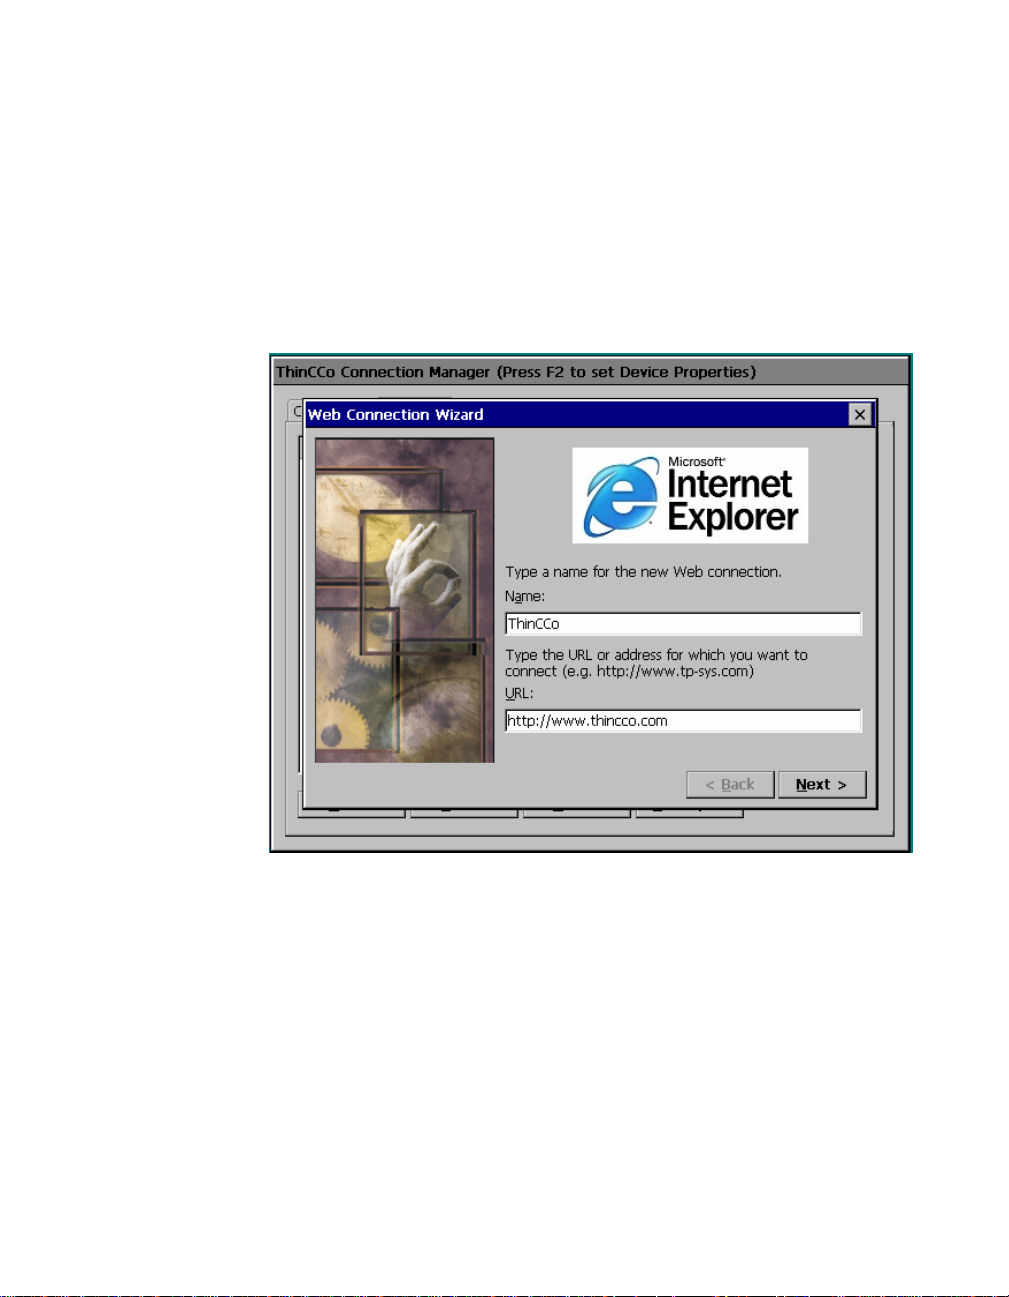
The Tisio Make New IE Browser Connection Wizard only appears if
you are adding a local Web Browser connection.
As with other connections, you can configure the automatic startup
of an IE Browser Connection.
14
Figure 8 - Web Browser Connection Wizard
To create the connection:
1. Enter a name for your connection and the URL or IP address of
the web connection. Click Finish.
2. When the Connection Manager appears, select the connection
you just created and click Connect.
Page 23
ThinPATH Systems, Inc. Tisio User’s Guide
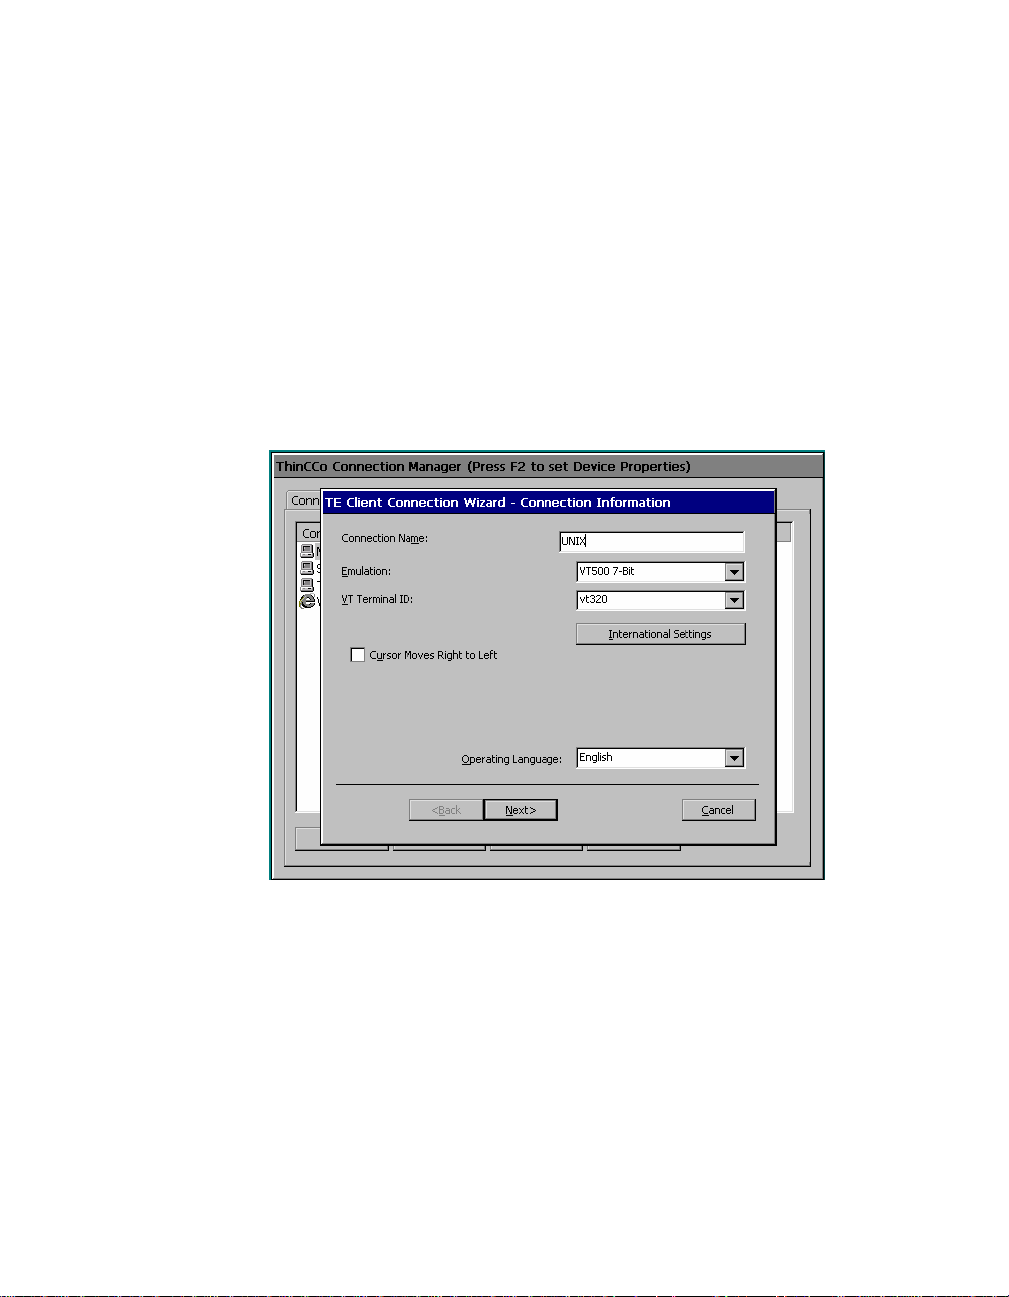
The Terminal Emulator Connection Wizard
The Tisio New Terminal Emulator Connection Wizard only appears
if you are adding a Terminal Emulator.
Note The Terminal Emulator Client is an optional licensed
software component and may not be installed on your Tisio
device.
If the New Terminal Emulator Connection Wizard appears, create a
Terminal Emulator connection.
Figure 9 - Terminal Emulation Connection Wizard
To create the connection:
1. Give the connection a descriptive name, select Emulation,
Terminal ID, Operating Language and click Next.
2. Select the type of connection you will be using. Consult your
Network Administrator for details. Click Next.
3. Set Automate Login Process, if desired. Click Next.
4. Set Printer Port Settings, if desired. Click Next.
15
Page 24

ThinPATH Systems, Inc. Tisio User’s Guide
5. Set GUI Overrides, if desired. Click Next.
6. Set Aux Port Settings for a secondary output device if connected.
Click Next.
7. Next verify setting choices, if satisfied Click Finish and the
Connection Manager appear.
8. Select the Terminal Emulator connection and click Connect.
16
Page 25
ThinPATH Systems, Inc. Tisio User’s Guide
Using the Tisio Connection Manager
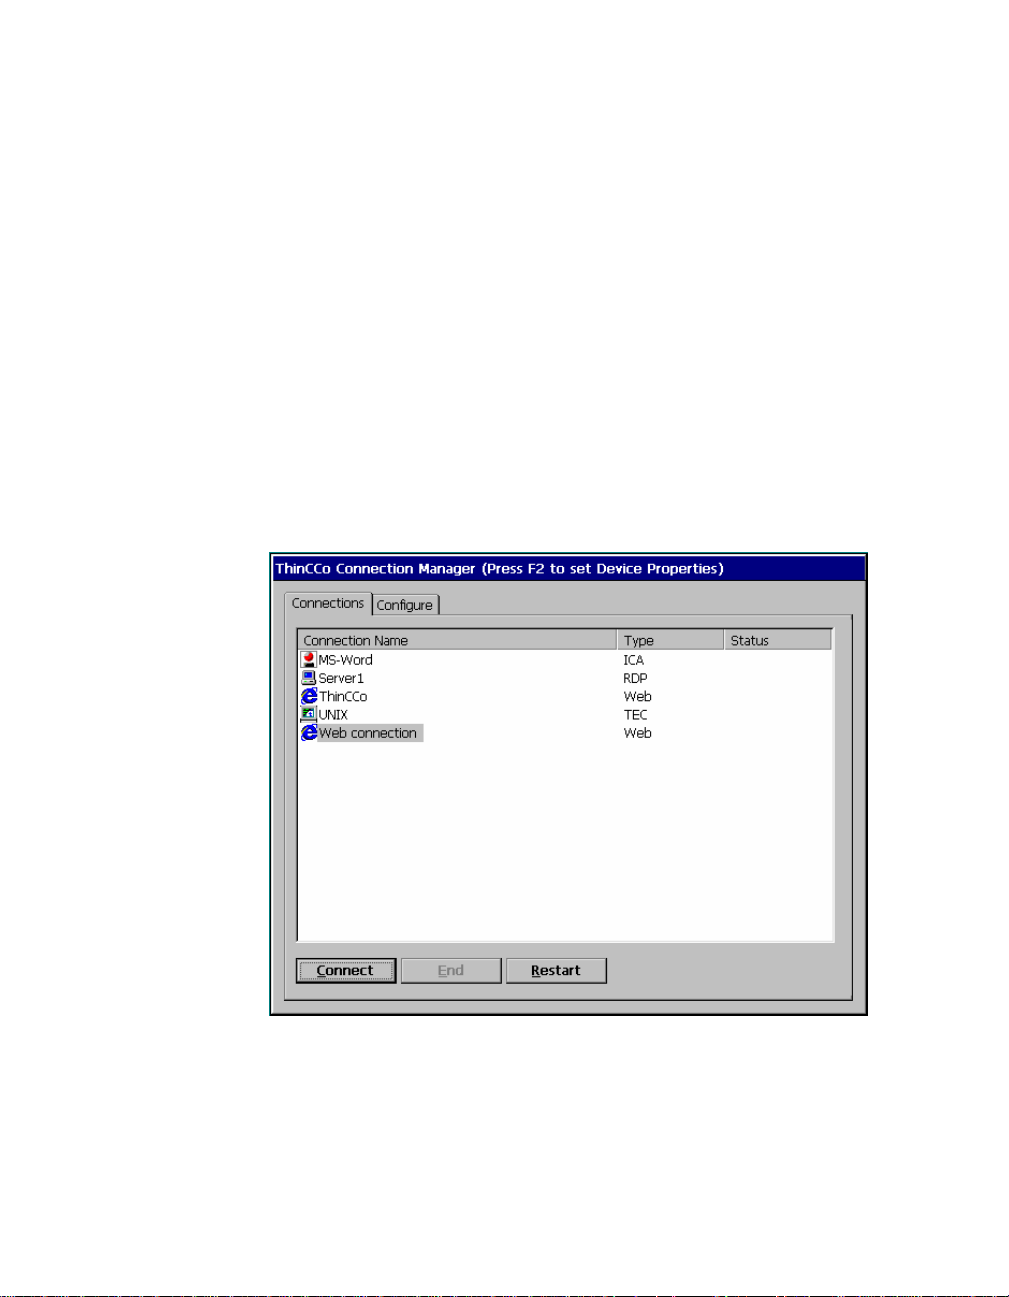
The Tisio Connection Manager lists all defined network
connections. Active connections are designated in the Status
column.
This section explains how to use the Connection Manager to start,
stop, add, edit, and manage connections.
When the terminal is not connected to a server, the Connection
Manager is always displayed. When the terminal is connected to a
server, you can display the Connection Manager by pressing
Ctrl+Alt+End.
Figure 10 - Tisio Connection Manager
17
Page 26

ThinPATH Systems, Inc. Tisio User’s Guide
The Tisio Connection Manager lets you:
Start connections
Select the connection name and click Connect.
Switch among currently active connections.
See Starting Multiple Connections
for more details.
Stop connections.
If problems on the server cause your connection to be
unresponsive to a normal log off, select the connection name
and click End. See Logging Off
Add or edit new connections.
See Adding or Editing Connections
, for more details.
18
Page 27
ThinPATH Systems, Inc. Tisio User’s Guide
Adding or Editing Connections
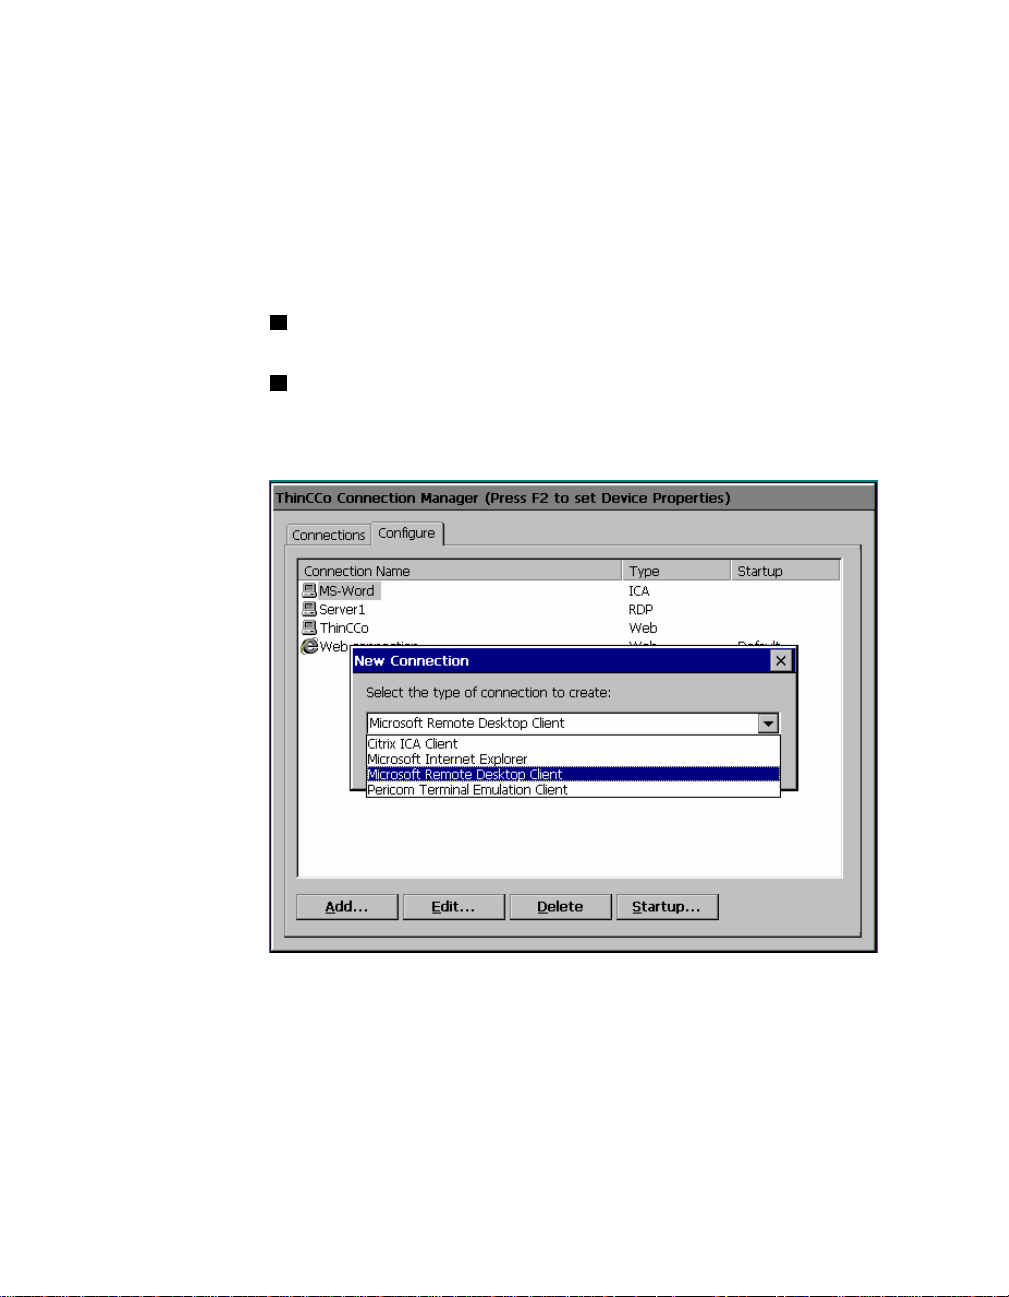
To add or edit a connection when connected to a server, press
Ctrl+Alt+End to bring up the Tisio Connection Manager, and click
the Configure tab.
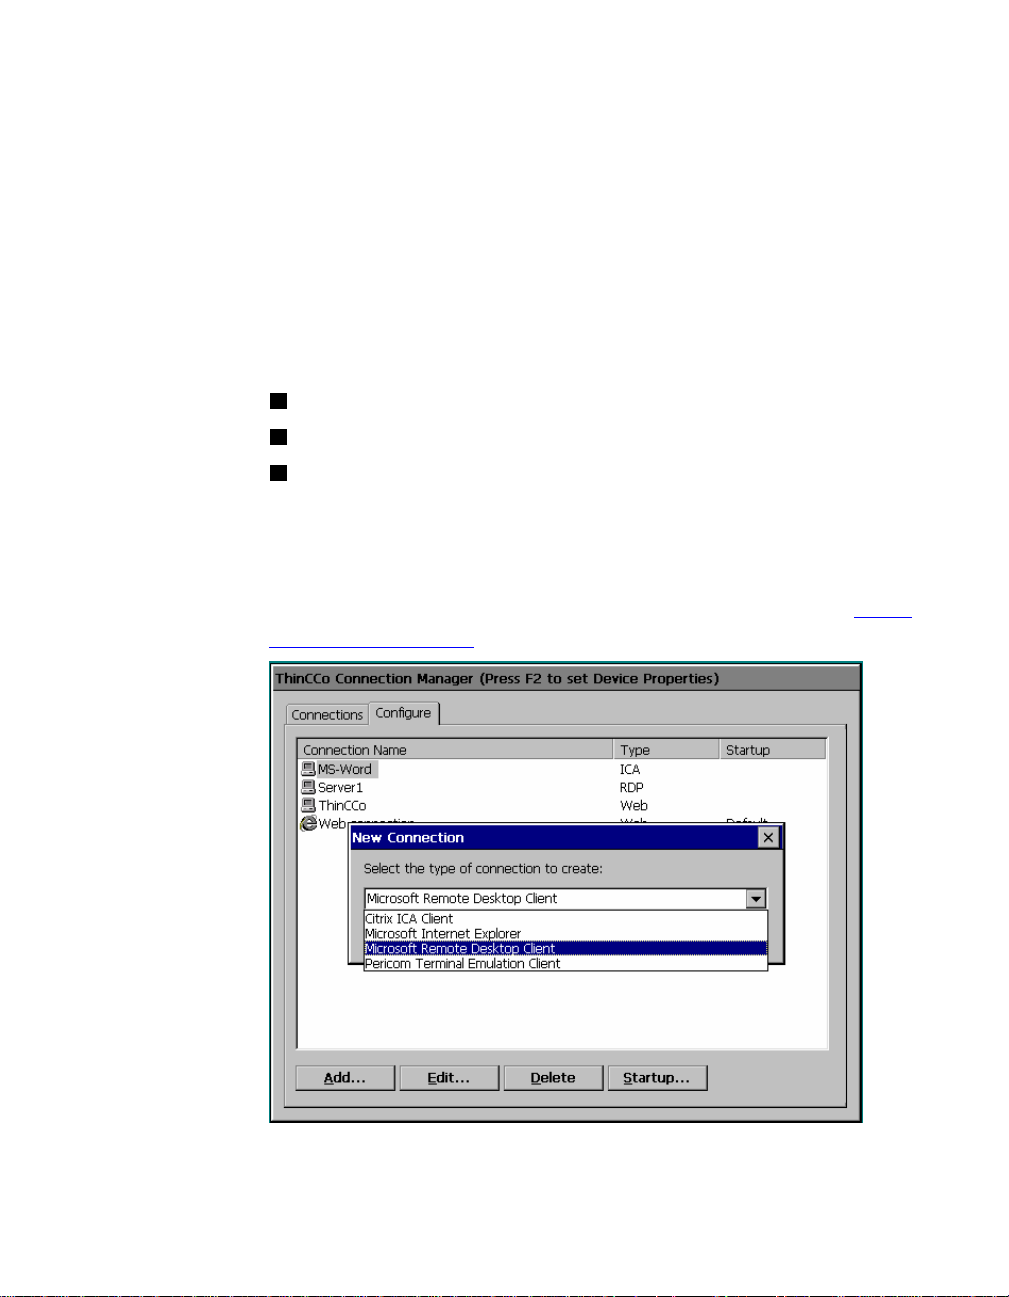
To add a connection, click Add. The New Connection dialog box
appears. Select a client from the drop-down list and click OK.
To edit a connection, select a connection name and click Edit.
In either case, the appropriate connection wizard for the client you
selected appears.
Figure 11 - Tisio Connection Manager, Add or Edit
Note If the Configure tab does not appear, your system
administrator has disabled it.
19
Page 28

ThinPATH Systems, Inc. Tisio User’s Guide
Setting the Default Connections
Specifying a connection as the default connection:
Highlights that connection when the terminal starts up and the
Tisio Connection Manager appears.
Starts the connection if Ctrl+Alt+Home are pressed.
To select a connection as the default:
1. Select the Configure tab of the Tisio Connection Manager
window.
2. Select a connection (defined previously) and click Startup.
3. Click Make the selected connection your default connection and
click OK.
Setting Autostart Connections
Specifying an autostart connection:
Starts that connection when the terminal starts up.
20
Restarts the connection when it ends.
1. On the Configure tab of the Tisio Connection Manager, select
the connection you want to start automatically.
2. To display the Connection Startup dialog box, click Startup.
3. Click Automatically Start the selected connection at startup and
click OK.
For more information, see Ending Autostart Connections
.
Note An autostart connection also functions as the default
connection. Designating a different connection as the default
makes any autostart connection revert to non-autostart
status. When you log off an autostart connection, the
connection restarts automatically. For details, see Ending
Autostart Connections.
Page 29

ThinPATH Systems, Inc. Tisio User’s Guide
Starting Multiple Connections
The Tisio terminal allows multiple simultaneous LAN connections
to one or more servers. The number of connections you can start
depends on the amount of memory in your terminal.
To start your second connection:
1. Press Ctrl+Alt+End to bring up the Tisio Connection Manager.
2. Select the connection name, and then click Connect.
To switch between running connections:
Press Ctrl+Alt+End to bring up the Tisio Connection Manager.
Select a connection name whose Status field is active, and then
click Connect.
OR
Press Ctrl+Alt+Up arrow or Ctrl+Alt+Down arrow to cycle
through the list of active connections. The connection list reflects
the order in which the connections were started, the most recent
being on top.
Note Hot keys
explained in more detail in hot keys section and also,
Managing multiple connections.
for managing multiple connections are
21
Page 30

ThinPATH Systems, Inc. Tisio User’s Guide
Hotkeys
Hotkeys are used to navigate through active connections and to
display Tisio setup and configurations screens. These hot keys are
used for local control of the Tisio client windows.
Client applications windows used to connect to remote hosts
resources are displayed in full screen mode. In most cases the full
screen client application does not display a title bar allowing the full
screen window to be lowered. Hotkeys are used to lower and raise
these windows to enable access other active client application
sessions, local configuration windows and even local Operating
System recovery scenarios.
Hot Key Use
Ctrl+Alt+Down-Arrow Cycle up through active connections in the
Connection Manager.
Ctrl+Alt+Up-Arrow Cycle down through active connections in
the Connection Manager.
Ctrl+Alt+Home Go to the default connection. The
connection is started if it is not already
active.
Ctrl+Alt+End Display Tisio Connection Manager
Window Display
22
F2 Display Tisio Device Properties Window.
The Tisio Connection Manager Window
must be visible. Press Ctrl+Alt+End if not
showing.
Ctrl+Alt+F8 Used to initiate a boot forcing video
settings to a standard VGA mode.
Ctrl+Alt+F10 Used to initiate a Forced Recovery of the
Operating System. See System Recovery
for details on use.
Ctrl+Alt+F2 Used to initiate a Forced Recovery of the
Operating System with logging enabled.
See System Recovery for details on use.
Figure 7 - Hot keys Description
Page 31

ThinPATH Systems, Inc. Tisio User’s Guide
23
Page 32

ThinPATH Systems, Inc. Tisio User’s Guide
Logging Off
To log off and end your session:
1. If you connected to an application instead of a server’s desktop,
closing the application terminates the connection.
2. If you connected to a Windows server running Microsoft
Terminal Services or Citrix Presentation server:
— Close all applications.
— Click Start on the taskbar at the bottom of the Windows
server desktop.
— Select Logoff, and then click OK. The Windows server closes
any programs that are still running.
3. If you connected local Terminal Emulator session:
— Logoff as described by your application.
— Close Terminal Emulator window.
4. If problems on the server cause your connection to not respond
to a normal log off, bring up the Tisio Connection Manager by
pressing Ctrl-Alt-End, select the connection name and click End.
Your session is will be disconnected, but you may not be logged
off. Contact your systems administrator for more astistance.
24
Once a session ends, a new session starts or the Tisio Connection
Manager appears. Repeat the steps to end all active connections and
then you can turn off the terminal.
Page 33

ThinPATH Systems, Inc. Tisio User’s Guide
Disconnecting vs. Logging Off
To disconnect from a server session:
Select Start > Disconnect on a Windows server or Citrix
MetaFrame
Select File > Disconnect on Citrix WinFrame.
This suspends all open applications.
When you reconnect to the session later by logging on again, your
applications resume. Because disconnected sessions still consume
server resources, most system administrators prefer that you log off.
When you log off, your programs are terminated and the session is
ended. You must restart the programs at the next log on.
Ending Autostart Connections
To end an autostart connection, follow these steps:
1. Press Ctrl+Alt+End to bring up the Tisio Connection Manager
and select the Configure tab.
2. Select the autostart connection name, click Startup and the
Connection Startup dialog box appears.
3. Select Make the selected connection your Default connection
and click OK.
4. Log off from the session as described above or select the
Connections tab, select the connection name, and click End.
25
Page 34

ThinPATH Systems, Inc. Tisio User’s Guide
Using the Tisio Startup Wizard
The first time a terminal is powered on, the Tisio Startup Wizard
appears. The Startup Wizard may also appear if the Tisio thin client
was reset to factory defaults or a System Recovery
This section describes the configuration settings associated Tisio
Startup Wizard:
License Agreement – Requires acceptance to operate device.
Network Settings – Defines network connectivity settings
Device Manager – Defines the Management server settings
Display Settings – Color, Resolution and screen saver settings
Once you exit from the Startup wizard, the Tisio Connection
Manager appears.
License Agreement Screen
The License Agreement window provides information about the
Tisio thin client Operating System License. The License Agreement
must be accepted be for use of the product can begin.
was performed.
26
Click Accept to accept License agreement. Click Next to continue.
Page 35

ThinPATH Systems, Inc. Tisio User’s Guide
Network Settings Screen
The Network Settings window provides information and access to
modify the Tisio Network settings that will be used when attached
to a Local Area or Wide Area Network. These settings include:
Host Name – View and modify the name of the Tisio thin client.
Domain Name – View and modify the domain name of the Tisio
thin client.
Network Adapter Settings – Defines the network IP Address,
Subnet Mask and Default Gateway settings.
Host Name
The Host Name field defines the name of the Tisio and is the same
as the Terminal Name
device’s MAC address, TTC-000fea6ebc71. Enter a new host name of
use the default.
Domain Name
. By default the TTC- is added to the Tisio
The Domain Name field defines the domain name portion of the
host name that will be used on the network to identify it from other
network devices.
Enter the Domain Name matching your local network requirement.
See you network administrator if you are unsure what your domain
name is. An example domain name is yourdomain.com.
Network Adapter Settings
The Network Adapter Settings allows configuration of all TCP/IP
Network parameters. The network parameters can be automatically
assigned or statically set.
The setting Obtain an IP Address via DHCP is the normal choice.
To manually set the IP Address settings refer to Network Adapter
Settings section.
27
Page 36

ThinPATH Systems, Inc. Tisio User’s Guide
Device Manager Screen
The Device Manager screen provides settings to specify the Tisio
management server also known as the Tisio Device Manager.
The controls and settings under the Device Manger screen include:
Device Manager server name field – Modify the host name of
the Tisio thin client management server.
Test button – Used to test connections to the Tisio thin client
management server.
Device Management Server
The Device Manager field defines the network host name and URL
of the Tisio Device Management server. This field can contain a
simply hostname, IP address or a full URL address.
Enter a new Tisio Device Manager server URL or accept the default.
See Device Management Server
Testing the Device Manager Connection
description for more details.
28
In the Device Manager window the Test button verifies
communication to the Device Management server.
Click on the Test button. A message indicating a pass or fail will be
returned in the message box.
Page 37

ThinPATH Systems, Inc. Tisio User’s Guide
Display Settings Screen
The Display Settings screen provides access to initially set the Tisio
display settings that will be used for the attached video monitor or
LCD Flat Panel Display. These settings include:
Desktop Area and Refresh Frequency setting and Test button.
Colors selection for 256, 16 Bit & 32 Bit Color depths.
Screen Saver Controls.
Set the desired Display settings required for your attached monitor.
For a full description of these settings see Display Settings
.
Finish Screen
Once at the finish screen you can Click Finish to begin using you
Tisio thin client. You also have the opportunity to go Back and
modify any previous Tisio Startup Wizard setting.
Once you have selected Finish you will be required to reboot your
Tisio thin client before you can begin using it. To change any
settings once you have finished the Tisio Startup Wizard refer to
Using the Tisio Device Properties
.
29
Page 38

ThinPATH Systems, Inc. Tisio User’s Guide
Using the Tisio Connection Manager
This section provides a quick reference and some additional detail
on the Tisio Connection Manager.
Modifying your terminal’s configuration can cause unexpected and
undesirable results — ask your system administrator before
attempting any of these procedures.
After initial configuration, you can modify connections using the
Tisio Connection Manager.
The Connection Manager is on the screen by default, unless you
have a active connection running. If you are connected to a server,
press Ctrl+Alt+End to display the Connection Manager.
30
Page 39

ThinPATH Systems, Inc. Tisio User’s Guide
y
Using Tisio Connection Manager (continued)
Task Action
Displaying the Tisio
Connection Manager
Viewing active connections
Managing multiple
connections
Creating new RDP
connections
Press Ctrl+Alt+End.
Note By default the Tisio Connection Manager
displa
s two tabs: Connections and Configure. If
the Configure tab does not appear, your system
administrator has disabled it.
Display the Connections tab of the Tisio Connection
Manager.
From within an active session you can bring up the
Connection Manager and create new connections.
Additionally, you can switch to another active
connection by using the following hot keys, which are
enabled by default.
Press Ctrl+Alt+Up arrow or Ctrl+Alt+Down arrow to
cycle through the list of active connections.
Press Ctrl+Alt+Home to display or start your default
connection.
On the Configure tab, display the New Connection
dialog box by clicking Add. Select Microsoft Terminal
Server Client and click OK.
Creating new ICA
connections
Follow the steps given in the WTS Connection Wizard
On the Configure tab, display the New Connection
dialog box by clicking Add. Select Citrix ICA Client
.
and click OK.
Follow the steps given in the Citrix ICA Connection
Wizard.
31
Page 40

ThinPATH Systems, Inc. Tisio User’s Guide
Using Tisio Connection Manager (continued)
Task Action
Creating new Microsoft IE
Browser connections.
Designating default or
autostart connections
Deleting connections
Modifying Citrix ICA Client
connections
Modifying Microsoft IE
Browser connections
Modifying Microsoft
Terminal Server client
connections — changing
connection Application
properties
On the Configure tab, display the New Connection
dialog box by clicking Add. Select Microsoft Internet
Explorer Browser and click OK.
Follow the steps given in the IE Browser Connection
Wizard
Use the Configure tab; follow the steps given in
Autostart Connections
.
On the Configure tab, select the connection you want
to delete, click Delete.
On the Configure tab, select the connection you want
to modify. Display the Citrix ICA Client’s utility for
making modifications by clicking Edit.
Make your changes and click OK.
On the Configure tab, select the connection you want
to modify. Display the Microsoft Internet Explorer
Browser utility for making modifications by clicking
Edit. Make your changes and click OK.
On the Configure tab, select the connection you want
to modify. Display the Properties dialog box by
clicking Edit. Use the Applications tab to change the
following attributes:
Desktop: Select Desktop if you want the standard
Windows desktop to appear when connecting to
the Terminal Server host.
File name: Select File Name if you want a
particular application to appear when connecting
to the Terminal Server host.
32
Page 41
ThinPATH Systems, Inc. Tisio User’s Guide
Using Tisio Connection Manager (continued)
Task Action
Modifying Microsoft
Terminal Server client
connections — changing
Network Connection
properties
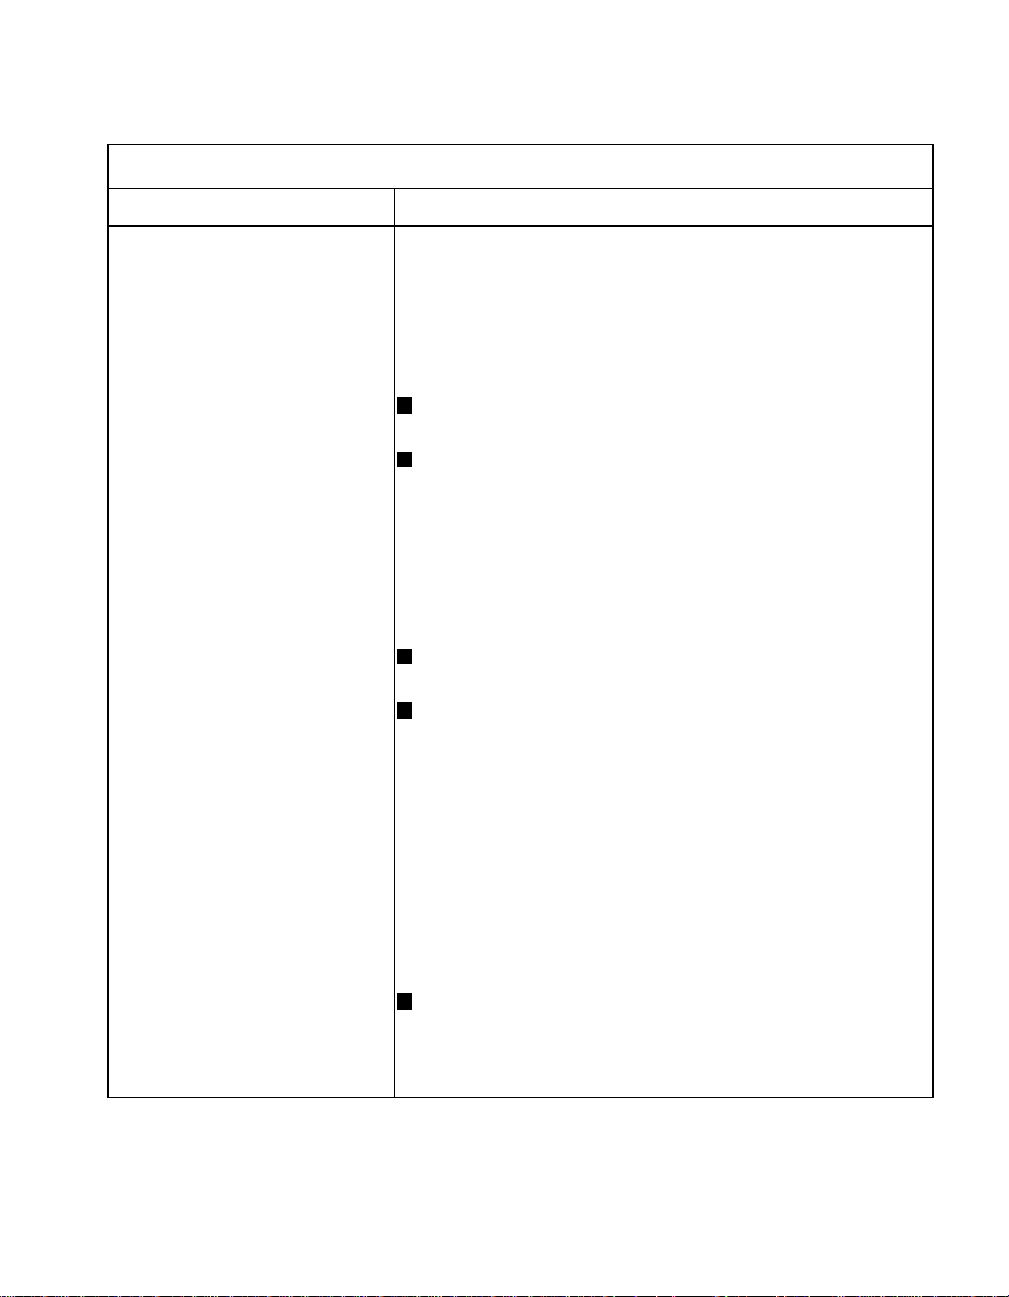
On the Configure tab, select the connection you want
to modify. Display the Properties dialog box by
clicking Edit. Use the Net Connections tab to change
the following attributes:
Name: a description for the connection
Server: the IP address or the name of the Terminal
Server host
Username: depending on what you enter for the
Domain:
— Username of a local account set up on a
particular Terminal Server host.
— Username of a global account set up on a
Domain Controller.
Password: The password associated with the
Username specified above.
Domain:
— If the Terminal Server host belongs to a
Windows domain, and you want users
authenticated by the Primary Domain
Controller, enter the Windows domain name.
— If the Terminal Server is not a member of a
Windows domain and/or you want users
authenticated locally on that server, enter the
name of the Terminal Server.
Low Speed Connection: If the physical connection
to the Terminal Server is through a low bandwidth
line (WAN or serial), rather than over an Ethernet
cable, check this box.
33
Page 42

ThinPATH Systems, Inc. Tisio User’s Guide
Using the Tisio Device Properties
After initial configuration, you can modify settings using Device
Properties.
To display Device Properties when the Connection Manager is on
the screen, press F2. If you are connected to a server, first press
Ctrl+Alt+End to display the Connection Manager, and then press
F2.
After making changes, you can click OK to apply changes without
closing Tisio Device Properties, click OK again to close Device
Properties.
Note Your system administrator may have set a password in
order to prevent you from making changes to Tisio Device
Properties. In that case, access to the Device Properties
window is denied until you enter the password when
prompted. If no password has been set, you can make
changes to any Device Properties field.
34
This section describes the configuration settings associated Tisio
Device Manager:
Introduction – Set terminal name and reset to factory
Display Settings – Color, Resolution and screen saver settings
Network Settings – Defines network connectivity settings
Device Manager – Defines the Management server settings
Update Manager – Defines software update settings
Control Panel – Access the local control panel window for
additional settings.
Page 43

ThinPATH Systems, Inc. Tisio User’s Guide
Introduction Tab
The Introduction window provides information about the Tisio
Tisio thin client, the terminal name and factory-default.
Tisio Thin Client Information
Product ID – Used to license Microsoft Terminal Server sessions.
OEM Software Version – Base Tisio software version.
Microsoft Windows CE – Base version of Windows CE.
Terminal name – View and modify the name of the Tisio thin
client.
Factory-defaults check box – Reset all settings to their factory
default.
Terminal Name
The Terminal Name field defines the name of the Tisio that will be
used on the network to identify it self from other network devices.
The Terminal name can be viewed or modified. To modify the
Terminal Name simply enter a new name. The next time the device
is rebooted the new name will be registered with the Tisio Device
Management server.
Factory-Default
The “Reset the terminal to Factory-default property settings” check
box is used to force the Tisio thin client to reset all setting to factorydefaults on the next reboot or power-up. After a Factory-default, the
Tisio thin client will automatically start the Device Manager Startup
Wizard requesting input on basic settings required for basic
operation of the Tisio thin client.
To reset to factory the Tisio terminal, follow these steps:
1. When the Terminal Connection Manager is showing press F2 to
display the Tisio Device Manager Startup Wizard.
2. Select the Introduction Tab.
35
Page 44

ThinPATH Systems, Inc. Tisio User’s Guide
3. Chick in the Reset the terminal to Factory-default property
settings check box.
4. At the prompt “All settings will be reset to default value. Would
you like to do it now?” click Yes.
The Tisio device will now reboot and reset all settings to factory.
Display Settings Tab
The Display Settings window provides information and access to
modify the Tisio display settings that will be used for the attached
video monitor or LCD Flat Panel Display. These settings include:
Desktop Area and Refresh Frequency setting and Test button.
Colors selection for 256, 16 Bit & 32 Bit Color depths.
Hide Video Settings check box.
Screen Saver Controls.
Power Saver Controls
The next sections describe in detail these individual controls,
settings and how to modify and test a new video resolution.
36
Page 45

ThinPATH Systems, Inc. Tisio User’s Guide
Desktop Area and Refresh Frequency
The Desktop Area and Refresh Frequency setting is used to allow
the resolution to be changed. By default the best desktop resolution
and refresh frequency will be automatically selected based on the
capabilities of the attached video display device. The default
resolution and Frequency is set to a value recommended by the
video display manufacture. The Tisio device supports the following
list of video settings.
Supported Video settings:
— 320 x 200 @60Hz
— 320 x 240 @60Hz
— 400 x 300 @60Hz
— 640 x 480 @60Hz, 75Hz, 85Hz, 100Hz & 120Hz
— 720 x 480 @60Hz
— 720 x 576 @60Hz
— 800 x 600 @60Hz, 75Hz, 85Hz, 100Hz & 120Hz
— 848 x 480 @60Hz
— 1024 x 768 @60Hz, 75Hz, 85Hz & 100Hz
— 1280 x 720 @60Hz
— 1280 x 768 @60Hz
— 1280 x 960 @60Hz
— 1280 x 1024 @60Hz, 75Hz & 85Hz
— 1360 x 768 @60Hz
— 1366 x 768 @60Hz
— 1400 x 1050 @60Hz
— 1600 x 1200 @60Hz, 75Hz & 85Hz
— 1920 x 1080 @60Hz
— 1920 x 1440 @60Hz
— 2048 x 1536 @60Hz
Note Your terminal may not display all resolutions listed here.
The list of resolutions depends on the capabilities of the
attached video display device.
37
Page 46

ThinPATH Systems, Inc. Tisio User’s Guide
Hide & Show all Video Modes
Uncheck the box labeled “Hides modes this monitor cannot
display” see the full list of supported video resolution settings. The
video settings not supported by the Monitor are hidden by default.
Note Selecting a video setting not supported by your monitor may
cause severe damage to your monitor. Please consult the
Monitors operators’ manual for supported settings not in the
supported list.
Colors
The colors setting allow selection for 256 colors, High Color (16 Bit),
and True Color (32 Bit). For proper support of Windows 2003
Terminal Server sessions, 16 or 32 Bit color modes must be selected.
Screen Saver
The Enable Screen Saver and Wait setting is used to allow the screen
saver control to be changed. By default the screen saver is enabled
and set to a wait time of 20 minutes. To disable the screen saver
click the check box.
38
Power Saver
The Power Saver provides controls to automatically power down
the Monitor or Tisio device. By default these are set to Never. Click
on the Power Button to modify these controls.
Modifying Display Settings
When modifying display settings the Tisio thin client will require
restarting. When changing the desktop resolution the new setting
must be verified the new value will be visible to the user. The test
button is used to allow the new video setting to be tried be fore
making the selection permanent.
To change and test a new the display resolution, follow these steps:
1. When the Terminal Connection Manager is showing press F2 to
display the Tisio Device Manager Startup Wizard.
Page 47

ThinPATH Systems, Inc. Tisio User’s Guide
2. Select the Display Setting Tab.
3. Select a new display resolution and frequency from the drop
down menu.
4. Select the desired Color setting.
5. Click on the Test box and follow the instructions in the screen
dialog window.
6. At the prompt “Did you see the test image properly?” click Yes
if it was visible otherwise select No.
7. If you selected “No”, Repeat steps 2, 4 and 5 until a new setting
is visible.
When the Device Manager Startup Wizard window is closed The
Tisio device will require rebooting for the new display settings to
take affect.
Network Settings Tab
The Network Settings window provides information and access to
modify the Tisio Network settings that will be used when attached
to a Local Area or Wide Area Network. These settings include:
Host Name – View and modify the name of the Tisio thin client.
Domain Name – View and modify the domain name of the Tisio
thin client.
Network Adapter Settings – Defines the network IP Address,
Subnet Mask and Default Gateway settings.
Host Name
The Host Name field defines the name of the Tisio and is the same
as the Terminal Name
.
Domain Name
The Domain Name field defines the domain name portion of the
host name that will be used on the network to identify it from other
network devices.
39
Page 48

ThinPATH Systems, Inc. Tisio User’s Guide
The Domain name can be viewed or modified. To modify the
Domain Name simply enter a new name, i.e. yourdomain.com. The
next time the Tisio device is rebooted the new domain name will be
activated.
Network Adapter Settings
The Network Adapter Settings allows configuration of all TCP/IP
Network parameters. The network parameters can be automatically
assigned or statically set. Normally the IP Address, Subnet Mask,
Default Gateway, and DNS parameters are obtained via DHCP.
Adapter Name
This is the name assigned to the network interface hardware. The
Adapter Name field is automatically defined by the local hardware
configuration and can not be changed by the user.
Getting an IP Address via DHCP
By default the “Getting an IP Address via DHCP” is set so at initial
boot the Tisio thin client will try broadcast on the local subnet to
automatically obtain all TCP/IP address settings. This includes the
IP Address, Subnet Mask, Default Gateway, Domain name and DNS
host.
40
When unchecked the TCP/IP address settings below for the Tisio
thin client become active enabling them to be manually entered.
Note Assigning the same IP address to more that one TPC/IP
network attached device can cause loss of data. Your
network administrator is responsible for assigning the
proper network addressing so each device will properly
communicate over your network.
IP Address
This defines the address use on the local TCP/IP network. Use this
field to manually enter an IP Address. An example IP address is;
192.168.1.22
Page 49

ThinPATH Systems, Inc. Tisio User’s Guide
Subnet Mask
This defines the subnet mask use on the local TCP/IP network. Use
this field to manually enter an IP Address. An Example Subnet
Mask; 255.255.255.0 where this is a Class C defined network
Default Gateway
This defines the Tisio default gateway use on a TCP/IP network.
Use this field to manually enter an IP Address. An Example Default
Gateway is; 192.168.1.1, where this is the address of the local
gateway on this subnet.
41
Page 50

ThinPATH Systems, Inc. Tisio User’s Guide
Advanced Network Settings
The advanced network setting allows for manual setup of Domain
Name Service (DNS) hosts. Use these settings to set the Primary
and Secondary DNS server names providing domain name lookup
on your local area network. The IP address of the DNS server must
be used; not the host name of the primary and secondary DNS
servers.
Note When using the Tisio local IE Web browser the DNS setting
must be properly configured to allow for World Wide Web
URL host name lookups.
Advanced Network Utilities
The advanced network utilities “ipconfig”, “ping” and “wzctool”
allow administrators to diagnose network related issues. Select the
Usage button to see the command line options available for these
commands. Enter a command in the top entry box and click on the
Run button.
Security Tab
The Security window provides settings to block access to all local
settings and configurations. Setting a password here will require a
password to be entered to change any setting under the Terminal
Properties window. If “Disable the Configure tab” is checked the
Configure tab is not displayed in the Connection Manager window.
So users are unable to edit or create new connections.
Device Manager Tab
The Device Manager window provides settings to specify the Tisio
management server also known as the Tisio Device Manager. The
Tisio Device Manager provides administrators a simple and easy
tool to perform remote management for all Tisio thin client
configurations.
42
Page 51

ThinPATH Systems, Inc. Tisio User’s Guide
The controls and settings under the Device Manger tab include:
Device Manager Name field – View and modify the host name
of the Tisio thin client management server.
Connection button – Used to test connections to the Tisio thin
client management server.
43
Page 52

ThinPATH Systems, Inc. Tisio User’s Guide
Device Management Server
The Device Manager field defines the network host name and URL
of the Tisio Device Management server. This field can contain a
single hostname, IP address or a full URL address. The following
syntax is supported:
http[s:]/[<username>:<password>@<hostname>.<domain
name>:8080/ThinCCo/Servlet
Example: thinccodm.yourdomain.com or
http://thinccodm.yourdomain.com/ThinCCo/Servlet
— At minimum a single host name or IP address must be
entered to change it from the default settings
— If the Tisio Device Manger server was set up as a secure web
server use https:// otherwise use http://. If not included, the
value http:// will be used.
— The username and password can optionally be used if the
Tisio Device Manger server was configured to require user
name and password values for enhanced security.
.
44
— The Tisio Device Manger is configured by default to use port
:8080, and can be left off. This value should be included
however, if changed at the Tisio Device Manger server.
— The Tisio Device Manger server is configured by default to
use the directory path /ThinCCo/Servlet, and can be left off. If
the virtual directory path was changed on the Tisio Device
Manger server, the directory path is required.
Page 53

ThinPATH Systems, Inc. Tisio User’s Guide
Tisio Device Manager Default Settings
The Device Manager field is initial set to default settings. When set to
default settings, the Device Management server name used to contact
the management server will be http://thinccodm.<your
domain>:8080/ThinCCo/Servlet, where your domain is the Tisio thin
client’s domain name set by DHCP or from the Domain Name
under Network Setting.
Testing the Device Manager Connection
In the Device Manager window the Connection button allows
communication to the Device Management server to be verified to
validate the Device Manager server name field.
1. when the Connection Manager window is displayed, Press F2 to
open the Tisio Startup wizard.
2. Click in the Device Manager tab.
3. Enter the device Manger server name
.
4. Click on the Test button. A message indicating a pass or fail will
be returned in the message box.
45
Page 54

ThinPATH Systems, Inc. Tisio User’s Guide
Update Manager Tab
The Update Manager window allows new client components to be
installed from the Tisio Device Manager (TDM) server. The TDM
server must be correctly defined under the Device Manager tab.
The Update Manager window shows Installed Software
components and any new available components to install.
Installed Software
The Installed Software window displays the version of installed
software client components. The Information button displays
detailed information about the selected installed component. Select
the Uninstall button to remove the selected component.
Avaiable for Update
The Available for Update window displays either newer or new
software client components that can be installed from the TDM
server.
46
Page 55

ThinPATH Systems, Inc. Tisio User’s Guide
Using Tisio Device Properties Control Panel
After initial configuration, you can modify settings using Device
Properties.
To display Device Properties Control Panel when the Connection
Manager is on the screen, press F2 and select the Control Panel tab.
If you are connected to a server, first press Ctrl+Alt+End to display
the Connection Manager, then press F2 and select the Control Panel
tab.
After making changes, you can click OK to apply changes without
closing Tisio Device Properties, click OK again to close Device
Properties.
Note Your system administrator may have set a password in
order to prevent you from making changes to Device
Properties. In that case, access to the Device Properties
window is denied until you enter the password when
prompted. If no password has been set, you can make
changes to any Device Properties field.
The table on the next page describes the settings and how to change
them.
47
Page 56

ThinPATH Systems, Inc. Tisio User’s Guide
g
Using Device Properties under Control Panel (continued)
Setting
Internet Options – IE
Browser
Internet Options Connections
Internet Options Security
Internet Options Privacy
Internet Options Advanced
How to Change settings under Control Panel
In the Internet Options applet select the General tab.
Start Page—Enter the initial web pa
e to be visible when
IE Browser starts.
Search Page—enter the default search web page, i.e...
http://www.google.com.
User Agent—Select Default Windows CE.
Cache Size—Select the amount of RAM memory in
Kbytes to use for caching of web pages. Default is 512.
In the Internet Options applet select the Connection tab.
Autodial—Check Use Lan to disable accessing the
network over a modem connection. Select an Autodial
name to automatically connect to the network using a
modem
Network—Configure the Tisio device to use a proxy
.
server. Consult your network administrator for proper
settings.
In the Internet Options applet select the Security tab.
Settings—Configure the IE browser security settings.
Consult your network administrator for proper settings
matching your environment
.
In the Internet Options applet select the Privacy tab.
Cookies—Configure the IE browser cookie settings.
Consult your network administrator for proper settings
matching your environment
.
In the Internet Options applet select the Advanced tab.
Advanced Settings—Configure the IE browser
Advanced settings. Consult your network administrator
for proper settings matching your environment
.
48
Page 57
ThinPATH Systems, Inc. Tisio User’s Guide
Using Device Properties under Control Panel (continued)
Setting
Internet Options –
Browser Popup
How to Change settings under Control Panel
In the Internet Options applet select the Popup tab.
Popup—Configure the IE browser popup settings.
Consult your network administrator for proper settings
matching your environment
.
Printers Add Printer—Used to add a local printer or a network
shared printer to be used for printing in a RDP session.
Note: ICA, local IE Brower, or other local clients will not be
able to use these printers.
Terminal Server Client
License
Terminal Server Client License—This is used to view or
delete a Terminal Server Client license. This license is
assigned by the Microsoft Terminal Server and is used for
both ICA and RDP Terminal Server connections.
Keyboard
Use the Keyboard Properties applet to set:
Keyboard Repeat—Enable or disable character repeat.
Repeat Delay—Select the character repeat delay with
slider bar.
Repeat Rate—Set repeat rate with slider bar.
Password
The Password Properties screen is used to set a password to
control locking of the Tisio thin client device. A password
can be set so a password prompt will be displayed at power
on or after the screen saver.
Password—Enter a password confirm password to use
this feature.
Enable Password Protection—Click on At Power On or
(and) Screen Saver
to enable password protection on the
Tisio thin client.
49
Page 58
ThinPATH Systems, Inc. Tisio User’s Guide
y
Using Device Properties under Control Panel (continued)
Setting
Owner
Power
System
Display
Mouse
How to Change settings under Control Panel
The Owner Properties are used identify the location,
Company and network identification of the Tisio thin client.
This information is used by the Tisio Device Manager
providing administrator’s information to easily locate the
Tisio thin client.
Identification and Notes—Use these fields to identif
the
location of the Tisio thin client.
Network ID—Used to access network resources. Enter the
Windows Username, Password and Domain name.
The Power Properties are used to control when the device
enters the suspend state. User and System states are not
supported at this time.
The System Properties displays information on the device
name, memory usage and copyrights.
General – Displays the Operating System Version.
Memory – Shows memory usage and controls the
amount of RAM memory to reserve for client
applications. The Program Memory allocation is
typically larger and is used for running local client
programs.
Device Name – Displays the network name of the
device. Can also be modified.
Copyrights – Display local software Copyrights.
The Display Properties areas used to change the appearance
and background on the Tisio thin client.
Mouse Double-click—In the Mouse Properties, you can
adjust the double click speed of the Mouse. To test, click on
the test icon.
50
Page 59
ThinPATH Systems, Inc. Tisio User’s Guide
j
y
Using Device Properties under Control Panel (continued)
Setting
Mouse
Volume & Sound
Properties – Volume
tab
Volume & Sound
Properties – Sound tab
Remove Programs
Date & Time
Certificates
How to Change settings under Control Panel
Mouse right or left handedness—Make these ad
ustments on
the Terminal Server host through Start > Settings > Control
Panel > Mouse, if using Windows or Citrix Presentation
Server. If using Citrix ICA, go to Main > Control Panel >
Pointing Device on the Citrix Server.
In the Volume & Sound applet select the Volume tab.
Speaker volume—Slide the tab to set the volume.
Enable sounds for: —Check or uncheck to enable Event,
Applications and Notification sounds.
Enable Clicks and taps for—Check Key Clicks to enable
keyboard key presses through speakers. Select Loud or
Soft to set key click volume.
In the Volume & Sound applet select the Sounds tab.
Event window—Select a sound event to be modified or
played.
Sound —Select a new sound to be associated with the
sound event selected in the Event window. Click on the
Play button to test the sound and Stop, to stop playing
the sound.
Scheme—Select either the Windows CE Default, No
Sounds, or All Sounds sound scheme.
The Remove Program window displays installed local
software components. Removing components using this
utility is not supported at this time.
Set the local clocks date, time, and time zone.
The Certificates are used to improve authenticit
of network
connections and are used primarily for secure IE Browser
connections. See your network Administrator for details on
adding Certificates required by your company.
51
Page 60

ThinPATH Systems, Inc. Tisio User’s Guide
guag
guag
Using Device Properties under Control Panel (continued)
Setting
Regional Settings
How to Change settings under Control Panel
Regional and Language Settings Select the locale, language
and input device such as keyboards.
Regional Settings > Local—Select the desired language
to represent numbers, currency, time and dates on the
Tisio thin client.
User Interface Language—Select the lan
for local menus, dialogs and alerts.
Input Language > Input Language—Select the input
lan
e that matches the keyboard attached to the Tisio
thin client.
Network
The Network Connections are used to define how the Tisio
thin client communicates over a TCP/IP network. See
Citrix ICA Client
Network Settings
Used to set Citrix ICA Client global attributes.
for details on setting these parameters.
Specify the default client by selecting a client from the
Set Default Client list.
Attribute
Attribute
Terminal Server Client
Licenses
ThinPATH Systems
LPD
Displays Microsoft Terminal Server CAL’s.
Used to configure a local LPD print server. This enables
remote LPD print spoolers to print to a locally attached
printer on the Tisio device.
Figure 8 - Using the Device Properties Control Panel Applets
e to be used
52
Page 61
ThinPATH Systems, Inc. Tisio User’s Guide
Tisio System Recovery
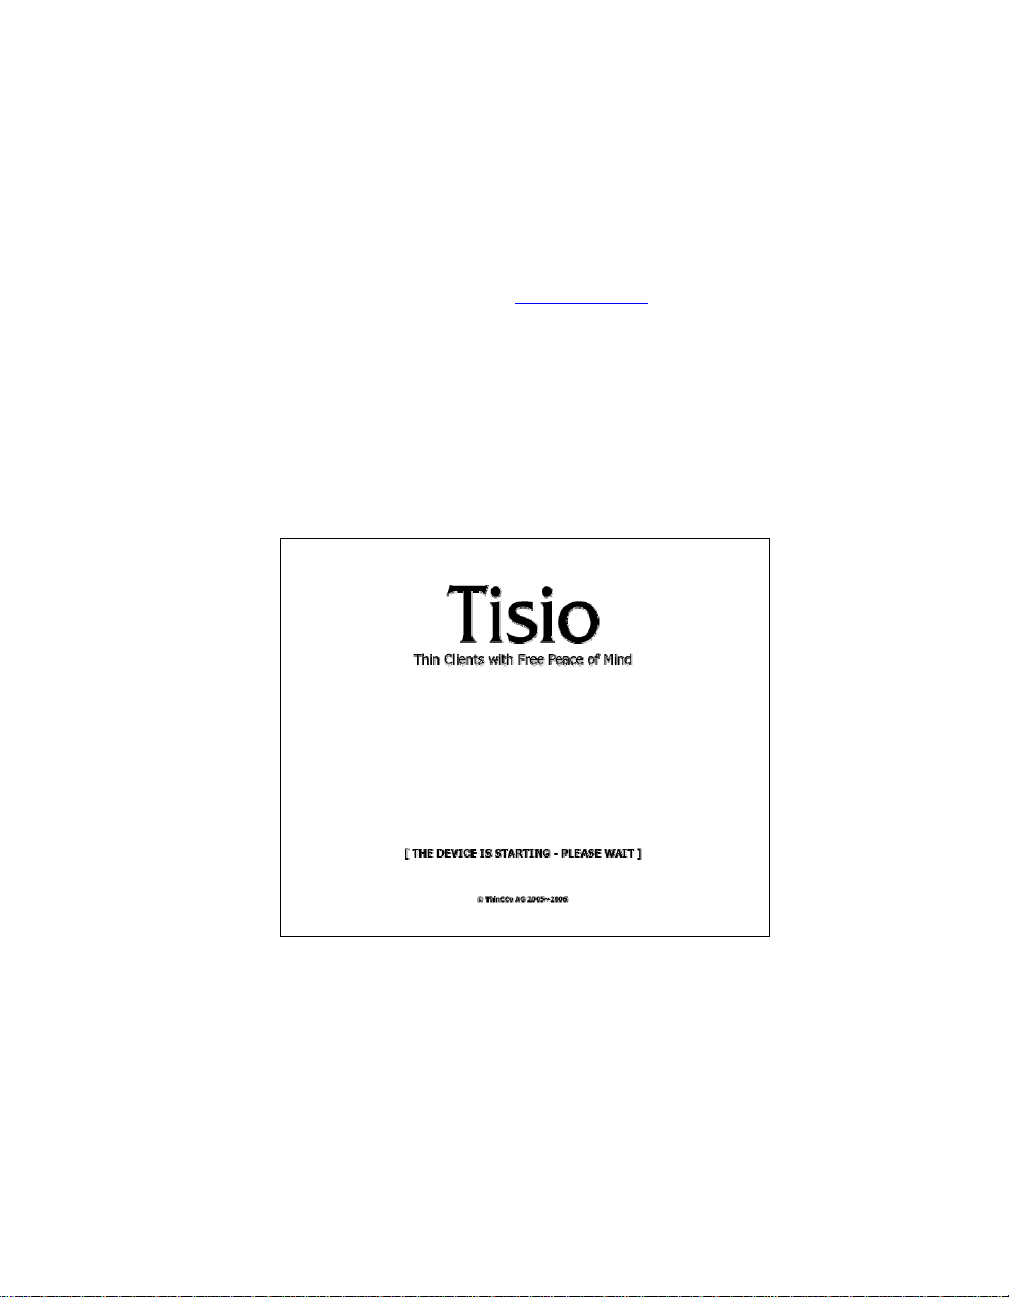
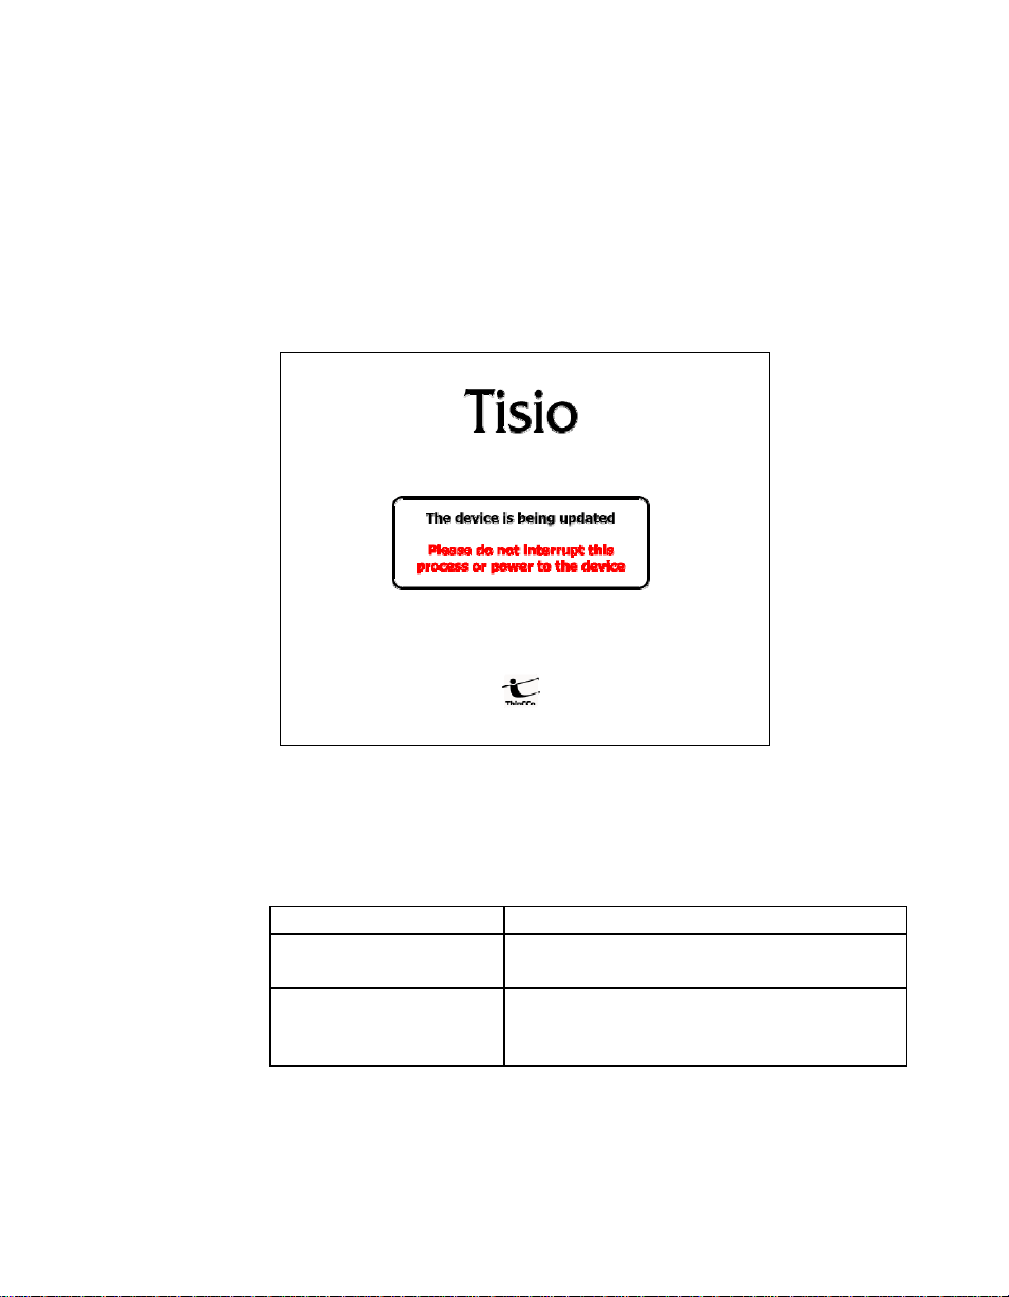
When the terminal is powered on, the Tisio appears while loading
its operating system. After the operating system has been loaded,
the Tisio will display the initial screens
screens do not display properly or the Tisio boot screen never
disappears then a system recovery should be performed.
The Tisio system recovery process downloads a new Operating
System image from the Tisio Device Management recovery server.
See the Tisio Device Manager Installation documentation on
installing and configuring the Tisio Device Management recovery
server.
for normal use. If the initial
Figure 12 -Tisio Boot Screen
53
Page 62
ThinPATH Systems, Inc. Tisio User’s Guide
The Tisio system recovery process is initiated just after power on by
a key press sequence. During the system recovery process the Error!
Reference source not found. is shown.
Note The power to the Tisio terminal should not be interrupted
until the system recovery has completed.
Figure 13- Tisio Boot Screen
Initiating System Recovery
When the terminal is powered on, system recovery can be initiated
using the key sequences below.
Key Press Sequence Use
Ctrl+Alt+F10 Used to initiate a normal system recovery
Ctrl+Alt+F2 Used to initiate an advanced system
The system recovery key sequence can only be pressed within a short
period of time and only during the initial power up sequence. After power
54
of the Operating System.
recovery of the Operating System with
logging enabled.
Page 63
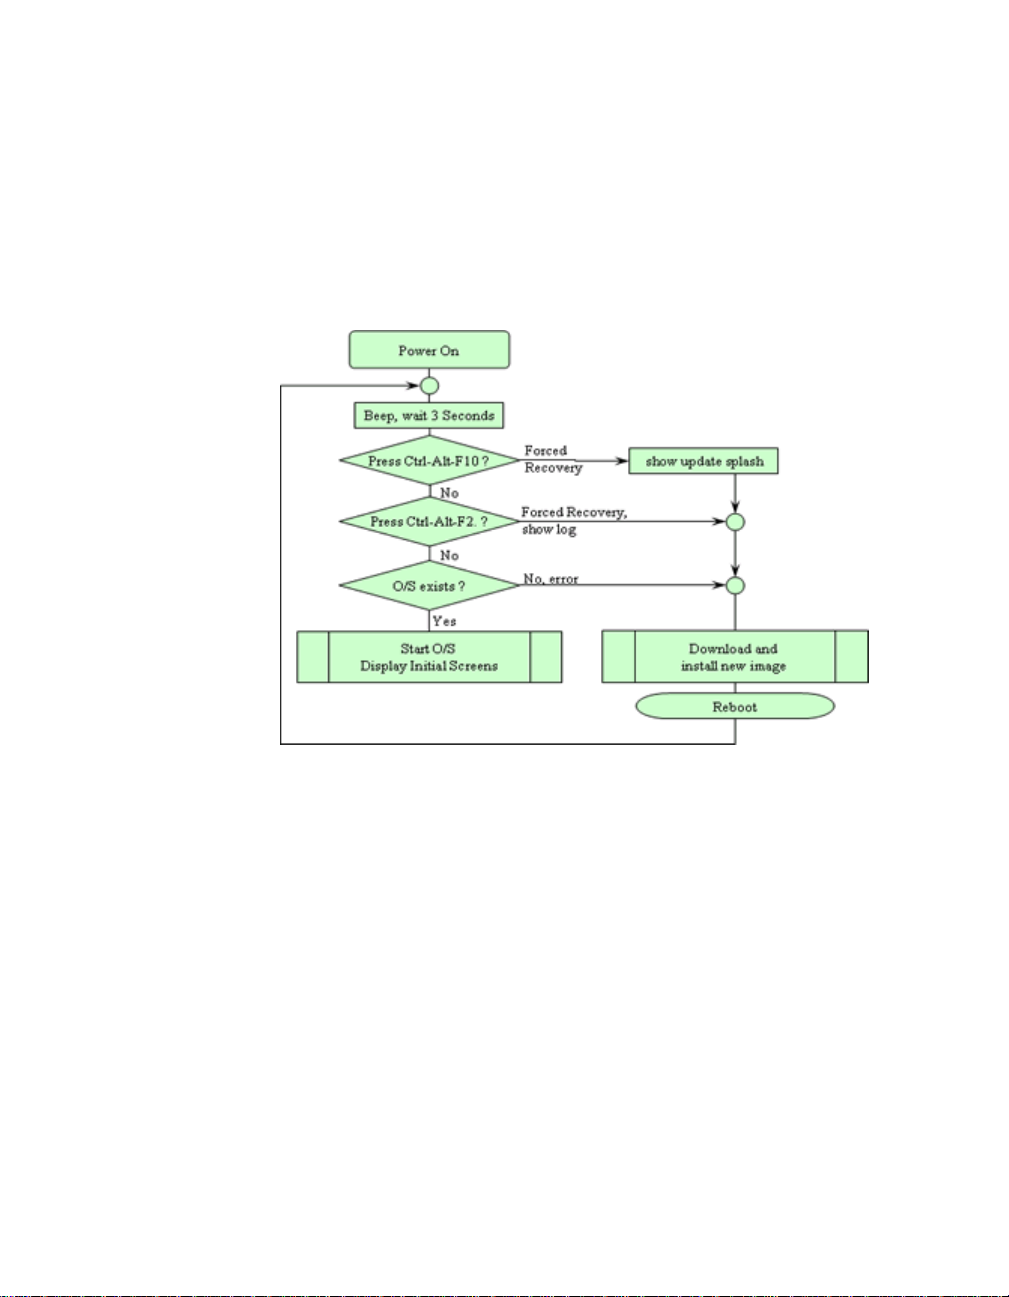
ThinPATH Systems, Inc. Tisio User’s Guide
on, wait for a second beep before pressing the system recovery key
sequence. There is a 3 second window in which the system recovery key
sequences can be pressed. If the system recovery key sequence is pressed
after the 3 second window it will be ignored. The diagram below shows
what happens during power on and the recovery process.
Figure 14 - Tisio Recovery Process
Start System Recovery
The system recovery key sequence can only be pressed within a short
period of time and only during the initial power up sequence. To start Tisio
system recovery, follow these steps.
1. Power on the Tisio terminal.
2. After power on wait for a first beep, and a short while later
there will be a second beep. After the second beep there is a
three second window in which the system recovery key
sequences can be pressed.
3. Press the system recovery key sequence before the three second
window.
55
Page 64

ThinPATH Systems, Inc. Tisio User’s Guide
4. If the system recovery key sequence is pressed after the three
second window it will be ignored. Repeat the steps until the
Error! Reference source not found. is shown.
After the Tisio recovery sequence completes, the Tisio Startup
Wizard will appear indicating Tisio thin client has been fully
recovered and set to factory defaults. Follow the steps in the section
If the Tisio Startup Wizard Appears
to configure your Tisio
terminal.
56
Page 65

ThinPATH Systems, Inc. Tisio User’s Guide
In Case of Trouble
1
This section describes some exceptional circumstances that may
occur when you power on the Tisio Tisio terminal. This is the place
to look for information if the initial screen on your terminal does not
resemble those described in
57
Page 66

ThinPATH Systems, Inc. Tisio User’s Guide
Initial Screens.
If your problem is not addressed in this section, see your system
administrator.
This section explains the steps to take if a network error dialog box
or other error message appears and how to handle upgrade
messages. Also discussed are screen display problems and blinking
LEDs.
Display is Blank – Reset Video to VGA Mode
When the attached display is blank the video setting defined on the
Tisio device may not match the supported video rates of the
attached monitor. When the terminal is powered on, a video system
initialization can be initiated using the key sequences below. This
will reset all Tisio video settings to a default VGA mode.
Key Press Sequence Use
Ctrl+Alt+F8 Used to initiate a normal video system
initialization of settings stored in the
Operating System.
The Tisio IP address is set to 0.0.0.0
If the terminal cannot detect the network connection, the Tisio IP
address is set to “0.0.0.0”. Check the network cable is properly
attached and network indicator led next to the network connector is
on. Also ensure there is a DHCP server running on your network or
open the Tisio Device Properties window and under the Network
Settings assign a valid IP address.
Fixing a Cable Problem
If there is a problem with the terminal’s network cable, the Network
dialog box appears indicating that the terminal may not be
58
Page 67

ThinPATH Systems, Inc. Tisio User’s Guide
connected to the network.
First, check the network cable connection at the terminal and at the
outlet on the wall or hub. If the cable is not secure, make sure it is
plugged. Once properly attached the Tisio terminal will
automatically initialize its network interface and obtain an IP
address from a DHCP server.
Fixing an Address Problem
If the terminal cannot be assigned the address information required
for network communication. Contact your system administrator.
If the system administrator is able to fix the problem on the
Terminal Server host, click Restart when told to do so.
If you have to fix the problem at the terminal:
1. Obtain the necessary address information from the system
administrator.
2. Open the Tisio Device Properties window and under the
Network Settings
assign a valid IP address.
3. Enter the address information obtained from your system
administrator.
59
Page 68

ThinPATH Systems, Inc. Tisio User’s Guide
A Device Manager Update Message Appears
Each time it is turned on, the Tisio terminal checks the network for a
newer version of its operating software. If it detects that an upgrade
is necessary, it displays the following upgrade message:
Figure 15 - Device Manager Update dialog
Note Do not turn off the Tisio terminal during a software
upgrade. Turning off the terminal at this time may damage
it.
60
After the upgrade is complete, the terminal automatically restarts.
Page 69

ThinPATH Systems, Inc. Tisio User’s Guide
The Screen Looks Garbled
If the screen is unreadable or blank when you turn on the terminal,
this means that the terminal’s monitor settings (desktop area
and/or refresh frequency) may be incorrect.
To restore the screen to a readable state, you must perform a Tisio
System Recovery.
Error Messages Appear
If error messages appear right after you power on the terminal, the
terminal may not be able to start. For example:
Unable to Load Operating System
If such messages appear and the terminal does not connect to a
Terminal Server host or display a panel, contact your system
administrator.
61
Page 70

ThinPATH Systems, Inc. Tisio User’s Guide
LEDs Blink on Front of Base Unit
If there is a problem and the terminal is not able to display an error
on the screen, the screen goes blank, the base unit beeps, and an
on the front of the base unit blinks. If this happens, contact your
system administrator.
LED
62
Page 71

ThinPATH Systems, Inc. Tisio User’s Guide
locale, 52
A
audio, configuring, 48, 49, 51
C
clients
definition, 2
configuring the terminal, 30, 34, 47
Connection Manager
procedure, 5
using, 17
connections
autostart, 25, 35, 38
default
autostart, 20
creating new, 19
deleting, 32
editing, 19
hot keys, 52
starting, 18
stopping, 18
E
error messages, 61
locale
keyboard, 52
logging off, 24
logging on, 4
microphone, 48, 49, 51
mouse
pointer speed, 50
right/left handedness, 51
pointer, speed, 50
published application, 12
RDP connections
creating, 9
modifying connection properties, 19, 32
modifying network properties, 19, 33
L
M
P
R
H
hot keys, multiple connections, 31
I
ICA connections
configuring the client, 52
creating, 12
modifying, 32
wizard, 12
K
keyboard
character repeat, 49
S
screen
unreadable
blank
screens, 61
Setup Wizard
initial display, 3
procedure, 6, 26, 34, 53
speaker, 48, 49, 51
specifications, 52
T
Terminal Properties
accessing, 30, 34, 47
63
Page 72

ThinPATH Systems, Inc. Tisio User’s Guide
Network dialog box
terminal network cable, 58
troubleshooting
cable connection, 59
troubleshooting
addresses
problems, 59
U
upgrades
message
upgrades, 60
W
WBT, 1
WTS Connection Wizard, 9
64
 Loading...