

Think Tank Photo Logistics Manager 30 Instructions Manual
1
2
3
4
5
1105 N. Dutton Avenue, Suite C, Santa Rosa, CA 95401 USA Phone #: 1.707.527.0101 FAX #: 1.707.527.0808
Large Capacity Rolling Gear Bag
Logistics Managerr® 30 Instructions
For more information please visit: www.thinktankphoto.com
©2013 Think Tank Photo PIN0004b
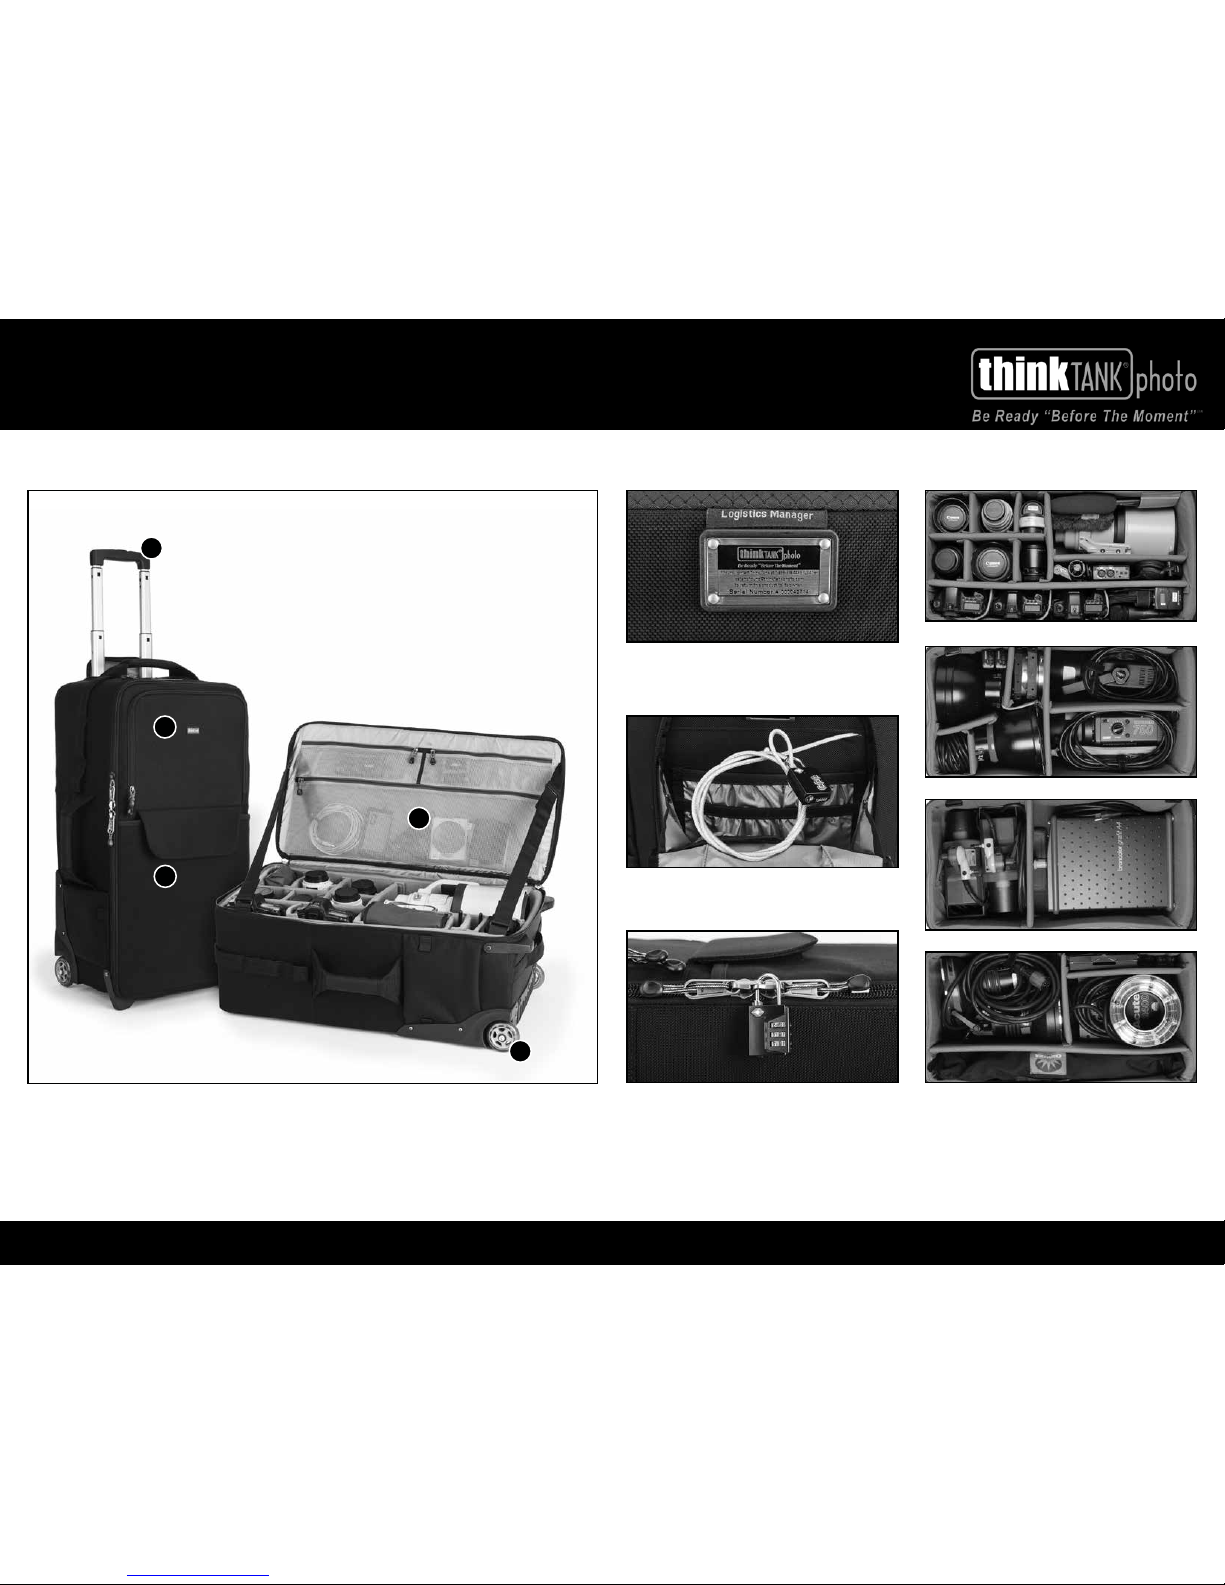
Logistics Manager® 30 - Rolling Gear Case
TSA combination lock to secure zipper. There
are many instances when photographers must
leave behind some or all of their gear. It is absolutely vital that this gear be secured from theft.
Security cable and combination lock can be used
to secure zipper and lock it to immovable objects.
Endless interior layouts to adapt to numerous
equipment combinations and help manage all
of the “logistics” of transporting and using a lot
of equipment while on location.
The security ID plate located on the back may be
registered at:
www.thinktankphoto.com/lostandfound_registration.aspx
1. Hide-away top handle with easy accessibility and maneuverability; 2. Top pocket contains
many organizational options for managing
small items.
3. Lower pocket expands for cords, reectors, or
other peripheral items; 4. Mesh interior pockets
for accessories; 5. Replaceable wheels within a
protective housing adds stability.
1105 N. Dutton Avenue, Suite C, Santa Rosa, CA 95401 USA Phone #: 1.707.527.0101 FAX #: 1.707.527.0808
Large Capacity Rolling Gear Bag
Logistics Managerr® 30 Instructions
For more information please visit: www.thinktankphoto.com
©2013 Think Tank Photo PIN0004b
Shown (left to right): With monopod,
standard tripod in tripod pocket, large tripod
with tripod cup
Step 1: Place the Tripod Strap under the webbing
on the side of the bag, matching the hook and loop
material to keep the strap in position.
STANDARD TRIPOD ATTACHMENT
Step 2: Place two tripod legs into the expandable
pocket on the side of the bag and use the
compression strap to secure the lower portion of the
tripod to the side of the bag. Pull the buckle straps
on both the Compression Strap and Tripod Strap to
tighten the tripod onto the side of the bag.
Step 3: Adjust the length of the strap so that the
Tripod Cup has adequate clearance from the ground.
Step 1: Place the Tripod Strap under the webbing
on the side of the bag, matching the hook and loop
material to keep the strap in position.
LARGE TRIPOD ATTACHMENT
Step 2: Weave the webbing on the tripod cup through
the buckle on the side of the bag as shown. It’s
important to back-loop the strap through the buckle to
prevent the strap from loosening with usage. Airport
Security V2.0 owners will nd this buckle on the inside
of the side zippered pocket.
Turn the dials and align the numbers so
that 0-0-0 is visible inside the combination
windows that are located on the narrow side
of the lock. Pull up the shackle and turn it 90º
counter-clockwise to align the small protrusion
on the shackle with the notch on the lock body.
Press the shackle down rmly and then turn
the shackle a further 90º counter-clockwise.
With the shackle still turned in the position
above, turn the dials to your own personal
combination. Return the shackle back to the
original position. Your personal combination is
now ready to use.
SETTING THE REAR SECURITY
CABLE LOCK
 Loading...