

Page 1

UserGuide
ThinkPadX230andX230i
Page 2

Notes:Beforeusingthisinformationandtheproductitsupports,besuretoreadandunderstandthe
following:
•Safety,Warranty,andSetupGuide
•RegulatoryNotice
•“Importantsafetyinformation”onpagevi
•AppendixE“Notices”onpage167
TheSafety,Warranty,andSetupGuideandtheRegulatoryNoticehavebeenuploadedtotheWebsite.
Torefertothem,gotohttp://www.lenovo.com/ThinkPadUserGuides.
FourthEdition(August2012)
©CopyrightLenovo2012.
LIMITEDANDRESTRICTEDRIGHTSNOTICE:IfdataorsoftwareisdeliveredpursuantaGeneralServicesAdministration
“GSA”contract,use,reproduction,ordisclosureissubjecttorestrictionssetforthinContractNo.GS-35F-05925.
Page 3

Contents
Readthisrst..............v
Importantsafetyinformation..........vi
Conditionsthatrequireimmediateaction..vii
Safetyguidelines............vii
Chapter1.Productoverview......1
Locatingcomputercontrols,connectors,and
indicators..................1
Frontview................1
Right-sideview..............4
Left-sideview..............6
Bottomview...............7
Rearview................8
Statusindicators.............8
Locatingimportantproductinformation.....10
Machinetypeandmodellabel.......10
FCCIDandICCerticationnumberlabel..11
CerticateofAuthenticitylabel......11
Features.................12
Specications...............13
Operatingenvironment...........14
Lenovoprograms.............14
AccessingLenovoprogramsontheWindows
7operatingsystem...........14
AccessingLenovoprogramsontheWindows
8operatingsystem...........16
AnintroductiontoLenovoprograms....17
Chapter2.Usingyourcomputer...21
Registeringyourcomputer..........21
Frequentlyaskedquestions.........21
Specialkeysandbuttons..........23
Functionkeycombinations........23
Volumeandmutebuttons........25
Windowskey.............26
UsingtheUltraNavpointingdevice.......26
UsingtheTrackPointpointingdevice....27
Usingthetouchpad...........28
DisablingtheUltraNavpointingdeviceand
usinganexternalmouse.........29
AddingtheUltraNavicontothesystemtray.29
Powermanagement............29
Checkingbatterystatus.........29
Usingtheacpoweradapter........30
Chargingthebattery..........30
Maximizingbatterylife..........30
Managingyourbatterypower.......31
Power-savingmodes..........31
Handlingthebattery...........32
Connectingtothenetwork..........33
Ethernetconnections..........34
Wirelessconnections..........34
Presentationsandmultimedia.........38
Changingdisplaysettings........38
Connectingaprojectororexternaldisplay..38
Settingupapresentation.........40
UsingtheExtenddesktopfunction.....40
Usingaudiofeatures............41
Usingtheintegratedcamera.........42
UsinganExpressCard,aashmediacard,ora
smartcard................42
Chapter3.Y ouandyourcomputer..45
Accessibilityandcomfort..........45
Ergonomicinformation..........45
Comfort...............46
Accessibilityinformation.........46
Travelingwithyourcomputer.........47
Traveltips...............47
Travelaccessories...........47
Chapter4.Security..........49
Attachingamechanicallock.........49
Usingpasswords..............49
Passwordsandsleepmode........49
Typingpasswords...........49
Power-onpassword...........50
Harddiskpasswords..........50
Supervisorpassword..........52
Harddisksecurity.............54
Settingthesecuritychip...........55
Usingthengerprintreader..........56
Noticeondeletingdatafromyourharddiskdrive
orsolid-statedrive.............59
Usingrewalls...............59
Protectingdataagainstviruses........60
Chapter5.Recoveryoverview....61
RecoveryoverviewfortheWindows7operating
system..................61
Creatingandusingrecoverymedia.....61
Performingbackupandrecoveryoperations.62
UsingtheRescueandRecoveryworkspace.63
Creatingandusingarescuemedium....64
©CopyrightLenovo2012
i
Page 4

Reinstallingpreinstalledprogramsanddevice
drivers................65
Solvingrecoveryproblems........65
RecoveryoverviewfortheWindows8operating
system..................66
Chapter6.Replacingdevices.....69
Staticelectricityprevention..........69
Replacingthebattery............69
ReplacingtheSIMcard...........72
Replacingtheharddiskdriveorsolid-statedrive.73
Replacingamemorymodule.........75
Replacingthekeyboard...........78
Replacingthepalmrest...........81
Replacingthespeaker............85
Replacingthebackupbattery.........86
Chapter7.Enhancingyour
computer...............89
FindingThinkPadoptions..........89
ThinkPadBattery19+............89
ThinkPadUltraBaseSeries3.........92
Topview...............93
Bottomview..............94
AttachingtheThinkPadUltraBaseSeries3..94
DetachingtheThinkPadUltraBaseSeries3.96
Securityfeature............97
OtherThinkPadportreplicatorsanddocking
stations.................98
Frontview...............99
Rearview...............101
AttachingaThinkPadportreplicatoror
dockingstation.............103
DetachingaThinkPadportreplicatoror
dockingstation.............105
Securityfeature............106
Usingthesystemlockkey........106
Chapter8.Advanced
conguration............107
Installinganewoperatingsystem.......107
Beforeyoubegin............107
InstallingtheWindows7operatingsystem..108
InstallingtheWindows8operatingsystem..109
Installingdevicedrivers...........109
ThinkPadSetup..............110
Mainmenu..............111
Congmenu..............111
Date/Timemenu............117
Securitymenu.............117
Startupmenu.............122
Restartmenu.............123
UpdatingyoursystemUEFIBIOS.....124
Usingsystemmanagement..........124
Systemmanagement..........124
Settingmanagementfeatures.......125
Chapter9.Preventingproblems..127
Generaltipsforpreventingproblems......127
Makingsuredevicedriversarecurrent.....128
Takingcareofyourcomputer.........129
Cleaningthecoverofyourcomputer....130
Chapter10.Troubleshooting
computerproblems.........133
Diagnosingproblems............133
Troubleshooting..............133
Computerstopsresponding.......133
Spillsonthekeyboard..........134
Errormessages............134
Errorswithoutmessages.........136
Beeperrors..............137
Memorymoduleproblems........137
Networkingproblems..........137
Problemswiththekeyboardandotherpointing
devices................139
Problemswiththedisplayandmultimedia
devices................140
Fingerprintreaderproblems........143
Batteryandpowerproblems.......144
Problemswithdrivesandotherstorage
devices................147
Asoftwareproblem...........147
Problemswithportsandconnectors....148
AUSBproblem............148
Adockingstationorportreplicator
problem...............148
Chapter11.Gettingsupport....149
BeforeyoucontactLenovo..........149
Gettinghelpandservice...........149
Usingdiagnosticprograms........150
LenovosupportWebsite.........150
CallingLenovo.............150
Purchasingadditionalservices........151
AppendixA.Regulatory
Information.............153
Wirelessrelatedinformation.........153
LocationoftheUltraConnect™wireless
antennas...............154
Locatingwirelessregulatorynotices....155
Exportclassicationnotice..........155
Electronicemissionnotices..........155
iiUserGuide
Page 5

FederalCommunicationsCommission
DeclarationofConformity........155
IndustryCanadaClassBemissioncompliance
statement...............156
EuropeanUnion-Compliancetothe
ElectromagneticCompatibilityDirective...156
GermanClassBcompliancestatement...156
KoreaClassBcompliancestatement....157
JapanVCCIClassBcompliancestatement..157
Japancompliancestatementforproducts
whichconnecttothepowermainswith
ratedcurrentlessthanorequalto20Aper
phase................157
Lenovoproductserviceinformationfor
Taiwan................157
AppendixB.WEEEandrecycling
statements.............159
ImportantWEEEinformation.........159
BatteryrecyclinginformationforJapan.....159
BatteryrecyclinginformationforBrazil.....160
BatteryrecyclinginformationforTaiwan.....160
BatteryrecyclinginformationfortheEuropean
Union..................161
BatteryrecyclinginformationfortheUnitedStates
andCanada................161
AppendixC.ENERGYSTARmodel
information.............163
AppendixD.RestrictionofHazardous
SubstancesDirective(RoHS)....165
ChinaRoHS................165
TurkishRoHS...............165
UkraineRoHS...............165
IndiaRoHS................166
AppendixE.Notices.........167
Trademarks................168
©CopyrightLenovo2012
iii
Page 6

ivUserGuide
Page 7
Readthisrst
Besuretofollowtheimportanttipsgivenheretogetthemostuseandenjoymentoutofyourcomputer.
Failuretodosomightleadtodiscomfortorinjury,orcauseyourcomputertofail.
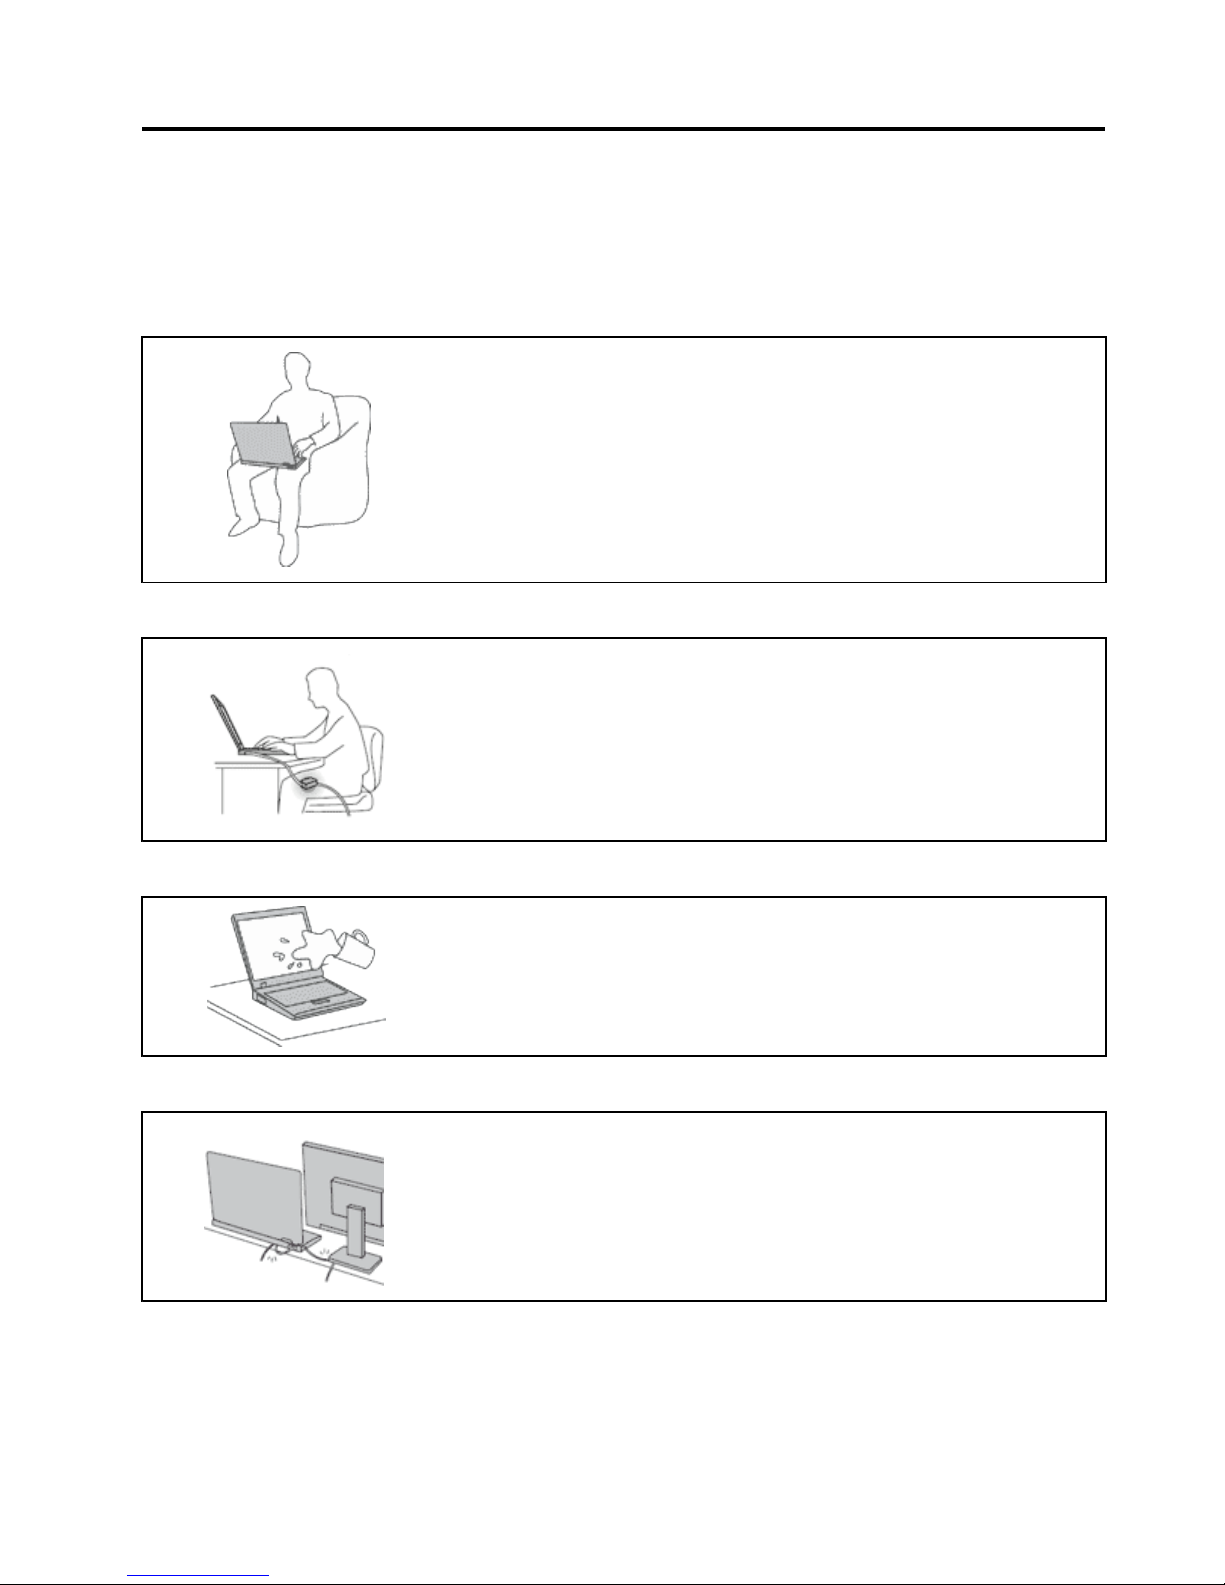
Protectyourselffromtheheatthatyourcomputergenerates.
Whenyourcomputeristurnedonorthebatteryischarging,thebase,thepalm
rest,andsomeotherpartsmaybecomehot.Thetemperaturetheyreach
dependsontheamountofsystemactivityandthelevelofchargeinthebattery.
Extendedcontactwithyourbody,eventhroughclothing,couldcause
discomfortorevenaskinburn.
•Avoidkeepingyourhands,yourlap,oranyotherpartofyourbodyin
contactwithahotsectionofthecomputerforanyextendedtime.
•Periodicallytakehandsfromusingthekeyboardbyliftingyourhandsfrom
thepalmrest.
Protectyourselffromtheheatgeneratedbytheacpoweradapter .
Whentheacpoweradapterisconnectedtoanelectricaloutletandyour
computer,itgeneratesheat.
Extendedcontactwithyourbody,eventhroughclothing,maycauseaskin
burn.
•Donotplacetheacpoweradapterincontactwithanypartofyourbody
whileitisinuse.
•Neveruseittowarmyourbody.
Preventyourcomputerfromgettingwet.
Toavoidspillsandthedangerofelectricalshock,keepliquidsawayfromyour
computer.
Protectthecablesfrombeingdamaged.
Applyingstrongforcetocablesmaydamageorbreakthem.
Routecommunicationlines,orthecablesofanacpoweradapter,amouse,a
keyboard,aprinter,oranyotherelectronicdevice,sothattheycannotbewalked
on,trippedover,pinchedbyyourcomputerorotherobjects,orinanyway
subjectedtotreatmentthatcouldinterferewiththeoperationofyourcomputer.
©CopyrightLenovo2012
v
Page 8
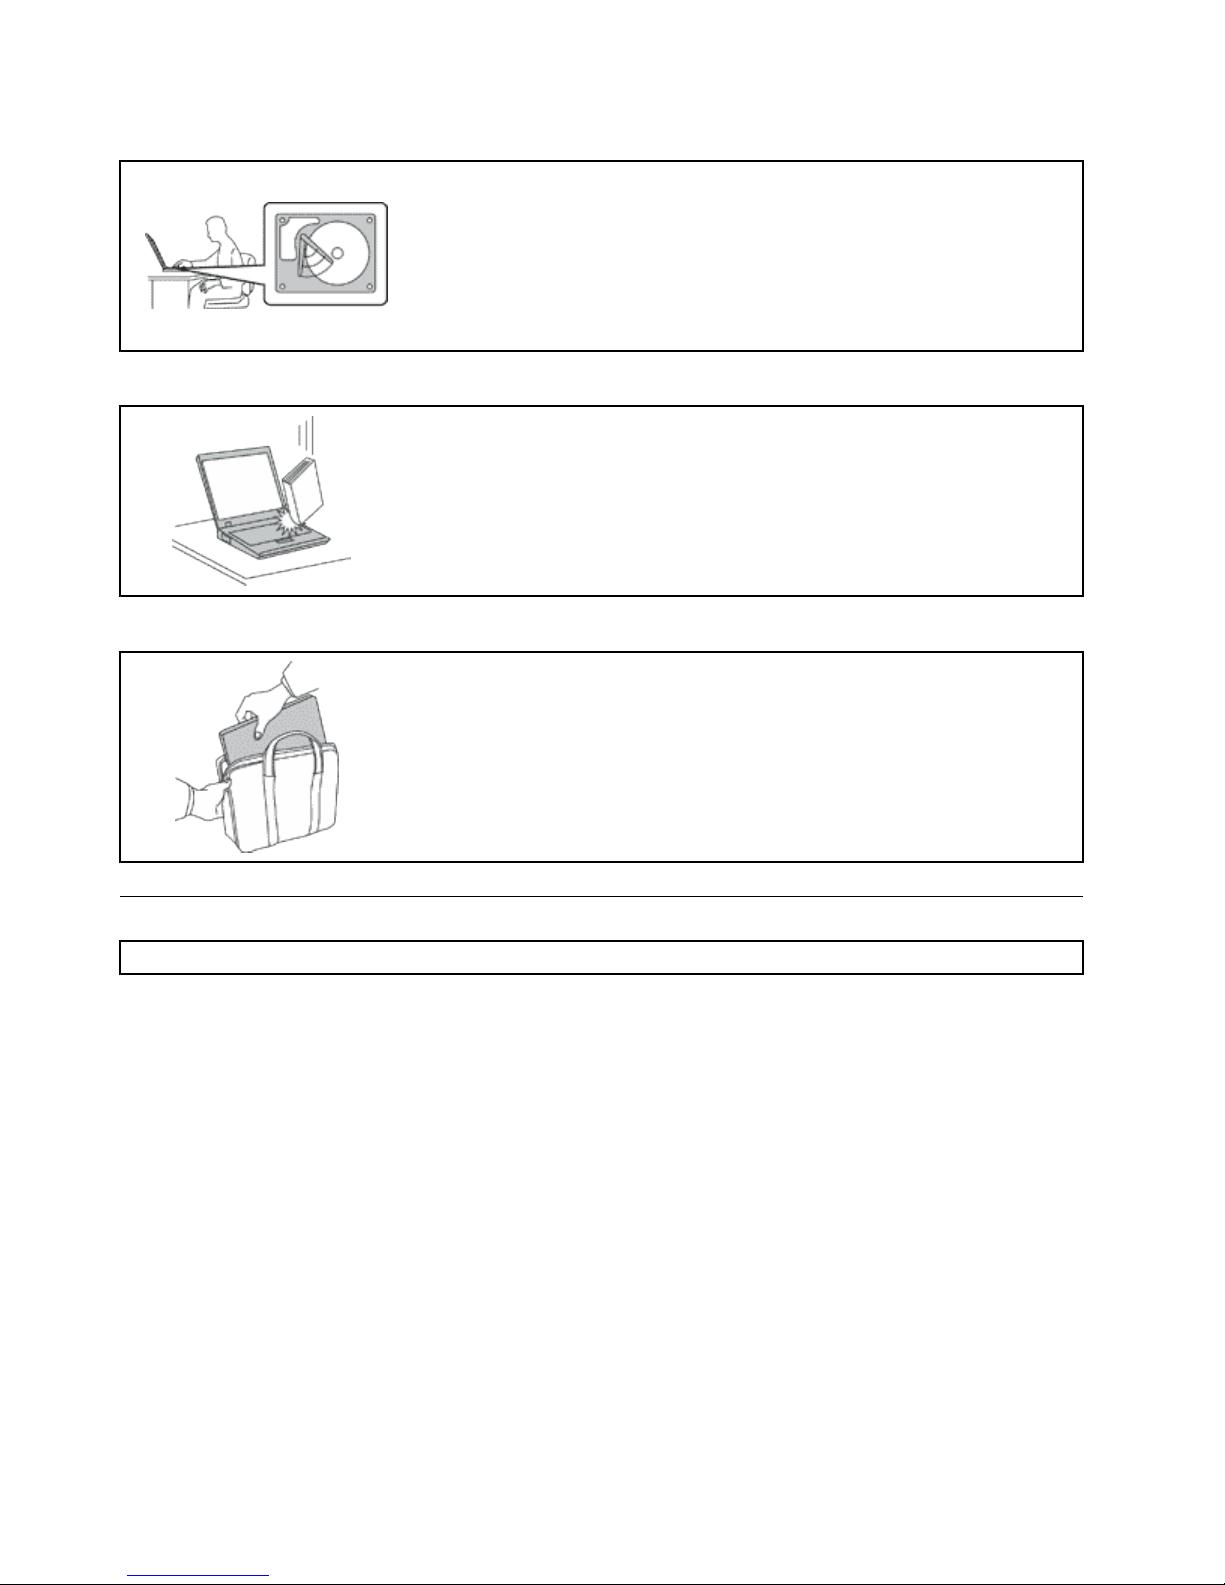
Protectyourcomputeranddatawhenmovingit.
Beforemovingacomputerequippedwithaharddiskdrive,dooneofthe
following,andmakesurethatthepowerbuttonisofforisblinking:
•Turnitoff.
•Putitinsleepmode.
•Putitinhibernationmode.
Thiswillhelptopreventdamagetothecomputer,andpossiblelossofdata.
Handleyourcomputergently.
Donotdrop,bump,scratch,twist,hit,vibrate,push,orplaceheavyobjectson
yourcomputer,display,orexternaldevices.
Carryyourcomputercarefully.
•Useaqualitycarryingcasethatprovidesadequatecushioningandprotection.
•Donotpackyourcomputerinatightlypackedsuitcaseorbag.
•Beforeputtingyourcomputerinacarryingcase,makesurethatitisoff,insleep
mode,orinhibernationmode.Donotputacomputerinacarryingcasewhileit
isturnedon.
Importantsafetyinformation
Note:Readtheimportantsafetyinformationrst.
Thisinformationcanhelpyousafelyuseyournotebookcomputer.Followandretainallinformationincluded
withyourcomputer.Theinformationinthisdocumentdoesnotalterthetermsofyourpurchaseagreement
ortheLenovo
®
LimitedWarranty.Formoreinformation,see“WarrantyInformation”intheSafety,Warranty,
andSetupGuidethatcomeswithyourcomputer.
Customersafetyisimportant.Ourproductsaredevelopedtobesafeandeffective.However,personal
computersareelectronicdevices.Powercords,poweradapters,andotherfeaturescancreatepotential
safetyrisksthatcanresultinphysicalinjuryorpropertydamage,especiallyifmisused.T oreducethese
risks,followtheinstructionsincludedwithyourproduct,observeallwarningsontheproductandinthe
operatinginstructions,andreviewtheinformationincludedinthisdocumentcarefully.Bycarefullyfollowing
theinformationcontainedinthisdocumentandprovidedwithyourproduct,youcanhelpprotectyourself
fromhazardsandcreateasafercomputerworkenvironment.
Note:Thisinformationincludesreferencestopoweradaptersandbatteries.Inadditiontonotebook
computers,someproducts(suchasspeakersandmonitors)shipwithexternalpoweradapters.Ifyouhave
suchaproduct,thisinformationappliestoyourproduct.Inaddition,computerproductscontainacoin-sized
internalbatterythatprovidespowertothesystemclockevenwhenthecomputerisunplugged,sothe
batterysafetyinformationappliestoallcomputerproducts.
viUserGuide
Page 9

Conditionsthatrequireimmediateaction
Productscanbecomedamagedduetomisuseorneglect.Someproductdamageisseriousenough
thattheproductshouldnotbeusedagainuntilithasbeeninspectedand,ifnecessary,repairedby
anauthorizedservicer.
Aswithanyelectronicdevice,paycloseattentiontotheproductwhenitisturnedon.Onveryrare
occasions,youmightnoticeanodororseeapuffofsmokeorsparksventfromyourproduct.Oryou
mighthearsoundslikepopping,crackingorhissing.Theseconditionsmightmerelymeanthatan
internalelectroniccomponenthasfailedinasafeandcontrolledmanner.Or,theymightindicate
apotentialsafetyissue.However,donottakerisksorattempttodiagnosethesituationyourself.
ContacttheCustomerSupportCenterforfurtherguidance.ForalistofServiceandSupportphone
numbers,seethefollowingWebsite:
http://www.lenovo.com/support/phone
Frequentlyinspectyourcomputeranditscomponentsfordamageorwearorsignsofdanger.Ifyou
haveanyquestionabouttheconditionofacomponent,donotusetheproduct.ContacttheCustomer
SupportCenterortheproductmanufacturerforinstructionsonhowtoinspecttheproductand
haveitrepaired,ifnecessary.
Intheunlikelyeventthatyounoticeanyofthefollowingconditions,orifyouhaveanysafetyconcerns
withyourproduct,stopusingtheproductandunplugitfromthepowersourceandtelecommunication
linesuntilyoucanspeaktotheCustomerSupportCenterforfurtherguidance.
•Powercords,plugs,poweradapters,extensioncords,surgeprotectors,orpowersuppliesthatare
cracked,broken,ordamaged.
•Signsofoverheating,smoke,sparks,orre.
•Damagetoabattery(suchascracks,dents,orcreases),dischargefromabattery,orabuildupofforeign
substancesonthebattery.
•Acracking,hissingorpoppingsound,orstrongodorthatcomesfromtheproduct.
•Signsthatliquidhasbeenspilledoranobjecthasfallenontothecomputerproduct,thepowercordor
poweradapter.
•Thecomputerproduct,powercord,orpoweradapterhasbeenexposedtowater.
•Theproducthasbeendroppedordamagedinanyway.
•Theproductdoesnotoperatenormallywhenyoufollowtheoperatinginstructions.
Note:Ifyounoticetheseconditionswithaproduct(suchasanextensioncord)thatisnotmanufacturedfor
orbyLenovo,stopusingthatproductuntilyoucancontacttheproductmanufacturerforfurtherinstructions,
oruntilyougetasuitablereplacement.
Safetyguidelines
Alwaysobservethefollowingprecautionstoreducetheriskofinjuryandpropertydamage.
Serviceandupgrades
DonotattempttoserviceaproductyourselfunlessinstructedtodosobytheCustomerSupportCenteror
yourdocumentation.OnlyuseaServiceProviderwhoisapprovedtorepairyourparticularproduct.
Note:Somecomputerpartscanbeupgradedorreplacedbythecustomer.Upgradestypicallyare
referredtoasoptions.ReplacementpartsapprovedforcustomerinstallationarereferredtoasCustomer
ReplaceableUnits,orCRUs.Lenovoprovidesdocumentationwithinstructionswhenitisappropriatefor
customerstoinstalloptionsorreplaceCRUs.Y oumustcloselyfollowallinstructionswheninstallingor
replacingparts.TheOffstateofapowerindicatordoesnotnecessarilymeanthatvoltagelevelsinsidea
©CopyrightLenovo2012
vii
Page 10
productarezero.Beforeyouremovethecoversfromaproductequippedwithapowercord,alwaysmake
surethatthepoweristurnedoffandthattheproductisunpluggedfromanypowersource.Ifyouhave
anyquestionsorconcerns,contacttheCustomerSupportCenter.
Althoughtherearenomovingpartsinyourcomputerafterthepowercordhasbeendisconnected,the
followingwarningsarerequiredforyoursafety.
CAUTION:
Hazardousmovingparts.Keepngersandotherbodypartsaway.
CAUTION:
BeforereplacinganyCRUs,turnoffthecomputerandwaitthreetoveminutestoletthecomputer
coolbeforeopeningthecover.
Powercordsandpoweradapters
DANGER
Useonlythepowercordsandpoweradapterssuppliedbytheproductmanufacturer.
Thepowercordsshallbesafetyapproved.ForGermany,itshallbeH05VV-F ,3G,0.75mm
2
,or
better.Forothercountries,thesuitabletypesshallbeusedaccordingly.
Neverwrapapowercordaroundapoweradapterorotherobject.Doingsocanstressthecordin
waysthatcancausethecordtofray,crack,orcrimp.Thiscanpresentasafetyhazard.
Alwaysroutepowercordssothattheywillnotbewalkedon,trippedover,orpinchedbyobjects.
Protectpowercordsandpoweradaptersfromliquids.Forinstance,donotleaveyourpowercord
orpoweradapternearsinks,tubs,toilets,oronoorsthatarecleanedwithliquidcleansers.
Liquidscancauseashortcircuit,particularlyifthepowercordorpoweradapterhasbeenstressed
bymisuse.Liquidsalsocancausegradualcorrosionofpowercordterminalsand/ortheconnector
terminalsonapoweradapter,whichcaneventuallyresultinoverheating.
Alwaysconnectpowercordsandsignalcablesinthecorrectorderandensurethatallpowercord
connectorsaresecurelyandcompletelypluggedintoreceptacles.
Donotuseanypoweradapterthatshowscorrosionattheacinputpinsorshowssignsof
overheating(suchasdeformedplastic)attheacinputpinsoranywhereonthepoweradapter.
Donotuseanypowercordswheretheelectricalcontactsoneitherendshowsignsofcorrosionor
overheatingorwherethepowercordappearstohavebeendamagedinanyway.
viiiUserGuide
Page 11

Topreventpossibleoverheating,donotcoverthepoweradapterwithclothingorotherobjects
whenthepoweradapterispluggedintoanelectricaloutlet.
Extensioncordsandrelateddevices
Ensurethatextensioncords,surgeprotectors,uninterruptiblepowersupplies,andpowerstripsthatyouuse
areratedtohandletheelectricalrequirementsoftheproduct.Neveroverloadthesedevices.Ifpowerstrips
areused,theloadshouldnotexceedthepowerstripinputrating.Consultanelectricianformoreinformation
ifyouhavequestionsaboutpowerloads,powerrequirements,andinputratings.
Plugsandoutlets
DANGER
Ifareceptacle(poweroutlet)thatyouintendtousewithyourcomputerequipmentappearstobe
damagedorcorroded,donotusetheoutletuntilitisreplacedbyaqualiedelectrician.
Donotbendormodifytheplug.Iftheplugisdamaged,contactthemanufacturertoobtain
areplacement.
Donotshareanelectricaloutletwithotherhomeorcommercialappliancesthatdrawlargeamounts
ofelectricity;otherwise,unstablevoltagemightdamageyourcomputer,data,orattacheddevices.
Someproductsareequippedwithathree-prongedplug.Thisplugtsonlyintoagrounded
electricaloutlet.Thisisasafetyfeature.Donotdefeatthissafetyfeaturebytryingtoinsertitinto
anon-groundedoutlet.Ifyoucannotinserttheplugintotheoutlet,contactanelectricianforan
approvedoutletadapterortoreplacetheoutletwithonethatenablesthissafetyfeature.Never
overloadanelectricaloutlet.Theoverallsystemloadshouldnotexceed80percentofthebranch
circuitrating.Consultanelectricianformoreinformationifyouhavequestionsaboutpowerloads
andbranchcircuitratings.
Besurethatthepoweroutletyouareusingisproperlywired,easilyaccessible,andlocatedclose
totheequipment.Donotfullyextendpowercordsinawaythatwillstressthecords.
Besurethatthepoweroutletprovidesthecorrectvoltageandcurrentfortheproductyouare
installing.
Carefullyconnectanddisconnecttheequipmentfromtheelectricaloutlet.
Powersupplystatement
DANGER
Neverremovethecoveronapowersupplyoranypartthathasthefollowinglabelattached.
©CopyrightLenovo2012
ix
Page 12

Hazardousvoltage,current,andenergylevelsarepresentinsideanycomponentthathasthislabel
attached.Therearenoserviceablepartsinsidethesecomponents.Ifyoususpectaproblemwith
oneoftheseparts,contactaservicetechnician.
Externaldevices
CAUTION:
DonotconnectordisconnectanyexternaldevicecablesotherthanUSBcableswhilethecomputer
powerison;otherwise,youmightdamageyourcomputer .Toavoidpossibledamagetoattached
devices,waitatleastvesecondsafterthecomputerisshutdowntodisconnectexternaldevices.
Generalbatterynotice
DANGER
PersonalcomputersmanufacturedbyLenovocontainacoincellbatterytoprovidepowerto
thesystemclock.Inaddition,manymobileproducts,suchasnotebookcomputers,utilizea
rechargeablebatterypacktoprovidesystempowerwheninportablemode.Batteriessuppliedby
Lenovoforusewithyourproducthavebeentestedforcompatibilityandshouldonlybereplaced
withapprovedparts.
Neverattempttoopenorserviceanybattery.Donotcrush,puncture,orincineratebatteriesor
shortcircuitthemetalcontacts.Donotexposethebatterytowaterorotherliquids.Onlyrecharge
thebatterypackstrictlyaccordingtoinstructionsincludedintheproductdocumentation.
Batteryabuseormishandlingcancausethebatterytooverheat,whichcancausegassesorame
to“vent”fromthebatterypackorcoincell.Ifyourbatteryisdamaged,orifyounoticeany
dischargefromyourbatteryorthebuildupofforeignmaterialsonthebatteryleads,stopusingthe
batteryandobtainareplacementfromthebatterymanufacturer.
Batteriescandegradewhentheyareleftunusedforlongperiodsoftime.Forsomerechargeable
batteries(particularlyLithiumIonbatteries),leavingabatteryunusedinadischargedstatecould
increasetheriskofabatteryshortcircuit,whichcouldshortenthelifeofthebatteryandalsocan
poseasafetyhazard.DonotletrechargeableLithium-Ionbatteriescompletelydischargeorstore
thesebatteriesinadischargedstate.
Rechargeablebatterynotice
DANGER
Donotattempttodisassembleormodifythebatterypack.Attemptingtodosocancausean
explosion,orliquidleakagefromthebatterypack.Abatterypackotherthantheonespeciedby
Lenovo,oradisassembledormodiedbatterypackisnotcoveredbythewarranty.
Iftherechargeablebatterypackisincorrectlyreplaced,thereisdangerofanexplosion.Thebattery
packcontainsasmallamountofharmfulsubstances.T oavoidpossibleinjury:
•ReplaceonlywithabatteryofthetyperecommendedbyLenovo.
•Keepthebatterypackawayfromre.
•Donotexposeittowaterorrain.
•Donotattempttodisassembleit.
•Donotshort-circuitit.
xUserGuide
Page 13

•Keepitawayfromchildren.
•Donotdropthebatterypack.
Donotputthebatterypackintrashthatisdisposedofinlandlls.Whendisposingofthebattery,
complywithlocalordinancesorregulations.
Thebatterypackshouldbestoredatroomtemperature,chargedtoapproximately30to50%
ofcapacity.Werecommendthatbatterypackbechargedaboutonceperyeartoprevent
overdischarge.
Lithiumcoincellbatterynotice
DANGER
Dangerofexplosionifbatteryisincorrectlyreplaced.
Whenreplacingthelithiumcoincellbattery,useonlythesameoranequivalenttypethatis
recommendedbythemanufacturer.Thebatterycontainslithiumandcanexplodeifnotproperly
used,handled,ordisposedof.
Donot:
•Throworimmerseintowater
•Heattomorethan100°C(212°F)
•Repairordisassemble
Disposeofthebatteryasrequiredbylocalordinancesorregulations.
ThefollowingstatementappliestousersinthestateofCalifornia,U.S.A.
CaliforniaPerchlorateInformation:
ProductscontainingCR(manganesedioxide)lithiumcoincellbatteriesmaycontainperchlorate.
PerchlorateMaterial-specialhandlingmayapply,See
www.dtsc.ca.gov/hazardouswaste/perchlorate
Heatandproductventilation
DANGER
Computers,acpoweradapters,andmanyaccessoriescangenerateheatwhenturnedonandwhen
batteriesarecharging.Notebookcomputerscangenerateasignicantamountofheatduetotheir
compactsize.Alwaysfollowthesebasicprecautions:
•Whenyourcomputeristurnedonorthebatteryischarging,thebase,thepalmrest,andsome
otherpartsmaybecomehot.Avoidkeepingyourhands,yourlap,oranyotherpartofyour
bodyincontactwithahotsectionofthecomputerforanyextendedlengthoftime.Whenyou
usethekeyboard,avoidkeepingyourpalmsonthepalmrestforaprolongedperiodoftime.
Yourcomputergeneratessomeheatduringnormaloperation.Theamountofheatdependson
theamountofsystemactivityandthebatterychargelevel.Extendedcontactwithyourbody,
eventhroughclothing,couldcausediscomfortorevenaskinburn.Periodicallytakebreaks
©CopyrightLenovo2012
xi
Page 14

fromusingthekeyboardbyliftingyourhandsfromthepalmrest;andbecarefulnottouse
thekeyboardforanyextendedlengthoftime.
•Donotoperateyourcomputerorchargethebatterynearammablematerialsorinexplosive
environments.
•Ventilationslots,fansand/orheatsinksareprovidedwiththeproductforsafety,comfort,and
reliableoperation.Thesefeaturesmightinadvertentlybecomeblockedbyplacingtheproducton
abed,sofa,carpet,orotherexiblesurface.Neverblock,cover,ordisablethesefeatures.
•Whentheacpoweradapterisconnectedtoanelectricaloutletandyourcomputer,itgenerates
heat.Donotplacetheadapterincontactwithanypartofyourbodywhileusingit.Neverusethe
acpoweradaptertowarmyourbody.Extendedcontactwithyourbody,eventhroughclothing,
maycauseaskinburn.
Foryoursafety,alwaysfollowthesebasicprecautionswithyourcomputer:
•Keepthecoverclosedwheneverthecomputerispluggedin.
•Regularlyinspecttheoutsideofthecomputerfordustaccumulation.
•Removedustfromventsandanyperforationsinthebezel.Morefrequentcleaningsmightbe
requiredforcomputersindustyorhigh-trafcareas.
•Donotrestrictorblockanyventilationopenings.
•Donotoperateyourcomputerinsidefurniture,asthismightincreasetheriskofoverheating.
•Airowtemperaturesintothecomputershouldnotexceed35°C(95°F).
Electricalcurrentsafetyinformation
DANGER
Electriccurrentfrompower,telephone,andcommunicationcablesishazardous.
Toavoidashockhazard:
•Donotuseyourcomputerduringalightningstorm.
•Donotconnectordisconnectanycablesorperforminstallation,maintenance,orreconguration
ofthisproductduringanelectricalstorm.
•Connectallpowercordstoaproperlywiredandgroundedelectricaloutlet.
•Connecttoproperlywiredoutletsanyequipmentthatwillbeattachedtothisproduct.
•Wheneverpossible,useonehandonlytoconnectordisconnectsignalcables.
•Neverturnonanyequipmentwhenthereisevidenceofre,water,orstructuraldamage.
•Disconnecttheattachedpowercords,batterypack,andallthecablesbeforeyouopenthe
devicecovers,unlessinstructedotherwiseintheinstallationandcongurationprocedures.
•Donotuseyoucomputeruntilallinternalpartsenclosuresarefastenedintoplace.Neveruse
thecomputerwheninternalpartsandcircuitsareexposed.
xiiUserGuide
Page 15

DANGER
Connectanddisconnectcablesasdescribedinthefollowingprocedureswheninstalling,moving,
oropeningcoversonthisproductorattacheddevices.
Toconnect:
1.TurneverythingOFF .
2.First,attachallcablestodevices.
3.Attachsignalcablestoconnectors.
4.Attachpowercordstooutlets.
5.TurndevicesON.
Todisconnect:
1.TurneverythingOFF .
2.First,removepowercordsfromoutlets.
3.Removesignalcablesfromconnectors.
4.Removeallcablesfromdevices.
Thepowercordmustbedisconnectedfromthewalloutletorreceptaclebeforeinstallingallother
electricalcablesconnectedtothecomputer.
Thepowercordmaybereconnectedtothewalloutletorreceptacleonlyafterallotherelectrical
cableshavebeenconnectedtothecomputer.
Liquidcrystaldisplay(LCD)notice
CAUTION:
Theliquidcrystaldisplay(LCD)ismadeofglass,androughhandlingordroppingthecomputercan
causetheLCDtobreak.IftheLCDbreaksandtheinternaluidgetsintoyoureyesoronyour
hands,immediatelywashtheaffectedareaswithwaterforatleast15minutes;ifanysymptomsare
presentafterwashing,getmedicalcare.
Note:Forproductswithmercury-containinguorescentlamps(forexample,non-LED),theuorescentlamp
intheliquidcrystaldisplay(LCD)containsmercury;disposeofaccordingtolocal,state,orfederallaws.
Usingheadphonesorearphones
Ifyourcomputerhasbothaheadphoneconnectorandanaudio-outconnector,alwaysusetheheadphone
connectorforheadphones(alsocalledaheadset)orearphones.
CAUTION:
Excessivesoundpressurefromearphonesandheadphonescancausehearingloss.Adjustmentof
theequalizertomaximumincreasestheearphoneandheadphoneoutputvoltageandthesound
pressurelevel.Therefore,toprotectyourhearing,adjusttheequalizertoanappropriatelevel.
Excessiveuseofheadphonesorearphonesforalongperiodoftimeathighvolumecanbedangerousifthe
outputoftheheadphoneorearphoneconnectorsdonotcomplywithspecicationsofEN50332-2.The
headphoneoutputconnectorofyourcomputercomplieswithEN50332-2Subclause7.Thisspecication
limitsthecomputer’smaximumwidebandtrueRMSoutputvoltageto150mV.Tohelpprotectagainst
hearingloss,ensurethattheheadphonesorearphonesyouusealsocomplywithEN50332-2(Clause7
limits)forawidebandcharacteristicvoltageof75mV.UsingheadphonesthatdonotcomplywithEN
50332-2canbedangerousduetoexcessivesoundpressurelevels.
IfyourLenovocomputercamewithheadphonesorearphonesinthepackage,asaset,thecombinationof
theheadphonesorearphonesandthecomputeralreadycomplieswiththespecicationsofEN50332-1.
Ifdifferentheadphonesorearphonesareused,ensurethattheycomplywithEN50332-1(Clause6.5
LimitationValues).UsingheadphonesthatdonotcomplywithEN50332-1canbedangerousdueto
excessivesoundpressurelevels.
©CopyrightLenovo2012
xiii
Page 16

Additionalsafetyinformation
DANGER
Plasticbagscanbedangerous.Keepplasticbagsawayfrombabiesandchildrentoavoiddanger
ofsuffocation.
NoticeforusersintheU.S.A.
Manypersonalcomputerproductsandaccessoriescontaincords,cablesorwires,suchaspowercordsor
cordstoconnecttheaccessorytoapersonalcomputer.Ifthisproducthassuchacord,cableorwire,then
thefollowingwarningapplies:
WARNING:Handlingthecordonthisproductorcordsassociatedwithaccessoriessoldwiththisproduct
willexposeyoutolead,achemicalknowntotheStateofCaliforniatocausecancer,andbirthdefectsor
otherreproductiveharm.Washhandsafterhandling.
Savetheseinstructions.
xivUserGuide
Page 17
Chapter1.Productoverview
Thischapterprovidesinformationaboutthelocationsofconnectors,locationsofimportantproductlabels,
computerfeatures,specications,operatingenvironment,andpreinstalledprograms.
•“Locatingcomputercontrols,connectors,andindicators”onpage1
•“Locatingimportantproductinformation”onpage10
•“Features”onpage12
•“Specications”onpage13
•“Operatingenvironment”onpage14
•“Lenovoprograms”onpage14
Locatingcomputercontrols,connectors,andindicators
Thissectionintroducesthecomputerhardwarefeaturestogiveyouthebasicinformationyouwillneed
tostartusingthecomputer.
Frontview
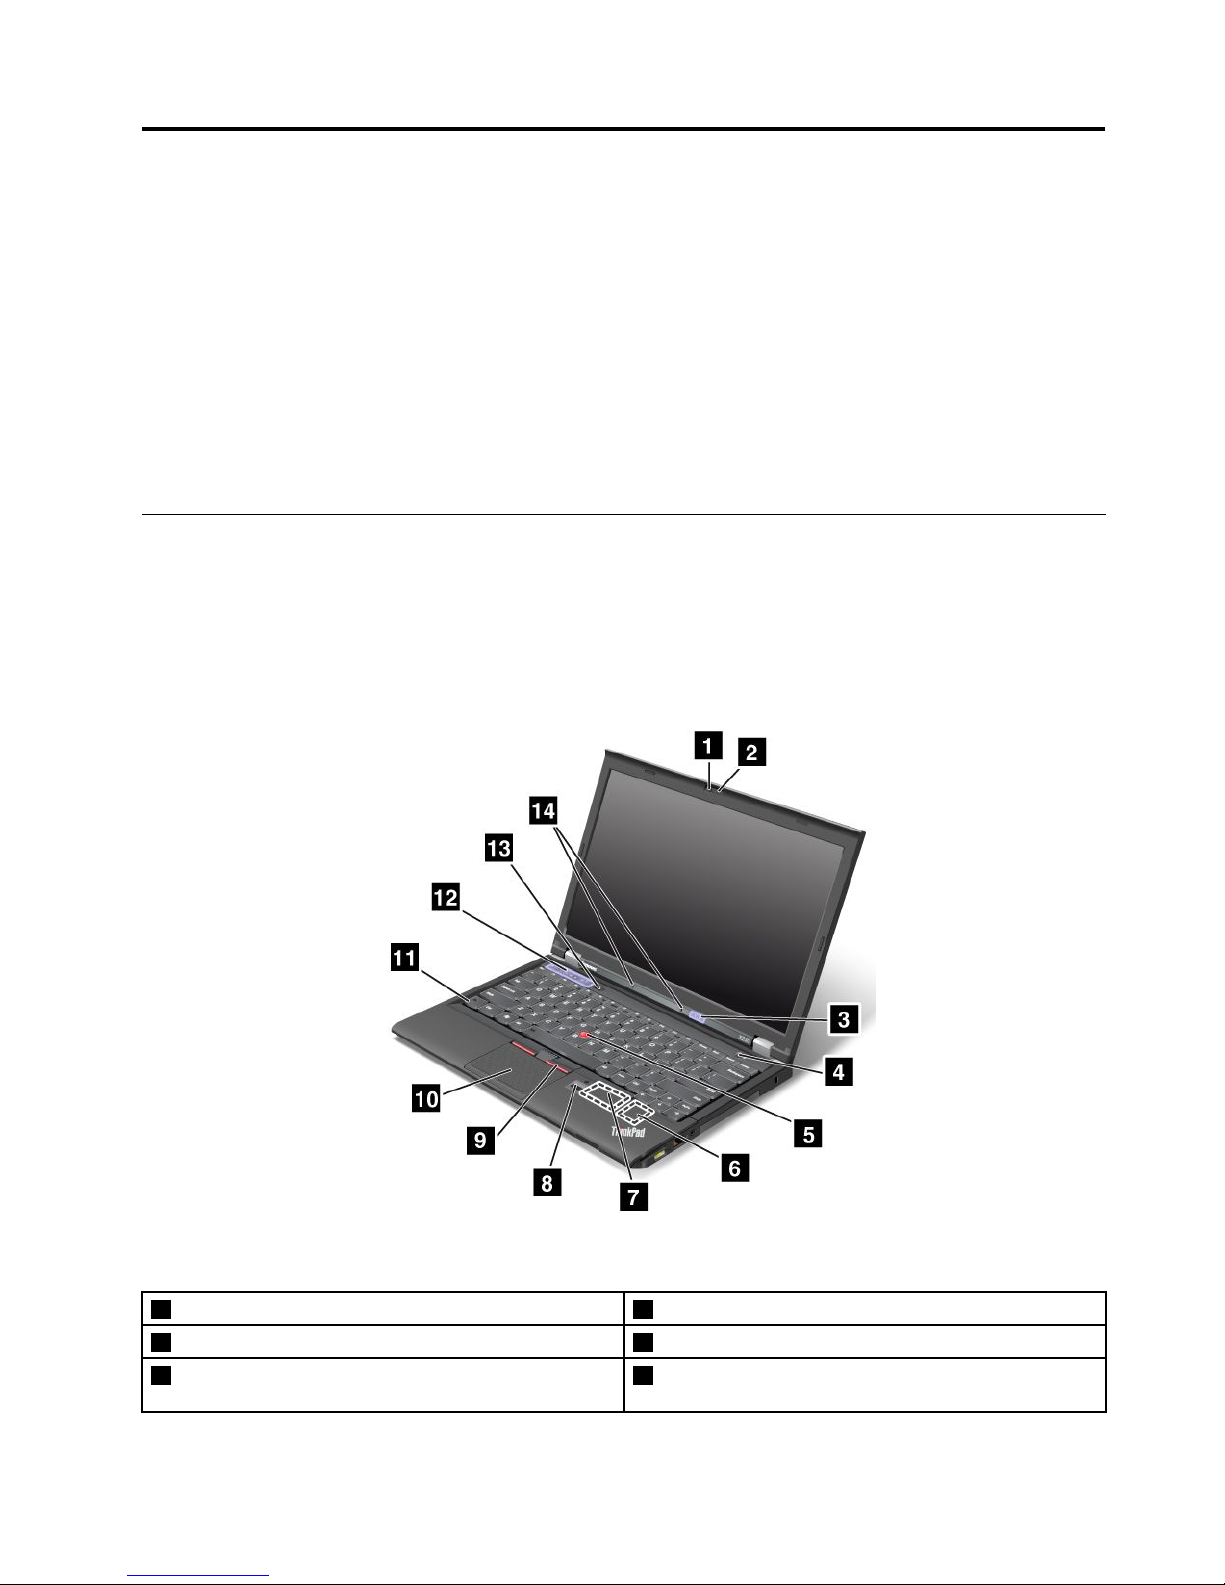
Figure1.ThinkPadX230andX230ifrontview
1Integratedcamera2ThinkLight
®
light
3Statusindicators
4Powerbutton
5TrackPoint
®
pointingstick
6PCIExpressMiniCardslotforwirelessLAN/WiMAX
card
©CopyrightLenovo2012
1
Page 18

7PCIExpressMiniCardslotforwirelessWANcardor
mSATAsolid-statedrive
8Fingerprintreader
9TrackPointbuttons10Touchpad
11Fnkey12Volumecontrolbuttons
13Blackbutton14Built-inmicrophones
1Integratedcamera
Somemodelshaveanintegratedcamera.Usethecameratotakepicturesorholdavideoconference.For
moreinformation,see“Usingtheintegratedcamera”onpage42.
2ThinkLightlight
TheThinkLightlightenablesyoutouseyourcomputerwhenthelightingconditionisnotideal.Toturnonthe
ThinkLightlight,presstheFnkeyandthespacekeytogether.Toturnitoff,pressthecombinationagain.
CAUTION:
Avoidusingyourcomputerindarkconditionsforprolongedperiods.Itisbadforyoureyes.
3Statusindicators
Yourcomputerhasseveralstatusindicators.Forthedetailedinformationaboutthelocationandmeaningof
eachindicator,see“Statusindicators”onpage8.
4Powerbutton
Usethepowerbuttontoturnonthecomputer.
Toturnoffthecomputer,usetheStartmenushutdownoptionontheWindows
®
7operatingsystem.For
theWindows8operatingsystem,movethecursortothetop-rightorbottom-rightcornerofthescreento
displaythecharms.ThenclickSettings➙Power➙Shutdown.
Ifyourcomputerstopsrespondingandyoucannotturnitoff,pressandholdthepowerbuttonforfour
secondsormore.Ifthecomputerstillisnotresponding,removetheacpoweradapterandthebattery
toresetthecomputer.
Youalsocanprogramthepowerbuttonsothatbypressingthepowerbuttonyoucanshutdownthe
computerorputitintosleeporhibernationmode.Toachievethis,youneedtochangeyourpowerplan
settings.Toaccesspowerplansettings,dothefollowing:
•ForWindows7:StartthePowerManagerprogramandthenclickthePowerPlantab.Forinstructionson
howtostartthePowerManagerprogram,see“AccessingLenovoprogramsontheWindows7operating
system”onpage14
.
•ForWindows8:ClickthebatterystatusiconfromtheWindowsnoticationareaandclickMorepower
options.ThenclickChoosewhatthepowerbuttonsdo.
UltraNav
®
pointingdevice
5T rackPointpointingstick
9T rackPointbuttons
10T ouchpad
ThekeyboardcontainstheLenovouniqueUltraNavpointingdevice.Pointing,selecting,anddraggingare
allpartofasingleprocessthatyoucanperformwithoutmovingyourngersfromatypingposition.For
moreinformation,see“UsingtheUltraNavpointingdevice”onpage26
.
2UserGuide
Page 19

6PCIExpressMiniCardslotforwirelessLAN/WiMAX
Yourcomputermightincludeawirelesslocalareanetwork(LAN)cardorawirelesscombocardforLAN
andWorldwideInteroperabilityforMicrowaveAccess(WiMAX)inthePCIExpressMiniCardslotforyouto
establishwirelessLAN/WiMAXconnections.
7PCIExpressMiniCardslotforwirelessWANcardormSA T Asolid-statedrive
Yourcomputermighthaveawirelesswideareanetwork(WAN)cardinstalledinthePCIExpressMini
CardslotforwirelessWANconnections.
SomemodelsareequippedwithanmSATAsolid-statedrivefordatastorage.
8Fingerprintreader
Somemodelshaveangerprintreader.Thengerprintauthenticationtechnologyenablesyoutouseyour
ngerprinttostartthecomputer,entertheThinkPadSetupprogram,orentertheWindowsoperatingsystem.
Fordetails,see“Usingthengerprintreader”onpage56
.
11Fnkey
UsetheFnkeytotakeadvantageofThinkPad
®
functionkeys,suchasturningontheThinkLightlight,
lockingthecomputer,managingthewirelessconnections,andsoon.Formoreinformation,see“Function
keycombinations”onpage23
.
12Volumecontrolbuttons
Thevolumecontrolbuttonsenableyoutoquicklyadjustthesoundvolume,mutethespeakers,ormutethe
microphonesofyourcomputer.Formoreinformation,see“Volumeandmutebuttons”onpage25
.
13Blackbutton
Whentheoperatingsystemisworkingnormally,pressingtheblackbuttonlaunchestheSimpleTapprogram
ontheWindows7operatingsystemortheLenovoPCDeviceExperienceprogramontheWindows8
operatingsystem.
OntheWindows7operatingsystem,youalsocanusetheblackbuttontointerruptthestartupsequence
ofyourcomputertostarttheRescueandRecovery®workspace.ToaccesstheRescueandRecovery
workspace,turnonyourcomputerandpresstheblackbuttonwhentheThinkPadlogoisdisplayedon
thescreen.FormoreinformationabouttheRescueandRecoveryWorkspace,see“UsingtheRescue
andRecoveryworkspace”onpage63
.
14Built-inmicrophones
Thebuilt-inmicrophonescapturesoundandvoicewhenusedwithaprogramcapableofhandlingaudio.
Chapter1.Productoverview3
Page 20
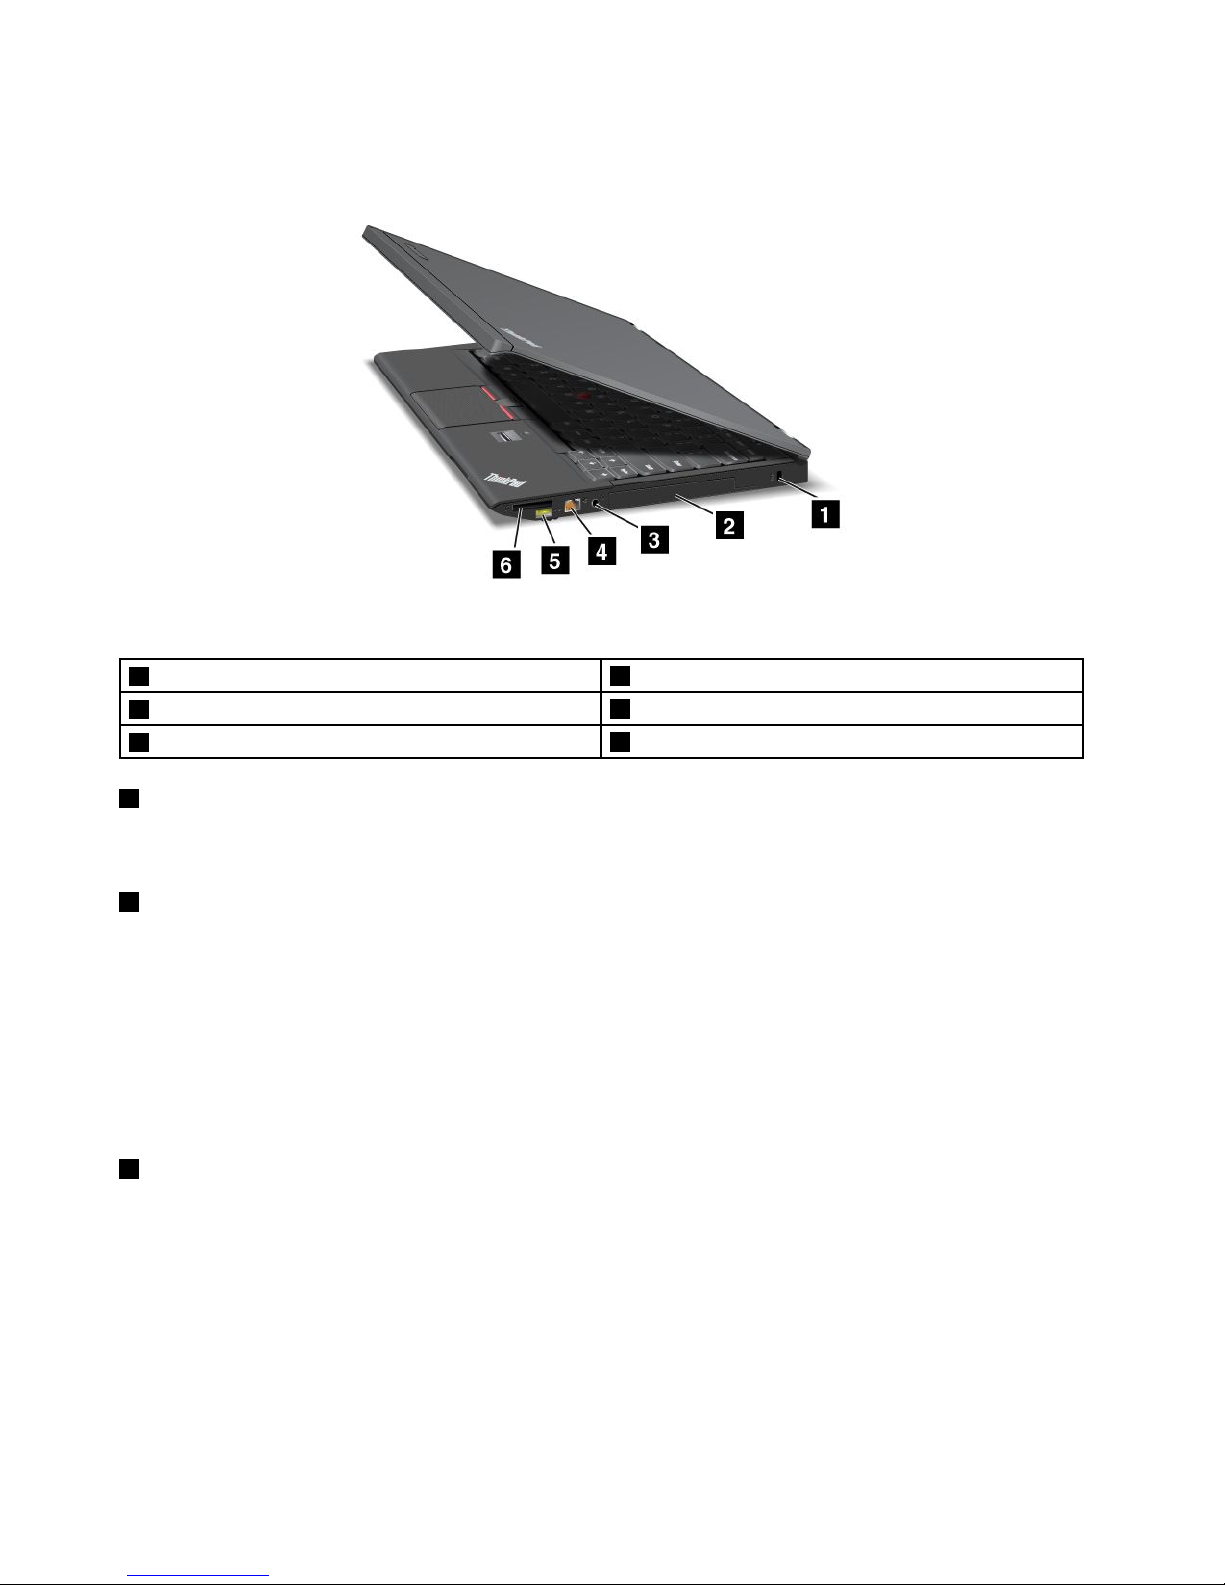
Right-sideview
Figure2.ThinkPadX230andX230iright-sideview
1Securitykeyhole
2Harddiskdriveorsolid-statedrive
3Comboaudiojack
4Ethernetconnector
5AlwaysOnUSBconnector
6Mediacardreaderslot
1Securitykeyhole
Purchaseasecuritycablelockthattsthiskeyholetolockyourcomputertoastationaryobjecttoprotect
yourcomputerfromtheft.
2Harddiskdriveorsolid-statedrive
Dependingonthemodel,yourcomputermighthavealarge-capacity,customer-upgradableharddisk
drivethatcanmeetavarietyofstoragedemands.
Somemodelsareequippedwithasolid-statedrivefordatastorage,makingyourcomputerlighter,smaller,
andfaster.
Note:Thehiddenservicepartitionisthereasonwhythereislessfreespacethanexpectedonyourhard
diskdriveorsolid-statedrive.Thisreductionismorenoticeableonthesolid-statedrivebecauseofits
smallercapacity.
3Comboaudiojack
Tolistentothesoundfromyourcomputer,connectaheadphoneoraheadsetthathasa3.5mm4-pole
plugtothecomboaudiojack.
Notes:
•Ifyouareusingaheadsetwithafunctionswitch,forexample,aheadsetforaniPhone
®
mobiledigital
device,donotpressthisswitchwhileusingtheheadset.Ifyoupressit,theheadsetmicrophonewillbe
disabled,andtheintegratedmicrophonesonthecomputerwillbeenabledinstead.
•Thecomboaudiojackdoesnotsupportaconventionalmicrophone.Formoreinformation,see“Using
audiofeatures”onpage41
.
4UserGuide
Page 21

4Ethernetconnector
ConnectyourcomputertoaLANwiththeEthernetconnector.
DANGER
Toavoidtheriskofelectricalshock,donotconnectthetelephonecabletotheEthernetconnector.
YoucanonlyconnectanEthernetcabletothisconnector .
Twoindicators,totheupperrightandleftoftheconnector,showthestatusofthenetworkconnection.
WhenyourcomputerconnectstoaLANandasessionwiththenetworkisavailable,theupperleftindicator
issteadygreen.Whiledataisbeingtransmitted,theupperrightindicatorblinksyellow.
Note:IfyouattachyourcomputertoaThinkPadUltrabase,dockingstation,orreplicator,usetheEthernet
connectorontheUltrabase,dockingstation,orreplicatortoconnecttoaLAN,nottheoneonthecomputer.
5AlwaysOnUSBconnector
Bydefault,theAlwaysOnUSBconnectorenablesyoutochargesomemobiledigitaldevicesand
smartphoneswhenyourcomputerisinsleeporhibernationmode.
Ifyouwanttochargethesedeviceswhenyourcomputeristurnedoff,dothefollowing:
1.Connectthecomputertoanacpowersupply.
2.GotoThinkPadSetupandenableAlwaysOnUSBChargeinoffmode.Formoreinformation,see
“Congmenu”onpage111
.
3.Dooneofthefollowing:
•ForWindows7:StartthePowerManagerprogramandclicktheGlobalPowerSettingstab.Then
selecttheEnableAlwaysOnUSBcheckbox.
•ForWindows8:PresstheWindowskeytogototheStartscreen.ClickLenovoSettings➙Power.
ThenselecttheEnablewhenthecomputerisoffcheckbox.
6Mediacardreaderslot
Yourcomputerhasamediacardreaderslot.Formoreinformationaboutthesupportedcards,see“Usingan
ExpressCard,aashmediacard,orasmartcard”onpage42.
Chapter1.Productoverview5
Page 22
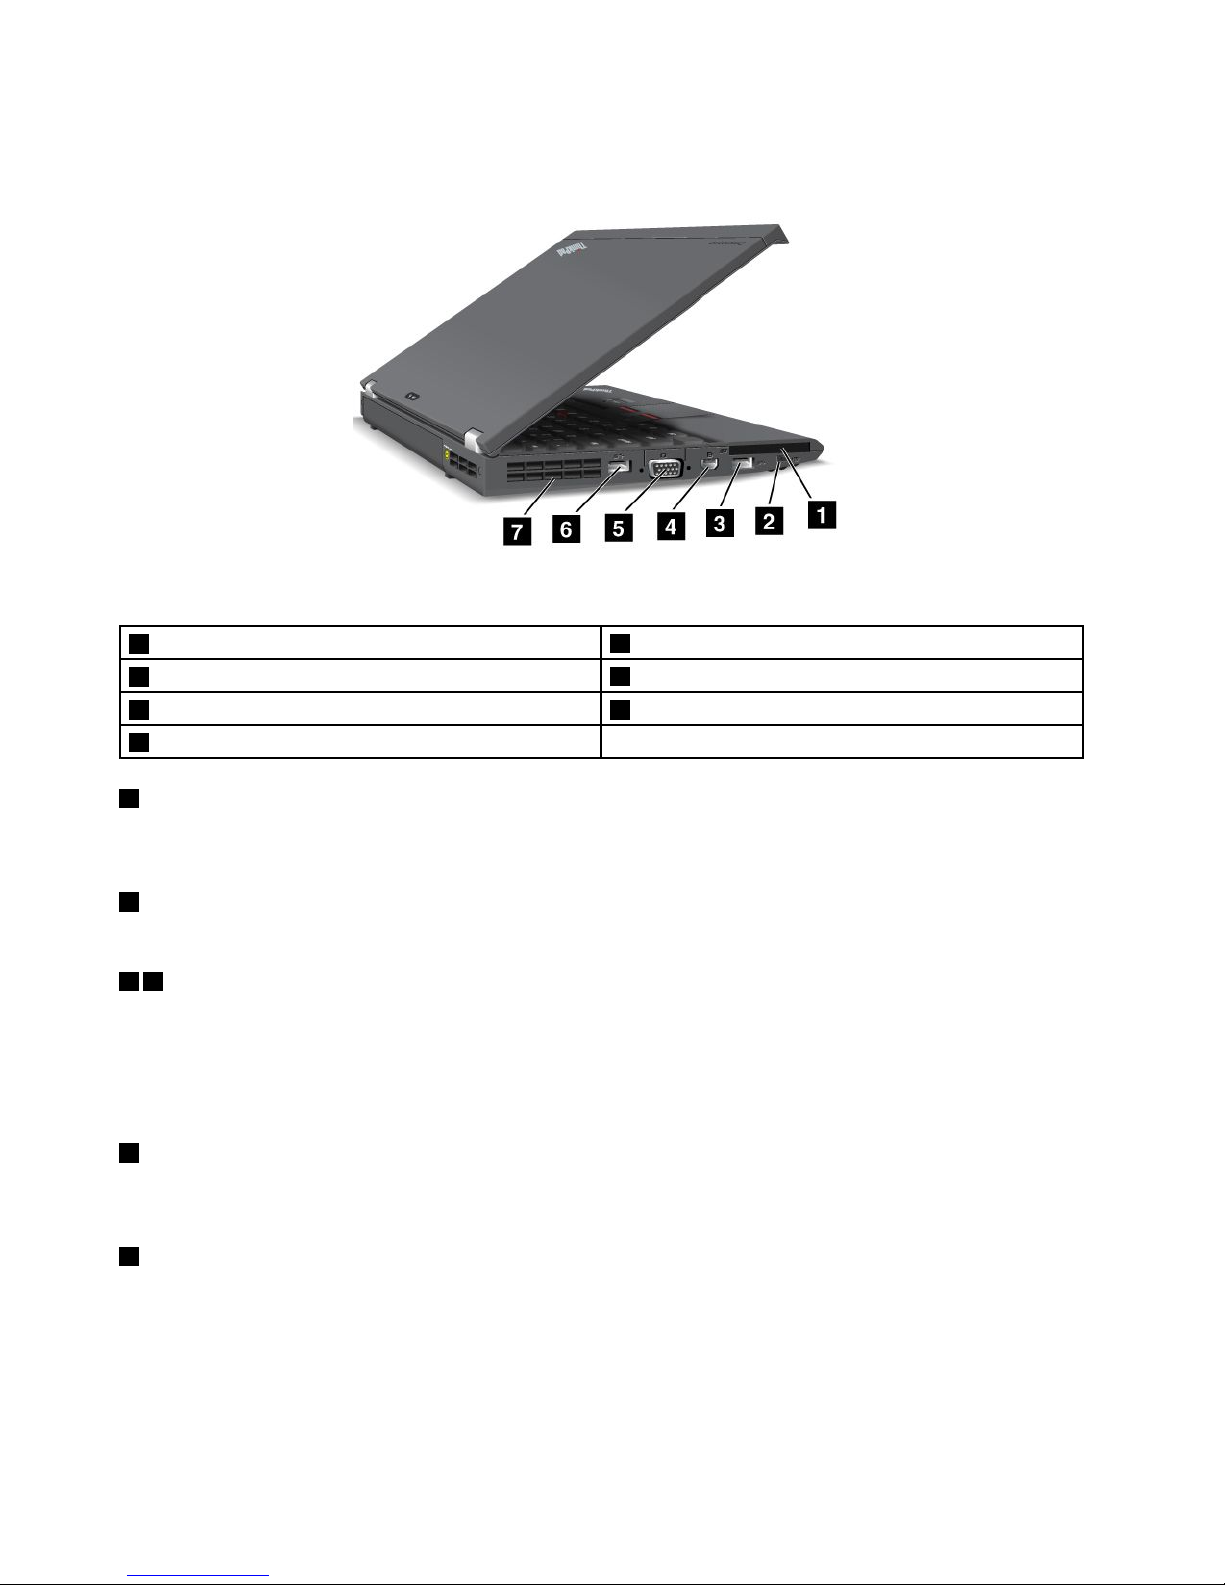
Left-sideview
Figure3.ThinkPadX230andX230ileft-sideview
1ExpressCardslot
2Wirelessradioswitch
3USB3.0connector
4MiniDisplayPortconnector
5Videographicsarray(VGA)connector6USB3.0connector
7Fanlouvers
1ExpressCardslot
YourcomputerhasanExpressCardslotfora54mm-wideExpressCardorasmartcard.Formore
information,see“UsinganExpressCard,aashmediacard,orasmartcard”onpage42
.
2Wirelessradioswitch
Usethisswitchtoquicklyturnonorturnoffallwirelessconnections.
36USB3.0connectors
TheUniversalSerialBus(USB)3.0connectorsareusedforconnectingdevicescompatiblewithaUSB
interface,suchasaUSBprinteroradigitalcamera.
Note:WhenyouattachaUSBcabletotheconnector,makesurethattheUSBmarkisfacingupward.
Otherwisetheconnectormightbedamaged.
4MiniDisplayPortconnector
UsetheminiDisplayPortconnectortoconnectyourcomputertoacompatibleprojector,externalmonitor,or
high-denitiontelevision.
5Videographicsarray(VGA)connector
AttachaVGAcompatiblemonitororprojectortoyourcomputertodisplaythecomputeroutput.
Note:IfyouattachyourcomputertoaThinkPadUltrabase,dockingstation,orportreplicator,usetheVGA
connectorontheUltrabase,dockingstation,orreplicator,nottheoneonthecomputer.
Fordetails,see“Attachinganexternalmonitor”onpage38
.
6UserGuide
Page 23
7Fanlouvers
Theinternalfanandlouversenableairtocirculateinthecomputerandcoolthecentralprocessor.
Note:T oavoidimpedingairow,donotplaceanyobstacleinfrontofthefan.
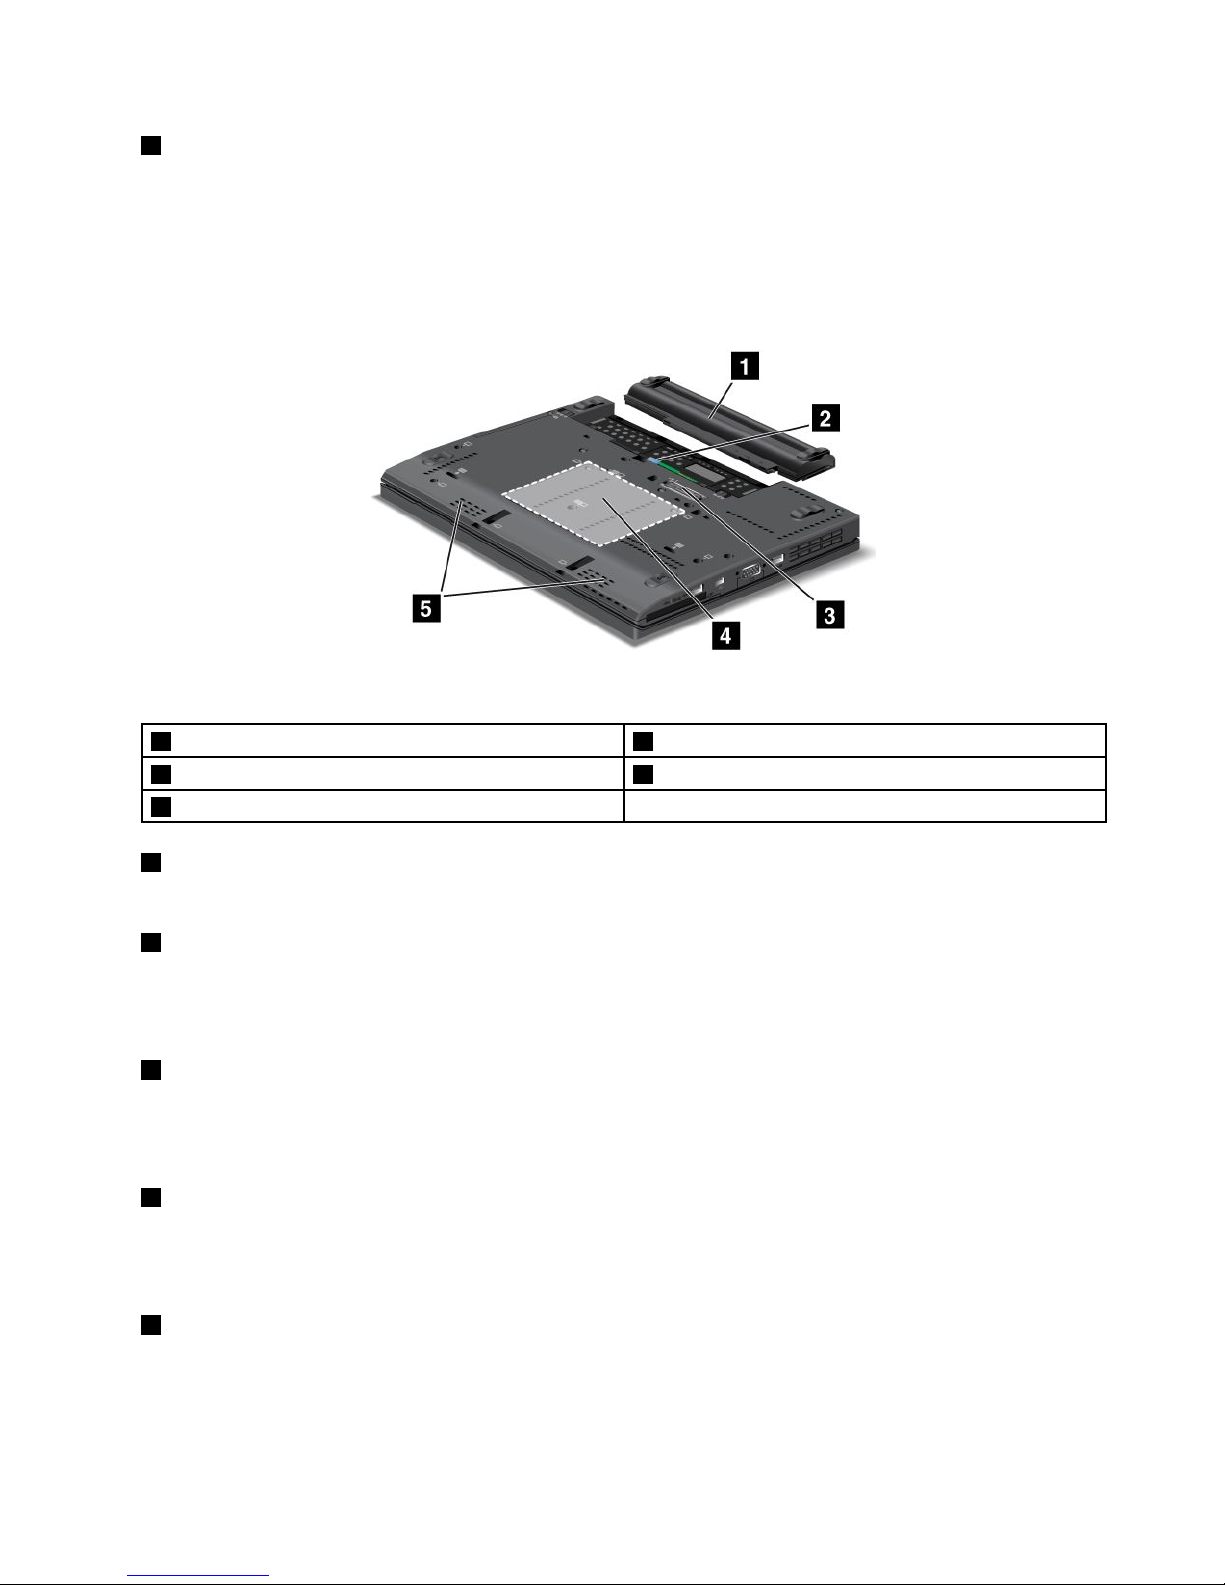
Bottomview
Figure4.ThinkPadX230andX230ibottomview
1Battery
2SIMcardslot
3Dockingstationconnector4Memory-upgradeslot
5Built-inspeakers
1Battery
Useyourcomputerwiththebatterypowerwheneveracpowerisunavailable.
2SIMcardslot
IfyourcomputerhasawirelessWANfeature,itmightrequireaSubscriberIdenticationModule(SIM)card
toestablishwirelessWANconnections.Dependingonthecountryofdelivery,theSIMcardmightalreadybe
installedintheSIMcardslot.
3Dockingstationconnector
ConnectyourcomputertoasupportedThinkPadUltrabase,portreplicator,ordockingstationthroughthis
connectortoextendthecomputercapabilitieswhenyouareinyourofceorathome.Formoreinformation
aboutthesupporteddockingstations,seeChapter7“Enhancingyourcomputer”onpage89.
4Memory-upgradeslot
Youcanincreasetheamountofmemoryinyourcomputerbyinstallingamemorymoduleinthe
memory-upgradeslot.MemorymodulesareavailableasoptionsfromLenovo.Formoreinformation,
see“Replacingamemorymodule”onpage75.
5Built-inspeakers
Thestereospeakersarebuiltintoyourcomputer.
Chapter1.Productoverview7
Page 24

Rearview
Figure5.ThinkPadX230andX230irearview
1Powerjack2Fanlouvers
1Powerjack
Connecttheacpoweradaptertothepowerjacktoprovideacpowertothecomputerandchargethebattery.
2Fanlouvers
Theinternalfanandlouversenableairtocirculateinthecomputerandcoolthecentralprocessor.
Note:T oavoidimpedingairow,donotplaceanyobstacleinfrontofthefan.
Statusindicators
Yourcomputerhassystem-statusindicatorsandpower-statusindicators.Thestatusindicatorsshowthe
currentstatusofyourcomputer.
8UserGuide
Page 25
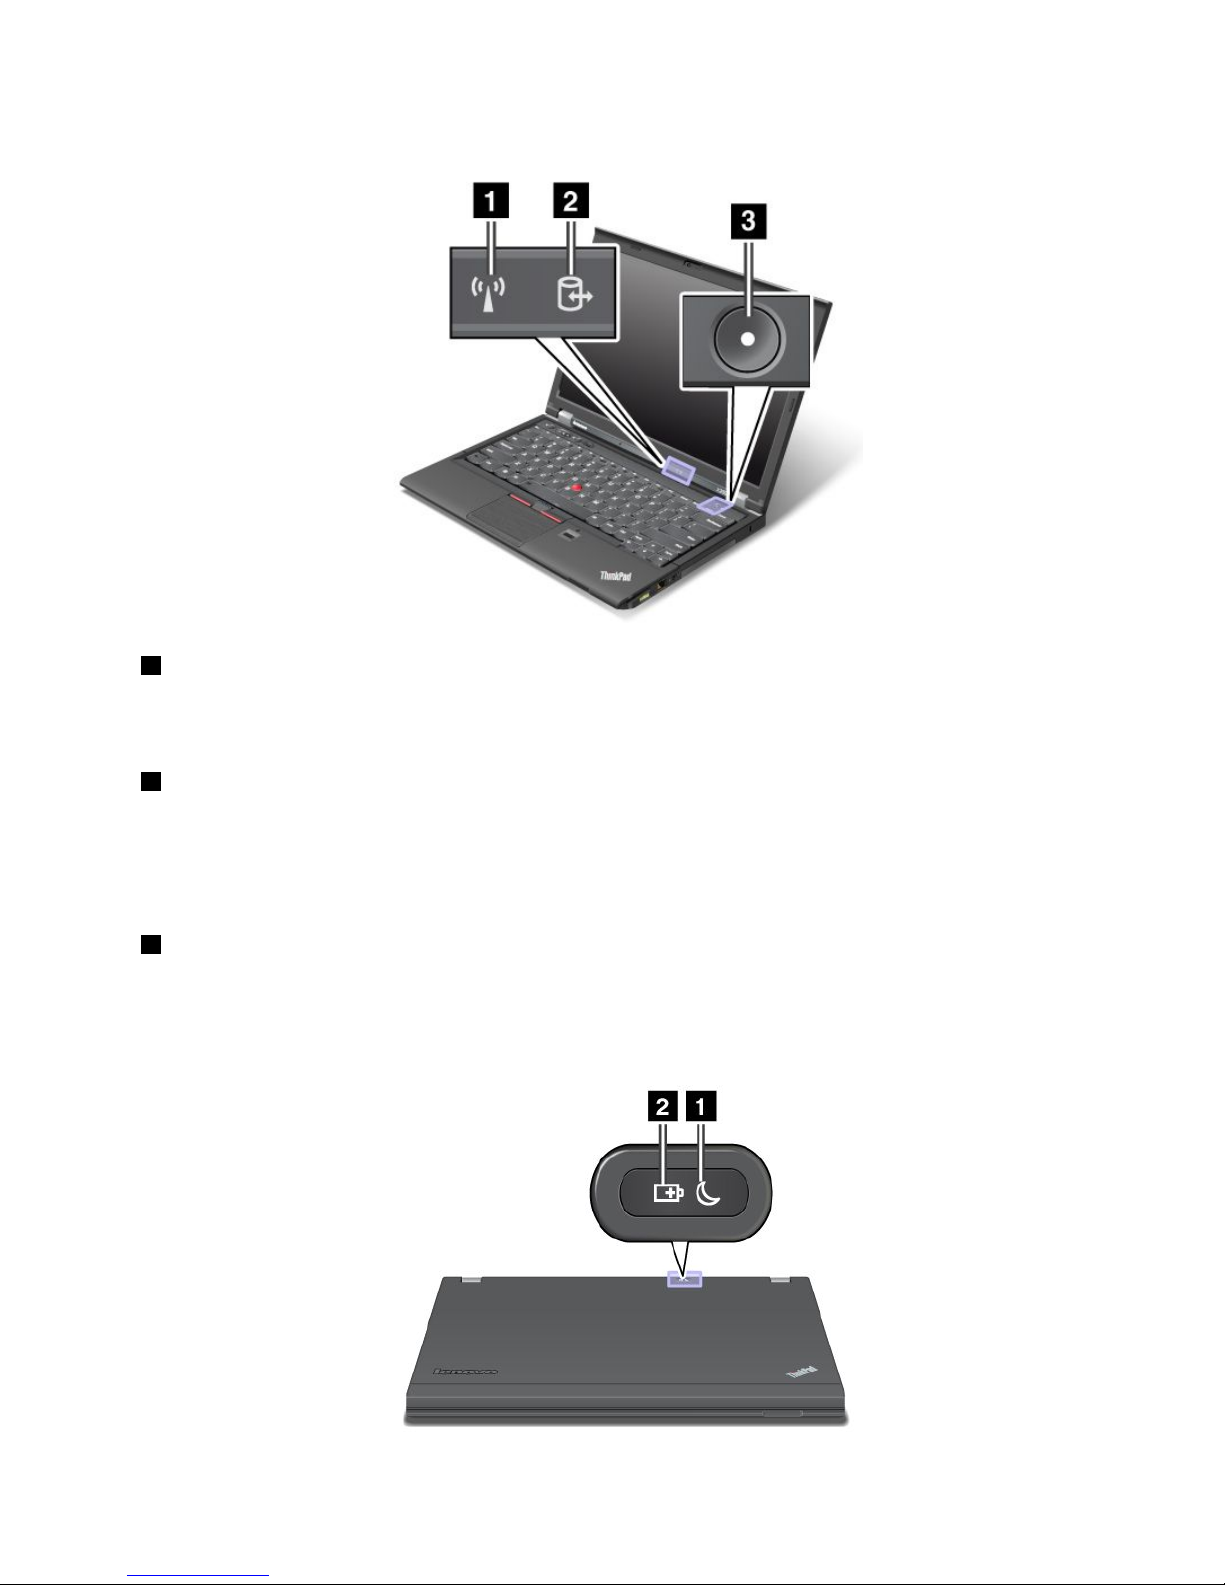
System-statusindicators
1WirelessLAN/WAN/WiMAX/Bluetoothstatusindicator
•Green:ThewirelessLAN,WAN,BluetoothorWiMAXfeatureison.
•Off:Wirelessnetworkdevicesaredisabledorthewirelessradioisturnedoff.
2Deviceaccessstatusindicator
Theharddiskdrive,solid-statedrive,ormSATAsolid-statedriveisreadingorwritingdata.
Note:Whenthisindicatorisblinking,donotputthecomputerintosleepmode,removethedrive,orturn
offthecomputer.
3Poweronstatusindicator
Thepowerbuttonstayslitwheneverthecomputerison,blinkswhenthecomputerisinsleepmode,and
isoffwhenthecomputeristurnedoff.
Powerstatusindicators
Chapter1.Productoverview9
Page 26
1Sleepstatusindicator
•Green:Thecomputerisinsleepmode.
•Blinkinggreen:Thecomputerisenteringsleeporhibernationmode,orisresumingnormaloperation.
2Batterystatusindicator
•Green:Thebatterychargelevelis20%orhigher
•Orange:Thebatterychargelevelisbetween5%and20%.
•Fastblinkingorange:Thebatterychargelevelis5%orless.
•Slowblinkingorange:Thebatteryisbeingcharged.Whenthechargelevelreaches20%,theblinking
colorchangestogreen.
•Slowblinkinggreen:Thebatterychargelevelisbetween20%and80%,andchargingiscontinuing.
Whenthebatterychargelevelreaches80%,thebatterystatusindicatorstopsblinking,butthecharging
mightcontinueuntilthebatteryis100%charged.
Note:Ifthecomputerisoperatingonbatterypower,thebatterystatusindicatordoesnotworkwhile
thecomputeristurnedofforisinsleepmodeorhibernationmode.
•Quickblinkingorange:Anerroroccurredinthebattery.
•Thebatterystatusindicatorblinksthreetimes:Theacpoweradapterisattachedtothecomputer.
•Thebatterystatusindicatorisoff:Thebatteryisfullychargedorthebatteryisdetached.
Locatingimportantproductinformation
Thissectionprovidesinformationtohelpyoulocateyourmachinetypeandmodellabel,FCCIDandIC
Certicationlabel,andMicrosoft
®
CerticateofAuthenticity(COA)label.
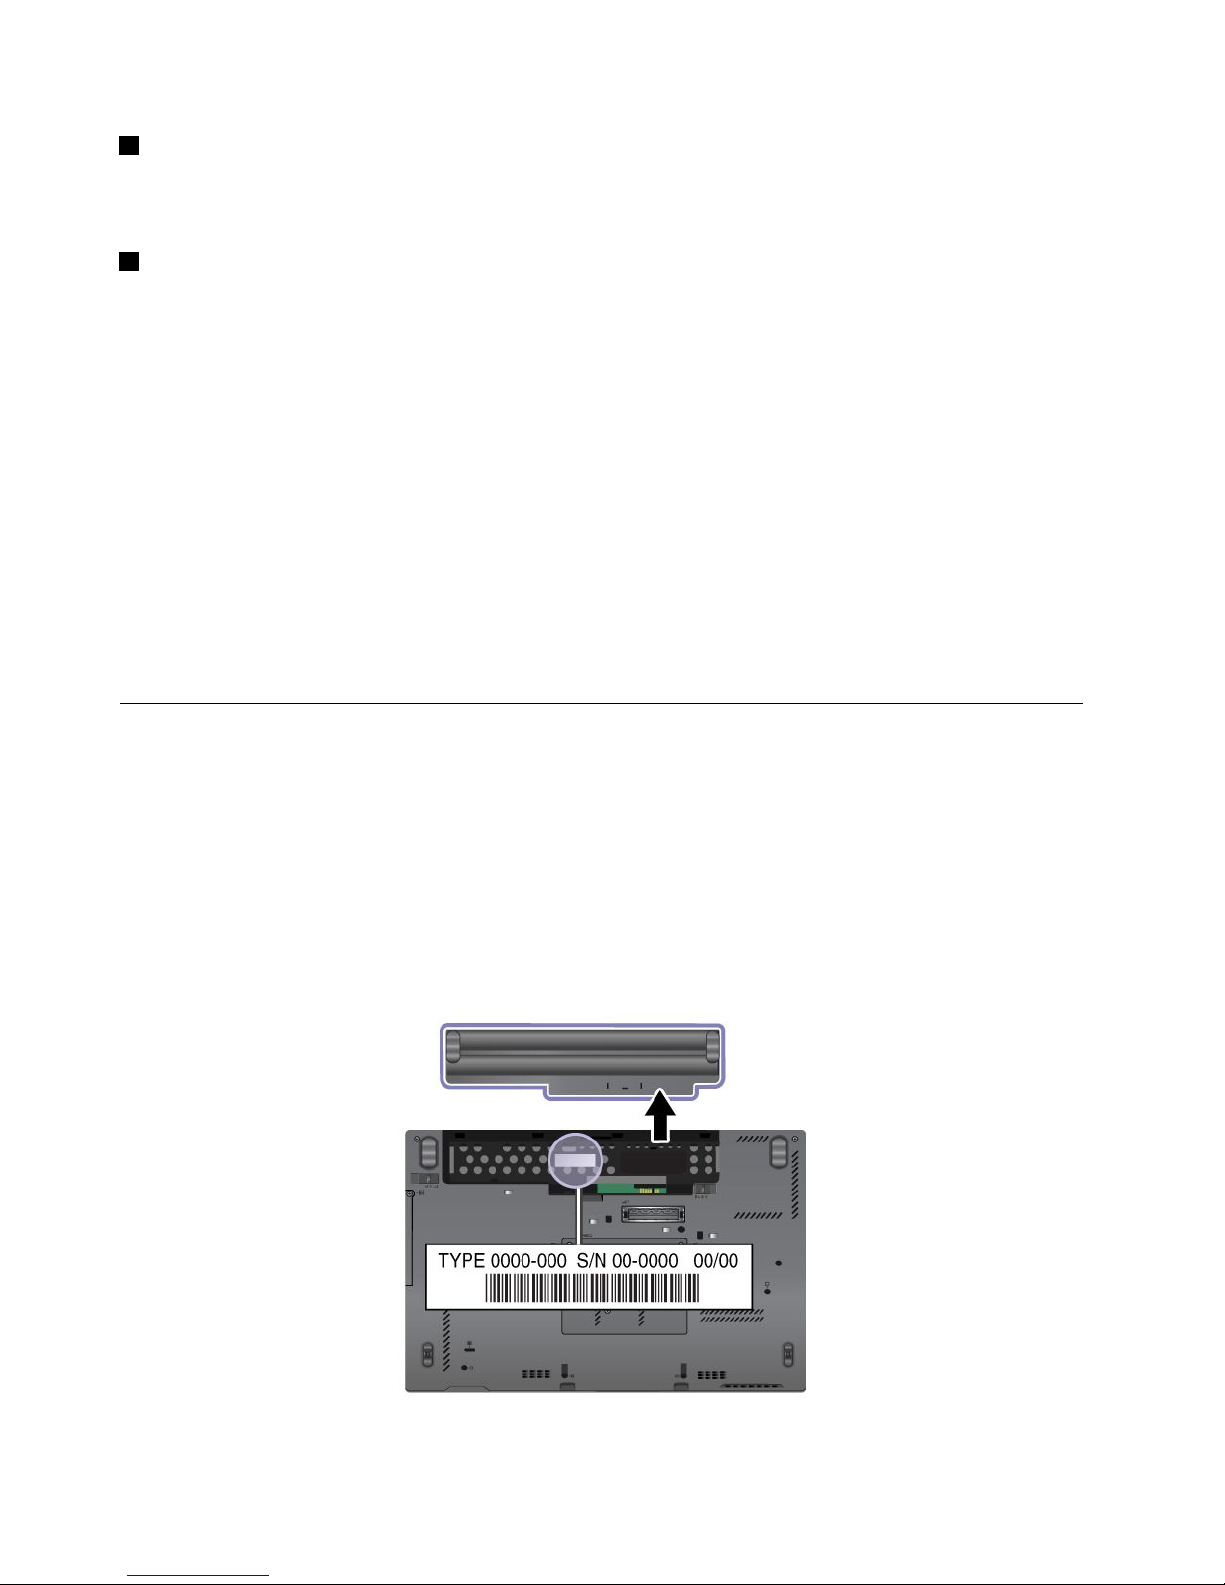
Machinetypeandmodellabel
Themachinetypeandmodellabelidentiesyourcomputer.IfyoucontactLenovoforhelp,themachine
typeandmodelnumberwillhelpsupporttechnicianstoidentifyyourcomputerandprovidethehighest
levelofservice.
Youcanndthemachinetypeandmodelofyourcomputerinthelabelasshownbelow:
10UserGuide
Page 27
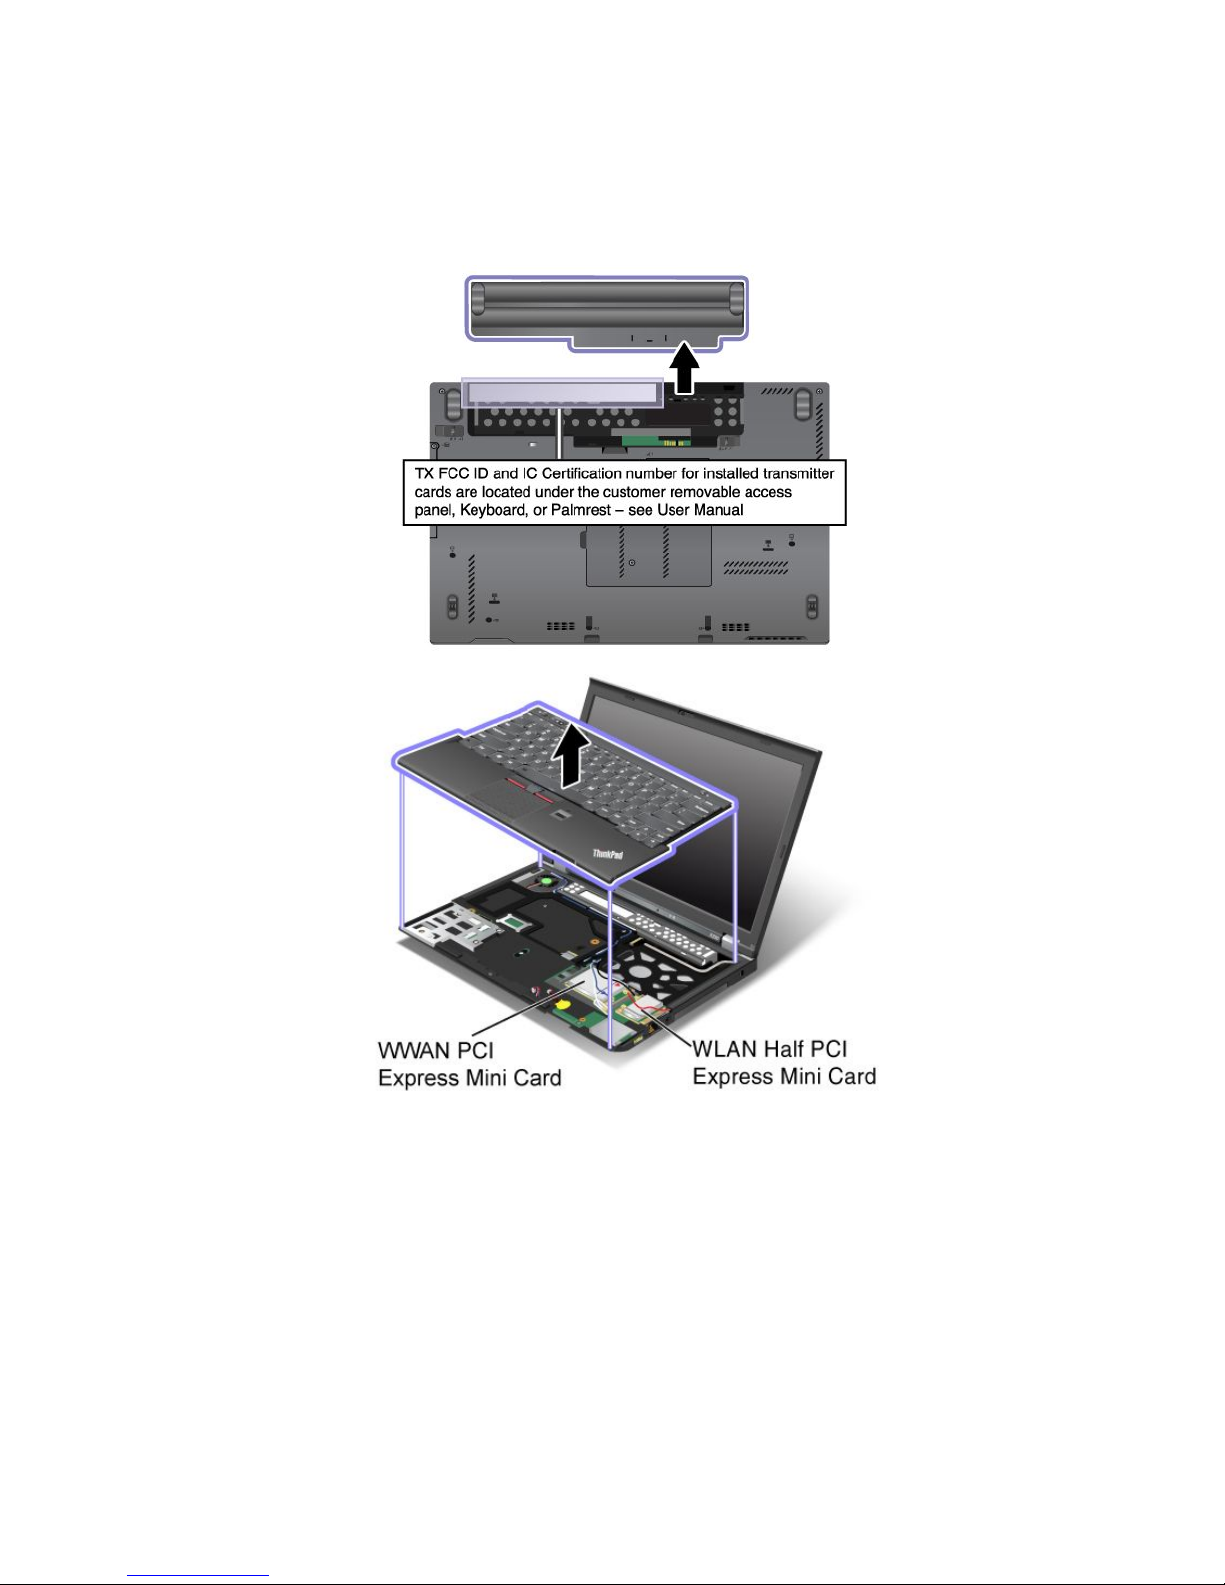
FCCIDandICCerticationnumberlabel
ThereisnoFCCIDorICCerticationnumberforthePCIExpressMiniCardshownontheenclosureof
yourcomputer.TheFCCIDandICCerticationnumberlabelisafxedonthecardinstalledinthePCI
ExpressMiniCardslotofyourcomputer.
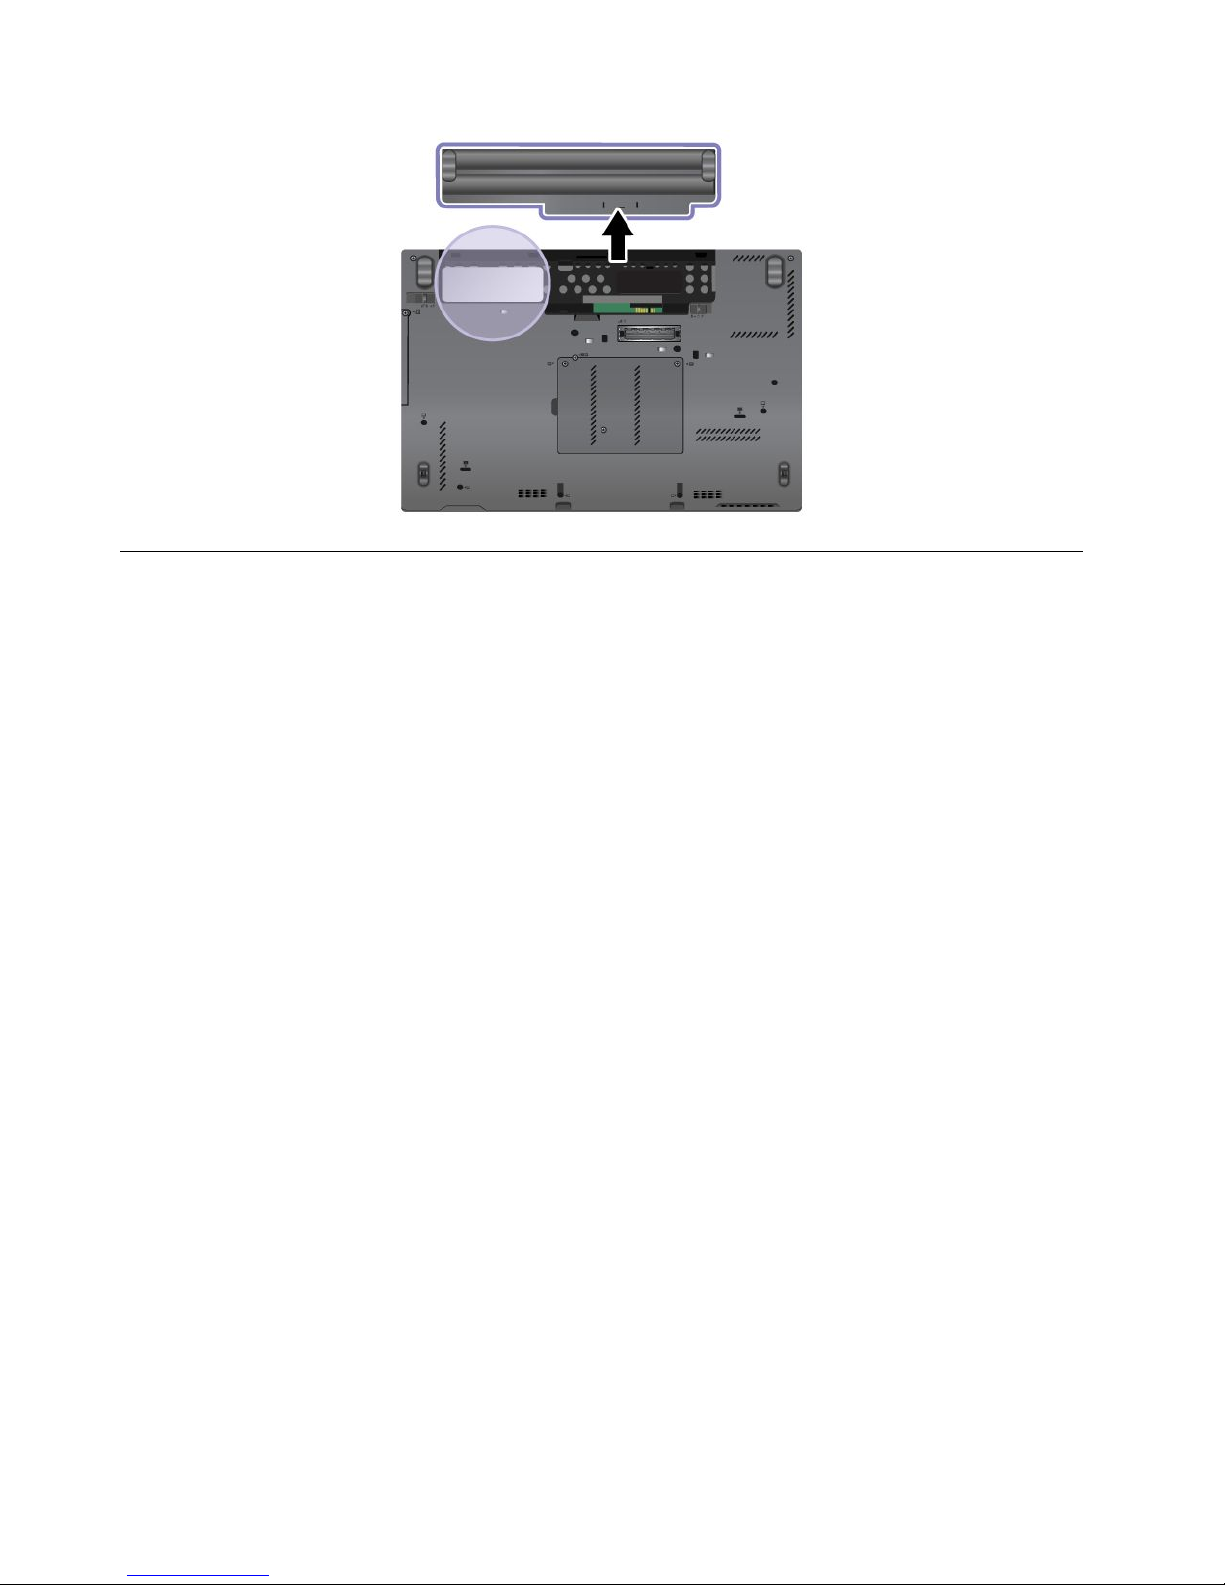
CerticateofAuthenticitylabel
TheMicrosoftCerticateofAuthenticitylabelforthepreinstalledoperatingsystemisattached.Printedonthis
labelaretheproductIDandtheproductkeyinformationforyourcomputer.Recordthisinformationandkeep
itinasafeplace.Youmightneedthesenumberstostartyourcomputerorreinstalltheoperatingsystem.
Note:TheCerticateofAuthenticitylabelappliesonlytocomputerspreinstalledwiththeWindows7
operatingsystem.
TheWindowsCerticateofAuthenticityofyourcomputerisshownasbelow:
Chapter1.Productoverview11
Page 28
Features
Processor
•Toviewtheprocessorinformationofyourcomputer,dothefollowing:
–ForWindows7:ClickStart,right-clickComputer.ThenclickProperties.
–ForWindows8:Movethecursortothetop-rightorbottom-rightcornerofthescreentodisplaythe
charms.ThenclickSettings➙PCinfo.
Memory
•Doubledatarate3(DDR3)synchronousdynamicrandomaccessmemory(SDRAM)
Storagedevice
Dependingonthemodel:
•2.5-inch(7mmheight)harddiskdrive
•2.5-inch(7mmheight)solid-statedrive
Systemperformance
•mSATAsolid-statedrive
Display
•ThecolordisplayusestheTFTtechnology
•Displaysize:12.5inches(317.5mm)
•Displayresolution:1366-by-768
•ThinkLightlight
•Integratedcamera
•Built-inmicrophones
Keyboard
•6-rowbacklitkeyboardor6-rowstandardkeyboard(dependingonthemodel)
•UltraNavpointingdevice
12UserGuide
Page 29

•Fnkeyfunction
•Volumecontrolbuttons
•Speakermutebutton
•Microphonemutebutton
Interface
•Externalmonitorconnectors(VGAandMiniDisplayPort)
•Comboaudiojack
•TwoUSB3.0connectorsandoneAlwaysOnUSB2.0connector
•RJ45Ethernetconnector
•ExpressCardslot
•4-in-1digitalmediacardreader
•Dockingstationconnector
Wirelessfeatures
•IntegratedwirelessLAN
•IntegratedBluetooth(onsomemodels)
•IntegratedwirelessWAN(onsomemodels)
•IntegratedWiMAX(onsomemodels)
Securityfeatures
•Fingerprintreader(onsomemodels)
Specications
Size
•Width:305.0mm(12inches)
•Depth:206.5mm(8.13inches)
•Height:19to26.6mm(0.75inchesto1.05inches)
Heatoutput
•65W(222Btu/hr)maximumor90W(307Btu/hr)maximum,dependingonthemodel
Powersource(acpoweradapter)
•Sine-waveinputat50to60Hz
•Inputratingoftheacpoweradapter:100to240Vac,50to60Hz
Batterypack
•Lithium-ion(Li-Ion)batterypack
Batterylife
•Forthepercentageofremainingbatterypower,checkthebatterystatusiconintheWindowsnotication
area.
Chapter1.Productoverview13
Page 30

Operatingenvironment
Thissectionprovidesinformationaboutyourcomputeroperatingenvironment.
Environment
•Maximumaltitudewithoutpressurization:3048m(10,000ft)
•Temperature
–Ataltitudesupto2438m(8000ft)
–Operating:5.0°Cto35.0°C(41°Fto95°F)
–Storage:5.0°Cto43.0°C(41°Fto109°F)
–Ataltitudesabove2438m(8000ft)
Maximumtemperaturewhenoperatingundertheunpressurizedcondition:31.3°C(88°F)
Note:Whenyouchargethebatterypack,itstemperaturemustbeatleast10°C(50°F).
•Relativehumidity:
–Operating:8%to80%
–Storage:5%to95%
Ifpossible,placeyourcomputerinawell-ventilatedanddryareawithoutdirectexposuretosunshine.
Keepelectricalappliancessuchasanelectricfan,radio,high-poweredspeakers,airconditioner,and
microwaveovenawayfromyourcomputerbecausethestrongmagneticeldsgeneratedbythese
appliancescandamagethemonitoranddataontheharddiskdriveorsolid-statedrive.
Donotplaceanybeveragesontopoforbesidethecomputerorotherattacheddevices.Ifliquidisspilledon
orinthecomputeroranattacheddevice,ashortcircuitorotherdamagemightoccur.
Donoteatorsmokeoveryourkeyboard.Particlesthatfallintoyourkeyboardcancausedamage.
Lenovoprograms
YourcomputercomeswithLenovoprogramstohelpyouworkmoreeasilyandsecurely.Dependingon
theWindowsoperatingsystempreinstalled,theprogramsmightvary.
TolearnmoreabouttheprogramsandothercomputingsolutionsofferedbyLenovo,goto
http://www.lenovo.com/support.
AccessingLenovoprogramsontheWindows7operatingsystem
OntheWindows7operatingsystem,youcanaccessLenovoprogramsfromeithertheLenovoThinkVantage
ToolsprogramorfromControlPanel.
AccessingLenovoprogramsfromtheLenovoThinkVantageT oolsprogram
ToaccessLenovoprogramsfromtheLenovoThinkVantageToolsprogram,clickStart➙AllPrograms➙
LenovoThinkVantageTools.Thendouble-clickaprogramicontoaccesstheprogram.
Note:IfaprogramiconintheLenovoThinkVantageToolsprogramnavigationwindowisdimmed,it
indicatesthatyouneedtoinstalltheprogrammanually.Toinstalltheprogrammanually,double-clickthe
programicon.Then,followtheinstructionsonthescreen.Whentheinstallationprocesscompletes,the
programiconwillbeactivated.
14UserGuide
Page 31

Table1.ProgramsintheLenovoThinkVantageT oolsprogram
ProgramIconname
AccessConnections™InternetConnection
ActiveProtectionSystem™
AirbagProtection
ClientSecuritySolutionEnhancedSecurity
CommunicationsUtilityWebConferencing
FingerprintSoftware
FingerprintReader
GPSEnablerGPS
LenovoSolutionCenterSystemHealthandDiagnostics
MobileBroadbandConnect3GMobileBroadband
PasswordManagerPasswordVault
PowerManager
PowerControls
RecoveryMediaFactoryRecoveryDisks
RescueandRecovery
®
EnhancedBackupandRestore
SimpleTapSimpleTap
SystemUpdate
UpdateandDrivers
Note:Dependingonyourcomputermodel,someoftheprogramsmightnotbeavailable.
AccessingLenovoprogramsfromControlPanel
ToaccessLenovoprogramsfromControlPanel,clickStart➙ControlPanel.Thendependingonthe
programyouwanttoaccess,clickthecorrespondingsectionandthenclickthecorrespondinggreentext.
Note:IfyoudonotndtheprogramyouneedinControlPanel,opentheLenovoThinkVantageTools
programnavigationwindowanddouble-clickthedimmedicontoinstalltheprogramyouneed.Then,
followtheinstructionsonthescreen.Whentheinstallationprocesscompletes,theprogramiconwillbe
activated,andyoucanndtheprograminControlPanel.
TheprogramsandthecorrespondingsectionsandgreentextsinControlPanelarelistedinthefollowing
table.
Table2.ProgramsinControlPanel
Program
ControlPanelsectionGreentextinControlPanel
AccessConnections
NetworkandInternet
Lenovo-InternetConnection
ActiveProtectionSystemSystemandSecurity
HardwareandSound
Lenovo-AirbagProtection
ClientSecuritySolutionSystemandSecurityLenovo-EnhancedSecurity
CommunicationsUtilityHardwareandSoundLenovo-WebConferencing
FingerprintSoftwareSystemandSecurity
HardwareandSound
Lenovo-FingerprintReader
or
Lenovo-NotebookFingerprint
Reader
GPSEnabler
NetworkandInternet
Lenovo-GPS
LenovoSolutionCenterSystemandSecurityLenovo-SystemHealthand
Diagnostics
Chapter1.Productoverview15
Page 32

Table2.ProgramsinControlPanel(continued)
Program
ControlPanelsectionGreentextinControlPanel
MessageCenterPlus
Programs
MessagesfromLenovo
MobileBroadbandConnect
NetworkandInternet
Lenovo-3GMobileBroadband
PasswordManager
SystemandSecurity
UserAccountsandFamilySafety
Lenovo-PasswordVault
PowerManager
HardwareandSound
SystemandSecurity
Lenovo-PowerControls
RecoveryMedia
SystemandSecurity
Lenovo-FactoryRecoveryDisks
SimpleTap
Programs
Lenovo-SimpleTap
SystemUpdateSystemandSecurity
Lenovo-UpdateandDrivers
RescueandRecovery
SystemandSecurity
Lenovo-EnhancedBackupand
Restore
Note:Dependingonyourcomputermodel,someoftheprogramsmightnotbeavailable.
AccessingLenovoprogramsontheWindows8operatingsystem
IfyourcomputerispreinstalledwiththeWindows8operatingsystem,youcanaccessLenovoprogramsby
doingeitherofthefollowing:
•ClicktheLenovoQuickLaunchiconfromthetaskbar.Alistofprogramsisdisplayed.Double-clicka
Lenovoprogramtolaunchit.Ifadesiredprogramisnotinthelist,clicktheplusicon+.
•PresstheWindowskeytogototheStartscreen.ClickaLenovoprogramtolaunchit.Ifyoucannotnd
theprogramyouneed,movethecursortothetop-rightorbottom-rightcornerofthescreentodisplaythe
charms.ThenclicktheSearchcharmtosearchforthedesiredprogram.
YourcomputersupportsthefollowingLenovoprograms:
•ActiveProtectionSystem
•FingerprintSoftware
•LenovoCompanion
•LenovoSettings
•LenovoMobileAccess
•LenovoSolutionCenter
•LenovoQuickLaunch
•LenovoSupport
•LenovoThinkVantageT ools
•PasswordManager
•SystemUpdate
Note:ThePasswordManagerprogramisnotpreinstalledonyourWindows8computers.Youcandownload
itfromtheLenovoSupportWebsitehttp://www.lenovo.com/support.
Foranintroductiontotheseprograms,see“AnintroductiontoLenovoprograms”onpage17
.
16UserGuide
Page 33

AnintroductiontoLenovoprograms
ThistopicprovidesabriefintroductiontosomeLenovoprograms.
Note:Dependingonyourcomputermodel,someoftheprogramsmightnotbeavailable.
•AccessConnections
TheAccessConnectionsprogramisaconnectivityassistantprogramforcreatingandmanaginglocation
proles.EachlocationprolestoresallthenetworkandInternetcongurationsettingsneededfor
connectingtoanetworkinfrastructurefromaspeciclocationsuchasahomeoranofce.
Byswitchingbetweenlocationprolesasyoumoveyourcomputerfromplacetoplace,youcanquickly
andeasilyconnecttoanetworkwithnoneedtorecongureyoursettingsmanuallyandrestartthe
computereachtime.
•ActiveProtectionSystem
TheActiveProtectionSystemprogramprotectsyourharddiskdrivewhentheshocksensorinsideyour
computerdetectsaconditionthatcoulddamagethedrive,suchassystemtilt,excessivevibration,or
shock.Theharddiskdriveislessvulnerabletodamagewhenitisnotoperating.Thisisbecausewhen
theharddiskdriveisnotoperating,thesystemstopsitfromspinning,andmightalsomovetheread
andwriteheadsofthedrivetoareasthatdonotcontaindata.Assoonastheshocksensorsenses
thattheenvironmentisstableagain(minimalchangeinsystemtilt,vibration,orshock),itturnsthe
harddiskdriveon.
•ClientSecuritySolution
TheClientSecuritySolutionprogramprotectsyourcomputerbysecuringclientdataanddeecting
securitybreachattempts.Italsocanhelpmanageyourpasswords,recoveraforgottenpassword,
monitorsecuritysettingsonyourcomputer,andsuggesthowtoenhanceyourcomputersecurity.
•CommunicationsUtility
UsetheCommunicationsUtilityprogramtoconguresettingsfortheintegratedcameraandaudiodevices.
•FingerprintSoftware
Ifyoursystemcomeswithangerprintreader,theFingerprintSoftwareprogramenablesyoutoenroll
yourngerprintandassociateitwithyourWindowspassword.Asaresult,thengerprintauthentication
canreplaceyourpasswordandenablesimpleandsecureuseraccess.
•GPSEnabler
IfthePCIExpressMiniCardinstalledinyourcomputersupportsGPS,yourcomputercanreceivesignals
fromGPSsatellitesanddetermineitslocation.IfyourcomputerisconnectedtotheInternet,youcannd
yourlocationonareal-timemapprovidedbyGoogleMapsorMicrosoftBing™Maps.
•LenovoCompanion
ThroughtheLenovoCompanionprogram,youcangettheinformationabouttheaccessoriesforyour
computer,viewbolgsandarticlesaboutyourcomputer,andcheckforotherrecommendedprograms.
•LenovoSettings
UsetheLenovoSettingsprogramtoenhanceyourcomputingexperiencebyturningyourcomputerintoa
portablehotspot,conguringcameraandaudiosettings,optimizingyourpowersettings,andcreating
andmanagingmultiplenetworkproles.
•LenovoMobileAccess
TheLenovoMobileAccessprogramenablesyoutomanageyourmobilebroadbandconnection.You
cancreateanaccount,addmoneytotheaccount,andpurchasemobilebroadbandsessionsusing
youraccount.
•LenovoSolutionCenter
Chapter1.Productoverview17
Page 34

TheLenovoSolutionCenterprogramenablesyoutotroubleshootandresolvecomputerproblems.It
combinesdiagnostictests,systeminformationcollection,securitystatus,andsupportinformation,along
withhintsandtipsformaximumsystemperformance.
•LenovoQuickLaunch
TheLenovoQuickLaunchprogramprovidesyouwithquickaccesstoprogramsinstalledonyour
computer,includingLenovoprograms,Microsoftprograms,andotherthirdpartyprograms.
•LenovoSupport
TheLenovoSupportprogramenablesyoutoregisteryourcomputerwithLenovo,checkthecomputer
healthconditionandbatterystatus,downloadandviewusermanualsforyourcomputer,getthewarranty
informationofyourcomputer,andexplorehelpandsupportinformation.
•LenovoThinkVantageT ools
TheLenovoThinkVantageToolsprogramhelpsyouworkmoreeasilyandsecurelybyprovidingeasy
accesstovariousprograms,suchasFingerprintSoftware,LenovoSolutionCenter,andsoon.
•MessageCenterPlus
TheMessageCenterPlusprogramautomaticallydisplaysmessagestoinformyouaboutimportantnotices
fromLenovo,suchasalertsonsystemupdatesandalertsonconditionsthatrequireyourattention.
•MobileBroadbandConnect
TheMobileBroadbandConnectprogramenablesyourcomputertoconnecttothemobilebroadband
(3G)networkthroughasupportedwirelessWANcard.
•PasswordManager
ThePasswordManagerprogramautomaticallycapturesandllsinauthenticationinformationfor
WindowsprogramsandWebsites.
•PowerManager
ThePowerManagerprogramprovidesconvenient,exible,andcompletepowermanagementforyour
computer.Itenablesyoutoadjustyourcomputerpowersettingstoachievethebestbalancebetween
performanceandpowersaving.
•RecoveryMedia
TheRecoveryMediaprogramenablesyoutorestorethecontentsoftheharddiskdrivetothefactory
defaultsettings.
•RescueandRecovery
TheRescueandRecoveryprogramisaone-buttonrecoveryandrestoresolutionthatincludesasetof
self-recoverytoolstohelpyoudiagnosecomputerproblems,gethelp,andrecoverfromsystemcrashes,
evenifyoucannotstarttheWindowsoperatingsystem.
•SimpleT ap
TheSimpleTapprogramprovidesyouwithaquickwaytocustomizesomebasiccomputersettingssuch
asmutingthespeakers,adjustingthevolume,lockingthecomputeroperatingsystem,launchinga
program,openingaWebpage,openingale,andsoon.YoualsocanusetheSimpleTapprogramto
accesstheLenovoAppShop,fromwhichyoucandownloadvariousprogramsandcomputersoftware.
TostarttheSimpleTapprograminaquickway,doanyofthefollowing:
–ClicktheredSimpleTaplaunchpointonthedesktop.Theredlaunchpointisavailableonthedesktop
afteryouhavelaunchedtheSimpleTapprogramforthersttime.
–Presstheblackbuttononthekeyboard(nexttothevolumecontrolbuttons).
Note:TheSimpleTapprogramisonlyavailableoncertainmodelspreinstalledwiththeWindows7
operatingsystem.IfyourWindows7modelisnotpreinstalledwiththeSimpleTapprogram,youcan
downloaditfromhttp://www.lenovo.com/support.
18UserGuide
Page 35

•SystemUpdate
TheSystemUpdateprogramhelpsyoukeepthesoftwareonyourcomputerup-to-datebydownloading
andinstallingsoftwareupdatepackages(Lenovoprograms,devicedrivers,UEFIBIOSupdates,and
otherthirdpartyprograms).
Chapter1.Productoverview19
Page 36

20UserGuide
Page 37

Chapter2.Usingyourcomputer
Thischapterprovidesinformationonusingsomeofthecomputercomponents.
•“Registeringyourcomputer”onpage21
•“Frequentlyaskedquestions”onpage21
•“Specialkeysandbuttons”onpage23
•“UsingtheUltraNavpointingdevice”onpage26
•“Powermanagement”onpage29
•“Connectingtothenetwork”onpage33
•“Presentationsandmultimedia”onpage38
•“Usingaudiofeatures”onpage41
•“Usingtheintegratedcamera”onpage42
•“UsinganExpressCard,aashmediacard,orasmartcard”onpage42
Registeringyourcomputer
Whenyouregisteryourcomputer,informationisenteredintoadatabase,whichenablesLenovotocontact
youincaseofarecallorothersevereproblem.AfteryouregisteredyourcomputerwithLenovo,youwill
alsoreceivequickerservicewhenyoucallLenovoforhelp.Inaddition,somelocationsofferextended
privilegesandservicestoregisteredusers.
ToregisteryourcomputerwithLenovo,dooneofthefollowing:
•Gotohttp://www.lenovo.com/registerandfollowtheinstructionsonthescreentoregisteryourcomputer.
•ConnectyourcomputertotheInternetandregisteryourcomputerthroughapreinstalledregistration
program:
–ForWindows7:ThepreinstalledLenovoProductRegistrationprogramlaunchesautomaticallyafteryou
haveusedyourcomputerforatime.Followtheinstructionsonthescreentoregisteryourcomputer.
–ForWindows8:OpentheLenovoSupportprogram.ThenclickRegistrationandfollowtheinstructions
onthescreentoregisteryourcomputer.
Frequentlyaskedquestions
HereareafewtipsthatwillhelpyouoptimizetheuseofThinkPadnotebook.
Toensurethatyoureceivethebestperformancefromyourcomputer,browsethefollowingWebpagetond
informationsuchasaidsfortroubleshootingandanswerstofrequentlyaskedquestions:
http://www.lenovo.com/support/faq.
CanIgetmyuserguideinanotherlanguage?
•Todownloadtheuserguideinanotherlanguage,goto:http://www.lenovo.com/support.Thenfollow
theinstructionsonthescreen.
Onthegoandneedtousebatterypowermoreeffectively?
•Toconservepower,ortosuspendoperationwithoutexitingprogramsorsavingles,see“Power-saving
modes”onpage31
.
©CopyrightLenovo2012
21
Page 38

•Toachievethebestbalancebetweenperformanceandpowersaving,changepowerplansettings.
See“Managingyourbatterypower”onpage31.
•Ifyourcomputerwillbeturnedoffforanextendedperiodoftime,youcanpreventbatterypowerfrom
drainingbyremovingthebattery.Formoreinformation,see“Powermanagement”onpage29.
Concernedaboutsecurityorneedtosecurelydisposeofdatastoredonyourharddiskorsolid-state
drive?
•StudyChapter4“Security”onpage49tondouthowyoucanprotectyourcomputerfromtheftand
unauthorizeduse.
•UsethePasswordManagerprogramtoprotectthedatastoredonyourcomputer.Fordetails,seethe
helpinformationsystemoftheprogram.
•Beforeyoudisposeofthedataontheharddiskdriveorthesolid-statedrive,besuretoreadthetopic
“Noticeondeletingdatafromyourharddiskdriveorsolid-statedrive”onpage59.
Gettingconnectedindifferentlocationsisachallenge?
•Totroubleshootawirelessnetworkingissue,gotohttp://www.lenovo.com/support/faq.
•TakeadvantageofthenetworkingfeaturesprovidedbytheAccessConnectionsprogram(onthe
Windows7operatingsystem)orLocationAwarenessintheLenovoSettingsprogram(ontheWindows8
operatingsystem).
•Tolearnmoreaboutusingthewirelessfeaturesofyourcomputer,referto“Wirelessconnections”on
page34
.
•Totravelmorecondently,besuretocheckthetipsin“Travelingwithyourcomputer”onpage47.
•PressFn+F5,orusethewirelessradioswitchtoenableordisablethewirelessfeatures.
Needtogivepresentationsorattachanexternalmonitoroften?
•Makesurethatyoufollowtheprocedureinthetopic“Attachinganexternalmonitor”onpage38
.
•WiththeExtenddesktopfunction,youcandisplayoutputonboththecomputerdisplayandtheexternal
monitor.See“UsingtheExtenddesktopfunction”onpage40
.
Needtoattachorreplaceadevice?
•SeeChapter6“Replacingdevices”onpage69formoreinformationaboutreplacingthedevicesof
yourcomputer.
•SeeChapter7“Enhancingyourcomputer”onpage89formoreinformationaboutenhancingthefeatures
ofyourcomputer.
Youhavebeenusingyourcomputerforsometimealready,anditisgettingslower?
•Followthe“Generaltipsforpreventingproblems”onpage127.
•Diagnoseproblemsyourselfbyusingthepreinstalleddiagnosticsoftware.See“Diagnosingproblems”on
page133.
•Alsorecoverytoolisprovidedonyourcomputerharddiskorsolid-statedrive.Formoreinformation,
seeChapter5“Recoveryoverview”onpage61
.
Printthefollowingsectionsandkeepthemwithyourcomputerincaseyouareunabletoaccessthis
onlinehelpwhennecessary.
•“Installinganewoperatingsystem”onpage107
•“Computerstopsresponding”onpage133
•“Powerproblems”onpage145
22UserGuide
Page 39
Specialkeysandbuttons
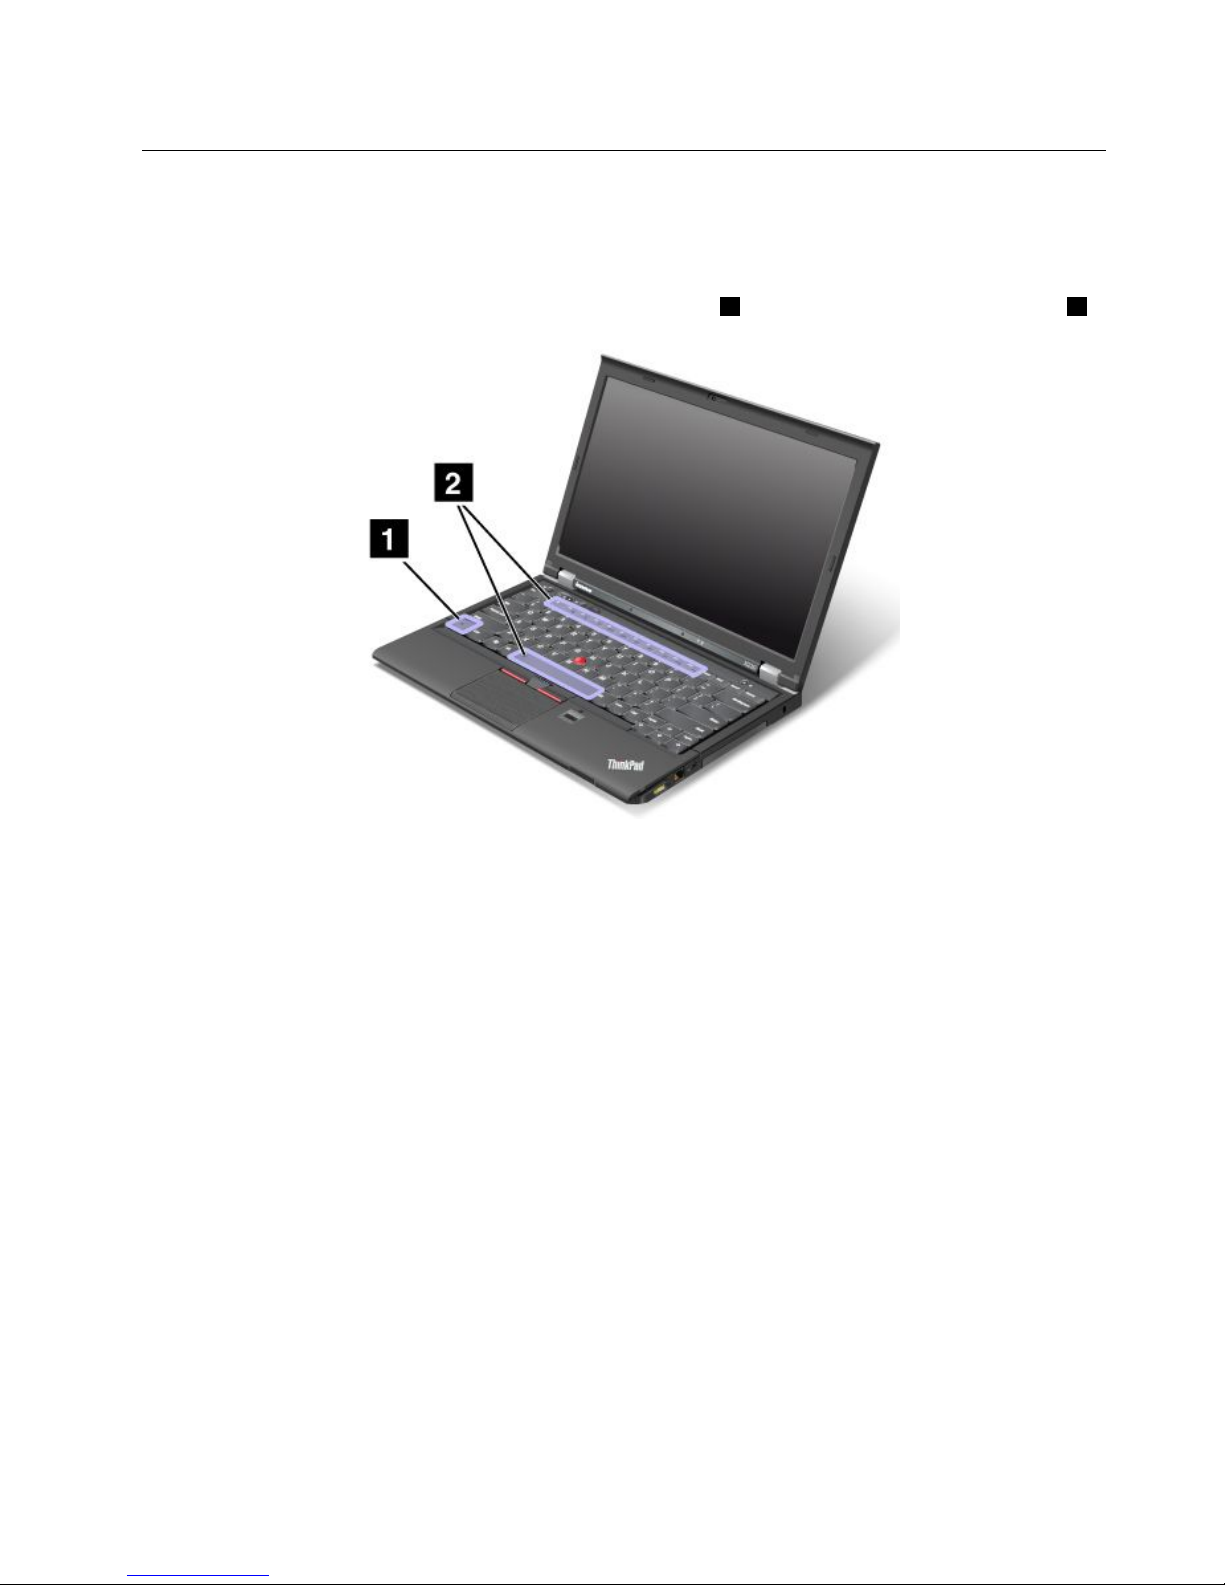
Yourcomputerhasseveralspecialkeysandbuttonstohelpyouworkmoreeasilyandeffectively.
Functionkeycombinations
Tousethefunctionkeycombinations,pressandholdtheFnkey1,thenpressoneofthefunctionkeys2.
Powerconservation
Fn+F4
Putyourcomputerintosleepmode.Toreturntonormaloperation,presstheFnkeyonly.
Ifyouwanttousethecombinationtoputthecomputerintohibernationmode,youneedtochangeyour
powerplansettings.T oaccesspowerplansettings,dothefollowing:
•ForWindows7:StartthePowerManagerprogramandthenclickthePowerPlantab.Forinstructionson
howtostartthePowerManagerprogram,see“AccessingLenovoprogramsontheWindows7operating
system”onpage14.
•ForWindows8:Right-clickthebatterystatusiconfromtheWindowsnoticationareaandclickPower
Options.ThenclickChangeplansettingsthatisnexttoyourpowerplan.
Switchingadisplayoutputlocation
•Fn+F7
Switchthedisplayoutputlocationbetweenthecomputerdisplayandanexternalmonitorbyselecting
oneofthefollowingoptions:
–Computerdisplayonly
–Computerdisplayandexternalmonitor(sameimage)
–Computerdisplayandexternalmonitor(extendeddesktopfunction)
–Externalmonitoronly
Chapter2.Usingyourcomputer23
Page 40

Note:TheWindows+PkeycombinationhasthesamefunctionalityasFn+F7.
Enablingordisablingthewirelessfeatures
•Fn+F5
Enableordisablethebuilt-inwirelessnetworkingfeatures.
Changingthecameraandaudiosettings
•Fn+F6
–ForWindows7:OpentheCommunicationssettingswindow,inwhichyoucanpreviewyourvideo
image,takeasnapshotofyourcurrentimage,andchangethecameraandaudiosettings.
–ForWindows8:StarttheLenovoSettingsprogram.Tousethecameraorchangethecamerasettings,
clickCamera.Toadjusttheaudiosettings,clickAudio.
Adjustingthebrightnesslevelofthecomputerdisplay
•Fn+F8:Thecomputerdisplaybecomesdimmer.
•Fn+F9:Thecomputerdisplaybecomesbrighter.
Theisfunctionchangesthebrightnessleveltemporarily.Tochangethedefaultbrightnesslevel,change
thesettingsthroughthePowerManagerprogram.
Multimediacontrols
•Fn+F10:Previoustrack/scene
•Fn+F11:Playorpause
•Fn+F12:Nexttrack/scene
Otherfunctions
•Fn+Spacebar:ControlthekeyboardbacklightandtheThinkLightlight:
–Pressonce:Turnonthekeyboardbacklighttolowbrightnesslevel.
–Pressagain:Adjustthekeyboardbacklighttohighbrightnesslevel.
–Pressthethirdtime:TurnoffthekeyboardbacklightandturnontheThinkLightlight.
–Pressthefourthtime:TurnofftheThinkLightlight.
Note:Ifyourcomputerdoesnothaveabacklitkeyboard,theFn+Spacebarcombinationcontrolsonlythe
ThinkLightlight.
Tochangethefunctionalityofthiscombination,see“Congmenu”onpage111
.
•Fn+F3:Lockyourcomputer.
•Fn+B:HavethesamefunctionastheBreakkeyonaconventionalkeyboard.
•Fn+P:HavethesamefunctionasthePausekeyonaconventionalkeyboard.
•Fn+S:HavethesamefunctionastheSysRqkeyonaconventionalkeyboard.
•Fn+K:HavethesamefunctionastheScrLKkeyonaconventionalkeyboard.
24UserGuide
Page 41
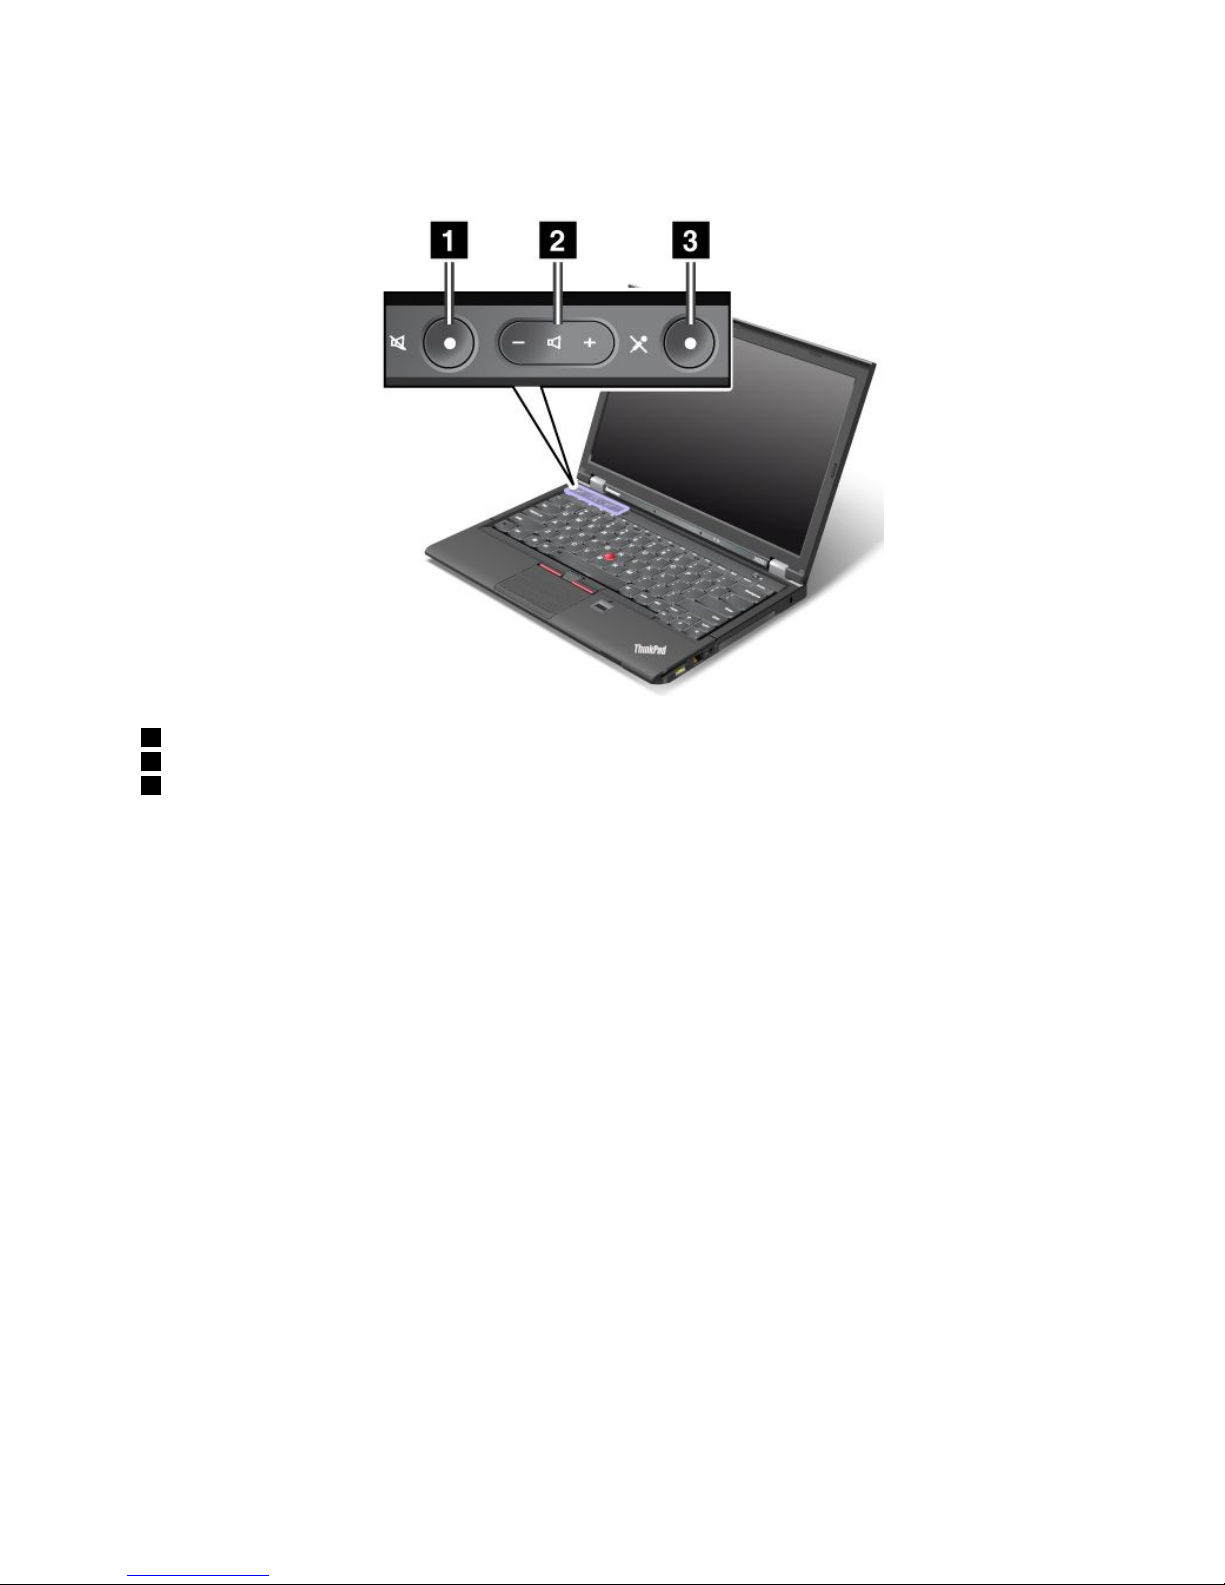
Volumeandmutebuttons
Adjustthesoundvolumelevelofthebuilt-inspeakersbyusingthefollowingthreebuttons:
1Speakermutebutton
2Volumecontrolbutton
3Microphonemutebutton
Ifyoumutethesoundandthenturnoffyourcomputer,thesoundwillremainmutedwhenyouturnonyour
computeragain.Toturnonthesound,pressthespeakermutebuttonagainorpressthevolumecontrol
button.
Settingthevolume
Toadjusttheoutputvolumeortherecordingvolume,dothefollowing:
1.GotoControlPanelandclickHardwareandSound➙Sound.TheSoundwindowopens.
2.ClickthePlaybacktaborRecordingtab,andthenclickadevicethatyouwanttocustomize.
3.ClickthePropertiesbutton.
4.ClicktheLevelstab,andthenchangethevolumebymovingtheslider.
YoualsocangetaccesstothedesktopvolumecontrolbyclickingthevolumeiconintheWindows
noticationarea.Fordetailsaboutcontrollingvolume,refertoyourWindowshelpinformationsystem.
SettingthemicrophonemutebuttonontheWindows7operatingsystem
Bydefault,whenyoupressthemicrophonemutebutton,alloftherecordingdevicesaresetonmute
orunmute.
Ifyouwanttocontrolonlyoneoftherecordingdevicesusingthemicrophonemutebutton,dothefollowing:
1.PressFn+F6.TheCommunicationssettingswindowopens.
2.ClicktheManageSettingsbutton.TheCommunicationsUtilitywindowopens.
3.OntheVoIPCallSettingstab,clickMicrophonemutebuttonsettings.TheSettingforMicrophone
Mutewindowopens.
Chapter2.Usingyourcomputer25
Page 42
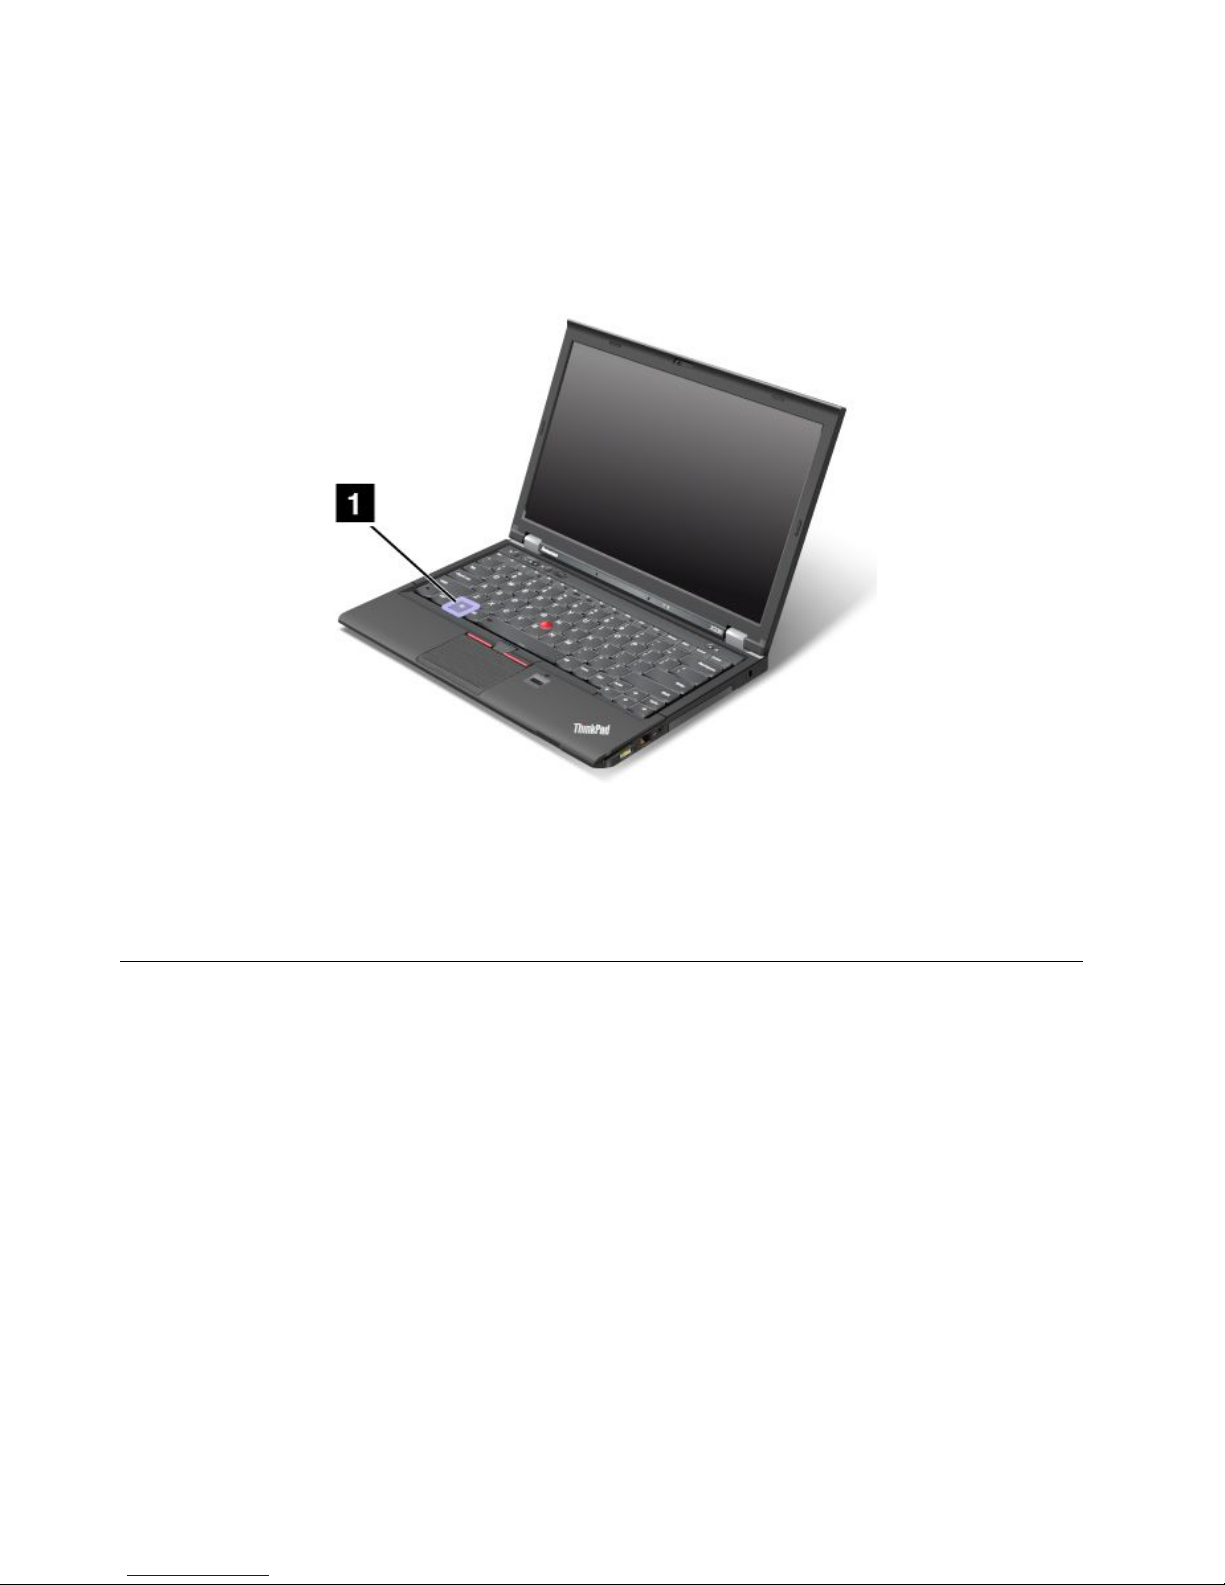
4.SelectOnlytherecordingdeviceselectedbelow:.Thenselecttherecordingdevicefromthe
drop-downlistbox.
5.ClickOK.
Windowskey
OntheWindows7operatingsystem,presstheWindowskeytoopentheStartmenu.OntheWindows8
operatingsystem,presstheWindowskeytoswitchbetweenthecurrentworkspaceandtheStartscreen.
YoualsocanusetheWindowskeytogetherwithanotherkeytoachieveotherfunctions.Fordetails,referto
thehelpinformationsystemoftheWindowsoperatingsystem.
UsingtheUltraNavpointingdevice
YourcomputercomeswiththeUltraNavpointingdevice.TheUltraNavpointingdeviceconsistsofthe
TrackPointpointingdeviceandthetouchpad,eachofwhichisitselfapointingdevicewithbothbasicand
extendedfunctions.Y oucancongurebothdevicesbychoosingthesettingsyouprefer.
•SetboththeT rackPointpointingdeviceandthetouchpadaspointingdevices.
ThissettingenablestheuseofallthebasicandextendedfunctionsoftheTrackPointpointingdevice
andthetouchpad.
•SettheT rackPointpointingdeviceasthemainpointingdeviceandthetouchpadforextended
functionsonly.
ThissettingenablestheuseofallbasicandextendedfunctionswiththeT rackPointpointingdevicewhile
limitingtheuseofthetouchpadtoscrolling,tapzones,orslow-motioncursorfunctions.
•SettheTrackPointpointingdeviceasthemainpointingdevice,anddisablethetouchpad.
•Setthetouchpadasthemainpointingdevice,anddisabletheT rackPointpointingdevice.
ChangingtheUltraNavpointingdevicesettings
TochangeyourUltraNavpointingdevicesettings,gotoControlPanelandclickHardwareandSound➙
Mouse➙UltraNav.Thenchangethesettingsasdesired.
26UserGuide
Page 43
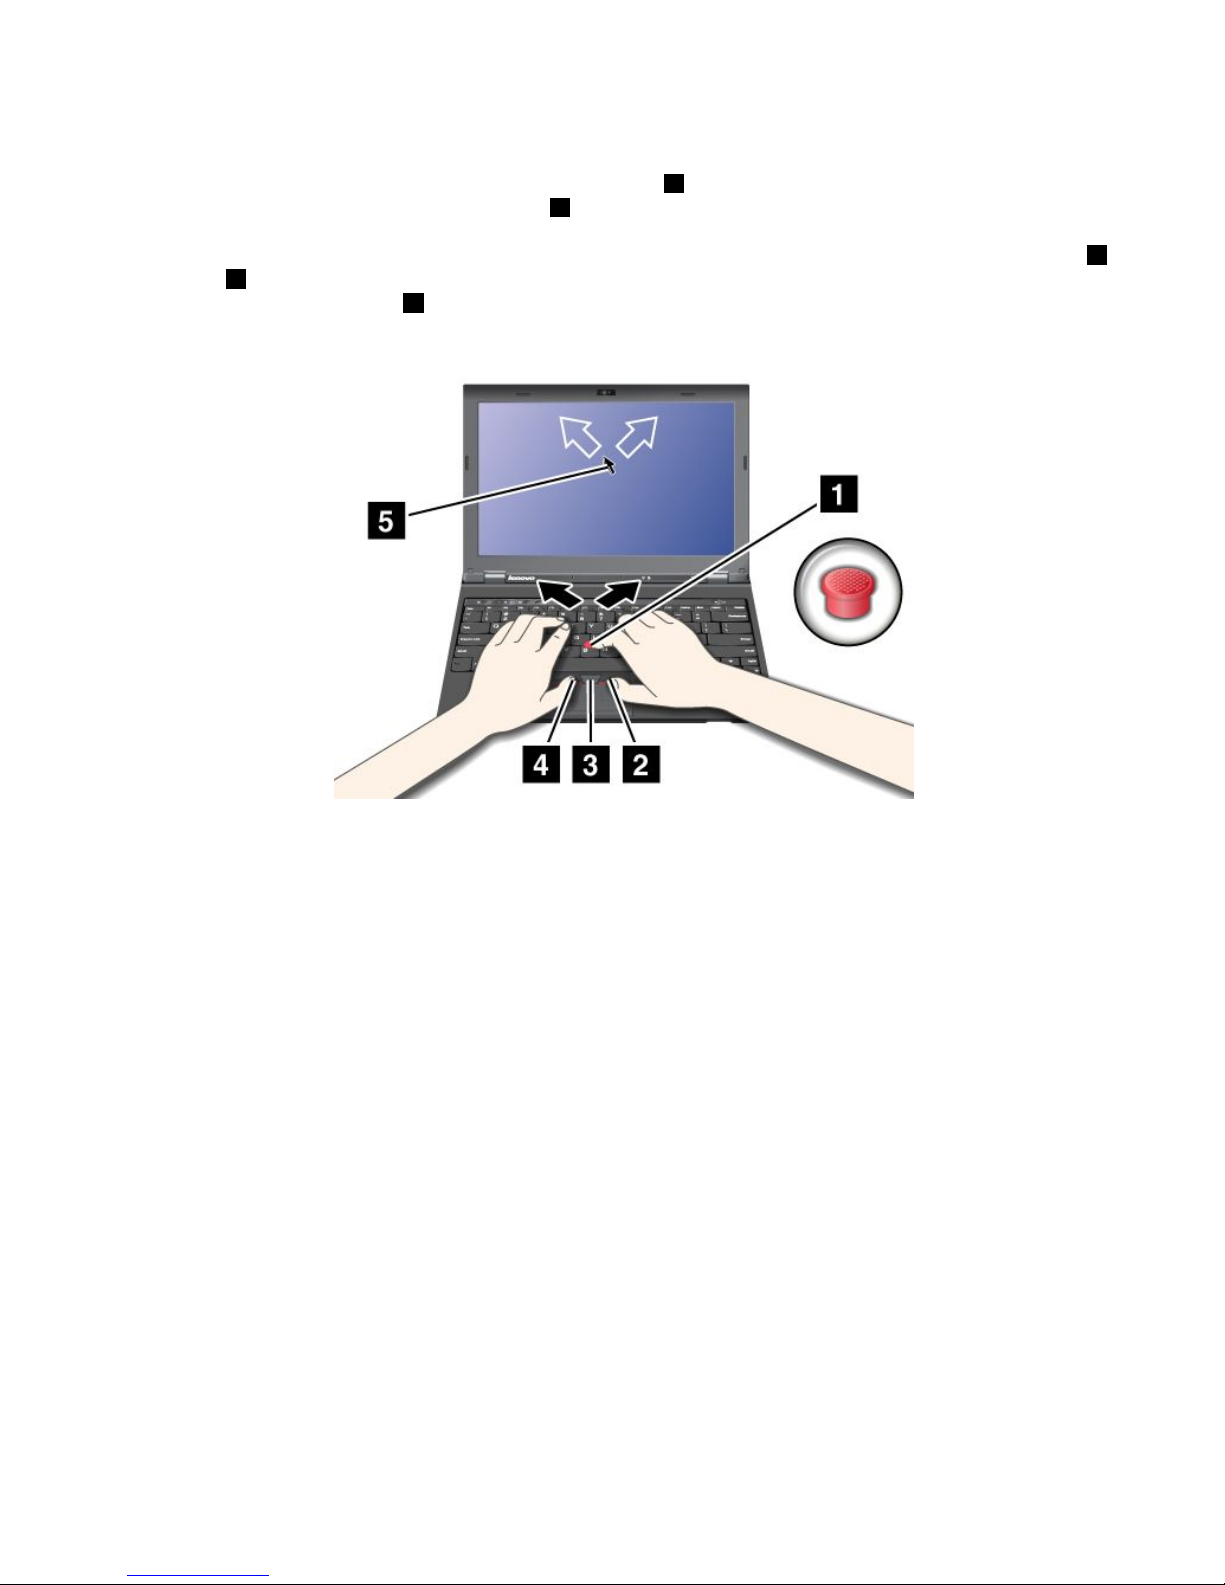
UsingtheT rackPointpointingdevice
TheTrackPointpointingdeviceconsistsofapointingstick1onthekeyboardandthreeclickbuttonsatthe
bottomofthekeyboard.Tomovethepointer5onthescreen,applypressuretothenonslipcaponthe
pointingstickinanydirectionparalleltothekeyboard;thepointingstickitselfdoesnotmove.Thespeedat
whichthepointermovesdependsonthepressureyouapplytothepointingstick.Thefunctionsoftheleft
4
andright2clickbuttonscorrespondtothoseoftheleftandrightmousebuttonsonaconventionalmouse.
TheTrackPointcenterbutton3,calledthescrollbar,enablesyoutoscrollWebpagesordocumentsinany
directionwithnoneedtousethegraphicscrollbarsonthesideofthewindow.
IfyouarenotfamiliarwiththeTrackPoint,theseinstructionswillhelpyougetstarted:
1.Placeyourhandsinthetypingposition,andpressgentlywitheitherindexngeronthepointingstickin
thedirectioninwhichyouwantthepointertomove.
Tomovethepointer,pressthepointingstickawayfromyoutomoveitup,towardyoutomoveit
down,toonesideortheothertomoveitsideways.
Note:Thepointermightdrift.Thisisnotadefect.StopusingtheTrackPointpointingdevicefora
fewseconds,thenthepointerwillstopmoving.
2.T oselectanddragasrequiredbyyoursoftware,presstheleftorrightclickbuttonwitheitherthumb
andmovetheTrackPointpointingstick.
ByenablingPress-to-Select,youcanmaketheTrackPointpointingstickfunctionthesameasthe
leftorrightclickbutton.
CustomizingthesettingsoftheTrackPointpointingdevice
YoucancustomizetheT rackPointpointingdeviceanditsbuttonsasfollows:
•Switchthefunctionsoftheleftandrightbuttons.
•ChangethesensitivityoftheTrackPointpointingdevice.
•EnablethePress-to-Selectfunction.
•EnabletheTrackPointScrollingTips.
TocustomizethesettingsoftheTrackPointpointingdevice,dothefollowing:
1.GotoControlPanelandclickHardwareandSound➙Mouse➙UltraNav.
2.UnderTrackPoint,proceedtochangingthesettings.
Chapter2.Usingyourcomputer27
Page 44
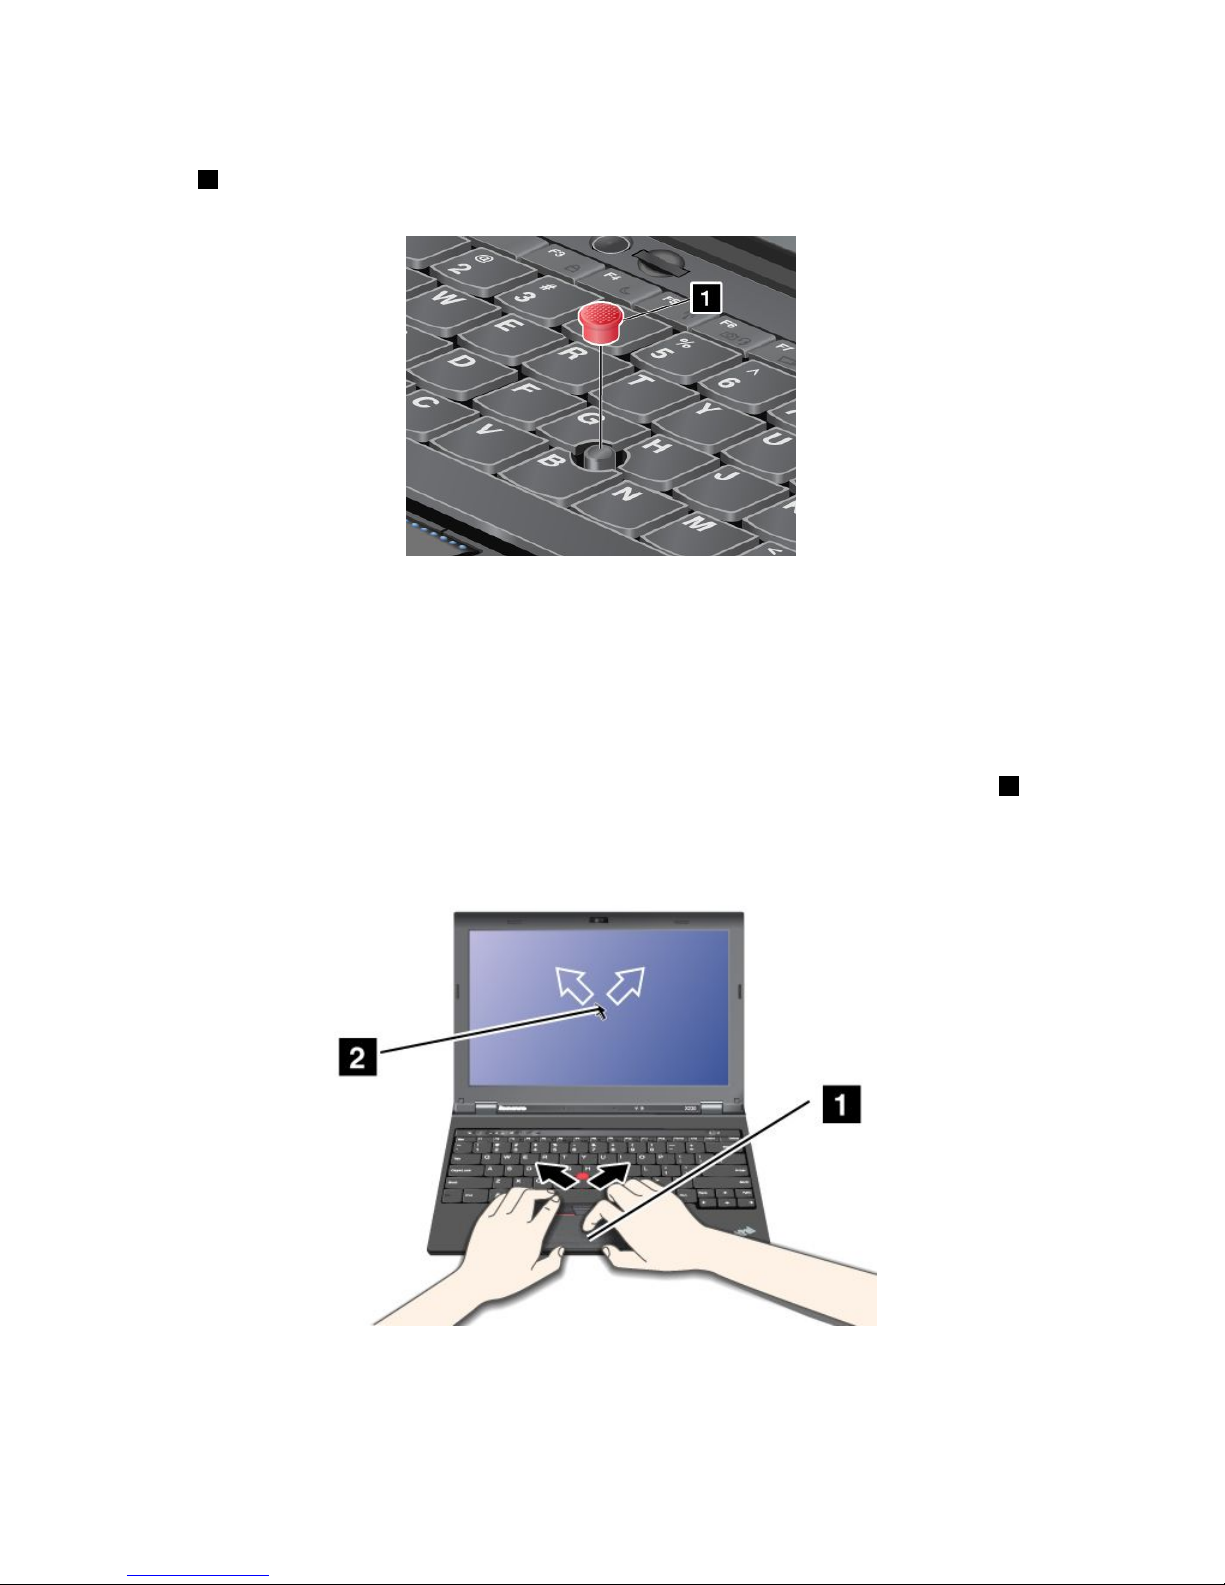
Changingthecap
Thecap1ontheendoftheTrackPointpointingstickisremovable.Youcanreplaceitasshownin
thedrawing.
Note:Ifyoureplacethekeyboard,anewkeyboardisshippedwiththedefaultcap.Ifyouwish,youcan
keepthecapfromyouroldkeyboardanduseitonthenewone.
Usingthetouchpad
Thetouchpadofyourcomputersupportsmulti-touchwithwhichyoucanzoomin,zoomout,scrollorrotate
onthescreenwhilebrowsingtheInternetorreadingoreditingadocument.
ThetouchpadisbelowtheTrackPointbuttonsatthebottomofthekeyboard.Tomovethepointer
2onthe
screen,slideyourngertipoverthepadinthedirectioninwhichyouwantthepointertomove.Theleft
andrightbottomofthepadworkasclickbuttons.Thefunctionscorrespondtothoseoftheleftandright
mousebuttonsonaconventionalmouse.
Customizingthetouchpad
Tocustomizethetouchpad,doasfollows:
1.GotoControlPanelandclickHardwareandSound➙Mouse➙UltraNav.
28UserGuide
Page 45

2.UnderTouchPad,proceedtochangingthesettings.
DisablingtheUltraNavpointingdeviceandusinganexternalmouse
IfyouattachanexternalmousetoaUSBconnector,youcanusetheexternalmousesimultaneouslywith
theT rackPointpointingdeviceandthetouchpad.
DisablingtheTrackPointpointingdeviceorthetouchpad
TodisabletheTrackPointpointingdeviceorthetouchpad,dothefollowing:
1.GotoControlPanelandclickHardwareandSound➙Mouse➙UltraNav.
2.T odisabletheTrackPointpointingdevice,clearthecheckboxforEnableTrackPoint.T odisablethe
touchpad,clearthecheckboxforEnableT ouchPad.
3.ClickOK.
AddingtheUltraNavicontothesystemtray
ForeasyaccesstotheUltraNavproperties,youcanenablethedisplayoftheUltraNaviconintheWindows
noticationarea.
ToenablethedisplayoftheUltraNaviconintheWindowsnoticationarea,dothefollowing:
1.ClickStart➙ControlPanel➙HardwareandSound➙Mouse➙UltraNav.
2.SelectthecheckboxforShowUltraNavicononthesystemtray.
3.ClickOK.YoucannowchangethepropertiesoftheUltraNavpointingdevicebyclickingtheUltraNav
iconintheWindowsnoticationarea.
Note:IfyoucannotseetheUltraNavicon,clickthetriangularicononthetaskbartoshowhiddenicons.
Powermanagement
Whenyouneedtouseyourcomputerawayfromelectricaloutlets,youdependonbatterypowertokeep
yourcomputerrunning.Differentcomputercomponentsconsumepoweratdifferentrates.Themoreyou
usethepower-intensivecomponents,thefasteryouconsumebatterypower.
Checkingbatterystatus
ThebatteryiconintheWindowsnoticationareadisplaysthepercentageofbatterypowerremaining.
Therateatwhichyouusebatterypowerwilldeterminehowlongyoucanusethebatteryofyourcomputer
betweencharges.Becauseeachcomputeruserhasdifferenthabitsandneeds,itisdifculttopredicthow
longabatterychargewilllast.Therearetwomainfactors:
•Howmuchenergyisstoredinthebatterywhenyoubegintowork.
•Thewayyouuseyourcomputer.Forexample:
–Howoftenyouaccesstheharddiskdrive.
–Howbrightyoumakethecomputerdisplay.
–Howoftenyouusethewirelessfeatures.
Tocheckfordetailedbatterystatusinformation,dothefollowing:
•ForWindows7:OpenthePowerManagerprogramandclicktheBatterytab.
•ForWindows8:OpentheLenovoSupportprogramandclickBatteryHealth,oropentheLenovo
SettingsprogramandclickPower.
Chapter2.Usingyourcomputer29
Page 46

Usingtheacpoweradapter
Thepowertorunyourcomputercancomeeitherfromthelithium-ion(Li-ion)batterypack,orfromacpower
throughtheacpoweradapter.Whileyouuseacpower,thebatterychargesautomatically.
Theacpoweradapterthatcomeswithyourcomputerhastwobasiccomponents:
•Thetransformerpackthatconvertsacpoweradapterforusewiththecomputer.
•Thepowercordthatplugsintotheacoutletandintothetransformerpack.
Attention:Usinganimproperpowercordmightcauseseveredamagetoyourcomputer.
Connectingtheacpoweradapter
Tousetheacpoweradapter,dothefollowing.Besuretotakethesestepsintheorderinwhichtheyare
givenhere.
1.Connecttheacpoweradaptertothepowerjackofthecomputer.
2.Connectthepowercordtothetransformerpack.
3.Plugthepowercordintoanelectricaloutlet.
Tipsonusingtheacpoweradapter
•Whentheacpoweradapterisnotinuse,disconnectitfromtheelectricaloutlet.
•Donotbindthepowercordtightlyaroundtheacpoweradaptertransformerpackwhenitisconnectedto
thetransformer.
•Beforeyouusetheacpoweradaptertochargethebattery,makesurethatthebatterytemperature
isatleast10°C(50°F).
•Youcanchargethebatterywhentheacpoweradapterisconnectedtothecomputerandthebatteryis
installed.Youneedtochargeitinanyofthefollowingconditions:
–Whenyoupurchaseanewbattery
–Ifthebatterystatusindicatorstartsblinking
–Ifthebatteryhasnotbeenusedforalongtime
Chargingthebattery
Whenyoucheckbatterystatusandndthatthepercentageofpowerremainingisloworwhenthepower
alarmalertsyouthattheremainingpowerislow,youneedtochargeyourbatteryorreplaceitwitha
chargedbattery.
Ifanacoutletisconvenient,plugtheacpoweradapterintoit,andtheninsertthejackintothecomputer.
Thebatterywillbefullychargedinabout3to6hours.Thechargingtimeisaffectedbythebatterysize
andthephysicalenvironment.Youcancheckthebatterychargingstatusatanytimebylookingatthe
batterymetericonattheWindowsnoticationarea.
Note:Toincreasethelifeofthebattery,thecomputerdoesnotstartrechargingthebatteryiftheremaining
powerisgreaterthan95%.
Maximizingbatterylife
Tomaximizethelifeofthebattery,dothefollowing:
•Usethebatteryuntilthechargeiscompletelydepleted,thatis,usethebatteryuntilthebatterystatus
indicatorstartsblinkingorange.
•Rechargethebatterycompletelybeforeusingit.Thebatteryisfullychargedifthebatteryindicatorshows
greenwhentheacpoweradapterispluggedin.
30UserGuide
Page 47

•Alwaysusepower-savingmodes,suchasscreenblank,sleep,andhibernation.
Managingyourbatterypower
Toachievethebestbalancebetweenperformanceandpowersaving,adjustyourpowerplansettings.
Toaccesspowerplansettings,dothefollowing:
•ForWindows7:StartthePowerManagerprogramandthenclickthePowerPlantab.Forinstructionson
howtostartthePowerManagerprogram,see“AccessingLenovoprogramsontheWindows7operating
system”onpage14
.
•ForWindows8:Right-clickthebatterystatusiconfromtheWindowsnoticationareaandclickPower
Options.ThenclickChangeplansettingsthatisnexttoyourpowerplan.
Formoreinformation,refertothehelpinformationsystemoftheprogram.
Power-savingmodes
Thereareseveralmodesthatyoucanuseatanytimetoconservepower.Thissectionintroduceseach
modeandgivestipsontheeffectiveuseofthebatterypower.
Understandingthepower-savingmodes
•Screenblank(fortheWindows7operatingsystemonly)
Thecomputerdisplayrequiresconsiderablebatterypower.T oturnoffpowertothedisplay,right-clickthe
batterygaugeiconfromtheWindowsnoticationareaandselectPoweroffdisplay.
•Sleep
Insleepmode,yourworkissavedtomemory,andthenthesolid-statedriveortheharddiskdriveandthe
computerdisplayareturnedoff.Whenyourcomputerwakesup,yourworkisrestoredwithinseconds.
Toputyourcomputerintosleepmode,pressFn+F4.Toreturnfromsleepmode,presstheFnkey.
Dependingonthecomputermodel,yourcomputermightsupportthe30DayStandbyfunction.Whenthis
functionisenabled,thecomputerconsumesevenlesspowerinsleepmodeandtakesonlyseconds
toresumenormaloperationwhenyoupressthepowerbutton.Formoreinformationaboutthe30Day
Standbyfunction,dothefollowing:
–ForWindows7:RefertothehelpinformationsystemofthePowerManagerprogram.Forinstructions
onhowtostartthePowerManagerprogram,see“AccessingLenovoprogramsontheWindows7
operatingsystem”onpage14
.
–ForWindows8:OpentheLenovoSettingsprogramandclickPower.
•Hibernation
Byusingthismode,youcanturnoffyourcomputercompletelywithoutsavinglesorexitingfromany
programsthatarerunning.Whenthecomputerentershibernation,allopenprograms,folders,andles
aresavedtotheharddisk,andthenthecomputerturnsoff.
Toputthecomputerintohibernationmode,changeyourpowerplansettings.Toaccesspowerplan
settings,dothefollowing:
–ForWindows7:StartthePowerManagerprogramandthenclickthePowerPlantab.Forinstructions
onhowtostartthePowerManagerprogram,see“AccessingLenovoprogramsontheWindows7
operatingsystem”onpage14.
–ForWindows8:Right-clickthebatterystatusiconfromtheWindowsnoticationareaandclickPower
Options.ThenclickChangeplansettingsthatisnexttoyourpowerplan.
•Wirelessoff
Whenyouarenotusingthewirelessfeatures,suchasBluetoothorwirelessLAN,turnthemoff.Thiswill
helpconservepower.Toturnoffthewirelessfeatures,pressFn+F5orusethewirelessradioswitch.
Chapter2.Usingyourcomputer31
Page 48

Enablingthewakeupfunction
Ifyouputyourcomputerintohibernationmode,andthewakeupfunctionisdisabled(thisisthedefault
setting),thecomputerdoesnotconsumeanypower.Ifthewakeupfunctionisenabled,itconsumesasmall
amountofpower.Toenablethewakeupfunction,dothefollowing:
1.GotoControlPanelandclickSystemandSecurity➙AdministrativeTools.
2.Double-clickT askScheduler.Ifyouarepromptedforanadministratorpasswordorconrmation,type
thepasswordorprovideconrmation.
3.Fromtheleftpane,selectthetaskfolderforwhichyouwanttoenablethewakeupfunction.The
scheduledtasksaredisplayed.
4.Clickascheduledtask,andthenclicktheConditionstab.
5.UnderPower,selectthecheckboxforWakethecomputertorunthistask.
EnablingthebatteryalarmontheWindows7operatingsystem
FortheWindows7operatingsystem,youcanprogramyourcomputersothatwhenthebatterypowerfalls
belowacertainlevel,threeeventsoccur:
•Thealarmgoesoff.
•Awarningmessageisdisplayed.
•TheLCDisturnedoff.
Toenablethebatteryalarm,dothefollowing:
1.StartthePowerManagerprogram.
2.ClicktheGlobalPowerSettingstab.
3.ForLowbatteryalarmorCriticallylowbatteryalarm,setthepercentageofthepowerlevelandset
theaction.
Note:Ifyourcomputerenterssleeporhibernationmodewhenthebatteryislow,butthealarmmessage
hasnotyetbeendisplayed,themessagewillbedisplayedwhenthecomputerresumes.Toresumenormal
operation,clickOK.
Handlingthebattery
ThissystemsupportsonlybatteriesspeciallydesignedforthisspecicsystemandmanufacturedbyLenovo
oranauthorizedbuilder.Thesystemdoesnotsupportunauthorizedbatteriesorbatteriesdesignedforother
systems.Ifanunauthorizedbatteryorabatterydesignedforanothersystemisinstalled,thesystemwill
notcharge.
Attention:Lenovohasnoresponsibilityfortheperformanceorsafetyofunauthorizedbatteries,and
providesnowarrantiesforfailuresordamagearisingoutoftheiruse.
DANGER
Donotattempttodisassembleormodifythebatterypack.
Attemptingtodosocancauseanexplosion,orliquidleakagefromthebatterypack.
AbatterypackotherthantheonespeciedbyLenovo,oradisassembledormodiedbattery
packisnotcoveredbythewarranty.
32UserGuide
Page 49

DANGER
Iftherechargeablebatterypackisincorrectlyreplaced,thereisdangerofanexplosion.Thebattery
packcontainsasmallamountofharmfulsubstances.T oavoidpossibleinjury:
•ReplaceonlywithabatteryofthetyperecommendedbyLenovo.
•Keepthebatterypackawayfromre.
•Donotexposeittoexcessiveheat.
•Donotexposeittowaterorrain.
•Donotshort-circuitit.
•Storeitinacooldryplace.
•Keepitawayfromchildren.
Thebatterypackisaconsumablesupply.Ifyourbatterybeginstodischargetooquickly,replacethe
batterypackwithanewoneofthetyperecommendedbyLenovo.Formoreinformationonreplacingthe
batterypack,contactyourCustomerSupportCenter.
DANGER
Donotdrop,crush,puncture,orsubjecttostrongforces.Batteryabuseormishandlingcancause
thebatterytooverheat,whichcancausegassesorameto“vent”fromthebatterypackorcoin
cell.Ifyourbatteryisdamaged,orifyounoticeanydischargefromyourbatteryorthebuildup
offoreignmaterialsonthebatteryleads,stopusingthebatteryandobtainareplacementfrom
thebatterymanufacturer .
DANGER
Onlyrechargethebatterypackstrictlyaccordingtoinstructionsincludedintheproduct
documentation.
DANGER
Donotputthebatterypackintrashthatisdisposedofinlandlls.Whendisposingofthebattery,
complywithlocalordinancesorregulationsandyourcompany'ssafetystandards.
DANGER
Thereisadangerofanexplosionifthebackupbatteryisincorrectlyplaced.Thelithiumbattery
containslithiumandcanexplodeifitisnotproperlyhandled,ordisposedof.Replaceonlywitha
batteryofthesametype.Toavoidpossibleinjuryordeath,Donot:(1)throworimmerseintowater,
(2)allowittoheattomorethan100°C(212°F),or(3)attempttorepairordisassembleit.Disposeof
itasrequiredbylocalordinancesorregulationsandyourcompany'ssafetystandards.
Connectingtothenetwork
YourcomputerhasoneormorenetworkcardsforconnectingtotheInternetandtoyourcompany'swired
LANorwirelessLANnetwork.
Chapter2.Usingyourcomputer33
Page 50

Note:Somemodelscomewithabuilt-inwirelessWANcardenablingyoutoestablishwirelessconnections
overremotepublicorprivatenetworks.
Ethernetconnections
YoucanconnecttoyourlocalnetworkorabroadbandconnectionbyuseoftheEthernetfeaturebuiltinto
yourcomputer.IfyouareusingtheWindows7operatingsystem,theAccessConnectionsprogramalso
enablesyoutomanageyourlocationproles.Formoreinformation,see“AccessingLenovoprograms
ontheWindows7operatingsystem”onpage14
.
DANGER
YourcomputerhasanEthernetconnector.Toavoidtheriskofelectricalshock,donotconnect
thetelephonecabletotheEthernetconnector.
Wirelessconnections
Wirelesscommunicationisthetransferofdatawithouttheuseofcablesbutbymeansofradiowavesonly.
Dependingonthewirelessdeviceusedinyourcomputer,youmightbeabletoconnecttothefollowing
categoriesofwirelessnetworks.
WirelessLAN
Awirelesslocalareanetwork(LAN)coversarelativelysmallgeographicarea,suchasanofcebuildingora
house.Devicesbasedonthe802.11standardscanconnecttothisnetwork.
Yourcomputercomeswithabuilt-inwirelessnetworkcardandacongurationutilitytohelpyoumake
wirelessconnectionsandmonitorthestatusofyourconnection,sothatyoucanstayconnectedtoyour
networkwhileyouareintheofce,inameetingroom,orathome,withnoneedforawiredconnection.
TipsforusingthewirelessLANfeature
Toachievethebestconnection,usethefollowingguidelines:
•PlaceyourcomputersothatthereareasfewobstaclesaspossiblebetweenthewirelessLANaccess
pointandthecomputer.
•Openyourcomputerdisplaytoanangleofslightlymorethan90degrees.
•Ifyouusethewirelessfeature(the802.11standard)ofyourcomputersimultaneouslywithaBluetooth
option,thedatatransmissionspeedcanbedelayedandtheperformanceofthewirelessfeaturecanbe
degraded.
WirelessWAN
WirelessWideAreaNetwork(wirelessWAN),usingcellularnetworksfordatatransmission,enablesyou
toestablishwirelessconnectionsoverremotepublicorprivatenetworks.Theseconnectionscanbe
maintainedoveralargegeographicalarea,suchasacityoranentirecountry,byuseofmultipleantenna
sitesorsatellitesystemsmaintainedbywirelessserviceproviders.
SomeThinkPadnotebookcomputerscomewithabuilt-inwirelessWANcardintegratingsomewireless
WANtechnologies,suchas1xEV-DO,HSPA,3G,GPRSorL TE.Byusingthebuilt-inwirelessWANcardand
thecongurationutilitythatcomeswithyourcomputer,youcanestablishwirelessWANconnectionsand
monitorthestatusofyourconnection.
Note:WirelessWANserviceisprovidedbyauthorizedserviceprovidersinsomecountries.
34UserGuide
Page 51

TipsforusingthewirelessWANfeature
Toachievethebestconnection,usethefollowingguidelines:
•Keepyourcomputerawayfromyourbody.
•Placeyourcomputeronaatsurfaceandopenyourcomputerdisplaytoanangelofslightlymore
than90degrees.
•Placeyourcomputerawayfromconcreteorbrickwallsthatmightdampencellularsignals.
•Bestreceptionwillbeavailablenearwindowsandotherlocationswherecellularphonereceptionisthe
strongest.
WiMAX
SomeThinkPadnotebookcomputerscomewithabuilt-inwirelessLANcardintegratingWiMAXtechnology.
Thislong-rangewirelessdatatransmissiontechnologybasedonthe802.16standardisexpectedtoprovide
theusera“lastmile”broadbandconnectivitysimilartothatprovidedbycableorADSL,butwithouttheneed
tophysicallyconnectacabletothepersonalcomputer.
Bluetooth
Bluetoothisoneofanumberoftechnologiesusedtocreateawirelesspersonalareanetwork.Bluetooth
canconnectdevicesashortdistancefromoneanother,andiscommonlyusedforconnectingperipheral
devicestoacomputer,transferringdatabetweenhand-helddevicesandapersonalcomputer,orremotely
controllingandcommunicatingwithdevicessuchasmobilephones.
Establishingawirelessconnection
Toestablishawirelessconnection,dothefollowing:
1.PressFn+F5toturnonthewirelessfeature.
2.ClickthewirelessnetworkconnectionstatusiconintheWindowsnoticationarea.Alistofavailable
wirelessnetworksisdisplayed.
3.Double-clickanetworktoconnecttoit.Providerequiredinformationifneeded.
Ifyouneedtoconnecttodifferentwirelessnetworksindifferentlocations,usethefollowingsoftwareto
managemultiplenetworkprolessothatthecomputerconnectstoanavailablenetworkautomaticallywhen
thelocationchanges:
•ForWindows7:UsetheAccessConnectionsprogram.ForinstructionsonhowtostarttheAccess
Connectionsprogram,see“AccessingLenovoprogramsontheWindows7operatingsystem”onpage14.
•ForWindows8:OpentheLenovoSettingsprogramandclickLocationAwareness.See“Accessing
LenovoprogramsontheWindows8operatingsystem”onpage16.
Attention:
•Ifyouwanttousethewirelessfeaturesonanairplane,checkthewirelessserviceswiththeairlinebefore
boardingtheairplane.
•Iftherearerestrictionsontheuseofcomputerwirelessfeaturesonanairplane,youneedtodisableyour
computerwirelessfeaturesbeforeboarding.Todisablethewirelessfeatures,see“Enablingordisabling
thewirelessfeature”onpage37
.
UsingBluetooth
SomemodelsareequippedwithaBluetoothcardthatiscompliantwithBluetoothSpecication4.0.
Chapter2.Usingyourcomputer35
Page 52

ToenabletheBluetoothfeatureontheWindows7operatingsystem,pressFn+F5toopenthewireless
radioswitchboard.ThenturnontheBluetoothradio.FortheWindows8operatingsystem,theBluetooth
featureisonbydefault.
SendingdatatoaBluetooth-enableddevice
TosenddatatoaBluetooth-enableddevice,dothefollowing:
1.EnabletheBluetoothfeature.
2.Right-clickthedatathatyouwanttosend.
3.SelectSendT o➙BluetoothDevices.
4.SelectaBluetoothdeviceandthenfollowtheinstructionsonthescreen.
Note:Ifyouusethewirelessfeature(the802.11standard)ofyourcomputersimultaneouslywithaBluetooth
option,thedatatransmissionspeedcanbedelayedandtheperformanceofthewirelessfeaturecanbe
degraded.
FormoreinformationaboutusingtheBluetoothfeature,refertotheWindowshelpinformationsystemand
theBluetoothhelpinformationsystem.
Checkingthewirelessnetworkconnectionstatus
Youcancheckyourcomputerwirelessnetworkconnectionstatusandwirelesssignalstrengththroughthe
wirelessnetworkconnectionstatusiconintheWindowsnoticationarea.Themorebarsencompassed,the
betterthesignal.
FortheWindows7operatingsystem,youalsocanchecktheAccessConnectionsgauge,theAccess
Connectionsstatusicon,ortheAccessConnectionswirelessnetworkconnectionstatusiconinthe
Windowsnoticationarea.
AccessConnectionsgauge
OntheWindows7operatingsystem,theAccessConnectionsgaugeintheWindowsnoticationarea
displaysthestatusandsignalstrengthofyourwirelessconnection.
Youcanndmoredetailedinformationaboutthestatusandsignalstrengthofyourwirelessconnection
byopeningtheAccessConnectionsprogramorbyright-clickingtheAccessConnectionsgaugeinthe
WindowsnoticationareaandselectingViewStatusofWirelessConnection.
•AccessConnectionsgaugestates:wirelessLAN
–Powertothewirelessradioisoffornosignal.
–Powertothewirelessradioison.Thesignalstrengthofthewirelessconnectionispoor.To
improvethesignalstrength,moveyourcomputerclosertothewirelessaccesspoint.
–
Powertothewirelessradioison.Thesignalstrengthofthewirelessconnection
ismarginal.
–Powertothewirelessradioison.Thesignalstrengthofthewirelessconnectionis
excellent.
•AccessConnectionsgaugestates:wirelessWAN
–
Nosignal
–Signallevel1
–Signallevel2
36UserGuide
Page 53

–Signallevel3
AccessConnectionsstatusicon
TheAccessConnectionsstatusicondisplaysgeneralconnectionstatus.
•AccessConnectionsstatusiconstates
–Nolocationproleisactiveornoneexists.
–Currentlocationproleisdisconnected.
–Currentlocationproleisconnected.
AccessConnectionswirelessstatusicon
TheAccessConnectionswirelessstatusicondisplaysthestatusandsignalstrengthofyourwireless
connection.
Youcanndmoredetailedinformationaboutthestatusandsignalstrengthofyourwirelessconnection
eitherbyopeningtheAccessConnectionsprogramorbydouble-clickingtheAccessConnectionswireless
statusiconintheWindowsnoticationarea.
•Wirelessstatusiconstates:wirelessLAN
–
Powertothewirelessradioisoff.
–Powertothewirelessradioison.Noassociation.
–Powertothewirelessradioison.Nosignal.
–
Powertothewirelessradioison.Thesignalstrengthofthewirelessconnectionisexcellent.
–
Powertothewirelessradioison.Thesignalstrengthofthewirelessconnectionismarginal.
–
Powertothewirelessradioison.Thesignalstrengthofthewirelessconnectionispoor.Toimprove
thesignalstrength,moveyourcomputerclosertothewirelessaccesspoint.
•Wirelessstatusiconstates:wirelessWAN
–Powertothewirelessradioisoff.
–Noassociation
–Nosignal
–Signallevel1
–Signallevel2
–Signallevel3
Note:Ifyouhavetroubleinmakingaconnection,trymovingyourcomputerclosertoyourwirelessaccess
point.
Enablingordisablingthewirelessfeature
Toenableordisablethewirelessfeatures,dooneofthefollowing:
•ForWindows7:PressFn+F5toopenthewirelessradioswitchboard.Turnonorturnoffthewireless
featureasdesired.
•ForWindows8:PressFn+F5toenableordisabletheAirplanemode.WhentheAirplanemodeisenabled,
allofyourwirelessdevicesareturnedoff.
Youalsocanusethewirelessradioswitchtoturnonorturnoffthewirelessradiosofallthewirelessdevices
onyourcomputer.
Chapter2.Usingyourcomputer37
Page 54

Presentationsandmultimedia
Youcanconnectyourcomputertoaprojectortogivepresentationsoryoucanconnectyourcomputer
toanexternalmonitortoexpandyourworkspace.
Changingdisplaysettings
Youcanchangethedisplaysettings,suchasthedisplayresolution,fontsize,andsoon.
Tochangethedisplaysettings,dothefollowing:
1.OpenControlPanelandclickAppearanceandPersonalization.
2.ClickDisplayforfurtherconguration.
Connectingaprojectororexternaldisplay
Thistopicprovidesinformationaboutconnectingaprojectororanexternalmonitor.
Attachinganexternalmonitor
Yourcomputercansupportamaximumvideoresolutionofupto2048x1536(withanexternalmonitor
attachedtotheVGAconnector)orupto2560x1600(withanexternalmonitorattachedtotheMini
DisplayPortconnector),providedthattheexternalmonitoralsosupportsthatresolution.Formoredetails,
refertothemanualsprovidedwithyourmonitor.
Youcansetanyresolutionforeitherthecomputerdisplayortheexternalmonitor.Whenyouusebothatthe
sametime,theresolutionofbothisthesame.Ifyousetahigherresolutionforthecomputerdisplay,you
canseeonlypartofthescreenatatime.Y oucanseeotherpartsbymovingtheimagewiththeTrackPoint
pointingdeviceoranotherpointingdevice.
Youcanmovethedisplayoutputtothecomputerdisplay,theexternalmonitor,orbothbypressingFn+F7.
Connectinganexternalmonitor
Toattachanexternalmonitor,dothefollowing:
1.ConnecttheexternalmonitortotheVGAconnectorortheMiniDisplayPortconnector.
2.Connectthemonitortoanelectricaloutlet.
3.T urnontheexternalmonitor.
4.ChangethedisplayoutputlocationbypressingFn+F7.Thisenablesyoutoswitchbetweenviewing
outputontheexternalmonitor,thecomputermonitor,andbothmonitors.
Note:Ifyourcomputercannotdetecttheexternalmonitor,right-clickonthedesktop,thenselectScreen
resolution.ClicktheDetectbutton.
Settingtheexternalmonitortype
Tosettheexternalmonitortype,dothefollowing:
1.Connecttheexternalmonitortothemonitorconnector,andthenconnectthemonitortoanelectrical
outlet.
2.T urnontheexternalmonitor.
3.Right-clickonthedesktop,andclickScreenresolution.
Note:Ifyourcomputercannotdetecttheexternalmonitor,clicktheDetectbutton.
4.SelecttheexternalmonitorandsetResolution.
38UserGuide
Page 55

5.ClickAdvancedSettings.
6.ClicktheMonitortab.Checkthemonitorinformationtomakesurethatthemonitortypeiscorrect.Ifit
is,clickOKtoclosethewindow;otherwiseproceedwiththefollowingsteps.
7.Ifmorethantwomonitortypesaredisplayed,selectGenericPnPMonitororGenericNon-PnP
Monitor.
8.ClickProperties.Ifyouarepromptedforanadministratorpasswordorconrmation,typethepassword
orprovideconrmation.
9.ClicktheDrivertab.
10.ClickUpdateDriver.
11.ClickBrowsemycomputerfordriversoftware,andthenclickLetmepickfromalistofdevice
driversonmycomputer.
12.CleartheShowcompatiblehardwarecheckbox.
13.Selectthecorrectmanufacturerandmodelfortheexternalmonitor.Ifyoucannotndyourmonitoron
thelist,stoptheinstallationofthisdriverandusethedrivershippedwithyourmonitor.
14.Afterupdatingthedriver,clickClose.
15.FortheWindows7operatingsystem,tochangethecolorsettings,right-clickonthedesktop,andclick
Screenresolution.ClickAdvancedSettings,selecttheMonitortab,thensetColors.
16.ClickOK.
Considerationsforattachinganexternalmonitor
•Wheninstallinganoperatingsystem,youmustinstallthedisplaydriverforyourmonitorthatissupplied
withthecomputer,andthemonitorINFlethatissuppliedwiththeexternalmonitor.
•Ifyousetaresolutionhigherthantheresolutionyouareusingonthecomputermonitor,andusean
externalmonitorthatdoesnotsupportthatresolution,takeadvantageofthevirtualscreenfunction,
whichenablesyoutodisplayonlyapartofthehigh-resolutionscreenimageyourcomputerproduces.
YoucanseeotherpartsoftheimagebymovingthescreenwiththeTrackPointpointingdeviceoranother
pointingdevice.
•Iftheexternalmonitoryouareusingisoutdated,theresolutionandtherefreshratemightbelimited.
UsingtheDVImonitor
Ifyourcomputerisattachedtooneofthefollowingoptionalexpansionunits,youcanconnectadigitalvisual
interface(DVI)monitortoyourcomputerthroughtheDVIconnectorofthatunit.
•ThinkPadMiniDockSeries3
•ThinkPadMiniDockSeries3withUSB3.0
•ThinkPadMiniDockPlusSeries3
•ThinkPadMiniDockPlusSeries3withUSB3.0
Notes:
•ThescreenmodethatcanbeuseddependsonthespecicationsoftheDVImonitor.
•BeforeyouattachtheDVImonitor,makesurethatthecomputerisattachedtotheexpansionunitand
thesystemworksproperly.
ToattachtheDVImonitor,dothefollowing:
1.T urnoffthecomputer.
2.ConnecttheDVImonitortotheDVIconnectoroftheexpansionunit,andthenconnectthemonitor
toanelectricaloutlet.
3.T urnontheDVImonitorandthecomputer.Thesystemstarts.
Chapter2.Usingyourcomputer39
Page 56

IfthecomputeroutputdoesnotappearontheDVImonitor,dothefollowing:
•ForWindows7:
1.PressCtrl+Alt+F12.TheIntelGraphicsandMediaControlPanelwindowopens.
2.SelectAdvancedModeandclickOK.
3.SelectMultipleDisplays.
4.IntheOperatingModeeld,selectanyofthefollowingoptions.
–SingleDisplay:Dependingonyourconguration,thecomputeroutputisdisplayedoneitherthe
computerdisplayortheDVImonitor.
–CloneDisplays:Thesamecomputeroutputisdisplayedonboththecomputerdisplayand
theDVImonitor.
–ExtendedDesktop:Differentcomputeroutputisdisplayedonthecomputerdisplayandthe
DVImonitor.
•ForWindows8:
1.Movethecursortothetop-rightorbottom-rightcornerofthescreenandclicktheDevicescharm.
2.ClickSecondscreenandselectDuplicate,Extend,orSecondScreenOnly.
ConsiderationsforattachingaDVImonitor
ConnecttheDVImonitortotheexpansionunit,andturnitonbeforeyouturnonthecomputer.Otherwisethe
systemcannotrecognizetheDVImonitor.IftheoptionforenablingtheDVImonitorintheDisplayProperties
windowisnotdisplayed,tryclosingthewindowandopeningitagain.Iftheoptionstillisnotdisplayed,make
surethattheconnectorofthemonitorisattachedrmly,andrepeattheprocedureforattachingthemonitor.
UsingtheMiniDisplayPortconnector
YourcomputerhasaMiniDisplayPortconnector,adigitaldisplayinterfaceforconnectiontovarious
externaldevices,suchasCRTmonitors,LCDmonitors,projectors,orevenhigh-denitiontelevisions.This
compactconnectorenablesaplug-and-playsetupandsupportsadaptersthatcanplugintoDVI,VGA,or
HDMIconnectors.
TheMiniDisplayPortconnectorofyourcomputersupportsaudioaswellasvideostreaming.
Settingupapresentation
Todisplayinformationandmakepresentations,youcanattachadataprojectortoyourcomputerthrough
theVGAconnectoronyourcomputer.
Note:Itmaytakeseveralsecondsbeforetheprojectordisplaystheimage.Ifyoudonotseeyourdesktop
displayedafter60seconds,trypressingFn+F7toswitchbetweendifferentdisplayoutputlocations.
Yourprojectormighthaveoneormoreaudio-inputconnectors.Toprojectsound,youwillneedtoattachthe
comboaudiojackonyourcomputertotheseconnectors,usinganaudiocable(commerciallyavailable).
UsingtheExtenddesktopfunction
YourcomputersupportsafunctionnamedtheExtenddesktopfunction.WiththeExtenddesktopfunction,
youcandisplayoutputonboththecomputerdisplayandanexternalmonitor.Youalsocandisplaydifferent
desktopimagesoneachmonitor.
ConsiderationsforusingtheExtenddesktopfunction
•WhenaprogramusingDirectDraworDirect3Displayedinfull-screenmode,itisshownonlyonthe
primarydisplay.
40UserGuide
Page 57

•IfyouwanttoshowDOSfull-screenwhileintheExtenddesktopmode,onlytheprimarydisplayshows
DOS;theotherdisplayisblackedout.
•IfyourcomputerhastheIntelgraphicscard,youcandesignatetheotherdisplayastheprimarydisplay
bydoingthefollowing:
1.Right-clickonthedesktopandselectScreenResolution.
2.ClickthedesireddisplayimageandselecttheMakethismymaindisplaycheckbox.
3.ClickOK.
EnablingtheExtenddesktopfunction
ToenabletheExtenddesktopfunction,dothefollowing:
1.Connecttheexternalmonitortothemonitorconnector;thenconnectthemonitortoanelectricaloutlet.
2.T urnontheexternalmonitor.
3.PressFn+F7,thenselectExtend.
Tochangetheresolutionandcolorqualityforeachmonitor,dothefollowing:
1.Right-clickonthedesktop,andclickScreenresolution.
2.Clickthemonitor-1icon(fortheprimarydisplay,thecomputerdisplay).
3.Settheresolutionfortheprimarydisplay.
4.Clickthemonitor-2icon(forthesecondarydisplay,theexternaldisplay).
5.Settheresolutionforthesecondarydisplay.
6.ClickAdvancedsettingsandsetupthecolorqualityontheMonitortab.
7.ClickOKtoapplythechanges.
Usingaudiofeatures
Yourcomputerisequippedwiththefollowing:
•Comboaudiojack,1/8inch(3.5mm)indiameter
•Built-inspeakers
•Built-inmicrophones
Yourcomputeralsohasanaudiochipthatenablesyoutoenjoyvariousmultimediaaudiofeatures,such
asthefollowing:
•RecordingandplaybackofPCMandWAVles
•PlaybackofMIDIandMP3les
•Recordingfromvarioussoundsources,suchasaheadsetattached
Thefollowingtableshowswhichfunctionsoftheaudiodevicesattachedtothejacksonyourcomputeror
dockingstationaresupported.
Chapter2.Usingyourcomputer41
Page 58

Table3.Audiofeaturelist
JackHeadsetwitha3.5mm
4-poleplug
ConventionalheadphoneConventionalmicrophone
Comboaudiojack
Headphoneand
microphonefunctions
supported
Headphonefunction
supported
Notsupported
Headphonejackofthe
dockingstation
Onlyheadphonefunction
supported
Microphonefunctionnot
supported
Headphonefunction
supported
Notsupported
Microphonejackofthe
dockingstation
NotsupportedNotsupported
Microphonefunction
supported
Tocongurethemicrophoneforoptimizedsoundrecording,usetheRealtekHDAudioManagerprogram.To
starttheprogram,gotoControlPanelandclickHardwareandSound➙RealtekHDAudioManager.
Usingtheintegratedcamera
Ifyourcomputerhasanintegratedcamera,youcanusethecameratopreviewyourvideoimageand
takeasnapshotofyourcurrentimage.
Tostartthecamera,dothefollowing:
•ForWindows7:PressFn+F6toopentheCommunicationssettingswindow.
•ForWindows8:PressFn+F6tostarttheLenovoSettingsprogram.ThenclickCamera.
Whenthecameraisstarted,thegreencamera-in-useindicatorturnson.
Youalsocanusetheintegratedcamerawithotherprogramsthatprovidefeaturessuchasphotographing,
videocapturing,andvideoconferencing.T ousetheintegratedcamerawithotherprograms,openoneofthe
programsandstartthephotographing,videocapturing,orvideoconferencingfunction.Then,thecamera
willstartautomaticallyandthegreencamera-in-useindicatorwillturnon.Formoreinformationaboutusing
thecamerawithaprogram,refertothehelpinformationsystemoftheprogram.
Conguringcamerasettings
Youcancongurethecamerasettingstomeetyourneeds,suchasadjustingthequalityofthevideooutput.
Tocongurethecamerasettings,dothefollowing:
•ForWindows7:PressFn+F6.TheCommunicationssettingswindowopens.ClicktheManageSettings
buttonandcongurethecamerasettingsasdesired.
•ForWindows8,dooneofthefollowing:
–Congurethecamerasettingsdirectlyfromtheprogramthatisusingthecamera.Fordetails,seethe
helpinformationsystemoftheprogram.
–ClickLenovoSettingsfromtheStartscreen.ThenclickCamera.Followtheinstructionsonthe
screentocongurethecamerasettingsasdesired.
UsinganExpressCard,aashmediacard,orasmartcard
Dependingonthemodel,yourcomputermighthavethefollowingcardslots:
•AnExpressCardslotthatsupports:
42UserGuide
Page 59

–54mm-wideExpressCard
–Smardcard
•A4-in-1mediacardreaderslotthatsupports:
–SDcard
–SDHCcard
–SDXCcard
–MultiMediaCard(MMC)
Notes:
•YourcomputerdoesnotsupporttheCPRMfeaturefortheSDcard.
•Whiletransferringdatatoorfromaashmediacard,suchasanSDcard,donotputyourcomputerinto
sleeporhibernationmodebeforethedatatransferiscomplete;otherwise,yourdatacouldbecome
damaged.
InstallinganExpressCard,aashmediacard,orasmartcard
Attention:Beforeyoustartinstallingacard,touchametaltableoragroundedmetalobject.Thisaction
reducesanystaticelectricityfromyourbody.Thestaticelectricitycoulddamagethecard.
ToinstallanExpressCardoraashmediacard,dothefollowing:
1.Locatetheappropriatetypeofslotforyourcard.See“Locatingcomputercontrols,connectors,and
indicators”onpage1.
2.Makesurethatthecardiscorrectlyoriented:
•ForExpressCard:Thenotchededgeofthecardisfacingupwardandpointingtowardtothecardslot.
•Forashmediacard:Themetalcontactsarefacingdownwardandpointingtowardthecardslot.
3.Pressthecardrmlyintothecardslot.
Toinstallasmartcard,dothefollowing:
1.Locatethe54mm-wideExpressCardslot.See“Locatingcomputercontrols,connectors,and
indicators”onpage1.
2.Installthesmartcardintoa54mmsmartcardreader.Youcanpurchasea54mmsmartcardreader
fromLenovo.
3.InsertthesmartcardreaderintotheExpressCardslotrmly.
Iftheplug-and-playfeatureisnotenabledfortheinstalledExpressCard,ashmediacard,orsmartcard,
dothefollowingtoenablethefeature:
1.OpenControlPanel.
2.ClickHardwareandSound.
3.ClickDeviceManager.Ifyouarepromptedforanadministratorpasswordorconrmation,typethe
passwordorprovideconrmation.
4.FromtheActionmenu,selectAddlegacyhardware.TheAddHardwareWizardstarts.
5.Followtheinstructionsonthescreen.
RemovinganExpressCard,aashmediacard,orasmartcard
Attention:Beforeremovingacard,stopthecardrst.Otherwise,dataonthecardmightbecorruptedorlost.
Toremoveacard,dothefollowing:
Chapter2.Usingyourcomputer43
Page 60

1.ClickthetriangulariconintheWindowsnoticationareatoshowhiddenicons.Then,right-clickthe
SafelyRemoveHardwareandEjectMediaicon.
2.Selecttheitemyouwanttoremovetostopthecard.
3.Pressthecardtoejectitfromyourcomputer.
4.Removethecardandstoreitsafelyforfutureuse.
Note:IfyoudonotremovethecardfromyourcomputerafteryouejectthecardfromtheWindowsoperating
system,thecardcannolongerbeaccessed.Toaccessthecard,youmustremoveitrst,theninsertitagain.
44UserGuide
Page 61
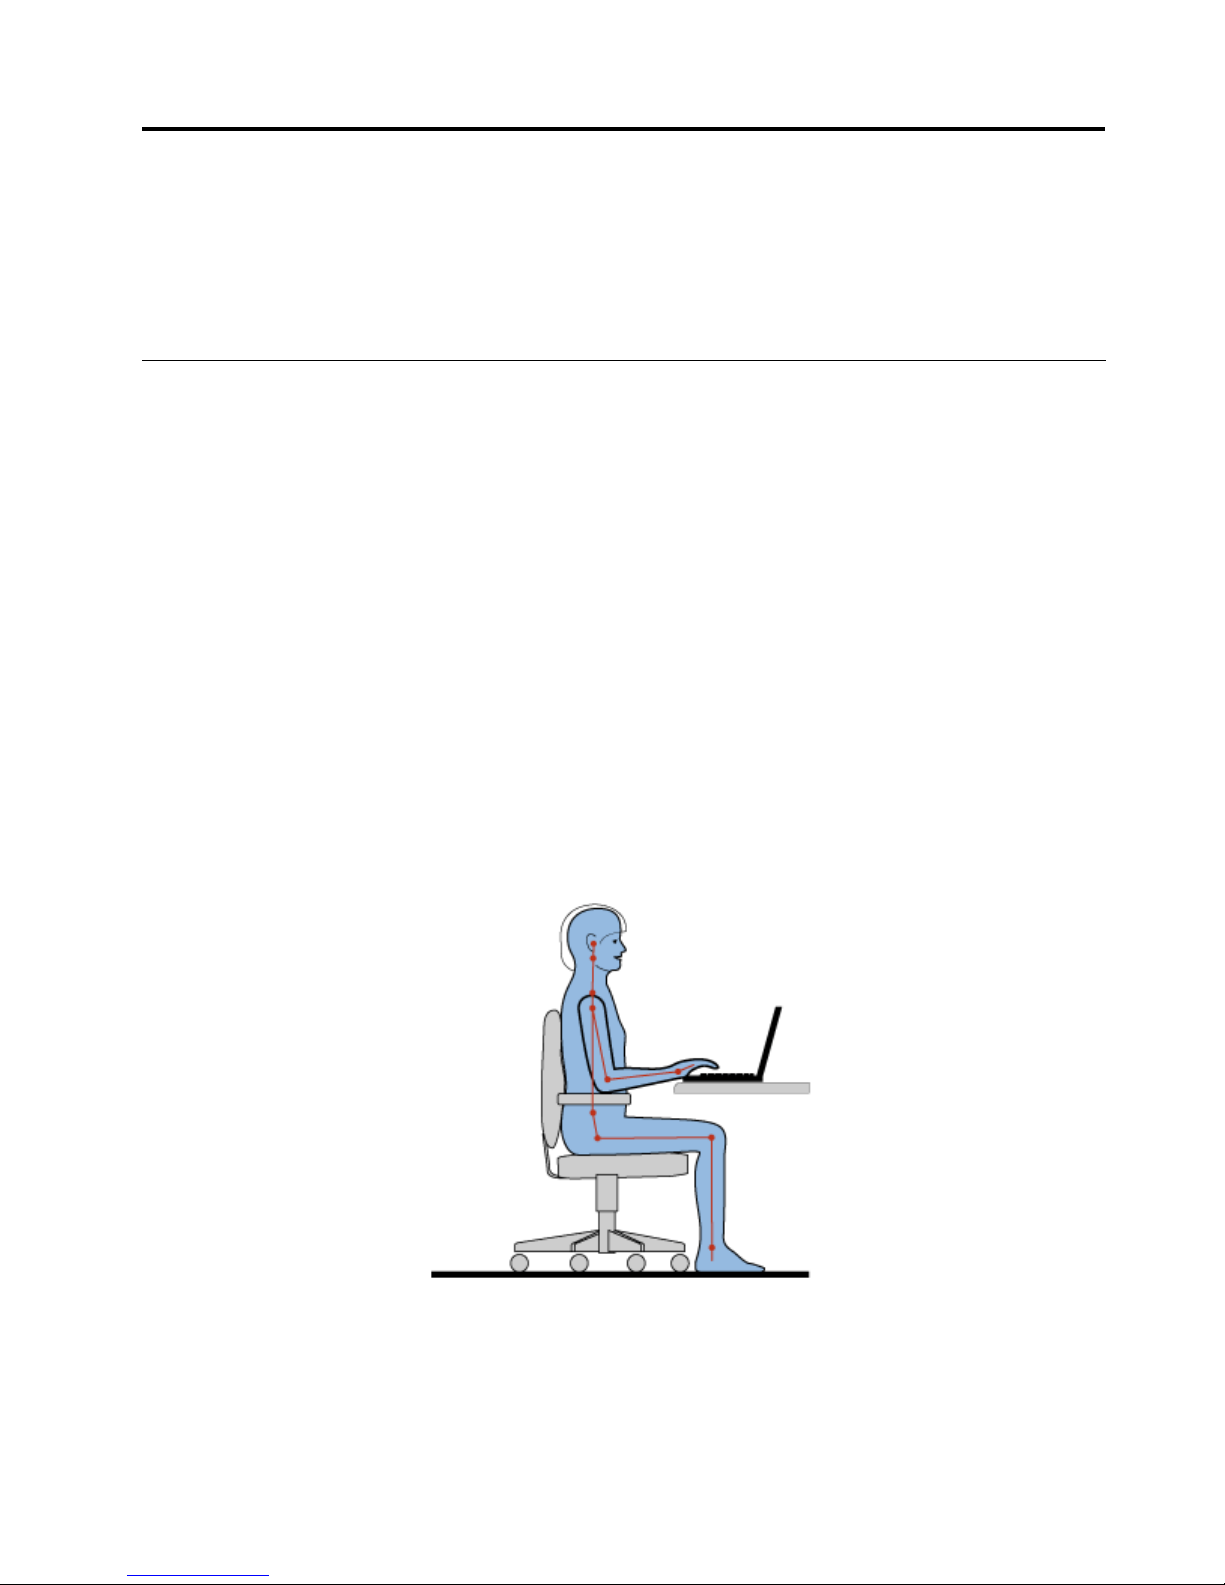
Chapter3.Youandyourcomputer
Thischapterprovidesinformationaboutaccessibility,comfort,andtravelingwithyourcomputer.
•“Accessibilityandcomfort”onpage45
•“Travelingwithyourcomputer”onpage47
Accessibilityandcomfort
Goodergonomicpracticeisimportanttogetthemostfromyourpersonalcomputerandtoavoiddiscomfort.
Arrangeyourworkplaceandtheequipmentyouusetosuityourindividualneedsandthekindofwork
thatyouperform.Inaddition,usehealthyworkhabitstomaximizeyourperformanceandcomfortwhile
usingyourcomputer.
Thefollowingtopicsprovideinformationaboutarrangingyourworkarea,settingupyourcomputer
equipment,andestablishinghealthyworkhabits.
Lenovoiscommittedtoprovidingthelatestinformationandtechnologytoourcustomerswithdisabilities.
Refertoouraccessibilityinformationwhichoutlinesoureffortsinthisarea.
Ergonomicinformation
Workinginthevirtualofcemightmeanadaptingtofrequentchangesinyourenvironment.Forexample,
adaptingtothesurroundinglightsources,properseating,andtheplacementofyourcomputerhardware
canhelpyouimproveyourperformanceandachievegreatercomfort.
Thisexampleshowssomeoneinaconventionalsetting.Evenwhennotinsuchasetting,youcanfollow
manyofthesetips.Developgoodhabits,andtheywillserveyouwell.
Generalposture:Makeminormodicationsinyourworkingposturetodetertheonsetofdiscomfortcaused
bylongperiodsofworkinginthesameposition.Frequent,shortbreaksfromyourworkalsohelptoprevent
minordiscomfortassociatedwithyourworkingposture.
Display:Positionthedisplaytomaintainacomfortableviewingdistanceof510-760mm(20-30inches).
Avoidglareorreectionsonthedisplayfromoverheadlightingoroutsidesourcesoflight.Keepthedisplay
©CopyrightLenovo2012
45
Page 62

screencleanandsetthebrightnesstolevelsthatenableyoutoseethescreenclearly.PressFn+F8
orFn+F9toadjustdisplaybrightness.
Headposition:Keepyourheadandneckinacomfortableandneutral(vertical,orupright)position.
Chair:Useachairthatgivesyougoodbacksupportandseatheightadjustment.Usechairadjustmentsto
bestsuityourdesiredposture.
Armandhandposition:Ifavailable,usechairarmrestsoranareaonyourworkingsurfacetoprovide
weightsupportforyourarms.Keepyourforearms,wrists,andhandsinarelaxedandneutral(horizontal)
position.Typewithasofttouchwithoutpoundingthekeys.
Legposition:Keepyourthighsparalleltotheoorandyourfeetatontheoororonafootrest.
Whatifyouaretraveling?
Itmightnotbepossibletoobservethebestergonomicpracticeswhenyouareusingyourcomputerwhile
onthemoveorinacasualsetting.Regardlessofthesetting,trytoobserveasmanyofthesetipsas
possible.Sittingproperlyandusingadequatelighting,forexample,willhelpyoumaintaindesirablelevels
ofcomfortandperformance.
Questionsaboutvision?
ThevisualdisplayscreensofThinkPadnotebookcomputersaredesignedtomeetthehigheststandards
andtoprovideyouwithclear,crispimagesandlarge,brightdisplaysthatareeasytosee,yeteasyonthe
eyes.Ofcourse,anyconcentratedandsustainedvisualactivitycanbetiring.Ifyouhavequestionsoneye
fatigueorvisualdiscomfort,consultavisioncarespecialistforadvice.
Comfort
Observethefollowingguidelinestoachievegreatercomfortandimproveperformance.
Activesittingandrestbreaks:Thelongeryousitandworkwithyourcomputer,themoreimportantitisto
observeyourworkingposture.Follow“Ergonomicinformation”onpage45
andpractice“activesitting”to
avoiddiscomfortassociatedwithyourworkingpostures.Makingminorvoluntaryposturalchangesand
takingshortfrequentworkbreaksarethekeyingredientsforhealthycomputing.Yourcomputerislightand
mobile;youcaneasilyrepositionyourworkingsurfacetoaccommodatemanyposturemodications.
Workareasetupoptions:Familiarizeyourselfwithallofyourofcefurnituresothatyouknowhowto
adjustyourworksurface,seat,andotherworktoolstoaccommodateyourpreferencesforcomfort.
Ifyourworkareaisnotinanofcesetting,besuretotakespecialnoteofemployingactivesitting
andtakingworkbreaks.ManyThinkPadproductsolutionsareavailabletohelpyoumodifyandexpand
yourcomputertobestsuityourneeds.AccessthefollowingWebsitetoviewsomeoftheseoptions:
http://www.lenovo.com/accessories/services/index.html.Exploreyouroptionsfordockingsolutionsand
externalproductsthatprovidetheadjustabilityandfeaturesthatyouwant.
Accessibilityinformation
Lenovoiscommittedtoprovidingpeoplewithdisabilitiesgreateraccesstoinformationandtechnology.
Asaresult,thefollowinginformationprovideswaystohelpusersthathavehearing,vision,andmobility
limitationsgetthemostoutoftheircomputerexperience.
Assistivetechnologiesenableuserstoaccessinformationinthemostappropriateway.Someofthese
technologiesarealreadyprovidedinyouroperatingsystem.Otherscanbepurchasedthroughvendors,or
accessedthroughtheWorldWideWebhttp://www.lenovo.com/healthycomputing.
46UserGuide
Page 63

Assistivetechnologies
SomeaccessibilitytechnologiesareavailablethroughtheAccessibilityOptionsprogram.Depending
onyouroperatingsystem,thenumberofaccessibilityoptionsavailablevaries.Ingeneral,accessibility
optionsenhancethewayuserswithhearing,vision,ormobilitylimitationsnavigateandusetheircomputer.
Forexample,someusersmightnothavethenemotorskillsrequiredtouseamouseorselectkey
combinations.Otherusersmightrequirelargerfontsorhigh-contrastdisplaymodes.Insomecases,
magniersandbuilt-inspeechsynthesizersareavailable.Fordetailedinformationabouteachofthese
features,consulttheMicrosofthelpinformationsystem.
TousetheAccessibilityOptionsprogram,openControlPanelandclickEaseofAccess➙Easeof
AccessCenter.
Screen-readertechnologies
Screen-readertechnologiesareprimarilyfocusedonsoftwareprograminterfaces,helpinformationsystems,
andavarietyofonlinedocuments.However,inthecasewhereascreenreadercannotreaddocuments,
thedocumentmustrstgothroughaconversionprocess.OnesolutionconvertsAdobePDFlesintoa
formatthatisreadbythescreen-readerprograms.ThissolutionisaWeb-basedserviceprovidedbyAdobe
SystemsIncorporated.Throughhttp://access.adobe.com,AdobePDFdocumentscanbeconvertedto
HTMLorplaintextinmanylanguages.OneconversionoptionconvertsPDFdocumentsontheInternet.A
secondoptionenablesuserstosubmittheURLofanAdobePDFlethroughe-mailtoconvertittoHTMLor
ASCIItext.AdobePDFlesonalocalharddiskdrive,localCD-ROM,orLANalsocanbeconvertedby
attachingtheAdobePDFletoane-mailmessage.
Travelingwithyourcomputer
Thistopicprovidesinformationtohelpyouworkwithyourcomputerwhenyouaretraveling.
Traveltips
Usethefollowingtraveltipstotravelmorecondentlyandefcientlywithyourcomputer.
•Althoughitissafetoallowyourcomputertogothroughthex-raymachinesatairportsecuritystations,it
isimportanttokeepyoureyesonthecomputeratalltimestopreventtheft.
•Considerbringinganelectricaladapterforuseinanairplaneorautomobile.
•Ifyoucarryanacpoweradapter,detachtheaccordfromittoavoiddamagingthecord.
Traveltipsonairplanes
Ifyoucarryyourcomputerintoanairplane,takenoteofthefollowingtips:
•Ifyouintendtouseyourcomputerorwirelessservices(suchasInternetandBluetooth),checkwiththe
airlineforrestrictionsandavailabilityofservicesbeforeboardingtheairplane.Iftherearerestrictions
ontheuseofcomputerswithwirelessfeaturesontheairplane,youmustabidebythoserestrictions.If
necessary,disablewirelessfeaturesbeforeboarding.
•Becarefulabouttheseatinfrontofyouonairplanes.Angleyourcomputerdisplaysothatitdoesnotget
caughtwhenthepersoninfrontofyouleansback.
•Whentakingoff,remembertoturnoffyourcomputerorputitintohibernationmode.
Travelaccessories
Thefollowingisachecklistofitemstoconsiderpackingwhenyouaregoingtotravel:
•ThinkPadacpoweradapter
•ThinkPadAC/DCComboAdapter
Chapter3.Y ouandyourcomputer47
Page 64

•Externalmouse,ifyouareaccustomedtousingone
•Ethernetcable
•Extrabattery,charged
•Aqualitycarryingcasethatprovidesadequatecushionandprotection
•Externalstoragedevice
Ifyouaretravelingtoanothercountry,youmightwanttoconsideranacpoweradapterforthecountryto
whichyouaretraveling.
Topurchasetravelaccessories,gotohttp://www.lenovo.com/accessories.
48UserGuide
Page 65

Chapter4.Security
Thischapterprovidesinformationabouthowtoprotectyourcomputerfromtheftandunauthorizeduse.
•“Attachingamechanicallock”onpage49
•“Usingpasswords”onpage49
•“Harddisksecurity”onpage54
•“Settingthesecuritychip”onpage55
•“Usingthengerprintreader”onpage56
•“Noticeondeletingdatafromyourharddiskdriveorsolid-statedrive”onpage59
•“Usingrewalls”onpage59
•“Protectingdataagainstviruses”onpage60
Attachingamechanicallock
Youcanattachamechanicallocktoyourcomputertohelppreventitfrombeingremovedwithoutyour
permission.
Attachamechanicallocktothekeyholeofthecomputer;thensecurethechainonthelocktoastationary
object.Refertotheinstructionsshippedwiththemechanicallock.
Note:Youareresponsibleforevaluating,selecting,andimplementingthelockingdeviceandsecurity
feature.Lenovomakesnocomments,judgments,orwarrantiesaboutthefunction,quality,orperformance
ofthelockingdeviceandsecurityfeature.
Usingpasswords
Byusingpasswords,youcanhelppreventyourcomputerfrombeingusedbyothers.Onceyouseta
password,apromptisdisplayedonthescreeneachtimeyouturnonthecomputer.Enteryourpasswordat
theprompt.Y oucannotusethecomputerunlessyoutypethecorrectpassword.
Passwordsandsleepmode
IfyouhavesetaWindowspasswordandyouputyourcomputerintosleepmodebypressingFn+F4,you
willbepromptedtoenterthepasswordwhenresumingoperation.
Ifanyharddiskdriveorsolid-statedrivealsohasapassword,itisunlockedautomaticallywhenyouresume
operation.
Typingpasswords
Ifthisiconisdisplayed,typeapower-onpasswordorasupervisorpassword.
Ifthisiconisdisplayed,typeauserharddiskpassword.Ifyouwanttotypeamasterharddisk
password,dothefollowing:
1.PressF1.Theiconchangestothis:
©CopyrightLenovo2012
49
Page 66

2.T ypethemasterharddiskpassword.
Note:Toreturntotheicon,pressF1again.
Note:PresstheBackspacekeyifyouenterawrongpasswordwhileyouaretypingyourpassword.
Power-onpassword
Youcansetapower-onpasswordtohelpprotectyourcomputeragainstaccessbyunauthorizedusers.
Ifyousetapower-onpassword,thepasswordpromptisdisplayedonthescreenwheneveryouturnonthe
computer.Youmustenterthecorrectpasswordtostartusingthecomputer.
Settingapower-onpassword
1.Printtheseinstructions.
2.Saveallopenles,andexitallprograms.
3.T urnyourcomputeroffandthenturnitonagain.
4.Whenthelogoscreenisdisplayed,pressF1.TheThinkPadSetupprogrammainmenuopens.
5.SelectSecurity,usingthecursordirectionalkeystomovedownthemenu.
6.SelectPassword.
7.SelectPower-onPassword.
8.IntheEnterNewPasswordeld,typeadesiredpassword,andpressEnter.
9.IntheConrmNewPasswordeld,retypethepasswordandpressEnter.
Note:Youmightwanttonotedownyourpower-onpasswordinasafeplace.Otherwise,ifyou
forgetit,youhavetotakeyourcomputertoaLenovoreselleroramarketingrepresentativetohave
thepasswordcanceled.
10.IntheSetupNoticewindowthatisdisplayed,pressEntertocontinue.
11.PressF10.TheSetupConrmationwindowopens.SelectYestosavecongurationchangesandexit.
Changingorremovingthepower-onpassword
Tochangethepower-onpassword,followsteps1through7asintroducedabove.Enteryourcurrent
password.WhentheEnterNewPasswordeldisdisplayed,typeanewpasswordintheeldandthen
retypeittoverify.Toremovethepassword,followsteps1through7.Typeyourcurrentpassword.Whenthe
EnterNewPasswordeldisdisplayed,leaveitblankandpressEntertwice.
Harddiskpasswords
Twotypesofharddiskpasswordshelpprotecttheinformationstoredontheharddiskdriveorsolid-state
drive:
•Userharddiskpassword
•Masterharddiskpassword,whichrequiresauserharddiskpassword
Ifauserharddiskpasswordhasbeenset,butnomasterharddiskpasswordhasbeen,theusermustenter
theuserharddiskpasswordinordertogainaccesstolesandprogramsontheharddiskdrive.
Themasterpasswordcanbesetandusedonlybyasystemadministrator.Likeamasterkey,itenablesthe
administratortogetaccesstoanyharddiskdriveinasystem.Theadministratorsetsthemasterpassword;
nooneelseknowsit.Thentheadministratorsetsauserpasswordforeachcomputerinthenetwork,and
50UserGuide
Page 67

tellseachuserthepasswordforhisorhercomputer.Theusercanthenchangetheuserpasswordas
desired,buttheadministratorstillcangetaccessbyusingthemasterpassword.
Note:Whenamasterharddiskpasswordisset,onlytheadministratorcanremovetheuserharddisk
password.
Settingaharddiskpassword
1.Printtheseinstructions.
2.Saveallopenles,andexitallprograms.
3.T urnoffyourcomputerandthenturnonagain.
4.Whenthelogoscreenisdisplayed,pressF1.TheThinkPadSetupprogrammainmenuopens.
5.SelectSecurity,usingthecursordirectionalkeystomovedownthemenu.
6.SelectPassword.
7.SelectHardDisk1Password.
8.Apasswordwindowopens.YouarepromptedtoselectUserorUser+Master.SelectUserifyouwant
tosetonlyoneharddiskpassword.Ifyouareanadministratororsupervisor,selectUser+Mastertoset
twopasswords.(Theusercanchangetheuserpasswordlater.)
•IfyouselectUseronly,dothefollowing:
a.Whenawindowfortypingthenewpasswordopens,typeyournewpasswordintheEnterNew
Passwordeld.PressEnter.
Notes:
–YoucansettheminimumlengthofaharddiskpasswordthroughSetMinimumLengthon
theSecuritymenu.
–Ifyousetaharddiskpasswordofoversevencharacters,theharddiskdrivecanbeusedonly
withacomputerthatcanrecognizeaharddiskpasswordofoversevencharacters.Ifyouthen
installtheharddiskdriveinacomputerthatcannotrecognizeaharddiskpasswordthat
containsmorethansevencharacters,youcannotgetaccesstothedrive.
b.IntheConrmNewPasswordeld,retypethepasswordyoujustenteredtoverifyit.PressEnter.
•IfyouselectUser+Master,dothefollowing:
a.Whenawindowfortypingthenewuserharddiskpasswordopens,typeyournewpasswordin
theEnterNewPasswordeld.PressEnter.
b.IntheConrmNewPasswordeld,retypethepasswordyoujustenteredtoverifyit.PressEnter.
c.Amessagewindowopensandpromptsyoutosetthemasterharddiskpassword.PressEnterto
continue.
d.Awindowfortypingthenewmasterharddiskpasswordopens.Typeyournewpasswordin
theEnterNewPasswordeld.PressEnter.
e.IntheConrmNewPasswordeld,retypethepasswordyoujustenteredtoverifyit.PressEnter.
Attention:Youmightwanttonotedownyourpasswordsandkeeptheminasafeplace.Otherwise,if
youforgettheuserpassword,orbothuserandmasterpasswords,Lenovocannotresetyourpasswords
orrecoverdatafromtheharddiskdrive.Y oumusttakeyourcomputertoaLenovoresellerora
marketingrepresentativetohavetheharddiskdrivereplaced.Proofofpurchaseisrequired,andafee
willbechargedforpartsandservice.
9.IntheSetupNoticewindowthatisdisplayed,pressEntertocontinue.
10.PressF10.TheSetupConrmationwindowopens.SelectYestosavecongurationchangesandexit.
Chapter4.Security51
Page 68

Thenexttimeyouturnonyourcomputer,youwillhavetotypetheuserormasterharddiskpasswordin
ordertostartyourcomputerandgetaccesstoyouroperatingsystem.
Changingorremovingaharddiskpassword
Tochangeorremovetheuserharddiskpassword,dothefollowing:
1.Followsteps1through7in“Settingaharddiskpassword”onpage51.
Note:YouneedtotypeyourpasswordtogetaccesstotheThinkPadSetupprogram.
2.SelectUserHDPandthendoeitherofthefollowing:
•Tochangetheuserharddiskpassword,typethecurrentpasswordintheEnterCurrentPassword
eld.ThentypethenewpasswordintheEnterNewPasswordeld,andretypethepassword
youjustenteredtoverifyitintheConrmNewPasswordeld.PressEnter,andaSetupNotice
windowisdisplayed.PressF10toexitfromtheSetupNoticewindow.Theuserharddiskpassword
willbechanged.
•Toremovetheuserharddiskpassword,typethecurrentpasswordintheEnterCurrentPassword
eld.ThenleavetheEnterNewPasswordandConrmNewPasswordeldsblank,andpress
Enter.ASetupNoticewindowisdisplayed.PressF10toexitfromtheSetupNoticewindow.The
userharddiskpasswordwillberemoved.
Tochangeorremovethemasterharddiskpasswords,dothefollowing:
1.Followsteps1through7in“Settingaharddiskpassword”onpage51.
Note:YouneedtotypeyourpasswordtogetaccesstotheThinkPadSetupprogram.
2.SelectMasterHDPandthendoeitherofthefollowing:
•Tochangethemasterharddiskpassword,typethecurrentmasterharddiskpasswordintheEnter
CurrentPasswordeld.ThentypethenewmasterharddiskpasswordintheEnterNewPassword
eld,andretypethepasswordyoujustenteredtoverifyitintheConrmNewPasswordeld.Press
Enter,andaSetupNoticewindowisdisplayed.PressF10toexitfromtheSetupNoticewindow.The
masterharddiskpasswordischanged.
•Toremovethemasterharddiskpassword,typethecurrentmasterharddiskpasswordintheEnter
CurrentPasswordeld.ThenleavetheEnterNewPasswordandConrmNewPasswordelds
blank,andpressEnter.ASetupNoticewindowisdisplayed.PressF10toexitfromtheSetupNotice
window.Boththeuserandmasterharddiskpasswordswillberemoved.
Supervisorpassword
ThesupervisorpasswordprotectsthesysteminformationstoredinThinkPadSetup.Noonecanchangethe
computercongurationwithoutthesupervisorpassword.Itprovidesthefollowingsecurityfeatures:
•Ifasupervisorpasswordisset,apasswordpromptisdisplayedwhenyoutrytostarttheThinkPadSetup
program.Unauthorizeduserscannotgetaccesstocongurationdata.
•Thesystemadministratorcanusethesupervisorpasswordtogetaccesstoacomputereveniftheuserof
thatcomputerhassetapower-onpassword.Thesupervisorpasswordoverridesthepower-onpassword.
•Ifbothasupervisorpasswordandapower-onpasswordareset,youcandothefollowingonlyifyou
havethesupervisorpassword:
–Deletingthepower-onpassword
–Changingordeletingthesupervisorpassword
–EnablingordisablingtheWakeonLANfeature
–EnablingordisablingtheInternalNetworkOptionROMfeature
–Changingdateandtime
52UserGuide
Page 69

–EnablingordisablingtheLockUEFIBIOSSettingsfeature
–EnablingordisablingthePasswordatunattendedbootfeature
–Specifyingtheminimumlengthforpower-onpasswordsandharddiskpasswords
–Changingthesettingforthesecuritychip
–EnablingordisablingtheBootDeviceListF12Optionfeature
–EnablingordisablingtheBootOrderLockfeature
–EnablingordisablingtheFlashBIOSUpdatingbyEnd-Usersfeature
–Enablingordisablingtheinternalnetworkdevice
–Enablingordisablingtheinternalwirelessdevice
–EnablingordisablingtheinternalBluetoothdevice
–EnablingordisablingtheinternalwirelessWANdevice
–EnablingordisablingtheSecuritymode
–Enablingordisablingthengerprintreaderpriority
–Erasingthengerprintdata
Notes:
•ThesystemadministratorcansetthesamesupervisorpasswordonmanyThinkPadnotebookcomputers
tomakeadministrationeasier.
•ByenablingtheLockUEFIBIOSSettingsfeatureonthePasswordmenuandsettingthesupervisor
password,youmakeitimpossibleforanyonebutyoutomakecongurationchanges.
Setting,changing,orremovingasupervisorpassword
Onlyasystemadministratorcanset,change,orremoveasupervisorpassword.
Toset,change,orremoveasupervisorpassword,dothefollowing:
1.Printtheseinstructions.
2.Saveallopenles,andexitallprograms.
3.T urnyourcomputeroffandthenturnitonagain.
4.Whenthelogoscreenisdisplayed,pressF1.TheThinkPadSetupprogrammainmenuopens.
5.SelectSecurity,usingthecursordirectionalkeystomovedownthemenu.
6.SelectPassword.
7.SelectSupervisorPassword.
8.Awindowopens,promptingyoutoenteranewpassword.Dependingonyourneeds,dooneofthe
following:
•Tosetapassword,dothefollowing:
a.IntheEnterNewPasswordeld,typeadesiredpasswordandpressEnter.
b.IntheConrmNewPasswordeld,retypethepasswordandpressEnter.
•Tochangeapassword,dothefollowing:
a.IntheEnterCurrentPasswordeld,typethecurrentsupervisorpasswordandpressEnter.
b.IntheEnterNewPasswordeld,typethenewsupervisorpassword;thenretypethepassword
youjustenteredtoverifyitintheConrmNewPasswordeld.
•Toremoveapassword,dothefollowing:
a.IntheEnterCurrentPasswordeld,typethecurrentsupervisorpasswordandpressEnter.
Chapter4.Security53
Page 70

b.LeavetheEnterNewPasswordandConrmNewPasswordeldsblank.PressEnter.
Attention:Youmightwanttonotedownyourpasswordandkeepitinasafeplace.Ifyouforget
yoursupervisorpassword,Lenovocannotresetyourpassword.Youmusttakeyourcomputertoa
LenovoreselleroraLenovomarketingrepresentativetohavethesystemboardreplaced.Proofof
purchaseisrequired,andafeewillbechargedforpartsandservice.
9.IntheSetupNoticewindowthatisdisplayed,pressEntertocontinue.
10.PressF10.TheSetupConrmationwindowopens.SelectYestosavecongurationchangesandexit.
ThenexttimeyouopentheThinkPadSetupprogram,youwillbepromptedtotypeyourpasswordtoproceed.
Harddisksecurity
Toprotectpasswordsfromunauthorizedsecurityattacks,severalofthelatesttechnologiesandalgorithms
areintegratedintoUEFIBIOSandhardwaredesignofThinkPadnotebookcomputers.
Tomaximizesecurity,dothefollowing:
1.Setapower-onpasswordaswellasaharddiskpasswordforyourinternalsolid-statedriveorharddisk
drive.Refertotheproceduresin“Power-onpassword”onpage50and“Harddiskpasswords”onpage
50
.Forsecurity,alongerpasswordisrecommended.
2.T oprovidereliablesecurityforUEFIBIOS,usethesecuritychipandasecurityprogramwithaT rusted
PlatformModulemanagementfeature.Referto“Settingthesecuritychip”onpage55
.
Note:TheMicrosoftWindows7andWindows8operatingsystemsupporttheTPMmanagement
feature.
3.IfaDiskEncryptionharddiskdriveandEncryptionsolid-statedriveisinstalledinyourcomputer,be
suretoprotectthecontentsofyourcomputermemoryfromunauthorizedaccessesbyuseofdrive
encryptionsoftware,suchasMicrosoftWindowsBitLocker
®
DriveEncryption,whichissupportedinthe
UltimateandEnterpriseeditionsoftheWindows7operatingsystemandWindows8operatingsystem.
See“UsingWindowsBitLockerDriveEncryption”onpage54
.
4.Beforeyoudisposeof,sell,orhandoveryourcomputer,makesuretodeletedatastoredonit.See
“Noticeondeletingdatafromyourharddiskdriveorsolid-statedrive”onpage59.
UsingWindowsBitLockerDriveEncryption
Tohelpprotectyourcomputeragainstunauthorizedaccess,besuretousedriveencryptionsoftware,such
asWindowsBitLockerDriveEncryption.
WindowsBitLockerDriveEncryptionisanintegralsecurityfeatureofWindows7andandWindows8
operatingsystems.ItissupportedintheUltimateandEnterpriseeditionsoftheWindows7operating
systemandWindows8operatingsystem.Itcanhelpyouprotecttheoperatingsystemanddatastored
onyourcomputer,evenifyourcomputerislostorstolen.BitLockerworksbyencryptingalluserand
systemles,includingtheswapandhibernationles.
BitLockerusesaT rustedPlatformModuletoprovideenhancedprotectionforyourdataandtoensureearly
bootcomponentintegrity.AcompatibleTPMisdenedasaV1.2TPM.
TochecktheBitLockerstatus,gotoControlPanelandclickSystemandSecurity➙BitLockerDrive
Encryption.
FordetailsaboutWindowsBitLockerDriveEncryption,seethehelpinformationsystemoftheWindows
operatingsystem,orsearchfor“MicrosoftWindowsBitLockerDriveEncryptionStep-by-StepGuide”on
theMicrosoftWebsite.
54UserGuide
Page 71

DiskEncryptionharddiskdriveandEncryptionsolid-statedrive
SomemodelscontaintheDiskEncryptionharddiskdriveorEncryptionsolid-statedrive.Thisfeature
helpstoprotectyourcomputeragainstsecurityattacksonmedia,NANDashordevicecontrollersbyuse
ofahardwareencryptionchip.Fortheefcientuseoftheencryptionfeature,besuretosetaharddisk
passwordfortheinternalstoragedevice.
Settingthesecuritychip
Strictsecurityrequirementsareimposedonnetworkclientcomputersthattransfercondentialinformation
electronically.Dependingontheoptionsyouordered,yourcomputermighthaveanembeddedsecuritychip,
acryptographicmicroprocessor.WiththesecuritychipandClientSecuritySolution,youcandothefollowing:
•Protectyourdataandsystem
•Strengthenaccesscontrols
•Securecommunications
Settingthesecuritychip
ThechoicesofferedontheSecurityChipsubmenuundertheSecuritymenuofThinkPadSetupareas
follows:
•SecurityChip:activate,inactivate,ordisablethesecuritychip.
•SecurityReportingOptions:enableordisableeachsecurityreportingoption.
•ClearSecurityChip:cleartheencryptionkey.
Notes:
•BesurethatthesupervisorpasswordhasbeensetinThinkPadSetup.Otherwiseanyonecanchangethe
settingsforthesecuritychip.
•IfyouareusingClientSecuritySolution,handlethesecuritychipbydoingthefollowing:
–Donotclearthesecuritychip.Ifyoudo,thefunctionsassignedtothekeyswillbeerased.
–Donotdisablethesecuritychip.Ifyoudo,ClientSecuritySolutionwillnotwork.
•Ifthesecuritychipisremovedorreplaced,oranewonehasbeenadded,thecomputerwillnotstart.Y ou
willhearfourcyclesoffourbeepseach.
•Ifthesecuritychipisinactiveordisabled,theClearSecurityChipoptionwillnotbedisplayed.
•Whenyouclearthesecuritychip,besuretoturnyourcomputeroffandthenturnitonagainafteryouset
thesecuritychiptoActive.Otherwise,theClearSecurityChipoptionisnotdisplayed.
TosetanitemontheSecurityChipsubmenu,dothefollowing:
1.Printtheseinstructions.
2.Saveallopenles,andexitallprograms.
3.T urnyourcomputeroffandthenturnitonagain.
4.Whenthelogoscreenisdisplayed,pressF1.TheThinkPadSetupprogrammainmenuopens.
5.Usingthecursorkeys,movetoSecurity.TheSecuritymenuopens.
6.Usingthecursorkeys,movetoSecurityChip,andpressEnter.TheSecurityChipsubmenuopens.
7.Usingthecursorkeys,movetoanitemyouwanttoset.Whentheitemishighlighted,pressEnter.
8.Setotheritemsthatyouwanttoset.
9.PressF10tosavechangesandexit.
10.PressEnterintheSetupConrmationwindowtoconrmtheexit.
Chapter4.Security55
Page 72
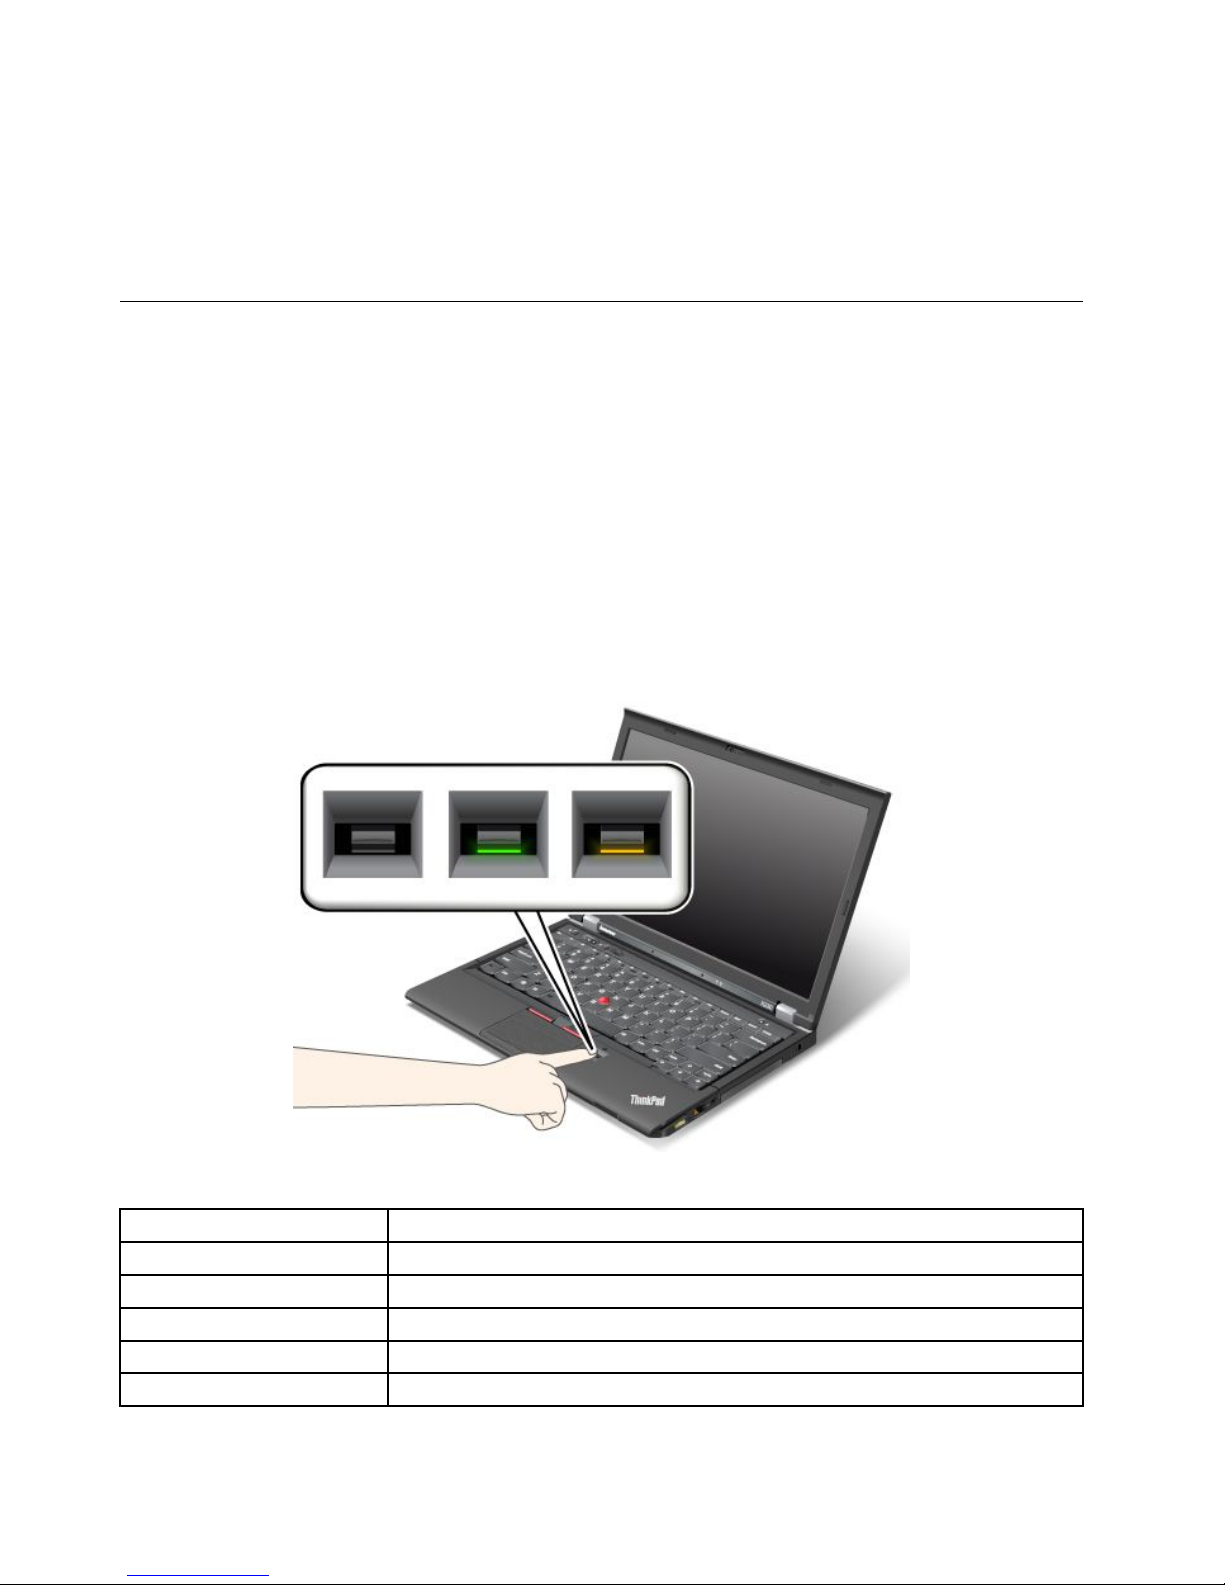
Tosetthesecuritychip,youhavetostartClientSecuritySolution,andfollowtheinstructionsonthescreen.
Note:ClientSecuritySolutionisnotpreinstalledonWindows7andWindows8models.T ocongure
thesecuritychip,youneedtodownloadthelatestversionofClientSecuritySolutionfromtheLenovo
Website.TodownloadClientSecuritySolution,gotohttp://www.lenovo.com/support.Thenfollowthe
instructionsonthescreen.
Usingthengerprintreader
Dependingontheoptionsyouordered,yourcomputermighthaveanintegratedngerprintreader.By
enrollingyourngerprintandassociatingitwithapower-onpassword,aharddiskpassword,orboth
passwordsbeforehand,youcanstartthecomputer,logontothesystem,andenterThinkPadSetupby
swipingyourngeroverthereader,withouttypingapassword.Thusngerprintauthenticationcanreplace
passwordsandenablesimpleandsecureuseraccess.
Enrollingyourngerprint
1.T urnonyourcomputer.
2.T ostartLenovoFingerprintsoftware,referto“Lenovoprograms”onpage14.
3.Followtheinstructionsonthescreentoenrollyourngerprint.Fordetails,refertotheHelpforthe
program.
LEDbehaviorofthengerprintreader
Table4.LEDbehaviorlist_ngerprintreader
LEDbehaviorDescription
Steadygreen
Thengerprintreaderisreadytoswipe.
Blinkinggreenonce
Thengerprintisbeingauthenticatedorhasbeenauthenticated.
Blinkinggreen
Thengerprintreaderisreadytoswipeinpower-onauthenticationstate.
Blinkingamber
Thengerprintcouldnotbeauthenticated.
Steadyamberfor15seconds
Thepower-onauthenticationfeatureisdisabledafterthreebadngerprintswipes.
56UserGuide
Page 73
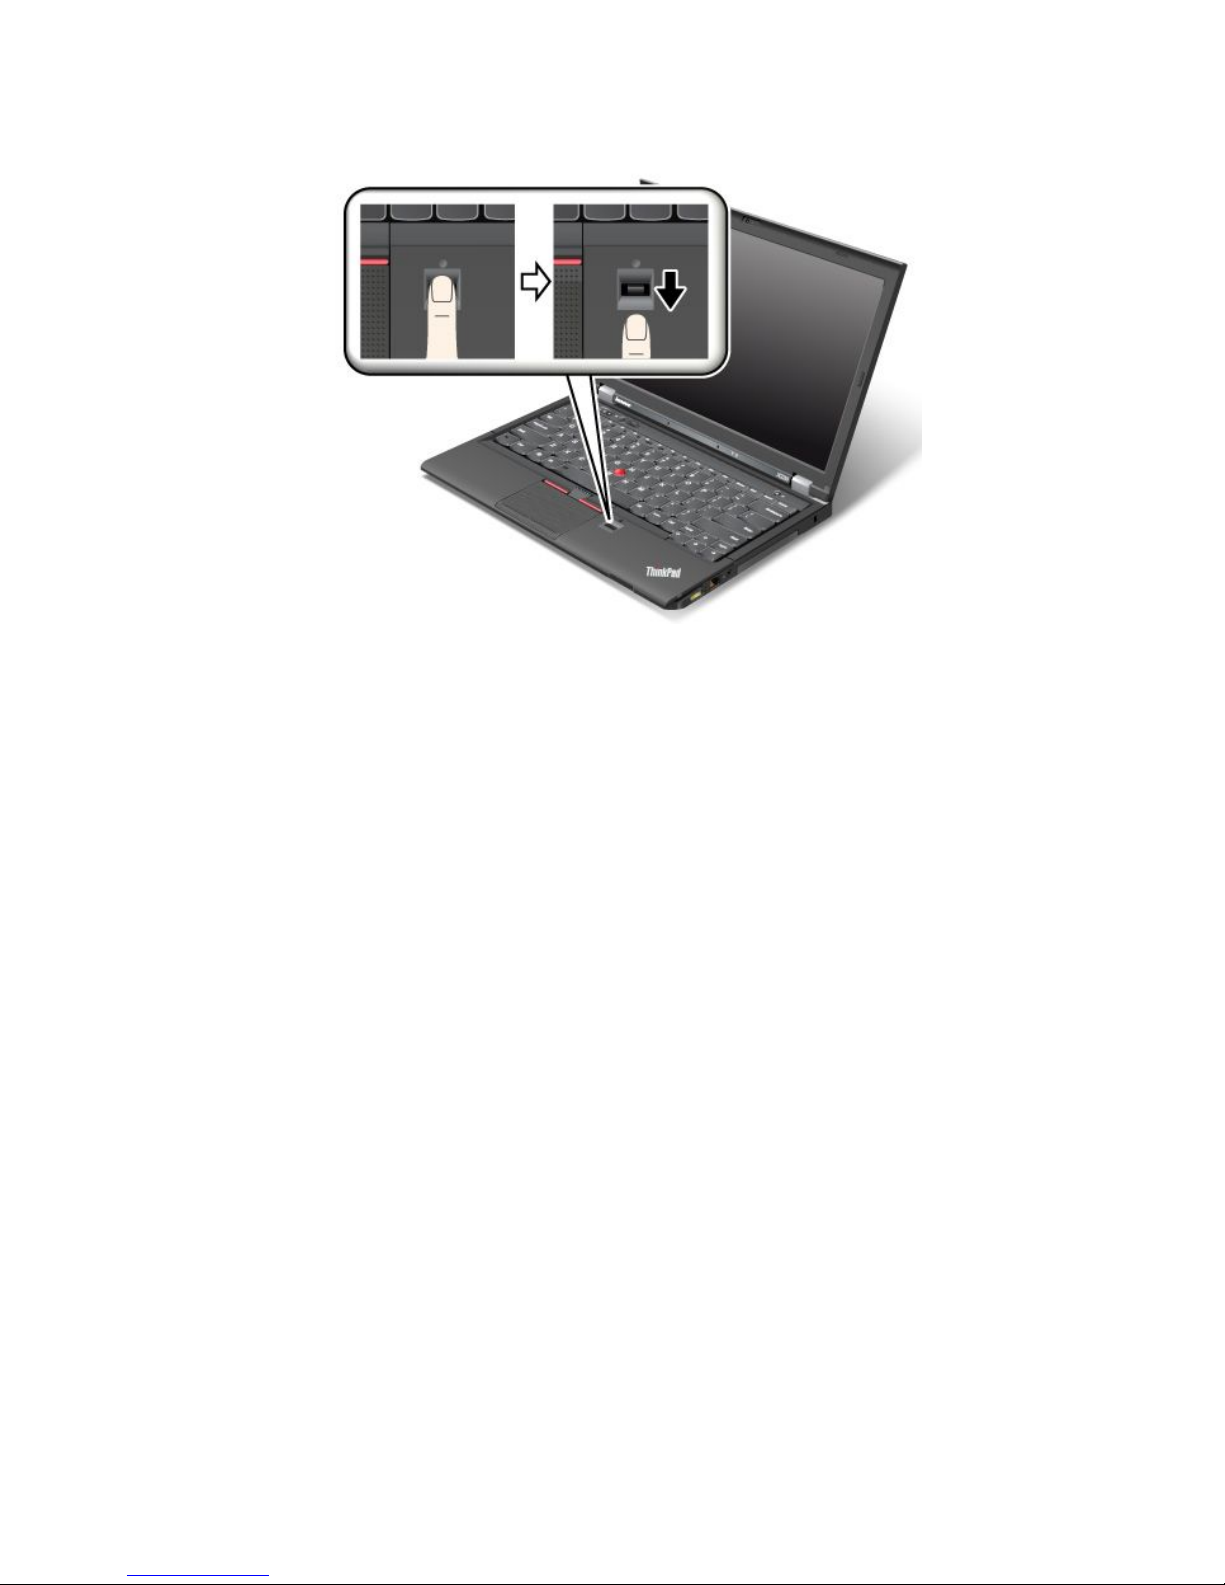
Swipingyourngeroverthereader
Toswipeyourngeroverthereader,placetheballofyournger,thatis,thecentralpartofthengerprint,on
thesmallcircleabovethereader.Makesurethattheentiretopjointofthengerisonthereader.ThenApply
lightpressureandswipeyourngeracrossthereaderinonesmoothmotion.
Loggingontothesystem
Afteryouenrollyourngerprint,logontothesystembydoingthefollowing:
1.Setapower-onpasswordoraharddiskpassword,orboth.
2.T urnyourcomputeroffandthenonagain.
3.Whenprompted,swipeyourngeroverthereader.
4.Onrequest,typeyourpower-onpassword,yourharddiskpassword,orboth.Theenrolledngerprintis
nowassociatedwithyourpower-onpassword,yourharddiskpassword,orboth.
Thenexttimeyoustartthecomputer,youcanlogontothesystembyswipingyourngeroverthe
readeronce.
Attention:Ifyoualwaysuseyourngerprinttologontothesystem,youmightforgetyourpassword.Write
downyourpassword,andkeepitinasafeplace.Ifyouforgetitandforsomereasonyoucannotswipe
yourngeracrossthereader,forexample,ifyouinjurethatnger,youcannotstartthecomputerorchange
thepassword.Ifyouforgetyourpower-onpassword,youmusttakeyourcomputertoaLenovoauthorized
serviceroramarketingrepresentativetohavethepasswordcanceled.
Ifyouforgetyourharddiskpassword,Lenovocannotresetyourpasswordorrecoverdatafromthehard
disk.YoumusttakeyourcomputertoaLenovoauthorizedserviceroramarketingrepresentativetohavethe
harddiskdrivereplaced.Proofofpurchaseisrequired,andafeewillbechargedforpartsandservice.
Settingthengerprintreader
Ifyouwanttochangethesettingsofthengerprintreader,followtheprocedurebelow.
ThengerprintsubmenuundertheSecuritymenuofThinkPadSetupoffersthefollowingchoices:
•PredesktopAuthentication:Enableordisablengerprintauthenticationbeforetheoperatingsystem
isloaded.
Chapter4.Security57
Page 74

•ReaderPriority:Denethepriorityforngerprintreadersifanexternalngerprintreaderisattached.
•SecurityMode:Specifythesettingsofthesecuritymode.
•PasswordAuthentication:Enableordisablepasswordauthentication.
Note:ThisitemappearsifHighsecuritymodeisselected.
•ResetFingerprintData:Bychoosingthisitem,youcaneraseallofthengerprintdatastoredineither
theinternalorexternalngerprintreader.
Tosetaniteminthengerprintsubmenu:
1.Printtheseinstructions.Tocongurethengerprintreader,youmustturnyourcomputeroffand
thenonagain.
2.Saveallopenles,andexitallprograms.
3.T urnyourcomputeroffandthenonagain.
4.Whenthelogoscreenisdisplayed,pressF1.TheThinkPadSetupprogrammainmenuopens.
5.Usingthecursorkeys,movetoSecurity,andpressEnter.TheSecuritymenuopens.
6.Usingthecursorkeys,movetoFingerprint,andpressEnter.TheFingerprintsubmenuopens.
7.Usingthecursorkeys,movetoanitemyouwanttoset.Whenthatitemishighlighted,pressEnter.
8.Settheitemsyouwanttoset.
9.PressF10toexit.
10.IntheSetupConrmationwindow,selectYes.
Careforthengerprintreader
Thefollowingactionscoulddamagethengerprintreaderorcauseitnottoworkproperly:
•Scratchingthesurfaceofthereaderwithahard,pointedobject.
•Scrapingthesurfaceofthereaderwithyourngernailoranythinghard.
•Usingortouchingthereaderwithadirtynger.
Ifyounoticeanyofthefollowingconditions,gentlycleanthesurfaceofthereaderwithadry,soft,lint-free
cloth:
•Thesurfaceofthereaderisdirtyorstained.
•Thesurfaceofthereaderiswet.
•Thereaderoftenfailstoenrollorauthenticateyourngerprint.
Ifyourngerhasanyofthefollowingconditions,youmightnotbeabletoregisterorauthenticateit:
•Yourngeriswrinkled.
•Yourngerisrough,dry,orinjured.
•Yourngerisverydry.
•Yourngerisstainedwithdirt,mud,oroil.
•Thesurfaceofyourngerisverydifferentfromwhenyouenrolledyourngerprint.
•Yourngeriswet.
•Angerisusedthathasnotbeenenrolled.
Toimprovethesituation,trythefollowing:
•Cleanorwipeyourhandstoremoveanyexcessdirtormoisturefromthengers.
58UserGuide
Page 75

•Enrollanduseadifferentngerforauthentication.
•Ifyourhandsaretoodry,applylotiontothem.
Noticeondeletingdatafromyourharddiskdriveorsolid-statedrive
Ascomputersspreadintoeverycorneroflife,theyprocessmoreandmoreinformation.Thedataonyour
computer,someofwhichmightbesensitive,isstoredonaharddiskdrive.Beforeyoudisposeof,sell,or
handoveryourcomputer,besuretodeletedatastoredonit.
Handingyourcomputerovertosomeoneelsewithoutdeletingtheloadedsoftware,suchasoperating
systemsandprogramsoftware,mightevenviolatelicenseagreements.Youareadvisedtocheckthe
termsandconditionsofthoselicenseagreements.
Therearemethodsthatseemtodeletethedata:
•Movethedatatotherecyclebin,andthenclickEmptyrecyclebin.
•UsetheDeleteoption.
•Formatyourharddiskdrive,usingthesoftwareforinitializingit.
•Usingtherecoveryprogramtosettheharddiskdrivebacktothefactorydefaultsettings.
Theseoperations,however,onlychangetheleallocationofthedata,theydonotdeletethedataitself.In
otherwords,thedataretrievalprocessingisdisabledunderanoperatingsystemsuchasWindows.The
dataisstillthere,eventhoughitseemstobelost.Thus,itissometimespossibletoreadthedatabyuseof
specialsoftwarefordatarecovery.Thereisariskthatpeopleofbadfaithmightreadandmisusethecritical
dataonharddiskdrivesforunexpectedpurposes.
Topreventleakageofdata,itbecomesveryimportantthatyoutakeresponsibilityfordeletingallthedata
fromtheharddiskdrivewhenyoudisposeof,sell,orhandoveryourcomputer.Y oucandestroythedata
physicallybysmashingtheharddiskdrivewithahammer,ormagneticallybymeansofstrongmagnetic
power,thusmakingthedataunreadable.Butwerecommendthatyoumakeuseofthesoftware(payware)or
service(payservice)specicallydevelopedforthepurpose.
Fordisposingofdataontheharddiskdrive,LenovoprovidestheSecureDataDisposal™tool.Todownload
eitherprogram,gotohttp://www.lenovo.com/support.
Note:Runningtheprogramwilltakeacoupleofhours.
IfanEncryptionsolid-statedriveoraDiskEncryptionharddiskdriveissupportedandinstalledinyour
computer,youcanlogicallydisposeofallthedataonthedriveinaveryshorttimebyerasingthe
cryptographickey.Thedataencryptedwiththeoldkeyisnotphysicallyerasedbutremainsonthedrive;
however,itcannotbedecryptedwithouttheoldkey.ThisfeatureisenabledbyThinkPadSetupMenu
ExtensionUtilityandisavailableasamenuiteminThinkPadSetup.
Usingrewalls
Ifyoursystemispreinstalledwitharewallprogram,itprotectsagainstcomputerInternetsecuritythreats,
unauthorizedaccesses,intrusions,andInternetattacks.Italsoprotectsyourprivacy.
Formoreinformationabouthowtousetherewallprogram,refertothehelpinformationsystemthat
comeswiththeprogram.
Chapter4.Security59
Page 76

Protectingdataagainstviruses
Yourcomputerispreinstalledwithanantivirusprogramsoyoucandetectandeliminateviruses.The
antivirusprogramisdesignedtohelpyoudetectandeliminateviruses.
Lenovoprovidesafullversionofantivirussoftwareonyourcomputerwithafree30-daysubscription.After
30days,youmustrenewthelicensetocontinuereceivingtheantivirussoftwareupdates.
Formoreinformationabouthowtouseyourantivirussoftware,refertothehelpinformationsystemof
yourantivirussoftware.
60UserGuide
Page 77

Chapter5.Recoveryoverview
Thischapterprovidesinformationabouttherecoverysolutions.
•“RecoveryoverviewfortheWindows7operatingsystem”onpage61
•“RecoveryoverviewfortheWindows8operatingsystem”onpage66
RecoveryoverviewfortheWindows7operatingsystem
ThissectionprovidesinformationabouttherecoverysolutionsprovidedbyLenovoontheWindows7
operatingsystem.
Notes:
•Thereareavarietyofmethodstochoosefromwhenconsideringhowtorecoverintheeventofa
software-relatedorhardware-relatedproblem.Somemethodsvarydependingonthetypeofyour
operatingsystem.
•Theproductontherecoverymediamightbeusedonlyforthefollowingpurposes:
–Restoretheproductpreinstalledonyourcomputer
–Reinstalltheproduct
–ModifytheproductusingtheAdditionalFiles
Notes:T opreventpotentialperformancerisksorunexpectedbehaviorthatmightbecausedbythenew
harddiskdrivetechnology,itisrecommendedthatyouuseoneofthefollowingback-upsoftwareprograms:
•ThinkVantageRescueandRecoveryversion4.3orlater
•SymantecNortonGhostversion15orlater
Notes:Tousethisprogram,dothefollowing:
1.ClickStart➙Run.TheRunwindowopens.
2.T ypecmdintheeld.ThenclickOK.
3.T ypeghost-align=1mbandpressEnter.
•AcronisT rueImage2010orlater
•ParagonBackup&Recovery10Suiteorlater,ParagonBackup&Recovery10Homeorlater
Creatingandusingrecoverymedia
Youcanuserecoverymediatorestoretheharddiskdrivetothefactorydefaultsettings.Recoverymedia
areusefulifyoutransferthecomputertoanotherarea,sellthecomputer,recyclethecomputer,orputthe
computerinanoperationalstateafterallothermethodsofrecoveryhavefailed.Asaprecautionarymeasure,
itisimportanttocreaterecoverymediaasearlyaspossible.
Note:Therecoveryoperationsyoucanperformusingrecoverymediavarydependingontheoperating
systemfromwhichtherecoverymediawerecreated.Therecoverymediamightcontainabootmedium
andadatamedium.Y ourMicrosoftWindowslicensepermitsyoutocreateonlyonedatamedium,soitis
importantthatyoustoretherecoverymediainasafeplaceafteryouhavemadethem.
Creatingrecoverymedia
Note:OntheWindows7operatingsystem,youcancreaterecoverymediausingdiscsorexternalUSB
storagedevices.
©CopyrightLenovo2012
61
Page 78

TocreaterecoverymediaontheWindows7operatingsystem,clickStart➙AllPrograms➙Lenovo
ThinkVantageTools➙FactoryRecoveryDisks.Then,followtheinstructionsonthescreen.
Usingrecoverymedia
OntheWindows7operatingsystemoperatingsystem,youcanuserecoverymediatorestorethecomputer
tothefactorydefaultsettingsonly.
Attention:Whenyouuserecoverymediatorestorethecomputertothefactorydefaultsettings,alltheles
currentlyontheharddiskdrivewillbedeletedandreplacedbythefactorydefaultsettings.
TouserecoverymediaontheWindows7operatingsystemoperatingsystem,dothefollowing:
1.Dependingonthetypeofyourrecoverymedia,connectthebootmedium(memorykeyorotherUSB
storagedevice)tothecomputer,orinsertthebootdiscintotheopticaldrive.
2.T urnoffthecomputerandthenturniton.
3.WhenThinkPadlogoisdisplayed,repeatedlypressandreleasetheF12key.WhentheBootMenu
windowopens,releasetheF12key.
4.SelectthedesiredstartupdeviceandpressEnter.Therestoreprocessbegins.
5.Followtheinstructionsonthescreentocompletetheoperation.
Notes:
1.Afterrestoringyourcomputertothefactorydefaultsettings,youmighthavetoreinstalldevicedrivers
forsomedevices.See“Reinstallingpreinstalledprogramsanddevicedrivers”onpage65.
2.SomecomputerscomewithMicrosoftOfceorMicrosoftWorkspreinstalled.Ifyouneedtorecover
orreinstallyourMicrosoftOfceorMicrosoftWorksprograms,youmustusetheMicrosoftOfceCD
orMicrosoftWorksCD.ThesediscsareprovidedonlywithcomputerspreinstalledwithMicrosoft
OfceorMicrosoftWorks.
Performingbackupandrecoveryoperations
UsetheRescueandRecoveryprogramtobackupallyourharddiskdrivecontentsincludingtheoperating
system,datales,softwareprograms,andpersonalsettings.YoucandesignatewheretheRescueand
Recoveryprogramstoresthebackup:
•Inaprotectedareaofyourharddiskdrive
•Onthesecondaryharddiskdriveifasecondaryharddiskdriveisinstalledinyourcomputer
•OnanattachedexternalUSBharddiskdrive
•Onanetworkdrive
•Onrecordablediscs(arecordableopticaldriveisrequiredforthisoption)
Afteryouhavebackedupthecontentsontheharddiskdrive,youcanrestorethecompletecontentsofthe
harddiskdrive,restoreonlytheselectedles,orrestoreonlytheWindowsoperatingsystemandprograms.
Performingabackupoperation
ToperformabackupoperationusingtheRescueandRecoveryprogramontheWindows7operating
system,dothefollowing:
1.FromtheWindowsdesktop,clickStart➙AllPrograms➙LenovoThinkVantageTools➙Enhanced
BackupandRestore.TheRescueandRecoveryprogramopens.
2.IntheRescueandRecoverymainwindow,clicktheLaunchadvancedRescueandRecoveryarrow.
3.ClickBackupyourharddriveandselectbackupoperationoptions.Then,followtheinstructionson
thescreentocompletethebackupoperation.
62UserGuide
Page 79

Performingarecoveryoperation
ToperformarecoveryoperationusingtheRescueandRecoveryprogramontheWindows7operating
system,dothefollowing:
1.FromtheWindowsdesktop,clickStart➙AllPrograms➙LenovoThinkVantageTools➙Enhanced
BackupandRestore.TheRescueandRecoveryprogramopens.
2.IntheRescueandRecoverymainwindow,clicktheLaunchadvancedRescueandRecoveryarrow.
3.ClicktheRestoreyoursystemfromabackupicon.
4.Followtheinstructionsonthescreentocompletetherecoveryoperation.
FormoreinformationaboutperformingarecoveryoperationfromtheRescueandRecoveryworkspace,see
“UsingtheRescueandRecoveryworkspace”onpage63
.
UsingtheRescueandRecoveryworkspace
TheRescueandRecoveryworkspaceresidesinaprotected,hiddenareaofyourharddiskdrivethat
operatesindependentlyfromtheWindowsoperatingsystem.Itenablesyoutoperformrecoveryoperations
evenifyoucannotstarttheWindowsoperatingsystem.Youcanperformthefollowingrecoveryoperations
fromtheRescueandRecoveryworkspace:
•Rescuelesfromyourharddiskdriveorfromabackup
TheRescueandRecoveryworkspaceenablesyoutolocatelesonyourharddiskdriveandtransfer
themtoanetworkdriveorotherrecordablemedia,suchasaUSBdeviceoradisc.Thissolutionis
availableevenifyoudidnotbackupyourlesorifchangesweremadetothelessinceyourlastbackup
operation.YoualsocanrescueindividuallesfromaRescueandRecoverybackuplocatedonyourlocal
harddiskdrive,aUSBdevice,oranetworkdrive.
•RestoreyourharddiskdrivefromaRescueandRecoverybackup
IfyouhavebackedupyourharddiskdriveusingtheRescueandRecoveryprogram,youcanrestorethe
harddiskdrivefromaRescueandRecoverybackup,evenifyoucannotstarttheWindowsoperating
system.
•Restoreyourharddiskdrivetothefactorydefaultsettings
TheRescueandRecoveryworkspaceenablesyoutorestorethecompletecontentsofyourharddiskdrive
tothefactorydefaultsettings.Ifyouhavemultiplepartitionsonyourharddiskdrive,youhavetheoption
torestorethefactorydefaultsettingstotheC:partitionandleavetheotherpartitionsintact.Becausethe
RescueandRecoveryworkspaceoperatesindependentlyfromtheWindowsoperatingsystem,youcan
restorethefactorydefaultsettingsevenifyoucannotstarttheWindowsoperatingsystem.
Attention:IfyourestoretheharddiskdrivefromaRescueandRecoverybackuporrestoretheharddisk
drivetothefactorydefaultsettings,alllesontheprimaryharddiskdrivepartition(usuallydriveC:)willbe
deletedintherecoveryprocess.Ifpossible,makecopiesofimportantles.Ifyouareunabletostartthe
Windowsoperatingsystem,youcanusetherescuelesfeatureoftheRescueandRecoveryworkspaceto
copylesfromyourharddiskdrivetoothermedia.
TostarttheRescueandRecoveryworkspace,dothefollowing:
1.T urnoffthecomputerandthenturniton.
2.WhentheThinkPadlogoisdisplayed,presstheblackbuttonorrepeatedlypressandreleasetheF11key.
3.IfyouhavesetaRescueandRecoverypassword,typeyourpasswordwhenprompted.TheRescue
andRecoveryworkspaceopensafterashortdelay.
Note:IftheRescueandRecoveryworkspacefailstoopen,see“Solvingrecoveryproblems”onpage65.
4.Dooneofthefollowing:
Chapter5.Recoveryoverview63
Page 80

•Torescuelesfromyourharddiskdriveorfromabackup,clickRescuelesandfollowthe
instructionsonthescreen.
•TorestoreyourharddiskdrivefromaRescueandRecoverybackuportorestoreyourharddiskdrive
tothefactorydefaultsettings,clickRestoreyoursystemandfollowtheinstructionsonthescreen.
FormoreinformationaboutthefeaturesoftheRescueandRecoveryworkspace,clickHelp.
Notes:
1.Afterrestoringyourharddiskdrivetothefactorydefaultsettings,youmighthavetoreinstalldevice
driversforsomedevices.See“Reinstallingpreinstalledprogramsanddevicedrivers”onpage65.
2.SomecomputerscomewithMicrosoftOfceorMicrosoftWorkspreinstalled.Ifyouneedtorecover
orreinstallyourMicrosoftOfceorMicrosoftWorksprograms,youmustusetheMicrosoftOfceCD
orMicrosoftWorksCD.ThesediscsareprovidedonlywithcomputerspreinstalledwithMicrosoft
OfceorMicrosoftWorks.
Creatingandusingarescuemedium
Witharescuemedium,suchasadiscoraUSBharddiskdrive,youcanrecoverthecomputerfromfailures
thatpreventyoufromgainingaccesstotheRescueandRecoveryworkspaceonyourharddiskdrive.
Notes:
1.Therecoveryoperationsyoucanperformusingarescuemediumvarydependingontheoperating
system.
2.Therescuedisccanbestartedinalltypesofopticaldrives.
Creatingarescuemedium
TocreatearescuemediumontheWindows7operatingsystem,dothefollowing:
1.FromtheWindowsdesktop,clickStart➙AllPrograms➙LenovoThinkVantageTools➙Enhanced
BackupandRestore.TheRescueandRecoveryprogramopens.
2.IntheRescueandRecoverymainwindow,clicktheLaunchadvancedRescueandRecoveryarrow.
3.ClicktheCreateRescueMediaicon.TheCreateRescueandRecoveryMediawindowopens.
4.IntheRescueMediaarea,selectthetypeoftherescuemediumyouwanttocreate.Youcancreatea
rescuemediumusingadisc,aUSBharddiskdrive,orasecondaryinternalharddiskdrive.
5.ClickOKandfollowtheinstructionsonthescreentocreatearescuemedium.
Usingarescuemedium
Thissectionprovidesinstructionsonhowtousetherescuemediumyouhavecreated.
•Ifyouhavecreatedarescuemediumusingadisc,usethefollowinginstructionstousetherescuemedium:
1.T urnoffyourcomputer.
2.RepeatedlypressandreleasetheF12keywhenturningonthecomputer.WhentheBootMenu
windowisdisplayed,releasetheF12key.
3.IntheBootMenuwindow,selectthedesiredopticaldriveastherstbootdevice.Then,insertthe
rescuediscintotheopticaldriveandpressEnter.Therescuemediumstarts.
•IfyouhavecreatedarescuemediumusingaUSBharddiskdrive,usethefollowinginstructionsto
usetherescuemedium:
1.AttachtheUSBharddiskdrivetooneoftheUSBconnectorsonyourcomputer.
2.RepeatedlypressandreleasetheF12keywhenturningonthecomputer.WhentheBootMenu
windowopens,releasetheF12key.
64UserGuide
Page 81

3.IntheBootMenuwindow,selecttheUSBharddiskdriveastherstbootdeviceandpressEnter.
Therescuemediumstarts.
•Ifyouhavecreatedarescuemediumusingthesecondaryinternalharddiskdrive,setthesecondary
internalharddiskdriveastherstbootdeviceinthestartupdevicesequencetostarttherescuemedium.
Whentherescuemediumstarts,theRescueandRecoveryworkspaceopens.Thehelpinformationfor
eachfeatureisavailablefromtheRescueandRecoveryworkspace.Followtheinstructionstocomplete
therecoveryprocess.
Reinstallingpreinstalledprogramsanddevicedrivers
Yourcomputerhasprovisionsthatenableyoutoreinstallselectedfactory-installedprogramsanddevice
drivers.
Reinstallingpreinstalledprograms
Toreinstallselectedprograms,dothefollowing:
1.T urnonyourcomputer.
2.GototheC:\SWTOOLSdirectory.
3.OpentheAPPSfolder.Initareseveralsubfoldersnamedforthevariouspreinstalledprograms.
4.Openthesubfolderfortheprogramyouarereinstalling.
5.Double-clickSetup,andthenfollowtheon-screenstepstoreinstalltheprogram.
Reinstallingpreinstalleddevicedrivers
Attention:Whenyoureinstalldevicedrivers,youarechangingthecurrentcongurationofyourcomputer.
Reinstalldevicedriversonlywhenitisnecessarytocorrectaproblemwithyourcomputer.
Toreinstalladevicedriverforafactory-installeddevice,dothefollowing:
1.T urnonyourcomputer.
2.GototheC:\SWTOOLSdirectory.
3.OpentheDRIVERSfolder.WithintheDRIVERSfolderareseveralsubfoldersnamedforthevarious
devicesinstalledinyourcomputer(forexample,AUDIOandVIDEO).
4.Openthesubfolderforthedevice.
5.Reinstallthedevicedriverbyoneofthefollowingmethods:
•Inthesubfolderforthedevice,lookforatextle(alewiththeextension.txt).Thetextlecontains
informationonhowtoreinstallthatdevicedriver.
•Ifthesubfolderforthedevicecontainsaleofsetupinformation(alewiththeextension.inf),you
canusetheAddNewHardwareprogram(intheWindowsControlPanel)toreinstallthedevicedriver.
Notalldevicedriverscanbereinstalledbyuseofthisprogram.IntheAddNewHardwareprogram,
whenpromptedforthedevicedriveryouwanttoinstall,clickHaveDiskandBrowse.Thenselect
thedevicedriverlefromthedevicesubfolder.
•Inthesubfolderforthedevice,lookfortheexecutablele(alewiththeextension.exe).Double-click
thele,andfollowtheinstructionsonthescreen.
Attention:Ifyouneedupdateddevicedrivers,donotdownloadthemfromtheWindowsUpdateWebsite.
ObtainthemfromLenovo.Formoreinformation,see“Makingsuredevicedriversarecurrent”onpage128.
Solvingrecoveryproblems
IfyouareunabletoaccesstheRescueandRecoveryworkspaceortheWindowsenvironment,doone
ofthefollowing:
Chapter5.Recoveryoverview65
Page 82

•UsearescuemediumtostarttheRescueandRecoveryworkspace.See“Creatingandusingarescue
medium”onpage64.
•Userecoverymediaifallothermethodsofrecoveryhavefailedandyouneedtorestoretheharddisk
drivetothefactorydefaultsettings.See“Performingbackupandrecoveryoperations”onpage62.
Note:IfyouareunabletoaccesstheRescueandRecoveryworkspaceortheWindowsenvironmentfrom
arescuemediumorrecoverymedia,youmightnothavetherescuedevice(aninternalharddiskdrive,a
disc,aUSBharddiskdrive,orotherexternaldevices)setastherstbootdeviceinthestartupdevice
sequence.Youmustrstmakesurethatyourrescuedeviceissetastherstbootdeviceinthestartup
devicesequenceintheSetupUtilityprogram.See“Startupmenu”onpage122fordetailedinformation
abouttemporarilyorpermanentlychangingthestartupdevicesequence.Formoreinformationaboutthe
SetupUtilityprogram,see“ThinkPadSetup”onpage110.
Itisimportanttocreatearescuemediumandasetofrecoverymediaasearlyaspossibleandstorethem
inasafeplaceforfutureuse.
RecoveryoverviewfortheWindows8operatingsystem
Thissectionprovidesinformationabouttherecoverysolutionsprovidedoncomputerspreinstalledwiththe
Windows8operatingsystem.
Refreshingyourcomputer
Ifyourcomputerdoesnotperformwellandtheproblemmightbecausedbyarecentlyinstalledprogram,
youcanrefreshyourcomputerwithoutlosingyourpersonallesorchangingyoursettings.
Attention:Ifyourefreshyourcomputer,theprogramsthatcamewithyourcomputerandtheprogramsthat
youinstalledfromWindowsStorewillbereinstalled,butallotherprogramswillberemoved.
Torefreshyourcomputer,dothefollowing:
1.Moveyourcursortothetop-rightorbottom-rightcornerofthescreentodisplaythecharms.Click
Settings➙ChangePCsettings➙General.
2.IntheRefreshyourPCwithoutaffectingyourlessection,clickGetstarted.
Resettingyourcomputertothefactorydefaultsettings
Youcanresetyourcomputertothefactorydefaultsettings.Resettingthecomputerwillreinstallthe
operatingsystem,andreinstallalltheprogramsandsettingsthatcamewithyourcomputer.
Attention:Ifyouresetyourcomputer,allyourpersonallesandsettingswillbedeleted.Toavoiddataloss,
makeabackupcopyofallthedatathatyouwanttokeep.
Toresetyourcomputer,dothefollowing:
1.Moveyourcursortothetop-rightorbottom-rightcornerofthescreentodisplaythecharms.Click
Settings➙ChangePCsettings➙General.
2.IntheRemoveeverythingandreinstallWindowssection,clickGetstarted.
Advancedstartupoptions
AdvancedstartupoptionsenableyoutochangethestartupsettingsofyourWindowsoperatingsystem,
startthecomputerfromanexternaldevice,orrestoretheWindowsoperatingsystemfromasystemimage.
Tousetheadvancedstartupoptions,dothefollowing:
1.Moveyourcursortothetop-rightorbottom-rightcornerofthescreentodisplaythecharms.Click
Settings➙ChangePCsettings➙General.
66UserGuide
Page 83

2.IntheAdvancedstartupsection,clickRestartnow➙T roubleshoot➙Advancedoptions.
3.Restartyourcomputerfollowingtheinstructionsonthescreen.
FormoredetailsabouttherecoverysolutionsprovidedoncomputerspreinstalledwiththeWindows8
operatingsystem,refertothehelpinformationsystemoftheWindows8operatingsystem.
Chapter5.Recoveryoverview67
Page 84

68UserGuide
Page 85

Chapter6.Replacingdevices
Thischapterprovidesinstructionsonhowtoinstallorreplacesomehardwareforyourcomputer.
•“Staticelectricityprevention”onpage69
•“Replacingthebattery”onpage69
•“ReplacingtheSIMcard”onpage72
•“Replacingtheharddiskdriveorsolid-statedrive”onpage73
•“Replacingamemorymodule”onpage75
•“Replacingthekeyboard”onpage78
•“Replacingthepalmrest”onpage81
•“Replacingthespeaker”onpage85
•“Replacingthebackupbattery”onpage86
Staticelectricityprevention
Staticelectricity,althoughharmlesstoyou,canseriouslydamagecomputercomponentsandoptions.
Improperhandlingofstatic-sensitivepartscancausedamagetothepart.Whenyouunpackanoption
orCRU,donotopenthestatic-protectivepackagecontainingthepartuntiltheinstructionsdirectyou
toinstallit.
WhenyouhandleoptionsorCRUs,orperformanyworkinsidethecomputer,takethefollowingprecautions
toavoidstatic-electricitydamage:
•Limityourmovement.Movementcancausestaticelectricitytobuilduparoundyou.
•Alwayshandlecomponentscarefully.Handleadapters,memorymodules,andothercircuitboardsbythe
edges.Nevertouchexposedcircuitry.
•Preventothersfromtouchingcomponents.
•Whenyouinstallastatic-sensitiveoptionorCRU,touchthestatic-protectivepackagecontainingthe
parttoametalexpansion-slotcoverorotherunpaintedmetalsurfaceonthecomputerforatleasttwo
seconds.Thisreducesstaticelectricityfromthepackageandyourbody.
•Whenpossible,removethestatic-sensitivepartfromthestatic-protectivepackagingandinstallthepart
withoutsettingitdown.Whenthisisnotpossible,placethestatic-protectivepackagingonasmooth,
levelsurfaceandplacethepartonit.
•Donotplacethepartonthecomputercoverorothermetalsurface.
Replacingthebattery
Beforeyoustart,printtheseinstructions.
ThissystemsupportsonlybatteriesspeciallydesignedforthisspecicsystemandmanufacturedbyLenovo
oranauthorizedbuilder.Thesystemdoesnotsupportunauthorizedbatteriesorbatteriesdesignedforother
systems.Ifanunauthorizedbatteryorabatterydesignedforanothersystemisinstalled,thesystemwill
notcharge.
Attention:Lenovohasnoresponsibilityfortheperformanceorsafetyofunauthorizedbatteries,and
providesnowarrantiesforfailuresordamagearisingoutoftheiruse.
©CopyrightLenovo2012
69
Page 86

DANGER
Iftherechargeablebatterypackisincorrectlyreplaced,thereisdangerofanexplosion.Thebattery
packcontainsasmallamountofharmfulsubstances.T oavoidpossibleinjury:
•ReplaceonlywithabatteryofthetyperecommendedbyLenovo.
•Keepthebatterypackawayfromre.
•Donotexposeittoexcessiveheat.
•Donotexposeittowaterorrain.
•Donotshort-circuitit.
•Donotdrop,crush,puncture,orsubjecttostrongforces.Batteryabuseormishandlingcan
causethebatterytooverheat,whichcancausegassesorameto“vent”fromthebattery
packorcoincell.
Toreplacethebattery,dothefollowing:
1.T urnoffthecomputer.Thendisconnecttheacpoweradapterandallcablesfromthecomputer.
2.Closethecomputerdisplay,andturnthecomputerover.
70UserGuide
Page 87
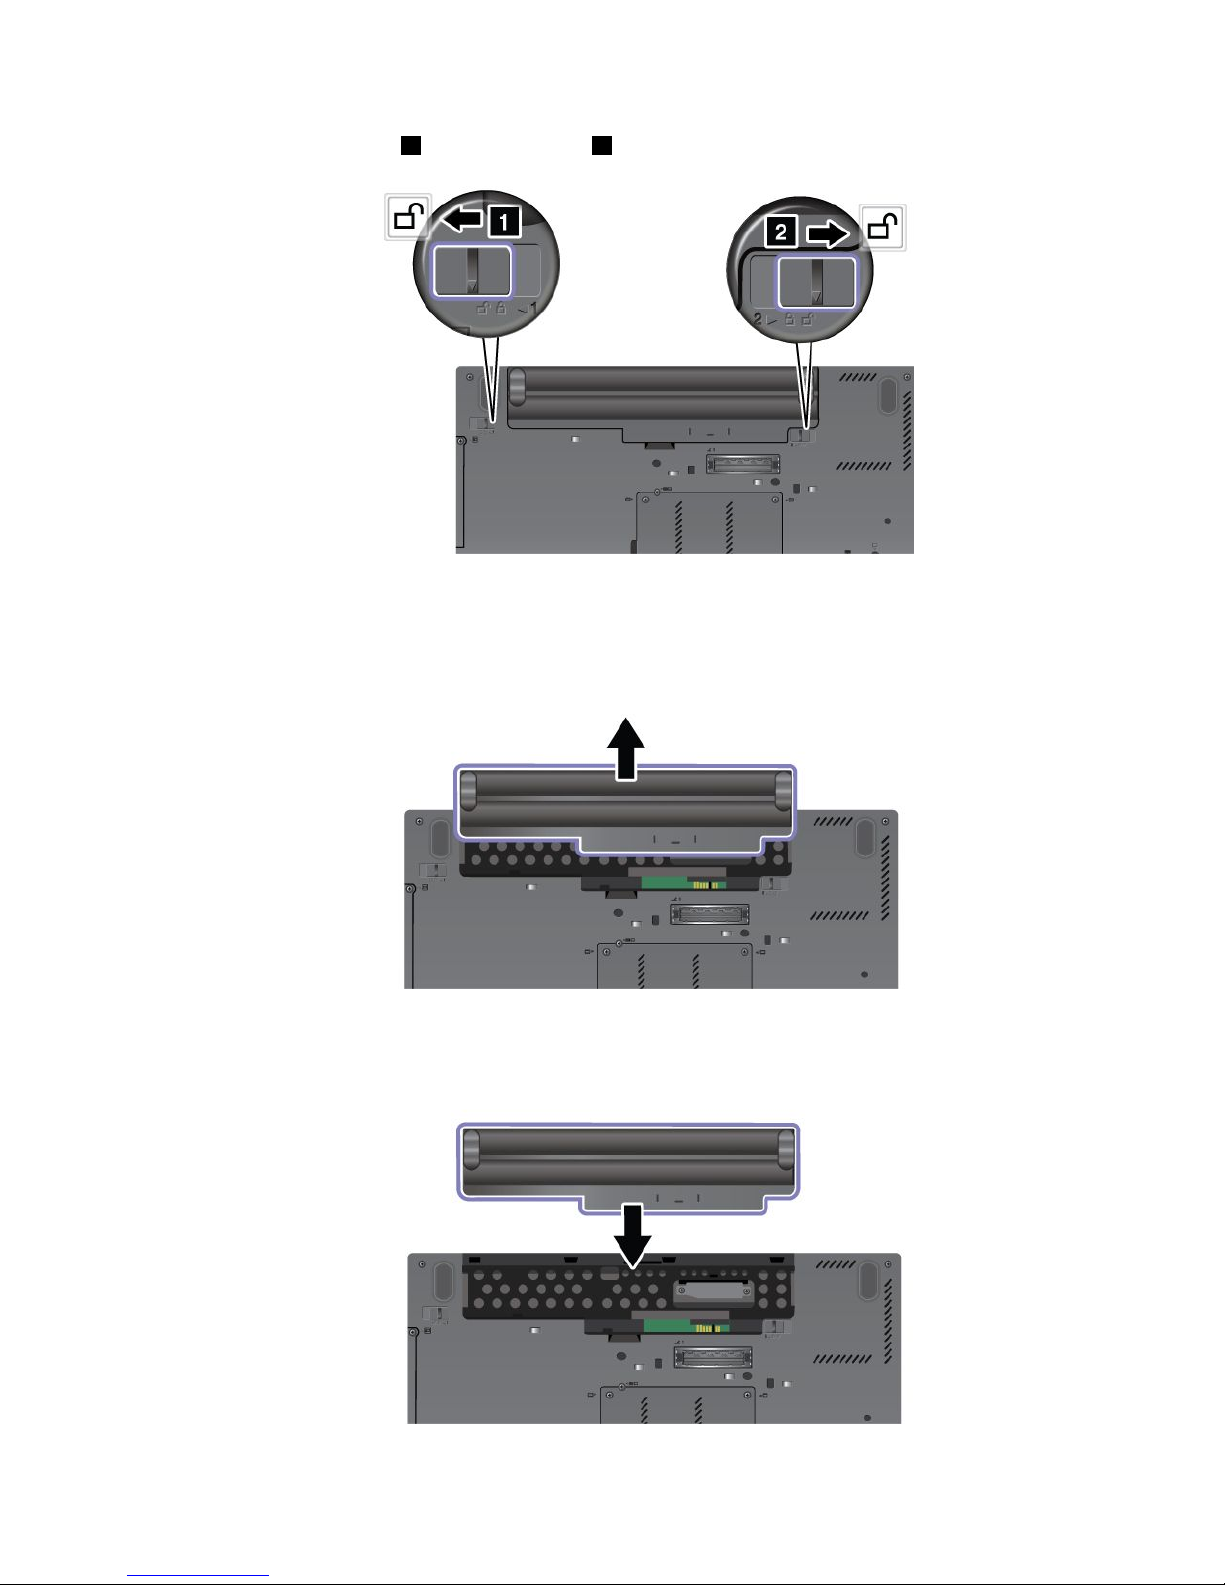
3.Unlockthebatterylatch1andholdthelatch2intheunlockedposition.
4.Removethebattery.
5.Slidethenewbatteryintothecomputer.
Chapter6.Replacingdevices71
Page 88
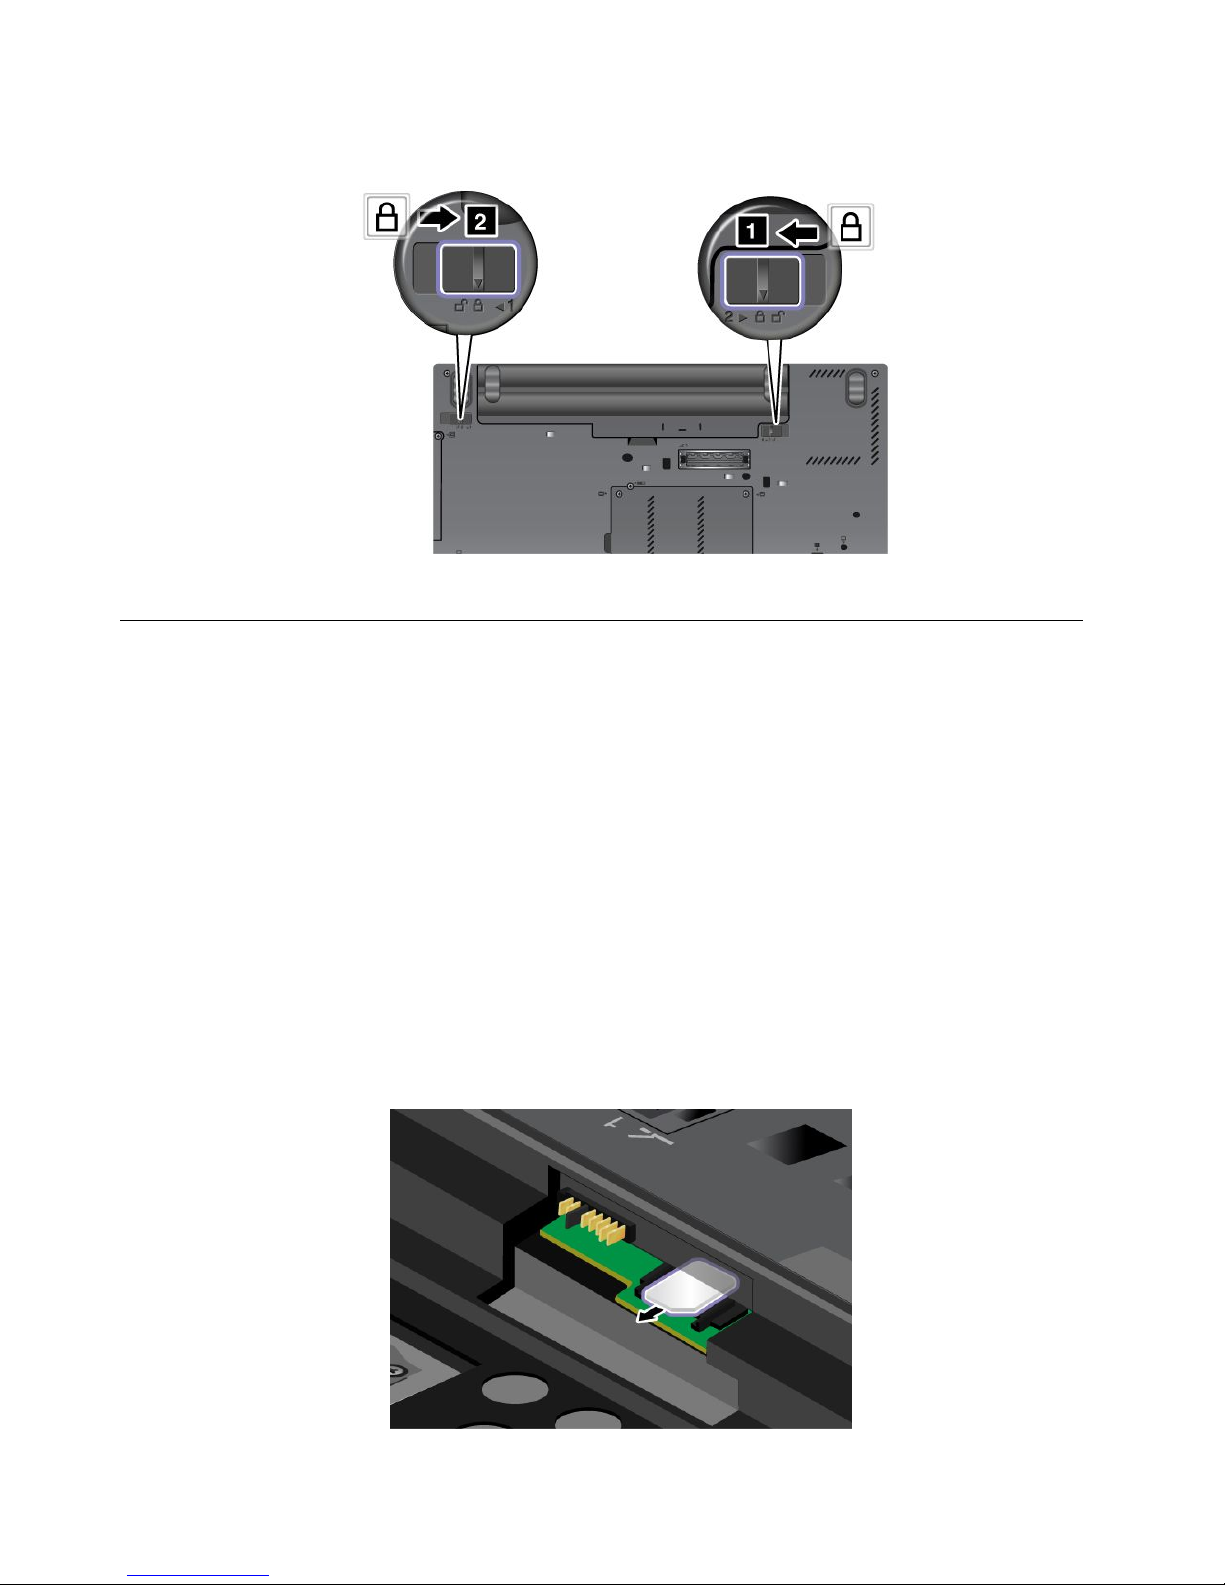
6.Makesurethatthebatterylatchtothelockedposition.
7.T urnthecomputeroveragain.Connecttheacpoweradapterandallcables.
ReplacingtheSIMcard
Beforeyoustart,printtheseinstructions.
YourcomputermightrequireaSIMcardtoestablishwirelessWANconnections.Dependingonthecountry
ofdelivery,youmightneedtopurchaseaSIMcardoraSIMcardmightalreadybeinstalledinyourcomputer
orispartoftheshippingcontentsthatcomewithyourcomputer.
IfyoundaSIMcardincludedintheshippingcontents,adummycardisinstalledintheSIMcardslot.Then
proceedwiththefollowinginstructions.
Note:TheSIMcardisidentiedbytheICchipmountedononesideofthecard.
ToreplacetheSIMcard,dothefollowing:
1.T urnoffthecomputer;thendisconnecttheacpoweradapterandallcablesfromthecomputer.
2.Closethecomputerdisplay,andturnitover.
3.Removethebattery.See“Replacingthebattery”onpage69.
4.FindtheSIMcardslotinsidetheopenbatterycompartment.Removethecard.
72UserGuide
Page 89
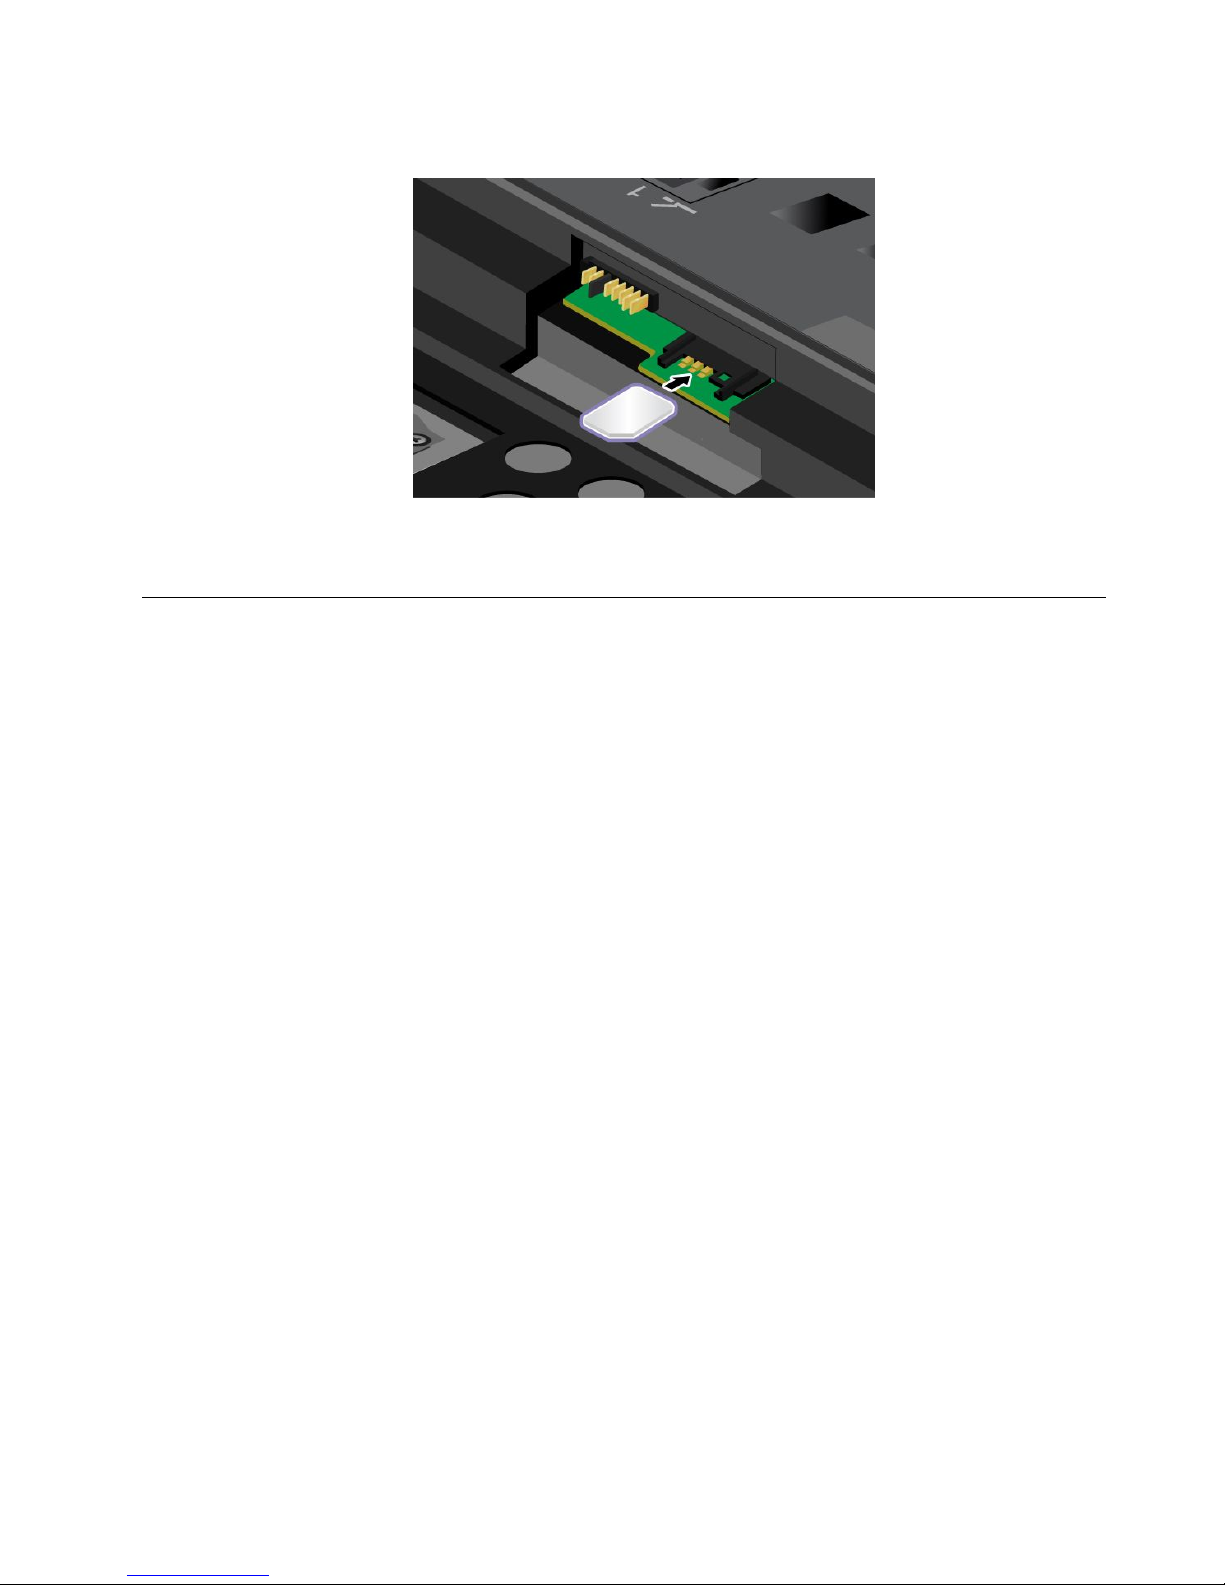
5.InsertthenewSIMcardrmlyintotheslot.
6.Reinstallthebattery.See“Replacingthebattery”onpage69.
7.T urnthecomputeroveragain.Connecttheacpoweradapterandallcables.
Replacingtheharddiskdriveorsolid-statedrive
Beforeyoustart,printtheseinstructions.
Whenreplacingthedrive,besuretofollowtheprecautions.
Attention:Theharddiskdriveorsolid-statedriveisverysensitive.Incorrecthandlingcancausedamage
andpermanentlossofdata.Observethefollowingguidelines:
•Replacetheharddiskdriveorsolid-statedriveonlyifyouupgradeitorhaveitrepaired.Theconnectors
andslotoftheharddiskdriveorsolid-statedrivearenotdesignedforfrequentchanges,ordrive
swapping.
•Donotdropthedriveorsubjectittophysicalshocks.Putthedriveonamaterial,suchassoftcloth,that
absorbsanyphysicalshocks.
•Donotapplypressuretothecoverofthedrive.
•Donottouchtheconnector.
•Beforeremovingtheharddiskdrive,makeabackupcopyofalltheinformationonit,andthenturn
thecomputeroff.
•Neverremovethedrivewhilethecomputerisoperating,insleepmode,orinhibernationmode.
Toreplacetheharddiskdriveorsolid-statedrive,dothefollowing:
1.T urnoffthecomputer,thendisconnecttheacpoweradapterandallcablesfromthecomputer.
2.Closethecomputerdisplay,andturnthecomputerover.
3.Removethebattery.See“Replacingthebattery”onpage69.
Chapter6.Replacingdevices73
Page 90
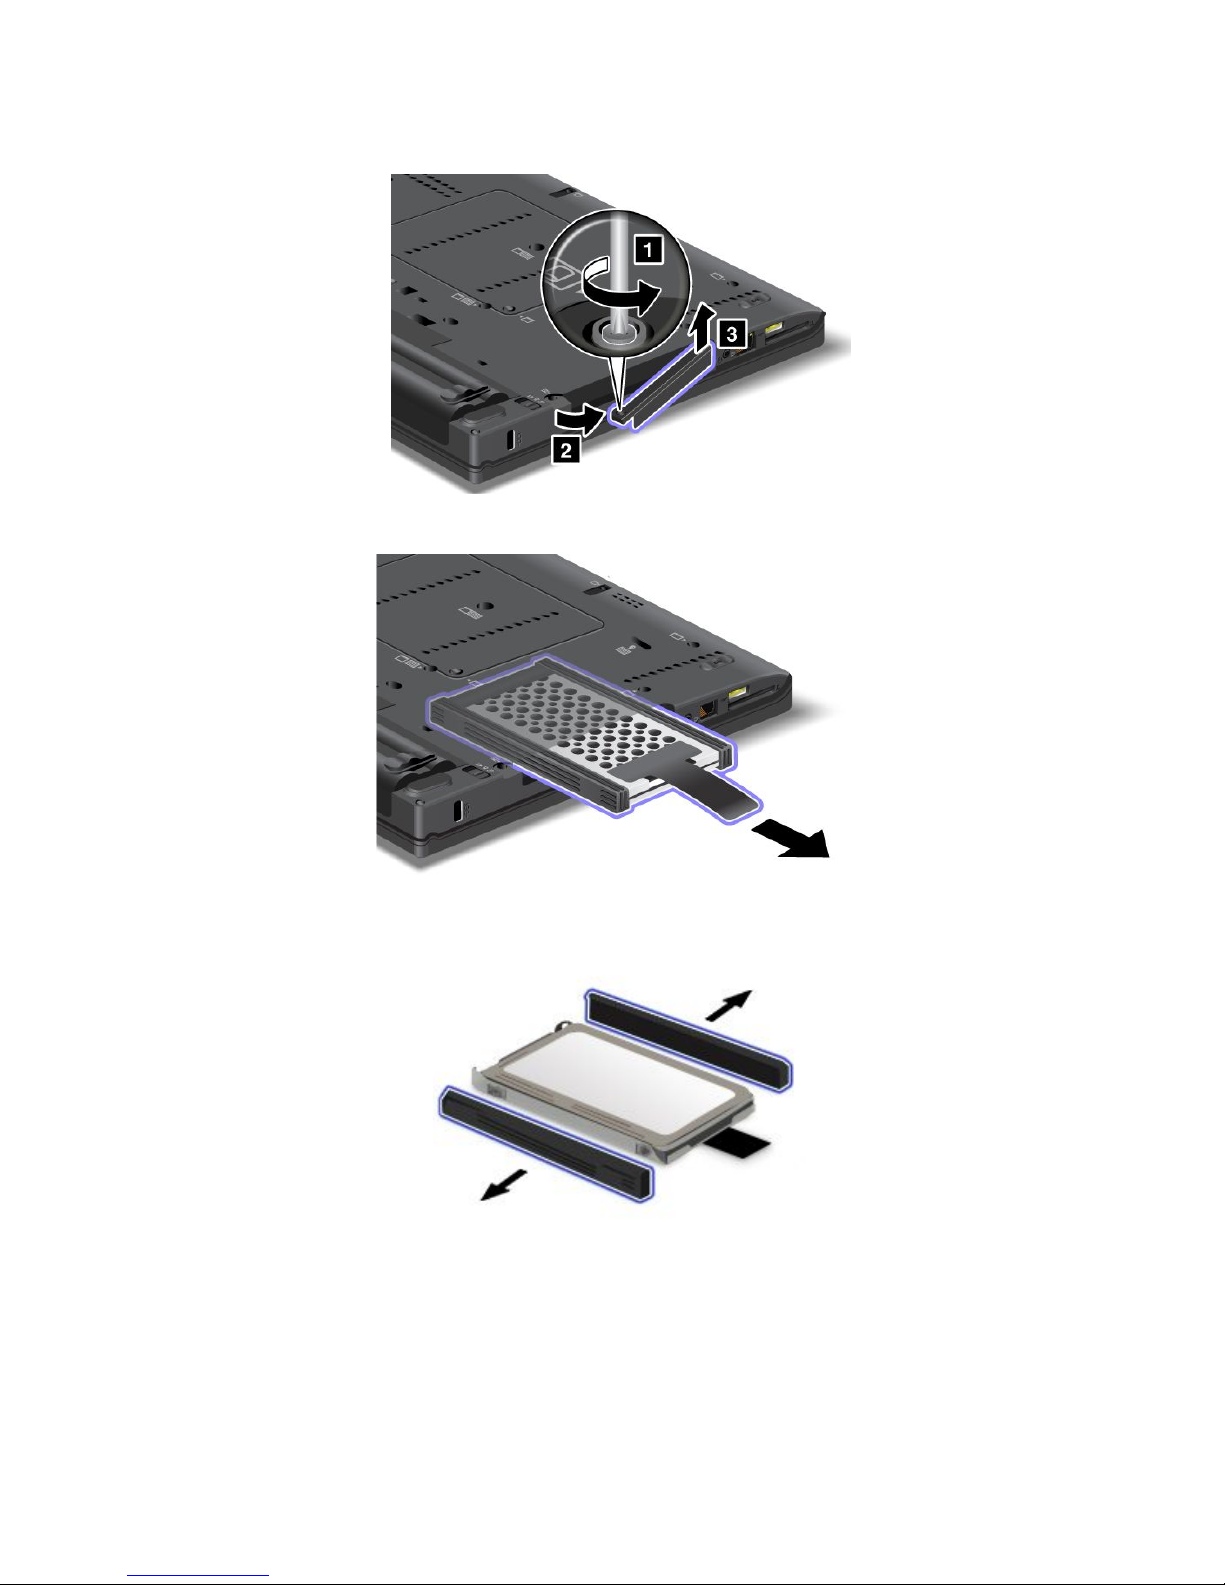
4.Loosenthescrewthatsecurestheslotcover.Thenremovethecover.
5.Removetheharddiskdriveorsolid-statedrivebypullingoutthetab.
6.Detachthesiderubberrailsfromtheharddiskdriveorthesidespacerrailsfromthesolid-statedrive.
74UserGuide
Page 91
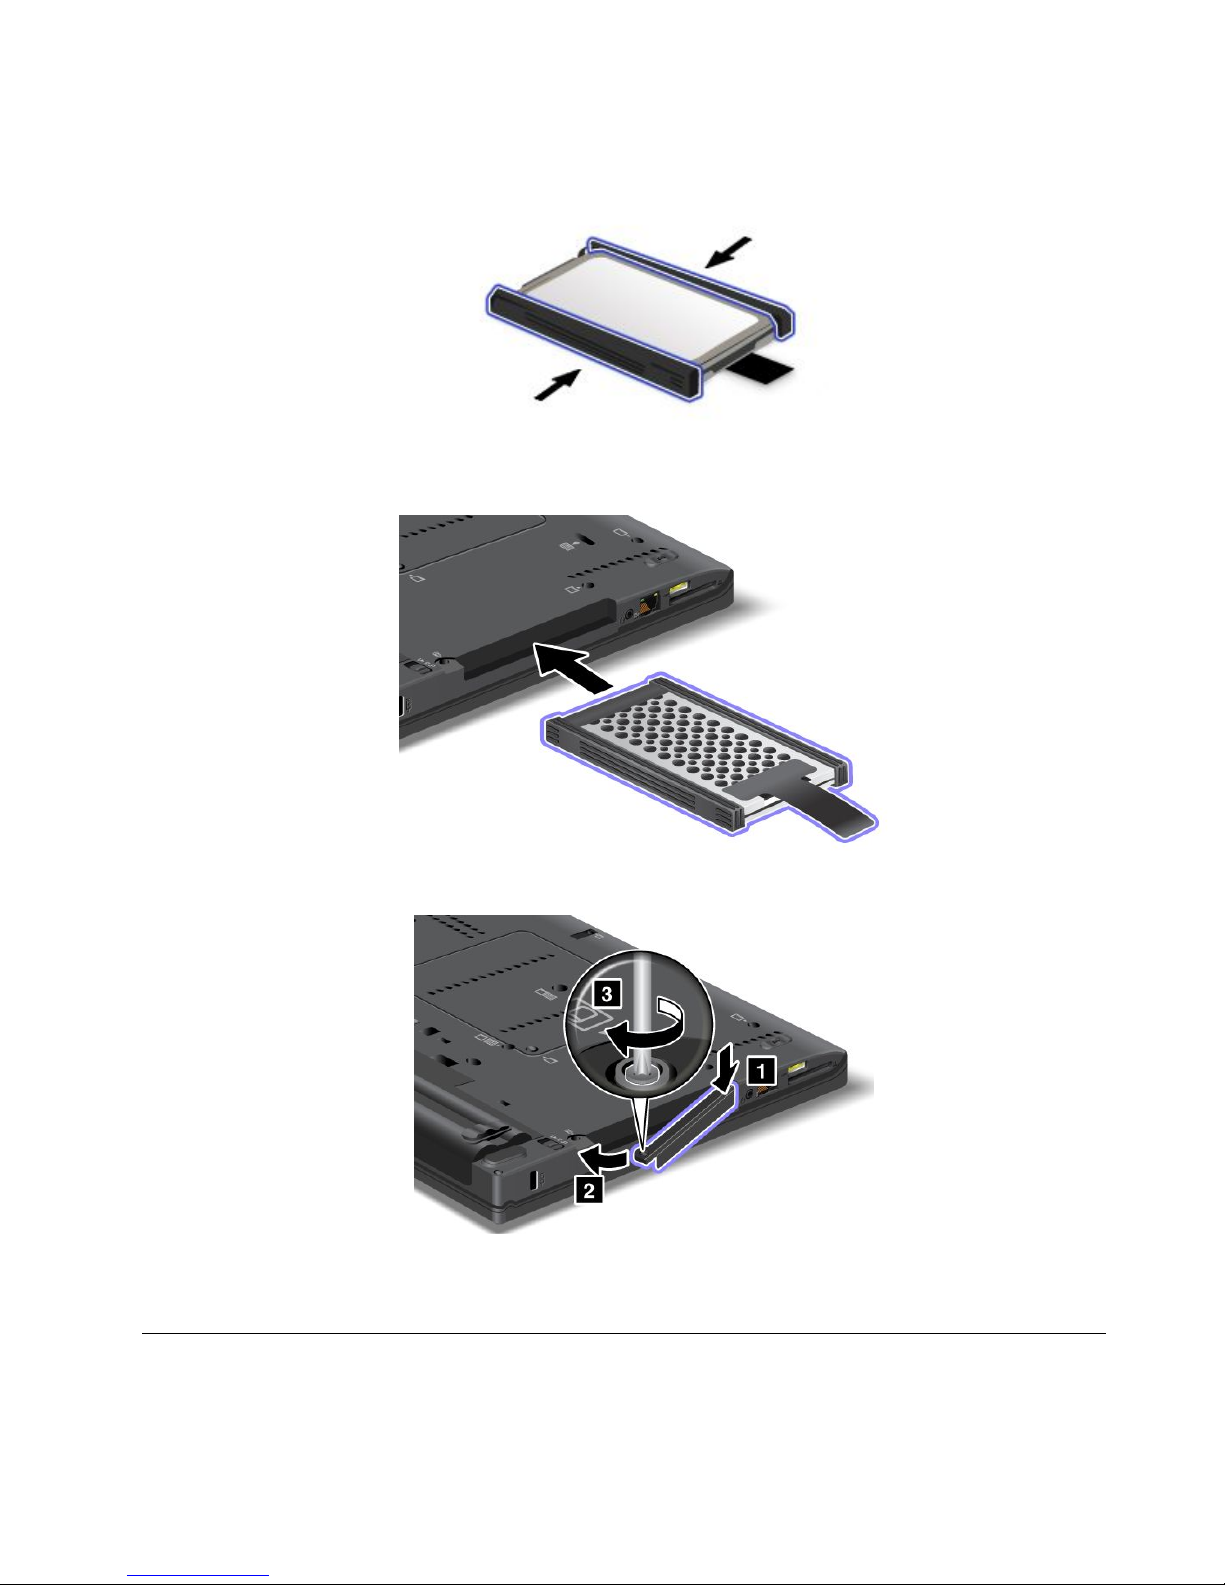
7.Attachthesiderubberrailstothenewharddiskdriveorthesidespacerrailstothenewsolid-statedrive.
8.Insertthenewharddiskdriveorsolid-statedriveintotheslot.
9.Reinstalltheslotcoverandtightenthescrewtosecureit.
10.Reinstallthebattery.See“Replacingthebattery”onpage69.
11.T urnthecomputeroveragain.Connecttheacpoweradapterandallcables.
Replacingamemorymodule
Beforeyoustart,printtheseinstructions.
Chapter6.Replacingdevices75
Page 92
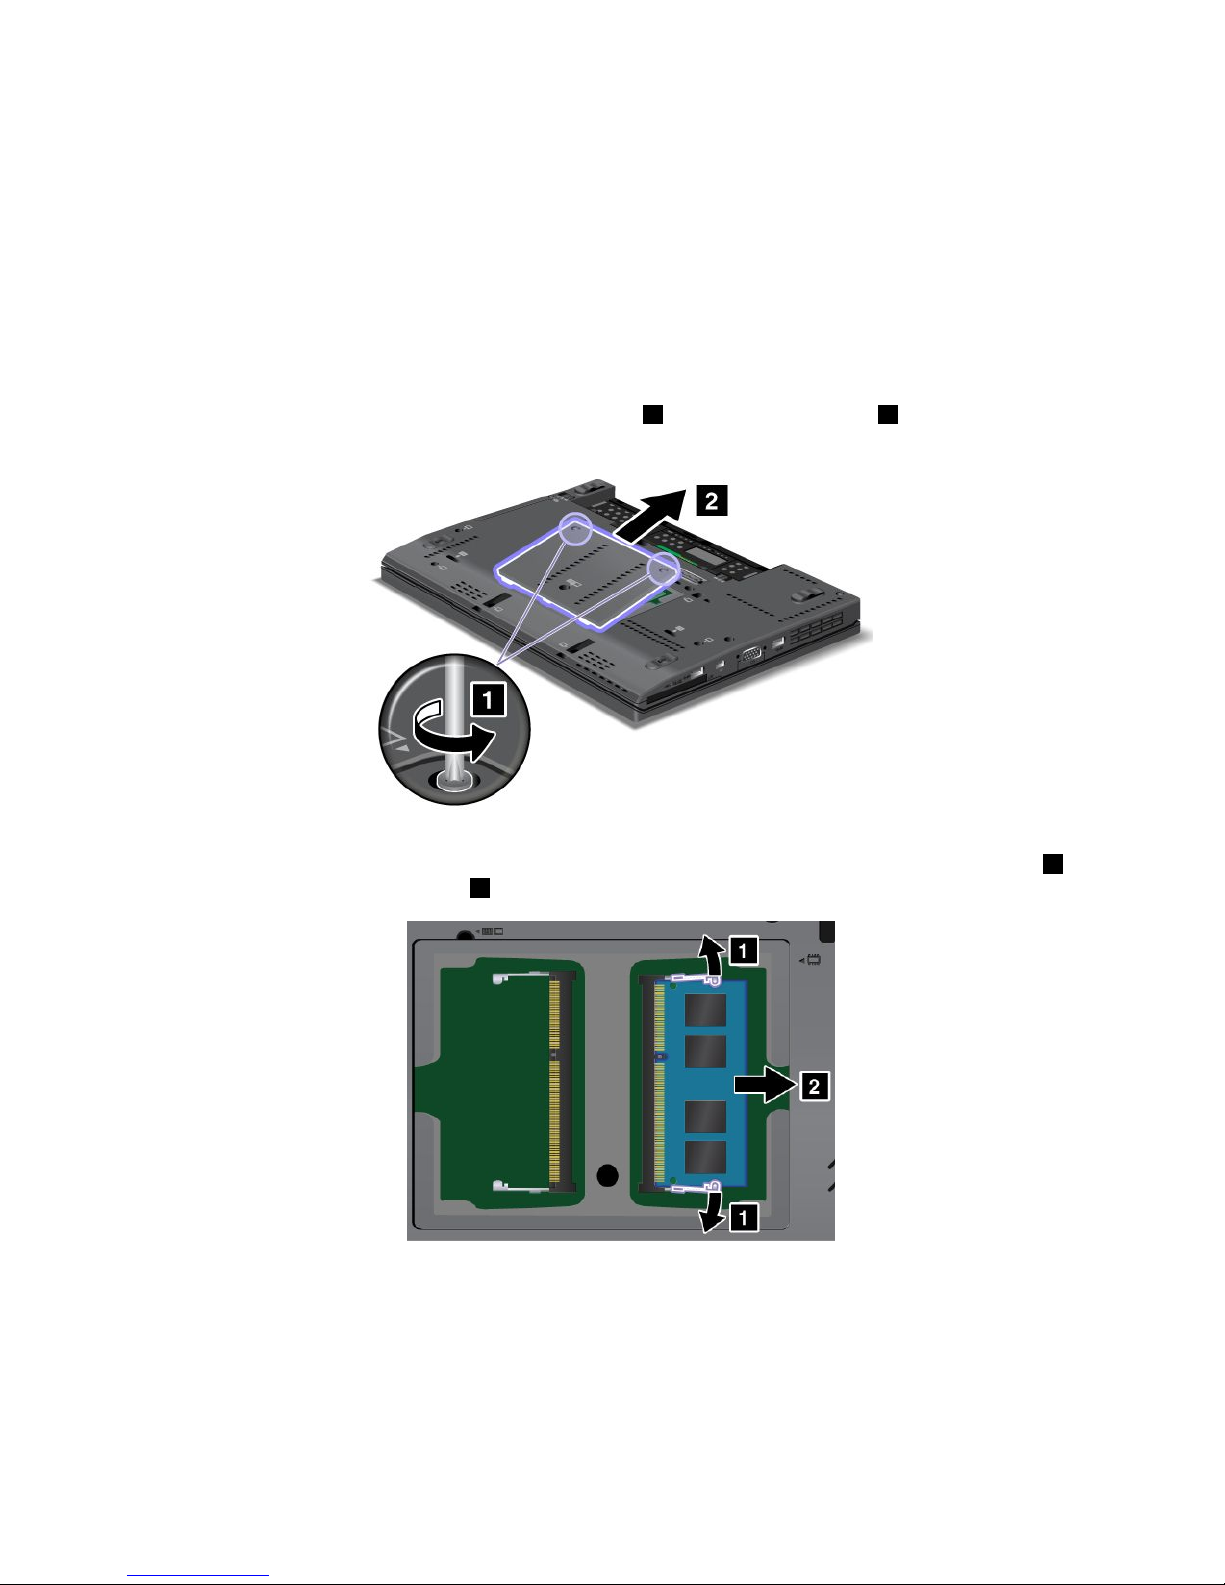
Note:Theoperatingspeedofthememorymodulehasdependencyonthesystemconguration.Insome
conditions,thememoryinyourcomputermightnotbeabletooperateatthemaximumspeed.
Attention:Beforeyoustartinstallingamemorymodule,touchametaltableoragroundedmetalobject.This
actionreducesanystaticelectricityfromyourbody.Thestaticelectricitycoulddamagethememorymodule.
Toreplaceamemorymodule,dothefollowing:
1.T urnoffthecomputer;thendisconnecttheacpoweradapterandallcablesfromthecomputer.
2.Closethecomputerdisplay,andturnitover.
3.Removethebattery.See“Replacingthebattery”onpage69.
4.Loosenthescrewsthatsecurethememoryslotcover1,thenremovethecover2.
Iftwomemorymodulesalreadyareinstalledinthememoryslots,removeamemorymoduletomake
roomforthenewonebypressingoutonthelatchesonbothedgesofthesocketatthesametime1
andremovingthememorymodule2.Savetheremovedmemorymoduleforfutureuse.
5.Findthenotchonthecontactedgesideofthememorymoduleyouareinstalling.
Attention:Toavoiddamagingthememorymodule,donottouchitscontactedge.
76UserGuide
Page 93
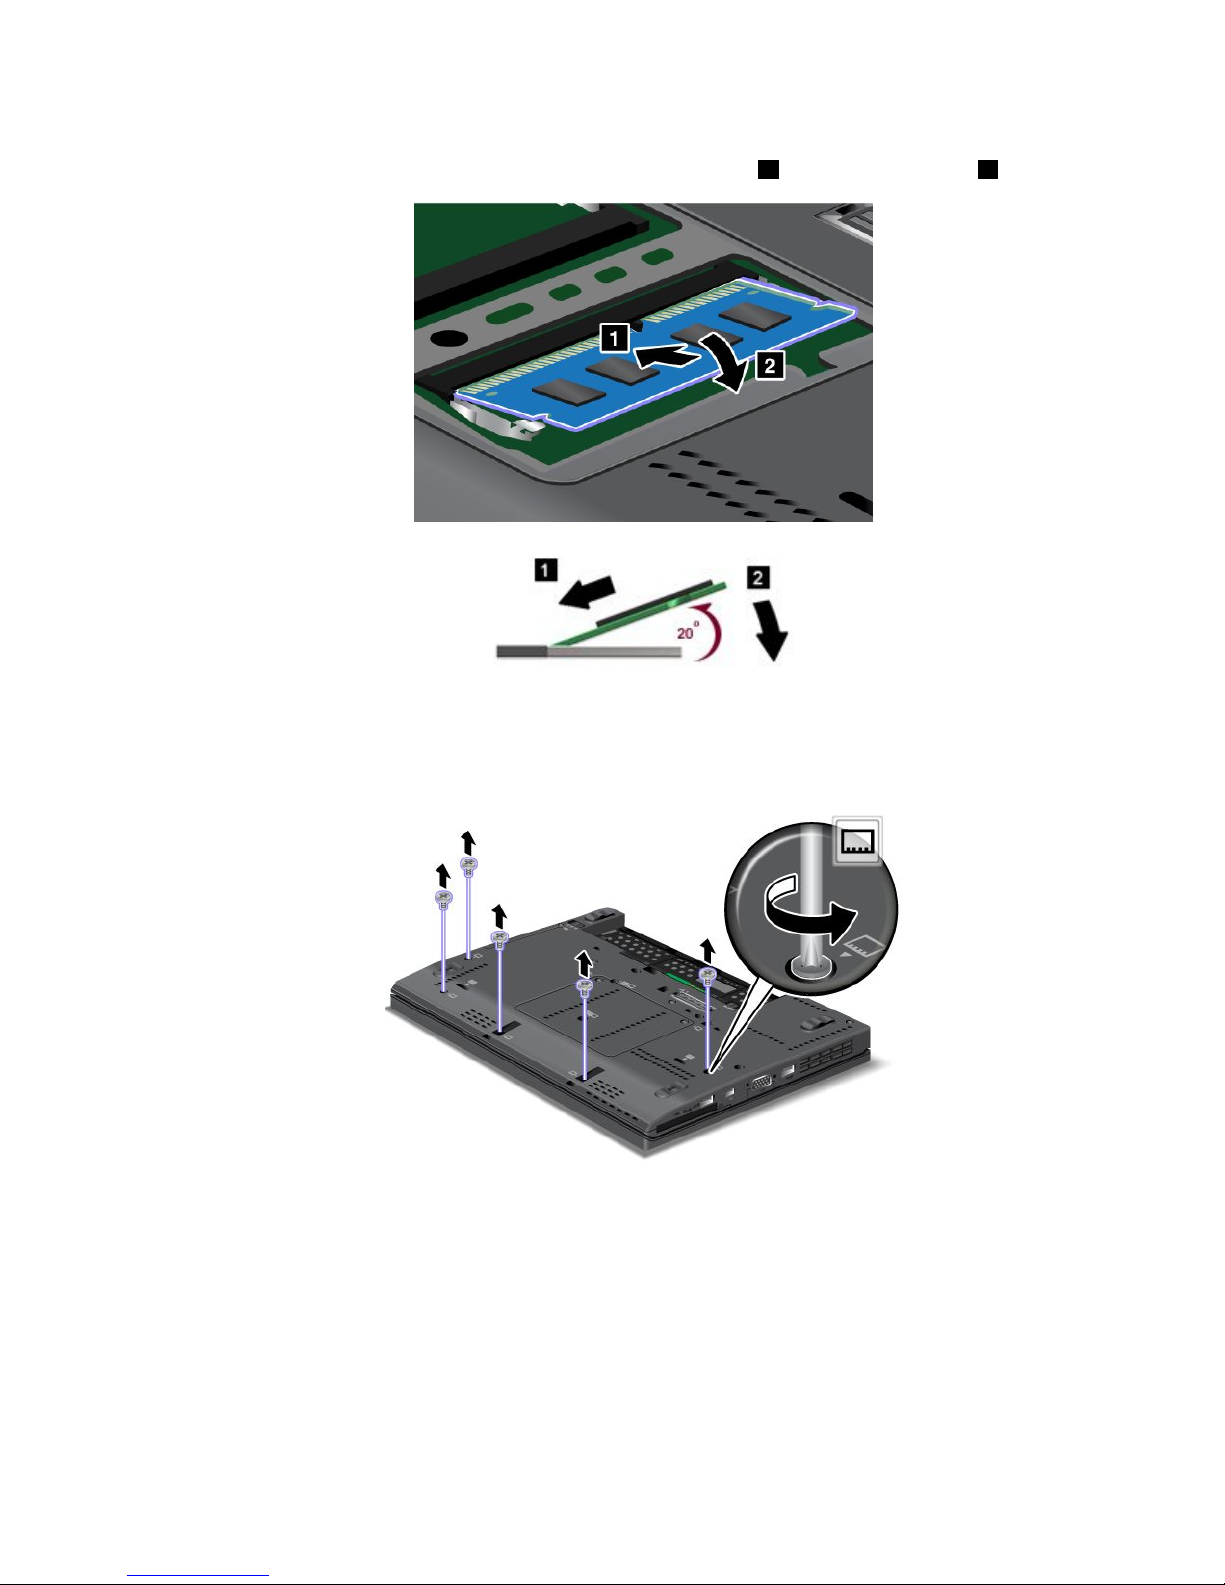
6.Withthenotchedendofthememorymoduletowardthecontactedgesideofthesocket,insertthe
memorymoduleintothesocketatanangleofabout20degrees1;thenpressitinrmly2.
7.Pivotthememorymoduledownwarduntilitsnapsintoplace.
8.Makesurethatthememorymoduleisrmlyxedintheslotandcannotbemovedeasily.
9.Reinstallthememoryslotcoverandtightenthescrewstosecureit.
10.Reinstallthebattery.See“Replacingthebattery”onpage69.
11.T urnthecomputeroveragain.Connecttheacpoweradapterandallcables.
Checkingthetotalamountofmemoryinstalledinyourcomputer
Tomakesurethatthememorymodulesareinstalledcorrectly,youcancheckthetotalamountofmemory
yourcomputerhasbydoingthefollowing:
1.T urnthecomputeron.
2.Whenthelogoscreenisdisplayed,pressF1.TheThinkPadSetupprogramopens.TheInstalled
memoryitemshowsthetotalamountofmemoryinstalledinyourcomputer.
Chapter6.Replacingdevices77
Page 94
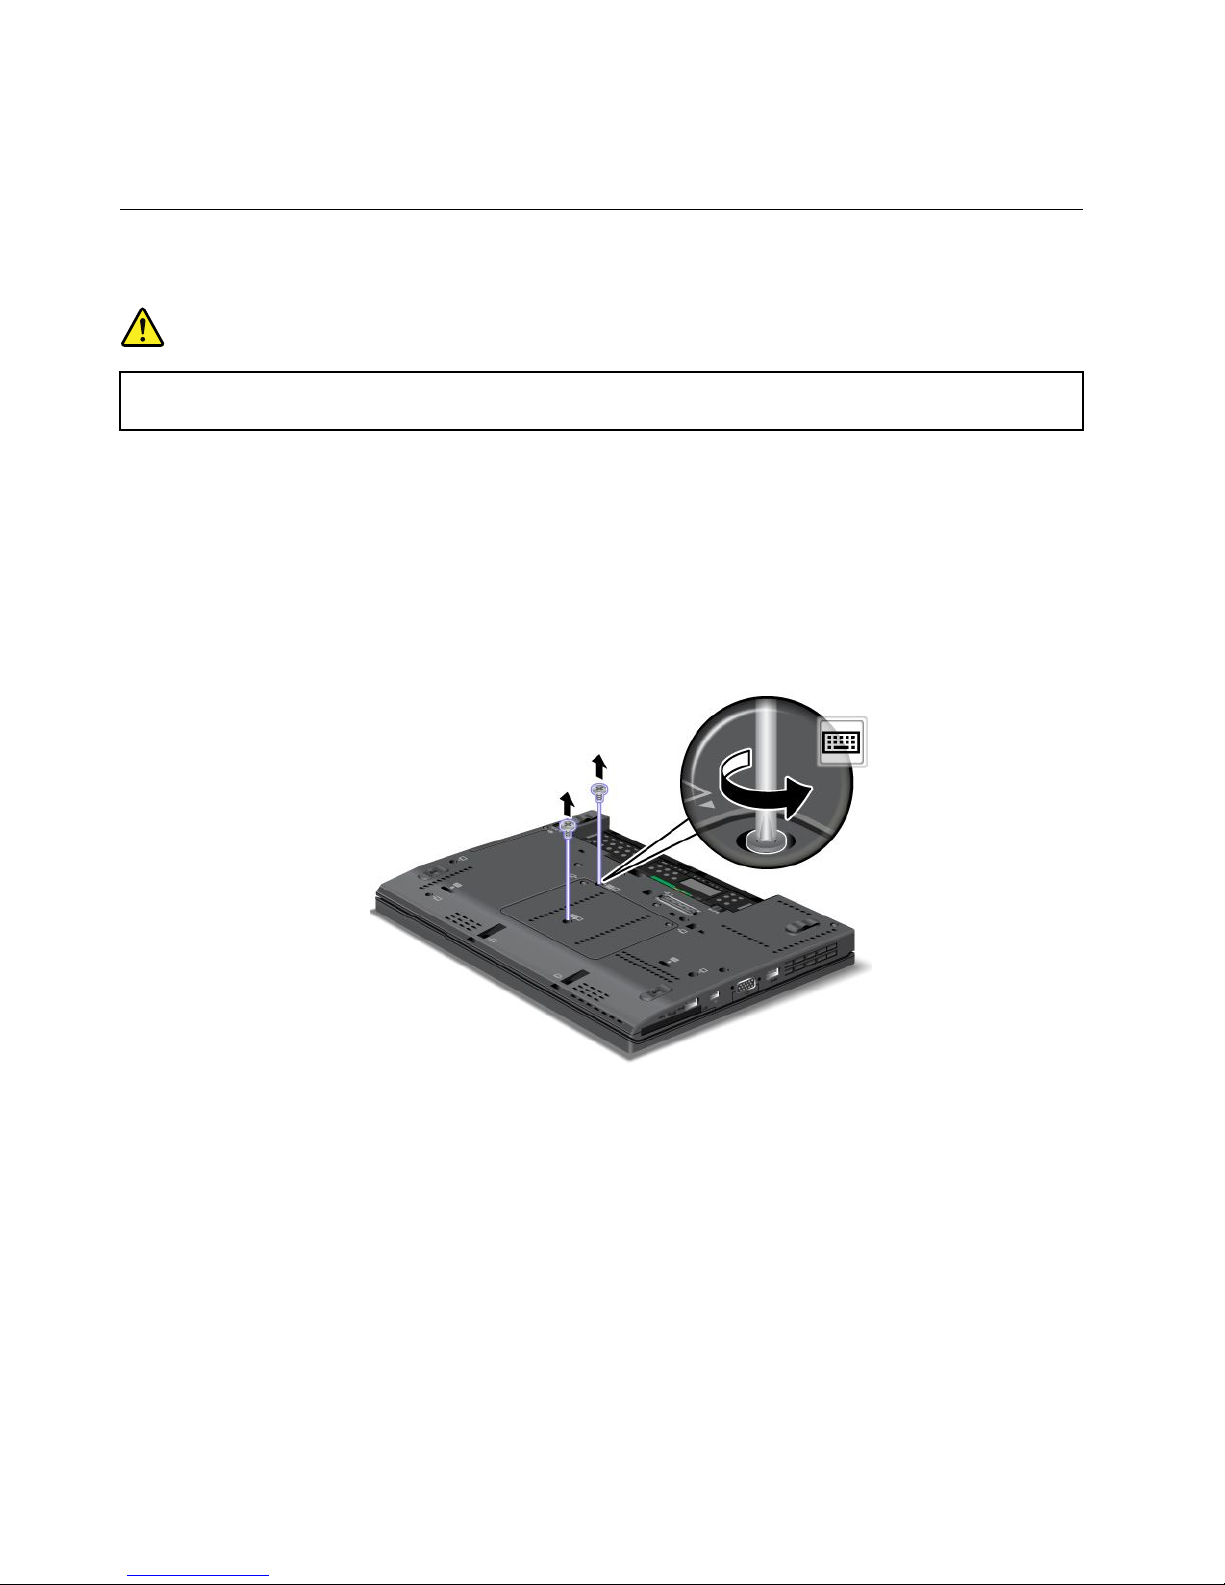
3.IftheInstalledmemoryitemshowsadifferentamountofmemoryfromwhatyouinstalled,check
whetheryouhavecorrectlyfollowedtheinstructionsinthissection.
Replacingthekeyboard
Beforeyoustart,printtheseinstructions.
DANGER
Electriccurrentfrompower,telephone,andcommunicationcablesishazardous.Toavoidshock
hazard,disconnectthecablesbeforeopeningthecoverofthisslot.
Removingthekeyboard
Toremovethekeyboard,dothefollowing:
1.T urnoffthecomputer;thendisconnecttheacpoweradapterandallcablesfromthecomputer.Waitfor
threetoveminutes,tilltheinsideofthecomputercools.
2.Closethecomputerdisplay,andturnthecomputerover.
3.Removethebattery.See“Replacingthebattery”onpage69.
4.Removethetwoscrewsthatsecurethekeyboard.
5.T urnthecomputeroverandopenthedisplay.
78UserGuide
Page 95
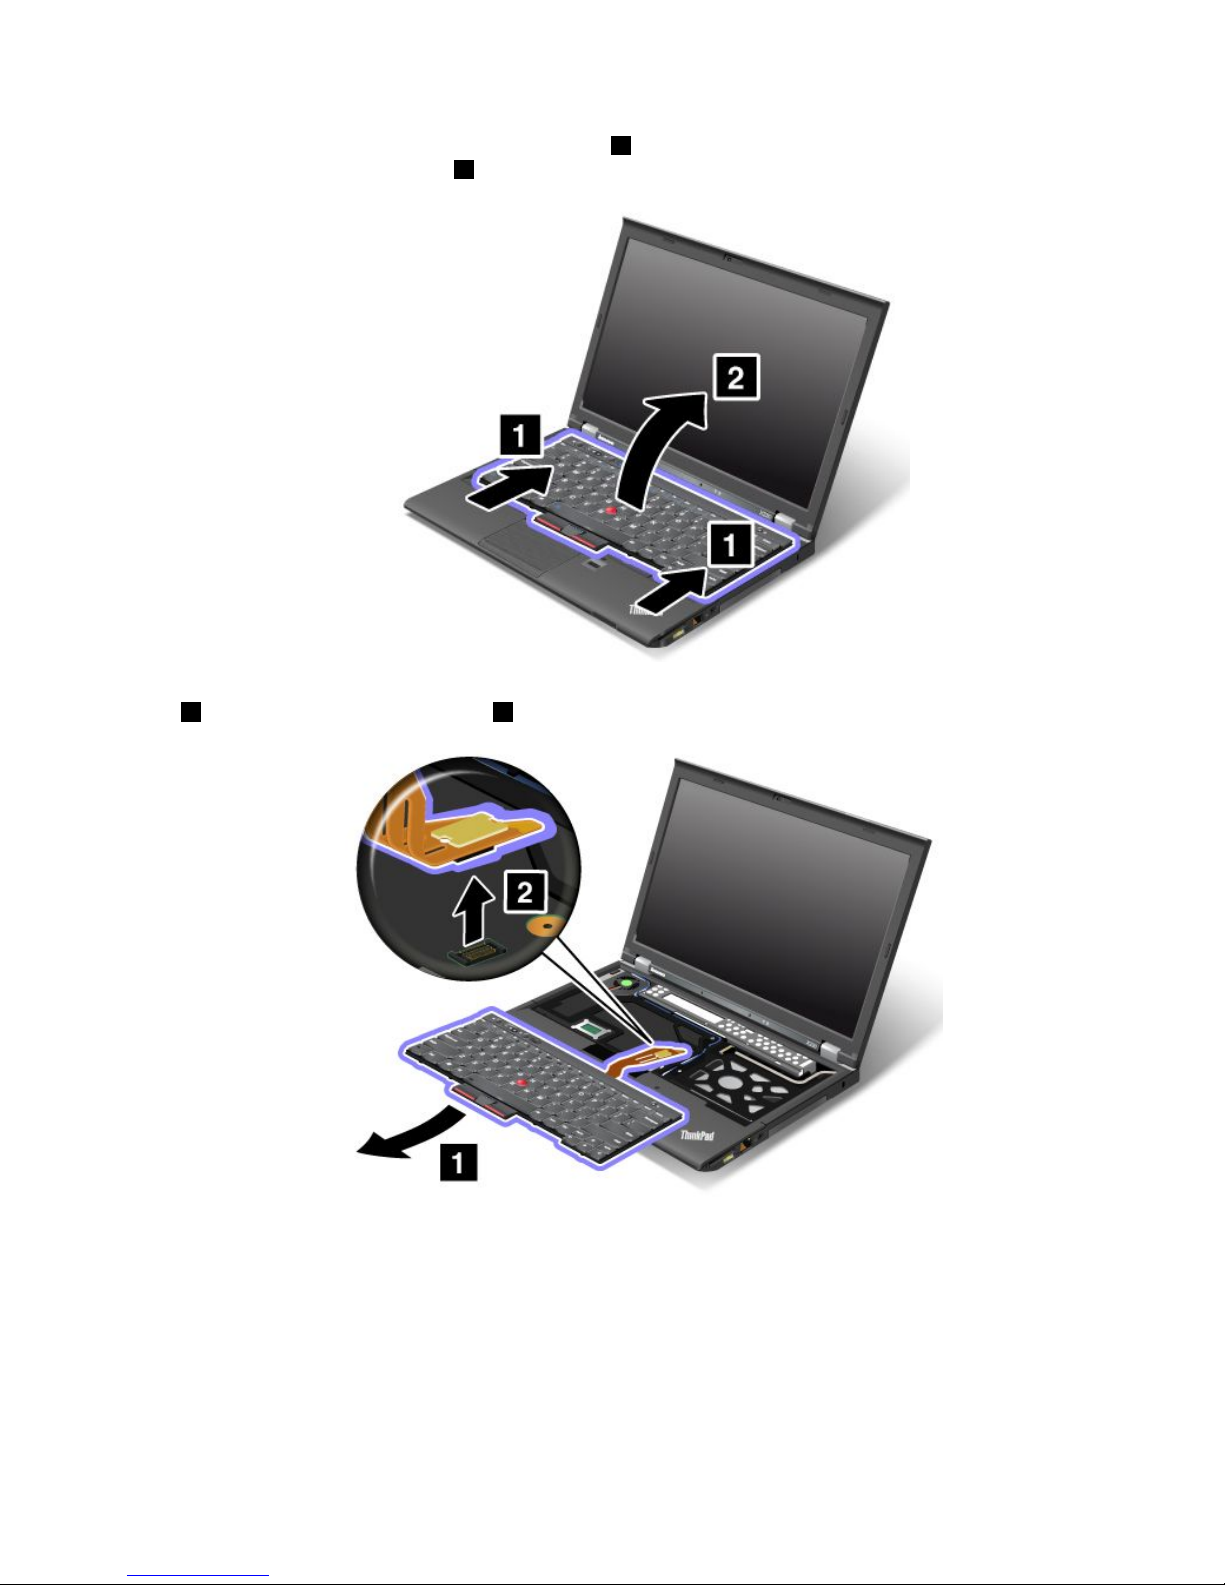
6.Pushhardinthedirectionshownbythearrows1tounlatchthefrontsideofthekeyboard.The
keyboardwillopenupslightly2.
7.Carefullyliftthekeyboarduntilyoucanseehowitisconnected.Holdthekeyboardabovethecomputer
1,andthendetachtheconnector2.Removethekeyboard.
Installingthekeyboard
Toinstallthekeyboard,dothefollowing:
Chapter6.Replacingdevices79
Page 96
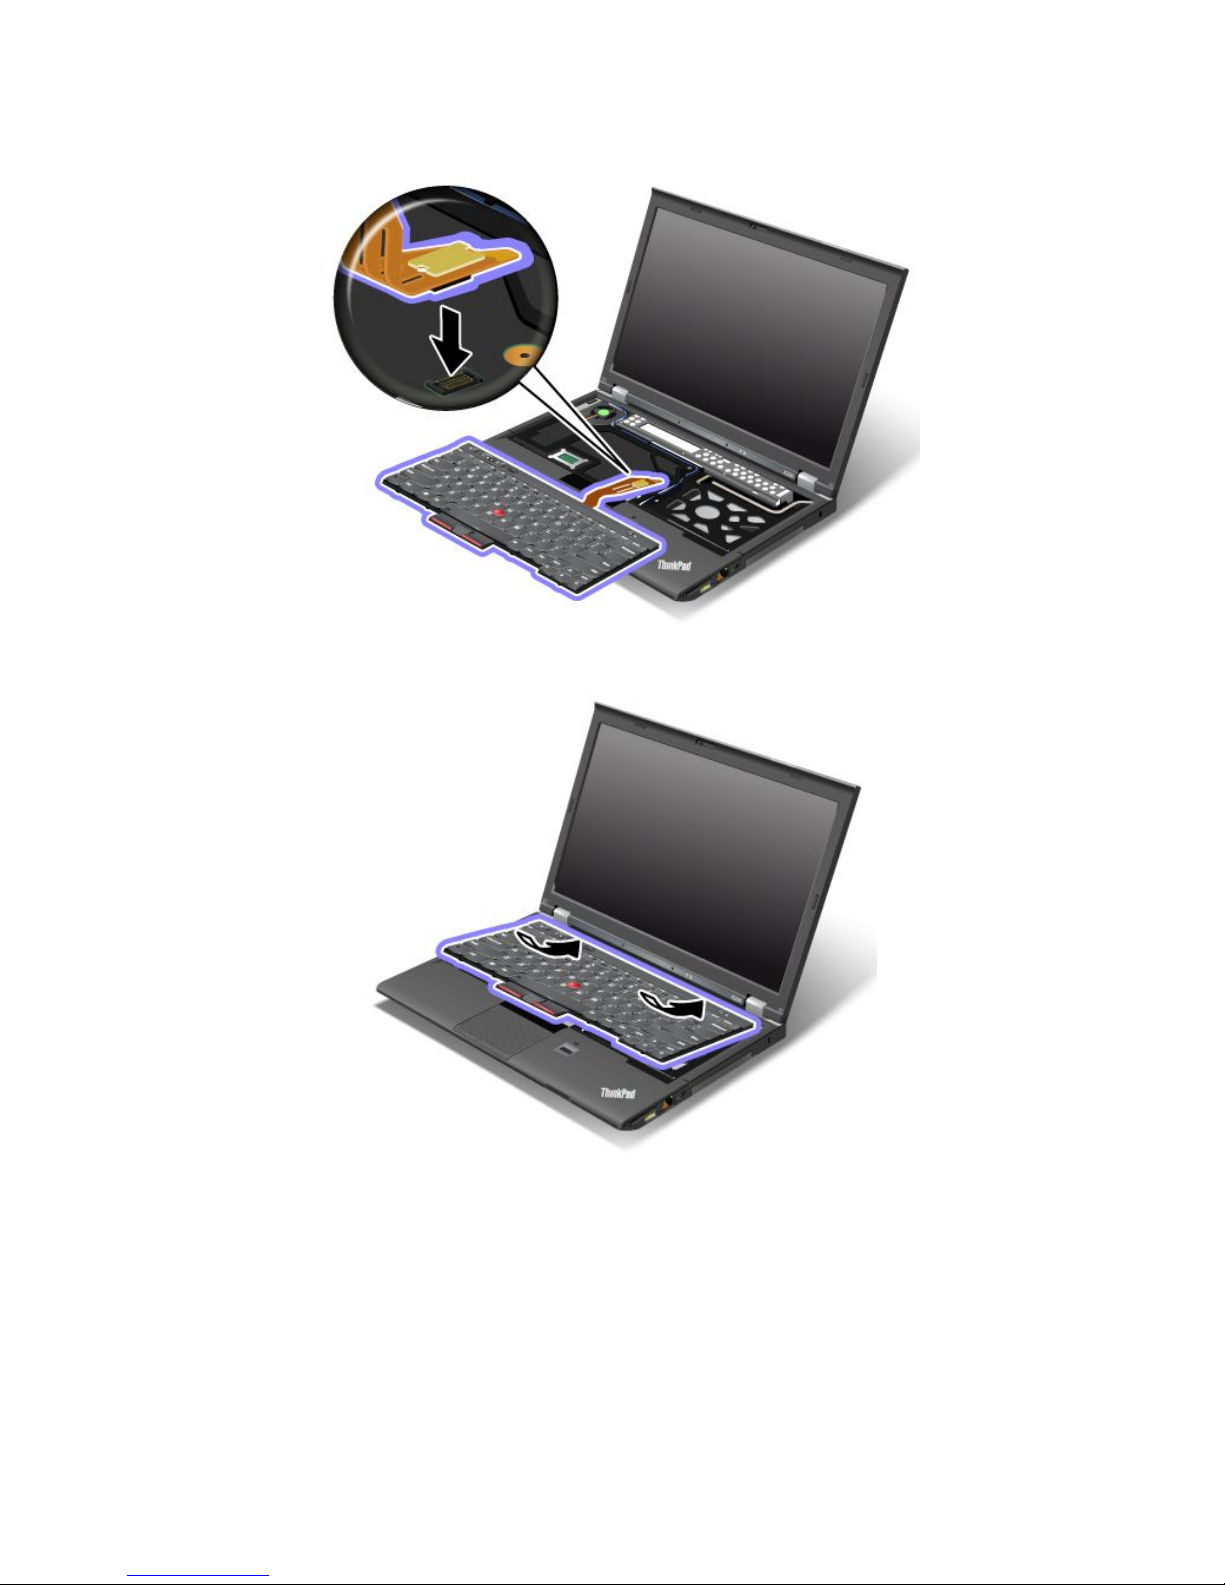
1.Attachtheconnector.
2.Insertthekeyboard.Makesurethattherearedgesofthekeyboardareundertheframe.
80UserGuide
Page 97
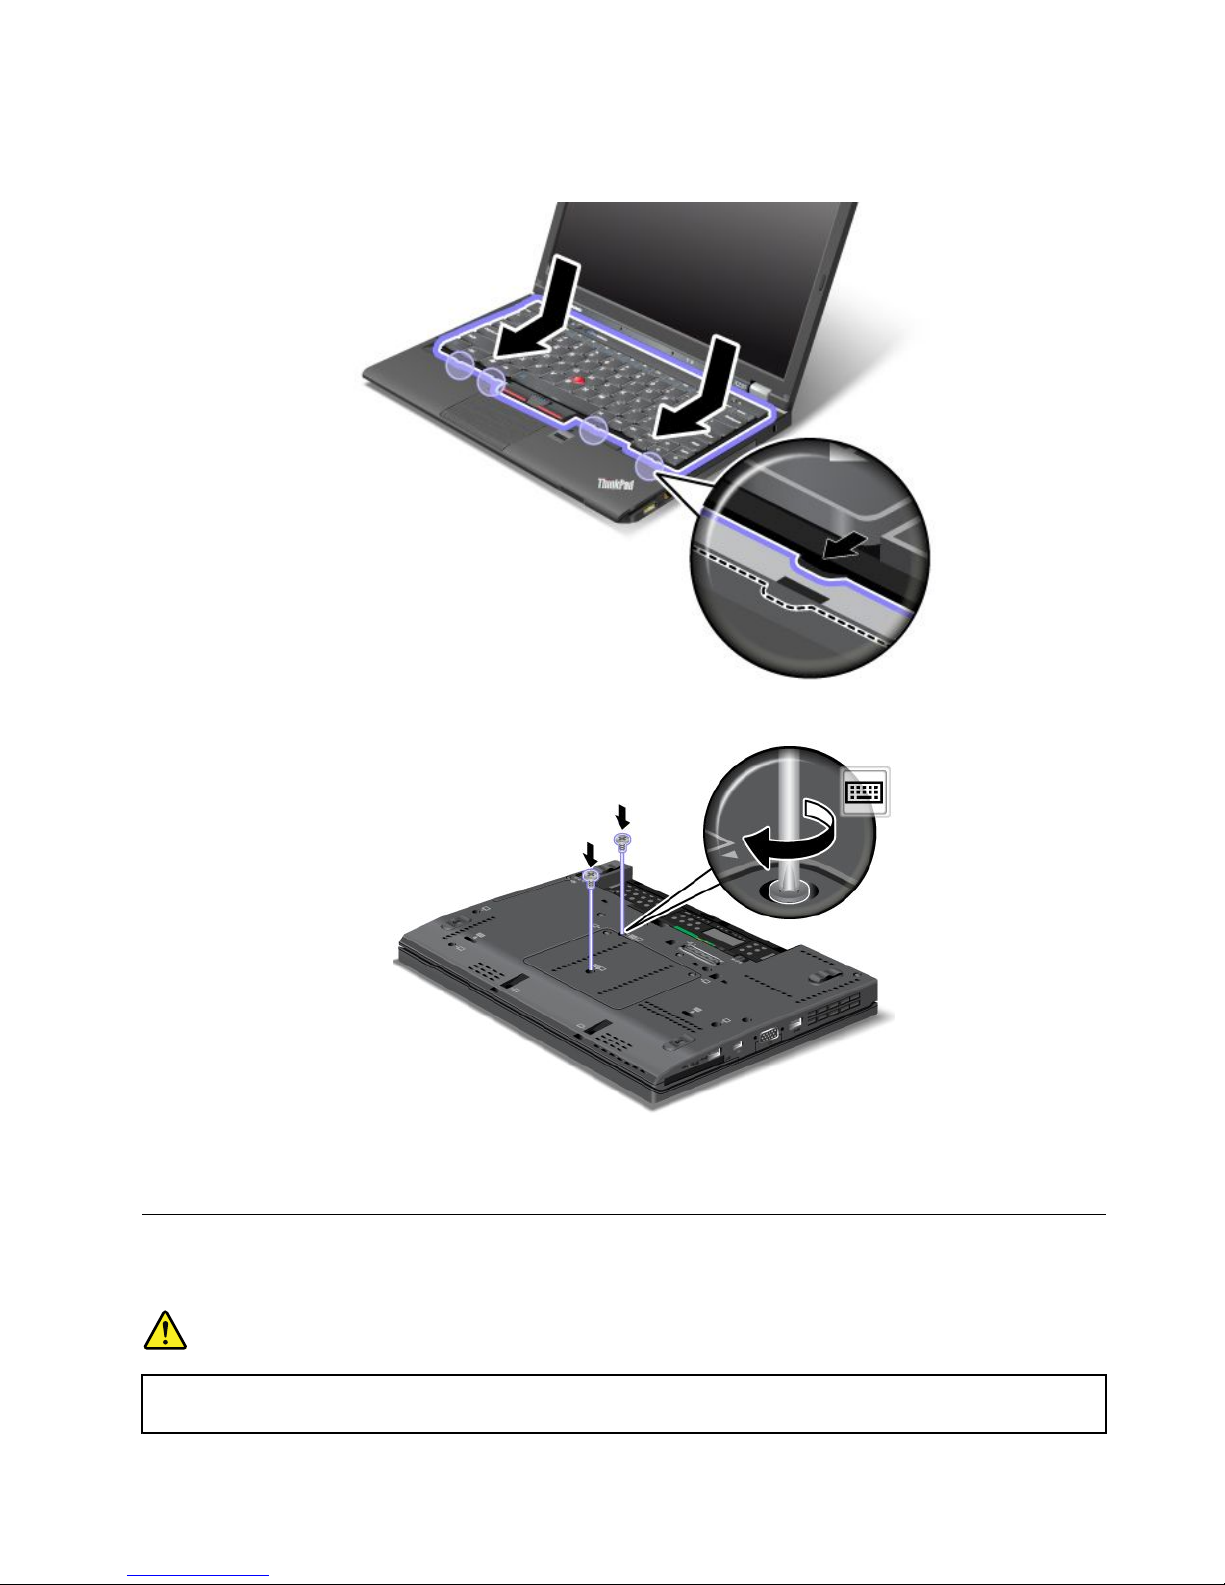
3.Pressgentlyonthekeyboardandslidethekeyboardinthedirectionshownbythearrows.Makesure
thattheedgesofthekeyboardareundertheframe.
4.T urnthecomputeroverandreinstallthescrews.
5.Reinstallthebattery.See“Replacingthebattery”onpage69.
6.T urnthecomputeroveragain.Connecttheacpoweradapterandallcables.
Replacingthepalmrest
Beforeyoustart,printtheseinstructions.
DANGER
Electriccurrentfrompower,telephone,andcommunicationcablesishazardous.Toavoidshock
hazard,disconnectthecablesbeforeopeningthecoverofthisslot.
Chapter6.Replacingdevices81
Page 98
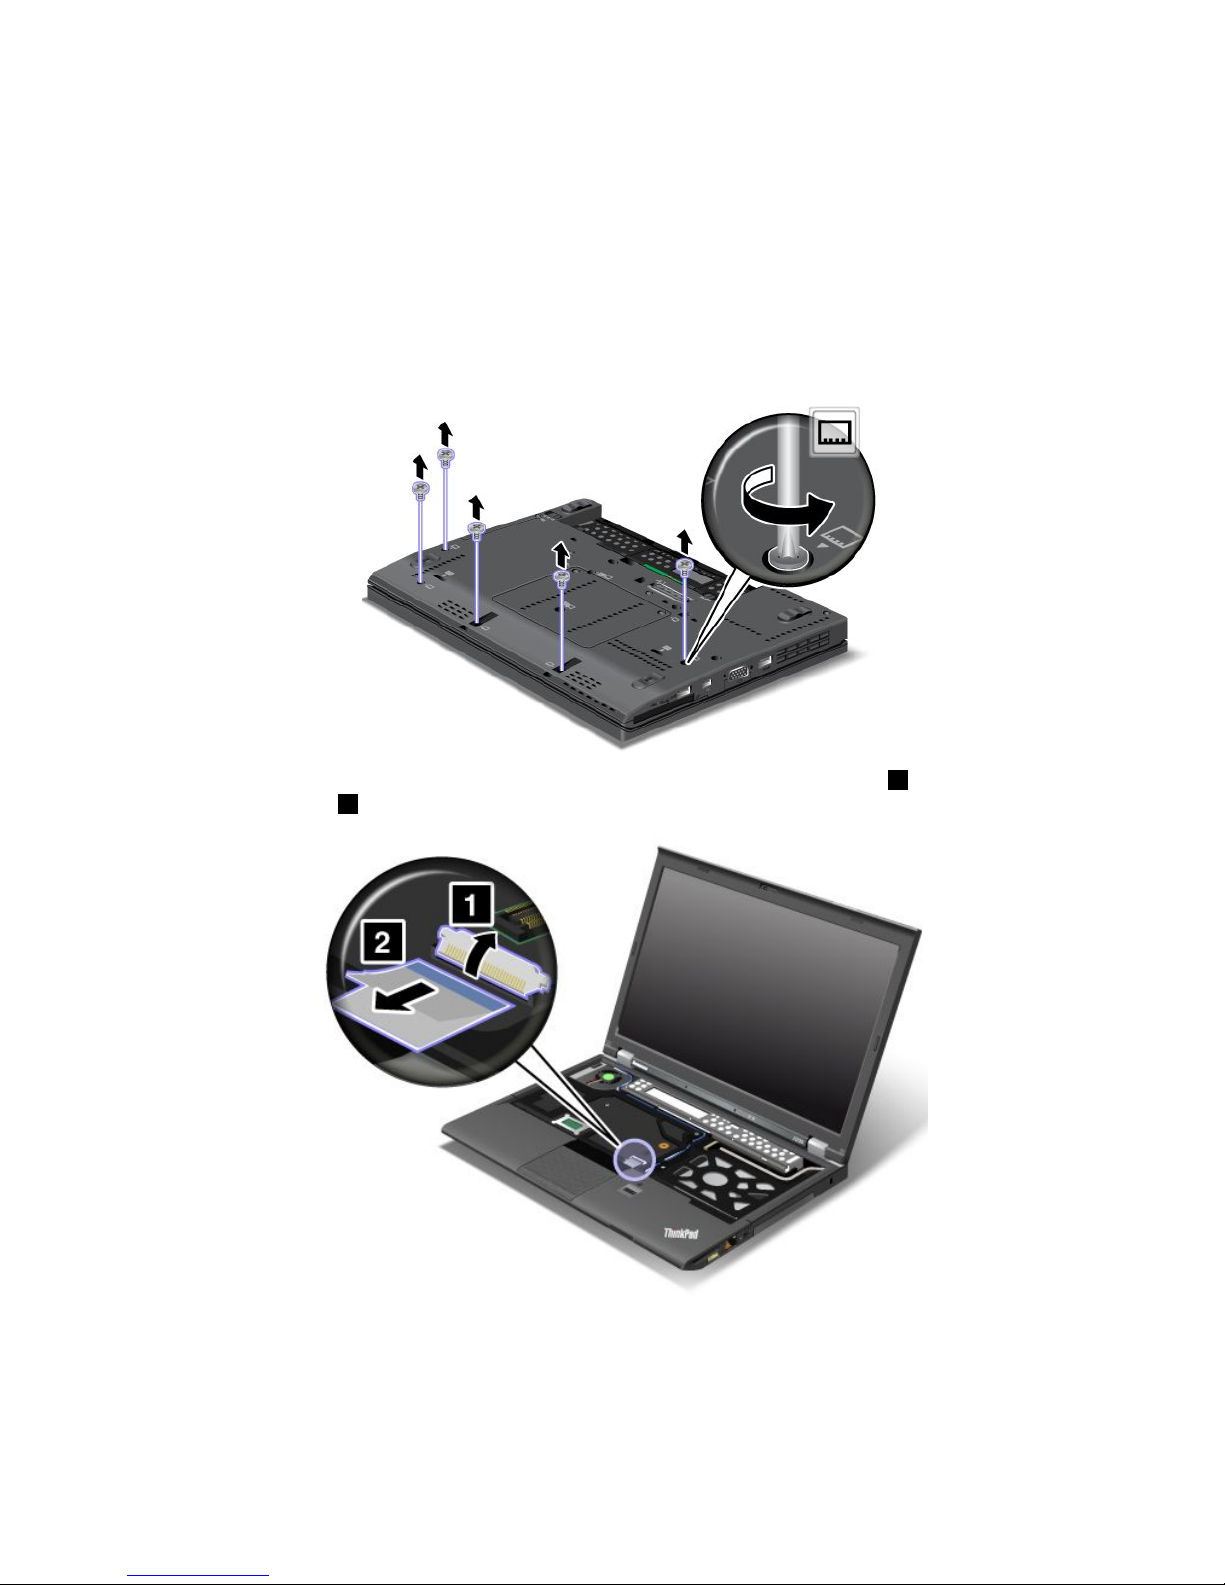
Removingthepalmrest
Toremovethepalmrest,dothefollowing:
1.T urnoffthecomputer;thendisconnecttheacpoweradapterandallcablesfromthecomputer.Waitfor
threetoveminutes,tilltheinsideofthecomputercools.
2.Closethecomputerdisplay,andturnthecomputerover.
3.Removethebattery.See“Replacingthebattery”onpage69.
4.Removethekeyboard.See“Replacingthekeyboard”onpage78.
5.Removethescrewsthatsecurethepalmrest.
6.T urnthecomputeroverandopenthedisplay.Detachtheip-lockZIFconnector1,thenremove
thepalmrestcable2.
7.Liftthepalmrestupandremoveit.
82UserGuide
Page 99
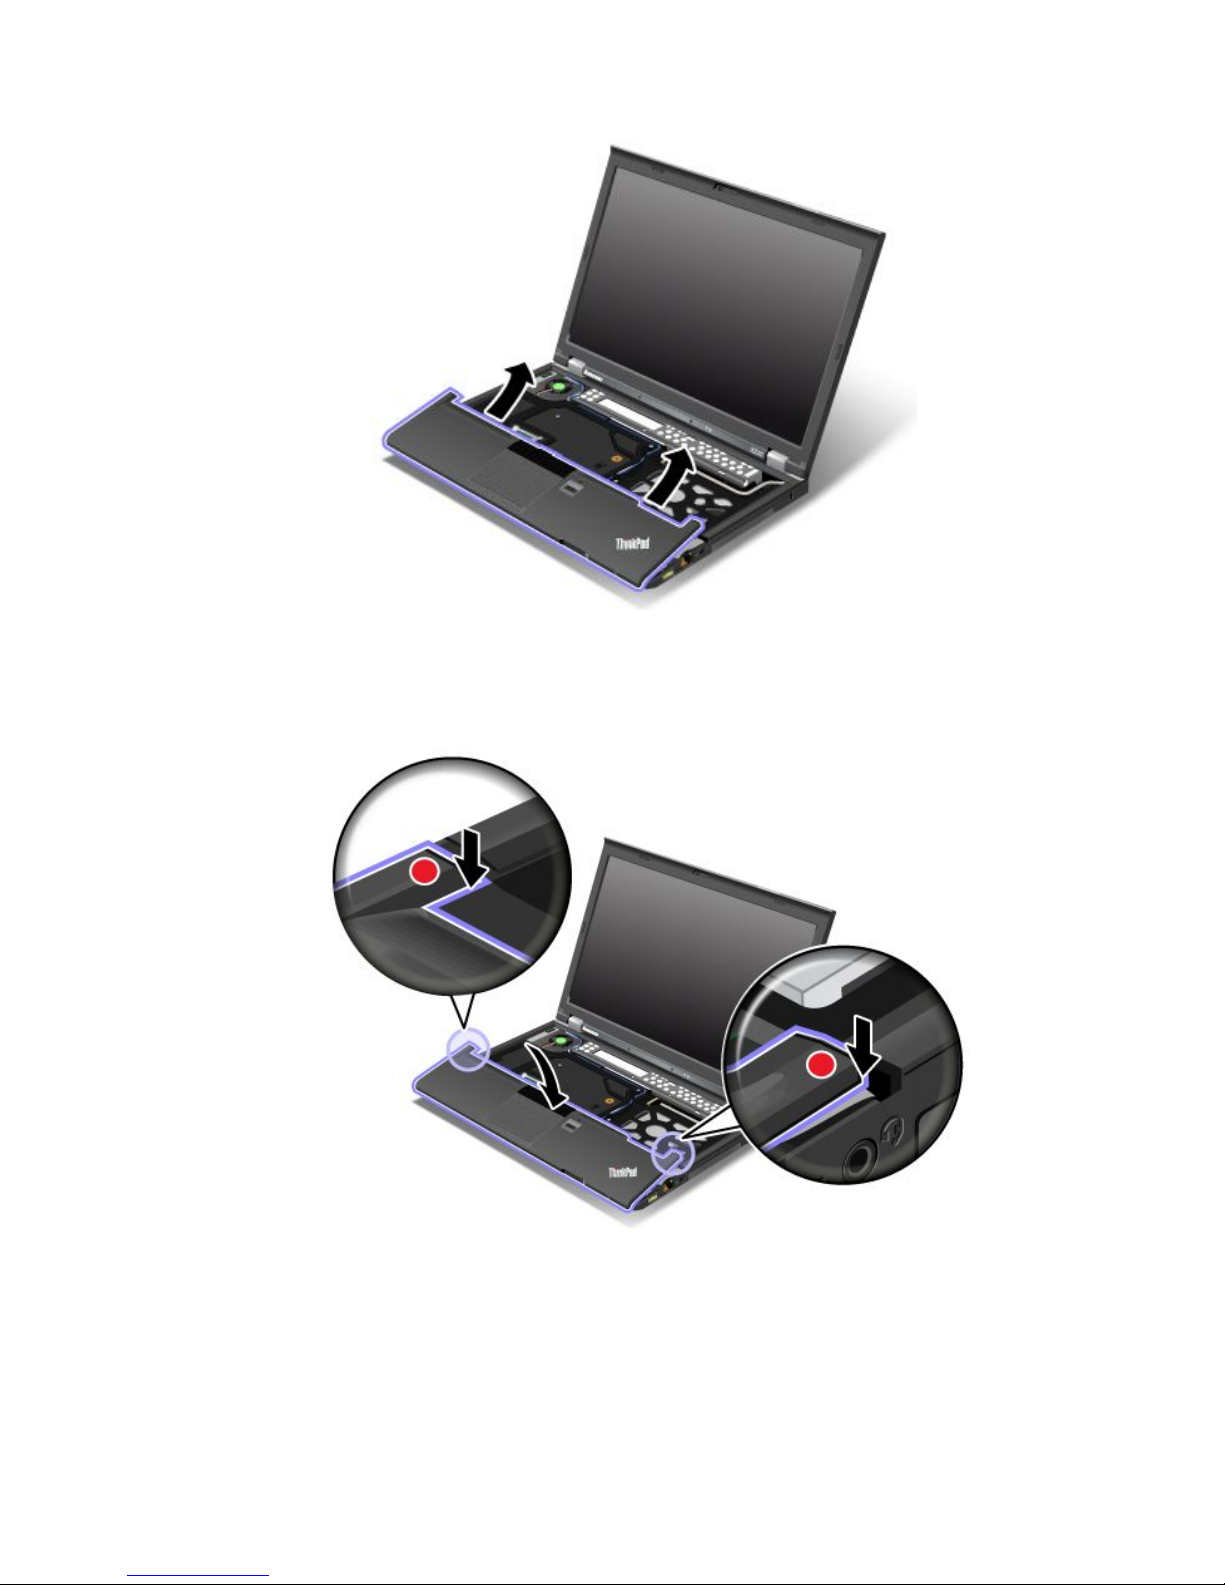
Installingthepalmrest
Toinstallthepalmrest,dothefollowing:
1.Attachthepalmrest,makingsurethelatchesnearthetopleftandrightedgesofthepalmrestaresecure.
2.Presstheedgeofthepalmrestuntilitclicksintoplace.
Chapter6.Replacingdevices83
Page 100
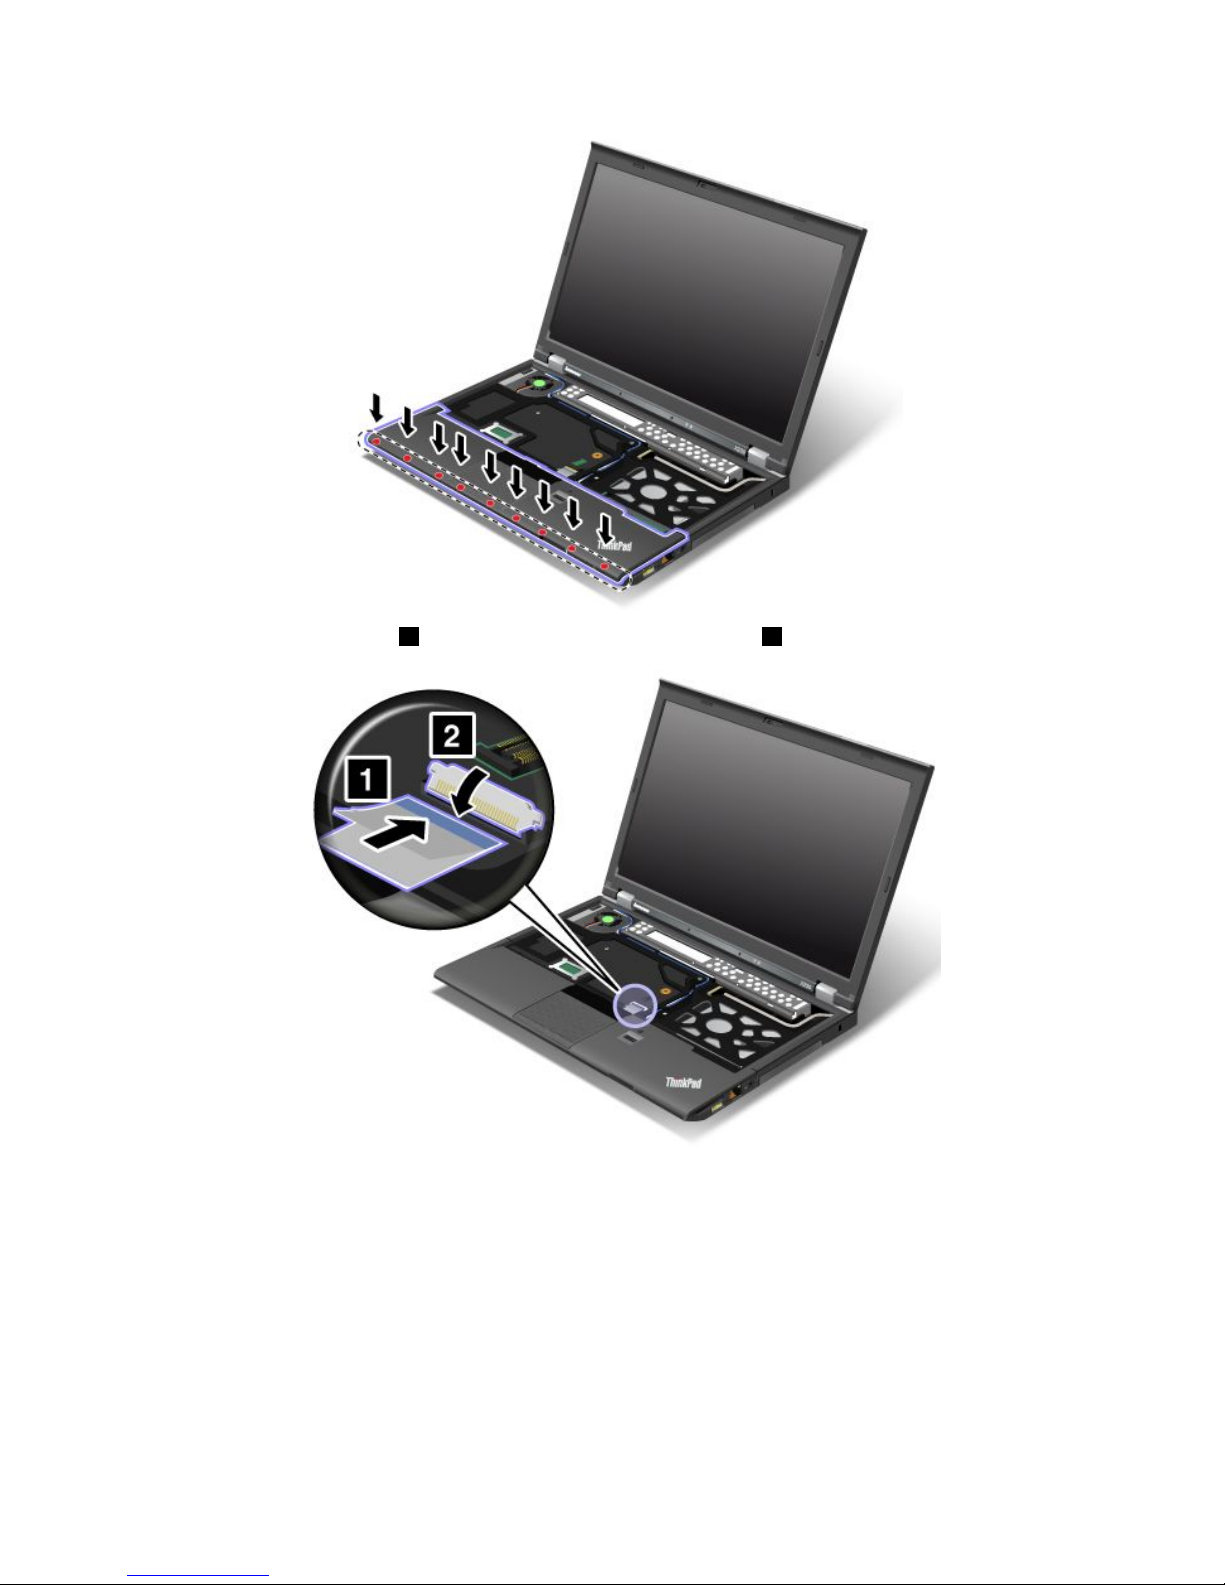
3.Attachthepalmrestcable1byippingtheip-lockZIFconnector2downwards.
4.Reinstallthescrewstosecurethepalmrest.
84UserGuide
 Loading...