

Page 1

UserGuide
ThinkPadX140e
Page 2

Note:Beforeusingthisinformationandtheproductitsupports,besuretoreadandunderstandthefollowing:
•Safety,Warranty,andSetupGuide
•RegulatoryNotice
•“Importantsafetyinformation”onpagevi
•AppendixE“Notices”onpage135
ThelatestSafety,Warranty,andSetupGuideandtheRegulatoryNoticeareavailableontheLenovoSupport
Websiteat:
http://www.lenovo.com/ThinkPadUserGuides
FirstEdition(October2013)
©CopyrightLenovo2013.
LIMITEDANDRESTRICTEDRIGHTSNOTICE:IfdataorsoftwareisdeliveredpursuantaGeneralServicesAdministration
“GSA”contract,use,reproduction,ordisclosureissubjecttorestrictionssetforthinContractNo.GS-35F-05925.
Page 3

Contents
Readthisrst..............v
Importantsafetyinformation..........vi
Conditionsthatrequireimmediateaction..vii
Safetyguidelines............vii
Chapter1.Productoverview......1
Locatingcomputercontrols,connectors,and
indicators..................1
Frontview................1
Right-sideview..............3
Left-sideview..............4
Bottomview...............5
Statusindicators.............6
Locatingimportantproductinformation......8
Machinetypeandmodellabel........8
FCCIDandICCerticationnumberlabel...9
CerticateofAuthenticitylabel.......9
GenuineMicrosoftlabel.........10
Features.................10
Specications...............11
Operatingenvironment...........12
Lenovoprograms.............12
AccessingLenovoprogramsontheWindows
7operatingsystem...........12
AccessingLenovoprogramsontheWindows
8operatingsystem...........14
AnintroductiontoLenovoprograms....14
Chapter2.Usingyourcomputer...17
Registeringyourcomputer..........17
Frequentlyaskedquestions.........17
Specialkeysandbuttons..........19
Functionkeycombinations........19
Windowskey.............21
UsingtheThinkPadpointingdevice......21
Powermanagement............23
Checkingthebatterystatus........23
Usingtheacpoweradapter........24
Chargingthebattery..........24
Maximizingthebatterylife........24
Managingthebatterypower.......25
Power-savingmodes..........25
Handlingthebattery...........26
Connectingtothenetwork..........28
Ethernetconnections..........28
Wirelessconnections..........28
Presentationsandmultimedia.........31
Changingdisplaysettings........31
Connectingaprojectororanexternal
monitor................31
Usingdualdisplays...........33
Usingaudiofeatures............33
Usingtheintegratedcamera.........34
Usingaashmediacard...........35
Insertingaashmediacard........35
Removingaashmediacard.......35
Chapter3.Youandyourcomputer..37
Accessibilityandcomfort..........37
Ergonomicinformation..........37
Comfort...............38
Accessibilityinformation.........38
Travelingwithyourcomputer.........39
Traveltips...............39
Travelaccessories...........39
Chapter4.Security..........41
Attachingamechanicallock.........41
Usingpasswords..............41
Passwordsandsleepmode........41
Typingpasswords...........41
Power-onpassword...........42
Harddiskpasswords..........42
Supervisorpassword..........44
Harddisksecurity.............46
Noticeondeletingdatafromyourharddiskdrive
orsolid-statedrive.............46
Usingrewalls...............47
Protectingdataagainstviruses........47
Chapter5.Recoveryoverview....49
RecoveryoverviewfortheWindows7operating
system..................49
Creatingandusingarecoverymedia....49
Performingbackupandrecoveryoperations.50
UsingtheRescueandRecoveryworkspace.51
Creatingandusingarescuemedium....52
Reinstallingpreinstalledprogramsanddevice
drivers................53
Solvingrecoveryproblems........53
RecoveryoverviewfortheWindows8operating
system..................54
Refreshingyourcomputer........54
Resettingyourcomputertothefactorydefault
settings................54
©CopyrightLenovo2013
i
Page 4

Usingtheadvancedstartupoptions....55
RecoveringyouroperatingsystemifWindows
8failstostart.............55
Creatingandusingrecoverymedia.....55
Chapter6.Replacingdevices.....57
Staticelectricityprevention..........57
Replacingthebattery............57
Replacingtheharddiskdriveorsolid-statedrive.59
ReplacingaPCIExpressMiniCardforwireless
LANconnection..............62
Replacingamemorymodule.........64
Replacingthekeyboard...........67
Replacingthebackupbattery.........72
Chapter7.Advancedconguration..75
Installinganewoperatingsystem.......75
Beforeyoubegin............75
InstallingtheWindows7operatingsystem..76
InstallingtheWindows8operatingsystem..77
Installingdevicedrivers...........77
Installingthedriverforthe4-in-1mediacard
reader................77
InstallingthedriverforUSB3.0onthe
Windows7operatingsystem.......77
InstallingtheThinkPadmonitorlefor
Windows2000/XP/Vista/7/8ontheWindows
7operatingsystem...........78
Installingotherdevicedriversandsoftwareon
theWindows7operatingsystem......78
ThinkPadSetup..............78
Mainmenu..............79
Congmenu..............79
Date/Timemenu............83
Securitymenu.............83
Startupmenu.............87
Restartmenu.............90
UpdatingyoursystemUEFIBIOS.....90
Usingsystemmanagement..........90
Systemmanagement..........90
Settingmanagementfeatures.......91
Chapter8.Preventingproblems...93
Generaltipsforpreventingproblems......93
Makingsuredevicedriversarecurrent.....94
Takingcareofyourcomputer.........95
Cleaningthecoverofyourcomputer....96
Chapter9.Troubleshootingcomputer
problems...............99
Diagnosingproblems............99
Troubleshooting..............99
Computerstopsresponding.......99
Spillsonthekeyboard..........100
Errormessages............100
Errorswithoutmessages.........102
Beeperrors..............103
Memorymoduleproblems........103
Networkingproblems..........104
Problemswiththekeyboardandotherpointing
devices................105
Problemswiththedisplayandmultimedia
devices................106
Batteryandpowerproblems.......111
Problemswithdrivesandotherstorage
devices................114
Asoftwareproblem...........114
Problemswithportsandconnectors....115
Chapter10.Gettingsupport....117
BeforeyoucontactLenovo..........117
Gettinghelpandservice...........117
Usingdiagnosticprograms........118
LenovoSupportWebsite.........118
CallingLenovo.............118
FindingThinkPadoptions........119
Purchasingadditionalservices........119
AppendixA.Regulatory
information.............121
Wirelessrelatedinformation.........121
LocationoftheUltraConnectwireless
antennas...............122
Locatingwirelessregulatorynotices....122
Exportclassicationnotice..........123
Electronicemissionnotices..........123
FederalCommunicationsCommission
DeclarationofConformity........123
IndustryCanadaClassBemissioncompliance
statement...............123
EuropeanUnion-Compliancetothe
ElectromagneticCompatibilityDirective...123
GermanClassBcompliancestatement...124
KoreaClassBcompliancestatement....124
JapanVCCIClassBcompliancestatement..125
Japancompliancestatementforproducts
whichconnecttothepowermainswith
ratedcurrentlessthanorequalto20Aper
phase................125
Lenovoproductserviceinformationfor
Taiwan................125
Eurasiancompliancemark..........125
AppendixB.WEEEandrecycling
statements.............127
ImportantWEEEInformation.........127
iiUserGuide
Page 5

RecyclinginformationforJapan........127
BatteryrecyclinginformationforBrazil.....128
BatteryrecyclinginformationforTaiwan.....128
BatteryrecyclinginformationfortheEuropean
Union..................129
BatteryrecyclinginformationfortheUnitedStates
andCanada................129
AppendixC.ENERGYST ARmodel
information.............131
AppendixD.RestrictionofHazardous
SubstancesDirective(RoHS)....133
EuropeanUnionRoHS...........133
ChinaRoHS................133
TurkishRoHS...............133
UkraineRoHS...............134
IndiaRoHS................134
AppendixE.Notices.........135
Trademarks................136
©CopyrightLenovo2013
iii
Page 6

ivUserGuide
Page 7
Readthisrst
Besuretofollowtheimportanttipsgivenheretogetthemostuseandenjoymentoutofyourcomputer.
Failuretodosomightleadtodiscomfortorinjury,orcauseyourcomputertofail.
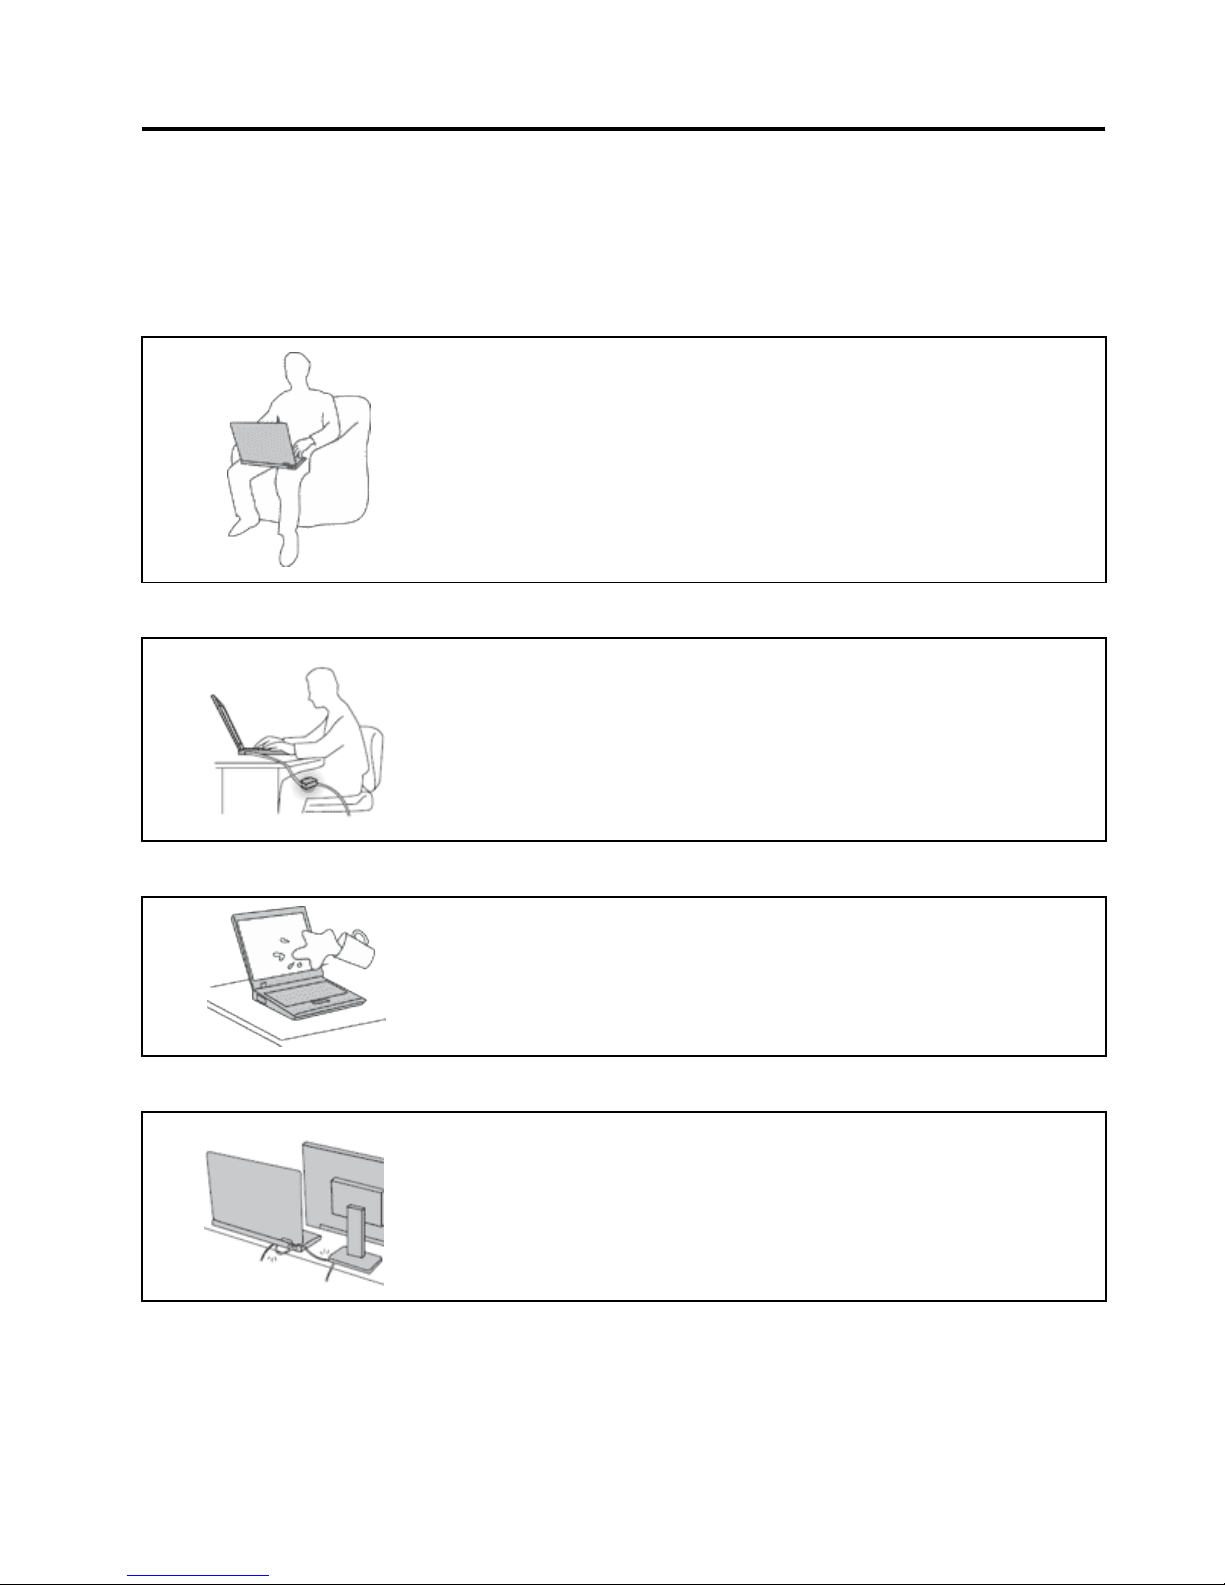
Protectyourselffromtheheatthatyourcomputergenerates.
Whenyourcomputeristurnedonorthebatteryischarging,thebase,thepalm
rest,andsomeotherpartsmaybecomehot.Thetemperaturetheyreach
dependsontheamountofsystemactivityandthelevelofchargeinthebattery.
Extendedcontactwithyourbody,eventhroughclothing,couldcause
discomfortorevenaskinburn.
•Avoidkeepingyourhands,yourlap,oranyotherpartofyourbodyin
contactwithahotsectionofthecomputerforanyextendedtime.
•Periodicallytakehandsfromusingthekeyboardbyliftingyourhandsfrom
thepalmrest.
Protectyourselffromtheheatgeneratedbytheacpoweradapter.
Whentheacpoweradapterisconnectedtoanelectricaloutletandyour
computer,itgeneratesheat.
Extendedcontactwithyourbody,eventhroughclothing,maycauseaskin
burn.
•Donotplacetheacpoweradapterincontactwithanypartofyourbody
whileitisinuse.
•Neveruseittowarmyourbody.
Preventyourcomputerfromgettingwet.
Toavoidspillsandthedangerofelectricalshock,keepliquidsawayfromyour
computer.
Protectthecablesfrombeingdamaged.
Applyingstrongforcetocablesmaydamageorbreakthem.
Routecommunicationlines,orthecablesofanacpoweradapter,amouse,a
keyboard,aprinter,oranyotherelectronicdevice,sothattheycannotbewalked
on,trippedover,pinchedbyyourcomputerorotherobjects,orinanyway
subjectedtotreatmentthatcouldinterferewiththeoperationofyourcomputer.
©CopyrightLenovo2013
v
Page 8
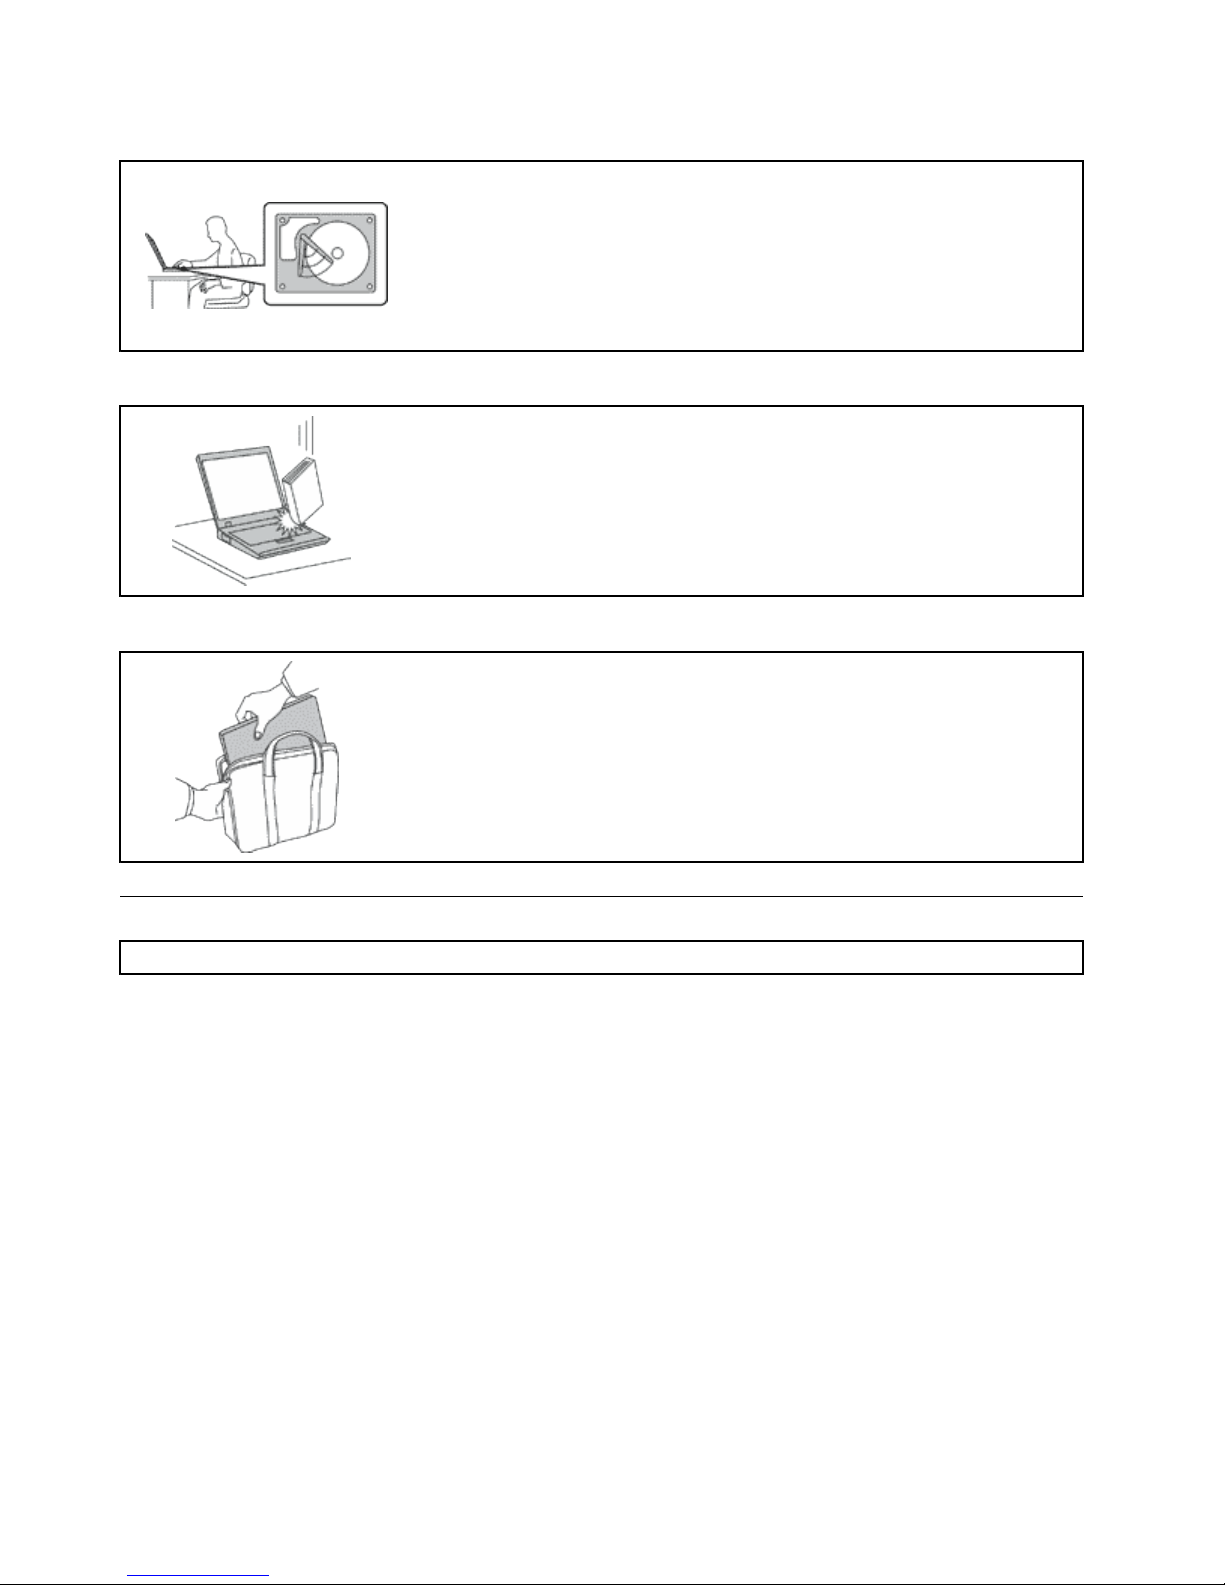
Protectyourcomputeranddatawhenmovingit.
Beforemovingacomputerequippedwithaharddiskdrive,dooneofthe
following,andmakesurethatthepowerbuttonisofforisblinking:
•Turnitoff.
•Putitinsleepmode.
•Putitinhibernationmode.
Thiswillhelptopreventdamagetothecomputer,andpossiblelossofdata.
Handleyourcomputergently.
Donotdrop,bump,scratch,twist,hit,vibrate,push,orplaceheavyobjectson
yourcomputer,display,orexternaldevices.
Carryyourcomputercarefully.
•Useaqualitycarryingcasethatprovidesadequatecushioningandprotection.
•Donotpackyourcomputerinatightlypackedsuitcaseorbag.
•Beforeputtingyourcomputerinacarryingcase,makesurethatitisoff,insleep
mode,orinhibernationmode.Donotputacomputerinacarryingcasewhileit
isturnedon.
Importantsafetyinformation
Note:Readtheimportantsafetyinformationrst.
Thisinformationcanhelpyousafelyuseyournotebookcomputer.Followandretainallinformationincluded
withyourcomputer.Theinformationinthisdocumentdoesnotalterthetermsofyourpurchaseagreement
ortheLenovo
®
LimitedWarranty.Formoreinformation,see“WarrantyInformation”intheSafety,Warranty,
andSetupGuidethatcomeswithyourcomputer.
Customersafetyisimportant.Ourproductsaredevelopedtobesafeandeffective.However,personal
computersareelectronicdevices.Powercords,poweradapters,andotherfeaturescancreatepotential
safetyrisksthatcanresultinphysicalinjuryorpropertydamage,especiallyifmisused.T oreducethese
risks,followtheinstructionsincludedwithyourproduct,observeallwarningsontheproductandinthe
operatinginstructions,andreviewtheinformationincludedinthisdocumentcarefully.Bycarefullyfollowing
theinformationcontainedinthisdocumentandprovidedwithyourproduct,youcanhelpprotectyourself
fromhazardsandcreateasafercomputerworkenvironment.
Note:Thisinformationincludesreferencestopoweradaptersandbatteries.Inadditiontonotebook
computers,someproducts(suchasspeakersandmonitors)shipwithexternalpoweradapters.Ifyouhave
suchaproduct,thisinformationappliestoyourproduct.Inaddition,computerproductscontainacoin-sized
internalbatterythatprovidespowertothesystemclockevenwhenthecomputerisunplugged,sothe
batterysafetyinformationappliestoallcomputerproducts.
viUserGuide
Page 9

Conditionsthatrequireimmediateaction
Productscanbecomedamagedduetomisuseorneglect.Someproductdamageisseriousenough
thattheproductshouldnotbeusedagainuntilithasbeeninspectedand,ifnecessary,repairedby
anauthorizedservicer.
Aswithanyelectronicdevice,paycloseattentiontotheproductwhenitisturnedon.Onveryrare
occasions,youmightnoticeanodororseeapuffofsmokeorsparksventfromyourproduct.Oryou
mighthearsoundslikepopping,crackingorhissing.Theseconditionsmightmerelymeanthatan
internalelectroniccomponenthasfailedinasafeandcontrolledmanner .Or,theymightindicate
apotentialsafetyissue.However,donottakerisksorattempttodiagnosethesituationyourself.
ContacttheCustomerSupportCenterforfurtherguidance.ForalistofServiceandSupportphone
numbers,seethefollowingWebsite:
http://www.lenovo.com/support/phone
Frequentlyinspectyourcomputeranditscomponentsfordamageorwearorsignsofdanger.Ifyou
haveanyquestionabouttheconditionofacomponent,donotusetheproduct.ContacttheCustomer
SupportCenterortheproductmanufacturerforinstructionsonhowtoinspecttheproductand
haveitrepaired,ifnecessary.
Intheunlikelyeventthatyounoticeanyofthefollowingconditions,orifyouhaveanysafetyconcerns
withyourproduct,stopusingtheproductandunplugitfromthepowersourceandtelecommunication
linesuntilyoucanspeaktotheCustomerSupportCenterforfurtherguidance.
•Powercords,plugs,poweradapters,extensioncords,surgeprotectors,orpowersuppliesthatare
cracked,broken,ordamaged.
•Signsofoverheating,smoke,sparks,orre.
•Damagetoabattery(suchascracks,dents,orcreases),dischargefromabattery,orabuildupofforeign
substancesonthebattery.
•Acracking,hissingorpoppingsound,orstrongodorthatcomesfromtheproduct.
•Signsthatliquidhasbeenspilledoranobjecthasfallenontothecomputerproduct,thepowercordor
poweradapter.
•Thecomputerproduct,powercord,orpoweradapterhasbeenexposedtowater.
•Theproducthasbeendroppedordamagedinanyway.
•Theproductdoesnotoperatenormallywhenyoufollowtheoperatinginstructions.
Note:Ifyounoticetheseconditionswithaproduct(suchasanextensioncord)thatisnotmanufacturedfor
orbyLenovo,stopusingthatproductuntilyoucancontacttheproductmanufacturerforfurtherinstructions,
oruntilyougetasuitablereplacement.
Safetyguidelines
Alwaysobservethefollowingprecautionstoreducetheriskofinjuryandpropertydamage.
Serviceandupgrades
DonotattempttoserviceaproductyourselfunlessinstructedtodosobytheCustomerSupportCenteror
yourdocumentation.OnlyuseaServiceProviderwhoisapprovedtorepairyourparticularproduct.
Note:Somecomputerpartscanbeupgradedorreplacedbythecustomer.Upgradestypicallyare
referredtoasoptions.ReplacementpartsapprovedforcustomerinstallationarereferredtoasCustomer
ReplaceableUnits,orCRUs.Lenovoprovidesdocumentationwithinstructionswhenitisappropriatefor
customerstoinstalloptionsorreplaceCRUs.Youmustcloselyfollowallinstructionswheninstallingor
replacingparts.TheOffstateofapowerindicatordoesnotnecessarilymeanthatvoltagelevelsinsidea
productarezero.Beforeyouremovethecoversfromaproductequippedwithapowercord,alwaysmake
©CopyrightLenovo2013
vii
Page 10

surethatthepoweristurnedoffandthattheproductisunpluggedfromanypowersource.Ifyouhave
anyquestionsorconcerns,contacttheCustomerSupportCenter.
Althoughtherearenomovingpartsinyourcomputerafterthepowercordhasbeendisconnected,the
followingwarningsarerequiredforyoursafety.
CAUTION:
Hazardousmovingparts.Keepngersandotherbodypartsaway.
CAUTION:
BeforereplacinganyCRUs,turnoffthecomputerandwaitthreetoveminutestoletthecomputer
coolbeforeopeningthecover.
Powercordsandpoweradapters
DANGER
Useonlythepowercordsandpoweradapterssuppliedbytheproductmanufacturer.
Thepowercordsshallbesafetyapproved.ForGermany,itshallbeH05VV-F ,3G,0.75mm
2
,or
better.Forothercountries,thesuitabletypesshallbeusedaccordingly.
Neverwrapapowercordaroundapoweradapterorotherobject.Doingsocanstressthecordin
waysthatcancausethecordtofray,crack,orcrimp.Thiscanpresentasafetyhazard.
Alwaysroutepowercordssothattheywillnotbewalkedon,trippedover,orpinchedbyobjects.
Protectpowercordsandpoweradaptersfromliquids.Forinstance,donotleaveyourpowercord
orpoweradapternearsinks,tubs,toilets,oronoorsthatarecleanedwithliquidcleansers.
Liquidscancauseashortcircuit,particularlyifthepowercordorpoweradapterhasbeenstressed
bymisuse.Liquidsalsocancausegradualcorrosionofpowercordterminalsand/ortheconnector
terminalsonapoweradapter,whichcaneventuallyresultinoverheating.
Alwaysconnectpowercordsandsignalcablesinthecorrectorderandensurethatallpowercord
connectorsaresecurelyandcompletelypluggedintoreceptacles.
Donotuseanypoweradapterthatshowscorrosionattheacinputpinsorshowssignsof
overheating(suchasdeformedplastic)attheacinputpinsoranywhereonthepoweradapter.
Donotuseanypowercordswheretheelectricalcontactsoneitherendshowsignsofcorrosionor
overheatingorwherethepowercordappearstohavebeendamagedinanyway.
viiiUserGuide
Page 11

Topreventpossibleoverheating,donotcoverthepoweradapterwithclothingorotherobjects
whenthepoweradapterispluggedintoanelectricaloutlet.
Extensioncordsandrelateddevices
Ensurethatextensioncords,surgeprotectors,uninterruptiblepowersupplies,andpowerstripsthatyouuse
areratedtohandletheelectricalrequirementsoftheproduct.Neveroverloadthesedevices.Ifpowerstrips
areused,theloadshouldnotexceedthepowerstripinputrating.Consultanelectricianformoreinformation
ifyouhavequestionsaboutpowerloads,powerrequirements,andinputratings.
Plugsandoutlets
DANGER
Ifareceptacle(poweroutlet)thatyouintendtousewithyourcomputerequipmentappearstobe
damagedorcorroded,donotusetheoutletuntilitisreplacedbyaqualiedelectrician.
Donotbendormodifytheplug.Iftheplugisdamaged,contactthemanufacturertoobtain
areplacement.
Donotshareanelectricaloutletwithotherhomeorcommercialappliancesthatdrawlargeamounts
ofelectricity;otherwise,unstablevoltagemightdamageyourcomputer,data,orattacheddevices.
Someproductsareequippedwithathree-prongedplug.Thisplugtsonlyintoagrounded
electricaloutlet.Thisisasafetyfeature.Donotdefeatthissafetyfeaturebytryingtoinsertitinto
anon-groundedoutlet.Ifyoucannotinserttheplugintotheoutlet,contactanelectricianforan
approvedoutletadapterortoreplacetheoutletwithonethatenablesthissafetyfeature.Never
overloadanelectricaloutlet.Theoverallsystemloadshouldnotexceed80percentofthebranch
circuitrating.Consultanelectricianformoreinformationifyouhavequestionsaboutpowerloads
andbranchcircuitratings.
Besurethatthepoweroutletyouareusingisproperlywired,easilyaccessible,andlocatedclose
totheequipment.Donotfullyextendpowercordsinawaythatwillstressthecords.
Besurethatthepoweroutletprovidesthecorrectvoltageandcurrentfortheproductyouare
installing.
Carefullyconnectanddisconnecttheequipmentfromtheelectricaloutlet.
Powersupplystatement
DANGER
Neverremovethecoveronapowersupplyoranypartthathasthefollowinglabelattached.
©CopyrightLenovo2013
ix
Page 12

Hazardousvoltage,current,andenergylevelsarepresentinsideanycomponentthathasthislabel
attached.Therearenoserviceablepartsinsidethesecomponents.Ifyoususpectaproblemwith
oneoftheseparts,contactaservicetechnician.
Externaldevices
CAUTION:
DonotconnectordisconnectanyexternaldevicecablesotherthanUSBcableswhilethecomputer
powerison;otherwise,youmightdamageyourcomputer.T oavoidpossibledamagetoattached
devices,waitatleastvesecondsafterthecomputerisshutdowntodisconnectexternaldevices.
Generalbatterynotice
DANGER
PersonalcomputersmanufacturedbyLenovocontainacoincellbatterytoprovidepowerto
thesystemclock.Inaddition,manymobileproducts,suchasnotebookcomputers,utilizea
rechargeablebatterypacktoprovidesystempowerwheninportablemode.Batteriessuppliedby
Lenovoforusewithyourproducthavebeentestedforcompatibilityandshouldonlybereplaced
withapprovedparts.
Neverattempttoopenorserviceanybattery.Donotcrush,puncture,orincineratebatteriesor
shortcircuitthemetalcontacts.Donotexposethebatterytowaterorotherliquids.Onlyrecharge
thebatterypackstrictlyaccordingtoinstructionsincludedintheproductdocumentation.
Batteryabuseormishandlingcancausethebatterytooverheat,whichcancausegassesorame
to“vent”fromthebatterypackorcoincell.Ifyourbatteryisdamaged,orifyounoticeany
dischargefromyourbatteryorthebuildupofforeignmaterialsonthebatteryleads,stopusingthe
batteryandobtainareplacementfromthebatterymanufacturer.
Batteriescandegradewhentheyareleftunusedforlongperiodsoftime.Forsomerechargeable
batteries(particularlyLithiumIonbatteries),leavingabatteryunusedinadischargedstatecould
increasetheriskofabatteryshortcircuit,whichcouldshortenthelifeofthebatteryandalsocan
poseasafetyhazard.DonotletrechargeableLithium-Ionbatteriescompletelydischargeorstore
thesebatteriesinadischargedstate.
Rechargeablebatterynotice
DANGER
Donotattempttodisassembleormodifythebatterypack.Attemptingtodosocancausean
explosion,orliquidleakagefromthebatterypack.Abatterypackotherthantheonespeciedby
Lenovo,oradisassembledormodiedbatterypackisnotcoveredbythewarranty.
Iftherechargeablebatterypackisincorrectlyreplaced,thereisdangerofanexplosion.Thebattery
packcontainsasmallamountofharmfulsubstances.T oavoidpossibleinjury:
•ReplaceonlywithabatteryofthetyperecommendedbyLenovo.
•Keepthebatterypackawayfromre.
•Donotexposeittowaterorrain.
•Donotattempttodisassembleit.
•Donotshort-circuitit.
xUserGuide
Page 13

•Keepitawayfromchildren.
•Donotdropthebatterypack.
Donotputthebatterypackintrashthatisdisposedofinlandlls.Whendisposingofthebattery,
complywithlocalordinancesorregulations.
Thebatterypackshouldbestoredatroomtemperature,chargedtoapproximately30to50%
ofcapacity.Werecommendthatbatterypackbechargedaboutonceperyeartoprevent
overdischarge.
Lithiumcoincellbatterynotice
DANGER
Dangerofexplosionifbatteryisincorrectlyreplaced.
Whenreplacingthelithiumcoincellbattery,useonlythesameoranequivalenttypethatis
recommendedbythemanufacturer.Thebatterycontainslithiumandcanexplodeifnotproperly
used,handled,ordisposedof.
Donot:
•Throworimmerseintowater
•Heattomorethan100°C(212°F)
•Repairordisassemble
Disposeofthebatteryasrequiredbylocalordinancesorregulations.
ThefollowingstatementappliestousersinthestateofCalifornia,U.S.A.
CaliforniaPerchlorateInformation:
Productscontainingmanganesedioxidelithiumcoincellbatteriesmaycontainperchlorate.
PerchlorateMaterial-specialhandlingmayapply,See
www.dtsc.ca.gov/hazardouswaste/perchlorate
Heatandproductventilation
DANGER
Computers,acpoweradapters,andmanyaccessoriescangenerateheatwhenturnedonandwhen
batteriesarecharging.Notebookcomputerscangenerateasignicantamountofheatduetotheir
compactsize.Alwaysfollowthesebasicprecautions:
•Whenyourcomputeristurnedonorthebatteryischarging,thebase,thepalmrest,andsome
otherpartsmaybecomehot.Avoidkeepingyourhands,yourlap,oranyotherpartofyour
bodyincontactwithahotsectionofthecomputerforanyextendedlengthoftime.Whenyou
usethekeyboard,avoidkeepingyourpalmsonthepalmrestforaprolongedperiodoftime.
Yourcomputergeneratessomeheatduringnormaloperation.Theamountofheatdependson
theamountofsystemactivityandthebatterychargelevel.Extendedcontactwithyourbody,
eventhroughclothing,couldcausediscomfortorevenaskinburn.Periodicallytakebreaks
©CopyrightLenovo2013
xi
Page 14

fromusingthekeyboardbyliftingyourhandsfromthepalmrest;andbecarefulnottouse
thekeyboardforanyextendedlengthoftime.
•Donotoperateyourcomputerorchargethebatterynearammablematerialsorinexplosive
environments.
•Ventilationslots,fansand/orheatsinksareprovidedwiththeproductforsafety,comfort,and
reliableoperation.Thesefeaturesmightinadvertentlybecomeblockedbyplacingtheproducton
abed,sofa,carpet,orotherexiblesurface.Neverblock,cover,ordisablethesefeatures.
•Whentheacpoweradapterisconnectedtoanelectricaloutletandyourcomputer,itgenerates
heat.Donotplacetheadapterincontactwithanypartofyourbodywhileusingit.Neverusethe
acpoweradaptertowarmyourbody.Extendedcontactwithyourbody,eventhroughclothing,
maycauseaskinburn.
Foryoursafety,alwaysfollowthesebasicprecautionswithyourcomputer:
•Keepthecoverclosedwheneverthecomputerispluggedin.
•Regularlyinspecttheoutsideofthecomputerfordustaccumulation.
•Removedustfromventsandanyperforationsinthebezel.Morefrequentcleaningsmightbe
requiredforcomputersindustyorhigh-trafcareas.
•Donotrestrictorblockanyventilationopenings.
•Donotoperateyourcomputerinsidefurniture,asthismightincreasetheriskofoverheating.
•Airowtemperaturesintothecomputershouldnotexceed35°C(95°F).
Electricalcurrentsafetyinformation
DANGER
Electriccurrentfrompower,telephone,andcommunicationcablesishazardous.
Toavoidashockhazard:
•Donotuseyourcomputerduringalightningstorm.
•Donotconnectordisconnectanycablesorperforminstallation,maintenance,orreconguration
ofthisproductduringanelectricalstorm.
•Connectallpowercordstoaproperlywiredandgroundedelectricaloutlet.
•Connecttoproperlywiredoutletsanyequipmentthatwillbeattachedtothisproduct.
•Wheneverpossible,useonehandonlytoconnectordisconnectsignalcables.
•Neverturnonanyequipmentwhenthereisevidenceofre,water,orstructuraldamage.
•Disconnecttheattachedpowercords,batterypack,andallthecablesbeforeyouopenthe
devicecovers,unlessinstructedotherwiseintheinstallationandcongurationprocedures.
•Donotuseyourcomputeruntilallinternalpartsenclosuresarefastenedintoplace.Neveruse
thecomputerwheninternalpartsandcircuitsareexposed.
xiiUserGuide
Page 15

DANGER
Connectanddisconnectcablesasdescribedinthefollowingprocedureswheninstalling,moving,
oropeningcoversonthisproductorattacheddevices.
Toconnect:
1.TurneverythingOFF.
2.First,attachallcablestodevices.
3.Attachsignalcablestoconnectors.
4.Attachpowercordstooutlets.
5.TurndevicesON.
Todisconnect:
1.TurneverythingOFF.
2.First,removepowercordsfromoutlets.
3.Removesignalcablesfromconnectors.
4.Removeallcablesfromdevices.
Thepowercordmustbedisconnectedfromthewalloutletorreceptaclebeforeinstallingallother
electricalcablesconnectedtothecomputer.
Thepowercordmaybereconnectedtothewalloutletorreceptacleonlyafterallotherelectrical
cableshavebeenconnectedtothecomputer.
Liquidcrystaldisplay(LCD)notice
CAUTION:
Theliquidcrystaldisplay(LCD)ismadeofglass,androughhandlingordroppingthecomputercan
causetheLCDtobreak.IftheLCDbreaksandtheinternaluidgetsintoyoureyesoronyour
hands,immediatelywashtheaffectedareaswithwaterforatleast15minutes;ifanysymptomsare
presentafterwashing,getmedicalcare.
Note:Forproductswithmercury-containinguorescentlamps(forexample,non-LED),theuorescentlamp
intheLiquidcrystaldisplay(LCD)containsmercury;disposeofaccordingtolocal,state,orfederallaws.
Usingheadphonesorearphones
CAUTION:
Excessivesoundpressurefromearphonesandheadphonescancausehearingloss.Adjustmentof
theequalizertomaximumincreasestheearphoneandheadphoneoutputvoltageandthesound
pressurelevel.Therefore,toprotectyourhearing,adjusttheequalizertoanappropriatelevel.
Excessiveuseofheadphonesorearphonesforalongperiodoftimeathighvolumecanbedangerousifthe
outputoftheheadphoneorearphoneconnectorsdonotcomplywithspecicationsofEN50332-2.The
headphoneoutputconnectorofyourcomputercomplieswithEN50332-2Subclause7.Thisspecication
limitsthecomputer’smaximumwidebandtrueRMSoutputvoltageto150mV.Tohelpprotectagainst
hearingloss,ensurethattheheadphonesorearphonesyouusealsocomplywithEN50332-2(Clause7
limits)forawidebandcharacteristicvoltageof75mV.UsingheadphonesthatdonotcomplywithEN
50332-2canbedangerousduetoexcessivesoundpressurelevels.
IfyourLenovocomputercamewithheadphonesorearphonesinthepackage,asaset,thecombinationof
theheadphonesorearphonesandthecomputeralreadycomplieswiththespecicationsofEN50332-1.
Ifdifferentheadphonesorearphonesareused,ensurethattheycomplywithEN50332-1(Clause6.5
LimitationValues).UsingheadphonesthatdonotcomplywithEN50332-1canbedangerousdueto
excessivesoundpressurelevels.
©CopyrightLenovo2013
xiii
Page 16

Additionalsafetyinformation
DANGER
Plasticbagscanbedangerous.Keepplasticbagsawayfrombabiesandchildrentoavoiddanger
ofsuffocation.
Noticefortabletpersonalcomputerusers
SafetynoticeforusersinAustralia
DANGER
Donotconnectphonelinewhileusingtabletmode.
NoticeforusersintheU.S.A.
Manypersonalcomputerproductsandaccessoriescontaincords,cablesorwires,suchaspowercordsor
cordstoconnecttheaccessorytoapersonalcomputer.Ifthisproducthassuchacord,cableorwire,then
thefollowingwarningapplies:
WARNING:Handlingthecordonthisproductorcordsassociatedwithaccessoriessoldwiththisproduct
willexposeyoutolead,achemicalknowntotheStateofCaliforniatocausecancer,andbirthdefectsor
otherreproductiveharm.Washhandsafterhandling.
Savetheseinstructions.
xivUserGuide
Page 17
Chapter1.Productoverview
Thischapterprovidesinformationaboutconnectorlocations,importantproductlabels,computerfeatures,
specications,operatingenvironment,andpreinstalledprograms.
Thischaptercontainsthefollowingtopics:
•“Locatingcomputercontrols,connectors,andindicators”onpage1
•“Locatingimportantproductinformation”onpage8
•“Features”onpage10
•“Specications”onpage11
•“Operatingenvironment”onpage12
•“Lenovoprograms”onpage12
Locatingcomputercontrols,connectors,andindicators
Thissectionintroducesthecomputerhardwarefeaturestogiveyouthebasicinformationyouneedto
startusingthecomputer.
Frontview
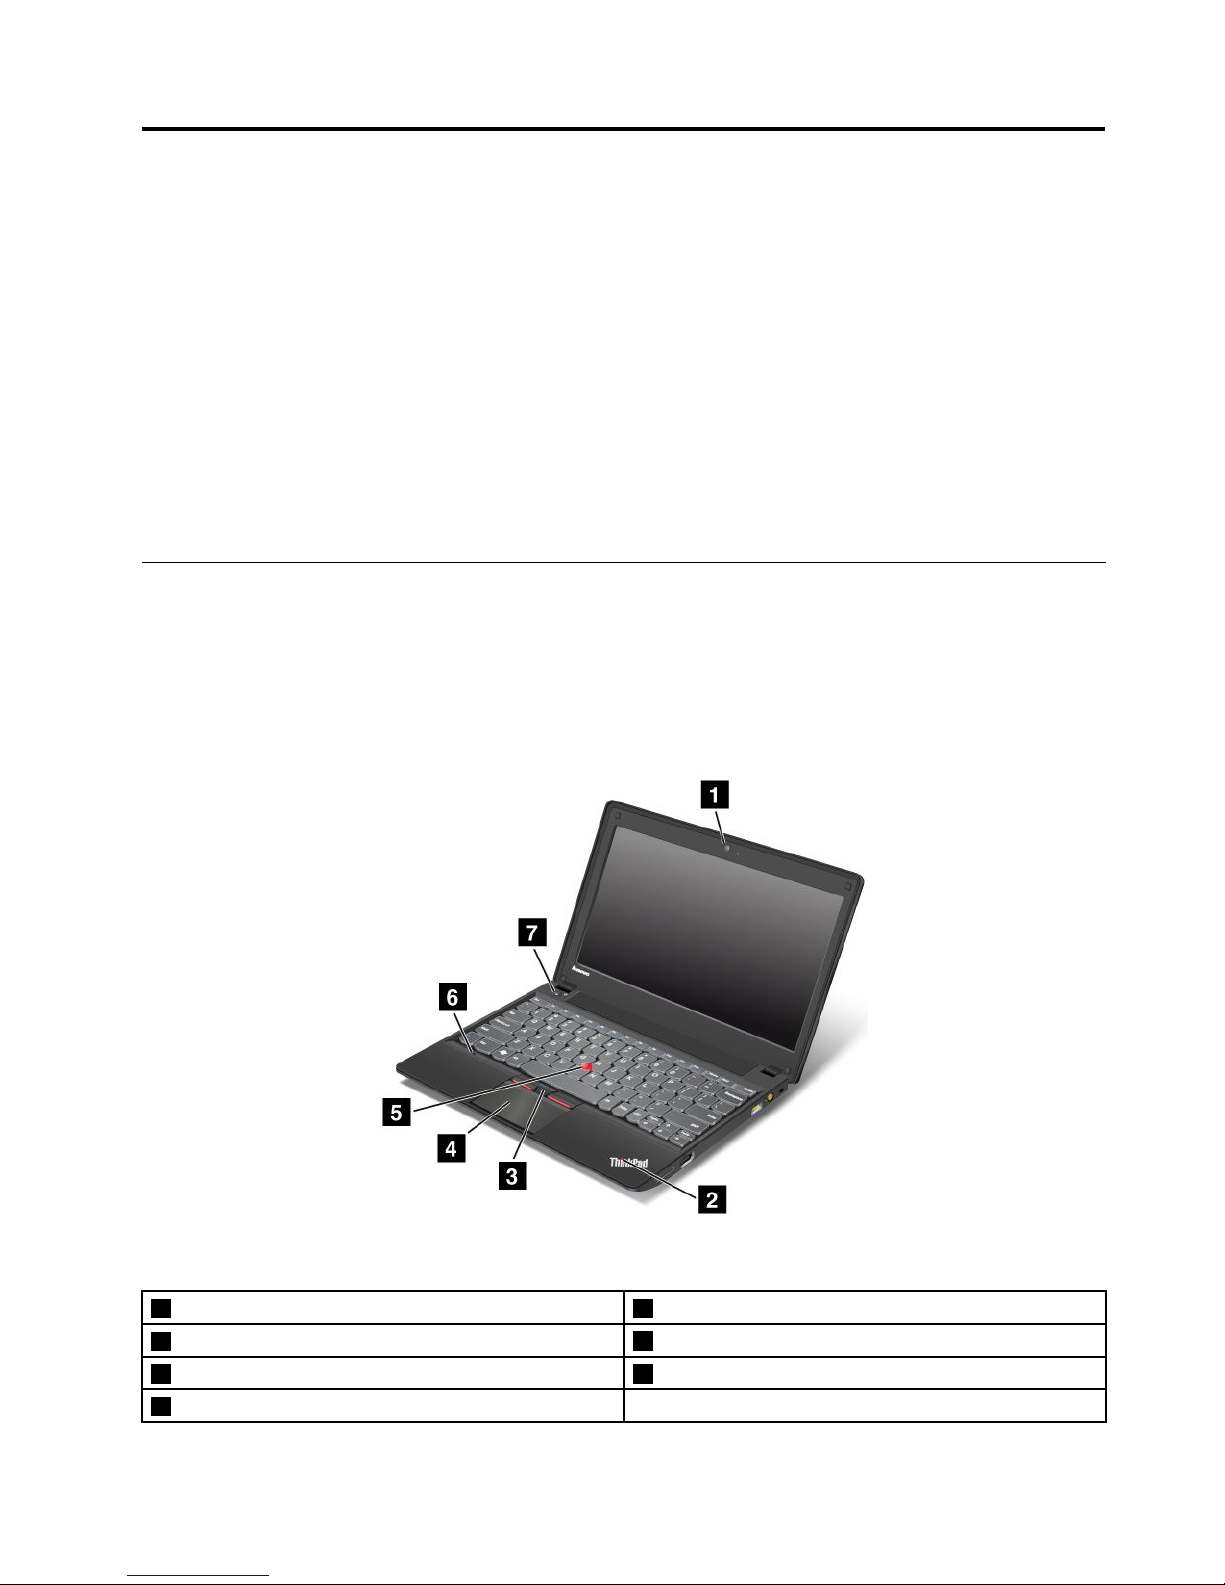
Figure1.ThinkPadX140efrontview
1Integratedcamera5T rackPointpointingstick
2Systemstatusindicator(illuminatedThinkPad
®
logo)
6Built-inmicrophone
3T rackPoint
®
buttons7Powerbutton
4Touchpad
©CopyrightLenovo2013
1
Page 18

1Camera
Usethecameratotakepicturesorholdavideoconference.Formoreinformation,see“Usingtheintegrated
camera”onpage34.
2Systemstatusindicator(illuminatedThinkPadlogo)
TheilluminatedThinkPadlogoonthepalmrestfunctionsasasystemstatusindicator.Yourcomputerhas
severalstatusindicators.Formoreinformation,see“Systemstatusindicators”onpage6.
ThinkPadpointingdevice
3T rackPointbuttons
4T ouchpad
5TrackPointpointingstick
ThekeyboardcontainstheLenovouniqueThinkPadpointingdevice.Pointing,selecting,anddraggingareall
partofasingleprocessthatyoucanperformwithoutmovingyourngersfromatypingposition.Formore
information,see“UsingtheThinkPadpointingdevice”onpage21.
6Microphones
Thebuilt-inmicrophonescapturesoundandvoicewhenusedwithaprogramcapableofhandlingaudio.
7Powerbutton
Usethepowerbuttontoturnonthecomputer.
Toturnoffthecomputer,usetheStartmenushutdownoptionontheWindows
®
7operatingsystem.For
theWindows8operatingsystem,movethecursortothetop-rightorbottom-rightcornerofthescreento
displaythecharms.ThenclickSettings➙Power➙Shutdown.
Ifyourcomputerstopsrespondingandyoucannotturnitoff,pressandholdthepowerbuttonforfour
secondsormore.Ifthecomputerstillisnotresponding,removetheacpoweradapterandthebattery
toresetthecomputer.
Youalsocanprogramthepowerbuttonsothatbypressingthepowerbuttonyoucanshutdownthe
computerorputitintosleeporhibernationmode.T oachievethis,youneedtochangeyourpowerplan
settings.Toaccesspowerplansettings,dothefollowing:
•ForWindows7:StartthePowerManagerprogramandthenclickthePowerPlantab.Forinstructionson
howtostartthePowerManagerprogram,see“AccessingLenovoprogramsontheWindows7operating
system”onpage12
.
•ForWindows8:ClickthebatterystatusiconintheWindowsnoticationareaandclickMorepower
options.ThenclickChoosewhatthepowerbuttonsdo.
2UserGuide
Page 19
Right-sideview
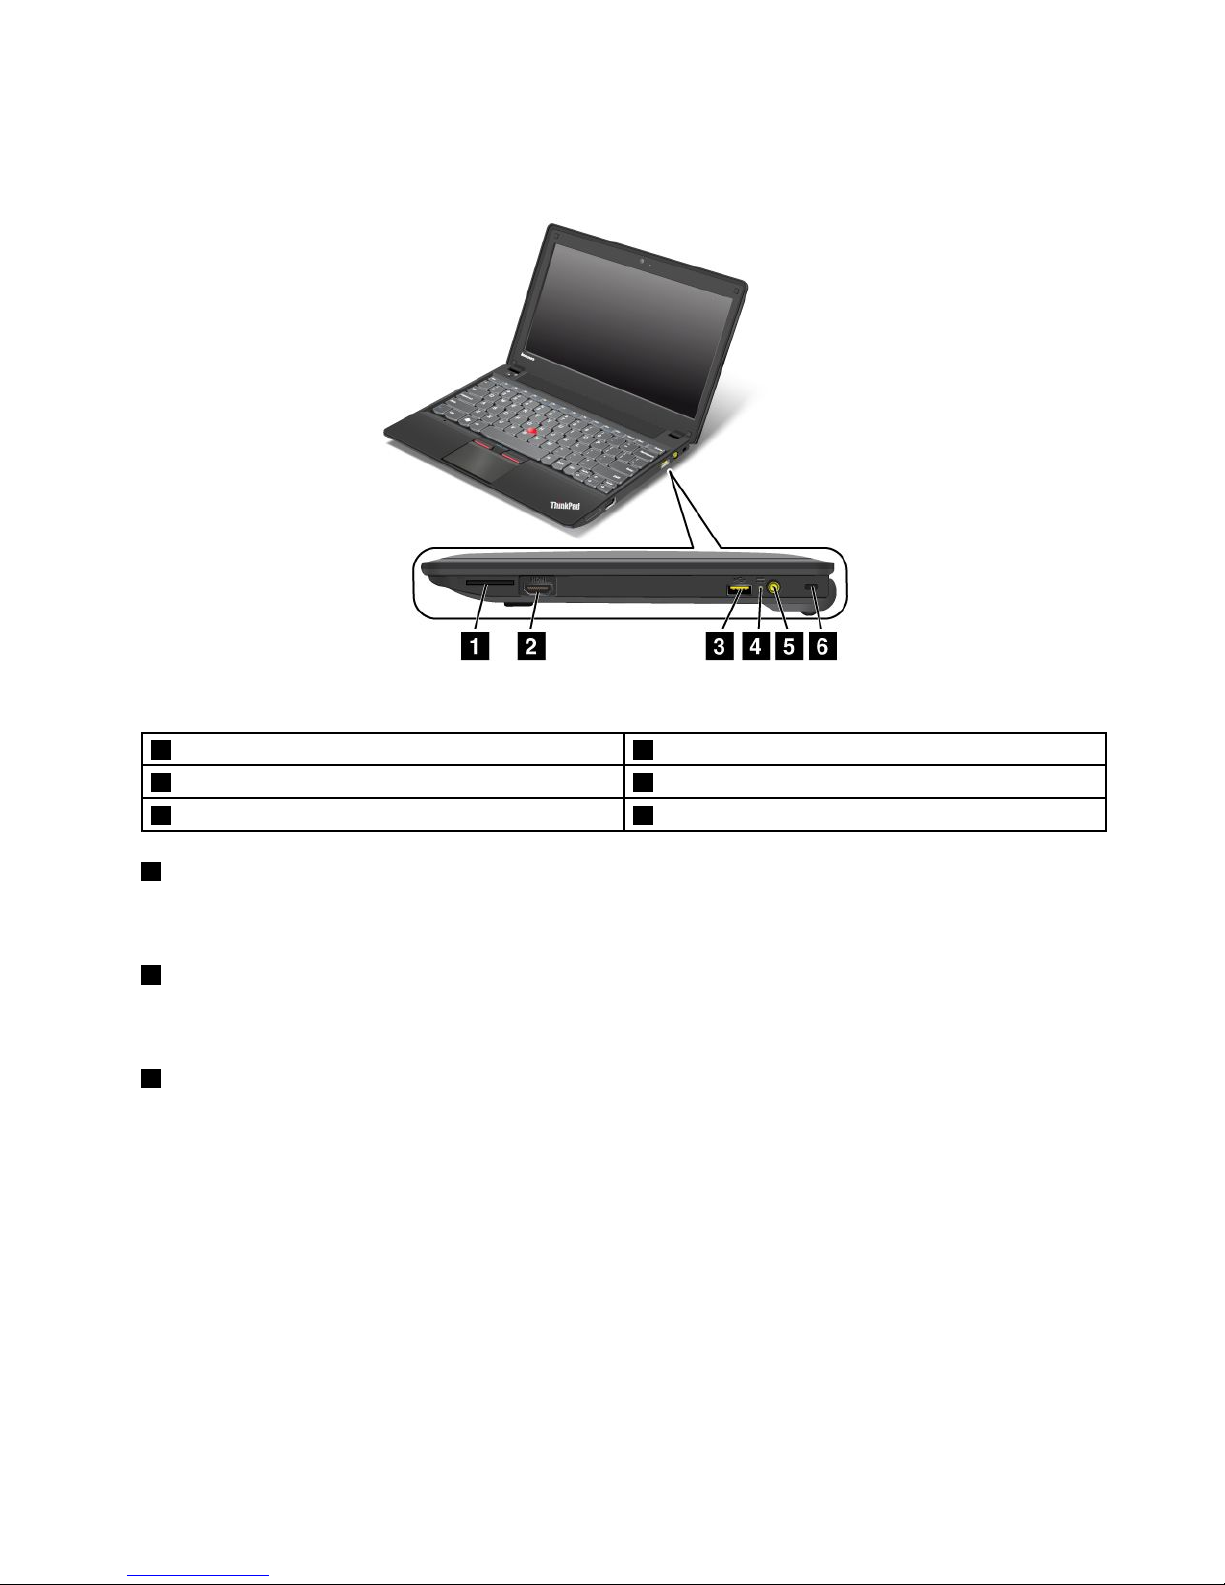
Figure2.ThinkPadX140eright-sideview
1Mediacardreaderslot4Power-statusindicator
2HDMIport5Powerconnector
3AlwaysOnUSBconnector6Security-lockslot
1Mediacardreaderslot
Dependingonthemodels,yourcomputermighthaveamediacardreaderslot.Formoreinformationabout
thesupportedcards,see“Usingaashmediacard”onpage35.
2HDMIport
Yourcomputersupportsthehigh-denitionmultimediainterface(HDMI)port,adigitalaudioandvideo
interfacethatcanconnectacompatibledigitalaudiodeviceorvideomonitor,suchasanHDTV.
3AlwaysonUSBconnector
Bydefault,theAlwaysOnUSBconnectorenablesyoutochargesomemobiledigitaldevicesand
smartphoneswhenyourcomputerisinsleeporhibernationmode.
Ifyouwanttochargethesedeviceswhenyourcomputeristurnedoff,dothefollowing:
1.Connectthecomputertoanacpowersupply.
2.GotoThinkPadSetupandenableAlwaysOnUSBChargeinoffmode.Formoreinformation,see
“Congmenu”onpage79.
3.Dooneofthefollowing:
•ForWindows7:StartthePowerManagerprogramandclicktheGlobalPowerSettingstab.Then
selecttheEnableAlwaysOnUSBcheckbox.
•ForWindows8:PresstheWindowskeytogototheStartscreen.ClickLenovoSettings➙Power.
ThenselecttheEnablewhenthecomputerisoffcheckbox.
Chapter1.Productoverview3
Page 20
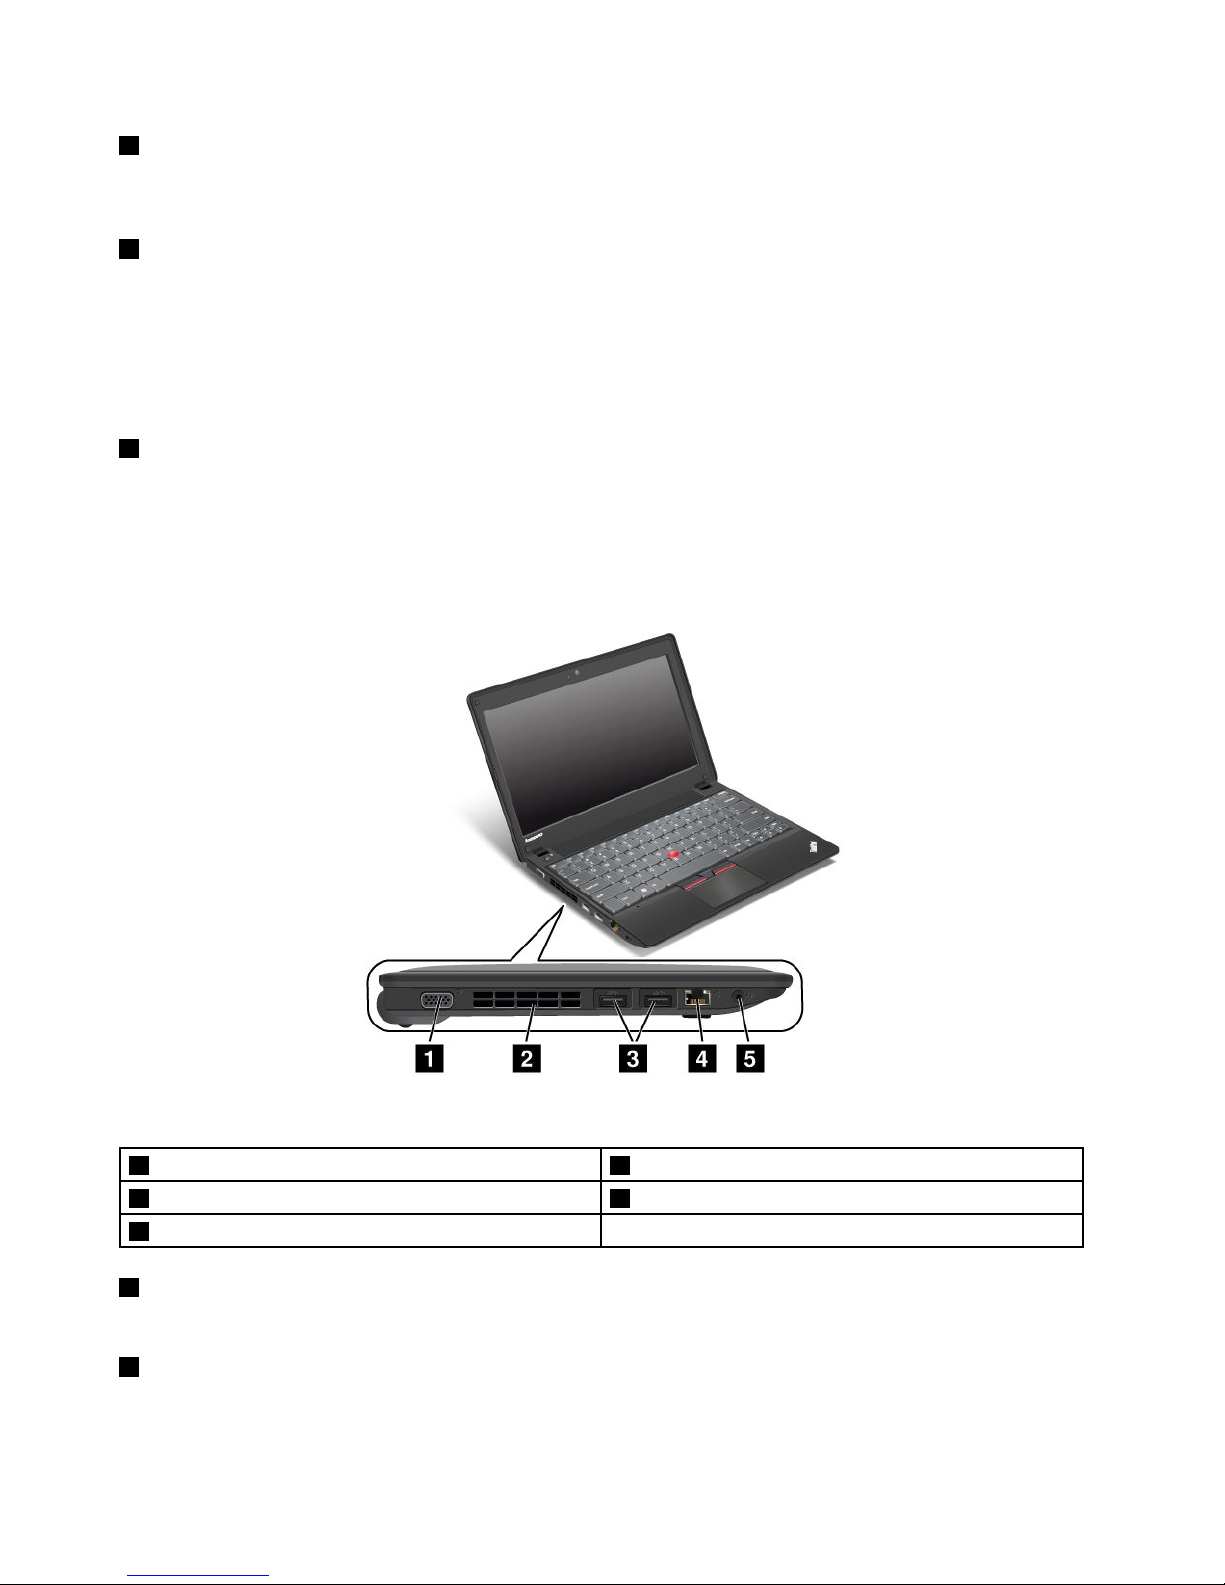
4Power-statusindicator
Yourcomputerhasapowerstatusindicatortoshowtheacpoweradapterstatusofyourcomputer.For
moreinformation,see“Powerstatusindicator”onpage7.
5Powerconnector
Connecttheacpoweradaptertothepowerconnectortoprovideacpowertothecomputerandcharge
thebattery.
Anindicatortotheleftoftheconnectorshowsthestatusofacpower.Whentheacpoweradapteris
connected,theindicatorislit.Ifabatteryisinstalledinthecomputer,theindicatorisgreenwhenthe
batterycharges.
6Security-lockslot
Purchaseasecuritycablelockthattsthiskeyholetolockyourcomputertoastationaryobjecttoprotect
yourcomputerfromtheft.
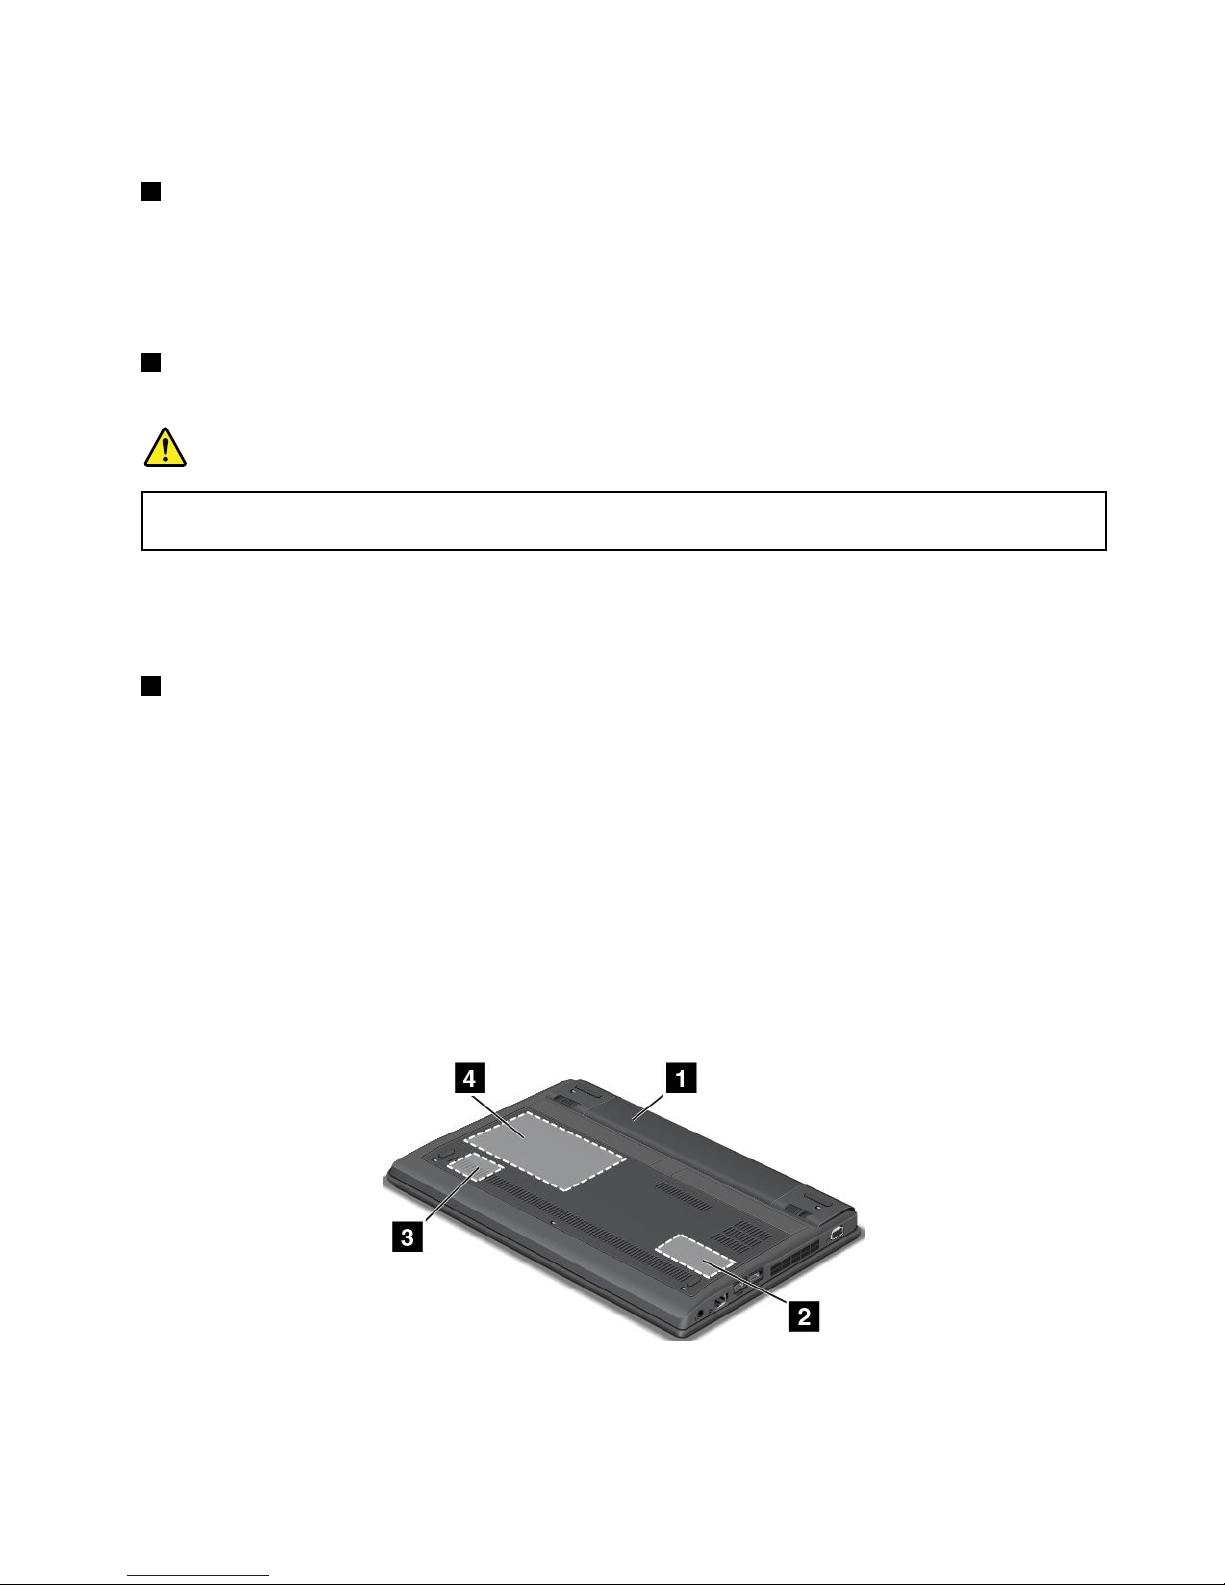
Left-sideview
Figure3.ThinkPadX140eleft-sideview
1Videographicsarray(VGA)connector
4Ethernetconnector
2Fanlouver
5Comboaudioconnector
3USB3.0connectors
1Videographicsarray(VGA)connector
AttachaVGAcompatiblemonitororprojectortoyourcomputertodisplaythecomputeroutput.
2Fanlouver
Thefanlouversandtheinternalfanenableairtocirculateinthecomputertoensurepropercooling,
especiallythecoolingofthemicroprocessor.
4UserGuide
Page 21
Note:Toensureproperairow,donotplaceanyobstaclesinfrontofthefanlouvers.
3USB3.0connectors
TheUniversalSerialBus(USB)3.0connectorsareusedforconnectingdevicescompatiblewithaUSB
interface,suchasaUSBprinteroradigitalcamera.
Note:WhenyouattachaUSBcabletotheconnector,makesurethattheUSBmarkisfacingupward.
Otherwisetheconnectormightbedamaged.
4Ethernetconnector
ConnectyourcomputertoaLANwiththeEthernetconnector.
DANGER
Toavoidtheriskofelectricalshock,donotconnectthetelephonecabletotheEthernetconnector.
YoucanonlyconnectanEthernetcabletothisconnector.
Twoindicators,totheupperrightandleftoftheconnector,showthestatusofthenetworkconnection.
WhenyourcomputerconnectstoaLANandasessionwiththenetworkisavailable,theupperleftindicator
issteadygreen.Whiledataisbeingtransmitted,theupperrightindicatorblinksyellow.
5Comboaudioconnector
Tolistentothesoundfromyourcomputer,connectaheadphoneoraheadsetthathasa3.5mm4-poleplug
tothecomboaudioconnector.
Notes:
•Ifyouareusingaheadsetwithafunctionswitch,donotpressthisswitchwhileusingtheheadset.If
youpresstheswitch,theheadsetmicrophonewillbedisabled,andtheintegratedmicrophoneson
thecomputerwillbeenabledinstead.
•Thecomboaudioconnectordoesnotsupportaconventionalmicrophone.Formoreinformation,see
“Usingaudiofeatures”onpage33.
Bottomview
Figure4.ThinkPadX140ebottomview
Chapter1.Productoverview5
Page 22
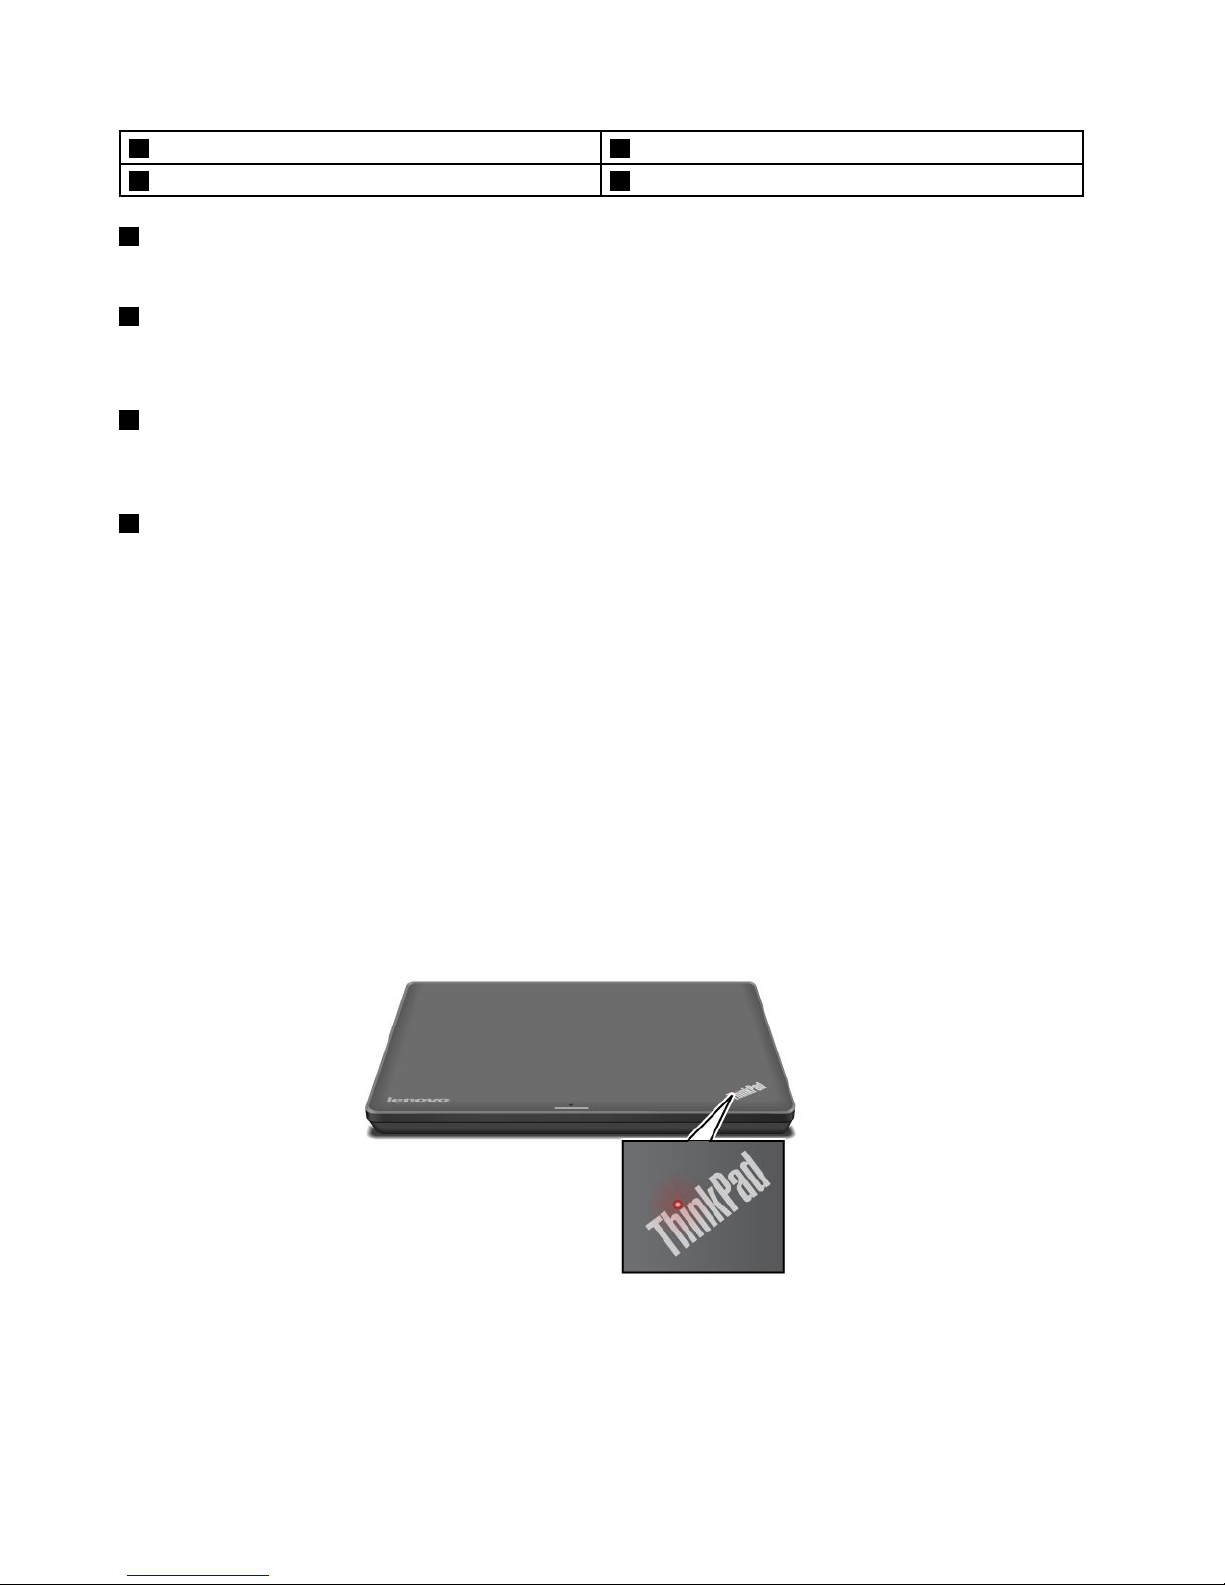
1Battery3WirelessLANcardslot
2Memoryupgradeslot4Harddiskdriveorsolid-statedrive
1Battery
Useyourcomputerwiththebatterypowerwheneveracpowerisunavailable.
2Memory-upgradeslot
Youcanincreasetheamountofmemoryinyourcomputerbyinstallingamemorymoduleinthe
memory-upgradeslot.MemorymodulesareavailableasoptionsfromLenovo.
3WirelessLANcardslot
Yourcomputerincludesawirelesslocalareanetwork(LAN)cardforyoutoestablishwirelessLAN
connections.
4Harddiskdriveorsolid-statedrive
Dependingonmodels,yourcomputermighthavealarge-capacity,customer-upgradableharddiskdrive
thatcanmeetavarietyofstoragedemands.
Somemodelsareequippedwithasolid-statedrivefordatastorage,makingyourcomputerlighter,smaller,
andfaster.
Note:Thehiddenservicepartitionisthereasonwhythereislessfreespacethanexpectedonyourhard
diskdriveorsolid-statedrive.Thisreductionismorenoticeableonthesolid-statedrivebecauseofits
smallercapacity.
Statusindicators
Thestatusindicatorsshowthecurrentstatusofyourcomputer.
Systemstatusindicators
TheilluminateddotintheThinkPadlogoontheouterlidofyourcomputerandonthepalmrestworks
asasystemstatusindicator.
6UserGuide
Page 23
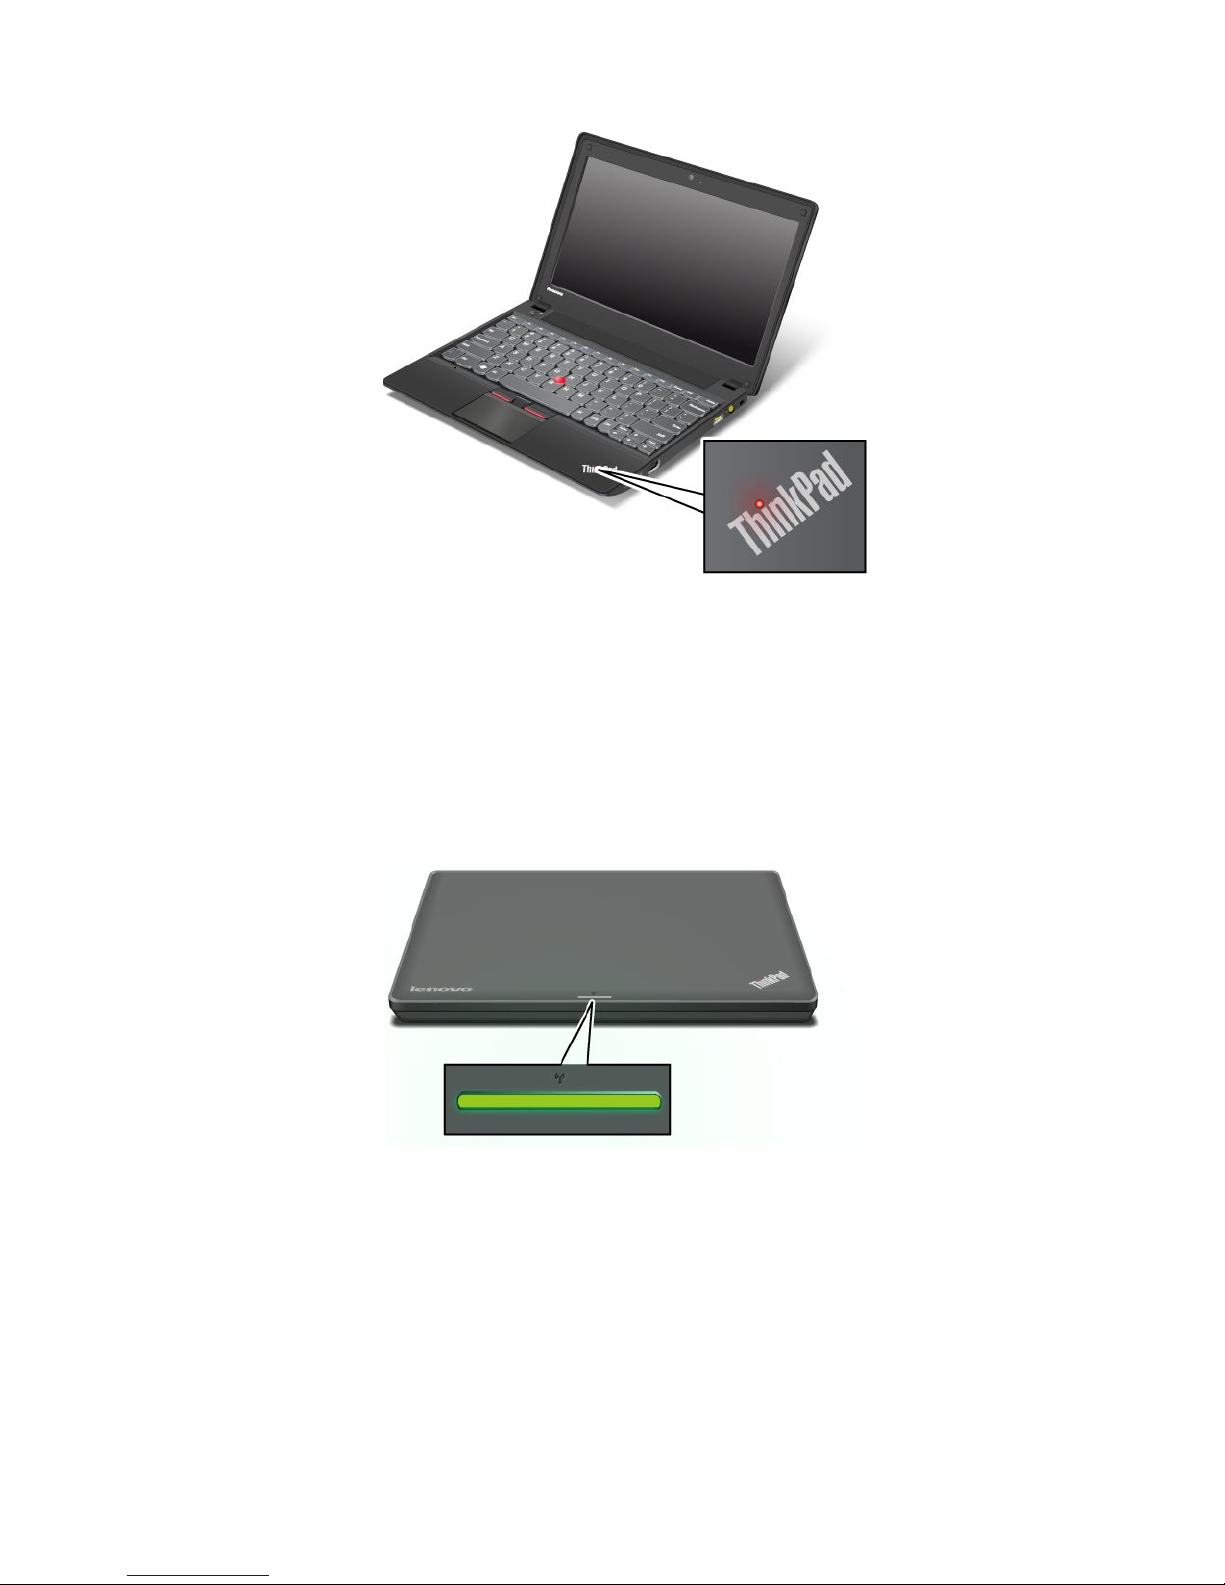
Themeaningoftheindicatorisasfollows:
•Red:Thecomputerison(innormalmode).
•Fastblinkingred:Thecomputerisenteringsleeporhibernationmode.
•Slowblinkingred:Thecomputerisinsleepmode.
•Off:Thecomputerisofforinhibernationmode.
Wirelessstatusindicator
Thewirelessstatusindicatorislocatedontheouterlidofthecomputer.
Themeaningoftheindicatorisasfollows:
•Solidgreen:Thewirelessfeaturesofthecomputerareon.
•Off:Thewirelessfeaturesofthecomputerareoff.
Powerstatusindicator
Yourcomputerhasanindicatorthatshowsthestatusofacpower.
Chapter1.Productoverview7
Page 24
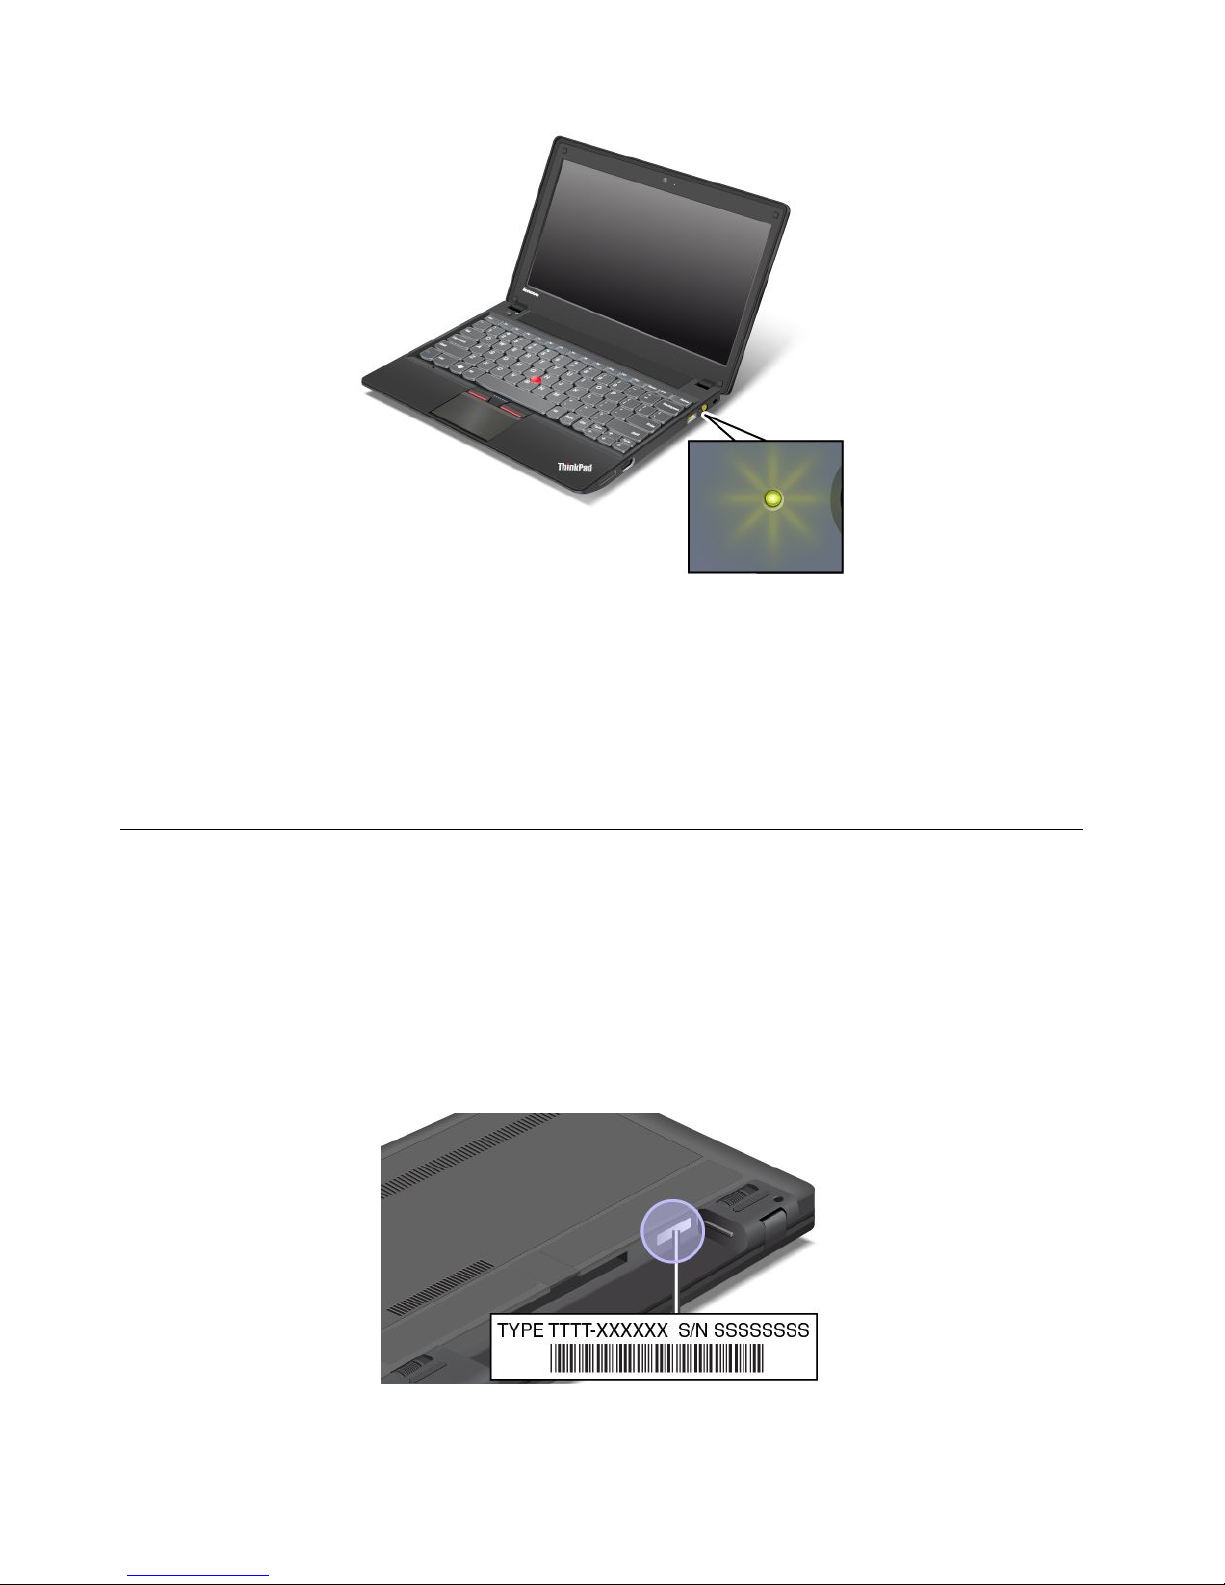
Themeaningoftheindicatorisasfollows:
•Green:Theacpoweradapterisconnected.
•Off:Theacpoweradapterisnotconnected.
CapsLockindicator
PresstheCapsLockkeytoenabletheCapsLockmodetotypeallalphabeticcharacters(A-Z)inuppercase
directly.WhentheCapsLockmodeisenabled,theCapsLockindicatorisdisplayedonthescreen.
Locatingimportantproductinformation
Thissectionprovidesinformationtohelpyoulocateyourmachinetypeandmodellabel,FCCIDandIC
Certicationlabel,andtheMicrosoft
®
CerticateofAuthenticity(COA)label.
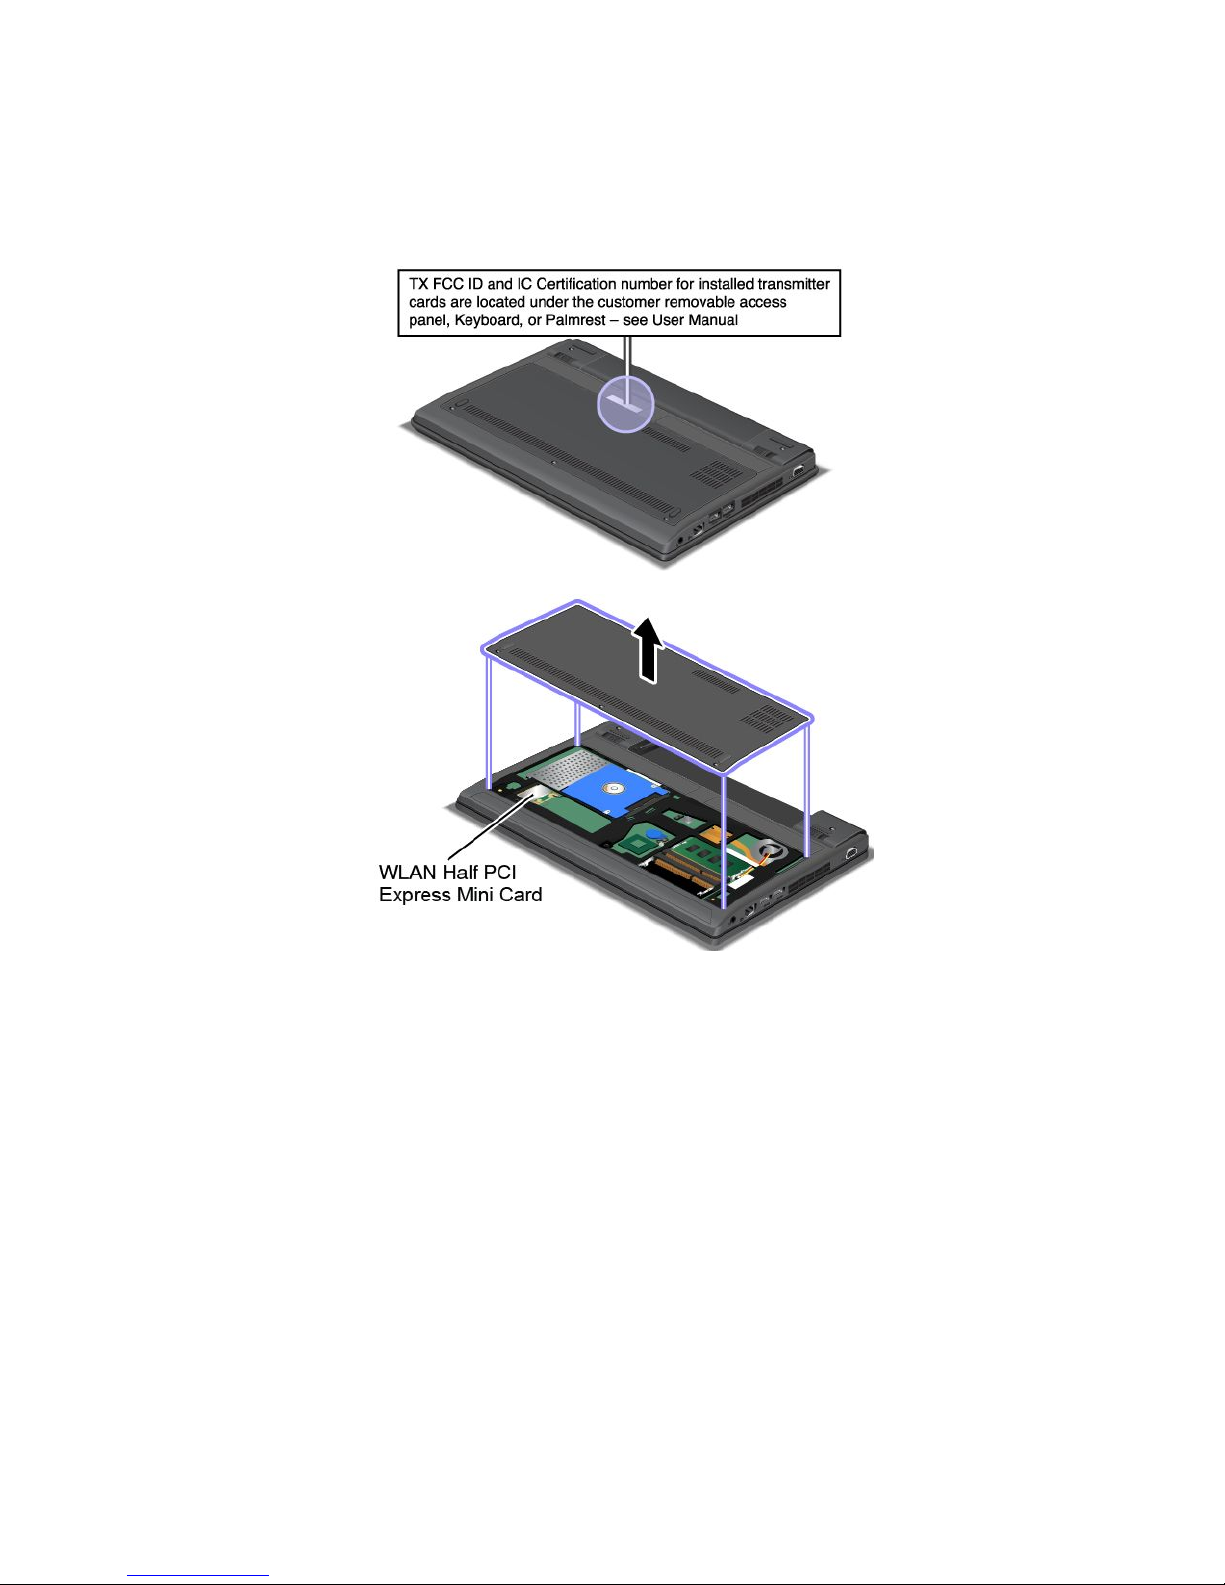
Machinetypeandmodellabel
Themachinetypeandmodellabelidentiesyourcomputer.WhenyoucontactLenovoforhelp,themachine
typeandmodelinformationhelpssupporttechnicianstoidentifyyourcomputerandprovidefasterservice.
Youcanndthemachinetypeandmodelofyourcomputeronthelabelasshownbelow:
8UserGuide
Page 25
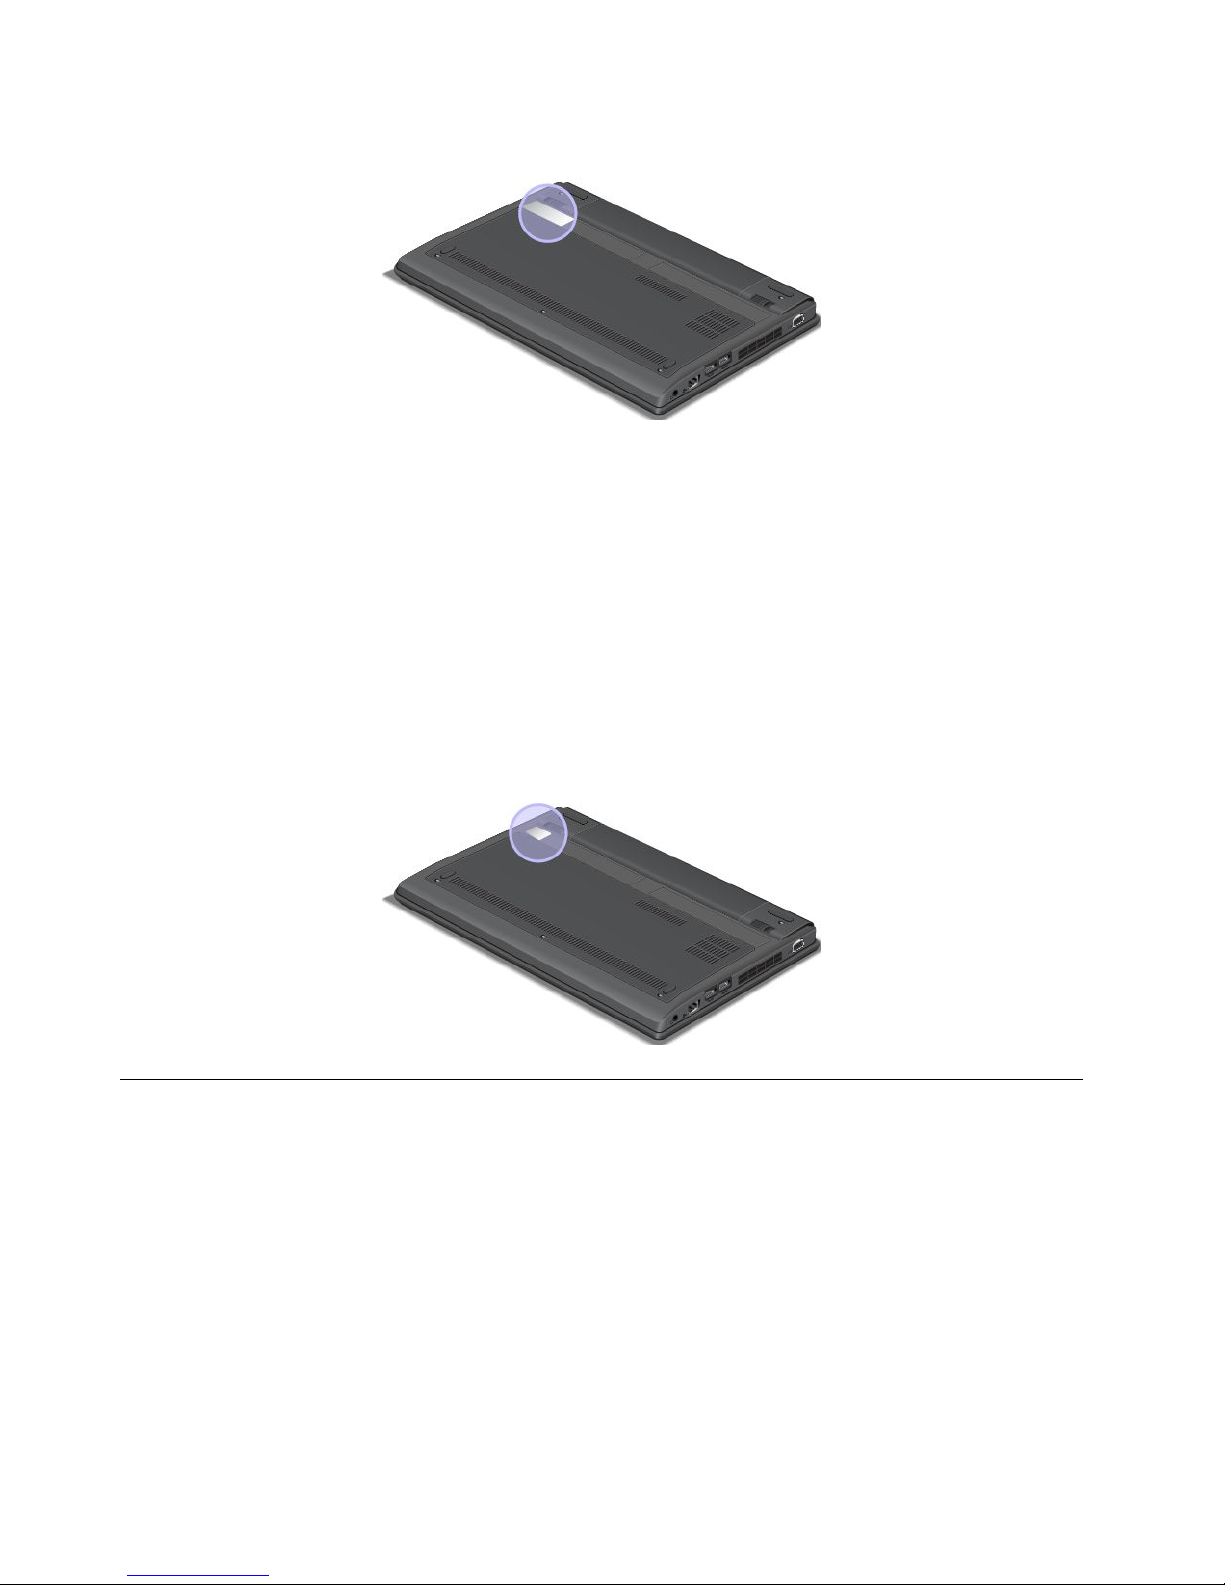
FCCIDandICCerticationnumberlabel
ThereisnoFCCIDorICCerticationnumberforthePCIExpressMiniCardshownontheenclosureof
yourcomputer.TheFCCIDandICCerticationnumberlabelisafxedonthecardinstalledinthePCI
ExpressMiniCardslotofyourcomputer.
Note:OnlyLenovoauthorizedwirelessLANcardsareallowedtobeusedinyourcomputer.Ifyouinstallan
unauthorizedPCIExpressMiniCardthatisnotapprovedforuseinyourcomputer,thecomputerwillnot
start,butwillonlydisplayanerrormessageandemitaudiblebeeps.
CerticateofAuthenticitylabel
TheCerticateofAuthenticitylabelforthepreinstalledoperatingsystemisattached.Printedonthislabelare
theproductIDandtheproductkeyinformationforyourcomputer.Recordthisinformationandkeepitina
safeplace.Youmightneedthesenumberstostartyourcomputerorreinstalltheoperatingsystem.
Note:TheCerticateofAuthenticitylabelappliesonlytocomputerspreinstalledwiththeWindows7
operatingsystem.
Chapter1.Productoverview9
Page 26
TheCerticateofAuthenticitylabelofyourcomputerisshownasbelow:
GenuineMicrosoftlabel
TheGenuineMicrosoftlabelisprovidedonmodelsthatarelicensedtouseaWindows8operatingsystem.
TheversionoftheWindows8operatingsystemisprintedonthelabel.Ifyourcomputermodelislicensedto
usetheWindows8Prooperatingsystem,thatlicensealsopermitsyoutousetheWindows7Professional
operatingsysteminplaceoftheWindows8Prooperatingsystemifyouprefer.Lenovocomputersthatare
licensedforusewithaWindows8operatingsystemareshippedwiththeWindows8licensekeydigitally
encodedintothecomputerhardware.Dependingonthecomputermodel,theGenuineMicrosoftlabelcan
beonthecomputercover,underthebattery,oronthepoweradapter.
FormoreinformationabouttheGenuineMicrosoftlabel,goto:
http://www.microsoft.com/en-us/howtotell/Hardware.aspx
ThefollowinggureshowsthelocationoftheGenuineMicrosoftlabelonthecomputercover:
Features
Thistopicliststhefeaturesofyourcomputer.
Processor
•Toviewtheprocessorinformationofyourcomputer,dothefollowing:
–ForWindows7:ClickStart,right-clickComputer.ThenclickProperties.
–ForWindows8:Movethecursortothetop-rightorbottom-rightcornerofthescreentodisplaythe
charms.ThenclickSettings➙PCinfo.
Memory
•Doubledatarate3synchronousdynamicrandomaccessmemorymodules(DDR3SDRAM)
10UserGuide
Page 27

Storagedevice
•2.5-inch(7mmheight)harddiskdriveor2.5-inch(7mmheight)solid-statedrive
Display
ThecolordisplayusestheTFTtechnology.
•Size:11.6inches(294.64mm)
•Resolution:
–LCD:Upto1366x768
–Externalmonitor:Upto2048x1536(VGA)orupto2560x1600(HDMI)
•Brightnesscontrol
•Integratedcamera
Keyboard
•6-rowkeyboard
•ThinkPadpointingdevice(T rackPointandmulti-touchtouchpad)
•Fnkey
Interface
•Externalmonitorconnectors(VGAconnectorandHDMIconnector)
•Comboaudioconnector
•TwoUSB3.0connectors
•OneAlwaysonUSBconnector
•RJ45Ethernetconnector
•4-in-1digitalmediacardreader
Wirelessfeatures
•IntegratedwirelessLAN
•IntegratedBluetooth(onsomemodels)
Specications
Thissectionliststhephysicalspecicationsforyourcomputer.
Size
•Width:293.4mm(11.55inches)
•Depth:216mm(8.50inches)
•Height:32.3mm(1.27inches)
Heatoutput
•65W(222Btu/hr)maximum
Powersource(acpoweradapter)
•Sine-waveinputat50to60Hz
•Inputratingoftheacpoweradapter:100to240Vac,50to60Hz
Chapter1.Productoverview11
Page 28

Batterypack
•Lithium-ion(Li-Ion)batterypack
Batterylife
•Forthepercentageofremainingbatterypower,checkthebatterystatusiconintheWindowsnotication
area.
Operatingenvironment
Thissectionprovidesinformationaboutyourcomputeroperatingenvironment.
Environment:
•Maximumaltitudewithoutpressurization:3048m(10000ft)
•Temperature
–Ataltitudesupto2438m(8000ft)
–Operating:5.0°Cto35.0°C(41°Fto95°F)
–Storage:5.0°Cto43.0°C(41°Fto109°F)
–Ataltitudesabove2438m(8000ft)
–Maximumtemperaturewhenoperatingundertheunpressurizedcondition:31.3°C(88°F)
Note:Whenyouchargethebatterypack,itstemperaturemustbeatleast10°C(50°F).
•Relativehumidity:
–Operating:8%to80%
–Storage:5%to95%
Ifpossible,placeyourcomputerinawell-ventilatedanddryareawithoutdirectexposuretosunshine.
Keepelectricalappliancessuchasanelectricfan,radio,airconditioner,andmicrowaveovenawayfrom
yourcomputerbecausethestrongmagneticeldsgeneratedbytheseappliancescandamagethemonitor
anddataontheharddiskdrive.
Donotplaceanybeveragesontopoforbesidethecomputerorotherattacheddevices.Ifliquidisspilledon
orinthecomputeroranattacheddevice,ashortcircuitorotherdamagemightoccur.
Donoteatorsmokeoveryourkeyboard.Particlesthatfallintoyourkeyboardcancausedamage.
Lenovoprograms
YourcomputercomeswithLenovoprogramstohelpyouworkmoreeasilyandsecurely.Dependingon
theWindowsoperatingsystempreinstalled,theprogramsmightvary.
TolearnmoreabouttheprogramsandothercomputingsolutionsofferedbyLenovo,goto
http://www.lenovo.com/support.
AccessingLenovoprogramsontheWindows7operatingsystem
OntheWindows7operatingsystem,youcanaccessLenovoprogramsfromeithertheLenovoThinkVantage
ToolsprogramorfromControlPanel.
12UserGuide
Page 29

AccessingLenovoprogramsfromtheLenovoThinkVantageT oolsprogram
ToaccessLenovoprogramsfromtheLenovoThinkVantageToolsprogram,clickStart➙AllPrograms➙
LenovoThinkVantageT ools.Thendouble-clickaprogramicontoaccesstheprogram.
Note:IfaprogramiconintheLenovoThinkVantageToolsprogramnavigationwindowisdimmed,it
indicatesthatyouneedtoinstalltheprogrammanually.T oinstalltheprogrammanually,double-clickthe
programicon.Then,followtheinstructionsonthescreen.Whentheinstallationprocesscompletes,the
programiconwillbeactivated.
Table1.ProgramsintheLenovoThinkVantageToolsprogram
ProgramIconname
AccessConnections™InternetConnection
ClientSecuritySolutionEnhancedSecurity
CommunicationsUtilityWebConferencing
GPSEnablerGPS
LenovoSolutionCenterSystemHealthandDiagnostics
PasswordManagerPasswordVault
PowerManager
PowerControls
RecoveryMediaFactoryRecoveryDisks
RescueandRecovery
®
EnhancedBackupandRestore
SystemUpdate
UpdateandDrivers
Note:Dependingonyourcomputermodel,someoftheprogramsmightnotbeavailable.
AccessingLenovoprogramsfromControlPanel
ToaccessLenovoprogramsfromControlPanel,clickStart➙ControlPanel.Thendependingonthe
programyouwanttoaccess,clickthecorrespondingsectionandthenclickthecorrespondinggreentext.
Note:IfyoudonotndtheprogramyouneedinControlPanel,opentheLenovoThinkVantageTools
programnavigationwindowanddouble-clickthedimmedicontoinstalltheprogramyouneed.Then,
followtheinstructionsonthescreen.Whentheinstallationprocesscompletes,theprogramiconwillbe
activated,andyoucanndtheprograminControlPanel.
TheprogramsandthecorrespondingsectionsandgreentextsinControlPanelarelistedinthefollowing
table.
Table2.ProgramsinControlPanel
Program
ControlPanelsectionGreentextinControlPanel
AccessConnections
NetworkandInternet
Lenovo-InternetConnection
ClientSecuritySolutionSystemandSecurityLenovo-EnhancedSecurity
CommunicationsUtilityHardwareandSoundLenovo-WebConferencing
GPSEnabler
NetworkandInternet
Lenovo-GPS
LenovoSolutionCenterSystemandSecurityLenovo-SystemHealthand
Diagnostics
MessageCenterPlus
Programs
MessagesfromLenovo
Chapter1.Productoverview13
Page 30

Table2.ProgramsinControlPanel(continued)
Program
ControlPanelsectionGreentextinControlPanel
PasswordManager
SystemandSecurity
UserAccountsandFamilySafety
Lenovo-PasswordVault
PowerManager
HardwareandSound
SystemandSecurity
Lenovo-PowerControls
RecoveryMedia
SystemandSecurity
Lenovo-FactoryRecoveryDisks
SystemUpdateSystemandSecurity
Lenovo-UpdateandDrivers
RescueandRecovery
SystemandSecurity
Lenovo-EnhancedBackupand
Restore
Note:Dependingonyourcomputermodel,someoftheprogramsmightnotbeavailable.
AccessingLenovoprogramsontheWindows8operatingsystem
IfyourcomputerispreinstalledwiththeWindows8operatingsystem,youcanaccessLenovoprogramsby
doingeitherofthefollowing:
•ClicktheLenovoQuickLaunchiconfromthetaskbar.Alistofprogramsisdisplayed.Double-clicka
Lenovoprogramtolaunchit.Ifadesiredprogramisnotinthelist,clicktheplusicon+.
•PresstheWindowskeytogototheStartscreen.ClickaLenovoprogramtolaunchit.Ifyoucannotnd
theprogramyouneed,Movethecursortothetop-rightorbottom-rightcornerofthescreentodisplaythe
charms.ThenclicktheSearchcharmtosearchforthedesiredprogram.
YourcomputersupportsthefollowingLenovoprograms:
•LenovoCompanion
•LenovoSettings
•LenovoMobileAccess
•LenovoSolutionCenter
•LenovoQuickLaunch
•LenovoSupport
•LenovoThinkVantageTools
•PasswordManager
•SystemUpdate
Note:ThePasswordManagerprogramisnotpreinstalledonyourWindows8computers.Youcandownload
itfromtheLenovoSupportWebsitehttp://www.lenovo.com/support.
Foranintroductiontotheseprograms,see“AnintroductiontoLenovoprograms”onpage14
.
AnintroductiontoLenovoprograms
ThistopicprovidesabriefintroductiontosomeLenovoprograms.
Note:Dependingonyourcomputermodel,someoftheprogramsmightnotbeavailable.
•AccessConnections
TheAccessConnectionsprogramisaconnectivityassistantprogramforcreatingandmanaginglocation
proles.EachlocationprolestoresallthenetworkandInternetcongurationsettingsneededfor
connectingtoanetworkinfrastructurefromaspeciclocationsuchasahomeoranofce.
14UserGuide
Page 31

Byswitchingbetweenlocationprolesasyoumoveyourcomputerfromplacetoplace,youcanquickly
andeasilyconnecttoanetworkwithnoneedtorecongureyoursettingsmanuallyandrestartthe
computereachtime.
•ClientSecuritySolution
TheClientSecuritySolutionprogramprotectsyourcomputerbysecuringclientdataanddeecting
securitybreachattempts.Italsocanhelpmanageyourpasswords,recoveraforgottenpassword,
monitorsecuritysettingsonyourcomputer,andsuggesthowtoenhanceyourcomputersecurity.
•CommunicationsUtility
UsetheCommunicationsUtilityprogramtoconguresettingsfortheintegratedcameraandaudiodevices.
•GPSEnabler
IfthePCIExpressMiniCardinstalledinyourcomputersupportsGPS,yourcomputercanreceivesignals
fromGPSsatellitesanddetermineitslocation.IfyourcomputerisconnectedtotheInternet,youcannd
yourlocationonareal-timemapprovidedbyGoogleMapsorMicrosoftBing™Maps.
•LenovoCompanion
ThroughtheLenovoCompanionprogram,youcangettheinformationabouttheaccessoriesforyour
computer,viewbolgsandarticlesaboutyourcomputer,andcheckforotherrecommendedprograms.
•LenovoSettings
UsetheLenovoSettingsprogramtoenhanceyourcomputingexperiencebyturningyourcomputerintoa
portablehotspot,conguringcameraandaudiosettings,optimizingyourpowersettings,andcreating
andmanagingmultiplenetworkproles.
•LenovoMobileAccess
TheLenovoMobileAccessprogramenablesyoutomanageyourmobilebroadbandconnection.You
cancreateanaccount,addmoneytotheaccount,andpurchasemobilebroadbandsessionsusing
youraccount.
•LenovoSolutionCenter
TheLenovoSolutionCenterprogramenablesyoutotroubleshootandresolvecomputerproblems.It
combinesdiagnostictests,systeminformationcollection,securitystatus,andsupportinformation,along
withhintsandtipsformaximumsystemperformance.
•LenovoQuickLaunch
TheLenovoQuickLaunchprogramprovidesyouwithquickaccesstoprogramsinstalledonyour
computer,includingLenovoprograms,Microsoftprograms,andotherthirdpartyprograms.
•LenovoSupport
TheLenovoSupportprogramenablesyoutoregisteryourcomputerwithLenovo,checkthecomputer
healthconditionandbatterystatus,downloadandviewusermanualsforyourcomputer,getthewarranty
informationofyourcomputer,andexplorehelpandsupportinformation.
•LenovoThinkVantageTools
TheLenovoThinkVantageT oolsprogramhelpsyouworkmoreeasilyandsecurelybyprovidingeasy
accesstovariousprograms,suchasLenovoSolutionCenter.
•MessageCenterPlus
TheMessageCenterPlusprogramautomaticallydisplaysmessagestoinformyouaboutimportantnotices
fromLenovo,suchasalertsonsystemupdatesandalertsonconditionsthatrequireyourattention.
•PasswordManager
ThePasswordManagerprogramautomaticallycapturesandllsinauthenticationinformationfor
WindowsprogramsandWebsites.
•PowerManager
Chapter1.Productoverview15
Page 32

ThePowerManagerprogramprovidesconvenient,exible,andcompletepowermanagementforyour
computer.Itenablesyoutoadjustyourcomputerpowersettingstoachievethebestbalancebetween
performanceandpowersaving.
•RecoveryMedia
TheRecoveryMediaprogramenablesyoutorestorethecontentsoftheharddiskdrivetothefactory
defaultsettings.
•RescueandRecovery
TheRescueandRecoveryprogramisaone-buttonrecoveryandrestoresolutionthatincludesasetof
self-recoverytoolstohelpyoudiagnosecomputerproblems,gethelp,andrecoverfromsystemcrashes,
evenifyoucannotstarttheWindowsoperatingsystem.
•SystemUpdate
TheSystemUpdateprogramhelpsyoukeepthesoftwareonyourcomputerup-to-datebydownloading
andinstallingsoftwareupdatepackages(Lenovoprograms,devicedrivers,UEFIBIOSupdates,and
otherthirdpartyprograms).
16UserGuide
Page 33

Chapter2.Usingyourcomputer
Thischapterprovidesinformationonusingsomeofthecomputercomponents.
Thischaptercontainsthefollowingtopics:
•“Registeringyourcomputer”onpage17
•“Frequentlyaskedquestions”onpage17
•“Specialkeysandbuttons”onpage19
•“UsingtheThinkPadpointingdevice”onpage21
•“Powermanagement”onpage23
•“Connectingtothenetwork”onpage28
•“Presentationsandmultimedia”onpage31
•“Usingaudiofeatures”onpage33
•“Usingtheintegratedcamera”onpage34
•“Usingaashmediacard”onpage35
Registeringyourcomputer
Whenyouregisteryourcomputer,informationisenteredintoadatabase,whichenablesLenovotocontact
youincaseofarecallorothersevereproblem.AfteryouregisteredyourcomputerwithLenovo,youwill
alsoreceivequickerservicewhenyoucallLenovoforhelp.Inaddition,somelocationsofferextended
privilegesandservicestoregisteredusers.
ToregisteryourcomputerwithLenovo,dooneofthefollowing:
•Gotohttp://www.lenovo.com/registerandfollowtheinstructionsonthescreentoregisteryourcomputer.
•ConnectyourcomputertotheInternetandregisteryourcomputerthroughapreinstalledregistration
program:
–ForWindows7:ThepreinstalledLenovoProductRegistrationprogramlaunchesautomaticallyafteryou
haveusedyourcomputerforatime.Followtheinstructionsonthescreentoregisteryourcomputer.
–ForWindows8:OpentheLenovoSupportprogram.ThenclickRegistrationandfollowtheinstructions
onthescreentoregisteryourcomputer.
Frequentlyaskedquestions
Thefollowingareafewtipsthatwillhelpyouoptimizetheuseofyourcomputer.
Toensurethatyoureceivethebestperformancefromyourcomputer,gotothefollowingWebpage
tondinformationsuchasaidsfortroubleshootingandanswerstofrequentlyaskedquestions:
http://www.lenovo.com/support/faq
CanIgetmyuserguideinanotherlanguage?
•Todownloadtheuserguideinanotherlanguage,goto:http://www.lenovo.com/support.Thenfollow
theinstructionsonthescreen.
Howtousethebatterypowermoreeffectively?
©CopyrightLenovo2013
17
Page 34

•Toconservepower,ortosuspendoperationwithoutexitingprogramsorsavingles,see“Power-saving
modes”onpage25.
•Toachievethebestbalancebetweenperformanceandpowersaving,changepowerplansettings.
•Ifyourcomputerwillbeturnedoffforanextendedperiodoftime,youcanpreventbatterypower
fromdrainingbyremovingthebattery.Lookformoreinformationaboutusingthebatteryin“Power
management”onpage23.
Concernedaboutsecurityorneedtosecurelydisposeofdatastoredonyourharddiskdriveor
solid-statedrive?
•StudyChapter4“Security”onpage41
tondouthowyoucanprotectyourcomputerfromtheftand
unauthorizeduse.
•UsethePasswordManagerprogramtoprotectthedatastoredonyourcomputer.Fordetails,seethe
helpinformationsystemoftheprogram.
•Beforeyoudisposeofthedataontheharddiskdriveorsolid-statedrive,besuretoread“Noticeon
deletingdatafromyourharddiskdriveorsolid-statedrive”onpage46.
Isgettingconnectedindifferentlocationsachallenge?
•Totroubleshootawirelessnetworkingissue,goto:
http://www.lenovo.com/support/faq
•TakeadvantageofthenetworkingfeaturesprovidedbytheAccessConnectionsprogram(onthe
Windows7operatingsystem)orLocationAwarenessintheLenovoSettingsprogram(ontheWindows8
operatingsystem).
•Tolearnmoreaboutusingthewirelessfeaturesofyourcomputer,referto“Wirelessconnections”on
page28
.
•Totravelmorecondently,besuretocheckthetipsin“Travelingwithyourcomputer”onpage39.
•PressFn+F5toenableordisablethewirelessfeatures.
Needtogivepresentationsorattachanexternalmonitoroften?
•Makesurethatyoufollowtheprocedurefor“Attachinganexternalmonitor”onpage31
.
•WiththeExtenddesktopfunction,youcandisplayoutputonboththecomputerdisplayandanexternal
monitor.
Needtoattachorreplaceadevice?
•SeeChapter6“Replacingdevices”onpage57
formoreinformationaboutreplacingthedevicesof
yourcomputer.
Ihavebeenusingyourcomputerforsometimealready,anditisgettingslower?
•Follow“Generaltipsforpreventingproblems”onpage93.
•Youcandiagnoseproblemsyourselfbyusingthepreinstalleddiagnosticsoftware.
•CheckforrecoverysolutionsinChapter5“Recoveryoverview”onpage49
.
Printthefollowingsectionsandkeepthemwithyourcomputerincaseyouareunabletoaccessthisonline
userguidewhennecessary.
•“Installinganewoperatingsystem”onpage75
•“Computerstopsresponding”onpage99
•“Powerproblems”onpage112
18UserGuide
Page 35
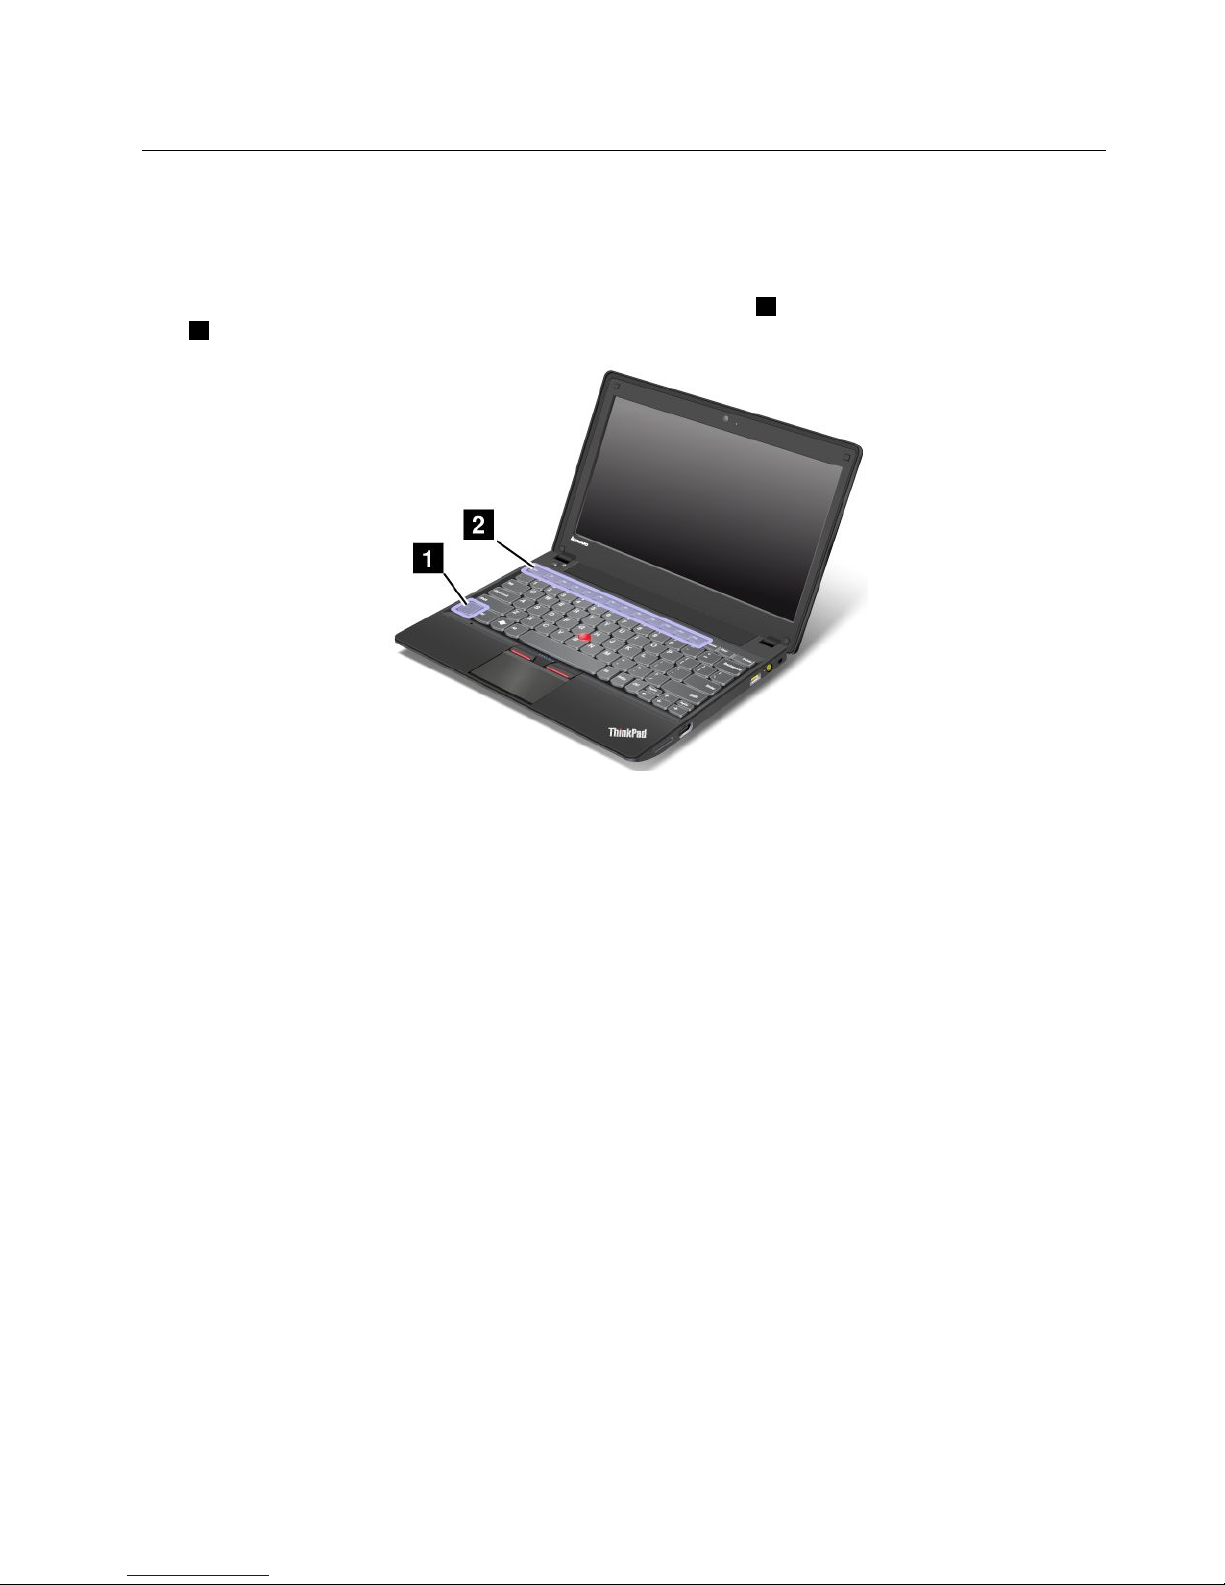
Specialkeysandbuttons
Yourcomputerhasseveralspecialfunctionkeysandbuttonstohelpyouworkmoreeasilyandeffectively.
Functionkeycombinations
TousetheFnfunctionkeycombinations,pressandholdtheFnkey1;thenpressoneofthefunction
keys2.Releasebothkeys.
Volumeandmutebuttons
Toquicklyadjustthevolumeofthesoundfromyourcomputer,mutethesoundentirely,orsetthe
microphonetomute,pressoneofthefollowingkeycombinations.
•Fn+Esc:Speakermute
•Fn+F1:Speakervolumedown
•Fn+F2:Speakervolumeup
•Fn+F3:Microphonemute
Note:Ifyoumutethesoundbeforeyouturnoffthecomputer,thesoundwillremainmutedwhenyou
turnonyourcomputeragain.Tounmutethesound,pressthespeakervolumeuporspeakervolume
downkeycombination.
Powerconservation
•Fn+F4
Putyourcomputerintosleepmode.Toreturntonormaloperation,presstheFnkeyonly.
Ifyouwanttousethecombinationtoputthecomputerintohibernationmode,youneedtochangeyour
powerplansettings.Toaccesspowerplansettings,dothefollowing:
•ForWindows7:StartthePowerManagerprogramandthenclickthePowerPlantab.Forinstructionson
howtostartthePowerManagerprogram,see“AccessingLenovoprogramsontheWindows7operating
system”onpage12
.
•ForWindows8:Right-clickthebatterystatusiconfromtheWindowsnoticationareaandclickPower
Options.ThenclickChangeplansettingsthatisnexttoyourpowerplan.
Chapter2.Usingyourcomputer19
Page 36

Wirelessfeatures
•Fn+F5
Enableordisablethebuilt-inwirelessnetworkingfeatures.
Launchingthecameraandaudiosettings
•Fn+F6
–ForWindows7:OpentheCommunicationssettingswindow,inwhichyoucanpreviewyourvideo
image,takeasnapshotofyourcurrentimage,andchangethecameraandaudiosettings.
–ForWindows8:StarttheLenovoSettingsprogram.Tousethecameraorchangethecamerasettings,
clickCamera.Toadjusttheaudiosettings,clickAudio.
Switchingthedisplayoutputlocation
•Fn+F7
PressFn+F7toswitchbetweenthecomputerdisplayandanexternalmonitor.Afteryoupressthiskey
combination,thefollowingoptionswillbedisplayed:
•Computerdisplayonly(LCD)
•Computerdisplayandexternalmonitor(duplicatedimage)
•Computerdisplayandexternalmonitor(theExtendeddesktopfunction)
•Externalmonitoronly
Note:TheWindows+PkeycombinationcanachievethesamefunctionalityasFn+F7.
Adjustingthebrightnesslevelofthecomputerdisplay
•Fn+F8:Thecomputerdisplaybecomesdimmer.
•Fn+F9:Thecomputerdisplaybecomesbrighter.
Note:Thisfunctionchangesthebrightnessleveltemporarily.Tochangethedefaultbrightnesslevel,change
thesettingsthroughthePowerManagerprogram.
Multimediacontrols
•Fn+F10:Previoustrack/scene
•Fn+F11:Playorpause
•Fn+F12:Nexttrack/scene
Legacyfunctionkeys
•Fn+B:HasthesamefunctionsastheBreakkeyontheconventionalkeyboard.
•Fn+K:HasthesamefunctionsastheScrLkkeyontheconventionalkeyboard.
•Fn+P:HasthesamefunctionsasthePausekeyontheconventionalkeyboard.
•Fn+S:HasthesamefunctionsastheSysRqkeyontheconventionalkeyboard.
20UserGuide
Page 37
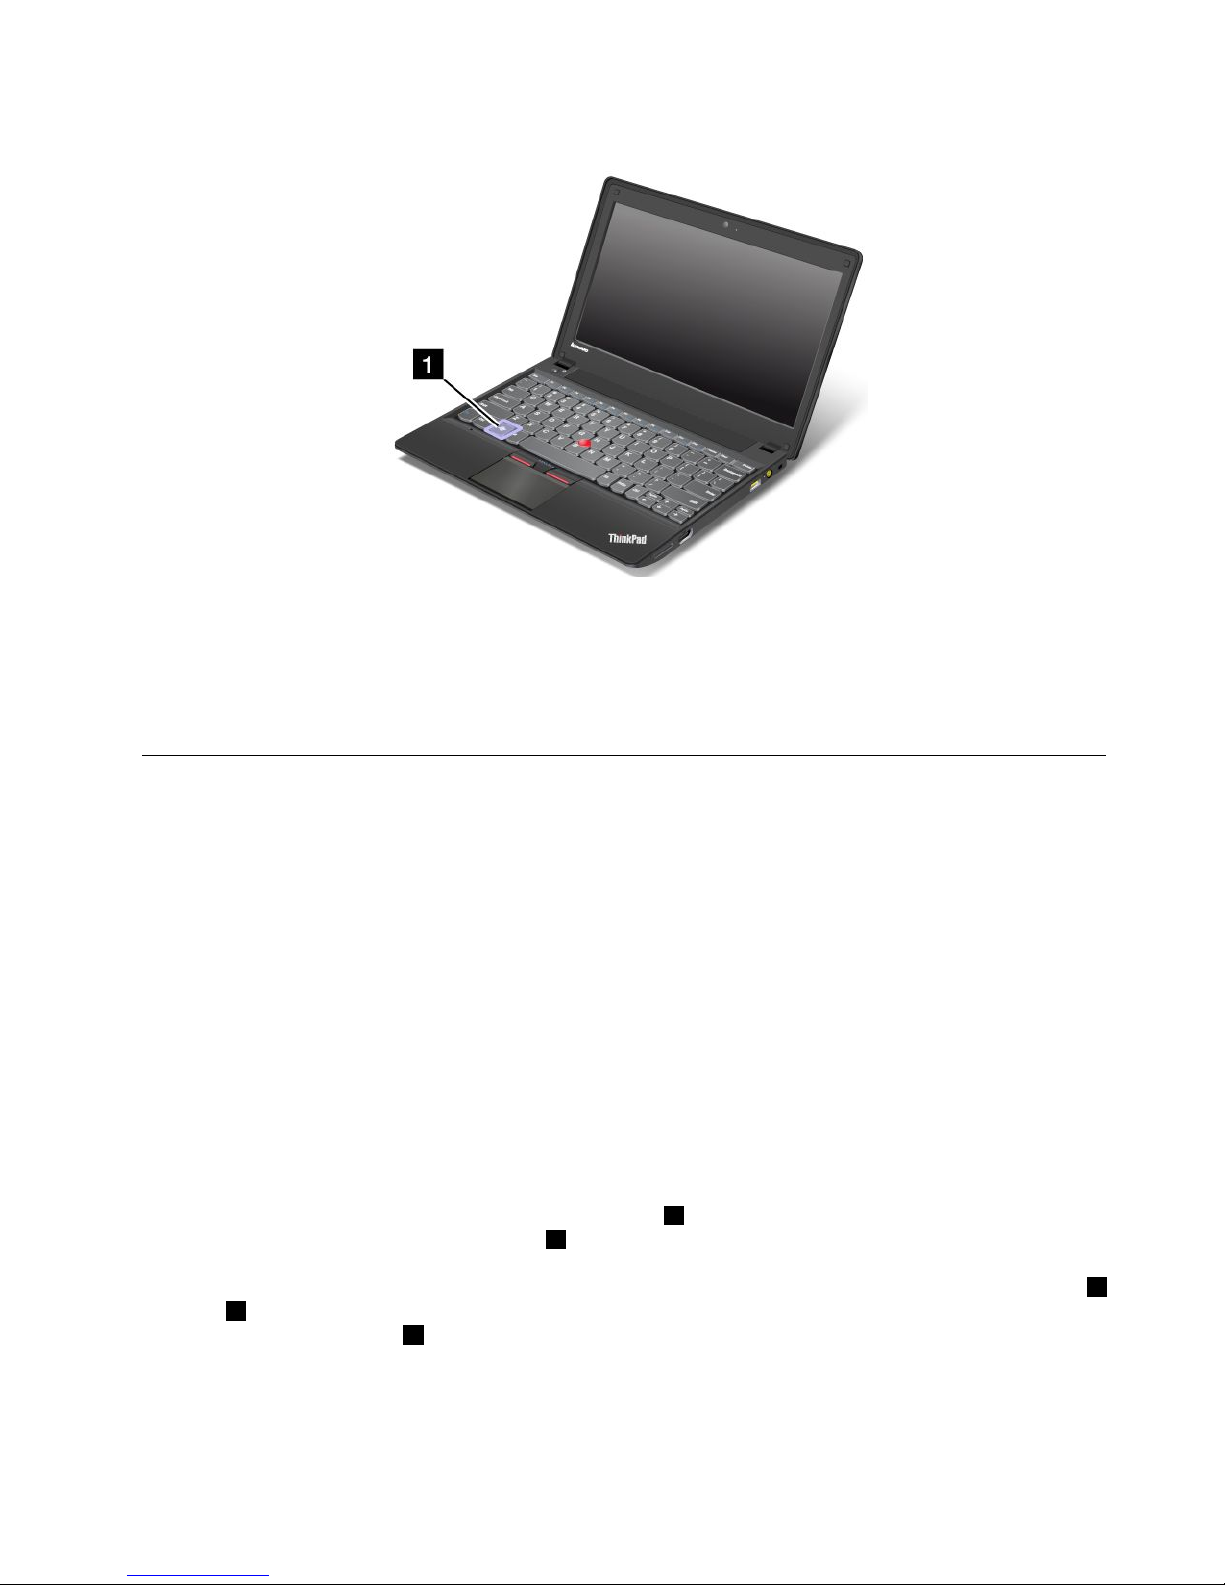
Windowskey
OntheWindows7operatingsystem,presstheWindowskeytoopentheStartmenu.OntheWindows8
operatingsystem,presstheWindowskeytoswitchbetweenthecurrentworkspaceandtheStartscreen.
YoualsocanusetheWindowskeytogetherwithanotherkeytoachieveotherfunctions.Formore
information,refertothehelpinformationsystemoftheWindowsoperatingsystem.
UsingtheThinkPadpointingdevice
YourcomputercomeswiththeThinkPadpointingdevice.TheThinkPadpointingdeviceconsistsofthe
TrackPointpointingdeviceandthetouchpad,eachofwhichisitselfapointingdevicewithbothbasicand
extendedfunctions.Y oucancongurebothdevicesbychoosingthesettingsyoupreferasfollows:
•SetboththeT rackPointpointingdeviceandthetouchpadaspointingdevices.
ThissettingenablestheuseofallthebasicandextendedfunctionsoftheTrackPointpointingdevice
andthetouchpad.
•SettheTrackPointpointingdeviceasthemainpointingdeviceandthetouchpadforextended
functionsonly.
ThissettingenablestheuseofallbasicandextendedfunctionswiththeTrackPointpointingdevicewhile
limitingtheuseofthetouchpadtoscrolling,tapzones,andslow-motionpointerfunctions.
•SettheTrackPointpointingdeviceasthemainpointingdevice,anddisablethetouchpad.
•Setthetouchpadasthemainpointingdevice,anddisabletheTrackPointpointingdevice.
UsingtheT rackPointpointingdevice
TheT rackPointpointingdeviceconsistsofapointingstick1onthekeyboardandthreeclickbuttonsatthe
bottomofthekeyboard.T omovethepointer
5onthescreen,youapplypressuretothenonslipcaponthe
pointingstickinanydirectionparalleltothekeyboard;thepointingstickitselfdoesnotmove.Thespeedat
whichthepointermovesdependsonthepressureyouapplytothepointingstick.Thefunctionsoftheleft4
andright2clickbuttonscorrespondtothoseoftheleftandrightmousebuttonsonaconventionalmouse.
TheT rackPointcenterbutton3,calledthescrollbar,enablesyoutoscrollWebpagesordocumentsinany
directionwithnoneedtousethegraphicscrollbarsonthesideofthewindow.
Chapter2.Usingyourcomputer21
Page 38
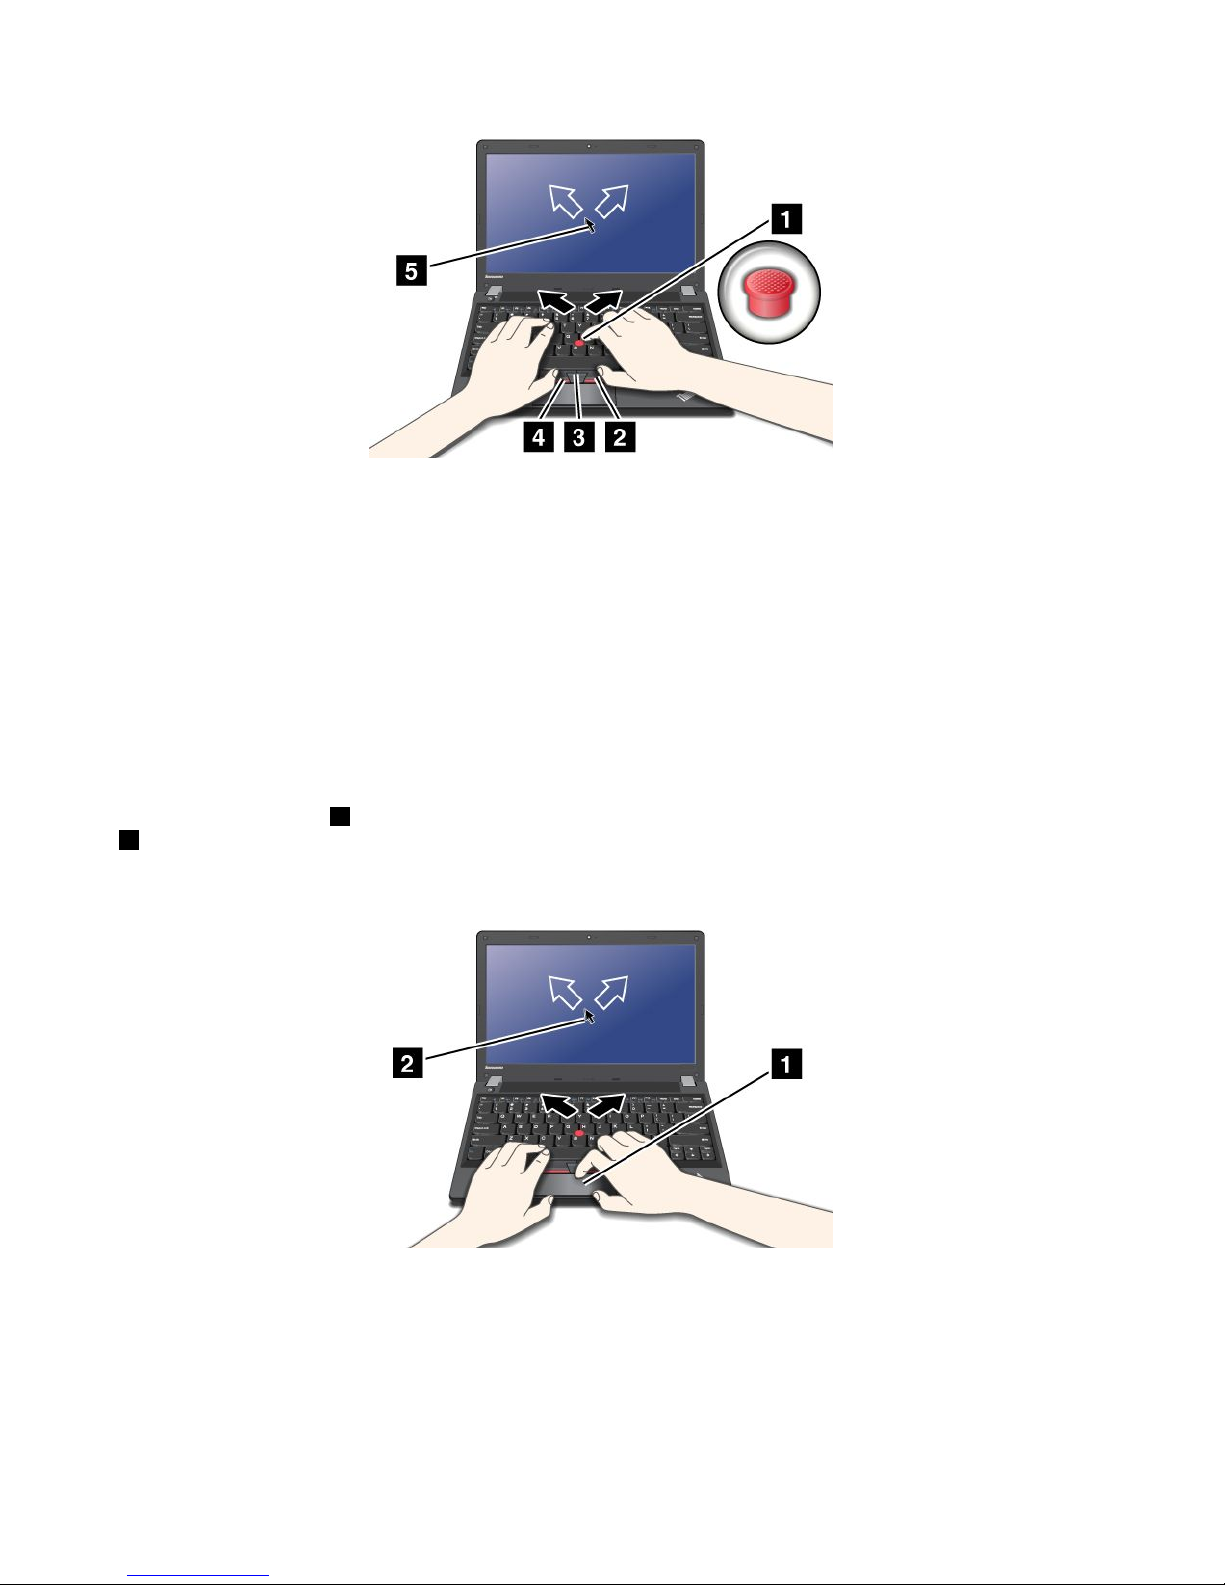
IfyouarenotfamiliarwiththeTrackPointpointingdevice,theseinstructionswillhelpyougetstarted:
1.Placeyourhandsinthetypingposition,andpressgentlywithanindexngeroramiddlengeronthe
pointingstickinthedirectioninwhichyouwantthepointertomove.
Tomovethepointer,pressthepointingstickawayfromyoutomoveitup,towardyoutomoveit
down,toonesideortheothertomoveitsideways.
Note:Thepointermightdrift.Thisisnotadefect.StopusingtheT rackPointpointingdeviceforafew
seconds;thepointerwillstopmoving.
2.T oselectanddragasrequiredbyyoursoftware,presstheleftorrightclickbuttonwitheitherthumb
andmovetheTrackPointpointingstick.
Usingthetouchpad
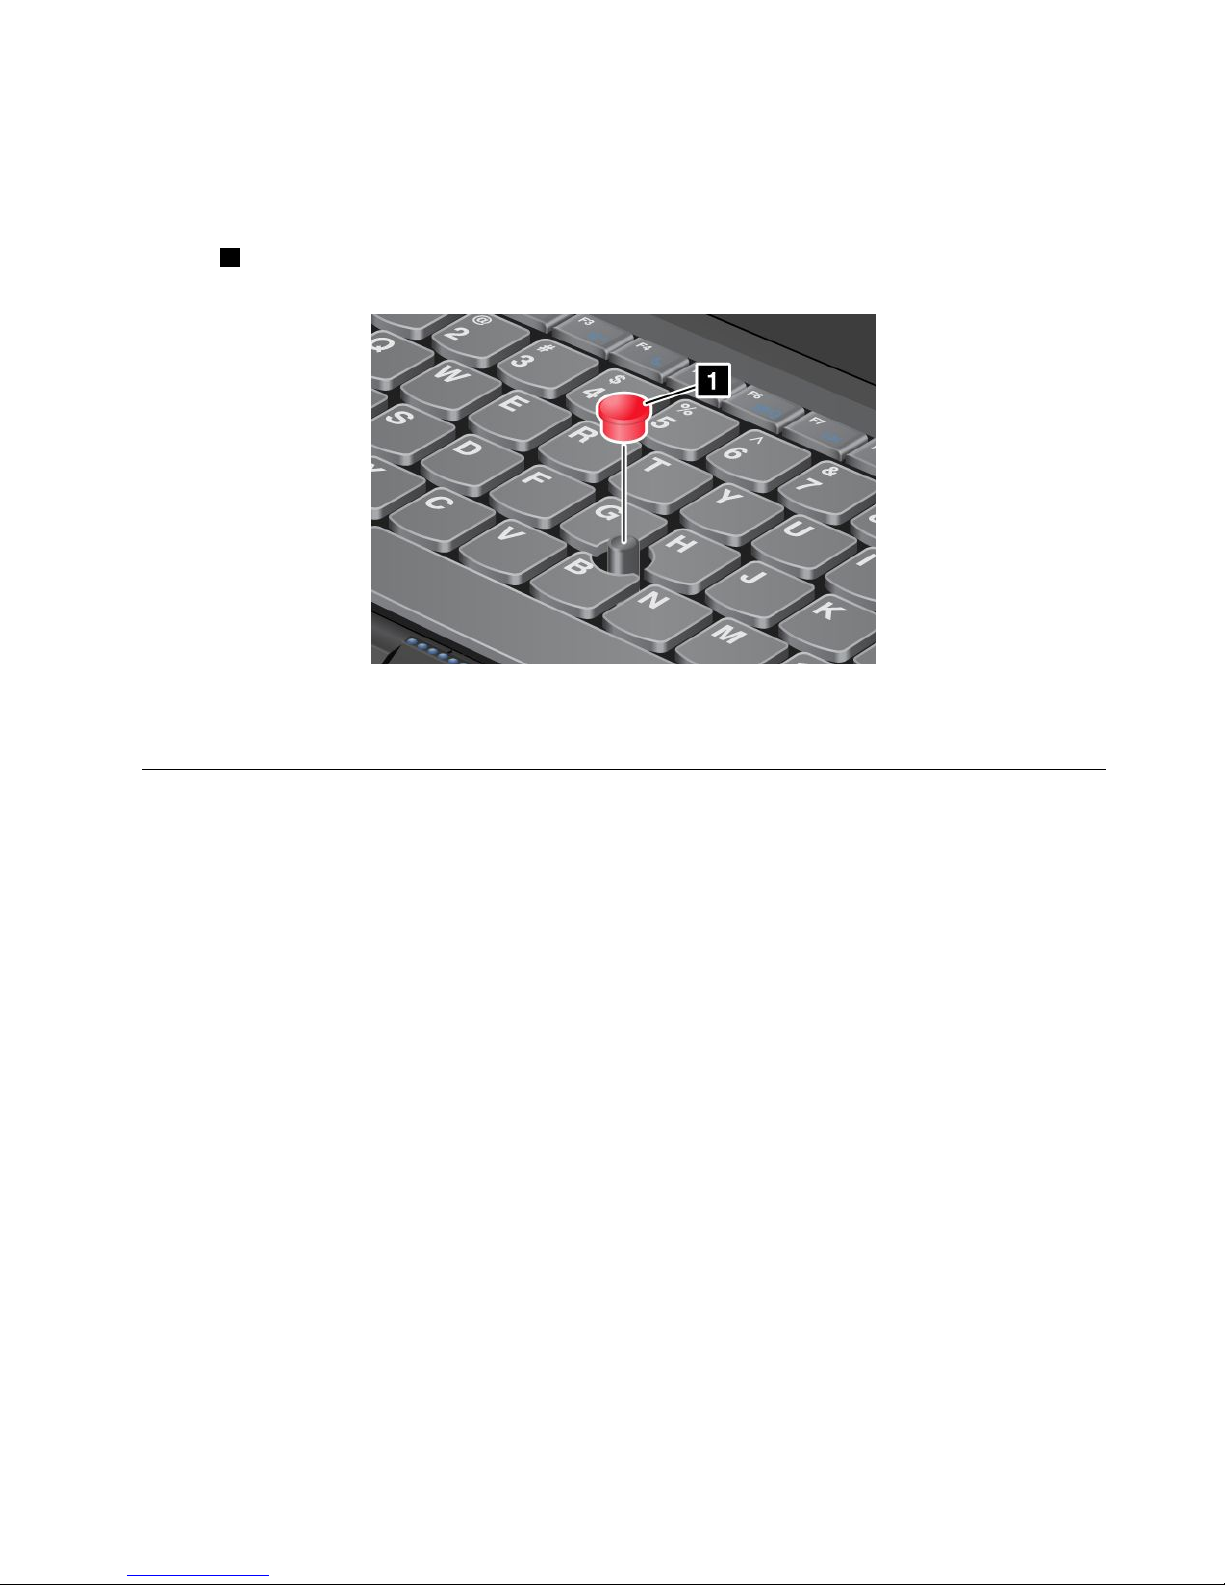
Thetouchpadisapad1belowtheTrackPointbuttonsatthebottomofthekeyboard.Tomovethepointer
2onthescreen,slideyourngertipoverthepadinthedirectioninwhichyouwantthepointertomove.
Theleftandrightbottomofthepadworkasclickbuttons.Thefunctionscorrespondtothoseoftheleft
andrightmousebuttonsonaconventionalmouse.
CustomizingtheThinkPadpointingdevice
YoucancustomizetheThinkPadpointingdevicetoachievetheextendedfunctionsoftheThinkPad
pointingdevice.
TocustomizetheThinkPadpointingdevice,dothefollowing:
1.GotoControlPanel.
22UserGuide
Page 39
2.ClickHardwareandSound➙Mouse➙ThinkPad.
3.Followtheinstructionsonthescreen.
Replacingthecap
Thecap1ontheendoftheTrackPointpointingstickisremovable.Youcanreplaceitasshownin
thedrawing.
Note:Ifyoureplacethekeyboard,anewkeyboardisshippedwiththedefaultcap.Ifyouwish,youcan
keepthecapfromyouroldkeyboardanduseitonthenewone.
Powermanagement
Whenyouneedtouseyourcomputerawayfromelectricaloutlets,youdependonbatterypowertokeep
yourcomputerrunning.Differentcomputercomponentsconsumepoweratdifferentrates.Themoreyou
usethepower-intensivecomponents,thefasteryouconsumebatterypower.
SpendmoretimeunpluggedwithThinkPadbatteries.Mobilityhasrevolutionizedbusinessbyallowing
youtotakeyourworkwhereveryougo.WithThinkPadbatteries,youwillbeabletoworklongerwithout
beingtiedtoanelectricaloutlet.
Checkingthebatterystatus
ThebatterystatusiconintheWindowsnoticationareadisplaysthepercentageofbatterypowerremaining.
Therateatwhichyouusebatterypowerwilldeterminehowlongyoucanusethebatteryofyourcomputer
betweencharges.Becauseeachcomputeruserhasdifferenthabitsandneeds,itisdifculttopredicthow
longabatterychargewilllast.Therearetwomainfactors:
•Howmuchenergyisstoredinthebatterywhenyoubegintowork.
•Thewayyouuseyourcomputer.Forexample:
–Howoftenyouaccesstheharddiskdrive.
–Howbrightyoumakethecomputerdisplay.
–Howoftenyouusethewirelessfeatures.
Tocheckfordetailedbatterystatusinformation,dothefollowing:
•ForWindows7:OpenthePowerManagerprogramandclicktheBatterytab.
Chapter2.Usingyourcomputer23
Page 40

•ForWindows8:OpentheLenovoSupportprogramandclickBatteryHealth,oropentheLenovo
SettingsprogramandclickPower.
Usingtheacpoweradapter
Thepowertorunyourcomputercancomeeitherfromthelithium-ion(Li-ion)batterypackprovidedwithit,
orfromacpowerthroughtheacpoweradapter.Whileyouuseacpower,thebatterychargesautomatically.
Theacpoweradapterthatcomeswithyourcomputerhastwobasiccomponents:
•Thetransformerpackthatconvertsacpowerforusewiththecomputer.
•Thepowercordthatplugsintotheacoutletandintothetransformerpack.
Attention:Usinganimproperpowercordcouldcauseseveredamagetoyourcomputer.
Connectingtheacpoweradapter
Tousetheacpoweradapter,dothefollowing.Besuretotakethesestepsintheorderinwhichtheyare
givenhere.
1.Connectthepowercordtoanelectricaloutlet.
2.Connectthepowercordtothetransformerpack.
3.Connecttheacpoweradaptertothepowerconnectorofthecomputer.
Tipsonusingtheacpoweradapter
Youcancheckthestatusofyourbatteryatanytimebylookingatthebatterymeteratthebottomofyour
display.
•Whentheacpoweradapterisnotinuse,disconnectitfromtheelectricaloutlet.
•Donotbindthepowercordtightlyaroundtheacpoweradaptertransformerpackwhenitisconnectedto
thetransformer.
•Beforeyouchargethebattery,makesurethatitstemperatureisatleast10°C(50°F).
•Youcanchargethebatterywhentheacpoweradapterisconnectedtothecomputerandthebatteryis
installed.Youneedtochargeitinanyofthefollowingconditions:
–Whenyoupurchaseanewbattery
–Ifthebatterymeteratthebottomofyourdisplayshowsthebatterychargeislow
–Ifthebatteryhasnotbeenusedforalongtime
Chargingthebattery
Whenyoucheckbatterystatusandndthatthepercentageofpowerremainingisloworwhenthepower
alarmalertsyouthattheremainingpowerislow,youneedtochargeyourbatteryorreplaceitwitha
chargedbattery.
Ifanacoutletisconvenient,plugtheacpoweradapterintoit,andtheninsertthejackintothecomputer.
Thebatterywillbefullychargedinaboutthreetosixhours.Thisisaffectedbythebatterysizeandthe
physicalenvironment.Thebatterystatusindicatorwillletyouknowthatthebatteryischarging,andwill
alsonotifyyouwhenthebatteryisfullycharged.
Note:Toincreasethelifeofthebattery,thecomputerdoesnotstartrechargingthebatteryiftheremaining
powerisgreaterthan95%.
Maximizingthebatterylife
Tomaximizethelifeofthebattery,dothefollowing:
24UserGuide
Page 41

•Usethebatteryuntilthechargeiscompletelydepleted;thatis,usethebatteryuntilthebatterystatus
indicatorstartsblinkingorange.
•Rechargethebatterycompletelybeforeusingit.Thebatteryisfullychargedifthebatteryindicatorshows
greenwhentheacpoweradapterispluggedin.
•Alwaysusepowermanagementfeaturessuchaspowermodes,screenblank,sleep,andhibernation.
Managingthebatterypower
Toachievethebestbalancebetweenperformanceandpowersaving,adjustyourpowerplansettings.
Toaccesspowerplansettings,dothefollowing:
•ForWindows7:StartthePowerManagerprogramandthenclickthePowerPlantab.Forinstructionson
howtostartthePowerManagerprogram,see“AccessingLenovoprogramsontheWindows7operating
system”onpage12.
•ForWindows8:Right-clickthebatterystatusiconfromtheWindowsnoticationareaandclickPower
Options.ThenclickChangeplansettingsthatisnexttoyourpowerplan.
Formoreinformation,refertothehelpinformationsystemoftheprogram.
Power-savingmodes
Thereareseveralpower-savingmodesthatyoucanuseatanytimetoconservepower.Thissection
introduceseachmodeandgivestipsontheeffectiveuseofthebatterypower.
Introducingthepower-savingmodes
•Screenblank(fortheWindows7operatingsystemonly)
Thecomputerdisplayrequiresconsiderablebatterypower.Toturnoffpowertothedisplay,dothe
following:
1.Right-clickthePowerManagerbatterygaugeonthetaskbar.
2.SelectPoweroffdisplay.
•Sleep
Insleepmode,yourworkissavedtomemory,andthenthesolid-statedriveortheharddiskdriveandthe
computerdisplayareturnedoff.Whenyourcomputerwakesup,yourworkisrestoredwithinseconds.To
putyourcomputerintosleepmode,pressFn+F4.T oreturnfromsleepmode,pressFnkey.
•Hibernation
Byusingthismode,youcanturnoffyourcomputercompletelywithoutsavinglesorexitingfromany
programsthatarerunning.Whenthecomputerentershibernation,allopenprograms,folders,andles
aresavedtotheharddisk,andthenthecomputerturnsoff.
Toputthecomputerintohibernationmode,changeyourpowerplansettings.Toaccesspowerplan
settings,dothefollowing:
–ForWindows7:StartthePowerManagerprogramandthenclickthePowerPlantab.Forinstructions
onhowtostartthePowerManagerprogram,see“AccessingLenovoprogramsontheWindows7
operatingsystem”onpage12
.
–ForWindows8:Right-clickthebatterystatusiconfromtheWindowsnoticationareaandclickPower
Options.ThenclickChangeplansettingsthatisnexttoyourpowerplan.
•Wirelessoff
Whenyouarenotusingthewirelessfeatures,suchasBluetoothorwirelessLAN,turnthemoff.Thiswill
helpconservepower.Toturnoffthewirelessfeatures,pressFn+F5orusethewirelessradioswitch.
Chapter2.Usingyourcomputer25
Page 42

Enablingthewakeupfunction
Ifyouputyourcomputerintohibernationmode,andthewakeupfunctionisdisabled(thisisthedefault
setting),thecomputerdoesnotconsumeanypower.Ifthewakeupfunctionisenabled,itconsumesa
smallamountofpower.
Toenablethefunction,dothefollowing:
1.GotoControlPanelandclickSystemandSecurity➙AdministrativeT ools.
2.Double-clickTaskScheduler.Ifyouarepromptedforanadministratorpasswordorconrmation,type
thepasswordorprovideconrmation.
3.Fromtheleftpane,selectthetaskfolderforwhichyouwanttoenablethewakeupfunction.The
scheduledtasksaredisplayed.
4.Clickascheduledtask,andthenclicktheConditionstab.
5.UnderPower,selectthecheckboxforWakethecomputertorunthistask.
EnablingthebatteryalarmontheWindows7operatingsystem
FortheWindows7operatingsystem,youcanprogramyourcomputersothatwhenthebatterypowerfalls
belowacertainlevel,threeeventsoccur:
•Thealarmgoesoff.
•Awarningmessageisdisplayed.
•TheLCDisturnedoff.
Toenablethebatteryalarm,dothefollowing:
1.StartthePowerManagerprogram.
2.ClicktheGlobalPowerSettingstab.
3.ForLowbatteryalarmorCriticallylowbatteryalarm,setthepercentageofthepowerlevelandset
theaction.
Note:Ifyourcomputerenterssleeporhibernationmodewhenthebatteryislow,butthealarmmessage
hasnotyetbeendisplayed,themessagewillbedisplayedwhenthecomputerresumes.Toresumenormal
operation,clickOK.
Handlingthebattery
ThissystemsupportsonlybatteriesspeciallydesignedforthisspecicsystemandmanufacturedbyLenovo
oranauthorizedbuilder.Thesystemdoesnotsupportunauthorizedbatteriesorbatteriesdesignedforother
systems.Ifanunauthorizedbatteryorabatterydesignedforanothersystemisinstalled,thesystemwill
notcharge.
Attention:Lenovohasnoresponsibilityfortheperformanceorsafetyofunauthorizedbatteries,and
providesnowarrantiesforfailuresordamagearisingoutoftheiruse.
Note:Ifanunauthorizedbatteryisinstalled,thefollowingmessagewillbedisplayed:“Thebatteryinstalled
isnotsupportedbythissystemandwillnotcharge.PleasereplacethebatterywiththecorrectLenovo
batteryforthissystem.”
26UserGuide
Page 43

DANGER
Donotattempttodisassembleormodifythebatterypack.
Attemptingtodosocancauseanexplosion,orliquidleakagefromthebatterypack.
AbatterypackotherthantheonespeciedbyLenovo,oradisassembledormodiedbattery
packisnotcoveredbythewarranty.
DANGER
Iftherechargeablebatterypackisincorrectlyreplaced,thereisdangerofanexplosion.Thebattery
packcontainsasmallamountofharmfulsubstances.T oavoidpossibleinjury:
•ReplaceonlywithabatteryofthetyperecommendedbyLenovo.
•Keepthebatterypackawayfromre.
•Donotexposeittoexcessiveheat.
•Donotexposeittowaterorrain.
•Donotshort-circuitit.
•Storeitinacooldryplace.
•Keepitawayfromchildren.
Thebatterypackisaconsumablesupply.Ifyourbatterybeginstodischargetooquickly,replacethe
batterypackwithanewoneofthetyperecommendedbyLenovo.Formoreinformationonreplacingthe
batterypack,contactyourCustomerSupportCenter.
DANGER
Donotdrop,crush,puncture,orsubjecttostrongforces.Batteryabuseormishandlingcancause
thebatterytooverheat,whichcancausegassesorameto“vent”fromthebatterypackorcoin
cell.Ifyourbatteryisdamaged,orifyounoticeanydischargefromyourbatteryorthebuildup
offoreignmaterialsonthebatteryleads,stopusingthebatteryandobtainareplacementfrom
thebatterymanufacturer.
DANGER
Onlyrechargethebatterypackstrictlyaccordingtoinstructionsincludedintheproduct
documentation.
DANGER
Donotputthebatterypackintrashthatisdisposedofinlandlls.Whendisposingofthebattery,
complywithlocalordinancesorregulationsandyourcompany'ssafetystandards.
Chapter2.Usingyourcomputer27
Page 44

DANGER
Thereisadangerofanexplosionifthebackupbatteryisincorrectlyplaced.Thelithiumbattery
containslithiumandcanexplodeifitisnotproperlyhandled,ordisposedof.Replaceonlywitha
batteryofthesametype.Toavoidpossibleinjuryordeath,donot:(1)throworimmerseintowater,
(2)allowittoheattomorethan100°C(212°F),or(3)attempttorepairordisassembleit.Disposeof
itasrequiredbylocalordinancesorregulationsandyourcompany'ssafetystandards.
Connectingtothenetwork
YourcomputerhasoneormorenetworkadaptersforconnectingtotheInternetortoyourcompany'swired
LANorwirelessLANnetwork.
Ethernetconnections
YoucanconnecttoyourlocalnetworkorabroadbandconnectionbyuseoftheEthernetfeaturebuiltinto
yourcomputer.IfyouareusingtheWindows7operatingsystem,theAccessConnectionsprogramalso
enablesyoutomanageyourlocationproles.Formoreinformation,see“AccessingLenovoprograms
ontheWindows7operatingsystem”onpage12
.
DANGER
YourcomputerhasanEthernetconnector.Toavoidtheriskofelectricalshock,donotconnect
thetelephonecabletotheEthernetconnector.
Wirelessconnections
Wirelesscommunicationisthetransferofdatawithouttheuseofcablesbutbymeansofradiowavesonly.
Dependingonthewirelessdeviceusedinyourcomputer,youmightbeabletoconnecttothefollowing
categoriesofwirelessnetworks.
WirelessLAN
Awirelesslocalareanetwork(LAN)coversarelativelysmallgeographicarea,suchasanofcebuildingora
house.Devicesbasedonthe802.11standardscanconnecttothisnetwork.
Yourcomputercomeswithabuilt-inwirelessnetworkcardandacongurationutilitytohelpyoumake
wirelessconnectionsandmonitorthestatusofyourconnection,sothatyoucanstayconnectedtoyour
networkwhileyouareintheofce,inameetingroom,orathome,withnoneedforawiredconnection.
TipsforusingthewirelessLANfeature
Toachievethebestconnection,usethefollowingguidelines:
•PlaceyourcomputersothatthereareasfewobstaclesaspossiblebetweenthewirelessLANaccess
pointandthecomputer.
•Openyourcomputerdisplaytoanangleofslightlymorethan90degrees.
•Ifyouusethewirelessfeature(the802.11standard)ofyourcomputersimultaneouslywithaBluetooth
option,thedatatransmissionspeedcanbedelayedandtheperformanceofthewirelessfeaturecanbe
degraded.
28UserGuide
Page 45

Bluetooth
Bluetoothisoneofanumberoftechnologiesusedtocreateawirelesspersonalareanetwork.Bluetooth
canconnectdevicesashortdistancefromoneanother,andiscommonlyusedforconnectingperipheral
devicestoacomputer,transferringdatabetweenhand-helddevicesandapersonalcomputer,orremotely
controllingandcommunicatingwithdevicessuchasmobilephones.
Establishingawirelessconnection
Toestablishawirelessconnection,dothefollowing:
1.PressFn+F5toturnonthewirelessfeature.
2.ClickthewirelessnetworkconnectionstatusiconintheWindowsnoticationarea.Alistofavailable
wirelessnetworksisdisplayed.
3.Double-clickanetworktoconnecttoit.Providerequiredinformationifneeded.
Ifyouneedtoconnecttodifferentwirelessnetworksindifferentlocations,usethefollowingsoftwareto
managemultiplenetworkprolessothatthecomputerconnectstoanavailablenetworkautomaticallywhen
thelocationchanges:
•ForWindows7:UsetheAccessConnectionsprogram.ForinstructionsonhowtostarttheAccess
Connectionsprogram,see“AccessingLenovoprogramsontheWindows7operatingsystem”onpage12
.
•ForWindows8:OpentheLenovoSettingsprogramandclickLocationAwareness.
Attention:
•Ifyouwanttousethewirelessfeaturesonanairplane,checkthewirelessserviceswiththeairlinebefore
boardingtheairplane.
•Iftherearerestrictionsontheuseofcomputerwirelessfeaturesonanairplane,youneedtodisableyour
computerwirelessfeaturesbeforeboarding.Todisablethewirelessfeatures,see“Enablingordisabling
thewirelessfeatures”onpage31
.
UsingBluetooth
SomemodelsareequippedwithaBluetoothcardthatiscompliantwithBluetoothSpecication4.0.
ToenabletheBluetoothfeatureontheWindows7operatingsystem,pressFn+F5toopenthewireless
radioswitchboard.ThenturnontheBluetoothradio.FortheWindows8operatingsystem,theBluetooth
featureisonbydefault.
SendingdatatoaBluetooth-enableddevice
TosenddatatoaBluetooth-enableddevice,dothefollowing:
1.EnabletheBluetoothfeature.
2.Right-clickthedatathatyouwanttosend.
3.SelectSendTo➙BluetoothDevices.
4.SelectaBluetoothdeviceandthenfollowtheinstructionsonthescreen.
Note:Ifyouusethewirelessfeature(the802.11standard)ofyourcomputersimultaneouslywithaBluetooth
option,thedatatransmissionspeedcanbedelayedandtheperformanceofthewirelessfeaturecanbe
degraded.
FormoreinformationaboutusingtheBluetoothfeature,refertotheWindowshelpinformationsystemand
theBluetoothhelpinformationsystem.
Chapter2.Usingyourcomputer29
Page 46

Checkingthewirelessnetworkconnectionstatus
Youcancheckyourcomputerwirelessnetworkconnectionstatusandwirelesssignalstrengththroughthe
wirelessnetworkconnectionstatusiconintheWindowsnoticationarea.Themorebarsencompassed,the
betterthesignal.
FortheWindows7operatingsystem,youalsocanchecktheAccessConnectionsgauge,theAccess
Connectionsstatusicon,ortheAccessConnectionswirelessnetworkconnectionstatusiconinthe
Windowsnoticationarea.
AccessConnectionsgauge
OntheWindows7operatingsystem,theAccessConnectionsgaugeintheWindowsnoticationarea
displaysthestatusandsignalstrengthofyourwirelessconnection.
Youcanndmoredetailedinformationaboutthestatusandsignalstrengthofyourwirelessconnection
byopeningtheAccessConnectionsprogramorbyright-clickingtheAccessConnectionsgaugeinthe
WindowsnoticationareaandselectingViewStatusofWirelessConnection.
•AccessConnectionsgaugestates:wirelessLAN
–Powertothewirelessradioisoffornosignal.
–Powertothewirelessradioison.Thesignalstrengthofthewirelessconnectionispoor.To
improvethesignalstrength,moveyourcomputerclosertothewirelessaccesspoint.
–Powertothewirelessradioison.Thesignalstrengthofthewirelessconnection
ismarginal.
–
Powertothewirelessradioison.Thesignalstrengthofthewirelessconnectionis
excellent.
AccessConnectionsstatusicon
TheAccessConnectionsstatusicondisplaysgeneralconnectionstatus.
•AccessConnectionsstatusiconstates
–Nolocationproleisactiveornoneexists.
–Currentlocationproleisdisconnected.
–
Currentlocationproleisconnected.
AccessConnectionswirelessstatusicon
TheAccessConnectionswirelessstatusicondisplaysthestatusandsignalstrengthofyourwireless
connection.
Youcanndmoredetailedinformationaboutthestatusandsignalstrengthofyourwirelessconnection
eitherbyopeningtheAccessConnectionsprogramorbydouble-clickingtheAccessConnectionswireless
statusiconintheWindowsnoticationarea.
•Wirelessstatusiconstates:wirelessLAN
–
Powertothewirelessradioisoff.
–Powertothewirelessradioison.Noassociation.
–Powertothewirelessradioison.Nosignal.
–Powertothewirelessradioison.Thesignalstrengthofthewirelessconnectionisexcellent.
–
Powertothewirelessradioison.Thesignalstrengthofthewirelessconnectionismarginal.
30UserGuide
Page 47

–Powertothewirelessradioison.Thesignalstrengthofthewirelessconnectionispoor.Toimprove
thesignalstrength,moveyourcomputerclosertothewirelessaccesspoint.
Note:Ifyouhavetroubleinmakingaconnection,trymovingyourcomputerclosertoyourwirelessaccess
point.
Enablingordisablingthewirelessfeatures
Toenableordisablethewirelessfeatures,dooneofthefollowing:
•ForWindows7:PressFn+F5toopenthewirelessradioswitchboard.Turnonorturnoffthewireless
featureasdesired.
•ForWindows8:PressFn+F5toenableordisabletheAirplanemode.WhentheAirplanemodeisenabled,
allofyourwirelessdevicesareturnedoff.
Youalsocanusethewirelessradioswitchtoturnonorturnoffthewirelessradiosofallthewirelessdevices
onyourcomputer.
Presentationsandmultimedia
Youcanconnectyourcomputertoaprojectortogivepresentationsoryoucanconnectyourcomputer
toanexternalmonitortoexpandyourworkspace.
Changingdisplaysettings
Youcanchangethedisplaysettings,suchasthedisplayresolution,fontsize,andsoon.
Tochangethedisplaysettings,dothefollowing:
1.OpenControlPanelandclickAppearanceandPersonalization.
2.ClickDisplayforfurtherconguration.
Connectingaprojectororanexternalmonitor
Thistopicprovidesinformationaboutconnectingaprojectororanexternalmonitor.
Attachinganexternalmonitor
Note:Ifyouattachanexternalmonitor,avideointerfacecablewithaferritecoreinstalledonthecable
isrequired.
Yourcomputercansupportamaximumvideoresolutionofupto2048x1536(withanexternalmonitor
attachedtotheVGAconnector)orupto2560x1600(withanexternalmonitorattachedtotheHDMI
connector),providedthattheexternalmonitoralsosupportsthatresolution.Formoredetails,referto
themanualsprovidedwithyourmonitor.
Youcansetanyresolutionforeitherthecomputerdisplayortheexternalmonitor.Whenyouusebothatthe
sametime,theresolutionofbothisthesame.Ifyousetahigherresolutionforthecomputerdisplay,you
canseeonlypartofthescreenatatime.YoucanseeotherpartsbymovingtheimagewiththeTrackPoint
pointingdeviceoranotherpointingdevice.
Youcanswitchthedisplayoutputbetweenthecomputerdisplayandtheexternalmonitor,orevenoutput
thedisplaytobothofthecomputerdisplayandtheexternalmonitorbychangingthecongurationin
theDisplaySettingswindow.
Connectinganexternalmonitor
Toattachanexternalmonitor,dothefollowing:
Chapter2.Usingyourcomputer31
Page 48

1.Connecttheexternalmonitortothemonitorconnector;thenconnectthemonitortoanelectricaloutlet.
2.T urnontheexternalmonitor.
3.ChangethedisplayoutputlocationbypressingFn+F7.Thisenablesyoutoswitchbetweenviewing
outputontheexternalmonitor,thecomputermonitor,andbothmonitors.
Note:Ifyourcomputercannotdetecttheexternalmonitor,right-clickonthedesktop,thenselectScreen
resolution.ClicktheDetectbutton.
Settingthemonitortype
Tosetyourmonitortype,dothefollowing:
1.Connecttheexternalmonitortothemonitorconnector,andthenconnectthemonitortoanelectrical
outlet.
2.T urnontheexternalmonitor.
3.Right-clickonthedesktop,andclickScreenresolution.
Note:Ifyourcomputercannotdetecttheexternalmonitor,clicktheDetectbutton.
4.Clicktheiconforthedesiredmonitor(theMonitor-2iconisfortheexternalmonitor).
5.SetResolution.
6.ClickAdvancedSettings.
7.ClicktheMonitortab.Checkthemonitorinformationwindowtomakesurethatthemonitortypeis
correct.Ifitis,clickOKtoclosethewindow;otherwiseproceedwiththefollowingsteps.
8.Ifmorethantwomonitortypesaredisplayed,selectGenericPnPMonitororGenericNon-PnP
Monitor.
9.ClickProperties.Ifyouarepromptedforanadministratorpasswordorconrmation,typethepassword
orprovideconrmation.
10.ClicktheDrivertab.
11.ClickUpdateDriver.
12.ClickBrowsemycomputerfordriversoftware,andthenclickLetmepickfromalistofdevice
driversonmycomputer.
13.CleartheShowcompatiblehardwarecheckbox.
14.SelectManufacturerandModelforyourmonitor.Ifyoucannotndyourmonitoronthelist,stopthe
installationofthisdriverandusethedrivershippedwithyourmonitor.
15.Afterupdatingthedriver,clickClose.
16.FortheWindows7operatingsystem,tochangethecolorsettings,right-clickonthedesktop,andclick
Screenresolution.ClickAdvancedSettings,selecttheMonitortab,thensetColors.
17.ClickOK.
Considerationsforattachinganexternalmonitor
•Wheninstallinganoperatingsystem,youmustinstallthedisplaydriverforyourmonitorthatissupplied
withthecomputer,andthemonitorINFlethatissuppliedwiththeexternalmonitor.
•Ifyousetaresolutionhigherthantheresolutionyouareusingonthecomputermonitor,andusean
externalmonitorthatdoesnotsupportthatresolution,takeadvantageofthevirtualscreenfunction,
whichenablesyoutodisplayonlyapartofthehigh-resolutionscreenimageyourcomputerproduces.
YoucanseeotherpartsoftheimagebymovingthescreenwiththeTrackPointpointingdeviceoranother
pointingdevice.
•Iftheexternalmonitoryouareusingisoutdated,theresolutionandtherefreshratemightbelimited.
32UserGuide
Page 49

Usingdualdisplays
ThissectionintroducestheExtenddesktopfunctionthatenablesyoutodisplayoutput(thesameordifferent)
onboththecomputerdisplayandanexternalmonitor.
UsingtheExtenddesktopfunction
YourcomputersupportsafunctionnamedtheExtenddesktop.WiththeExtenddesktopfunction,you
candisplayoutputonboththecomputerdisplayandanexternalmonitor.Y oualsocandisplaydifferent
desktopimagesoneachmonitor.
YoucanusetheExtenddesktopfunctionwithoutchanginganysettings.Ifthefunctiondoesnotwork,refer
to“EnablingtheExtenddesktopfunction”onpage33
toenableit.
ConsiderationsforusingtheExtenddesktopfunction
•IfyouwanttoshowDOSfull-screenwhileintheExtenddesktopmode,onlytheprimarydisplayshows
DOS;theotherdisplayisblackedout.
•Youcandesignatetheotherdisplayastheprimarydisplaybydoingthefollowing:
1.Right-clickonthedesktop,thenselectScreenresolution.
2.SelectExtendthesedisplaysinMultipleDisplays.
3.Changethesettingtodesignatetheprimarydisplay.
•WhenaprogramusingDirectDraworDirect3Displayedinfull-screenmode,itisshownonlyonthe
primarydisplay.
•YoucannotusethedisplayswitchingfunctionwhenyouareintheExtenddesktopmode.
EnablingtheExtenddesktopfunction
ToenabletheExtenddesktopfunction,dothefollowing:
1.Connecttheexternalmonitortothemonitorconnector;thenconnectthemonitortoanelectricaloutlet.
2.T urnontheexternalmonitor.
3.PressFn+F7,thenselectExtend.
Tochangetheresolutionforeachmonitor,dothefollowing:
1.Right-clickonthedesktop,andclickScreenresolution.
2.ClicktheMonitor-1icon(fortheprimarydisplay,thecomputerdisplay).
3.Settheresolutionfortheprimarydisplay.
4.ClicktheMonitor-2icon(forthesecondarydisplay,theexternaldisplay).
5.Settheresolutionforthesecondarydisplay.
6.Placetheiconsforthemonitorssothattheytouch.
Note:Youcansetthemonitorsinanyrelativeposition,buttheiconsmusttoucheachother.
7.ClickOKtoapplythechanges.
Note:Tochangethecolorsettings,right-clickonthedesktop,andclickScreenresolution.ClickAdvanced
Settings,selecttheMonitortab,thensetColors.
Usingaudiofeatures
Yourcomputerisequippedwiththefollowing:
•Comboaudioconnector,1/8inch(3.5mm)indiameter
Chapter2.Usingyourcomputer33
Page 50

•Built-instereospeakers
•Built-indigitalmicrophone
Yourcomputeralsohasanaudiochipthatenablesyoutoenjoyvariousmultimediaaudiofeatures:
•RecordingandplaybackofPCMandWAVlesin16-bitor24-bitformat
•PlaybackofaWAVleatasamplerateof44.1KHzto192KHz
•PlaybackofMIDIlesthroughaWavetablesynthesizerunderMicrosoftWindowsoperatingsystems
•PlaybackofMP3lesthroughtheWindowsMediaPlayerorasoftwareMP3player
•Recordingfromvarioussoundsources
Note:Thecomboaudioconnectordoesnotsupportaconventionalmicrophone.
Thefollowingtableshowswhichfunctionsoftheaudiodevicesattachedtotheconnectoronyourcomputer
aresupported.
Table3.Audiofeaturelist
Connector
Headsetwitha3.5mm
4-poleplug
ConventionalheadphoneConventionalmicrophone
Comboaudioconnector
Headphoneand
microphonefunctions
supported
Headphonefunction
supported
Notsupported
Conguringforsoundrecording
Tocongurethemicrophoneforoptimizedsoundrecording,usetheRealtekHDAudioManagerprogram.To
starttheprogram,gotoControlPanelandclickHardwareandSound➙RealtekHDAudioManager.
Usingtheintegratedcamera
Ifyourcomputerhasanintegratedcamera,youcanusethecameratopreviewyourvideoimageand
takeasnapshotofyourcurrentimage.
Tostartthecamera,dothefollowing:
•ForWindows7:PressFn+F6toopentheCommunicationssettingswindow.
•ForWindows8:PressFn+F6tostarttheLenovoSettingsprogram.ThenclickCamera.
Whenthecameraisstarted,thegreencamera-in-useindicatorturnson.
Youalsocanusetheintegratedcamerawithotherprogramsthatprovidefeaturessuchasphotographing,
videocapturing,andvideoconferencing.Tousetheintegratedcamerawithotherprograms,openoneofthe
programsandstartthephotographing,videocapturing,orvideoconferencingfunction.Then,thecamera
willstartautomaticallyandthegreencamera-in-useindicatorwillturnon.Formoreinformationaboutusing
thecamerawithaprogram,refertothehelpinformationsystemoftheprogram.
Conguringcamerasettings
Youcancongurethecamerasettingstomeetyourneeds,suchasadjustingthequalityofthevideooutput.
Tocongurethecamerasettings,dothefollowing:
•ForWindows7:PressFn+F6.TheCommunicationssettingswindowopens.ClicktheManageSettings
buttonandcongurethecamerasettingsasdesired.
•ForWindows8,dooneofthefollowing:
34UserGuide
Page 51

–Congurethecamerasettingsdirectlyfromtheprogramthatisusingthecamera.Fordetails,seethe
helpinformationsystemoftheprogram.
–ClickLenovoSettingsfromtheStartscreen.ThenclickCamera.Followtheinstructionsonthe
screentocongurethecamerasettingsasdesired.
Usingaashmediacard
Yourcomputerhasonemediacardreaderslot.
Themediacardreaderslotsupportsthefollowingfourtypesofcards:
•SecureDigital(SD)card
•SecureDigitalHigh-Capacity(SDHC)card
•SecureDigitaleXtended-Capacity(SDXC)card
•MultiMediaCard(MMC)
Note:Whiletransferringdatatoorfromamediacard,suchasanSDcard,donotputyourcomputerinto
sleeporhibernationmodebeforethedatatransferiscomplete;otherwise,yourdatacouldbecomedamaged.
Formoreinformationaboutashmediacards,refertoanyofthefollowingtopics:
•“Insertingaashmediacard”onpage35
•“Removingaashmediacard”onpage35
Insertingaashmediacard
Attention:Beforeyoustartinstallinganyofthefollowingcards,touchametaltableoragroundedmetal
object.Thisactionreducesanystaticelectricityfromyourbody.Thestaticelectricitycoulddamagethecard.
•SDcard
•SDHCcard
•SDXCcard
•MultiMediaCard
Toinsertaashmediacardintothe4-in-1mediacardreaderslot,dothefollowing:
1.Makesurethatthecardiscorrectlyoriented.
2.Insertthecardrmlyintothe4-in-1mediacardreaderslot.Thecardmightstopbeforeitiscompletely
installedintotheslot.
Iftheashmediacardisnotplugandplay,dothefollowing:
1.OpenControlPanel.
2.ClickHardwareandSound.
3.ClickDeviceManager.Ifyouarepromptedforanadministratorpasswordorconrmation,typethe
passwordorprovideconrmation.
4.FromtheActionmenu,selectAddlegacyhardware.TheAddHardwareWizardstarts.
5.Followtheinstructionsonthescreen.
Removingaashmediacard
Toremoveaashmediacard,dothefollowing:
Chapter2.Usingyourcomputer35
Page 52

1.ClickthetriangulariconintheWindowsnoticationareatoshowhiddenicons.Then,right-clickthe
SafelyRemoveHardwareandEjectMediaicon.
2.SelectthecorrespondingitemtoejectthecardfromtheWindowsoperatingsystem.
3.Pressthecardtoejectitfromyourcomputer.
4.Removethecardfromyourcomputerandstoreitsafelyforfutureuse.
Note:IfyoudonotremovethecardfromyourcomputerafteryouejectthecardfromtheWindows
operatingsystem,thecardcannolongerbeaccessed.Toaccessthecard,youmustremoveitonce,
theninsertitagain.
36UserGuide
Page 53
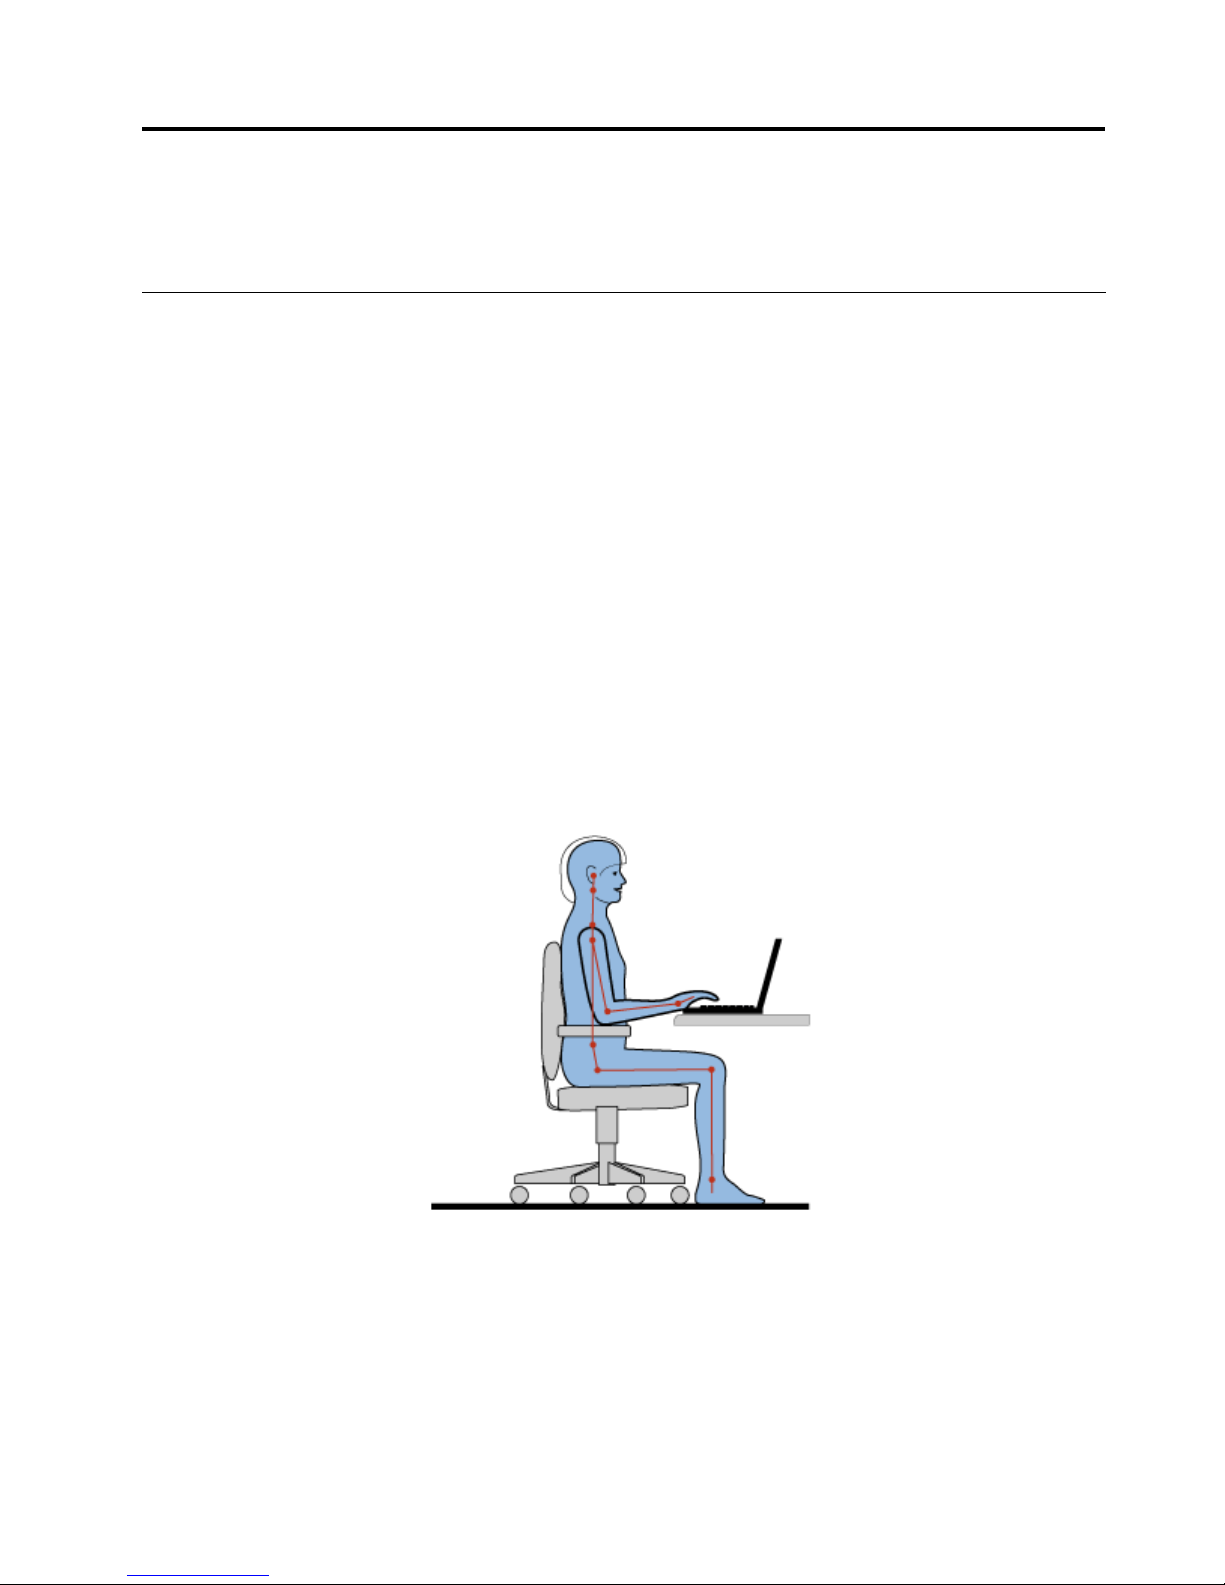
Chapter3.Youandyourcomputer
Thischapterprovidesinformationaboutaccessibility,comfort,andtravelingwithyourcomputer.
Accessibilityandcomfort
Goodergonomicpracticeisimportanttogetthemostfromyourpersonalcomputerandtoavoiddiscomfort.
Arrangeyourworkplaceandtheequipmentyouusetosuityourindividualneedsandthekindofwork
thatyouperform.Inaddition,usehealthyworkhabitstomaximizeyourperformanceandcomfortwhile
usingyourcomputer.
Thefollowingtopicsprovideinformationaboutarrangingyourworkarea,settingupyourcomputer
equipment,andestablishinghealthyworkhabits.
Lenovoiscommittedtoprovidingthelatestinformationandtechnologytoourcustomerswithdisabilities.
Refertoouraccessibilityinformationwhichoutlinesoureffortsinthisarea.
Ergonomicinformation
Workinginthevirtualofcemightmeanadaptingtofrequentchangesinyourenvironment.Forexample,
adaptingtothesurroundinglightsources,properseating,andtheplacementofyourcomputerhardware
canhelpyouimproveyourperformanceandachievegreatercomfort.
Thisexampleshowssomeoneinaconventionalsetting.Evenwhennotinsuchasetting,youcanfollow
manyofthesetips.Developgoodhabits,andtheywillserveyouwell.
Generalposture:Makeminormodicationsinyourworkingposturetodetertheonsetofdiscomfortcaused
bylongperiodsofworkinginthesameposition.Frequent,shortbreaksfromyourworkalsohelptoprevent
minordiscomfortassociatedwithyourworkingposture.
Display:Positionthedisplaytomaintainacomfortableviewingdistanceof510-760mm(20-30inches).
Avoidglareorreectionsonthedisplayfromoverheadlightingoroutsidesourcesoflight.Keepthedisplay
screencleanandsetthebrightnesstolevelsthatenableyoutoseethescreenclearly.PressFn+F8
orFn+F9toadjustdisplaybrightness.
©CopyrightLenovo2013
37
Page 54

Headposition:Keepyourheadandneckinacomfortableandneutral(vertical,orupright)position.
Chair:Useachairthatgivesyougoodbacksupportandseatheightadjustment.Usechairadjustmentsto
bestsuityourdesiredposture.
Armandhandposition:Ifavailable,usechairarmrestsoranareaonyourworkingsurfacetoprovide
weightsupportforyourarms.Keepyourforearms,wrists,andhandsinarelaxedandneutral(horizontal)
position.Typewithasofttouchwithoutpoundingthekeys.
Legposition:Keepyourthighsparalleltotheoorandyourfeetatontheoororonafootrest.
Whatifyouaretraveling?
Itmightnotbepossibletoobservethebestergonomicpracticeswhenyouareusingyourcomputerwhile
onthemoveorinacasualsetting.Regardlessofthesetting,trytoobserveasmanyofthesetipsas
possible.Sittingproperlyandusingadequatelighting,forexample,willhelpyoumaintaindesirablelevels
ofcomfortandperformance.
Questionsaboutvision?
ThevisualdisplayscreensofThinkPadnotebookcomputersaredesignedtomeetthehigheststandards
andtoprovideyouwithclear,crispimagesandlarge,brightdisplaysthatareeasytosee,yeteasyonthe
eyes.Ofcourse,anyconcentratedandsustainedvisualactivitycanbetiring.Ifyouhavequestionsoneye
fatigueorvisualdiscomfort,consultavisioncarespecialistforadvice.
Comfort
Observethefollowingguidelinestoachievegreatercomfortandimproveperformance.
Activesittingandrestbreaks:Thelongeryousitandworkwithyourcomputer,themoreimportantitisto
observeyourworkingposture.Follow“Ergonomicinformation”onpage37
andpractice“activesitting”to
avoiddiscomfortassociatedwithyourworkingpostures.Makingminorvoluntaryposturalchangesand
takingshortfrequentworkbreaksarethekeyingredientsforhealthycomputing.Y ourcomputerislightand
mobile;youcaneasilyrepositionyourworkingsurfacetoaccommodatemanyposturemodications.
Workareasetupoptions:Familiarizeyourselfwithallofyourofcefurnituresothatyouknowhowto
adjustyourworksurface,seat,andotherworktoolstoaccommodateyourpreferencesforcomfort.
Ifyourworkareaisnotinanofcesetting,besuretotakespecialnoteofemployingactivesitting
andtakingworkbreaks.ManyThinkPadproductsolutionsareavailabletohelpyoumodifyandexpand
yourcomputertobestsuityourneeds.AccessthefollowingWebsitetoviewsomeoftheseoptions:
http://www.lenovo.com/accessories/services/index.html.Exploreyouroptionsfordockingsolutionsand
externalproductsthatprovidetheadjustabilityandfeaturesthatyouwant.
Accessibilityinformation
Lenovoiscommittedtoprovidingpeoplewithdisabilitiesgreateraccesstoinformationandtechnology.
Asaresult,thefollowinginformationprovideswaystohelpusersthathavehearing,vision,andmobility
limitationsgetthemostoutoftheircomputerexperience.
Assistivetechnologiesenableuserstoaccessinformationinthemostappropriateway.Someofthese
technologiesarealreadyprovidedinyouroperatingsystem.Otherscanbepurchasedthroughvendors,or
accessedthroughtheWorldWideWebhttp://www.lenovo.com/healthycomputing.
38UserGuide
Page 55

Assistivetechnologies
SomeaccessibilitytechnologiesareavailablethroughtheAccessibilityOptionsprogram.Depending
onyouroperatingsystem,thenumberofaccessibilityoptionsavailablevaries.Ingeneral,accessibility
optionsenhancethewayuserswithhearing,vision,ormobilitylimitationsnavigateandusetheircomputer.
Forexample,someusersmightnothavethenemotorskillsrequiredtouseamouseorselectkey
combinations.Otherusersmightrequirelargerfontsorhigh-contrastdisplaymodes.Insomecases,
magniersandbuilt-inspeechsynthesizersareavailable.Fordetailedinformationabouteachofthese
features,consulttheMicrosofthelpinformationsystem.
TousetheAccessibilityOptionsprogram,openControlPanelandclickEaseofAccess➙Easeof
AccessCenter.
Screen-readertechnologies
Screen-readertechnologiesareprimarilyfocusedonsoftwareprograminterfaces,helpinformationsystems,
andavarietyofonlinedocuments.However,inthecasewhereascreenreadercannotreaddocuments,
thedocumentmustrstgothroughaconversionprocess.OnesolutionconvertsAdobePDFlesintoa
formatthatisreadbythescreen-readerprograms.ThissolutionisaWeb-basedserviceprovidedbyAdobe
SystemsIncorporated.Throughhttp://access.adobe.com,AdobePDFdocumentscanbeconvertedto
HTMLorplaintextinmanylanguages.OneconversionoptionconvertsPDFdocumentsontheInternet.A
secondoptionenablesuserstosubmittheURLofanAdobePDFlethroughe-mailtoconvertittoHTMLor
ASCIItext.AdobePDFlesonalocalharddiskdrive,localCD-ROM,orLANalsocanbeconvertedby
attachingtheAdobePDFletoane-mailmessage.
Travelingwithyourcomputer
Thistopicprovidesinformationtohelpyouworkwithyourcomputerwhenyouaretraveling.
Traveltips
Usethefollowingtraveltipstotravelmorecondentlyandefcientlywithyourcomputer.
•Althoughitissafetoallowyourcomputertogothroughthex-raymachinesatairportsecuritystations,it
isimportanttokeepyoureyesonthecomputeratalltimestopreventtheft.
•Considerbringinganelectricaladapterforuseinanairplaneorautomobile.
•Ifyoucarryanacpoweradapter,detachtheaccordfromittoavoiddamagingthecord.
Traveltipsonairplanes
Ifyoucarryyourcomputerintoanairplane,takenoteofthefollowingtips:
•Ifyouintendtouseyourcomputerorwirelessservices(suchasInternetandBluetooth),checkwiththe
airlineforrestrictionsandavailabilityofservicesbeforeboardingtheairplane.Iftherearerestrictions
ontheuseofcomputerswithwirelessfeaturesontheairplane,youmustabidebythoserestrictions.If
necessary,disablewirelessfeaturesbeforeboarding.
•Becarefulabouttheseatinfrontofyouonairplanes.Angleyourcomputerdisplaysothatitdoesnotget
caughtwhenthepersoninfrontofyouleansback.
•Whentakingoff,remembertoturnoffyourcomputerorputitintohibernationmode.
Travelaccessories
Thefollowingisachecklistofitemstoconsiderpackingwhenyouaregoingtotravel:
•ThinkPadacpoweradapter
•ThinkPadAC/DCComboAdapter
Chapter3.Y ouandyourcomputer39
Page 56

•Externalmouse,ifyouareaccustomedtousingone
•Ethernetcable
•Extrabattery,charged
•Aqualitycarryingcasethatprovidesadequatecushionandprotection
•Externalstoragedevice
Ifyouaretravelingtoanothercountry,youmightwanttoconsideranacpoweradapterforthecountryto
whichyouaretraveling.
Topurchasetravelaccessories,gotohttp://www.lenovo.com/accessories.
40UserGuide
Page 57

Chapter4.Security
Thischapterprovidesinformationabouthowtoprotectyourcomputerfromtheftandunauthorizeduse.
•“Attachingamechanicallock”onpage41
•“Usingpasswords”onpage41
•“Harddisksecurity”onpage46
•“Noticeondeletingdatafromyourharddiskdriveorsolid-statedrive”onpage46
•“Usingrewalls”onpage47
•“Protectingdataagainstviruses”onpage47
Attachingamechanicallock
Youcanattachamechanicallocktoyourcomputertohelppreventitfrombeingremovedwithoutyour
permission.
Attachamechanicallocktothekeyholeofthecomputer;thensecurethechainonthelocktoastationary
object.Refertotheinstructionsshippedwiththemechanicallock.
Note:Y ouareresponsibleforevaluating,selecting,andimplementingthelockingdevicesandsecurity
features.Lenovomakesnocomments,judgments,orwarrantiesaboutthefunction,quality,orperformance
oflockingdevicesandsecurityfeatures.
Usingpasswords
Byusingpasswords,youcanhelppreventyourcomputerfrombeingusedbyothers.Onceyouseta
password,apromptisdisplayedonthescreeneachtimeyouturnonthecomputer.Enteryourpasswordat
theprompt.Y oucannotusethecomputerunlessyouenterthevalidpassword.
Passwordsandsleepmode
Ifyouhavesetpasswordsandyouputyourcomputerintosleepmode,theprocedureforresuming
operationisasfollows:
•Youarenotpromptedtotypethepasswordwhenresumingoperation.
•Ifanyharddiskdriveorsolid-statedrivehasapassword,itisunlockedautomaticallywhenyouresume
operation.
Note:IfaWindowspasswordhasbeenset,youwillbepromptedtoenterit.
Typingpasswords
Ifthisiconisdisplayed,typeapower-onpasswordorasupervisorpassword.
Ifthisiconisdisplayed,typeauserharddiskpassword.Ifyouwanttotypeamasterharddisk
password,dothefollowing:
1.PressF1.Theiconchangestothis:
2.T ypethemasterharddiskpassword.
©CopyrightLenovo2013
41
Page 58

Note:Toreturntotheicon,pressF1again.
Note:PresstheBackspacekeyifyouenterawrongpasswordwhileyouaretypingyourpassword.
Power-onpassword
Youcansetapower-onpasswordtohelpprotectyourcomputeragainstaccessbyunauthorizedusers.
Ifyousetapower-onpassword,thepasswordpromptisdisplayedonthescreenwheneveryouturnonthe
computer.Youmustenterthecorrectpasswordtostartusingthecomputer.
Settingapower-onpassword
1.Printtheseinstructions.
2.Saveallopenles,andexitallprograms.
3.T urnyourcomputeroffandthenturnitonagain.
4.Whenthelogoscreenisdisplayed,pressF1.TheThinkPadSetupprogrammainmenuopens.
5.SelectSecurity,usingthecursordirectionalkeystomovedownthemenu.
6.SelectPassword.
7.SelectPower-onPassword.
8.IntheEnterNewPasswordeld,typeadesiredpassword,andpressEnter.
9.IntheConrmNewPasswordeld,retypethepasswordandpressEnter.
Attention:Youmightwanttonotedownyourpower-onpasswordinasafeplace.Otherwise,ifyou
forgetit,youhavetotakeyourcomputertoaLenovoreselleroramarketingrepresentativetohave
thepasswordcanceled.
10.IntheSetupNoticewindowthatisdisplayed,pressEntertocontinue.
11.PressF10.TheSetupConrmationwindowopens.SelectYestosavecongurationchangesandexit.
Changingorremovingthepower-onpassword
Tochangethepower-onpassword,followsteps1through7.Enteryourcurrentpassword.WhentheEnter
NewPasswordeldisdisplayed,typeanewpasswordintheeldandthenretypeittoverify.T oremove
thepassword,followsteps1through7.Typeyourcurrentpassword.WhentheEnterNewPasswordeld
isdisplayed,leaveitblankandpressEntertwice.
Harddiskpasswords
Twotypesofharddiskpasswordshelpprotecttheinformationstoredontheharddiskdrive:
•Userharddiskpassword
•Masterharddiskpassword,whichrequiresauserharddiskpassword
Ifauserharddiskpasswordhasbeenset,butnomasterharddiskpasswordhasbeen,theusermustenter
theuserharddiskpasswordinordertogainaccesstolesandprogramsontheharddiskdrive.
Themasterpasswordcanbesetandusedonlybyasystemadministrator.Likeamasterkey,itenablesthe
administratortogetaccesstoanyharddiskdriveinasystem.Theadministratorsetsthemasterpassword;
nooneelseknowsit.Thentheadministratorsetsauserpasswordforeachcomputerinthenetwork,and
tellseachuserthepasswordforhisorhercomputer.Theusercanthenchangetheuserpasswordas
desired,buttheadministratorstillcangetaccessbyusingthemasterpassword.
42UserGuide
Page 59

Note:Whenamasterharddiskpasswordisset,onlytheadministratorcanremovetheuserharddisk
password.
Settingaharddiskpassword
1.Printtheseinstructions.
2.Saveallopenles,andexitallprograms.
3.T urnyourcomputeroffandthenonagain.
4.Whenthelogoscreenisdisplayed,pressF1.TheThinkPadSetupprogrammainmenuopens.
5.SelectSecurity,usingthecursordirectionalkeystomovedownthemenu.
6.SelectPassword.
7.SelectHardDisk1Password.
8.Apasswordwindowopens.Y ouarepromptedtoselectUserorUser+Master.SelectUserifyouwant
tosetonlyoneharddiskpassword.Ifyouareanadministratororsupervisor,youcanselectUser+
Mastertosettwopasswords.(Theusercanchangetheuserpasswordlater.)
•IfyouselectUser+Master,dothefollowing:
a.Whenawindowfortypingthenewuserharddiskpasswordopens,typeyournewpasswordin
theEnterNewPasswordeld.PressEnter.
b.IntheConrmNewPasswordeld,retypethepasswordyoujustenteredtoverifyit.PressEnter.
c.Amessagewindowopensandpromptsyoutosetthemasterharddiskpassword.PressEnterto
continue.
d.Awindowfortypingthenewmasterharddiskpasswordopens.T ypeyournewpasswordin
theEnterNewPasswordeld.PressEnter.
e.IntheConrmNewPasswordeld,retypethepasswordyoujustenteredtoverifyit.PressEnter.
•IfyouselectUseronly,dothefollowing:
a.Whenawindowfortypingthenewpasswordopens,typeyournewpasswordintheEnterNew
Passwordeld.PressEnter.
Notes:
–YoucansettheminimumlengthofaharddiskpasswordthroughtheSecuritymenu.
–Ifyousetaharddiskpasswordofoversevencharacters,theharddiskdrivecanbeusedonly
withacomputerthatcanrecognizeaharddiskpasswordofoversevencharacters.Ifyouthen
installtheharddiskdriveinacomputerthatcannotrecognizeaharddiskpasswordthat
containsmorethansevencharacters,youcannotgetaccesstothedrive.
b.IntheConrmNewPasswordeld,retypethepasswordyoujustenteredtoverifyit.PressEnter.
Attention:Youmightwanttonotedownyourpasswordsandkeeptheminasafeplace.Otherwise,if
youforgettheuserpassword,orbothuserandmasterpasswords,Lenovocannotresetyourpasswords
orrecoverdatafromtheharddiskdrive.Y oumusttakeyourcomputertoaLenovoresellerora
marketingrepresentativetohavetheharddiskdrivereplaced.Proofofpurchaseisrequired,andafee
willbechargedforpartsandservice.
9.IntheSetupNoticewindowthatisdisplayed,pressEntertocontinue.
10.PressF10.TheSetupConrmationwindowopens.SelectYestosavecongurationchangesandexit.
Thenexttimeyouturnonyourcomputer,youwillhavetotypetheuserormasterharddiskpasswordin
ordertostartyourcomputerandgetaccesstoyouroperatingsystem.
Chapter4.Security43
Page 60

Changingorremovingaharddiskpassword
Followsteps1through7in“Settingaharddiskpassword”onpage43,typingyourpasswordtogetaccess
totheThinkPadSetupprogram.
Tochangeorremovetheuserharddiskpassword,dothefollowing:
•Tochangetheharddiskpassword,typethecurrentpasswordintheEnterCurrentPasswordeld.Then
typethenewpasswordintheEnterNewPasswordeld,andretypethepasswordyoujustenteredto
verifyitintheConrmNewPasswordeld.PressEnter,andaSetupNoticewindowisdisplayed.Press
EntertoexitfromtheSetupNoticewindow.Theuserharddiskpasswordwillbechanged.
•Toremovetheharddiskpassword,typethecurrentpasswordintheEnterCurrentPasswordeld.Then
leavetheEnterNewPasswordandConrmNewPasswordeldsblank,andpressEnter.ASetup
Noticewindowisdisplayed.PressEntertoexitfromtheSetupNoticewindow.Theuserharddisk
passwordwillberemoved.
TochangeorremovetheUser+Masterharddiskpasswords,selectUserHDPorMasterHDP.
IfyouchooseUserHDP,dothefollowing:
•Tochangetheuserharddiskpassword,typethecurrentuserharddiskpasswordorthecurrentmaster
harddiskpasswordintheEnterCurrentPasswordeld.Thentypethenewuserharddiskpasswordin
theEnterNewPasswordeld,andretypethepasswordyoujustenteredtoverifyitintheConrmNew
Passwordeld.PressEnter,andaSetupNoticewindowisdisplayed.PressEntertoexitfromtheSetup
Noticewindow.Theuserharddiskpasswordischanged.
•Toremovetheuserharddiskpassword,typethecurrentmasterharddiskpasswordintheEnterCurrent
Passwordeld.ThenleavetheEnterNewPasswordandConrmNewPasswordeldsblank,and
pressEnter.ASetupNoticewindowisdisplayed.PressEntertoexitfromtheSetupNoticewindow.Both
theuserandmasterharddiskpasswordswillberemoved.
IfyouchooseMasterHDP,dothefollowing:
•Tochangethemasterharddiskpassword,typethecurrentmasterharddiskpasswordintheEnter
CurrentPasswordeld.ThentypethenewmasterharddiskpasswordintheEnterNewPassword
eld,andretypethepasswordyoujustenteredtoverifyitintheConrmNewPasswordeld.Press
Enter,andaSetupNoticewindowisdisplayed.PressEntertoexitfromtheSetupNoticewindow.The
masterharddiskpasswordischanged.
•Toremovethemasterharddiskpassword,typethecurrentmasterharddiskpasswordintheEnter
CurrentPasswordeld.ThenleavetheEnterNewPasswordandConrmNewPasswordeldsblank,
andpressEnter.ASetupNoticewindowisdisplayed.PressEntertoexitfromtheSetupNoticewindow.
Boththeuserandmasterharddiskpasswordswillberemoved.
Supervisorpassword
ThesupervisorpasswordprotectsthesysteminformationstoredinThinkPadSetup.Withoutit,noonecan
changethecongurationofthecomputer.Itprovidesthefollowingsecurityfeatures:
•Ifasupervisorpasswordisset,apasswordpromptisdisplayedwhenyoutrytostarttheThinkPadSetup
program.Unauthorizeduserscannotgetaccesstocongurationdata.
•Thesystemadministratorcanusethesupervisorpasswordtogetaccesstoacomputereveniftheuserof
thatcomputerhassetapower-onpassword.Thesupervisorpasswordoverridesthepower-onpassword.
•Ifbothasupervisorpasswordandapower-onpasswordareset,youcandothefollowingonlyifyou
havethesupervisorpassword:
–Deletingthepower-onpassword
–Changingordeletingthesupervisorpassword
44UserGuide
Page 61

–EnablingordisablingtheWakeonLAN
–EnablingordisablingtheInternalNetworkOptionROMfeature
–Changingdateandtime
–EnablingordisablingtheLockUEFIBIOSSettingsfeature
–EnablingordisablingthePasswordatunattendedbootfeature
–Specifyingtheminimumlengthforpower-onpasswordsandharddiskpasswords
–EnablingordisablingtheBootDeviceListF12Optionfeature
–EnablingordisablingtheBootOrderLockfeature
–EnablingordisablingtheFlashBIOSUpdatingbyEnd-Usersfeature
–Enablingordisablingtheinternalnetworkdevice
–Enablingordisablingtheinternalwirelessdevice
–EnablingordisablingtheinternalBluetoothdevice
–EnablingordisablingtheSecuritymode
Notes:
•ThesystemadministratorcansetthesamesupervisorpasswordonmanyThinkPadnotebookcomputers
tomakeadministrationeasier.
•ByenablingtheLockUEFIBIOSSettingsfeatureonthePasswordmenuwhenyousetthesupervisor
password,youmakeitimpossibleforanyonebutyoutomakechanges.
Setting,changing,orremovingasupervisorpassword
Onlyasystemadministratorcanset,change,orremoveasupervisorpassword.
Toset,change,orremoveasupervisorpassword,dothefollowing:
1.Printtheseinstructions.
2.Saveallopenles,andexitallprograms.
3.T urnyourcomputeroffandthenturnitonagain.
4.Whenthelogoscreenisdisplayed,pressF1.TheThinkPadSetupprogrammainmenuopens.
5.SelectSecurity,usingthecursordirectionalkeystomovedownthemenu.
6.SelectPassword.
7.SelectSupervisorPassword.
8.Awindowopens,promptingyoutoenteranewpassword.Dependingonyourneeds,dooneofthe
following:
•Tosetapassword,dothefollowing:
a.IntheEnterNewPasswordeld,typeadesiredpasswordandpressEnter.
b.IntheConrmNewPasswordeld,retypethepasswordandpressEnter.
•Tochangeapassword,dothefollowing:
a.IntheEnterCurrentPasswordeld,typethecurrentsupervisorpasswordandpressEnter.
b.IntheEnterNewPasswordeld,typethenewsupervisorpassword;thenretypethepassword
youjustenteredtoverifyitintheConrmNewPasswordeld.PressEnter.
•Toremoveapassword,dothefollowing:
a.IntheEnterCurrentPasswordeld,typethecurrentsupervisorpasswordandpressEnter.
b.LeavetheEnterNewPasswordandConrmNewPasswordeldsblank.PressEnter.
Chapter4.Security45
Page 62

Attention:Youmightwanttonotedownyourpasswordandkeepitinasafeplace.Ifyouforgetyour
supervisorpassword,Lenovocannotresetyourpassword.YoumusttakeyourcomputertoaLenovo
reselleroraLenovomarketingrepresentativetohavethesystemboardreplaced.Proofofpurchaseis
required,andafeewillbechargedforpartsandservice.
9.IntheSetupNoticewindowthatisdisplayed,pressEntertocontinue.
10.PressF10.TheSetupConrmationwindowopens.SelectYestosavecongurationchangesandexit.
ThenexttimeyouopentheThinkPadSetupprogram,youwillbepromptedtotypeyourpasswordtoproceed.
Harddisksecurity
Toprotectpasswordsfromunauthorizedsecurityattacks,severalofthelatesttechnologiesandalgorithms
areintegratedintoUEFIBIOSandhardwaredesignofThinkPadnotebookcomputers.
Tomaximizesecurity,dothefollowing:
1.Setapower-onpasswordaswellasaharddiskpasswordforyourinternalsolid-statedriveorharddisk
drive.Refertotheproceduresin“Power-onpassword”onpage42and“Harddiskpasswords”onpage
42
.Forsecurity,alongerpasswordisrecommended.
2.IfaDiskEncryptionharddiskdriveoraDiskEncryptionsolid-statedriveisinstalledinyourcomputer,
besuretoprotectthecontentsofyourcomputermemoryfromunauthorizedaccessesbyuseofdrive
encryptionsoftware.
3.Beforeyoudisposeof,sell,orhandoveryourcomputer,besuretodeletedatastoredonit.Referto
“Noticeondeletingdatafromyourharddiskdriveorsolid-statedrive”onpage46.
Note:TheharddiskdrivebuiltintoyourcomputercanbeprotectedbyUEFIBIOS.
DiskEncryptionharddiskdriveandEncryptionsolid-statedrive
SomemodelscontaintheDiskEncryptionharddiskdriveorEncryptionsolid-statedrive.Thisfeature
helpstoprotectyourcomputeragainstsecurityattacksonmedia,NANDashordevicecontrollersbyuse
ofahardwareencryptionchip.Fortheefcientuseoftheencryptionfeature,besuretosetaharddisk
passwordfortheinternalstoragedevice.
Noticeondeletingdatafromyourharddiskdriveorsolid-statedrive
Ascomputersspreadintoeverycorneroflife,theyprocessmoreandmoreinformation.Thedataonyour
computer,someofwhichmightbesensitive,isstoredonaharddiskdriveorsolid-statedrive.Beforeyou
disposeof,sell,orhandoveryourcomputer,besuretodeletedatastoredonit.
Handingyourcomputerovertosomeoneelsewithoutdeletingtheloadedsoftware,suchasoperating
systemsandprogramsoftware,mightevenviolatelicenseagreements.Youareadvisedtocheckthe
termsandconditionsofthoselicenseagreements.
Therearemethodsthatseemtodeletethedata:
•Movethedatatotherecyclebin,andthenemptytheRecycleBin.
•Deletethedata.
•Formatyourharddiskdriveorsolid-statedrive,usingthesoftwareforinitializingit.
•UsetherecoveryprogramprovidedbyLenovotobringtheharddiskdriveorsolid-statedrivebackto
thefactorydefaultsettings.
Theseoperations,however,onlychangetheleallocationofthedata;theydonotdeletethedataitself.In
otherwords,thedataretrievalprocessingisdisabledunderanoperatingsystemsuchasWindows.The
46UserGuide
Page 63

dataisstillthere,eventhoughitseemstobelost.Thus,itissometimespossibletoreadthedatabyuseof
specialsoftwarefordatarecovery.Thereisariskthatpeopleofbadfaithmightreadandmisusethecritical
dataonharddiskdrivesorsolid-statedrivesforunexpectedpurposes.
Topreventleakageofdata,itbecomesveryimportantthatyoutakeresponsibilityfordeletingallthedata
fromtheharddiskdriveorsolid-statedrivewhenyoudisposeof,sell,orhandoveryourcomputer.Y ou
candestroythedataphysicallybysmashingtheharddiskdriveorsolid-statedrivewithahammer,or
magneticallybymeansofstrongmagneticpower,thusmakingthedataunreadable.Butwerecommend
thatyoumakeuseofthesoftware(payware)orservice(payservice)specicallydevelopedforthepurpose.
Fordisposingofdataontheharddiskdriveorsolid-statedrive,LenovoprovidestheSecureDataDisposal
tool.Todownloadtheprogram,goto:
http://www.lenovo.com/support
Note:Runningeitherprogramwilltakeacoupleofhours.
Ifyouusesoftwaredesignedforusewiththeharddiskdrivetodeletedatastoredonthesolid-statedrive,it
willeraseonlydatathatisaccessiblebynormaloperation.Itmaynoterasethehiddenareaoftheash
chip.Therefore,sometimesitmaystillbepossibletoreadthedatabyuseofspecialequipmentora
specialtool.T opreventleakageofdatafromthesolid-statedrive,itisrecommendedthatyoudelete
alldataontheashchipsbyuseofaprogramprovidedbyLenovo.ThisprogramcalledtheThinkPad
SetupMenuExtensionUtilitymakesitpossibletoeraseallthedataontheashchipsofthesolid-state
drivefromtheThinkPadSetupwithinaminute.Todownloadthisprogram,gototheLenovoWebsite
http://www.lenovo.com/support.
IfEncryptionsolid-statedriveorDiskEncryptionharddiskdriveissupportedandinstalledinyourcomputer,
youcanlogicallydisposeofallthedataonadeviceinaveryshorttimebyerasingthecryptographickey.
Thedataencryptedwiththeoldkeyisnotphysicallyerasedbutremainsonthedisk;however,itcannotbe
decryptedwithouttheoldkey.ThisfeatureisenabledbytheThinkPadSetupMenuExtensionUtilityandis
availableasamenuitemintheThinkPadSetup.
Usingrewalls
Ifyoursystemispreinstalledwitharewallprogram,itprotectsagainstcomputerInternetsecuritythreats,
unauthorizedaccesses,intrusions,andInternetattacks.Italsoprotectsyourprivacy.
Formoreinformationabouthowtousetherewallprogram,refertothehelpinformationsystemthat
comeswiththeprogram.
Protectingdataagainstviruses
Yourcomputerispreinstalledwithanantivirusprogramsoyoucandetectandeliminateviruses.The
antivirusprogramisdesignedtohelpyoudetectandeliminateviruses.
Lenovoprovidesafullversionofantivirussoftwareonyourcomputerwithafree30-daysubscription.After
30days,youmustrenewthelicensetocontinuereceivingtheantivirussoftwareupdates.
Formoreinformationabouthowtouseyourantivirussoftware,refertothehelpinformationsystemof
yourantivirussoftware.
Chapter4.Security47
Page 64

48UserGuide
Page 65

Chapter5.Recoveryoverview
Thischapterprovidesinformationabouttherecoverysolutions.
•“RecoveryoverviewfortheWindows7operatingsystem”onpage49
•“RecoveryoverviewfortheWindows8operatingsystem”onpage54
RecoveryoverviewfortheWindows7operatingsystem
ThissectionprovidesinformationabouttherecoverysolutionsprovidedbyLenovoontheWindows7
operatingsystem.
Notes:
•Thereareavarietyofmethodstochoosefromwhenconsideringhowtorecoverintheeventofa
software-relatedorhardware-relatedproblem.Somemethodsvarydependingonthetypeofyour
operatingsystem.
•Theproductontherecoverymediamightbeusedonlyforthefollowingpurposes:
–Restoretheproductpreinstalledonyourcomputer
–Reinstalltheproduct
–ModifytheproductusingtheAdditionalFiles
Notes:Topreventpotentialperformancerisksorunexpectedbehaviorthatmightbecausedbythenew
harddiskdrivetechnology,itisrecommendedthatyouuseoneofthefollowingback-upsoftwareprograms:
•ThinkVantageRescueandRecoveryversion4.3orlater
•SymantecNortonGhostversion15orlater
Notes:Tousethisprogram,dothefollowing:
1.ClickStart➙Run.TheRunwindowopens.
2.T ypecmdintheeld.ThenclickOK.
3.T ypeghost-align=1mbandpressEnter.
•AcronisTrueImage2010orlater
•ParagonBackup&Recovery10Suiteorlater,ParagonBackup&Recovery10Homeorlater
Creatingandusingarecoverymedia
Youcanuserecoverymediatorestoretheharddiskdrivetothefactorydefaultsettings.Recoverymedia
areusefulifyoutransferthecomputertoanotherarea,sellthecomputer,recyclethecomputer,orputthe
computerinanoperationalstateafterallothermethodsofrecoveryhavefailed.Asaprecautionarymeasure,
itisimportanttocreaterecoverymediaasearlyaspossible.
Note:Therecoveryoperationsyoucanperformusingrecoverymediavarydependingontheoperating
systemfromwhichtherecoverymediawerecreated.Therecoverymediamightcontainabootmedium
andadatamedium.YourMicrosoftWindowslicensepermitsyoutocreateonlyonedatamedium,soitis
importantthatyoustoretherecoverymediainasafeplaceafteryouhavemadethem.
Creatingrecoverymedia
Thissectionprovidesinstructionsonhowtocreaterecoverymedia.
©CopyrightLenovo2013
49
Page 66

Note:YoucancreaterecoverymediausingdiscsorexternalUSBstoragedevices.
Tocreaterecoverymedia,clickStart➙AllPrograms➙LenovoThinkVantageTools➙FactoryRecovery
Disks.Then,followtheinstructionsonthescreen.
Usingrecoverymedia
Youcanuserecoverymediatorestorethecomputertothefactorydefaultsettingsonly.Youcanuse
recoverymediatoputthecomputerinanoperationalstateafterallothermethodsofrecoveryhavefailed.
Attention:Whenyouuserecoverymediatorestorethecomputertothefactorydefaultsettings,alltheles
currentlyontheharddiskdrivewillbedeletedandreplacedbythefactorydefaultsettings.
Touserecoverymedia,dothefollowing:
1.Dependingonthetypeofyourrecoverymedia,connectthebootmedium(memorykeyorotherUSB
storagedevice)tothecomputer,orinsertthebootdiscintotheexternalopticaldrive.
2.RepeatedlypressandreleasetheF12keywhenturningonthecomputer.WhentheBootMenuwindow
opens,releasetheF12key.
3.SelectthedesiredstartupdeviceandpressEnter.Therestoreprocessbegins.
4.Followtheinstructionsonthescreentocompletetheoperation.
Notes:
1.Afterrestoringyourcomputertothefactorydefaultsettings,youmighthavetoreinstalldevicedrivers
forsomedevices.See“Reinstallingpreinstalledprogramsanddevicedrivers”onpage53.
2.SomecomputerscomewithMicrosoftOfceorMicrosoftWorkspreinstalled.Ifyouneedtorecover
orreinstallyourMicrosoftOfceorMicrosoftWorksprograms,youmustusetheMicrosoftOfceCD
orMicrosoftWorksCD.ThesediscsareprovidedonlywithcomputerspreinstalledwithMicrosoft
OfceorMicrosoftWorks.
Performingbackupandrecoveryoperations
TheRescueandRecoveryprogramenablesyoutobackupallyourharddiskdrivecontentsincludingthe
operatingsystem,datales,softwareprograms,andpersonalsettings.Youcandesignatewherethe
RescueandRecoveryprogramstoresthebackup:
•Inaprotectedareaofyourharddiskdrive
•OnanattachedexternalUSBharddiskdrive
•Onanetworkdrive
•Onrecordablediscs(arecordableopticaldriveisrequiredforthisoption)
Afteryouhavebackedupthecontentsontheharddiskdrive,youcanrestorethecompletecontentsofthe
harddiskdrive,restoreonlytheselectedles,orrestoreonlytheWindowsoperatingsystemandprograms.
Performingabackupoperation
ThissectionprovidesinstructionsonhowtoperformabackupoperationusingtheRescueandRecovery
program.
1.FromtheWindowsdesktop,clickStart➙AllPrograms➙LenovoThinkVantageT ools➙Enhanced
BackupandRestore.TheRescueandRecoveryprogramopens.
2.IntheRescueandRecoverymainwindow,clicktheLaunchadvancedRescueandRecoveryarrow.
3.ClickBackupyourharddriveandselectbackupoperationoptions.Then,followtheinstructionson
thescreentocompletethebackupoperation.
50UserGuide
Page 67

Performingarecoveryoperation
ThissectionprovidesinstructionsonhowtoperformarecoveryoperationusingtheRescueandRecovery
program.
1.FromtheWindowsdesktop,clickStart➙AllPrograms➙LenovoThinkVantageT ools➙Enhanced
BackupandRestore.TheRescueandRecoveryprogramopens.
2.IntheRescueandRecoveryprogrammainwindow,clicktheLaunchadvancedRescueandRecovery
arrow.
3.ClicktheRestoreyoursystemfromabackupicon.
4.Followtheinstructionsonthescreentocompletetherecoveryoperation.
FormoreinformationaboutperformingarecoveryoperationfromtheRescueandRecoveryworkspace,see
“UsingtheRescueandRecoveryworkspace”onpage51.
UsingtheRescueandRecoveryworkspace
TheRescueandRecoveryworkspaceresidesinaprotected,hiddenareaofyourharddiskdrivethat
operatesindependentlyfromtheWindowsoperatingsystem.Thisenablesyoutoperformrecovery
operationsevenifyoucannotstarttheWindowsoperatingsystem.Y oucanperformthefollowingrecovery
operationsfromtheRescueandRecoveryworkspace:
•Rescuelesfromyourharddiskdriveorfromabackup
TheRescueandRecoveryworkspaceenablesyoutolocatelesonyourharddiskdriveandtransfer
themtoanetworkdriveorotherrecordablemedia,suchasaUSBdeviceoradisc.Thissolutionis
availableevenifyoudidnotbackupyourlesorifchangesweremadetothelessinceyourlastbackup
operation.YoualsocanrescueindividuallesfromaRescueandRecoverybackuplocatedonyourlocal
harddiskdrive,aUSBdevice,oranetworkdrive.
•RestoreyourharddiskdrivefromaRescueandRecoverybackup
IfyouhavebackedupyourharddiskdriveusingtheRescueandRecoveryprogram,youcanrestorethe
harddiskdrivefromaRescueandRecoverybackup,evenifyoucannotstarttheWindowsoperating
system.
•Restoreyourharddiskdrivetothefactorydefaultsettings
TheRescueandRecoveryworkspaceenablesyoutorestorethecompletecontentsofyourharddiskdrive
tothefactorydefaultsettings.Ifyouhavemultiplepartitionsonyourharddiskdrive,youhavetheoption
torestorethefactorydefaultsettingstotheC:partitionandleavetheotherpartitionsintact.Becausethe
RescueandRecoveryworkspaceoperatesindependentlyfromtheWindowsoperatingsystem,youcan
restorethefactorydefaultsettingsevenifyoucannotstarttheWindowsoperatingsystem.
Attention:IfyourestoretheharddiskdrivefromaRescueandRecoverybackuporrestoretheharddisk
drivetothefactorydefaultsettings,alllesontheprimaryharddiskdrivepartition(usuallydriveC:)willbe
deletedintherecoveryprocess.Ifpossible,makecopiesofimportantles.Ifyouareunabletostartthe
Windowsoperatingsystem,youcanusetherescuelesfeatureoftheRescueandRecoveryworkspaceto
copylesfromyourharddiskdrivetoothermedia.
TostarttheRescueandRecoveryworkspace,dothefollowing:
1.Makesurethatthecomputeristurnedoff.
2.RepeatedlypressandreleasetheF11keywhenturningonthecomputer.Whenyouhearbeepsor
seealogoscreen,releasetheF11key.
3.IfyouhavesetaRescueandRecoverypassword,typeyourpasswordwhenprompted.TheRescue
andRecoveryworkspaceopensafterashortdelay.
Note:IftheRescueandRecoveryworkspacefailstoopen,see“Solvingrecoveryproblems”onpage53
.
Chapter5.Recoveryoverview51
Page 68

4.Dooneofthefollowing:
•Torescuelesfromyourharddiskdriveorfromabackup,clickRescuelesandfollowthe
instructionsonthescreen.
•TorestoreyourharddiskdrivefromaRescueandRecoverybackuportorestoreyourharddiskdrive
tothefactorydefaultsettings,clickRestoreyoursystemandfollowtheinstructionsonthescreen.
FormoreinformationaboutthefeaturesoftheRescueandRecoveryworkspace,clickHelp.
Notes:
1.Afterrestoringyourharddiskdrivetothefactorydefaultsettings,youmighthavetoreinstalldevice
driversforsomedevices.See“Reinstallingpreinstalledprogramsanddevicedrivers”onpage53.
2.SomecomputerscomewithMicrosoftOfceorMicrosoftWorkspreinstalled.Ifyouneedtorecover
orreinstallyourMicrosoftOfceorMicrosoftWorksprograms,youmustusetheMicrosoftOfceCD
orMicrosoftWorksCD.ThesediscsareprovidedonlywithcomputerspreinstalledwithMicrosoft
OfceorMicrosoftWorks.
Creatingandusingarescuemedium
Witharescuemedium,suchasadiscoraUSBharddiskdrive,youcanrecoverthecomputerfromfailures
thatpreventyoufromgainingaccesstotheRescueandRecoveryworkspaceonyourharddiskdrive.
Notes:
1.Therecoveryoperationsyoucanperformusingarescuemediumvarydependingontheoperating
system.
2.Therescuedisccanbestartedinalltypesofexternalopticaldrives.
Creatingarescuemedium
Thissectionprovidesinstructionsonhowtocreatearescuemedium.
1.FromtheWindowsdesktop,clickStart➙AllPrograms➙LenovoThinkVantageT ools➙Enhanced
BackupandRestore.TheRescueandRecoveryprogramopens.
2.IntheRescueandRecoverymainwindow,clicktheLaunchadvancedRescueandRecoveryarrow.
3.ClicktheCreateRescueMediaicon.TheCreateRescueandRecoveryMediawindowopens.
4.IntheRescueMediaarea,selectthetypeoftherescuemediumyouwanttocreate.Youcancreatea
rescuemediumusingadiscoraUSBharddiskdrive.
5.ClickOKandfollowtheinstructionsonthescreentocreatearescuemedium.
Usingarescuemedium
Thissectionprovidesinstructionsonhowtousetherescuemediumyouhavecreated.
•Ifyouhavecreatedarescuemediumusingadisc,usethefollowinginstructionstousetherescuemedium:
1.T urnoffyourcomputer.
2.RepeatedlypressandreleasetheF12keywhenturningonthecomputer.WhentheBootMenu
windowopens,releasetheF12key.
3.IntheBootMenuwindow,selectthedesiredopticaldriveastherstbootdevice.Then,insertthe
rescuediscintotheexternalopticaldriveandpressEnter.Therescuemediumstarts.
•IfyouhavecreatedarescuemediumusingaUSBharddiskdrive,usethefollowinginstructionsto
usetherescuemedium:
1.AttachtheUSBharddiskdrivetooneoftheUSBconnectorsonyourcomputer.
2.RepeatedlypressandreleasetheF12keywhenturningonthecomputer.WhentheBootMenu
windowopens,releasetheF12key.
52UserGuide
Page 69

3.IntheBootMenuwindow,selecttheUSBharddiskdriveastherstbootdeviceandpressEnter.
Therescuemediumstarts.
Whentherescuemediumstarts,theRescueandRecoveryworkspaceopens.Thehelpinformationfor
eachfeatureisavailablefromtheRescueandRecoveryworkspace.Followtheinstructionstocomplete
therecoveryprocess.
Reinstallingpreinstalledprogramsanddevicedrivers
Yourcomputerhasprovisionsthatenableyoutoreinstallselectedfactory-installedprogramsanddevice
drivers.
Reinstallingpreinstalledprograms
Toreinstallselectedprograms,dothefollowing:
1.T urnonyourcomputer.
2.GototheC:\SWTOOL Sdirectory.
3.OpentheAPPSfolder.Initareseveralsubfoldersnamedforthevariouspreinstalledprograms.
4.Openthesubfolderfortheprogramyouarereinstalling.
5.Double-clickSetup,andthenfollowtheon-screenstepstoreinstalltheprogram.
Reinstallingpreinstalleddevicedrivers
Attention:Whenyoureinstalldevicedrivers,youarechangingthecurrentcongurationofyourcomputer.
Reinstalldevicedriversonlywhenitisnecessarytocorrectaproblemwithyourcomputer.
Toreinstalladevicedriverforafactory-installeddevice,dothefollowing:
1.T urnonyourcomputer.
2.GototheC:\SWTOOL Sdirectory.
3.OpentheDRIVERSfolder.WithintheDRIVERSfolderareseveralsubfoldersnamedforthevarious
devicesinstalledinyourcomputer(forexample,AUDIOandVIDEO).
4.Openthesubfolderforthedevice.
5.Reinstallthedevicedriverbyoneofthefollowingmethods:
•Inthesubfolderforthedevice,lookforatextle(alewiththeextension.txt).Thetextlecontains
informationonhowtoreinstallthatdevicedriver.
•Ifthesubfolderforthedevicecontainsaleofsetupinformation(alewiththeextension.inf),you
canusetheAddNewHardwareprogram(intheWindowsControlPanel)toreinstallthedevicedriver.
Notalldevicedriverscanbereinstalledbyuseofthisprogram.IntheAddNewHardwareprogram,
whenpromptedforthedevicedriveryouwanttoinstall,clickHaveDiskandBrowse.Thenselect
thedevicedriverlefromthedevicesubfolder.
•Inthesubfolderforthedevice,lookfortheexecutablele(alewiththeextension.exe).Double-click
thele,andfollowtheinstructionsonthescreen.
Attention:Ifyouneedupdateddevicedrivers,donotdownloadthemfromtheWindowsUpdateWebsite.
ObtainthemfromLenovo.Formoreinformation,see“Makingsuredevicedriversarecurrent”onpage94.
Solvingrecoveryproblems
IfyouareunabletoaccesstheRescueandRecoveryworkspaceortheWindowsenvironment,doone
ofthefollowing:
•UsearescuemediumtostarttheRescueandRecoveryworkspace.See“Creatingandusingarescue
medium”onpage52.
Chapter5.Recoveryoverview53
Page 70

•Userecoverymediaifallothermethodsofrecoveryhavefailedandyouneedtorestoretheharddisk
drivetothefactorydefaultsettings.See“Creatingandusingarecoverymedia”onpage49.
Note:IfyouareunabletoaccesstheRescueandRecoveryworkspaceortheWindowsenvironmentfrom
arescuemediumorrecoverymedia,youmightnothavetherescuedevice(aninternalharddiskdrive,a
disc,aUSBharddiskdrive,orotherexternaldevices)setastherstbootdeviceinthestartupdevice
sequence.Y oumustrstmakesurethatyourrescuedeviceissetastherstbootdeviceinthestartup
devicesequenceintheThinkPadSetupprogram.See“Startupmenu”onpage87
fordetailedinformation
abouttemporarilyorpermanentlychangingthestartupdevicesequence.
Itisimportanttocreatearescuemediumandasetofrecoverymediaasearlyaspossibleandstorethem
inasafeplaceforfutureuse.
RecoveryoverviewfortheWindows8operatingsystem
ThissectionprovidesinformationabouttherecoverysolutionsfortheWindows8operatingsystem.
AWindowsrecoveryimageispreinstalledintherecoverypartitiononyourcomputer.TheWindowsrecovery
imageenablesyoutorefreshyourcomputer,orresetyourcomputertothefactorydefaultsettings.
YoucancreaterecoverymediaasbackupsorreplacementfortheWindowsrecoveryimage.Withthe
recoverymedia,youcantroubleshootandxtheproblemsonyourcomputerevenifyoucannotstartthe
Windows8operatingsystem.Itisrecommendedthatyoucreaterecoverymediaasearlyaspossible.For
moreinformation,see“Creatingandusingrecoverymedia”onpage55.
Refreshingyourcomputer
Ifyourcomputerdoesnotperformwellandtheproblemmightbecausedbyarecentlyinstalledprogram,
youcanrefreshyourcomputerwithoutlosingyourpersonallesorchangingyoursettings.
Attention:Ifyourefreshyourcomputer,theprogramsthatcamewithyourcomputerandtheprogramsthat
youinstalledfromWindowsStorewillbereinstalled,butallotherprogramswillberemoved.
Torefreshyourcomputer,dothefollowing:
1.Moveyourcursortothetop-rightorbottom-rightcornerofthescreentodisplaythecharms.Click
Settings➙ChangePCsettings➙General.
2.IntheRefreshyourPCwithoutaffectingyourlessection,clickGetstarted.
3.Followtheinstructionsonthescreentorefreshyourcomputer.
Resettingyourcomputertothefactorydefaultsettings
Ifyouwanttorecycleyourcomputerorjuststartover,youcanresetyourcomputertothefactorydefault
settings.Resettingthecomputerwillreinstalltheoperatingsystem,reinstallalltheprogramsthatcamewith
yourcomputer,andresetallthesettingstothefactorydefaultsettings.
Attention:Ifyouresetthecomputertothefactorydefaultsettings,allyourpersonallesandsettingswillbe
deleted.Toavoiddataloss,makeabackupcopyofallthedatathatyouwanttokeep.
Toresetyourcomputertothefactorydefaultsettings,dothefollowing:
1.Moveyourcursortothetop-rightorbottom-rightcornerofthescreentodisplaythecharms.Click
Settings➙ChangePCsettings➙General.
2.IntheRemoveeverythingandreinstallWindowssection,clickGetstarted.ThenclickNextto
conrmtheoperation.
3.Dependingonyourneeds,dooneofthefollowing:
54UserGuide
Page 71

•Toperformaquickformat,clickJustremovemylestostarttheprocess.Theprocesswilltake
severalminutes.
•Toperformacompleteformat,clickFullycleanthedrivetostarttheprocess.Theprocesswill
takeseveralhours.
4.Followtheinstructionsonthescreentoresetyourcomputertothefactorydefaultsettings.
Usingtheadvancedstartupoptions
Withtheadvancedstartupoptions,youcanchangethermwaresettingsofthecomputer,changethe
startupsettingsoftheWindowsoperatingsystem,startthecomputerfromanexternaldevice,orrestorethe
Windowsoperatingsystemfromasystemimage.
Tousetheadvancedstartupoptions,dothefollowing:
1.Moveyourcursortothetop-rightorbottom-rightcornerofthescreentodisplaythecharms.Click
Settings➙ChangePCsettings➙General.
2.IntheAdvancedstartupsection,clickRestartnow➙Troubleshoot➙Advancedoptions.
3.Selectadesiredstartupoption,thenfollowtheinstructionsonthescreen.
RecoveringyouroperatingsystemifWindows8failstostart
TheWindowsrecoveryenvironmentonyourcomputeriscapableofoperatingindependentlyfromthe
Windows8operatingsystem.Thisenablesyoutorecoverorrepairtheoperatingsystemevenifthe
Windows8operatingsystemfailstostart.
Aftertwoconsecutivefailedbootattempts,theWindowsrecoveryenvironmentstartsautomatically.Then
youcanchooserepairandrecoveryoptionsbyfollowingtheinstructionsonthescreen.
Note:Ensurethatyourcomputerisconnectedtoacpowerduringtherecoveryprocess.
Creatingandusingrecoverymedia
YoucancreaterecoverymediaasbackupsfortheWindowsrecoveryenvironmentandtheWindows
recoveryimage.Ifyoucannotstartthecomputer,youcanuserecoverymediatotroubleshootandxthe
problemsonyourcomputer.
Itisrecommendedthatyoucreaterecoverymediaasearlyaspossible.Onceyoucreaterecoverymedia,
keeptheminasafeplaceanddonotusethemtostoreotherdata.
Creatingrecoverymedia
Tocreaterecoverymedia,youneedaUSBdrivewithatleast8GBofstorage.TherequiredUSBcapacity
dependsonthesizeoftherecoveryimage.
Attention:CreatingrecoverymediawilldeleteanythingstoredontheUSBdrive.Toavoiddataloss,makea
backupcopyofallthedatathatyouwanttokeep.
Tocreaterecoverymedia,dothefollowing:
Note:Ensurethatyourcomputerisconnectedtoacpower.
1.Moveyourcursortothetop-rightorbottom-rightcornerofthescreentodisplaythecharms,and
clickSearch.
2.T yperecoveryintheSearcheldandclickSettings.ThenclickCreatearecoverydrive.
3.ClickYesintheUserAccountControlwindowtoallowtheRecoveryMediaCreatorprogramtostart.
Chapter5.Recoveryoverview55
Page 72

4.EnsurethatyouselecttheCopytherecoverypartitionfromthePCtotherecoverydrive.option.
ThenclickNext.
Important:IfyoucleartheCopytherecoverypartitionfromthePCtotherecoverydrive.option,
youwillcreaterecoverymediawithouttherecoverypartitioncontent.Youstillcanstartthecomputer
fromtherecoverymedia,butyoumightbeunabletorecoveryourcomputeriftherecoverypartitionon
yourcomputerisdamaged.
5.ConnectaproperUSBdrivethenclickNext.
6.ClickCreateintheRecoveryDrivewindow.Thecreationoftherecoverymediastarts.
7.Whenthecreationoftherecoverymedianishes,dooneofthefollowing:
•Tokeeptherecoverypartitiononyourcomputer,clickFinish.
•Todeletetherecoverypartitiononyourcomputer,clickDeletetherecoverypartition.
Attention:Ifyoudeletetherecoverypartitiononyourcomputer,dokeeptherecoverymediaina
safeplace.TheWindowsrecoveryimagewillnotbestoredinyourcomputeranymore,andyouwill
needtherecoverymediatorefreshorresetyourcomputer.
8.RemovetheUSBdrive.Therecoverymediaarecreatedsuccessfully.
Usingrecoverymedia
Ifyoucannotstartyourcomputer,orifyoucannotstarttheWindowsrecoveryimageonyourcomputer,use
recoverymediatorecoveryourcomputer.
Touserecoverymedia,dothefollowing:
Note:Ensurethatyourcomputerisconnectedtoacpower.
1.T urnonorrestartthecomputer.BeforetheWindowsoperatingsystemstarts,repeatedlypresstheF12
key.TheBootMenuwindowopens.
2.Selecttherecoverydriveasthebootdevice.
3.Selectapreferredlanguageandthenselectapreferredkeyboardlayout.
4.ClickTroubleshoottodisplaytheoptionalrecoverysolutions.
5.Selectacorrespondingrecoverysolutionaccordingtoyoursituation.Forexample,selectResetyour
PCifyouwanttoresetyourcomputertothefactorydefaultsettings.
FormoreinformationabouttherecoverysolutionsprovidedbytheWindows8operatingsystem,goto:
http://go.microsoft.com/fwlink/?LinkID=263800
56UserGuide
Page 73

Chapter6.Replacingdevices
Thischapterprovidesinstructionsonhowtoinstallorreplacehardwareforyourcomputer.
•“Staticelectricityprevention”onpage57
•“Replacingthebattery”onpage57
•“Replacingtheharddiskdriveorsolid-statedrive”onpage59
•“ReplacingaPCIExpressMiniCardforwirelessLANconnection”onpage62
•“Replacingamemorymodule”onpage64
•“Replacingthekeyboard”onpage67
•“Replacingthebackupbattery”onpage72
Staticelectricityprevention
Staticelectricity,althoughharmlesstoyou,canseriouslydamagecomputercomponentsandoptions.
Improperhandlingofstatic-sensitivepartscancausedamagetothepart.Whenyouunpackanoptionor
aCRU,donotopenthestatic-protectivepackagecontainingthepartuntiltheinstructionsdirectyou
toinstallit.
WhenyouhandleoptionsorCRUs,orperformanyworkinsidethecomputer,takethefollowingprecautions
toavoidstatic-electricitydamage:
•Limityourmovement.Movementcancausestaticelectricitytobuilduparoundyou.
•Alwayshandlecomponentscarefully.Handleadapters,memorymodules,andothercircuitboardsbythe
edges.Nevertouchexposedcircuitry.
•Preventothersfromtouchingcomponents.
•Whenyouinstallastatic-sensitiveoptionorCRU,touchthestatic-protectivepackagecontainingthe
parttoametalexpansion-slotcoverorotherunpaintedmetalsurfaceonthecomputerforatleasttwo
seconds.Thisreducesstaticelectricityfromthepackageandyourbody.
•Whenpossible,removethestatic-sensitivepartfromthestatic-protectivepackagingandinstallthepart
withoutsettingitdown.Whenthisisnotpossible,placethestatic-protectivepackagingonasmooth,
levelsurfaceandplacethepartonit.
•Donotplacethepartonthecomputercoverorothermetalsurface.
Replacingthebattery
Beforeyoustart,printtheseinstructions.
ThissystemsupportsonlybatteriesspeciallydesignedforthisspecicsystemandmanufacturedbyLenovo
oranauthorizedbuilder.Thesystemdoesnotsupportunauthorizedbatteriesorbatteriesdesignedforother
systems.Ifanunauthorizedbatteryorabatterydesignedforanothersystemsisinstalled,thesystemwill
notcharge.
Attention:Lenovohasnoresponsibilityfortheperformanceorsafetyofunauthorizedbatteries,and
providesnowarrantiesforfailuresordamagearisingoutoftheiruse.
Note:Ifanunauthorizedbatteryisinstalled,thefollowingmessagewillbedisplayed:“Thebatteryinstalled
isnotsupportedbythissystemandwillnotcharge.PleasereplacethebatterywiththecorrectLenovo
batteryforthissystem.”
©CopyrightLenovo2013
57
Page 74
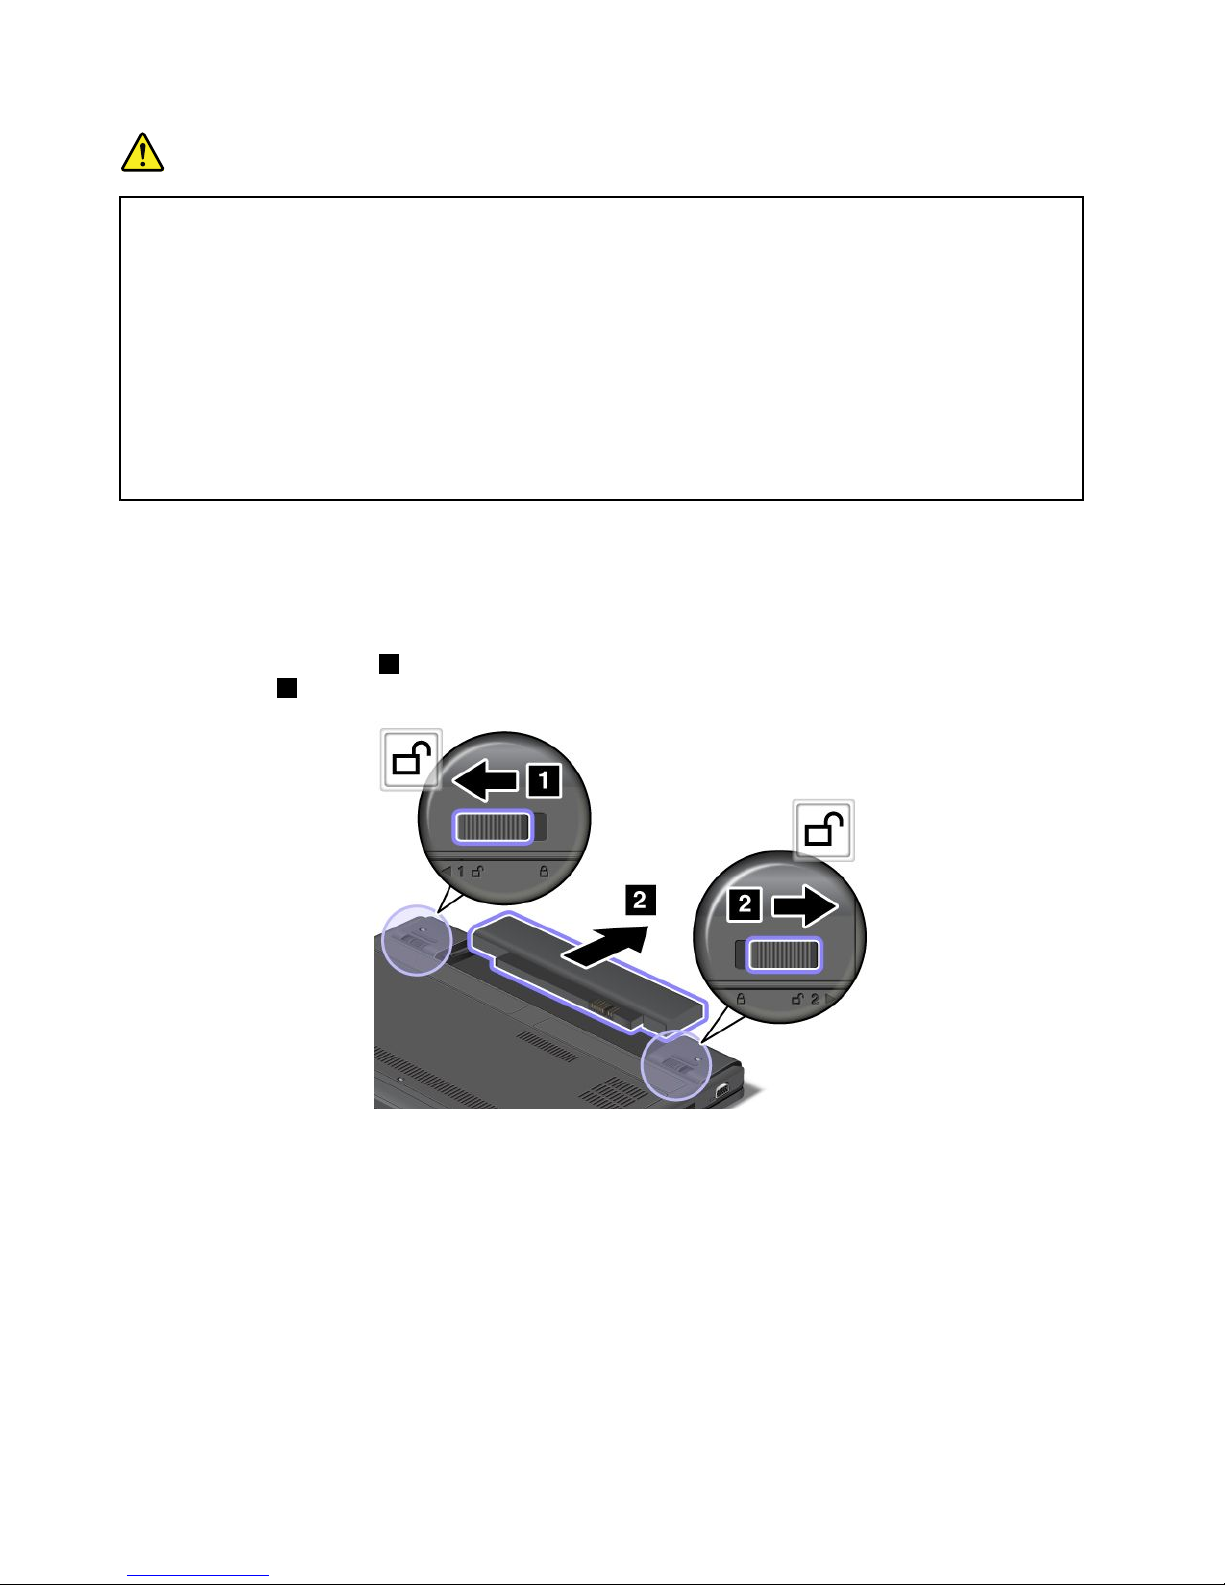
DANGER
Iftherechargeablebatterypackisincorrectlyreplaced,thereisdangerofanexplosion.Thebattery
packcontainsasmallamountofharmfulsubstances.Toavoidinjury:
•ReplaceonlywithabatteryofthetyperecommendedbyLenovo.
•Keepthebatterypackawayfromre.
•Donotexposethebatterytoexcessiveheat.
•Donotexposethebatterytowaterorrain.
•Donotshort-circuitthebattery.
•Donotdrop,crush,puncture,orsubjecttostrongforces.Batteryabuseormishandlingcan
causethebatterytooverheat,whichcancausegassesorameto“vent”fromthebattery
packorcoincell.
Toreplacethebattery,dothefollowing:
1.T urnoffthecomputer,orenterhibernationmode.Thendisconnecttheacpoweradapterandallcables
fromthecomputer.
2.Closethecomputerdisplayandturnthecomputerover.
3.Unlockthebatterylatch1.Holdingthebatterylockleverintheunlockedpositionandremovethe
batterypack2.
58UserGuide
Page 75
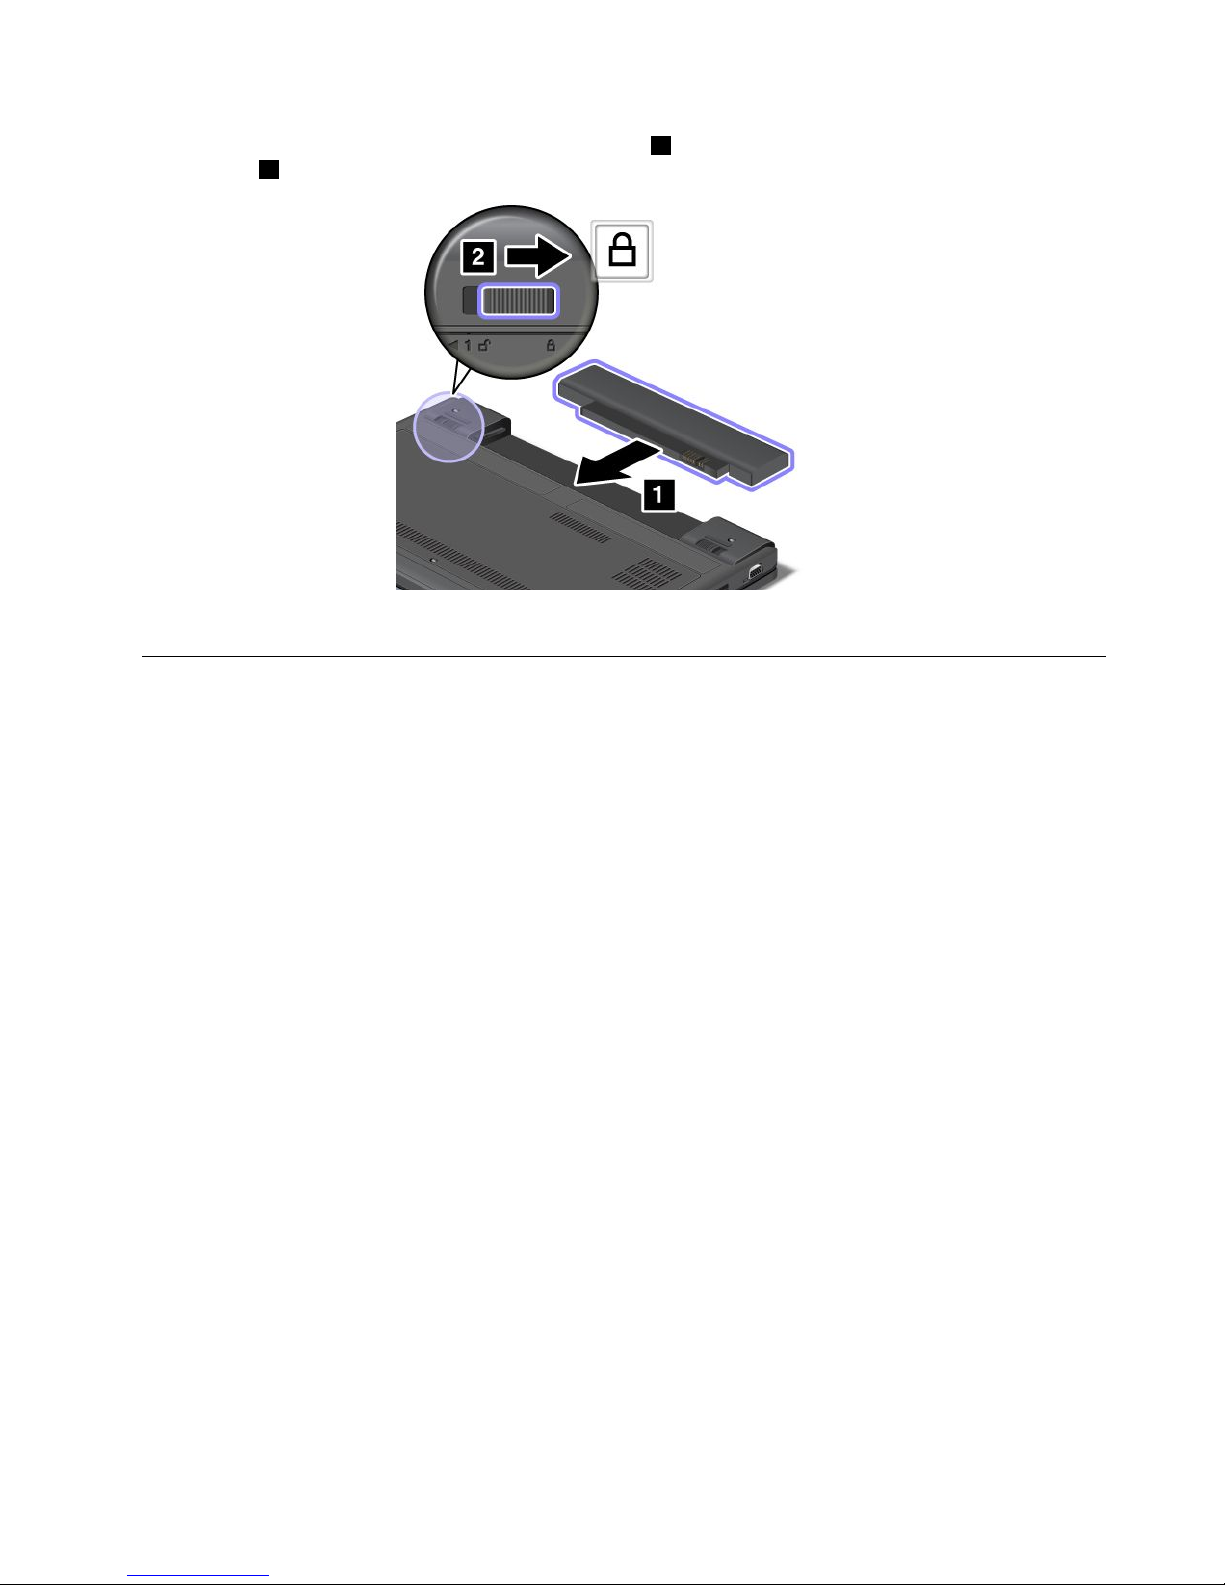
4.Insertafullychargedbatteryuntilitclicksintoplace1,andthenslidethebatterylatchtothelocked
position2.
5.T urnthecomputeroveragain.Connecttheacpoweradapterandallcables.
Replacingtheharddiskdriveorsolid-statedrive
Beforeyoustart,printtheseinstructions.
Attention:Theharddiskdriveorsolid-statedriveisverysensitive.Incorrecthandlingcancausedamage
andpermanentlossofdata.Observethefollowingguidelines:
•Replacetheharddiskdriveorsolid-statedriveonlyifyouupgradeitorhaveitrepaired.Theconnectors
andslotoftheharddiskdriveorsolid-statedrivearenotdesignedforfrequentchanges,ordrive
swapping.
•Donotdropthedriveorsubjectittophysicalshocks.Putthedriveonamaterial,suchassoftcloth,that
absorbsanyphysicalshocks.
•Donotapplypressuretothecoverofthedrive.
•Donottouchtheconnector.
•Beforeremovingtheharddiskdriveorsolid-statedrive,makeabackupcopyofalltheinformation
onit,andthenturnthecomputeroff.
•Neverremovethedrivewhilethecomputerisoperating,insleepmode,orinhibernationmode.
Toreplacetheharddiskdriveorsolid-statedrive,dothefollowing:
1.T urnoffthecomputer;thendisconnecttheacpoweradapterandallcablesfromthecomputer.
2.Closethecomputerdisplay,andturnthecomputerover.
3.Removethebattery.See“Replacingthebattery”onpage57.
Chapter6.Replacingdevices59
Page 76
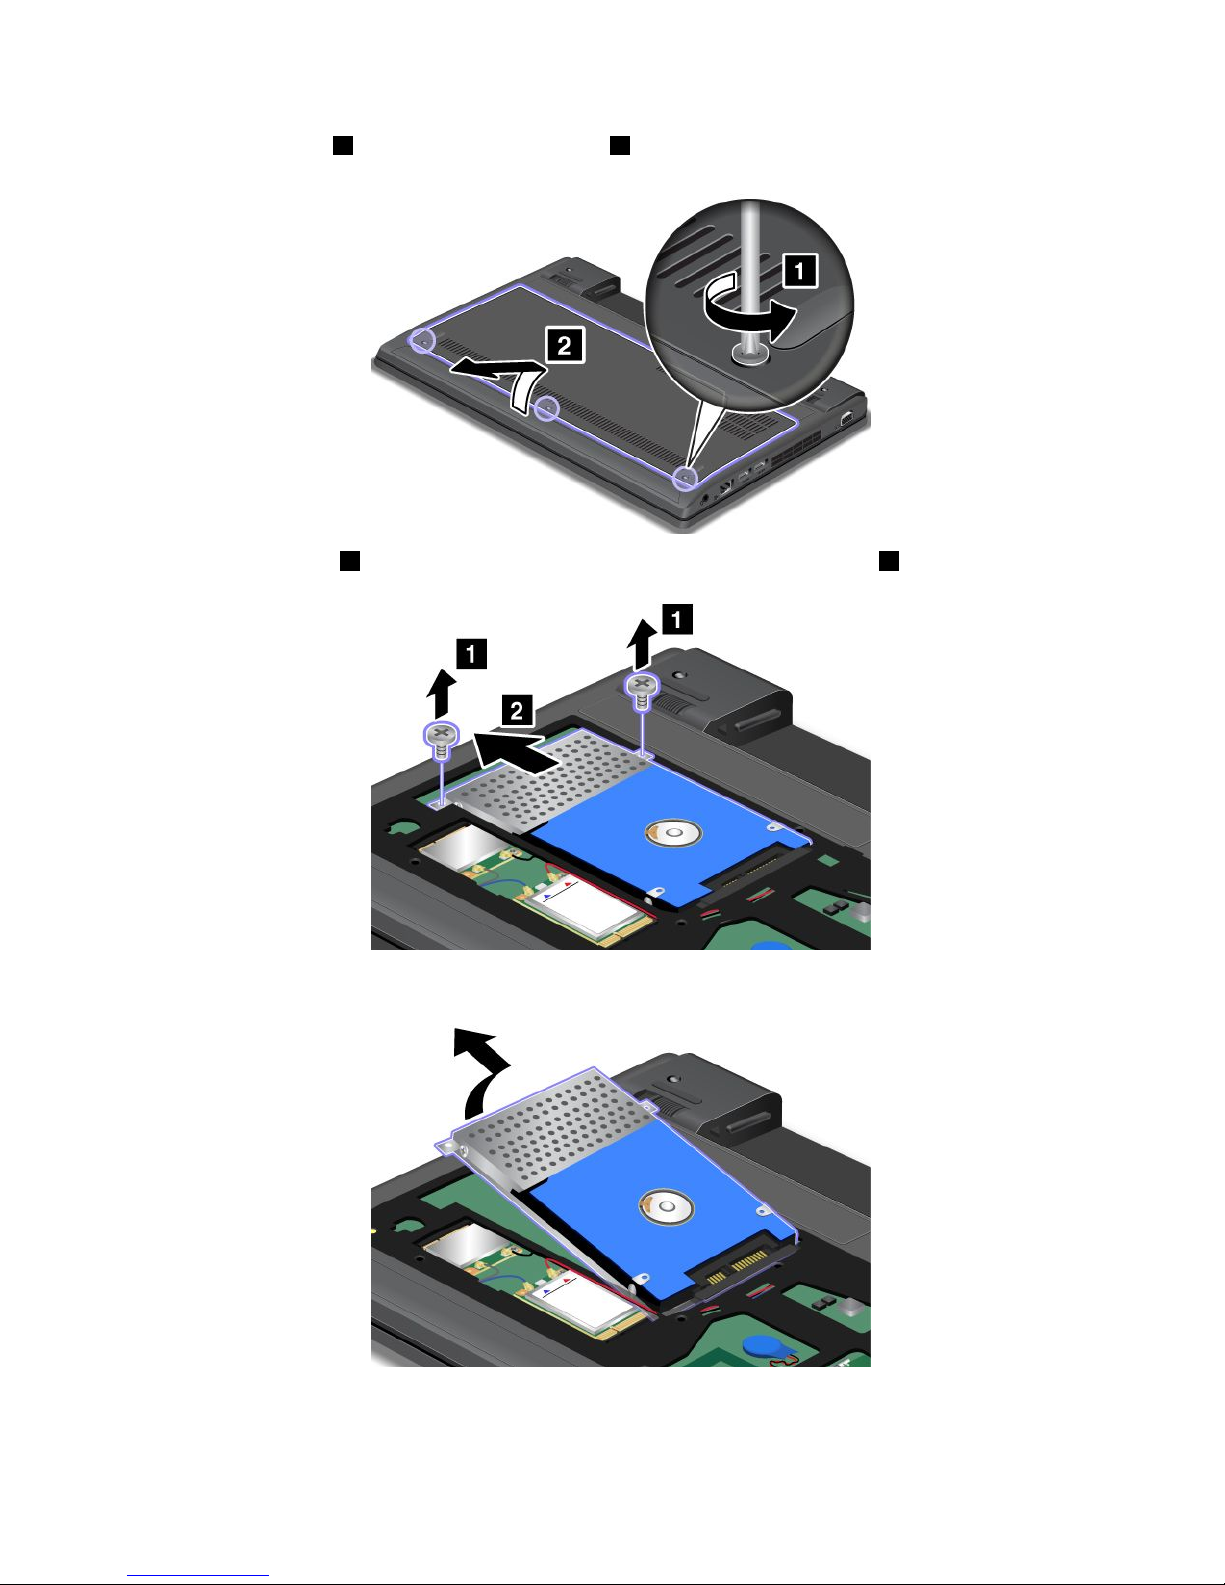
4.Loosenthescrews1,andthenremovethecover2.
5.Removethescrews1,andthenslidetheharddiskdriveorsolid-statedriveout2.
6.Removetheharddiskdriveorsolid-statedrivebyliftingitsleftside.
60UserGuide
Page 77
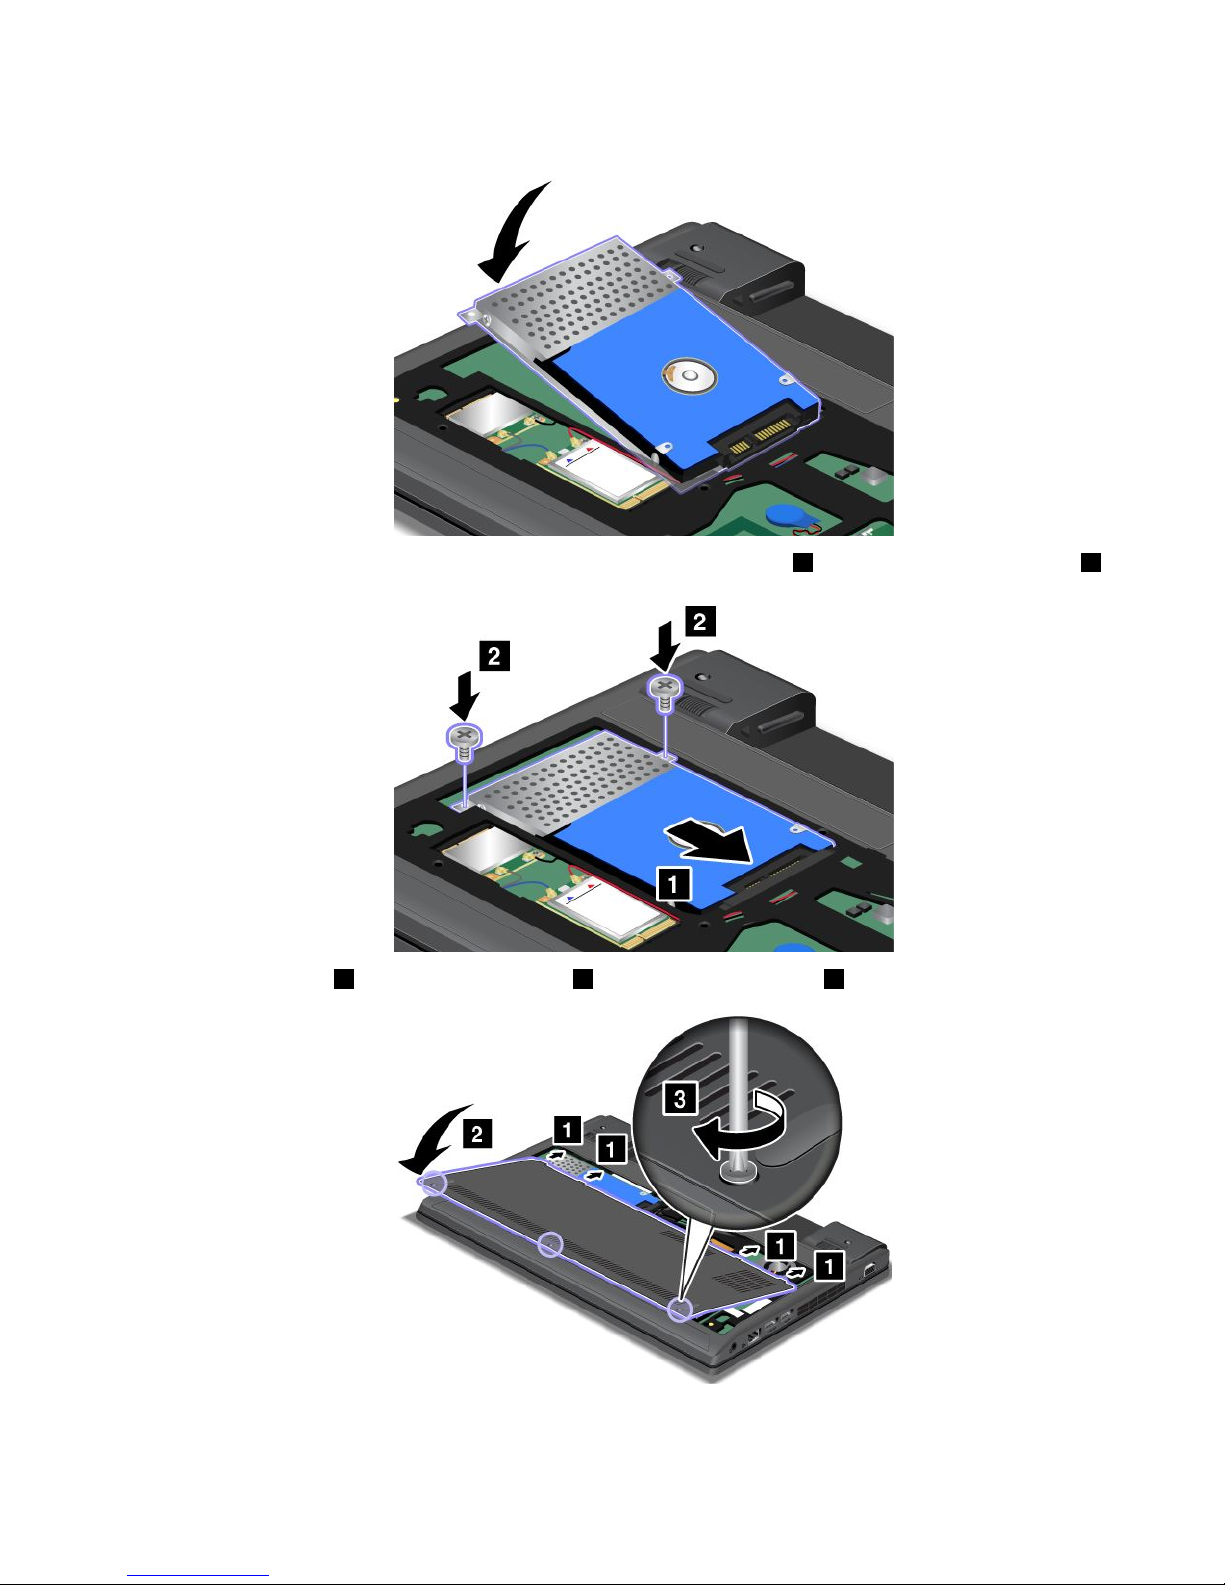
7.Placethenewharddiskdriveorsolid-statedriveintotheharddiskdriveorsolid-statedrivebay.
8.Slidetheharddiskdriveorsolid-statedrivermlyintotheconnector1,andthenreinstallthescrews2.
9.Attachthecover1andpivotitdownwards2.Thentightenthescrews3.
10.Reinstallthebattery.See“Replacingthebattery”onpage57.
11.T urnthecomputeroveragain.Connecttheacpoweradapterandallcables.
Chapter6.Replacingdevices61
Page 78
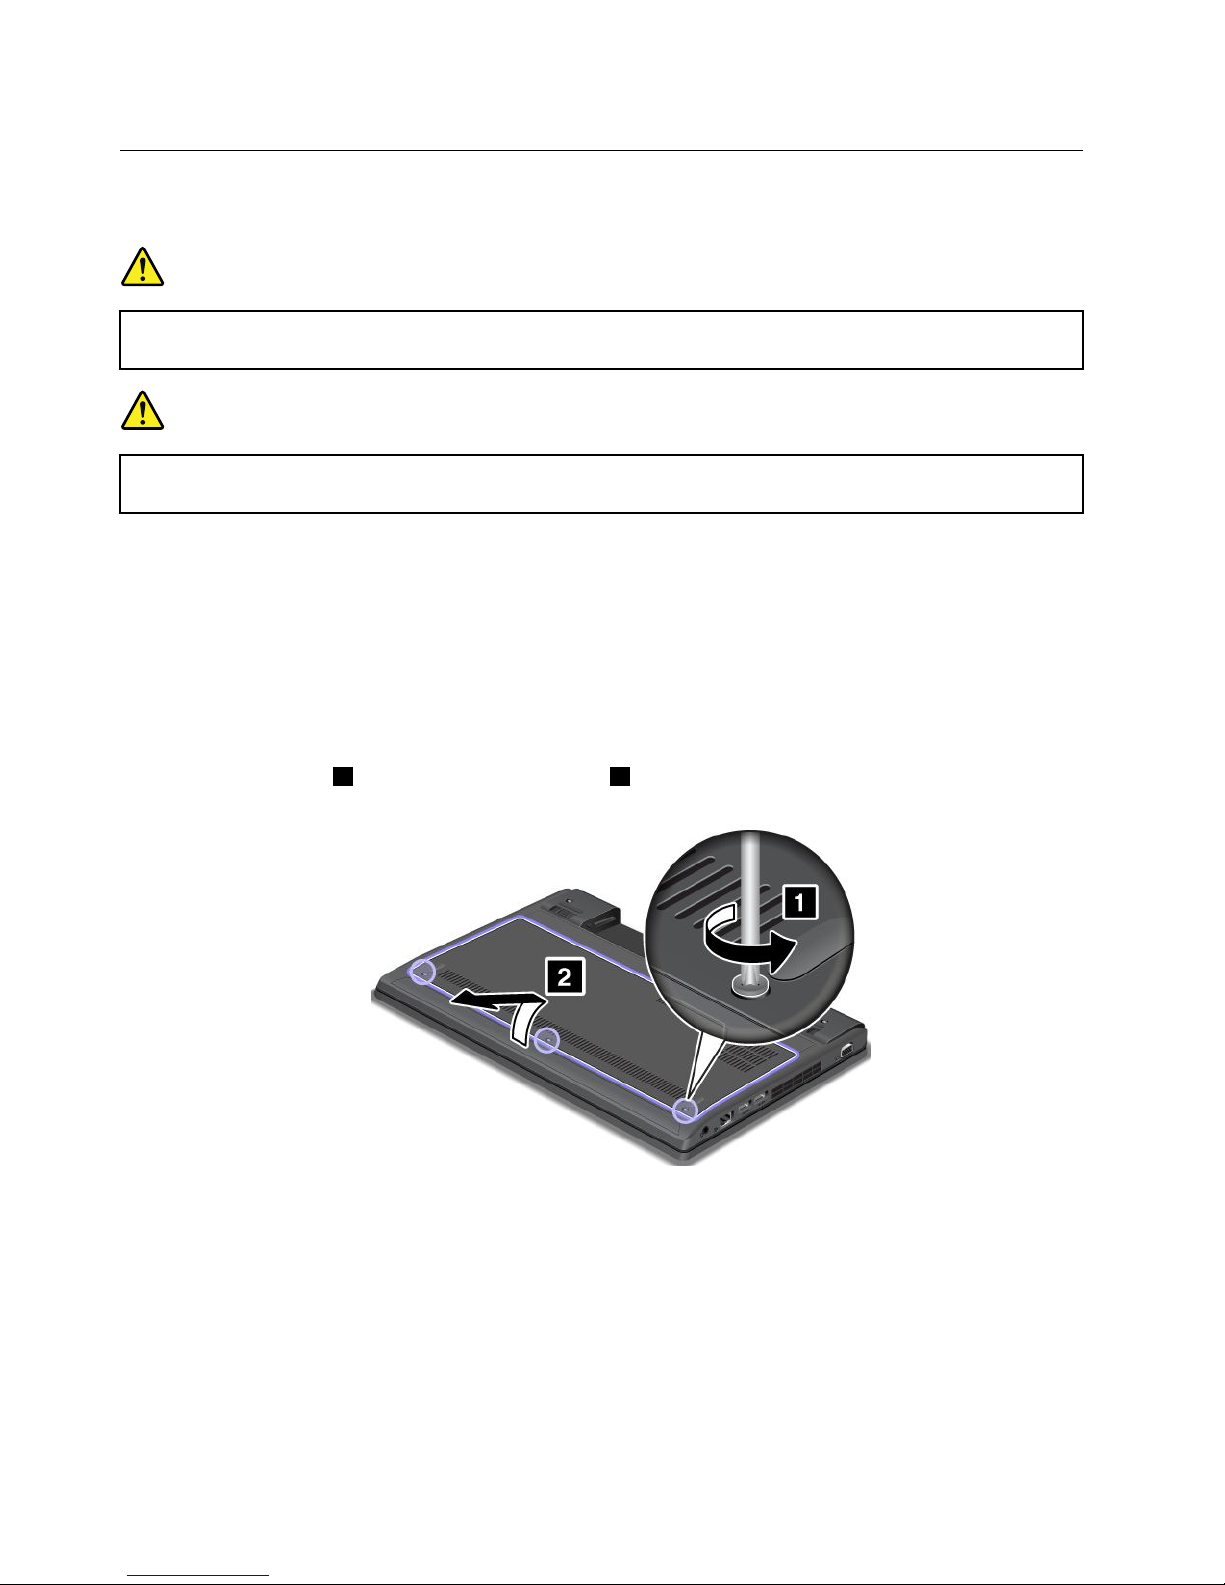
ReplacingaPCIExpressMiniCardforwirelessLANconnection
Beforeyoustart,printtheseinstructions.
DANGER
Duringelectricalstorms,donotconnectthecabletoordisconnectitfromthetelephoneoutlet
onthewall.
DANGER
Electriccurrentfrompower,telephone,andcommunicationcablesishazardous.T oavoidshock
hazard,disconnectthecablesbeforeopeningthecoverofthisslot.
Attention:BeforeyoustartinstallingaPCIExpressMiniCard,touchametaltableoragroundedmetal
object.Thisactionreducesanystaticelectricityfromyourbody.Thestaticelectricitycoulddamagethecard.
ToreplacethePCIExpressMiniCardforwirelessLANconnection,dothefollowing:
1.T urnoffthecomputer;thendisconnecttheacpoweradapterandallcablesfromthecomputer.Wait
threetoveminutestoletthecomputercool.
2.Closethecomputerdisplay,andturnthecomputerover.
3.Removethebattery.See“Replacingthebattery”onpage57.
4.Loosenthescrews1,andthenremovethecover2.
62UserGuide
Page 79
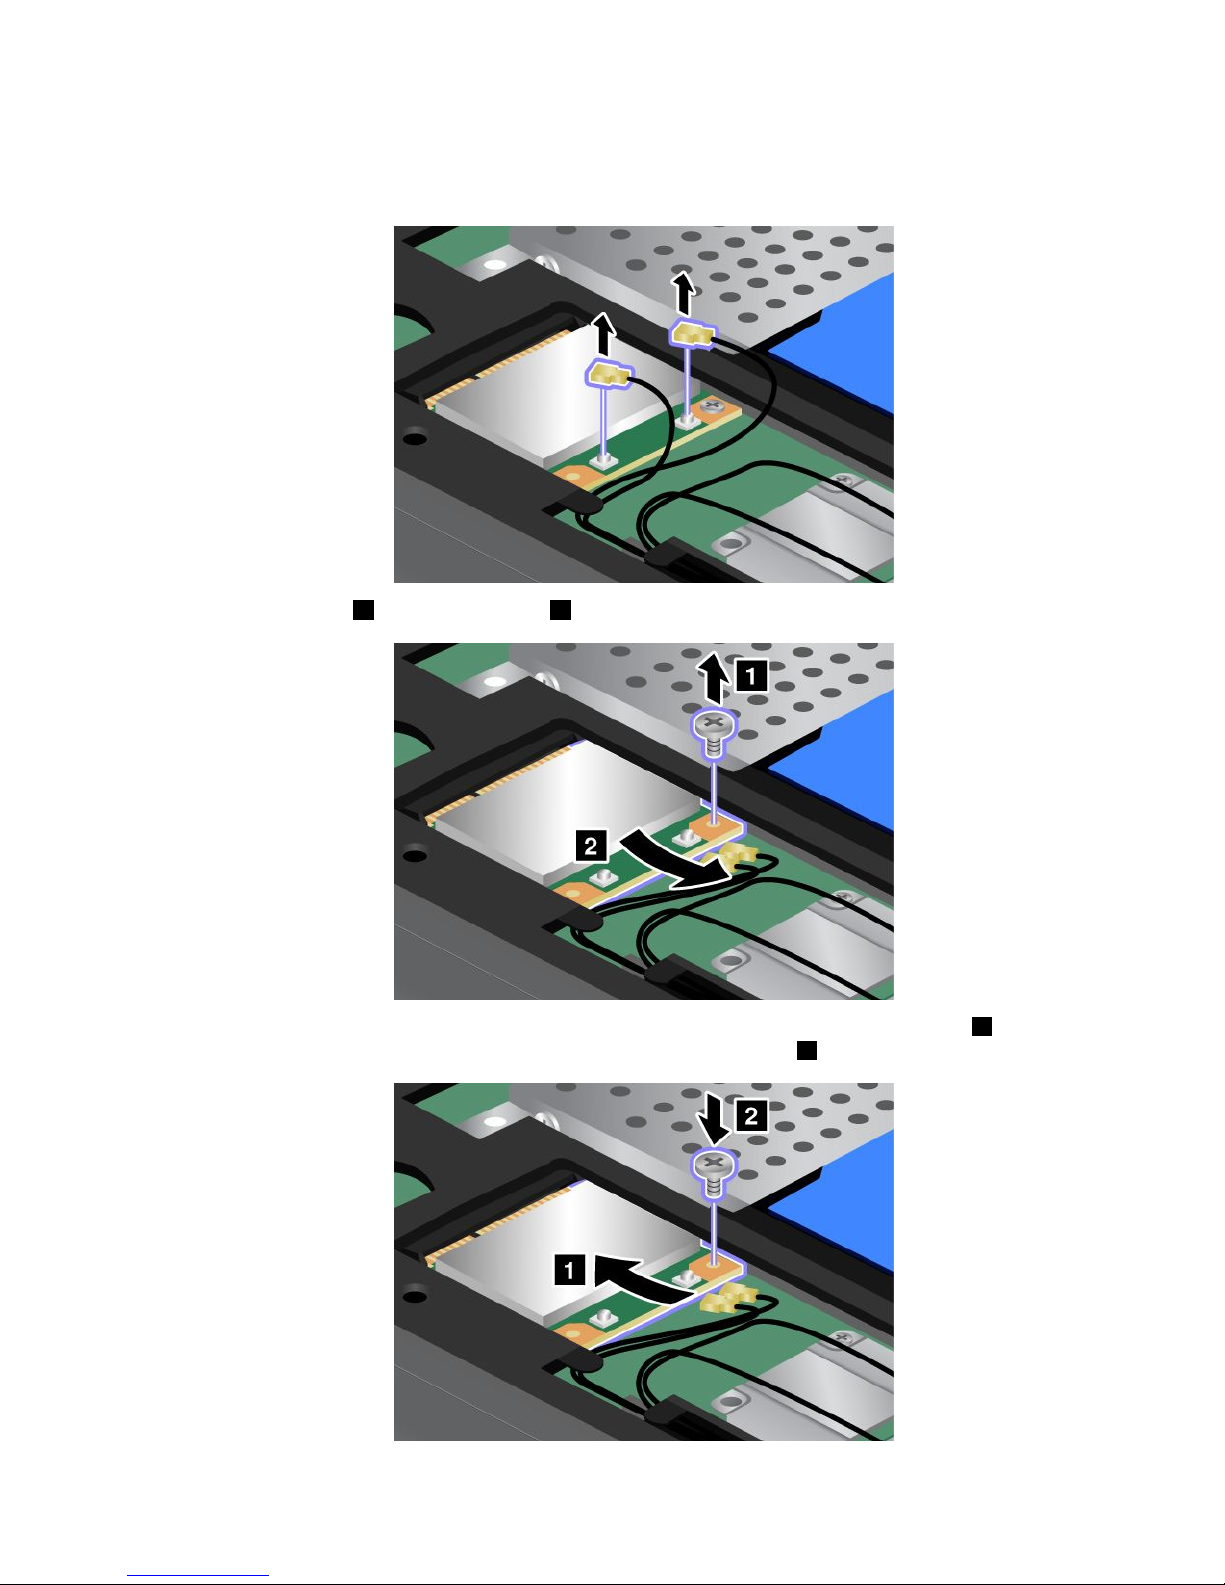
5.Ifatoolforremovingconnectorsisincludedinthepackagewiththenewcard,useittodisconnectthe
cablesfromthecard.Ifnosuchtoolisincluded,disconnectthecablesbypickinguptheconnectors
withyourngersandgentlyunpluggingthem.
6.Removethescrew1.Thecardpopsup2.Removethecard.
7.AlignthecontactedgeofthenewPCIExpressMiniCardwiththecorrespondingsocket1.Pivotthe
carduntilyoucansnapitintoplace.Securethecardwiththescrew2.
Chapter6.Replacingdevices63
Page 80
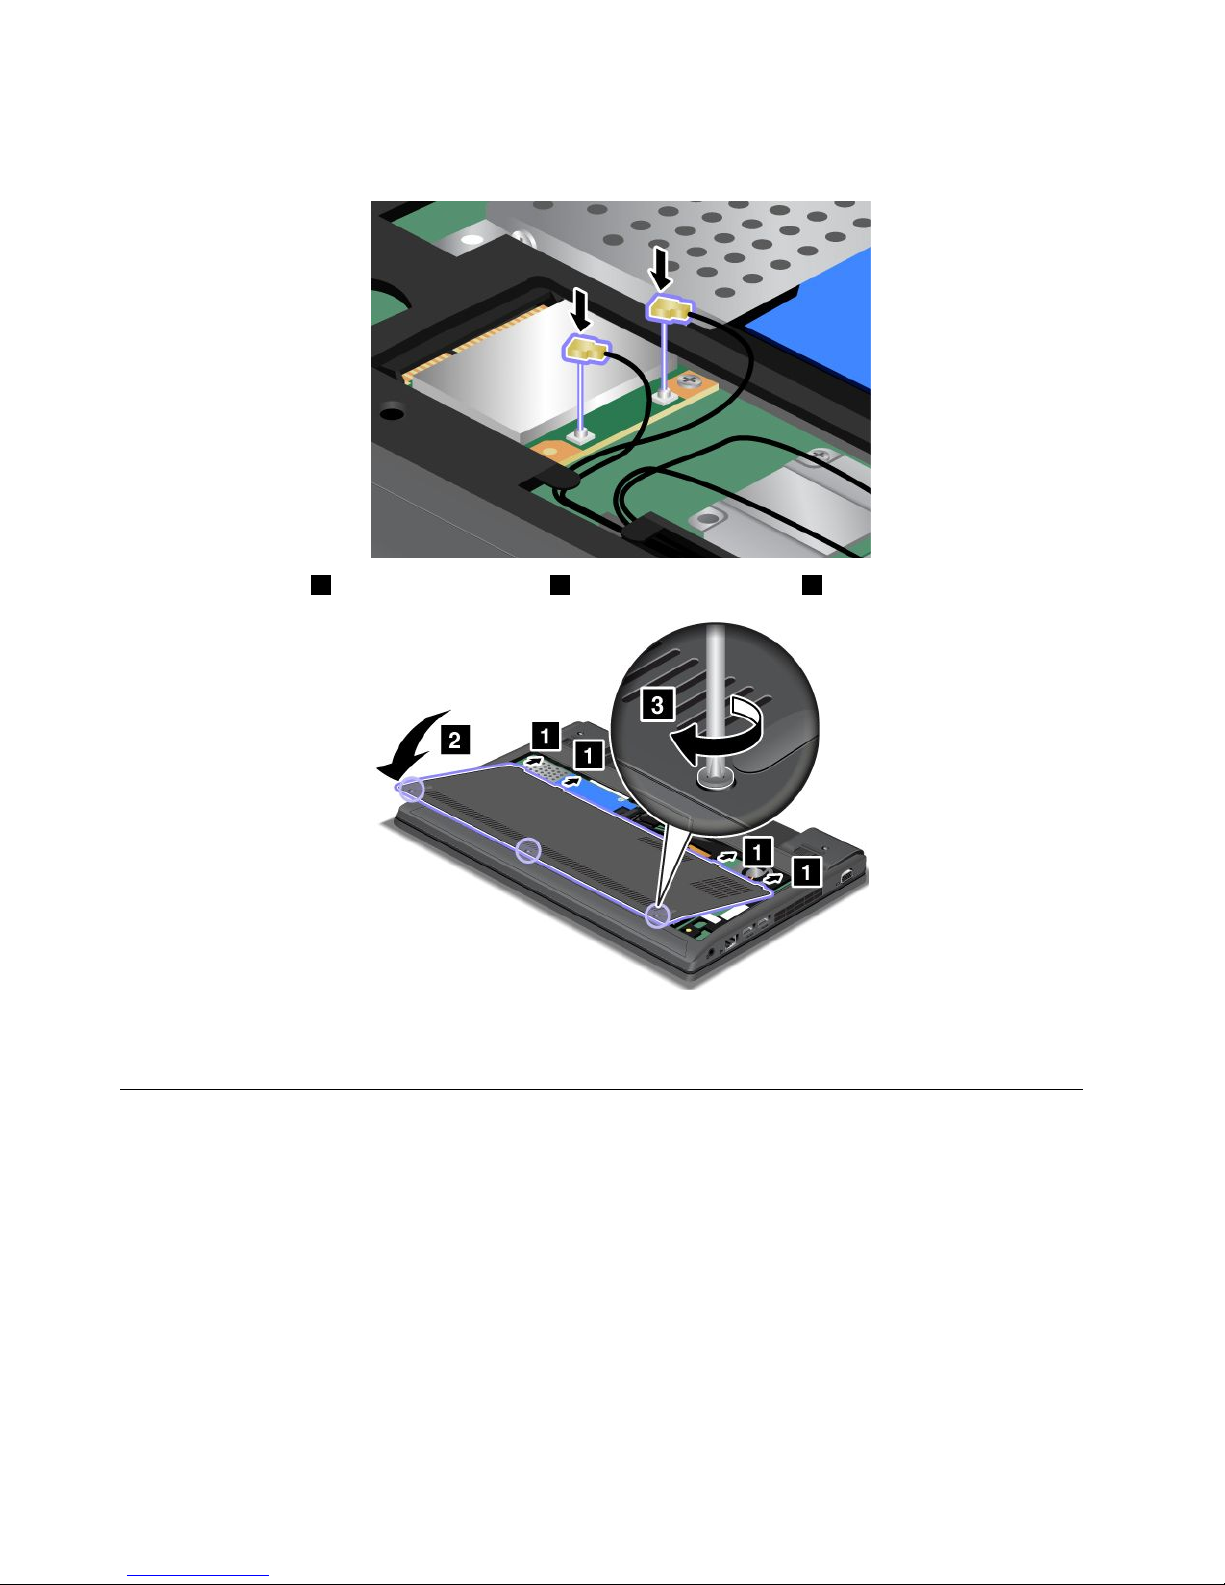
8.ConnecttheantennacablestothenewPCIExpressMiniCard.Besuretoattachthegraycabletothe
connectormarked“MAIN”or“M”onthecard,andtheblackcabletotheconnectormarked“AUX”or“A.”
9.Attachthecover1andpivotitdownwards2.Thentightenthescrews3.
10.Reinstallthebattery.See“Replacingthebattery”onpage57.
11.T urnthecomputeroveragain.Connecttheacpoweradapterandallcables.
Replacingamemorymodule
Beforeyoustart,printtheseinstructions.
Increasingmemorycapacityisaneffectivewaytomakeprogramsrunfaster.Toreplaceoraddamemory
module,readthefollowingprerequisites,andthentheinstructions.
Whenreplacingamemorymodule,besuretofollowtheprecautions.
Note:Theoperatingspeedofthememorymodulehasdependencyonthesystemconguration.Insome
conditions,thememorymoduleinyourcomputermightnotbeabletooperateatthemaximumspeed.
Attention:Beforeyoustartinstallingamemorymodule,touchametaltableoragroundedmetalobject.This
actionreducesanystaticelectricityfromyourbody.Thestaticelectricitycoulddamagethememorymodule.
64UserGuide
Page 81
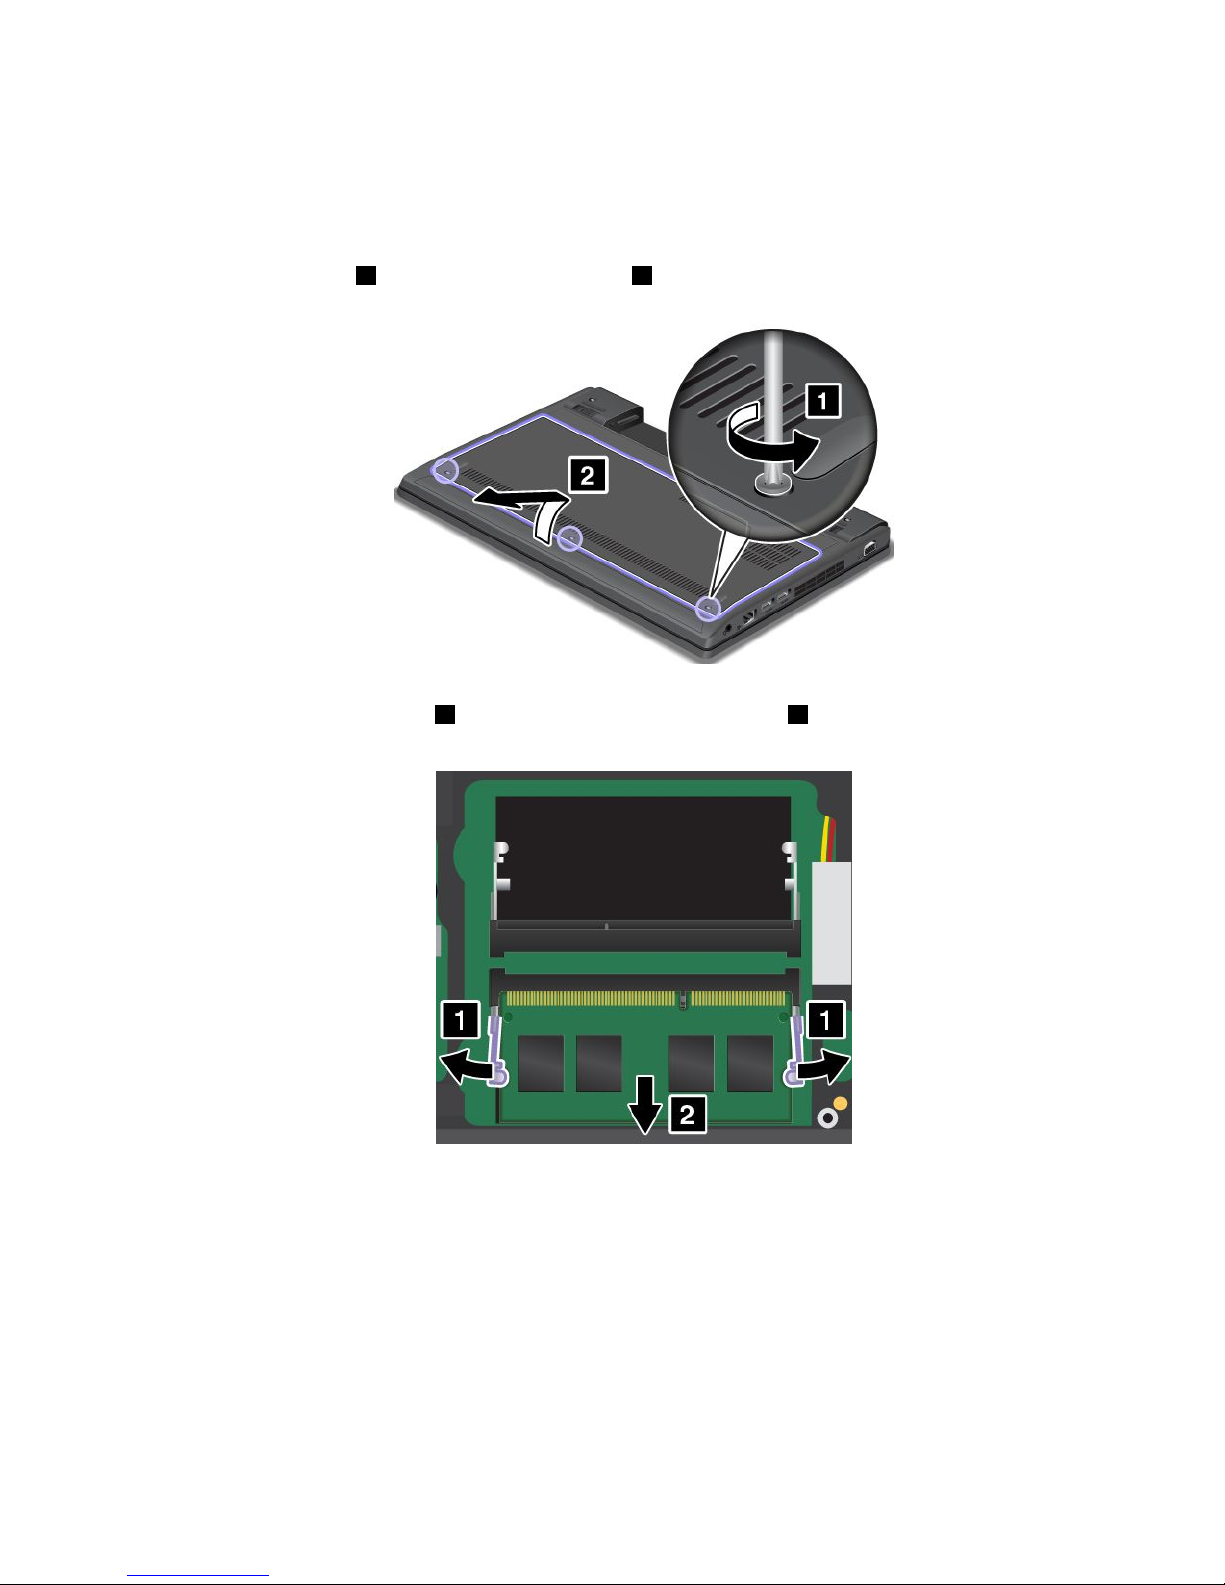
Toreplaceamemorymodule,dothefollowing:
1.T urnoffthecomputer;thendisconnecttheacpoweradapterandallcablesfromthecomputer.
2.Closethecomputerdisplay,andturnitover.
3.Removethebattery.See“Replacingthebattery”onpage57.
4.Loosenthescrews1,andthenremovethecover2.
5.Iftwomemorymodulesarealreadyinthememoryslots,pressoutonthelatchesonbothedgesof
thesocketatthesametime
1,andthenremoveamemorymodule2tomakeroomforthenewone.
Savetheremovedmemorymoduleforfutureuse.
6.Findthenotchonthecontactedgesideofthememorymoduleyouareinstalling.
Attention:Toavoiddamagingthememorymodule,donottouchitscontactedge.
Chapter6.Replacingdevices65
Page 82
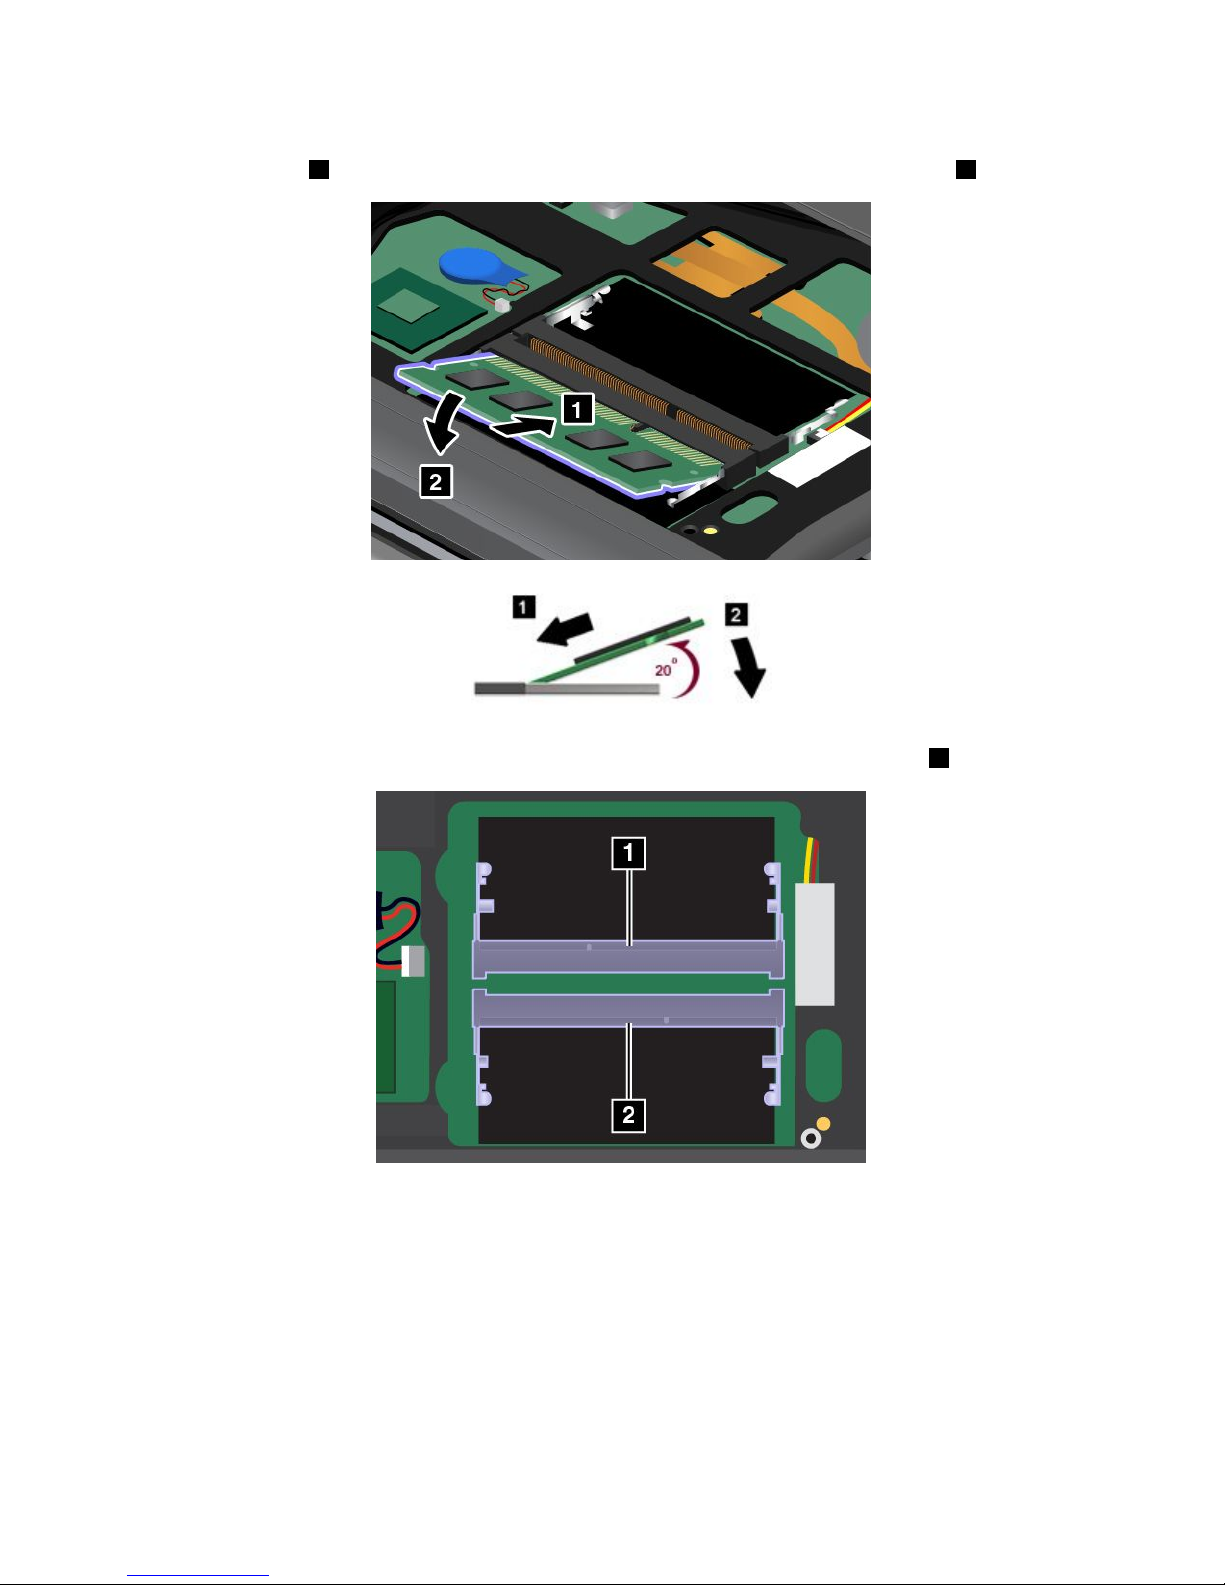
7.Withthenotchedendofthememorymoduletowardthecontactedgesideofthesocket,insertthe
memorymodule1intothesocketatanangleofabout20degrees;thenpressitinrmly2.
Important:Ifonlyonememorymoduleisinstalled,ensurethatyouinstallitintheslot2.
8.Pivotthememorymoduledownwarduntilitsnapsintoplace.
9.Makesurethatthememorymoduleisrmlyinstalledintheslotandcannotbemovedeasily.
66UserGuide
Page 83
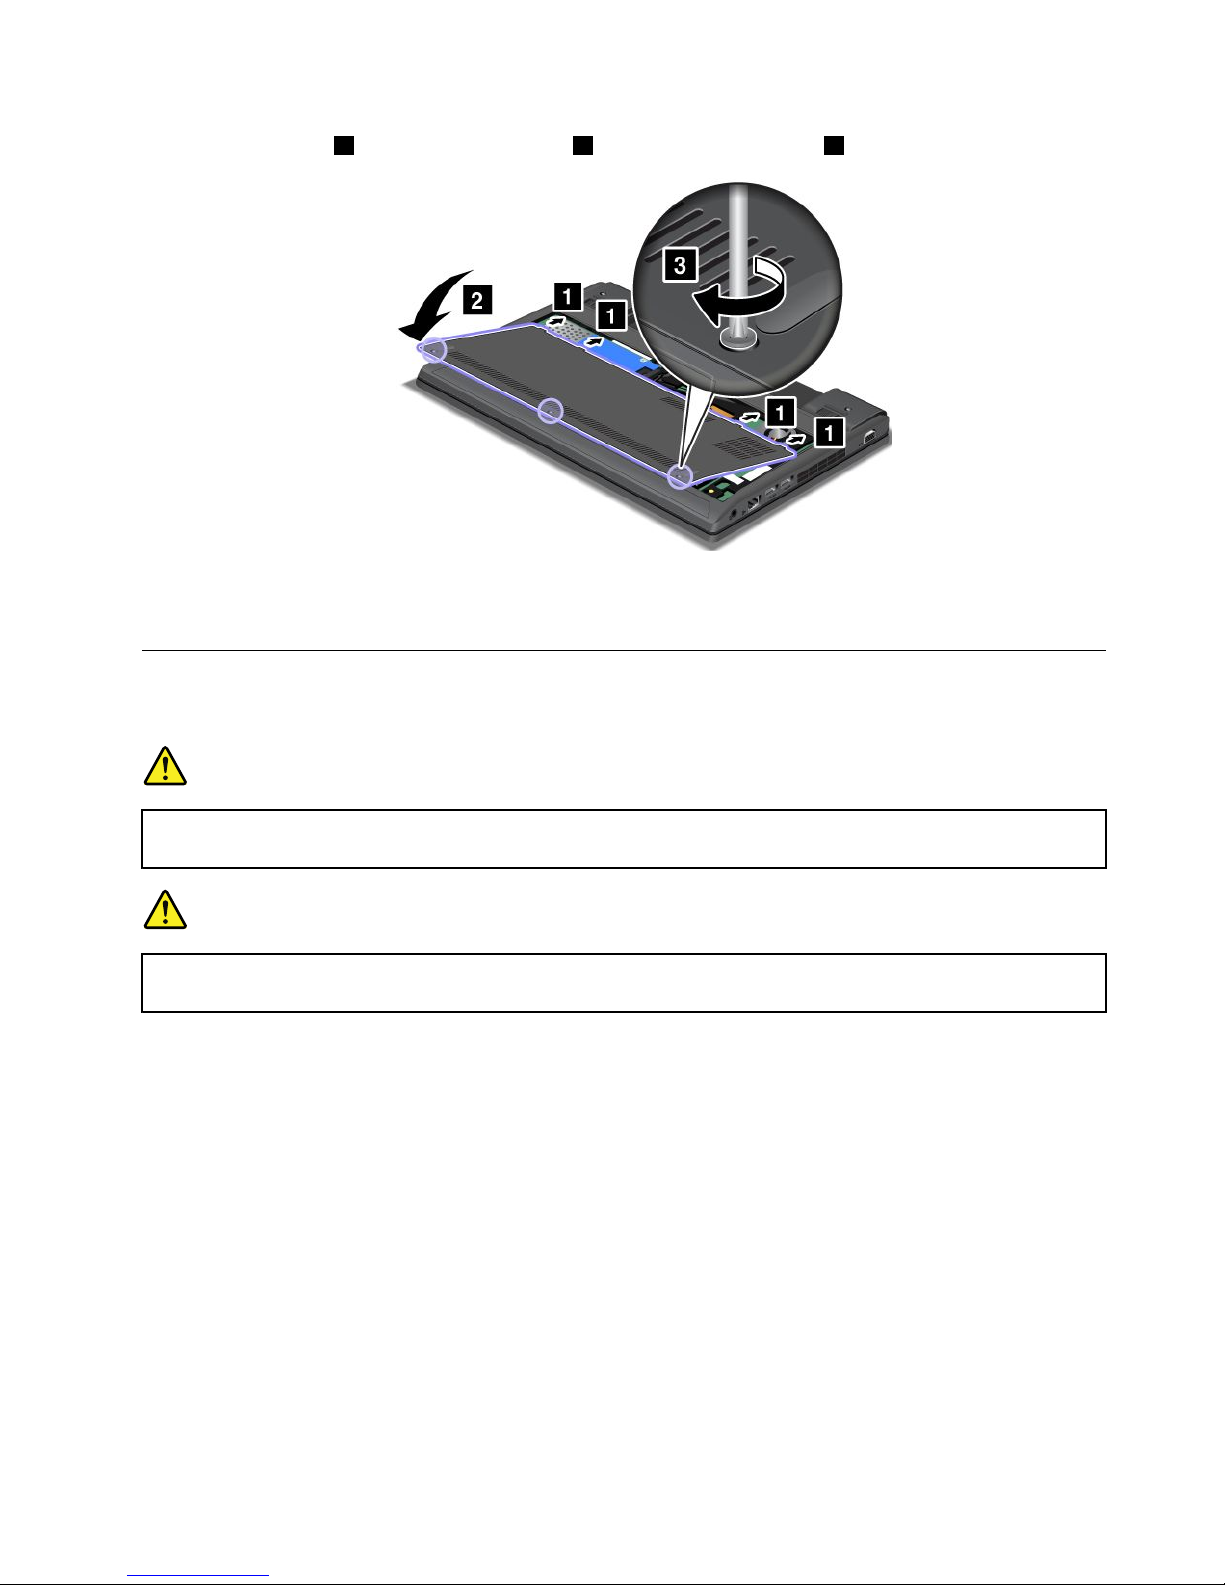
10.Attachthecover1andpivotitdownwards2.Thentightenthescrews3.
11.Reinstallthebattery.See“Replacingthebattery”onpage57.
12.T urnthecomputeroveragain.Connecttheacpoweradapterandallcables.
Replacingthekeyboard
Beforeyoustart,printtheseinstructions.
DANGER
Duringelectricalstorms,donotconnectthecabletoordisconnectitfromthetelephoneoutlet
onthewall.
DANGER
Electriccurrentfrompower,telephone,andcommunicationcablesishazardous.T oavoidshock
hazard,disconnectthecablesbeforeopeningthecoverofthisslot.
Removingthekeyboard
Toremovethekeyboard,dothefollowing:
1.T urnoffthecomputer;thendisconnecttheacpoweradapterandallcablesfromthecomputer.
2.Closethecomputerdisplay,andturnthecomputerover.
3.Removethebattery.See“Replacingthebattery”onpage57.
Chapter6.Replacingdevices67
Page 84
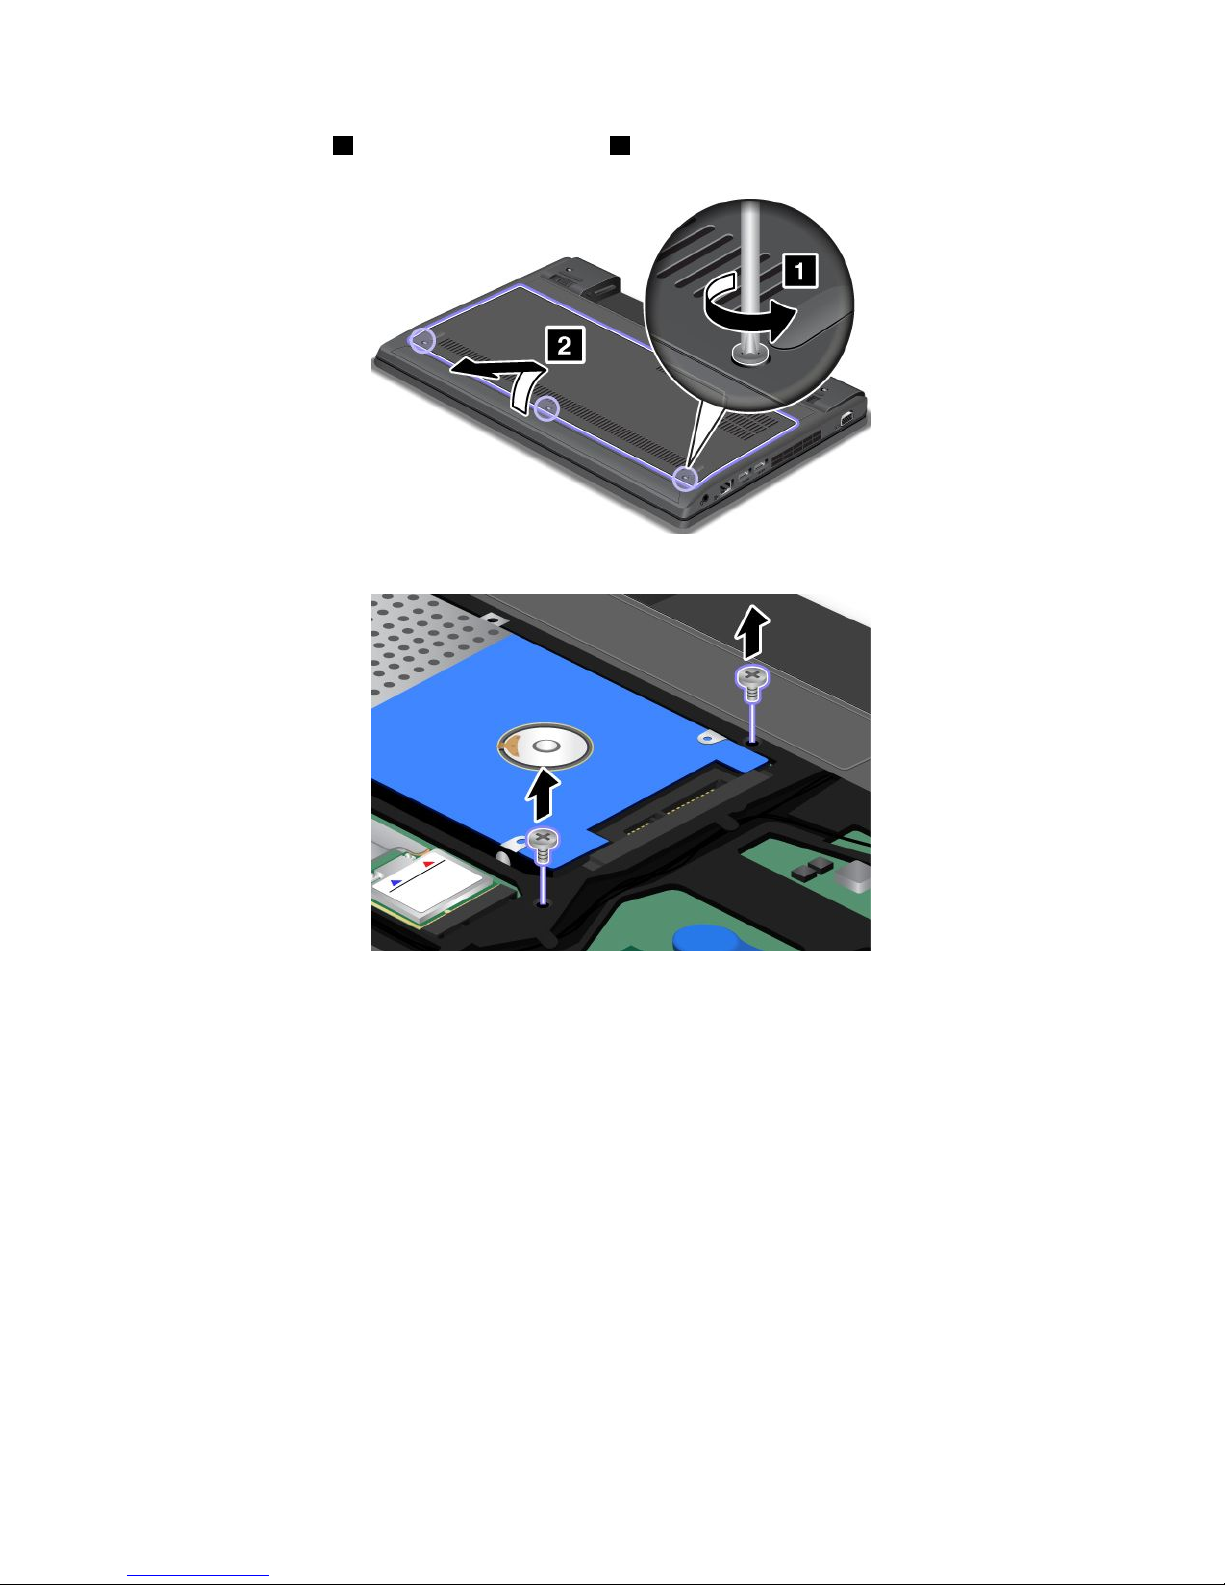
4.Loosenthescrews1,andthenremovethecover2.
5.Removethescrewsthatsecurethekeyboard.
6.T urnthecomputeroverandopenthedisplay.
68UserGuide
Page 85
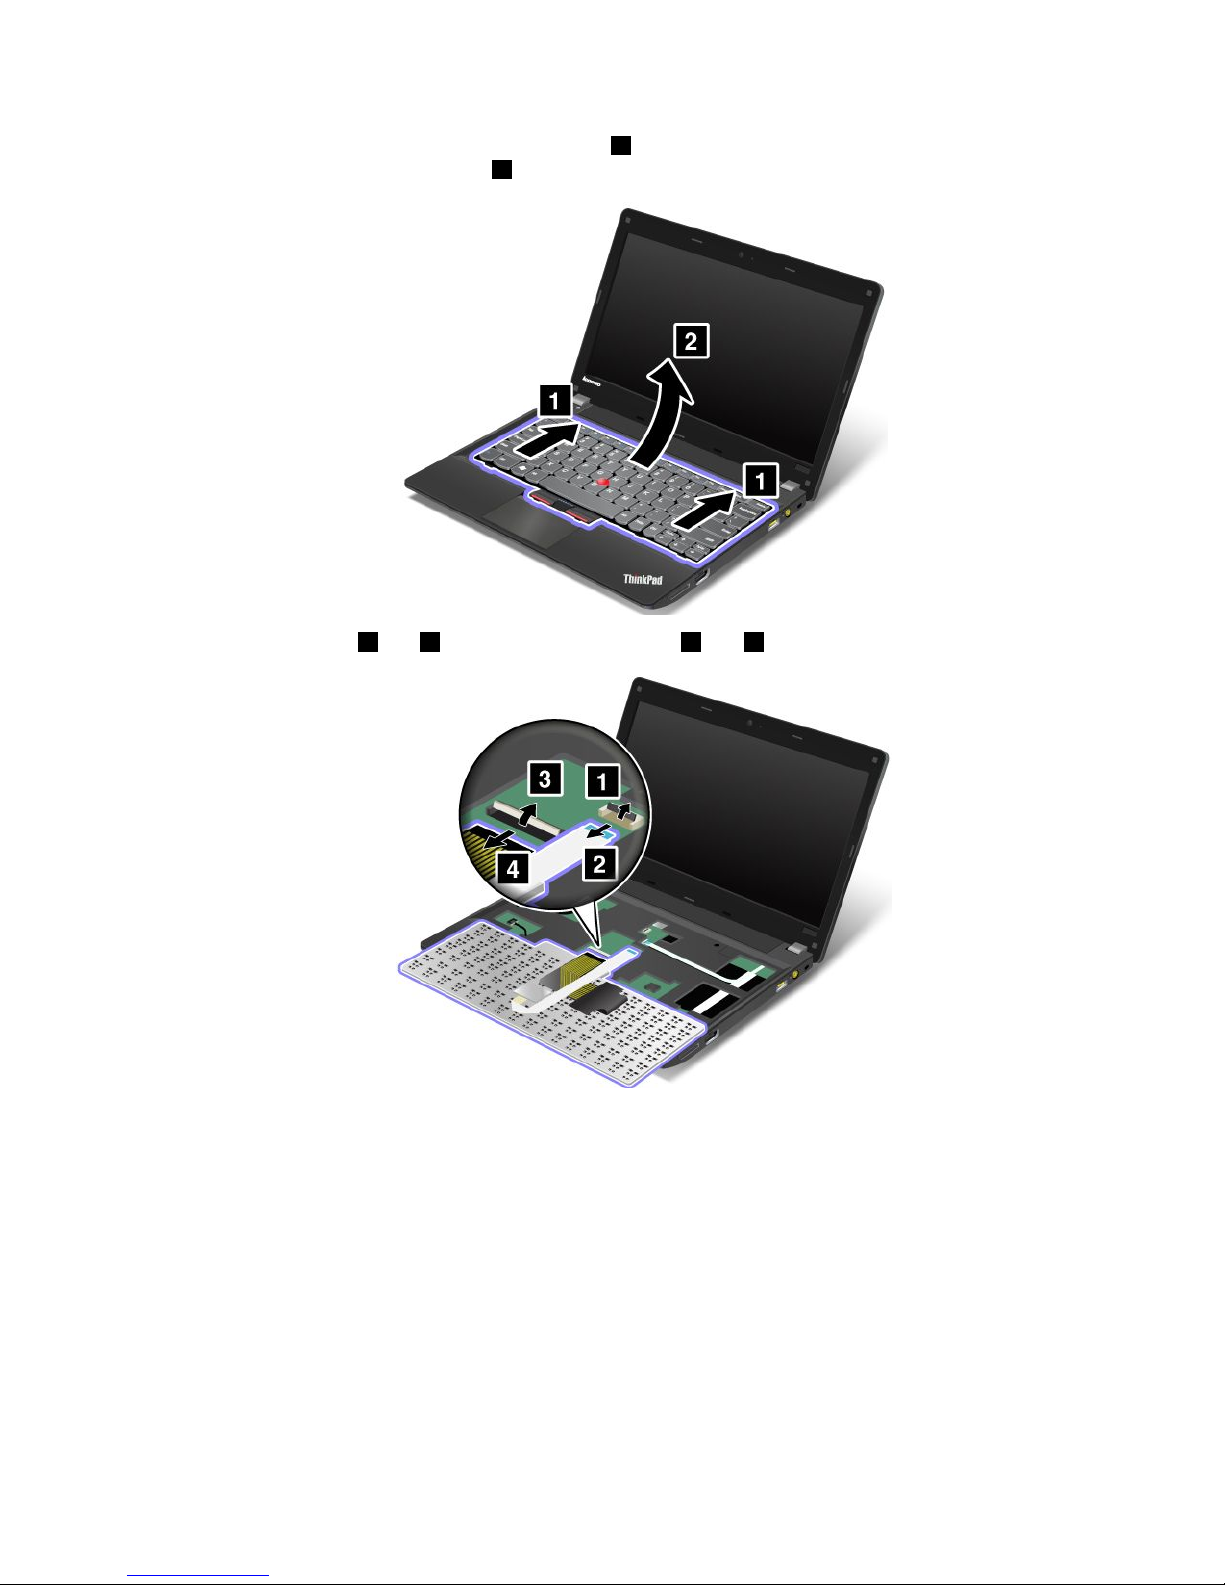
7.Pushhardinthedirectionshownbythearrows1tounlatchthefrontsideofthekeyboard.The
keyboardwillbedetachedslightly2.
8.Removethecables2and4byippingtheconnectors1and3upwards.Removethekeyboard.
Installingthekeyboard
Toinstallthekeyboard,dothefollowing:
Chapter6.Replacingdevices69
Page 86
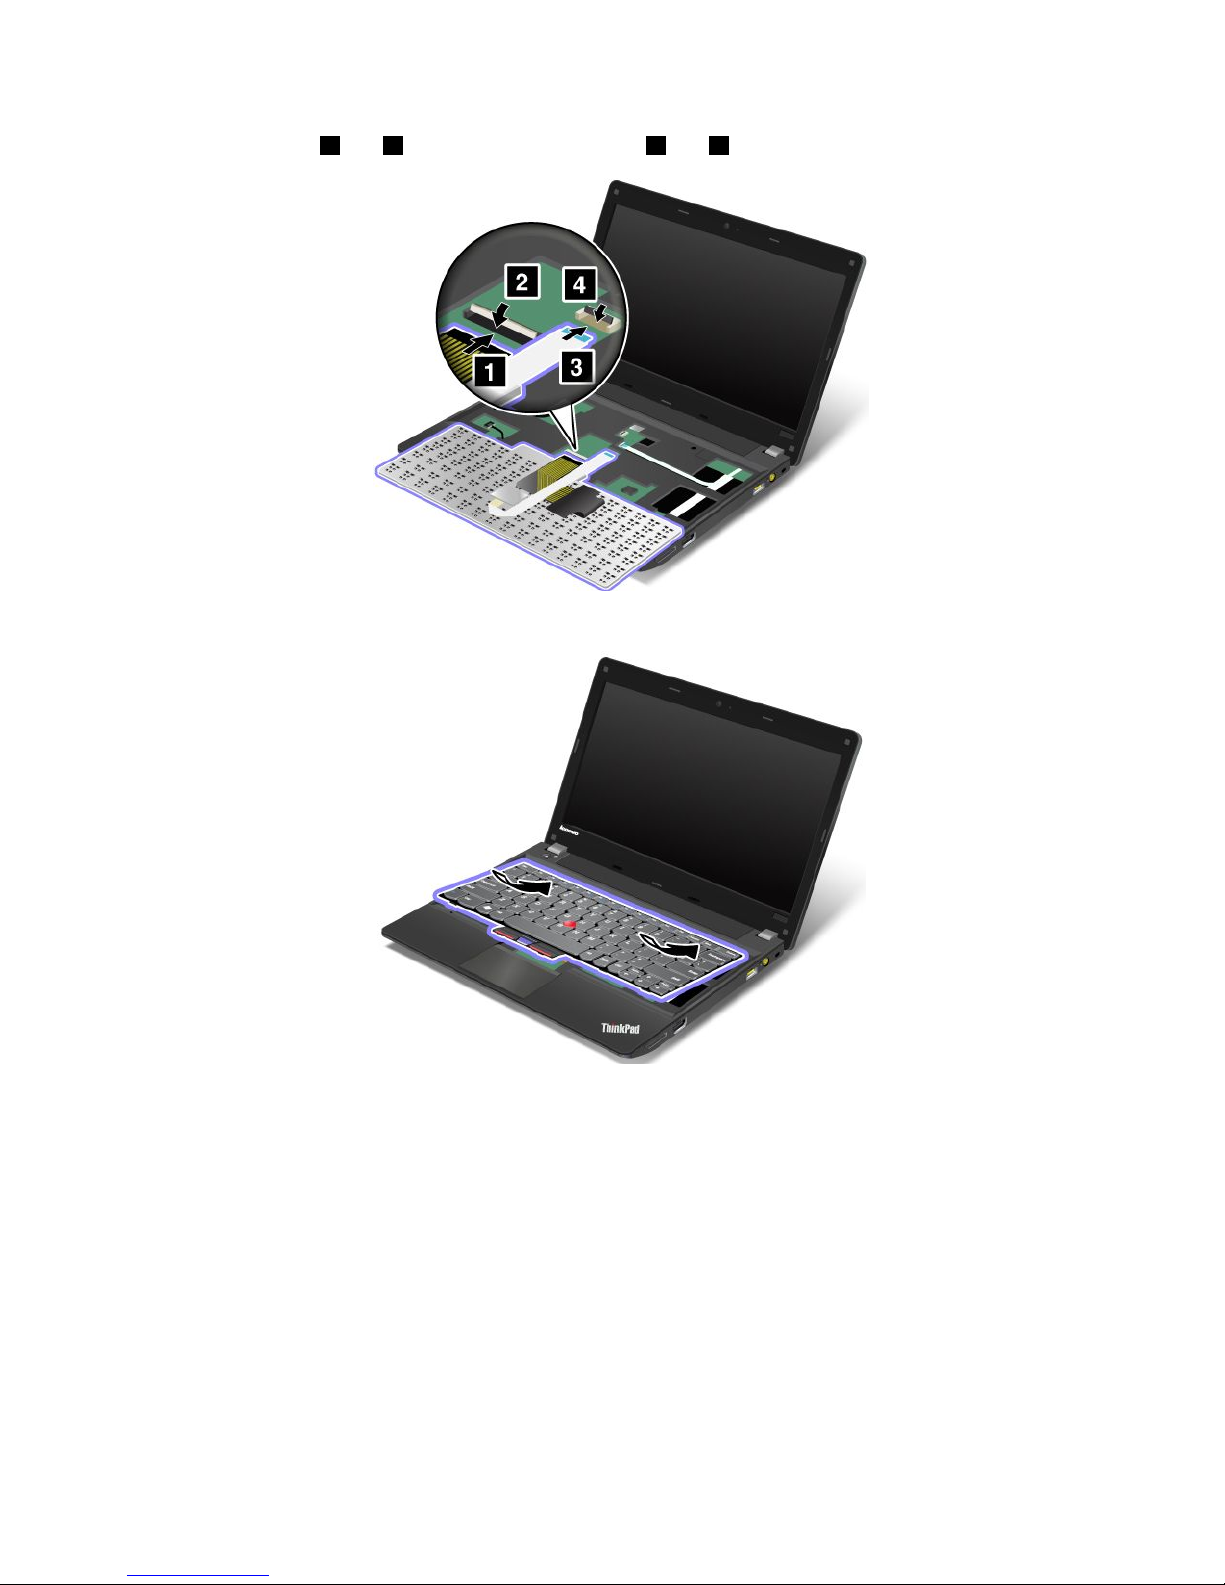
1.Attachthecables1and3byippingtheconnectors2and4downwards.
2.Insertthekeyboard.Makesurethattherearedgeofthekeyboardisundertheframe.
70UserGuide
Page 87
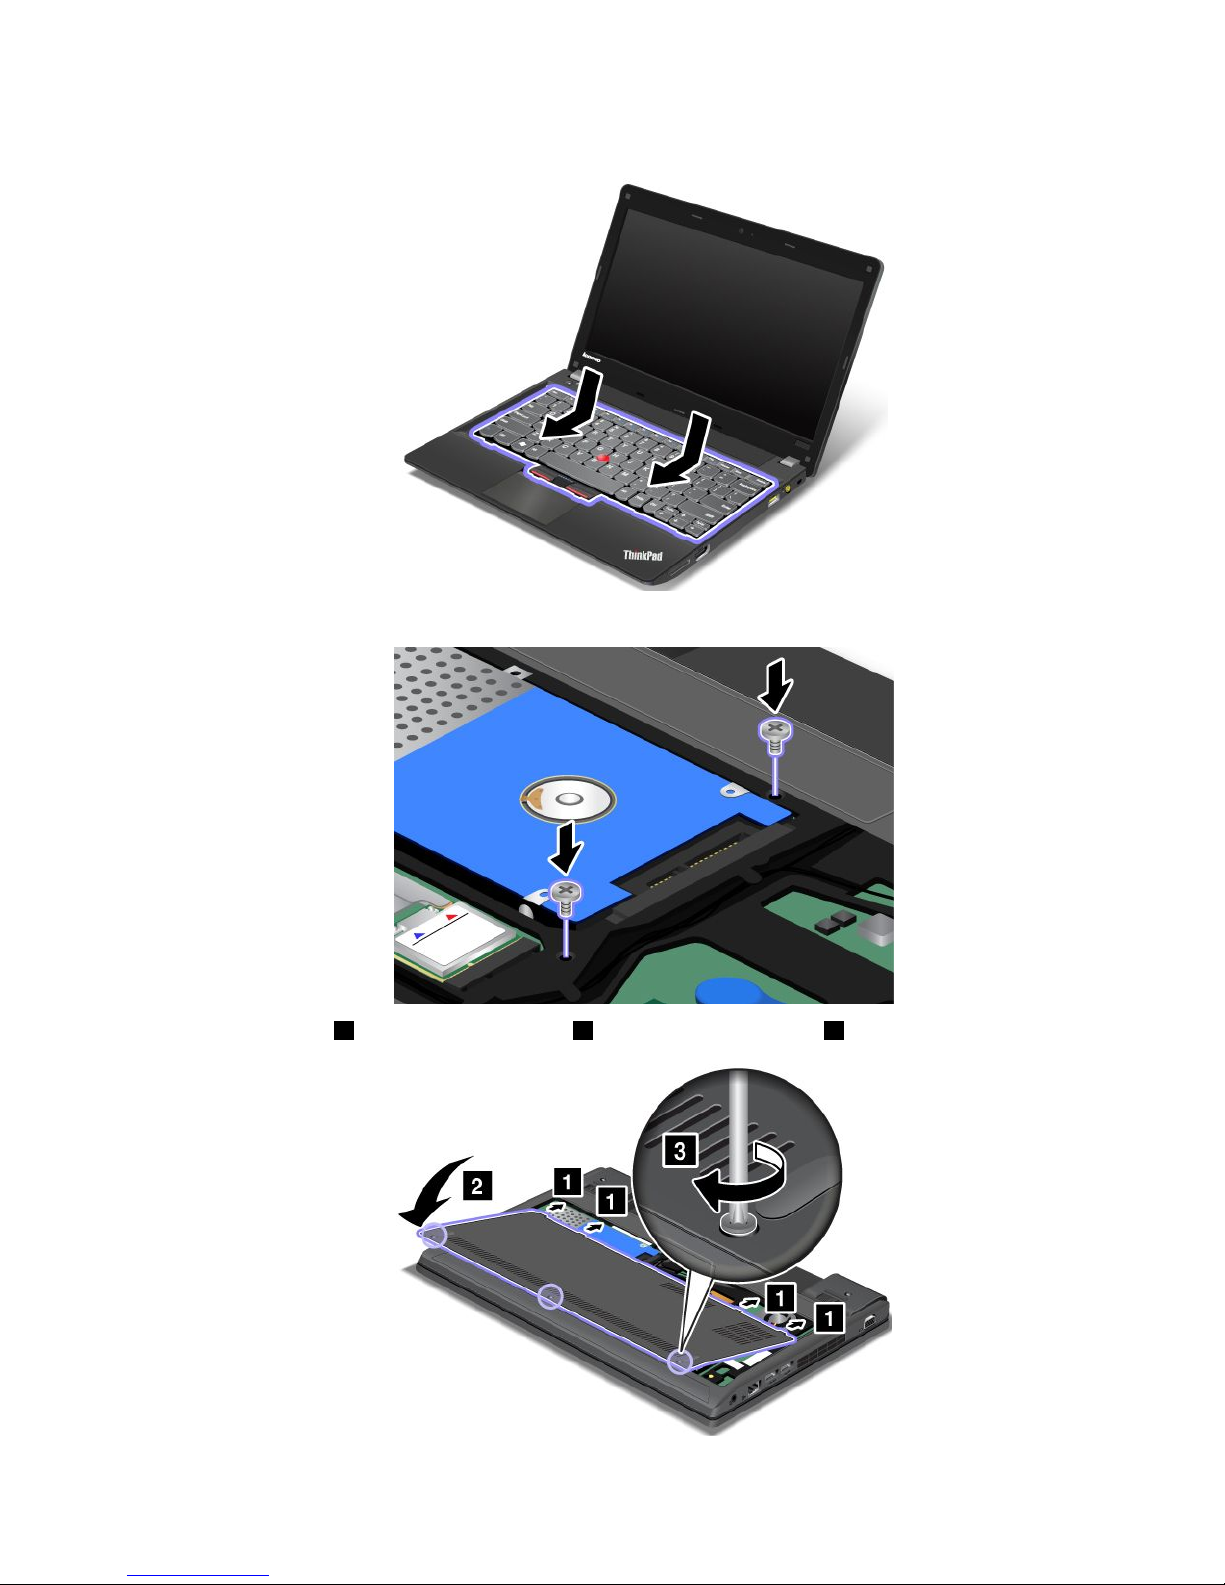
3.Slidethekeyboardinthedirectionshownbythearrows,untilthekeyboardissecuredinplace.
4.Reinstallthescrews.
5.Attachthecover1andpivotitdownwards2.Thentightenthescrews3.
Chapter6.Replacingdevices71
Page 88
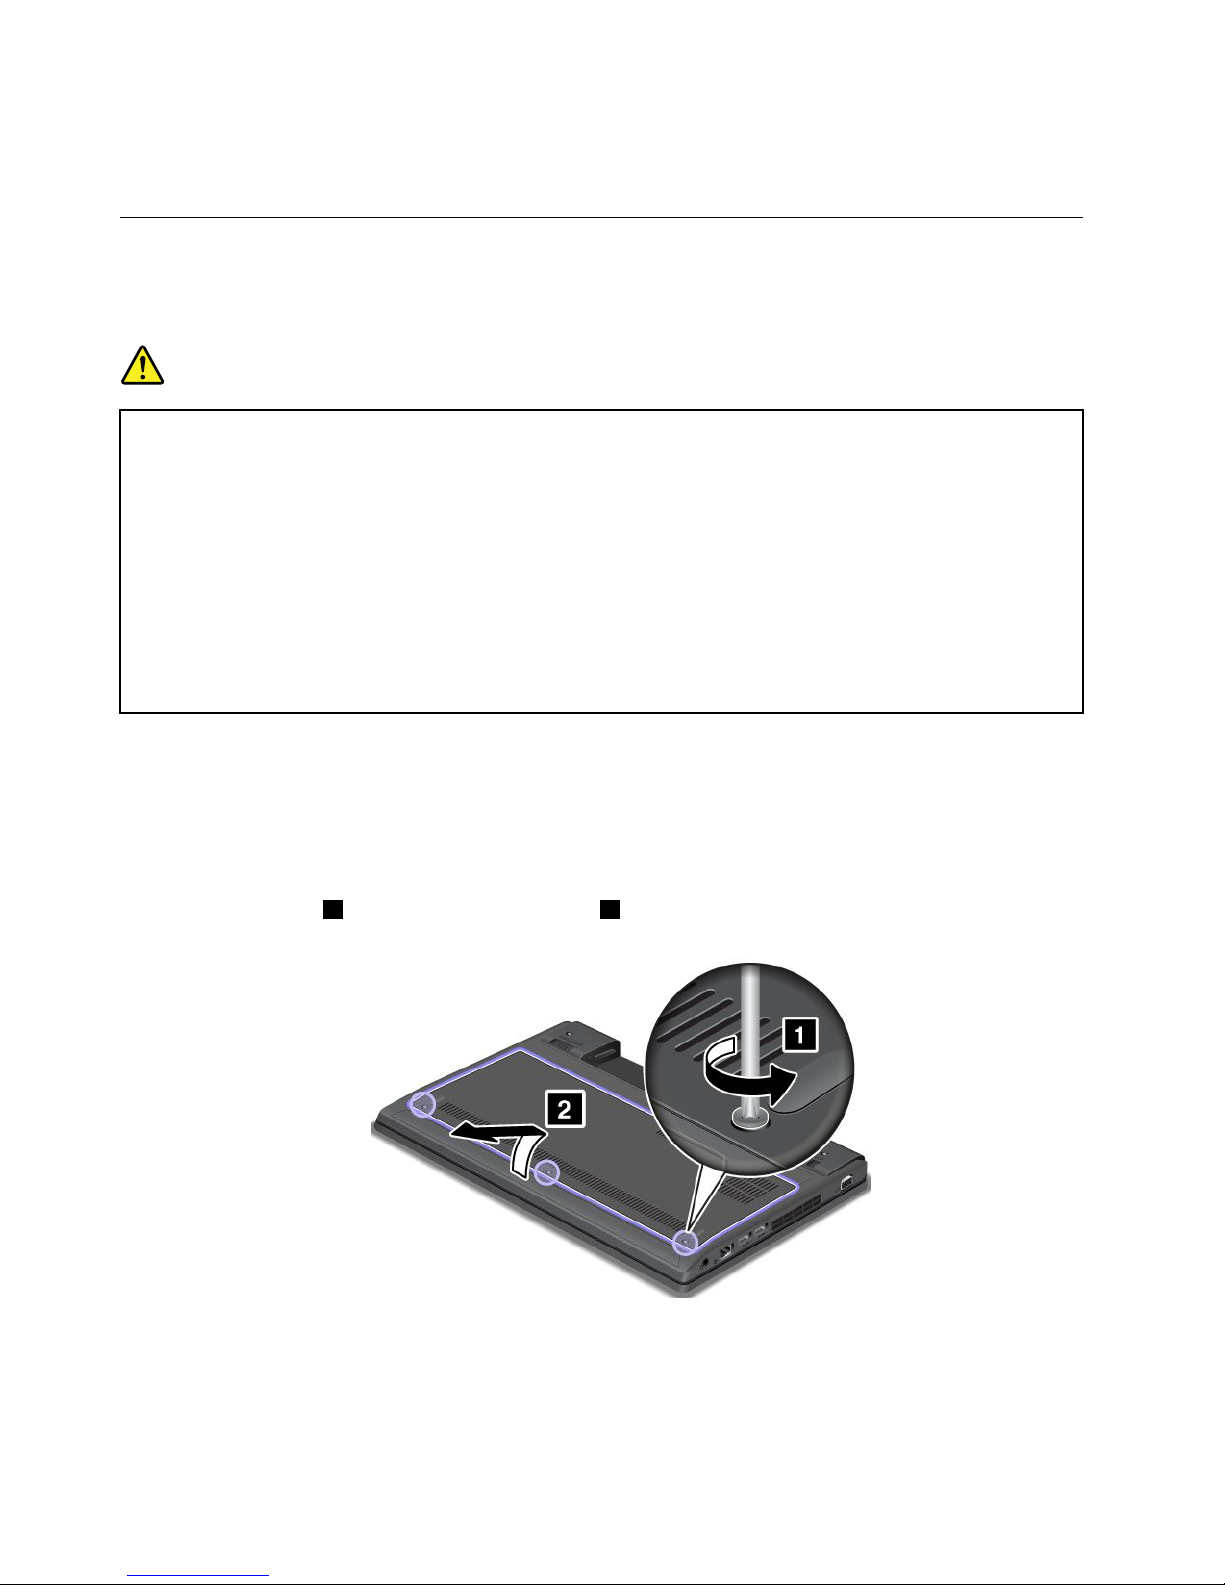
6.Reinstallthebattery.See“Replacingthebattery”onpage57.
7.T urnthecomputeroveragain.Connecttheacpoweradapterandallcables.
Replacingthebackupbattery
Beforeyoustart,printtheseinstructions.
Prerequisitesfortheprocedure
DANGER
Ifthebackupbatteryisincorrectlyreplaced,thereisdangerofanexplosion.Thebackupbattery
containsasmallamountofharmfulsubstances.Toavoidpossibleinjury:
•ReplaceonlywithabatteryofthetyperecommendedbyLenovo.
•Keepthebatterypackawayfromre.
•Donotexposeittoexcessiveheat.
•Donotexposeittowaterorrain.
•Donotshort-circuitit.
•Donotdrop,crush,puncture,orsubjecttostrongforces.Batteryabuseormishandlingcan
causethebatterytooverheat,whichcancausegassesorameto“vent”fromthebattery
packorcoincell.
Toremovethebackupbattery,dothefollowing:
1.T urnoffthecomputer;thendisconnecttheacpoweradapterandallcablesfromthecomputer.Wait
threetoveminutestoletthecomputercool.
2.Closethecomputerdisplay,andturnthecomputerover.
3.Removethebattery.See“Replacingthebattery”onpage57.
4.Loosenthescrew1,andthenremovethecover2.
72UserGuide
Page 89
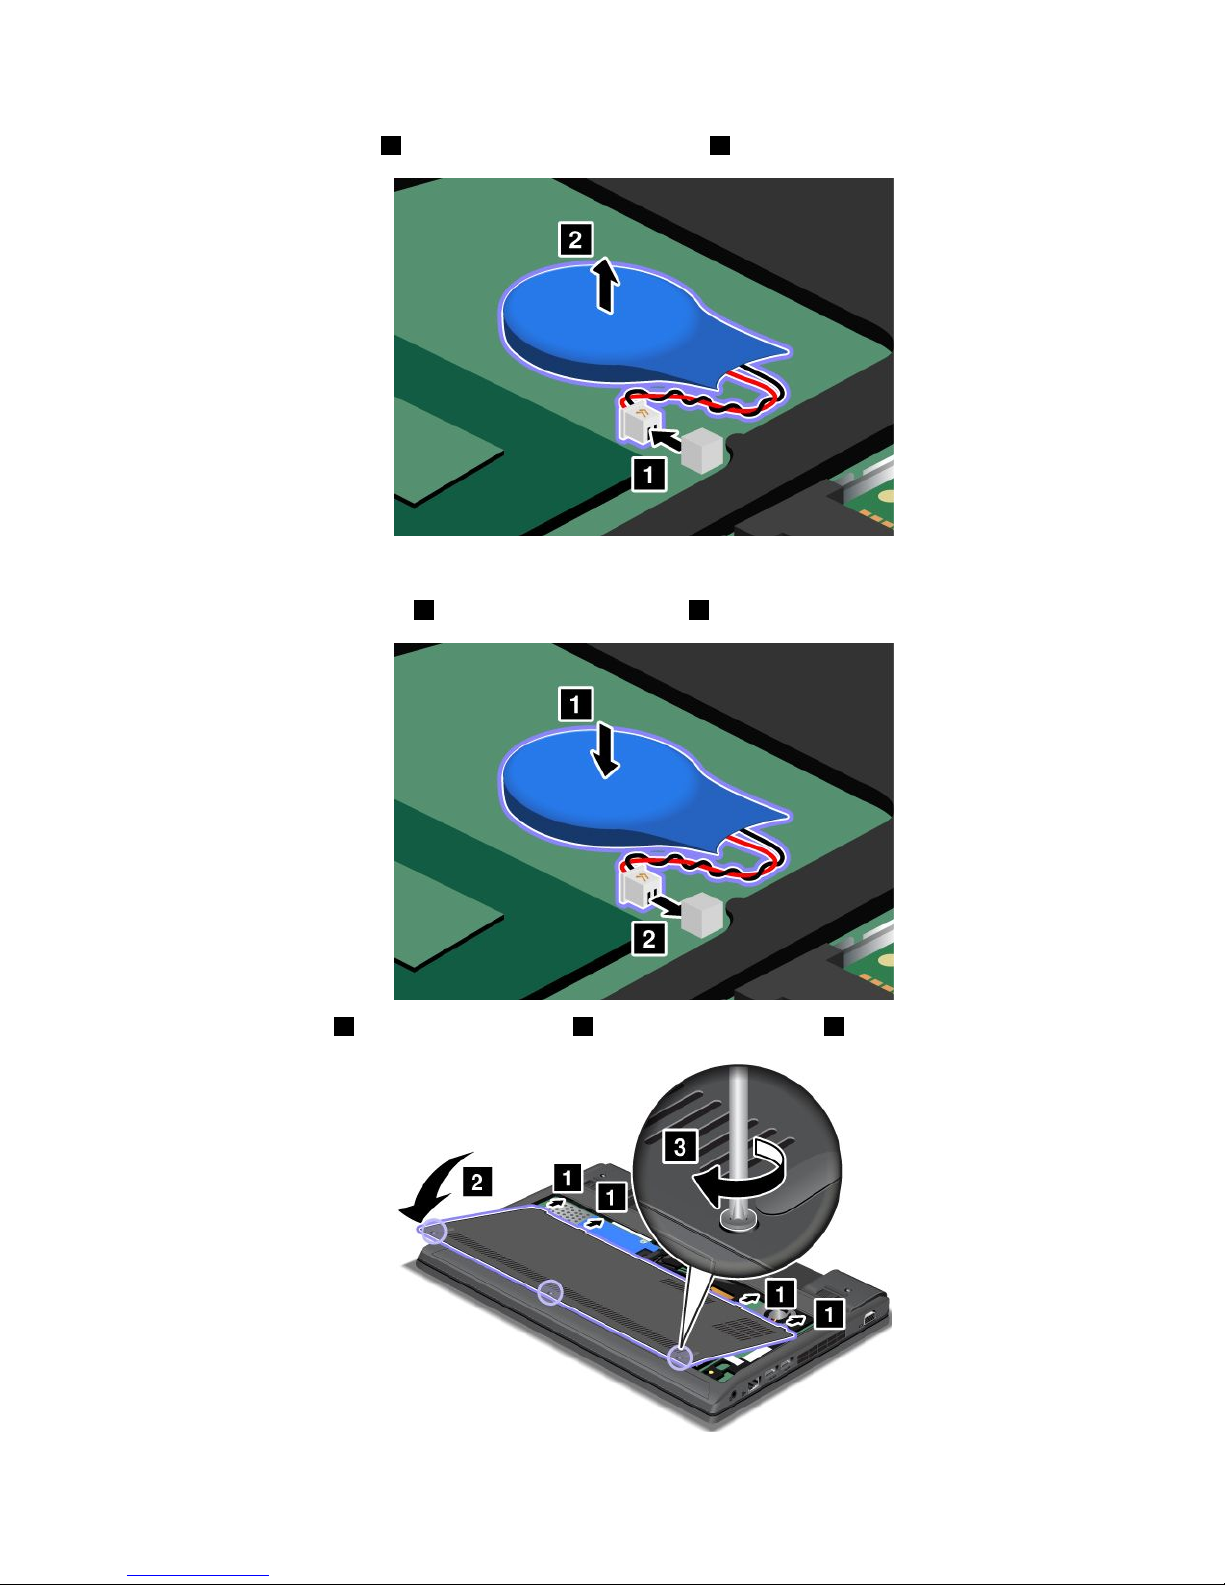
5.Detachtheconnector1.Thenremovethebackupbattery2.
Toinstallthebackupbattery,dothefollowing:
1.Installthebackupbattery1.Thenattachtheconnector2.
2.Attachthecover1andpivotitdownwards2.Thentightenthescrews3.
Chapter6.Replacingdevices73
Page 90

3.Reinstallthebattery.See“Replacingthebattery”onpage57.
4.T urnthecomputeroveragain.Connecttheacpoweradapterandallcables.
74UserGuide
Page 91

Chapter7.Advancedconguration
Whileitisimportanttoprotectles,data,andsettingsthatareontheharddiskdriveorsolid-statedrive,
youalsomightneedtoinstallanewoperatingsystem,installnewdevicedrivers,updateyoursystemUEFI
BIOS,orrecoverpreinstalledsoftware.Thisinformationwillhelpyouhandleyourcomputerwithproper
careandkeepitintopworkingshape.
•“Installinganewoperatingsystem”onpage75
•“Installingdevicedrivers”onpage77
•“ThinkPadSetup”onpage78
Installinganewoperatingsystem
Ifyouinstallanewoperatingsystemonyourcomputer,youneedtoinstallthesupplementlesand
ThinkPaddevicedriversforitatthesametime.
•IfyouinstallanewWindows7operatingsystem,thenecessarylesarelocatedinthefollowingdirectories
onyoursolid-statedriveorharddiskdrive:
–ThesupplementlesfortheoperatingsystemsupportedareintheC:\SWTOOLS\OSFIXESdirectory.
–ThedevicedriversfortheoperatingsystemsupportedareintheC:\SWTOOLS\DRIVERSdirectory.
–ThepreloadedsoftwareprogramsareintheC:\SWTOOLS\APPSdirectory.
Note:Ifyoucannotndthesupplementles,thedevicedrivers,andprogramsoftwareyouneedon
yourharddiskdrive,orifyouwanttoreceiveupdatesandthelatestinformationaboutthem,goto
http://www.lenovo.com/ThinkPadDrivers.
•IfyouinstallanewWindows8operatingsystem,gotohttp://www.lenovo.com/ThinkPadDriversto
downloadandinstallthelatestdevicedrivers.
Note:Theprocessofinstallingthenewoperatingsystemdeletesallthedataonyourharddiskdrive,
includingbackupsorimagesthatwerestoredinahiddenfolderbyuseoftheRescueandRecoveryprogram.
Beforeyoubegin
Beforeyouinstalltheoperatingsystem,dothefollowing:
•IfyouaregoingtoinstallanewWindows7operatingsystem,copyallthesubdirectoriesandlesinthe
C:\SWTOOLSdirectorytoaremovablestoragedevice,toavoidlosinglesduringtheinstallation.
•Printtheinstructionsyouwilluse.Gotothesectionfortheoperatingsystemyouareusing:
–“InstallingtheWindows7operatingsystem”onpage76
–“InstallingtheWindows8operatingsystem”onpage77
Notes:
–TheUEFIBIOSfeaturesaresupportedontheWindows7operatingsystem(64-bit)andtheWindows8
operatingsystem(64-bit).EnsurethattheUEFI/LegacyBootsettinginThinkPadSetupissettoyour
preferencetobootthedesiredoperatingsystem.
–Afterinstallingtheoperatingsystem,youshouldnotchangetheinitialUEFI/LegacyBootsettingin
ThinkPadSetup.TheUEFI/LegacyBootsettingmustbethesameasitwaswhentheWindows
operatingsystemimagewasinstalled.Otherwise,theoperatingsystemwillnotbootcorrectly.
Forthecountryorregioncoderequiredintheinstallation,useoneofthefollowing:
©CopyrightLenovo2013
75
Page 92

Countryorregion:Code
China:SC
Denmark:DK
Finland:FI
France:FR
Germany:GR
Italy:IT
Japan:JP
Netherlands:NL
Norway:NO
Spain:SP
Sweden:SV
TaiwanandHongKong:TC
UnitedStates:US
InstallingtheWindows7operatingsystem
Beforeyoustart,printtheseinstructions.
ToinstalltheWindows7operatingsystemanditsrelatedsoftwareonyourcomputer,dothefollowing:
1.StartThinkPadSetup.
2.SelectStartup.
3.SelectUEFI/LegacyBoot.
4.Dooneofthefollowing:
•IfyouwanttoinstalltheWindows7(32–bit)operatingsystem,selectLegacyOnlyorBoth.
•IfyouwanttoinstalltheWindows7(64–bit)operatingsysteminLegacymode,selectLegacyOnly.
•IfyouwanttoinstalltheWindows7(64–bit)operatingsysteminUEFImode,selectUEFIOnly.
5.PressF10tosavethechangesandrestartthesystem.
6.InserttheWindows7operatingsysteminstallationDVDintotheexternalDVDdrive,andrestartthe
computer.
7.RestoreC:\SWTOOLSfromthebackupcopyyoumadebeforestartingtheinstallation.
8.InstalltheThinkPadAMDSMBusDriverforWindows7andtheThinkPadAMDSATAControllerDriver
forWindows7.
9.Installdevicedrivers.See“InstallingotherdevicedriversandsoftwareontheWindows7operating
system”onpage78.
InstallingtheregistrypatchesforWindows7
Gotohttp://www.lenovo.com/supportandinstallthefollowingregistrypatches:
•RegistrypatchenablingWakeUponLANfromStandbyforEnergyStar
•FixforIssueofHDDwithHDDetection
InstallingtheWindows7xmodules
TheWindows7xmodulesareinthefollowingdirectory:
C:\SWTOOLS\OSFIXES\
Thenameofeachsubfolderisthenumberofaxmodule.Forinformationabouteachxmodule,goto
theMicrosoftKnowledgeBasehomepageathttp://support.microsoft.com/,typethenumberofthex
moduleyouneedinthesearcheld,andclickSearch.
76UserGuide
Page 93

Toinstallaxmodule,runtheEXEleinasubfolderandfollowtheinstructionsonthescreen.
Note:Ifyouremovetheharddiskdrivefromthecomputerwithasingle-coreprocessorandinstallitona
computerwithadual-coreprocessor,youcangetaccesstotheharddiskdrive.Theopposite,however,is
nottrue:Ifyouremovetheharddiskdrivefromacomputerwithadual-coreprocessorandinstallitona
computerwithasingle-coreprocessor,youcannotgetaccesstotheharddiskdrive.
InstallingtheWindows8operatingsystem
Beforeyoustart,printtheseinstructions.
ToinstalltheWindows8operatingsystemanditsrelatedsoftwareonyourcomputer,dothefollowing:
1.StartThinkPadSetup.
2.SelectStartup➙Boot.
3.ChangethebootpriorityordertobootyourcomputerfromthedrivethatcontainstheWindows
8operatingsysteminstaller.
4.PressF10.
5.ConnectthedrivethatcontainstheWindows8operatingsysteminstallertoyourcomputer,and
restartthecomputer.
6.Installdevicedrivers.See“Installingdevicedrivers”onpage77.
InstallingtheWindows8xmodules
TodownloadandinstallaWindows8xmodule,gototheMicrosoftKnowledgeBasehomepageat
http://support.microsoft.com/,typethenumberofthexmoduleyouneedinthesearcheld,andclick
Search.
Installingdevicedrivers
Thedevicedriversareavailableathttp://www.lenovo.com/ThinkPadDrivers.Clickyourcomputerproduct
nametoviewallthedevicedriversforyourcomputer.
Attention:Alwaysgotohttp://www.lenovo.com/ThinkPadDriversforthelatestdevicedrivers.Donot
downloadthemfromtheWindowsUpdateWebsite.
Installingthedriverforthe4-in-1mediacardreader
Tousethe4-in-1mediacardreader,youneedtodownloadandinstalltheRealtekCardReaderDriverfrom
theLenovoSupportWebsiteat:
http://www.lenovo.com/support
InstallingthedriverforUSB3.0ontheWindows7operatingsystem
IfyourcomputersupportsUSB3.0,andyouhavereinstalledtheoperatingsystem,youneedtodownload
andinstalltheUSB3.0drivertousetheUSB3.0bydoingthefollowing:
1.Gotohttp://www.lenovo.com/support.Findyourmodelanddisplaythedriverlinks.
2.SelecttheUSB3.0driverforthe32-bitor64-bitoperatingsystemandextractittoyourlocalhard
diskdrive.
3.Double-clicktheSetup.exeleintheC:\DRIVERS\WIN\USB3.0\directory.
4.ClickNext.Ifthedevicedriverisalreadyinstalled,clickCancel.Followtheinstructionsonthescreen
untiltheinstallationisnished.
Chapter7.Advancedconguration77
Page 94

InstallingtheThinkPadmonitorleforWindows2000/XP/Vista/7/8on
theWindows7operatingsystem
TheThinkPadmonitorleforWindows2000/XP/Vista/7/8isinthefollowingdirectory:
C:\SWTOOLS\DRIVERS\MONITOR
Note:Ifyoucannotndthisdirectoryonyourharddiskdriveorsolid-statedrive,downloadtheThinkPad
monitorleforWindows2000/XP/Vista/7/8fromtheThinkPadWebsiteat:
http://www.lenovo.com/ThinkPadDrivers
Note:Beforeyouinstallthisle,makesurethatthecorrectvideodriverhasbeeninstalled.
1.Right-clickonthedesktop,andclickPersonalize.
2.ClickDisplayattheleft.
3.ClickChangedisplaysettings.
4.ClickAdvancedSettings.
5.ClicktheMonitortab.
6.ClickProperties.
7.ClicktheDrivertab.
8.ClickUpdateDriver.
9.SelectBrowsemycomputerfordriversoftware,andthenclickLetmepickfromalistofdevice
driversonmycomputer.
10.ClickHaveDisk.
11.SpecifypathC:\SWTOOLS\DRIVERS\MONITORtothismonitorINFle.Then,clickOpen.
12.ClickOK.
13.Conrmthecorrectdisplaytype,thenclickNext.
14.Wheninstallationcompletes,clickClose.
15.ClickClosetoclosetheDisplayPropertieswindow.
16.ClickOKontheMonitortab.
17.ClickOKandclosetheDisplaySettingswindow.
InstallingotherdevicedriversandsoftwareontheWindows7operating
system
ThedevicedriversareprovidedintheC:\SWTOOL S\DRIVERSdirectoryonyourharddiskdrive.Youwillalso
needtoinstallprogramsoftware,whichisprovidedintheC:\SWTOOLS\APPSdirectoryonyourharddiskdrive.
Todothis,refertotheinstructionsin“Reinstallingpreinstalledprogramsanddevicedrivers”onpage53
.
Note:IfyoucannotndtheSupplementles,devicedrivers,andprogramsoftwareyouneedon
yourharddiskdrive,orifyouwanttoreceiveupdatesandthelatestinformationaboutthem,goto
http://www.lenovo.com/ThinkPadDrivers.
ThinkPadSetup
YourcomputercomeswiththeThinkPadSetupprogramtoenableyoutoselectvarioussetupparameters.
TostartThinkPadSetup,dothefollowing:
1.T urnonthecomputer.Whenthelogoscreenisdisplayed,presstheF1key.theThinkPadSetup
programmainmenuopens.
Ifyouhavesetasupervisorpassword,theThinkPadSetupprogrammainmenuwillbedisplayed
afteryouenterthepassword.Y oucanstartThinkPadSetupbypressingEnterinsteadofenteringthe
78UserGuide
Page 95

supervisorpassword.However,youcannotchangetheparametersthatareprotectedbythesupervisor
password.Formoreinformation,referto“Usingpasswords”onpage41.
2.Usingthecursorkeys,movetoanitemyouwanttochange.Whentheitemishighlighted,press
Enter.Asubmenuisdisplayed.
3.Changetheitemsyouwishtochange.Tochangethevalueofanitem,pressthefollowingkeys:
•F5or–:Changetoalowervalue.
•F6orthecombinationofShiftand+:Changetoahighervalue.
Iftheitemhasasubmenu,youcandisplayitbypressingEnter.
4.PressEsctoexitfromthesubmenu.
5.Ifyouareonanestedsubmenu,pressEscrepeatedlyuntilyoureachtheThinkPadSetupprogram
mainmenu.
Note:Ifyouneedtorestorethesettingstotheiroriginalstateasofthetimeofpurchase,pressF9to
loadthedefaultsettings.Y oualsocanselectanoptionontheRestartsubmenutoloadthedefault
settingsordiscardthechanges.
6.SelectRestart.Movethecursortotheoptionyouwantforrestartingyourcomputer;thenpressEnter.
Yourcomputerrestarts.
Note:Dependingontheoperatingsystemyouareusing,somemenuitemslistedinthischaptermightnot
beavailableonyourcomputer,andsomemenuitemsmightbeslightlydifferentfromtheactualmenuitems
displayedonyourcomputer.
Mainmenu
TheMainmenuistherstinterfaceyouseeafteryouenterThinkPadSetup.Itdisplaysthefollowing
congurationofyourcomputer:
•UEFIversion
•UEFIdate
•Embeddedcontrollerversion
•Machinetypemodel
•System-unitserialnumber
•Systemboardserialnumber
•Assettag
•CPUtype
•CPUspeed
•Installedmemory
•UUID
•MACaddress(InternalLAN)
•Preinstalledoperatingsystemlicense
•UEFISecureBoot
Congmenu
Ifyouneedtochangethecongurationofyourcomputer,selectCongfromtheThinkPadSetupprogram
mainmenu.
Thefollowingsubmenuisdisplayed:
•Network:SettheLANrelatedfunctions.
Chapter7.Advancedconguration79
Page 96

•USB:EnableordisableUSBrelatedfunctions.
•Keyboard/Mouse:Setthekeyboardandmouserelatedfunctions.
•Display:Specifythesettingsfordisplayoutput.
•Power:Setpowermanagementrelatedfunctions.
•BeepandAlarm:Enableordisabletheaudiorelatedfunctions.
•SerialAT A(SAT A):Specifythesettingsfortheharddiskdrive.
Notes:
•Thedefaultsettingsarealreadyoptimizedforyou.Ifyouconsiderchangingthecomputerconguration,
proceedwithextremecaution.Settingthecongurationincorrectlymightcauseunexpectedresults.
•Oneachsubmenu,youcanenableafunctionbyselectingEnabled,ordisableitbyselectingDisabled.
ThefollowingtableshowsthecontentsoftheCongmenu.
Notes:
•Someitemsaredisplayedonthemenuonlyifthecomputersupportsthecorrespondingfeatures.
•Defaultvaluesareinboldface.
Table4.Congmenuitems
Menuitem
SubmenuitemSelectionComments
WakeOnLAN
•Disabled
•ACOnly
•ACandBattery
Enablethesystemtopower
onwhentheEthernet
controllerreceivesamagic
packet.
IfyouselectACOnly,the
WakeonLANfunctionis
enabledonlywhentheac
poweradapterisattached.
IfyouselectACand
Battery,theWakeonLAN
functionisenabledwithany
powersources.
Notes:
•Themagicpackettype
WakeonLANrequiresac
power.
•TheWakeonLAN
functiondoesnot
workwhenaharddisk
passwordisset.
EthernetLANOptionROM
(forLegacyOnlyboot
modeorBothwithLegacy
rst)
•Disabled
•Enabled
Congurewhethertoload
theEthernetLANOption
ROMtoenablestartup
fromanintegratednetwork
device.Thisoptionmustbe
enabledtodisplaytheMAC
Addressfortheintegrated
networkdevice.
Network
80UserGuide
Page 97

Table4.Congmenuitems(continued)
Menuitem
SubmenuitemSelectionComments
UEFIIPv4NetworkStack
(forUEFIOnlybootmode
orBothwithUEFIrst)
•Disabled
•Enabled
EnableordisableInternet
ProtocolVersion4(IPv4)
networkstackforUEFI
environment.
UEFIIPv6NetworkStack
(forUEFIOnlybootmode
orBothwithUEFIrst)
•Disabled
•Enabled
EnableordisableInternet
ProtocolVersion6(IPv6)
networkstackforUEFI
environment.
UEFIPXEBootPriority
(forBothwithUEFIrst
bootmode,andIPv6
andIPv4stacksareboth
enabled.)
•IPv6First
•IPv4First
Selectnetworkstack
priorityforUEFIPXEboot.
WirelessLANRadio
•On
•Off
IfyouselectOn,theinternal
wirelessradioisturnedon.
IfyouselectOff,theinternal
wirelessradioisturnedoff.
AlwaysOnUSB
•Disabled
•Enabled
IfyouselectDisabled,
theexternalUSBdevices
cannotbechargedthrough
USBconnectors.
ChargeinBatteryOperation
•Disabled
•Enabled
IfyouselectEnabled,the
AlwaysOnUSBconnector
enablesyoutocharge
somemobiledigitaland
smartphoneswhenthe
computerispoweredoff
andinbatteryoperation.
USB
USB3.0Mode
•Disabled
•Enabled
SettheUSB3.0controller
modefortheconnectors
sharedbetweenUSB2.0
andUSB3.0controllers.
IfyouselectEnabled,it
enablesUSB3.0mode
andallowsUSB3.0tobe
supportedintheoperating
system.
IfyouselectDisabled,it
disablesandhidestheUSB
3.0controller,andUSB3.0
connectorswillworkinUSB
2.0mode.
Chapter7.Advancedconguration81
Page 98

Table4.Congmenuitems(continued)
Menuitem
SubmenuitemSelectionComments
FnandCtrlKeyswap
•Disabled
•Enabled
IfyouselectEnabled,the
FnkeyworksastheCtrl
key,andtheCtrlkeyworks
astheFnkey.
Note:EvenwhenEnabled
isselected,youneedto
presstheFnkeytoresume
thecomputerfromsleep
modetonormaloperation.
Keyboard/Mouse
FnKeyLock•Disabled
•Enabled
IfyouselectEnabled,you
canpresstheFnkeyonceto
activatetheFnkeyfunction,
asifthekeyiskeptina
pressedcondition,andthen
pressthedesiredfunction
key.Theactionisequivalent
topressingtheFnkeyand
thedesiredfunctionkey
simultaneously.Ifyoupress
theFnkeytwice,theFn
keyiskeptinapressed
conditionuntilyoupress
theFnkeyagain.
DisplayBootDisplayDevice
•ThinkPadLCD
•Analog(VGA)
•DigitalonThinkPad
Selectthedisplaydevice
thatistobeactivatedat
boottime.Thisselection
iseffectiveforboottime,
passwordprompt,and
ThinkPadSetup.
CPUPowerManagement
•Disabled
•Enabled
Unlessthispower-saving
featureisdisabled,it
stopstheprocessorclock
automaticallywhenthere
isnosystemactivity.Y ou
usuallydonotneedto
changethisfunction.
Power
AdaptiveS4
•Disabled
•Enabled
Enableordisableafeature
thatpowersonthesystem
whenACisattached.
IfyouselectEnabled,the
systemispoweredonwhen
theacpoweradapteris
attached.Whenthesystem
isinhibernatestate,the
systemresumes.
IfyouselectDisabled,the
systemisnotpoweredon
norresumedwhentheac
poweradapterisattached.
82UserGuide
Page 99

Table4.Congmenuitems(continued)
Menuitem
SubmenuitemSelectionComments
PasswordBeep•Disabled
•Enabled
Enablesordisablesthe
passwordbeepwhenthe
systemispromptingfor
thepower-on,harddisk,or
supervisorpasswordtobe
typed.
BeepandAlarm
KeyboardBeep•Disabled
•Enabled
Enablesordisablesthe
keyboardbeepwhen
unmanageablekey
combinationsarepressed.
SerialAT A(SAT A)SATAControllerMode
Option
•Compatibility
•AHCI
SelectsSATAcontroller
operationmode.Ifyou
selectCompatibility,the
SATAcontrolleroperatesin
compatibilitymode.
Date/Timemenu
Ifyouneedtosetthecurrentdateandtimeofyourcomputer,selectDate/TimefromtheThinkPadSetup
programmainmenu.Thefollowingsubmenuisdisplayed:
•SystemDate
•SystemTime
Tochangethedateandtime,dothefollowing:
1.Usingtheupanddownarrowkeys,selecttheitemtochangethedateortime.
2.PressT ab,Shift+Tab,orEntertoselectaeld.
3.T ypethedateortime.
Notes:Anotherwaytoadjustthedateandtimeispressingthefollowingkeys:
•F5or–:Changetoalowervalue.
•F6orthecombinationofShiftand+:Changetoahighervalue.
4.PressF10tosavethechangesandrestartthesystem.
Securitymenu
Ifyouneedtosetthesecurityfeaturesofyourcomputer,selectSecurityfromtheThinkPadSetupprogram
mainmenu.
Notes:
•Thedefaultsettingsarealreadyoptimizedforyou.Ifyouconsiderchangingthecomputerconguration,
proceedwithextremecaution.Settingthecongurationincorrectlymightcauseunexpectedresults.
•Oneachsubmenu,youcanenableafunctionbyselectingEnabled,ordisableitbyselectingDisabled.
Thefollowingsubmenuisdisplayed:
•Password:Setapassword.
•UEFIBIOSUpdateOption:SpecifythesettingsforFlashUEFIBIOSupdate.
•MemoryProtection:SpecifythesettingsfortheDataExecutionPreventionfeature.
•Virtualization:EnableordisablethesettingsforAMD-V™Technology(formodelswithanAMDCPU).
Chapter7.Advancedconguration83
Page 100

•I/OPortAccess:EnableordisabletheaccesstoindividualI/Oports.
•Anti- Theft:EnableordisabletheUEFIBIOSinterfacetoactivateanti-theftservices,suchasComputrace.
•SecureBoot:ConguretheSecureBootfunction.
ThefollowingtableshowsthecontentsoftheSecuritymenu.
Notes:
•Someitemsaredisplayedonthemenuonlyifthecomputersupportsthecorrespondingfeatures.
•Defaultvaluesareinboldface.
Table5.Securitymenuitems
Menuitem
SubmenuitemSelectionComments
SupervisorPassword
•Enter
Referto“Supervisor
password”onpage44
.
LockUEFIBIOSSettings
•Disabled
•Enabled
Enablesordisablesthe
functionthatprotects
itemsintheThinkPad
Setupprogramfrom
beingchangedbyauser
whodoesnothavethe
supervisorpassword.
Bydefault,thisissetto
Disabled.Ifyousetthe
supervisorpasswordand
enablethisfunction,no
onebutyoucanchange
anyitemsintheThinkPad
Setupprogram.
Passwordatunattended
boot
•Disabled
•Enabled
Ifyouselectandenable
Passwordatunattended
boot,apasswordprompt
isdisplayedwhenthe
computeristurnedon,
fromeitherapower-off
stateorhibernationstate.
IfyouselectDisabled,
nopasswordpromptis
displayed;thecomputer
goesaheadandloads
theoperatingsystem.
Topreventunauthorized
access,settheuser
authenticationonthe
operatingsystem.
Passwordatrestart•Disabled
•Enabled
Ifyouselectandenable
Passwordatrestart,
apasswordpromptis
displayedwhenyourestart
thecomputer.Ifyouselect
Disabled,nopassword
promptisdisplayed;the
computergoesaheadand
loadstheoperatingsystem.
Topreventunauthorized
access,settheuser
Password
84UserGuide
 Loading...