

Page 1

HardwareMaintenanceManual
ThinkPadX100eandX120e
Page 2

Note
Beforeusingthisinformationandtheproductitsupports,besuretoreadthegeneralinformationunder
AppendixA“Notices”onpage125
.
FifthEdition(September2011)
©CopyrightLenovo2009,2011.
LIMITEDANDRESTRICTEDRIGHTSNOTICE:Ifproducts,data,computersoftware,orservicesaredeliveredpursuant
aGeneralServicesAdministration“GSA”contract,use,reproduction,ordisclosureissubjecttorestrictionssetforth
inContractNo.GS-35F-05925.
Page 3

Contents
Aboutthismanual...........iii
Chapter1.Safetyinformation......1
Generalsafety................1
Electricalsafety...............2
Safetyinspectionguide............3
Handlingdevicesthataresensitivetoelectrostatic
discharge..................3
Groundingrequirements............4
Safetynotices-multilingualtranslations......4
Chapter2.Importantservice
information..............19
StrategyforreplacingFRUs.........19
Strategyforreplacingaharddiskdrive...20
Importantnoticeforreplacingasystem
board................20
Howtouseerrormessage........20
StrategyforreplacingFRUsforCTO,CMV ,and
GAV...................20
Productdenition............20
FRUidenticationforCTO,CMV ,andGAV
products...............21
Chapter3.Generalcheckout.....23
Whattodorst..............23
Checkoutguide..............24
DiagnosticsusingPC-DoctorforDOS....24
LenovoThinkVantageT oolbox.......27
FRUtests...............27
Powersystemcheckout...........28
Checkingtheacadapter.........29
Checkingoperationalcharging......29
Checkingthebatterypack........30
Checkingthebackupbattery.......30
Chapter4.Relatedservice
information..............33
RestoringthefactorycontentsbyusingRecovery
DiscSet.................33
Passwords................34
Power-onpassword...........34
Hard-diskpassword...........34
Supervisorpassword..........35
Howtoremovethepower-onpassword...35
Howtoremovethehard-diskpassword...35
Powermanagement............36
Screenblankmode...........36
Sleeporstandbymode.........36
Hibernationmode...........37
Symptom-to-FRUindex...........37
Numericerrorcodes..........38
Errormessages............40
No-beepsymptoms...........40
LCD-relatedsymptoms.........40
Intermittentproblems..........41
Undeterminedproblems.........41
Chapter5.Statusindicators.....43
Chapter6.Fnkeycombinations...45
Chapter7.FRUreplacement
notices................49
Screwnotices...............49
Retainingserialnumbers...........50
Restoringtheserialnumberofthesystem
unit.................50
RetainingtheUUID...........51
ReadingorwritingtheECAinformation...51
Chapter8.Removingandreplacinga
FRU..................53
BeforeservicingThinkPadX100eandThinkPad
X120e..................53
1010Batterypack.............54
1020Bottomdoor.............55
1030Harddiskdrive(HDD)..........58
1040DIMM................60
1050PCIExpressMiniCardforwirelessLAN..60
1060PCIExpressMiniCardforwirelessWAN..62
1070Bluetoothdaughtercard(BDC-2).....63
1080Keyboard..............64
1090Palmrestassembly,power-onboard
assembly(withcable),andmicrophone.....67
1100CRTboardassembly(withcable).....72
1110Speakerassembly...........73
1120I/Oboard(forThinkPadX120e)......74
1130Systemboard,fanassembly,andbackup
battery..................75
1140LCDunit...............81
1150DC-incableandbasecoverassembly...82
2010LCDbezelassembly..........85
2020Integratedcamera...........86
2030LCDpanel,hinges,andLCDcable....87
2090AntennakitandLCDrearcoverassembly..89
©CopyrightLenovo2009,2011
i
Page 4

Chapter9.Locations.........91
Frontview................91
Rearview.................92
Bottomview...............92
Chapter10.Partslist.........93
Overall..................94
LCDFRUs................109
Keyboard.................112
ACadapters...............113
Miscellaneousparts............114
Powercords...............114
Recoverydiscs..............115
WindowsXPHomeEdition(32bit)DVDs..115
Windows7Starter(32bit)DVDs......116
Windows7HomeBasic(32bit)DVDs....117
Windows7HomePremium(32bit)DVDs..118
Windows7HomePremium(64bit)DVDs..119
Windows7Professional(32bit)DVDs....120
Windows7Professional(64bit)DVDs....121
Windows7Ultimate(32bit)DVDs.....122
Windows7Ultimate(64bit)DVDs.....123
WindowsVistaBusiness(32bit)DVDs...123
WindowsVistaHomeBasic(32bit)DVDs..123
Commonservicetools...........123
AppendixA.Notices.........125
Trademarks................126
iiHardwareMaintenanceManual
Page 5

Aboutthismanual
ThismanualcontainsserviceandreferenceinformationforthefollowingThinkPad
®
products:
ThinkPadX100e
MT0022,2876,3506,3507,and3508
ThinkPadX120e
MT0596,0611,and0613
Usethismanualalongwiththeadvanceddiagnosticteststotroubleshootproblems.
Important:ThismanualisintendedonlyfortrainedservicetechnicianswhoarefamiliarwithThinkPad
products.Usethismanualalongwiththeadvanceddiagnosticteststotroubleshootproblemseffectively.
BeforeservicingaThinkPadproduct,besuretoreadalltheinformationunderChapter1“Safetyinformation”
onpage1
.
©CopyrightLenovo2009,2011
iii
Page 6

ivHardwareMaintenanceManual
Page 7

Chapter1.Safetyinformation
Thischapterpresentsfollowingsafetyinformationthatyouneedtobefamiliarwithbeforeyouservice
aThinkPadNotebook.
•“Generalsafety”onpage1
•“Electricalsafety”onpage2
•“Safetyinspectionguide”onpage3
•“Handlingdevicesthataresensitivetoelectrostaticdischarge”onpage3
•“Groundingrequirements”onpage4
•“Safetynotices-multilingualtranslations”onpage4
Generalsafety
Followtheserulestoensuregeneralsafety:
•Observegoodhousekeepingintheareaofthemachinesduringandaftermaintenance.
•Whenliftinganyheavyobject:
1.Makesurethatyoucanstandsafelywithoutslipping.
2.Distributetheweightoftheobjectequallybetweenyourfeet.
3.Useaslowliftingforce.Nevermovesuddenlyortwistwhenyouattempttolift.
4.Liftbystandingorbypushingupwithyourlegmuscles;thisactionremovesthestrainfromthe
musclesinyourback.Donotattempttoliftanyobjectthatweighsmorethan16kg(35lb)orthat
youthinkistooheavyforyou.
•Donotperformanyactionthatcauseshazardstothecustomer,orthatmakestheequipmentunsafe.
•Beforeyoustartonthemachine,makesurethatotherservicetechniciansandthecustomer'spersonnel
arenotinahazardousposition.
•Placeremovedcoversandotherpartsinasafeplace,awayfromallpersonnel,whileyouareservicing
themachine.
•Keepyourtoolcaseawayfromwalkareassothatotherpeoplewillnottripoverit.
•Donotwearlooseclothingthatcanbetrappedinthemovingpartsofamachine.Makesurethatyour
sleevesarefastenedorrolledupaboveyourelbows.Ifyourhairislong,fastenit.
•Inserttheendsofyournecktieorscarfinsideclothingorfastenitwithanonconductiveclip,about8
centimeters(3inches)fromtheend.
•Donotwearjewelry,chains,metal-frameeyeglasses,ormetalfastenersforyourclothing.
Attention:Metalobjectsaregoodelectricalconductors.
•Wearsafetyglasseswhenyouarehammering,drilling,soldering,cuttingwire,attachingsprings,using
solvents,orworkinginanyotherconditionsthatmightbehazardoustoyoureyes.
•Afterservice,reinstallallsafetyshields,guards,labels,andgroundwires.Replaceanysafetydevice
thatiswornordefective.
•Reinstallallcoverscorrectlybeforereturningthemachinetothecustomer.
•Fanlouversonthemachinehelptopreventoverheatingofinternalcomponents.Donotobstructfan
louversorcoverthemwithlabelsorstickers.
©CopyrightLenovo2009,2011
1
Page 8

Electricalsafety
Observethefollowingruleswhenworkingonelectricalequipment.
Important:
Useonlyapprovedtoolsandtestequipment.Somehandtoolshavehandlescoveredwithasoftmaterial
thatdoesnotinsulateyouwhenworkingwithliveelectricalcurrents.
Manycustomershave,neartheirequipment,rubberoormatsthatcontainsmallconductivebersto
decreaseelectrostaticdischarges.Donotusethistypeofmattoprotectyourselffromelectricalshock.
•Findtheroomemergencypower-off(EPO)switch,disconnectingswitch,orelectricaloutlet.Ifanelectrical
accidentoccurs,youcanthenoperatetheswitchorunplugthepowercordquickly.
•Donotworkaloneunderhazardousconditionsornearequipmentthathashazardousvoltages.
•Disconnectallpowerbefore:
–Performingamechanicalinspection
–Workingnearpowersupplies
–Removingorinstallingmainunits
•Beforeyoustarttoworkonthemachine,unplugthepowercord.Ifyoucannotunplugit,askthecustomer
topower-offthewallboxthatsuppliespowertothemachine,andtolockthewallboxintheoffposition.
•Ifyouneedtoworkonamachinethathasexposedelectricalcircuits,observethefollowingprecautions:
–Ensurethatanotherperson,familiarwiththepower-offcontrols,isnearyou.
Attention:Anotherpersonmustbetheretoswitchoffthepower,ifnecessary.
–Useonlyonehandwhenworkingwithpowered-onelectricalequipment;keeptheotherhandinyour
pocketorbehindyourback.
Attention:Anelectricalshockcanoccuronlywhenthereisacompletecircuit.Byobservingtheabove
rule,youmaypreventacurrentfrompassingthroughyourbody.
–Whenusingtesters,setthecontrolscorrectlyandusetheapprovedprobeleadsandaccessoriesfor
thattester.
–Standonsuitablerubbermats(obtainedlocally,ifnecessary)toinsulateyoufromgroundssuchas
metaloorstripsandmachineframes.
Observethespecialsafetyprecautionswhenyouworkwithveryhighvoltages;Instructionsforthese
precautionsareinthesafetysectionsofmaintenanceinformation.Useextremecarewhenmeasuring
highvoltages.
•Regularlyinspectandmaintainyourelectricalhandtoolsforsafeoperationalcondition.
•Donotusewornorbrokentoolsandtesters.
•Neverassumethatpowerhasbeendisconnectedfromacircuit.First,checkthatithasbeenpoweredoff.
•Alwayslookcarefullyforpossiblehazardsinyourworkarea.Examplesofthesehazardsaremoistoors,
nongroundedpowerextensioncables,powersurges,andmissingsafetygrounds.
•Donottouchliveelectricalcircuitswiththereectivesurfaceofaplasticdentalmirror.Thesurfaceis
conductive;suchtouchingcancausepersonalinjuryandmachinedamage.
•Donotservicethefollowingpartswiththepoweronwhentheyareremovedfromtheirnormaloperating
placesinamachine:
–Powersupplyunits
–Pumps
–Blowersandfans
–Motorgenerators
–Similarunitstolistedabove
Thispracticeensurescorrectgroundingoftheunits.
•Ifanelectricalaccidentoccurs:
2HardwareMaintenanceManual
Page 9

–Usecaution;donotbecomeavictimyourself.
–Switchoffpower.
–Sendanotherpersontogetmedicalaid.
Safetyinspectionguide
Thepurposeofthisinspectionguideistoassistyouinidentifyingpotentiallyunsafeconditions.Aseach
machinewasdesignedandbuilt,requiredsafetyitemswereinstalledtoprotectusersandservicetechnicians
frominjury.Thisguideaddressesonlythoseitems.Y oushouldusegoodjudgmenttoidentifypotential
safetyhazardsduetoattachmentofnon- ThinkPadfeaturesoroptionsnotcoveredbythisinspectionguide.
Ifanyunsafeconditionsarepresent,youmustdeterminehowserioustheapparenthazardcouldbeand
whetheryoucancontinuewithoutrstcorrectingtheproblem.
Considertheseconditionsandthesafetyhazardstheypresent:
•Electricalhazards,especiallyprimarypower(primaryvoltageontheframecancauseseriousorfatal
electricalshock)
•Explosivehazards,suchasadamagedCRTfaceorabulgingcapacitor
•Mechanicalhazards,suchaslooseormissinghardware
Todeterminewhetherthereareanypotentiallyunsafeconditions,usethefollowingchecklistatthebeginning
ofeveryservicetask.Beginthecheckswiththepoweroff,andthepowercorddisconnected.
Checklist:
1.Checkexteriorcoversfordamage(loose,broken,orsharpedges).
2.Poweroffthecomputer.Disconnectthepowercord.
3.Checkthepowercordfor:
a.Athird-wiregroundconnectoringoodcondition.Useametertomeasurethird-wireground
continuityfor0.1ohmorlessbetweentheexternalgroundpinandtheframeground.
b.Thepowercordshouldbethetypespeciedinthepartslist.
c.Insulationmustnotbefrayedorworn.
4.Checkforcrackedorbulgingbatteries.
5.Removethecover.
6.Checkforanyobviousnon- ThinkPadalterations.Usegoodjudgmentastothesafetyofany
non-ThinkPadalterations.
7.Checkinsidetheunitforanyobviousunsafeconditions,suchasmetallings,contamination,wateror
otherliquids,orsignsofreorsmokedamage.
8.Checkforworn,frayed,orpinchedcables.
9.Checkthatthepower-supplycoverfasteners(screwsorrivets)havenotbeenremovedortamperedwith.
Handlingdevicesthataresensitivetoelectrostaticdischarge
Anycomputerpartcontainingtransistorsorintegratedcircuits(ICs)shouldbeconsideredsensitiveto
electrostaticdischarge(ESD.)ESDdamagecanoccurwhenthereisadifferenceinchargebetweenobjects.
ProtectagainstESDdamagebyequalizingthechargesothatthemachine,thepart,theworkmat,andthe
personhandlingthepartareallatthesamecharge.
Note:
Useproduct-specicESDprocedureswhentheyexceedtherequirementsnotedhere.
Chapter1.Safetyinformation3
Page 10

MakesurethattheESDprotectivedevicesyouusehavebeencertied(ISO9000)asfullyeffective.
WhenhandlingESD-sensitiveparts:
•Keepthepartsinprotectivepackagesuntiltheyareinsertedintotheproduct.
•Avoidcontactwithotherpeople.
•Wearagroundedwriststrapagainstyourskintoeliminatestaticonyourbody.
•Preventthepartfromtouchingyourclothing.Mostclothingisinsulativeandretainsachargeevenwhen
youarewearingawriststrap.
•Useagroundedworkmattoprovideastatic-freeworksurface.Thematisespeciallyusefulwhen
handlingESD-sensitivedevices.
•Selectagroundingsystem,suchasthoselistedbelow,toprovideprotectionthatmeetsthespecic
servicerequirement.
Note:TheuseofagroundingsystemtoguardagainstESDdamageisdesirablebutnotnecessary.
–AttachtheESDgroundcliptoanyframeground,groundbraid,orgreen-wireground.
–Whenworkingonadouble-insulatedorbattery-operatedsystem,useanESDcommongroundor
referencepoint.Youcanusecoaxorconnector-outsideshellsonthesesystems.
–Usetheroundgroundprongoftheacplugonac-operatedcomputers.
Groundingrequirements
Electricalgroundingofthecomputerisrequiredforoperatorsafetyandcorrectsystemfunction.Proper
groundingoftheelectricaloutletcanbeveriedbyacertiedelectrician.
Safetynotices-multilingualtranslations
Thesafetynoticesinthissectionareprovidedinthefollowinglanguages:
•English
•Arabic
•BrazilianPortuguese
•French
•German
•Hebrew
•Japanese
•Korean
•Spanish
•T raditionalChinese
DANGER
DANGER
4HardwareMaintenanceManual
Page 11
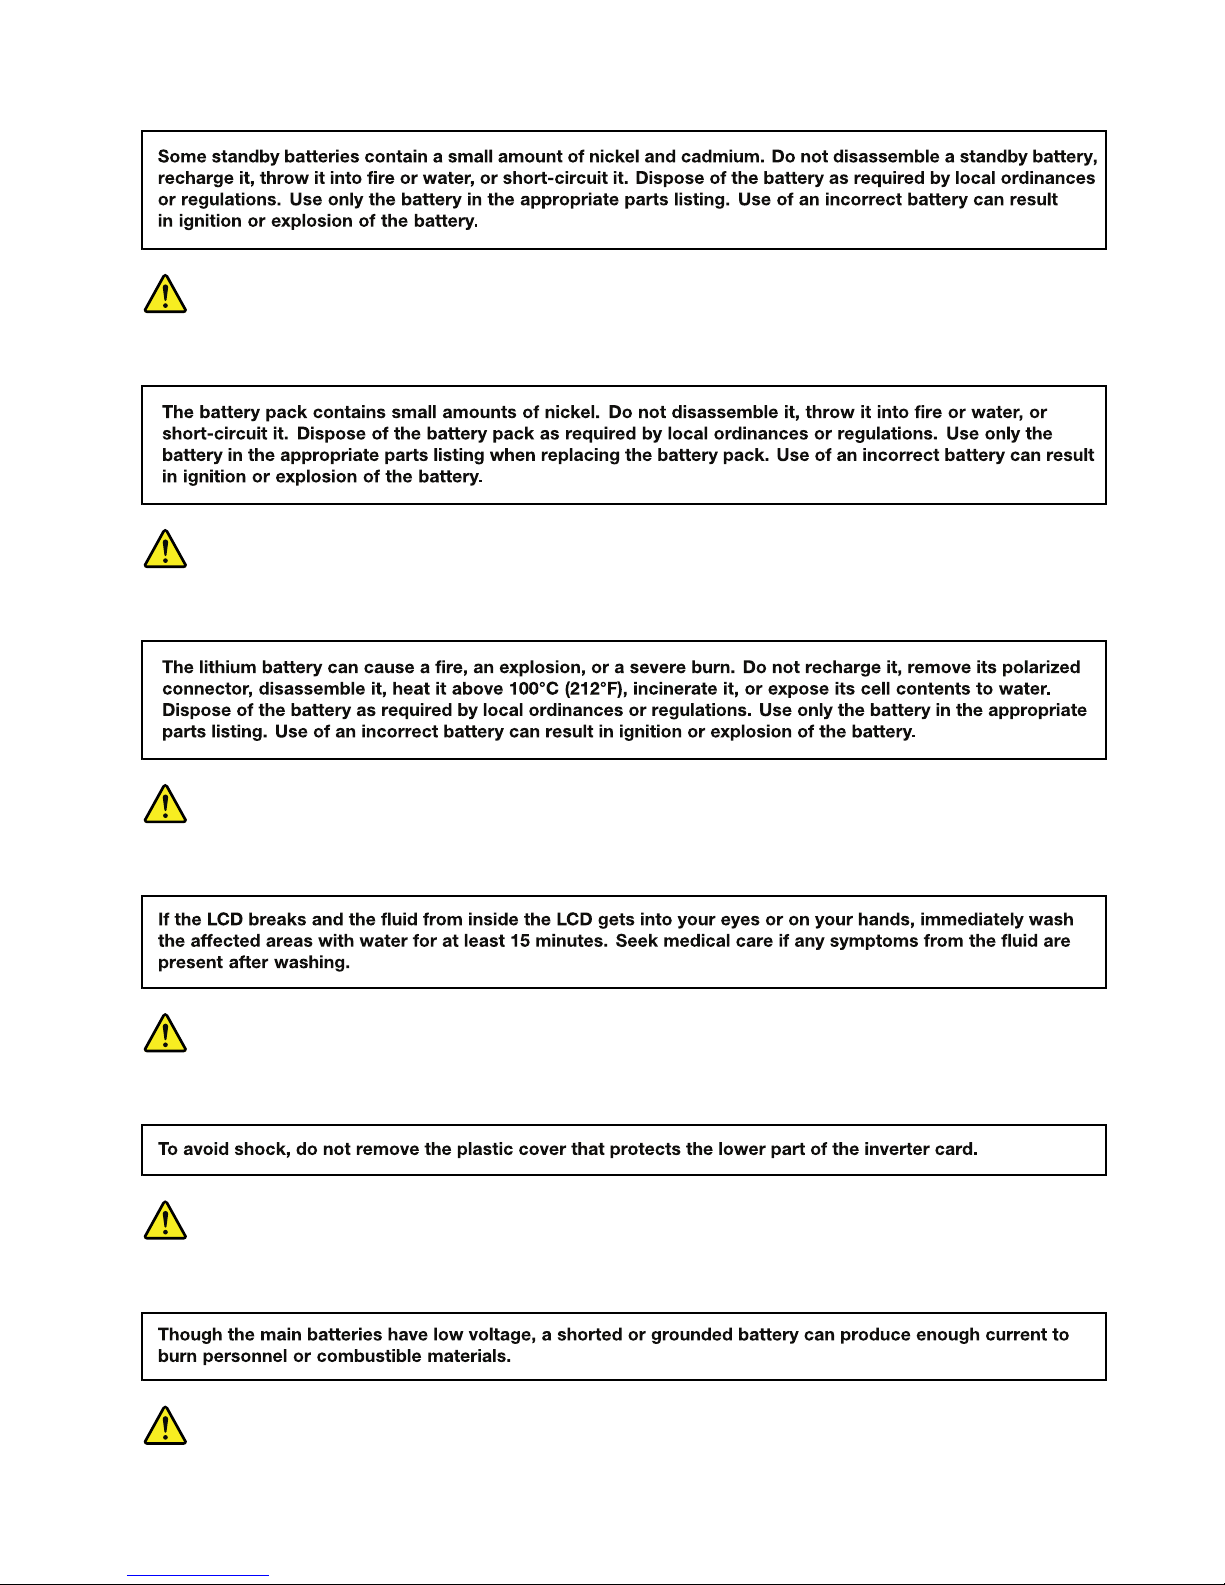
DANGER
DANGER
DANGER
DANGER
DANGER
Chapter1.Safetyinformation5
Page 12
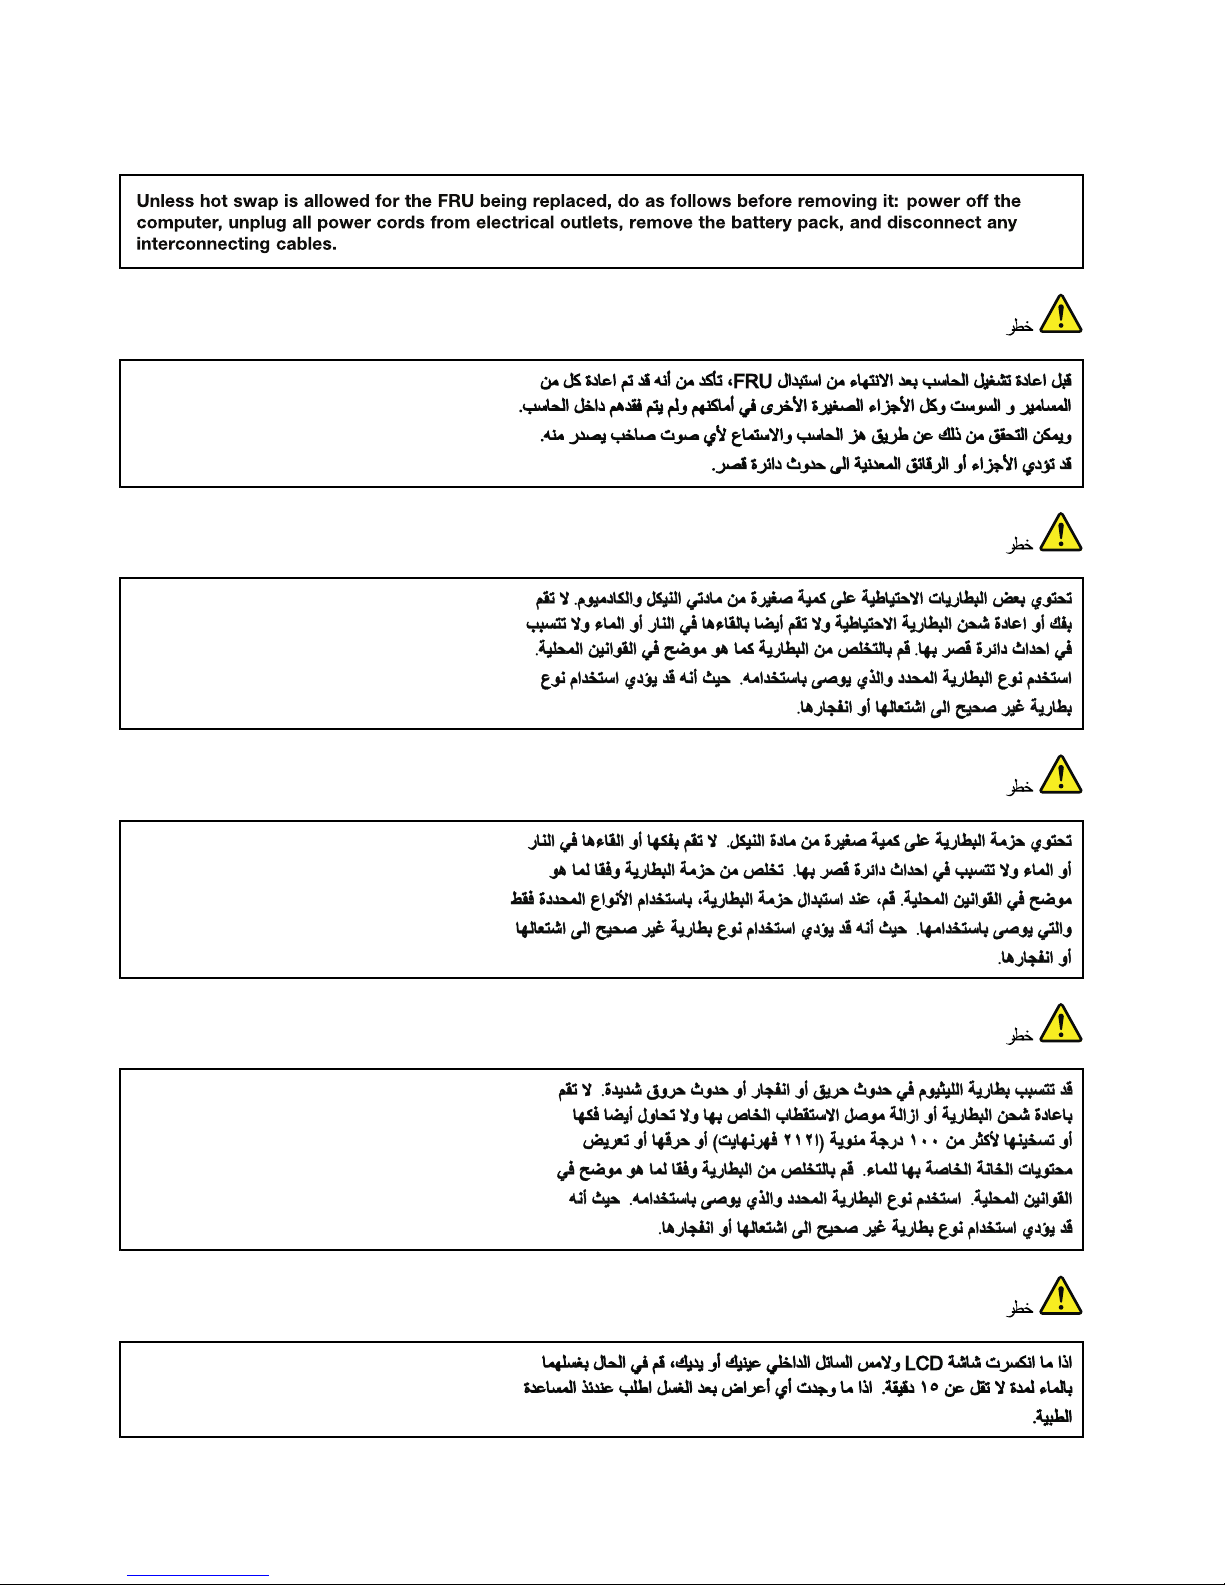
DANGER
6HardwareMaintenanceManual
Page 13
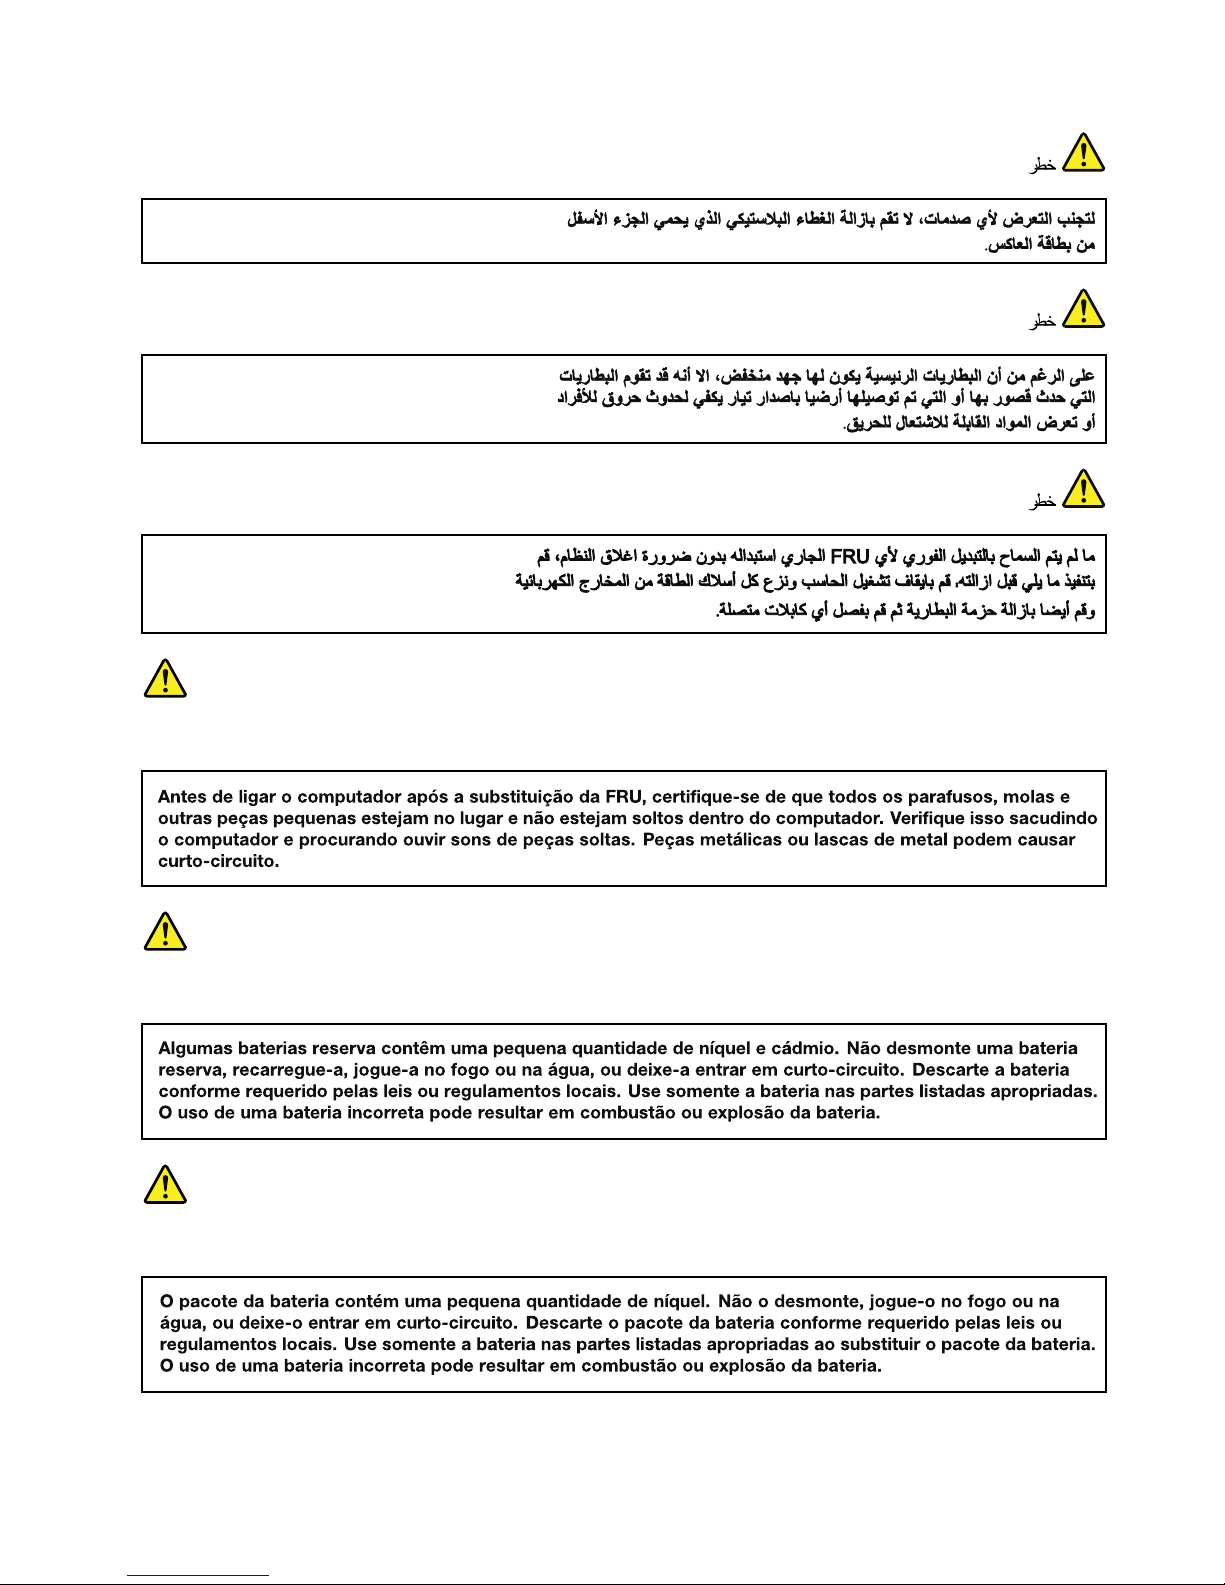
PERIGO
PERIGO
PERIGO
Chapter1.Safetyinformation7
Page 14
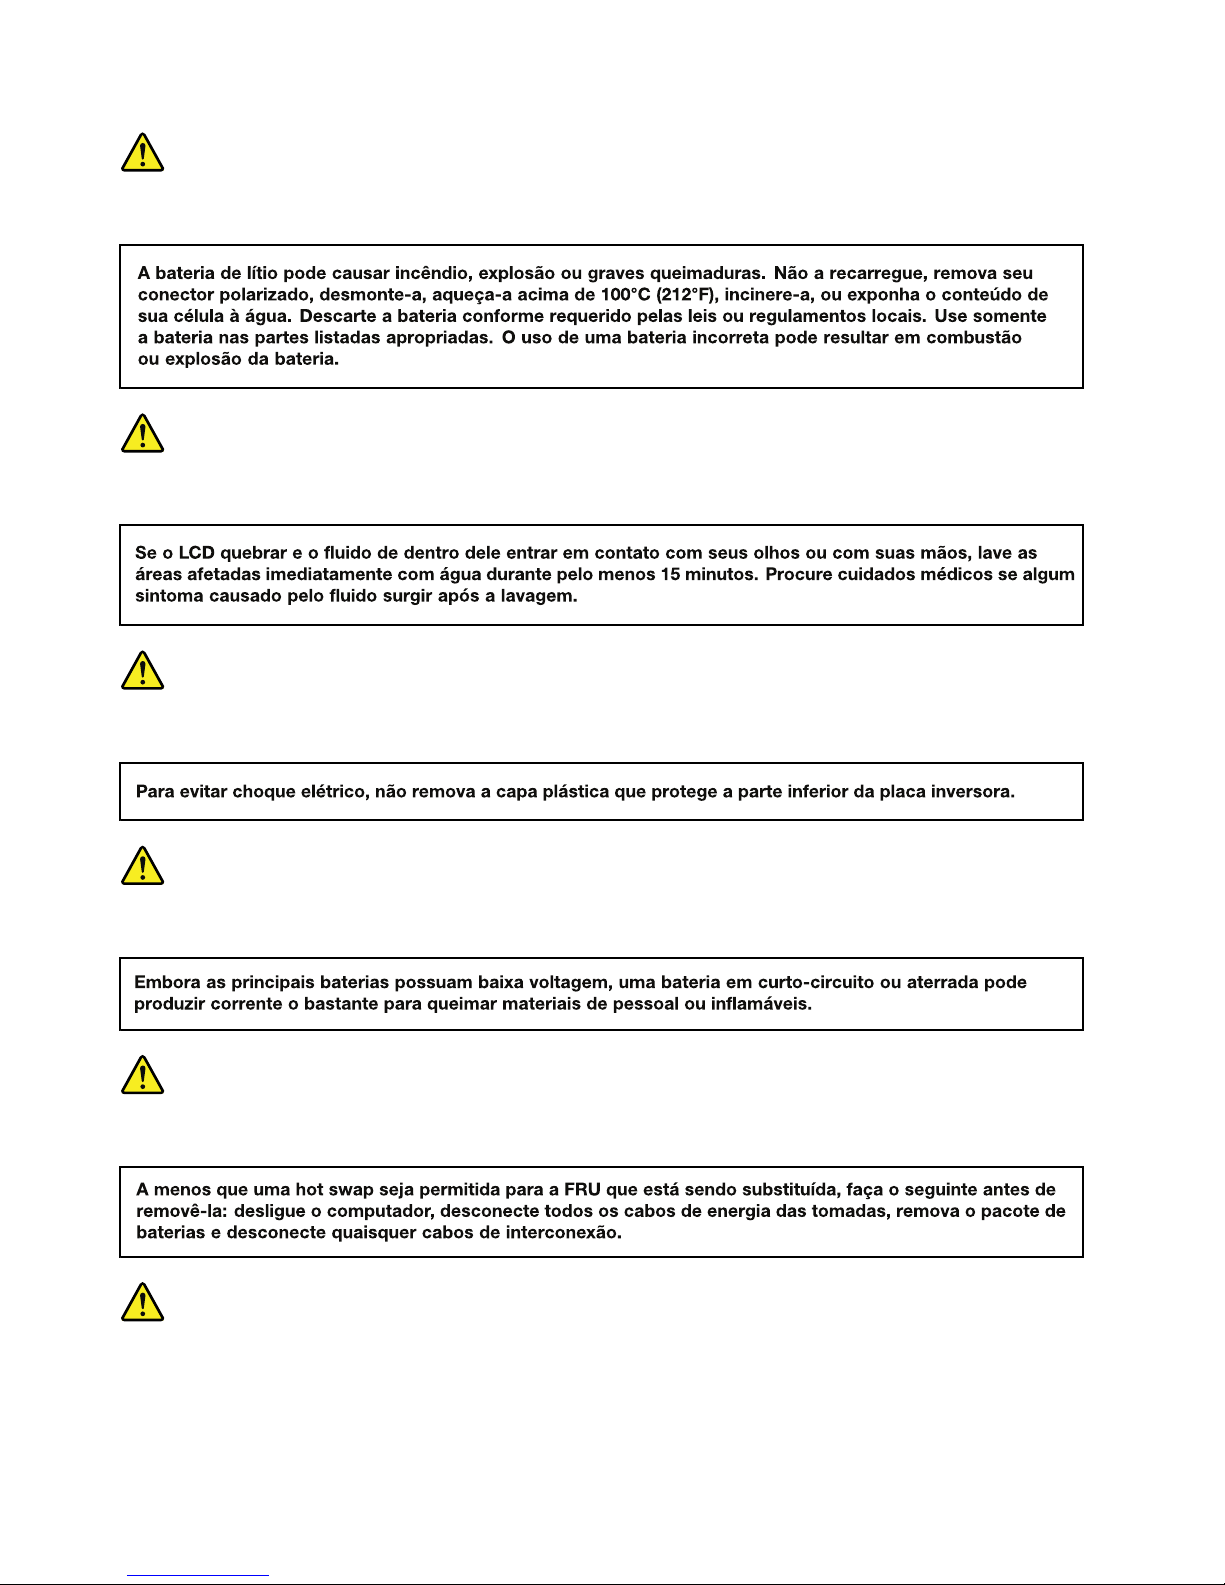
PERIGO
PERIGO
PERIGO
PERIGO
PERIGO
DANGER
8HardwareMaintenanceManual
Page 15
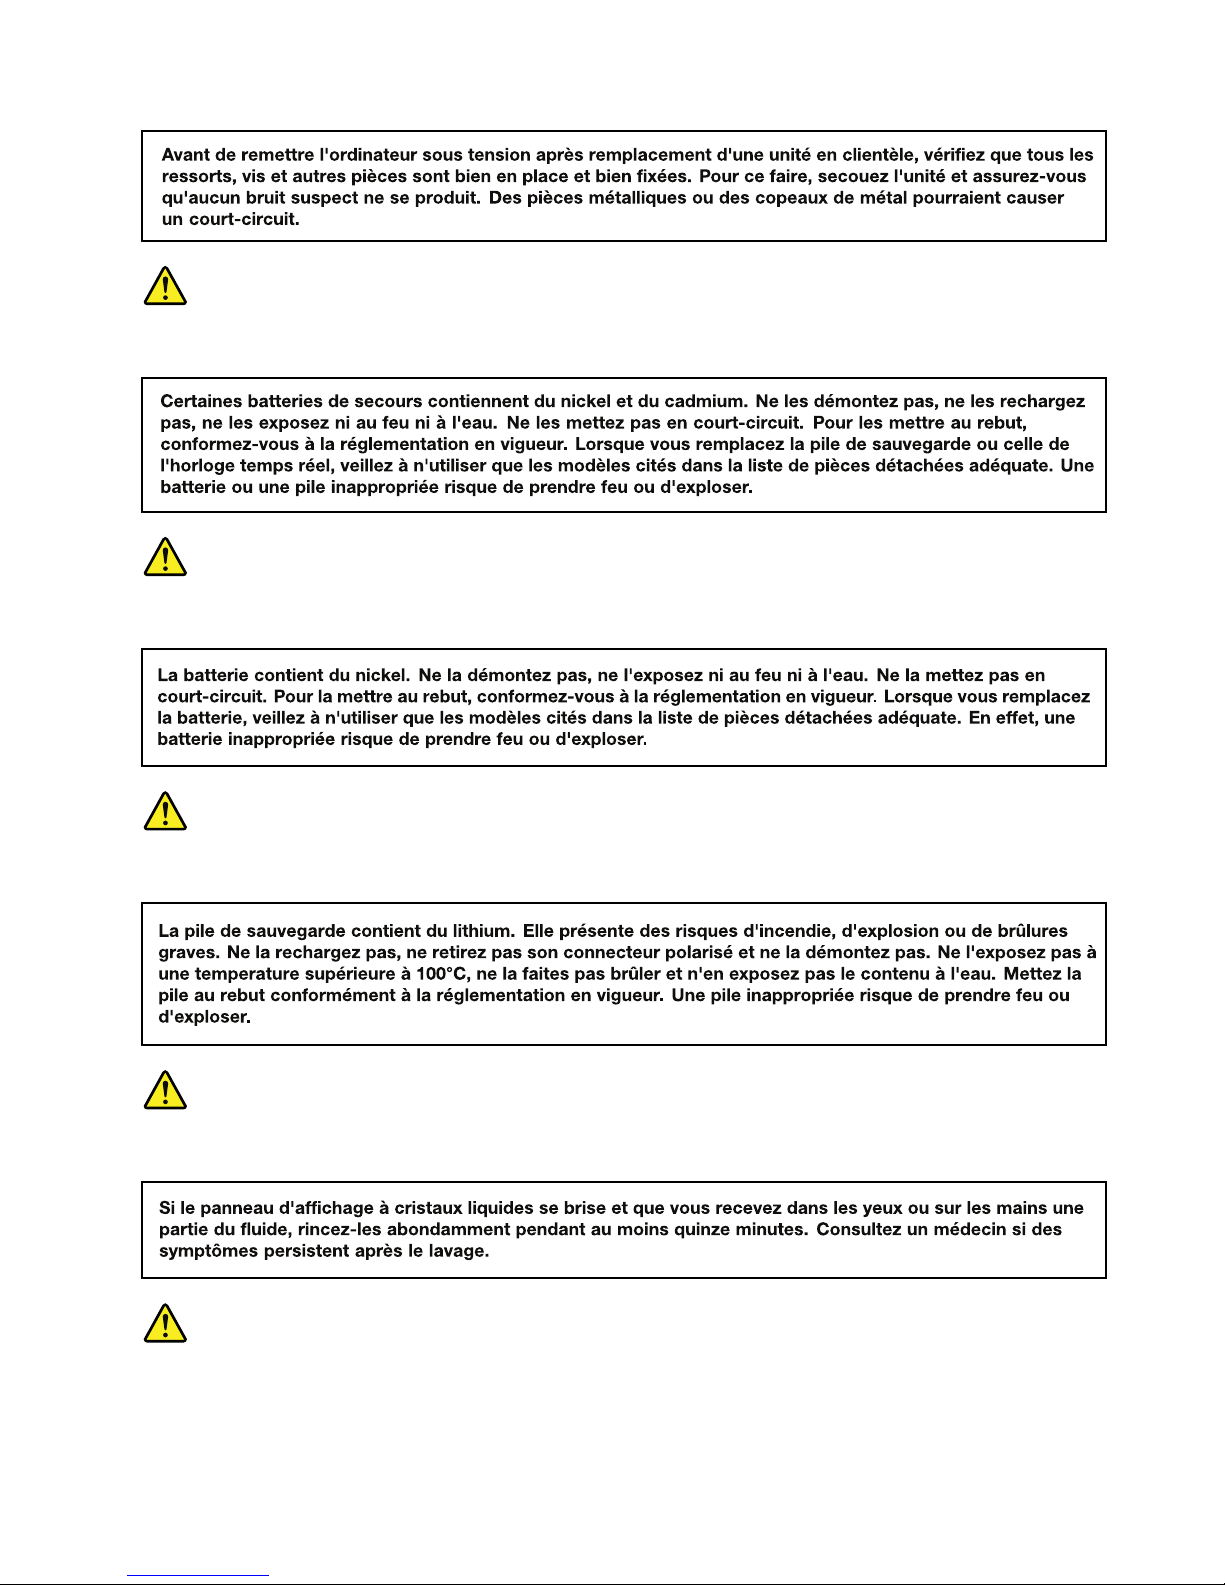
DANGER
DANGER
DANGER
DANGER
DANGER
Chapter1.Safetyinformation9
Page 16
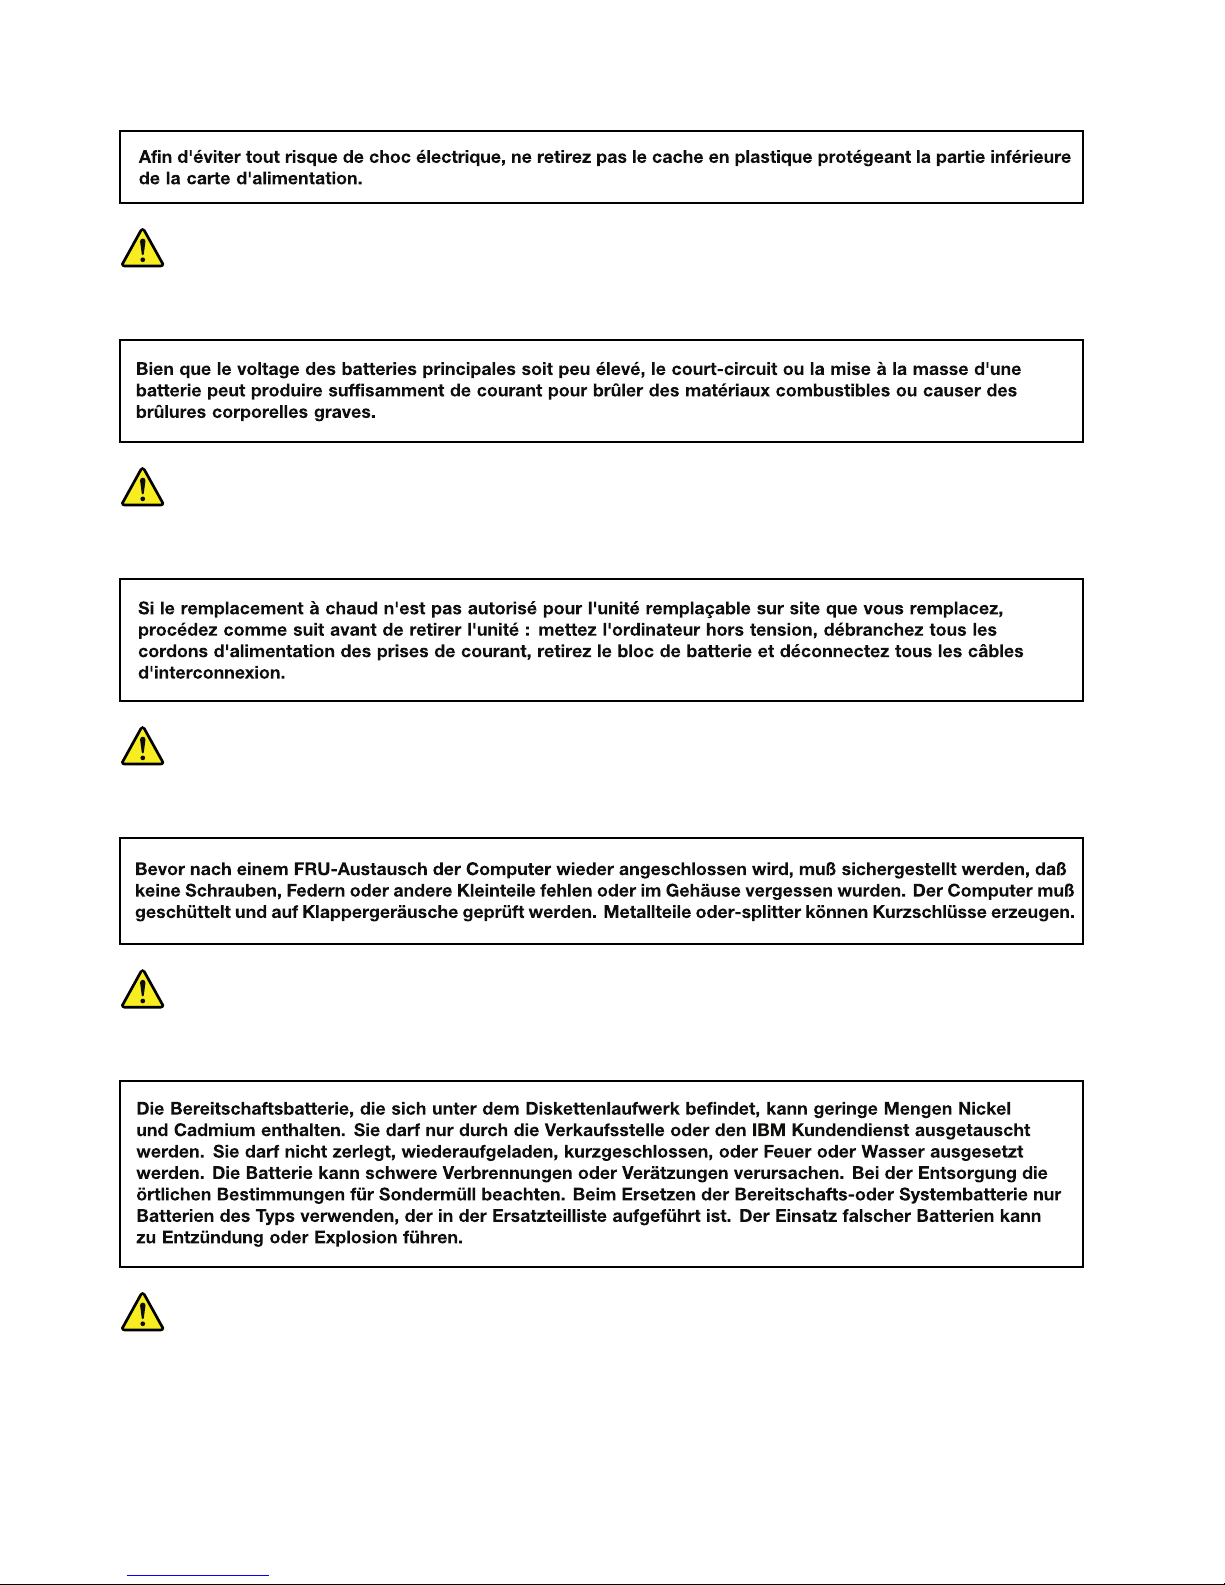
DANGER
DANGER
VORSICHT
VORSICHT
VORSICHT
10HardwareMaintenanceManual
Page 17
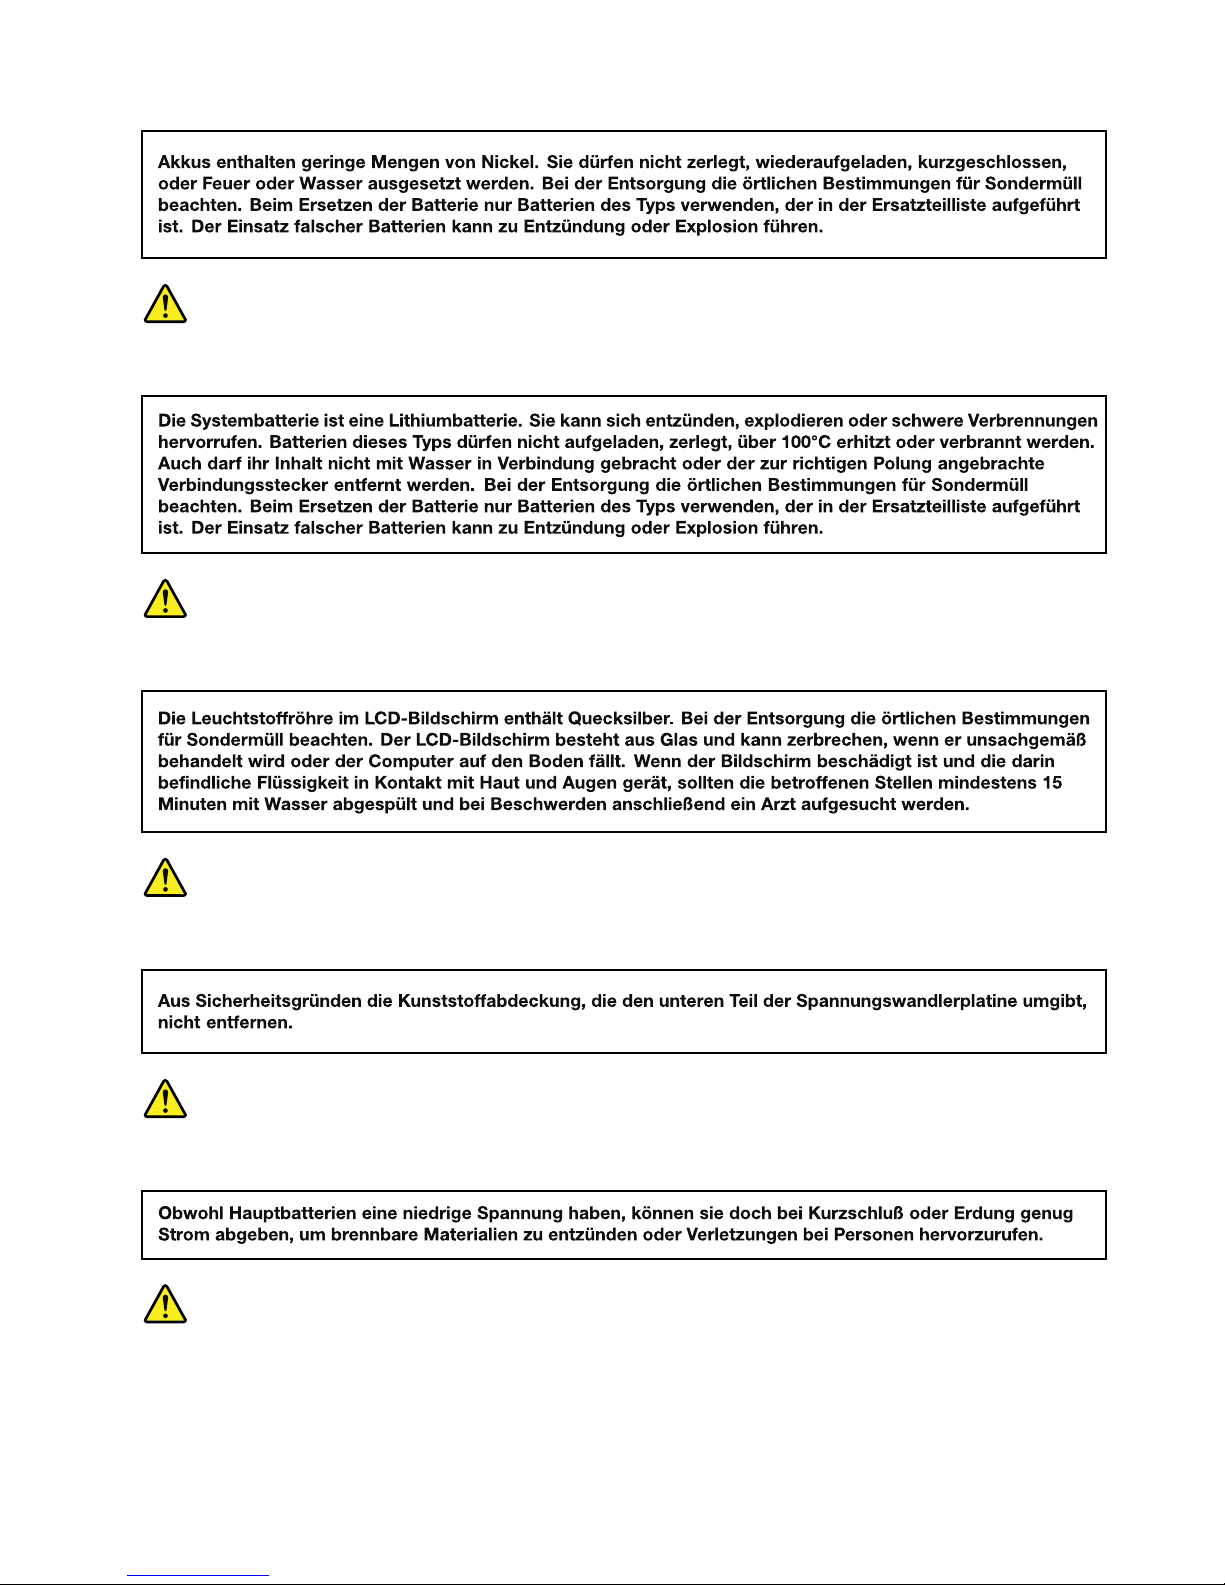
VORSICHT
VORSICHT
VORSICHT
VORSICHT
VORSICHT
Chapter1.Safetyinformation11
Page 18
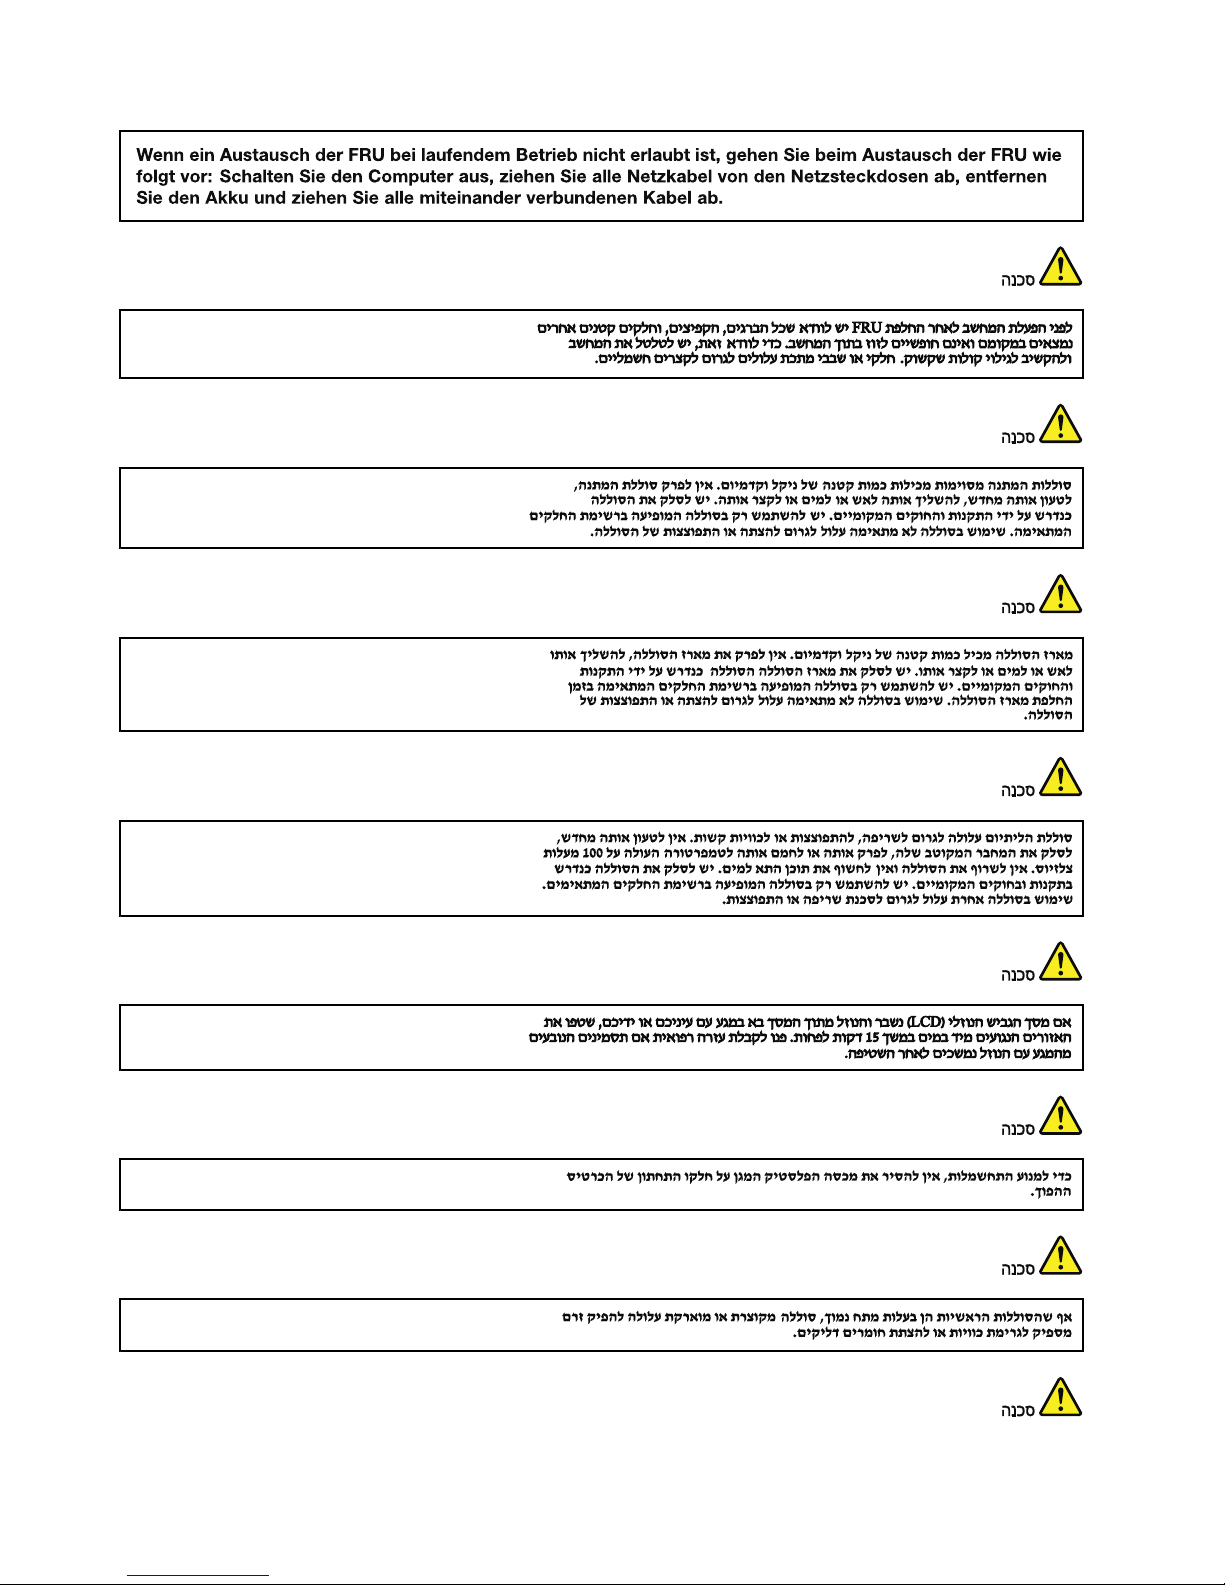
12HardwareMaintenanceManual
Page 19

Chapter1.Safetyinformation13
Page 20
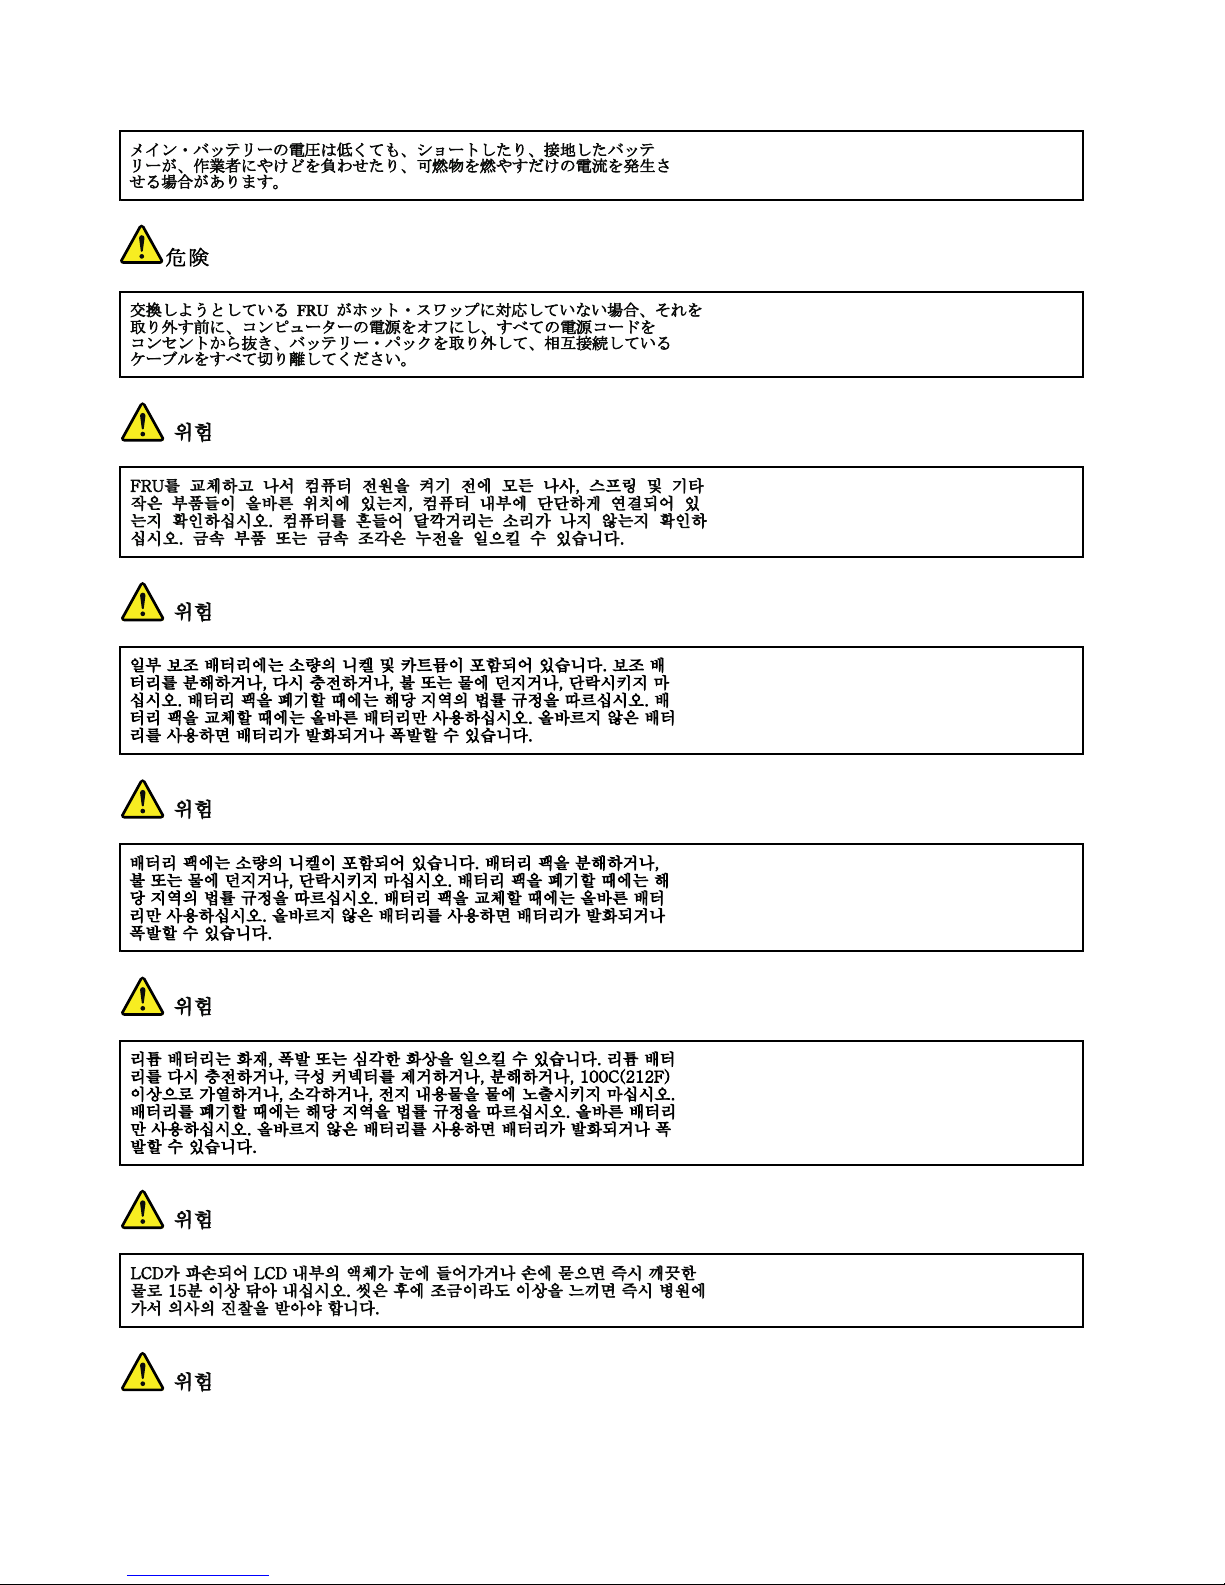
14HardwareMaintenanceManual
Page 21
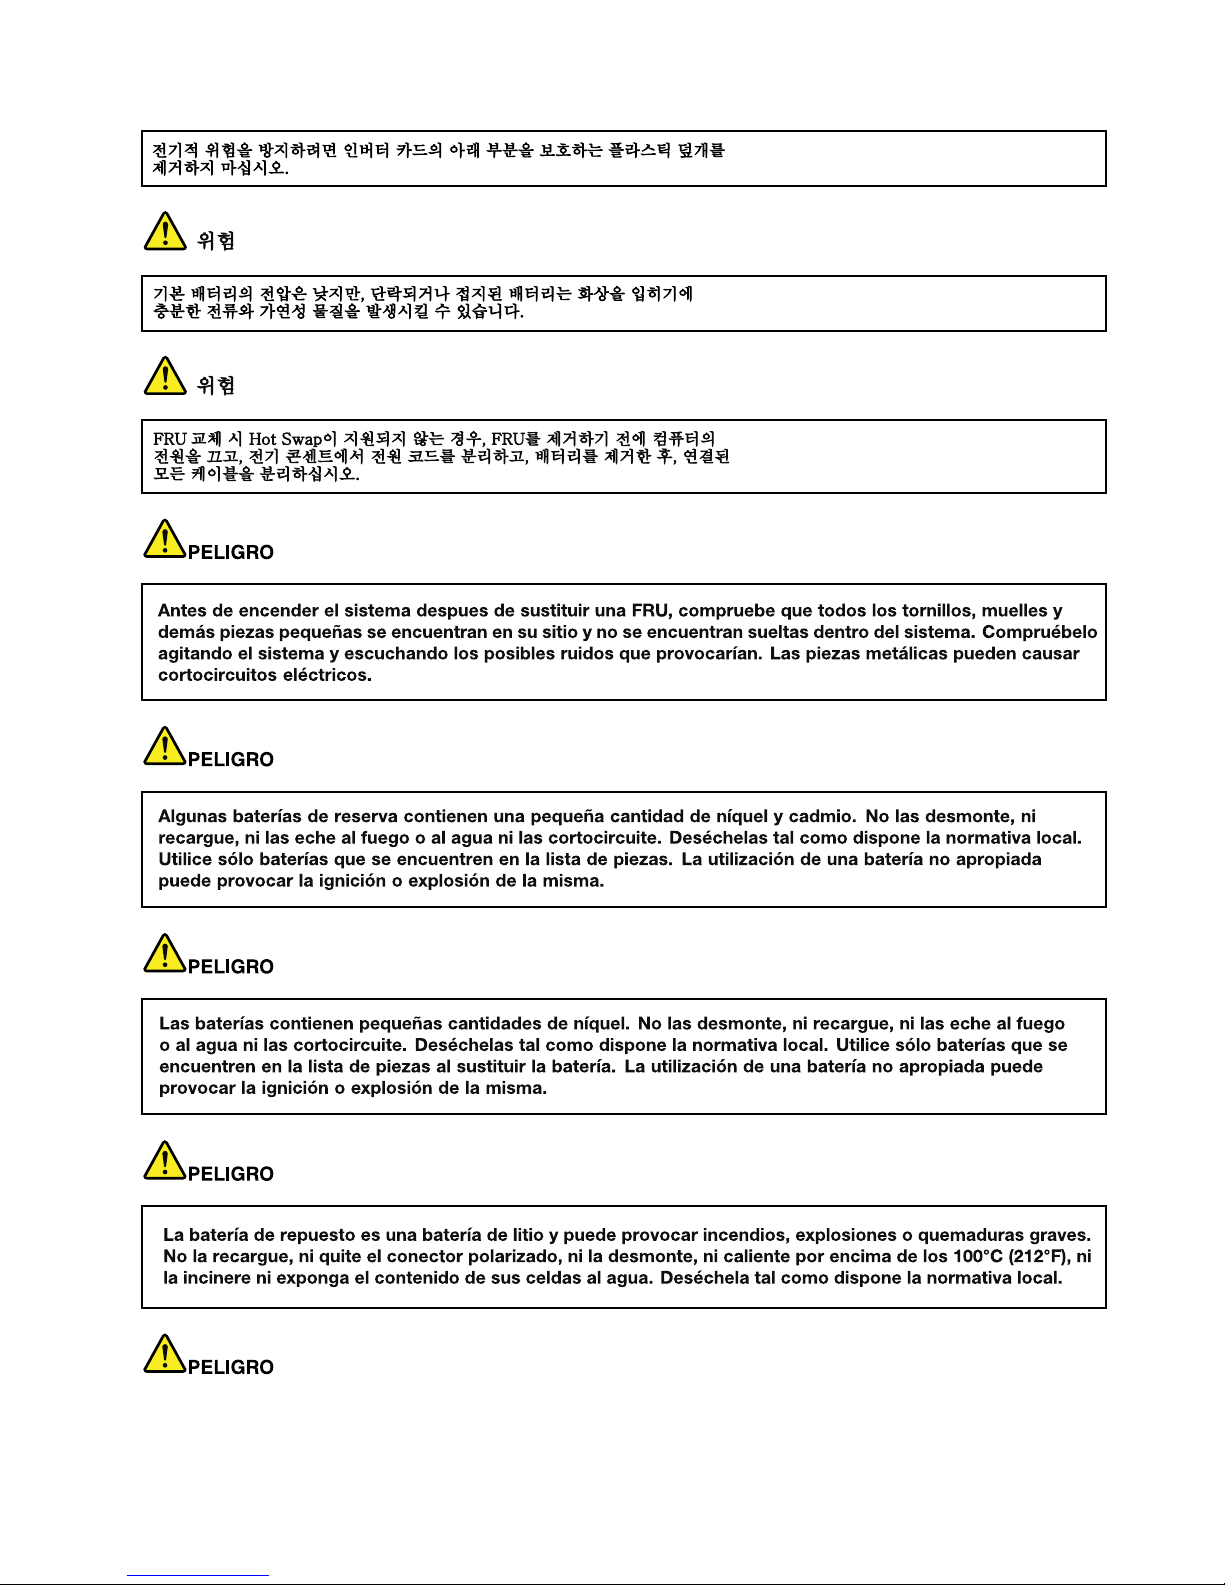
Chapter1.Safetyinformation15
Page 22
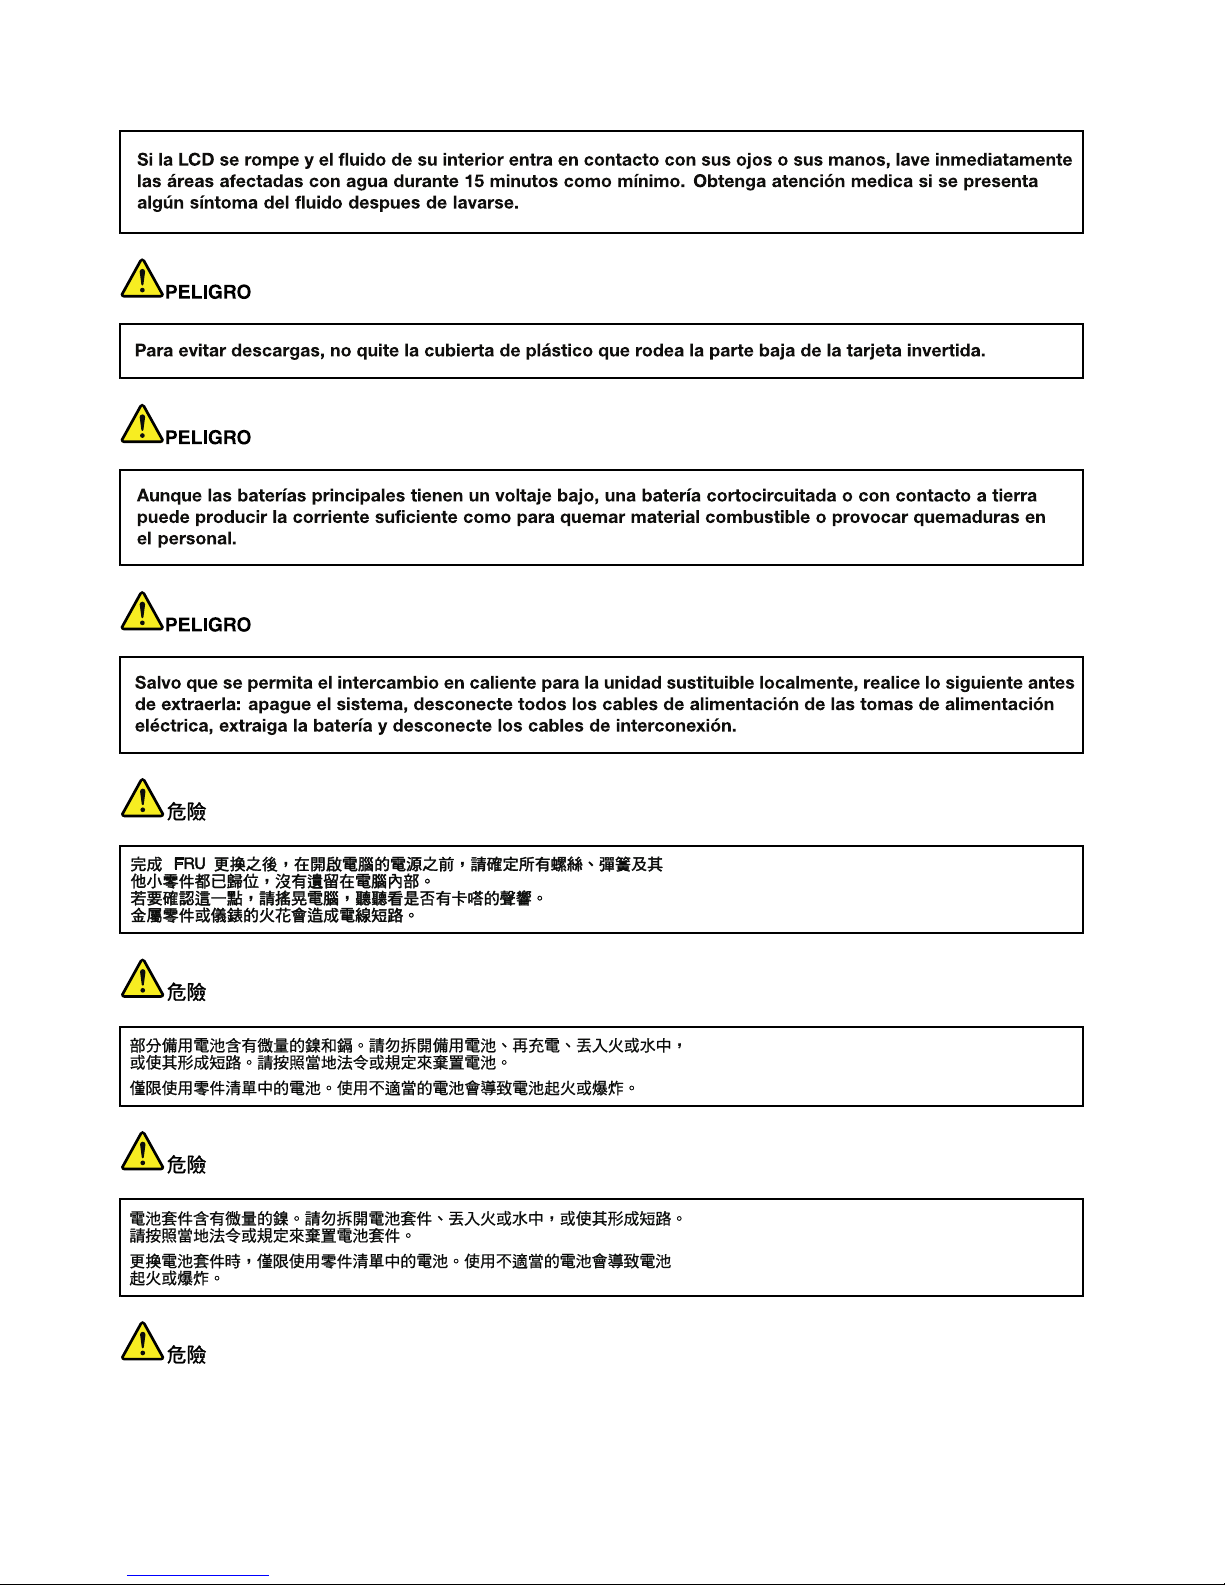
16HardwareMaintenanceManual
Page 23
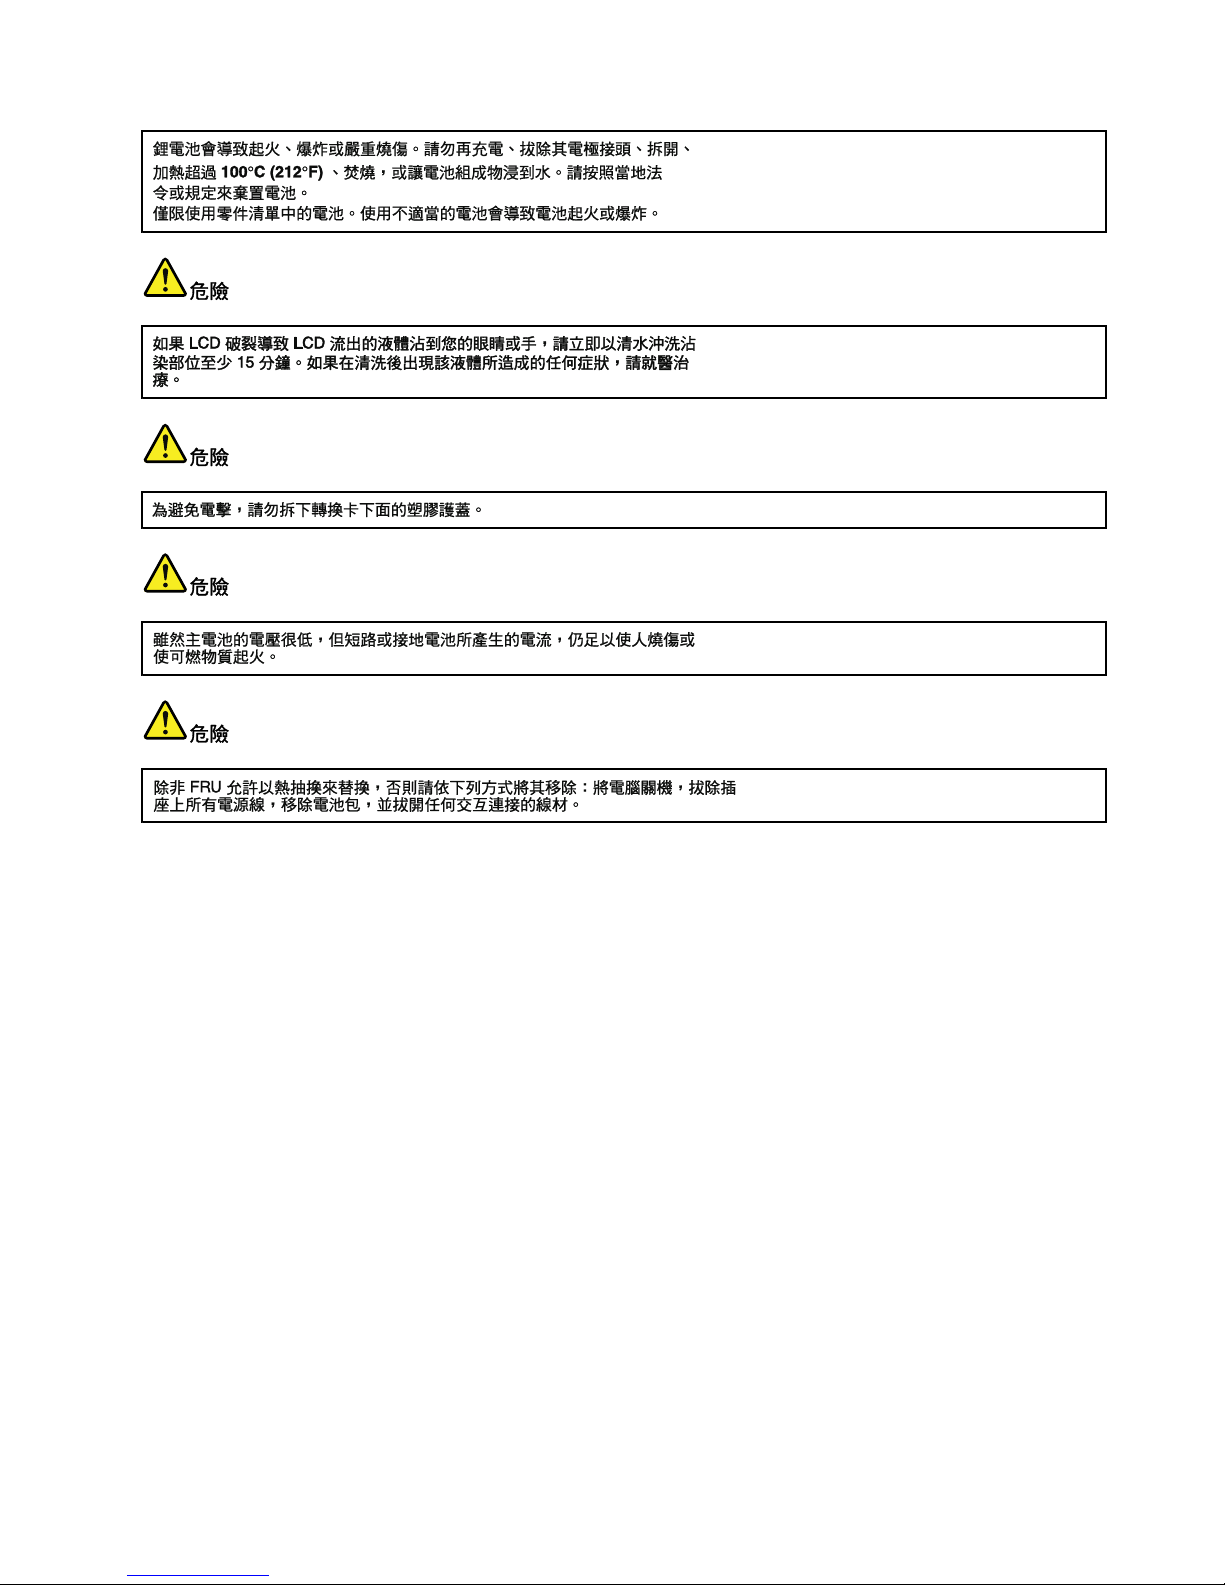
Chapter1.Safetyinformation17
Page 24

18HardwareMaintenanceManual
Page 25

Chapter2.Importantserviceinformation
Thischapterpresentsfollowingimportantserviceinformationthatappliestoallmachinetypessupportedby
thismanual:
•“StrategyforreplacingFRUs”onpage19
–“Strategyforreplacingaharddiskdrive”onpage20
–“Importantnoticeforreplacingasystemboard”onpage20
–“Howtouseerrormessage”onpage20
•“StrategyforreplacingFRUsforCTO,CMV ,andGAV”onpage20
–“Productdenition”onpage20
–“FRUidenticationforCTO,CMV,andGAVproducts”onpage21
Important:BIOSanddevicedriverxesarecustomer-installable.TheBIOSanddevicedriversareposted
onthecustomersupportsitehttp://www.lenovo.com/support/phone.
SystemDisassembly/ReassemblyvideosthatshowtheFRUremovalsorreplacementsfortheLenovo
®
authorizedservicetechniciansareavailableinthefollowingsupportsite:
http://www.lenovoservicetraining.com/ion/
AdvisecustomerstocontacttheCustomerSupportCenterat800-426-7378iftheyneedassistancein
obtainingorinstallinganysoftwarexes,drivers,andBIOSdownloads.
StrategyforreplacingFRUs
Beforereplacingparts:
Makesurethatallsoftwarexes,drivers,andBIOSdownloadsareinstalledbeforereplacinganyFRUs
listedinthismanual.
Afterasystemboardisreplaced,ensurethatthelatestBIOSisloadedtothesystemboardbefore
completingtheserviceaction.
Todownloadsoftwarexes,drivers,andBIOS,doasfollows:
1.Gotohttp://support.lenovo.com.
2.EntertheproductnumberofthecomputerorpressAuto-detectbuttononthescreen.
3.SelectDownloadsanddrivers.
4.Followthedirectionsonthescreenandinstallthenecessarysoftware.
UsethefollowingstrategytopreventunnecessaryexpenseforreplacingandservicingFRUs:
•IfyouareinstructedtoreplaceaFRUbutthereplacementdoesnotcorrecttheproblem,reinstall
theoriginalFRUbeforeyoucontinue.
•Somecomputershavebothaprocessorboardandasystemboard.Ifyouareinstructedtoreplaceeither
theprocessorboardorthesystemboard,andreplacingoneofthemdoesnotcorrecttheproblem,
reinstallthatboard,andthenreplacetheotherone.
•IfanadapteroradeviceconsistsofmorethanoneFRU,anyoftheFRUsmaybethecauseoftheerror.
Beforereplacingtheadapterordevice,removetheFRUs,onebyone,toseeifthesymptomschange.
ReplaceonlytheFRUthatchangedthesymptoms.
Attention:Thesetupcongurationonthecomputeryouareservicingmayhavebeencustomized.Running
AutomaticCongurationmayalterthesettings.Notethecurrentcongurationsettings(usingtheView
Congurationoption);then,whenservicehasbeencompleted,verifythatthosesettingsremainineffect.
©CopyrightLenovo2009,2011
19
Page 26

Strategyforreplacingaharddiskdrive
Alwaystrytorunalow-levelformatbeforereplacingaharddiskdrive.Thiswillcauseallcustomerdataon
theharddisktobelost.Besurethatthecustomerhasacurrentbackupofthedatabeforedoingthistask.
Attention:Thedrivestartupsequenceinthecomputeryouareservicingmayhavebeenchanged.Be
extremelycarefulduringwriteoperationssuchascopying,saving,orformatting.Ifyouselectanincorrect
drive,dataorprogramscanbeoverwritten.
Importantnoticeforreplacingasystemboard
Somecomponentsmountedonasystemboardareverysensitive.Improperhandlingofasystemboardcan
causedamagetothosecomponents,andmaycauseasystemmalfunction.
Attention:Whenhandlingasystemboard:
•Donotdropasystemboardorapplyanyexcessiveforcetoit.
•Avoidroughhandlingofanykind.
•AvoidbendingasystemboardandhardpushingtopreventcrackingateachBGA(BallGridArray)chipset.
Howtouseerrormessage
Usetheerrorcodesdisplayedonthescreentodiagnosefailures.Ifmorethanoneerrorcodeisdisplayed,
beginthediagnosiswiththersterrorcode.Whatevercausesthersterrorcodemayalsocausefalseerror
codes.Ifnoerrorcodeisdisplayed,seewhethertheerrorsymptomislistedintheSymptom-to-FRU
Indexforthecomputeryouareservicing.
StrategyforreplacingFRUsforCTO,CMV ,andGAV
Productdenition
DynamicCongureToOrder(CTO)
ThisprovidestheabilityforacustomertocongureaLenovosolutionfromaneSite,andhavethis
congurationsenttofulllment,whereitisbuiltandshippeddirectlytothecustomer.Themachinelabel,
ProductEntitlementWarehouse(PEW),eSupport,andtheHMMwillloadtheseproductsasthe4-digitMT
and3-digitmodel,wheremodel=“CTO”(Example:1829-CTO).
CustomModelVariant(CMV)
ThisisanuniquecongurationthathasbeennegotiatedbetweenLenovoandthecustomer.Aunique4-digit
MTand3-digitmodelisprovidedtothecustomertoplaceorders(Example:1829-W15).ACMVisaspecial
bidoffering.Therefore,itisNOTgenerallyannounced.
•TheMTMportionofthemachinelabelisthe4-digitMTand3-digitmodel,wheremodel=“CTO”
(Example:1829-CTO).ThePRODUCTIDportionofthemachinelabelisthe4-digitMTand3-digitCMV
model(Example:1829-W15).
•ThePEWrecordisthe4-digitMTand3-digitmodel,wheremodel=“CTO”(Example:1829-CTO).
•eSupportwillshowboththeCTOandCMVmachinetypemodels(Example:1829-CTOand1829-W15
willbefoundontheeSupportsite.)
•TheHMMwillhavethe4-digitMTand3-digitCTOmodelonly(Example:1829-CTO).Again,CMVsare
custommodelsandarenotfoundintheHMM.
20HardwareMaintenanceManual
Page 27

GeneralAnnounceVariant(GAV)
Thisisastandardmodel(xedconguration).GAVsareannouncedandofferedtoallcustomers.TheMTM
portionofthemachinelabelisa4-digitMTand3-digitmodel,wheremodel=a“xedpartnumber”,not
“CTO”(Example:1829-F1U).Also,PEW,eSupport,andtheHMMwilllisttheseproductsunderthesame
xedmodelnumber.
FRUidenticationforCTO,CMV,andGAVproducts
TherearethreeinformationresourcestoidentifywhichFRUsareusedtosupportCTO,CMV ,andGAV
products.ThesesourcesarePEW,eSupport,andtheHMM.
UsingPEW
•PEWistheprimarysourceforidentifyingFRUpartnumbersandFRUdescriptionsforthekeycommodities
forCTO,CMVandGAVproductsataMT-serialnumberlevel.Anexampleofkeycommoditiesarehard
diskdrives,systemboards,microprocessors,LiquidCrystalDisplays(LCDs),andmemory.
•Remember,allCTOandCMVproductsareloadedinPEWunderthe4-digitMTand3-digitmodel,where
model=“CTO”(Example:1829-CTO).GAVsareloadedinPEWunderthe4-digitMTand3-digitmodel,
wheremodel=a“xedpartnumber”,not“CTO”(Example:1829-F1U).
•PEWcanbeaccessedatthefollowingWebsite:
http://www.lenovo.com/support/site.wss/document.do?lndocid=LOOK-WARNTY
SelectWarrantylookup.InputtheMTandtheSerialnumberandthelistofkeycommoditieswillbe
returnedinthePEWrecordunderCOMPONENTINFORMA TION.
UsingeSupport
ForKeyCommodities(Examples-harddiskdrive,systemboard,microprocessor,LCD,andmemory)
•eSupportcanbeusedtoviewthelistofkeycommoditiesbuiltinaparticularmachineserial(thisisthe
samerecordfoundinPEW).
•eSupportcanbeaccessedattheWebsitehttp://support.lenovo.com.
•T oviewthekeycommodities,clickonPARTSINFORMATION,thenP ARTSLOOKUP .T ypeinthemodel
typeandserialnumber.ThekeycommoditieswillbereturnedintheeSupportrecordunderPARTS
SHIPPEDWITHYOURSYSTEM.
FortheRemainingFRUs(thecompletelistofFRUsattheMTModellevel)
•eSupportcanbeusedtoviewthecompletelistofFRUsforamachinetypeandmodel.
•T oviewthecompletelistofFRUs,typeinthemachinetypeandmodel(Example:1829-CTO)under
QUICKPATH.Under“ViewbyDocumentT ype”selectP ARTSINFORMA TION.Under“FilterbyCategory”
selectSERVICEP ARTS.Under“PartsInformationbyDate”selectSYSTEMSERVICEP ARTS.Thelistof
servicepartsbydescription,withapplicablemachinetypemodelandFRUwillbedisplayed.
UsingtheHMM
ForKeyCommodities(Examples-harddiskdrive,systemboard,microprocessor,LCD,andmemory)
UsetheHMMasaback-uptoPEWandeSupporttoviewthecompletelistofFRUsattheMTModellevel.
Chapter2.Importantserviceinformation21
Page 28

22HardwareMaintenanceManual
Page 29

Chapter3.Generalcheckout
Thischapterpresentsfollowinginformation:
•“Whattodorst”onpage23
•“Checkoutguide”onpage24
–“DiagnosticsusingPC-DoctorforDOS”onpage24
–“Testingthecomputer”onpage25
–“DetectingsysteminformationwithPC-Doctor”onpage26
–“LenovoThinkVantageToolbox”onpage27
–“FRUtests”onpage27
•“Powersystemcheckout”onpage28
–“Checkingtheacadapter”onpage29
–“Checkingoperationalcharging”onpage29
–“Checkingthebatterypack”onpage30
–“Checkingthebackupbattery”onpage30
ThedescriptionsinthischapterapplytoanyThinkPadmodelthatsupportsthePC-Doctor
®
forDOS
diagnosticsprogram.Somedescriptionsmightnotapplytoyourparticularcomputer.
Beforeyougotothecheckoutguide,besuretoreadthefollowingimportantnotes.
Important:
•Onlycertiedtrainedpersonnelshouldservicethecomputer.
•BeforereplacinganyFRU,readtheentirepageonremovingandreplacingFRUs.
•WhenyoureplaceFRUs,usenewnylon-coatedscrews.
•Beextremelycarefulduringsuchwriteoperationsascopying,saving,orformatting.Drivesinthe
computerthatyouareservicingsequencemighthavebeenaltered.Ifyouselectanincorrectdrive,
dataorprogramsmightbeoverwritten.
•ReplaceaFRUonlywithanotherFRUofthecorrectmodel.WhenyoureplaceaFRU,makesurethat
themodelofthemachineandtheFRUpartnumberarecorrectbyreferringtotheFRUpartslist.
•AFRUshouldnotbereplacedbecauseofasingle,unreproduciblefailure.Singlefailurescanoccur
foravarietyofreasonsthathavenothingtodowithahardwaredefect,suchascosmicradiation,
electrostaticdischarge,orsoftwareerrors.ConsiderreplacingaFRUonlywhenaproblemrecurs.Ifyou
suspectthataFRUisdefective,cleartheerrorlogandrunthetestagain.Iftheerrordoesnotrecur,do
notreplacetheFRU.
•BecarefulnottoreplaceanondefectiveFRU.
Whattodorst
WhenyoudoreturnaFRU,youmustincludethefollowinginformationinthepartsexchangeformor
partsreturnformthatyouattachtoit:
1.Nameandphonenumberofservicetechnician
2.Dateofservice
3.Dateonwhichthemachinefailed
4.Dateofpurchase
5.Failuresymptoms,errorcodesappearingonthedisplay,andbeepsymptoms
6.ProcedureindexandpagenumberinwhichthefailingFRUwasdetected
7.FailingFRUnameandpartnumber
8.Machinetype,modelnumber,andserialnumber
9.Customer'snameandaddress
©CopyrightLenovo2009,2011
23
Page 30

Noteforwarranty:Duringthewarrantyperiod,thecustomermayberesponsibleforrepaircostsifthe
computerdamagewascausedbymisuse,accident,modication,unsuitablephysicaloroperating
environment,orimpropermaintenancebythecustomer.Followingisalistofsomecommonitemsthat
arenotcoveredunderwarrantyandsomesymptomsthatmightindicatethatthesystemwassubjected
tostressbeyondnormaluse.
Beforecheckingproblemswiththecomputer,determinewhetherthedamageiscoveredunderthewarranty
byreferringtothefollowinglist:
Thefollowingarenotcoveredunderwarranty:
•LCDpanelcrackedfromtheapplicationofexcessiveforceorfrombeingdropped
•Scratched(cosmetic)parts
•Distortion,deformation,ordiscolorationofthecosmeticparts
•Plasticparts,latches,pins,orconnectorsthathavebeencrackedorbrokenbyexcessiveforce
•Damagecausedbyliquidspilledintothesystem
•DamagecausedbytheimproperinsertionofaPCCardortheinstallationofanincompatiblecard
•Improperdiscinsertionoruseofanopticaldrive
•Diskettedrivedamagecausedbypressureonthediskettedrivecover,foreignmaterialinthedrive,
ortheinsertionofadiskettewithmultiplelabels
•Damagedorbentdisketteejectbutton
•Fusesblownbyattachmentofanonsupporteddevice
•Forgottencomputerpassword(makingthecomputerunusable)
•Stickykeyscausedbyspillingaliquidontothekeyboard
•Useofanincorrectacadapteronlaptopproducts
Thefollowingsymptomsmightindicatedamagecausedbynonwarrantedactivities:
•Missingpartsmightbeasymptomofunauthorizedserviceormodication.
•Ifthespindleofaharddiskdrivebecomesnoisy,itmayhavebeensubjectedtoexcessiveforce,
ordropped.
Checkoutguide
UsethefollowingproceduresasaguideinidentifyingandcorrectingproblemswiththeThinkPadNotebook.
Note:ThediagnostictestsareintendedtotestonlyThinkPadproducts.Theuseofnon- ThinkPadproducts,
prototypecards,ormodiedoptionscanleadtofalseindicationsoferrorsandinvalidsystemresponses.
1.Identifythefailingsymptomsinasmuchdetailaspossible.
2.Verifythesymptoms.T rytore-createthefailurebyrunningthediagnostictestorbyrepeatingthe
operation.
DiagnosticsusingPC-DoctorforDOS
TheThinkPadNotebookhasatestprogramcalledPC-DoctorforDOS(hereaftercalledPC-Doctor.)Y oucan
detecterrorsbyrunningthediagnosticstestincludedinPC-Doctor.
Note:
PC-DoctorforDOSisavailableattheWebsitehttp://support.lenovo.com.
TocreatethePC-DoctordiagnosticCD,followtheinstructionsontheWebsite.
Forsomepossiblecongurationsofthecomputer,PC-Doctormightnotruncorrectly.T oavoidthisproblem,
youneedtoinitializetheBIOSSetupUtility(ThinkPadSetupforThinkPadX120e)beforeyourunPC-Doctor.
ToinitializetheBIOSSetupUtility(ThinkPadSetupforThinkPadX120e),doasfollows:
1.T urnonthecomputer.
24HardwareMaintenanceManual
Page 31

2.WhentheThinkPadlogocomesup,immediatelypressF1toentertheBIOSSetupUtility(ThinkPad
SetupforThinkPadX120e).
Note:Ifasupervisorpasswordhasbeensetbythecustomer,BIOSmenuorUEFIBIOSmenuappears
afterthepasswordisentered.Y oucanstarttheutilitybypressingEnterinsteadofenteringthesupervisor
password;however,youcannotchangetheparametersthatareprotectedbythesupervisorpassword.
3.OntheBIOSSetupUtility(ThinkPadSetupforThinkPadX120e)screen,pressF9,Enter,F10,and
thenpressEnter.
Note:Whenyouinitializethecomputerconguration,somedevicesaredisabled,suchastheserial
port.Ifyoutestoneofthesedevices,youwillneedtoenableitbyusingCongurationutilityforDOS.
TheutilityisavailableonthefollowingWebsite:
http://support.lenovo.com
PC-Doctorcannotbeusedtotestadevicethatisinthedockingstation,evenifthecomputersupportsthe
dockingstation.TotestaUSBdevice,connectittotheUSBconnectorofthecomputer.
Testingthecomputer
Inthisproduct,youneedanexternalopticaldrivetousethePC-DoctordiagnosticCDtotestthehardware
features.
Note:ThePC-DoctordiagnosticCDdoesnotsupportanyexternalopticaldrivesconnectedthroughUSB
devicesoranyothers.
Torunthetest,doasfollows:
1.T urnoffthecomputer.
2.AttachanexternalopticaldrivethroughtheUSBconnectortothecomputer.
3.Settheexternalopticaldriveasastartupdevice.
4.T urnoffthecomputer.
5.T urnonthecomputer.Ifthecomputercannotbepoweredon,goto“Powersystemcheckout”on
page28,andcheckthepowersources.
Ifanerrorcodeappears,goto“Symptom-to-FRUindex”onpage37.
6.WhentheThinkPadlogocomesup,immediatelypressF12toentertheBootMenu.
7.InsertthePC-DoctorCDintotheexternalopticaldrive.
8.PresscursorkeystoselectAT APICDx(x:0,1,...)andthenpressEnter.
9.Followtheinstructionsonthescreen.
10.ThemainpanelofPC-Doctorappears.
11.SelectDiagnosticswiththearrowkeys,andpressEnter.
Note:Y oucanselectanitemnotonlywiththearrowkeys,butalsowiththeTrackPoint
®
pointer.
InsteadofpressingEnter,clicktheleftbutton.
Apull-downmenuappears.(Itsexactformdependsonthemodel.)
Note:PC-Doctormenudoesnotmeantheformalsupportdevicelist.Someunsupporteddevicenames
mayappearinthePC-Doctormenu.
Chapter3.Generalcheckout25
Page 32
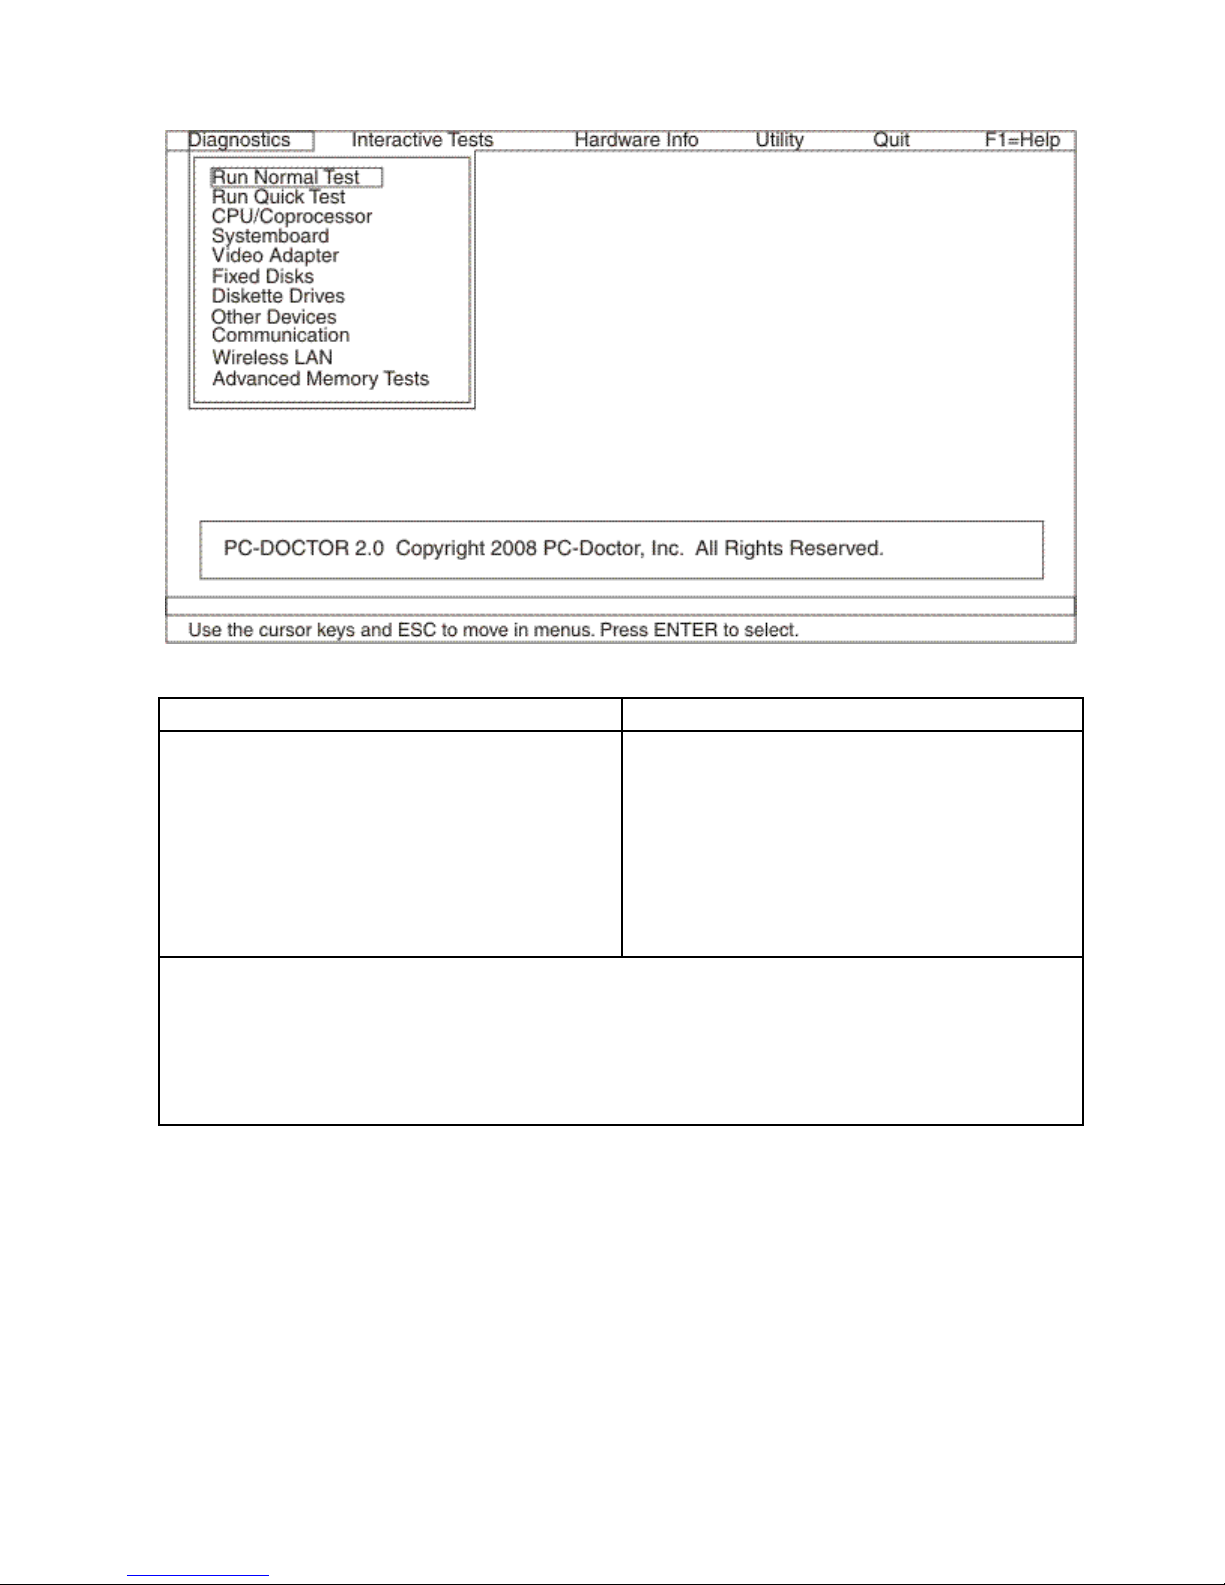
Theoptionsonthetestmenuareasfollows:
DiagnosticsInteractiveTests
•RunNormalT est
•RunQuickT est
•CPU/Coprocessor
•Systemboard
•VideoAdapter
•FixedDisks
•DisketteDrives
•OtherDevices
•WirelessLAN
•AdvancedMemoryT ests
•Keyboard
•Video
•InternalSpeaker
•Mouse
•Diskette
•SystemLoad
•OpticalDriveT est
•IntelWLANRadioT est
Notes:
•IntheKeyboardtestinInteractiveT ests,theFnkeyshouldbehelddownforatleast2seconds;otherwise,it
cannotbesensed.
•VideoAdaptertestsupportsonlytheLCDdisplayontheThinkPadNotebook.Ifyouhaveanexternalmonitor
attachedtoyourcomputer ,detachitbeforerunningPC-DoctorforDOS.
•T otestDigitalSignatureChip,thesecuritychipmustbesettoActive.
12.Runtheapplicablefunctiontest.
13.Followtheinstructionsonthescreen.Ifthereisaproblem,PC-Doctorshowsmessagesdescribingit.
14.T oexitthetest,selectQuit➙ExitDiag.T ocancelthetest,pressEsc.
Note:AfterrunningPC-Doctor,checkthetimeanddateonthesystemandresetthemiftheyareincorrect.
DetectingsysteminformationwithPC-Doctor
PC-Doctorcandetectthefollowingsysteminformation:
26HardwareMaintenanceManual
Page 33

Hardware
Info
•SystemConguration
•MemoryContents
•PhysicalDiskDrives
•LogicalDiskDrives
•VGAInformation
•IDEDriveInfo
•PCIInformation
•PNPISAInfo
•SMBIOSInfo
•VESALCDInfo
•HardwareEventsLog
Utility
•RunExternalTests
•SurfaceScanHardDisk
•BenchmarkSystem
•DOSShell
•T echSupportForm
•BatteryRundown
•ViewT estLog
•PrintLog
•SaveLog
•FullEraseHardDrive
•QuickEraseHardDrive
LenovoThinkVantageT oolbox
LenovoThinkVantage
®
ToolboxisadiagnosticprogramthatworksthroughtheWindowsoperatingsystem.
Itenablesyoutoviewsymptomsofcomputerproblemsandsolutionsforthem,andincludesautomatic
noticationwhenactionisrequired,computingassistance,advanceddiagnostics,anddiagnostichistory.
Note:ThelatestLenovoThinkVantageToolboxisavailableattheWebsitehttp://support.lenovo.com.To
installthelatestLenovoThinkVantageToolbox,followtheinstructionsontheWebsite.
Torunthisprogram,doasfollows:
ForWindows7:
ClickStart➙ControlPanel➙SystemandSecurity➙Lenovo’sSystemHealthandDiagnostics
(Lenovo-SystemHealthandDiagnosticsforThinkPadX120e).
ForWindowsVistaandWindowsXP:
ClickStart➙AllPrograms➙ThinkVantage➙LenovoThinkVantageT oolbox.
LenovoThinkVantageToolboxalsohasproblemdeterminationaidsthatdeterminesoftwareandusage
problems.Foradditionalinformationaboutthisprogram,seetheHelpfortheprogram.
FRUtests
ThefollowingtableshowsthetestforeachFRU.
Chapter3.Generalcheckout27
Page 34

Table1.FRUtests
FRUApplicabletest
Systemboard1.Diagnostics➙CPU/Coprocessor
2.Diagnostics➙Systemboard
Power
Diagnostics➙ThinkPadDevices➙ACAdapter➙Battery1(Battery2)
LCDunit
1.Diagnostics➙VideoAdapter
2.InteractiveT ests➙Video
Audio
EntertheBIOSSetupUtility(ThinkPadSetupforThinkPadX120e)andchange
SerialATA(SATA)settingtoCompatibility,andrunDiagnostics➙OtherDevice
➙ConexantAudio
SpeakerInteractiveT ests➙InternalSpeaker
Note:OnceAudiotestisdone,thenosoundisheardthistest.Inthiscase,turnoff
andturnonthecomputer.Then,runthistestagain.
Keyboard
1.Diagnostics➙Systemboard➙Keyboard
2.InteractiveT ests➙Keyboard
EntertheBIOSSetupUtility(ThinkPadSetupforThinkPadX120e)andchangeSerial
ATA(SATA)settingtoCompatibility,andrunDiagnostics➙FixedDisks.
Harddiskdriveorsolidstate
drive
ForThinkPadX100e,youcanalsodiagnosethedrivewithoutstartinguptheoperating
system.TodiagnosethedrivefromtheBIOSSetupUtility,doasfollows:
1.Removeanydiskettefromthediskettedrive,andthenturnoffthecomputer.
2.Turnonthecomputer.
3.Whilethemessage,“T ointerruptnormalstartup,presstheblueThinkVangate
button,”isdisplayedatthelowerleftofthescreen,pressF1toentertheBIOS
SetupUtility.
4.Usingcursorkeys,selectHDDdiagnosticprogram.Pressenter.
5.Usingcursorkeys,selectMainharddiskdrive.
6.PressEntertostartthediagnosticprogram.
Diskettedrive1.Diagnostics➙DisketteDrives
2.InteractiveT ests➙Diskette
Memory
1.IftwoDIMMsareinstalled,removeoneofthemandrunDiagnostics➙Advanced
MemoryT ests.
2.Iftheproblemdoesnotrecur,returntheDIMMtoitsplace,removetheotherone,
andrunthetestagain.
TrackPointorpointing
device
IftheTrackPointdoesnotwork,checkthecongurationasspeciedintheBIOSSetup
Utility(ThinkPadSetupforThinkPadX120e).IftheT rackPointisdisabled,select
Automatictoenableit.
AfteryouusetheT rackPoint,thepointermaydriftonthescreenforashorttime.This
driftcanoccurwhenaslight,steadypressureisappliedtotheT rackPointpointer.
Thissymptomisnotahardwareproblem.Ifthepointerstopsafterashorttime,no
serviceactionisnecessary.
IfenablingtheT rackPointdoesnotcorrecttheproblem,continuewiththefollowing:
•InteractiveT ests➙Mouse
TouchPad
IftheTouchPaddoesnotwork,checkthecongurationasspeciedintheBIOS
SetupUtility(ThinkPadSetupforThinkPadX120e).IftheT ouchPadisdisabled,select
Automatictoenableit.IfenablingtheT ouchPaddoesnotcorrecttheproblem,
continuewiththefollowing:
•InteractiveT ests➙Mouse
Powersystemcheckout
Toverifyasymptom,dothefollowing:
28HardwareMaintenanceManual
Page 35
1.T urnoffthecomputer.
2.Removethebatterypack.
3.Connecttheacadapter.
4.Checkthatpowerissuppliedwhenyouturnonthecomputer.
5.T urnoffthecomputer.
6.Disconnecttheacadapterandinstallthechargedbatterypack.
7.Checkthatthebatterypacksuppliespowerwhenyouturnonthecomputer.
Ifyoususpectapowerproblem,seetheappropriateoneofthefollowingpowersupplycheckouts:
•“Checkingtheacadapter”onpage29
•“Checkingoperationalcharging”onpage29
•“Checkingthebatterypack”onpage30
•“Checkingthebackupbattery”onpage30
Checkingtheacadapter
Youareherebecausethecomputerfailsonlywhentheacadapterisused.
•Ifthepowerproblemoccursonlywhenthedockingstationortheportreplicatorisused,replacethe
dockingstationortheportreplicator.
•Ifthepower-onindicatordoesnotturnon,checkthepowercordoftheacadapterforcorrectcontinuity
andinstallation.
•Ifthecomputerdoesnotchargeduringoperation,goto“Checkingoperationalcharging”onpage29.
Tochecktheacadapter,dothefollowing:
1.Unplugtheacadaptercablefromthecomputer.
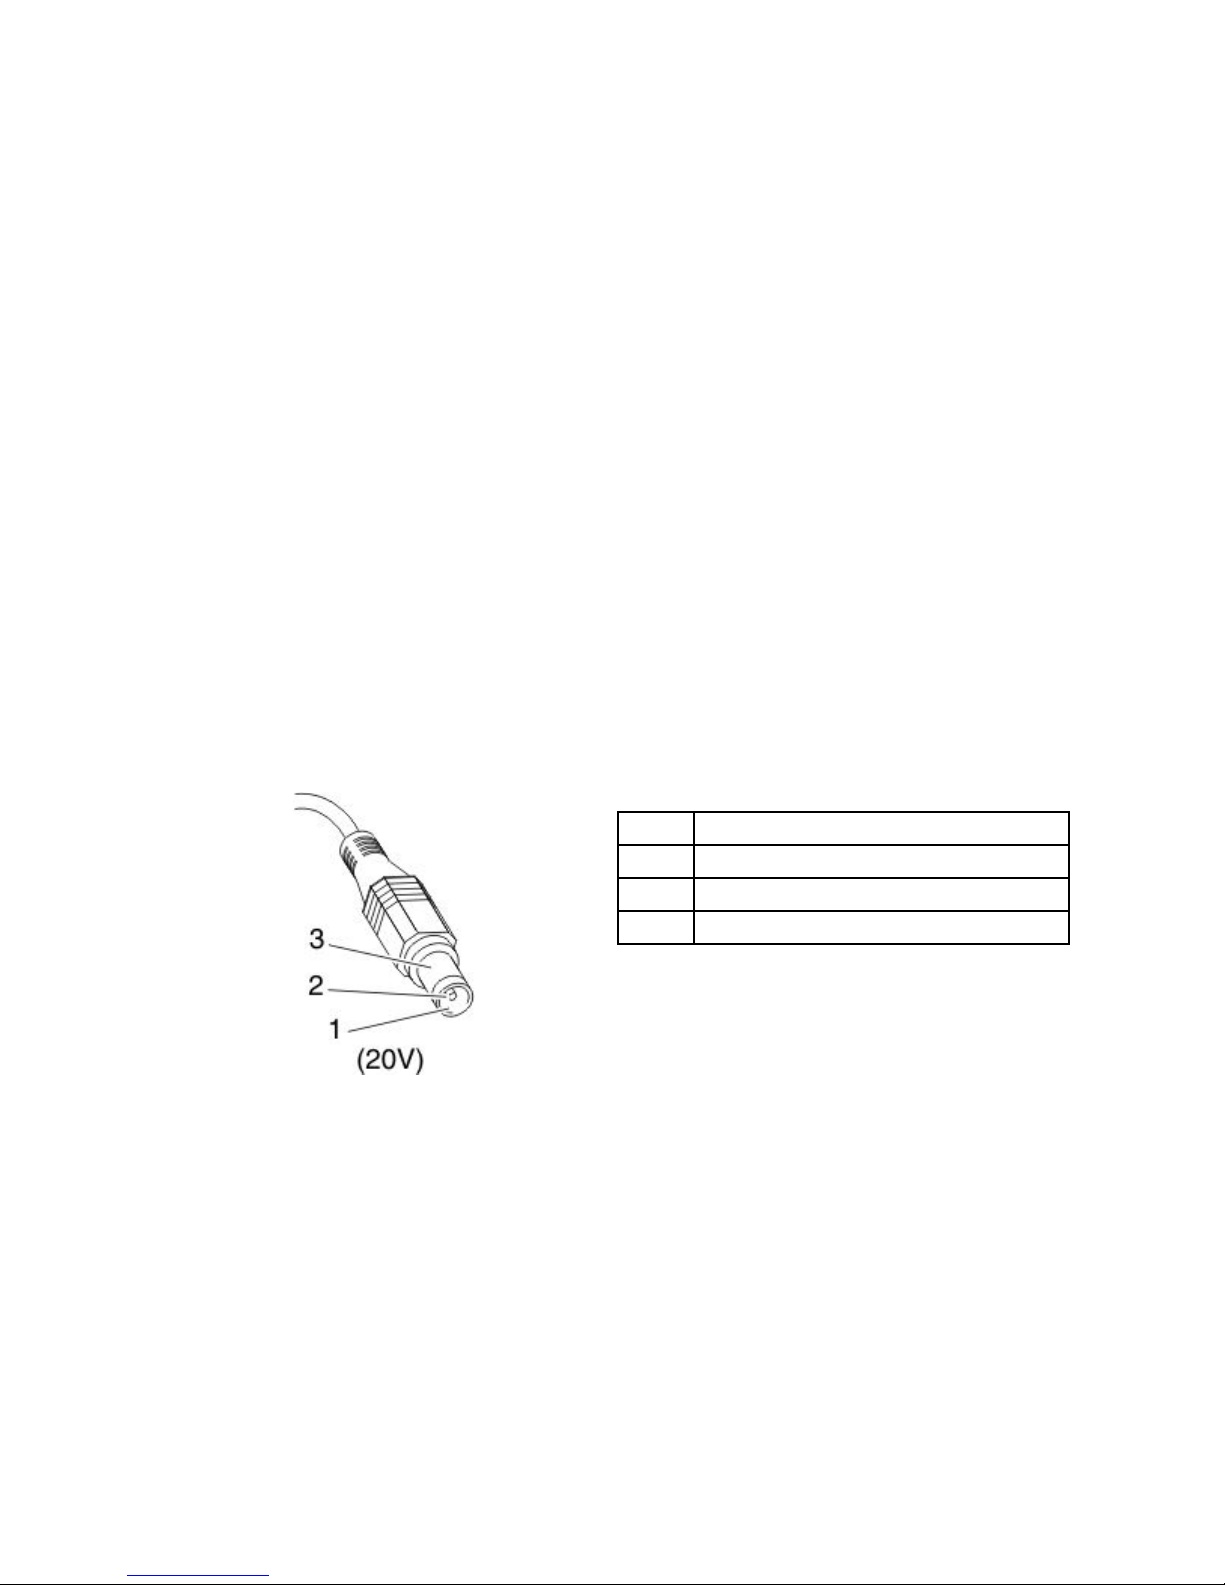
2.Measuretheoutputvoltageattheplugoftheacadaptercable.Seethefollowinggure:
Pin
Voltage(Vdc)
1+20
20
3
Ground
Note:Outputvoltageofpinno.2oftheacadaptermaydifferentfromtheoneyouareservicing.
3.Ifthevoltageisnotcorrect,replacetheacadapter.
4.Ifthevoltageisacceptable,dothefollowing:
•Replacethesystemboard.
•Iftheproblempersists,goto“FRUtests”onpage27
.
Note:Noisefromtheacadapterdoesnotalwaysindicateadefect.
Checkingoperationalcharging
Tocheckwhetherthebatterychargesproperlyduringoperation,useadischargedbatterypackorabattery
packthathaslessthan50%ofthetotalpowerremainingwheninstalledinthecomputer.
Chapter3.Generalcheckout29
Page 36
Performoperationalcharging.Ifthebatterystatusindicatororicondoesnotturnon,removethebattery
packandletitreturntoroomtemperature.Reinstallthebatterypack.Ifthechargeindicatororiconstilldoes
notturnon,replacethebatterypack.
Ifthechargeindicatorstilldoesnotturnon,replacethesystemboard.Thenreinstallthebatterypack.Ifitis
stillnotcharged,gotothenextsection.
Checkingthebatterypack
BatterychargingdoesnotstartuntilthePowerManagerBatteryGaugeshowsthatlessthan96%ofthe
totalpowerremains;underthisconditionthebatterypackcanchargeto100%ofitscapacity.Thisprotects
thebatterypackfrombeingoverchargedorfromhavingashortenedlife.
Tocheckyourbattery,moveyourcursortothePowerManagerBatteryGaugeiconintheicontrayofthe
Windowstaskbarandwaitforamoment(butdonotclick),andthepercentageofbatterypowerremaining
isdisplayed.Togetdetailedinformationaboutthebattery,double-clickthePowerManagerBattery
Gaugeicon.
Note:Ifthebatterypackbecomeshot,itmaynotbeabletocharge.Removeitfromthecomputerandleave
itatroomtemperatureforawhile.Afteritcoolsdown,reinstallandrechargeit.
Tocheckthebatterypack,dothefollowing:
1.Poweroffthecomputer.
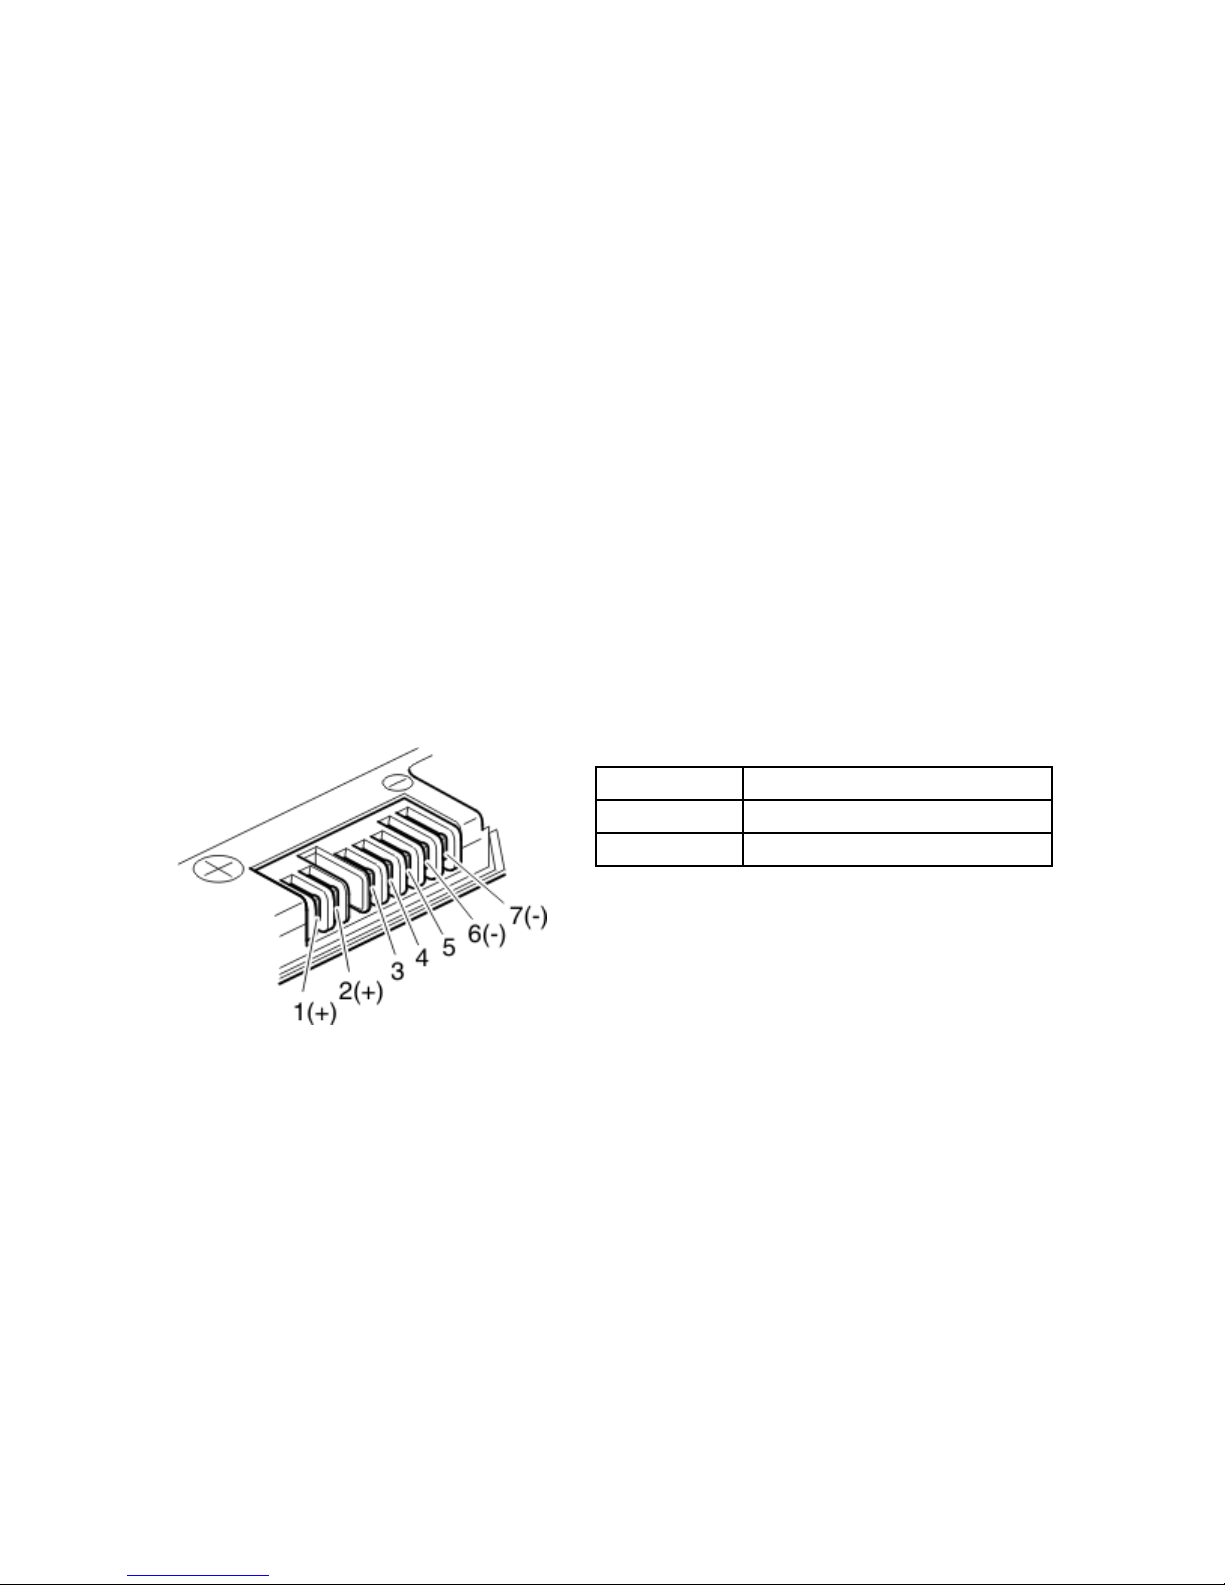
2.Removethebatterypackandmeasurethevoltagebetweenbatteryterminals1(+)and7(-).Seethe
followinggure:
Terminal
Voltage(Vdc)
1+0to+12.6
7
Ground(-)
3.Ifthevoltageislessthan+11.0Vdc,thebatterypackhasbeendischarged.
Note:Rechargingwilltakeatleast3hours,eveniftheindicatordoesnotturnon.
Ifthevoltageisstilllessthan+11.0Vdcafterrecharging,replacethebattery.
4.Ifthevoltageismorethan+11.0Vdc,measuretheresistancebetweenbatteryterminals5and7.
Theresistancemustbe4to30KΩ.Iftheresistanceisnotcorrect,replacethebatterypack.Ifthe
resistanceiscorrect,replacethesystemboard.
Checkingthebackupbattery
Dothefollowing:
1.Poweroffthecomputer,andunplugtheacadapterfromit.
2.T urnthecomputerupsidedown.
3.Removethebatterypack(see“1010Batterypack”onpage54).
4.Removethebackupbattery(see“1130Systemboard,fanassembly,andbackupbattery”onpage75).
30HardwareMaintenanceManual
Page 37
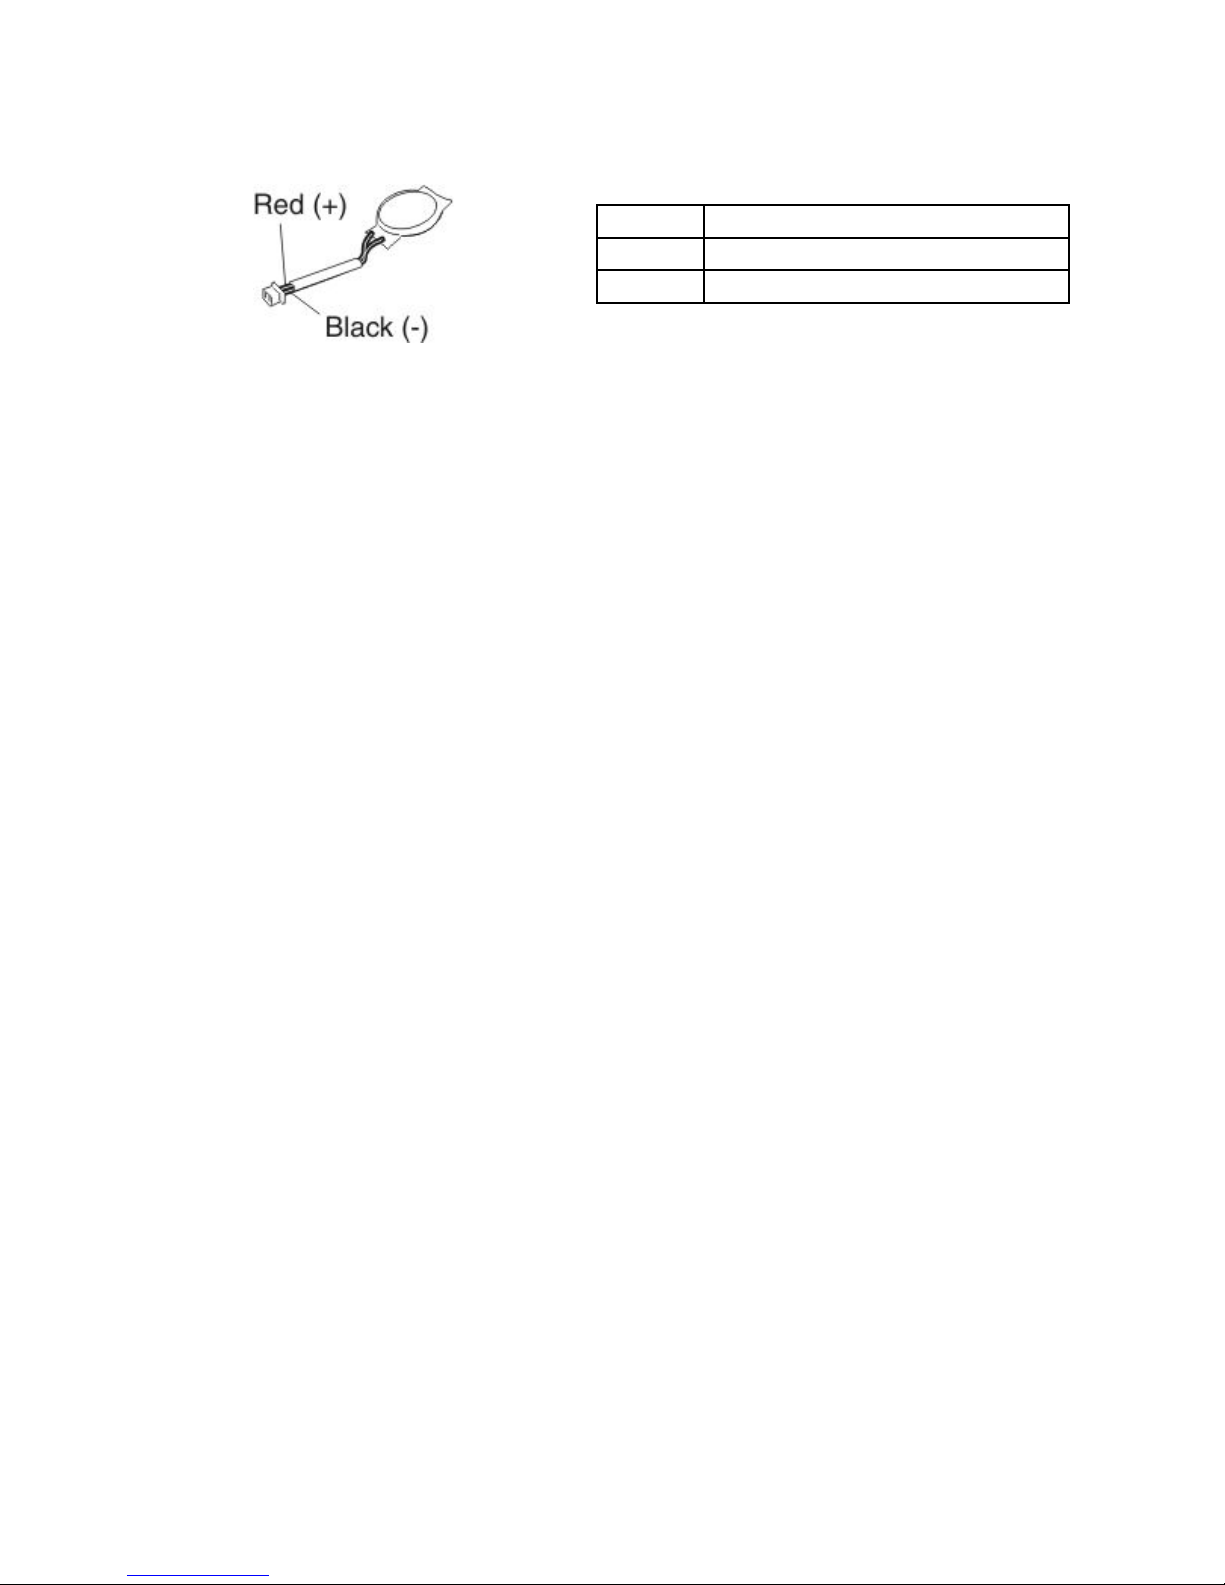
5.Measurethevoltageofthebackupbattery.Seethefollowinggure.
Wire
Voltage(Vdc)
Red+2.5to+3.2
Black
Ground
•Ifthevoltageiscorrect,replacethesystemboard.
•Ifthevoltageisnotcorrect,replacethebackupbattery.
•Ifthebackupbatterydischargesquicklyafterreplacement,replacethesystemboard.
Chapter3.Generalcheckout31
Page 38

32HardwareMaintenanceManual
Page 39

Chapter4.Relatedserviceinformation
Thischapterpresentsfollowinginformation:
•“RestoringthefactorycontentsbyusingRecoveryDiscSet”onpage33
•“Passwords”onpage34
•“Powermanagement”onpage36
•“Symptom-to-FRUindex”onpage37
ServiceWebsite:
Whenthelatestmaintenancedisketteandthesystemprogramservicediskettebecomeavailable,theywill
bepostedonhttp://support.lenovo.com.
RestoringthefactorycontentsbyusingRecoveryDiscSet
Whentheharddiskdrive(HDD)orsolidstatedrive(SSD)isreplacedbecauseofafailure,noproductrecovery
programisonthenewdrive.Inthiscase,youmustusetheRecoveryDiscSetforthecomputer.Orderthe
RecoveryDiscSetandthedriveatthesametimesothatyoucanrecoverthenewdrivewiththepre-installed
softwarewhentheyarrive.Forinformationonwhichdiscstoorder,see“Recoverydiscs”onpage115
.
TherecoverydiscsetconsistsoftheuserinstructionsandthefollowingsetofDVDstorestorethecomputer
totheoriginalfactoryconguration.
OperatingSystemRecoveryDisc(onedisc)
ThisdiscrestorestheMicrosoft
®
Windowsoperatingsystem.Usethisdisctostarttherecoveryprocess.
ApplicationsandDriversRecoveryDisc(oneormorediscs)
Thisdiscrestoresthepreinstalledapplicationsanddriversonthecomputer.
SupplementalRecoveryDisc
Thisdisccontainsadditionalcontent,suchasupdatestothesoftwarethatwaspreinstalledonthe
computer.NotallrecoverydiscsetscomewithaSupplementalRecoveryDisc.
Notes:
•Y oumusthaveaDVDdrivetousetherecoverydiscs.IfyoudonothaveaninternalDVDdrive,you
canuseanexternalUSBDVDdrive.
•Duringtherecoveryprocess,alldataonthedrivewillbedeleted.Ifpossible,copyanyimportantdata
orpersonallesthatyouwanttokeepontoremovablemediaoranetworkdrivebeforeyoustartthe
recoveryprocess.
Torestorethecomputertotheoriginalfactorycongurationusingtherecoverydiscset,dothefollowing:
Note:Recoverytakesseveralhours.Thelengthoftimedependsonthemethodyouuse.Ifyouuserecovery
discs,recoverytakesatleastvehours.
1.MaketheCD/DVDdrivetherststartupdeviceinthestartupsequenceusingthefollowingprocedure:
a.PressandholddowntheF1key,andthenturnonthecomputer.Whenthelogoscreenisdisplayed
orifyouhearrepeatingbeeps,releasetheF1key.TheSetupUtilityprogramopens.
b.UsethearrowkeystoselectStartup➙Boot.
c.SelecttheCD/DVDdriveasthe1stBootDevice.
2.InserttheOperatingSystemRecoveryDiscintotheDVDdrive.
©CopyrightLenovo2009,2011
33
Page 40

3.PressF10tosavetheSetupUtilitycongurationchanges.Followtheinstructionsonthescreento
begintherecoveryprocess.
4.SelectyourlanguageandclickNext.
5.Readthelicense.Ifyouagreewiththetermsandconditions,selectIacceptthesetermsand
conditionsandthenclickNext.Ifyoudonotagreewiththetermsandconditions,followthe
instructionsonthescreen.
6.ClickY esinthedisplayedwindowtobegintheoperatingsystemrecoveryprocess.
7.InserttheApplicationsandDriversRecoveryDiscwhenpromptedandthenclickOKtobeginthe
applicationsanddriversrecoveryprocess.
8.IfyouhaveaSupplementalRecoveryDisc,insertitwhenpromptedandclickY es.Ifyoudonothavea
SupplementalRecoveryDisc,clickNo.
9.Whenallofthedatahasbeencopiedfromthelastdiscinthesetandhasbeenprocessed,removethe
discandrestartthecomputer.
Note:Therestoftherecoveryprocessisfullyautomatedandnoactionisrequiredbyyou.The
computerwillrestartintotheMicrosoftWindowsdesktopseveraltimesandyoumightexperience
periodswhennoactivityisapparentonthescreenforseveralminutesatatime.Thisisnormal.
10.Whentherecoveryprocessiscomplete,theSetUpWindowsscreenisdisplayed.Followthe
instructionsonthescreentocompletetheWindowssetup.
11.AfteryouhavecompletedtheWindowssetup,youmightwanttorestoretheoriginalstartupsequence.
StarttheSetupUtilityprogramandthenpressF9torestorethedefaultsettings.PressF10tosaveand
exittheSetupUtility.
Note:Afterrestoringadrivetothefactorydefaultsettings,youmightneedtoreinstallsomedevicedrivers.
Passwords
AsmanyasthreepasswordsmaybeneededforanyThinkPadNotebook:thepower-onpassword(POP),
thehard-diskpassword(HDP),andthesupervisorpassword(SVP).
Ifanyofthesepasswordshasbeenset,apromptforitappearsonthescreenwheneverthecomputeris
turnedon.Thecomputerdoesnotstartuntilthepasswordisentered.
Exception:IfonlyanSVPisinstalled,thepasswordpromptdoesnotappearwhentheoperatingsystem
isbooted.
Power-onpassword
Apower-onpassword(POP)protectsthesystemfrombeingpoweredonbyanunauthorizedperson.The
passwordmustbeenteredbeforeanoperatingsystemcanbebooted.ForhowtoremovethePOP ,see
“Howtoremovethepower-onpassword”onpage35.
Hard-diskpassword
Therearetwohard-diskpasswords(HDPs):
•UserHDP—fortheuser
•MasterHDP—forthesystemadministrator,whocanuseittogetaccesstotheharddiskeveniftheuser
haschangedtheuserHDP
Note:TherearetwomodesfortheHDP:UseronlyandMaster+User.TheMaster+Usermoderequires
twoHDPs;thesystemadministratorentersbothinthesameoperation.Thesystemadministratorthen
providestheuserHDPtothesystemuser.
34HardwareMaintenanceManual
Page 41

Attention:IftheuserHDPhasbeenforgotten,checkwhetheramasterHDPhasbeenset.Ifithas,itcanbe
usedforaccesstotheharddiskdrive.IfnomasterHDPisavailable,neitherLenovonorLenovoauthorized
servicetechniciansprovideanyservicestoreseteithertheuserorthemasterHDP ,ortorecoverdatafrom
theharddiskdrive.Theharddiskdrivecanbereplacedforascheduledfee.
ForhowtoremovethePOP ,see“Howtoremovethehard-diskpassword”onpage35.
Supervisorpassword
Asupervisorpassword(SVP)protectsthesysteminformationstoredintheBIOSSetupUtility(ThinkPad
SetupforThinkPadX120e).TheusermustentertheSVPinordertogetaccesstotheBIOSSetupUtilityor
ThinkPadSetupandchangethesystemconguration.
Attention:IftheSVPhasbeenforgottenandcannotbemadeavailabletotheservicetechnician,thereisno
serviceproceduretoresetthepassword.Thesystemboardmustbereplacedforascheduledfee.
Howtoremovethepower-onpassword
ToremoveaPOPthatyouhaveforgotten,dothefollowing:
(A)IfnoSVPhasbeenset:
1.T urnoffthecomputer.
2.Removethebatterypack.Forhowtoremovethebatterypack,see“1010Batterypack”onpage54.
3.Removethebackupbattery.Forhowtoremovethebackupbattery,see“1130Systemboard,fan
assembly,andbackupbattery”onpage75.
4.T urnonthecomputerandwaituntilthePOSTends.AfterthePOSTends,thepasswordpromptdoes
notappear.ThePOPhasbeenremoved.
5.Reinstallthebackupbatteryandthebatterypack.
(B)IfanSVPhasbeensetandisknownbytheservicetechnician:
1.T urnonthecomputer.
2.WhentheThinkPadlogocomesup,immediatelypressF1toenterBIOSSetupUtility(ThinkPadSetup
forThinkPadX120e).
3.T ypethesupervisorpasswordwhenthesystemrequiresapasswordandpressenter.TheBIOSSetup
Utilitywindow(ThinkPadSetupwidnowforX120e)opens.
4.SelectSecurity,usingthecursordirectionalkeystomovedownthemenu.
5.SelectPassword.
6.SelectPower-OnPassword.
7.T ypethecurrentPower-OnPasswordintheEnterCurrentPasswordeld.thenleavetheEnter
NewPasswordeldblank,andpressEntertwice.
8.Inthe“Changeshavebeensaved”window,pressEnter.
9.PressF10;then,intheSetupconrmationwindow,selectY es.
Howtoremovethehard-diskpassword
Attention:IfUseronlymodeisselectedandtheuserHDPhasbeenforgottenandcannotbemade
availabletotheservicetechnician,neitherLenovonorLenovoauthorizedservicetechniciansprovideany
servicestoresettheuserHDPsortorecoverdatafromtheharddiskdrive.Theharddiskdrivecanbe
replacedforascheduledfee.
ToremoveauserHDPthathasbeenforgotten,whentheSVPandthemasterHDPareknown,dothe
following:
Chapter4.Relatedserviceinformation35
Page 42

1.T urnonthecomputer.
2.WhentheThinkPadlogocomesup,immediatelypressF1toenterBIOSSetupUtility(ThinkPadSetup
forThinkPadX120e).
3.SelectSecurity,usingthecursordirectionalkeystomovedownthemenu.
4.SelectPassword.
5.SelectHard-diskxpassword,wherexistheletteroftheharddiskdrive.Apop-upwindowopens.
6.SelectMasterHDP.
7.T ypethecurrentmasterHDPintheEnterCurrentPasswordeld.thenleavetheEnterNewPassword
eldblank,andpressEntertwice.
8.PressF10.
9.SelectY esintheSetupCongurationwindow.BothuserHDPandmasterHDPwillhavebeenremoved.
Powermanagement
Toreducepowerconsumption,thecomputerhasthreepowermanagementmodes:screenblank,sleep
(standbyinWindowsXP),andhibernation.
Screenblankmode
Ifthetimesetonthe“T urnoffmonitor”timerintheoperatingsystemexpires,theLCDbacklightturnsoff.
Toputthecomputerintoscreenblankmode,doasfollows:
1.PressFn+End.Apanelforselectingapowerplan(inWindowsXP ,powerscheme)appears.
2.SelectPoweroffdisplay(keepcurrentpowerplan)(inWindowsXP ,keepcurrentpowerscheme).
Toendscreenblankmodeandresumenormaloperation,pressanykey.
Sleeporstandbymode
Whenthecomputerenterssleep(standby)mode,thefollowingeventsoccurinadditiontowhatoccurs
inscreenblankmode:
•TheLCDispoweredoff.
•Theharddiskdriveispoweredoff.
•TheCPUstops.
Toentersleep(standby)mode,pressFn+F4.
Note:YoucanchangetheactionoftheFn+F4keycombinationbychangingthesettingsinPowerManager.
Incertaincircumstances,thecomputergoesintosleep(standby)modeautomatically:
•Ifa“suspendtime”hasbeensetonthetimer,andtheuserdoesnotdoanyoperationwiththekeyboard,
theT rackPoint,theharddisk,theparallelconnector,orthediskettedrivewithinthattime.
•Ifthebatteryindicatorblinksorange,indicatingthatthebatterypowerislow.
Note:Evenifyoudonotsetthelow-batteryalarm,thechargeindicatornotiesyouwhenthebatteryislow,
andthenthecomputerentersthepower-savingmodeautomatically.
Tocausethecomputertoreturnfromsleep(standby)modeandresumeoperation,dooneofthefollowing:
•PresstheFnkey.
•OpentheLCDcover.
•T urnonthepowerswitch.
36HardwareMaintenanceManual
Page 43

Also,ineitherofthefollowingevents,thecomputerautomaticallyreturnsfromsleep(standby)modeand
resumesoperation:
•Theringindicator(RI)issignaledbyaserialdeviceoraPCCarddevice.(doesnotsupportthering
indicator(RI)resumebyPCCarddevice.)
•Thetimesetontheresumetimerelapses.
Note:Thecomputerdoesnotacceptanyinputimmediatelyafteritenterssleep(standby)mode.Waita
fewsecondsbeforetakinganyactiontoreenteroperationmode.
Hibernationmode
Inhibernationmode,thefollowingoccurs:
•Thesystemstatus,RAM,VRAM,andsetupdataarestoredontheharddisk.
•Thesystemispoweredoff.
Note:Ifthecomputerentersthehibernationmodewhileitisdockedtothedockingstation,donotundockit
beforeresumingnormaloperation.Ifyoudoundockitandthentrytoresumenormaloperation,youwillget
anerrormessage,andyouwillhavetorestartthesystem.
Tocausethecomputertoenterhibernationmode,doanyofthefollowing:
•PresstheFn+F12keys.
•Ifyouhavedenedoneofthefollowingactionsastheeventthatcausesthesystemtogointohibernation
mode,performthataction.
–Closingthelid.
–Pressingthepowerbutton.
–PressingFn+F4keys.
Also,thecomputergoesintohibernationmodeautomaticallyineitherofthefollowingconditions:
•Ifa“hibernationtime”hasbeensetonthetimer,andiftheuserdoesnotdoanyoperationwiththe
keyboard,theT rackpoint,theharddiskdrive,theparallelconnector,orthediskettedrivewithinthattime.
•Ifthetimerconditionsaresatisedinsuspendmode.
Whenthepoweristurnedon,thecomputerreturnsfromhibernationmodeandresumesoperation.The
hibernationleinthebootrecordontheharddiskdriveisread,andsystemstatusisrestoredfromthe
harddiskdrive.
Symptom-to-FRUindex
Thissectioncontainsfollowinginformation:
•“Numericerrorcodes”onpage38
•“Errormessages”onpage40
•“No-beepsymptoms”onpage40
•“LCD-relatedsymptoms”onpage40
•“Intermittentproblems”onpage41
•“Undeterminedproblems”onpage41
Thesymptom-to-FRUindexinthissectionlistssymptomsanderrorsandtheirpossiblecauses.Themost
likelycauseislistedrst,inboldfacetype.
Note:DotheFRUreplacementorotheractionsinthesequenceshowninthecolumnheaded“FRUor
action,insequence.”IfreplacingaFRUdoesnotsolvetheproblem,puttheoriginalpartbackinthe
computer.DonotreplaceanondefectiveFRU.
Chapter4.Relatedserviceinformation37
Page 44

Thisindexcanalsohelpyoudetermine,duringregularservicing,whatFRUsarelikelytoneedtobe
replacednext.
AnumericerrorisdisplayedforeacherrordetectedinPOSTorsystemoperation.Inthedisplays,ncan
beanynumber.
Ifnonumericcodeisdisplayed,checkthenarrativedescriptionsofsymptoms.Ifthesymptomisnot
describedthere,goto“Intermittentproblems”onpage41.
Note:ForadevicenotsupportedbydiagnosticcodesintheThinkPadNotebooks,seethemanualfor
thatdevice.
Numericerrorcodes
Table2.Numericerrorcodes
Symptomorerror(beeps,ifany)
FRUoraction,insequence
0187
EAIAdataaccesserror—TheaccesstoEEPROMisfailed.
(twoshortbeeps)
Systemboard.
0189
InvalidRFIDcongurationinformationarea—The
EEPROMchecksumisnotcorrect.
(twoshortbeeps)
Systemboard.
0190
Criticallow-batteryerror
(twoshortbeeps)
1.Chargethebatterypack.
2.Batterypack.
0191
SystemSecurity—InvalidRemoteChangerequested.
1.RunBIOSSetupUtility(ThinkPadSetupfor
ThinkPadX120e),andthensavecurrentsettingby
pressingF10.
2.Systemboard.
0210
StuckKey
(twoshortbeeps)
Changekeyboard,andrestartthecomputer.
0211
Keyboarderror
(twoshortbeeps)
Runinteractivetestsofthekeyboardandtheauxiliary
inputdevice.
0230
ShadowRAMerror—ShadowRAMfailsatoffsetnnnn.
(twoshortbeeps)
Systemboard.
0231
SystemRAMerror—SystemRAMfailsatoffsetnnnn.
(twoshortbeeps)
1.DIMM.
2.Systemboard.
0232
ExtendedRAMerror—ExtendedRAMfailsatoffsetnnnn.
(twoshortbeeps)
1.DIMM.
2.Systemboard.
0250
Systembatteryerror—Systembatteryisdead.
(twoshortbeeps)
1.Chargethebackupbatteryformorethan8hours
byconnectingtheacadapter.
2.ReplacethebackupbatteryandrunBIOSSetup
Utility(ThinkPadSetupforThinkPadX120e)toreset
thetimeanddate.
38HardwareMaintenanceManual
Page 45

Table2.Numericerrorcodes(continued)
Symptomorerror(beeps,ifany)
FRUoraction,insequence
0251
SystemCMOSchecksumbad—Defaultconguration
used.
(twoshortbeeps)
1.Chargethebackupbatteryformorethan8hours
byconnectingtheacadapter.
2.ReplacethebackupbatteryandrunBIOSSetup
Utility(ThinkPadSetupforThinkPadX120e)toreset
thetimeanddate.
0254
SystemNV7Volumechecksumbad—Default
congurationused
(twoshortbeeps)
TurnoffthecomputeranddischargeCMOS.Then
restartthecomputer.
0260
Systemtimererror.
(twoshortbeeps)
1.Chargethebackupbatteryformorethan8hours
byconnectingtheacadapter.
2.ReplacethebackupbatteryandrunBIOSSetup
Utility(ThinkPadSetupforThinkPadX120e)toreset
thetimeanddate.
3.Systemboard.
0270
Real-timeclockerror.
(twoshortbeeps)
1.Chargethebackupbatteryformorethan8hours
byconnectingtheacadapter.
2.ReplacethebackupbatteryandrunBIOSSetup
Utility(ThinkPadSetupforThinkPadX120e)toreset
thetimeanddate.
3.Systemboard.
0271
Dateandtimeerror—eitherthedatenorthetimeissetin
thecomputer.
(twoshortbeeps)
RunBIOSSetupUtility(ThinkPadSetupforThinkPad
X120e)toresetthetimeanddate.
0280
Previousbootincomplete—Defaultcongurationused.
(twoshortbeeps)
1.Load“SetupDefault”inBIOSSetupUtility
(ThinkPadSetupforThinkPadX120e).
2.DIMM.
3.Systemboard.
02D0
Systemcacheerror.
(twoshortbeeps)
1.CPU.
2.Systemboard.
02F0
CPUID:xxFailed.
1.CPU.
2.Systemboard.
02F5
DMAtestfailed.
(twoshortbeeps)
1.DIMM.
2.Systemboard.
02F6
SoftwareNMIfailed
(twoshortbeeps)
1.DIMM.
2.Systemboard.
02F7
Fail-safetimerNMIfailed
(twoshortbeeps)
1.DIMM.
2.Systemboard.
1802
Unauthorizednetworkcardispluggedin—Turnoffand
removetheminiPCInetworkcard.
(twoshortbeeps)
1.RemovetheMiniPCInetworkcard.
2.Systemboard.
1804
UnauthorizedWANcardispluggedin—Poweroffand
removetheWANcard.
1.RemovethewirelessWANcard.
2.Systemboard.
Chapter4.Relatedserviceinformation39
Page 46

Errormessages
Table3.Errormessages
Symptomorerror(beeps,ifany)
FRUoraction,insequence
BadCRC2.EnterBIOSSetupUtility,andloadSetup
defaults.
(twoshortbeeps)
PressF1toenterBIOSSetupUtility(ThinkPadSetup
forThinkPadX120e).PressF9,andEntertoload
thedefaultsetting.Thensavethecurrentsettingby
pressingF10,andrestartthecomputer.
Fanerror.
(fourshortbeeps,onelongbeep)
1.Fan.
2.Thermalgrease.
3.Systemboard.
DRAMisunplugged.
(oneshortbeep,pause,threeshortbeeps,pause,three
shortbeeps,pause,oneshortbeep.)
Memorycardisnotinstalled.Installmemorycard.
DRAMisnotwellplugged.
(oneshortbeep,pause,threeshortbeeps,pause,three
shortbeeps,pause,oneshortbeep.)
Reinstallthememorycard.
Operatingsystemnotfound.1.Checkthattheoperatingsystemhasnofailure
andisinstalledcorrectly.
2.EnterBIOSSetupUtility(ThinkPadSetupfor
ThinkPadX120e)andseewhethertheharddiskdrive
isproperlyidentied.Ifyoustillseethesameerror
message,checkthebootsequence.
3.Reinstalltheharddiskdrive.
4.Reinstalltheoperatingsystem.
SystemCongurationDataReadError
(twoshortbeeps)
PressF1toenterBIOSSetupUtility(ThinkPadSetup
forThinkPadX120e).PressF9,andEntertoload
thedefaultsetting.Thensavethecurrentsettingby
pressingF10,andrestartthecomputer.
No-beepsymptoms
Table4.No-beepsymptoms
Symptomorerror
FRUoraction,insequence
Nobeep,power-onindicatoron,LCDblank,andno
POST.
1.Makesurethateveryconnectorisconnected
tightlyandcorrectly.
2.DIMM.
3.Systemboard.
Nobeep,power-onindicatoron,andLCDblankduring
POST.
1.ReseatDIMM.
2.Systemboard.
Thepower-onpasswordpromptappears.Apower-onpasswordorasupervisorpasswordisset.
TypethepasswordandpressEnter.
Thehard-diskpasswordpromptappears.Ahard-diskpasswordisset.T ypethepasswordand
pressEnter.
LCD-relatedsymptoms
Important:TheTFTLCDforthenotebookcomputercontainsmanythin-lmtransistors(TFT s).The
presenceofasmallnumberofdotsthataremissing,discolored,oralwayslightedischaracteristicofTFT
LCDtechnology,butexcessivepixelproblemscancauseviewingconcerns.
40HardwareMaintenanceManual
Page 47

IftheLCDyouareservicinghastwoorlessvisibledefectivepixels,itshouldnotbeconsideredfaulty.
However,iftheLCDhasthreeormorevisibledefectivepixels,itwillbedeemedasdefectivebyLenovoand
itshouldbereplaced.
Note:
•ThispolicyappliestoallThinkPadNotebookspurchasedon1January,2008orlater.
•LenovowillnotprovidereplacementiftheLCDiswithinspecicationaswecannotguaranteethat
anyreplacementLCDwillhavezeropixeldefects.
•OnepixelconsistsofR,G,Bsub-pixels.
Table5.LCD-relatedsymptoms
Symptomorerror
FRUoraction,insequence
Nobeep,power-onindicatoron,andablankLCDduring
POST.
Systemboard.
•LCDbacklightnotworking.
•LCDtoodark.
•LCDbrightnesscannotbeadjusted.
•LCDcontrastcannotbeadjusted.
1.ReseattheLCDconnectors.
2.LCDassembly.
3.Systemboard.
•LCDscreenunreadable.
•Charactersmissingpixels.
•Screenabnormal.
•Wrongcolordisplayed.
1.Seeimportantnotefor“LCD-relatedsymptoms.”
2.ReseatallLCDconnectors.
3.LCDassembly.
4.Systemboard.
HorizontalorverticallinesdisplayedonLCD.LCDassembly.
Intermittentproblems
Intermittentsystemhangproblemscanbeduetoavarietyofcausesthathavenothingtodowithahardware
defect,suchascosmicradiation,electrostaticdischarge,orsoftwareerrors.FRUreplacementshouldbe
consideredonlywhenaproblemrecurs.
Whenanalyzinganintermittentproblem,dothefollowing:
1.Runthediagnostictestforthesystemboardinloopmodeatleast10times.
2.Ifnoerrorisdetected,donotreplaceanyFRUs.
3.Ifanyerrorisdetected,replacetheFRUshownbytheFRUcode.Rerunthetesttoverifythatno
moreerrorsexist.
Undeterminedproblems
Ifthediagnostictestsdidnotidentifytheadapterordevicethathasfailed,ifwrongdevicesareinstalled,
orifthesystemsimplyisnotoperating,followtheseprocedurestoisolatethefailingFRU(donotisolate
FRUsthathavenodefects).
Verifythatallattacheddevicesaresupportedbythecomputer.
Verifythatthepowersupplybeingusedatthetimeofthefailureisoperatingcorrectly.(See“Powersystem
checkout”onpage28.)
1.T urnoffthecomputer.
2.VisuallycheckeachFRUfordamage.ReplaceanydamagedFRU.
3.Removeordisconnectallofthefollowingdevices:
a.Non- ThinkPaddevices
b.Devicesattachedtothedockingstationortheportreplicator
c.Printer,mouse,andotherexternaldevices
Chapter4.Relatedserviceinformation41
Page 48

d.Batterypack
e.Harddiskdrive
f.Externaldiskettedriveoropticaldrive
g.DIMM
h.Opticaldiskordisketteintheinternaldrive
i.PCCards
4.T urnonthecomputer.
5.Determinewhethertheproblemhasbeensolved.
6.Iftheproblemdoesnotrecur,reconnecttheremoveddevicesoneatatimeuntilyoundthefailingFRU.
7.Iftheproblemremains,replacethefollowingFRUsoneatatime(donotreplaceanondefectiveFRU):
a.Systemboard
b.LCDassembly
42HardwareMaintenanceManual
Page 49
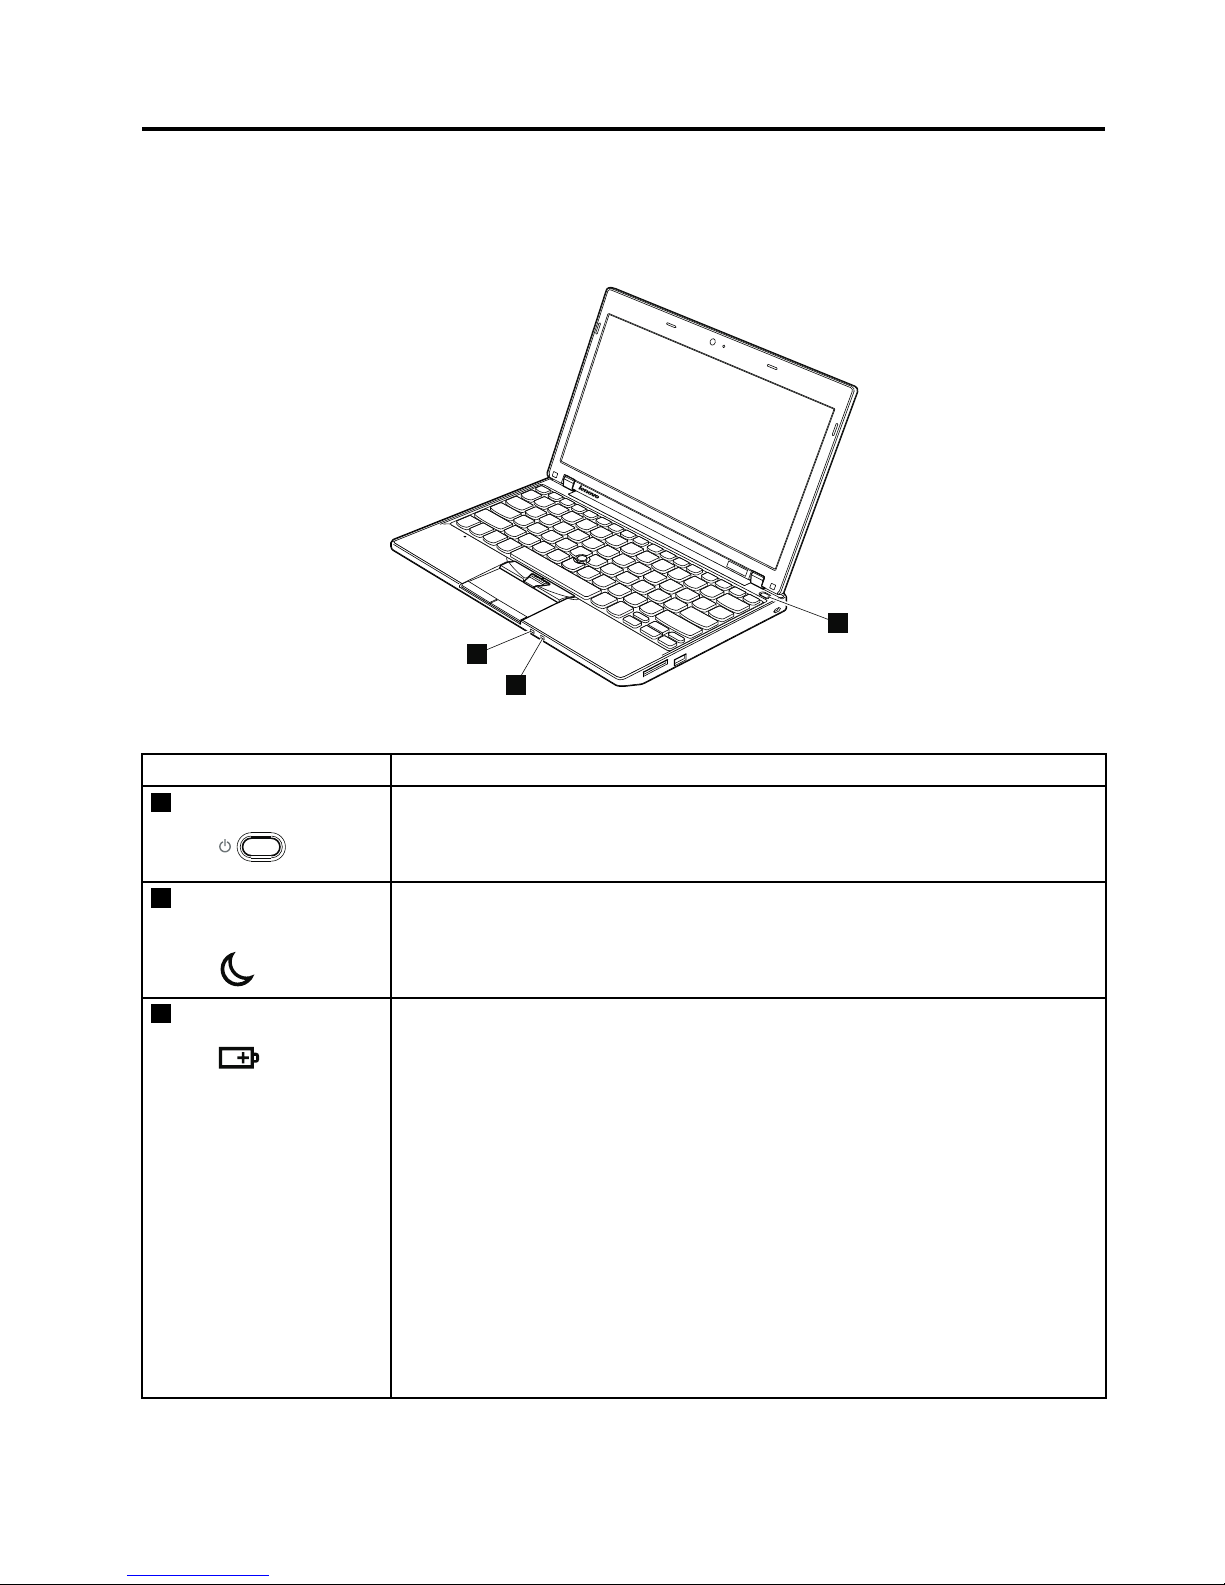
Chapter5.Statusindicators
Thischapterpresentsthesystemstatusindicatorsthatshowthestatusofthecomputer.
1
2
3
Table6.Statusindicators
IndicatorMeaning
1
Poweron
Green:
Thecomputerisonandreadytouse.Thepowerswitch
stayslitwheneverthecomputerisonandisnotlitwhen
thecomputerisinsleep(standby)mode.
2
Sleep(standbyfor
WindowsXP)status
Green:Thecomputerisinsleep(standby)mode.
Blinkinggreen:
Thecomputerisenteringsleep(standby)modeor
hibernationmode,orisresumingnormaloperation.
3
Batterystatus
Green:
Thebatteryhasmorethan20%charge.
Orange:
Thebatteryhasbetween5%and20%charge.
Fastblinkingorange:
Thebatteryhaslessthan5%charge.
Note:Thebatterymaybecharging.
Slowblinkingorange:
Thebatteryisbeingcharged.Whenitreaches20%,the
blinkingcolorchangestogreen.
Slowblinkinggreen:
Thebatteryhasbetween20%and80%charge,and
chargingiscontinuing.Whenthebatteryreaches80%
charge,blinkingstops,butthechargingmaycontinue
untilthebatteryis100%charged.
Quickblinkingorange:
Anerrorhasbeenoccurredinthebattery.
Thebatterystatus
indicatorisoff:
Thebatterypackofthecomputerisdetached.
©CopyrightLenovo2009,2011
43
Page 50

Table6.Statusindicators(continued)
IndicatorMeaning
Note:Ifthecomputerisoperatingonbatterypower,thebatterystatusindicatordoes
notworkwhilethecomputeristurnedofforisinsleep(standby)modeorhibernation
mode.
On-screenindicators:Followingindicatorsaredisplayedonthescreen.
CapslockCapsLockmodeisenabled.Youcanenterallalphabeticcharacters(A-Z)inuppercase
withoutpressingtheShiftkey.
Wirelessstatus
PressFn+F5toenableordisablethewirelessfeatures.Youcanquicklychangethe
powerstateofeachfeatureinthelist.
44HardwareMaintenanceManual
Page 51

Chapter6.Fnkeycombinations
ThefollowingtableshowsthefunctionofeachcombinationofFnwithafunctionkey.
Table7.Fnkeycombinations
KeycombinationDescription
Fn+F1Turntheaudiovolumedown.
Fn+F2Turntheaudiovolumeup.
Fn+F3Mutethemicrophone
Fn+F4
Putthecomputerinsleep(standby)mode.T oreturntonormaloperation,presstheFnkey
only,withoutpressingafunctionkey .
Notes:
Tousethiscombinationofthekeys,ThinkPadPMdevicedrivermusthavebeeninstalled
onthecomputer.
Ifyouwanttousethecombinationtoputthecomputerintohibernationmodeor
do-nothingmode(inWindowsXP ,shutthecomputerdownorshowthepanelforturning
offthecomputer),changethesettingsinthePowerManager.
Fn+F5
Enableordisablethebuilt-inwirelessnetworkingfeatures.IfyoupressFn+F5,alistofwireless
featuresisdisplayed.Y oucanquicklychangethepowerstateofeachfeatureinthelist.
Notes:IfyouwanttouseFn+F5toenableordisablethewirelessfeatures,thefollowing
devicedriversmustbeinstalledonthecomputerbeforehand:
•PowerManagementdriver
•OnScreenDisplayUtility
•Wirelessdevicedrivers
Fn+F6
Changethecameraandmicrophonemutesettings.WhenyoupressFn+F6,thecameraand
microphonemutesettingwindowisopenedandthecamerapreviewisturnedon.
Fromthecamerasettingwindow,youcanalsochangethesettingofthemicrophonemute
button.
Notes:
Thecamerasettingsareaonlyappearsifthecomputerhasanintegratedcamera.
IfthecomputerisrunningWindowsXP ,itdoesnothavethesettingofthemicrophone
mutebutton.
Fn+F7ForWindowsXP:
Applyapresentationschemedirectly,withnoneedtostartPresentationDirector.
TodisablethisfunctionandusetheFn+F7keycombinationforswitchingadisplayoutput
location,startPresentationDirector,andchangethesettings.
ClickStart➙AllPrograms➙ThinkVantage➙PresentationDirector.
Note:IfthecomputerisanWindows7model,itdoesnotsupportpresentationschemes,
howevertheFn+F7combinationmightstillbeusedtoswitchdisplayoutputlocation.
ForWindows7:
Switchbetweenthecomputerdisplayandanexternalmonitor.Windowswillshowthese
displayoptions:
•Computerdisplayonly(LCD)
•Computerdisplayandexternalmonitor(sameimage)
•Computerdisplayandexternalmonitor(extendeddesktopfunction)
©CopyrightLenovo2009,2011
45
Page 52

Table7.Fnkeycombinations(continued)
KeycombinationDescription
•Externalmonitoronly
Note:T oswitchbetweenthecomputerdisplayandanexternalmonitor,theWin+Pkey
combinationisalsoavailable.
ForWindowsXP:
Switchbetweenthecomputerdisplayandanexternalmonitor.Ifanexternalmonitoris
attached,computeroutputisdisplayedinthefollowingthreepatternsbyturns:
•Externalmonitor(CRTdisplay)
•Computerdisplayandexternalmonitor(LCD+CRTdisplay)
•Computerdisplay(LCD)
Notes:
Thisfunctionisnotsupportedifdifferentdesktopimagesaredisplayedonthecomputer
displayandtheexternalmonitor(theExtenddesktopfunction).
ThisfunctiondoesnotworkwhileaDVDmovieoravideoclipisplaying.
Toenablethisfunction,startPresentationDirector,andchangethesettings.
Note:MultipleuserscanlogontoasingleoperatingsystembyusingdifferentuserIDs.Each
userneedstodothefollowing:ClickStart➙AllPrograms➙ThinkVantage➙Presentation
Director,andchangetheFn+F7settings.
Fn+F8
ChangethesettingsoftheUltraNav
®
pointingdevice.
Fn+F9Multimediacontrol.
Fn+F10Multimediacontrol.
Fn+F11Multimediacontrol.
Fn+F12Putthecomputerintohibernationmode.T oreturntonormaloperation,pressthepower
buttonforlessthanfourseconds.
Notes:
Tousethiscombinationofthekeys,ThinkPadPMdevicedrivermusthavebeeninstalled
onthecomputer.
ThoughthescreenfadesoutimmediatelyafterFn+F12arepressed,thecomputer
doesnotenterthehibernationmodeimmediately.Donotmovethesystemuntilthe
sleep(standby)statusindicatorstopsblinking.Movingthecomputerwhenitisentering
hibernationmightcausecorruptionoftheharddiskdrive.
Fn+DeleteThecomputerdisplaybecomesdimmer.
Thepurposeofthismethodistochangethebrightnessleveltemporarily.T ochangethe
defaultbrightnesslevel,changethesettingsofthePowerOptionintheControlPanelor
usethePowerManager.
Fn+End
Selectapowerplan(inWindowsXP ,powerscheme)thathasbeencreatedbyPowerManager
oradjustthepowerlevelbyusingtheslidercontrol.Whenyoupressthiscombinationofkeys,
apanelforselectingapowerplan(inWindowsXP ,powerscheme)oradjustingthepower
levelappears.
Note:IfyouloggedonwithanadministratoruserIDinWindowsXP ,andyoupressFn+End,
thepanelforselectingapowerschemeappears.IfyouhaveloggedonwithanotheruserIDin
WindowsXP ,andyoupressFn+End,thepaneldoesnotappear .
Fn+EscMutethespeaker.
46HardwareMaintenanceManual
Page 53

Table7.Fnkeycombinations(continued)
KeycombinationDescription
Fn+HomeThecomputerdisplaybecomesbrighter.
Thepurposeofthismethodistochangethebrightnessleveltemporarily.T ochangethe
defaultbrightnesslevel,changethesettingsofthePowerOptionintheControlPanelor
usethePowerManager.
Fn+PgUpReserved.
Fn+SpacebarEnabletheFullScreenMagnierfunction.
Fn+B
HavethesamefunctionastheBreakkey.
Fn+CHavethesamefunctionastheScrLKkey.
Fn+P
HavethesamefunctionasthePausekey.
Fn+SHavethesamefunctionastheSysRqkey.
Fn+C
Enableordisablethenumerickeypad.Theindicatorofnumericlockwillbedisplayedon
thescreen.
Chapter6.Fnkeycombinations47
Page 54

48HardwareMaintenanceManual
Page 55
Chapter7.FRUreplacementnotices
ExternalCRUstatementtocustomers:
Someproblemswithyourproductcanberesolvedwithareplacementpartyoucaninstallyourself,called
a“CustomerReplaceableUnit”or“CRU.”SomeCRUsaredesignatedasSelf-serviceCRUsandothers
aredesignatedasOptional-serviceCRUs.InstallationofSelf-serviceCRUsisyourresponsibility;youmay
requestthatLenovoinstallsanOptional-serviceCRUaccordingtothewarrantyserviceforyourproduct.
WhereyouareinstallingtheCRU,LenovowillshiptheCRUtoyou.CRUinformationandreplacement
instructionsareshippedwithyourproductandareavailablefromLenovoatanytimeuponrequest.Youmay
ndalistofCRUsinthepublicationsthatshipwithyourproductorathttp://www.lenovo.com/CRUs.Y ou
mayberequiredtoreturnthedefectivepartthatisreplacedbytheCRU.Whenreturnisrequired:(1)return
instructions,aprepaidshippinglabel,andacontainerwillbeincludedwiththereplacementCRU;and(2)you
maybechargedforthereplacementCRUifLenovodoesnotreceivethedefectivepartwithinthirty(30)days
ofyourreceiptofthereplacementCRU.SeeyourLenovoLimitedWarrantydocumentationforfulldetails.
Thischapterpresentsnoticesrelatedtoremovingandreplacingparts.Readthischaptercarefullybefore
replacinganyFRU.
Screwnotices
Loosescrewscancauseareliabilityproblem.IntheThinkPadNotebook,thisproblemisaddressedwith
specialnylon-coatedscrewsthathavethefollowingcharacteristics:
•Theymaintaintightconnections.
•Theydonoteasilycomeloose,evenwithshockorvibration.
•Theyarehardertotighten.
•Eachoneshouldbeusedonlyonce.
Dothefollowingwhenyouservicethismachine:
•Keepthescrewkit(fortheP/N,see“Miscellaneousparts”onpage114
)inyourtoolbag.
•Alwaysusenewscrews.
•Useatorquescrewdriverifyouhaveone.
Tightenscrewsasfollows:
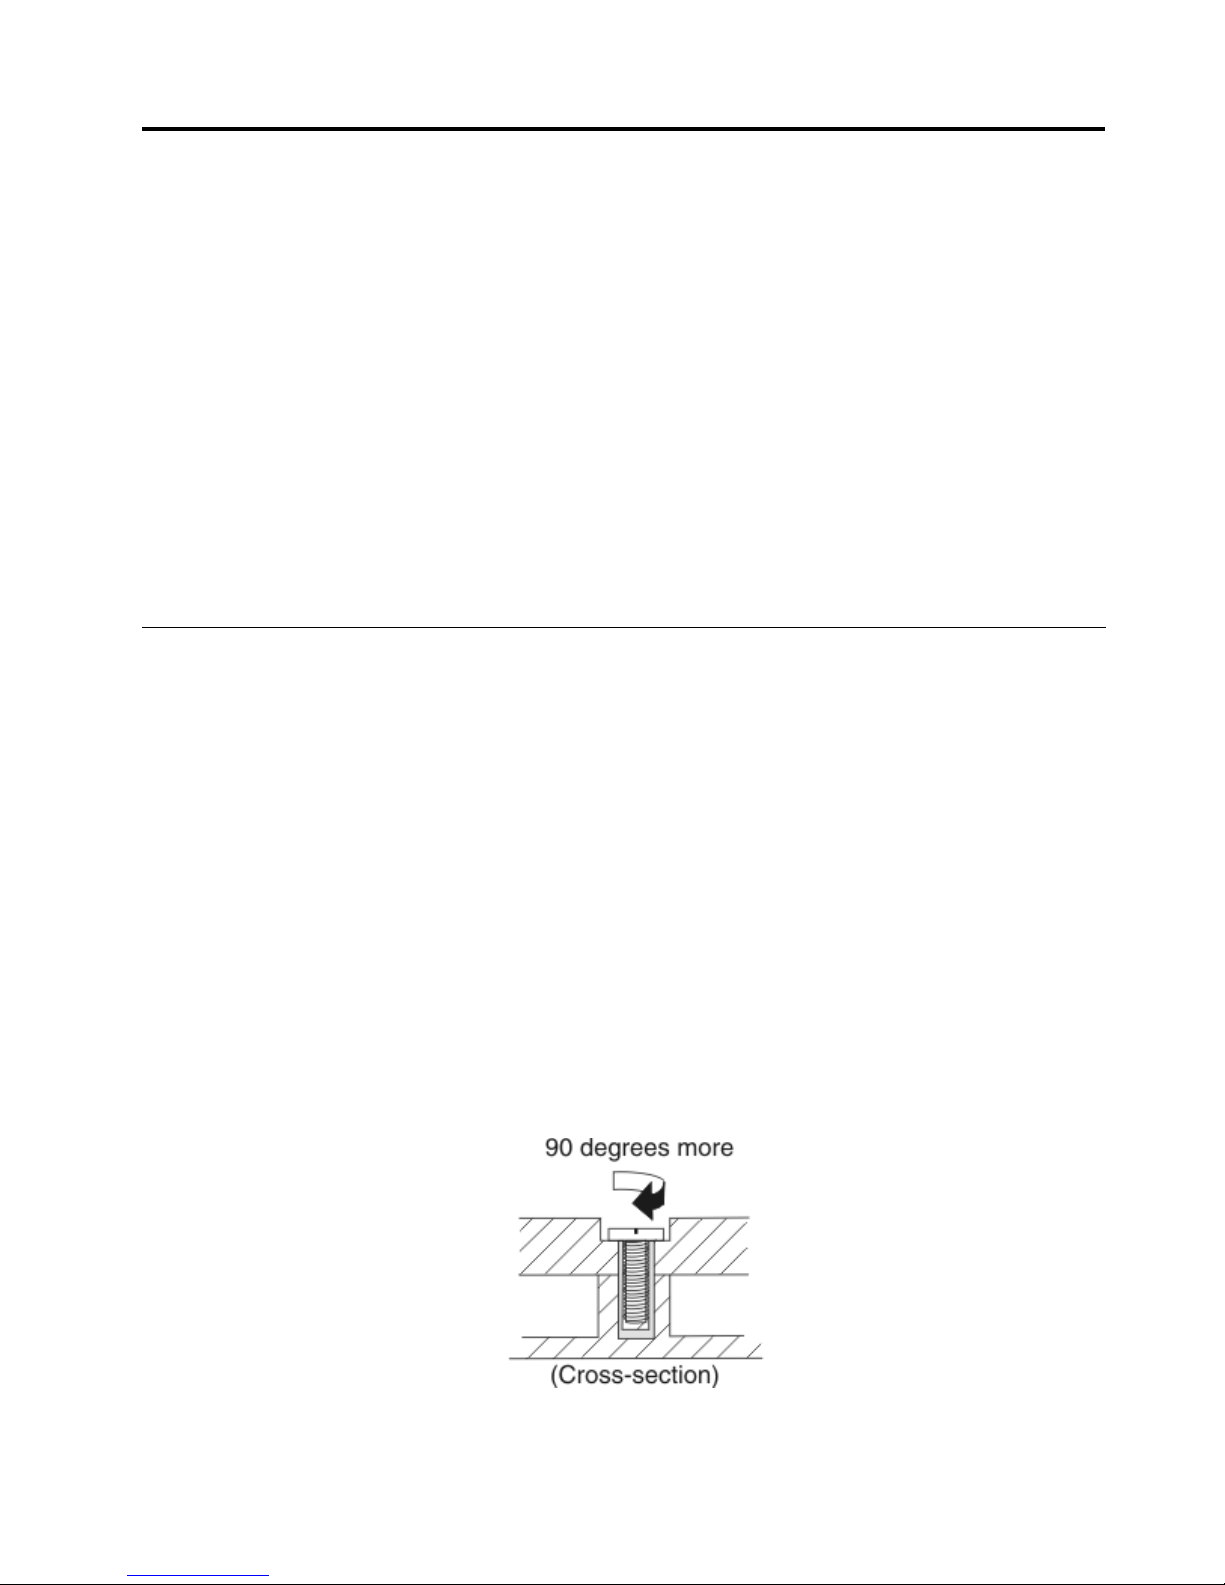
•Plastictoplastic
Turnanadditional90degreesafterthescrewheadtouchesthesurfaceoftheplasticpart:
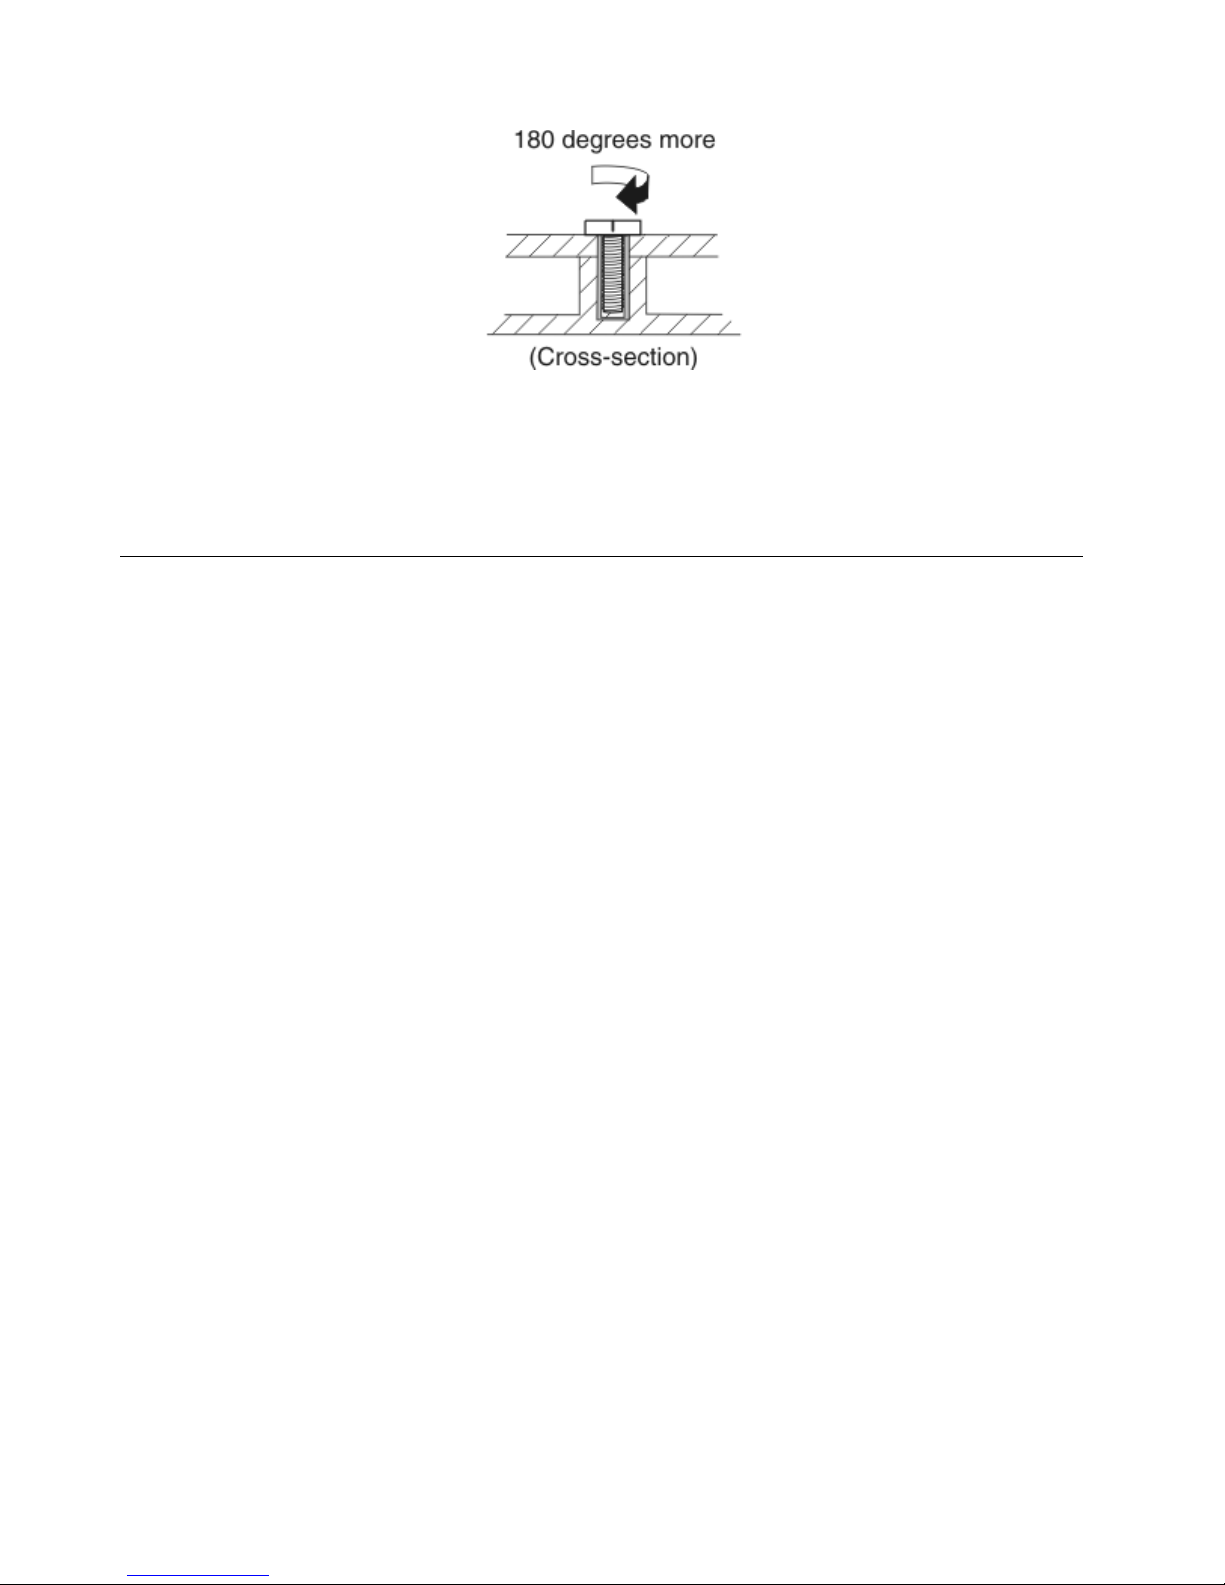
•Logiccardtoplastic
Turnanadditional180degreesafterthescrewheadtouchesthesurfaceofthelogiccard:
©CopyrightLenovo2009,2011
49
Page 56
•T orquedriver
Ifyouhaveatorquedriver,refertothe“Torque”columnforeachstep.
•Makesurethatyouusethecorrectscrew.Ifyouhaveatorquescrewdriver,tightenallscrewsrmlytothe
torqueshowninthetable.Neveruseascrewthatyouremoved.Useanewone.Makesurethatall
ofthescrewsaretightenedrmly.
•Ensuretorquescrewdriversarecalibratedcorrectlyfollowingcountryspecications.
Retainingserialnumbers
Thissectionincludesthefollowingdescriptions:
•“Restoringtheserialnumberofthesystemunit”onpage50
•“RetainingtheUUID”onpage51
•“ReadingorwritingtheECAinformation”onpage51
Restoringtheserialnumberofthesystemunit
Whenthecomputerwasmanufactured,theEEPROMonthesystemboardwasloadedwiththeserial
numbersofthesystemandallmajorcomponents.Thesenumbersneedtoremainthesamethroughout
thelifeofthecomputer.
Ifyoureplacethesystemboard,youmustrestoretheserialnumberofthesystemunittoitsoriginalvalue.
Beforereplacingthesystemboard,savetheoriginalserialnumberbydoingthefollowing:
1.InstalltheLENOVOThinkPadHardwareMaintenanceDisketteVersion1.76orlater,andrestartthe
computer.
2.Fromthemainmenu,select1.SetSystemIdentication.
3.Select2.ReadS/NdatafromEEPROM.
Theserialnumberofeachdeviceinyourcomputerisdisplayed;theserialnumberofthesystemunitis
listedasfollows:
•20:Serialnumber
Writedownthatnumber.
Note:Theserialnumberofthesystemunitisalsowrittenonthelabelattachedtothebottomofthecomputer.
Afteryouhavereplacedthesystemboard,restoretheserialnumberbydoingthefollowing:
1.InstalltheLENOVOThinkPadHardwareMaintenanceDisketteVersion1.76orlaterandrestartthe
computer.
2.Fromthemainmenu,select1.SetSystemIdentication.
3.Select1.AddS/NdatafromEEPROM.Followtheinstructionsonthescreen.
50HardwareMaintenanceManual
Page 57

IftheMTMandProductIDnumbersdifferfromeachotherontherearlabel,usewhatisshownforthe
ProductIDeld.Seeexamplebelow:
MTMonrearlabel:
TTTT-CTOS/NSSSSSSS
ProductIDonrearlabel:
TTTT-MMM(UsethisnumberwhensettingSerialNumber)
Intheexample,theSerialNumbertobeinputis'1STTTTMMMSSSSSSS'.
RetainingtheUUID
TheUniversallyUniqueIdentier(UUID)isa128-bitnumberuniquelyassignedtoyourcomputerat
productionandstoredintheEEPROMofyoursystemboard.Thealgorithmthatgeneratesthenumberis
designedtoprovideuniqueIDsuntiltheyearA.D.3400.Notwocomputersintheworldhavethesame
number.
Whenyoureplacethesystemboard,youmustsettheUUIDonthenewsystemboardasfollows:
1.InstalltheLENOVOThinkPadHardwareMaintenanceDisketteVersion1.76orlater,andrestartthe
computer.
2.Fromthemainmenu,select4.AssignUUID.AnewUUIDiscreatedandwritten.IfavalidUUIDalready
exists,itisnotoverwritten.
ReadingorwritingtheECAinformation
InformationonEngineeringChangeAnnouncements(ECA)arestoredintheEEPROMofthesystemboard.
TheelectronicstorageofthisinformationsimpliestheproceduretocheckiftheECAhasbeenpreviously
appliedtoamachine.ThemachinedoesnotneedtobedisassembledtocheckfortheECAapplication.
TocheckwhatECAshavebeenpreviouslyappliedtothemachine,usetheECAInformationRead/Write
functionontheLENOVOThinkPadHardwareMaintenanceDisketteVersion1.76orlater.
1.InserttheLENOVOThinkPadHardwareMaintenanceDisketteVersion1.76orlater,andrestartthe
computer.
2.Fromthemainmenu,select6.SetECAInformation.
3.T oreadECAinformation,select2.ReadECA/reworknumberfromEEPROMandfollowthe
instruction.
4.T oreadboxbuilddate,select5.ReadboxbuilddatefromEEPROM,andfollowtheinstructionon
thescreen.
AfteranECAhasbeenappliedtothemachine,theEEPROMmustbeupdatedtoreecttheECA's
application.UsetheLENOVOThinkPadHardwareMaintenanceDisketteVersion1.76orlatertoupdatethe
EEPROM.
Note:OnlytheECAnumberisstoredintheEEPROM.ThemachinetypeoftheECAisassumedbethesame
asthemachinetypeofthemachinethathadtheECAappliedtoit.
1.InserttheLENOVOThinkPadHardwareMaintenanceDisketteVersion1.76orlater,andrestartthe
computer.
2.Fromthemainmenu,select6.SetECAInformation.
3.T owriteECAinformation,select1.WriteECA/reworknumberfromEEPROM,andfollowthe
instruction.
4.T owriteboxbuilddate,select4.WriteboxbuilddatefromEEPROM,andfollowtheinstructionon
thescreen.
Chapter7.FRUreplacementnotices51
Page 58

Ifthesystemboardisbeingreplaced,trytoreadtheECAinformationfromtheoldsystemboardandtransfer
theinformationtothenewsystem.Ifthesystemboardisinoperable,thiswillnotbepossible.
52HardwareMaintenanceManual
Page 59

Chapter8.RemovingandreplacingaFRU
ExternalCRUstatementtocustomers:
Someproblemswithyourproductcanberesolvedwithareplacementpartyoucaninstallyourself,called
a“CustomerReplaceableUnit”or“CRU.”SomeCRUsaredesignatedasSelf-serviceCRUsandothers
aredesignatedasOptional-serviceCRUs.InstallationofSelf-serviceCRUsisyourresponsibility;youmay
requestthatLenovoinstallsanOptional-serviceCRUaccordingtothewarrantyserviceforyourproduct.
WhereyouareinstallingtheCRU,LenovowillshiptheCRUtoyou.CRUinformationandreplacement
instructionsareshippedwithyourproductandareavailablefromLenovoatanytimeuponrequest.Youmay
ndalistofCRUsinthepublicationsthatshipwithyourproductorathttp://www.lenovo.com/CRUs.Y ou
mayberequiredtoreturnthedefectivepartthatisreplacedbytheCRU.Whenreturnisrequired:(1)return
instructions,aprepaidshippinglabel,andacontainerwillbeincludedwiththereplacementCRU;and(2)you
maybechargedforthereplacementCRUifLenovodoesnotreceivethedefectivepartwithinthirty(30)days
ofyourreceiptofthereplacementCRU.SeeyourLenovoLimitedWarrantydocumentationforfulldetails.
ThischapterpresentsdirectionsanddrawingsforuseinremovingandreplacingaFRU.Besuretoobserve
thefollowinggeneralrules:
1.Donottrytoserviceanycomputerunlessyouhavebeentrainedandcertied.Anuntrainedpersonruns
theriskofdamagingparts.
2.BeforereplacinganyFRU,reviewChapter7“FRUreplacementnotices”onpage49.
3.BeginbyremovinganyFRUsthathavetoberemovedbeforethefailingFRU.AnysuchFRUsarelisted
atthetopofthepage.Removethemintheorderinwhichtheyarelisted.
4.FollowthecorrectsequenceinthestepsforremovingtheFRU,asgiveninthedrawingsbythe
numbersinsquarecallouts.
5.WhenturningascrewtoreplaceaFRU,turnitinthedirectionasgivenbythearrowinthedrawing.
6.WhenremovingtheFRU,moveitinthedirectionasgivenbythearrowinthedrawing.
7.T oputthenewFRUinplace,reversetheremovalprocedureandfollowanynotesthatpertainto
replacement.Forinformationaboutconnectingandarranginginternalcables,seeChapter9“Locations”
onpage91.
8.WhenreplacingaFRU,usethecorrectscrewasshownintheprocedures.
DANGER
BeforeremovinganyFRU,turnoffthecomputer ,unplugallpowercordsfromelectricaloutlets,
removethebatterypack,andthendisconnectanyinterconnectingcables.
Attention:AfterreplacingaFRU,donotturnonthecomputeruntilyouhavemadesurethatallscrews,
springs,andothersmallpartsareinplaceandnonearelooseinsidethecomputer.Verifythisbyshaking
thecomputergentlyandlisteningforrattlingsounds.Metallicpartsormetalakescancauseelectrical
shortcircuits.
Attention:Thesystemboardissensitiveto,andcanbedamagedby,electrostaticdischarge.Before
touchingit,establishpersonalgroundingbytouchingagroundpointwithonehandorbyusingan
electrostaticdischarge(ESD)strap(P/N6405959).
BeforeservicingThinkPadX100eandThinkPadX120e
SomemodelsoftheThinkPadX100eandThinkPadX120emighthavetheSIMcardthatthecustomer
hasinstalled.
©CopyrightLenovo2009,2011
53
Page 60
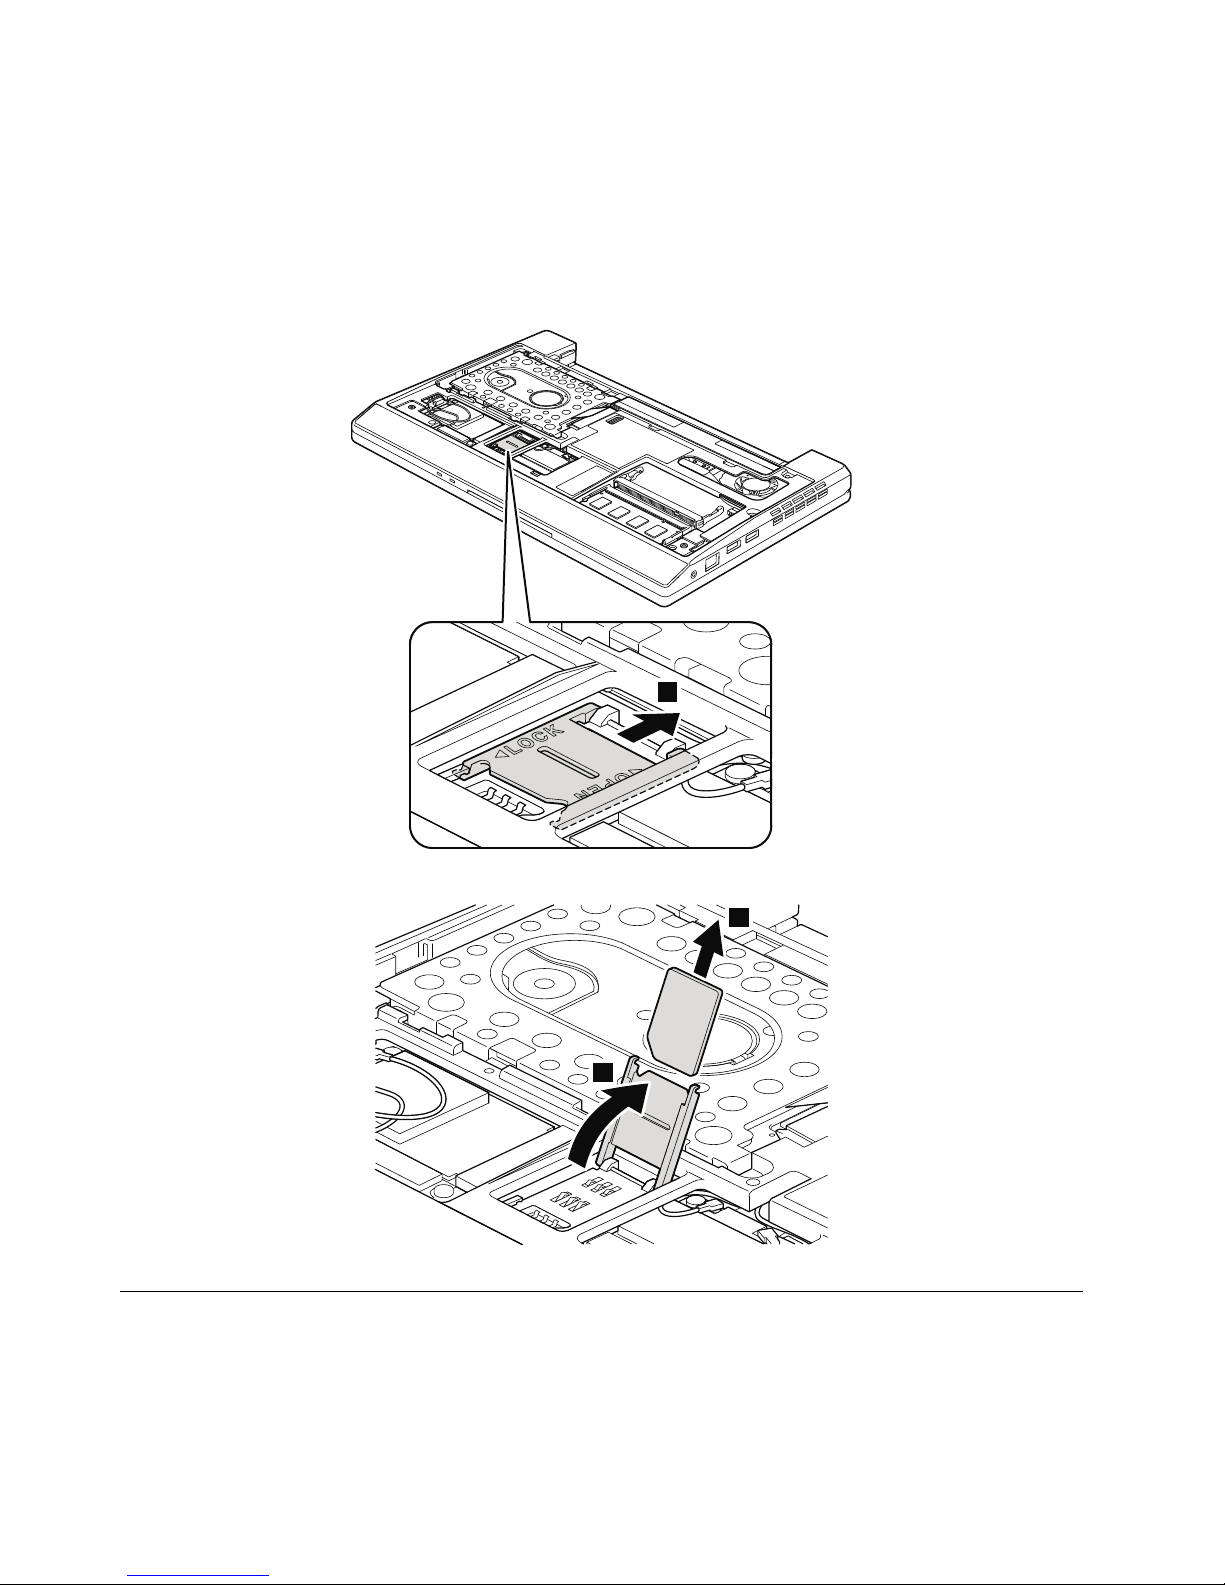
IfthecomputeryouareservicinghastheSIMcard,removeitbeforeyoustarttheservicing.
ToremovetheSIMcard,youneedtoremovefollowingFRUs:
•“1010Batterypack”onpage54
•“1020Bottomdoor”onpage55
Afteryounishtheservicing,makesurethatyouinsertthecardbackintotheslotrmly.
1
2
3
1010Batterypack
Importantnoticeforreplacingabatterypack:
LenovoThinkVantageToolboxhaveanautomaticbatterydiagnosticthatdeterminesifthebatterypack
isdefective.AbatterypackFRUshouldnotbereplacedunlessthisdiagnosticshowsthatthebattery
isdefective.
54HardwareMaintenanceManual
Page 61
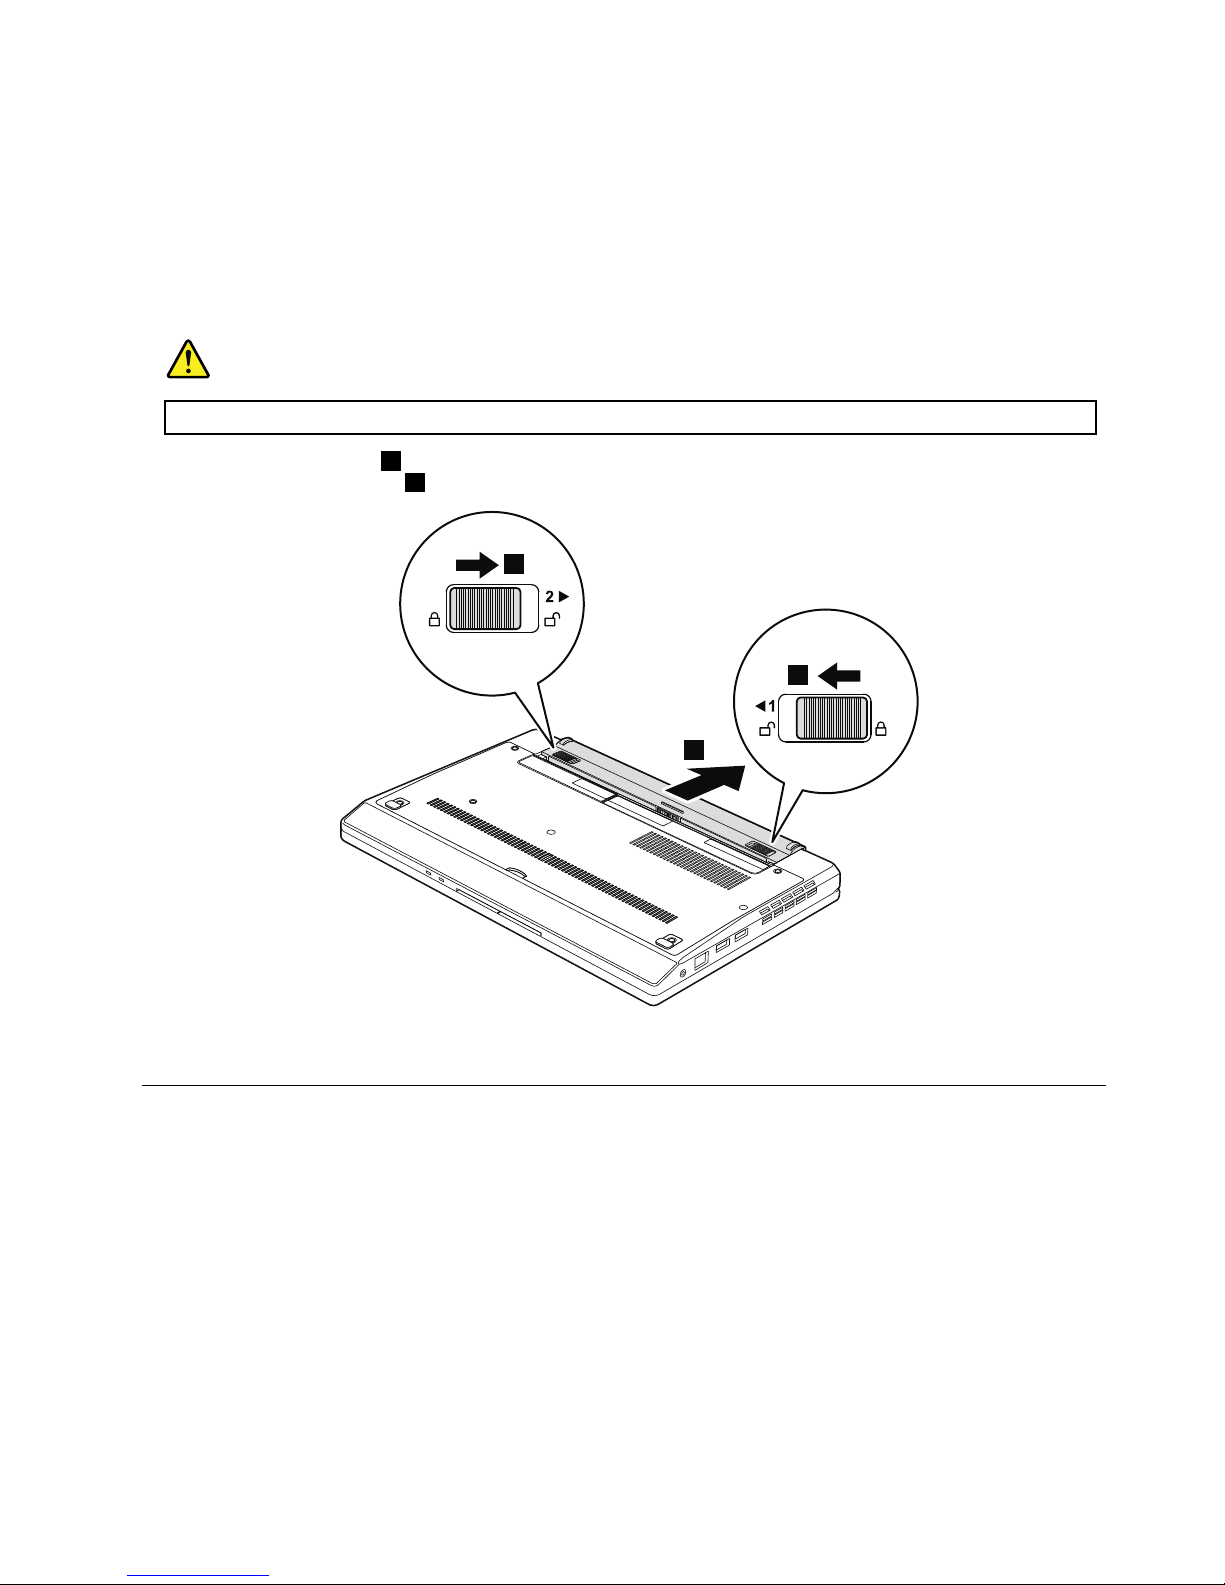
Theonlyexceptiontothisisifthebatterypackisphysicallydamagedoracustomerisreportingapossible
safetyissue.
IfThinkVantageT oolboxisnotinstalledinthecomputer,thecustomershoulddownloadthisprogram
beforeanon-physicallydamagedbatterypackisreplaced.Notethataphysicallydamagedbatterypack
isnon-warrantyreplacement.
Table8.Removalstepsofbatterypack
DANGER
Useonlythebatteryspeciedinthepartslistforyourcomputer.Anyotherbatterycouldigniteorexplode.
Unlockthebatterylatches1.Holdingthebatterylatchesintheunlockedposition,removethebatterypackin
thedirectionshownbyarrow
2.
1
1
2
Wheninstalling:Installthebatterypackintheslot,andthenmakesurethatthebatterylatchisinthelockedposition.
1020Bottomdoor
Foraccess,removethisFRU:
•“1010Batterypack”onpage54
Chapter8.RemovingandreplacingaFRU55
Page 62
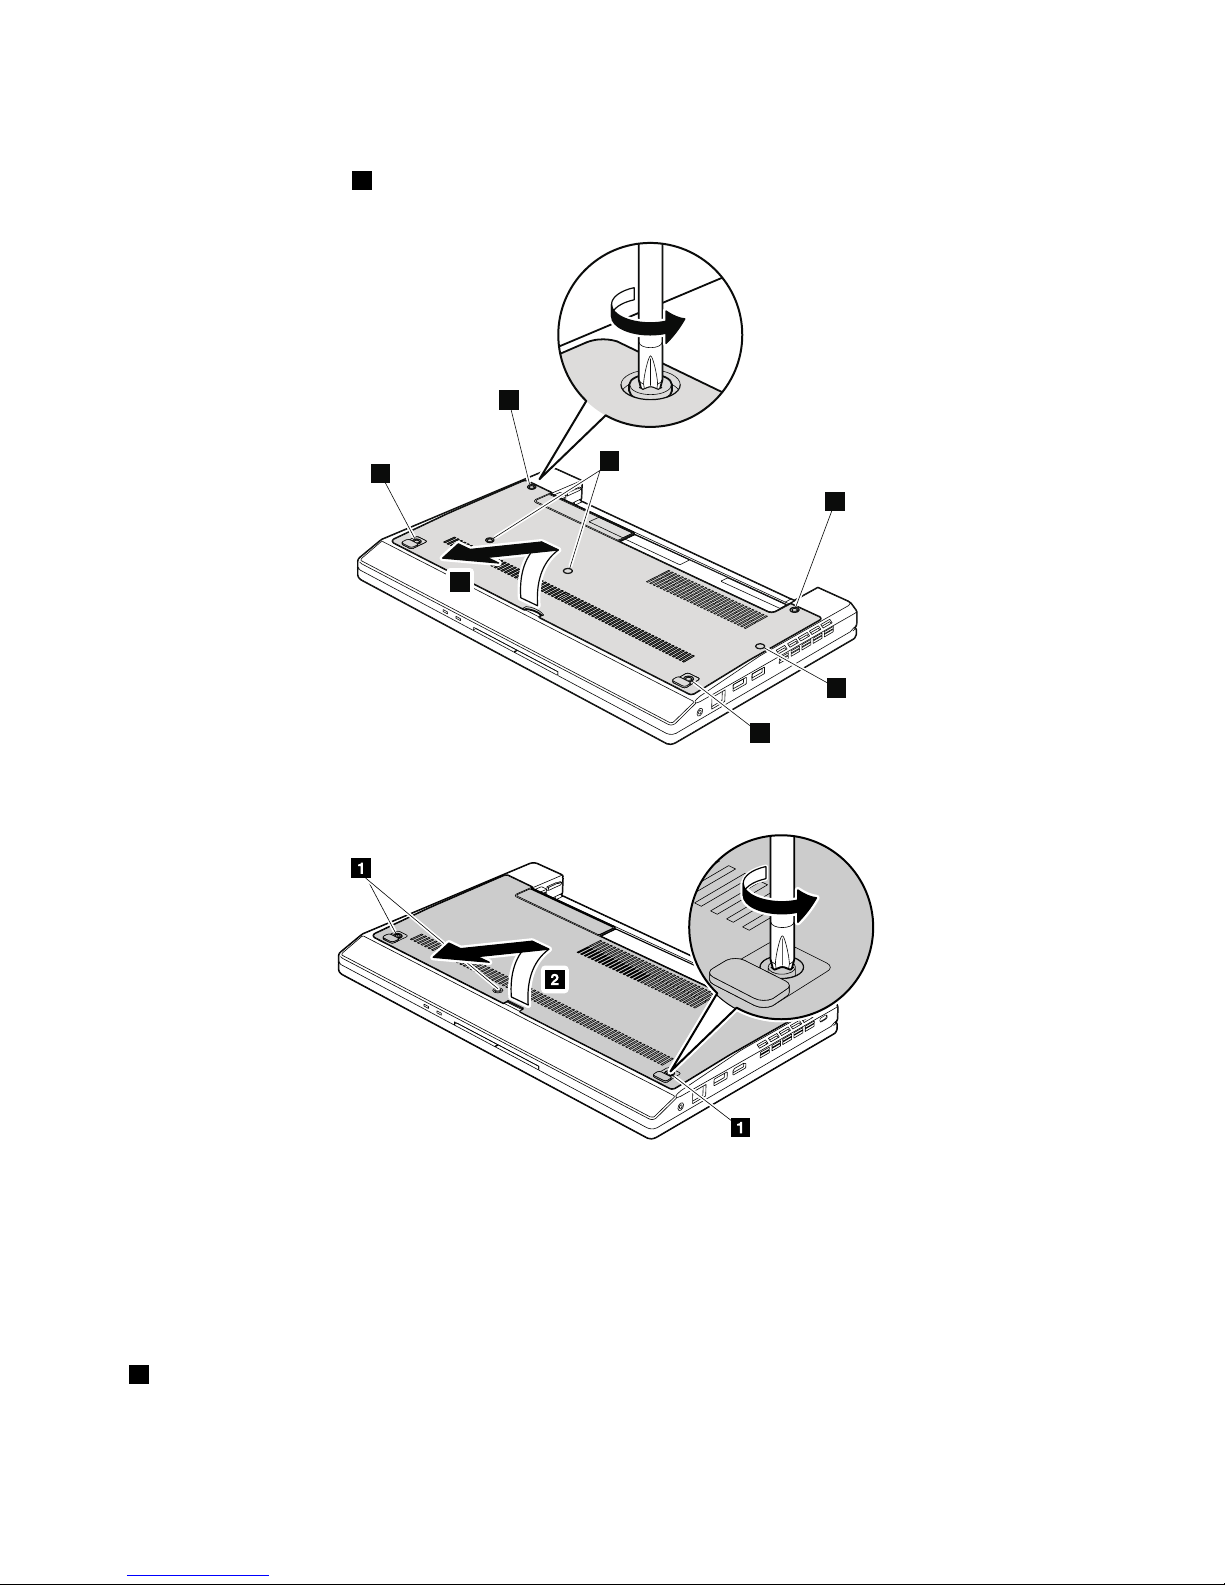
Table9.Removalstepsofbottomdoor
Note:Loosenthescrews1,butdonotremovethem.
ForThinkPadX100e
1
1
1
1
1
1
2
ForThinkPadX120e
Applyinglabelstothebottomdoor
ForThinkPadX100e
ThenewbottomdoorFRUisshippedwithakitcontaininglabel.Whenyoureplacethebottomdoor,
youneedtoapplythefollowinglabel:
1
Serialnumberblanklabel79x16
Followinglabelsneedtobepeeledofffromtheoldbottomdoor,andneedtobeputonthenewbottomdoor.
56HardwareMaintenanceManual
Page 63
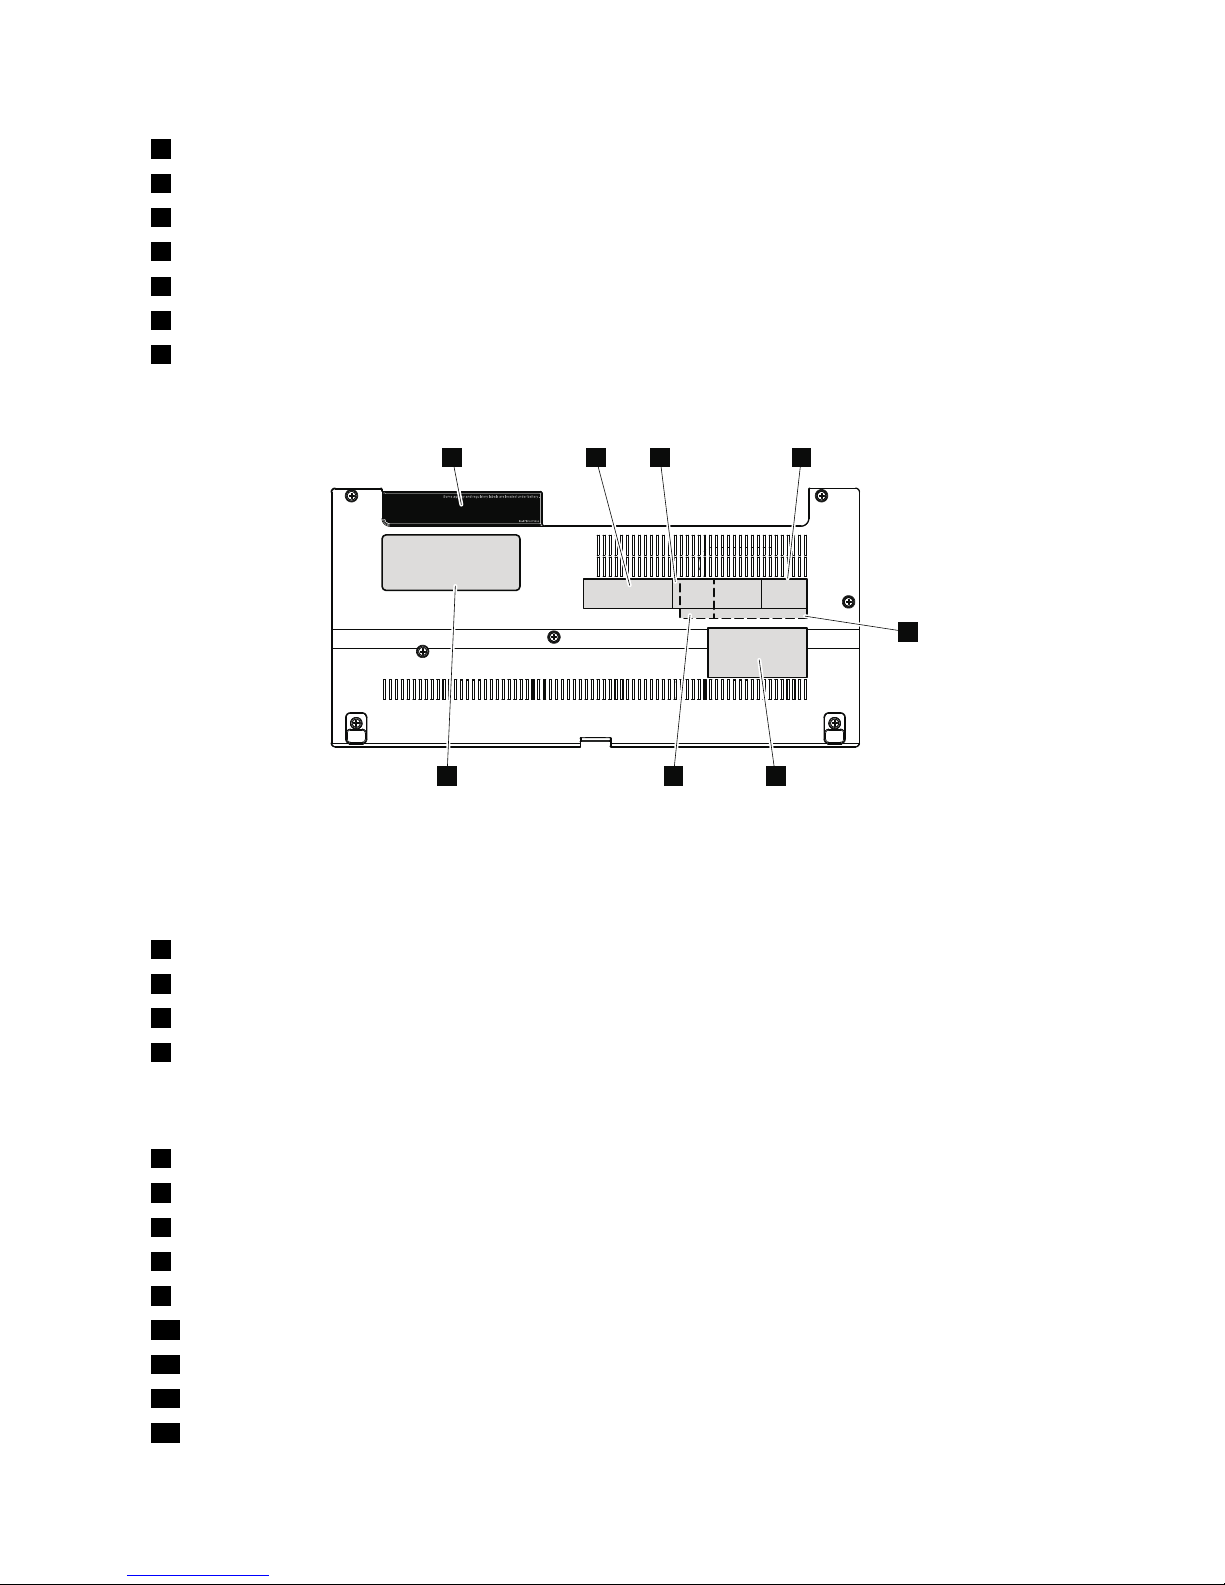
2
SIRMlabel
3
BrazilANA TELwirelessLANlabel
4
BrazilANA TELBluetoothlabel
5
SIRMlabel(bySKU)
6
SIMICCIDlabel
7
Israellabel
8
Windowslicenselabel(COA)
Forthelocationofeachlabel,referthefollowinggure:
1 2 3 4
67
5
8
ForThinkPadX120e
ThenewbottomdoorFRUisshippedwithakitcontaininglabel.Whenyoureplacethebottomdoor,
youneedtoapplythefollowinglabels:
1
Serialnumberblanklabel79x16
2
Homologationlabel
3
FCClabel
4
Informationlabelunderbattery
Followinglabelsneedtobepeeledofffromtheoldbottomdoor,andneedtobeputonthenewbottomdoor.
5
Windowslicenselabel(COA)
6
ChinawirelessWANlabel
7
WirelessWANlabel
8
SIMICCIDlabel
9
BrazilANA TELwirelessWANlabel
10
BrazilANA TELlabelforb/g/n
11
BrazilANA TELBluetoothlabel
12
BraziANA TELLabel(AMoM)
13
SIRMlabel(bySKU)
Chapter8.RemovingandreplacingaFRU57
Page 64
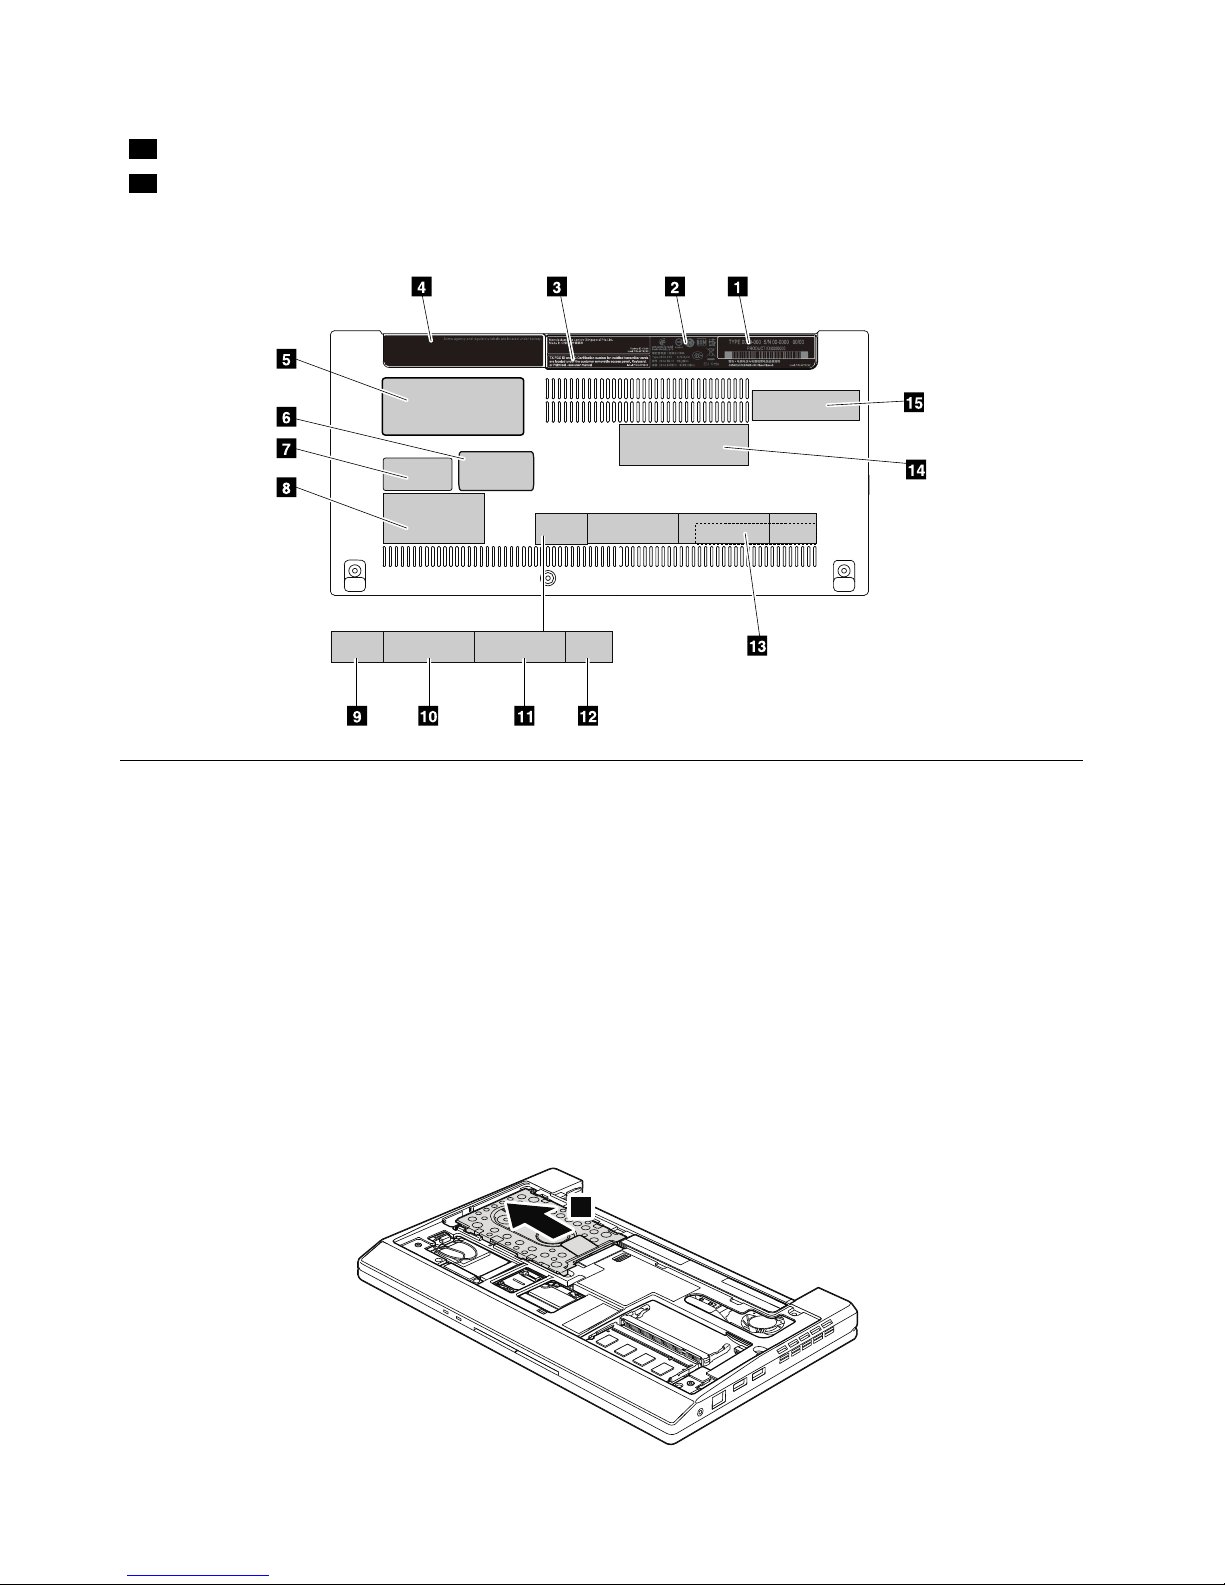
14
Israellabel
15
ChinawirelessLANlabel
Forthelocationofeachlabel,referthefollowinggure:
1030Harddiskdrive(HDD)
Foraccess,removetheseFRUsinorder:
•“1010Batterypack”onpage54
•“1020Bottomdoor”onpage55
Attention:
•Donotdropthedriveorapplyanyphysicalshocktoit.Thedriveissensitivetophysicalshock.
Improperhandlingcancausedamageandpermanentlossofdata.
•Beforeremovingthedrive,havetheusermakeabackupcopyofalltheinformationonitifpossible.
•Neverremovethedrivewhilethesystemisoperatingorisinsuspendmode.
Table10.RemovalstepsofHDD
ForThinkPadX100e
1
58HardwareMaintenanceManual
Page 65
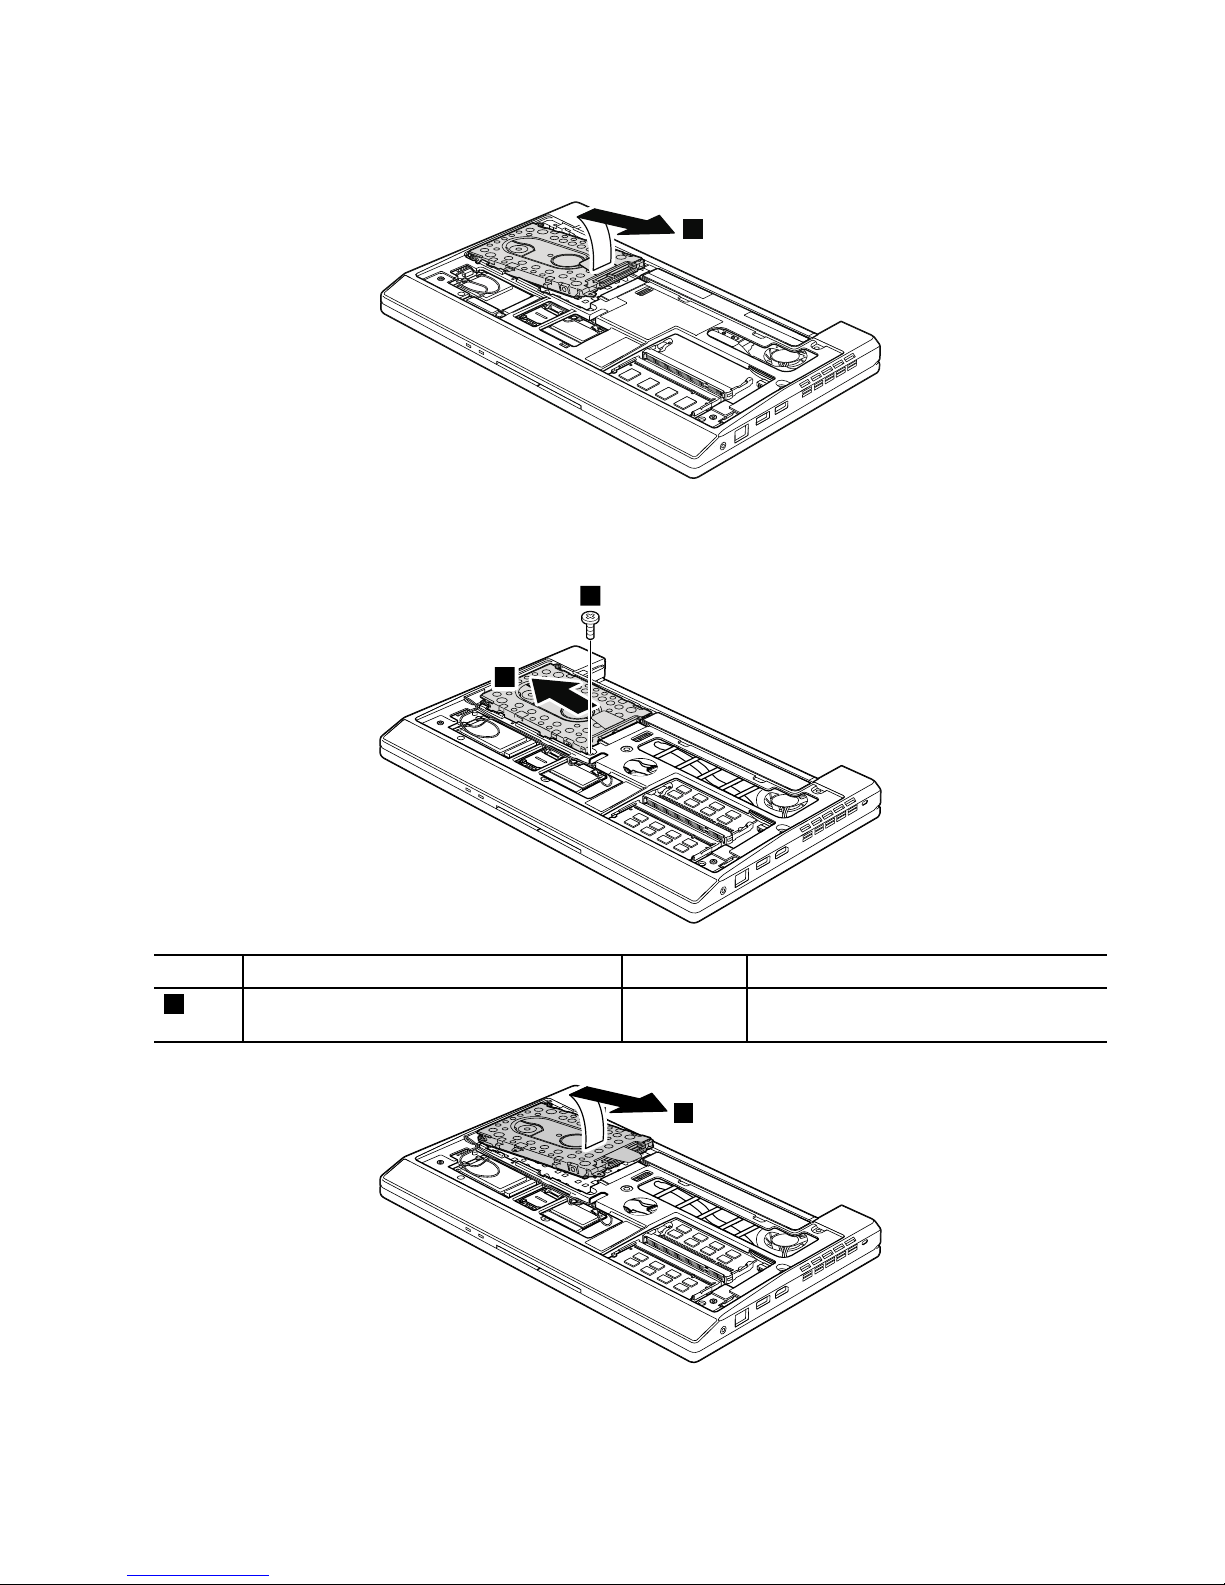
Table10.RemovalstepsofHDD(continued)
2
ForThinkPadX120e
1
2
1
StepScrew(quantity)Color
Torque
1
M2×7mm,wafer-head,nylon-coated(1)Silver
0.181Nm
(1.85kgfcm)
3
Wheninstalling:MakesurethattheHDDconnectorisattachedrmly.
Chapter8.RemovingandreplacingaFRU59
Page 66
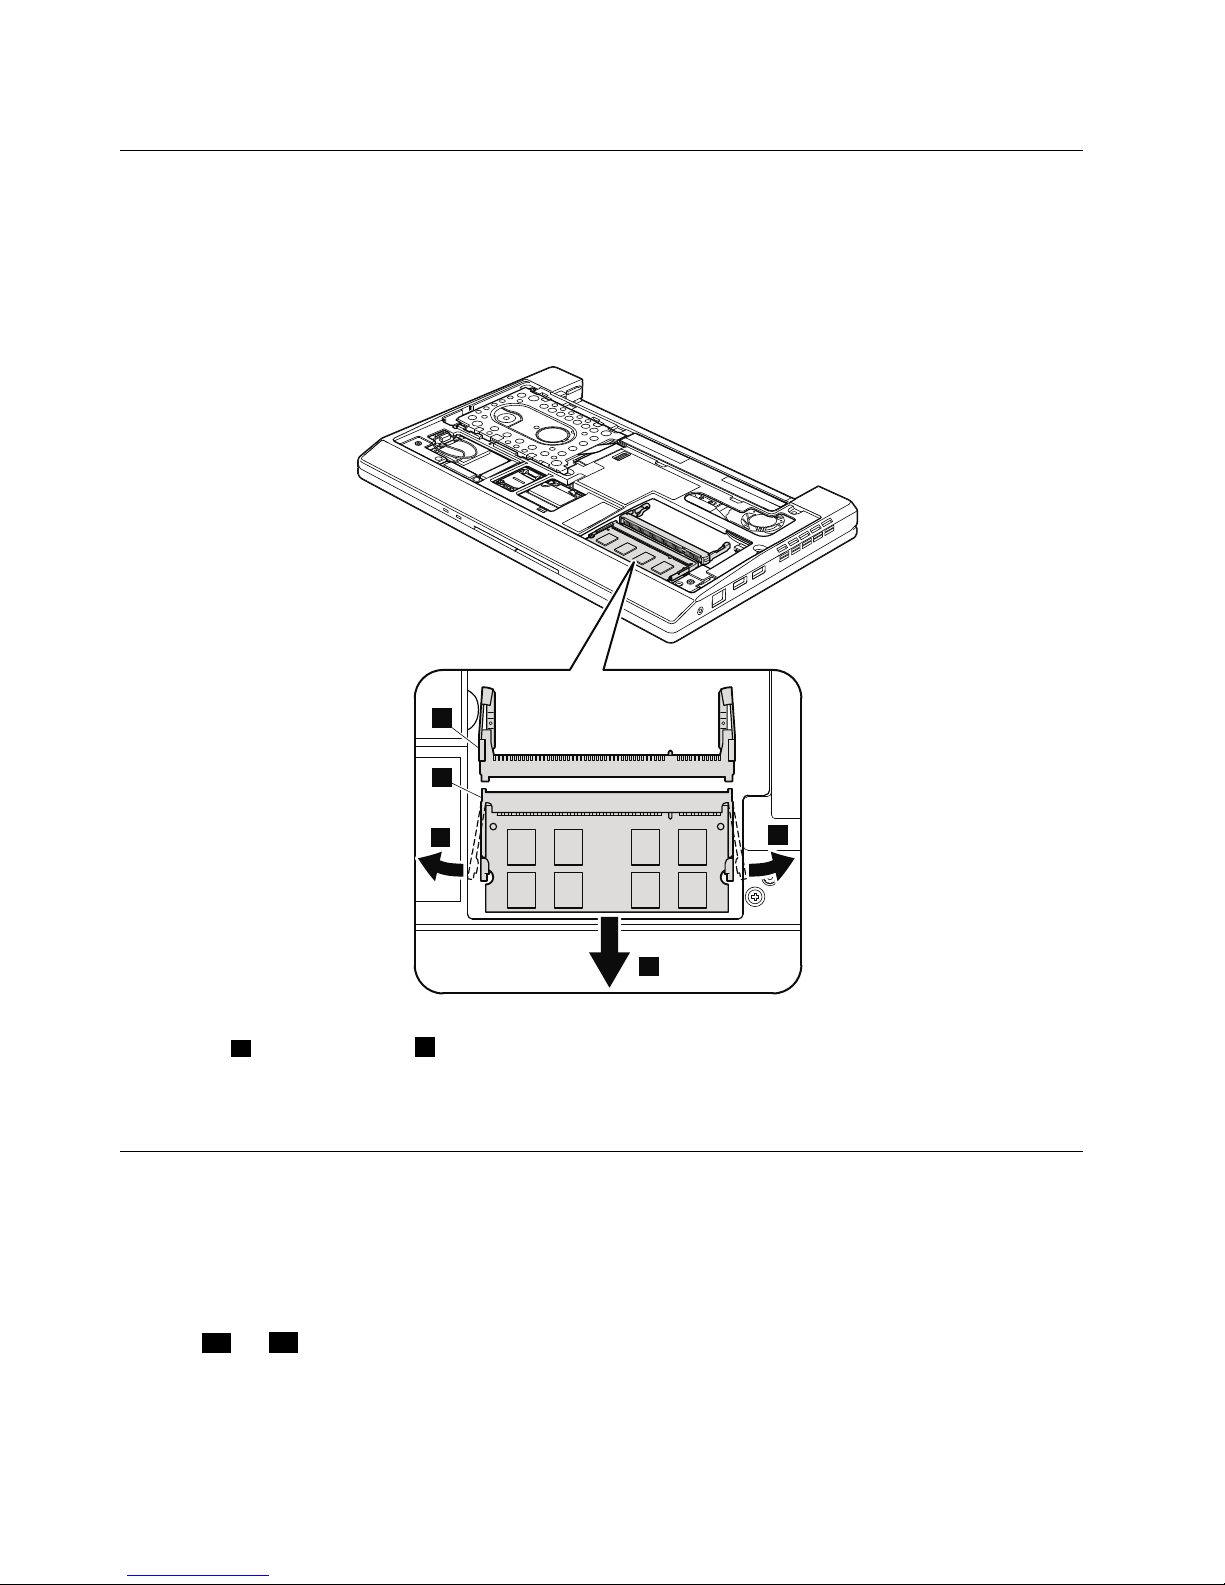
1040DIMM
Foraccess,removetheseFRUsinorder:
•“1010Batterypack”onpage54
•“1020Bottomdoor”onpage55
Table11.RemovalstepsofDIMM
1
1
2
a
b
Note:IfthecomputeryouareservicinghastwoDIMMslotsandonlyoneDIMMisused,thecardmustbeinstalled
inSLOT-0(
a),butnotinSLOT-1(b).SomemodelsonlyhaveoneDIMMslot.
Wheninstalling:InsertthenotchedendoftheDIMMintothesocket.PresstheDIMMrmly,andpivotituntilit
snapsintotheplace.Makesurethatitisrmlyxedintheslotanddoesnotmoveeasily.
1050PCIExpressMiniCardforwirelessLAN
Foraccess,removetheseFRUsinorder:
•“1010Batterypack”onpage54
•“1020Bottomdoor”onpage55
Table12.RemovalstepsofPCIExpressMiniCardforwirelessLAN
Instep1aand1b,unplugthejacksbyusingtheremovaltoolantennaRFconnector(P/N:08K7159)orpickthe
connectorswithyourngersandgentlyunplugthemindirectionofthearrow.
60HardwareMaintenanceManual
Page 67
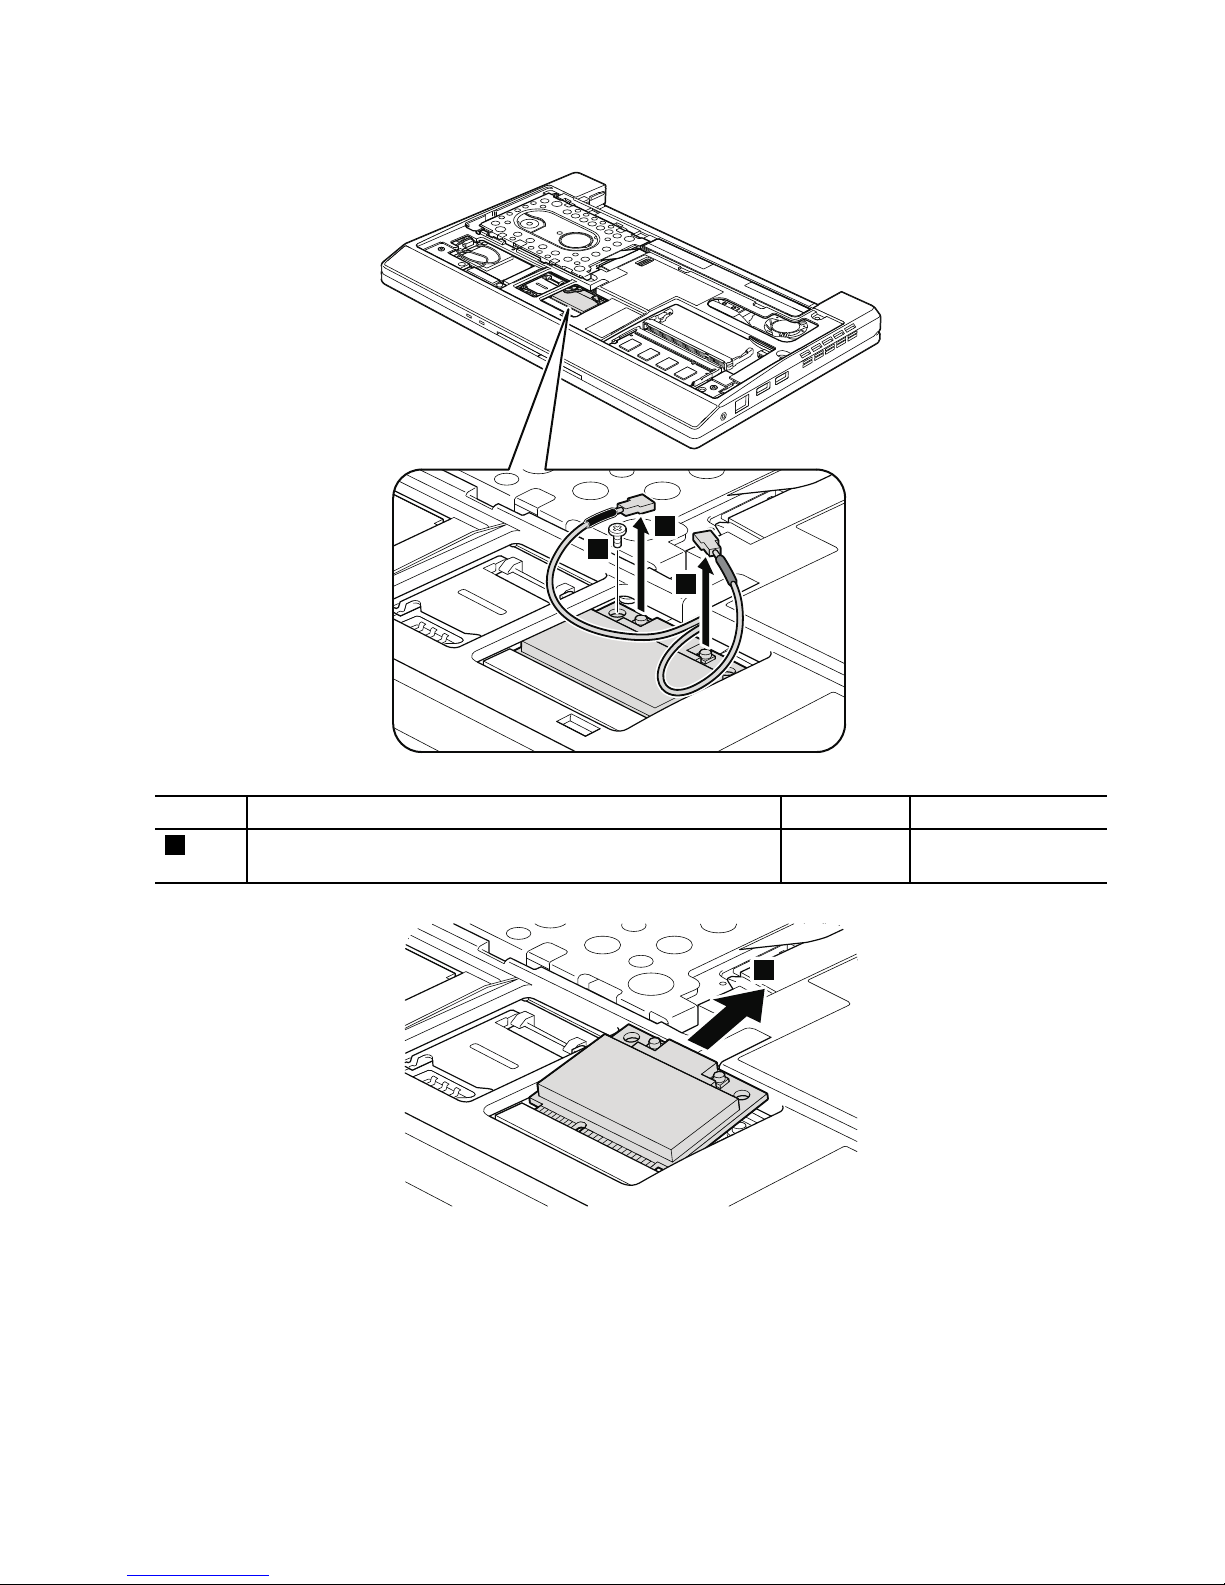
Table12.RemovalstepsofPCIExpressMiniCardforwirelessLAN(continued)
1a
1b
2
StepScrew(quantity)Color
Torque
2
M2×3mm,small-head,nylon-coated(1)Silver
0.181Nm
(1.85kgfcm)
3
Wheninstalling:
ForThinkPadX100e:PlugthegraycableintothejackmarkedMAINorM,andtheblackcableintothejack
markedAUXorAonthecard.
ForThinkPadX120e:Plugthewhitecableintothejackmarked1orM,andtheblackcableintothejack
marked2orAonthecard.
Chapter8.RemovingandreplacingaFRU61
Page 68
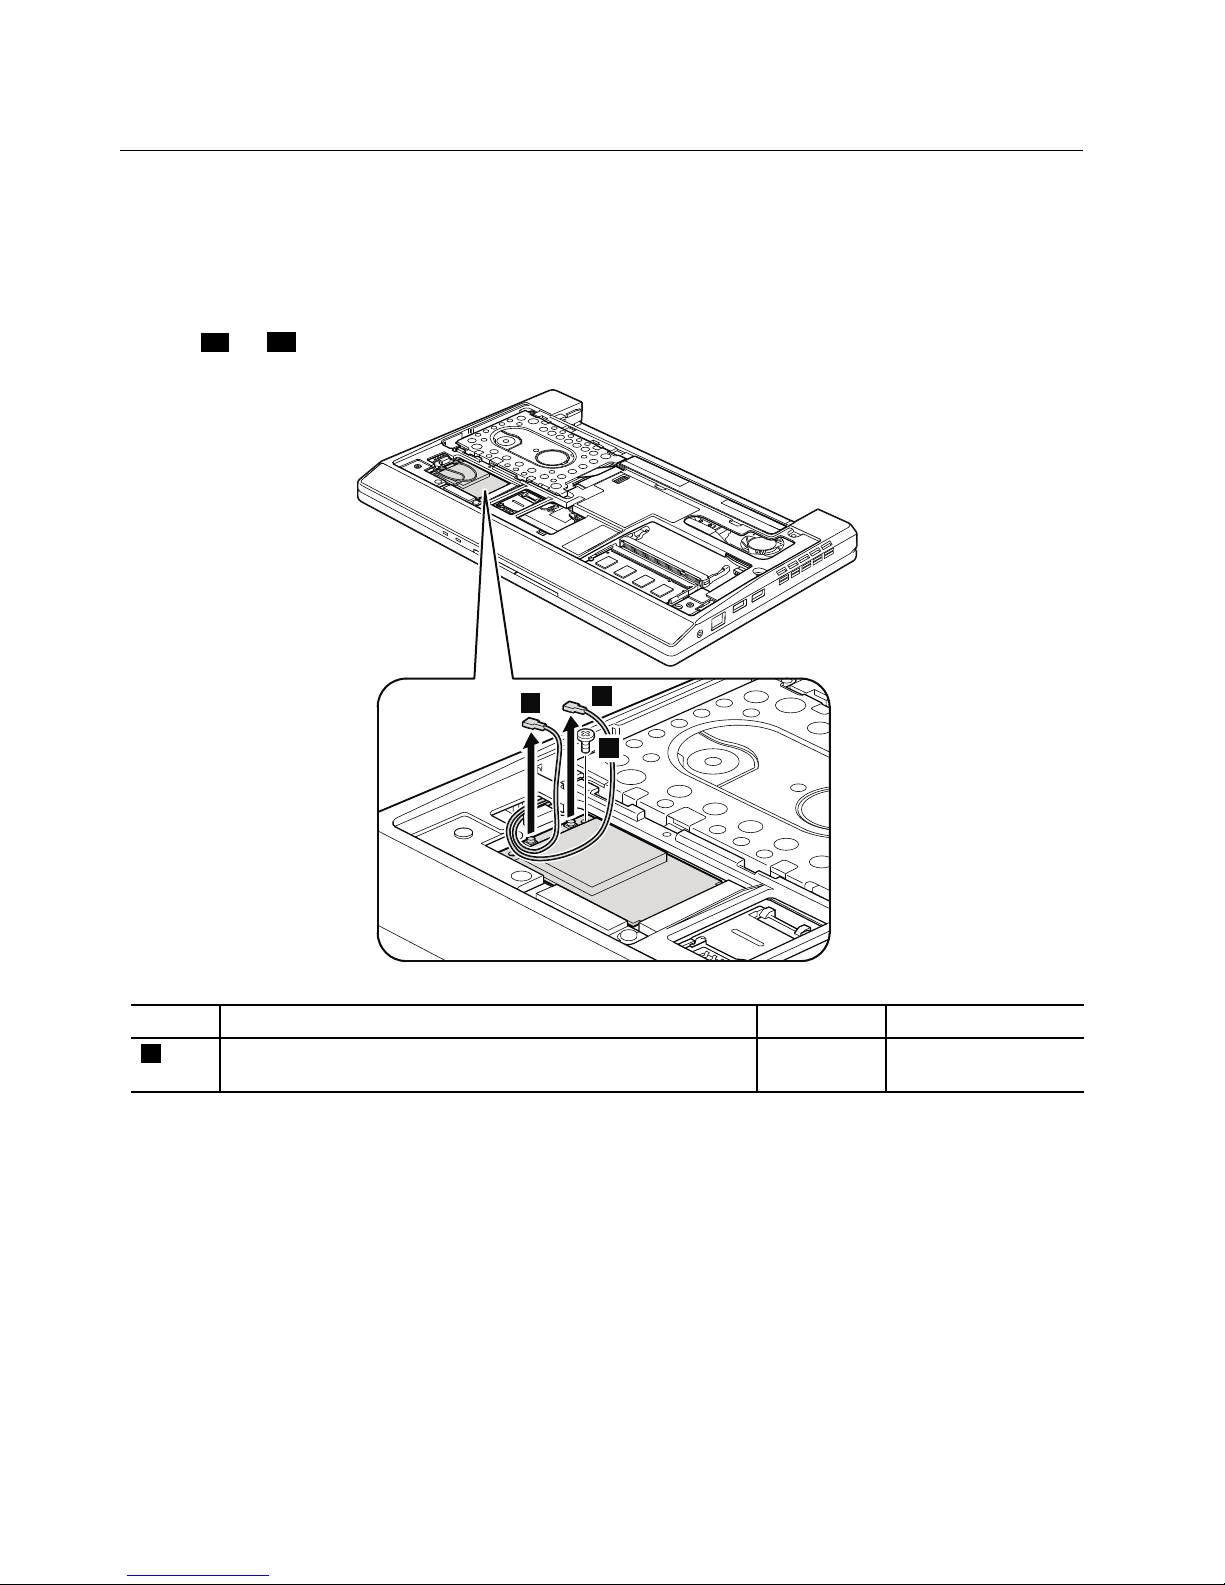
1060PCIExpressMiniCardforwirelessWAN
Foraccess,removetheseFRUsinorder:
•“1010Batterypack”onpage54
•“1020Bottomdoor”onpage55
Table13.RemovalstepsofPCIExpressMiniCardforwirelessWAN
Instep1aand1b,unplugthejacksbyusingtheremovaltoolantennaRFconnector(P/N:08K7159)orpickthe
connectorswithyourngersandgentlyunplugthemindirectionofthearrow.
2
1a
1b
StepScrew(quantity)Color
Torque
2
M2×3mm,small-head,nylon-coated(1)Silver
0.181Nm
(1.85kgfcm)
62HardwareMaintenanceManual
Page 69
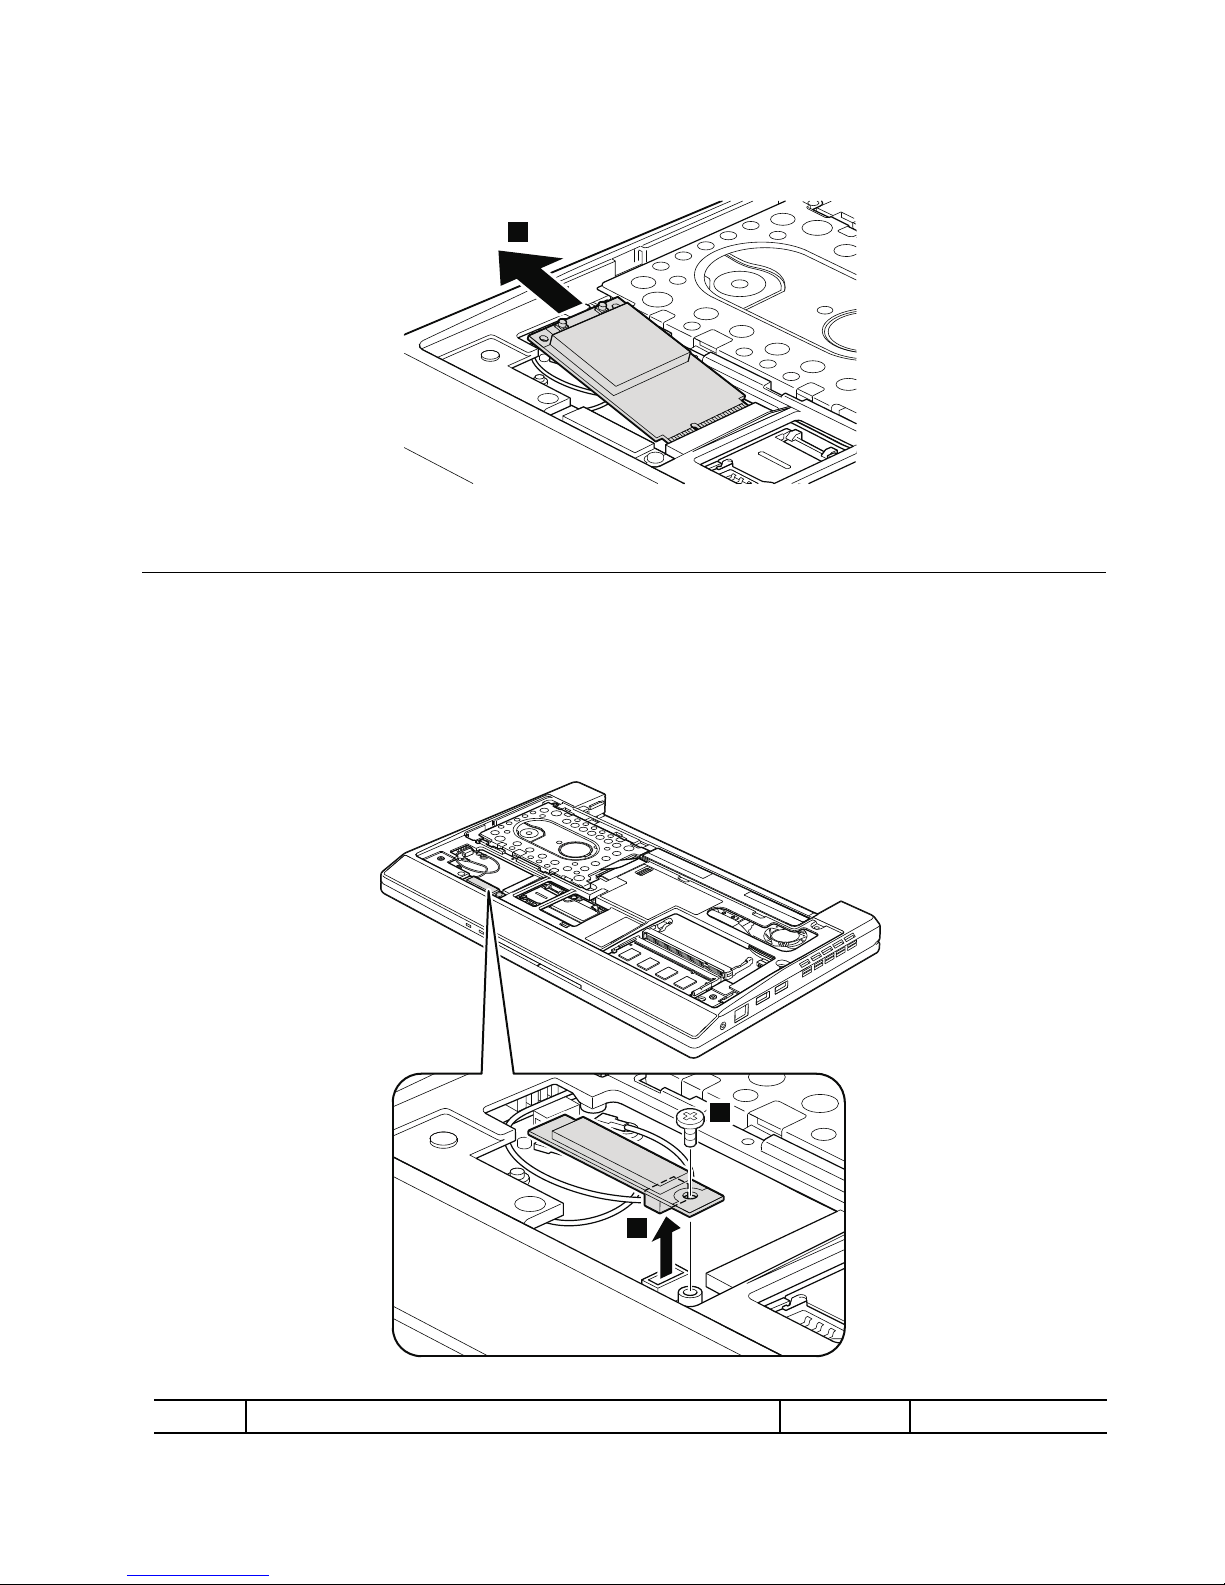
Table13.RemovalstepsofPCIExpressMiniCardforwirelessWAN(continued)
3
Note:PlugtheredcableintothejackmarkedMAIN,andthebluecableintothejackmarkedAUXonthecard.
1070Bluetoothdaughtercard(BDC-2)
ForThinkPadX100e:
Foraccess,removetheseFRUsinorder:
•“1010Batterypack”onpage54
•“1020Bottomdoor”onpage55
Table14.RemovalstepsofBDC-2forThinkPadX100e
1
2
StepScrew(quantity)Color
Torque
Chapter8.RemovingandreplacingaFRU63
Page 70
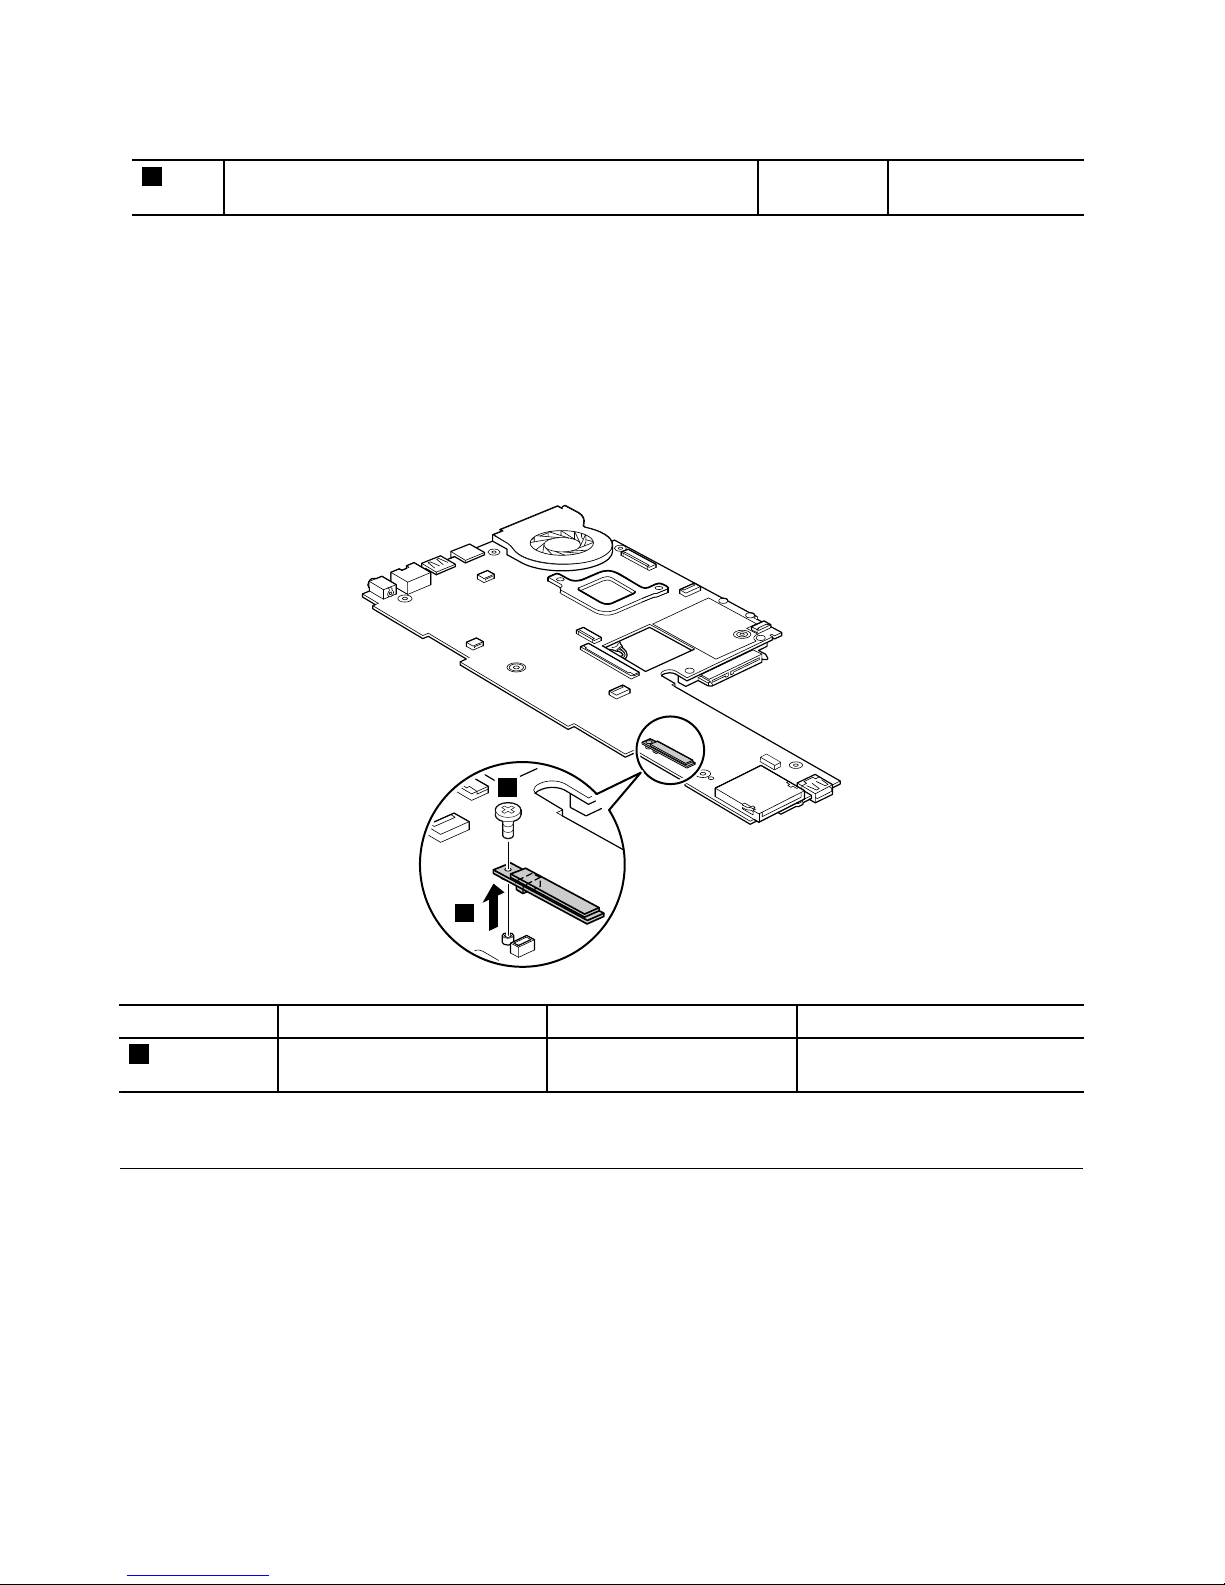
Table14.RemovalstepsofBDC-2forThinkPadX100e(continued)
1
M2×3mm,small-head,nylon-coated(1)Silver
0.181Nm
(1.85kgfcm)
ForThinkPadX120e:
Foraccess,removetheseFRUsinorder:
•“1010Batterypack”onpage54
•“1020Bottomdoor”onpage55
•“1030Harddiskdrive(HDD)”onpage58
•“1080Keyboard”onpage64
•“1090Palmrestassembly,power-onboardassembly(withcable),andmicrophone”onpage67
Table15.RemovalstepsofBDC-2forThinkPadX120e
2
1
StepScrew(quantity)Color
Torque
1
M2×3mm,small-head,
nylon-coated(1)
Silver
0.181Nm
(1.85kgfcm)
Wheninstalling:Makesurethattheconnectorisattachedrmly.
1080Keyboard
Foraccess,removetheseFRUsinorder:
•“1010Batterypack”onpage54
•“1020Bottomdoor”onpage55
•“1030Harddiskdrive(HDD)”onpage58
64HardwareMaintenanceManual
Page 71
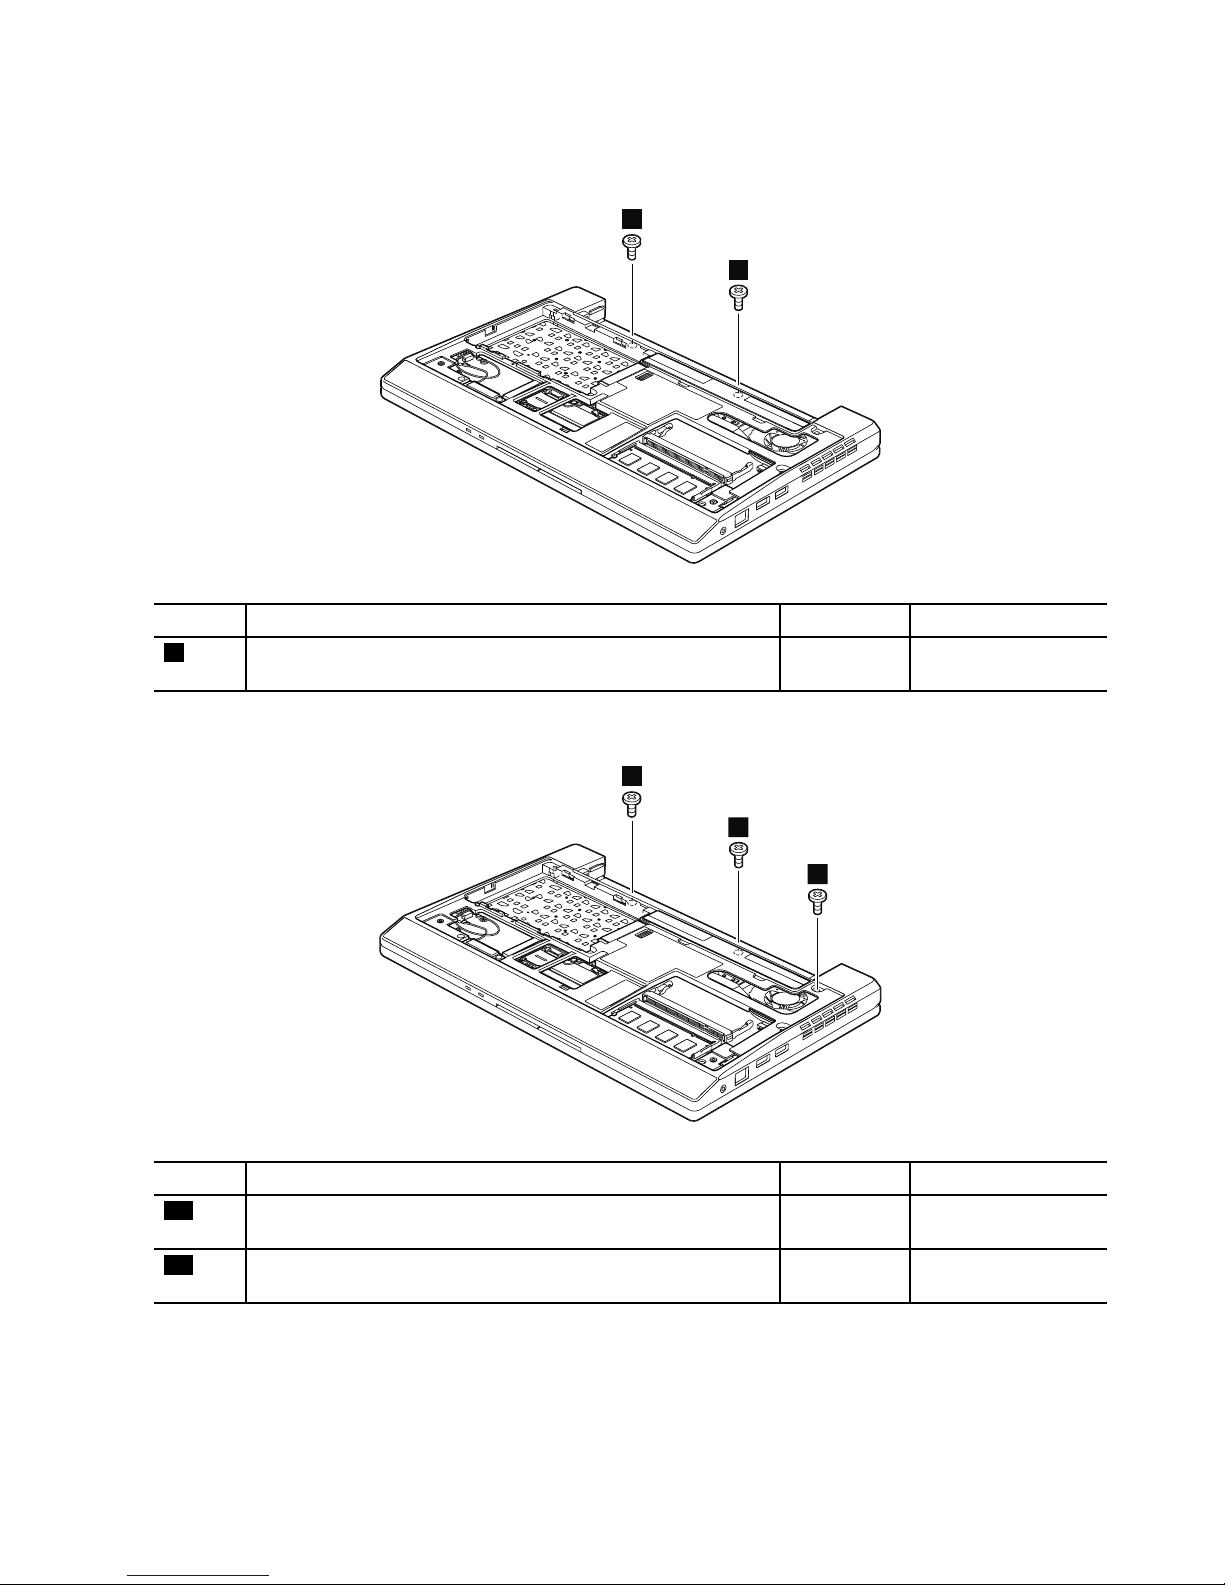
Table16.Removalstepsofkeyboard
ForThinkPadX100e
1
1
StepScrew(quantity)Color
Torque
1
M2×3mm,big-head,nylon-coated(2)
Black0.181Nm
(1.85kgfcm)
ForThinkPadX120e
1a
1a
1b
StepScrew(quantity)Color
Torque
1a
M2×3mm,big-head,nylon-coated(2)
Black0.181Nm
(1.85kgfcm)
1b
M2×7mm,at-head,nylon-coated(1)
Black0.181Nm
(1.85kgfcm)
Chapter8.RemovingandreplacingaFRU65
Page 72
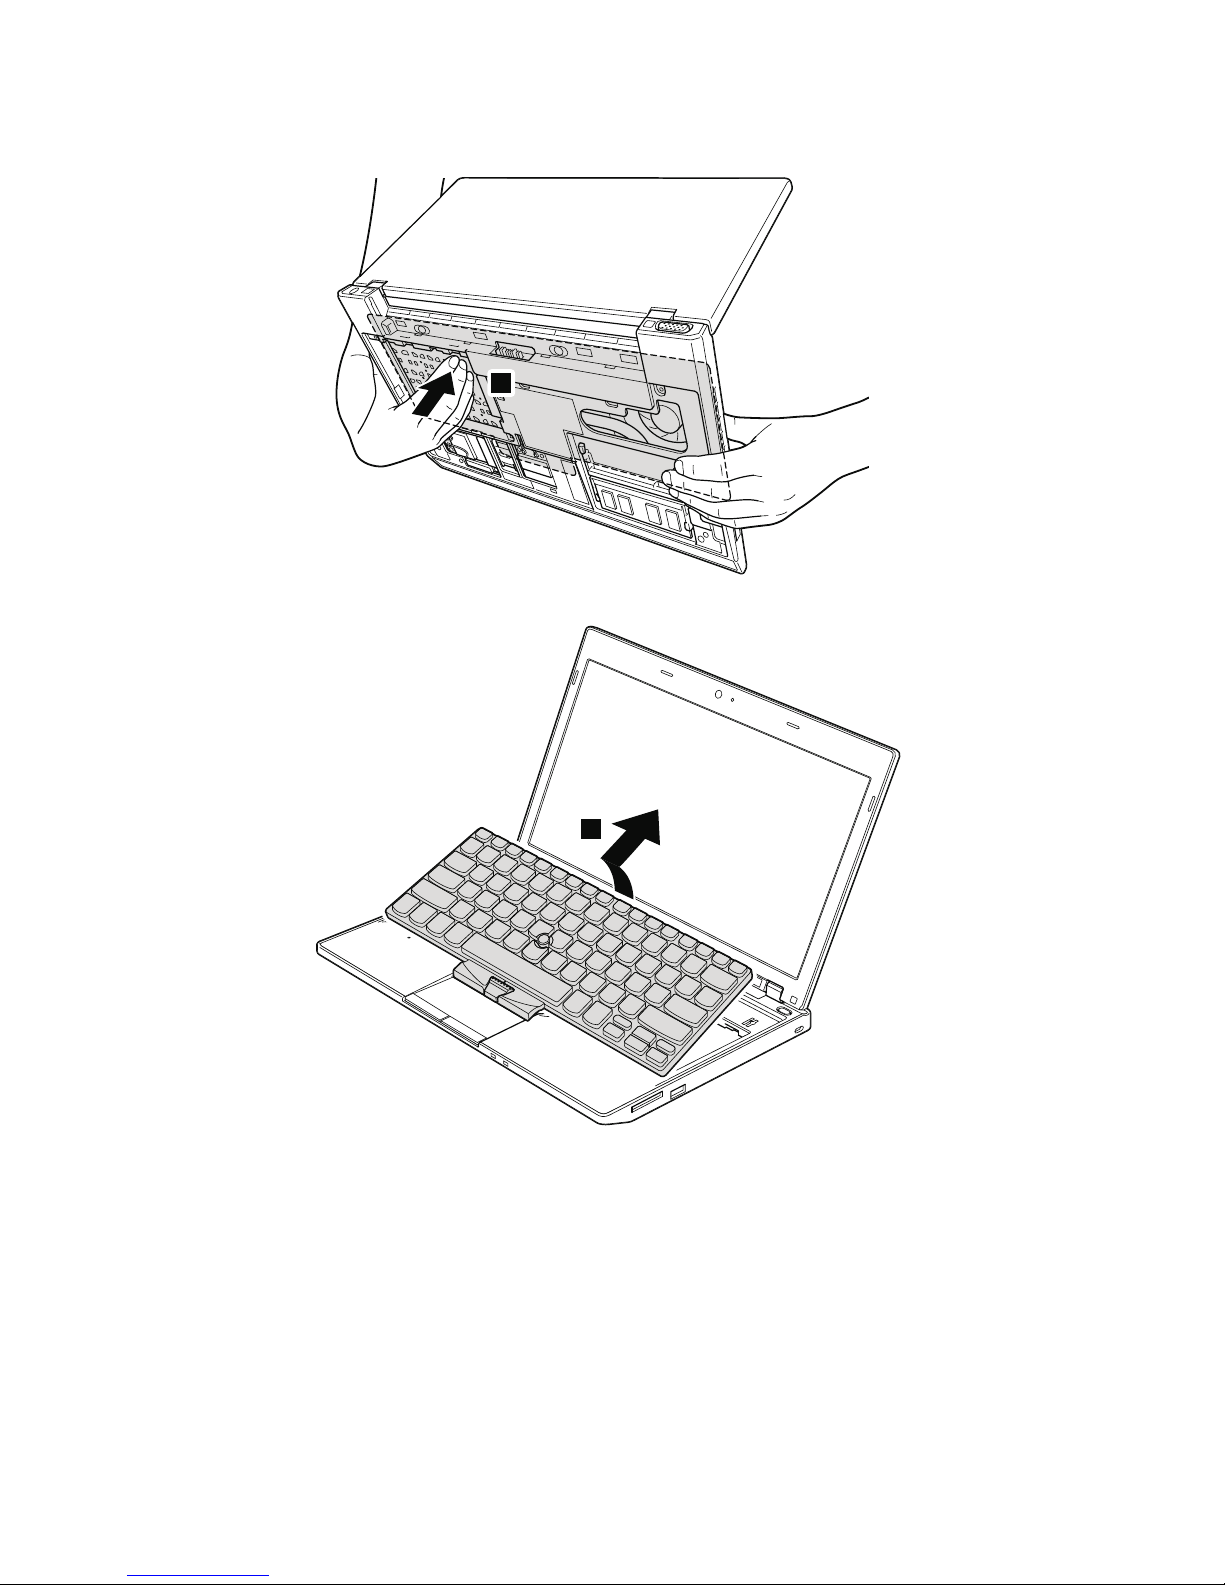
Table16.Removalstepsofkeyboard(continued)
2
3
66HardwareMaintenanceManual
Page 73
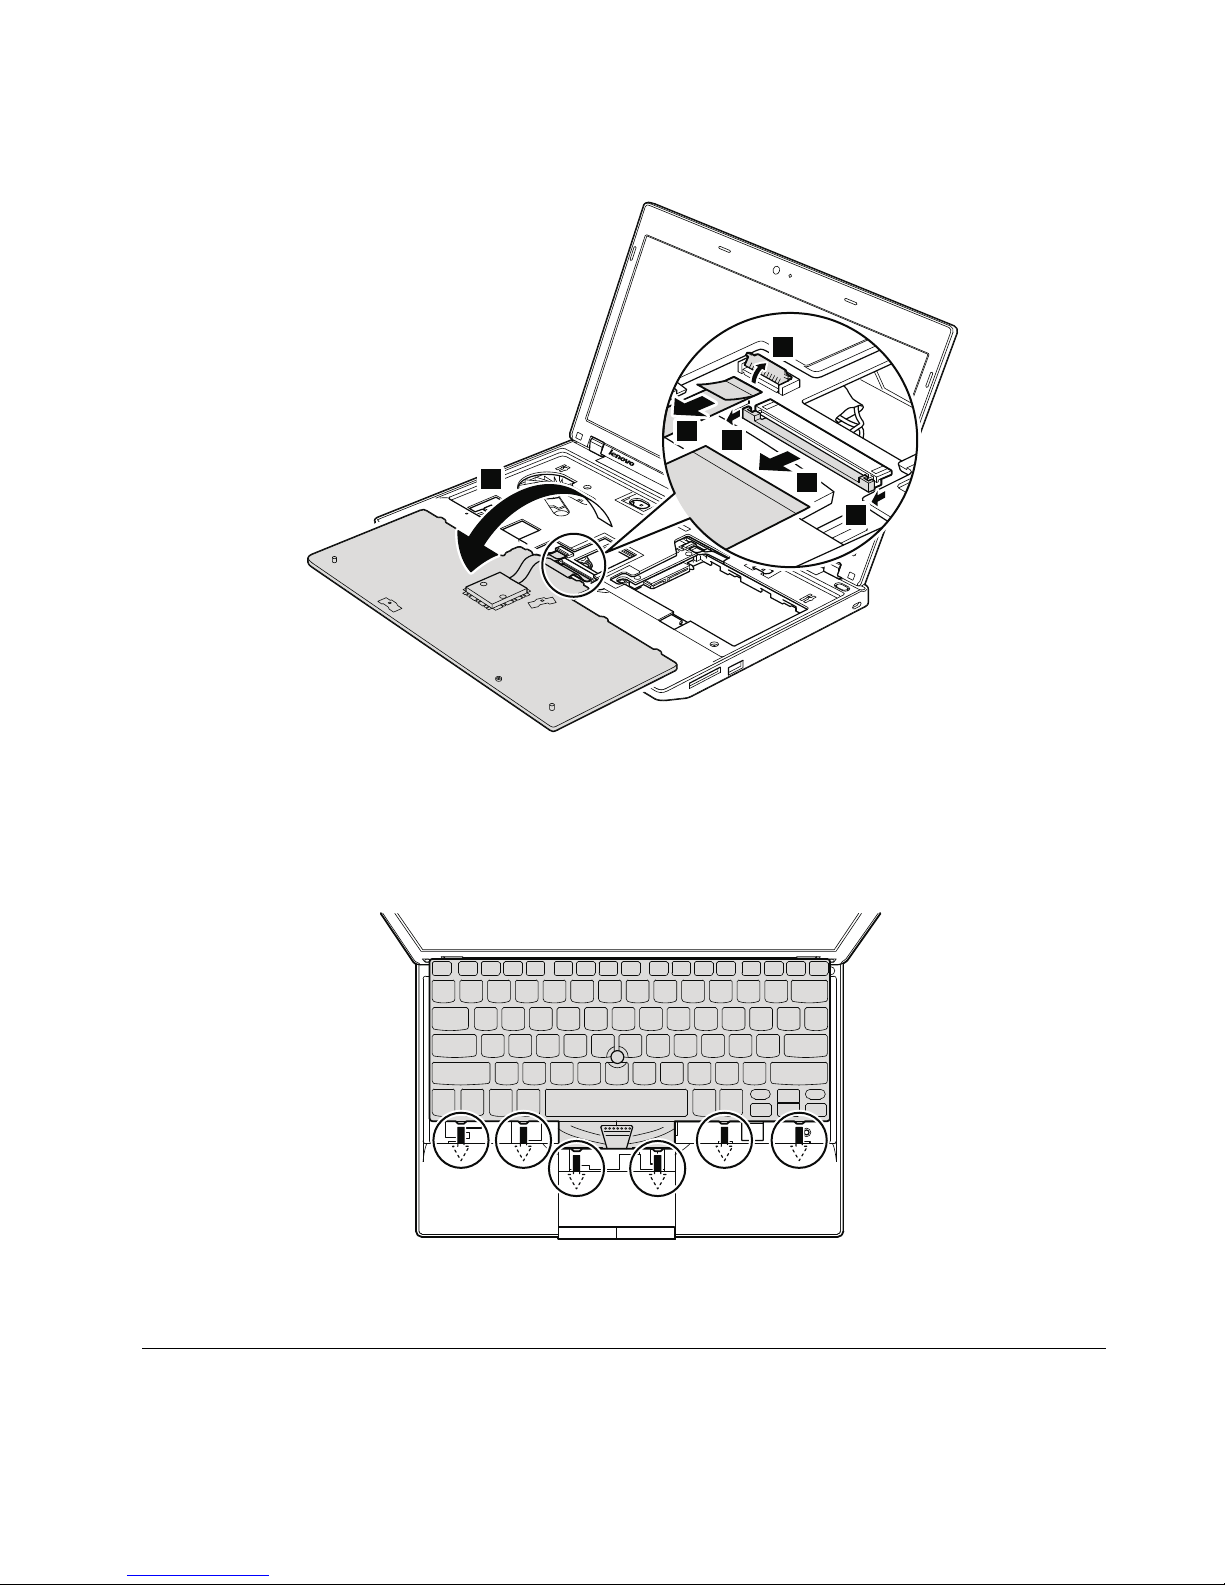
Table16.Removalstepsofkeyboard(continued)
4
5
6
7
7
8
Table17.Installationstepsofkeyboard
Wheninstallingthekeyboard,doasfollows:
1.Attachthekeyboardconnectors.
2.Attachthekeyboardsothatthefrontedgeofthekeyboardareundertheframeasshowninthisgure.
3.Securethekeyboardbytighteningthescrewsfromthebottomsideofthecomputer.
1090Palmrestassembly,power-onboardassembly(withcable),and
microphone
Foraccess,removetheseFRUsinorder:
Chapter8.RemovingandreplacingaFRU67
Page 74
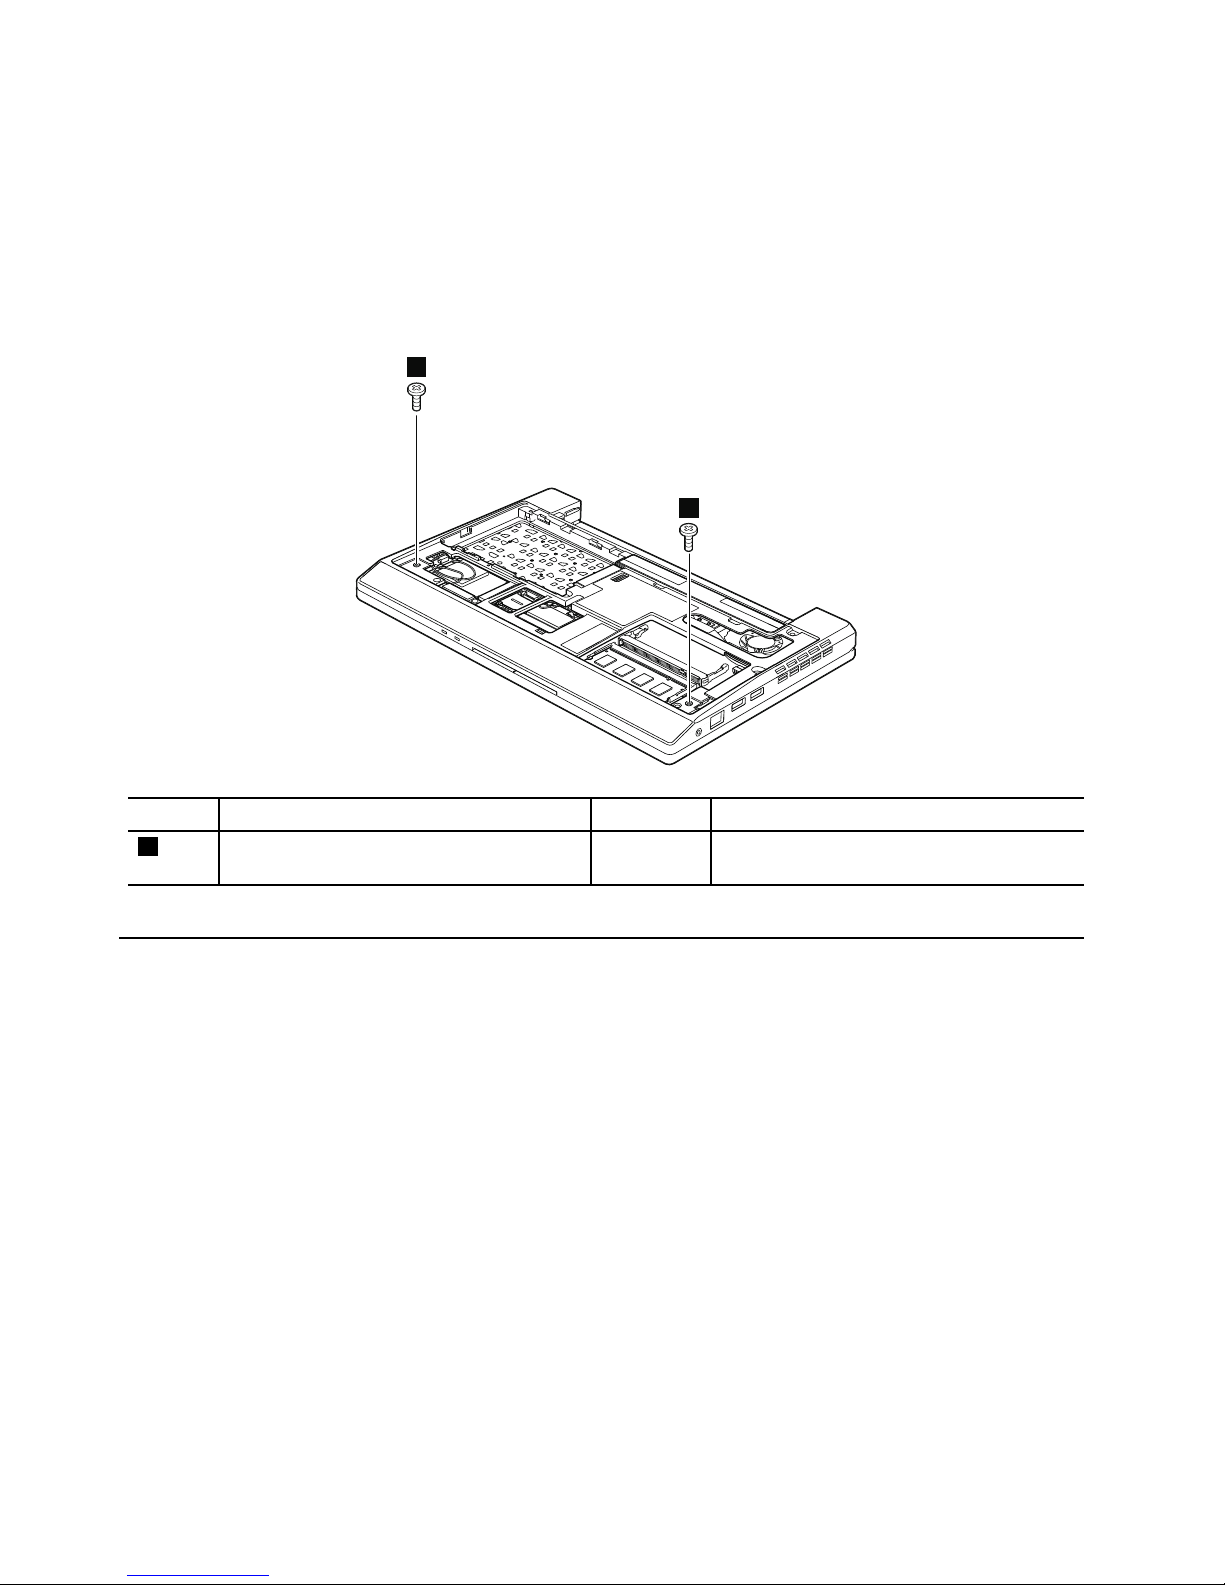
•“1010Batterypack”onpage54
•“1020Bottomdoor”onpage55
•“1030Harddiskdrive(HDD)”onpage58
•“1080Keyboard”onpage64
Table18.Removalstepsofpalmrestassembly,power-onboardassembly(withcable),andmicrophone
Note:Thepower-onboardassembly(withcable)andthemicrophoneareattachedtothepalmrestassembly .
1
1
StepScrew(quantity)Color
Torque
1
M2×7mm,wafer-head,nylon-coated(2)Silver
0.181Nm
(1.85kgfcm)
ForThinkPadX100e
68HardwareMaintenanceManual
Page 75
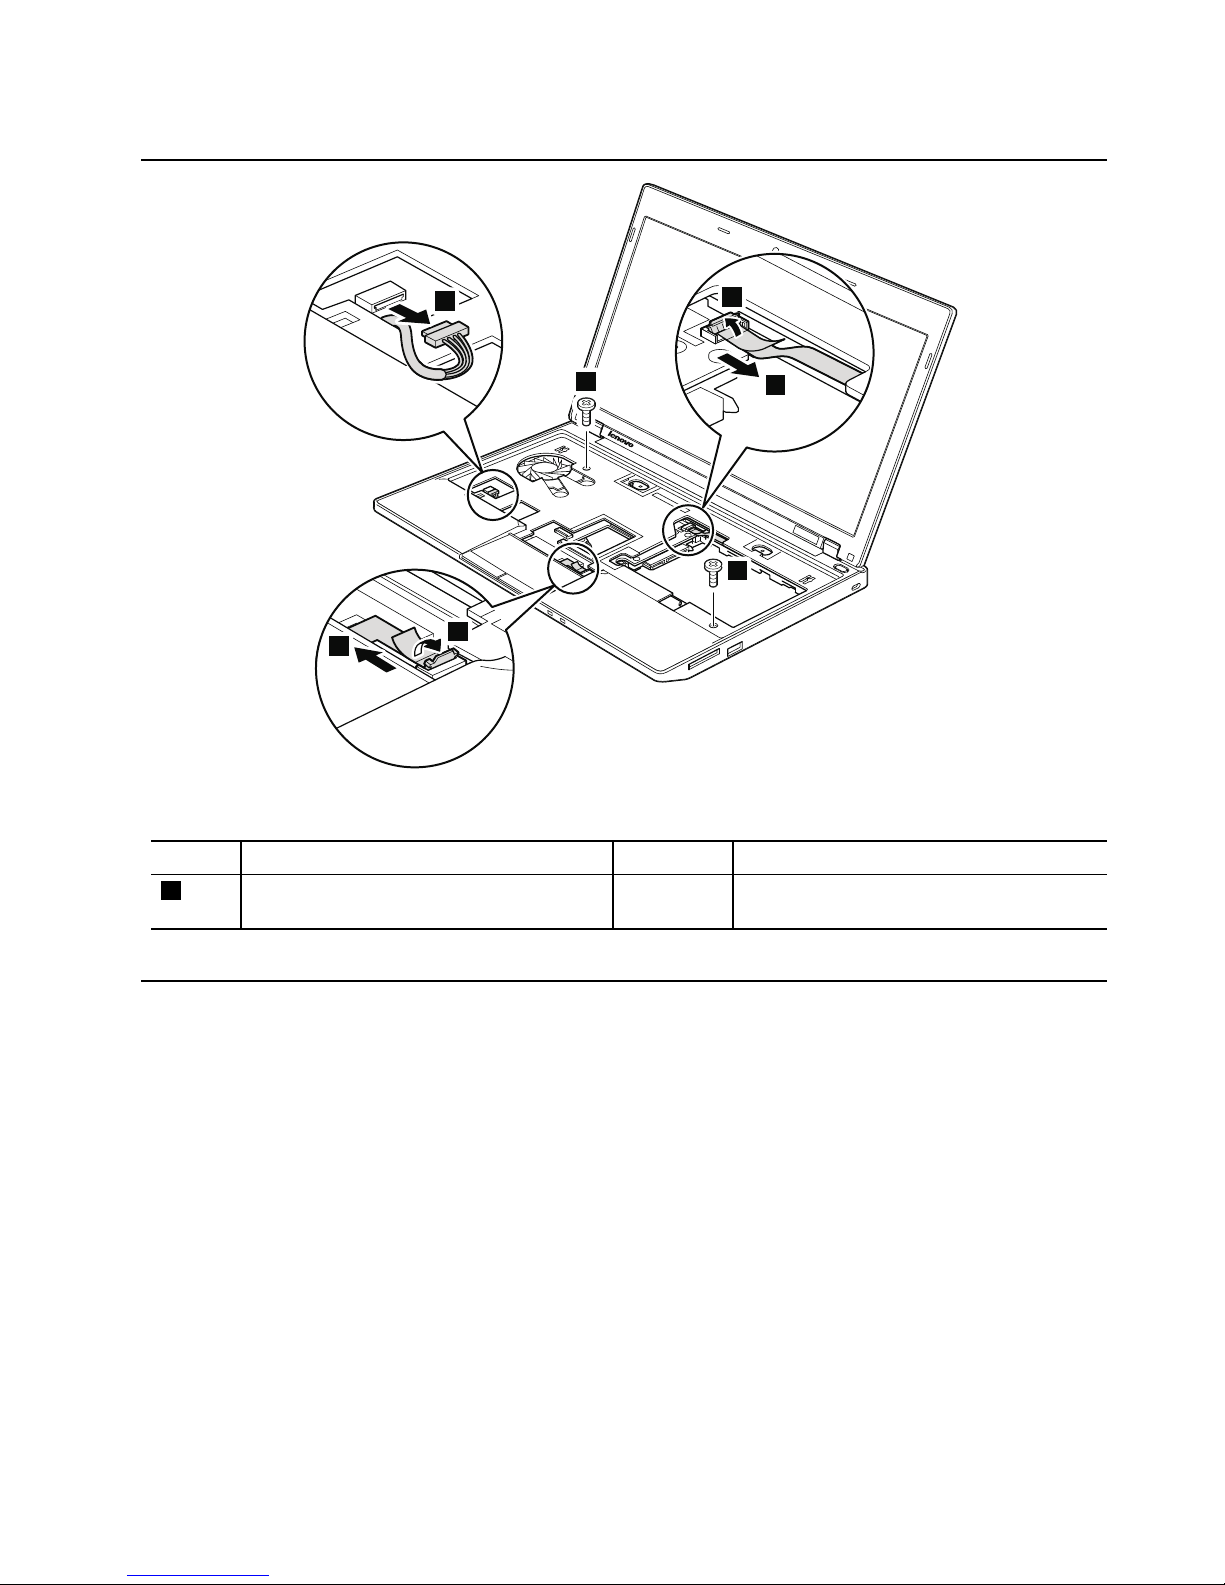
Table18.Removalstepsofpalmrestassembly,power-onboardassembly(withcable),andmicrophone(continued)
1
2
3
4
5
6
6
StepScrew(quantity)Color
Torque
6
M2×6mm,wafer-head,nylon-coated(2)Silver
0.181Nm
(1.85kgfcm)
ForThinkPadX120e
Chapter8.RemovingandreplacingaFRU69
Page 76
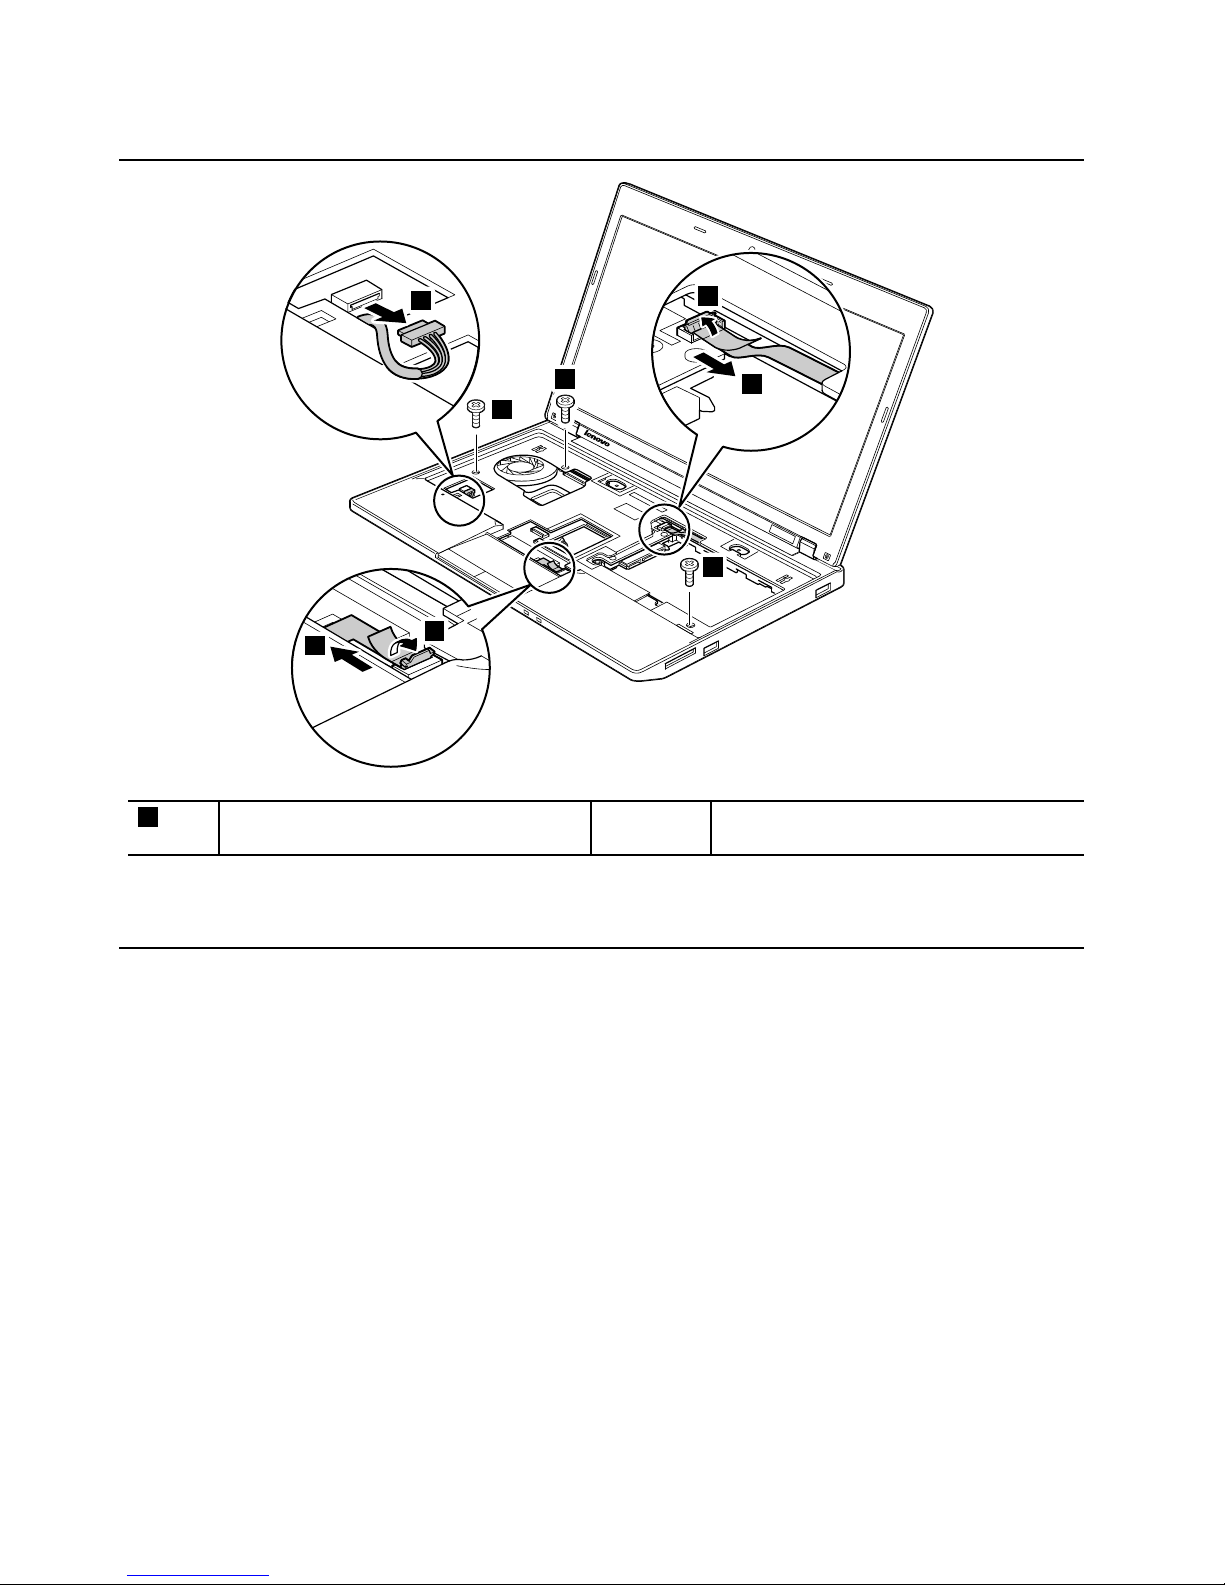
Table18.Removalstepsofpalmrestassembly,power-onboardassembly(withcable),andmicrophone(continued)
1
2
3
4
5
6
6
6
6
M2×7mm,wafer-head,nylon-coated(3)Silver
0.181Nm
(1.85kgfcm)
Wheninstalling:Makesurethattheconnectorsareattachedrmly.
70HardwareMaintenanceManual
Page 77
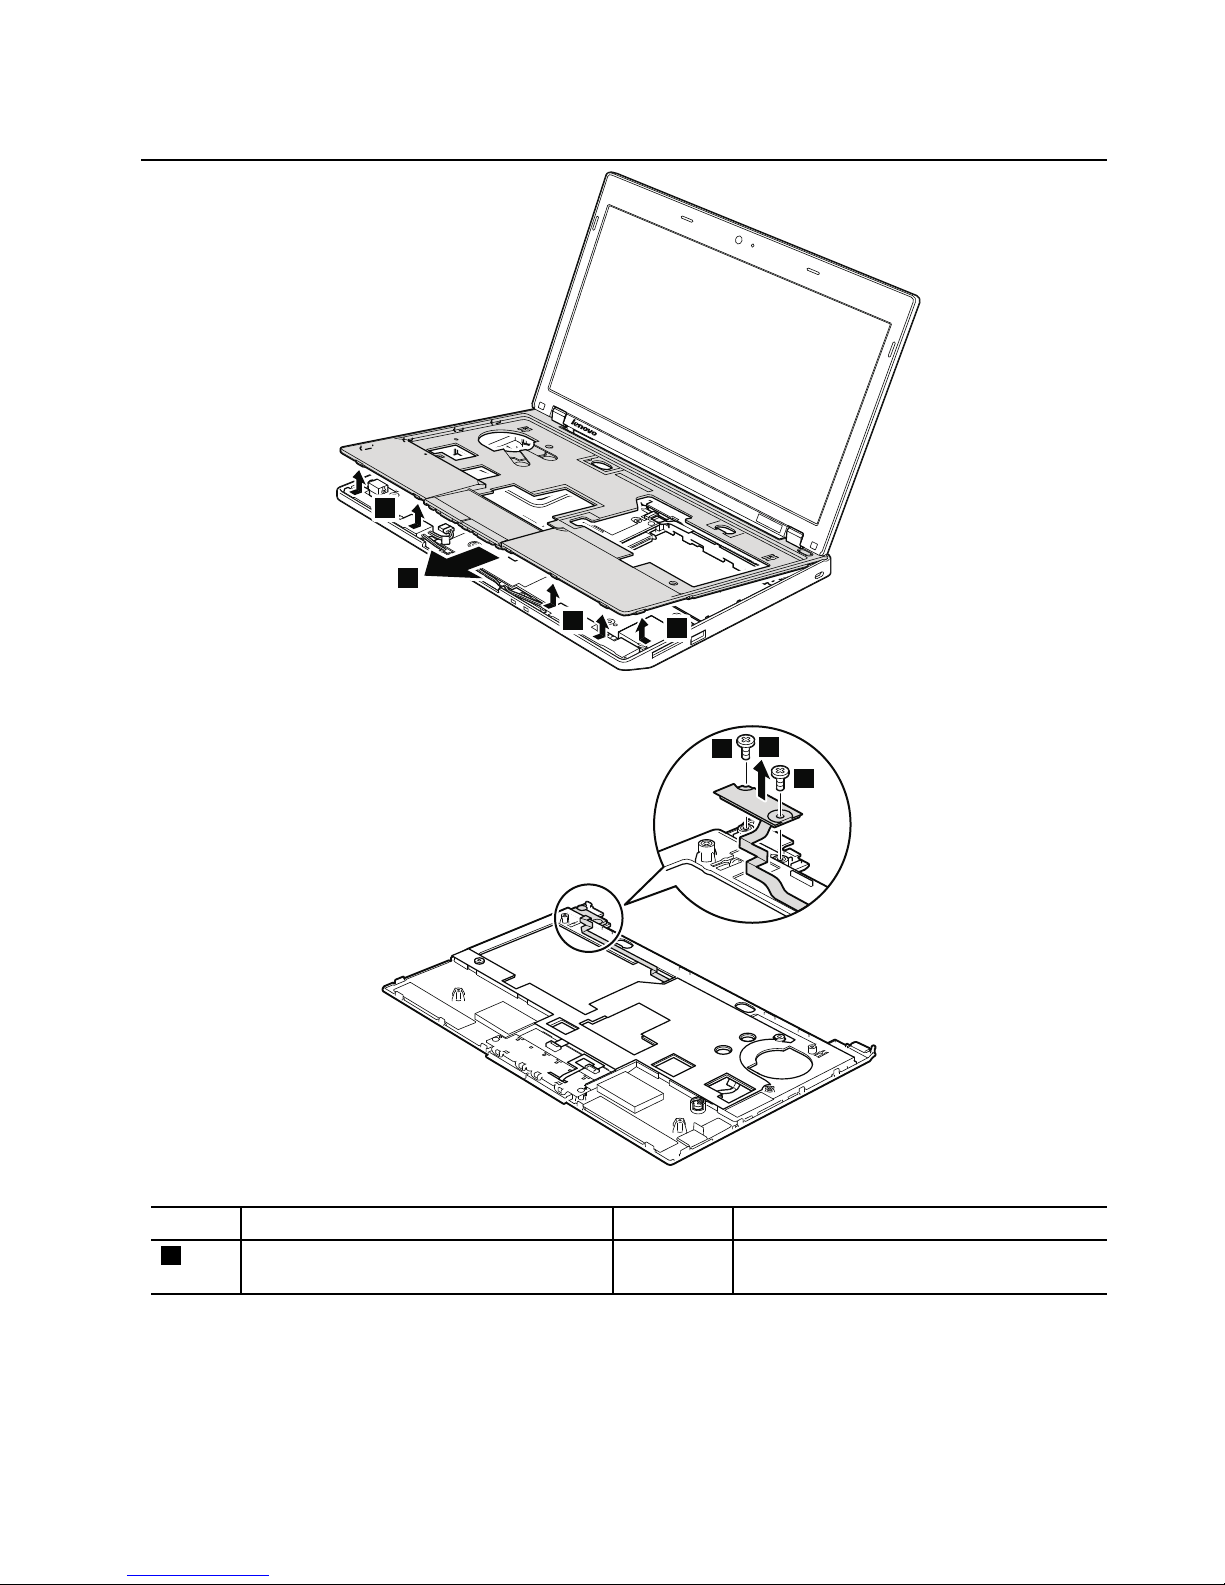
Table18.Removalstepsofpalmrestassembly,power-onboardassembly(withcable),andmicrophone(continued)
7
7
7
8
1
1
2
StepScrew(quantity)Color
Torque
1
M2×3mm,big-head,nylon-coated(2)
Black0.181Nm
(1.85kgfcm)
Chapter8.RemovingandreplacingaFRU71
Page 78
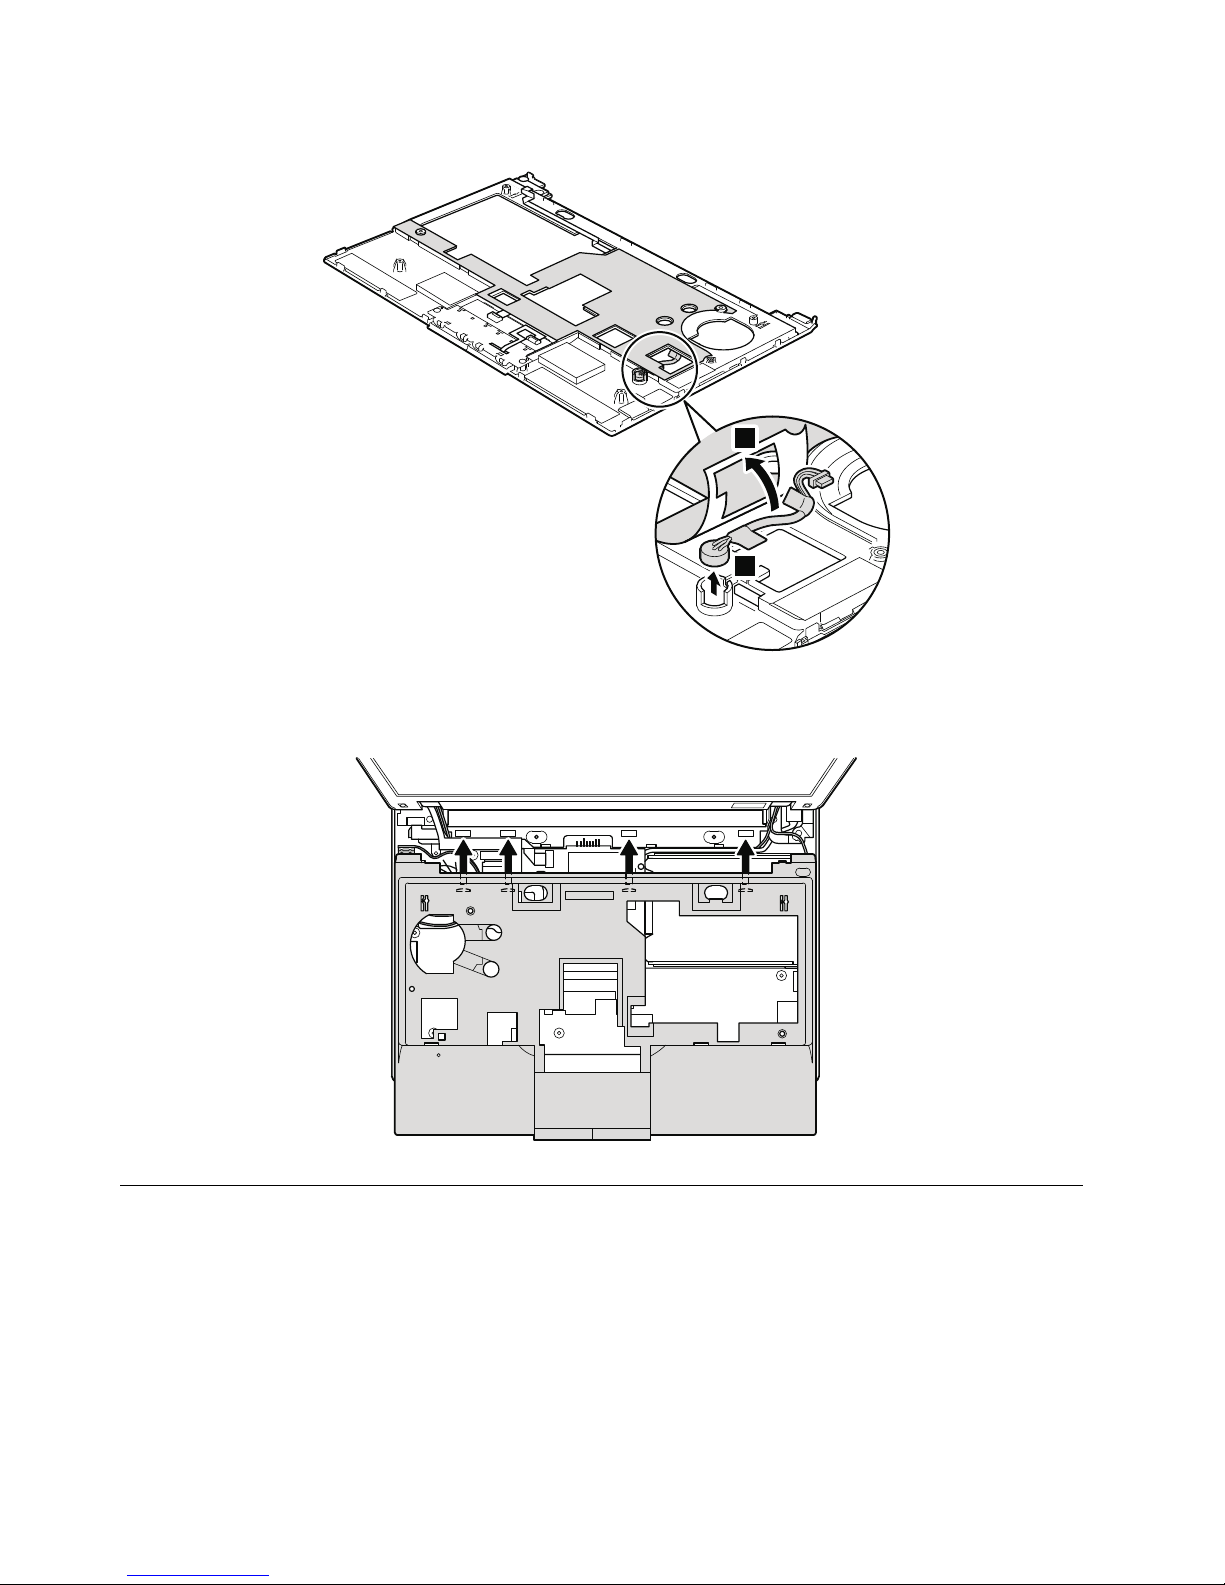
Table18.Removalstepsofpalmrestassembly,power-onboardassembly(withcable),andmicrophone(continued)
1
2
Wheninstalling:Makesurethatalltheprojectionsofthepalmrestassemblyareattachedrmlytotheguide
holesofthebasecover.
1100CRTboardassembly(withcable)
Foraccess,removetheseFRUsinorder:
•“1010Batterypack”onpage54
•“1020Bottomdoor”onpage55
•“1030Harddiskdrive(HDD)”onpage58
•“1080Keyboard”onpage64
•“1090Palmrestassembly,power-onboardassembly(withcable),andmicrophone”onpage67
72HardwareMaintenanceManual
Page 79
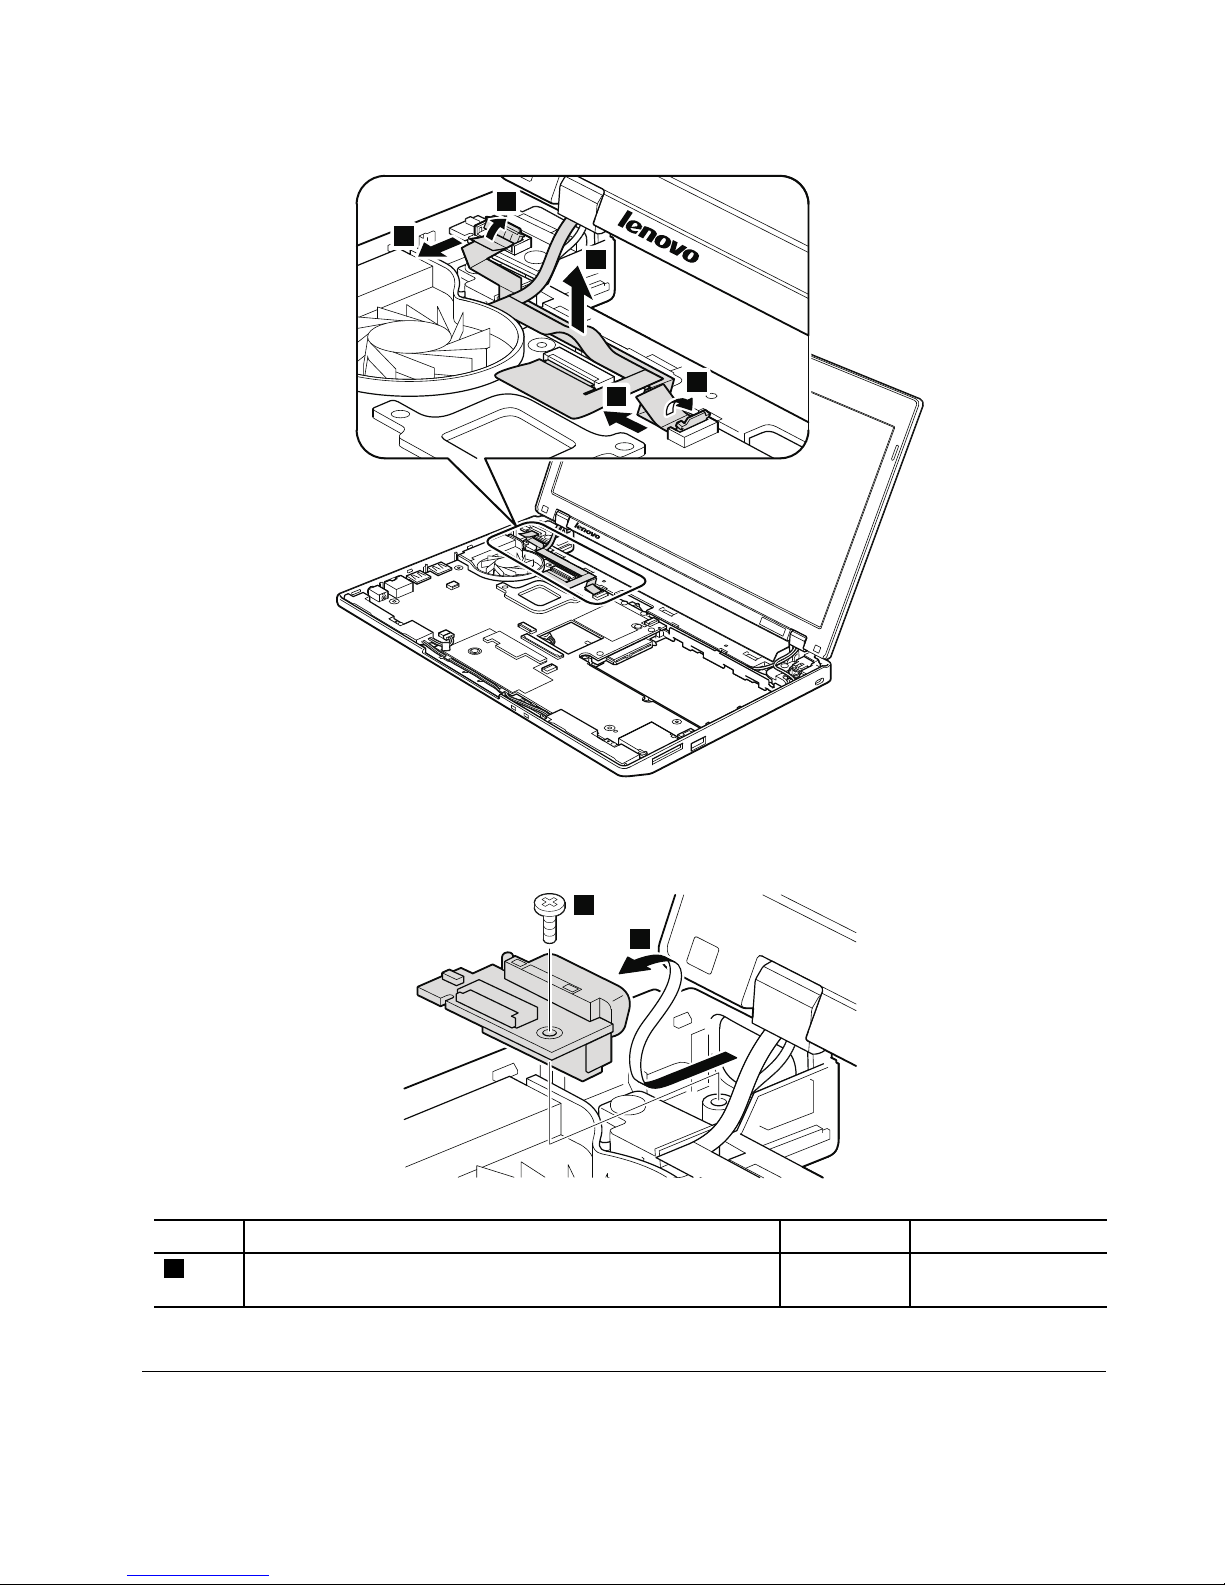
Table19.RemovalstepsofCRTboardassembly(withcable)
1
2
3
4
5
Wheninstalling:Makesurethattheconnectorsareattachedrmly.
6
7
StepScrew(quantity)Color
Torque
6
M2×4mm,wafer-head,nylon-coated(1)Silver
0.181Nm
(1.85kgfcm)
1110Speakerassembly
Foraccess,removetheseFRUsinorder:
Chapter8.RemovingandreplacingaFRU73
Page 80
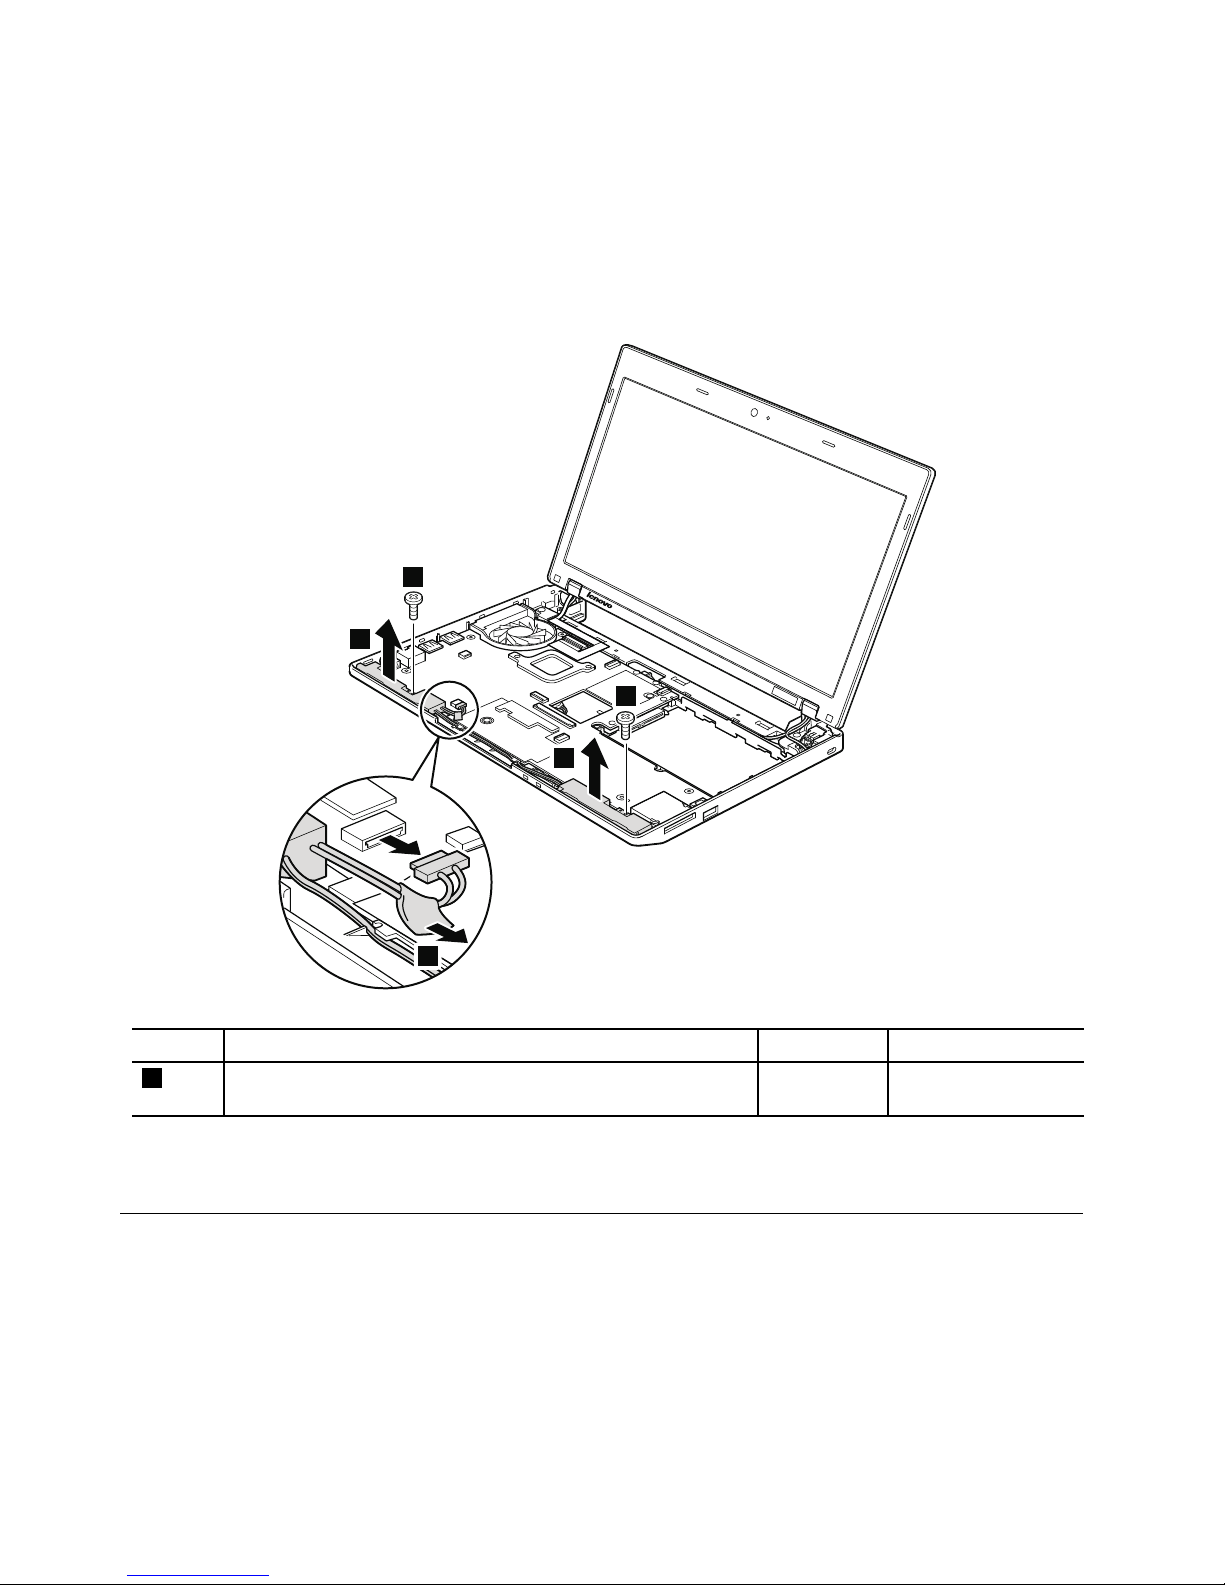
•“1010Batterypack”onpage54
•“1020Bottomdoor”onpage55
•“1030Harddiskdrive(HDD)”onpage58
•“1080Keyboard”onpage64
•“1090Palmrestassembly,power-onboardassembly(withcable),andmicrophone”onpage67
Table20.Removalstepsofspeakerassembly
3
3
2
2
1
StepScrew(quantity)Color
Torque
2
M2×4mm,wafer-head,nylon-coated(2)Silver
0.181Nm
(1.85kgfcm)
Wheninstalling:Makesurethattheconnectorisattachedrmly.
1120I/Oboard(forThinkPadX120e)
Foraccess,removetheseFRUsinorder:
•“1010Batterypack”onpage54
•“1020Bottomdoor”onpage55
•“1030Harddiskdrive(HDD)”onpage58
•“1080Keyboard”onpage64
•“1090Palmrestassembly,power-onboardassembly(withcable),andmicrophone”onpage67
74HardwareMaintenanceManual
Page 81
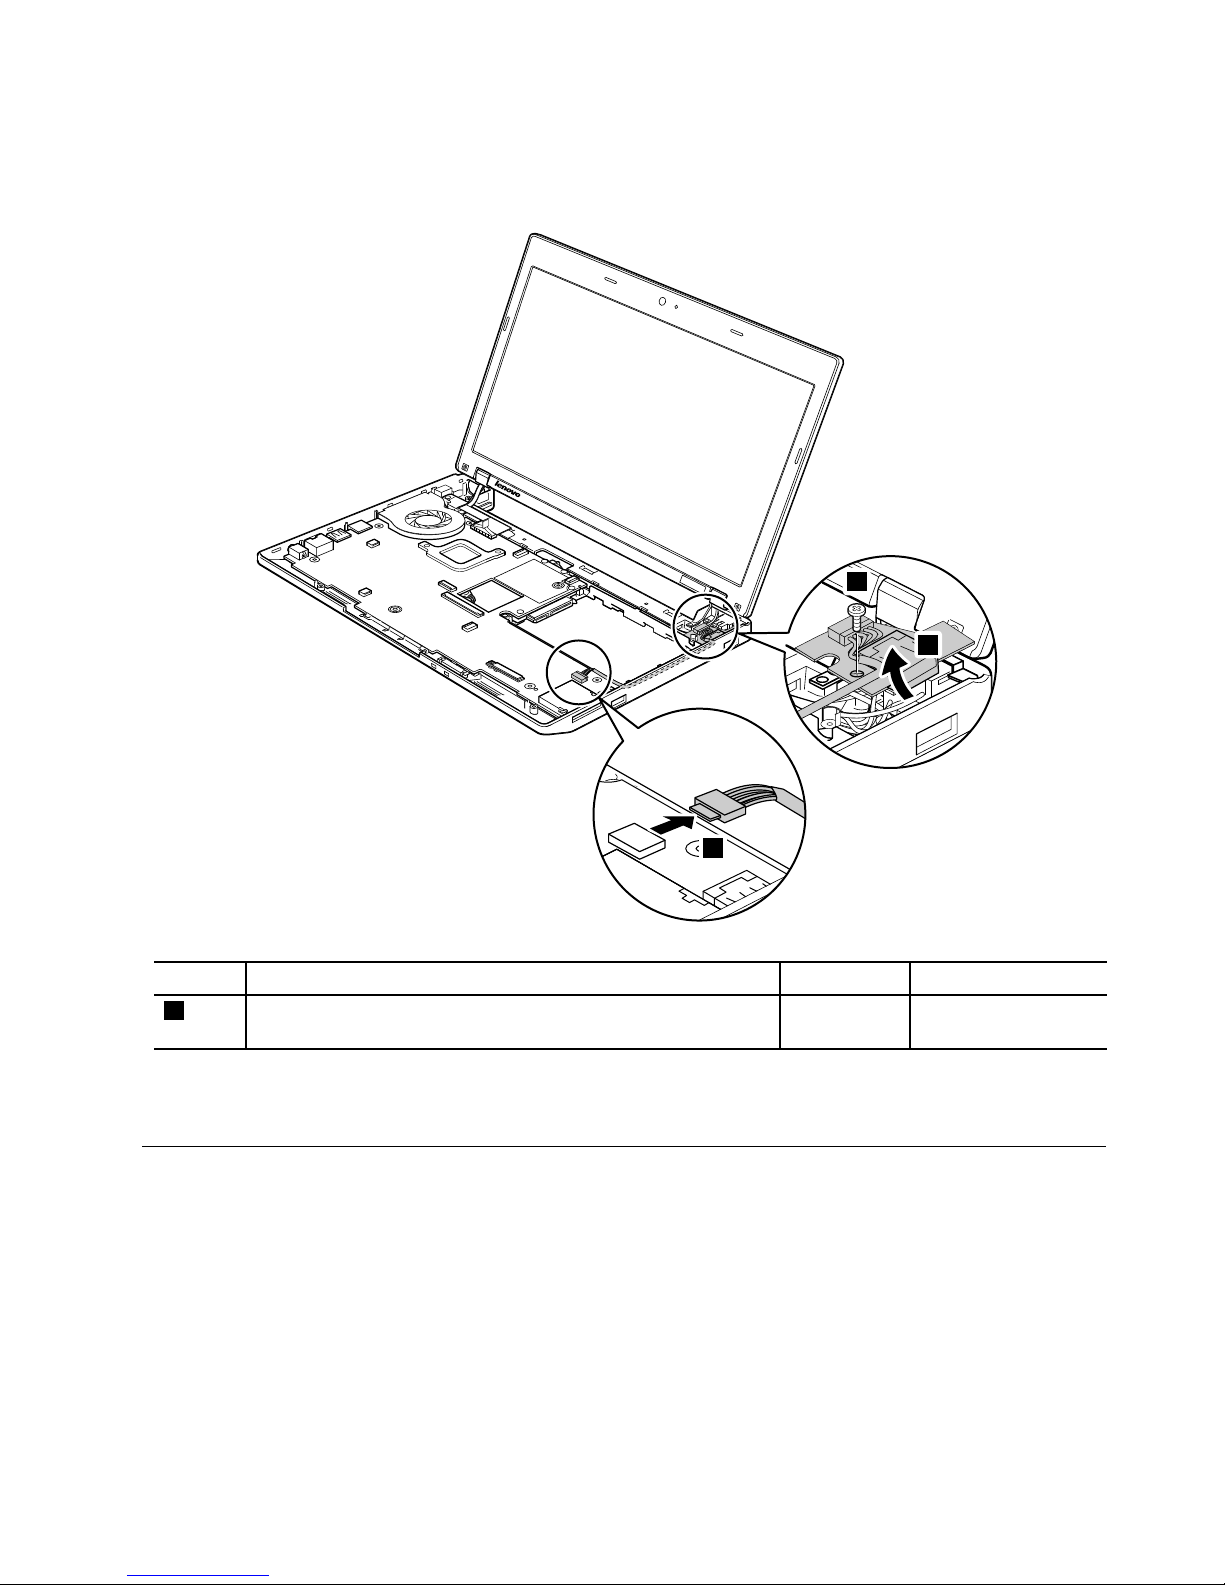
Table21.RemovalstepsofI/Oboard
1
2
3
StepScrew(quantity)Color
Torque
1
M2×4mm,wafer-head,nylon-coated(1)Silver
0.181Nm
(1.85kgfcm)
Wheninstalling:Makesurethattheconnectorisattachedrmly.
1130Systemboard,fanassembly,andbackupbattery
Importantnoticesforhandlingthesystemboard:
Whenhandlingthesystemboard,bearthefollowinginmind.
•Thesystemboardhasanaccelerometer,whichcanbebrokenbyapplyingseveralthousandsofG-forces.
Note:Droppingasystemboardfromaheightofaslittleas6inchessothatitfallsatonahardbench
cansubjecttheaccelerometertoasmuchas6,000G'sofshock.
•Becarefulnottodropthesystemboardonabenchtopthathasahardsurface,suchasmetal,wood,or
composite.
•Avoidroughhandlingofanykind.
Chapter8.RemovingandreplacingaFRU75
Page 82
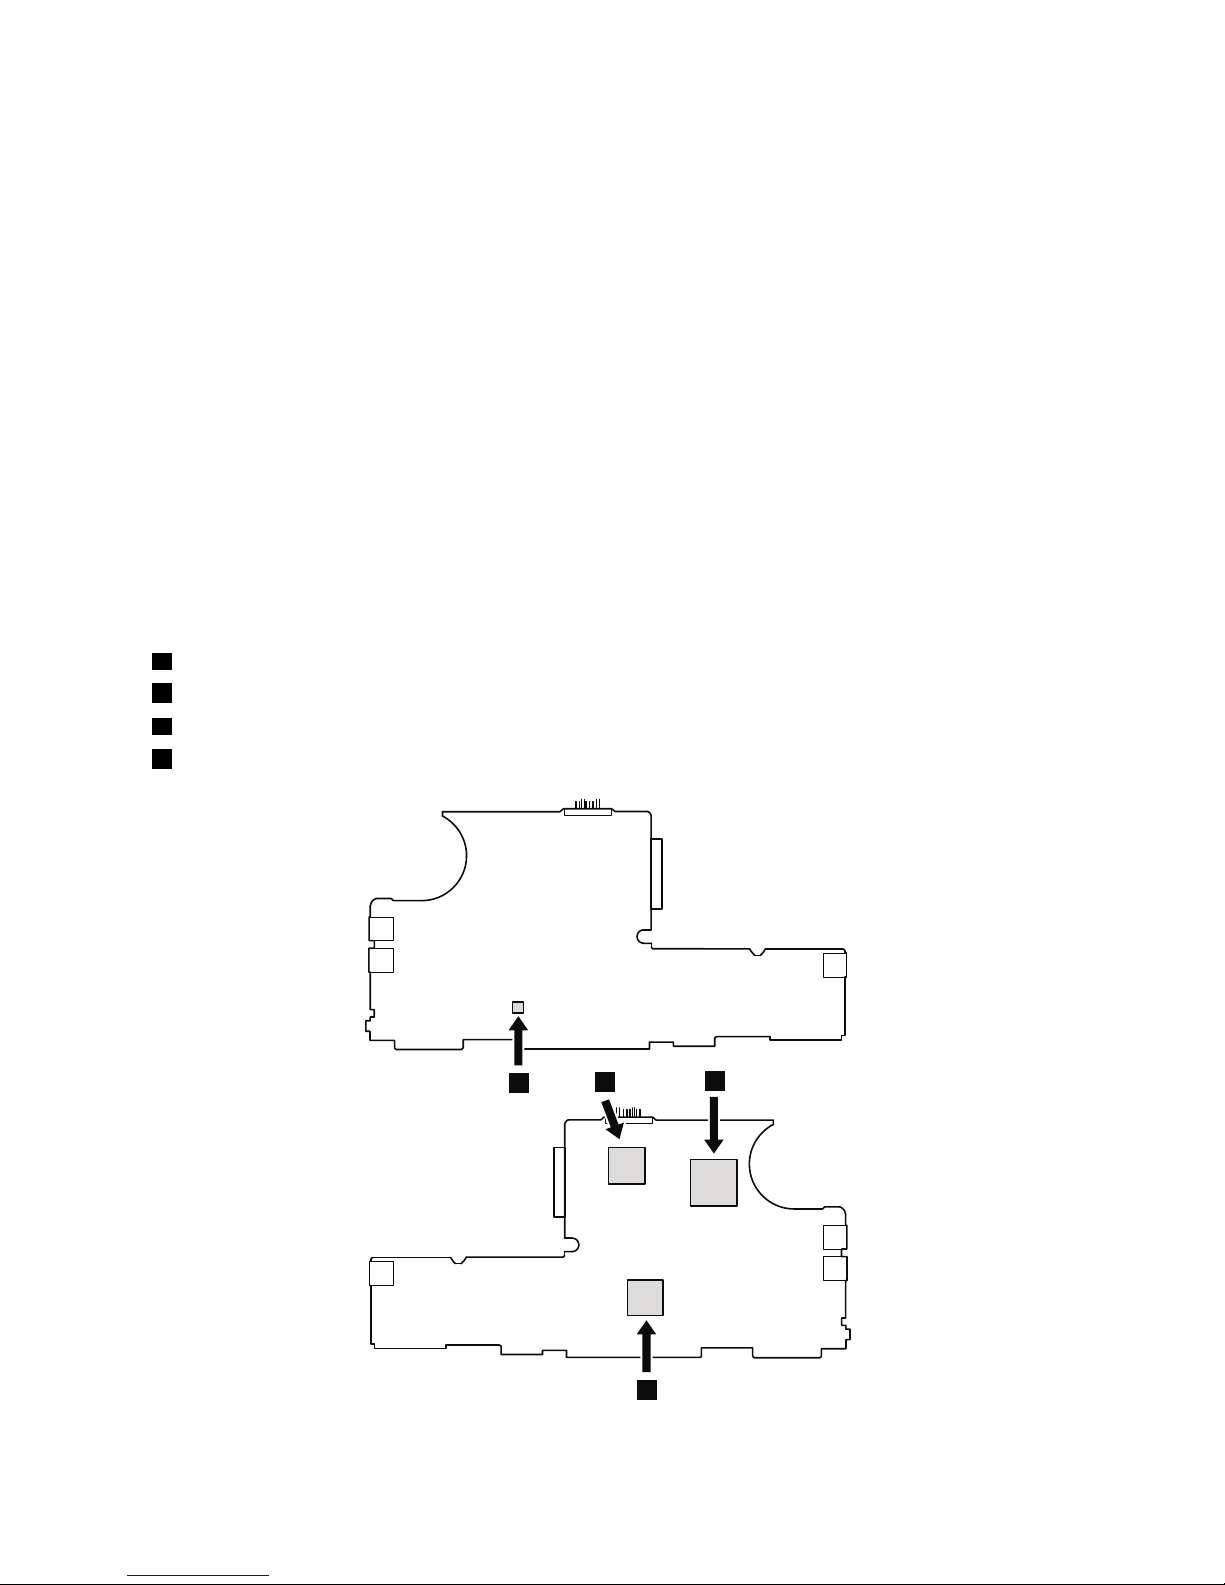
•Ateverypointintheprocess,besurenottodroporstackthesystemboard.
•Ifyouputasystemboarddown,besuretoputitonlyonapaddedsurfacesuchasanESDmator
conductivecorrugatedmaterial.
Note:Thefanassemblyandthebackupbatteryareattachedtothesystemboard.
Foraccess,removetheseFRUsinorder:
•“1010Batterypack”onpage54
•“1020Bottomdoor”onpage55
•“1030Harddiskdrive(HDD)”onpage58
•“1080Keyboard”onpage64
•“1090Palmrestassembly,power-onboardassembly(withcable),andmicrophone”onpage67
•“1100CRTboardassembly(withcable)”onpage72
•“1110Speakerassembly”onpage73
•“1120I/Oboard(forThinkPadX120e)”onpage74
Table22.Locationofmajorsensitivecomponentsonthesystemboard
Followingcomponentssolderedonthetopsideofthesystemboardareextremelysensitive.Whenyouservice
thesystemboard,avoidanykindofroughhandling.
ForThinkPadX100e
a
AccelerometerchipfortheHDDActiveProtectionSystem™
b
NorthBridge
c
CPU
d
SouthBridge
c
b
a
d
76HardwareMaintenanceManual
Page 83
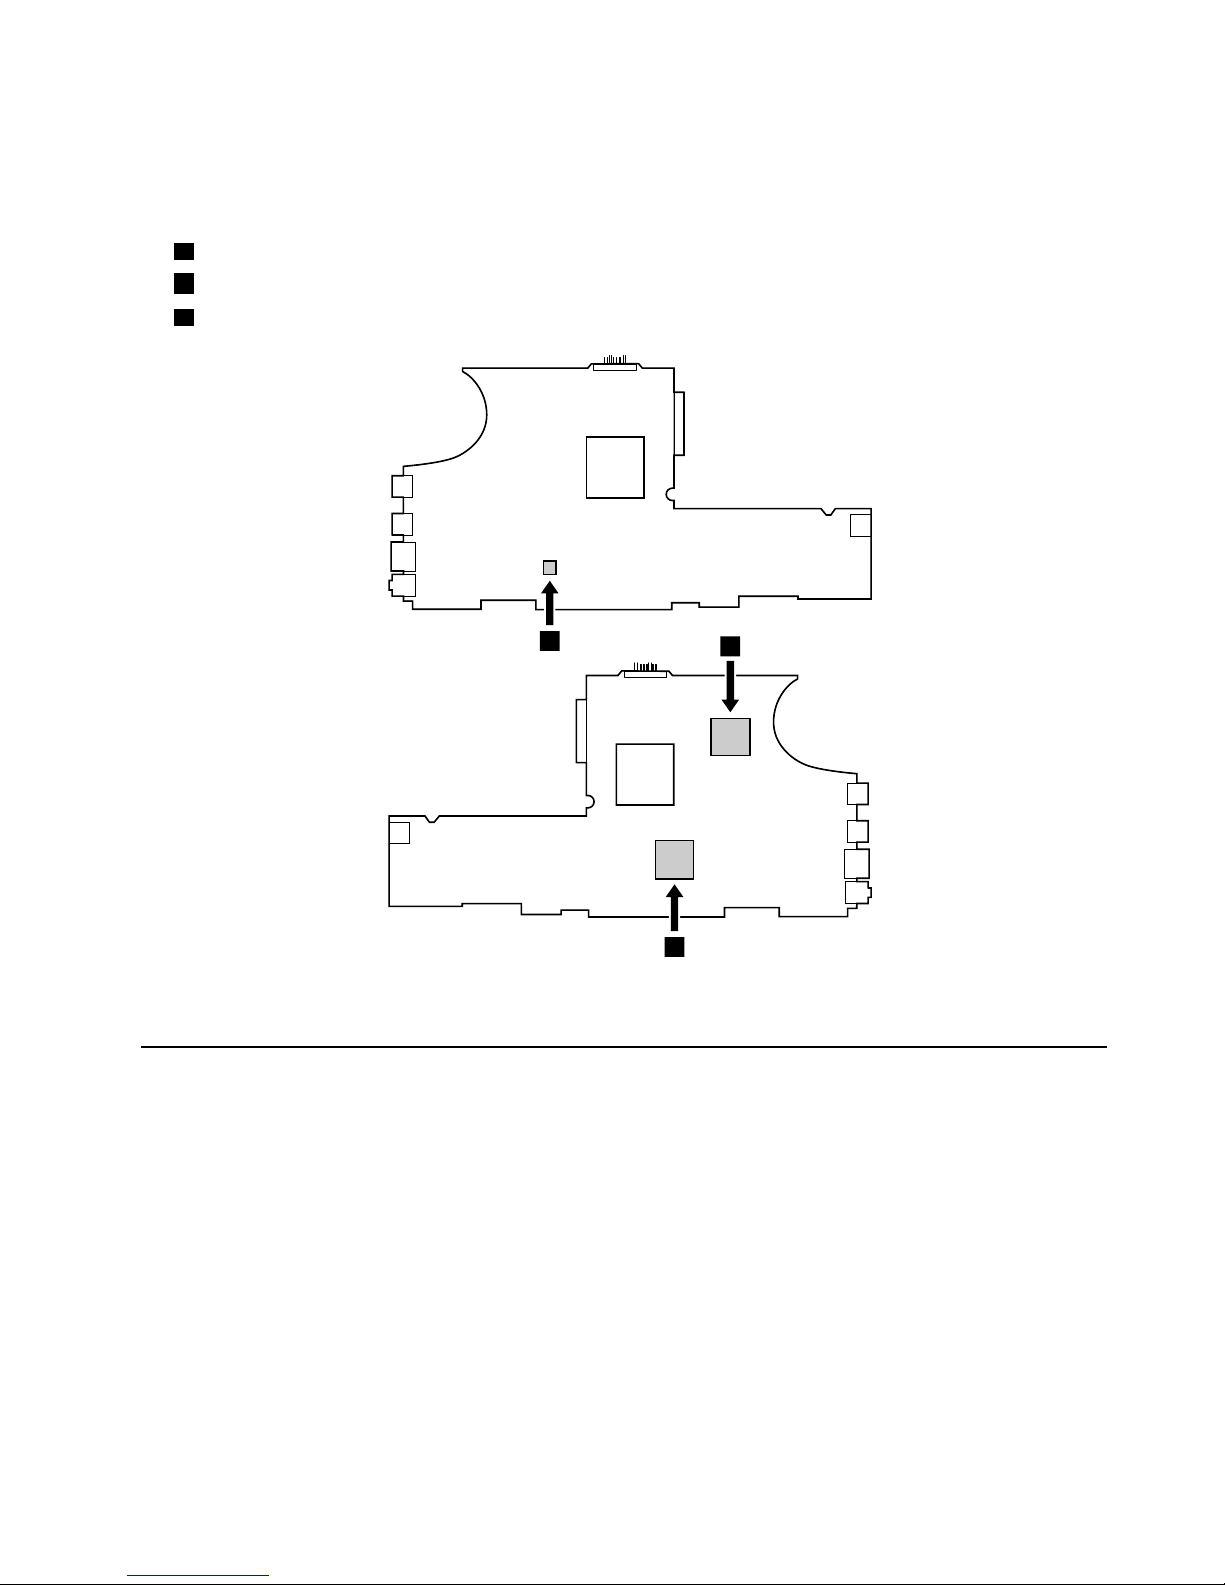
Table22.Locationofmajorsensitivecomponentsonthesystemboard(continued)
ForThinkPadX120e
a
AccelerometerchipfortheHDDActiveProtectionSystem™
b
APU(AcceleratedProcessingUnits)
c
PCH(PlatformControllerHub)
1
a
b
c
Table23.Removalstepsofsystemboard,bluetoothdaughtercard,fanassembly,andbackupbattery
ForThinkPadX100e
Chapter8.RemovingandreplacingaFRU77
Page 84
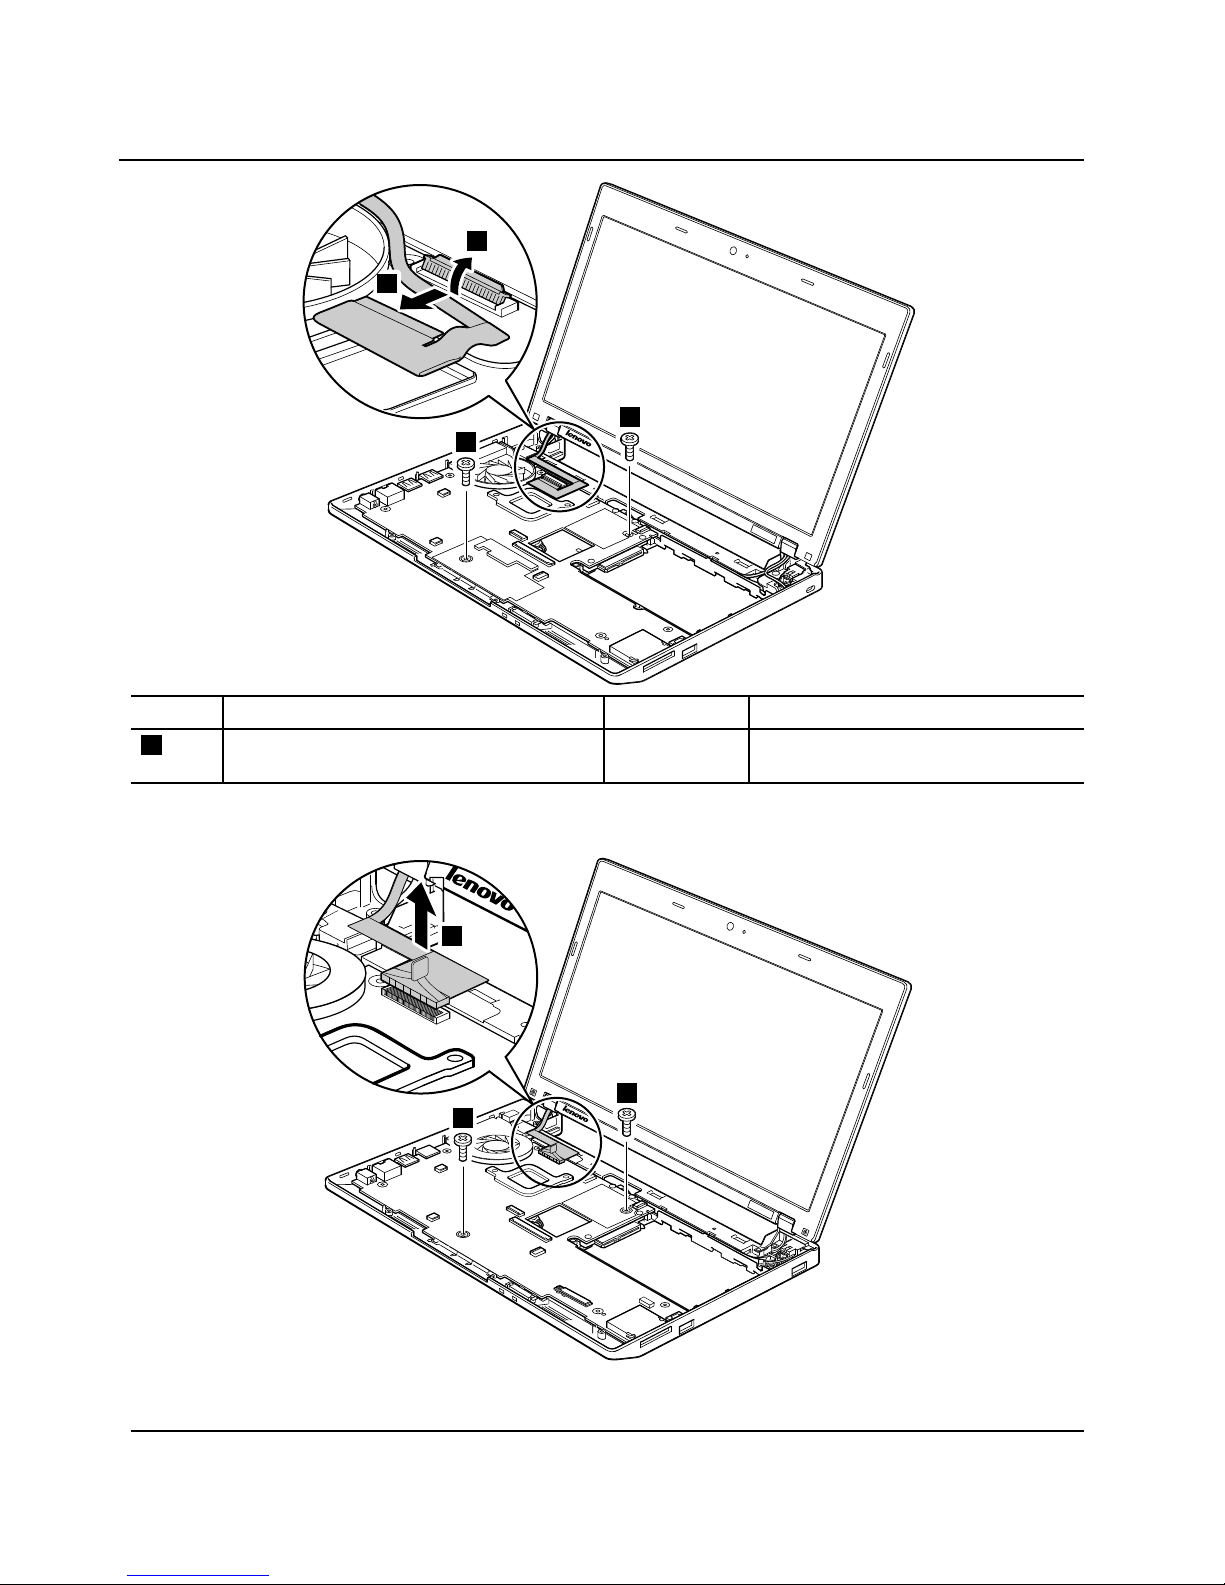
Table23.Removalstepsofsystemboard,bluetoothdaughtercard,fanassembly,andbackupbattery(continued)
2
2
1a
1b
StepScrew(quantity)Color
Torque
2
M2×4mm,wafer-head,nylon-coated(2)Silver
0.181Nm
(1.85kgfcm)
ForThinkPadX120e
2
2
1
78HardwareMaintenanceManual
Page 85
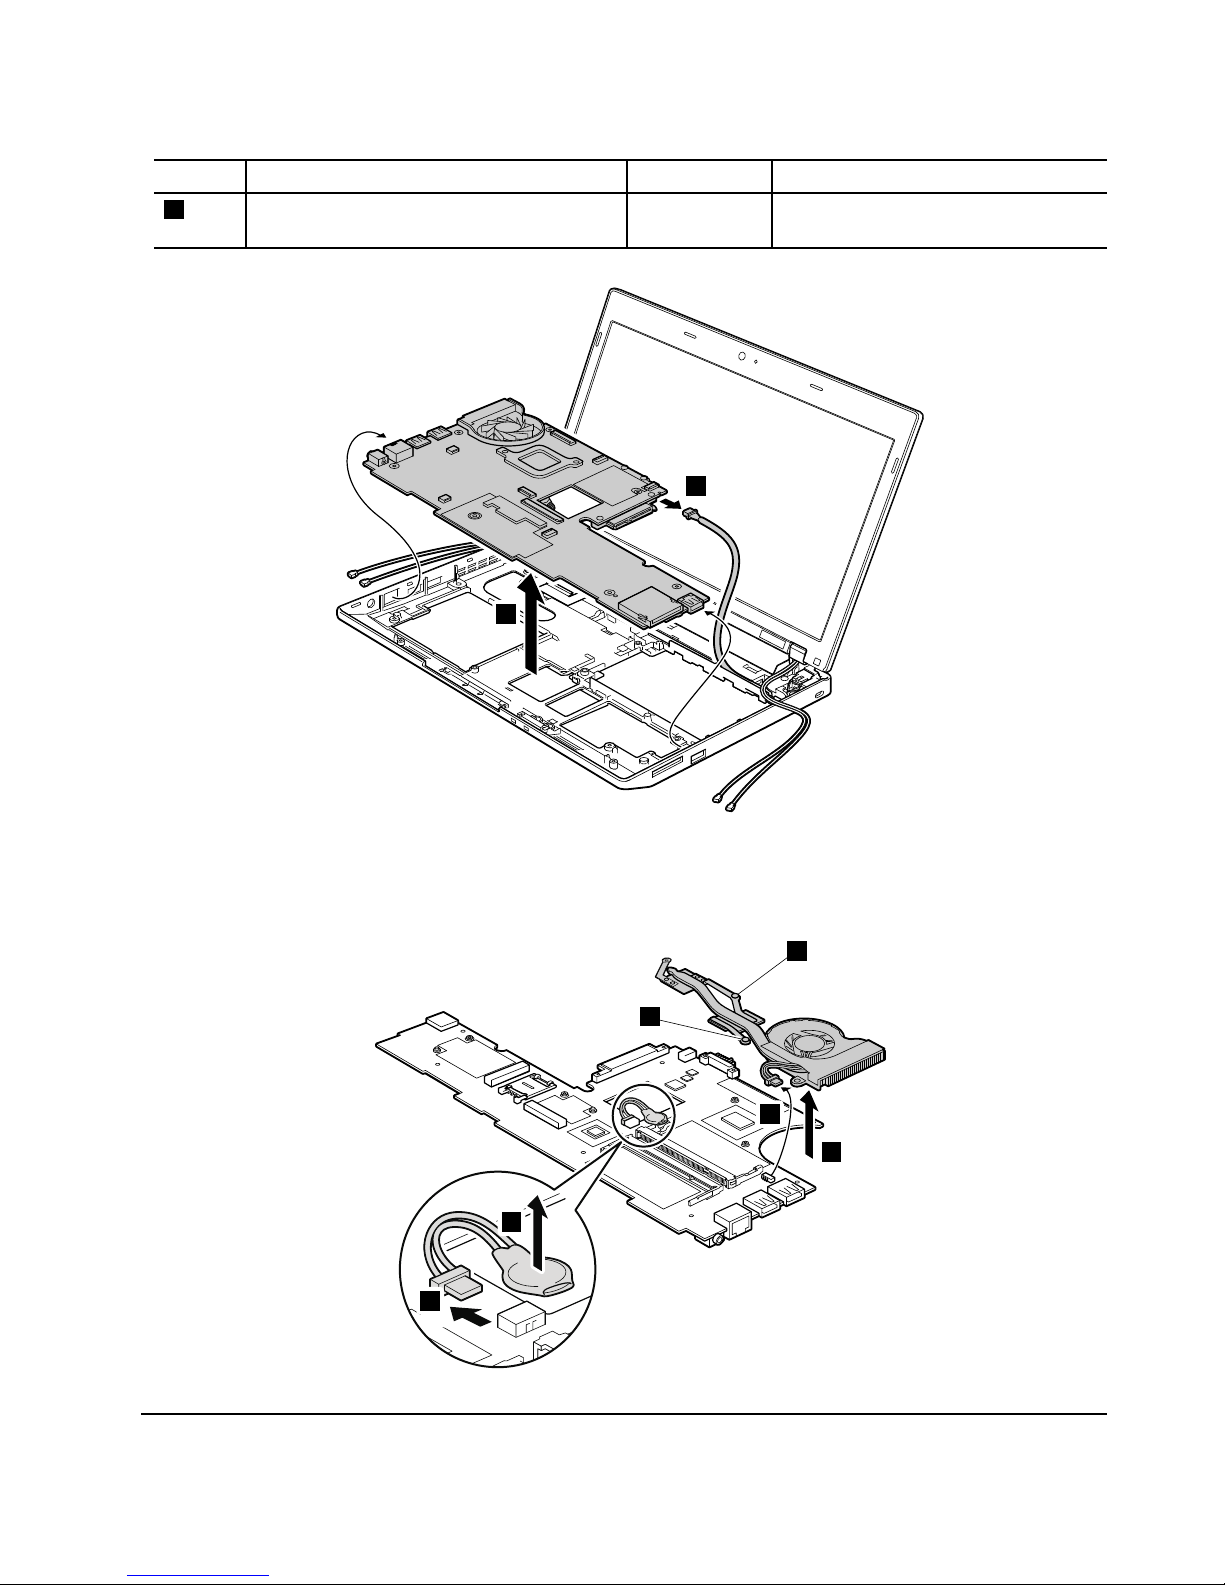
Table23.Removalstepsofsystemboard,bluetoothdaughtercard,fanassembly,andbackupbattery(continued)
StepScrew(quantity)Color
Torque
2
M2×4mm,wafer-head,nylon-coated(2)Silver
0.181Nm
(1.85kgfcm)
3
4
Wheninstalling:Makesurethattheconnectorisattachedrmly.
ForThinkPadX100e
5
5
6
7
8
9
ForThinkPadX120e
Chapter8.RemovingandreplacingaFRU79
Page 86
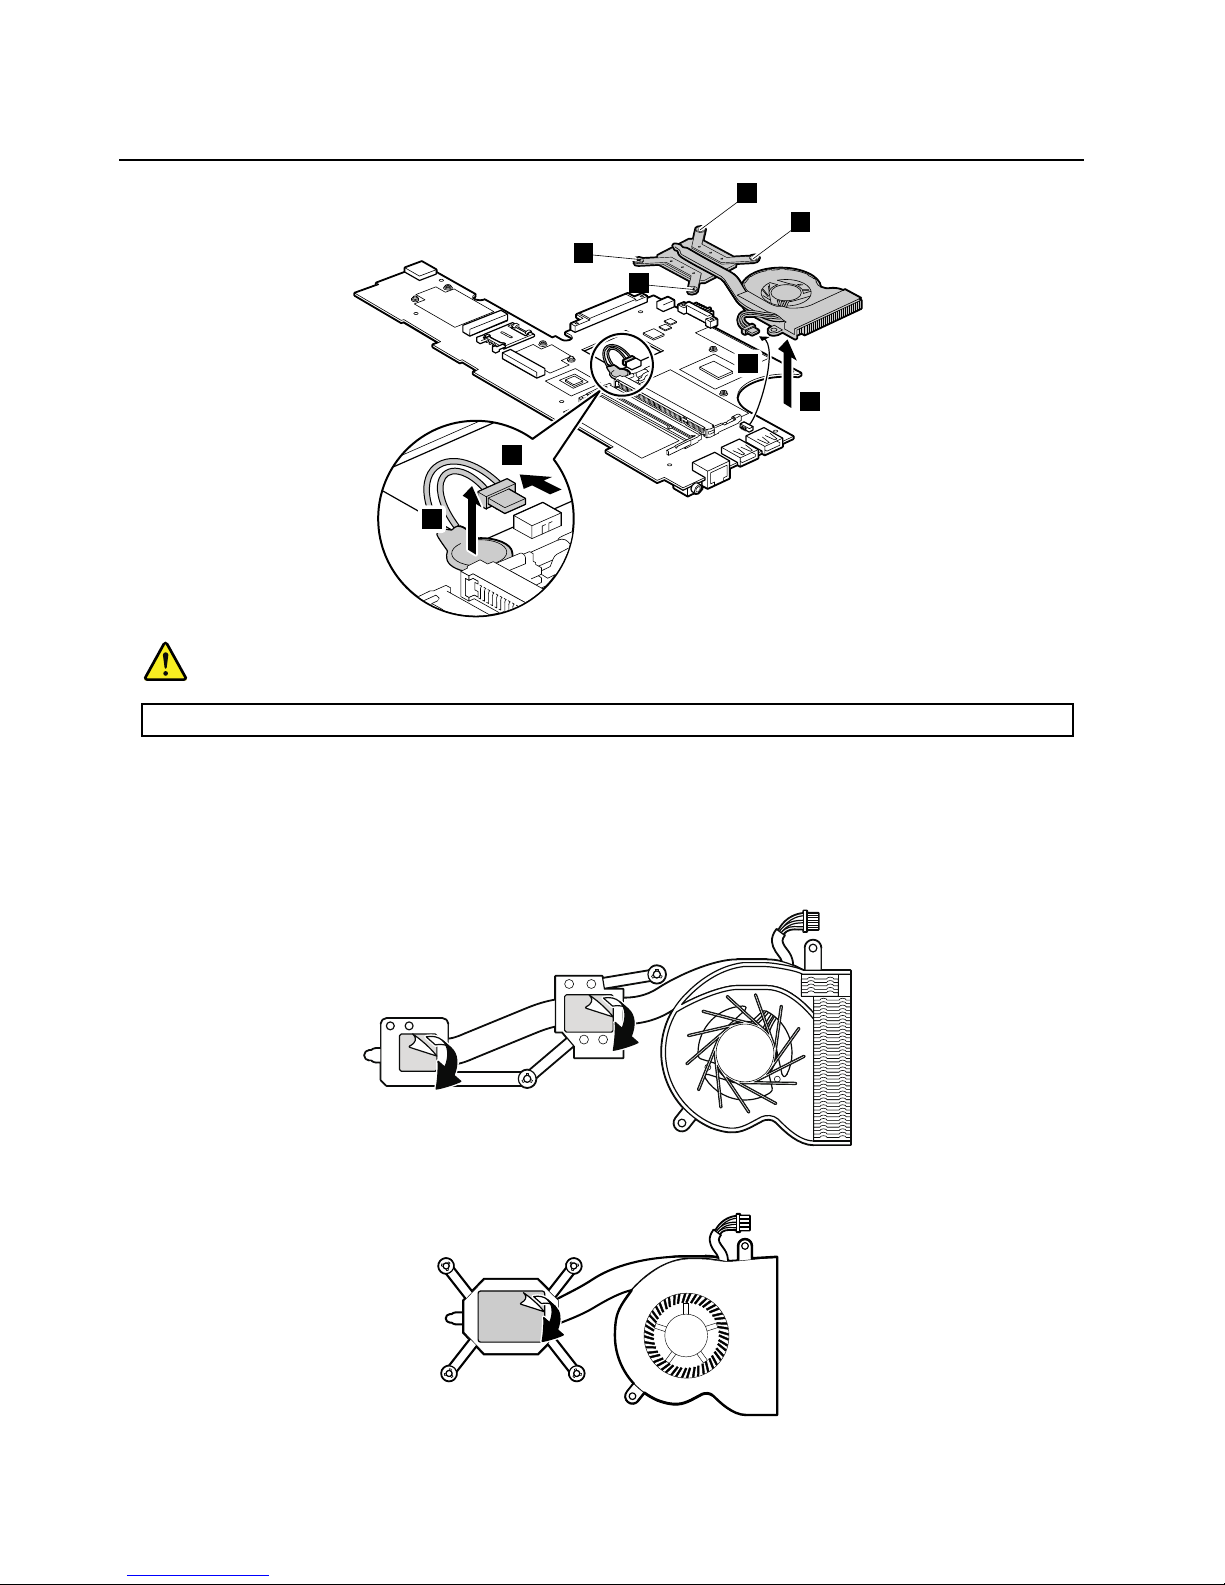
Table23.Removalstepsofsystemboard,bluetoothdaughtercard,fanassembly,andbackupbattery(continued)
6
7
9
8
5
5
5
5
DANGER
Useonlythebatteryspeciedinthepartslistforyourcomputer.Anyotherbatterycouldigniteorexplode.
Wheninstalling:Makesurethattheconnectorsareattachedrmly.
Wheninstalling:Beforeyouattachthefanassemblytothesystemboard,youneedtopeelthethinlmofffromthe
thermalrubbersasshowninthisgure.
ForThinkPadX100e
ForThinkPadX120e
80HardwareMaintenanceManual
Page 87
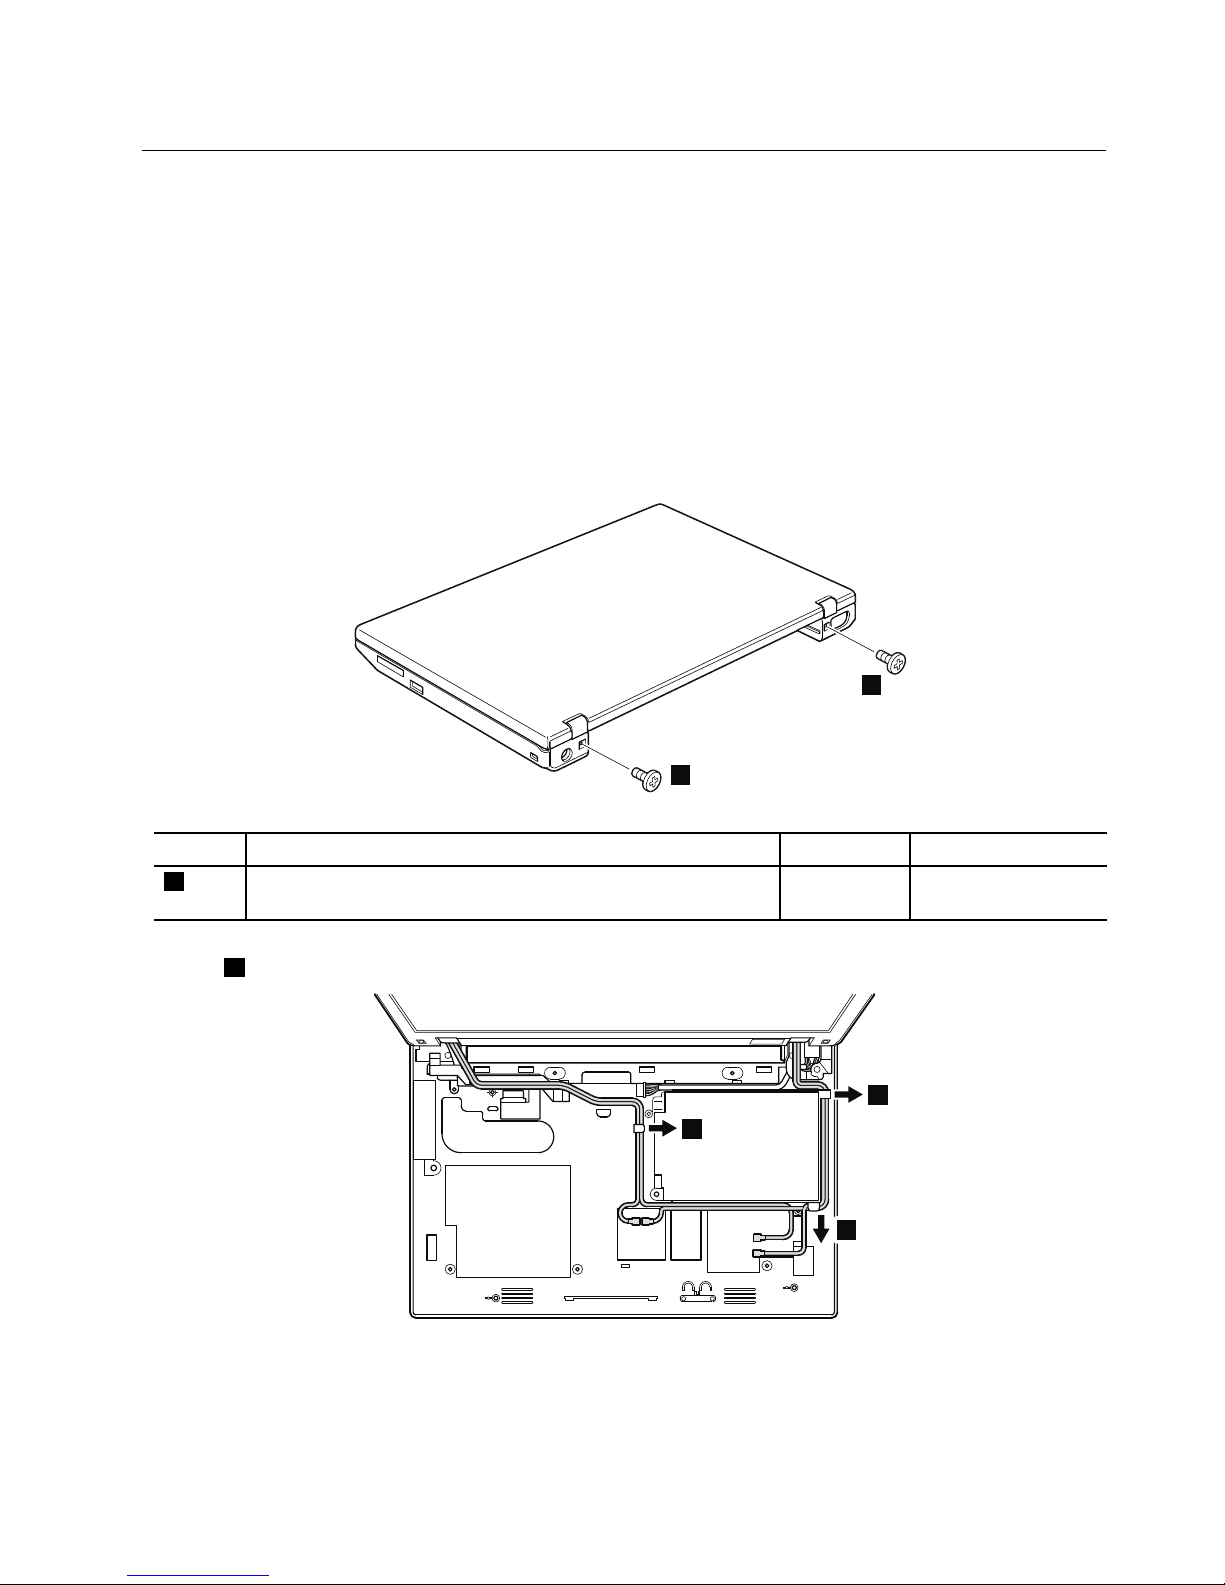
1140LCDunit
Foraccess,removetheseFRUsinorder:
•“1010Batterypack”onpage54
•“1020Bottomdoor”onpage55
•“1030Harddiskdrive(HDD)”onpage58
•“1080Keyboard”onpage64
•“1090Palmrestassembly,power-onboardassembly(withcable),andmicrophone”onpage67
•“1100CRTboardassembly(withcable)”onpage72
•“1110Speakerassembly”onpage73
•“1120I/Oboard(forThinkPadX120e)”onpage74
•“1130Systemboard,fanassembly,andbackupbattery”onpage75
Table24.RemovalstepsofLCDunit
1
1
StepScrew(quantity)Color
Torque
1
ForThinkPadX100e,M2×3mm,wafer-head,nylon-coated(2)
ForThinkPadX120e,M2×4mm,wafer-head,nylon-coated(2)
Silver
0.181Nm
(1.85kgfcm)
Instep2,releasealloftheantennacablesfromthecableguides.
2
2
2
Wheninstalling:
•Makesurethatyouroutethecablesrmlyasshowninthisgure.
•Whenyouroutethecables,makesurethattheyarenotsubjectedtoanytension.T ensioncouldcausethecables
tobedamagedbythecableguides,orawiretobebroken.
Chapter8.RemovingandreplacingaFRU81
Page 88
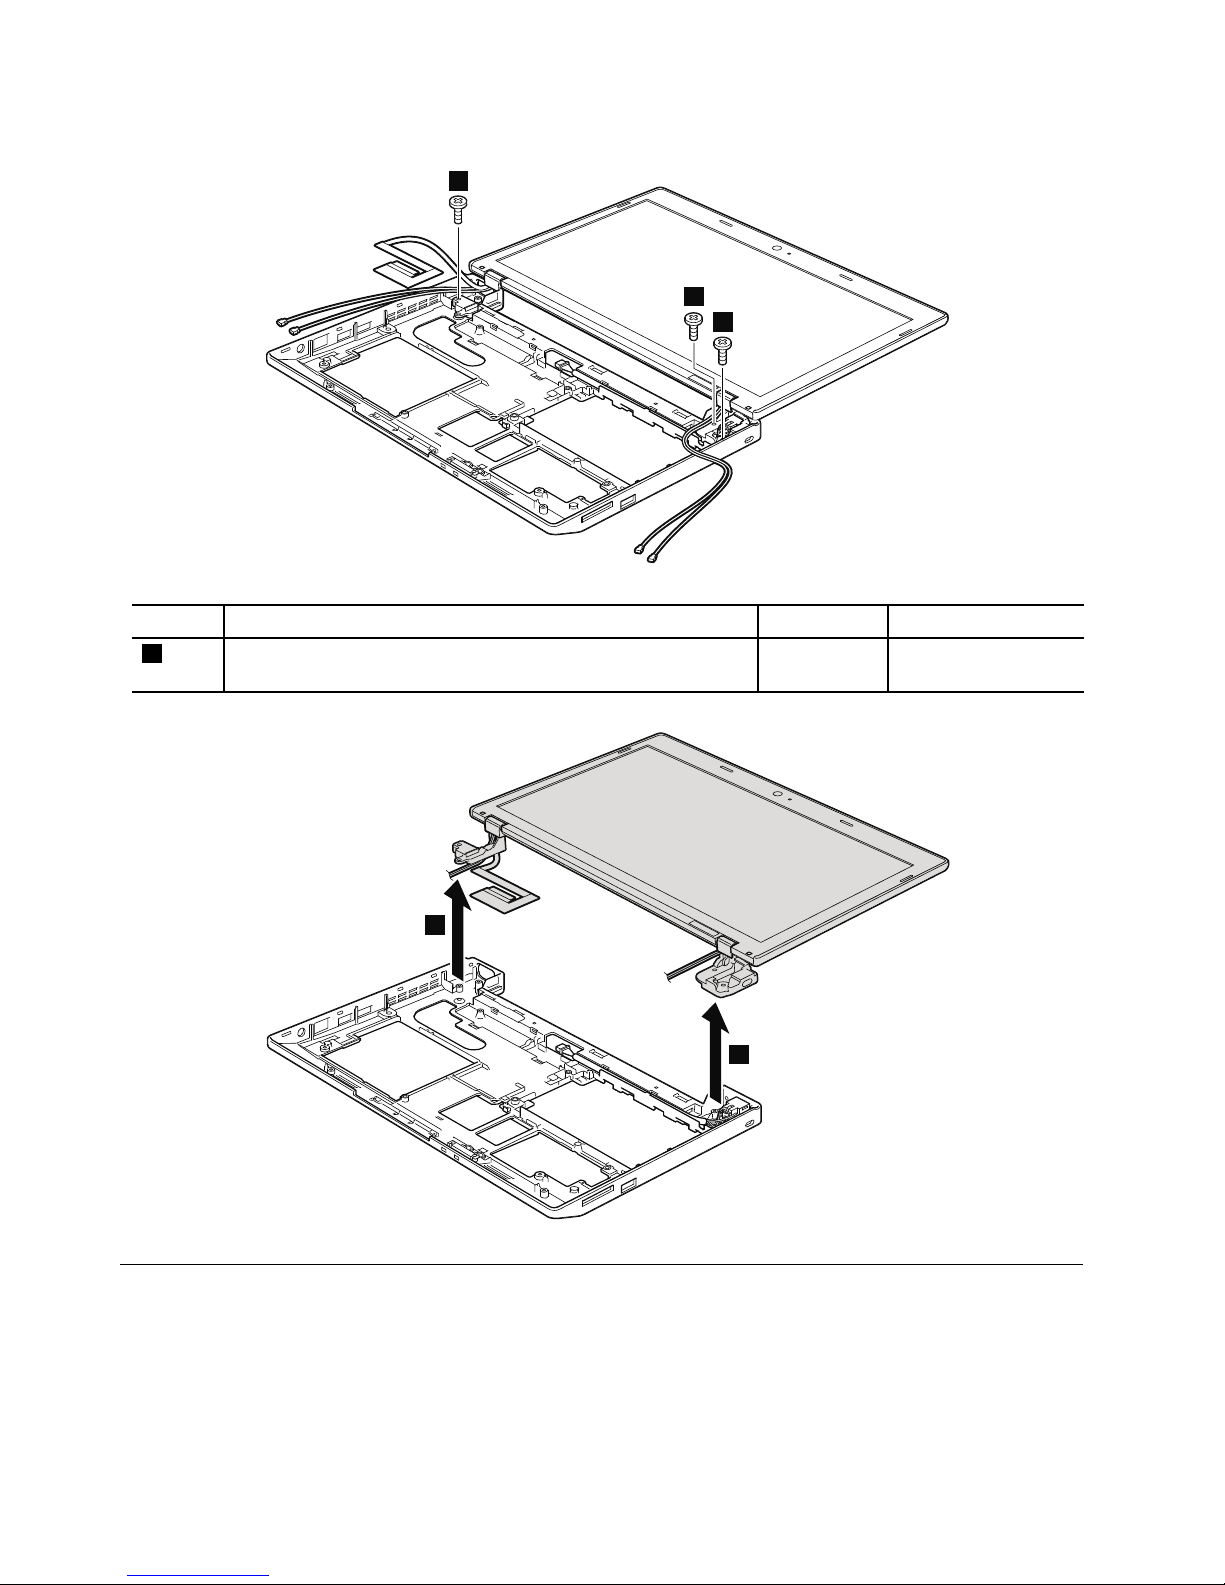
Table24.RemovalstepsofLCDunit(continued)
3
3
3
StepScrew(quantity)Color
Torque
3
ForThinkPadX100e,M2×4mm,wafer-head,nylon-coated(3)
ForThinkPadX120e,M2.5×4mm,wafer-head,nylon-coated(3)
Silver
0.181Nm
(1.85kgfcm)
4
4
1150DC-incableandbasecoverassembly
Foraccess,removetheseFRUsinorder:
•“1010Batterypack”onpage54
•“1020Bottomdoor”onpage55
•“1030Harddiskdrive(HDD)”onpage58
•“1080Keyboard”onpage64
•“1090Palmrestassembly,power-onboardassembly(withcable),andmicrophone”onpage67
82HardwareMaintenanceManual
Page 89
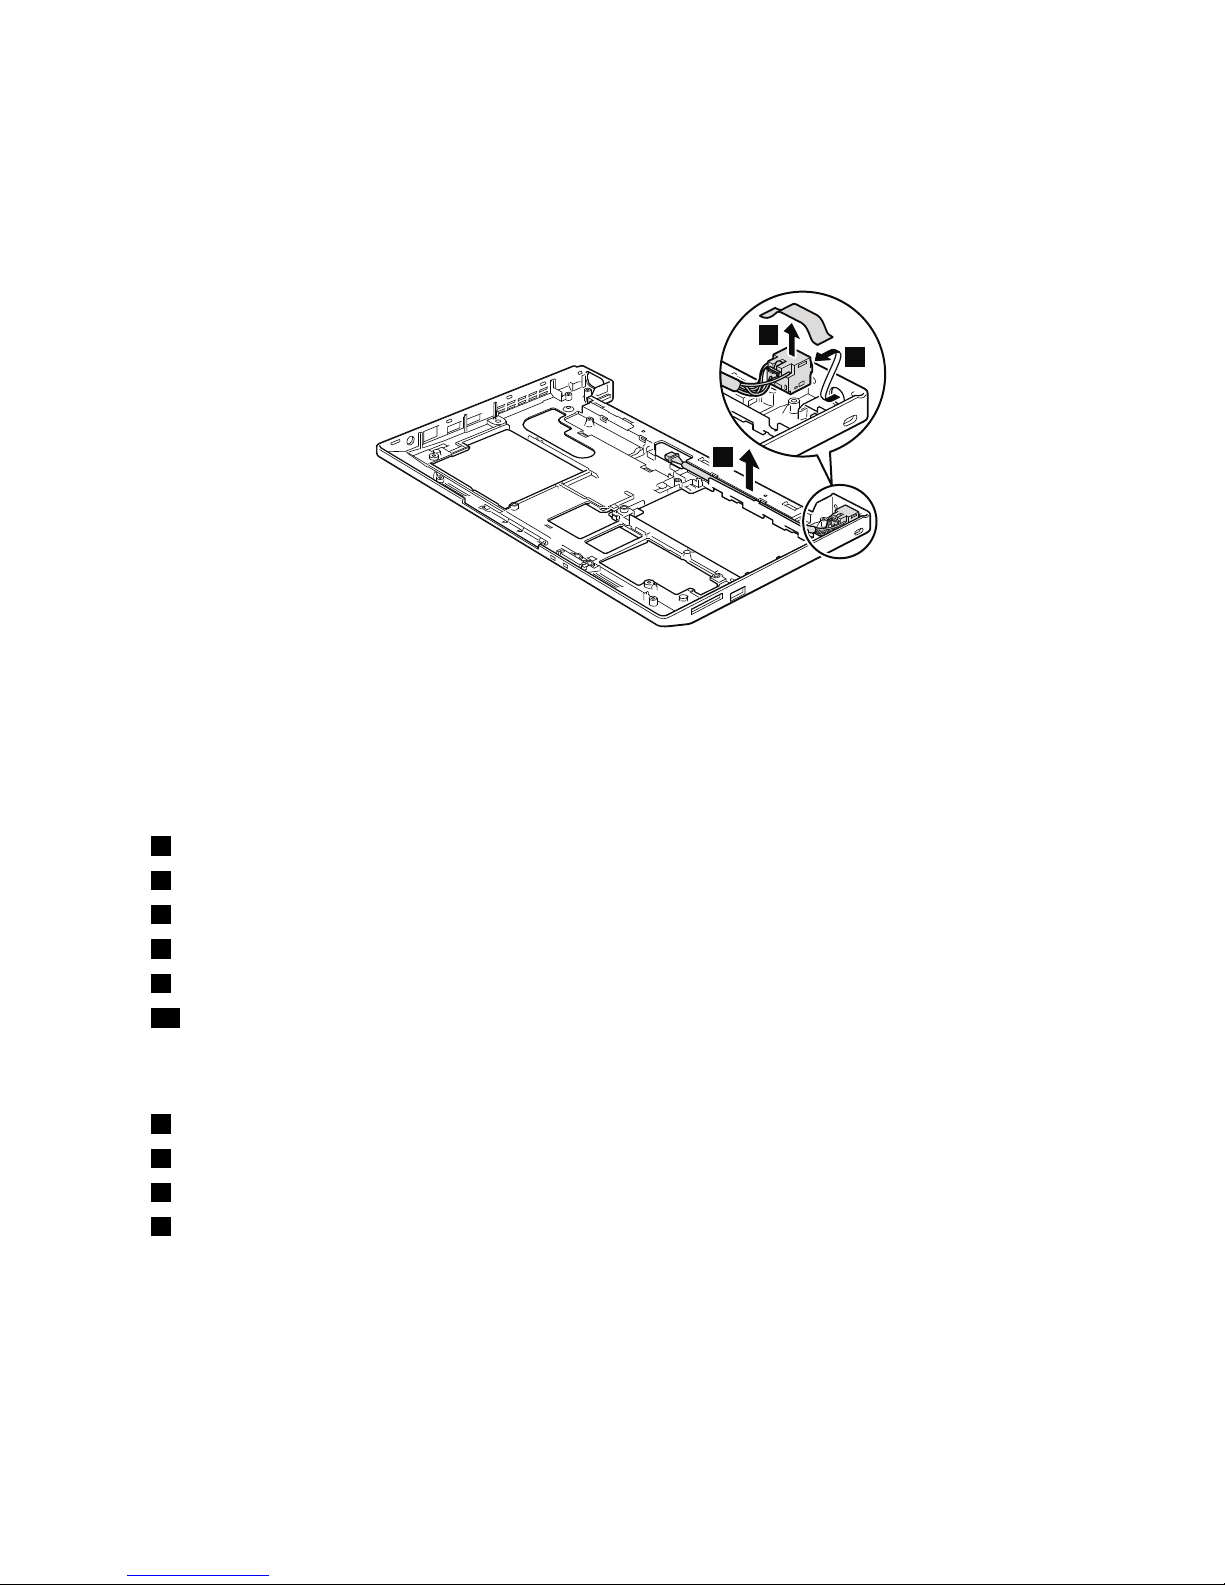
•“1100CRTboardassembly(withcable)”onpage72
•“1110Speakerassembly”onpage73
•“1120I/Oboard(forThinkPadX120e)”onpage74
•“1130Systemboard,fanassembly,andbackupbattery”onpage75
Table25.RemovalstepsofDC-incableandbasecoverassembly
1
2
3
Note:Applyinglabelstothebasecover
ForThinkPadX100e
ThenewbasecoverFRUisshippedwithakitcontaininglabelsofseveralkinds.Whenyoureplacethe
basecover,youneedtoapplythefollowinglabels:
2
Homologationlabel
3
FFClabel
5
Certiedlabelunderbattery
6
Serialnumberbarcodeblanklabel
9
Informationlabelunderdoor
10
SIMinformationlabelunderdoor
Followinglabelsneedtobepeeledofffromtheoldbasecover,andneedtobeputonthenewbasecover.
1
Windowslicenselabel(COA)(onlyforWindows7models)
4
Ethernetlabel
7
WirelessWANlabel
8
ChinaWirelessWANlabel
Forsomemodels,youalsoneedtoapplyoneortwoFCClabels.Checktheoldbasecover;ifithasoneor
twoFCClabels,ndduplicatesoftheminthelabelkitandapplythemtothenewbasecover.
Forthelocationofeachlabel,referthefollowinggure:
Chapter8.RemovingandreplacingaFRU83
Page 90
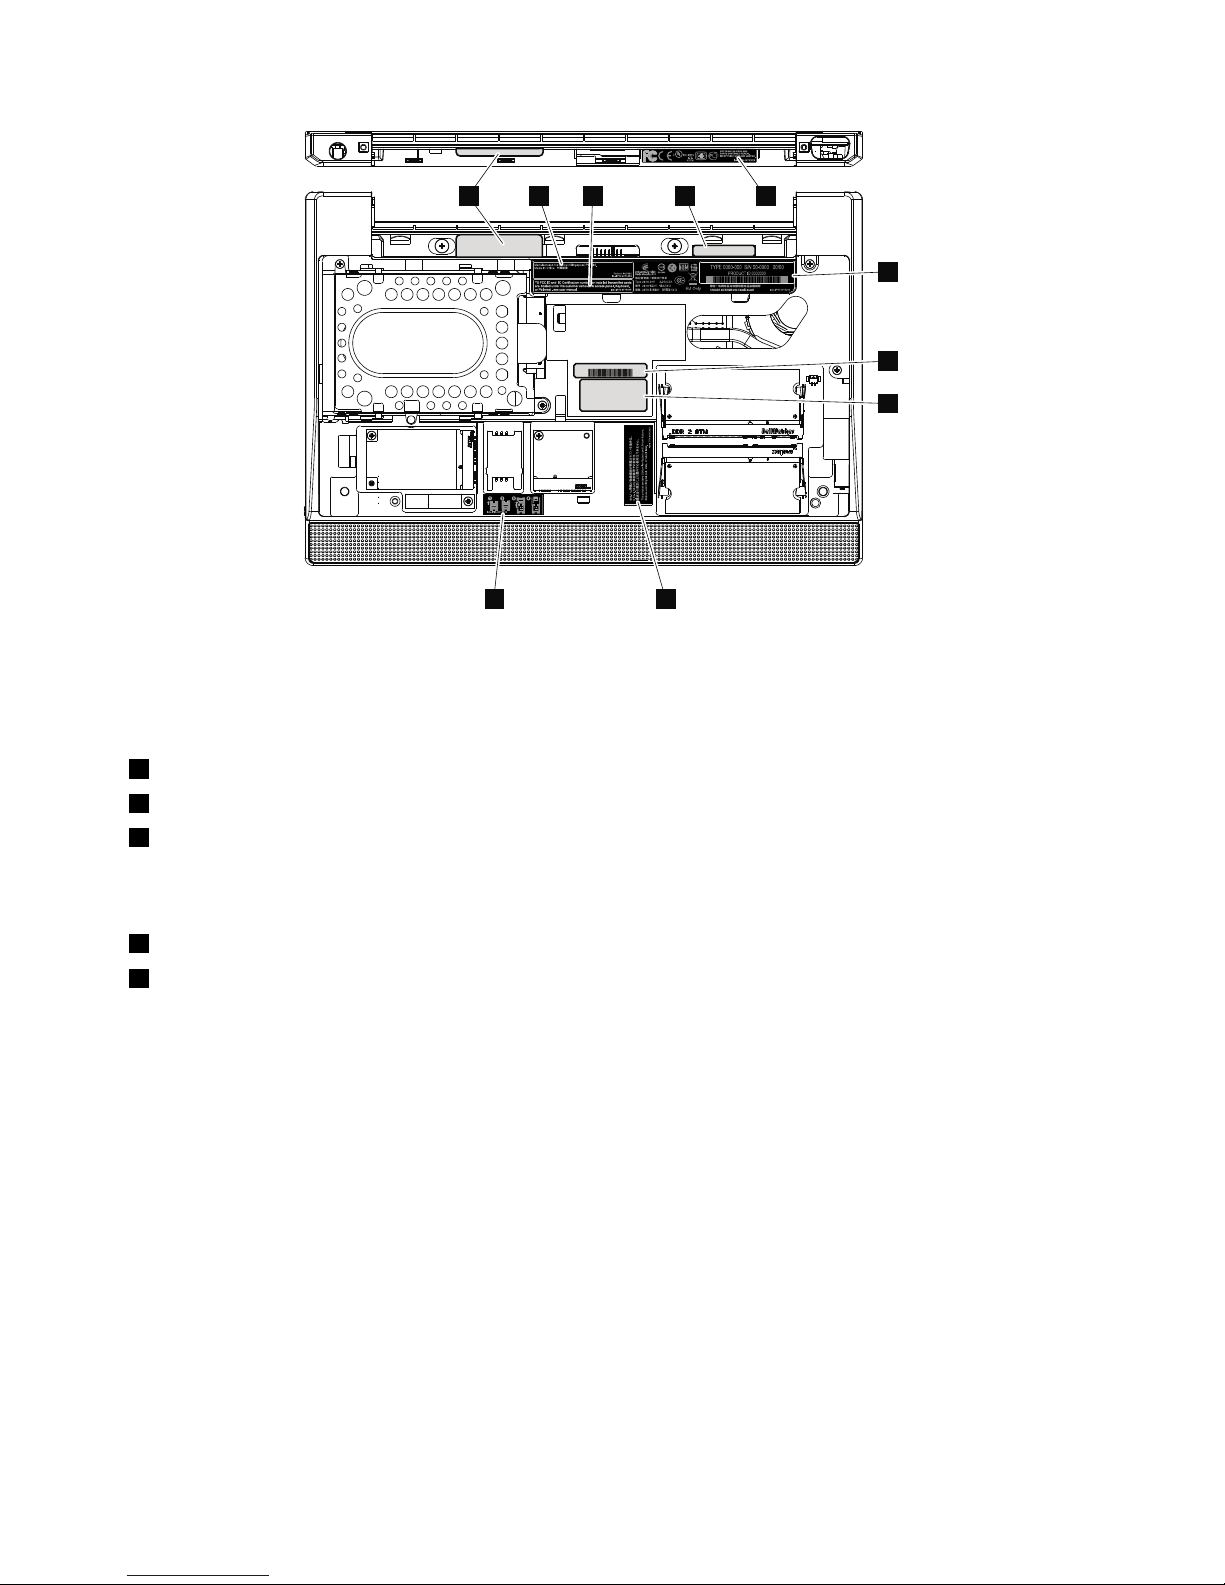
1 5
7
6
8
910
432
ForThinkPadX120e
ThenewbasecoverFRUisshippedwithakitcontaininglabelsofseveralkinds.Whenyoureplacethe
basecover,youneedtoapplythefollowinglabels:
2
SIMinformationlabelunderdoor
3
Informationlabelunderdoor
5
Certiedlabelunderbattery
Followinglabelsneedtobepeeledofffromtheoldbasecover,andneedtobeputonthenewbasecover.
1
Windowslicenselabel(COA)(onlyforWindows7models)
4
Ethernetlabel
Forsomemodels,youalsoneedtoapplyoneortwoFCClabels.Checktheoldbasecover;ifithasoneor
twoFCClabels,ndduplicatesoftheminthelabelkitandapplythemtothenewbasecover.
Forthelocationofeachlabel,referthefollowinggure:
84HardwareMaintenanceManual
Page 91
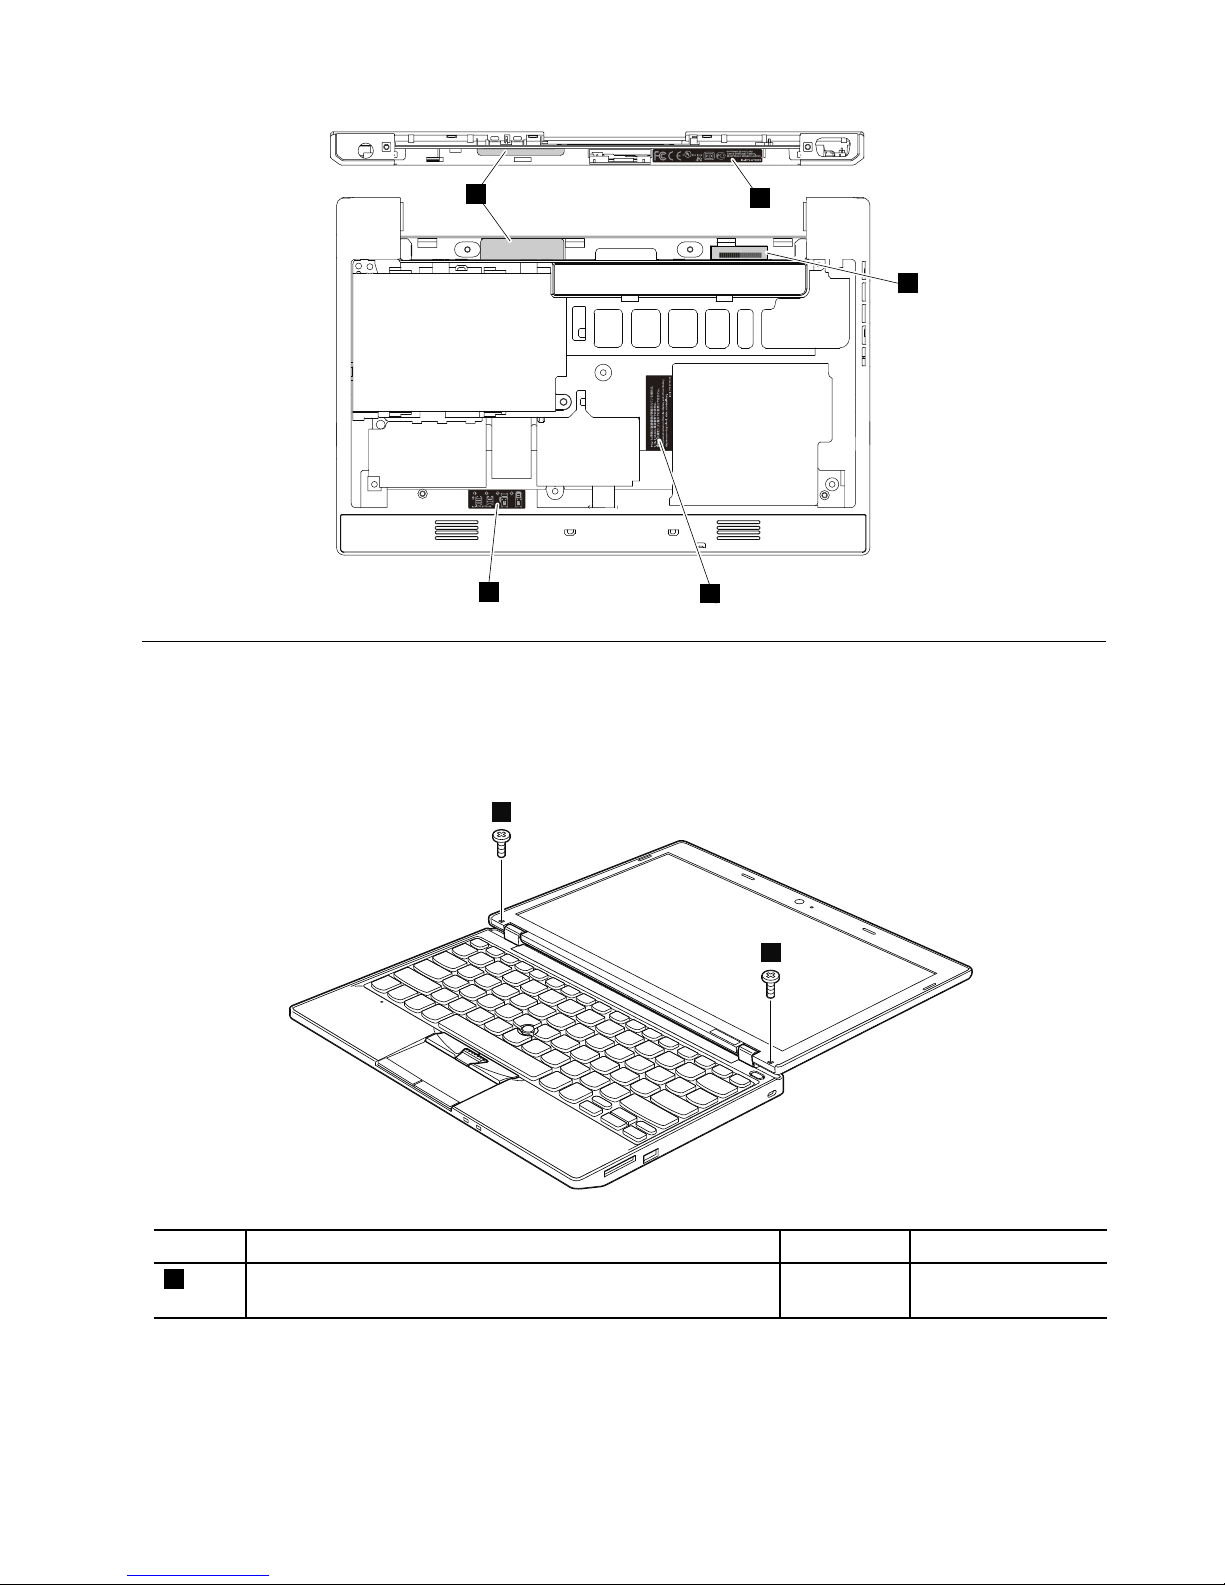
1
5
4
3
2
2010LCDbezelassembly
Foraccess,removethefollowingFRU:
•“1010Batterypack”onpage54
Table26.RemovalstepsofLCDbezelassembly
1
1
StepScrew(quantity)Color
Torque
1
M2×4mm,wafer-head,nylon-coated(2)Silver
0.181Nm
(1.85kgfcm)
Chapter8.RemovingandreplacingaFRU85
Page 92
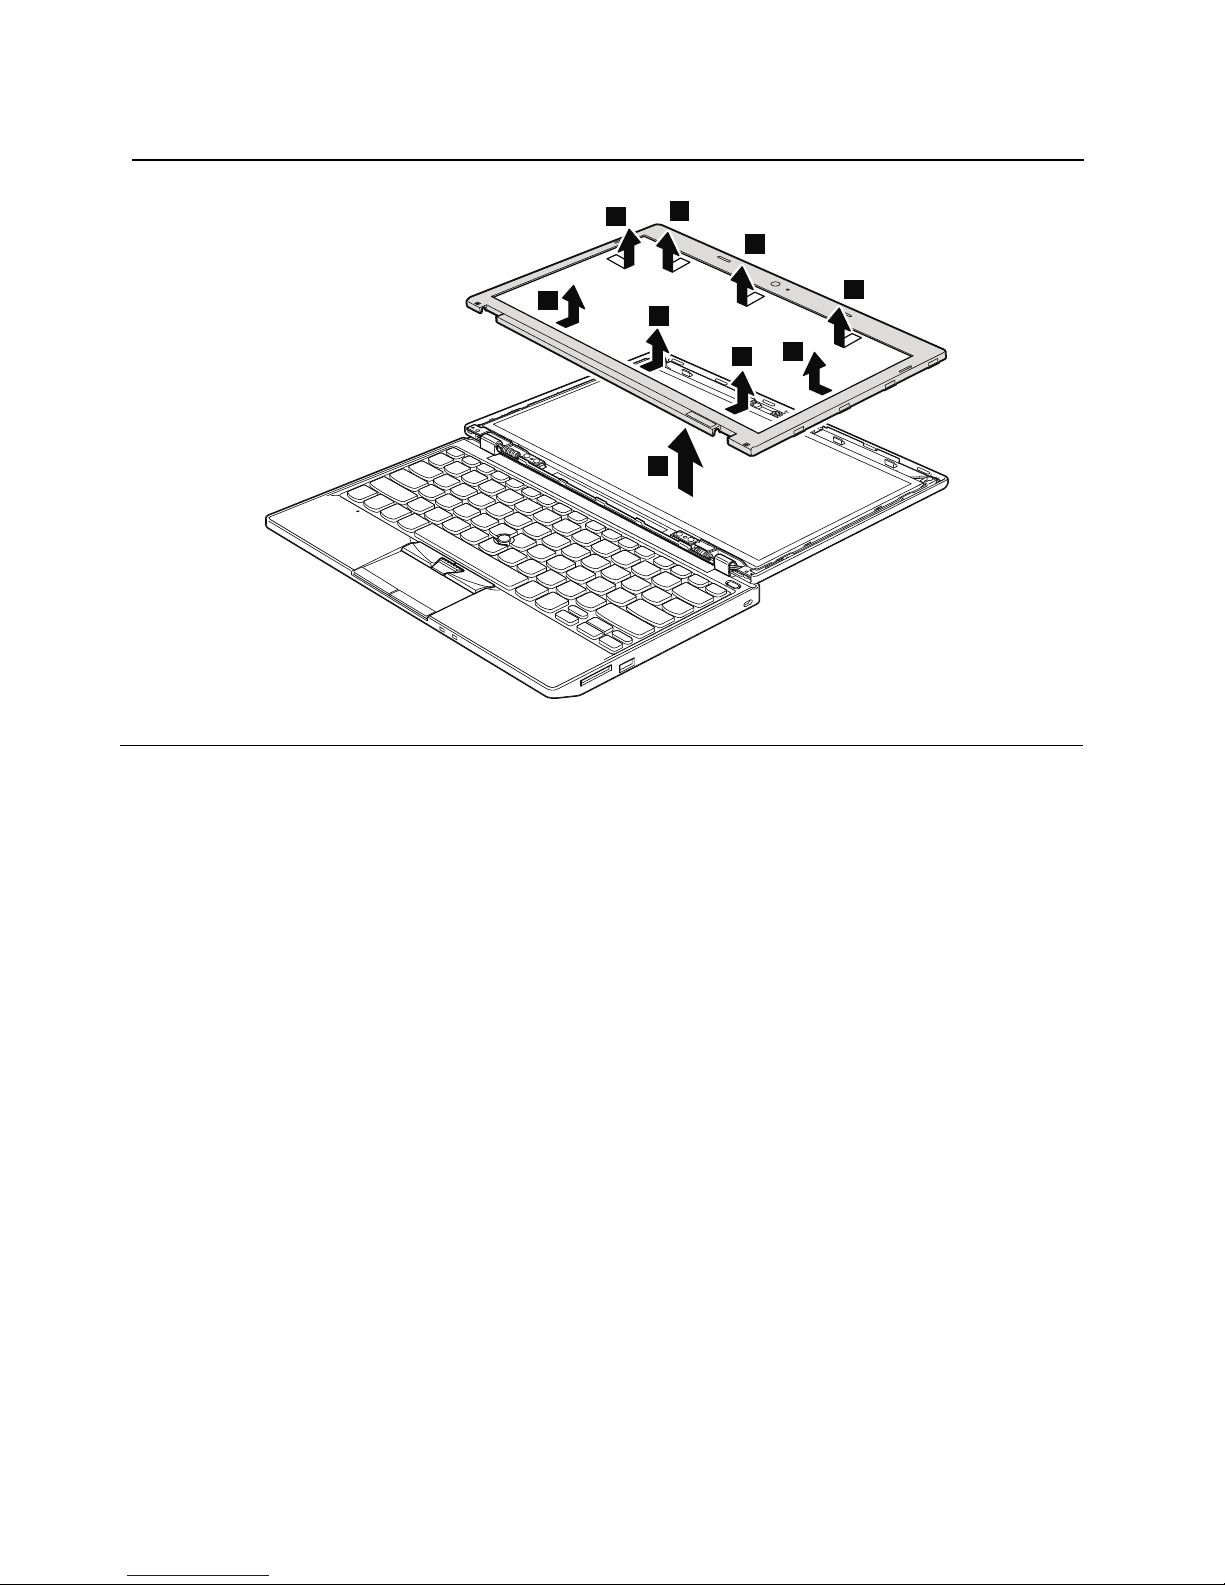
Table26.RemovalstepsofLCDbezelassembly(continued)
2
2
2
2
2
2
2
2
3
2020Integratedcamera
Foraccess,removetheseFRUs,inorder:
•“1010Batterypack”onpage54
•“2010LCDbezelassembly”onpage85
86HardwareMaintenanceManual
Page 93
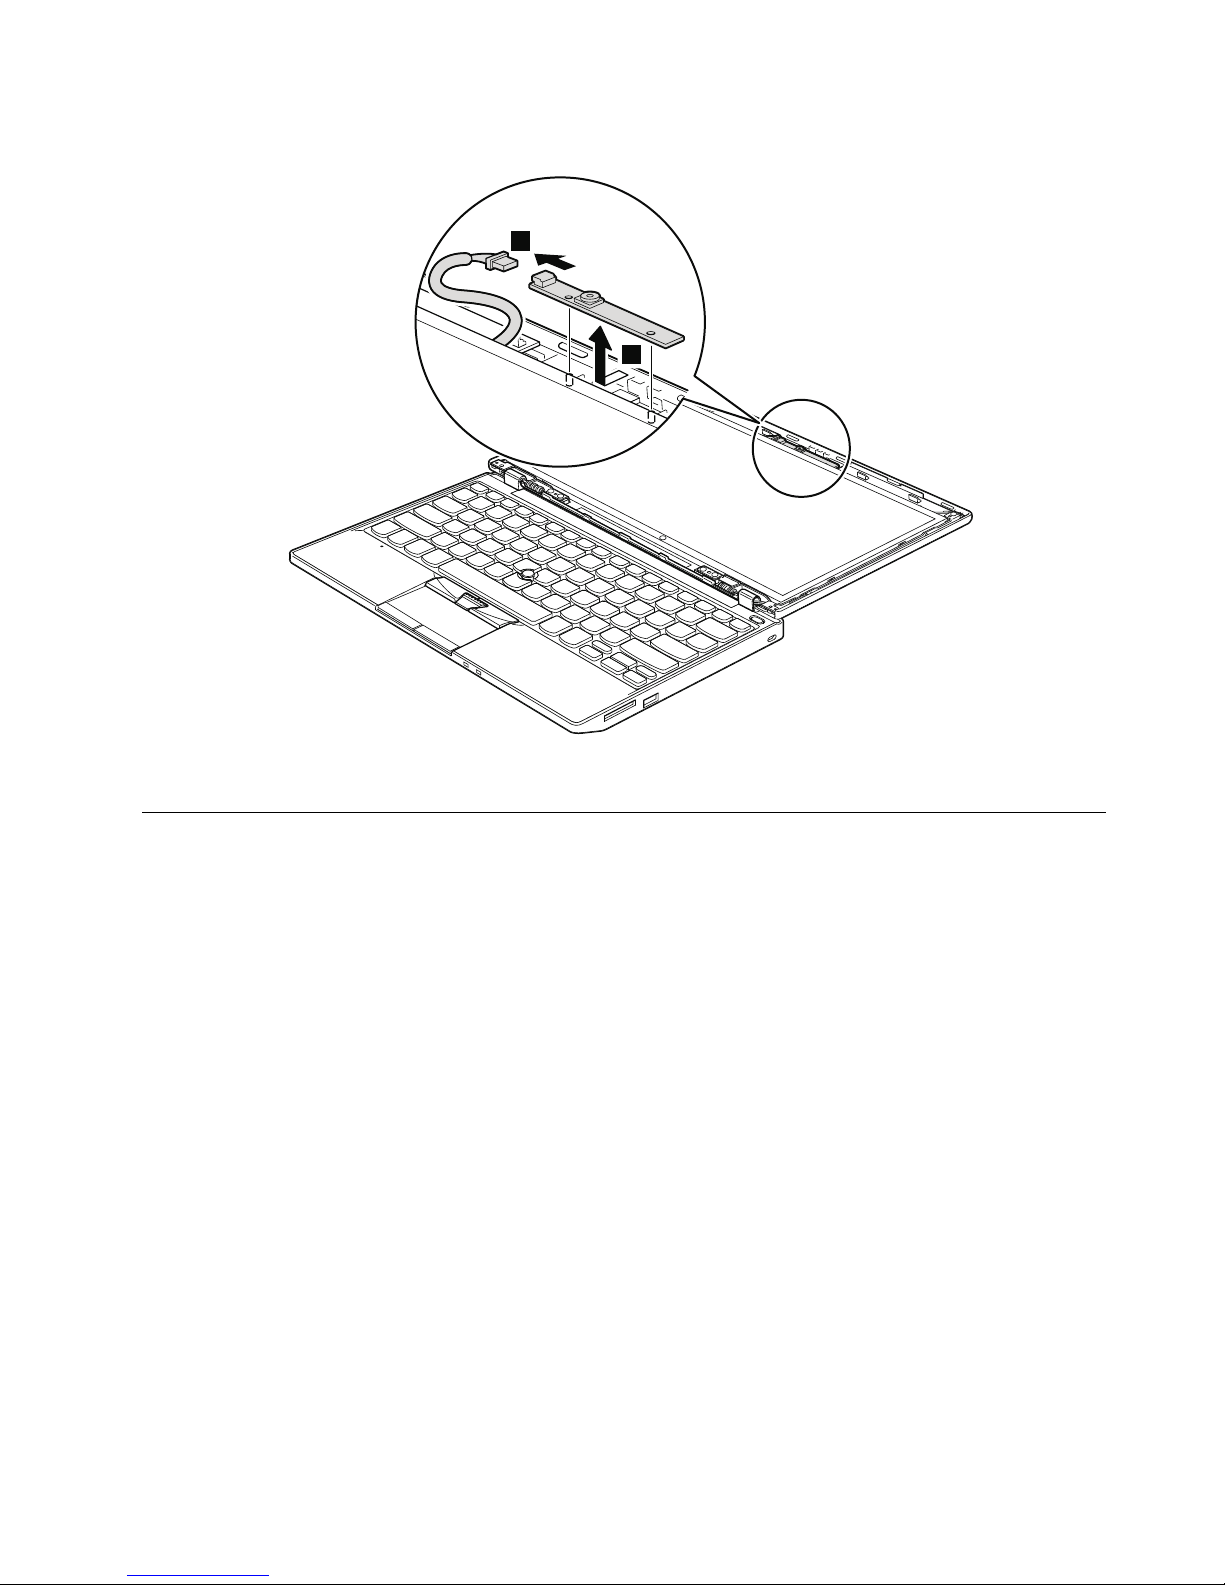
Table27.Removalstepsofintegratedcamera
2
1
Wheninstalling:Makesurethattheconnectorisattachedrmly.
2030LCDpanel,hinges,andLCDcable
Foraccess,removetheseFRUsinorder:
•“1010Batterypack”onpage54
•“1020Bottomdoor”onpage55
•“1030Harddiskdrive(HDD)”onpage58
•“1080Keyboard”onpage64
•“1090Palmrestassembly,power-onboardassembly(withcable),andmicrophone”onpage67
•“1100CRTboardassembly(withcable)”onpage72
•“1110Speakerassembly”onpage73
•“1120I/Oboard(forThinkPadX120e)”onpage74
•“1130Systemboard,fanassembly,andbackupbattery”onpage75
•“2010LCDbezelassembly”onpage85
Chapter8.RemovingandreplacingaFRU87
Page 94
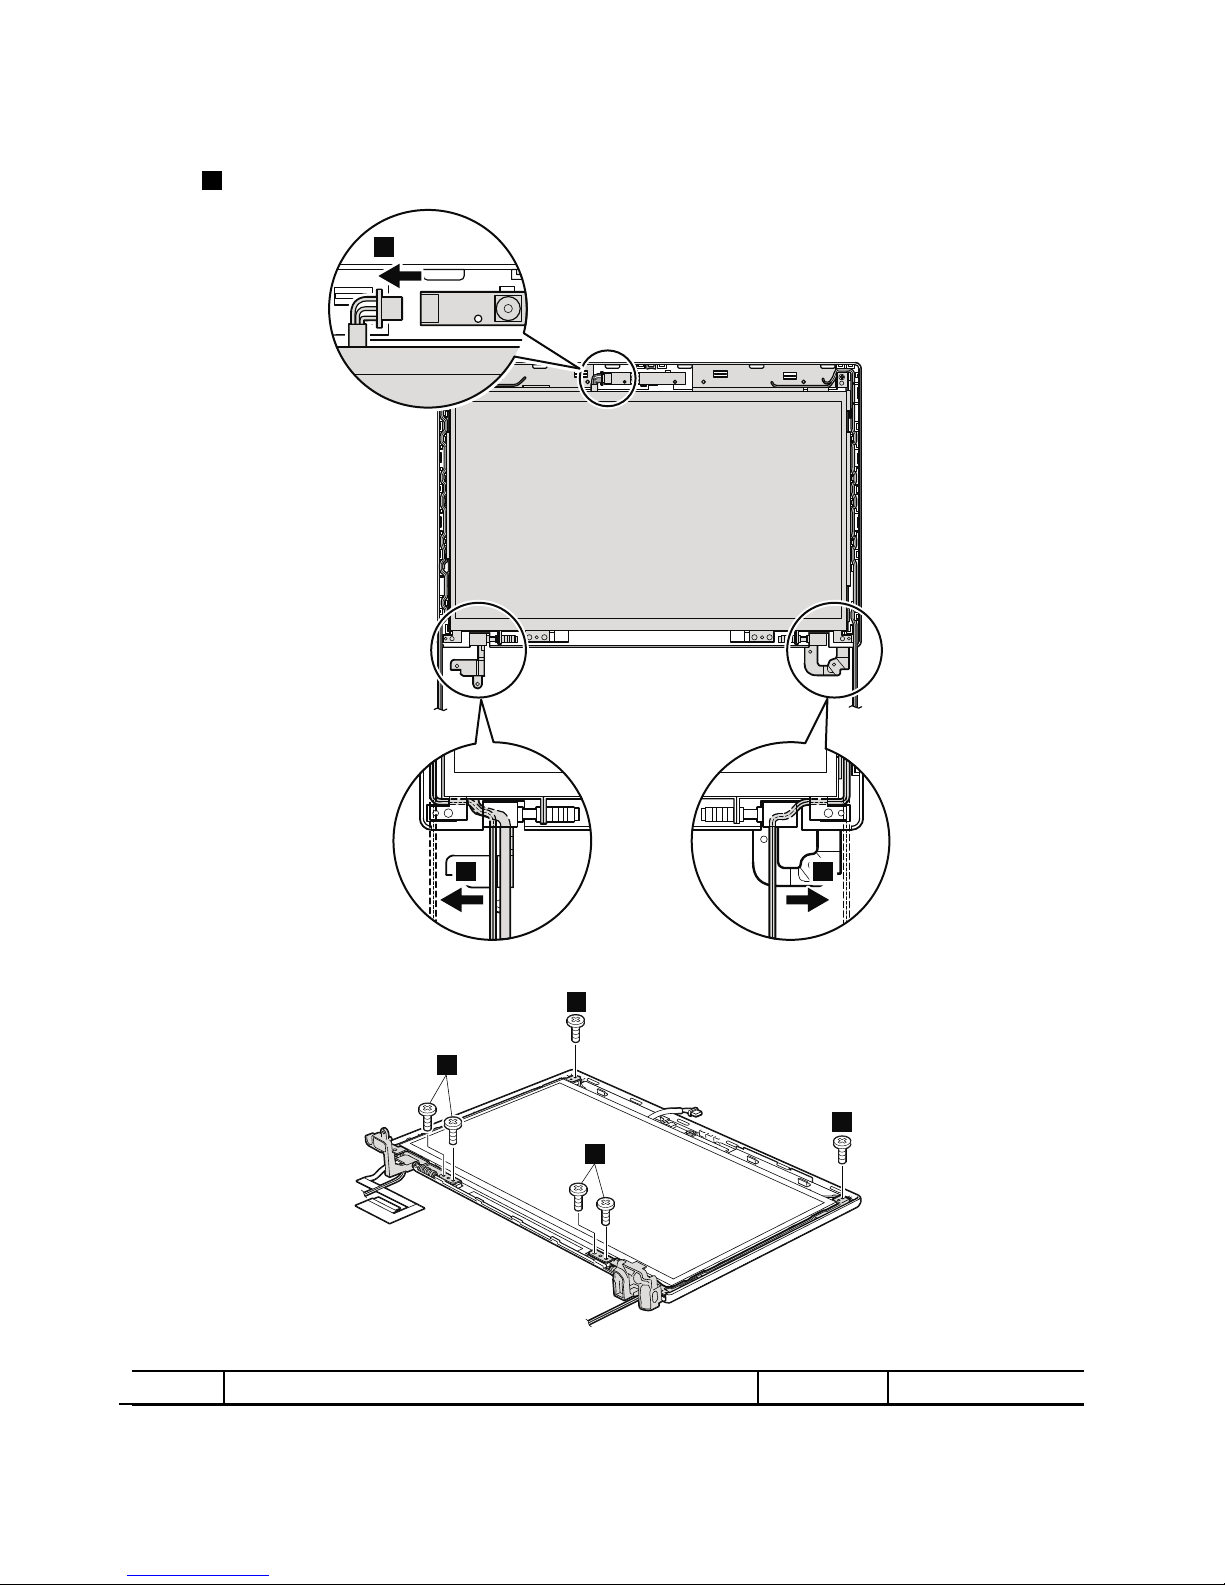
Table28.RemovalstepsofLCDpanel,hinges,andL CDcable
Instep1,releasethecablesfromthecableguideoftheleftandrighthinges.
2
1 1
3
3
3
3
StepScrew(quantity)Color
Torque
88HardwareMaintenanceManual
Page 95
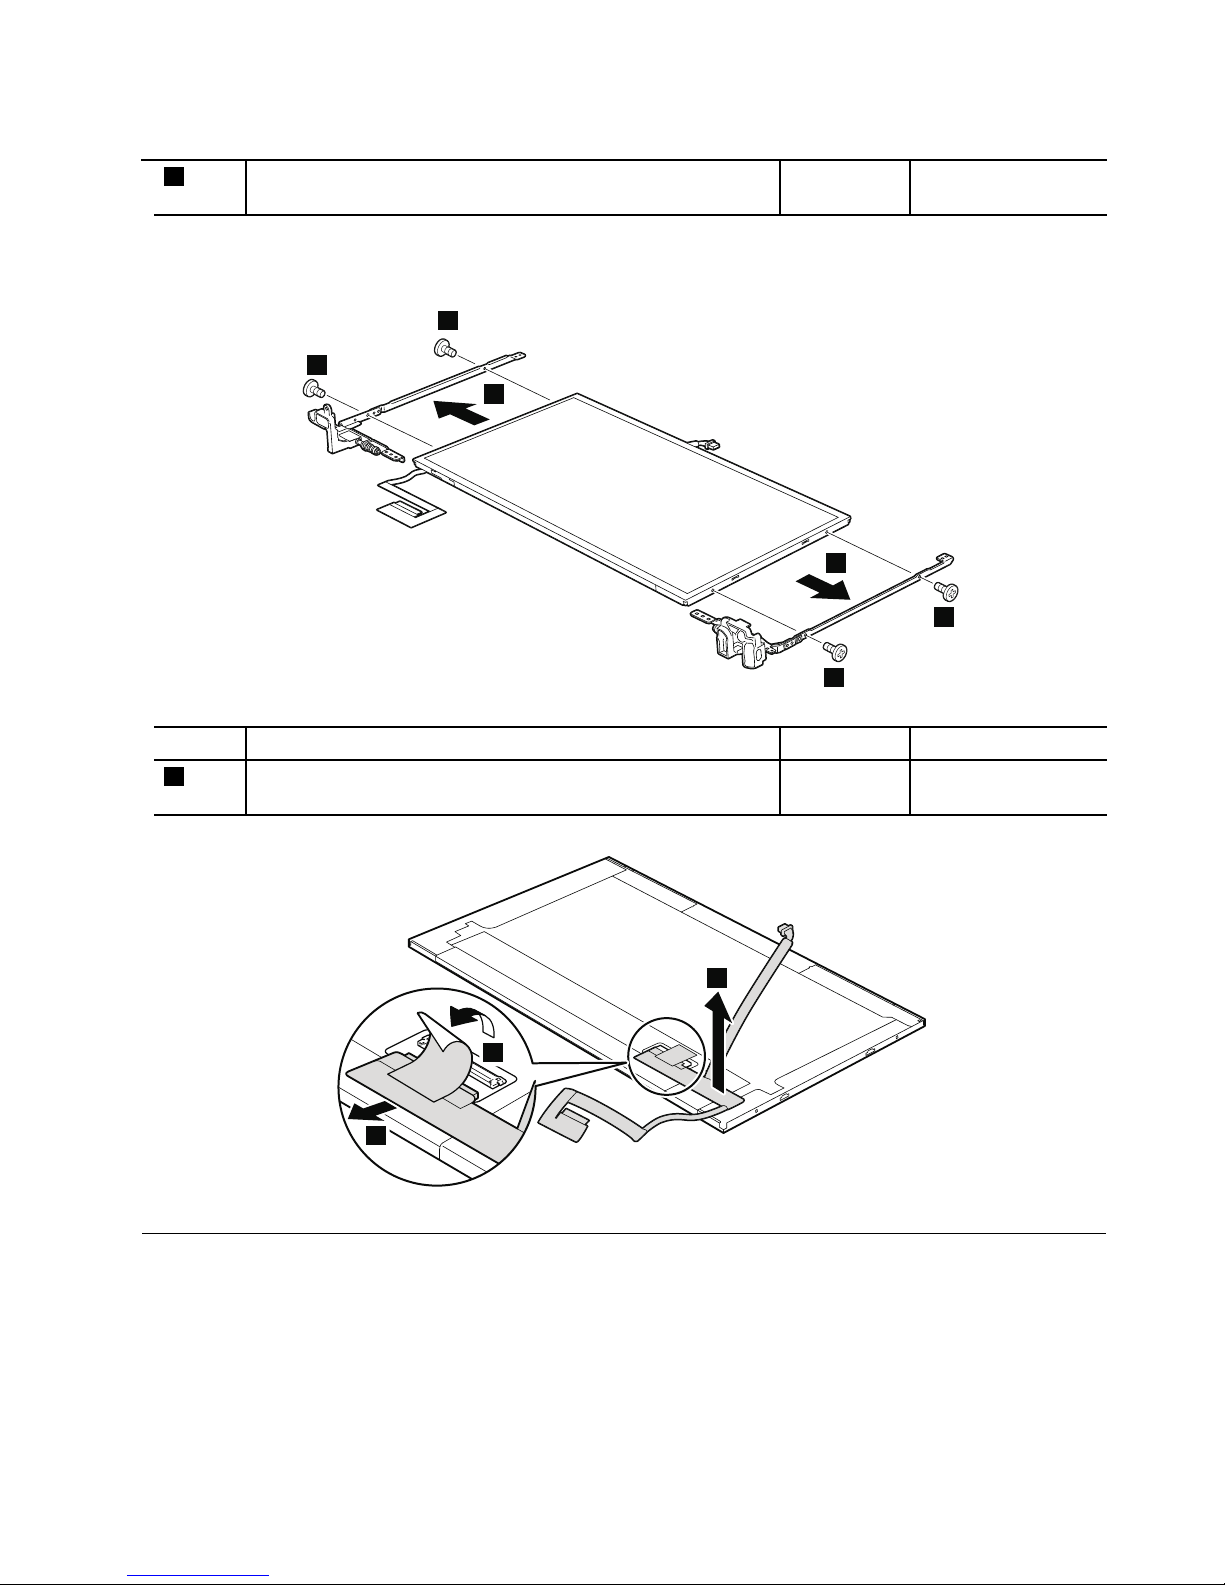
Table28.RemovalstepsofLCDpanel,hinges,andLCDcable(continued)
3
M2×4mm,wafer-head,nylon-coated(6)Silver
0.181Nm
(1.85kgfcm)
Wheninstalling:WhenattachingtheLCDpaneltothecover,presstheleftandrightedgescoveredwithmetal
gentlywithyourngers.DONOTpressthesurfaceofthepanelorapplyanyexcessiveforcetothepanel.
4
4
4
4
5
5
StepScrew(quantity)Color
Torque
4
M2×3mm,wafer-head,nylon-coated(4)Silver
0.181Nm
(1.85kgfcm)
6
7
8
2090AntennakitandLCDrearcoverassembly
Foraccess,removetheseFRUsinorder:
•“1010Batterypack”onpage54
•“1020Bottomdoor”onpage55
•“1030Harddiskdrive(HDD)”onpage58
•“1080Keyboard”onpage64
•“1090Palmrestassembly,power-onboardassembly(withcable),andmicrophone”onpage67
•“1100CRTboardassembly(withcable)”onpage72
Chapter8.RemovingandreplacingaFRU89
Page 96
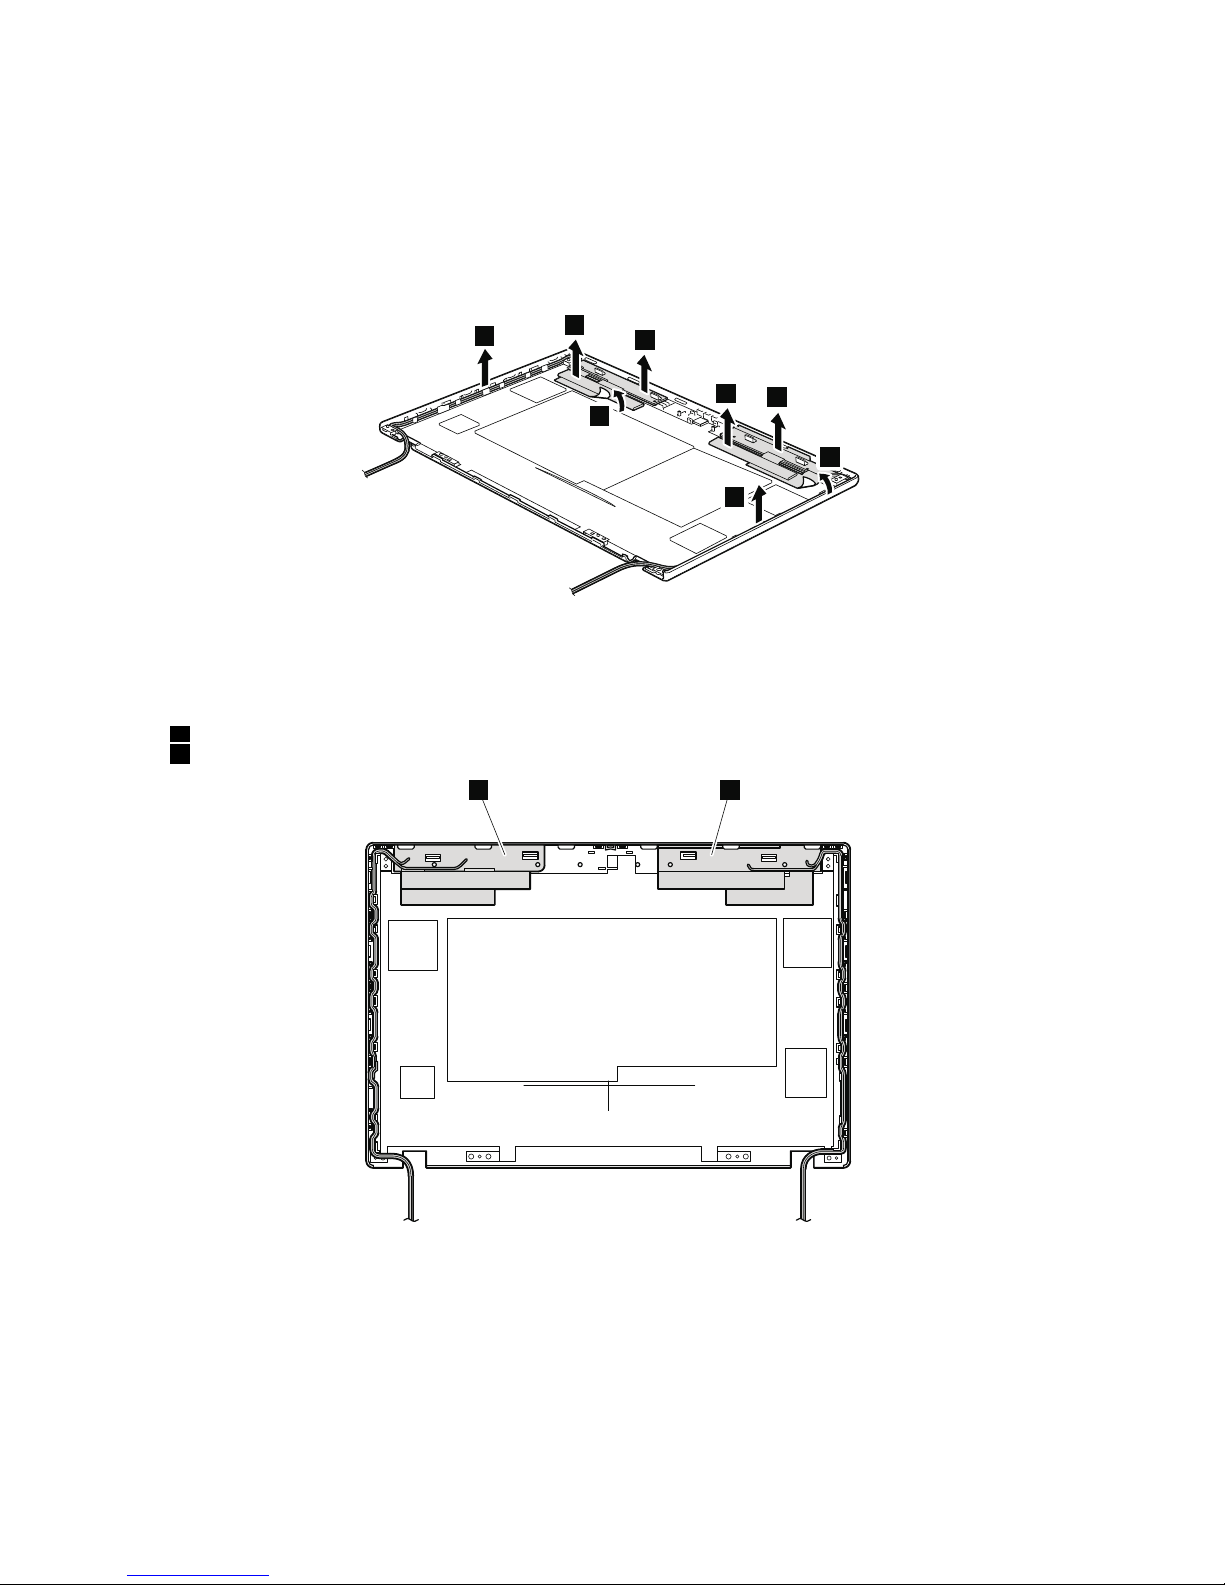
•“1110Speakerassembly”onpage73
•“1120I/Oboard(forThinkPadX120e)”onpage74
•“1130Systemboard,fanassembly,andbackupbattery”onpage75
•“2010LCDbezelassembly”onpage85
•“2030LCDpanel,hinges,andLCDcable”onpage87
Table29.RemovalstepsofantennakitandL CDrearcoverassembly
1
1
2
2
3
3
4
4
Wheninstalling:Whenyouinstalltheantennakit,routethecablesasshownintheguresbelow.Asyouroutethe
cables,makesurethattheyarenotsubjectedtoanytension.T ensioncouldcausethecablestobedamagedby
thecableguides,orawiretobebroken.
a:WirelessLANAUXantenna(black)andwirelessWANAUXantenna(blue)
b:WirelessLANMAINantenna(gray)andwirelessWANMAINantenna(red)
a b
90HardwareMaintenanceManual
Page 97
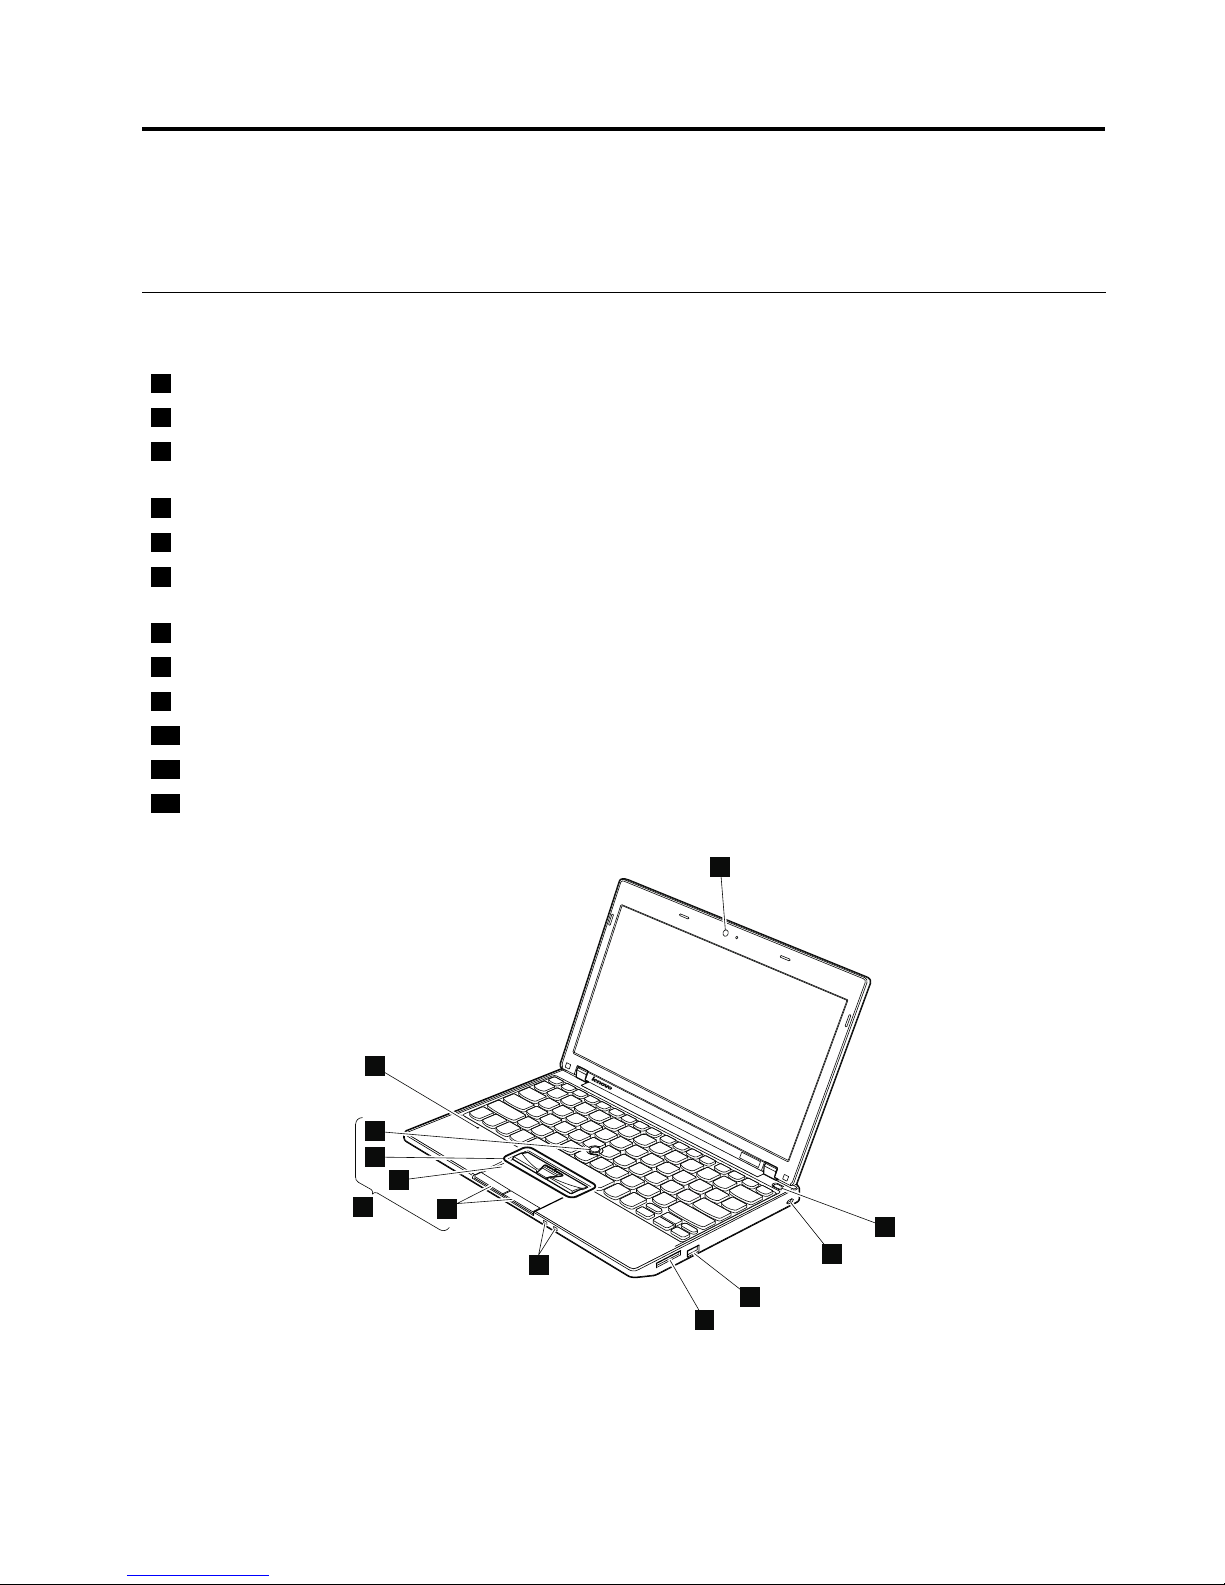
Chapter9.Locations
ThischapterpresentsthelocationofThinkPadX120efeaturesandhardware.
Frontview
1
Integratedcamera(forsomemodels)
2
Powerswitch
3
Securitykeyhole(forX100e)
Universalserialbus(USB)connector(forX120e)
4
Universalserialbus(USB)connector
5
4-in-1MediaCardReaderslot
6
Powerstatusindicators
Note:Forthedescriptionofeachindicator,seeChapter5“Statusindicators”onpage43.
7
Touchpadbuttons
8
Touchpad
9
TrackPointbuttons
10
TrackPointpointingstick
11
UltraNav
12
Built-indigitalmicrophone
1
2
3
4
5
6
7
8
9
10
11
12
©CopyrightLenovo2009,2011
91
Page 98
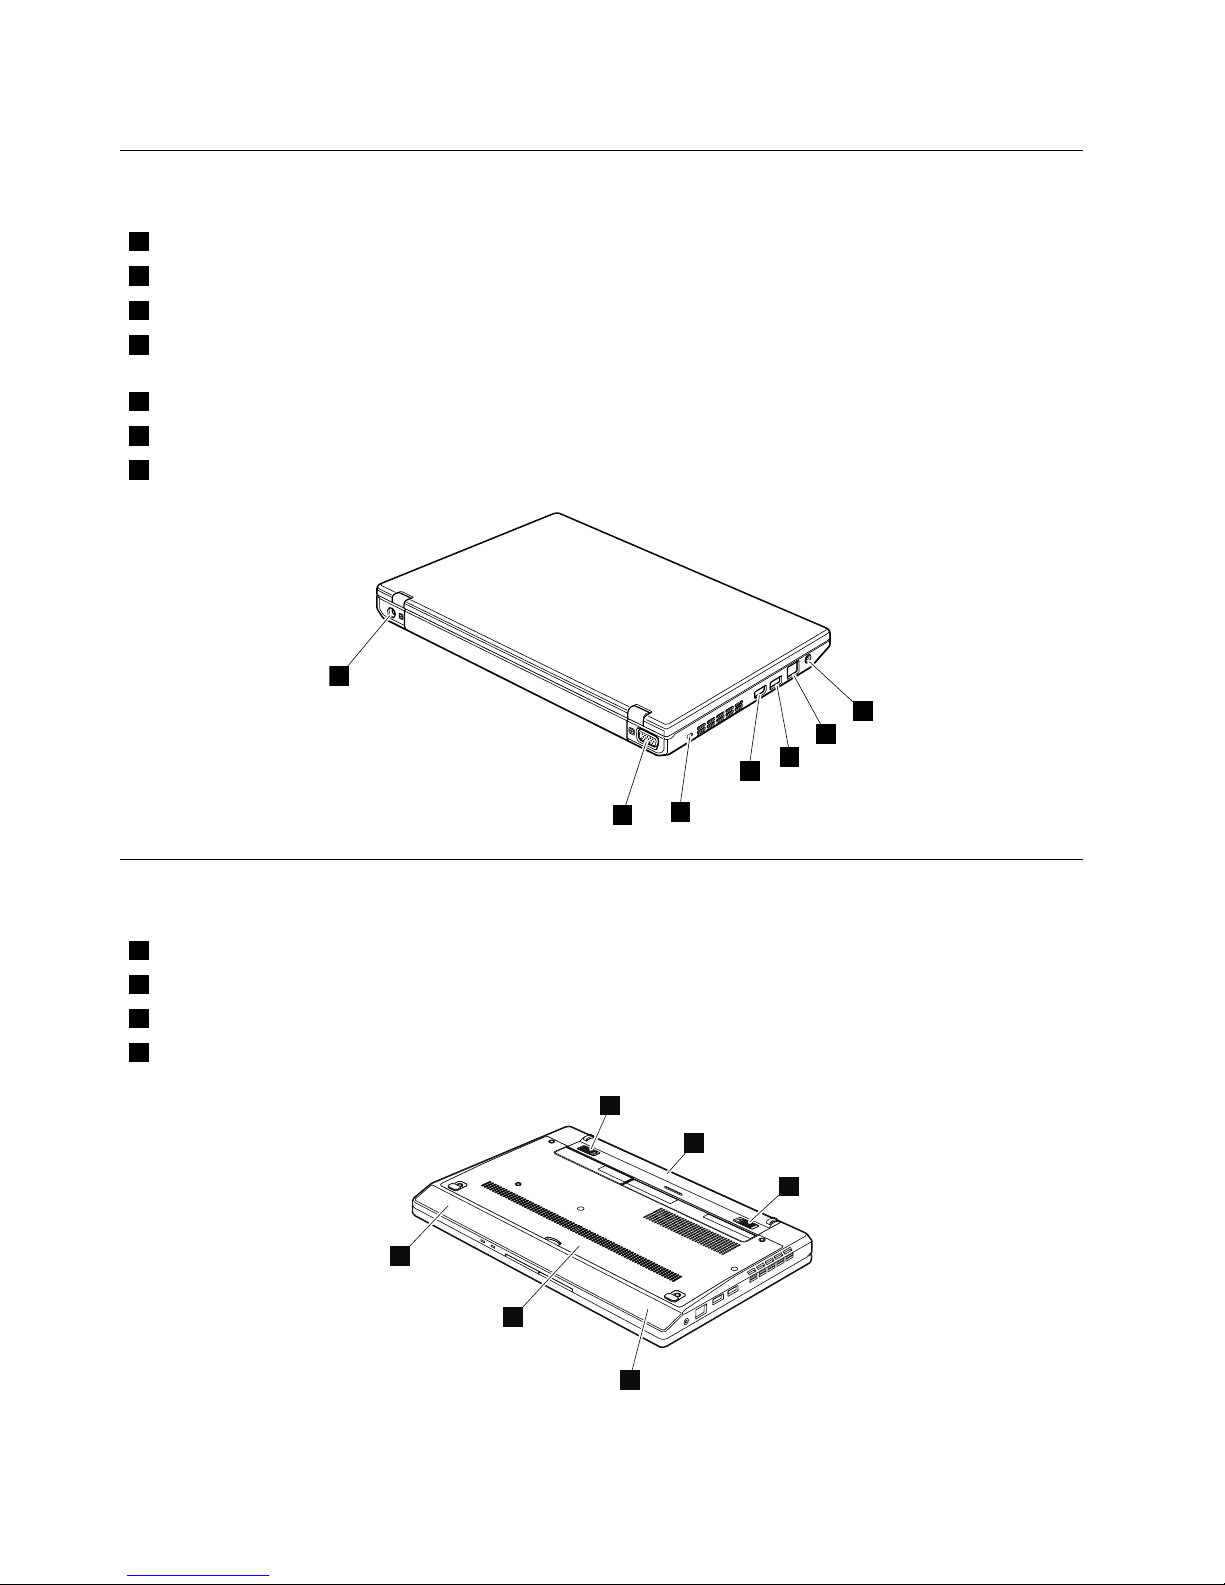
Rearview
1
Comboaudiojack
2
RJ-45(Ethernet)connector
3
Universalserialbus(USB)connector
4
Universalserialbus(USB)connector(forX100e)
High-denitionmultimediainterface(HDMI)port(forX120e)
5
Securitykeyhole(forX120e)
6
Externalmonitorconnector
7
ACpowerconnector
7
3
4
2
1
6
5
Bottomview
1
Batterypacklatch
2
Batterypack
3
Built-instereospeaker
4
Bottomdoor
3
3
4
1
1
2
92HardwareMaintenanceManual
Page 99

Chapter10.Partslist
Thischaptercontainsfollowinglistsoftheserviceparts.
•“Overall”onpage94
•“LCDFRUs”onpage109
•“Keyboard”onpage112
•“ACadapters”onpage113
•“Miscellaneousparts”onpage114
•“Powercords”onpage114
•“Recoverydiscs”onpage115
•“Commonservicetools”onpage123
Notes:
•EachFRUisavailableforalltypesormodels,unlessspecictypesormodelsarespecied.
•FRUwithspecicmodelslistedanddescribedasxxU(whereUisanexampleofacountrydesignator)
shouldbeusedforallmodelsendinginU.
•FRUwithspecicmodelslistedanddescribedas3Dx(where3Disanexampleofauniqueconguration)
shouldbeusedforallofthesemodels,unlessspeciccountryorregiondesignatorisspecied.
•ACRU(customerreplaceableunit)isidentiedbyasingleasterisk(*)ortwoasterisks(**)intheCRUID
column.AnNintheCRUIDcolumnmeansthatthepartisnotaCRU.Asingleasterisk(*)meansthatthe
partisaSelf-serviceCRU;twoasterisks(**)meansthatthepartisanOptional-serviceCRU.
ExternalCRUstatementtocustomers:
Someproblemswithyourproductcanberesolvedwithareplacementpartyoucaninstallyourself,called
a“CustomerReplaceableUnit”or“CRU.”SomeCRUsaredesignatedasSelf-serviceCRUsandothers
aredesignatedasOptional-serviceCRUs.InstallationofSelf-serviceCRUsisyourresponsibility;youmay
requestthatLenovoinstallsanOptional-serviceCRUaccordingtothewarrantyserviceforyourproduct.
WhereyouareinstallingtheCRU,LenovowillshiptheCRUtoyou.CRUinformationandreplacement
instructionsareshippedwithyourproductandareavailablefromLenovoatanytimeuponrequest.Y ou
mayndalistofCRUsinthepublicationsthatshipwithyourproductorathttp://www.lenovo.com/CRUs.
YoumayberequiredtoreturnthedefectivepartthatisreplacedbytheCRU.Whenreturnisrequired:
(1)returninstructions,aprepaidshippinglabel,andacontainerwillbeincludedwiththereplacement
CRU;and(2)youmaybechargedforthereplacementCRUifLenovodoesnotreceivethedefective
partwithinthirty(30)daysofyourreceiptofthereplacementCRU.SeeyourLenovoLimitedWarranty
documentationforfulldetails.
ThinkPadcomputerscontainthefollowingtypesofCRUs:
–Self-serviceCRUs:TheseCRUsunplugorareheldbynomorethantwoscrews.Examplesof
thesetypesofCRUsincludetheacpoweradapter,powercord,battery,andharddiskdrive.Other
Self-serviceCRUsdependingonproductdesignmayincludethememorymodule,wirelesscard,
keyboard,andpalmrestwithngerprintreaderandtouchpad.
–Optional-serviceCRUs:TheseCRUsareisolatedpartswithinthecomputerthatareconcealedbyan
accesspanelthatistypicallysecuredbymorethantwoscrews.Oncetheaccesspanelisremoved,
thespecicCRUisvisible.
•FRUsmarkedwith
OPareavailableasoptions.
©CopyrightLenovo2009,2011
93
Page 100
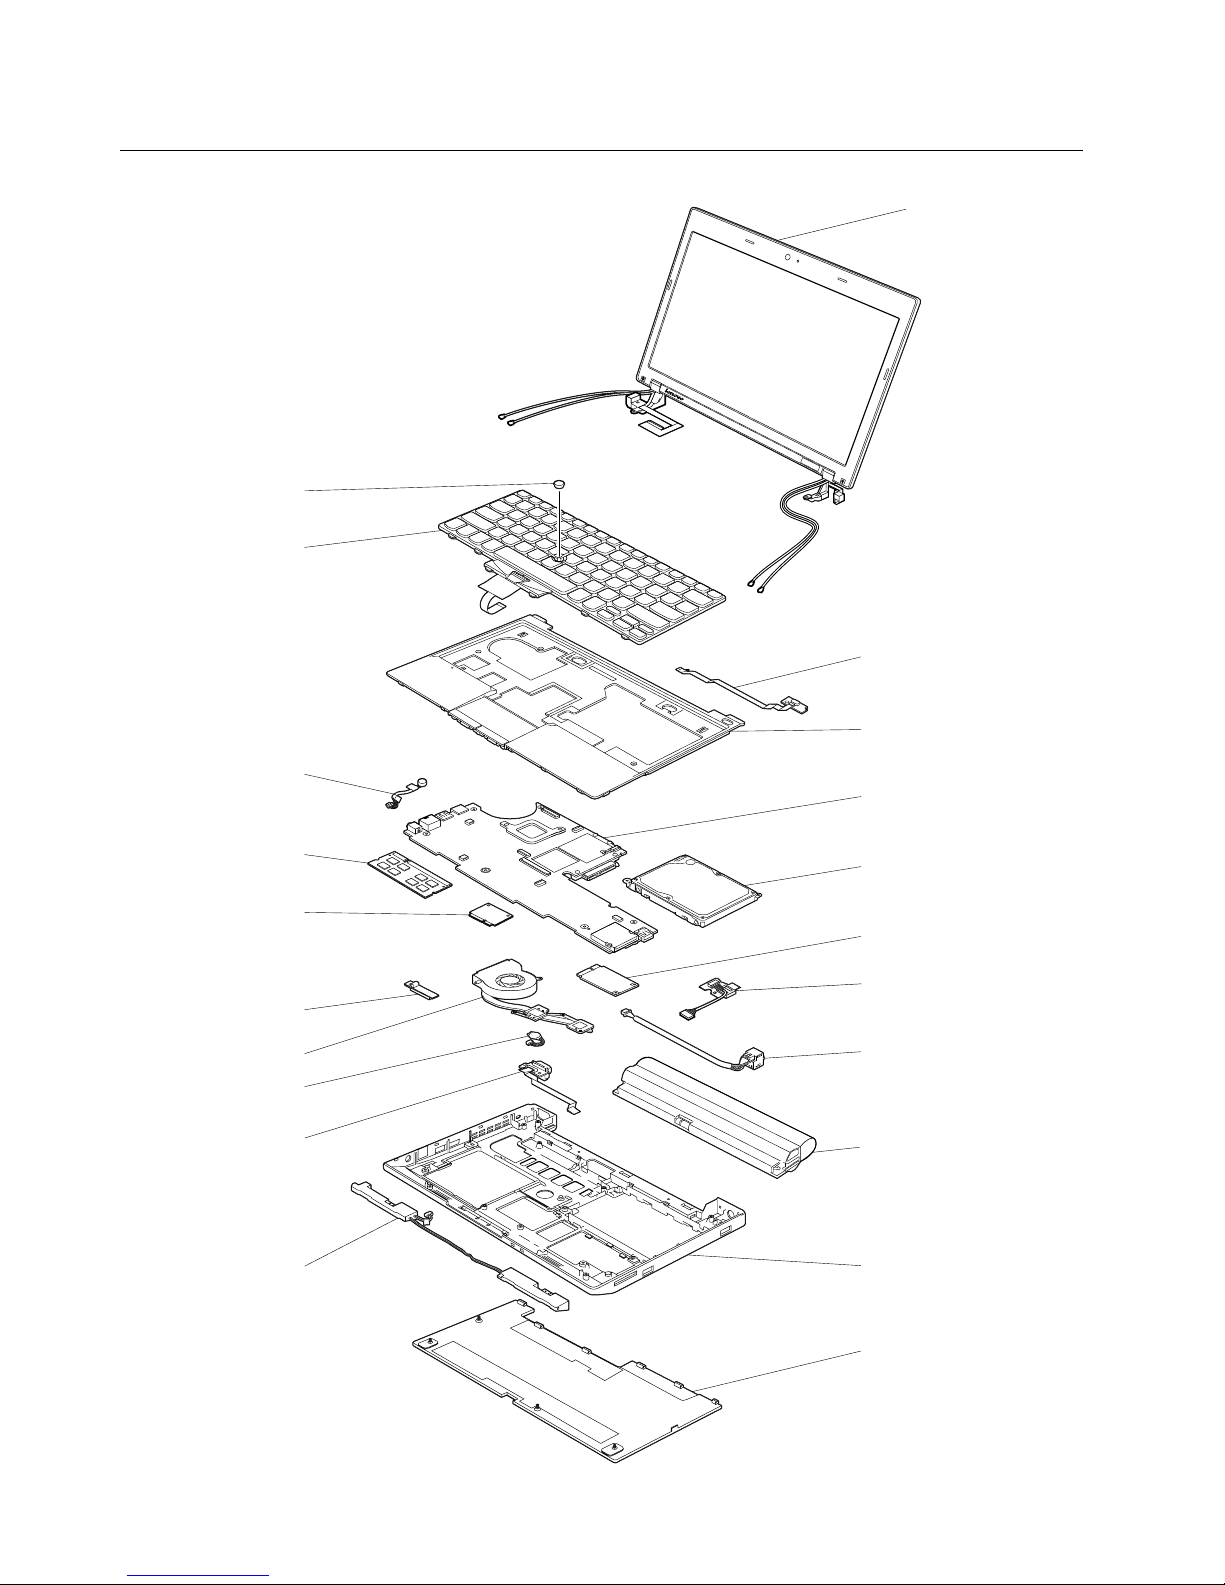
Overall
1
2
1
3
4
5
6
8
9
10
19
20
21
18
17
16
15
14
13
12
11
7
94HardwareMaintenanceManual
 Loading...