

Page 1

UserGuide
ThinkPadS531
Page 2

Notes:Beforeusingthisinformationandtheproductitsupports,besuretoreadandunderstandthe
following:
•Safety,Warranty,andSetupGuide
•RegulatoryNotice
•Importantsafetyinformation
•Notices
TheSafety,Warranty,andSetupGuideandtheRegulatoryNoticehavebeenuploadedtotheWebsite.To
refertothem,gotohttp://www.lenovo.com/ThinkPadUserGuidesandfollowtheinstructionsonthescreen.
ThirdEdition(January2014)
©CopyrightLenovo2013,2014.
LIMITEDANDRESTRICTEDRIGHTSNOTICE:IfdataorsoftwareisdeliveredpursuantaGeneralServicesAdministration
“GSA”contract,use,reproduction,ordisclosureissubjecttorestrictionssetforthinContractNo.GS-35F-05925.
Page 3

Contents
Readthisfirst..............v
Importantsafetyinformation..........vi
Conditionsthatrequireimmediateaction..vii
Safetyguidelines............vii
Chapter1.Productoverview......1
Locatingcomputercontrols,connectors,and
indicators..................1
Frontview................1
Right-sideview..............3
Left-sideview..............4
Bottomview...............6
Rearview................7
Statusindicators.............7
Locatingimportantproductinformation......8
Machinetypeandmodellabel........8
FCCIDandICCertificationinformation....8
CertificateofAuthenticitylabel.......9
Features.................10
Specifications...............11
Operatingenvironment...........12
Lenovoprograms.............12
AccessingLenovoprogramsontheWindows
7operatingsystem...........12
AccessingLenovoprogramsontheWindows
8operatingsystem...........14
AnintroductiontoLenovoprograms....14
Chapter2.Usingyourcomputer...17
Registeringyourcomputer..........17
Frequentlyaskedquestions.........17
Specialkeys...............19
UsingtheThinkPadpointingdevice......20
Powermanagement............22
Checkingthebatterystatus........22
Usingtheacpoweradapter........22
Chargingthebattery..........23
Maximizingthebatterylife........23
Managingthebatterypower.......23
Power-savingmodes..........24
Connectingtothenetwork..........25
Ethernetconnections..........25
Wirelessconnections..........26
Attachinganexternalmonitor.........29
Changingdisplaysettings........30
UsingtheExtenddesktopfunction.......30
Settingupapresentation..........31
UsingtheAMDSwitchableGraphicsfeature...31
Usingaudiofeatures............31
Usingtheintegratedcamera.........32
Usingamediacard.............32
Insertingamediacard..........33
Removingamediacard.........33
Chapter3.Youandyourcomputer..35
Accessibilityandcomfort..........35
Ergonomicinformation..........35
Comfort...............36
Accessibilityinformation.........36
Travelingwithyourcomputer.........37
Traveltips...............37
Travelaccessories...........38
Chapter4.Security..........39
Attachingamechanicallock.........39
Usingpasswords..............39
Passwordsandsleepmode........39
Typingpasswords...........39
Power-onpassword...........40
Harddiskpasswords..........40
Supervisorpassword..........42
Harddisksecurity.............44
Settingthesecuritychip...........45
Usingthefingerprintreader..........46
Noticeondeletingdatafromyourharddiskdrive,
hybriddrive,orsolid-statedrive........48
Usingfirewalls...............48
Protectingdataagainstviruses........49
Chapter5.Recoveryoverview....51
RecoveryoverviewfortheWindows7operating
system..................51
Creatingandusingarecoverymedia....51
Performingbackupandrecoveryoperations.52
UsingtheRescueandRecoveryworkspace.53
Creatingandusingarescuemedium....54
Reinstallingpreinstalledapplicationsand
devicedrivers.............55
Solvingrecoveryproblems........55
RecoveryoverviewfortheWindows8operating
system..................56
Refreshingyourcomputer........56
Resettingyourcomputertothefactorydefault
settings................56
Advancedstartupoptions........56
©CopyrightLenovo2013
i
Page 4

Chapter6.Replacingdevices.....59
Staticelectricityprevention..........59
Disablingthebuilt-inbattery.........59
Replacingthebasecoverassembly......59
Replacingtheharddiskdrive,hybriddrive,or
solid-statedrive..............61
Replacingamemorymodule.........63
ReplacingawirelessLANcard........64
Chapter7.Advancedconfiguration..67
Installinganewoperatingsystem.......67
Beforeyoubegin............67
InstallingtheWindows7operatingsystem..68
InstallingtheWindows8operatingsystem..69
Installingdevicedrivers...........69
Installingthedriverforthe4-in-1mediacard
reader................69
InstallingthedriverforUSB3.0(forWindows
7)..................70
InstallingtheThinkPadmonitorfilefor
Windows2000/XP/Vista/7/8(forWindows
7)..................70
Installingotherdriversandsoftware(for
Windows7)..............70
ThinkPadSetup..............71
Mainmenu..............71
Configmenu..............72
Date/Timemenu............75
Securitymenu.............76
Startupmenu.............79
Restartmenu.............81
UpdatingyoursystemUEFIBIOS.....82
Usingsystemmanagement..........82
Systemmanagement..........82
Settingmanagementfeatures.......83
Chapter8.Preventingproblems...85
Generaltipsforpreventingproblems......85
Makingsuredevicedriversarecurrent.....86
Takingcareofyourcomputer.........87
Cleaningthecoverofyourcomputer....88
Chapter9.Troubleshootingcomputer
problems...............91
Diagnosingproblems............91
Troubleshooting..............91
Computerstopsresponding.......91
Spillsonthekeyboard..........92
Errormessages............92
Errorswithoutmessages.........94
Beeperrors..............95
Memorymoduleproblems........95
Networkingproblems..........96
Problemswiththekeyboardandotherpointing
devices................98
Problemswiththedisplayandmultimedia
devices................98
Fingerprintreaderproblems........103
Batteryandpowerproblems.......103
Problemswithdrivesandotherstorage
devices................106
Asoftwareproblem...........107
Problemswithportsandconnectors....107
Chapter10.Gettingsupport....109
BeforeyoucontactLenovo..........109
Gettinghelpandservice...........110
Usingdiagnosticprograms........110
LenovoSupportWebsite.........110
CallingLenovo.............110
FindingThinkPadoptions........111
Purchasingadditionalservices........112
AppendixA.Regulatory
information.............113
Wirelessrelatedinformation.........113
LocationoftheUltraConnectwireless
antennas...............114
Locatingwirelessregulatorynotices....115
Exportclassificationnotice..........115
Electronicemissionnotices..........115
FederalCommunicationsCommission
DeclarationofConformity........115
IndustryCanadaClassBemissioncompliance
statement...............115
EuropeanUnion-Compliancetothe
ElectromagneticCompatibilityDirective...116
GermanClassBcompliancestatement...116
KoreaClassBcompliancestatement....117
JapanVCCIClassBcompliancestatement..117
Japancompliancestatementforproducts
whichconnecttothepowermainswith
ratedcurrentlessthanorequalto20Aper
phase................117
Lenovoproductserviceinformationfor
Taiwan................117
AppendixB.WEEEandrecycling
statements.............119
ImportantWEEEinformation.........119
Japanrecyclingstatements.........119
RecyclinginformationforBrazil........120
BatteryrecyclinginformationfortheEuropean
Union..................120
BatteryrecyclinginformationforTaiwan.....121
iiUserGuide
Page 5

BatteryrecyclinginformationfortheUnitedStates
andCanada................121
AppendixC.ENERGYSTARmodel
information.............123
AppendixD.Notices.........125
Trademarks................126
AppendixE.RestrictionofHazardous
SubstancesDirective(RoHS)....127
EuropeanUnionRoHS...........127
ChinaRoHS................127
TurkishRoHS...............127
UkraineRoHS...............128
IndiaRoHS................128
AppendixF .Eurasiancompliance
mark.................129
©CopyrightLenovo2013
iii
Page 6

ivUserGuide
Page 7
Readthisfirst
Besuretofollowtheimportanttipsgivenheretogetthemostuseandenjoymentoutofyourcomputer.
Failuretodosomightleadtodiscomfortorinjury,orcauseyourcomputertofail.
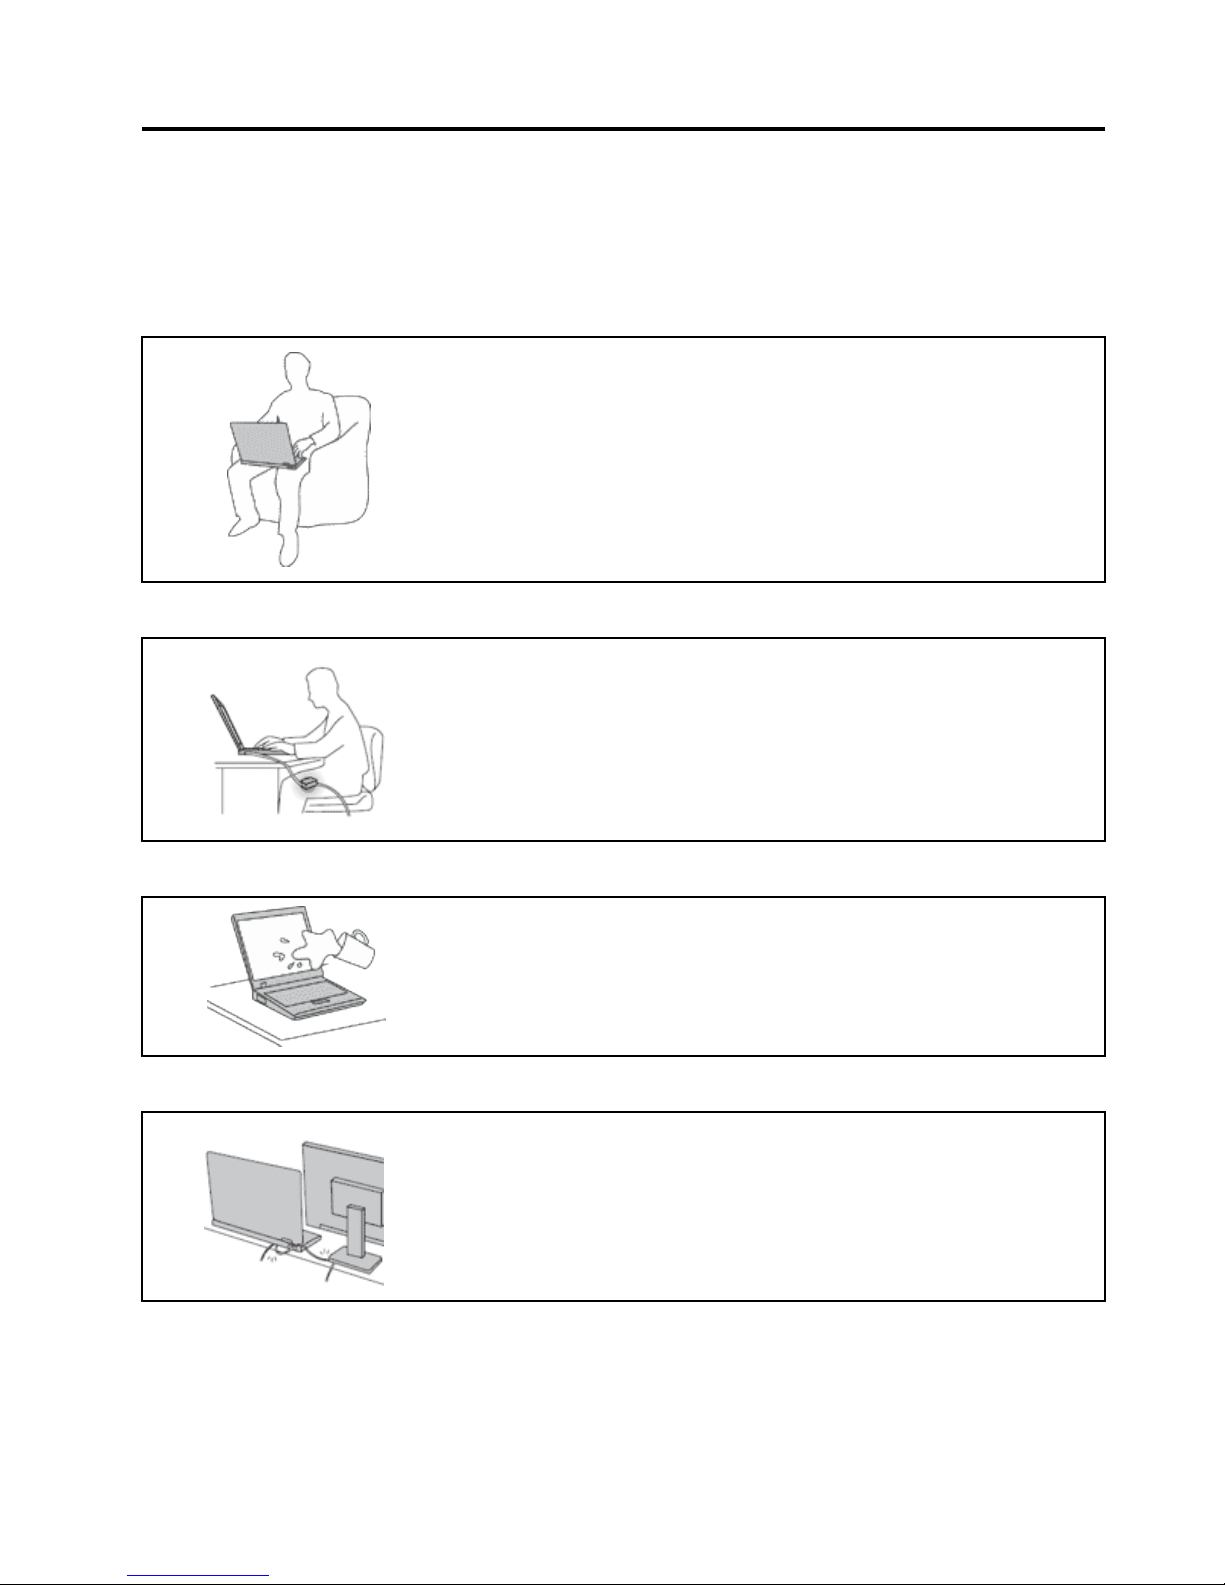
Protectyourselffromtheheatthatyourcomputergenerates.
Whenyourcomputeristurnedonorthebatteryischarging,thebase,thepalm
rest,andsomeotherpartsmaybecomehot.Thetemperaturetheyreach
dependsontheamountofsystemactivityandthelevelofchargeinthebattery.
Extendedcontactwithyourbody,eventhroughclothing,couldcause
discomfortorevenaskinburn.
•Avoidkeepingyourhands,yourlap,oranyotherpartofyourbodyin
contactwithahotsectionofthecomputerforanyextendedtime.
•Periodicallytakehandsfromusingthekeyboardbyliftingyourhandsfrom
thepalmrest.
Protectyourselffromtheheatgeneratedbytheacpoweradapter.
Whentheacpoweradapterisconnectedtoanelectricaloutletandyour
computer,itgeneratesheat.
Extendedcontactwithyourbody,eventhroughclothing,maycauseaskin
burn.
•Donotplacetheacpoweradapterincontactwithanypartofyourbody
whileitisinuse.
•Neveruseittowarmyourbody.
Preventyourcomputerfromgettingwet.
Toavoidspillsandthedangerofelectricalshock,keepliquidsawayfromyour
computer.
Protectthecablesfrombeingdamaged.
Applyingstrongforcetocablesmaydamageorbreakthem.
Routecommunicationlines,orthecablesofanacpoweradapter,amouse,a
keyboard,aprinter,oranyotherelectronicdevice,sothattheycannotbewalked
on,trippedover,pinchedbyyourcomputerorotherobjects,orinanyway
subjectedtotreatmentthatcouldinterferewiththeoperationofyourcomputer.
©CopyrightLenovo2013
v
Page 8
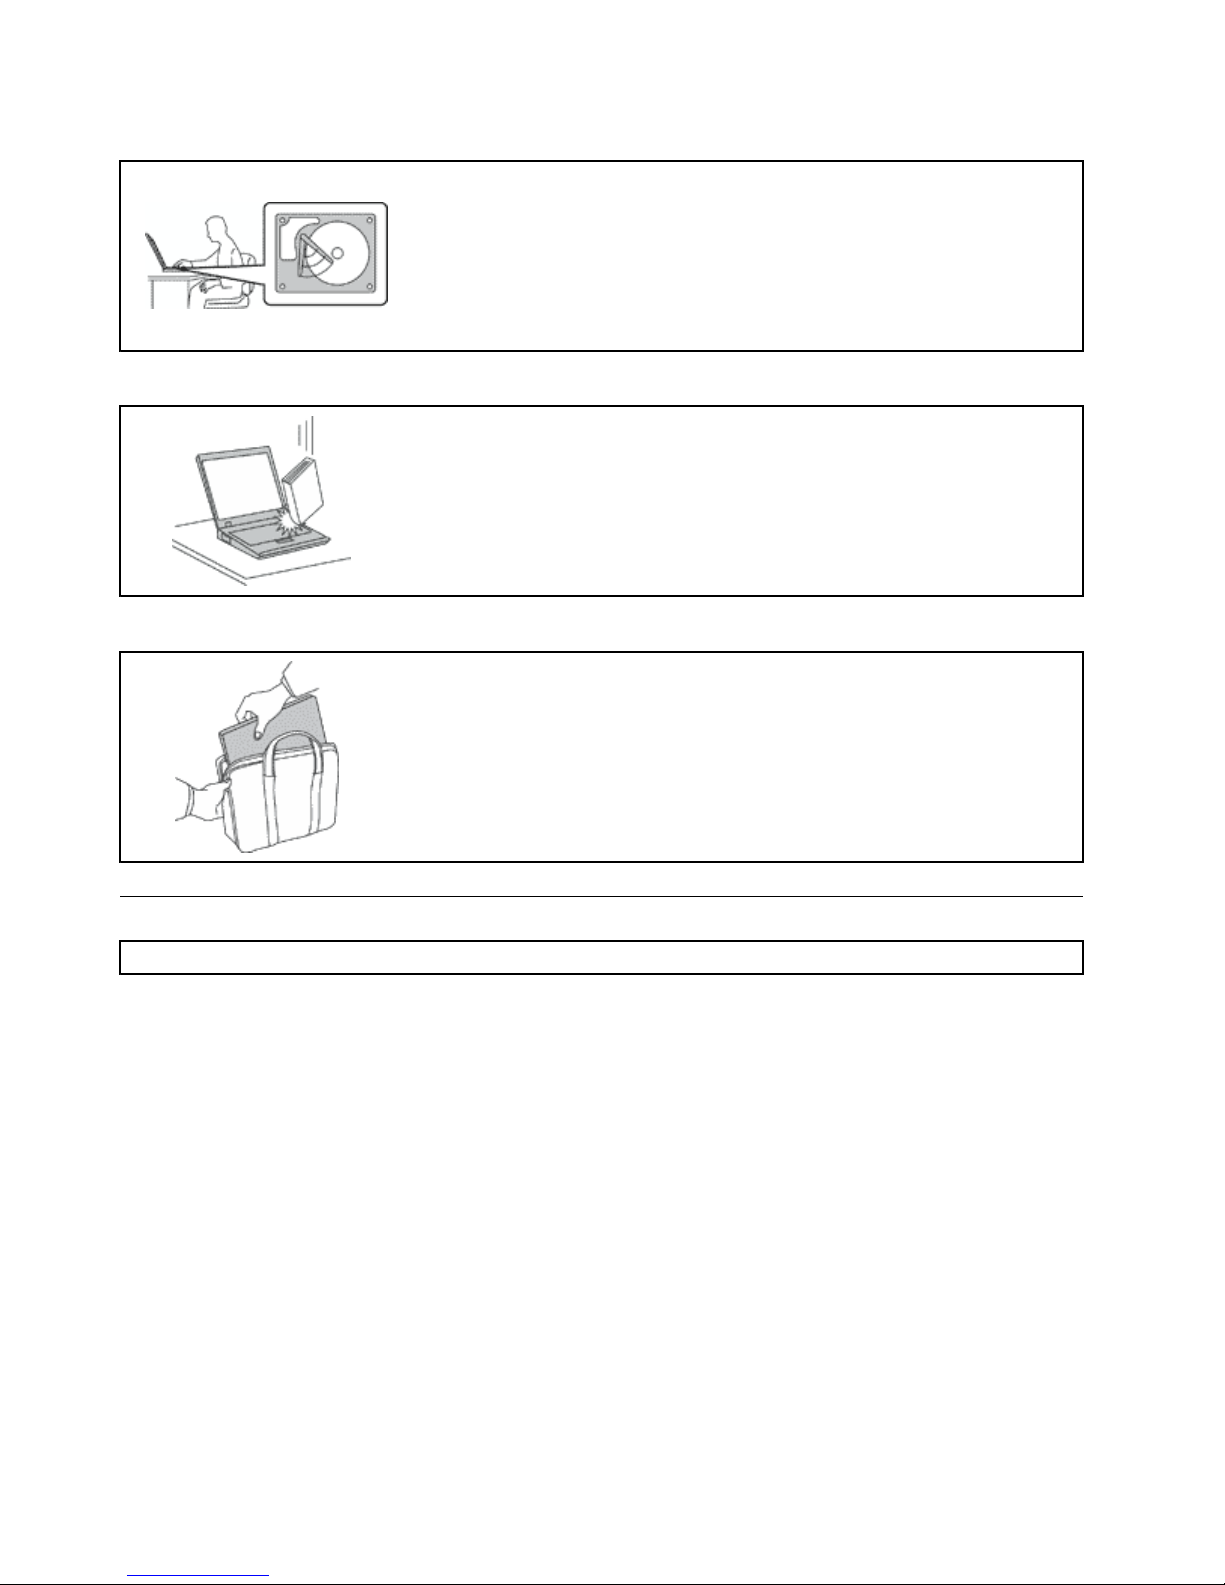
Protectyourcomputeranddatawhenmovingit.
Beforemovingacomputerequippedwithaharddiskdrive,hybriddrive,orsolid
statedrive,dooneofthefollowing:
•Turnitoff.
•Putitinsleepmode.
•Putitinhibernationmode.
Thiswillhelptopreventdamagetothecomputer,andpossiblelossofdata.
Handleyourcomputergently.
Donotdrop,bump,scratch,twist,hit,vibrate,push,orplaceheavyobjectson
yourcomputer,display,orexternaldevices.
Carryyourcomputercarefully.
•Useaqualitycarryingcasethatprovidesadequatecushioningandprotection.
•Donotpackyourcomputerinatightlypackedsuitcaseorbag.
•Beforeputtingyourcomputerinacarryingcase,ensurethatitisoff,insleep
mode,orinhibernationmode.Donotputacomputerinacarryingcasewhileit
isturnedon.
Importantsafetyinformation
Note:Readtheimportantsafetyinformationfirst.
Thisinformationcanhelpyousafelyuseyournotebookcomputer.Followandretainallinformationincluded
withyourcomputer.Theinformationinthisdocumentdoesnotalterthetermsofyourpurchaseagreement
ortheLenovo
®
LimitedWarranty.Formoreinformation,see“WarrantyInformation”intheSafety,Warranty,
andSetupGuidethatcomeswithyourcomputer.
Customersafetyisimportant.Ourproductsaredevelopedtobesafeandeffective.However,personal
computersareelectronicdevices.Powercords,poweradapters,andotherfeaturescancreatepotential
safetyrisksthatcanresultinphysicalinjuryorpropertydamage,especiallyifmisused.Toreducethese
risks,followtheinstructionsincludedwithyourproduct,observeallwarningsontheproductandinthe
operatinginstructions,andreviewtheinformationincludedinthisdocumentcarefully.Bycarefullyfollowing
theinformationcontainedinthisdocumentandprovidedwithyourproduct,youcanhelpprotectyourself
fromhazardsandcreateasafercomputerworkenvironment.
Note:Thisinformationincludesreferencestopoweradaptersandbatteries.Inadditiontonotebook
computers,someproducts(suchasspeakersandmonitors)shipwithexternalpoweradapters.Ifyouhave
suchaproduct,thisinformationappliestoyourproduct.Inaddition,computerproductscontainacoin-sized
internalbatterythatprovidespowertothesystemclockevenwhenthecomputerisunplugged,sothe
batterysafetyinformationappliestoallcomputerproducts.
viUserGuide
Page 9

Conditionsthatrequireimmediateaction
Productscanbecomedamagedduetomisuseorneglect.Someproductdamageisseriousenough
thattheproductshouldnotbeusedagainuntilithasbeeninspectedand,ifnecessary,repairedby
anauthorizedservicer.
Aswithanyelectronicdevice,paycloseattentiontotheproductwhenitisturnedon.Onveryrare
occasions,youmightnoticeanodororseeapuffofsmokeorsparksventfromyourproduct.Oryou
mighthearsoundslikepopping,crackingorhissing.Theseconditionsmightmerelymeanthatan
internalelectroniccomponenthasfailedinasafeandcontrolledmanner.Or ,theymightindicate
apotentialsafetyissue.However,donottakerisksorattempttodiagnosethesituationyourself.
ContacttheCustomerSupportCenterforfurtherguidance.ForalistofServiceandSupportphone
numbers,seethefollowingWebsite:
http://www.lenovo.com/support/phone
Frequentlyinspectyourcomputeranditscomponentsfordamageorwearorsignsofdanger.
Ifyouhaveanyquestionabouttheconditionofacomponent,donotusetheproduct.Contact
theCustomerSupportCenterortheproductmanufacturerforinstructionsonhowtoinspectthe
productandhaveitrepaired,ifnecessary.
Intheunlikelyeventthatyounoticeanyofthefollowingconditions,orifyouhaveanysafety
concernswithyourproduct,stopusingtheproductandunplugitfromthepowersourceand
telecommunicationlinesuntilyoucanspeaktotheCustomerSupportCenterforfurtherguidance.
•Powercords,plugs,poweradapters,extensioncords,surgeprotectors,orpowersuppliesthatare
cracked,broken,ordamaged.
•Signsofoverheating,smoke,sparks,orfire.
•Damagetoabattery(suchascracks,dents,orcreases),dischargefromabattery,orabuildupofforeign
substancesonthebattery.
•Acracking,hissingorpoppingsound,orstrongodorthatcomesfromtheproduct.
•Signsthatliquidhasbeenspilledoranobjecthasfallenontothecomputerproduct,thepowercordor
poweradapter.
•Thecomputerproduct,powercord,orpoweradapterhasbeenexposedtowater.
•Theproducthasbeendroppedordamagedinanyway.
•Theproductdoesnotoperatenormallywhenyoufollowtheoperatinginstructions.
Note:Ifyounoticetheseconditionswithaproduct(suchasanextensioncord)thatisnotmanufacturedfor
orbyLenovo,stopusingthatproductuntilyoucancontacttheproductmanufacturerforfurtherinstructions,
oruntilyougetasuitablereplacement.
Safetyguidelines
Alwaysobservethefollowingprecautionstoreducetheriskofinjuryandpropertydamage.
Serviceandupgrades
DonotattempttoserviceaproductyourselfunlessinstructedtodosobytheCustomerSupportCenteror
yourdocumentation.OnlyuseaServiceProviderwhoisapprovedtorepairyourparticularproduct.
Note:Somecomputerpartscanbeupgradedorreplacedbythecustomer.Upgradestypicallyare
referredtoasoptions.ReplacementpartsapprovedforcustomerinstallationarereferredtoasCustomer
ReplaceableUnits,orCRUs.Lenovoprovidesdocumentationwithinstructionswhenitisappropriatefor
customerstoinstalloptionsorreplaceCRUs.Youmustcloselyfollowallinstructionswheninstallingor
replacingparts.TheOffstateofapowerindicatordoesnotnecessarilymeanthatvoltagelevelsinsidea
productarezero.Beforeyouremovethecoversfromaproductequippedwithapowercord,alwaysensure
©CopyrightLenovo2013
vii
Page 10

thatthepoweristurnedoffandthattheproductisunpluggedfromanypowersource.Ifyouhaveany
questionsorconcerns,contacttheCustomerSupportCenter.
Althoughtherearenomovingpartsinyourcomputerafterthepowercordhasbeendisconnected,the
followingwarningsarerequiredforyoursafety.
CAUTION:
Hazardousmovingparts.Keepfingersandotherbodypartsaway.
CAUTION:
BeforereplacinganyCRUs,turnoffthecomputerandwaitthreetofiveminutestoletthecomputer
coolbeforeopeningthecover.
Powercordsandpoweradapters
DANGER
Useonlythepowercordsandpoweradapterssuppliedbytheproductmanufacturer.
Thepowercordsshallbesafetyapproved.ForGermany,itshallbeH05VV-F,3G,0.75mm
2
,or
better.Forothercountries,thesuitabletypesshallbeusedaccordingly.
Neverwrapapowercordaroundapoweradapterorotherobject.Doingsocanstressthecordin
waysthatcancausethecordtofray,crack,orcrimp.Thiscanpresentasafetyhazard.
Alwaysroutepowercordssothattheywillnotbewalkedon,trippedover,orpinchedbyobjects.
Protectpowercordsandpoweradaptersfromliquids.Forinstance,donotleaveyourpowercord
orpoweradapternearsinks,tubs,toilets,oronfloorsthatarecleanedwithliquidcleansers.
Liquidscancauseashortcircuit,particularlyifthepowercordorpoweradapterhasbeenstressed
bymisuse.Liquidsalsocancausegradualcorrosionofpowercordterminalsand/ortheconnector
terminalsonapoweradapter,whichcaneventuallyresultinoverheating.
Alwaysconnectpowercordsandsignalcablesinthecorrectorderandensurethatallpowercord
connectorsaresecurelyandcompletelypluggedintoreceptacles.
Donotuseanypoweradapterthatshowscorrosionattheacinputpinsorshowssignsof
overheating(suchasdeformedplastic)attheacinputpinsoranywhereonthepoweradapter.
Donotuseanypowercordswheretheelectricalcontactsoneitherendshowsignsofcorrosionor
overheatingorwherethepowercordappearstohavebeendamagedinanyway.
viiiUserGuide
Page 11

Topreventpossibleoverheating,donotcoverthepoweradapterwithclothingorotherobjects
whenthepoweradapterispluggedintoanelectricaloutlet.
Extensioncordsandrelateddevices
Ensurethatextensioncords,surgeprotectors,uninterruptiblepowersupplies,andpowerstripsthatyouuse
areratedtohandletheelectricalrequirementsoftheproduct.Neveroverloadthesedevices.Ifpowerstrips
areused,theloadshouldnotexceedthepowerstripinputrating.Consultanelectricianformoreinformation
ifyouhavequestionsaboutpowerloads,powerrequirements,andinputratings.
Plugsandoutlets
DANGER
Ifareceptacle(poweroutlet)thatyouintendtousewithyourcomputerequipmentappearstobe
damagedorcorroded,donotusetheoutletuntilitisreplacedbyaqualifiedelectrician.
Donotbendormodifytheplug.Iftheplugisdamaged,contactthemanufacturertoobtain
areplacement.
Donotshareanelectricaloutletwithotherhomeorcommercialappliancesthatdrawlargeamounts
ofelectricity;otherwise,unstablevoltagemightdamageyourcomputer,data,orattacheddevices.
Someproductsareequippedwithathree-prongedplug.Thisplugfitsonlyintoagrounded
electricaloutlet.Thisisasafetyfeature.Donotdefeatthissafetyfeaturebytryingtoinsertitinto
anon-groundedoutlet.Ifyoucannotinserttheplugintotheoutlet,contactanelectricianforan
approvedoutletadapterortoreplacetheoutletwithonethatenablesthissafetyfeature.Never
overloadanelectricaloutlet.Theoverallsystemloadshouldnotexceed80percentofthebranch
circuitrating.Consultanelectricianformoreinformationifyouhavequestionsaboutpowerloads
andbranchcircuitratings.
Besurethatthepoweroutletyouareusingisproperlywired,easilyaccessible,andlocatedclose
totheequipment.Donotfullyextendpowercordsinawaythatwillstressthecords.
Besurethatthepoweroutletprovidesthecorrectvoltageandcurrentfortheproductyouare
installing.
Carefullyconnectanddisconnecttheequipmentfromtheelectricaloutlet.
Powersupplystatement
DANGER
Neverremovethecoveronapowersupplyoranypartthathasthefollowinglabelattached.
©CopyrightLenovo2013
ix
Page 12

Hazardousvoltage,current,andenergylevelsarepresentinsideanycomponentthathasthislabel
attached.Therearenoserviceablepartsinsidethesecomponents.Ifyoususpectaproblemwith
oneoftheseparts,contactaservicetechnician.
Externaldevices
CAUTION:
DonotconnectordisconnectanyexternaldevicecablesotherthanUSBcablewhilethecomputer
powerison;otherwise,youmightdamageyourcomputer .Toavoidpossibledamagetoattached
devices,waitatleastfivesecondsafterthecomputerisshutdowntodisconnectexternaldevices.
Generalbatterynotice
DANGER
PersonalcomputersmanufacturedbyLenovocontainacoincellbatterytoprovidepowerto
thesystemclock.Inaddition,manymobileproducts,suchasnotebookcomputers,utilizea
rechargeablebatterypacktoprovidesystempowerwheninportablemode.Batteriessuppliedby
Lenovoforusewithyourproducthavebeentestedforcompatibilityandshouldonlybereplaced
withapprovedparts.
Neverattempttoopenorserviceanybattery.Donotcrush,puncture,orincineratebatteriesor
shortcircuitthemetalcontacts.Donotexposethebatterytowaterorotherliquids.Onlyrecharge
thebatterypackstrictlyaccordingtoinstructionsincludedintheproductdocumentation.
Batteryabuseormishandlingcancausethebatterytooverheat,whichcancausegassesorflame
to“vent”fromthebatterypackorcoincell.Ifyounoticeanysignsofbulging,leakageorcorrosion
ontheexterioroftheproduct,thismaybetheresultofaninternalbatteryfault.Ifthisoccurs,stop
usingtheproductimmediatelyandpleasecontacttheLenovoSupportteamforfurtherinstructions.
Factoryreplacementofthebatteriesmayberequired.
Batteriescandegradewhentheyareleftunusedforlongperiodsoftime.Forsomerechargeable
batteries(particularlyLithiumIonbatteries),leavingabatteryunusedinadischargedstatecould
increasetheriskofabatteryshortcircuit,whichcouldshortenthelifeofthebatteryandcanalso
poseasafetyhazard.DonotletrechargeableLithium-Ionbatteriescompletelydischargeorstore
thesebatteriesinadischargedstate.
Built-inrechargeablebatterynotice
DANGER
Donotattempttoreplacetheinternalrechargeablelithiumionbatteries.ContactLenovoSupport
forfactoryreplacement.
Lithiumcoincellbatterynotice
ThefollowingstatementappliestousersinthestateofCalifornia,U.S.A.
CaliforniaPerchlorateInformation:
Productscontainingmanganesedioxidelithiumcoincellbatteriesmaycontainperchlorate.
PerchlorateMaterial-specialhandlingmayapply,See
www.dtsc.ca.gov/hazardouswaste/perchlorate
xUserGuide
Page 13

Heatandproductventilation
DANGER
Computers,acpoweradapters,andmanyaccessoriescangenerateheatwhenturnedonandwhen
batteriesarecharging.Notebookcomputerscangenerateasignificantamountofheatduetotheir
compactsize.Alwaysfollowthesebasicprecautions:
•Whenyourcomputeristurnedonorthebatteryischarging,thebase,thepalmrest,andsome
otherpartsmaybecomehot.Avoidkeepingyourhands,yourlap,oranyotherpartofyour
bodyincontactwithahotsectionofthecomputerforanyextendedlengthoftime.Whenyou
usethekeyboard,avoidkeepingyourpalmsonthepalmrestforaprolongedperiodoftime.
Yourcomputergeneratessomeheatduringnormaloperation.Theamountofheatdependson
theamountofsystemactivityandthebatterychargelevel.Extendedcontactwithyourbody,
eventhroughclothing,couldcausediscomfortorevenaskinburn.Periodicallytakebreaks
fromusingthekeyboardbyliftingyourhandsfromthepalmrest;andbecarefulnottouse
thekeyboardforanyextendedlengthoftime.
•Donotoperateyourcomputerorchargethebatterynearflammablematerialsorinexplosive
environments.
•Ventilationslots,fansand/orheatsinksareprovidedwiththeproductforsafety,comfort,and
reliableoperation.Thesefeaturesmightinadvertentlybecomeblockedbyplacingtheproducton
abed,sofa,carpet,orotherflexiblesurface.Neverblock,cover,ordisablethesefeatures.
•Whentheacpoweradapterisconnectedtoanelectricaloutletandyourcomputer,itgenerates
heat.Donotplacetheadapterincontactwithanypartofyourbodywhileusingit.Neverusethe
acpoweradaptertowarmyourbody.Extendedcontactwithyourbody,eventhroughclothing,
maycauseaskinburn.
Foryoursafety,alwaysfollowthesebasicprecautionswithyourcomputer:
•Keepthecoverclosedwheneverthecomputerispluggedin.
•Regularlyinspecttheoutsideofthecomputerfordustaccumulation.
•Removedustfromventsandanyperforationsinthebezel.Morefrequentcleaningsmightbe
requiredforcomputersindustyorhigh-trafficareas.
•Donotrestrictorblockanyventilationopenings.
•Donotoperateyourcomputerinsidefurniture,asthismightincreasetheriskofoverheating.
•Airflowtemperaturesintothecomputershouldnotexceed35°C(95°F).
Electricalcurrentsafetyinformation
DANGER
Electriccurrentfrompower,telephone,andcommunicationcablesishazardous.
Toavoidashockhazard:
•Donotuseyourcomputerduringalightningstorm.
•Donotconnectordisconnectanycablesorperforminstallation,maintenance,orreconfiguration
ofthisproductduringanelectricalstorm.
•Connectallpowercordstoaproperlywiredandgroundedelectricaloutlet.
•Connecttoproperlywiredoutletsanyequipmentthatwillbeattachedtothisproduct.
•Wheneverpossible,useonehandonlytoconnectordisconnectsignalcables.
©CopyrightLenovo2013
xi
Page 14

•Neverturnonanyequipmentwhenthereisevidenceoffire,water,orstructuraldamage.
•Disconnectallattachedcablesanddisablebatteriesbeforeopeninganyaccessibledevice
coversunlessinstructedotherwiseintheinstallationandconfigurationprocedures.
•Donotuseyourcomputeruntilallinternalpartsenclosuresarefastenedintoplace.Neveruse
thecomputerwheninternalpartsandcircuitsareexposed.
DANGER
Connectanddisconnectcablesasdescribedinthefollowingprocedureswheninstalling,moving,
oropeningcoversonthisproductorattacheddevices.
Toconnect:
1.TurneverythingOFF .
2.First,attachallcablestodevices.
3.Attachsignalcablestoconnectors.
4.Attachpowercordstooutlets.
5.TurndevicesON.
Todisconnect:
1.TurneverythingOFF .
2.First,removepowercordsfromoutlets.
3.Removesignalcablesfromconnectors.
4.Removeallcablesfromdevices.
Thepowercordmustbedisconnectedfromthewalloutletorreceptaclebeforeinstallingallother
electricalcablesconnectedtothecomputer .
Thepowercordmaybereconnectedtothewalloutletorreceptacleonlyafterallotherelectrical
cableshavebeenconnectedtothecomputer.
Liquidcrystaldisplay(LCD)notice
CAUTION:
Theliquidcrystaldisplay(LCD)ismadeofglass,androughhandlingordroppingthecomputercan
causetheLCDtobreak.IftheLCDbreaksandtheinternalfluidgetsintoyoureyesoronyour
hands,immediatelywashtheaffectedareaswithwaterforatleast15minutes;ifanysymptomsare
presentafterwashing,getmedicalcare.
Note:Forproductswithmercury-containingfluorescentlamps(forexample,non-LED),thefluorescentlamp
intheliquidcrystaldisplay(LCD)containsmercury;disposeofaccordingtolocal,state,orfederallaws.
Usingheadphonesorearphones
CAUTION:
Excessivesoundpressurefromearphonesandheadphonescancausehearingloss.Adjustmentof
theequalizertomaximumincreasestheearphoneandheadphoneoutputvoltageandthesound
pressurelevel.Therefore,toprotectyourhearing,adjusttheequalizertoanappropriatelevel.
Excessiveuseofheadphonesorearphonesforalongperiodoftimeathighvolumecanbedangerousifthe
outputoftheheadphoneorearphoneconnectorsdonotcomplywithspecificationsofEN50332-2.The
headphoneoutputconnectorofyourcomputercomplieswithEN50332-2Subclause7.Thisspecification
limitsthecomputer’smaximumwidebandtrueRMSoutputvoltageto150mV.T ohelpprotectagainst
hearingloss,ensurethattheheadphonesorearphonesyouusealsocomplywithEN50332-2(Clause7
limits)forawidebandcharacteristicvoltageof75mV.UsingheadphonesthatdonotcomplywithEN
50332-2canbedangerousduetoexcessivesoundpressurelevels.
IfyourLenovocomputercamewithheadphonesorearphonesinthepackage,asaset,thecombinationof
theheadphonesorearphonesandthecomputeralreadycomplieswiththespecificationsofEN50332-1.
Ifdifferentheadphonesorearphonesareused,ensurethattheycomplywithEN50332-1(Clause6.5
xiiUserGuide
Page 15

LimitationValues).UsingheadphonesthatdonotcomplywithEN50332-1canbedangerousdueto
excessivesoundpressurelevels.
Additionalsafetyinformation
DANGER
Plasticbagscanbedangerous.Keepplasticbagsawayfrombabiesandchildrentoavoiddanger
ofsuffocation.
Noticefortabletpersonalcomputerusers
SafetynoticeforusersinAustralia
DANGER
Donotconnectphonelinewhileusingtabletmode.
NoticeforusersintheU.S.A.
Manypersonalcomputerproductsandaccessoriescontaincords,cablesorwires,suchaspowercordsor
cordstoconnecttheaccessorytoapersonalcomputer.Ifthisproducthassuchacord,cableorwire,then
thefollowingwarningapplies:
WARNING:Handlingthecordonthisproductorcordsassociatedwithaccessoriessoldwiththisproduct
willexposeyoutolead,achemicalknowntotheStateofCaliforniatocausecancer,andbirthdefectsor
otherreproductiveharm.Washhandsafterhandling.
Savetheseinstructions.
©CopyrightLenovo2013
xiii
Page 16

xivUserGuide
Page 17
Chapter1.Productoverview
Thischapterprovidesinformationaboutthelocationsofconnectors,locationsofimportantproductlabels,
computerfeatures,specifications,operatingenvironment,andpreinstalledprograms.
Thischaptercontainsthefollowingtopics:
•Locatingcomputercontrols,connectors,andindicators
•Locatingimportantproductinformation
•Features
•Specifications
•Operatingenvironment
•Lenovoprograms
Locatingcomputercontrols,connectors,andindicators
Thissectionintroducesthecomputerhardwarefeaturestogiveyouthebasicinformationyouwillneed
tostartusingthecomputer.
Frontview
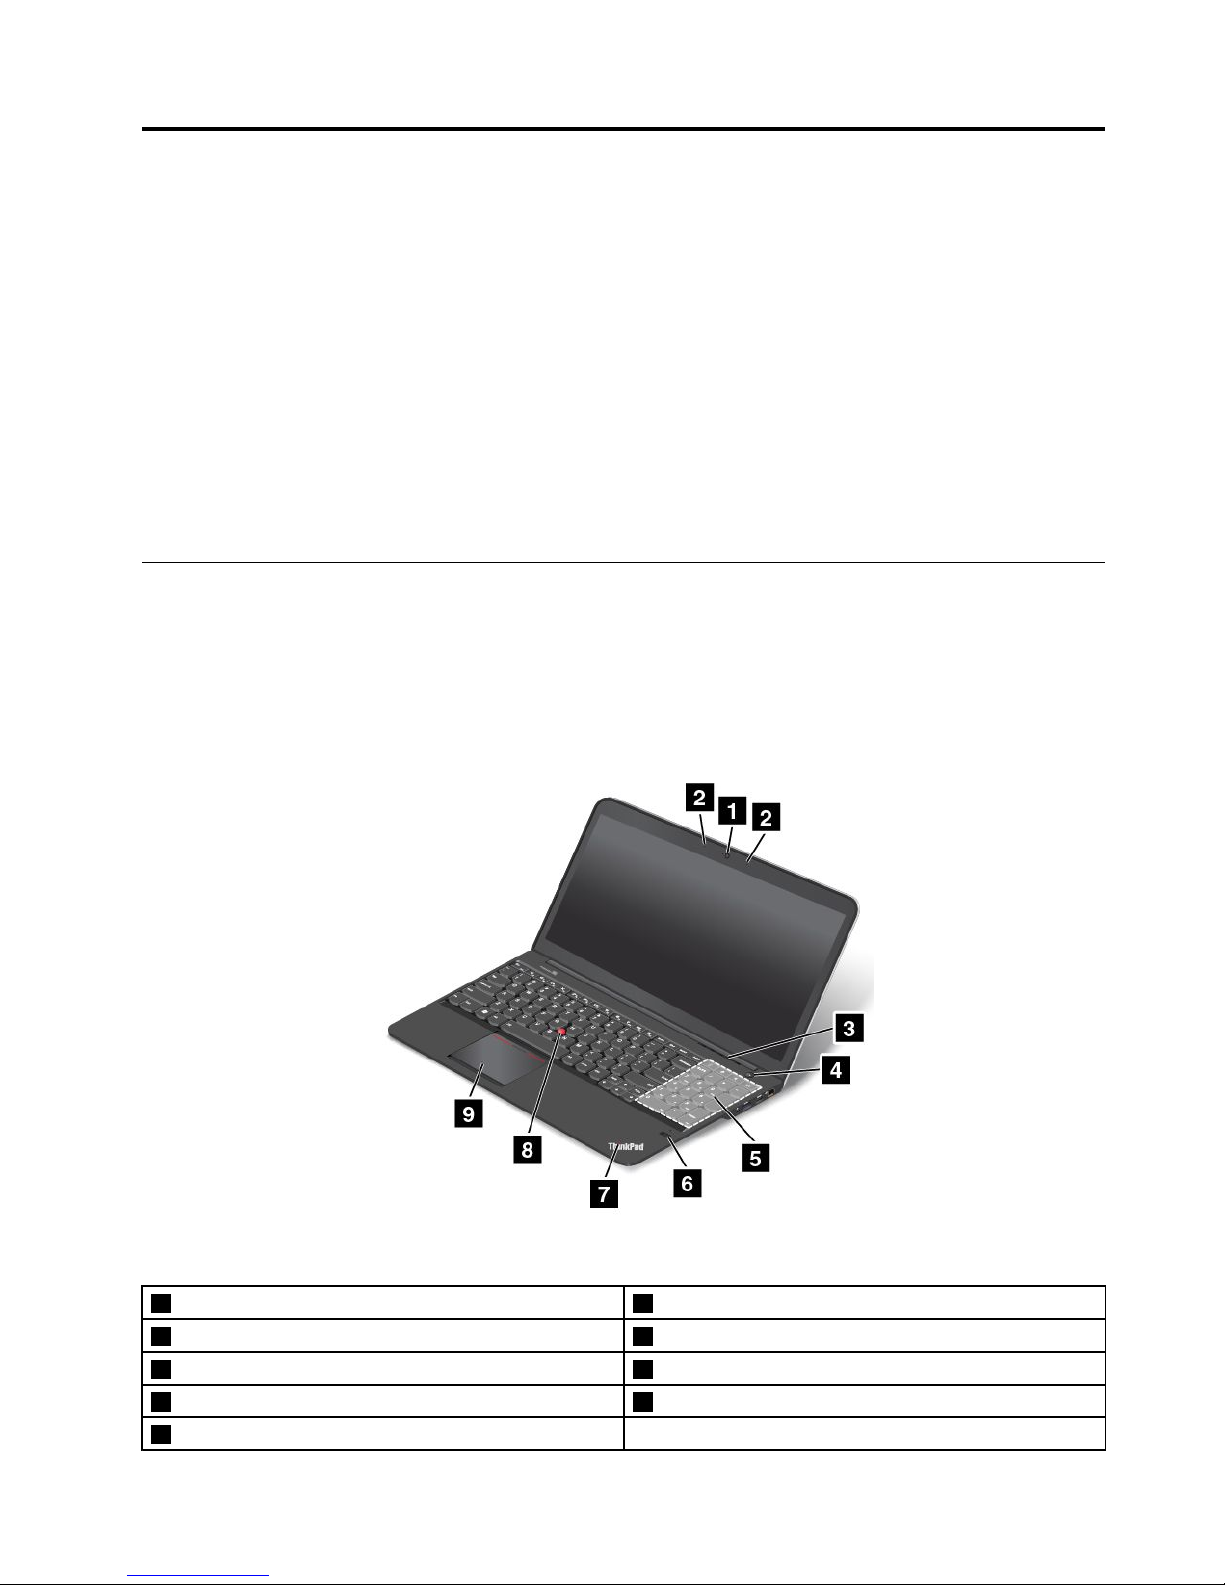
Figure1.Frontview
1Integratedcamera6Fingerprintreader
2Built-inmicrophones
7Systemstatusindicator(illuminatedThinkPad
®
logo)
3Fanlouvers8TrackPoint
®
pointingstick
4Powerbutton9T ouchpad
5Numerickeypad
©CopyrightLenovo2013
1
Page 18

1Integratedcamera
Usethecameratotakepicturesorholdavideoconference.Fordetails,seeUsingtheintegratedcamera.
2Built-inmicrophones
Thebuilt-inmicrophonescapturesoundandvoicewhenusedwithanapplicationprogramcapableof
handlingaudio.
3Fanlouvers
Thefanlouversandinternalfanenableairtocirculateinthecomputerandensurepropercooling,especially
thecoolingofthemicroprocessor.
Notes:
•Thefanlouversarelocatedbehindthehinge.
•Toensureproperairflow,donotplaceanyobstaclesinfrontofthefanlouvers.
4Powerbutton
Usethepowerbuttontoturnonthecomputer.
Toturnoffthecomputer,usetheStartmenushutdownoptionontheMicrosoft
®
Windows
®
7operating
system.FortheMicrosoftWindows8operatingsystem,movethepointertothebottomrightcornerofthe
screentobringupthecharms.ThenclickSettings➙Power➙Shutdown.
Ifyourcomputerstopsrespondingandyoucannotturnitoff,pressandholdthepowerbuttonforfour
secondsormore.Ifthecomputerstillisnotresponding,removetheacpoweradapterandresetthe
computerbyinsertinganeedleorastraightenedpaperclipintotheemergencyresetholetoturnoffthe
computer.Tolocatetheemergencyresethole,seeBottomview.
Youalsocanprogramthepowerbuttonsothatbypressingthepowerbuttonyoucanshutdownthe
computerorputitintosleeporhibernationmode.Toachievethis,youneedtochangeyourpowerplan
settings.Toaccesspowerplansettings,dothefollowing:
•ForWindows7:StartthePowerManagerprogramandthenclickthePowerPlantab.Forinstructions
onhowtostartthePowerManagerprogram,seeAccessingLenovoprogramsontheWindows7
operatingsystem
•ForWindows8:Right-clickthebatterystatusiconfromtheWindowsnotificationareaandclickMore
poweroptions➙Choosewhatthepowerbuttonsdo.
5Numerickeypad
Yourcomputerhasanumerickeypadthatcanbeusedtoquicklyinputnumbers.
6Fingerprintreader
Somemodelshaveafingerprintreader.Fingerprintauthenticationtechnologyprovidesasimpleandsecure
useraccessbyassociatingyourfingerprintwithapassword.Fordetails,seeUsingthefingerprintreader.
7Systemstatusindicator(illuminatedThinkPadlogo)
TheilluminatedThinkPadlogoonthepalmrestfunctionsasasystemstatusindicator.Yourcomputerhas
severalstatusindicators.Forinformationaboutthelocationandmeaningofeachindicator,seeStatus
indicators.
ThinkPadpointingdevice
8TrackPointpointingstick
9Touchpad
2UserGuide
Page 19
ThekeyboardcontainstheThinkPadpointingdevice.Pointing,selecting,anddraggingareallpartofasingle
processthatyoucanperformwithoutmovingyourfingersfromatypingposition.Formoreinformation,
seeUsingtheThinkPadpointingdevice.
Right-sideview
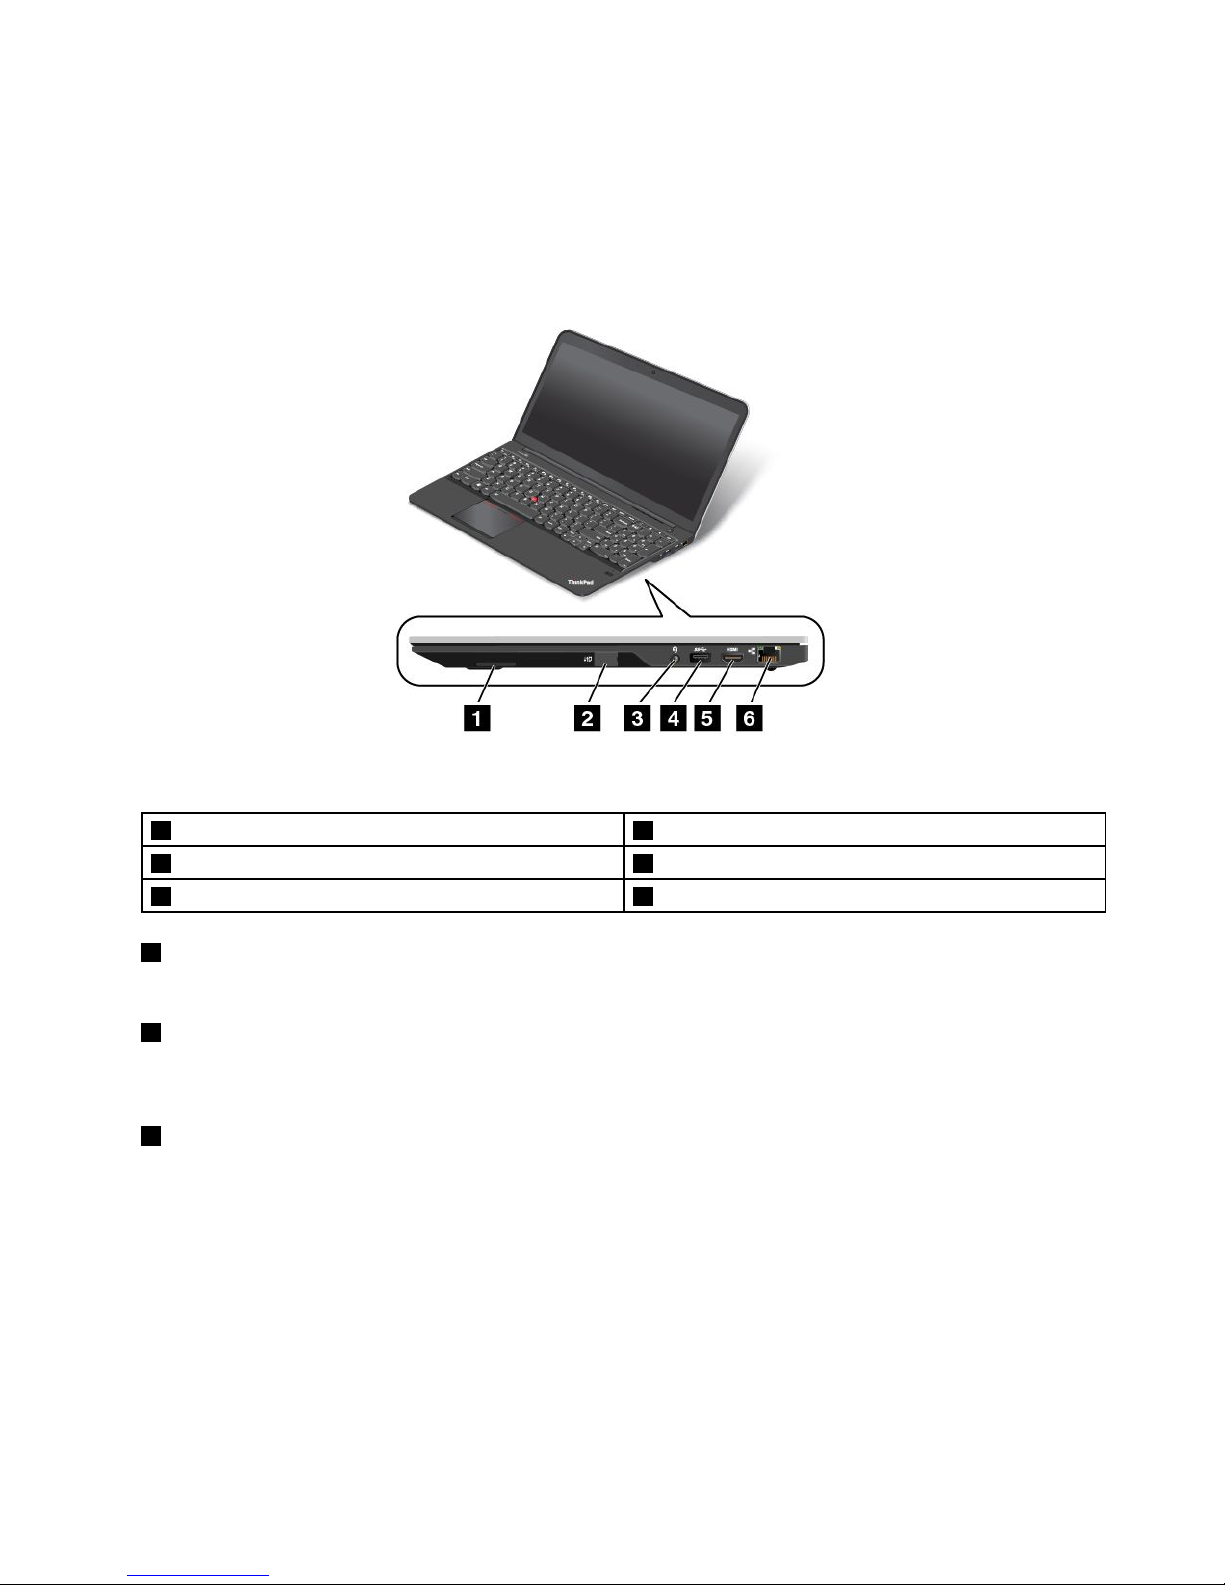
Figure2.Right-sideview
1Built-instereospeaker(right)4USB3.0connector
2SIMcardslot
5HDMIport
3Comboaudiojack
6Ethernetconnector
1Built-instereospeaker(right)
Fordetails,seeFunctionkeys.
2SIMcardslot
YourcomputermighthaveaSubscriberIdentificationModule(SIM)cardslot.Dependingonthemodel,
aSIMcardmightbeinstalledinyourcomputer.
3Comboaudiojack
Tolistentothesoundfromyourcomputer,connectheadphonesoraheadsetthathasa3.5mm4-pole
plugtothecomboaudiojack.
Notes:
•Ifyouareusingaheadsetwithafunctionswitch,forexample,aheadsetforamobiledigitaldevice,do
notpressthisswitchwhileusingtheheadset.Ifyoupressit,theheadsetmicrophonewillbedisabled,
andtheintegratedmicrophonesonthecomputerwillbeenabledinstead.
•Thecomboaudiojackdoesnotsupportaconventionalmicrophone.Formoreinformation,seeUsing
audiofeatures.
Chapter1.Productoverview3
Page 20
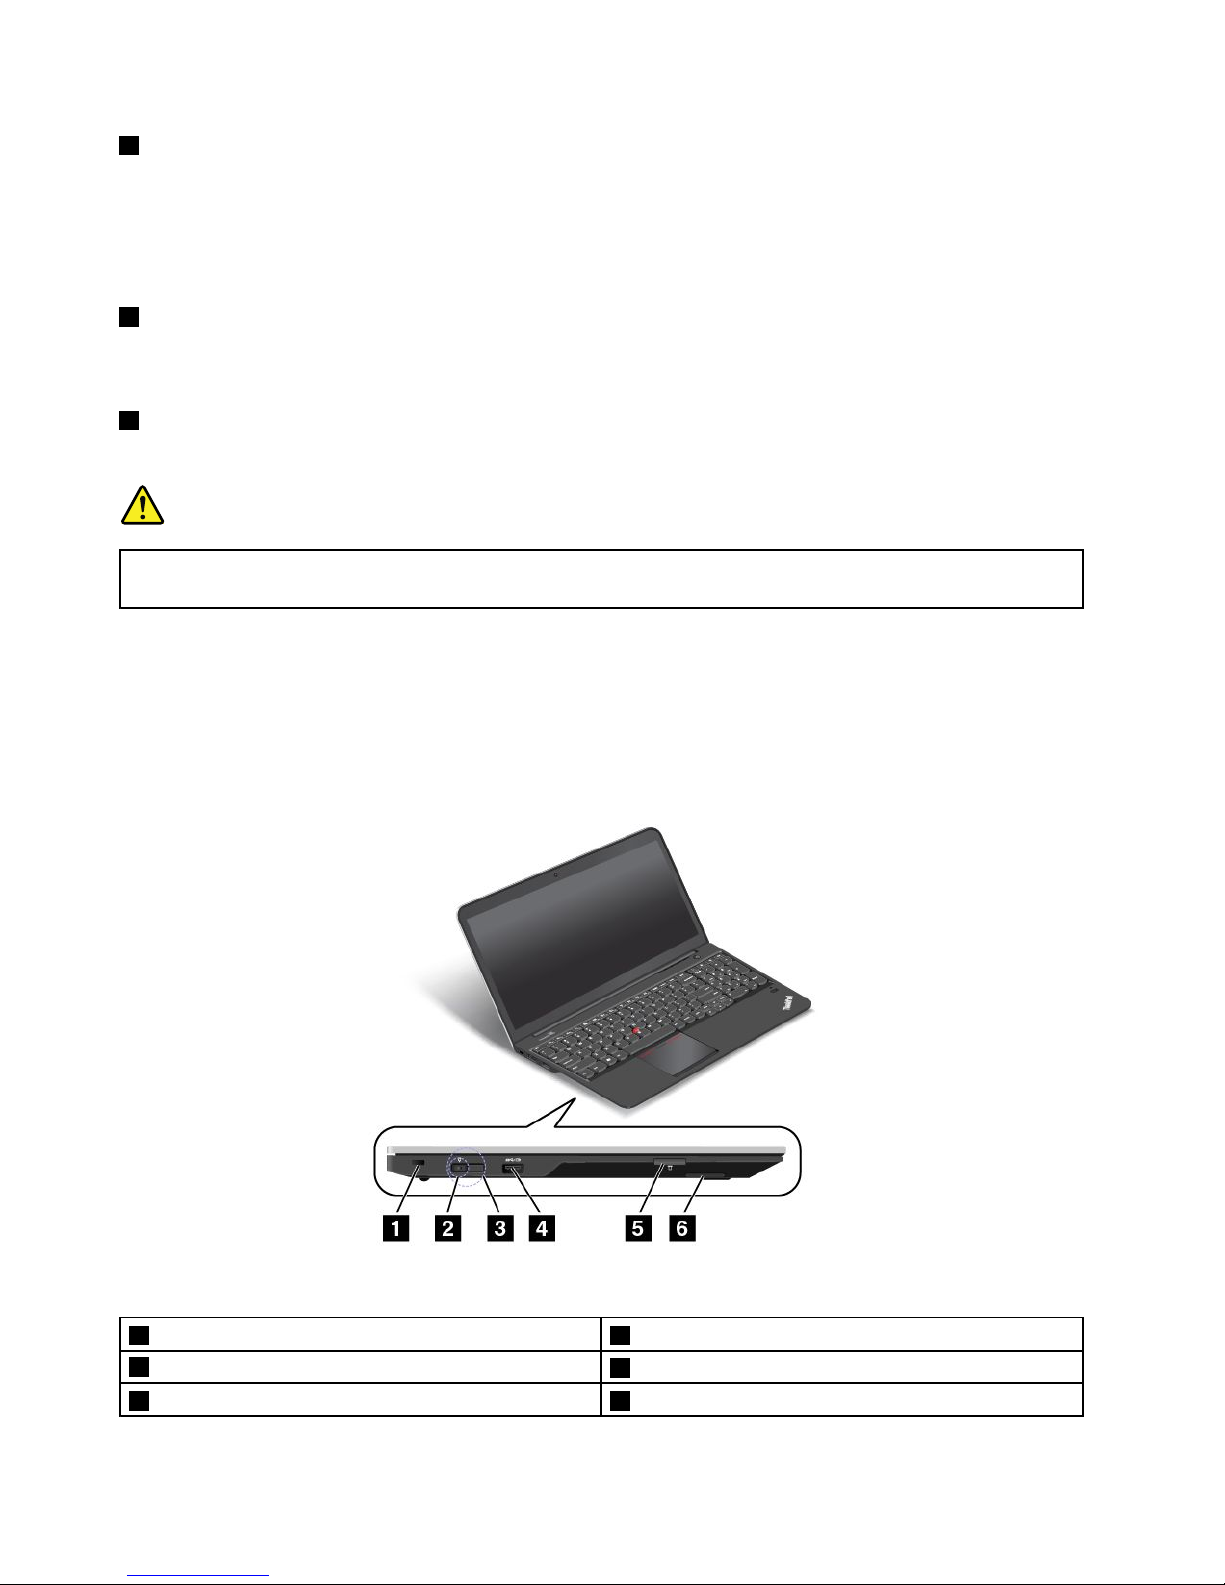
4USB3.0connector
TheUniversalSerialBus(USB)3.0connectorisusedforconnectingdevicescompatiblewithaUSB
interface,suchasaUSBprinteroradigitalcamera.
Attention:WhenyouattachaUSBcabletothisconnector,ensurethattheUSBmarkisfacingupward.
Otherwisetheconnectormightbedamaged.
5HDMIport
Yourcomputersupportsthehigh-definitionmultimediainterface(HDMI)port,adigitalaudioandvideo
interfacethatcanconnectacompatibledigitalaudiodeviceorvideomonitor,suchasanHDTV.
6Ethernetconnector
Connectyourcomputertoalocalareanetwork(LAN)withtheEthernetconnector.
DANGER
Toavoidtheriskofelectricalshock,donotconnectthetelephonecabletotheEthernetconnector.
YoucanonlyconnectanEthernetcabletothisconnector.
Twoindicators,totheupperrightandleftoftheconnector,showthestatusofthenetworkconnection.
WhenyourcomputerconnectstoaLANandasessionwiththenetworkisavailable,theupperleftindicator
issolidgreen.Whiledataisbeingtransmitted,theupperrightindicatorblinksyellow.
Left-sideview
Figure3.Left-sideview
1Security-lockslot4AlwaysonUSBconnector
2acpowerconnector
5Mediacardreaderslot
3LenovoOneLinkconnector6Built-instereospeaker(left)
4UserGuide
Page 21

1Security-lockslot
Toprotectyourcomputerfromtheft,purchaseasecuritycablelock,usuallyaKensington-stylecablelock,
thatfitsthissecurity-lockslottolockyourcomputertoastationaryobject.
2acpowerconnector
3LenovoOneLinkconnector
Whentheacpoweradapterisconnectedtotheacpowerconnector,itprovidesacpowertothecomputer
andchargesthebattery.WhenasupportedThinkPadOneLinkDockisconnectedtotheLenovoOneLink
connector,itcannotonlyextendthecomputercapabilitiesbutalsoprovideacpowertothecomputer
andchargethebattery.
TousetheLenovoOneLinkconnector,youneedtoremovetheconnectorcoverfromtheLenovoOneLink
connectorfirst.
Note:Ensurethatyoukeeptheconnectorcover.ReattachittotheLenovoOneLinkconnectorwhen
youarenotusingtheLenovoOneLinkconnector.
4AlwaysOnUSBconnector
Bydefault,theAlwaysOnUSBconnectorenablesyoutochargesomemobiledigitaldevicesand
smartphoneswhenyourcomputerisinsleeporhibernationmode.
Ifyouwanttochargethesedeviceswhenyourcomputeristurnedoff,dothefollowing:
1.Connectthecomputertoanacpowersupply.
2.GotoThinkPadSetupandenableAlwaysOnUSBChargeinoffmode.Formoreinformation,see
Configmenu.
3.Dooneofthefollowing:
•ForWindows7:OpenthePowerManagerprogramandclickGlobalPowerSettingsorclick
Advanced➙GlobalPowerSettings.ThenselectEnableAlwaysOnUSBandclickOK.
•ForWindows8:PresstheWindowskeytogototheStartscreen.ClickLenovoSettings➙Power.
ThenselectEnablewhenthecomputerisoffunderAlwaysOnUSB.
5Mediacardreaderslot
Yourcomputermighthaveamediacardreaderslot.Fordetails,seeUsingamediacard.
6Built-instereospeaker(left)
Fordetails,seeFunctionkeys.
Chapter1.Productoverview5
Page 22
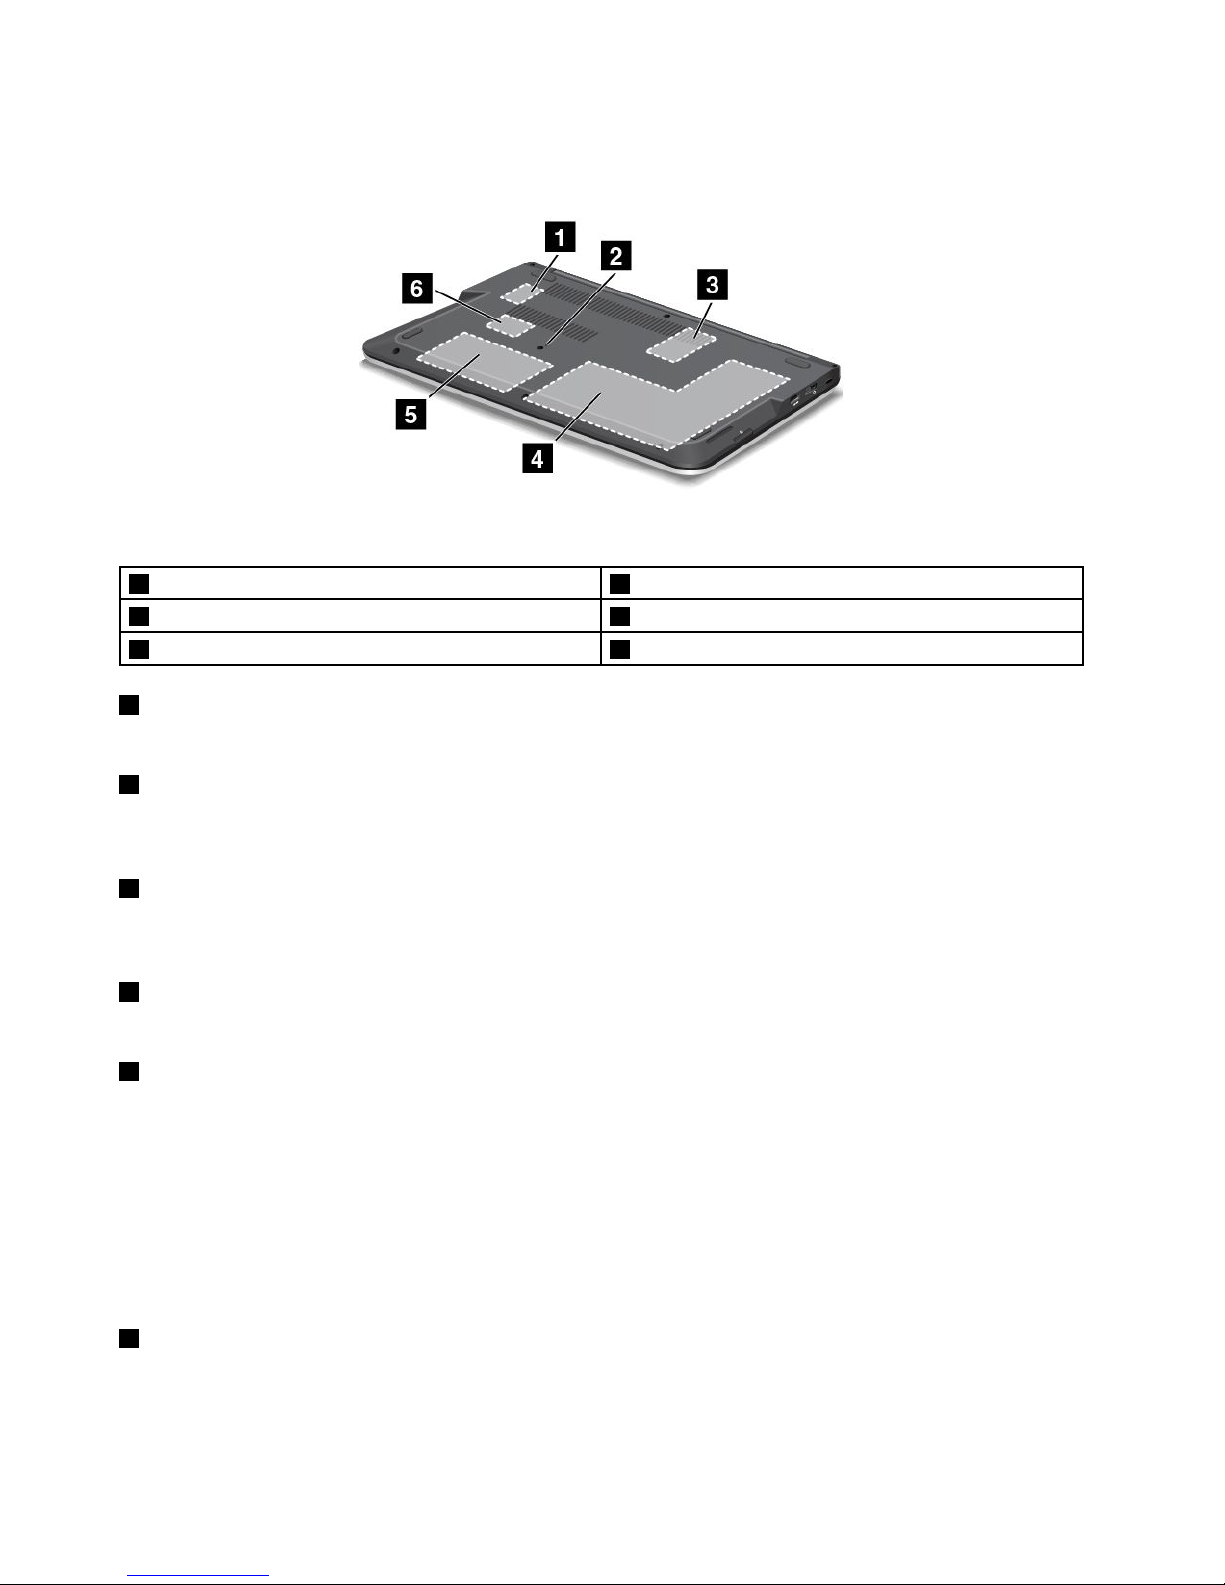
Bottomview
Figure4.Bottomview
1M.2solid-statedriveslot4Integratedbattery
2Emergencyresethole5Harddiskdrive,hybriddrive,orsolid-statedrive
3Memory-upgradeslot6WirelessLANcardslot
1M.2solid-statedriveslot
Forsomemodels,anM.2solid-statedrivemightbeinstalledfordatastorage.
2Emergencyresethole
Ifthecomputerdoesnotrespond,removetheacpoweradapterandresetthecomputerbyinsertinga
straightenedpaperclipintotheemergencyresetholetoturnoffthecomputer.
3Memory-upgradeslot
Youcanincreasetheamountofmemoryinyourcomputerbyinstallingamemorymoduleinthe
memory-upgradeslot.MemorymodulesareavailableasoptionsfromLenovo.
4Integratedbattery
Useyourcomputerwiththebatterypowerwheneveracpowerisunavailable.
5Harddiskdrive,hybriddrive,orsolid-statedrive
Dependingonthemodel,yourcomputermighthavealarge-capacity,customer-upgradableharddiskdrive,
hybriddrive,orsolid-statedrivethatcanmeetavarietyofstoragedemands.
Somemodelsareequippedwithasolid-statedrivefordatastorage,makingyourcomputerlighter,smaller,
andfaster.
Note:Thehiddenservicepartitionisthereasonwhythereislessfreespacethanexpectedonyourhard
diskdrive,hybriddrive,orsolid-statedrive.Thisreductionismorenoticeableonthesolid-statedrive
becauseofitssmallercapacity.
6WirelessLANcardslot
YourcomputermighthaveawirelessLANcardforyoutoestablishwirelessLANconnections.
6UserGuide
Page 23
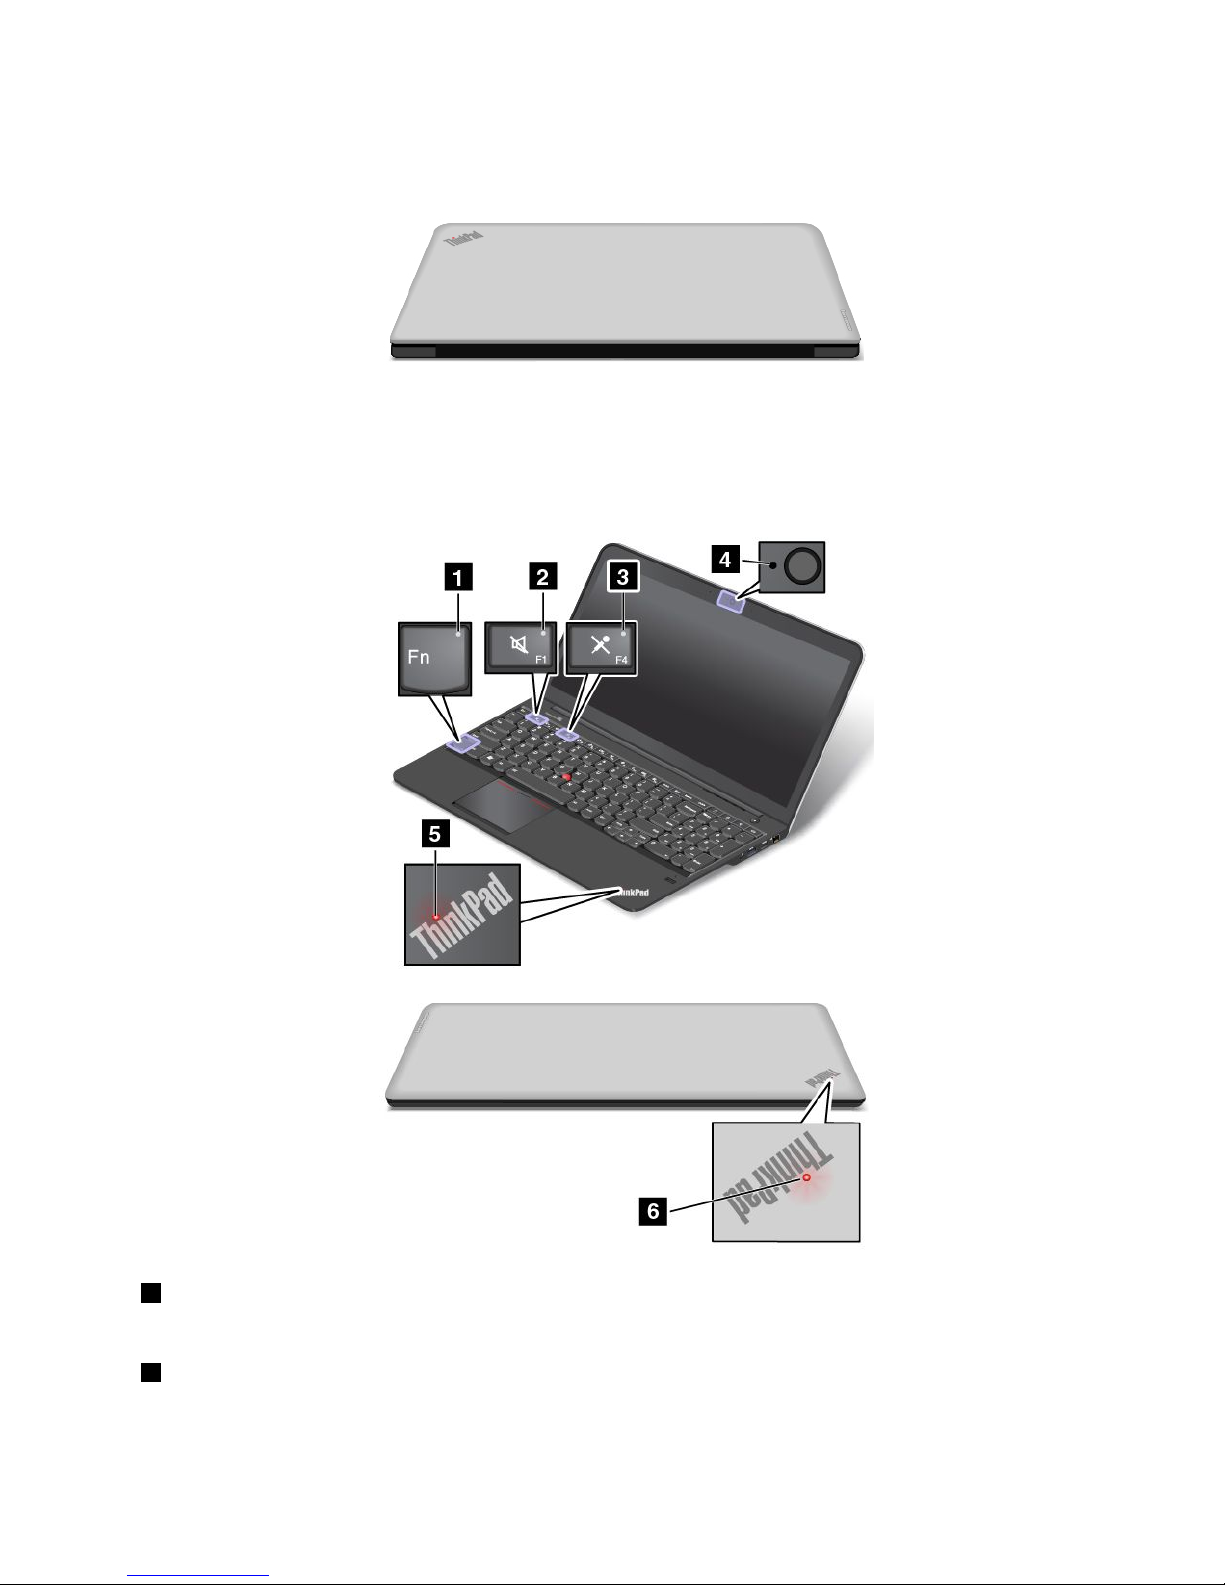
Rearview
Figure5.Rearview
Statusindicators
Yourcomputerhasseveralstatusindicatorsthatshowthestatusofyourcomputer.
1FnLockindicator
TheFnLockindicatorshowsthestatusoftheFnLockfunction.Formoreinformation,seeSpecialkeys.
2Speakermuteindicator
Whenthespeakermuteindicatorison,thespeakersaremuted.
Chapter1.Productoverview7
Page 24
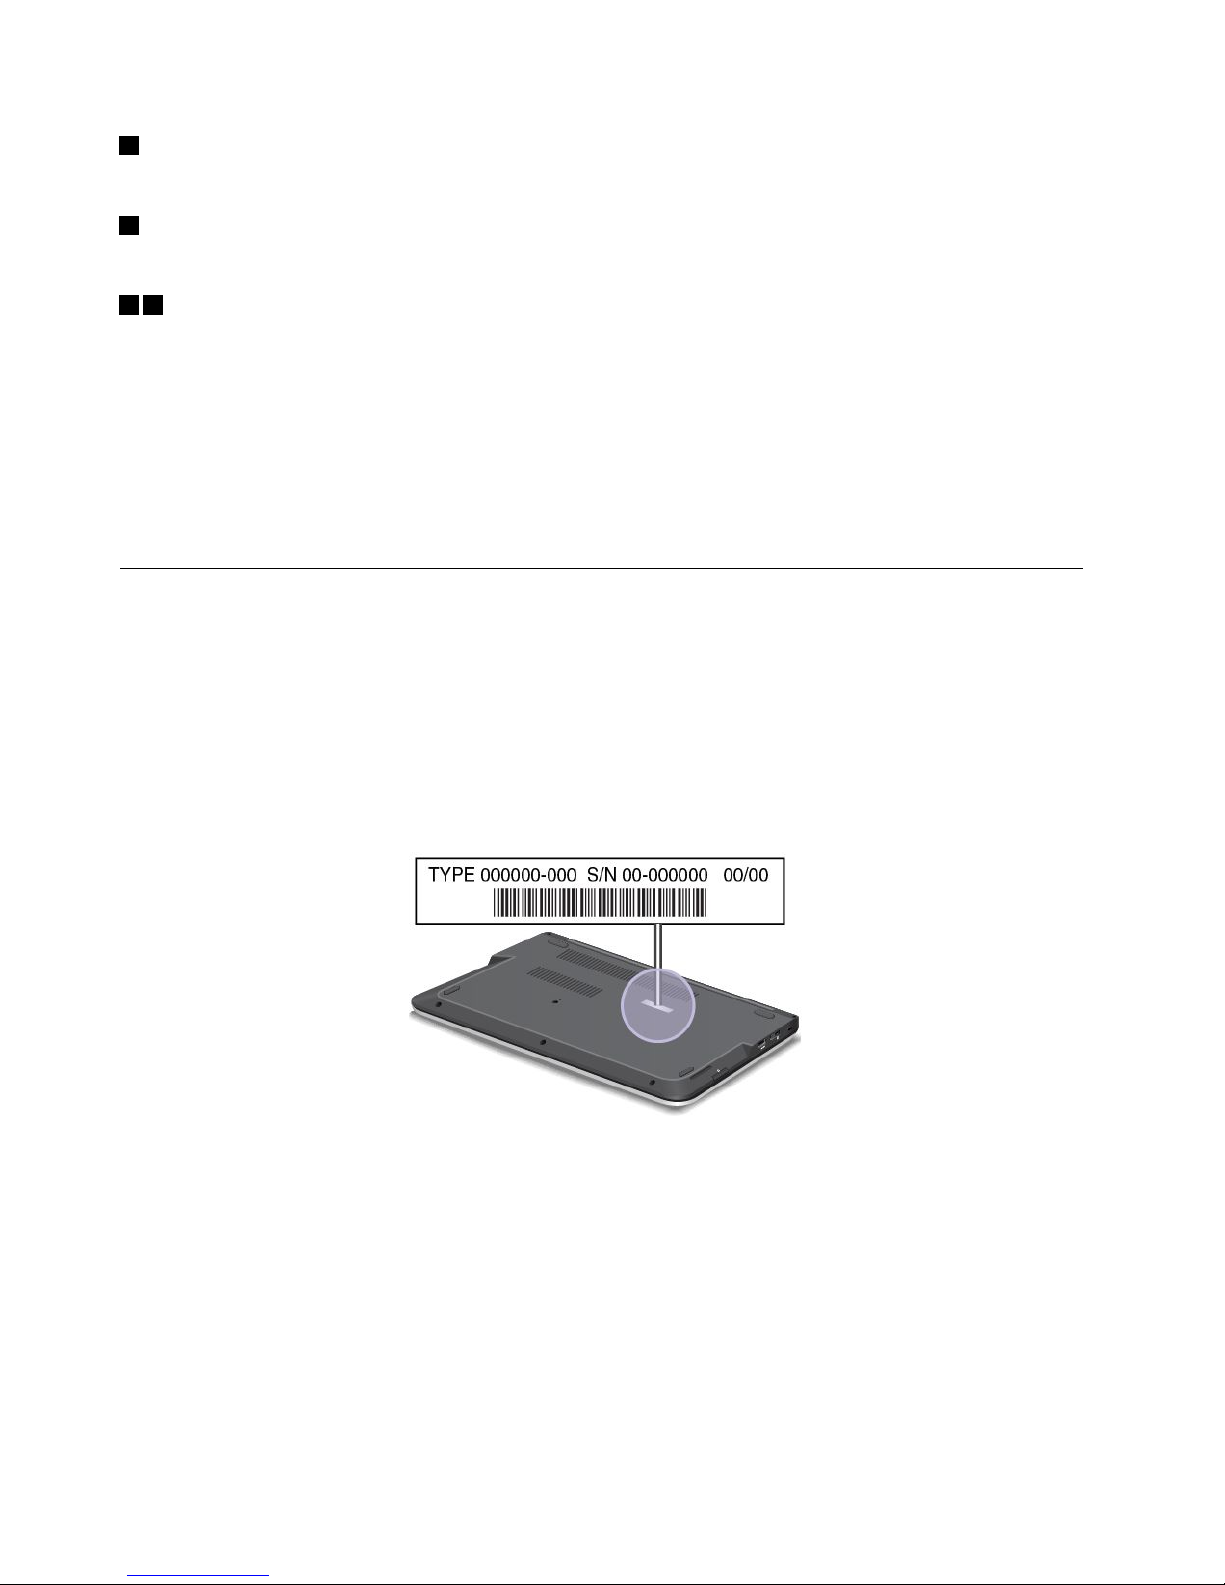
3Microphonemuteindicator
Whenthemicrophonemuteindicatorison,themicrophonesaremuted.
4Camerastatusindicator
WhentheCamerastatusindicatorison,thecameraisinuse.
56Systemstatusindicators
TheilluminateddotsintheThinkPadlogoontheouterlidofyourcomputerandonthepalmrestshowthe
systemstatusofyourcomputer:
•Blinksthreetimes:Thecomputerisinitiallyconnectedtothepower.
•On:Thecomputerisinuse.
•Off:Thecomputerisofforinhibernationmode.
•Slowblinking:Thecomputerisinsleepmode.
•Fastblinking:Thecomputerisenteringsleeporhibernationmode.
Locatingimportantproductinformation
Thissectionprovidesinformationtohelpyoulocateyourmachinetypeandmodellabel,FCCIDandIC
Certificationlabel,andtheWindows
®
CertificateofAuthenticity(COA)label.
Machinetypeandmodellabel
Themachinetypeandmodellabelidentifiesyourcomputer.WhenyoucontactLenovoforhelp,themachine
typeandmodelinformationhelpssupporttechnicianstoidentifyyourcomputerandprovidefasterservice.
Youcanfindthemachinetypeandmodelofyourcomputeronthelabelasshownbelow:
FCCIDandICCertificationinformation
ThereisnoFCCIDorICCertificationnumberforthewirelesscommunicationcardsshownontheenclosure
ofthecomputer.Onsomemodels,LenovoprovidesyoutheinformationaboutthelocationoftheFCCID
andICCertificationnumberlabelonthecomputerbottomcoverassembly.
ThefollowingfigureshowswhereyoucanfindtheinformationofFCCIDorICCertificationnumber.
8UserGuide
Page 25
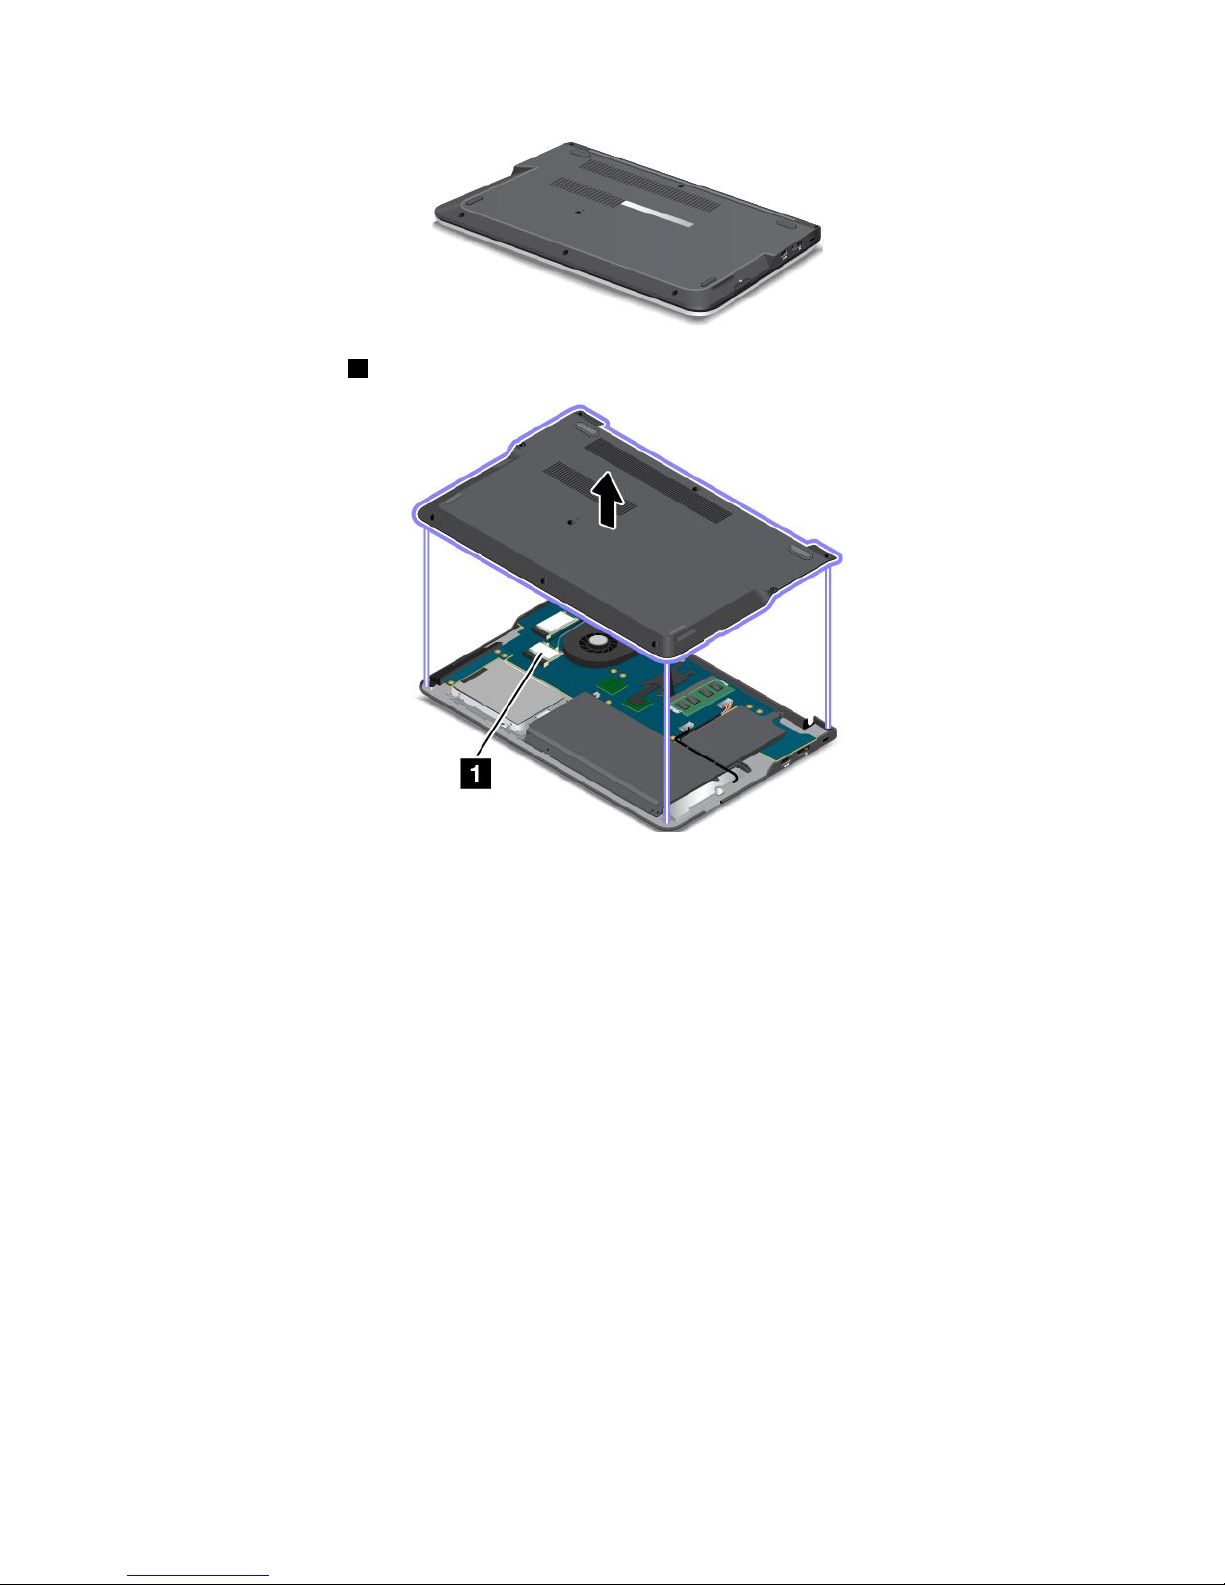
ThewirelessLANcard1(onsomemodels)islocatedasshown.
IfyouneedtoremovetheWirelessLANcardforrepairorreplacement,followtheprocedureinReplacinga
wirelessLANcard.
Note:OnlyLenovoauthorizedwirelessLANcardsareallowedtobeusedinyourcomputer.Ifyouinstallan
unauthorizedcardthatisnotapprovedforuseinyourcomputer,thecomputerwillnotstart,butwillonly
displayanerrormessageandemitaudiblebeeps.
CertificateofAuthenticitylabel
TheCertificateofAuthenticitylabelforthepreinstalledWindows7operatingsystemisattachedonthe
computer.PrintedonthislabelaretheproductIDandtheproductkeyinformationforyourcomputer.
Recordthisinformationandkeepitinasafeplace.Youmightneedthesenumberstostartyourcomputeror
reinstalltheWindows7operatingsystem.
Chapter1.Productoverview9
Page 26

ThefollowingfigureshowsthelocationoftheCertificateofAuthenticitylabelofyourcomputer:
Note:TheCertificateofAuthenticitylabelappliesonlytocomputerspreinstalledwiththeWindows7
operatingsystem.
Features
Thistopicliststhefeaturesofyourcomputer.
Processor
Toviewthesystempropertiesofyourcomputer,dothefollowing:
•ForWindows7:ClickStart,right-clickComputer.ThenclickProperties.
•ForWindows8:Movethecursortothebottomrightcornerofthescreentobringupthecharms.Then
clickSettings➙PCinfo.
Memory
Doubledatarate3synchronousdynamicrandomaccessmemorymodules(DDR3SDRAM)
Storagedevice
•2.5-inch(7mmheight)harddiskdrive(onsomemodels)
•2.5-inch(9.5mmheight)harddiskdrive(onsomemodels)
•2.5-inch(7mmheight)hybriddrive(onsomemodels)
•2.5-inch(7mmheight)solid-statedrive(onsomemodels)
•M.2solid-statedriveforcacheonly(onsomemodels)
Display
ThecolordisplayusestheThinFilmTransistor(TFT)technology.
•Size:396.2mm(15.6inches)
•Resolution:
–LCD:1366x768or1920x1080,dependingonthemodel
–Externalmonitor:upto1920x1200
•Brightnesscontrol
•Integratedcamera
•Built-inmicrophones
Keyboard
•Fnkey
10UserGuide
Page 27

•Numerickeypad
•6-rowbacklitkeyboard
•ThinkPadpointingdevice(T rackPointpointingdeviceandmulti-touchtouchpad)
Interface
•acpowerconnector
•AlwaysonUSB(USB3.0)connector
•Comboaudiojack
•4-in-1digitalmediacardreader
•HDMIport
•LenovoOneLinkconnector
•RJ45Ethernetconnector
•USB3.0connector
Wirelessfeatures
•IntegratedwirelessLAN
•IntegratedBluetooth
Securityfeatures
Fingerprintreader
Specifications
Thissectionliststhephysicalspecificationsforyourcomputer.
Size
•Width:379mm(14.92inches)
•Depth:252.4mm(9.94inches)
•Height:20.75mm(0.82inch)
Heatoutput
45W(154Btu/hr)maximumor65W(222Btu/hr)maximum,dependingonthemodel
Powersource(acpoweradapter)
•Sine-waveinputat50to60Hz
•Inputratingoftheacpoweradapter:100to240Vac,50to60Hz
Batterypack
Integratedlithium-ion(Li-Ion)batterypack
Batterylife
•ForWindows7:OpenthePowerManagerprogram.ClicktheBatterytab.Forinstructionsonhowtostart
theAccessConnections™program,seeAccessingLenovoprogramsontheWindows7operatingsystem.
•ForWindows8:PresstheWindowskeytogototheStartscreen.ClickLenovoSettings➙Power.
Chapter1.Productoverview11
Page 28

Operatingenvironment
Thissectionprovidesinformationaboutyourcomputeroperatingenvironment.
Environment:
•Maximumaltitudewithoutpressurization:3048m(10000ft)
•Temperature
–Ataltitudesupto2438m(8000ft)
–Operating:5.0°Cto35.0°C(41°Fto95°F)
–Storage:5.0°Cto43.0°C(41°Fto109°F)
–Ataltitudesabove2438m(8000ft)
–Maximumtemperaturewhenoperatingundertheunpressurizedcondition:31.3°C(88°F)
Note:Whenyouchargethebatterypack,itstemperaturemustbeatleast10°C(50°F).
•Relativehumidity:
–Operating:8%to80%
–Storage:5%to95%
Ifpossible,placeyourcomputerinawell-ventilatedanddryareawithoutdirectexposuretosunshine.
Keepelectricalappliancessuchasanelectricfan,radio,airconditioner,andmicrowaveovenawayfrom
yourcomputerbecausethestrongmagneticfieldsgeneratedbytheseappliancescandamagethemonitor
anddataontheharddiskdrive,hybriddrive,orsolidstatedrive.
Donotplaceanybeveragesontopoforbesidethecomputerorotherattacheddevices.Ifliquidisspilledon
orinthecomputeroranattacheddevice,ashortcircuitorotherdamagemightoccur.
Donoteatorsmokeoveryourkeyboard.Particlesthatfallintoyourkeyboardcancausedamage.
Lenovoprograms
YourcomputercomeswithLenovoprogramstohelpyouworkmoreeasilyandsecurely.Dependingon
theWindowsoperatingsystempreinstalled,theprogramsmightvary.
TolearnmoreabouttheprogramsandothercomputingsolutionsofferedbyLenovo,goto:
http://www.lenovo.com/support
AccessingLenovoprogramsontheWindows7operatingsystem
OntheWindows7operatingsystem,youcanaccessLenovoprogramsfromeithertheLenovo
ThinkVantage
®
ToolsprogramorfromControlPanel.
AccessingLenovoprogramsfromtheLenovoThinkVantageToolsprogram
ToaccessLenovoprogramsfromtheLenovoThinkVantageToolsprogram,clickStart➙AllPrograms➙
LenovoThinkVantageTools.Thendouble-clickaprogramicontoaccesstheprogram.
Notes:
•IfaprogramiconintheLenovoThinkVantageToolsprogramnavigationwindowisdimmed,itindicates
thatyouneedtoinstalltheprogrammanually.Toinstalltheprogrammanually,double-clicktheprogram
12UserGuide
Page 29

icon.Then,followtheinstructionsonthescreen.Whentheinstallationprocesscompletes,theprogram
iconwillbeactivated.
•Dependingonyourcomputermodel,someoftheprogramsmightnotbeavailable.
Table1.ProgramsintheLenovoThinkVantageToolsprogram
ProgramIconname
AccessConnectionsInternetConnection
ActiveProtectionSystem™
AirbagProtection
ClientSecuritySolutionEnhancedSecurity
CommunicationsUtilityWebConferencing
FingerprintSoftware
FingerprintReader
LenovoSolutionCenterSystemHealthandDiagnostics
RescueandRecovery
®
EnhancedBackupandRestore
PasswordManagerPasswordVault
PowerManager
PowerControls
RecoveryMediaFactoryRecoveryDisks
SimpleTapSimpleTap
SystemUpdate
UpdateandDrivers
AccessingLenovoprogramsfromControlPanel
ToaccessLenovoprogramsfromControlPanel,clickStart➙ControlPanel.Thendependingonthe
programyouwanttoaccess,clickthecorrespondingsectionandthenclickthecorrespondinggreentext.
Note:IfyoudonotfindtheprogramyouneedinControlPanel,opentheLenovoThinkVantageTools
programnavigationwindowanddouble-clickthedimmedicontoinstalltheprogramyouneed.Then,
followtheinstructionsonthescreen.Whentheinstallationprocesscompletes,theprogramiconwillbe
activated,andyoucanfindtheprograminControlPanel.
TheprogramsandthecorrespondingsectionsandgreentextsinControlPanelarelistedinthefollowing
table.
Note:Dependingonyourcomputermodel,someoftheprogramsmightnotbeavailable.
Table2.ProgramsinControlPanel
Program
ControlPanelsectionGreentextinControlPanel
AccessConnections
NetworkandInternet
Lenovo-InternetConnection
ActiveProtectionSystemSystemandSecurity
HardwareandSound
Lenovo-AirbagProtection
ClientSecuritySolutionSystemandSecurityLenovo-EnhancedSecurity
CommunicationsUtilityHardwareandSoundLenovo-WebConferencing
FingerprintSoftwareSystemandSecurity
HardwareandSound
Lenovo-FingerprintReader
or
Lenovo-NotebookFingerprint
Reader
LenovoSolutionCenterSystemandSecurityLenovo-SystemHealthand
Diagnostics
Chapter1.Productoverview13
Page 30

Table2.ProgramsinControlPanel(continued)
Program
ControlPanelsectionGreentextinControlPanel
MessageCenterPlus
Programs
MessagesfromLenovo
RescueandRecovery
SystemandSecurity
Lenovo-EnhancedBackupand
Restore
PasswordManager
SystemandSecurity
UserAccountsandFamilySafety
Lenovo-PasswordVault
PowerManager
HardwareandSound
SystemandSecurity
Lenovo-PowerControls
RecoveryMedia
SystemandSecurity
Lenovo-FactoryRecoveryDisks
SimpleTap
Programs
Lenovo-SimpleTap
SystemUpdateSystemandSecurity
Lenovo-UpdateandDrivers
AccessingLenovoprogramsontheWindows8operatingsystem
IfyourcomputerispreinstalledwiththeWindows8operatingsystem,youcanaccessLenovoprogramsby
doingeitherofthefollowing:
•ClicktheLenovoQuickLaunchiconfromthetaskbar.Alistofprogramsisdisplayed.Double-clicka
Lenovoprogramtolaunchit.Ifadesiredprogramisnotinthelist,clicktheplusicon+.
•PresstheWindowskeytogototheStartscreen.ClickaLenovoprogramtolaunchit.Ifyoucannotfind
theprogramyouneed,movethecursortothebottomrightcornerofthescreentobringupthecharms.
ThenclicktheSearchcharmtosearchthedesiredprogram.
YourcomputersupportsthefollowingLenovoprograms:
•ActiveProtectionSystem
•FingerprintSoftware
•LenovoCompanion
•LenovoSettings
•LenovoSolutionCenter
•LenovoQuickLaunch
•LenovoQuickSnip
•LenovoSupport
•LenovoThinkVantageT ools
•PasswordManager
•SystemUpdate
Foranintroductiontotheseprograms,seeAnintroductiontoLenovoprograms.
AnintroductiontoLenovoprograms
ThistopicprovidesabriefintroductiontosomeLenovoprograms.
Note:Dependingonyourcomputermodel,someoftheprogramsmightnotbeavailable.
•AccessConnections
14UserGuide
Page 31

TheAccessConnectionsprogramisaconnectivityassistantprogramforcreatingandmanaginglocation
profiles.EachlocationprofilestoresallthenetworkandInternetconfigurationsettingsneededfor
connectingtoanetworkinfrastructurefromaspecificlocationsuchasahomeoranoffice.
Byswitchingbetweenlocationprofilesasyoumoveyourcomputerfromplacetoplace,youcanquickly
andeasilyconnecttoanetworkwithnoneedtoreconfigureyoursettingsmanuallyandrestartthe
computereachtime.
•ActiveProtectionSystem
TheActiveProtectionSystemprogramprotectsyourharddiskdriveorhybriddrivewhentheshock
sensorinsideyourcomputerdetectsaconditionthatcoulddamagethedrive,suchassystemtilt,
excessivevibration,orshock.Theharddiskdriveorhybriddriveislessvulnerabletodamagewhenitis
notoperating.Thisisbecausewhentheharddiskdriveorhybriddriveisnotoperating,thesystemstops
itfromspinning,andmightalsomovethereadandwriteheadsofthedrivetoareasthatdonotcontain
data.Assoonastheshocksensorsensesthattheenvironmentisstableagain(minimalchangeinsystem
tilt,vibration,orshock),itturnstheharddiskdriveorhybriddriveon.
•ClientSecuritySolution
TheClientSecuritySolutionprogramprotectsyourcomputerbysecuringclientdataanddeflecting
securitybreachattempts.Italsocanhelpmanageyourpasswords,recoveraforgottenpassword,
monitorsecuritysettingsonyourcomputer,andsuggesthowtoenhanceyourcomputersecurity.
•CommunicationsUtility
UsetheCommunicationsUtilityprogramtoconfiguresettingsfortheintegratedcameraandaudiodevices.
•FingerprintSoftware
Ifyoursystemcomeswithafingerprintreader,theFingerprintSoftwareprogramenablesyoutoenroll
yourfingerprintandassociateitwithyourWindowspassword.Asaresult,thefingerprintauthentication
canreplaceyourpasswordandenablesimpleandsecureuseraccess.
•LenovoCompanion
ThroughtheLenovoCompanionprogram,youcangettheinformationabouttheaccessoriesforyour
computer,viewblogsandarticlesaboutyourcomputer,andcheckforotherrecommendedprograms.
•LenovoSettings
UsetheLenovoSettingsprogramtoenhanceyourcomputingexperiencebyturningyourcomputerinto
aportablehotspot,configuringcameraandmicrophonesettings,optimizingyourpowersettings,and
creatingandmanagingmultiplenetworkprofiles.
•LenovoSolutionCenter
TheLenovoSolutionCenterprogramenablesyoutotroubleshootandresolvecomputerproblems.It
combinesdiagnostictests,systeminformationcollection,securitystatus,andsupportinformation,along
withhintsandtipsformaximumsystemperformance.
•LenovoQuickLaunch
TheLenovoQuickLaunchprogramprovidesyouwithquickaccesstoprogramsinstalledonyour
computer,includingLenovoprograms,Microsoftprograms,andotherthirdpartyprograms.
•LenovoQuickSnip
TheLenovoQuickSnipprogramprovidesyouwithaquickandeasywaytocaptureandshareyour
experience.Itenablesyoutograbascreenshot,snipandsavethescreenshot,anduseitinother
applications.
•LenovoSupport
TheLenovoSupportprogramenablesyoutoregisteryourcomputerwithLenovo,checkthecomputer
healthconditionandbatterystatus,downloadandviewusermanualsforyourcomputer,getthewarranty
informationofyourcomputer,andexplorehelpandsupportinformation.
•LenovoThinkVantageT ools
Chapter1.Productoverview15
Page 32

TheLenovoThinkVantageToolsprogramhelpsyouworkmoreeasilyandsecurelybyprovidingeasy
accesstovarioustechnologies,suchasFingerprintSoftware,LenovoSolutionCenter,andsoon.
•MessageCenterPlus
TheMessageCenterPlusprogramautomaticallydisplaysmessagestoinformyouaboutimportantnotices
fromLenovo,suchasalertsonsystemupdatesandalertsonconditionsthatrequireyourattention.
•PasswordManager
ThePasswordManagerprogramautomaticallycapturesandfillsinauthenticationinformationfor
WindowsprogramsandWebsites.
•PowerManager
ThePowerManagerprogramprovidesconvenient,flexible,andcompletepowermanagementforyour
computer.Itenablesyoutoadjustyourcomputerpowersettingstoachievethebestbalancebetween
performanceandpowersaving.
•RecoveryMedia
TheRecoveryMediaprogramenablesyoutorestorethecontentsoftheharddiskdrivetothefactory
defaultsettings.
•RescueandRecovery
TheRescueandRecoveryprogramisaone-buttonrecoveryandrestoresolutionthatincludesasetof
self-recoverytoolstohelpyoudiagnosecomputerproblems,gethelp,andrecoverfromsystemcrashes,
evenifyoucannotstarttheWindowsoperatingsystem.
•SimpleT ap
TheSimpleTapprogramprovidesyouwithaquickwaytocustomizesomebasiccomputersettingssuch
asmutingthespeakers,adjustingthevolume,lockingthecomputeroperatingsystem,launchinga
program,openingaWebpage,openingafile,andsoon.YoualsocanusetheSimpleTapprogramto
accesstheLenovoAppShop,fromwhichyoucandownloadvariousprogramsandcomputersoftware.
TostarttheSimpleTapprograminaquickway,doanyofthefollowing:
–ClicktheredSimpleT aplaunchpointonthedesktop.Theredlaunchpointisavailableonthedesktop
afteryouhavelaunchedtheSimpleTapprogramforthefirsttime.
–Presstheblackbuttononthekeyboard(nexttothevolumecontrolbuttons).
Note:TheSimpleTapprogramisonlyavailableoncertainmodelspreinstalledwiththeWindows7
operatingsystem.IfyourWindows7modelisnotpreinstalledwiththeSimpleTapprogram,youcan
downloaditfromhttp://www.lenovo.com/support.
•SystemUpdate
TheSystemUpdateprogramhelpsyoukeepthesoftwareonyourcomputerup-to-datebydownloading
andinstallingsoftwareupdatepackages(Lenovoprograms,devicedrivers,UEFIBIOSupdates,and
otherthirdpartyprograms).
16UserGuide
Page 33

Chapter2.Usingyourcomputer
Thischapterprovidesinformationonusingsomeofthecomputercomponents.
Thischaptercontainsthefollowingtopics:
•Registeringyourcomputer
•Frequentlyaskedquestions
•Specialkeys
•UsingtheThinkPadpointingdevice
•Powermanagement
•Connectingtothenetwork
•Attachinganexternalmonitor
•UsingtheExtenddesktopfunction
•Settingupapresentation
•UsingtheAMDSwitchableGraphicsfeature
•Usingaudiofeatures
•Usingtheintegratedcamera
•Usingamediacard
Registeringyourcomputer
Whenyouregisteryourcomputer,informationisenteredintoadatabase,whichenablesLenovotocontact
youincaseofarecallorothersevereproblem.AfteryouregisteredyourcomputerwithLenovo,youwill
alsoreceivequickerservicewhenyoucallLenovoforhelp.Inaddition,somelocationsofferextended
privilegesandservicestoregisteredusers.
ToregisteryourcomputerwithLenovo,dooneofthefollowing:
•Gotohttp://www.lenovo.com/registerandfollowtheinstructionsonthescreentoregisteryourcomputer.
•ConnectyourcomputertotheInternetandregisteryourcomputerthroughapreinstalledregistration
program:
–ForWindows7:ThepreinstalledLenovoProductRegistrationprogramlaunchesautomaticallyafteryou
haveusedyourcomputerforatime.Followtheinstructionsonthescreentoregisteryourcomputer.
–ForWindows8:LaunchtheLenovoSupportprogram.ThenclickRegistrationandfollowthe
instructionsonthescreentoregisteryourcomputer.
Frequentlyaskedquestions
Thefollowingareafewtipsthatwillhelpyouoptimizetheuseofyourcomputer.
Toensurethatyoureceivethebestperformancefromyourcomputer,gotothefollowingWebpage
tofindinformationsuchasaidsfortroubleshootingandanswerstofrequentlyaskedquestions:
http://www.lenovo.com/support/faq
CanIgetmyuserguideinanotherlanguage?
©CopyrightLenovo2013
17
Page 34

•Todownloadtheuserguideinanotherlanguage,goto:http://www.lenovo.com/support.Thenfollow
theinstructionsonthescreen.
Onthegoandneedtousebatterypowermoreeffectively?
•Toconservepower,ortosuspendoperationwithoutexitingapplicationsorsavingfiles,seePower-saving
modes.
•Toachievethebestbalancebetweenperformanceandpowersaving,createandapplypowerplans.See
Managingthebatterypower.
•Ifyourcomputerwillbeturnedoffforanextendedperiodoftime,youcanpreventbatterypowerfrom
drainingbyremovingthebattery.LookformoreinformationaboutusingthebatteryinPowermanagement.
Concernedaboutsecurityorneedtosecurelydisposeofdatastoredonyourharddiskdrive,hybrid
drive,orsolid-statedrive?
•StudySecuritytofindouthowyoucanprotectyourcomputerfromtheftandunauthorizeduse.
•UsethePasswordManagerprogramtoprotectthedatastoredonyourcomputer.Fordetails,seethe
helpinformationsystemoftheprogram.
•Beforeyoudisposeofthedataontheharddiskdrive,hybriddrive,orsolid-statedrive,besuretoread
Noticeondeletingdatafromyourharddiskdrive,hybriddrive,orsolid-statedrive.
Gettingconnectedindifferentlocationsisachallenge?
•Totroubleshootawirelessnetworkingissue,goto:
http://www.lenovo.com/support/faq
•TakeadvantageofthenetworkingfeaturesbyuseoftheAccessConnectionsprogram(ontheWindows7
operatingsystem)orLocationAwarenessprogram(ontheWindows8operatingsystem).
•Tolearnmoreaboutusingthewirelessfeaturesofyourcomputer,refertoWirelessconnections.
•Totravelmoreconfidently,besuretocheckthetipsinTravelingwithyourcomputer.
•PressF8toenableordisablethewirelessfeatures.
Needtogivepresentationsorattachanexternalmonitoroften?
•EnsurethatyoufollowtheprocedureforAttachinganexternalmonitor.
•WiththeExtenddesktopfunction,youcandisplayoutputonboththecomputerdisplayandanexternal
monitor.
Needtoattachorreplaceadevice?
•SeeReplacingdevicesformoreinformationaboutreplacingthedevicesofyourcomputer.
Youhavebeenusingyourcomputerforsometimealready,anditisgettingslower?
•FollowtheGeneraltipsforpreventingproblems.
•Youcandiagnoseproblemsyourselfbyusingthepreinstalleddiagnosticsoftware.
•CheckforrecoverysolutionsinRecoveryoverview.
Printthefollowingsectionsandkeepthemwithyourcomputerincaseyouareunabletoaccessthisonline
userguidewhennecessary.
•Installinganewoperatingsystem
•Computerstopsresponding
•Powerproblems
18UserGuide
Page 35
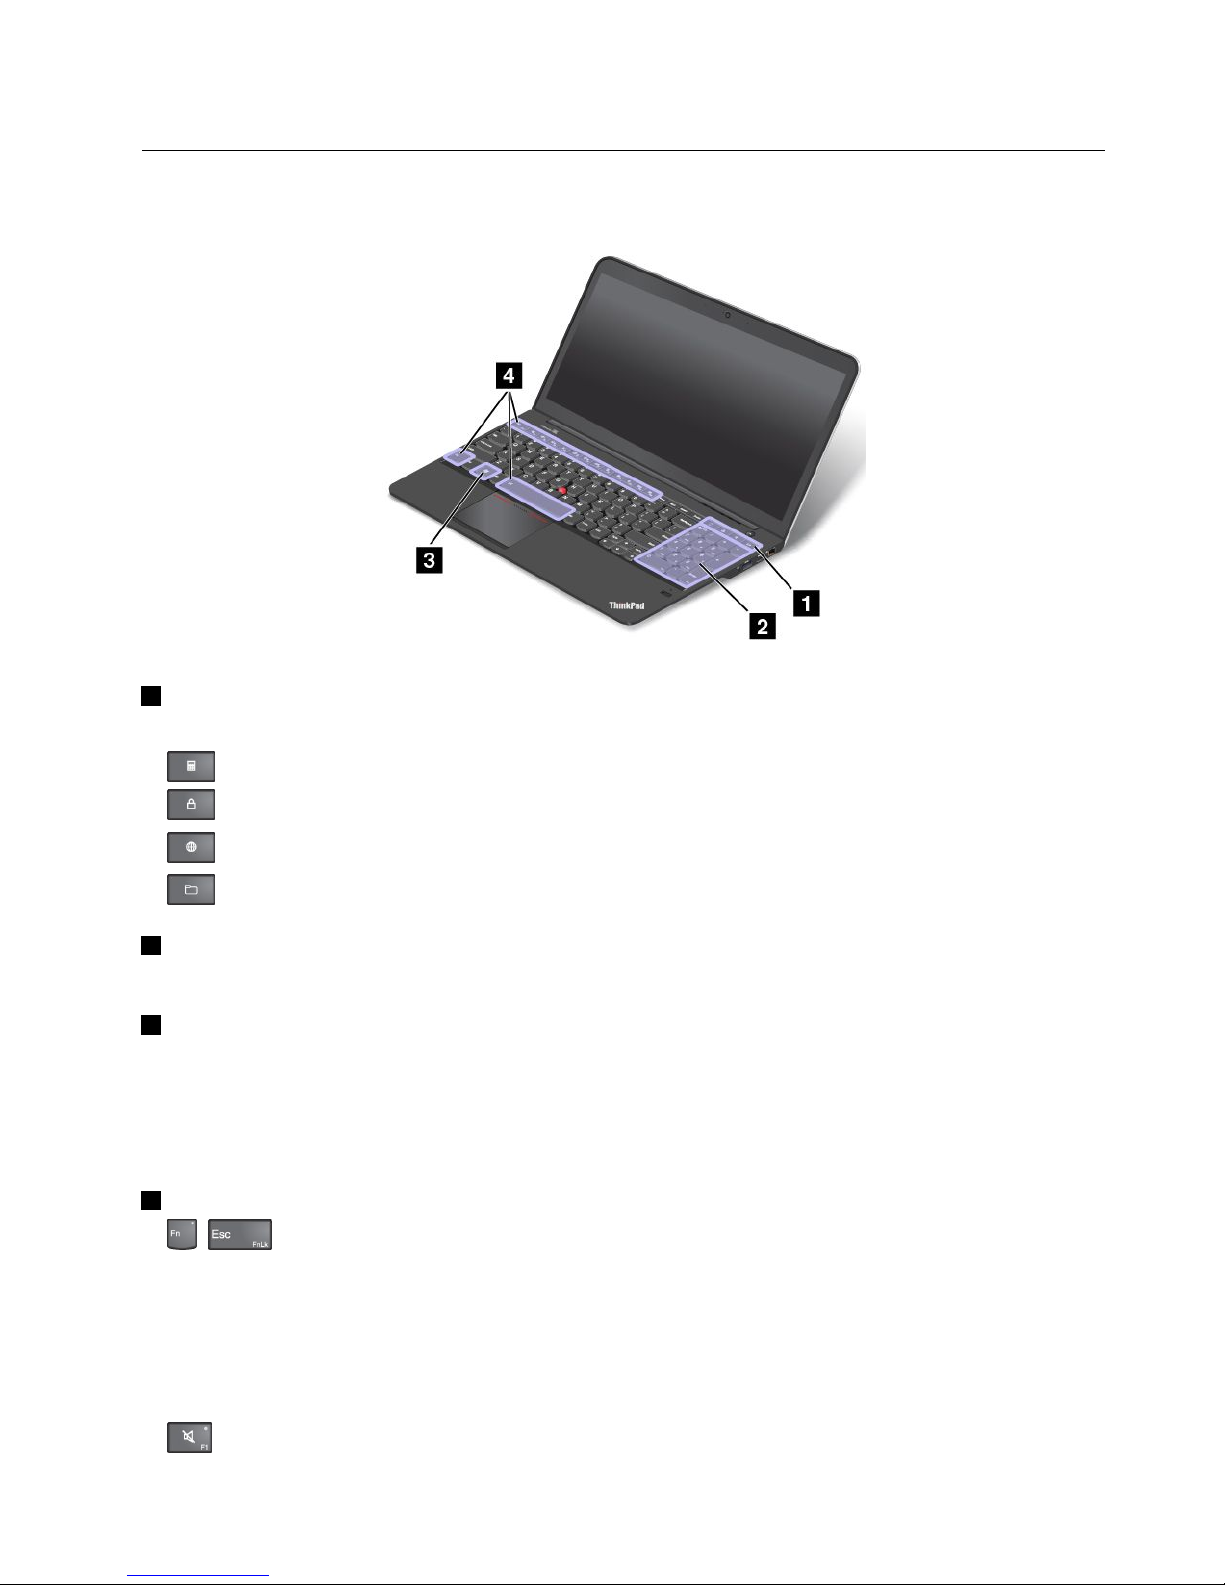
Specialkeys
ThefollowingfigureshowsthelocationsofmainspecialkeysforThinkPadS531.
1Additionalshortcutkeys
Yourcomputerhasfouradditionalshortcutkeys:
•:Launchcalculator
•
:Lockoperatingsystem
•
:OpenthedefaultWebbrowser
•:OpenComputer
2Numerickeypad
Youcanusethisnumerickeypadtoinputnumbersquickly.
3Windowskey
OntheWindows7operatingsystem,presstheWindowskeytoopentheStartmenu.OntheWindows8
operatingsystem,presstheWindowskeytoswitchbetweenthecurrentworkspaceandtheStartscreen
ForinformationaboutusingtheWindowskeywithotherkeys,refertothehelpinformationsystemofthe
Windowsoperatingsystem.
4Functionkeys
•+:PressFn+EsctoenableordisabletheFnLockfunction.
WhentheFnLockfunctionisdisabled:TheFnLockindicatorisoff(defaultmode).Toinitiatethe
specialfunctionofeachkey,pressthefunctionkeysdirectly.ToinputF1–F12,youneedtopresstheFn
keyandthecorrespondingfunctionkey.
WhentheFnLockfunctionisenabled:TheFnLockindicatorturnson.T oinputF1–F12,pressthe
functionkeysdirectly.Toinitiatethespecialfunctionofeachkey,youneedtopresstheFnkeyandthe
correspondingfunctionkey.
•:Mutesorunmutesthespeakers.Whenthespeakersaremuted,thespeakermuteindicatorturnson.
Chapter2.Usingyourcomputer19
Page 36

Ifyoumutethesoundandturnoffyourcomputer,thesoundwillremainmutedwhenyouturnonyour
computeragain.Toturnonthesound,pressF1,F2,orF3.
•
:Decreasesthespeakervolume.
•:Increasesthespeakervolume.
•:Mutesorunmutesthemicrophones.Whenthemicrophonesaremuted,themicrophonemute
indicatorturnson.
Ifyoumutethemicrophonesandturnoffyourcomputer,themicrophoneswillremainmutedwhenyou
turnonyourcomputeragain.Tounmutethemicrophones,pressF4.
•:Darkensthedisplay.
•
:Brightensthedisplay.
Youcantemporarilychangethecomputerdisplaybrightnessbypressingthetwokeys.Tochangethe
defaultbrightnesslevel,right-clickthebatterystatusiconintheWindowsnotificationarea.Thenclick
Adjustscreenbrightnessandmakechangesasdesired.
•
:Switchesthedisplayoutputlocationbetweenthecomputerdisplayandanexternalmonitor.
Note:Toswitchbetweenthecomputerdisplayandanexternalmonitor,theWindows+Pkeycombination
alsoisavailable.
•:Enablesordisablesthebuilt-inwirelessnetworkingfeatures.Formoreinformationonthewireless
features,refertoWirelessconnections.
•:
ForWindows8:OpenstheSettingscharm.
ForWindows7:OpensControlPanel.
•
:
ForWindows8:OpenstheSearchcharm.
ForWindows7:OpensWindowsSearch.
•:Viewstheprogramsthatyouhaveopened.
•:
ForWindows8:Viewsalltheprograms.
ForWindows7:OpensComputer.
•
+:Controlsthekeyboardbacklight
Therearethreemodesforthekeyboardbacklight:Off,Low,andHigh.PressFn+Spacebartochange
themodesofthekeyboardbacklight.
•Fn+B:HasthesamefunctionastheBreakkey.
•Fn+P:HasthesamefunctionasthePausekey.
•Fn+S:HasthesamefunctionastheSysRqkey.
•Fn+K:HasthesamefunctionastheScrLKkey.
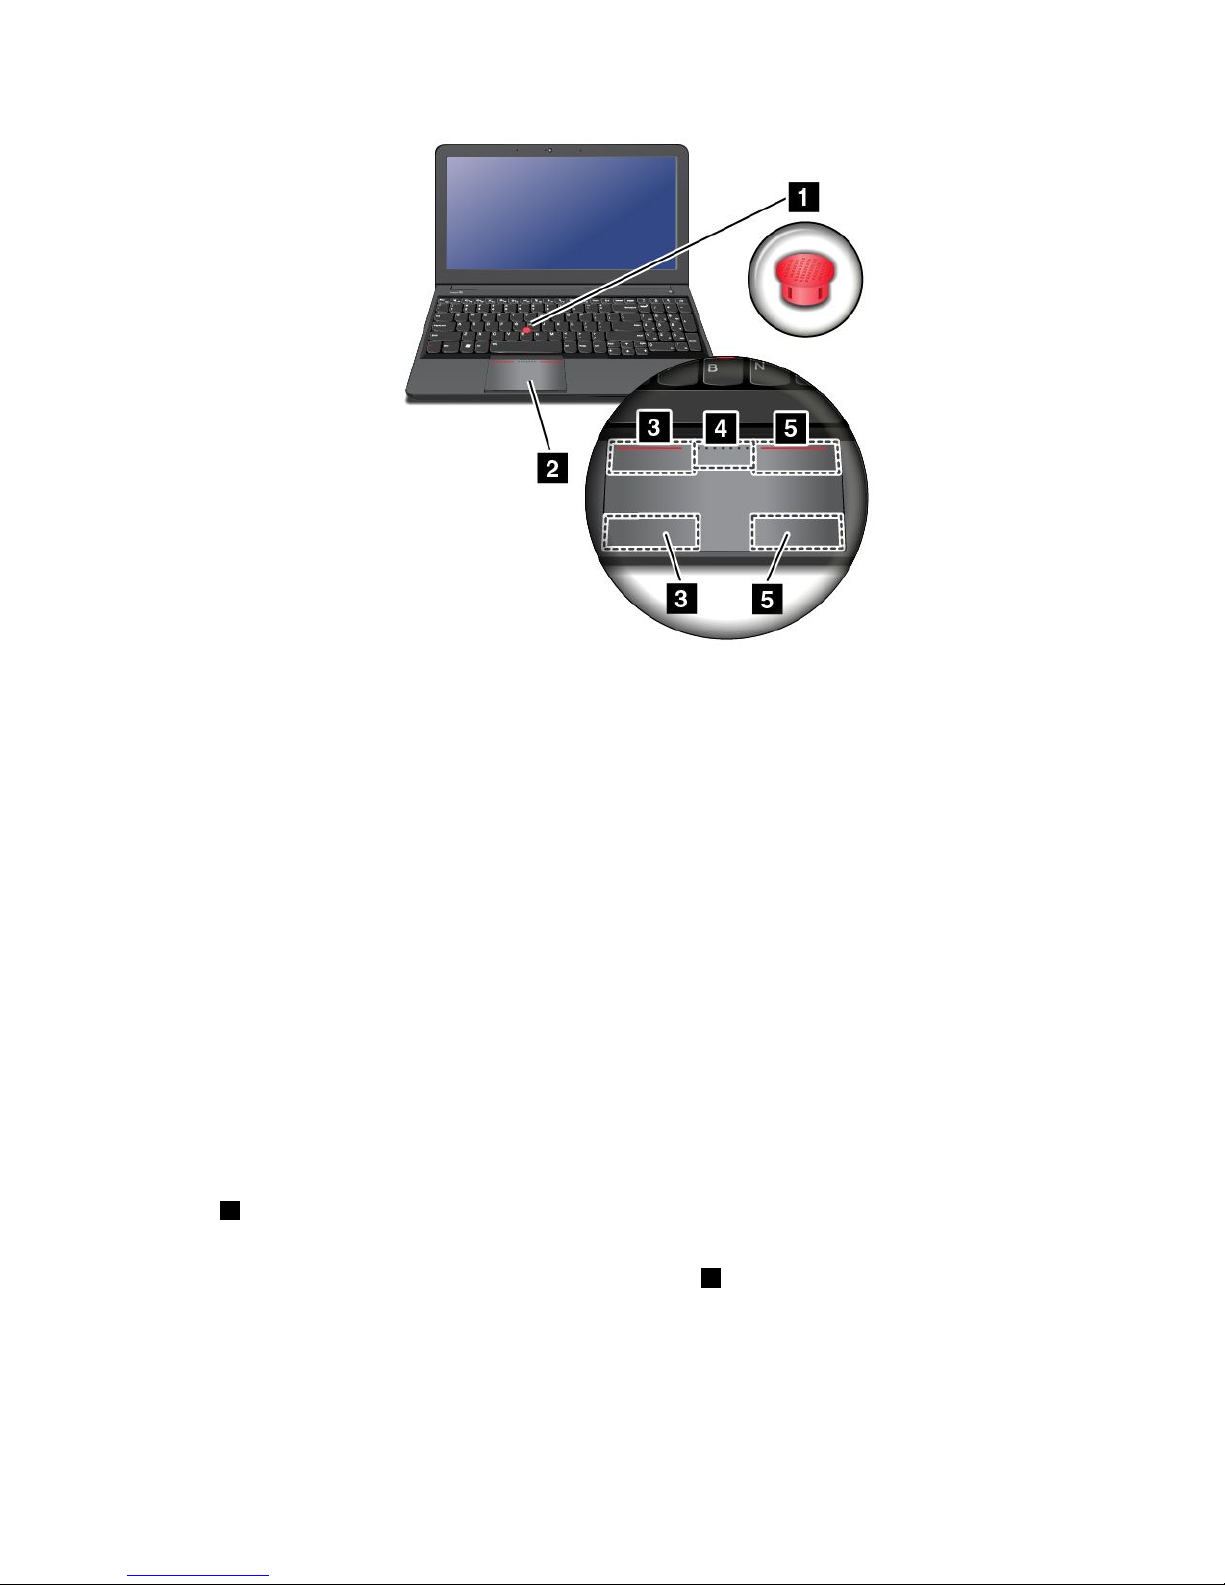
UsingtheThinkPadpointingdevice
TheThinkPadpointingdeviceconsistsoftheTrackPointpointingstick1andthetouchpad2.Thewhole
touchpadisanactiveareasensitivetofingermovement.Theleftclickzones3andrightclickzones5
workastheleftandrightmousebuttonsonaconventionalmouse.Thescrollzone4enablesyouto
scrollWebpagesordocumentsinanydirection.
20UserGuide
Page 37
UsingtheTrackPointpointingstick
TousetheTrackPointpointingstick,applypressuretothenonslipcaponthepointingstickinanydirection
paralleltothekeyboard.Thenyoucanmovethecursor.Butthepointingstickitselfdoesnotmove.The
speedatwhichthecursormovesdependsonthepressureyouapplytothepointingstick.
Usingthemulti-touchtouchpad
Thetouchpadofyourcomputersupportsmulti-touchwithwhichyoucanzoomin,zoomout,scroll,or
rotateonthescreenwhilebrowsingtheInternetorreadingoreditingadocument.
CustomizingtheThinkPadpointingdevice
YoucancustomizetheThinkPadpointingdevicetoachievetheextendedfunctionsoftheThinkPad
pointingdevice.
TocustomizetheThinkPadpointingdevice,dothefollowing:
1.GotoControlPanel.
2.ClickHardwareandSound➙Mouse➙ThinkPad.
3.Followtheinstructionsonthescreen.
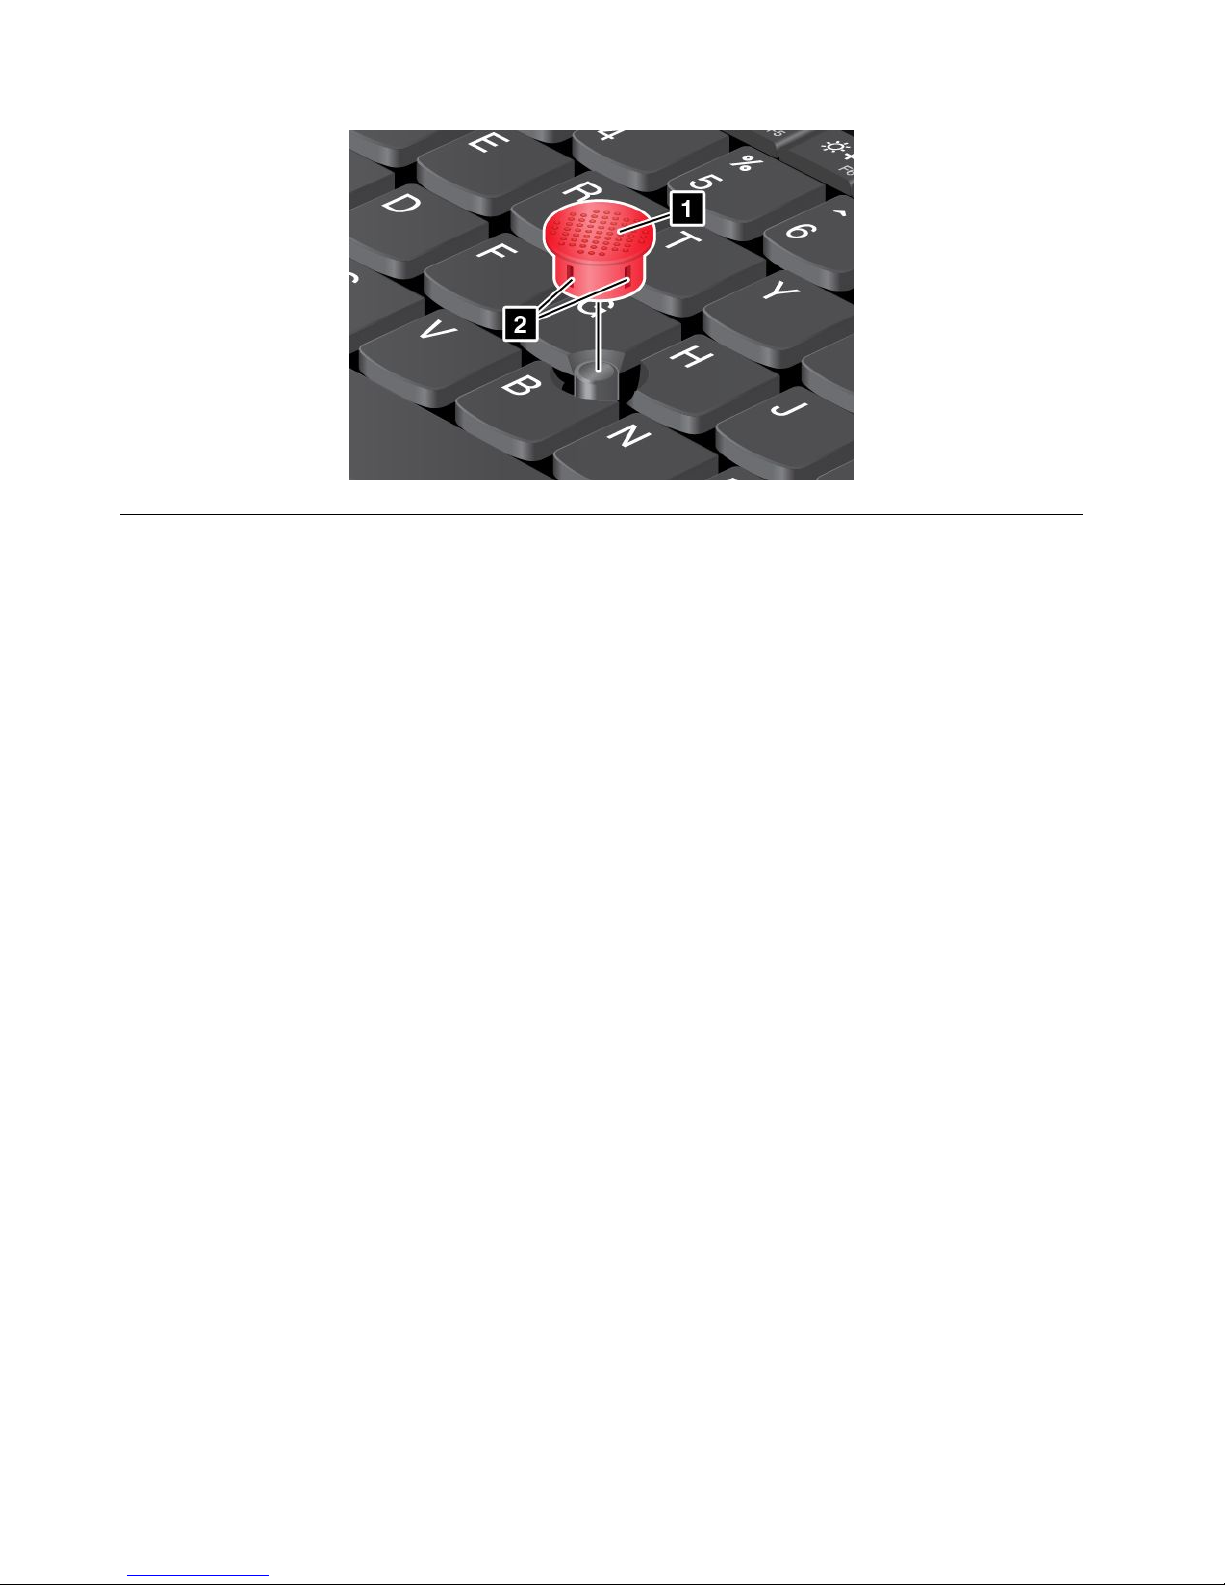
Replacingthecap
Thecap1ontheendoftheTrackPointpointingstickisremovable.Afteryouusethecapforaperiod
oftime,youcanreplacethecapwithanewone.
Note:TheTrackPointcapusedinyourcomputerhasgrooves2asshowninthefollowingillustration.
EnsurethatyoureplacetheT rackPointcapwithacorrectonethathassuchgrooves.
Chapter2.Usingyourcomputer21
Page 38
Powermanagement
Whenyouuseyourcomputerawayfromelectricaloutlets,youdependonbatterypowertokeepyour
computerrunning.Differentcomputercomponentsconsumepoweratdifferentrates.Themoreyouusethe
power-intensivecomponents,thefasteryouconsumebatterypower.Mobilityhasrevolutionizedbusiness
byallowingyoutotakeyourworkwhereveryougo.WithThinkPadbatteries,youwillbeabletoworklonger
withoutbeingtiedtoanelectricaloutlet.
Checkingthebatterystatus
ThebatterystatusiconintheWindowsnotificationareadisplaysthepercentageofbatterypowerremaining.
Therateatwhichyouusebatterypowerwilldeterminehowlongyoucanusethebatteryofyourcomputer
betweencharges.Becauseeachcomputeruserhasdifferenthabitsandneeds,itisdifficulttopredicthow
longabatterychargewilllast.Therearetwomainfactors:
•Howmuchenergyisstoredinthebatterywhenyoubegintowork.
•Thewayyouuseyourcomputer.Forexample:
–Howoftenyouaccesstheharddiskdrive,hybriddrive,orsolid-statedrive.
–Howbrightyoumakethecomputerdisplay.
–Howoftenyouusethewirelessfeatures.
Tocheckfordetailedbatterystatusinformation,dothefollowing:
•ForWindows7:OpenthePowerManagerprogramandclicktheBatterytab.
•ForWindows8:
–OpentheLenovoSupportprogramandclickBatteryHealth.
–OpentheLenovoSettingsprogramandclickPower.
Usingtheacpoweradapter
Thepowertorunyourcomputercancomeeitherfromthelithium-ion(Li-ion)batterypackprovidedwithit,
orfromacpowerthroughtheacpoweradapter.Whileyouuseacpower,thebatterychargesautomatically.
Theacpoweradapterthatcomeswithyourcomputerhastwobasiccomponents:
•Thetransformerpackthatconvertsacpowerforusewiththecomputer.
•Thepowercordthatplugsintotheacoutletandintothetransformerpack.
22UserGuide
Page 39

Attention:Usinganimproperpowercordcouldcauseseveredamagetoyourcomputer.
Connectingtheacpoweradapter
Tousetheacpoweradapter,dothefollowing.Besuretotakethesestepsintheorderinwhichtheyare
givenhere.
1.Plugtheacpoweradapterintoanacoutlet.
2.Connectthepowercordtothetransformerpack.
3.Insertthepowerjackintothecomputer.
Tipsonusingtheacpoweradapter
•Whentheacpoweradapterisnotinuse,disconnectitfromtheelectricaloutlet.
•Donotbindthepowercordtightlyaroundtheacpoweradaptertransformerpackwhenitisconnectedto
thetransformer.
•Beforeyouchargethebattery,ensurethatitstemperatureisatleast10°C(50°F).
•Youcanchargethebatterywhentheacpoweradapterisconnectedtothecomputerandthebatteryis
installed.Youneedtochargeitinanyofthefollowingconditions:
–Whenyouuseanewbattery
–Thepercentageofpowerremainingislow.
–Thebatteryhasnotbeenusedforalongtime.
Chargingthebattery
Whenyoucheckbatterystatusandfindthatthepercentageofpowerremainingisloworwhenthepower
alarmalertsyouthattheremainingpowerislow,youneedtochargeyourbattery.
Ifanacoutletisconvenient,plugtheacpoweradapterintoit,andtheninsertthejackintothecomputer.
Thebatterywillbefullychargedinabout3to6hours.Thisisaffectedbythebatterysizeandthephysical
environment.
Note:Toincreasethelifeofthebattery,thecomputerdoesnotstartrechargingthebatteryiftheremaining
powerisgreaterthan95%.
Maximizingthebatterylife
Tomaximizethelifeofthebattery,dothefollowing:
•Usethebatteryuntilthechargeiscompletelydepleted.
•Rechargethebatterycompletelybeforeusingit.Y oucanseewhetherthebatteryisfullychargedfromthe
batterystatusiconintheWindowsnotificationarea.
•Alwaysusepowermanagementfeaturessuchaspowermodes,screenblank,sleep,andhibernation.
Managingthebatterypower
Toachievethebestbalancebetweenperformanceandpowersaving,adjustyourpowerplansettings.
Toaccesspowerplansettings,dothefollowing:
•ForWindows7:StartthePowerManagerprogramandthenclickthePowerPlantab.Forinstructionson
howtostartthePowerManagerprogram,seeAccessingLenovoprogramsontheWindows7operating
system.
•ForWindows8:Right-clickthebatterystatusiconfromtheWindowsnotificationareaandclickPower
Options.ThenclickChangeplansettingsthatisnexttoyourpowerplan.
Chapter2.Usingyourcomputer23
Page 40

Formoreinformation,refertothehelpinformationsystem.
Power-savingmodes
Youcanusethefollowingpower-savingmodestoconservethepowerofyourcomputer.
•Screenblank(fortheWindows7operatingsystemonly)
Thecomputerdisplayrequiresconsiderablebatterypower.Toturnoffpowertothedisplay,right-clickthe
batterygaugeiconfromtheWindowsnotificationareaandselectPoweroffdisplay.
•Sleep
Insleepmode,yourworkissavedtomemory,andthenthesolid-statedrive,hybriddrive,ortheharddisk
driveandthecomputerdisplayareturnedoff.Whenyourcomputerwakesup,yourworkisrestored
withinseconds.
–ForWindows7:
1.ClickStart.
2.ClickthetrianglemarkontherightsideoftheShutdownicon;thenselectSleep.
–ForWindows8:
1.Movethecursortothebottomrightcornerofthescreentobringupthecharm.
2.ClickSettings➙Power➙Sleep.
•Hibernation
Byusingthismode,youcanturnoffyourcomputercompletelywithoutsavingfilesorexitingfromany
programsthatarerunning.Whenthecomputerentershibernation,allopenprograms,folders,andfiles
aresavedtotheharddisk,andthenthecomputerturnsoff.
Toputthecomputerintohibernationmode,changeyourpowerplansettings.Toaccesspowerplan
settings,dothefollowing:
–ForWindows7:
1.OpenthePowerManagerprogram.
2.ClickPowerPlanorclickAdvanced➙PowerPlan.
–ForWindows8:
1.ClickthebatterystatusiconintheWindowsnotificationarea.
2.ClickMorepoweroptions.ThenclickChangeplansettingsthatisnexttoyourpowerplan.
•30DayStandbyfunction
Dependingonthecomputermodel,yourcomputermightsupportthe30DayStandbyfunction.Whenthis
functionisenabled,thecomputerconsumesevenlesspowerinsleepmodeandtakesonlyseconds
toresumenormaloperationwhenyoupressthepowerbutton.Toenablethe30DayStandbyfunction,
dothefollowing:
–ForWindows7:
1.OpenthePowerManagerprogram.
2.ClickGlobalPowerSettingsorclickAdvanced➙GlobalPowerSettings.
3.SelectEnable30DayStandby;thenclickOK.
–ForWindows8:
1.OpentheLenovoSettingsprogram.
2.ClickPower.
3.Under30DayStandby,movetheslidertotheright.
24UserGuide
Page 41

•Wirelessoff
Whenyouarenotusingthewirelessfeatures,suchasBluetoothorwirelessLAN,turnthemoff.This
willhelpconservepower.T oturnoffthewirelessfeatures,pressF8.
Enablingthewakeupfunction
Ifyouputyourcomputerintohibernationmode,andthewakeupfunctionisdisabled(thisisthedefault
setting),thecomputerdoesnotconsumeanypower.Ifthewakeupfunctionisenabled,itconsumesa
smallamountofpower.
Toenablethewakeupfunction,dothefollowing:
1.GotoControlPanelandclickSystemandSecurity.
2.ClickAdministrativeTools.
3.Double-clickT askScheduler.Ifyouarepromptedforanadministratorpasswordorconfirmation,type
thepasswordorprovideconfirmation.
4.Fromtheleftpane,selectthetaskfolderforwhichyouwanttoenablethewakeupfunction.The
scheduledtasksaredisplayed.
5.Clickascheduledtask,andthenclicktheConditionstab.
6.UnderPower,selectthecheckboxforWakethecomputertorunthistask.
Settingtheactionsforcriticalandlowpower
Whenyourbatterypowerfallsbelowacertainlevel,someactionswillbetriggered.Forexample,thealarm
willgoofforyourcomputerwillgointosleeporhibernationmodeorpoweroff.
Tosettheactionstriggeredandthecorrespondingcriticalandlowpowerlevel,dothefollowing:
1.ClickthebatterystatusiconintheWindowsnotificationarea,andthenclickMorepoweroptions.
2.ClickChangeplansettings➙Changeadvancedpowersettings➙Battery.
3.ChangethesettingsasyoudesireintheBatterylist.
Connectingtothenetwork
YourcomputerhasoneormorenetworkcardsthatenableyoutoconnectyourcomputertotheInternet
andothernetworkconnections.
Ethernetconnections
YoucanconnecttoalocalnetworkorabroadbandconnectionbyuseoftheEthernetfeaturebuiltintoyour
computer.
ToconnecttoanetworkthroughEthernet,dothefollowing:
•ForWindows7:UsetheAccessConnectionsprogram.ForinstructionsonhowtostarttheAccess
Connectionsprogram,seeAccessingLenovoprogramsontheWindows7operatingsystem.
•ForWindows8:OpentheLenovoSettingsprogramandclickLocationAwareness.Thenfollowthe
instructionsonthescreen.
DANGER
YourcomputerhasanEthernetconnector.T oavoidtheriskofelectricalshock,donotconnect
thetelephonecabletotheEthernetconnector.
Chapter2.Usingyourcomputer25
Page 42

Wirelessconnections
Wirelesscommunicationisthetransferofdatawithouttheuseofcablesbutbymeansofradiowavesonly.
Dependingonthewirelessdeviceusedinyourcomputer,youmightbeabletoconnecttothefollowing
categoriesofwirelessnetworks.
WirelessLAN
AwirelessLANcoversarelativelysmallgeographicarea,suchasanofficebuildingorahouse.Devices
basedonthe802.11standardscanconnecttothisnetwork.
Yourcomputercomeswithabuilt-inwirelessnetworkcardandaconfigurationutilitytohelpyoumake
wirelessconnectionsandmonitorthestatusofyourconnection,sothatyoucanstayconnectedtoyour
networkwhileyouareintheoffice,inameetingroom,orathome,withnoneedforawiredconnection.
TipsforusingthewirelessLANfeature
Toachievethebestconnection,usethefollowingguidelines:
•PlaceyourcomputersothatthereareasfewobstaclesaspossiblebetweenthewirelessLANaccess
pointandthecomputer.
•Openyourcomputerdisplaytoanangleofslightlymorethan90degrees.
•Ifyouusethewirelessfeature(the802.11standard)ofyourcomputersimultaneouslywithaBluetooth
option,thedatatransmissionspeedcanbedelayedandtheperformanceofthewirelessfeaturecanbe
degraded.
Bluetooth
Bluetoothisoneofanumberoftechnologiesusedtocreateawirelesspersonalareanetwork.Bluetooth
canconnectdevicesashortdistancefromoneanother,andiscommonlyusedforconnectingperipheral
devicestoacomputer,transferringdatabetweenhand-helddevicesandapersonalcomputer,orremotely
controllingandcommunicatingwithdevicessuchasmobilephones.
Tipsforusingthewirelessconnectionfeatures
Toachievethebestconnection,usethefollowingguidelines:
•Keepyourcomputerawayfromyourbody.
•PlaceyourcomputersothatthereareasfewobstaclesaspossiblebetweentheBluetoothdeviceandthe
computer.
•Openyourcomputerdisplaytoanangleslightlygreaterthan90degrees.
•Ifyouusethewirelessfeature(the802.11standard)ofyourcomputersimultaneouslywithaBluetooth
option,thedatatransmissionspeedcanbedelayedandtheperformanceofthewirelessfeaturecanbe
degraded.
Note:YoucanpurchaseawirelessnetworkcardasanoptionfromLenovoat:
http://www.lenovo.com/accessories/services/index.html.
Usingthewirelessfeatures
Toenableordisablethewirelessfeatures,dooneofthefollowing:
•ForWindows7:PressF8toopenthewirelessradioswitchboard.Turnonorturnoffthewirelessfeature
asdesired.
•ForWindows8:PressF8toenableordisabletheAirplanemode.WhentheAirplanemodeisenabled,all
ofyourwirelessdevicesareturnedoff.
26UserGuide
Page 43

Toestablishawirelessconnection,turnonthewirelessfeature.AndthenDouble-clickanetworktoconnect
toit.Providerequiredinformationifneeded.
Ifyouneedtoconnecttodifferentwirelessnetworksindifferentlocations,usethefollowingsoftwareto
managemultiplenetworkprofilessothatthecomputerconnectstoanavailablenetworkautomaticallywhen
thelocationchanges:
•ForWindows7:UsetheAccessConnectionsprogram.ForinstructionsonhowtostarttheAccess
Connectionsprogram,seeAccessingLenovoprogramsontheWindows7operatingsystem.
•ForWindows8:OpentheLenovoSettingsprogramandclickLocationAwareness.SeeAccessing
LenovoprogramsontheWindows8operatingsystem.
Attention:
•Ifyouwanttousethewirelessfeaturesonanairplane,checktheserviceswiththeairlinebeforeboarding
theairplane.
•Iftherearerestrictionsontheuseofcomputerwirelessfeaturesonanairplane,youneedtodisable
yourcomputerwirelessfeaturesbeforeboarding..
Tolocatethewirelessantennasonyourcomputer,seeLocationoftheUltraConnectwirelessantennas.
UsingBluetooth
SomemodelsareequippedwithaBluetoothcardthatiscompliantwithBluetoothSpecification4.0.
ToenabletheBluetoothfeatureontheWindows7operatingsystem,pressF9toopenthewirelessradio
switchboard.ThenturnontheBluetoothradio.FortheWindows8operatingsystem,theBluetoothfeature
isonbydefault.
ToconfigureaBluetoothdeviceormanageconnectionsettings,useBluetoothDevicesinControlPanel.
1.OpenControlPanel.
2.ClickHardwareandSound.
3.ClickDevicesandPrinters.
TosenddatatoaBluetooth-enableddevice,dothefollowing:
1.Right-clickthedatathatyouwanttosend.
2.SelectSendTo➙BluetoothDevices.
Note:Ifyouusethewirelessfeature(the802.11standard)ofyourcomputersimultaneouslywithaBluetooth
option,thedatatransmissionspeedcanbedelayedandtheperformanceofthewirelessfeaturecanbe
degraded.
FormoreinformationaboutusingtheBluetoothfeature,refertotheWindowshelpinformationsystemand
theBluetoothhelpinformationsystem.
Checkingthewirelessnetworkconnectionstatus
Youcancheckyourcomputerwirelessnetworkconnectionstatusandwirelesssignalstrengththroughthe
wirelessnetworkconnectionstatusiconintheWindowsnotificationarea.Themorebarsencompassed,the
betterthesignal.
FortheWindows7operatingsystem,youalsocanchecktheAccessConnectionsgauge,theAccess
Connectionsstatusicon,ortheAccessConnectionswirelessnetworkconnectionstatusiconinthe
Windowsnotificationarea.
Chapter2.Usingyourcomputer27
Page 44

AccessConnectionsgauge
OntheWindows7operatingsystem,theAccessConnectionsgaugeintheWindowsnotificationarea
displaysthestatusandsignalstrengthofyourwirelessconnection.
Youcanfindmoredetailedinformationaboutthestatusandsignalstrengthofyourwirelessconnection
byopeningtheAccessConnectionsprogramorbyright-clickingtheAccessConnectionsgaugeinthe
WindowsnotificationareaandselectingViewStatusofWirelessConnection.
AccessConnectionsgaugestates:wirelessLAN
•Powertothewirelessradioisoffornosignal.
•Powertothewirelessradioison.Thesignalstrengthofthewirelessconnectionispoor.T o
improvethesignalstrength,moveyourcomputerclosertothewirelessaccesspoint.
•Powertothewirelessradioison.Thesignalstrengthofthewirelessconnection
ismarginal.
•
Powertothewirelessradioison.Thesignalstrengthofthewirelessconnection
isexcellent.
AccessConnectionsstatusicon
TheAccessConnectionsstatusicondisplaysgeneralconnectionstatus.
•AccessConnectionsstatusiconstates
–
Nolocationprofileisactiveornoneexists.
–
Currentlocationprofileisdisconnected.
–Currentlocationprofileisconnected.
AccessConnectionswirelessstatusicon
TheAccessConnectionswirelessstatusicondisplaysthestatusandsignalstrengthofyourwireless
connection.
Youcanfindmoredetailedinformationaboutthestatusandsignalstrengthofyourwirelessconnection
eitherbyopeningtheAccessConnectionsprogramorbydouble-clickingtheAccessConnectionswireless
statusiconintheWindowsnotificationarea.
Wirelessstatusiconstates:wirelessLAN
•Powertothewirelessradioisoff.
•Powertothewirelessradioison.Noassociation.
•Powertothewirelessradioison.Nosignal.
•Powertothewirelessradioison.Thesignalstrengthofthewirelessconnectionisexcellent.
•Powertothewirelessradioison.Thesignalstrengthofthewirelessconnectionismarginal.
•Powertothewirelessradioison.Thesignalstrengthofthewirelessconnectionispoor.Toimprove
thesignalstrength,moveyourcomputerclosertothewirelessaccesspoint.
Note:Ifyouhavetroubleinmakingaconnection,trymovingyourcomputerclosertoyourwirelessaccess
point.
28UserGuide
Page 45

Attachinganexternalmonitor
Youcanattachanexternalmonitortoyourcomputertoexpandyourcomputercapabilities.
Note:Ifyouattachanexternalmonitor,avideointerfacecablewithaferritecoreinstalledonthecable
isrequired.
Yourcomputersupportsamaximumvideoresolutionofupto1920x1200,providedthattheexternal
monitoralsosupportsthatresolution.Formoredetails,refertothemanualsprovidedwithyourmonitor.
Youcansetanyresolutionforeitherthecomputerdisplayortheexternalmonitor.Whenyouusebothatthe
sametime,theresolutionofbothisthesame.Ifyousetahigherresolutionforthecomputerdisplay,you
canseeonlypartofthescreenatatime.YoucanseeotherpartsbymovingtheimagewiththeTrackPoint
pointingdeviceoranotherpointingdevice.
Youcanmovethedisplayoutputtothecomputerdisplay,theexternalmonitor,orbothbyconfiguring
settingsintheDisplaySettingswindow.
Connectinganexternalmonitor
Ifyourcomputercannotdetecttheexternalmonitor,right-clickonthedesktop,thenselectScreen
resolution.ClicktheDetectbutton.
Toattachanexternalmonitor,dothefollowing:
1.ConnecttheexternalmonitortotheHDMIport;thenconnectthemonitortoanelectricaloutlet.
2.Turnontheexternalmonitor.
3.ChangethedisplayoutputlocationbypressingF7.Thisenablesyoutoswitchbetweenviewingoutput
ontheexternalmonitor,thecomputermonitor,andbothmonitors.
Settingthemonitortype
Tosetyourmonitortype,dothefollowing:
1.Connecttheexternalmonitortothemonitorconnector,andthenconnectthemonitortoanelectrical
outlet.
2.Turnontheexternalmonitor.
3.Right-clickonthedesktop,andclickScreenresolution.
Note:Ifyourcomputercannotdetecttheexternalmonitor,clicktheDetectbutton.
4.Clicktheiconforthedesiredmonitor(theMonitor-2iconisfortheexternalmonitor).
5.SetResolution.
6.ClickAdvancedSettings.
7.ClicktheMonitortab.Checkthemonitorinformationwindowtoensurethatthemonitortypeiscorrect.
Ifitis,clickOKtoclosethewindow;otherwiseproceedwiththefollowingsteps.
8.Ifmorethantwomonitortypesaredisplayed,selectGenericPnPMonitororGenericNon-PnP
Monitor.
9.ClickProperties.Ifyouarepromptedforanadministratorpasswordorconfirmation,typethepassword
orprovideconfirmation.
10.ClicktheDrivertab.
11.ClickUpdateDriver.
Chapter2.Usingyourcomputer29
Page 46

12.ClickBrowsemycomputerfordriversoftware,andthenclickLetmepickfromalistofdevice
driversonmycomputer.
13.CleartheShowcompatiblehardwarecheckbox.
14.SelectManufacturerandModelforyourmonitor.Ifyoucannotfindyourmonitoronthelist,stopthe
installationofthisdriverandusethedrivershippedwithyourmonitor.
15.Afterupdatingthedriver,clickClose.
16.FortheWindows7operatingsystem,tochangethecolorsettings,right-clickonthedesktop,andclick
Screenresolution.ClickAdvancedSettings,selecttheMonitortab,thensetColors.
17.ClickOK.
Note:Tochangethecolorsettings,right-clickonthedesktop,andclickScreenresolution.ClickAdvanced
Settings,selecttheMonitortab,thensetColors.
Considerationsforattachinganexternalmonitor
•Wheninstallinganoperatingsystem,youmustinstallthedisplaydriverforyourmonitorthatissupplied
withthecomputer,andthemonitorINFfilethatissuppliedwiththeexternalmonitor.
•Ifyousetaresolutionhigherthantheresolutionyouareusingonthecomputermonitor,andusean
externalmonitorthatdoesnotsupportthatresolution,takeadvantageofthevirtualscreenfunction,
whichenablesyoutodisplayonlyapartofthehigh-resolutionscreenimageyourcomputerproduces.
YoucanseeotherpartsoftheimagebymovingthescreenwiththeTrackPointpointingdeviceoranother
pointingdevice.
•Iftheexternalmonitoryouareusingisoutdated,theresolutionandtherefreshratemightbelimited.
Changingdisplaysettings
Youcanchangethedisplaysettings,suchasthedisplayresolution,fontsize,andsoon.
Tochangethedisplaysettings,dothefollowing:
1.OpenControlPanelandclickAppearanceandPersonalization.
2.ClickDisplayforfurtherconfiguration.
UsingtheExtenddesktopfunction
YourcomputersupportsafunctionnamedtheExtenddesktop.WiththeExtenddesktopfunction,you
candisplayoutputonboththecomputerdisplayandanexternalmonitor.Youalsocandisplaydifferent
desktopimagesoneachmonitor.
YoucanusetheExtenddesktopfunctionwithoutchanginganysettings.Ifthefunctiondoesnotwork,refer
toEnablingtheExtenddesktopfunctiontoenableit.
ConsiderationsforusingtheExtenddesktopfunction
•IfyouwanttoshowDOSfull-screenwhileintheExtenddesktopmode,onlytheprimarydisplayshows
DOS;theotherdisplayisblackedout.
•IfyourcomputerhastheIntel
®
graphicscard,youcandesignatetheotherdisplayastheprimarydisplay
bydoingthefollowing:
1.PressCtrl+Alt+Fn+F12.TheIntelGraphicsandMediaControlPanelwindowopens.
2.SelectAdvanceModeandclickOK.
3.ClickMultipleDisplay.
4.Selectthedesireddisplayastheprimarydisplay.
30UserGuide
Page 47

•WhenanapplicationusingDirectDraworDirect3Displayedinfull-screenmode,itisshownonlyonthe
primarydisplay.
•YoucannotusethedisplayswitchingfunctionwhenyouareintheExtenddesktopmode.
EnablingtheExtenddesktopfunction
ToenabletheExtenddesktopfunction,dothefollowing:
1.Connecttheexternalmonitortothemonitorconnector;thenconnectthemonitortoanelectricaloutlet.
2.Turnontheexternalmonitor.
3.PressF7,thenselectExtend.
Tochangetheresolutionforeachmonitor,dothefollowing:
1.Right-clickonthedesktop,andclickScreenresolution.
2.ClicktheMonitor-1icon(fortheprimarydisplay,thecomputerdisplay).
3.Settheresolutionfortheprimarydisplay.
4.ClicktheMonitor-2icon(forthesecondarydisplay,theexternaldisplay).
5.Settheresolutionforthesecondarydisplay.
6.ClickOKtoapplythechanges.
Note:Tochangethecolorsettings,right-clickonthedesktop,andclickScreenresolution.ClickAdvanced
Settings,selecttheMonitortab,thensetColors.
Settingupapresentation
Tomakepresentations,youcanattachaprojectortoyourcomputerthroughtheHDMIportonyourcomputer.
Note:IftheprojectorconnectorisnotcompatibletotheHDMIportonyourcomputer,youcanpurchasea
convertercableonhttp://www.lenovo.com/accessories/services/index.html.
Itmighttakeseveralsecondsbeforetheprojectordisplaystheimage.Ifyoudonotseeyourdesktop
displayedafter60seconds,pressF7toswitchbetweendifferentdisplayoutputlocations.
Yourprojectormighthaveoneormoreaudio-inputconnectors.Toprojectsound,youwillneedtoattachthe
comboaudiojackonyourcomputertotheseconnectors,usinganaudiocable(commerciallyavailable).
UsingtheAMDSwitchableGraphicsfeature
SomeThinkPadnotebookcomputerssupporttheAMDSwitchableGraphicsfeature.
Toachievethebestbalancebetweenthecomputerperformanceandalongbatterylife,dependingonthe
graphicsqualitydemandoftherunningprogramandthesettingsofthepowerplanthatyouuse,theAMD
SwitchableGraphicsfeatureautomaticallyswitchesbetweenHighPerformanceGraphicsandEnergySaving
Graphics,withnoneedtorestartyourcomputer,closeprograms,orintervenemanually.
Usingaudiofeatures
Yourcomputerisequippedwiththefollowing:
•Comboaudiojack,1/8inch(3.5mm)indiameter
•Built-instereospeakers
•Built-indigitalmicrophone
Chapter2.Usingyourcomputer31
Page 48

Yourcomputeralsohasanaudiochipthatenablesyoutoenjoyvariousmultimediaaudiofeatures:
•CompliantwithIntelHighDefinitionAudio
•RecordingandplaybackofPCMandWAVfilesin16-bitor24-bitformat
•PlaybackofaWAVfileatasamplerateof44.1KHzto192KHz
•PlaybackofMIDIfilesthroughaWavetablesynthesizerunderMicrosoftWindowsoperatingsystems
•PlaybackofMP3filesthroughtheWindowsMediaPlayerorasoftwareMP3player
•Recordingfromvarioussoundsources
Note:Thecomboaudiojackdoesnotsupportaconventionalmicrophone.
Thefollowingtableshowswhichfunctionsoftheaudiodevicesattachedtothejacksonyourcomputerare
supported.
Table3.Audiofeaturelist
JackHeadsetwitha3.5mm
4-poleplug
Conventional
headphone
Conventional
microphone
Comboaudiojack
Headphoneand
microphonefunctions
supported
Headphonefunction
supported
Notsupported
Configuringforsoundrecording
Toconfigurethemicrophoneforoptimizedsoundrecording,opentheRealtekHDAudioManagerwindow
bydoingthefollowing:
OpenControlPanel.ThenclickHardwareandSound➙RealtekHDAudioManager.TheRealtekHD
AudioManagerwindowopens.
Toconfigurethemicrophoneforoptimalsoundrecording,usetheRealtekHDAudioManagerprogram.To
starttheprogram,gotoControlPanelandclickHardwareandSound➙RealtekHDAudioManager.
Usingtheintegratedcamera
Ifyourcomputerhasanintegratedcamera,youcanusethecameratopreviewyourvideoimageand
takeasnapshotofyourcurrentimage.
Tolaunchtheintegratedcameraandconfigurethecamerasettings,dothefollowing:
•ForWindows7:OpentheCommunicationUtilityprogram.
•ForWindows8:OpentheLenovoSettingsprogram,andclickCamera.
Whenthecameraisstarted,thegreencamera-in-useindicatorturnson.
Youalsocanusetheintegratedcamerawithotherprogramsthatprovidefeaturessuchasphotographing,
videocapturing,andvideoconferencing.Tousetheintegratedcamerawithotherprograms,openoneofthe
programsandstartthephotographing,videocapturing,orvideoconferencingfunction.Then,thecamera
willstartautomaticallyandthegreencamera-in-useindicatorwillturnon.Formoreinformationaboutusing
thecamerawithaprogram,refertothedocumentationthatcamewiththeprogram.
Usingamediacard
Yourcomputerhasonemediacardreaderslot.Themediacardreaderslotsupportsthefollowingfour
typesofcards:
32UserGuide
Page 49

•SecureDigital(SD)card
•SecureDigitalHigh-Capacity(SDHC)card
•SecureDigitaleXtended-Capacity(SDXC)card
•MultiMediaCard(MMC)
Note:Whiletransferringdatatoorfromamediacard,suchasanSDcard,donotputyourcomputer
intosleeporhibernationmodebeforethedatatransferiscompleted;otherwise,yourdatacouldbecome
damaged.
Insertingamediacard
Attention:Beforeyoustartinstallinganyofthefollowingcards,touchametaltableoragroundedmetal
object.Thisactionreducesanystaticelectricityfromyourbody.Thestaticelectricitycoulddamagethecard.
Toinsertamediacardintothe4-in-1mediacardreaderslot,dothefollowing:
1.Ensurethatthecardiscorrectlyoriented.
2.Insertthecardfirmlyintothe4-in-1mediacardreaderslot.Pressthecardfirmlyintotheslot.
Ifthemediacardisnotplugandplay,dothefollowing:
1.GotoControlPanel.ClickHardwareandSound➙DeviceManager.Ifyouarepromptedforan
administratorpasswordorconfirmation,typethepasswordorprovideconfirmation.
2.FromtheActionmenu,selectAddlegacyhardware.TheAddHardwareWizardstarts.
3.Followtheinstructionsonthescreen.
Removingamediacard
Attention:
•Beforeremovingthecard,stopthecardfirst.Otherwise,dataonthecardmightbecorruptedorlost.
•Donotremovethecardwhilethecomputerisinsleepmodeorhibernationmode.Otherwise,thesystem
mightnotrespondwhenyoutrytoresumeoperation.
Toremoveamediacard,dothefollowing:
1.ClickthetriangulariconintheWindowsnotificationareatoshowhiddenicons.Then,
2.Right-clicktheSafelyRemoveHardwareandEjectMediaicon.
3.SelectthecorrespondingitemtoejectthecardfromtheWindowsoperatingsystem.
4.Pressthecardtoejectitfromyourcomputer.
5.Removethecardfromyourcomputerandstoreitsafelyforfutureuse.
Note:IfyoudonotremovethecardfromyourcomputerafteryouejectthecardfromtheWindows
operatingsystem,thecardcannolongerbeaccessed.Toaccessthecard,youmustremoveitonce,
theninsertitagain.
Chapter2.Usingyourcomputer33
Page 50

34UserGuide
Page 51
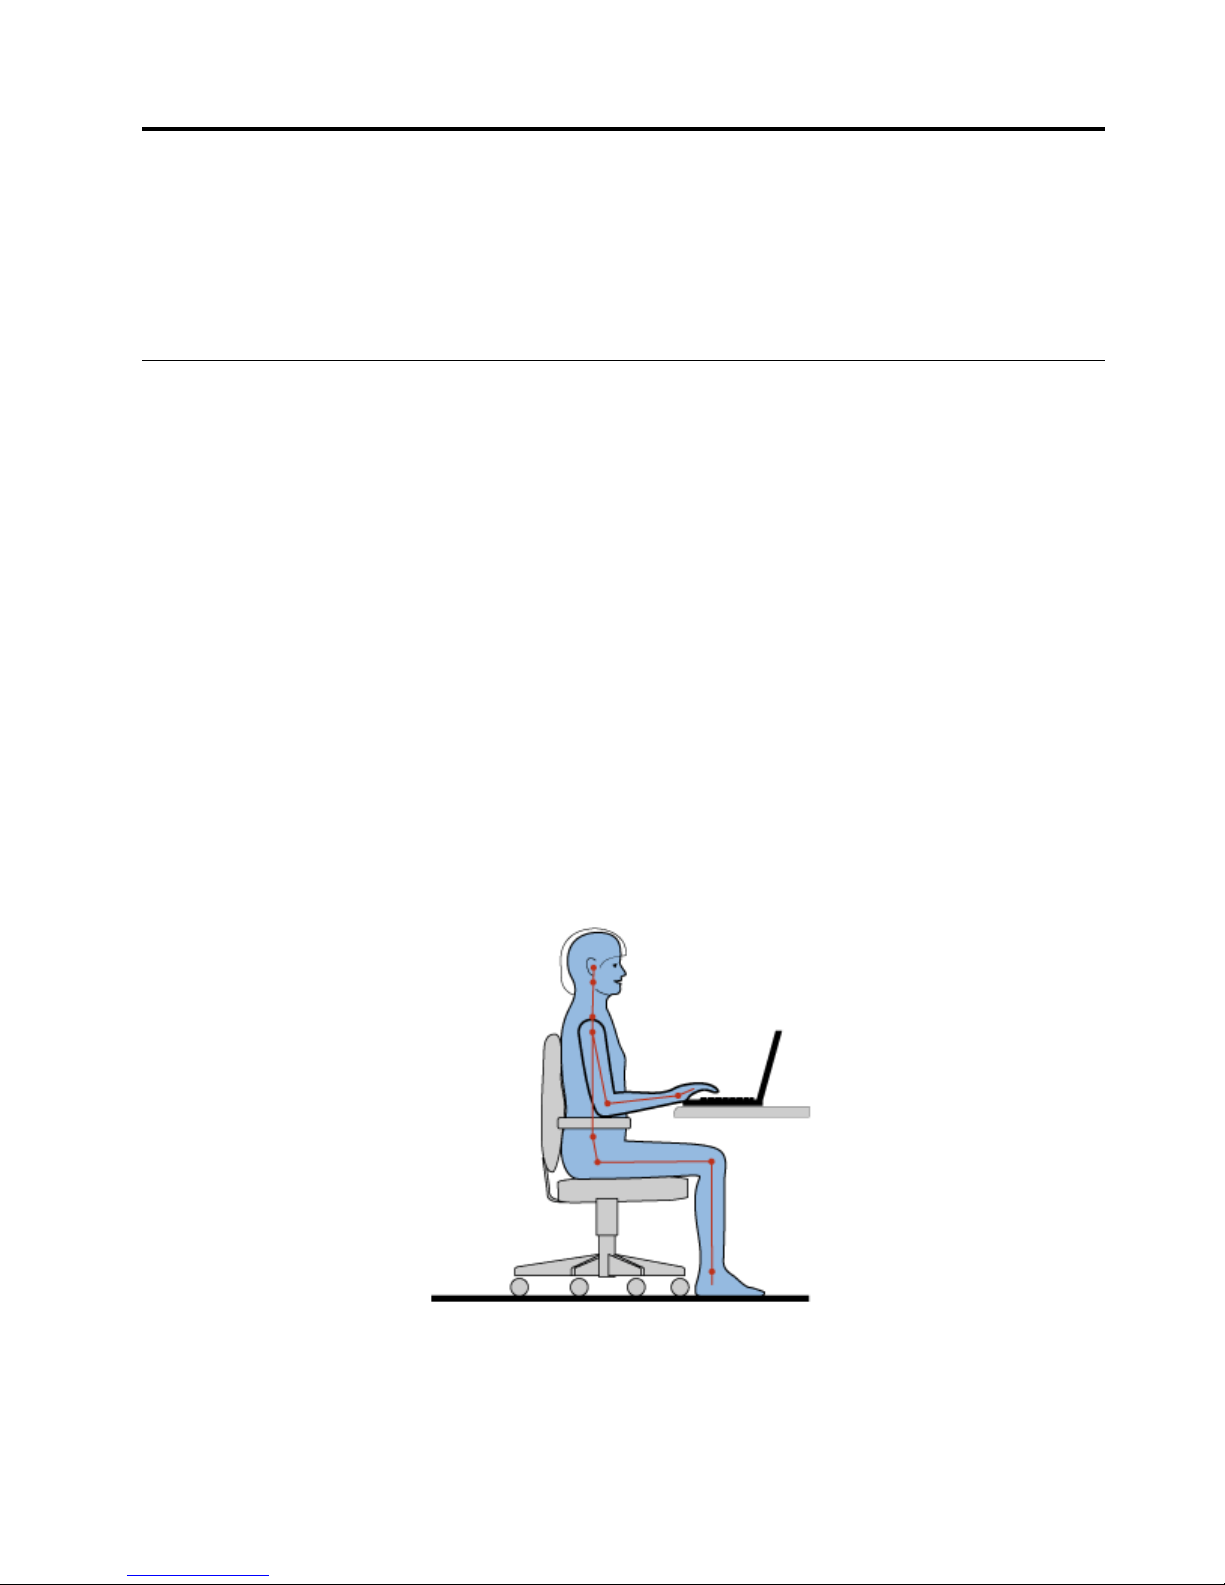
Chapter3.Youandyourcomputer
Thischapterprovidesinformationaboutaccessibility,comfort,andtravellingwithyourcomputer.
•Accessibilityandcomfort
•Travelingwithyourcomputer
Accessibilityandcomfort
Goodergonomicpracticeisimportanttogetthemostfromyourpersonalcomputerandtoavoiddiscomfort.
Arrangeyourworkplaceandtheequipmentyouusetosuityourindividualneedsandthekindofwork
thatyouperform.Inaddition,usehealthyworkhabitstomaximizeyourperformanceandcomfortwhile
usingyourcomputer.
Thefollowingtopicsprovideinformationaboutarrangingyourworkarea,settingupyourcomputer
equipment,andestablishinghealthyworkhabits.
Lenovoiscommittedtoprovidingthelatestinformationandtechnologytoourcustomerswithdisabilities.
Refertoouraccessibilityinformationwhichoutlinesoureffortsinthisarea.
Ergonomicinformation
Workinginthevirtualofficemightmeanadaptingtofrequentchangesinyourenvironment.Followingsome
simpleruleswillmakethingseasierandbringyouthemaximumbenefitsofyourcomputer.Keepinginmind
suchbasicsasgoodlightingandproperseating,forexample,canhelpyouimproveyourperformance
andachievegreatercomfort.
Thisexampleshowssomeoneinaconventionalsetting.Evenwhennotinsuchasetting,youcanfollow
manyofthesetips.Developgoodhabits,andtheywillserveyouwell.
Generalposture:Makeminormodificationsinyourworkingposturetodetertheonsetofdiscomfort
causedbylongperiodsofworkinginthesameposition.Frequentshortbreaksfromyourworkalsohelp
topreventminordiscomfortassociatedwithyourworkingposture.
©CopyrightLenovo2013
35
Page 52

Display:Positionthedisplaytomaintainacomfortableviewingdistanceof20-30inches(510-760mm).
Avoidglareorreflectionsonthedisplayfromoverheadlightingoroutsidesourcesoflight.Keepthedisplay
screencleanandsetthebrightnesstolevelsthatenableyoutoseethescreenclearly.PressF5orF6
toadjustdisplaybrightness.
Headposition:Keepyourheadandneckinacomfortableandneutral(vertical,orupright)position.
Chair:Useachairthatgivesyougoodbacksupportandseatheightadjustment.Usechairadjustmentsto
bestsuityourdesiredposture.
Armandhandposition:Ifavailable,usechairarmrestsoranareaonyourworkingsurfacetoprovide
weightsupportforyourarms.Keepyourforearms,wrists,andhandsinarelaxedandneutral(horizontal)
position.Typewithasofttouchwithoutpoundingthekeys.
Legposition:Keepyourthighsparalleltothefloorandyourfeetflatonthefloororonafootrest.
Whatifyouaretraveling?
Itmightnotbepossibletoobservethebestergonomicpracticeswhenyouareusingyourcomputer
whileonthemoveorinacasualsetting.Regardlessofthesetting,trytoobserveasmanyofthetipsas
possible.Sittingproperlyandusingadequatelighting,forexample,willhelpyoumaintaindesirablelevels
ofcomfortandperformance.
Questionsaboutvision?
ThevisualdisplayscreensofThinkPadnotebookcomputersaredesignedtomeetthehigheststandards
andtoprovideyouwithclear,crispimagesandlarge,brightdisplaysthatareeasytosee,yeteasyonthe
eyes.Ofcourse,anyconcentratedandsustainedvisualactivitycanbetiring.Ifyouhavequestionsoneye
fatigueorvisualdiscomfort,consultavisioncarespecialistforadvice.
Comfort
Observethefollowingguidelinestoachievegreatercomfortandimproveperformance.
Activesittingandrestbreaks:Thelongeryousitandworkwithyourcomputer,themoreimportantitis
toobserveyourworkingposture.FollowErgonomicinformationandpractice“activesitting”toavoid
discomfortassociatedwithyourworkingpostures.Makingminorvoluntaryposturalchangesandtaking
shortfrequentworkbreaksarethekeyingredientsforhealthycomputing.Yourcomputerislightandmobile;
youcaneasilyrepositionyourworkingsurfacetoaccommodatemanyposturemodifications.
Workareasetupoptions:Familiarizeyourselfwithallofyourofficefurnituresothatyouknowhowto
adjustyourworksurface,seat,andotherworktoolstoaccommodateyourpreferencesforcomfort.
Ifyourworkareaisnotinanofficesetting,besuretotakespecialnoteofemployingactivesitting
andtakingworkbreaks.ManyThinkPadproductsolutionsareavailabletohelpyoumodifyandexpand
yourcomputertobestsuityourneeds.AccessthefollowingWebsitetoviewsomeoftheseoptions:
http://www.lenovo.com/accessories/services/index.html.Exploreyouroptionsfordockingsolutionsand
externalproductsthatprovidetheadjustabilityandfeaturesthatyouwant.
Accessibilityinformation
Lenovoiscommittedtoprovidingpeoplewithdisabilitiesgreateraccesstoinformationandtechnology.
Asaresult,thefollowinginformationprovideswaystohelpusersthathavehearing,vision,andmobility
limitationsgetthemostoutoftheircomputerexperience.
36UserGuide
Page 53

Assistivetechnologiesenableuserstoaccessinformationinthemostappropriateway.Someofthese
technologiesarealreadyprovidedinyouroperatingsystem.Otherscanbepurchasedthroughvendors,or
accessedthroughtheWorldWideWebhttp://www.lenovo.com/healthycomputing.
Assistivetechnologies
SomeaccessibilitytechnologiesareavailablethroughtheAccessibilityOptionsprogram.Depending
onyouroperatingsystem,thenumberofaccessibilityoptionsavailablevaries.Ingeneral,accessibility
optionsenhancethewayuserswithhearing,vision,ormobilitylimitationsnavigateandusetheircomputer.
Forexample,someusersmightnothavethefinemotorskillsrequiredtouseamouseorselectkey
combinations.Otherusersmightrequirelargerfontsorhigh-contrastdisplaymodes.Insomecases,
magnifiersandbuilt-inspeechsynthesizersareavailable.Fordetailedinformationabouteachofthese
features,consulttheMicrosofthelpinformationsystem.
TousetheAccessibilityOptionsprogram,clickStart➙ControlPanel➙EaseofAccess➙Easeof
AccessCenter.
Screen-readertechnologies
Screen-readertechnologiesareprimarilyfocusedonsoftwareapplicationinterfaces,helpinformation
systems,andavarietyofonlinedocuments.However,inthecasewhereascreenreadercannotread
documents,thedocumentmustfirstgothroughaconversionprocess.OnesolutionconvertsAdobe
PDFfilesintoaformatthatisreadbythescreen-readerprograms.ThissolutionisaWeb-basedservice
providedbyAdobeSystemsIncorporated.Throughhttp://access.adobe.com,AdobePDFdocumentscan
beconvertedtoHTMLorplaintextinmanylanguages.OneconversionoptionconvertsPDFdocuments
ontheInternet.AsecondoptionenablesuserstosubmittheURLofanAdobePDFfilethroughe-mailto
convertittoHTMLorASCIItext.AdobePDFfilesonalocalharddiskdrive,localCD-ROM,orLANalsocan
beconvertedbyattachingtheAdobePDFfiletoane-mailmessage.
Travelingwithyourcomputer
Thistopicprovidesinformationtohelpyouworkwithyourcomputerwhenyouaretravelling.
Traveltips
Usethefollowingtraveltipstotravelmoreconfidentlyandefficientlywithyourcomputer.
•Althoughitissafetoallowyourcomputertogothroughthex-raymachinesatairportsecuritystations,it
isimportanttokeepyoureyesonthecomputeratalltimestopreventtheft.
•Considerbringinganelectricaladapterforuseinanairplaneorautomobile.
•Becauseyoumightneedtouseyourcomputerinlessthanperfectlightingconditions,enablethebacklit
featurebypressingFn+Spacebartoilluminatethekeyboard.
•Ifyoucarryanacpoweradapter,detachtheaccordfromittoavoiddamagingthecord.
Note:Ifyouusethebacklitfeature,thebatterylifeisslightlyreduced.
Traveltipsonairplanes
Ifyoucarryyourcomputerintoanairplane,takenoteofthefollowingtips:
•Ifyouintendtouseyourcomputerorwirelessservices(suchasInternetandBluetooth),checkwiththe
airlineforrestrictionsandavailabilityofservicesbeforeboardingtheairplane.Iftherearerestrictions
ontheuseofcomputerswithwirelessfeaturesontheairplane,youmustabidebythoserestrictions.If
necessary,disablewirelessfeaturesbeforeboarding.
•Becarefulabouttheseatinfrontofyouonairplanes.Angleyourcomputerdisplaysothatitdoesnotget
caughtwhenthepersoninfrontofyouleansback.
Chapter3.Youandyourcomputer37
Page 54

•Whentakingoff,remembertoturnoffyourcomputerorputitintohibernationmode.
Travelaccessories
Thefollowingisachecklistofitemstoconsiderpackingwhenyouaregoingtotravel:
•ThinkPadacpoweradapter
•ThinkPadAC/DCcomboadapter
•Externalmouse(ifyouareaccustomedtousingone)
•Ethernetcable
•Aqualitycarryingcasethatprovidesadequatecushionandprotection
•Externalstoragedevice
•HDMIcable
•ConvertercableforHDMIport
Ifyouaretravelingtoanothercountry,youmightneedtoconsideranacpoweradapterforthecountryto
whichyouaretravelling.
Topurchasetravelaccessories,gotohttp://www.lenovo.com/accessories.
38UserGuide
Page 55

Chapter4.Security
Thischapterprovidesinformationabouthowtoprotectyourcomputerfromtheftandunauthorizeduse.
•Attachingamechanicallock
•Usingpasswords
•Harddisksecurity
•Settingthesecuritychip
•Usingthefingerprintreader
•Noticeondeletingdatafromyourharddiskdrive,hybriddrive,orsolid-statedrive
•Usingfirewalls
•Protectingdataagainstviruses
Attachingamechanicallock
Youcanattachamechanicallocktoyourcomputertohelppreventitfrombeingremovedwithoutyour
permission.
Attachamechanicallocktothesecurity-lockslotofthecomputer;thensecurethechainonthelocktoa
stationaryobject.Refertotheinstructionsshippedwiththemechanicallock.
Note:Y ouareresponsibleforevaluating,selecting,andimplementingthelockingdevicesandsecurity
features.Lenovomakesnocomments,judgments,orwarrantiesaboutthefunction,quality,orperformance
oflockingdevicesandsecurityfeatures.
Usingpasswords
Byusingpasswords,youcanhelppreventyourcomputerfrombeingusedbyothers.Onceyouseta
password,apromptisdisplayedonthescreeneachtimeyouturnonthecomputer.Enteryourpasswordat
theprompt.Youcannotusethecomputerunlessyoutypethecorrectpassword.
Passwordsandsleepmode
Ifyouhavesetpasswordsandyouputyourcomputerintosleepmode,theprocedureforresuming
operationisasfollows:
•Youarenotpromptedtotypethepasswordwhenresumingoperation.
•Ifanyharddiskdrive,hybriddrive,orsolid-statedrivehasapassword,itisunlockedautomatically
whenyouresumeoperation.
Note:IfaWindowspasswordhasbeenset,youwillbepromptedtoenterit.
Typingpasswords
Ifthisiconisdisplayed,typeapower-onpasswordorasupervisorpassword.
Ifthisiconisdisplayed,typeauserharddiskpassword.Ifyouwanttotypeamasterharddisk
password,dothefollowing:
©CopyrightLenovo2013
39
Page 56

1.PressF1.Theiconchangestothis:
2.Typethemasterharddiskpassword.
Notes:
•Toreturntotheicon,pressF1again.
•PresstheBackspacekeyifyouenterawrongpasswordwhileyouaretypingyourpassword.
Power-onpassword
Youcansetapower-onpasswordtohelpprotectyourcomputeragainstaccessbyunauthorizedusers.
Ifyousetapower-onpassword,thepasswordpromptisdisplayedonthescreenwheneveryouturnonthe
computer.Youmustenterthecorrectpasswordtostartusingthecomputer.
Settingapower-onpassword
1.Printtheseinstructions.
2.Saveallopenfiles,andexitallapplications.
3.Turnyourcomputeroffandthenturnitonagain.
4.Whenthelogoscreenisdisplayed,pressF1.TheThinkPadSetupprogrammainmenuopens.
5.SelectSecurity,usingthecursordirectionalkeystomovedownthemenu.
6.SelectPassword.
7.SelectPower-onPassword.
8.IntheEnterNewPasswordfield,typeadesiredpassword,andpressEnter.
9.IntheConfirmNewPasswordfield,retypethepasswordandpressEnter.
Note:Youmightwanttorecordyourpasswordandstoreitinasafeplace.Otherwise,ifyouforgetit,
youhavetotakeyourcomputertoaLenovoreselleroramarketingrepresentativetohavethepassword
canceled.
10.IntheSetupNoticewindowthatisdisplayed,pressEntertocontinue.
11.PressF10.TheSetupConfirmationwindowopens.SelectYestosaveconfigurationchangesandexit.
Changingorremovingthepower-onpassword
Tochangethepower-onpassword,followsteps1through7.Enteryourcurrentpassword.WhentheEnter
NewPasswordfieldisdisplayed,typeanewpasswordinthefieldandthenretypeittoverify.Toremove
thepassword,followsteps1through7.Typeyourcurrentpassword.WhentheEnterNewPasswordfield
isdisplayed,leaveitblankandpressEntertwice.
Harddiskpasswords
Twotypesofharddiskpasswordshelpprotecttheinformationstoredontheharddiskdrive,hybriddrive,or
solid-statedrive:
•Userharddiskpassword
•Masterharddiskpassword,whichrequiresauserharddiskpassword
Ifauserharddiskpasswordhasbeenset,butnomasterharddiskpasswordhasbeen,theusermustenter
theuserharddiskpasswordinordertogainaccesstofilesandapplicationsontheharddiskdrive.
40UserGuide
Page 57

Themasterpasswordcanbesetandusedonlybyasystemadministrator.Likeamasterkey,itenables
theadministratortogetaccesstoanyharddiskdrive,hybriddrive,orsolid-statedriveinasystem.The
administratorsetsthemasterpassword;nooneelseknowsit.Thentheadministratorsetsauserpassword
foreachcomputerinthenetwork,andtellseachuserthepasswordforhisorhercomputer.Theusercan
thenchangetheuserpasswordasdesired,buttheadministratorstillcangetaccessbyusingthemaster
password.
Note:Whenamasterharddiskpasswordisset,onlytheadministratorcanremovetheuserharddisk
password.
Settingaharddiskpassword
1.Printtheseinstructions.
2.Saveallopenfiles,andexitallapplications.
3.Turnyourcomputeroffandthenonagain.
4.Whenthelogoscreenisdisplayed,pressF1.TheThinkPadSetupprogrammainmenuopens.
5.SelectSecurity,usingthecursordirectionalkeystomovedownthemenu.
6.SelectPassword.
7.SelectHardDisk1PasswordorHardDisk2Password.
8.Apasswordwindowopens.YouarepromptedtoselectUserorUser+Master.SelectUserifyou
wanttosetonlyoneharddiskpassword.Ifyouareanadministratororsupervisor,youcanselectUser
+Mastertosettwopasswords.(Theusercanchangetheuserpasswordlater.)
•IfyouselectUser+Master,dothefollowing:
a.Whenawindowfortypingthenewuserharddiskpasswordopens,typeyournewpasswordin
theEnterNewPasswordfield.PressEnter.
b.IntheConfirmNewPasswordfield,retypethepasswordyoujustenteredtoverifyit.PressEnter.
c.Amessagewindowopensandpromptsyoutosetthemasterharddiskpassword.PressEnterto
continue.
d.Awindowfortypingthenewmasterharddiskpasswordopens.Typeyournewpasswordin
theEnterNewPasswordfield.PressEnter.
e.IntheConfirmNewPasswordfield,retypethepasswordyoujustenteredtoverifyit.PressEnter.
•IfyouselectUseronly,dothefollowing:
a.Whenawindowfortypingthenewpasswordopens,typeyournewpasswordintheEnterNew
Passwordfield.PressEnter.
Notes:
–YoucansettheminimumlengthofaharddiskpasswordthroughtheSecuritymenu.
–Ifyousetaharddiskpasswordofoversevencharacters,theharddiskdrivecanbeusedonly
withacomputerthatcanrecognizeaharddiskpasswordofoversevencharacters.Ifyouthen
installtheinacomputerthatcannotrecognizeaharddiskpasswordthatcontainsmorethan
sevencharacters,youcannotgetaccesstothedrive.
b.IntheConfirmNewPasswordfield,retypethepasswordyoujustenteredtoverifyit.PressEnter.
Attention:Youmightwanttonotedownyourpasswordsandkeeptheminasafeplace.Otherwise,if
youforgettheuserpassword,orbothuserandmasterpasswords,Lenovocannotresetyourpasswords
orrecoverdatafromtheharddiskdrive.YoumusttakeyourcomputertoaLenovoresellerora
marketingrepresentativetohavetheharddiskdrivereplaced.Proofofpurchaseisrequired,andafee
willbechargedforpartsandservice.
9.IntheSetupNoticewindowthatisdisplayed,pressEntertocontinue.
Chapter4.Security41
Page 58

10.PressF10.TheSetupConfirmationwindowopens.SelectYestosaveconfigurationchangesandexit.
Thenexttimeyouturnonyourcomputer,youwillhavetotypetheuserormasterharddiskpasswordin
ordertostartyourcomputerandgetaccesstoyouroperatingsystem.
Changingorremovingaharddiskpassword
Followsteps1through7inSettingaharddiskpassword,typingyourpasswordtogetaccesstothe
ThinkPadSetupprogram.
Tochangeorremovetheuserharddiskpassword,dothefollowing:
•Tochangetheharddiskpassword,typethecurrentpasswordintheEnterCurrentPasswordfield.Then
typethenewpasswordintheEnterNewPasswordfield,andretypethepasswordyoujustenteredto
verifyitintheConfirmNewPasswordfield.PressEnter,andaSetupNoticewindowisdisplayed.Press
EntertoexitfromtheSetupNoticewindow.Theuserharddiskpasswordwillbechanged.
•Toremovetheharddiskpassword,typethecurrentpasswordintheEnterCurrentPasswordfield.Then
leavetheEnterNewPasswordandConfirmNewPasswordfieldsblank,andpressEnter.ASetup
Noticewindowisdisplayed.PressEntertoexitfromtheSetupNoticewindow.Theuserharddisk
passwordwillberemoved.
TochangeorremovetheUser+Masterharddiskpasswords,selectUserHDPorMasterHDP.
IfyouchooseUserHDP,dothefollowing:
•Tochangetheuserharddiskpassword,typethecurrentuserharddiskpasswordorthecurrentmaster
harddiskpasswordintheEnterCurrentPasswordfield.Thentypethenewuserharddiskpasswordin
theEnterNewPasswordfield,andretypethepasswordyoujustenteredtoverifyitintheConfirmNew
Passwordfield.PressEnter,andaSetupNoticewindowisdisplayed.PressEntertoexitfromtheSetup
Noticewindow.Theuserharddiskpasswordischanged.
•Toremovetheuserharddiskpassword,typethecurrentmasterharddiskpasswordintheEnterCurrent
Passwordfield.ThenleavetheEnterNewPasswordandConfirmNewPasswordfieldsblank,and
pressEnter.ASetupNoticewindowisdisplayed.PressEntertoexitfromtheSetupNoticewindow.
Theuserharddiskpasswordwillberemoved.
IfyouchooseMasterHDP,dothefollowing:
•Tochangethemasterharddiskpassword,typethecurrentmasterharddiskpasswordintheEnter
CurrentPasswordfield.ThentypethenewmasterharddiskpasswordintheEnterNewPassword
field,andretypethepasswordyoujustenteredtoverifyitintheConfirmNewPasswordfield.Press
Enter,andaSetupNoticewindowisdisplayed.PressEntertoexitfromtheSetupNoticewindow.The
masterharddiskpasswordischanged.
•Toremovethemasterharddiskpassword,typethecurrentmasterharddiskpasswordintheEnter
CurrentPasswordfield.ThenleavetheEnterNewPasswordandConfirmNewPasswordfieldsblank,
andpressEnter.ASetupNoticewindowisdisplayed.PressEntertoexitfromtheSetupNoticewindow.
Boththeuserandmasterharddiskpasswordswillberemoved.
Supervisorpassword
ThesupervisorpasswordprotectsthesysteminformationstoredinThinkPadSetup.Withoutit,noonecan
changetheconfigurationofthecomputer.Itprovidesthefollowingsecurityfeatures:
•Ifasupervisorpasswordisset,apasswordpromptisdisplayedwhenyoutrytostarttheThinkPadSetup
program.Unauthorizeduserscannotgetaccesstoconfigurationdata.
•Thesystemadministratorcanusethesupervisorpasswordtogetaccesstoacomputereveniftheuserof
thatcomputerhassetapower-onpassword.Thesupervisorpasswordoverridesthepower-onpassword.
42UserGuide
Page 59

•Ifbothasupervisorpasswordandapower-onpasswordareset,youcandothefollowingonlyifyou
havethesupervisorpassword:
–Deletingthepower-onpassword
–Changingordeletingthesupervisorpassword
–EnablingordisablingtheWakeonLANfeature
–EnablingordisablingtheInternalNetworkOptionROMfeature
–Changingdateandtime
–EnablingordisablingtheLockUEFIBIOSSettingsfeature
–EnablingordisablingthePasswordatunattendedbootfeature
–Specifyingtheminimumlengthforpower-onpasswordsandharddiskpasswords
–Changingthesettingforthesecuritychip
–EnablingordisablingtheBootDeviceListF12Optionfeature
–EnablingordisablingtheBootOrderLockfeature
–EnablingordisablingtheFlashBIOSUpdatingbyEnd-Usersfeature
–Enablingordisablingtheinternalnetworkdevice
–Enablingordisablingtheinternalwirelessdevice
–EnablingordisablingtheinternalBluetoothdevice
–EnablingordisablingtheSecuritymode
–Erasingthefingerprintdata
Notes:
•ThesystemadministratorcansetthesamesupervisorpasswordonmanyThinkPadnotebookcomputers
tomakeadministrationeasier.
•ByenablingtheLockUEFIBIOSSettingsfeatureonthePasswordmenuwhenyousetthesupervisor
password,youmakeitimpossibleforanyonebutyoutomakechanges.
Setting,changing,orremovingasupervisorpassword
Onlyasystemadministratorcanset,change,orremoveasupervisorpassword.
Toset,change,orremoveasupervisorpassword,dothefollowing:
1.Printtheseinstructions.
2.Saveallopenfiles,andexitallapplications.
3.Turnyourcomputeroffandthenturnitonagain.
4.Whenthelogoscreenisdisplayed,pressF1.TheThinkPadSetupprogrammainmenuopens.
5.SelectSecurity,usingthecursordirectionalkeystomovedownthemenu.
6.SelectPassword.
7.SelectSupervisorPassword.
8.Awindowopens,promptingyoutoenteranewpassword.Dependingonyourneeds,dooneofthe
following:
•Tosetapassword,dothefollowing:
a.IntheEnterNewPasswordfield,typeadesiredpasswordandpressEnter.
b.IntheConfirmNewPasswordfield,retypethepasswordandpressEnter.
•Tochangeapassword,dothefollowing:
Chapter4.Security43
Page 60

a.IntheEnterCurrentPasswordfield,typethecurrentsupervisorpasswordandpressEnter.
b.IntheEnterNewPasswordfield,typethenewsupervisorpassword;thenretypethepassword
youjustenteredtoverifyitintheConfirmNewPasswordfield.PressEnter.
•Toremoveapassword,dothefollowing:
a.IntheEnterCurrentPasswordfield,typethecurrentsupervisorpasswordandpressEnter.
b.LeavetheEnterNewPasswordandConfirmNewPasswordfieldsblank.PressEnter.
Attention:Youmightwanttonotedownyourpasswordandkeepitinasafeplace.Ifyouforgetyour
supervisorpassword,Lenovocannotresetyourpassword.YoumusttakeyourcomputertoaLenovo
reselleroraLenovomarketingrepresentativetohavethesystemboardreplaced.Proofofpurchaseis
required,andafeewillbechargedforpartsandservice.
9.IntheSetupNoticewindowthatisdisplayed,pressEntertocontinue.
10.PressF10.TheSetupConfirmationwindowopens.SelectYestosaveconfigurationchangesandexit.
ThenexttimeyouopentheThinkPadSetupprogram,youwillbepromptedtotypeyourpasswordtoproceed.
Harddisksecurity
Toprotectpasswordsfromunauthorizedsecurityattacks,severalofthelatesttechnologiesandalgorithms
areintegratedintoUEFIBIOSandhardwaredesignofThinkPadnotebookcomputers.
Tomaximizesecurity,dothefollowing:
•Setapower-onpasswordaswellasaharddiskpasswordforyourinternalharddiskdrive,hybriddrive,or
solid-statedrive.RefertotheproceduresinPower-onpasswordandHarddiskpasswords.Forsecurity,
alongerpasswordisrecommended.
•ToprovidereliablesecurityforUEFIBIOS,usethesecuritychipandasecurityapplicationwithaTrusted
PlatformModule(TPM)managementfeature.RefertoSettingthesecuritychip.
Note:TheMicrosoftWindows7andWindows8operatingsystemsupportstheTPMmanagementfeature.
•Ifaharddiskdrive,hybriddrive,orsolid-statedrivewithencryptiontechnologyisinstalledinyour
computer,besuretoprotectthecontentsofyourcomputermemoryfromunauthorizedaccessbyuseof
driveencryptionsoftware,suchasMicrosoftWindowsBitLocker
®
DriveEncryption,whichissupportedin
theUltimateandEnterpriseeditionsoftheWindows7operatingsystemandProfessionalandEnterprise
editionsoftheWindows8operatingsystem.SeeUsingWindowsBitLockerDriveEncryption.
•Beforeyoudisposeof,sell,orhandoveryourcomputer,besuretodeletedatastoredonit.Referto
Noticeondeletingdatafromyourharddiskdrive,hybriddrive,orsolid-statedrive.
Note:Theharddiskdrive,hybriddrive,orsolid-statedrivebuiltintoyourcomputercanbeprotectedby
UEFIBIOS.
UsingWindowsBitLockerDriveEncryption
Tohelpprotectyourcomputeragainstunauthorizedaccess,besuretousedriveencryptionsoftware,such
asWindowsBitLockerDriveEncryption.
WindowsBitLockerDriveEncryptionisanintegralsecurityfeatureoftheWindows7andWindows8
operatingsystems.ItissupportedintheUltimateandEnterpriseeditionsoftheWindows7andProfessional
andEnterpriseeditionsoftheWindows8operatingsystem.
BitLockerusesaTrustedPlatformModuletoprovideenhancedprotectionforyourdataandtoensureearly
bootcomponentintegrity.AcompatibleTPMisdefinedasaV1.2TPM.
44UserGuide
Page 61

TochecktheBitLockerstatus,gotoControlPanel,andclickSystemandSecurity➙BitLockerDrive
Encryption.
FordetailsaboutWindowsBitLockerDriveEncryption,seetheWindowsHelpandSupport,orsearchfor
“MicrosoftWindowsBitLockerDriveEncryptionStep-by-StepGuide”ontheMicrosoftWebsite.
DiskEncryptionharddiskdrive,DiskEncryptionhybriddrive,andEncryptionsolid-statedrive
SomemodelscontaintheDiskEncryptionharddiskdrive,DiskEncryptionhybriddrive,orEncryption
solid-statedrive.Thisfeaturehelpstoprotectyourcomputeragainstsecurityattacksonmedia,NANDflash
ordevicecontrollersbyuseofahardwareencryptionchip.Fortheefficientuseoftheencryptionfeature,
besuretosetaharddiskpasswordfortheinternalstoragedevice.
Settingthesecuritychip
Strictsecurityrequirementsareimposedonnetworkclientcomputersthattransferconfidentialinformation
electronically.Dependingontheoptionsyouordered,yourcomputermighthaveanembeddedsecurity
chip,acryptographicmicroprocessor.Withthesecuritychip,youcandothefollowing:
•Protectyourdataandsystem
•Strengthenaccesscontrols
•Securecommunications
Settingthesecuritychip
ThechoicesofferedontheSecurityChipsubmenuundertheSecuritymenuofThinkPadSetupareas
follows:
•SecurityChip:activate,inactivate,ordisablethesecuritychip.
•SecurityReportingOptions:enableordisableeachsecurityreportingoption.
•ClearSecurityChip:cleartheencryptionkey.
Notes:
1.EnsurethatthesupervisorpasswordhasbeensetinThinkPadSetup.Otherwiseanyonecanchange
thesettingsforthesecuritychip.
2.IfyouareusingClientSecuritySolution,handlethesecuritychipbydoingthefollowing:
•Donotclearthesecuritychip.Ifyoudo,thefunctionsassignedtothekeyswillbeerased.
•Donotdisablethesecuritychip.Ifyoudo,ClientSecuritySolutionwillnotwork.
3.Ifthesecuritychipisremovedorreplaced,oranewonehasbeenadded,thecomputerwillnotstart.
Youwillhearfourcyclesoffourbeepseach.
4.Ifthesecuritychipisinactiveordisabled,theClearSecurityChipoptionwillnotbedisplayed.
5.Whenyouclearthesecuritychip,besuretoturnyourcomputeroffandthenturnitonagainafteryou
setthesecuritychiptoActive.Otherwise,theClearSecurityChipoptionisnotdisplayed.
TosetanitemontheSecurityChipsubmenu,dothefollowing:
1.Printtheseinstructions.
2.Saveallopenfiles,andexitallapplications.
3.Turnyourcomputeroffandthenturnitonagain.
4.Whenthelogoscreenisdisplayed,pressF1.TheThinkPadSetupprogrammainmenuopens.
5.Usingthecursorkeys,movetoSecurity.TheSecuritymenuopens.
6.Usingthecursorkeys,movetoSecurityChip,andpressEnter.TheSecurityChipsubmenuopens.
Chapter4.Security45
Page 62
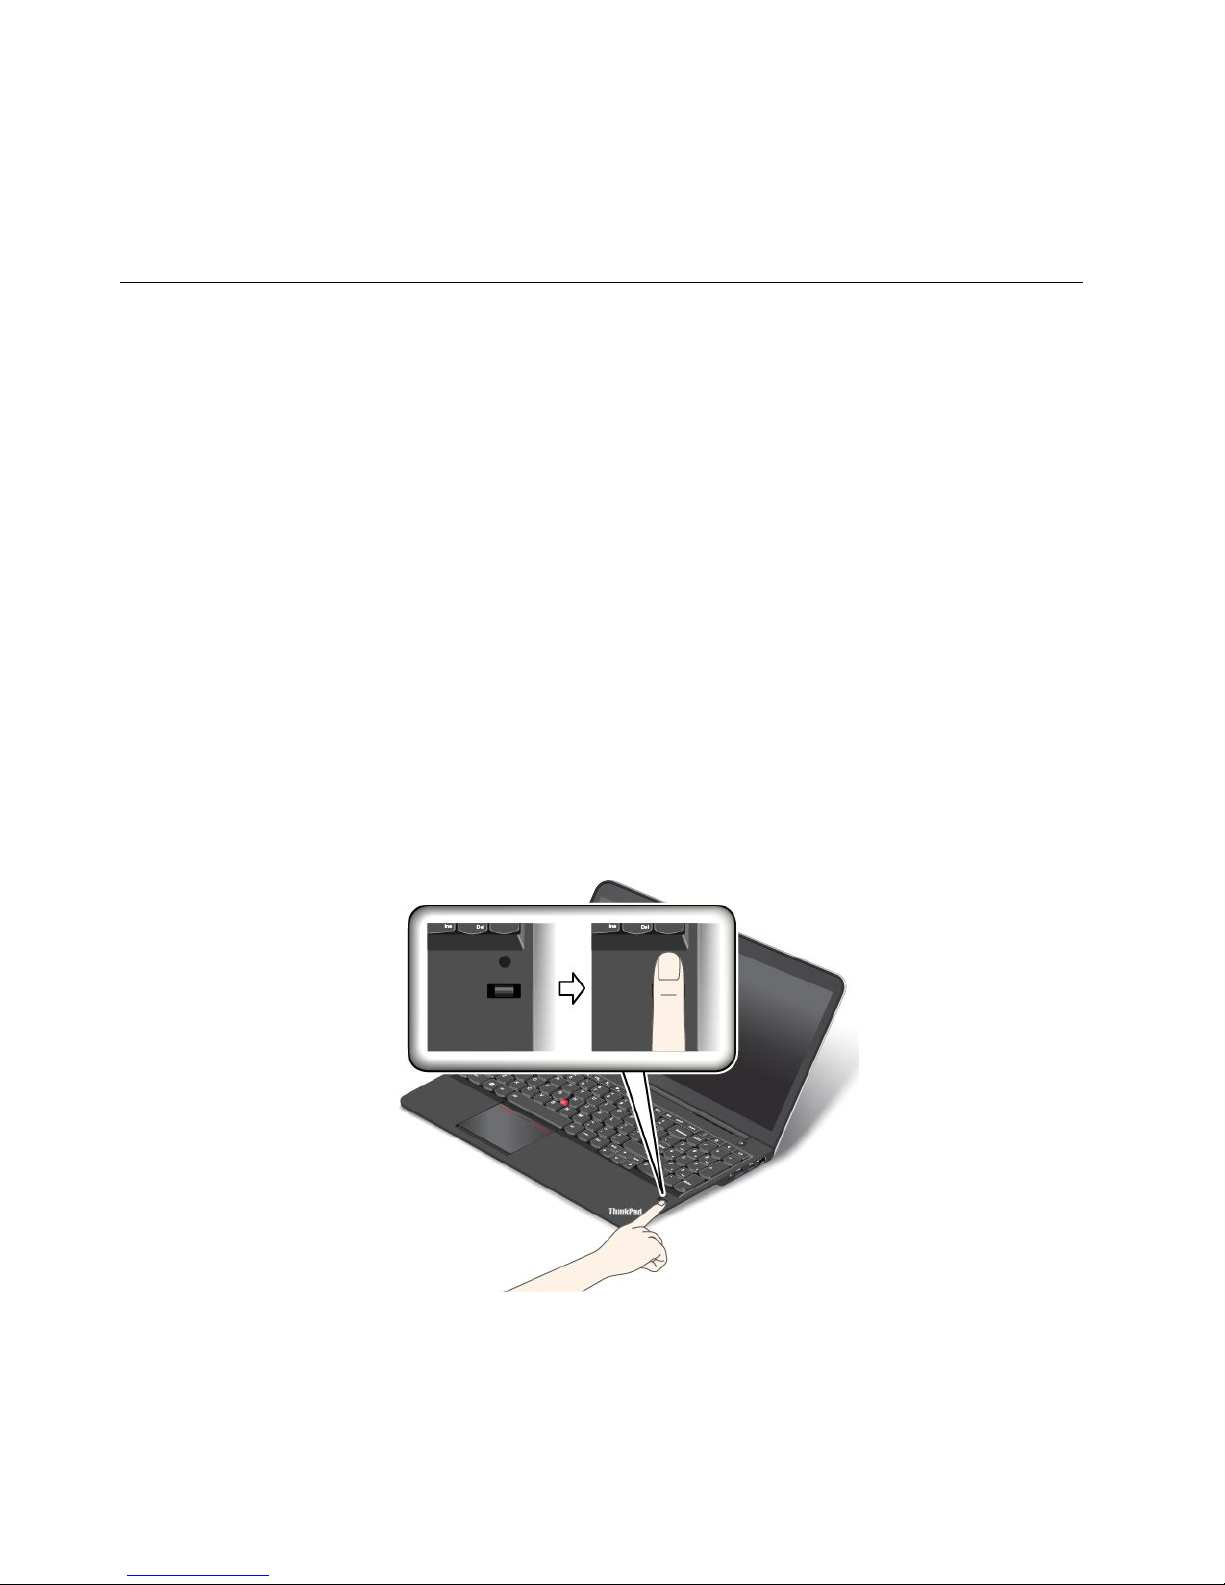
7.Usingthecursorkeys,movetoanitemyouwanttoset.Whentheitemishighlighted,pressEnter.
8.Setotheritemsthatyouwanttoset.
9.PressF10tosavechangesandexit.
10.PressEnterintheSetupConfirmationwindowtoconfirmtheexit.
Usingthefingerprintreader
Yourcomputerhasanintegratedfingerprintreader.Fingerprintauthenticationcanreplacepasswordsand
enablesimpleandsecureuseraccess.ByenrollingyourfingerprintandassociatingitwithaWindows
password,youcanlogontothecomputerbyswipingyourfingeroverthereader,withouttypingpasswords.
Enrollingyourfingerprint
Tousetheintegratedfingerprintreader,beginbyenrollingyourfingerprintasfollows:
1.Turnonyourcomputer.
2.Doeitherofthefollowing:
•ForWindows7:TostarttheLenovoFingerprintsoftware,refertoAccessingLenovoprograms
ontheWindows7operatingsystem.
•ForWindows8:TostarttheLenovoFingerprintsoftware,refertoAccessingLenovoprograms
ontheWindows8operatingsystem.
3.Followtheinstructionsonthescreentoenrollyourfingerprint.Fordetails,refertothehelpinformation
systemfortheprogram.
Swipingyourfingeroverthereader
Toswipeyourfingeroverthereader,dothefollowing:
1.Placetheballofyourfinger(thecentralpartofthefingerprint)onthesmallcircleabovethereader.
Ensurethattheentiretopjointofthefingerisonthereader.
46UserGuide
Page 63
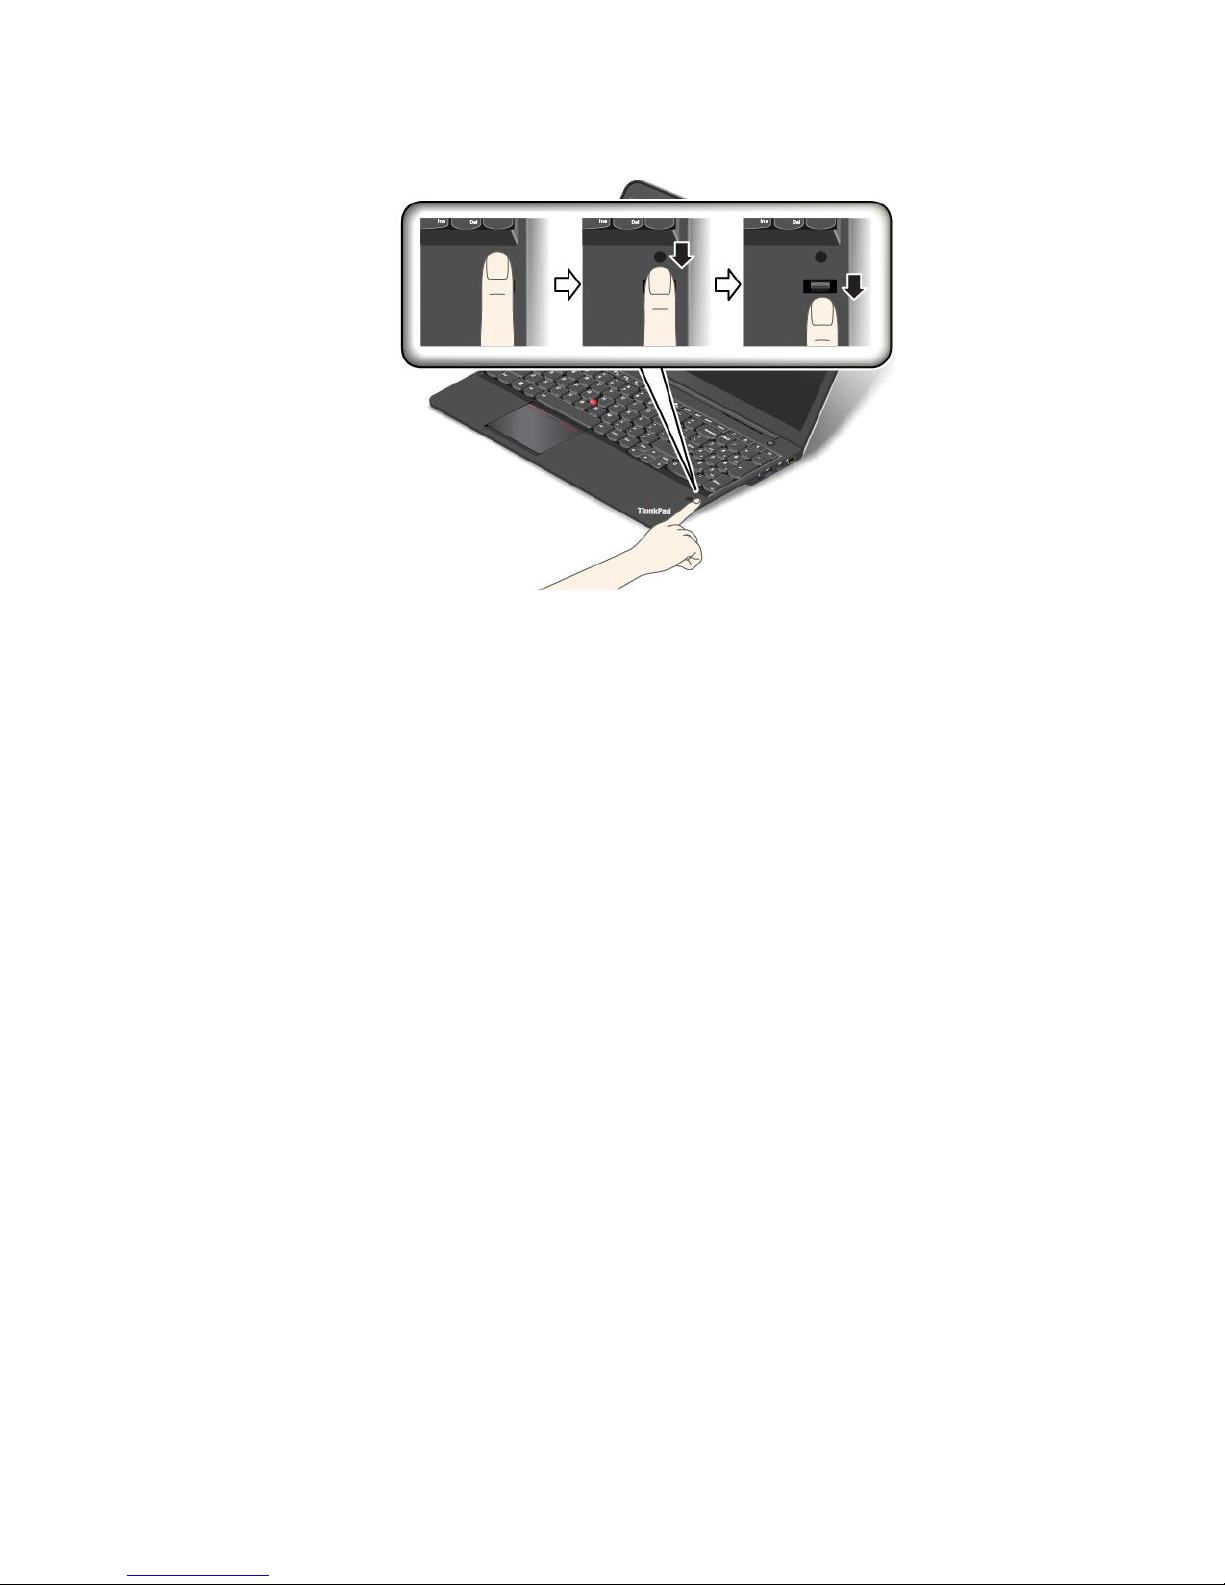
2.Applylightpressureandswipeyourfingeracrossthereaderinonesmoothmotion.
Maintainingthefingerprintreader
Thefollowingactionscoulddamagethefingerprintreaderorcauseitnottoworkproperly:
•Scratchingthesurfaceofthereaderwithahard,pointedobject.
•Scrapingthesurfaceofthereaderwithyourfingernailoranythinghard.
•Usingortouchingthereaderwithadirtyfinger.
Ifyounoticeanyofthefollowingconditions,gentlycleanthesurfaceofthereaderwithadry,soft,lint-free
cloth:
•Thesurfaceofthereaderisdirtyorstained.
•Thesurfaceofthereaderiswet.
•Thereaderoftenfailstoenrollorauthenticateyourfingerprint.
Ifyourfingerhasanyofthefollowingconditions,youmightnotbeabletoregisterorauthenticateit:
•Yourfingeriswrinkled.
•Yourfingerisrough,dry,orinjured.
•Yourfingerisstainedwithdirt,mud,oroil.
•Thesurfaceofyourfingerisverydifferentfromwhenyouenrolledyourfingerprint.
•Yourfingeriswet.
•Afingerthathasnotbeenenrolledisused.
Toimprovethesituation,trythefollowing:
•Cleanorwipeyourhandstoremoveanyexcessdirtormoisturefromthefingers.
•Enrollanduseadifferentfingerforauthentication.
•Ifyourhandsaretoodry,applylotiontothem.
Chapter4.Security47
Page 64

Noticeondeletingdatafromyourharddiskdrive,hybriddrive,or
solid-statedrive
Ascomputersspreadintoeverycorneroflife,theyprocessmoreandmoreinformation.Thedataonyour
computer,someofwhichmightbesensitive,isstoredonaharddiskdrive,hybriddrive,orsolid-statedrive.
Beforeyoudisposeof,sell,orhandoveryourcomputer,besuretodeletedatastoredonit.
Handingyourcomputerovertosomeoneelsewithoutdeletingtheloadedsoftware,suchasoperating
systemsandapplicationsoftware,mightevenviolatelicenseagreements.Y ouareadvisedtocheckthe
termsandconditionsofthoselicenseagreements.
Therearemethodsthatseemtodeletethedata:
•Movethedatatotherecyclebin,andthenclickEmptyrecyclebin.
•UsetheDeleteoption.
•Formatyourharddiskdrive,hybriddrive,orsolid-statedrive,usingthesoftwareforinitializingit.
•Usingtherecoveryprogram,bringtheharddiskdrive,hybriddrive,orsolid-statedrivebacktothe
factorydefaultsettings.
Theseoperations,however,onlychangethefilelocationofthedata;theydonotdeletethedataitself.In
otherwords,thedataretrievalprocessingisdisabledunderanoperatingsystemsuchasWindows.The
dataisstillthere,eventhoughitseemstobelost.Thus,itissometimespossibletoreadthedatabyuseof
specialsoftwarefordatarecovery.Thereisariskthatpeopleofbadfaithmightreadandmisusethecritical
dataonharddiskdrive,hybriddrive,orsolid-statedriveforunexpectedpurposes.
Topreventleakageofdata,itisimportantthatyoudeleteallthedatafromtheharddiskdriveorhybriddrive
whenyoudisposeof,sell,orhandoveryourcomputer.Y oucandestroythedataphysicallybysmashingthe
harddiskdriveorhybriddrivewithahammer,ormagneticallybymeansofstrongmagneticpower,thus
makingthedataunreadable.Butitisrecommendedthatyouusethesoftware(payware)orservice(pay
service)developedforthatpurpose.Theprocessmighttakeseveralhours.
Fordisposingofdataonthesolid-statedrive,LenovoprovidestheDriveEraseUtilityforResettingthe
CryptographicKeyandErasingtheSolidStateDrivetool.Fordisposingofdataontheharddiskdriveor
hybriddrive,LenovoprovidestheSecureDataDisposal™tool.Gotohttp://www.lenovo.com/supportto
downloadthesetools.
IfanEncryptionsolid-statedrive,aDiskEncryptionharddiskdrive,oraDiskEncryptionhybriddriveis
supportedandinstalledinyourcomputer,youcanlogicallydisposeofallthedataonthedriveinashort
timebyerasingthecryptographickey.Thedataencryptedwiththeoldkeyisnotphysicallyerasedbut
remainsonthedrive;however,itcannotbedecryptedwithouttheoldkey.Thisfeatureisalsoavailablewith
theDriveEraseUtilityforResettingtheCryptographicKeyandErasingtheSolidStateDrivetool.
Usingfirewalls
Ifyoursystemispreinstalledwithafirewallprogram,itprotectsagainstcomputerInternetsecuritythreats,
unauthorizedaccesses,intrusions,andInternetattacks.Italsoprotectsyourprivacy.
Formoreinformationabouthowtousethefirewallprogram,refertothehelpinformationsystemthat
comeswiththeprogram.
48UserGuide
Page 65

Protectingdataagainstviruses
Yourcomputerispreinstalledwithanantivirusprogramsoyoucandetectandeliminateviruses.The
antivirusprogramisdesignedtohelpyoudetectandeliminateviruses.
Lenovoprovidesafullversionofantivirussoftwareonyourcomputerwithafree30-daysubscription.After
30days,youmustrenewthelicensetocontinuereceivingtheantivirussoftwareupdates.
Formoreinformationabouthowtouseyourantivirussoftware,refertothehelpinformationsystemof
yourantivirussoftware.
Chapter4.Security49
Page 66

50UserGuide
Page 67

Chapter5.Recoveryoverview
ThischapterprovidesinformationabouttherecoverysolutionsprovidedbyLenovo.
•RecoveryoverviewfortheWindows7operatingsystem
•RecoveryoverviewfortheWindows8operatingsystem
RecoveryoverviewfortheWindows7operatingsystem
ThissectionprovidesinformationabouttherecoverysolutionsprovidedbyLenovoontheWindows7
operatingsystem.
Notes:
•Thereareavarietyofmethodstochoosefromwhenconsideringhowtorecoverintheeventofasoftwareorhardware-relatedproblem.Somemethodsvarydependingonthetypeofyouroperatingsystem.
•Theproductontherecoverymediamightbeusedonlyforthefollowingpurposes:
–Restoretheproductpreinstalledonyourcomputer
–Reinstalltheproduct
–ModifytheproductusingtheAdditionalFiles
Notes:Topreventpotentialperformancerisksorunexpectedbehaviorthatmightbecausedbythenew
harddiskdrivetechnology,itisrecommendedthatyouuseoneofthefollowingback-upsoftwareprograms:
•ThinkVantageRescueandRecoveryversion4.3orlater
•SymantecNortonGhostversion15orlater
Notes:Tousethisprogram,dothefollowing:
1.ClickStart➙Run.TheRunwindowopens.
2.Typecmdinthefield.ThenclickOK.
3.Typeghost-align=1mbandpressEnter.
•AcronisTrueImage2010orlater
•ParagonBackup&Recovery10Suitorlater,ParagonBackup&Recovery10Homeorlater
Creatingandusingarecoverymedia
Youcanuserecoverymediatorestoretheharddiskdrivetothefactorydefaultsettings.Recoverymedia
areusefulifyoutransferthecomputertoanotherarea,sellthecomputer,recyclethecomputer,orputthe
computerinanoperationalstateafterallothermethodsofrecoveryhavefailed.Asaprecautionarymeasure,
itisimportanttocreaterecoverymediaasearlyaspossible.
Note:Therecoveryoperationsyoucanperformusingrecoverymediavarydependingontheoperating
systemfromwhichtherecoverymediawerecreated.Therecoverymediamightcontainabootmedium
andadatamedium.Y ourMicrosoftWindowslicensepermitsyoutocreateonlyonedatamedium,soitis
importantthatyoustoretherecoverymediainasafeplaceafteryouhavemadethem.
Creatingrecoverymedia
Thissectionprovidesinstructionsonhowtocreaterecoverymedia.
Note:YoucancreaterecoverymediausingdiscsorexternalUSBstoragedevices.
©CopyrightLenovo2013
51
Page 68

Tocreaterecoverymedia,clickStart➙AllPrograms➙LenovoThinkVantageTools➙FactoryRecovery
Disks.Then,followtheinstructionsonthescreen.
Usingrecoverymedia
Thissectionprovidesinstructionsonhowtouserecoverymediaondifferentoperatingsystems.
•Youcanuserecoverymediatorestorethecomputertothefactorydefaultsettingsonly.Y oucanuse
recoverymediatoputthecomputerinanoperationalstateafterallothermethodsofrecoveryhavefailed.
Attention:Whenyouuserecoverymediatorestorethecomputertothefactorydefaultsettings,allthe
filescurrentlyontheharddiskdrivewillbedeletedandreplacedbythefactorydefaultsettings.
Touserecoverymedia,dothefollowing:
1.Dependingonthetypeofyourrecoverymedia,connectthebootmedium(memorykeyorotherUSB
storagedevice)tothecomputer,orinsertthebootdiscintoanexternalopticaldrive.
2.RepeatedlypressandreleasetheF12keywhenturningonthecomputer.WhentheBootMenu
windowopens,releasetheF12key.
3.SelectthedesiredstartupdeviceandpressEnter.Therestoreprocessbegins.
4.Followtheinstructionsonthescreentocompletetheoperation.
Notes:
1.Afterrestoringyourcomputertothefactorydefaultsettings,youmighthavetoreinstalldevicedrivers
forsomedevices.SeeReinstallingpreinstalledapplicationsanddevicedrivers.
2.SomecomputerscomewithMicrosoftOfficeorMicrosoftWorkspreinstalled.Ifyouneedtorecover
orreinstallyourMicrosoftOfficeorMicrosoftWorksapplications,youmustusetheMicrosoftOffice
CDorMicrosoftWorksCD.ThesediscsareprovidedonlywithcomputerspreinstalledwithMicrosoft
OfficeorMicrosoftWorks.
Performingbackupandrecoveryoperations
TheRescueandRecoveryprogramenablesyoutobackupallyourharddiskdrivecontentsincludingthe
operatingsystem,datafiles,softwareprograms,andpersonalsettings.Y oucandesignatewherethe
RescueandRecoveryprogramstoresthebackup:
•Inaprotectedareaofyourharddiskdrive
•OnanattachedexternalUSBharddiskdrive
•Onanetworkdrive
•Onrecordablediscs(anexternalrecordableopticaldriveisrequiredforthisoption)
Afteryouhavebackedupthecontentsontheharddiskdrive,youcanrestorethecompletecontentsofthe
harddiskdrive,restoreonlytheselectedfiles,orrestoreonlytheWindowsoperatingsystemandapplications.
Performingabackupoperation
ThissectionprovidesinstructionsonhowtoperformabackupoperationusingtheRescueandRecovery
program.
1.FromtheWindowsdesktop,clickStart➙AllPrograms➙LenovoThinkVantageTools➙Enhanced
BackupandRestore.TheRescueandRecoveryprogramopens.
2.IntheRescueandRecoverymainwindow,clicktheLaunchadvancedRescueandRecoveryarrow.
3.ClickBackupyourharddriveandselectbackupoperationoptions.Then,followtheinstructionson
thescreentocompletethebackupoperation.
52UserGuide
Page 69

Performingarecoveryoperation
ThissectionprovidesinstructionsonhowtoperformarecoveryoperationusingtheRescueandRecovery
program.
1.FromtheWindowsdesktop,clickStart➙AllPrograms➙LenovoThinkVantageTools➙Enhanced
BackupandRestore.TheRescueandRecoveryprogramopens.
2.IntheRescueandRecoveryprogrammainwindow,clicktheLaunchadvancedRescueandRecovery
arrow.
3.ClicktheRestoreyoursystemfromabackupicon.
4.Followtheinstructionsonthescreentocompletetherecoveryoperation.
FormoreinformationaboutperformingarecoveryoperationfromtheRescueandRecoveryworkspace,
seeUsingtheRescueandRecoveryworkspace.
UsingtheRescueandRecoveryworkspace
TheRescueandRecoveryworkspaceresidesinaprotected,hiddenareaofyourharddiskdrivethat
operatesindependentlyfromtheWindowsoperatingsystem.Thisenablesyoutoperformrecovery
operationsevenifyoucannotstarttheWindowsoperatingsystem.Y oucanperformthefollowingrecovery
operationsfromtheRescueandRecoveryworkspace:
•Rescuefilesfromyourharddiskdriveorfromabackup
TheRescueandRecoveryworkspaceenablesyoutolocatefilesonyourharddiskdriveandtransfer
themtoanetworkdriveorotherrecordablemedia,suchasaUSBdeviceoradisc.Thissolutionis
availableevenifyoudidnotbackupyourfilesorifchangesweremadetothefilessinceyourlastbackup
operation.YoualsocanrescueindividualfilesfromaRescueandRecoverybackuplocatedonyourlocal
harddiskdrive,aUSBdevice,oranetworkdrive.
•RestoreyourharddiskdrivefromaRescueandRecoverybackup
IfyouhavebackedupyourharddiskdriveusingtheRescueandRecoveryprogram,youcanrestorethe
harddiskdrivefromaRescueandRecoverybackup,evenifyoucannotstarttheWindowsoperating
system.
•Restoreyourharddiskdrivetothefactorydefaultsettings
TheRescueandRecoveryworkspaceenablesyoutorestorethecompletecontentsofyourharddiskdrive
tothefactorydefaultsettings.Ifyouhavemultiplepartitionsonyourharddiskdrive,youhavetheoption
torestorethefactorydefaultsettingstotheC:partitionandleavetheotherpartitionsintact.Becausethe
RescueandRecoveryworkspaceoperatesindependentlyfromtheWindowsoperatingsystem,youcan
restorethefactorydefaultsettingsevenifyoucannotstarttheWindowsoperatingsystem.
Attention:IfyourestoretheharddiskdrivefromaRescueandRecoverybackuporrestoretheharddisk
drivetothefactorydefaultsettings,allfilesontheprimaryharddiskdrivepartition(usuallydriveC:)willbe
deletedintherecoveryprocess.Ifpossible,makecopiesofimportantfiles.Ifyouareunabletostartthe
Windowsoperatingsystem,youcanusetherescuefilesfeatureoftheRescueandRecoveryworkspaceto
copyfilesfromyourharddiskdrivetoothermedia.
TostarttheRescueandRecoveryworkspace,dothefollowing:
1.Ensurethatthecomputeristurnedoff.
2.RepeatedlypressandreleasetheF11keywhenturningonthecomputer.Whenyouhearbeepsor
seealogoscreen,releasetheF11key.
3.IfyouhavesetaRescueandRecoverypassword,typeyourpasswordwhenprompted.TheRescue
andRecoveryworkspaceopensafterashortdelay.
Note:IftheRescueandRecoveryworkspacefailstoopen,seeSolvingrecoveryproblems.
Chapter5.Recoveryoverview53
Page 70

4.Dooneofthefollowing:
•Torescuefilesfromyourharddiskdriveorfromabackup,clickRescuefilesandfollowthe
instructionsonthescreen.
•TorestoreyourharddiskdrivefromaRescueandRecoverybackuportorestoreyourharddiskdrive
tothefactorydefaultsettings,clickRestoreyoursystemandfollowtheinstructionsonthescreen.
FormoreinformationaboutthefeaturesoftheRescueandRecoveryworkspace,clickHelp.
Notes:
1.Afterrestoringyourharddiskdrivetothefactorydefaultsettings,youmighthavetoreinstalldevice
driversforsomedevices.SeeReinstallingpreinstalledapplicationsanddevicedrivers.
2.SomecomputerscomewithMicrosoftOfficeorMicrosoftWorkspreinstalled.Ifyouneedtorecover
orreinstallyourMicrosoftOfficeorMicrosoftWorksapplications,youmustusetheMicrosoftOffice
CDorMicrosoftWorksCD.ThesediscsareprovidedonlywithcomputerspreinstalledwithMicrosoft
OfficeorMicrosoftWorks.
Creatingandusingarescuemedium
Witharescuemedium,suchasadiscoraUSBharddiskdrive,youcanrecoverthecomputerfromfailures
thatpreventyoufromgainingaccesstotheRescueandRecoveryworkspaceonyourharddiskdrive.
Notes:
1.Therecoveryoperationsyoucanperformusingarescuemediumvarydependingontheoperating
system.
2.Therescuedisccanbestartedinalltypesofexternalopticaldrives.
Creatingarescuemedium
Thissectionprovidesinstructionsonhowtocreatearescuemedium.
1.FromtheWindowsdesktop,clickStart➙AllPrograms➙LenovoThinkVantageTools➙Enhanced
BackupandRestore.TheRescueandRecoveryprogramopens.
2.IntheRescueandRecoverymainwindow,clicktheLaunchadvancedRescueandRecoveryarrow.
3.ClicktheCreateRescueMediaicon.TheCreateRescueandRecoveryMediawindowopens.
4.IntheRescueMediaarea,selectthetypeoftherescuemediumyouwanttocreate.Youcancreatea
rescuemediumusingadiscoraUSBharddiskdrive.
5.ClickOKandfollowtheinstructionsonthescreentocreatearescuemedium.
Usingarescuemedium
Thissectionprovidesinstructionsonhowtousetherescuemediumyouhavecreated.
•Ifyouhavecreatedarescuemediumusingadisc,usethefollowinginstructionstousetherescuemedium:
1.Turnoffyourcomputer.
2.RepeatedlypressandreleasetheF12keywhenturningonthecomputer.WhentheBootMenu
windowopens,releasetheF12key.
3.IntheBootMenuwindow,selectthedesiredexternalopticaldriveasthefirstbootdevice.Then,
inserttherescuediscintotheopticaldriveandpressEnter.Therescuemediumstarts.
•IfyouhavecreatedarescuemediumusingaUSBharddiskdrive,usethefollowinginstructionsto
usetherescuemedium:
1.AttachtheUSBharddiskdrivetooneoftheUSBconnectorsonyourcomputer.
2.RepeatedlypressandreleasetheF12keywhenturningonthecomputer.WhentheBootMenu
windowopens,releasetheF12key.
54UserGuide
Page 71

3.IntheBootMenuwindow,selecttheUSBharddiskdriveasthefirstbootdeviceandpressEnter.
Therescuemediumstarts.
Whentherescuemediumstarts,theRescueandRecoveryworkspaceopens.Thehelpinformationfor
eachfeatureisavailablefromtheRescueandRecoveryworkspace.Followtheinstructionstocomplete
therecoveryprocess.
Reinstallingpreinstalledapplicationsanddevicedrivers
Yourcomputerhasprovisionsthatenableyoutoreinstallselectedfactory-installedapplicationsanddevice
drivers.
Reinstallingpreinstalledapplications
Toreinstallselectedapplicationprograms,dothefollowing:
1.Turnonyourcomputer.
2.GototheC:\SWTOOL Sdirectory.
3.OpentheAPPSfolder.Initareseveralsubfoldersnamedforthevariouspreinstalledapplications.
4.Openthesubfolderfortheapplicationyouarereinstalling.
5.Double-clickSetup,andthenfollowtheon-screenstepstoreinstalltheprogram.
Reinstallingpreinstalleddevicedrivers
Attention:Whenyoureinstalldevicedrivers,youarechangingthecurrentconfigurationofyourcomputer.
Reinstalldevicedriversonlywhenitisnecessarytocorrectaproblemwithyourcomputer.
Toreinstalladevicedriverforafactory-installeddevice,dothefollowing:
1.Turnonyourcomputer.
2.GototheC:\SWTOOL Sdirectory.
3.OpentheDRIVERSfolder.WithintheDRIVERSfolderareseveralsubfoldersnamedforthevarious
devicesinstalledinyourcomputer(forexample,AUDIOandVIDEO).
4.Openthesubfolderforthedevice.
5.Reinstallthedevicedriverbyoneofthefollowingmethods:
•Inthesubfolderforthedevice,lookforatextfile(afilewiththeextension.txt).Thetextfilecontains
informationonhowtoreinstallthatdevicedriver.
•Ifthesubfolderforthedevicecontainsafileofsetupinformation(afilewiththeextension.inf),you
canusetheAddNewHardwareprogram(intheWindowsControlPanel)toreinstallthedevicedriver.
Notalldevicedriverscanbereinstalledbyuseofthisprogram.IntheAddNewHardwareprogram,
whenpromptedforthedevicedriveryouwanttoinstall,clickHaveDiskandBrowse.Thenselect
thedevicedriverfilefromthedevicesubfolder.
•Inthesubfolderforthedevice,lookfortheexecutablefile(afilewiththeextension.exe).Double-click
thefile,andfollowtheinstructionsonthescreen.
Attention:Ifyouneedupdateddevicedrivers,donotdownloadthemfromtheWindowsUpdateWebsite.
ObtainthemfromLenovo.Formoreinformation,seeMakingsuredevicedriversarecurrent.
Solvingrecoveryproblems
IfyouareunabletoaccesstheRescueandRecoveryworkspaceortheWindowsenvironment,doone
ofthefollowing:
•UsearescuemediumtostarttheRescueandRecoveryworkspace.SeeCreatingandusingarescue
medium.
Chapter5.Recoveryoverview55
Page 72

•Userecoverymediaifallothermethodsofrecoveryhavefailedandyouneedtorestoretheharddisk
drivetothefactorydefaultsettings.SeeCreatingandusingarecoverymedia.
Note:IfyouareunabletoaccesstheRescueandRecoveryworkspaceortheWindowsenvironmentfrom
arescuemediumorrecoverymedia,youmightnothavetherescuedevice(aninternalharddiskdrive,a
disc,aUSBharddiskdrive,orotherexternaldevices)setasthefirstbootdeviceinthestartupdevice
sequence.Youmustfirstensurethatyourrescuedeviceissetasthefirstbootdeviceinthestartupdevice
sequenceintheThinkPadSetupprogram.SeeStartupmenufordetailedinformationabouttemporarilyor
permanentlychangingthestartupdevicesequence.
Itisimportanttocreatearescuemediumandasetofrecoverymediaasearlyaspossibleandstorethem
inasafeplaceforfutureuse.
RecoveryoverviewfortheWindows8operatingsystem
ThissectionprovidesinformationabouttherecoverysolutionsprovidedbyWindows8operatingsystem.
Refreshingyourcomputer
Ifyourcomputerdoesnotperformwellandtheproblemmightbecausedbyarecentlyinstalledprogram,
youcanrefreshyourcomputerwithoutlosingyourpersonalfilesorchangingyoursettings.
Attention:Ifyourefreshyourcomputer,theprogramsthatcamewithyourcomputerandtheprogramsthat
youinstalledfromWindowsStorewillbereinstalled,butallotherprogramswillberemoved.
Torefreshyourcomputer,dothefollowing:
1.Swipeinfromtherightedgeofthescreentodisplaythecharms.
2.TaptheSettingscharm.
3.TapChangePCsettings.
4.TapGeneral.
5.IntheRefreshyourPCwithoutaffectingyourfilessection,clickGetstarted.
Resettingyourcomputertothefactorydefaultsettings
Youcanresetyourcomputertothefactorydefaultsettings.Resettingthecomputerwillreinstallthe
operatingsystem,andreinstallalltheprogramsandsettingsthatcamewithyourcomputer.
Attention:Ifyouresetyourcomputer,allyourpersonalfilesandsettingswillbedeleted.Toavoiddataloss,
makeabackupcopyofallthedatathatyouwanttokeep.
Toresetyourcomputer,dothefollowing:
1.Moveyourcursortothebottomrightcornerofthescreentobringupthecharms.ClickSettings
➙ChangePCsettings➙General.
2.IntheRemoveeverythingandreinstallWindowssection,clickGetstarted.
Advancedstartupoptions
AdvancedstartupoptionsenableyoutochangethestartupsettingsofyourWindowsoperatingsystem,
startthecomputerfromanexternaldevice,orrestoretheWindowsoperatingsystemfromasystemimage.
Tousetheadvancedstartupoptions,dothefollowing:
1.Moveyourcursortothebottomrightcornerofthescreentobringupthecharms.ClickSettings
➙ChangePCsettings➙General.
56UserGuide
Page 73

2.IntheAdvancedstartupsection,clickRestartnow➙Troubleshoot➙Advancedoptions.
3.Restartyourcomputerfollowingtheinstructionsonthescreen.
FormoredetailsabouttherecoverysolutionsprovidedoncomputerspreinstalledwiththeWindows8
operatingsystem,refertothehelpinformationsystemoftheWindows8operatingsystem.
Chapter5.Recoveryoverview57
Page 74

58UserGuide
Page 75

Chapter6.Replacingdevices
Thischapterprovidesinstructionsonhowtoinstallorreplacehardwareforyourcomputer.
•Staticelectricityprevention
•Disablingthebuilt-inbattery
•Replacingthebasecoverassembly
•Replacingtheharddiskdrive,hybriddrive,orsolid-statedrive
•Replacingamemorymodule
•ReplacingawirelessLANcard
Staticelectricityprevention
Staticelectricity,althoughharmlesstoyou,canseriouslydamagecomputercomponentsandoptions.
Improperhandlingofstatic-sensitivepartscancausedamagetothepart.Whenyouunpackanoptionor
aCRU,donotopenthestatic-protectivepackagecontainingthepartuntiltheinstructionsdirectyou
toinstallit.
WhenyouhandleoptionsorCRUs,orperformanyworkinsidethecomputer,takethefollowingprecautions
toavoidstatic-electricitydamage:
•Limityourmovement.Movementcancausestaticelectricitytobuilduparoundyou.
•Alwayshandlecomponentscarefully.Handleadapters,memorymodules,andothercircuitboardsbythe
edges.Nevertouchexposedcircuitry.
•Preventothersfromtouchingcomponents.
•Whenyouinstallastatic-sensitiveoptionorCRU,touchthestatic-protectivepackagecontainingthe
parttoametalexpansion-slotcoverorotherunpaintedmetalsurfaceonthecomputerforatleasttwo
seconds.Thisreducesstaticelectricityinthepackageandyourbody.
•Whenpossible,removethestatic-sensitivepartfromthestatic-protectivepackagingandinstallthepart
withoutsettingitdown.Whenthisisnotpossible,placethestatic-protectivepackagingonasmooth,
levelsurfaceandplacethepartonit.
•Donotplacethepartonthecomputercoverorothermetalsurface.
Disablingthebuilt-inbattery
BeforereplacinganyCRU,ensurethatyouhavedisabledthebuilt-inbatterybydoingthefollowing:
1.Turnoffyourcomputeranddisconnecttheacpoweradapterandallcablesfromthecomputer.
2.Turnonyourcomputer.PressF1toenterThinkPadSetupwhentheThinkPadlogoappears.
3.SelectConfig➙Power.ThePowersubmenuisdisplayed.
4.SelectDisableBuilt-inBattery.
5.ClickYesintheSetupWarningwindow,thenthecomputerwillbeturnedoffautomatically.Waitthreeto
fiveminutestoletthecomputercool.
Replacingthebasecoverassembly
Beforeyoustart,printtheseinstructions.
©CopyrightLenovo2013
59
Page 76
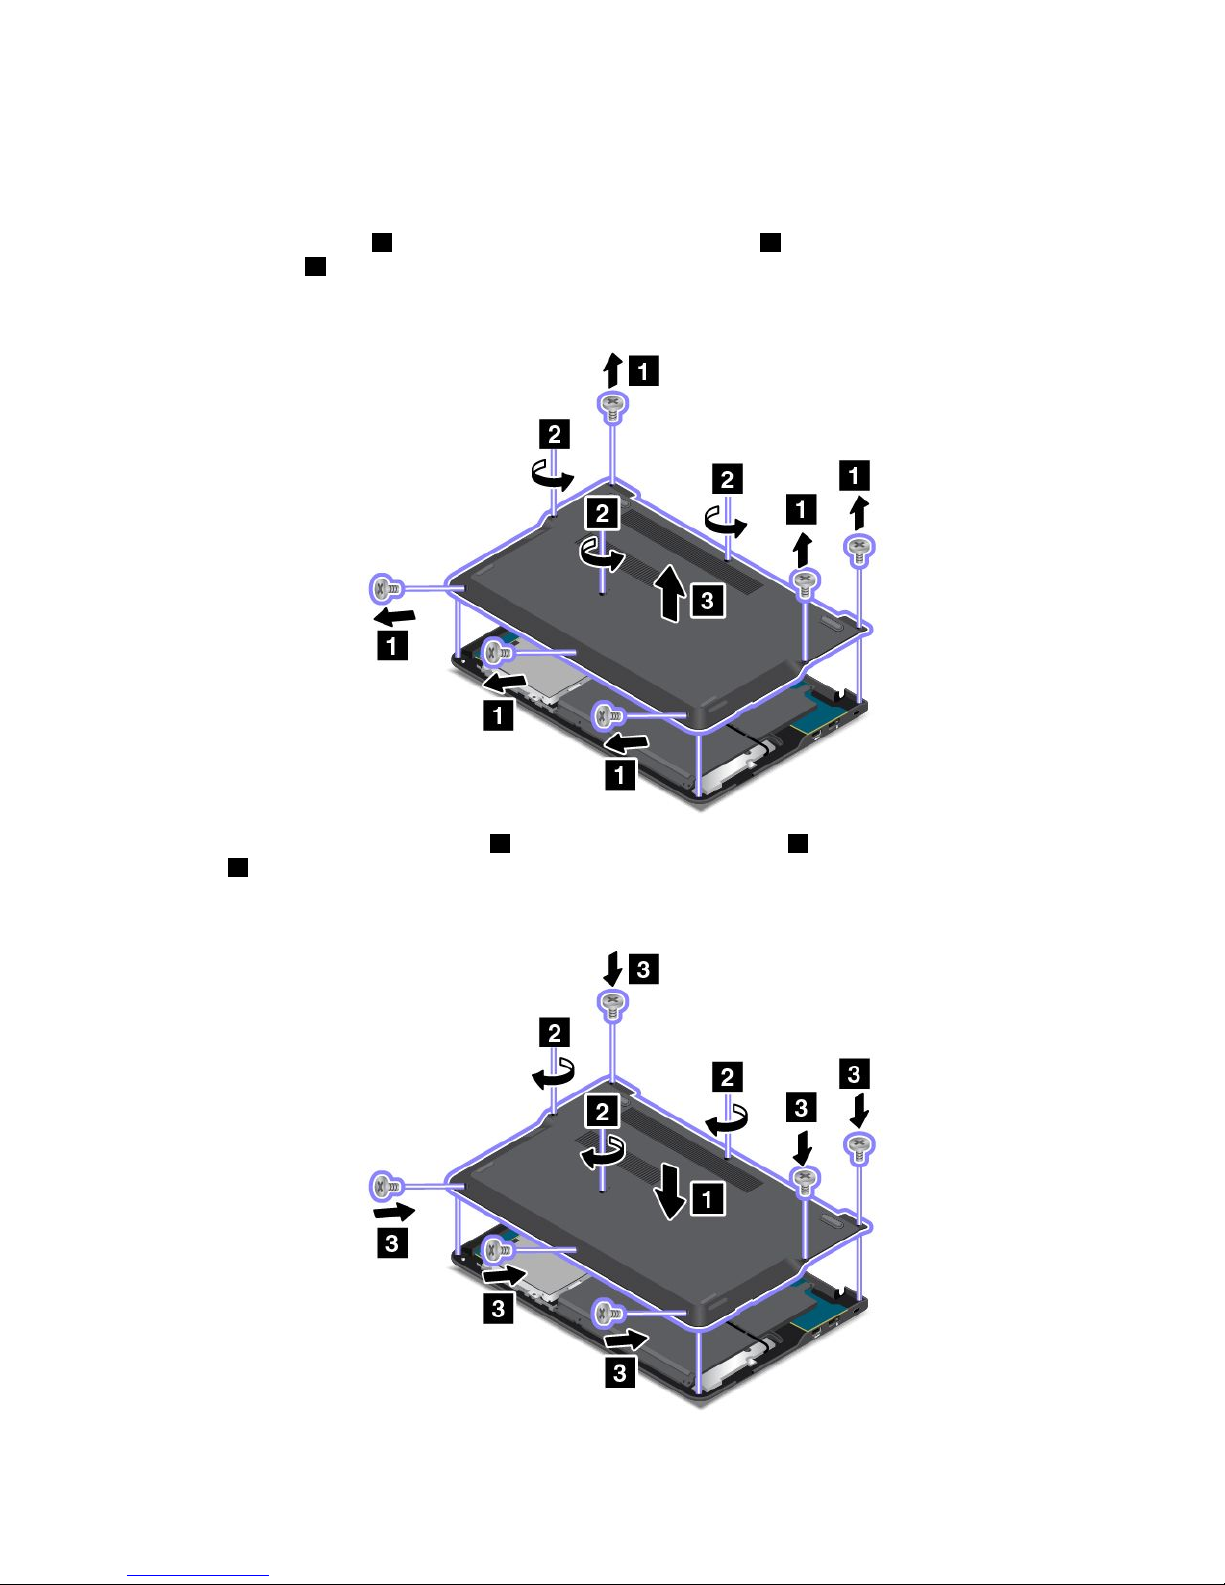
Toreplacethebasecoverassembly,dothefollowing:
1.Disablethebuilt-inbattery.SeeDisablingthebuilt-inbattery.
2.Closethecomputerdisplay,andturnthecomputerover.
3.Removethesixscrews1,thenloosentheremainingthreescrews2,andthenremovethebase
coverassembly3.
Note:Followthecorrespondingdirectionasshowninthefollowingillustrationtoremoveeachscrew.
4.Installthenewbasecoverassembly1,thentightenthethreescrews2,andtheninstallthesix
screws3.
Note:Followthecorrespondingdirectionasshowninthefollowingillustrationtoinstalleachscrew.
5.Turnthecomputeroveragain.Connecttheacpoweradapterandallcables.
60UserGuide
Page 77
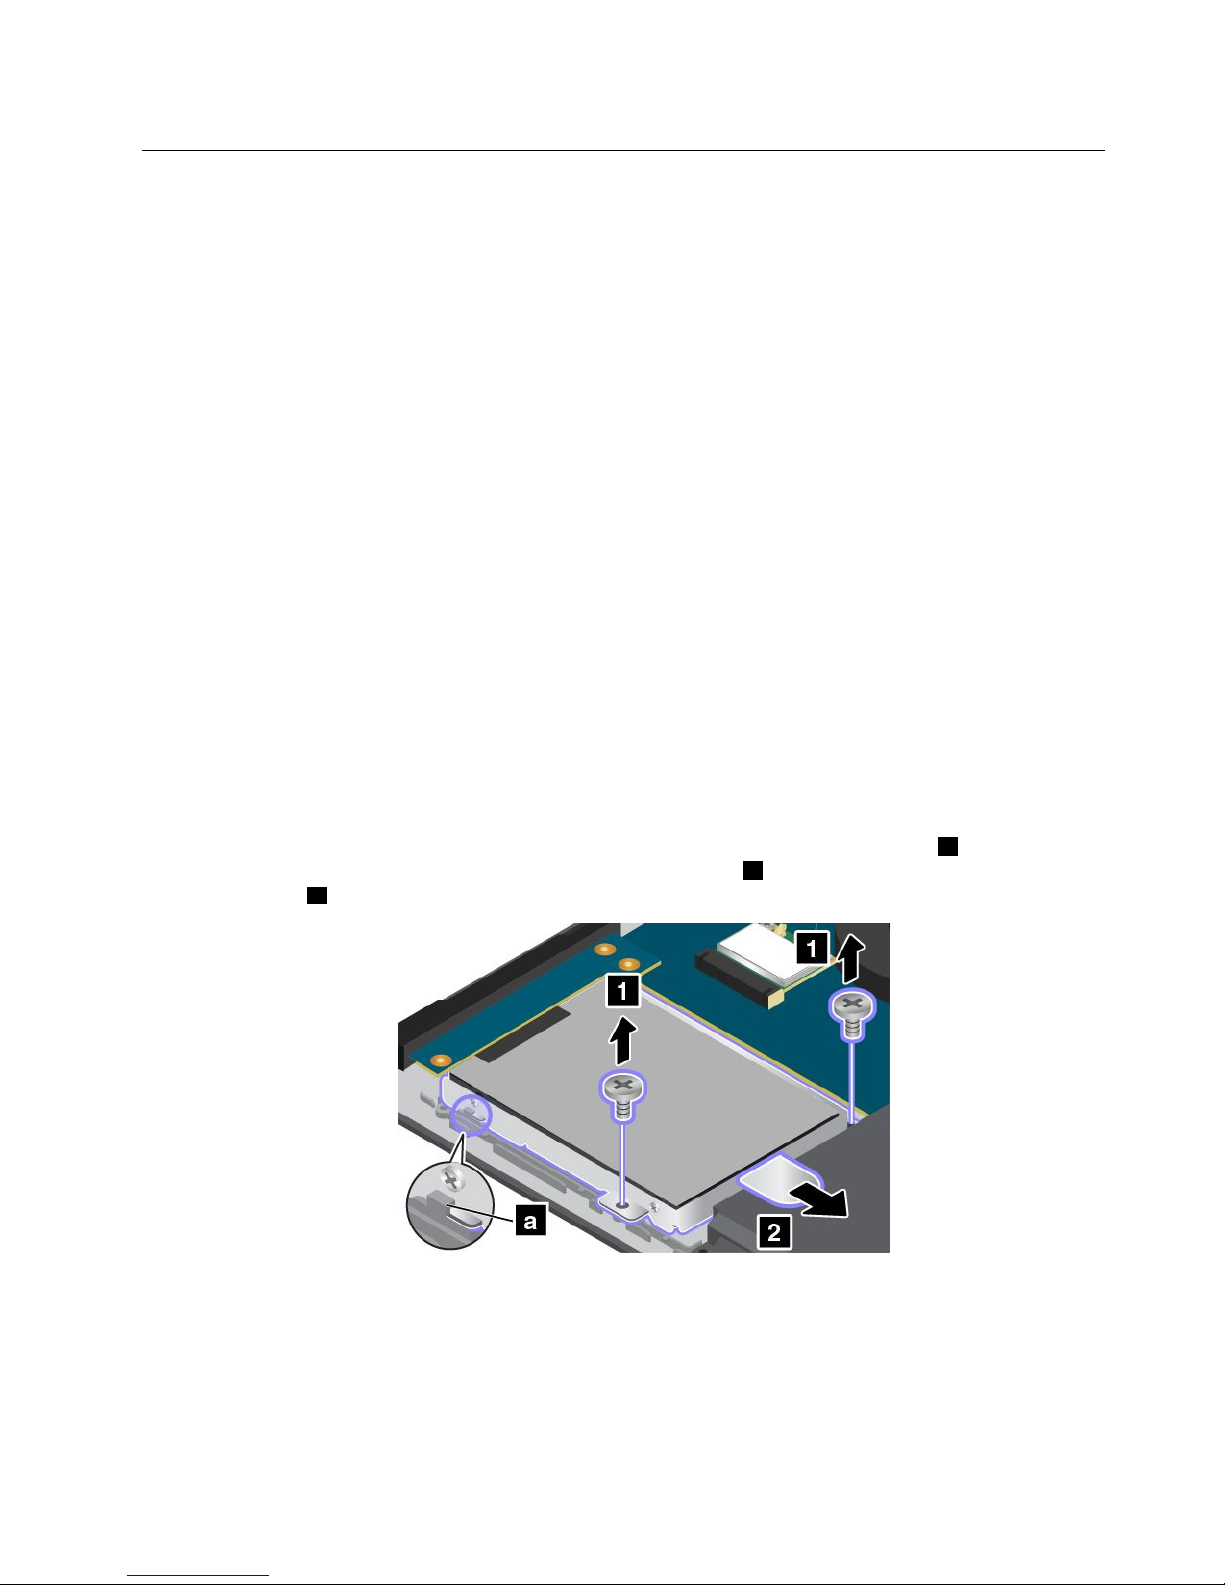
Replacingtheharddiskdrive,hybriddrive,orsolid-statedrive
Beforeyoustart,printtheseinstructions.
Attention:Theharddiskdrive,hybriddrive,orsolid-statedriveisverysensitive.Incorrecthandlingcan
causedamageandpermanentlossofdata.Observethefollowingguidelines:
•Replacetheharddiskdrive,hybriddrive,orsolid-statedriveonlyifyouupgradeitorhaveitrepaired.
Theconnectorsandslotoftheharddiskdrive,hybriddrive,orsolid-statedrivearenotdesignedfor
frequentchanges,ordriveswapping.
•Donotdroptheharddiskorsolid-statedriveorsubjectittophysicalshocks.Puttheharddiskdrive,
hybriddrive,orsolid-statedriveonamaterial,suchassoftcloth,thatabsorbsanyphysicalshocks.
•Donotapplypressuretothecoveroftheharddiskdrive,hybriddrive,orsolid-statedrive.
•Donottouchtheconnector.
•Beforeremovingtheharddiskdrive,hybriddrive,orsolid-statedrive,makeabackupcopyofallthe
informationonit,andthenturnthecomputeroff.
•Neverremovetheharddiskdrive,hybriddrive,orsolid-statedrivewhilethecomputerisoperating,in
sleepmode,orinhibernationmode.
Toreplacetheharddiskdrive,hybriddrive,orsolid-statedrive,dothefollowing:
Note:Dependingonthemodel,yourharddiskdrive,hybriddrive,orsolid-statedrivemightlookslightly
differentfromtheillustrationsinthistopic.
1.Disablethebuilt-inbattery.SeeDisablingthebuilt-inbattery.
2.Closethecomputerdisplay,andturnthecomputerover.
3.Removethebasecoverassembly.SeeReplacingthebasecoverassembly.
4.Removethescrewsthatsecuretheharddiskdrive,hybriddrive,orsolid-statedrive1.Thenslide
theharddiskdrive,hybriddrive,orsolid-statedriveasshown
2toreleaseitfromtheconnector
andthehooka.
Chapter6.Replacingdevices61
Page 78
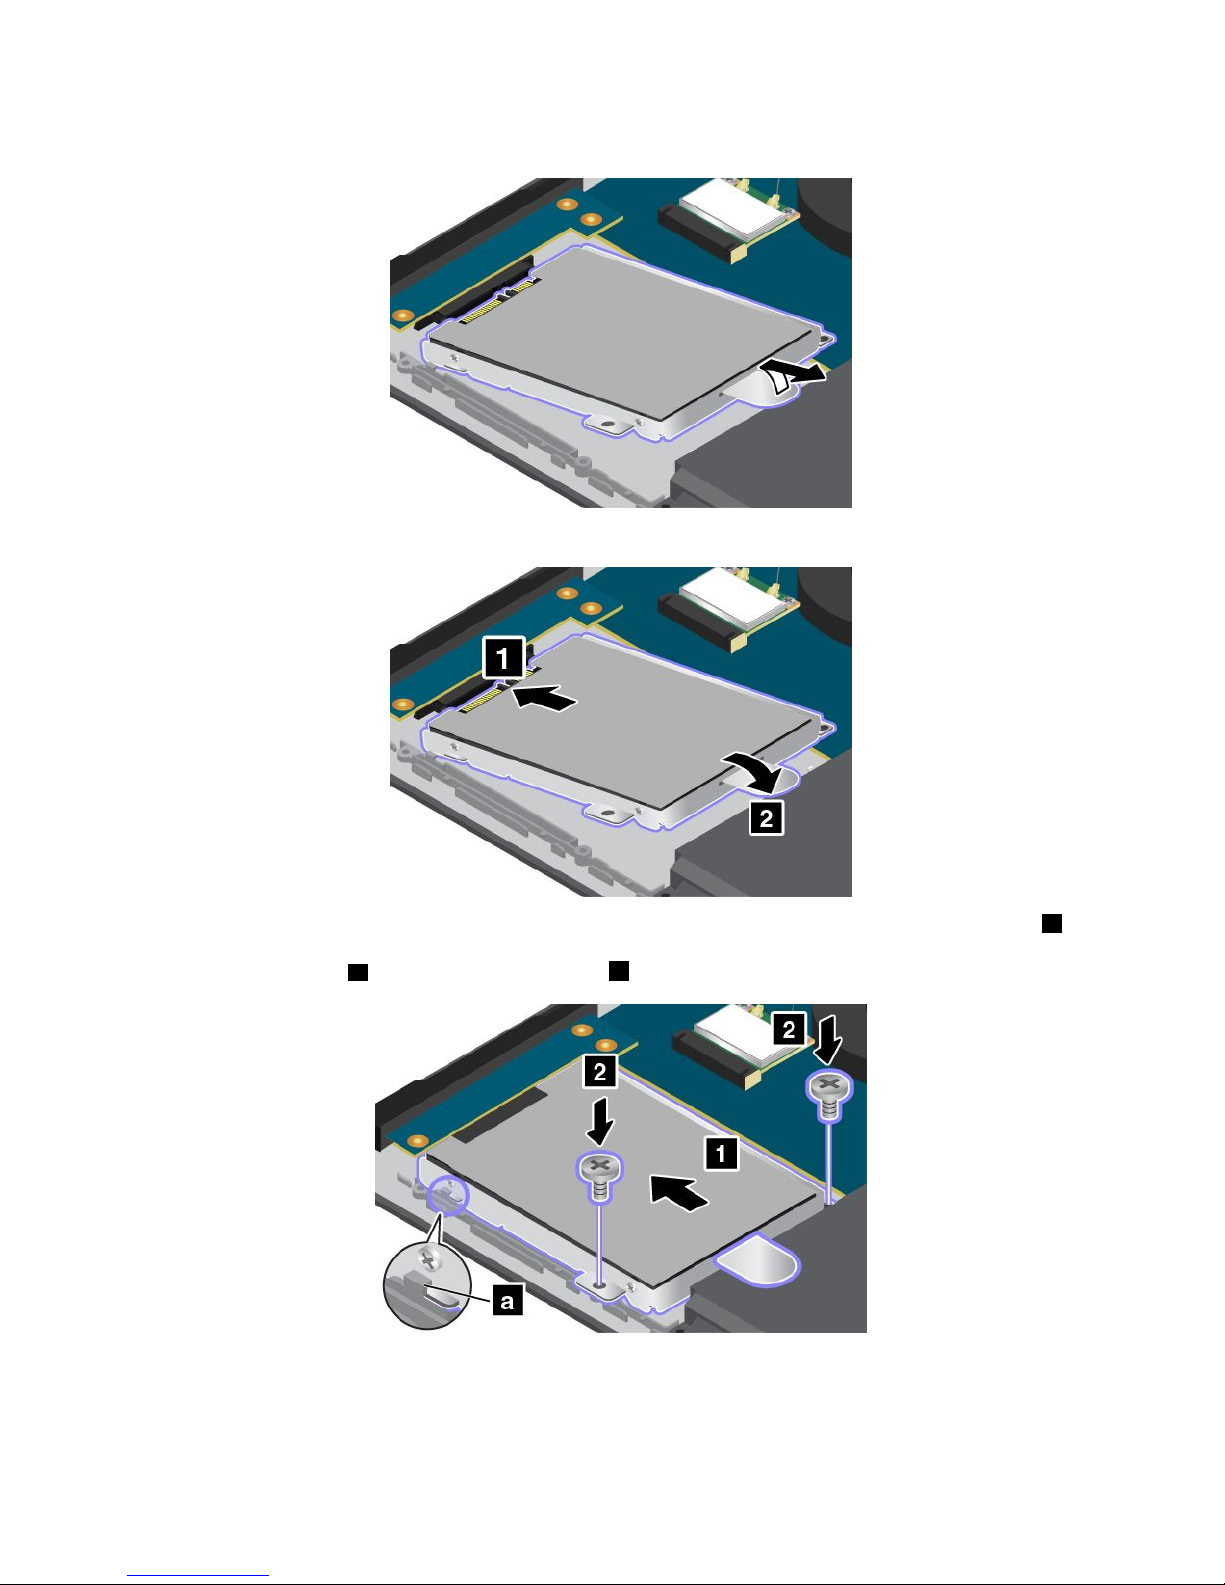
5.Removetheharddiskdrive,hybriddrive,orsolid-statedrivebyliftingthetab.
6.Placethenewharddiskdrive,hybriddrive,orsolid-statedriveintothedrivebay.
7.Slidetheharddiskdrive,hybriddrive,orsolid-statedrivehorizontallyandfirmlyintotheconnector1.
Ensurethattheharddiskdrive,hybriddrive,orsolid-statedriveiscorrectlyseatedinthebayand
securedbythehook
a.Thenreinstallthescrews2.
8.Reinstallthebasecoverassembly.SeeReplacingthebasecoverassembly.
9.Turnthecomputeroveragain.Connecttheacpoweradapterandallcables.
62UserGuide
Page 79
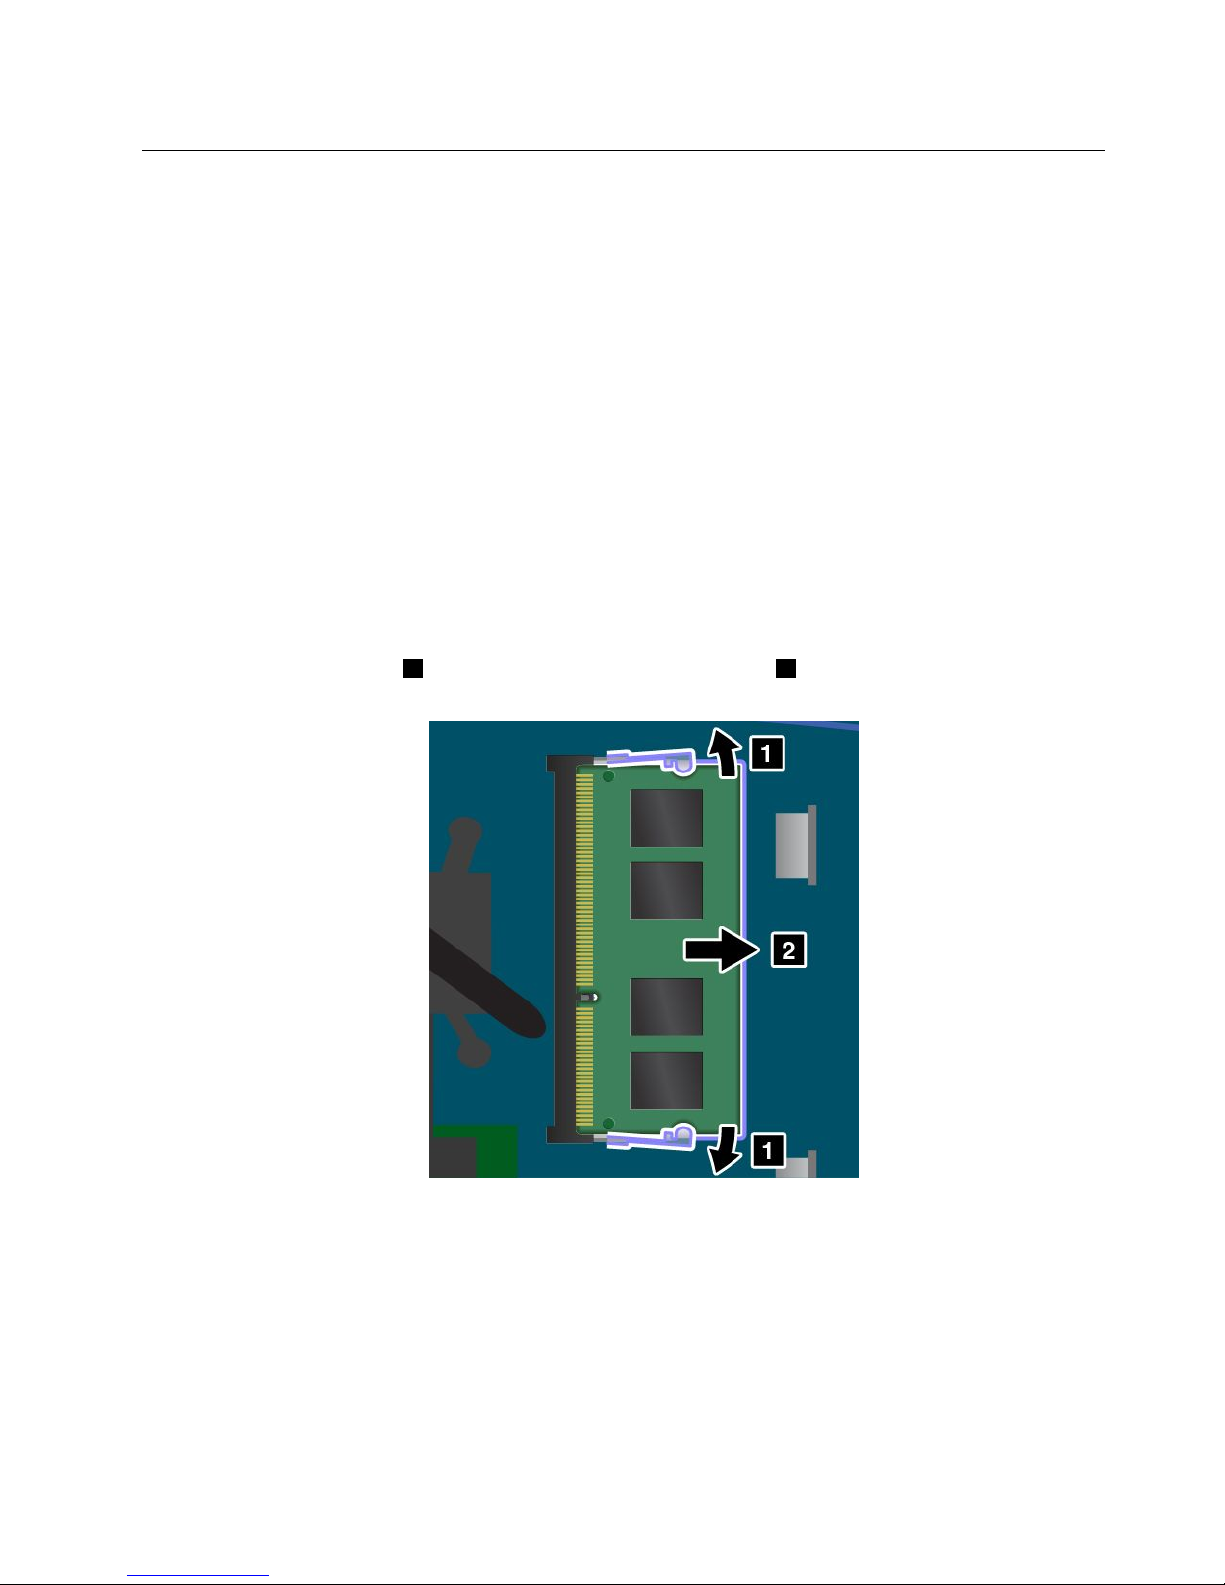
Replacingamemorymodule
Beforeyoustart,printtheseinstructions.
Increasingmemorycapacityisaneffectivewaytomakeprogramsrunfaster.Toreplaceoraddamemory
module,readthefollowingprerequisites,andthentheinstructions.
Whenreplacingamemorymodule,besuretofollowtheprecautions.
Note:Theoperatingspeedofthememorymodulehasdependencyonthesystemconfiguration.Insome
conditions,thememorymoduleinyourcomputermightnotbeabletooperateatthemaximumspeed.
Attention:Beforeyoustartinstallingamemorymodule,touchametaltableoragroundedmetalobject.This
actionreducesanystaticelectricityfromyourbody.Thestaticelectricitycoulddamagethememorymodule.
Toreplaceamemorymodule,dothefollowing:
1.Disablethebuilt-inbattery.SeeDisablingthebuilt-inbattery.
2.Closethecomputerdisplay,andturnitover.
3.Removethebasecoverassembly.SeeReplacingthebasecoverassembly.
4.Ifthememorymodulealreadyisinthememoryslot,pressoutonthelatchesonbothedgesofthe
socketatthesametime1,andthenremovethememorymodule2.Savetheremovedmemory
moduleforfutureuse.
5.Findthenotchonthecontactedgesideofthememorymoduleyouareinstalling.
Attention:Toavoiddamagingthememorymodule,donottouchitscontactedge.
Chapter6.Replacingdevices63
Page 80
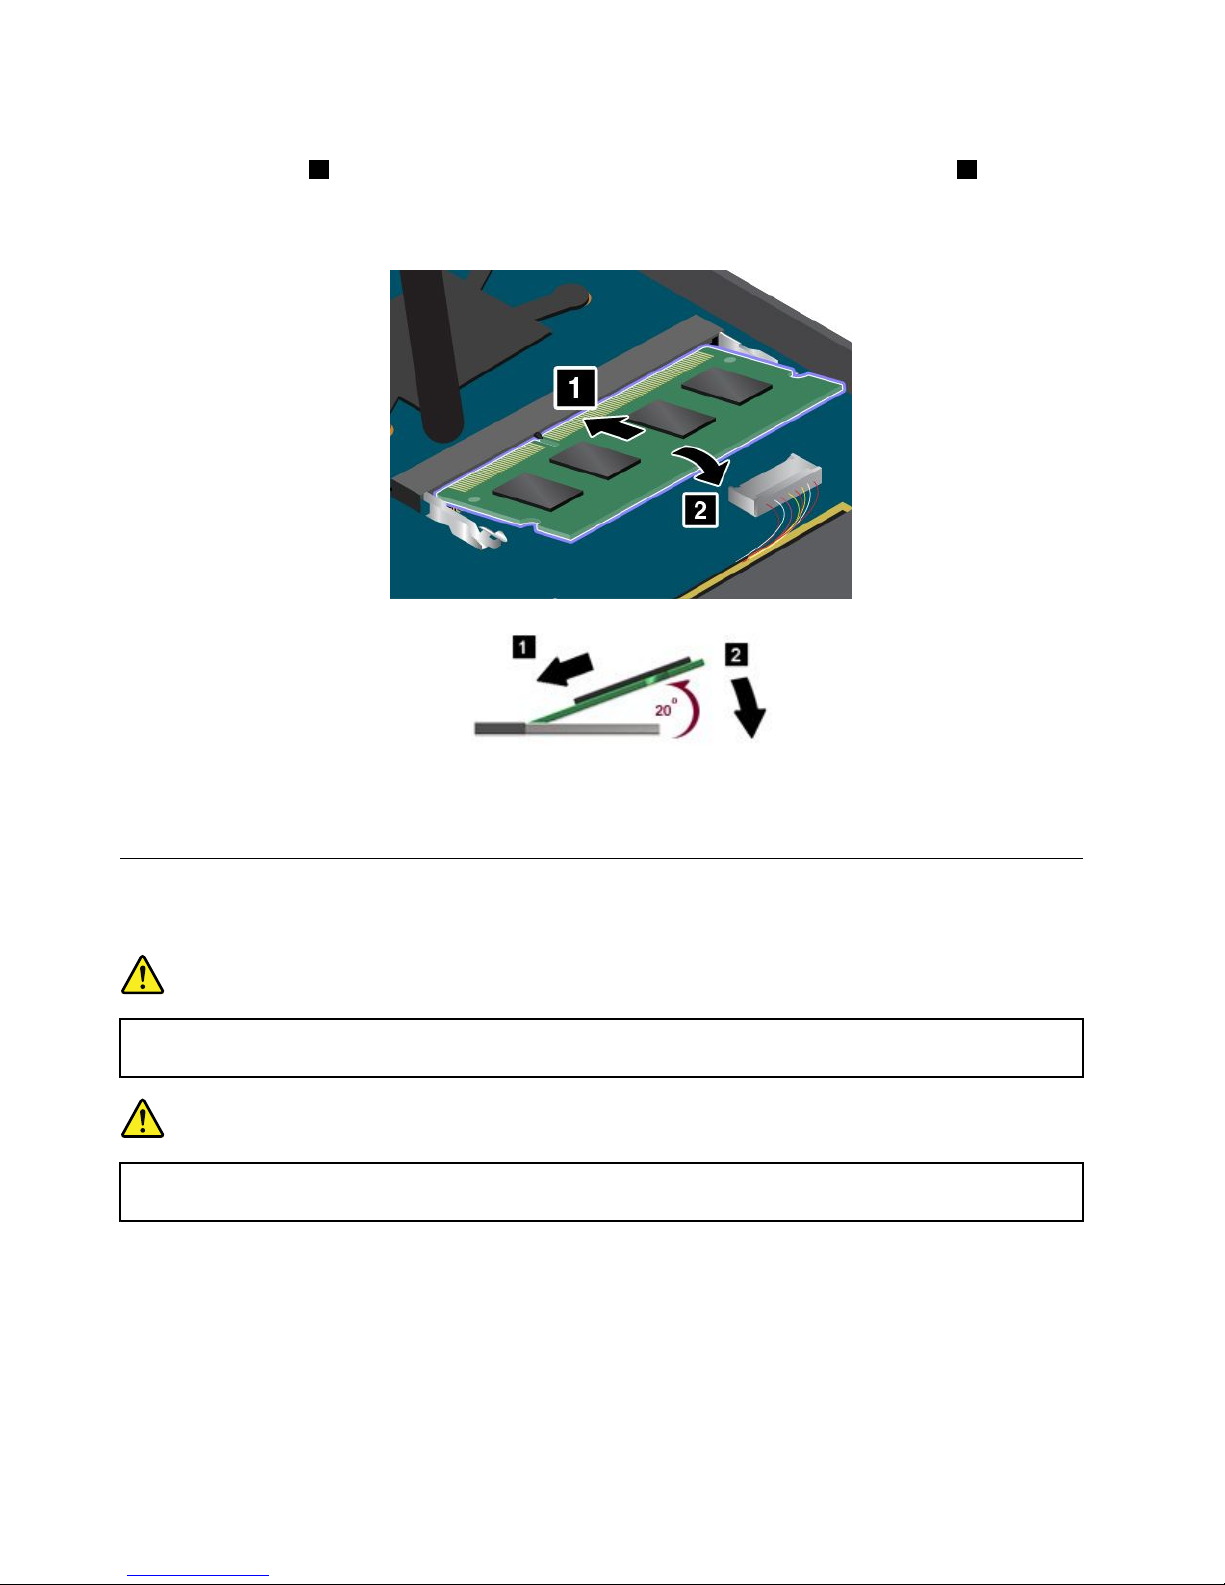
6.Withthenotchedendofthememorymoduletowardthecontactedgesideofthesocket,insertthe
memorymodule
1intothesocketatanangleofabout20degrees;thenpressitinfirmly2.Pivotthe
memorymoduledownwarduntilitsnapsintoplace.
Note:Makesurethatthememorymoduleisfirmlyinstalledintheslotandcannotbemovedeasily.
7.Reinstallthebasecoverassembly.SeeReplacingthebasecoverassembly.
8.Turnthecomputeroveragain.Connecttheacpoweradapterandallcables.
ReplacingawirelessLANcard
Beforeyoustart,printtheseinstructions.
DANGER
Duringelectricalstorms,donotconnectthecabletoordisconnectitfromthetelephoneoutlet
onthewall.
DANGER
Electriccurrentfrompower,telephone,andcommunicationcablesishazardous.Toavoidshock
hazard,disconnectthecablesbeforeopeningthecoverofthisslot.
Attention:BeforeyoustartinstallingawirelessLANcard,touchametaltableoragroundedmetalobject.
Thisactionreducesanystaticelectricityfromyourbody.Thestaticelectricitycoulddamagethecard.
ToreplacethewirelessLANcard,dothefollowing:
1.Disablethebuilt-inbattery.SeeDisablingthebuilt-inbattery.
2.Closethecomputerdisplay,andturnthecomputerover.
3.Removethebasecoverassembly.SeeReplacingthebasecoverassembly.
64UserGuide
Page 81
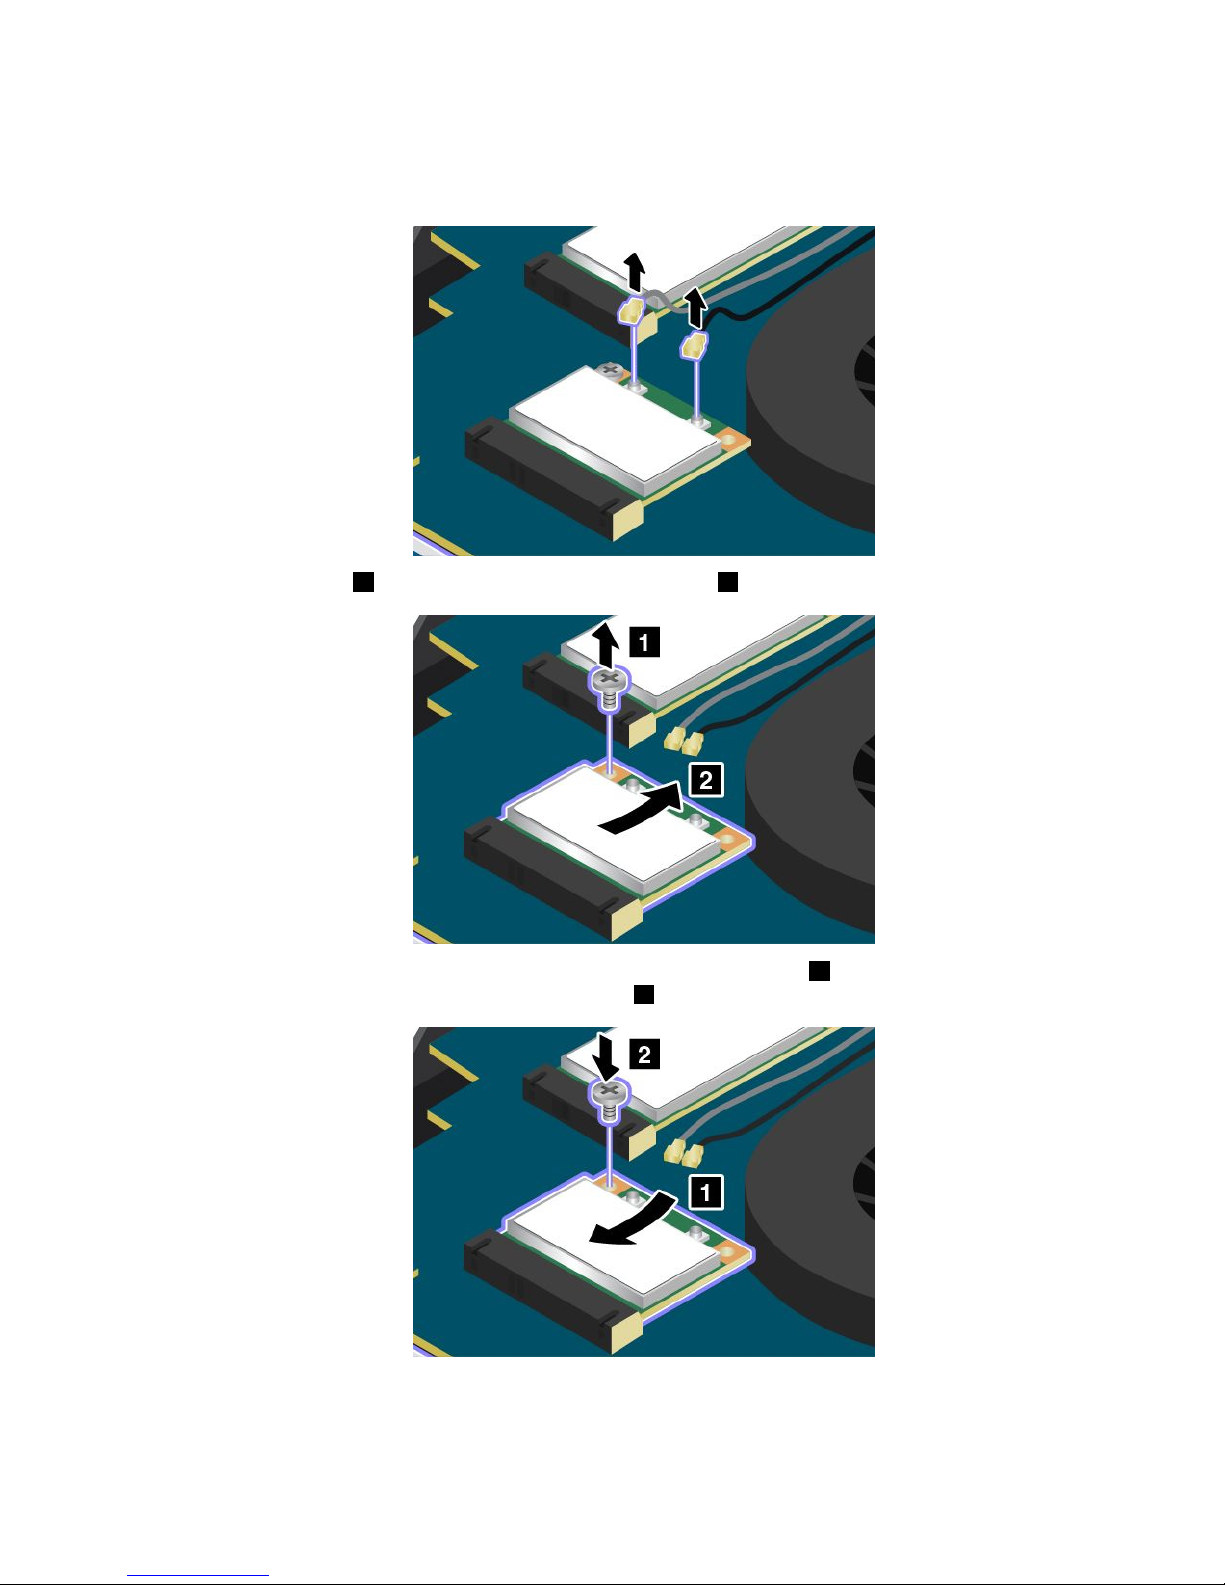
4.Ifatoolforremovingconnectorsisincludedinthepackagewiththenewcard,usethetooltodisconnect
thecablesfromthecard.Ifnosuchtoolisincluded,disconnectthecablesbypickinguptheconnectors
withyourfingersandgentlyunpluggingthem.
5.Removethescrew1.Thecardpopsup.Removethecard2.
6.Alignthecontactedgeofthenewcardwiththecorrespondingsocket1.Pivotthecarduntilyoucan
snapitintoplace.Securethecardwiththescrew2.
Chapter6.Replacingdevices65
Page 82
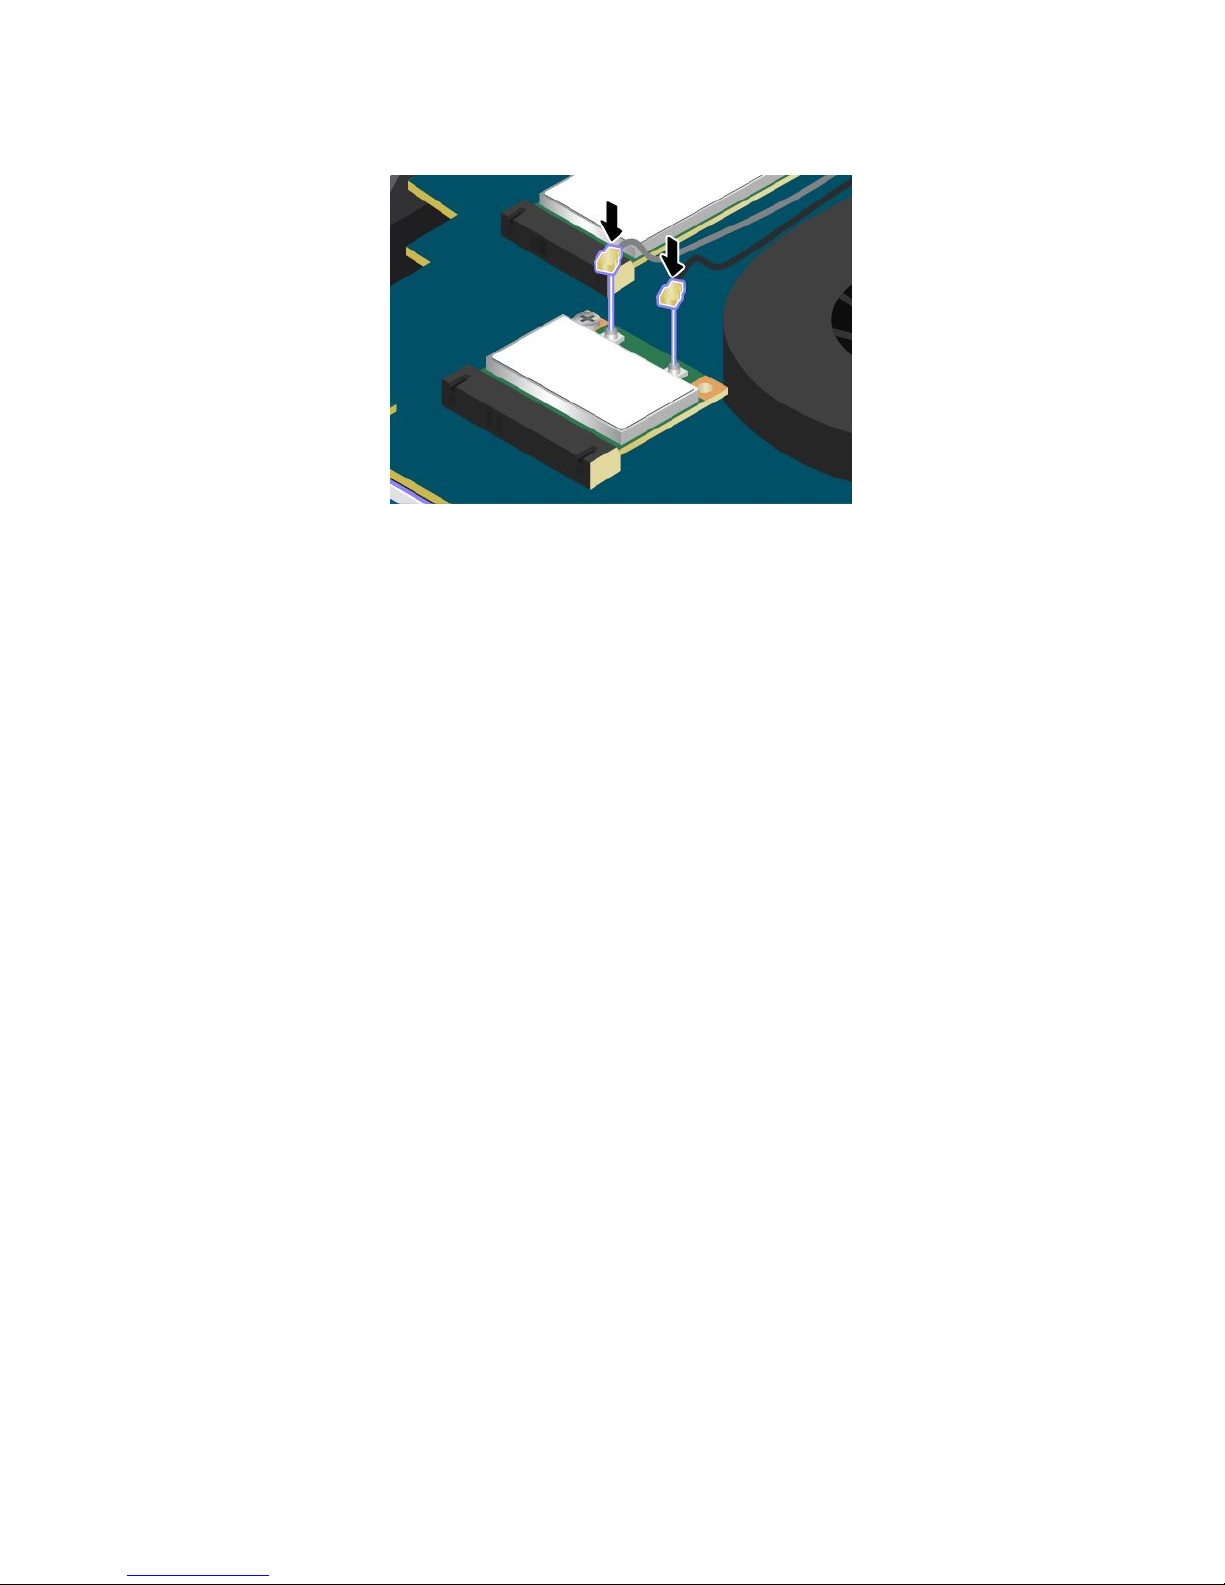
7.Connecttheantennacablestothenewcard.
8.Reinstallthebasecoverassembly.SeeReplacingthebasecoverassembly.
9.Turnthecomputeroveragain.Connecttheacpoweradapterandallcables.
66UserGuide
Page 83

Chapter7.Advancedconfiguration
Whileitisimportanttoprotectfiles,data,andsettingsthatareontheharddiskdrive,hybriddrive,or
solid-statedrive,youalsomightneedtoinstallanewoperatingsystem,installnewdevicedrivers,update
yoursystemUEFIBIOS,orrecoverpreinstalledsoftware.Thisinformationwillhelpyouhandleyour
computerwithpropercareandkeepitintopworkingshape.
•Installinganewoperatingsystem
•Installingdevicedrivers
•ThinkPadSetup
•Usingsystemmanagement
Installinganewoperatingsystem
Ifyouinstallanewoperatingsystemonyourcomputer,youneedtoinstallthesupplementfilesand
ThinkPaddevicedriversforitatthesametime.
•IfyouinstallanewWindows7operatingsystem,thenecessaryfilesarelocatedinthefollowingdirectories
onyourharddiskdrive,hybriddrive,orsolid-statedrive:
–ThesupplementfilesfortheoperatingsystemsupportedareintheC:\SWTOOLS\OSFIXESdirectory.
–ThedevicedriversfortheoperatingsystemsupportedareintheC:\SWTOOLS\DRIVERSdirectory.
–ThepreloadedsoftwareapplicationsareintheC:\SWTOOLS\APPSdirectory.
Note:Ifyoucannotfindthesupplementfiles,thedevicedrivers,andapplicationsoftwareyouneedon
yourharddiskdrive,hybriddrive,orsolid-statedrive,orifyouwanttoreceiveupdatesandthelatest
informationaboutthem,goto:
http://www.lenovo.com/drivers
•IfyouinstallanewWindows8operatingsystem,gotohttp://www.lenovo.com/driverstodownloadand
installthelatestdevicedrivers.
Note:Theprocessofinstallinganewoperatingsystemdeletesallthedataonyourharddiskdrive,
hybriddrive,orsolid-statedrive,includingbackupsorimagesthatwerestoredinahiddenfolderbyuse
ofarecoveryprogram.
Beforeyoubegin
Note:IfyourcomputerisequippedwithbothaharddiskdriveandanM.2solid-statedrive,youarenot
recommendedtousetheM.2solid-statedriveasabootabledevice.TheM.2solid-statedriveisdesigned
anddevelopedfor“cache”functionpurposeonly.IfyouusetheM.2solid-statedriveasabootabledevice,
itsreliabilityisnotguaranteed.
Beforeyouinstalltheoperatingsystem,dothefollowing:
•IfyouaregoingtoinstallanewWindows7operatingsystem,copyallthesubdirectoriesandfilesinthe
C:\SWTOOLSdirectorytoaremovablestoragedevice,toavoidlosingfilesduringtheinstallation.
•Printtheinstructionsyouwilluse.Gotothesectionfortheoperatingsystemyouareusing:
–InstallingtheWindows7operatingsystem
–InstallingtheWindows8operatingsystem
Notes:
©CopyrightLenovo2013
67
Page 84

–TheUEFIBIOSfeaturesaresupportedontheWindows7operatingsystem(64-bit)andtheWindows
8operatingsystem(64-bit).
–Aftertheoperatingsysteminstallation,youshouldnotchangetheinitialUEFI/LegacyBootsetting
inThinkPadSetup.TheUEFI/LegacyBootsettingmustbethesameasitwaswhentheWindows
operatingsystemimagewasinstalled.Otherwise,theoperatingsystemwillnotbootproperly.
Forthecountryorregioncoderequiredintheinstallation,useoneofthefollowing:
Countryorregion:Code
China:SC
Denmark:DK
Finland:FI
France:FR
Germany:GR
Italy:IT
Japan:JP
Netherlands:NL
Norway:NO
Spain:SP
Sweden:SV
TaiwanandHongKong:TC
UnitedStates:US
InstallingtheWindows7operatingsystem
Beforeyoustart,printtheseinstructions.
ToinstalltheWindows7operatingsystemanditsrelatedsoftwareonyourcomputer,dothefollowing:
1.StartThinkPadSetup.
2.SelectStartup.
3.SelectUEFI/LegacyBoot.
4.Dooneofthefollowing:
•IfyouwanttoinstalltheWindows7(32–bit)operatingsystem,selectLegacyOnlyorBoth.
•IfyouwanttoinstalltheWindows7(64–bit)operatingsysteminLegacymode,selectLegacyOnly.
•IfyouwanttoinstalltheWindows7(64–bit)operatingsysteminUEFImode,selectUEFIOnly.
5.PressF10.
6.InserttheWindows7operatingsysteminstallationDVDintotheDVDdrive,andrestartthecomputer.
7.RestoreC:\SWTOOLSfromthebackupcopyyoumadebeforestartingtheinstallation.
8.InstalltheIntelChipsetSupportforWindows2000/XP/Vista/7/8.Todothis,runtheSetup.exefileinthe
C:\SWTOOLS\DRIVERS\INTELINF\innst_autoldirectory.
9.Installdevicedrivers.SeeInstallingotherdriversandsoftware(forWindows7).
InstallingtheregistrypatchesforWindows7
Gotohttp://www.lenovo.com/supportandinstallthefollowingregistrypatches:
•RegistrypatchenablingWakeUponLANfromStandbyforEnergyStar
•FixforIssueofHDDwithHDDetection
68UserGuide
Page 85

InstallingtheWindows7fixmodules
TheWindows7fixmodulesareinthefollowingdirectory:
C:\SWTOOLS\OSFIXES\
Thenameofeachsubfolderisthenumberofafixmodule.Forinformationabouteachfixmodule,goto
theMicrosoftKnowledgeBasehomepageathttp://support.microsoft.com,typethenumberofthefix
moduleyouneedinthesearchfield,andclickSearch.
Toinstallafixmodule,runtheEXEfileinasubfolderandfollowtheinstructionsonthescreen.
Note:Ifyouremovetheharddiskdrive,hybriddrive,orsolid-statedrivefromthecomputerwithasingle-core
processorandinstallitonacomputerwithadual-coreprocessor,youcangetaccesstotheharddiskdrive,
hybriddrive,orsolid-statedrive.Theopposite,however,isnottrue:Ifyouremovetheharddiskdrive,hybrid
drive,orsolid-statedrivefromacomputerwithadual-coreprocessorandinstallitonacomputerwitha
single-coreprocessor,youcannotgetaccesstotheharddiskdrive,hybriddrive,orsolid-statedrive.
InstallingtheWindows8operatingsystem
Beforeyoustart,printtheseinstructions.
ToinstalltheWindows8operatingsystemanditsrelatedsoftwareonyourcomputer,dothefollowing:
1.StartThinkPadSetup.
2.SelectStartup➙Boot.
3.ChangethebootpriorityordertobootyourcomputerfromthedrivethatcontainstheWindows
8operatingsysteminstaller.
4.PressF10.
5.ConnectthedrivethatcontainstheWindows8operatingsysteminstallertoyourcomputer,and
restartthecomputer.
6.InstalltheIntelChipsetSupportforWindows832/864.
7.Installdevicedrivers.SeeInstallingdevicedrivers.
InstallingtheWindows8fixmodules
TodownloadandinstallaWindows8fixmodules,gototheMicrosoftKnowledgeBasehomepageat
http://support.microsoft.com/,typethenumberofthefixmoduleyouneedinthesearchfield,andclick
Search.
Installingdevicedrivers
Thedevicedriversareavailableathttp://www.lenovo.com/drivers.Clickyourcomputerproductname
toviewallthedevicedriversforyourcomputer.
Attention:Alwaysgotohttp://www.lenovo.com/driversforthelatestdevicedrivers.Donotdownload
themfromtheWindowsUpdateWebsite.
Installingthedriverforthe4-in-1mediacardreader
Tousethe4-in-1mediacardreader,youneedtodownloadandinstalltheRealtekCardReaderDriverfrom
theLenovoSupportWebsiteat:
http://www.lenovo.com/support
Chapter7.Advancedconfiguration69
Page 86

InstallingthedriverforUSB3.0(forWindows7)
IfyourcomputersupportsUSB3.0,andyouhavereinstalledtheoperatingsystem,youneedtodownload
andinstalltheUSB3.0drivertousetheUSB3.0bydoingthefollowing:
1.Gotohttp://www.lenovo.com/support.Findyourmodelanddisplaythedriverlinks.
2.SelecttheUSB3.0driverforthe32-bitor64-bitoperatingsystemandextractittoyourlocalharddisk
drive,hybriddrive,orsolid-statedrive.
3.Double-clicktheSetup.exefileintheC:\DRIVERS\WIN\USB3.0\directory.
4.ClickNext.Ifthedevicedriverisalreadyinstalled,clickCancel.Followtheinstructionsonthescreen
untiltheinstallationisfinished.
InstallingtheThinkPadmonitorfileforWindows2000/XP/Vista/7/8(for
Windows7)
TheThinkPadmonitorfileforWindows2000/XP/Vista/7/8isinthefollowingdirectory:
C:\SWTOOLS\DRIVERS\MONITOR
Note:Ifyoucannotfindthisdirectoryonyourharddiskdrive,hybriddrive,orsolid-statedrive,download
theThinkPadmonitorfileforWindows2000/XP/Vista/7/8fromtheThinkPadWebsiteat:
http://www.lenovo.com/drivers
Note:Beforeyouinstallthisfile,ensurethatthecorrectvideodriverhasbeeninstalled.
1.Right-clickonthedesktop,andclickPersonalize.
2.ClickDisplayattheleft.
3.ClickChangedisplaysettings.
4.ClickAdvancedSettings.
5.ClicktheMonitortab.
6.ClickProperties.
7.ClicktheDrivertab.
8.ClickUpdateDriver.
9.SelectBrowsemycomputerfordriversoftware,andthenclickLetmepickfromalistofdevice
driversonmycomputer.
10.ClickHaveDisk.
11.SpecifypathC:\SWTOOL S\DRIVERS\MONITORtothismonitorINFfile.Then,clickOpen.
12.ClickOK.
13.Confirmthecorrectdisplaytype,thenclickNext.
14.Wheninstallationcompletes,clickClose.
15.ClickClosetoclosetheDisplayPropertieswindow.
16.ClickOKontheMonitortab.
17.ClickOKandclosetheDisplaySettingswindow.
Installingotherdriversandsoftware(forWindows7)
ThedevicedriversareprovidedintheC:\SWTOOLS\DRIVERSdirectoryonyourharddiskdrive,hybriddrive,or
solid-statedrive.Y ouwillalsoneedtoinstallapplicationsoftware,whichisprovidedintheC:\SWTOOL S\APPS
directoryonyourharddiskdrive,hybriddrive,orsolid-statedrive.Todothis,refertotheinstructionsin
Reinstallingpreinstalledapplicationsanddevicedrivers.
Note:IfyoucannotfindtheSupplementfiles,devicedrivers,andapplicationsoftwareyouneedonyour
harddiskdrive,hybriddrive,orsolid-statedrive,orifyouwanttoreceiveupdatesandthelatestinformation
aboutthem,gotohttp://www.lenovo.com/drivers.
70UserGuide
Page 87

ThinkPadSetup
YourcomputercomeswiththeThinkPadSetupprogramtoenableyoutoselectvarioussetupparameters.
TostartThinkPadSetup,dothefollowing:
1.Turnonthecomputer.Whenthelogoscreenisdisplayed,presstheF1key.TheThinkPadSetup
programmainmenuopens.
Ifyouhavesetasupervisorpassword,theThinkPadSetupprogrammainmenuwillbedisplayed
afteryouenterthepassword.Y oucanstartThinkPadSetupbypressingEnterinsteadofenteringthe
supervisorpassword.However,youcannotchangetheparametersthatareprotectedbythesupervisor
password.Formoreinformation,refertoUsingpasswords.
2.Usethecursorkeystomovetoanitemthatyouwanttochange.Whentheitemishighlighted,press
Enter.Asubmenuisdisplayed.
3.Changetheitemsyouwanttochange.Tochangethevalueofanitem,pressthe+or–key.Iftheitem
hasasubmenu,youcandisplayitbypressingEnter.
4.PressEsctoexitfromthesubmenu.
5.Ifyouareonanestedsubmenu,pressEscrepeatedlyuntilyoureachtheThinkPadSetupprogram
mainmenu.
Note:Ifyouneedtorestorethesettingstotheoriginalstateasofthetimeofpurchase,pressF9to
loadthedefaultsettings.YoualsocanselectanoptionontheRestartsubmenutoloadthedefault
settingsordiscardthechanges.
6.SelectRestart.Movethecursortotheoptionyouwanttorestartyourcomputer;thenpressEnter.
Yourcomputerrestarts.
Note:Dependingontheoperatingsystemyouareusing,somemenuitemslistedinthischaptermightnot
beavailableonyourcomputer,andsomemenuitemsmightbeslightlydifferentfromtheactualmenuitems
displayedonyourcomputer.
Mainmenu
TheMainmenuisthefirstinterfaceyouseeafteryouenterThinkPadSetup.Itdisplaysthefollowing
configurationofyourcomputer:
•UEFIBIOSVersion
•UEFIBIOSDate
•EmbeddedControllerVersion
•MachineTypeModel
•System-unitserialnumber
•Systemboardserialnumber
•AssetTag
•CPUType
•CPUSpeed
•Installedmemory
•UUID
•MACaddress(InternalLAN)
•PreinstalledOSLicense
•UEFISecureBoot
Chapter7.Advancedconfiguration71
Page 88

Configmenu
Ifyouneedtochangetheconfigurationofyourcomputer,selectConfigfromtheThinkPadSetupmenu.
Notes:
•Defaultvaluesareinboldface.Thedefaultsettingsarealreadyoptimizedforyou.Ifyouconsider
changingthecomputerconfiguration,proceedwithextremecaution.Settingtheconfigurationincorrectly
mightcauseunexpectedresults.
•Oneachsubmenu,pressEntertoshowselectableoptionsandselectadesiredoption,ortypedesired
valuesfromthekeyboarddirectly.
•Someitemsaredisplayedonthemenuonlyifthecomputersupportsthecorrespondingfeatures.
ThefollowingtableliststheConfigmenuitems.
Table4.Configmenuitems
Menuitem
SubmenuitemSelectionComments
WakeOnLAN
•Disabled
•ACOnly
•ACandBattery
EnablethesystemtoPoweron
whentheEthernetcontroller
receivesamagicpacket(a
specialnetworkmessage).
IfyouselectACOnly,theWake
onLANfunctionisenabledonly
whentheacpoweradapteris
attached.
IfyouselectACandBattery,
theWakeonLANfunctionis
enabledwithanypowersources.
Notes:
•ThemagicpackettypeWake
onLANrequiresacpower.
•TheWakeonLANfunction
doesnotworkwhenahard
diskpasswordisset.
EthernetLANOptionROM
(forLegacyOnlyboot
modeorBothwithLegacy
first)
•Disabled
•Enabled
LoadtheEthernetLANOption
ROMtoenablestartupfroman
integratednetworkdevice.
UEFIIPv4NetworkStack
(forUEFIOnlybootmode
orBothwithUEFIfirst)
•Disabled
•Enabled
EnableorDisableUEFIIPv4
NetworkStackforUEFI
environment
UEFIIPv6NetworkStack
(forUEFIOnlybootmode
orBothwithUEFIfirst)
•Disabled
•Enabled
EnableorDisableUEFIIPv6
NetworkStackforUEFI
environment
Network
UEFIPXEBootPriority
(forUEFIOnlybootmode
andBothwithUEFIfirst
•IPv6First
•IPv4First
SelectNetworkStackPriorityfor
UEFIPXEBoot.
72UserGuide
Page 89

Table4.Configmenuitems(continued)
Menuitem
SubmenuitemSelectionComments
andIPv6andIPv4stacks
arebothenabled.)
USBUEFIBIOSSupport
•Disabled
•Enabled
Enableordisablebootsupport
fromUSBstoragedevices.
AlwaysOnUSB
•Disabled
•Enabled
TheUSBportscancharge
externaldeviceduringlow
powerstates(standby,hibernate
orpower-off).Ifthesystemruns
onbatterymode,thisworksonly
instandbystate.
•Enabled:USBportsare
poweredduringlowpower
states.
•Disabled:USBportsare
disabledduringlowpower
states.
AlwaysOnUSBChargein
offmode
•Disabled
•Enabled
Enableordisablecharging
iPod(R),iPhone(TM),or
BlackBerry(R)smartphone
whensystemisturnedoff.
•Enabled:Enablescharging
whensystemisturnedoff.
•Disabled:Disablescharging
whensystemisturnedoff.
USB
USB3.0Mode
•Disabled
•Enabled
•Auto
SettheUSB3.0controllermode
fortheportssharedbetween
USB2.0andUSB3.0controller.
IfyouselectAuto,itenablesyou
toconnectandrouteappropriate
USB3.0orUSB2.0connectors.
IfyouselectEnabled,itenables
theUSB3.0modeandallows
theUSB3.0tobesupported
intheWindows7operating
system.
IfyouselectDisabled,itdisables
andhidestheUSB3.0controller,
andtheUSB3.0connectorswill
workasUSB2.0connectors.
Keyboard/MouseFnandCtrlKeyswap
•Disabled
•Enabled
IfyouselectEnabled,theFnkey
worksastheCtrlkey,andthe
CtrlkeyworksastheFnkey.
Note:EvenwhenEnabledis
selected,youneedtopressthe
Fnkeytoresumethecomputer
fromsleepmodetonormal
operation.
Chapter7.Advancedconfiguration73
Page 90

Table4.Configmenuitems(continued)
Menuitem
SubmenuitemSelectionComments
BootDisplayDevice
•ThinkPadLCD
•HDMI
•Displayondock
Selectavideodeviceforboot.
GraphicsDevice•IntegratedGraphics
•Switchable
Graphics
IntegratedGraphicsmodewill
achievelongerbatterylife.
DiscreteGraphicschipwill
bepoweredandactivated
whenneededwithSwitchable
Graphicsmode.
Display
OSDetectionfor
SwitchableGraphics
•Disabled
•Enabled
IfyouselectEnabled,the
systemUEFIBIOSautomatically
switchestheGraphicsDevice
settingtoSwitchableGraphics
modeiftheoperatingsystem
supportsthisfeature,andto
IntegratedGraphicsmodeif
theoperatingsystemdoesnot
supportthisfeature.
Intel(R)SpeedStep
®
technology
•Disabled
•Enabled
EnableordisableIntel
SpeedSteptechnology.
•Enabled:CPUcanworkat
lowerspeedtosavepower.
•Disabled:CPUalwaysworks
athighestspeed.
CPUPowerManagement
•Disabled
•Enabled
Enableordisablethepower
savingfeaturethatstops
themicroprocessorclock
automaticallywhenthereareno
systemactivities.
Intel(R)RapidStart
Technology
•Disabled
•Enabled
Enterafter:
•Immediately
•1minute
•2minutes
•5minutes
•10minutes
•15minutes
•30minutes
•1hour
•2hours
•3hours
Tousethisfeature,aspecial
partitiononthesolid-statedrive
isrequired.
Whenenabled,youcanenable
the30DayStandbyfunction
throughthePowerManager
program.Thefunctionenables
thecomputertoenteralower
powerstateafterthespecified
timeinsleepstate.Alsoittakes
onlysecondstoresumenormal
operation.
Power
DisableBuilt-inBattery
Usethisfeaturetotemporarily
disablethebuilt-inbattery.The
systemwillbeautomatically
poweredoffafteryouselect
thisitem.Thenthecomputeris
readytobeserviced.
74UserGuide
Page 91

Table4.Configmenuitems(continued)
Menuitem
SubmenuitemSelectionComments
Note:Theacpoweradapter
mustbedisconnectedtoperform
thisoperation.Thebuilt-in
batterywillbeautomatically
enabledwhentheacpower
adapterisreconnected.
PasswordBeep•Disabled
•Enabled
Enablethisoptiontohavea
beepsoundwhenthesystem
iswaitingforapower-on,hard
disk,orsupervisorpassword.
Differentbeepswillbesounded
whentheenteredpassword
matchesordoesnotmatchthe
configuredpassword.
BeepandAlarm
KeyboardBeep•Disabled
•Enabled
Enableordisablethekeyboard
beepwhenunmanageablekey
combinationsarepressed.
SerialAT A(SA T A)SATAControllerMode
Option
•Compatibility
•AHCI
SelectSATAcontroller
operationmode.Ifyou
selectCompatibility,the
SATAcontrolleroperatesin
compatibilitymode.
CoreMulti-Processing
•Disabled
•Enabled
Enableordisableadditional
executioncoreunitswithina
CPU.
Note:Ifyouareusinga
computerwithasingle-core
processor,thisitemisnot
available.
CPU
IntelHyper- Threading
Technology
•Disabled
•Enabled
Enableordisableadditional
logicalprocessorswithina
processorcore.
Date/Timemenu
Ifyouneedtosetthecurrentdateandtimeofyourcomputer,selectDate/TimefromtheThinkPadSetup
programmainmenu.Thefollowingsubmenuisdisplayed:
•SystemDate
•SystemTime
Tochangethedateandtime,dothefollowing:
1.Usingtheupanddownarrowkeystoselecttheitemtochangethedateortime.
2.PressTab,Shift+Tab,orEntertoselectafield.
3.Typethedateortime.
Notes:Anotherwaytoadjustthedateandtimeispressingthefollowingkeys:
•F5or–:Changetoalowervalue.
•F6orthecombinationofShiftand+:Changetoahighervalue.
4.PressF10tosavethechangesandrestartthesystem.
Chapter7.Advancedconfiguration75
Page 92

Securitymenu
Ifyouneedtosetthesecurityfeaturesofyourcomputer,selectSecurityfromtheThinkPadSetupmenu.
Notes:
•Defaultvaluesareinboldface.Thedefaultsettingsarealreadyoptimizedforyou.Ifyouconsider
changingthecomputerconfiguration,proceedwithextremecaution.Settingtheconfigurationincorrectly
mightcauseunexpectedresults.
•Oneachsubmenu,pressEntertoshowselectableoptionsandselectadesiredoption,ortypedesired
valuesfromthekeyboarddirectly.
•Someitemsaredisplayedonthemenuonlyifthecomputersupportsthecorrespondingfeatures.
ThefollowingtableliststheSecuritymenuitems.
Table5.Securitymenuitems
Menuitem
SubmenuitemSelectionComments
SupervisorPassword
•Disabled
•Enabled
RefertoSupervisorpassword.
LockUEFIBIOSSettings
•Disabled
•Enabled
Enableordisablethefunctionthat
protectsitemsintheThinkPad
Setupprogramfrombeingchanged
byunauthorizedusers.Bydefault,
thisissettoDisabled.Ifyouset
thesupervisorpasswordandenable
thisfunction,noonebutyoucan
changetheitemsintheThinkPad
Setupprogram.
Passwordatunattended
boot
•Disabled
•Enabled
IfyouselectandenablePassword
atunattendedboot,apassword
promptisdisplayedwhenthe
computeristurnedon,fromeither
apower-offorhibernationstate.If
youselectDisabled,nopassword
promptisdisplayed;thecomputer
goesaheadandloadstheoperating
system.Topreventunauthorized
access,youcansettheuser
authenticationontheoperating
system.
Passwordatrestart•Disabled
•Enabled
IfyouselectandenablePassword
atrestart,apasswordpromptis
displayedwhenyourestartthe
computer.IfyouselectDisabled,
nopasswordpromptisdisplayed;
thecomputergoesaheadandloads
theoperatingsystem.Toprevent
unauthorizedaccess,youcanset
theuserauthenticationonthe
operatingsystem.
SetMinimumLength
•Disabled
•xcharacters
(4≤x≤12)
Specifyaminimumlengthfor
power-onpasswordandharddisk
passwords.Ifyousetthesupervisor
passwordandspecifyaminimum
lengthforpasswords,noonebut
youcanchangethelength.
Password
76UserGuide
Page 93

Table5.Securitymenuitems(continued)
Menuitem
SubmenuitemSelectionComments
Power-OnPassword
•Disabled
•Enabled
RefertoPower-onpassword.
HardDisk1Password•Disabled
•Enabled
RefertoHarddiskpasswords.
HardDisk2Password•Disabled
•Enabled
RefertoHarddiskpasswords.
SecurityChip
•Active
•Inactive
•Disabled
IfyouselectActive,thesecurity
chipisfunctional.Ifyouselect
Inactive,theSecurityChipoption
isvisible,butthesecuritychip
isnotfunctional.Ifyouselect
Disabled,theSecurityChipoption
ishiddenandthesecuritychipis
notfunctional.
SecurityReporting
Options
Enableordisablethefollowing
SecurityReportingOptions:
•BIOSROMStringsReporting:
BIOStextstring
•CMOSReporting:CMOSdata
•NVRAMReporting:Security
datastoredintheAssetID
•SMBIOSReporting:SMBIOS
data
ClearSecurityChip
EnterThisoptionisusedtoclear
encryptionkeys.Itwill
notbepossibletoaccess
already-encrypteddataafter
thesekeysarecleared.
PhysicalPresencefor
Provisioning
•Disabled
•Enabled
Thisoptionenablesordisablesthe
confirmationmessagewhenyou
changethesettingsofthesecurity
chip.
SecurityChip
PhysicalPresencefor
Clear
•Disabled
•Enabled
Thisoptionenablesordisablesthe
confirmationmessagewhenyou
clearthesecuritychip.
FlashBIOSUpdatingby
End-Users
•Disabled
•Enabled
IfyouselectEnabled,alluserscan
updatetheUEFIBIOS.Ifyouselect
Disabled,onlythepersonwho
knowsthesupervisorpasswordcan
updatetheUEFIBIOS.
UEFIBIOSUpdateOption
SecureRollBack
Prevention
•Disabled(IfOS
Optimizedis
Disabled)
•Enabled(IfOS
Optimizedis
Enabled)
IfyouselectDisabled,youcanflash
theolderversionoftheUEFIBIOS.
Chapter7.Advancedconfiguration77
Page 94

Table5.Securitymenuitems(continued)
Menuitem
SubmenuitemSelectionComments
MemoryProtectionExecutionPrevention•Disabled
•Enabled
Somecomputervirusesandworms
causememorybufferstooverflow.
ByselectingEnabledyoucan
protectyourcomputeragainst
attacksbysuchvirusesandworms.
Ifyoufindthatanapplication
programdoesnotruncorrectlyafter
choosingEnabled,selectDisabled
andresetthesetting.
Intel(R)Virtualization
Technology
•Disabled
•Enabled
IfyouselectEnabled,aVirtual
MachineMonitor(VMM)canutilize
theadditionalhardwarecapabilities
providedbyVirtualization
Technology.
Virtualization
IntelVT-dFeature•Disabled
•Enabled
IntelVT-dstandsforIntel
VirtualizationTechnologyfor
directedI/O.Whenenabled,aVMM
canutilizetheplatforminfrastructure
forI/Ovirtualization.
EthernetLAN•Disabled
•Enabled
IfyouselectEnabled,youcanuse
theEthernetLANdevice.
WirelessLAN•Disabled
•Enabled
IfyouselectEnabled,youcanuse
theWirelessLANdevice.
Bluetooth•Disabled
•Enabled
IfyouselectEnabled,youcanuse
theBluetoothdevice.
USBPort
•Disabled
•Enabled
IfyouselectEnabled,youcanuse
theUSBconnectors.
MemoryCardSlot
•Disabled
•Enabled
IfyouselectEnabled,youcanuse
thememorycardslotforanSDcard
oraMultiMediaCard.
IntegratedCamera
•Disabled
•Enabled
IfyouselectEnabled,youcanuse
theintegratedcamera.
Microphone•Disabled
•Enabled
IfyouselectEnabled,youcanuse
themicrophone(internal,external,
orline-in).
I/OPortAccess
FingerprintReader•Disabled
•Enabled
IfyouselectEnabled,youcanuse
thefingerprintreader.
IntelA TModuleActivation•Disabled
•Enabled
•Permanently
Disabled
EnableordisabletheUEFIBIOS
interfacetoactivatetheIntelAT
module,whichisanoptional
anti-theftservicefromIntel.
Note:IfyousettheIntelAT
moduleactivationtoPermanently
Disabled,youwillbeunableto
enablethissettingagain.
Anti-Theft
Computrace
•Disabled
•Enabled
EnableordisabletheUEFIBIOS
interfacetoactivatethecomputrace
78UserGuide
Page 95

Table5.Securitymenuitems(continued)
Menuitem
SubmenuitemSelectionComments
•Permanently
Disabled
module.Computraceisanoptional
monitoringservicefromAbsolute
Software.
Note:Ifyousetthecomputrace
moduleactivationtoPermanently
Disabled,youwillbeunableto
enablethissettingagain.
SecureBoot
•Disabled
•Enabled
EnableordisabletheSecureBoot
feature.SelectEnabletoprevent
unauthorizedoperatingsystems
fromrunningatboottime.Select
Disabledtoallowanyoperating
systemstorunatboottime.
PlatformMode
•SetupMode
•UserMode
Specifythesystemoperatingmode.
SecureBootMode•StandardMode
•CustomMode
SpecifytheSecureBootmode.
ResettoSetupMode
•Yes
•No
Thisoptionisusedtoclearthe
currentplatformkeyandputthe
systemintosetupmode.Y ou
caninstallyourownplatformkey
andcustomizetheSecureBoot
signaturedatabasesinsetupmode.
SecureBootmodewillbesetto
custommode.
SecureBoot
RestoreFactorykeys•Yes
•No
Thisoptionisusedtorestoreall
keysandcertificatesinSecureBoot
databasestofactorydefaults.Any
customizedSecureBootsettings
willbeerased,andthedefault
platformkeywillbere-established
alongwiththeoriginalsignature
databasesincludingcertificatefor
Windows8operatingsystem.
Startupmenu
Tochangethecomputerstartupsettings,selectStartupfromtheThinkPadSetupmainmenu.
Attention:
•Afteryouchangethestartupsequence,youmustbeextremelycarefulnottospecifyawrongdevice
duringacopy,save,orformatoperation.Ifyouspecifyawrongdevice,yourdataandprogramsmightbe
erasedoroverwritten.
•IfyouareusingtheBitLockerdriveencryption,youshouldnotchangethestartupsequence.BitLocker
driveencryptiondetectsthechangeofstartupsequenceandlocksthecomputerfrombooting.
Changingthestartupsequence
Tochangethestartupsequence,dothefollowing:
Chapter7.Advancedconfiguration79
Page 96

1.SelectBootorNetworkBoot,thenpressEnter.Thedefaultbootlistisdisplayed,showingtheorderin
whichdeviceswillbestartedup.Evendevicesthatarenotattachedtoorinstalledonyourcomputer
arelisted.
•UsetheBootsubmenutospecifythestartupsequencethatrunswhenyouturnonthepower.
•UsetheNetworksubmenutospecifythestartupsequencethatrunswhenWakeonLANisenabled.
WakeonLANiscommonlyusedbyLANadministratorsincorporatenetworkstogetremoteaccess
toyourcomputer.
2.Setthestartupsequencebyusingthefollowingkeys:
•Usecursorkeystoselectadevice.
•UseF6orthecombinationofShiftand+tomovethedeviceuptoahigherpriority.
•UseF5or–tomovethedevicedowntoalowerpriority.
•UseShift+!toexcludeorincludeadevice.
3.PressF10tosavethechangesandrestartthesystem.
Tochangethestartupsequencetemporarilysothatthesystemstartsupfromadifferentdrive,dothe
following:
1.Turnoffthecomputer.
2.Turnonthecomputer,then,whiletheThinkPadlogoisdisplayedatthelower-leftofthescreen,
pressF12.
3.Selectthedeviceyouwanttostartfirst.
Note:TheBootmenuwillbedisplayedwhenthesystemcannotbootfromanydeviceortheoperating
systemcannotbefound.
ThefollowingtableshowsthecontentsoftheStartupmenuitems.
Notes:
•Defaultvaluesareinboldface.
•Oneachsubmenu,pressEntertoshowselectableoptionsandselectadesiredoption.
•Someitemsaredisplayedonthemenuonlyifthecomputersupportsthecorrespondingfeatures.
ThefollowingtableliststheStartupmenuitems.
Table6.Startupmenuitems
Menuitem
SelectionComments
Boot
RefertoChangingthestartupsequence.
NetworkBoot
Selectthebootdevicewhenthesystem
wakesfromLAN.IftheWakeon
LANfunctionisenabled,thenetwork
administratorcanturnonallofthe
computersinaLANremotelybyuseof
networkmanagementsoftware.
80UserGuide
Page 97

Table6.Startupmenuitems(continued)
Menuitem
SelectionComments
UEFI/LegacyBoot
•Both
•UEFIOnly
•LegacyOnly
UEFI/LegacyBootPriority
•UEFIFirst
•LegacyFirst
CSMSupport(forUEFIOnly)
•No
•Yes
Selectsystembootcapability.
•Both:Thesystemwillbootbythe
followingUEFI/LegacyBootPriority
setting.
•UEFIOnly:Thesystemwillbootfrom
theUEFIenabledoperatingsystem.
•LegacyOnly:Thesystemwillboot
fromanyoperatingsystemotherthan
theUEFIenabledone.
Note:IfyouselectUEFIOnly,the
systemcannotbootfromthebootable
devicesthatdonothavetheUEFI
enabledoperatingsystem.
CompatibilitySupportModule(CSM)is
requiredforbootingthelegacyoperating
system.IfyouselectUEFIOnly,CSM
Supportisselectable.ForBothor
LegacyOnlymood,CSMSupportis
notselectable.
BootMode
•Quick
•Diagnostics
TheQuickbootisintendedtobootthe
operatingsystemassoonaspossible
byreducingthePOSTelapsedtime.The
Diagnosticsbootistobeusedforthe
problemdeterminationbyperforming
testsofthedevices.
OptionKeyDisplay
•Disabled
•Enabled
IfyouselectDisabled,thenthemessage
“Tointerruptnormalstartup,pressEnter”
isnotdisplayedduringthePOST.
BootDeviceListF12Option
•Disabled
•Enabled
IfyouselectEnabled,theF12keyis
recognizedandtheBootmenuwindow
isdisplayed.
BootOrderLock
•Disabled
•Enabled
IfyouselectDisabled,yourcomputer
willbootusingthedefaultpriority.Ifyou
selectEnabled,yourcomputerwillboot
usingthepriorityyouhavecustomized.
Restartmenu
IfyouneedtoclosetheThinkPadSetupprogramandrestartthesystem,selectRestartfromtheThinkPad
Setupprogrammainmenu.Thefollowingsubmenuoptionsaredisplayed:
•ExitSavingChanges:Restartthesystemaftersavingthechanges.
•ExitDiscardingChanges:Restartthesystemwithoutsavingthechanges.
•LoadSetupDefaults:Loadthedefaultsettingthatwasineffectatthetimeofpurchase.
EnableOSOptimizedDefaultstomeettheMicrosoftWindows8certificationrequirements.Whenyou
changethissetting,someothersettingsarechangedautomatically.TheaffectedsettingsareCSM
Support,UEFI/LegacyBoot,SecureBoot,andSecureRollBackPrevention.
•DiscardChanges:Discardthechanges.
•SaveChanges:Savethechanges.
Chapter7.Advancedconfiguration81
Page 98

UpdatingyoursystemUEFIBIOS
TheUnifiedExtensibleFirmwareInterface(UEFI)BIOSisapartofthesystemprogramsthatmakeupthe
basiclayerofsoftwarebuiltintoyourcomputer.TheUEFIBIOStranslatestheinstructionsfromother
softwarelayers.
YourcomputersystemboardhasamodulecalledEEPROM,alsoreferredtoasflashmemory.Youcan
updatetheUEFIBIOSandtheThinkPadSetupprogrambystartingyourcomputerwithaflashupdate
opticaldiscorflashupdateapplicationrunningintheWindowsenvironment.
Insomeinstanceswhenyouaddsoftware,hardware,oradevicedriver,youmightbeinformedthatyou
needtoupdateyourUEFIBIOSinorderforthenewadditiontoworkproperly.
ToupdateyourUEFIBIOS,gotothefollowingWebsiteandfollowtheinstructionsonthescreen:
http://www.lenovo.com/drivers
Usingsystemmanagement
Thissectionisintendedprimarilyfornetworkadministrators.
Yourcomputerisdesignedformanageability,sothatyoucanredirectmoreofyourresourcestobetter
meetyourbusinessobjectives.
Thismanageability,or“TotalCostofOwnership”(TCO),enablesyoutoremotelyoperateclientcomputersin
thesamewayasyouoperateyourowncomputer,suchasturningonaclientcomputer,formattinghard
diskdrive,hybriddrive,orsolid-statedrive,andinstallingsoftware.
Oncethecomputerisconfiguredandoperational,youcanmanageitbyuseofsoftwareandmanageability
featuresalreadyintegratedintotheclientsystemandthenetwork.
Systemmanagement
Readthistopictolearnmoreaboutfeaturesofsystemmanagement:
DesktopManagementInterface
ThesystemUEFIBIOSofyourcomputersupportsaninterfacecalledSystemManagementBIOSReference
Specification(SMBIOS)V2.7.1SMBIOSprovidesinformationaboutthehardwarecomponentsofyour
system.ItistheresponsibilityoftheBIOStosupplythisdatabasewithinformationaboutitselfandthe
devicesonthesystemboard.ThisspecificationdocumentsthestandardsforgettingaccesstothisBIOS
information.
PrebooteXecutionEnvironment
PrebooteXecutionEnvironment(PXE)technologymakesyourcomputermoremanageable(itisPXE
2.1-compliant)byenablingittoboot(loadanoperatingsystemoranotherexecutableimage)froma
server.YourcomputersupportsthepersonalcomputerfunctionsthatPXErequires.Forexample,withthe
appropriateLANcard,yourcomputercanbebootedfromthePXEserver.
Note:RemoteProgramLoad(RPL)cannotbeusedwithyourcomputer.
WakeonLAN
AnetworkadministratorcanuseWakeonLANtoturnonacomputerfromamanagementconsole.
WhenWakeonLANisusedwithnetworkmanagementsoftware,manyfunctions,suchasdatatransfer,
softwareupdates,andFlashupdatesofUEFIBIOS,canbeperformedremotelywithoutremoteattendance.
82UserGuide
Page 99

Thisupdatingcanbedoneafternormalworkinghoursandonweekends,tosavetimeandincrease
productivity.Usersarenotinterruptedduringnormalworkinghours,andLANtrafficiskepttoaminimum.
IfacomputeristurnedonbytheWakeonLANfunction,theNetworkbootsequenceisused.
AssetIDEEPROM
TheAssetIDEEPROMcontainsinformationaboutthesystem,includingitsconfigurationandtheserial
numbersofkeycomponents.Italsoincludesanumberofblankfieldsinwhichyoucanrecordinformation
abouttheendusersinyournetwork.
Settingmanagementfeatures
Toenablethenetworkadministratortocontrolyourcomputerremotely,youmustconfigurethenetwork
interfacebysettingthesystem-managementfeaturesintheThinkPadSetupprogram.Y oucanconfigure
thefollowingfunctionsintheprogram:
•WakeonLAN
•NetworkBootsequence
•Flashupdate
Ifanadministratorpassword(supervisorpassword)hasbeenset,youwillneedtospecifyitwhenyoustart
ThinkPadSetuptousethesefunctions.
WakeonLAN
WhentheWakeonLANfeatureisenabledonacomputerthatisconnectedtoaLAN,anetworkadministrator
canstartthecomputerremotelyfromamanagementconsole,usingremotenetwork-managementsoftware.
Whenyourcomputerisnotunderthenetworkadministrator'ssystemmanagement,youcandisableWake
onLAN.
ToenableordisableWakeonLAN,dothefollowing:
1.StartThinkPadSetup.
2.SelectConfig.TheConfigsubmenuisdisplayed.
3.SelectNetwork.TheNetworkitemsubmenuisdisplayed.
4.ForWakeOnLAN,selectoneofthefollowing:ACOnly,ACandBattery,orDisabled.
5.PressF10tosavechangesandexit.
NetworkBootsequence
Whenyourcomputeristurnedonremotely,thesystemwilltrytobootfromthedevicethatisspecifiedinthe
NetworkBootsetting,andthenfollowthebootorderlistontheBootmenu.
Todefineasequence,dothefollowing:
1.OntheThinkPadSetupprogrammenu,selectStartup.Thesubmenuisdisplayed.
2.SelectNetworkBootandpresstheEnterkey.Thebootdevicelistisdisplayed.
3.Selectabootdevicefromthelisttomakeitasthetopbootpriority.
4.PressF10tosavechangesandexit.
Note:Ifyouwanttoinitializethesettingtoreturntothedefaultstartupsequence,pressF9.Thedefault
settingsareautomaticallyreloaded.
Chapter7.Advancedconfiguration83
Page 100

Flashupdate
Yournetworkadministratorcanremotelyupdatethesystemprogramsonyourcomputerfromamanagement
console.Thefollowingrequirementsmustbemet:
•YourcomputermustbestartedovertheLAN.
•YourcomputermustbeengagedinaPrebooteXecutionEnvironment.
•Network-managementsoftwaremustbeinstalledontheremoteadministrator'scomputer.
84UserGuide
 Loading...