

Page 1

UserGuide
ThinkPadEdgeE440andE540
Page 2

Notes:Beforeusingthisinformationandtheproductitsupports,besuretoreadandunderstandthe
following:
•Safety,Warranty,andSetupGuide
•RegulatoryNotice
•“Importantsafetyinformation”onpagevi
•AppendixD“Notices”onpage167
TheSafety,Warranty,andSetupGuideandtheRegulatoryNoticehavebeenuploadedtotheWebsite.To
refertothem,gotohttp://www.lenovo.com/UserManualandfollowtheinstructionsonthescreen.
LIMITEDANDRESTRICTEDRIGHTSNOTICE:IfdataorsoftwareisdeliveredpursuantaGeneralServicesAdministration
“GSA”contract,use,reproduction,ordisclosureissubjecttorestrictionssetforthinContractNo.GS-35F-05925.
SecondEdition(January2014)
©CopyrightLenovo2013,2014.
Page 3

Contents
Readthisfirst..............v
Importantsafetyinformation..........vi
Conditionsthatrequireimmediateaction..vii
Safetyguidelines............vii
Chapter1.Productoverview......1
Locatingcomputercontrols,connectors,and
indicators..................1
Frontview................1
Right-sideview..............5
Left-sideview..............6
Bottomview...............9
Rearview...............10
Statusindicators............10
Locatingimportantproductinformation.....12
Machinetypeandmodellabel.......12
FCCIDandICCertificationnumberlabel..12
CertificateofAuthenticitylabel......13
GenuineMicrosoftlabel.........14
Features.................14
Specifications...............15
Operatingenvironment...........16
Lenovoprograms.............17
AccessingLenovoprogramsontheWindows
7operatingsystem...........17
AccessingLenovoprogramsontheWindows
8orWindows8.1operatingsystem....18
Lenovoprogramsoverview........19
Chapter2.Usingyourcomputer...21
Registeringyourcomputer..........21
Frequentlyaskedquestions.........21
Usingthemulti-touchscreen.........23
Specialkeys...............26
ThinkPadEdgeE440specialkeys.....27
ThinkPadEdgeE540specialkeys.....28
UsingtheThinkPadpointingdevice......30
Powermanagement............31
Checkingthebatterystatus........32
Usingtheacpoweradapter........32
Chargingthebattery..........33
Maximizingthebatterylife........33
Managingthepowerplans........33
Power-savingmodes..........33
Handlingthebattery...........35
Connectingtothenetwork..........36
Ethernetconnections..........36
Wirelessconnections..........36
Presentationsandmultimedia.........40
Changingdisplaysettings........40
Usinganexternalmonitor........40
Usingaprojector............41
Usingdualdisplays...........42
Usingaudiofeatures............43
Usingthecamera.............43
Usingtheopticaldrive...........44
Usingaflashmediacard...........44
Insertingaflashmediacard........44
Removingaflashmediacard.......45
Chapter3.Y ouandyourcomputer..47
Accessibilityandcomfort..........47
Ergonomicinformation..........47
Comfort...............48
Accessibilityinformation.........48
Travelingwithyourcomputer.........49
Traveltips...............49
Travelaccessories...........49
Chapter4.Security..........51
Attachingamechanicallock.........51
Usingpasswords..............51
Typingpasswords...........51
Power-onpassword...........51
Supervisorpassword..........52
Harddiskpasswords..........54
Harddisksecurity.............55
Usingthefingerprintreader..........56
Noticeondeletingdatafromyourharddiskdrive
orsolid-statedrive.............58
Usingfirewalls...............59
Protectingdataagainstviruses........59
Chapter5.Recoveryoverview....61
RecoveryoverviewfortheWindows7operating
system..................61
Creatingandusingarecoverymedia....61
Performingbackupandrecoveryoperations.62
UsingtheRescueandRecoveryworkspace.63
Creatingandusingarescuemedium....64
Reinstallingpreinstalledprogramsanddevice
drivers................65
Solvingrecoveryproblems........65
RecoveryoverviewfortheWindows8and
Windows8.1operatingsystems........66
©CopyrightLenovo2013
i
Page 4

Refreshingyourcomputer........66
Resettingyourcomputertothefactorydefault
settings................66
Usingtheadvancedstartupoptions....67
RecoveringyouroperatingsystemifWindows
8orWindows8.1failstostart.......67
Creatingandusingrecoverymedia.....68
Chapter6.Replacingdevices.....71
Staticelectricityprevention..........71
Replacingthebattery............71
ReplacingtheSIMcard...........73
Replacingthekeyboard...........74
ThinkPadEdgeE440..........74
ThinkPadEdgeE540..........81
Replacingtheharddiskdriveorsolid-statedrive.87
Replacingtheopticaldrive..........90
ThinkPadEdgeE440..........90
ThinkPadEdgeE540..........92
ReplacingawirelessLANcard........94
ReplacingawirelessWANcard........97
Replacingamemorymodule.........99
Replacingthecoin-cellbattery........102
Chapter7.Enhancingyour
computer..............105
FindingThinkPadoptions..........105
ThinkPadOneLinkDock...........105
ThinkPadOneLinkProDock.........106
Chapter8.Advanced
configuration............109
Installinganewoperatingsystem.......109
InstallingtheWindows7operatingsystem..109
InstallingtheWindows8operatingsystemor
theWindows8.1operatingsystem.....110
Installingdevicedrivers...........111
UsingtheThinkPadSetupprogram......111
Mainmenu..............112
Configmenu..............112
DateandTimemenu..........116
Securitymenu.............116
Startupmenu.............121
Restartmenu.............123
UpdatingyoursystemUEFIBIOS.....123
Chapter9.Preventingproblems..125
Generaltipsforpreventingproblems......125
Makingsuredevicedriversarecurrent.....126
Takingcareofyourcomputer.........127
Cleaningthecoverofyourcomputer....128
Chapter10.Troubleshooting
computerproblems.........131
Diagnosingproblems............131
Troubleshooting..............131
Computerstopsresponding.......131
Spillsonthekeyboard..........132
Errormessages............132
Errorswithoutmessages.........134
Beeperrors..............135
Memorymoduleproblems........136
Networkingproblems..........136
Problemswiththekeyboardandotherpointing
devices................138
Problemswiththedisplayandmultimedia
devices................139
Fingerprintreaderproblems........144
Batteryandpowerproblems.......144
Problemswithdrivesandotherstorage
devices................147
Asoftwareproblem...........148
Problemswithportsandconnectors....149
Chapter11.Gettingsupport....151
BeforeyoucontactLenovo..........151
Gettinghelpandservice...........151
Usingdiagnosticprograms........152
LenovoSupportWebsite.........152
CallingLenovo.............152
Purchasingadditionalservices........153
AppendixA.Regulatory
information.............155
Wirelessrelatedinformation.........155
LocationoftheUltraConnectwireless
antennas...............156
Locatingwirelessregulatorynotices....157
Exportclassificationnotice..........157
Electronicemissionnotices..........157
FederalCommunicationsCommission
DeclarationofConformity........157
IndustryCanadaClassBemissioncompliance
statement...............158
EuropeanUnion-Compliancetothe
ElectromagneticCompatibilityDirective...158
GermanClassBcompliancestatement...158
KoreaClassBcompliancestatement....159
JapanVCCIClassBcompliancestatement..159
Japancompliancestatementforproducts
whichconnecttothepowermainswith
ratedcurrentlessthanorequalto20Aper
phase................159
Lenovoproductserviceinformationfor
Taiwan................159
iiUserGuide
Page 5

AppendixB.WEEEandrecycling
statements.............161
ImportantWEEEinformation.........161
Japanrecyclingstatements.........161
RecyclinginformationforBrazil........162
BatteryrecyclinginformationfortheEuropean
Union..................162
BatteryrecyclinginformationforTaiwan.....163
BatteryrecyclinginformationfortheUnitedStates
andCanada................163
RecyclinginformationforChina........163
AppendixC.ENERGYSTARmodel
information.............165
AppendixD.Notices.........167
Trademarks................168
AppendixE.RestrictionofHazardous
SubstancesDirective(RoHS)....169
EuropeanUnionRoHS...........169
ChinaRoHS................169
IndiaRoHS................169
TurkishRoHS...............169
UkraineRoHS...............170
AppendixF .Eurasiancompliance
mark.................171
©CopyrightLenovo2013
iii
Page 6

ivUserGuide
Page 7
Readthisfirst
Besuretofollowtheimportanttipsgivenheretogetthemostuseandenjoymentoutofyourcomputer.
Failuretodosomightleadtodiscomfortorinjury,orcauseyourcomputertofail.
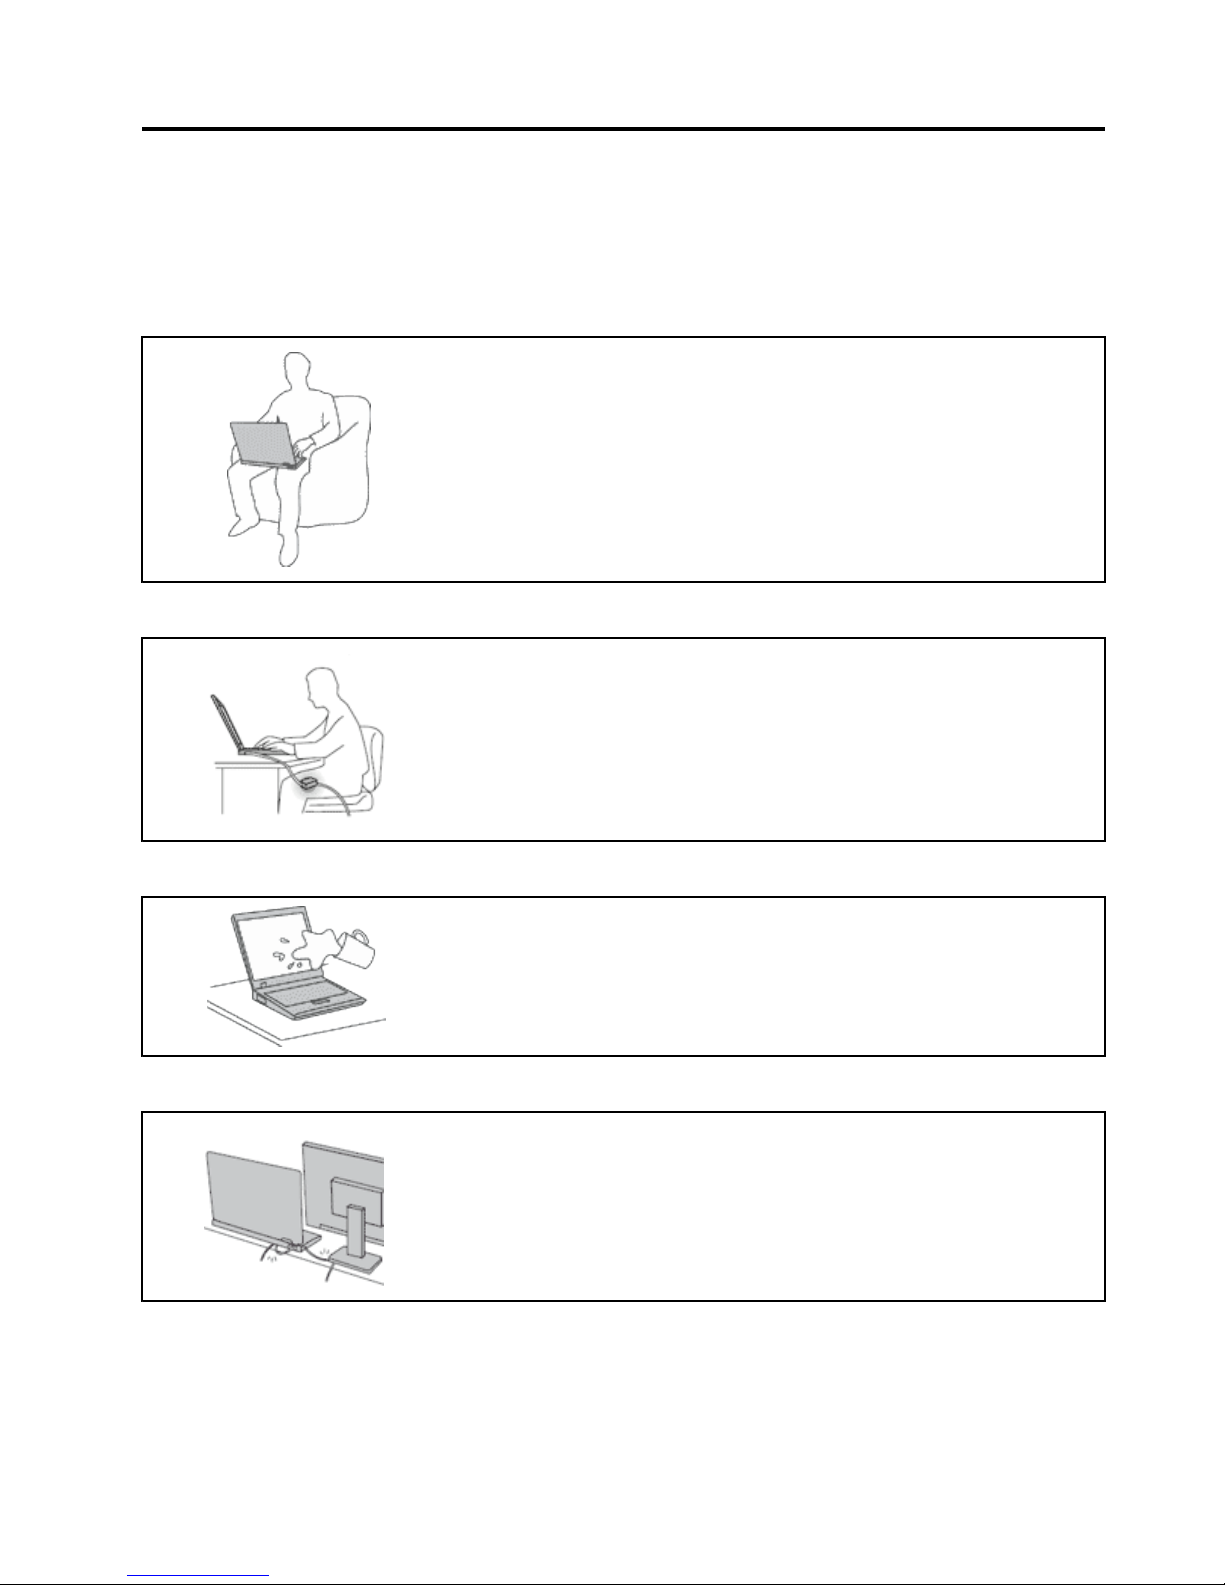
Protectyourselffromtheheatthatyourcomputergenerates.
Whenyourcomputeristurnedonorthebatteryischarging,thebase,thepalm
rest,andsomeotherpartsmaybecomehot.Thetemperaturetheyreach
dependsontheamountofsystemactivityandthelevelofchargeinthebattery.
Extendedcontactwithyourbody,eventhroughclothing,couldcause
discomfortorevenaskinburn.
•Avoidkeepingyourhands,yourlap,oranyotherpartofyourbodyin
contactwithahotsectionofthecomputerforanyextendedtime.
•Periodicallytakehandsfromusingthekeyboardbyliftingyourhandsfrom
thepalmrest.
Protectyourselffromtheheatgeneratedbytheacpoweradapter.
Whentheacpoweradapterisconnectedtoanelectricaloutletandyour
computer,itgeneratesheat.
Extendedcontactwithyourbody,eventhroughclothing,maycauseaskin
burn.
•Donotplacetheacpoweradapterincontactwithanypartofyourbody
whileitisinuse.
•Neveruseittowarmyourbody.
Preventyourcomputerfromgettingwet.
Toavoidspillsandthedangerofelectricalshock,keepliquidsawayfromyour
computer.
Protectthecablesfrombeingdamaged.
Applyingstrongforcetocablesmaydamageorbreakthem.
Routecommunicationlines,orthecablesofanacpoweradapter,amouse,a
keyboard,aprinter,oranyotherelectronicdevice,sothattheycannotbewalked
on,trippedover,pinchedbyyourcomputerorotherobjects,orinanyway
subjectedtotreatmentthatcouldinterferewiththeoperationofyourcomputer.
©CopyrightLenovo2013
v
Page 8
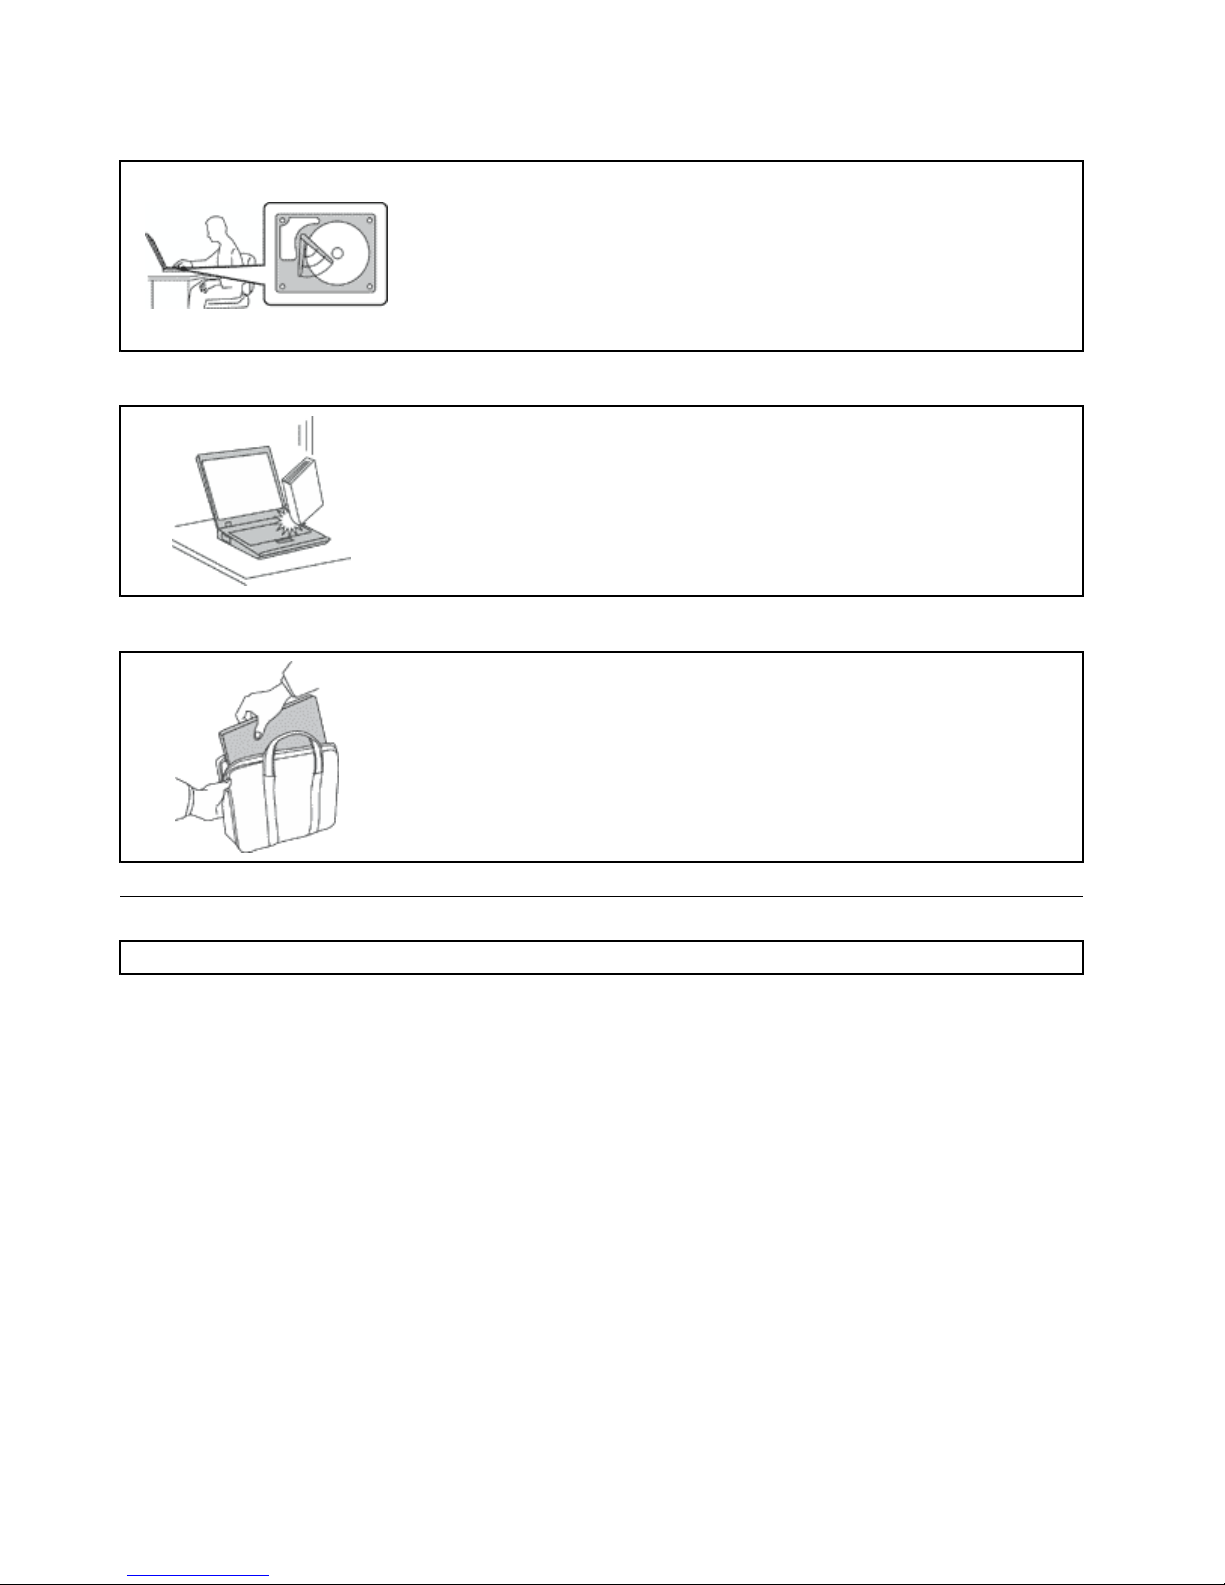
Protectyourcomputeranddatawhenmovingit.
Beforemovingacomputerequippedwithaharddiskdrive,dooneofthe
following,andmakesurethatthepowerswitchisofforisblinking:
•Turnitoff.
•Putitinsleepmode.
•Putitinhibernationmode.
Thiswillhelptopreventdamagetothecomputer,andpossiblelossofdata.
Handleyourcomputergently.
Donotdrop,bump,scratch,twist,hit,vibrate,push,orplaceheavyobjectson
yourcomputer,display,orexternaldevices.
Carryyourcomputercarefully.
•Useaqualitycarryingcasethatprovidesadequatecushioningandprotection.
•Donotpackyourcomputerinatightlypackedsuitcaseorbag.
•Beforeputtingyourcomputerinacarryingcase,makesurethatitisoff,insleep
mode,orinhibernationmode.Donotputacomputerinacarryingcasewhileit
isturnedon.
Importantsafetyinformation
Note:Readtheimportantsafetyinformationfirst.
Thisinformationcanhelpyousafelyuseyournotebookcomputer.Followandretainallinformationincluded
withyourcomputer.Theinformationinthisdocumentdoesnotalterthetermsofyourpurchaseagreement
ortheLenovo
®
LimitedWarranty.Formoreinformation,see“WarrantyInformation”intheSafety,Warranty,
andSetupGuidethatcomeswithyourcomputer.
Customersafetyisimportant.Ourproductsaredevelopedtobesafeandeffective.However,personal
computersareelectronicdevices.Powercords,poweradapters,andotherfeaturescancreatepotential
safetyrisksthatcanresultinphysicalinjuryorpropertydamage,especiallyifmisused.T oreducethese
risks,followtheinstructionsincludedwithyourproduct,observeallwarningsontheproductandinthe
operatinginstructions,andreviewtheinformationincludedinthisdocumentcarefully.Bycarefullyfollowing
theinformationcontainedinthisdocumentandprovidedwithyourproduct,youcanhelpprotectyourself
fromhazardsandcreateasafercomputerworkenvironment.
Note:Thisinformationincludesreferencestopoweradaptersandbatteries.Inadditiontonotebook
computers,someproducts(suchasspeakersandmonitors)shipwithexternalpoweradapters.Ifyouhave
suchaproduct,thisinformationappliestoyourproduct.Inaddition,computerproductscontainacoin-sized
internalbatterythatprovidespowertothesystemclockevenwhenthecomputerisunplugged,sothe
batterysafetyinformationappliestoallcomputerproducts.
viUserGuide
Page 9

Conditionsthatrequireimmediateaction
Productscanbecomedamagedduetomisuseorneglect.Someproductdamageisseriousenough
thattheproductshouldnotbeusedagainuntilithasbeeninspectedand,ifnecessary,repairedby
anauthorizedservicer.
Aswithanyelectronicdevice,paycloseattentiontotheproductwhenitisturnedon.Onveryrare
occasions,youmightnoticeanodororseeapuffofsmokeorsparksventfromyourproduct.Oryou
mighthearsoundslikepopping,crackingorhissing.Theseconditionsmightmerelymeanthatan
internalelectroniccomponenthasfailedinasafeandcontrolledmanner.Or,theymightindicate
apotentialsafetyissue.However,donottakerisksorattempttodiagnosethesituationyourself.
ContacttheCustomerSupportCenterforfurtherguidance.ForalistofServiceandSupportphone
numbers,seethefollowingWebsite:
http://www.lenovo.com/support/phone
Frequentlyinspectyourcomputeranditscomponentsfordamageorwearorsignsofdanger.
Ifyouhaveanyquestionabouttheconditionofacomponent,donotusetheproduct.Contact
theCustomerSupportCenterortheproductmanufacturerforinstructionsonhowtoinspectthe
productandhaveitrepaired,ifnecessary.
Intheunlikelyeventthatyounoticeanyofthefollowingconditions,orifyouhaveanysafety
concernswithyourproduct,stopusingtheproductandunplugitfromthepowersourceand
telecommunicationlinesuntilyoucanspeaktotheCustomerSupportCenterforfurtherguidance.
•Powercords,plugs,poweradapters,extensioncords,surgeprotectors,orpowersuppliesthatare
cracked,broken,ordamaged.
•Signsofoverheating,smoke,sparks,orfire.
•Damagetoabattery(suchascracks,dents,orcreases),dischargefromabattery,orabuildupofforeign
substancesonthebattery.
•Acracking,hissingorpoppingsound,orstrongodorthatcomesfromtheproduct.
•Signsthatliquidhasbeenspilledoranobjecthasfallenontothecomputerproduct,thepowercordor
poweradapter.
•Thecomputerproduct,powercord,orpoweradapterhasbeenexposedtowater.
•Theproducthasbeendroppedordamagedinanyway.
•Theproductdoesnotoperatenormallywhenyoufollowtheoperatinginstructions.
Note:Ifyounoticetheseconditionswithaproduct(suchasanextensioncord)thatisnotmanufacturedfor
orbyLenovo,stopusingthatproductuntilyoucancontacttheproductmanufacturerforfurtherinstructions,
oruntilyougetasuitablereplacement.
Safetyguidelines
Alwaysobservethefollowingprecautionstoreducetheriskofinjuryandpropertydamage.
Serviceandupgrades
DonotattempttoserviceaproductyourselfunlessinstructedtodosobytheCustomerSupportCenteror
yourdocumentation.OnlyuseaServiceProviderwhoisapprovedtorepairyourparticularproduct.
Note:Somecomputerpartscanbeupgradedorreplacedbythecustomer.Upgradestypicallyare
referredtoasoptions.ReplacementpartsapprovedforcustomerinstallationarereferredtoasCustomer
ReplaceableUnits,orCRUs.Lenovoprovidesdocumentationwithinstructionswhenitisappropriatefor
customerstoinstalloptionsorreplaceCRUs.Youmustcloselyfollowallinstructionswheninstallingor
replacingparts.TheOffstateofapowerindicatordoesnotnecessarilymeanthatvoltagelevelsinsidea
productarezero.Beforeyouremovethecoversfromaproductequippedwithapowercord,alwaysmake
©CopyrightLenovo2013
vii
Page 10

surethatthepoweristurnedoffandthattheproductisunpluggedfromanypowersource.Ifyouhave
anyquestionsorconcerns,contacttheCustomerSupportCenter.
Althoughtherearenomovingpartsinyourcomputerafterthepowercordhasbeendisconnected,the
followingwarningsarerequiredforyoursafety.
CAUTION:
Hazardousmovingparts.Keepfingersandotherbodypartsaway.
CAUTION:
BeforereplacinganyCRUs,turnoffthecomputerandwaitthreetofiveminutestoletthecomputer
coolbeforeopeningthecover.
Powercordsandpoweradapters
DANGER
Useonlythepowercordsandpoweradapterssuppliedbytheproductmanufacturer.
Thepowercordsshallbesafetyapproved.ForGermany,itshallbeH05VV-F,3G,0.75mm
2
,or
better.Forothercountries,thesuitabletypesshallbeusedaccordingly.
Neverwrapapowercordaroundapoweradapterorotherobject.Doingsocanstressthecordin
waysthatcancausethecordtofray,crack,orcrimp.Thiscanpresentasafetyhazard.
Alwaysroutepowercordssothattheywillnotbewalkedon,trippedover ,orpinchedbyobjects.
Protectpowercordsandpoweradaptersfromliquids.Forinstance,donotleaveyourpowercord
orpoweradapternearsinks,tubs,toilets,oronfloorsthatarecleanedwithliquidcleansers.
Liquidscancauseashortcircuit,particularlyifthepowercordorpoweradapterhasbeenstressed
bymisuse.Liquidsalsocancausegradualcorrosionofpowercordterminalsand/ortheconnector
terminalsonapoweradapter,whichcaneventuallyresultinoverheating.
Alwaysconnectpowercordsandsignalcablesinthecorrectorderandensurethatallpowercord
connectorsaresecurelyandcompletelypluggedintoreceptacles.
Donotuseanypoweradapterthatshowscorrosionattheacinputpinsorshowssignsof
overheating(suchasdeformedplastic)attheacinputpinsoranywhereonthepoweradapter.
Donotuseanypowercordswheretheelectricalcontactsoneitherendshowsignsofcorrosionor
overheatingorwherethepowercordappearstohavebeendamagedinanyway.
viiiUserGuide
Page 11

Extensioncordsandrelateddevices
Ensurethatextensioncords,surgeprotectors,uninterruptiblepowersupplies,andpowerstripsthatyouuse
areratedtohandletheelectricalrequirementsoftheproduct.Neveroverloadthesedevices.Ifpowerstrips
areused,theloadshouldnotexceedthepowerstripinputrating.Consultanelectricianformoreinformation
ifyouhavequestionsaboutpowerloads,powerrequirements,andinputratings.
Plugsandoutlets
DANGER
Ifareceptacle(poweroutlet)thatyouintendtousewithyourcomputerequipmentappearstobe
damagedorcorroded,donotusetheoutletuntilitisreplacedbyaqualifiedelectrician.
Donotbendormodifytheplug.Iftheplugisdamaged,contactthemanufacturertoobtain
areplacement.
Donotshareanelectricaloutletwithotherhomeorcommercialappliancesthatdrawlargeamounts
ofelectricity;otherwise,unstablevoltagemightdamageyourcomputer,data,orattacheddevices.
Someproductsareequippedwithathree-prongedplug.Thisplugfitsonlyintoagrounded
electricaloutlet.Thisisasafetyfeature.Donotdefeatthissafetyfeaturebytryingtoinsertitinto
anon-groundedoutlet.Ifyoucannotinserttheplugintotheoutlet,contactanelectricianforan
approvedoutletadapterortoreplacetheoutletwithonethatenablesthissafetyfeature.Never
overloadanelectricaloutlet.Theoverallsystemloadshouldnotexceed80percentofthebranch
circuitrating.Consultanelectricianformoreinformationifyouhavequestionsaboutpowerloads
andbranchcircuitratings.
Besurethatthepoweroutletyouareusingisproperlywired,easilyaccessible,andlocatedclose
totheequipment.Donotfullyextendpowercordsinawaythatwillstressthecords.
Besurethatthepoweroutletprovidesthecorrectvoltageandcurrentfortheproductyouare
installing.
Carefullyconnectanddisconnecttheequipmentfromtheelectricaloutlet.
Powersupplystatement
DANGER
Neverremovethecoveronapowersupplyoranypartthathasthefollowinglabelattached.
Hazardousvoltage,current,andenergylevelsarepresentinsideanycomponentthathasthislabel
attached.Therearenoserviceablepartsinsidethesecomponents.Ifyoususpectaproblemwith
oneoftheseparts,contactaservicetechnician.
©CopyrightLenovo2013
ix
Page 12

Externaldevices
CAUTION:
DonotconnectordisconnectanyexternaldevicecablesotherthanUSBand1394cableswhilethe
computerpowerison;otherwise,youmightdamageyourcomputer.Toavoidpossibledamageto
attacheddevices,waitatleastfivesecondsafterthecomputerisshutdowntodisconnectexternal
devices.
Generalbatterynotice
DANGER
PersonalcomputersmanufacturedbyLenovocontainacoin-cellbatterytoprovidepowerto
thesystemclock.Inaddition,manymobileproducts,suchasnotebookcomputers,utilizea
rechargeablebatterypacktoprovidesystempowerwheninportablemode.Batteriessuppliedby
Lenovoforusewithyourproducthavebeentestedforcompatibilityandshouldonlybereplaced
withapprovedparts.
Neverattempttoopenorserviceanybattery.Donotcrush,puncture,orincineratebatteriesor
shortcircuitthemetalcontacts.Donotexposethebatterytowaterorotherliquids.Onlyrecharge
thebatterypackstrictlyaccordingtoinstructionsincludedintheproductdocumentation.
Batteryabuseormishandlingcancausethebatterytooverheat,whichcancausegassesorflame
to“vent”fromthebatterypackorcoin-cellbattery.Ifyourbatteryisdamaged,orifyounoticeany
dischargefromyourbatteryorthebuildupofforeignmaterialsonthebatteryleads,stopusingthe
batteryandobtainareplacementfromthebatterymanufacturer.
Batteriescandegradewhentheyareleftunusedforlongperiodsoftime.Forsomerechargeable
batteries(particularlyLithiumIonbatteries),leavingabatteryunusedinadischargedstatecould
increasetheriskofabatteryshortcircuit,whichcouldshortenthelifeofthebatteryandalsocan
poseasafetyhazard.DonotletrechargeableLithium-Ionbatteriescompletelydischargeorstore
thesebatteriesinadischargedstate.
Rechargeablebatterynotice
DANGER
Donotattempttodisassembleormodifythebatterypack.Attemptingtodosocancausean
explosion,orliquidleakagefromthebatterypack.Abatterypackotherthantheonespecifiedby
Lenovo,oradisassembledormodifiedbatterypackisnotcoveredbythewarranty.
Iftherechargeablebatterypackisincorrectlyreplaced,thereisdangerofanexplosion.Thebattery
packcontainsasmallamountofharmfulsubstances.T oavoidpossibleinjury:
•ReplaceonlywithabatteryofthetyperecommendedbyLenovo.
•Keepthebatterypackawayfromfire.
•Donotexposeittowaterorrain.
•Donotattempttodisassembleit.
•Donotshort-circuitit.
•Keepitawayfromchildren.
•Donotdropthebatterypack.
Donotputthebatterypackintrashthatisdisposedofinlandfills.Whendisposingofthebattery,
complywithlocalordinancesorregulations.
xUserGuide
Page 13

Thebatterypackshouldbestoredatroomtemperature,chargedtoapproximately30to50%
ofcapacity.Werecommendthatbatterypackbechargedaboutonceperyeartoprevent
overdischarge.
Lithiumcoin-cellbatterynotice
DANGER
Dangerofexplosionifbatteryisincorrectlyreplaced.
Whenreplacingthelithiumcoin-cellbattery,useonlythesameoranequivalenttypethatis
recommendedbythemanufacturer.Thebatterycontainslithiumandcanexplodeifnotproperly
used,handled,ordisposedof.
Donot:
•Throworimmerseintowater
•Heattomorethan100°C(212°F)
•Repairordisassemble
Disposeofthebatteryasrequiredbylocalordinancesorregulations.
ThefollowingstatementappliestousersinthestateofCalifornia,U.S.A.
CaliforniaPerchlorateInformation:
Productscontainingmanganesedioxidelithiumcoin-cellbatteriesmaycontainperchlorate.
PerchlorateMaterial-specialhandlingmayapply,See
www.dtsc.ca.gov/hazardouswaste/perchlorate
Heatandproductventilation
DANGER
Computers,acpoweradapters,andmanyaccessoriescangenerateheatwhenturnedonandwhen
batteriesarecharging.Notebookcomputerscangenerateasignificantamountofheatduetotheir
compactsize.Alwaysfollowthesebasicprecautions:
•Whenyourcomputeristurnedonorthebatteryischarging,thebase,thepalmrest,andsome
otherpartsmaybecomehot.Avoidkeepingyourhands,yourlap,oranyotherpartofyour
bodyincontactwithahotsectionofthecomputerforanyextendedlengthoftime.Whenyou
usethekeyboard,avoidkeepingyourpalmsonthepalmrestforaprolongedperiodoftime.
Yourcomputergeneratessomeheatduringnormaloperation.Theamountofheatdependson
theamountofsystemactivityandthebatterychargelevel.Extendedcontactwithyourbody,
eventhroughclothing,couldcausediscomfortorevenaskinburn.Periodicallytakebreaks
fromusingthekeyboardbyliftingyourhandsfromthepalmrest;andbecarefulnottouse
thekeyboardforanyextendedlengthoftime.
•Donotoperateyourcomputerorchargethebatterynearflammablematerialsorinexplosive
environments.
©CopyrightLenovo2013
xi
Page 14

•Ventilationslots,fansand/orheatsinksareprovidedwiththeproductforsafety,comfort,and
reliableoperation.Thesefeaturesmightinadvertentlybecomeblockedbyplacingtheproducton
abed,sofa,carpet,orotherflexiblesurface.Neverblock,cover,ordisablethesefeatures.
•Whentheacpoweradapterisconnectedtoanelectricaloutletandyourcomputer,itgenerates
heat.Donotplacetheadapterincontactwithanypartofyourbodywhileusingit.Neverusethe
acpoweradaptertowarmyourbody.Extendedcontactwithyourbody,eventhroughclothing,
maycauseaskinburn.
Foryoursafety,alwaysfollowthesebasicprecautionswithyourcomputer:
•Keepthecoverclosedwheneverthecomputerispluggedin.
•Regularlyinspecttheoutsideofthecomputerfordustaccumulation.
•Removedustfromventsandanyperforationsinthebezel.Morefrequentcleaningsmightbe
requiredforcomputersindustyorhigh-trafficareas.
•Donotrestrictorblockanyventilationopenings.
•Donotoperateyourcomputerinsidefurniture,asthismightincreasetheriskofoverheating.
•Airflowtemperaturesintothecomputershouldnotexceed35°C(95°F).
Electricalcurrentsafetyinformation
DANGER
Electriccurrentfrompower,telephone,andcommunicationcablesishazardous.
Toavoidashockhazard:
•Donotuseyourcomputerduringalightningstorm.
•Donotconnectordisconnectanycablesorperforminstallation,maintenance,orreconfiguration
ofthisproductduringanelectricalstorm.
•Connectallpowercordstoaproperlywiredandgroundedelectricaloutlet.
•Connecttoproperlywiredoutletsanyequipmentthatwillbeattachedtothisproduct.
•Wheneverpossible,useonehandonlytoconnectordisconnectsignalcables.
•Neverturnonanyequipmentwhenthereisevidenceoffire,water,orstructuraldamage.
•Disconnecttheattachedpowercords,batterypack,andallthecablesbeforeyouopenthe
devicecovers,unlessinstructedotherwiseintheinstallationandconfigurationprocedures.
•Donotuseyourcomputeruntilallinternalpartsenclosuresarefastenedintoplace.Neveruse
thecomputerwheninternalpartsandcircuitsareexposed.
xiiUserGuide
Page 15

DANGER
Connectanddisconnectcablesasdescribedinthefollowingprocedureswheninstalling,moving,
oropeningcoversonthisproductorattacheddevices.
Toconnect:
1.T urneverythingOFF .
2.First,attachallcablestodevices.
3.Attachsignalcablestoconnectors.
4.Attachpowercordstooutlets.
5.T urndevicesON.
Todisconnect:
1.T urneverythingOFF .
2.First,removepowercordsfromoutlets.
3.Removesignalcablesfromconnectors.
4.Removeallcablesfromdevices.
Thepowercordmustbedisconnectedfromthewalloutletorreceptaclebeforeinstallingallother
electricalcablesconnectedtothecomputer.
Thepowercordmaybereconnectedtothewalloutletorreceptacleonlyafterallotherelectrical
cableshavebeenconnectedtothecomputer.
Lasercompliancestatement
CAUTION:
Whenlaserproducts(suchasCD-ROMs,DVDdrives,fiberopticdevices,ortransmitters)are
installed,notethefollowing:
•Donotremovethecovers.Removingthecoversofthelaserproductcouldresultinexposureto
hazardouslaserradiation.Therearenoserviceablepartsinsidethedevice.
•Useofcontrolsoradjustmentsorperformanceofproceduresotherthanthosespecifiedherein
mightresultinhazardousradiationexposure.
DANGER
SomelaserproductscontainanembeddedClass3AorClass3Blaserdiode.Notethefollowing.
Laserradiationwhenopen.Donotstareintothebeam,donotviewdirectlywithoptical
instruments,andavoiddirectexposuretothebeam.
Liquidcrystaldisplay(LCD)notice
CAUTION:
TheLCDismadeofglass,androughhandlingordroppingthecomputercancausetheLCDtobreak.
IftheLCDbreaksandtheinternalfluidgetsintoyoureyesoronyourhands,immediatelywash
theaffectedareaswithwaterforatleast15minutes;ifanysymptomsarepresentafterwashing,
getmedicalcare.
Note:Forproductswithmercury-containingfluorescentlamps(forexample,non-LED),thefluorescentlamp
intheliquidcrystaldisplay(LCD)containsmercury;disposeofaccordingtolocal,state,orfederallaws.
Usingheadphonesorearphones
Ifyourcomputerhasbothaheadphoneconnectorandanaudio-outconnector,alwaysusetheheadphone
connectorforheadphones(alsocalledaheadset)orearphones.
©CopyrightLenovo2013
xiii
Page 16

CAUTION:
Excessivesoundpressurefromearphonesandheadphonescancausehearingloss.Adjustmentof
theequalizertomaximumincreasestheearphoneandheadphoneoutputvoltageandthesound
pressurelevel.Therefore,toprotectyourhearing,adjusttheequalizertoanappropriatelevel.
Excessiveuseofheadphonesorearphonesforalongperiodoftimeathighvolumecanbedangerousifthe
outputoftheheadphoneorearphoneconnectorsdonotcomplywithspecificationsofEN50332-2.The
headphoneoutputconnectorofyourcomputercomplieswithEN50332-2Subclause7.Thisspecification
limitsthecomputer’smaximumwidebandtrueRMSoutputvoltageto150mV.Tohelpprotectagainst
hearingloss,ensurethattheheadphonesorearphonesyouusealsocomplywithEN50332-2(Clause7
limits)forawidebandcharacteristicvoltageof75mV.UsingheadphonesthatdonotcomplywithEN
50332-2canbedangerousduetoexcessivesoundpressurelevels.
IfyourLenovocomputercamewithheadphonesorearphonesinthepackage,asaset,thecombinationof
theheadphonesorearphonesandthecomputeralreadycomplieswiththespecificationsofEN50332-1.
Ifdifferentheadphonesorearphonesareused,ensurethattheycomplywithEN50332-1(Clause6.5
LimitationValues).UsingheadphonesthatdonotcomplywithEN50332-1canbedangerousdueto
excessivesoundpressurelevels.
Additionalsafetyinformation
DANGER
Plasticbagscanbedangerous.Keepplasticbagsawayfrombabiesandchildrentoavoiddanger
ofsuffocation.
Noticefortabletpersonalcomputerusers
SafetynoticeforusersinAustralia
DANGER
Donotconnectphonelinewhileusingtabletmode.
NoticeforusersintheU.S.A.
Manypersonalcomputerproductsandaccessoriescontaincords,cablesorwires,suchaspowercordsor
cordstoconnecttheaccessorytoapersonalcomputer.Ifthisproducthassuchacord,cableorwire,then
thefollowingwarningapplies:
WARNING:Handlingthecordonthisproductorcordsassociatedwithaccessoriessoldwiththisproduct
willexposeyoutolead,achemicalknowntotheStateofCaliforniatocausecancer,andbirthdefectsor
otherreproductiveharm.Washhandsafterhandling.
Savetheseinstructions.
xivUserGuide
Page 17
Chapter1.Productoverview
Thischapterprovidesinformationaboutconnectorlocations,importantproductlabels,computerfeatures,
specifications,operatingenvironment,andpreinstalledprograms.
Thischaptercontainsthefollowingtopics:
•“Locatingcomputercontrols,connectors,andindicators”onpage1
•“Locatingimportantproductinformation”onpage12
•“Features”onpage14
•“Specifications”onpage15
•“Operatingenvironment”onpage16
•“Lenovoprograms”onpage17
Locatingcomputercontrols,connectors,andindicators
Thissectionintroducesthecomputerhardwarefeaturestogiveyouthebasicinformationyouneedto
startusingthecomputer.
Frontview
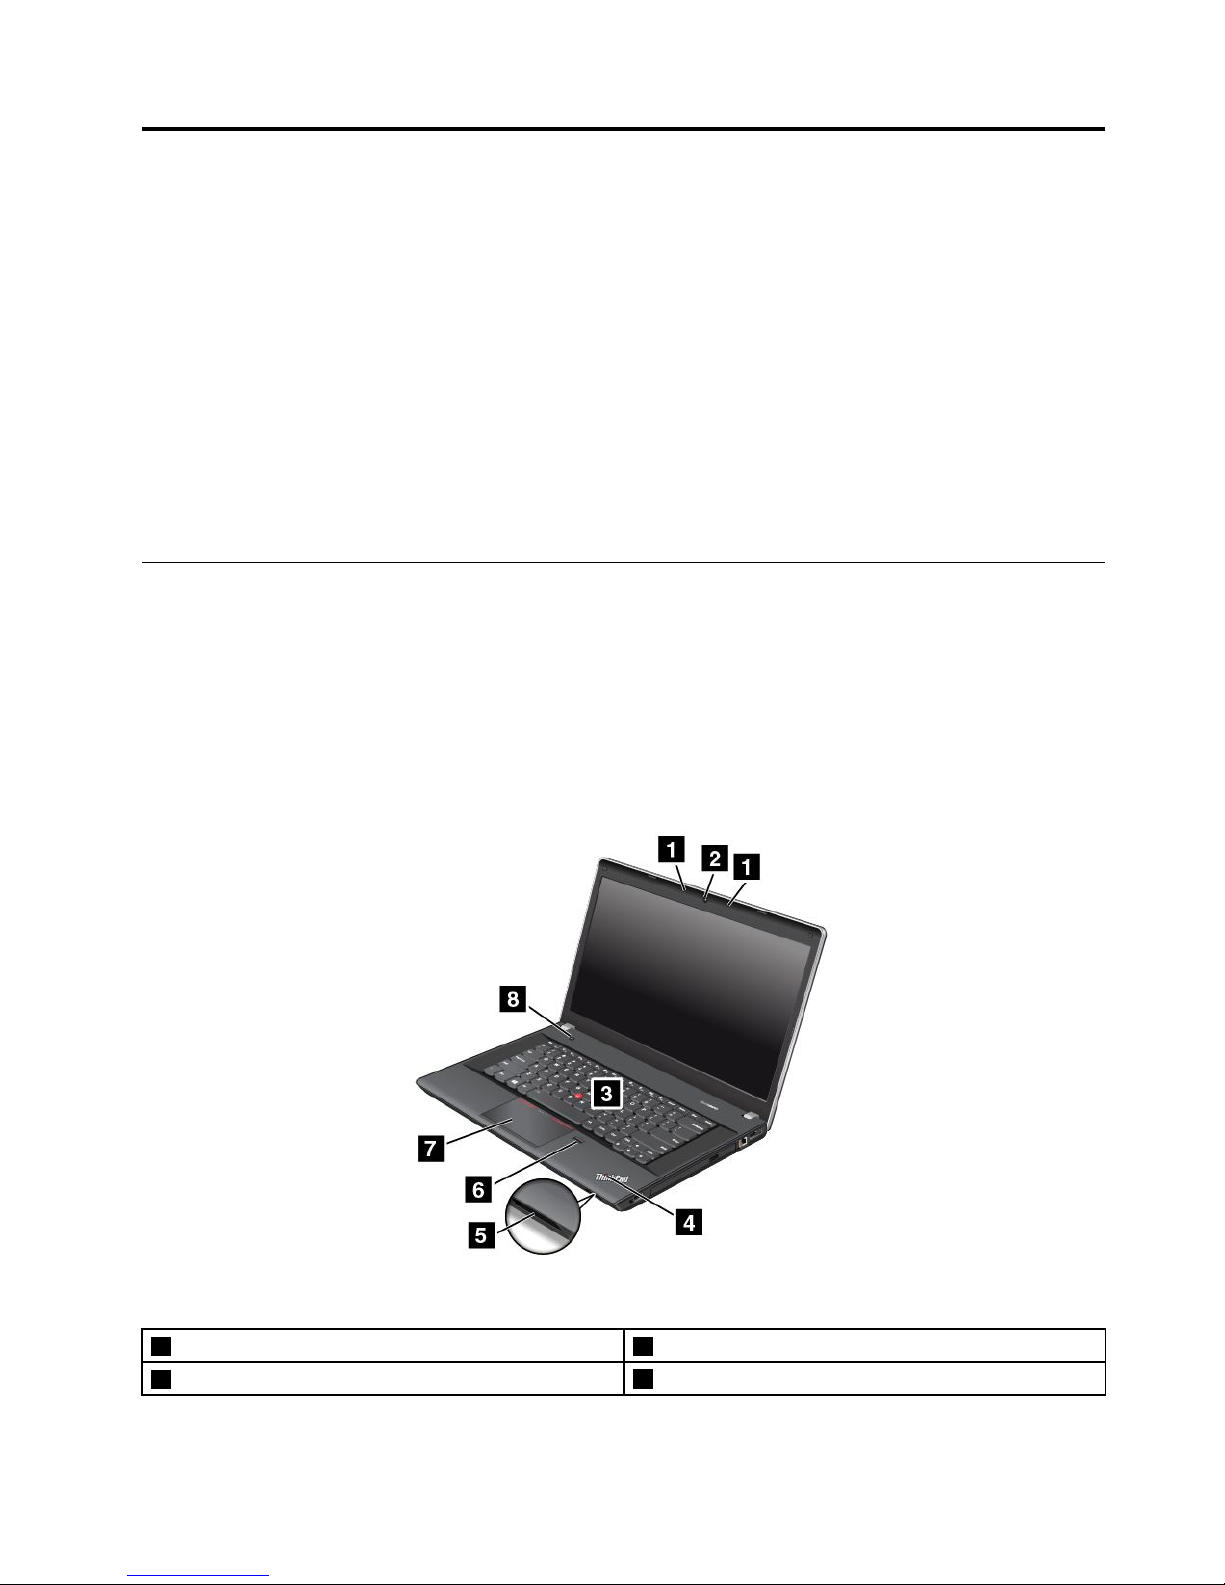
ThinkPadEdgeE440frontview
Figure1.ThinkPadEdgeE440frontview
1Microphones5Mediacardreaderslot
2Camera
6Fingerprintreader
©CopyrightLenovo2013
1
Page 18

3TrackPoint
®
pointingstick7ThinkPad
®
trackpad
4Systemstatusindicator
8Powerbutton
1Microphones
Thebuilt-inmicrophonescapturesoundandvoicewhenusedwithaprogramcapableofhandlingaudio.
Dependingonyourmodel,yourcomputermightcomewithonemicrophone.
2Camera
Somemodelshaveanintegratedcamera.Usethecameratotakepicturesorholdavideoconference.
Fordetails,see“Usingthecamera”onpage43.
ThinkPadpointingdevice
3TrackPointpointingstick
7ThinkPadtrackpad
ThekeyboardcontainstheThinkPadpointingdevice.Pointing,selecting,anddraggingareallpartofasingle
processthatyoucanperformwithoutmovingyourfingersfromatypingposition.Formoreinformation,see
“UsingtheThinkPadpointingdevice”onpage30.
4Systemstatusindicator
TheilluminateddotontheThinkPadlogofunctionsasasystemstatusindicator.Forthedetailedinformation
abouttheindicator,see“Statusindicators”onpage10
.
5Mediacardreaderslot
Yourcomputerhasamediacardreaderslot.Insertyourflashmediacardintothisslottoreadthedataon
thecard.Formoreinformationaboutthesupportedcards,see“Usingaflashmediacard”onpage44.
6Fingerprintreader
Somemodelshaveafingerprintreader.Fingerprintauthenticationtechnologyprovidesasimpleandsecure
useraccessbyassociatingyourfingerprintwithapassword.Formoreinformationaboutthefingerprint
reader,see“Usingthefingerprintreader”onpage56.
8Powerbutton
Usethepowerbuttontoturnonthecomputer.
Toturnoffthecomputer,usetheStartmenushutdownoptionontheMicrosoft
®
Windows
®
7operating
system.FortheMicrosoftWindows8operatingsystemandMicrosoftWindows8.1operatingsystem,
movethepointertothetop-rightorbottom-rightcornerofthescreentobringupthecharms.Thenclick
Settings➙Power➙Shutdown.
Ifyourcomputerstopsrespondingandyoucannotturnitoff,pressandholdthepowerbuttonforfour
secondsormore.Ifthecomputerstillisnotresponding,removetheacpoweradapterorthesupported
ThinkPadOneLinkDockandthebatterytoresetthecomputer.
Youalsocanprogramthepowerbuttonsothatbypressingthepowerbuttonyoucanshutdownthe
computerorputitintosleeporhibernationmode.T oachievethis,youneedtochangeyourpowerplan
settings.Toaccesspowerplansettings,dothefollowing:
•ForWindows7:StartthePowerManagerprogramandthenclickthePowerPlantab.Forinstructionson
howtostartthePowerManagerprogram,see“AccessingLenovoprogramsontheWindows7operating
system”onpage17
.
2UserGuide
Page 19
•ForWindows8andWindows8.1:Gotothedesktop.Right-clickthebattery-statusiconintheWindows
notificationareaandclickMorepoweroptions➙Choosewhatthepowerbuttondoes.
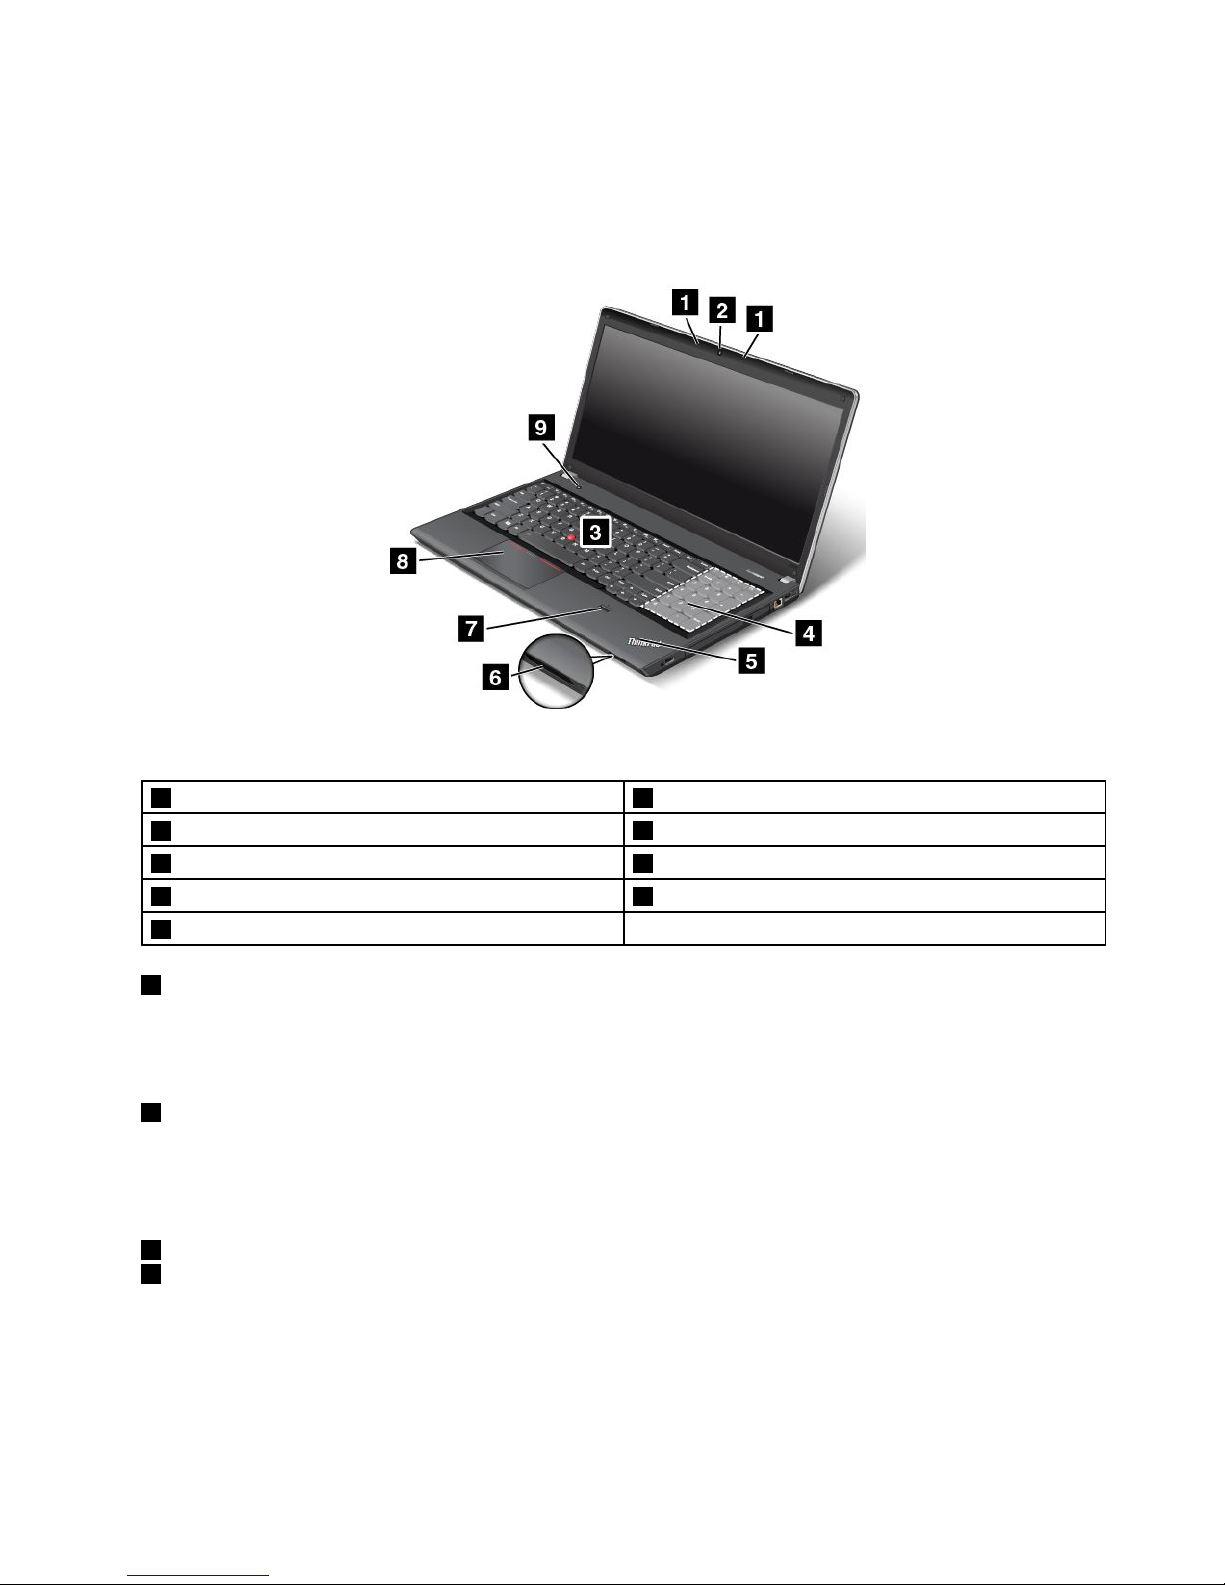
ThinkPadEdgeE540frontview
Figure2.ThinkPadEdgeE540frontview
1Microphones6Mediacardreaderslot
2Camera
7Fingerprintreader
3TrackPointpointingstick8ThinkPadtrackpad
4Numerickeypad9Powerbutton
5Systemstatusindicator
1Microphones
Thebuilt-inmicrophonescapturesoundandvoicewhenusedwithaprogramcapableofhandlingaudio.
Dependingonyourmodel,yourcomputermightcomewithonemicrophone.
2Camera
Somemodelshaveanintegratedcamera.Usethecameratotakepicturesorholdavideoconference.
Fordetails,see“Usingthecamera”onpage43
.
ThinkPadpointingdevice
3TrackPointpointingstick
8ThinkPadtrackpad
ThekeyboardcontainstheThinkPadpointingdevice.Pointing,selecting,anddraggingareallpartofasingle
processthatyoucanperformwithoutmovingyourfingersfromatypingposition.Formoreinformation,see
“UsingtheThinkPadpointingdevice”onpage30
.
Chapter1.Productoverview3
Page 20

4Numerickeypad
Yourcomputerhasanumerickeypadthatcanbeusedtoquicklyinputnumbers.
5Systemstatusindicator
TheilluminatedThinkPadlogoonthepalmrestfunctionsasasystemstatusindicator.Forthedetailed
informationaboutthelocationandmeaningoftheindicator,see“Statusindicators”onpage10.
6Mediacardreaderslot
Yourcomputermighthaveamediacardreaderslot.Insertyourflashmediacardintothisslottoreadthedata
onthecard.Formoreinformationaboutthesupportedcards,see“Usingaflashmediacard”onpage44.
6Fingerprintreader
Somemodelshaveafingerprintreader.Fingerprintauthenticationtechnologyprovidesasimpleandsecure
useraccessbyassociatingyourfingerprintwithapassword.Formoreinformationaboutthefingerprint
reader,see“Usingthefingerprintreader”onpage56
.
9Powerbutton
Usethepowerbuttontoturnonthecomputer.
Toturnoffthecomputer,usetheStartmenushutdownoptionontheMicrosoftWindows7operating
system.FortheMicrosoftWindows8operatingsystemandMicrosoftWindows8.1operatingsystem,
movethepointertothetop-rightorbottom-rightcornerofthescreentobringupthecharms.Thenclick
Settings➙Power➙Shutdown.
Ifyourcomputerstopsrespondingandyoucannotturnitoff,pressandholdthepowerbuttonforfour
secondsormore.Ifthecomputerstillisnotresponding,removetheacpoweradapterorthesupported
ThinkPadOneLinkDockandthebatterytoresetthecomputer.
Youalsocanprogramthepowerbuttonsothatbypressingthepowerbuttonyoucanshutdownthe
computerorputitintosleeporhibernationmode.T oachievethis,youneedtochangeyourpowerplan
settings.Toaccesspowerplansettings,dothefollowing:
•ForWindows7:StartthePowerManagerprogramandthenclickthePowerPlantab.Forinstructionson
howtostartthePowerManagerprogram,see“AccessingLenovoprogramsontheWindows7operating
system”onpage17
.
•ForWindows8andWindows8.1:Gotothedesktop.Right-clickthebattery-statusiconintheWindows
notificationareaandclickMorepoweroptions➙Choosewhatthepowerbuttondoes.
4UserGuide
Page 21
Right-sideview
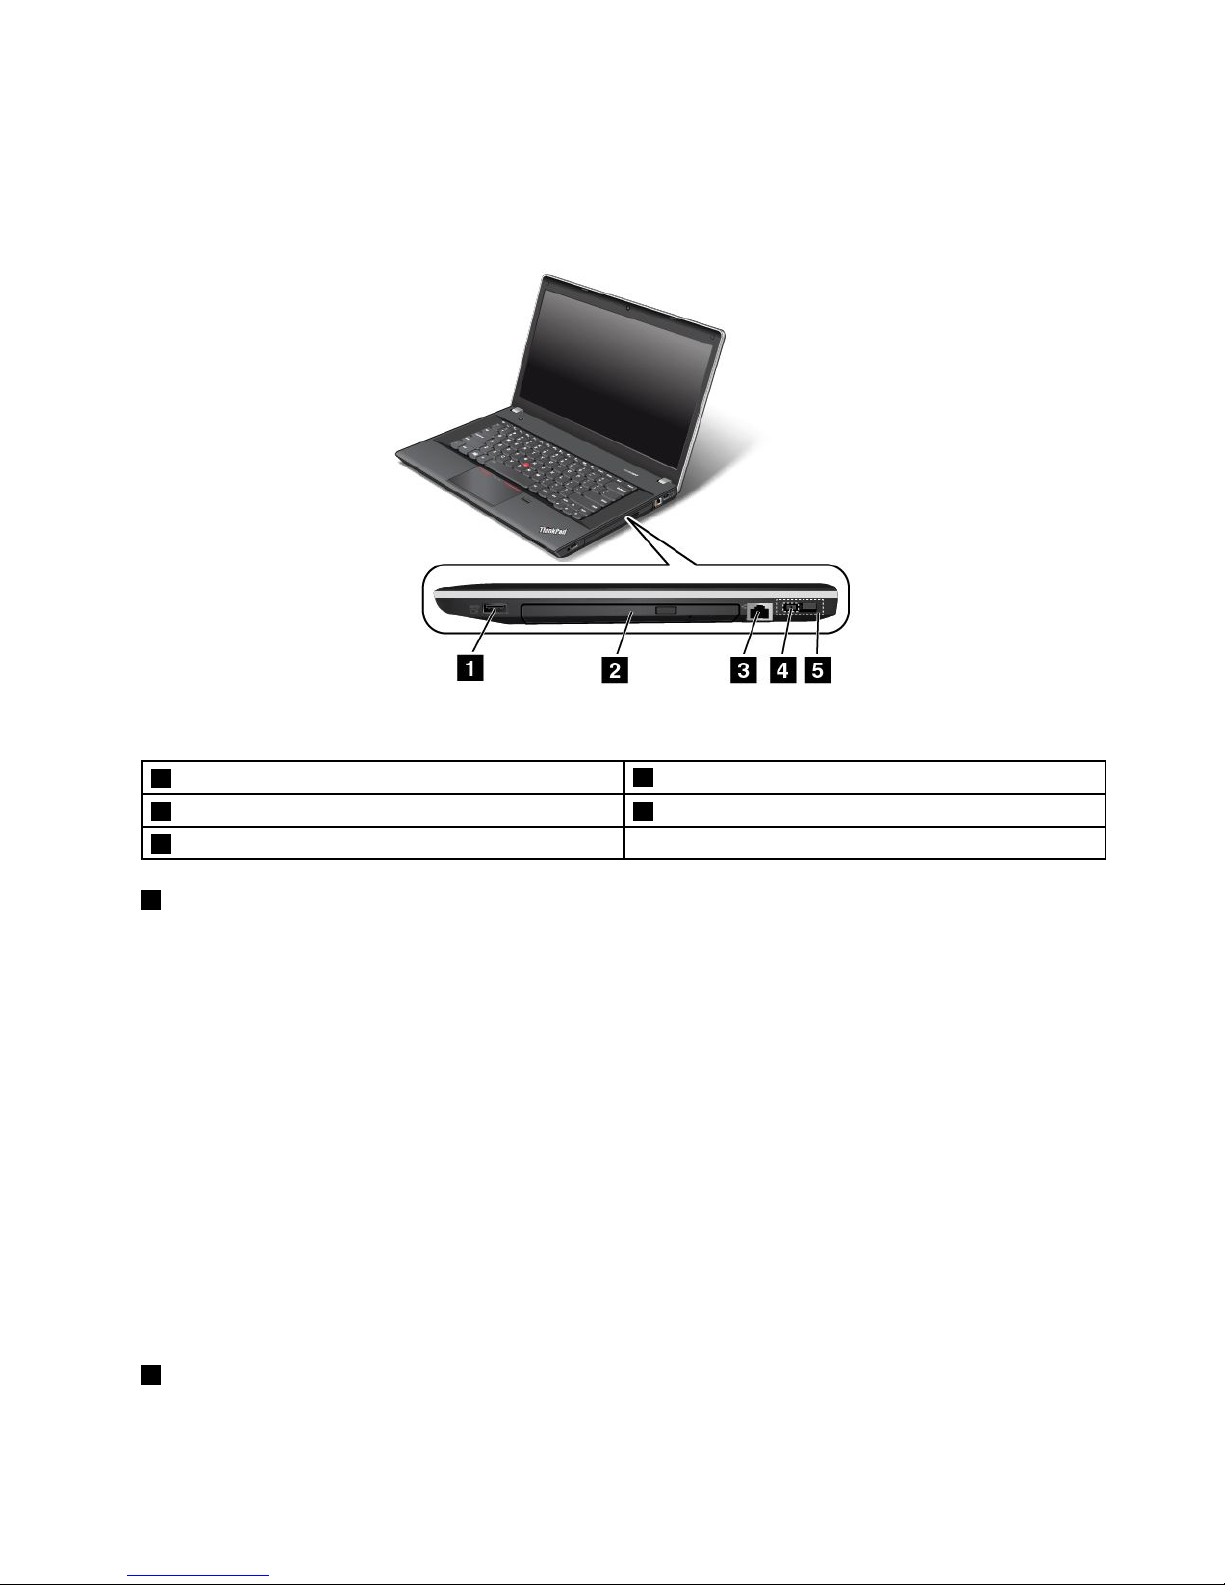
Note:Y ourcomputerkeyboardmightlookdifferentfromthefollowingillustration.
Figure3.ThinkPadEdgeE440andE540right-sideview
1Always-onUSBconnector(USB2.0connector)
4acpowerconnector
2Opticaldrive5LenovoOneLinkconnector
3Ethernetconnector
1Always-onUSBconnector(USB2.0connector)
Bydefault,theAlwaysOnUniversalSerialBus(USB)connectorenablesyoutochargesomemobiledigital
devicesandsmartphonesinthefollowingsituations:
•Whenyourcomputerisonorinsleepmode
•Whenyourcomputerisinhibernationmodeoristurnedoff,butconnectedtoacpower
Ifyouwanttochargethesedeviceswhenyourcomputerisinhibernationmodeoristurnedoff,andthe
computerisnotconnectedtoacpower,dothefollowing:
•ForWindows7:StartthePowerManagerprogramandclicktheGlobalPowerSettingstab.Then
selecttheEnableUSBchargefromthecomputerbatteryevenwhenthecomputerisoffcheck
box,andclickOKorApply.
•ForWindows8andWindows8.1:PresstheWindowskeytogototheStartscreen.ClickLenovo
Settings➙Power.ThenselectEnableUSBchargefromthecomputerbatteryevenwhenthe
computerisoffcheckboxunderAlwaysOnUSB.
Note:WhenyouattachaUSBcabletothisUSBconnector,ensurethattheUSBmarkisfacingupward.
Otherwisetheconnectormightbedamaged.
2Opticaldrive
Usetheopticaldrivetoreadorburnopticaldiscs.
Chapter1.Productoverview5
Page 22
3Ethernetconnector
Connectthecomputertoalocalareanetwork(LAN)withtheEthernetconnector.
DANGER
Toavoidtheriskofelectricalshock,donotconnectthetelephonecabletotheEthernetconnector.
YoucanonlyconnectanEthernetcabletothisconnector.
TheEthernetconnectorhastwoindicatorsthatshowthestatusofthenetworkconnection.Whenthe
upper-leftindicatorissolidgreen,itindicatesthatthecomputerconnectstoaLANandasessionwiththe
networkisavailable.Whentheupper-rightindicatorblinksyellow,itindicatesthatdataisbeingtransmitted.
Note:IfyouconnectthecomputertoasupportedThinkPadOneLinkDock,usetheEthernetconnectoron
thedocktoconnecttoaLAN,nottheoneonthecomputer.
4acpowerconnector
5LenovoOneLinkconnector
Whentheacpoweradapterisconnectedtotheacpowerconnector,itprovidespowertothecomputer
andchargesthebattery.WhenasupportedThinkPadOneLinkDockisconnectedtotheLenovoOneLink
connector,itcannotonlyextendthecomputercapabilitiesbutalsoprovideacpowertothecomputer
andchargethebattery.
TousetheLenovoOneLinkconnector,youneedtoremovetheconnectorcoverfromtheLenovoOneLink
connectorfirst.
Note:Ensurethatyoukeeptheconnectorcover.ReattachittotheLenovoOneLinkconnectorwhen
youarenotusingtheLenovoOneLinkconnector.
Left-sideview
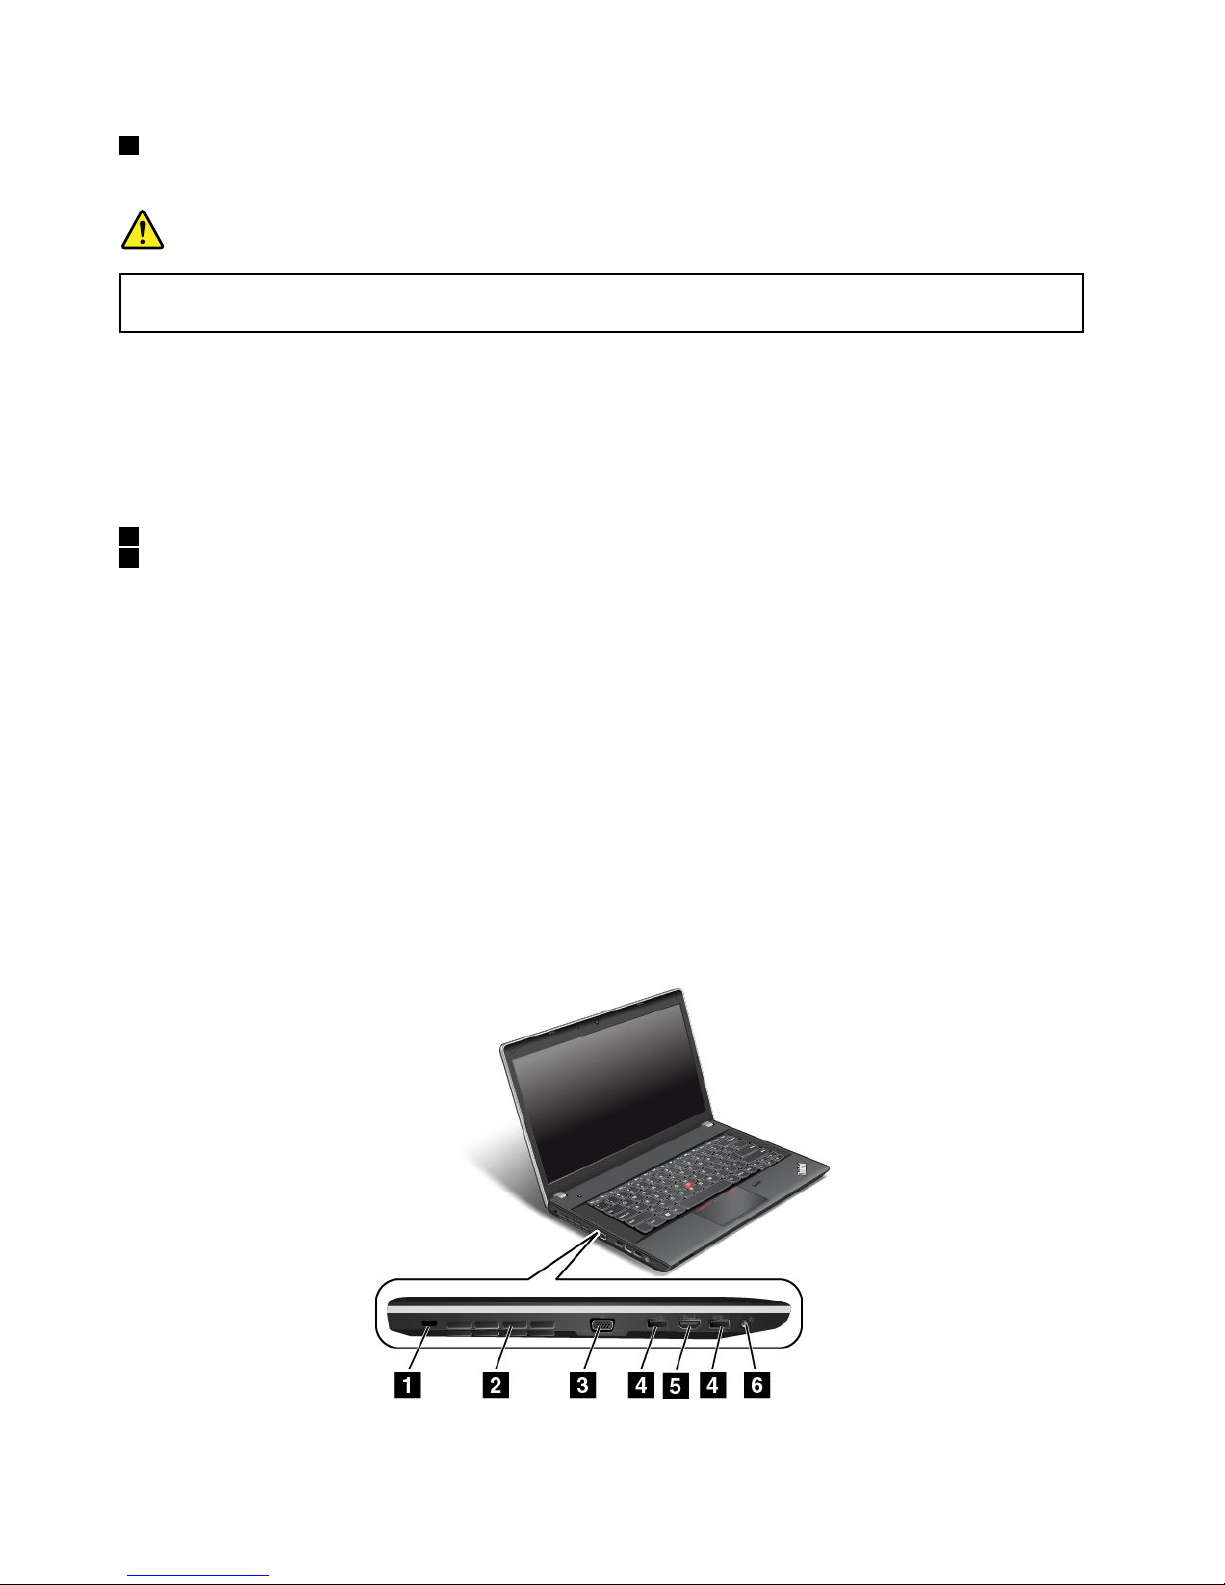
ThinkPadEdgeE440left-sideview
Figure4.ThinkPadEdgeE440left-sideview
6UserGuide
Page 23

1Security-lockslot4USB3.0connectors
2Fanlouvers(left)
5HighDefinitionMultimediaInterfaceHDMI™connector
3VGAconnector6Comboaudioconnector
1Security-lockslot
Purchaseasecuritycablelockthatfitsthissecurity-lockslottolockyourcomputertoastationaryobjectto
protectyourcomputerfromtheft.
2Fanlouvers(left)
Thefanlouversandtheinternalfanenableairtocirculateinthecomputertoensurepropercooling,
especiallythecoolingofthemicroprocessor.
Note:T oensureproperairflow,donotplaceanyobstacleinfrontofthefanlouvers.
3VGAconnector
Usethevideographicsarray(VGA)connectortoconnectthecomputertoaVGA-compatiblevideodevice,
suchasaVGAmonitor.
Note:IfyouconnectthecomputertoasupportedThinkPadOneLinkDock,usetheVGAconnectoron
thedock,nottheoneonthecomputer.
4USB3.0connectors
TheUSB3.0connectorsareusedforconnectingUSB-compatibledevices,suchasaUSBprinteror
adigitalcamera.
Note:WhenyouattachaUSBcabletothisUSBconnector,ensurethattheUSBmarkisfacingupward.
Otherwisetheconnectormightbedamaged.
5HDMIconnector
Usethehigh-definitionmultimediainterface(HDMI)connectortoconnectthecomputertoa
HDMI-compatibleaudiodeviceorvideomonitor,suchasanhigh-definitiontelevision(HDTV).
Note:IfyouconnectthecomputertoasupportedThinkPadOneLinkDock,usetheHMDIconnectoron
thedock,nottheoneonthecomputer.
6Comboaudioconnector
Tolistentothesoundfromyourcomputer,connectaheadphoneoraheadsetthathasa3.5mm,4-pole
plugtothecomboaudioconnector.
Notes:
•Ifyouareusingaheadsetwithafunctionswitch,donotpressthisswitchwhileusingtheheadset.If
youpressit,theheadsetmicrophonewillbedisabled,andtheintegratedmicrophonesonthecomputer
willbeenabledinstead.
•Thecomboaudioconnectordoesnotsupportaconventionalmicrophone.Formoreinformation,see
“Usingaudiofeatures”onpage43
.
Chapter1.Productoverview7
Page 24
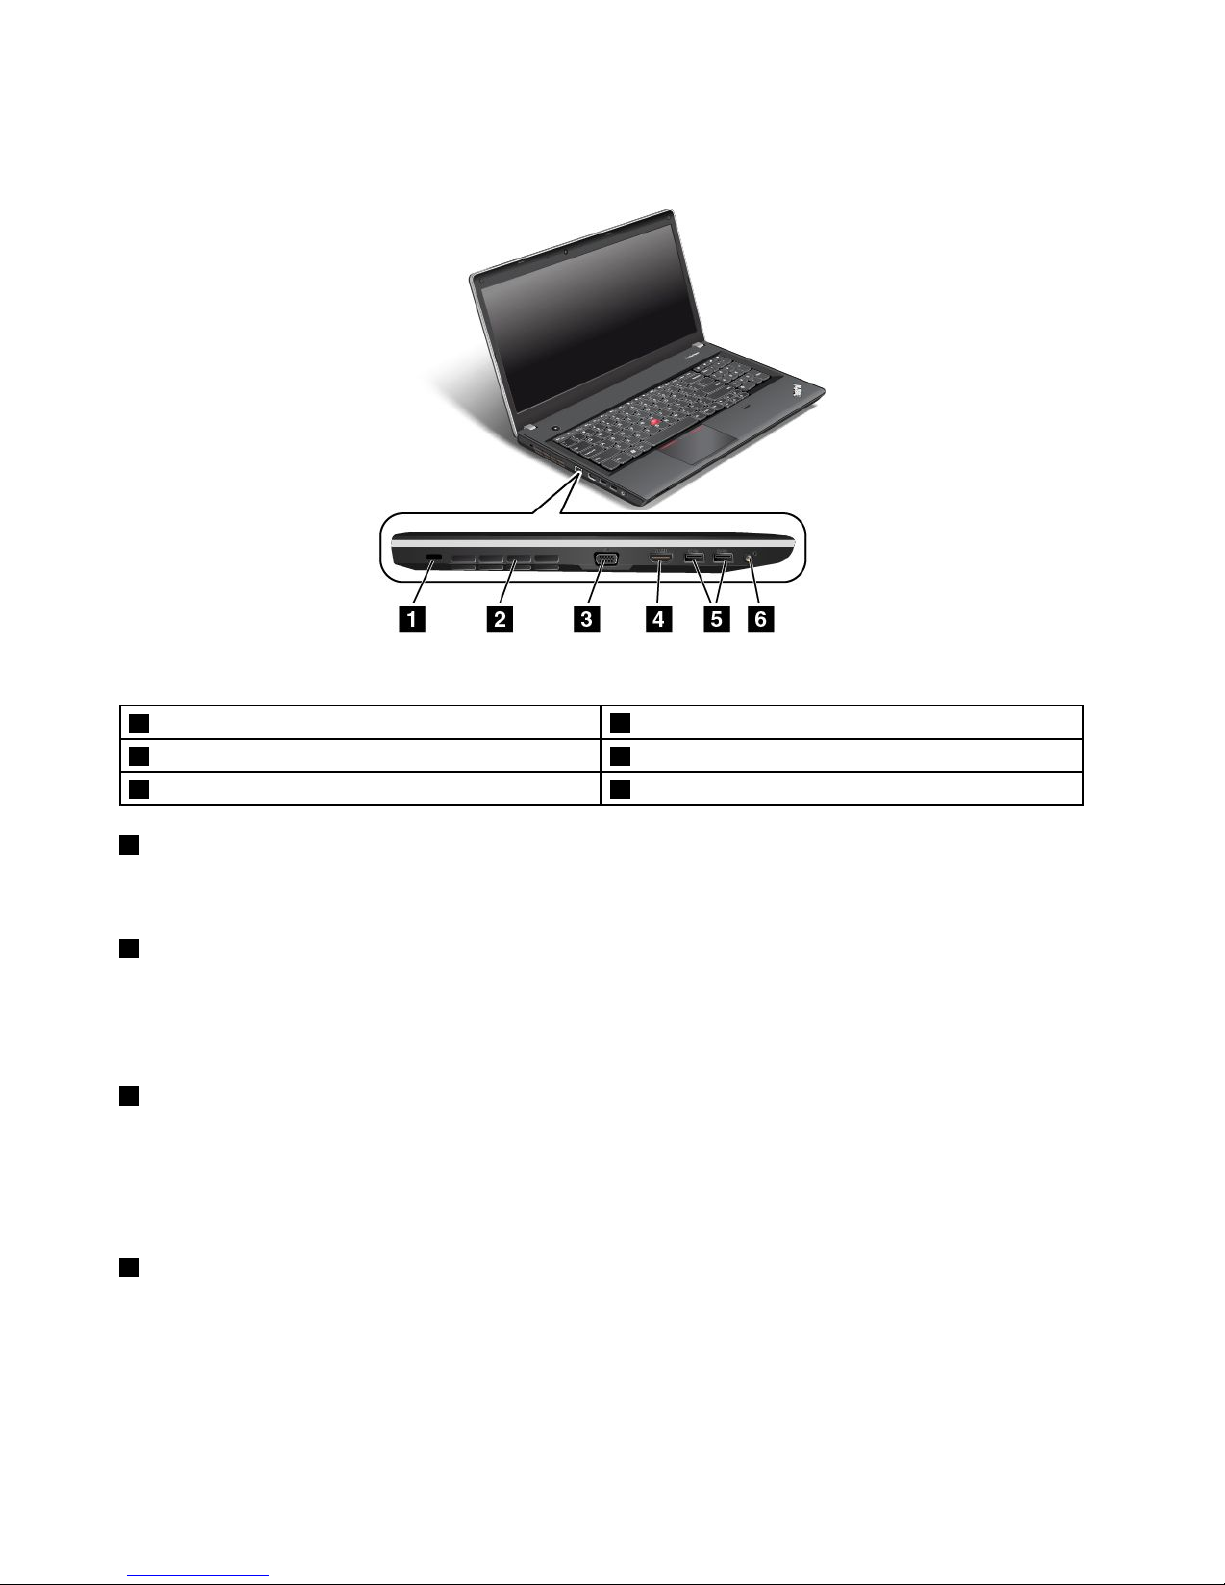
ThinkPadEdgeE540left-sideview
Figure5.ThinkPadEdgeE540left-sideview
1Security-lockslot
4HDMIconnector
2Fanlouvers(left)5USB3.0connectors
3VGAconnector6Comboaudioconnector
1Security-lockslot
Purchaseasecuritycablelockthatfitsthissecurity-lockslottolockyourcomputertoastationaryobjectto
protectyourcomputerfromtheft.
2Fanlouvers(left)
Thefanlouversandtheinternalfanenableairtocirculateinthecomputertoensurepropercooling,
especiallythecoolingofthemicroprocessor.
Note:T oensureproperairflow,donotplaceanyobstacleinfrontofthefanlouvers.
3VGAconnector
Usethevideographicsarray(VGA)connectortoconnectthecomputertoaVGA-compatiblevideodevice,
suchasaVGAmonitor.
Note:IfyouconnectthecomputertoasupportedThinkPadOneLinkDock,usetheVGAconnectoron
thedock,nottheoneonthecomputer.
5HDMIconnector
Usethehigh-definitionmultimediainterface(HDMI)connectortoconnectthecomputertoa
HDMI-compatibleaudiodeviceorvideomonitor,suchasanhigh-definitiontelevision(HDTV).
Note:IfyouconnectthecomputertoasupportedThinkPadOneLinkDock,usetheHMDIconnectoron
thedock,nottheoneonthecomputer.
8UserGuide
Page 25
5USB3.0connectors
TheUSB3.0connectorsareusedforconnectingUSB-compatibledevices,suchasaUSBprinteror
adigitalcamera.
Note:WhenyouattachaUSBcabletothisUSBconnector,ensurethattheUSBmarkisfacingupward.
Otherwisetheconnectormightbedamaged.
6Comboaudioconnector
Tolistentothesoundfromyourcomputer,connectaheadphoneoraheadsetthathasa3.5mm,4-pole
plugtothecomboaudioconnector.
Notes:
•Ifyouareusingaheadsetwithafunctionswitch,donotpressthisswitchwhileusingtheheadset.If
youpressit,theheadsetmicrophonewillbedisabled,andtheintegratedmicrophonesonthecomputer
willbeenabledinstead.
•Thecomboaudioconnectordoesnotsupportaconventionalmicrophone.Formoreinformation,see
“Usingaudiofeatures”onpage43
.
Bottomview
Note:Yourcomputerbottomviewmightlookslightlydifferentfromthefollowingillustration.
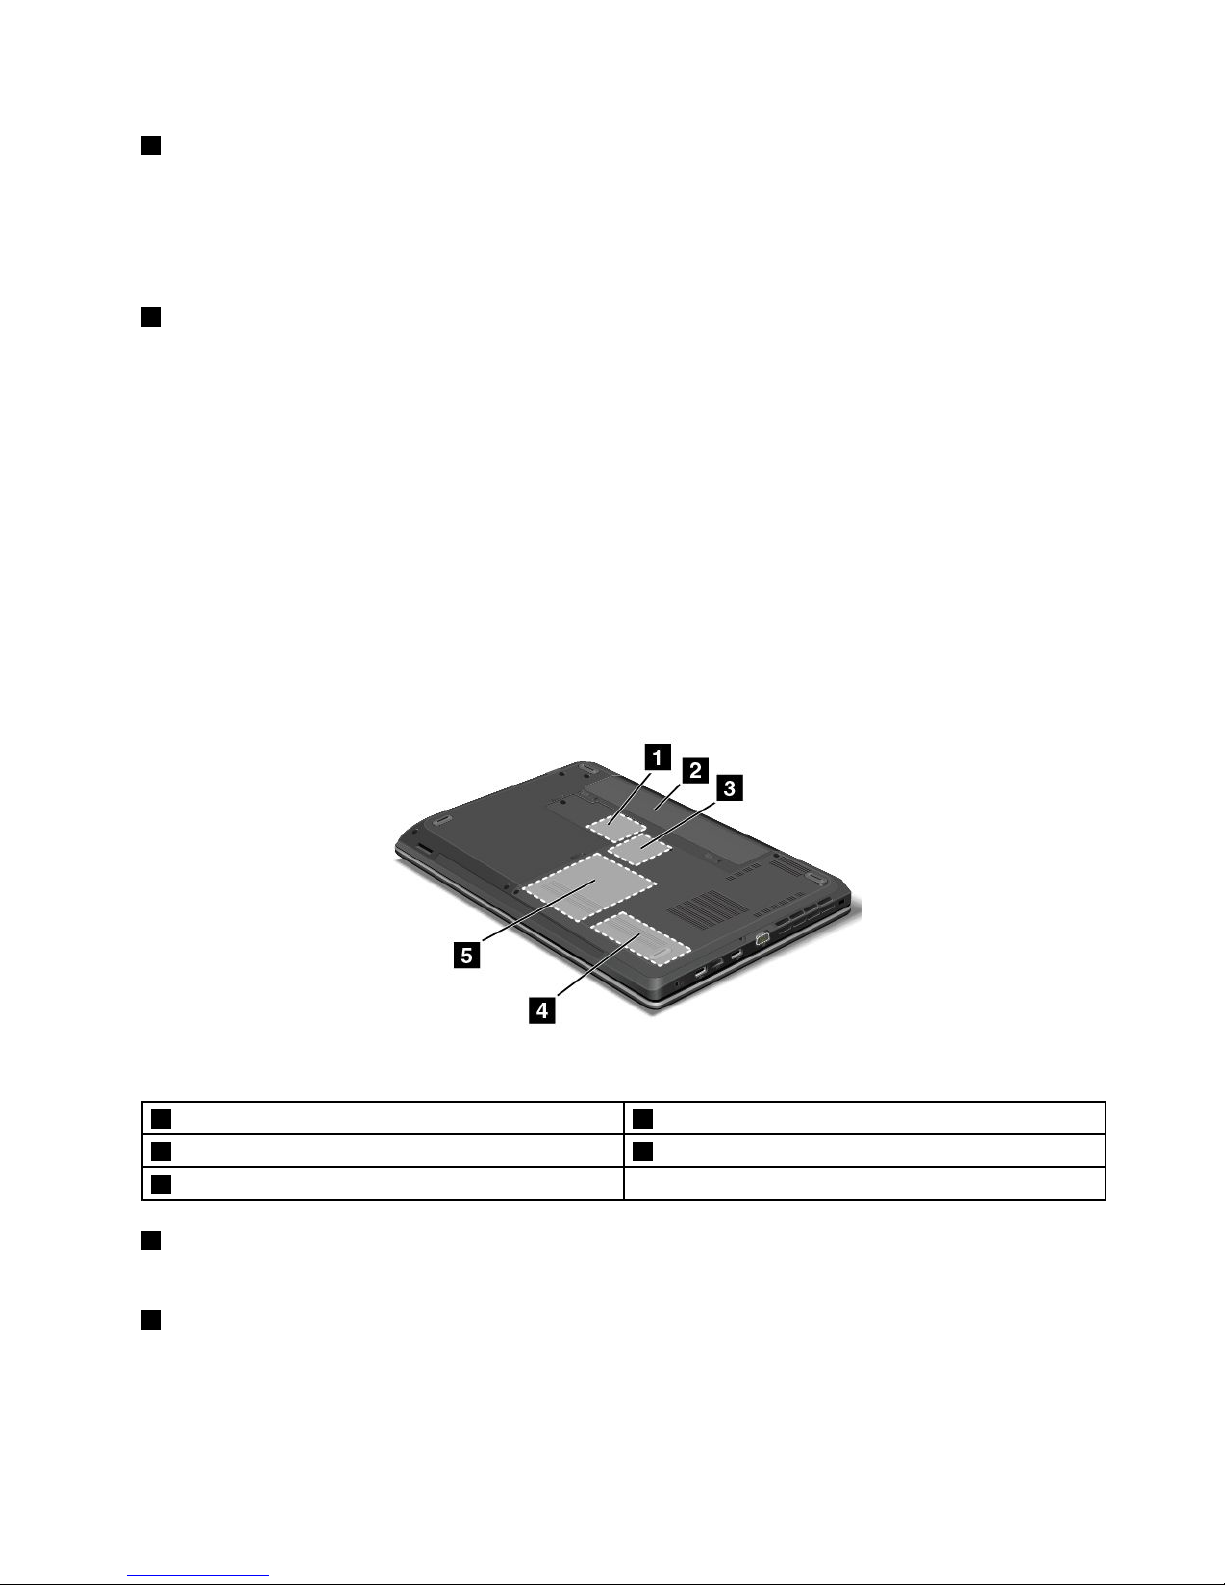
Figure6.ThinkPadEdgeE440andE540bottomview
1WirelessLANcardslot4Memory-upgradeslot
2Battery5Harddiskdriveorsolid-statedrive
3SlotforwirelessWANcardorM.2solid-statedrive
1WirelessLANcardslot
YourcomputermighthaveawirelessLANcardinstalledforyoutoestablishwirelessLANconnections.
2Battery
Useyourcomputerwithbatterypowerwheneveracpowerisunavailable.
YoucanusethePowerManagerprogramtoadjustyourpowersettingsasneeded.Fordetailedinformation,
seethehelpinformationsystemofthePowerManagerprogram.
Chapter1.Productoverview9
Page 26
3SlotforwirelessWANcardorM.2solid-statedrive
Yourcomputermighthaveawirelesswideareanetwork(WAN)cardinstalledinthisslotforyoutoestablish
wirelessWANconnections.
Forsomemodels,anM.2solid-statedrivemightbeinstalledfordatastorageinsteadofawirelessWANcard.
4Memory-upgradeslot
Youcanincreasetheamountofmemoryinyourcomputerbyinstallingamemorymoduleinthe
memory-upgradeslot.MemorymodulesareavailableasoptionsfromLenovo.
5Harddiskdriveorsolid-statedrive
Dependingonthemodel,thecomputermighthavealarge-capacity,customer-upgradableharddiskdrive
thatcanmeetvariousstoragedemands.
Somemodelshaveasolid-statedrivefordatastorage.Thesolid-statedrivemakesyourcomputerlight,
small,andfast.
Note:Thehiddenservicepartitionisthereasonwhythereislessfreespacethanexpectedonyourhard
diskdriveorsolid-statedrive.Thisreductionismorenoticeableonthesolid-statedrivebecauseofits
smallercapacity.
Rearview
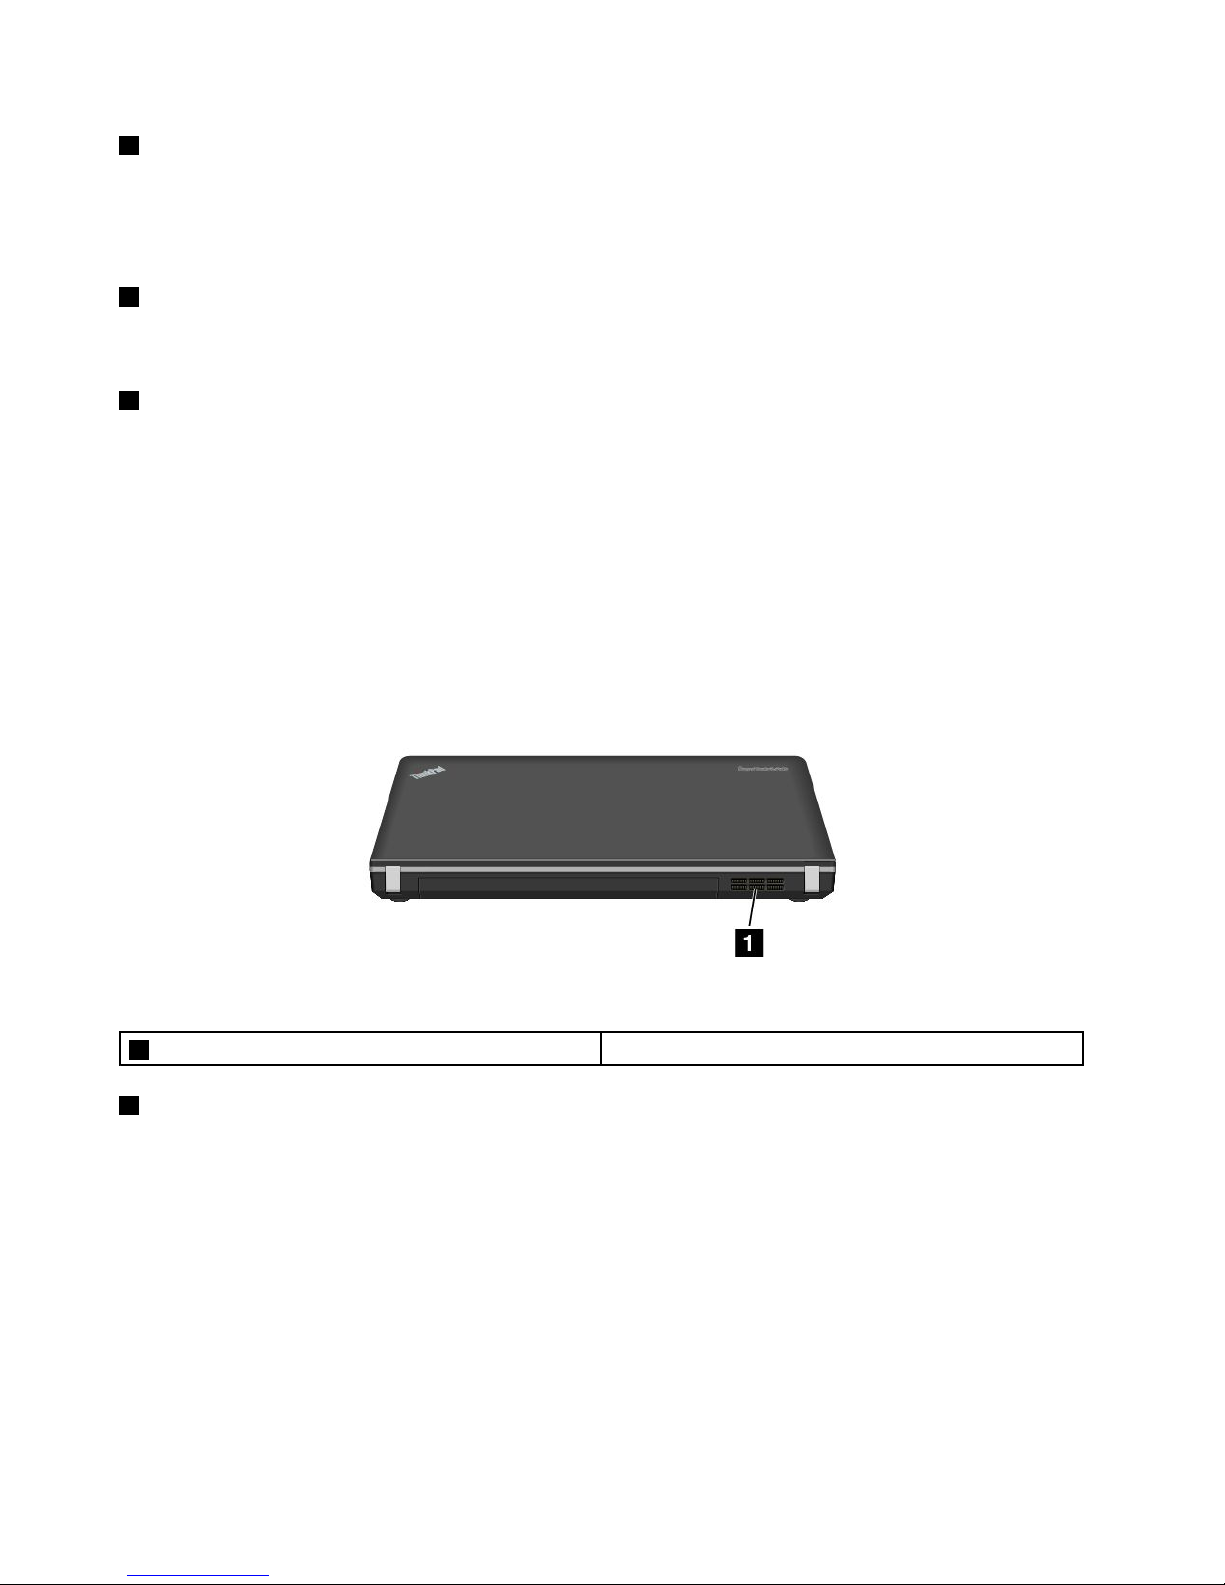
Figure7.ThinkPadEdgeE440andE540rearview
1Fanlouvers(rear)
1Fanlouvers(rear)
Thefanlouversandtheinternalfanenableairtocirculateinthecomputertoensurepropercooling,
especiallythecoolingofthemicroprocessor.
Note:T oensureproperairflow,donotplaceanyobstacleinfrontofthefanlouvers.
Statusindicators
Yourcomputerhasseveralstatusindicatorsshowingthestatusofyourcomputer.
Note:Y ourcomputerkeyboardmightlookdifferentfromthefollowingillustration.
10UserGuide
Page 27
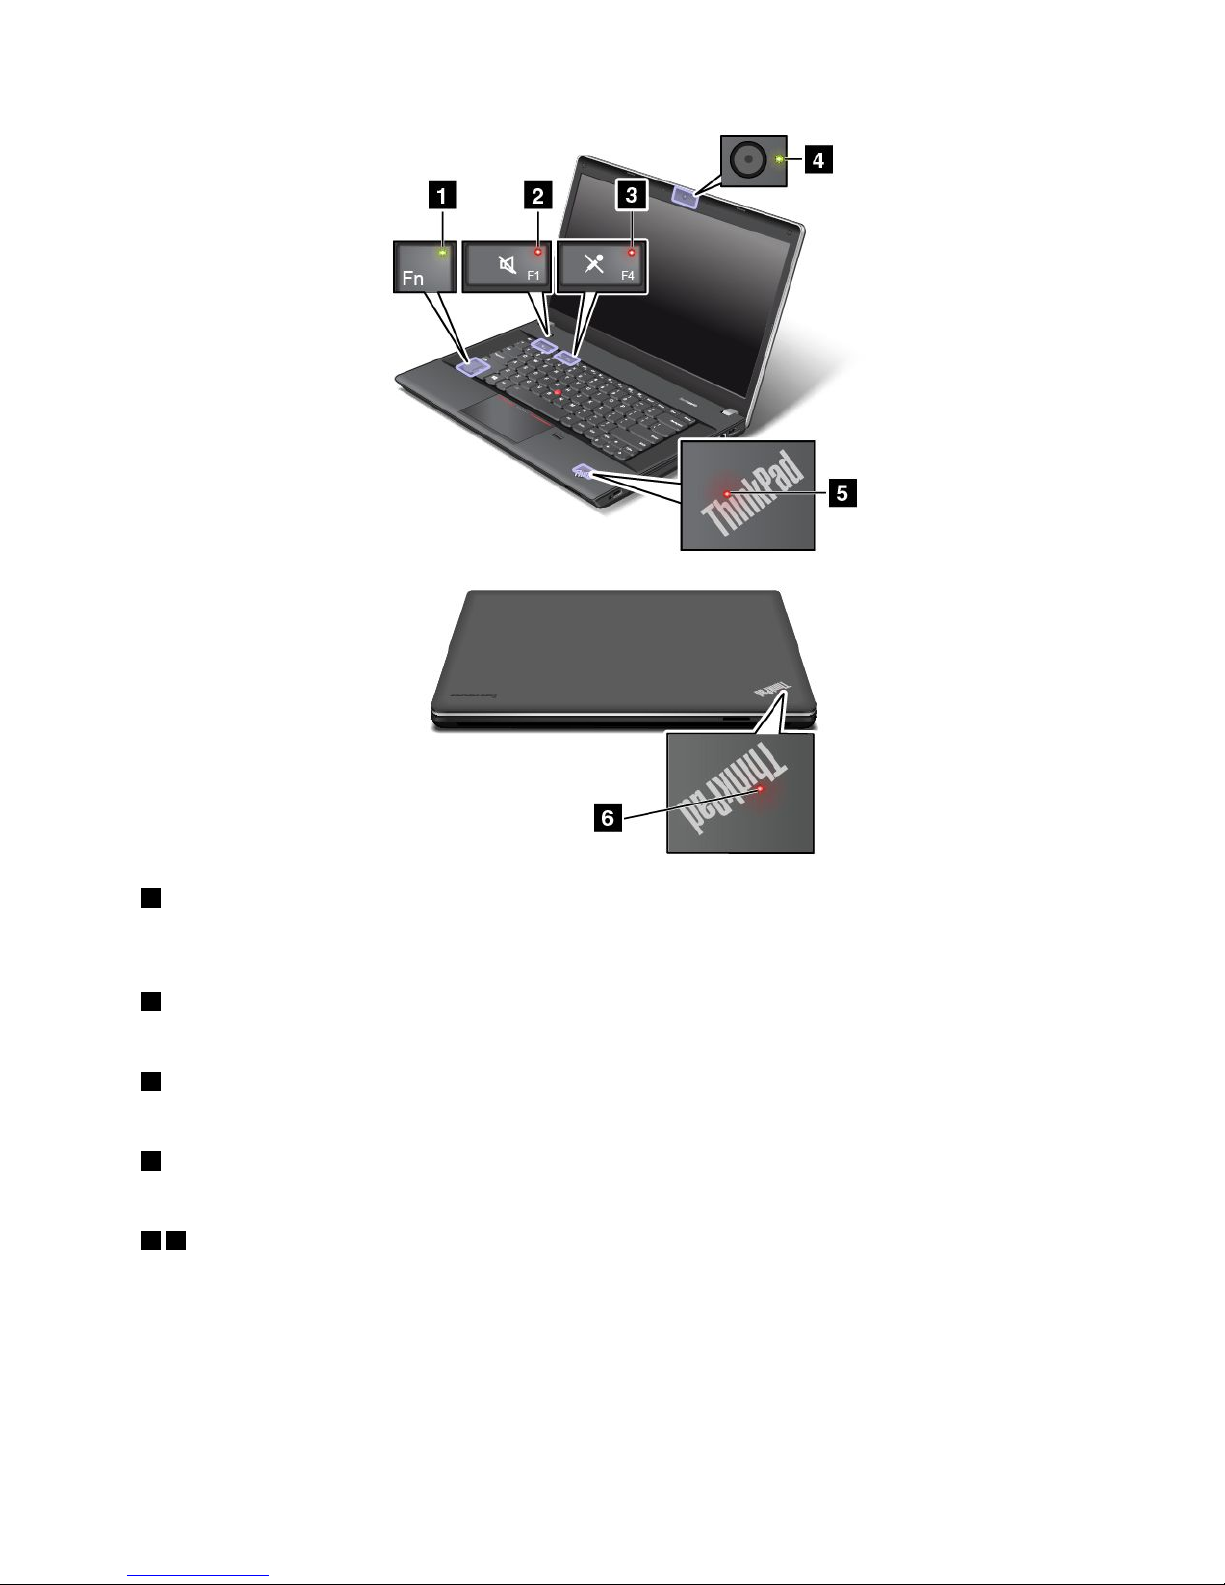
1FnLockindicator
TheFnLockindicatorshowsthestatusofFnLockfunction.Formoreinformation,see“Specialkeys”
onpage26.
2Speaker-muteindicator
Whenthespeaker-muteindicatorison,thespeakersaremuted.
3Microphone-muteindicator
Whenthemicrophone-muteindicatorison,themicrophonesaremuted.
4Camera-statusindicator
Whenthecamera-statusindicatorison,thecameraisinuse.
56System-statusindicators
Theilluminateddots,oneintheThinkPadlogoontheouterlidofyourcomputerandtheotheronthepalm
rest,showthesystemstatusofyourcomputer:
•Blinksforthreetimes:Thecomputerisinitiallyconnectedtothepower.
•On:Thecomputerison(innormalmode).
•Blinksfast:Thecomputerisenteringhibernationmode.
•Blinksslowly:Thecomputerisinsleepmode.
Chapter1.Productoverview11
Page 28
•Off:Thecomputerisofforinhibernationmode.
Locatingimportantproductinformation
Thissectionprovidesinformationtohelpyoulocatethemachinetypeandmodellabel,theFCCIDandIC
Certificationlabel,theWindowsCertificateofAuthenticitylabel,andtheGenuineMicrosoftlabel.
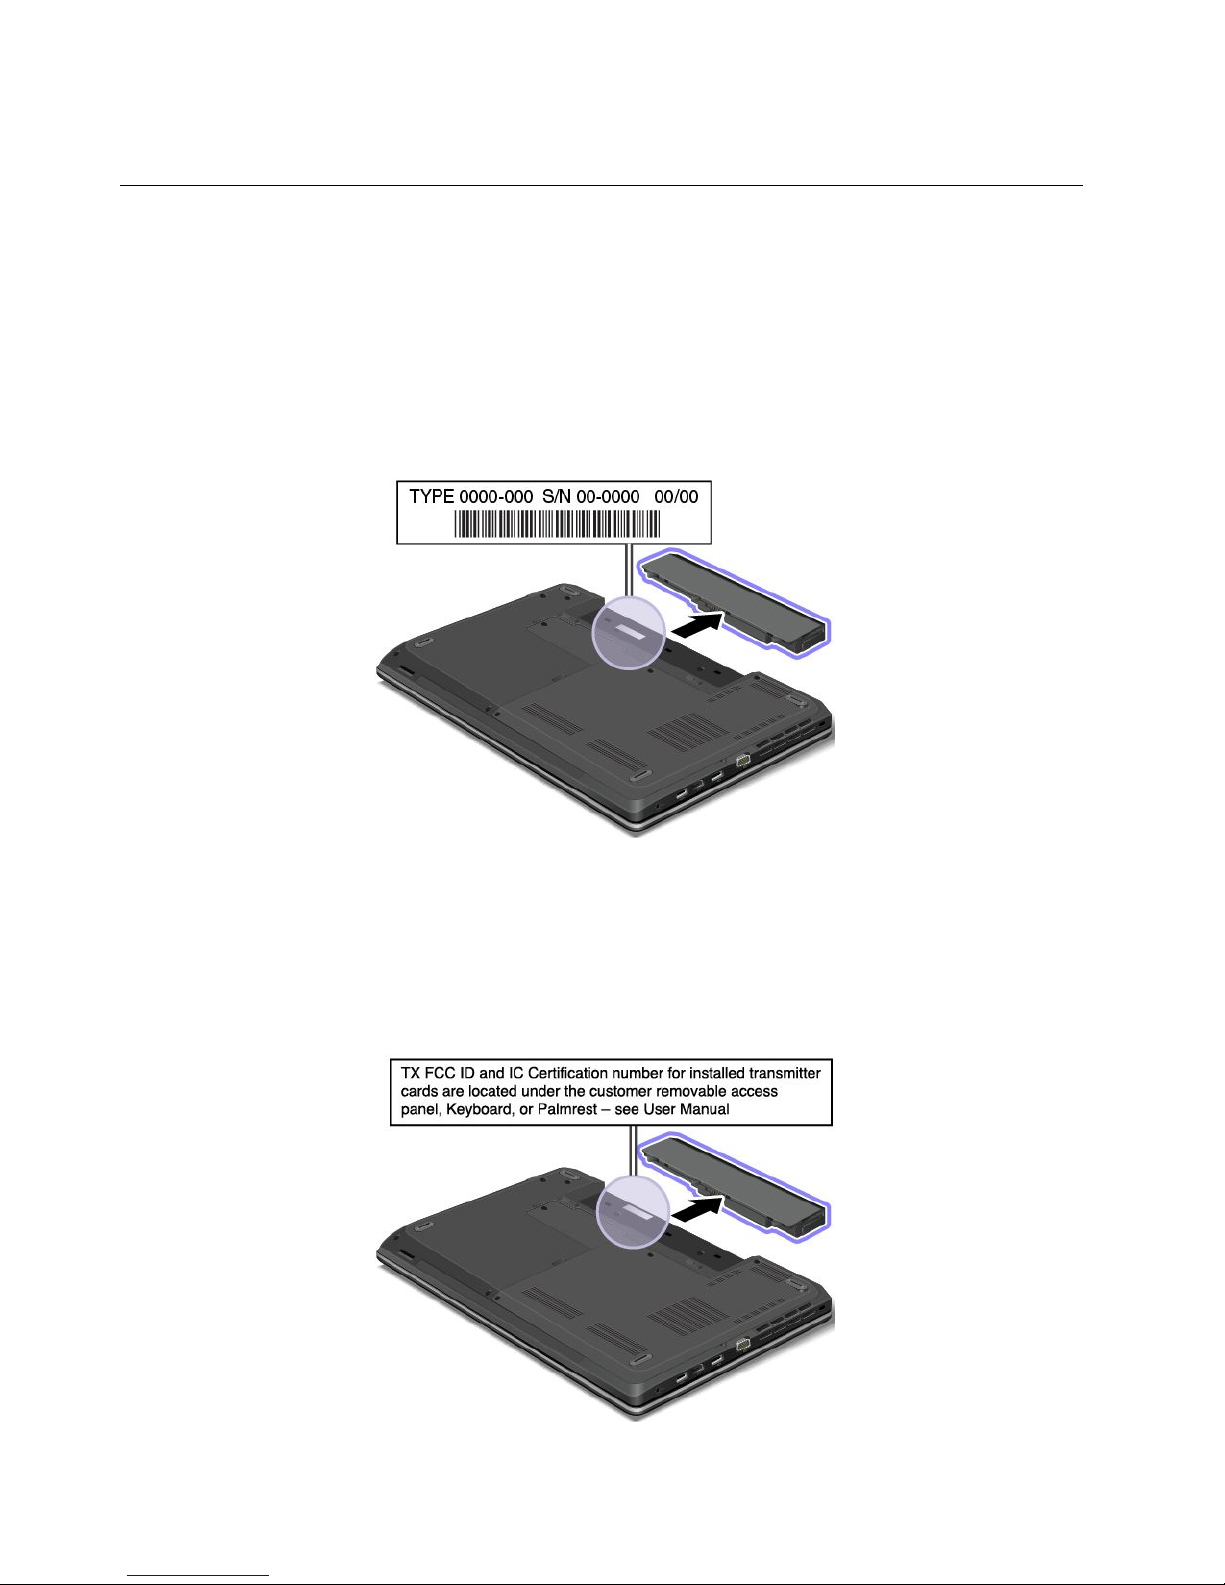
Machinetypeandmodellabel
Themachinetypeandmodellabelidentifiesyourcomputer.WhenyoucontactLenovoforhelp,themachine
typeandmodelinformationhelpssupporttechnicianstoidentifyyourcomputerandprovidefasterservice.
Thefollowingfigureshowsthelocationofthemachinetypeandmodelofyourcomputer:
FCCIDandICCertificationnumberlabel
ThereisnoFCCIDorICCertificationnumberforthewirelesscommunicationcardsshownontheenclosure
ofthecomputer.Onsomemodels,LenovoprovidesyoutheinformationaboutthelocationoftheFCCID
andICCertificationnumberlabelonthecomputerbackcoverassembly.
ThefollowingfigureshowsthelocationoftheFCCIDandICCertificationnumberlabelofthecomputer.
12UserGuide
Page 29
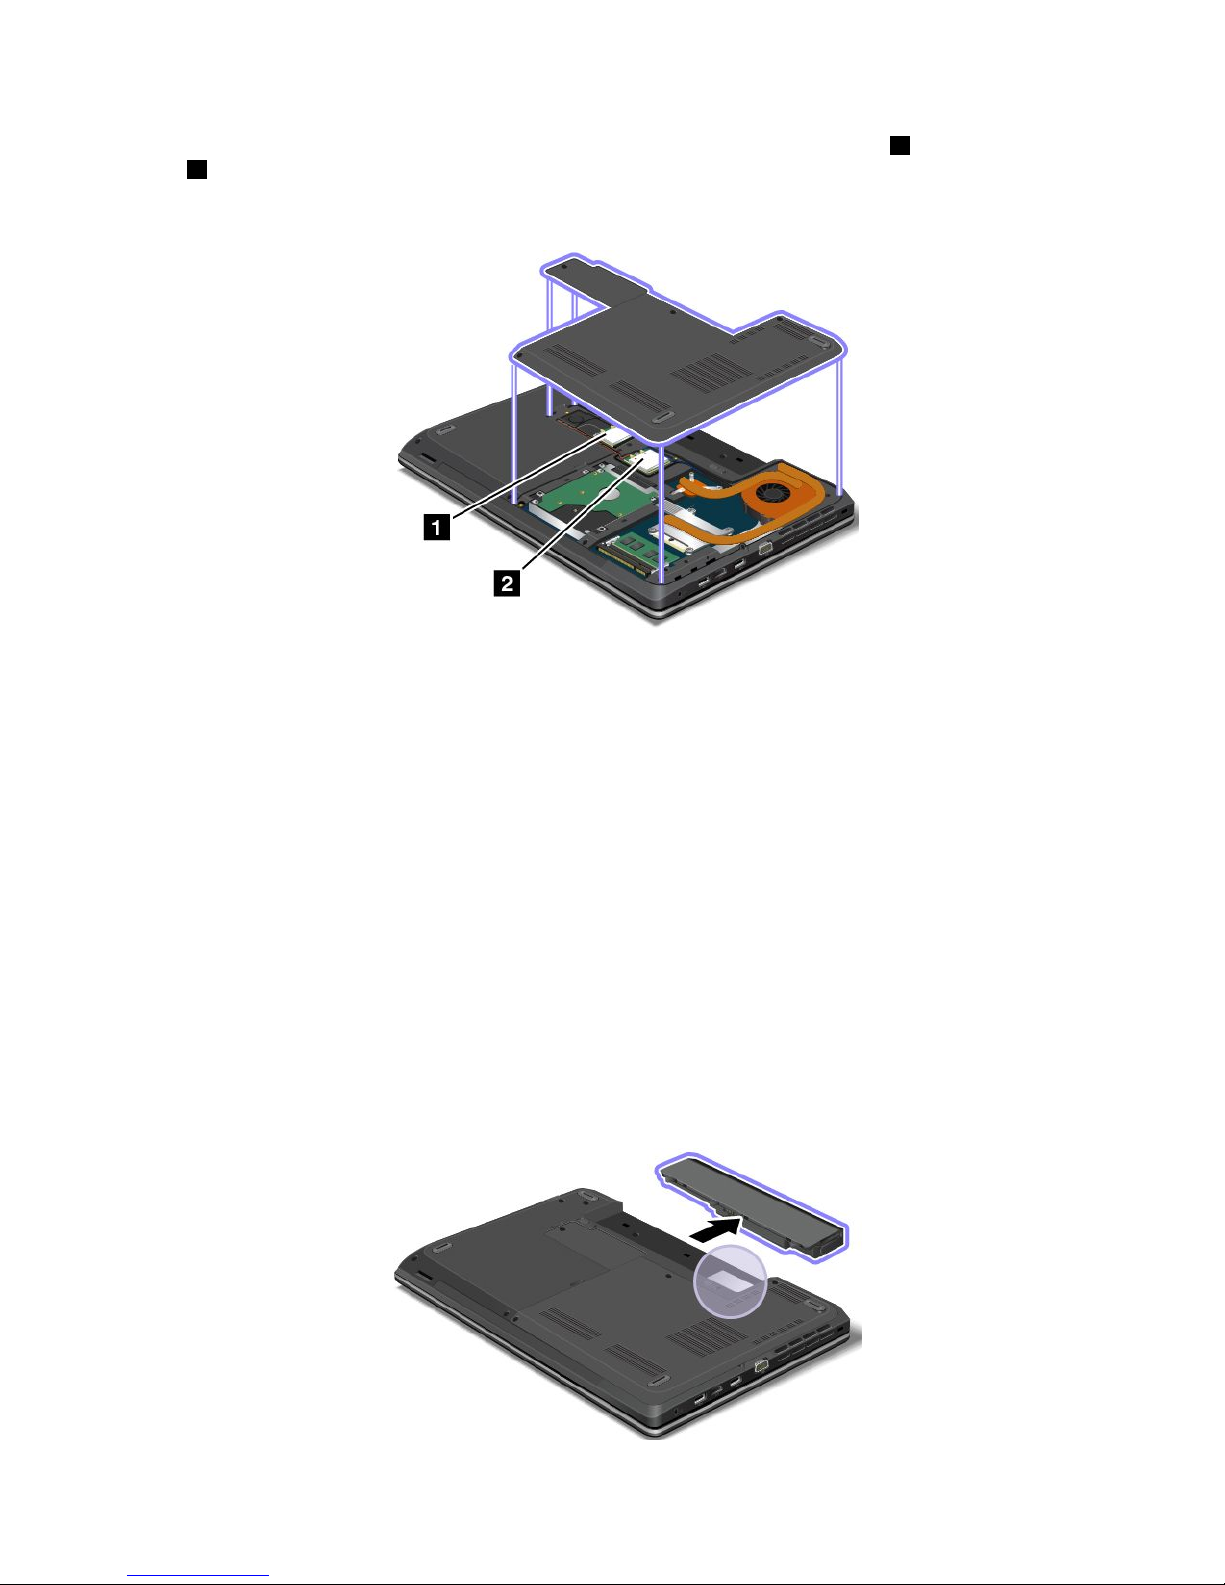
TheFCCIDandICCertificationnumberlabelsareaffixedonthewirelessLANcard1andwirelessWAN
card
2installedinthewirelesscommunicationcardslotsofthecomputer.
ThefollowingfigureshowsthelocationoftheFCCIDandICCertificationnumberlabelsofyourcomputer.
ToremovethewirelessLANcardforrepairorreplacement,see“ReplacingawirelessLANcard”onpage94.
ToremovethewirelessWANcardforrepairorreplacement,see“ReplacingawirelessWANcard”onpage97
.
Note:UseonlyLenovo-authorizedwirelesscommunicationcardsforthecomputer.Ifyouinstallan
unauthorizedwirelesscommunicationcardthatisnotapprovedforuseinyourcomputer,anerrormessage
willbedisplayedandthecomputerwillbeepwhenyouturnonthecomputer.
CertificateofAuthenticitylabel
TheCertificateofAuthenticitylabelisprovidedonmodelsthatarelicensedtouseaWindows7
operatingsystem.ThelicensedWindowsversionandproductkeyassociatedwiththecomputerareprinted
onthislabel.Recordthisinformationandkeepitinasafeplace.Y oumightneedthesenumberstostart
yourcomputerorreinstalltheWindows7operatingsystem.Dependingonthemodel,theCertificateof
Authenticitylabelcanbeonthecomputercover,underthebattery,oronthepoweradapter.
FormoreinformationabouttheCertificateofAuthenticitylabel,goto:
http://www.microsoft.com/en-us/howtotell/Hardware.aspx
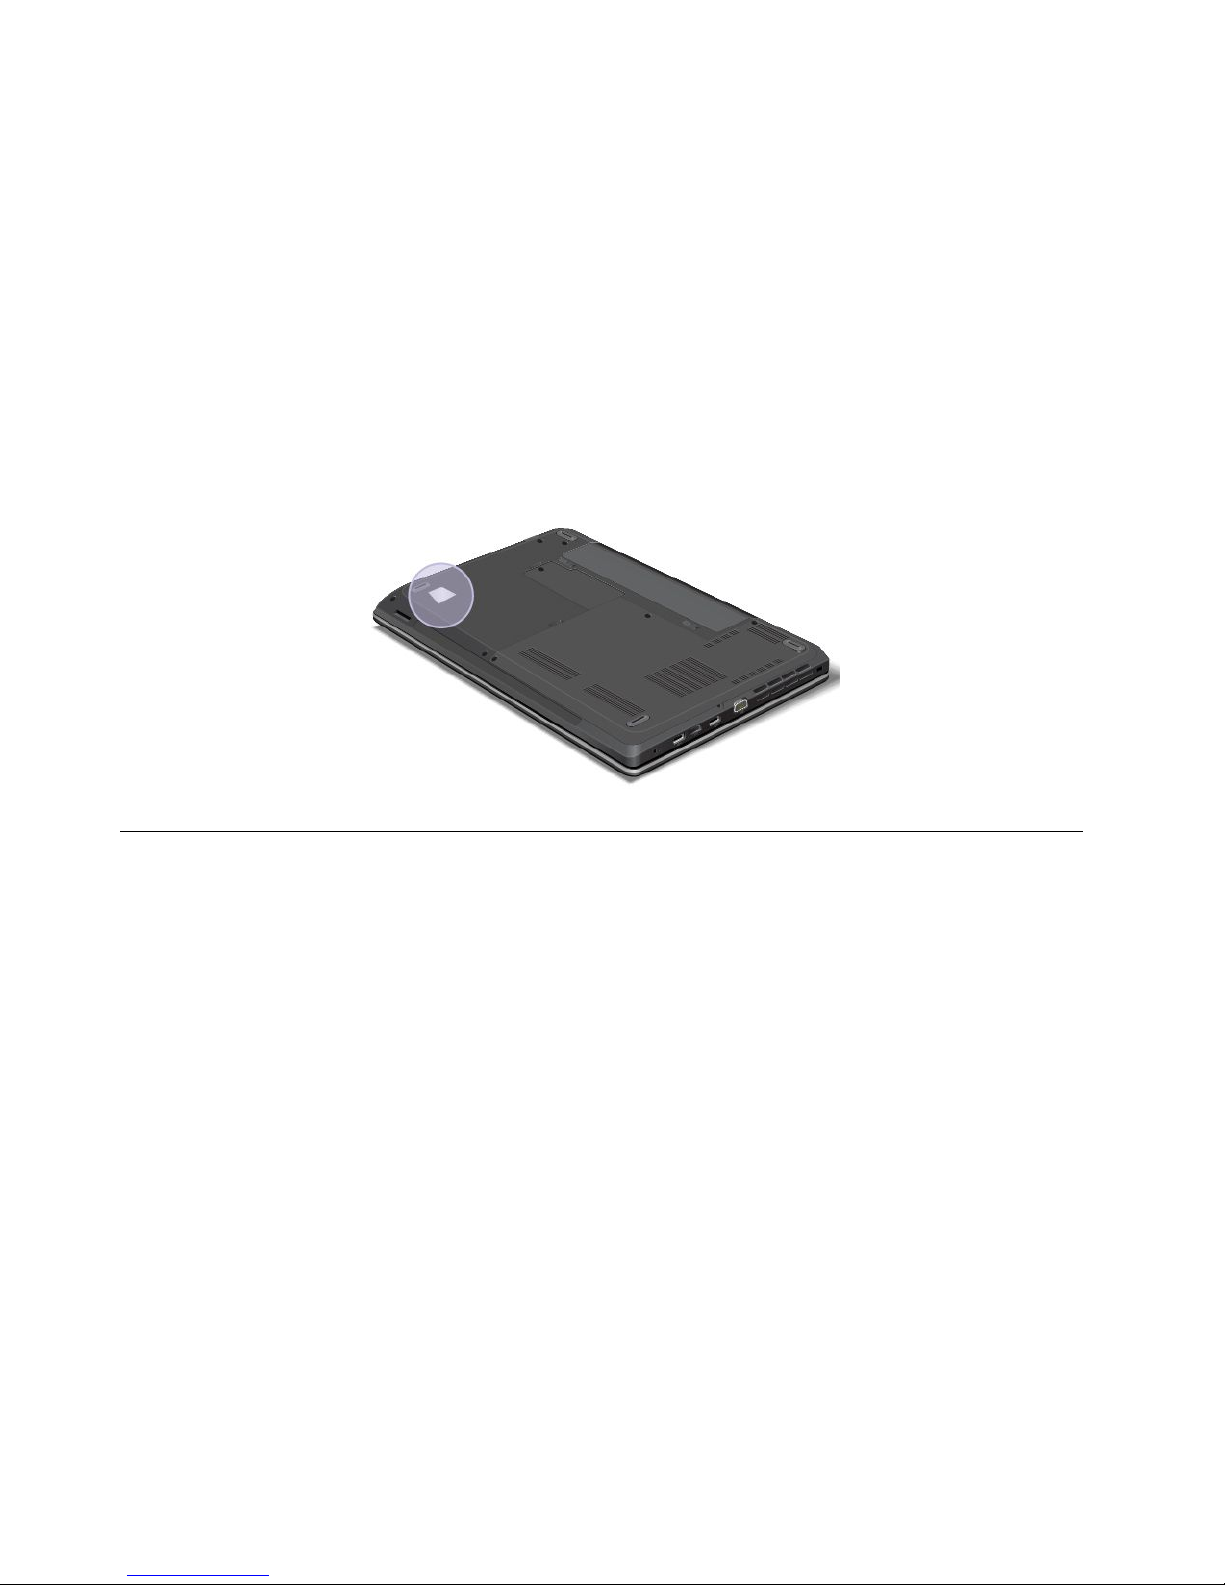
ThefollowingfigureshowsthelocationoftheCertificateofAuthenticitylabelonthecomputercover:
Chapter1.Productoverview13
Page 30
GenuineMicrosoftlabel
TheGenuineMicrosoftlabelisprovidedonmodelsthatarelicensedtouseaWindows8orWindows8.1
operatingsystem.Theversionoftheoperatingsystemisprintedonthelabel.Ifyourcomputermodelis
licensedtousetheWindows8ProorWindows8.1Prooperatingsystem,thatlicensealsopermitsyouto10
UserGuideusetheWindows7ProfessionaloperatingsysteminplaceoftheWindows8ProorWindows
8.1Prooperatingsystemifyouprefer.LenovocomputersthatarelicensedforusewithaWindows8or
Windows8.1operatingsystemareshippedwiththecorrespondinglicensekeydigitallyencodedinto
thecomputerhardware.Dependingonthecomputermodel,theGenuineMicrosoftlabelcanbeonthe
computercover,underthebattery,oronthepoweradapter.
FormoreinformationabouttheGenuineMicrosoftlabel,goto:
http://www.microsoft.com/en-us/howtotell/Hardware.aspx
ThefollowingfigureshowsthelocationoftheGenuineMicrosoftlabelonthecomputercover:
Features
Thistopicliststhefeaturesofyourcomputer.
Toviewthesystempropertiesofyourcomputer,dothefollowing:
•ForWindows7:ClickStartandright-clickComputer.ThenclickProperties.
•ForWindows8andWindows8.1:Movethepointertothetop-rightorbottom-rightcornerofthescreen
tobringupthecharms.ThenclickSettings➙PCinfo.
Memory
•Doubledatarate3lowvoltagesynchronousdynamicrandomaccessmemorymodules(DDR3LVSDRAM)
Storagedevice
•2.5-inchformfactor,7-mmor9.5-mmheightharddiskdrive
•2.5-inchformfactor,7-mmheightsolid-statedrive
•M.2solid-statedriveforcachingonly(onsomemodels)
Display
ThecolordisplayusestheThinFilmTransistor(TFT)technology.
•Size:
–ForE440models:14.0inches(355.6mm)
14UserGuide
Page 31

–ForE540models:15.6inches(396.2mm)
•Resolution:
–LCD:
–ForE440models:Upto1366x768or1600x900,dependingonthemodel
–ForE540models:Upto1366x768or1920x1080,dependingonthemodel
–Externalmonitor:Upto2048x1536
•Brightnesscontrol
•Integratedcamera
•Microphones
Keyboard
•6-rowkeyboard
•ThinkPadpointingdevice(T rackPointpointingdeviceandThinkPadtrackpad)
•Fnkey
•Numerickeypad(onsomemodels)
Interface
•Externalmonitorconnectors(VGAconnectorandHDMIconnector)
•Comboaudioconnector
•TwoUSB3.0connectors
•OneAlwaysOnUSBconnector(USB2.0)
•RJ45Ethernetconnector
•4-in-1digitalmediacardreader
•LenovoOneLinkconnector
•acpowerconnector
Opticaldrive
•Multi-Burnerdrive
Wirelessfeatures
•IntegratedwirelessLAN
•IntegratedwirelessWAN(onsomemodels)
•IntegratedBluetooth
Securityfeatures
•Fingerprintreader(onsomemodels)
Specifications
Thissectionliststhephysicalspecificationsforyourcomputer.
Size
•ForE440models:
–Width:344mm(13.54inches)
Chapter1.Productoverview15
Page 32

–Depth:239mm(9.41inches)
–Height:26.3mm(1.04inches)
•ForE540models:
–Width:377mm(14.84inches)
–Depth:250mm(9.84inches)
–Height:26.6mm(1.05inches)
Heatoutput
•65W(222Btu/hr)maximumor90W(307Btu/hr)maximum(dependingonthemodel)
Powersource(acpoweradapter)
•Sine-waveinputat50to60Hz
•Inputratingoftheacpoweradapter:100to240Vac,50to60Hz
Batterypack
•Lithium-ion(Li-Ion)batterypack
Batterylife
•Forthepercentageoftheremainingbatterypower,checkthebatterystatusiconintheWindows
notificationarea.
Operatingenvironment
Thissectionprovidesinformationabouttheoperatingenvironmentofyourcomputer.
Environment:
•Maximumaltitudewithoutpressurization:3048m(10000ft)
•Temperature
–Ataltitudesupto2438m(8000ft)
–Operating:5.0°Cto35.0°C(41°Fto95°F)
–Storage:5.0°Cto43.0°C(41°Fto109°F)
–Ataltitudesabove2438m(8000ft)
–Maximumtemperaturewhenoperatingundertheunpressurizedcondition:31.3°C(88°F)
Note:Whenyouchargethebatterypack,itstemperaturemustbeatleast10°C(50°F).
•Relativehumidity:
–Operating:8%to80%
–Storage:5%to95%
Ifpossible,placeyourcomputerinawell-ventilatedanddryareawithoutdirectexposuretosunshine.
Attention:
•Keepelectricalappliancessuchasanelectricfan,radio,airconditioner,andmicrowaveovenawayfrom
thecomputer.Thestrongmagneticfieldsgeneratedbytheseappliancescandamagethemonitorand
dataontheharddiskdrive.
16UserGuide
Page 33

•Donotplaceanybeveragesontopoforbesidethecomputerorotherattacheddevices.Ifliquidisspilled
onorinthecomputeroranattacheddevice,ashortcircuitorotherdamagemightoccur.
•Donoteatorsmokeoveryourkeyboard.Particlesthatfallintoyourkeyboardcancausedamage.
Lenovoprograms
YourcomputercomeswithLenovoprogramstohelpyouworkmoreeasilyandsecurely.Theprograms
mightvarydependingonthepreinstalledWindowsoperatingsystem.
TolearnmoreabouttheprogramsandothercomputingsolutionsofferedbyLenovo,goto
http://www.lenovo.com/support.
AccessingLenovoprogramsontheWindows7operatingsystem
OntheWindows7operatingsystem,youcanaccessLenovoprogramsfromeithertheLenovo
ThinkVantage
®
ToolsprogramorfromControlPanel.
AccessingLenovoprogramsfromtheLenovoThinkVantageToolsprogram
ToaccessLenovoprogramsfromtheLenovoThinkVantageToolsprogram,clickStart➙AllPrograms➙
LenovoThinkVantageT ools.Thendouble-clickaprogramicontoaccesstheprogram.
Note:IfaprogramiconisdimmedinthenavigationwindowoftheLenovoThinkVantageToolsprogram,it
indicatesthatyouneedtomanuallyinstalltheprogram.T omanuallyinstalltheprogram,double-clickthe
programicon.Then,followtheinstructionsonthescreen.Whentheinstallationprocesscompletes,the
programiconwillbeactivated.
Thefollowingtableliststheprogramsandthecorrespondingiconnamesonthenavigationwindowofthe
LenovoThinkVantageT oolsprogram.
Note:Dependingonthemodel,someoftheprogramsmightnotbeavailable.
Table1.ProgramsintheLenovoThinkVantageToolsprogram
ProgramIconname
AccessConnections™InternetConnection
ActiveProtectionSystem™
AirbagProtection
CommunicationsUtilityWebConferencing
LenovoSolutionCenterSystemHealthandDiagnostics
MobileBroadbandConnect3GMobileBroadband
RescueandRecovery
®
EnhancedBackupandRestore
PasswordManagerPasswordVault
PowerManager
PowerControls
RecoveryMediaFactoryRecoveryDisks
SystemUpdate
UpdateandDrivers
AccessingLenovoprogramsfromControlPanel
ToaccessLenovoprogramsfromControlPanel,clickStart➙ControlPanel.Thendependingonthe
programyouwanttoaccess,clickthecorrespondingsectionandthenclickthecorrespondinggreentext.
Chapter1.Productoverview17
Page 34

Note:IfyoucannotfindtheprogramyouneedinControlPanel,openthenavigationwindowoftheLenovo
ThinkVantageToolsprogramanddouble-clickthecorrespondingdimmedicontoinstalltheprogramyou
need.Then,followtheinstructionsonthescreen.Whentheinstallationprocesscompletes,theprogram
iconwillbeactivated,andyoucanfindtheprograminControlPanel.
ThefollowingtableliststheprogramsandthecorrespondingsectionsandgreentextsinControlPanel.
Note:Dependingonthemodel,someoftheprogramsmightnotbeavailable.
Table2.ProgramsinControlPanel
Program
ControlPanelsectionGreentextinControlPanel
AccessConnections
NetworkandInternet
Lenovo-InternetConnection
ActiveProtectionSystemSystemandSecurity
HardwareandSound
Lenovo-AirbagProtection
CommunicationsUtilityHardwareandSoundLenovo-WebConferencing
LenovoSolutionCenterSystemandSecurityLenovo-SystemHealthand
Diagnostics
MessageCenterPlus
Programs
MessagesfromLenovo
MobileBroadbandConnect
NetworkandInternet
Lenovo-3GMobileBroadband
RescueandRecovery
SystemandSecurity
Lenovo-EnhancedBackupand
Restore
PasswordManager
SystemandSecurity
UserAccountsandFamilySafety
Lenovo-PasswordVault
PowerManager
HardwareandSound
SystemandSecurity
Lenovo-PowerControls
RecoveryMedia
SystemandSecurity
Lenovo-FactoryRecoveryDisks
SystemUpdateSystemandSecurity
Lenovo-UpdateandDrivers
Note:Dependingonyourcomputermodel,someoftheprogramsmightnotbeavailable.
AccessingLenovoprogramsontheWindows8orWindows8.1operating
system
IfyourcomputerispreinstalledwiththeWindows8orWindows8.1operatingsystem,toaccessLenovo
programs,presstheWindowskeytogototheStartscreenandthenclickaLenovoprogramtolaunchit.
Ifyoucannotfindtheprogramyouneed,movethepointertothetop-rightorbottom-rightcornerofthe
screentobringupthecharms.ThenclicktheSearchcharmtosearchforthedesiredprogram.
YourcomputersupportsthefollowingLenovoprograms:
•ActiveProtectionSystem
•LenovoFingerprintManager
•LenovoCompanion
•LenovoMobileAccess
•LenovoQuickCast
•LenovoQuickControl
•LenovoSettings
18UserGuide
Page 35

•LenovoSolutionCenter
•LenovoSupport
•LenovoThinkVantageT ools
•LenovoT ools
•PasswordManager
•SystemUpdate
Lenovoprogramsoverview
ThistopicprovidesinformationaboutsomeLenovoprograms.
Note:Dependingonthemodel,someoftheprogramsmightnotbeavailable.
•AccessConnections(Windows7)
TheAccessConnectionsprogramisaconnectivityassistantprogramforcreatingandmanaginglocation
profiles.EachlocationprofilestoresallthenetworkandInternetconfigurationsettingsneededfor
connectingtoanetworkinfrastructurefromaspecificlocationsuchasahomeoranoffice.
Byswitchingbetweenlocationprofilesasyoumoveyourcomputerfromplacetoplace,youcanquickly
andeasilyconnecttoanetworkwithnoneedtomanuallyreconfigureyoursettingsandrestartthe
computereachtime.
•ActiveProtectionSystem(Windows7,Windows8,andWindows8.1)
TheActiveProtectionSystemprogramprotectsyourharddiskdrivewhentheshocksensorinsideyour
computerdetectsaconditionthatcoulddamagethedrive,suchassystemtilt,excessivevibration,or
shock.Theharddiskdriveislessvulnerabletodamagewhenitisnotoperating.Thisisbecausewhen
theharddiskdriveisnotoperating,thesystemstopsitfromspinning,andmightalsomovetheread
andwriteheadsofthedrivetoareasthatdonotcontaindata.Assoonastheshocksensorsenses
thattheenvironmentisstableagain(minimalchangeinsystemtilt,vibration,orshock),itturnsonthe
harddiskdrive.
•ClientSecuritySolution(Windows7)
TheClientSecuritySolutionprogramprotectsyourcomputerbysecuringclientdataanddeflecting
securitybreachattempts.Italsocanhelpmanageyourpasswords,recoveraforgottenpassword,
monitorsecuritysettingsonyourcomputer,andsuggesthowtoenhancethecomputersecurity.
•CommunicationsUtility(Windows7)
TheCommunicationsUtilityprogramenablesyoutoconfiguresettingsfortheintegratedcameraand
audiodevices.
•LenovoFingerprintManager(Windows7,Windows8,andWindows8.1)
Ifyoursystemcomeswithafingerprintreader,theLenovoFingerprintManagerprogramenablesyou
toenrollyourfingerprintandassociateitwithyourWindowspassword.Asaresult,thefingerprint
authenticationcanreplaceyourpasswordandenablesimpleandsecureuseraccess.
•LenovoCompanion(Windows8andWindows8.1)
ThroughtheLenovoCompanionprogram,youcangettheinformationabouttheaccessoriesforyour
computer,viewblogsandarticlesaboutyourcomputer,andcheckforotherrecommendedprograms.
•LenovoMobileAccess(Windows8andWindows8.1)
TheLenovoMobileAccessprogramenablesyoutomanageyourmobilebroadbandconnection.You
cancreateanaccount,addmoneytotheaccount,andpurchasemobilebroadbandsessionsusing
youraccount.
•LenovoQuickControl(Windows7,Windows8,andWindows8.1)
Chapter1.Productoverview19
Page 36

TheLenovoQuickControlprogramenablesyoutocontrolyourcomputerremotelythroughyour
smartphone,suchascontrollingthecursor,changingprojectionsettings,andmanagingforeground
applicationsandwindows.
•LenovoTools(Windows8andWindows8.1)
TheLenovoToolsprogramhelpsyouworkmoreeasilyandsecurelybyprovidingeasyaccesstovarious
program,suchasLenovoFingerprintManager,LenovoSolutionCenter,andsoon.
•LenovoSettings(Windows8andWindows8.1)
TheLenovoSettingsprogramenablesyoutoenhanceyourcomputingexperiencebyturningyour
computerintoaportablehotspot(forWindows8only),configuringcameraandaudiosettings,optimizing
yourpowersettings,andcreatingandmanagingmultiplenetworkprofiles.
•LenovoSolutionCenter(Windows7,Windows8,andWindows8.1)
TheLenovoSolutionCenterprogramenablesyoutotroubleshootandresolvecomputerproblems.It
combinesdiagnostictests,systeminformationcollection,securitystatus,andsupportinformation,along
withhintsandtipsforoptimalsystemperformance.
•LenovoSupport(Windows8andWindows8.1)
TheLenovoSupportprogramenablesyoutoregisteryourcomputerwithLenovo,checkthecomputer
healthconditionandbatterystatus,downloadandviewusermanuals,getthewarrantyinformationof
yourcomputer,andexplorehelpandsupportinformation.
•LenovoThinkVantageTools(Windows7)
TheLenovoThinkVantageT oolsprogramhelpsyouworkmoreeasilyandsecurelybyprovidingeasy
accesstovariousprogram,suchastheLenovoFingerprintManagerprogramandtheLenovoSolution
Centerprogram.
•MessageCenterPlus(Windows7)
TheMessageCenterPlusprogramautomaticallydisplaysmessagestoinformyouaboutimportantnotices
fromLenovo,suchasalertsonsystemupdatesandalertsonconditionsthatrequireyourattention.
•MobileBroadbandConnect(Windows7)
TheMobileBroadbandConnectprogramenablesyoutoconnectthecomputertothemobilebroadband
(3G)networkthroughasupportedwirelessWANcard.
•PasswordManager(Windows7,Windows8,andWindows8.1)
ThePasswordManagerprogramautomaticallycapturesandfillsinauthenticationinformationfor
WindowsprogramsandWebsites.
•PowerManager(Windows7)
ThePowerManagerprogramprovidesconvenient,flexible,andcompletepowermanagementforthe
computer.Itenablesyoutoadjustyourcomputerpowersettingstoachievethebestbalancebetween
performanceandpowersaving.
•RecoveryMedia(Windows7)
TheRecoveryMediaprogramenablesyoutorestorethecontentsoftheharddiskdrivetothefactory
defaultsettings.
•RescueandRecovery(Windows7)
TheRescueandRecoveryprogramisaone-buttonrecoveryandrestoresolution.Itincludesasetof
self-recoverytoolstohelpyoudiagnosecomputerproblems,gethelp,andrecoverfromsystemcrashes,
evenifyoucannotstarttheWindowsoperatingsystem.
•SystemUpdate(Windows7,Windows8,andWindows8.1)
TheSystemUpdateprogramenablesyoutokeepthesoftwareonthecomputerup-to-dateby
downloadingandinstallingsoftwarepackages,includingThinkVantageprograms,devicedrivers,UEFI
BIOSupdates,andotherthirdpartyprograms.
20UserGuide
Page 37

Chapter2.Usingyourcomputer
Thischapterprovidesinformationonusingsomeofthecomputercomponents.
Thischaptercontainsthefollowingtopics:
•“Registeringyourcomputer”onpage21
•“Frequentlyaskedquestions”onpage21
•“Specialkeys”onpage26
•“UsingtheThinkPadpointingdevice”onpage30
•“Powermanagement”onpage31
•“Connectingtothenetwork”onpage36
•“Presentationsandmultimedia”onpage40
•“Usingaudiofeatures”onpage43
•“Usingthecamera”onpage43
•“Usingtheopticaldrive”onpage44
•“Usingaflashmediacard”onpage44
Registeringyourcomputer
Whenyouregisteryourcomputer,informationisenteredintoadatabase,whichenablesLenovotocontact
youincaseofarecallorothersevereproblem.Inaddition,somelocationsofferextendedprivilegesand
servicestoregisteredusers.
WhenyouregisteryourcomputerwithLenovo,youalsowillreceivethefollowingbenefits:
•QuickerservicewhenyoucallLenovoforhelp
•Automaticnotificationoffreesoftwareandspecialpromotionaloffers
ToregisteryourcomputerwithLenovo,dooneofthefollowing:
•Gotohttp://www.lenovo.com/registerandfollowtheinstructionsonthescreentoregisteryourcomputer.
•ConnectyourcomputertotheInternetandregisteryourcomputerthroughapreinstalledregistration
program:
–ForWindows7:ThepreinstalledLenovoProductRegistrationprogramlaunchesautomaticallyafteryou
haveusedyourcomputerforatime.Followtheinstructionsonthescreentoregisteryourcomputer.
–ForWindows8andWindows8.1:OpentheLenovoSupportprogram.ThenclickRegistrationand
followtheinstructionsonthescreentoregisteryourcomputer.
Frequentlyaskedquestions
Thefollowingareafewtipsthatwillhelpyouoptimizetheuseofyourcomputer.
Toensurethatyoureceivethebestperformancefromyourcomputer,gotothefollowingWebpagetofind
informationsuchasaidsfortroubleshootingandanswerstofrequentlyaskedquestions:
http://www.lenovo.com/support/faq
CanIgetmyuserguideinanotherlanguage?
©CopyrightLenovo2013
21
Page 38

•Todownloadtheuserguideinanotherlanguage,gotohttp://www.lenovo.com/support.Thenfollow
theinstructionsonthescreen.
HowdoIusebatterypowermoreeffectivelywhenIamonthego?
•Toconservepower,ortosuspendoperationwithoutexitingprogramsorsavingfiles,see“Power-saving
modes”onpage33
.
•Toachievethebestbalancebetweenperformanceandpowersaving,createandapplypowerplans.See
“Managingthepowerplans”onpage33
•Ifyourcomputerwillbeturnedoffforanextendedperiodoftime,youcanpreventbatterypower
fromdrainingbyremovingthebattery.Lookformoreinformationaboutusingthebatteryin“Power
management”onpage31
.
HowdoIsecurelydisposeofdatastoredontheharddiskdriveorsolid-statedrive?
•StudyChapter4“Security”onpage51
sectiontofindouthowyoucanprotectyourcomputerfrom
theftandunauthorizeduse.
•UsethePasswordManagerprogramtoprotectthedatastoredonyourcomputer.Fordetails,seethe
helpinformationsystemoftheprogram.
•Beforeyoudisposeofthedataontheharddiskdriveorsolid-statedrive,besuretoread“Noticeon
deletingdatafromyourharddiskdriveorsolid-statedrive”onpage58.
HowdoIgetconnectedindifferentlocations?
•Totroubleshootawirelessnetworkingissue,goto:
http://www.lenovo.com/support/faq
•TakeadvantageofthenetworkingfeaturesprovidedbytheAccessConnectionsprogram(onthe
Windows7operatingsystem)orLocationAwarenessprograminLenovoSettings(ontheWindows
8orWindows8.1operatingsystem).
•Tolearnmoreaboutusingthewirelessfeaturesofyourcomputer,referto“Wirelessconnections”on
page36.
•Totravelmoreconfidently,besuretocheckthetipsin“T ravelingwithyourcomputer”onpage49.
•PressF8toenableordisablethewirelessfeatures.
HowdoIgivepresentationsorattachanexternalmonitoroften?
•Ensurethatyoufollowtheprocedurefor“Usinganexternalmonitor”onpage40
.
•WiththeExtenddesktopfunction,youcandisplayoutputonboththecomputerdisplayandanexternal
monitor.
HowdoIattachorreplaceadevice?
•SeeChapter6“Replacingdevices”onpage71
formoreinformationaboutreplacingthedevicesof
yourcomputer.
Ihavebeenusingthecomputerforsometimealready,anditisgettingslower.WhatshouldIdo?
•Followthe“Generaltipsforpreventingproblems”onpage125.
•Diagnoseproblemsyourselfbyusingthepreinstalleddiagnosticsoftware.
•CheckforrecoverysolutionsinChapter5“Recoveryoverview”onpage61.
Printthefollowingsectionsandkeepthemwithyourcomputerincaseyouareunabletoaccessthisonline
userguidewhennecessary.
•“Installinganewoperatingsystem”onpage109
22UserGuide
Page 39
•“Computerstopsresponding”onpage131
•“Powerproblems”onpage145
Usingthemulti-touchscreen
Thistopicprovidesinstructionsonhowtousethemulti-touchscreenthatisavailableonsomemodels.
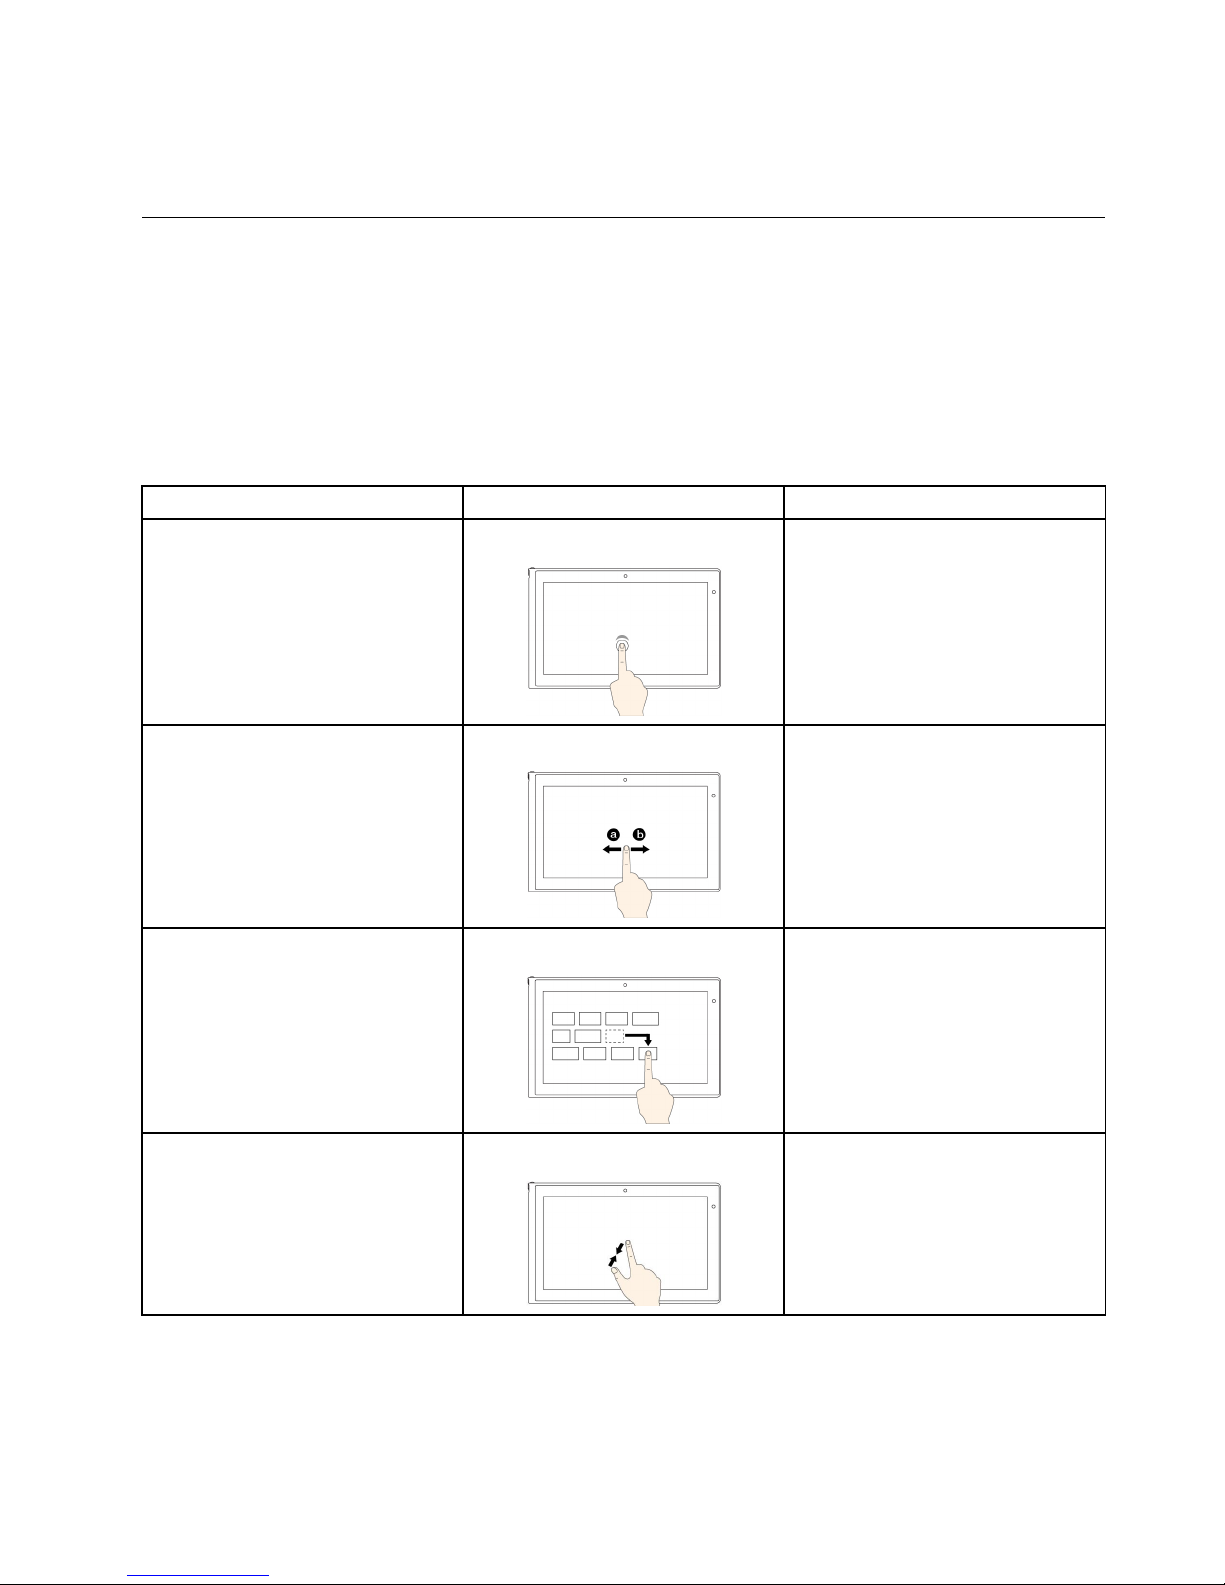
Commontouchgesturesandmouseactions
Thefollowingtablelistssomecommontouchgesturesandthecorrespondingmouseactionsthatis
applicabletotheWindows7operatingsystem,Windows8operatingsystem,andWindows8.1operating
system.
Note:Y ourcomputerscreenmightlookdifferentfromthefollowingillustrations.
Tasks
Touchgestures(touchmodelsonly)
Mouseactions
Toopenanapplicationorperform
anactiononanopenapplication,
suchasCopy,Save,andDelete,
dependingontheapplication
Tap.
Click.
Toscrollthroughitems,suchaslists,
pages,andphotos
Slide.Scrollthemousewheel,movethe
scrollbar,orclickthescrollarrow.
TomoveanobjectDraganitemtothedesiredlocation.
Click,hold,anddraganitem.
Tozoomout
Movetwofingersclosertogether.
PresstheCtrlkeywhilescrollingthe
mousewheelbackward.
Chapter2.Usingyourcomputer23
Page 40
Tasks
Touchgestures(touchmodelsonly)
Mouseactions
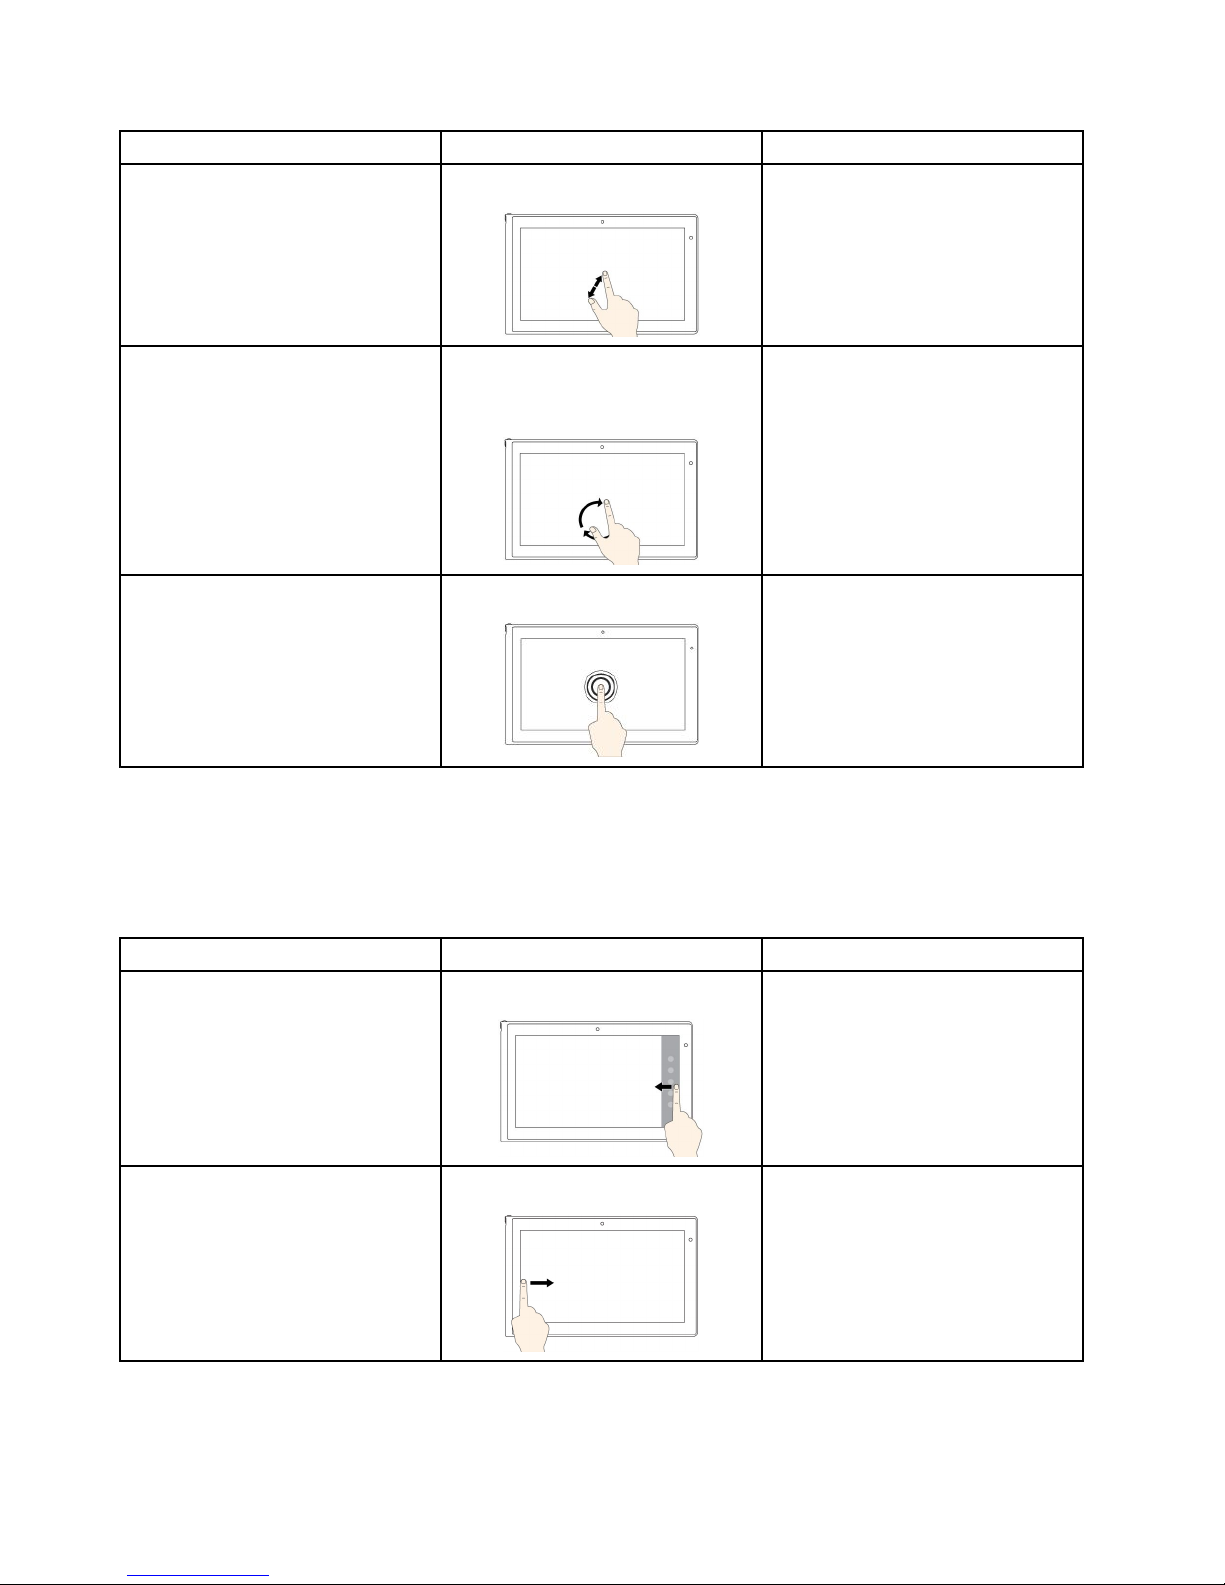
Tozoomin
Movetwofingersfartherapart.
PresstheCtrlkeywhilescrollingthe
mousewheelforward.
Torotateanitem
Puttwoormorefingersonan
item,andthenrotateyourfingers
(supportedonlyonsomemodels).
Iftheapplicationsupportsrotation,
clicktherotationicon.
ToopenamenuwithmultipleoptionsTapandhold.Double-click.
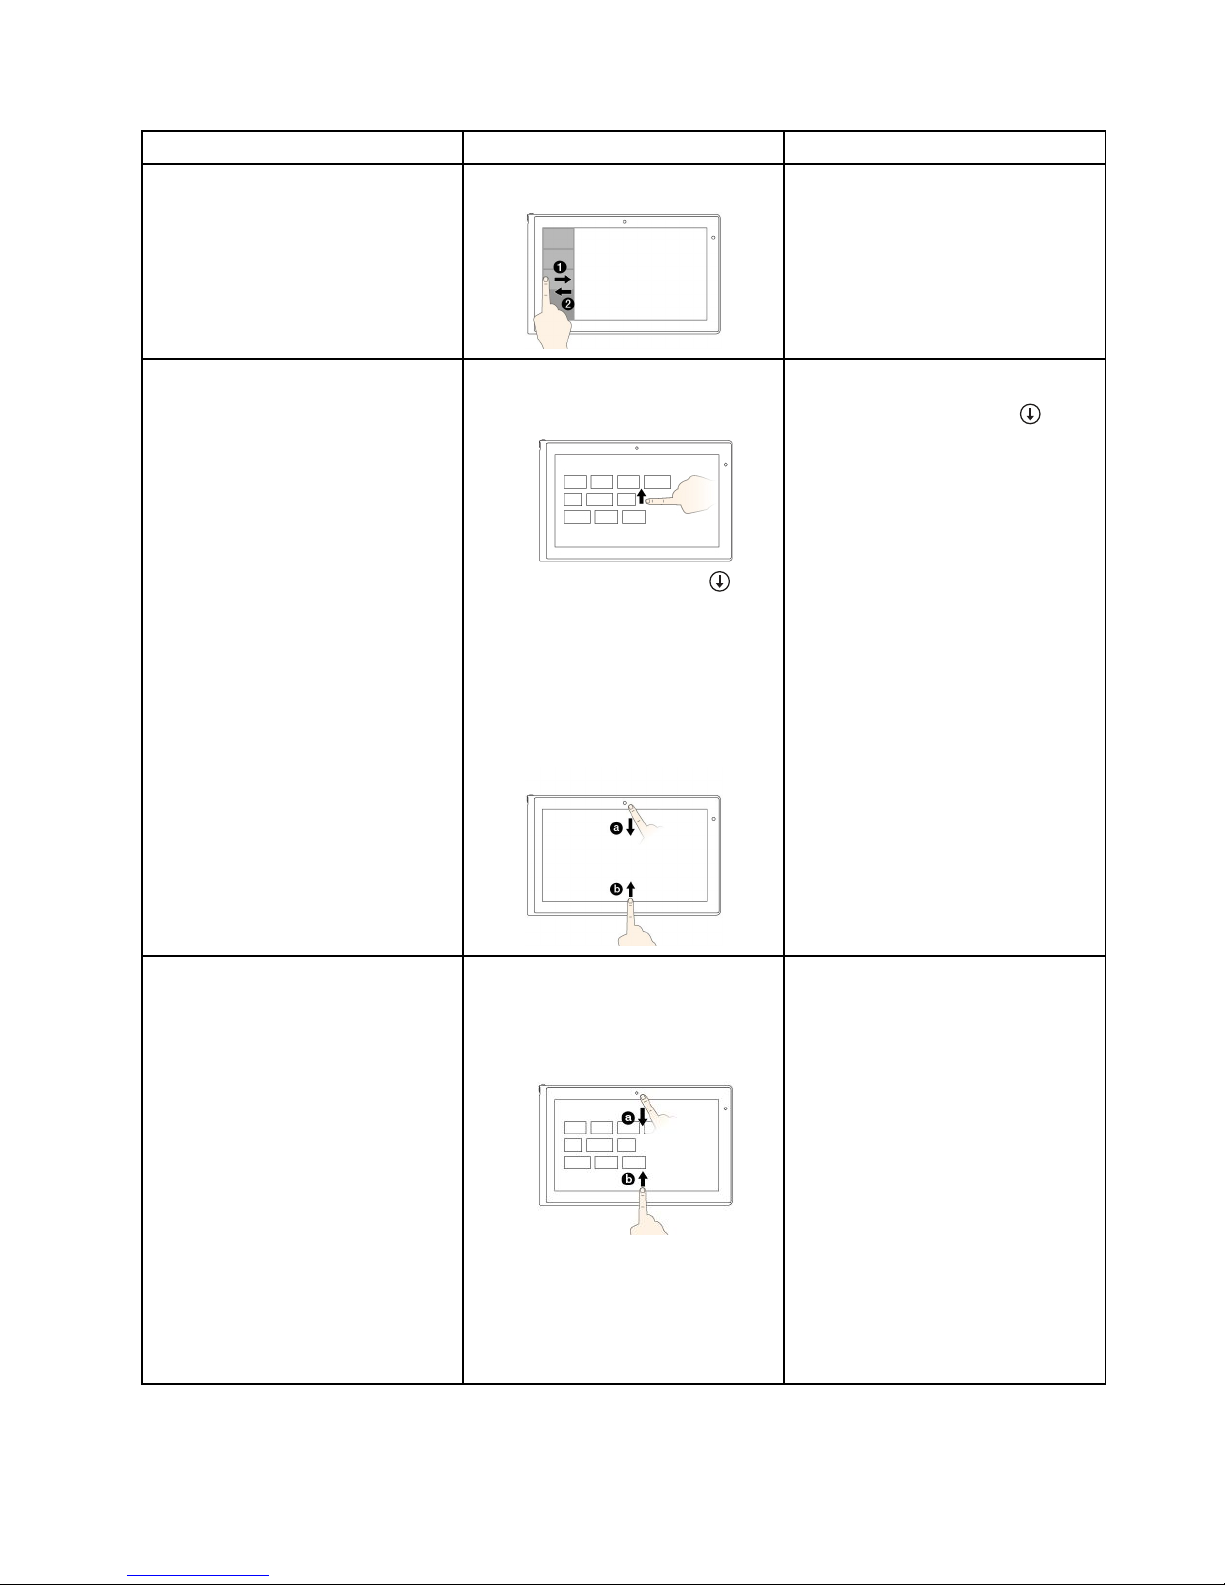
TouchgesturesandmouseactionsforWindows8andWindows8.1operatingsystems
Thefollowingtablelistssometouchgesturesandthecorrespondingmouseactionssupportedbythe
Window8andWindows8.1operatingsystems.
Note:Y ourcomputerscreenmightlookdifferentfromthefollowingillustrations.
Tasks
Touchgestures(touchmodelsonly)
Mouseactions
Todisplaythecharmsthatcontain
systemcommands,suchasStart,
Settings,Search,Share,and
Devices
Swipeinfromtherightedge.
Movethepointertothebottom-right
ortop-rightcornerofyourscreen.
Tocyclethroughandswitchtoopen
applications
Swipeinfromtheleftedge.
Movethepointertothetop-leftcorner
ofyourscreen,andthenclick.Keep
clickingtocyclethroughtheopen
applications.
24UserGuide
Page 41
Tasks
Touchgestures(touchmodelsonly)
Mouseactions
Toviewtherecentlyusedapplications
orselectanactiveapplicationfrom
thelist
Swipeinandoutontheleftedge.
Movethepointertothetop-leftcorner
ofthescreen,andthenmovethe
pointerdownwardalongtheleftedge.
Tomakeaselection,clickthedesired
application.
ToviewallapplicationsontheStart
screen
Windows8.1:
•Swipeuptothetopedge.
•Tapthedownwardarrow()
locatednearthebottom-leftcorner
oftheStartscreen.
Windows8:
Swipeinfromthetoporbottomedge,
andtapAllapps.
Windows8.1:
Clickthedownwardarrow(
)
locatednearthebottom-leftcornerof
theStartscreen.
Windows8:
Right-clickablankareaontheStart
screen,andthenclickAllapps
TocustomizetilesontheStartscreen,
oruninstallanapplication
Windows8.1:
•Swipeinfromthetoporbottom
edge,
tapCustomize,andthentapthe
desiredicon.
•Pressandholdthedesiredicon.
Windows8:
Windows8.1:
•Right-clickablankareaonthe
Startscreen,clickCustomize,and
thenclickthedesiredicon.
•Right-clickthedesiredicon.
Windows8:
Right-clickthedesiredicon.
Chapter2.Usingyourcomputer25
Page 42
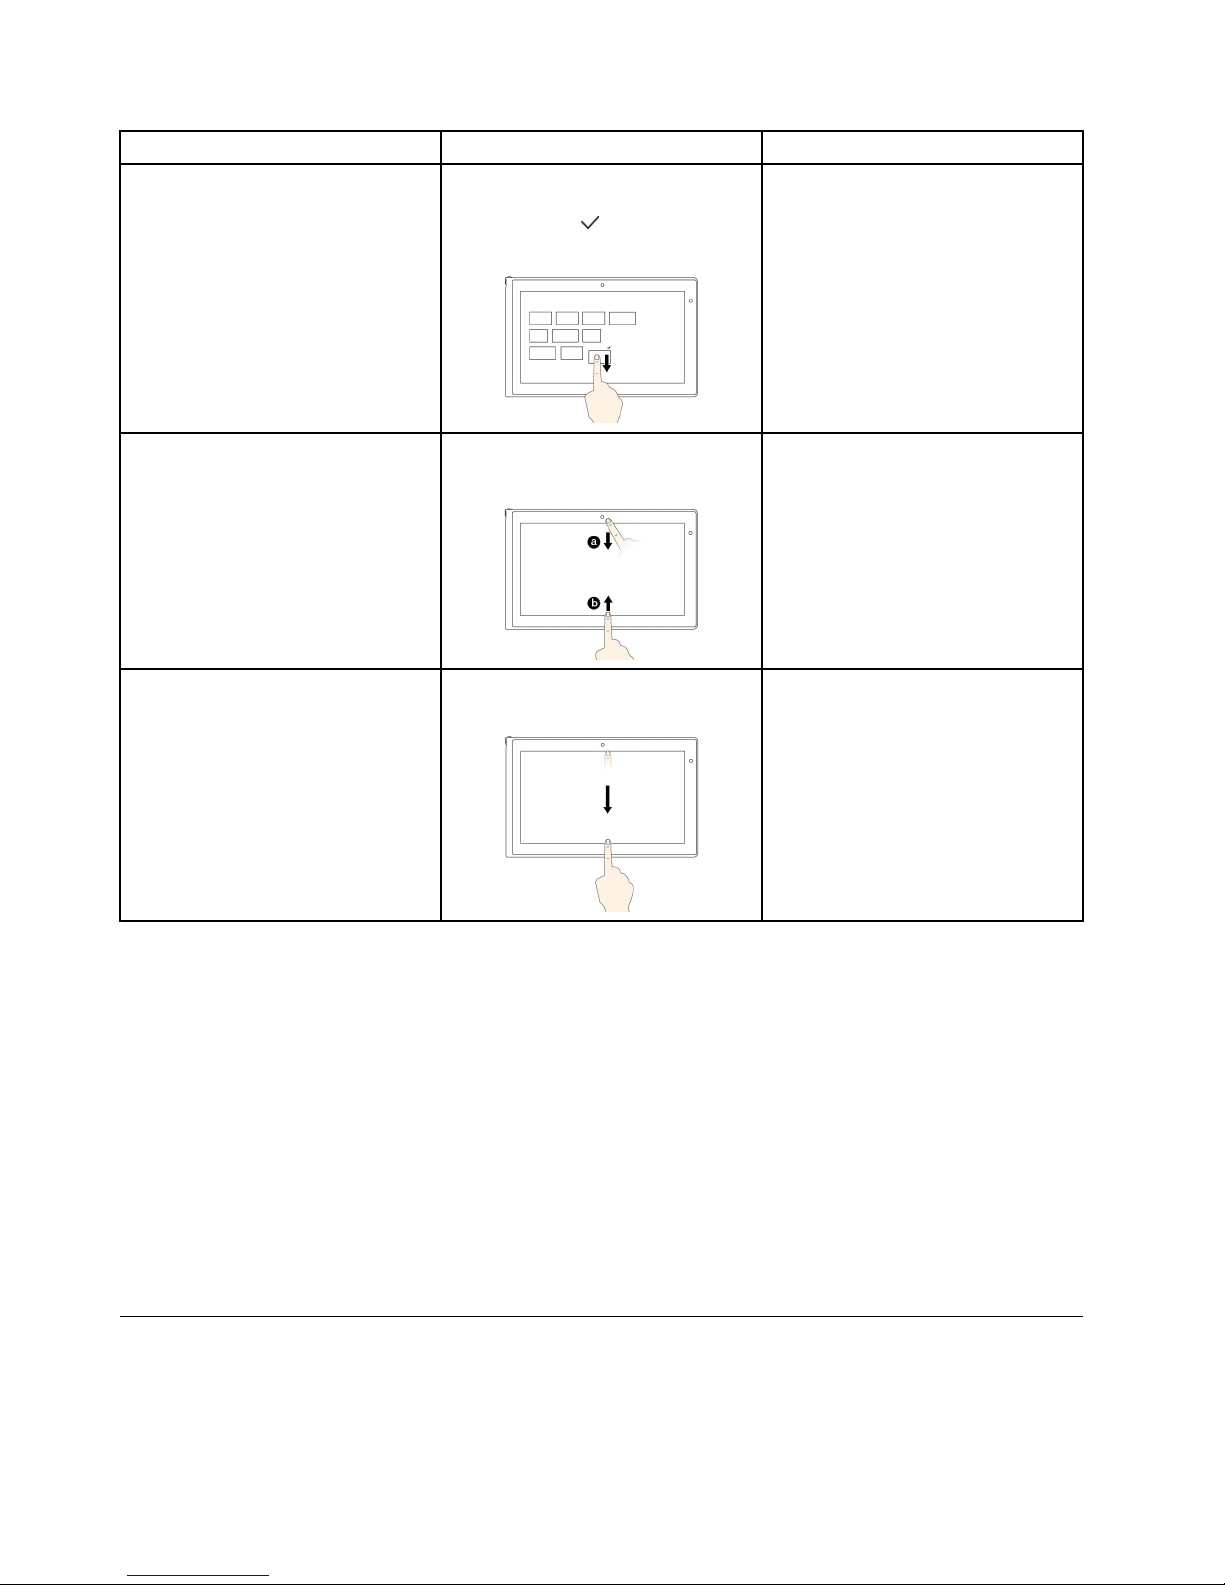
Tasks
Touchgestures(touchmodelsonly)
Mouseactions
Movethedesiredicondownward
untilatickicon(
)isdisplayed,then
releaseyourfinger.
Toviewtheapplicationcommandson
anopenapplication,suchasCopy,
Save,andDelete,dependingonthe
application
Swipeinfromthetoporbottomedge.
Right-clickanopenapplication.
Toclosethecurrentapplication
Swipeinfromthetopedgetothe
bottom.
Movethepointertothetopedgeof
thescreen,clickandholdtheleft
buttononyourmouse,thenmovethe
pointertothebottomofthescreen.
Releasetheleftbuttonwhenyou
reachthebottomofthescreen.
Tipsonusingthemulti-touchscreen
•Themulti-touchscreenisaglasspanelcoveredwithaplasticfilm.Donotapplypressureorplaceany
metallicobjectonthescreen,whichmightdamagethetouchpanelorcauseittomalfunction.
•Donotusefingernails,glovedfingers,orinanimateobjectsexcepttheapproveddigitizerpenforinputon
thescreen.
•Regularlycalibratetheaccuracyofthefingerinputtoavoidadiscrepancy.
Tipsoncleaningthemulti-touchscreen
•Turnoffthecomputerbeforecleaningthemulti-touchscreen.
•Useadry,soft,andlint-freeclothorapieceofabsorbentcottontoremovefingerprintsordustfromthe
multi-touchscreen.Donotapplysolventstothecloth.
•Gentlywipethescreenusingatop-downmotion.Donotapplyanypressureonthescreen.
Specialkeys
Yourcomputerhasseveralspecialkeystohelpyouworkmoreeasilyandeffectively.
26UserGuide
Page 43
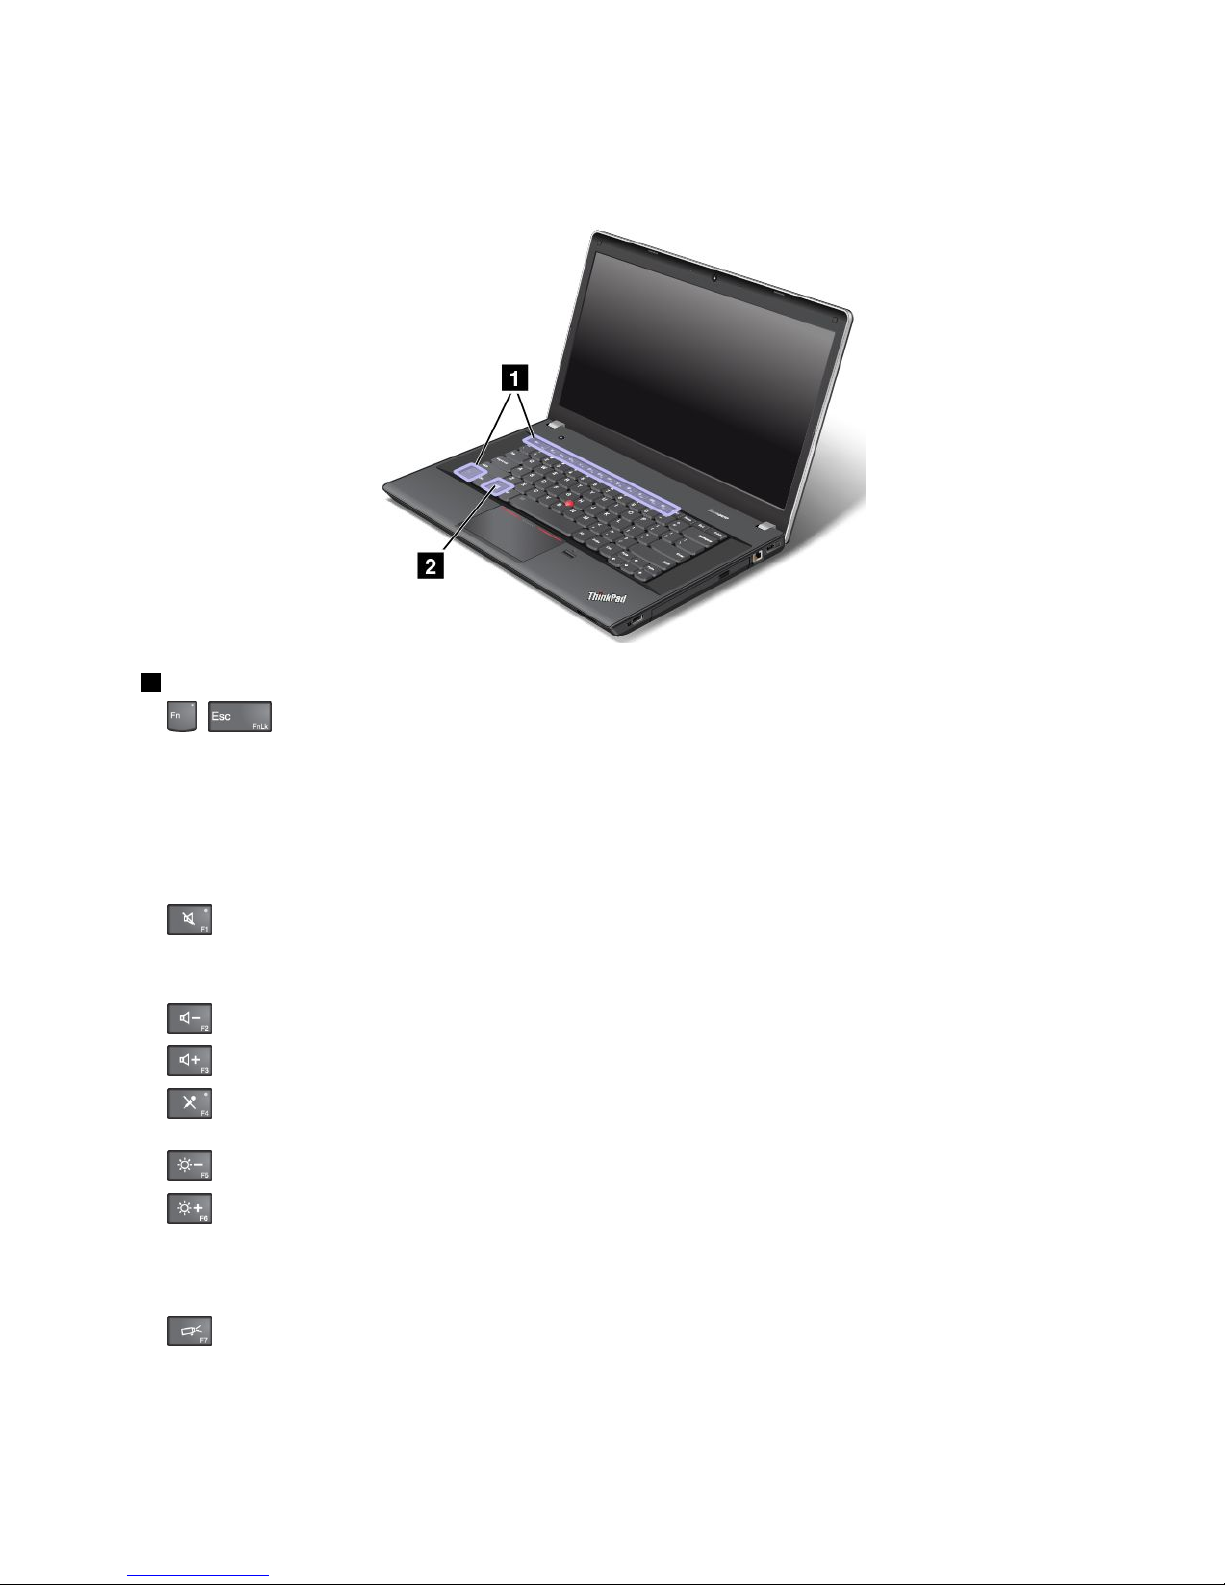
ThinkPadEdgeE440specialkeys
ThefollowingfigureshowsthelocationsofmainspecialkeysforThinkPadEdgeE440.
1Functionkeys
•+:PressFn+EsctoenableordisabletheFnLockfunction.
WhentheFnLockfunctionisdisabled:TheFnLockindicatorisoff(defaultmode).T oinitiatethe
specialfunctionofeachkey,pressthefunctionkeysdirectly.ToinputF1–F12,presstheFnkeyandthe
correspondingfunctionkey.
WhentheFnLockfunctionisenabled:TheFnLockindicatorturnson.ToinputF1–F12,pressthe
functionkeysdirectly.Toinitiatethespecialfunctionofeachkey,presstheFnkeyandthecorresponding
functionkey.
•:Mutesorunmutesthespeakers.Whenthespeakersaremuted,thespeakermuteindicatorturnson.
Ifyoumutethesoundandturnoffyourcomputer,thesoundwillremainmutedwhenyouturnonyour
computeragain.T oturnonthesound,pressF1,F2,orF3.
•:Decreasesthespeakervolume.
•:Increasesthespeakervolume.
•:Mutesorunmutesthemicrophones.Whenthemicrophonesaremuted,themicrophone-mute
indicatorturnson.
•:Darkensthedisplay.
•:Brightensthedisplay.
Youcantemporarilychangethecomputerdisplaybrightnessbypressingthetwokeys.T ochangethe
defaultbrightnesslevel,right-clickthebatterystatusiconintheWindowsnotificationarea.Thenclick
Adjustscreenbrightnessandmakechangesasdesired.
•
:Switchesthedisplayoutputlocationbetweenthecomputerdisplayandanexternalmonitor.For
moreinformation,referto“Presentationsandmultimedia”onpage40.
Note:Toswitchbetweenthecomputerdisplayandanexternalmonitor,theWindows+Pkeycombination
alsoisavailable.
Chapter2.Usingyourcomputer27
Page 44
•:Enablesordisablesthebuilt-inwirelessnetworkingfeatures.Formoreinformationonthewireless
features,referto“Wirelessconnections”onpage36.
•
:
ForWindows8andWindows8.1:OpenstheSettingscharm.
ForWindows7:OpensControlPanel.
•:
ForWindows8andWindows8.1:OpenstheSearchcharm.
ForWindows7:OpensWindowsSearch.
•
:Viewstheprogramsthatyouhaveopened.
•:
ForWindows8andWindows8.1:Viewsalltheprograms.
ForWindows7:OpensComputer.
•Fn+B:HasthesamefunctionastheBreakkey.
•Fn+P:HasthesamefunctionasthePausekey.
•Fn+S:HasthesamefunctionastheSysRqkey.
•Fn+K:HasthesamefunctionastheScrLKkey.
2Windowskey
OntheWindows7operatingsystem,presstheWindowskeytoopentheStartmenu.OntheWindows8
andWindows8.1operatingsystems,presstheWindowskeytoswitchbetweenthecurrentworkspaceand
theStartscreen.
ForinformationaboutusingtheWindowskeywithotherkeys,refertothehelpinformationsystemofthe
Windowsoperatingsystem.
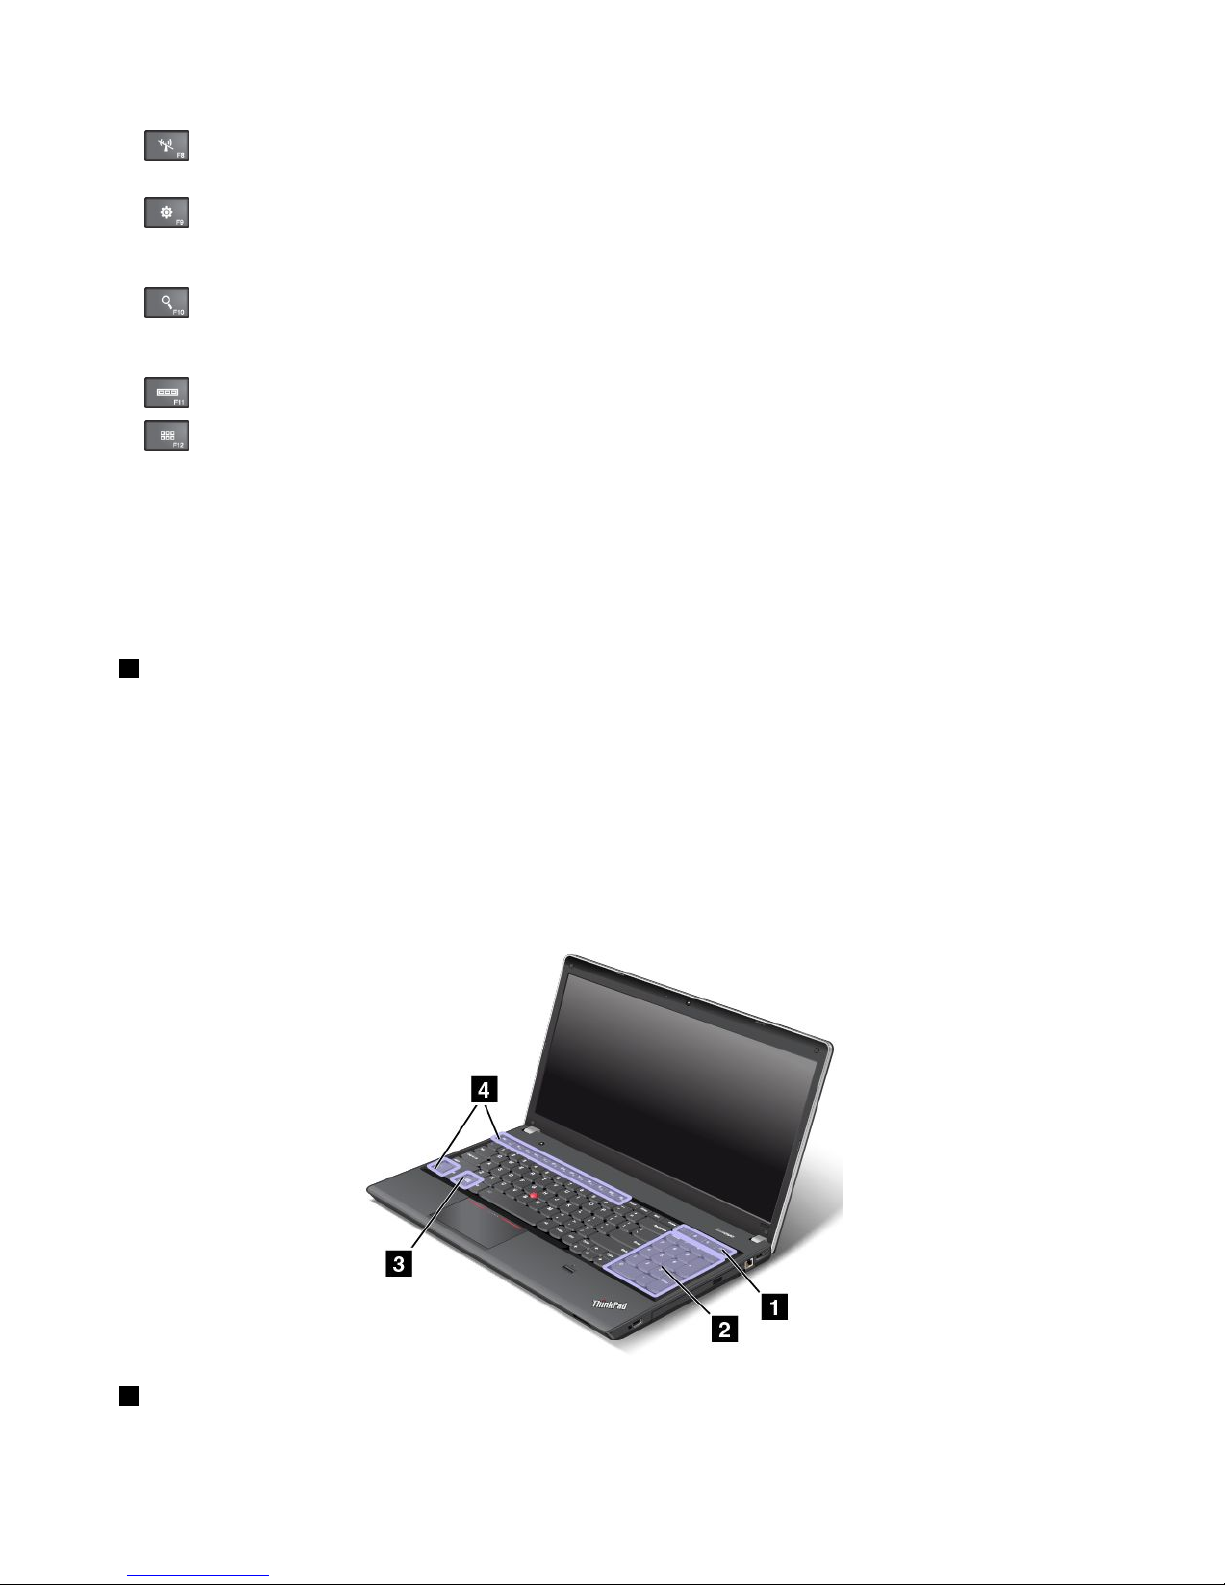
ThinkPadEdgeE540specialkeys
ThefollowingfigureshowsthelocationsofmainspecialkeysforThinkPadEdgeE540.
1Additionalshortcutkeys
Yourcomputermighthavefouradditionalshortcutkeys:
28UserGuide
Page 45

•:Launchescalculator
•:Locksoperatingsystem
•:Opensthedefaultbrowser
•:OpensComputer
Note:Dependingonyourcomputermodel,theshortcutkeysmightnotbeavailable.
2Numerickeypad
Youcanusethisnumerickeypadtoinputnumbersquickly.
Note:Dependingonyourcomputermodel,thenumerickeypadmightnotbeavailable.
3Windowskey
OntheWindows7operatingsystem,presstheWindowskeytoopentheStartmenu.OntheWindows8
andWindows8.1operatingsystems,presstheWindowskeytoswitchbetweenthecurrentworkspaceand
theStartscreen
ForinformationaboutusingtheWindowskeywithotherkeys,refertothehelpinformationsystemofthe
Windowsoperatingsystem.
4Functionkeys
•+:PressFn+EsctoenableordisabletheFnLockfunction.
WhentheFnLockfunctionisdisabled:TheFnLockindicatorisoff(defaultmode).T oinitiatethe
specialfunctionofeachkey,pressthefunctionkeysdirectly.ToinputF1–F12,presstheFnkeyandthe
correspondingfunctionkey.
WhentheFnLockfunctionisenabled:TheFnLockindicatorturnson.ToinputF1–F12,pressthe
functionkeysdirectly.Toinitiatethespecialfunctionofeachkey,presstheFnkeyandthecorresponding
functionkey.
•
:Mutesorunmutesthespeakers.Whenthespeakersaremuted,thespeaker-muteindicatorturns
on.
Ifyoumutethesoundandturnoffyourcomputer,thesoundwillremainmutedwhenyouturnonyour
computeragain.T oturnonthesound,pressF1,F2,orF3.
•
:Decreasesthespeakervolume.
•:Increasesthespeakervolume.
•:Mutesorunmutesthemicrophones.Whenthemicrophonesaremuted,themicrophone-mute
indicatorturnson.
•
:Darkensthedisplay.
•
:Brightensthedisplay.
Youcantemporarilychangethecomputerdisplaybrightnessbypressingthetwokeys.T ochangethe
defaultbrightnesslevel,right-clickthebatterystatusiconintheWindowsnotificationarea.Thenclick
Adjustscreenbrightnessandmakechangesasdesired.
•
:Switchesthedisplayoutputlocationbetweenthecomputerdisplayandanexternalmonitor.For
moreinformation,referto“Presentationsandmultimedia”onpage40.
Chapter2.Usingyourcomputer29
Page 46
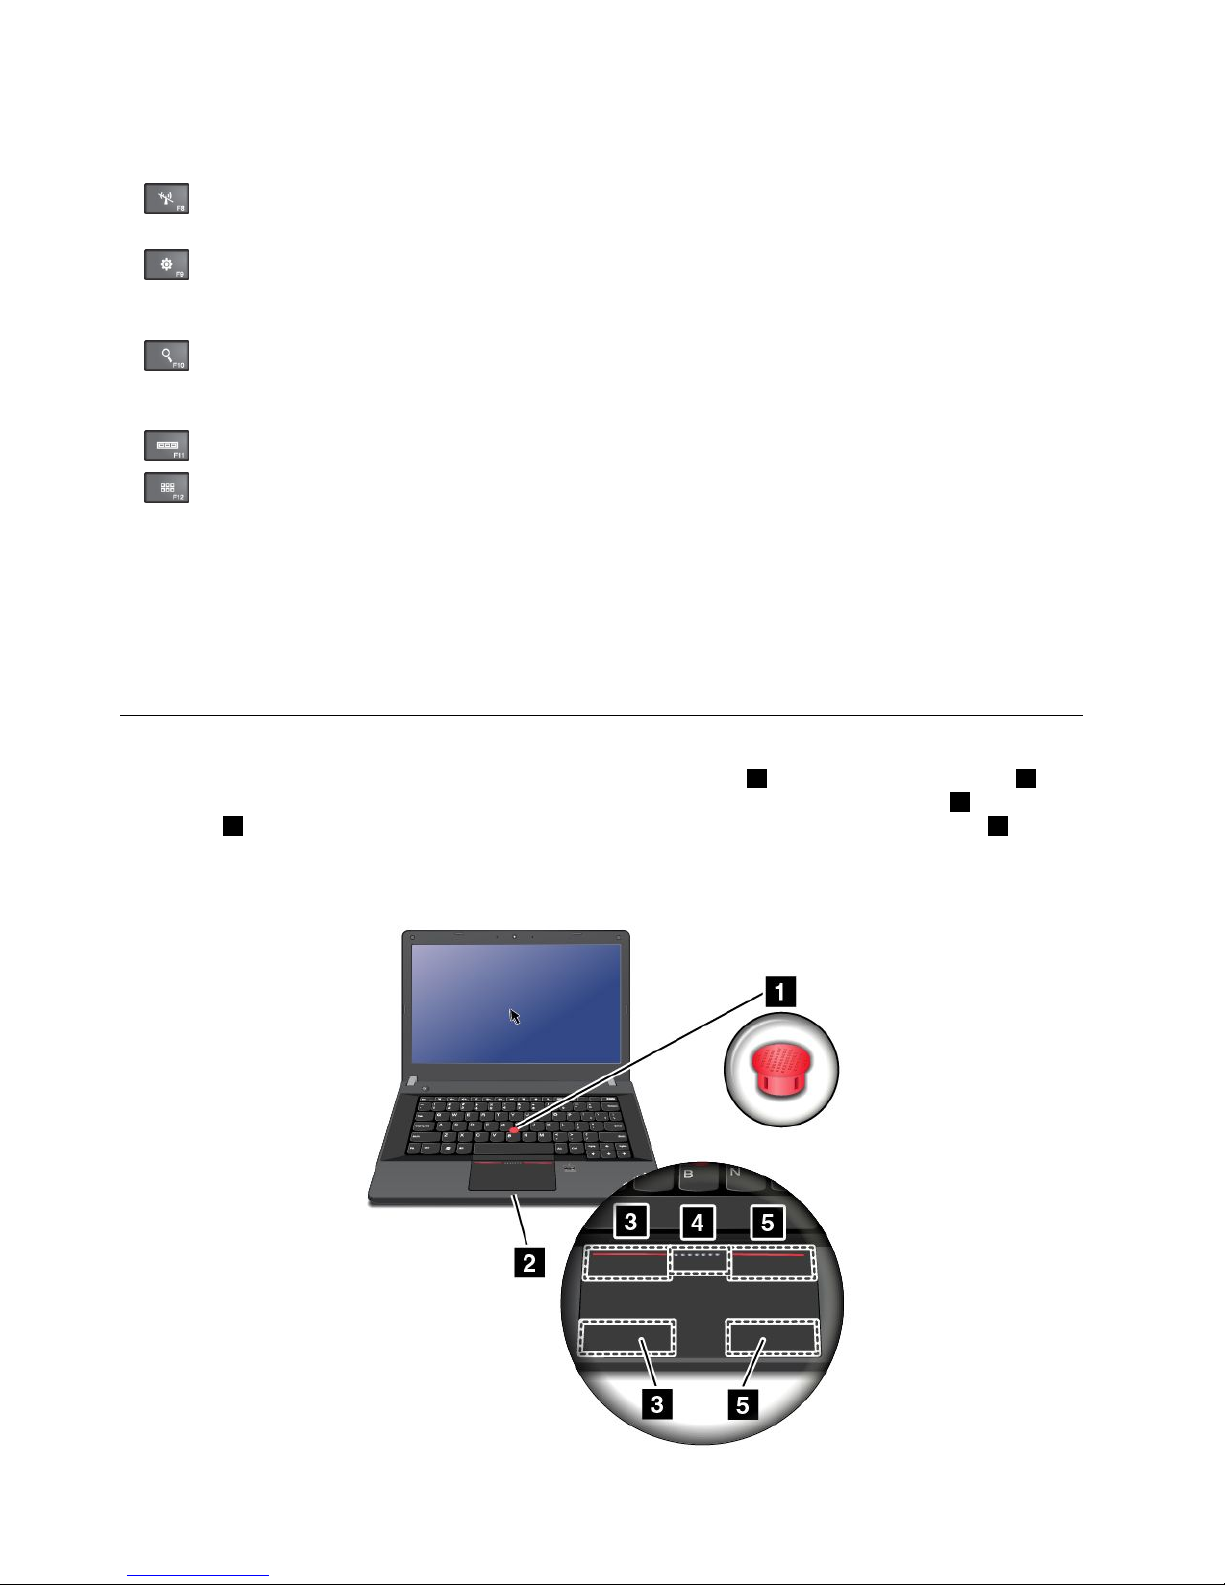
Note:Toswitchbetweenthecomputerdisplayandanexternalmonitor,theWindows+Pkeycombination
alsoisavailable.
•:Enablesordisablesthebuilt-inwirelessnetworkingfeatures.Formoreinformationonthewireless
features,referto“Wirelessconnections”onpage36
.
•:
ForWindows8andWindows8.1:OpenstheSettingscharm.
ForWindows7:OpensControlPanel.
•:
ForWindows8andWindows8.1:OpenstheSearchcharm.
ForWindows7:OpensWindowsSearch.
•
:Viewstheprogramsthatyouhaveopened.
•:
ForWindows8andWindows8.1:Viewsalltheprograms.
ForWindows7:OpensComputer.
•Fn+B:HasthesamefunctionastheBreakkey.
•Fn+P:HasthesamefunctionasthePausekey.
•Fn+S:HasthesamefunctionastheSysRqkey.
•Fn+K:HasthesamefunctionastheScrLKkey.
UsingtheThinkPadpointingdevice
TheThinkPadpointingdeviceconsistsoftheTrackPointpointingstick1andtheThinkPadtrackpad2.The
wholeThinkPadtrackpadisanactiveareasensitivetofingermovement.Theleftclickzones
3andright
clickzones5workastheleftandrightmousebuttonsonaconventionalmouse.Thescrollzone4enables
youtoscrollWebpagesordocumentsinanydirection.
Note:Y ourcomputerkeyboardmightlookslightlydifferentfromthefollowingillustration.
30UserGuide
Page 47
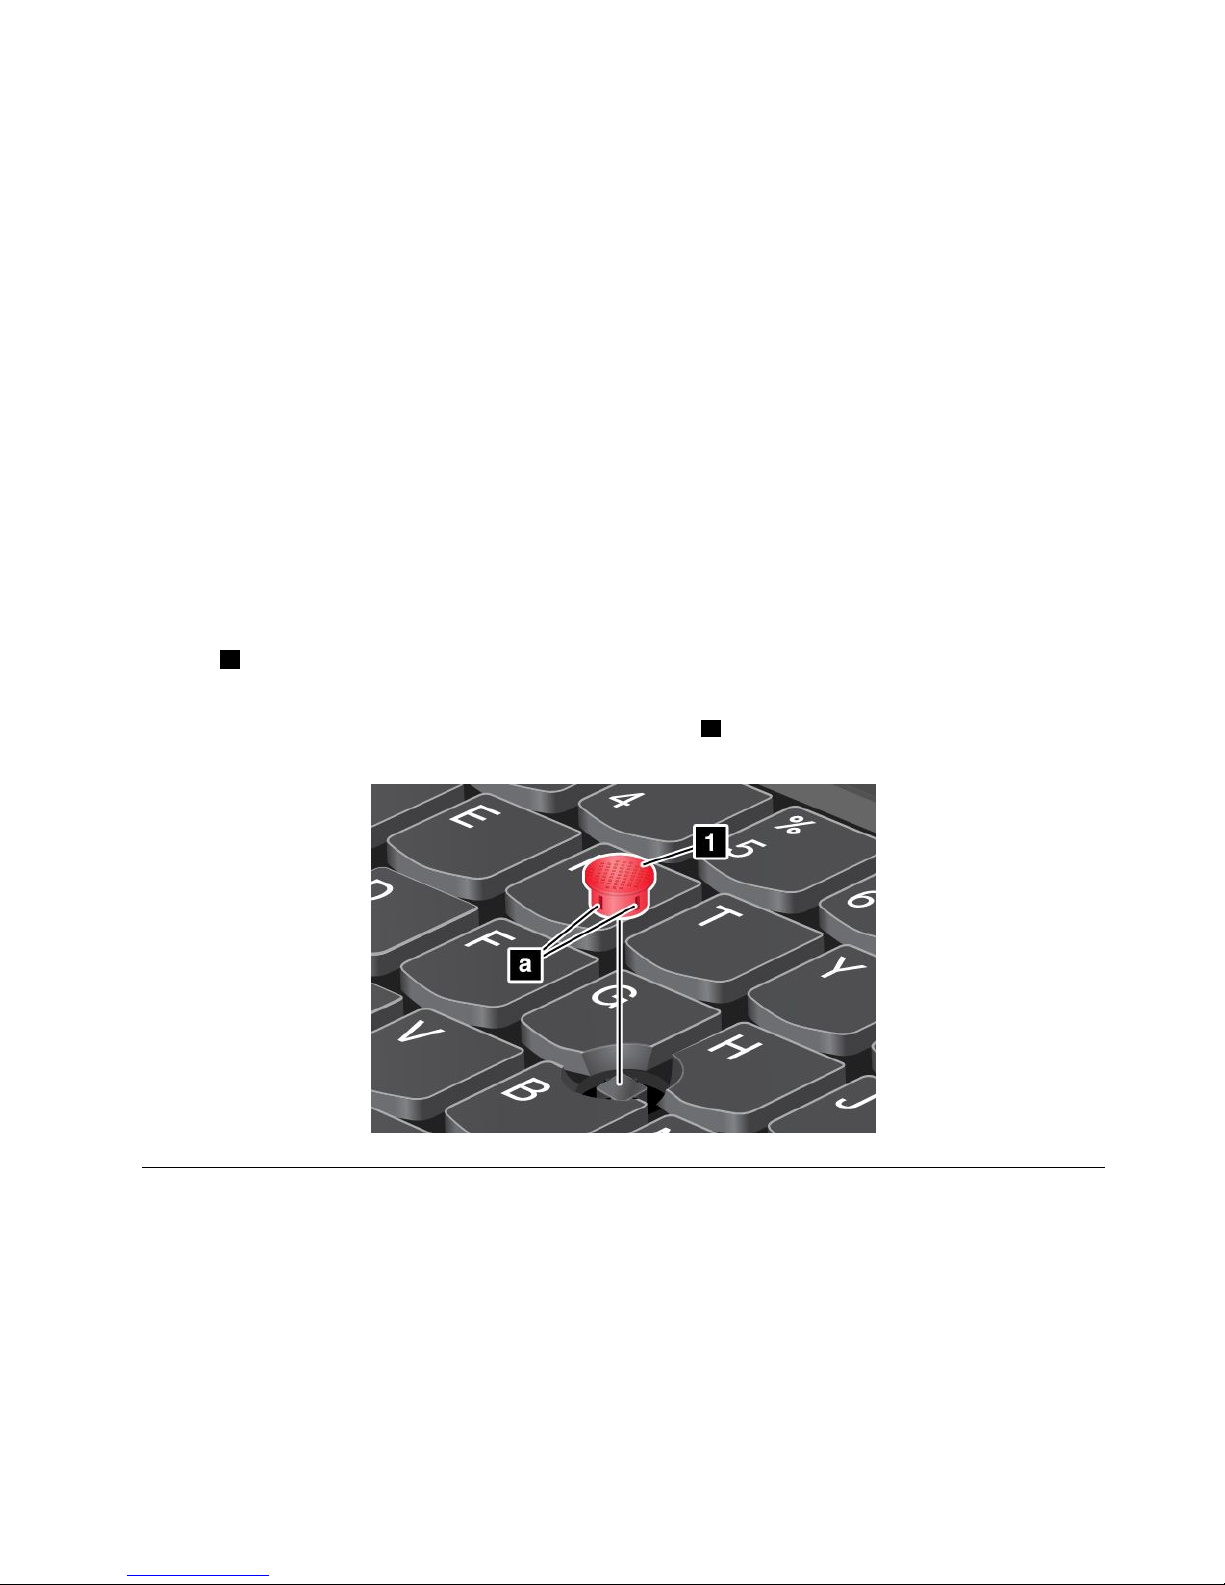
UsingtheT rackPointpointingstick
TousetheT rackPointpointingstick,applypressuretothenonslipcaponthepointingstickinanydirection
paralleltothekeyboard.Thenyoucanmovethecursor.Butthepointingstickitselfdoesnotmove.The
speedatwhichthecursormovesdependsonthepressureyouapplytothepointingstick.
UsingtheThinkPadtrackpad
TheThinkPadtrackpadofyourcomputersupportsmulti-touchwithwhichyoucanzoomin,zoomout,scroll,
orrotateonthescreenwhilebrowsingtheInternetorreadingoreditingadocument.
CustomizingtheThinkPadpointingdevice
YoucancustomizetheThinkPadpointingdevicetoachievetheextendedfunctionsoftheThinkPad
pointingdevice.
TocustomizetheThinkPadpointingdevice,dothefollowing:
1.GotoControlPanel.
2.ClickHardwareandSound➙Mouse➙ThinkPad.
3.Followtheinstructionsonthescreen.
Replacingthecap
Thecap1ontheendoftheTrackPointpointingstickisremovable.Afteryouusethecapforaperiod
oftime,youcanreplacethecapwithanewone.
Note:TheTrackPointcapusedinyourcomputerhasgroovesaasshowninthefollowingillustration.
EnsurethatyoureplacetheTrackPointcapwithacorrectonethathassuchgrooves.
Powermanagement
Whenyouuseyourcomputerawayfromelectricaloutlets,youdependonbatterypowertokeepyour
computerrunning.Differentcomputercomponentsconsumepoweratdifferentrates.Themoreyouusethe
power-intensivecomponents,thefasteryouconsumebatterypower.
SpendmoretimeunpluggedwithThinkPadbatteries.Mobilityhasrevolutionizedbusinessbyenabling
youtotakeyourworkwhereveryougo.WithThinkPadbatteries,youwillbeabletoworklongerwithout
beingtiedtoanelectricaloutlet.
Chapter2.Usingyourcomputer31
Page 48

Checkingthebatterystatus
ThebatterystatusiconintheWindowsnotificationareadisplaysthepercentageofbatterypowerremaining.
Therateatwhichyouusebatterypowerwilldeterminehowlongyoucanusethebatteryofyourcomputer
betweencharges.Becauseeachcomputeruserhasdifferenthabitsandneeds,itisdifficulttopredicthow
longabatterychargewilllast.Therearetwomainfactors:
•Howmuchenergyisstoredinthebatterywhenyoubegintowork.
•Thewayyouuseyourcomputer:
–Howoftenyouaccesstheharddiskdriveorsolid-statedrive.
–Howbrightyoumakethecomputerdisplay.
–Howoftenyouusethewirelessfeatures.
Tocheckfordetailedbatterystatusinformation,dothefollowing:
•ForWindows7:OpenthePowerManagerprogramandclicktheBatterytab.
•ForWindows8andWindows8.1:OpentheLenovoSettingsprogramandclickPower.
EnablingthebatteryalarmontheWindows7operatingsystem
FortheWindows7operatingsystem,youcanprogramyourcomputersothatwhenthebatterypowerfalls
belowacertainlevel,threeeventsoccur:thealarmgoesoff,amessageisdisplayed,andtheLCDis
turnedoff.
Toenablethebatteryalarm,dothefollowing:
1.StartthePowerManagerprogram.
2.ClicktheGlobalPowerSettingstab.
3.ForLowbatteryalarmorCriticallylowbatteryalarm,setthepercentageofthepowerlevelandset
theaction.
Note:Ifyourcomputerenterssleeporhibernationmodewhenthebatteryislow,butthealarmmessage
hasnotyetbeendisplayed,themessagewillbedisplayedwhenthecomputerresumes.T oresumenormal
operation,whenthemessageisdisplayed,clickOK.
Usingtheacpoweradapter
Thepowertorunyourcomputercancomeeitherfromthelithium-ion(Li-ion)batterypackofyourcomputer,
orfromacpowerthroughtheacpoweradapter.Whileyouuseacpower,thebatterychargesautomatically.
Theacpoweradapterthatcomeswithyourcomputerhastwobasiccomponents:
•Thetransformerpackthatconvertsacpowerforusewiththecomputer.
•Thepowercordthatplugsintotheacoutletandintothetransformerpack.
Attention:Usinganimproperpowercordcouldcauseseveredamagetoyourcomputer.
Connectingtheacpoweradapter
Toconnecttheacpoweradapter,dothefollowing.
Note:Ensurethatyouperformtheactionsinthefollowingorder:
1.Connectthepowercordtoanelectricaloutlet.
2.Connectthepowercordtothetransformerpack.
3.Connecttheacpoweradaptertotheacpowerconnectorofthecomputer.
32UserGuide
Page 49

Tipsonusingtheacpoweradapter
•Whentheacpoweradapterisnotinuse,disconnectitfromtheelectricaloutlet.
•Donotbindthepowercordtightlyaroundtheacpoweradaptertransformerpackwhenitisconnectedto
thetransformer.
•Beforeyouchargethebattery,makesurethatitstemperatureisatleast10°C(50°F).
•Youcanchargethebatterywhentheacpoweradapterisconnectedtothecomputerandthebatteryis
installed.Youneedtochargethebatteryinanyofthefollowingconditions:
–Anewbatteryisinstalled.
–Thepercentageofpowerremainingislow.
–Thebatteryhasnotbeenusedforalongtime.
Chargingthebattery
Whenyoufindthatthepercentageofpowerremainingisloworwhenthepoweralarmalertsyouthatthe
remainingpowerislow,youneedtochargeyourbatteryorreplaceitwithachargedbattery.
Ifanacoutletisconvenient,plugtheacpoweradapterintoit,andtheninserttheconnectorintothe
computer.Thebatterywillbefullychargedinaboutthreetosixhours.Thisisaffectedbythebatterysize
andthephysicalenvironment.Y oucancheckthebatterychargingstatusatanytimethroughthebattery
statusiconintheWindowsnotificationarea.
Note:Tomaximizethelifeofthebattery,thecomputerdoesnotstartrechargingthebatteryiftheremaining
powerisgreaterthan95%.
Maximizingthebatterylife
Tomaximizethelifeofthebattery,dothefollowing:
•Usethebatteryuntilthechargeiscompletelydepleted.
•Rechargethebatterycompletelybeforeusingit.Youcanseewhetherthebatteryisfullychargedfromthe
batterystatusiconintheWindowsnotificationarea.
•Alwaysusepowermanagementfeaturessuchaspower-savingmodes.
Managingthepowerplans
Toachievethebestbalancebetweenperformanceandpowersaving,adjustyourpowerplansettings.
Toaccesspowerplansettings,dothefollowing:
1.ForWindows7:StartthePowerManagerprogramandthenclickPowerPlanorAdvanced➙Power
Plan.
2.ForWindows8andWindows8.1:Gotothedesktop.Right-clickthebattery-statusiconintheWindows
notificationareaandclickPowerOptions.ThenclickChangeplansettingsthatisnexttoyour
powerplan.
FormoreinformationaboutthePowerManagerprogram,refertothehelpinformationsystem.
Power-savingmodes
Thereareseveralmodesthatyoucanuseatanytimetoconservepower.Thissectionintroduceseach
modeandgivestipsontheeffectiveuseofbatterypower.
•Screenblankmode(forWindows7only)
Thecomputerdisplayrequiresconsiderablebatterypower.Toturnoffthepowertothedisplayandmake
Chapter2.Usingyourcomputer33
Page 50

thecomputerenterscreenblankmode,right-clickthebatterygaugeiconintheWindowsnotificationarea
andselectPoweroffdisplay.
•Sleepmode
Insleepmode,yourworkissavedtomemory,andthenthesolid-statedriveortheharddiskdriveandthe
computerdisplayareturnedoff.Whenyourcomputerwakesup,yourworkisrestoredwithinseconds.
Dependingonthemodel,yourcomputermightsupportthe30DayStandbyfunction.Whenthisfunction
isenabled,thecomputerconsumesevenlesspowerinsleepmodeandtakesonlysecondstoresume
normaloperationwhenyoupressthepowerbutton.Formoreinformationaboutthe30DayStandby
function,dothefollowing:
–ForWindows7:RefertothehelpinformationsystemofthePowerManagerprogram.Forinstructions
onhowtostartthePowerManagerprogram,see“AccessingLenovoprogramsontheWindows7
operatingsystem”onpage17
.
–ForWindows8andWindows8.1:OpentheLenovoSettingsprogramandclickPower➙30Day
Standby.
Toputyourcomputerintosleepmode,dothefollowing:
–ForWindows7:UsetheStartmenushutdownoption.
–ForWindows8andWindows8.1:Movethepointertothetop-rightorbottom-rightcornerofthescreen
tobringupthecharms.ThenclickSettings➙Power➙Sleep.
•Hibernationmode
Byusingthismode,youcanturnoffyourcomputercompletelywithoutsavingfilesorexitingany
programsthatarerunning.Whenthecomputerentershibernationmode,allopenprograms,folders,and
filesaresavedtotheharddiskdriveorsolid-statedrive,andthenthecomputerturnsoff.
Ifyouputyourcomputerintohibernationmodewiththewake-upfunctiondisabled,thecomputerdoes
notconsumeanypower.Thewake-upfunctionisdisabledbydefault.Ifyouputyourcomputerinto
hibernationmodewiththewake-upfunctionenabled,thecomputerconsumesasmallamountofpower.
Toenablethewake-upfunction,dothefollowing:
1.GotoControlPanelandclickSystemandSecurity.
2.ClickAdministrativeT ools.
3.ClickT askScheduler.Ifyouarepromptedforanadministratorpasswordorconfirmation,typethe
passwordorprovideconfirmation.
4.Fromtheleftpane,selectthetaskfolderforwhichyouwanttoenablethewake-upfunction.The
scheduledtasksaredisplayed.
5.Clickascheduledtask,andthenclicktheConditionstab.
6.UnderPower,selectthecheckboxforWakethecomputertorunthistask.
Toputthecomputerintohibernationmode,changeyourpowerplansettingsbydoingthefollowing:
–ForWindows7:StartthePowerManagerprogramandthenclickthePowerPlantab.Thenfollow
theinstructionsonthescreen.ForinstructionsonhowtostartthePowerManagerprogram,see
“AccessingLenovoprogramsontheWindows7operatingsystem”onpage17
.
–ForWindows8andWindows8.1:Gotothedesktop.Right-clickthebatterystatusiconinthe
WindowsnotificationareaandclickPowerOptions,clickChangeplansettingsthatisnexttoyour
powerplan.Thenfollowtheinstructionsonthescreen.
•Wirelessoff
Whenyouarenotusingthewirelessfeatures,suchasBluetoothorwirelessLAN,turnthemoff.This
willhelpconservepower.T oturnoffthewirelessfeatures,pressF8.
34UserGuide
Page 51

Handlingthebattery
ThissystemsupportsonlybatteriesspeciallydesignedforthisspecificsystemandmanufacturedbyLenovo
oranauthorizedbuilder.Thesystemdoesnotsupportunauthorizedbatteriesorbatteriesdesignedforother
systems.Ifanunauthorizedbatteryorabatterydesignedforanothersystemisinstalled,thesystemwill
notcharge.
Attention:Lenovohasnoresponsibilityfortheperformanceorsafetyofunauthorizedbatteries,and
providesnowarrantiesforfailuresordamagearisingoutoftheiruse.
Note:Ifanunauthorizedbatteryisinstalled,thefollowingmessagewillbedisplayed:“Thebatteryinstalled
isnotsupportedbythissystemandwillnotcharge.PleasereplacethebatterywiththecorrectLenovo
batteryforthissystem.”
DANGER
Donotattempttodisassembleormodifythebatterypack.
Attemptingtodosocancauseanexplosion,orliquidleakagefromthebatterypack.
AbatterypackotherthantheonespecifiedbyLenovo,oradisassembledormodifiedbattery
packisnotcoveredbythewarranty.
DANGER
Iftherechargeablebatterypackisincorrectlyreplaced,thereisdangerofanexplosion.Thebattery
packcontainsasmallamountofharmfulsubstances.T oavoidpossibleinjury:
•ReplaceonlywithabatteryofthetyperecommendedbyLenovo.
•Keepthebatterypackawayfromfire.
•Donotexposeittoexcessiveheat.
•Donotexposeittowaterorrain.
•Donotshort-circuitit.
•Storeitinacooldryplace.
•Keepitawayfromchildren.
Thebatterypackisaconsumablesupply.Ifyourbatterybeginstodischargetooquickly,replacethebattery
packwithanewoneofthetyperecommendedbyLenovo.Formoreinformationaboutreplacingthe
batterypack,contactyourCustomerSupportCenter.
DANGER
Donotdrop,crush,puncture,orsubjecttostrongforces.Batteryabuseormishandlingcancause
thebatterytooverheat,whichcancausegassesorflameto“vent”fromthebatterypackor
coin-cellbattery.Ifyourbatteryisdamaged,orifyounoticeanydischargefromyourbatteryorthe
buildupofforeignmaterialsonthebatteryleads,stopusingthebatteryandobtainareplacement
fromthebatterymanufacturer.
Chapter2.Usingyourcomputer35
Page 52

DANGER
Onlyrechargethebatterypackstrictlyaccordingtoinstructionsincludedintheproduct
documentation.
DANGER
Donotputthebatterypackintrashthatisdisposedofinlandfills.Whendisposingofthebattery,
complywithlocalordinancesorregulationsandyourcompany'ssafetystandards.
DANGER
Thereisadangerofanexplosionifthecoin-cellbatteryisincorrectlyplaced.Thelithiumbattery
containslithiumandcanexplodeifitisnotproperlyhandled,ordisposedof.Replaceonlywitha
batteryofthesametype.Toavoidpossibleinjuryordeath,donot:(1)throworimmerseintowater,
(2)allowittoheattomorethan100°C(212°F),or(3)attempttorepairordisassembleit.Disposeof
itasrequiredbylocalordinancesorregulationsandyourcompany'ssafetystandards.
Connectingtothenetwork
YourcomputerhasoneormorenetworkcardsthatenableyoutoconnectyourcomputertotheInternet
andothernetworkconnections.
Ethernetconnections
Youcanconnectyourcomputertoalocalnetworkorabroadbandconnectionbyusingthebuilt-inEthernet
featureofthecomputer.
DANGER
YourcomputerhasanEthernetconnector.T oavoidtheriskofelectricalshock,donotconnect
thetelephonecabletotheEthernetconnector.
Wirelessconnections
Wirelessconnectionisthetransferofdatawithouttheuseofcablesbutbymeansofradiowavesonly.
Attention:
•Ifyouwanttousethewirelessfeaturesonanairplane,checkthewirelessserviceswiththeairlinebefore
boardingtheairplane.
•Iftherearerestrictionsontheuseofcomputerwirelessfeaturesonanairplane,youneedtodisablethe
wirelessfeaturesofyourcomputerbeforeboarding.
Dependingonthewirelessdevicesinstalledonyourcomputer,youmightbeabletousethefollowing
wirelessnetworks:
•WirelessLANconnection
•WirelessWANconnection
•Bluetoothconnection
36UserGuide
Page 53

UsingthewirelessLANconnection
Awirelesslocalareanetwork(LAN)coversarelativelysmallgeographicarea,suchasanofficebuildingora
house.Devicesbasedonthe802.11standardscanconnecttothistypeofnetwork.
Yourcomputercomeswithabuilt-inwirelessnetworkcardandaconfigurationutilitytohelpyouestablish
wirelessconnectionsandmonitortheconnectionstatus.Thisenablesyoutostayconnectedtoyournetwork
whileyouareattheoffice,inameetingroom,orathome,withnoneedforawiredconnection.
ToestablishawirelessLANconnection,dothefollowing:
ForWindows7:
1.PressF8andfollowtheinstructionsonthescreentoenablethewirelessfeature.
2.Clickthewireless-network-connection-statusiconintheWindowsnotificationarea.Alistofavailable
wirelessnetworksisdisplayed.
3.Double-clickanetworktoconnecttoit.Providerequiredinformationifneeded.
ForWindows8andWindows8.1:
1.Gotothedesktopandclickthewireless-network-connection-statusiconintheWindowsnotification
area.Alistofavailablewirelessnetworksisdisplayed.
Note:T odisplaythelist,ensurethatairplanemode(flightmode)issettooff.
2.Double-clickanetworktoconnecttoit.Providerequiredinformationifneeded.
Ifyouneedtoconnecttodifferentwirelessnetworksindifferentlocations,usethefollowingsoftwareto
managemultiplenetworkprofilessothatthecomputerautomaticallyconnectstoanavailablenetworkwhen
thelocationchanges:
•ForWindows7:UsetheAccessConnectionsprogram.Formoreinformation,see“AccessingLenovo
programsontheWindows7operatingsystem”onpage17
.
•ForWindows8andWindows8.1:OpentheLenovoSettingsprogramandclickLocationAwareness.
Formoreinformation,see“AccessingLenovoprogramsontheWindows8orWindows8.1operating
system”onpage18.
TipsforusingthewirelessLANfeature
Toachievethebestconnection,usethefollowingguidelines:
•PlaceyourcomputersothatthereareasfewobstaclesaspossiblebetweenthewirelessLANaccess
pointandthecomputer.
•Openyourcomputerlidtoanangleofslightlymorethan90degrees.
•Ifyouusethewirelessfeature(the802.11standards)ofyourcomputersimultaneouslywithaBluetooth
option,thedatatransmissionspeedcanbedelayedandtheperformanceofthewirelessfeaturecanbe
degraded.
Checkingthewireless-LANconnectionstatus
Youcancheckthewireless-LANconnectionstatusthroughthewireless-network-connection-statusiconin
theWindowsnotificationarea.Themorebarsencompassed,thebetterthesignalis.
FortheWindows7operatingsystem,youalsocanchecktheAccessConnectionsgauge,theAccess
Connectionsstatusicon,ortheAccessConnectionswirelessstatusiconintheWindowsnotificationarea.
AccessConnectionsgauge:
•
Powertothewirelessradioisoffornosignal.
Chapter2.Usingyourcomputer37
Page 54

•Powertothewirelessradioison.Thesignalstrengthofthewirelessconnectionispoor.T o
improvesignalstrength,moveyourcomputerclosertothewirelessaccesspoint.
•Powertothewirelessradioison.Thesignalstrengthofthewirelessconnection
ismarginal.
•Powertothewirelessradioison.Thesignalstrengthofthewirelessconnection
isexcellent.
AccessConnectionsstatusicon:
•Nolocationprofileisactiveornoneexists.
•Currentlocationprofileisdisconnected.
•Currentlocationprofileisconnected.
AccessConnectionswirelessstatusicon
•Powertothewirelessradioisoff.
•Powertothewirelessradioison.Noassociation.
•Powertothewirelessradioison.Nosignal.
•
Powertothewirelessradioison.Thesignalstrengthofthewirelessconnectionisexcellent.
•Powertothewirelessradioison.Thesignalstrengthofthewirelessconnectionismarginal.
•
Powertothewirelessradioison.Thesignalstrengthofthewirelessconnectionispoor.T oimprove
signalstrength,moveyourcomputerclosertothewirelessaccesspoint.
UsingthewirelessWANconnection
WirelessWideAreaNetwork(wirelessWAN)whichusescellularnetworksfordatatransmission,enables
youtoestablishwirelessconnectionsoverremotepublicorprivatenetworks.Theseconnectionscanbe
maintainedoveralargegeographicalarea,suchasacityoranentirecountry,byuseofmultipleantenna
sitesorsatellitesystemsmaintainedbywirelessserviceproviders.
SomeThinkPadnotebookcomputerscomewithabuilt-inwirelessWANcardintegratedwithsomewireless
WANtechnologies,suchas1xEV-DO,HSPA,3G,GPRS,orL TE.Byusingthebuilt-inwirelessWANcardand
theconfigurationutilitythatcomeswithyourcomputer,youcanestablishwirelessWANconnectionsand
monitortheconnectionstatus.
Note:ThewirelessWANserviceisprovidedbyauthorizedserviceprovidersinsomecountries.
TipsforusingthewirelessWANfeature
Toachievethebestconnection,usethefollowingguidelines:
•Keepyourcomputerawayfromyourbody.
•Placeyourcomputeronaflatsurfaceandopenyourcomputerlidtoanangleofslightlymorethan
90degrees.
•Placeyourcomputerawayfromconcreteorbrickwallsthatmightdampencellularsignals.
•Bestreceptionwillbeavailablenearwindowsandotherlocationswherecellularphonereceptionisthe
strongest.
Checkingthewireless-WANconnectionstatus
Youcancheckthewireless-WANconnectionstatusthroughthewireless-network-connection-statusiconin
theWindowsnotificationarea.Themorebarsencompassed,thebetterthesignalis.
38UserGuide
Page 55

FortheWindows7operatingsystem,youalsocanchecktheAccessConnectionsgauge,theAccess
Connectionsstatusicon,ortheAccessConnectionswirelessstatusiconintheWindowsnotificationarea.
AccessConnectionsgauge:
•Nosignal
•
Weaksignal
•Mediumsignal
•Strongsignal
AccessConnectionsstatusicon:
•
Nolocationprofileisactiveornoneexists.
•
Currentlocationprofileisdisconnected.
•Currentlocationprofileisconnected.
AccessConnectionswirelessstatusicon:
•
PowertotheWANradioisoff
•Noassociation
•Nosignal
•Weaksignal
•Mediumsignal
•Strongsignal
UsingBluetooth
Bluetoothcanconnectdevicesashortdistancefromoneanother,andiscommonlyusedforconnecting
peripheraldevicestoacomputer,transferringdatabetweenhand-helddevicesandapersonalcomputer,or
remotelycontrollingandcommunicatingwithdevicessuchasmobilephones.
Dependingonthemodel,yourcomputermightsupporttheBluetoothfeature.Totransferdatathrough
theBluetoothfeature,dothefollowing:
Note:Ifyouusethewirelessfeature(the802.11standards)ofyourcomputersimultaneouslywitha
Bluetoothoption,thedatatransmissionspeedcanbedelayedandtheperformanceofthewirelessfeature
canbedegraded.
•ForWindows7:
1.PressF8andthenfollowtheinstructionsonthescreentoenabletheBluetoothfeature.
2.Right-clickthedatathatyouwanttosend.
3.SelectSendT o➙BluetoothDevices.
4.SelectaBluetoothdevice,andthenfollowtheinstructionsonthescreen.
•ForWindows8andWindows8.1:
1.Gotothedesktop,andthenright-clickthedatathatyouwanttosend.
2.SelectSendT o➙BluetoothDevices.
3.SelectaBluetoothdevice,andthenfollowtheinstructionsonthescreen.
Chapter2.Usingyourcomputer39
Page 56

Formoreinformation,refertotheWindowshelpinformationsystemandtheBluetoothhelpinformation
system.
Presentationsandmultimedia
Youcanconnectyourcomputertoaprojectortogivepresentationsoryoucanconnectyourcomputer
toanexternalmonitortoexpandyourworkspace.
Changingdisplaysettings
Youcanchangethedisplaysettings,suchasthedisplayresolution,fontsize,andsoon.
Tochangethedisplaysettings,dothefollowing:
1.GotoControlPanelandclickAppearanceandPersonalization.
2.ClickDisplayforfurtherconfiguration.
3.ClickApply.Thechangewilltakeeffectafteryoulogoff.
Usinganexternalmonitor
Note:Whenyouconnectanexternalmonitor,avideointerfacecablewithaferritecoreisrequired.
Yourcomputercansupportamaximumvideoresolutionofupto2048x1536,providedthattheexternal
monitoralsosupportsthatresolution.Formoreinformation,refertothemanualsprovidedwithyourmonitor.
Youcansetanyresolutionforeitherthecomputerdisplayortheexternalmonitor.Whenyouusebothatthe
sametime,theresolutionofbothisthesame.Ifyousetahigherresolutionforthecomputerdisplay,you
canseeonlypartofthescreenatatime.YoucanseeotherpartsbymovingtheimagewiththeTrackPoint
pointingdeviceoranotherpointingdevice.
Youcanmovethedisplayoutputtothecomputerdisplay,theexternalmonitor,orbothbychangingsettings
intheDisplaySettingswindow.
Connectinganexternalmonitor
Toconnectanexternalmonitor,dothefollowing:
1.Connecttheexternalmonitortotheexternalmonitorconnector(VGAconnectororHDMIconnector)of
yourcomputer.
2.Connecttheexternalmonitortoanelectricaloutlet.
3.T urnontheexternalmonitor.
4.ChangethedisplayoutputlocationbypressingF7.Thisenablesyoutoswitchamongviewingoutput
ontheexternalmonitor,thecomputermonitor,andbothmonitors.
Note:Ifyourcomputercannotdetecttheexternalmonitor,right-clickonthedesktop,thenselectScreen
resolution.ClicktheDetectbutton.
Settingthemonitortype
Tosettheexternalmonitortype,dothefollowing:
1.Connecttheexternalmonitortoyourcomputer,andthenconnectthemonitortoanelectricaloutlet.
2.T urnontheexternalmonitor.
3.Right-clickonthedesktop,andthenclickScreenresolution.
Note:Ifyourcomputercannotdetecttheexternalmonitor,clicktheDetectbutton.
40UserGuide
Page 57

4.SelecttheexternalmonitorandsetResolution.
5.ClickAdvancedSettings.
6.ClicktheMonitortab.Checkthemonitorinformationtoensurethatthemonitortypeiscorrect.Ifitis,
clickOKtoclosethewindow;otherwiseproceedwiththefollowingsteps.
7.Ifmorethantwomonitortypesaredisplayed,selectGenericPnPMonitororGenericNon-PnP
Monitor.
8.ClickProperties.Ifyouarepromptedforanadministratorpasswordorconfirmation,typethepassword
orprovideconfirmation.
9.ClicktheDrivertab.
10.ClickUpdateDriver.
11.ClickBrowsemycomputerfordriversoftware,andthenclickLetmepickfromalistofdevice
driversonmycomputer.
12.CleartheShowcompatiblehardwarecheckbox.
13.Selectthecorrectmanufacturerandmodelfortheexternalmonitor.Ifyoucannotfindyourmonitoron
thelist,stoptheinstallationofthisdriverandusethedrivershippedwithyourmonitor.
14.Afterupdatingthedriver,clickClose.
Changingthecolorsettings
Tochangethecolorsettings,dothefollowing:
ForWindow7:
1.Right-clickonthedesktop,andclickScreenresolution.
2.ClickAdvancedSettings,selecttheMonitortab,thensetColors.
3.ClickOK.
ForWindow8andWindows8.1:
1.Right-clickonthedesktop,andclickScreenresolution.
2.ClickAdvancedSettings,andthenselecttheColorManagementtab.
3.ClickColorManagement,andthenselecttheAdvancedtab.
4.Changethecolorsettingsasyoudesired,andthenclickClose.
Considerationsforconnectinganexternalmonitor
•Wheninstallinganoperatingsystem,youmustinstallthedisplaydriverforyourmonitorthatissupplied
withthecomputer,andthemonitorINFfilethatissuppliedwiththeexternalmonitor.
•Ifyousetaresolutionhigherthantheresolutionyouareusingonthecomputermonitor,andusean
externalmonitorthatdoesnotsupportthatresolution,takeadvantageofthevirtualscreenfunction,
whichenablesyoutodisplayonlyapartofthehigh-resolutionscreenimageyourcomputerproduces.
YoucanseeotherpartsoftheimagebymovingthescreenwiththeT rackPointpointingdeviceoranother
pointingdevice.
•Iftheexternalmonitoryouareusingisoutdated,theresolutionandtherefreshratemightbelimited.
Usingaprojector
Tomakepresentations,youcanconnectaprojectortoyourcomputerthroughtheVGAconnectoronyour
computer.
Note:Itmighttakeseveralsecondsbeforetheprojectordisplaystheimage.Ifyoudonotseeyourdesktop
displayedafter60seconds,pressF7toswitchamongdifferentdisplayoutputlocations.
Chapter2.Usingyourcomputer41
Page 58

Yourprojectormighthaveoneormoreaudio-inputconnectors.T oprojectsound,youneedtoattach
thecomboaudioconnectoronyourcomputertotheseconnectors,usinganaudiocable(commercially
available).
Usingdualdisplays
ThissectionintroducestheDuplicateandExtenddesktopfunctionsthatenableyoutodisplayoutputon
boththecomputerdisplayandanexternalmonitor.
UsingtheDuplicateorExtenddesktopfunction
WiththeDuplicatedesktopfunction,youcandisplaythesameoutputonboththecomputerdisplayand
anexternaldisplay.YoualsocandisplaydifferentdesktopimagesoneachmonitorwiththeExtend
desktopfunction.
YoucanusetheDuplicateorExtenddesktopfunctionwithoutchanginganysettings.Ifthefunctiondoes
notwork,refertothefollowingtopiconhowtoenabletheDuplicateorExtenddesktopfunction.
EnablingtheDuplicateorExtenddesktopfunction
ToenabletheDuplicateorExtenddesktopfunction,dothefollowing:
1.Connecttheexternalmonitortothemonitorconnector;thenconnecttheexternalmonitortoan
electricaloutlet.
2.T urnontheexternalmonitor.
3.PressF7,thenselectDuplicateorExtend.
Tochangetheresolutionforeachmonitor,dothefollowing:
1.Right-clickonthedesktop,andclickScreenresolution.
2.ClicktheMonitor-1icon,whichisfortheprimarydisplay(thecomputerdisplaybydefault).
3.Settheresolutionfortheprimarydisplay.
4.ClicktheMonitor-2icon,whichisforthesecondarydisplay(theexternaldisplaybydefault).
5.Settheresolutionforthesecondarydisplay.
6.ClickAdvancedsettingsandsetupthecolorqualityontheMonitortab.
7.ClickOKtoapplythechanges.
ConsiderationsforusingtheExtenddesktopfunction
•IfyouwanttoshowDOSfull-screenwhileinExtenddesktopmode,onlytheprimarydisplayshows
DOS;theotherdisplayisblackedout.
•IfyourcomputerhastheIntel
®
graphicscard,youcandesignatetheprimarydisplaybydoingthe
following:
1.PressCtrl+Alt+Fn+F12.TheIntelCUIwindowopens.
2.SelectExtendedDesktop.
3.Changethesettingtodesignatetheprimarydisplay.
•IfyourcomputerhastheAMD
®
graphicscard,youcandesignatetheprimarydisplaybydoingthe
following:
1.Right-clickonthedesktopandthenselectScreenresolution.
2.SelectExtendthesedisplaysinMultipleDisplays.
3.Changethesettingtodesignatetheprimarydisplay.
42UserGuide
Page 59

•WhenaprogramusingDirectDraworDirect3Disrunninginfull-screenmode,onlytheprimarydisplay
showstheoutput.
•YoucannotusethedisplayswitchingfunctioninExtenddesktopmode.
Usingaudiofeatures
Yourcomputerisequippedwiththefollowingitems:
•Speakers
•Microphones
•Comboaudioconnector,3.5mm(0.14inch)indiameter
Yourcomputeralsohasanaudiochipthatenablesyoutoenjoyvariousmultimediaaudiofeatures,such
asthefollowing:
•CompliantwithIntelHighDefinitionAudio
•PlaybackofMusicalInstrumentDigitalInterface(MIDI)andMovingPictureExpertsGroupAudioLayer-3
(MP3)files
•Recordingandplaybackofpulse-codemodulation(PCM)andWaveformAudioFileFormat(WAV)files
•Recordingfromvarioussoundsources,suchasaheadsetattached
Thefollowingtableshowswhichfunctionsoftheaudiodevicesattachedtotheconnectorsonyourcomputer
orthesupportedThinkPadOneLinkDockaresupported.
Table3.Audiofeaturelist
Connector
Headsetwitha3.5–mm,
4-poleplug
ConventionalheadphoneConventionalmicrophone
Comboaudioconnector
Headphoneand
microphonefunctions
supported
Headphonefunction
supported
Notsupported
Comboaudioconnector
ofthesupportedThinkPad
OneLinkDock
Headphoneand
microphonefunctions
supported
Headphonefunction
supported
Notsupported
Configuringforsoundrecording
Toconfigurethemicrophoneforoptimalsoundrecording,usetheSmartAudioprogram.Tostartthe
program,gotoControlPanelandclickHardwareandSound➙SmartAudio.
Usingthecamera
Ifyourcomputerhasanintegratedcamera,youcanusethecameratopreviewyourvideoimageand
takeasnapshotofyourcurrentimage.
Tostartthecameraandconfigurethecamerasettings,dothefollowing:
•ForWindows7:OpentheCommunicationsUtilityprogram.
•ForWindows8andWindows8.1:ClickCamerafromtheStartscreen.
Whenthecameraisstarted,thegreencamera-in-useindicatorturnson.
Youalsocanusetheintegratedcamerawithotherprogramsthatprovidefeaturessuchasphotographing,
videocapturing,andvideoconferencing.Tousetheintegratedcamerawithotherprograms,openoneofthe
Chapter2.Usingyourcomputer43
Page 60

programsandstartthephotographing,videocapturing,orvideoconferencingfunction.Then,thecamera
willstartautomaticallyandthecamerastatusindicatorturnsongreen.Formoreinformationaboutusingthe
camerawithaprogram,refertothedocumentationthatcamewiththeprogram.
Configuringcamerasettings
Youcanconfigurethecamerasettingstomeetyourneeds,suchasadjustingthequalityofthevideooutput.
Toconfigurethecamerasettings,dothefollowing:
•ForWindows8orWindows8.1,dooneofthefollowing:
–Configurethecamerasettingsdirectlyfromtheprogramthatisusingthecamera.Formoreinformation,
seethehelpinformationsystemoftheprogram.
–OpentheLenovoSettingsprogram.ThenclickCamera.Followtheinstructionsonthescreento
configurethecamerasettingsasdesired.
•ForWindows7:StarttheCommunicationsUtilityprogramandconfigurethecamerasettingsasdesired.
Usingtheopticaldrive
Note:YourcomputeronlysupportstheMulti-Burnerdrive.
Multi-Burnerdrive
ThisdrivecanreadDVD-ROMdiscs,DVD-Rdiscs,DVD-RAMdiscs,DVD-RWdiscs,andalltypesofCDs,
suchasCD-ROMdiscs,CD-RWdiscs,CD-Rdiscs,andaudioCDs.Inaddition,itcanrecordonDVD-R
discs,DVD-RWdiscs,typeIIDVD-RAMdiscs,CD-RWstandardandhighspeeddiscs,andCD-Rdiscs.
Usingaflashmediacard
Yourcomputerhasonemediacardreaderslot.
Themediacardreaderslotsupportsthefollowingfourtypesofcards:
•MultiMediaCard(MMC)
•SecureDigitaleXtended-Capacity(SDXC)card
•SecureDigital(SD)card
•SecureDigitalHigh-Capacity(SDHC)card
Note:Y ourcomputerdoesnotsupporttheCPRMfeaturefortheSDcard.
Attention:Whiletransferringdatatoorfromaflashmediacard,suchasanSDcard,donotputyour
computerintosleeporhibernationmodebeforethedatatransfercompletes;otherwise,yourdatacould
becomedamaged.
Insertingaflashmediacard
Attention:Beforeyoustartinstallingaflashmediacard,touchametaltableoragroundedmetalobject.
Thisactionreducesanystaticelectricityfromyourbody.
Toinsertaflashmediacard,dothefollowing:
1.Locatetheappropriatetypeofslotforyourcard.See“Locatingcomputercontrols,connectors,and
indicators”onpage1.
2.Ensurethatthemetalcontactsarefacingdownandpointingtowardtothecardslot.
3.Pressthecardfirmlyintothecardslot.
44UserGuide
Page 61

Iftheplug-and-playfeatureisnotenabled,dothefollowing:
1.GotoControlPanel.
2.ClickHardwareandSound.
3.ClickDeviceManager.Ifyouarepromptedforanadministratorpasswordorconfirmation,typethe
passwordorprovideconfirmation.
4.FromtheActionmenu,selectAddlegacyhardware.TheAddHardwareWizardstarts.
5.Followtheinstructionsonthescreen.
Removingaflashmediacard
Attention:
•Stopalltheactivitiesinvolvingthecardbeforeremovingit.Otherwise,dataonthecardmightbe
damagedorlost.
•Donotremoveacardwhilethecomputerisinsleepmodeorhibernationmode.Otherwise,thesystem
mightnotrespondwhenyoutrytoresumeoperation.
Toremoveaflashmediacard,dothefollowing:
1.ClickthetriangulariconintheWindowsnotificationareatoshowhiddenicons.
2.Right-clicktheSafelyRemoveHardwareandEjectMediaicon.
3.SelectthecorrespondingitemtoejectthecardfromtheWindowsoperatingsystem.
4.Pressthecardtoejectitfromyourcomputer.
5.Removethecardandstoreitsafelyforfutureuse.
Note:IfyoudonotremovethecardfromyourcomputerafteryouejectthecardfromtheWindowsoperating
system,thecardcannolongerbeaccessed.Toaccessthecard,youmustremoveitfirst,theninsertitagain.
Chapter2.Usingyourcomputer45
Page 62

46UserGuide
Page 63
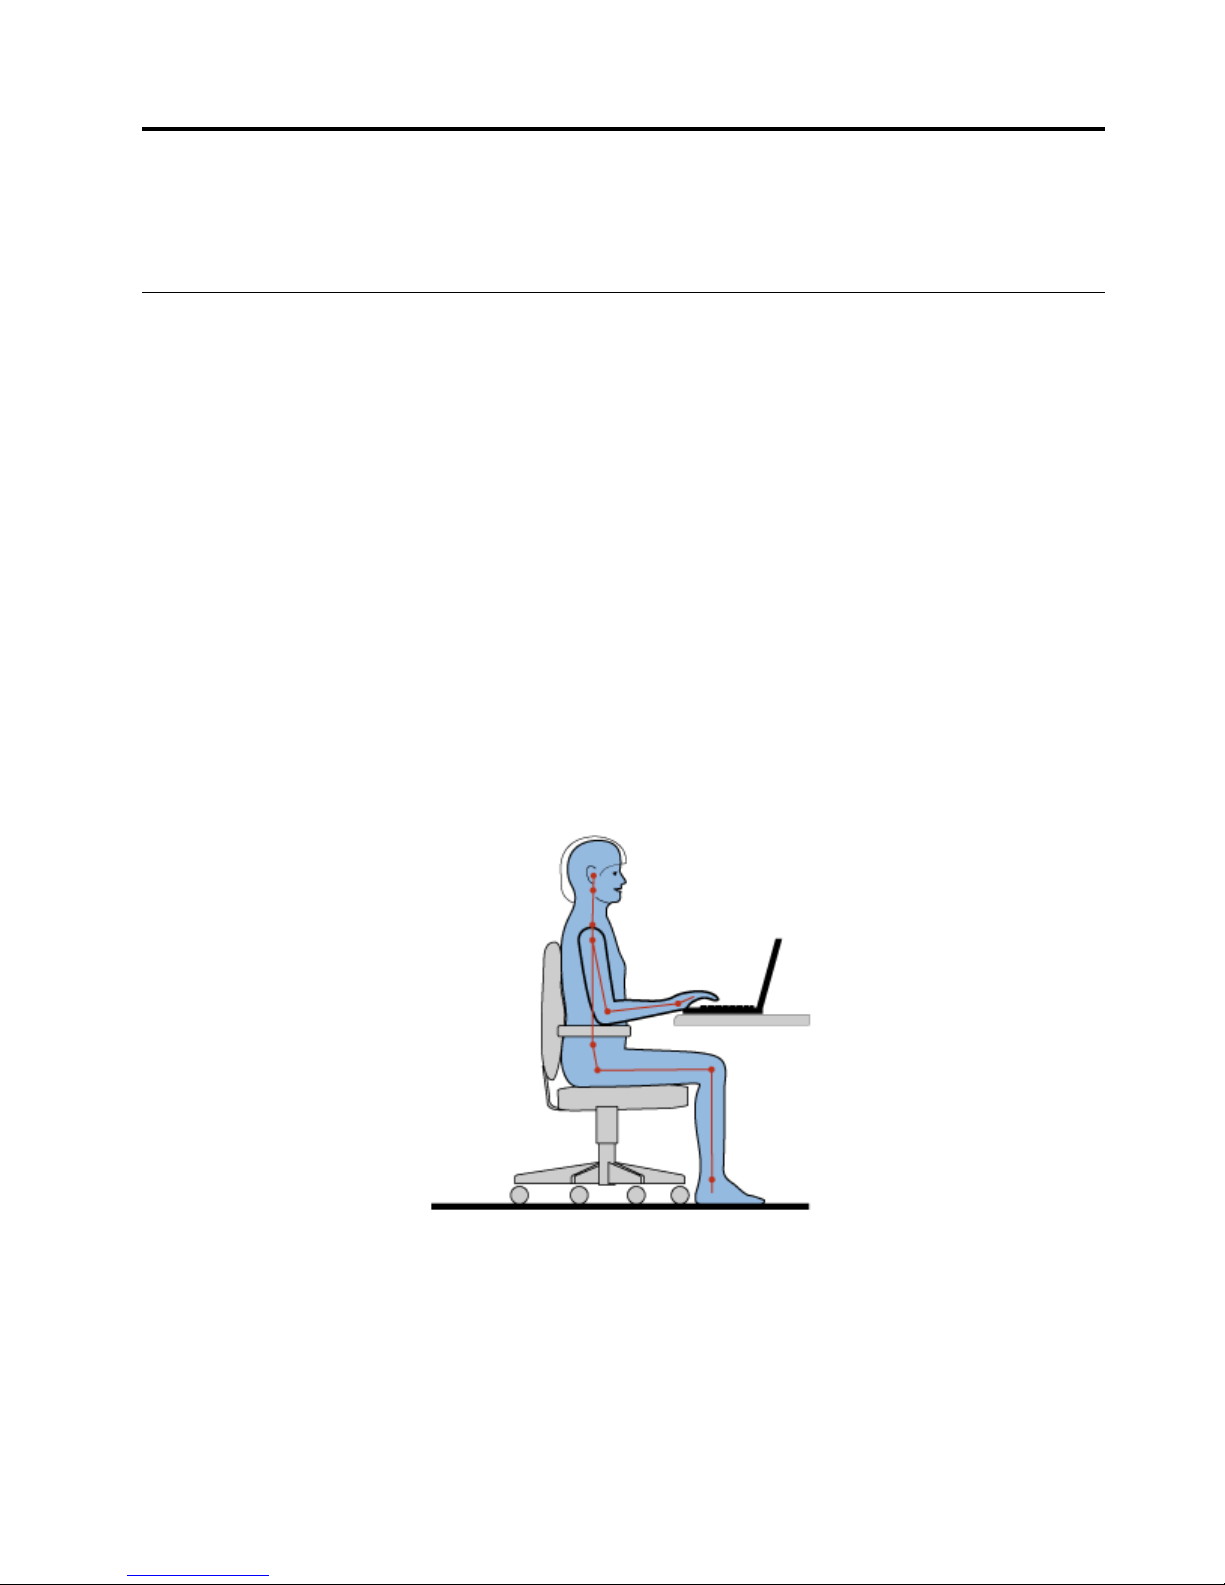
Chapter3.Youandyourcomputer
Thischapterprovidesinformationaboutaccessibility,comfort,andtravellingwithyourcomputer.
Accessibilityandcomfort
Goodergonomicpracticeisimportanttogetthemostfromyourpersonalcomputerandtoavoiddiscomfort.
Arrangeyourworkplaceandtheequipmentyouusetosuityourindividualneedsandthekindofwork
thatyouperform.Inaddition,usehealthyworkhabitstomaximizeyourperformanceandcomfortwhile
usingyourcomputer.
Thefollowingtopicsprovideinformationaboutarrangingyourworkarea,settingupyourcomputer
equipment,andestablishinghealthyworkhabits.
Lenovoiscommittedtoprovidingthelatestinformationandtechnologytoourcustomerswithdisabilities.
Refertoouraccessibilityinformationthatoutlinesoureffortsinthisarea.
Ergonomicinformation
Workinginthevirtualofficemightmeanadaptingtofrequentchangesinyourenvironment.Forexample,
adaptingtothesurroundinglightsources,properseating,andtheplacementofyourcomputerhardware,
canhelpyouimproveyourperformanceandachievegreatercomfort.
Thisexampleshowssomeoneinaconventionalsetting.Evenwhennotinsuchasetting,youcanfollow
manyofthesetips.Developgoodhabits,andtheywillserveyouwell.
Generalposture:Makeminormodificationsinyourworkingposturetodetertheonsetofdiscomfort
causedbylongperiodsofworkinginthesameposition.Frequent,shortbreaksfromyourworkalsohelp
topreventminordiscomfortassociatedwithyourworkingposture.
Display:Positionthedisplaytomaintainacomfortableviewingdistanceof510-760mm(20-30inches).
Avoidglareorreflectionsonthedisplayfromoverheadlightingoroutsidesourcesoflight.Keepthedisplay
screencleanandsetthebrightnesstolevelsthatenableyoutoseethescreenclearly.PressF5orF6
toadjustdisplaybrightness.
©CopyrightLenovo2013
47
Page 64

Headposition:Keepyourheadandneckinacomfortableandneutral(vertical,orupright)position.
Chair:Useachairthatgivesyougoodbacksupportandseatheightadjustment.Usechairadjustmentsto
bestsuityourdesiredposture.
Armandhandposition:Ifavailable,usechairarmrestsoranareaonyourworkingsurfacetoprovide
weightsupportforyourarms.Keepyourforearms,wrists,andhandsinarelaxedandneutral(horizontal)
position.Typewithasofttouchwithoutpoundingthekeys.
Legposition:Keepyourthighsparalleltothefloorandyourfeetflatonthefloororonafootrest.
Whatifyouaretraveling?
Itmightnotbepossibletoobservethebestergonomicpracticeswhenyouareusingyourcomputer
whileonthemoveorinacasualsetting.Regardlessofthesetting,trytoobserveasmanyofthetipsas
possible.Sittingproperlyandusingadequatelighting,forexample,willhelpyoumaintaindesirablelevels
ofcomfortandperformance.
Questionsaboutvision?
ThevisualdisplayscreensofThinkPadnotebookcomputersaredesignedtomeetthehigheststandards
andtoprovideyouwithclear,crispimagesandlarge,brightdisplaysthatareeasytosee,yeteasyonthe
eyes.Ofcourse,anyconcentratedandsustainedvisualactivitycanbetiring.Ifyouhavequestionsoneye
fatigueorvisualdiscomfort,consultavision-carespecialistforadvice.
Comfort
Observethefollowingguidelinestoachievegreatercomfortandimproveperformance.
Activesittingandrestbreaks:Thelongeryousitandworkwithyourcomputer,themoreimportantitisto
observeyourworkingposture.Follow“Ergonomicinformation”onpage47andpractice“activesitting”to
avoiddiscomfortassociatedwithyourworkingpostures.Makingminorvoluntaryposturalchangesand
takingshortfrequentworkbreaksarethekeyingredientsforhealthycomputing.Y ourcomputerislightand
mobile;youcaneasilyrepositionyourworkingsurfacetoaccommodatemanyposturemodifications.
Workareasetupoptions:Familiarizeyourselfwithallofyourofficefurnituresothatyouknowhowtoadjust
yourworksurface,seat,andotherworktoolstoaccommodateyourpreferencesforcomfort.Ifyourwork
areaisnotinanofficesetting,besuretotakespecialnoteofemployingactivesittingandtakingworkbreaks.
ManyThinkPadproductsolutionsareavailabletohelpyoumodifyandexpandyourcomputertobestsuit
yourneeds.Y oucanfindsomeoftheseoptionsathttp://www.lenovo.com/accessories/services/index.html.
Exploreyouroptionsfordockingsolutionsandexternalproductsthatprovidetheadjustabilityandfeatures
thatyouwant.
Accessibilityinformation
Lenovoiscommittedtoprovidingpeoplewithdisabilitiesgreateraccesstoinformationandtechnology.
Asaresult,thefollowinginformationprovideswaystohelpusersthathavehearing,vision,andmobility
limitationsgetthemostoutoftheircomputerexperience.
Assistivetechnologiesenableuserstoaccessinformationinthemostappropriateway.Someofthese
technologiesarealreadyprovidedinyouroperatingsystem.Otherscanbepurchasedthroughproviders,or
accessedthroughtheWebsiteathttp://www.lenovo.com/healthycomputing.
48UserGuide
Page 65

Assistivetechnologies
SomeaccessibilitytechnologiesareavailablethroughtheAccessibilityOptionsprogram.Depending
onyouroperatingsystem,thenumberofaccessibilityoptionsavailablevaries.Ingeneral,accessibility
optionsenhancethewayuserswithhearing,vision,ormobilitylimitationsnavigateandusetheircomputer.
Forexample,someusersmightnothavethefinemotorskillsrequiredtouseamouseorselectkey
combinations.Otherusersmightrequirelargerfontsorhigh-contrastdisplaymodes.Insomecases,
magnifiersandbuilt-inspeechsynthesizersareavailable.Fordetailedinformationabouteachofthese
features,consulttheMicrosofthelpinformationsystem.
TousetheAccessibilityOptionsprogram,openControlPanelandclickEaseofAccess➙Easeof
AccessCenter.
Screenreadertechnologies
Screen-readertechnologiesareprimarilyfocusedonsoftwareprograminterfaces,helpinformationsystems,
andvariousonlinedocuments.However,inthecasewhereascreenreadercannotreaddocuments,the
documentmustfirstgothroughaconversionprocess.OnesolutionconvertsAdobePDFfilesintoaformat
thatisreadbythescreen-readerprograms.ThissolutionisaWeb-basedserviceprovidedbyAdobe
SystemsIncorporated.Throughhttp://access.adobe.com,AdobePDFdocumentscanbeconvertedto
HTMLorplaintextinmanylanguages.OneconversionoptionconvertsPDFdocumentsontheInternet.A
secondoptionenablesuserstosubmittheURLofanAdobePDFfilethroughe-mailtoconvertittoHTMLor
ASCIItext.AdobePDFfilesonalocalharddiskdrive,localCD-ROM,orLANalsocanbeconvertedby
attachingtheAdobePDFfiletoane-mailmessage.
Travelingwithyourcomputer
Thistopicprovidesinformationtohelpyouworkwithyourcomputerwhenyouaretravelling.
Traveltips
Usethefollowingtraveltipstotravelmoreconfidentlyandefficientlywithyourcomputer.
•Althoughitissafetoallowyourcomputertogothroughthex-raymachinesatairportsecuritystations,it
isimportanttokeepyoureyesonthecomputeratalltimestopreventtheft.
•Considerbringinganelectricaladapterforuseinanairplaneorautomobile.
•Ifyoucarryanacpoweradapter,detachtheaccordfromittoavoiddamagingthecord.
Traveltipsonairplanes
Ifyoucarryyourcomputerintoanairplane,takenoteofthefollowingtips:
•Ifyouintendtouseyourcomputerorwirelessservices(suchasInternetandBluetooth),checkwiththe
airlineforrestrictionsandavailabilityofservicesbeforeboardingtheairplane.Iftherearerestrictions
ontheuseofcomputerswithwirelessfeaturesontheairplane,youmustabidebythoserestrictions.If
necessary,disablewirelessfeaturesbeforeboarding.
•Becarefulabouttheseatinfrontofyouonairplanes.Angleyourcomputerdisplaysothatitdoesnotget
caughtwhenthepersoninfrontofyouleansback.
•Whentakingoff,remembertoturnoffyourcomputerorputitintohibernationmode.
Travelaccessories
Thefollowingisachecklistofitemstoconsiderpackingwhenyouaregoingtotravel:
•ThinkPadacpoweradapter
•ThinkPadAC/DCcomboadapter
Chapter3.Y ouandyourcomputer49
Page 66

•Externalmouse,ifyouareaccustomedtousingone
•Ethernetcable
•Extrabattery,charged
•Aqualitycarryingcasethatprovidesadequatecushionandprotection
•Externalstoragedevice
Ifyouaretravelingtoanothercountry,youmightwanttoconsideranacpoweradapterforthecountryto
whichyouaretravelling.
Topurchasetravelaccessories,gotohttp://www.lenovo.com/accessories.
50UserGuide
Page 67

Chapter4.Security
Thischapterprovidesinformationabouthowtoprotectyourcomputerfromtheftandunauthorizeduse.
•“Attachingamechanicallock”onpage51
•“Usingpasswords”onpage51
•“Harddisksecurity”onpage55
•“Usingthefingerprintreader”onpage56
•“Noticeondeletingdatafromyourharddiskdriveorsolid-statedrive”onpage58
•“Usingfirewalls”onpage59
•“Protectingdataagainstviruses”onpage59
Attachingamechanicallock
Youcanattachamechanicallocktoyourcomputer,tohelppreventitfrombeingremovedwithoutyour
permission.
Attachamechanicallocktothekeyholeofthecomputer;thensecurethechainonthelocktoastationary
object.Refertotheinstructionsshippedwiththemechanicallock.
Note:Youareresponsibleforevaluating,selecting,andimplementingthelockingdeviceandsecurity
feature.Lenovomakesnocomments,judgments,orwarrantiesaboutthefunction,quality,orperformance
ofthelockingdeviceandsecurityfeature.
Usingpasswords
Youcanhelppreventyourcomputerfromunauthorizedusebyusingpasswords.Onceyousetapassword,
apromptisdisplayedonthescreeneachtimeyouturnonthecomputer.Enteryourpasswordattheprompt.
Youcannotusethecomputerunlessyoutypethecorrectpassword.
Ifyouhavesetapower-onpassword,asupervisorpassword,oraharddiskpassword,itunlocks
automaticallywhenthecomputerresumesfromsleepmode.
Note:IfaWindowspasswordhasbeenset,youwillbepromptedtoenterit.
Typingpasswords
Whenthisiconisdisplayed,typeapower-onpasswordorasupervisorpassword.
Whenthisiconisdisplayed,typeauserharddiskpassword.Totypeamasterharddiskpassword,
pressF1.Whentheiconchangesto,typethemasterharddiskpassword
Note:Toreturntotheicon
,pressF1again.
Power-onpassword
Youcansetapower-onpasswordtohelpprotectyourcomputeragainstunauthorizedaccess.
©CopyrightLenovo2013
51
Page 68

Ifyousetapower-onpassword,thepasswordpromptisdisplayedonthescreenwheneveryouturnonthe
computer.Youmustenterthecorrectpasswordtostartusingthecomputer.
Setting,changing,orremovingapower-onpassword
Beforeyoustart,printtheseinstructions.
Toset,change,orremoveapower-onpassword,dothefollowing:
1.T urnoffyourcomputer.Waitforaboutfiveseconds,andthenturnonthecomputeragain.
2.Whenthelogoscreenisdisplayed,pressF1tostarttheThinkPadSetupprogram.
3.SelectSecurity➙Password➙Power-onPasswordbyusingthedirectionalkeys.
4.Dependingonyourneed,dooneofthefollowing:
•Tosetapassword,dothefollowing:
a.IntheEnterNewPasswordfield,typeadesiredpasswordandpressEnter.
b.IntheConfirmNewPasswordfield,retypethepasswordandpressEnter.
•Tochangeapassword,dothefollowing:
a.IntheEnterCurrentPasswordfield,typethecurrentpower-onpasswordandpressEnter.
b.IntheEnterNewPasswordfield,typethenewpower-onpasswordandpressEnter;thenretype
thepasswordintheConfirmNewPasswordfieldandPressEnter.
•Toremoveapassword,dothefollowing:
a.IntheEnterCurrentPasswordfield,typethecurrentpower-onpasswordandpressEnter.
b.LeavetheEnterNewPasswordandConfirmNewPasswordfieldsblank.PressEntertwice.
5.ASetupNoticewindowisdisplayed.PressEntertocontinue.
6.PressFn+F10.ASetupConfirmationwindowisdisplayed.SelectYestosavetheconfiguration
changesandexit.
Note:Y oumightwanttorecordyourpasswordandstoreitinasafeplace.Otherwise,ifyouforgetthe
password,youhavetotakeyourcomputertoaLenovoreselleroramarketingrepresentativetohave
thepasswordcanceled.
Supervisorpassword
ThesupervisorpasswordprotectsthesysteminformationstoredintheThinkPadSetupprogram.Ifyouhave
setasupervisorpassword,noonecanchangetheconfigurationofthecomputerwithoutthepassword.It
providesthefollowingsecurityfeatures:
•Ifonlyasupervisorpasswordisset,apasswordpromptisdisplayedwhenyoutrytostarttheThinkPad
Setupprogram.UnauthorizeduserscannotaccesstheThinkPadSetupprogramwithoutthepassword.
•Thesystemadministratorcanusethesupervisorpasswordtoaccessacomputereveniftheuserofthat
computerhassetapower-onpassword.Thesupervisorpasswordoverridesthepower-onpassword.
•Ifbothasupervisorpasswordandapower-onpasswordareset,youcandothefollowingonlyifyou
havethesupervisorpassword:
–Changingordeletingthepower-onpassword
–Changingordeletingthesupervisorpassword
–Changingdateandtime
–Specifyingtheminimumlengthforpower-onpasswordandharddiskpassword
–Changingthesettingforthesecuritychip
–Erasingthefingerprintdata
52UserGuide
Page 69

–Enablingordisablingthefollowingfeatures:
–WakeonLANandFlashoverLAN
–LockUEFIBIOSSettings
–Passwordatunattendedboot
–BootDeviceListF12Option
–BootOrderLock
–FlashBIOSUpdatingbyEnd-Users
–Internalnetworkdevice
–Internalwirelessdevice
–InternalBluetoothdevice
–InternalNetworkOptionROM
–InternalwirelessWANdevice
–Securitymode
–Fingerprintreaderpriority
Notes:
•ThesystemadministratorcansetthesamesupervisorpasswordonmanyThinkPadnotebookcomputers
tomakeadministrationeasier.
•WhenLockUEFIBIOSSettingsoptionisenabled,allBIOSsettingscannotbechanged.T ochange
thesettings,asupervisorpasswordisrequired.
Setting,changing,orremovingasupervisorpassword
Beforeyoustart,printtheseinstructions.
Onlyasystemadministratorcanset,change,orremoveasupervisorpassword.Toset,change,orremovea
supervisorpassword,dothefollowing:
1.T urnoffyourcomputer.Waitforaboutfiveseconds,andthenturnonthecomputeragain.
2.Whenthelogoscreenisdisplayed,pressF1tostarttheThinkPadSetupprogram.
3.SelectSecurity➙Password➙SupervisorPasswordbyusingthedirectionalkeys.
4.Dependingonyourneeds,dooneofthefollowing:
•Tosetapassword,dothefollowing:
a.IntheEnterNewPasswordfield,typeadesiredpasswordandpressEnter.
b.IntheConfirmNewPasswordfield,retypethepasswordandpressEnter.
•Tochangeapassword,dothefollowing:
a.IntheEnterCurrentPasswordfield,typethecurrentsupervisorpasswordandpressEnter.
b.IntheEnterNewPasswordfield,typethenewsupervisorpasswordandpressEnter;thenretype
thepasswordintheConfirmNewPasswordfieldandpressEnter.
•Toremoveapassword,dothefollowing:
a.IntheEnterCurrentPasswordfield,typethecurrentsupervisorpasswordandpressEnter.
b.LeavetheEnterNewPasswordandConfirmNewPasswordfieldsblank.PressEntertwice.
5.ASetupNoticewindowisdisplayed.PressEntertocontinue.
6.PressFn+F10.ASetupConfirmationwindowisdisplayed.SelectYestosavetheconfiguration
changesandexit.
Chapter4.Security53
Page 70

Note:Y oumightwanttorecordyourpasswordandstoreitinasafeplace.Thenexttimeyouopenthe
ThinkPadSetupprogram,youwillbepromptedtotypeyoursupervisorpasswordtoproceed.Ifyouforget
yoursupervisorpassword,Lenovocannotresetyourpassword.YoumusttakeyourcomputertoaLenovo
reselleroraLenovomarketingrepresentativetohavethesystemboardreplaced.Proofofpurchaseis
required,andafeewillbechargedforpartsandservice.
Harddiskpasswords
Thefollowingtwotypesofharddiskpasswordscanhelpprotecttheinformationstoredontheharddiskdrive:
•Userharddiskpassword
Ifauserharddiskpasswordhasbeenset,butnomasterharddiskpasswordhasbeen,theusermust
entertheuserharddiskpasswordtoaccessfilesandapplicationsontheharddiskdrive.
•Masterharddiskpassword
Themasterharddiskpasswordalsorequiresauserharddiskpassword.Themasterharddiskpassword
isusuallysetandusedbyasystemadministrator.Itenablestheadministratortoaccessanyharddisk
driveinasystemlikeamasterkey.Theadministratorsetsthemasterpassword;thenassignsauser
passwordforeachcomputerinthenetwork.Theusercanthenchangetheuserpasswordasdesired,but
theadministratorstillcangetaccessbyusingthemasterpassword.
Whenamasterharddiskpasswordisset,onlytheadministratorcanremovetheuserharddiskpassword.
Settingaharddiskpassword
Beforeyoustart,printtheseinstructions.
Tosetaharddiskpassword,dothefollowing:
1.T urnoffyourcomputer.Waitforaboutfiveseconds,andthenturnonthecomputeragain.
2.Whenthelogoscreenisdisplayed,pressF1tostarttheThinkPadSetupprogram.
3.SelectSecurity➙Password➙Harddisk1Passwordbyusingthedirectionalkeys.
4.Apasswordwindowisdisplayed.YouarepromptedtoselectUserorUser+Master.SelectUserif
youwanttosetonlyoneharddiskpassword.SelectUser+Masterifyouwanttosetauserharddisk
passwordandamasterharddiskpassword,forexampleifyouareanadministratororasupervisor.
•IfyouselectUser,dothefollowing:
a.Whenawindowfortypingthenewpasswordopens,typeyournewpasswordintheEnterNew
PasswordfieldandpressEnter.
b.IntheConfirmNewPasswordfield,retypethepasswordyoujustenteredandpressEnter.
•IfyouselectUser+Master,dothefollowing:
a.First,setauserharddiskpassword.Whenamessagewindowpromptsyoutosettheuserhard
diskpassword,pressEntertocontinue.T ypeyournewuserharddiskpasswordintheEnter
NewPasswordfieldandpressEnter.RetypethepasswordintheConfirmNewPassword
fieldandpressEnter.
b.Then,setamasterharddiskpassword.Whenamessagewindowpromptsyoutosetthemaster
harddiskpassword.PressEntertocontinue.Typeyournewmasterharddiskpasswordinthe
EnterNewPasswordfieldandpressEnter.RetypethepasswordintheConfirmNewPassword
fieldandpressEnter.
5.ASetupNoticewindowisdisplayed.PressEntertocontinue.
6.PressFn+F10.ASetupConfirmationwindowisdisplayed.SelectYestosavetheconfiguration
changesandexit.
Thenexttimeyouturnonyourcomputer,typetheuserormasterharddiskpasswordtostartyourcomputer
andaccesstheoperatingsystem.
54UserGuide
Page 71

Changingorremovingaharddiskpassword
Tochangeorremovetheharddiskpassword,dothefollowing:
•IfyouareinUser+Masterharddiskmode,youcanselecteitherUserHDPorMasterHDPtochange
thepassword,dependingonyourneeds.
–IfyouselectUserHDPmode,followthefollowingstepstochangetheuserharddiskpassword:
1.T ypethecurrentuserharddiskpasswordintheEnterCurrentPasswordfieldandpressEnter.
2.T ypethenewpasswordintheEnterNewPasswordfieldandpressEnter;thenretypethe
passwordintheConfirmNewPasswordfieldandpressEnter.
3.ASetupNoticewindowisdisplayed.PressEnteragaintocontinue.Theuserharddiskpassword
ischanged.
Note:TheharddiskpasswordcannotberemovedinUserHDPmode.
–IfyouselectMasterHDPmode,followthefollowingstepstochangethemasterharddiskpassword:
1.T ypethecurrentmasterharddiskpasswordintheEnterCurrentPasswordfieldandpressEnter.
2.T ypethenewmasterharddiskpasswordintheEnterNewPasswordfieldandpressEnter;then
retypethenewpasswordyoujustenteredintheConfirmNewPasswordfieldandpressEnter.
3.ASetupNoticewindowisdisplayed.PressEntertocontinue.Themasterharddiskpasswordis
changed.
Note:IfyouleavetheEnterNewPasswordandConfirmNewPasswordfieldsblankandpressEnter
twice,boththeuserandmasterharddiskpasswordsareremoved.
•IfyouareinUserharddiskmode,followthefollowingstepstochangetheuserharddiskpassword:
1.Followsteps1through7in“Settingaharddiskpassword”onpage54,typingyourpasswordtoget
accesstotheThinkPadSetupprogram.
2.T ypethecurrentuserharddiskpasswordintheEnterCurrentPasswordfieldandpressEnter.
3.T ypethenewpasswordintheEnterNewPasswordfieldandpressEnter;thenretypethenew
passwordintheConfirmNewPasswordfieldandpressEnter.
4.ASetupNoticewindowisdisplayed.PressEnteragaintocontinue.Theuserharddiskpasswordis
changed.
Note:IfyouleavetheEnterNewPasswordandConfirmNewPasswordfieldsblankandpressEnter
twice,theuserharddiskpasswordisremoved.
Tipsonusingtheharddiskpasswords
•YoucansettheminimumlengthofaharddiskpasswordthroughtheSecuritymenu.
•Ifyousetaharddiskpasswordofoversevencharacters,theharddiskdrivecanbeusedonlywitha
computerthatcanrecognizeaharddiskpasswordofoversevencharacters.Ifyoutheninstallthe
harddiskdriveinacomputerthatcannotrecognizeaharddiskpasswordthatcontainsmorethan
sevencharacters,youcannotaccessthedrive.
•Recordyourpasswordandstoreitinasafeplace.Ifyouforgettheuserharddiskpassword,orbothuser
andmasterharddiskpasswords,Lenovocannotresetyourpasswordsorrecoverdatafromtheharddisk
drive.Y oumusttakeyourcomputertoaLenovoreselleroramarketingrepresentativetohavethehard
diskdrivereplaced.Proofofpurchaseisrequired,andafeewillbechargedforpartsandservice.
Harddisksecurity
Toprotectpasswordsfromunauthorizedsecurityattacks,refertothefollowingtipstomaximizesecurity:
Chapter4.Security55
Page 72

•Setapower-onpasswordaswellasaharddiskpasswordforyourinternalsolid-statedriveorharddisk
drive.Refertotheproceduresin“Power-onpassword”onpage51
and“Harddiskpasswords”onpage
54.Forsecurity,alongerpasswordisrecommended.
•IfaDiskEncryptionharddiskdriveoraDiskEncryptionsolid-statedriveisinstalledinyourcomputer,
besuretoprotectthecontentsofyourcomputermemoryfromunauthorizedaccessbyuseofdrive
encryptionsoftware.
•Beforeyoudisposeof,sell,orhandoveryourcomputer,deletethedatastoredonit.Formoreinformation,
referto“Noticeondeletingdatafromyourharddiskdriveorsolid-statedrive”onpage58
.
TheharddiskdrivebuiltintoyourcomputercanbeprotectedbyUEFIBIOS.
DiskEncryptionharddiskdriveandEncryptionsolid-statedrive
SomemodelscontaintheDiskEncryptionharddiskdriveorEncryptionsolid-statedrive.Thisfeaturehelps
toprotectyourcomputeragainstsecurityattacksonmedia,NANDflash,ordevicecontrollersbyuseofa
hardwareencryptionchip.Fortheefficientuseoftheencryptionfeature,setaharddiskpasswordforthe
internalstoragedevice.
Usingthefingerprintreader
Dependingonthemodel,yourcomputermighthaveafingerprintreader.Fingerprintauthenticationcan
replaceyourWindowspassword.Inthisway,youcanlogontoyourcomputersimplyandsecurely.To
enablefingerprintauthentication,enrollyourfingerprintsfirst.
Enrollingyourfingerprint
Toenrollyourfingerprints,dothefollowing:
1.StarttheLenovoFingerprintManagerprogram.ForinstructionsonhowtostarttheFingerprintManager
Proprogram,see“Lenovoprograms”onpage17.
2.EntertheWindowspasswordasrequired.
3.Clicktheiconforthefingerthatyouwanttoenroll,andconstantlyswipeyourcorrespondingfinger
acrossthefingerprintreaderuntiltheenrollmentcompletes.Formoreinformation,see“Swipingyour
fingeroverthefingerprintreader”onpage57.
4.ClickFinish.Yourfingerprintisenrolledsuccessfully.
Note:Itisrecommendedthatyouenrollmorethanonefingerprintincaseofanyinjuriestoyourfingers.
56UserGuide
Page 73
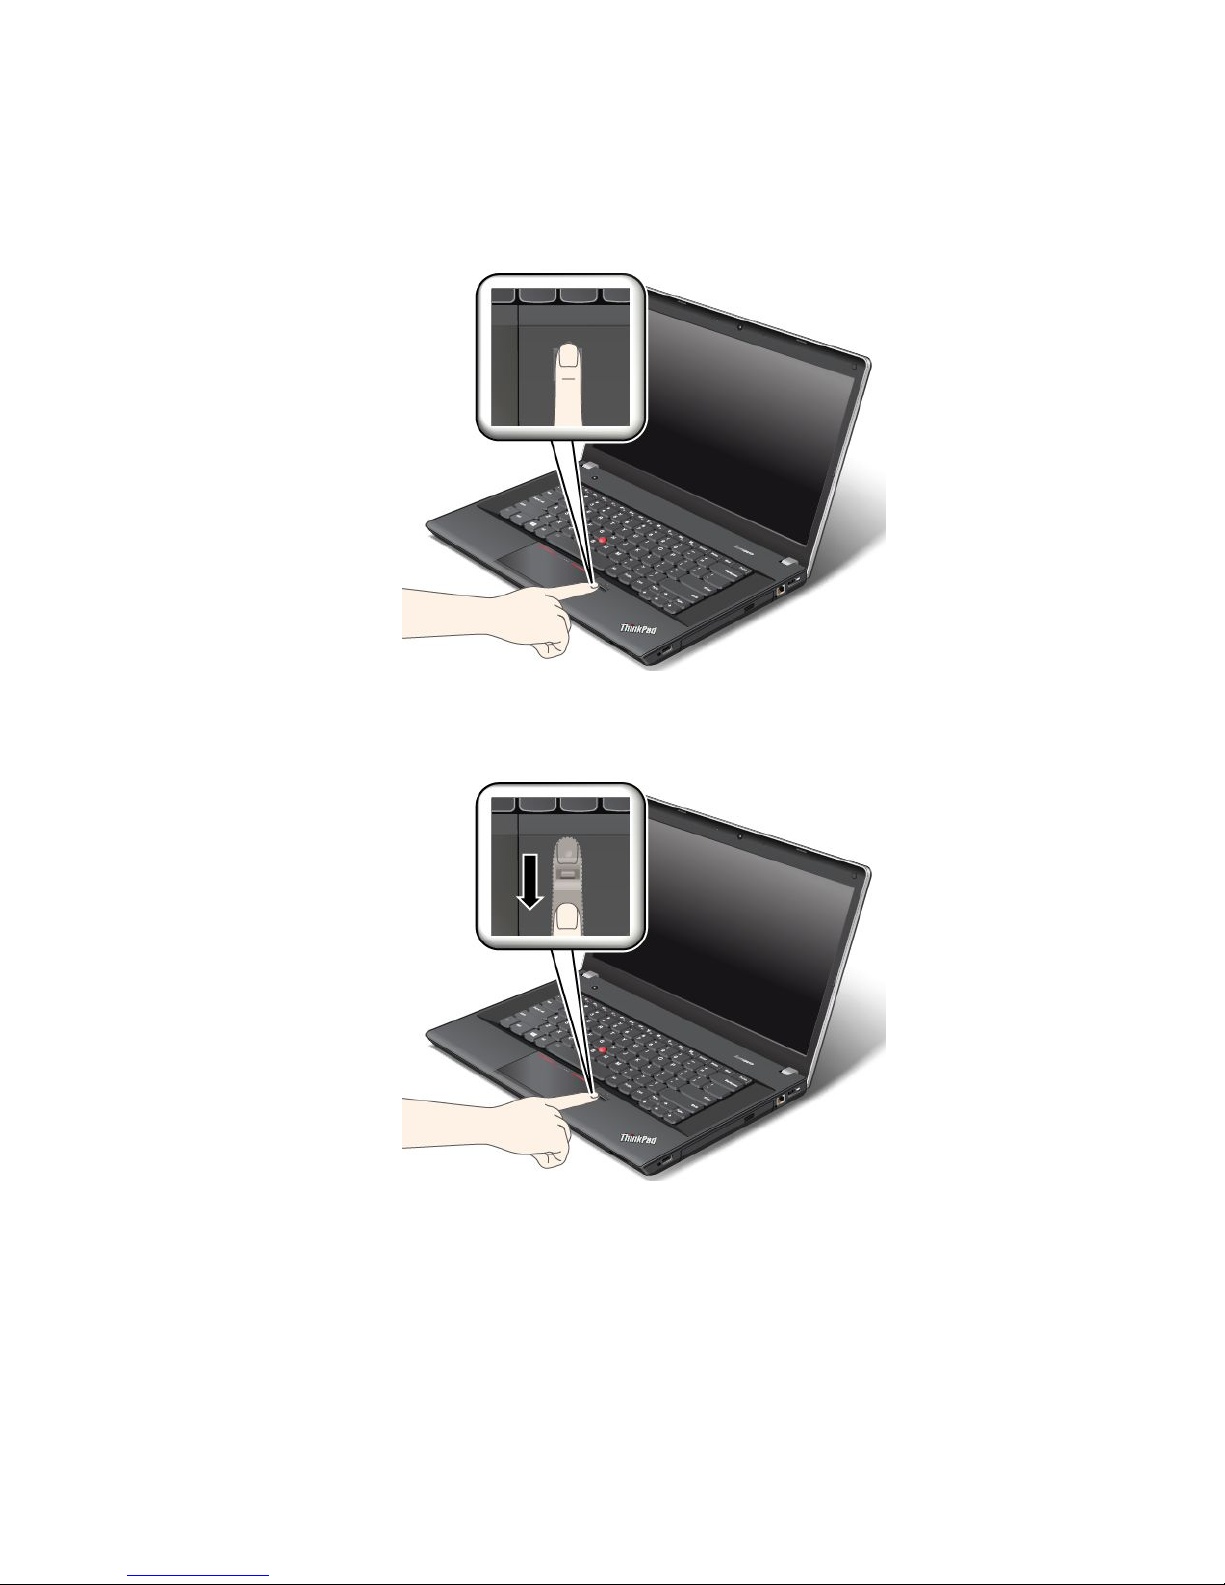
Swipingyourfingeroverthefingerprintreader
Toswipeyourfingeroverthereader,dothefollowing:
1.Placethetopjointofyourfingeronthesensor.
2.Applylightpressureandswipeyourfingertowardyouacrossthethereaderinonesmoothmotion.
Donotliftyourfingerwhenyouareswipingit.
Maintainingthefingerprintreader
Thefollowingactionscoulddamagethefingerprintreaderorcauseitnottoworkproperly:
•Scratchingthesurfaceofthereaderwithahard,pointedobject.
•Scrapingthesurfaceofthereaderwithyourfingernailoranythinghard.
•Usingortouchingthereaderwithadirtyfinger.
Ifyounoticeanyofthefollowingconditions,gentlycleanthesurfaceofthereaderwithadry,soft,lint-free
cloth:
Chapter4.Security57
Page 74

•Thesurfaceofthereaderisdirtyorstained.
•Thesurfaceofthereaderiswet.
•Thereaderoftenfailstoenrollorauthenticateyourfingerprint.
Ifyourfingerhasanyofthefollowingconditions,youmightnotbeabletoregisterorauthenticateit:
•Yourfingeriswrinkled.
•Yourfingerisrough,dry,orinjured.
•Yourfingerisstainedwithdirt,mud,oroil.
•Thesurfaceofyourfingerisdifferentfromwhenyouenrolledyourfingerprint.
•Yourfingeriswet.
•Afingerisusedthathasnotbeenenrolled.
Toimprovethesituation,trythefollowing:
•Cleanorwipeyourhandstoremoveanyexcessdirtormoisturefromthefingers.
•Enrollanduseadifferentfingerforauthentication.
•Ifyourhandsaredry,applylotiontothem.
Formoreinformationonhowtousethefingerprintreader,refertothehelpsystemoftheLenovoFingerprint
Managerprogram.
Noticeondeletingdatafromyourharddiskdriveorsolid-statedrive
Someofthedatastoredontheharddiskdriveorsolid-statedrivemightbesensitive.Handingyour
computerovertosomeoneelsewithoutdeletingtheloadedsoftware,suchasoperatingsystemsand
applicationsoftware,mightevenviolatelicenseagreements.Besuretodeletedatastoredontheharddisk
driveorsolid-statedrivebeforeyoudisposeof,sell,orhandoveryourcomputer.
Youcanusethefollowingmethodstodeletedatafromtheharddiskdriveorsolid-statedrive:
•MovethedatatotheRecycleBin,andthenemptytheRecycleBin.
•Deletethedata.
•Formatyourharddiskdriveorsolid-statedrive,usingthesoftwareforinitializingit.
•UsetherecoveryprogramprovidedbyLenovotobringtheharddiskdriveorsolid-statedrivebackto
thefactorydefaultsettings.
Theseoperations,however,onlychangethefilelocationofthedata;theydonotdeletethedataitself.In
otherwords,thedataretrievalprocessingisdisabledunderanoperatingsystemsuchasWindows.The
dataisstillthere,eventhoughitseemstobelost.Thus,itissometimespossibletoreadthedatabyuseof
specialsoftwarefordatarecovery.Thereisariskthatpeopleofbadfaithmightreadandmisusethecritical
dataonharddiskdrivesorsolid-statedrivesforunexpectedpurposes.
Topreventleakageofdata,itisimportantthatyoudeleteallthedatafromtheharddiskdrivewhenyou
disposeof,sell,orhandoveryourcomputer.Y oucandestroythedataphysicallybysmashingtheharddisk
drivewithahammer,ormagneticallybymeansofstrongmagneticpower,thusmakingthedataunreadable.
Butitisrecommendedthatyouusethesoftware(payware)orservice(payservice)developedforthat
purpose.Theprocessmighttakeseveralhours.
Fordisposingofdataonthesolid-statedrive,LenovoprovidestheDriveEraseUtilityforResettingthe
CryptographicKeyandErasingtheSolidStateDrivetool.Fordisposingofdataontheharddiskdrive,Lenovo
providestheSecureDataDisposal™tool.Gotohttp://www.lenovo.com/supporttodownloadthesetools.
58UserGuide
Page 75

IfanEncryptionsolid-statedriveoraDiskEncryptionharddiskdriveissupportedandinstalledinyour
computer,youcanlogicallydisposeofallthedataonthedriveinashorttimebyerasingthecryptographic
key.Thedataencryptedwiththeoldkeyisnotphysicallyerasedbutremainsonthedrive;however,itcannot
bedecryptedwithouttheoldkey.ThisfeatureisalsoavailablewiththeDriveEraseUtilityforResettingthe
CryptographicKeyandErasingtheSolidStateDrivetool.
Usingfirewalls
Ifyoursystemispreinstalledwithafirewallprogram,itprotectsagainstcomputerInternetsecuritythreats,
unauthorizedaccess,intrusions,andInternetattacks.Italsoprotectsyourprivacy.
Formoreinformationabouthowtousethefirewallprogram,refertothehelpinformationsystemthat
comeswiththeprogram.
Protectingdataagainstviruses
Yourcomputerispreinstalledwithanantivirusprogramsoyoucandetectandeliminateviruses.The
antivirusprogramisdesignedtohelpyoudetectandeliminateviruses.
Lenovoprovidesafullversionofantivirussoftwareonyourcomputerwithafree30-daysubscription.After
30days,youmustrenewthelicensetocontinuereceivingtheantivirussoftwareupdates.
Formoreinformationabouthowtouseyourantivirussoftware,refertothehelpinformationsystemof
yourantivirussoftware.
Chapter4.Security59
Page 76

60UserGuide
Page 77

Chapter5.Recoveryoverview
ThischapterprovidesinformationabouttherecoverysolutionsprovidedbyLenovo.
•“RecoveryoverviewfortheWindows7operatingsystem”onpage61
•“RecoveryoverviewfortheWindows8andWindows8.1operatingsystems”onpage66
RecoveryoverviewfortheWindows7operatingsystem
ThissectionprovidesinformationabouttherecoverysolutionsprovidedbyLenovoontheWindows7
operatingsystem.
Notes:
•Thereareavarietyofmethodstochoosefromwhenconsideringhowtorecoverintheeventofasoftwareorhardware-relatedproblem.Somemethodsvarydependingonthetypeofyouroperatingsystem.
•Theproductontherecoverymediamightbeusedonlyforthefollowingpurposes:
–Restoretheproductpreinstalledonyourcomputer
–Reinstalltheproduct
–ModifytheproductusingtheAdditionalFiles
Topreventpotentialperformancerisksorunexpectedbehaviorthatmightbecausedbythenewharddisk
drivetechnology,itisrecommendedthatyouuseoneofthefollowingsoftwareprogramsforbackup:
•ThinkVantageRescueandRecovery4.3orlater
•SymantecNortonGhostversion15orlater
TostarttheSymantecNortonGhostprogram,dothefollowing:
1.ClickStart➙Run.TheRunwindowopens.
2.T ypecmdinthefield.ThenclickOK.
3.T ypeghost-align=1mbandpressEnter.
•AcronisTrueImage2010orlater
•ParagonBackup&Recovery10Suitorlater,ParagonBackup&Recovery10Homeorlater
Creatingandusingarecoverymedia
Youcanuserecoverymediatorestoretheharddiskdrivetothefactorydefaultsettings.Recoverymedia
areusefulifyoutransferthecomputertoanotherarea,sellthecomputer,recyclethecomputer,orputthe
computerinanoperationalstateafterallothermethodsofrecoveryhavefailed.Asaprecautionarymeasure,
itisimportanttocreaterecoverymediaasearlyaspossible.
Note:Therecoveryoperationsyoucanperformusingrecoverymediavarydependingontheoperating
systemfromwhichtherecoverymediawerecreated.Therecoverymediamightcontainabootmedium
andadatamedium.Y ourMicrosoftWindowslicensepermitsyoutocreateonlyonedatamedium,soitis
importantthatyoustoretherecoverymediainasafeplaceafteryouhavemadethem.
Creatingrecoverymedia
Thissectionprovidesinstructionsonhowtocreaterecoverymedia.
Note:Y oucancreaterecoverymediausingdiscsorexternalUSBstoragedevices.
©CopyrightLenovo2013
61
Page 78

Tocreaterecoverymedia,clickStart➙AllPrograms➙LenovoThinkVantageT ools➙FactoryRecovery
Disks.Then,followtheinstructionsonthescreen.
Usingrecoverymedia
Thissectionprovidesinstructionsonhowtouserecoverymediaondifferentoperatingsystems.
•Youcanuserecoverymediatorestorethecomputertothefactorydefaultsettingsonly.Y oucanuse
recoverymediatoputthecomputerinanoperationalstateafterallothermethodsofrecoveryhavefailed.
Attention:Whenyouuserecoverymediatorestorethecomputertothefactorydefaultsettings,allthe
filescurrentlyontheharddiskdrivewillbedeletedandreplacedbythefactorydefaultsettings.
Touserecoverymedia,dothefollowing:
1.Dependingonthetypeofyourrecoverymedia,connectthebootmedium(memorykeyorotherUSB
storagedevice)tothecomputer,orinsertthebootdiscintotheopticaldrive.
2.RepeatedlypressandreleasetheF12keywhenturningonthecomputer.WhentheBootMenu
windowopens,releasetheF12key.
3.SelectthedesiredstartupdeviceandpressEnter.Therestoreprocessbegins.
4.Followtheinstructionsonthescreentocompletetheoperation.
Notes:
1.Afterrestoringyourcomputertothefactorydefaultsettings,youmighthavetoreinstalldevicedrivers
forsomedevices.See“Reinstallingpreinstalledprogramsanddevicedrivers”onpage65.
2.SomecomputerscomewithMicrosoftOfficeorMicrosoftWorkspreinstalled.Ifyouneedtorecover
orreinstallyourMicrosoftOfficeorMicrosoftWorksprograms,youmustusetheMicrosoftOfficeCD
orMicrosoftWorksCD.ThesediscsareprovidedonlywithcomputerspreinstalledwithMicrosoft
OfficeorMicrosoftWorks.
Performingbackupandrecoveryoperations
TheRescueandRecoveryprogramenablesyoutobackupallyourharddiskdrivecontentsincludingthe
operatingsystem,datafiles,softwareprograms,andpersonalsettings.Y oucandesignatewherethe
RescueandRecoveryprogramstoresthebackup:
•Inaprotectedareaofyourharddiskdrive
•Onthesecondaryharddiskdriveifasecondaryharddiskdriveisinstalledinyourcomputer
•OnanattachedexternalUSBharddiskdrive
•Onanetworkdrive
•Onrecordablediscs(arecordableopticaldriveisrequiredforthisoption)
Afteryouhavebackedupthecontentsontheharddiskdrive,youcanrestorethecompletecontentsofthe
harddiskdrive,restoreonlytheselectedfiles,orrestoreonlytheWindowsoperatingsystemandapplications.
Performingabackupoperation
ThissectionprovidesinstructionsonhowtoperformabackupoperationusingtheRescueandRecovery
program.
1.FromtheWindowsdesktop,clickStart➙AllPrograms➙LenovoThinkVantageT ools➙Enhanced
BackupandRestore.TheRescueandRecoveryprogramopens.
2.IntheRescueandRecoverymainwindow,clicktheLaunchadvancedRescueandRecoveryarrow.
3.ClickBackupyourharddriveandselectbackupoperationoptions.Then,followtheinstructionson
thescreentocompletethebackupoperation.
62UserGuide
Page 79

Performingarecoveryoperation
ThissectionprovidesinstructionsonhowtoperformarecoveryoperationusingtheRescueandRecovery
program.
1.FromtheWindowsdesktop,clickStart➙AllPrograms➙LenovoThinkVantageT ools➙Enhanced
BackupandRestore.TheRescueandRecoveryprogramopens.
2.IntheRescueandRecoveryprogrammainwindow,clicktheLaunchadvancedRescueandRecovery
arrow.
3.ClicktheRestoreyoursystemfromabackupicon.
4.Followtheinstructionsonthescreentocompletetherecoveryoperation.
FormoreinformationaboutperformingarecoveryoperationfromtheRescueandRecoveryworkspace,see
“UsingtheRescueandRecoveryworkspace”onpage63.
UsingtheRescueandRecoveryworkspace
TheRescueandRecoveryworkspaceresidesinaprotected,hiddenareaofyourharddiskdrivethat
operatesindependentlyfromtheWindowsoperatingsystem.Thisenablesyoutoperformrecovery
operationsevenifyoucannotstarttheWindowsoperatingsystem.Y oucanperformthefollowingrecovery
operationsfromtheRescueandRecoveryworkspace:
•Rescuefilesfromyourharddiskdriveorfromabackup
TheRescueandRecoveryworkspaceenablesyoutolocatefilesonyourharddiskdriveandtransfer
themtoanetworkdriveorotherrecordablemedia,suchasaUSBdeviceoradisc.Thissolutionis
availableevenifyoudidnotbackupyourfilesorifchangesweremadetothefilessinceyourlastbackup
operation.YoualsocanrescueindividualfilesfromaRescueandRecoverybackuplocatedonyourlocal
harddiskdrive,aUSBdevice,oranetworkdrive.
•RestoreyourharddiskdrivefromaRescueandRecoverybackup
IfyouhavebackedupyourharddiskdriveusingtheRescueandRecoveryprogram,youcanrestorethe
harddiskdrivefromaRescueandRecoverybackup,evenifyoucannotstarttheWindowsoperating
system.
•Restoreyourharddiskdrivetothefactorydefaultsettings
TheRescueandRecoveryworkspaceenablesyoutorestorethecompletecontentsofyourharddiskdrive
tothefactorydefaultsettings.Ifyouhavemultiplepartitionsonyourharddiskdrive,youhavetheoption
torestorethefactorydefaultsettingstotheC:partitionandleavetheotherpartitionsintact.Becausethe
RescueandRecoveryworkspaceoperatesindependentlyfromtheWindowsoperatingsystem,youcan
restorethefactorydefaultsettingsevenifyoucannotstarttheWindowsoperatingsystem.
Attention:IfyourestoretheharddiskdrivefromaRescueandRecoverybackuporrestoretheharddisk
drivetothefactorydefaultsettings,allfilesontheprimaryharddiskdrivepartition(usuallydriveC:)willbe
deletedintherecoveryprocess.Ifpossible,makecopiesofimportantfiles.Ifyouareunabletostartthe
Windowsoperatingsystem,youcanusetherescuefilesfeatureoftheRescueandRecoveryworkspaceto
copyfilesfromyourharddiskdrivetoothermedia.
TostarttheRescueandRecoveryworkspace,dothefollowing:
1.Makesurethatthecomputeristurnedoff.
2.RepeatedlypressandreleasetheF11keywhenturningonthecomputer.Whenyouhearbeepsor
seealogoscreen,releasetheF11key.
3.IfyouhavesetaRescueandRecoverypassword,typeyourpasswordwhenprompted.TheRescue
andRecoveryworkspaceopensafterashortdelay.
Note:IftheRescueandRecoveryworkspacefailstoopen,see“Solvingrecoveryproblems”onpage65.
Chapter5.Recoveryoverview63
Page 80

4.Dooneofthefollowing:
•Torescuefilesfromyourharddiskdriveorfromabackup,clickRescuefilesandfollowthe
instructionsonthescreen.
•TorestoreyourharddiskdrivefromaRescueandRecoverybackuportorestoreyourharddiskdrive
tothefactorydefaultsettings,clickRestoreyoursystemandfollowtheinstructionsonthescreen.
FormoreinformationaboutthefeaturesoftheRescueandRecoveryworkspace,clickHelp.
Notes:
1.Afterrestoringyourharddiskdrivetothefactorydefaultsettings,youmighthavetoreinstalldevice
driversforsomedevices.See“Reinstallingpreinstalledprogramsanddevicedrivers”onpage65.
2.SomecomputerscomewithMicrosoftOfficeorMicrosoftWorkspreinstalled.Ifyouneedtorecover
orreinstallyourMicrosoftOfficeorMicrosoftWorksprograms,youmustusetheMicrosoftOfficeCD
orMicrosoftWorksCD.ThesediscsareprovidedonlywithcomputerspreinstalledwithMicrosoft
OfficeorMicrosoftWorks.
Creatingandusingarescuemedium
Witharescuemedium,suchasadiscoraUSBharddiskdrive,youcanrecoverthecomputerfromfailures
thatpreventyoufromgainingaccesstotheRescueandRecoveryworkspaceonyourharddiskdrive.
Notes:
1.Therecoveryoperationsyoucanperformusingarescuemediumvarydependingontheoperating
system.
2.Therescuedisccanbestartedinalltypesofopticaldrives.
Creatingarescuemedium
Thissectionprovidesinstructionsonhowtocreatearescuemedium.
1.FromtheWindowsdesktop,clickStart➙AllPrograms➙LenovoThinkVantageT ools➙Enhanced
BackupandRestore.TheRescueandRecoveryprogramopens.
2.IntheRescueandRecoverymainwindow,clicktheLaunchadvancedRescueandRecoveryarrow.
3.ClicktheCreateRescueMediaicon.TheCreateRescueandRecoveryMediawindowopens.
4.IntheRescueMediaarea,selectthetypeoftherescuemediumyouwanttocreate.Youcancreatea
rescuemediumusingadisc,aUSBharddiskdrive,orasecondaryinternalharddiskdrive.
5.ClickOKandfollowtheinstructionsonthescreentocreatearescuemedium.
Usingarescuemedium
Thissectionprovidesinstructionsonhowtousetherescuemediumyouhavecreated.
•Ifyouhavecreatedarescuemediumusingadisc,usethefollowinginstructionstousetherescuemedium:
1.T urnoffyourcomputer.
2.RepeatedlypressandreleasetheF12keywhenturningonthecomputer.WhentheBootMenu
windowopens,releasetheF12key.
3.IntheBootMenuwindow,selectthedesiredopticaldriveasthefirstbootdevice.Then,insertthe
rescuediscintotheopticaldriveandpressEnter.Therescuemediumstarts.
•IfyouhavecreatedarescuemediumusingaUSBharddiskdrive,usethefollowinginstructionsto
usetherescuemedium:
1.AttachtheUSBharddiskdrivetooneoftheUSBconnectorsonyourcomputer.
2.RepeatedlypressandreleasetheF12keywhenturningonthecomputer.WhentheBootMenu
windowopens,releasetheF12key.
64UserGuide
Page 81

3.IntheBootMenuwindow,selecttheUSBharddiskdriveasthefirstbootdeviceandpressEnter.
Therescuemediumstarts.
Whentherescuemediumstarts,theRescueandRecoveryworkspaceopens.Thehelpinformationfor
eachfeatureisavailablefromtheRescueandRecoveryworkspace.Followtheinstructionstocomplete
therecoveryprocess.
Reinstallingpreinstalledprogramsanddevicedrivers
Yourcomputerhasprovisionsthatenableyoutoreinstallselectedfactory-installedprogramsanddevice
drivers.
Reinstallingpreinstalledprograms
Toreinstallsomepreinstalledapplicationprograms,dothefollowing:
1.T urnonyourcomputer.
2.GototheC:\SWTOOLSdirectory.
3.OpentheAPPSfolder.Thefoldercontainsseveralsubfoldersnamedforthevariouspreinstalled
applications.
4.Openthesubfolderfortheapplicationyouwanttoreinstall.
5.Double-clickSetup,andthenfollowtheon-screenstepstoreinstalltheapplication.
Reinstallingpreinstalleddevicedrivers
Attention:Whenyoureinstalldevicedrivers,youarechangingthecurrentconfigurationofyourcomputer.
Reinstalldevicedriversonlywhenitisnecessarytocorrectaproblemwithyourcomputer.
Toreinstalladevicedriverforafactory-installeddevice,dothefollowing:
1.T urnonyourcomputer.
2.GototheC:\SWTOOLSdirectory.
3.OpentheDRIVERSfolder.Thefoldercontainsseveralsubfoldersnamedforthevariousdevices
installedinyourcomputer(forexample,AUDIOandVIDEO).
4.Openthesubfolderforthedevice.
5.Reinstallthedevicedriverbyoneofthefollowingmethods:
•Inthesubfolderforthedevice,lookforatextfile(afilewiththeextension.txt).Thetextfilecontains
informationonhowtoreinstallthatdevicedriver.
•Ifthesubfolderforthedevicecontainsafileofsetupinformation(afilewiththeextension.inf),you
canusetheAddNewHardwareprogram(intheWindowsControlPanel)toreinstallthedevicedriver.
Notalldevicedriverscanbereinstalledbyuseofthisprogram.IntheAddNewHardwareprogram,
whenpromptedforthedevicedriveryouwanttoinstall,clickHaveDiskandBrowse.Thenselect
thedevicedriverfilefromthedevicesubfolder.
•Inthesubfolderforthedevice,lookfortheexecutablefile(afilewiththeextension.exe).Double-click
thefile,andfollowtheinstructionsonthescreen.
Attention:Ifyouneedupdateddevicedriversforyourcomputer,donotdownloadthemfromtheWindows
UpdateWebsite.ObtainthemfromLenovo.Formoreinformation,see“Makingsuredevicedriversare
current”onpage126.
Solvingrecoveryproblems
IfyouareunabletoaccesstheRescueandRecoveryworkspaceortheWindowsenvironment,doone
ofthefollowing:
Chapter5.Recoveryoverview65
Page 82

•UsearescuemediumtostarttheRescueandRecoveryworkspace.See“Creatingandusingarescue
medium”onpage64
.
•Userecoverymediaifallothermethodsofrecoveryhavefailedandyouneedtorestoretheharddisk
drivetothefactorydefaultsettings.See“Creatingandusingarecoverymedia”onpage61.
Note:IfyouareunabletoaccesstheRescueandRecoveryworkspaceortheWindowsenvironment
fromarescuemediumorrecoverymedia,youmightnothavetherescuedevice(aninternalharddisk
drive,adisc,aUSBharddiskdrive,orotherexternaldevices)setasthefirstbootdeviceinthestartup
devicesequence.Y oumustfirstmakesurethatyourrescuedeviceissetasthefirstbootdeviceinthe
startupdevicesequenceintheThinkPadSetupprogram.Fordetailedinformationonhowtotemporarilyor
permanentlychangethestartupdevicesequence,see“Startupmenu”onpage121
.
Itisimportanttocreatearescuemediumandasetofrecoverymediaasearlyaspossibleandstorethem
inasafeplaceforfutureuse.
RecoveryoverviewfortheWindows8andWindows8.1operating
systems
ThissectionprovidesinformationabouttherecoverysolutionsfortheWindows8andWindows8.1
operatingsystems.
AWindowsrecoveryimageispreinstalledintherecoverypartitiononyourcomputer.TheWindowsrecovery
imageenablesyoutorefreshyourcomputer,orresetyourcomputertothefactorydefaultsettings.
YoucancreaterecoverymediaasbackupsorreplacementfortheWindowsrecoveryimage.Withthe
recoverymedia,youcantroubleshootandfixtheproblemsonyourcomputerevenifyoucannotstartthe
Windows8orWindows8.1operatingsystem.Itisrecommendedthatyoucreaterecoverymediaasearlyas
possible.Formoreinformation,see“Creatingandusingrecoverymedia”onpage68
.
Refreshingyourcomputer
Ifyourcomputerdoesnotperformwellandtheproblemmightbecausedbyarecentlyinstalledprogram,
youcanrefreshyourcomputerwithoutlosingyourpersonalfilesorchangingyoursettings.
Attention:Ifyourefreshyourcomputer,theprogramsthatcamewithyourcomputerandtheprogramsthat
youinstalledfromWindowsStorewillbereinstalled,butallotherprogramswillberemoved.
Torefreshyourcomputer,dothefollowing:
1.Dependingontheoperatingsystem,dooneofthefollowing:
•ForWindows8:
Moveyourpointertothetop-rightorbottom-rightcornerofthescreentodisplaythecharms.Click
Settings➙ChangePCsettings➙General.
•ForWindows8.1:
Moveyourpointertothetop-rightorbottom-rightcornerofthescreentodisplaythecharms.Click
Settings➙ChangePCsettings➙Updateandrecovery➙Recovery.
2.IntheRefreshyourPCwithoutaffectingyourfilessection,clickGetstarted.
3.Followtheinstructionsonthescreentorefreshyourcomputer.
Resettingyourcomputertothefactorydefaultsettings
Ifyouwanttorecycleyourcomputerorjuststartover,youcanresetyourcomputertothefactorydefault
settings.Resettingthecomputerwillreinstalltheoperatingsystem,reinstallalltheprogramsthatcamewith
yourcomputer,andresetallthesettingstothefactorydefaultsettings.
66UserGuide
Page 83

Attention:Ifyouresetthecomputertothefactorydefaultsettings,allyourpersonalfilesandsettingswillbe
deleted.T oavoiddataloss,makeabackupcopyofallthedatathatyouwanttokeep.
Toresetyourcomputertothefactorydefaultsettings,dothefollowing:
1.Dependingontheoperatingsystem,dooneofthefollowing:
•ForWindows8:
Moveyourpointertothetop-rightorbottom-rightcornerofthescreentodisplaythecharms.Click
Settings➙ChangePCsettings➙General.
•ForWindows8.1:
Moveyourpointertothetop-rightorbottom-rightcornerofthescreentodisplaythecharms.Click
Settings➙ChangePCsettings➙Updateandrecovery➙Recovery.
2.IntheRemoveeverythingandreinstallWindowssection,clickGetstarted.ThenclickNextto
confirmtheoperation.
3.Dependingonyourneeds,dooneofthefollowing:
•Toperformaquickformat,clickJustremovemyfilestostarttheprocess.Theprocesswilltake
severalminutes.
•Toperformacompleteformat,clickFullycleanthedrivetostarttheprocess.Theprocesswill
takeseveralhours.
4.Followtheinstructionsonthescreentoresetyourcomputertothefactorydefaultsettings.
Usingtheadvancedstartupoptions
Withtheadvancedstartupoptions,youcanchangethefirmwaresettingsofthecomputer,changethe
startupsettingsoftheWindowsoperatingsystem,startthecomputerfromanexternaldevice,orrestorethe
Windowsoperatingsystemfromasystemimage.
Tousetheadvancedstartupoptions,dothefollowing:
1.Dependingontheoperatingsystem,dooneofthefollowing:
•ForWindows8:
Moveyourpointertothetop-rightorbottom-rightcornerofthescreentodisplaythecharms.Click
Settings➙ChangePCsettings➙General.
•ForWindows8.1:
Moveyourpointertothetop-rightorbottom-rightcornerofthescreentodisplaythecharms.Click
Settings➙ChangePCsettings➙Updateandrecovery➙Recovery.
2.IntheAdvancedstartupsection,clickRestartnow➙T roubleshoot➙Advancedoptions.
3.Selectadesiredstartupoption,thenfollowtheinstructionsonthescreen.
RecoveringyouroperatingsystemifWindows8orWindows8.1fails
tostart
TheWindowsrecoveryenvironmentonyourcomputeriscapableofoperatingindependentlyfromthe
Windows8orWindows8.1operatingsystem.Thisenablesyoutorecoverorrepairtheoperatingsystem
eveniftheWindows8orWindows8.1operatingsystemfailstostart.
Aftertwoconsecutivefailedbootattempts,theWindowsrecoveryenvironmentstartsautomatically.Then
youcanchooserepairandrecoveryoptionsbyfollowingtheinstructionsonthescreen.
Note:Ensurethatyourcomputerisconnectedtoacpowerduringtherecoveryprocess.
Chapter5.Recoveryoverview67
Page 84

Creatingandusingrecoverymedia
YoucancreaterecoverymediaasbackupsfortheWindowsrecoveryenvironmentandtheWindows
recoveryimage.Ifyoucannotstartthecomputer,youcanuserecoverymediatotroubleshootandfixthe
problemsonyourcomputer.
Itisrecommendedthatyoucreaterecoverymediaasearlyaspossible.Onceyoucreaterecoverymedia,
keeptheminasafeplaceanddonotusethemtostoreotherdata.
Creatingrecoverymedia
Tocreaterecoverymedia,youneedaUSBdrivewithatleast8GBofstorage.TherequiredUSBcapacity
dependsonthesizeoftherecoveryimage.
Attention:CreatingrecoverymediawilldeleteanythingstoredontheUSBdrive.Toavoiddataloss,makea
backupcopyofallthedatathatyouwanttokeep.
Tocreaterecoverymedia,dothefollowing:
Note:Ensurethatyourcomputerisconnectedtoacpower.
1.Moveyourpointertothetop-rightorbottom-rightcornerofthescreentodisplaythecharms,and
clickSearch.
2.Dependingontheoperatingsystem,dooneofthefollowing:
•ForWindows8:
TyperecoveryintheSearchfieldandclickSettings.ThenclickCreatearecoverydrive.
•ForWindows8.1:
TyperecoveryintheSearchfieldandclicktheSearchbutton.ThenclickCreatearecoverydrive.
3.ClickY esintheUserAccountControlwindowtoallowtheRecoveryMediaCreatorprogramtostart.
4.EnsurethatyouselecttheCopytherecoverypartitionfromthePCtotherecoverydrive.option.
ThenclickNext.
Important:IfyoucleartheCopytherecoverypartitionfromthePCtotherecoverydrive.option,
youwillcreaterecoverymediawithouttherecoverypartitioncontent.Y oustillcanstartthecomputer
fromtherecoverymedia,butyoumightbeunabletorecoveryourcomputeriftherecoverypartitionon
yourcomputerisdamaged.
5.ConnectaproperUSBdrivethenclickNext.
6.ClickCreateintheRecoveryDrivewindow.Thecreationoftherecoverymediastarts.
7.Whenthecreationoftherecoverymediafinishes,dooneofthefollowing:
•Tokeeptherecoverypartitiononyourcomputer,clickFinish.
•Todeletetherecoverypartitiononyourcomputer,clickDeletetherecoverypartition.
Attention:Ifyoudeletetherecoverypartitiononyourcomputer,dokeeptherecoverymediaina
safeplace.TheWindowsrecoveryimagewillnotbestoredinyourcomputeranymore,andyouwill
needtherecoverymediatorefreshorresetyourcomputer.
8.RemovetheUSBdrive.Therecoverymediaarecreatedsuccessfully.
Usingrecoverymedia
Ifyoucannotstartyourcomputer,orifyoucannotstarttheWindowsrecoveryimageonyourcomputer,use
recoverymediatorecoveryourcomputer.
Touserecoverymedia,dothefollowing:
68UserGuide
Page 85

Note:Ensurethatyourcomputerisconnectedtoacpower.
1.T urnonorrestartthecomputer.BeforetheWindowsoperatingsystemstarts,repeatedlypresstheF12
key.TheBootMenuwindowopens.
2.Selecttherecoverydriveasthebootdevice.
3.Selectapreferredlanguageandthenselectapreferredkeyboardlayout.
4.ClickTroubleshoottodisplaytheoptionalrecoverysolutions.
5.Selectacorrespondingrecoverysolutionaccordingtoyoursituation.Forexample,selectResetyour
PCifyouwanttoresetyourcomputertothefactorydefaultsettings.
FormoreinformationabouttherecoverysolutionsprovidedbytheWindows8andWindows8.1operating
systems,goto:
http://go.microsoft.com/fwlink/?LinkID=263800
Chapter5.Recoveryoverview69
Page 86

70UserGuide
Page 87

Chapter6.Replacingdevices
Thischapterprovidesinstructionsonhowtoinstallorreplacehardwareforyourcomputer.
•“Staticelectricityprevention”onpage71
•“Replacingthebattery”onpage71
•“ReplacingtheSIMcard”onpage73
•“Replacingthekeyboard”onpage74
•“Replacingtheharddiskdriveorsolid-statedrive”onpage87
•“Replacingtheopticaldrive”onpage90
•“ReplacingawirelessLANcard”onpage94
•“ReplacingawirelessWANcard”onpage97
•“Replacingamemorymodule”onpage99
•“Replacingthecoin-cellbattery”onpage102
Staticelectricityprevention
Staticelectricity,althoughharmlesstoyou,canseriouslydamagecomputercomponentsandoptions.
Improperhandlingofstatic-sensitivepartscancausedamagetothepart.Whenyouunpackanoptionor
aCRU,donotopenthestatic-protectivepackagethatcontainsthepartuntiltheinstructionsdirectyou
toinstallthepart.
WhenyouhandleoptionsorCRUs,orperformanyworkinsidethecomputer,takethefollowingprecautions
toavoidstatic-electricitydamage:
•Limityourmovement.Movementcancausestaticelectricitytobuilduparoundyou.
•Alwayshandlecomponentscarefully.Handleadapters,memorymodules,andothercircuitboardsbythe
edges.Nevertouchexposedcircuitry.
•Preventothersfromtouchingcomponents.
•Whenyouinstallastatic-sensitiveoptionorCRU,touchthestatic-protectivepackagethatcontainsthe
parttoametalexpansion-slotcoverorotherunpaintedmetalsurfaceonthecomputerforatleasttwo
seconds.Thisreducesstaticelectricityinthepackageandyourbody.
•Whenpossible,removethestatic-sensitivepartfromthestatic-protectivepackageandinstallthepart
withoutsettingitdown.Whenthisisnotpossible,placethestatic-protectivepackageonasmooth,
levelsurfaceandplacethepartonthepackage.
•Donotplacethepartonthecomputercoverorothermetalsurface.
Replacingthebattery
Beforeyoustart,printtheseinstructions.
ThissystemsupportsonlybatteriesspeciallydesignedforthisspecificsystemandmanufacturedbyLenovo
oranauthorizedbuilder.Thesystemdoesnotsupportunauthorizedbatteriesorbatteriesdesignedforother
systems.Ifanunauthorizedbatteryorabatterydesignedforanothersystemisinstalled,thesystemwill
notcharge.
Attention:Lenovohasnoresponsibilityfortheperformanceorsafetyofunauthorizedbatteries,and
providesnowarrantiesforfailuresordamagearisingoutoftheiruse.
©CopyrightLenovo2013
71
Page 88
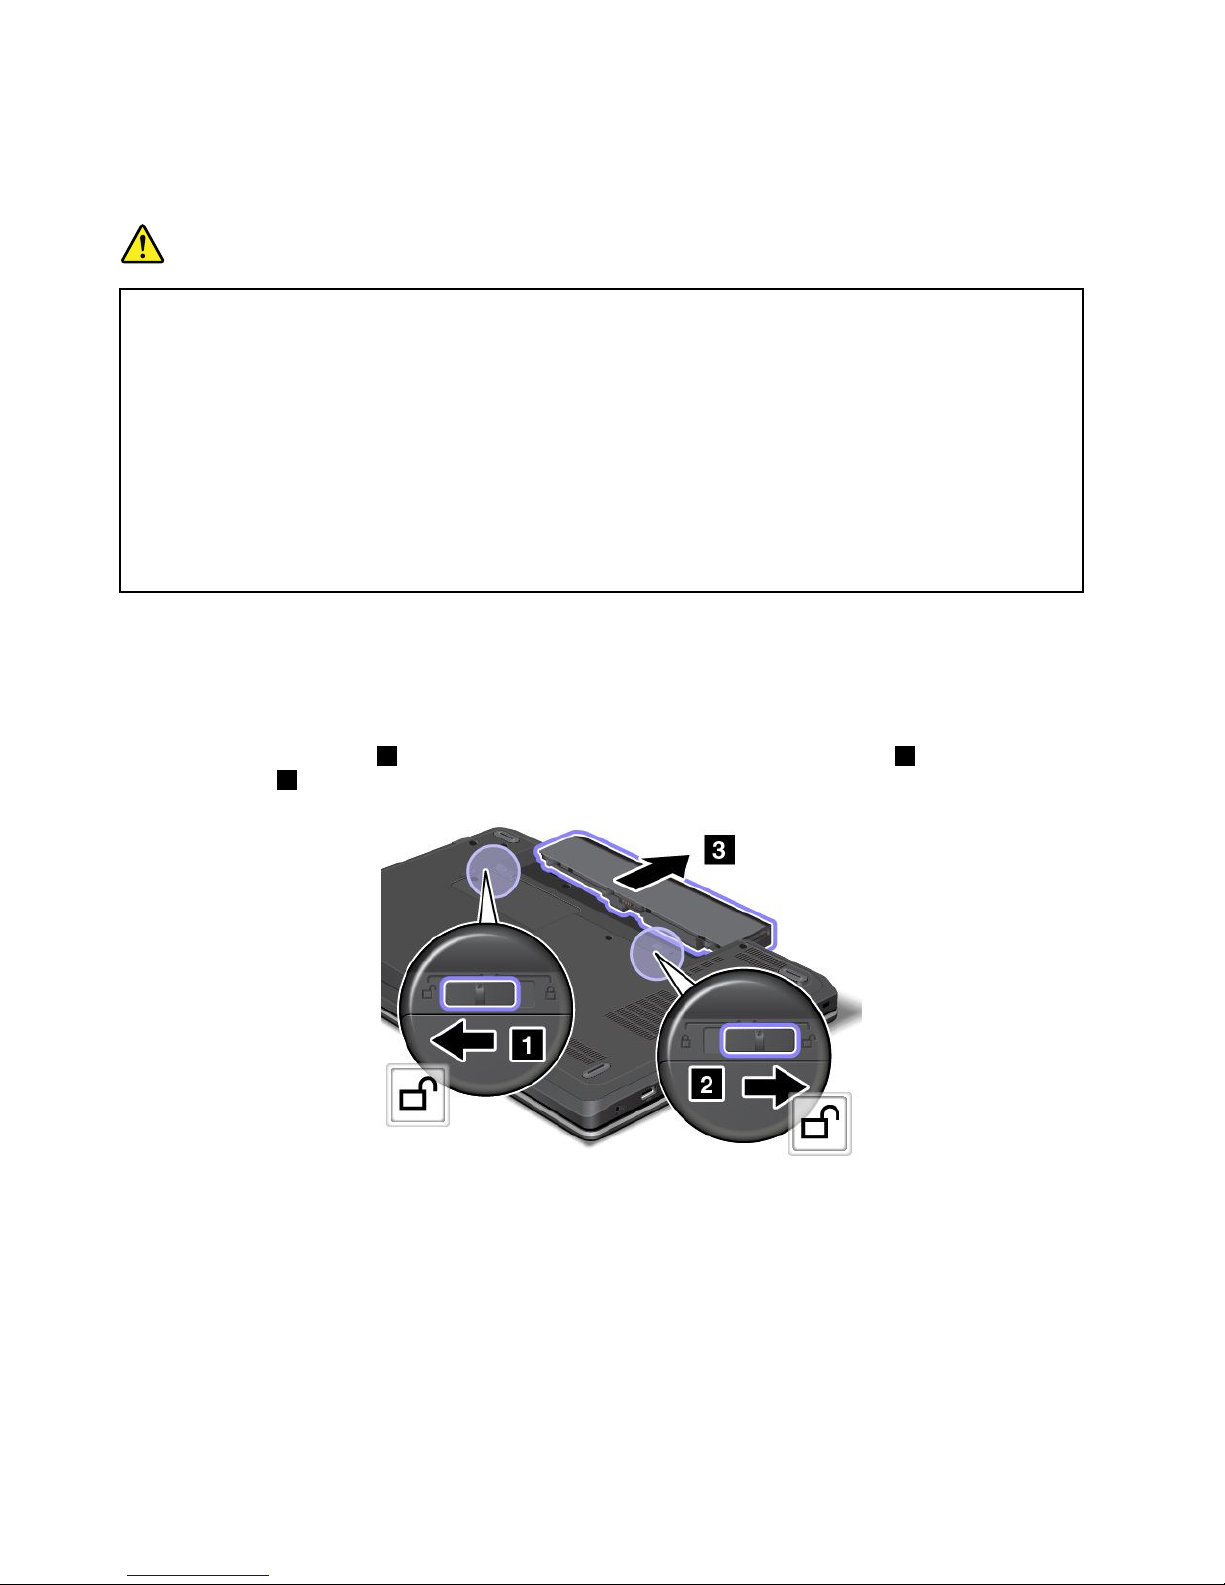
Note:Ifanunauthorizedbatteryisinstalled,thefollowingmessagewillbedisplayed:“Thebatteryinstalled
isnotsupportedbythissystemandwillnotcharge.PleasereplacethebatterywiththecorrectLenovo
batteryforthissystem.”
DANGER
Iftherechargeablebatterypackisincorrectlyreplaced,thereisdangerofanexplosion.Thebattery
packcontainsasmallamountofharmfulsubstances.T oavoidpossibleinjury:
•ReplaceonlywithabatteryofthetyperecommendedbyLenovo.
•Keepthebatterypackawayfromfire.
•Donotexposeittoexcessiveheat.
•Donotexposeittowaterorrain.
•Donotshort-circuitit.
•Donotdrop,crush,puncture,orsubjecttostrongforces.Batteryabuseormishandlingcan
causethebatterytooverheat,whichcancausegassesorflameto“vent”fromthebattery
packorcoin-cellbattery.
Toreplacethebattery,dothefollowing:
1.T urnoffthecomputer,orenterhibernationmode.Thendisconnecttheacpoweradapterandallcables
fromthecomputer.
2.Closethecomputerdisplay,andturnthecomputerover.
3.Unlockthebatterylatch1.Holdingthebatterylockleverintheunlockedposition2,andremovethe
batterypack3.
72UserGuide
Page 89
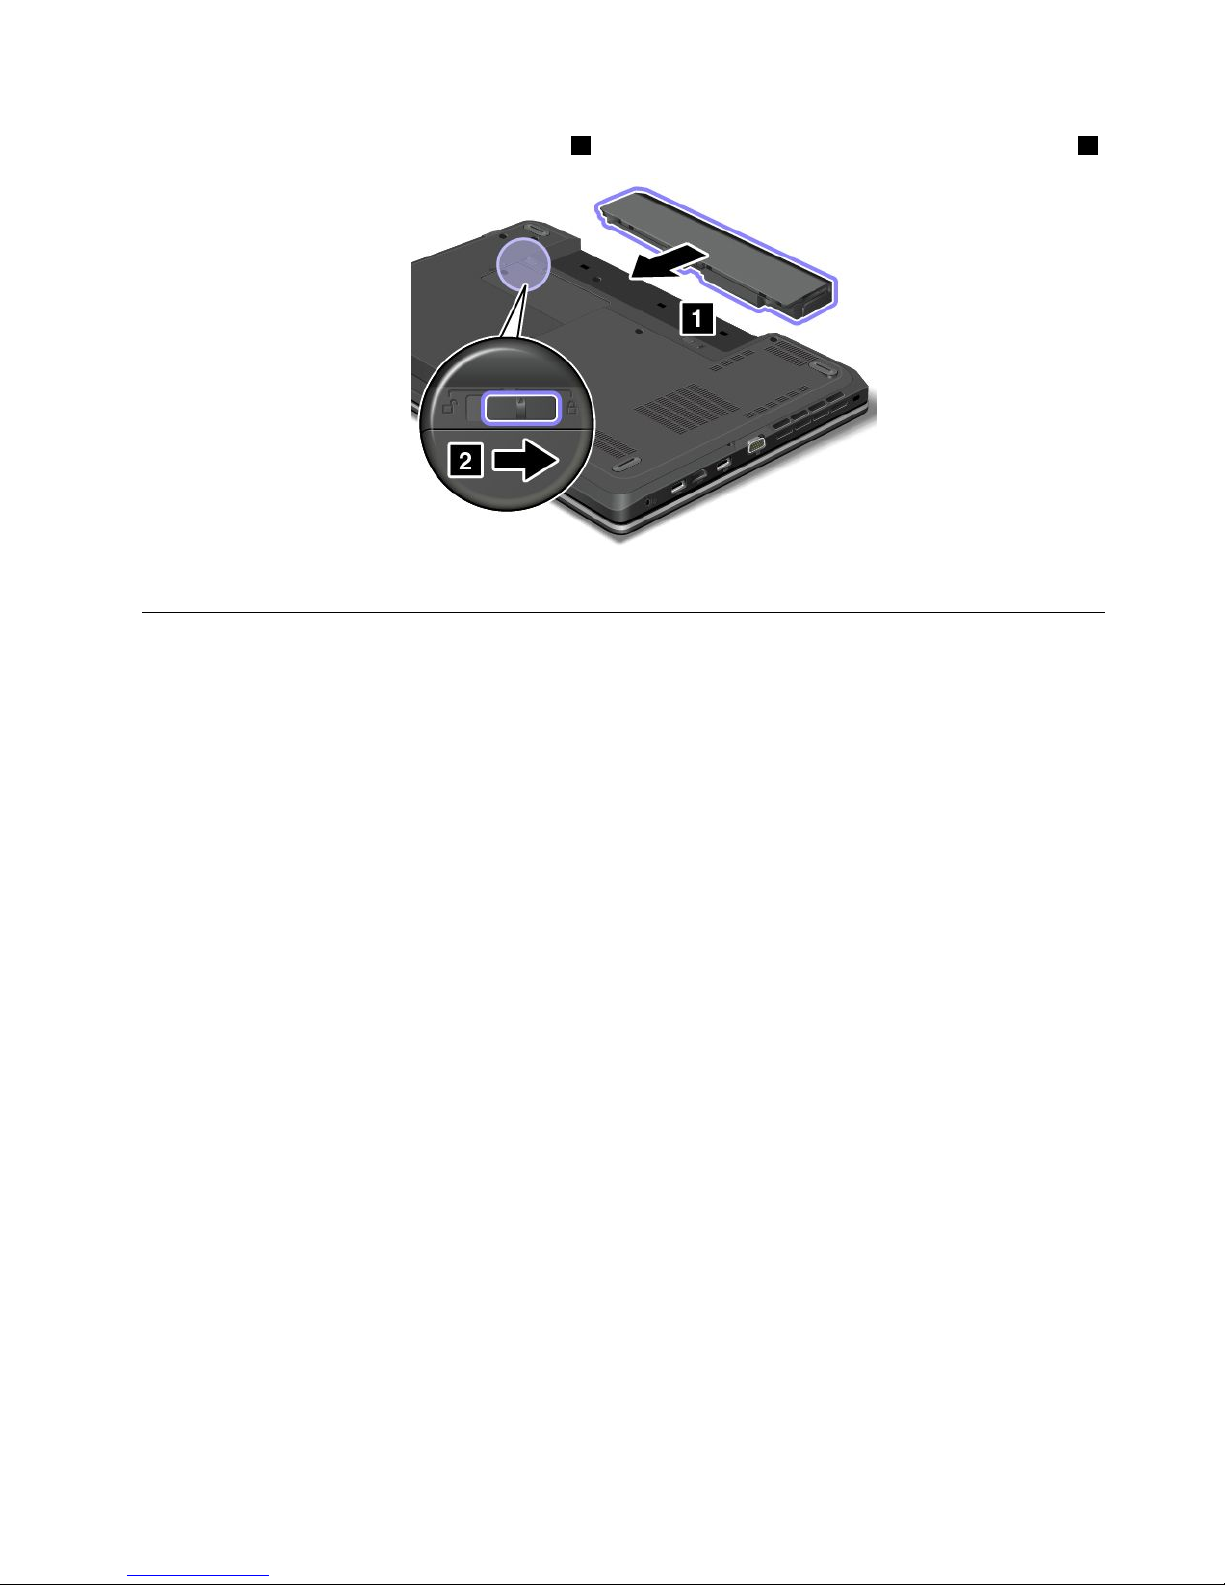
4.Insertanewbatteryuntilitclicksintoplace1,andthenslidethebatterylatchtothelockedposition2.
5.T urnthecomputeroveragain.Connecttheacpoweradapterandallcables.
ReplacingtheSIMcard
Beforeyoustart,printtheseinstructions.
IfyourcomputerisequippedwithaSIMcardslot,yourcomputermightrequireaSIMcardtoestablish
wirelessWANconnections.Dependingonthecountryofdelivery,youmightneedtopurchaseaSIM
cardoraSIMcardmightalreadybeinstalledinyourcomputerorispartoftheshippingcontentsthat
comewithyourcomputer.
IfyoufindaSIMcardincludedintheshippingcontents,adummycardisinstalledintheSIMcardslot.
Note:TheSIMcardisidentifiedbytheICchipmountedononesideofthecard.
ToreplacetheSIMcard,dothefollowing:
1.T urnoffthecomputer;thendisconnecttheacpoweradapterandallcablesfromthecomputer.Wait
threetofiveminutestoletthecomputercool.
2.Closethecomputerdisplay,andturnitover.
3.Removethebattery.See“Replacingthebattery”onpage71.
Chapter6.Replacingdevices73
Page 90
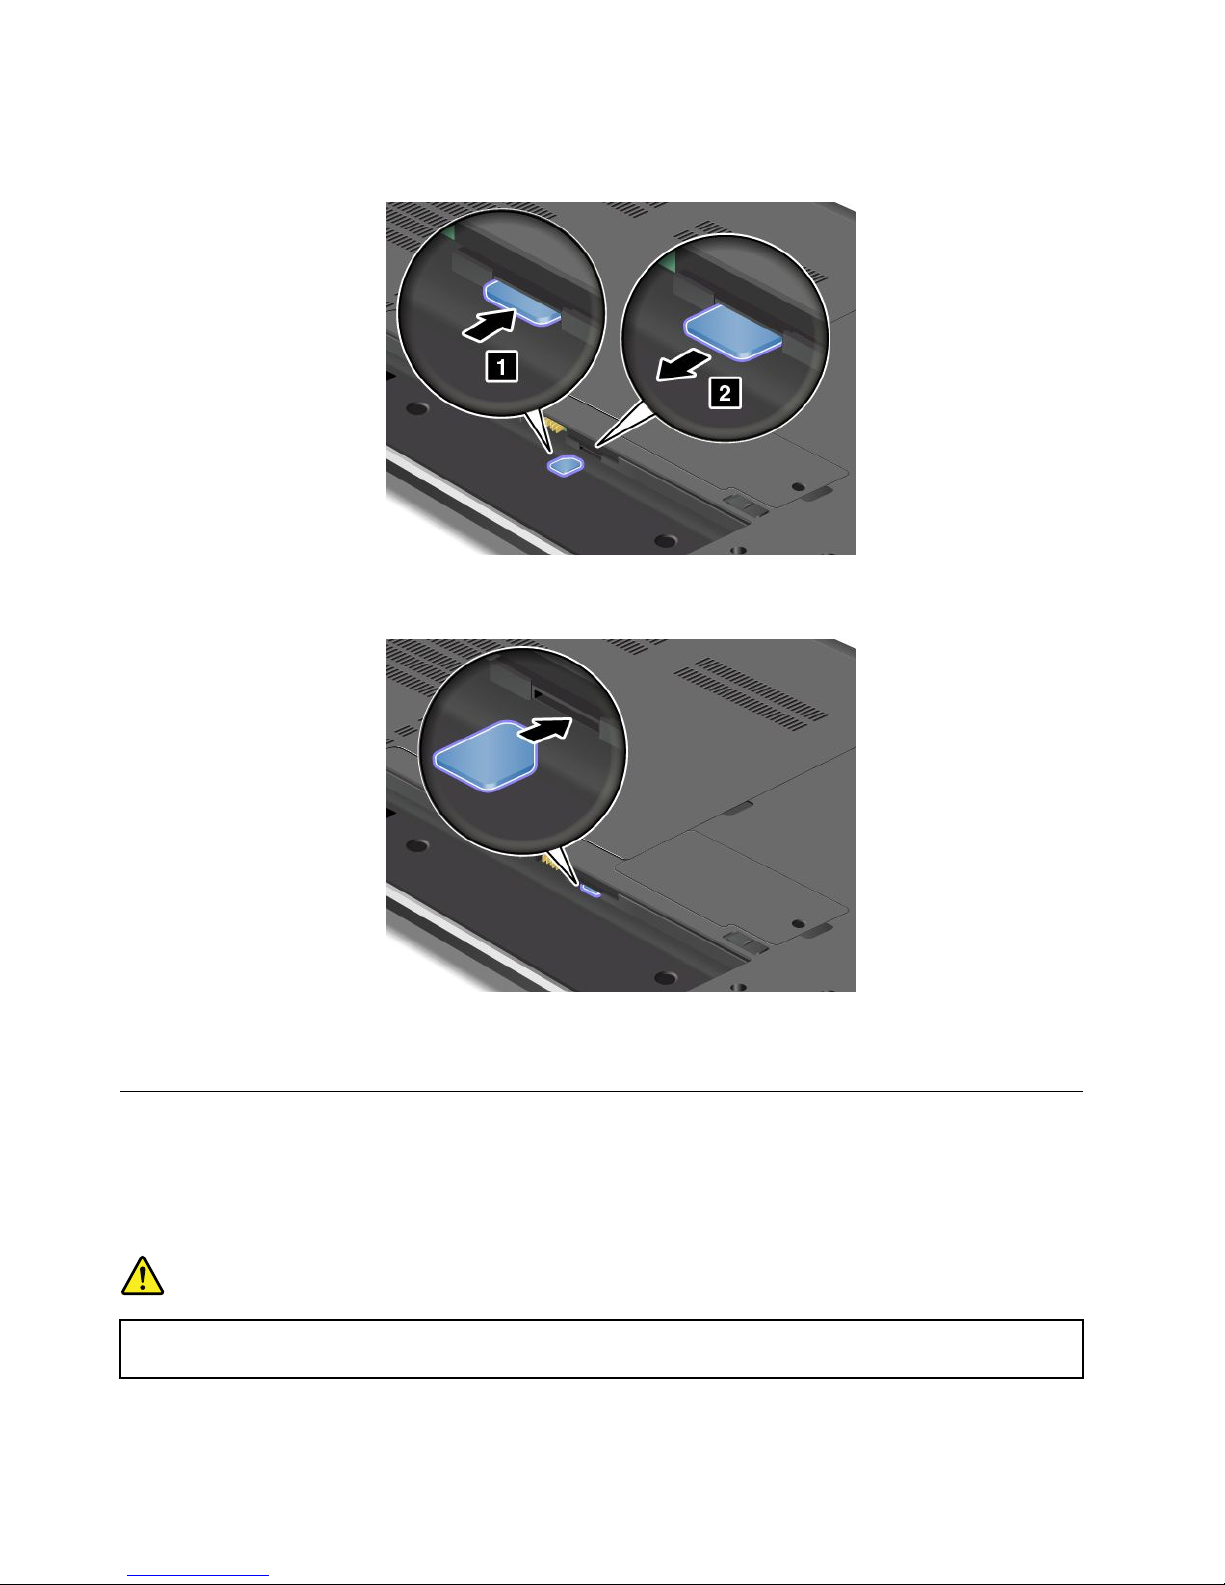
4.LocatetheSIMcardslotinsidethebatterycompartment.Gentlypushthecardtoremoveitfromthe
computer.
5.Holdthenewcardwiththemetalcontactfacingupwardandgoingintotheslotfirst.Then,insert
thecardfirmlyintotheslotuntilyouhearaclick.
6.Reinstallthebattery.See“Replacingthebattery”onpage71.
7.T urnthecomputeroveragain.Connecttheacpoweradapterandallcables.
Replacingthekeyboard
ThinkPadEdgeE440
Beforeyoustart,printtheseinstructions.
DANGER
Duringelectricalstorms,donotconnectthecabletoordisconnectitfromthetelephoneoutlet
onthewall.
74UserGuide
Page 91
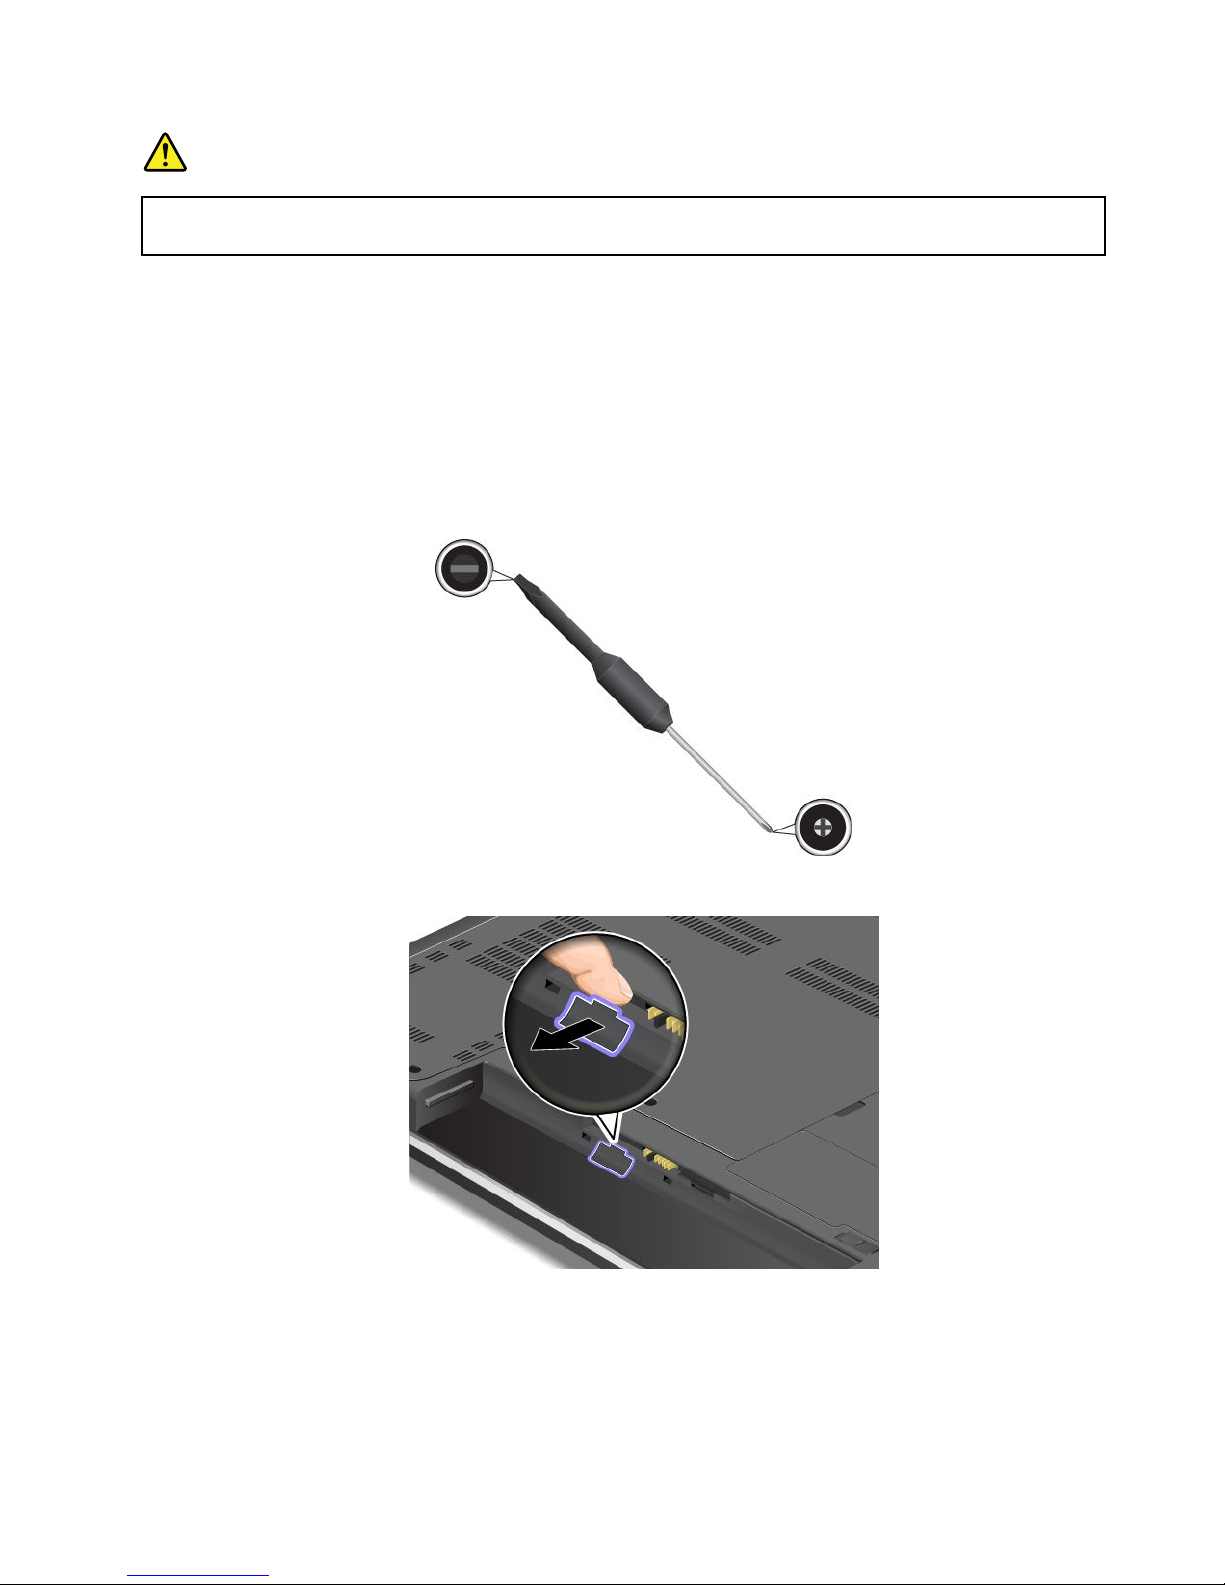
DANGER
Electriccurrentfrompower,telephone,andcommunicationcablesishazardous.Toavoidshock
hazard,disconnectthecablesbeforeopeningthecoverofthisslot.
Removingthekeyboard
Toremovethekeyboard,dothefollowing:
1.T urnoffthecomputerandthendisconnecttheacpoweradapterandallcablesfromthecomputer.Wait
threetofiveminutestoletthecomputercool.
2.Closethecomputerdisplayandturnthecomputerover.
3.Removethebattery.See“Replacingthebattery”onpage71.
4.Findthekeyboardmulti-toolintheshippingpackageofthenewkeyboard.Thefollowingillustration
showsakeyboardmulti-tool.
5.Unlockthekeyboardframe.
Chapter6.Replacingdevices75
Page 92
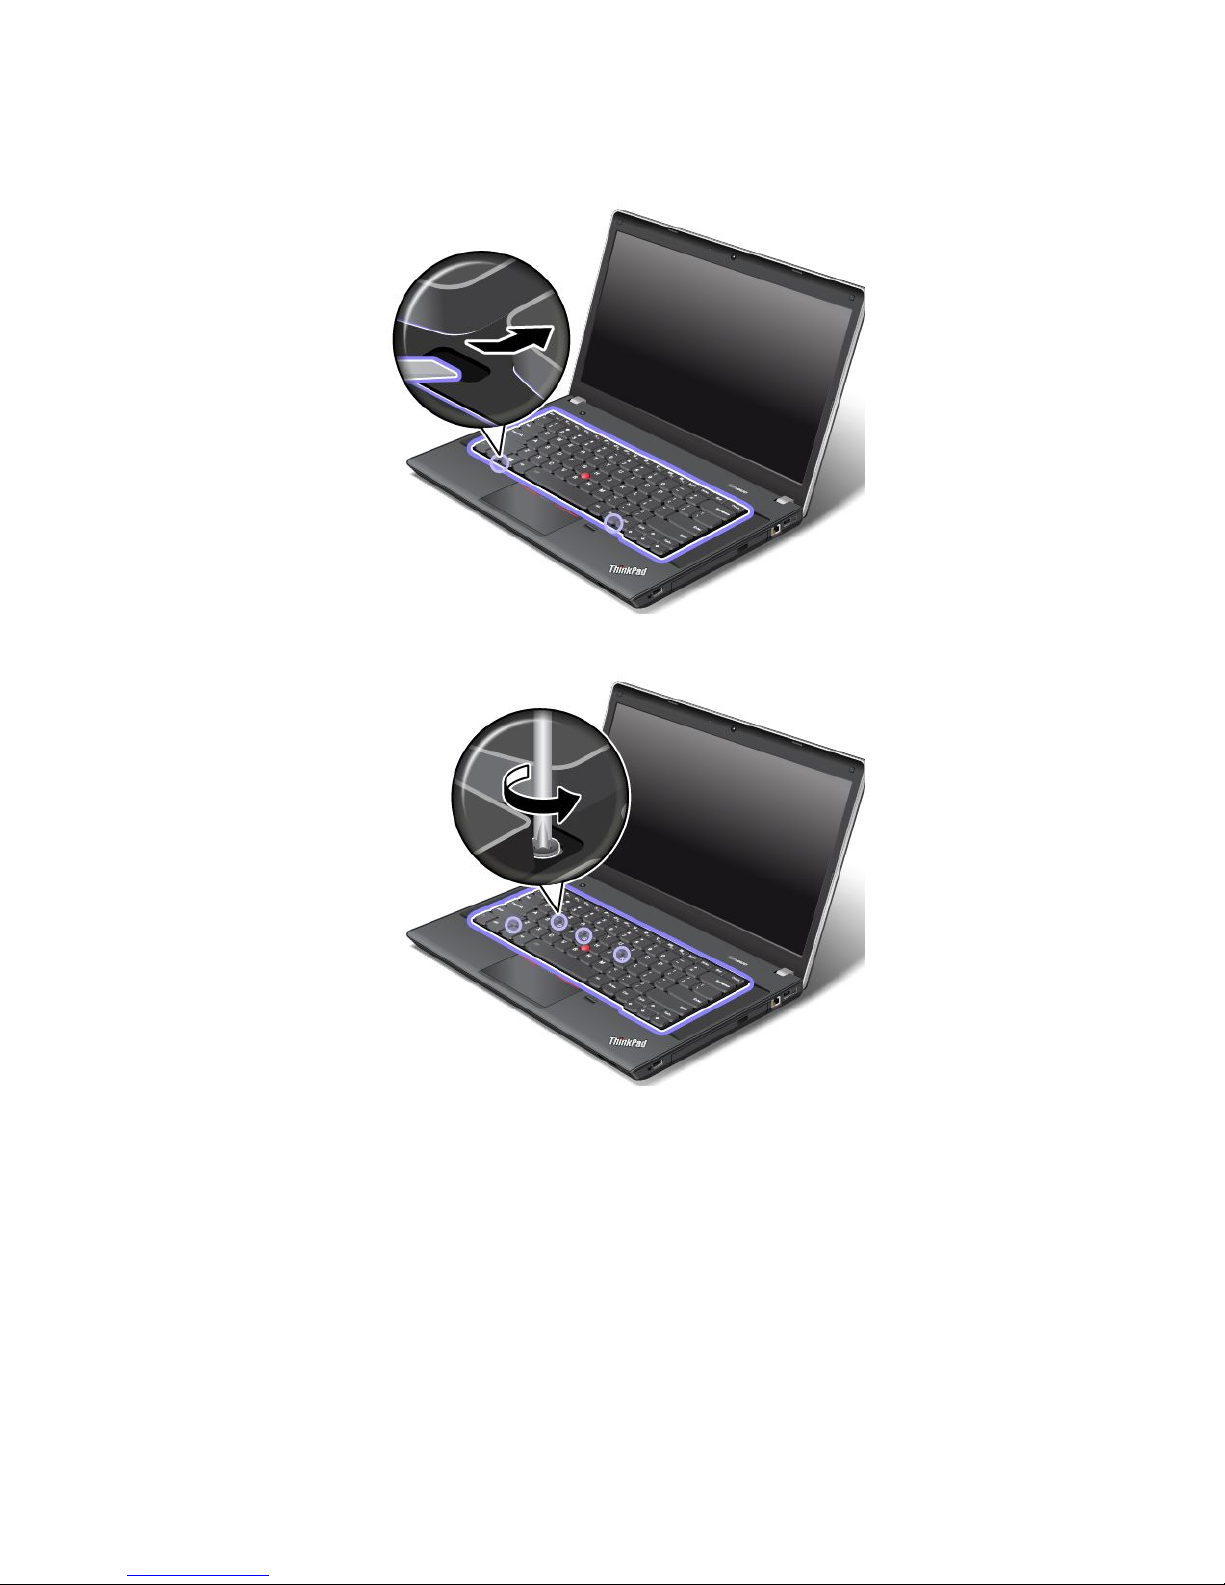
6.T orevealthescrewheadsbeneaththekeyboardframe,slidethekeyboardframeforwardby2.5mm
(0.1inch)withthekeyboardmulti-tool.
7.Loosenthescrewsthatsecurethekeyboardwiththekeyboardmulti-tool.
76UserGuide
Page 93
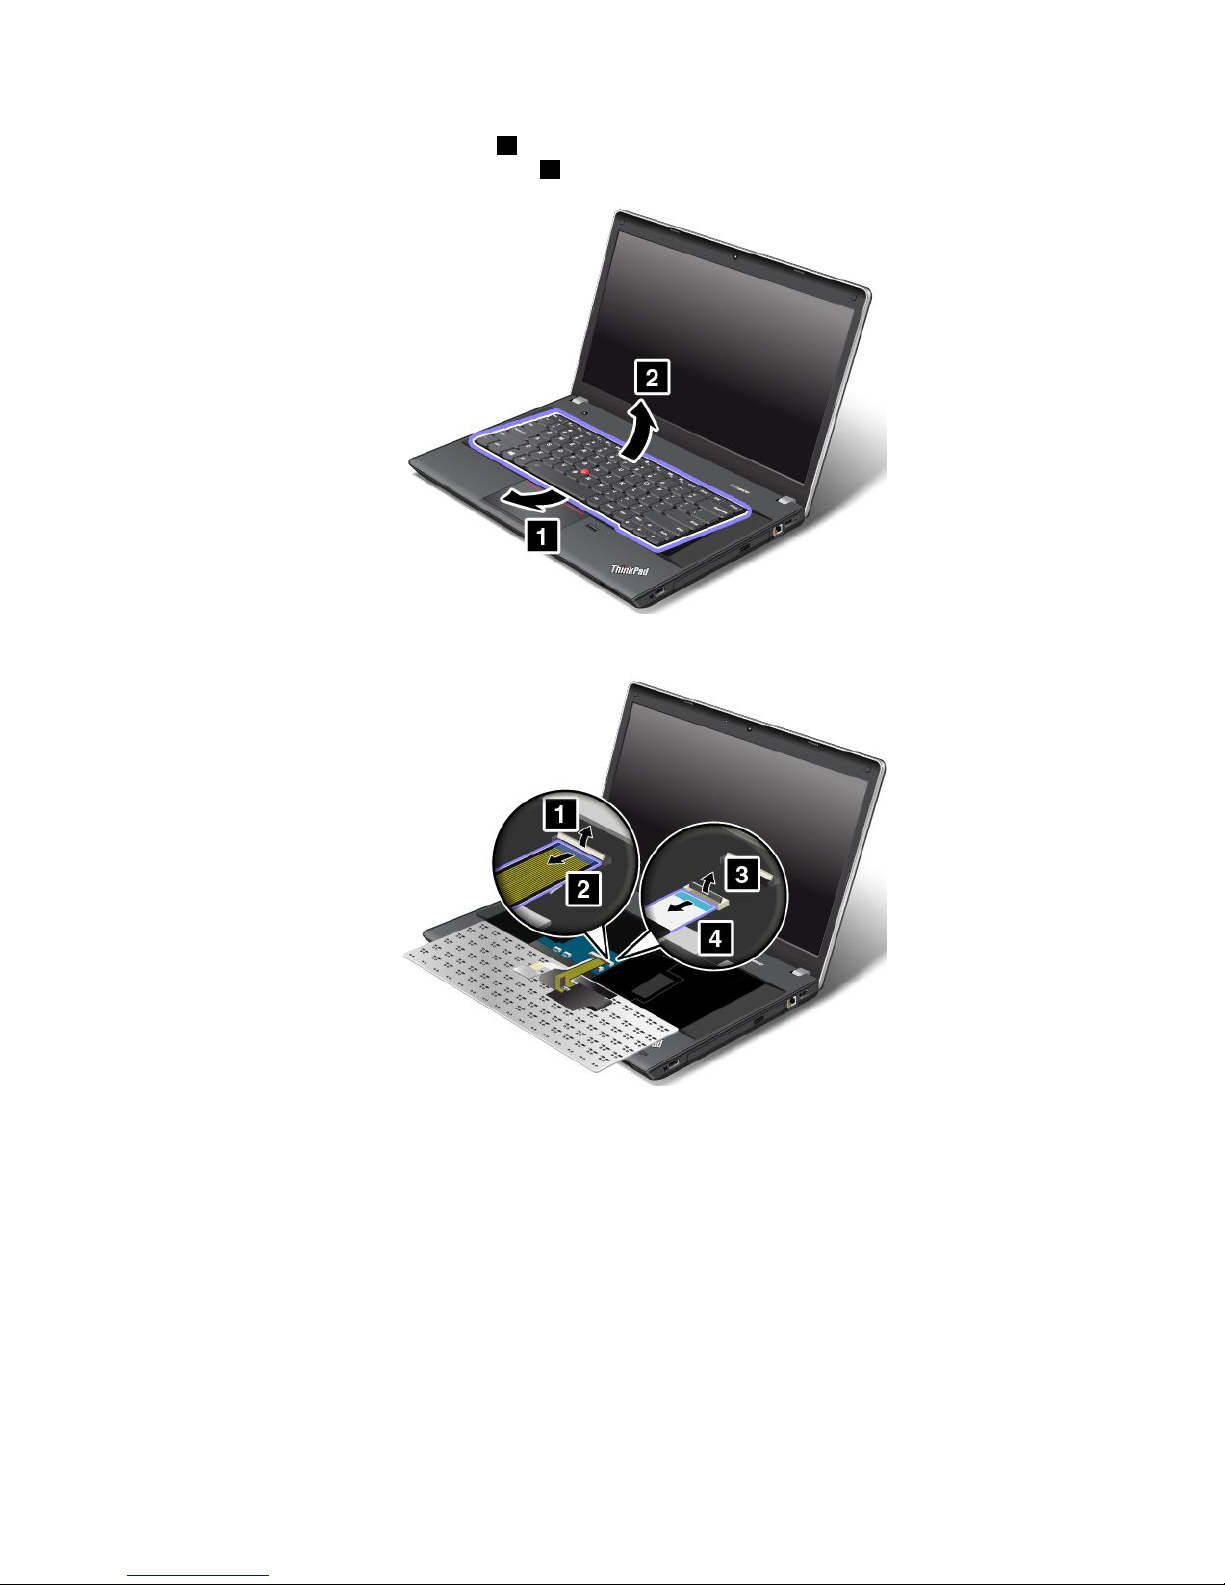
8.Pivotthekeyboardslightlyupward1untilyoucanseetheconnectorsonthebottomsideofthe
keyboard.Thenturnoverthekeyboard
2.
9.Gentlyputthekeyboardonthepalmrestanddetachtheconnectors.Thenremovethekeyboard.
Installingthekeyboard
Toinstallthekeyboard,dothefollowing:
Chapter6.Replacingdevices77
Page 94
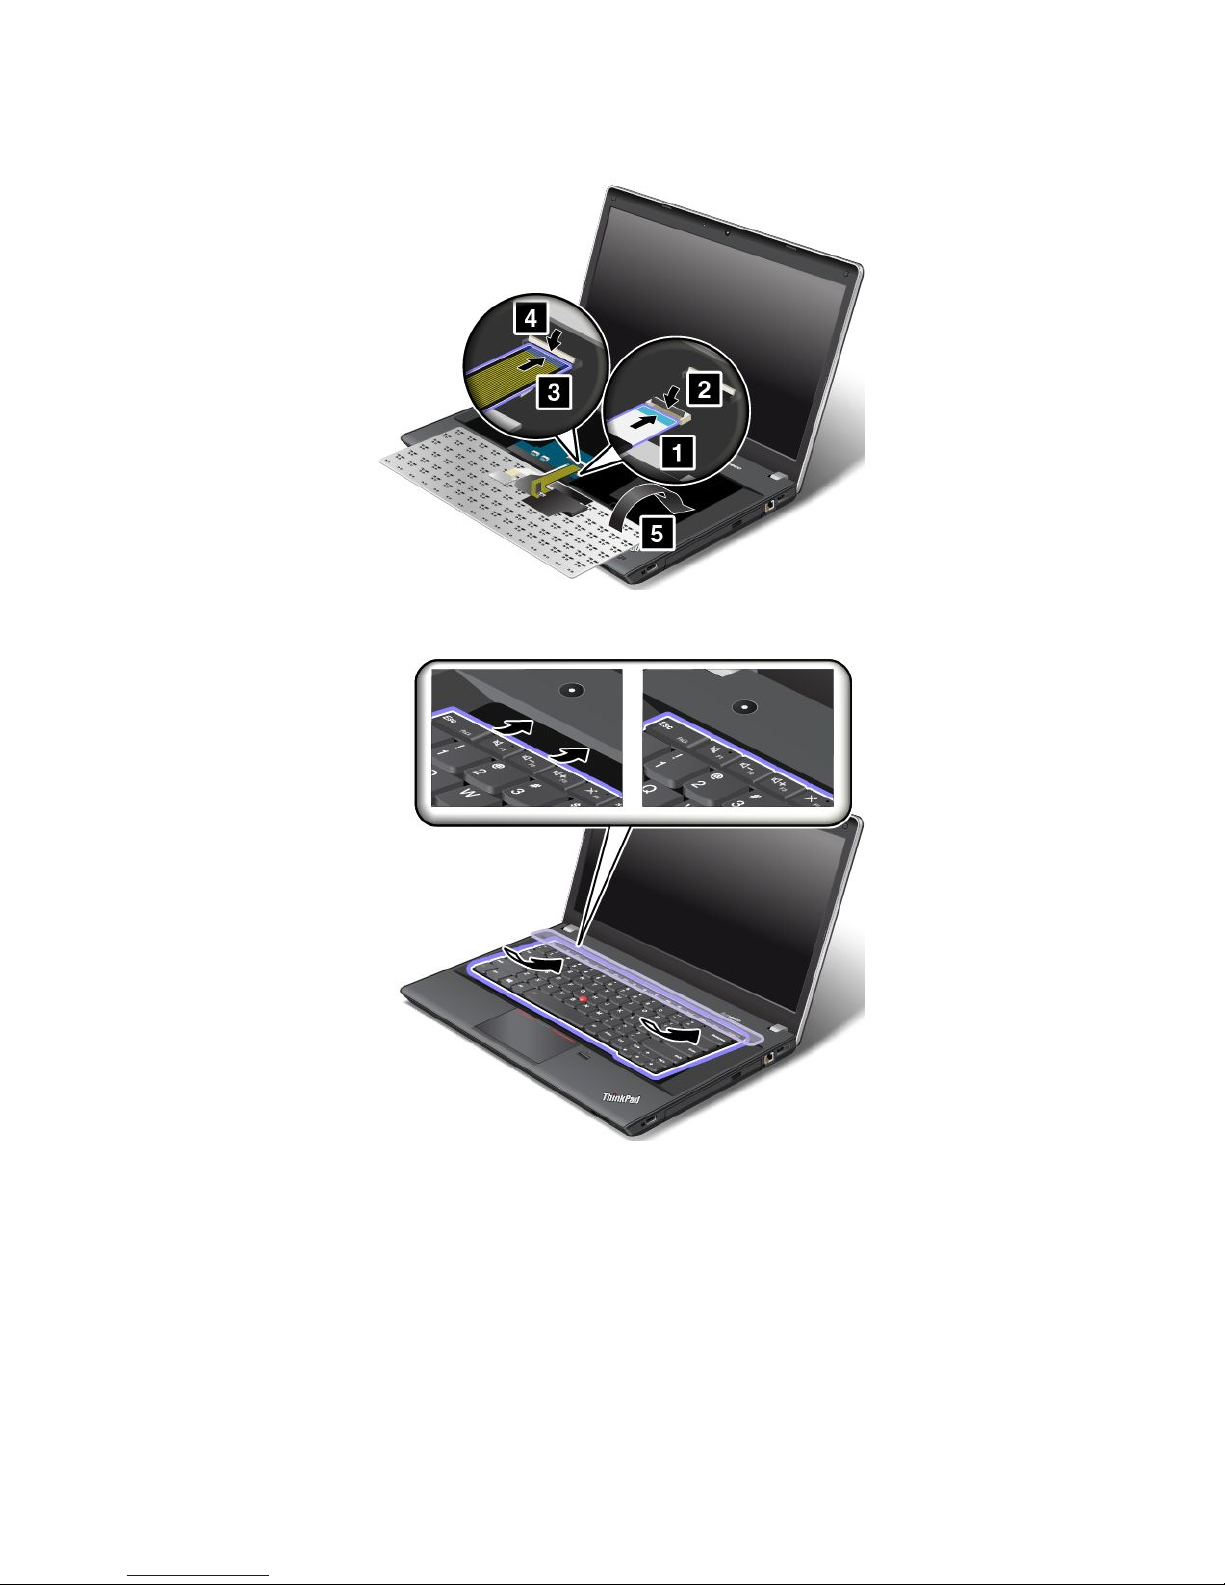
1.Attachtheconnectorsandthenturnoverthekeyboard.
2.Insertthekeyboardintothespaceundertheframeofthekeyboardbezelasshown.
78UserGuide
Page 95
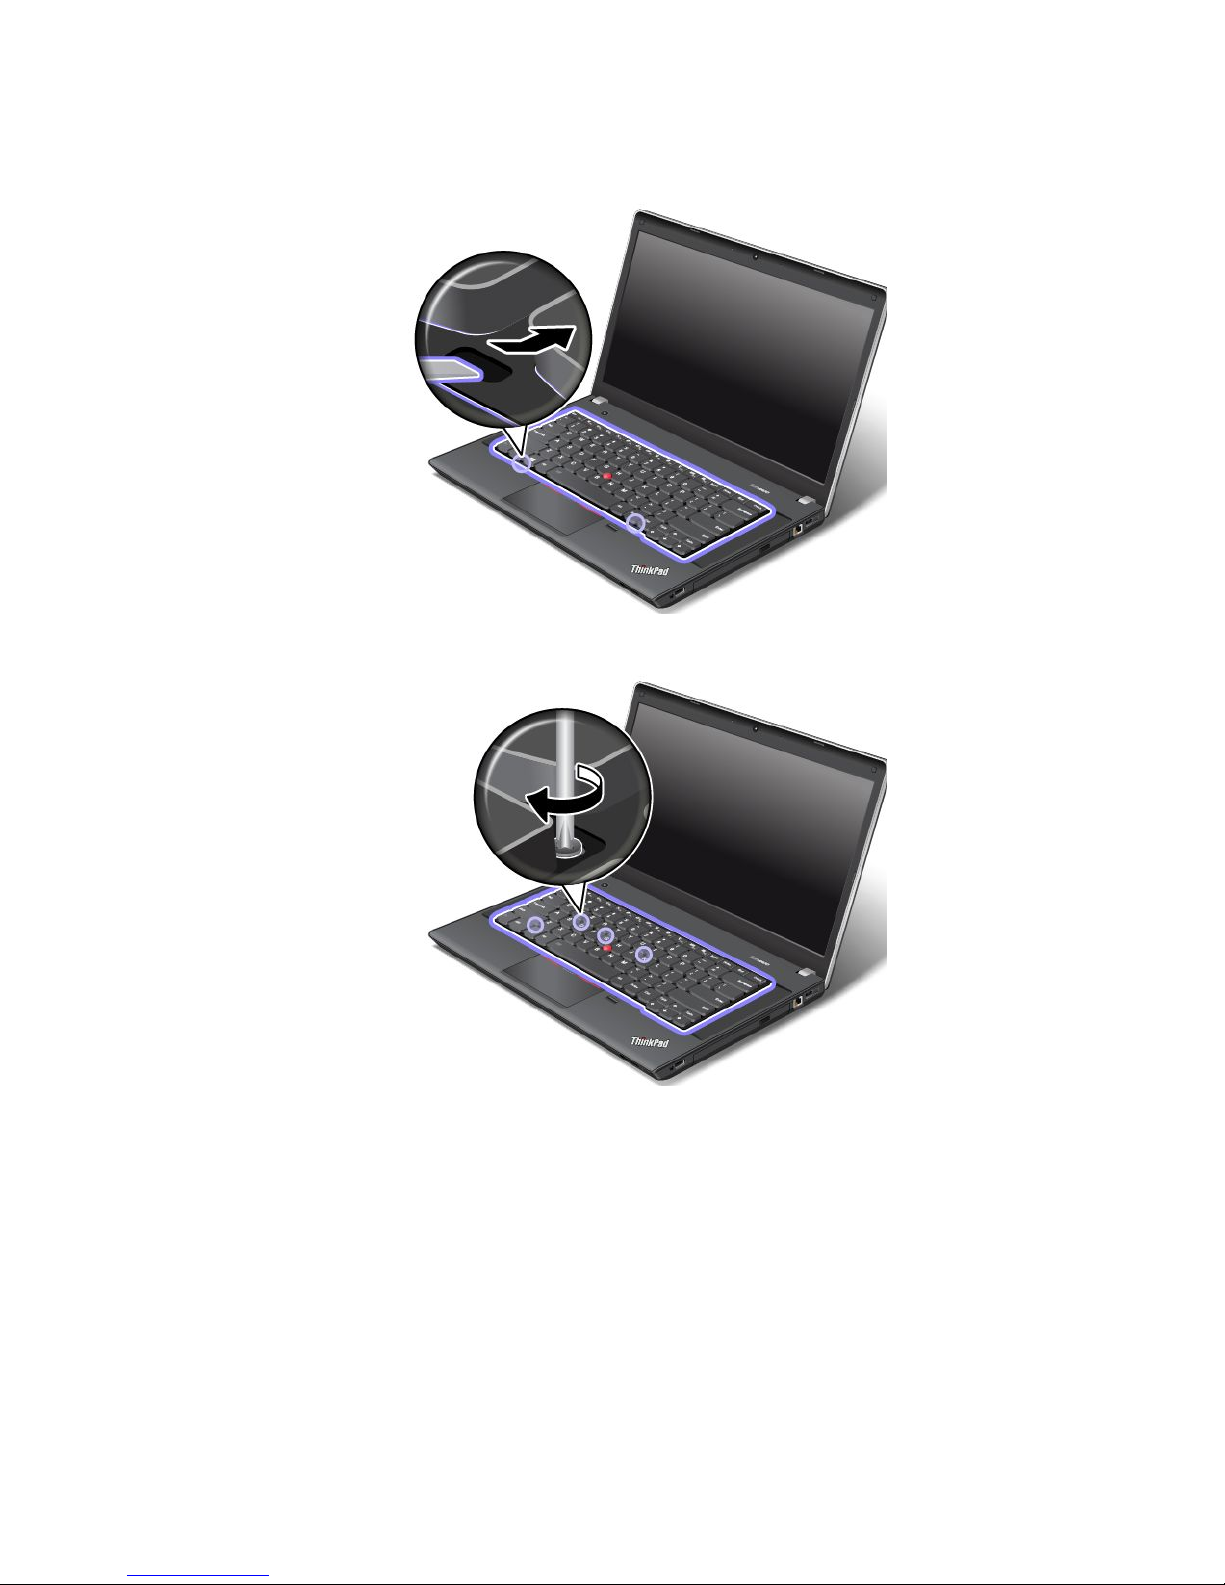
3.Revealthescrewheadsbyslidingthekeyboardframeforwardwiththekeyboardmulti-tool.Ensure
thatthescrewheadsareexposedcompletely.
4.Tightenthescrewswiththekeyboardmulti-tooltosecurethekeyboardinplace.
Chapter6.Replacingdevices79
Page 96
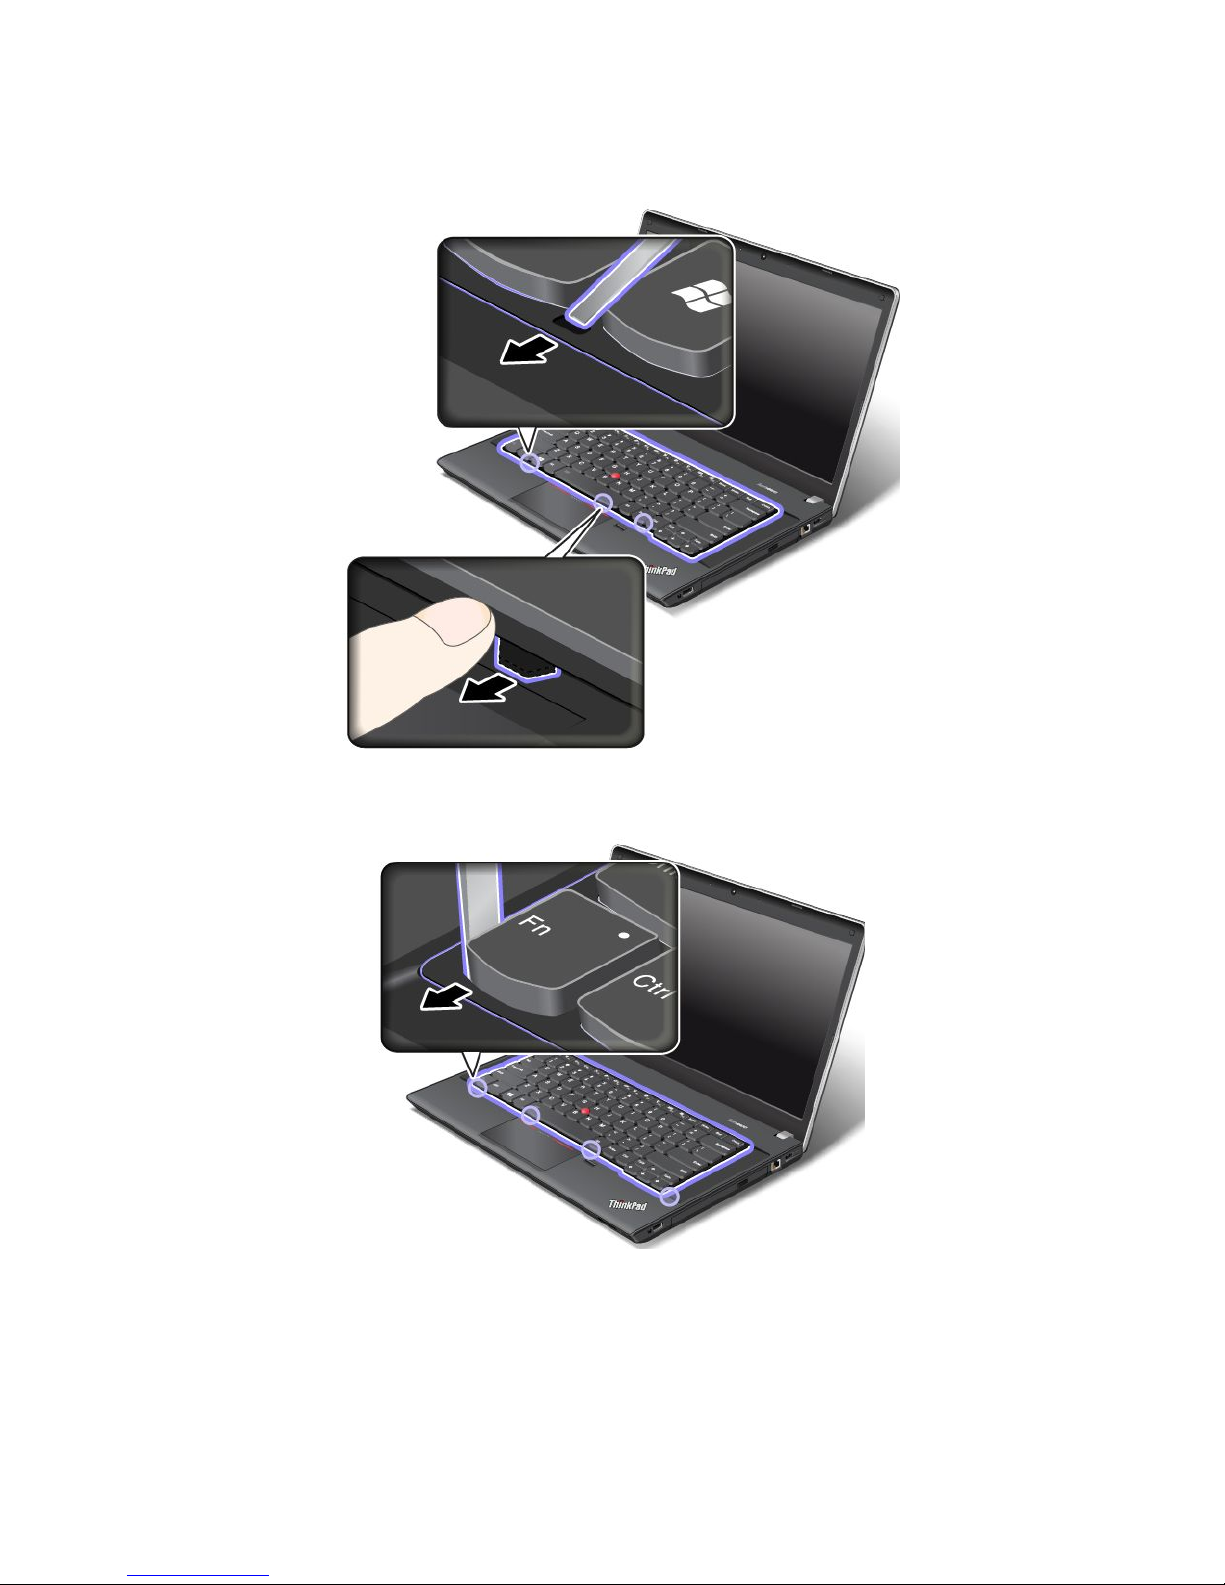
5.Slidethekeyboardframebackwardby2.5mm(0.1inch)withthekeyboardmulti-tool.Hidethelatches
ofthekeyboardframeunderthekeyboardbezelbypushingthelatcheswithyourfingerasshown.
6.Adjustthekeyboardframeinplacewiththekeyboardmulti-toolandensurethatallthelatchesare
securedunderthekeyboardbezel.
80UserGuide
Page 97
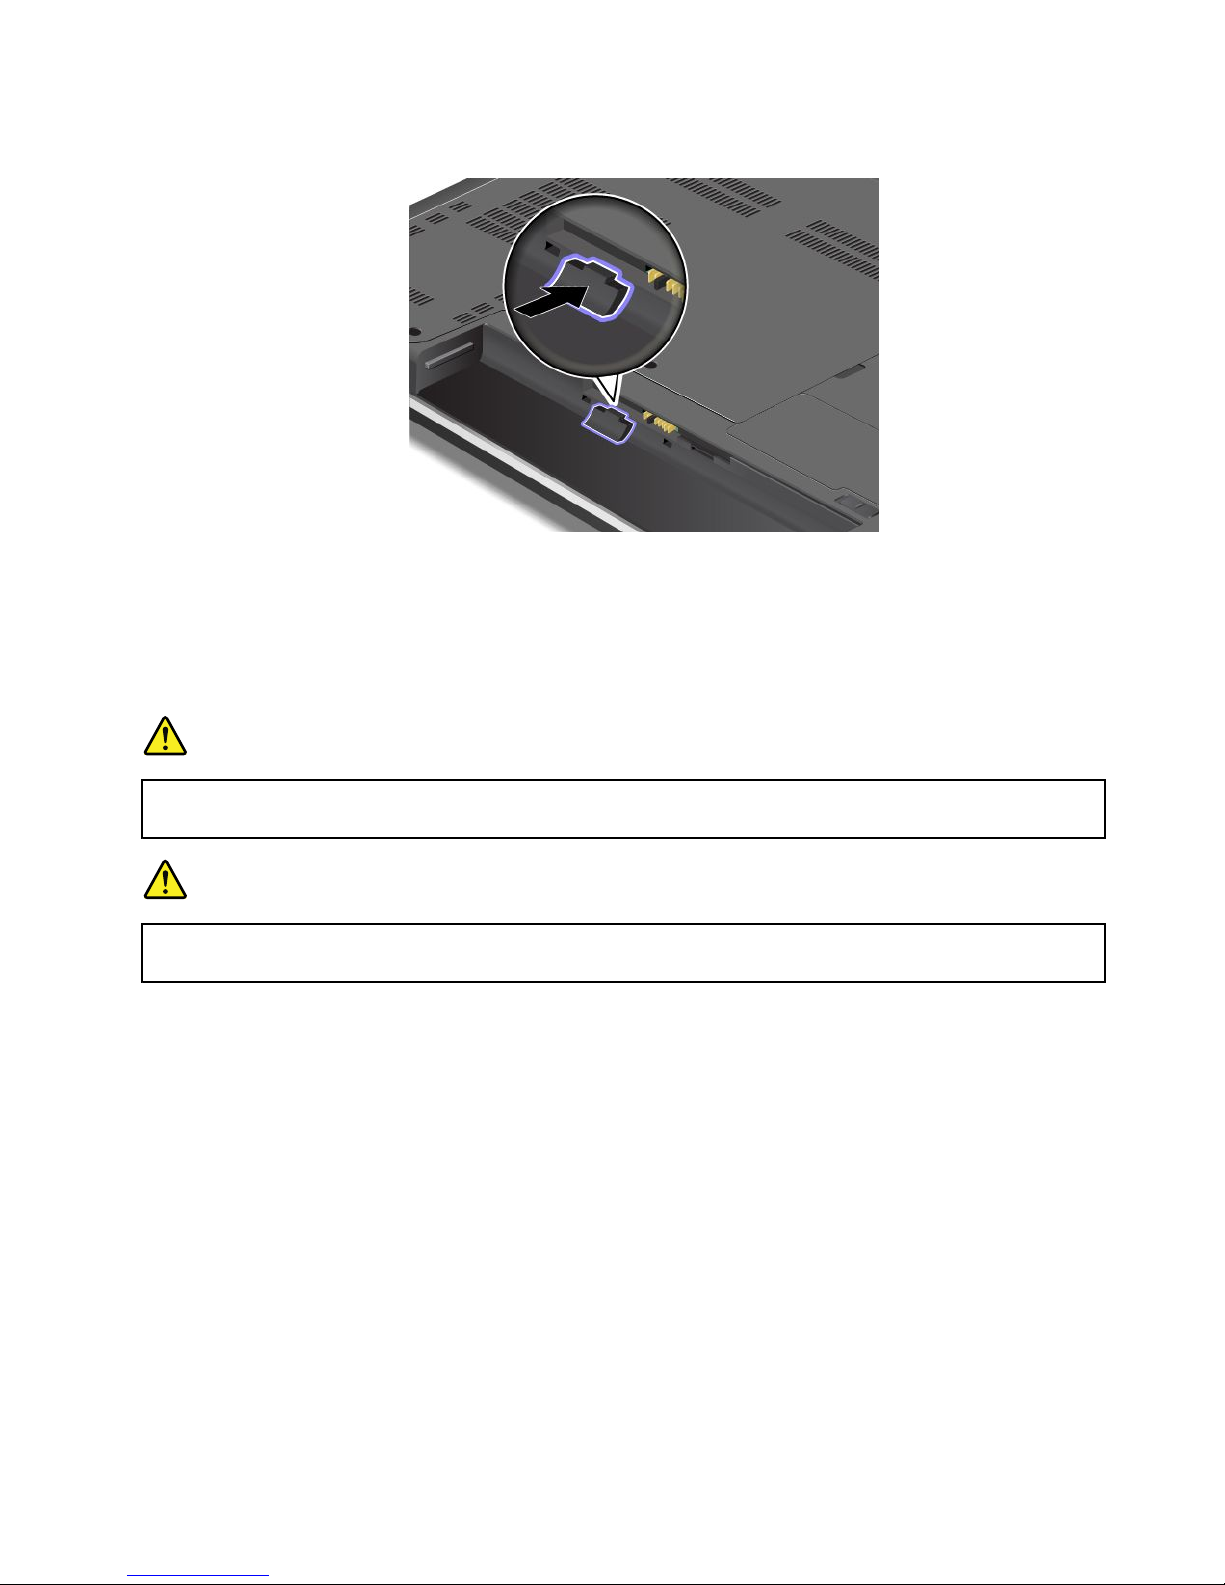
7.T urnthecomputeroverandlockthekeyboardframe.
8.Reinstallthebattery.See“Replacingthebattery”onpage71.
9.T urnthecomputeroveragain.Connecttheacpoweradapterandallcables.
ThinkPadEdgeE540
Beforeyoustart,printtheseinstructions.
DANGER
Duringelectricalstorms,donotconnectthecabletoordisconnectitfromthetelephoneoutlet
onthewall.
DANGER
Electriccurrentfrompower,telephone,andcommunicationcablesishazardous.Toavoidshock
hazard,disconnectthecablesbeforeopeningthecoverofthisslot.
Removingthekeyboard
Toremovethekeyboard,dothefollowing:
1.T urnoffthecomputerandthendisconnecttheacpoweradapterandallcablesfromthecomputer.Wait
threetofiveminutestoletthecomputercool.
2.Closethecomputerdisplayandturnthecomputerover.
3.Removethebattery.See“Replacingthebattery”onpage71.
Chapter6.Replacingdevices81
Page 98
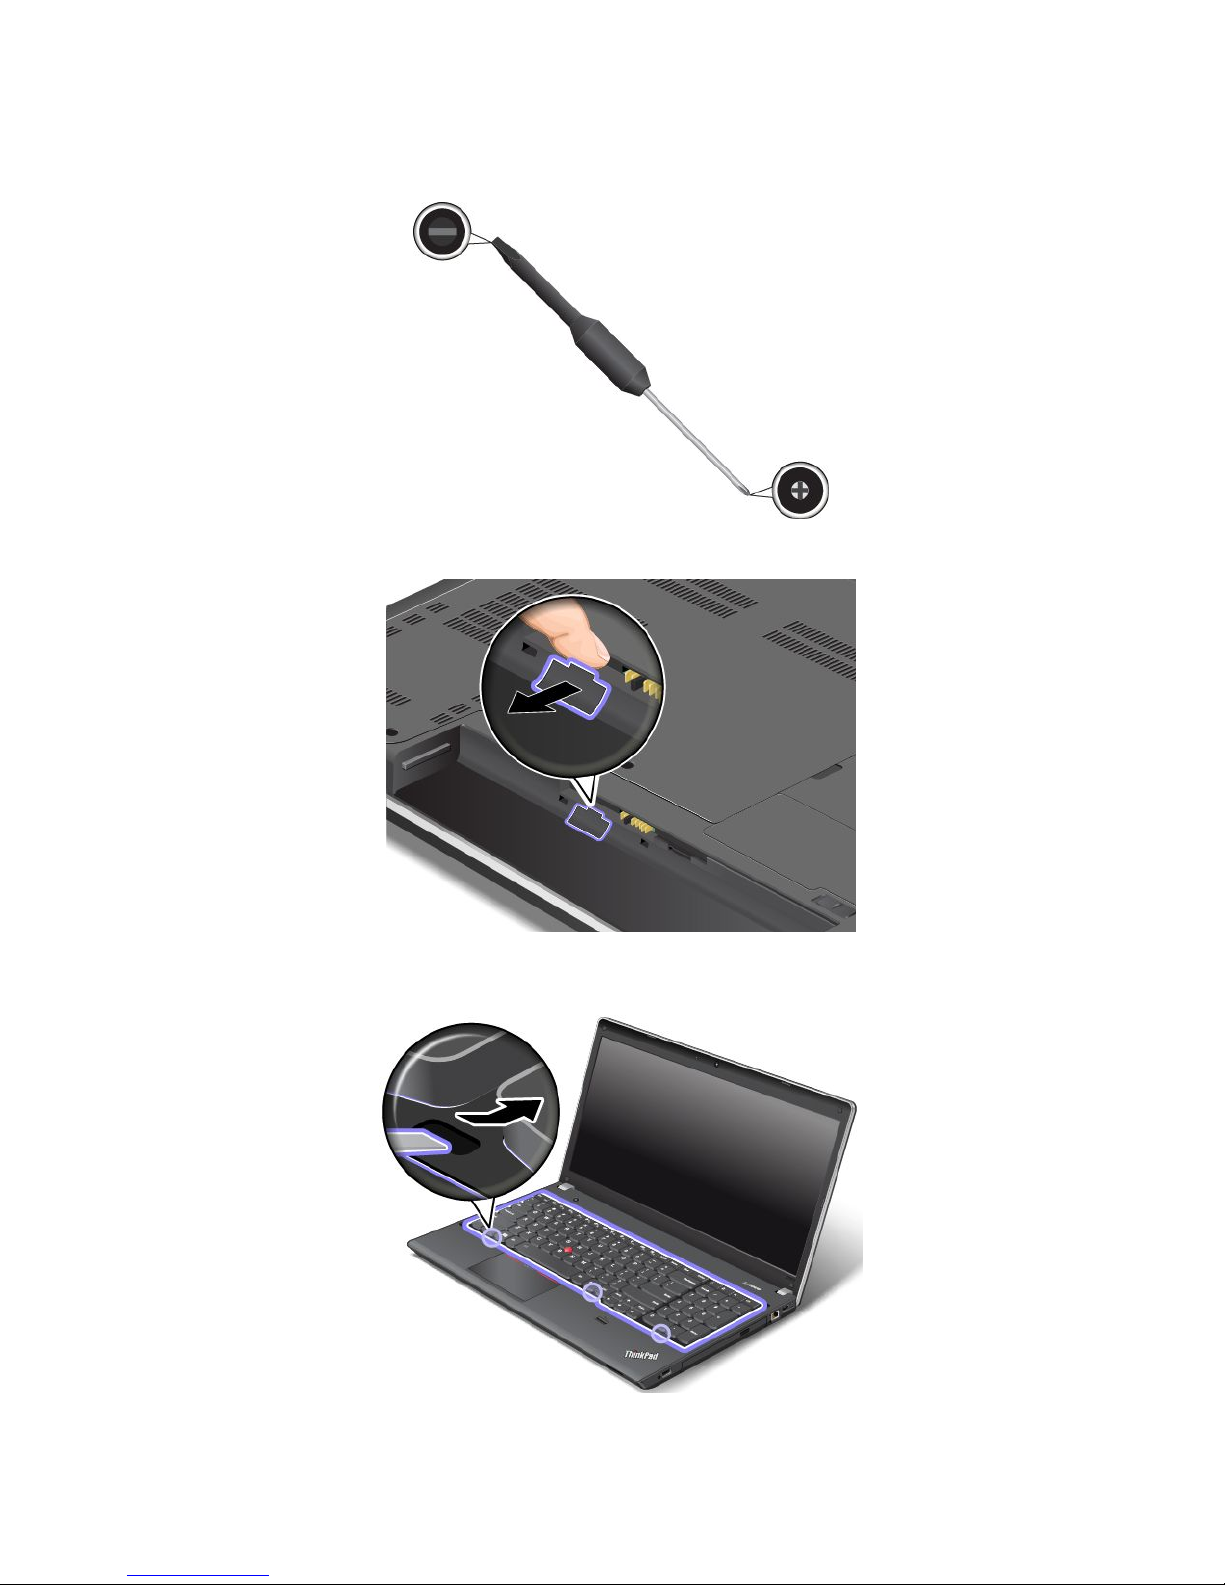
4.Findthekeyboardmulti-toolintheshippingpackageofthenewkeyboard.Thefollowingillustration
showsakeyboardmulti-tool.
5.Unlockthekeyboardframe.
6.T orevealthescrewheadsbeneaththekeyboardframe,slidethekeyboardframeforwardby2.5mm
(0.1inch)withthekeyboardmulti-tool.
82UserGuide
Page 99
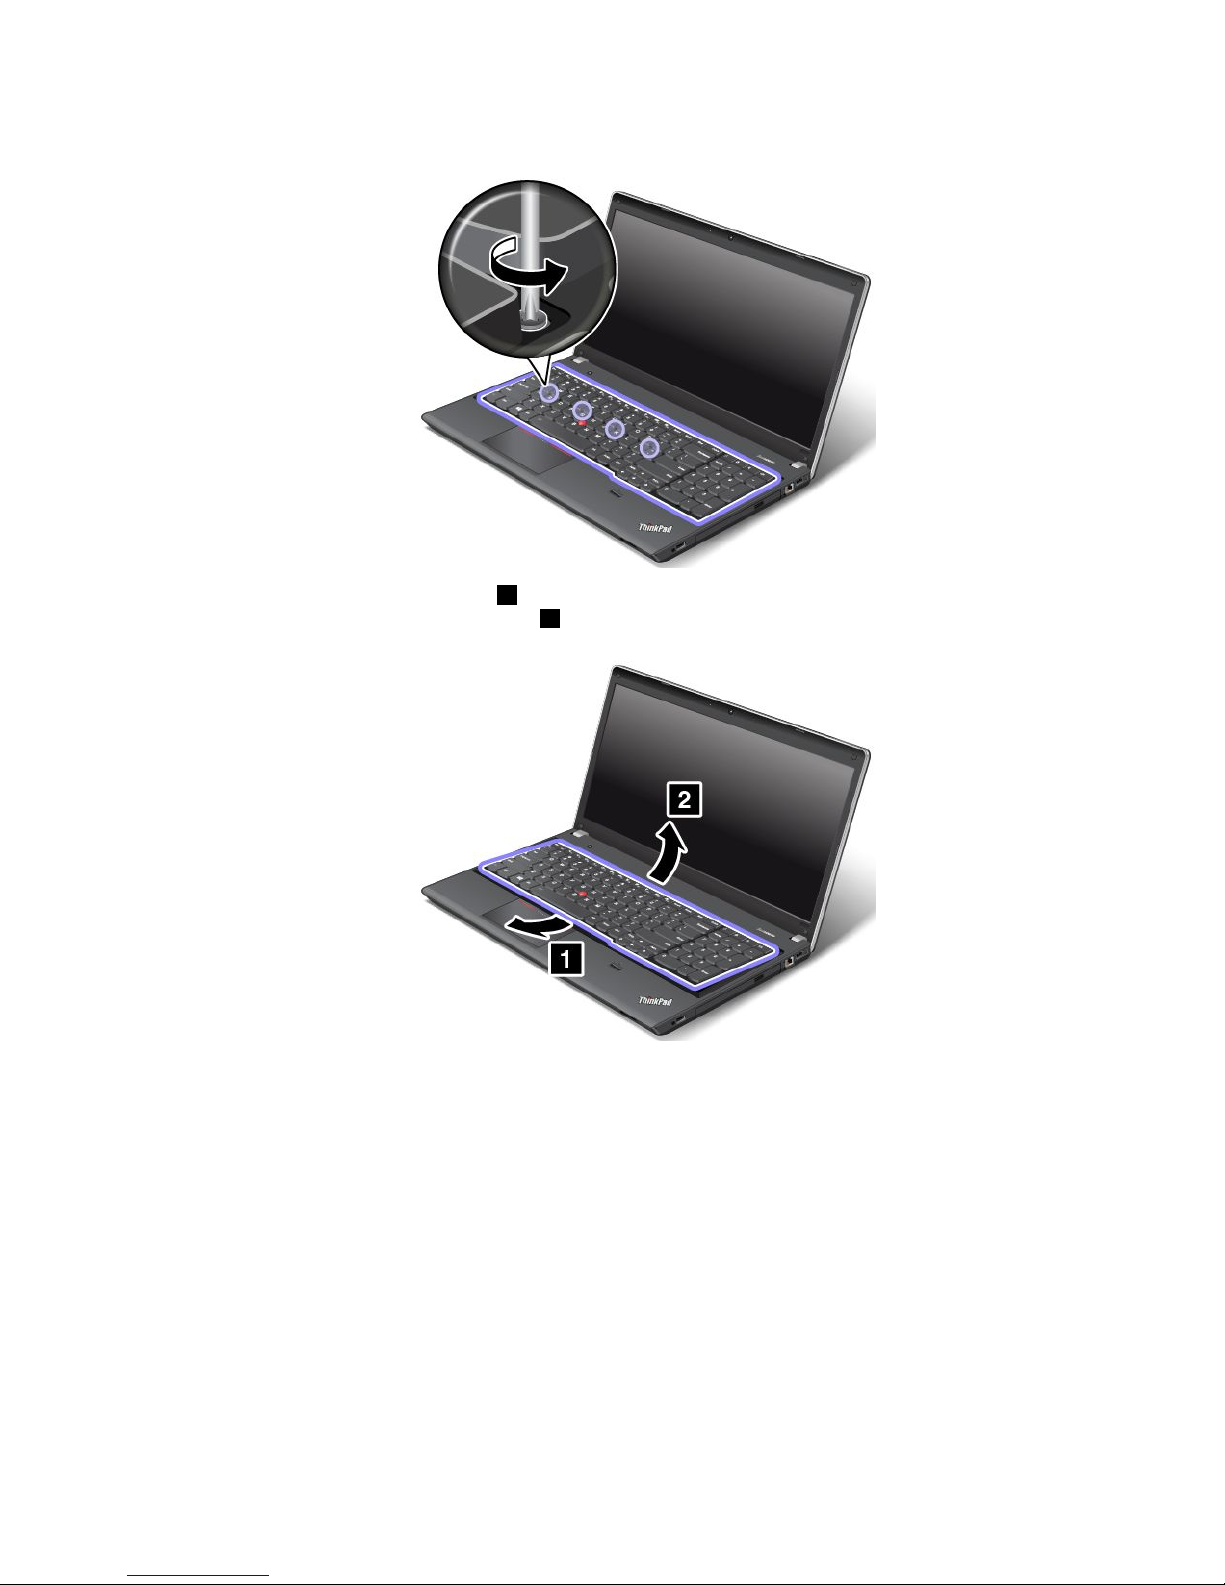
7.Loosenthescrewsthatsecurethekeyboardwiththekeyboardmulti-tool.
8.Pivotthekeyboardslightlyupward1untilyoucanseetheconnectorsonthebottomsideofthe
keyboard.Thenturnoverthekeyboard2.
Chapter6.Replacingdevices83
Page 100
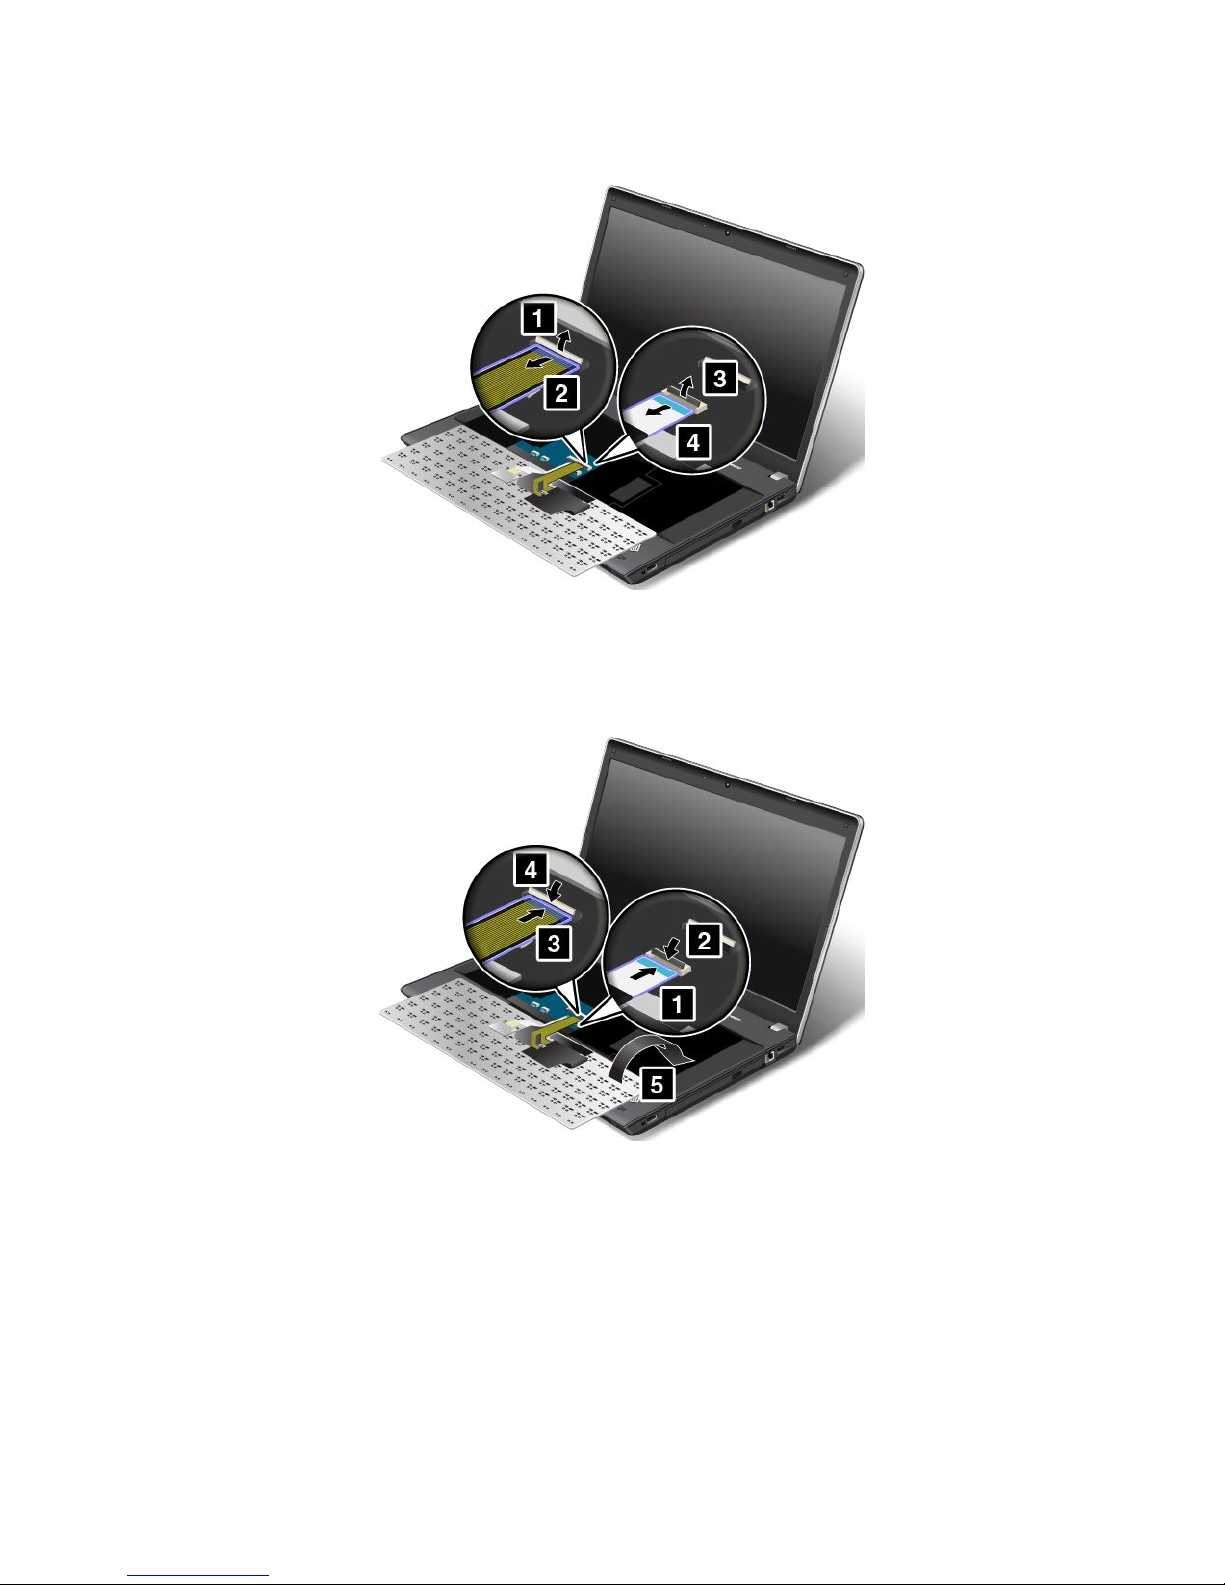
9.Gentlyputthekeyboardonthepalmrestanddetachtheconnectors.Thenremovethekeyboard.
Installingthekeyboard
Toinstallthekeyboard,dothefollowing:
1.Attachtheconnectorsandthenturnoverthekeyboard.
84UserGuide
 Loading...