

Page 1

HardwareMaintenanceManual
ThinkPadEdgeE530,E530c,andE535
Page 2

Note:Beforeusingthisinformationandtheproductitsupports,besuretoreadthegeneralinformation
underAppendixA“Notices”onpage109.
FourthEdition(May2013)
©CopyrightLenovo2012,2013.
LIMITEDANDRESTRICTEDRIGHTSNOTICE:IfdataorsoftwareisdeliveredpursuantaGeneralServicesAdministration
“GSA”contract,use,reproduction,ordisclosureissubjecttorestrictionssetforthinContractNo.GS-35F-05925.
Page 3

Contents
Aboutthismanual...........iii
Chapter1.Safetyinformation......1
Generalsafety................1
Electricalsafety...............2
Safetyinspectionguide............3
Handlingdevicesthataresensitivetoelectrostatic
discharge..................3
Groundingrequirements............4
Safetynotices(multilingualtranslations)......4
Lasercompliancestatement(multilingual
translations)................17
Chapter2.Importantservice
information..............23
StrategyforreplacingFRUs.........23
Strategyforreplacingaharddiskdrive...24
Importantnoticeforreplacingasystem
board................24
Howtouseerrorcodes.........24
StrategyforreplacingFRUsforCTO,CMV,and
GAVproducts...............24
Productdenition............24
FRUidenticationforCTO,CMV,andGAV
products...............25
Chapter3.Generalcheckout.....27
Whattodorst..............27
Checkoutguide..............28
LenovoSolutionCenter.........28
Quicktestprograms...........28
UEFIdiagnosticprogram.........29
Bootablediagnosticprograms.......29
Powersystemcheckout...........30
Checkingtheacpoweradapter......30
Checkingoperationalcharging......31
Checkingthebatterypack........31
Checkingthebackupbattery.......32
Chapter4.Relatedservice
information..............33
Restoringthefactorycontentsbyusingthe
productRecoveryDiscSet..........33
RecoveryoverviewfortheWindows8operating
system..................34
Refreshingyourcomputer........34
Resettingyourcomputertothefactorydefault
settings................34
Usingtheadvancedstartupoptions....35
RecoveringyouroperatingsystemifWindows
8failstostart.............35
Creatingandusingrecoverymedia.....35
Passwords................36
Power-onpassword...........37
Harddiskpassword...........37
Supervisorpassword..........37
Howtoremovethepower-onpassword...37
Howtoremovetheharddiskpassword...38
Powermanagement............38
Screenblankmode(fortheWindows7
operatingsystemonly)..........38
Sleepmode..............38
Hibernationmode...........39
Symptom-to-FRUindex...........39
Numericerrorcodes..........40
Errormessages............40
No-beepsymptoms...........41
LCD-relatedsymptoms.........41
Intermittentproblems..........42
Undeterminedproblems.........42
Chapter5.Statusindicators.....43
Chapter6.Specialkeys........45
Chapter7.Locations.........47
Locatingcomputercontrols,connectors,and
indicators.................47
Frontview...............48
Rearview...............50
Bottomview..............50
LocatingFRUsandCRUs..........50
MajorFRUsandCRUs..........52
LCDFRUsandCRUs..........54
MiscellaneouspartsandotherFRUs....55
LookingupFRUinformation.........55
Chapter8.FRUreplacement
notices................57
Screwnotices...............57
Retainingserialnumbers...........58
Restoringtheserialnumberofthesystem
unit.................58
RetainingtheUUID...........59
ReadingorwritingtheECAinformation...59
©CopyrightLenovo2012,2013
i
Page 4

Chapter9.Removingorreplacinga
FRU..................61
Generalguidelines.............61
BeforeservicingThinkPadEdgeE530andE530c
models..................62
1010Batterypack.............62
1020Largebottomcover..........63
1030Smallbottomcover..........64
1040Opticaldriveorblankbezel.......65
1050Memorymodules...........65
1060Harddiskdriveassembly........66
1070PCIExpressMiniCardforwirelessLAN..68
1080PCIExpressMiniCardforwirelessWANor
mSATAsolidstatedrive...........69
1090Backupbattery............73
1100Thermalfan.............74
1110Thermalpipes.............74
1120Keyboard..............76
1130Keyboardbezel............80
1140CPU................82
1150Systemboardassembly.........83
1160Speakerassembly...........86
1170Powerbuttonsubcard.........89
1180I/OsubcardwithUSBconnectorandaudio
jack...................90
1190RJ45subcard............91
1200Opticaldrivesubcard.........93
1210LCDunit...............94
1220BasecoverassemblyandDC-inconnector.97
2010LCDbezelassembly..........99
2020LCDpanelandhinges.........101
2030IntegratedcameraandLCDcables....103
2040WirelessantennaassemblyandLCDrear
coverassembly..............105
AppendixA.Notices.........109
Electronicemissionnotices..........110
Trademarks................110
iiHardwareMaintenanceManual
Page 5

Aboutthismanual
ThismanualcontainsserviceandreferenceinformationforthefollowingThinkPad
®
products.
ThinkPadEdgeE530,E530c,andE535
MachineType(MT)3259,3260,3366,and6272
Usethismanualalongwiththeadvanceddiagnosticteststotroubleshootproblems.
Important:
ThismanualisintendedonlyfortrainedservicetechnicianswhoarefamiliarwithThinkPadproducts.Use
thismanualalongwiththeadvanceddiagnosticteststotroubleshootproblemseffectively.
BeforeservicingaThinkPadproduct,besuretoreadalltheinformationunderChapter1“Safety
information”onpage1
andChapter2“Importantserviceinformation”onpage23.
©CopyrightLenovo2012,2013
iii
Page 6

ivHardwareMaintenanceManual
Page 7

Chapter1.Safetyinformation
Thischapterpresentsthefollowingsafetyinformationthatyouneedtobefamiliarwithbeforeyouservicea
ThinkPadnotebookcomputer.
•“Generalsafety”onpage1
•“Electricalsafety”onpage2
•“Safetyinspectionguide”onpage3
•“Handlingdevicesthataresensitivetoelectrostaticdischarge”onpage3
•“Groundingrequirements”onpage4
•“Safetynotices(multilingualtranslations)”onpage4
•“Lasercompliancestatement(multilingualtranslations)”onpage17
Generalsafety
Followtheserulestoensuregeneralsafety:
•Observegoodhousekeepingintheareaofthemachinesduringandaftermaintenance.
•Whenliftinganyheavyobject:
1.Makesurethatyoucanstandsafelywithoutslipping.
2.Distributetheweightoftheobjectequallybetweenyourfeet.
3.Useaslowliftingforce.Nevermovesuddenlyortwistwhenyouattempttolift.
4.Liftbystandingorbypushingupwithyourlegmuscles;thisactionremovesthestrainfromthe
musclesinyourback.Donotattempttoliftanyobjectthatweighsmorethan16kg(35lb)orthatyou
thinkistooheavyforyou.
•Donotperformanyactionthatcauseshazardstothecustomer,orthatmakestheequipmentunsafe.
•Beforeyoustartthemachine,makesurethatotherservicetechniciansandthecustomer'spersonnelare
notinahazardousposition.
•Placeremovedcoversandotherpartsinasafeplace,awayfromallpersonnel,whileyouareservicing
themachine.
•Keepyourtoolcaseawayfromwalkareassothatotherpeoplewillnottripoverit.
•Donotwearlooseclothingthatcanbetrappedinthemovingpartsofamachine.Makesurethatyour
sleevesarefastenedorrolledupaboveyourelbows.Ifyourhairislong,fastenit.
•Inserttheendsofyournecktieorscarfinsideclothingorfastenitwithanonconductiveclip,about8
centimeters(3inches)fromtheend.
•Donotwearjewelry,chains,metal-frameeyeglasses,ormetalfastenersforyourclothing,becausemetal
objectsaregoodelectricalconductors.
•Wearsafetyglasseswhenyouarehammering,drilling,soldering,cuttingwire,attachingsprings,using
solvents,orworkinginanyotherconditionsthatmightbehazardoustoyoureyes.
•Afterservice,reinstallallsafetyshields,guards,labels,andgroundwires.Replaceanysafetydevice
thatiswornordefective.
•Reinstallallcoverscorrectlybeforereturningthemachinetothecustomer.
•Fanlouversonthemachinehelptopreventoverheatingofinternalcomponents.Donotobstructfan
louversorcoverthemwithlabelsorstickers.
©CopyrightLenovo2012,2013
1
Page 8

Electricalsafety
Observethefollowingruleswhenworkingonelectricalequipment.
Important:
•Useonlyapprovedtoolsandtestequipment.Somehandtoolshavehandlescoveredwithasoftmaterial
thatdoesnotinsulateyouwhenworkingwithliveelectricalcurrents.
•Manycustomershave,neartheirequipment,rubberoormatsthatcontainsmallconductivebersto
decreaseelectrostaticdischarges.Donotusethistypeofmattoprotectyourselffromelectricalshock.
•Findtheroomemergencypower-off(EPO)switch,disconnectingswitch,orelectricaloutlet.Ifanelectrical
accidentoccurs,youcanthenoperatetheswitchorunplugthepowercordquickly.
•Donotworkaloneunderhazardousconditionsornearequipmentthathashazardousvoltages.
•Disconnectallpowerbefore:
–Performingamechanicalinspection
–Workingnearpowersupplies
–Removingorinstallingmainunits
•Beforeyoustarttoworkonthemachine,unplugthepowercord.Ifyoucannotunplugit,askthecustomer
topoweroffthewallboxthatsuppliespowertothemachine,andtolockthewallboxintheoffposition.
•Ifyouneedtoworkonamachinethathasexposedelectricalcircuits,observethefollowingprecautions:
–Ensurethatanotherperson,familiarwiththepower-offcontrols,isnearyou.Thatpersonmustbethere
toswitchoffthepower,ifnecessary.
–Useonlyonehandwhenworkingwithpowered-onelectricalequipment;keeptheotherhandinyour
pocketorbehindyourback.
CAUTION:
Anelectricalshockcanoccuronlywhenthereisacompletecircuit.Byobservingtheabove
rule,youmaypreventacurrentfrompassingthroughyourbody.
–Whenusingtesters,setthecontrolscorrectlyandusetheapprovedprobeleadsandaccessoriesfor
thattester.
–Standonsuitablerubbermats(obtainedlocally,ifnecessary)toinsulateyoufromgroundssuchas
metaloorstripsandmachineframes.
Observethespecialsafetyprecautionswhenyouworkwithveryhighvoltages.Instructionsforthese
precautionsareinthesafetysectionsofmaintenanceinformation.Useextremecarewhenmeasuring
highvoltages.
•Regularlyinspectandmaintainyourelectricalhandtoolsforsafeoperationalcondition.
•Donotusewornorbrokentoolsandtesters.
•Neverassumethatpowerhasbeendisconnectedfromacircuit.First,checkthatithasbeenpoweredoff.
•Alwayslookcarefullyforpossiblehazardsinyourworkarea.Examplesofthesehazardsaremoistoors,
nongroundedpowerextensioncables,powersurges,andmissingsafetygrounds.
•Donottouchliveelectricalcircuitswiththereectivesurfaceofaplasticdentalmirror.Thesurfaceis
conductive;suchtouchingcancausepersonalinjuryandmachinedamage.
•Donotservicethefollowingpartswiththepoweron:
–Powersupplyunits
–Pumps
–Blowersandfans
–Motorgenerators
–Unitssimilartothoselistedabove
Thispracticeensurescorrectgroundingoftheunits.
2HardwareMaintenanceManual
Page 9

•Ifanelectricalaccidentoccurs:
–Usecaution;donotbecomeavictimyourself.
–Switchoffpower.
–Sendanotherpersontogetmedicalaid.
Safetyinspectionguide
Thepurposeofthisinspectionguideistoassistyouinidentifyingpotentiallyunsafeconditions.Aseach
machinewasdesignedandbuilt,requiredsafetyitemswereinstalledtoprotectusersandservicetechnicians
frominjury.Thisguideaddressesonlythoseitems.Youshouldusegoodjudgmenttoidentifypotential
safetyhazardsduetoattachmentofnon- ThinkPadfeaturesoroptionsnotcoveredbythisinspectionguide.
Ifanyunsafeconditionsarepresent,youmustdeterminehowserioustheapparenthazardcouldbeand
whetheryoucancontinuewithoutrstcorrectingtheproblem.
Considertheseconditionsandthesafetyhazardstheypresent:
•Electricalhazards,especiallyprimarypower(primaryvoltageontheframecancauseseriousorfatal
electricalshock)
•Explosivehazards,suchasadamagedCRTfaceorabulgingcapacitor
•Mechanicalhazards,suchaslooseormissinghardware
Todeterminewhetherthereareanypotentiallyunsafeconditions,usethefollowingchecklistatthebeginning
ofeveryservicetask.Beginthecheckswiththepoweroff,andthepowercorddisconnected.
Checklist:
1.Checkexteriorcoversfordamage(loose,broken,orsharpedges).
2.T urnoffthecomputer.Disconnectthepowercord.
3.Checkthepowercordfor:
a.Athird-wiregroundconnectoringoodcondition.Useametertomeasurethird-wireground
continuityfor0.1ohmorlessbetweentheexternalgroundpinandtheframeground.
b.Thepowercordshouldbetheauthorizedtypespeciedforyourcomputer.Goto:
http://www.lenovo.com/serviceparts-lookup.
c.Insulationmustnotbefrayedorworn.
4.Checkforcrackedorbulgingbatteries.
5.Removethecover.
6.Checkforanyobviousnon-ThinkPadalterations.Usegoodjudgmentastothesafetyofany
non-ThinkPadalterations.
7.Checkinsidetheunitforanyobviousunsafeconditions,suchasmetallings,contamination,wateror
otherliquids,orsignsofreorsmokedamage.
8.Checkforworn,frayed,orpinchedcables.
9.Checkthatthepower-supplycoverfasteners(screwsorrivets)havenotbeenremovedortamperedwith.
Handlingdevicesthataresensitivetoelectrostaticdischarge
Anycomputerpartcontainingtransistorsorintegratedcircuits(ICs)shouldbeconsideredsensitiveto
electrostaticdischarge(ESD).ESDdamagecanoccurwhenthereisadifferenceinchargebetweenobjects.
ProtectagainstESDdamagebyequalizingthechargesothatthemachine,thepart,theworkmat,andthe
personhandlingthepartareallatthesamecharge.
Chapter1.Safetyinformation3
Page 10
Notes:
1.Useproduct-specicESDprocedureswhentheyexceedtherequirementsnotedhere.
2.MakesurethattheESDprotectivedevicesyouusehavebeencertied(ISO9000)asfullyeffective.
WhenhandlingESD-sensitiveparts:
•Keepthepartsinprotectivepackagesuntiltheyareinsertedintotheproduct.
•Avoidcontactwithotherpeople.
•Wearagroundedwriststrapagainstyourskintoeliminatestaticonyourbody.
•Preventthepartfromtouchingyourclothing.Mostclothingisinsulativeandretainsachargeevenwhen
youarewearingawriststrap.
•Useagroundedworkmattoprovideastatic-freeworksurface.Thematisespeciallyusefulwhen
handlingESD-sensitivedevices.
•Selectagroundingsystem,suchasthoselistedbelow,toprovideprotectionthatmeetsthespecic
servicerequirement.
Note:TheuseofagroundingsystemtoguardagainstESDdamageisdesirablebutnotnecessary.
–AttachtheESDgroundcliptoanyframeground,groundbraid,orgreen-wireground.
–Whenworkingonadouble-insulatedorbattery-operatedsystem,useanESDcommongroundor
referencepoint.Y oucanusecoaxorconnector-outsideshellsonthesesystems.
–Usetheroundgroundprongoftheacplugonac-operatedcomputers.
Groundingrequirements
Electricalgroundingofthecomputerisrequiredforoperatorsafetyandcorrectsystemfunction.Proper
groundingoftheelectricaloutletcanbeveriedbyacertiedelectrician.
Safetynotices(multilingualtranslations)
Thesafetynoticesinthissectionareprovidedinthefollowinglanguages:
•English
•Arabic
•BrazilianPortuguese
•French
•German
•Hebrew
•Japanese
•Korean
•Spanish
•T raditionalChinese
DANGER
4HardwareMaintenanceManual
Page 11
DANGER
DANGER
DANGER
DANGER
DANGER
DANGER
Chapter1.Safetyinformation5
Page 12
DANGER
6HardwareMaintenanceManual
Page 13
PERIGO
PERIGO
PERIGO
Chapter1.Safetyinformation7
Page 14
PERIGO
PERIGO
PERIGO
PERIGO
PERIGO
8HardwareMaintenanceManual
Page 15

DANGER
DANGER
DANGER
DANGER
DANGER
Chapter1.Safetyinformation9
Page 16
DANGER
DANGER
DANGER
VORSICHT
VORSICHT
10HardwareMaintenanceManual
Page 17
VORSICHT
VORSICHT
VORSICHT
VORSICHT
VORSICHT
VORSICHT
Chapter1.Safetyinformation11
Page 18
12HardwareMaintenanceManual
Page 19
Chapter1.Safetyinformation13
Page 20
14HardwareMaintenanceManual
Page 21
Chapter1.Safetyinformation15
Page 22

16HardwareMaintenanceManual
Page 23
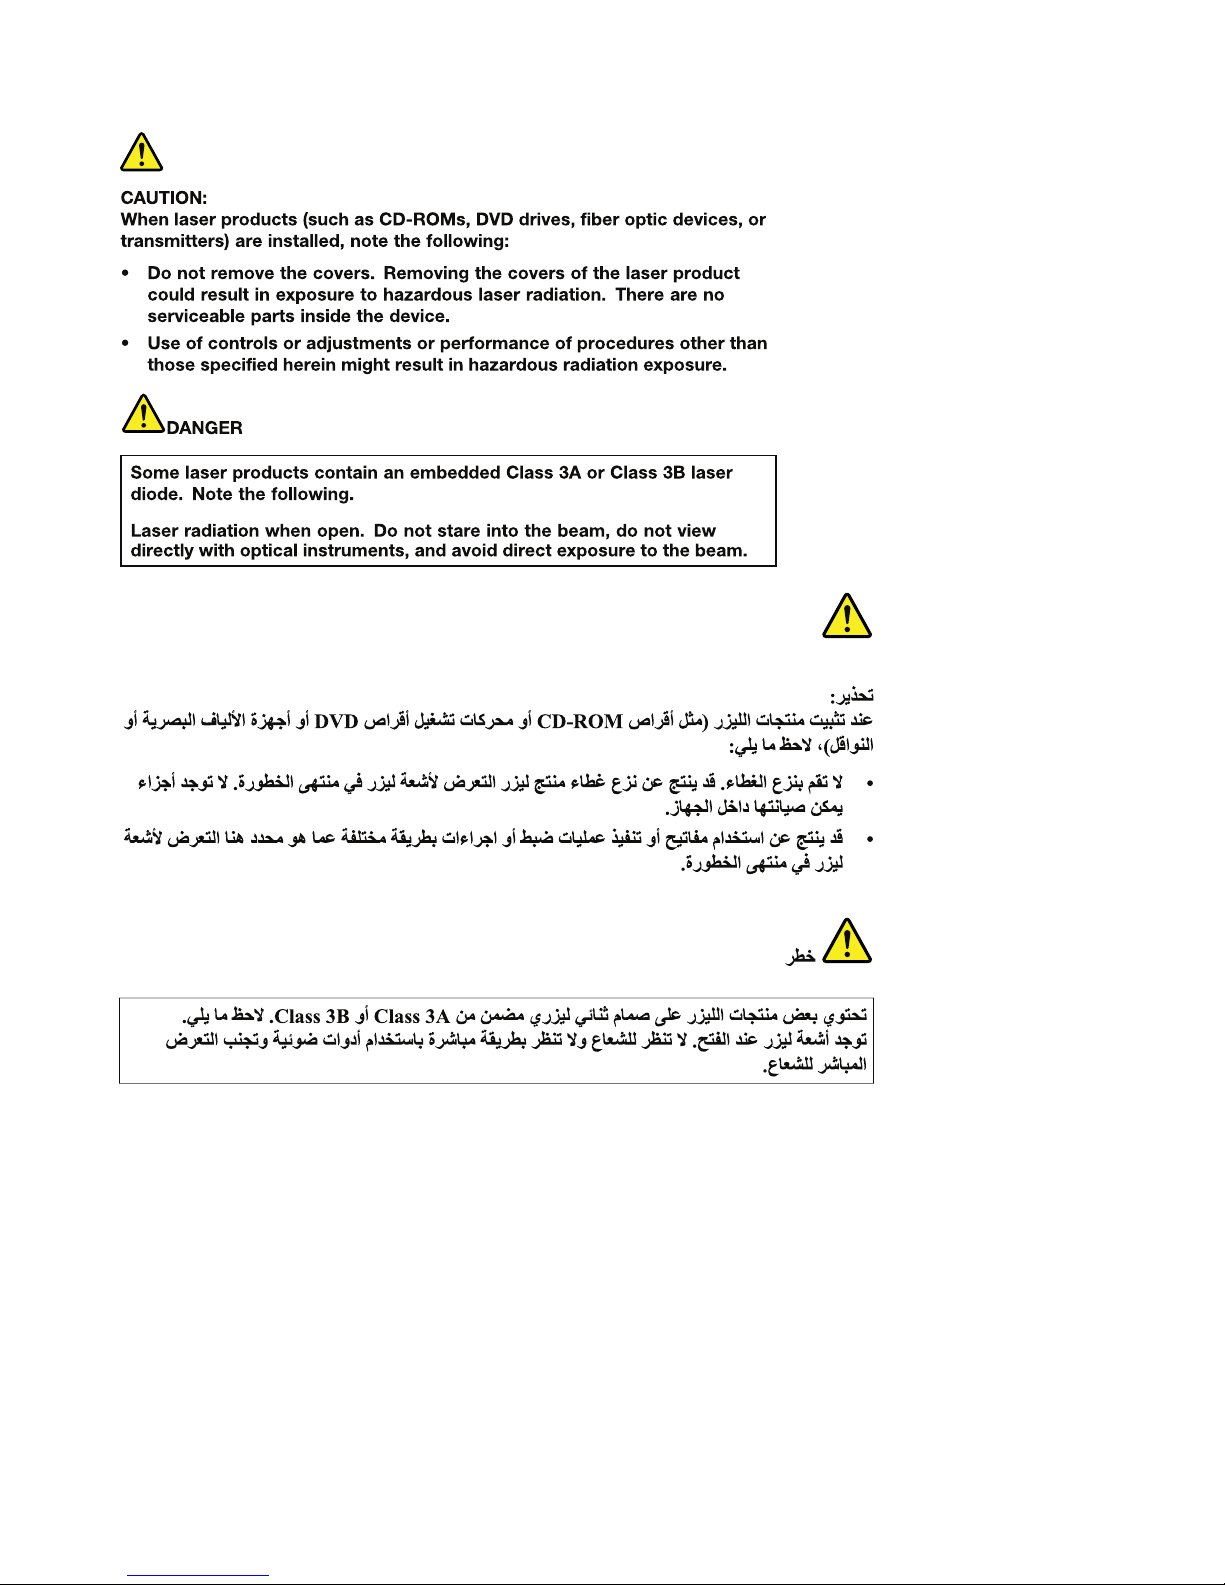
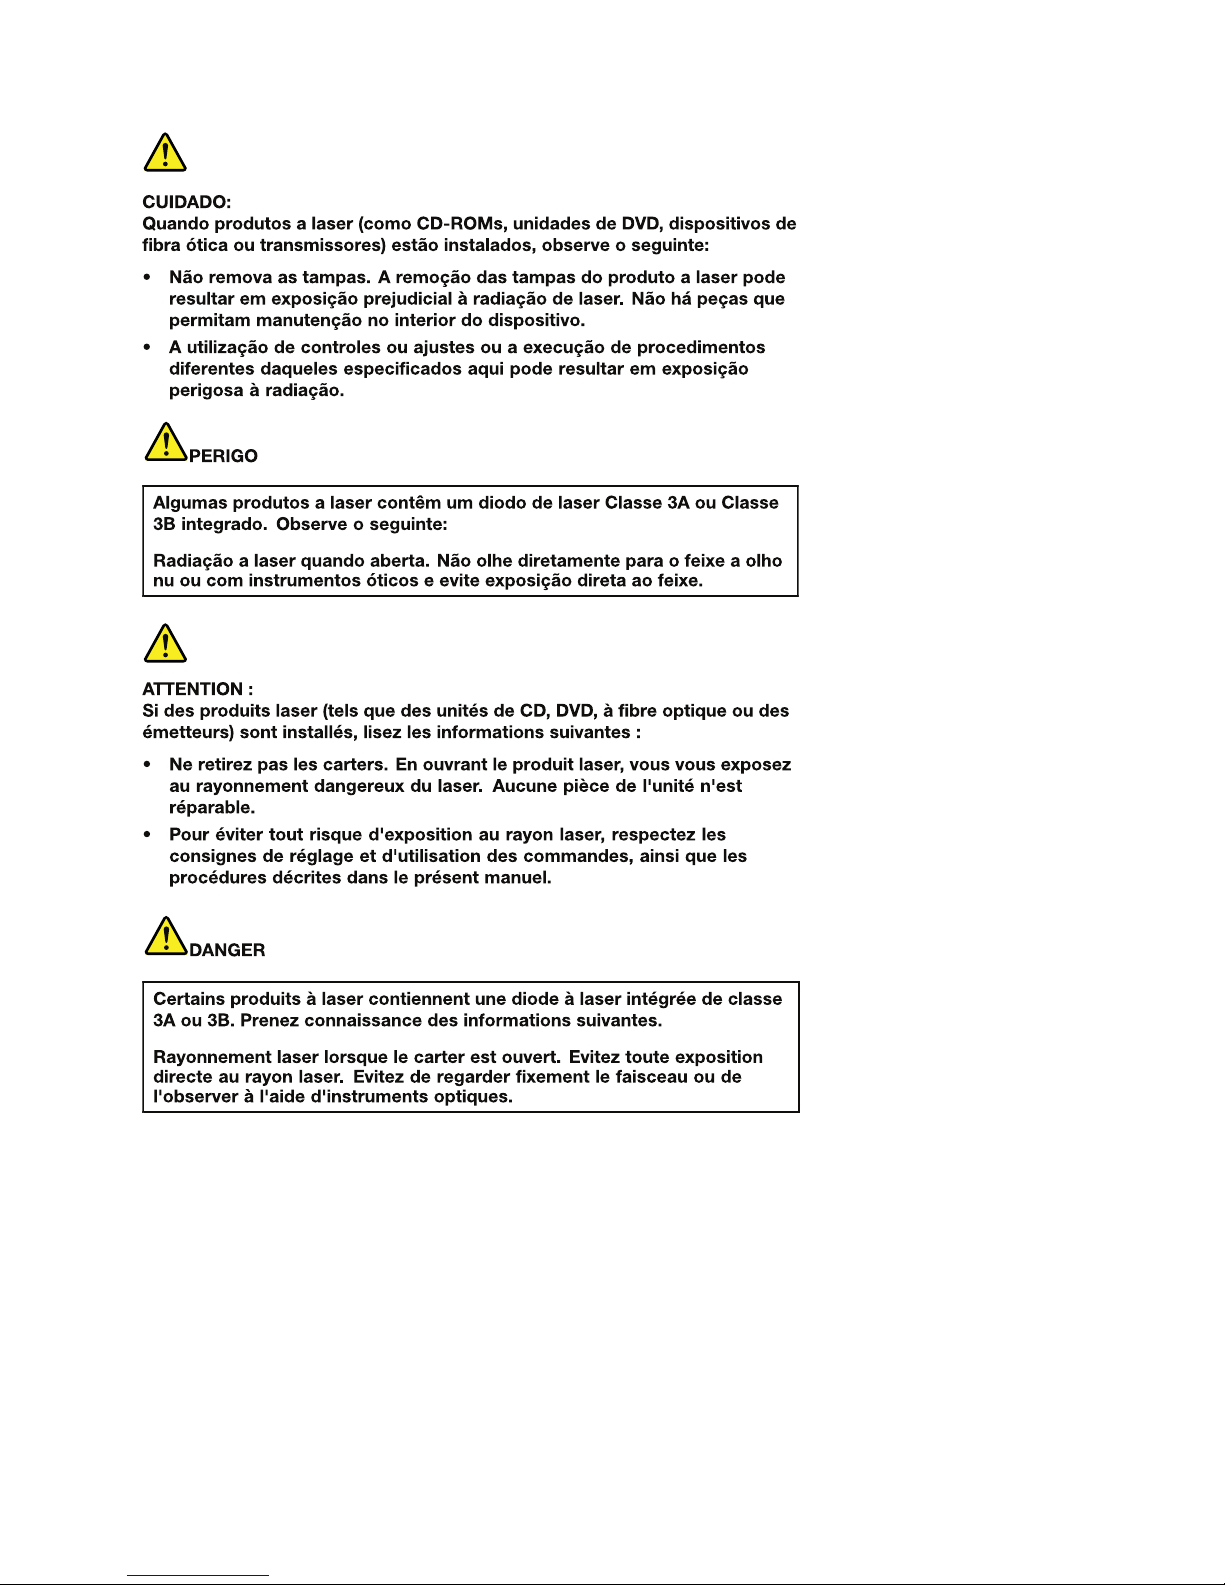
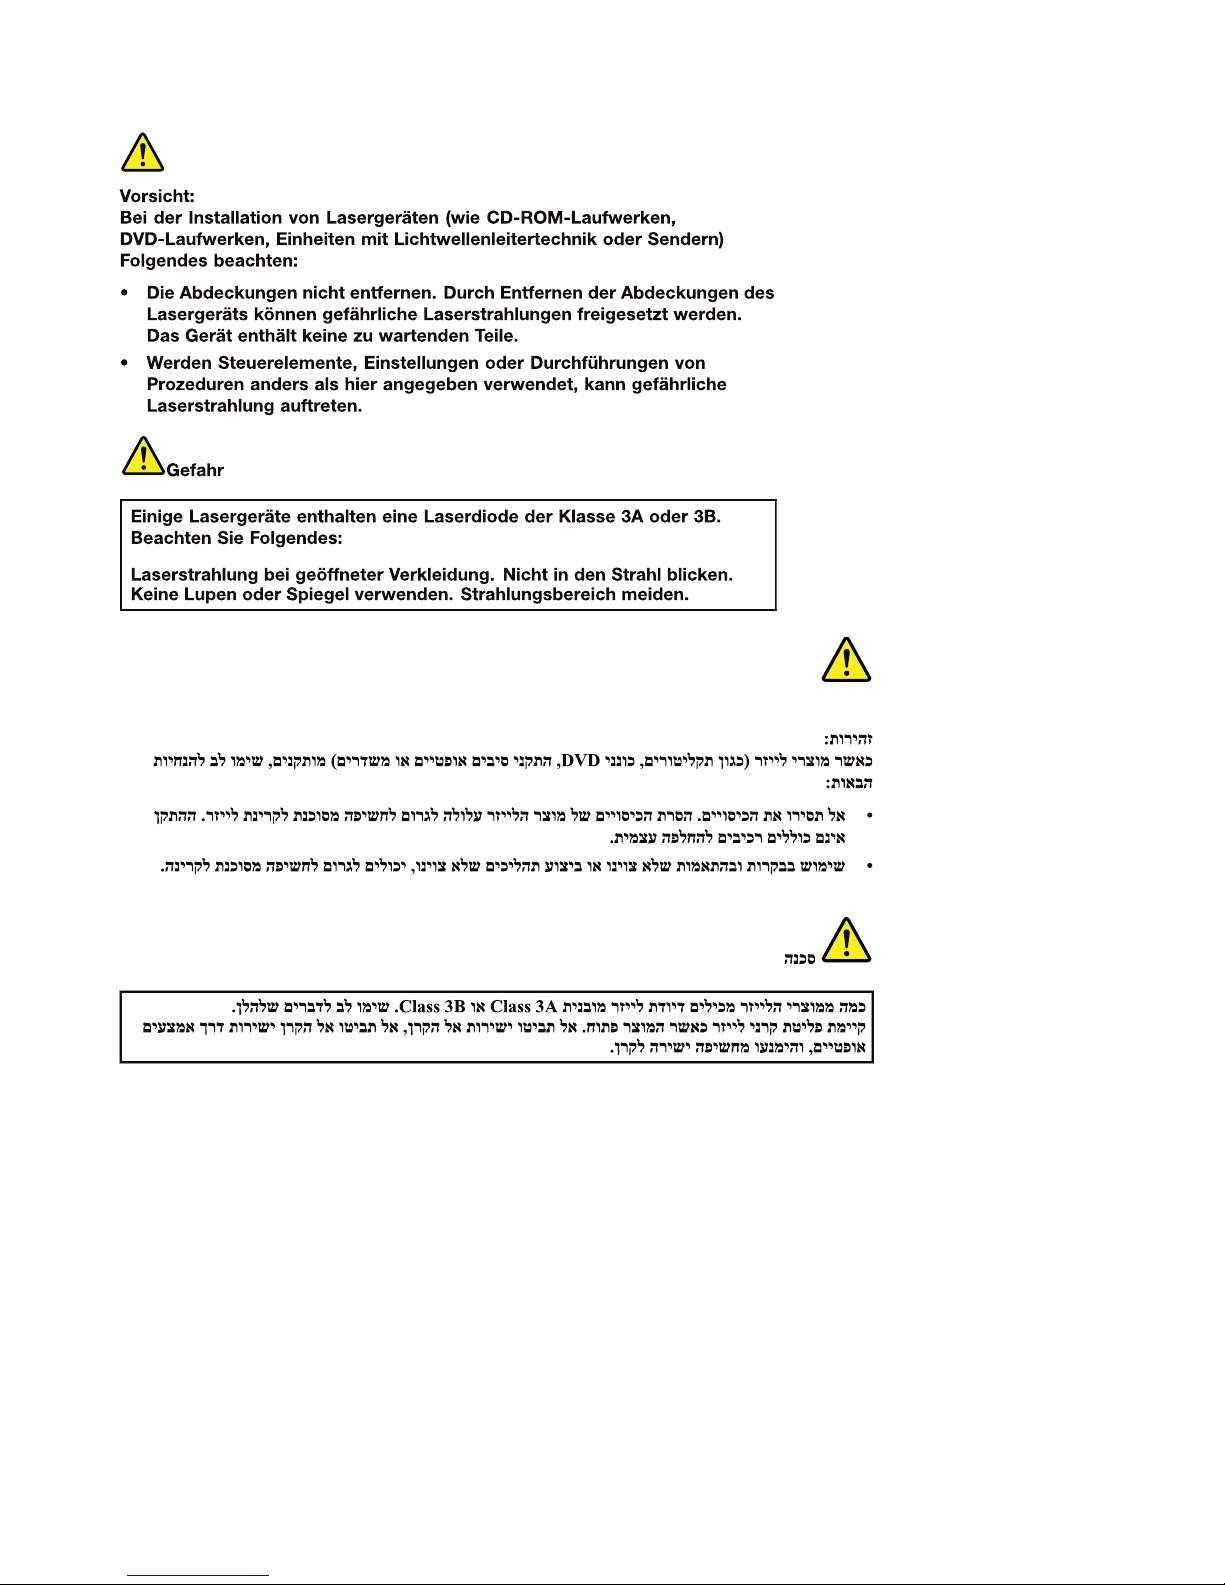
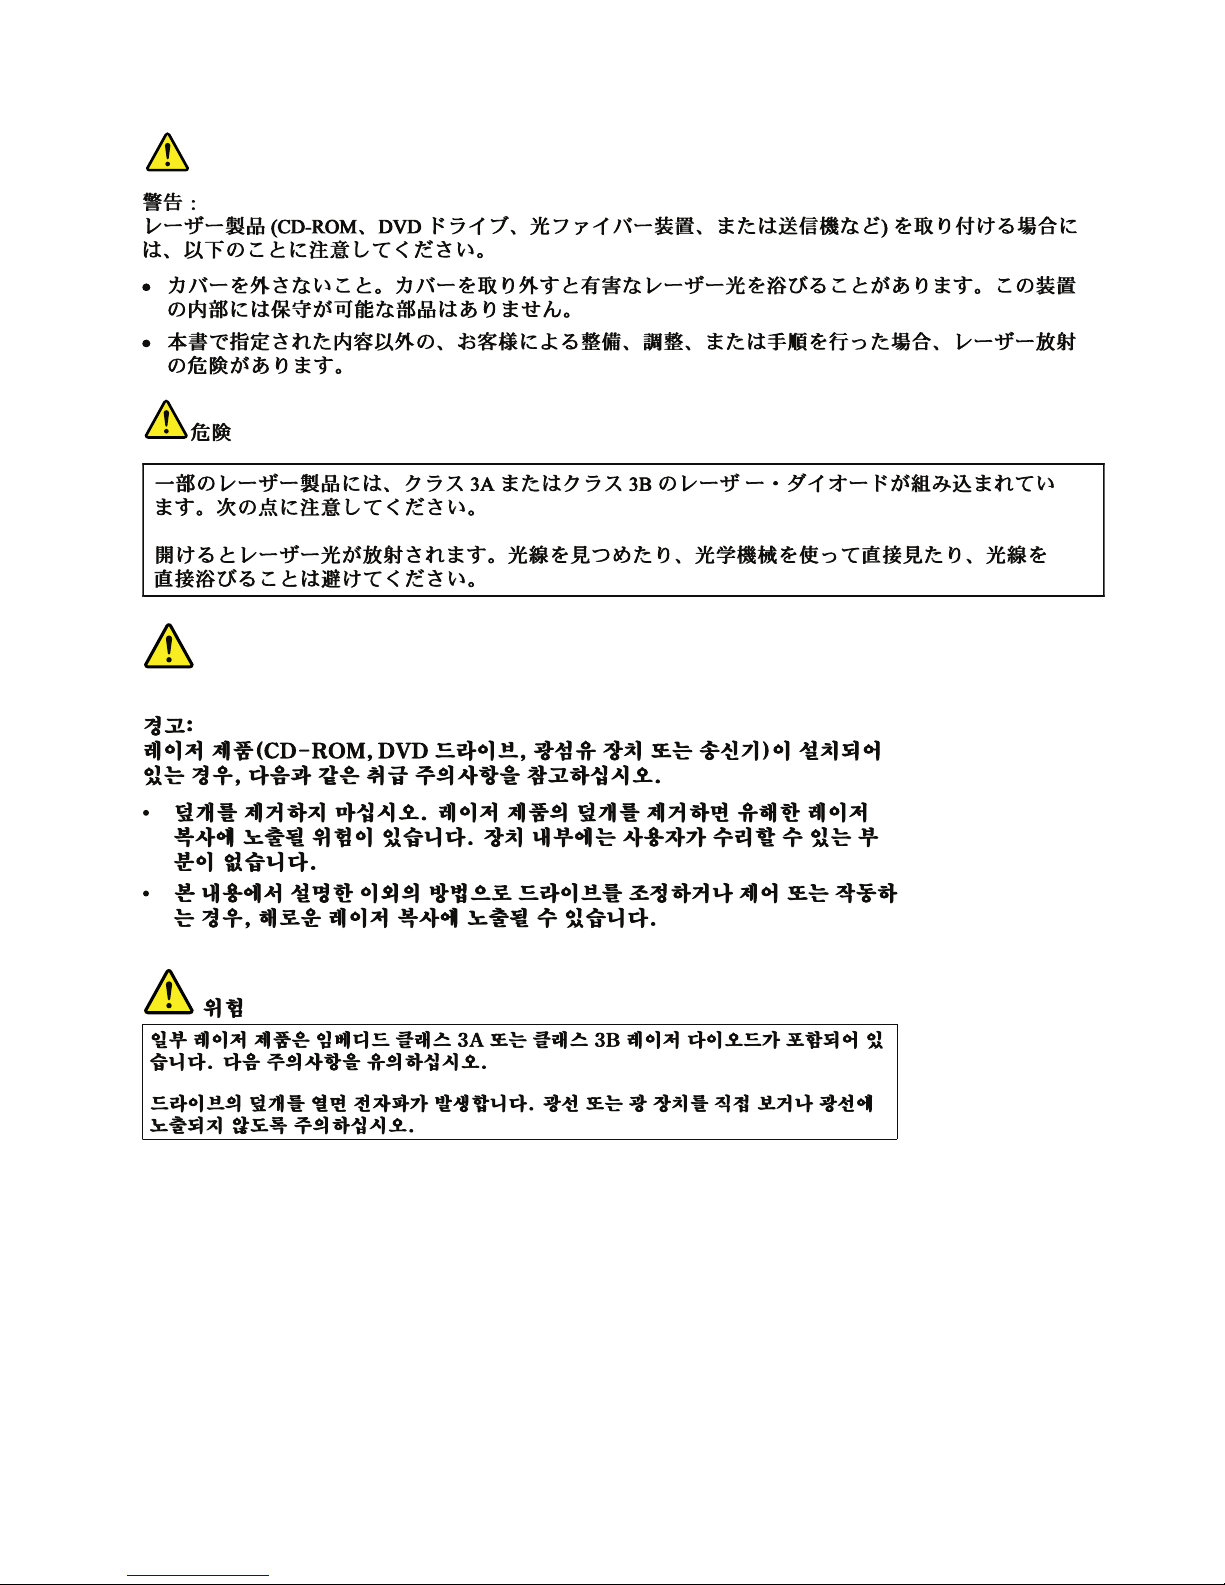
Lasercompliancestatement(multilingualtranslations)
Thelasercompliancestatementsinthissectionareprovidedinthefollowinglanguages:
•English
•Arabic
•BrazilianPortuguese
•French
•German
•Hebrew
•Japanese
•Korean
•Spanish
•T raditionalChinese
Chapter1.Safetyinformation17
Page 24
18HardwareMaintenanceManual
Page 25
Chapter1.Safetyinformation19
Page 26
20HardwareMaintenanceManual
Page 27
Chapter1.Safetyinformation21
Page 28
22HardwareMaintenanceManual
Page 29

Chapter2.Importantserviceinformation
Thischapterpresentsthefollowingimportantserviceinformationthatappliestoallmachinetypessupported
bythismanual:
•“StrategyforreplacingFRUs”onpage23
–“Strategyforreplacingaharddiskdrive”onpage24
–“Importantnoticeforreplacingasystemboard”onpage24
–“Howtouseerrorcodes”onpage24
•“StrategyforreplacingFRUsforCTO,CMV ,andGAVproducts”onpage24
–“Productdenition”onpage24
–“FRUidenticationforCTO,CMV,andGAVproducts”onpage25
Important:
•IfthecomputerisequippedwithbothaharddiskdriveandanmSATAsolidstatedrive,donotusethe
mSATAsolidstatedriveasabootabledevice.ThemSATAsolidstatedriveisdesignedanddevelopedfor
“cache”functionpurposeonly.
•AdvisecustomerstocontacttheLenovo
®
CustomerSupportCenteriftheyneedanyassistancein
obtainingorinstallinganysoftwarexes,drivers,andUEFIBIOSdownloads.T elephonenumbersfor
LenovoSupportareavailableat:
http://www.lenovo.com/support/phone
•SystemdisassemblyandreassemblyvideosthatshowtheFRUremovalorreplacementproceduresfor
theLenovoauthorizedservicetechniciansareavailableat:
http://www.lenovoservicetraining.com/ion/
StrategyforreplacingFRUs
Beforereplacingparts:
Makesurethatallsoftwarexes,drivers,andUEFIBIOSdownloadsareinstalledbeforeyoureplaceany
FRUslistedinthismanual.
Afterasystemboardisreplaced,ensurethatthelatestUEFIBIOSisloadedtothesystemboardbeforeyou
completetheserviceaction.
Todownloadandinstallsoftwarexes,drivers,andUEFIBIOS,dothefollowing:
1.Gotohttp://www.lenovo.com/support.
2.ClickDownloadDrivers&Softwareandthenfollowtheinstructionsonthescreentoreachthe
DownloadDriversandSoftwarepage.
3.Followtheinstructionsonthescreentodownloadandinstallthenecessarysoftware.
UsethefollowingstrategytopreventunnecessaryexpenseforreplacingandservicingFRUs:
•IfyouareinstructedtoreplaceaFRUbutthereplacementdoesnotcorrecttheproblem,reinstallthe
originalFRUbeforeyoucontinue.
•Somecomputershavebothaprocessorboardandasystemboard.Ifyouareinstructedtoreplaceeither
theprocessorboardorthesystemboard,andreplacingoneofthemdoesnotcorrecttheproblem,
reinstallthatboard,andthenreplacetheotherone.
©CopyrightLenovo2012,2013
23
Page 30

•IfanadapteroradeviceconsistsofmorethanoneFRU,anyoftheFRUsmightbethecauseoftheerror.
Beforereplacingtheadapterordevice,removetheFRUs,onebyone,toseeifthesymptomschange.
ReplaceonlytheFRUthatchangedthesymptoms.
Strategyforreplacingaharddiskdrive
Alwaystrytorunalow-levelformatoperationbeforereplacingaharddiskdrive.Thiswillcauseallcustomer
dataontheharddiskdrivetobelost.Besurethatthecustomerhasacurrentbackupofthedatabefore
youperformthistask.
Attention:Thedrivestartupsequenceinthecomputeryouareservicingmighthavebeenchanged.Be
extremelycarefulduringwriteoperationssuchascopying,saving,orformatting.Ifyouselectanincorrect
drive,dataorprogramscanbeoverwritten.
IfthecomputeryouareservicingisshippedwithbothanmSA T Asolid-statedriveandaharddiskdrive,the
mSATAsolid-statedriveisusedforthe“cache”functionandtosupporttheIntel
®
RapidStartT echnology.
UsersarenotrecommendedtoreplacethemSA T Asolid-statedrivebythemselves.Werecommendthat
usersdonotreplacethemSATAsolid-statedrivebythemselves.Otherwise,the“cache”functionwillnot
workandtheIntelRapidStartTechnologycannotbeusedanymore.
Attention:EnsurethatyoupartitionthemSAT Asolid-statedriveafterinstallingitonthecomputeryouare
servicing.Otherwise,themSAT Asolid-statedrivewillnotfunctioncorrectly.Forinstructionsonhowto
partitionanmSATAsolid-statedrive,gotohttp://www.lenovo.com/support/msata-fru.
Importantnoticeforreplacingasystemboard
Somecomponentsmountedonasystemboardareverysensitive.Improperhandlingofasystemboardcan
causedamagetothosecomponents,andmaycauseasystemmalfunction.
Attention:Whenhandlingasystemboard:
•Donotdropasystemboardorapplyanyexcessiveforcetoit.
•Avoidroughhandlingofanykind.
•AvoidbendingasystemboardandhardpushingtopreventcrackingateachBallGridArray(BGA)chipset.
Howtouseerrorcodes
Usetheerrorcodesdisplayedonthescreentodiagnosefailures.Ifmorethanoneerrorcodeisdisplayed,
beginthediagnosiswiththersterrorcode.Whatevercausesthersterrorcodemightalsocausefalse
errorcodes.Ifnoerrorcodeisdisplayed,seewhethertheerrorsymptomislistedinthe“Symptom-to-FRU
Index”section.
StrategyforreplacingFRUsforCTO,CMV,andGAVproducts
Productdenition
DynamicCongureToOrder(CTO)
ThisprovidestheabilityforacustomertocongureaLenovosolutionfromaneSite,andhavethis
congurationsenttofulllment,whereitisbuiltandshippeddirectlytothecustomer.Themachinelabeland
eSupportwillloadtheseproductsasthe4-digitMTand3-digitmodel,wheremodel=“CTO”(Example:
1829-CTO).
24HardwareMaintenanceManual
Page 31

CustomModelVariant(CMV)
ThisisauniquecongurationthathasbeennegotiatedbetweenLenovoandthecustomer.Aunique4-digit
MTand3-digitmodelisprovidedtothecustomertoplaceorders(Example:1829-W15).ACMVisaspecial
bidoffering.Therefore,itisNOTgenerallyannounced.
•TheMTMportionofthemachinelabelisthe4-digitMTand3-digitmodel,wheremodel=“CTO”
(Example:1829-CTO).ThePRODUCTIDportionofthemachinelabelisthe4-digitMTand3-digitCMV
model(Example:1829-W15).
•eSupportwillshowboththeCTOandCMVmachinetypemodels(Example:1829-CTOand1829-W15
willbefoundontheeSupportsite.)
GeneralAnnounceVariant(GAV)
Thisisastandardmodel(xedconguration).GAVsareannouncedandofferedtoallcustomers.TheMTM
portionofthemachinelabelisa4-digitMTand3-digitmodel,wheremodel=a“xedpartnumber”,not
“CTO”(Example:1829-F1U).Also,eSupportwilllisttheseproductsunderthesamexedmodelnumber.
FRUidenticationforCTO,CMV,andGAVproducts
UseLenovoeSupporttoidentifymajorFRUs,FRUpartnumbers,andFRUdescriptionsforCTO,CMV,and
GAVproductsatanMT-serialnumberlevel.ExamplesofmajorFRUsareharddiskdrive,systemboard,
liquidcrystaldisplay(LCD),andmemorymodule.AllCTOandCMVproductsareloadedunderthe4-digit
MTand3-digitmodel,wheremodel=“CTO”(example:1829-CTO).GAVsareloadedunderthe4-digitMT
and3-digitmodel,wheremodel=a“xedpartnumber”,not“CTO”(example:1829-F1U).
ToidentifythemajorFRUsforaproduct,dothefollowing:
1.Goto:
http://www.lenovo.com/support
2.ClickWarranty&Services.
3.ClickCheckWarrantyStatus.
4.OntheWarrantyStatusLookuppage,clickPartsLookup.
5.T ypeyourmachinetypeandserialnumber,andthenclickSubmit.
eSupportalsocanbeusedtoviewthegeneralFRUlistforaproduct.
TogetthegeneralFRUlistforaproduct,dothefollowing:
1.Goto:
http://www.lenovo.com/support
2.ClickParts&Accessories.
3.Followtheinstructionsonthescreentoselectproduct.
4.ClickProductsandPartsDetail.
5.OnthePRODUCTANDPARTSDETAILpage,clickthePartsDetailtabtoviewtheFRUlist.
Note:TheFRUlistisagenerallistofcomponentsanddoesnotcontainspecicmodelinformation.
Chapter2.Importantserviceinformation25
Page 32

26HardwareMaintenanceManual
Page 33

Chapter3.Generalcheckout
Thischapterpresentsfollowinginformation:
•“Whattodorst”onpage27
•“Checkoutguide”onpage28
–“LenovoSolutionCenter”onpage28
–“Quicktestprograms”onpage28
–“UEFIdiagnosticprogram”onpage29
–“Bootablediagnosticprograms”onpage29
•“Powersystemcheckout”onpage30
Somedescriptionsinthischaptermightnotapplytoyourparticularcomputer.
Beforeyougotothecheckoutguide,besuretoreadthefollowingimportantnotes.
Importantnotes:
•Onlycertiedtrainedpersonnelshouldservicethecomputer .
•BeforereplacinganyFRU,readtheentirepageonremovingandreplacingFRUs.
•WhenyoureplaceFRUs,itisrecommendedtousenewnylon-coatedscrews.
•Beextremelycarefulduringsuchwriteoperationsascopying,saving,orformatting.Drivesinthecomputer
thatyouareservicingsequencemighthavebeenaltered.Ifyouselectanincorrectdrive,dataorprograms
mightbeoverwritten.
•ReplaceaFRUonlywithanotherFRUofthecorrectmodel.WhenyoureplaceaFRU,makesurethatthemodel
ofthemachineandtheFRUpartnumberarecorrect.
•AFRUshouldnotbereplacedbecauseofasingle,unreproduciblefailure.Singlefailurescanoccurfora
varietyofreasonsthathavenothingtodowithahardwaredefect,suchascosmicradiation,electrostaticdischarge,
orsoftwareerrors.ConsiderreplacingaFRUonlywhenaproblemrecurs.IfyoususpectthataFRUisdefective,
cleartheerrorlogandrunthetestagain.Iftheerrordoesnotrecur,donotreplacetheFRU.
•BecarefulnottoreplaceanondefectiveFRU.
Whattodorst
WhenyoureturnaFRU,youmustincludethefollowinginformationinthepartsexchangeformorparts
returnformthatyouattachtoit:
1.Nameandphonenumberofservicetechnician
2.Dateofservice
3.Dateonwhichthemachinefailed
4.Dateofpurchase
5.Failuresymptoms,errorcodesappearingonthedisplay,andbeepsymptoms
6.ProcedureindexandpagenumberinwhichthefailingFRUwasdetected
7.FailingFRUnameandpartnumber
8.Machinetype,modelnumber,andserialnumber
9.Customer'snameandaddress
Note:Duringthewarrantyperiod,thecustomermayberesponsibleforrepaircostsifthecomputerdamage
wascausedbymisuse,accident,modication,unsuitablephysicaloroperatingenvironment,orimproper
maintenancebythecustomer.Followingisalistofsomecommonitemsthatarenotcoveredunderwarranty
andsomesymptomsthatmightindicatethatthesystemwassubjecttostressbeyondnormaluse.
Beforecheckingproblemswiththecomputer,determinewhetherthedamageiscoveredunderthewarranty
byreferringtothefollowinglist:
©CopyrightLenovo2012,2013
27
Page 34

Thefollowingarenotcoveredunderwarranty:
•LCDpanelcrackedfromtheapplicationofexcessiveforceorfrombeingdropped
•Scratched(cosmetic)parts
•Distortion,deformation,ordiscolorationofthecosmeticparts
•Plasticparts,latches,pins,orconnectorsthathavebeencrackedorbrokenbyexcessiveforce
•Damagecausedbyliquidspilledintothesystem
•DamagecausedbytheimproperinsertionofaPCCardortheinstallationofanincompatiblecard
•Improperdiscinsertionoruseofanopticaldrive
•Diskettedrivedamagecausedbypressureonthediskettedrivecover,foreignmaterialinthedrive,
ortheinsertionofadiskettewithmultiplelabels
•Damagedorbentdisketteejectbutton
•Fusesblownbyattachmentofanonsupporteddevice
•Forgottencomputerpassword(makingthecomputerunusable)
•Stickykeyscausedbyspillingaliquidontothekeyboard
•Useofanincorrectacpoweradapteronlaptopproducts
Thefollowingsymptomsmightindicatedamagecausedbynonwarrantedactivities:
•Missingpartsmightbeasymptomofunauthorizedserviceormodication.
•Checkforobviousdamagetoaharddiskdrive.Ifthespindleofaharddiskdrivebecomesnoisy,thehard
diskdrivemighthavebeendroppedorsubjecttoexcessiveforce.
Checkoutguide
UsethefollowingproceduresasaguideinidentifyingandcorrectingproblemswiththeThinkPadnotebook
computer.
Note:ThediagnostictestsareintendedtotestonlyThinkPadproducts.Theuseofnon-ThinkPadproducts,
prototypecards,ormodiedoptionscanleadtofalseindicationsoferrorsandinvalidsystemresponses.
1.Identifythefailingsymptomsinasmuchdetailaspossible.
2.Verifythesymptoms.T rytore-createthefailurebyrunningthediagnostictestorbyrepeatingthe
operation.
LenovoSolutionCenter
TheLenovoSolutionCenterprogramenablesyoutotroubleshootandresolvecomputerproblems.It
combinesdiagnostictests,systeminformationcollection,securitystatus,andsupportinformation,along
withhintsandtipsformaximumsystemperformance.
TheLenovoSolutionCenterprogramisavailablefordownloadathttp://www.lenovo.com/diags.
ToruntheLenovoSolutionCenterprogram,gotoControlPanelandclickSystemandSecurity➙Lenovo-
SystemHealthandDiagnostics,andthenfollowtheinstructionsonthescreen.
FormoreinformationabouttheLenovoSolutionCenterprogram,refertothehelpinformationsystem
oftheprogram.
Quicktestprograms
Youcanrunquicktestprogramstotroubleshootandresolvecomputerproblems,especiallywhenthe
computerdoesnothavetheLenovoSolutionCenterprograminstalled.
Lenovoprovidesthefollowingquicktestprograms:
•LenovoHardDriveQuickTest:Usethisprogramtotroubleshootandresolveinternalstorageproblems.
•LenovoMemoryQuickTest:Usethisprogramtotroubleshootandresolvememorymoduleproblems.
28HardwareMaintenanceManual
Page 35

Thequicktestprogramsareapplicableonthefollowingoperatingsystems:
•Microsoft
®
Windows
®
8
•MicrosoftWindows7
•MicrosoftWindowsXP
•MicrosoftWindowsServer
®
2003
•MicrosoftWindowsServer2008
Todownloadandinstallaquicktestprogram,gotohttp://www.lenovo.com/diags,andfollowtheinstructions
ontheWebsite.
Torunatestusingaquicktestprogram,dothefollowing:
1.GototheC:\SWTOOLS\ldiagdirectory.
2.Double-clickthegui_lsc_lite.exele.
3.WhentheUserAccountControlwindowopens,clickYes.
4.Selectthedeviceclasstobetested.
5.Selectthedevicestobetested.
6.Selectthetesttobeperformed.
7.Followtheinstructionsonthescreentostartthetest.Whenaproblemisdetected,information
messagesaredisplayed.Refertothemessagestotroubleshoottheproblem.
UEFIdiagnosticprogram
AUEFIdiagnosticprogramispreinstalledonthecomputer.Itenablesyoutotestmemorymodulesand
internalstoragedevices,viewsysteminformation,andcheckandrecoverbadsectorsoninternalstorage
devices.
ToruntheUEFIdiagnosticprogram,dothefollowing:
1.T urnonthecomputer.Ifthecomputercannotbeturnedon,goto“Powersystemcheckout”onpage30,
andcheckthepowersources.Ifanerrorcodeisdisplayed,goto“Symptom-to-FRUindex”onpage39
forerrorcodedescriptionsandtroubleshootinghints.
2.WhentheThinkPadlogoisdisplayed,repeatedlypressandreleasetheF10key.Themainscreenofthe
UEFIdiagnosticprogramisdisplayed.
3.Followtheinstructionsonthescreentousetheprogram.
Theoptionsonthemainscreenareasfollows:
Table1.ItemsonthemainscreenoftheUEFIdiagnosticprogram
TestsTools
•QuickMemoryT est
•QuickStorageDeviceTest
•ExitApplication
•SystemInformation
•RecoverBadSectorsT ool
Bootablediagnosticprograms
IfthecomputeryouareservicingisnotinstalledwiththeUEFIdiagnosticprogram,youcandownloada
bootablediagnosticprogramfromtheLenovoSupportWebsite.Thebootablediagnosticprogramsenable
youtotestcomputermemoryandinternalstoragedevices,viewsysteminformation,andcheckandrecover
theinternalstoragedevices.T ousethebootablediagnosticprograms,youcancreateabootablediagnostic
mediumonaUSBdeviceorCD.
Chapter3.Generalcheckout29
Page 36

Tocreateabootablediagnosticmedium,dothefollowing:
1.Gotohttp://www.lenovo.com/diags.
2.ClickLenovoBootableDiagnostics.
3.FollowtheinstructionsontheWebsitetocreateabootablediagnosticmediumonaUSBdeviceorCD.
Tousethediagnosticmediumyouhavecreated,dooneofthefollowing:
•IfyouhavecreatedthebootablediagnosticmediumonaUSBdevice,dothefollowing:
1.AttachtheUSBdevicetothecomputer.
2.T urnonthecomputer.Ifthecomputercannotbeturnedon,goto“Powersystemcheckout”onpage
30,andcheckthepowersources.Ifanerrorcodeisdisplayed,goto“Symptom-to-FRUindex”on
page39forerrorcodedescriptionsandtroubleshootinghints.
3.WhentheThinkPadlogoisdisplayed,repeatedlypressandreleasetheF12key.WhentheBoot
Menuwindowopens,releasetheF12key.
4.UsethearrowkeystoselectUSBHDDandthenpressEnter.Thediagnosticprogramwillbe
launchedautomatically.
5.Followtheinstructionsonthescreentousethediagnosticprogram.
•IfyouhavecreatedthebootablediagnosticmediumonaCD,dothefollowing:
1.T urnonthecomputer.Ifthecomputercannotbeturnedon,goto“Powersystemcheckout”onpage
30
,andcheckthepowersources.Ifanerrorcodeisdisplayed,goto“Symptom-to-FRUindex”on
page39forerrorcodedescriptionsandtroubleshootinghints.
2.InserttheCDintotheopticaldrive.
3.Restartthecomputer.
4.WhentheThinkPadlogoisdisplayed,repeatedlypressandreleasetheF12key.WhentheBoot
Menuwindowopens,releasetheF12key.
5.UsethearrowkeystoselectA T APICDx(x:0,1,...)andthenpressEnter.Thediagnosticprogram
willbelaunchedautomatically.
6.Followtheinstructionsonthescreentousethediagnosticprogram.
Powersystemcheckout
Toverifyasymptom,dothefollowing:
1.T urnoffthecomputer.
2.Removethebatterypack.
3.Connecttheacpoweradapter.
4.Checkthatpowerissuppliedwhenyouturnonthecomputer.
5.T urnoffthecomputer.
6.Disconnecttheacpoweradapterandinstallthechargedbatterypack.
7.Checkthatthebatterypacksuppliespowerwhenyouturnonthecomputer.
Ifyoususpectapowerproblem,seetheappropriateoneofthefollowingpowersupplycheckouts:
•“Checkingtheacpoweradapter”onpage30
•“Checkingoperationalcharging”onpage31
•“Checkingthebatterypack”onpage31
•“Checkingthebackupbattery”onpage32
Checkingtheacpoweradapter
Ifyoucomputerfailsonlywhentheacpoweradapterisused,usetheinstructionsinthistopic.
30HardwareMaintenanceManual
Page 37
•Ifthepower-onindicatordoesnotturnon,checkthepowercordoftheacpoweradapterforcorrect
continuityandinstallation.
•Ifthecomputerdoesnotchargeduringoperation,goto“Checkingoperationalcharging”onpage31.
Tochecktheacpoweradapter,dothefollowing:
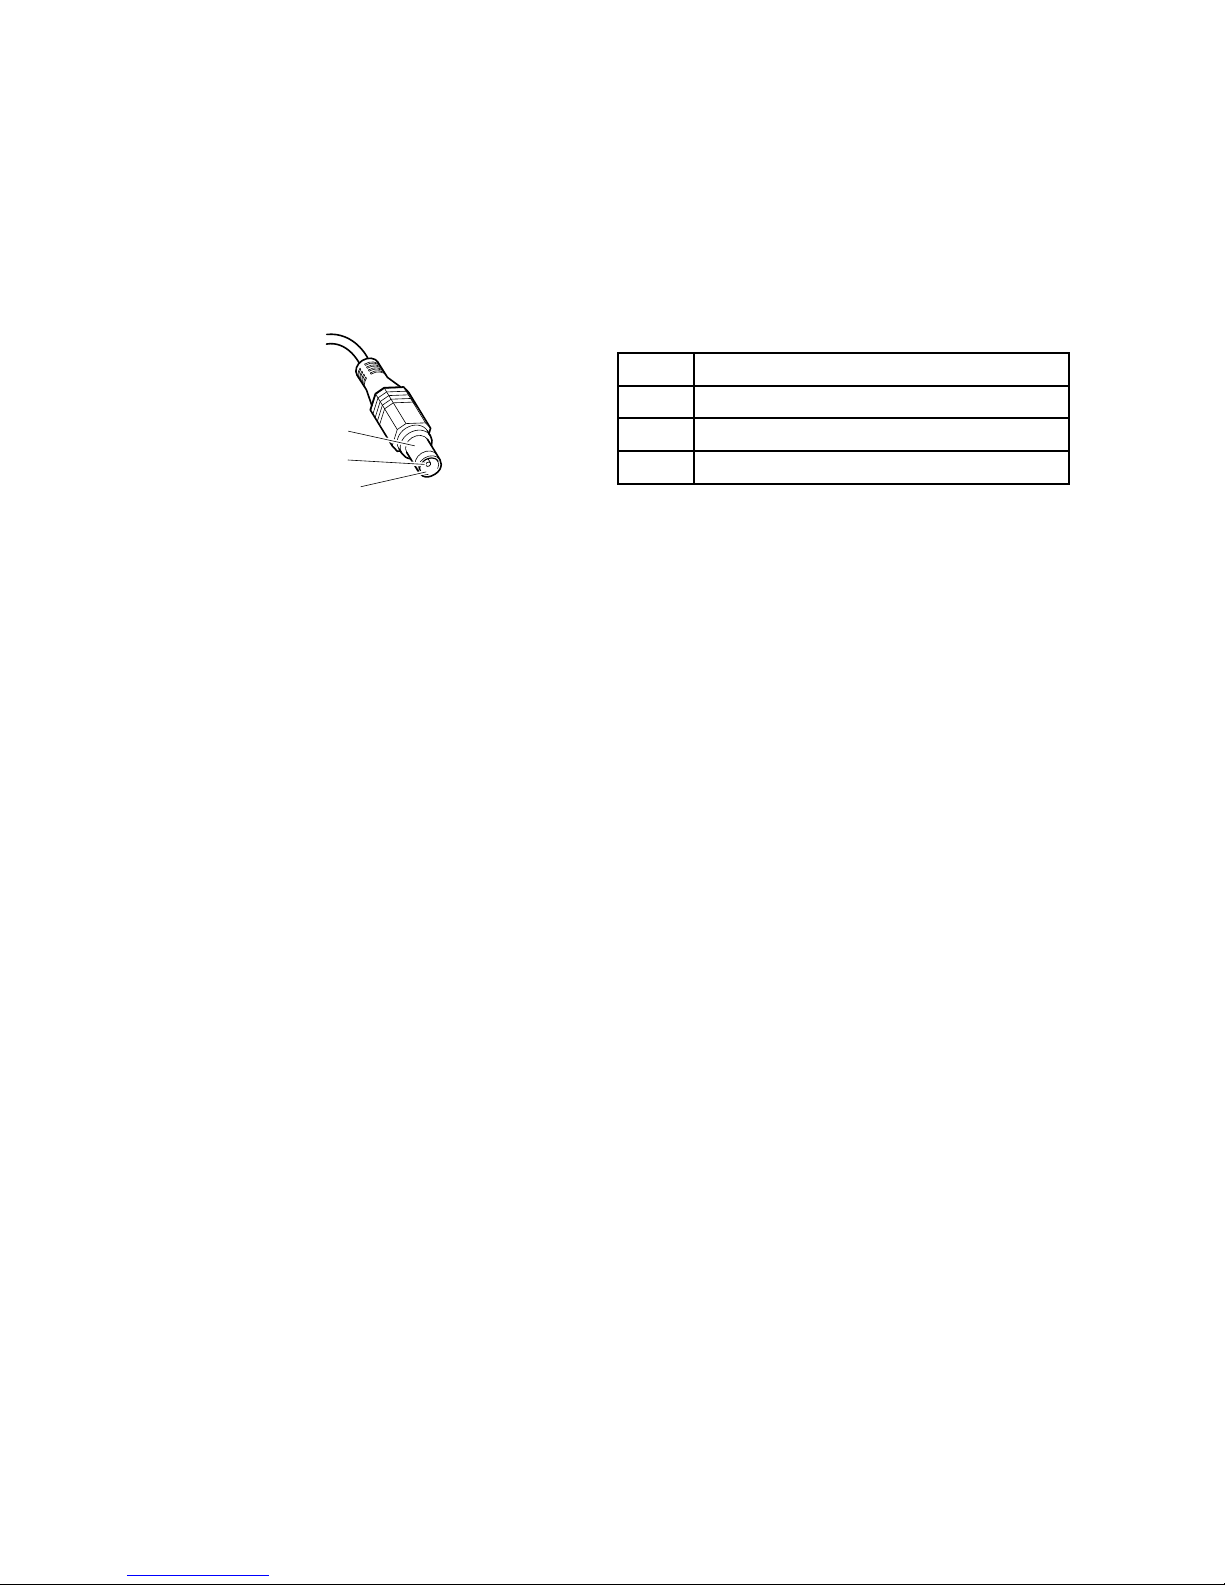
1.Unplugtheacpoweradaptercablefromthecomputer.
2.Measuretheoutputvoltageattheplugoftheacpoweradaptercable.Seethefollowinggure:
Pin
Voltage(Vdc)
1+20
20
3
Ground
1
2
3
(20V)
Note:Outputvoltageacrosspin2oftheacpoweradaptermightdifferfromtheoneyouareservicing.
3.Ifthevoltageisnotcorrect,replacetheacpoweradapter.
4.Ifthevoltageisacceptable,replacethesystemboard.
Note:Noisefromtheacpoweradapterdoesnotalwaysindicateadefect.
Checkingoperationalcharging
Tocheckwhetherthebatterychargescorrectlyduringoperation,useadischargedbatterypackorabattery
packthathaslessthan50%ofthetotalpowerremainingwheninstalledinthecomputer.
Performoperationalcharging.Ifthebatterystatusindicatororicondoesnotturnon,removethebattery
packandletitreturntoroomtemperature.Reinstallthebatterypack.Ifthechargeindicatororiconstilldoes
notturnon,replacethebatterypack.
Ifthechargeindicatorstilldoesnotturnon,replacethesystemboard.Thenreinstallthebatterypack.Ifitis
stillnotcharged,gotothenexttopic.
Checkingthebatterypack
ThebatterystatusiconintheWindowsnoticationareadisplaysthepercentageofbatterypowerremaining.
Tocheckfordetailedbatterystatusinformation,dothefollowing:
•ForWindows7:OpenthePowerManagerprogramandclicktheBatterytab.
•ForWindows8:OpentheLenovoSupportprogramandclickBatteryHealth,oropentheLenovo
SettingsprogramandclickPower.
Note:Ifthebatterypackbecomeshot,itmaynotbeabletocharge.Removeitfromthecomputerandleave
itatroomtemperatureforawhile.Afteritcoolsdown,reinstallandrechargeit.
Tocheckthebatterypack,dothefollowing:
1.Poweroffthecomputer.
2.Removethebatterypackandmeasurethevoltagebetweenbatteryterminals1(+)and7(-).Seethe
followinggure:
Chapter3.Generalcheckout31
Page 38
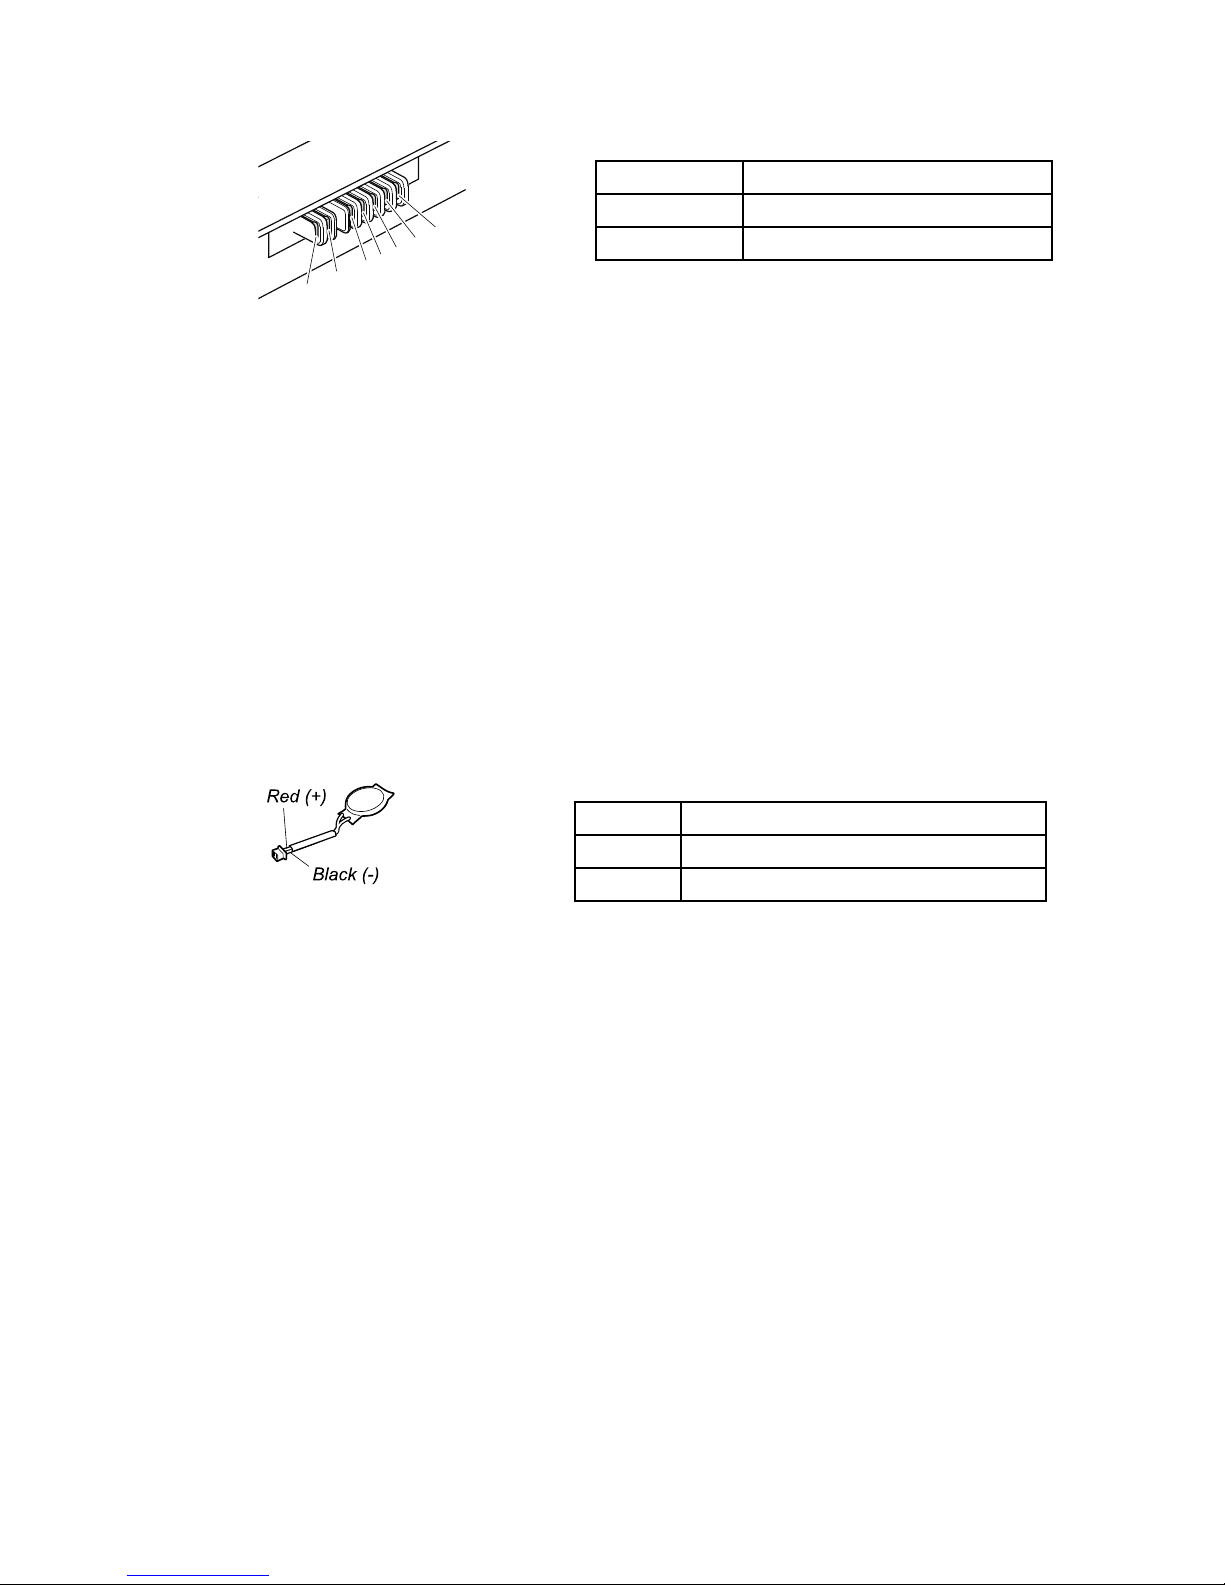
Terminal
Voltage(Vdc)
1+0to+12.6
7
Ground(-)
1(+)
2(+)
3
4
5
6(-)
7(-)
3.Ifthevoltageislessthan+11.0Vdc,thebatterypackhasbeendischarged.
Note:Rechargingwilltakeatleast3hours,eveniftheindicatordoesnotturnon.
Ifthevoltageisstilllessthan+11.0Vdcafterrecharging,replacethebattery.
4.Ifthevoltageismorethan+11.0Vdc,measuretheresistancebetweenbatteryterminals5and7.
Theresistancemustbe4to30KΩ.Iftheresistanceisnotcorrect,replacethebatterypack.Ifthe
resistanceiscorrect,replacethesystemboard.
Checkingthebackupbattery
Dothefollowing:
1.Poweroffthecomputer,andunplugtheacpoweradapterfromit.
2.T urnthecomputerupsidedown.
3.Removethebatterypack(see“1010Batterypack”onpage62).
4.Removethebackupbattery(see“1090Backupbattery”onpage73).
5.Measurethevoltageofthebackupbattery.Seethefollowinggure.
Wire
Voltage(Vdc)
Red+2.5to+3.2
Black
Ground
•Ifthevoltageiscorrect,replacethesystemboard.
•Ifthevoltageisnotcorrect,replacethebackupbattery.
•Ifthebackupbatterydischargesquicklyafterreplacement,replacethesystemboard.
32HardwareMaintenanceManual
Page 39

Chapter4.Relatedserviceinformation
Thischapterpresentsfollowinginformation:
•“RestoringthefactorycontentsbyusingtheproductRecoveryDiscSet”onpage33
•“RecoveryoverviewfortheWindows8operatingsystem”onpage34
•“Passwords”onpage36
•“Powermanagement”onpage38
•“Symptom-to-FRUindex”onpage39
ServiceWebsite:
Whenthelatestmaintenancedisketteandthesystemprogramservicediskettebecomeavailable,they
willbepostedonhttp://www.lenovo.com/support.
RestoringthefactorycontentsbyusingtheproductRecoveryDiscSet
Whenthemainstoragedeviceisreplacedbecauseofafailure,noproductrecoveryprogramisonthenew
drive.Inthiscase,thecustomermustusetheRecoveryDiscSettorecoverthetablet.OrdertheRecovery
DiscSetandthedriveatthesametimesothatthecustomercanrestorethetablettothefactorydefault
settingsbyusingtheRecoveryDiscSetafterthenewdriveisinstalled.Forinformationaboutwhichdiscsto
order,goto:
http://www.lenovo.com/serviceparts-lookup.
Dependingonthemodel,thenumberofrecoverydiscsincludedintheRecoveryDiscSetdiffers.Torestore
thefactorycontentsbyusingtheproductRecoveryDiscSet,dothefollowing:
Notes:
•Duringtherecoveryprocess,alldataonthedrivewillbedeleted.Ifpossible,copyanyimportantdata
orpersonallesthatyouwanttokeepontoremovablemediaoranetworkdrivebeforeyoustartthe
recoveryprocess.
•Therecoveryprocesstakesonetotwohourstocomplete.Thelengthoftimedependsonthemethodyou
use.IfyouuseproductRecoveryDiscSet,therecoveryprocesstakesabouttwohours.
1.ConnectanexternalCD/DVDdrive.
2.MaketheCD/DVDdrivetherststartupdeviceinthestartupsequenceusingthefollowingprocedure:
a.OpentheThinkPadSetupprogramandselectStartup➙Boot.
b.SelecttheCD/DVDdriveasthe1stBootDevice.
3.InsertthebootablerecoverydiscintotheCD/DVDdrive.
4.StartthecomputerfromtheexternalCD/DVDdrive.
5.Whenpromoted,selectyourlanguageandclickNext.
6.Readthelicenseandacceptthetermsandconditions.Thenfollowtheinstructionsonthescreen.
7.IftheRecoveryDiscSetcontainsaSupplementalRecoveryDisc,insertitwhenpromptedandclickY es.
Note:NotallRecoveryDiscSetscomewithaSupplementalRecoveryDisc.IfthereisaSupplemental
RecoveryDisc,itwillbeclearlymarkedassuch.
8.Whenallofthedatahasbeencopiedfromthelastdiscinthesetandhasbeenprocessed,remove
theexternalCD/DVDdriveandrestartthecomputer.Followtheinstructionsonthescreentonish
therecovery.
©CopyrightLenovo2012,2013
33
Page 40

Note:Therestoftherecoveryprocessisfullyautomatedandnoactionfromyouisrequired.The
computerwillrestartintotheMicrosoftWindowsdesktopseveraltimesandyoumightexperience
periodswhennoactivityisapparentonthescreenforseveralminutesatatime.Thisisnormal.
9.Whentherecoveryprocesscompletes,theWelcometoMicrosoftWindowsscreenisdisplayed.Follow
theinstructionsonthescreentocompletetheWindowssetup.
10.AfteryouhavecompletedtheWindowssetup,youmightwanttorestoretheoriginalstartupsequence.
StarttheThinkPadSetupprogramandthenpressF9torestorethedefaultsettings.PressF10tosave
changesandexittheThinkPadSetupprogram.
Note:Afterrestoringadrivetothefactorydefaultsettings,youmightneedtoreinstallsomedevice
drivers.
RecoveryoverviewfortheWindows8operatingsystem
ThissectionprovidesinformationabouttherecoverysolutionsfortheWindows8operatingsystem.
AWindowsrecoveryimageispreinstalledintherecoverypartitiononyourcomputer.TheWindowsrecovery
imageenablesyoutorefreshyourcomputer,orresetyourcomputertothefactorydefaultsettings.
YoucancreaterecoverymediaasbackupsorreplacementfortheWindowsrecoveryimage.Withthe
recoverymedia,youcantroubleshootandxtheproblemsonyourcomputerevenifyoucannotstartthe
Windows8operatingsystem.Itisrecommendedthatyoucreaterecoverymediaasearlyaspossible.For
moreinformation,see“Creatingandusingrecoverymedia”onpage35.
Refreshingyourcomputer
Ifyourcomputerdoesnotperformwellandtheproblemmightbecausedbyarecentlyinstalledprogram,
youcanrefreshyourcomputerwithoutlosingyourpersonallesorchangingyoursettings.
Attention:Ifyourefreshyourcomputer,theprogramsthatcamewithyourcomputerandtheprogramsthat
youinstalledfromWindowsStorewillbereinstalled,butallotherprogramswillberemoved.
Torefreshyourcomputer,dothefollowing:
1.Moveyourcursortothetop-rightorbottom-rightcornerofthescreentodisplaythecharms.Click
Settings➙ChangePCsettings➙General.
2.IntheRefreshyourPCwithoutaffectingyourlessection,clickGetstarted.
3.Followtheinstructionsonthescreentorefreshyourcomputer.
Resettingyourcomputertothefactorydefaultsettings
Ifyouwanttorecycleyourcomputerorjuststartover,youcanresetyourcomputertothefactorydefault
settings.Resettingthecomputerwillreinstalltheoperatingsystem,reinstallalltheprogramsthatcamewith
yourcomputer,andresetallthesettingstothefactorydefaultsettings.
Attention:Ifyouresetthecomputertothefactorydefaultsettings,allyourpersonallesandsettingswillbe
deleted.T oavoiddataloss,makeabackupcopyofallthedatathatyouwanttokeep.
Toresetyourcomputertothefactorydefaultsettings,dothefollowing:
1.Moveyourcursortothetop-rightorbottom-rightcornerofthescreentodisplaythecharms.Click
Settings➙ChangePCsettings➙General.
2.IntheRemoveeverythingandreinstallWindowssection,clickGetstarted.ThenclickNextto
conrmtheoperation.
3.Dependingonyourneeds,dooneofthefollowing:
34HardwareMaintenanceManual
Page 41

•T operformaquickformat,clickJustremovemylestostarttheprocess.Theprocesswilltake
severalminutes.
•T operformacompleteformat,clickFullycleanthedrivetostarttheprocess.Theprocesswill
takeseveralhours.
4.Followtheinstructionsonthescreentoresetyourcomputertothefactorydefaultsettings.
Usingtheadvancedstartupoptions
Withtheadvancedstartupoptions,youcanchangethermwaresettingsofthecomputer,changethe
startupsettingsoftheWindowsoperatingsystem,startthecomputerfromanexternaldevice,orrestorethe
Windowsoperatingsystemfromasystemimage.
Tousetheadvancedstartupoptions,dothefollowing:
1.Moveyourcursortothetop-rightorbottom-rightcornerofthescreentodisplaythecharms.Click
Settings➙ChangePCsettings➙General.
2.IntheAdvancedstartupsection,clickRestartnow➙Troubleshoot➙Advancedoptions.
3.Selectadesiredstartupoption,thenfollowtheinstructionsonthescreen.
RecoveringyouroperatingsystemifWindows8failstostart
TheWindowsrecoveryenvironmentonyourcomputeriscapableofoperatingindependentlyfromthe
Windows8operatingsystem.Thisenablesyoutorecoverorrepairtheoperatingsystemevenifthe
Windows8operatingsystemfailstostart.
Aftertwoconsecutivefailedbootattempts,theWindowsrecoveryenvironmentstartsautomatically.Then
youcanchooserepairandrecoveryoptionsbyfollowingtheinstructionsonthescreen.
Note:Ensurethatyourcomputerisconnectedtoacpowerduringtherecoveryprocess.
Creatingandusingrecoverymedia
YoucancreaterecoverymediaasbackupsfortheWindowsrecoveryenvironmentandtheWindows
recoveryimage.Ifyoucannotstartthecomputer,youcanuserecoverymediatotroubleshootandxthe
problemsonyourcomputer.
Itisrecommendedthatyoucreaterecoverymediaasearlyaspossible.Onceyoucreaterecoverymedia,
keeptheminasafeplaceanddonotusethemtostoreotherdata.
Creatingrecoverymedia
Tocreaterecoverymedia,youneedaUSBdrivewithatleast8GBofstorage.TherequiredUSBcapacity
dependsonthesizeoftherecoveryimage.
Attention:CreatingrecoverymediawilldeleteanythingstoredontheUSBdrive.T oavoiddataloss,makea
backupcopyofallthedatathatyouwanttokeep.
Tocreaterecoverymedia,dothefollowing:
Note:Ensurethatyourcomputerisconnectedtoacpower.
1.Moveyourcursortothetop-rightorbottom-rightcornerofthescreentodisplaythecharms,and
clickSearch.
2.T yperecoveryintheSearcheldandclickSettings.ThenclickCreatearecoverydrive.
3.ClickYesintheUserAccountControlwindowtoallowtheRecoveryMediaCreatorprogramtostart.
Chapter4.Relatedserviceinformation35
Page 42

4.EnsurethatyouselecttheCopytherecoverypartitionfromthePCtotherecoverydrive.option.
ThenclickNext.
Important:IfyoucleartheCopytherecoverypartitionfromthePCtotherecoverydrive.option,
youwillcreaterecoverymediawithouttherecoverypartitioncontent.Youstillcanstartthecomputer
fromtherecoverymedia,butyoumightbeunabletorecoveryourcomputeriftherecoverypartitionon
yourcomputerisdamaged.
5.ConnectaproperUSBdrivethenclickNext.
6.ClickCreateintheRecoveryDrivewindow.Thecreationoftherecoverymediastarts.
7.Whenthecreationoftherecoverymedianishes,dooneofthefollowing:
•T okeeptherecoverypartitiononyourcomputer,clickFinish.
•T odeletetherecoverypartitiononyourcomputer,clickDeletetherecoverypartition.
Attention:Ifyoudeletetherecoverypartitiononyourcomputer,dokeeptherecoverymediaina
safeplace.TheWindowsrecoveryimagewillnotbestoredinyourcomputeranymore,andyouwill
needtherecoverymediatorefreshorresetyourcomputer.
8.RemovetheUSBdrive.Therecoverymediaarecreatedsuccessfully.
Usingrecoverymedia
Ifyoucannotstartyourcomputer,orifyoucannotstarttheWindowsrecoveryimageonyourcomputer,use
recoverymediatorecoveryourcomputer.
Touserecoverymedia,dothefollowing:
Note:Ensurethatyourcomputerisconnectedtoacpower.
1.T urnonorrestartthecomputer.BeforetheWindowsoperatingsystemstarts,repeatedlypresstheF12
key.TheBootMenuwindowopens.
2.Selecttherecoverydriveasthebootdevice.
3.Selectapreferredlanguageandthenselectapreferredkeyboardlayout.
4.ClickTroubleshoottodisplaytheoptionalrecoverysolutions.
5.Selectacorrespondingrecoverysolutionaccordingtoyoursituation.Forexample,selectResetyour
PCifyouwanttoresetyourcomputertothefactorydefaultsettings.
FormoreinformationabouttherecoverysolutionsprovidedbytheWindows8operatingsystem,goto:
http://go.microsoft.com/fwlink/?LinkID=263800
Passwords
AsmanyasthreepasswordsmightbeneededforaThinkPadnotebookcomputer:thepower-onpassword,
theharddiskpassword,andthesupervisorpassword.
Ifanyofthesepasswordshasbeenset,apromptforitwillbedisplayedonthescreenwheneverthe
computeristurnedon.Thecomputerdoesnotstartuntilthepasswordisentered.
Note:Ifonlyasupervisorpasswordisset,thepasswordpromptwillnotbedisplayedwhentheoperating
systemisstarted.
36HardwareMaintenanceManual
Page 43

Power-onpassword
Apower-onpasswordprotectsthesystemfrombeingturnedonbyanunauthorizedperson.Thepassword
mustbeenteredbeforetheoperatingsystemcanbestarted.Forinstructionsonhowtoremovethe
power-onpassword,see“Howtoremovethepower-onpassword”onpage37.
Harddiskpassword
Therearetwoharddiskpasswords:
•Userharddiskpassword-fortheuser
•Masterharddiskpassword-forthesystemadministrator,whocanuseittogetaccesstotheharddisk
eveniftheuserhaschangedtheuserharddiskpassword.
Note:Therearetwomodesfortheharddiskpassword:UseronlyandMaster+User.TheMaster+User
moderequirestwoharddiskpasswords;thesystemadministratorentersbothinthesameoperation.The
systemadministratorthenprovidestheuserharddiskpasswordtothesystemuser.
Attention:Iftheuserharddiskpasswordhasbeenforgotten,checkwhetheramasterharddiskpassword
hasbeenset.Ifamasterharddiskpasswordhasbeenset,itcanbeusedtoaccesstheharddiskdrive.If
nomasterharddiskpasswordisavailable,neitherLenovonorLenovoauthorizedservicetechniciansprovide
anyservicestoreseteithertheuserharddiskpasswordorthemasterharddiskpassword,ortorecoverdata
fromtheharddiskdrive.Theharddiskdrivecanbereplacedforascheduledfee.
Forinstructionsonhowtoremovetheharddiskpassword,see“Howtoremovetheharddiskpassword”
onpage38
.
Supervisorpassword
AsupervisorpasswordprotectsthesysteminformationstoredintheThinkPadSetupprogram.Theuser
mustenterthesupervisorpasswordinordertogetaccesstotheThinkPadSetupprogramandchangethe
systemconguration.
Attention:Ifthesupervisorpasswordhasbeenforgottenandcannotbemadeavailabletotheservice
technician,thereisnoserviceproceduretoresetthepassword.Thesystemboardmustbereplacedfor
ascheduledfee.
Howtoremovethepower-onpassword
Toremovethepower-onpassword,dooneofthefollowing:
Ifnosupervisorpasswordhasbeenset,dothefollowingtoremovethepower-onpassword:
1.T urnoffthecomputer.
2.Removethebatterypack.Forinstructionsonhowtoremovethebatterypack,see“1010Battery
pack”onpage62.
3.Removethebackupbattery.Forinstructionsonhowtoremovethebackupbattery,see“1090Backup
battery”onpage73.
4.T urnonthecomputerandwaituntilthePOSTends.AfterthePOSTends,thepasswordpromptwillnot
bedisplayed.Thepower-onpasswordhasbeenremoved.
5.Reinstallthebackupbatteryandthebatterypack.
Ifasupervisorpasswordhasbeensetandisknowntotheservicetechnician,dothefollowingtoremove
thepower-onpassword:
1.T urnonthecomputer.
2.WhentheThinkPadlogoisdisplayed,immediatelypressF1.
Chapter4.Relatedserviceinformation37
Page 44

3.T ypethesupervisorpasswordtoentertheThinkPadSetupprogram.
4.SelectSecurity.
5.SelectPassword.
6.SelectPower-OnPassword.
7.T ypethecurrentsupervisorpasswordintheEnterCurrentPasswordeld.Then,leavetheEnter
NewPasswordeldblank,andpressEntertwice.
8.IntheChangeshavebeensavedwindow,pressEnter.
9.PressFn+F10tosavechangesandexittheThinkPadSetupprogram.
Howtoremovetheharddiskpassword
Attention:IfUseronlymodeisselectedandtheuserharddiskpasswordhasbeenforgottenandcannotbe
madeavailabletotheservicetechnician,neitherLenovonorLenovoauthorizedservicetechniciansprovide
anyservicestoresettheuserharddiskpassword,ortorecoverdatafromtheharddiskdrive.Toputthe
systembacktooperationalstatus,theonlyLenovoandLenovo-authorizedservicesolutionwouldbeto
replacetheharddiskdriveorsolid-statedrivewithascheduledfee.
Toremoveauserharddiskpasswordthathasbeenforgotten,whenthesupervisorpasswordandthemaster
harddiskpasswordareknown,dothefollowing:
1.T urnonthecomputer.
2.WhentheThinkPadlogoisdisplayed,immediatelypressF1toentertheThinkPadSetupprogram.
3.SelectSecurity.
4.SelectPassword.
5.SelectHard-diskxpasswordwherexistheletteroftheharddiskdrive.Apop-upwindowopens.
6.SelectMasterHDP,whereHDPstandsforharddiskpassword.
7.T ypethecurrentmasterharddiskpasswordintheEnterCurrentPasswordeld.Then,leavetheEnter
NewPasswordeldblank,andpressEntertwice.
8.PressFn+F10tosavechangesandexittheThinkPadSetupprogram.Theuserharddiskpasswordand
themasterharddiskpasswordhavebeenremoved.
Powermanagement
Toreducepowerconsumption,thecomputerhasthreepowermanagementmodes:screenblank,sleep,
andhibernation.
Screenblankmode(fortheWindows7operatingsystemonly)
Ifthetimesetonthe“Turnoffmonitor”timerintheoperatingsystemexpires,theLCDbacklightturnsoff.
Toputthecomputerintoscreenblankmode,dothefollowing:
1.Right-clickthebatterygaugeinthetaskbar.
2.SelectPoweroffdisplay(keepcurrentpowerplan).
Toendscreenblankmodeandresumenormaloperation,pressanykey.
Sleepmode
Whenthecomputerenterssleepmode,thefollowingeventsoccurinadditiontowhatoccursinscreen
blankmode:
•TheLCDispoweredoff.
•Theharddiskdriveispoweredoff.
38HardwareMaintenanceManual
Page 45

•Themicroprocessorstops.
Tocausethecomputertoreturnfromsleepmodeandresumeoperation,dooneofthefollowing:
•PresstheFnkey.
•OpentheLCDcover.
•T urnonthepowerbutton.
Also,ineitherofthefollowingevents,thecomputerautomaticallyreturnsfromsleepmodeandresumes
operation:
•Theringindicator(RI)issignaledbyaserialdeviceoraPCCarddevice.
•Thetimesetontheresumetimerelapses.
Note:Thecomputerdoesnotacceptanyinputimmediatelyafteritenterssleepmode.Waitafew
secondsbeforetakinganyactiontoreenteroperationmode.
Hibernationmode
Inhibernationmode,thefollowingoccurs:
•Thesystemstatus,RAM,VRAM,andsetupdataarestoredontheharddiskdrive.
•Thesystemispoweredoff.
Ifyouhavedenedoneofthefollowingactionsastheeventthatcausesthesystemtogointohibernation
mode,performthataction.
•Closingthelid.
•Pressingthepowerbutton.
Also,thecomputergoesintohibernationmodeautomaticallyafteraperiodofinactivityspeciedinpower
plansettings.
Whenthepoweristurnedon,thecomputerreturnsfromhibernationmodeandresumesoperation.The
hibernationleinthebootrecordontheharddiskdriveisread,andsystemstatusisrestoredfromthe
harddiskdrive.
Symptom-to-FRUindex
Thissectioncontainsfollowinginformation:
•“Numericerrorcodes”onpage40
•“Errormessages”onpage40
•“No-beepsymptoms”onpage41
•“LCD-relatedsymptoms”onpage41
•“Intermittentproblems”onpage42
•“Undeterminedproblems”onpage42
Thesymptom-to-FRUindexinthissectionlistssymptomsanderrorsandtheirpossiblecauses.Themost
likelycauseislistedrst,inboldfacetype.
Note:DotheFRUreplacementorotheractionsinthesequenceshowninthecolumnheaded“FRUor
action,insequence.”IfreplacingaFRUdoesnotsolvetheproblem,puttheoriginalpartbackinthe
computer.DonotreplaceanondefectiveFRU.
Thisindexcanalsohelpyoudetermine,duringregularservicing,whatFRUsarelikelytoneedtobe
replacednext.
Chapter4.Relatedserviceinformation39
Page 46

AnumericerrorisdisplayedforeacherrordetectedinPOSTorsystemoperation.Inthedisplays,ncan
beanynumber.
Ifnonumericcodeisdisplayed,checkthenarrativedescriptionsofsymptoms.Ifthesymptomisnot
describedthere,goto“Intermittentproblems”onpage42.
Note:ForadevicenotsupportedbydiagnosticcodesintheThinkPadnotebooks,seethemanualfor
thatdevice.
Numericerrorcodes
Table2.Numericerrorcodes
Symptomorerror(beeps,ifany)
FRUoraction,insequence
0187
EAIAdataaccesserror-TheaccesstoEEPROMisfailed.
(twoshortbeeps)
Systemboard.
0189
InvalidRFIDcongurationinformationarea-TheEEPROM
checksumisnotcorrect.
(twoshortbeeps)
Systemboard.
0190
Criticallow-batteryerror
(twoshortbeeps)
1.Chargethebatterypack.
2.Batterypack.
0191
SystemSecurity-InvalidRemoteChangerequested.
1.RuntheThinkPadSetupprogram,andthensave
currentsettingbypressingFn+F10.
2.Systemboard.
0251
SystemCMOSchecksumbad-Defaultconguration
used.
(twoshortbeeps)
1.Chargethebackupbatteryformorethan8hours
byconnectingtheacpoweradapter.
2.ReplacethebackupbatteryandruntheThinkPad
Setupprogramtoresetthetimeanddate.
0271
Dateandtimeerror-Neitherthedatenorthetimeisset
inthecomputer.
(twoshortbeeps)
RuntheThinkPadSetupprogramtoresetthetime
anddate.
1802
Unauthorizednetworkcardispluggedin-T urnoffand
removetheminiPCInetworkcard.
(twoshortbeeps)
1.RemovetheMiniPCInetworkcard.
2.Systemboard.
Errormessages
Table3.Errormessages
Symptomorerror(beeps,ifany)
FRUoraction,insequence
Fanerror.
(fourshortbeeps,onelongbeep)
1.Fan.
2.Thermalgrease.
3.Systemboard.
Thissystemdoesnotsupportbatteriesthatarenot
genuineLenovo-madeorauthorized.Thesystemwill
continuetoboot,butmaynotchargeunauthorized
batteries.
Attention:Lenovohasnoresponsibilityforthe
performanceorsafetyofunauthorizedbatteries,and
Replacethebattery.
40HardwareMaintenanceManual
Page 47

Table3.Errormessages(continued)
Symptomorerror(beeps,ifany)
FRUoraction,insequence
providesnowarrantiesforfailuresordamagearisingout
oftheiruse.
No-beepsymptoms
Table4.No-beepsymptoms
Symptomorerror
FRUoraction,insequence
Nobeep,power-onindicatoron,LCDblank,andno
POST.
1.Makesurethateveryconnectorisconnected
tightlyandcorrectly.
2.DIMM.
3.Systemboard.
Nobeep,power-onindicatoron,andLCDblankduring
POST.
1.ReseatDIMM.
2.Systemboard.
Thepower-onpasswordpromptappears.Apower-onpasswordorasupervisorpasswordisset.
TypethepasswordandpressEnter.
Thehard-diskpasswordpromptappears.Ahard-diskpasswordisset.T ypethepasswordand
pressEnter.
LCD-relatedsymptoms
Important:TheTFTLCDforthenotebookcomputercontainsmanythin-lmtransistors(TFT s).The
presenceofasmallnumberofdotsthataremissing,discolored,oralwayslightedischaracteristicofTFT
LCDtechnology,butexcessivepixelproblemscancauseviewingconcerns.
IftheLCDyouareservicinghastwoorlessvisibledefectivepixels,itshouldnotbeconsideredfaulty.
However,iftheLCDhasthreeormorevisibledefectivepixels,itwillbedeemedasdefectivebyLenovoand
itshouldbereplaced.
Notes:
•LenovowillnotprovidewarrantyreplacementiftheLCDiswithinspecicationsbecausewecannot
guaranteethatanyreplacementLCDwillhavezeropixeldefects.
•ThispolicyappliestoallThinkPadNotebookspurchasedon1January,2008orlater.
•OnepixelconsistsofR,G,Bsub-pixels.
Table5.LCD-relatedsymptoms
Symptomorerror
FRUoraction,insequence
Nobeep,power-onindicatoron,andablankLCDduring
POST.
Systemboard.
•LCDbacklightnotworking.
•LCDtoodark.
•LCDbrightnesscannotbeadjusted.
•LCDcontrastcannotbeadjusted.
1.ReseattheLCDconnectors.
2.LCDassembly.
3.Systemboard.
•LCDscreenunreadable.
•Charactersmissingpixels.
•Screenabnormal.
•Wrongcolordisplayed.
1.Seeimportantnotefor“LCD-relatedsymptoms.”
2.ReseatallLCDconnectors.
3.LCDassembly.
4.Systemboard.
HorizontalorverticallinesdisplayedonLCD.LCDassembly.
Chapter4.Relatedserviceinformation41
Page 48

Intermittentproblems
Intermittentsystemhangproblemscanbeduetoavarietyofcausesthathavenothingtodowithahardware
defect,suchascosmicradiation,electrostaticdischarge,orsoftwareerrors.FRUreplacementshouldbe
consideredonlywhenaproblemrecurs.
Undeterminedproblems
Ifthediagnostictestsdidnotidentifythedevicethathasfailed,ifwrongdevicesareinstalled,orifthe
systemsimplyisnotoperating,followtheseprocedurestoisolatethefailingFRU(donotisolateFRUs
thathavenodefects).
Verifythatallattacheddevicesaresupportedbythecomputer.
Verifythatthepowersupplybeingusedatthetimeofthefailureisoperatingcorrectly.(See“Powersystem
checkout”onpage30)
1.T urnoffthecomputer.
2.VisuallycheckeachFRUfordamage.ReplaceanydamagedFRU.
3.Removeordisconnectallofthefollowingdevices:
a.Non- ThinkPaddevices
b.Printer,mouse,andotherexternaldevices
c.Batterypack
d.Harddiskdrive
e.Externaldiskettedriveoropticaldrive
f.DIMM
g.Opticaldiskordisketteintheinternaldrive
h.PCCards
4.T urnonthecomputer.
5.Determinewhethertheproblemhasbeensolved.
6.Iftheproblemdoesnotrecur,reconnecttheremoveddevicesoneatatimeuntilyoundthefailingFRU.
7.Iftheproblemremains,replacethefollowingFRUsoneatatime(donotreplaceanondefectiveFRU):
a.Systemboard
b.LCDassembly
42HardwareMaintenanceManual
Page 49
Chapter5.Statusindicators
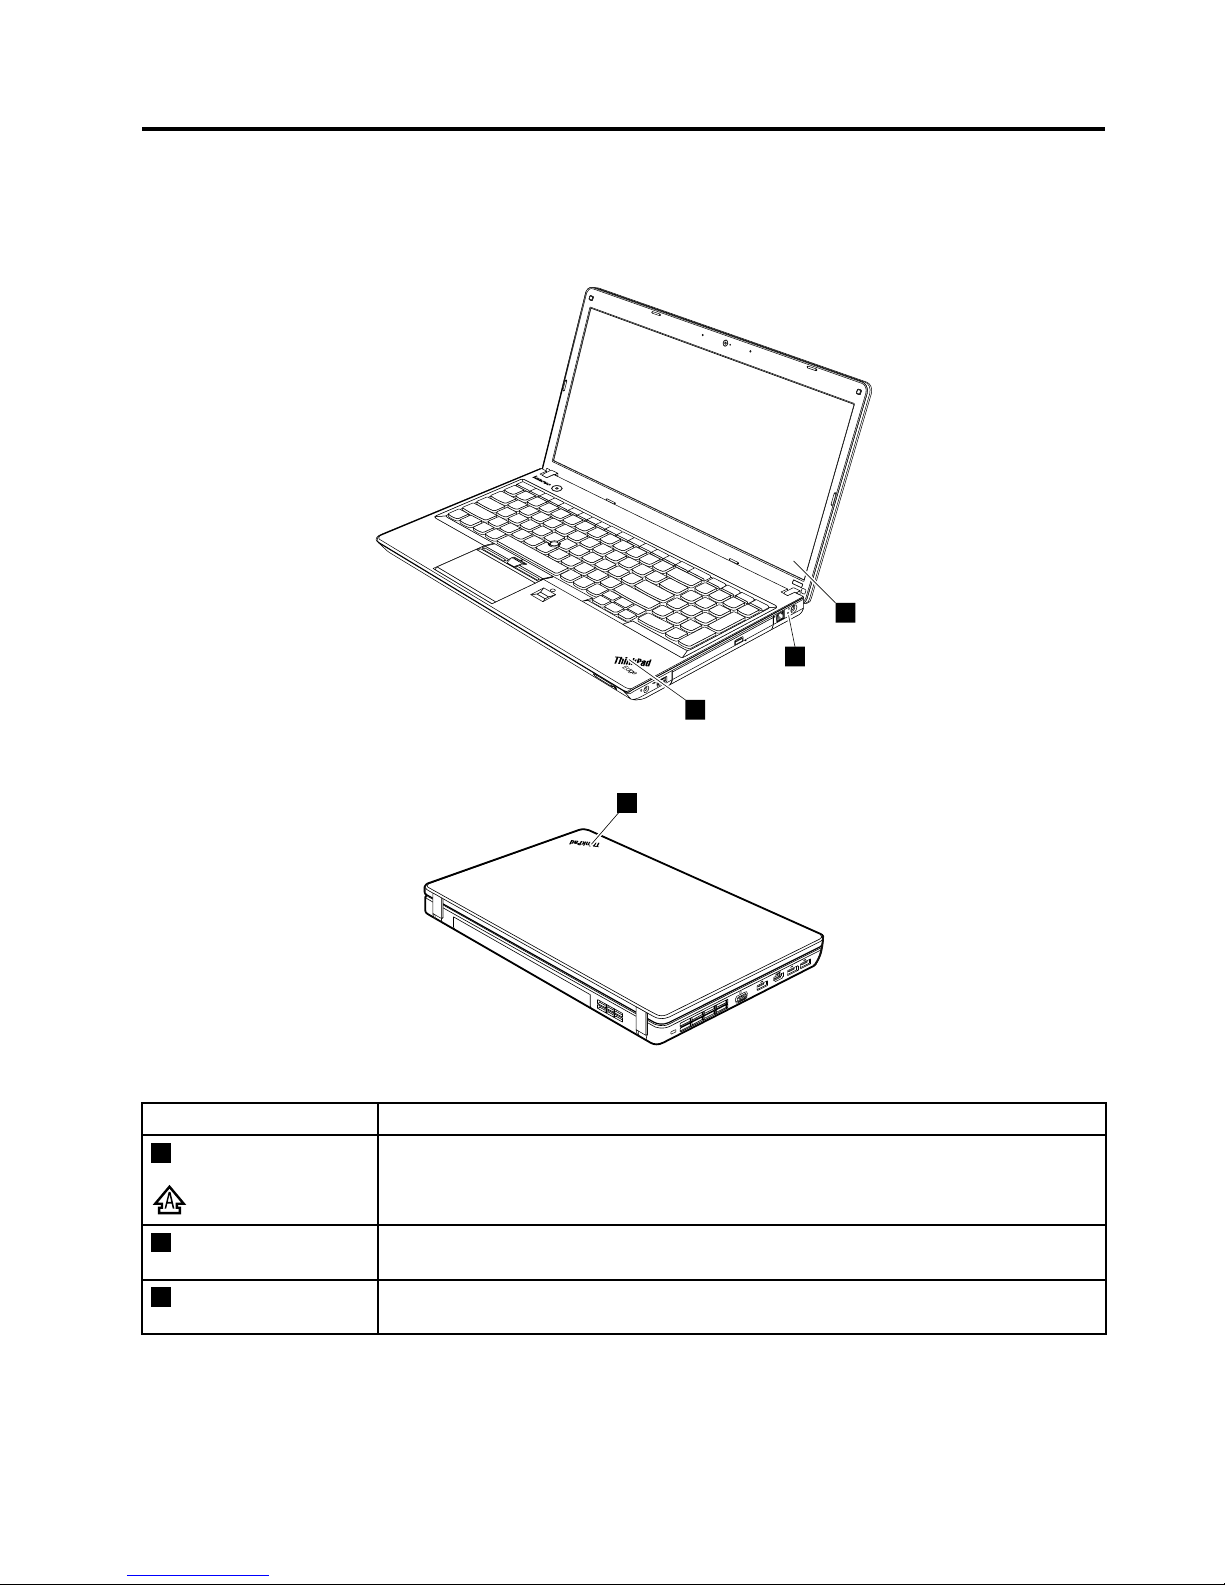
Thischapterpresentsthesystemstatusindicatorsthatshowthestatusofthecomputer.
1
2
3
Note:Thecomputerkeyboardmightlookdifferentfromtheillustrationabove.
4
Table6.Statusindicators
IndicatorMeaning
1CapsLockWhentheCapsLockmodeisenabled,theCapsLockindicatorisdisplayedonthe
screen.Youcantypeallalphabeticcharacters(A-Z)inuppercasedirectly.
1Wirelessstatus
PressF9toenableordisablethewirelessfeatures.Y oucanquicklychangethepower
stateofeachfeatureonthelist.
2Powerstatus
•Green:Theacpoweradapterisconnected.
•Off:Theacpoweradapterisnotconnected.
©CopyrightLenovo2012,2013
43
Page 50
Table6.Statusindicators(continued)
IndicatorMeaning
3Systemstatus
4Systemstatus
TheilluminateddotintheThinkPadlogoontheouterlidofthecomputerandonthe
palmrestworksasasystemstatusindicator:itshowswhetherthecomputerisinsleep,
hibernation,ornormalmode.
•Red:Thecomputerison(innormalmode).
•Fastblinkingred:Thecomputerisenteringsleeporhibernationmode.
•Slowblinkingred:Thecomputerisinsleepmode.
•Off:Thecomputerisofforinhibernationmode.
44HardwareMaintenanceManual
Page 51
Chapter6.Specialkeys
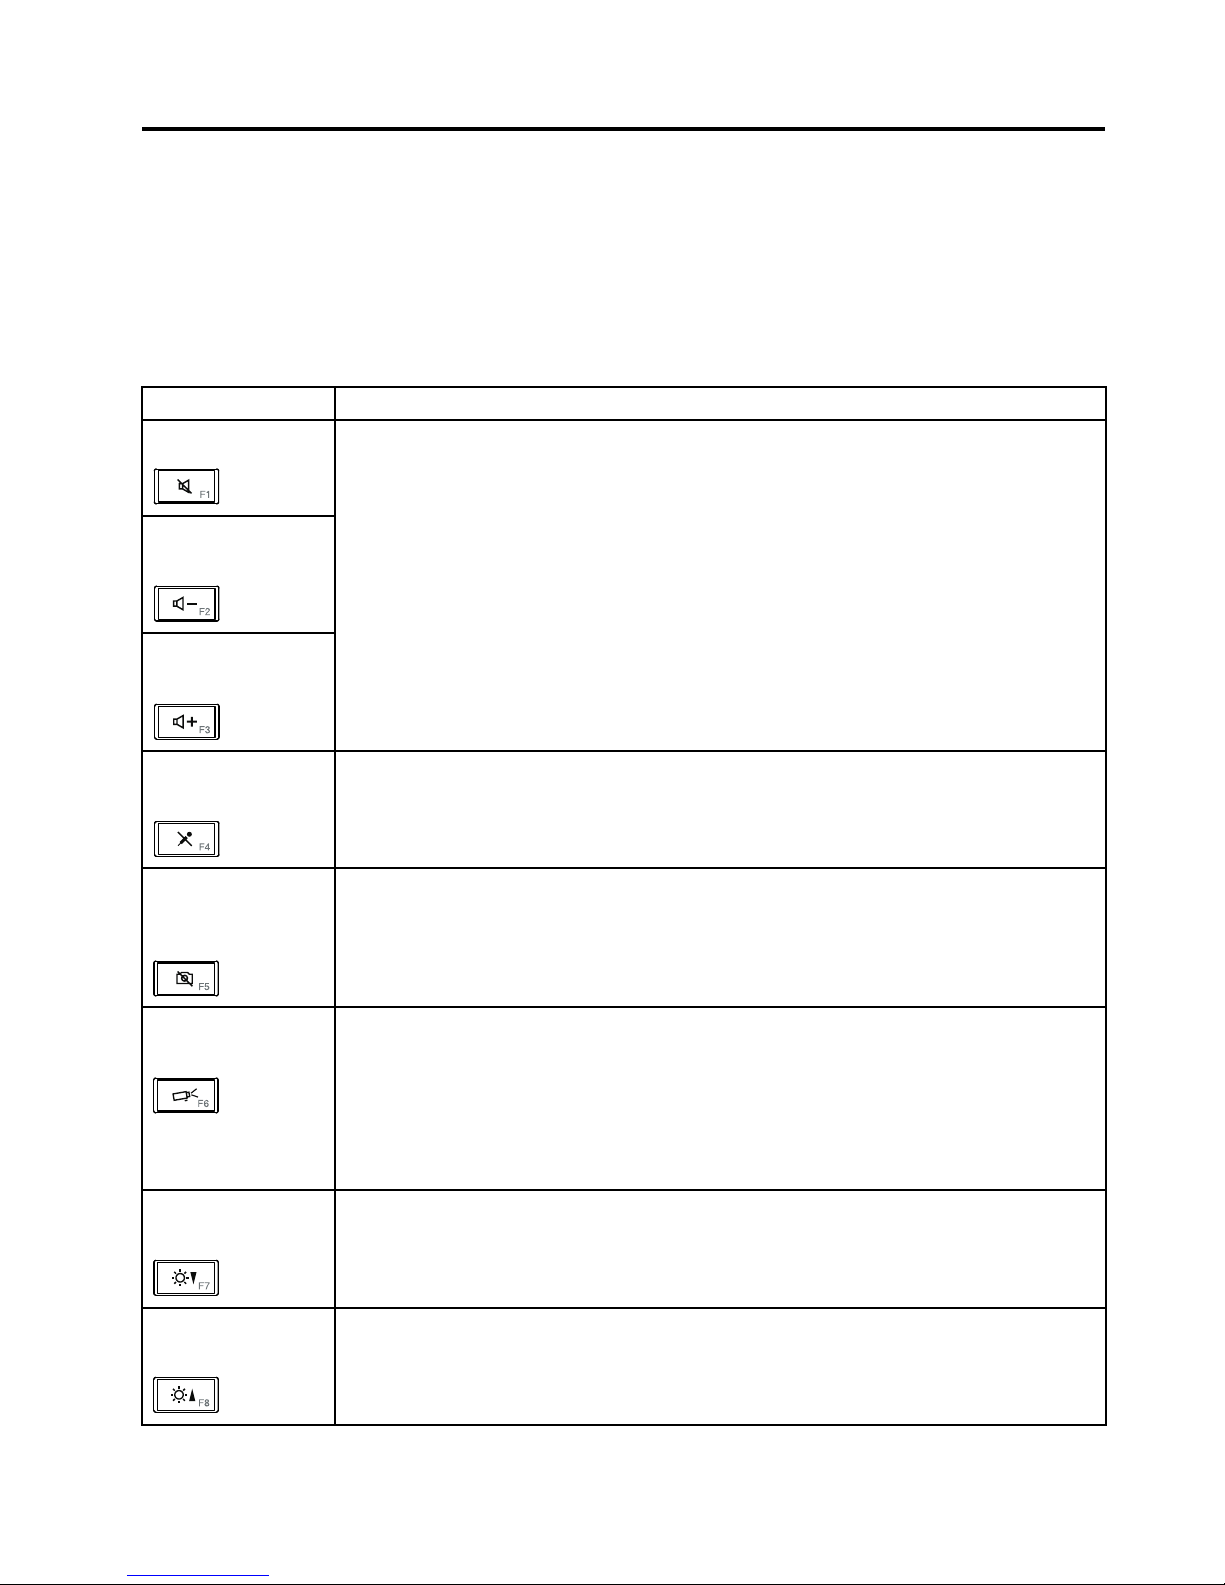
Thecomputercomeswithseveralspecialkeysattheupperrowofthekeyboard.Touseeachfunction,
directlypressthedesiredkey.
Thefollowingtableexplainsthefunctionofeachspecialkey.
Table7.Specialkeys
Specialkey
Description
Speakermute(F1)
Speakervolume
down(F2)
Speakervolumeup
(F3)
Ifyoumutethesoundandthenturnoffthecomputer,thesoundwillremainmutedwhenyou
turnonthecomputeragain.T oturnonthesound,pressthespeakervolumeuporspeaker
volumedownkey.
Microphonemute
(F4)
Pressthemicrophonemutekeytomuteorunmutealloftherecordingdevices.
Launchthe
communications
settingsutility(F5)
•ForWindows7:OpenstheCommunicationssettingswindow,inwhichyoucanpreview
yourvideoimage,takeasnapshotofyourcurrentimage,andchangethecameraand
audiosettings.
•ForWindows8:StartstheLenovoSettingsprogram,whichenablesyoutochangethe
cameraandaudiosettings.
Switchingthedisplay
outputlocation(F6)
Pressthiskeytoswitchbetweenthecomputerdisplayandanexternalmonitor.Thefollowing
optionswillbedisplayed:
•Computerdisplayonly(LCD)
•Computerdisplayandexternalmonitor(sameimage)
•Computerdisplayandexternalmonitor(theExtenddesktopfunction)
•Externalmonitoronly
Note:Y oualsocanusetheWindows+Pcombinationtoswitchbetweenthecomputerdisplay
andanexternalmonitor.
Displaybrightness
down(F7)
Whenyoupressthiskey,thecomputerdisplaybecomesdimmer.Thepurposeofthismethod
istochangethebrightnessleveltemporarily.T ochangethedefaultbrightnesslevel,usethe
PowerManagerprogram,orgointoControlPanel➙PerformanceandMaintenance➙
PowerOptionsandmakechangesasdesired.
Displaybrightnessup
(F8)
Whenyoupressthiskey,thecomputerdisplaybecomesbrighter.Thepurposeofthismethod
istochangethebrightnessleveltemporarily.T ochangethedefaultbrightnesslevel,usethe
PowerManagerprogram,orgointoControlPanel➙PerformanceandMaintenance➙
PowerOptionsandmakechangesasdesired.
©CopyrightLenovo2012,2013
45
Page 52
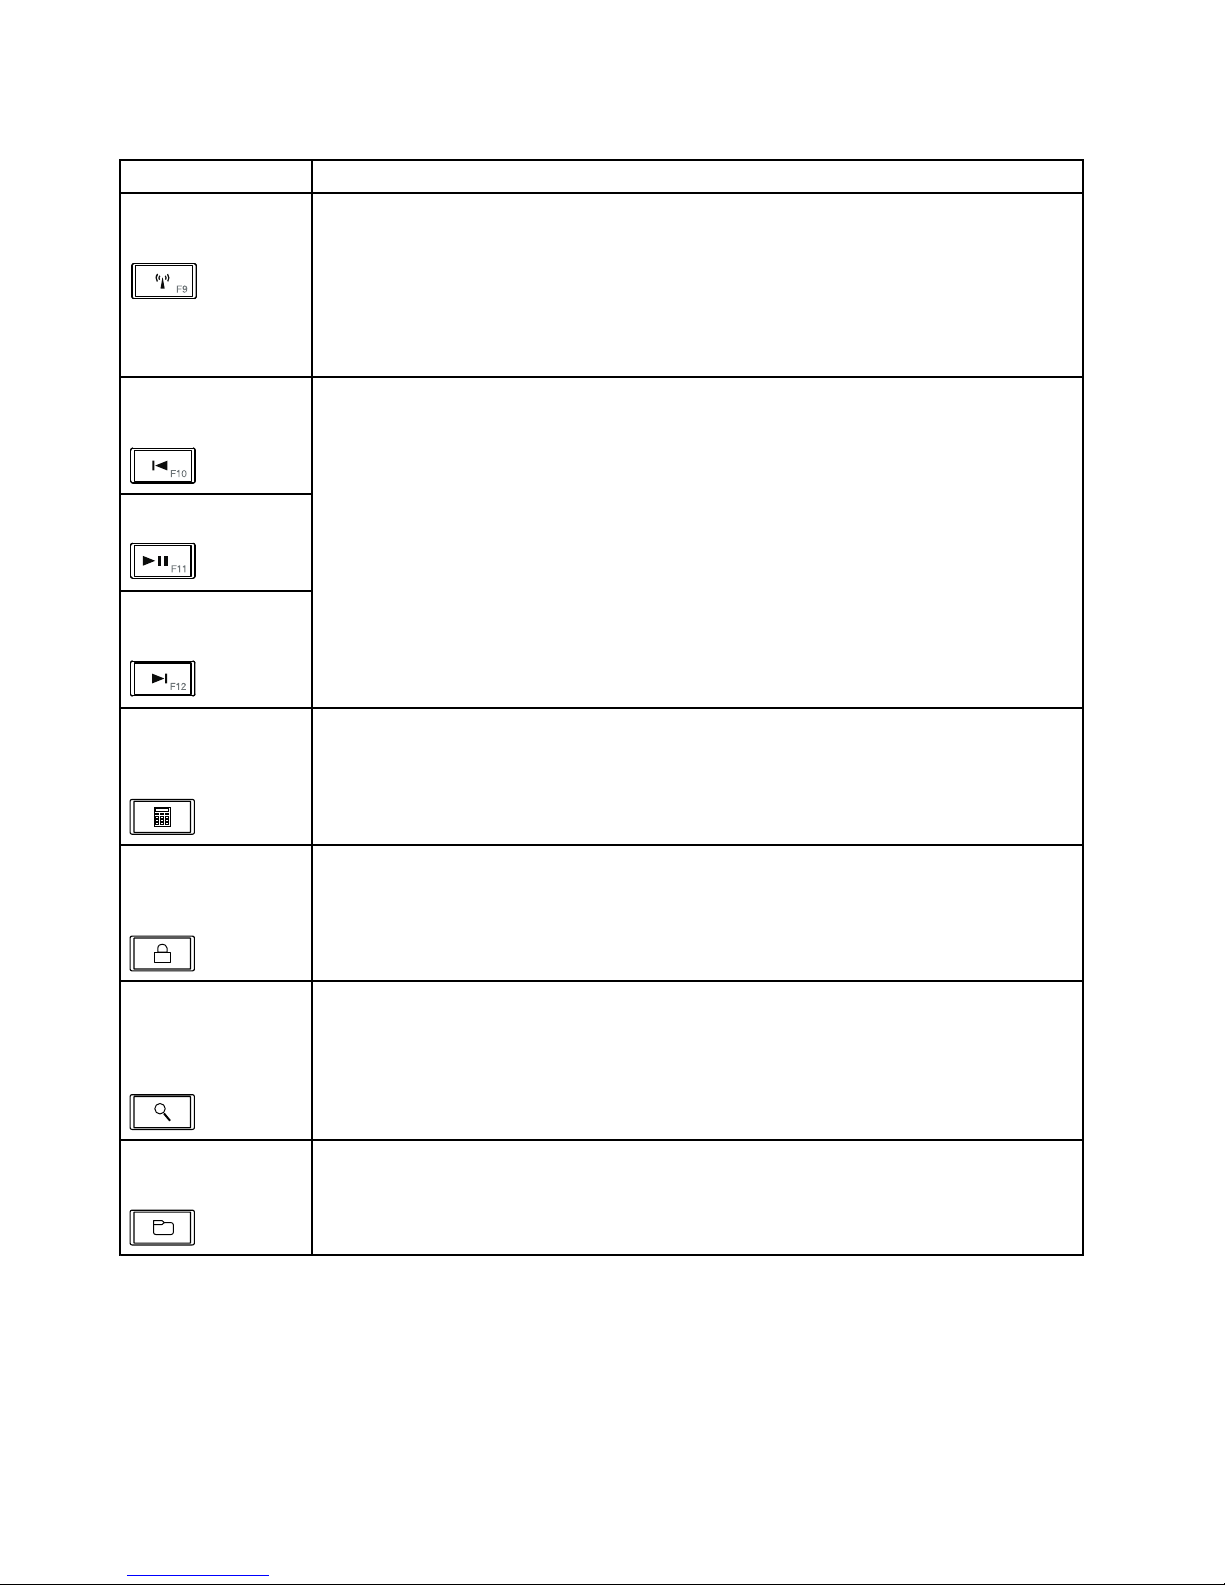
Table7.Specialkeys(continued)
Specialkey
Description
Wirelessradiocontrol
(F9)
Pressthiskeytoenableordisablethebuilt-inwirelessnetworkingfeatures.Whenyou
pressthiskey,alistofwirelessfeaturesisdisplayed.Youcanquicklychangethestateof
eachfeatureonthelist.
Notes:Ifyouwanttousethisbuttontoenableordisablethewirelessfeatures,thefollowing
devicedriversmustbeinstalledonyourcomputerbeforehand:
•PowerManagementdriver
•OnScreenDisplayUtility
•Wirelessdevicedrivers
Previoustrack/scene
(F10)
Play/Pause(F11)
Nexttrack/scene
(F12)
Usethesekeysformultimediacontrol.
Launchingthe
calculator(onsome
models)
PressthiskeytolaunchtheMicrosoftCalculatorprogram.
Lockingtheoperating
system(onsome
models)
PressthiskeytolocktheWindowsoperatingsystem.Thiskeyhasthesamefunctionas
theWindows+Lkeycombination.
Openingthe
operatingsystem
searchprogram(on
somemodels)
PressthiskeytoopentheMicrosoftSearchCompanionprogram.Thiskeyhasthesame
functionastheWindows+Fkeycombination.
OpeningComputer
(onsomemodels)
PressthiskeytoopenComputer.ThiskeyhasthesamefunctionastheWindows+Ekey
combination.
46HardwareMaintenanceManual
Page 53

Chapter7.Locations
ThischapterintroducesthelocationsofthehardwarecomponentsonThinkPadEdgeE530,E530c,and
E535models.
Locatingcomputercontrols,connectors,andindicators
Thistopicintroducesthelocationsofthecomputercontrols,connectors,andindicators.
©CopyrightLenovo2012,2013
47
Page 54
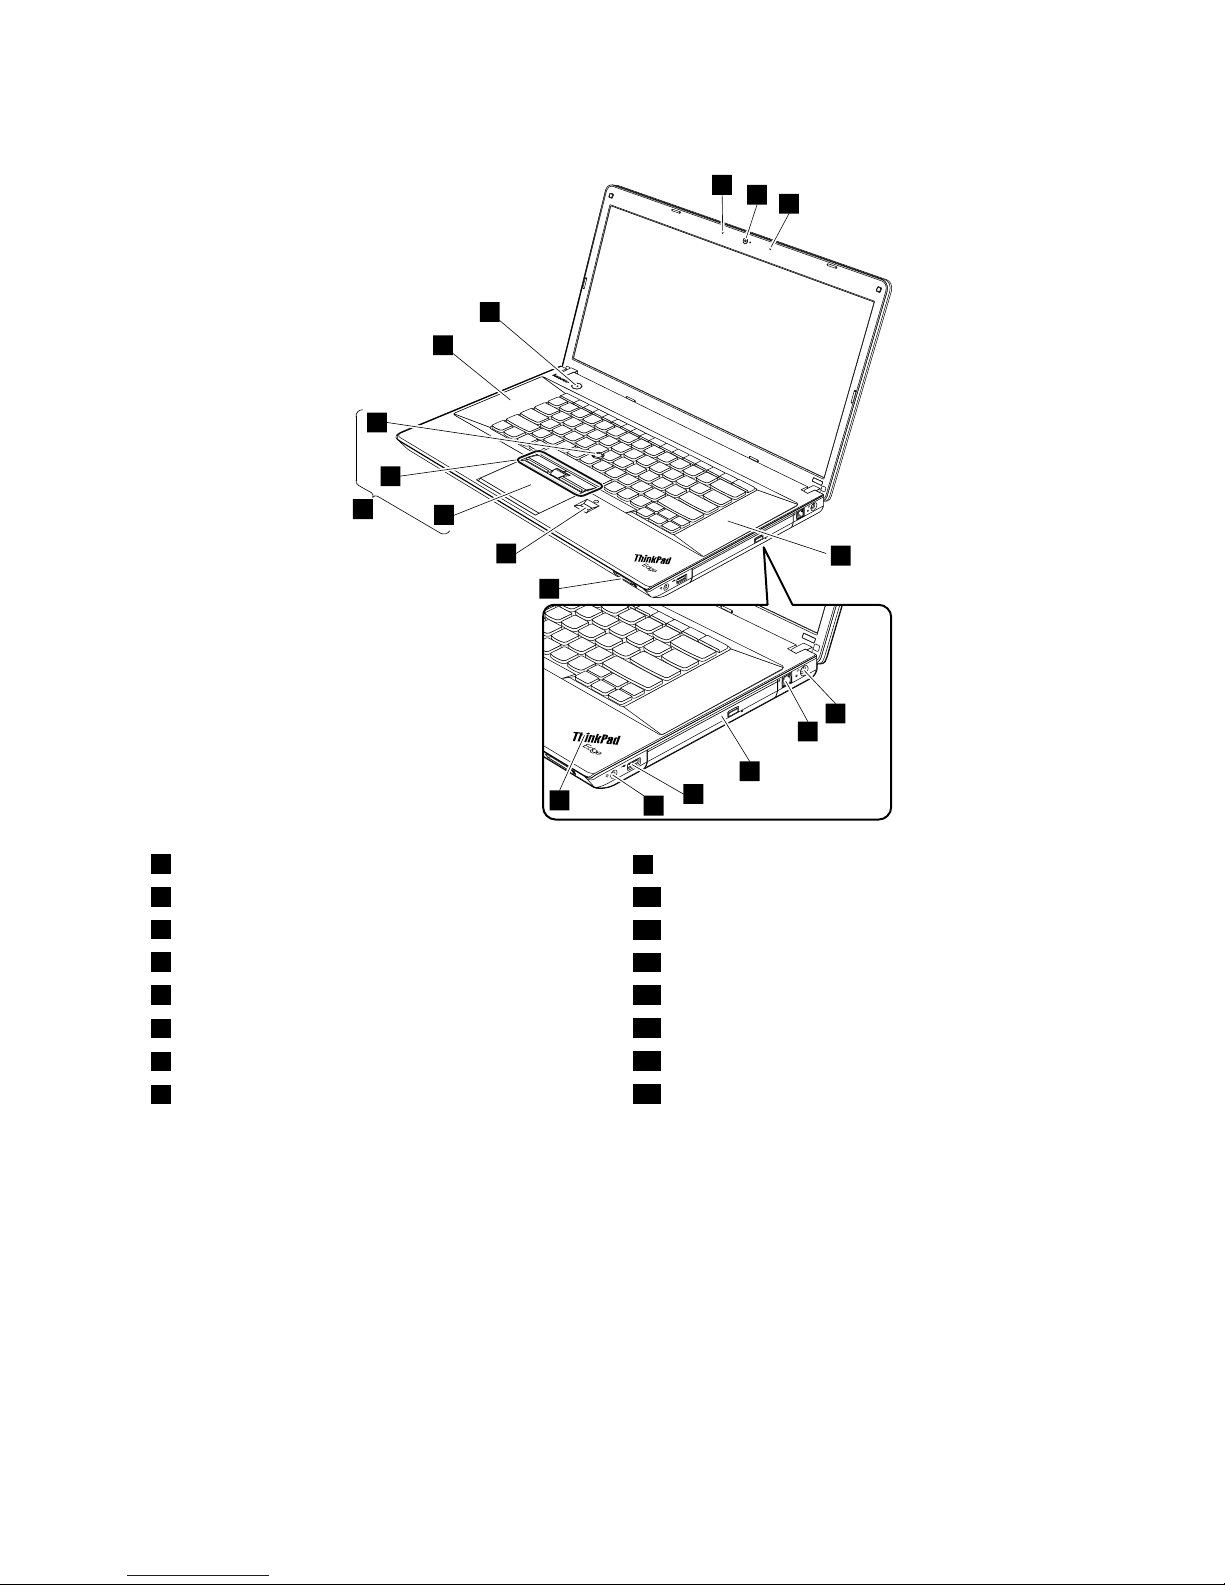
Frontview
Forsomemodels:
1
2
2
9
11
10
12
13
14
15
3
4
5
6
7
8
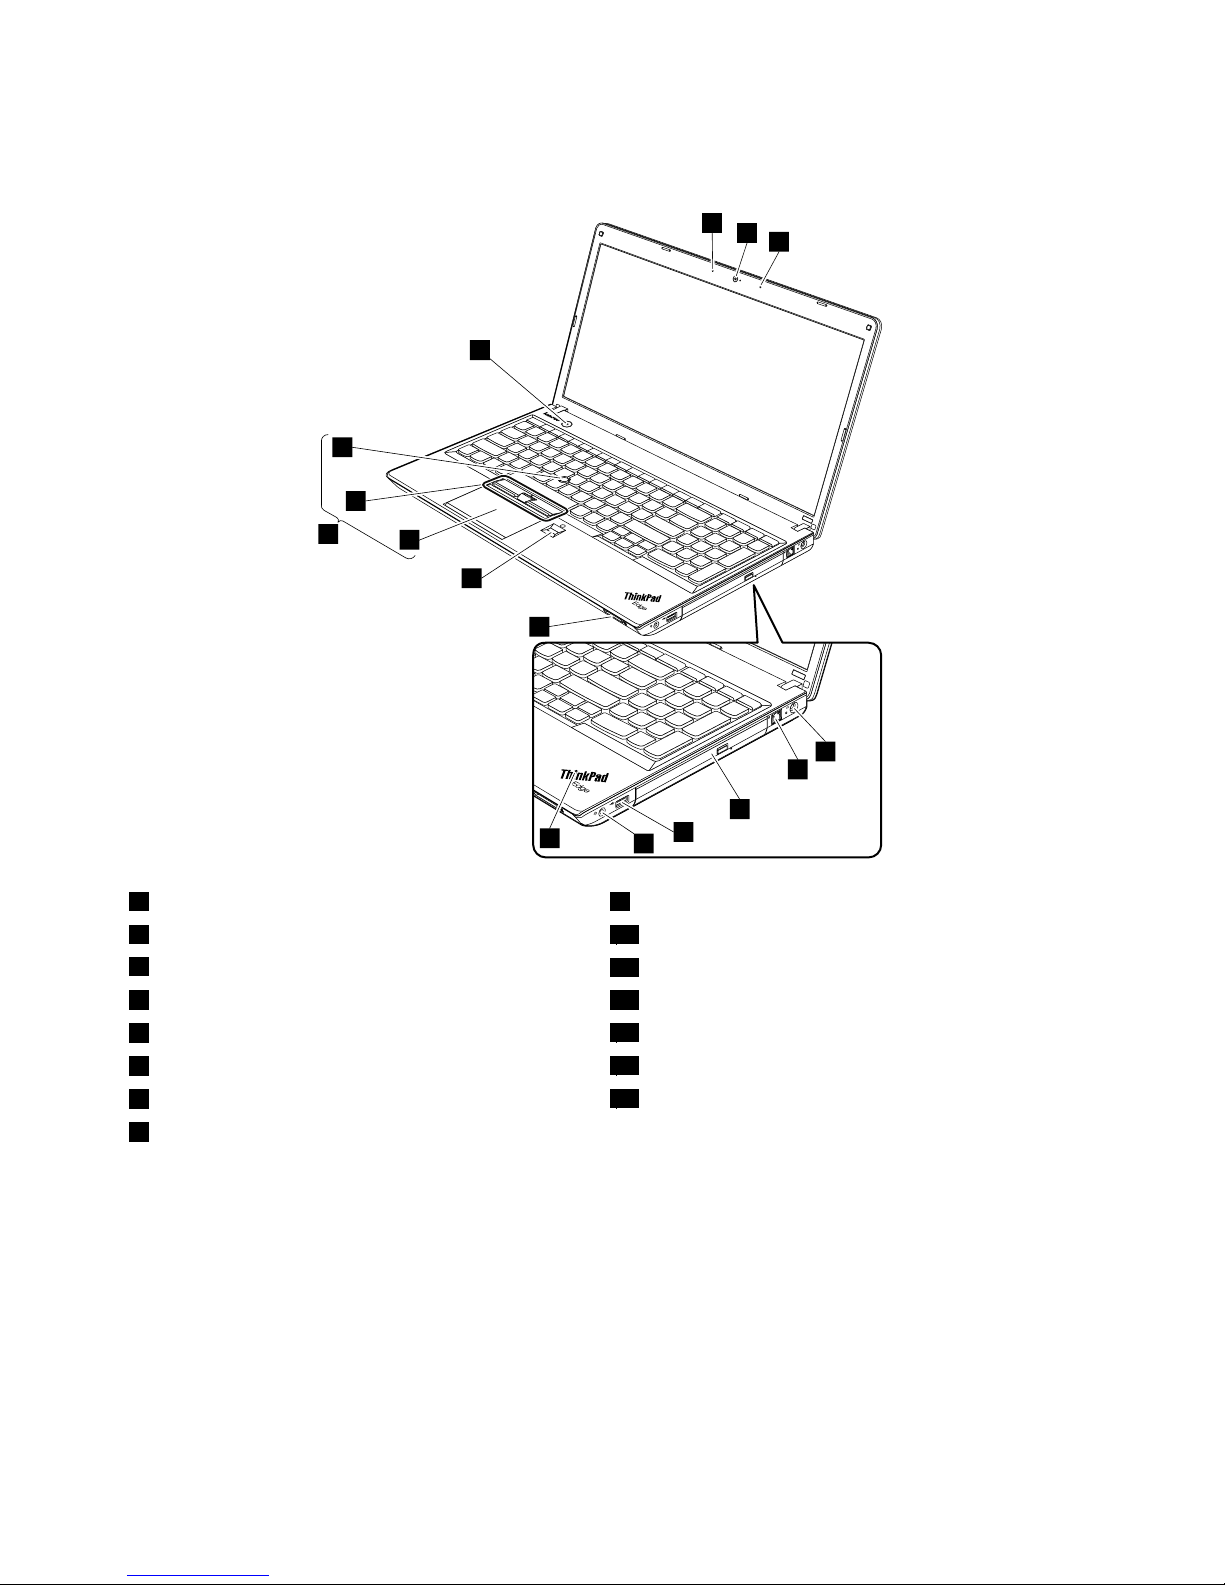
1Integratedcamera9Mediacardreaderslot
2Built-inmicrophones
10Fingerprintreader(onsomemodels)
3acpowerconnector
11Touchpad
4RJ45Ethernetconnector12TrackPointbuttons
5Opticaldriveorblankbezel
13TrackPointpointingstick
6AlwaysOnUSBconnector
14UltraNav
®
pointingdevice
7Comboaudiojack
15Powerbutton
8Systemstatusindicator
1
1
:Forthedescriptionofthesystemstatusindicator,seeChapter5“Statusindicators”onpage43.
48HardwareMaintenanceManual
Page 55
Forothermodels:
1
2
2
10
12
11
13
14
15
16
3
3
4
5
6
7
8
9
1Integratedcamera
9Systemstatusindicator
1
2Built-inmicrophones10Mediacardreaderslot
3Built-instereospeakers
11Fingerprintreader(onsomemodels)
4acpowerconnector
12Touchpad
5RJ45Ethernetconnector13TrackPointbuttons
6Opticaldriveorblankbezel
14TrackPointpointingstick
7AlwaysOnUSBconnector
15UltraNavpointingdevice
8Comboaudiojack
16Powerbutton
1
:Forthedescriptionofthesystemstatusindicator,seeChapter5“Statusindicators”onpage43
.
Chapter7.Locations49
Page 56
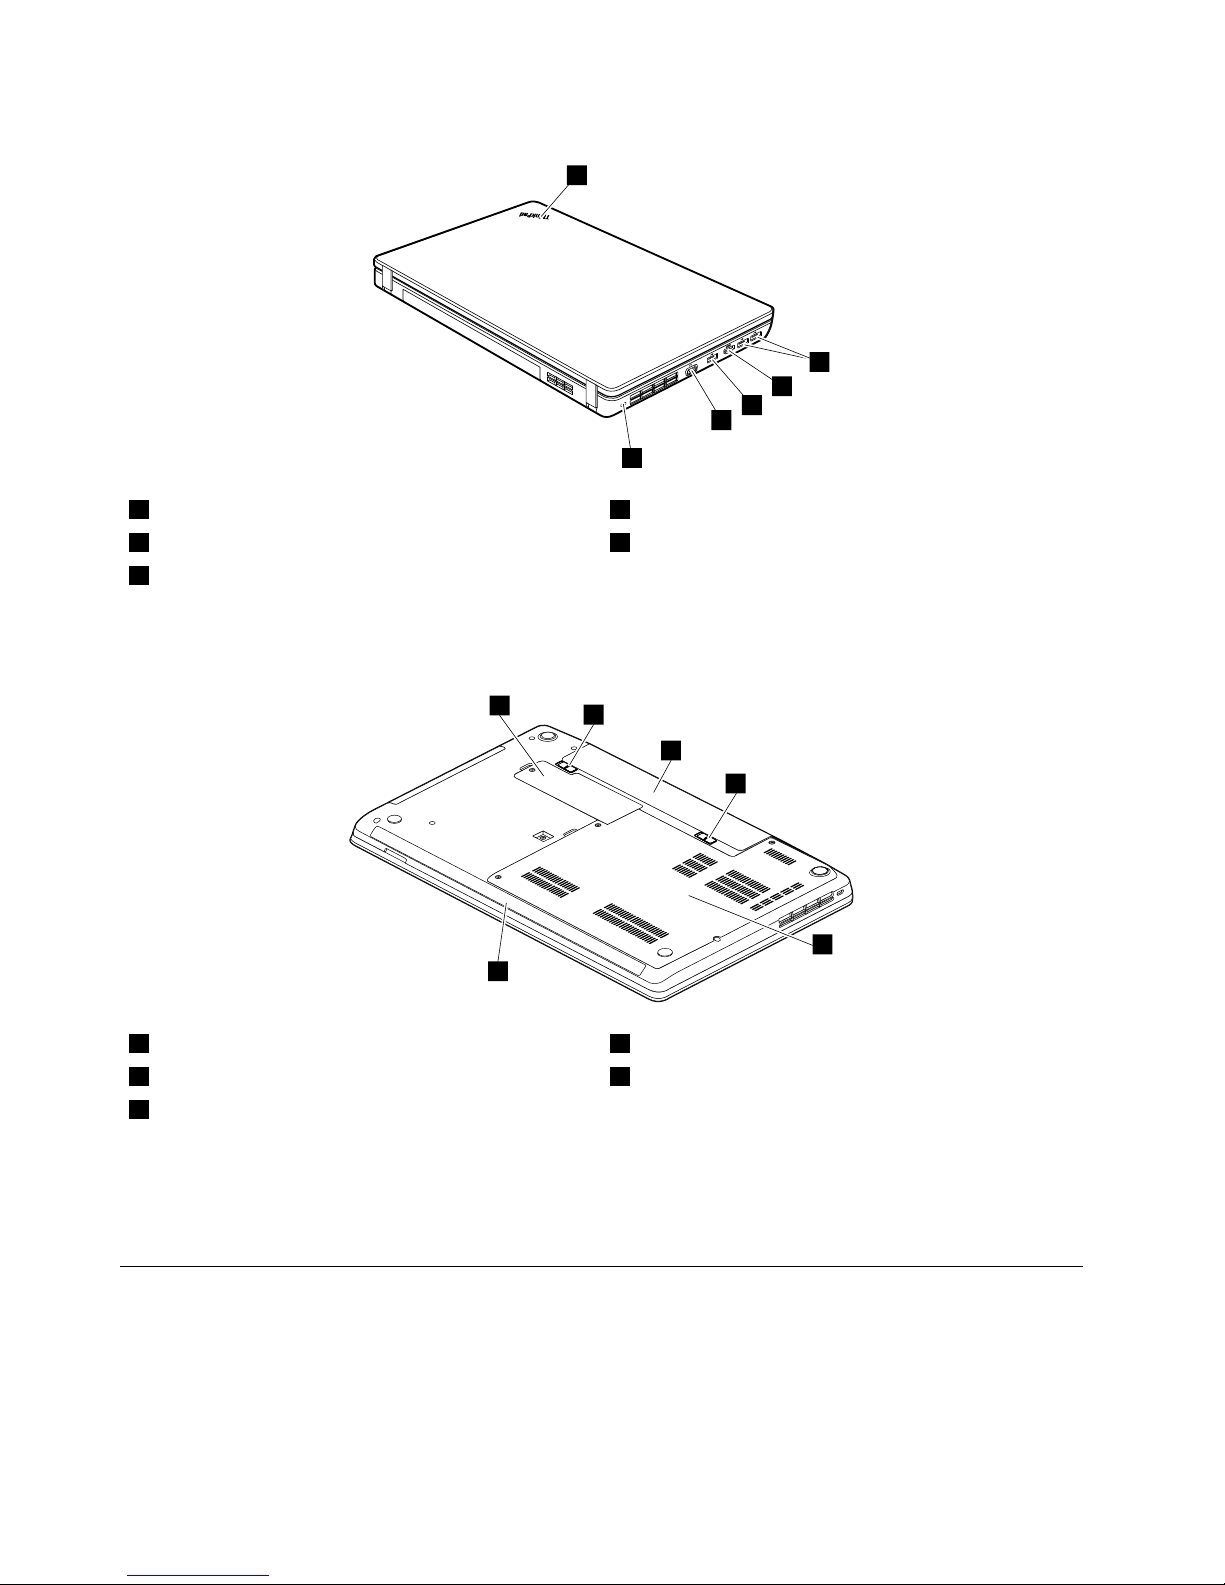
Rearview
1
3
2
4
5
2
1Systemstatusindicator
1
4Externalmonitorconnector
2USBconnectors5Securitykeyhole
3HDMIport
1
:Forthedescriptionofthesystemstatusindicator,seeChapter5“Statusindicators”onpage43.
Bottomview
3
2
2
1
4
5
1Smallbottomcover
1
4Largebottomcover
2
2Batterypacklatches
5Built-instereospeakers(onsomemodels)
3Batterypack
1
:ThewirelessWANcardormSATAsolidstatedrive,andthebackupbatteryarelocatedunderneath
thesmallbottomcover.
2
:Thememorymodules,harddiskdrive,andwirelessLANcardarelocatedunderneaththebottom
slotcover.
LocatingFRUsandCRUs
Thistopicintroducesthefollowingserviceparts:
•“MajorFRUsandCRUs”onpage52
•“LCDFRUsandCRUs”onpage54
50HardwareMaintenanceManual
Page 57

Notes:
•EachFRUisavailableforalltypesormodels,unlessotherwisespecied.
•CRUstatementforcustomers:
Youcanresolvesomeproblemswithyourproductwithareplacementpartyoucaninstallyourself,calleda
“CustomerReplaceableUnit”or“CRU.”SomeCRUsaredesignatedasself-serviceCRUsandothersare
designatedasoptional-serviceCRUs.Installationofself-serviceCRUsisyourresponsibility.Foroptional-service
CRUs,youcaneitherinstalltheCRUyourselforyoucanrequestthataServiceProviderinstalltheCRUaccording
tothewarrantyserviceforyourproduct.IfyouintendoninstallingtheCRU,LenovowillshiptheCRUtoyou.CRU
informationandreplacementinstructionsareshippedwithyourproductandareavailablefromLenovoatanytime
uponrequest.Y oucanndalistofCRUsforyourproductinthisHardwareMaintenanceManual.Anelectronic
versionofthismanualcanbefoundathttp://www.lenovo.com/support.ClickUserGuides&Manualsand
thenfollowtheon-screeninstructionstondthemanualforyourproduct.Y oumightberequiredtoreturnthe
defectiveCRU.Whenreturnisrequired:(1)returninstructions,aprepaidshippinglabel,andacontainerwillbe
includedwiththereplacementCRU;and(2)youmightbechargedforthereplacementCRUifLenovodoesnot
receivethedefectiveCRUwithinthirty(30)daysofyourreceiptofthereplacementCRU.SeeyourLenovoLimited
Warrantydocumentationforfulldetails.
ThinkPadcomputerscontainthefollowingtypesofCRUs:
–Self-serviceCRUs:TheseCRUsunplugorareheldbynomorethantwoscrews.Examplesofthesetypes
ofCRUsincludetheacpoweradapter,powercord,battery,andharddiskdrive.Otherself-serviceCRUs
dependingonproductdesignmightincludethememorymodule,wirelesscard,keyboard,andpalmrestwith
ngerprintreaderandtouchpad.
–Optional-serviceCRUs:TheseCRUsareisolatedpartswithinthecomputerthatareconcealedbyanaccess
panelthatistypicallysecuredbymorethantwoscrews.Oncetheaccesspanelisremoved,thespecic
CRUisvisible.
Chapter7.Locations51
Page 58
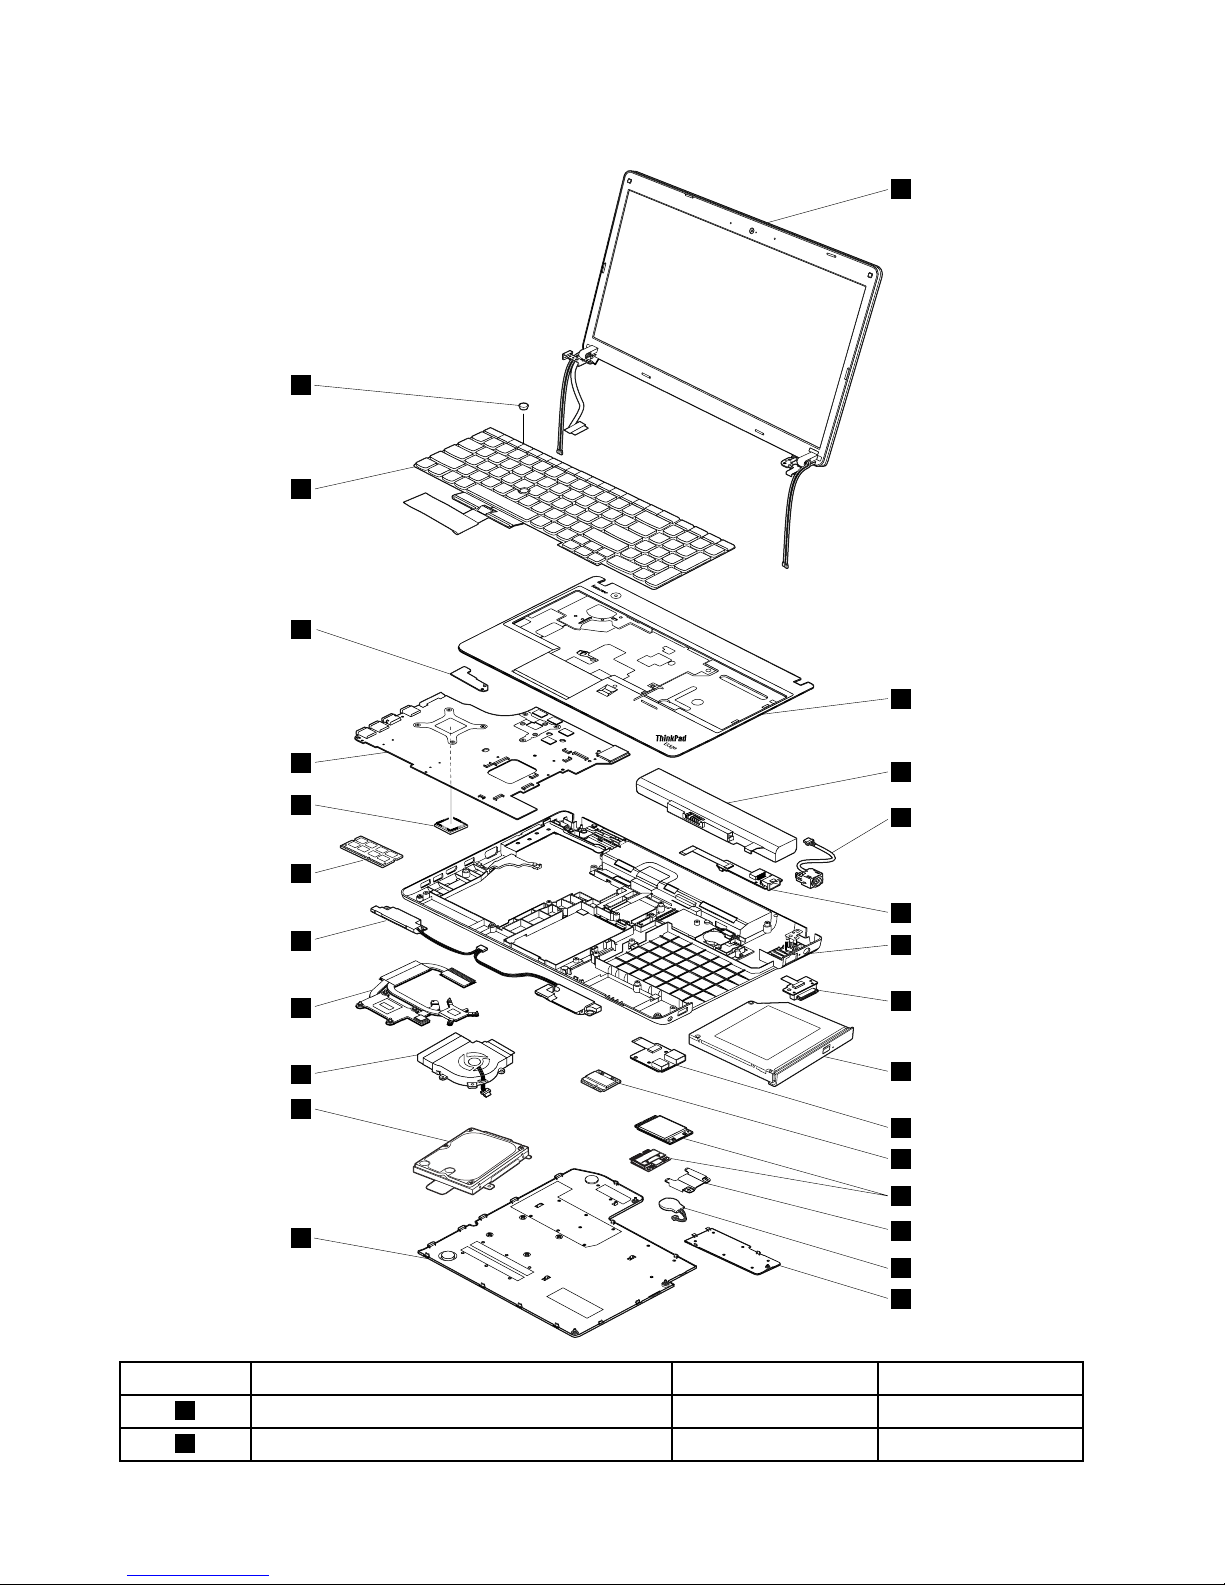
MajorFRUsandCRUs
1
2
1
3
4
5
6
7
8
9
10
11
12
13
14
15
16
17
18
19
20
21
22
23
24
25
No.FRUdescription
Self-serviceCRUOptional-serviceCRU
1
LCDunit
NoNo
2
KeyboardbezelNoNo
52HardwareMaintenanceManual
Page 59

FRUdescriptions
Self-service
CRU
Optionalservice
CRU
3
BatterypackYesNo
4
DC-inconnector
NoNo
5
RJ45subcardNoNo
6
BasecoverassemblyNoNo
7
Opticaldrivesubcard
NoNo
8
Opticaldriveorblankbezel
YesNo
9
I/OsubcardwithUSBconnectorandaudiojack
NoNo
10
WirelessLANcardNoYes
11
WirelessWANcardormSATAsolidstatedrive
NoNo
12
Half-sizewirelessWANcardbracket
NoYes
13
BackupbatteryYesNo
14
Smallbottomcover
YesNo
15
LargebottomcoverY esNo
16
HarddiskdriveYesNo
17
Thermalfan
NoYes
18
ThermalpipesNoNo
19
Speakerassembly
NoNo
20
MemorymoduleYesNo
21
CPU
NoNo
22
Systemboardassembly
NoNo
23
PowerbuttonsubcardNoNo
24
KeyboardNoYes
25
TrackPointcapY esNo
Chapter7.Locations53
Page 60
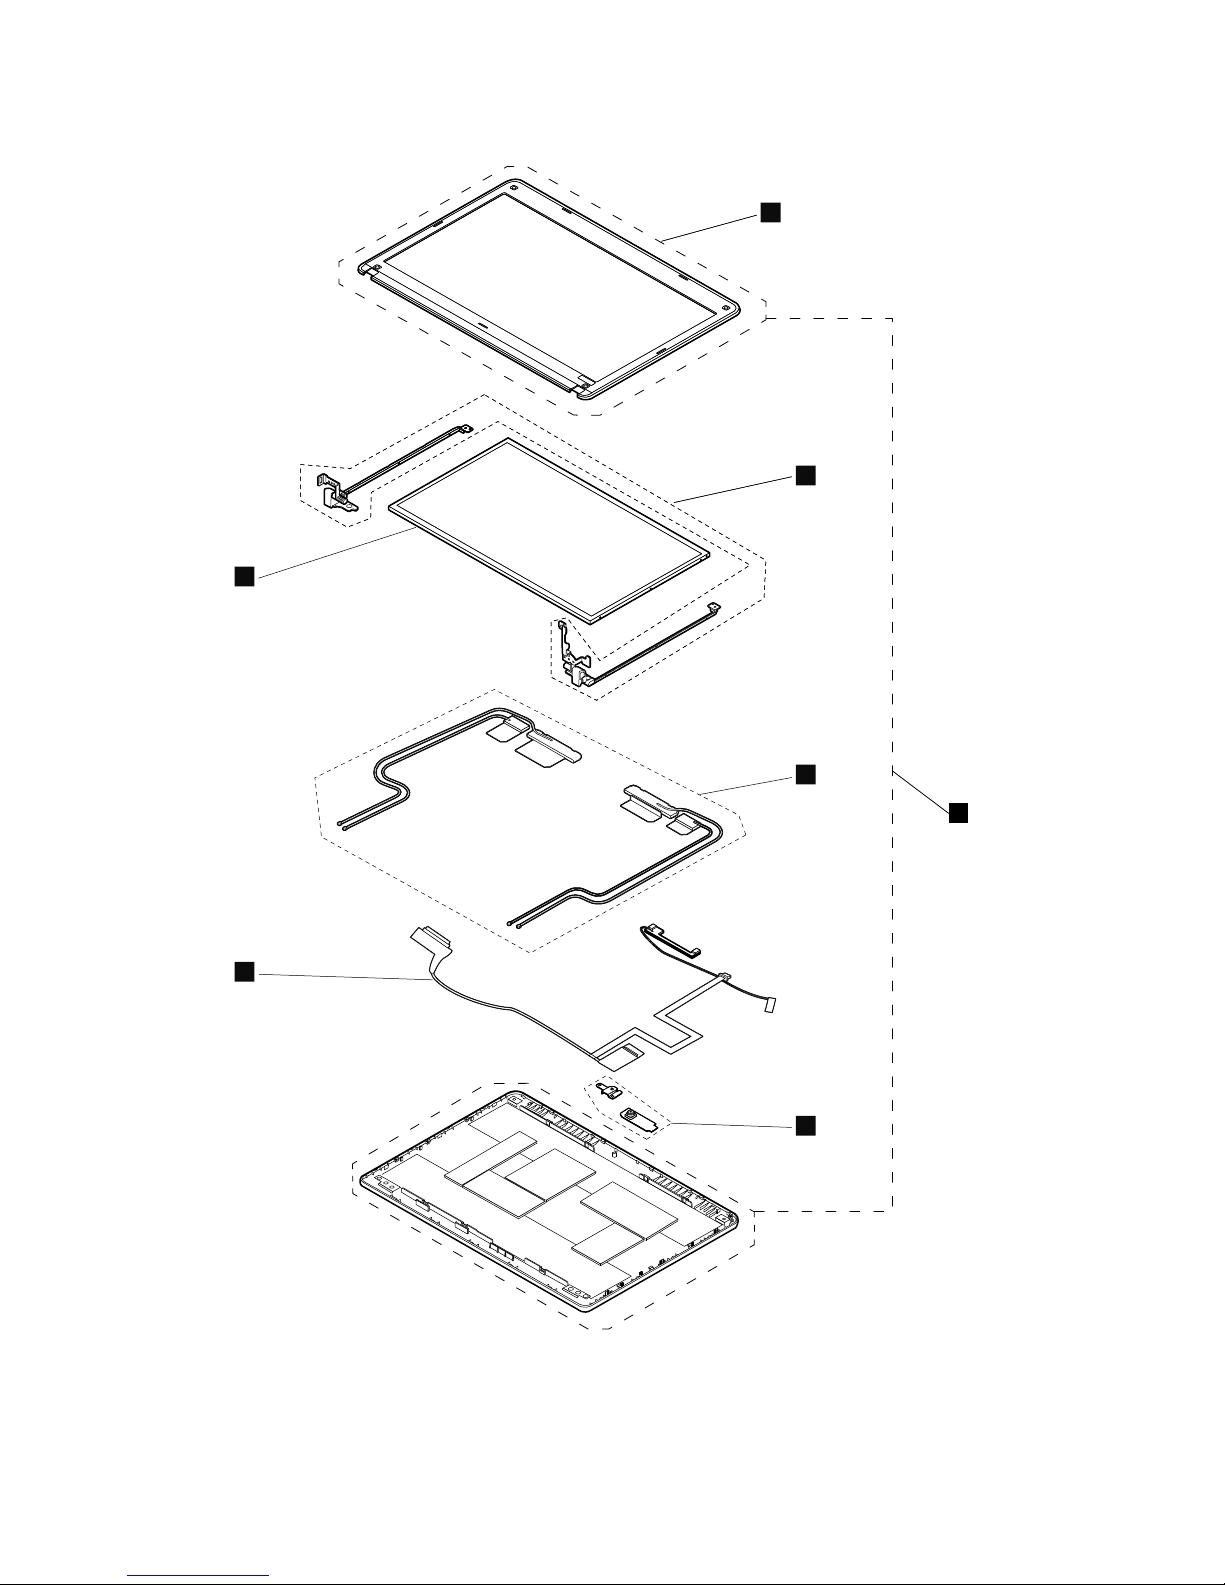
LCDFRUsandCRUs
6
7
2
3
4
2
3
4
6
7
5
11
1
54HardwareMaintenanceManual
Page 61

No.FRUdescription
Self-serviceCRUOptional-serviceCRU
1
LCDbezel
NoNo
2
HingesNoNo
3
WirelessantennaassemblyNoNo
4
IntegratedcameraassemblyNoNo
5
LCDcoverkit
NoNo
6
LCDcable
NoNo
7
LCDpanel
NoNo
MiscellaneouspartsandotherFRUs
Table8.Miscellaneousparts
FRUdescriptions
Self-service
CRU
Optionalservice
CRU
Miscellaneousparts:
•RubbercapLCDmainstream
–Rubberscrewcaptopmainstream
–Rubberscrewcapbottommainstream
•RubbercapLCDretail
–Rubberscrewcaptopretail
–Rubberscrewcapbottomretail
NoNo
Screwkit
NoNo
Table9.OtherFRUs
FRUdescriptions
Self-service
CRU
Optionalservice
CRU
acpoweradapterYesNo
PowercordYesNo
LookingupFRUinformation
FordetailedFRUinformation,includingpartnumbers,descriptions,andsubstitutionpartnumbers,goto
http://www.lenovo.com/serviceparts-lookup.
Chapter7.Locations55
Page 62

56HardwareMaintenanceManual
Page 63

Chapter8.FRUreplacementnotices
CRUstatementforcustomers:
Youcanresolvesomeproblemswithyourproductwithareplacementpartyoucaninstallyourself,called
a“CustomerReplaceableUnit”or“CRU.”SomeCRUsaredesignatedasself-serviceCRUsandothers
aredesignatedasoptional-serviceCRUs.Installationofself-serviceCRUsisyourresponsibility.For
optional-serviceCRUs,youcaneitherinstalltheCRUyourselforyoucanrequestthataServiceProvider
installtheCRUaccordingtothewarrantyserviceforyourproduct.IfyouintendoninstallingtheCRU,
LenovowillshiptheCRUtoyou.CRUinformationandreplacementinstructionsareshippedwithyour
productandareavailablefromLenovoatanytimeuponrequest.YoucanndalistofCRUsforyour
productinthisHardwareMaintenanceManual.Anelectronicversionofthismanualcanbefoundat
http://www.lenovo.com/support.ClickUserGuides&Manualsandthenfollowtheon-screeninstructions
tondthemanualforyourproduct.Y oumightberequiredtoreturnthedefectiveCRU.Whenreturn
isrequired:(1)returninstructions,aprepaidshippinglabel,andacontainerwillbeincludedwiththe
replacementCRU;and(2)youmightbechargedforthereplacementCRUifLenovodoesnotreceivethe
defectiveCRUwithinthirty(30)daysofyourreceiptofthereplacementCRU.SeeyourLenovoLimited
Warrantydocumentationforfulldetails.
Thischapterpresentsnoticesrelatedtoremovingandreplacingparts.Readthischaptercarefullybefore
replacinganyFRU.
Screwnotices
Loosescrewscancauseareliabilityproblem.IntheThinkPadnotebookcomputer,thisproblemisaddressed
withspecialnylon-coatedscrewsthathavethefollowingcharacteristics:
•Theymaintaintightconnections.
•Theydonoteasilycomeloose,evenwithshockorvibration.
•Theyarehardertotighten.
Dothefollowingwhenyouservicethecomputer:
•Keepthescrewkitinyourtoolbag.Forthepartnumberofthescrewkit,goto
http://www.lenovo.com/serviceparts-lookup.
•Itisrecommendedtousenewscrews.
•Itisrecommendedtouseeachscrewonlyonce.
•Useatorquescrewdriverifyouhaveone.
Tightenscrewsasfollows:
•Plastictoplastic
Turnanadditionalangleof90degreesafterthescrewheadtouchesthesurfaceoftheplasticpart.
•Logiccardtoplastic
Turnanadditionalangleof180degreesafterthescrewheadtouchesthesurfaceofthelogiccard.
©CopyrightLenovo2012,2013
57
Page 64

Notes:
•Makesurethatyouusethecorrectscrew.Itisrecommendedtousenewscrewsforreplacements.If
youhaveatorquescrewdriver,tightenallscrewsrmlytothetorquespeciedinthescrewinformation
tableforeachstep.
•Ensuretorquescrewdriversarecalibratedcorrectlyfollowingcountryspecications.
Retainingserialnumbers
Thissectionincludesthefollowingdescriptions:
•“Restoringtheserialnumberofthesystemunit”onpage58
•“RetainingtheUUID”onpage59
•“ReadingorwritingtheECAinformation”onpage59
Restoringtheserialnumberofthesystemunit
Whenthecomputerwasmanufactured,theEEPROMonthesystemboardwasloadedwiththeserial
numbersofthesystemandallmajorcomponents.Thesenumbersneedtoremainthesamethroughout
thelifeofthecomputer.
Ifyoureplacethesystemboard,youmustrestoretheserialnumberofthesystemunittoitsoriginalvalue.
Beforereplacingthesystemboard,savetheoriginalserialnumberbydoingthefollowing:
1.InstallthelatestversionofLENOVOThinkPadHardwareMaintenanceDisketteorMaintenanceKey,
andthenrestartthecomputer.
2.Fromthemainmenu,select1.Setsystemidentication.
3.T urnoffthecomputer,andthenturnonthecomputeragain.
4.WhentheThinkPadlogoisdisplayed,pressEsc.
5.Select2.ReadS/NdatafromEEPROMandfollowtheinstructionsonthescreen.Theserialnumberof
eachdeviceinyourcomputerisdisplayed;theserialnumberofthesystemunitislistedasfollows:
•20Serialnumber
6.Writedownthatnumber.
Note:Theserialnumberofthesystemunitisalsowrittenonthelabelattachedtothebottomofthe
computer.
Afteryouhavereplacedthesystemboard,restoretheserialnumberbydoingthefollowing:
1.InstallthelatestversionofLENOVOThinkPadHardwareMaintenanceDisketteorMaintenanceKey,
andthenrestartthecomputer.
2.Fromthemainmenu,select1.Setsystemidentication.
3.T urnoffthecomputer,andthenturnonthecomputeragain.
4.WhentheThinkPadlogoisdisplayed,pressEsc.
5.Select1.AddS/NdatafromEEPROM.Followtheinstructionsonthescreen.
58HardwareMaintenanceManual
Page 65

IftheMTMandProductIDnumbersdifferfromeachotherontherearlabel,usewhatisshownforthe
ProductIDeld.Seeexamplebelow:
MTMonrearlabel:
TTTT-CTOS/NSSSSSSS
ProductIDonrearlabel:
TTTT-MMM(UsethisnumberwhensettingSerialNumber)
Intheexample,theSerialNumbertobeinputis'1STTTTMMMSSSSSSS'.
RetainingtheUUID
TheUniversallyUniqueIdentier(UUID)isa128-bitnumberuniquelyassignedtoyourcomputerat
productionandstoredintheEEPROMofyoursystemboard.
ThealgorithmthatgeneratesthenumberisdesignedtoprovideuniqueIDsuntiltheyearA.D.3400.Notwo
computersintheworldhavethesamenumber.
Whenyoureplacethesystemboard,followthefollowingstepstocreatenewUUIDforthesystemboardif
thesystemboarddoesnothaveaUUID:
1.InstallthelatestversionofLENOVOThinkPadHardwareMaintenanceDisketteorMaintenanceKey,
andthenrestartthecomputer.
2.Fromthemainmenu,select4.AssignUUID.AnewUUIDiscreatedandwritten.IfavalidUUIDalready
exists,itisnotoverwritten.
ReadingorwritingtheECAinformation
InformationonEngineeringChangeAnnouncements(ECA)arestoredintheEEPROMofthesystemboard.
TheelectronicstorageofthisinformationsimpliestheproceduretocheckiftheECAhasbeenpreviously
appliedtoamachine.ThemachinedoesnotneedtobedisassembledtocheckfortheECAapplication.
TocheckwhatECAshavebeenpreviouslyappliedtothemachine,usetheECAInformationRead/Write
functionontheLENOVOThinkPadHardwareMaintenanceDisketteorMaintenanceKey.
1.InsertthelatestversionofLENOVOThinkPadHardwareMaintenanceDisketteorMaintenanceKey,
andthenrestartthecomputer.
2.Fromthemainmenu,select6.SetECAInformation.
3.T oreadtheECAinformation,select2.ReadECA/reworknumberfromEEPROMandfollowthe
instructionsonthescreen;Toreadboxbuilddate,select5.ReadboxbuilddatefromEEPROM,and
followtheinstructionsonthescreen.
AfteranECAhasbeenappliedtothemachine,theEEPROMmustbeupdatedtoreecttheECA's
application.UsethelatestversionofLENOVOThinkPadHardwareMaintenanceDisketteorMaintenance
KeytoupdatetheEEPROM.
Note:OnlytheECAnumberisstoredintheEEPROM.ThemachinetypeoftheECAisassumedtobethe
sameasthemachinetypeofthemachinethathadtheECAappliedtoit.
1.InsertthelatestversionofLENOVOThinkPadHardwareMaintenanceDisketteorMaintenanceKey,
andthenrestartthecomputer.
2.Fromthemainmenu,select6.SetECAInformation.
3.T owritetheECAinformation,select1.WriteECA/reworknumberfromEEPROM,andfollowthe
instruction;T owriteboxbuilddate,select4.WriteboxbuilddatefromEEPROM,andfollowthe
instructiononthescreen.
Chapter8.FRUreplacementnotices59
Page 66

Ifthesystemboardisbeingreplaced,trytoreadtheECAinformationfromtheoldsystemboardandtransfer
theinformationtothenewsystem.Ifthesystemboardisinoperable,thiswillnotbepossible.
60HardwareMaintenanceManual
Page 67

Chapter9.RemovingorreplacingaFRU
ThischapterprovidesinstructionsonhowtoremoveorreplaceaFRU.
CRUstatementforcustomers:
Youcanresolvesomeproblemswithyourproductwithareplacementpartyoucaninstallyourself,called
a“CustomerReplaceableUnit”or“CRU.”SomeCRUsaredesignatedasself-serviceCRUsandothers
aredesignatedasoptional-serviceCRUs.Installationofself-serviceCRUsisyourresponsibility.For
optional-serviceCRUs,youcaneitherinstalltheCRUyourselforyoucanrequestthataServiceProvider
installtheCRUaccordingtothewarrantyserviceforyourproduct.IfyouintendoninstallingtheCRU,
LenovowillshiptheCRUtoyou.CRUinformationandreplacementinstructionsareshippedwithyour
productandareavailablefromLenovoatanytimeuponrequest.YoucanndalistofCRUsforyour
productinthisHardwareMaintenanceManual.Anelectronicversionofthismanualcanbefoundat
http://www.lenovo.com/support.ClickUserGuides&Manualsandthenfollowtheon-screeninstructions
tondthemanualforyourproduct.Y oumightberequiredtoreturnthedefectiveCRU.Whenreturn
isrequired:(1)returninstructions,aprepaidshippinglabel,andacontainerwillbeincludedwiththe
replacementCRU;and(2)youmightbechargedforthereplacementCRUifLenovodoesnotreceivethe
defectiveCRUwithinthirty(30)daysofyourreceiptofthereplacementCRU.SeeyourLenovoLimited
Warrantydocumentationforfulldetails.
Generalguidelines
WhenremovingorreplacingaFRU,besuretoobservethefollowinggeneralguidelines:
1.Donottrytoserviceanycomputerunlessyouhavebeentrainedandcertied.Anuntrainedpersonruns
theriskofdamagingparts.
2.BeforereplacinganyFRU,reviewChapter8“FRUreplacementnotices”onpage57.
3.BeginbyremovinganyFRUsthathavetoberemovedbeforereplacingthefailingFRU.Anysuch
FRUsarelistedatthebeginningofeachFRUreplacementprocedure.Removethemintheorderin
whichtheyarelisted.
4.FollowthecorrectsequenceinthestepsforremovingaFRU,asgiveninthedrawingsbythenumbers
insquarecallouts.
5.Whenturningascrew,turnitinthedirectionasgivenbythearrowinthedrawing.
6.WhenremovingaFRU,moveitinthedirectionasgivenbythearrowinthedrawing.
7.T oputthenewFRUinplace,reversetheremovalprocedureandfollowanynotesthatpertainto
replacement.Forinformationaboutconnectingandarranginginternalcables,seeChapter7“Locations”
onpage47
.
8.WhenreplacingaFRU,usethecorrectscrew(s)asshowninthereplacementprocedure.
DANGER
BeforeremovinganyFRU,turnoffthecomputer,unplugallpowercordsfromelectricaloutlets,
removethebatterypack,andthendisconnectanyinterconnectingcables.
Attention:AfterreplacingaFRU,donotturnonthecomputeruntilyouhavemadesurethatallscrews,
springs,andothersmallpartsareinplaceandnonearelooseinsidethecomputer.Verifythisbyshaking
thecomputergentlyandlisteningforrattlingsounds.Metallicpartsormetalakescancauseelectrical
shortcircuits.
©CopyrightLenovo2012,2013
61
Page 68
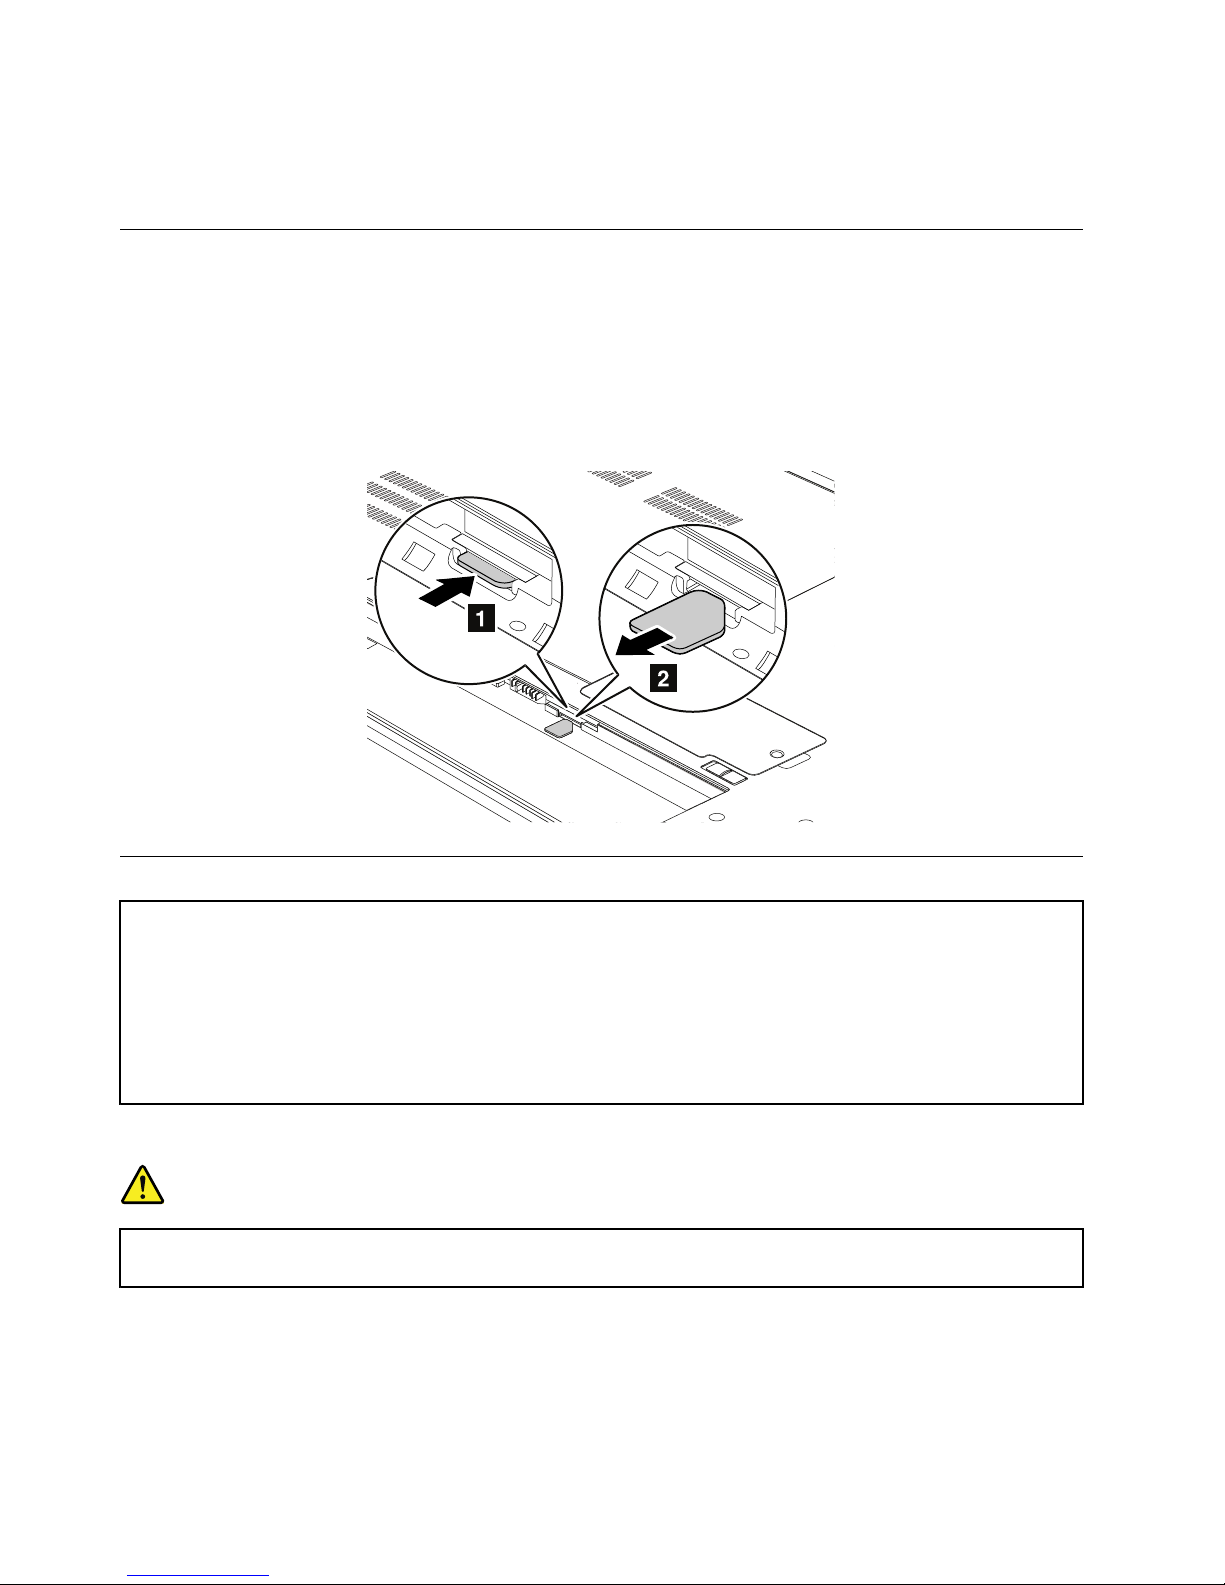
Attention:Thesystemboardissensitiveto,andcanbedamagedby,electrostaticdischarge.Before
touchingit,establishpersonalgroundingbytouchingagroundpointwithonehandorbyusingan
electrostaticdischarge(ESD)strap.
BeforeservicingThinkPadEdgeE530andE530cmodels
SomeThinkPadEdgeE530andE530cmodelsyouareservicingmighthavetheSIMcardthatthecustomer
hasinstalled.IfthecomputeryouareservicinghastheSIMcardinstalled,removeitbeforeyoustart
theservicing.
ToremovetheSIMcard,youneedtoremovethebatterypackrst.See“1010Batterypack”onpage62.
Afteryounishtheservicing,makesurethatyouinsertthecardbackintotheslotrmly.
1010Batterypack
Importantnoticeforreplacingabatterypack:
•TheLenovoSolutionCenterprogramprovidesanautomaticbatterydiagnostictestthatdeterminesifthebattery
packisdefective.AbatterypackFRUshouldnotbereplacedunlessthisdiagnostictestshowsthatthebatteryis
defective.Theonlyexceptiontothisisifthebatterypackisphysicallydamagedoracustomerisreporting
apossiblesafetyissue.
•IfLenovoSolutionCenterisnotinstalledinthecomputer,thecustomershoulddownloadthisprogrambeforea
non-physicallydamagedbatterypackisreplaced.Notethataphysicallydamagedbatterypackisanon-warranty
replacementpart.
Removalstepsofbatterypack
DANGER
Useonlytheauthorizedbatteryspeciedforyourcomputer .Anyotherbatterycouldigniteor
explode.
62HardwareMaintenanceManual
Page 69
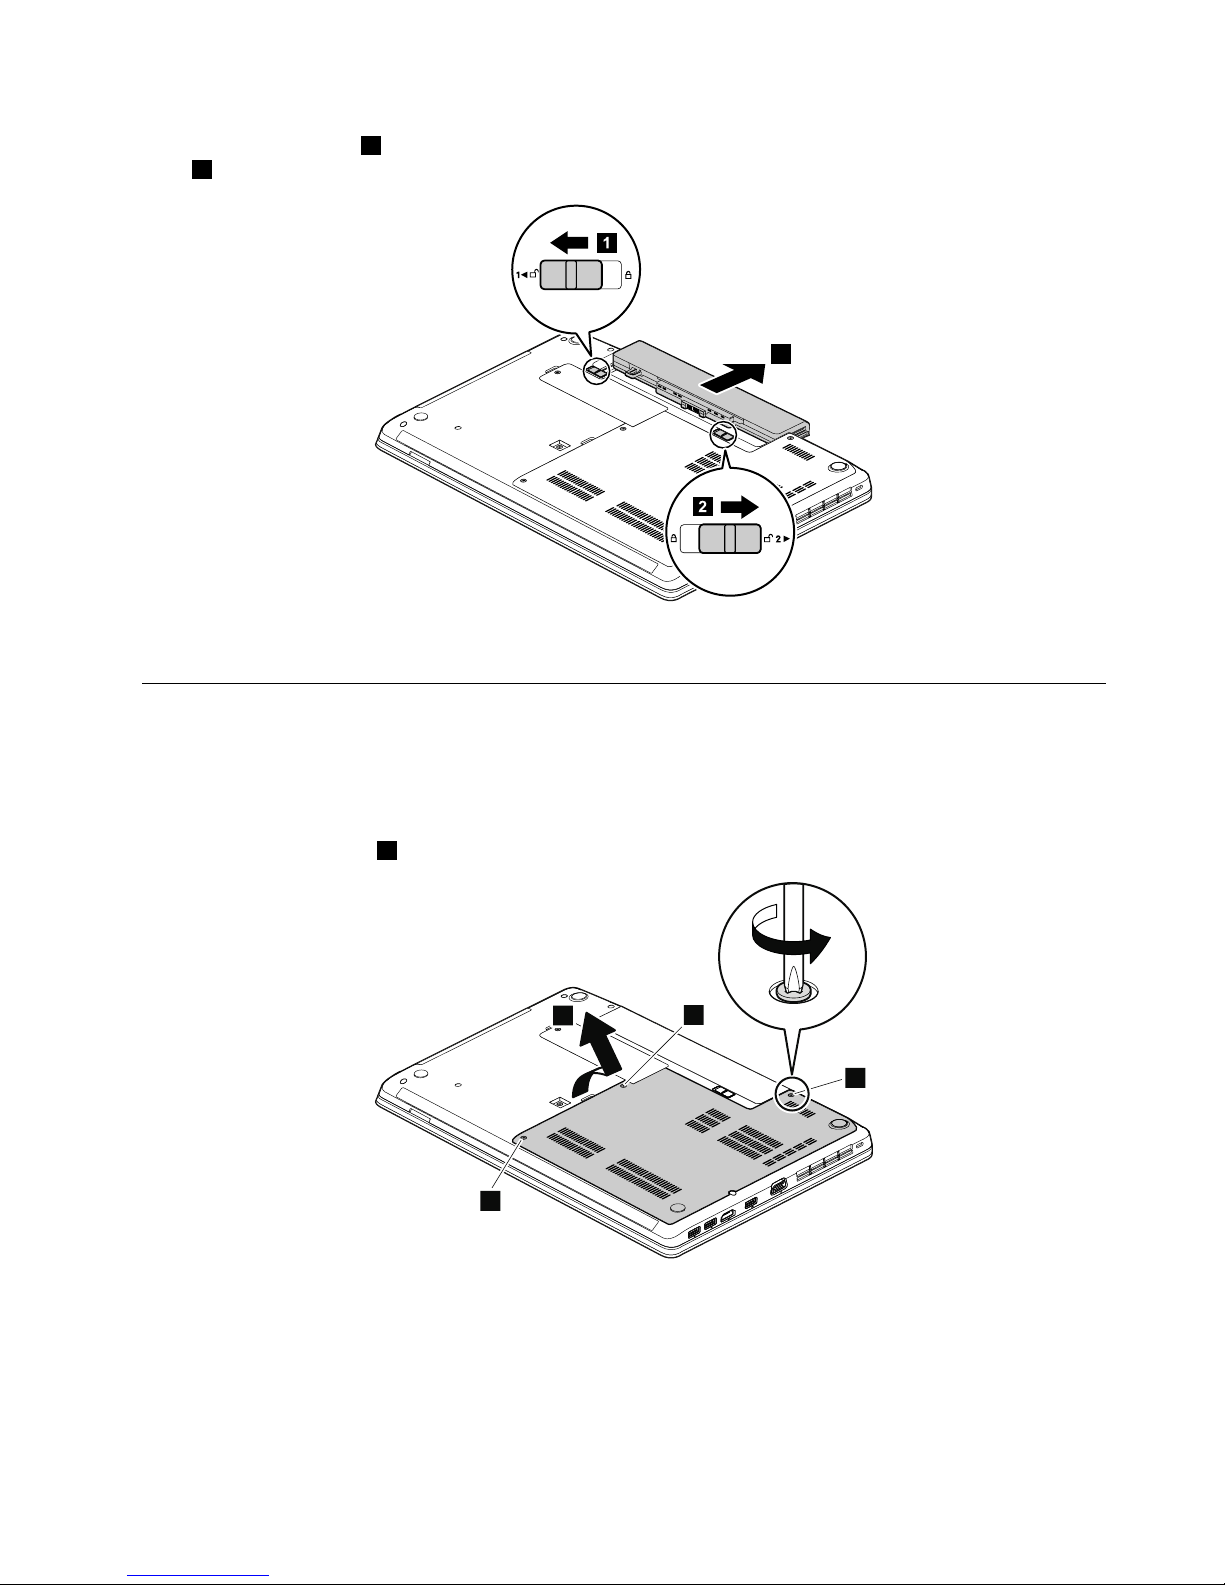
Unlockthebatterylatch1.Holdthebatterylockleverintheunlockedposition,andremovethebattery
pack2.
2
2
1
Wheninstalling:Installthebatterypackintheslot.Makesurethatthebatterylatchisinthelockedposition.
1020Largebottomcover
Foraccess,removethisFRU:
•“1010Batterypack”onpage62
Removalstepsoflargebottomcover
Note:Loosenthescrews1.
2
1
1
1
Chapter9.RemovingorreplacingaFRU63
Page 70
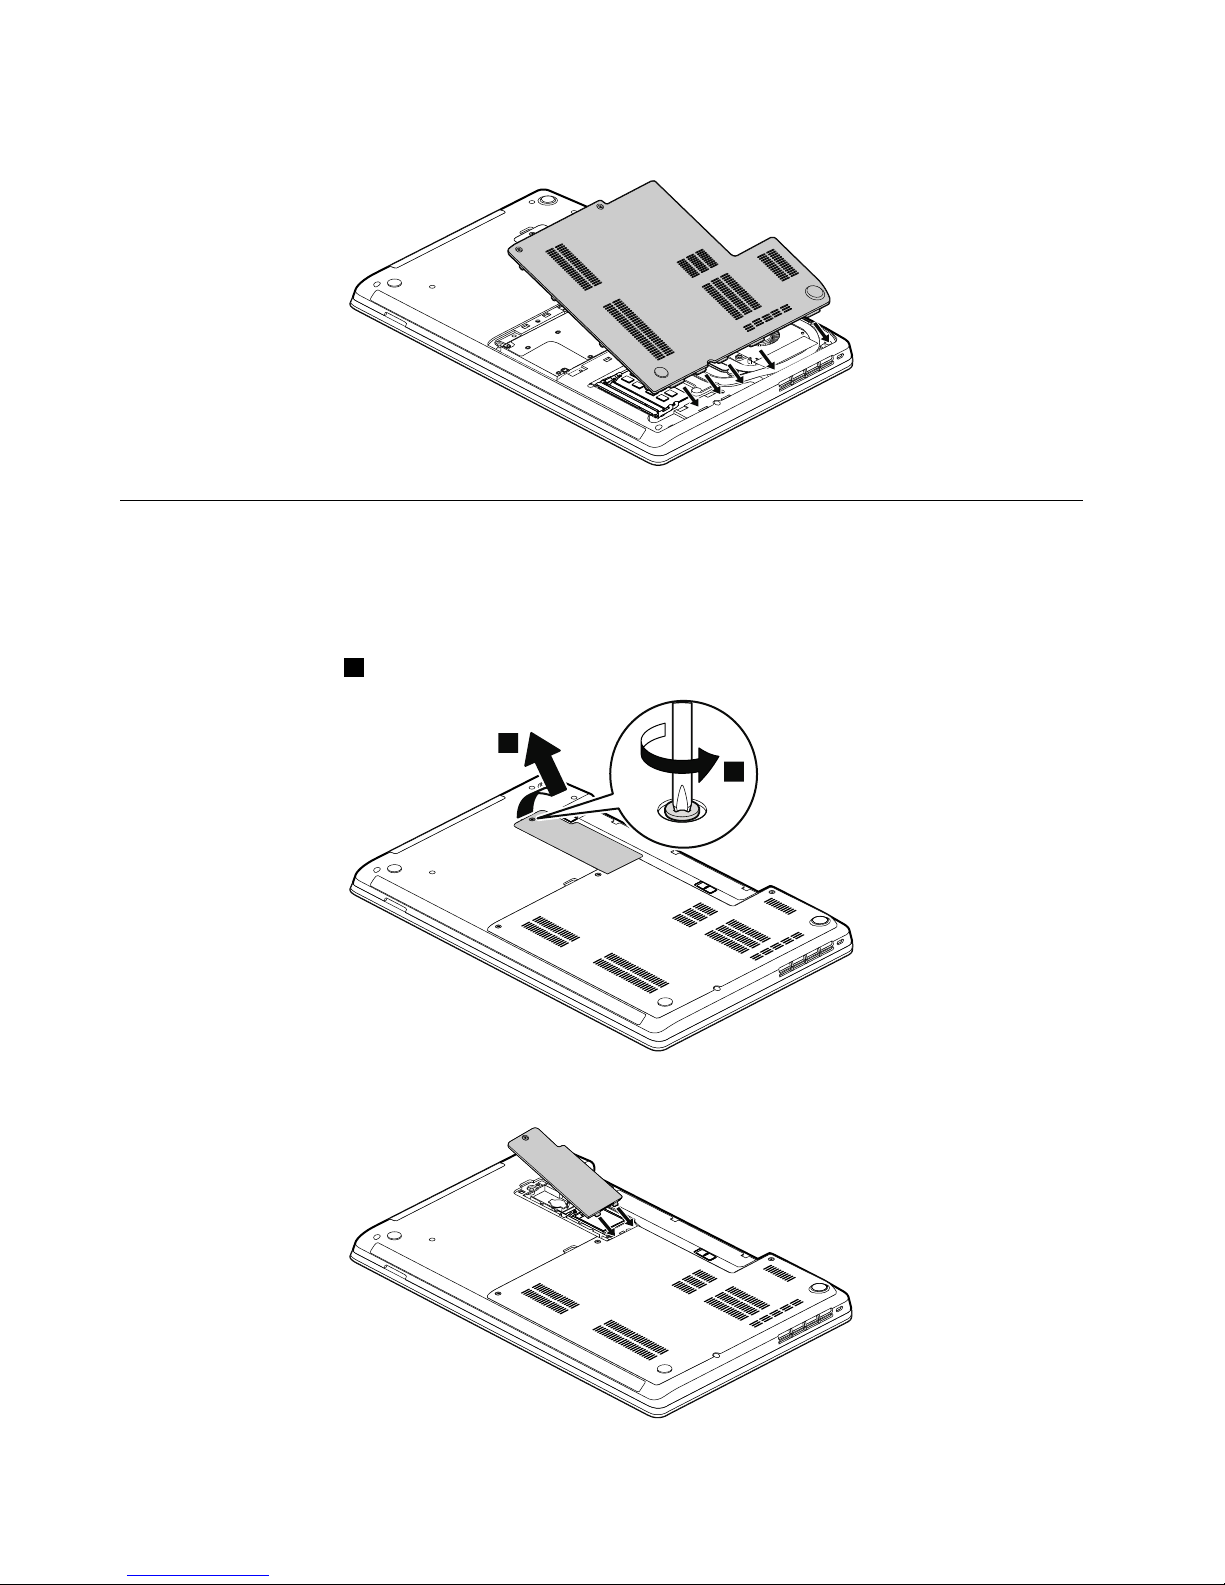
Wheninstalling:Attachthelargebottomcoverasshowninthefollowingillustration.
1030Smallbottomcover
Foraccess,removethisFRU:
•“1010Batterypack”onpage62
Removalstepsofsmallbottomcover
Note:Loosenthescrew1.
2
1
Wheninstalling:Attachthesmallbottomcoverasshowninthefollowingillustration.
64HardwareMaintenanceManual
Page 71
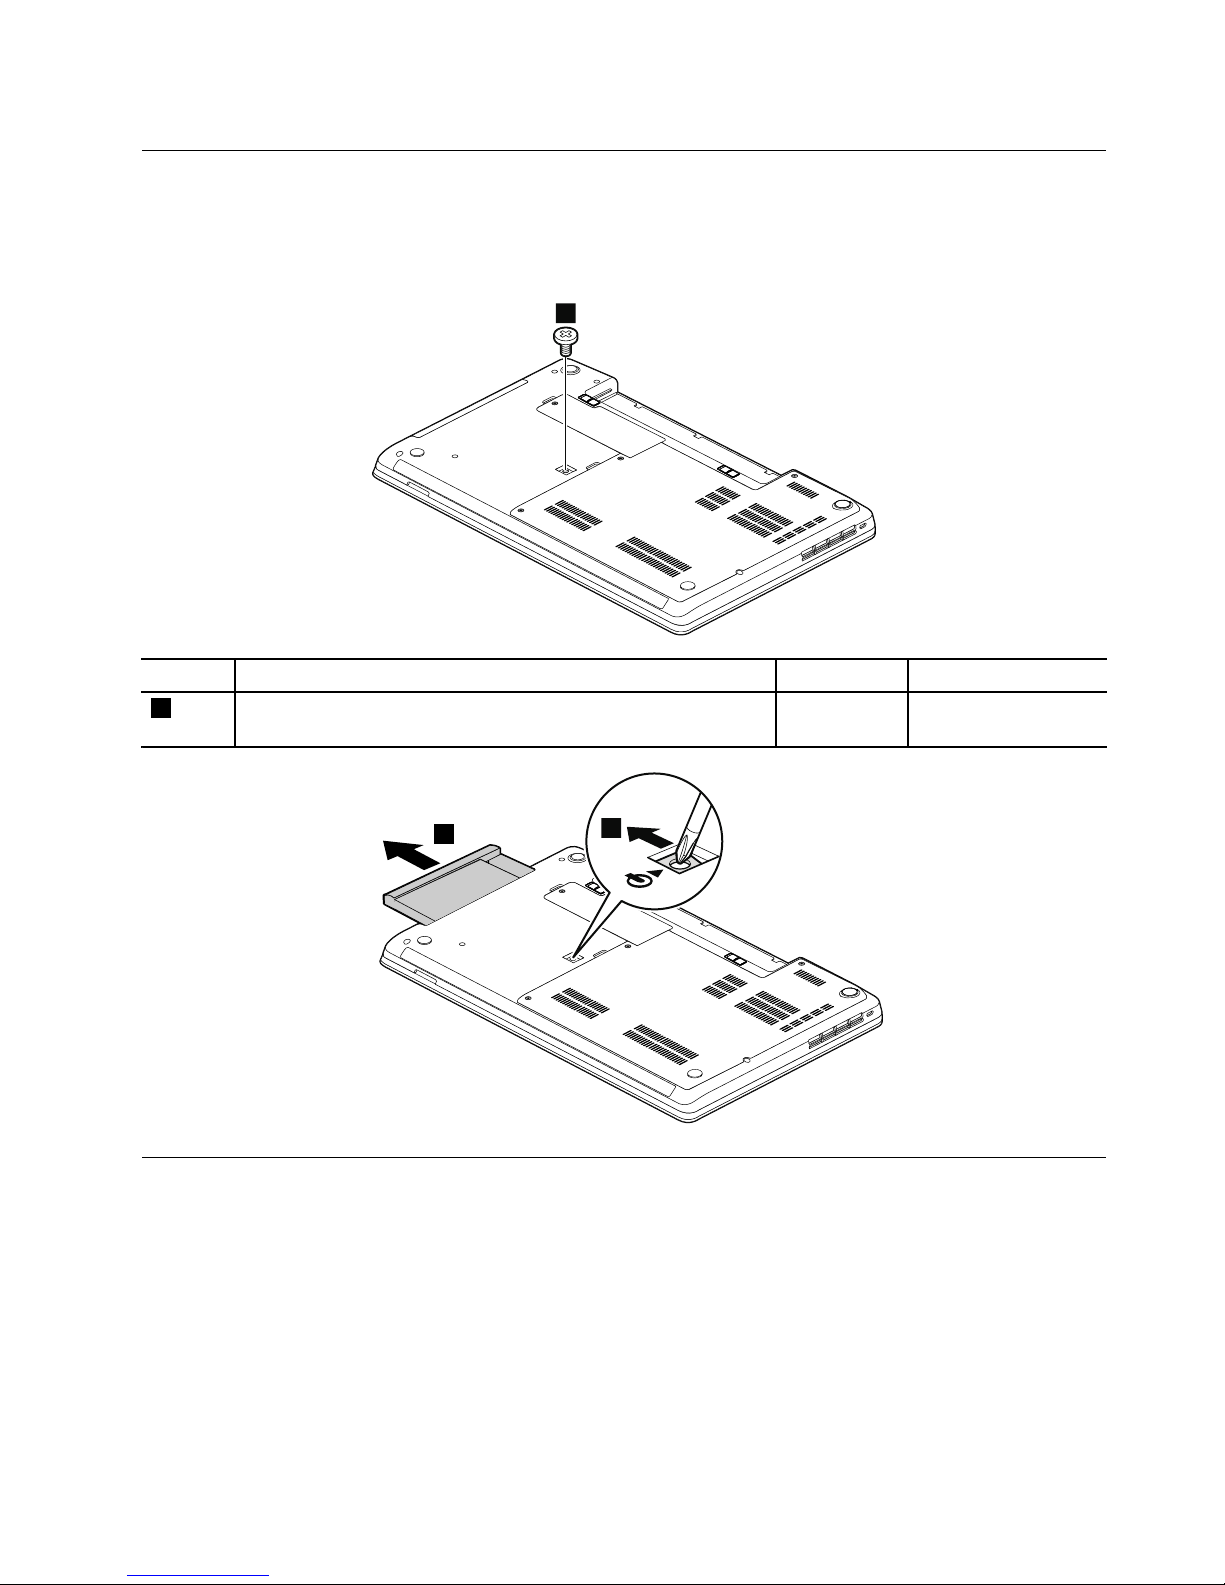
1040Opticaldriveorblankbezel
Foraccess,removetheseFRUsinorder:
•“1010Batterypack”onpage62
Removalstepsofopticaldriveorblankbezel
1
StepScrew(quantity)Color
Torque
1
M2×3mm,wafer-head,nylon-coated(1)
Black0.181Nm
(1.85kgf-cm)
2
3
1050Memorymodules
Foraccess,removetheseFRUsinorder:
•“1010Batterypack”onpage62
•“1020Largebottomcover”onpage63
Chapter9.RemovingorreplacingaFRU65
Page 72
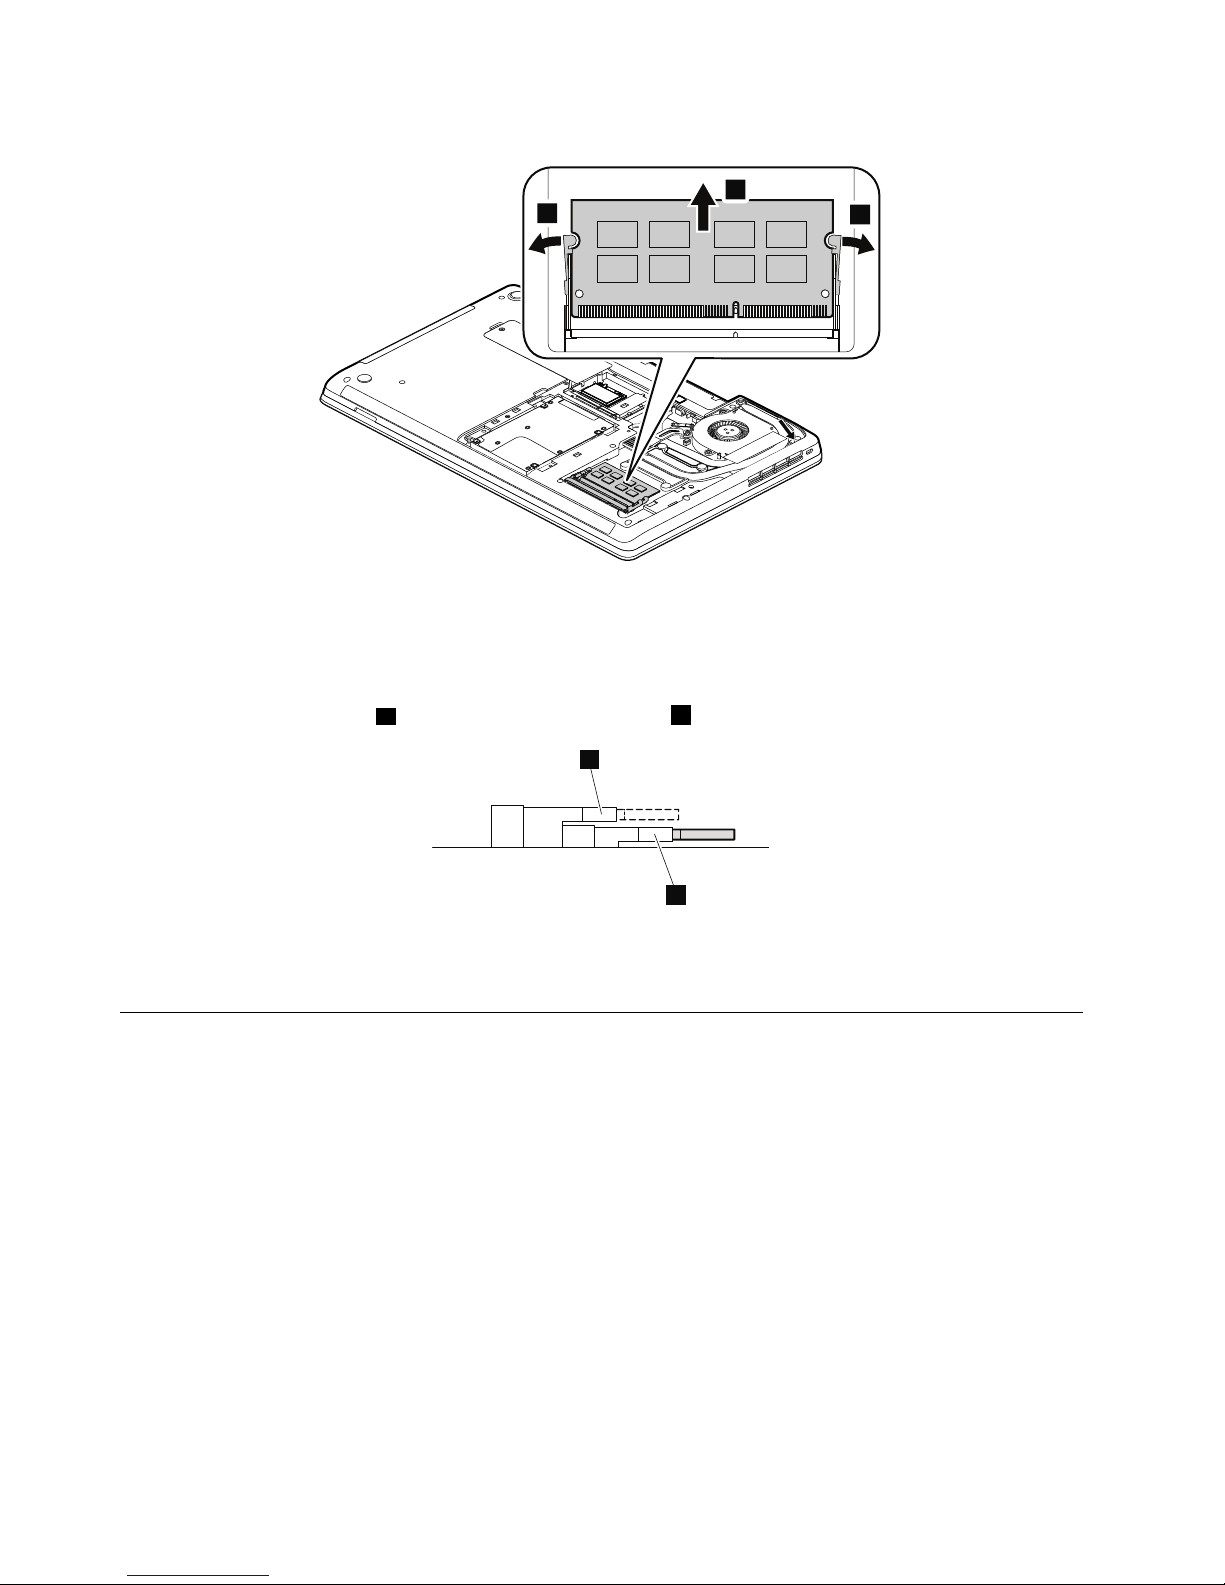
Removalstepsofmemorymodules
2
1
1
Note:Y ourmodelmightlookslightlydifferentfromtheillustrationabove.
Wheninstalling:
Note:Ifonlyonememorymoduleistobeinstalledonthecomputeryouareservicing,thememorymodule
mustbeinstalledinSLOT-0(alowerslot),butnotinSLOT -1(bupperslot).
b
a
Insertthenotchedendofthememorymoduleintotheslot.Pressthememorymodulermly,andpivotit
untilitsnapsintoplace.Makesurethatitisrmlyinstalledintheslotanddoesnotmoveeasily.
1060Harddiskdriveassembly
Foraccess,removetheseFRUsinorder:
•“1010Batterypack”onpage62
•“1020Largebottomcover”onpage63
Attention:
•Donotdropthedriveorapplyanyphysicalshocktoit.Thedriveissensitivetophysicalshock.Improper
handlingcancausedamageandpermanentlossofdata.
•Beforeremovingthedrive,havetheusermakeabackupcopyofalltheinformationonitifpossible.
•Neverremovethedrivewhilethecomputerisoperatingorisinsuspendmode.
66HardwareMaintenanceManual
Page 73
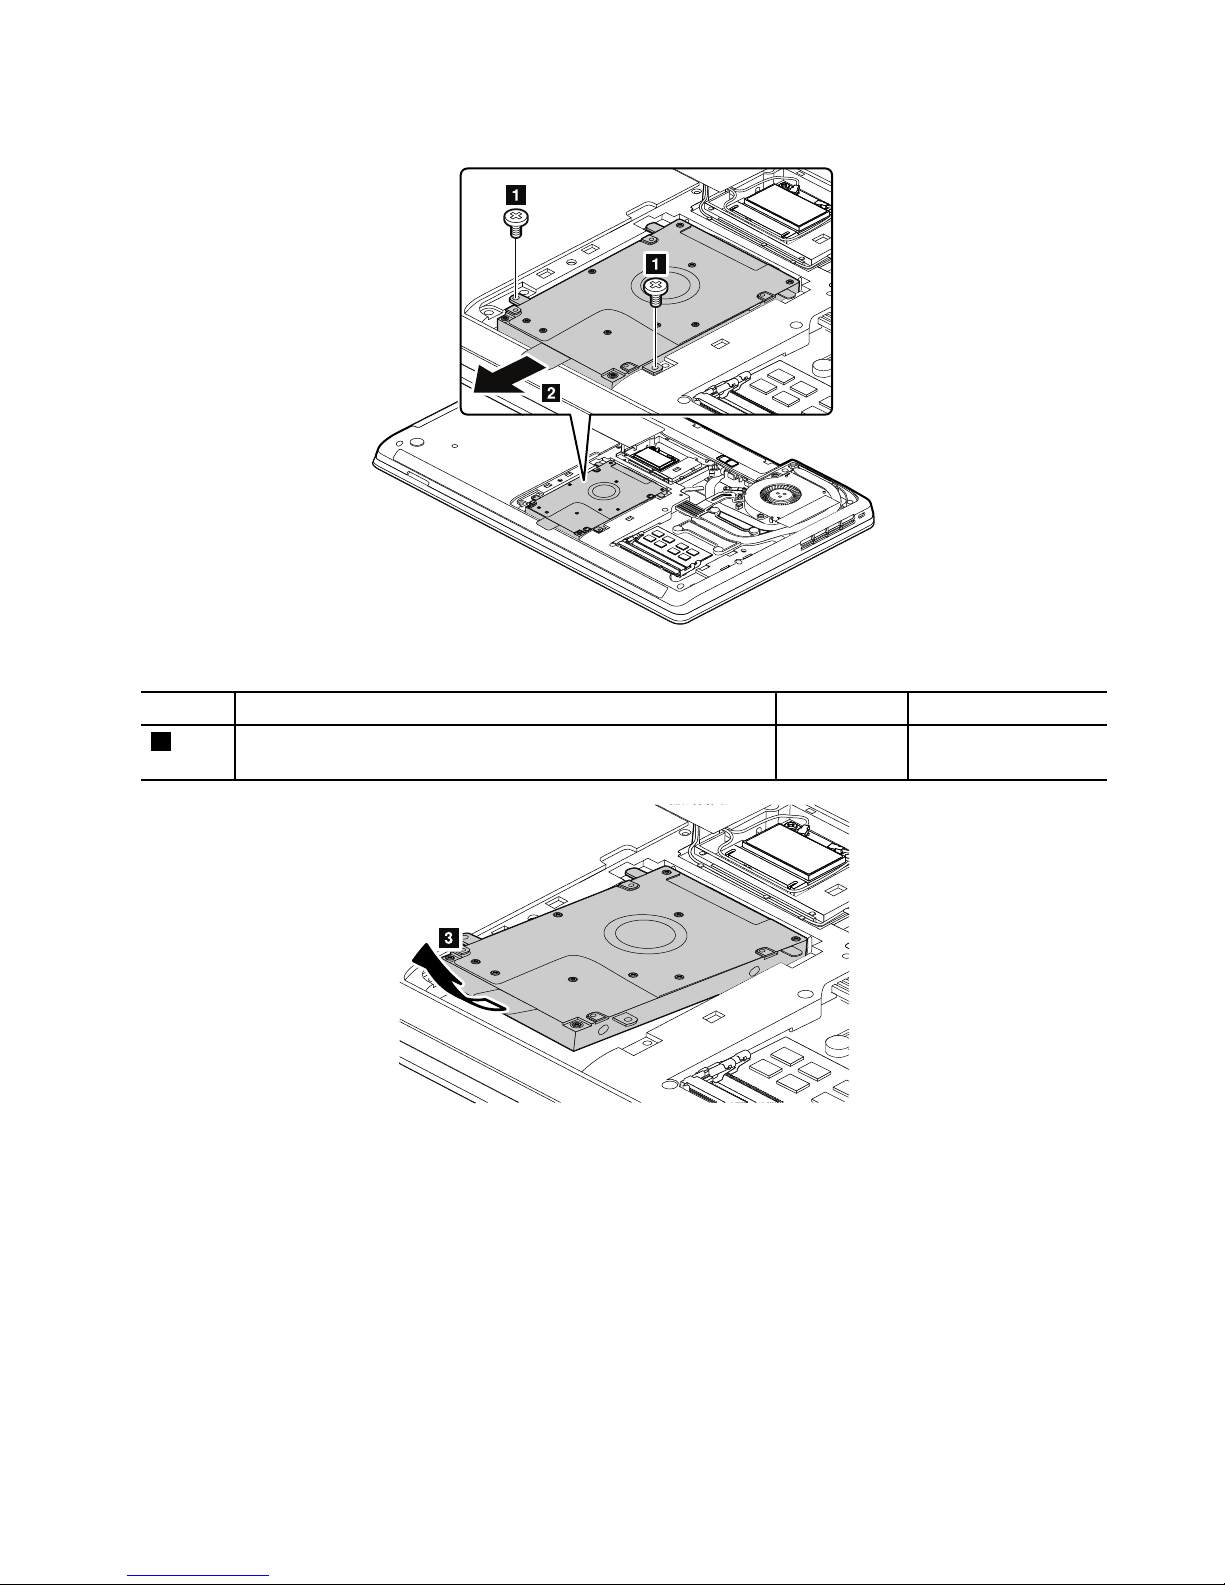
Removalstepsofharddiskdriveassembly
Note:Y ourmodelmightlookslightlydifferentfromtheillustrationabove.
StepScrew(quantity)Color
Torque
1
M2×3mm,wafer-head,nylon-coated(2)
Black0.181Nm
(1.85kgf-cm)
Wheninstalling:Makesurethattheharddiskdriveisattachedrmly.
Chapter9.RemovingorreplacingaFRU67
Page 74
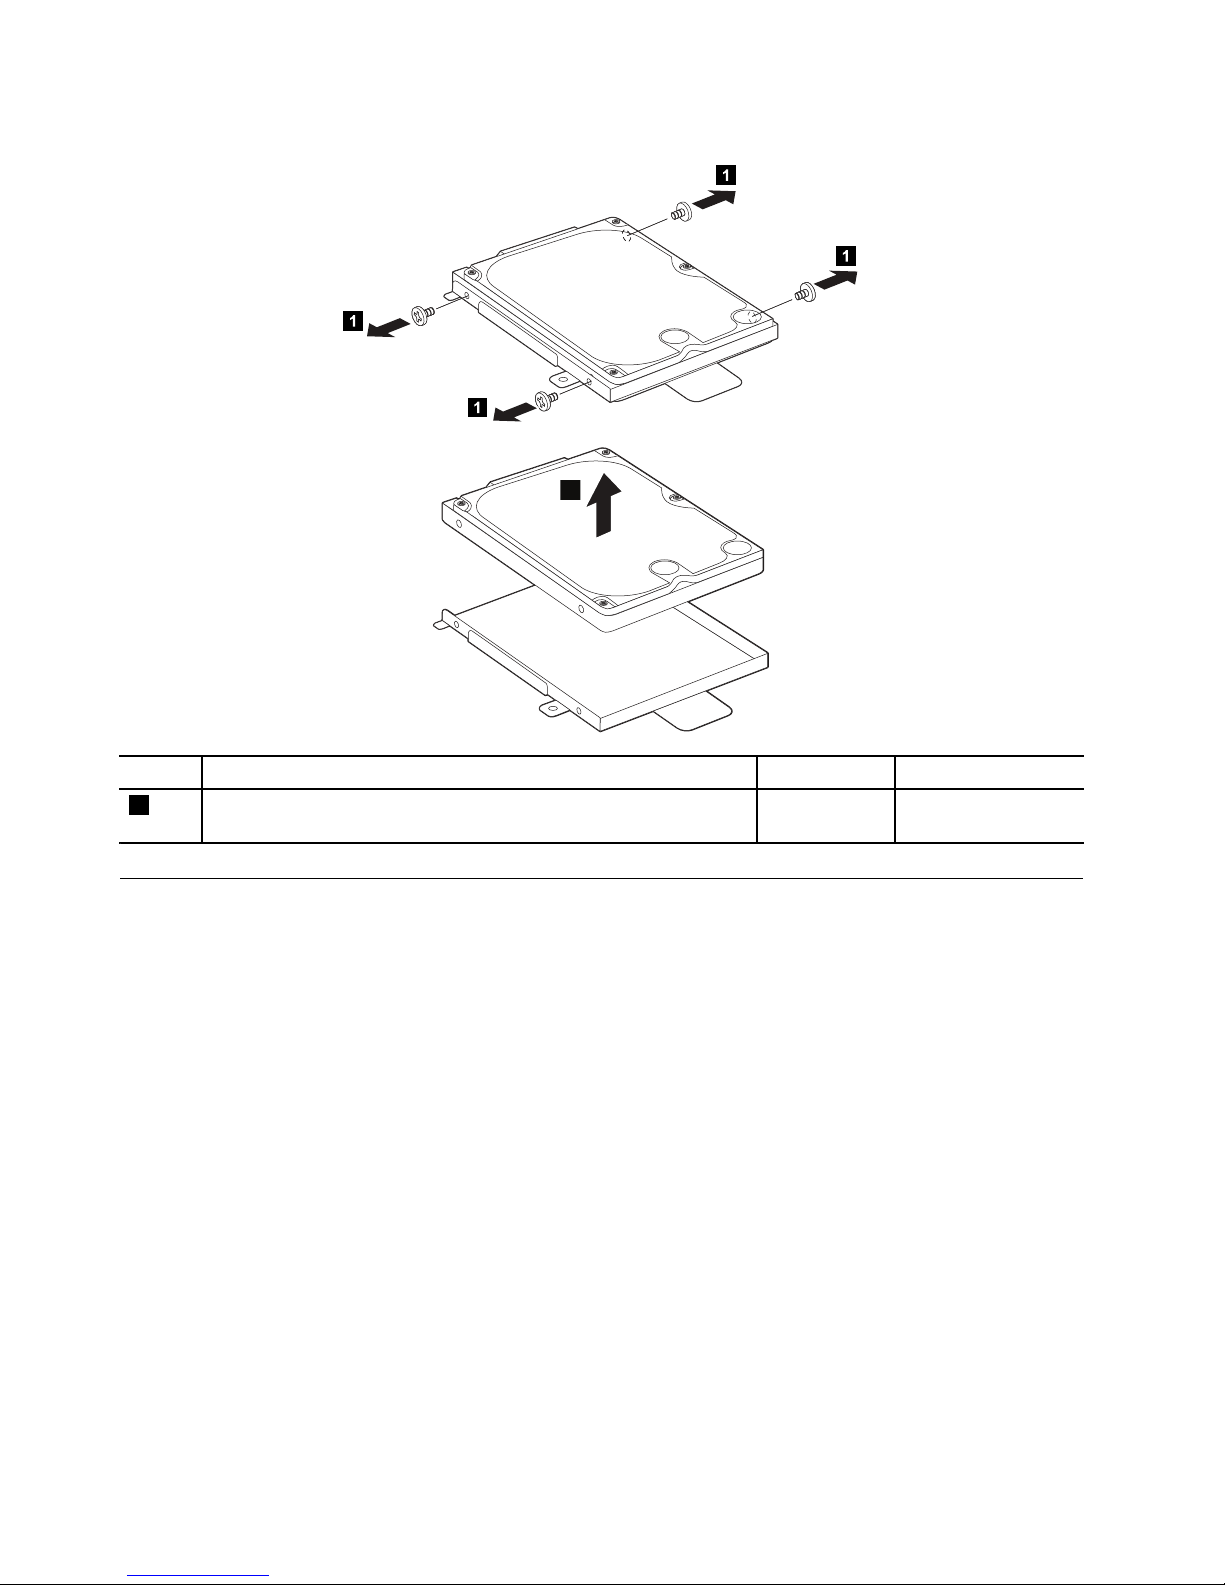
Removalstepsofharddiskdrivebracket
1
1
1
1
2
StepScrew(quantity)Color
Torque
1
M3×3mm,wafer-head,nylon-coated(4)Silver
0.392Nm
(4kgf-cm)
1070PCIExpressMiniCardforwirelessLAN
Foraccess,removetheseFRUsinorder:
•“1010Batterypack”onpage62
•“1020Largebottomcover”onpage63
68HardwareMaintenanceManual
Page 75
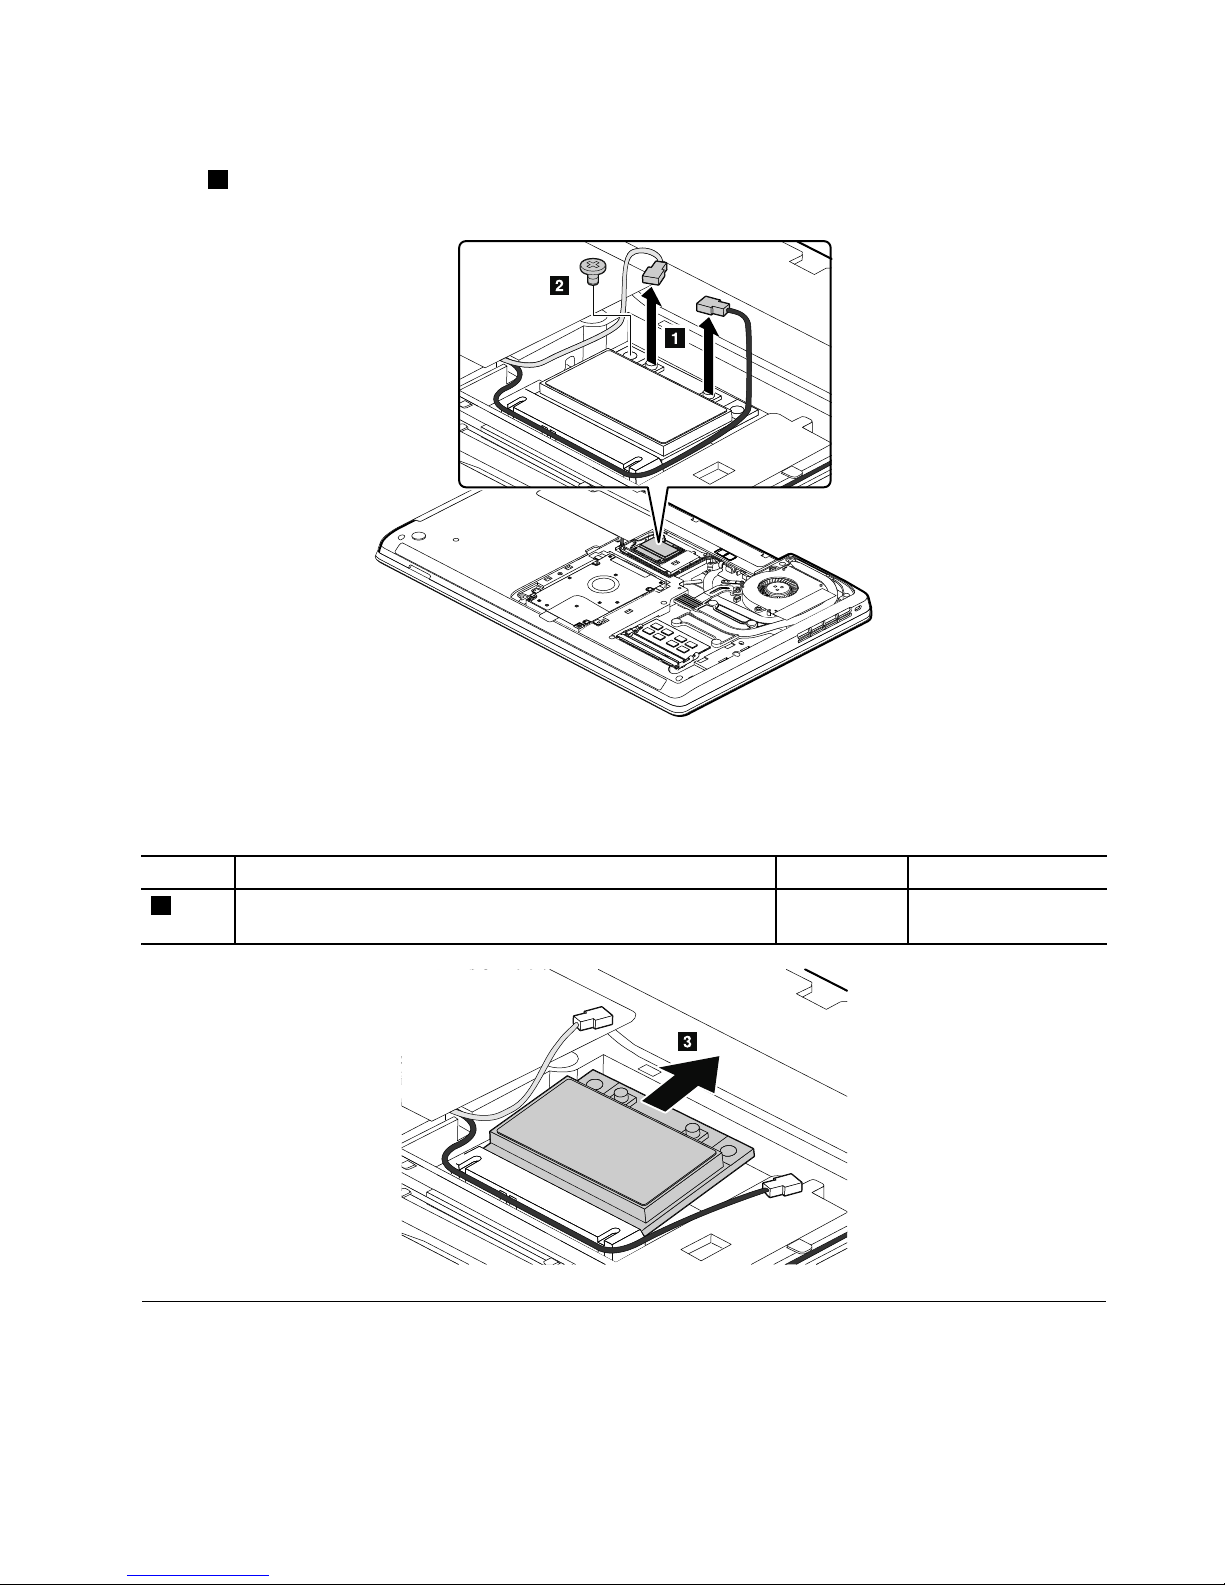
RemovalstepsofPCIExpressMiniCardforwirelessLAN
Instep1,unplugtheconnectorsbyusingtheantennaRFconnectorremovaltoolorpicktheconnectors
withyourngersandgentlyunplugtheminthedirectionofthearrows.
Note:Y ourmodelmightlookslightlydifferentfromtheillustrationabove.
Wheninstalling:PlugthegraycableintothejackmarkedMAINorM,andtheblackcableintothejack
markedAUXorAonthecard.
StepScrew(quantity)Color
Torque
2
M2×3mm,wafer-head,nylon-coated(1)
Black0.181Nm
(1.85kgf-cm)
1080PCIExpressMiniCardforwirelessWANormSA TAsolidstatedrive
Foraccess,removetheseFRUsinorder:
•“1010Batterypack”onpage62
•“1030Smallbottomcover”onpage64
Chapter9.RemovingorreplacingaFRU69
Page 76
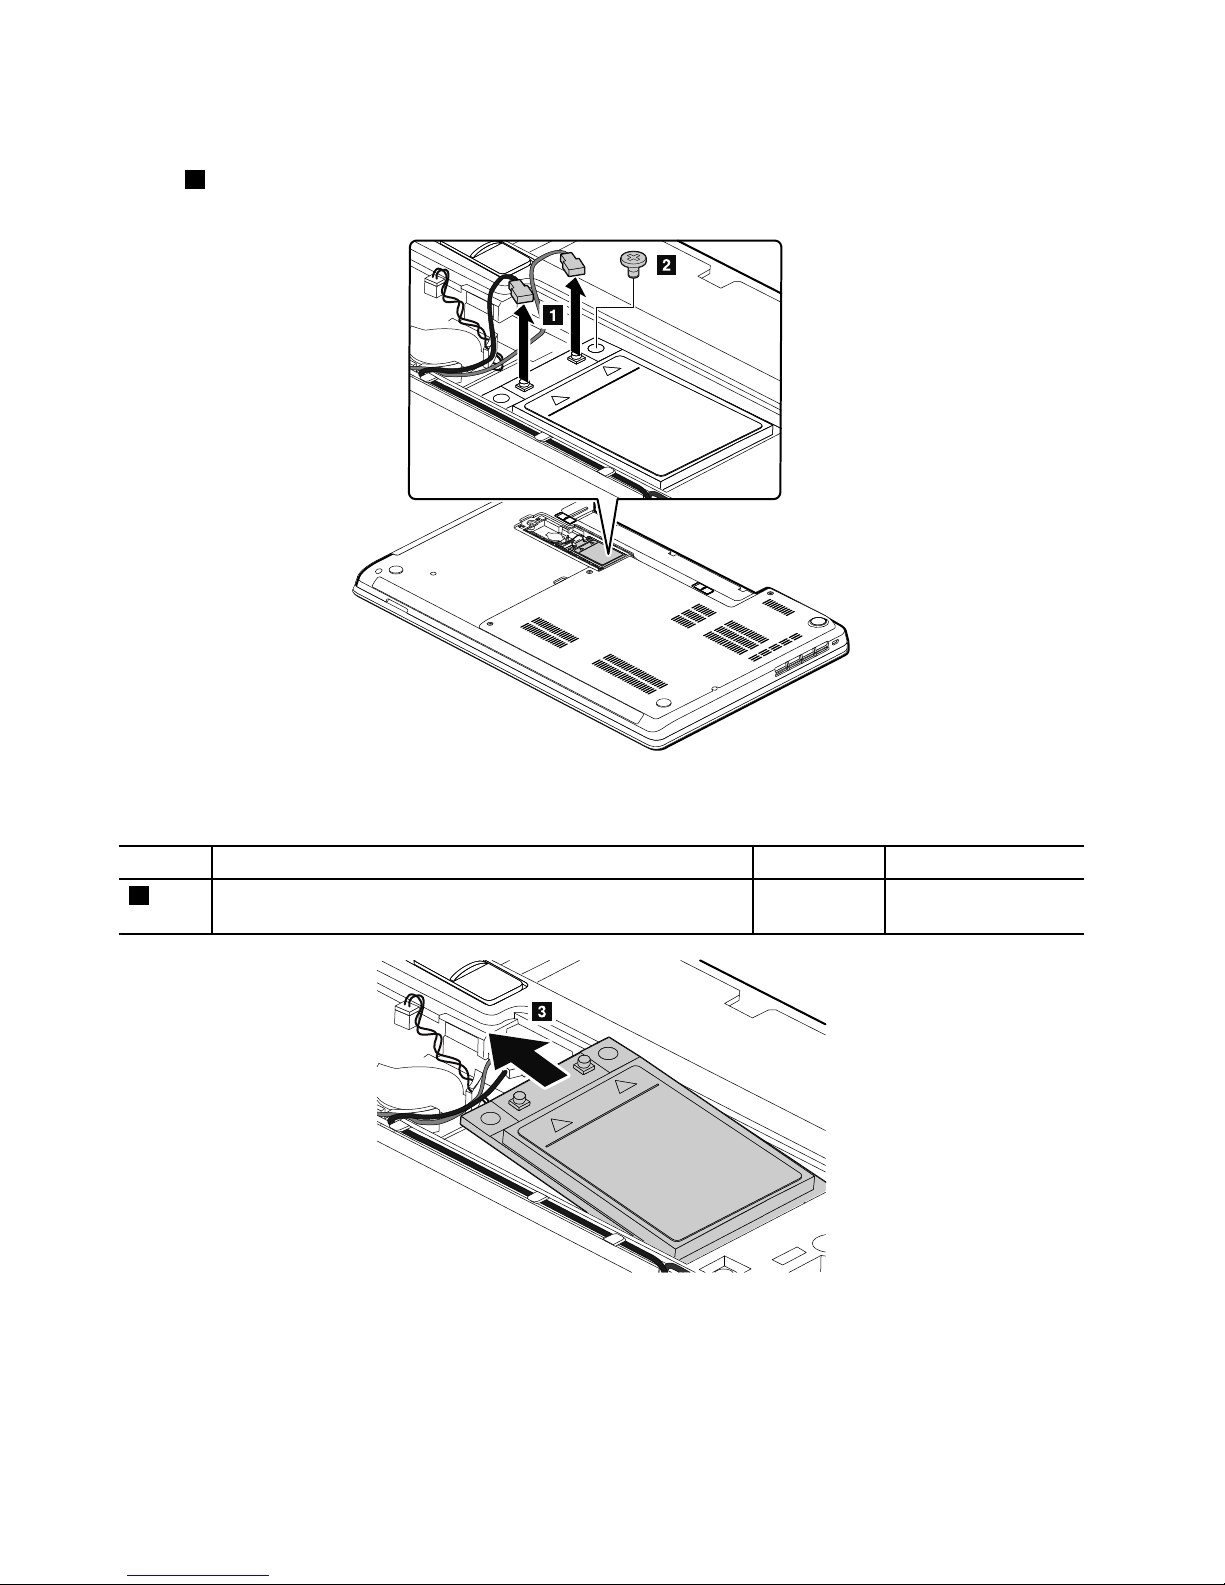
RemovalstepsofPCIExpressMiniCardforwirelessWAN
Instep1,unplugtheconnectorsbyusingtheantennaRFconnectorremovaltoolorpicktheconnectors
withyourngersandgentlyunplugtheminthedirectionofthearrows.
Wheninstalling:PlugtheredcableintothejackmarkedMAIN,andthebluecableintothejackmarked
AUXonthecard.
StepScrew(quantity)Color
Torque
2
M2×3mm,wafer-head,nylon-coated(1)
Black0.181Nm
(1.85kgf-cm)
70HardwareMaintenanceManual
Page 77
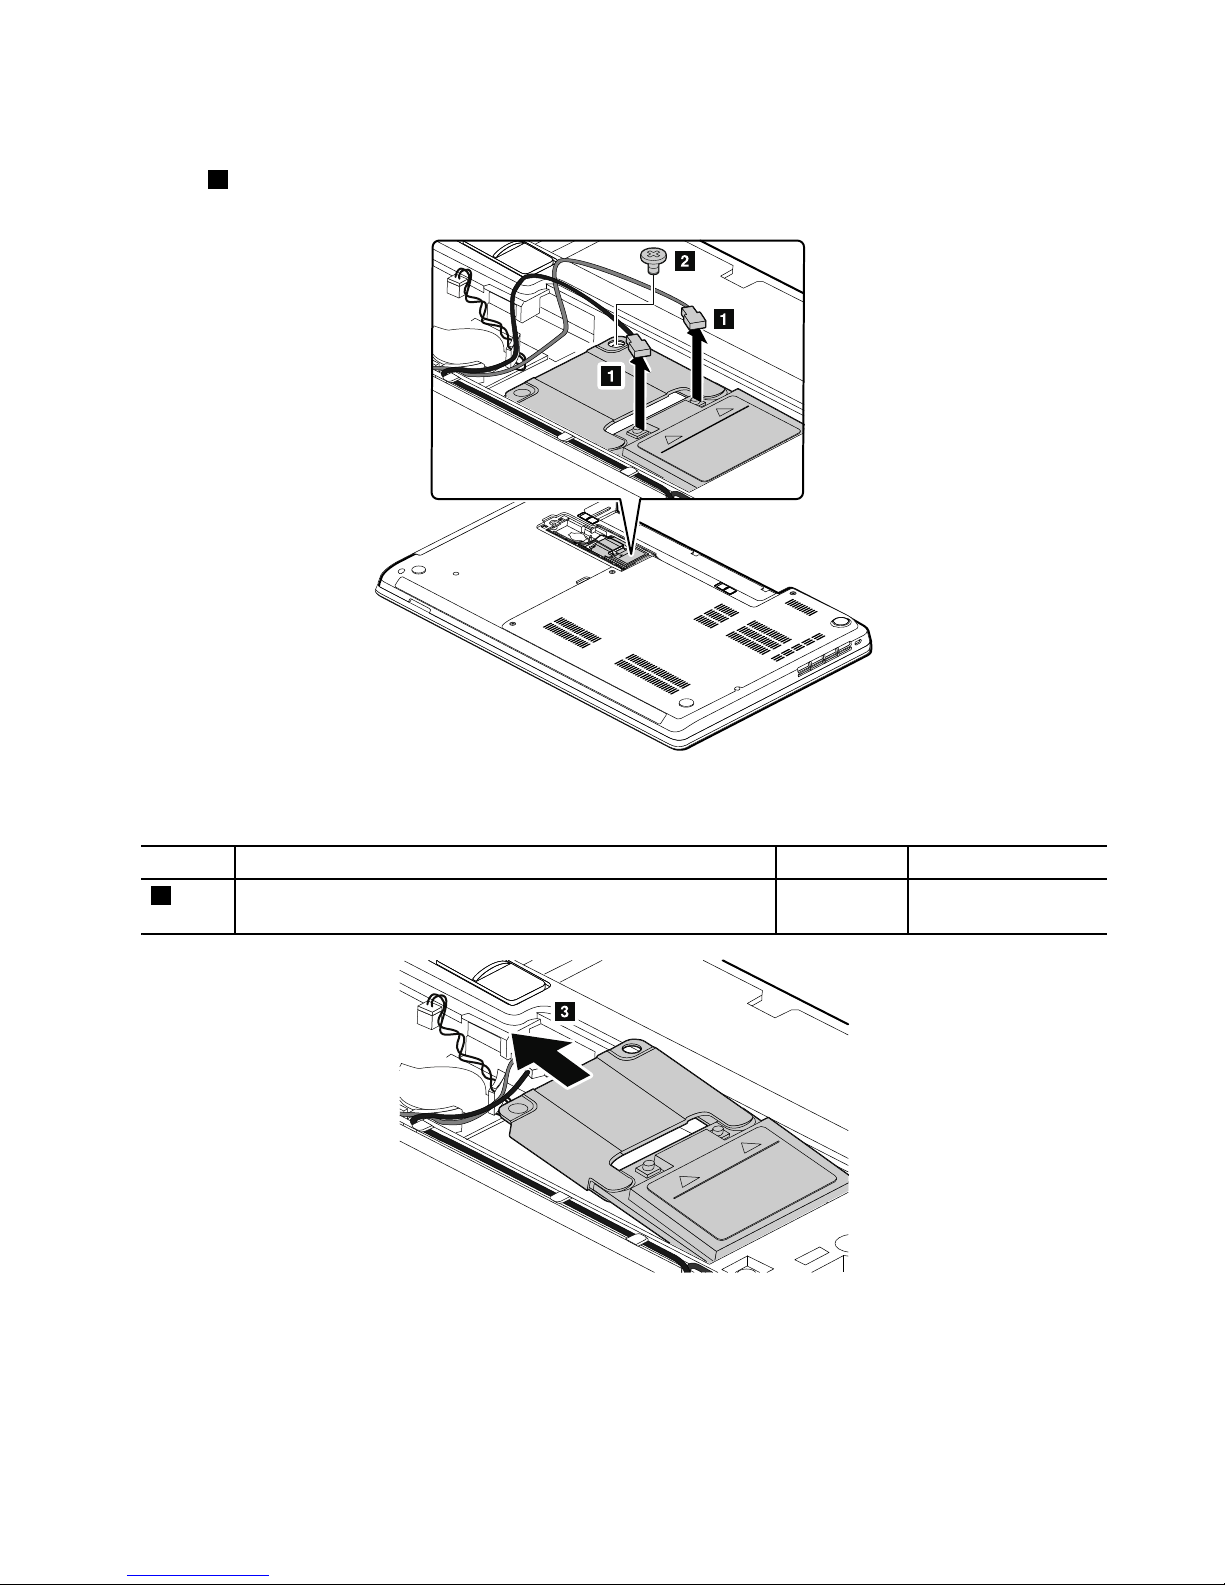
RemovalstepsofPCIExpressHalfMiniCardforwirelessWAN
Instep1,unplugtheconnectorsbyusingtheantennaRFconnectorremovaltoolorpicktheconnectors
withyourngersandgentlyunplugtheminthedirectionofthearrows.
Wheninstalling:PlugtheredcableintothejackmarkedMAIN,andthebluecableintothejackmarked
AUXonthecard.
StepScrew(quantity)Color
Torque
2
M2×3mm,wafer-head,nylon-coated(1)
Black0.181Nm
(1.85kgf-cm)
Chapter9.RemovingorreplacingaFRU71
Page 78
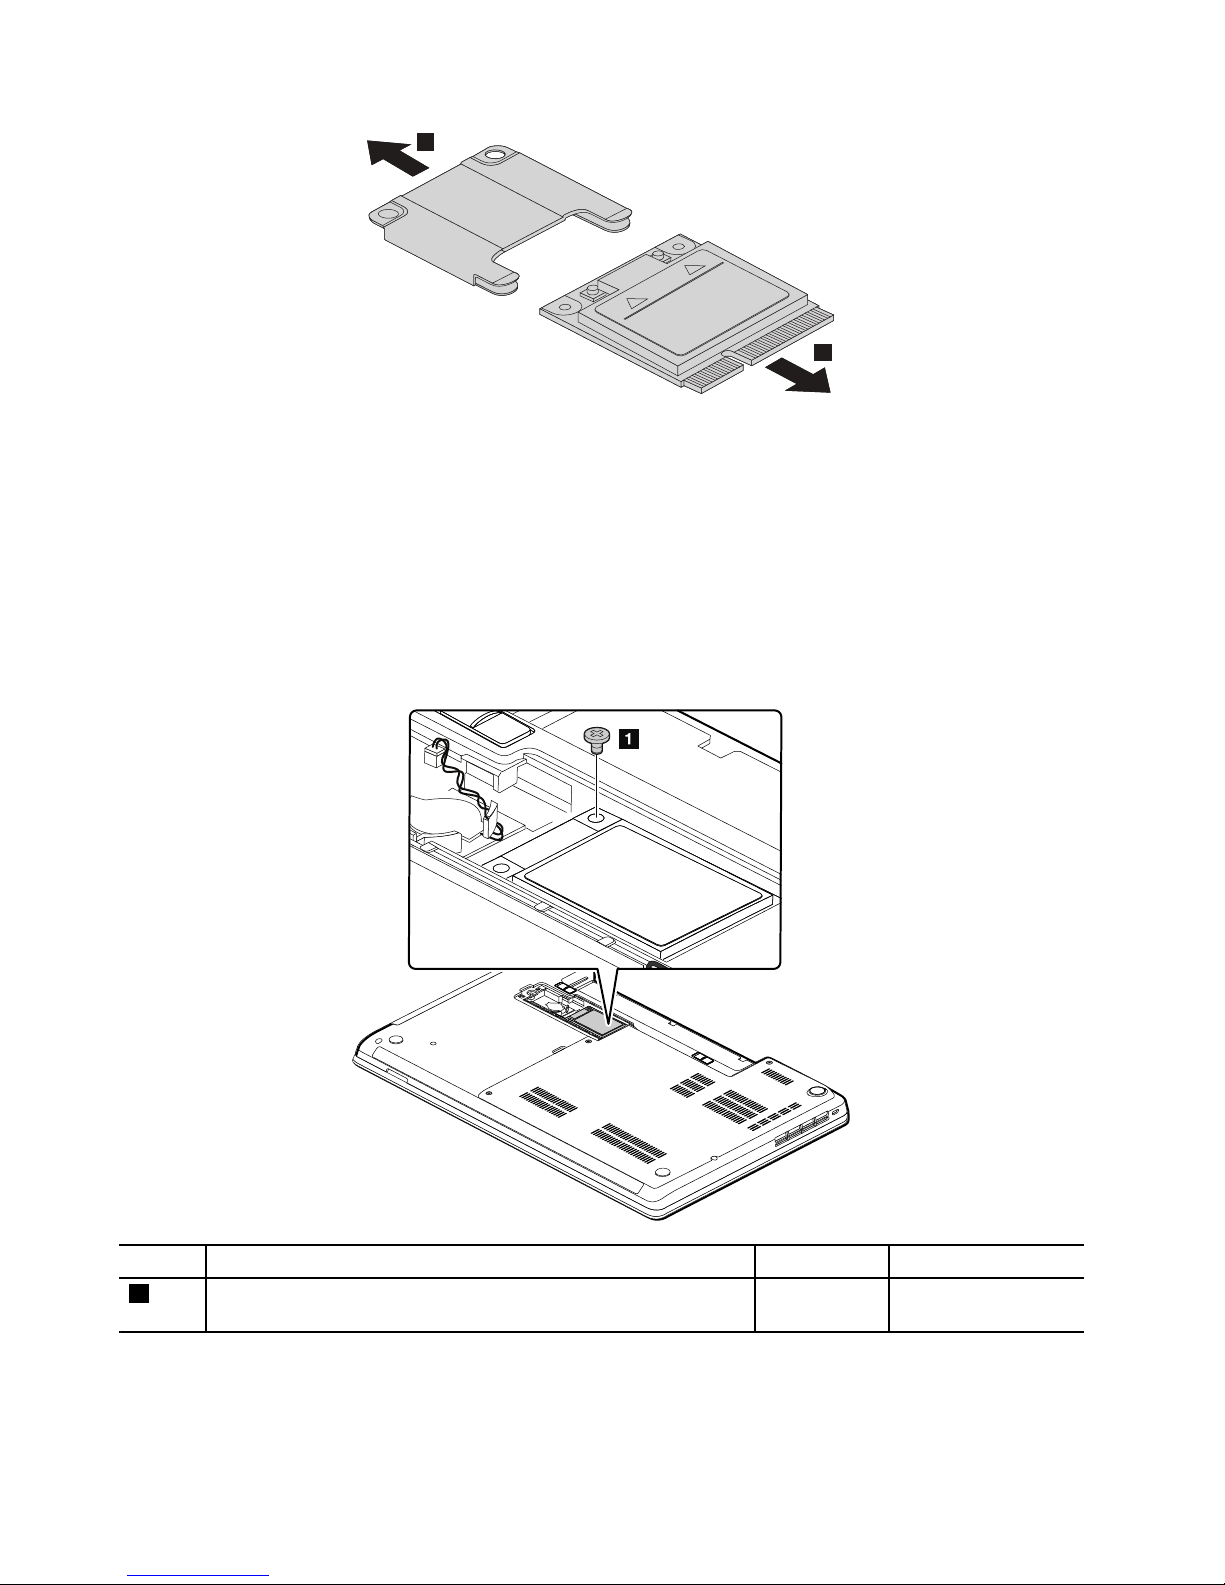
4
4
RemovalstepsofmSATAsolidstatedrive
Attention:
•Donotdropthedriveorapplyanyphysicalshocktoit.Thedriveissensitivetophysicalshock.Improper
handlingcancausedamageandpermanentlossofdata.
•Beforeremovingthedrive,havetheusermakeabackupcopyofalltheinformationonitifpossible.
•Neverremovethedrivewhilethecomputerisoperatingorisinsuspendmode.
•EnsurethatyoupartitionthemSATAsolid-statedriveafterinstallingitonthecomputeryouareservicing.
Otherwise,themSATAsolid-statedrivewillnotfunctioncorrectly.Forinstructionsononhowtopartition
anmSA T Asolid-statedrive,gotohttp://www.lenovo.com/support/msata-fru.
StepScrew(quantity)Color
Torque
1
M2×3mm,wafer-head,nylon-coated(1)
Black0.181Nm
(1.85kgf-cm)
72HardwareMaintenanceManual
Page 79
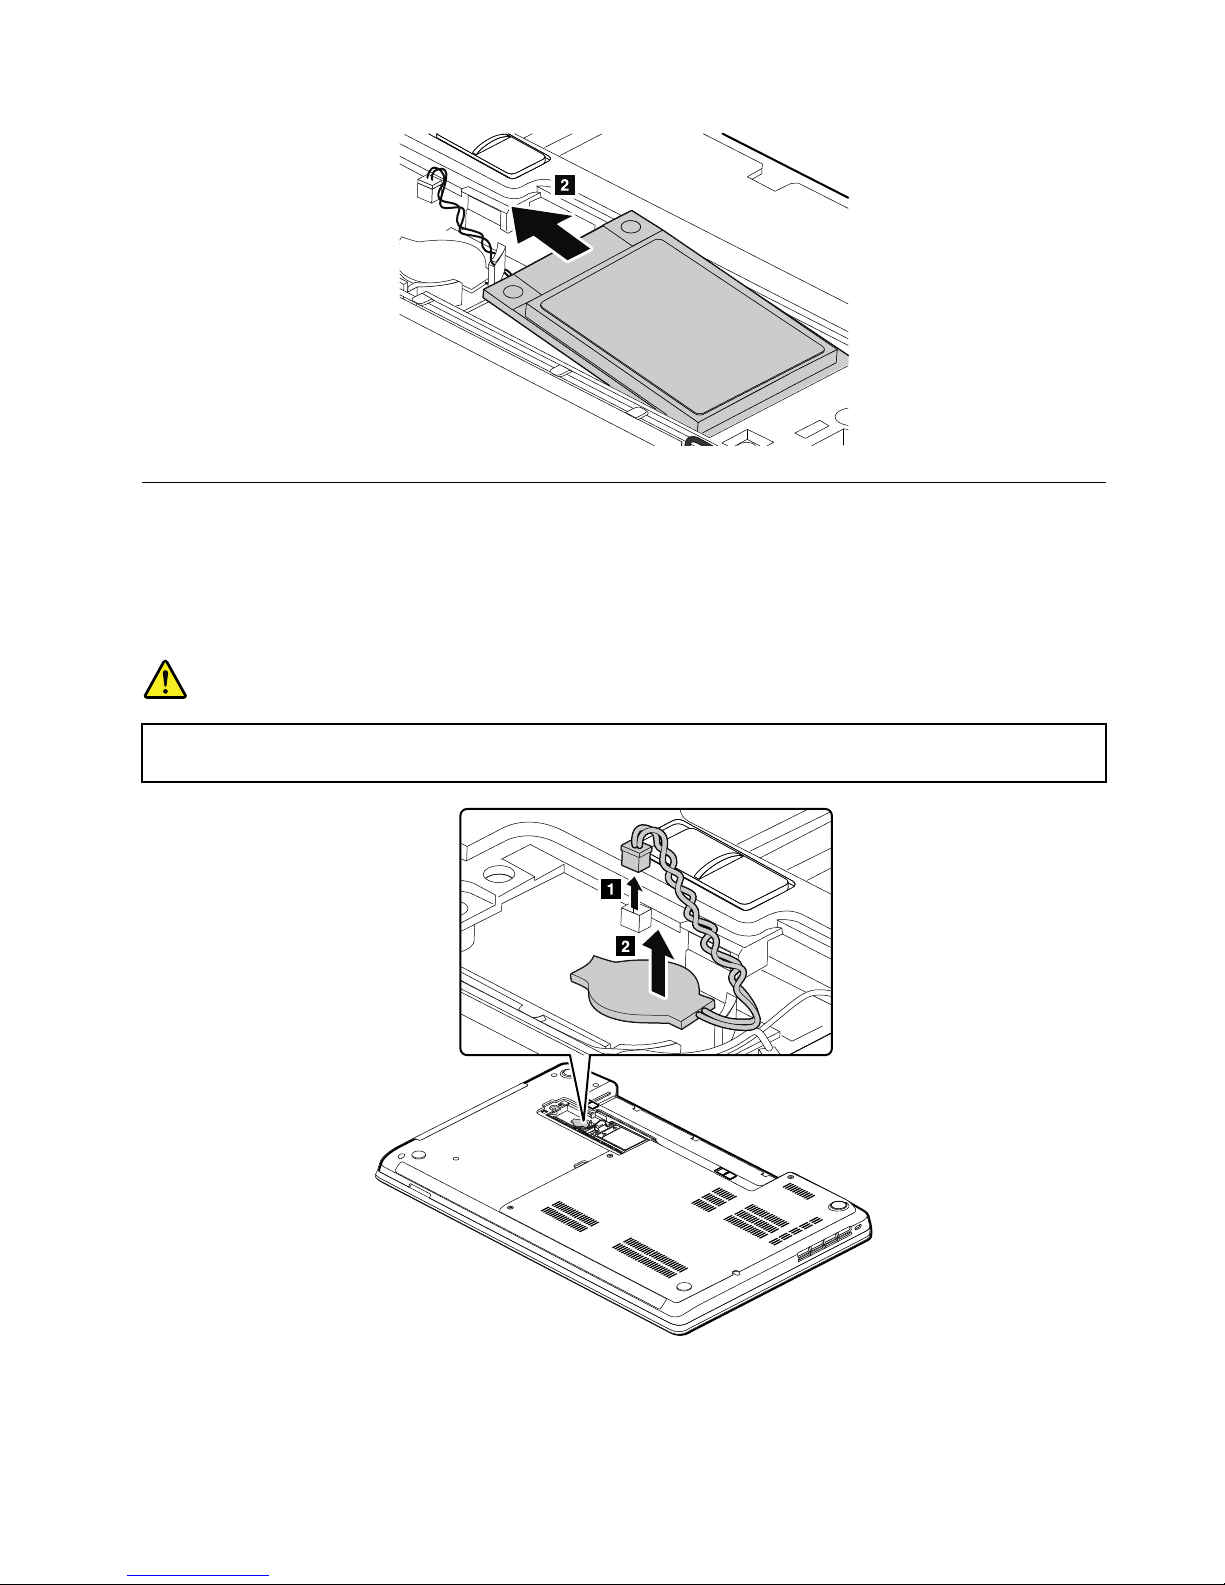
1090Backupbattery
Foraccess,removetheseFRUsinorder:
•“1010Batterypack”onpage62
•“1030Smallbottomcover”onpage64
Removalstepsofbackupbattery
DANGER
Useonlytheauthorizedbatteryspeciedforyourcomputer .Anyotherbatterycouldigniteor
explode.
Wheninstalling:Makesurethattheconnectorisattachedrmly.
Chapter9.RemovingorreplacingaFRU73
Page 80
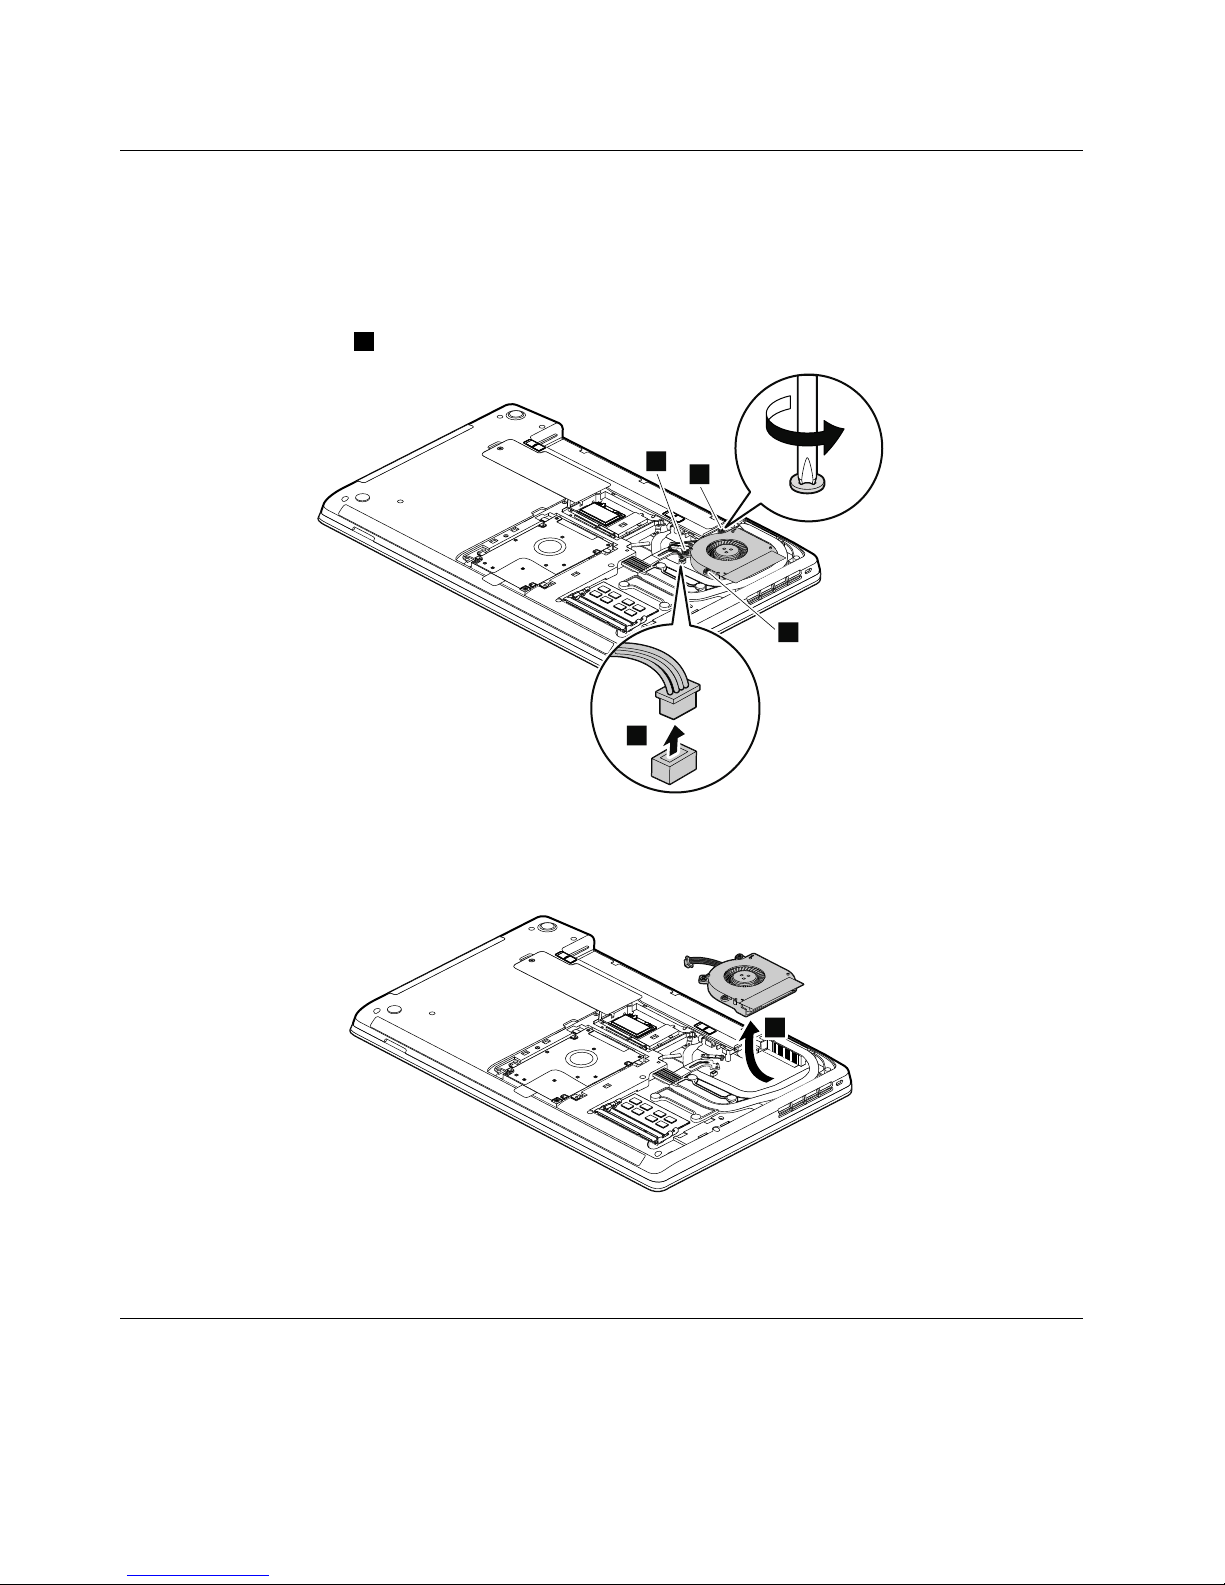
1100Thermalfan
Foraccess,removetheseFRUsinorder:
•“1010Batterypack”onpage62
•“1020Largebottomcover”onpage63
Removalstepsofthermalfan
Note:Loosenthescrews2.
1
2
2
2
Note:Y ourmodelmightlookslightlydifferentfromtheillustrationabove.
Wheninstalling:Makesurethattheconnectorisattachedrmlytothesystemboard.
3
Note:Y ourmodelmightlookslightlydifferentfromtheillustrationabove.
Wheninstalling:Donotpressthetopofthefancoverandthefanhub.
1110Thermalpipes
Foraccess,removetheseFRUsinorder:
•“1010Batterypack”onpage62
•“1020Largebottomcover”onpage63
74HardwareMaintenanceManual
Page 81
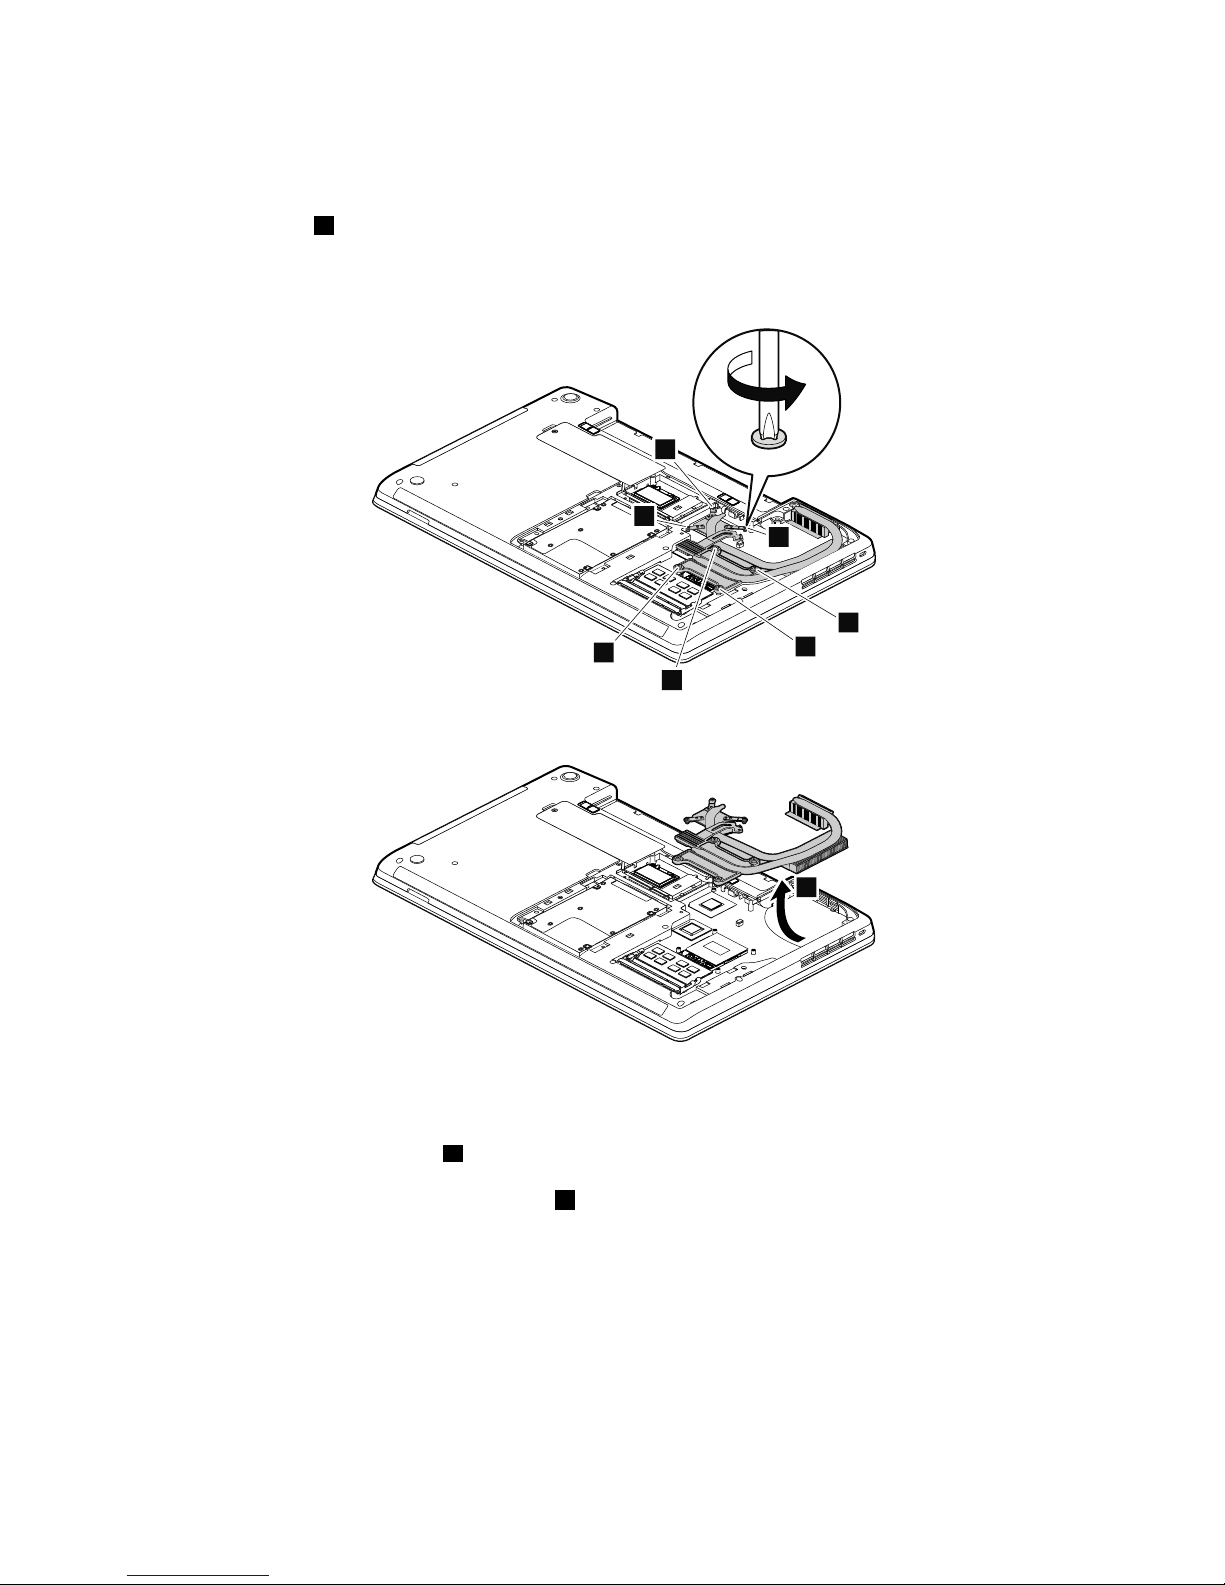
•“1100Thermalfan”onpage74
Removalstepsofthermalpipes
Loosenthescrews1inascendingalphabeticorderasillustrated.Whenattachingthethermalpipes,secure
thescrewsinreverseorder.
Note:Differentmodelsmighthavedifferentnumbersofscrews.
1c
1a
1d
1g
1e
1f
1b
Note:Y ourmodelmightlookslightlydifferentfromtheillustrationabove.
2
Note:Y ourmodelmightlookslightlydifferentfromtheillustrationabove.
Wheninstalling:Beforeyouattachthethermalpipestothecomputer,applythermalgrease,atanamount
of0.2grams,onthepartmarkedaasshowninthefollowingillustrations.Eithertoomuchortooless
applicationofgreasecancauseathermalproblemduetoimperfectcontactwithacomponent.Youneedto
peelthethinlmofffromtherubbersmarkedb.
Formodelswithadiscretethermalpipes
Chapter9.RemovingorreplacingaFRU75
Page 82
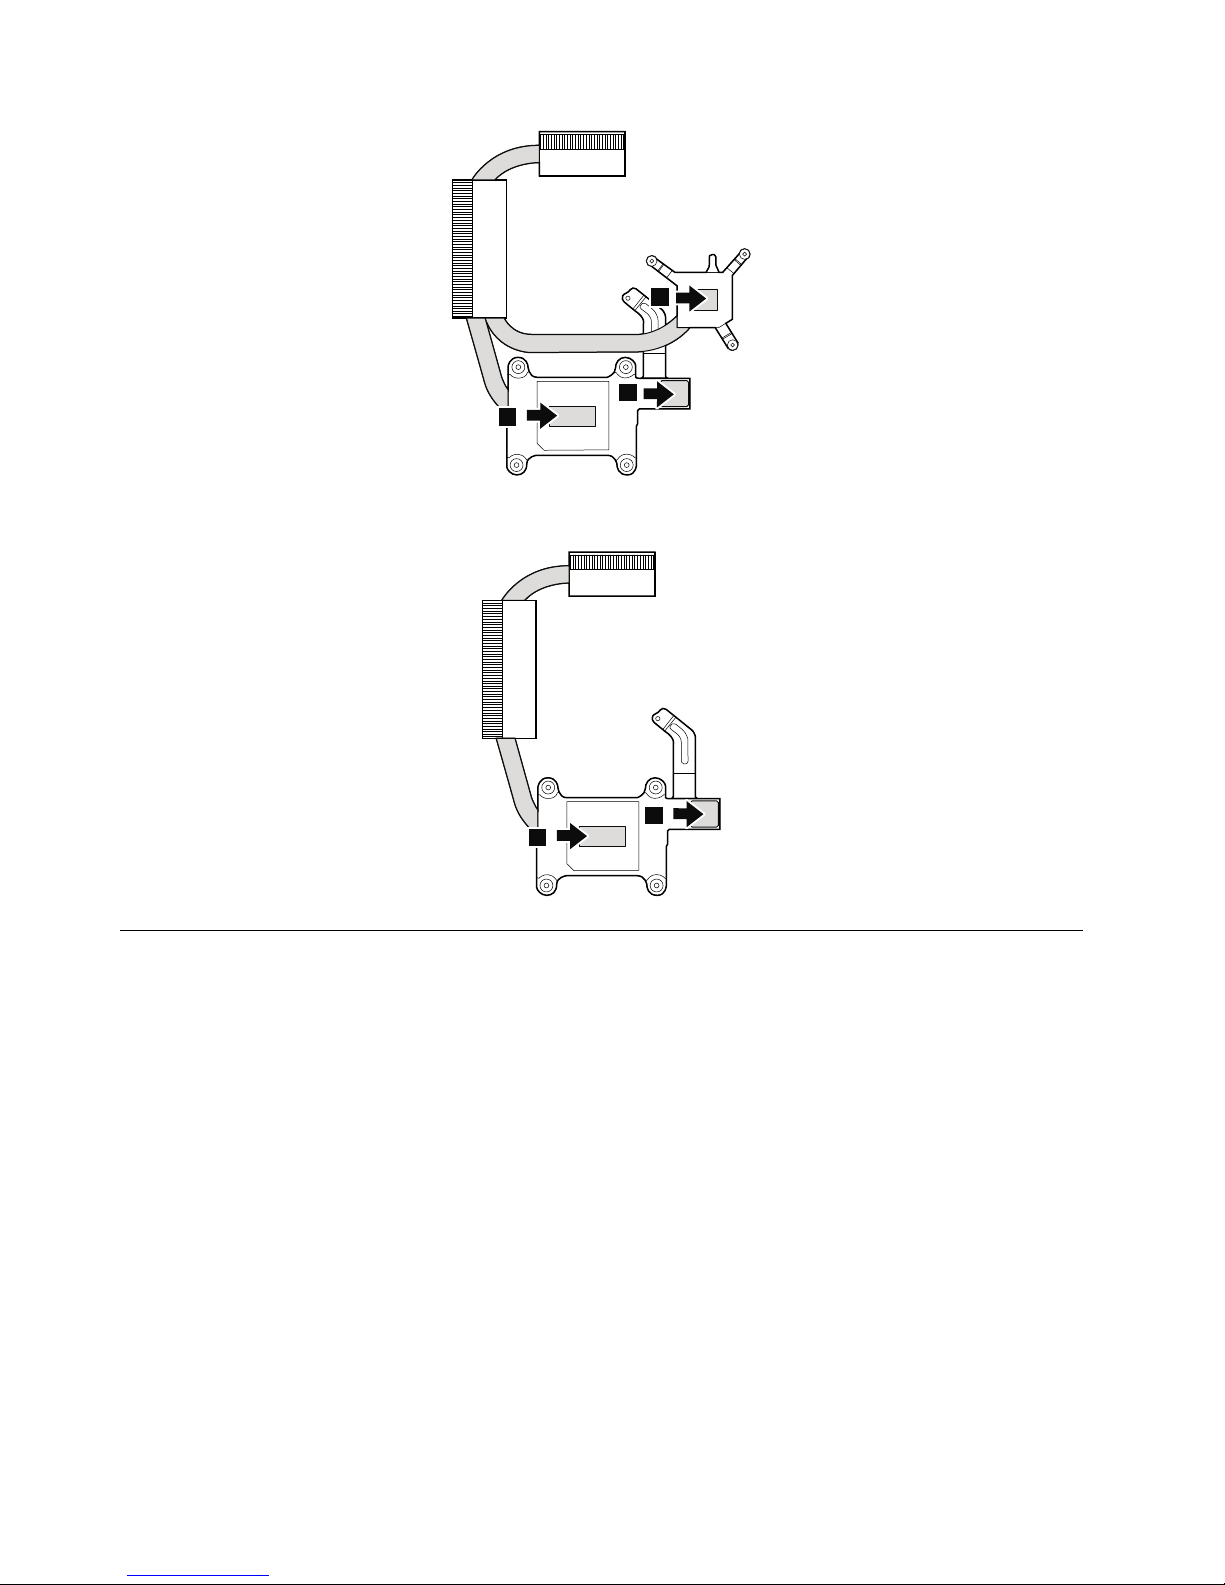
a
a
b
Formodelswithanintegratedthermalpipes
a
b
1120Keyboard
Foraccess,removetheseFRUsinorder:
•“1010Batterypack”onpage62
•“1020Largebottomcover”onpage63
76HardwareMaintenanceManual
Page 83
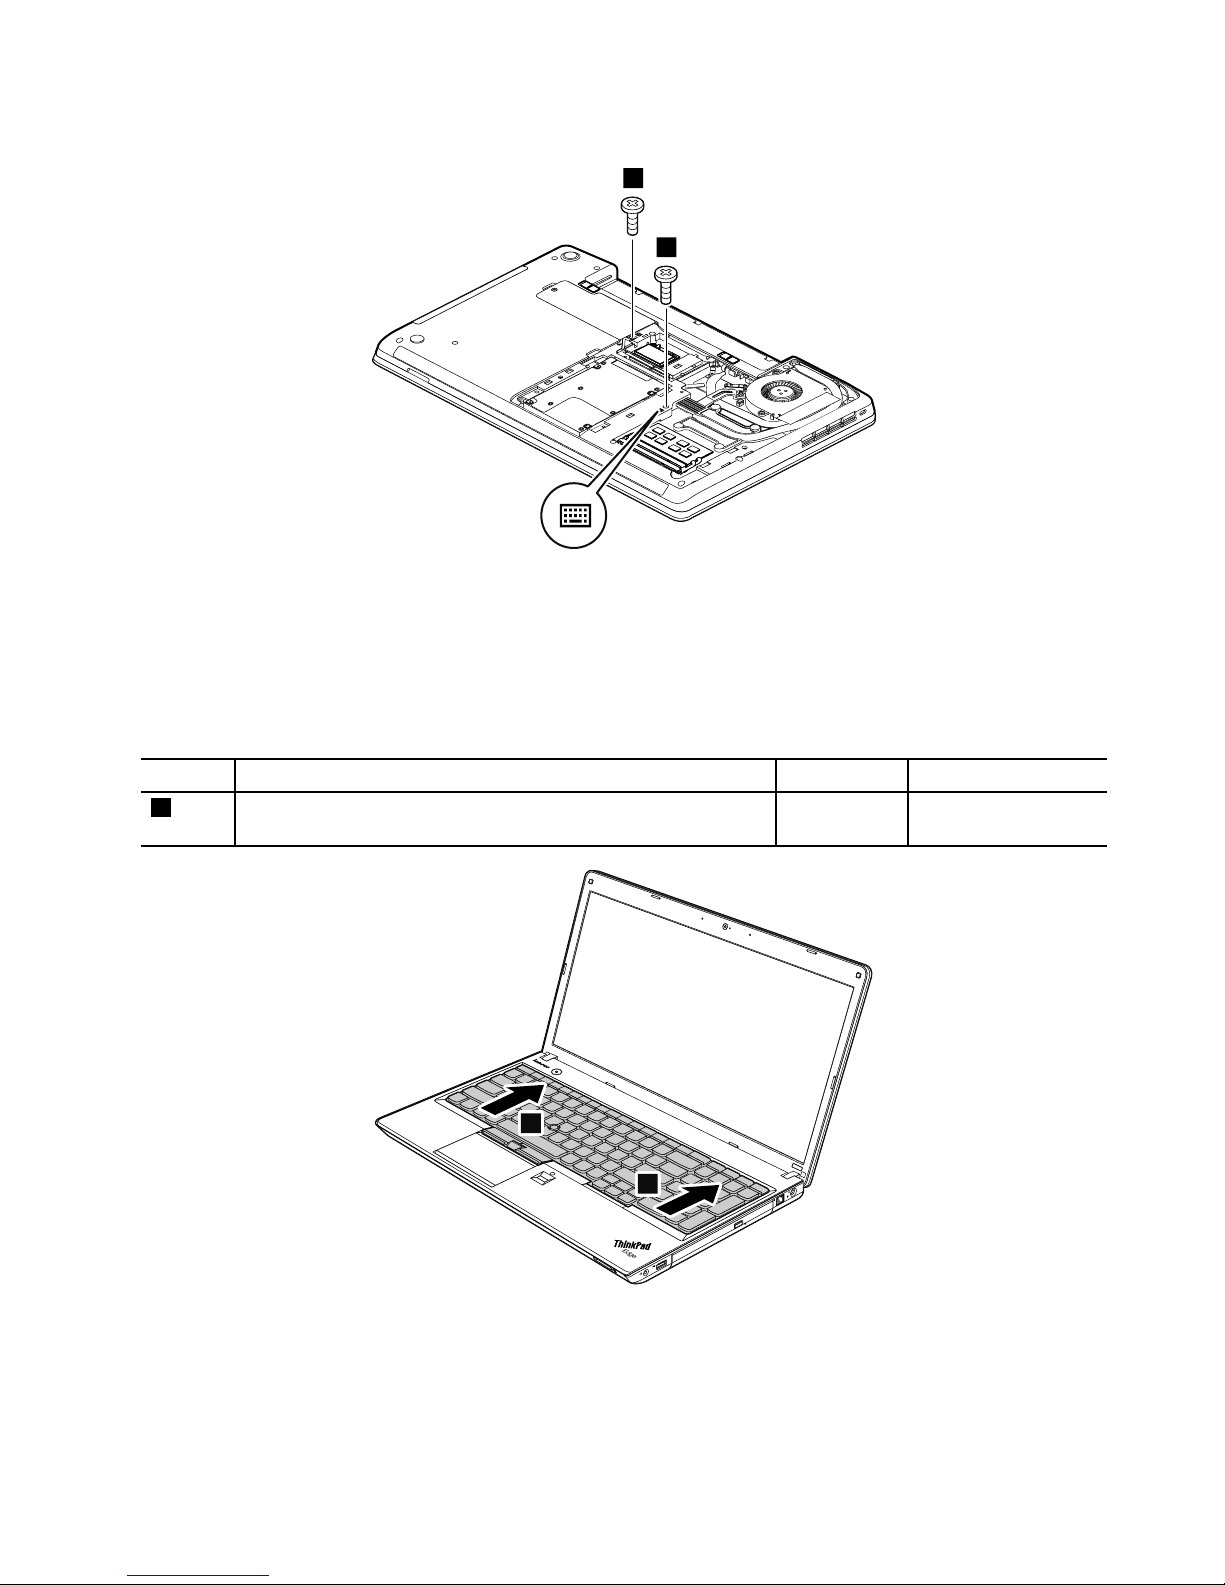
Removalstepsofkeyboard
1
1
Notes:
•Y ourmodelmightlookslightlydifferentfromtheillustrationabove.
•Thelocationofthescrewsthatsecurethekeyboardmightbedifferentfromtheillustrationabove.Referto
thewatermarksprintedonthecomputer.
Wheninstalling:Makesurethatthescrewsarefastenedandthekeyboardissecured.
StepScrew(quantity)Color
Torque
1
M2×8mm,wafer-head,nylon-coated(2)
Black0.181Nm
(1.85kgf-cm)
2
2
Note:Y ourcomputerkeyboardmightlookdifferentfromtheillustrationabove.
Chapter9.RemovingorreplacingaFRU77
Page 84
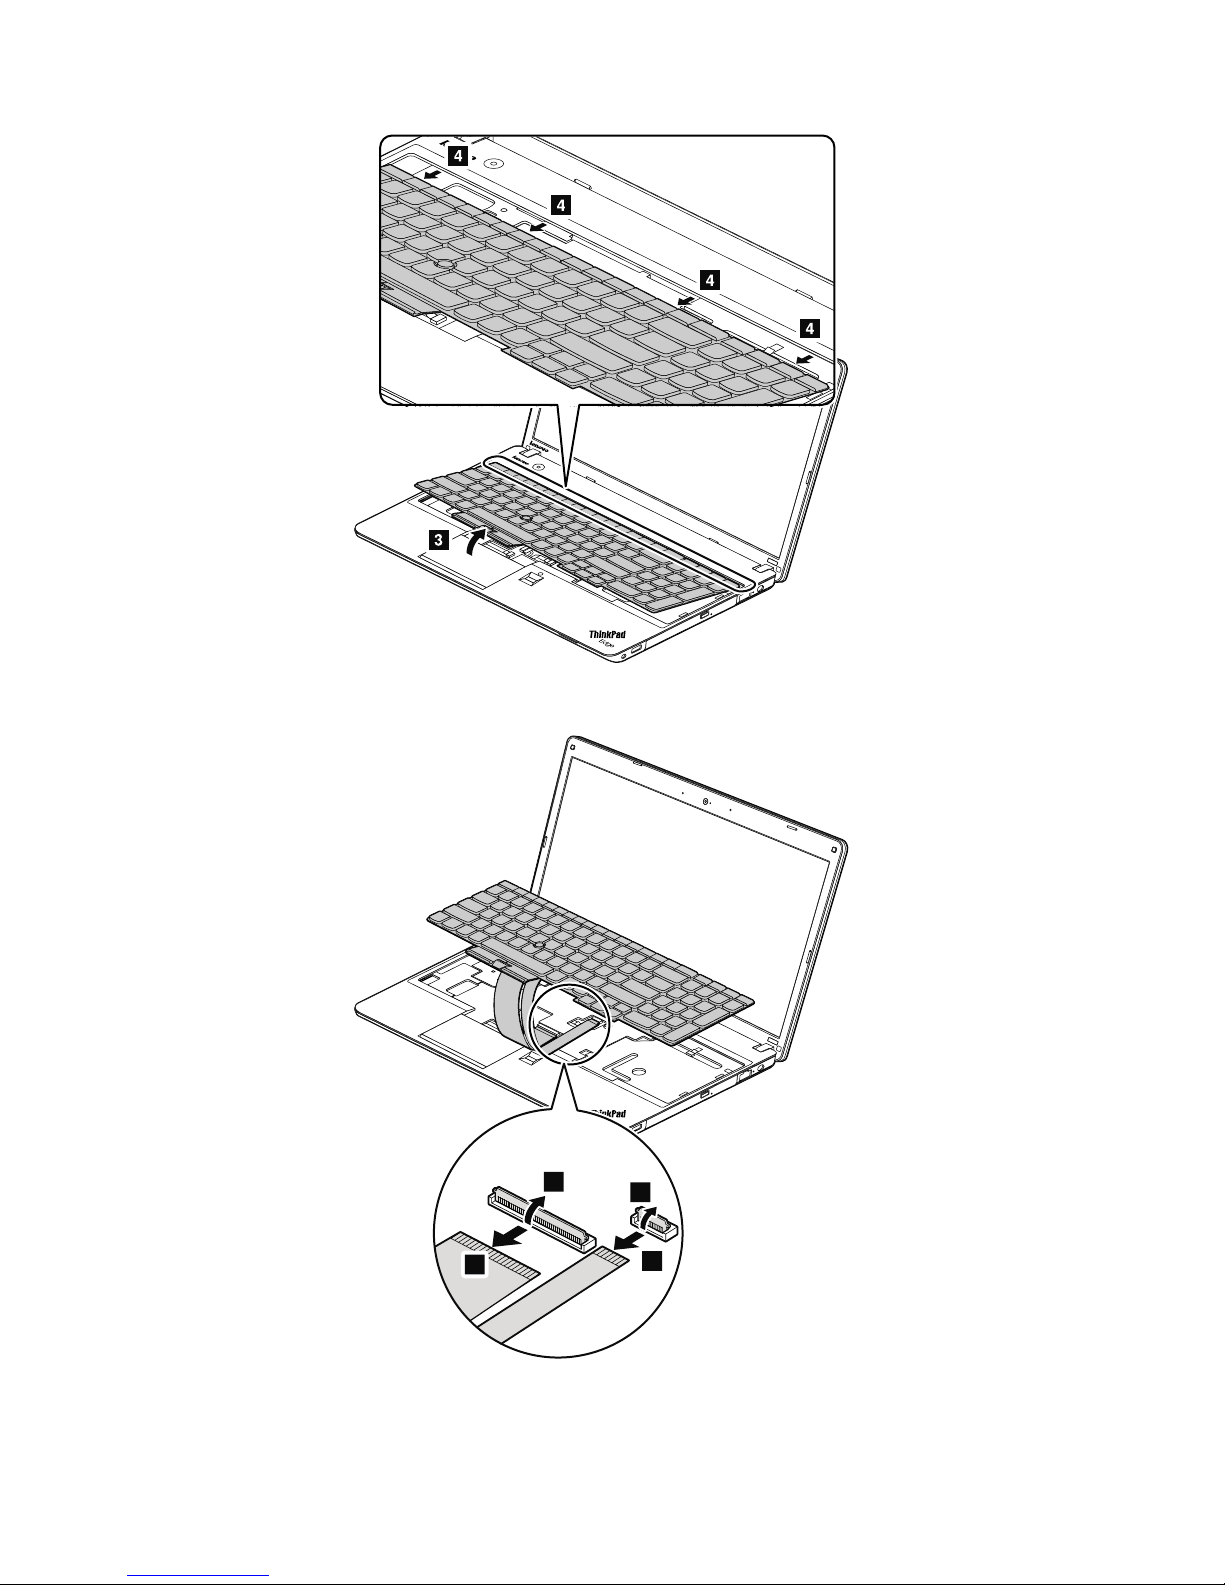
Note:Y ourcomputerkeyboardmightlookdifferentfromtheillustrationabove.
6
5
7
8
Note:Y ourcomputerkeyboardmightlookdifferentfromtheillustrationabove.
78HardwareMaintenanceManual
Page 85
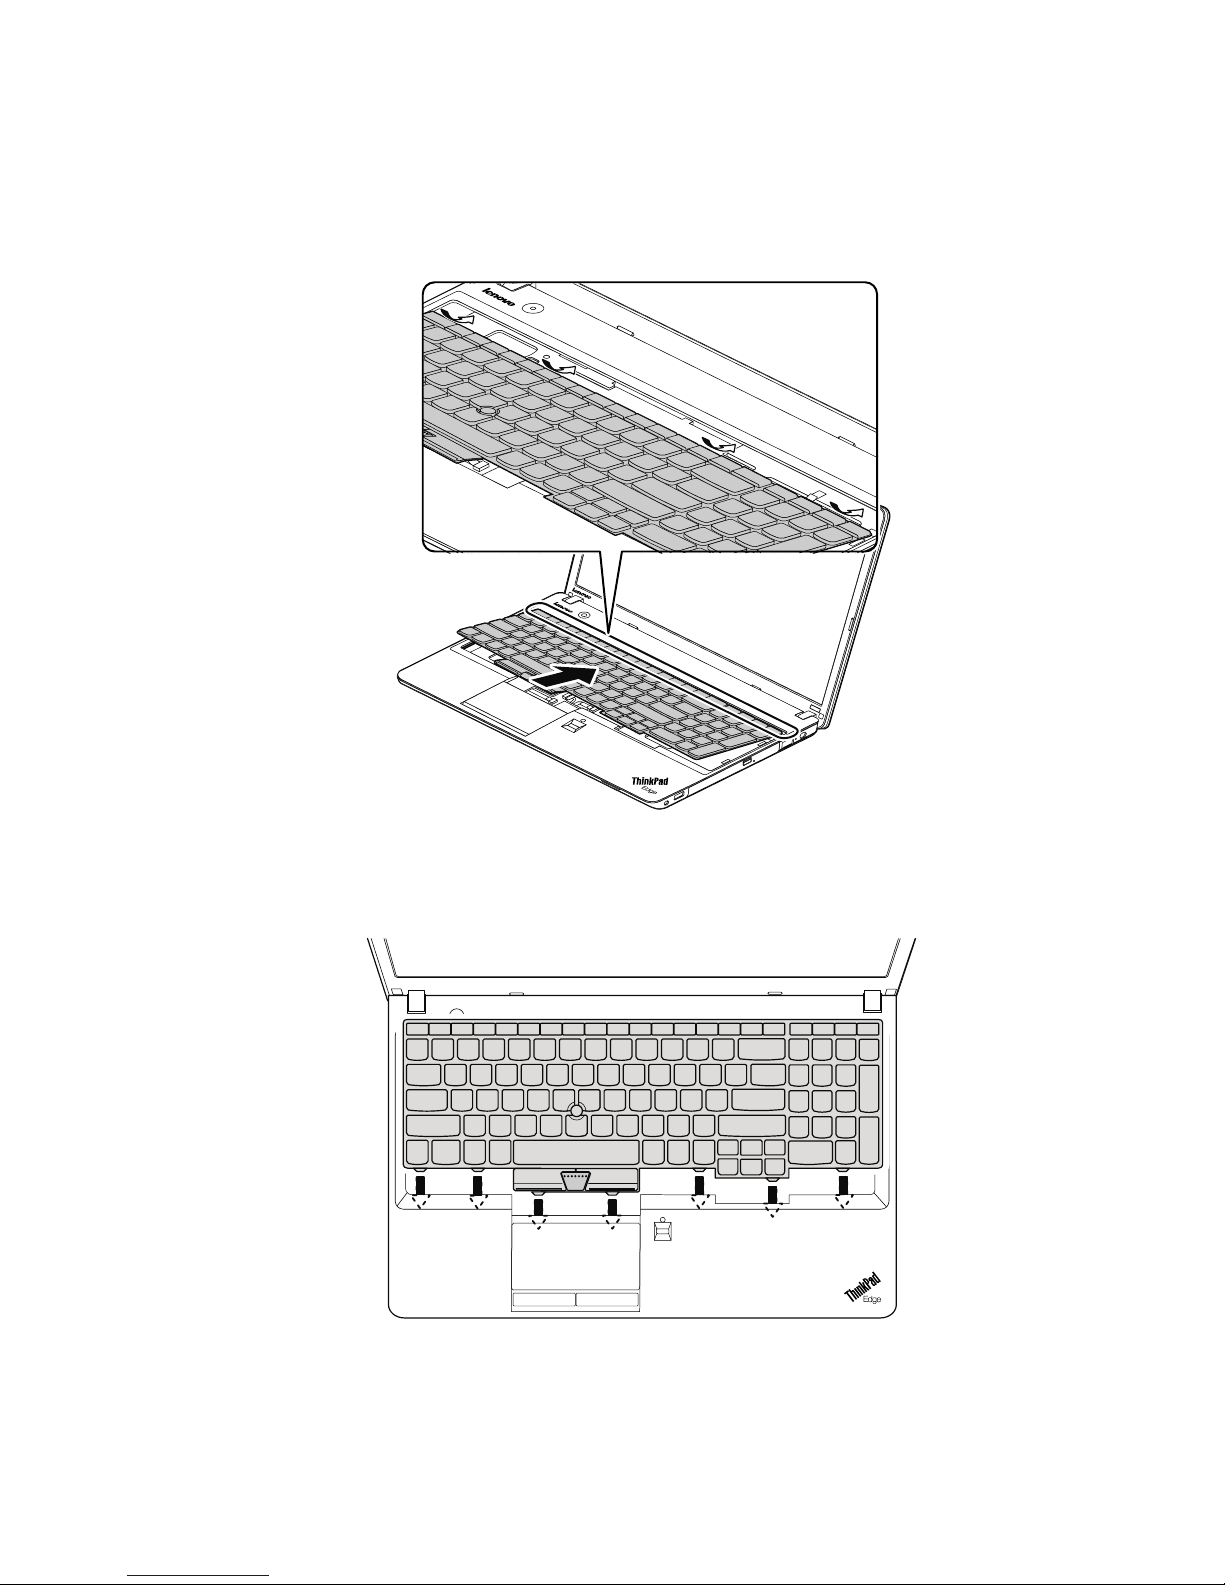
Installationstepsofkeyboard
Toinstallthekeyboard,dothefollowing:
1.Attachtheconnectors.
2.Attachthekeyboardandensurethatthekeyboardedgesareundertheframe.
Note:Y ourcomputerkeyboardmightlookdifferentfromtheillustrationabove.
3.T omakesurethatthefrontsideofthekeyboardishousedrmly,gentlypressthekeyswithyourthumbs
andslidethekeyboardtowardyouuntilthekeyboardisinplace.
Note:Y ourcomputerkeyboardmightlookdifferentfromtheillustrationabove.
4.Securethekeyboardbytighteningthescrewsfromthebottomsideofthecomputer.
Chapter9.RemovingorreplacingaFRU79
Page 86
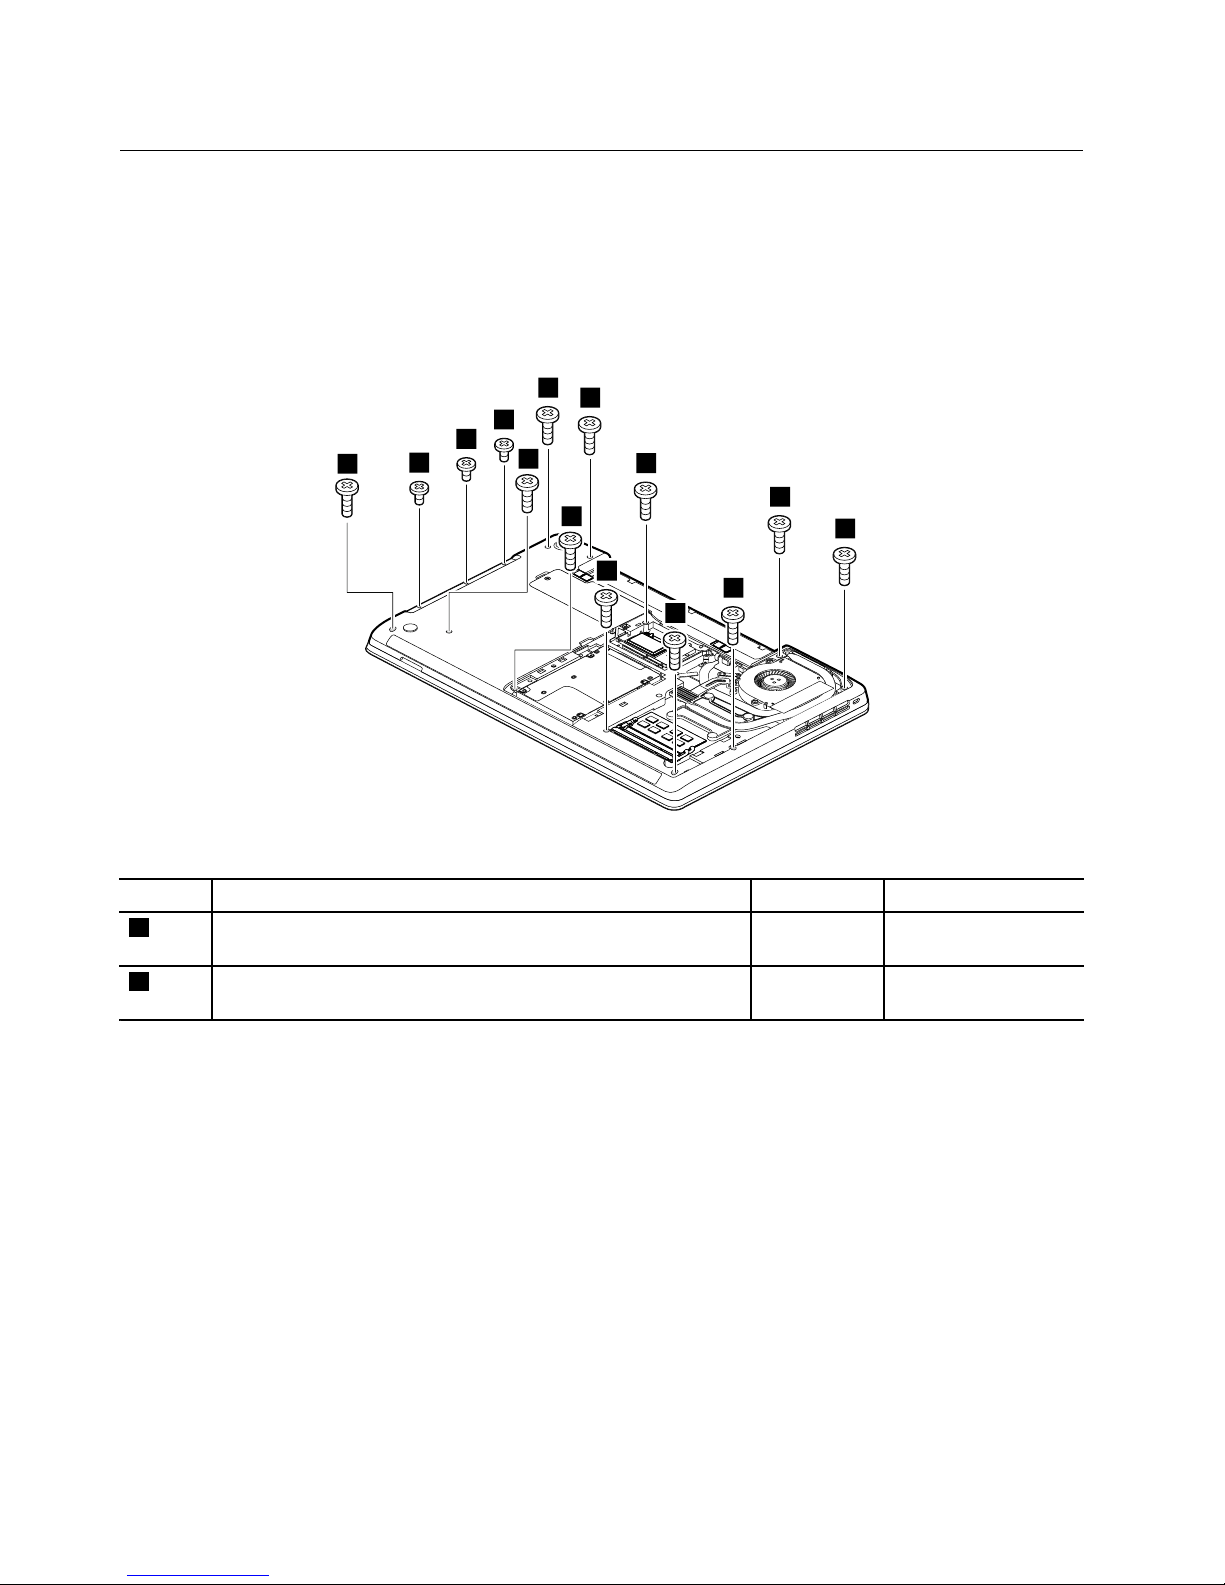
1130Keyboardbezel
Foraccess,removetheseFRUsinorder:
•“1010Batterypack”onpage62
•“1020Largebottomcover”onpage63
•“1040Opticaldriveorblankbezel”onpage65
•“1120Keyboard”onpage76
Removalstepsofkeyboardbezel
1
1
1
1
1
1
1
1
1
1
1
2
2
2
Note:Y ourmodelmightlookslightlydifferentfromtheillustrationabove.
StepScrew(quantity)Color
Torque
1
M2×8mm,wafer-head,nylon-coated(11)
Black0.181Nm
(1.85kgf-cm)
2
M2×3mm,wafer-head,nylon-coated(3)
Black0.181Nm
(1.85kgf-cm)
80HardwareMaintenanceManual
Page 87
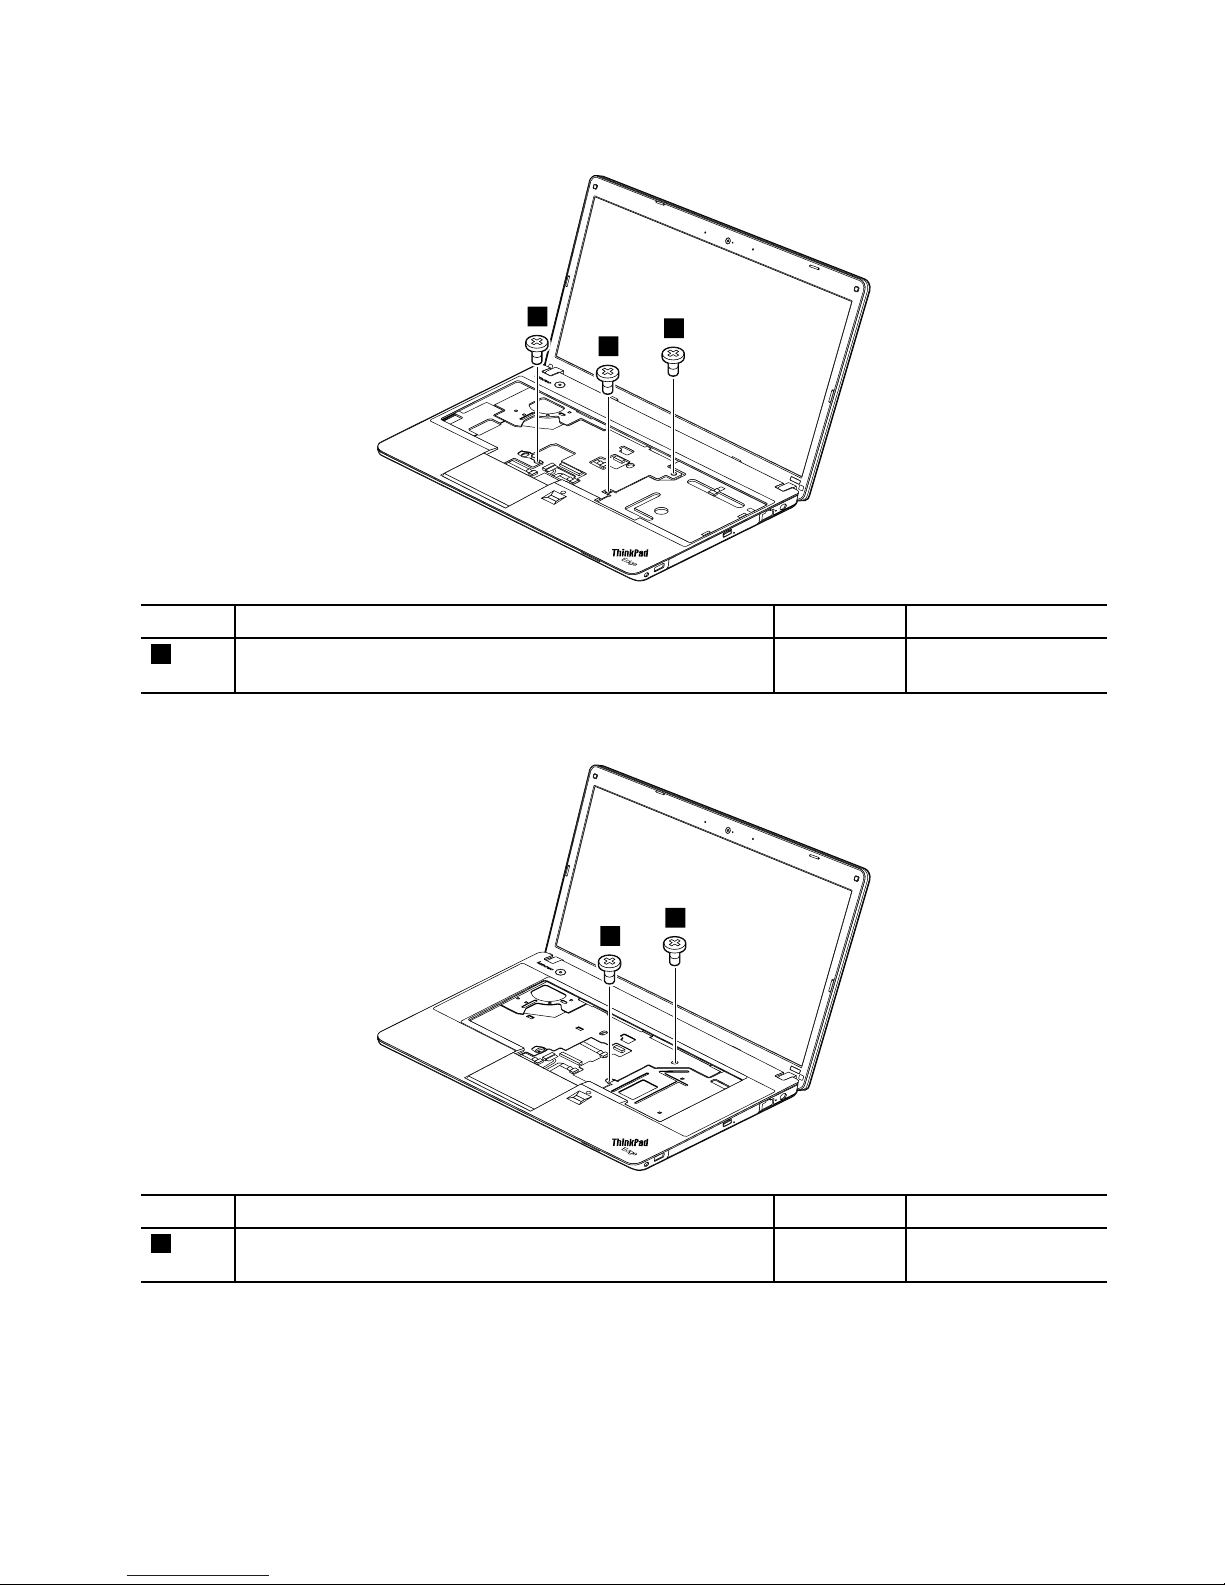
Forsomemodels:
3
3
3
StepScrew(quantity)Color
Torque
3
M2×5mm,wafer-head,nylon-coated(3)Silver
0.181Nm
(1.85kgf-cm)
Forothermodels:
3
3
StepScrew(quantity)Color
Torque
3
M2×5mm,wafer-head,nylon-coated(2)Silver
0.181Nm
(1.85kgf-cm)
Chapter9.RemovingorreplacingaFRU81
Page 88
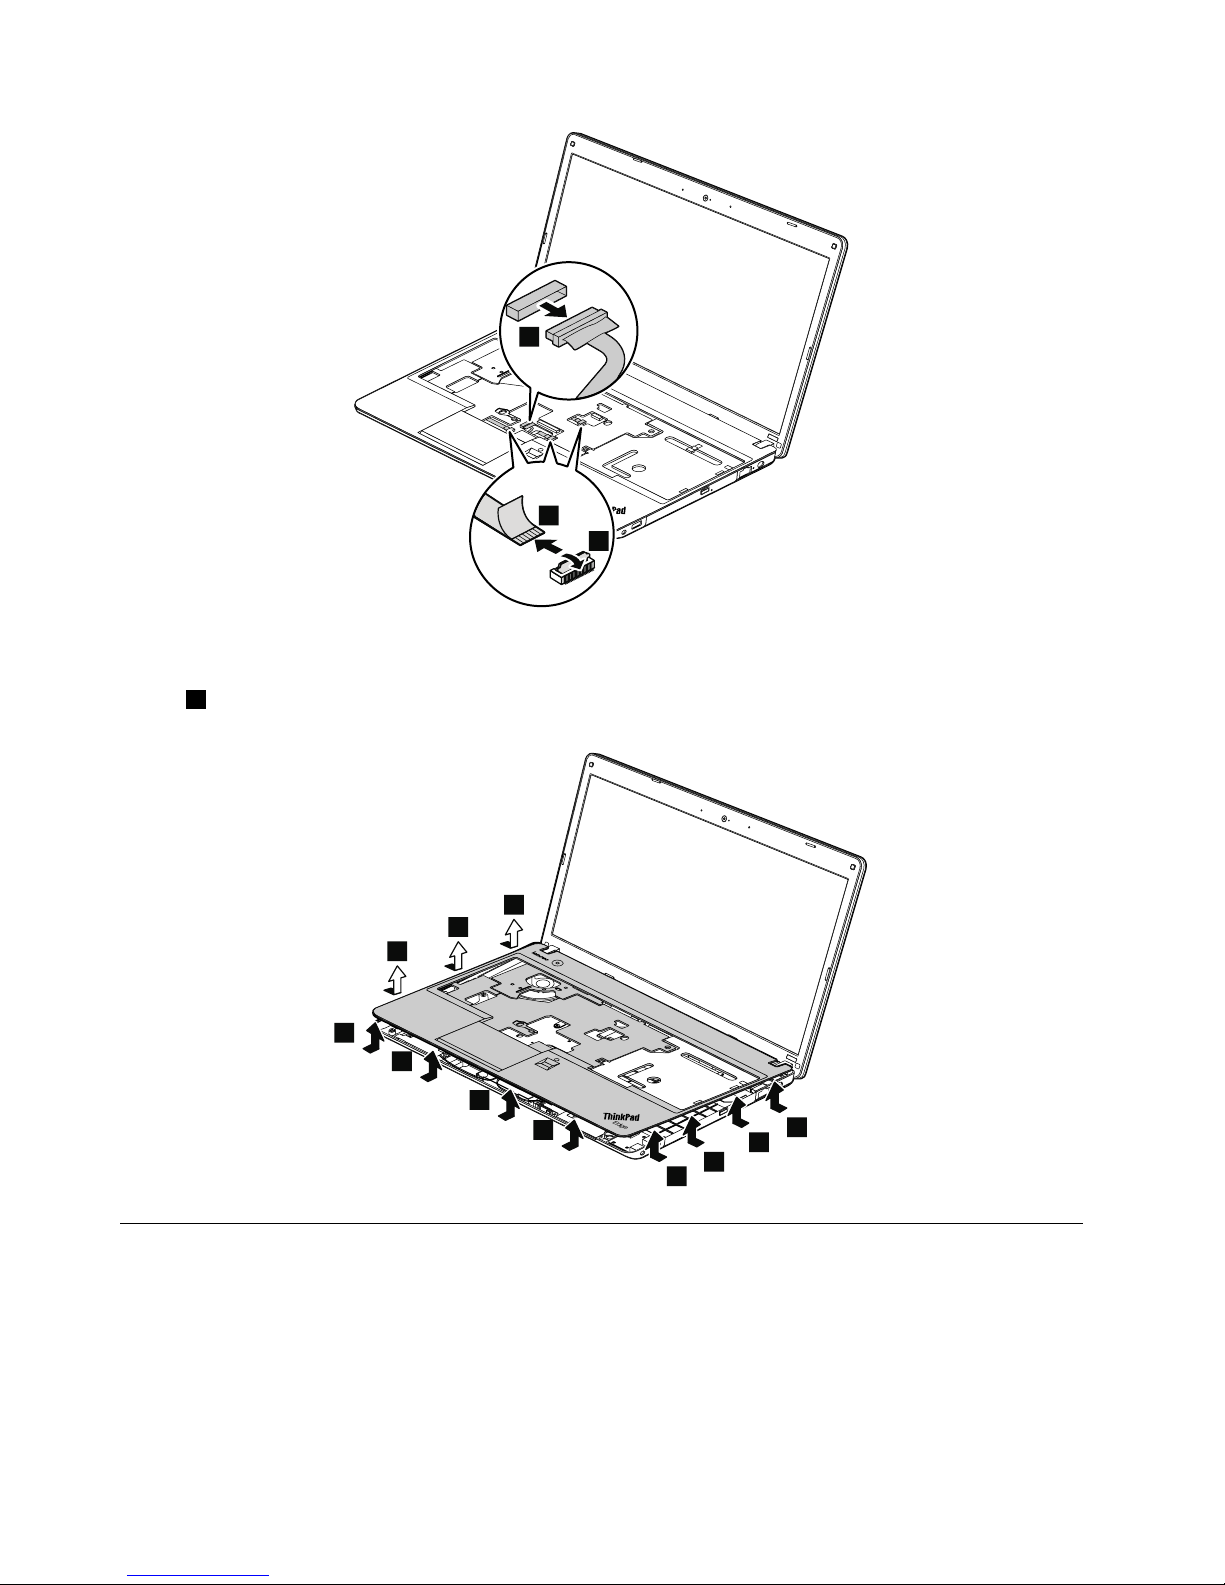
5
4
6
Wheninstalling:Makesurethattheconnectorsareattachedrmlytothesystemboard.
Instep7,releasethekeyboardbezelfromtheframeusingaplasticprytoolasshowninthefollowing
illustration.
7
7
7
7
7
7
7
7
7
7
7
1140CPU
Foraccess,removetheseFRUsinorder:
•“1010Batterypack”onpage62
•“1020Largebottomcover”onpage63
•“1100Thermalfan”onpage74
•“1110Thermalpipes”onpage74
Attention:TheCPUisextremelysensitive.WhenyouservicetheCPU,avoidanykindofroughhandling.
82HardwareMaintenanceManual
Page 89
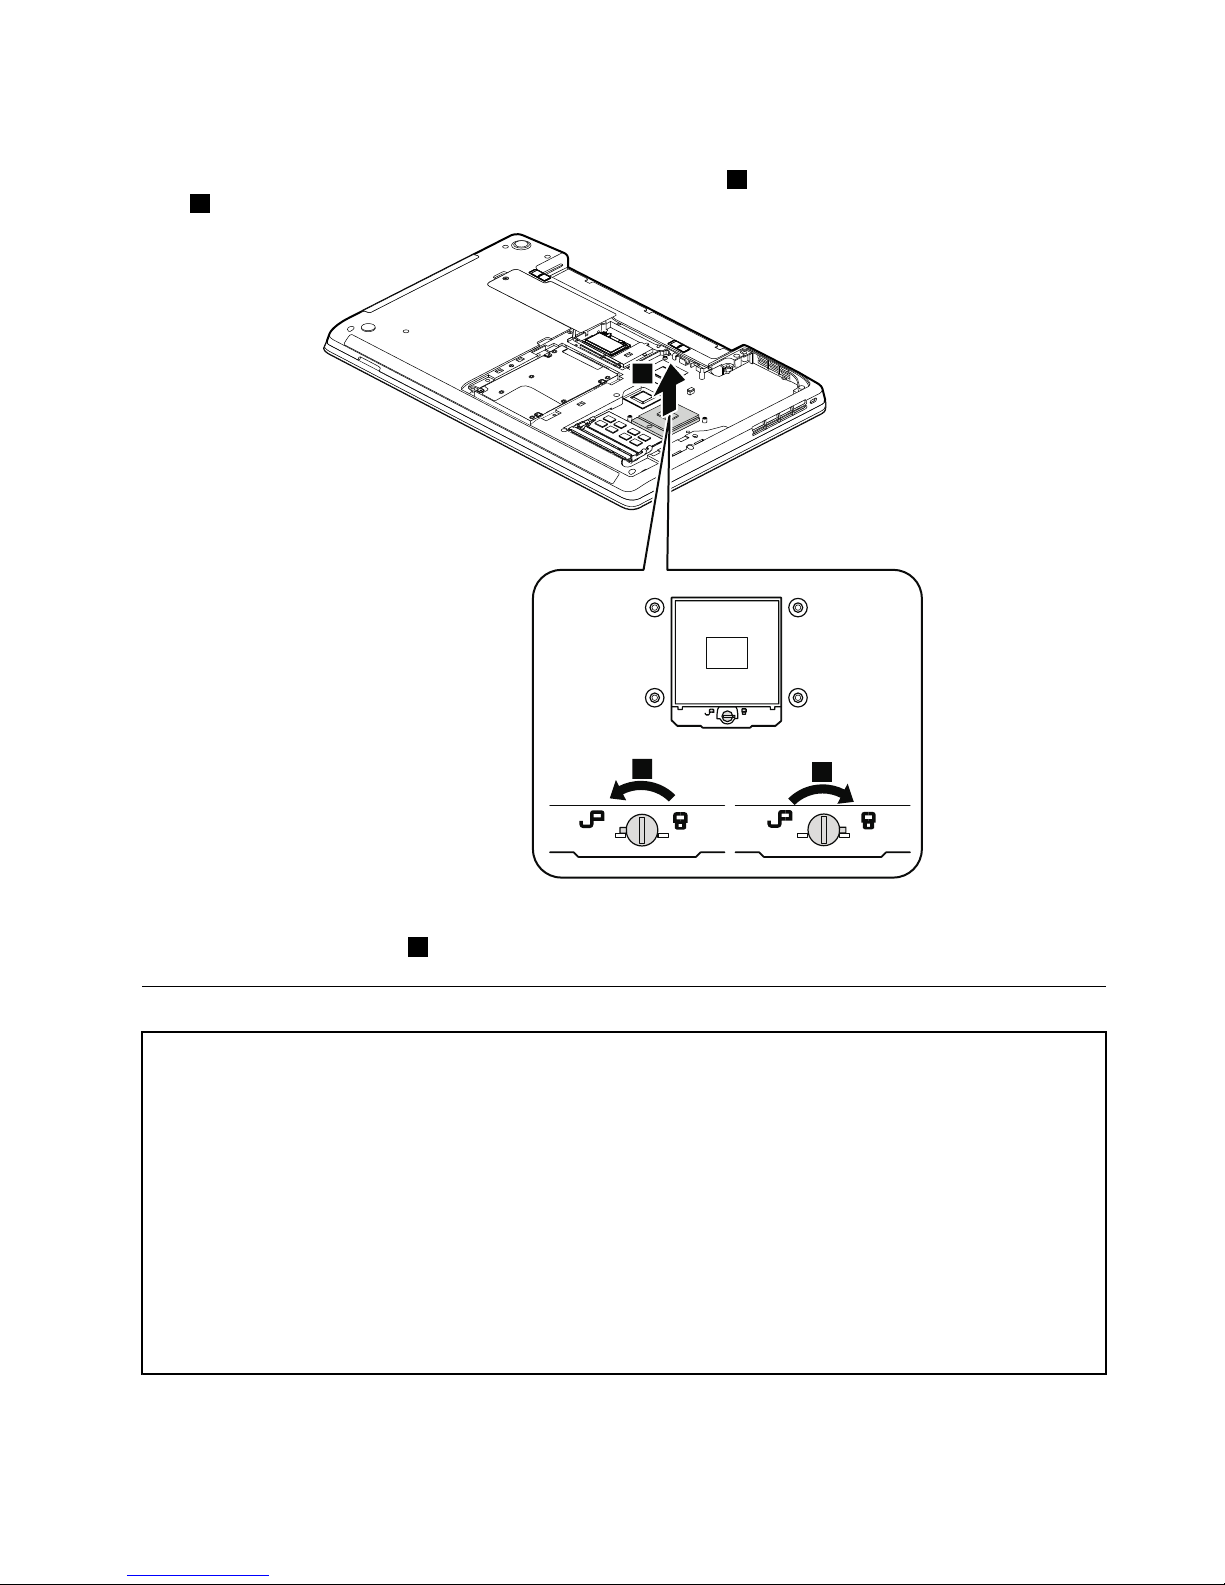
RemovalstepsofCPU
Rotatetheheadofthescrewinthedirectionshownbythearrow1toreleasethelock;thenremovethe
CPU2.
1
3
2
Wheninstalling:PlacetheCPUabovetheCPUsocket,andthenrotatetheheadofthescrewinthe
directionshownbythearrow3tosecuretheCPU.
1150Systemboardassembly
Importantnoticesforhandlingthesystemboard:
Whenhandlingthesystemboard,bearthefollowinginmind:
•Thesystemboardhasanaccelerometer,whichcanbebrokenifseveralthousandsofG-forcesareapplied.
Note:Droppingasystemboardfromaheightofaslittleas6inchessothatitfallsatonahardbenchcansubject
theaccelerometertoasmuchas6,000G'sofshock.
•Becarefulnottodropthesystemboardonabenchtopthathasahardsurface,suchasmetal,wood,orcomposite.
•Ifasystemboardisdropped,besuretodocumentthedropinanyrejectreport,andreplacethesystemboard.
•Avoidroughhandlingofanykind.
•Ateverypointintheprocess,besurenottodroporstackthesystemboard.
•Ifyouputasystemboarddown,besuretoputitonlyonapaddedsurfacesuchasanESDmatoracorrugated
conductivesurface.
Foraccess,removetheseFRUsinorder:
•“1010Batterypack”onpage62
Chapter9.RemovingorreplacingaFRU83
Page 90
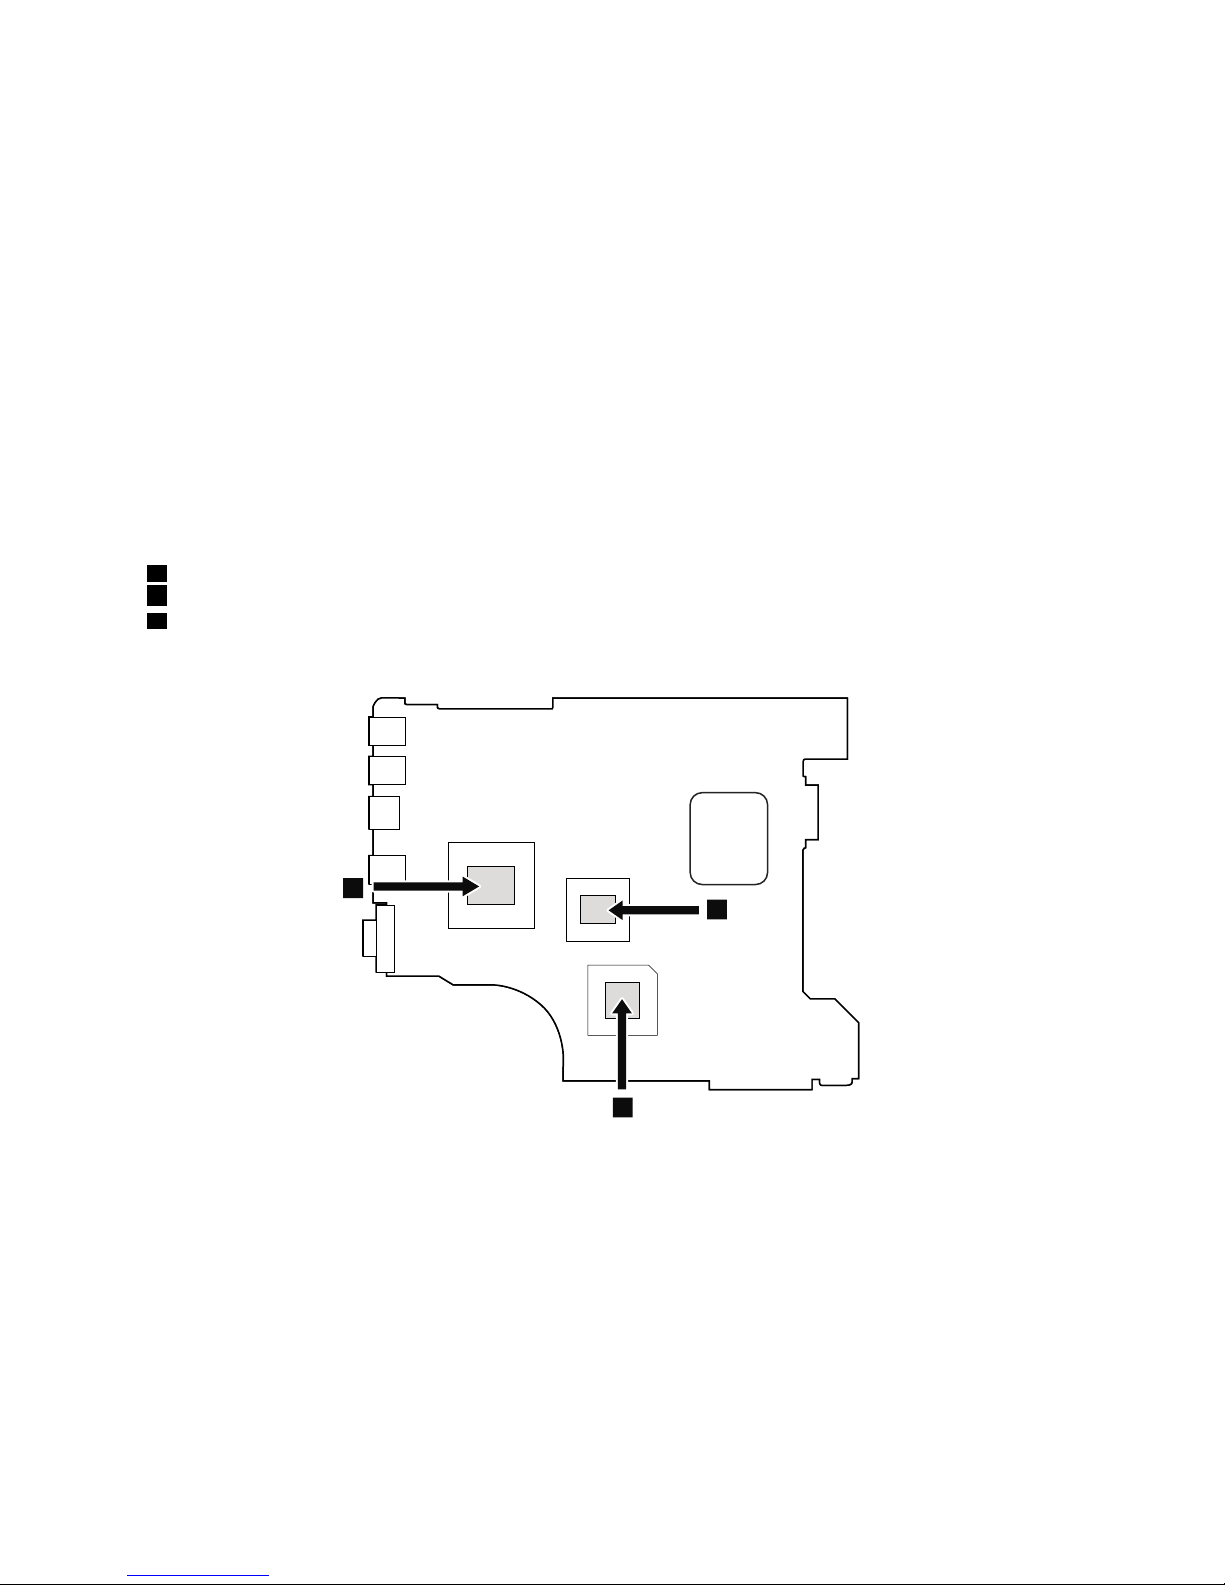
•“1020Largebottomcover”onpage63
•“1030Smallbottomcover”onpage64
•“1040Opticaldriveorblankbezel”onpage65
•“1050Memorymodules”onpage65
•“1060Harddiskdriveassembly”onpage66
•“1070PCIExpressMiniCardforwirelessLAN”onpage68
•“1080PCIExpressMiniCardforwirelessWANormSATAsolidstatedrive”onpage69
•“1090Backupbattery”onpage73
•“1100Thermalfan”onpage74
•“1110Thermalpipes”onpage74
•“1120Keyboard”onpage76
•“1130Keyboardbezel”onpage80
•“1140CPU”onpage82
Removalstepsofsystemboard
Attention:Thefollowingcomponentssolderedonthetopsideofthesystemboardareextremelysensitive.
Whenyouservicethesystemboard,avoidanykindofroughhandling.
aCPU
bPlatformControllerHub(PCH)
cGraphicsProcessingUnit(GPU)(discretegraphicscard)
Formodelswithadiscretethermalmodule
a
c
b
84HardwareMaintenanceManual
Page 91
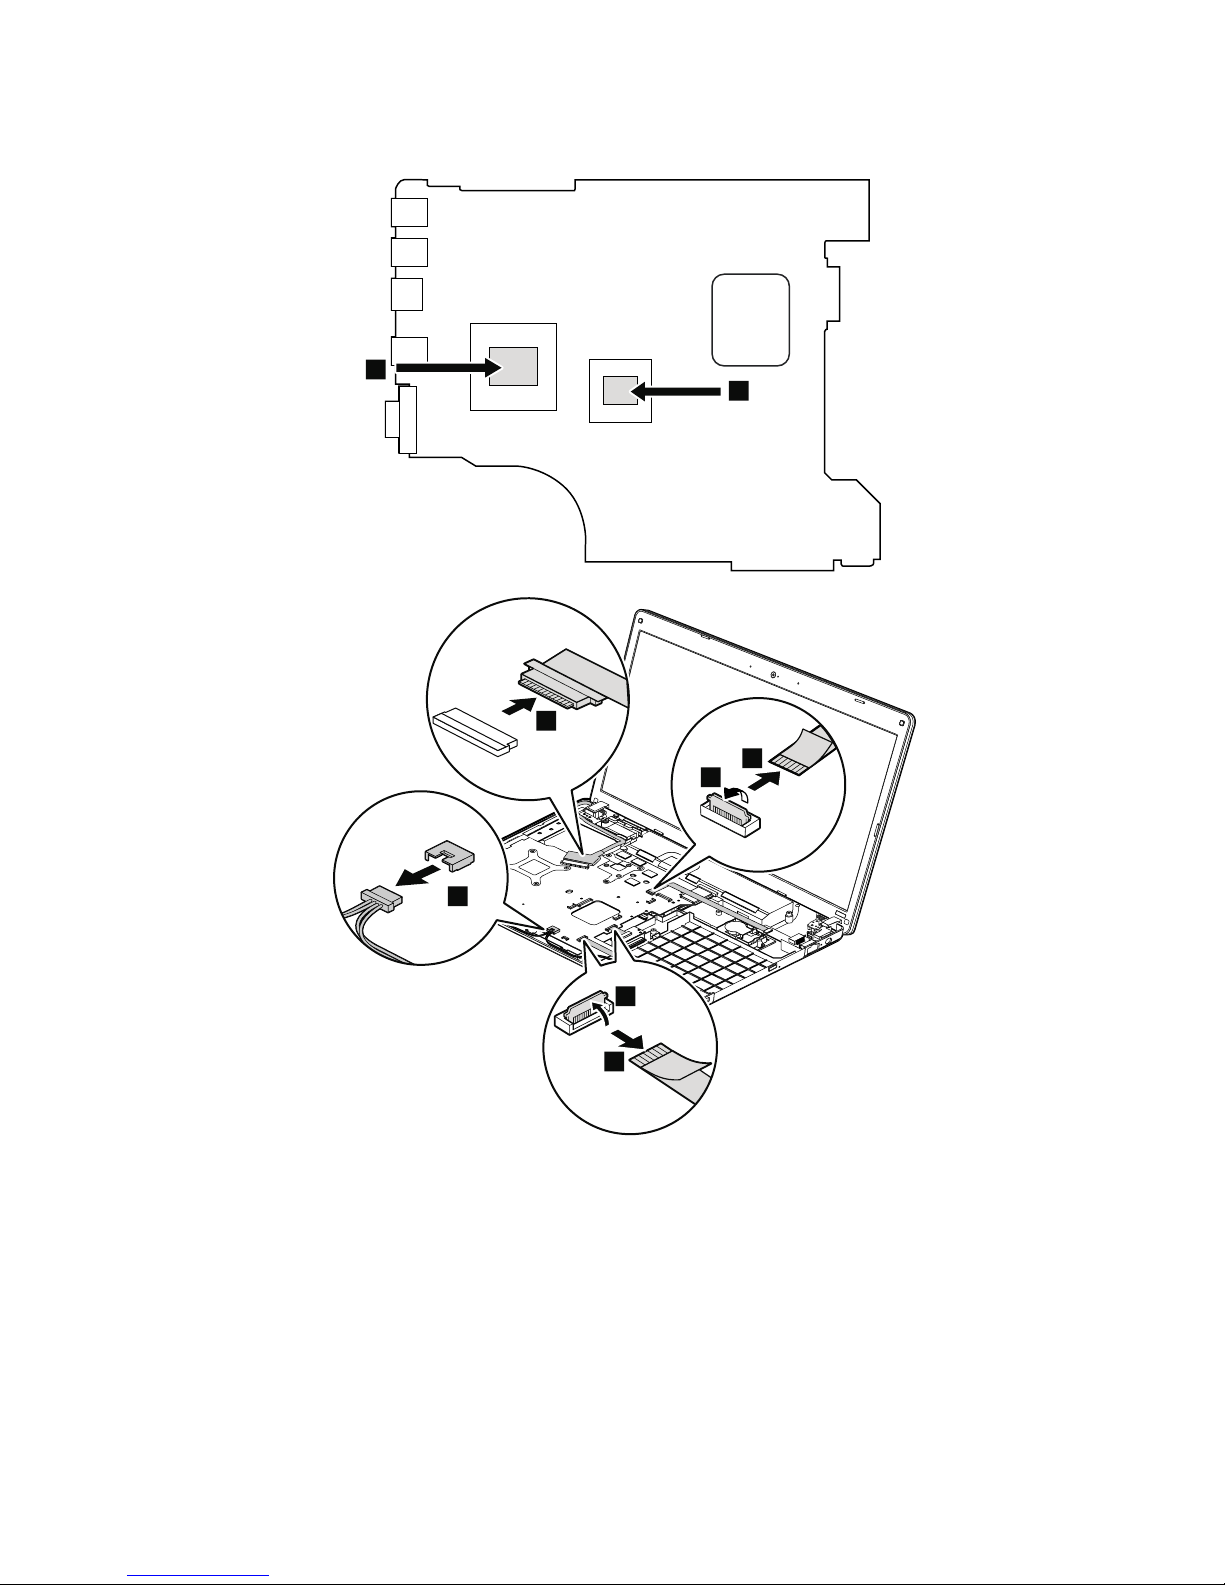
Formodelswithanintegratedthermalmodule
b
a
3
4
1
2
5
6
Wheninstalling:Makesurethattheconnectorsareattachedrmlytothesystemboard.
Chapter9.RemovingorreplacingaFRU85
Page 92
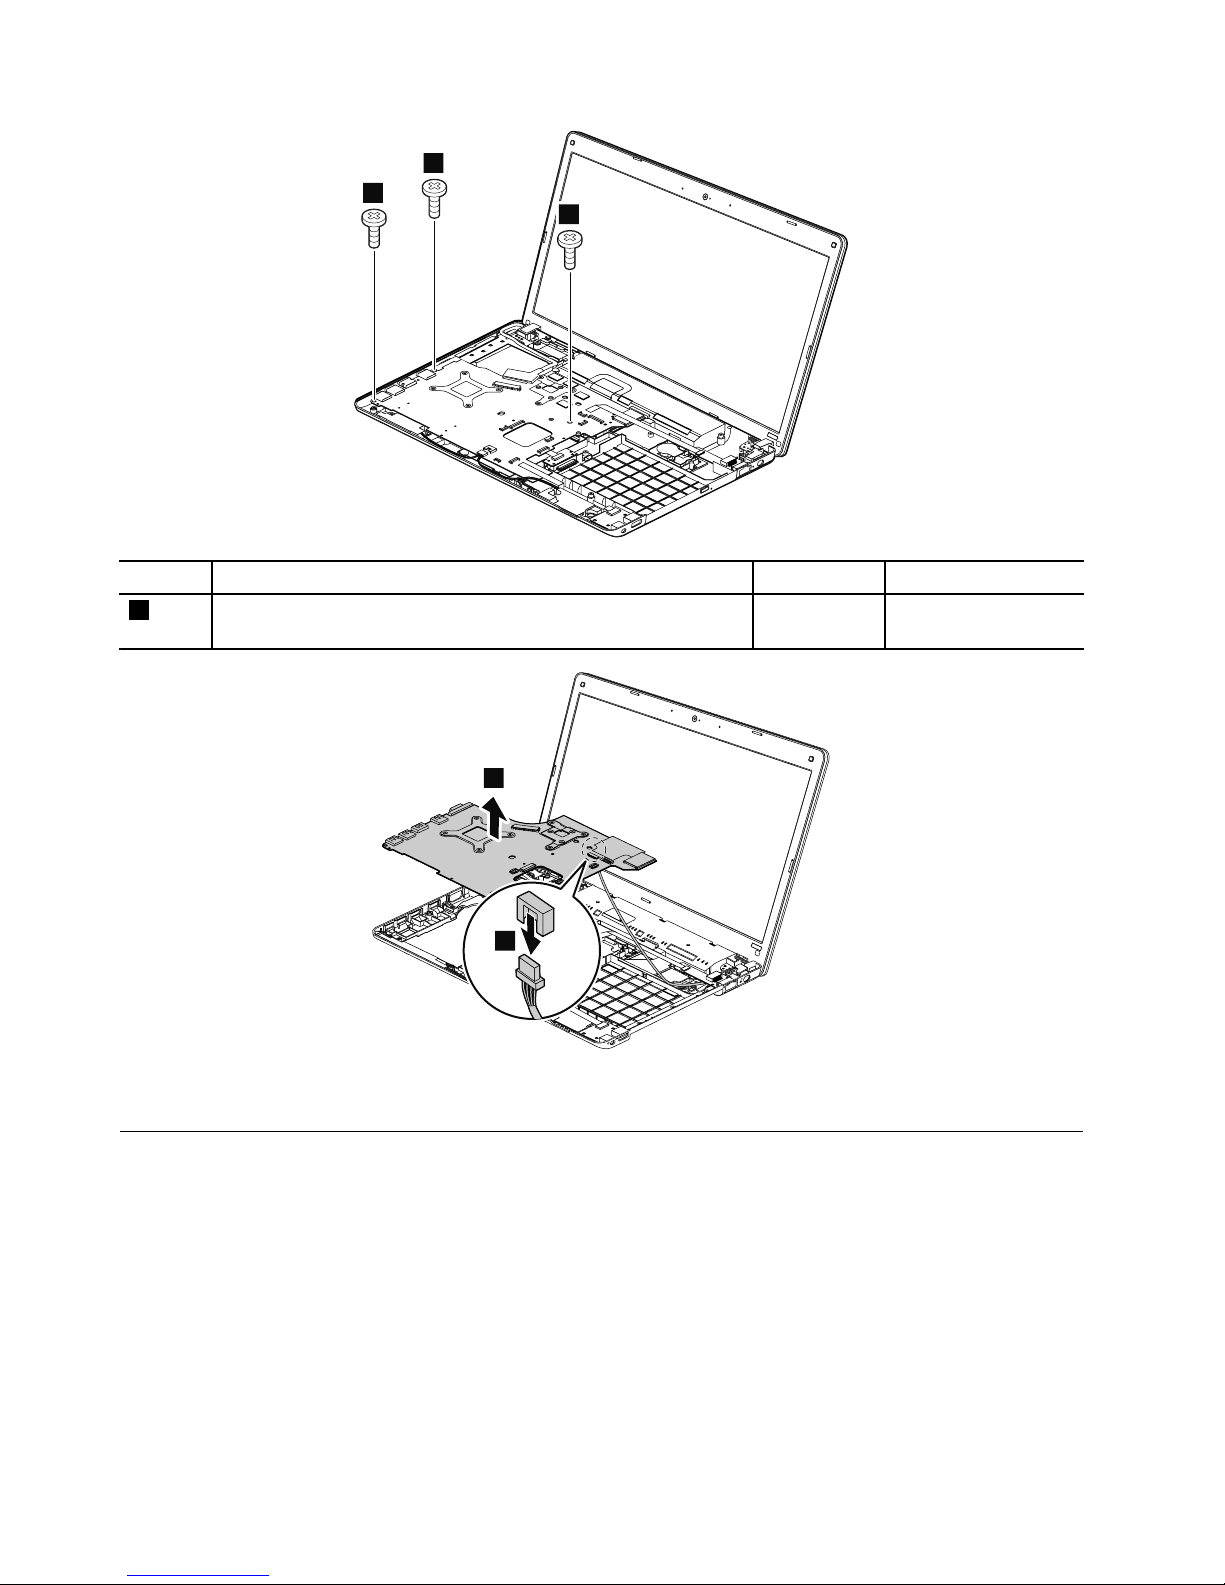
7
7
7
StepScrew(quantity)Color
Torque
7
M2×5mm,wafer-head,nylon-coated(3)Silver
0.181Nm
(1.85kgf-cm)
8
9
Wheninstalling:Makesurethattheconnectorisattachedrmlytothesystemboard.
1160Speakerassembly
Foraccess,removetheseFRUsinorder:
•“1010Batterypack”onpage62
•“1020Largebottomcover”onpage63
•“1040Opticaldriveorblankbezel”onpage65
•“1120Keyboard”onpage76
•“1130Keyboardbezel”onpage80
Removalstepsofspeakerassembly
Forsomemodels:
86HardwareMaintenanceManual
Page 93
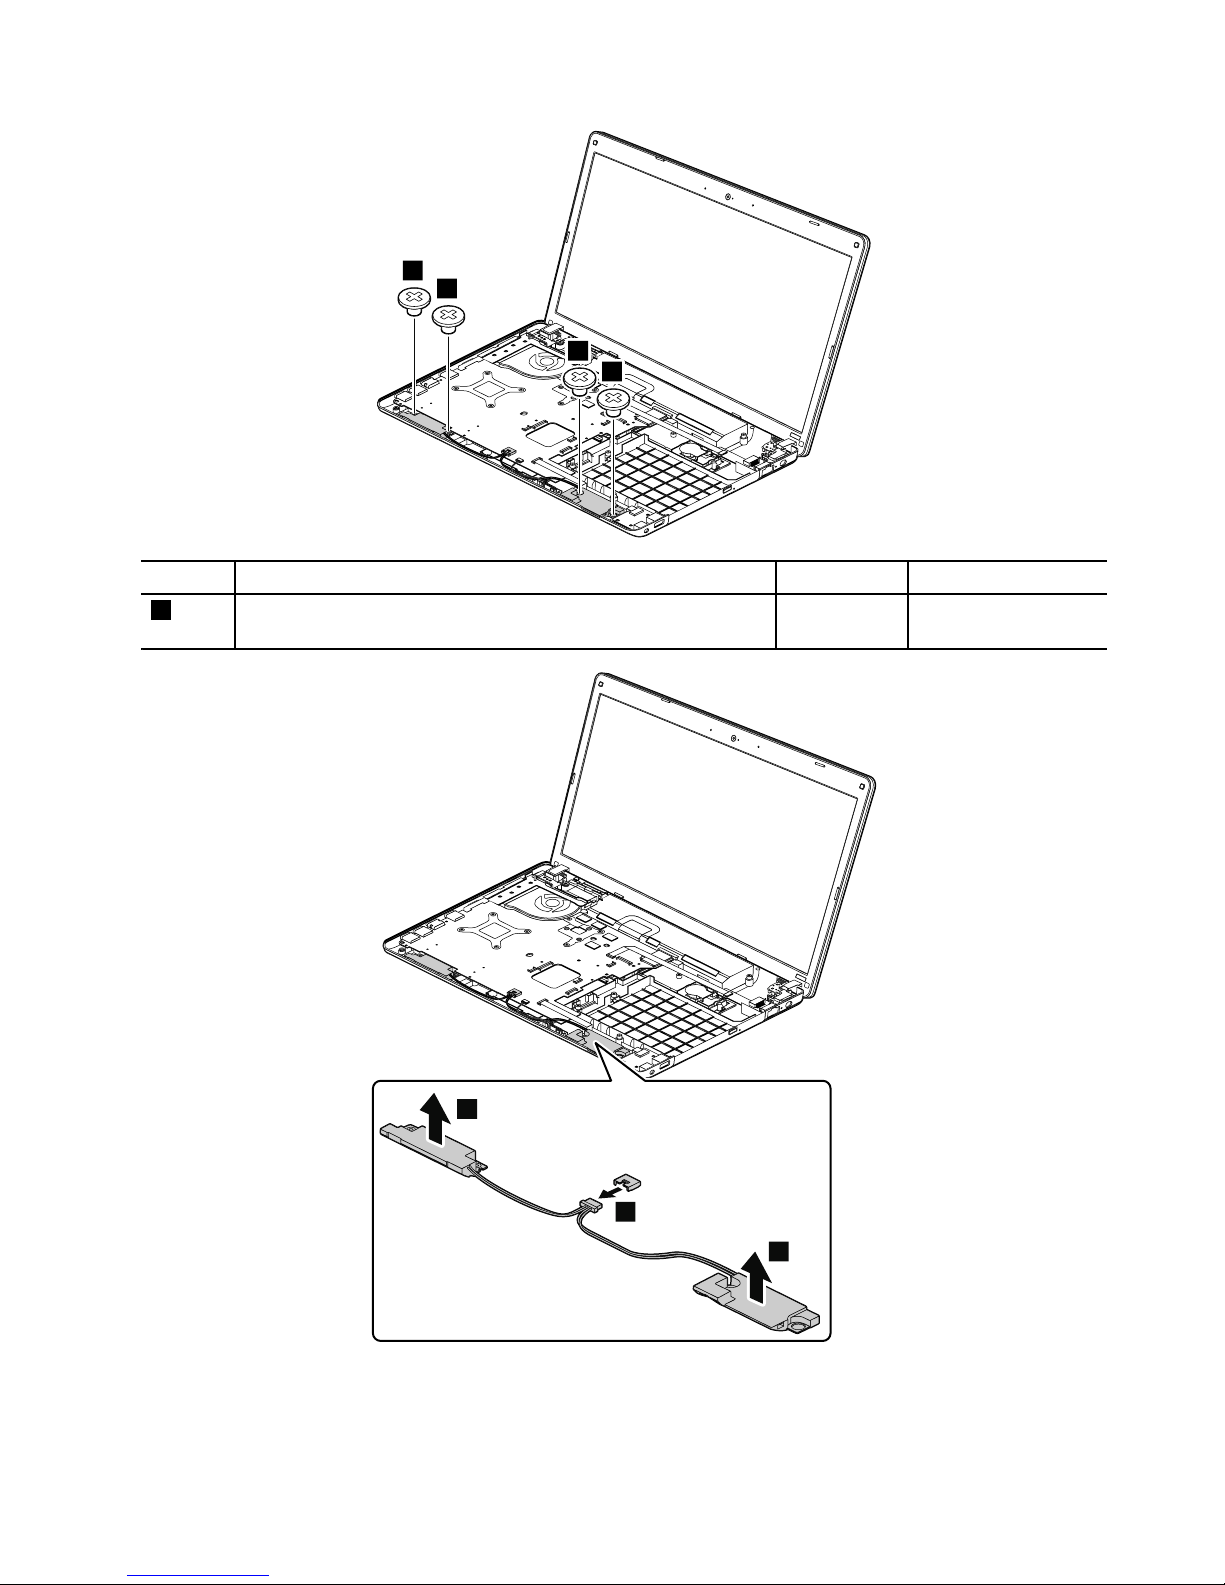
1
1
1
1
StepScrew(quantity)Color
Torque
1
M2×2mm,wafer-head,nylon-coated,bighead(4)
Black0.181Nm
(1.85kgf-cm)
3
3
2
Wheninstalling:Attachthespeakerassemblyandroutethecableasshowninthefollowinggure,and
makesurethatthespeakerconnectorisattachedrmly.
Chapter9.RemovingorreplacingaFRU87
Page 94
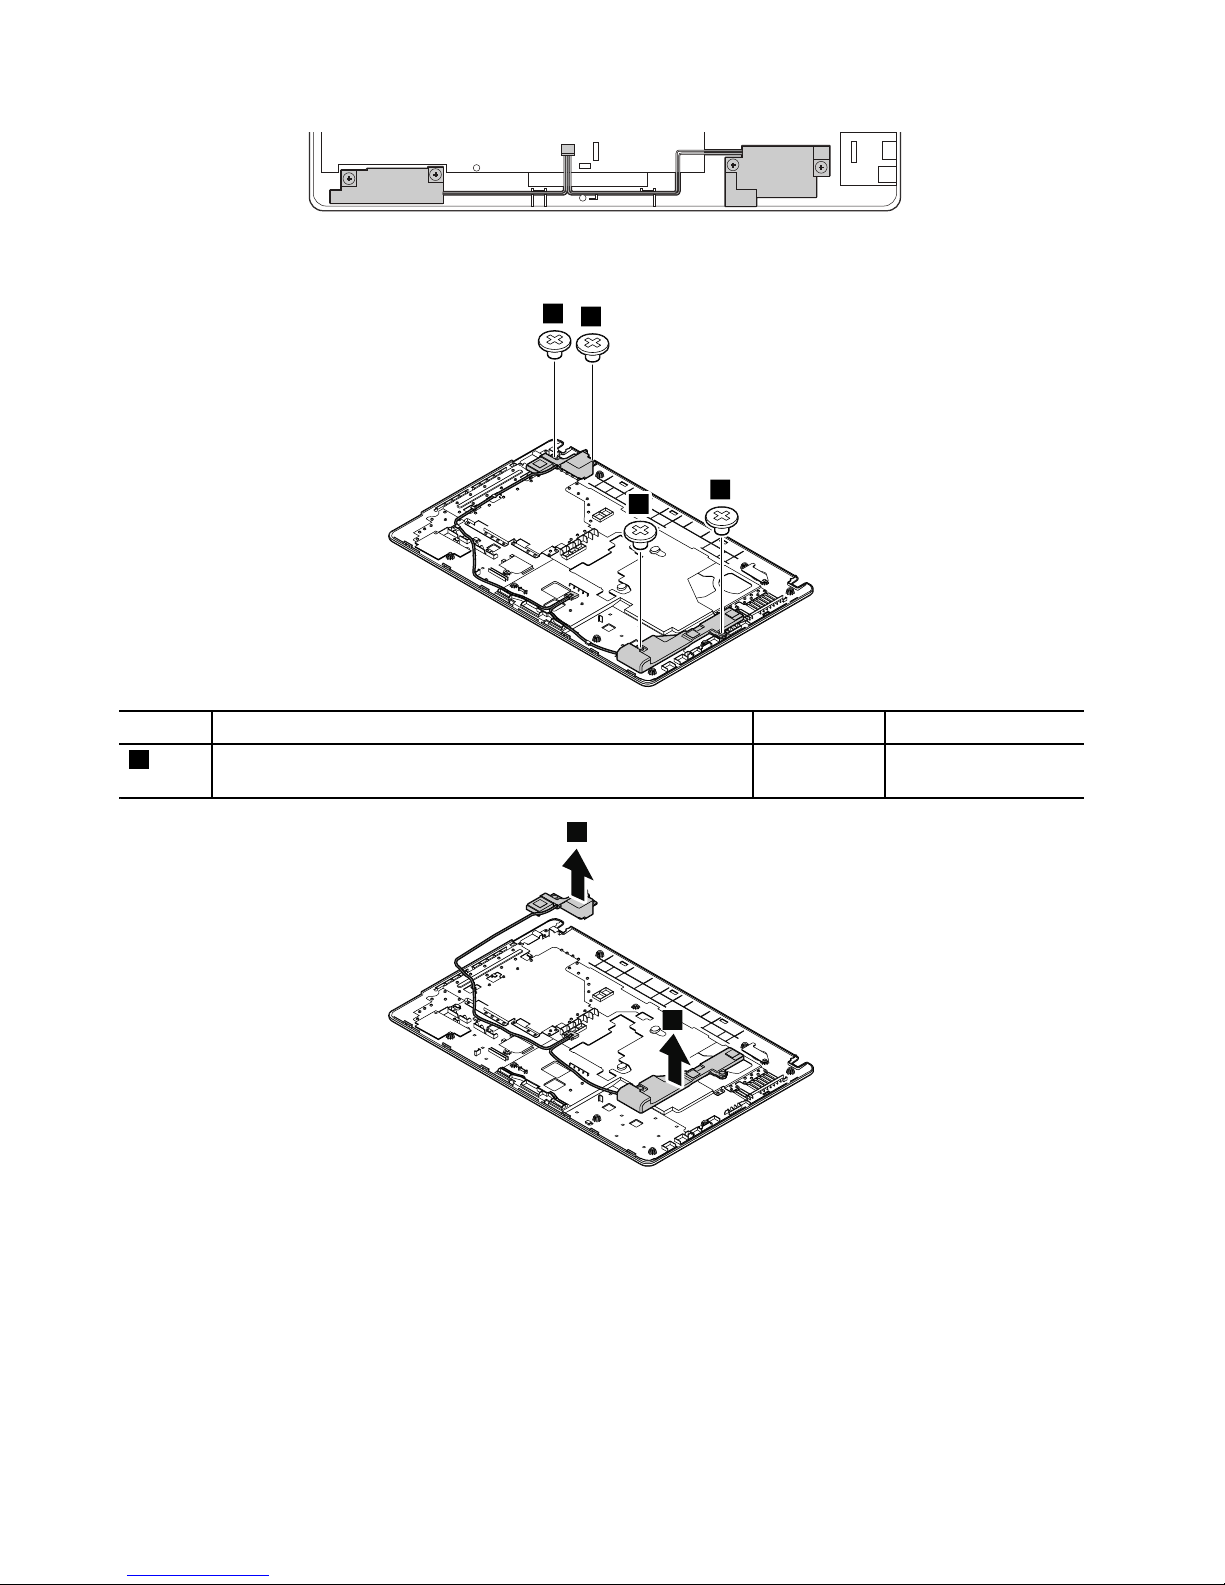
Forothermodels:
1
1
1
1
StepScrew(quantity)Color
Torque
1
M2×2mm,wafer-head,nylon-coated,bighead(4)
Black0.181Nm
(1.85kgf-cm)
2
2
Wheninstalling:Attachthespeakerassemblyandroutethecableasshowninthefollowinggure,and
makesurethatthespeakerconnectorisattachedrmly.
88HardwareMaintenanceManual
Page 95
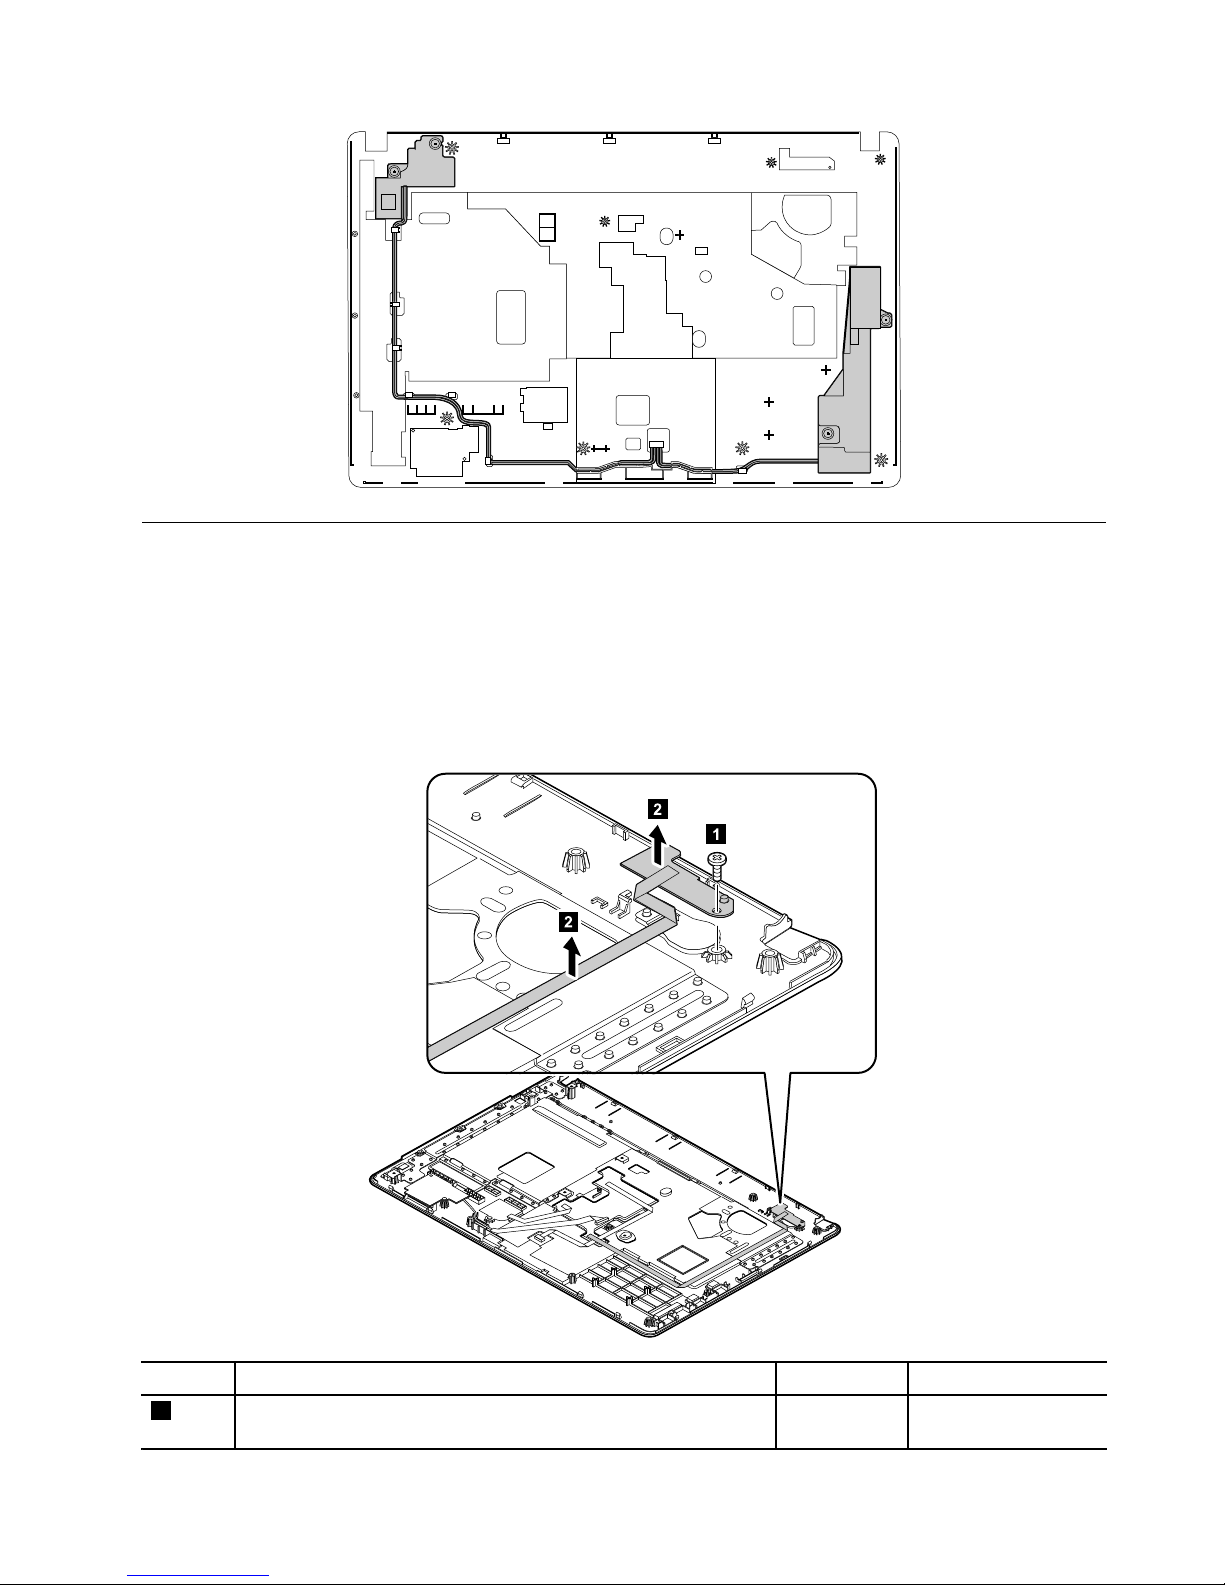
1170Powerbuttonsubcard
Foraccess,removetheseFRUsinorder:
•“1010Batterypack”onpage62
•“1020Largebottomcover”onpage63
•“1040Opticaldriveorblankbezel”onpage65
•“1120Keyboard”onpage76
•“1130Keyboardbezel”onpage80
Removalstepsofpowerbuttonsubcard
1
2
2
StepScrew(quantity)Color
Torque
1
M2×3mm,wafer-head,nylon-coated(1)
Black0.181Nm
(1.85kgf-cm)
Chapter9.RemovingorreplacingaFRU89
Page 96
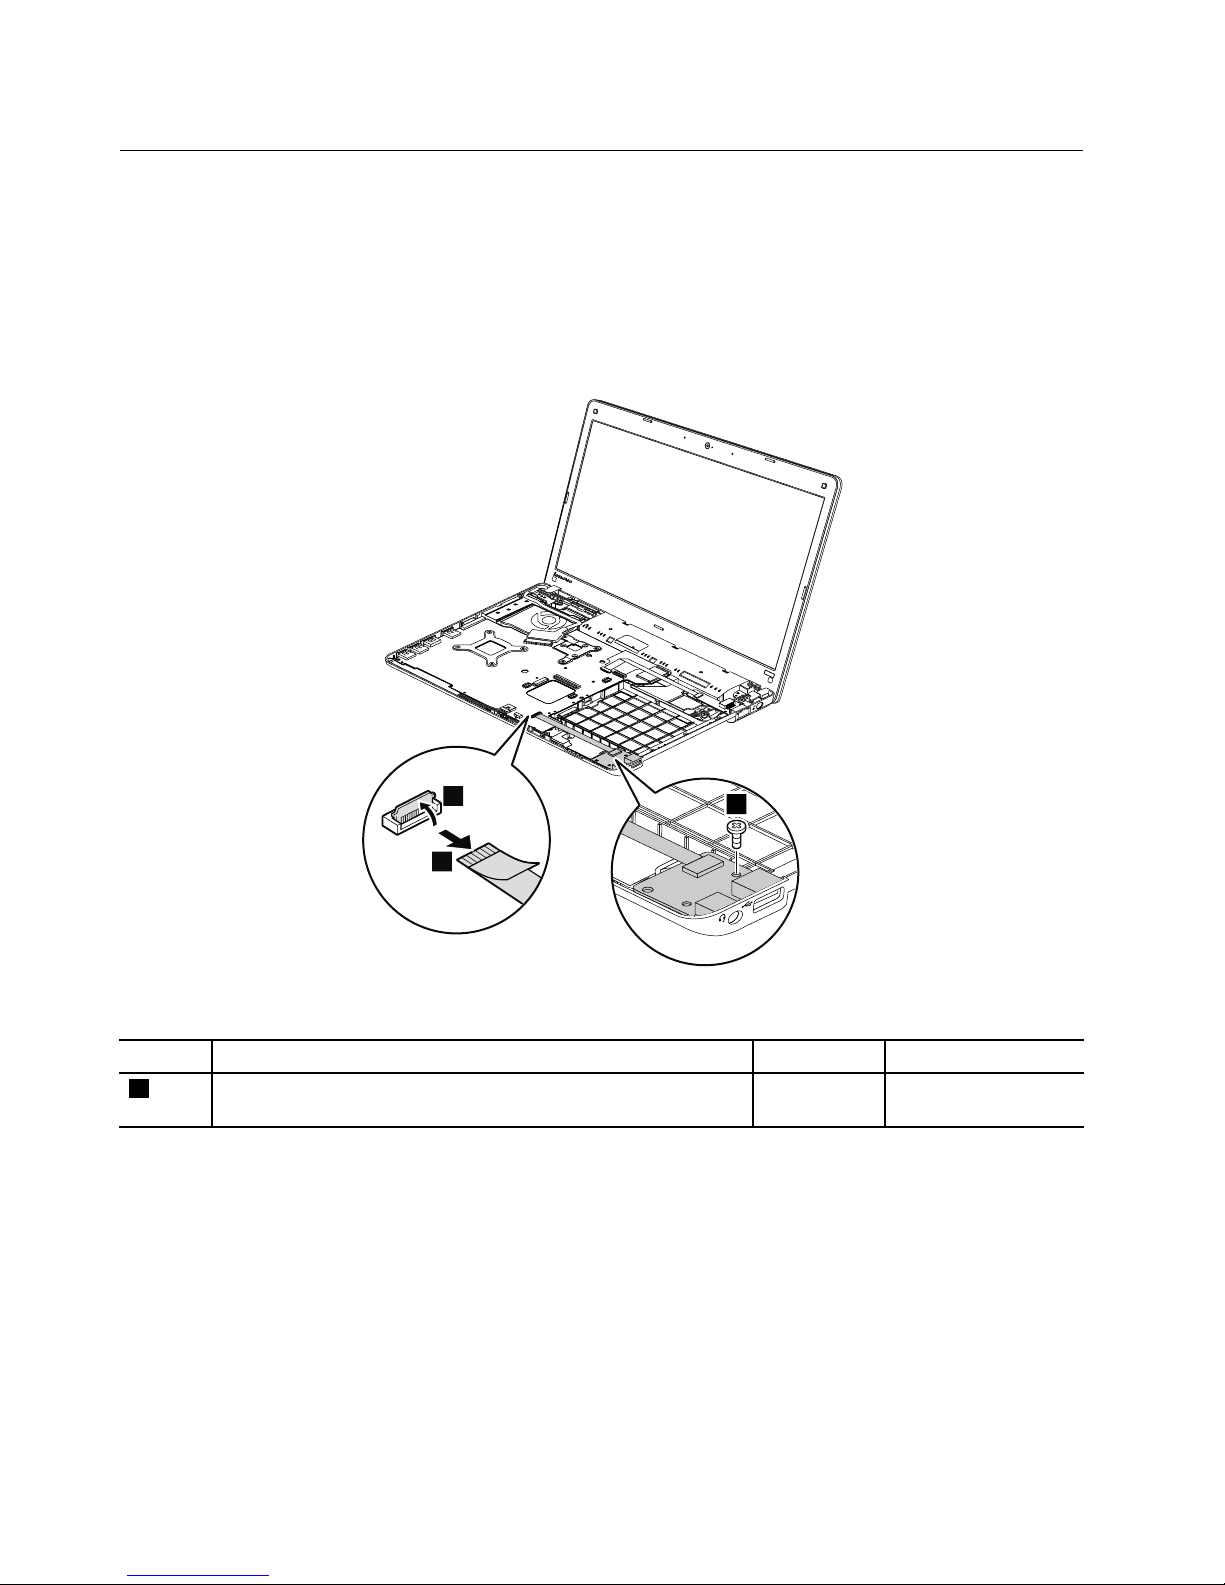
1180I/OsubcardwithUSBconnectorandaudiojack
Foraccess,removetheseFRUsinorder:
•“1010Batterypack”onpage62
•“1020Largebottomcover”onpage63
•“1040Opticaldriveorblankbezel”onpage65
•“1120Keyboard”onpage76
•“1130Keyboardbezel”onpage80
RemovalstepsofI/OsubcardwithUSBconnectorandaudiojack
1
2
3
Wheninstalling:Makesurethattheconnectorisattachedrmlytothesystemboard.
StepScrew(quantity)Color
Torque
3
M2×5mm,wafer-head,nylon-coated(1)Silver
0.181Nm
(1.85kgf-cm)
90HardwareMaintenanceManual
Page 97
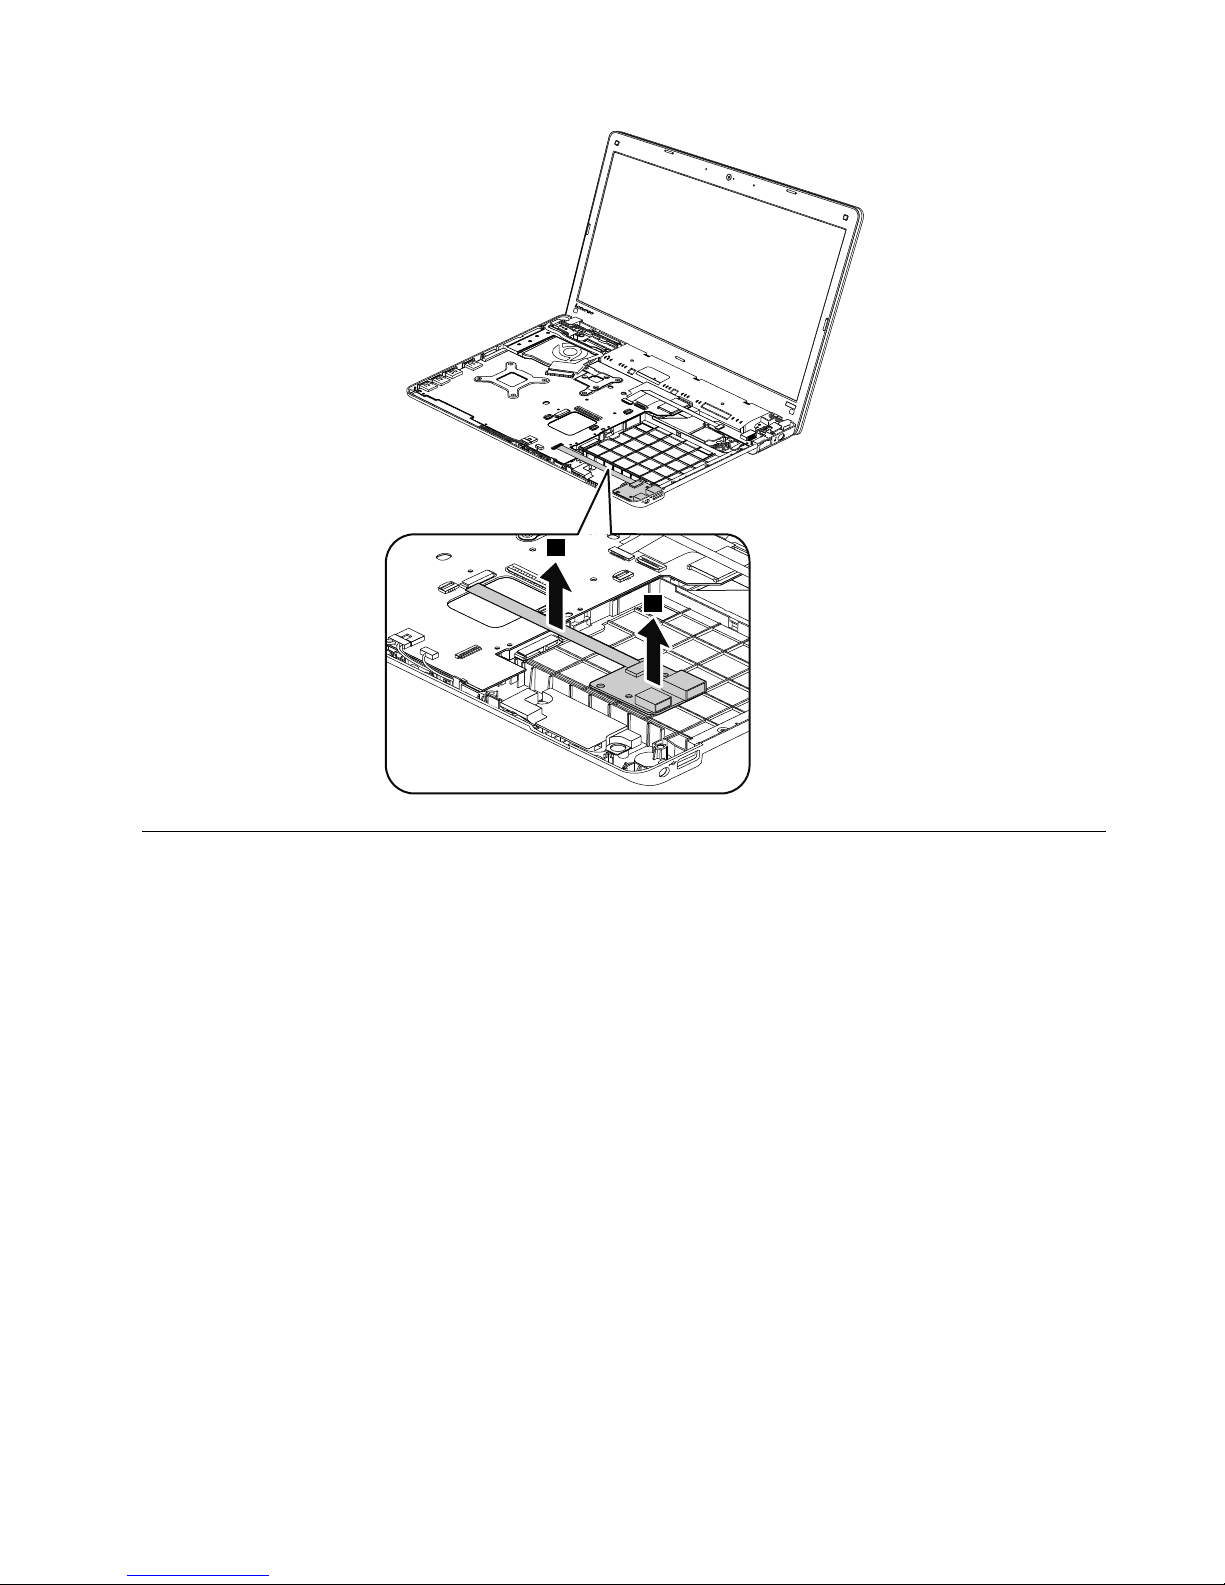
4
4
1190RJ45subcard
Foraccess,removetheseFRUsinorder:
•“1010Batterypack”onpage62
•“1020Largebottomcover”onpage63
•“1040Opticaldriveorblankbezel”onpage65
•“1120Keyboard”onpage76
•“1130Keyboardbezel”onpage80
Chapter9.RemovingorreplacingaFRU91
Page 98
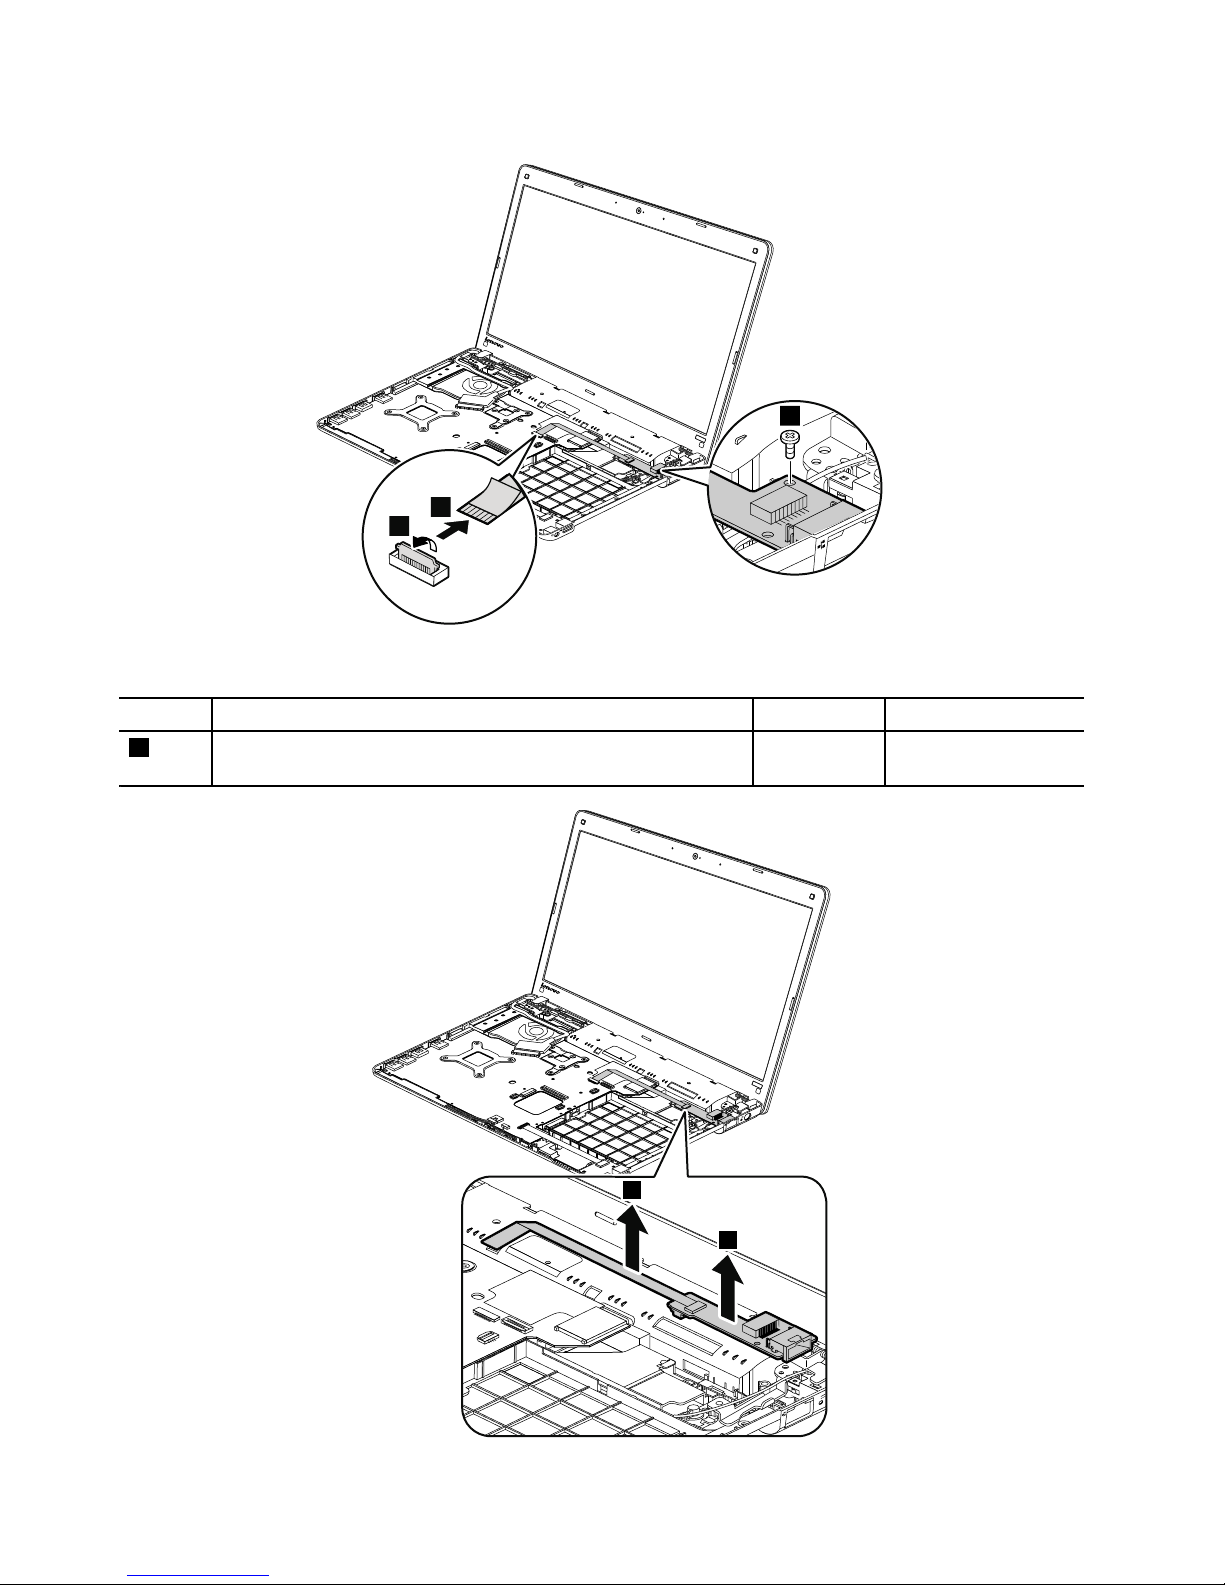
RemovalstepsofRJ45subcard
1
2
3
Wheninstalling:Makesurethattheconnectorisattachedrmlytothesystemboard.
StepScrew(quantity)Color
Torque
3
M2×5mm,wafer-head,nylon-coated(1)Silver
0.181Nm
(1.85kgf-cm)
4
4
92HardwareMaintenanceManual
Page 99
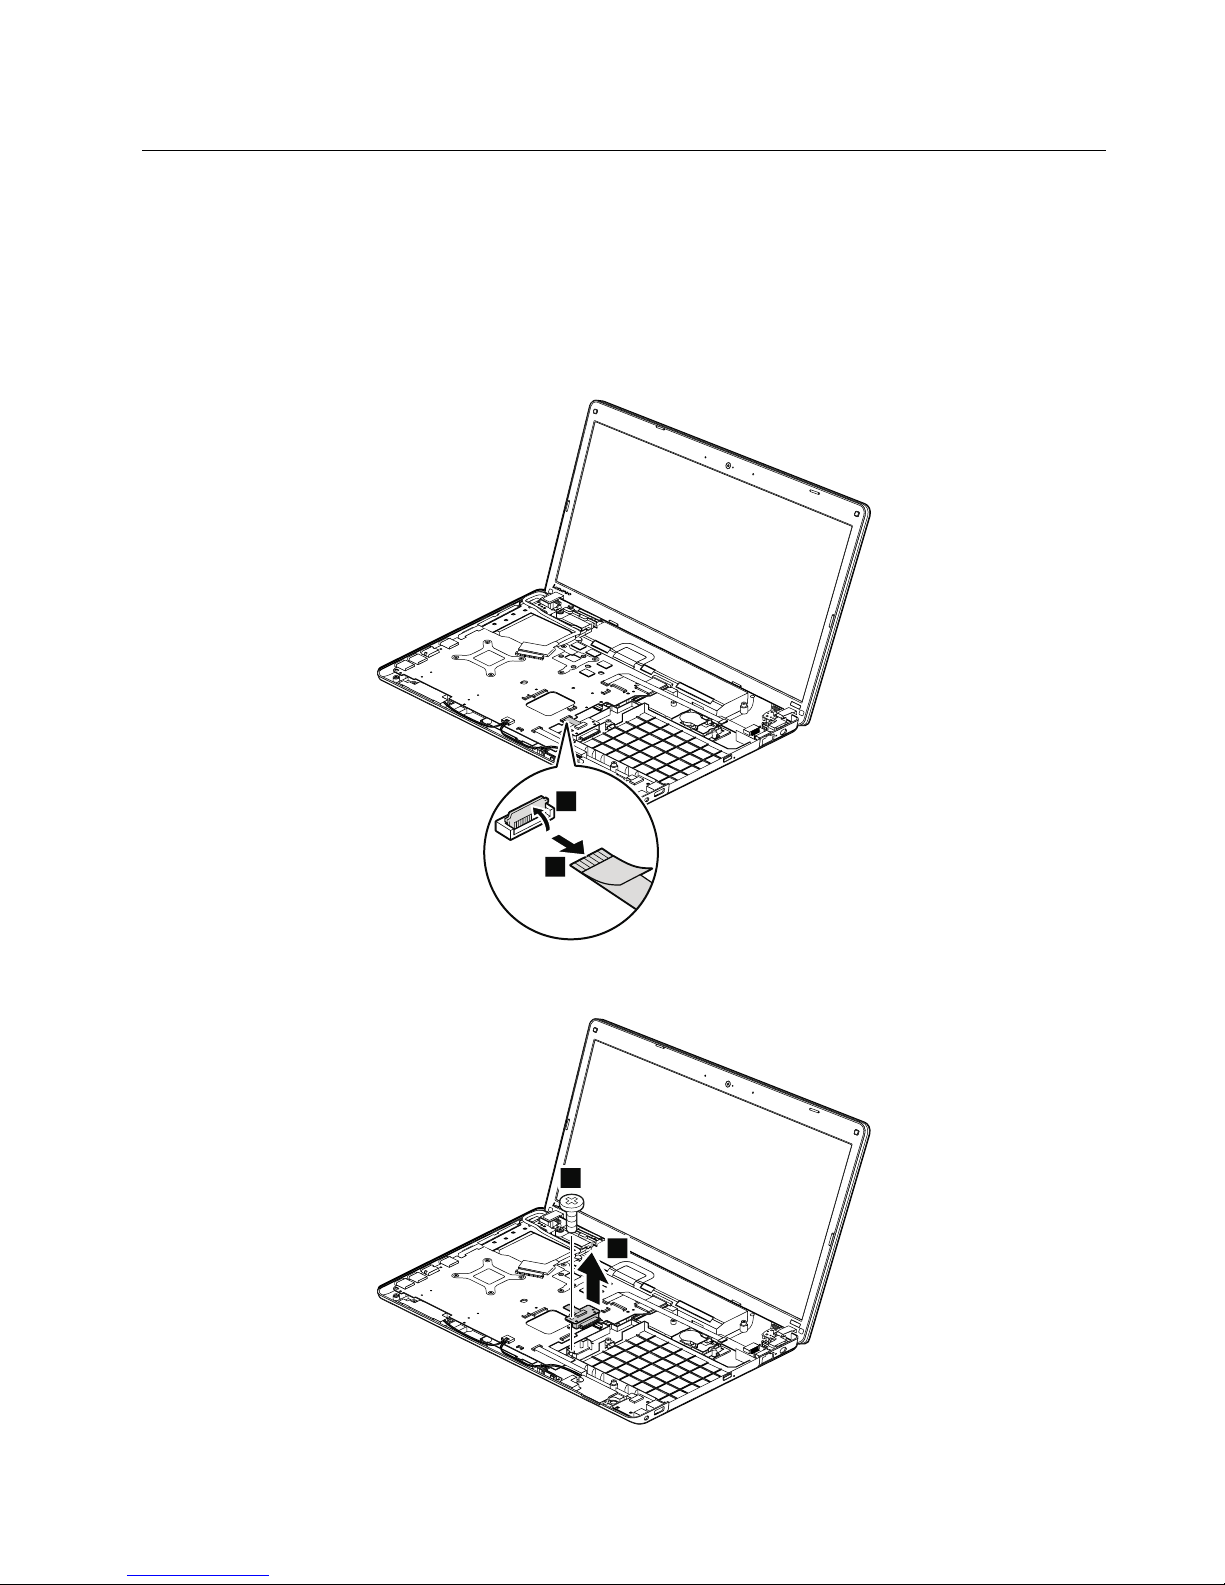
1200Opticaldrivesubcard
Foraccess,removetheseFRUsinorder:
•“1010Batterypack”onpage62
•“1020Largebottomcover”onpage63
•“1040Opticaldriveorblankbezel”onpage65
•“1120Keyboard”onpage76
•“1130Keyboardbezel”onpage80
Removalstepsofopticaldrivesubcard
1
2
Wheninstalling:Makesurethattheconnectorisattachedrmlytothesystemboard.
3
4
Chapter9.RemovingorreplacingaFRU93
Page 100
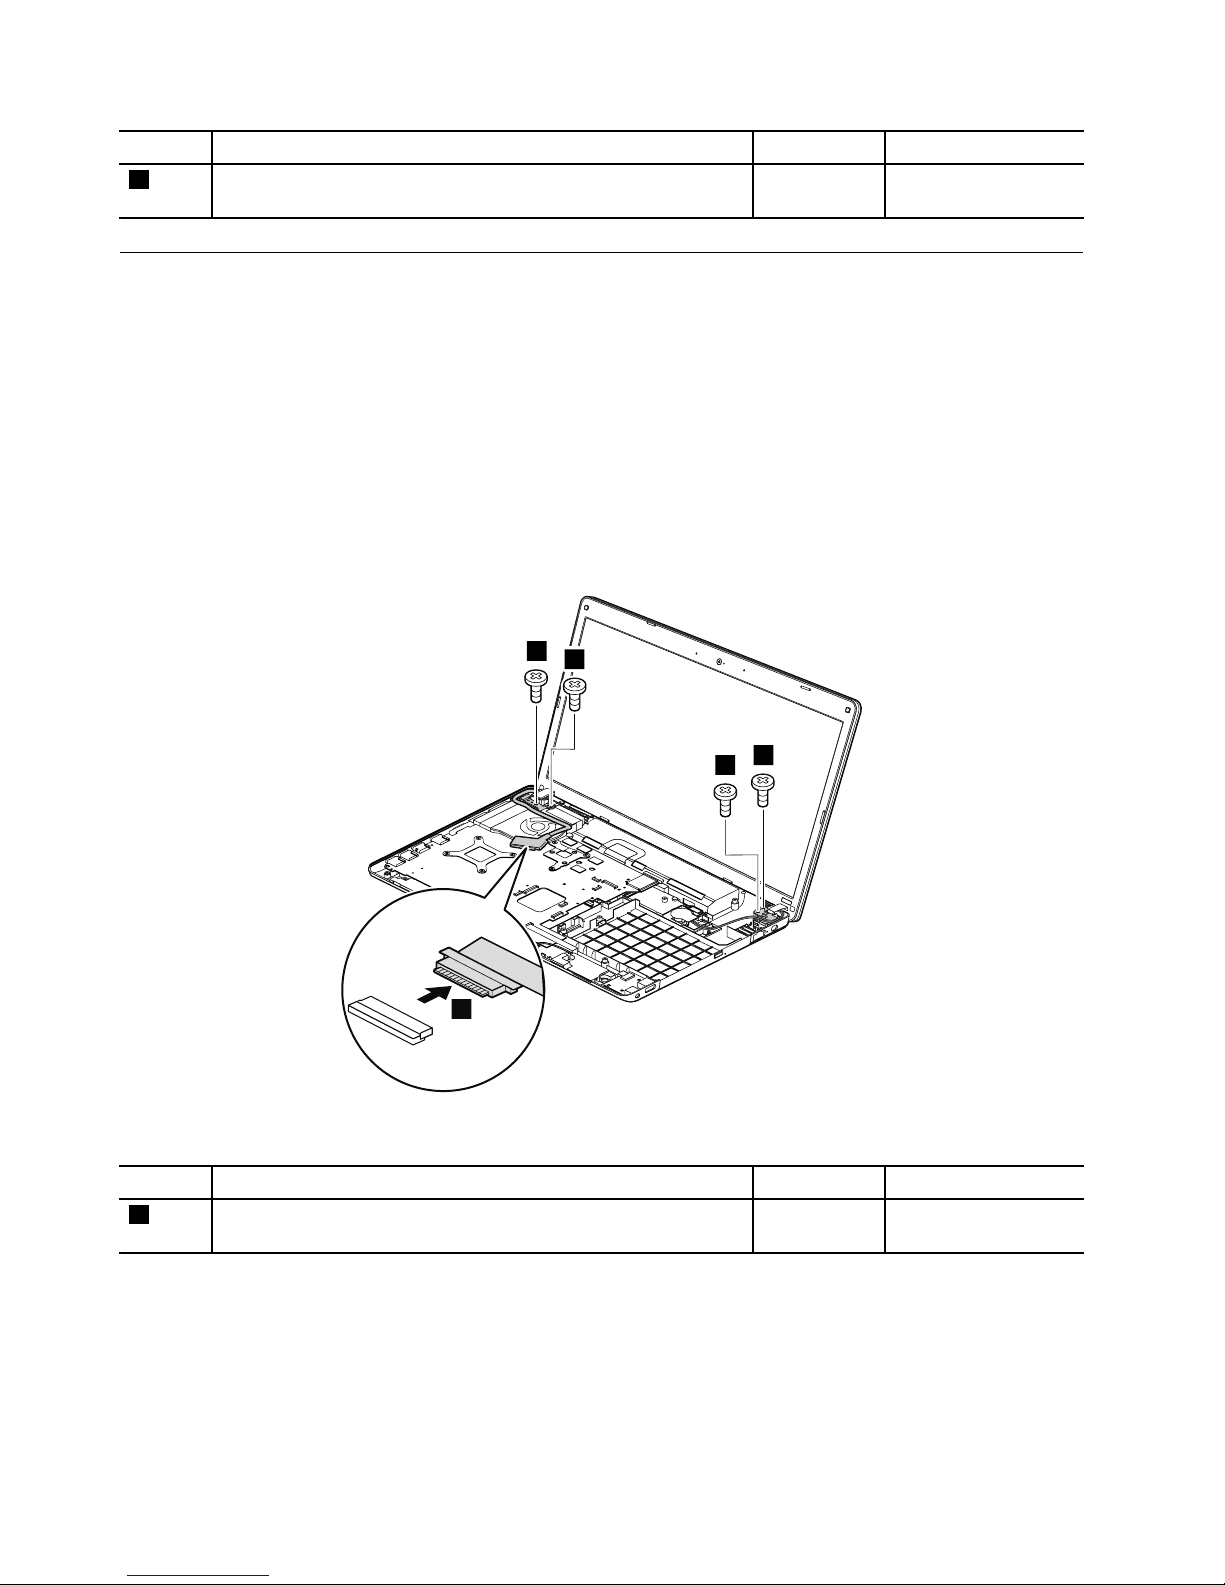
StepScrew(quantity)Color
Torque
3
M2×5mm,wafer-head,nylon-coated(1)Silver
0.181Nm
(1.85kgf-cm)
1210LCDunit
Foraccess,removetheseFRUsinorder:
•“1010Batterypack”onpage62
•“1020Largebottomcover”onpage63
•“1030Smallbottomcover”onpage64
•“1040Opticaldriveorblankbezel”onpage65
•“1070PCIExpressMiniCardforwirelessLAN”onpage68
•“1080PCIExpressMiniCardforwirelessWANormSATAsolidstatedrive”onpage69
•“1120Keyboard”onpage76
•“1130Keyboardbezel”onpage80
•“1190RJ45subcard”onpage91
RemovalstepsofLCDunit
2
2
2
2
1
Wheninstalling:Makesurethattheconnectorisattachedrmlytothesystemboard.
StepScrew(quantity)Color
Torque
2
M2.5×5mm,wafer-head,nylon-coated(4)
Black0.392Nm
(4kgf-cm)
94HardwareMaintenanceManual
 Loading...