

Page 1
STOWAWAY
SIERRA
Quick Start Guide
Guide de démarrage rapide
Kurzanleitung
Page 2
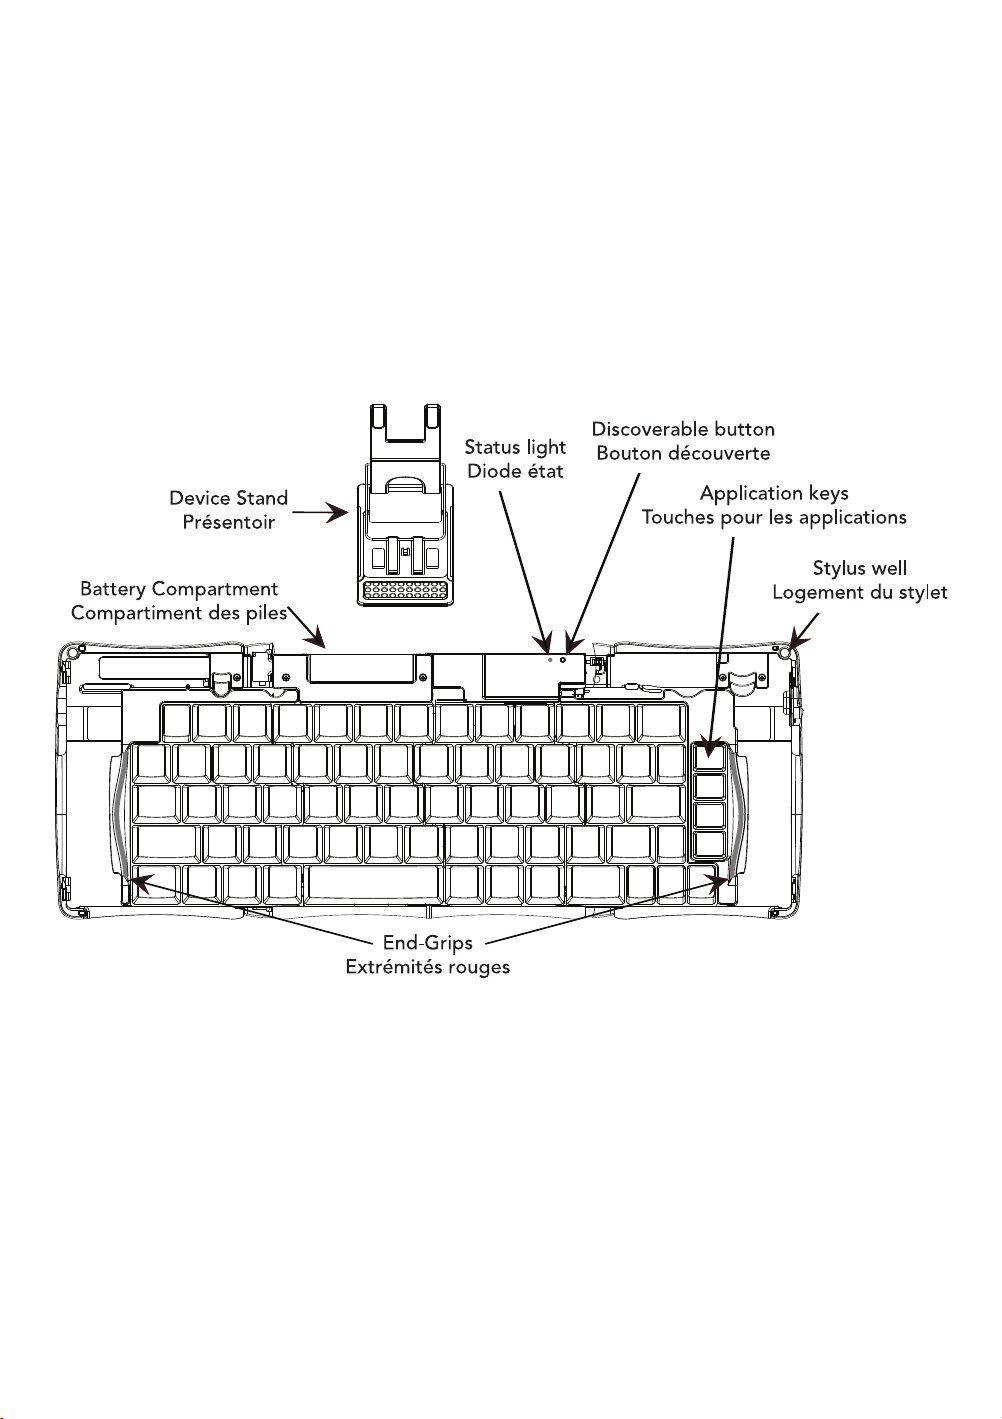
English
Opening the keyboard:
1 Hold the unit in your hands and slide the button down to open the case.
2 Unfold the keyboard and set it on a flat surface.
3 Slide the left and right key panels with red end-grips, inward to bring the
keyboard sections completely together.
NOTE: The right key panel must be slid all the way in to turn on the keyboard.
Français
Deutsch
Ouvrir le clavier :
1 Tenez le clavier dans vos mains et faites glisser le bouton vers le bas pour
ouvrir le boîtier.
2 Dépliez le clavier et placez-le sur une surface plane.
3 Glissez les panneaux de gauche et droite avec les extrémités rouges vers
l’intérieur pour rassembler les différentes parties.
NOTE : Le panneau de droite doit être glissé entièrement pour allumer le clavier.
Öffnen der Tastatur
1 Nehmen Sie die Tastatur in beide Hände und schieben Sie dann den Knopf
nach unten, um das Gerät zu öffnen.
2 Falten Sie die T
Oberfläche.
3 Schieben Sie das linke und rechte T
vollständig funktionsfähig zu machen.
ACHTUNG: Der rechte Tastaturteil muss vollständig nach innen geschoben werden um die Tastatur einzuschalten.
astatur auseinander und legen Sie sie auf eine flache
teil nach innen, um die T
astatur
astatur
Page 3

Battery Installation:
+
-
1 Remove the battery door by placing your thumb on the top of the door and
your index finger underneath the door lip and prying out and up.
2 Insert one (1) AAA battery (included) inside the battery compartment being
sure to note the polarity.
3 Replace the battery door by first inserting the tabs into the slots in the front
of the compartment and then rotating the door over and snapping into place.
English
Installation des piles :
1 Retirez le capot des piles en plaçant votre pouce en haut du capot et votre
index sous le capot et appuyez vers le haut.
2 Insérez une (1) pile AAA-R6 (incluse) dans le compartiment des piles en tenant attentivement compte de la polarité.
3 Replacez le capot des piles en insérant en premier les ergots sur le devant
du compartiment, puis en faisant tourner le capot pour le mettre en place.
Installieren der Batterie
1 Öffnen Sie den Batteriefachdeckel mit Daumen und Zeigefinger indem sie
den Plastiknippel mit dem aufhebeln und den Deckel nach oben wegnehmen.
2 Legen Sie die mitgelieferte AAA Batterie ein (bitte beachten sie dabei die
Polarität).
3 Schließen Sie das Batteriefach wieder, indem Sie zuerst die Laschen in die
vorgesehenen Schlitze schieben und den Deckel dann herunterdrücken, bis er
einrastet.
Français
Deutsch
Page 4
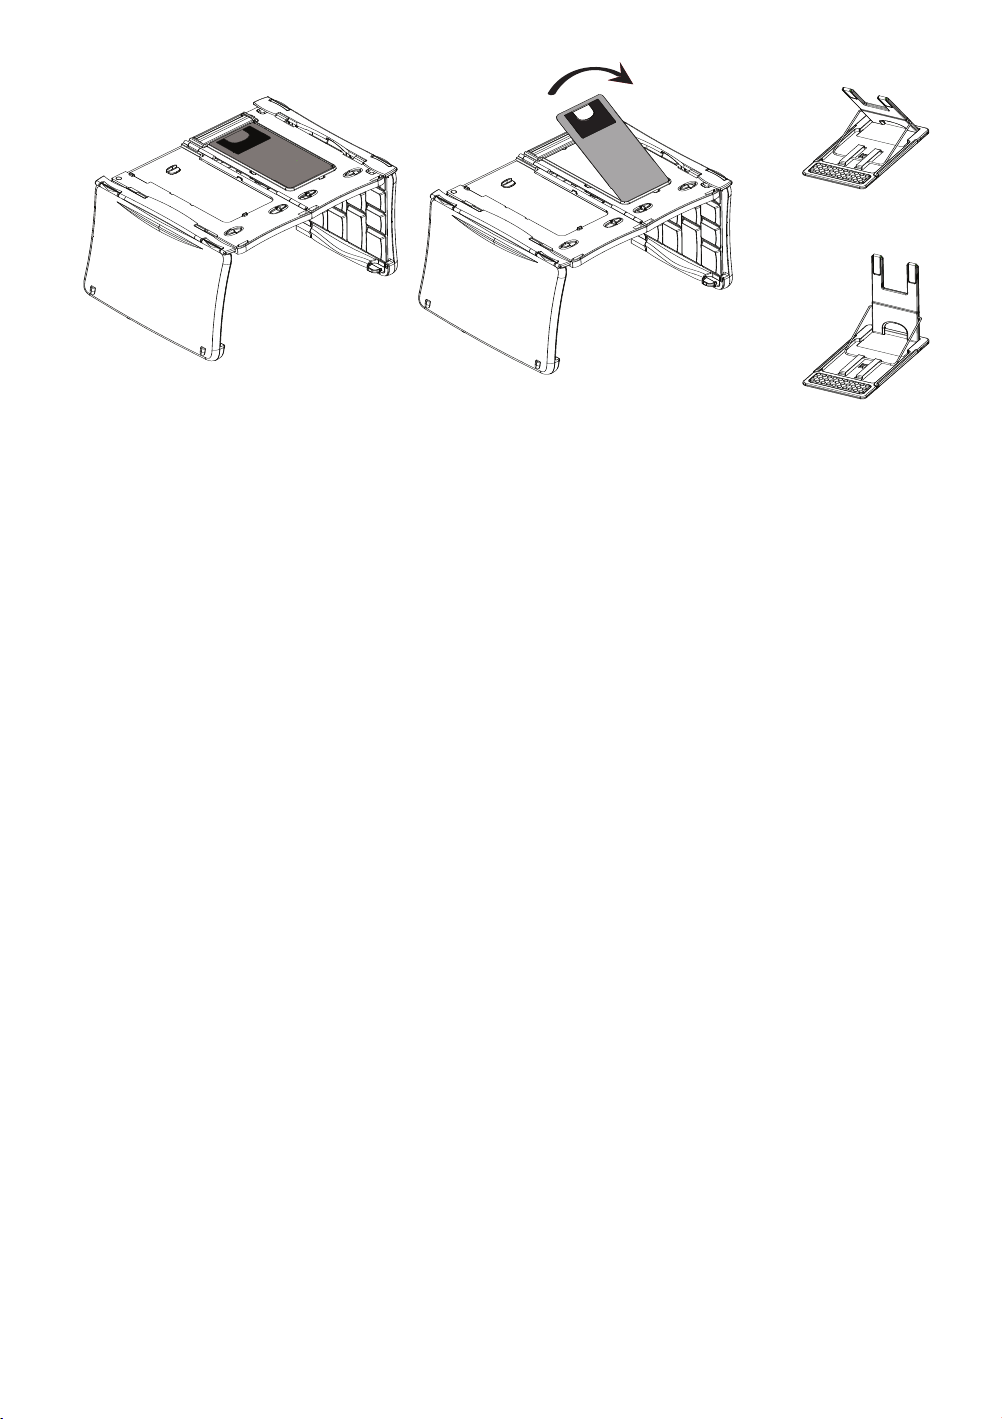
English
Setting up the device stand:
1 With the underside of the open keyboard facing up, place your finger in
the cutout and lift the stand out.
2 Flip up the device back rest. The first detent is for devices in landscape
mode, stand_landscape.ai the second is for devices in portrait mode.
3 To replace the stand, return the folded stand to its holder and snap into place.
Français
Deutsch
Mise en place du présentoir :
1 Avec le dessous du clavier ouvert faisant face, placez votre doigt dans
l’encoche et relevez le présentoir.
2 Relevez le support arrière du dispositif. La première position est destinée
aux appareil en mode paysage, stand_landscape.ai la seconde est pour ceux
en mode portrait.
3 Pour refermer le présentoir, remettez-le, plié, dans son emplacement et
clippez-le.
Aufstellen der Tastaturhalterung
1 Legen Sie die geöffnete Tastatur mit der Unterseite nach oben. Ziehen Sie
mit den Fingern die Tastaturhalterung heraus.
2 Lassen Sie die Arretierung einrasten. Das erste Einrasten sieht die Benutzung
im Querformat vor, das zweite Einrasten ist für Benutzung im Hochformat.
3 Um die Halterung wieder zusammenzulegen, bringen Sie die gefaltete
Halterung in ihre vorgesehene Befestigung, bis sie einrastet.
Page 5
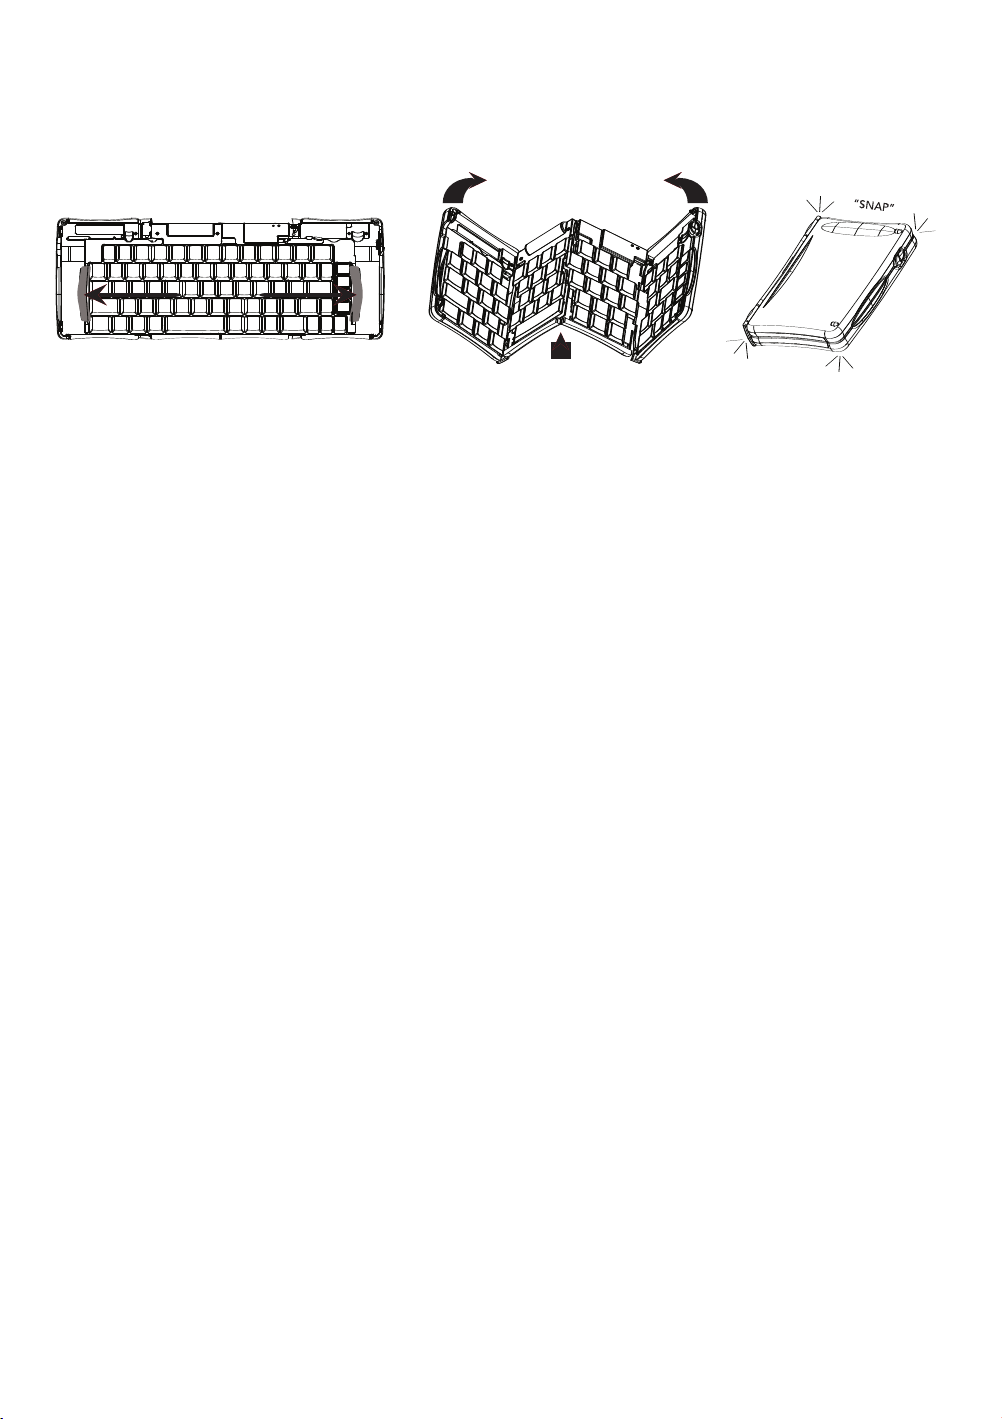
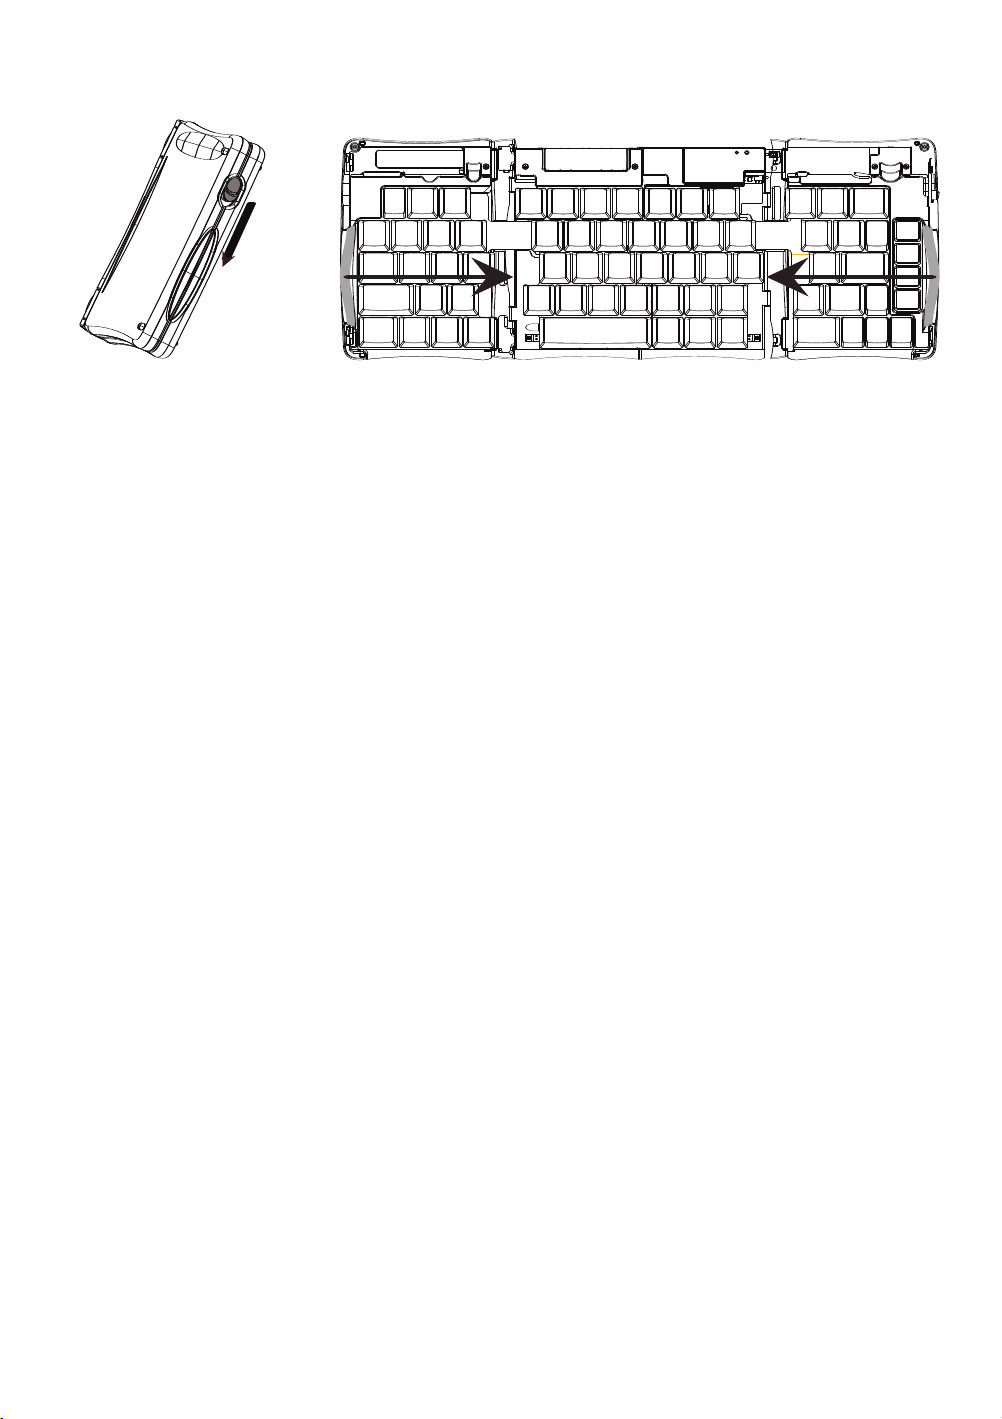
Closing the keyboard:
1 With the unit on a flat surface, slide the red end-grips apart and toward the
outside edge of the case. Make sure to slide the keyboard sections as wide
apart as possible.
2 Lift the keyboard and push up from under the center to form a “W”, and
then close.
3 Press the four corners of the case together until they snap into place.
NOTE: Sliding the right key panel out turns the keyboard off and preserves battery life.
English
Fermer le clavier :
1 Placez l’appareil sur une surface plane, faites glisser les extrémités rouges
vers l’extérieur du boîtier. Assurez-vous de faire glisser les parties du clavier
aussi loin que possible.
2 Soulevez le clavier et poussez vers le haut sous le milieu pour former un “W”,
et refermez-le.
3 Appuyez sur les quatre coins du boîtier en même temps jusqu’à ce qu’ils
soient fixés.
NOTE : Faire glisser le panneau de droite éteint le clavier et préserve la durée
de vie des piles.
Schließen der T
1 Legen Sie die Tastatur auf eine flache Oberfläche. und ziehen Sie die beiden
Seitenteile an den roten Griffen soweit wie möglich auseinander.
2 Heben Sie die T
eine W-Form bildet. Schließen Sie nun die Tastatur.
3 Drücken Sie die vier Ecken der Hülle aufeinander, bis sie ineinander rasten.
ACHTUNG: Sie können Batterielaufzeit sparen, indem Sie das rechten
Tastaturteil herausziehen. Dadurch schaltet sich die Tastatur ab
astatur:
astatur an und drücken Sie unten mittig dagegen, sodass sich
Français
Deutsch
Page 6

Installing the keyboard application
his software application enables your handheld device to interact with the Stowaway® Sierra keyboard.
T
You will need at least 250KB of memory for the keyboard application.
The keyboard application can be installed from the accompanying CD or if your mobile device
has internet access it can be downloaded directly by browsing to the Think Outside website:
www.thinkoutside.com. The website will automatically detect the type of device and offer the
correct driver for download.
Pocket PC/Windows Mobile® Smartphone
ActiveSync® 4.0 or later is required to install the Stowaway Sierra keyboard application. Before installing the
keyboard application, it is a good idea to back up your data using ActiveSync. For more information on this,
see the User’s Guide that came with your mobile device. Please uninstall any other keyboard software you
have previously installed on your device to avoid potential conflicts.
1 Connect your mobile device to its synchronization cradle/cable and establish a connection between the
computer and your mobile device using ActiveSync.
2 Insert the CD-ROM into the CD-ROM drive on your PC. Click on the buttons: Stowaway Sierra > Windows
Mobile > English > Keyboard Driver.
3 Follow the on-screen instructions to complete the installation.
4 For proper operation, the driver must be installed into Main Memory (default location).
5 When the installation is complete, you will be prompted by your mobile device to perform a reset.
Symbian OS™
After the driver is successfully installed, the keyboard icon will appear in the Applications or Menu list.
Method 1: Sync a connection between the computer and your Symbian mobile device using its sync cable.
A Insert the CD-ROM into the CD-ROM drive on your PC. Click on the buttons: Stowaway Sierra > Symbian
> Series 60/UIQ > English > Keyboard Driver.
B If necessary, launch the .SIS file to begin installation.
C Be sure to install the driver to Phone Memory.
Method 2: Launch the installation from a Flash Memory card.
A Transfer the .SIS file to a memory card.
B Navigate to the location the file was saved to on the memory card.
C Launch the .SIS file to begin installation;
.
D Be sur
Method 3: Beam the driver via Infrared or Bluetooth.
A Right click the .SIS file.
B Select Send To Bluetooth device and find your device in the list.
C The keyboard driver will appear in the phone’s Inbox.
D When prompted select Yes then Install.
Palm OS®
Windows users:
1 Connect your Palm OS device to a computer using the HotSync® cradle or cable.
2 Insert the CD-ROM into the CD-ROM drive on your PC. Click on the buttons: Stowaway Sierra > Palm >
3 The keyboard application will be installed during your next HotSync.
e to install the driver to Phone Memor
English > Keyboard Driver.
y
Page 7

ac users:
M
onnect your Palm OS device to your Mac using the HotSync cradle or cable.
1 C
nsert the CD-ROM in to the CD-ROM drive and navigate to: Sierra > Palm > English > Driver and double
2 I
click on the keyboard.prc file.
3 The driver will be installed during your next HotSync.
Making the keyboard discoverable
Place the keyboard in Discoverable mode by pressing the discoverable button (above the “-” key) until the
Status light flashes green once per second. Once the keyboard is paired, the Status light will flash once
every four seconds.
NOTE: During the passkey sequence the light will not flash.
Pairing the keyboard and your mobile device
Pocket PC (Windows Mobile)
1 If necessary after reset, open the keyboard application (Start > Programs > Stowaway Keyboard).
2 Place the keyboard in discoverable mode, select Bluetooth wireless keyboard and tap Setup.
3 On some mobile devices it may be necessary to tap the Disable built-in HID driver button.
4 Tap Connect.
5 When prompted, enter a numeric-only passkey (of your own choosing between 1 and 9 digits) on the
mobile device using the on-screen keyboard and stylus.
6 Type the same passkey on the keyboard and press <Enter>.
Windows Mobile Smartphone
1 After reset, select Enable BT from the Menu.
2 Place the keyboard in discoverable mode.
3 On some mobile devices it may be necessary to disable the built-in HID driver. Select Advanced > Disable
built-in HID driver from the Menu.
4 When prompted enter a numeric-only passkey (of your own choosing between 1 and 9 digits) on the
mobile device using the dialpad and press Done.
5 Type the same passkey on the keyboard and press <Enter>.
Symbian UIQ (touchscreen)
1 After installation, open the phone Applications list.
2 Scroll to and select Stowaway keyboard.
3 Place the keyboard in discoverable mode
4 At the Status tab, select Enable BT. Connection and Scanning to discover the Stowaway keyboard should
begin within a few seconds.
Symbian Series 60 (menu driven)
1 After installation, pr
2 At the Status page, press the Options button, and select Enable BT.
3 Place the keyboard in discoverable mode.
4 Connection and Scanning to discover the Stowaway keyboard should begin within a few seconds.
If necessary, select the Think Outside Keyboard from the list and press Connect.
ess Menu on your phone and select Stowaway
.
Page 8

alm OS
P
fter reset, tap the Keyboard icon on the Application page.
1 A
lace the keyboard in discoverable mode.
2 P
3 Check the Secure box and tap Connect.
4 When prompted, check Add to Trusted Device List and enter a numeric-only passkey (of your own
choosing between 1 and 9 digits) using Graffiti and tap OK.
5 Type the same passkey on the keyboard and press <Enter>.
NOTE: Palm OS devices can only support one Bluetooth device connection at a time. You will have to disable any other Bluetooth connection to enable the keyboard connection.
The Bluetooth connection can break for various reasons (if the mobile device or keyboard are powered
off, or either is idle for too long, etc.). Before it can be used, the keyboard will need to be reconnected.
To restore the connection, make sure the keyboard and mobile device are powered on and in range, then
tap any key on the keyboard. The connection should be reestablished in a few seconds (when using a
secure connection).
NOTE: For instructions on setting up an Unsecured connection or more comprehensive information on
Secure connections, please refer to the electronic Owner’s Manual on the CD-ROM included with the
Stowaway Sierra Keyboard.
Warranty
Think Outside warrants this product against defects in materials and workmanship under normal use for a
period of one (1) year from the date of original retail purchase. Think Outside’s and its suppliers’ entire liability,
and your exclusive remedy, if you discover a defect and return the product with proof of purchase to Think
Outside during the warranty period, is that Think Outside will, at its option, repair, replace, or refund the
purchase price of the product to you at no charge. This limited warranty is void if the defect results from
accident, alteration, abuse, improper use, or exposure to water or extreme temperature. TO THE MAXIMUM
EXTENT PERMITTED BY LAW, THIS LIMITED WARRANTY IS EXCLUSIVE AND THINK OUTSIDE DISCLAIMS
ALL OTHER WARRANTIES, EXPRESS OR IMPLIED, INCLUDING WARRANTIES OF MERCHANTABILITY,
FITNESS FOR A PARTICULAR PURPOSE, TITLE AND NON-INFRINGEMENT. THINK OUTSIDE IS NOT
RESPONSIBLE FOR SPECIAL, INCIDENTAL, INDIRECT OR CONSEQUENTIAL DAMAGES (INCLUDING
WITHOUT LIMITATION, DAMAGES FOR LOST PROFITS, LOST SAVINGS, OR OTHER DAMAGES) ARISING
OUT OF THE USE OR INABILITY TO USE THE PRODUCT OR THE BREACH OF ANY EXPRESS OR IMPLIED
WARRANTY, EVEN IF THINK OUTSIDE HAS BEEN ADVISED OF THE POSSIBILITY OF THOSE DAMAGES.
Because some jurisdictions do not permit the exclusion or limitations set forth above, they may not apply in
all cases. This warranty is governed by the laws of the State of California.
©2006 Think Outside, Inc. All rights reserved. Reproduction of this document in any manner whatsoever without the written permission of
Think Outside, Inc. is strictly forbidden. Trademarks used in this text: Stowaway is a trademark of Think Outside, Inc. The Bluetooth word mark
and logos ar
ActiveSync are registered trademarks of Microsoft, Inc. Palm OS and HotSync are registered trademarks of Palm Source, Inc. Symbian is a
trademark of Symbian Software Ltd. Other trademarks and trade names are those of their respective owners. Think Outside, Inc. disclaims any
proprietary interest in trademarks and trade names other than its own.
e owned by the Bluetooth SIG, Inc. and any use of such marks by Think Outside, Inc. is under license. W
indows Mobile and
Page 9

Installation du logiciel du clavier
e logiciel permet à votre appareil numérique d’être utilisé avec le clavier Stowaway® Sierra. Vous
C
aurez besoin d’au moins 250 Ko de mémoire pour cette application.
Le logiciel du clavier peut être installé depuis le CD livré ou, si votre appareil mobile dispose d’un
accès à Internet, il peut être téléchargé directement en naviguant vers le site web de Think
Outside : www.thinkoutside.com. Le site web détecte automatiquement le type de votre
appareil et propose le pilote logiciel adéquat.
Smartphone Pocket PC/Windows Mobile®
ActiveSync® 4.0 ou une version plus récente est requis pour installer le pilote du clavier Stowaway Sierra.
Avant d’installer ce logiciel, il est conseillé de réaliser une sauvegarde de vos données en utilisant
ActiveSync. Pour plus d’informations, référez-vous au Guide de l’Utilisateur qui vous a été fourni avec votre
appareil. Veuillez désinstaller tout autre logiciel pilote de clavier que vous auriez installé précédemment
pour éviter les conflits potentiels.
1 Connectez votre appareil mobile à son câble ou sa station de synchronisation, et établissez une connexion
entre l’ordinateur et votre appareil mobile avec ActiveSync.
2 Insérez le CD-ROM dans le lecteur de CD-ROM de votre PC. Cliquez sur les boutons : Stowaway Sierra >
Windows Mobile > Français > Pilote du clavier.
3 Suivez les instructions à l’écran pour terminer l’installation.
4 Pour assurer un fonctionnement correct, le pilote doit être installé dans la mémoire principale
(emplacement par défaut).
5 Lorsque l’installation est terminée, il vous sera demandé d’effectuer une réinitialisation de votre
appareil mobile.
Symbian OS™
Une fois le pilote installé correctement, l’icône du clavier va apparaître dans les Applications ou la liste Menu.
Méthode 1 : Synchronisez votre ordinateur et votre appareil mobile Symbian avec le câble de synchronisation.
A Insérez le CD-ROM dans le lecteur de CD-ROM de votre PC. Cliquez sur les boutons : Stowaway Sierra >
Symbian > Series 60/UIQ > Français > Pilote du clavier.
B Si nécessaire, lancez le fichier .SIS pour démarrer l’installation.
C Assurez-vous d’installer le pilote dans la mémoire du téléphone.
Méthode 2 : Lancez l’installation depuis une car
ez le fichier .SIS sur une carte mémoir
ransfér
A T
B Retrouvez l’endroit où est stocké le fichier sur votre carte mémoire.
C Lancez le fichier .SIS pour démarrer l’installation.
D Assur
Méthode 3 : “Beamez” (envoyez) le pilote par infrarouge ou Bluetooth.
A Faites un clic droit sur le fichier .SIS.
B Sélectionnez Envoyer par Bluetooth et choisissez l’appar
C Le pilote du clavier doit apparaîtr
D Lorsque cela vous est demandé, sélection Oui et Installation.
ez-vous d’installer le pilote dans la mémoire du téléphone.
e dans la boîte de réception de votre mobile.
te mémoir
e.
e Flash.
eil dans la liste.
Page 10

alm OS®
P
tilisateurs de Windows :
U
onnectez votre appareil Palm OS à un ordinateur en utilisant la station d’accueil ou le câble HotSync.
1 C
2 Insérez le CD-ROM dans le lecteur de CD-ROM de votre PC. Cliquez sur les boutons : Stowaway Sierra >
Palm > Français > Pilote du clavier.
3 Le logiciel du clavier sera installé lors de votre prochaine HotSync.
Utilisateurs de Mac :
1 Connectez votre appareil Palm OS à votre Mac en utilisant la station d’accueil ou le câble HotSync.
2 Insérez le CD-ROM dans le lecteur de CD-ROM et naviguez vers : Sierra > Palm > French > Driver, puis
double-cliquez sur le fichier keyboard.prc.
3 Le logiciel du clavier sera installé lors de votre prochaine HotSync.
Rendre le clavier détectable
Placez le clavier en le mode de découverte en appuyant sur le bouton découverte (au-dessus de la touche “-”)
jusqu’à ce que la diode État clignote en vert une fois par seconde. Lorsque que le clavier est apparié, la
diode État clignotera une fois toutes les quatre secondes.
NOTE : Pendant la saisie clé privée, la diode de flashera pas.
Appairage du clavier de votre appareil mobile
Pocket PC (Windows Mobile)
1 Si nécessaire après une réinitialisation, lancez le logiciel du clavier (Démarrer > Programmes > Clavier
Stowaway).
2 Placez le clavier en mode Détectable, sélectionnez Clavier sans fil Bluetooth et cliquez sur Configuration.
3 Sur certains appareils mobiles, il peut être nécessaire de cliquer sur le bouton Désactiver le pilote
HID intégré.
4 Cliquez sur Connecter.
5 Lorsque cela vous est demandé, entrer la clé privée numérique (de votre choix, entre 1 et 9 chiffres) sur
l’appareil mobile en utilisant le clavier à l’écran et le stylet.
6 Tapez le même clé privée en utilisant le clavier et la pression <Entrée>.
Smartphone Windows Mobile
1 Après une réinitialisation, sélectionnez Activer BT depuis le Menu.
2 Placez le clavier en le mode de découverte.
3 Sur certains appareils mobiles, il peut être nécessaire de cliquer sur le bouton Désactiver le pilote
HID intégré.
4 Lorsque cela vous est demandé, entrez la clé privée numérique (de votre choix, entre 1 et 9 chiffres) sur
l’appareil mobile en utilisant le clavier du mobile et en choisissant Terminé.
5 Tapez le même mot de passe en utilisant le clavier et la pression <Entrée>.
Symbian UIQ (à écran tactile)
1 Après l’installation, ouvrez la liste des Applications du téléphone.
2 Descendez et sélectionnez clavier Stowaway.
3 Placez le clavier en le mode de découverte.
4 Sur l’onglet État, sélectionnez Activer BT. La connexion et le scan pour découvrir le clavier Stowaway
devraient démarrer quelques secondes plus tar
d.
Page 11

ymbian Series 60 (écran non tactile)
S
près l’installation, appuyez sur Menu sur votre téléphone et sélectionnez Stowaway.
1 A
ur la page État, appuyez sur le bouton Options et sélectionnez Activer BT.
2 S
3 Placez le clavier en le mode de découverte.
4 La connexion et le scan pour découvrir le clavier Stowaway devraient débuter quelques secondes plus
tard. Si nécessaire, sélectionnez le clavier Think Outside dans la liste et appuyez sur Connexion.
Palm OS
1 Après la réinitialisation, cliquez sur l’icône Clavier dans la page des Applications.
2 Placez le clavier en le mode de découverte.
3 Cochez la case Sécuriser et cliquez sur Connexion.
4 Lorsque cela vous est demandé, cochez Saisissez la clé pour et entrez une clé privée numérique (de votre
choix, entre 1 et 9 chiffres) sur l’appareil mobile en utilisant Graffiti et cliquez sur OK.
5 Tapez le même clé privée en utilisant le clavier et la pression <Entrée>.
NOTE : Les appareils Palm OS ne supportent qu’une seule connexion Bluetooth à la fois. Vous devez déconnecter toute autre connexion Bluetooth pour permettre la connexion du clavier.
La connexion Bluetooth peut être interrompue pour diverses raisons (si l’appareil mobile ou le clavier sont
éteints, or s’ils sont inactifs trop longtemps, etc.). Avant qu’il ne soit utilisé, le clavier doit être reconnecté.
Pour ce faire, assurez-vous que le clavier et l’appareil mobile sont allumés et proches, puis tapez sur n’importe quelle touche du clavier. La connexion devrait être rétablie en quelques secondes (lorsque vous
utilisez une connexion sécurisée).
NOTE : Pour plus de détails sur la manière de mettre en route une connexion non sécurisée, ou pour plus
d’informations sur les connexions sécurisées, référez-vous au Manuel du propriétaire électronique sur le CDROM fourni avec le clavier Stowaway Sierra.
Garantie
Think Outside garantit ce produit contre tout défaut de pièce ou de main-d'?uvre, dans des conditions
d'utilisation normales, pendant une période de un (1) an de la date d'achat originale. La seule responsabilité
de Think Outside et de ses fournisseurs, et votre seul recours si vous découvrez un défaut et que vous
renvoyez le produit avec une preuve d'achat à Think Outside au cours de la période de garantie, est que
Think Outside, à sa discrétion, réparera, remplacera ou vous remboursera sans frais le prix d'achat du produit.
Cette garantie limitée ne sera pas applicable si le défaut résulte d'un accident, d'une altération, d'un usage
abusif, d'un usage incorrect ou d'une exposition à l'eau ou à une température extrême. DANS TOUTE LA
MESURE PERMISE PAR LA LOI, CETTE GARANTIE LIMITÉE EST EXCLUSIVE ET THINK OUTSIDE REJETTE
TOUTE AUTRE GARANTIE, EXPRESSE OU TACITE, Y COMPRIS TOUTE GARANTIE DE QUALITÉ MARCHANDE,
DE CONVENANCE À UN DESSEIN PARTICULIER, DE TITRE ET D'ABSENCE DE CONTREFAÇON. THINK
OUTSIDE N'EST PAS RESPONSABLE DES DOMMAGES SPÉCIAUX, ACCESSOIRES, INDIRECTS OU
CONSÉCUTIFS (Y COMPRIS, DE FAÇON NON LIMITATIVE, DES DOMMAGES EN TERMES DE PROFITS
NON RÉALISÉS, D'ÉCONOMIES PERDUES OU D'AUTRES DOMMAGES) POUVANT SURVENIR SUITE À
L'UTILISA
EXPRESSE OU TACITE, MÊME SI THINK OUTSIDE A ÉTÉ AVISÉ DE LA POSSIBILITÉ DE TELS DOMMAGES.
Étant donné que certaines juridictions ne permettent pas l'exclusion ou les limitations énoncées ci-dessus,
elles peuvent ne pas s'appliquer dans tous les cas. Cette garantie est régie par les lois de l'État de Californie.
TION DU PRODUIT
, À L'IMPOSSIBILITÉ DE L'UTILISER OU À LA VIOLATION D'UNE GARANTIE
Page 12

2006 Think Outside, Inc. Tous droits réservés. La reproduction de ce document de quelque manière que ce soit sans la permission écrite
©
e Think Outside, Inc. est strictement interdite. Les marques déposées utilisées dans ce texte : Stowaway est une marque déposée de Think
d
utside, Inc. Le nom et les logos Bluetooth appartiennent au Bluetooth SIG, Inc. et toute utilisation de ces marques par Think Outside, Inc.
O
’effectue sous licence. Windows Mobile and ActiveSync sont des marques déposées de Microsoft, Inc. Palm OS and HotSync sont des mar-
s
ques déposées de Palm Source, Inc. Symbian est une marque déposée de Symbian Software Ltd. D’autres marques et noms commerciaux
peuvent être utilisés dans le présent document pour faire référence soit aux détenteurs de ces marques et noms, soit à leurs produits. Think
utside, Inc. ne saurait se prévaloir de droits sur des marques et noms commerciaux autres que les siens propres.
O
Page 13

Installieren des Tastaturtreibers
iese Software ermöglicht die Interaktion zwischen Ihrem Mobilgerät und der Stowaway® Sierra
D
Tastatur. Für die Installation benötigen Sie mindestens 250 KB freien Speicherplatz.
Der Tastaturtreiber ist auf der beiliegenden CD oder kann, falls Ihr Mobilgerät Internetzugang
hat, direkt von unserer Webseite heruntergeladen werden: www.thinkoutside.com. Die Webseite
erkennt automatisch das Modell und stellt den benötigten Treiber zum Download bereit.
Pocket PC/Windows Mobile® Smartphone
Um den Treiber für die Stowaway Sierra Tastatur zu installieren, benötigen Sie ActiveSync® 4.0 oder eine
neuere Version. Wir empfehlen die Datensicherung mit ActiveSync, bevor Sie mit der Installation anfangen.
Weitere Informationen zur Datensicherung entnehmen Sie bitte dem Handbuch, dass mit Ihrem Mobilgerät
mitgeliefert wurde. Bitte löschen Sie jegliche andere Tastatursoftware, die sich auf Ihrem Mobilgerät befindet, um treiberkonflikte zu vermeiden.
1 Stellen Sie eine Verbindung zwischen Ihrem Mobilgerät und dem Computer über ActiveSync® her, in dem
Sie Ihre Docking Station oder ein entsprechendes Kabel benutzen.
2 Legen Sie die beiliegende CD-Rom in das entsprechende Laufwerk Ihres Computers. Danach klicken Sie
folgende Buttons: Stowaway Sierra ? Windows Mobile ? Deutsch ? Tastaturtreiber.
3 Folgen Sie den Instruktionen auf dem Bildschirm, um die Installation zu vervollständigen.
4 Der Treiber muss auf dem mobilen Gerät in den Standardordner Ihres Hauptspeichers installiert werden,
um eine stabile Funktion sicherzustellen.
5 Nach Abschluss der Installation werden Sie zum Neustart Ihres Mobilgerätes aufgefordert.
Symbian OS™
Nach erfolgreicher Installation des Treibers wird das Tastatur-Icon in der Menüansicht oder in den
Einstellungen erscheinen.
Methode 1: Stellen Sie eine Verbindung zwischen Ihrem Symbian Gerät und Ihrem Computer her, indem
Sie das entsprechende Kabel benutzen.
A Legen Sie die beiliegende CD-Rom in das entsprechende Laufwerk Ihres Computers ein. Dann klicken Sie
folgende Buttons: Stowaway Sierra > Symbian > Specific OS > Sprache > Tastaturtreiber.
B Wenn nötig aktivieren Sie die .SIS Datei, um die Installation zu starten.
C Stellen Sie sicher, dass der Treiber in den Hauptspeicher Ihres Gerätes installiert wird.
Methode 2: Installation des Treibers von einer Flash Speicherkarte
A Speicher
B Navigier
C Aktivieren Sie die .SIS Datei, um die Installation zu starten.
D Stellen Sie sicher, dass der Treiber in den Hauptspeicher Ihres Gerätes installiert wird.
Methode 3: Übertragen des Treibers via Infrarot oder Bluetooth.
A Machen Sie einen Rechtsklick auf die .SIS Datei.
B Wählen Sie „Senden an > Bluetooth Gerät“ und wählen Sie Ihr Gerät aus der Liste aus.
C Der Tastaturtreiber wird in der Inbox Ihres Gerätes erscheinen.
D Nach abgeschlossener Über
n Sie die .SIS Datei auf einer Speicherkar
en Sie zu der Stelle, an dem die Datei auf der Speicherkar
tragung wählen Sie „Ja“ aus, dann „Installieren“.
te ab.
te gesichert wur
de.
Page 14

alm OS®
P
indows User:
W
erbinden Sie Ihren Palm OS® mit Ihrem Computer, indem Sie die HotSync Docking Station oder ein
1 V
entsprechendes Kabel benutzen.
2 Legen Sie die beiliegende CD-Rom in das entsprechende Laufwerk Ihres Computers und klicken Sie
folgende Buttons: Stowaway Sierra > Palm > Deutsch > Tastaturtreiber.
3 Der Tastaturtreiber wird bei Ihrer nächsten Synchronisation installiert.
Mac User:
1 Verbinden Sie Ihren Palm OS® mit einem Mac, indem Sie die HotSync Docking Station oder ein
entsprechendes Kabel benutzen.
2 Legen Sie die beiliegende CD-Rom in das entsprechende Laufwerk und navigieren Sie wie folgt: Stowaway
Sierra > Palm > Deutsch > Tastaturtreiber. Dann machen Sie einen Doppelklick auf die Datei „Tastatur.prc“.
3 Der Tastaturtreiber wird bei Ihrer nächsten Synchronisation installiert.
Einrichten der Geräteerkennung
Aktivieren Sie die Geräteerkennung, indem Sie die „Verbinden“-Taste (über der „-„Taste) klicken, bis die
Anzeige grün blinkt (1 x pro Sekunde). Wenn die Tastatur einmal erfolgreich verbunden wurde, blinkt die
grüne Anzeige alle vier Sekunden auf.
ACHTUNG: Während der Authentifizierung leuchtet die Anzeige nicht.
Verbinden der Tastatur mit Ihrem Mobilgerät
Pocket PC (Windows Mobile)
1 Wenn es nach dem Neustart nötig ist, öffnen Sie die Tastatur-Einstellungen (Start > Programme >
Stowaway Tastatur).
2 Aktivieren Sie die Geräteerkennung, wählen Sie „Wireless Bluetooth Keyboard“, dann „Setup“.
3 Bei manchen Mobilgeräten ist es notwendig, den „Disable built-in HID driver“ (interne HID-Treiber
ausschalten) Button zu klicken.
4 Wählen Sie „Verbinden“
5 Wenn die Verbindung hergestellt ist, geben Sie ein numerisches Passwort ein (wählen Sie eine beliebige
Zahlenfolge bestehend aus Ziffern zwischen 1 und 9). Dazu benutzen Sie bitte die On-Screen Tastatur in
Verbindung mit einem Stylus.
6 Geben Sie das selbe Passwort auf der Tastatur ein, indem Sie „LFn“ + Ziffer drücken, dann „Enter“.
Windows Mobile Smartphone
1 Aktivieren Sie Bluetooth nach dem Neustart.
2 Aktivieren Sie die Geräteerkennung.
3 Bei manchen Mobilgeräten ist es notwendig, vorinstallierte HID Treiber zu deaktiveren. Wählen Sie dazu
im Menü „Erweitert“ > „interne HID-Treiber ausschalten“.
enn die V
4 W
Zahlenfolge bestehend aus Ziffern zwischen 1 und 9). Dazu benutzen Sie bitte die Zifferntastatur. Dann
drücken Sie „Fertig“.
5 Geben Sie das selbe Passwort auf der Tastatur ein, indem Sie „LFn“ + Ziffer drücken, dann „Enter“.
erbindung hergestellt ist, geben Sie ein numerisches Passwort ein (wählen Sie eine beliebige
Symbian UIQ
1 Öffnen sie nach der Installation die Pr
2 Scrollen Sie und wählen Sie „Stowaway Tastatur“ aus.
ogrammliste Ihr
es Gerätes.
Page 15

ktivieren Sie die Geräteerkennung
3 A
4 Aktivieren Sie Bluetooth. Die Verbindung sollte nun innerhalb weniger Sekunden hergestellt werden.
Symbian Serie 60
1 Nach der Installation drücken Sie den „Menü“-Button auf Ihrem Mobilgerät und wählen Sie „Stowaway“ aus.
2 Drücken Sie den „Optionen“-Button und wählen Sie „Bluetooth aktivieren“
3 Aktivieren Sie die Geräteerkennung.
4 Die Verbindung sollte nun innerhalb weniger Sekunden hergestellt werden. Wenn nötig, wählen Sie aus
der Liste „ThinkOutside Tastatur“ aus und drücken dann „Verbinden“.
Palm OS
1 Nach dem Neustart klicken Sie auf das Tastatur-Icon in den Einstellungen.
2 Aktivieren Sie die Geräteerkennung.
3 Prüfen Sie Ihre „Secure“-Box und wählen Sie „Verbinden“.
4 Wenn nötig, prüfen Sie die „Add to Trusted Device List“ und geben Sie ein rein numerischen Passwort
ein (wählen Sie eine beliebige Kombination aus den Ziffern 1 bis 9), unter Benutzung von Graffiti. Dann
drücken Sie „Ok“.
5 Geben Sie das gleiche Passwort auf der Tastatur ein, indem Sie LFn + Ziffer und dann Enter drücken.
ACHTUNG: Palm OS Geräte können gleichzeitig nicht mehrere Bluetooth-Verbindungen aufrecht erhalten.
Gegebenenfalls müssen Sie eine andere Bluetooth-Verbindung abbrechen, um die Tastatur verbinden
zu können.
Die Bluetooth-Verbindung kann aus verschiedenen Gründen gestört werden (z. B. wenn die Akkus vom
Mobilgerät oder der Tastatur leer sind oder wenn die Tastatur lange Zeit nicht in Gebrauch war). Vor dem
Wiedergebrauch muss die Verbindung zwischen Tastatur und Mobilgerät wieder hergestellt werden. Dazu
stellen Sie bitte zuerst sicher, dass beide Geräte aufgeladen bzw. am Strom angeschlossen und funktionsbereit sind. Dann drücken Sie eine beliebige Taste auf der Tastatur. Die Verbindung sollte innerhalb weniger
Sekunden wieder hergestellt sein (wenn Sie eine sichere Verbindung benutzt haben).
ACHTUNG: Wenn Sie weitere Informationen zum Thema „Herstellen von sicheren und unsicheren
Verbindungen“ benötigen, lesen Sie sich bitte das digitale Handbuch auf der mitgelieferten CD-ROM durch.
Garantie
Think Outside garantiert, dass dieses Produkt bei normaler Verwendung ein (1) Jahr ab dem Datum des
erstmaligen Kaufs im Handel frei von Material- und Verarbeitungsfehlern ist. Die einzige Haftung von Think
Outside und ihren Zulieferern und Ihr einziger Rechtsanspruch bei Feststellung eines Defekts und Rückgabe
des Produkts mit Kaufbeleg an Think Outside während des Garantiezeitraums besteht darin, dass Think
Outside nach eigenem Ermessen das Produkt kostenlos repariert, ersetzt oder den Kaufpreis des Produkts
zurückerstattet. Diese beschränkte Garantie wird ungültig, wenn der Defekt auf Unfall, Änderung, Missbrauch,
wendung oder auf W
unsachgemäße V
DIESE BESCHRÄNKTE GARANTIE IST IN VOLLEM UMFANG DES GELTENDEN RECHTS AUSSCHLIESSLICH.
THINK OUTSIDE SIEHT ALLE ANDEREN GARANTIEN, OB AUSDRÜCKLICH ODER STILLSCHWEIGEND
T, EINSCHLIESSLICH VON GARANTIEN DER VERMARKTBARKEIT ODER EIGNUNG FÜR EINEN
TEIL
ER
BESTIMMTEN ZWECK, DES TITELS UND DER NICHTVERLETZUNG ALS UNGÜLTIG AN. THINK OUTSIDE
HAFTET NICHT FÜR BESONDERE SCHÄDEN, FOLGESCHÄDEN UND INDIREKTE SCHÄDEN UND
ANSPRÜCHE (EINSCHLIESSLICH, ABER NICHT BESCHRÄNKT AUF ANSPRÜCHE WEGEN GEWINNAUS
FALL, EINSPARUNGSAUSFALL ODER ANDERE ANSPRÜCHE), DIE AUF DIE VERWENDUNG ODER DIE
NICHT MÖGLICHE VERWENDUNG DES PRODUKTS ODER DIE VERLETZUNG JEGLICHER AUSDRÜCKLICHEN
ODER STILLSCHWEIGENDEN GARANTIEN ZURÜCKZUFÜHREN SIND, SELBST WENN THINK OUTSIDE
AUF DIE MÖGLICHKEIT SOLCHER ANSPRÜCHE HINGEWIESEN WURDE. W
die obigen Ausschlüsse oder Beschränkungen nicht zulässig sind, treffen sie evtl. nicht in allen Fällen zu. Die
Rechtsgrundlage für diese Garantie stellen die Gesetze des US-Bundesstaats Kalifornien dar.
er
assereinwirkung oder extreme Temperaturen zurückzuführen ist.
-
eil in einigen Gerichtsbarkeiten
Page 16

2006 Think Outside, Inc. All rights reserved.Reproduction of this document in any manner whatsoever without the written permission of
©
hink Outside, Inc. is strictly forbidden. Trademarks used in this text: Stowaway is a trademark of Think Outside, Inc. The Bluetooth word mark
T
nd logos are owned by the Bluetooth SIG, Inc. and any use of such marks by Think Outside, Inc. is under license. Windows Mobile and
a
ctiveSync are registered trademarks of Microsoft, Inc. Palm OS and HotSync are registered trademarks of Palm Source, Inc. Symbian is a
A
trademark of Symbian Software Ltd. Other trademarks and trade names are those of their respective owners. Think Outside, Inc. disclaims any
proprietary interest in trademarks and trade names other than its own.
PART #102106A
 Loading...