

ThinkNavi T7 User Manual
The contents of this user manual may be updated without prior notice to improve the performance of ThinkNavi.
Address: MERGENTHALERALLEE 79-81 65760 ESCHBORN, GERMANY I Website: www.ThinkNavi.com
This user manual is provided in 11 languages.
User's manual
(ThinkNavi T7)

Chapter 01_
Getting Ready
Features······················································································································································ 4
Safety Advice············································································································································ 5
Components··········································································································································· 10
Part Names ··············································································································································11
Installation··············································································································································· 14
Connecting ThinkNavi T7 ··················································································································16
Chapter 02_
Basic Functions
Basic Operation······································································································································20
Saving Video, Music and Image Files ····························································································25
Chapter 03_
Menu Overview
Initial Screen············································································································································28
Using the DVB-T·····································································································································29
Using the Video Player························································································································34
Using the Audio Player ·······················································································································38
Using the Photo Album······················································································································ 43
Using the e-Book···································································································································47
Using the AV-IN ·····································································································································52
Setting Menu·········································································································································· 55
Chapter 04_ Appendix
Troubleshooting····································································································································62
Product Specifications ························································································································64
Contents...
We reserve the right to make modifications to improve the performance of ThinkNavi without prior notice.
This manual is published based on the current standard and may contain technical and editorial errors
or omissions.
ThinkNavi T7 is a trademark of ThinkNavi GmbH.
The contents of this manual are protected by copyright.
All rights to the ThinkNavi program and map are owned by ThinkNavi and protected by copyright.
Windows is a trademark of Microsoft.
Other products and services referred to in this manual are trademarks of their respective owners.
Features
Advantages of ThinkNavi T7··············································································································· 4
Safety Advice
Warnings ····················································································································································5
Product ······················································································································································· 6
Vehicle installation and maintenance / Customer support···················································· 9
Components
Basic Components································································································································10
Part Names
T7 Main Unit - Front ·····························································································································11
T7 Main Unit - Rear ·······························································································································12
Installation
Dashboard Attachment······················································································································14
Windscreen Attachment···················································································································· 15
Connecting ThinkNavi T7
Connecting the Earphone ·················································································································16
Inserting/Disconnecting the SD Memory Card········································································· 17
Connecting Power································································································································18
Chapter 01_
Getting Ready
To ensure correct use of the device, please read the “Warnings” section before setting out.
ThinkNavi will not be held responsible for damage to equipment resulting from improper installation or use.
Do not continuously look at the ThinkNavi T7 screen while driving, as this could cause accidents.
Observe the traffic regulations and pay attention to the actual road conditions when driving.
Use ThinkNavi T7 only for navigational reference.
Thank you for choosing ThinkNavi T7.
For easy and efficient use of ThinkNavi T7, read and refer to this manual.
We endeavour to reward our customers’ trust in ThinkNavi T7 by continuously improving our products and services.

4
01
5
01
Getting Ready I
Features
Getting Ready I
Safety Advice
Safety Advice
For your own safety, please read the contents of this manual carefully.
Any information conrmed after publication of this manual will be published on the ThinkNavi website.
Operating the system while driving can cause accident.
Do not install the device where it may block the driver’s view.
The map included with the device may dier from the actual road situation.
Always observe the trac regulations and actual road conditions.
Use ThinkNavi only for navigational reference.
Changes to hardware, software and the map of this product that enhance its performance may be made without prior notice.
GPS reception quality may vary depending on the type of GPS receiver, navigation unit, and the presence of electromagnetic
waves caused by equipment in the car.
ThinkNavi does not guarantee good GPS reception under all circumstances and in-car conditions.
Disconnect the cigarette jack, that supplies the product with power before starting the car engine.
High voltage (when starting the engine) may damage the unit.
Pay special attention to the mounting bracket when installing it on a glass surface.
As it is attached by means of a rubber suction pad, take care to remove any air between the suction pad and the glass before
axing the bracket.
Otherwise, the mounting bracket may detach and be damaged while driving.
ThinkNavi is not responsible for this type of damage.
Warnings
Features
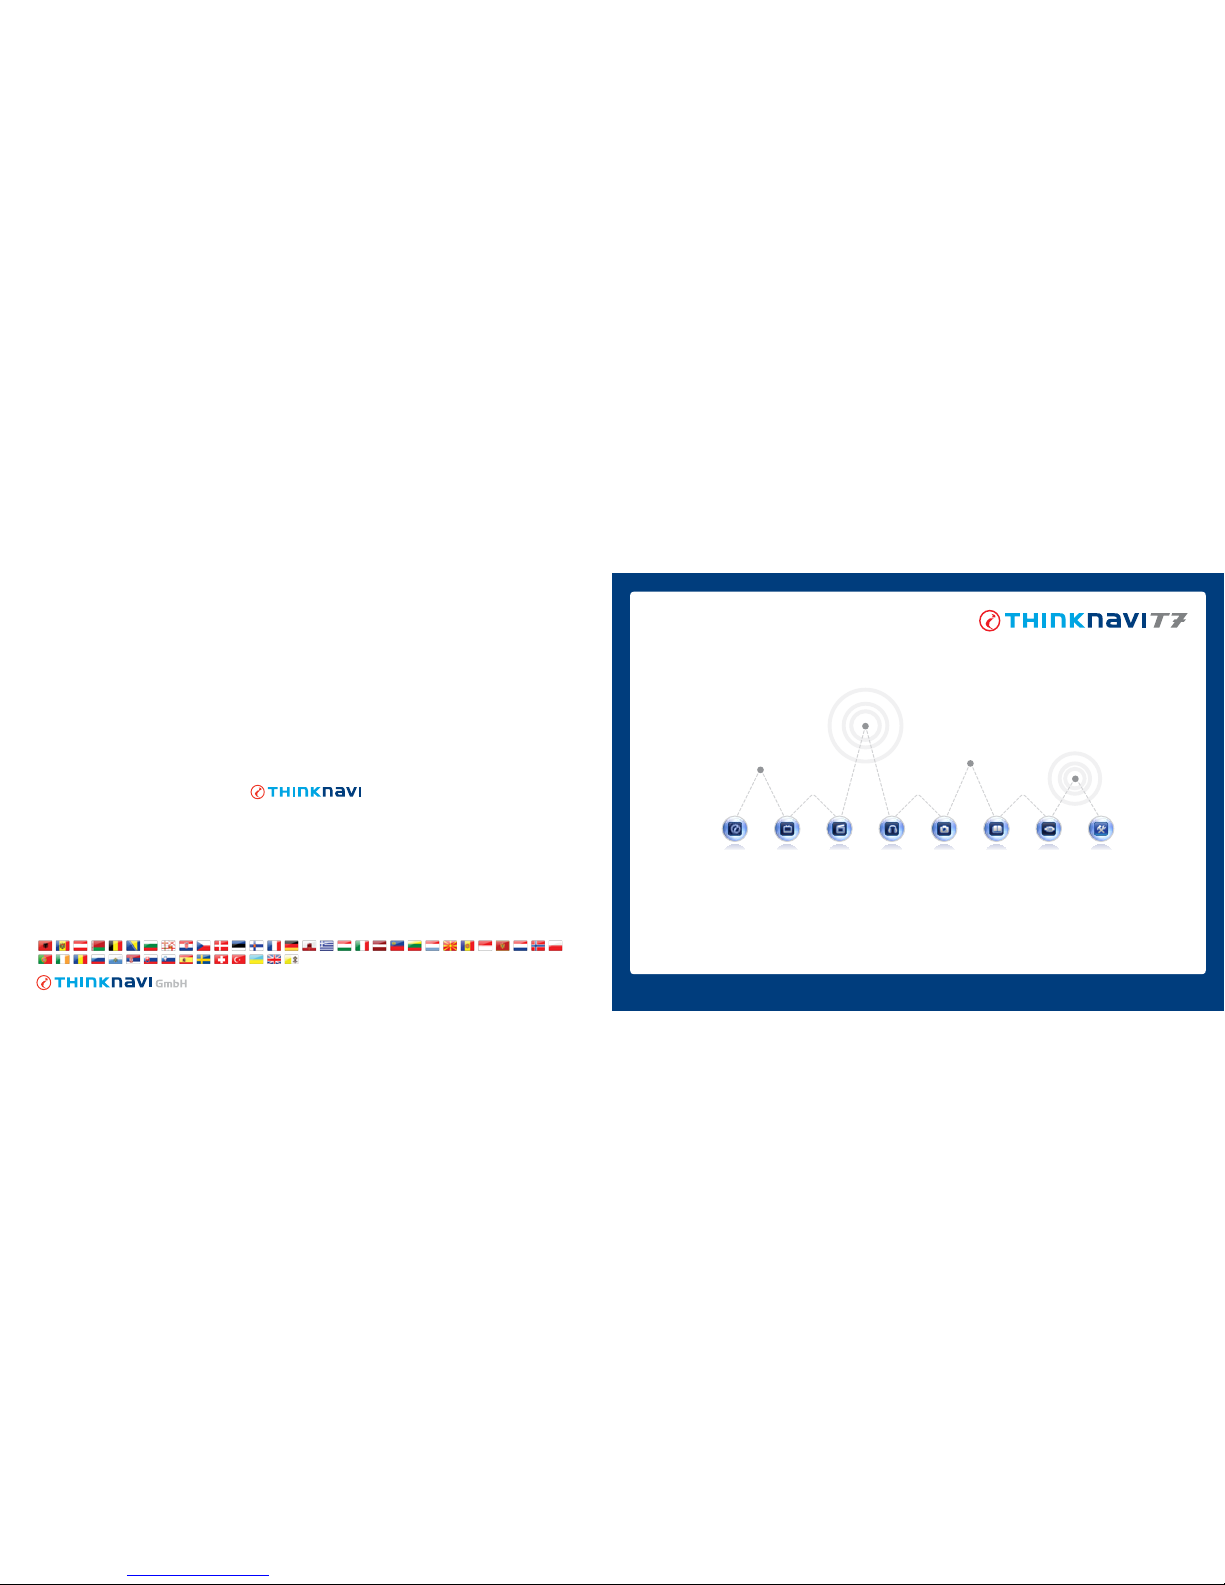
Complete your journey!
7 inch wide and slim TV in your car
Advantages of ThinkNavi T7
Unique functions
First 7” DVB-T Navigation device all around Europe.
Many entertaining multimedia and utility
Multitasking function
45 European countries included (Total seamless Europe)
20 European languages supportive
Risk of explosion if battery is replaced by an incorrect type.
Dispose of used batteries according to the instructions.

6
01
7
01
Getting Ready I
Safety Advice
Getting Ready I
Safety Advice
Safety Advice
The hardware and software used in products supported by Thinknavi are not guaranteed to perform well under all circumstances.
Use with other hardware or software may cause problems.
Avoid using the product under direct sunlight, as the screen may be dicult to read.
Please use your vehicle’s cigarette jack.
Buttons should not be pressed too hard as this may cause malfunction.
Only press the buttons lightly.
The LCD screen of the product may be damaged if heavy objects are placed on it or it is subjected to impact.
The GPS antenna is an integral part of the product unit.
Do not forcefully raise the GPS antenna.
Adhesives or paint on the GPS antenna or the unit itself may cause malfunction or impair signal reception.
Use only the supplied stylus pen to tap the LCD screen of the product.
Using sharp objects such as nails may damage the product.
Do not use chemicals or cleaners on the product unit.
Wipe it lightly with a soft cloth.
Product
Safety Advice
Do not dismantle the unit or subject it to shock.
In particular, apply sharp objects to the power terminals or the Reset hole.
Keep the product unit and stylus pen out of reach of children.
Animals and children may suer serious injury if they swallow the rubber cap or stylus pen. (Danger of choking or suocation.)
Do not touch the power terminals with wet hands.
Risk of electric shock or malfunction.
Do not use in places with high temperature or humidity.
If the product is used in rain or in a swimming pool, or liquid is spilt over the product, repair may be refused and liability for the damage rests with
the user.

8
01
9
01
Getting Ready I
Safety Advice
Getting Ready I
Safety Advice
Safety Advice
When installing, make sure not to apply undue force to the cables connecting the product or receiver.
Physical conditions such as vibration during driving may damage the products.
Particularly the connecting part between the cable and the product may become detached even through small movements.
Always ensure that the cable is not touching the dashboard or pulled.
Ensure that no foreign matter enters the GPS receiver, cable, mounting bracket or ThinkNavi T7 unit, as it may cause the device
to malfunction or stop working.
ThinkNavi cannot guarantee compatibility in the case of unauthorised installation or equipment (e.g. GPS receiver).
Any problems caused by this are not the responsibility of ThinkNavi.
No customer support will be provided if the product is modied or disassembled.
The temperature range for optimum operation of the GPS receiver is 0 ~ 45°C.
Maintain a suitable temperature in your vehicle to prevent any problems.
In hot summer weather, there could be problems with the dashboard attachment point or windscreen suction pad point.
It is advisable to keep the product detached from the dashboard mounting bracket or, in case of the windscreen mounting,
keep the suction pad dismantled.
For any inquiries for Customer support, please visit www.thinknavi.com
Tel: +49 (0) 180 53 33 211 (€ 0,14/Min)
Address: MERGENTHALERALLEE 79-81 65760 ESCHBORN, GERMANY
Vehicle installation and maintenance / Customer support
Safety Advice
Attention!
Before driving, always check that the mounting bracket and ThinkNavi T7 unit are rmly xed in position.
While driving the vibrations of the vehicle may cause them to detach and fall.
Do not operate the product while driving as this can cause accidents.
Position the receiver where it obstructs the driver’s view as little as possible.
Before installing the mounting bracket, remove all dust, dampness and any foreign matter from it’s intended location in the car.
Refer to <Vehicle installation> for installing the mounting bracket to avoid possible mishaps.
Install according to the section <Recommended installation procedure>.
ThinkNavi is not responsible for any damage due to vehicle vibration if installed improperly.
Before driving of, make sure the mounting bracket is properly axed and the product unit securely attached.
Vehicle vibration during driving may cause the product to detach and fall.
ThinkNavi is not responsible for any damage to the product caused in this way.
When the mounting bracket has been xed to the windscreen for a longer period of time, the suction power of the
rubber pad may diminish and the bracket may fall o while driving.
Remove foreign matter such as dust and moisture before axing the mounting bracket to the windscreen.
The life of the suction pad can be extended by dismantling the unit when not in use.
Undue force may damage the suction pad.
Observe this information carefully, as the unit may be damaged if the bracket falls o.
10
01
11
01
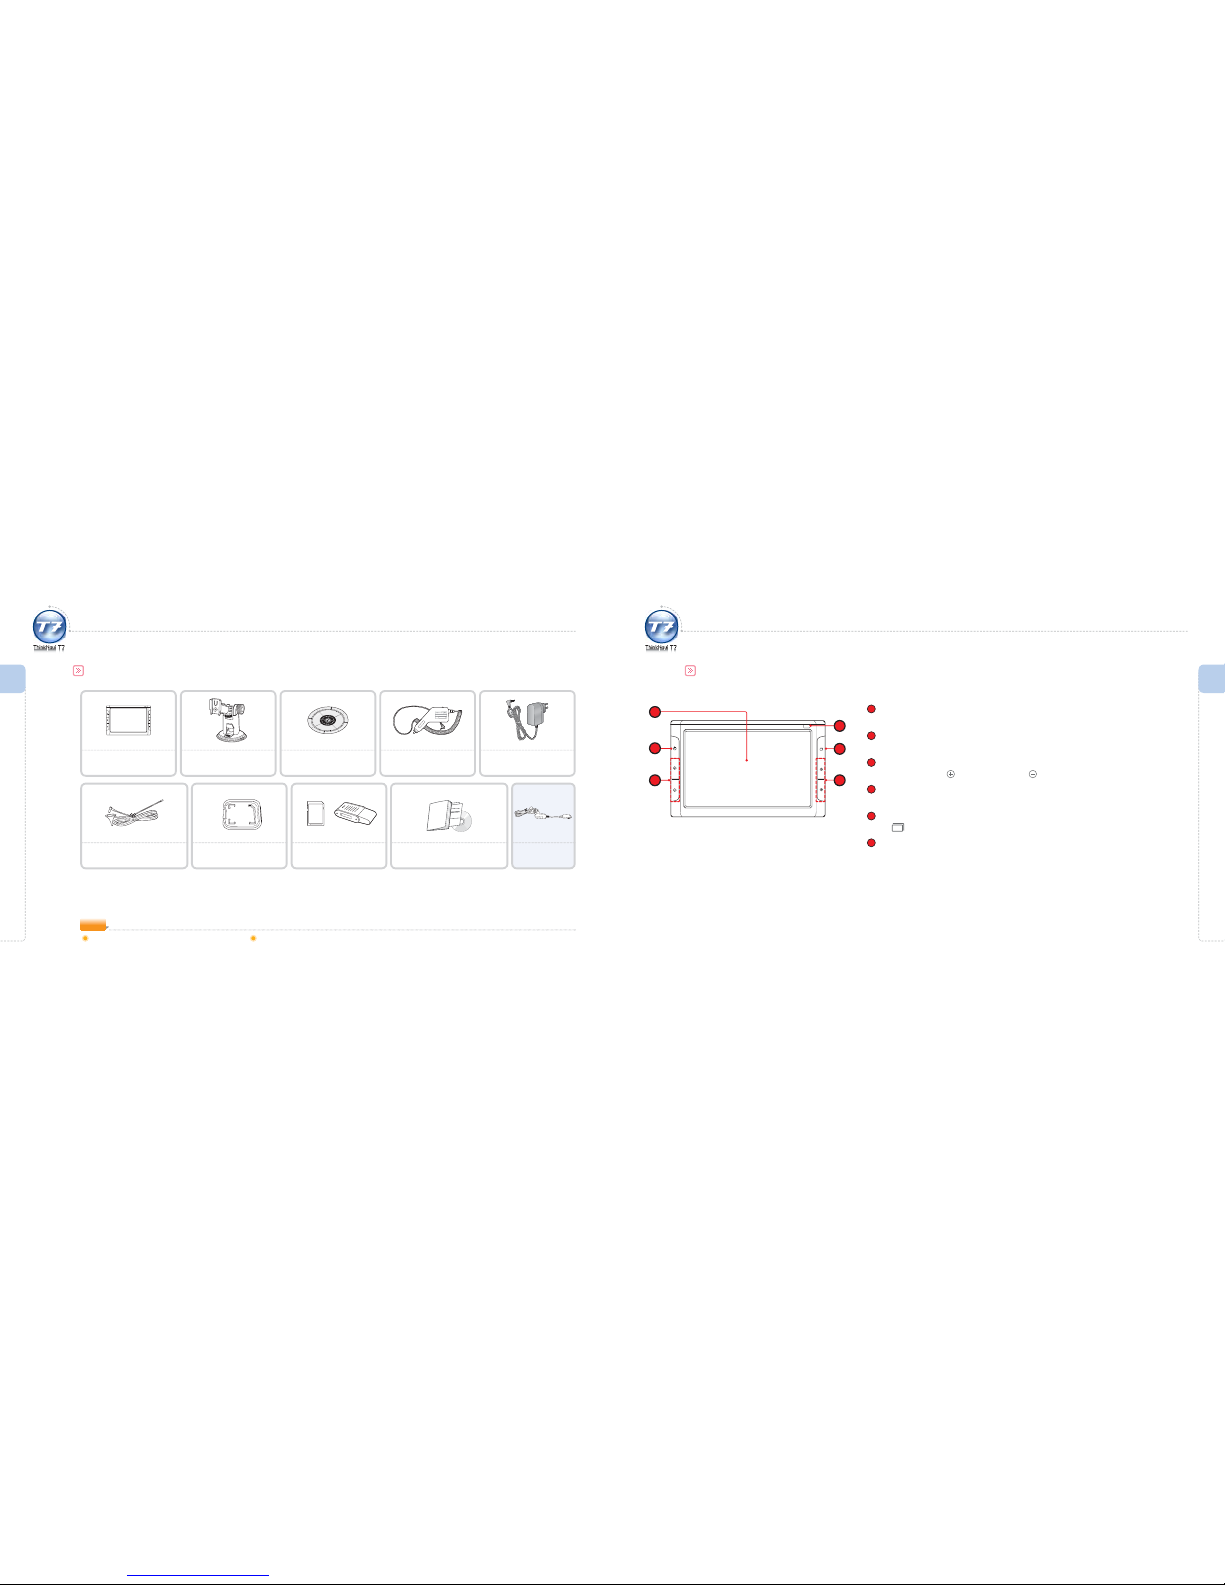
1
LCD Screen
A touch screen where you can see displays and use functions.
2
Power Button
To turn the main unit of ThinkNavi T7 on or o.
3
Volume Button
To increase volume : To reduce volume :
4
Remote Control Reception
The reception part of the remote control.
5
Multi-tasking Button
Use when the program is in use. (refer to page 24.)
6
Move Button
The function of the main unit’s channel button varies with each program menu.
2
1
3 6
5
4
Components
The appearance of this product may dier slightly from the picture.
(ThinkNavi may make modications without prior notice in order to improve ThinkNavi’s performance.)
Basic Components
Getting Ready I
Components
Getting Ready I
Part Names
Part Names
The appearance of this product may dier slightly from the picture.
T7 Main Unit - Front
Home Power Supply:
Manufacturer : PERFECT POWER CO., LTD.
Input Voltage : AC100-240~ 50/60Hz 0.5A
Output Voltage : DC 5V, 2.5A(MAX 3A)
Cigarette Jack Adaptor:
Manufacturer: PERFECT POWER CO., LTD.
Input Voltage: DC 12-36 V, 1.5 A
Output Voltage: DC 5 V, 2.5 A
NOTE
ThinkNavi T7 Window Mount
Cigarette Jack Adaptor
(Cigarette-lighter port)
Suction Cup
(For dashboard use)
External DVB-T Antenna SD Memory Card Case
SD Memory Card &
SD Memory Card Reader
Home Power Supply
User Manual
(Installation DVD, Quick Guide)
TMC Receiver
(Optional)
¿Pull out the end of the
DVB-T antenna before use
for better reception.
12
01
13
01
Getting Ready I
Part Names
Getting Ready I
Part Names
Part Names
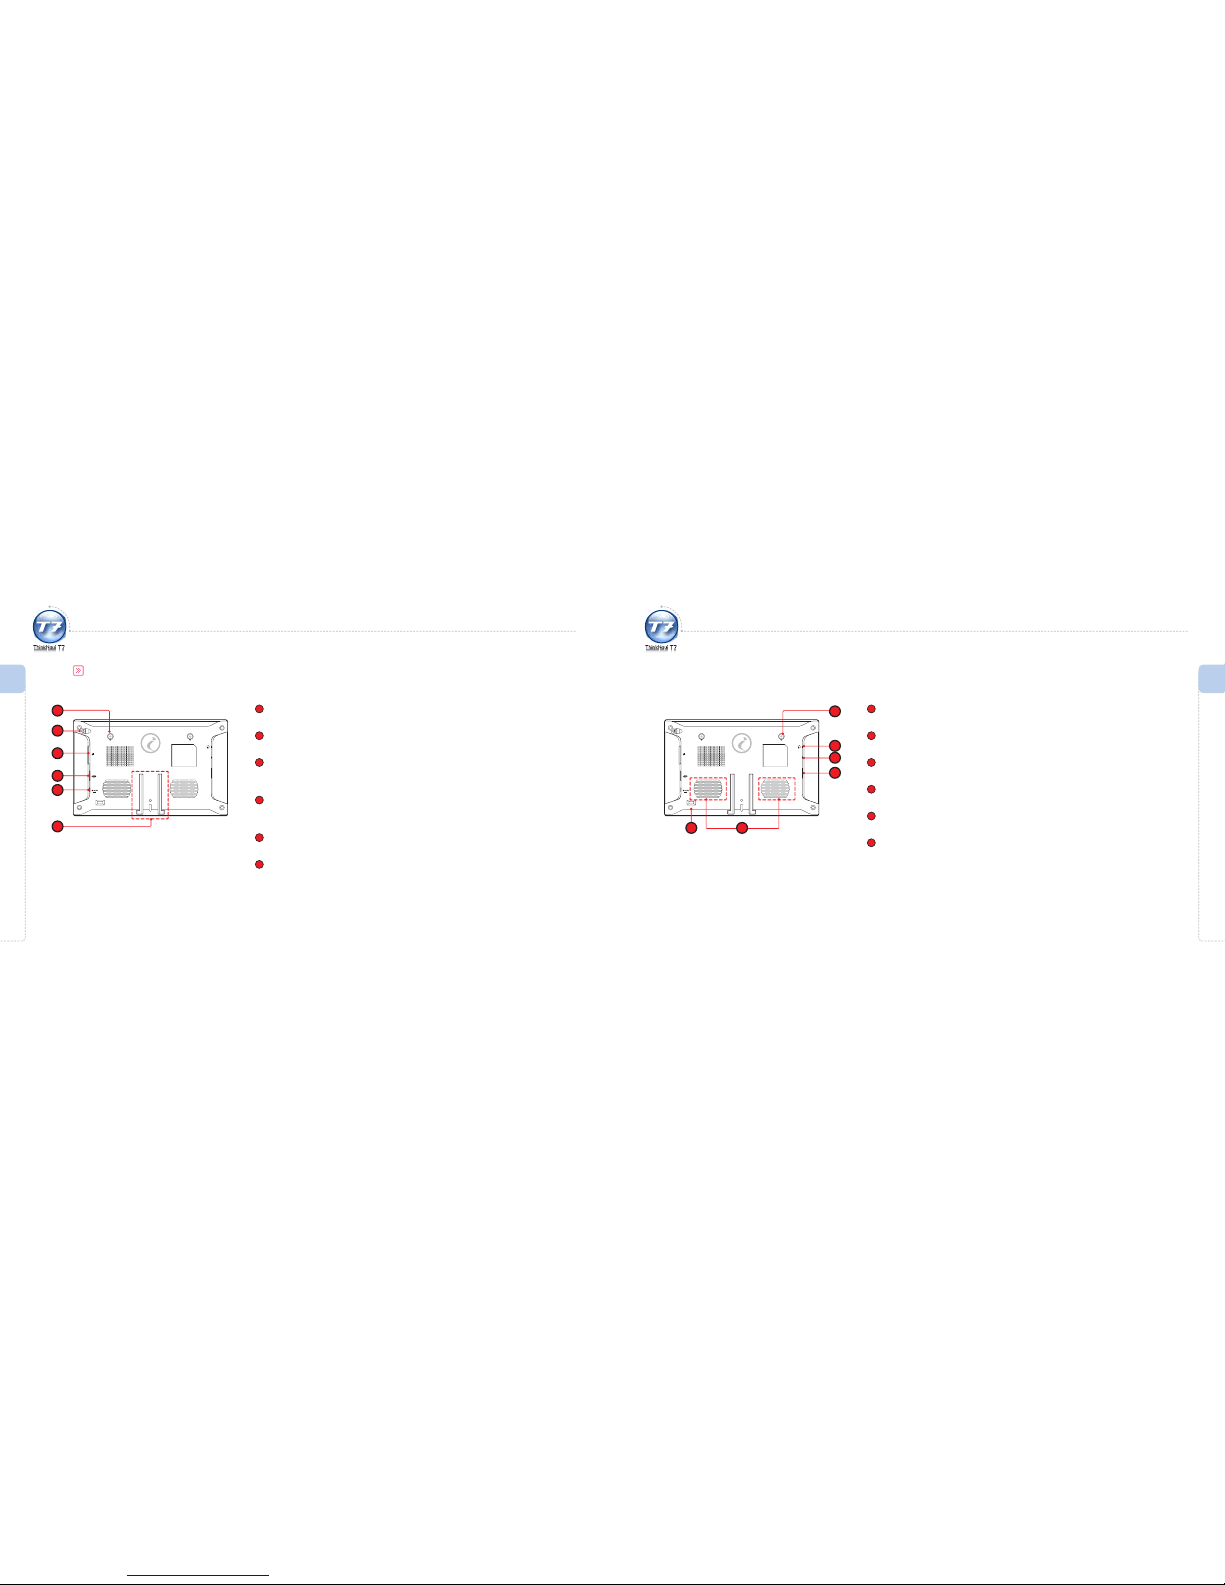
The appearance of this product may dier slightly from the picture.
T7 Main Unit -
Rear
DMB
EXT.ANT
GPS
EXT.ANT
RESET
A/V IN
SD CARD
DC 5V
2
1
3
4
5
6
Part Names
DMB
EXT.ANT
GPS
EXT.ANT
RESET
A/V IN
SD CARD
DC 5V
7
8
9
1112
10
1
External DVB-T Antenna Port
To connect an external DVB-T antenna.
2
DVB-T Antenna
DVB-T Antenna for ThinkNavi T7.
3
SD Memory Slot Card
You need an SD memory card inserted to use all the functions of ThinkNavi T7.
(refer to page 17 for Inserting/Disconnecting the SD Memory Card.)
4
USB Host Port
To connect other external devices (such as external hard disk and memory stick) using
USB cable.
5
Power Adapter Port
To connect the power adapter.
6
Mount Connection
To connect the mount. (refer to page 14~15 for connecting the mount.)
7
External GPS Antenna Port
To connect an external GPS antenna.
8
Earphone Port
To connect earphones.
9
AV IN Port
To connect an external audio or video device or to use the rear camera.
10
24-Pin Connector
To Use TMC Receiver to connect to the PC using the 24-pin USB cable. (optional)
11
Louder Speakers
Built-in stereo speakers.
12
RESET
To restart ThinkNavi T7.
14
01
15
01
Getting Ready I
Installation
Getting Ready I
Installation
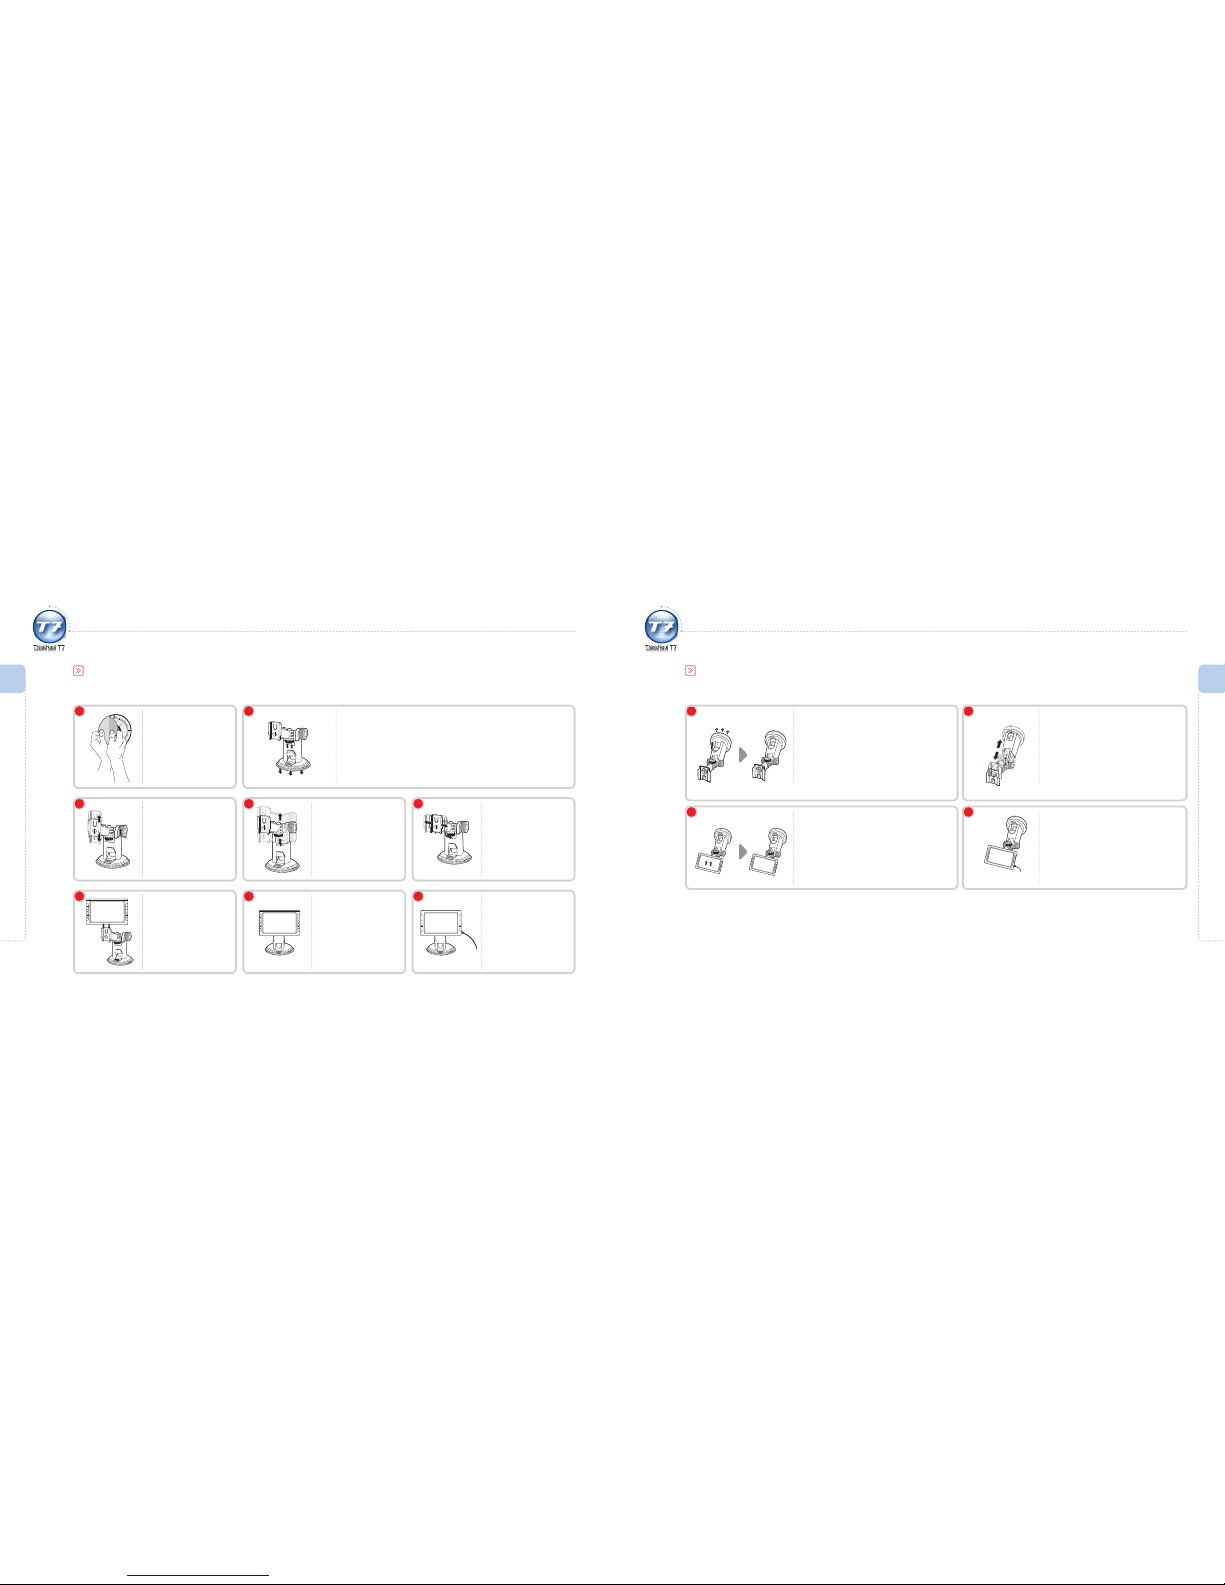
Installation
Make sure to review the mounting precautions thoroughly prior to installation (dashboard attachment recommended).
Dashboard Attachment
Adjust the height.
3
Adjust the angle and
fasten both screws in
the opposite direction
to x the mount
tightly.
4
Adjust the angle and
fasten the screw in the
direction of the arrow.
5
Once the mount is
rmly xed, ax the
ThinkNavi T7 main
unit.
6
Wipe and clean the
area and then ax the
urethane sticker on
the dashboard.
1
Fix the mount on the urethane sticker by pressing on it.
Adhere the suction cup on the sticker and press vertically to remove air.
Press the xing lever until you hear a click sound.
2
Check to see that the
ThinkNavi T7 main
unit and mounting
unit are securely
fastened.
7
Connect the unit to
the power adapter
(cigarette-lighter port)
and ThinkNavi T7 will
be ready to use.
8
Installation
Windscreen Attachment
1 2
Wipe and clean the area and then
ax the mount to the windscreen in a
position that does not interfere with the
driver’s view.
Turn the compression lever in the direction of
the arrow until you hear a clicking sound.
3
Adjust the height.
Connect the unit to the power
adapter (cigarette-lighter port)
and ThinkNavi T7 will be ready to
use.
4
Attach the ThinkNavi T7 main unit
securely to the mount. Make sure that
the main unit is attached correctly.
Refer to 4 and 5 on page 14 for adjusting angle
and securing the mount.

16
01
17
01
Connecting ThinkNavi T7
Connecting the Earphone
1
Connect the earphone to the earphone port located on the left side of the
main unit.
If the earphone is connected, you can hear the sound only through the earphone.
1
Getting Ready I
Connecting ThinkNavi T7
Getting Ready I
Connecting ThinkNavi T7
Inserting/Disconnecting the SD Memory Card
Connecting ThinkNavi T7
If the SD memory card is inserted upside down or incorrectly, this may cause damage to the card
or ThinkNavi. Any resulting damage is the sole responsibility of the user.
NOTE
Front Rear
1
2
1
Push the SD memory card in the direction of the arrow.
Caution : Do not insert the memory card with force; this may damage the card.
2
With the one-touch mechanism, lightly press the edge of the SD Memory Card
for automatic ejection.
Fully extract the slightly ejected SD Memory Card.
: To insert
: To disconnect

18
01
Getting Ready I
Connecting ThinkNavi T7
AC Adapter
1
Connect the AC adapter to the DC 5V port on the right side of the main unit.
2
Connect the AC adapter to a power source.
When connected to an external power source: Red LED is lit.
Auto Power Adapter – Cigarette-Lighter Port
1
Connect the auto power adapter (cigarette-lighter port) provided to the
DC 5V port on the right side of the main unit.
2
Connect the auto power adapter to the cigarette-lighter port in the vehicle.
When connected to an external power source: Red LED is lit.
Connecting ThinkNavi T7
Connecting Power
1
1
2
Basic Operation
Automatic Booting······························································································································· 20
Turning Power ON/OFF······················································································································ 21
Volume Adjustment·····························································································································22
Muting·······················································································································································22
Changing DVB-T channel···················································································································23
Resetting ··················································································································································23
Multi-tasking Function························································································································24
Saving Video, Music and Image Files
Downloading Files································································································································25
Chapter 02_
Basic Functions
 Loading...