

FRITEUSE À AIR
AIR FRYER
1200 WATTS / 120 V
Mode d’emploi / Instructions
RAPID AIR FRYER
FRITEUSE À AIR
AIR FRYER
1200 WATTS / 120 V
Mode d’emploi / Instructions
RAPID AIR FRYER

READ ALL INSTRUCTIONS BEFORE USE

1 Safety Instructions
4 Features
5 Operating Instructions
9 Troubleshooting
10 Cleaning and Maintenance
11 Terms and Conditions
12 Warranty Card
Contents
Warranty

1
THIS APPLIANCE IS FOR HOUSEHOLD USE ONLY.
WARNING: When using electrical appliances especially when children are present, basic
safety precautions should always be followed to reduce the risk of fire, electric shock,
and/or injury to persons, including the following:
1. This appliance is intended for indoor home use only.
2. Never use any accessories or parts from other manufactures. Your warranty will
become invalid if such accessories or parts have been used.
3. Wash all removable parts with a mild cleanser before the first use.
4. Check that your home power supply corresponds with this appliance’s intended
voltage.
5. Place this appliance on a stable, heat resistant surface. Make sure not to place near or
on a heat source such as gas or electric burner or oven.
6. Short power cords are attached to this item to prevent entanglement and tripping
hazards. Extension cords with corresponding voltage, electrical rating and grounding
wires can be used. Care should be taken so that any exposed cord is not hanging
down from a counter or table where it can be pulled on or tripped over by any child
or adult.
7. Before using this appliance inspect the plug and cord line for cuts and/or abrasion
marks if they are found. Do not use this appliance and contact our authorized
customer service representative.
8. Insert the plug by grasping it firmly and guiding it into your home’s grounded electric
outlet. Disconnect by grasping the plug and removing it from your home’s grounded
electric outlet. Never wrap the cord tightly around the appliance during use or
storage as this can cause the wire to fray and break.
9. During initial use, you may notice some smoke and or a slight odor. This is normal and
should quickly dissipate. It should not reoccur after the appliance has been used a f
ew more times.
10. This appliance should be used only by persons who are capable of understanding
the user manual or are supervised by those who have adequate understanding of
the appliances’ features, their use and the operating instructions. Children must be
supervised and should not be left alone with appliances during their operation.
11. During use appliances should not be left unattended.
12. Care should be taken not to move appliances that are in use.
13. Do not move appliances that are full of food or liquid whether hot or cold.
14. Appliances can emit heat or steam when in use therefore care should be taken not
to block inlets or outlets.
IMPORTANT SAFEGUARDS
SAFETY INSTRUCTIONS

2
SAFETY INSTRUCTIONS
15. Appliance exteriors are designed to be cool to the touch. Portions do get HOT
during use. Burns can result from touching heating elements, air vents and
removable baskets or containers and - if any part is designed to be handled do so
with care.
16. Do not use this appliance near an open flame or flammable materials.
17. Do not fill this appliance with oil. Oil can be used in small quantities to assist with
air frying. This will help make food crispier.
18. Do not leave uncooked ingredients in this pot for more than a short period of
time. Raw meat, poultry, fish, fruits or vegetables can spoil.
19. Use protective gloves or utensils to remove hot food from this appliance.
20. Unplug the appliance when you have finished cooking.
21. Before cleaning, make sure that the pot is turned off, unplugged, cooled to room
temperature and all pressure has been released.
22. Do not clean the appliance until the unit is cool.
23. Do not immerse complete appliance in water or a dishwasher for cleaning.
24. Clean with a non-abrasive cleaner, soft pad or cloth.
25. Store unit in a cool, dry location.
26. In case of any electric emergency such as a fire call 911.
Take a minute to unwrap your appliance. Remove any packaging or labels that
may interfere with the use of your appliance. Locate your instruction manual. For
your safety and the continued enjoyment of this product, read all the directions
carefully and store this manual in a safe place for future reference.

3
WARNING: This appliance has a polarized plug (one blade is wider than the other). To
reduce the risk of electric shock, this plug is intended to fit into a polarized outlet only
one way. If the plug does not fit fully into the outlet, reverse the plug. If it still does not
fit, contact a qualified electrician. Do not attempt to modify the plug in any way.
SHORT CORD INSTRUCTIONS
A short power supply cord is provided to reduce the hazards resulting from
entanglement or tripping over a longer cord. Longer detachable power-supply cords
or extension cords are available and may be used if care is exercised in their use. If a
longer detachable power-supply extension cord is used:
1. The marked electrical rating of the cord set or extension cord should be at least as
great as the electrical rating of the appliance, and:
2. The cord should be arranged so that it will not drape over the countertop or tabletop
where it can be pulled on by children or tripped over unintentionally.
LINE CORD SAFETY TIPS
1. Never pull or yank on cord or the appliance.
2. To insert plug, grasp it firmly and guide it into outlet.
3. To disconnect appliance, grasp plug and remove it from outlet.
4. Before each use, inspect the line cord for cuts and/or abrasion marks. If any are
found, this indicates that the appliance should be serviced and the line cord
replaced. Please return it to an authorized service representative.
5. Never wrap the cord tightly around the appliance, as this could place undue stress
on the cord where it enters the appliance and cause it to fray and break.
DO NOT OPERATE APPLIANCE IF THE LINE CORD SHOWS ANY DAMAGE OR IF
APPLIANCE WORKS INTERMITTENTLY OR STOPS WORKING ENTIRELY.
CAUTION: To ensure continued protection against risk of electric shock, connect to
properly grounded outlets only.
IMPORTANT: During the first few minutes of initial use, you may notice smoke
and/or a slight odor. This is normal and should quickly disappear. It will not recur after
appliance has been used a few more times.
This appliance is not intended for use by persons (including children) with reduced
physical, sensory or mental capabilities, or lack of experience and knowledge, unless
they have been given supervision or instruction concerning use of the appliance by a
person responsible for their safety.
SAFETY INSTRUCTIONS
4
MODEL: RJ38-V2-35
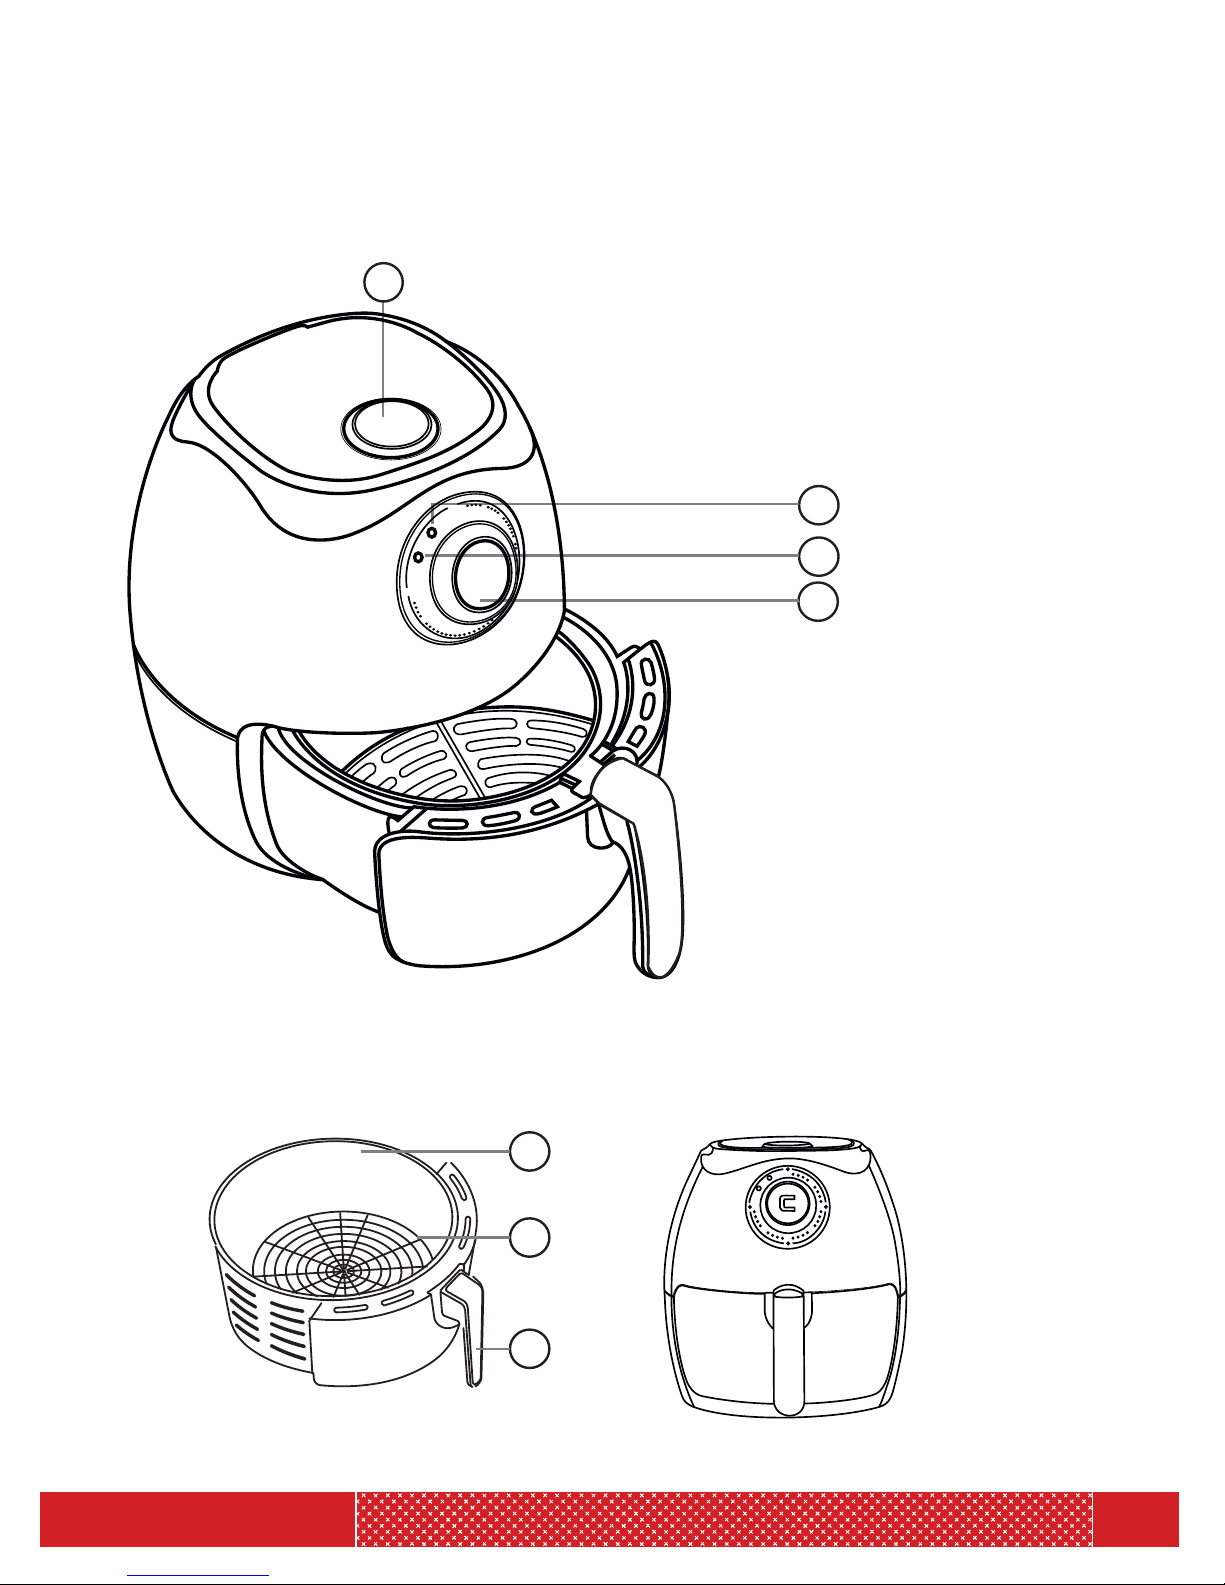
Features
2
3
4
1
0
5
10
25
30
0
5
10
15
20
25
30
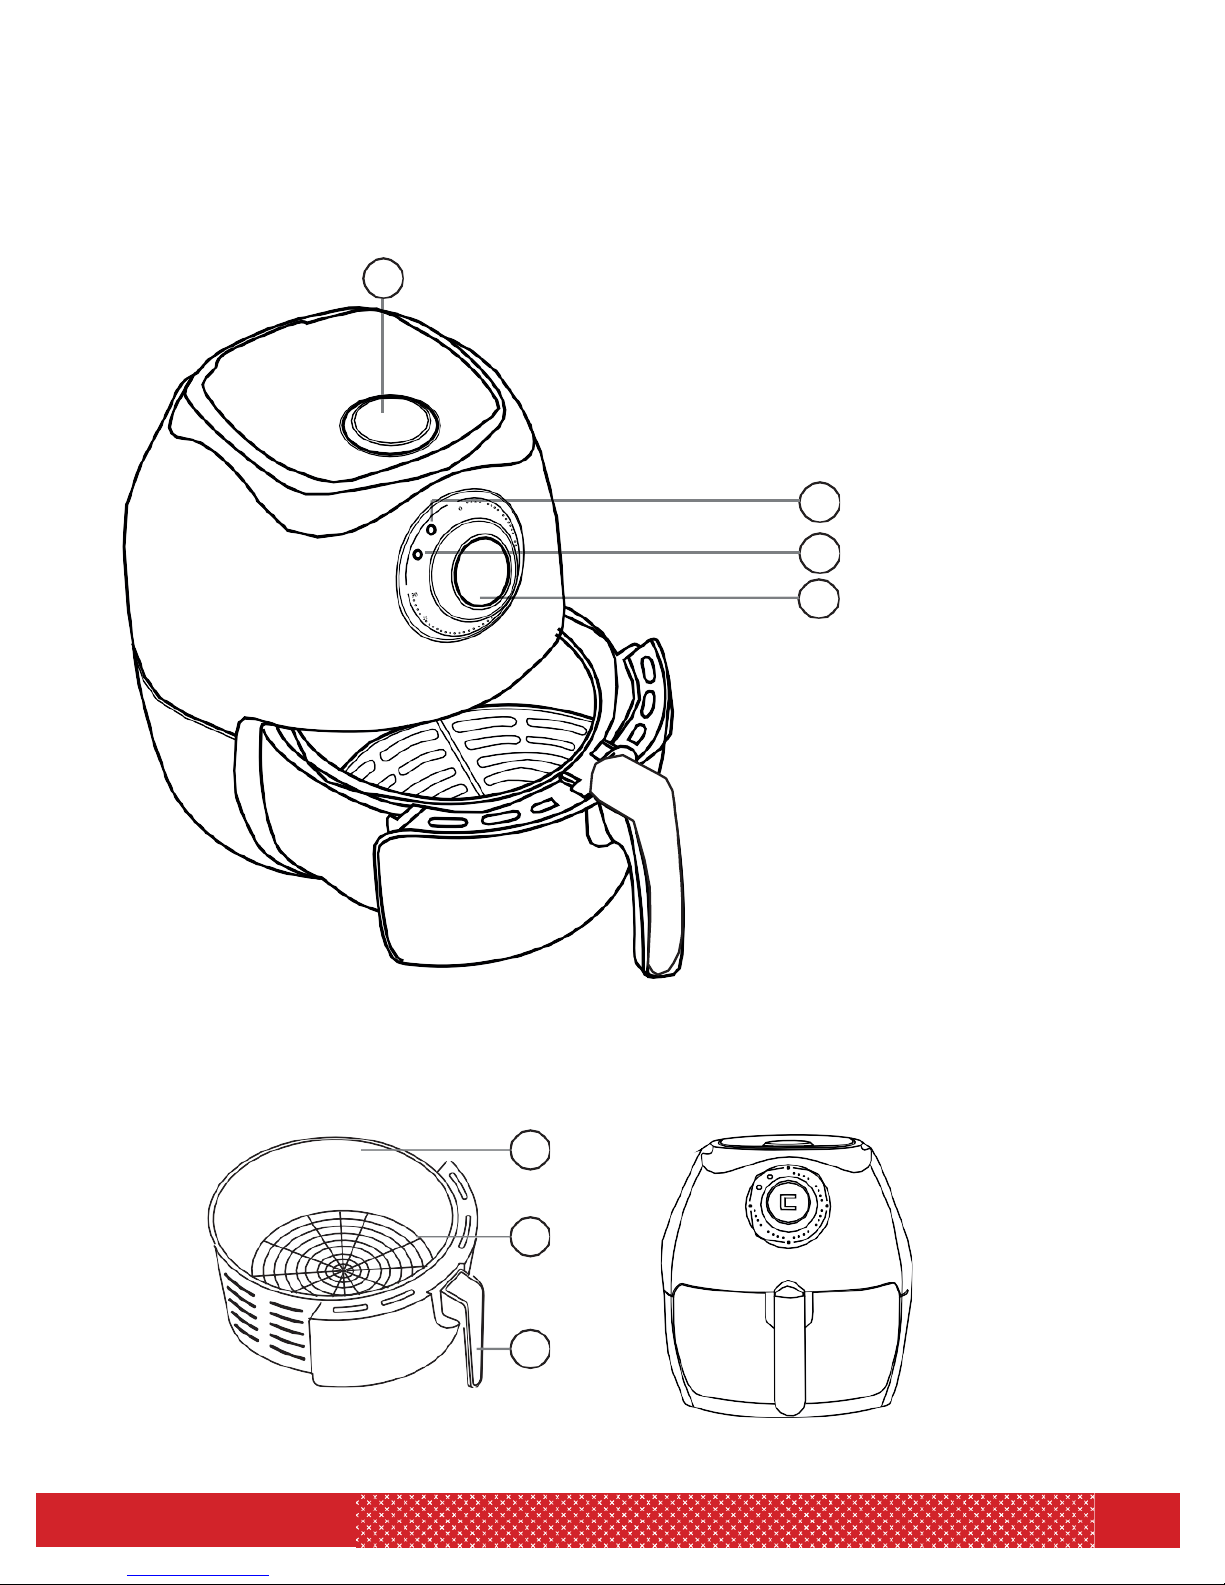
1. TEMPERATURE CONTROL KNOB
2. HEATING LIGHT
3. POWER ON LIGHT
4. TIMER CONTROL KNOB
5. FRYER BASKET
6. BASKET TRAY
7. BASKET HANDLE
5
6
7
5
Operating Instructions
BEFORE FIRST USE
1. Remove all packaging materials.
2. Remove stickers from unit before use. Do not remove the rating label from underneath
the unit.
3. Thoroughly clean the fryer basket and tank with soap, hot water and a
non-abrasive sponge. Wipe the inside and outside of the appliance with a damp
cloth and allow to dry before using.
NOTE: Fryer basket and tank are dishwasher safe.
4. This is a healthy electric oil free fryer that works on hot air. Do not fill the basket with
oil or frying fat.
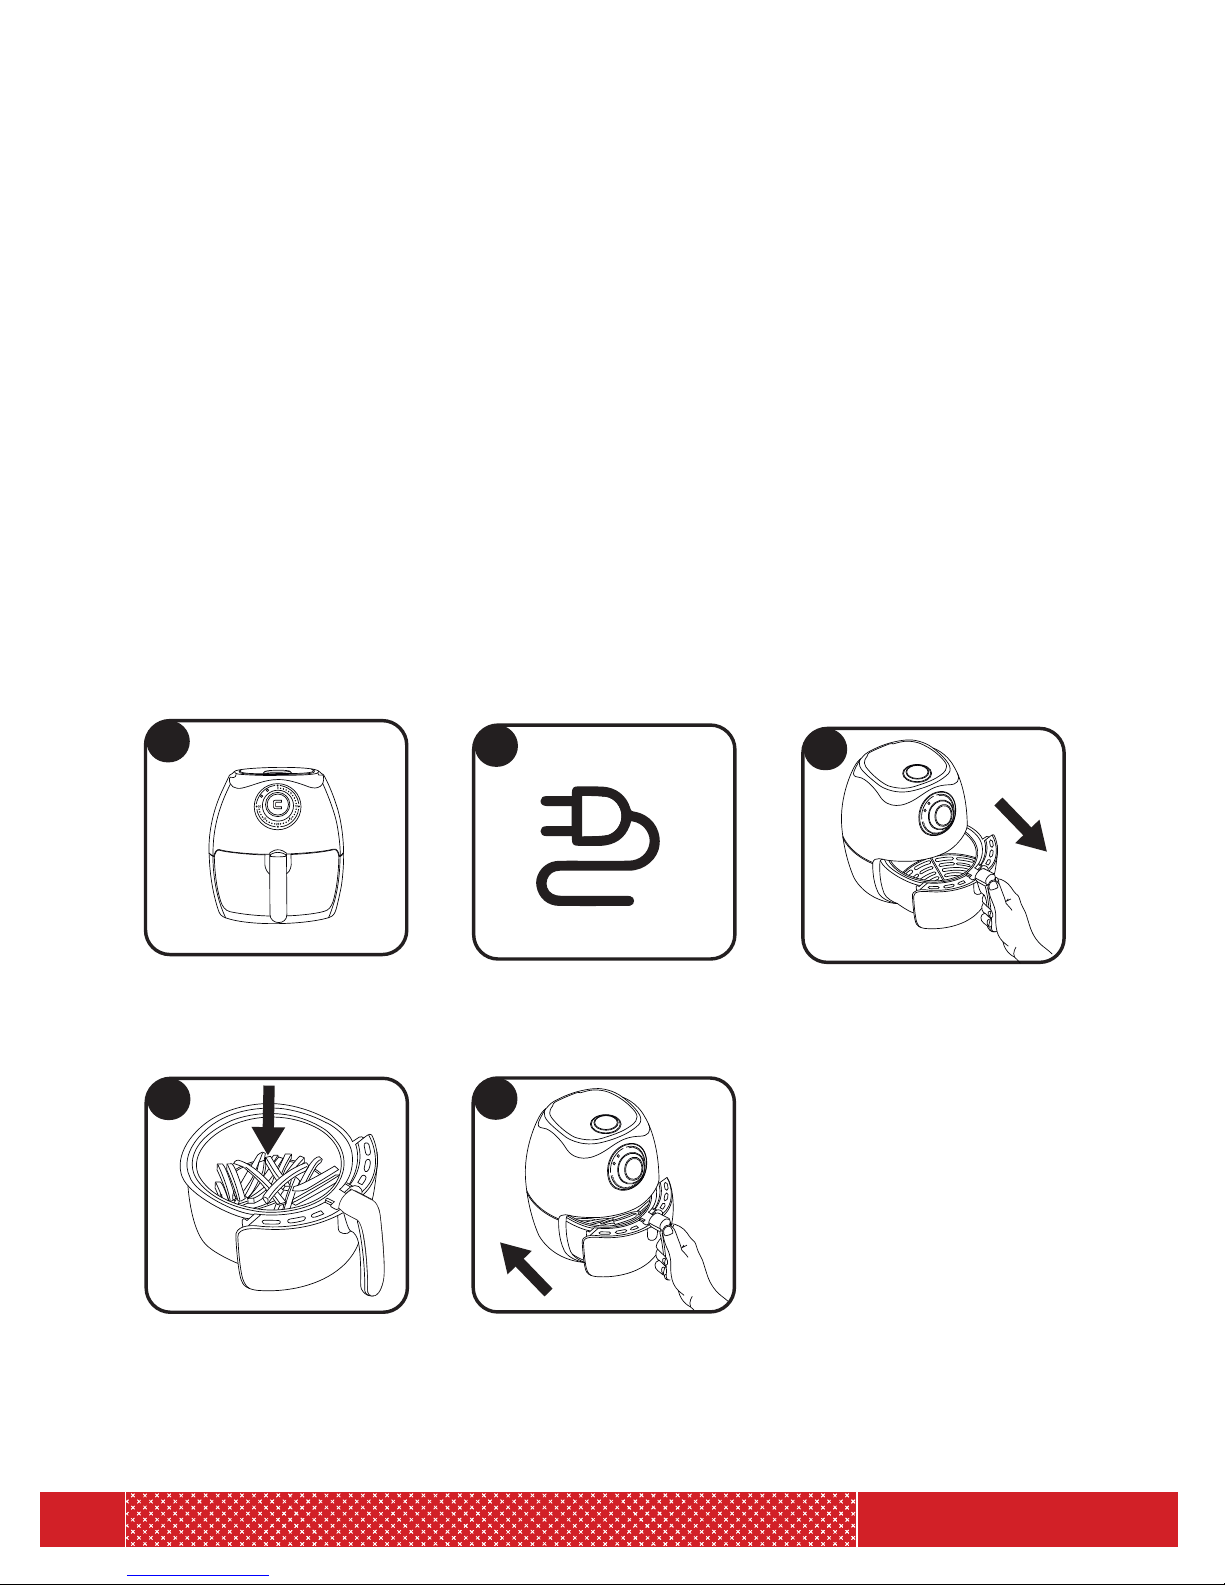
HOW TO USE
To assemble the fryer basket and tray, lower the basket tray until it firmly clicks into
place inside the tank.
Place appliance on a flat,
stable surface.
Connect the power
plug to a grounded wall
electrical socket.
Place the ingredients
into the basket.
NOTE: Do not fill the
basket more than
indicated in your recipe or
in the table on page 7 as
this can adversely affect
the cooking result.
Carefully pull fryer
basket out of the fryer.
Slide the tank back into
the air fryer.
4
1
2
3
5
6
Operating Instructions
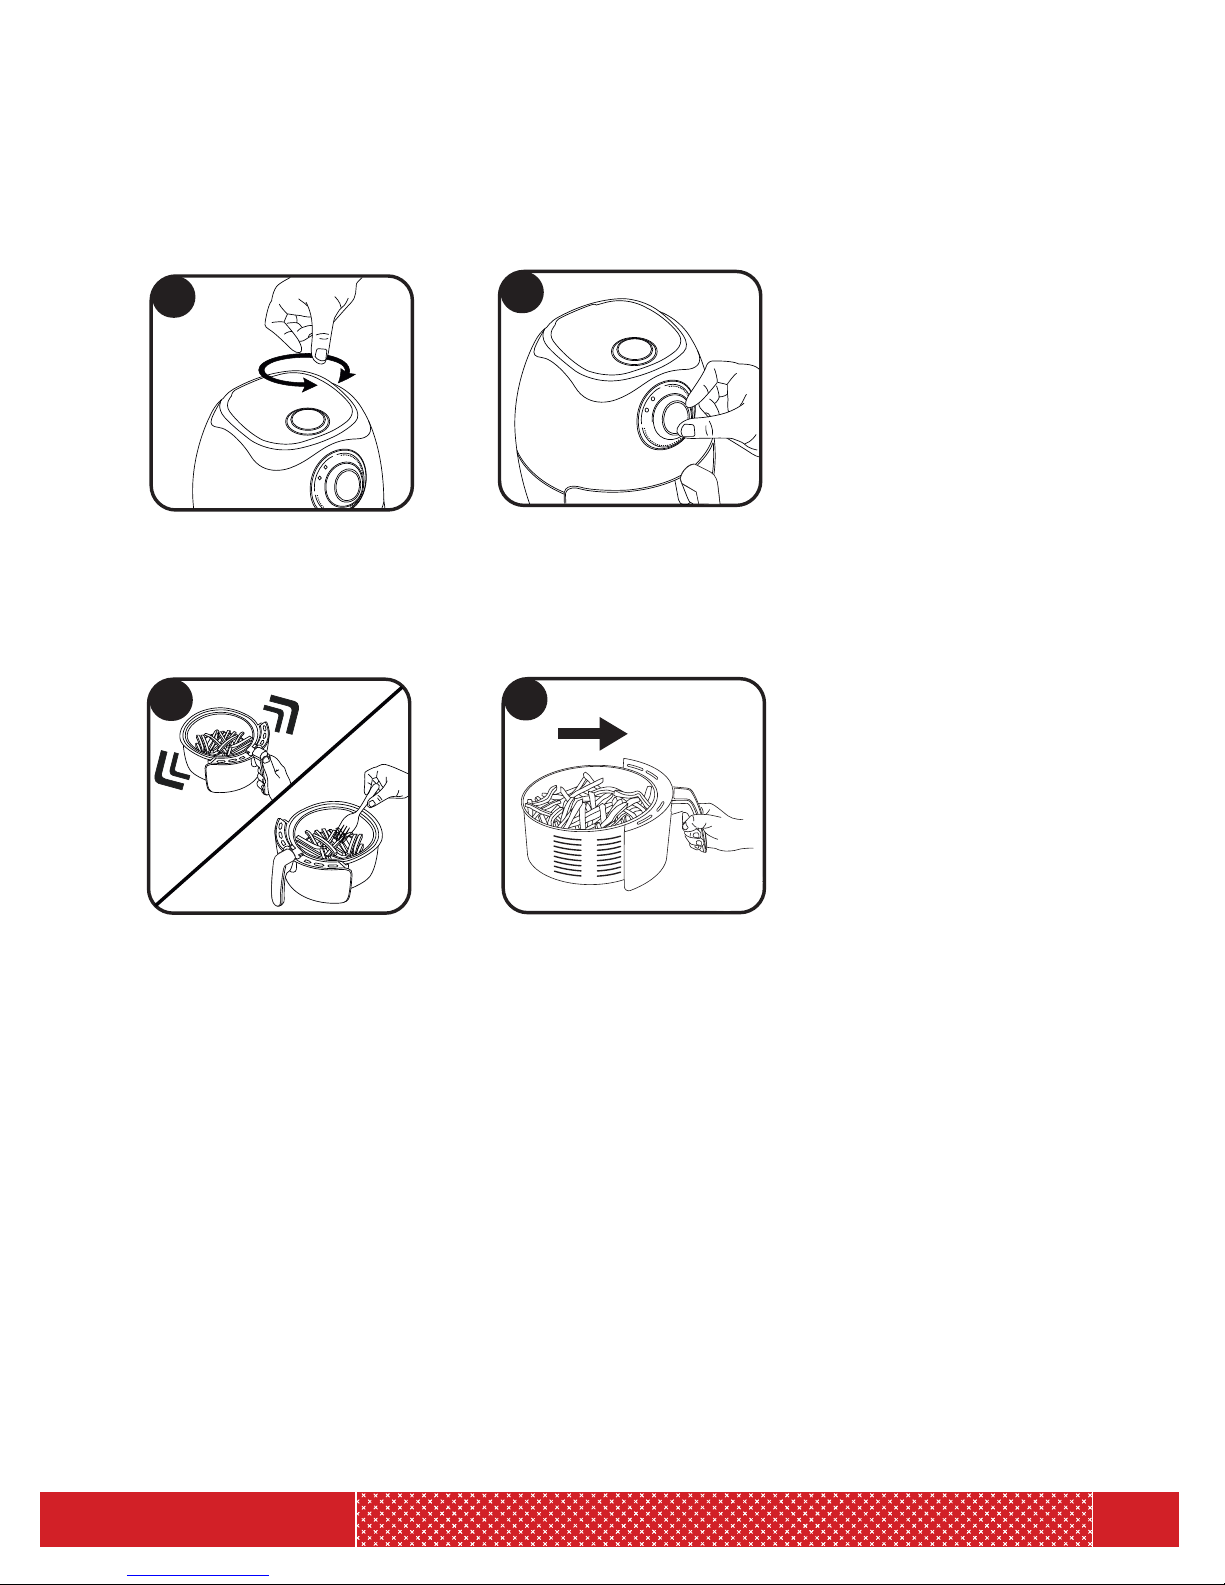
Turn the temperature
control knob to
the recommended
temperature for your
recipe (see page 8).
Pull the fryer basket out of
the appliance and shake or
turn using a fork (or tongs).
Then put the fryer basket
back into the air fryer.
After the bell rings, pull
out the tank and and
check if the ingredients
are ready.
If not ready, simply slide
the tank back in and reset
the timer.
Turn the timer control
knob to the required
preparation time.
NOTE: Add 3 minutes of
preparation time when the
appliance is cold. If not
preheated, some ingredients
may require shaking halfway
through preparation time.
You can also preheat the
appliance without food for
approx. 4 minutes.
6
8
7
9

7
Operating Instructions
Type Min to Max
Amount
Time
(mins)
Temp
(°F)
Shake Cooking Tip
Thin Frozen Fries 100-400g 9-16 390 Ye s
Thick Frozen Fries 100-400g 11-20 390 Ye s
Home-made Fries 100-400g 16-20 390 Ye s Add 1/2 tablespoon of oil
Home-made
Potato Wedges
100-400g
18-22
360 Ye s Add 1/2 tablespoon of oil
Home-made
Potato Cubes
100-350g 12-18 360 Ye s Add 1/2 tablespoon of oil
Rösti 250g
15-18
360 Ye s
Potato Gratin 400g 15-18 390 Ye s
Steak 100-400g 8-12 360 No
Pork Chops 100-400g 10-14 360 No
Hamburger 100-400g 7-14 360 No
Sausage Roll
100-400g 13-15 390 No
Drumsticks
100-400g 18-22 360 No
Chicken Breast
100-400g 10-15 360 No
Spring Rolls
100-400g 8-10 390 Yes Use oven-ready
Frozen Chicken
Nuggets
100-400g 6-10 390 Yes Use oven-ready
Frozen Fish
Fingers
100-400g 6-10 390 No Use oven-ready
Frozen Breaded
Cheese Snacks
100-400g 8-10 360 No Use oven-ready
Stuffed
Vegetables
100-400g 10 320 No
Cake
300g 20-25 320 No Use baking tin
Quiche
400g 20-22 360 No Use baking tin/oven dish
Muffins
300g 15-18 390 No Use baking tin
Sweet Snacks
400g 20 320 No Use baking tin/oven dish
Please see table below for tips on how to be prepare different foods.
NOTE: This table is only a guide and does noit contain exact recipes.
NOTE: Use extreme caution while handling hot food in fryer basket and tank.
Excess oil will drip into tank when preparing greasy foods.

8
Operating Instructions
COOKING TIPS
1. Smaller ingredients usually require a slightly shorter preparation time than
larger ingredients.
2. For best results of smaller foods such as fries, onion rings and chicken
nuggets, remove the fryer basket halfway through preparation time and
shake to mix the food around. This will help to evenly fry the food being
prepared.
3. Add some oil to fresh potatoes for a crispy result. Fry your ingredients in the
airfryer within a few minutes after you added the oil. Do not fill basket with
oil.
4. Do not prepare extremely greasy ingredients such as sausages in the air
fryer.
5. Snacks that can be prepared in an oven can also be prepared in the air fryer.
6. For French fries, use 14 ounces of fries at a time for best frying results.
7. This air fryer is great for reheating food. To reheat your food, set the
temperature control to 300º Fahrenheit for up to 10 minutes.

9
Troubleshooting Guide
Problem Possible Cause Solution
The Air Fryer does
not work
The appliance is not
plugged in
Insert plug into the electrical outlet
The timer was not set Turn the timer knob to the desired cook
time to switch on the appliance
The ingredients fried
with the air fryer are
not done
The amount of
ingredients in the basket
is too large
Put smaller batches of
ingredients in the basket.
Smaller batches fry more evenly
The set temperature is
too low
Turn the temperature control knob to the
desired temperature setting
The ingredients are
fried unevenly in the
air fryer
Certain ingredients need
to be shaken halfway
through
Shake halfway through
the preparation time
Fried snacks are not
crispy when they come
out of the air fryer.
The snack was meant to
be prepared in a
traditional deep fryer
Lightly brush some oil onto the snacks for
a crisper result
I cannot slide the
basket into the
appliance properly
Too many ingredients in
the basket
Do not fill the basket beyond the MAX
indication
Basket is not placed in the
fryer correctly
Push the basket into the fryer until you
hear a click
White smoke comes
out from the appliance
Greasy ingredients are
being prepared
Frying greasy ingredients, a large amount
of oil will leak into the basket. The oil
produces white smoke but does not affect
the appliance or end result
The pan still cointains
grease residues from
previous use
White smoke is caused by grease heating
up in the basket. Make sure the basket is
cleaned properly after use
Fresh fries are fried
unevenly in the air fryer
The right type of potato
was not used
Use fresh potatoes and make sure that
they stay firm during frying
You did not rinse the
potato sticks properly
before you fried them
Rinse the potato sticks properly to
remove starch from the outside
of the sticks
Fresh fries are not
crispy when they come
out of the air fryer
The crispiness of the fries
depends on the amount of
oil and water in the fries
Make sure you dry the potato sticks
properly before adding oil
Cut the potato sticks smaller for a
crispier result
Add slightly more oil for a crisper result

10
Cleaning & Maintenance
Before cleaning, turn the
Timer control knob to "0".
Remove the fryer basket
tray and wash with soap,
hot water and a
non-abrasive sponge.
Unit housing is NOT
dishwasher safe.
Do not use abrasive
cleaning materials, they
may cause scratching or
damage to the non-stick
coating.
Tip: If food is stuck to the basket or bottom of
the tank, fill the tank with hot, soapy water and
allow the basket and inside of the tank to soak for
approximately 10 minutes.
Fryer basket and basket
tray are dishwasher safe.
Wipe the outside of
the unit housing with
a damp cloth. Do not
immerse unit housing
in water or rinse under
running water.
Unplug the appliance
and allow to cool.
Tip: After the unit has
been turned off, remove
the tank to help the unit
to cool down quickly.

11
Terms & Conditions
LIMITED TWO YEAR WARRANTY
The limited warranty on this product covers defects in materials and workmanship, such
this be the case, please bring product back to one of our stores along with original receipt
or proof of purchase or call us at 1 888-786-5375. The warranty obligations of THINK-
KITCHEN for this product are limited to the terms set forth below.
This limited warranty does not cover any damage, deterioration or malfunction resulting
from any alteration, modification, improper or unreasonable use or maintenance, misuse,
abuse, accident, neglect, exposure to excess moisture, fire, lightning, power surges, or
other acts of nature. This limited warranty does not cover any unauthorized tampering
with this product, any repairs attempted by anyone unauthorized by THINKKITCHEN to
make such repairs, or any other cause which does not relate directly to a defect in materi-
als and/or workmanship of this product.
1111
Terms & Conditions
LIMITED TWO YEAR WARRANTY
The limited warranty on this product covers defects in materials and workmanship, such
this be the case, please bring product back to one of our stores along with original receipt
or proof of purchase or call us at 1 888-786-5375. The warranty obligations of THINKKITCHEN for this product are limited to the terms set forth below.
This limited warranty does not cover any damage, deterioration or malfunction resulting
from any alteration, modification, improper or unreasonable use or maintenance, misuse,
abuse, accident, neglect, exposure to excess moisture, fire, lightning, power surges, or
other acts of nature. This limited warranty does not cover any unauthorized tampering
with this product, any repairs attempted by anyone unauthorized by THINKKITCHEN to
make such repairs, or any other cause which does not relate directly to a defect in materials and/or workmanship of this product.


TOUJOURS LIRE ET SUIVRE LES INSTRUCTIONS
AVANT D’UTILISER L’APPAREIL.
TOUJOURS LIRE ET SUIVRE LES INSTRUCTIONS
AVANT D’UTILISER L’APPAREIL.

Table des matières
1 Consignes de sécurité
4
Caractéristiques de l’appareil
5
Mode d’emploi
9 Dépannage
10
Nettoyage et entretien
11
Garantie
18
21
22
26
27
28

CONSIGNES DE SÉCURIT
É
I
MPORTANTES
POUR USAGE DOMESTIQUE SEULEMENT.
Miseengarde:Afinderéduirelerisqued’incendie,dedéchargesélectriqueset/oublessuresphysiques,toujours
respecterlesconsignesdesécuritédebaseaumomentd’utiliserdesappareilsélectriques,ycomprislesdirectives
suivantes:
1. Nepasutiliserl’appareilàl’extérieur.
2. Nejamaisutiliserd’accessoiresoudepiècesd’unautremanufacturier.Votregarantieserainvalidesidetels
accessoiresoupiècesavaientétéutilisés.
3. Avantlapremièreutilisation,laverchaquepièceamovibleavecunsavondoux.
4. Vérifierquelatensionindiquéesurl’appareilcorrespondeàlatensionsupportéeparlesecteurlocal.
5. Placerl’appareilsurunesurfaceplaneetrésistanteàlachaleur.Nepasplacerl’appareilsurunesurface
pouvantgénérerdelachaleurtellequeledessusd’unecuisinière.
6. L’appareilestpourvud’uncordond’alimentationcourtafindeprévenirl’enchevêtrementetlesrisquesde
trébuchement.Lesrallongesélectriquespeuventêtreutiliséessilescapacitésélectriquescorrespondentà
cellesdel’appareiletqu’ellessontmuniesd’unemiseàlaterre.Assurez-vousquelecordond’alimentation
nependepasd’uncomptoiroud’unetableoùquelqu’unpourraitletireroutrébucher.
7. Nepasutilisersilaficheélectriqueoulecordond’alimentationestendommagé.Contactezunreprésentant
duserviceàlaclientèle.
8. Insérezlaficheélectriquedansunepriseélectriquemunied’unemiseàlaterre.Retirezentirantlafiche
électriqueetnonentirantlecordond’alimentation.N’entourezjamaislecordond’alimentationfermement
autourdel’appareildurantl’utilisationoupourlerangercarcelapourraitendommagerlecordon.
9. Lorsdelapremièreutilisation,unelégèrefuméeouodeurpeus’échapperdel’appareil.Ceciestnormalet
devraitdisparaîtrerapidementaprèsquelquesutilisations.
10. Cet appareil doit être utilisé seulement par des personnes en état de comprendre les directives de
l’
appareil ou sous la supervision de personnes en état de comprendre ces mêmes directives. Les
enfants doivent toujours être supervisés lorsqu’ils utilisent l’appareil.
11. Ne pas laisser l’appareil fonctionner sans surveillance.
1
THIS APPLIANCE IS FOR HOUSEHOLD USE ONLY.
WARNING: When using electrical appliances especially when children are present, basic
safety precautions should always be followed to reduce the risk of fire, electric shock,
and/or injury to persons, including the following:
1. This appliance is intended for indoor home use only.
2. Never use any accessories or parts from other manufactures. Your warranty will
become invalid if such accessories or parts have been used.
3. Wash all removable parts with a mild cleanser before the first use.
4. Check that your home power supply corresponds with this appliance’s intended
voltage.
5. Place this appliance on a stable, heat resistant surface. Make sure not to place near or
on a heat source such as gas or electric burner or oven.
6. Short power cords are attached to this item to prevent entanglement and tripping
hazards. Extension cords with corresponding voltage, electrical rating and grounding
wires can be used. Care should be taken so that any exposed cord is not hanging
down from a counter or table where it can be pulled on or tripped over by any child
or adult.
7. Before using this appliance inspect the plug and cord line for cuts and/or abrasion
marks if they are found. Do not use this appliance and contact our authorized
customer service representative.
8. Insert the plug by grasping it firmly and guiding it into your home’s grounded electric
outlet. Disconnect by grasping the plug and removing it from your home’s grounded
electric outlet. Never wrap the cord tightly around the appliance during use or
storage as this can cause the wire to fray and break.
9. During initial use, you may notice some smoke and or a slight odor. This is normal and
should quickly dissipate. It should not reoccur after the appliance has been used a f
ew more times.
10. This appliance should be used only by persons who are capable of understanding
the user manual or are supervised by those who have adequate understanding of
the appliances’ features, their use and the operating instructions. Children must be
supervised and should not be left alone with appliances during their operation.
11. During use appliances should not be left unattended.
12. Care should be taken not to move appliances that are in use.
13. Do not move appliances that are full of food or liquid whether hot or cold.
14. Appliances can emit heat or steam when in use therefore care should be taken not
to block inlets or outlets.
IMPORTANT SAFEGUARDS
SAFETY INSTRUCTIONS
quelqu’un pourrait
.
18

2
SAFETY INSTRUCTIONS
15. Appliance exteriors are designed to be cool to the touch. Portions do get HOT
during use. Burns can result from touching heating elements, air vents and
removable baskets or containers and - if any part is designed to be handled do so
with care.
16. Do not use this appliance near an open flame or flammable materials.
17. Do not fill this appliance with oil. Oil can be used in small quantities to assist with
air frying. This will help make food crispier.
18. Do not leave uncooked ingredients in this pot for more than a short period of
time. Raw meat, poultry, fish, fruits or vegetables can spoil.
19. Use protective gloves or utensils to remove hot food from this appliance.
20. Unplug the appliance when you have finished cooking.
21. Before cleaning, make sure that the pot is turned off, unplugged, cooled to room
temperature and all pressure has been released.
22. Do not clean the appliance until the unit is cool.
23. Do not immerse complete appliance in water or a dishwasher for cleaning.
24. Clean with a non-abrasive cleaner, soft pad or cloth.
25. Store unit in a cool, dry location.
26. In case of any electric emergency such as a fire call 911.
Take a minute to unwrap your appliance. Remove any packaging or labels that
may interfere with the use of your appliance. Locate your instruction manual. For
your safety and the continued enjoyment of this product, read all the directions
carefully and store this manual in a safe place for future reference.
CONSIGNES DE SÉCURITÉ
1.
L’extérieur de l’appareil a été conçu pour demeurer frais. Cependant,
certaines parties deviennent CHAUDES durant l’utilisation. Des brûlures
peuvent survenir lors de contact avec les éléments chauffants, les
bouches d’aération et les paniers ou contenants amovibles. Manipuler
toutes ces pièces avec précautions.
2.
Ne pas utiliser cet appareil près d’une flamme nue ou près de matériel inflammable.
3.
Ne remplissez pas l’appareil avec de l’huile. L’huile peut être utilisée en
petite quantité pour aider à rendre la nourriture plus croustillante.
4.
Ne laissez pas d’aliments non cuits dans le panier pour une longue
période de temps. Les viandes et volailles crues, les poissons, les
fruits et légumes peuvent être abîmés et devenir impropres à la
consommation.
5.
Utilisez des gants de cuisine ou des ustensiles pour retirer les aliments de
l
’appareil.
6.
Débranchez l’appareil lorsqu’il n’est pas utilisé.
7.
Avant le nettoyage, assurez vous que l’appareil soit éteint, débranché,
revenu à température ambiante et que toute pression résiduelle ait été
évacuée.
8.
Ne pas nettoyer l’appareil avant qu’il ne soit complètement refroidi.
9.
Ne pas immerger l’appareil dans l’eau ou le placer au lave-vaisselle.
10.
Nettoyer avec un nettoyant non-abrasif et un chiffon doux.
11.
Ranger l’appareil dans un endroit frais et sec.
12.
En cas d’incident électrique tel qu’un incendie, contactez le 911.
Prenez quelques instants pour déballer votre appareil. Retirez tout emballage ou
étiquettes qui pourrait gêner l’utilisation de l’appareil. Pour votre sécurité et pour tirer
le maximum de votre appareil, veuillez lire attentivement toutes les consignes et
directives et conserver ce manuel pour référence future.
Gardez hors de
portée de enfants
Ne pas laisser pendre le cordon
quelqu’un pourrait
.
19

3
CONSIGNES DE SÉCURITÉ
AVERTISSEMENTS:
cet appareil est muni d’une fiche polarisée (une lame est plus
large que l’autre). Afin d’éviter tout risque d’électrocution, on ne peut brancher la
fiche que dans un seul sens. Si la fiche ne s’insère pas complètement dans la prise,
on doit la tourner dans l’autre sens. Si cela ne fonctionne toujours pas,
communiquez avec un électricien qualifié. Ne modifiez pas la fiche d’aucune façon.
NOTES SUR LE CORDON D’ALIMENTATION COURT
L’appareil est doté d’un cordon d’alimentation court pour réduire le risque de
blessures qui pourraient survenir en cas d’enchevêtrement ou de trébuchement
sur un cordon trop long. Des rallonges électriques peuvent être utilisées
seulement si les points suivants sont respectés:
1.
Les capacités électriques de la rallonge sont AU MOINS égales aux capacités
électriques de l’appareil
2.
La rallonge ne doit pas pendre d’une table ou d’un comptoir où quelqu’un pourrait
la tirer ou trébucher.
CO
NSEILS SUR LE CORDON D’ALIMENTATION
1.
Ne tirez jamais sur le cordon d’alimentation de l’appareil.
2.
Pour insérer la fiche, tenez-la fermement en guidant les lames dans la prise électrique murale.
3.
Pour débrancher l’appareil, tirer sur la fiche et retirez la de la prise électrique murale.
4.
Avant chaque utilisation, verifiez le cordon d’alimentation pour des signes
d’usure ou de dommages. Ne pas utiliser l’appareil si le cordon
d’alimentation est endommagé et contacter un représentant du service à la
clientèle.
5.
N’entourez jamais le cordon d’alimentation fermement autour de l’appareil durant
l’utilisation ni pour le ranger car cela pourrait endommager le cordon.
NE
PAS UTILISER L’APPAREIL SI LE CORDON D’ALIMENTATION EST
ENDOMMAGÉ OU SI L’APPAREIL FONCTIONNE DE FAÇON INTERMITTENTE
OU ARRÊTE DE FONCTIONNER TOTALEMENT.
AVERTISSEMENT:
pour assurer une protection contre les risques d’électrocution, toujours
brancher l’appareil à une prise munie d’une mise à la terre.
IMPORTANT:
Lors de la première utilisation, une légère fumée ou odeur peu s’échapper de l’appareil.
Ceci est normal et devrait disparaître rapidement après quelques utilisations.
.
Cet appareil n’est pas destiné à être utilisé par des personnes (y compris des
enfants) dont les capacitiés physiques, sensorielles ou mentales sont limitées ou
qui ne possèdent ni l’expérience ni les compétences nécessaires pour utiliser
l’appareil, à moins qu’elles ne soient supervisées ou qu’elles aient reçu des
directives d’utilisation adéquates de l’appareil par la personne responsable de leur
sécurité.
20
4
M
Caractéristiques de l’appareil
1
5
10
3
4
1.
BOUTON DE RÉGLAGE DE
TEMPÉRATURE
2.
VOYANT LUMINEUX DE
PRÉCHAUFFAGE
3.
VOYANT LUMINEUX
D’ALIMENTATION
4.
BOUTON DE RÉGLAGE DE LA
MINUTERIE
5.
PANIER À FRITURE
6.
PLATEAU DU PANIER À FRITURE
7.
POIGNÉE DU PANIER À FRITURE
0
5
30 10
25 15
20
2
5
6
7
quelqu’un pourrait
.
21

5
Operating Instructions
BEFORE FIRST USE
1. Remove all packaging materials.
2. Remove stickers from unit before use. Do not remove the rating label from underneath
the unit.
3. Thoroughly clean the fryer basket and tank with soap, hot water and a
non-abrasive sponge. Wipe the inside and outside of the appliance with a damp
cloth and allow to dry before using.
NOTE: Fryer basket and tank are dishwasher safe.
4. This is a healthy electric oil free fryer that works on hot air. Do not fill the basket with
oil or frying fat.
HOW TO USE
To assemble the fryer basket and tray, lower the basket tray until it firmly clicks into
place inside the tank.
Place appliance on a flat,
stable surface.
Connect the power
plug to a grounded wall
electrical socket.
Place the ingredients
into the basket.
NOTE: Do not fill the
basket more than
indicated in your recipe or
in the table on page 7 as
this can adversely affect
the cooking result.
Carefully pull fryer
basket out of the fryer.
Slide the tank back into
the air fryer.
4
1
2
3
5
5
Mode d’emploi
AVANT LA PREMIÈRE UTILISATION
1.
Retirez tout l’emballage de l’appareil
2.
Retirez les autocollants de l’appareil avant de l’utiliser. Ne pas retirer l’autocollant des
caractéristiques électriques sous l’appareil.
3.
Laver le panier à friture et la cuve avec un savon doux et une éponge non
abrasive. Nettoyer l’intérieur et l’extérieur de l’appareil avec un chiffon humide
et laisser sécher avant d’utiliser l’appareil.
NOTE:
Le panier à friture et la cuve peuvent aller au lave-vaisselle.
4.
Ceci est une friteuse à air électrique et santé qui fonctionne sans huile. Ne pas
remplir la cuve avec de l’huile ou du gras à cuisson.
MODE D’EMPLOI
Pour assembler le panier à friture et le plateau du panier à friture, descendez le plateau
jusqu’à ce qu’il soit solidement fixé en place dans la cuve.
Placer l’appareil sur une
surface plane et stable.
Brancher la fiche dans un
prise électrique munie
d’une mise à la terre.
Retirez doucement le panier
à friture de l’appareil.
NOTE:
Ne remplissez pas
le panier plus qu’indiqué
dans la rectte ou dans le
tableau de la
page 7
puisque cela peut affecter
grandement les résultats
de cuisson.
Placer les
ingrédients dans le
panier.
Faites glisser le panier dans
l’appareil.
2
3
1
4 5
quelqu’un pourrait
.
22

6
M
Mode d’emploi
NOTE:
Ajoutez 3 minutes si
vous mettez les ingrédients
dans un appareil froid. Si
vous ne faites pas
préchauffer l’appareil,
certains aliments peuvent
avoir besoin d’être retournés
à la mi-cuisson.
Tournez le bouton de
réglage de
température à la
température
recommandée pour
votre recette. (voir
page 7)
Tirez le panier à friture hors
de l’appareil et brasser ou
secouer les aliments en
utilisant une fourchette ou
des pinces. Remettez le
panier en place.
Tournez le bouton de
réglage de la minuterie
au temps spécifié dans la
recette.
Lor
sque la minuterie
sonne, tirer le panier et
vérifiez que les aliments
soient prêts. S’ils ne le
sont pas, remettez le
panier en place et
tourner le bouton de
réglage de la minuterie
pour quelques minutes.
Vous pouvez aussi préchauffer
l’appareil vide durant 4 minutes.
8
9
6
7
quelqu’un pourrait
.
23

7
Operating Instructions
Type Min to Max
Amount
Time
(mins)
Temp
(°F)
Shake Cooking Tip
Thin Frozen Fries 100-400g 9-16 390 Ye s
Thick Frozen Fries 100-400g 11-20 390 Ye s
Home-made Fries 100-400g 16-20 390 Ye s Add 1/2 tablespoon of oil
Home-made
Potato Wedges
100-400g
18-22
360 Ye s Add 1/2 tablespoon of oil
Home-made
Potato Cubes
100-350g 12-18 360 Ye s Add 1/2 tablespoon of oil
Rösti 250g
15-18
360 Ye s
Potato Gratin 400g 15-18 390 Ye s
Steak 100-400g 8-12 360 No
Pork Chops 100-400g 10-14 360 No
Hamburger 100-400g 7-14 360 No
Sausage Roll
100-400g 13-15 390 No
Drumsticks
100-400g 18-22 360 No
Chicken Breast
100-400g 10-15 360 No
Spring Rolls
100-400g 8-10 390 Yes Use oven-ready
Frozen Chicken
Nuggets
100-400g 6-10 390 Yes Use oven-ready
Frozen Fish
Fingers
100-400g 6-10 390 No Use oven-ready
Frozen Breaded
Cheese Snacks
100-400g 8-10 360 No Use oven-ready
Stuffed
Vegetables
100-400g 10 320 No
Cake
300g 20-25 320 No Use baking tin
Quiche
400g 20-22 360 No Use baking tin/oven dish
Muffins
300g 15-18 390 No Use baking tin
Sweet Snacks
400g 20 320 No Use baking tin/oven dish
Please see table below for tips on how to be prepare different foods.
NOTE: This table is only a guide and does noit contain exact recipes.
NOTE: Use extreme caution while handling hot food in fryer basket and tank.
Excess oil will drip into tank when preparing greasy foods.
7
Mode d’emploi
Veuillez vous référez au tableau plus bas pour des conseils de cuisson concernant
une variété d’aliments.
Ce tableau est à titre indicatif seulement et ne contient pas de recettes exactes.
NOTE: Soyez extrêmement prudent lorsque vous manipulez des aliments chauds
dans le panier à friture et la cuve. L’excès d’huile s’égouttera dans la cuve lorsque
vous préparez des aliments gras.
Type
Quantité
min- max
Durée
(minutes)
Temp
(°F)
Secouer
Conseils de cuisson
Frites minces
surgelées
100-400g
9-16
390
Oui
Frites épaisses
surgelées
100-400g
11-20
390
Oui
Frites fraîches
maison
100-400g
16-20
390
Oui
Ajoutez ½ cuillère à table
d’huile
Quartiers de
pommes de terre
frais
100-400g
18-22
360
Oui
Ajoutez ½ cuillère à table
d’huile
Cubes de pommes
de terre frais
100-350g
12-18
360
Oui
Ajoutez ½ cuillère à table
d’huile
Rösti
250g
15-18
360
Oui
Gratin de pommes de
terre
400g
15-18
390
Oui
Steak
100-400g
8-12
360 Non
Côtelettes de porc
100-400g
10-14
360 Non
Hamburger
100-400g
7-14
360 Non
Saucisses en pâte
100-400g
13-15
390 Non
Pilons de poulet
100-400g
18-22
360 Non
Poitrines de poulet
100-400g
10-15
360 Non
Rouleaux de
printemps
100-400g
8-10
390
Oui
Utilisez ceux prêts pour le
four
Croquettes de
poulet surgelées
100-400g
6-10
390
Oui
Utilisez ceux prêts pour le
four
Bâtonnets de
poisson surgelés
100-400g
6-10
390
Non
Utilisez ceux prêts pour le
four
Bâtonnets de
fromage surgelés
100-400g
8-10
360
Non
Utilisez ceux prêts pour le
four
Légumes
farcis
100-400g
10
320
Non
Gâteau
300g
20-25
320 Non
Utilisez un moule à cuisson
Quiche
400g
20-22
360 Non
Utilisez un moule à cuisson
Muffins
300g
15-18
390 Non
Utilisez un moule à cuisson
Pâtisseries
400g
20
320
Non
Utilisez un moule à cuisson
5
quelqu’un pourrait
.
24

8
Mode d’emploi
CONSEILS DE CUISSON
1.
Des aliments plus petits demandent généralement un temps de cuisson
pl
us court que les aliments plus gros.
2.
Pour de meilleurs résultats avec des aliments plus petits tels que des
frites, des rondelles d’oignon et croquettes de poulet, retirez le panier
à friture à la mi-cuisson et secouer pour mélanger les aliments. Ceci
contribuera à cuire uniformément les aliments.
3.
Ajoutez un peu d’huile si vous utilisez des pommes de terre fraîches pour
un résultat plus croustillant. Mettez les aliments dans le panier à friture
quelques minutes après avoir ajouté l’huile. Ne remplissez pas la cuve
d’huile.
4.
Ne préparez pas d’aliments très gras tel que des saucisses dans
l’appareil.
5.
Les collations qui peuvent être préparées dans un four peuvent également être
pr
éparées dans la friteuse à air.
6.
Utilisez 14 onces de frites à la fois donnera de meilleurs résultats de friture.
7.
La friteuse à air est idéale pour réchauffer les aliments. Il suffit de
r
égler la température à 300º Fahrenheit jusqu’à 10 minutes.
quelqu’un pourrait
.
25

9
Guide de dépannage
Problème Cause possible Solution
L’appareil ne
fonctionne pas
L’appareil n’est pas
branché
Insérez la fiche dans une prise électrique.
La minuterie n’a pas été
réglée
Tournez le bouton de réglage de la
minuterie au temps désiré.
Les aliments frits
avec l’appareil ne
sont pas cuits
Il y a trop d’aliments dans
le panier
Faites frire de plus petites quantités à la
fois. Les petites quantités cuisent plus
uniformément.
Le réglage de
la température est trop
bas
Tournez le bouton de réglage de la
température à une température plus
élevée.
Les aliments ne sont
pas frits uniformément
Certains aliments doivent
être secoués à la micuisson
Secouez les aliments à la mi-cuisson
Les collations frites ne
sont pas croustillantes
en sortant de l’appareil
Les collations étaient
destinées à être
préparées dans une
friteuse traditionnelle
Arrosez les collations d’un filet d’huile
pour un résultat plus croustillant.
Le panier ne glisse
pas facilement à
l’intérieur de
l’appareil
Il y a trop d’aliments dans
le panier
Ne remplissez pas le panier au-delà du
niveau MAX
Le panier n’est pas bien
enligné
Poussez le panier dans l’appareil jusqu’à
ce qu’un « clic » se fasse entendre.
De la fumée blanche
s’échappe de l’appareil
Des aliments gras sont
préparés
Les aliments gras relâchent une grande
quantité d’huile qui coulera au fond de la
cuve. Cette huile dégage de la fumée
blanche mais n’affecte pas l’appareil ou le
résultat final.
La cuve contient des
résidus de gras de la
dernière utilisation
Assurez vous que le panier et lavé
adéquatement.
Les frites fraîches ne
sont pas frites
uniformément
Le mauvais type de
pomme de terre a été
utilisé
Utilisez des pommes de terre fraîches et
assurez vous qu’elles restent fermes
durant la friture.
Les frites n’ont pas été
bien rincées avant d’être
mises dans le panier
Rincez les frites pour enlever l’amidon de
l’extérieur des pommes de terre.
Les frites fraîches ne
sont pas croustillantes
en sortant de l’appareil
Le croustillant des frites
dépend des taux de gras
et d’eau présents dans
les frites
Assurez vous d’épongez les frites avant
d’ajouter l’huile.
Coupez les frites plus minces pour un
résultat plus croustillant.
Ajoutez légèrement plus d’huile pour un
résultat plus croustillant.
26

10
M
Nettoyage et entretien
Avant le nettoyage,
tournez le bouton de
réglage de la minuterie à
« 0 ».
Retirez le plateau du
panier à friture et laver
avec de l’eau chaude
savonneuse et une
éponge non abrasive.
Débranchez l’appareil et
laissez refroidir.
Conseil:
Après que
l’appareil ait été
débranché, retirez la
cuve afin de permettre
un refroidissement
rapide.
N’employez pas de
produits abrasifs car ils
peuvent endommager
ou égratigner la surface
anti-adhésive.
Essuyez l’extérieur de
l’appareil avec un linge
humide. Ne pas
immerger l’appareil dans
l’eau ou le rincer sous
l’eau du robinet.
Le plateau du panier et le
panier peuvent être lavés
au lave-vaisselle.
Conseil:
Si des aliments sont restés collés au
fond du panier ou de la cuve, remplissez la cuve
d’eau chaude savonneuse et laissez tremper
environ 10 min
L’appareil ne va pas au
lave-vaisselle
quelqu’un pourrait
.
27

11
Garantie limitée de 2 ans
La garantie limitée sur ce produit couvre les défauts de matériaux et de fabrication, si tel est le
cas, s’il vous plaît retourner le produit à l’un de nos magasins avec la facture originale ou une
preuve d’achat . Vous pouvez également contacter le service à la clientèle par téléphone au
1-888-786-5375 ou par courriel à l’adresse suivante : serviceclient@stokesstores.com. Les
obligations de garantie de THINKKITCHEN pour ce produit sont limitées aux conditions
énoncées ci-dessous.
Cette garantie limitée ne couvre pas les dommages, déteriorations ou dysfonctionnements
résultant de toute altération, modification, usage inaproprié ou déraisonnable ou d’entretien,
d’abus, d’accident, de négligence, d’exposition à l’excès d’humidité, le feu, la foudre, les
surtensions, ou d’autres actes de la nature. Cette garantie limitée ne couvre pas les
interventions non autorisées sur ce produit, toutes les tentatives de réparation par toute
personne non autorisée par THINKKITCHEN pour faire de telles réparations, ou toute autre
cause qui ne se rapportent pas directement à un défaut de matériaux et / ou de fabrication de ce
produit.
28

FRITEUSE À AIR
AIR FRYER
1200 WATTS / 120V ~ 60Hz
FRITEUSE À AIR
AIR FRYER
1200 WATTS / 120V ~ 60Hz
 Loading...