

THINK GIZMOS TG671, TG645 User Manual
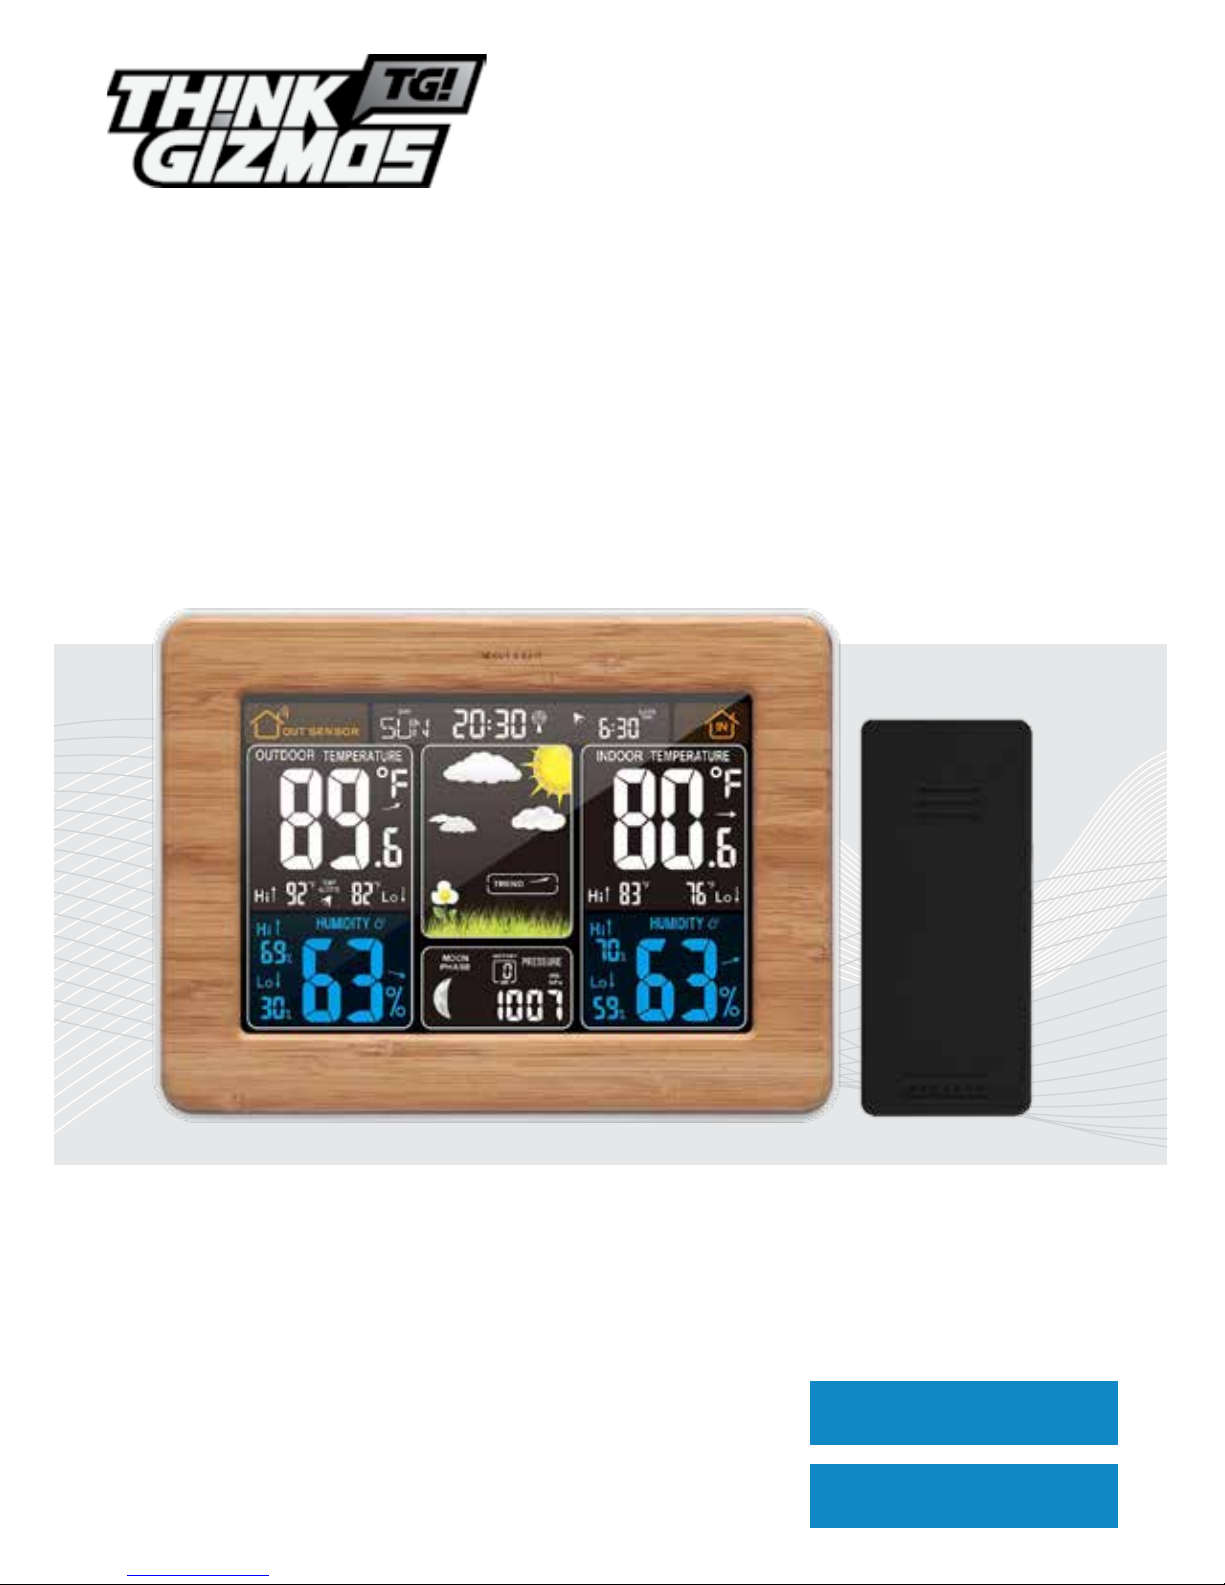
TG671 WEATHER STATION
CONGRATULATIONS ON PURCHASING THE THINK GIZMOS WIRELESS WEATHER STATION.
BY FOLLOWING THESE INSTRUCTIONS CAREFULLY IT WILL BE A GREAT ASSET IN YOUR LOCAL
WEATHER FORCASTING NEEDS.
User Manual
WITH REMOTE SENSOR
English p 1
Español p 13

ENGLISH MANUAL - CONTENTS
1.
2.
3.
4.
1.1 Weather Station Features ................................................................................... 3
1.2 Remote Sensor (Transmitter) Features ............................................................. 3
3.1 Important Information ....................................................................................... 5
3.2 Initial Operation ................................................................................................... 5
3.3 Backlight ............................................................................................................... 5
2.1 Weather Station Appearance ............................................................................ 4
6.1 Setting the Daily Alarm ....................................................................................... 8
6.2 Activating and Deactivating the Alarm .............................................................. 8
6.3 Alarm Information ............................................................................................... 8
6.4 Automatic Snooze Function .............................................................................. 8
WEATHER STATION FEATURES
IMPORTANT INFORMATION
WEATHER STATION FEATURES CONTINUED
ALARM SETTING
2
5.
7.1 °C/°F Temperature Display ................................................................................ 9
7.2 Temperature Trend Display .............................................................................. 9
7.3 Outdoor Temperature Alert Setting ................................................................. 9
7.4 Activating and Deactivating Temp/Frost Alerts ............................................... 9
7.5 Maximum/Minimum Temperature .................................................................. 9
TEMPERATURE INFORMATION
6.
8.1 Relative Humidity Trend Display ..................................................................... 10
8.2 Maximum/Minimum Relative Humidity ......................................................... 10
8.3 Barometric Pressure Display ........................................................................... 10
8.4 Relative Barometric Pressure History ............................................................ 10
HUMIDITY AND AIR PRESSURE INFORMATION
7.
10.1 Weather Forecast ........................................................................................... 11
10.3 The Moon Phase ............................................................................................ 11
WEATHER FORECAST / MOON PHASES
8.
9.
11.1 Warranty Information ................................................................................... 12
WARRANTY
4.1 Automatic Time/Date Setting ............................................................................ 6
4.2 Automatic Time/Date Further Information ...................................................... 6
TIME AND CALENDAR SETTINGS
5.1 Manual Time / Date Setting ............................................................................... 7
TIME AND CALENDAR SETTINGS CONT.
9.1 Relative Barometric Trend Display ................................................................. 11
AIR PRESSURE INFORMATION CONTINUED
10.
11.

1. WEATHER STATION FEATURES
3
1.1 Weather Station Features
● WWVB Radio Controlled Time
● Time in optional 12/24 hour format.
● Date and weekday display.
● Continuous calendar up to 2099.
● Daily Alarm Feature.
● Automatic snooze function.
● Lunar phases display.
● Barometric pressure reading with 12 hour recording.
● Weather forecasting function
● Temperature display in °C or °F.
● Thermometer: Indoor measurement ranges: 0°C (32°F) - 50°C (122°F), outdoor
measurement ranges: -20°C (-4°F) - 60°C (140°F).
● Temperature trend display.
● Hygrometer: Indoor and Outdoor measurement range: 20%-95% RH.
● Minimum / maximum display for air humidity and temperature.
● Temperature Alert.
● LED back light display.
● Batteries: 2xAA (not included).
● DC power supply: 4.5V DC (Included).
1.2 Remote Sensor (Transmitter) Features
● Transmitter frequency: 433MHz.
● Range of transmission is up to 60m (Open Space).
● Wall mountable.
● Batteries: 2xAAA (not included).
2. WEATHER STATION FEATURES CONTINUED
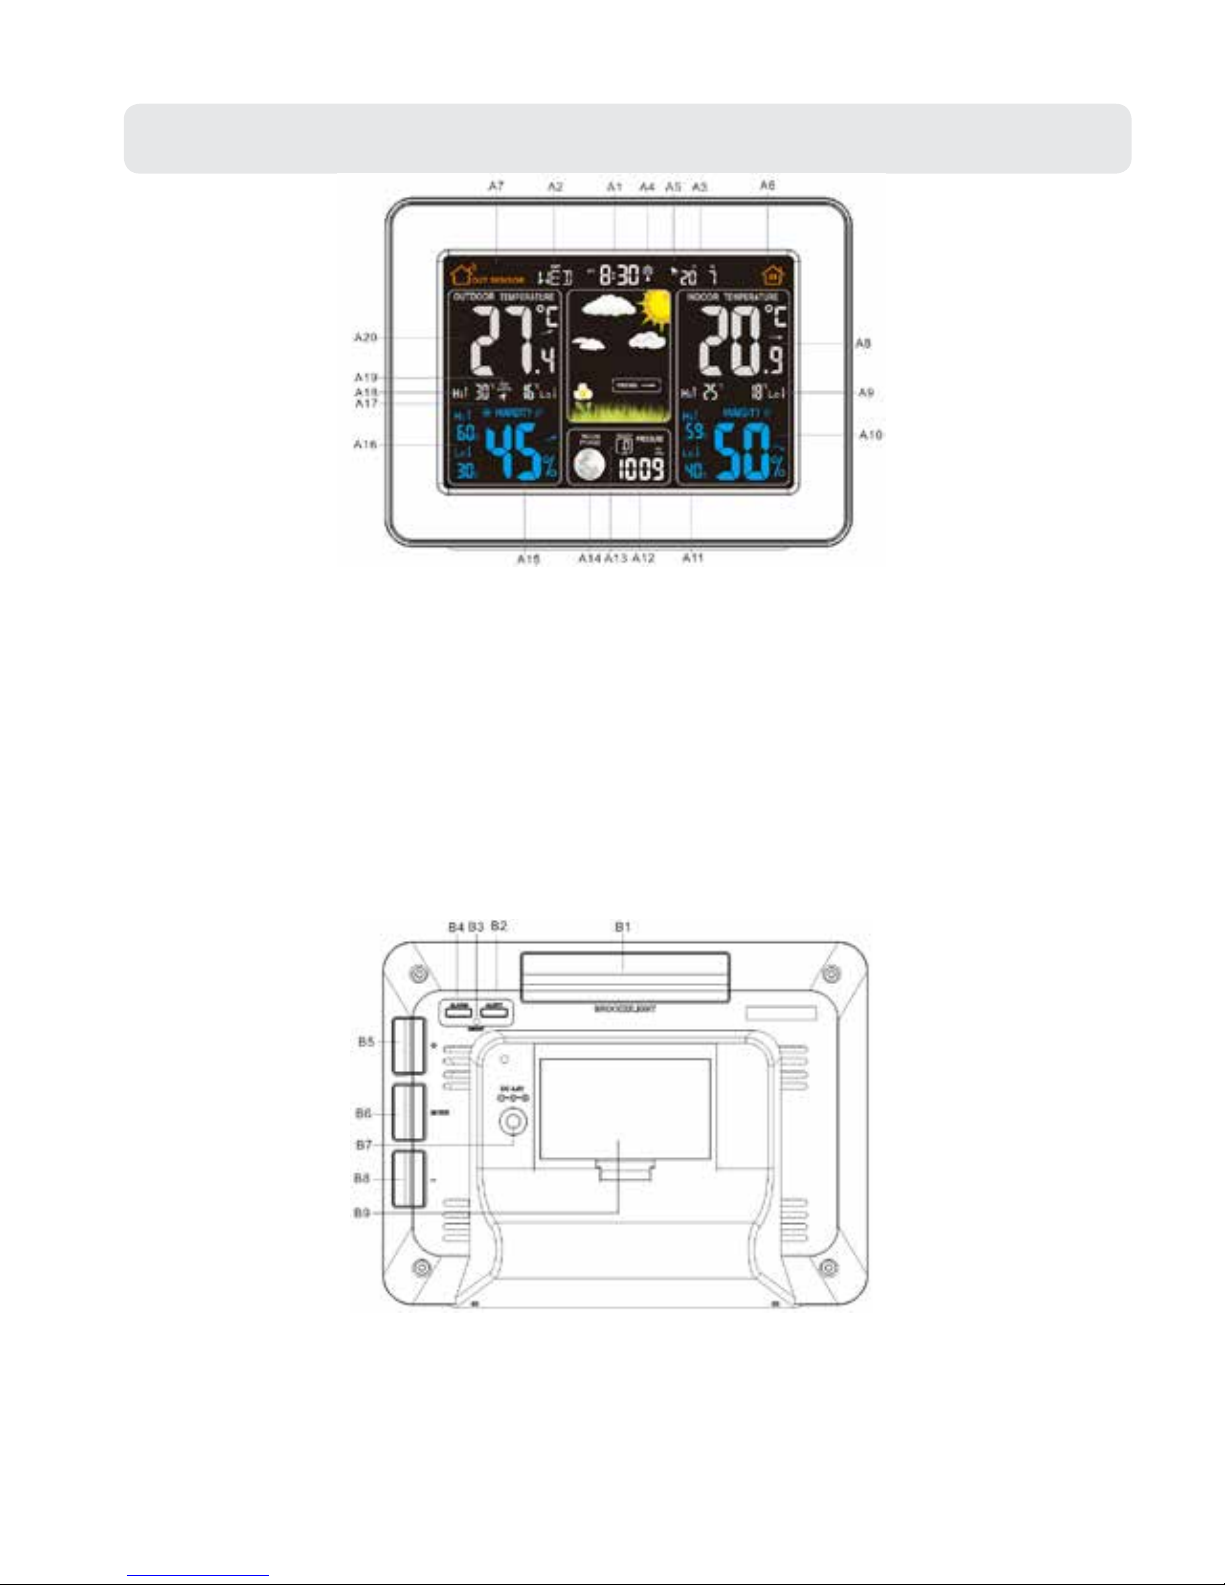
2.1 Weather Station Appearance
4
Weather Station Front:
A1: Time
A2: Week
A3: Date
A4: WWVB Signal Icon
A5: Alarm Icon
A6: Indoor Icon
A7: Outdoor Icon
A8: Indoor Temp.
A9: Indoor Min/Max Temp.
A10: Indoor Humidity
A11: Indoor Min/Max Humidity
A12: Barometric Pressure
A13: Barometric Pressure past 12 hours
A14: Lunar Phases
A15: Outdoor Humidity
A16: Outdoor Min/Max Humidity
A17: Frost Alert Icon
A18: Outdoor Min/Max Temp.
A19: Outdoor Temp. Alert Icon
A20: Outdoor Temp.
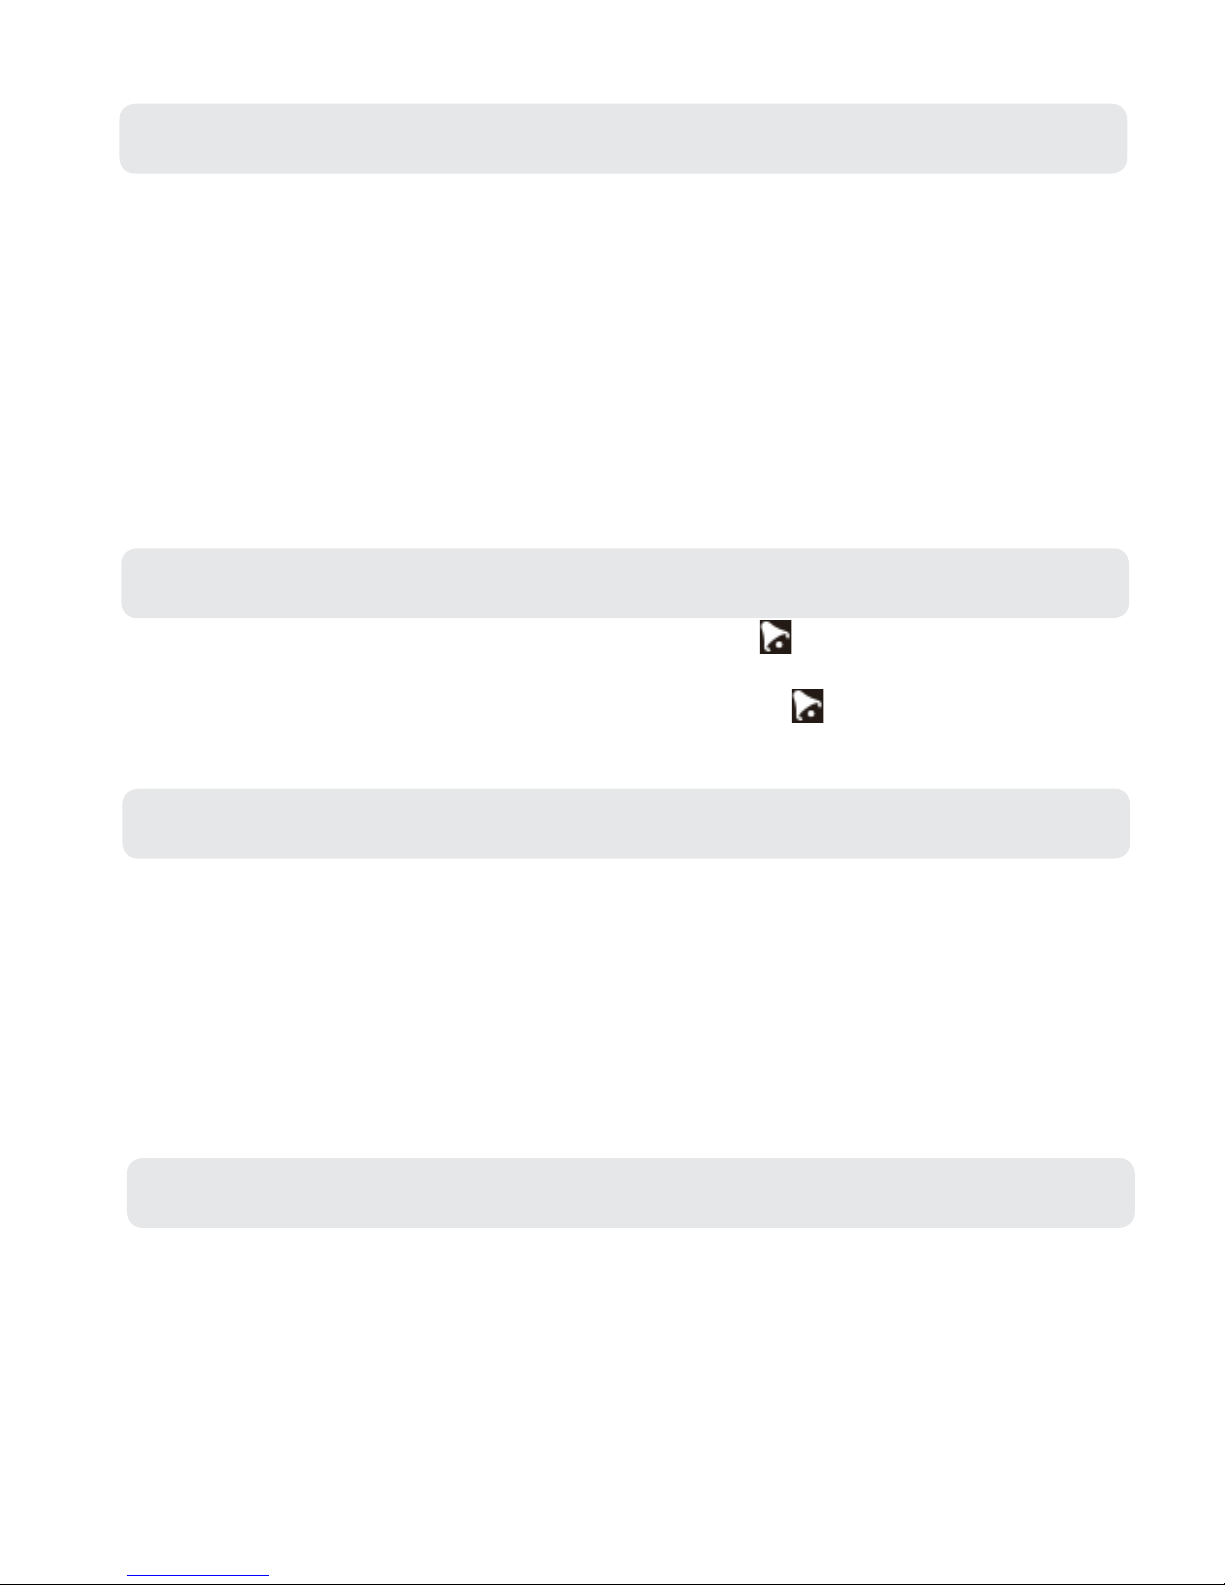
Weather Station Back:
B1: SNOOZE/LIGHT button
B2: ALERT button
B3: RESET button
B4: ALARM button
B5: + Button
B6: MODE button
B7: DC power input
B8: - button
B9: Battery compartment

3. IMPORTANT INFORMATION
5
3.1 Important Information
● In order to get the full screen brightness and easy visability of all numbers and symbols,
we recommend you use the included mains adaptor rather than batteries for the main
unit.
● The remote sensor will work better if the main unit is powered by the included mains
adaptor rather than batteries.
● Regarding the wireless remote sensor (which can be positioned indoors or outdoors),
if it is used outside particulatly in cold conditions we recommend the use of Lithium AA
(requires 2) batteries as this will result in a more powerful signal and ensure no signal
loss. This is only precautionary advice and the remote sensor does work ne with normal
Alkaline batteries.
● The weather station needs to be powered for 12 hours before an accurate predition will
display.
3.2 Initial Operation
● Open the Weather Station Battery compartment.
● Insert 2 x AA batteries observing the correct polarity (+ and - marks) or connect the
mains power. Close the battery compartment.
● When the power is connected all the icons on the LCD display will light up for 3 seconds,
you will hear a beep tone and the weather station will start to detect the indoor
temperature and humidity.
● Next the Weather Station will attempt to connect with the outdoor sensor. This lasts
approximately 3 minutes and is displayed by the RF icon ashing.
● Remove the battery compartment on the Wireless Outdoor Sensor, insert 2 x
AAA batteries observing the correct polarity (+ and - marks) and close the battery
compartment.
● Once the weather station has created a connetion to the outdoor sensor the clock will
start automatically searching for the WWVB Signal to set the time and date.
● If Weather Station failed to receive transmission from outdoor sensor (“- -” is displayed
on the LCD), press and hold - button for 3 seconds to receive transmission manually.
The RF icon will ash on the LCD and the outdoor temperature will show when it is
connected.
3.3 Backlight
● When using battery power the backlight will be o. Press the SNOOZE/LIGHT button to
enable the backlight for 15 seconds.
● When using Mains power the backlight will be lit automatically. Press the SNOOZE/
LIGHT button to adjust the backlight. The backlight has three settings on mains power
High Brightness / Low Brightness / No Backlight.

4. TIME AND CALENDAR SETTINGS
4.1 Automatic Time/Date Setting
● The Weather Station automatically starts the WWVB Signal search after 7 minutes of any
restart or change of batteries.
● To manually start the WWVB signal search, press and hold down the + button for 2
seconds.
● The radio mast icon will ash showing it is searching for signal.
● Once the signal is found the Time and Date will be automatically set. If no signal is
found within 7 minutes the radio mast icon will dissapear and it will automatically start
searching again in 1 hour.
4.2 Automatic Time/Date Further Information
● During the WWVB signal search mode only the SNOOZE/LIGHT and + button will
function, all other buttons have no function. If you wish to carry out any other functions
press the + button to cancel the WWVB signal search.
● A ashing radion mast icon indicates that the WWVB signal search is in progress.
● A continuously displayed radio mast icon indicates that the WWVB signal has been
received successfully.
● At 1:00 / 2:00 / 3:00am the Weather Station automatically carries out a synchronization
procedure with the WWVB signal to correct any deviations to the exact time. If this
synchronization attempt is unsuccessful (The radio mast symbol disappears from the
display), the system will automatically attempt another synchronization at the next full
hour. This procedure is repeated automatically up to 5 times.
● If the clock cannot receive the WWVB signal you have the option of setting the time
manually and instructions can be found on page 7. As soon as the reception of the
WWVB signal is received the Weather Station is re-adjusted automatically.
● We recommend a minimum distance of 2.5 meters (8.2 Feet) to all sources of
interference, such as televisions or computer monitors.
● Radio reception can be weaker in rooms with concrete walls and in oces. In such
extreme circumstances, place the system close to the window for better signal reception.
6

5. TIME AND CALENDAR SETTINGS CONT.
7
5.1 Manual Time / Date Setting
Note: After 20 seconds without pressing any button, the clock switches automatically from
Set Mode to Normal Time Mode.
● Press and hold down the MODE button for 2 seconds, the 12/24 hour mode display
starts to ash. Now use + and - buttons to set the correct 12/24 hour mode.
● Press MODE button to conrm your setting, the temperature display shown by °C starts
to ash. Now use + and - buttons to set the temperature unit in °C or °F.
● Press MODE button to conrm your setting, the barometric pressure displayed by mb/
hPa starts to ash. Now use + and - buttons to set the pressure unit in mb/hPa or inHg
or mmHg.
● Press MODE button to conrm your setting, the Time Zone starts to ash. Now use +
and - buttons to set the time zone (PST, MST, CST, EST, AST, HAT and AKT).
● Press MODE to conrm your setting, the Hour display starts to ash. Now use + and -
buttons to set the correct hour.
● Press MODE to conrm your setting, the Minute displays starts to ash. Now use + and -
buttons to set the correct minute.
● Press MODE to conrm your setting, the date format displays starts to ash. Now use +
and - buttons to set the correct date format.
● Press MODE to conrm your setting, the Year display 2014 starts to ash. Now use + and
- buttons to set the correct year.
● Press MODE to conrm your setting, the Month display starts to ash. Now use + and -
buttons to set the correct month.
● Press MODE to conrm your setting, the Date display starts to ash. Now use + and -
buttons to set the correct date.
● Press MODE to conrm your setting and to end the setting procedure.
Time Zone Settings:
● AST: Atlantic Standard Time
● EST: Eastern Standard Time
● CST: Central Standard Time
● MST: Mountain Standard Time
● PST: Pacic Standard Time
● AKT: Alaska Standard Time
● HAT: Hawaii-Aleutian Standard Time
6. ALARM SETTING
8
6.1 Setting the Daily Alarm
Note: After 20 seconds without pressing any button, the clock switches automatically from
Set Mode to Normal Time Mode.
Proceed as follows to set the alarms:
● Press and hold down the ALARM button for 2 seconds until the alarm time hour display
starts to ash.
● Press the + and - keys to to set the correct hour.
● Press ALARM to conrm the settings.
● The minute display will start to ash. Press the + and - keys to to set the correct minute.
● Press ALARM to conrm the settings end the alarm setting procedure.
6.2 Activating and Deactivating the Alarm
● Press the ALARM button once to activate the alarm. The icon will show on the display
when the alarm is active.
● Press the ALARM button again to deactivate the alarm. The icon will no longer be
shown on the display.
6.3 Alarm Information
● Press any button except the SNOOZE/LIGHT button to deactivate the alarm when it
sounds.
● If not manually stopped the alarm will sound for 2 minutes before automatically
stopping.
● Once the alarm has been stopped it does not need resetting as it will automatically
sound 24 hours later at the set time.
● Rising Alarm (length: 2 minutes) changes the volume four times whilst the alarm signal is
heard.
6.4 Automatic Snooze Function
Proceed as follows to activate the automatic snooze function:
● While the alarm is sounding, press the SNOOZE/LIGHT button to activate the snooze
function.
● This operation moves the alarm back by 5 minutes and the alarm will restart at this time.
● The snooze function can be interrupted by pressing any button.
 Loading...