

ThinkGizmos TG637 User Manual

TG637 BUMP ‘N’ EJECT BUMPER CAR
CONGRATULATIONS!! YOU ARE NOW THE OWNER OF THE BUMP ‘N’ EJECT BUMPER CARS.
FOR AGES 6+
PLEASE READ AND FOLLOW THESE INSTRUCTIONS AT ALL TIMES FOR OPTIMUM ENJOYMENT.
User Manual
English p 1
Deutsch p 8
Francais p 15
Italiano p 22
Español p 29
This toy contains small parts that could be a
choking hazard. Small Children under 6 years
old should be closely supervised while playing
with this toy.

ENGLISH MANUAL - CONTENTS
1.
2.
3.
2.1 Controlling The Bumper Cars ............................................................................. 4
2.2 Controlling The Bumper Cars Continued ......................................................... 5
2.3 Adjusting the Directional Movement ............................................................... 6
2.4 Troubleshooting ..................................................................................................6
1.1 Bumper Cars Battery Installation ..................................................................... 3
1.2 Remote Battery Installation ............................................................................... 3
OPERATING INSTRUCTIONS
IMPORTANT INFORMATION
2
3.1 Warranty Information ........................................................................................ 7
WARRANTY
1. IMPORTANT INFORMATION
3
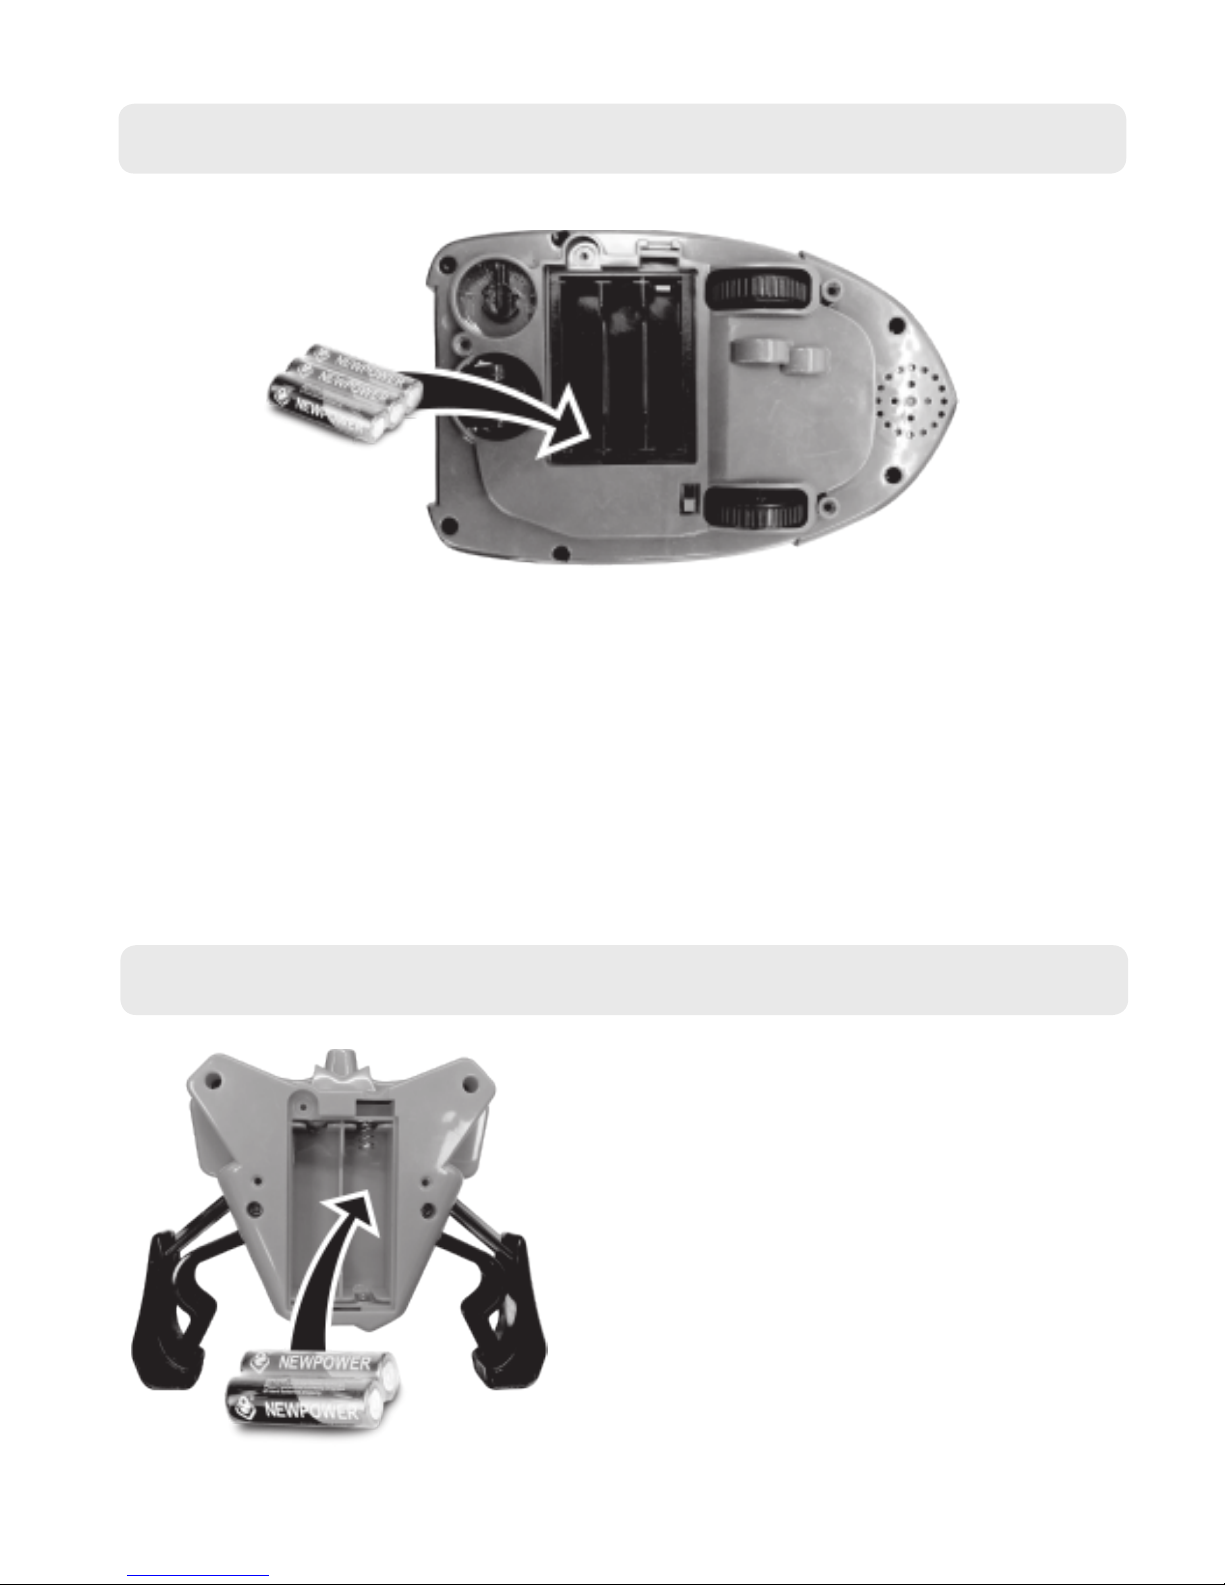
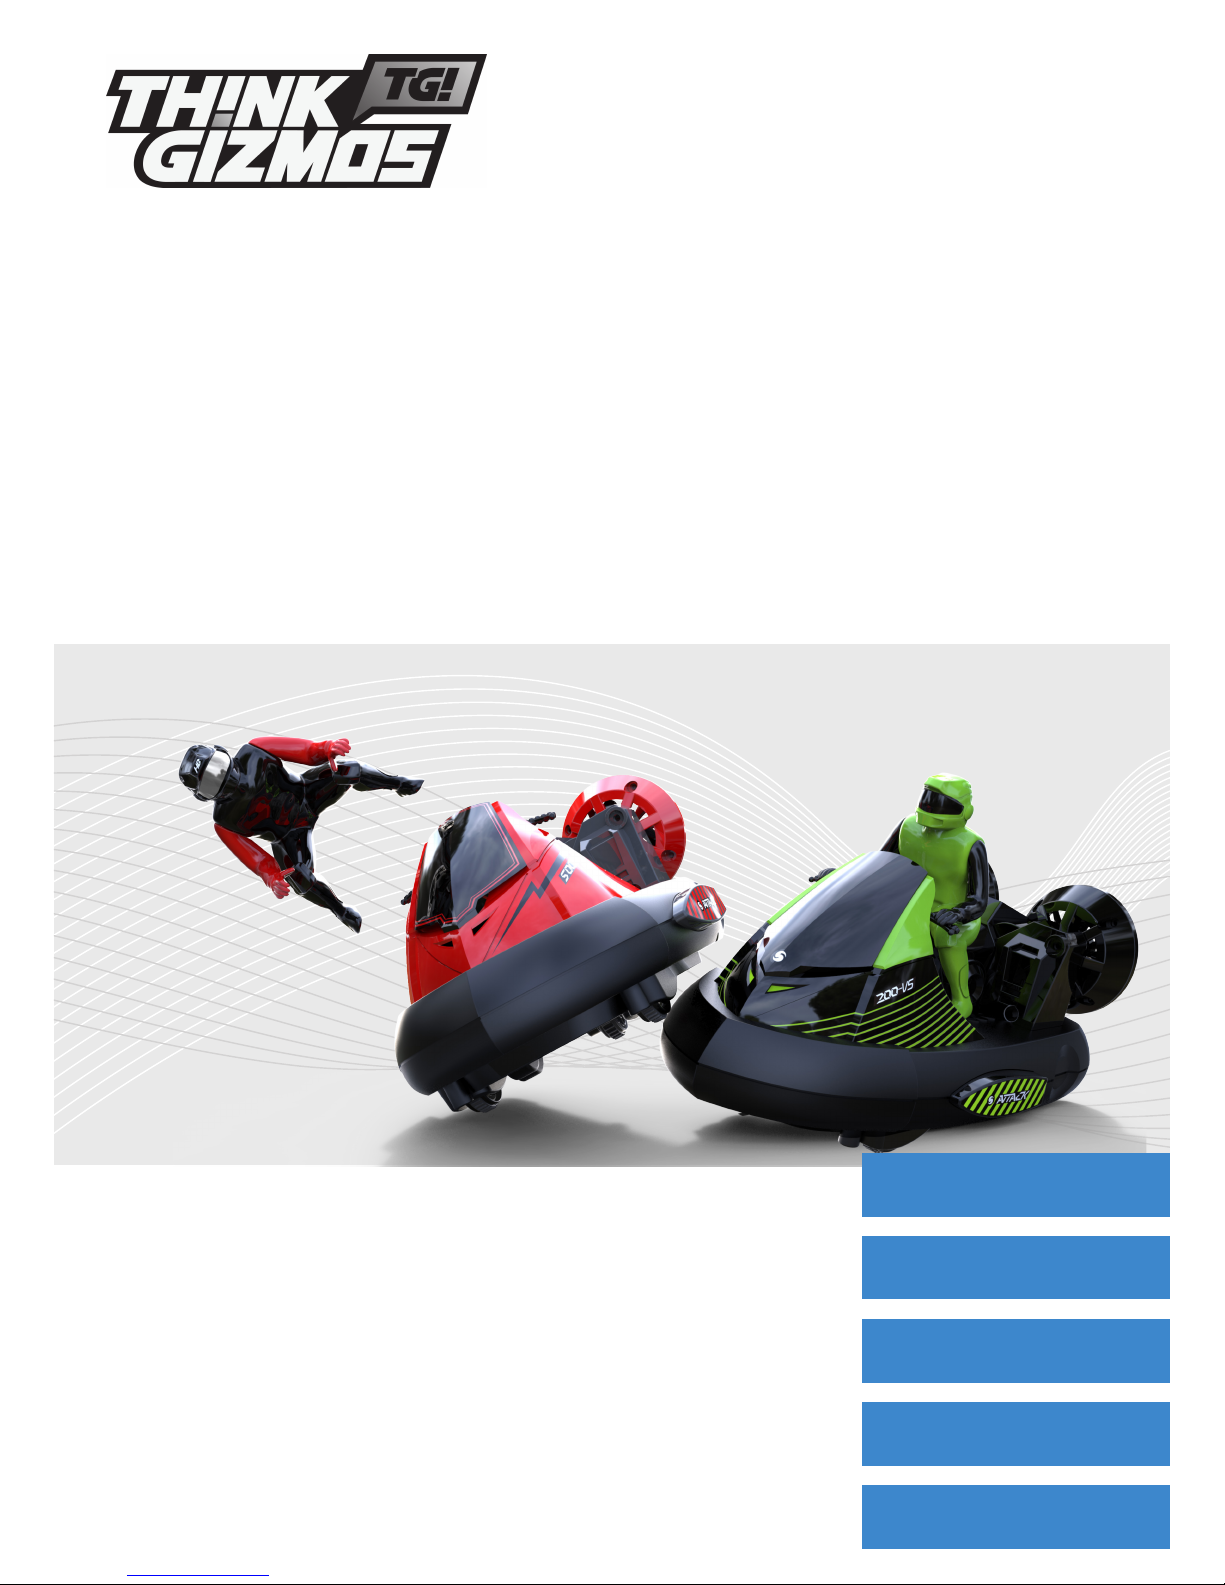
1.1 Bumper Cars Battery Installation
● Turn the Bumper Cars over so that you can gain access to the underside of the vehicle.
● Making sure that the Power switch is in the OFF position, remove the screw from the
battery cover and remove the battery compartment cover.
● Insert 3x AAA batteries (supplied) into the battery compartment observing the correct
polarity as indicated.
● Re-t the battery cover and secure with the screw.
(Warning - Remove the batteries if the Bumper Car is not going to be used for a long time.)
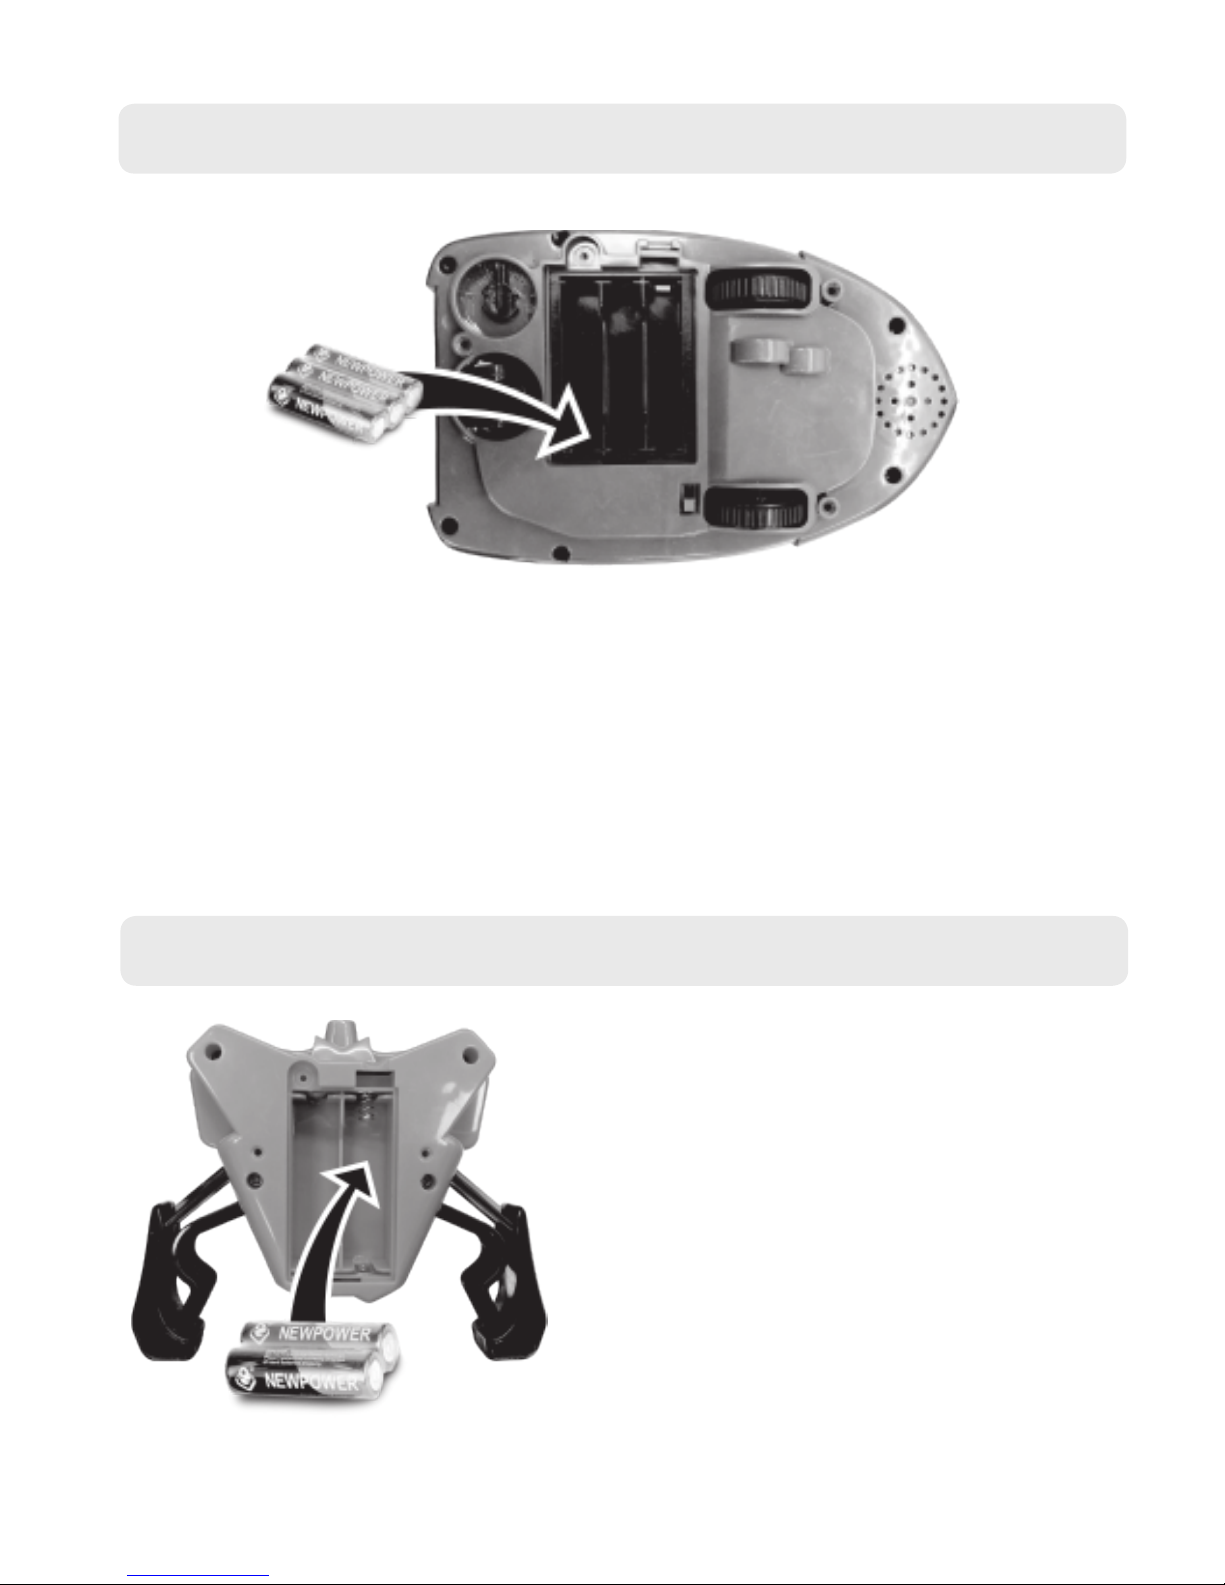
1.2 Remote Battery Installation
● The battery compartment is located on the
underside of the controller.
● Remove the screw from the battery cover and
remove the battery compartment cover.
● Insert 2 AA batteries (supplied) into the battery
compartment observing the correct polarity as
shown.
● Re-t the battery cover and secure with the
screw.
WARNING
Do not mix old and new batteries.
Keep batteries away from small children.
Do not short-circuit batteries or dispose of in a re.
Remove the batteries if the Bumper Car is not going
to be used for a long time.
2. OPERATING INSTRUCTIONS
4
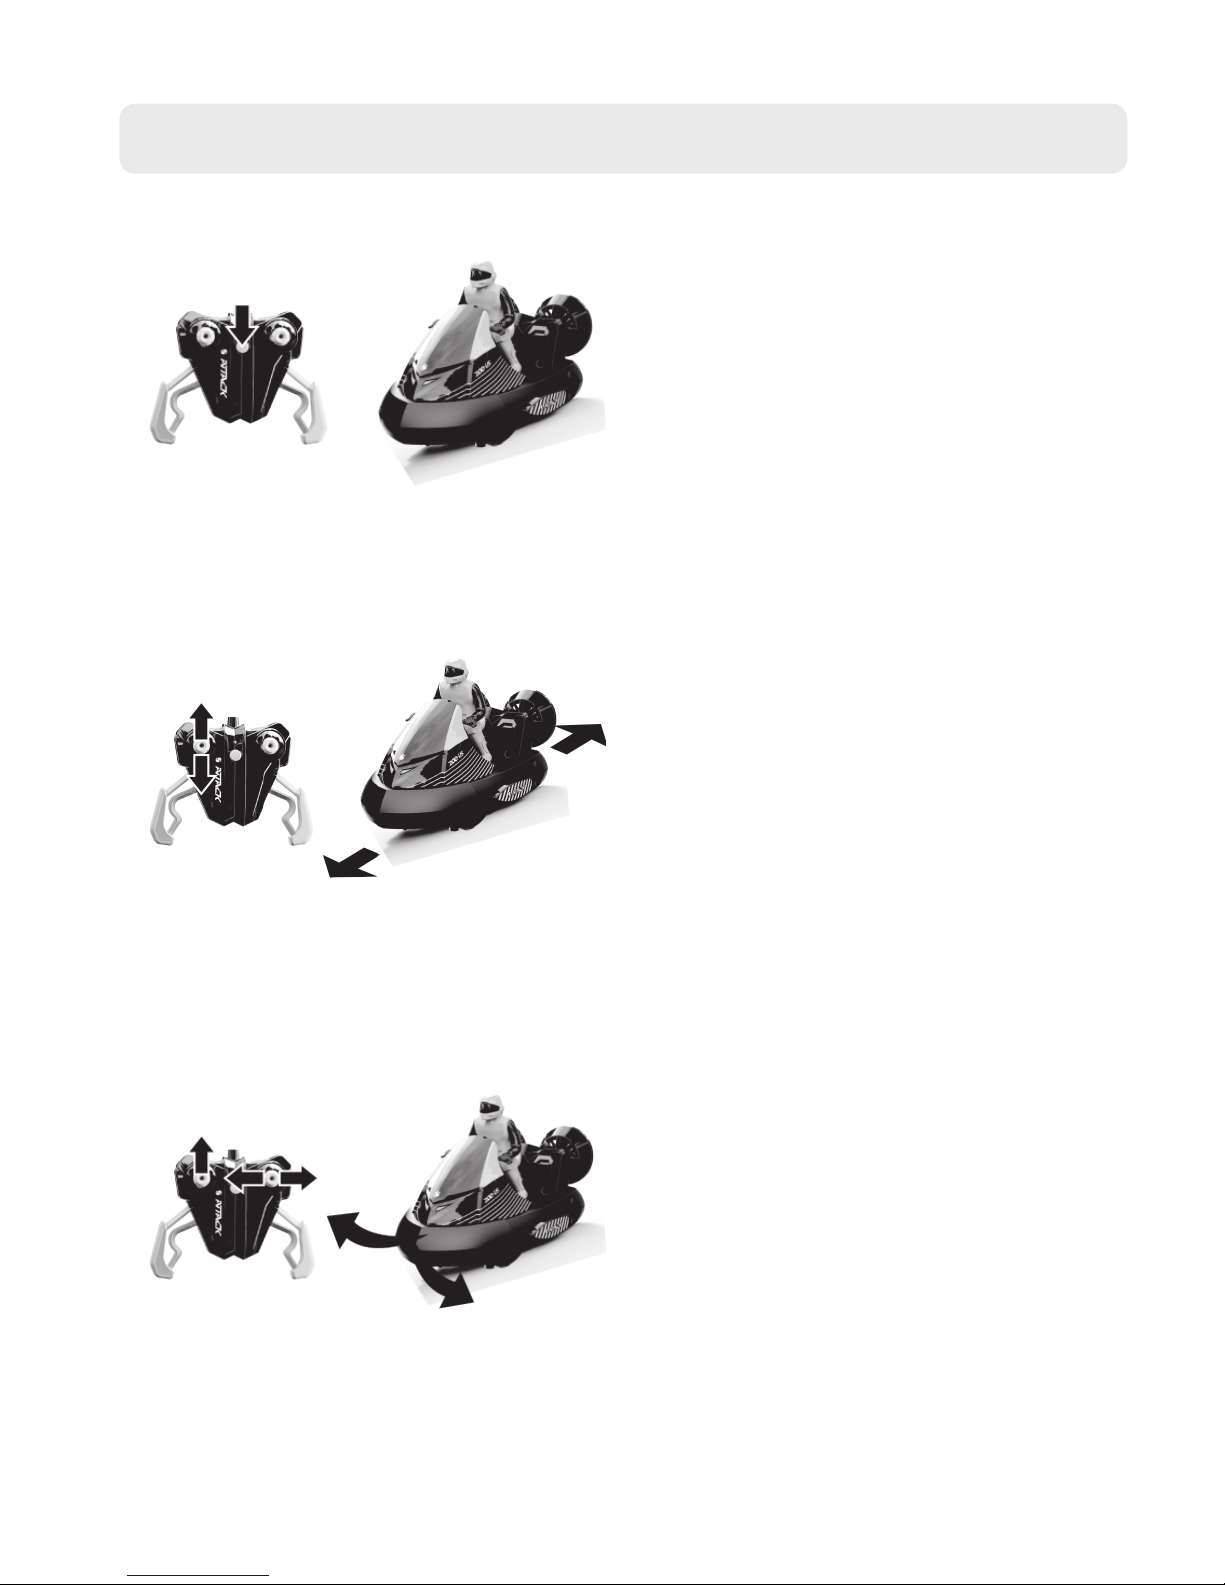
2.1 Controlling the Bumper Cars
● Load the batteries in the controller and
Bumper Cars.
● Switch on the power of the controller
and Bumper Cars.
● Press the Left Stick on the controller
Forward/Backwards.
● The Bumper Car will move Forward/
Backwards.
● Whilst pressing Forward on the
controller, press the right stick Left/
Right.
● The Bumper Car will turn Left/Right in a
forward direction.
5
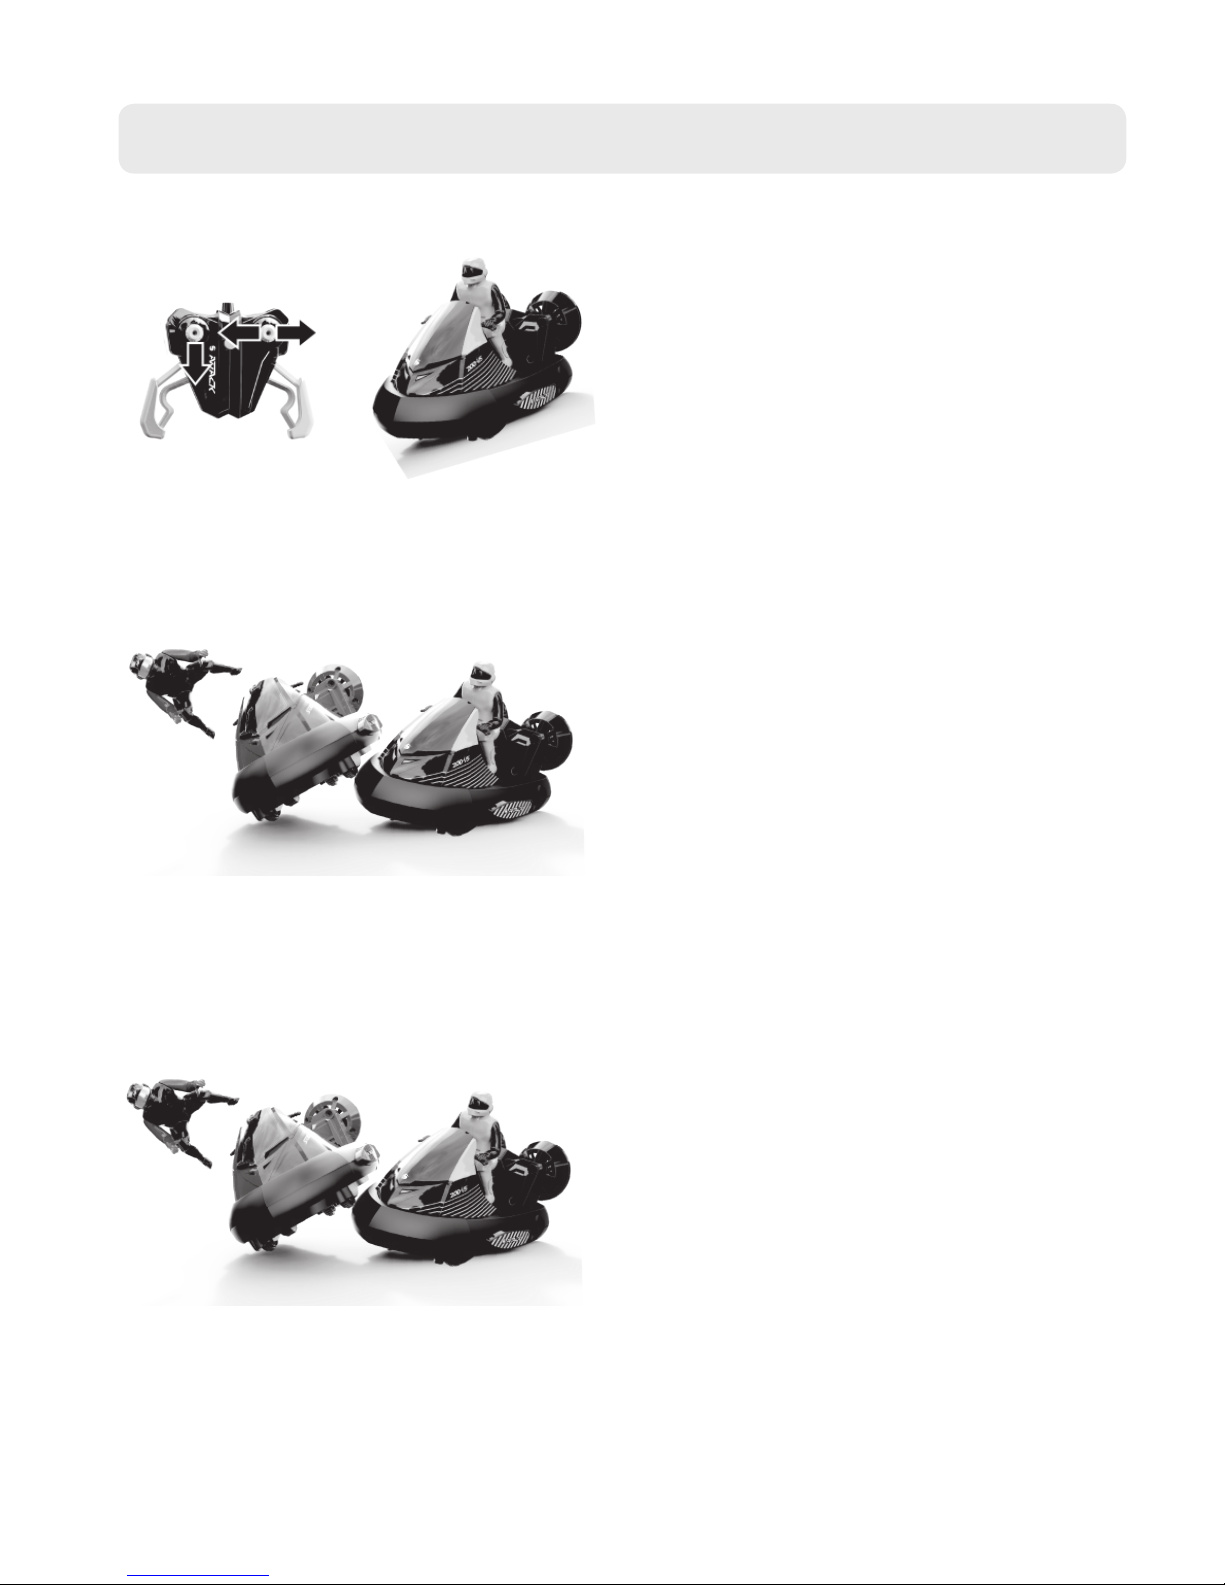
2.2 Controlling the Bumper Cars Continued
● Whilst pressing Backwards on the
controller, press the right stick Left/
Right.
● The Bumper Car will turn Left/Right in a
Backwards direction.
● Hitting the buttons on the side of the
Bumper Cars will cause the driver to be
ejected out of the Bumper Car.
● With 2 Bumper Cars being controlled
the aim is to strike the opposition
bumper Car until the driver is ejected.
● The Bumper Car with the driver still
remaining in the seat is the winner.
6
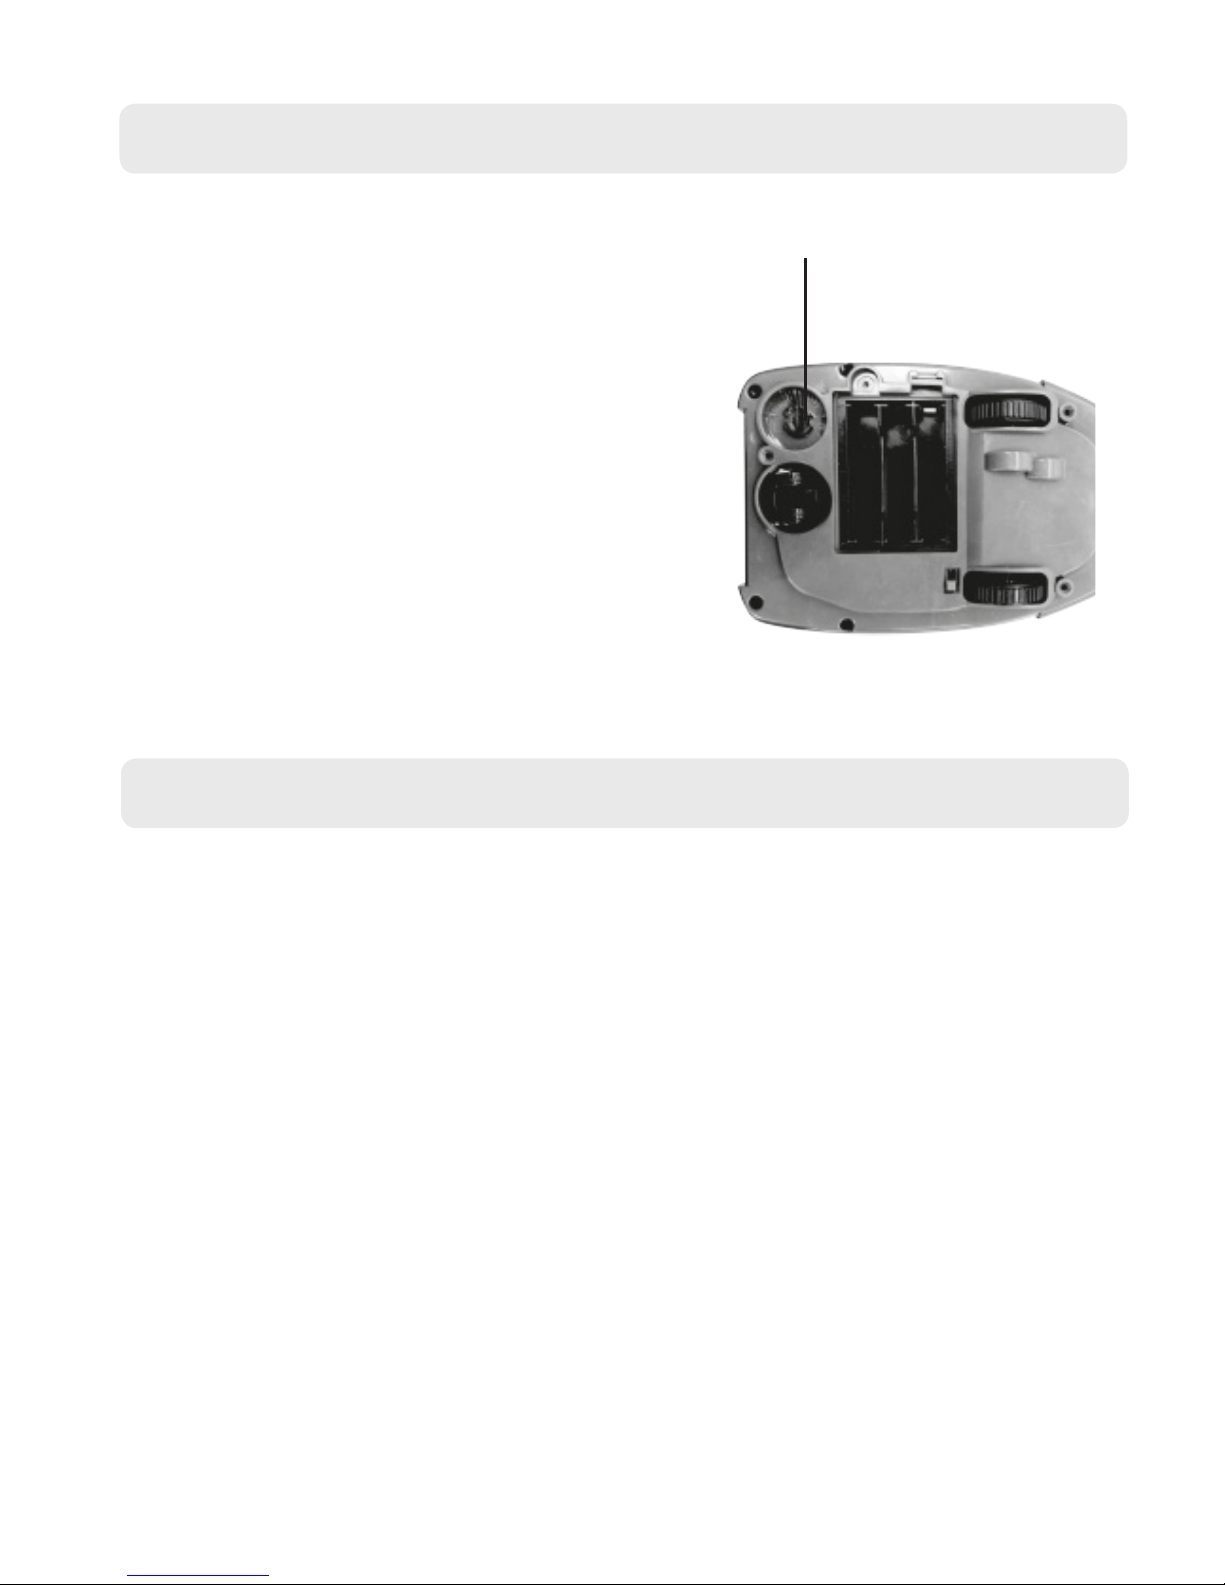
2.3 Adjusting the Directional Movement
● It may be necessary to ne tune the steering via
the steering adjustment control, located on the
underside of the Bumper Cars.
● If while travelling in a straight line you nd that
the Bumper Car strays to the left or right, then
you will need to adjust the steering control to
correct this issue.
● It is best to make several small adjustments
to the steering this allows for an accurate
adjustment of the steering.
● If the Bumper Car strays to the left, then you
will need to move the steering adjustment to
the right (R).
● If the Bumper Car strays to the right, then you
will need to move the steering adjustment to
the left (L).
2.4 Troubleshooting
If you are experiencing problems with your Bumper Cars, here are some quick and easy
checks that you can carry out, which may help to resolve the problem.
No Response from the Bumper Car:
● Please ensure that the Bumper Car is in range of the controller and that there are no
obstructions between the controller and the Bumper Car which could block the signal.
● Make sure that the batteries in the Controller are tted correctly and that they have not
reached the end of their life. If required replace the batteries in the controller.
● Make sure that the batteries in the Bumper Cars are tted correctly. If required replace
the batteries in the Bumper Cars.
● Please ensure that the power switch on the Bumper Car and Controller is switched to
‘ON’.
The Bumper Car does not travel straight:
● Please adjust the steering using the steering adjustment control located on the
underside of the Bumper Car.
The Bumper Car Starts to Run Slow:
● The batteries in the Bumper Car are running low, please insert new batteries.
Steering Adjustment
Control

3. WARRANTY
3.1 Warranty Information
Think Gizmos, Unit 19, Lawson Hunt Industrial Park,
Broadbridge Heath, West Sussex, RH12 3JR
Tel.: +44/(0)203 384 8304
help@thinkgizmos.com ● www.thinkgizmos.com
What is Covered:
This warranty covers any defects in materials or workmanship, with the exceptions stated
below.
How Long Coverage Lasts:
This warranty runs for 1 Year from the date your Bump ‘n’ Eject Bumper Car is delivered.
What is not covered:
Any problem that is caused by abuse, misuse, or an act of God (such as a ood) are not
covered.
What We Will Do:
If the Product proves defective during the warranty period, we will provide you with the
instructions for the return, and we will take one of the following actions: (i) replace the
Product with a product that is the same or equivalent to the Product you purchased; (ii)
repair the Product; or (iii) refund to you the whole of or part of the purchase price of the
Product.
How To Get Service:
To obtain instructions on how to obtain service under this warranty, contact our customer
service by phone or email. You will nd the contact details of our customer service below.
Customer service may ask you questions to determine your eligibility under this warranty,
and if you are eligible you’ll be given instructions for returning the defective Product. If
we send you a replacement or repair your Product, we will pay the cost of delivering the
replacement or repaired Product to you.
Do not return the item to the original place of purchase, please contact Think
Gizmos direct.
7
TG637 BUMP ‘N’ EJECT BUMPER CAR
HERZLICHEN GLÜCKWUNSCH! SIE BESITZEN NUN DEN BUMP ‘N’ EJECT BUMPER CARS.
AB 6 JAHREN
BITTE LESEN UND BEFOLGEN SIE FÜR DEN GRÖSSTEN SPASSFAKTOR IMMER DIESE ANLEITUNG.
BEDIENUNGSANLEITUNG
English p 1
Deutsch p 8
Francais p 15
Italiano p 22
Español p 29
Dieses Spielzeug enthält Kleinteile , die eine Er-
stickungsgefahr sein könnte. Kleine Kinder unter
6 Jahren sollten engmaschig überwacht werden,
während sie mit diesem Spielzeug spielen.

DEUTSCHE BEDIENUNGSANLEITUNG - INHALTSVERZEICHNIS
1.
2.
3.
2.1 Die Autoscooter steuern ................................................................................... 11
2.2 Die Autoscooter steuern - fortgesetzt ..............................................................12
2.3 Die Lenkung einstellen ..................................................................................... 13
2.4 Fehlerbehebung .................................................................................................13
1.1 Batterien in die Autoscooter einlegen ........................................................... 10
1.2 Batterien in die Fernsteuerung einlegen ....................................................... 10
BETRIEBSANLEITUNG
WICHTIGE INFORMATIONEN
9
3.1 Garantieinformationen .....................................................................................14
GARANTIE
1. WICHTIGE INFORMATIONEN
10
1.1 Batterien in die Autoscooter einlegen
● Drehen Sie die Autoscooter um, sodass Sie Zugang zum Boden des Fahrzeugs erhalten.
● Stellen Sie sicher, dass sich der Netzschalter in der Position „OFF” bendet und
schrauben Sie die Schraube vom Batteriefach ab und entfernen Sie dieses.
● Legen Sie 3 AA Batterien (enthalten) in das Batteriefach ein und achten Sie dabei auf die
korrekte Polarität.
● Schrauben Sie das Batteriefach wieder an.
(Achtung - Entfernen Sie die Batterien, wenn der Autoscooter für längere Zeit nicht
verwendet wird.)
1.2 Batterien in die Fernsteuerung einlegen
● Das Batteriefach bendet sich auf der Unterseite
der Fernsteuerung.
● Schrauben Sie die Schraube vom Batteriefach ab
und entfernen Sie dieses.
● Legen Sie 2 AA-Batterien (enthalten) in das
Batteriefach ein und achten Sie dabei auf die
korrekte Polarität.
● Schrauben Sie das Batteriefach wieder an.
ACHTUNG
Verwenden Sie keine alten und neuen Batterien
zusammen.
Halten Sie die Batterien von kleinen Kindern fern.
Schließen Sie Batterien nicht kurz oder entsorgen
Sie sie in einem Feuer.
Entfernen Sie die Batterien, wenn der Autoscooter
für längere Zeit nicht verwendet wird.

2. BETRIEBSANLEITUNG
11
2.1 Die Autoscooter steuern
● Legen Sie die Batterien in die
Fernsteuerung und die Autoscooter ein.
● Schalten Sie die Fernsteuerung und die
Autoscooter ein.
● Drücken Sie den linken Controller der
Fernsteuerung nach vorne/hinten.
● Der Autoscooter fährt vorwärts/
rückwärts.
● Drücken Sie den rechten Controller
nach links/rechts, während Sie auf der
Fernsteuerung vorwärts drücken.
● Der Autoscooter fährt links/rechts
vorwärts.
 Loading...