

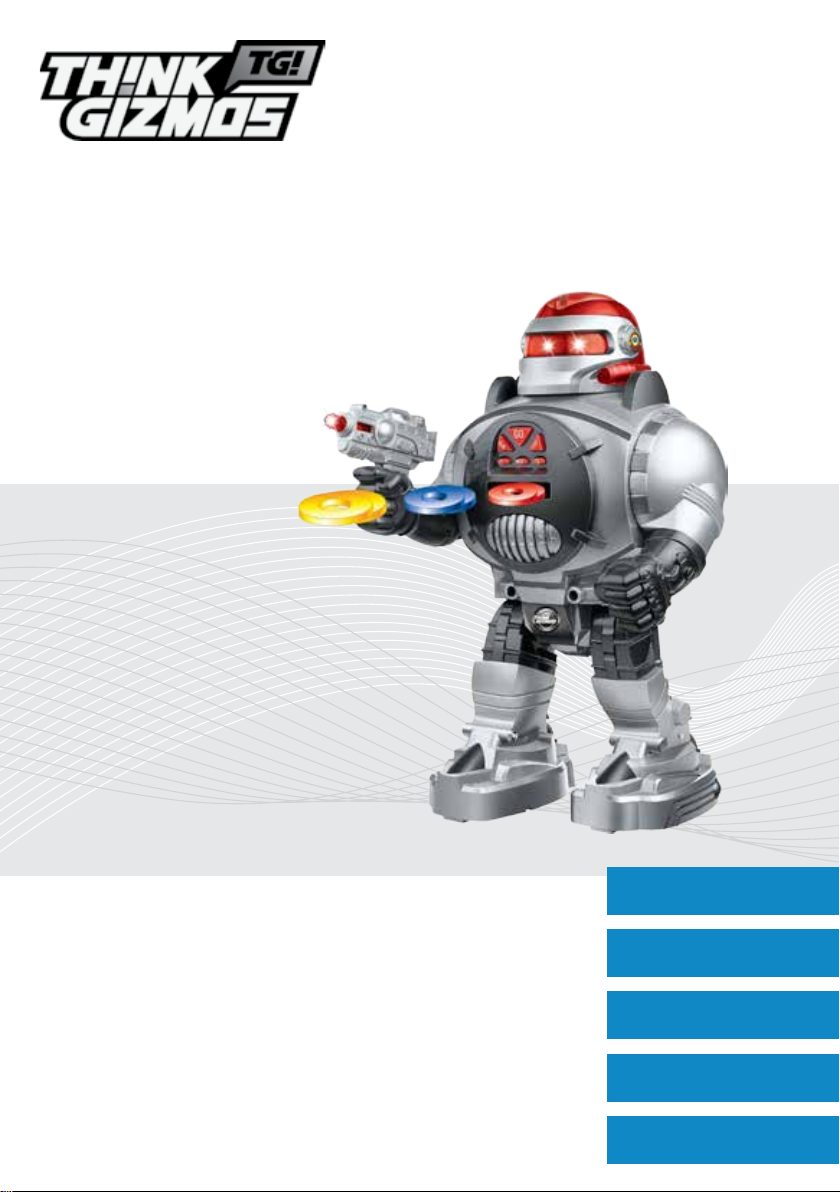
TG542 ROBO SHOOTER
User Manual
This toy contains small parts that could be a
choking hazard. Small Children under 6 years
old should be closely supervised while playing
with this toy.
CONGRATULATIONS!! YOU ARE NOW THE MASTER OF THIS AWESOME ROBO SHOOTER ROBOT
PLEASE READ AND FOLLOW THESE INSTRUUCTIONS AT ALL TIME FOR OPTIMUM ENJOYMENT.
English p 1
Deutsch p 7
Francais p 13
Italiano p 19
Español p 25

ENGLISH MANUAL - CONTENTS
1.
2.
3.
4.
IMPORTANT INFORMATION
1.1 Robot Battery Installation .................................................................................. 3
1.2 Remote Battery Installation ............................................................................... 3
1.3 Warning ................................................................................................................ 3
INSTRUCTIONS PART 1
2.1 Operating Instructions ....................................................................................... 4
2.2 Robot Features .................................................................................................... 4
INSTRUCTIONS PART 2
3.1 Robot Features Continued ................................................................................. 5
3.2 Disc Firing ............................................................................................................. 5
WARRANTY
4.1 Warranty Information ......................................................................................... 6
2
1. IMPORTANT INFORMATION
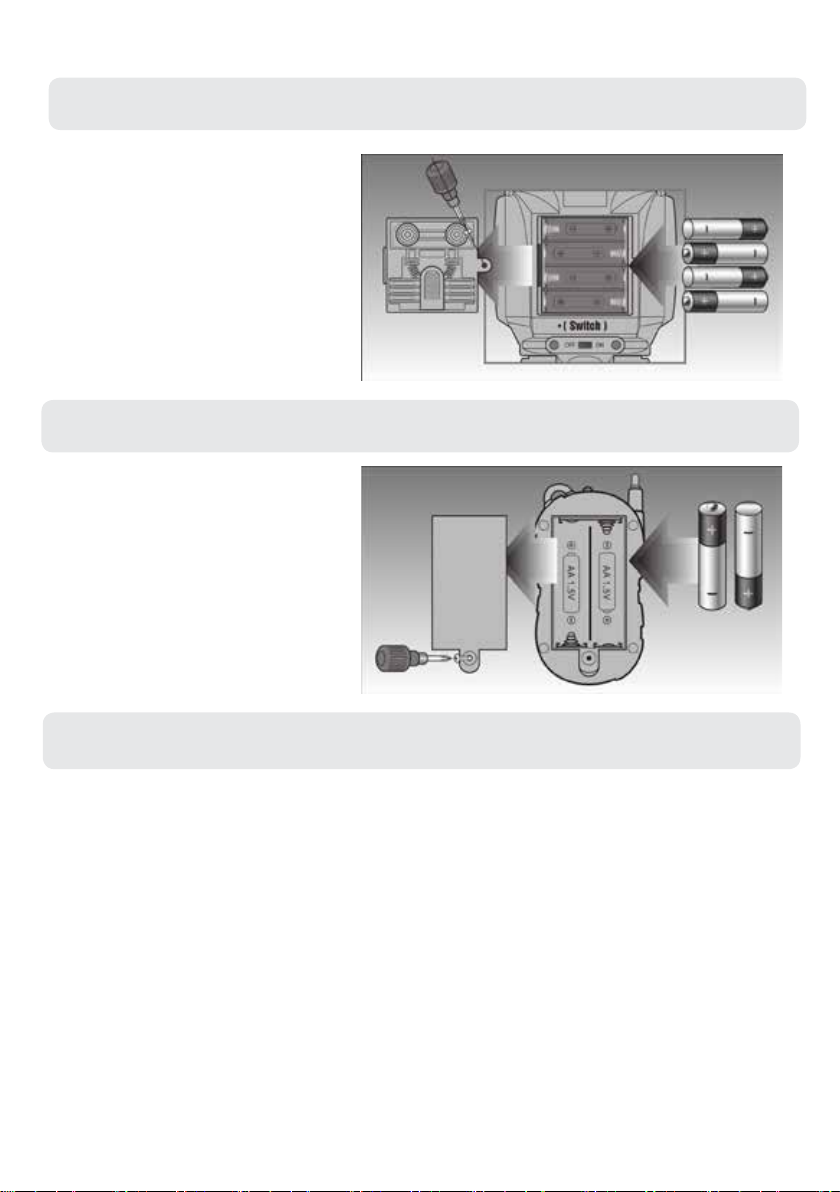
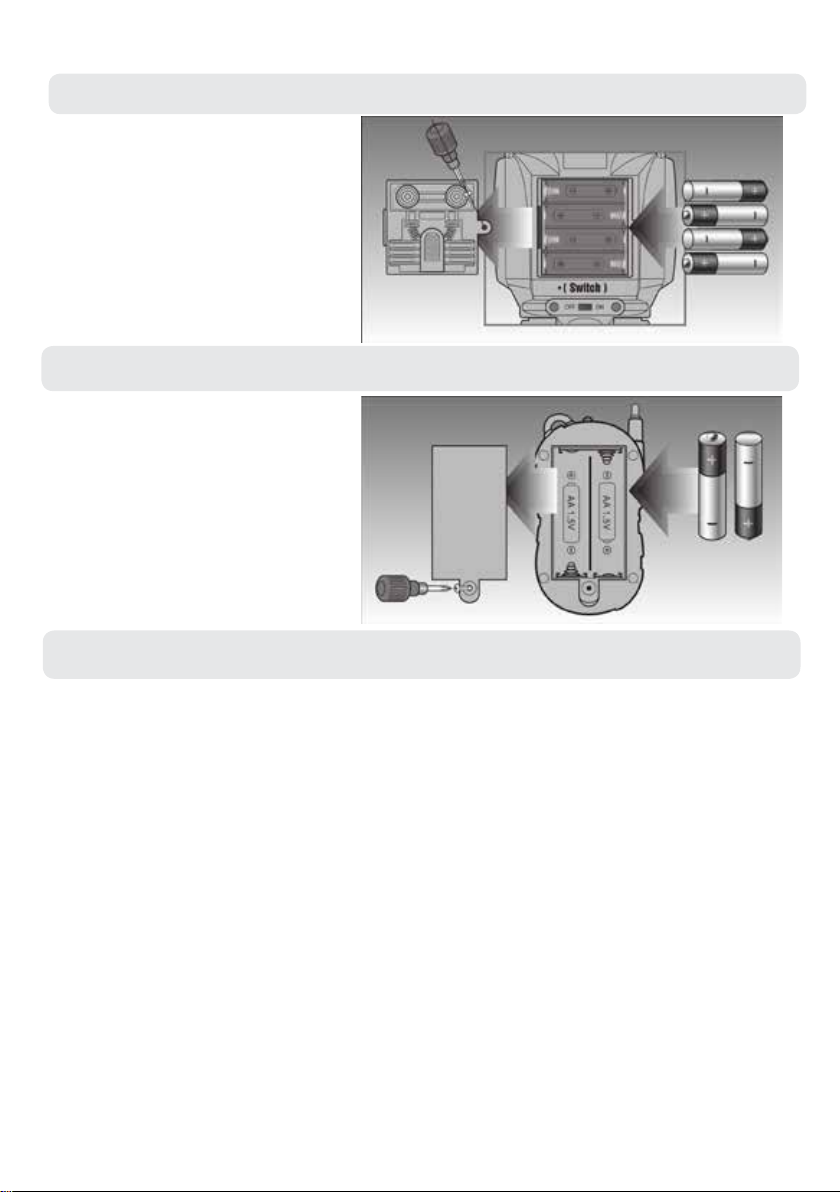
1.1 Robot Battery Installation
The robot takes four AA 1.5v Batteries.
(not included).
a) Using a screwdriver loosen the
screw on the battery compartment.
b) Insert four AA 1.5v batteries making
sure you follow the designated + signs.
c) Close the battery compartment.
1.2 Remote Battery Installation
The remote control takes two AA 1.5v
batteries. (not included).
a) Using a screwdriver loosen the
screw on the battery compartment.
b) Insert two AA 1.5v batteries making
sure you follow the designated + signs.
c) Close the battery compartment.
1.3 Warning
1. Please do not try and recharge batteries always replace them.
2. Incorrect use of batteries may cause damage, so please pay attention to the following:
● Do not install batteries with opposite polarity.
● When not in use, please switch to ‘OFF’ position and if the robot is not going to be used
for a long time, please remove the batteries to avoid corrosion.
● Do not mix old and new batteries.
● Please replace exhausted batteries as soon as possible.
● Keep batteries away from children.
● Do not place batteries near res or expose them to strong sunlight or damp conditions.
● Please dispose of batteries carefully.
3. Don’t aim the discs at people or animals.
4. Careful with small parts, do not eat.
5. Do not place near re, high temperature or damp conditions.
3
2. INSTRUCTIONS PART 1
2.1 Operating Instructions
● Switch the main switch on the Robot to ‘ON’, and press the ‘GO’ button on the Robots
chest. The robot will respond by saying “Greetings Master! I am yours to command”, and
his eyes will ash conrming he is awaiting your orders.
● Use the remote control or the program buttons on the Robots chest to control the robot.
● If you don’t issue orders to him for a period of time he will say “Mission Accomplished”
and go into sleep mode.
● To get him out of sleep mode you should press ‘GO’ on his chest again.
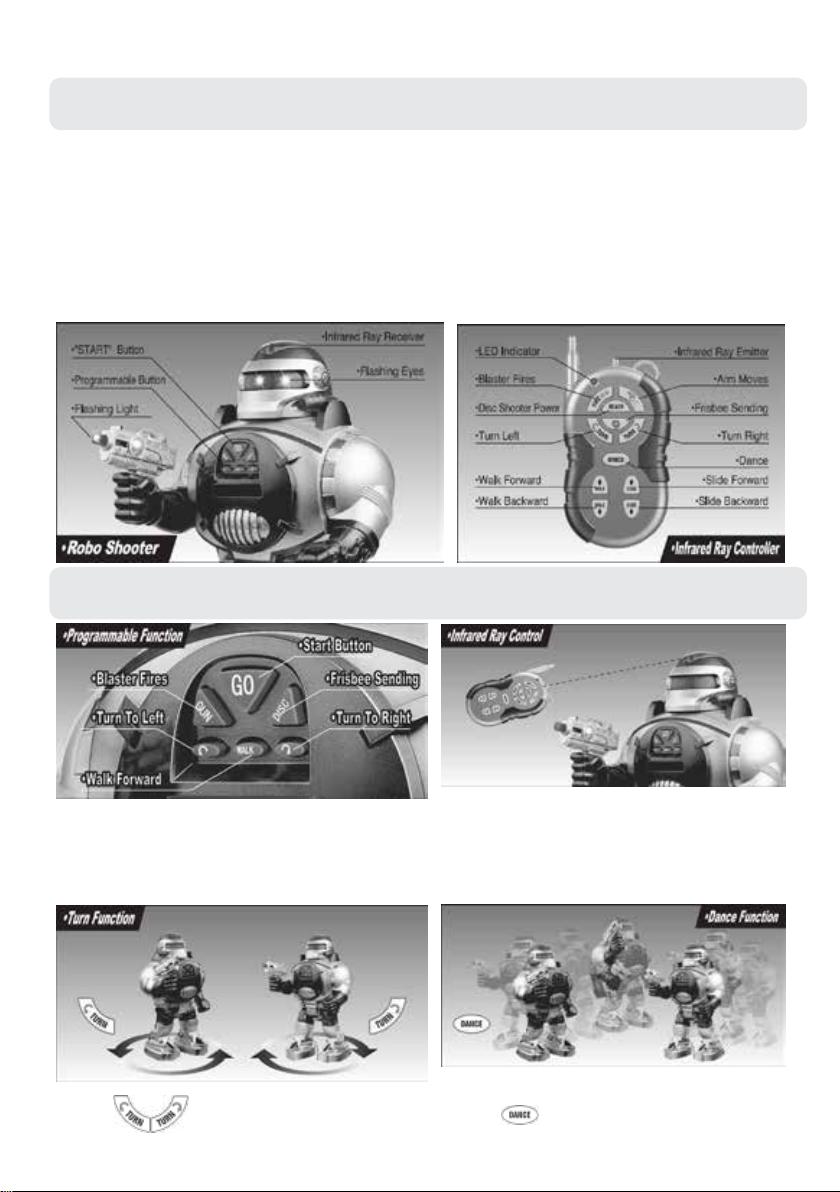
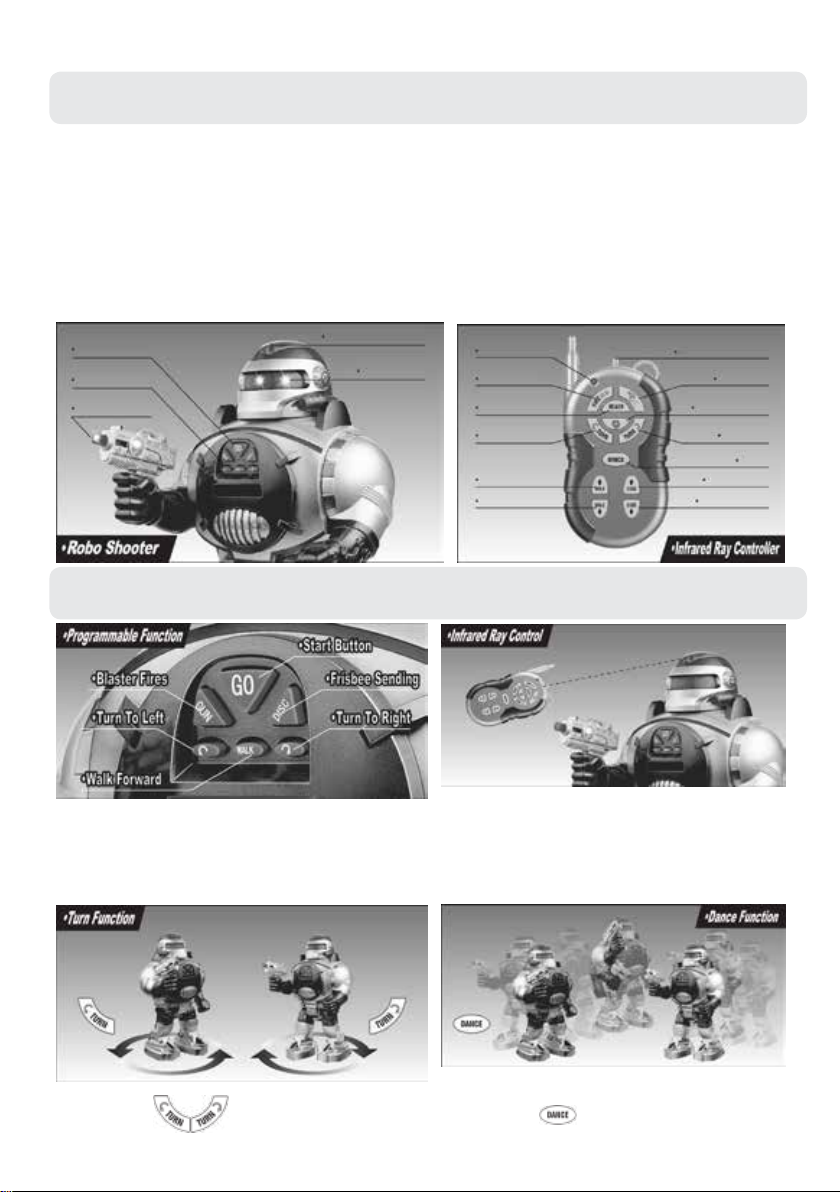
2.2 Robot Features
Programmable Function:
After being turned ‘ON’, press the ‘GO’ button and the light
on the gun will ash. Then press the buttons according to the
actions you want him to do. Press the ‘GO’ button again and he
will follow the actions.
Turn Function:
Press the buttons on the controller, the robot will
turn to the left and to the right correspondingly.
4
Infrared Control:
For maximum performance, always aim the remote
control at the receiver on the robot’s head.
Dance Function:
Press the button on the controller, and the robot
will do a cool dancel.
3. INSTRUCTIONS PART 2
3.1 Robot Features Continued
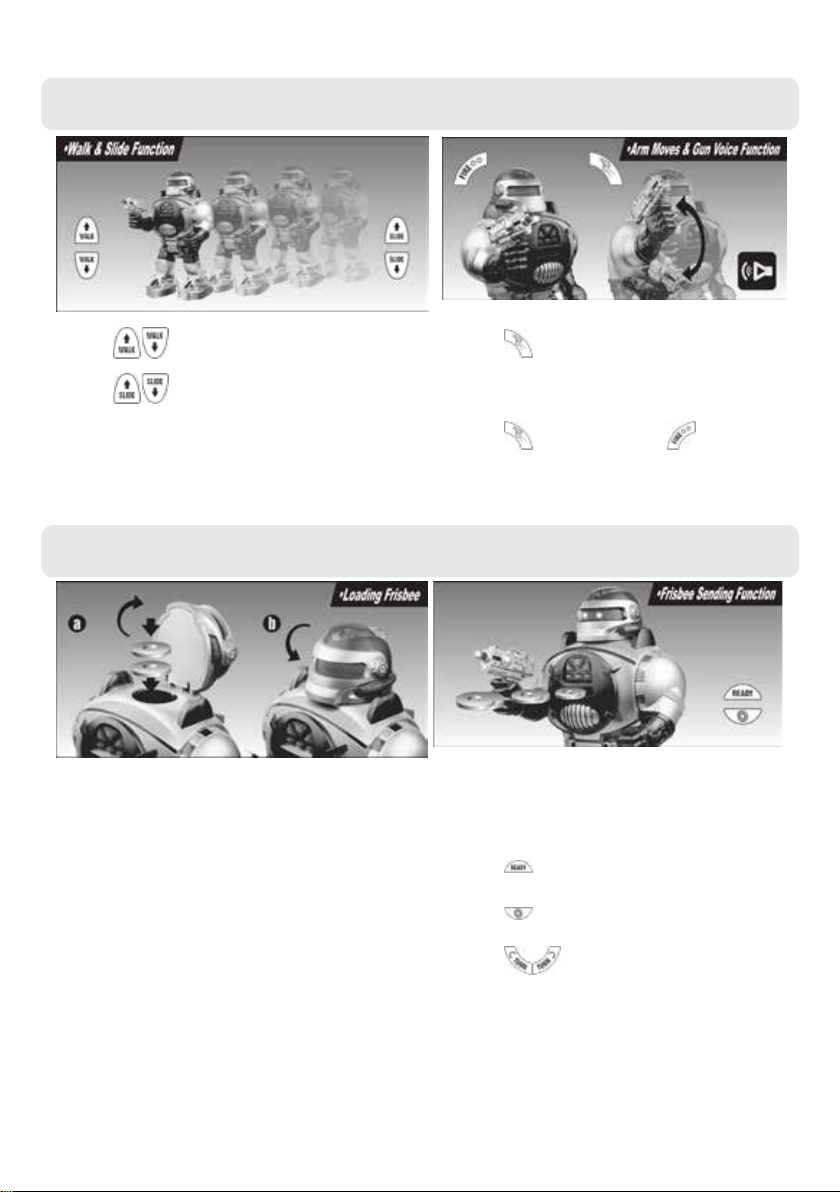
Walk & Slide Function:
Press the buttons on the controller, the robot will
walk forwand backwards correspondingly.
Press the buttons on the controller, the robot will
slide forward and backward correspondingly.
3.2 Disc Firing
Loading Discs:
As illustrated, pull the head up from the front, and then insert
the discs into the hole.
Please do not use any other objects other than the supplied
discs, if the discs do not re as expected, take out all discs and
reload them
Arm & Gun Voice Function::
Press the button on the controller, the robot will
lift the gun and say “Freeze! Identify yourself. Or I will
shoot”. Press it again and the robot will shoot and say
“Surrender now” You are under arrest”.
Press the button and then the button to hear
dierent commands and to make the gun light up.
Firing Discs:
1. Install the discs.
2. Press the ‘GO’ Button to make sure the robot is
powered on.
3. Press the button on the remote, the robot will say
“Laser On” and the motor will start.
4. Press the button to re the discs. You can hold
the button for continuous re.
5. Press the buttons to change the direction the
discs are being red.
5

4. WARRANTY
4.1 Warranty Information
What is Covered:
This warranty covers any defects in materials or workmanship, with the exceptions stated
below.
How Long Coverage Lasts:
This warranty runs for 1 Year from the date your RC RoboShooter is delivered.
What is not covered:
Any problem that is caused by abuse, misuse, or an act of God (such as a ood) are not
covered.
What We Will Do:
If the Product proves defective during the warranty period, we will provide you with the
instructions for the return, and we will take one of the following actions: (i) replace the
Product with a product that is the same or equivalent to the Product you purchased; (ii)
repair the Product; or (iii) refund to you the whole of or part of the purchase price of the
Product.
How To Get Service:
To obtain instructions on how to obtain service under this warranty, contact our customer
service by phone or email. You will nd the contact details of our customer service below.
Customer service may ask you questions to determine your eligibility under this warranty,
and if you are eligible you’ll be given instructions for returning the defective Product. If
we send you a replacement or repair your Product, we will pay the cost of delivering the
replacement or repaired Product to you.
Do not return the item to the original place of purchase, please contact Think
Gizmos direct.
Think Gizmos, Unit 19, Lawson Hunt Industrial Park,
Broadbridge Heath, West Sussex, RH12 3JR
Tel.: +44/(0)203 384 8304
help@thinkgizmos.com ● www.thinkgizmos.com
6
TG542 ROBO SHOOTER
BEDIENUNGSANLEITUNG
Dieses Spielzeug enthält Kleinteile , die eine Er-
stickungsgefahr sein könnte. Kleine Kinder unter
6 Jahren sollten engmaschig überwacht werden,
während sie mit diesem Spielzeug spielen.
HERZLICHEN GLÜCKWUNSCH! SIE BESITZEN NUN DEN ROBO SHOOTER.
BITTE LESEN UND BEFOLGEN SIE FÜR DEN GRÖSSTEN SPASSFAKTOR IMMER DIESE ANLEITUNG.
English p 1
Deutsch p 7
Francais p 13
Italiano p 19
Español p 25

DEUTSCHE BEDIENUNGSANLEITUNG - INHALTSVERZEICHNIS
1.
2.
3.
4.
WICHTIGE INFORMATIONEN
1.1 Batterien in den Roboter einlegen ...................................................................9
1.2 Batterien in die Fernsteuerung einlegen .........................................................9
1.3 Achtung ................................................................................................................9
ANLEITUNG TEIL 1
2.1 Gebrauchsanweisung ........................................................................................10
2.2 Robot Funktionen ..............................................................................................10
ANLEITUNG TEIL 2
3.1 Robot Funktionen Fortsetzung ........................................................................ 11
3.2 Frisbee feuern Funktion ................................................................................... 11
GARANTIE
4.1 Garantieinformationen .................................................................................... 12
8
1. WICHTIGE INFORMATIONEN
1.1 Batterien in den Roboter einlegen
Der Roboter benötigt vier AA 1,5V
Batterien (nicht enthalten).
a) Entfernen Sie die Schrauben
des Batteriefachs mit einem
Schraubenzieher.
b) Legen Sie vier AA 1,5V Batterien ein.
Achten Sie dabei auf die Polarität (+, -).
c) Schließen Sie das Batteriefach.
1.2 Batterien in die Fernsteuerung einlegen
Die Fernsteuerung benötigt zwei AA
1,5V Batterien (nicht enthalten).
a) Entfernen Sie die Schrauben
des Batteriefachs mit einem
Schraubenzieher.
b) Legen Sie zwei AA 1,5V Batterien
ein. Achten Sie dabei auf die Polarität
(+, -).
c) Schließen Sie das Batteriefach.
1.3 Achtung
1. Bitte ersetzen Sie die Batterien im Bedarfsfall und versuchen Sie nicht, sie wieder aufzuladen.
2. Die unsachgemäße Verwendung von Batterie kann zu Beschädigungen führen. Beachten Sie
daher Folgendes:
● Legen Sie die Batterien mit der richtigen Polarität ein.
● Schalten Sie den Roboter aus, wenn Sie ihn nicht verwenden. Sollten Sie ihn länger nicht
verwenden, entnehmen Sie bitte die Batterien.
● Verwenden Sie keine alten und neuen Batterien zusammen.
● Ersetzen Sie leere Batterien umgehend.
● Halten Sie die Batterien von kleinen Kindern fern.
● Bewahren Sie die Batterien nicht in der Nähe eines oenen Feuers auf, und setzten Sie sie nicht
direktem Sonnenlicht oder Feuchtigkeit aus.
● Entsorgen Sie die Batterien ordnungsgemä..
3. Bitten verwenden Sie den Roboter nicht bei starkem Sonnenlicht. Schießen Sie mit den Frisbees
nicht auf Menschen.
4. Schlucken Sie keine Kleinteile.
5. Bewahren Sie den Roboter nicht in der Nähe eines oenen Feuers auf, und setzten Sie ihn nicht
direktem Sonnenlicht oder Feuchtigkeit aus.
6. Zielen Sie niemals auf Menschen oder Tiere, wenn Sie feuern.
9
2. ANLEITUNG TELL 1
2.1 Gebrauchsanweisung
● Schalten Sie den Ein/Ausschalter des Roboters auf “ON” und drucken Sie den “GO”-Knopf
auf der Brust des Roboters. Der Roboter antwortet: “Greetings Master! I am yours to
command”, und seine Augen blinken, um zu bestätigen, dass er auf lhre Befehle wartet.
● Verwenden Sie die Fernsteuerung oder die ProgrammKnöpfe auf der Brust des Roboters.
● Wenn Sie dem Roboter längere Zeit keine Befehle erteilen, sagt er “Mission Accomplished”
und geht in den Ruhemodus über.
● Um ihn a us dem Ruhemodus zu holen, drücken Sie wieder auf den “GO”-Brust auf seiner
Brust.
START- Knopf
Programmierknopf
Blitzlicht
2.2 Robot Funktionen
Infarot Empfänger
Blinkende Augen
LED Licht
Feuerblaster
Scheiben
Schussstärke
Links drehen
Vorwärts gehen
Rückwärts gehen
Infarot Sender
Armbewegungen
Frisbees feuern
Rechts
drehen
Vorwärts gleiten
Rückwärds gleiten
Tanzen
Programm wiihlen:
Drücken Sie den “GO”-Knopf, nachdem Sie durch bet atigen
des “ON”-Knopfs den Roboter eingeschalten haben. Das Licht
auf der Pistole blinkt. Drücken Sie dann einfach auf die Taste
der Aktion , die Sie den Roboter durchfUhren lassen wollen.
Drucken Sie erneut auf”GO”, und der Roboter wird die Aktion
ausihren.
Dreh-Funktion:
Drücken Sie den Knopf, und der Roboter dreht sich
in die entsprechende Richtung.
10
lnfrarot Fernsteuerung:
Für optimale Leistung richten Sie die Fernsteuerung auf
den Empfanger auf dem Kopf des Roboters.
Tanz Funktion:
Drücken Sie den Knopfund der Roboter fuhrt einen
cool en Tanz auf!

3. ANLEITUNG TELL 2
3.1 Robot Funktionen Fortsetzung
Geh - und Gleitfunktion:
Drücken Sie den Knopf, und der Rebater geht in die
entsprechende Richtung.
Drücken Sle den Knopf, und der Rebater gleitet In die
entsprechende Richtung.
3.2 Frisbee feuern Funktion
Frisbees laden:
Kippen Sie den Kopf des Roboters, wie eben abgebildet, von
verne nach hinten und laden Sie die Frisbeescheiben in den
Rebater. Verwenden Sie bitte keine anderen Gegenstande als
die mitgelieferten Scheiben.
Sollten die Scheiben nicht ordnungsgemäß abgefeuert
werden, nehmen Sie sie heraus und wiederholen Sie den
Ladevorgang.
Armbewegungen & Pistolen-Sprachfunktion:::
Heben Sie die Pistole durch betätigen des -Knopf an.
Er hebt die Wae an und sagt “Freeze! Identify yourself.
Or I will shoot”. Drucken Sle die Taste erneut und er
schleBt in die Luft und sagt: “Surrender now’ You are
under arrest”.
Drucken Sie den -Knopf, dann den -Knopf, um
verschiedene Sounds zu erzeugen und die Pistole blitzt
auf.
Frisbee feuern Funktlon:
1. Laden Sie Frisbees korrekt.
2. Drücken Sie den “GO”-Knopf auf der Brust des
Roboters.
3. Sie mussen den Knopf drucken. Der Rebater sagt
“Laser on”.
4. Drücken Sie den Knopf, um die Frisbees
abzufeuern.
5. Sie können die Knöpfe betatigen, um den
Winkel und den Zeltintervall, In den die Frisbees gefeuert
werden, zu ändern.
11

4. GARANTIE
4.1 Garantieinformationen
Was ist abgedeckt:
Die Garantie deckt alle Defekte von Materialien und der Verarbeitung, mit Ausnahme der
unten angeführten Fälle.
Wie lange die Garantie gilt:
Die Garantie gilt für ein Jahr ab dem Lieferdatum Ihrer Robo Shooter.
Was nicht abgedeckt ist:
Jedes Problem das durch Missbrauch oder höhere Gewalt (wie Überschwemmung) entsteht
ist nicht gedeckt.
Was wir tun werden:
Sollte das Produkt innerhalb der Laufzeit der Garantie als defekt befunden werden,
erhalten Sie Anweisungen für die Rückgabe und wir werden eine der folgenden Handlungen
vornehmen: (i) wir tauschen das Produkt gegen ein gleiches oder gleichwertiges Produkt
um, (ii) wird reparieren das Produkt, oder (iii) wir erstatten Ihnen den vollen oder einen
Teilbetrag des Kaufpreises des Produkts zurück.
Wie man Service in Anspruch nehmen kann:
Kontaktieren Sie unseren Kundendienst per Telefon oder E-Mail, um Anweisungen zu
erhalten wie Sie eine Serviceleistung unter diesen Garantiebestimmungen erhalten. Sie
nden die Kontaktdaten unseres Kundendienstes weiter unten. Unser Kundendienst kann
Ihnen Fragen stellen, um festzustellen, ob es sich um einen Garantiefall handelt. Sollte dies
der Fall sein, erhalten Sie Anweisungen zur Rücksendung des defekten Produkts. Sollten wir
Ihnen einen Ersatz schicken oder das Produkt reparieren, übernehmen wir die Lieferkosten.
Schicken Sie den Artikel nicht an den Händler zurück bei dem Sie ihn erworben
haben, sondern kontaktieren Sie bitte Think Gizmos direkt.
Think Gizmos, Unit 19, Lawson Hunt Industrial Park,
Broadbridge Heath, West Sussex, RH12 3JR
Tel.: +44/(0)203 384 8304
help@thinkgizmos.com ● www.thinkgizmos.com
12

TG542 ROBO SHOOTER
Manuel de l’utilisateur
Ce jouet contient de petites pièces qui pour-
raient être un risque d’étouement. Les petits
moins de 6 ans Les enfants doivent être sur-
veillés de près tout en jouant avec ce jouet.
FELICITATIONS ! VOUS ETES MAINTENANT LE PRIOPRIETAIRE DE BUMP ‘N’ EJECT BUMPER
CARS.
VEUILLEZ LIRE ET SUIVRE CES INSTRUCTIONS POUR UN PLAISIR OPTIMAL.
English p 1
Deutsch p 7
Francais p 13
Italiano p 19
Español p 25

MANUEL FRANCAIS - SOMMAIRE
1.
2.
3.
4.
INFORMATIONS IMPORTANTES
1.1 Installation des piles du robot ..........................................................................15
1.2 Installation des piles de la télécommande .....................................................15
1.3 Avertissement .....................................................................................................15
INSTRUCTIONS PARTIE 1
2.1 Mode D’Emploi .................................................................................................. 16
2.2 Fonctions du robot ........................................................................................... 16
INSTRUCTIONS PARTIE 2
3.1 Fonctions du robot - Suites .............................................................................. 17
3.2 Lancement de disque ....................................................................................... 17
GARANTIE
4.1 Informations sur la garantie ............................................................................ 18
14

1. INFORMATION IMPORTANTE
1.1 Installation des piles du Robot
Le robot nécessite quatre piles AA
1.5v. (non-inclus).
a) A l’aide d’un tournevis, desserrez la
vis du compartiment à piles.
b) Insérez quatre piles AA de 1,5 V en
vous assurant de suivre les signes + -.
c) Fermez le compartiment à piles.
1.2 Installation des piles de la télécommande
La técommande nécessite 2 piles AA
1.5v. (non-inclus).
a) A l’aide d’un tournevis, desserrez la
vis du compartiment à piles.
b) Insérez deux piles AA de 1,5 V en
vous assurant de suivre les signes + -.
c) Fermez le compartiment à piles.
1.3 Avertissement
1. Veuillez ne pas essayer de recharger les batteries mais remplacez les toujours.
2. Une utilisation incorrecte des piles peut causer des dommages, donc merci de prêter
attention à ce qui suit:
● Ne pas installer les batteries avec polarité opposée.
● En cas de non utilisation, merci de le mettre sur la position ‘OFF’ et si le robot ne va
pas être utilisé pendant une longue période, merci de retirer les piles an d’éviter la
corrosion.
● Ne mélangez pas des piles neuves avec des piles anciennes.
● Merci de remplacer les piles usagées dès que possible.
● Gardez les piles hors de la portée des enfants.
● Ne placez pas les piles près de feux, ne les exposer pas aux rayons solaires ou dans des
conditions humides.
● Merci de jeter les piles avec précaution.
3. Ne pas viser des personnes ou des animaux avec les disques.
4. Attention aux petites pièces, ne pas ingérer.
5. Ne placez pas près d’un feu, et ne les exposées pas à des conditions extrêmes de chaleur
ou d’humidité.
15

2. INSTRUCTIONS PARTIE 1
2.1 Mode D’Emploi
● Mettez l’interrupteur principal du Robot sur ‘ON’, puis appuyez sur le bouton ‘GO’ se
situant sur Ia poitrine du robot. Le robot vous répondra en disant “Greetins Master! I
am yours to command”, et ses yeux clignoteront conrmant qu’il est en attente de vos
ordres.
● Utilisez Ia télécommande ou les touches de programme se situant sur Ia poitrine du
robot pour contr61er le robot..
● Si vous ne lui donnez pas d’ordre pendant un moment, il dira “Mission Accomplished” et
se mettra en mode veille.
● Pour le fa ire sortir du mode veille, vous devrez appuyer sur le bouton ‘GO’ se situant sur
sa poitrine.
2.2 Fonctions du robot
Fonctlon programmable:
Après avoir mis Ia position ‘ON’, appuyez sur le bouton ‘GO’
et Ia iumière du pisloiet s’allumera. Ensuite, appuyez sur les
boutons seion ies actions que vous vouiez qu’il fasse. Appuyez
une nouvelle fois sur Je bouton ‘GO’ et ii exécutera Jes actions.
Fonction tourne:
Appuyez sur Jes boutons du contrôleur, Le robot
tournera sur sa gauche puis sur sa droite.
16
Contrôle lnfrarouge:
Pour une performance maximale, visez toujours Ia
télécommande en direction du récepteur situé sur Ia tête.
Fonction Danse:
Appuyez sur le bouton du contrôleur, et le robot
vous fera une danse cool!

3. INSTRUCTIONS PARTIE 2
3.1 Fonctions du robot- Suite
Fonction marche et glisse:
Appuyez sur les boutons du contrôleur, le robot
marchera en avant puis en arrière.
Appuyez sur les boutons du contrôleur, le robot
glissera en avant puis en arrière.
3.2 Lancement des disques
Chargement des disques:
Comme illustré, tirez Ia tête vers l’arrière, puis insérez les
disques dans le trou.
Merci de ne pas utiliser d’autres objets autres que les disques
fournis, si les disques ne se déclenchent pas comme prévu,
reprenez taus les dlsques et rechargez les de nouveau.
Fonction vocale bras et pistolet::
Appuyez sur le bouton du contrôeur, le robot lèvera
son arme et dira “Freeze! Identify yourself. Or I will
shoot”. Appuyez encore et le robot tirera en dlsant
“Surrender now, You are under arrest”.
Appuyez sur le bouton puis l’autre bouton pour
entendre diérents ordres et voir le pistolet allumé.
Lancer les disques:
1. lnstallez les disques.
2. Appuyez sur le bouton ‘GO’ pour vous assurer que le
robot est sous tension.
3. Appuyez sur le bouton de Ia télécommande, le
robot va dire “Laser On” et le moteur démarrera.
4. Appuyez sur le bouton pour lancer les disques
Vous pouvez maintenir le bouton pour un lancement en
continu.
5. Appuyez sur les boutons pour changer Ia
direction du lancement des disques.
17

4. GARANTIE
4.1 Les informations
Ce qui est garanti:
Cette garantie couvre tous les défauts de matériaux ou de fabrication, sauf les exceptions
indiquées ci-dessous.
Durée de la garantie:
Cette garantie est valable 1 an à partir de la date de livraison de votre RoboShooter.
Ce qui n’est pas garanti:
Tout problème qui est causé par une négligence, une mauvaise utilisation ou une
catastrophe naturelle (comme une inondation) ne sont pas couverts.
Ce que nous ferons:
S’il y a un dysfonctionnement du produit pendant la période de garantie, nous vous
fournirons les instructions pour le retour, et nous prendrons l’une des mesures suivantes :
(i) remplacer le produit par un produit identique ou équivalent à celui que vous avez acheté;
(Ii) la réparation du produit; ou (iii) de vous rembourser la totalité ou une partie du prix
d’achat du produit.
Comment obtenir le service:
Pour obtenir des instructions sur la façon d’obtenir un service sous garantie, veuillez
contacter notre service client par téléphone ou par email. Vous trouverez les coordonnées
de notre service clientèle ci-dessous. Le service clientèle peut vous poser des questions
pour déterminer votre admissibilité en vertu de cette garantie, et si vous êtes admissible,
nous vous communiquerons les instructions pour le retour du produit défectueux. Si nous
vous enverrons un produit remplacement ou la réparation de votre produit, nous paierons
le coût de la livraison du produit de remplacement ou de la réparation.
Ne retournez pas le produit à l’endroit où vous l’avez acheté, merci de contacter
directement Think Gizmos .
Think Gizmos, Unit 19, Lawson Hunt Industrial Park,
Broadbridge Heath, West Sussex, RH12 3JR
Tel.: +44/(0)203 384 8304
help@thinkgizmos.com ● www.thinkgizmos.com
18

TG542 ROBO SHOOTER
Manuale d’uso
Questo giocattolo contiene piccole parti che
potrebbero essere un rischio di soocamento.
Piccoli bambini sotto i 6 anni vanno tenuti sotto
controllo durante il gioco con questo giocattolo.
CONGRATULAZIONI PER L’AQUISTO DELLA ROBO SHOOTER.
SI CONSIGLIA DI LEGGERE E DI SEGUIRE LE ISTRUZIONI PER CONSENTIRE UN FUNZIONAMENTO SICURO.
English p 1
Deutsch p 7
Francais p 13
Italiano p 19
Español p 25

MANUALE ITALIANO - CONTENUTO
1.
2.
3.
4.
INFORMAZIONI IMPORTANTI
1.1 Inserimento delle batterie nel robot............................................................... 21
1.2 Inserimento Delle Batterie Remota ................................................................ 21
1.3 Attenzione .......................................................................................................... 21
ISTRUZIONI PARTE 1
2.1 Istruziono Per Le Operazioni ........................................................................... 22
2.2 Caratteristiche Robot ........................................................................................ 22
ISTRUZIONI PARTE 2
3.1 Caratteristiche Robot - Continua ..................................................................... 23
3.2 Funzione di Lancio dei Frisbee ........................................................................ 23
GARANZIA
4.1 Informazioni sulla garanzia ..............................................................................24
20

1. INFORMAZIONI IMPORTANTI
1.1 Inserimento delle batterie nel robot
Il robot necessita di quattro batterie
AA da 1,5V (non incluse).
a) Con un cacciavite, allenta la vite
dello scomparto per le batterie.
b) Inserisci quattro batterie AA da 1,5V
assicurandoti di rispettare i simboli + -.
c) Chiudi lo scomparto delle batterie.
1.2 Inserimento Delle Batterie Remota
Il telecomando necessita di due
batterie AA da 1,5V (non incluse).
a) Utilizzando un cacciavite, allenta la
vite dello scomparto delle batterie.
b) Inserisci due batterie AA da 1,5V,
assicurandoti di rispettare i simboli + -.
c) Chiudi lo scomparto delle batterie.
1.3 Attenzione
1. Sostituisci sempre le batterie scariche, non cercare di farle caricare.
2. L’utilizzo scorretto delle batterie potrebbe causare danni, quindi presta attenzione a
quanto segue:
● Non inserire batterie con la polarità opposta.
● Quando il robot non viene utilizzato, si prega di spegnerlo (OFF) e, se il robot non verrà
usato per molto tempo, rimuovere le batterie per evitarne la corrosione.
● Non mescolare batterie vecchie e nuove.
● Sostituire le batterie scariche il prima possibile.
● Tenere le batterie fuori dalla portata dei bambini.
● Non lasciare le batterie accanto al fuoco o esposte a intensa luce solare o in condizioni di
umidità.
● Si prega di smaltire le batterie con cura.
3. Fare attenzione a non indirizzare i dischetti verso persone o animali quando si deve
lanciare.
4. Non ingerire le piccole parti smontate del robot.
5. Non lasciare il robot accanto al fuoco, in zone ad alte temperature o umide.
21

2. ISTRUZIONI PARTE 1
2.1 lstruziono Per Le Operazioni
● Premi l’interruttore per accendere il robot (pulsante ON), poi premi il pulsante ‘GO’ sui
petto del Robot. Quest’ultimo risponderà dicendo “Greetings Master! I am yours to
command”, e i suoi occhi inizieranno a lampeggiare per confermare che sta aspettando i
tuoi comandi.
● Utilizza il controller o i pulsanti di programmazione sui petto del Robot.
● Se non gli mandi alcun ordine entro un certo periodo di tempo, lui dirà “Mission
Accomplished” ed entrerà in modalità sonno.
● Per farlo uscire da questa modalita, è suciente premere nuovamente il pulsante ‘GO’
sui suo petto.
Pulsante di AVVIO
Pulsante di
Programmazione
Luce lampeggiante
2.2 Caratteristiche Robot
Ricevitore dei
raggi infrarossi
Occhi
lampeggianti
Indicatore LED
Pulsante con
Suoni Pistola
Interruttore per
Lancio Dischi
Gira a Sinistra
Cammina in Avanti
Cammina all’Indietro
Emettitore di raggi
infrarossi
Movimenti del Braccio
Pulsante per
lanciare frisbee
Gira a
Destra
Balla
Slitta in Avanti
Slitta all’Indietro
Funzione di programmazione:
Dopa aver premuto ‘ON’, premi il pulsante ‘GO’ e Ia luce della
pistola inizierà a lampeggiare. In seguito devi solo premere il
pulsante corrispondente all’azione che vuoi che il robot
compia. Poi premi nuovamente ‘GO’ e lui seguirà il tuo ordine.
Funzione di Svolta:
Premi il pulsante del controller, il robot girerà a
destra o a sinistra a seconda dei tuoi ordini.
22
Controllo con Raggi lnfrarossi:
Per ottenere il massimo delle prestazioni dal tuo robot,
mira sempre il telecomando al ricevitore sui Ia testa del
robot.
Funzione Ballo:
Premi il pulsante sui controller, e il robot ti
mostrerà le sue divertentl mosse dl ballo.

3. ISTRUZIONI PARTE 2
3.1 Caratteristiche Robot- Continua
Funzione Cammina & Slitta:
Premi il pulsante sui controller, il robot inizierà a
camminare in avanti o all’indietro a seconda dei tuoi ordini.
Preml il pulsante sui controller, il robot inizierà a
slittare in avanti o all’indietro a seconda dei tuoi ordini.
Movimenti delle Braccia & Funzione Voce dalla Pistola:
Con il pulsante del controller, il robot solleverà Ia
pistola e dirà: “Freeze! Identify youself. Or I will shoot’’.
Premilo nuovamente, e II robot sparerà verso l’alto e dirà:
“Surrender now! You are under arrest’’
Premi il pulsante poi premi nuovamente il pulsante.
per ascoltare suoni dierenti, e Ia luce della pistola
continuerà lampeggiare
3.2 Funzione di Lancio dei Frisbee
Preparazione al Lancio dei Frisbee:
Come illustrato qui sopra, sposta Ia testa del robot in avanti
e inserisci i dischi sotto di essa.
Non utilizzare oggetti divers! dai dischi da noi forniti. Se i
dischi non vengono lanciati correttamente o incontri delle
dicoltà, estral tutti i dischi e reinseriscili
Firing Discs:
1. lnserisci i frisbee correttamente.
2. Premi il pulsante ‘GO’ e Ia luce della pistola inizierà a
lampeggiare.
3. Ora premi il pulsante il robot dirà “Laser on”.
4. Premi il pulsante per lanciare i frisbee.
5. Per farlo, premi il pulsante per regolare
l’angolazione e prolungare Ia durata dell’operazione di
Iancia..
23

4. GARANZIA
4.1 Informazioni sulla garanzia
Cosa Copre:
Questa garanzia copre qualsiasi difetto legato di produzione o dei materali, tranne le
eccezioni indicate in basso.
Quanto dura:
Questa garanzia dura 1 anno dalla data di consegna del Robo Shooter.
Cosa non copre:
Qualsiasi problema legato ad abuso o cattivo utilizzo del prodotto, o a un atto di Dio (come
un allagamento) non è coperto.
Cosa faremo noi:
Se questo prodotto dovesse presentare difetti nel periodo della garanzia ti daremo tutte
le informazioni necessarie per restituirlo, poi procederemo in uno dei seguenti modi: (i)
sostituiremo il prodotto con un prodotto uguale o equivalente a quello acquistato; (ii) lo
aggiusteremo; o (iii) ti rimborseremo una parte o tutto il prezzo del prodotto.
Come Procedere:
Contatta il nostro servizio clienti via telefono o per email per avere informazioni precise
legate a come procedere per richiedere il nostro aiuto nel periodo della garanzia. Troverai le
informazioni di contatto in basso. Il servizio clienti potrebbe farti delle domande per vedere
se hai diritto al nostro servizio con la garanzia, e se ne hai diritti ti dirà come procedere per
restituire il prodotto difettoso. Se dovessimo decidere di sostituire o riparare il prodotto
saremo noi a pagare per spedirti il prodotto nuovo o riparato.
Non restituire il prodotto da dove lo hai acquistato: contatta direttamente Think
Gizmos.
Think Gizmos, Unit 19, Lawson Hunt Industrial Park,
Broadbridge Heath, West Sussex, RH12 3JR
Tel.: +44/(0)203 384 8304
help@thinkgizmos.com ● www.thinkgizmos.com
24

TG542 ROBO SHOOTER
Manual de usuario
Este juguete contiene piezas pequeñas que
podrían ser un peligro de asxia. Los niños
pequeños menores de 6 años de edad deben
ser supervisados de cerca mientras juega con
este juguete.
FELICITACIONES!! USTED ESTA AHORA EL PROPIETARIO DE LA ROBO SHOOTER.
POR FAVOR LEA Y SIGA ESTAS INSTRUCCIONES EN TODO TIEMPO PARA DISFRUTAR ÓPTIMO
English p 1
Deutsch p 7
Francais p 13
Italiano p 19
Español p 25

MANUAL ESPAÑOL - CONTENIDO
1.
2.
3.
4.
INFORMACIÓN IMPORTANTE
1.1 Instalación de las pilas en el robot ................................................................. 27
1.2 Instalación de las pilas en el control remoto ................................................ 27
1.3 Adventencia ....................................................................................................... 27
INSTRUCCIONES PARTE 1
2.1 Instrucciones De Funcionamiento .................................................................. 28
2.2 Características del Robot ................................................................................. 28
INSTRUCCIONES PARTE 2
3.1 Características Robot - Continuación.............................................................. 29
3.2 Función Lanzamiento de Frisbees................................................................... 29
GARANTÍA
4.1 Información acerca de la garantía .................................................................. 30
26

1. INFORMACIÓN IMPORTANTE
1.1 Instalación de las pilas en el robot
El robot usa 4 pilas AA1.5V (no
incluidas).
a) Usando un destornillador, aojar
el tornillo del compartimiento de las
pilas.
b) Insertar cuatro pilas AA1.5V
asegurándose de que respeta los
símbolos + designados.
c) Cerrar el compartimiento de las
pilas
1.2 Instalación de las pilas en el control remoto
El control remoto usa dos pilas
AA1.5V. (no incluidas).
a) Usando un destornillador aojar
el tornillo del compartimiento de las
pilas.
b) Insertar dos pilas AA1.5V
asegurándose de que respeta los
símbolos + - designados.
c) Cerrar el compartimiento de las
pilas.
1.3 Adventencia
1. Por favor no intente recargar las pilas, Siempre reemplácelas.
2. El uso incorrecto de las pilas puede causar daños, así que por favor preste atención a lo
siguiente:
● No instalar las pilas con la polaridad opuesta.
● Cuando no lo esté usando, por favor póngalo en posición OFF y si no va a usar el robot
durante mucho tiempo, por favor quite las pilas para evitar la corrosión.
● No mezcle pilas nuevas y viejas.
● Por favor cambie las pilas agotadas lo antes posible.
● Mantenga las pilas fuera del alcance de los niños.
● No ponga las pilas cerca del fuego ni las exponga a la luz del sol o a condiciones de
humedad.
● Por favor deshágase las pilas de manera adecuada.
3. Por favor NO lazar los discos a personas o animales cuando dispare.
4. No ingerir pequeñas piezas desmontadas.
5. No lo exponga cerca del fuego, a temperaturas altas o condiciones de humedad.
27

2. INSTRUCCIONES PARTE 1
2.1 lnstrucciones De Funcionamiento
● Ponga el interrupter principal del Robot en posición “ON”, y luego pulse “GO” en el
botón del pecho del Robot. El Robot responde diciendo “Greetins Master! I am yours to
command”, y sus ojos destellarán conrmando que está esperando sus órdenes.
● Use el control remota o los botones programadores del pecho del Robot.
● Si usted no le da órdenes por un periodo de tiempo, el dirá “Mission Accomplished” e irá
a modo descanso.
● Para sacarlo del modo descanso tendrá pulsar “GO” en su pecho otra vez.
Receptor de Reyos
Botón de Encendido
Botón Programador
Luz Destellante
Infrarrojos
Ojos
Destellantes
2.2 Características del Robot
Indicador LED
Ráfaga de
Disparos
Interruptor del
Disparador de Discos
Giro a la lzquierda
Caminar hacia
Adelante
Caminar hacia Atrás
Emisor de Infrarrojos
Movimiento de Brazos
Disparador de
Frisbees
Deslizar hacia
Adelante
Deslizar hacia
Detrás
Giro a la
Derecha
Bailar
Seleccionar el programa:
Tras seleccionar “ON”, pulse el botón “GO” y Ia luz de Ia
pistola destellará. Luego simplemente pulse el botón de Ia
acción que desee que rea lice el robot. A continuación pulse
“GO” otra vez y él la hará.
Función de Giro:
Pulse los botones del controlador y el robot
glrará a Ia izqulerda y a Ia derecha según Ia arden reclblda.
28
Control De Rayos lnfrarrojos:
Para un mejor funcionamiento, enfoque siempre el
control remota hacia el receptor de Ia cabeza del robot
Función de Baile:
Pulse el botón del controlador, iY el robot
ejecutará un baile guayl

3. INSTRUCCIONES PARTE 2
3.1 Características Robot- Continuación
Función Caminar y Deslizarse:
Pulse los botones el controlador y el robot
caminará hacia delante y hacia atrás segun Ia arden recibida.
Pulse los botones del controlador y el robot se
deslizará hacia delante y hacia atrás segun Ia arden recibida.
Función de Voz de Movimiento de Brazos y Pistola::
Apriete el botón del controlador. El robot elevará Ia
pistola y dirá: “Freeze! Identify yourself. Or I will shoot”.
Apriételo de nuevo, el robot disparará a lo alto y dirá
“Surrender now” You are under arrest”.
Pulse el botón pulse otra vez el botón para que
suenen diferentes voces, y Ia luz de Ia pistola destellará.
3.2 Función Lanzamiento de Frisbees
Cargar Frisbees:
Tal y como se muestra en el dibujo, levante Ia cabeza par
delante, e inserte los Frisbees dentro.
Por favor no use ningún otro objeto que no sea los discos
suministrados. Si los discos no se disparan como debieran,
extráigalos y vuelva a lntroduclrlos
Función Lanzamiento de Frisbees:
1. lntroduzca los Frisbees adecuadamente.
2. Pulse el botón “GO” y Ia luz de Ia pistola destellará.
3. Pulse el botón el robot dirá “Laser On”.
4. Pulse el botón para lanzar los Frisbees.
5. Pulsar los botones para ajustar el ángulo y
prolongar el tiempo de anzamiento de Frisbees.
29

4. GARANTÍA
4.1 Información acerca de la Garantía
Lo que cubre:
Esta garantía cubre cualquier defecto de materiales o mano de obra, con las excepciones
que se indican a continuación
Duración de la cobertura:
Esta garantía tiene una duración de 1 año a partir de la fecha de entrega de su
RoboShooter.
Lo que no cubre:
No cubre ningún problema causado por mal uso, trato indebido, o un acto de Dios (como
una inundación).
Lo que haremos:
Si el producto resulta defectuoso durante el período de garantía, nosotros le
proporcionaremos las instrucciones para devolverlo, y seguiremos una de las siguientes
acciones: (i) sustituir el producto por uno igual o equivalente; (ii) reparar el producto; o (iii)
reembolsarle el precio de compra total o parcial del producto.
Cómo obtener servicio:
Para obtener indicaciones acerca de cómo obtener servicio cubierto por esta garantía,
póngase en contacto con nuestro servicio de atención al cliente por teléfono o correo
electrónico. Encontrará los datos de contacto con nuestro servicio de atención al cliente a
continuación. El servicio de atención al cliente puede hacerle preguntas para determinar su
derecho por esta garantía, y si usted tiene derecho se le darán instrucciones para devolver
el producto defectuoso. Si sustituimos o reparamos el producto, nosotros le pagaremos los
gastos de envío de la sustitución o reparación del producto.
No devuelva el artículo al lugar original de compra, por favor póngase en contacto
con Think Gizmos direct.
Think Gizmos, Unit 19, Lawson Hunt Industrial Park,
Broadbridge Heath, West Sussex, RH12 3JR
Tel.: +44/(0)203 384 8304
help@thinkgizmos.com ● www.thinkgizmos.com
30

To protect our environment, do not dispose of electrical equipment in with domestic waste.
Meaning of the ‘Dustbin’ Symbol:
Please return any electrical equipment that you will no longer use to the collection points
This helps to avoid the potential eects of incorrect disposal on the environment and human
This will contribute to the recycling and other forms of reutilisation of electrical and electronic
Information concerning where the equipment can be disposed of can be obtained from your
provided for their disposal.
health.
equipment.
local authority.
“CE” marking states that the product is compliant to European Directives
2014J35/EU Low Voltage Directive (LVD)
2004/108/EC EMC Directive
It is possible to request a full copy of Declaration of compliance from the
Distributor:
This product complies with the rules of RoHS Directive(2011/651EU)
This product complies with the rules of EuP Directive(2009/125/EC)
ThinkGizmos is a registered trademark of Paramount Zone Ltd
 Loading...