

THINK GIZMOS INGENIOUS MACHINES User Manual
INGENIOUS MACHINES REMOTE
CONTROL
PLEASE READ ALL INSTRUCTIONS CAREFULLY BEFORE USING YOUR INGENIOUS MACHINES.
KEEP THESE INSTRUCTIONS IN A SAFE PLACE FOR FUTURE REFERENCE.
User Manual
English p 2
Deutsch p 7
Francais p 13
Italiano p 19
Español p 25
This toy contains small parts that could be a
choking hazard. Small Children under 6 years
old should be closely supervised while playing
with this toy.

ENGLISH MANUAL - CONTENTS
1.
2.
2.1 The Remote Control ............................................................................................ 4
2.2 Setting Controller Channel ................................................................................ 4
2.3 Connecting the Motor ........................................................................................ 4
USAGE INSTRUCTIONS
2
1.1 Safety Information ............................................................................................. 3
1.2 Batteries .............................................................................................................. 3
IMPORTANT INFORMATION
3.1 Turning Controller and Motor On .................................................................... 5
POWERING BUILT MACHINE
3.
4.1 Warranty Information ....................................................................................... 6
WARRANTY
4.

3
1.1 Safety Information
● The Motor requires 4x AAA Batteries (Included)
(Warning - Remove the batteries if the Ingenious Machines are not going to be used
for a long time.)
Thank you for purchasing the awesome Ingenious Machines! Please read through this
instruction manual before use as it contains all the information you need about how to
correctly enjoy this product.
CAUTION
ELECTRONIC PRODUCT
Do not give this product to children aged 6 or below. This product should be used in
accordance with this user manual in a safe way to avoid electric shock.
ADULT SUPERVISION REQUIRED
WARNING! Do not try to modify this product in any way as this may invalidate your
warranty.
WARNING! Contains small parts, child supervision is required at all times.
1.2 Batteries
1. IMPORTANT INFORMATION
If more than one Ingenious machines product is being built and used at one time, for
example two of the cars are built to race each other, then you will need to adjust the
channels on one of the remote controls, otherwise one control will control both built
machines. These simple instructions show you how to adjust the channel on one of the
controllers.
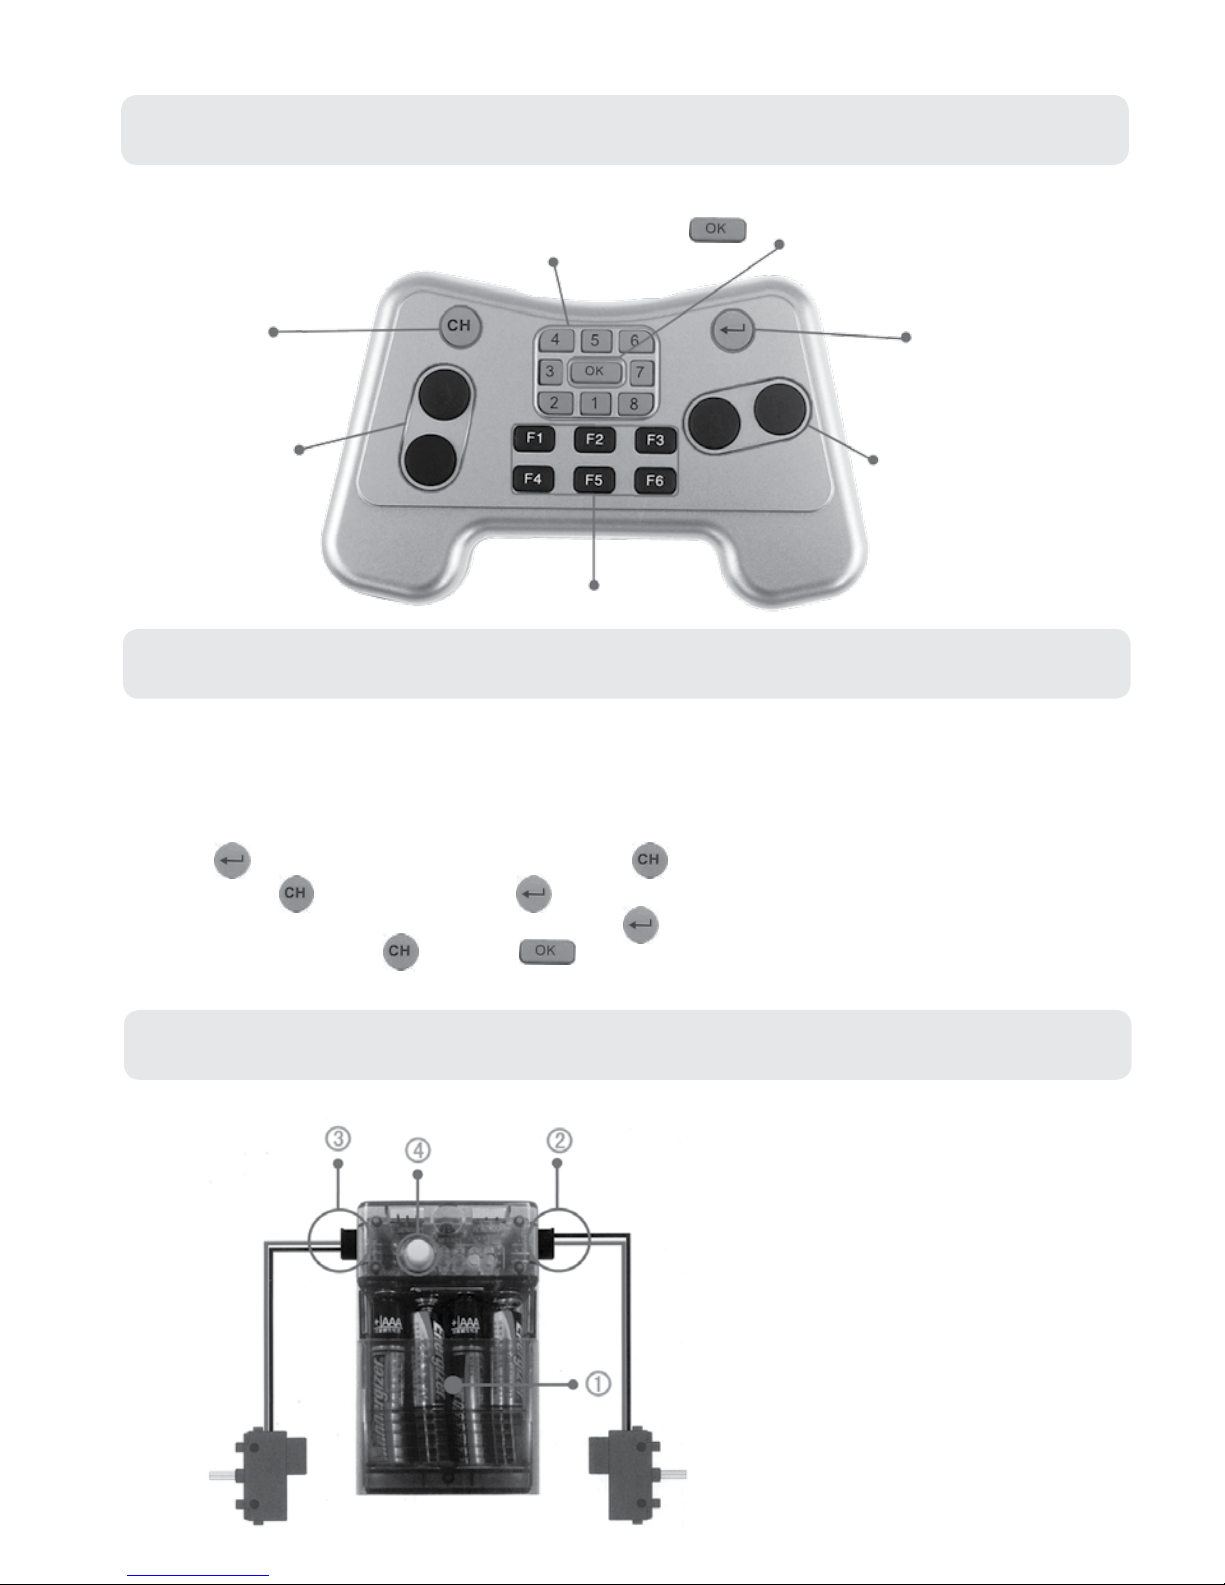
1. Press Key and at the same time press the Key.
2. Release the Key and press the Key again.
3. Choose the channel number by pressing the key to cycle through the channel
number, then press the Key. The Light will ash 3 times to show the channel has
been set successfully.
4
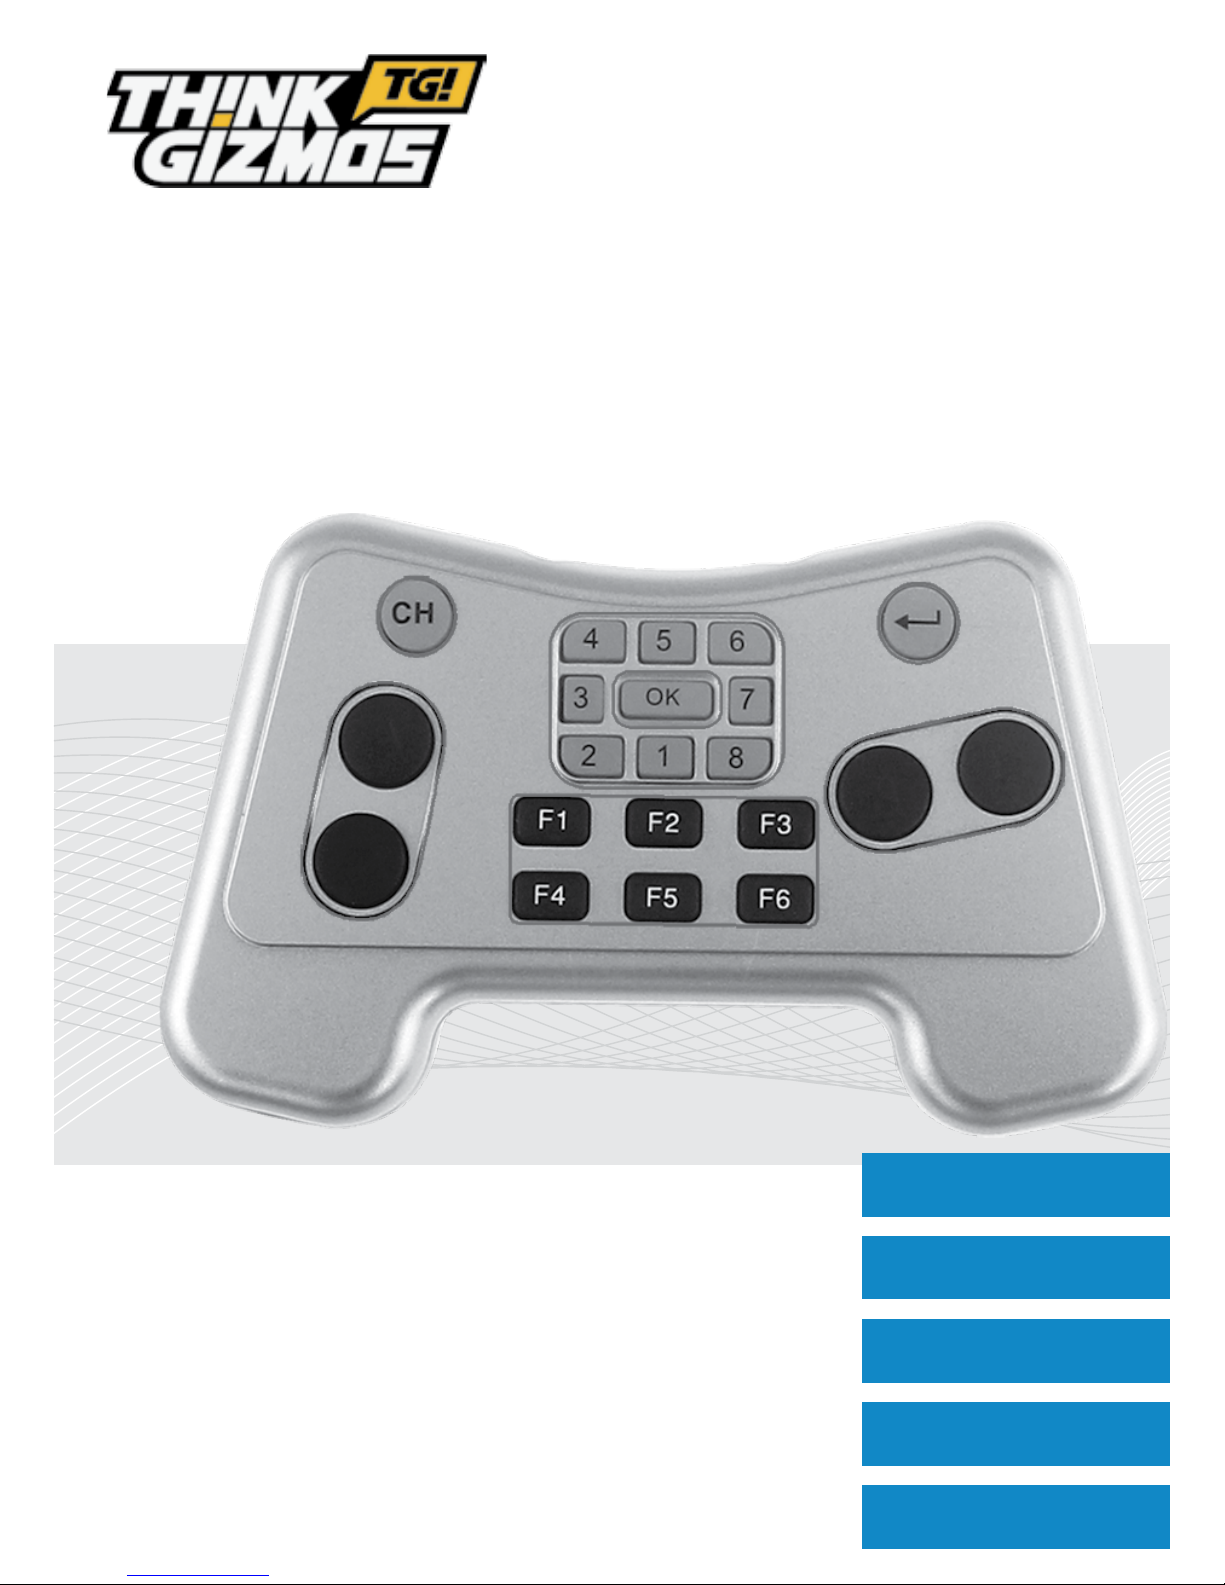
2.1 The Remote Control
2. USAGE INSTRUCTIONS
2.2 Setting Controller Channel
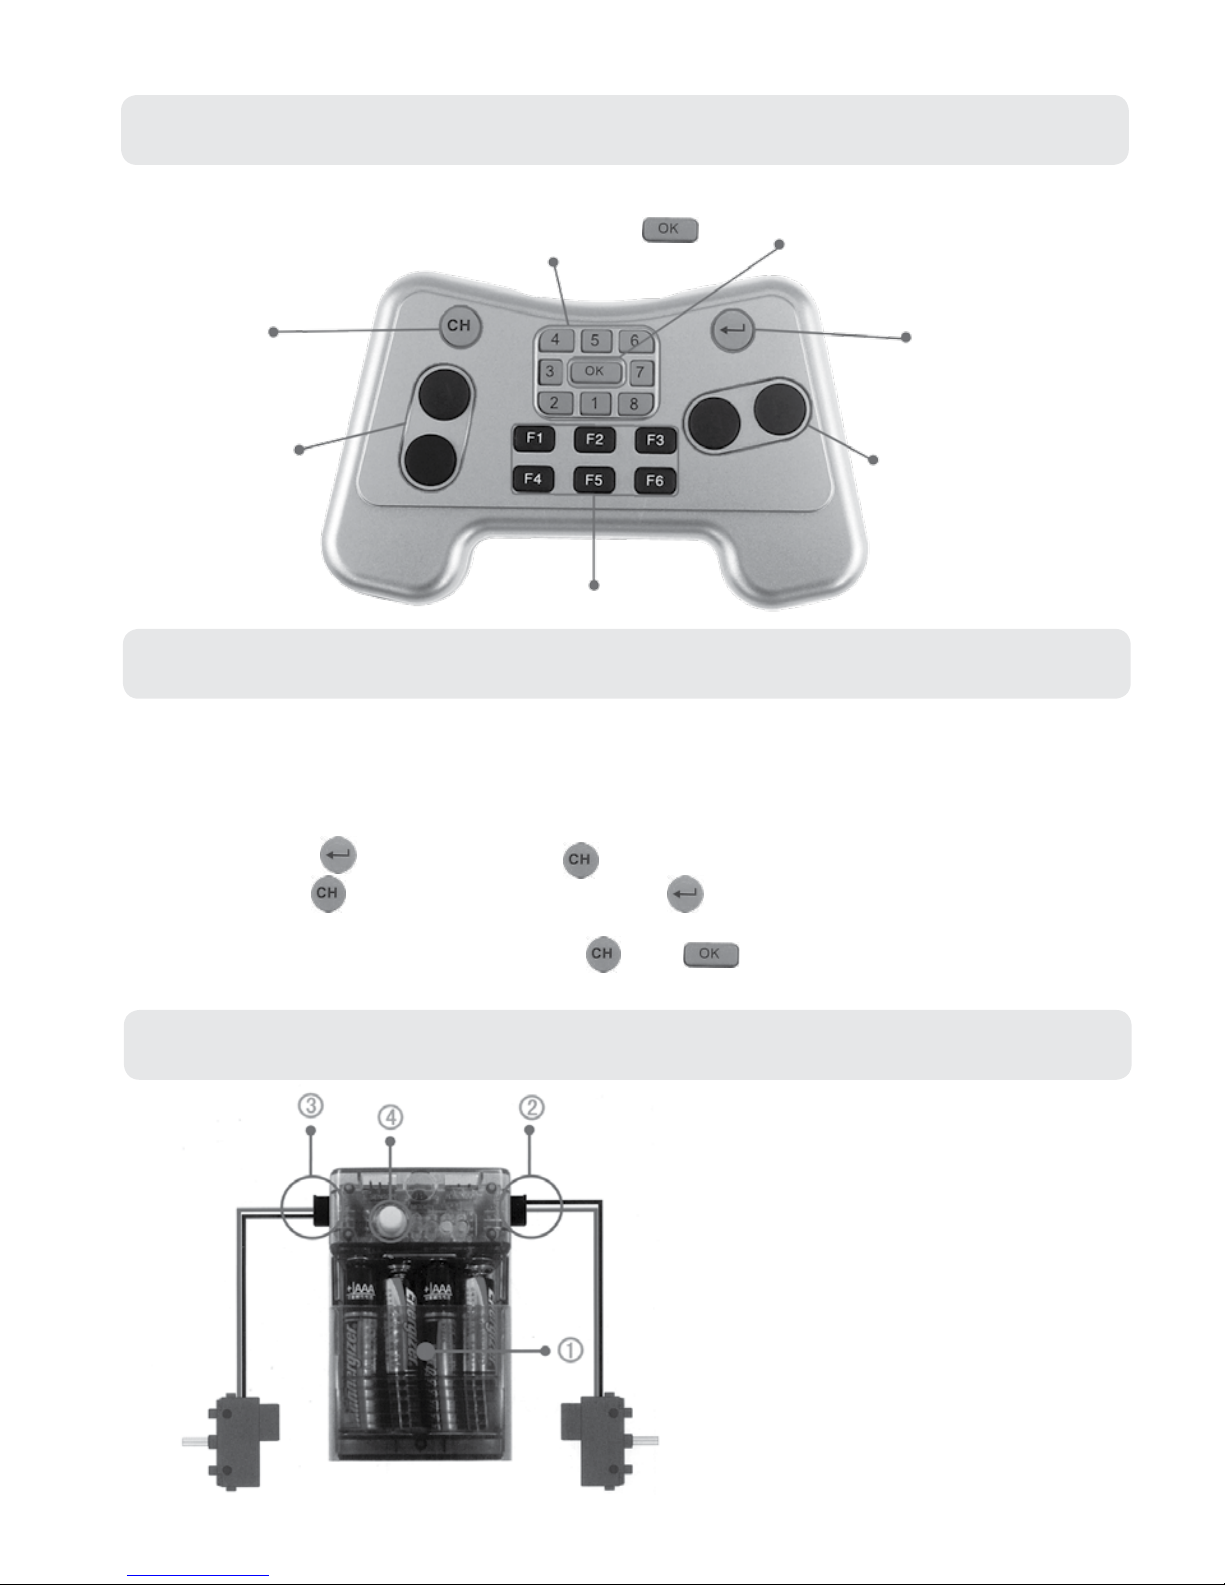
2.3 Connecting The Motor
1. Insert 4x AAA Batteries (Included).
2. Connect the right motor to the
batteries.
3. Connect the left motor to the
batteries.
Note: If more than one set of Ingenious
Machines are being used, set dierent
channels on each remote.
CHANNEL NUMBER (1-8)
CONFIRM CHANNEL NUMBER.
WHEN THE CHANNEL IS SET CORRECTLY
THE LIGHT WILL FLASH 3 TIMES.
CHANGE CHANNEL
BUTTON
TURN LEFT /
RIGHT BUTTON
FORWARD /
BACKWARD
BUTTON
SET CHANNEL
BUTTON
SPECIAL FUNCTION KEY

Once you are certain you have the channel congured correctly and the motor connected.
You are ready to power your machine.
1. Ensure the power switch on the motor is set to the “ON” position. The LED light on the
motor should ash to conrm.
2. Press the F4 key on the Remote. The LED on the motor will now stop ashing. This
conrms that the Controller and the motor are now connected.
3. Congratulations! Your Ingenious Machine is ready to go. Use the controller to command
your machine to move.
3.1 Turning Controller and Motor On
3. POWERING BUILT MACHINE
5

4. WARRANTY
4.1 Warranty Information
Think Gizmos, Unit 19, Lawson Hunt Industrial Park,
Broadbridge Heath, West Sussex, RH12 3JR
Tel.: +44/(0)203 384 8304
help@thinkgizmos.com ● www.thinkgizmos.com
What is Covered:
This warranty covers any defects in materials or workmanship, with the exceptions stated
below.
How Long Coverage Lasts:
This warranty runs for 1 Year from the date your Ingenious Machines are delivered.
What is not covered:
Any problem that is caused by abuse, misuse, or an act of God (such as a ood) are not
covered.
What We Will Do:
If the Product proves defective during the warranty period, we will provide you with the
instructions for the return, and we will take one of the following actions: (i) replace the
Product with a product that is the same or equivalent to the Product you purchased; (ii)
repair the Product; or (iii) refund to you the whole of or part of the purchase price of the
Product.
How To Get Service:
To obtain instructions on how to obtain service under this warranty, contact our customer
service by phone or email. You will nd the contact details of our customer service below.
Customer service may ask you questions to determine your eligibility under this warranty,
and if you are eligible you’ll be given instructions for returning the defective Product. If
we send you a replacement or repair your Product, we will pay the cost of delivering the
replacement or repaired Product to you.
Do not return the item to the original place of purchase, please contact Think
Gizmos direct.
6

INGENIOUS MACHINES REMOTE
CONTROL
BITTEL LESEN SIE SICH DIESE BEDIENUNGSANLEITUNG VOR DER VERWENDUNG IHRER INGENIOUS MACHINES SORGFÄLTIG DURCH.
BEWAHREN SIE DIESE BEDIENUNGSANLEITUNG AN EINEM SICHEREN ORT AUF.
BEDIENUNGSANLEITUNG
English p 2
Deutsch p 7
Francais p 13
Italiano p 19
Español p 25
Dieses Spielzeug enthält Kleinteile , die eine Er-
stickungsgefahr sein könnte. Kleine Kinder unter
6 Jahren sollten engmaschig überwacht werden,
während sie mit diesem Spielzeug spielen.

DEUTSCHEBEDIENUNGSANLEITUNG - INHALTSVERZEICHNIS
1.
2.
2.1 Die Fernbedienung ............................................................................................ 10
2.2 Den Fernbedienungskanaleinstellen ............................................................. 10
2.3 Den Motor anschließen ................................................................................... 10
VERWENDUNGSHINWEISE
8
1.1 Sicherheitsinformationen ................................................................................. 9
1.2 Batterien ............................................................................................................. 9
WICHTIGE INFORMATIONEN
3.1 Fernbedienung und Motor einschalten ........................................................ 11
VERWENDUNGSHINWEISE FORTGESETZT
3.
4.1 Garantieinformationen .................................................................................... 12
GARANTIE
4.
9
1.1 Sicherheitsinformationen
● Der Motor erfordert 4xAAA Batterien (enthalten)
(Warnung–Entfernen Sie die Batterien, wenn die Ingenious Machines längere Zeit
nicht verwendet werden.)
Wir gratulieren zum Kauf dieser fantastischenIngeniousMachines!Bitte lesen Sie diese
Bedienungsanleitung vor der Verwendung, da sie Informationen darüber enthält, wie Sie
dieses Produkt richtig verwenden.
ACHTUNG
ELEKTRONISCHES PRODUKT
Geben Sie dieses Produkt nicht an Kinder unter 6 Jahren. Dieses Produkt sollte gemäß
dieser Bedienungsanleitung auf eine sichere Art und Weise verwendet werden, um
Stromschläge zu vermeiden.
AUFSICHT DURCH ERWACHSENE ERFODERLICH
WARNUNG!Versuchen Sie nicht, dieses Produkt auf irgendeine Art zu verändern, da dies
zum Erlöschen Ihrer Garantie führen kann.
WARNUNG!Enthält Kleinteile, Kinder müssen immer beaufsichtigt werden.
1.2 Batterien
1. WICHTIGE INFORMATIONEN
10
2.1 Die Fernbedienung
2. VERWENDUNGSHINWEISE
2.2 Den Fernbedienungskanaleinstellen
1. Drücken Sie die und gleichzeitig die Taste.
2. Lassen Sie die Taste los und drücken Sie die Taste erneut.
3. Wählen Sie die Nummer des Kanals, indem Sie die entsprechende Zahl auf der
Fernbedienung drücken. Drücken Sie dann . Das Licht blink 3-mal, um anzuzeigen,
dass der Kanal erfolgreich eingestellt wurde.
2.3 Connecting The Motor
1. Legen Sie 4xAAA Batterien ein
(enthalten)
2. Schließen Sie den rechten Motor an
die Batterien an.
3. Schließen Sie den linken Motor an die
Batterien an.
HINWEIS: Wenn mehr alseine Ingenious
Machine verwendet wird, stellen Sie
bitte auf jeder Fernbedienung einen
anderen Kanal ein.
Wenn mehr als einIngenious Machines Produkt gebaut und gleichzeitig verwendet wird, z.
B. zwei Lokomotiven werden gebaut, um einWettrennen zu veranstalten, dann müssen Sie
die Kanäle auf einer der Fernbedienungen wechseln.Ansonsten wird eine Fernbedienung
beide gebauten Maschinen steuern. Diese einfachen Anweisungen, zeigen Ihnen, wie Sie
den Kanal auf einer der Fernbedienungen wechseln.
KANAL (1-8)
KANAL BESTÄTIGEN. WENN DER KANAL
KORREKT EINGESTELLT IST, BLINKT DIE
LEUCHTE 3-MAL.
KANAL
WECHSELN
LINKS / RECHTS
VORWÄRTS/
RÜCKWÄRTS
KANAL
EINSTELLEN
SPEZIELLE FUNKTIONEN
 Loading...