

Page 1

User Manual for your
GECE61SS
60cm 4 Solid Plate
Electric Cooktop
NOTE: This User Instruction Manual contains important
information, including safety & installation points, which will
enable you to get the most out of your appliance. Please keep it
in a safe place so that it is easily available for future reference; for
you or any person not familiar with the operation of the appliance.
JW 28/09/12
Page 2

2
Page 3

Contents
Environmental note 4
IMPORTANT SAFETY INFORMATION 5 – 8
Specifications 8 - 9
Product and aperture dimensions 8
Product specifications 8
Standard accessories 8
Electrical details 9
Using the cooktop 9 - 12
Before first use 9
Control knobs 10
Switching on a zone and setting a power level 10
Cooktop guidelines 10 – 11
Cleaning and maintenance 12 - 13
Cleaning the cooktop top 12
After each use 12
Using a specialist cooktop cleaner 13
Maintaining the solid plates 13
Installation 13 - 18
Positioning 14
Unpacking the appliance 14
Installing the appliance 15 – 16
Electrical connection 16 - 17
Connecting the mains supply cable 17 – 18
Replacing the mains supply cable 18
My appliance isn’t working correctly 18 – 19
Contact details 21
3
Page 4

Environmental note
o The packaging materials that the Manufacturer uses are
environmentally friendly and can be recycled.
o Please discard
environment.
all packaging material with due regard for the
4
Page 5

IMPORTANT SAFETY INFORMATION
Your safety is of the utmost importance to us. Please
make sure that you read this instruction booklet before
attempting to install or use the appliance. If you are
unsure of any of the information contained in this
booklet, p
General Information
This appliance is designed for domestic houso
the cooking and frying of domestic foodstuffs.
o IMPORTANT: The adjacent furniture and all materials used in
the installation must be able to withstand a minimum
temperature of 85°C above the
room it is located in, whilst in use.
o Certain types of vinyl or laminate kitchen furniture are
particularly prone to heat damage or di
temperatures below the guidelines given above.
o Any damage caused by the appliance being installed in
contravention
the owner.
o Your new appliance is guaranteed against electrical or
mechanical defects, subject to certain exclusions that are noted
in the Manufacturer’s Conditions Of
does not affect your statutory rights.
o The use of this appliance for any other purpose or in any other
environment without the express agreement o
will invalidate any warranty or liability claim.
o You shou
surface.
o No modificatio
Manufacturer.
o You should not store or place flammable or highly flammable
liquids/materials on top of or near the appliance. Items made
from aluminium, plastic or plastic film should also be
from the appliance, as they may fuse to the surface.
o Repairs
agents.
of this temperature limit, will be the liability of
ld not use this appliance to store items on or as a work
may only be carried out by authorised service
lease contact the Customer Care Department.
ehold use and for
ambient temperature of the
scolouration at
Guarantee. The foregoing
f the Manufacturer
ns to the appliance are permitted by the
kept away
5
Page 6

hild Safety
C
o The Manufacturer strongly recommends that babies and young
children are prevented from being near to the appliance and not
allowed to touch the appliance a
use, all surfaces will become hot.
o If it is necessary for younger family members to be in the
kitchen, plea
se ensure that they are kept under close supervision
at all times.
o Older children sho
uld only be allowed to utilise the appliance
when supervised.
eneral Safety
G
The appliance should only be installed and connected by a
suitably qualified person.
Care should be taken to ensure that the units and work surfaces
that you build the appliance into, meet with the relevant
standards.
If you notice any scratches, splits or cracks in the cooktop
surface, you should immediately switch off the appliance and
disconnect it from your mains supply. Otherwise there is the risk
of electric shock occurring.
uring use
D
Any film or stickers that are present on the cooktop surface
when it is delivered should be removed before use.
Care should be used when utilising the appliance, otherwise
there is a risk of burns being caused.
o You should not allow the electrical connection cables to come
into contac
t with the cooktop surface when it is hot or any hot
cookware.
o If fat and oil overheats, then it can ignite extremely quickly. For
this reason, when cooki
ng with fat and oil the appliance should
not be left unattended.
Make sure that all of the cooking zones are switched off after
use.
t any time. During and after
6
Page 7

leaning
C
Cleaning of the cooktop should be carried out on a regular basis.
o
o IMPORTANT: Before attempting to clean the applia
nce, it should
be disconnected from the mains and allowed to cool.
o Great care should be taken whils
following the cleaning procedure.
t using this appliance and when
o You should not use a steam jet or
equipment to clean the appliance.
Installation
This appliance must be correctly installed by a
suitably qualified person, strictly in accordance with
the manufacturer’s instructions. Please see
pecific section of this booklet that refers to
s
installation.
The Manufactur
er declines any responsibility for injury or damage,
to person or property, as a result of improper use or installation of
thi
s appliance.
Declaration of conformity
o The manufacturer declares that the cooktop is built using certified
materials and requires the appliance to be insta
with the standards currently in force. This appliance must be used
by a trained person for domestic pur
To avoid damaging your appliance
o The cooktop surface can be damaged by objects falling onto it.
The edge of the cooktop surface can be damaged by knocks from
o
cookware.
Cast iron and cast aluminium cookware with damaged bases may
o
scratch the cooktop surface if they are dragged across it.
Pans should be lifted on and off the cooktop surface and not
o
dragged.
Cooking zones should not be switched on without cookware placed
o
on it. Also the cookware should not be empty.
any other high pressure cleaning
the
lled in accordance
poses only.
7
Page 8

Specifications
Product dimensions: Aperture dimensions:
Depth: 500 mm
Width: 580 mm
Height: 38 mm
Product specifications:
o 1 x 1.50 kW rapid plate (Ø 188 mm)
1 x 1.50 kW standard plate (Ø 188 mm)
o
2 x 1.00 kW standard plate (Ø 155 mm)
o
Depth: 485 mm
Width: 560 mm
8
8
Page 9

Electrical details
Rated Voltage: 220-240 V
Supply Connection: 30A
ax Rated Inputs: 5.00 kW
M
ains Supply Lead: 3 core x 4.0 mm² (not supplied)
M
For future reference please record the following information which can
be found on the rating plate and the date of purchase which can be
found on your sales invoice. The rating plate of your cook
the underneath of the appliance. Therefore it is a good idea to
on
record this information before you install
Model Number ……………………………….
Serial Number ……………………………….
ate of Purchase ……………………………….
D
ac 50 Hz
top is located
your appliance.
Using the cook
top
Before
o You should switch on one cooking zone at a time, for 5 minutes
o When doi
o Do not burn off more than one zone at a time.
first use
MPORTANT: You should clean the cooktop surface and solid
I
plates (see “Cleaning and maintenance” section).
at the maximum setting. This will
smell that exists and evaporate any humidity that has formed on
the heating elements during transit.
ng this burn off process, an appropriately sized
saucepan containing cold water should be placed on the zone in
question.
help to eliminate any new
9
Page 10

Control knobs
All operations are performed by means of the 4 control knobs
o
that can be found on the right hand side of the cooktop top.
o The control knobs can be turned either clockwise or anti-
clockwise to select a
heating level. The numbers around the
outside of each control knob indicates the power level that you
have set the zone to.
o A marking next to each control knob indicates which zone that it
controls.
Switching on a zone and setting a power level
o Turn the co
ntrol knob of the zone that you wish to cook on,
clockwise or anticlockwise until it reaches the power level that
you desire.
o Each coo
king zone can be adjusted between 1 and 7, one being
the coolest zone setting and seven being the hottest zone
setting.
o When you have finished cooking, make sure that you turn the
control knob ant
i-clockwise, to the 0 position.
Cooktop guidelines
o The fi
rst few times the cooktop top is used, it may give off an acrid,
burning smell. This smell will disappear completely with repeated
use.
The cooktop surface is fitted with cooking areas of different
o
diametre and power.
o The positions where the heat will radiate from are clearly marked
on the cooktop. The saucepans must be positioned exactly
on these
zones for efficient heating to occur. Pans should have the same
diametre as the cooking zone that they are being used on.
You should not use saucepans with rough bottoms, as this can
o
scratch the solid plates.
Before use, make sure that the bottoms of the saucepans are clean
o
and dry.
o When cold, the bottom of the pans should be
slightly concave, as
they expand when hot and lie flat on the surface of the cooktop.
This will allow the heat to transfer more easily.
10
Page 11

o The best thickness for the bottom of the pans is 2 – 3 mm of
enamelled
steel and 4 – 6 mm for stainless steel with sandwich type
bottoms.
o If these rules are not followed, then there will be a great loss of
heat and energy. Heat not absorbed by the sau
cepan, will spread to
the cooktop, frame and surrounding cabinets.
Preferably cover pans with a lid to permit cooking at a lower heat.
o
o Always cook vegetable
s and potatoes, etc. in as little water to
reduce cooking times.
o Food or liquid that has high sugar content may damage the cooktop
top if it comes into contact with the cooktop surface. Any spillages
should be wiped up immediately, however
this may not prevent the
cooktop surface from becoming damaged.
o IMPORTANT: The cooktop surface is tough; however it is not
unbreakable and can be damaged. Especially
if pointed or hard
objects are allowed to fall on it with some force.
o DO NOT USE THE COOKTOP IF THE SURFACE BECOMES
BROKEN OR CRACKED. YOU SHOULD CO
NTACT THE
CUSTOMER CARE DEPARTMENT IMMEDIATELY.
11
Page 12

Cleaning and maintenance
Cleaning and maintenance operations must only
be carried out when the cooktop is cool.
The appliance should be disconnected from your
mains su
process.
Cleaning
the cooktop
Any residues that are left on the cooktop surface from cleaning
agents will damage it. You should
water and a little washing up liquid.
Abrasive cleaners or sharp objects will damage the cooktop
surface
; you should clean it using water and a little washing up
liquid.
Although it is easier to clean some deposits whilst the cooktop
surface is still warm, you should take care not to b
cleaning the cookt
After each use
o Wipe the a
ppliance over with a damp cloth and a little washing
up liquid.
o Dry the appliance by rubbing the surface with a clean cloth.
o If the cooktop surface is made from stainles
suitable stainless steel cleaner should be used.
o IMPORTANT: If a stainless steel cleaner is not used
regularly, then it is possible for the surfa
to change colour over a period of time.
pply before commencing any cleaning
remove any residues with
urn yourself if
op surface when it is still warm.
s steel, then a
ce of the cooktop
12
Page 13

aintaining the solid plates
M
o If something is spilt onto the plate itself, then it can be remo
using a soft brush, plastic or nylon scourer and warm water.
o To keep the solid plates in good condition, you should put a little
olive oil onto a kitchen towel and rub it onto the surface of the
plate. Th
e next time the plate is used, it may produce a little
smoke.
o Alternatively you can use a hotplate conditioner; these products
can normally be found at larger supermarkets and hardware
stores. The manufactu
rer’s instructions should be followed when
using these products.
o IMPORTANT: If the solid plates are not maintained
regularly w
ith olive oil or a hotplate conditioner, then they
may rust.
ved
13
Page 14

Installation
The installation must be carried out by a suitably
qualified person, in accordance with the current
ersion of the following.
v
o AS/NZS 3000:2007 Wiring Regulatio
o 2010 Ele
ctricity Safety Regulations
ositionin
P g
The adjacent furniture must be able to withstand a
minimum temperature rise of 85°C above the ambient
temperature of
the room it is located in, during
periods of use.
This appliance is classified as Class 3 and therefore is to be built into a
kitchen unit (depending on size) or 600 mm worktop that is at least 30
mm thick.
The following minimum clearance distances must be
observed:-
o 700 mm between the cookt
op surface and the underside of any
horizontal surface above it.
o 50 mm clearance around the sides and front of the appliance.
o 55 mm clearance b
etween the back of the cooktop surface and
the wall behind it.
o If the cooktop is positioned so that the right or left hand side of
the appliance will be near to the edge of a kitchen unit. There
must be a gap of at least 150 mm between the
cooktop and the vertical surf
ace of the kitchen unit.
Unpacking the appliance
When unpacking the appliance pleas
e check that the following items
are contained within the packaging:
1 Cooktop
1 Installation and
instruction manual
1 Warranty card
4 Fixing screws
4 Fixing bracket
Sealing strip
1
s
ns
side of the
14
Page 15

nstalling the appliance
I
o Cut a hole in
the worktop that corresponds with the drawing
shown above.
o IMPORTANT: You must
observe the ventilation
requirements sho
wn in the
drawing opposite.
o IMPORTANT: Do not use a silicon sealant to seal the appliance
against the aperture. This will make it difficult to remove the
cooktop fr
om the aperture in future, particularly if it needs to be
serviced.
15
Page 16
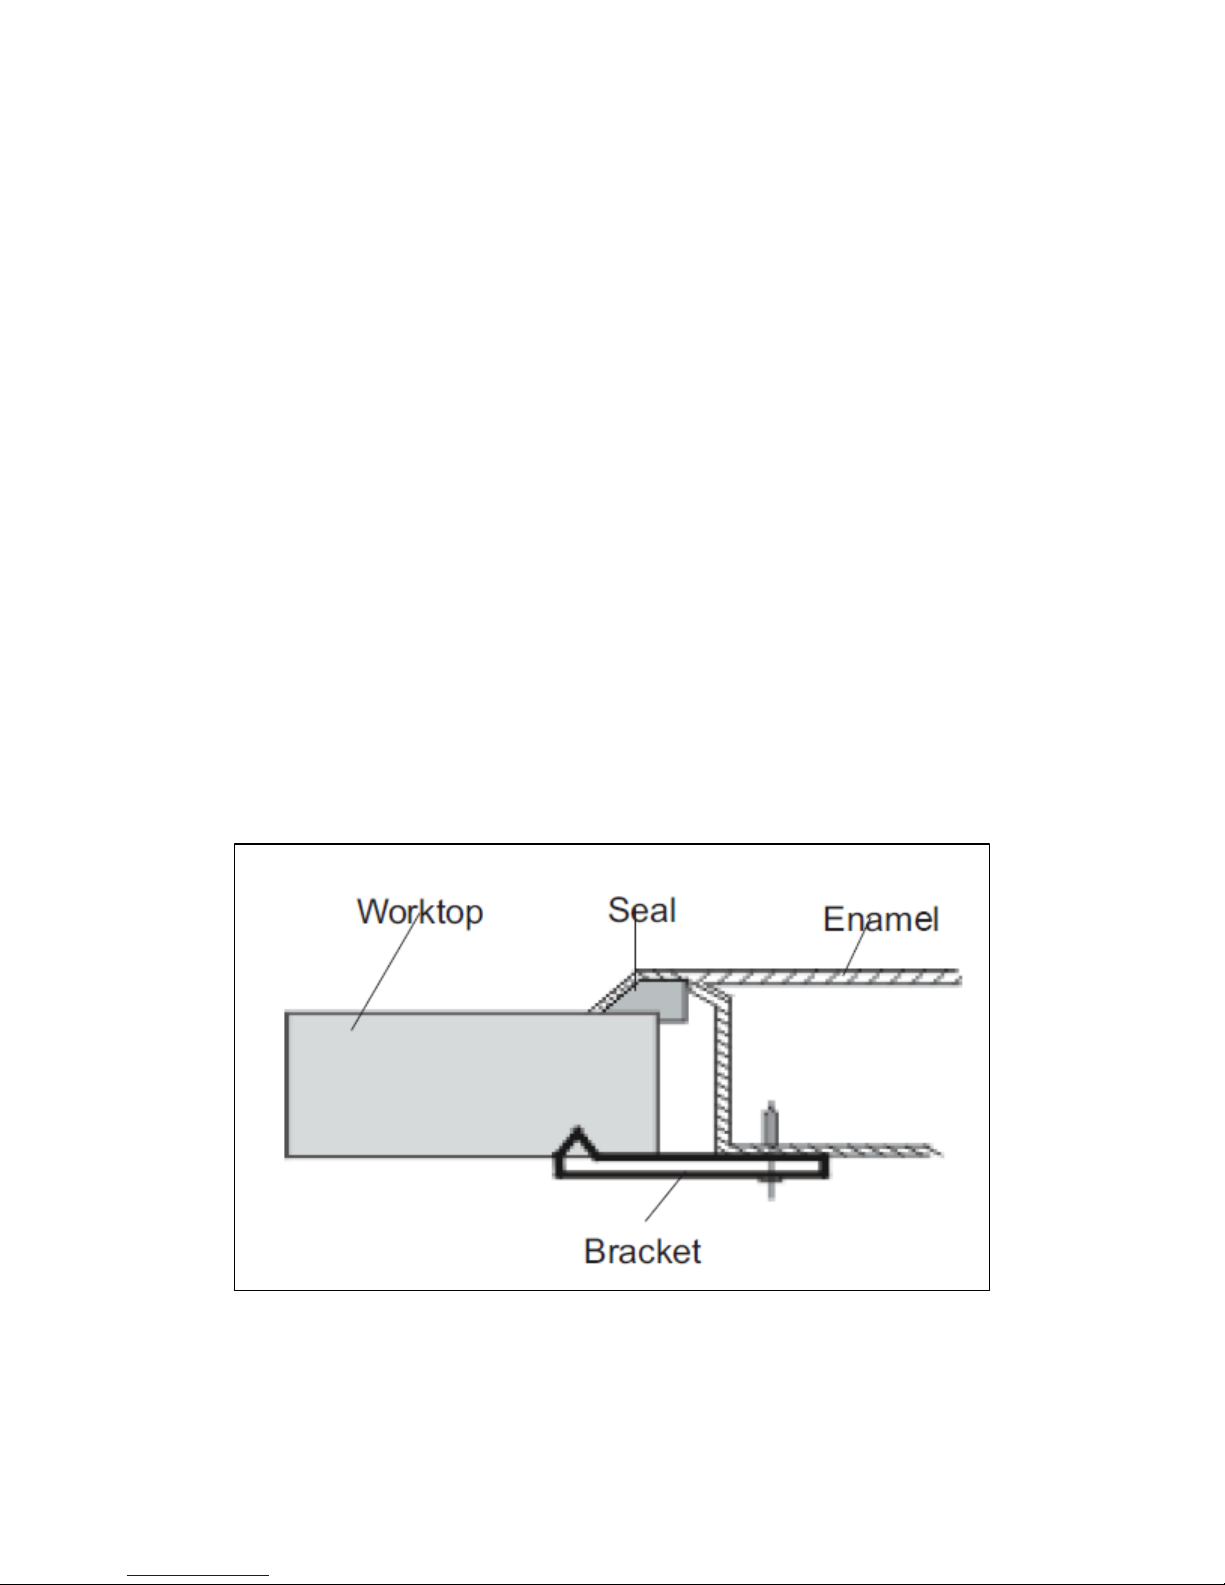
o Carefully turn the cooktop upside down and place it on a
cushioned mat.
o The supplied brackets need to be fitted to each of the four
corners on the underside of the cooktop.
o Place a bracket onto each corner, ensuring that the outer hole
lines up with the hole on the corner of the cooktop.
o Fasten the bracket to the corner of the cooktop with a screw.
o Place the long screw into the fixing hole on the outer edge of the
bracket but do not fully tighten.
o Carefully turn the cooktop back over and then gently lower it
into the aperture hole that you have cut out.
o When the cooktop is correctly positioned, tighten the long screws
to fix the cooktop securely in the aperture hole. These screws
MUST be securely tightened.
16
Page 17

lectrical connection
E
R COOKTOP IS INTENDED FOR FITTED AND
YOU
PERMANENT INSTALLATION.
o Cable type: H05
RRF 3 core x 4.0 mm² (Type RR-F <HAR>
marked).
o The mains cable is no
t supplied with this product.
o Before connecting the appliance, make sure that t
he supply
voltage marked on the rating plate corresponds with your mains
supply voltage.
o We recommend that the appliance is connected by an authorised
qualified electrician.
o WARNING: THIS APPLIANCE MUST BE EARTHED.
o he cooktop must be wired into a 30A double pole switched
T
fused spur outlet, having 3 mm co
an easily accessible position adjacent
outlet must still be accessible even w
ntact separation and placed in
to the appliance. The spur
hen your cooktop is located
in its housing.
o The wiring in the mains lead is coloured as follows:
Brown Live
Blue Neutral
Green and yellow
Earth
o
As the colours of the wires in the appliance’s mains lead may not
correspond with the coloured ma
your spur box, please proceed as follows:
in
rkings identifying the terminals
The brown wire must be connected to the terminal marked “L”
(live), or colou
red red.
The blue wire must be connected to the terminal marked “N”
(neutral), or coloured black.
The green and yellow wire must be connected to the terminal
marked “E” (earth), or by the earth symbol, or coloured green
and yellow.
17
Page 18

o When the connection is completed, no stray strands or cut wire
should be present. The cord clamp must be secured over the
outer sh
o Broken
suitably qualified person. A power lead of a similar type must be
used in replacem
eath.
or damaged power leads must only be replaced by a
ent.
My appliance isn’t working correctly
o The cooking zones are not functioning or will not switch
on.
* Check that the mains electrical supply to the appli
and working. Check the mains fuse.
o A humming sound is heard when a cooking zone is
selected.
* This is normal; the sound will disappear when the zone heats up.
ance is correct
o The cooking zones have become discoloured
* This maybe caused by burnt on remnants of food. This will not
affect the working of the appliance. However you should make
sure that the cleaning instructions are being followed regularly.
18
Page 19

IMPORTANT: If your appliance appears not to be
operating correctly, then you should disconnect it
from your mains supply and then contact the
Customer Care Department
DO NOT ATTEMPT TO REPAIR THE APPLIANCE YOURSELF.
Please no
nder guarantee and finds that the problem is not the result of an
u
te that if an engineer is asked to attend whilst the product is
appliance fault, then you may be liable for the cost of the call out
charge.
The appliance must be accessible for the engineer to perform
any necessa
ay that an engineer is concerned that damage will be caused
w
ry repair. If your appliance is installed in such a
to the appliance or your kitchen, then he will not complete a
repair.
This includes situations where appliances have been tiled in,
sealed in with sealant, have wooden obstructions placed in
front of the appliance, like plinths
han the one specified by the Manufacturer has been
t
ompleted.
c
. Or any installation other
lease refer to the conditions of guarantee that appear on the
P
arranty card that you receive with the appliance.
w
MPORTANT: The Manufacturer operates a policy of continuous
I
provement and reserves the right to adjust and modify its
im
roducts without prior notification.
p
19
Page 20

Think Appliances Pty Ltd.
416-424 Barry Rd
Coolaroo VIC 3048
Sales Telephone
1300 132 824
Service Telephone
1800 444 357
Website
www.thinkappliances.com
20
 Loading...